Unit - 3: Interaction with Windows application by ADO.NET ...ksvelearn.org/CSAunit3.pdf · For this...
39
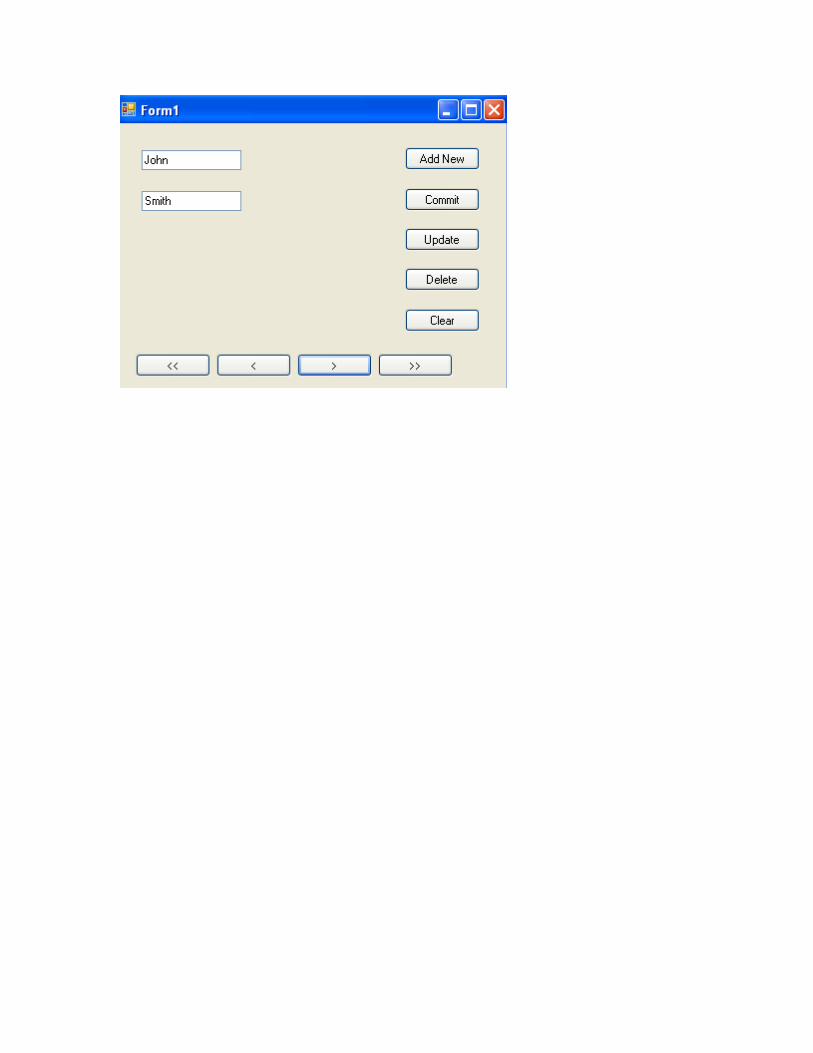
Unit - 3: Interaction with Windows application by ADO.NET [25%] Data binding and it’s technique ( wizard and coding both ) Application implementation by connection of database , Insert , Update , Delete process with from Implementation of error and alert message box for un authentication data entry Data binding and it’s technique Through wizard For this tutorial, we're going to create a simple Address Book project. The names and addresses will come from a Microsoft Access database. VB.Net allows you many ways to connect to a database or a data source. The technology used to interact with a database or data source is called ADO.NET. The ADO parts stands for Active Data Objects. Just like System was a Base Class so is ADO. Forming the foundation of the ADO Base Class are five other major objects: o Connection o Command o DataReader o DataSet o DataAdapter We’ll see just what these objects are, and how to use them, in a later section. But we can make a start the ADO.NET by creating a simple Address Book project. All we’ll do is see how to use ADO to open up the database you created, and scroll through each entry. What we’re going to be doing is to use a Wizard to create a programme that reads the database and allows us to scroll through it. The wizard will do most of the work for us, and create the controls that allow users to move through the database. The Form we create will look like this when it's finished:
Transcript of Unit - 3: Interaction with Windows application by ADO.NET ...ksvelearn.org/CSAunit3.pdf · For this...
Unit - 3: Interaction with Windows application by ADO.NET [25%]Data binding and it’s technique ( wizard and coding both ) Application implementation by connection of database , Insert , Update , Delete process with
fromImplementation of error and alert message box for un authentication data entry
Data binding and it’s technique Through wizard
For this tutorial, we're going to create a simple Address Book project. The namesand addresses will come from a Microsoft Access database. VB.Net allows you many ways to connect to a database or a data source. The technology used to interact with a database or data source is called ADO.NET. The ADO parts stands for Active Data Objects. Just like System was a Base Class so is ADO. Forming the foundation of the ADO Base Class are five other major objects:
o Connectiono Commando DataReadero DataSeto DataAdapter
We’ll see just what these objects are, and how to use them, in a later section. Butwe can make a start the ADO.NET by creating a simple Address Book project. All we’ll do is see how to use ADO to open up the database you created, and scroll through each entry.
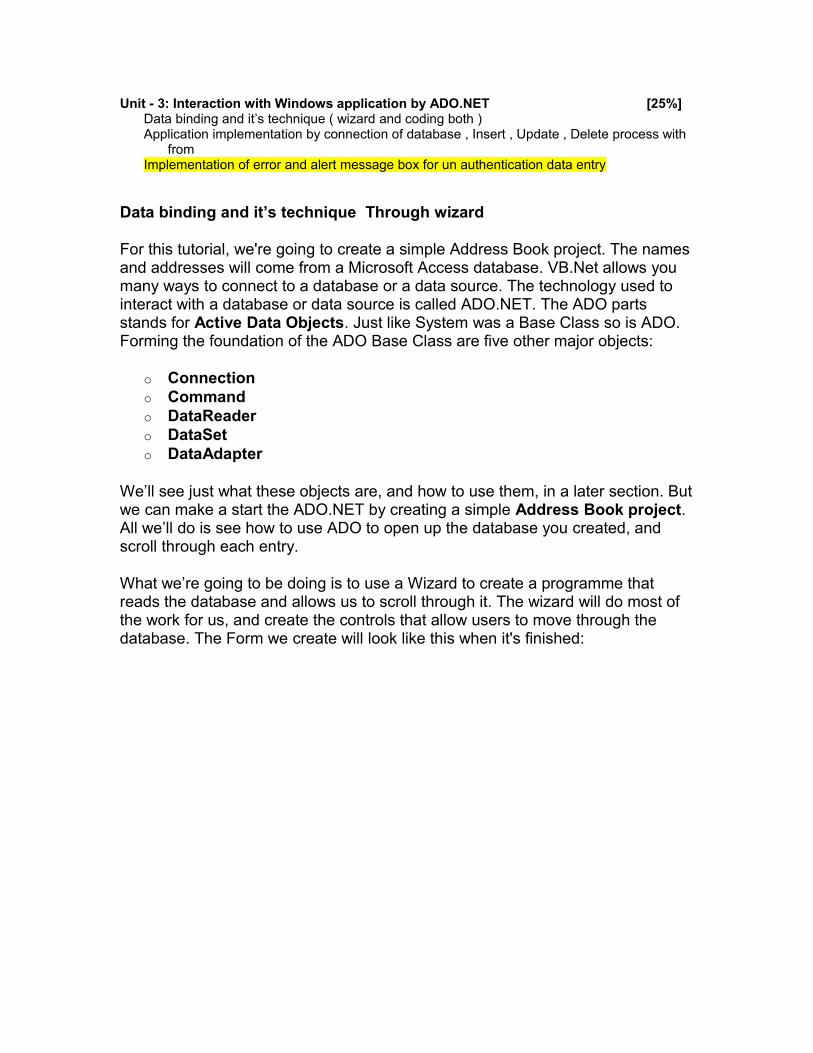
What we’re going to be doing is to use a Wizard to create a programme that reads the database and allows us to scroll through it. The wizard will do most of the work for us, and create the controls that allow users to move through the database. The Form we create will look like this when it's finished:
By clicking the buttons at the top, you can scroll through the database in the image above.
Let's make a start on our Database project. So, once you have your VB software open, do the following:
o Click File > New Project from the menu baro Select Windows Application, and then give it the Name AddressBook.
Click OKo Locate the Solution Explorer on the right hand side (If you can't see it,
click View > Solution Explorer from the menu bar, or View > Other Windows > Solution Explorer in version 2010.)
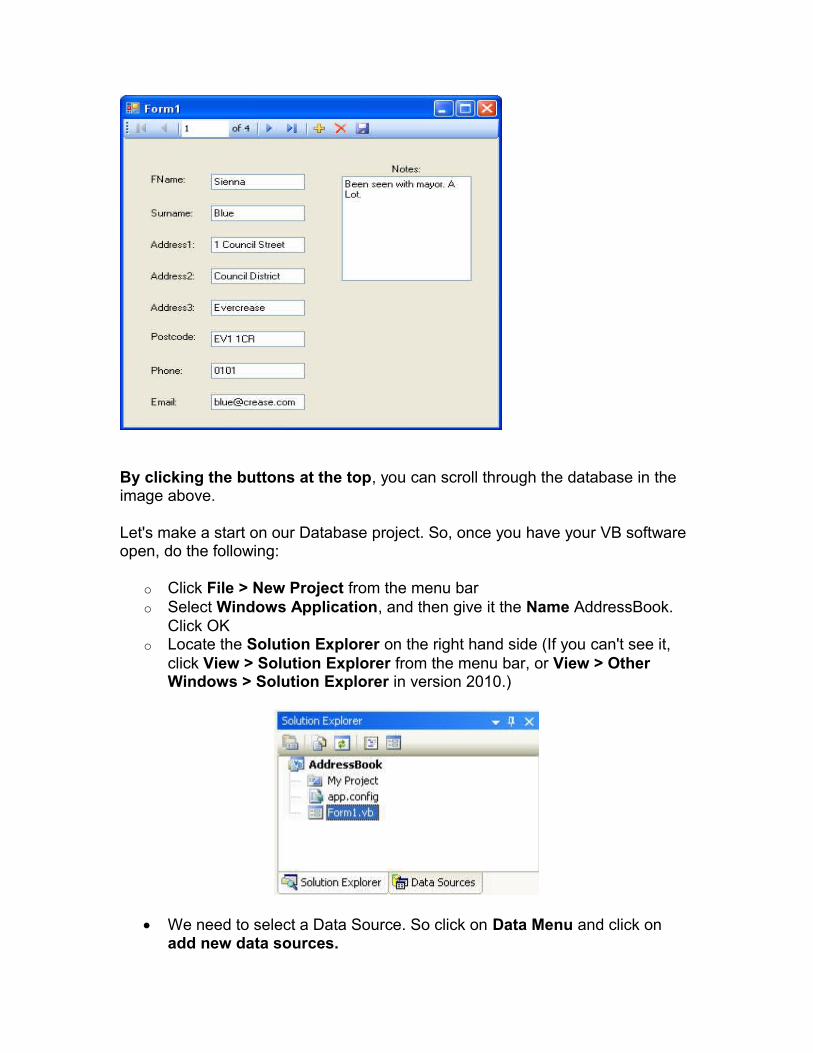
We need to select a Data Source. So click on Data Menu and click on add new data sources.
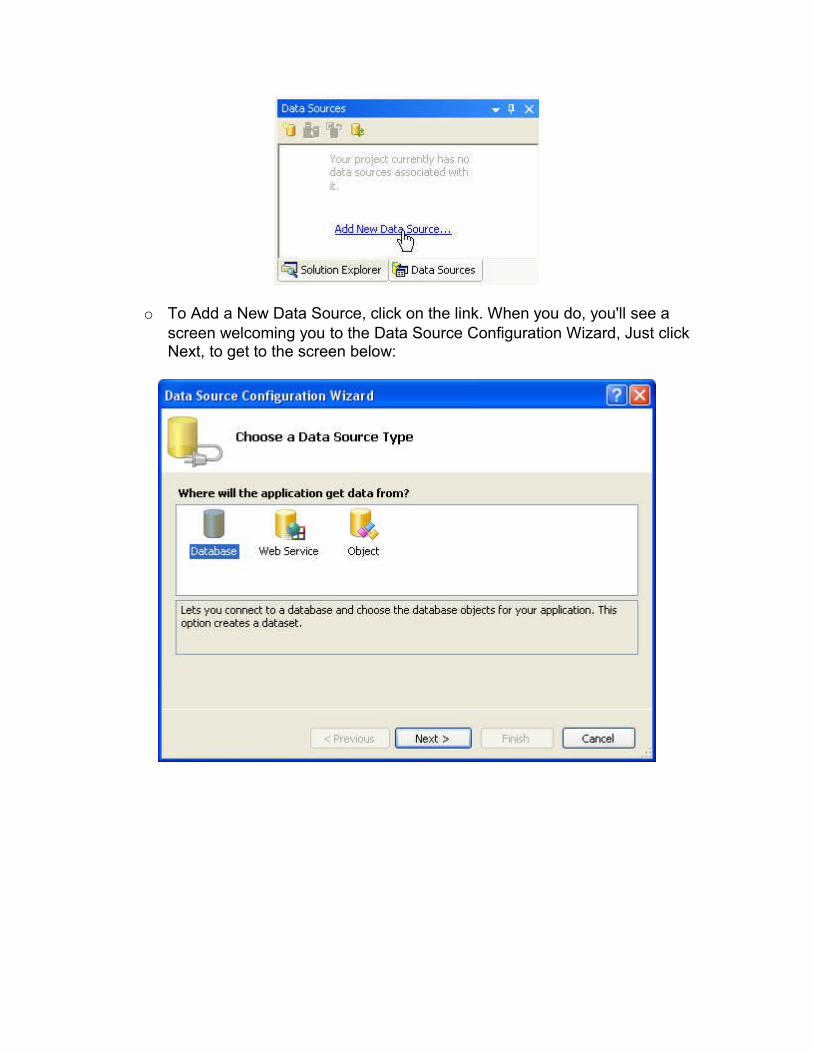
o To Add a New Data Source, click on the link. When you do, you'll see a screen welcoming you to the Data Source Configuration Wizard, Just clickNext, to get to the screen below:
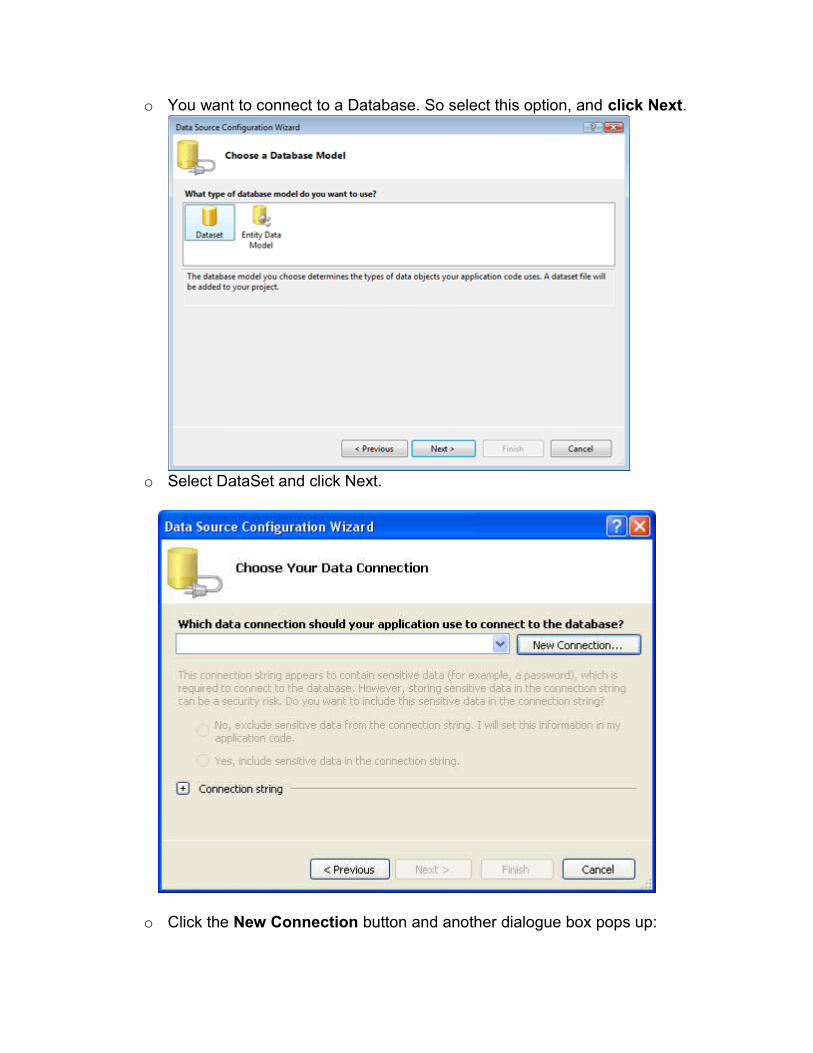
o You want to connect to a Database. So select this option, and click Next.
o Select DataSet and click Next.
o Click the New Connection button and another dialogue box pops up:
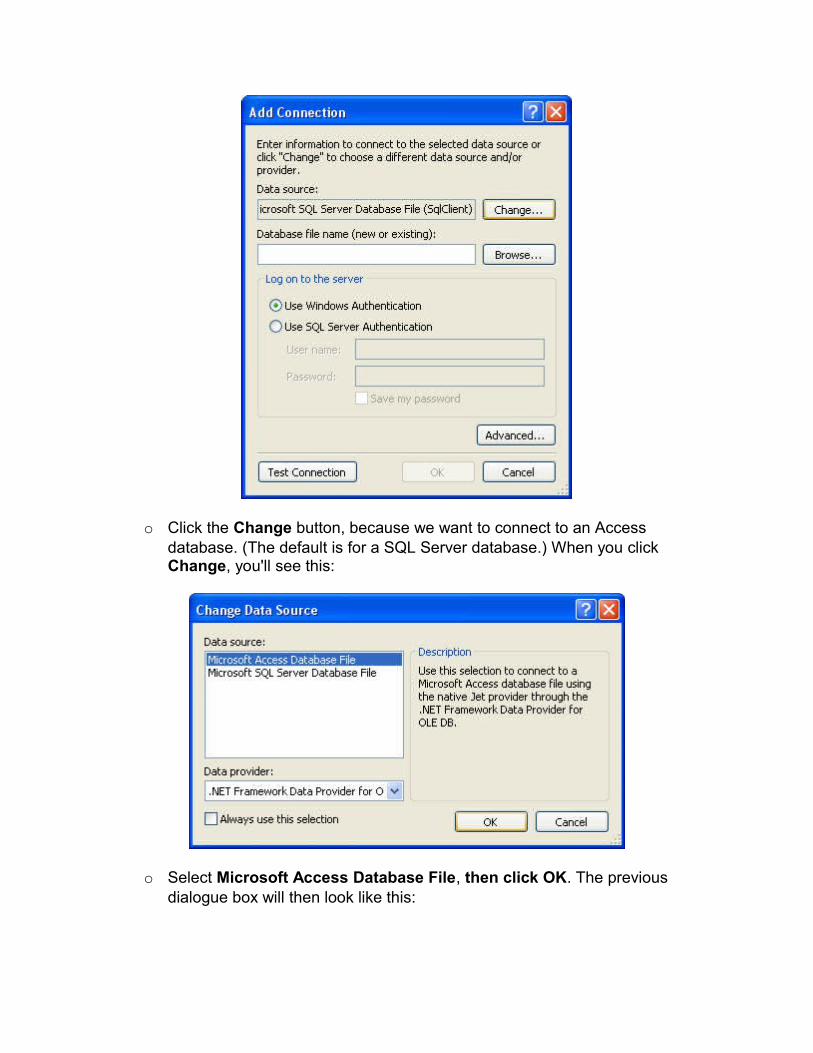
o Click the Change button, because we want to connect to an Access database. (The default is for a SQL Server database.) When you click Change, you'll see this:
o Select Microsoft Access Database File, then click OK. The previous dialogue box will then look like this:
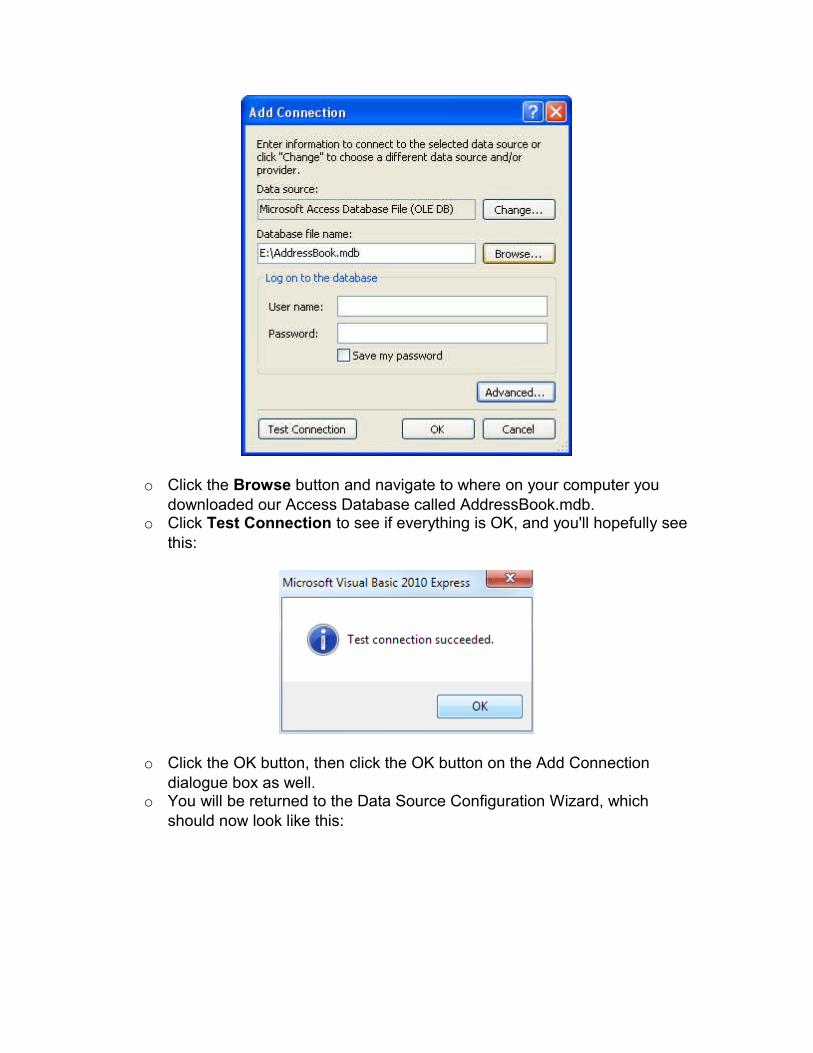
o Click the Browse button and navigate to where on your computer you downloaded our Access Database called AddressBook.mdb.
o Click Test Connection to see if everything is OK, and you'll hopefully see this:
o Click the OK button, then click the OK button on the Add Connection dialogue box as well.
o You will be returned to the Data Source Configuration Wizard, which should now look like this:
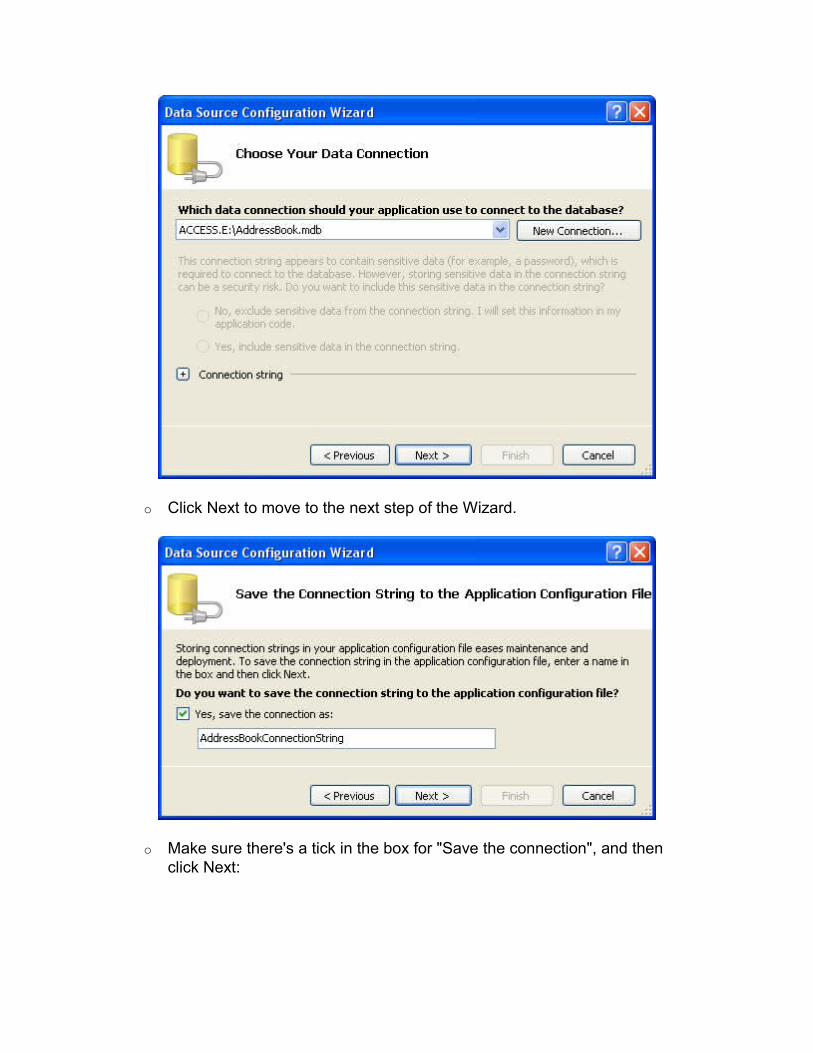
o Click Next to move to the next step of the Wizard.
o Make sure there's a tick in the box for "Save the connection", and then click Next:
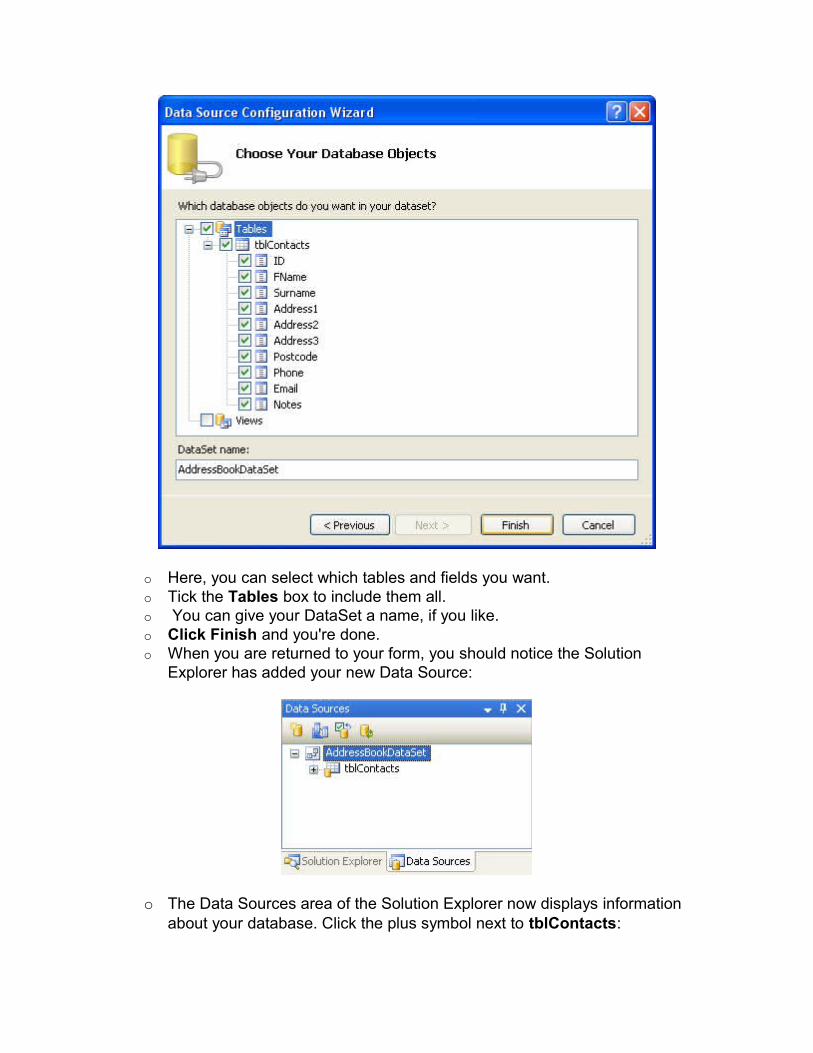
o Here, you can select which tables and fields you want. o Tick the Tables box to include them all.o You can give your DataSet a name, if you like. o Click Finish and you're done.o When you are returned to your form, you should notice the Solution
Explorer has added your new Data Source:
o The Data Sources area of the Solution Explorer now displays information about your database. Click the plus symbol next to tblContacts:
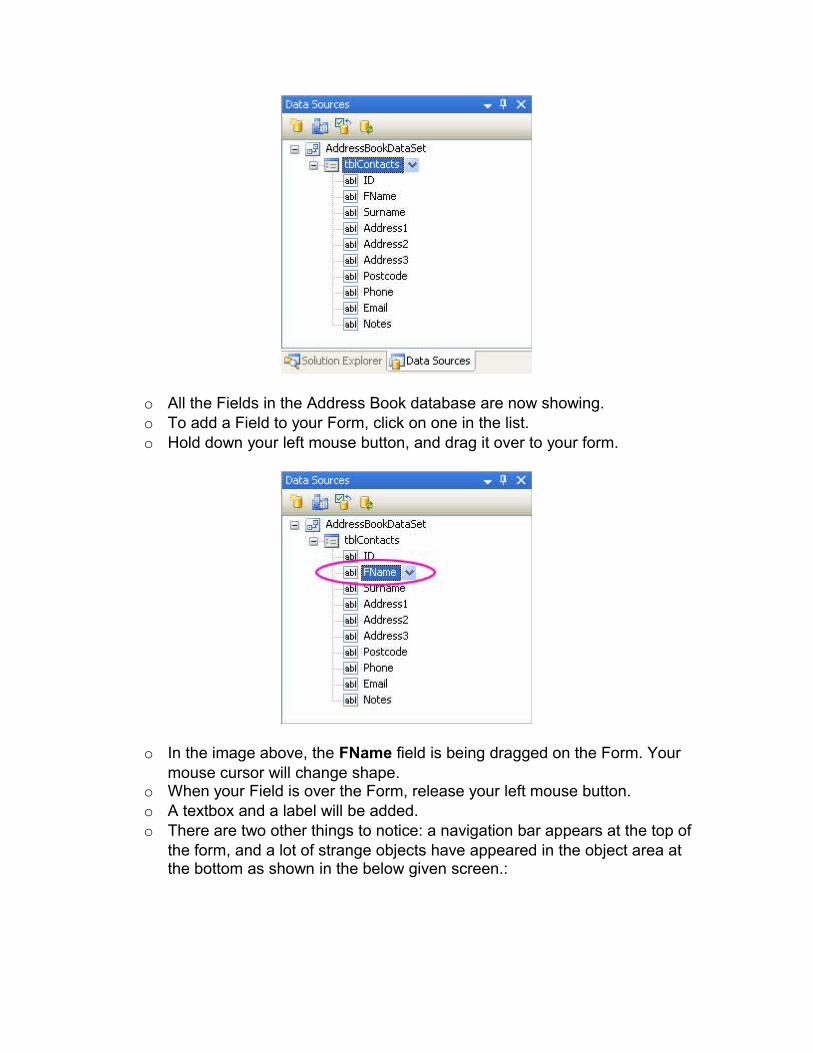
o All the Fields in the Address Book database are now showing.o To add a Field to your Form, click on one in the list. o Hold down your left mouse button, and drag it over to your form.
o In the image above, the FName field is being dragged on the Form. Your mouse cursor will change shape.
o When your Field is over the Form, release your left mouse button. o A textbox and a label will be added. o There are two other things to notice: a navigation bar appears at the top of
the form, and a lot of strange objects have appeared in the object area at the bottom as shown in the below given screen.:
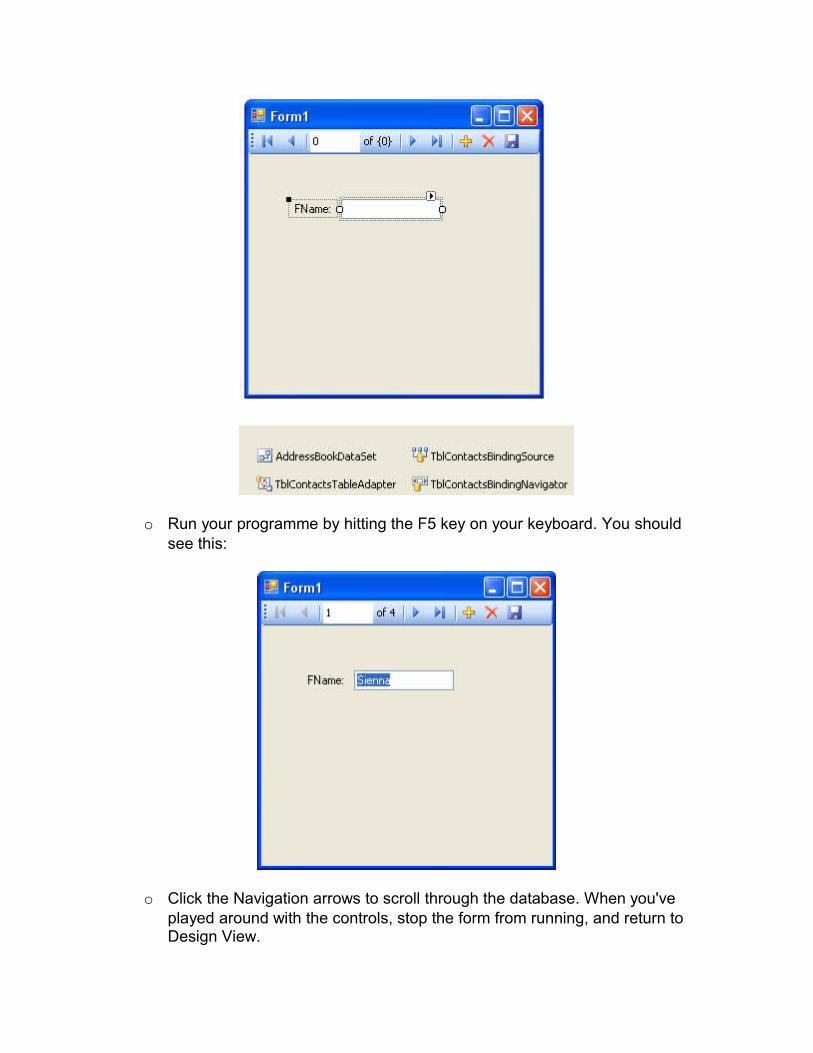
o Run your programme by hitting the F5 key on your keyboard. You should see this:
o Click the Navigation arrows to scroll through the database. When you've played around with the controls, stop the form from running, and return to Design View.
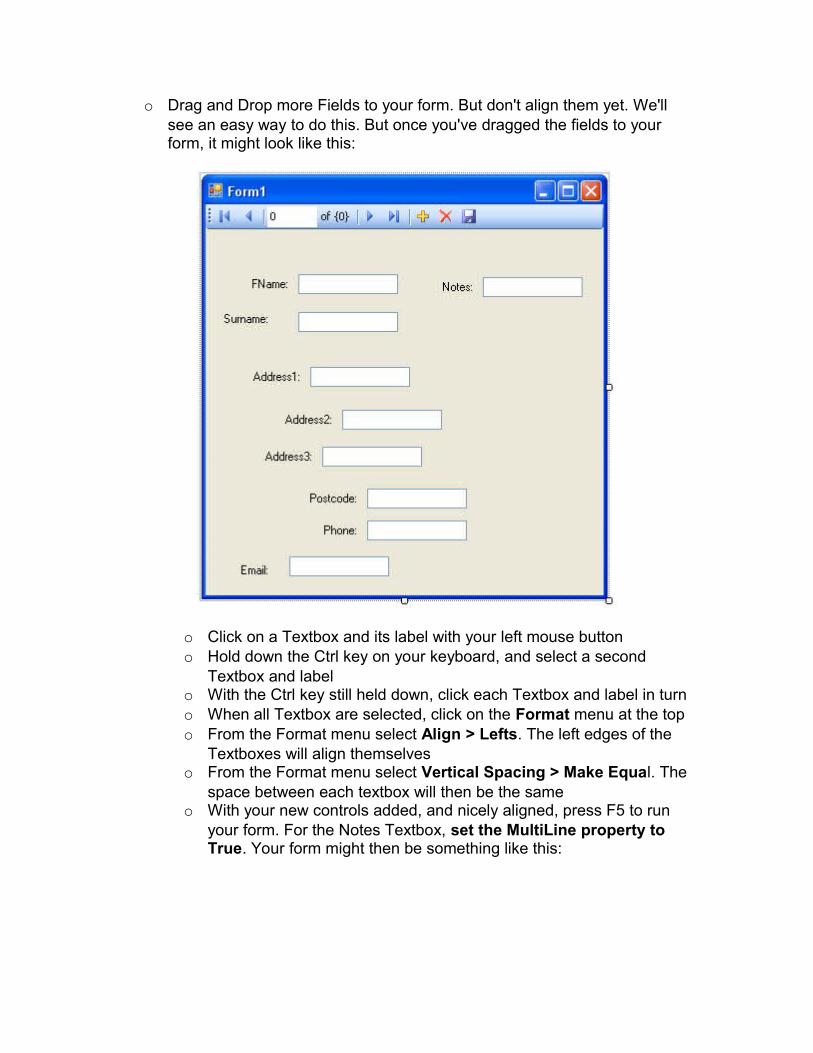
o Drag and Drop more Fields to your form. But don't align them yet. We'll see an easy way to do this. But once you've dragged the fields to your form, it might look like this:
o Click on a Textbox and its label with your left mouse button o Hold down the Ctrl key on your keyboard, and select a second
Textbox and label o With the Ctrl key still held down, click each Textbox and label in turn o When all Textbox are selected, click on the Format menu at the top o From the Format menu select Align > Lefts. The left edges of the
Textboxes will align themselves o From the Format menu select Vertical Spacing > Make Equal. The
space between each textbox will then be the same o With your new controls added, and nicely aligned, press F5 to run
your form. For the Notes Textbox, set the MultiLine property to True. Your form might then be something like this:

o Click the Navigation icons to move backwards and forwards through your database.
In the next part, you'll move away from the Wizards and learn how to add your own programming code to open up and manipulate databases.
Data binding through coding:
In this section, we'll take a look at the objects that you can use to open and read data from a Database. We'll stick with our Access database, the AddressBook.mdb, and recreate what the Wizard has done but now through coding.
o So close any open projects, and create a new one. Give it whatever name you like, and let's begin.
The Connection Object
The Connection Object is what you need if you want to connect to a database. There are a number of different connection objects, and the one you use depends largely on the type of database you're connecting to. Because we're
connecting to an Access database, we'll need something called the OLE DB connection object. OLE stands for Object Linking and Embedding,
There are a number of different OLE DB objects (called data providers), but the one we'll use is called "Jet". Others are SQL Server and Oracle.
o So place a button on your form. Change the Name property to btnLoad. Double click your button to open up the code window. Add the following line:
Dim con As New OleDb.OleDbConnection
The variable con will now hold the Connection Object. Notice that there is a full stop after the OleDB part. You'll then get a pop up box from where you can selectOleDbConnection. We're also creating a New object on this line.This is the objectthat you use to connect to an Access database.
Setting a Connection String
There are Properties and Methods associated with the Connection Object, of course. We want to start with the ConnectionString property. This can take MANY parameters . Fortunately, we only need a few of these.
We need to pass two things to our new Connection Object: the technology we want to use to do the connecting to our database; and where the database is. (If your database was password and user name protected, you would add these twoparameters as well. Ours isn't, so we only need the two.)
The technology is called the Provider; and you use Data Source to specify where your database is. So add this to your code:
Dim dbProvider As StringDim dbSource As String
dbProvider = "PROVIDER=Microsoft.Jet.OLEDB.4.0;"dbSource = "Data Source = C:/AddressBook.mdb"
con.ConnectionString = dbProvider & dbSource
The first part specifies which provider technology we want to use to do the connecting (JIT). The second part, typed after a semi-colon, points to where the database is.
In the above code, the database is on the D drive, in the root folder. The name ofthe Access file we want to connect to is called AddressBook.mdb.
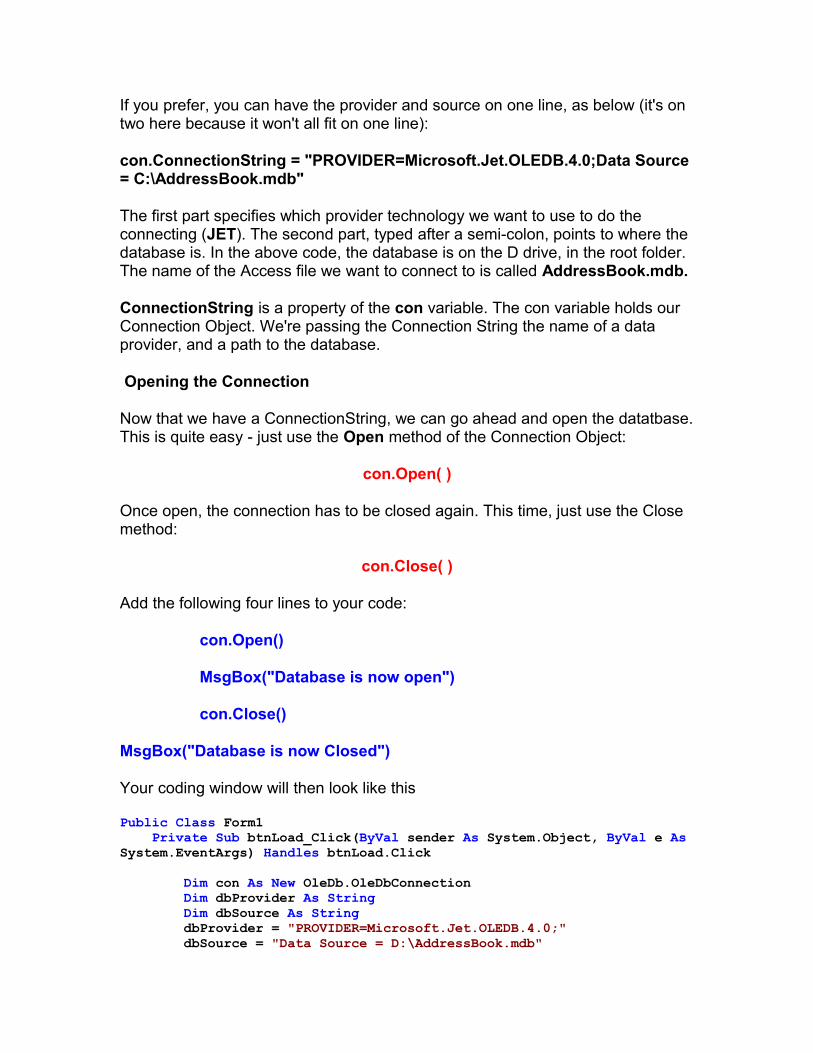
If you prefer, you can have the provider and source on one line, as below (it's on two here because it won't all fit on one line):
con.ConnectionString = "PROVIDER=Microsoft.Jet.OLEDB.4.0;Data Source = C:\AddressBook.mdb"
The first part specifies which provider technology we want to use to do the connecting (JET). The second part, typed after a semi-colon, points to where the database is. In the above code, the database is on the D drive, in the root folder. The name of the Access file we want to connect to is called AddressBook.mdb.
ConnectionString is a property of the con variable. The con variable holds our Connection Object. We're passing the Connection String the name of a data provider, and a path to the database.
Opening the Connection
Now that we have a ConnectionString, we can go ahead and open the datatbase.This is quite easy - just use the Open method of the Connection Object:
con.Open( )
Once open, the connection has to be closed again. This time, just use the Close method:
con.Close( )
Add the following four lines to your code:
con.Open()
MsgBox("Database is now open")
con.Close()
MsgBox("Database is now Closed")
Your coding window will then look like this
Public Class Form1 Private Sub btnLoad_Click(ByVal sender As System.Object, ByVal e AsSystem.EventArgs) Handles btnLoad.Click
Dim con As New OleDb.OleDbConnection Dim dbProvider As String Dim dbSource As String dbProvider = "PROVIDER=Microsoft.Jet.OLEDB.4.0;" dbSource = "Data Source = D:\AddressBook.mdb"
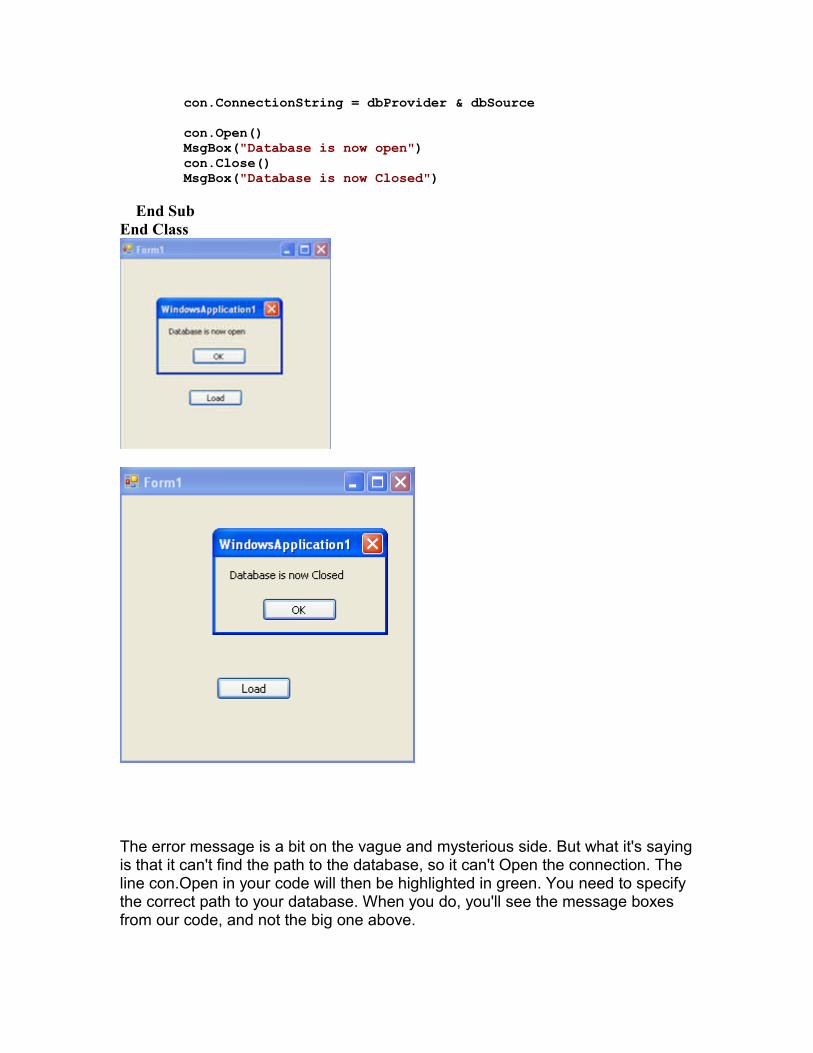
con.ConnectionString = dbProvider & dbSource
con.Open() MsgBox("Database is now open") con.Close() MsgBox("Database is now Closed")
End SubEnd Class
The error message is a bit on the vague and mysterious side. But what it's sayingis that it can't find the path to the database, so it can't Open the connection. The line con.Open in your code will then be highlighted in green. You need to specify the correct path to your database. When you do, you'll see the message boxes from our code, and not the big one above.
Now that we've opened a connection to the database, we need to read the information from it. This is where the DataSet and the DataAdapter come in.
In the previous part, you learned how to set up a Connection Object. This was so that you could open a connection to the database itself. But that's not the end of it. The data from the database needs to be stored somewhere, so that we can manipulate it.
ADO.NET uses something called a DataSet to hold all of your information from the database. The DataSet is not something you can draw on your form, like a Button or a Textbox. The DataSet is something that is hidden from you, and just stored in memory. Imagine a grid with rows and columns. Each imaginary row of the DataSet represents a Row of information in your Access database. And each imaginary column represents a Column of information in your Access database (called a Field in Access).
This, then, is a DataSet. But what's a Data Adapter?
The Connection Object and the DataSet can't see each other. They need a mediator so that they can communicate. This mediator is called a Data Adapter. The Data Adapter contacts your Connection Object, and then executes a query that you set up. The results of that query are then stored in the DataSet.
The Data Adapter and DataSet are objects. You set them up like this:
Dim ds As New DataSetDim da As OleDb.OleDbDataAdapterda = New OleDb.OleDbDataAdapter(sql, con)
The code needs a little explaining, though. First, the Data Adapter.
The Data Adapter
The Data Adapter is a property of the OLEDB object, hence the full stop betweenthe two:
OleDb.OleDbDataAdapter
We're passing this object to the variable called da. This variable will then hold a reference to the Data Adapter.
While the second line in the code above sets up a reference to the Data Adapter,the third line creates a new Data Adapter object. You need to put two things in the round brackets of the Object declaration: Your SQL string, and your
connection object. Our Connection Object is stored in the variable which we've called con. (Like all variable you can call it practically anything you like. We've gone for something short and memorable.) You then pass the New Data Adapter to your variable (da for us):
da = New OleDb.OleDbDataAdapter(sql, con)
We need something else, though. The sql in between the round brackets is the name of a variable. We haven't yet set this up. We'll have a look at SQL in a moment. But bear in mind what the Data Adaptor is doing: Acting as a mediatorfor the Connection Object and the Data Set
Structured Query Language
SQL (pronounced SeeKwel), is short for Structured Query Language, and is a way to query and write to databases (not just Access). The basics are quite easy to learn. If you want to grab all of the records from a table in a database, you use the SELECT word. Like this:
SELECT * FROM Table_Name
SQL is not case sensitive, so the above line could be written:
Select * from Table_Name
But your SQL statements are easier to read if you type the keywords in uppercase letters. The keywords in the lines above are SELECT and FROM. Theasterisk means "All Records". Table_Name is the name of a table in your database. So the whole line reads:
"SELECT all the records FROM the table called Table_Name"
You don't need to select all (*) the records from your database. You can just select the columns that you need. The name of the table in our database is tblContacts. If we wanted to select just the first name and surname columns from this table, we can specify that in our SQL String:
SELECT tblContacts.FirstName, tblContacts.Surname FROM tblContacts
When this SQL statement is executed, only the FirstName and Surname columnsfrom the database will be returned.
There are a lot more SQL commands, but for our purposes this is enough.
Because we want to SELECT all (*) the records from the table called tblContacts,we pass this string to the string variable we have called sql:

sql = "SELECT * FROM tblContacts"
Now that the Data Adapter has selected all of the records from the table in our database, we need somewhere to put those records - in the DataSet.
Filling the DataSet
The Data Adapter can Fill a DataSet with records from a Table. You only need a single line of code to do this:
da.Fill(ds, "AddressBook")
As soon as you type the name of your Data Adapter (da for us), you'll get a pop up box of properties and methods. Select Fill from the list, then type a pair of round brackets. In between the round brackets, you need two things: the Name of your DataSet (ds, in our case), and an identifying name. This identifying name can be anything you like. But it is just used to identify this particular Data AdapterFill.
Add the new line after the creation of the Data Adaptor:
da = New OleDb.OleDbDataAdapter(sql, con)da.Fill(ds, "AddressBook")
And that's it. The DataSet (ds) will now be filled with the records we selected from the table called tblContact. There's only one slight problem - nobody can see the data yet! We'll tackle that in the next part.
In the previous section, we saw what Data Adaptors and DataSets were. We created a Data Adaptor so that it could fill a DataSet with records from our database. What we want to do now is to display the records on a Form, so that people can see them. So do this:
o Add two textboxes to your formo Change the Name properties of your textboxes to txtFirstName and
txtSurnameo Go back to your code windowo Add the following two lines:
txtFirstName.Text = ds.Tables("AddressBook").Rows(0).Item(1)txtSurname.Text = ds.Tables("AddressBook").Rows(0).Item(2)
Your code should now look like this:
Public Class Form1
Private Sub btnLoad_Click(ByVal sender As System.Object, ByVal e AsSystem.EventArgs) Handles btnLoad.Click
Dim con As New OleDb.OleDbConnection Dim dbProvider As String Dim dbSource As String Dim ds As New DataSet Dim sql As String Dim da As OleDb.OleDbDataAdapter
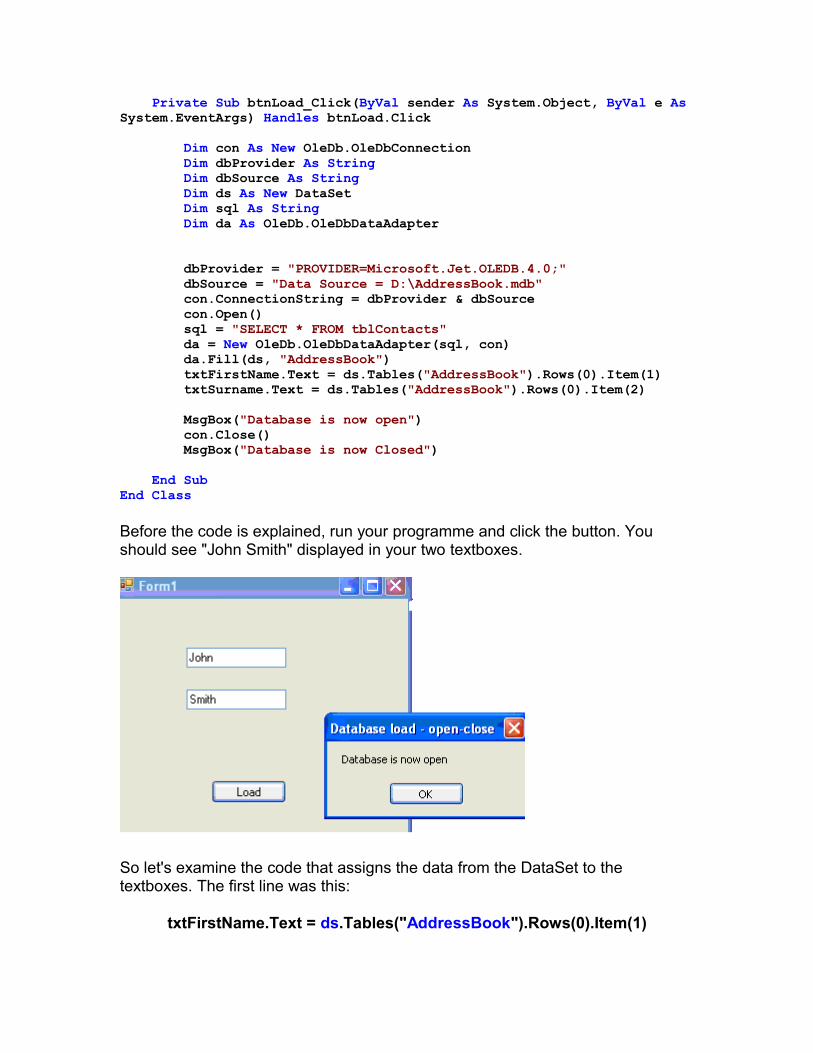
dbProvider = "PROVIDER=Microsoft.Jet.OLEDB.4.0;" dbSource = "Data Source = D:\AddressBook.mdb" con.ConnectionString = dbProvider & dbSource con.Open() sql = "SELECT * FROM tblContacts" da = New OleDb.OleDbDataAdapter(sql, con) da.Fill(ds, "AddressBook") txtFirstName.Text = ds.Tables("AddressBook").Rows(0).Item(1) txtSurname.Text = ds.Tables("AddressBook").Rows(0).Item(2)
MsgBox("Database is now open") con.Close() MsgBox("Database is now Closed")
End SubEnd Class
Before the code is explained, run your programme and click the button. You should see "John Smith" displayed in your two textboxes.
So let's examine the code that assigns the data from the DataSet to the textboxes. The first line was this:
txtFirstName.Text = ds.Tables("AddressBook").Rows(0).Item(1)
It's rather a long line! But after the equals sign, you type the name of your DataSet (ds). After a full stop, select Tables from the popup list. The Tables property needs something in between round brackets.
Quite bizarrely, this is NOT the name of your database table! It's that identifier you used with the Data Adapter Fill. We used the identifier "AddressBook".
But we didn't, so our code is:
ds.Tables("AddressBook")
Type a full stop and you'll see another list popping up at you. Select Rows from the list. In between round brackets, you need a number. This is a Row number from the DataSet. We want the first row, which is row zero in the DataSet:
ds.Tables("AddressBook").Rows(0)
Type full stop after Rows(0) and the popup list appears again. To identify a Column from the DataSet, you use Item. In between round brackets, you type which column you want:
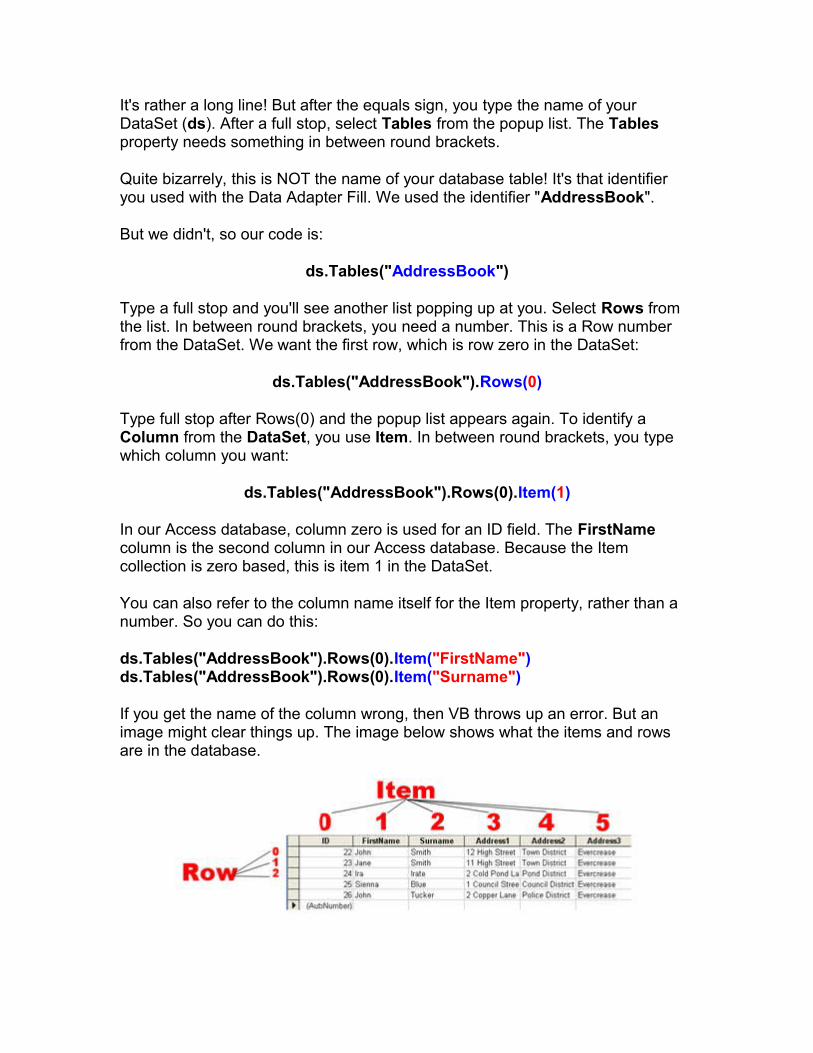
ds.Tables("AddressBook").Rows(0).Item(1)
In our Access database, column zero is used for an ID field. The FirstName column is the second column in our Access database. Because the Item collection is zero based, this is item 1 in the DataSet.
You can also refer to the column name itself for the Item property, rather than a number. So you can do this:
ds.Tables("AddressBook").Rows(0).Item("FirstName")ds.Tables("AddressBook").Rows(0).Item("Surname")
If you get the name of the column wrong, then VB throws up an error. But an image might clear things up. The image below shows what the items and rows are in the database.
The image shows which are the Rows and which are the Items in the Access database Table. So the Items go down and the Rows go across.
However, we want to be able to scroll through the table. We want to be able to click a button and see the next record. Or click another button and see the previous record. You can do this by incrementing the Row number. To see the next record, we'd want this:
txtFirstName.Text = ds.Tables("AddressBook").Rows(1).Item(1)txtSurname.Text = ds.Tables("AddressBook").Rows(1).Item(2)
The record after that would then be:
txtFirstName.Text = ds.Tables("AddressBook").Rows(2).Item(1)txtSurname.Text = ds.Tables("AddressBook").Rows(2).Item(2)
So by incrementing and decrementing the Row number, you can navigate through the records. Let's see how that's done.
You saw in the previous section that you can navigate through the records of a database by incrementing or decrementing the Row number of the DataSet. In this section, we're going to see a more practical example of howto do that.
To navigate through the dataset, let's change our form. By adding some navigation buttons, we can duplicate what the wizard did. We'll also need to move the code we already have. So let's start with that.
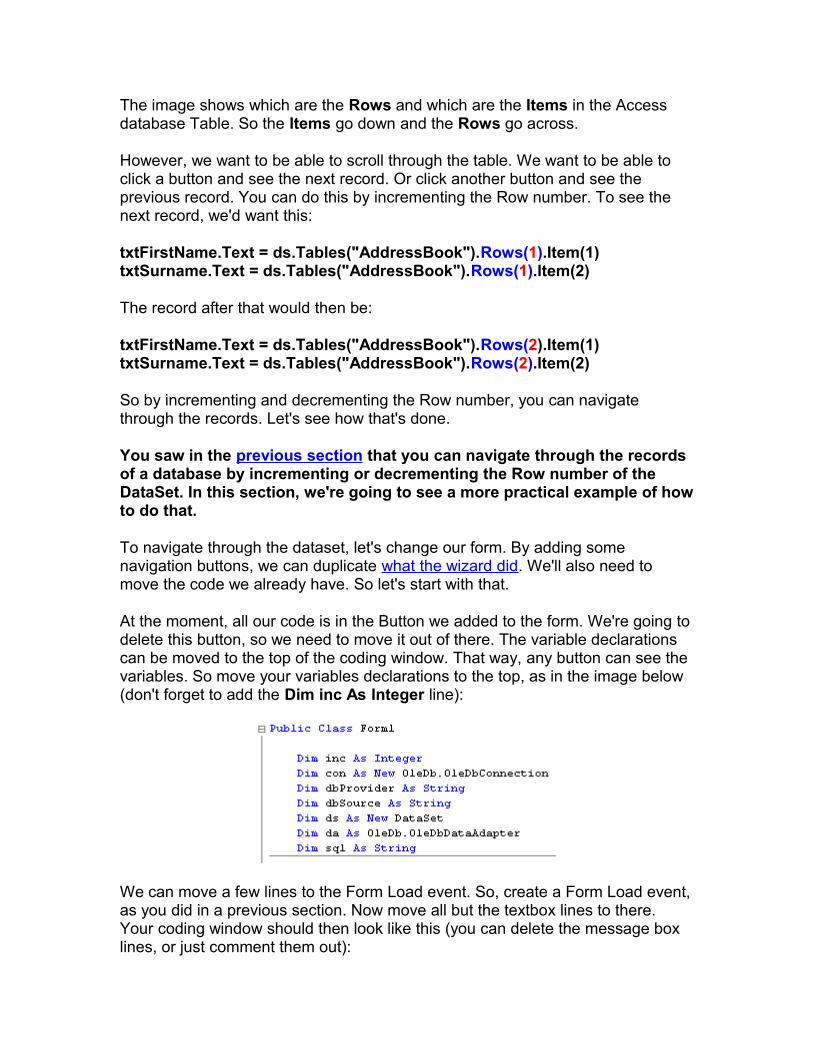
At the moment, all our code is in the Button we added to the form. We're going todelete this button, so we need to move it out of there. The variable declarations can be moved to the top of the coding window. That way, any button can see the variables. So move your variables declarations to the top, as in the image below (don't forget to add the Dim inc As Integer line):
We can move a few lines to the Form Load event. So, create a Form Load event,as you did in a previous section. Now move all but the textbox lines to there. Your coding window should then look like this (you can delete the message box lines, or just comment them out):
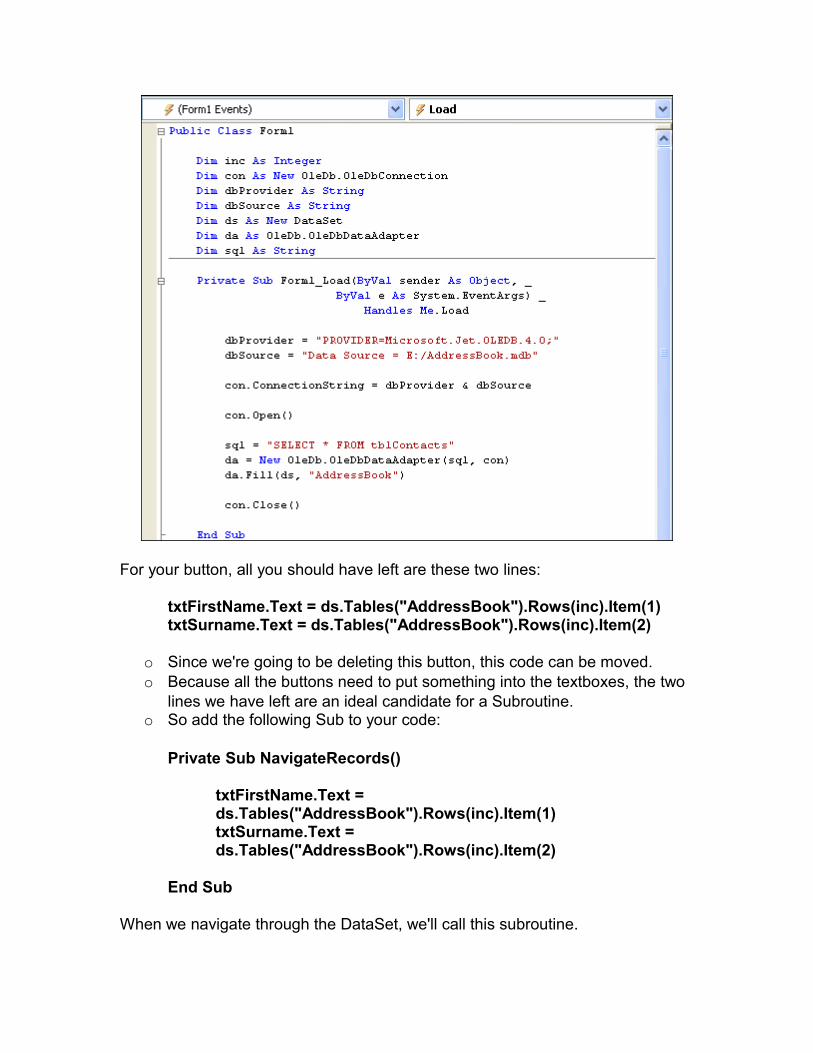
For your button, all you should have left are these two lines:
txtFirstName.Text = ds.Tables("AddressBook").Rows(inc).Item(1)txtSurname.Text = ds.Tables("AddressBook").Rows(inc).Item(2)
o Since we're going to be deleting this button, this code can be moved. o Because all the buttons need to put something into the textboxes, the two
lines we have left are an ideal candidate for a Subroutine. o So add the following Sub to your code:
Private Sub NavigateRecords()
txtFirstName.Text = ds.Tables("AddressBook").Rows(inc).Item(1)txtSurname.Text = ds.Tables("AddressBook").Rows(inc).Item(2)
End Sub
When we navigate through the DataSet, we'll call this subroutine.
o Now that all of your code has gone from your button, you can delete the button code altogether.
o Return to you form, click on the button to select it, then press the delete key on your keyboard. This will remove the button itself from your form. Here's what your coding window should like:
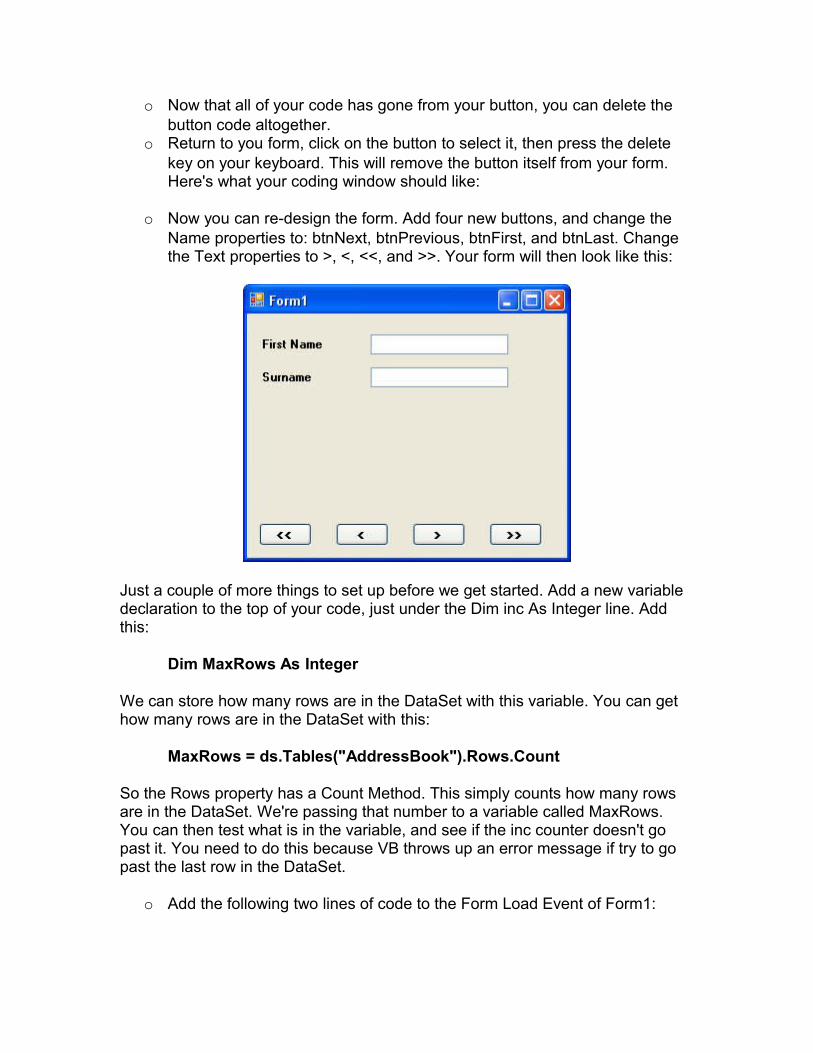
o Now you can re-design the form. Add four new buttons, and change the Name properties to: btnNext, btnPrevious, btnFirst, and btnLast. Change the Text properties to >, <, <<, and >>. Your form will then look like this:
Just a couple of more things to set up before we get started. Add a new variable declaration to the top of your code, just under the Dim inc As Integer line. Add this:
Dim MaxRows As Integer
We can store how many rows are in the DataSet with this variable. You can get how many rows are in the DataSet with this:
MaxRows = ds.Tables("AddressBook").Rows.Count
So the Rows property has a Count Method. This simply counts how many rows are in the DataSet. We're passing that number to a variable called MaxRows. You can then test what is in the variable, and see if the inc counter doesn't go past it. You need to do this because VB throws up an error message if try to go past the last row in the DataSet.
o Add the following two lines of code to the Form Load Event of Form1:
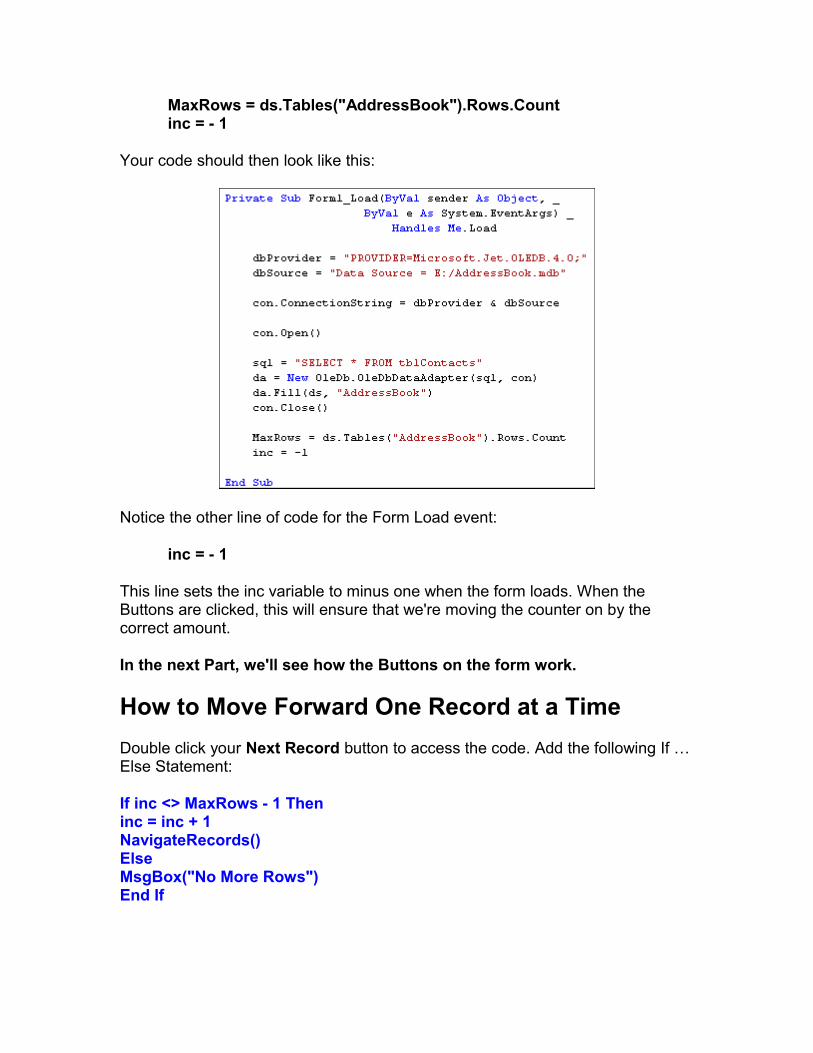
MaxRows = ds.Tables("AddressBook").Rows.Countinc = - 1
Your code should then look like this:
Notice the other line of code for the Form Load event:
inc = - 1
This line sets the inc variable to minus one when the form loads. When the Buttons are clicked, this will ensure that we're moving the counter on by the correct amount.
In the next Part, we'll see how the Buttons on the form work.
How to Move Forward One Record at a Time
Double click your Next Record button to access the code. Add the following If …Else Statement:
If inc <> MaxRows - 1 Theninc = inc + 1NavigateRecords()ElseMsgBox("No More Rows")End If
We're checking to see if the value in inc does not equal the value in MaxRows - 1. If they are both equal then we know we've reached the last record in the DataSet. In which case, we just display a message box. If they are not equal, these two lines get executed:
inc = inc + 1NavigateRecords()
First, we move the inc counter on by one. Then we call the Sub we set up:
NavigateRecords()
Our Subroutine is where the action takes place, and the values from the DataSet are placed in the textboxes. Here it is again:
Private Sub NavigateRecords()
txtFirstName.Text = ds.Tables("AddressBook").Rows(inc).Item(1)txtSurname.Text = ds.Tables("AddressBook").Rows(inc).Item(2)
End Sub
The part that moves the record forward (and backwards soon) is this part:
Rows(inc)
Previously, we hard-coded this with:
Rows(0)
Now the value is coming from the variable called inc. Because we're incrementing this variable with code, the value will change each time the button is clicked. And so a different record will be displayed.
o You can test out your Next button. Run your programme and click the button.
o You should now be able to move forward through the DataSet. o When you get to the end, you should see the message box display "No
More Rows".
None of the other button will work yet, of course. So let's move backwards.
No more reading these lessons online - get the eBook here!

Move Back One Record at a Time
To move backwards through the DataSet, we need to decrement the inc counter.All this means is deducting 1 from whatever is currently in inc.
But we also need to check that inc doesn't go past zero, which is the first record in the DataSet. Here's the code to add to your btnPrevious:
If inc > 0 Theninc = inc - 1NavigateRecords()ElseIf inc = -1 ThenMsgBox("No Records Yet")ElseIf inc = 0 ThenMsgBox("First Record")End If
This new If Statement now checks to see if inc is equal to minus 1, and displays a message if it does. It also checks if inc is equal to zero, and displays the "First Record" message box.
Moving to the Last Record in the DataSet
To jump to the last record in the DataSet, you only need to know how many records have been loaded into the DataSet - the MaxRows variable in our code. You can then set the inc counter to that value, but minus 1. Here's the code to add to your btnLast:
If inc <> MaxRows - 1 Theninc = MaxRows - 1NavigateRecords()End If
The reason we're saying MaxRows - 1 is that the row count might be 5, say, but the first record in the DataSet starts at zero. So the total number of records wouldbe zero to 4. Inside of the If Statement, we're setting the inc counter to MaxRows- 1, then calling the NavigateRecords() subroutine.
o That's all we need to do. So run your programme. o Click the Last button, and you should see the last record displayed in your
textboxes.
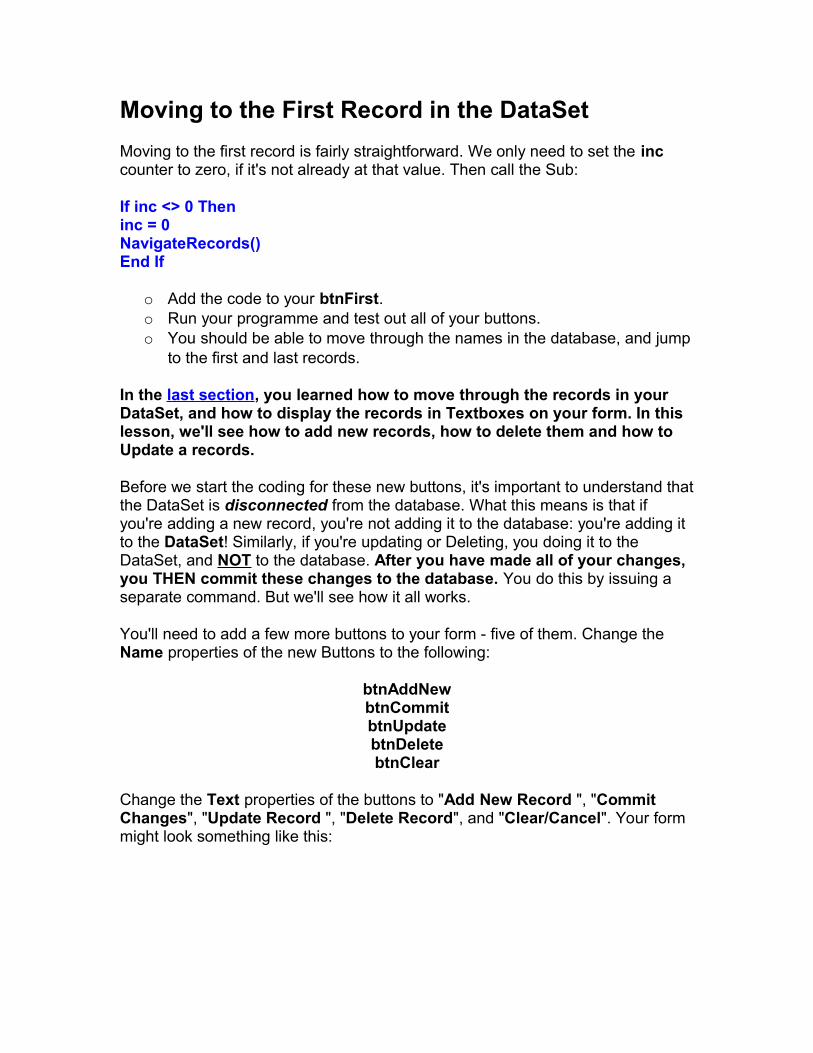
Moving to the First Record in the DataSet
Moving to the first record is fairly straightforward. We only need to set the inc counter to zero, if it's not already at that value. Then call the Sub:
If inc <> 0 Theninc = 0NavigateRecords()End If
o Add the code to your btnFirst. o Run your programme and test out all of your buttons. o You should be able to move through the names in the database, and jump
to the first and last records.
In the last section, you learned how to move through the records in your DataSet, and how to display the records in Textboxes on your form. In this lesson, we'll see how to add new records, how to delete them and how to Update a records.
Before we start the coding for these new buttons, it's important to understand thatthe DataSet is disconnected from the database. What this means is that if you're adding a new record, you're not adding it to the database: you're adding it to the DataSet! Similarly, if you're updating or Deleting, you doing it to the DataSet, and NOT to the database. After you have made all of your changes, you THEN commit these changes to the database. You do this by issuing a separate command. But we'll see how it all works.
You'll need to add a few more buttons to your form - five of them. Change the Name properties of the new Buttons to the following:
btnAddNewbtnCommitbtnUpdatebtnDeletebtnClear
Change the Text properties of the buttons to "Add New Record ", "Commit Changes", "Update Record ", "Delete Record", and "Clear/Cancel". Your form might look something like this:
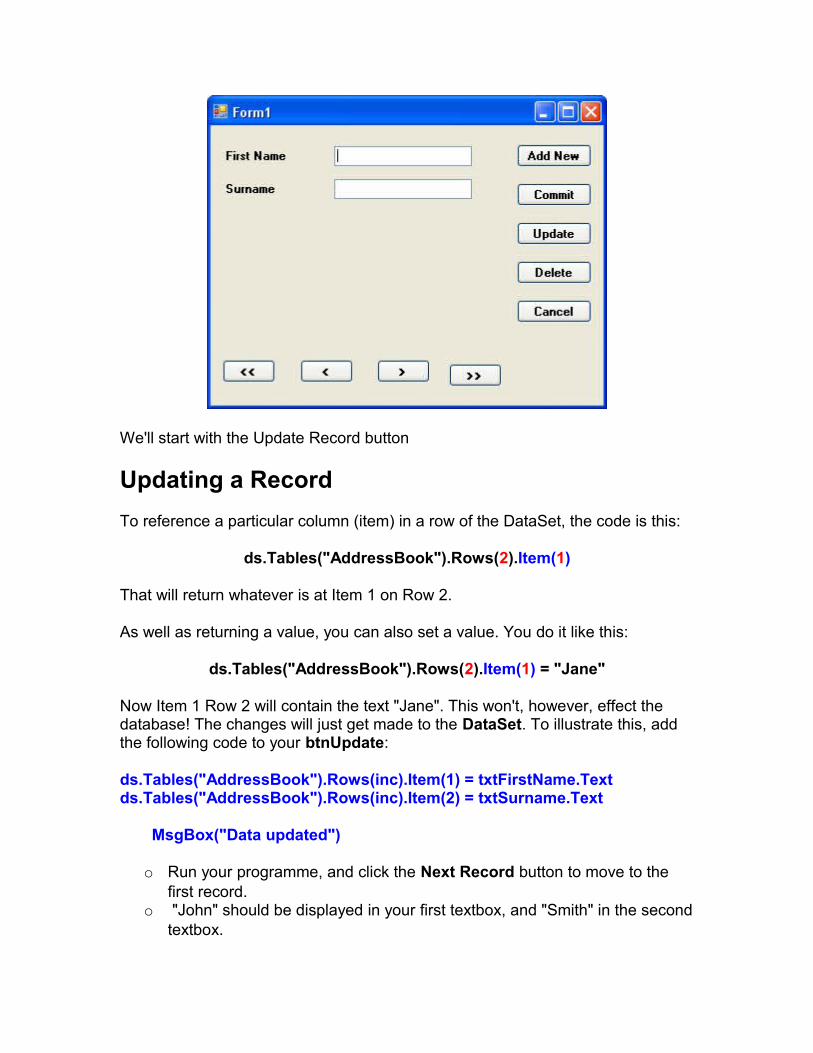
We'll start with the Update Record button
Updating a Record
To reference a particular column (item) in a row of the DataSet, the code is this:
ds.Tables("AddressBook").Rows(2).Item(1)
That will return whatever is at Item 1 on Row 2.
As well as returning a value, you can also set a value. You do it like this:
ds.Tables("AddressBook").Rows(2).Item(1) = "Jane"
Now Item 1 Row 2 will contain the text "Jane". This won't, however, effect the database! The changes will just get made to the DataSet. To illustrate this, add the following code to your btnUpdate:
ds.Tables("AddressBook").Rows(inc).Item(1) = txtFirstName.Textds.Tables("AddressBook").Rows(inc).Item(2) = txtSurname.Text
MsgBox("Data updated")
o Run your programme, and click the Next Record button to move to the first record.
o "John" should be displayed in your first textbox, and "Smith" in the secondtextbox.
o Click inside the textboxes and change "John" to "Joan" and "Smith" to "Smithy". (Without the quotes).
o Now click your Update Record button. o Move to the next record by clicking your Next Record button, and then
move back to the first record. o You should see that the first record is now "Joan Smithy".
Close down your programme, then run it again. Click the Next Record button to move to the first record. It will still be "John Smith". The data you updated has been lost! So here, again, is why:
"Changes are made to the DataSet, and NOT to the Database"
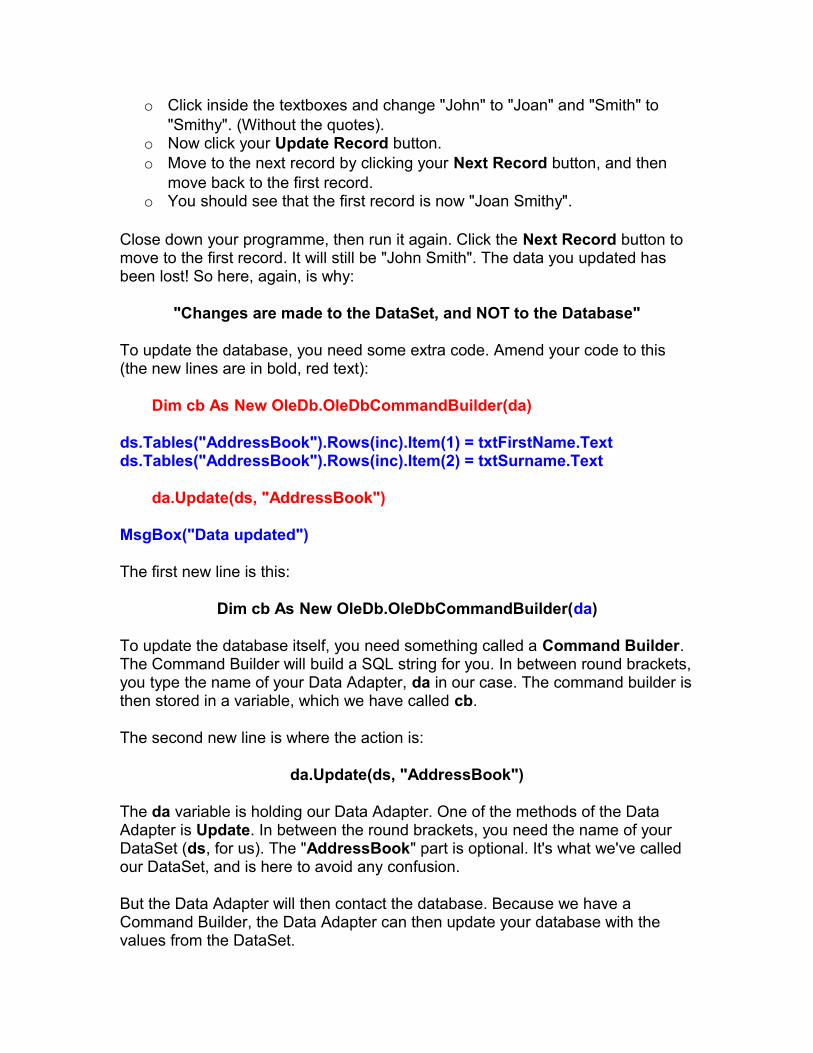
To update the database, you need some extra code. Amend your code to this (the new lines are in bold, red text):
Dim cb As New OleDb.OleDbCommandBuilder(da)
ds.Tables("AddressBook").Rows(inc).Item(1) = txtFirstName.Textds.Tables("AddressBook").Rows(inc).Item(2) = txtSurname.Text
da.Update(ds, "AddressBook")
MsgBox("Data updated")
The first new line is this:
Dim cb As New OleDb.OleDbCommandBuilder(da)
To update the database itself, you need something called a Command Builder. The Command Builder will build a SQL string for you. In between round brackets,you type the name of your Data Adapter, da in our case. The command builder isthen stored in a variable, which we have called cb.
The second new line is where the action is:
da.Update(ds, "AddressBook")
The da variable is holding our Data Adapter. One of the methods of the Data Adapter is Update. In between the round brackets, you need the name of your DataSet (ds, for us). The "AddressBook" part is optional. It's what we've called our DataSet, and is here to avoid any confusion.
But the Data Adapter will then contact the database. Because we have a Command Builder, the Data Adapter can then update your database with the values from the DataSet.
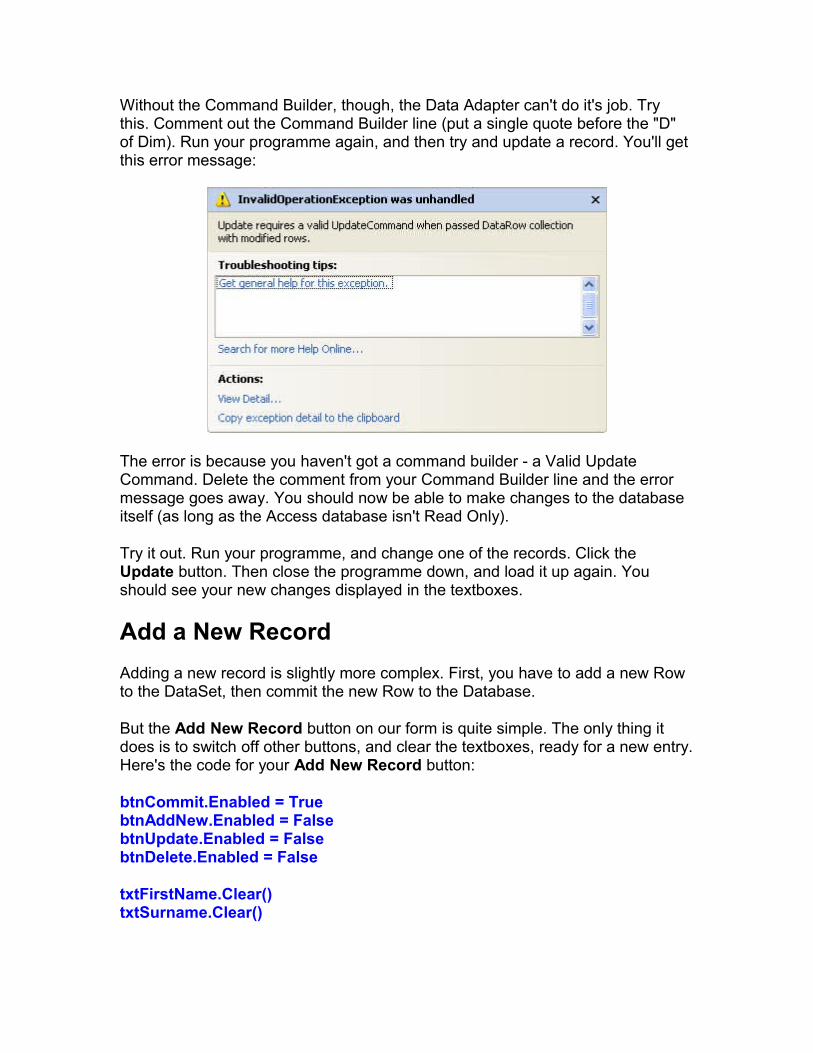
Without the Command Builder, though, the Data Adapter can't do it's job. Try this. Comment out the Command Builder line (put a single quote before the "D" of Dim). Run your programme again, and then try and update a record. You'll get this error message:
The error is because you haven't got a command builder - a Valid Update Command. Delete the comment from your Command Builder line and the error message goes away. You should now be able to make changes to the database itself (as long as the Access database isn't Read Only).
Try it out. Run your programme, and change one of the records. Click the Update button. Then close the programme down, and load it up again. You should see your new changes displayed in the textboxes.
Add a New Record
Adding a new record is slightly more complex. First, you have to add a new Row to the DataSet, then commit the new Row to the Database.
But the Add New Record button on our form is quite simple. The only thing it does is to switch off other buttons, and clear the textboxes, ready for a new entry.Here's the code for your Add New Record button:
btnCommit.Enabled = TruebtnAddNew.Enabled = FalsebtnUpdate.Enabled = FalsebtnDelete.Enabled = False
txtFirstName.Clear()txtSurname.Clear()
So three buttons are switched off when the Add New Record button is clicked, and one is switched on. The button that gets switched on is the Commit Changesbutton. The Enabled property of btnCommit gets set to True. But, for this to work, you need to set it to False when the form loads. So return to your Form. Click btnCommit to select it. Then locate the Enabled Property in the Propertiesbox. Set it to False. When the Form starts up, the button will be switched off.
The Clear/Cancel button can be used to switch it back on again. So add this code to your btnClear:
btnCommit.Enabled = FalsebtnAddNew.Enabled = TruebtnUpdate.Enabled = TruebtnDelete.Enabled = True
inc = 0NavigateRecords()
We're switching the Commit Changes button off, and the other three back on. The other two lines just make sure that we display the first record again, after theCancel button is clicked. Otherwise the textboxes will all be blank.
To add a new record to the database, we'll use the Commit Changes button. So double click your btnCommit to access its code. Add the following:
If inc <> -1 Then
Dim cb As New OleDb.OleDbCommandBuilder(da)Dim dsNewRow As DataRow
dsNewRow = ds.Tables("AddressBook").NewRow()
dsNewRow.Item("FirstName") = txtFirstName.TextdsNewRow.Item("Surname") = txtSurname.Text
ds.Tables("AddressBook").Rows.Add(dsNewRow)
da.Update(ds, "AddressBook")
MsgBox("New Record added to the Database")
btnCommit.Enabled = FalsebtnAddNew.Enabled = TruebtnUpdate.Enabled = TruebtnDelete.Enabled = True
End If
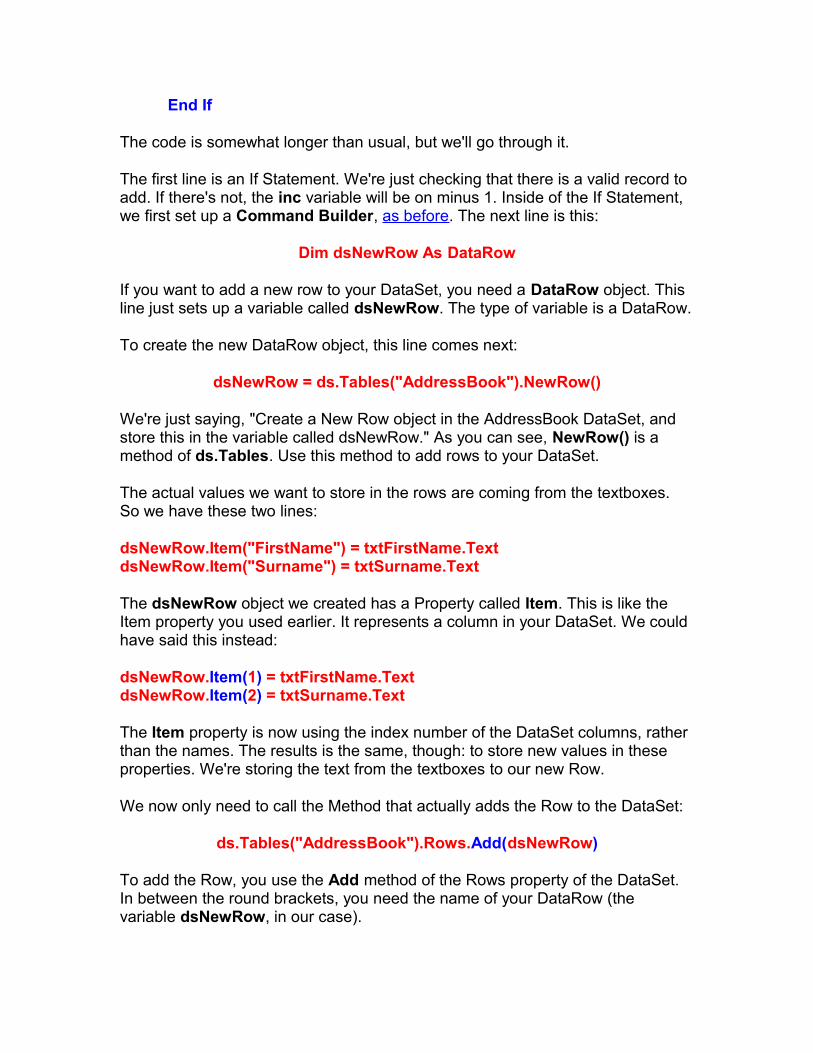
The code is somewhat longer than usual, but we'll go through it.
The first line is an If Statement. We're just checking that there is a valid record to add. If there's not, the inc variable will be on minus 1. Inside of the If Statement, we first set up a Command Builder, as before. The next line is this:
Dim dsNewRow As DataRow
If you want to add a new row to your DataSet, you need a DataRow object. This line just sets up a variable called dsNewRow. The type of variable is a DataRow.
To create the new DataRow object, this line comes next:
dsNewRow = ds.Tables("AddressBook").NewRow()
We're just saying, "Create a New Row object in the AddressBook DataSet, and store this in the variable called dsNewRow." As you can see, NewRow() is a method of ds.Tables. Use this method to add rows to your DataSet.
The actual values we want to store in the rows are coming from the textboxes. So we have these two lines:
dsNewRow.Item("FirstName") = txtFirstName.TextdsNewRow.Item("Surname") = txtSurname.Text
The dsNewRow object we created has a Property called Item. This is like the Item property you used earlier. It represents a column in your DataSet. We could have said this instead:
dsNewRow.Item(1) = txtFirstName.TextdsNewRow.Item(2) = txtSurname.Text
The Item property is now using the index number of the DataSet columns, rather than the names. The results is the same, though: to store new values in these properties. We're storing the text from the textboxes to our new Row.
We now only need to call the Method that actually adds the Row to the DataSet:
ds.Tables("AddressBook").Rows.Add(dsNewRow)
To add the Row, you use the Add method of the Rows property of the DataSet. In between the round brackets, you need the name of your DataRow (the variable dsNewRow, in our case).
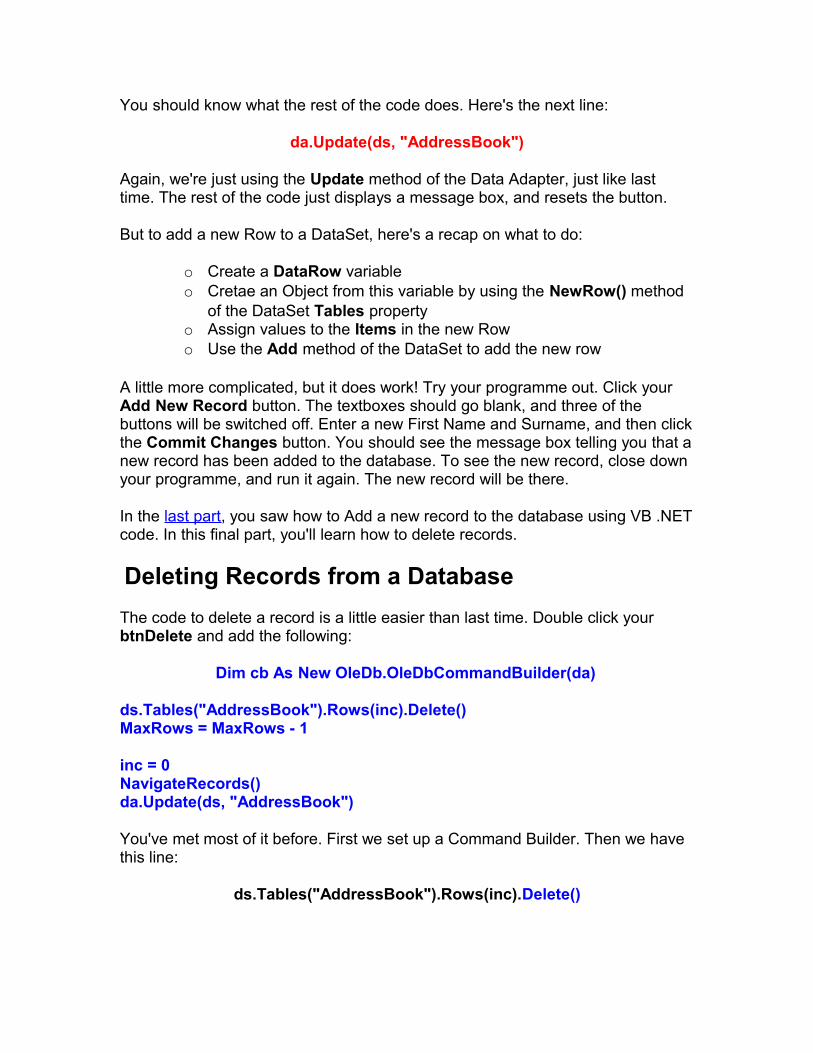
You should know what the rest of the code does. Here's the next line:
da.Update(ds, "AddressBook")
Again, we're just using the Update method of the Data Adapter, just like last time. The rest of the code just displays a message box, and resets the button.
But to add a new Row to a DataSet, here's a recap on what to do:
o Create a DataRow variableo Cretae an Object from this variable by using the NewRow() method
of the DataSet Tables propertyo Assign values to the Items in the new Rowo Use the Add method of the DataSet to add the new row
A little more complicated, but it does work! Try your programme out. Click your Add New Record button. The textboxes should go blank, and three of the buttons will be switched off. Enter a new First Name and Surname, and then clickthe Commit Changes button. You should see the message box telling you that anew record has been added to the database. To see the new record, close down your programme, and run it again. The new record will be there.
In the last part, you saw how to Add a new record to the database using VB .NETcode. In this final part, you'll learn how to delete records.
Deleting Records from a Database
The code to delete a record is a little easier than last time. Double click your btnDelete and add the following:
Dim cb As New OleDb.OleDbCommandBuilder(da)
ds.Tables("AddressBook").Rows(inc).Delete()MaxRows = MaxRows - 1
inc = 0NavigateRecords()da.Update(ds, "AddressBook")
You've met most of it before. First we set up a Command Builder. Then we have this line:
ds.Tables("AddressBook").Rows(inc).Delete()
Just as there is an Add method of the DataSet Rows property, so there is a Delete method. You don't need anything between the round brackets, this time. We've specified the Row to delete with:
Rows(inc)
The inc variable is setting which particular Row we're on. When the Delete method is called, it is this row that will be deleted.
However, it will only be deleted from the DataSet. To delete the row from the underlying database, we have this again:
da.Update(ds, "AddressBook")
The Command Builder, in conjunction with the Data Adapter, will take care of the deleting. All you need to is call the Update method of the Data Adapter.
The MaxRows line in the code just deducts 1 from the variable. This just ensuresthat the number of rows in the DataSet matches the number we have in the MaxRows variable.
We also reset the inc variable to zero, and call the NavigateRecords() subroutine. This will mean that the first record is displayed, after a record has been deleted.
Try out your programme. Click the Next Record button a few times to move to a valid record. Then click the Delete Record button. The record will be deleted from the DataSet AND the database. The record that is then displayed will be thefirst one.
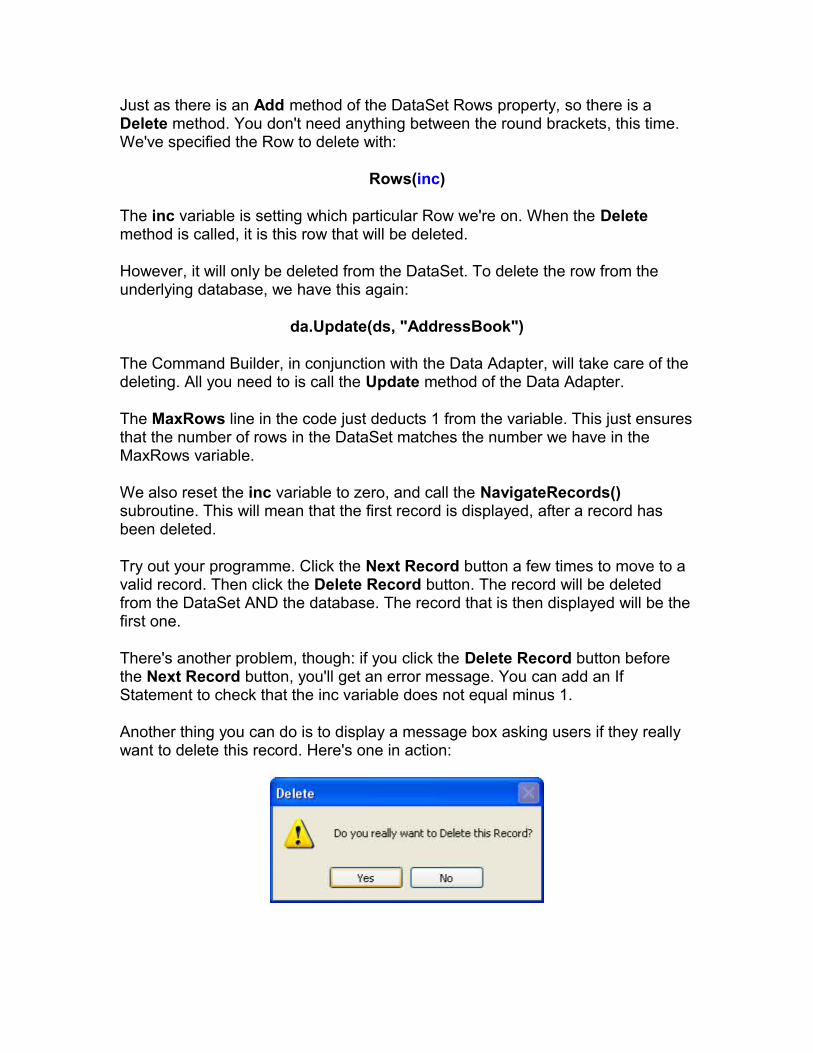
There's another problem, though: if you click the Delete Record button before the Next Record button, you'll get an error message. You can add an If Statement to check that the inc variable does not equal minus 1.
Another thing you can do is to display a message box asking users if they really want to delete this record. Here's one in action:
To get this in your own programme, add the following code to the very top of yourDelete button code:
If MessageBox.Show("Do you really want to Delete this Record?", _"Delete", MessageBoxButtons.YesNo, _MessageBoxIcon.Warning) = DialogResult.No Then
MsgBox("Operation Cancelled")Exit Sub
End If
The first three lines of the code are really one line. The underscore has been used to spread it out, so as to fit on this page.
But we're using the new message box function:
MessageBox.Show()
In between the round brackets, we specifying the message to display, followed by a caption for the message box. We then have this:
MessageBoxButtons.YesNo
You won't have to type all that out; you'll be able to select it from a popup list. Butwhat it does is give you Yes and No buttons on your message box.
After typing a comma, we selected the MessageBoxIcon.Warning icon from the popup list.
But you need to check which button the user clicked. This is done with this:
= DialogResult.No
Again, you select from a popup list. We want to check if the user clicked the No button. This will mean a change of mind from the user. A value of No will then be returned, which is what we're checking for in the If Statement.
The code for the If Statement itself is this:
MsgBox("Operation Cancelled")Exit Sub
This will display another message for the user. But most importantly, the subroutine will be exited: we don't want the rest of the Delete code to be executed, if the user clicked the No button.
And that's it for our introduction to database programming. You not only saw how to construct a database programme using the Wizard, but how to write code to do this yourself. There is an awful lot more to database programming, and we've just scratched the surface. But in a beginner's course, that's all we have time for.
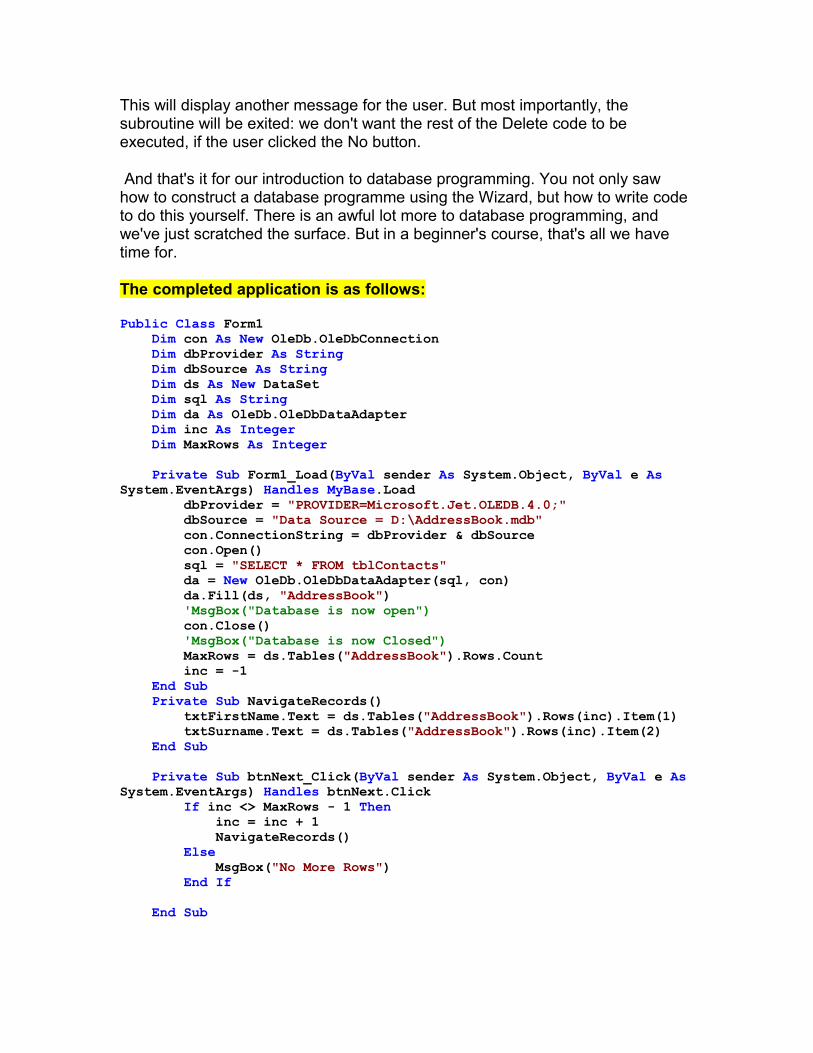
The completed application is as follows:
Public Class Form1 Dim con As New OleDb.OleDbConnection Dim dbProvider As String Dim dbSource As String Dim ds As New DataSet Dim sql As String Dim da As OleDb.OleDbDataAdapter Dim inc As Integer Dim MaxRows As Integer
Private Sub Form1_Load(ByVal sender As System.Object, ByVal e As System.EventArgs) Handles MyBase.Load dbProvider = "PROVIDER=Microsoft.Jet.OLEDB.4.0;" dbSource = "Data Source = D:\AddressBook.mdb" con.ConnectionString = dbProvider & dbSource con.Open() sql = "SELECT * FROM tblContacts" da = New OleDb.OleDbDataAdapter(sql, con) da.Fill(ds, "AddressBook") 'MsgBox("Database is now open") con.Close() 'MsgBox("Database is now Closed") MaxRows = ds.Tables("AddressBook").Rows.Count inc = -1 End Sub Private Sub NavigateRecords() txtFirstName.Text = ds.Tables("AddressBook").Rows(inc).Item(1) txtSurname.Text = ds.Tables("AddressBook").Rows(inc).Item(2) End Sub
Private Sub btnNext_Click(ByVal sender As System.Object, ByVal e AsSystem.EventArgs) Handles btnNext.Click If inc <> MaxRows - 1 Then inc = inc + 1 NavigateRecords() Else MsgBox("No More Rows") End If
End Sub
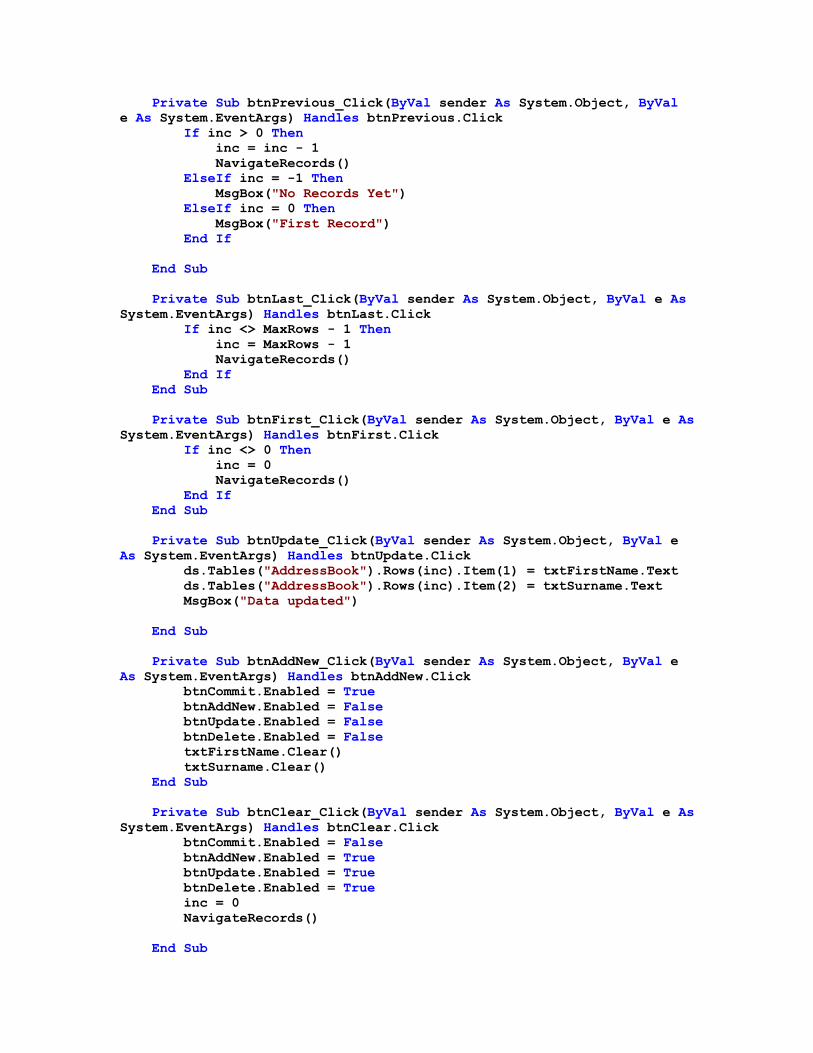
Private Sub btnPrevious_Click(ByVal sender As System.Object, ByVal e As System.EventArgs) Handles btnPrevious.Click If inc > 0 Then inc = inc - 1 NavigateRecords() ElseIf inc = -1 Then MsgBox("No Records Yet") ElseIf inc = 0 Then MsgBox("First Record") End If
End Sub
Private Sub btnLast_Click(ByVal sender As System.Object, ByVal e AsSystem.EventArgs) Handles btnLast.Click If inc <> MaxRows - 1 Then inc = MaxRows - 1 NavigateRecords() End If End Sub
Private Sub btnFirst_Click(ByVal sender As System.Object, ByVal e AsSystem.EventArgs) Handles btnFirst.Click If inc <> 0 Then inc = 0 NavigateRecords() End If End Sub
Private Sub btnUpdate_Click(ByVal sender As System.Object, ByVal e As System.EventArgs) Handles btnUpdate.Click ds.Tables("AddressBook").Rows(inc).Item(1) = txtFirstName.Text ds.Tables("AddressBook").Rows(inc).Item(2) = txtSurname.Text MsgBox("Data updated")
End Sub
Private Sub btnAddNew_Click(ByVal sender As System.Object, ByVal e As System.EventArgs) Handles btnAddNew.Click btnCommit.Enabled = True btnAddNew.Enabled = False btnUpdate.Enabled = False btnDelete.Enabled = False txtFirstName.Clear() txtSurname.Clear() End Sub
Private Sub btnClear_Click(ByVal sender As System.Object, ByVal e AsSystem.EventArgs) Handles btnClear.Click btnCommit.Enabled = False btnAddNew.Enabled = True btnUpdate.Enabled = True btnDelete.Enabled = True inc = 0 NavigateRecords()
End Sub
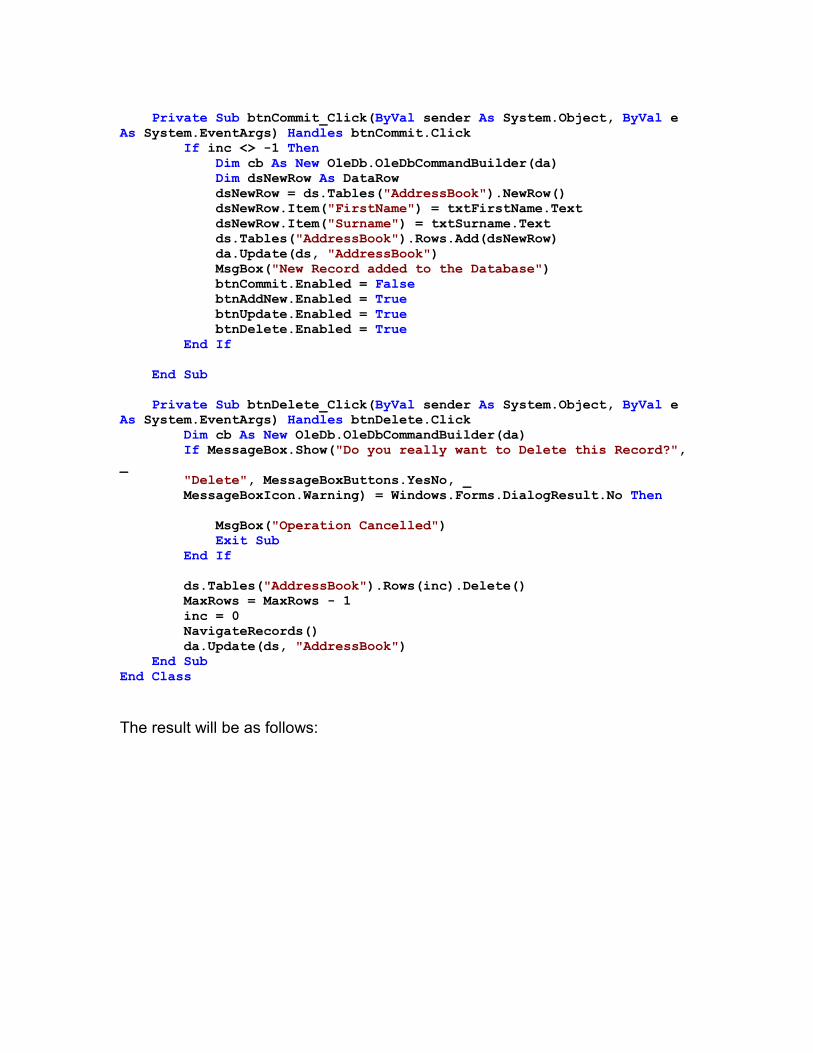
Private Sub btnCommit_Click(ByVal sender As System.Object, ByVal e As System.EventArgs) Handles btnCommit.Click If inc <> -1 Then Dim cb As New OleDb.OleDbCommandBuilder(da) Dim dsNewRow As DataRow dsNewRow = ds.Tables("AddressBook").NewRow() dsNewRow.Item("FirstName") = txtFirstName.Text dsNewRow.Item("Surname") = txtSurname.Text ds.Tables("AddressBook").Rows.Add(dsNewRow) da.Update(ds, "AddressBook") MsgBox("New Record added to the Database") btnCommit.Enabled = False btnAddNew.Enabled = True btnUpdate.Enabled = True btnDelete.Enabled = True End If
End Sub
Private Sub btnDelete_Click(ByVal sender As System.Object, ByVal e As System.EventArgs) Handles btnDelete.Click Dim cb As New OleDb.OleDbCommandBuilder(da) If MessageBox.Show("Do you really want to Delete this Record?",_ "Delete", MessageBoxButtons.YesNo, _ MessageBoxIcon.Warning) = Windows.Forms.DialogResult.No Then
MsgBox("Operation Cancelled") Exit Sub End If
ds.Tables("AddressBook").Rows(inc).Delete() MaxRows = MaxRows - 1 inc = 0 NavigateRecords() da.Update(ds, "AddressBook") End SubEnd Class
The result will be as follows:


![ADO.NET – part II August 2004 [ Marmagna Desai]. CONTENTS ADO vs ADO.NET ADO.NET – Managed providers Connecting to Database SqlConnection Selecting Database.](https://static.fdocuments.net/doc/165x107/56649e2d5503460f94b1cefd/adonet-part-ii-august-2004-marmagna-desai-contents-ado-vs-adonet.jpg)