UniQuest for EWI 4000s Quick...
44
20 November 2005 1 of 44 UniQuest for EWI 4000s Quick Start Thank you and congratulations on your choice of the Akai Professional EWI 4000s Electric Wind Instrument. While the EWI 4000s is equipped with a sophisticated on-board Analog Modeling Synthesizer, UniQuest expands on this feature by giving you remote access to all sound parameters from a connected Mac or PC computer. In addition to complete real-time editor functions, UniQuest for EWI 4000s also serves as a back-up and organizational tool to save and catalog your EWI 4000s sound creations. The editor will also display any notes you play on your EWI 4000s in real-time. 1.0 Getting Ready: Instructions UniQuest uses MIDI System Exclusive messages to communicate with your EWI 4000s. This means you’ll need to make certain connections before you install and run the software for the first time. Here we will explain the steps you need to take. Although the illustrations are PC Windows XP based, these instructions also apply to Mac OS X users. System Requirements Minimum requirements are a Mac G4 with 256 MB of Ram, or a Pentium III with 512 MB of RAM. As everybody knows, faster is better. You will also need a MIDI interface. fortunately, these can be purchased for under $50 these days.
Transcript of UniQuest for EWI 4000s Quick...

20 November 2005
UniQuest for EWI 4000s
Quick Start
Thank you and congratulations on your choice of the Akai Professional EWI 4000s Electric Wind Instrument. While the EWI 4000s is equipped with a sophisticated on-board Analog Modeling Synthesizer, UniQuest expands on this feature by giving you remote access to all sound parameters from a connected Mac or PC computer. In addition to complete real-time editor functions, UniQuest for EWI 4000s also serves as a back-up and organizational tool to save and catalog your EWI 4000s sound creations. The editor will also display any notes you play on your EWI 4000s in real-time.
1.0 Getting Ready: Instructions
UniQuest uses MIDI System Exclusive messages to communicate with your EWI 4000s. This means you’ll need to make certain connections before you install and run the software for the first time. Here we will explain the steps you need to take. Although the illustrations are PC Windows XP based, these instructions also apply to Mac OS X users.
System Requirements
Minimum requirements are a Mac G4 with 256 MB of Ram, or a Pentium III with 512 MB of RAM. As everybody knows, faster is better.
You will also need a MIDI interface. fortunately, these can be purchased for under $50 these days.
1 of 44

Getting Ready: Instructions
Your computer requires one free MIDI In port and one free MIDI Out port to run UniQuest. Please ensure that your MIDI interface is installed correctly and that all filtering options (especially ones that affect System Exclusive) are disa-bled.
Make sure your hardware instrument is properly connected to your computer. Two-way (duplex) MIDI communication is essential to the UniQuest software's installa-tion & operation. You will need to connect two MIDI cables between your compu-ter’s MIDI interface and your instrument as follows:
Ok, this one is pretty obvious. Still, better safe than sorry...
Here’s where you install the UniQuest software from the CD that shipped with your EWI 4000s. You can also download the software free of charge from the Akai Pro-fessional Website (www.akaipro.com). The download will be archived as a zip file.
When you run UniQuest for EWI 4000s for the first time, you will be prompted to choose the MIDI In port that the software will use:
Click on the Yes button to open the MIDI In Ports dialog - Here you will select the actual MIDI port that connects to your EWI 4000s.
2 of 44 UniQuest for EWI 4000s

Getting Ready: Instructions
You may have noticed that some of UniQuest for EWI 4000s’ dialogs, menu bars and icons have the words ‘Midi Quest’ in them. This is to be expected, since UniQuest for EWI 4000s is built on technology developed by Sound Quest Music Software (www.squest.com). This instrument will also available as an included instrument module for users of Sound Quest’s Midi Quest & Midi Quest XL prod-ucts in the near future.
You should now see the following choices in the Midi In Ports Dialog: In this illustration, there are 2 MIDI In ports to choose from - Your system will
show whatever MIDI ports it has available. For best results when you are using other MIDI processing programs in conjunction with UniQuest, your MIDI inter-face should have multi-client drivers. If you do not see any ports here, your MIDI interface drivers are not correctly installed and will need correction before you can proceed. When you have selected the MIDI In you want, please click ‘Ok’ to pro-ceed.
When you run UniQuest for the first time, you will also be prompted to choose the MIDI Out port that the software will use:
Click on the Yes button to open the MIDI Out Ports dialog - Here you will select the actual MIDI port that connects to your EWI 4000s.
You should now see your connected MIDI interface ports as choices in this Dialog(your system will have different MIDI ports available): Please select the port you have connected to your EWI 4000s’ MIDI in and click Ok.
UniQuest for EWI 4000s 3 of 44

Getting Ready: Instructions
UniQuest will now open. On Windows XP you will see an Application window that contains the Studio Window:
On Mac OS X you will see the Application menu and the Studio Window:
The studio window contains the EWI 4000s instrument module: This is the main interface used to transfer sound data between your EWI 4000s and the software.
The Instrument Module (Windows XP)
4 of 44 UniQuest for EWI 4000s

Getting Ready: Instructions
The Instrument Module (Mac OS X)
We’ll now explore the main controls of the instrument module.
• The Instrument Graphic: More than just a pretty picture, this graphic of the EWI 4000s can be single-clicked to give the instrument module focus, and can be double-clicked to upload (or get) the currently selected data from the instru-ment.
• The Set List: This control allows you to choose the EWI 4000s data component you wish to work with, such as Preset, Preset Bank or a more complex grouping of components called a Set. On installation, the Set List will have ‘Default Set’ selected as shown above.
• The Action Bar: This bar contains three mini-buttons labeled GET, NEW and OPEN. When you click on one of the mini-buttons, it will act on the currently selected Set List component. For example, to ‘get’ the preset bank from your EWI 4000s, select ‘Preset Bank’ in the Set List and click on the GET mini-button within the Action Bar.
• The Configuration Mini-Button: This mini-button sets the MIDI Port, SysEx ID, MIDI Channel and other properties of the currently selected component in the Set List. When ‘Default Set’ is selected in the Set List, this button sets the default properties of all the components.
We’ll get more into the instrument module’s settings later on in this document. For now, it’s important that you configure the module to use the correct MIDI in and out ports (if you have selected more than one in step 5) and to configure the module to communicate on the same MIDI and SysEx channels as your EWI 4000s - If this is not done correctly, UniQuest will not work.
When UniQuest is run for the first time, it searches for your EWI 4000s and sets the correct MIDI Ports and SysX channel in the instrument module automatically. This process is called AutoSense, and it should not take more than a few seconds if you have selected only one or two MIDI In and Out ports (back in Step 5).
If you have selected a single MIDI in and MIDI out port, you may not see the Auto-Sense dialog because it opens and closes too fast to you to notice. On the other hand if you have selected 8 ins and 8 outs (from a multi-port MIDI interface for exam-ple), AutoSense could take longer than 5 seconds to complete.
UniQuest for EWI 4000s 5 of 44

Getting Ready: Instructions
The AutoSense dialog is shown here:
If the AutoSense procedure cannot detect your instrument’s settings, you will need to make sure your Midi Interface drivers are installed correctly and that all cables are connected as per the diagram in Step 2. Make sure the output of your computer is connected to the input of the EWI 4000s (and vice-versa). Also ensure that no SysEx filtering is enabled on your MIDI interface.
Although UniQuest will now have detected the correct MIDI Ports and SysX Chan-nel used by your EWI 4000s, you still need to set the MIDI channel manually:
To open the default settings dialog for the instrument module, make sure that the ‘Default Set’ is selected in the Set List and then click on the Configuration mini-button.
6 of 44 UniQuest for EWI 4000s

Getting Ready: Instructions
This will open the default Settings Dialog for the EWI 4000s instrument module :
The Port and SysX (Comm) Channel settings will already have been set in this dia-log by the AutoSense procedure. This means that the Port In and Port Out settings controls will be set to the same MIDI ports that AutoSense discovered your EWI 4000s connected to. Likewise, the Comm Ch will be set to the SysEx communica-tion channel that your EWI 4000s used to respond to the AutoSense message.
By default, the EWI 4000s is configured to use Comm Ch 0 and MIDI Ch 1. UniQuest is also configured to these values by default, so everything will be set cor-rectly unless you plan to set your EWI 4000s to a different MIDI channel.
The SysEx ID (Comm Ch) used by your EWI 4000s is related to its currently selected MIDI channel as follows: A MIDI channel setting of 1 equals a SysEx ID setting of 0, a MIDI channel setting of 2 equals a SysEx ID setting of 1, and a MIDI channel setting of 3 equals a SysEx ID setting of 2, and so on. You must set the Comm Ch to be 1 less than the MIDI Channel in UniQuest’s settings for the soft-ware to work properly!
UniQuest for EWI 4000s 7 of 44

Getting Ready: Instructions
Now you will find out if UniQuest is correctly configured by uploading (or getting) the Internal Preset Bank from your EWI 4000s. This test is also an essential opera-tion since you’ll need to protect these sounds from accidents while you learn to use your new editor software.
1. Select ‘Preset Bank’ with the Set List control...
2. Click on the ‘Get’ mini-button...
8 of 44 UniQuest for EWI 4000s

Getting Ready: Instructions
3. The Preset Bank uploads from your EWI 4000s in about 12 seconds.
4. The Uploaded Data Opens As A Bank Editor Window (Windows XP)
Congratulations! You have just successfully installed UniQuest EWI 4000s and configured the software to work with your EWI 4000s.
Please save the set you have just uploaded by selecting File : Save EWI 4000s Pre-set Bank from the UniQuest application menu. UniQuest will save this data as a file on your computer’s hard drive, and you are now free to explore the sounds you have just transferred to UniQuest by stepping through the bank entries and auditioning each one.
UniQuest for EWI 4000s 9 of 44

Getting Ready: Instructions
1.1 Exploring the Bank Editor WindowYou can now explore each of the sounds you have uploaded by clicking on an entry in the bank window. When you do this, the sound data will be downloaded through MIDI to the EWI 4000s temporary editing buffer, allowing you to audition the cur-rent selection. This will not overwrite any of the EWI 4000s presets, so it is com-pletely safe to do.
More interestingly, you can also split the Bank Editor window to see the current preset loaded into the Virtual Instrument Interface editor. This is achieved by press-ing the Bank Editor Window’s Editor-Split button, which has the icons of 3 faders and two knobs on it:
1.1.1 The Split Bank WindowOnce the Bank Editor has been split, you can edit the Bank in the left side, and edit the current preset in the right side:
If you have not yet selected a preset, nothing will be shown on the right side of the split.
10 of 44 UniQuest for EWI 4000s

Getting Ready: Instructions
Selecting a preset by clicking on it loads the Editor into the right side of the split:
You are free to experiment as much as you like - Just remember to save the changed bank file under a new name. Otherwise, you will overwrite the backup you just made!
In the next section we will explain how UniQuest works in greater detail, and will also explore the Preset Editor’s Virtual Instrument Interface.
UniQuest for EWI 4000s 11 of 44

A Quick Tour of UniQuest For EWI 4000s
2.0 A Quick Tour of UniQuest For EWI 4000s
Getting the most from UniQuest requires a few adjustments in how you relate to your hardware instrument. In the past you have no doubt worked entirely "in-place" within the confines of your instrument's internal memory, which means perma-nently overwriting an existing sound before being allowed to listen to another.
In typical hardware instruments, the presets are organized into banks which are stored in ‘permanent’ memory which is either battery powered (in older instru-ments) or Flash RAM (in modern instruments). Simply put, this kind of memory is rewritable but does not get erased if you unplug the instrument. Typical hardware instruments also have an ‘editing buffer’ where the currently selected preset is loaded for editing and auditioning. This memory is temporary - It depends on the instrument remaining powered up. If you turn off the power, the editing buffer will be erased.
When you load a preset, you are actually copying it to the editing buffer. Similarly, When you save a preset, you are saving the contents of the editing buffer back to the preset bank - The destination location is up to you. This mechanism allows you to move presets around in the bank by shuffling them through the editing buffer, but it has a number of drawbacks. Firstly, there is only a limited amount of space in the bank so moving presets always means overwriting others. Secondly, it’s a tedious and difficult procedure to move blocks of presets around this way, and most impor-tantly, there is a large possibility for confusion and mistakes, which could cause you to lose the sound data you are trying to manage and protect! UniQuest eliminates this situation, as we will now see.
12 of 44 UniQuest for EWI 4000s

A Quick Tour of UniQuest For EWI 4000s
With UniQuest, you upload your EWI4000s preset bank to your computer, where it can be safely backed up to your hard drive. Then you are free to edit, audition, step between sounds, reorganize your banks and create searchable sound libraries with complete security and ease. You are never forced to erase useful sounds to make room for new ones with UniQuest.
Once you have ‘Gotten’ the Preset Bank from your EWI 4000s, you can save it to your computer’s hard drive and that’s it - Your entire preset bank is now backed up.
Each time you click on a preset inside the currently open bank editor window, the preset is loaded for editing on your computer while a copy of the preset’s data is sent to the EWI4000s’ editing buffer so you can hear the sound change as you edit the preset’s parameters.
Unlike a hardware instrument, when you step to the next preset, the changes you made in the editor are stored in the bank window - They are not lost. This lets you step through your bank editing presets as you go. You can also swap entries by drag-and-drop operations and can copy and paste presets between different bank editor windows and no permanent memory location on your EWI 4000s will be changed.
The only time UniQuest will change the Preset Bank that resides in your EWI 4000s’ permanent memory, is when you ‘Put’ the current bank you are editing back into the EWI4000s. Then, the EWI 4000s’ internal preset bank will become a copy of the bank editor window.
UniQuest for EWI 4000s 13 of 44

A Quick Tour of UniQuest For EWI 4000s
2.1 Working with Single Presets
If you only want to edit a single preset, UniQuest for EWI4000s has two compo-nents designed for this task: Preset and Preset Edit Buffer:
When either of these components are selected within the Instrument Module’s Set-List, UniQuest will Get, New, Open or Put a single Preset depending on which mini-button you press.
In the case of the Preset component, the choice of preset number within the EWI 4000s internal bank is set by pressing the configuration mini-button. The default is (Pch# 1), which is the first preset in the internal preset bank.
In the case of the Preset Edit Buffer component, the preset data that is currently being auditioned by the EWI 4000s in the Edit Buffer is what UniQuest will get or put. This component lets you browse through your EWI 4000s’ internal bank with the program up and down keys on the instrument and upload the current one for sin-gle preset editing whenever you like. The revised sound can then be saved on your computer’s hard drive and can also be saved to the EWI 4000s bank memory by performing the Program Save routine on the instrument.
Now it’s time to explore the Preset Editor’s Graphical User Interface and explain the EWI 4000s synthesizer parameters found there.
2.2 The Preset Editor Window
Whenever you upload, open or create a new EWI 4000s preset with UniQuest, the Preset Editor Window will open. Likewise, whenever you are working with an EWI 4000s preset bank and split the window, you will be accessing the Preset Editor through the right side of the Bank Window. Every processing section of the EWI 4000s synthesizer and effects architecture is represented here, with real-time con-trols that let you tweak, test and audition the final results as if your EWI4000s was equipped with a separate front panel desktop console.
All edits made from this window are instantly downloaded to the EWI 4000s' edit-ing buffer (temporary memory).
14 of 44 UniQuest for EWI 4000s

A Quick Tour of UniQuest For EWI 4000s
2.2.1 Preset Editor OverviewThere are 9 sections that make up the EWI 4000s Preset Editor :
In the illustration above, the sections have been separated from their normal layout and are shown according to their location in the EWI 4000s synthesizer architec-ture. The black arrows indicate the flow of audio signals within the EWI 4000s.
We will now explore each of these sections in greater detail.
2.2.2 LCD Display
The LCD display section shows the currently loaded preset’s name and number within the bank editor.
Clicking your mouse on the preset name area will open a dialog allowing you to rename the preset, while the preset number is display only. If you have opened the editor from the Preset component, the preset number will be whatever is currently configured in the instrument module (default #1). If you have opened the editor from the Preset Editing Buffer component there will be not be a preset number dis-played (--).
Underneath the preset name is a 7 octave virtual keyboard display. This keyboard will light up to indicate MIDI notes that are received from the EWI 4000s, so it makes a great tool for working on your fingerings and practicing scales.
UniQuest for EWI 4000s 15 of 44

A Quick Tour of UniQuest For EWI 4000s
2.2.3 OSC 1 & 2 SECTION
The EWI4000s has two analog modeled oscillators, which are editable independent of each other. Each oscillator outputs Sawtooth, Triangle and Pulse waves and includes a waveform mixer that lets you set how much of each wave is heard.
Oscillator 1 & Oscillator 2 are connected as follows:
As you can see there are many different textures that you can generate simply by adjusting the various level controls. What is not shown in this diagram is the influ-ence of the Breath Threshold and Curve controls on each oscillator’s output signal level - As will be explained, these parameters allow you control each output’s level with the air pressure of your breath.
16 of 44 UniQuest for EWI 4000s

A Quick Tour of UniQuest For EWI 4000s
The following parameters are common to each oscillator:
Oscillator Tuning Parameters
OCTAVE
• Range is -2 to +2 octaves.
SEMITONE
• Range is -12 to +12 semitones.
FINE
• Range is -50 to +50 cents. 100 cents = 1 semitone, so this parameter lets you detune the oscillator by as much as a quarter-tone either way. Great for thicken-ing and doubling the sound.
BEAT
• Range is 0 to 100%. This is a musical fine detune control. When the two oscilla-tors are detuned by a fixed amount with the FINE control, you will discover that there is a subtle ‘beating’ effect between them. This beating will be faster for higher pitched notes and slower for lower pitched notes, and this may not be desirable. The BEAT control allows you to detune the oscillators so that the beat-ing is constant for all notes played.
Oscillator Waveform Parameters
SAWTOOTH LEVEL ( )
• Range is 0 to 100 %. Adjusts the oscillator’s sawtooth wave output level.
TRIANGLE LEVEL ( )
• Range is 0 to 100 %. Adjusts the oscillator’s triangle wave output level.
PULSE LEVEL ( )
• Range is 0 to 100 %. Adjusts the oscillator’s pulse wave output level.
PULSE WIDTH
• Range is 0 to 100 %.The oscillator’s pulse wave width is adjustable, where 0% results in a narrow pulse wave, 50% results in a square wave and 100% results in a wide pulse wave.
PWM FREQUENCY
• Range is 0 to 100%. PWM stands for Pulse Width Modulation. Each oscillator has a dedicated LFO to modulate or change its pulse width. This control sets the speed (or frequency) of the PWM LFO.
PWM DEPTH
• Range is 0 to 100%. This control sets the amount (or depth) of the PWM applied by the LFO.
UniQuest for EWI 4000s 17 of 44

A Quick Tour of UniQuest For EWI 4000s
Oscillator Pitch & Volume Envelope Parameters
SWEEP TIME
• Range is 0 to 100%. Unlike a keyboard controlled synthesizer, the EWI 4000s does not use a standard envelope generator (ADSR) to control the Oscillator Pitch. Instead, your breath pressure can act as a real-time trigger of a Sweep whose time to complete is set by this control:
SWEEP DEPTH
• Range is -50% to +50%. Unlike a keyboard controlled synthesizer, the EWI 4000s does not use a standard envelope generator (ADSR) to control the Oscilla-tor Pitch. Instead, your breath pressure can act as a real-time trigger of a Sweep whose pitch depth is set by this control. As shown above, negative values cause the sweep to begin at a lower pitch than original, while positive values cause the sweep to begin at a higher pitch than original.
BREATH ATTAIN
• Range is 0 to 100%. As well as triggering the sweep, your breath pressure can act as a real-time controller of the sweep parameters. This parameter modulates the sweep time as follows:
BREATH DEPTH
• Range is 0 to 100%. As shown above, this parameter modulates the amount of pitch modulation according to the breath strength: At 100% the Breath Depth is the full amount set by the Sweep Depth control.
18 of 44 UniQuest for EWI 4000s

A Quick Tour of UniQuest For EWI 4000s
BREATH THRESH
• Range is 0 to 100%. This is the threshold level above which the Oscillator will begin sounding.
BREATH CURVE
• Range is -50% to +50%. This parameter sets the mapping of breath pressure to output volume for this oscillator. 0% means a linear 1:1 mapping as follows:
Oscillator Master Volume Parameters
LEVEL
• Range is 0% to 100%. This parameter sets the master volume of the Oscillator it belongs to.
Oscillator X-FADE Parameter
X-FADE
• Range is OFF or ON. This parameter is only effective when the BREATH THRESHOLD parameter of OSC2 is set to a non-zero value. When enabled, this parameter causes OSC 1 to be decreased in volume for breath pressure levels above the OSC 2 BREATH THRESHOLD:
In the example shown here, both oscillators are set to use linear breath curves, with OSC 1 and OSC 2 set to breath thresholds of 0% and 20% respectively.
UniQuest for EWI 4000s 19 of 44

A Quick Tour of UniQuest For EWI 4000s
2.2.4 OSC FILTER SECTION
SELECT
• Choices are 1, 2 or LINK. When 1 is selected, the block of controls in this section govern the settings of OSC FILTER 1. When 2 is selected, these controls govern the settings of OSC FILTER 2. LINK mode is now explained.
The Oscillator Filter section consists of 2 multi-mode filters that are connected in serial with each other. Each filter can be set individually or can be linked to realize a double-strength filter whose parameters are set by filter 1’s controls:
The following parameters are common to each filter:
Main Filter Parameters
MODE
This control changes the filter’s basic type:
• OFF: Filter is off, incoming signals are passed unchanged.• NTC: Notch - Removes a band of signal content around the filter cutoff
frequency. This signal is therefore ‘notched’.• BP: Band Pass - Removes signal content except for a band around the filter cut-
off frequncy. This band is allowed to pass unchanged.• HP: High Pass - Removes signal content below the filter cutoff frequency. High
frequencies are allowed to pass unchanged.• LP: Low Pass - Removes signal content above the filter cutoff frequency. Low
frequencies are allowed to pass unchanged.
FREQ
• Range is 65.5 Hz to 10.5 kHz. This control sets the cutoff frequency of the OSC FILTER.
20 of 44 UniQuest for EWI 4000s

A Quick Tour of UniQuest For EWI 4000s
Q-FACTOR
• Range is 0.5 to 12.7. This control sets the Quality Factor of the OSC FILTER, and is analogous to the RESONANCE control found in typical analog synthe-sizer filter sections.
The Q Factor of an audio filter is defined as the cutoff frequency divided by the bandwidth (the 3dB change in level around the cutoff frequency). While this sounds complicated and rather mathematical, it is easier to understand by comparing how the frequency response curve of a lowpass filter changes with different Q factors:
As can be seen, higher Q Factors mean the filter passes more signal around the cut-off frequency while stopping more signal content outside this bandwidth. This also makes the filter more resonant at higher Q factors, which is why the control can also be thought of as a ‘Resonance’ parameter.
KEY FOLLOW
• Range is -12 to 24. When this control is set to 0, the filter’s cutoff frequency remains the same for any note played. For all other values of KEY FOLLOW, the filter’s cutoff frequency will be changed based on the current note.
Note number 72 (which is MIDI Note C 6, and the starting note shown in the 5th octave of the LCD keyboard display) is the reference point for the filter cutoff fre-quency: No matter what value KEY FOLLOW is set to, the filter’s cutoff frequency will apply for this note:
Positive KEY FOLLOW settings will cause the cutoff frequency of the filter to be raised for notes higher than C6 and lowered for notes lower than C6. Negative set-tings have the opposite effect. When KEY FOLLOW is +/- 12, the tracking slope is 1:1 or -1:1 respectively, meaning that the cutoff frequency will be shifted by the same frequency amount as the the note (relative to C6). This produces a very musi-cal effect.
UniQuest for EWI 4000s 21 of 44

A Quick Tour of UniQuest For EWI 4000s
BREATH MOD
• Range is 0 to 100%. This control allows you to change the filter cutoff frequency with your breath pressure. Higher values apply more modulation to the cutoff frequency.
BREATH CURVE
• Range is -50% to +50%. This parameter sets the mapping of breath pressure to cutoff frequency for this filter. 0% means a linear 1:1 mapping as follows:
Filter LFO Parameters
Not only does each filter have a dedicated LFO that can be used to modulate its cut-off frequency, this LFO can be controlled in real-time by your breath pressure for a variety of exciting performance effects.
LFO FREQUENCY
• Range is 0 to 100%. This control changes the LFO rate.
LFO DEPTH
• Range is 0 to 100%. This control changes the amount of LFO modulation that is applied to the cutoff frequency. Higher values result in more modulation.
LFO BREATH
• Range is -50% to 50%. This control modulates the LFO DEPTH, allowing your breath pressure to control how much LFO modulation is applied to the filter’s cutoff frequency. Positive values cause greater breath pressures to result in greater amounts of LFO modulation, while negative amounts of this control cause greater breath pressures to result in lesser amounts of LFO modulation.
Note that since negative values of LFO BREATH reduce the amount of LFO Modu-lation, LFO DEPTH must be set to 100% to achieve the curve shown in the illustra-tion above.
22 of 44 UniQuest for EWI 4000s

A Quick Tour of UniQuest For EWI 4000s
LFO THRESHOLD
• Range is 0 to 100%. This control sets a point in the breath pressure range that acts as a trigger for LFO Modulation to begin or end:
When used in conjunction with the LFO DEPTH and LFO BREATH parameters, LFO THRESHOLD can be used to create a variety of sophisticated filter modula-tions.
Filter Envelope Parameters
SWEEP TIME
• Range is 0 to 100%. Unlike a keyboard controlled synthesizer, the EWI 4000s does not use a standard envelope generator (ADSR) to control the Filter Cutoff Frequency. Instead, your breath pressure can act as a real-time trigger of a Sweep whose time to complete is set by this control:
SWEEP DEPTH
• Range is -50% to +50%. Unlike a keyboard controlled synthesizer, the EWI 4000s does not use a standard envelope generator (ADSR) to control the Filter Cutoff Frequency. Instead, your breath pressure can act as a real-time trigger of a Sweep whose cutoff frequency value is set by this control. As shown above, neg-ative values cause the sweep to begin at a lower frequency than original, while positive values cause the sweep to begin at a higher frequency than original.
UniQuest for EWI 4000s 23 of 44

A Quick Tour of UniQuest For EWI 4000s
2.2.5 FORMANT FILTER SECTION
FILTER
• The Formant Filter applies the formant characteristics of two physical classes of instrument: String or Wood Wind.
2.2.6 NOISE GENERATOR SECTION
The Noise Generator allows for the creation of various white noise effects such as wind, breath and surf sounds. When mixed with the musical tones of the oscillators, the noise signal can be used to model realistic and synthesized sound attack tran-sients.
TIME
• Range is 0% to 100%. This control affects the decay time of the noise - Larger values result in longer decay times.
BREATH
• Range is -50% to +50%. This control sets the mapping of breath pressure to the output volume of the noise signal. 0% means a linear 1:1 mapping as follows:
LEVEL
• Range is 0% to 100%. Sets the master volume of the generated noise signal.
24 of 44 UniQuest for EWI 4000s

A Quick Tour of UniQuest For EWI 4000s
2.2.7 NOISE FILTER SECTION
The NOISE FILTER’s operation is identical to the OSC FILTER, with the exception that it filters the output of the NOISE GEN instead of the OSC SECTION.
This section consists of 2 multi-mode filters that are connected in serial with each other. Each filter can be set individually or can be linked to realize a double-strength filter whose parameters are set by filter 1’s controls. For detailed descriptions of each control in this section, please refer to the corresponding entry in the OSC FIL-TER section.
2.2.8 AMP SECTION
LEVEL
• Range is 0% to 100%. Sets the master volume of the combined OSC and NOISE signals.
UniQuest for EWI 4000s 25 of 44

A Quick Tour of UniQuest For EWI 4000s
2.2.9 EFFECTS SECTION
The EFFECTS SECTION consists of high quality chorus, delay, and reverb effects connected in serial:
Each digital effect will now be examined in the order of their connection.
Chorus Effect Parameters
The chorus effect combines two short delay lines with LFO modulation to apply a swirling doubling effect to the input signal. When enabled, the Chorus parameters process the signal as follows:
Each of the two delay lines outputs a delayed pitch modulated copy of the input sig-nal. When these output signals are fed back into the chorus input and recombined with the original signal the result is a wider, doubled sound.
26 of 44 UniQuest for EWI 4000s

A Quick Tour of UniQuest For EWI 4000s
OFF / ON
• These buttons disable and enable the chorus effect. When the chorus effect is off, the incoming signal is passed through unaffected.
FEEDBACK
• Range is -50% to +50%. This control regulates the amount of chorus output sig-nal that is fed back to the input of the delay lines. Negative values apply increas-ing levels of phase inverted signal to the input.
LFO FREQ
• Range is 0 Hz to 12.7 Hz. Sets the rate of the LFO that is used by both delay lines to apply vibrato (pitch modulation) to their respective signals.
DRY LEVEL
• Range is 0 % to 100%. Controls the volume of the unchorused signal.
SELECT 1 / 2
• These buttons select a delay line for editing. Unlike the OSC FILTER SELECT and NOISE FILTER SELECT buttons, the CHORUS SELECT buttons do not change any modes other than the display.
DELAY 1
• Range is 0 to 127 milliseconds. This control sets the time length of the first delay line.
MOD 1
• Range is -50 % to +50%. Controls the pitch modulation (vibrato) depth applied to the first delay line. Negative values apply increasing amounts of phase inverted LFO modulation. Try setting MOD 1 to a positive value while setting MOD 2 to a negative value for maximum effect.
WET 1
• Range is -50 % to +50%. Controls the output volume of the first delay line. Negative values apply increasing levels of phase inverted signal to the output.
DELAY 2
• Range is 0 to 127 milliseconds. This control sets the time length of the second delay line.
MOD 2
• Range is -50 % to +50%. Controls the pitch modulation (vibrato) depth applied to the first delay line. Negative values apply increasing amounts of phase inverted LFO modulation. Try setting MOD 1 to a positive value while setting MOD 2 to a negative value for maximum effect.
WET 2
• Range is -50 % to +50%. Controls the output volume of the second delay line. Negative values apply increasing levels of phase inverted signal to the output.
UniQuest for EWI 4000s 27 of 44

A Quick Tour of UniQuest For EWI 4000s
Delay Effect Parameters
The delay effect consists of a long delay line coupled with a lowpass filter for tonal control over the delayed signal. Useful for simulating echoes and other repeating effects.
TIME
• Range is 0 to 1.27 seconds. This control sets the time length of the delay line.
FEEDBACK
• Range is 0% to 100%. This control regulates the amount of Delay output signal that is fed back to the input of the delay line.
DAMP
• Range is 0 % to 100%. Controls the cutoff frequency of the lowpass filter applied to the delay line output. This control allows the delays to have less brightness than the original signal, which is useful when simulating natural echo effects.
LEVEL
• Range is 0 % to 100%. Controls the output volume of the delay effect.
Reverb Effect Parameters
The reverb effect consists of a very long multi-tap delay line coupled with a lowpass filter for tonal control over the reverberated signal. Useful for simulating acoustic spaces such as rooms, halls, caverns and arenas.
TIME
• Range is 1.0 to 5.0 seconds. This control sets the time length of the reverb’s multi-tap delay line.
DENSE:EARLY
• Range is 0% to 100%. This control regulates the density of the early reflections produced by the reverb algorithm. From 0-50% this control increases the number of early reflections in the reverb, while from 51-100% it increases the reverb density.
DAMP
• Range is -10 to +10. Controls the cutoff frequency of the lowpass filter applied to the reverb output. This control allows the reverberations to have less brightness than the original signal, which is useful when simulating various environments.
LEVEL
• Range is 0 % to 100%. Controls the output volume of the reverb effect.
28 of 44 UniQuest for EWI 4000s

A Quick Tour of UniQuest For EWI 4000s
2.2.10 COMMON SECTION
The common section contains a number of miscellaneous parameters that control the EWI 4000s’ general behavior when the preset is loaded.
KEY TRIGGER
• SINGLE: The envelope is only controlled by breath articulation.• MULTI: The envelope (sweep) of each new note is re-triggered, even while your
breath is continuous through the transition.
You can get a good idea on how this parameter works by setting a long sweep time in the filter section, apply sustained breath to the EWI 4000s and play a sequence of notes to see the difference with SINGLE selected and then repeat with MULTI selected.
OCT BUTTON LEVEL
• Range is 0% to 100%. Controls the level of the second voice that is played when the EWI 4000s’ OCT mode is enabled by pressing the OCT button on the instru-ment.
BEND RANGE
• Range is 0 to 12 semitones. Sets the pitch interval shifted up or down when the EWI 4000s’ BEND UP or BEND DOWN keys are touched.
STEP
• Off or On. When enabled, this button causes pitch bends to be semitone stepped when the EWI 4000s’ BEND UP or BEND DOWN keys are touched. If STEP is disabled, pitch bends will glide to their destination.
VIBRATO PITCH
• Range is 0% to 100%. Controls the amount of the pitch modulation (Vibrato) that is applied to the sound when the bite sensor in the EWI 4000s mouthpiece is activated.
VIBRATO AMP
• Range is 0% to 100%. Controls the amount of the volume modulation (Tremolo) that is applied to the sound when the bite sensor in the EWI 4000s mouthpiece is activated.
UniQuest for EWI 4000s 29 of 44

A Quick Tour of UniQuest For EWI 4000s
2.3 The Editor Controls in Closer DetailEach of the Preset editor sections is made up of various controls such as toggle switches, knobs and sliders. These are now explored in greater detail.
Knob
UniQuest’s knobs are rotary entry controls that are edited whenever the mouse is clicked and dragged in a circular motion around the knob’s center. You can change every knob’s entry mode to standard linear drag entry in UniQuest’s Preferences dialog, under the Patch Edit tab. You can also reset any knob to it’s default value by pressing Ctrl-Spacebar while hovering the mouse over it.
Knobs have real-time edit pop-up text and a direct entry mode, both of which are covered below.
Slider
UniQuest’s sliders are linear entry controls that are edited whenever the mouse is clicked and dragged vertically.You can reset any Slider to it’s default value by pressing Ctrl-Spacebar while hovering the mouse over it.
Sliders have real-time edit pop-up text and a direct entry mode, both of which are covered below.
Pop-Up Text for Knobs & Sliders
Whenever you edit a knob or slider, the current value will be shown in a pop-up text string. If the parameter has been edited since its inital load you will also see an asterisk (*) after the text.
Direct Entry Mode for Knobs & Sliders
Direct entry mode is activated for knobs and sliders when you right-click or double-click on the control in Windows. On the Mac platform, direct entry mode is activated with a Ctrl-Click on the desired control.
Direct entry mode is different between the Windows and Mac platforms. Here is the direct entry mode for the OSC FILTER 1’s FREQ Slider on Windows XP:
On the Windows platform, direct entry mode allows you to select an exact value for the parameter from a pop-up menu. The previous control selection is shown as checked, and the currently selected option in the list is highlighted. Clicking on any entry in the pop-up menu will replace the previous selection and close the pop-up.
30 of 44 UniQuest for EWI 4000s

A Quick Tour of UniQuest For EWI 4000s
On the Mac platform, Direct Mode entry operates as follows:
Instead of a multi-column pop-up menu, the direct mode menu is a single scrolling column, and the previous control selection is not shown as a checked entry (A con-sequence of the current OS X architecture). As with the Windows version, the cur-rent selection is highlighted and clicking on it will update the control and close the pop-up menu.
Toggle
UniQuest’s toggles are buttons that flip states whenever the mouse is clicked on them. You can reset any toggle to it’s default value by pressing Ctrl-Spacebar while hovering the mouse over it.
Radio Button Group
UniQuest’s Radio Button Groups are each a group of buttons that control a single parameter. Whenever the mouse is clicked on a button within the group, the remain-ing buttons are deselected, much like the channel selector buttons on an old-fash-ioned car radio.
You can reset any Radio Button Group to it’s default value by pressing Ctrl-Spacebar while hovering the mouse over it.
Text Control
UniQuest’s text controls launch a text entry dialog when the mouse is clicked on them. In the EWI 4000s preset editor, there is only of these controls and its function is to rename the preset.
MIDI Keyboard
UniQuest’s MIDI Keyboard control reacts to incoming MIDI notes by displaying them as illuminated keys.In the EWI 4000s preset editor, there is only of these con-trols, located in the LCD Display area beneath the Preset Name.
UniQuest for EWI 4000s 31 of 44

A Quick Tour of UniQuest For EWI 4000s
2.4 The Preset Bank Windows
Whenever you get, open or create a new Patch Bank in UniQuest, a Bank Window will open.
The entire memory space of an EWI 4000s Preset Bank is represented in this win-dow, and the dynamic tab control ensures you'll never have to scroll around to find the patch you want.
Presets can be dragged and dropped to reorganize the bank, and any selected preset is instantly downloaded to the EWI 4000s’ editing buffer (temporary memory) so you can audition it in real-time. To transfer the entire bank to your EWI 4000s’ flash memory, simply click on the button.
Clicking on the button will split the Bank Window so that the right-most pane contains the preset editor covered in the previous section of this document. This lets you step between each preset in the bank and edit the current selection in real-time.
32 of 44 UniQuest for EWI 4000s

A Quick Tour of UniQuest For EWI 4000s
2.4.1 Exporting Bank Windows to TextAlthough UniQuest for EWI 4000s does not operate as a plug-in for Digital Audio Workstation (DAW) software, it features very powerful preset export functions for use with these DAW programs and for sharing your EWI 4000s presets with others who are not UniQuest users. These functions are accessed from within the Bank Editor Window by performing a right-click (Windows) or Alt-Click (Mac) over the bank editing area as follows:
On selecting ‘Save Akai Pro EWI 4000s Preset Bank As...’ a Save dialog will be launched. This dialog can save to many useful formats besides native .Bnk:
SMF: Exports a standard MIDI File that can be played with any sequencer to dump the bank back to any connected EWI 4000s.
MIDIX: Exports a standard MIDIX file that can be dumped to any EWI 4000s with any MIDI utility program supporting this format.
Bank Names as Text: Exports either a tab delimited (for import to spreadsheets and databases) or as a multi-line text file (for import to word processing programs).
Cake Names: Exports to Cakewalk name formats for all versions of Cakewalk and Sonar. To import these into your specific version, please consult the owner’s manual for this DAW.
Cubase Names: Exports to Cubase name format. To import these into your specific version, please consult the owner’s manual for this DAW.
UniQuest for EWI 4000s 33 of 44
A Quick Tour of UniQuest For EWI 4000s
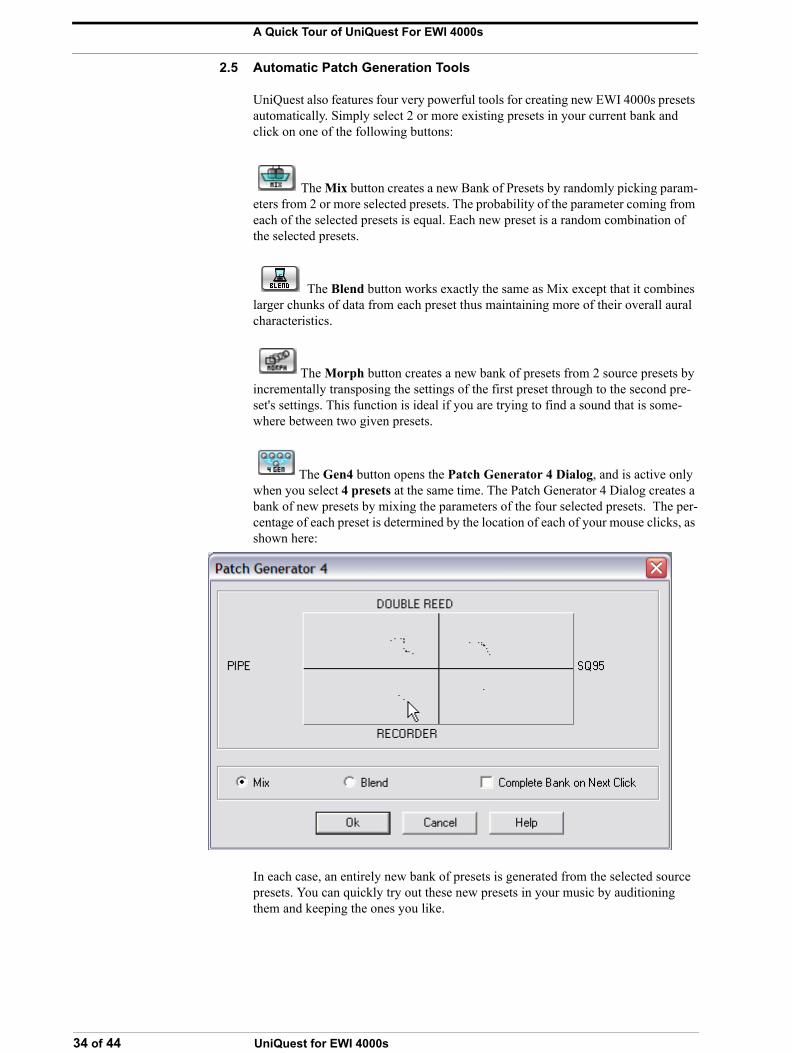
2.5 Automatic Patch Generation Tools
UniQuest also features four very powerful tools for creating new EWI 4000s presets automatically. Simply select 2 or more existing presets in your current bank and click on one of the following buttons:
The Mix button creates a new Bank of Presets by randomly picking param-eters from 2 or more selected presets. The probability of the parameter coming from each of the selected presets is equal. Each new preset is a random combination of the selected presets.
The Blend button works exactly the same as Mix except that it combines larger chunks of data from each preset thus maintaining more of their overall aural characteristics.
The Morph button creates a new bank of presets from 2 source presets by incrementally transposing the settings of the first preset through to the second pre-set's settings. This function is ideal if you are trying to find a sound that is some-where between two given presets.
The Gen4 button opens the Patch Generator 4 Dialog, and is active only when you select 4 presets at the same time. The Patch Generator 4 Dialog creates a bank of new presets by mixing the parameters of the four selected presets. The per-centage of each preset is determined by the location of each of your mouse clicks, as shown here:
In each case, an entirely new bank of presets is generated from the selected source presets. You can quickly try out these new presets in your music by auditioning them and keeping the ones you like.
34 of 44 UniQuest for EWI 4000s

A Quick Tour of UniQuest For EWI 4000s
2.6 The Set WindowComponents like Presets, Edit Buffers and Preset Banks do not have to be edited in separate windows: UniQuest also lets you upload, open or create a combined data file called a Set.
The entire memory space of your EWI 4000s is represented in the Default Set, which includes the preset bank, the preset edit buffer and the individual preset 01. Within the set window, you can step between each component in the tree-view and perform edits with a press of the button.
As with the bank window, presets can also be individually edited by pressing the Editor Split button within the patch bank pane of the window:
It is important to note that the Set functionality of UniQuest is not neccessary when working with the EWI 4000s, since this instrument does not have a global settings editor or multiple preset banks. If the EWI 4000s did have such a complicated inter-nal memory structure the set would be essential to proper sound management. As it is, you will likely find that the Preset Bank component is all you need to use when backing up and editing sounds on your EWI 4000s.
UniQuest for EWI 4000s 35 of 44

A Quick Tour of UniQuest For EWI 4000s
2.7 The Collection WindowThe Collection window is used to create and edit unstructured groupings of what-ever EWI 4000s components you like.
Just like the Set and Bank windows, the Collection window will split to show the relevant editor window whenever you select a member of the collection and click on the Collection’s Editor Split button (as shown here).
Collections time-stamp components as they are added, which means each collection acts like a tape-drive that allows you to archive sounds at each stage of development and “roll back the clock” whenever you want.
Collections can be also used to store your own structures of data: In the example shown above, there are 3 individual presets and two preset banks.
36 of 44 UniQuest for EWI 4000s

A Quick Tour of UniQuest For EWI 4000s
2.8 The Library Window
Since the Bank window is never larger than the maximum size of the your EWI-4000s’ internal memory, UniQuest is equipped with a virtually unlimited type of storage: The Library.
Each library you create can be as big as you like, but can only store one type of data: This is perfect for creating an EWI 4000s Preset Library. The library window also includes a suite of data maintenance and editing tools to keep your arsenal of sounds completely at the ready: In the example shown here, the entire contents of the EWI 4000s factory preset bank have been added to a Preset Edit Buffer Library with one drag-and-drop operation from the Default Set window.
Libraries can become extremely large, so the Library window is capable of per-forming key-word searches on as many as six criteria of your choice. Pressing the
button launches the Query dialog:
In the example shown above, the Query dialog is set to search the library for presets whose name contains the text ‘brass’ and who have the keywords ‘Tuba’ or ‘Trum-pet’ stored with their entry.
UniQuest for EWI 4000s 37 of 44

A Quick Tour of UniQuest For EWI 4000s
The result of this Query is now shown:
You will see that there seem to be duplicate results in this query. A new Query can be run on the results, set to remove these duplicates. This involves pressing the button again and checking the ‘Duplicates’ option in the Query Dialog. Here is the new result:
The ‘Duplicates’ option actually compares the data bytes of every preset and only shows one copy of each duplicate found - A very useful tool when you are not sure yourself. Please note that the library still contains the original number of presets. Queries simply hide any presets that are not returned. To reset the library to show all entries, simply click on the button.
From a single library window you can search the sounds you need by their name or by the automatic keys UniQuest inserts in each library entry when it is entered. You are also free to audition each patch by clicking on it, as well as mix, blend, morph and Gen4 new banks from the currently selected patches.
38 of 44 UniQuest for EWI 4000s

A Quick Tour of UniQuest For EWI 4000s
2.9 Transferring Presets Between WindowsIt is easy to transfer presets between any open editor window in UniQuest. In most cases where the source is a bank window, you need only drag and drop the entry to a new location such as another bank window, a library window (of the same type), a collection window, or an open preset editor window.
When the source is an open preset editor window, a simple drag and drop operation will not work, however. In this case, you must hold down the Alt key while clicking (Alt-Click) the mouse on the open preset editor window. You may then release the Alt key and continue to drag and drop the preset data to the destination as before.
2.10 The ‘Update Patch on Activate’ OptionWhen UniQuest for EWI 4000s is first installed, the Update Patch on Activate option is enabled. This preference controls how the program communicates with your EWI when multiple editor windows are open. Consider the followingscenario:
There are four open windows in this illustration, and each one contains a different preset for editing. Since the window containing the FAT SAW preset currently has focus (is selected for editing), you should expect the EWI 4000s editing buffer to contain this preset so that you could hear your sound edits as you work.
With Update Patch on Activate enabled, you can switch between each of these four open windows and always be sure that the current window’s data is loaded into the EWI 4000s because UniQuest will put the data to the instrument every time you switch to a new window.
In the situation above, selecting the window that is editing the FAT SAW preset will automatically put the preset into your EWI 4000s’ edit buffer. If you were then to select the Collection window, the current selection in this window (SAW+5) would replace FAT SAW in the EWI so that you could hear any changes you made within the collection editor window. Similarly, if you then selected the Bank window for editing, the current selection in this window (BRIGHT SYNTH) would replace SAW+5 in the EWI 4000s’ editing buffer.
Since single preset data is quickly transferred between UniQuest and your EWI, the Update Patch on Activate preference is best left enabled.
UniQuest for EWI 4000s 39 of 44

A Quick Tour of UniQuest For EWI 4000s
2.11 The ‘MIDI Thru’ FeatureBy default, UniQuest’s MIDI Thru feature is turned off. If you wish to create EWI sounds for layering with external synthesizers and samplers, however, you will need to enable this feature.
Before you can use the MIDI Thru feature, you need to ensure that your computer has a second MIDI port for connecting the external instrument to UniQuest. Here is how the EWI 4000s, the computer and the external synth or sampler will need to be connected for this application:
Please note that your external synth or sampler may have a USB Midi feature, in which case you can simply connect the instrument to your computer with a USB cable and install the MIDI drivers that came with the instrument on your computer.
Once you have connected the external synth or sampler, you will need to make sure that UniQuest for EWI 4000s is configured to use the MIDI port the external device is connected to: Open the MIDI->MIDI in Ports... and MIDI->Midi Out Ports.. dialogs respectively and select these ports in addition to the ones already connected to the EWI 4000s.
40 of 44 UniQuest for EWI 4000s

A Quick Tour of UniQuest For EWI 4000s
Next, open the UniQuest Preferences dialog (UniQuest for Akai EWI4000s->Preferences on Mac, or Options->Preferences on Windows). Now select the MIDI Tab of the dialog:
Turn on MIDI Thru and then select the MIDI Port Out to route the MIDI Thru sig-nals to. This selection must be the port to which the external synth or sampler is connected.
Do NOT select the same port that the EWI 4000s is already using. This will create a MIDI Feedback loop and cut the note output of the EWI 4000s’ synthesizer in half!
If you are not using an external device with UniQuest, turn the MIDI Thru feature OFF, or you may experience this problem by default.
If the correct output port is not shown in the Midi Port Out control, the external device’s MIDI Port may not be selected for use with UniQuest (see above for instructions) or the port’s drivers may not be correctly installed. Please refer to your MIDI interface or external device (if equipped with USB MIDI) installation instruc-tions to correctly install these drivers and try again.
When properly configured, the following MIDI control flow will occur:
• Notes and other MIDI performance data performed on EWI 4000s will enter the editor where it will be displayed as it is passed through to the external synth or sampler which will play along with the EWI 4000s.
• All edits performed within the software GUI will generate MIDI SysEx and NRPN data which will be passed to the EWI 4000s only.
UniQuest for EWI 4000s 41 of 44

A Quick Tour of UniQuest For EWI 4000s
2.12 Transferring Data Files Between Different ComputersThere are a few facts to keep in mind when transporting Preset, Bank and Set data created by UniQuest between different computers. If you plan to email these files or move them between Mac and PC computers, you should be aware of the following facts.
On Windows 2000 & XP, file extensions are used to indicate the data contained within the file and to cue the operating system which application should be launched when the file is double-clicked or otherwise interacted with.
UniQuest for EWI 4000s uses the following extensions: .Mem - Preset Edit Buffer, .Prs - Individual Preset (from internal Bank), .Bnk - Preset Bank, .SQS - Set File, .SQC - Collection File, and .SQL - Library File
The file extensions listed here are also used by the Mac OS X version of UniQuest, but this is not the whole picture, as will now be explained.
Mac OS X relies on File Type and File Creator properties embedded within the file to provide the information required when the file is double-clicked or interacted with.
UniQuest for EWI 4000s uses the following file Type and Creator properties:
DATA TYPE CREATORPreset Edit Buffer SQDA SQUQIndividual Preset SQDA SQUQPreset Bank SQDA SQUQSet File SQST SQUQCollection File SQDB SQUQLibrary File SQLB SQUQ
• If you create any of the above data files with the PC version of UniQuest, they will not have these properties set (Windows does not support them). As a result, Mac versions of UniQuest will not be able to open the files - They will appear gray and transparent in the ‘file open’ dialog.
• Likewise, if you email any of the above data files as raw attachments, their Type and Creator properties will be stripped off - Even if they were created on the Mac!
The solution to the email problem is simple: Simply remember to archive any Mac UniQuest data as a zip or binhex archive prior to attaching them, and always ensure you decompress the archive on a Mac running OS X. Both Mac and Windows com-puters will be able to load them if transferred this way.
Converting UniQuest data files created on PC for use with the Mac version is more difficult: Currently, the Mac OS X Get Info program does not show or set these file attributes. If your Mac is equipped with OSX Tiger, there is a way to do this with Automator: Otherwise, you may need to use a third-party shareware utility to do the conversion.
The next paragraphs will explain how to use OSX Tiger’s Automator application to convert files from PC or email to the correct file Type and Creator properties.
42 of 44 UniQuest for EWI 4000s

A Quick Tour of UniQuest For EWI 4000s
Mac OSX’s Automator utility can be applied to the task of converting UniQuest files from the PC version relatively easily. You will need:
• Mac OSX Tiger (which includes Automator)• The Change File Type and Creator Action from
www.apple.com/downloads/macosx/automator/changefiletypeandcrea-tor.html.
If this URL has been changed, you should search for ‘Change File Type and Creator’ on the www.apple.com/downloads/macosx/automator/ web page to access the download.
• The following workflow files downloadable from http://www.psicraft.com/Files/AkaiPro/Automator%20Actions.zip
The first step is to install the ‘Change File Type and Creator’ Action into Automa-tor. Actions are like audio plug-ins: They extend Automator do do specific tasks.
Next, extract the ‘Automator Actions.zip’ download to your desktop. Inside the archive are four Workflow files: Set PC Collection, Set PC Preset and Bank, Set PC Set and Set PC Library. When each file is opened with Automator, you will be ready to convert the appropriate data file so that the file Type and Creator attributes are set correctly.
Since Presets and Banks are the most common data type produced by UniQuest for EWI 4000s, here is an illustrated example of the procedure:
On opening the ‘Set PC Preset and Bank’ Workflow file, you will see the above dia-log open. Simply click on the ‘Run’ button to start the Workflow.
Never click the ‘Select file’ button in the ‘Change File Type and Creator’ action: This will only change the workflow so that it no longer sets the correct type and cre-ator attributes.
Once the Run button has been pressed, Automator will execute the first action in the workflow, which is ‘Ask for Finder Items’. This will launch a file selection dialog that will open to the default folder where Preset and Bank data files are stored by UniQuest for EWI 4000s:
UniQuest for EWI 4000s 43 of 44

Conclusion
In the illustration above, there are three bank files that already have the correct file type and creator attributes set (which is why they show the bank icon).
The top two bank files (which are selected in the illustration) do not have their attributes set correctly - Their icons (the blank document icon) reflect this fact.
Clicking ‘Choose’ will continue the workflow, setting the selected files to the proper attributes. Automator will indicate ‘Workflow Execution Completed’, and the files will now open within the Mac version of UniQuest.
Here you can see the finder’s view of the folder after the workflow completed:
The processed bank files are now showing the correct icon and document type.
3.0 Conclusion
This concludes the UniQuest for EWI 4000s Quick Start. You are encouraged to read through the complete PDF owner’s manual for Midi Quest XL (found on the installation CD) to master UniQuest’s deeper capabilities. We hope your music is enriched and enhanced by this innovative and unique music software, and also would like to thank you for reading the entire Quick Start. This knowledge will serve you well.
44 of 44 UniQuest for EWI 4000s