
UNIDAD ELECTRÓNICA ELECTRONIC MONITOR … · sportkoncept 3 CONFIGURACION DEL MONITOR.- CAMBIO DE...
113
SK2000T sportkoncept UNIDAD ELECTRÓNICA ELECTRONIC MONITOR ELEKTRONIKEINHEIT
Transcript of UNIDAD ELECTRÓNICA ELECTRONIC MONITOR … · sportkoncept 3 CONFIGURACION DEL MONITOR.- CAMBIO DE...

SK2000T
sportkoncept
UNIDAD ELECTRÓNICA ELECTRONIC MONITOR ELEKTRONIKEINHEIT

sportkoncept
2
ESPAÑOL
INDICACIONES GENERALES.- Este monitor electrónico está diseñado para ser utilizado de forma sencilla e intuitiva. Los textos que aparecen en la pantalla del televisor guiarán al usuario durante la realización del ejercicio. Sin embargo, recomendamos que el preparador físico lea atentamente esta sección con el fin de conocer a fondo el monitor electrónico y mostrar al usuario su funcionamiento de forma efectiva.
CONEXIONADO DE MAQUINA.- En primer lugar, conexione el cable del trasformador a la red eléctrica a un enchufe de 100V-240V con toma de tierra según le muestra la Fig.1. A continuación enchufe el terminal del transformador a la maquina Fig.2.
Fig.1 Fig.2
ELEMENTOS DE AUDIO.- Fig.5
M.-Conector para conectar un dispositivo mediante MTP.
N.-Conector de escucha por auriculares.
Fig.3
PUESTA EN MARCHA.- Pantalla 1 Una vez conexionada la máquina, se visualiza en el monitor la Pantalla 1.

sportkoncept
3
CONFIGURACION DEL MONITOR.- CAMBIO DE IDIOMA. Pantalla 1 Pantalla 2 1º.- Estando en la Pantalla 1:
Pulse el Lenguaje que este activo en la parte superior izquierda. 2º.- Seguido le aparecerá en la Pantalla 1 una lista desplegada de idiomas como se puede ver en la pantalla 2: Seleccione el idioma que desee.
ENTRADA/SALIDA AL BACKOFFICE. Pantalla 1 Pantalla 3 ENTRADA: Estando visualizando la Pantalla 1, pulse la tecla QUICK START y seguido la tecla parar, y le aparecerá la Pantalla 3. En la pantalla 3, mantenga la esquina inferior izquierda para entrar al menú oculto o backoffice (Pantalla 4). Pantalla 4 SALIDA: Estando dentro del backoffice, pulse la esquina superior izquierda, donde pone Configuration, para volver al menú principal.
NOTA: Por favor, no mofique ningún parámetro del menu oculto a menos que se detalle en este manual, ya que puede provocar el mal funcionamiento de la maquina. CAMBIO DE Km. A MILLAS. Pantalla 5 Una vez dentro del backoffice, vaya a la pestaña Preference y cambie la opción Unit a Imperial como se puede ver en la pantalla 5.

sportkoncept
4
INSTRUCCIONES DE FUNCIONAMIENTO.- MODO PROGRAMAS. Pantalla 1 Este monitor dispone de los siguientes programas: 8 programas en SESIONES DE ENTRENAMIENTO; 3 programas OBJETIVO; 1 programas de CONTROL DE FRECUENCIA CARDIACA y 1 programas en PRUEBA FISICA. Se acceden a todos ellos desde la Pantalla 1.
SESIONES DE ENTRENAMIENTO.- En estas sesiones de entrenamiento se pueden diferenciar en dos categorías: A).- Programa MANUAL B).- Resto de sesiones de entrenamiento MANUAL. En este programa MANUAL se pueden seleccionar: A).- Peso del usuario B).- Tiempo a realizar en el ejercicio. Pantalla 1 Pantalla 6 Para elegir el programa MANUAL basta con entrar dentro de los programas en SESION DE ENTRENAMIENTO dentro de la pantalla 1 y elegir el programa MANUAL. Tras elegirlo, aparece la pantalla 6 en la que se configuran los parámetros peso y tiempo y pulsando el botón de start comienza comienza el programa MANUAL. Cuando se está realizando el programa se puede variar el parámetro nivel con su respectivas teclas de +/-. Pantalla 3 Una vez se pulse la tecla Stop, pasará a la Pantalla 3, en la que se muestra un resumen de los valores más importantes del ejercicio. Pulse la tecla Anterior o espere unos segundos y pasará a la Pantalla 1. RESTO SESIONES DE ENTRENAMIENTO. En estos programas se pueden seleccionar: A).- Peso del usuario B).- Tiempo a realizar en el ejercicio. C).- Nivel de experiencia del usuario.

sportkoncept
5
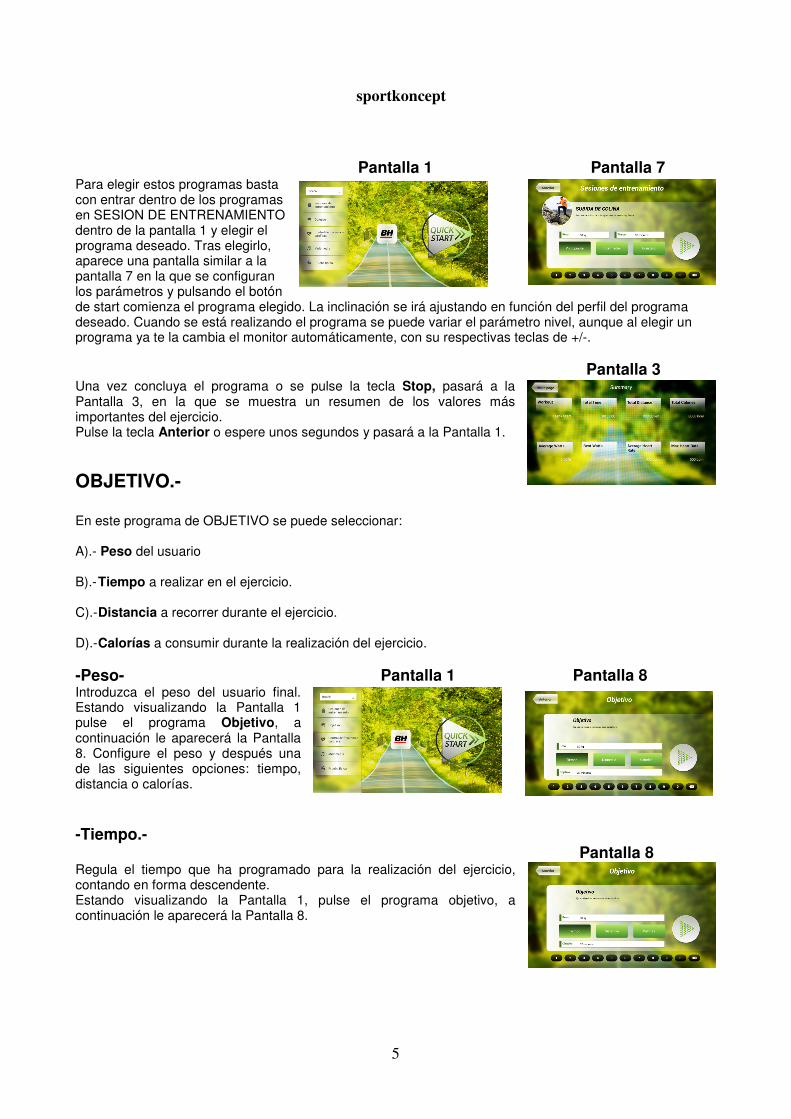
Pantalla 1 Pantalla 7 Para elegir estos programas basta con entrar dentro de los programas en SESION DE ENTRENAMIENTO dentro de la pantalla 1 y elegir el programa deseado. Tras elegirlo, aparece una pantalla similar a la pantalla 7 en la que se configuran los parámetros y pulsando el botón de start comienza el programa elegido. La inclinación se irá ajustando en función del perfil del programa deseado. Cuando se está realizando el programa se puede variar el parámetro nivel, aunque al elegir un programa ya te la cambia el monitor automáticamente, con su respectivas teclas de +/-. Pantalla 3 Una vez concluya el programa o se pulse la tecla Stop, pasará a la Pantalla 3, en la que se muestra un resumen de los valores más importantes del ejercicio. Pulse la tecla Anterior o espere unos segundos y pasará a la Pantalla 1.
OBJETIVO.- En este programa de OBJETIVO se puede seleccionar: A).- Peso del usuario B).- Tiempo a realizar en el ejercicio. C).- Distancia a recorrer durante el ejercicio. D).- Calorías a consumir durante la realización del ejercicio. -Peso- Pantalla 1 Pantalla 8 Introduzca el peso del usuario final. Estando visualizando la Pantalla 1 pulse el programa Objetivo, a continuación le aparecerá la Pantalla 8. Configure el peso y después una de las siguientes opciones: tiempo, distancia o calorías. -Tiempo.- Pantalla 8 Regula el tiempo que ha programado para la realización del ejercicio, contando en forma descendente. Estando visualizando la Pantalla 1, pulse el programa objetivo, a continuación le aparecerá la Pantalla 8.

SK2000T
sportkoncept
UNIDAD ELECTRÓNICA ELECTRONIC MONITOR ELEKTRONIKEINHEIT

sportkoncept
2
ESPAÑOL
INDICACIONES GENERALES.- Este monitor electrónico está diseñado para ser utilizado de forma sencilla e intuitiva. Los textos que aparecen en la pantalla del televisor guiarán al usuario durante la realización del ejercicio. Sin embargo, recomendamos que el preparador físico lea atentamente esta sección con el fin de conocer a fondo el monitor electrónico y mostrar al usuario su funcionamiento de forma efectiva.
CONEXIONADO DE MAQUINA.- En primer lugar, conexione el cable del trasformador a la red eléctrica a un enchufe de 100V-240V con toma de tierra según le muestra la Fig.1. A continuación enchufe el terminal del transformador a la maquina Fig.2.
Fig.1 Fig.2
ELEMENTOS DE AUDIO.- Fig.5
M.-Conector para conectar un dispositivo mediante MTP.
N.-Conector de escucha por auriculares.
Fig.3
PUESTA EN MARCHA.- Pantalla 1 Una vez conexionada la máquina, se visualiza en el monitor la Pantalla 1.

sportkoncept
3
CONFIGURACION DEL MONITOR.- CAMBIO DE IDIOMA. Pantalla 1 Pantalla 2 1º.- Estando en la Pantalla 1:
Pulse el Lenguaje que este activo en la parte superior izquierda. 2º.- Seguido le aparecerá en la Pantalla 1 una lista desplegada de idiomas como se puede ver en la pantalla 2: Seleccione el idioma que desee.
ENTRADA/SALIDA AL BACKOFFICE. Pantalla 1 Pantalla 3 ENTRADA: Estando visualizando la Pantalla 1, pulse la tecla QUICK START y seguido la tecla parar, y le aparecerá la Pantalla 3. En la pantalla 3, mantenga la esquina inferior izquierda para entrar al menú oculto o backoffice (Pantalla 4). Pantalla 4 SALIDA: Estando dentro del backoffice, pulse la esquina superior izquierda, donde pone Configuration, para volver al menú principal.
NOTA: Por favor, no mofique ningún parámetro del menu oculto a menos que se detalle en este manual, ya que puede provocar el mal funcionamiento de la maquina. CAMBIO DE Km. A MILLAS. Pantalla 5 Una vez dentro del backoffice, vaya a la pestaña Preference y cambie la opción Unit a Imperial como se puede ver en la pantalla 5.

sportkoncept
4
INSTRUCCIONES DE FUNCIONAMIENTO.- MODO PROGRAMAS. Pantalla 1 Este monitor dispone de los siguientes programas: 8 programas en SESIONES DE ENTRENAMIENTO; 3 programas OBJETIVO; 1 programas de CONTROL DE FRECUENCIA CARDIACA y 1 programas en PRUEBA FISICA. Se acceden a todos ellos desde la Pantalla 1.
SESIONES DE ENTRENAMIENTO.- En estas sesiones de entrenamiento se pueden diferenciar en dos categorías: A).- Programa MANUAL B).- Resto de sesiones de entrenamiento MANUAL. En este programa MANUAL se pueden seleccionar: A).- Peso del usuario B).- Tiempo a realizar en el ejercicio. Pantalla 1 Pantalla 6 Para elegir el programa MANUAL basta con entrar dentro de los programas en SESION DE ENTRENAMIENTO dentro de la pantalla 1 y elegir el programa MANUAL. Tras elegirlo, aparece la pantalla 6 en la que se configuran los parámetros peso y tiempo y pulsando el botón de start comienza comienza el programa MANUAL. Cuando se está realizando el programa se puede variar el parámetro nivel con su respectivas teclas de +/-. Pantalla 3 Una vez se pulse la tecla Stop, pasará a la Pantalla 3, en la que se muestra un resumen de los valores más importantes del ejercicio. Pulse la tecla Anterior o espere unos segundos y pasará a la Pantalla 1. RESTO SESIONES DE ENTRENAMIENTO. En estos programas se pueden seleccionar: A).- Peso del usuario B).- Tiempo a realizar en el ejercicio. C).- Nivel de experiencia del usuario.
sportkoncept
5
Pantalla 1 Pantalla 7 Para elegir estos programas basta con entrar dentro de los programas en SESION DE ENTRENAMIENTO dentro de la pantalla 1 y elegir el programa deseado. Tras elegirlo, aparece una pantalla similar a la pantalla 7 en la que se configuran los parámetros y pulsando el botón de start comienza el programa elegido. La inclinación se irá ajustando en función del perfil del programa deseado. Cuando se está realizando el programa se puede variar el parámetro nivel, aunque al elegir un programa ya te la cambia el monitor automáticamente, con su respectivas teclas de +/-. Pantalla 3 Una vez concluya el programa o se pulse la tecla Stop, pasará a la Pantalla 3, en la que se muestra un resumen de los valores más importantes del ejercicio. Pulse la tecla Anterior o espere unos segundos y pasará a la Pantalla 1.
OBJETIVO.- En este programa de OBJETIVO se puede seleccionar: A).- Peso del usuario B).- Tiempo a realizar en el ejercicio. C).- Distancia a recorrer durante el ejercicio. D).- Calorías a consumir durante la realización del ejercicio. -Peso- Pantalla 1 Pantalla 8 Introduzca el peso del usuario final. Estando visualizando la Pantalla 1 pulse el programa Objetivo, a continuación le aparecerá la Pantalla 8. Configure el peso y después una de las siguientes opciones: tiempo, distancia o calorías. -Tiempo.- Pantalla 8 Regula el tiempo que ha programado para la realización del ejercicio, contando en forma descendente. Estando visualizando la Pantalla 1, pulse el programa objetivo, a continuación le aparecerá la Pantalla 8.

sportkoncept
6
Seleccione el tiempo introduciéndolo con los números que aparecen en la parte inferior y pulse el � para confirmar el tiempo. Pulse el botón de start para comenzar el programa. Cuando se está realizando el programa se puede variar el parámetro nivel con su respectivas teclas de +/-. Pantalla 3 Una vez concluya el tiempo que se ha programado o se pulse la tecla Stop, pasará a la Pantalla 3, en la que se muestra un resumen de los valores más importantes del ejercicio. Pulse la tecla Anterior o espere unos segundos y pasará a la Pantalla 1. -Distancia.- Pantalla 8 Regula la distancia que ha programado para la realización del ejercicio, contando en forma descendente. Estando visualizando la Pantalla 1, pulse el programa objetivo, a continuación le aparecerá la Pantalla 8. Seleccione la distancia introduciéndolo con los números que aparecen en la parte inferior y pulse el � para confirmar la distancia. Pulse el botón de start para comenzar el programa. Cuando se está realizando el programa se puede variar el parámetro nivel con su respectivas teclas de +/-. Pantalla 3 Una vez concluya la distancia que se ha programado o se pulse la tecla Stop, pasará a la Pantalla 3, en la que se muestra un resumen de los valores más importantes del ejercicio. Pulse la tecla Anterior o espere unos segundos y pasará a la Pantalla 1. -Calorías.- Pantalla 8 Regula las Calorías que ha programado para la realización del ejercicio, contando en forma descendente. Estando visualizando la Pantalla 1, pulse el programa objetivo, a continuación le aparecerá la Pantalla 8. Seleccione el peso y las calorías introduciéndolo con los números que aparecen en la parte inferior y pulse el � para confirmar las calorías. Pulse el botón de start para comenzar el programa. Cuando se está realizando el programa se puede variar el parámetro nivel con su respectivas teclas de +/-. Pantalla 3 Una vez concluya las Calorías que se ha programado o se pulse la tecla Stop, pasara a la Pantalla 3, en la que se muestra un resumen de los valores más importantes del ejercicio. Pulse la tecla Anterior o espere unos segundos y pasará a la Pantalla 1.

sportkoncept
7
CONTROL DE FRECUENCIA CARDIACA.- Es conveniente hacer un pequeño calentamiento antes de realizar el programa. Esto evitará posibles lesiones. Este programa permite hacer el ejercicio a un ritmo cardiaco (entre el 65% y el 85% del ritmo cardiaco máximo) y la máquina le ajustara el nivel de resistencia para lograr que en todo momento el usuario mantenga el ritmo cardiaco al nivel seleccionado. Es obligatorio utilizar la medición del ritmo cardiaco, usando para ello los sensores manuales (hand-grip) o la banda de pulso telemétrico de pecho. El máximo número de pulsaciones que una persona nunca debe sobrepasar se le denomina ritmo máximo y éste disminuye con la edad. Una sencilla fórmula para calcular es restar a 220 la edad en años. El ejercicio, para que sea correcto, debe mantenerse entre el 65% y el 85 % del ritmo cardíaco máximo y se recomienda no sobrepasar el 85%. Dentro de éste podemos encontrar 4 programas, tres que vienen con el porcentaje predefinido (65%, 75% y 85%) y el cuarto (THR) que permite al usuario elegir las BPM que desee dentro del rango entre el 65%-85%. Pantalla 1 Pantalla 9 Estando el monitor en la Pantalla Principal, Pantalla 1, pulse el programa control de frecuencia cardíaca y le aparecerá la Pantalla 9. Rellene los campos necesarios para realizar la prueba y elija el ritmo cardíaco al que quiera ejercitarse. Tras hacer esto, pulse la tecla start para comenzar el ejercicio. Cuando se está realizando el programa se puede variar el parámetro nivel con su respectivas teclas de +/-. Además es necesario mantener las manos en el hand-grip para monitorizar el ritmo cardíaco. Pantalla 3 Una vez concluya el programa o se pulse la tecla Stop, pasará a la Pantalla 3, en la que se muestra un resumen de los valores más importantes del ejercicio. Pulse la tecla Anterior o espere unos segundos y pasará a la Pantalla 1.
PRUEBA FISICA.- Este monitor tiene siete programas en PRUEBA FISICA. Estas pruebas son las que realizan grupos de personas para comprobar su estado de forma es el adecuado para la actividad que realicen o vayan a realizar. Pantalla 1 Pantalla 10 Estando el monitor en la pantalla principal, Pantalla 1, pulse la opción Prueba física y le aparecerán todas las pruebas físicas disponibles. Elija la prueba que desee realizar y rellene los campos que se presentan en una pantalla similar a la pantalla 10, para confirmar algunos de ellos pulse el �. Tras hacer esto, pulse la tecla start para comenzar el ejercicio. Cuando se está realizando el programa se puede variar el parámetro nivel con su respectivas teclas de +/-.
sportkoncept
8
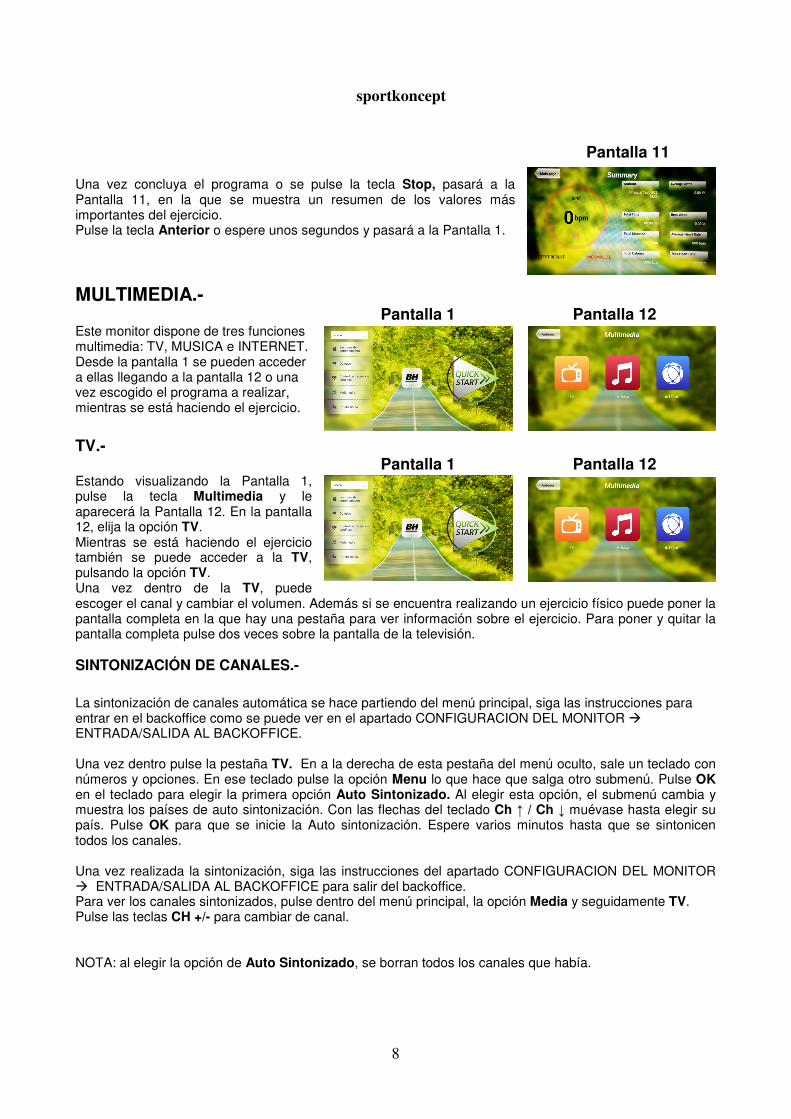
Pantalla 11 Una vez concluya el programa o se pulse la tecla Stop, pasará a la Pantalla 11, en la que se muestra un resumen de los valores más importantes del ejercicio. Pulse la tecla Anterior o espere unos segundos y pasará a la Pantalla 1.
MULTIMEDIA.- Pantalla 1 Pantalla 12 Este monitor dispone de tres funciones multimedia: TV, MUSICA e INTERNET. Desde la pantalla 1 se pueden acceder a ellas llegando a la pantalla 12 o una vez escogido el programa a realizar, mientras se está haciendo el ejercicio.
TV.- Pantalla 1 Pantalla 12 Estando visualizando la Pantalla 1, pulse la tecla Multimedia y le aparecerá la Pantalla 12. En la pantalla 12, elija la opción TV. Mientras se está haciendo el ejercicio también se puede acceder a la TV, pulsando la opción TV. Una vez dentro de la TV, puede escoger el canal y cambiar el volumen. Además si se encuentra realizando un ejercicio físico puede poner la pantalla completa en la que hay una pestaña para ver información sobre el ejercicio. Para poner y quitar la pantalla completa pulse dos veces sobre la pantalla de la televisión. SINTONIZACIÓN DE CANALES.- La sintonización de canales automática se hace partiendo del menú principal, siga las instrucciones para entrar en el backoffice como se puede ver en el apartado CONFIGURACION DEL MONITOR � ENTRADA/SALIDA AL BACKOFFICE. Una vez dentro pulse la pestaña TV. En a la derecha de esta pestaña del menú oculto, sale un teclado con números y opciones. En ese teclado pulse la opción Menu lo que hace que salga otro submenú. Pulse OK en el teclado para elegir la primera opción Auto Sintonizado. Al elegir esta opción, el submenú cambia y muestra los países de auto sintonización. Con las flechas del teclado Ch ↑ / Ch ↓ muévase hasta elegir su país. Pulse OK para que se inicie la Auto sintonización. Espere varios minutos hasta que se sintonicen todos los canales. Una vez realizada la sintonización, siga las instrucciones del apartado CONFIGURACION DEL MONITOR � ENTRADA/SALIDA AL BACKOFFICE para salir del backoffice. Para ver los canales sintonizados, pulse dentro del menú principal, la opción Media y seguidamente TV. Pulse las teclas CH +/- para cambiar de canal. NOTA: al elegir la opción de Auto Sintonizado, se borran todos los canales que había.

sportkoncept
9
BORRAR CANALES NO DESEADOS.- Partiendo del menú principal ya con los canales sintonizados, siga las instrucciones para entrar en el backoffice como se puede ver en el apartado CONFIGURACION DEL MONITOR � ENTRADA/SALIDA AL BACKOFFICE. Una vez dentro pulse la pestaña TV. En a la derecha de esta pestaña del menú oculto, sale un teclado con números y opciones. En ese teclado pulse la opción Menu lo que hace que salga otro submenú. Con las flechas del teclado Ch ↑ / Ch ↓ muévase hasta elegir Programme Edit. Al elegir esta opción, el submenú cambia mostrando todos los canales sintonizados. Usando las flechas del teclado Ch ↑ / Ch ↓ elija el canal a borrar y pulse la tecla 2 para borrar. Usa las flechas del teclado Ch ↑ / Ch ↓ para moverse a otro canal para borrarlo si lo desea. Una vez que termine de borrar los canales que desee, siga las instrucciones del apartado CONFIGURACION DEL MONITOR � ENTRADA/SALIDA AL BACKOFFICE para salir del backoffice. MOVER CANALES.- Partiendo del menú principal ya con los canales sintonizados, siga las instrucciones para entrar en el backoffice como se puede ver en el apartado CONFIGURACION DEL MONITOR � ENTRADA/SALIDA AL BACKOFFICE. Una vez dentro pulse la pestaña TV. En a la derecha de esta pestaña del menú oculto, sale un teclado con números y opciones. En ese teclado pulse la opción Menu lo que hace que salga otro submenú. Con las flechas del teclado Ch ↑ / Ch ↓ muévase hasta elegir Programme Edit. Al elegir esta opción, el submenú cambia mostrando todos los canales sintonizados. Usando las flechas del teclado Ch ↑ / Ch ↓ elija el canal a mover y pulse la tecla 8 para mover. Usa las flechas del teclado Ch ↑ / Ch ↓ para mover el canal a la posición que elija y pulse la tecla 8 o la tecla OK para confirmar la posición. Usa las flechas del teclado Ch ↑ / Ch ↓ para moverse a otro canal para borrarlo si lo desea. Una vez que termine de mover los canales que desee, siga las instrucciones del apartado CONFIGURACION DEL MONITOR � ENTRADA/SALIDA AL BACKOFFICE para salir del backoffice.
MUSIC.- Pantalla 1 Pantalla 12 Estando visualizando la Pantalla 1, pulse la tecla Multimedia y le aparecerá la Pantalla 12. En la pantalla 18, elija la opción MUSICA. Mientras se está haciendo el ejercicio también se puede acceder a la MUSICA, pulsando la opción MUSICA. Una vez dentro de la MUSICA, inserte su disposivo en el puerto USB y elija su canción a escuchar
INTERNET.- Pantalla 1 Pantalla 12 Estando visualizando la Pantalla 1, pulse la tecla Multimedia y le aparecerá la Pantalla 12. En la pantalla 18, elija la opción INTERNET. Mientras se está haciendo el ejercicio también se puede acceder a la INTERNET, pulsando la opción INTERNET. Una vez dentro de la INTERNET, elija la opción que desee ver.

sportkoncept
10
Para cualquier consulta, no dude en ponerse en contacto con el (S.A.T).Servicio de Asistencia Técnica, llamando al teléfono de atención al cliente (ver página final del presente manual).
BH SE RESERVA EL DERECHO A MODIFICAR LAS ESPECIFICACIONES DE SUS PRODUCTOS SIN PREVIO AVISO.

sportkoncept
11
ENGLISH
GENERAL INSTRUCTIONS.- This electronic monitor is designed to be easy and intuitive to use. The messages that appear on the television screen will guide the user throughout the whole exercise. It is recommended that a gym instructor read through this section carefully to become fully familiar with operating the electronic monitor so that he/she can show the user correctly.
CONNECTING THE MACHINE.- First plug the main power cable on the transformer into a 100-240 V grounded electrical socket, as shown in Fig. 1. Next, plug the jack on the transformer into the machine, Fig.2
Fig.1 Fig.2
AUDIO ELEMENTS.- M.- Used to connect a device using MTP.
N.- Head/earphone connector.
Fig.3
SWITCHING ON.- Screen 1 Once the machine is plugged in the monitor the Screen 1will be displayed.

sportkoncept
12
MONITOR CONFIGURATION.- CHANGING LANGUAGE Screen 1 Screen 2 1.-From Screen 1: Click the appropriate language in the top left drop down menu. 2.-Select the desired language.
ENTRANCE/EXIT OF BACKOFFICE MENU Screen 1 Screen 3 ENTRANCE: When viewing Screen 1, press QUICK START followed STOP, and you will be shown Screen 3. On the 3 screen, hold the lower left corner of the screen for 5 seconds to enter the hidden menu or backoffice menu (Screen 4). Screen 4 EXIT: While in the backoffice menu, press the top left, where it says Configuration, to return to the main menu.
Note: Please do not change any parameter of the backoffice menu unless it is detailed in this manual, it may cause a malfunction or cause the machine to operate improperly.
Change from km to miles. Screen 5 Once inside the backoffice menu, go to the Preference tab and change the option Unit from Metric to Imperial as shown on screen 5.

sportkoncept
13
OPERATING INSTRUCTIONS PROGRAM MODE. Screen 1 This monitor offers the following programs: 8 programs in TRAINING COURSES, 3 OBJECTIVE based programs, 1 HEART RATE CONTROL program and 1 PHYSICAL TEST. All can be accessed from Screen 1.
TRAINING COURSES.- There are two categories of Training Courses: A) Manual program B) Pre-programmed Training Courses MANUAL. In the MANUAL program you can select: A) User weight. B) Time setting for the exercise. Screen 1 Screen 6 To choose the MANUAL program just press TRAINING COURSES on screen 1 and then choose the MANUAL program. After choosing it, you will see Screen 6, which will display the configurable parameters of the workout that can be set. To begin the workout, press START. When the program is underway you can adjust the level of intensity with +/- keys. Screen 3 Once you press the Stop key, you will see Screen 7, which shows a summary of the workout. Press the previous button or wait a 2 minutes and it will go back to Screen 1. OTHER TRAINING COURSES: In these programs you can select: A) User weight. B) Time setting for the exercise. C).- Fitness level of the user.

sportkoncept
14
Screen 1 Screen 7 To choose these programs simply press Training Courses on screen 1 and choose the desired program. After selecting one, you will see screen 8 (or something similar) in which the parameters can be selected and the start button will begin the workout. Intensity will adjust itself according to the profile of the desired program. When the workout is in process, parameters can be adjusted using the +/- keys, but the program will revert to its normal settings as each new segment is completed. Screen 3 Once the workout is completed or the Stop key is pressed, you will see Screen 9, which shows a summary of the workout. Press the previous button or wait a 2 minutes and the display will return to Screen 1.
OBJECTIVE.- This program allows the user to set goals based upon: A) User weight B) Workout duration C) Distance covered during the workout D) Calories to be consumed during the workout - Weight - Screen 1 Screen 8 Enter the weight of the user. When viewing the Screen 1 press the Objective button, then Screen 10 will appear. Set the weight and then one of the following options: time, distance, or calories. - Time.- Screen 8 Adjusts the time that is scheduled for the workout (during the workout this will be displayed as a countdown.) When viewing Screen 1, press the Objective button, and you will see Screen 10 appear. Select the time by using the number buttons at the bottom of the screen and press the � to confirm the time. Press the start button to start the program. When the program is underway you can adjust the parameters with the +/- keys.

sportkoncept
15
Screen 3 Once the alloted time has been completed or the Stop key is pressed, you will see Screen 11, which shows a summary workout. Press the previous button or wait a few seconds and the screen will return to Screen 1. - Distance- Screen 8 This regulates the distance planned for the workout. (During the workout this will be displayed as a countdown.) When viewing Screen 1, press the Objective button, and you will see Screen 10 appear. Select the distance by using the number buttons at the bottom of the screen and press the � to confirm the distance. Press the start button to start the program. When the program is underway you can adjust the parameters with the +/- keys. Screen 3 Once the programmed distance has been achieved or the Stop key is pressed, you will see Screen 11, which shows a summary workout. Press the previous button or wait a 2 minutes and the screen will return to Screen 1 - Calories- Screen 8 This regulates the desired caloric consumption of the workout. (During the workout this will be displayed as a countdown.) When viewing Screen 1, press the Objective button, and you will see Screen 10 appear. Select the desired number of calories to be consumed by using the number buttons at the bottom of the screen and press the � to confirm the total calories desired to be consumed during the workout. Press the start button to start the program. When the program is underway you can adjust the parameters with the +/- keys. Screen 3 Once the programmed caloric burn has been achieved or the Stop key is pressed, you will see Screen 11, which shows a summary workout. Press the previous button or wait a 2 minutes and the screen will return to Screen 1

sportkoncept
16
HEART RATE CONTROL.- It is highly recommended that a short warm up program be completed prior to beginning the Heart Rate Control program. This will prevent possible injury. This program allows the user to workout to a target heart rate (between 65% and 85% of maximum heart rate) by the machine adjusting the resistance level to achieve that targeted heart rate level at all times. Heart Rate measurement is required during this workout, either by using hand sensors (hand-grip) or an optional telemetric pulse of chest band. (Please Note: Heart Rate monitoring systems may be inaccurate and should be used as guidelines only. Over-exercising may result in serious injury or death. If you feel faint, stop exercising immediately.) The heart rate that a person should never exceed is called maximum rate and this decreases with age. A simple formula to calculate is 220 beats per minutes minus the User’s Age (220-age). The target should be kept between 65% and 85% of maximum heart rate and it is recommended not to exceed 85%. There are four programs within Heart Rate Control: three that come with a predefined percentage (65%, 75% and 85%) and the fourth Target Heart Rate (THR) that allows the user to choose the BPM you want within the range of 65% - 85%. Screen 1 Screen 9 From Screen 1, press the Heart Rate Control button and you will then see Screen 14. Fill in the required fields for the test and choose the heart rate you wish to target. After doing this, press the Green Arrow key to begin the workout. When the program is underway you can vary the parameter levels with the +/- keys. It is also necessary to keep your hands in the hand-grip to monitor heart rate or to use an optional telemetric wireless chest strap. Screen 3 Once the workout has been completed or the Stop key is pressed, you will see Screen 15, which shows a summary of the workout. Press the previous button or wait a 2 minutes to return to Screen 1.
PHYSICAL TEST.- The Physical Test is a fitness test based upon VO2 MAX. VO2 Max, or maximal oxygen uptake, is one factor that can determine an athlete's capability to perform an endurance based workout. Screen 1 Screen 10 From Screen 1, press the PHYSICAL TEST button and you will next see screen 16. Set the parameters using the numbers at the bottom of the screen then click the � to confirm. Once everything is set, press the Green Arrow key to begin the exercise. When the workout is underway you can vary the parameter levels using the +/- keys.

sportkoncept
17
Screen 11 Once the workout is completed or the STOP key is pressed, you will see Screen 17, which shows a summary of the most important values of the exercise. Press the previous button or wait a few seconds and will go to the Screen 1.
MULTIMEDIA.- Screen 1 Screen 12 This monitor has three multimedia features: TV, MUSIC and the INTERNET. You can access the multimedia from screen 1. When you select Multimedia from screen 1 it will take you to screen 18 and from there you can choose which media you would like to access.
TV.- Screen 1 Screen 12 When viewing Screen 1, press the Multimedia key and you will be shown Screen 18. When on Screen 18 choose the TV option by touching the TV icon. While exercising to access the TV option, touch the TV tab on the bottom right hand portion of the screen. The TV will pop up in the middle of the screen and you can select a channel and change the volume. When exercising, to make the TV full screen tap twice on the television screen and the TV will go to full screen. Tap twice while in full screen mode to go back to regular TV mode. . CHANNEL TUNING.- Automatic channel tuning is located in the BACKOFFICE program section. Follow the instructions on how to access BACKOFFICE on the MONITOR CONFIGURATION section � ENTRANCE/EXIT OF BACKOFFICE MENU. *Note – you may need a box from your cable company to view their channels. The signal may be coded and requires a box to decode the signal. Once Back Office is accessed press the TV tab. On the right of the screen the hidden menu keyboard will appear. On the keyboard press the Menu option which takes you to a submenu. Use the ↑ Ch / Ch ↓ to select Auto Tune, then press OK to choose. The submenu will change and will show the countries for which the auto tuning can be selected. Using the arrow keys ↑ Ch / Ch ↓ choose your country and press OK. The machine will start Auto tuning. This will take several minutes.
Once the channel tunning finishes, follow the instructions on how to exit BACKOFFICE on the MONITOR CONFIGURATION section � ENTRANCE/EXIT OF BACKOFFICE MENU. To access the TV function go to the Multimedia tab, press it then go to the TV tab and press. Note: by choosing the option of Auto Tune, all previous channels will be deleted.

sportkoncept
18
DELETING UNWANTED CHANNELS.- Starting from the main menu with channels tuned, follow the instructions on how to access BACKOFFICE on the MONITOR CONFIGURATION section � ENTRANCE/EXIT OF BACKOFFICE MENU. Once inside click the TV tab. In a right of this tab from the hidden menu, exits a keyboard with numbers and options. On the keyboard press Menu option which makes to leave another submenu. With the arrow keys ↑ Ch / Ch ↓ scroll to choose Edit Programme. When you choose this option, the submenu changes showing all channels tuned. Using the arrow keys ↑ Ch / Ch ↓ select the channel to delete and press 2 to delete. Use the arrow keys ↑ Ch / Ch ↓ to move to another channel to delete it if you wish. Once you finish erasing the channels you want, follow the instructions on how to exit BACKOFFICE on the MONITOR CONFIGURATION section � ENTRANCE/EXIT OF BACKOFFICE MENU. MOVING CHANNELS.- Starting from the main menu with channels tuned, follow the instructions on how to access BACKOFFICE on the MONITOR CONFIGURATION section � ENTRANCE/EXIT OF BACKOFFICE MENU. Once inside click the TV tab. In a right of this tab from the hidden menu, exits a keyboard with numbers and options. On the keyboard press Menu option which makes to leave another submenu. With the arrow keys ↑ Ch / Ch ↓ scroll to choose Edit Programme. When you choose this option, the submenu changes showing all channels tuned. Using the arrow keys Ch ↑ / ↓ Ch select channel to move and press the 8 button to move. Use the arrow keys ↑ Ch / Ch ↓ to move the channel to the position that select and press the 8 key or the OK key to confirm the position. Use the arrow keys ↑ Ch / Ch ↓ to move to another channel to delete it if you wish. Once you finish moving the channels you want, follow the instructions on how to exit BACKOFFICE on the MONITOR CONFIGURATION section � ENTRANCE/EXIT OF BACKOFFICE MENU.
MUSIC.- Screen 1 Screen 12 When viewing Screen 1, press the Multimedia icon, this take you to Screen 18. Press the Music option to select. While exercising MUSIC is accessed on the menu bar at the bottom of the screen. Once MUSIC is selected connect your (Android) device into the USB port and choose your song to listen to.
INTERNET.- Screen 1 Screen 12 When viewing Screen 1, press the Multimedia icon, this take you to Screen 18. On Screen 18 choose the INTERNET option to access the INTERNET. While exercising you can access the INTERNET by touching the INTERNET tab on menu at the bottom of the screen. Once inside the INTERNET, choose the option that you want to access.

sportkoncept
19
Do not hesitate to get in touch with the Technical Assistance Service if you have any queries by phoning customer services (see last page in manual). BH RESERVES THE RIGHT TO MODIFY THE SPECIFICATIONS OF ITS PRODUCTS WITHOUT PRIOR NOTICE.

sportkoncept
20
DEUTSCH
ALLGEMEINE HINWEISE.- Dieses Trainingsgerät verfügt über einen elektrischen Stromgenerator, der die von dem Benutzer (während des Trainings) erzeugte Energie nutzt, um den Elektronik-Monitor und den Bremsregler zu versorgen. Dieser Elektronikmonitor ist so ausgelegt, dass er eine problemlose und intuitive Nutzung sicherstellt. Der Benutzer wird mit Hilfe der auf dem Bildschirm erscheinenden Texte durch die Trainingsübung geführt. Wir empfehlen jedoch, dass der Sportbetreuer diesen Abschnitt aufmerksam liest, um sich mit dem Elektronikmonitor vertraut zu machen und dem Benutzer dessen Funktionsweise effektiv erklären zu können.
ANSCHLUSS DER MASCHINE.- Schließen Sie zunächst das Kabel des Transformators an eine Netzdose mit 100V-240V und Erdungsanschluss Fig.1. Anschließend schließen Sie die Klemme des Transformators mit der Maschine Fig.2.
Fig.1 Fig.2
AUDIOELEMENTE.- Fig.3
M.- Konnektor um ein MTP Gerät zu verbinden.
N.- Kopfhörerbuchse. .
Fig.3
INBETRIEBNAHME. Bildschirm 1 Sobald das Gerät eingeschaltet wird, zeigt der Monitor den Bildschirm 1 an.

sportkoncept
21
KONFIGURIEREN DES MONITORS. ÄNDERN DER SPRACHE. Bildschirm 1 Bildschirm 2 1º.- Von Bildschirm 1 ausfolgen: Wählen Sie die Sprache, die oben links ausgewählt ist. 2º. Nach diesem Schritt (wie auf Bildschirm 1 angezeigt) folgt eine Auswahl mit verfügbaren Sprachen, wie auf Bildschirm 2 dargestellt ist. Wählen Sie eine Sprache aus.
EINGANG/AUSGANG ZUM BACKOFFICE Bildschirm 1 Bildschirm 3 EINGANG: Wählen Sie die Taste QUICK START (Bildschirm 1). Nach der Taste STOP erscheint Bildschirm 3. Klicken Sie ca. 10 Sekunden auf das Feld links unten um zum Backoffice zu kommen (Bildschirm 4). Bildschirm 4 AUSGANG: Klicken Sie im Backoffice auf die obere rechte Ecke, wo CONFIGURATION steht um in das Hauptmenü zurückzukommen.
Hinweis: Bitte passen Sie keinen Wert an, der nicht in dieser Gebrauchsanweisung beschrieben ist, das dies zu Missbrauch des Gerätes führen kann.
WECHSEL VON KM AUF MEILEN Bildschirm 5 Einmal im Backoffice, klicken Sie auf das Feld Preference und ändern Sie die Option Unit zu Imperial, wie auf Bildschirm 5 zu erkennen ist.

sportkoncept
22
HINWEISE ZUR FUNKTIONSWEISE PROGRAMM-MODUS Bildschirm 1 Dieser Monitor verfügt über die folgenden Prgamme: 8 Programme in Trainings-Sitzungen, 3 zielorienterte Programme, 1 Herzfrequenz-Programm und 1 Fitnesstest. Alle sind von Bildschirm 1 zugänglich.
TRAININGSEINHEIT Die Trainingseinheiten können in zwei Kategorien unterteilt werden: A) Manuelles Programm B) Weitere Trainingseinheiten MANUEL In dem manuellen Programm können folgende Optionen angewählt werden: A).- Gewicht des Benutzers. B).- Dauer, die für die Übung vorgesehen ist. Bildschirm 1 Bildschirm 6 Um das manuelle Programm auszuwählen, klicken Sie einfach auf Traniningskurse auf Bildschirm 1 und wählen Sie das manuelle Programm aus. Danach erscheint der Bildschirm 6, in dem die Werte Gewicht und Zeit angepasst werden können. Das Programm beginnt, in dem Sie auf START klicken. Mit den Tasten +/– kann die Steigungsverstellung angepasst werden. Bildschirm 3 Wenn Sie die Taste STOP drücken, erscheint Bildschirm 3, der die wichtigsten Trainingswerte zeigt. Klicken Sie auf “zurück” oder warten Sie einige Sekunden und Sie kommen automatisch auf Bildschirm 1 zurück. Weitere Trainingskurse In diesen Programmen können die folgenden Werte ausgewählt werden: A) Gewicht des Benutzers. B) Dauer, die für die Übung vorgesehen ist. C) Erfahrungsniveau des Nutzers

sportkoncept
23
Bildschirm 1 Bildschirm 7 Klicken Sie auf Trainingskurse (Bildschirm 1) und dann auf das gewünschte Programm. Danach erscheint ein Bildschirm, der Bildschirm 7 ähnlich ist. Hier können die Werte angepasst werden und mit der START Taste das Programm begonnen werden. Die Steigungsverstellung richtet sich nach den ausgewählten Programm. Während der Übung kann die Steigungsverstellung mit den Tasten +/- angepasst werden. Bildschirm 3 Wenn Sie die Taste STOP drücken, erscheint Bildschirm 3, der die wichtigsten Trainingswerte zeigt. Klicken Sie auf “zurück” oder warten Sie einige Sekunden und Sie kommen automatisch zu Bildschirm 1 zurück. OBJEKTIVIERUNG In diesem Programm kann folgendes gewählt werden: A) Nutzergewicht B) Zeit C) Distanz D) Kalorien Gewicht Bildschirm 1 Bildschirm 8 Klicken Sie wie auf Bildschirm 1 gezeigt auf das Obtivierungs-Programm. Folglich erscheint Bildschirm 8. Stellen Sie das Gewicht ein und dann eine der folgenden Optionen: Zeit, Distanz und Kalorien. ZEIT Bildschirm 8 Stellen Sie die Zeit für die Übung ein. Klicken Sie wie auf Bildschirm 1 gezeigt auf das Obtivierungs-Programm. Folglich erscheint Bildschirm 8. Stelen Sie die Zeit mit den Nummern im inneren Teil ein und klicken Sie auf � um die Zeit zu bestätigen. Klicken Sie auf START um das Programm zu beginnen. Während der Übung kann die Steigungsverstellung mit den Tasten +/- angepasst werden.

sportkoncept
24
Bildschirm 3 Wenn Sie die Taste STOP drücken, erscheint Bildschirm 3, der die wichtigsten Trainingswerte zeigt. Klicken Sie auf “zurück” oder warten Sie einige Sekunden und Sie kommen automatisch zu Bildschirm 1 zurück. Distanz Bildschirm 8 Stellen Sie die Distanz für die Übung ein. Klicken Sie wie auf Bildschirm 1 gezeigt auf das Obtivierungs-Programm. Folglich erscheint Bildschirm 8. Bildschirm 3 Stelen Sie die Distanz mit den Nummern im inneren Teil ein und klicken Sie auf � um die Zeit zu bestätigen. Klicken Sie auf START um das Programm zu beginnen. Während der Übung kann die Steigungsverstellung mit den Tasten +/- angepasst werden. Kalorien Bildschirm 8 Stellen Sie die Kalorien für die Übung ein. Klicken Sie wie auf Bildschirm 1 gezeigt auf das Obtivierungs-Programm. Folglich erscheint Bildschirm 8. Stelen Sie das Gewicht und die Distanz mit den Nummern im inneren Teil ein und klicken Sie auf � um die Zeit zu bestätigen. Klicken Sie auf START um das Programm zu beginnen. Während der Übung kann die Steigungsverstellung mit den Tasten +/- angepasst werden. Bildschirm 3 Wenn Sie die Taste STOP drücken, erscheint Bildschirm 3, der die wichtigsten Trainingswerte zeigt. Klicken Sie auf “zurück” oder warten Sie einige Sekunden und Sie kommen automatisch auf Bildschirm 1 zurück.

sportkoncept
25
HERZFREQUENZ-KONTROLLE Vor der Ausführung des Programms ist es ratsam, eine kurze Aufwärmübung auszuführen. Dadurch können Verletzungen vermieden werden. Mit diesem Programm können Sie eine Übung mit einem konstanten Herzrhythmus (zwischen 60 und 95% des maximalen Herzrhythmus) ausführen. Das Gerät passt den Widerstand so an, dass der Benutzer kontinuierlich auf dem gewählten Niveau des Herzrhythmus bleibt. Dabei ist die Messung des Herzrhythmus zwingende Voraussetzung. Verwenden Sie entweder die Handsensoren (Hand-Grip) oder das telemetrische Brustband. Vermeiden Sie es. Die maximale Pulszahl, die eine Person niemals überschreiten darf, wird maximaler Rhythmus genannt und nimmt mit dem Alter ab. Man kann diesen Rhythmus einfach berechnen, indem man von der Zahl 220 das Alter in Jahren abzieht. Damit die Übung korrekt ausgeführt wird, muss ein Wert zwischen 65% und 85% des maximalen Herzrhythmus gehalten werden. Es ist nicht ratsam, 85% des Herzrhythmus zu übersteigen. Hier kann zwischen 4 Programmen gewählt werden. Bei drei dieser Programme ist der Prozentsatz vordefiniert (65%, 75% und 85%), bei dem vierten (THR) kann der Benutzer den PPM-Wert zwischen 60% und 95% selbst wählen. Bildschirm 1 Bildschirm 9 Wählen Sie das Herzfrequenzkontroll-Programm auf Bildschirm 1. Danach erscheint Bildschirm 9. Füllen Sie die olbigatorischen Felder aus um einen Test auszuführen und wählen Sie den Herzrhythmus aus, mit dem Sie trainieren möchten. Wählen Sie danach die START Taste aus um die Übung zu beginnen. Während der Übung kann die Steigungsverstellung mit den Tasten +/- angepasst werden. Die Hände müssen an dem Handgriff gehalten werden, um den Herzrhythmus zu überwachen. Bildschirm 3 Wenn Sie die Taste STOP drücken, erscheint Bildschirm 3, der die wichtigsten Trainingswerte zeigt. Klicken Sie auf “zurück” oder warten Sie einige Sekunden und Sie kommen automatisch auf Bildschirm 1 zurück.
PHYSISCHER TEST Dieser Monitor hat 7 Programme des physischen Tests. Dieser Test dient dazu, die physische Kondition herauszufinden. Bildschirm 1 Bildschirm 10 Wählen Sie die Option Physischer Test auf Bildschirm 1. Wählen Sie den Test, den Sie gern belegen möchten und wählen Sie die Felder aus (ähnlich Bildschirm 10). Bestätigen Sie die Daten mit �. Drücken Sie die Taste START um die Übung zu starten. Während des Programmes können die Werte Steigungsverstellung und Geschwindigkeit mit den +/- Tasten angepasst werden.

sportkoncept
26
Bildschirm 11 Wenn Sie die Taste STOP drücken, erscheint Bildschirm 11, der die wichtigsten Trainingswerte zeigt. Klicken Sie auf “zurück” oder warten Sie einige Sekunden und Sie kommen automatisch zu Bildschirm 1 zurück.
MULTIMEDIA Bildschirm 1 Bildschirm 12 Dieser Monitor hat 2 Multimedia-Funktionen: TV, Musik und Internet. Von Bildschirm 1 kann auf diese zugegriffen werden und Sie kommen auf Bildschirm 12. Wählen Sie ein Programm aus.
TV. Bildschirm 1 Bildschirm 12 Wählen Sie die Taste Multimedia auf Bildschirm 1 und es erscheint Bildschirm 12. Wählen Sie die Option TV. Auf dieser Option kann auch während der Übung zugegriffen werden. In der TV Option können der Kanal und die Lautstärke gewechselt werden. KANALEINSTELLUNG Die automatische Kanaleinstellung erfolgt aus dem Hauptmenü. Folgen Sie den Anweisungen um in das Backoffice zu gelangen, wie oben beschrieben. Wählen Sie in dem Menü die Option TV. Auf der rechten Seite ist eine Tastatur mit Zahlen und Optionen zu sehen. Klicken Sie auf Menü, wodurch Sie in ein weiteres Untermenü gelangen. Wählen Sie OK auf der Tastatur um die erste Option automatische Kanaleinstellung auszuwählen. Wenn diese Option gewählt wird, ändert sich das Untermenü und zeigt die Kanäle der automatischen Kanaleinstellung an. Mit den Pfeilen Ch ↑ / Ch ↓ wählen Sie Ihr Land aus. Wählen Sie OK, damit die automatische Kanaleinstellung beginnt. Warten Sie einige Minuten, bis die Kanäle eingestellt sind. Wenn die Kanaleinstellung abgeschlossen ist, folgenden Sie den Anweisungen um aus dem Backoffice zu gelangen (oben beschrieben). Um die Kanäle zu sehen, klicken Sie auf das Hauptmenü, dann auf MEDIEN und auf TV. Mit den Tasten CH +/- kann der Kanal gewechselt werden. Hinweis: Wenn die Option automatische Kanaleinstellung gewählt wird, löschen sich alle aktuelle Kanäle.

sportkoncept
27
NICHT GEWÜNSCHTE KANÄLE LÖSCHEN Folgen Sie den Anweisungen um in das Backoffice zu gelangen (oben beschrieben). Wählen Sie in dem Menü die Option TV. Auf der rechten Seite ist eine Tastatur mit Zahlen und Optionen zu sehen. Klicken Sie auf Menü, wodurch Sie in ein weiteres Untermenü gelangen. Mit den Pfeilen Ch ↑ / Ch ↓ wählen Sie Proramme bearbeiten aus. Das Untermenü zeigt nun alle eingestellten Kanäle. Wählen Sie mit den Pfeilen Ch ↑ / Ch ↓ den Kanal, der gelöscht werden soll und drücken Sie die Taste 2. KANÄLE BEWEGEN. Folgen Sie den Anweisungen um in das Backoffice zu gelangen (oben beschrieben). Wählen Sie in dem Menü die Option TV. Auf der rechten Seite ist eine Tastatur mit Zahlen und Optionen zu sehen. Klicken Sie auf Menü, wodurch Sie in ein weiteres Untermenü gelangen. Wählen Sie OK auf der Tastatur um die erste Option automatische Kanaleinstellung auszuwählen. Wenn diese Option gewählt wird, ändert sich das Untermenü und zeigt alle automatisch eingestellten Kanäle an. Mit den Pfeilen Ch ↑ / Ch ↓ wählen Sie den Kanal, der verschoben werden soll. Wählen Sie die Taste 8 und OK.
MUSIK Bildschirm 1 Bildschirm 12 Wählen Sie die Taste Multimedia auf Bildschirm 1 und es erscheint Bildschirm 12. Wählen Sie die Option MUSIK. Auf diese Option kann auch während der Übung zugegriffen werden. Wenn Sie im Musik-Menü sind verbinden Sie den USB-Stick und wählen die Musik aus.
INTERNET Bildschirm 1 Bildschirm 12 Wählen Sie die Taste Multimedia auf Bildschirm 1 und es erscheint Bildschirm 12. Wählen Sie die Option INTERNET. Auf dieser Option kann auch während der Übung zugegriffen werden. Wenn Sie im Internet-Menü sind, wählen Sie die Option aus, die Sie sehen möchten.
Sollten über den Zustand einer Komponente Zweifel bestehen, setzen Sie sich bitte mit dem (TKD) Technischen Kundendienst in Verbindung, indem Sie das Servicetelefon anrufen (siehe letzte Seite des Handbuchs). BH BEHALT SICH DAS RECHT VOR, ÄNDERUNGEN DER MODELL-ANGABEN OHRE VORHERIGE ANKÜNDIGUNG VORZUNEHMEN.

SK LINE sportkoncept
28
BH HIPOWER SPAIN EXERCYCLE,S.L. (Manufacturer) P.O.BOX 195 01080 VITORIA (SPAIN) Tel.: +34 945 29 02 58 Fax: +34 945 29 00 49 e-mail: [email protected] www.bhfitness.com POST-VENTA Tel: +34 945 292 012 / 902 170 258 Fax: +34 945 56 05 27 e-mail: [email protected] BH HIPOWER NORTH AMERICA 20155 Ellipse Foothill Ranch CA 92610 Tel: + 1 949 206 0330 Toll free: +1 866 325 2339 Fax: +1 949 206 0013 e-mail: [email protected] www.bhnorthamerica.com BH HIPOWER ASIA BH Asia Ltd. No.80, Jhongshan Rd., Daya Dist., Taichung City 42841, Taiwan. R.O.C. Tel.: +886 4 25609200 Fax: +886 4 25609280 E-mail: [email protected]
BH HIPOWER PORTUGAL MAQUINASPORT, APARELHOS DE DESPORTO, S.A. Rua do Caminho Branco Lote 8, ZI Oiã 3770-068 Oiã Oliveira do Bairro (PORTUGAL) Tel.: +351 234 729 510 Fax: +351 234 729 519 e-mail: [email protected] BH SERVICE PORTUGAL Tel.: +351 234 729 510 Fax: +351 234 729 519 e-mail: [email protected] BH HIPOWER MEXICO BH Exercycle de México S.A. de CV Eje 132 / 136 Zona Industrial, 2A Secc. 78395 San Luis Potosí S:L:P: MÉXICO Tel.: +52 (444) 824 00 29 Fax: +52 (444) 824 00 31 www.bh.com.mx BH HIPOWER CHINA BH China Co., Ltd. Block A, NO.68, Branch Lane 455, Lane 822, Zhen Nan RD., Li Zi Yuan, Putuo, Shanghai 200331, P.R.C. Tel: +86-021-5284 6694 Fax:+86-021-5284 6814 e-mail: [email protected]
BH HIPOWER UK Tel: 02037347554 e-mail: [email protected] AFTER SALES – UK Tel.: 02074425525 e-mail: [email protected] BH HIPOWER FRANCE
SAV FRANCE Tel : +33 0810 000 301 Fax : +33 0810 000 290 [email protected] BH Germany GmbH Grasstrasse 13 45356 ESSEN GERMANY Tel: +49 2015 997018 e-mail: [email protected]
BH SE RESERVA EL DERECHO A MODIFICAR LAS ESPECIFICACIONES DE SUS PRODUCTOS SIN PREVIO AVISO. SPECIFICATIONS MAY BE CHANGED WITHOUT PRIOR NOTICE DUE TO OUR PROGRAMME OF CONTINUOUS PRODUCT DEVELOPMENT. BH SE RÉSERVE LE DROIT DE MODIFIER LES SPECIFICATIONS DE SES PRODUITS SANS PRÉAVIS. BH BEHALT SICH DAS RECHT VOR, ÄNDERUNGEN DER MODELL-ANGABEN OHRE VORHERIGE ANKÜNDIGUNG VORZUNEHMEN. DATI TECNICI E COMMERCIALI RELATIVI AGLI ARTICOLI DEL PRESENTE CATALOGO POSSONO ESSERE SOGGETIL A VARIAZIONI SENZA ALGUN PREAVVISO. BH SE RESERVA O DIREITO A MODIFICAÇÀO ESPECIFICAÇOES DOS SEUS PRODUCTOS SEM PRÉVIO AVISO. DOOR KONSTANTE PRODUKTVERNIEUWING EN VERBETERING HOUDEN WIJ ONS HET RECHT VAN WIJZIGING VOOR ZONDER VOORAFGAAND BERICHT.
v2

SK2000L H800; H895; G930;R250 H720; H775, G815, G818
sportkoncept
UNIDAD ELECTRÓNICA ELECTRONIC MONITOR UNITÉ ÉLECTRONIQUE ELEKTRONIKEINHEIT
UNIDADE ELECTRÓNICA IMPIANTO ELETTRONICO
ELEKTRONISCHE MONITOR

SK LINEsportkoncept
Fig.1

SK LINEsportkoncept
Fig.2
Fig.3

SK LINE sportkoncept
4
ESPAÑOL
INDICACIONES GENERALES.- Este aparato de ejercicio esta equipado con un generador de corriente eléctrica, que aprovecha la energía desarrollada por el usuario (realizando el ejercicio), para alimentar el monitor electrónico y el regulador de frenada del mismo. Esta pantalla de monitor es táctil, para lo cual el pulsar una tecla es, posicionando el dedo, en la señalización de dicha tecla en la pantalla. Este aparato de ejercicio incorpora también una serie de baterías que almacena la energía suficiente para mantener el monitor electrónico operativo durante 45 segundos después de dejar de hacer el ejercicio. En el caso de que la batería se agote por algún fallo de funcionamiento, esta se puede recargar mediante el adaptador que se suministra con la máquina. Para la puesta en marcha del monitor se tiene que realizar ejercicio sobre la máquina.
ATENCIÓN: El adaptador debe conectarse en una toma apropiada. Asegúrese de que el voltaje de su instalación es compatible al voltaje del adaptador que se suministra con la máquina. El monitor electrónico está diseñado para ser utilizado de forma sencilla e intuitiva. Los textos que aparecen en la pantalla inferior (B) guiarán al usuario durante la realización del ejercicio. Sin embargo, recomendamos que el preparador físico lea atentamente esta sección con el fin de conocer a fondo el monitor electrónico y mostrar al usuario su funcionamiento de forma efectiva.
IMPORTANTE: PARA UN BUEN FUNCIONAMENTO Y DURACIÓN DE LAS BATERIAS, SE RECOMIENDA RECARGARLAS CON EL ADAPTADOR QUE SE SUMINISTRA AL RECIBIR LA MÁQUINA.
SELECCIÓN DEL TIPO DE MÁQUINA.- En el menú principal, presione a la vez la tecla RESET y la tecla “0” durante 6 segundos. Le aparecerá en la pantalla alfanumérica (B) Fig.1, la palabra “FACTORY SETTINGS“, presione “2” y seleccione el tipo de máquina E (elíptica), B/R (Bici/ Recumbent) o S (Stepper) con las teclas LEVEL▲ y LEVEL▼. Si desea salir del modo personalización pulse la tecla STOP.
PERSONALIZACIÓN DEL MONITOR ELECTRÓNICO.- En el menú principal, presione a la vez la tecla RESET y la tecla “0” durante 6 segundos. Le aparecerá en la pantalla alfanumérica (B) Fig.1, la palabra “FACTORY SETTINGS“, presione “ENTER”.
1) CAMBIO DE Km. a Millas.- Le aparecerá parpadeando UNITS, pulse la tecla ENTER y le parpadeará METRIC, seleccione la medida de su velocidad con las teclas LEVEL▲ y LEVEL▼ (METRIC/Km. -- ENGLISH / Millas) pulse la tecla ENTER y le volverá a parpadear la palabra “UNITS”, con la tecla LEVEL▲, pase al punto (2 WHEELSIZE), del cuadro inferior adjunto. Si desea salir del modo personalización pulse la tecla STOP y visualizará en el display Matriz de LEDs (A) el programa manual.
2) CAMBIO DE DISTANCIA POR REVOLUCION.- Estando la palabra ‘WHEELSIZE’ parpadeando, pulse la tecla ENTER y le parpadeara la cifra entre 0 y 80, seleccione el valor 80 con las teclas LEVEL▲ y LEVEL▼ pulse la tecla ENTER y le volverá a parpadear la palabra “WHEELSIZE”, con la tecla LEVEL▲, pase al punto (3 LANGUAGE), del cuadro inferior adjunto. Si desea salir del modo personalización pulse la tecla STOP.

SK LINE sportkoncept
5
3) CAMBIO DE IDIOMA. Estando la palabra ‘LANGUAGE’ parpadeando, pulse la tecla ENTER y le parpadeara el idioma, seleccione su idioma con las teclas LEVEL▲ y LEVEL▼ pulse la tecla ENTER y le volverá a parpadear la palabra “LANGUAGE”, con la tecla LEVEL▲, pase al punto 4 “Power”, del cuadro inferior adjunto. Si desea salir del modo personalización pulse la tecla STOP.
4) ALIMENTACION AUTOGENERADA Ó ELECTRICA. Estando la palabra Power parpadeando, pulse la tecla ENTER y le parpadeara la palabra ON o OFF, con las teclas LEVEL▲ y LEVEL▼ seleccione la opción que se muestra parpadeante. La opción ON es para mantener el monitor siempre encendido. Si ha elegido la opción ON es necesario que la maquina este enchufada con el adaptador a la red eléctrica una vez elegida la opción pulse la tecla ENTER para confirmar y le volverá a parpadear la palabra Power, deje de hacer ejercicio. Si desea apagar el monitor en esta opción mantenga pulsada la tecla STOP, hasta que se oiga un pitido, espere 20 segundos y pasa a la opción OFF. En la opción OFF, al ser la maquina autogenerada, el monitor se pondrá en funcionamiento en el momento que se empiece a hacer el ejercicio. Una vez elegida la opción, pulse la tecla ENTER y le parpadeara Power. Con la tecla LEVEL▲, pase al punto 5 “SWR time” del cuadro inferior adjunto. Una vez validada la opción (OFF) basta con dejar de hacer el ejercicio que ha mantenido al monitor encendido y esperar los 45 segundos hasta que se apague. Si desea salir del modo personalización pulse la tecla STOP.
5) TIEMPO DE RESISTENCIA EN PROGRAMA WATT (SWR TIME) Mod; H800; H895 Estando la palabra SWR time parpadeando, pulse la tecla ENTER y le parpadeara la cifra entre 20 y 60 Segundos, con las teclas LEVEL▲ y LEVEL▼ seleccione la opción que se muestra parpadeante, una vez elegida la opción pulse la tecla ENTER para confirmar y le parpadeara la palabra SWR time, con la tecla LEVEL▲, pase al punto 6 “SPR time”, del cuadro inferior adjunto. Si desea salir del modo personalización pulse la tecla STOP.
6) TIEMPO DE RESISTENCIA EN PROGRAMA H.R.C. Estando la palabra SPR time parpadeando, pulse la tecla ENTER y le parpadeara la cifra entre 20 y 60 Segundos, con las teclas LEVEL▲ y LEVEL▼ seleccione la opción que se muestra parpadeante, una vez elegida la opción pulse la tecla ENTER para confirmar y le parpadeara la palabra SPR time, con la tecla LEVEL▲, pase al punto 7 “Manual T”, del cuadro inferior adjunto. Si desea salir del modo personalización pulse la tecla STOP.
7) TIEMPO MAX. EJERCICIO.- Estando la palabra Manual T. parpadeando, pulse la tecla ENTER y le parpadeara la cifra entre 0 y 60 Minutos, con las teclas LEVEL▲ y LEVEL▼, seleccione la opción que se muestra parpadeante, una vez elegida la opción pulse la tecla ENTER para confirmar y le parpadeara la palabra Manual T, con la tecla LEVEL▲, pase al punto 8 “Text”, del cuadro inferior adjunto. Si desea salir del modo personalización pulse la tecla STOP.
8) CAMBIO DE SALUDO INICIAL.- Estando la palabra Text parpadeando, pulse la tecla ENTER y le parpadeará la palabra ON o OFF, con las teclas LEVEL▲ y LEVEL▼ se cambia la opción que se muestra parpadeante. Eligiendo la palabra ON le permite cambiar el mensaje de saludo inicial del monitor. Una vez elegida la opción ON pulse la tecla ENTER y visualizará en la pantalla alfanumérica (B) un cursor parpadeante, con las teclas LEVEL▲ y LEVEL▼, seleccione letra a letra el mensaje de saludo inicial. Una vez haya completado el mensaje pulse la tecla ENTER durante unos segundos y le parpadeara la palabra Text, con la tecla LEVEL▲, pase al punto 9 “Sounds” del cuadro inferior adjunto. Si desea salir del modo personalización pulse la tecla STOP.
9) CAMBIO DE SONIDO.- Estando la palabra Sounds parpadeando, pulse la tecla ENTER y le parpadeará la palabra ON o OFF, con las teclas LEVEL▲ y LEVEL▼ se cambia la opción que se muestra parpadeante, una vez elegida la opción pulse la tecla ENTER para confirmar y le parpadeará la palabra Sounds. Pulse la tecla STOP para salir de los parámetros personalizables y visualizara en el display Matriz de LEDs (A) el programa manual. Comience el ejercicio y observe que los cambios de opciones han sido realizados.

SK LINE sportkoncept
6
CUADRO DE LOS PARÁMETROS PERSONALIZABLES
Parámetro Descripción 1) Metric Cambio de velocidad de Km/h a Millas 2) Wheelsize Cambio de relaccion rpm - distancia recorrida
3) Language Define el idioma en el que el monitor electrónico muestra los mensajes. Opciones: Español; Portugués; Ingles; Francés; Alemán; Holandés; Italiano
4) Power
Permite definir el modo de funcionamiento del aparato entre autogenerador o conectado a la red. En caso de estar en modo ON es necesario que la máquina esté enchufada a la red. Para apagar el monitor estando en modo ON basta con mantener pulsada la tecla STOP durante 4 segundos. Opciones:- OFF (Funcionamiento con baterías)
- ON (Funcionamiento enchufada a la red). IMPORTANTE: La máquina debe de estar enchufada a la red eléctrica en caso de elegir esta opción, de lo contrario se deteriorarán las baterías, pudiendo quedar inservibles)
5) SWR time
Establece la cadencia de cálculo de la resistencia en el programa de potencia cte. Esta opción solo esta disponible en los modelos que incorporan el programa de potencia constante. Opciones: Valor en segundos (mínimo 20 y máximo 60)
6) SPR time Establece la cadencia de cálculo de la resistencia en el programa de pulso constante. Opciones: Valor en segundos (mínimo 20 y máximo 60)
7) Manual T
Establece un tiempo máximo para la duración del ejercicio. Opciones:
0 (No se establece tiempo máximo) Valor en minutos del tiempo máximo de duración del ejercicio (máximo 60)
8) Text
Opciones: OFF (Se muestra el mensaje de saludo por defecto) ON (Permite editar el mensaje de saludo)
Permite personalizar el mensaje de saludo, incluyendo, por ejemplo, el nombre del gimnasio.
9) Sounds Habilita o deshabilita los mensajes sonoros del monitor electrónico. Opciones: - ON (Habilitado) - OFF (Deshabilitado)
ELEMENTOS DEL MONITOR ELECTRÓNICO (Fig.1) El monitor electrónico se compone de dos zonas bien diferenciadas; La zona superior Fig.2 (A – B – C) se encuentra la VISUALIZACIÓN. La zona inferior Fig.3 (D – F – G) se encuentra el TECLADO.
VISUALIZACIÓN. Esta zona está compuesta por dos pantallas. (A) Display Matriz de LEDs superior, donde se monitoriza el nivel de esfuerzo que se realiza del programa seleccionado en cada momento. (B) Display de Pantalla alfanumérica inferior, que guía al usuario durante la selección y realización del ejercicio. La pantalla superior (A) mostrara los diferentes perfiles preprogramados de esfuerzo (programas) que podemos seleccionar y, durante el ejercicio, el nivel de esfuerzo que se realiza en cada momento. La pantalla alfanumérica inferior (B) se encarga de guiar al usuario durante la selección del ejercicio a realizar y de mostrar información sobre el ejercicio durante y después de su realización. Los LEDs indicadores ( C ) que se encuentran debajo de la pantalla alfanumérica muestran simultáneamente la VELOCIDAD/R.P.M; TIEMPO/DISTANCIA; CALORIAS/WATIOS; PULSO e indican cual es la información que se está mostrando en cada momento del ejercicio.

SK LINE sportkoncept
7
Los datos que se muestran en los LEDs (C) durante la realización del ejercicio son los siguientes: SPEED - VELOCIDAD: Se muestra un valor estimado de la velocidad lineal a la que se desplazaría una bicicleta con la cadencia de pedaleo del usuario. El valor se muestra en kilómetros por hora (Km/h). STEPS/MIN - PASOS/MIN: Muestra el número de pasos por minuto. RPM: Se muestra la cadencia de pedaleo instantánea durante el ejercicio. Indica el número de veces que el pedalier realiza un giro completo en un minuto (RPM). TIME – TIEMPO: Durante el ejercicio se muestra el tiempo que ha trascurrido desde que comenzamos el mismo, o, en caso de haber seleccionado un tiempo de ejercicio predefinido, el tiempo que resta para acabar el ejercicio. El tiempo se muestra en minutos y segundos (mm:ss). DISTANCE – DISTANCIA: Se muestra la distancia que hemos recorrido desde el inicio del ejercicio. La distancia se calcula teniendo en cuenta la estimación de velocidad lineal (SPEED) y las unidades son los kilómetros y hectómetros. CALORIES – CALORIAS: Se muestra una estimación de las calorías que se han quemado hasta el momento. La estimación se realiza tomando en cuenta la energía que se está realizando en cada momento y los datos de peso y edad introducidos por el usuario. WATT – WATIOS: Se muestra la cantidad de energía que se está generando en cada momento del ejercicio. Este cálculo se realiza teniendo el cuenta el nivel de resistencia en el que se trabaja y la cadencia de pedaleo. La información se muestra en Watios (Watt.). PULSE – PULSO: Se muestra la frecuencia cardiaca del usuario, siempre que esta información sea accesible mediante los sensores de mano (Hand – Grip) o la banda telemétrica de pecho, cuando se utilizan los dos juntos, se da prioridad a la banda telemétrica de pecho. Para más información acerca de la frecuencia cardiaca, consultar la sección: Medida de pulso; banda de pecho y hand-grip.
TECLADO (Fig.3). A continuación se enumera la función de cada tecla. El monitor electrónico incluye un teclado de uso sencillo. Este teclado consta de las teclas de teclas numéricas (F) y de las teclas función (G). .- Teclas numéricas (F) - (1- 0) se utilizan para introducir los datos que el monitor solicite. .- Teclas de función (G)- reset; level▼; level▲; enter; pause; stop; quick/start. Estas teclas se utilizan para seleccionar el ejercicio a realizar, introducir los datos solicitados, controlar el nivel de resistencia del ejercicio y finalizar el mismo.
-reset.-Tecla de anulación. Se utiliza para borrar los datos que se introducen en el monitor a la hora de seleccionar un programa.
-level▼.- Tecla de disminución nivel de esfuerzo. Durante la realización del ejercicio esta tecla disminuye en un punto el grado de resistencia de la máquina. Durante la selección de los perfiles preprogramados se utiliza para mostrar en pantalla el perfil anterior al mostrado.
-level▲.- Tecla de incremento nivel de esfuerzo. Durante la realización del ejercicio está tecla aumenta en un punto el grado de resistencia de la máquina. Durante la selección de los perfiles preprogramados se utiliza para mostrar en pantalla el perfil siguiente al mostrado.
-enter.- Tecla de selección y validación. Se utiliza durante la selección de un perfil preprogramado para seleccionarlo, validar los datos que han de introducirse y comenzar el ejercicio. Durante la progre-mación del perfil de usuario se utiliza además para validar el nivel de esfuerzo correspondiente a cada minuto.
-pause.- Tecla de pausa. Si se pulsa durante la realización del ejercicio, éste se interrumpe, deteniendo el cronometro de duración de ejercicio. Para reanudar el cronometro de duración del ejercicio pulse la tecla pause de nuevo o reanude el ejercicio. El tiempo limite de modo pausa es de 45 segundos, una vez transcurrido este tiempo el ejercicio se dará por finalizado y se apaga el monitor. Si, estando en modo pausa, se pulsa la tecla STOP, el ejercicio se dará por finalizado.

SK LINE sportkoncept
8
-stop.- Tecla de parada. Si se pulsa durante la realización del ejercicio, éste se da por finalizado y la resistencia pasa a ser la resistencia mínima. Se muestra un resumen con los datos del ejercicio y se vuelve a la pantalla de inicio. En el modo Start/Ready, mantenga pulsada la tecla STOP durante 3 segundos, y el monitor cambiará automáticamente al estado de apagado con un sonido si la opción POWER bajo el modo de configuración está en ON.
-quick/start.- Tecla de inicio inmediato. Siempre que el LED de la tecla se encuentre parpadeando, al pulsar esta tecla se comienza el ejercicio en modo manual.
PUESTA EN MARCHA.- Para la puesta en marcha del monitor, se tiene que realizar ejercicio sobre la maquina a una cadencia de pedaleo de 45 r.p.m. del pedalier. Al llegar a las 45 r.p.m., se enciende el monitor, y tiene una duración para poder programar de 55 segundos. También se puede enchufar el adaptador que se suministra con la máquina a una toma de corriente, si ha optado poner en el cuadro de parámetros personalizables (paso 4 Power) en ON. Una vez encendido el monitor le mostrara en el display de matriz de LEDs (A) Fig.2, el perfil y la letra “M” de manual, y en display de pantalla alfanumérica inferior (B) le mostrara el saludo de bienvenida “BIENVENIDO A HI – POWER”. Pulsando la tecla QUICK/START se pone en marcha el programa, en manual y pulsando las teclas level▼ o level▲, usted puede aumentar o disminuir la resistencia del ejercicio.
INSTRUCCIONES DE FUNCIONAMIENTO.-
PUERTO USB.- Esta maquina dispone en el monitor de un puerto usb (D) para la carga del móvil.
MODO SLEEP: Si no se introduce una señal de RPM en un periodo de 45 segundos bajo el modo pausa, se activa este modo. En este modo, el monitor se encuentra apagado, y se deberá pedalear de nuevo para introducir una señal y encender el monitor. Si se ha conectado el cargador de baterías a la máquina, el monitor no puede ponerse en el modo Sleep cuando la opción POWER bajo el modo de configuración está en ON. Si el cargador no esá conectado el monitor se pondrá en el modo Sleep, aunque la opción POWER esté en ON.
P0 MODO MANUAL.- Una vez encendido el monitor le mostrara en el display de matriz de LEDs superior (A) Fig.2 el perfil y la letra “M” de manual, y en display de pantalla alfanumérica inferior (B) Fig.2 le mostrara el saludo de bienvenida “BIENVENIDO A HI – POWER”. Pulsando la tecla QUICK/START se pone en marcha el programa, en manual. En el display de matriz de LEDs superior (A) Fig.2 le indicara parpadeando en el nivel que esta realizando el ejercicio. Pulsando las teclas level▼ o level▲, usted puede aumentar o disminuir entre los veinte niveles de resistencia del ejercicio. En el display de pantalla alfanumérica inferior (B) Fig.2 le irá mostrando cada 10 segundos alternativa-mente: Los valores de; La velocidad SPEED (Mod.H800 y H895; Sistema Métrico Km./h, Sistema Británico Mª/h; Mod. G930 Pasos/Minuto; Mod.R250 Escalones/minuto); El tiempo (TIME); Calorías (CALORIES) y Pulso (PULSE) y en otra secuencia le mostrara: r.p.m.(Mod. H800 y H895; Nº de pasos Mod. G930; Escalones Mod. R250); Distancia (DISTANCE); Vatios (WATT) y Pulso (PULSE). Pulsando la tecla STOP se interrumpe el programa y en el display de pantalla alfanumérica inferior (B) Fig.2, le informara de la media de los valores TIEMPO DE EJERCICIO; DISTANCIA RECORRIDA; VELOCIDAD MEDIA; CALORIAS CONSUMIDAS; que ha realizado durante el ejercicio, mostrándoselos dos veces cada cinco segundos. Si en el tiempo que trascurre la información de los valores medios, no se toca ninguna tecla, o no se hace ejercicio y se pulsa la tecla STOP pasara al programa manual.

SK LINE sportkoncept
9
MODO PROGRAMAS. El monitor dispone de: 1 programa de perfil MANUAL; 8 PROGRAMAS con perfiles preprogramados; de un perfil programable por el usuario (USER); programas TEST masculino, y T E S T femenino; programa de ritmo cardiaco constante (H.R.C); programa de watios constantes (mod. H800/H895); programa distancia (mod. G930). Ver gráficos de los programas preprogramados en las paginas finales de este manual.
P1 - P8 PROGRAMAS DE GRÁFICOS. Estando el monitor encendido le mostrara el display de matriz de LEDs superior (A) Fig.2 el perfil y la letra “M” de manual. Para visualizar lo diferentes perfiles preprogramados se utilizan las teclas LEVEL▲ y LEVEL▼. Una vez se haya seleccionado un perfil en concreto pulse la tecla ENTER. En el display de matriz de LEDs superior (A) le pedirá la edad entre (10 y 99 años) seleccione su edad con las teclas numéricas (F) Fig.3, pulse ENTER. A continuación le pedirá el peso entre (30 y 199Kg.), seleccione su peso con las teclas numéricas (F) Fig.3, pulse ENTER. A continuación le pedirá el tiempo de duración del ejercicio entre (10 y 60 minutos), seleccione el tiempo con las teclas numéricas (F) Fig.3, pulse ENTER y dará comienzo a su ejercicio. Dentro de cada perfil preprogramado el usuario dispone de cuatro niveles de dificultad diferentes (L1 – L4), para seleccionar cualquiera de ellos es suficiente con utilizar las teclas LEVEL▲ y LEVEL▼ durante la realización del ejercicio. Una vez haya terminado el programa que ha estado realizando, el monitor le habrá calculado la media de los valores en el cual ha realizado el ejercicio y se los mostrara el la pantalla alfanumerica inferior (B) Fig.2. Pulsando la tecla STOP se interrumpe el programa y en el display de pantalla alfanumérica inferior (B) Fig.2, le informara de la media de los valores TIEMPO DE EJERCICIO; DISTANCIA RECORRIDA; VELOCIDAD MEDIA; CALORIAS CONSUMIDAS; que ha realizado durante el ejercicio, mostrándoselos dos veces cada cinco segundos . Si en el tiempo que trascurre la información de los valores medios, no se toca ninguna tecla, no se hace ejercicio y se pulsa la tecla STOP pasara al programa manual.
P9 PROGRAMA USUARIO (USER). Estando el monitor encendido le mostrara el display de matriz de LEDs superior (A) Fig.2 el perfil y la letra “M” de manual, para visualizar lo diferentes perfiles preprogramados se utilizan las teclas LEVEL▲ y LEVEL▼. Una vez se haya seleccionado el programa 9 (USER), pulse la tecla ENTER. En el display de matriz de LEDs (A) Fig.2 le pedirá la edad entre (10 y 99 años) seleccione su edad con las teclas numéricas (F) Fig.3, (si se introduce el valor, fuera de los dos dígitos le mostrara el valor mas cercano). Pulse ENTER. A continuación le pedirá el peso entre (30 y 199Kg.), seleccione su peso con las teclas numéricas (F) Fig.3, pulse ENTER. A continuación le pedirá el tiempo de duración del ejercicio entre (10 y 60 minutos), seleccione el tiempo con las teclas numéricas (F) y pulse ENTER a continuación pulse la tecla RESET y puede comenzar a diseñar el perfil de resistencia que usted desee en el display de matriz de LEDs (A). El perfil a diseñar esta subdividido en 21 pasos, los tres primeros pasos son de calentamiento y solo llegan al valor limitado de cuatro, para evitar posibles lesiones, el resto hasta 21 llegan al máximo .Para seleccionar el primer paso pulse RESET; las teclas LEVEL▲, LEVEL▼, a continuación pulse la tecla ENTER, y así sucesivamente hasta completar el grafico del programa que usted desee. Si se ha equivocado al grabar algún paso, pulse la tecla RESET y volverá al paso anterior. A continuación pulse tecla ENTER y comience el ejercicio con el perfil que ha diseñado. Una vez haya terminado el programa que ha estado realizando el ejercicio el monitor le habrá calculado la media de los valores en el cual ha realizado el ejercicio y se los mostrara el la pantalla alfanumerica (B) Fig.2. Pulsando la tecla STOP se interrumpe el programa y en el display de pantalla alfanumérica inferior (B) Fig.2, le informara de la media de los valores TIEMPO DE EJERCICIO; DISTANCIA RECORRIDA; VELOCIDAD MEDIA; CALORIAS CONSUMIDAS; que ha realizado durante el ejercicio, mostrándoselos dos veces cada cinco segundos .Si en el tiempo que trascurre la información de los valores medios no se toca ninguna tecla, no se hace ejercicio o se pulsa la tecla STOP pasara al programa manual. NOTA: Los tres primeros pasos del programa son de calentamiento con unos niveles de resistencia bajos, de ese modo evitaremos cualquier tipo de lesiones.

SK LINE sportkoncept
10
P10 - P11 PROGRAMAS DE TEST VARON – MUJER.
El objetivo del test es valorar la forma física del usuario. Para ello se ha de mantener una cadencia de pedaleo entre 70 y 80 revoluciones por minuto (R.P.M.) durante 5 minutos. La diferencia entre los programas de varón y mujer esta en los Watios, los valores del varón esta seleccionado en 150 W. y en el programa de mujer en 100 W. Estando el monitor encendido, el display de matriz de LEDs superior (A) Fig.2 le mostrará el perfil y la letra “M” de manual. Para visualizar los diferentes perfiles preprogramados se utilizan las teclas LEVEL▲ y LEVEL▼. Una vez se haya seleccionado el programa TEST Varón ó TEST Mujer, pulse la tecla ENTER. A continuación, el display de Pantalla alfanumérica inferior (B) Fig.2 le pedirá la edad (entre 10 y 99 años). Seleccione su edad con las teclas numéricas (F) Fig.3 y pulse ENTER. En el dispay de matriz de LEDs superior (A) Fig.2 le mostrara un corazón parpadeante, coloque sus manos sobre los sensores de pulso (hand-grip) situados en el manillar o en el caso de disponer de banda medidora de pulso telemétrica colóquesela en el pecho. Comience el TEST con una cadencia de pedaleo entre 70 y 80 R.P.M. de pedaleo durante 5 minutos, si en el caso de bajar el numero de R.P.M. le mostrara en el display R.P.M. ↑, si se sobrepasa las revoluciones le mostrara en el display R.P.M. ↓, si se mantiene la cadencia entre 70 y 80 r.p.m. le mostrara en el display OK. Al finalizar los 5 minutos de duración del test le mostrara una valoración entre el 1 (muy deficiente) y el 5 (excelente). También puede aparecer una valoración de 0 que quiere decir que el test no ha sido realizado correctamente (No se ha respetado la cadencia de pedaleo de 75 r.p.m. o no se ha utilizado la medición de ritmo cardiaco correctamente. NOTA: Es obligatorio para hacer el test utilizar la medición del ritmo cardiaco, usando para ello los sensores manuales (hand-grip) o la banda de pecho. Es conveniente hacer un pequeño calentamiento antes de realizar el test. Esto evitará lesiones. El máximo número de pulsaciones que una persona nunca debe sobrepasar se le denomina ritmo máximo y éste disminuye con la edad. Una sencilla fórmula para calcular es restar a 220 la edad en años. El ejercicio, para que sea correcto, debe mantenerse entre el 65% y el 85 % del ritmo cardíaco máximo y se recomienda no sobrepasar el 85%. Cuando sus pulsaciones pasen del 85% del ritmo cardiaco máximo aparecerá un corazón parpadeando y un pitido durante 2 segundos hasta que sus pulsaciones no bajen del 85 % de su ritmo cardiaco máximo. Se recomienda trabajar por debajo del 85% del ritmo cardíaco máximo por razones de seguridad.
P12 PROGRAMA DE RITMO CARDIACO CONSTANTE (H R C).
Es conveniente hacer un pequeño calentamiento antes de realizar el programa. Esto evitará posibles lesiones. Este programa permite hacer el ejercicio a un ritmo cardiaco (entre el 65 y el 85% del ritmo cardiaco máximo) y la máquina le ajustara el nivel de resistencia para lograr que en todo momento el usuario mantenga el ritmo cardiaco al nivel seleccionado. Es obligatorio utilizar la medición del ritmo cardiaco, usando para ello la banda de pulso telemétrico de pecho, y no sobrepasar del 85% del ritmo cardiaco máximo. Estando el monitor encendido le mostrara el display de matriz de LEDs superior (A) Fig.2 el perfil y la letra “M” de manual, para visualizar lo diferentes perfiles preprogramados se utilizan las teclas LEVEL▲ y LEVEL▼. Una vez se haya seleccionado el programa HRC pulse la tecla ENTER. Pulse ENTER para modificar el ritmo cardíaco objetivo y la ventana LED mostrará (INTRODUZCA CONSIGNA DE PULSO <40-220>). Pulse las teclas numéricas y la ventana LED mostrará (PULSO= xxx) y parpadearán los valores introducidos. Pulse las teclas numéricas para modificar e introducir un número de tres dígitos (valores: 40 ~ 220). Si se introduce un número inadecuado, se mostrará el número mayor o más pequeño. Introduzca un número adecuado y pulse ENTER para confirmar. Pulse ENTER para modificar el tiempo y la ventana LED mostrará (INTRODUZCA EL TIEMPO DE EJERCICIO <MINUTOS>). La matriz de puntos mostrará (? 10) y parpadeará su número. Pulse las teclas numéricas para modificar e introducir un número de dos dígitos (valores: 10 ~ 60). Si se introduce un número inadecuado, se mostrará el número por defecto. Introduzca un número adecuado y pulse ENTER para confirmar e iniciar el programa. Tras finalizar el último ajuste, se acumulan todos los valores. La resistencia es Nivel 1 y cambia a la línea siguiente cada minuto. Si la velocidad (RPM) no es suficiente, la matriz de puntos mostrará (RPM ↑) y se pasará al modo de pausa después de 15 segundos.

SK LINE sportkoncept
11
Comience el ejercicio con una cadencia de pedaleo entre 70 y 80 R.P.M, coloque sus manos sobre los sensores de pulso (hand-grip) situados en el manillar o en el caso de disponer de banda medidora de pulso telemétrica colóquesela en el pecho, si en el caso de bajar el numero de R.P.M. le mostrara en el display de matriz de LEDs superior (A) Fig.2 R.P.M�, y si sobrepasa las revoluciones le mostrara en el display R.P.M�. En los tres primeros minutos este programa tiene un esfuerzo programado para evitar cualquier tipo de lesión. A partir del minuto tercero, el ordenador adecua automáticamente el esfuerzo para mantener el pulso entorno al valor previamente programado.
REGULACION AUTOMÁTICA DE ESFUERZO.- Al iniciarse el ejercicio, la máquina ajusta el nivel de resistencia al minimo, 50W, hasta que realiza la primera medición de pulso. Una vez detectado el pulso, el programa realiza una valoración del ritmo cardíaco cada X segundos (Estos segundos son variables entre 20 y 60, dentro del programa SPR. La regulación del esfuerzo según las pulsaciones se detalla en los pasos siguientes. 1.- RITMO CARDIACO OBJETIVO mayor que RITMO CARDIACO REAL: .- Cuando la diferencia entre el RITMO CARDIACO OBJETIVO y el RITMO CARDIACO REAL es igual o superior a 15 P.P.M, la REGULACIÓN AUTOMATICA DEL ESFUERZO se hará aumentando de 20 en 20 Watios. Cuando esta diferencia sea inferior a 15 P.P.M, la regulación pasará a realizarse de 10 en 10 Watios hasta ajustar ambos ritmos cardiacos. 2.- RITMO CARDIACO REAL mayor que RITMO CARDIACO OBJETIVO: - Cuando la diferencia entre el RITMO CARDIACO REAL y el RITMO CARDIACO OBJETIVO es igual o superior a 15 P.P.M, la REGULACIÓN AUTOMATICA DEL ESFUERZO se hará disminuyendo de 20 en 20 Watios. Cuando esta diferencia sea inferior a 15 P.P.M, la regulación pasará a realizarse de 10 en 10 Watios hasta ajustar ambos ritmos cardiacos. - Cuando la diferencia entre el RITMO CARDIACO REAL y el RITMO CARDIACO OBJETIVO sea igual o superior a 30 P.P.M., el display de la Pantalla alfanumérica inferior (B) le mostrara la frase DISMINUYA LA INTENSIDAD DEL EJERCICIO, SU RITMO CARDIACO ES DEMASIADO ELEVADO y la regulación automática de la maquina bajara el esfuerzo al mínimo (50W). Si durante el ejercicio no se detecta el ritmo cardiaco se mostrara Cifra de ritmo cardiaco ? y parpadeara, si esta situación se mantiene durante 60 segundos , se pasa a modo manual . NOTA: Al máximo número de pulsaciones que una persona nunca debe sobrepasar se le denomina ritmo cardiaco máximo y éste disminuye con la edad. Una sencilla fórmula para calcular es restar a 220 la edad en años. El ejercicio, para que sea correcto, debe mantenerse entre el 65% y el 85 % del ritmo cardíaco máximo y se recomienda no sobrepasar el 85%. Se recomienda trabajar por debajo del 85% del ritmo cardíaco máximo por razones de seguridad. Si no se usa un sistema de medición del ritmo cardiaco, en la pantalla se encenderá el símbolo del corazón y una interrogante, si la máquina continua sin recibir información del ritmo cardiaco el programa se suspende y será necesario realizar una nueva selección de programa.
P13.- Mod. H800; H895; H720; H775 PROGRAMA DE WATIOS CONSTANTES.- Este programa permite seleccionar el nivel de potenc ia en (watios) en el que se desea hacer el ejercicio. La potencia que se desarrolla (watios) depende de la velocidad y e l es fuerzo al que se realiza el ejercicio. La máquina se encargará de regular el nivel de esfuerzo para que el usuario siempre desarrolle la misma potencia independientemente del nivel de la cadencia de pedaleo del mismo. En los cuarenta primeros segundos este programa tiene un esfuerzo programado para evitar cualquier tipo de lesión. A partir del segundo cuarenta, la máquina comienza a controlar la resistencia en función de la cadencia de pedaleo. Es conveniente antes de realizar el programa hacer un pequeño calentamiento. Esto evitará lesiones. Estando el monitor encendido le mostrara en el display de matriz de LEDs superior (A) Fig.2 el perfil y la letra “M” de manual .Para visualizar lo diferentes perfiles preprogramados se utilizan las teclas LEVEL▲ y LEVEL▼. Una vez se haya seleccionado el programa WATT, pulse la tecla ENTER. En el display de la Pantalla alfanumérica inferior (B) le pedirá el valor de WATT (Watios) que desea hacer el ejercicio. Seleccione con las teclas numéricas (F) Fig.3 entre (25 y 400 WATT Watios) y pulse ENTER. Pulse ENTER para modificar el tiempo y la ventana LED mostrará (INTRODUZCA EL TIEMPO DE EJERCICIO <MINUTOS>). La matriz de puntos mostrará (? 10 )y parpadeará su número.

SK LINE sportkoncept
12
Pulse las teclas numéricas para modificar e introducir un número de dos dígitos (valores: 10 ~ 60). Si se introduce un número inadecuado, se mostrará el número por defecto. Introduzca un número adecuado y pulse ENTER para confirmar e iniciar el programa. Tras finalizar el último ajuste, pulse Enter para acumular todos los valores. La resistencia es Nivel 1 y cambia a la línea siguiente cada minuto. Si la velocidad (RPM) no es suficiente, la matriz de puntos mostrará (RPM ↑) y se pasará al modo de pausa después de 15 segundos.
Si realizando el ejercicio el consumo de Watios es inferior a 25 W. le mostrara en el display de matriz de LEDs superior (A) Fig.2 (R.P.M ↑), y si es superior a 450 W. le mostrara (R.P.M ↓).
REGULACIÓN AUTOMÁTICA DE ESFUERZO Tras iniciarse el modo de entrenamiento, el programa realizará una estimación acerca de WATT durante cada “X” segundos (El valor “X” es ajustado por el usuario en el programa SWR incorporado en el monitor). El método de ajuste de los WATT se muestra del modo siguiente: 1.- Durante el entrenamiento, el programa comparará el valor en WATT real con el valor WATT objetivo. Si el valor de los WATT real es menor o igual que el valor 75, de los WATT objetivo,el NIVEL de resistencia de la maquina aumentará automáticamente de 3 en 3 niveles, hasta el NIVEL 20. 2.- Durante el entrenamiento, el programa comparará el valor en WATT real con el valor WATT objetivo. Si el valor de los WATT real es menor o igual que 50, de los WATT objetivo, el NIVEL de resistencia de la maquina aumentará automáticamente de 2 en 2 niveles hasta el NIVEL 20. 3.- Durante el entrenamiento, el programa comparará el valor en WATT real con el valor WATT objetivo. Si el valor de los WATT real es menor o igual que 15, de los WATT objetivo,el NIVEL de resistencia de la maquina aumentará automáticamente de 1 en 1 nivel hasta el NIVEL 20. 4.- Durante el entrenamiento, el programa comparará el valor en WATT real con el valor WATT objetivo. Si el valor de los WATT real es mayor o igual que 15, de los WATT objetivo,el NIVEL de resistencia de la maquina se reducirá automáticamente de 1 en 1 nivel hasta el NIVEL 1. 5.- Durante el entrenamiento, el programa comparará el valor en WATT real con el valor WATT objetivo. Si el valor de los WATT real es mayor o igual que 50 de los WATT objetivo,el NIVEL de resistencia de la maquina se reducirá automáticamente de 2 en 2 niveles hasta NIVEL 1. 6.- Durante el entrenamiento, el programa comparará el valor en WATT real con el valor WATT objetivo. Si el valor de los WATT real es mayor o igual que 75 de los WATT objetivo,el NIVEL de resistencia de la maquina se reducirá automáticamente de 3 en 3 niveles hasta NIVEL 1. NOTA: En cualquier momento del programa se podrá variar el nivel de watios programado, utilizando para ello las teclas LEVEL▲ y LEVEL▼. El nivel de watios programado aparecerá en el display parpadeando. La máquina está equipada con sensores manuales (hand-grip) para la captación del ritmo cardiaco del usuario, sin embargo también es compatible con el sistema telemétrico basado en un transmisor (banda de pecho) y un receptor incluido en el monitor electrónico. La utilización de los sensores manuales es muy sencilla, basta con agarrar los mismos durante la realización del ejercicio y esperar a que el ritmo cardiaco aparezca en el display habilitado al efecto. La información de ritmo cardiaco no aparece de forma instantánea, es necesario esperar unos 20 segundos antes de la aparición del mismo en pantalla. La banda del pecho transmite el pulso por contacto con el pecho y envía la señal al reloj que la muestra.
P-13.- Mod. G930; G815; G818 PROGRAMA DE CONTROL DE DISTANCIA.- Este programa le permite recorrer una distancia determinada previamente seleccionada. Estando el monitor encendido le mostrara el display de matriz de LEDs superior (A) Fig.2 el perfil y la letra “M” de manual, para visualizar lo diferentes perfiles preprogramados se utilizan las teclas LEVEL▲ y LEVEL▼. Una vez se haya seleccionado el programa DIST pulse la tecla ENTER. En la pantalla alfanumérica (B), aparecerá el mensaje INTRODUZCA DISTACIA A RECORRER <0.1-99.9>. Pulse las teclas numéricas para introducir la distancia deseada. Si se introduce un número inadecuado, se mostrará el número mayor o más pequeño. Introduzca un número adecuado y pulse ENTER para comenzar el ejercicio. EL valor de la distancia introducido aparece en la pantalla alfanumérica (B) y va disminuyendo a medida que se hace ejercicio. La resistencia es Nivel 9 y cambia a la línea siguiente cada minuto. Si la velocidad (RPM) no es suficiente, la matriz de puntos mostrará (RPM�) y se pasará al modo de pausa después de 15 segundos. Utilizando las teclas LEVEL▲ y LEVEL▼. Se puede modificar el valor de la resistencia durante el ejercicio.

SK LINE sportkoncept
13
PRECAUCIÓN. Antes de comenzar cualquier programa de ejercicio, debe de consultar a su médico y comunicarle la intensidad del ejercicio. Si utiliza un marcapasos no utilice la banda del pecho hasta que haya consultado con su médico.
SIGNIFICADO DE LOS SÍMBOLOS.- En la pantalla pueden aparecer una serie de símbolos o de palabras con el siguiente significado: Símbolo del corazón y una interrogante: No se ha colocado la banda del pecho o no se la ha colocado adecuadamente. Símbolo del corazón parpadeando: Este símbolo sólo aparecerá en los tests. Al máximo número de pulsaciones que una persona nunca debe sobrepasar se le denomina ritmo máximo y éste disminuye con la edad. Una sencilla fórmula para calcular es restar a 220 la edad en años. El ejercicio, para que sea correcto, debe mantenerse entre el 65 y el 85% del ritmo cardíaco máximo y se recomienda no sobrepasar el 85%. Cuando sus pulsaciones pasen del 85% del ritmo cardiaco máximo aparecerá un corazón parpadeando y un pitido durante 2 segundos hasta que sus pulsaciones no bajen del 85% de su ritmo cardiaco máximo. Se recomienda trabajar por debajo del 85% del ritmo cardíaco máximo por razones de seguridad. *0* : Este símbolo aparece en los tests masculino y femenino y significa que usted ha realizado el test mal(es decir usted no ha estado realizando el test a 75 r.p.m. o no se ha colocado la banda de pecho). Símbolo de Llave fija: Avería mecánica. Apagar la máquina y encenderla pasados 2 minutos. La máquina posee un sistema de corrección de averías automático, no obstante, si el problema persiste, póngase en contacto con el servicio técnico.
TEXTOS DE INFORMACIÓN MONITOR
1. “BIENVENIDO A HI POWER” 2. “PULSE LAS FLECHAS PARA SELECCIONAR PERFIL” 3. “PULSE QUICK/START PARA COMENZAR” 4. “PULSE ENTER PARA COMENZAR PERFIL” 5. “ERROR” 6. “CONSULTE SERVICIO TECNICO” 7. “INTRODUZCA SU EDAD <10-99>”
8. “INTRODUZCA SU PESO <30-199> KG” “INTRODUZCA SU PESO <70-440> LB”
9. “INTRODUZCA EL TIEMPO DE EJERCICIO <10-60> MINUTOS”
10. “INTRODUZCA CONSIGNA DE WATTIOS <25-400>”
“WATTS=” 11. “EDAD=” 12. “INTRODUZCA CONSIGNA DE PULSO <40-220>” 13. “PULSO=” 14. “PULSE PAUSE PARA CONTINUAR EJERCICIO. PULSE STOP PARA TERMINAR” 15. “TIEMPO DE EJERCICIO=” 16. “DISTANCIA RECORRIDA=” 17. “VELOCIDAD MEDIA=” 18. “CALORIAS CONSUMIDAS=” 19. “PULSE ENTER PARA ACEPTAR EL PERFIL MEMORIZADO. PULSE RESET PARA MODIFICAR EL PERFIL.”
20. “UTILICE LAS FLECHAS PARA SELECCIONAR LA INTENSIDAD PARA LA COLUMNA ACTIVA. PULSE ENTER PARA PASAR A LA SIGUIENTE COLUMNA. PULSE RESET PARA VOLVER A MODO MANUAL.”
21. “DISMINUYA LA INTENSIDAD DEL EJERCICIO. SU RITMO CARDIACO ES DEMASIADO ELEVADO” 22. “EL RESULTADO DEL TEST ES=”
Para cualquier consulta, no dude en ponerse en contacto con el (S.A.T).Servicio de Asistencia Técnica, llamando al teléfono de atención al cliente (ver página final del presente manual).
BH SE RESERVA EL DERECHO A MODIFICAR LAS ESPECIFICACIONES DE SUS PRODUCTOS SIN PREVIO AVISO.

SK LINE sportkoncept
14
ENGLISH
GENERAL INSTRUCTIONS.- This exercise machine is equipped with a dynamo that makes use of the energy produced by the user (while exercising) to power the electronic monitor and the brake controller. This monitor screen is touch sensitive, so to press a key just place your finger on the said key displayed on the screen. This exercise machine also includes a set of batteries that store enough energy to keep the electronic monitor operating for 60 seconds after the exercise has finished. Should the battery run down because of an operational fault, it can be recharged by using the adapter that is supplied with the exercise machine. To switch the monitor on, start exercising.
ATTENTION: The adapter should be plugged into an appropriate socket. Make sure that the main voltage is compatible with the voltage for the adapter supplied with the machine. The electronic monitor is designed to be easy and intuitive to use. The messages that appear on the bottom screen (B) will guide the user throughout the whole exercise. Nevertheless, we recommend that a gym instructor reads through this section carefully to become fully familiar with the electronic monitor in order to show the user how to operate it correctly. IMPORTANT: TO ENSURE THAT THE BATTERIES OPERATE CORRECTLY AND LAST LONGER IT IS ADVISABLE TO RECHARGE THEM USING THE ADAPTER SUPPLIED WITH THE MACHINE.
PERSONALIZING THE ELECTRONIC MONITOR.- From the main menu, press both the RESET key and the "0" button for 6 seconds. The words “FACTORY – SETTINGS” will appear on the alphanumeric screen (B), Fig.1, press "2" and select the machine type E (elliptical), B / R (Bike / Recumbent) or S (Stepper) with LEVEL ▲ and ▼ keys.If you wish to exit the personalization mode press the STOP key. Follow the steps below to access the monitor’s personalization mode: From the main menu, press both the RESET key and the "0" button for 6 seconds. The words “FACTORY – SETTINGS” will appear on the alphanumeric screen (B), Fig.1, press "ENTER".
1) CHANGING FROM Kilometers to Miles.- The word UNITS will appear, press the ENTER key and the word METRIC will flash, select the unit of speed by using the LEVEL▲ LEVEL▼ keys (METRIC / Km. -- ENGLISH / Miles) press the ENTER key. The word “UNITS” will start flashing. To set the Distance per Revolution/Wheelsize use the LEVEL ▲ key to navigate to the “WHEELSIZE” menu. (Step 2) If you wish to exit the persnalization mode, press the STOP key and the manual program will be displayed on the LED array (A).
2) CHANGING DISTANCE PER REVOLUTION.- With the word “WHEELSIZE” flashing, press the ENTER key and a figure between 0 - 80 will start flashing. Select the value using the LEVEL▲ LEVEL ▼ keys (models H800, H895, G930 select 80) press the ENTER key. The word “WHEELSIZE” will start flashing. To set the language use the LEVEL ▲ key to navigate to the “LANGUAGE” menu. (Step 3) If you wish to exit the personalization mode press the STOP key.
3) CHANGING LANGUAGE.- With the word “LANGUAGE" flashing, press the ENTER key and the current language will start flashing. Select your language using the LEVEL▲ LEVEL▼ keys and then press ENTER. The word “LANGUAGE” will start flashing. To set the type of Power use the LEVEL ▲ key to navigate to the “POWER” menu. (Step 4) If you wish to exit the personalization mode press the STOP key.

SK LINE sportkoncept
15
4) SELF OR ELECTRICALLY POWERED.- With the word “Power” flashing, press the ENTER key and the word ON or OFF will start flashing. Select the option that is flashing by using the LEVEL ▲ and LEVEL ▼ keys. The ON option is used to keep the monitor on at all times. If the ON option is selected it will be necessary to ensure that the machine is plugged into the main power supply by means of the adapter. When you have selected an option press the ENTER key to confirm and the word "POWER" will start flashing. Stop exercising. If you wish to switch the monitor off with this option, press and hold the STOP key until you hear a beep. Wait 45 seconds and the unit will switch over to the OFF option. With the OFF option, the machine is self powered, which means that the monitor will come on as soon as you start exercising. Once you have selected this option press the ENTER key and the word “POWER” will start flashing. Note: With the OFF option selected the monitor will switch itself off 45 seconds after you have finished exercising. To set the Steady Watt Rate/(SWR) use the LEVEL ▲ key to navigate to the ”SWR TIME” menu. (Step 5) If you wish to exit the personalization mode press the STOP key.
5) STEADY WATT RATE TIME (SWR TIME, Mod; H800; H895).- With the word “SWR time" flashing, press the ENTER key and a figure between 0 and 60 seconds will start flashing. Select the flashing value using the LEVEL▲ and LEVEL▼ keys and then press ENTER to confirm. The word “SWR time” will start flashing. To set the Steady Pulse Rate Time/(SPR) use the LEVEL ▲ key to navigate to the “SPR TIME” menu. (Step 6) If you wish to exit the personalization mode press the STOP key.
6) STEADY PULSE RATE TIME.- With the word “SPR time" flashing, press the ENTER key and a figure between 20 and 60 seconds will start flashing. Select the flashing value using the LEVEL▲ and LEVEL▼ keys and then press ENTER to confirm. The word “SPR time” will start flashging. To set the Max Exercise Time/(MANUAL T) use the LEVEL ▲ key to navigate to the “MANUAL T” menu. (Step 7) If you wish to exit the personalization mode press the STOP key.
7) MAX. EXERCISE TIME.- With the word “MANUAL T" flashing, press the ENTER key and a figure between 0 and 60 minutes will start flashing. Select the flashing value using the LEVEL▲ and LEVEL▼ keys and then press ENTER to confirm. The word “MANUAL T” will start flashing. To change the Welcome Message/(TEXT) use the LEVEL ▲ key to navigate to the “TEXT” menu. (Step 8) If you wish to exit the personalization mode press the STOP key.
8) CHANGING THE WELCOME MESSAGE.- With the word “TEXT” flashing, press the ENTER key and the word ON or OFF will start flashing. Select the option that is flashing by using the LEVEL▲ and LEVEL▼ keys. Choosing the ON option allows you to change the monitor’s welcome message. Once the ON option has been selected, press the ENTER key and a flashing cursor will appear on the alphanumeric screen (B). Use the LEVEL▲ LEVEL▼ keys to enter a welcome message letter by letter. Once you have finished entering the message, press the ENTER key for a few seconds and the word “TEXT” will start flashing. To change the Sound use the LEVEL ▲ key to navigate to the “SOUNDS” menu. (Step 9) If you wish to exit the personalization mode press the STOP key.
9) CHANGING THE SOUND.- With the word “SOUNDS" flashing, press the ENTER key and the word ON or OFF will start flashing. Select the flashing value using the LEVEL▲ LEVEL▼ keys and then press ENTER to confirm.The word “SOUNDS” will start flashing. Press the STOP key to exit the personalization mode and the manual program will be displayed on the LED array (A). Begin exercising and you will see that the changes have been made.

SK LINE sportkoncept
16
PERSONALISED SETTINGS PANEL Setting Description 1) Metric Change speed unit from km/h to mph 2) Wheelsize Change rpm – distance travelled ratio
3) Language Defines the language in which messages are displayed on the monitor. Options: Spanish, Portuguese, English, French, German, Dutch, Italian.
4) Power
Defines the method of operating the machine, between self-powered or connected to the main power supply. If the ON mode is selected, the machine has to be plugged into the main power supply. To switch off the monitor in ON mode, hold the STOP key down for 4 seconds. Options: - OFF (Battery operated) - ON (Electric operated). IMPORTANT: With the ON option the machine has to be plugged into the main power supply otherwise the batteries will run down and may be rendered useless.
5) SWR time Establishes the calculation rate for the steady watt rate program. This option is only available on models that include the steady watt rate program. Options: Value in seconds (minimum 20, maximum 60)
6) SPR time Establishes the calculation rate for the steady pulse rate program. Options: Value in seconds (minimum 20, maximum 60)
7) Manual T
Establishes a maximum time limit for the exercise. Options: - 0 (No maximum time limit established) Exercise time limit values in minutes (maximum 60)
8) Text
Options: - OFF (The default welcome message is displayed) - ON (Allows the welcome message to be edited) For personalizing the welcome message, including, for example, the name of the gymnasium.
9) Sounds Enables or disables sound messages emitted by the monitor. Options: - ON (Enabled) - OFF (Disabled)
ELEMENTS OF THE ELECTRONIC MONITOR (Fig.1).- The electronic monitor is made up of two distinct areas: Monitor pictured pages 2 and 3. The top area, Fig.2 (A – B – C) for the DISPLAY. The bottom area, Fig.3 (D – F – G) for the KEYPAD.
DISPLAY.- This is comprised of two screens. (A) The top LED array, which displays real-time exertion levels being produced during the selected program. (B) Bottom alphanumeric screen, which guides the user selection options and exercise. The top screen (A) displays the various pre-programmed exercise profiles (programs) that we can select during exercise as well as current exertion levels. The bottom alphanumeric screen (B) is used to guide the user when selecting the exercise and displays information about the exercise both during and after the session. The LED indicators (C) located below the alphanumeric screen gives a simultaneous readout of SPEED / R.P.M; TIME / DISTANCE; CALORIES / WATTS; PULSE RATE and indicates which information is being displayed throughout the exercise.

SK LINE sportkoncept
17
The data that is displayed on the LEDs (C) during exercise are as follows: - SPEED: This shows an estimated value of the linear velocity at which a bicycle would be travelling based on the user’s pedalling rate. The value is displayed in kilometres per hour (km/h or mph) -RPM: This shows the current pedalling rate during exercise. It indicates the number of full turns that the crank makes in one minute (RPM). -TIME: This shows the time that has elapsed since you started the exercise, or if a time limit has been established, the amount of time left before the exercise finishes. The time is displayed in minutes and seconds (mm:ss). -DISTANCE: This shows the distance that you have travelled since beginning the exercise. The distance is calculated by using the estimated linear velocity (SPEED) and the units displayed are kilometres and hectometres -CALORIES: This shows the estimated number of calories that have been burned up until now. This calculation is based on the energy being produced and the weight and age values provided by the user. -WATTS: This shows the amount of energy currently being produced during the exercise. This calculation is based on the exertion level at which the user is working and the pedalling rate. The information is displayed in Watts. -PULSE: This shows the user’s heart rate, assuming that this information can be accessed through the hand-grip sensors or the telemetric chest band. When both of these are used together, priority is given to the telemetric chest band. For more information about heart rate refer to the section entitled: Pulse measurement; chest band and hand-grip
KEYPAD. The function of each key is listed below. See Figure 3. The electronic monitor includes an easy-to-use keypad. This keypad consists of numeric keys (F) and function keys (G). - Numeric keys (F) - (1- 0) are used to enter the data requested by the monitor. - Function keys (G) – reset; level↑; level↓; enter; pause; stop; quick/start - are used to select a particular exercise, enter requested data, control exercise exertion levels and to finish the exercise.
-reset - Reset key. This is used to erase the data that has been entered into the monitor when selecting a program.
-level▼- Key for decreasing exertion level. When pressed during exercise this key will decrease the exertion level by one machine setting. During the selection of pre-programmed profiles, it is used to move on to the next profile screen.
-level▲- Key for increasing exertion levels. When pressed during exercise this key will increase the exertion level by one machine setting. During the selection of pre-programmed profiles, it is used to move back to the previous profile screen.
-enter- Selection and validation key. This is used during pre-programmed profile selection to select a profile, confirm data that has been entered and to start the exercise. It is also used during user profile programming to confirm exertion level settings.
-pause- Pause key. If this is pressed during a session, the exercise is interrupted and the exercise chronometer is halted. To restart the exercise chronometer press the pause key again or continue exercising. There is a 45 second time limit in pause mode, after which the exercise will be taken as finished and the monitor will switch itself off. If, in pause mode, the STOP key is pressed then the exercise will be understood as finished.
-stop- Stop key. If this is pressed during the session, the exercise will be taken as finished and exertion settings will drop to minimum level. A summary of all the exercise data will be displayed and it will then return to the start screen. Hold the STOP key down for 3 seconds in Start/Ready mode, and the console will automatically change to off status and will beep if the POWER option under personalization mode is on.

SK LINE sportkoncept
18
-quick/start- Quick start key. When this key is pressed, provided that the LED on the key is flashing, exercise will begin in manual mode.
STARTING.- In order to switch the monitor on it is necessary to pedal so that the crank spins at 45 r.p.m, as soon as it reaches 45 r.p.m the monitor will come on and remain on for 60 seconds so that you can program it. You can also plug the adapter that is supplied with the machine into a main power socket, assuming that you have chosen the ON option in the personalized settings (step 4 POWER). Once the monitor is on it will display the profile and the letter “M” for manual on the LED array (A) Fig.2 The “WELCOME TO HI – POWER” welcome message displays on the bottom of the alphanumeric screen (B). You can start the program in manual mode by pressing the QUICK/START key. By pressing the keys level▲ or level▼ keys you can increase or decrease the exertion levels.
OPERATING INSTRUCTIONS.-
USB PORT.- The monitor on this machine is fitted with USB port (D) for charge the mobile. SLEEP MODE.- This mode is activated if no RPM signal is received within 45 seconds when in stand-by mode. No windows are displayed while in this mode. You have to step on the footplate to produce a signal and reopen the display window. If the adapter is connected to the machine then the console will not switch over to sleep mode when the POWER option under personalization mode is switched ON. With no adapter connected, the console will switch over to sleep mode even when POWER option is switched ON.
P0 MANUAL MODE.- Once the monitor is on it will display the profile and the letter “M” for manual on the LED array (A) Fig.2, and the “WELCOME TO HI – POWER” welcome message on the bottom alphanumeric screen (B) Fig.2. You can start the program in manual mode by pressing the QUICK/START key. The flashing top LED array (A), Fig.2, will indicate the exertion level being produced during exercise. By pressing the level▲ or level▼ keys you can increase or decrease the exertion levels between twenty different settings. Every 10 seconds the alphanumeric screen (B), Fig.2, will switch between displayed readings for: Values relating to: (SPEED Mod.H800; H895 Metric system km/h or imperial system mph; Mod.G930 Strides per minute; Mod. R250 Steps per minute); TIME; CALORIES; PULSE RATE and In the second sequence: (r.p.m. H800; H895; Mod. G930 number of Strides; Steps Mod. R250); DISTANCE; WATT and PULSE RATE. The program can be interrupted by pressing the STOP key and the bottom alphanumeric screen (B), Fig.2, will display the average values for EXERCISE TIME; DISTANCE TRAVELLED; CALORIES CONSUMED during the exercise. These values will be displayed twice every five seconds. If, during the time it takes to display these average values, no keys are touched and no further exercise is done and the STOP key is pressed then the machine will go back to the manual program.
PROGRAM MODE.- The monitor has: 1 MANUAL profile program; 8 pre-programmed PROGRAM profiles; a user programmable profile (USER) as well as a male TEST, female TEST, steady pulse rate (H.R.C) and steady watt rate (mod. H800 / H895) / distance (mod. G930) programs. See pre-programmed graphs at the end of this manual.

SK LINE sportkoncept
19
P1 - P8 GRAPHIC PROGRAMS.-
With the monitor switched on, the top LED array (A), Fig.2, will display the profile and the letter “M” for manual. The LEVEL▲ and LEVEL▼ keys are used to display the various pre-programmed profiles. Once a specific profile has been selected press the ENTER key. The top LED array (A) will ask for an age value (between 10 and 99), select your age by using the number keys (F), Fig.3, press ENTER to select. It will now ask for your weight (between 30 and 199 kg), select your weight by using the number keys (F), Fig.3, press ENTER. It will now ask for an exercise time limit (between 10 and 60 minutes), select the time by using the number keys (F), Fig.3, press ENTER and this will begin your exercise session. There are four different difficulty levels (L1 – L4) within each pre-programmed profile, to select any of these just press the LEVEL▲ and LEVEL▼ keys during the exercise. Once you have finished the exercise program, the monitor will calculate the average values at which you did the exercise and display these on the bottom alphanumeric screen (B), Fig.2. The program can be interrupted by pressing the STOP key and the bottom alphanumeric screen (B), Fig.2, will display the average values for EXERCISE TIME; DISTANCE TRAVELLED; AVERAGE SPEED and CALORIES CONSUMED during the exercise. These values will be displayed twice every five seconds. If during the time it takes to display these average values, no keys are touched and no further exercise is done and the STOP key is pressed then the machine will go back to the manual program.
P9 USER PROGRAM (USER).-
With the monitor switched on, the top LED array (A), Fig.2, will display the profile and the letter “M” for manual. Use the LEVEL▲ and LEVEL▼ keys to display the various pre-programmed profiles. Once program 9 (USER) has been selected, press the ENTER key to select. The top LED array (A), Fig.2, will ask for an age value (between 10 and 99), select your age by using the number keys (F), Fig.3, (If the value entered exceeds these limits it will display the closest acceptable value). Press ENTER. It will now ask for your weight (between 30 and 199 kg), select your weight by using the number keys (F), Fig.3, press ENTER. It will now ask for an exercise time limit (between 10 and 60 minutes), select the time by using the number keys (F), and press ENTER. Now press the RESET key and you can begin to design a personalised exercise profile on the LED array (A). The profile to be designed is subdivided into 21 steps, the first three steps are for warm-up purposes and only reach a limited value of four in order to prevent possible injuries, the rest of the 21 steps reach maximum. To select the first step press RESET; the LEVEL▲, LEVEL▼ keys and then press the ENTER key, and so on until you have completed the graph for your own personal program. If you make a mistake when recording any step, press the RESET key and repeat the previous step. Next press the ENTER key and begin exercising with your custom designed program. Once you have finished the exercise program, the monitor will calculate the average values at which you did the exercise and display these on the bottom alphanumeric screen (B), Fig.2. The program can be interrupted by pressing the STOP key and the bottom alphanumeric screen (B), Fig.2, will display the average values for EXERCISE TIME; DISTANCE TRAVELLED; CALORIES CONSUMED during the exercise. These values will be displayed twice every five seconds. If, during the time it takes to display these average values, no keys are touched and no further exercise is done and the STOP key is pressed then the machine will go back to the manual program. NOTE: The first three steps of the program are for warm-up purposes with limited exertion levels to prevent any possible injuries.
P10 – P11 MALE - FEMALE TEST PROGRAMS.- The aim of this test is to assess the user’s level of fitness. To do this you have to maintain a pedalling speed of between 70 to 80 revolutions per minute (r.p.m) for 5 minutes. The difference between the Male and Female programs is in the Watts. The value for the Male test is set at 150 W whereas the Female test is set at 100 W. With the monitor switched on, the top LED array (A), Fig. 2, will display the profile and the letter “M” for manual. The LEVEL▲ and LEVEL▼ keys are used to display the various pre-programmed profiles. Once the Male TEST or Female TEST has been selected, press the ENTER key.

SK LINE sportkoncept
20
Next, the bottom alphanumeric screen (B), Fig.2, will ask for an age value (between 10 and 99), select your age by using the number keys (F), Fig.3, press ENTER. The top LED array (A), Fig.2, will display a flashing heart symbol. Place your hands on the pulse sensors (handgrip) located on the handlebar or place the telemetric chest band on your chest, if you have one. Begin the TEST at a pedalling rate of between 70 to 80 R.P.M, pedalling for 5 minutes. As long as you stay within 70 to 80 R.P.M limit the monitor will display “OK” however if you go above or drop below this R.P.M then the monitor will display the "R.P.M ?" prompt. At the end of the 5 minute test you will be awarded a score between 1 (very poor) and 5 (excellent). A 0 score may also appear, which means that the test was not done correctly (the 75 r.p.m pedalling rate was not maintained or heart rate measurement sensor was not used correctly). NOTE: In order to do the test it is essential to use heart rate measurement, using either the hand-grip sensors or the chest band. It is advisable to do a brief warm-up session before doing this test. This will prevent possible injuries. The maximum number of heartbeats that a person should not exceed is referred to as the maximum heart rate and this value drops with age. A simple formula to calculate this is to subtract your age, in years, from the number 220. The maximum heart rate should be kept between 65% and 85% for correct exercise, it is not advisable to go above 85%. Whenever your pulse rate exceeds 85% of the maximum heart rate value a flashing heart symbol will appear and a 2 second beep will sound until your pulse rate drops below 85% of your maximum heart rate. For safety reasons it is advisable to exercise at below 85% of the maximum heart rate.
P-12 CONSTANT HEART RATE PROGRAM (H R C).- It is advisable to do a brief warm-up session before using this program. This will prevent possible injuries. This program allows you to select a heart rate (between 65% and 85% of the maximum heart rate) and the machine will automatically adjust exertion levels to ensure that the user maintains the selected heart rate value. Use of heart rate measurement using the telemetric chest band is obligatory and you must not exceed 85% of your maximum heart rate value. With the monitor switched on, the top LED array (A), Fig.2, will display the profile and the letter “M” for manual. Use the LEVEL▲ and LEVEL▼ keys to display the various pre-programmed profiles. Once the HRC program has been selected, press the ENTER key. Press the ENTER key to modify the target heart rate and the LED window will display “ENTER PULSE SETTING <40-220>” Press the number keys and the LED window will show “PULSE = xxx” and the specified value will flash. Press the number keys to modify and enter a three digit number (values: 40 ~ 220). If the number is beyond these limits it will display a larger or smaller number. Enter a value within the said limits and press ENTER to confirm. Press ENTER to modify the time and the LED window will show “ENTER THE EXERCISE TIME <MINUTES>” The dot matrix display will prompt “? 10” and flash the number you have specified. Press the number keys to modify and enter a two digit number (values: 10 ~ 60). If the number is beyond these limits it will display the default time setting. Enter a value within the said limits and press ENTER to confirm. You can now start the program. After specifying the last setting, all of the values are stored together. The exertion level is 1 and moves to the next line every minute. If the speed (RPM) is too slow, the dot matrix display will show “RPM↑” and switch to pause mode alter 15 seconds. Begin the exercise at a pedalling rate of between 70 to 80 R.P.M., place your hands on the pulse sensors (handgrip) located on the handlebar or place the telemetric chest band on your chest, if you have one. Should you go above or drop below this R.P.M then the top LED array (A), Fig2, will display the "R.P.M ?" prompt. This program uses a preset exertion level during the first three minutes in order to prevent any type of injury. After the third minute, the computer will automatically adjust the exertion setting to keep the pulse rate at the previously programmed value.

SK LINE sportkoncept
21
AUTOMATIC EXERTION SETTING At the beginning of the exercise the machine sets the exertion level to minimum, i.e. 50W, until the first pulse reading is taken. Once the pulse rate is established the program calculates your heart rate every X seconds (this period can be modified between 20 to 60 seconds within the SPR program). The exertion setting based on pulse rate is explained in the following steps. 1.- TARGET HEART RATE greater than ACTUAL HEART RATE: When the difference between the TARGET HEART RATE and the ACTUAL HEART RATE is equal to or greater than 15 r.p.m., the AUTOMATIC EXERTION CONTROL will start increasing in steps of 20 Watts. When the difference is less than 15 r.p.m the setting will change in steps of 10 Watts until both heart rates match. 2.- ACTUAL HEART RATE greater than TARGET HEART RATE: When the difference between the ACTUAL HEART RATE and the TARGET HEART RATE is equal to or greater than 15 r.p.m., the AUTOMATIC EXERTION CONTROL will start decreasing in steps of 20 Watts. When the difference is less than 15 r.p.m the setting will change in steps of 10 Watts until both heart rates match. When the difference between the ACTUAL HEART RATE and the TARGET HEART RATE is equal to or greater than 30 r.p.m, the bottom alphanumeric screen ( B ) will display the message “REDUCE EXERTION LEVEL, YOUR HEART RATE IS TOO HIGH” and the machine’s automatic control will drop the exertion level to minimum (50 W). If no heart rate is detected during the exercise, the message “Heart rate value?” will flash. If this situation continues for more than 60 seconds the machine will go back to manual mode. NOTE: The maximum number of heartbeats that a person should not exceed is referred to as the maximum heart rate and this value drops with age. A simple formula to calculate this value is to subtract your age, in years, from 220. The maximum heart rate should be kept between 65% and 85% for correct exercise, it is not advisable to go above 85% For safety reasons it is advisable to exercise at below 85% of the maximum heart rate. If you do not use a heart rate measuring system then the heart symbol and a question mark will appear on the screen, if the machine continues not to receive any heart rate information then the program will be cancelled and you will have to make a new program selection.
P13 - Models. H800; H895; H720; H775 STEADY WATT RATE PROGRAM.- This program allows you to select the power level (watts) at which you would like to work. The power being developed (Watts) is based on the effort you make and the speed at which you do the exercise. The machine will automatically regulate the exertion level to ensure that the user always develops the same power output, independently of the pedalling rate. This program uses a preset exertion level during the first forty seconds in order to prevent any type of injury. After the fortieth second the machine takes control of the exertion settings based on the user’s pedalling rate. It is advisable to do a brief warm-up session before using this program. This will prevent possible injuries. With the monitor switched on, the top LED array (A), Fig.2, will display the profile and the letter “M” for manual. Use the LEVEL▲ and LEVEL▼ keys to display the various pre-programmed profiles. Once the WATT program has been selected, press the ENTER key. The bottom alphanumeric display (B) will ask for the WATT value at which you would like to do the exercise. Use the number keys (F), Fig.3, to select a value between 25 and 400 Watts, and press ENTER. Press ENTER to modify the time and the LED window will show “ENTER THE EXERCISE TIME <MINUTES>” The dot matrix display will prompt “? 10” and flash the number you have specified. Press the number keys to modify and enter a two digit number (values: 10 ~ 60). If the number is beyond these limits it will display the default time setting. Enter a value within the said limits and press ENTER to confirm, you can now start the program. After specifying the last setting, press ENTER to store all the values together. The exertion level is 1 and moves to the next line every minute. If the speed (RPM) is too slow, the dot matrix display will show “RPM↑” and switch to pause mode alter 15 seconds. The bottom alphanumeric screen (B) will ask you for the WATT value at which you wish to do the exercise, use the number keys (F), Fig.3, to select a value ( between 25 and 400 WATT ), then press ENTER. If less than 25 W is consumed during exercise, the top LED array (A), Fig.2, will display the message “R.P.M ?”, The same is true if you exceed 450 W.

SK LINE sportkoncept
22
AUTOMATIC EXERTION SETTING- After starting in Training Mode, the program will calculate the WATT value every X seconds (This "X" value can be modified by the user in the SWR program on the monitor). The method for setting the WATT rate is as follows: 1. – During training, the program will compare the actual WATT value with the target WATT value. If the actual WATT value is less than or equal to 75 (%) of the target WATT value, the exertion LEVEL will increase automatically in steps of 3 up to LEVEL 20. 2. – During training, the program will compare the actual WATT value with the target WATT value. If the actual WATT value is less than or equal to 50 (%) of the target WATT value, the exertion LEVEL will increase automatically in steps of 2 up to LEVEL 20. 3. – During training, the program will compare the actual WATT value with the target WATT value. If the actual WATT value is less than or equal to 15 (%) of the target WATT value, the exertion LEVEL will increase automatically in steps of 1 up to LEVEL 20. 4 .– During training, the program will compare the actual WATT value with the target WATT value. If the actual WATT value is greater than or equal to 15 (%) of the target WATT value, the exertion LEVEL will decrease automatically in steps of 1 down to LEVEL 1. 5. – During training, the program will compare the actual WATT value with the target WATT value. If the actual WATT value is greater than or equal to 50 (%) of the target WATT value, the exertion LEVEL will decrease automatically in steps of 2 down to LEVEL 1. 6. – During training, the program will compare the actual WATT value with the target WATT value. If the actual WATT value is greater than or equal to 75 (%) of the target WATT value, the exertion LEVEL will decrease automatically in steps of 3 down to LEVEL 1. NOTE: You can vary the programmed watt rate at any time during the exercise by using the LEVEL ↑ and LEVEL ↓ keys (this will not effect the time setting). The programmed watt rate will be shown flashing on the display. The machine is equipped with hand sensors (hand-grips) to gauge the user’s pulse rate. It can also be used with a telemetric system based on a transmitter (chest-band) and a receiver included on the electronic monitor. The hand sensors are easy to use, just grip them while doing the exercise and wait until the heart rate reading appears on the display. The pulse rate reading will not appear instantaneously, you will have to wait about 20 seconds before it appears on the screen. The chest band is in contact with the chest and sends a heart rate signal to the monitor, which then displays it.
P-13 – Model - G930; G815; G818 DISTANCE CONTROL PROGRAM.- This program allows you to run a pre-selected set distance. With the monitor switched on, the top LED array (A), Fig.2, will display the profile and the letter “M” for manual. Use the LEVEL▲ and LEVEL▼ keys to display the various pre-programmed profiles. Once the DIST program has been selected, press the ENTER key. The message “ENTER DISTANCE TO RUN <0.1-99.9>” will appear on alphanumeric screen (B). Use the number keys to enter the desired distance. If the number is beyond these limits it will display a larger or smaller number. Enter a value within the said limits and press ENTER to begin the exercise. The value for the specified distance is shown on alphanumeric screen B and will decrease accordingly as you do the exercise. The exertion level is 9 and moves to the next line every minute. If the speed (RPM) is too slow, the dot matrix display will show “RPM↑” and switch to pause mode after 15 seconds. You can use the LEVEL▲ and LEVEL▼ keys to modify the exertion level during exercise. CAUTION Before beginning any exercise program you should first consult your doctor and discuss the nature of the exercise. If you have a pacemaker fitted do not use the chest band until after you have consulted your doctor.

SK LINE sportkoncept
23
WHAT THE SYMBOLS MEAN.- A series of symbols or words may appear on the screen, meaning the following: Heart symbol and a question mark: The chest band has not been fitted or is fitted incorrectly. Flashing heart symbol: This symbol only appears in the tests. The maximum number of heartbeats that a person should not exceed is referred to as the maximum heart rate and this value drops with age. A simple formula to calculate this value is to deduct your age, in years, from the number 220. The maximum heart rate should be kept between 65% and 85% for correct exercise, it is not advisable to go above 85%. When your pulse rate exceeds 85% of the maximum heart rate value a flashing heart symbol will appear and a 2 second beep will sound until your pulse rate drops below 85% of your maximum heart rate. For safety reasons it is advisable to exercise at below 85% of the maximum heart rate.
This symbol appears in the male and female tests, it means that you have not done the test correctly (i.e. you have failed to maintain a speed of 75 r.p.m or you have not worn the chest band). Spanner symbol: Mechanical fault. Switch the machine off for 2 minutes and then switch it back on again. The machine has an automatic fault correction system, nevertheless if the problem persists get in touch with your technical service center. Text Prompts:
Do not hesitate to get touch with the Technical Assistance Service if you have any queries by phoning customer services (see last page in manual). BH RESERVES THE RIGHT TO MODIFY THE SPECIFICATIONS OF ITS PRODUCTS WITHOUT PRIOR NOTICE
1. “WELCOME TO HI POWER” 2. “PRESS THE ARROWS TO SELECT PROFILE” 3. “ PRESS QUICK/START TO BEGIN” 4. “ PRESS ENTER TO BEGIN PROFILE” 5. “ ERROR” 6. “ CONSULT TECHNICAL SERVICE” 7. “ INTRODUCE YOUR AGE <10-99>”
8. “ INTRODUCE YOUR WEIGHT <30-199> KG” “ INTRODUCE YOUR WEIGHT <70-440> LB”
9. “ INTRODUCE EXERCISE TIME <10-60> MINUTES”
10. “ INTRODUCE WATT SETTING <25-400>” “ WATTS=”
11. “ AGE=” 12. “ INTRODUCE PULSE RATE SETTING <40-220>” 13. “ PULSE RATE=” 14. “ PRESS PAUSE TO CONTINUE THE EXERCISE. PRESS STOP TO FINISH” 15. “ EXERCISE TIME=” 16. “ DISTANCE COVERED=” 17. “ AVERAGE SPEED=” 18. “ CALORIES BURNT=” 19. “ PRESS ENTER TO ACCEPT THE STORED PROFILE. PRESS RESET TO MODIFY THE PROFILE.”
20. “ USE THE ARROWS TO SELECT THE EXERTION LEVELS FOR THE ACTIVE COLUMN. PRESS ENTER TO MOVE TO THE NEXT COLUMN. PRESS RESET TO RETURN TO MANUAL MODE”
21. “ DECREASE EXERTION OF EXERCISE. YOUR HERAT RATE IS TOO HIGH” 22. “ THE RESULT OF THE TEST IS=”

SK LINE sportkoncept
24
FRANÇAIS
REMARQUES GÉNÉRALES.- Cet appareil d’exercice est équipé d’un générateur de courant électrique qui utilise l’énergie produite par l’utilisateur (pendant l’exercice) pour alimenter le moniteur électronique et le régulateur de freinage de celui-ci. Cet écran de moniteur étant tactile, pour appuyer sur une touche il faudra placer le doigt sur l’icône de cette touche située sur l’écran. Cet appareil d’exercice comprend également une série de batteries qui stocke l’énergie requise pour maintenir le moniteur électronique opérationnel pendant 60 secondes après la fin de l’exercice. Si la batterie s’épuise à cause d’une défaillance de fonctionnement, il est possible de la recharger par l’intermédiaire de l’adaptateur fourni avec l’appareil d’exercice. Pour mettre en marche le moniteur, de l’exercice doit être réalisé sur la machine. ATTENTION:L’adaptateur doit être branché à une prise appropriée. Vérifier si la tension du local concorde bien avec celle de l’adaptateur fourni avec la machine. Le moniteur électronique a été conçu pour être utilisé d’une façon simple et intuitive. Les textes qui s’afficheront sur l’écran inférieur (B) guideront l’utilisateur pendant la réalisation de l’exercice. Cependant, nous recommandons au préparateur physique (entraineur) de lire très attentivement ce chapitre afin de disposer de toutes les informations relatives au moniteur électronique et de montrer ensuite à l’utilisateur la bonne façon de l’utiliser.
IMPORTANT: POUR UN BON FONCTIONNEMENT ET UNE LONGUE DURÉE DES BATTERIES, IL EST RECOMMANDÉ DE LES RECHARGER AVEC L’ADAPTATEUR FOURNI, DÈS RÉCEPTION DE LA MACHINE.
SELECTION DU TYPE DE MACHINE Dans le menu principal, appuyez en meme temps sur les touches RESET et “0” pendant 6 secondes. Sur l’écran alphanumerique s’affichera “FACTORY SETTINGS” appuyez sur “2” et selectionnez le type de machine E (elliptique), B/R (vélo/recumbent) ou S (STEPPER) avec les touches LEVEL▲ et LEVEL▼. Si vous désirez sortir du mode de personnalisation appuyez sur la touche STOP.
PERSONNALISATION DU MONITEUR ÉLECTRONIQUE.- Pour entrer dans le mode de personnalisation du moniteur,il est necessaire de faire comme indiqué ci-après : dans le menu principal, appuyez en meme temps sur les touches RESET et “0” pendant 6 secondes. Sur l’écran alphanumerique s’affichera “FACTORY SETTINGS” appuyez sur “2”.
1) PASSER des km aux milles. Le mot UNITS clignotera, appuyez ensuite la touche ENTER et le mot METRIC clignotera, sélectionnez la vitesse avec les touches LEVEL▲ et LEVEL▼ (METRIC / km. -- ENGLISH / Milles) appuyez sur la touche ENTER et le mot “UNITS ” clignotera à nouveau, avec la touche LEVEL ▲ L passez au point (2 WHEELSIZE) du tableau inférieur ci-joint. Pour quitter le mode personnalisation, appuyez sur la touche STOP et le display général des LED (A) affichera le programme manuel.
2) CHANGER DISTANCE PAR TOUR. Quand le mot ‘WHEELSIZE’ clignote, appuyez sur ENTER et un chiffre de 0 à 80 clignotera, sélectionnez la valeur avec les touches LEVEL▲ et LEVEL▼ (modèles H800; H895; G930 sélectionnez 80), appuyez sur ENTER et le mot “WHEELSIZE” clignotera à nouveau, avec la touche LEVEL▲ passez au point (3 LANGUAGE) du tableau inférieur ci-joint. Pour quitter le mode personnalisation, appuyez sur la touche STOP.
3) MODIFICATION DE LA LANGUE. Avec le mot ‘LANGUAGE’ qui clignote, appuyez sur la touche ENTER et la langue clignotera, sélectionnez la langue de travail avec les touches LEVEL▲ et LEVEL▼, appuyez sur ENTER et le mot “LANGUAGE” clignotera à nouveau, avec la touche LEVEL▲ passez au point (4 Power) du tableau inférieur ci-joint. Pour quitter le mode personnalisation, appuyez sur la touche STOP.

SK LINE sportkoncept
25
4) ALIMENTATION AUTOGÉNÉRÉE OU ÉLECTRIQUE.- Avec le mot Power en train de clignoter, appuyez sur ENTER et le mot ON ou OFF clignotera, avec les touches LEVEL▲ et LEVEL▼ sélectionnez l’option qui clignote à l’écran. L’option ON permet de maintenir le moniteur allumé en permanence. Si vous avez sélectionné l’option ON, il faudra que la machine soit branchée avec l’adaptateur à la ligne électrique. Après avoir sélectionné l’option, appuyez sur ENTER pour confirmer, le mot Power clignotera à nouveau, arrêtez votre exercice. Si vous voulez éteindre le moniteur dans cette option, maintenez appuyées en même temps les touches STOP jusqu’à entendre un sifflement, attendez 45 secondes et le programme passe ensuite à l’option OFF. Étant donné qu’il s’agit d’une machine auto-générée, dans l’option OFF, le moniteur s’allumera dès que l’utilisateur commencera l’exercice. Après avoir sélectionné l’option, appuyez sur ENTER et le mot Power clignotera. Avec la touche LEVEL▲ passez au point (5 SWR time) du tableau inférieur ci-joint. Après avoir confirmé l’option (OFF), il suffira d’arrêter l’exercice qui a permis de maintenir le moniteur allumé et d’attendre 45 secondes pour qu’il s’éteigne. Pour quitter le mode personnalisation, appuyez sur la touche STOP.
5) TEMPS DE RÉSISTANCE DANS LE PROGRAMME WATT (SWR TIME, Mod; H800; H895).- Avec le mot SWR time en train de clignoter, appuyez sur ENTER et un chiffre de 0 à 60 secondes clignotera. Avec les touches LEVEL▲ et LEVEL▼ sélectionnez l’option qui clignote. Après avoir sélectionné l’option, appuyez sur ENTER pour confirmer. Le mot SWR time clignotera. Avec la touche LEVEL▲ passez au point ( 6 SPR time) du tableau inférieur ci-joint. Pour quitter le mode personnalisation, appuyez sur la touche STOP.
6) TEMPS DE RÉSISTANCE DANS LE PROGRAMME H.R.C.- Avec le mot SPR time en train de clignoter, appuyez sur ENTER et un chiffre de 20 à 60 secondes clignotera. Avec les touches LEVEL▲ et LEVEL▼ sélectionnez l’option qui clignote. Après avoir sélectionné l’option, appuyez sur ENTER pour confirmer. Le mot SPR time clignotera. Avec la touche LEVEL▲, passez au point (7 Manuel T) du tableau inférieur ci-joint. Pour quitter le mode personnalisation, appuyez sur la touche STOP.
7) TEMPS MAXIMUM DE l’EXERCICE.- Avec le mot Manuel T. en train de clignoter, appuyez sur ENTER et un chiffre de 0 à 60 minutes clignotera. Avec les touches LEVEL▲ et LEVEL▼ sélectionnez l’option qui clignote. Après avoir sélectionné l’option, appuyez sur ENTER pour confirmer. Le mot Manuel T. clignotera. Avec la touche LEVEL▲ passez au point ( 8 Text) du tableau inférieur ci-joint. Pour quitter le mode personnalisation, appuyez sur la touche STOP.
8) MODIFICATION FORMULE DE BIENVENUE.- Avec le mot Text qui clignote, appuyez sur ENTER et le mot ON ou OFF clignotera, avec les touches LEVEL▲ et LEVEL▼ sélectionnez l’option qui clignote à l’écran Si vous sélectionnez le mot ON vous pourrez modifier le message de bienvenue du moniteur. Après avoir choisi l’option ON, appuyez sur ENTER et un curseur clignotera sur l’écran alphanumérique (B). Avec les touches LEVEL▲ et LEVEL▼, sélectionnez lettre par lettre, le message de bienvenue. Ensuite, appuyez quelques secondes sur la touche ENTER et le mot Text clignotera. Avec la touche LEVEL▲ passer au point (9 Sounds) du tableau inférieur ci-après. Pour quitter le mode personnalisation, appuyez sur la touche STOP.
9) CHANGEMENT DU SON.- Avec le mot Sounds en train de clignoter, appuyez sur la touche ENTER et le mot ON ou OFF clignotera. Avec les touches LEVEL▲ et LEVEL▼ vous pourrez modifier l’option qui est en train de clignoter, ensuite appuyez sur la touche ENTER pour confirmer et le mot Sounds clignotera. Pour quitter les paramètres qui peuvent être personnalisés, appuyez sur la touche STOP et l’écran général des LED (A) affichera le programme manuel. Commencez l’exercice et vérifiez si les modifications des options ont bien été réalisées.

SK LINE sportkoncept
26
TABLEAUX DES PARAMÈTRES PERSONNALISABLES
Paramètre Description 1) Metric Passer la vitesse en km /h aux milles 2) Wheelsize Changement du rapport tpm (tours par minutes) – distance parcourue
3) Language Définit la langue d’affichage des messages sur le moniteur. Langues: espagnol, portugais, anglais, français, allemand, hollandais, italien.
4) Power
Permet de définir le mode de fonctionnement de l’appareil: soit autogénéré soit branché à la ligne électrique. Dans le mode ON, il faudra que la machine soit branchée à une prise de courant électrique. Pour éteindre le moniteur en étant dans le mode ON, il suffira de maintenir enfoncée la touche STOPT pendant 4secondes. Options: - OFF (Fonctionnement avec des batteries) - ON Fonctionnement machine branchée à la ligne électrique) IMPORTANT: Si cette option a été choisie, la machine devra être branchée à la ligne électrique, faute de quoi les batteries risquent de se détériorer et d’être inutilisables.
5) SWR time
Détermine la cadence de calcul de la résistance dans le programme de puissance cte. Cette option n’est disponible que sur les modèles qui disposent du programme de puissance constante. Options: Valeur en secondes (minimum 20 et maximum 60)
6) SPR time Détermine la cadence de calcul de la résistance dans le programme de pouls constant. Options: Valeur en secondes (minimum 20 et maximum 60)
7) Manual T
Établit un temps maximum pour la durée de l’exercice. Options: - 0 (il n’est pas établi de temps maximum) - Valeur en minutes du temps maximum de la durée de l’exercice (maximum 60) .
8) Text
Options: - OFF (Affichage du message par défaut) ON (Permet d’éditer le message de bienvenue)
Permet de personnaliser le message de bienvenue y compris par exemple le nom de la salle de sports
9) Sounds Active ou désactive les messages sonores du moniteur électronique. Options: - ON (Activé) - OFF (Désactivé)
ÉLÉMENTS DU MONITEUR ÉLECTRONIQUE (Fig.1).- Le moniteur électronique comprend deux zones bien différenciées: La zone supér ieure Fig.2 (A – B – C) ou se t rouve l ’AFFICHAGE. La zone inférieure Fig.3 (D – F – G) où se trouve le CLAVIER.
AFFICHAGE.- Cette partie comprend deux écrans: (A) Écran Général des LED supérieur sur lequel est affiché le niveau d’effort réalisé du programme sélectionné à chaque moment. (B) Écran alphanumérique inférieur qui guide l’utilisateur durant la sélection de l’exercice. L’écran supérieur (A) affichera les différents profils pré-programmés d’effort (programmes) qu’il est possible de sélectionner et durant l’exercice, il affichera l’effort fourni à chaque instant. L’écran alphanumérique inférieur (B) est chargé de guider l’utilisateur pendant la sélection de l’exercice à réaliser et d’afficher les informations relatives à l’exercice avant et après la réalisation de celui-ci.Les LED indicatrices (C)placées sous l’écran alphanumérique montrent simultanément la VITESSE/TPM,le TEMPS/la DISTANCE; les CALORIES/WATTS; le POULS et indiquent quelle est l’information qui est affichée à chaque instant de l’exercice.

SK LINE sportkoncept
27
Les informations montrées par les LED (C) durant la réalisation de l’exercice sont: -SPEED - VITESSE: Affichage d’une valeur approximative de la vitesse linéaire de déplacement de la bicyclette à la cadence de pédalage de l’utilisateur. La valeur est affichée en kilomètres/heure (km/h). -STEPS/MIN. - VITESSE: - STM: Affiche le nombre de pas par minute -TPM: Affichage de la cadence de pédalage instantanée pendant l’exercice. Indique le nombre de tours complets effectués en une minute (TOUR PAR MINUTE). -TIME – TEMPS : Pendant l’exercice, le programme montre le temps qui s’est écoulé depuis le début de l’exercice ou si l’utilisateur a sélectionné un temps d’exercice prédéfini, le temps qu’il reste pour le terminer. Le temps est affiché en minutes et en secondes (mm:ss). -DISTANCE – DISTANCE : Affichage de la distance parcourue depuis le démarrage de l’exercice. La distance est calculée en tenant compte de l’estimation de la vitesse linéaire (SPEED) et les unités sont les kilomètres et les hectomètres. -CALORIES – CALORIES: Le programme affiche une estimation des calories brûlées jusqu’à présent. L’estimation s’effectue en tenant compte de l’énergie produite à chaque instant et des paramètres poids et âge introduits par l’utilisateur. -WATT – WATTS : Affichage de la quantité d’énergie produite au moment de l’exercice. Ce calcul s’effectue en tenant compte du niveau de résistance sur lequel le travail est réalisé et selon la cadence de pédalage. L’information est affichée en watts (Watt.). -PULSE– POULS: Affichage de la fréquence cardiaque de l’utilisateur à condition que cette information soit accessible à travers les senseurs de pouls du guidon (Hand– Grip ) ou de la sangle télémétrique de poitrine. Quand les deux éléments sont utilisés ensemble il est donné priorité à la sangle télémétrique de poitrine. Pour toute information concernant la fréquence cardiaque, voir le chapitre: Mesure du pouls, sangle de poitrine et hand-grip.
CLAVIER.- La fonction assignée à chaque touche est indiquée ci-après: Voir Fig.3. Le moniteur électronique dispose d’un clavier très facile à utiliser. Ce clavier comprend des touches numériques (F) et des touches de fonction (G). - Les touches numériques (F) .- (1- 0) s’utilisent pour introduire les données demandées par le moniteur. - Les touches de fonction (G).- reset; level▼; level▲; enter; pause; stop; quick/start. Ces touches s’utilisent pour sélectionner l’exercice à réaliser, pour introduire les données demandées, pour contrôler le niveau de résistance de l’exercice et pour le terminer.
-reset.- Touche d’annulation. Cette touche permet d’effacer les données introduites dans le moniteur lors de la sélection d’un programme.
-level▼.- Touche pour diminuer le niveau de l’effort. Pendant la réalisation de l’exercice cette touche baisse d’un point le degré de résistance de la machine. Durant la sélection des profils pré-programmés, cette touche est utilisée pour afficher à l’écran le profil qui précède celui affiché.
-level▲.- Touche pour augmenter le niveau de l’effort. Pendant la réalisation de l’exercice cette touche augmente d’un point le degré de résistance de la machine. Durant la sélection des profils pré-programmés, cette touche est utilisée pour afficher à l’écran le profil qui suit celui affiché.
-enter.- Touche de sélection et de validation. Cette touche est utilisée pendant la sélection d’un profil pré-programmé pour le sélectionner, pour confirmer les données à introduire et pour commencer l’exercice. Lors de la programmation du profil de l’utilisateur, cette touche s’utilise également pour valider le niveau d’effort correspondant à chaque minute.
-pause.- Touche pause. L’appui sur cette touche interrompt l’exercice en cours et arrête le chronomètre du temps de l’exercice. Pour relancer le chronomètre de temps de l’exercice, appuyez à nouveau sur la touche pause ou reprenez l’exercice. Le temps limite du mode pause est de 45 secondes à l’issue desquelles ce temps d’exercice sera terminé et le moniteur s’éteindra. Si en étant dans le mode pause, l’utilisateur appuie sur la touche STOP, il sera entendu que l’exercice est terminé.

SK LINE sportkoncept
28
-stop.- Touche d’arrêt. Si cette touche est appuyée pendant l’exercice, celui-ci sera entendu être terminé et la résistance passe à la résistance minimale. Un résumé des données de l’exercice est affiché et le programme retourne à l’écran de démarrage. En mode Start/Ready, appuyez sur la touche STOP pendant 3 secondes; la console s’éteindra automatiquement en émettant un son si l’option POWER, en mode projet, est activée.
-quick/start.- Touche de démarrage immédiat. Si la LED de la touche clignote, en appuyant sur cette touche, l’exercice démarre en mode manuel.
MISE EN MARCHE.- Pour mettre en marche le moniteur, l’utilisateur doit réaliser un exercice sur la machine à un rythme de pédalage de 45 tours par minute du pédalier. Quand ces 45 tours sont atteints, le moniteur s’allume, la durée pouvant être programmée est de 60 secondes. Il est également possible de brancher l’adaptateur fourni avec la machine à une prise de courant, si la machine dispose de l’option du tableau des paramètres personnalisables ( point 4 Power ) sur ON. Après allumage, le moniteur affichera à l’écran général des LED (A) Fig.2, le profil et la lettre “M” de manuel et sur l’écran alphanumérique inférieur (B) le message de bienvenue “BIENVENUE À HI – POWER ”. En appuyant sur la touche QUICK/START le programme se met en marche et en appuyant sur les touches level▼ ou level▲ , vous pourrez augmenter ou baisser la résistance de l’exercice.
FONCTIONNEMENT.-
PORT USB.- Sur cette machine, le moniteur dispose d'un port usb (D) pour la charge mobile.
MODE SLEEP: Si aucun signal de RPM (tours/min.) n’est introduit pendant 45 secondes en mode attente, le mode Sleep s’active. Sous ce mode, aucune fenêtre n’est visible et vous devrez poser le pied sur la plaque pour introduire un signal et réinitialiser la fenêtre. Si un adaptateur a été branché sur la carcasse, la console ne peut passer en mode Sleep lorsque l'option ON a été activée dans la configuration du mode POWER. S’il n’y a pas d’adaptateur, la console passera en mode Sleep même si l’option POWER est sur ON.
P0 MODE MANUEL.- Quand le moniteur s’allume, l’écran général supérieur des LED (A) Fig.2 affiche le profil et la lettre “M” de manuel et l’écran alphanumérique inférieur (B)Fig.2 affichera le message de bienvenue “BIENVENUE À HI – POWER ”. En appuyant sur la touche QUICK/START le programme se met en marche en mode manuel. L’écran général supérieur des LED (A) Fig.2 affichera en clignotant le niveau dans lequel l’exercice est réalisé. En appuyant sur les touches level▼ ou level▲ vous pourrez augmenter ou baisser les vingt niveaux de résistance de l’exercice. L’écran alphanumérique inférieur (B) Fig.2 affichera au fur et à mesure, toutes les 10 secondes, successivement, les valeurs de; La vitesse (SPEED Mod. H800 y H895; Système Métrique km/h, Système du Royaume-Uni Milles/h; pas/minute Mod. G930; marches par mintute Mod. R250); Le temps (TIME); Calories (CALORIES) et le Pouls (PULSE) et dans une autre séquence, le display affichera: (les tours par minute, Mod. H800; H895; nombre total de pas Mod. G930);Distance (DISTANCE); Watts (WATT) et le Pouls (PULSE). En appuyant sur la touche STOP, le programme s’interrompt et l’écran alphanumérique inférieur (B) Fig.2 , affichera la moyenne des valeurs TEMPS DE L’EXERCICE, DISTANCE PARCOURUE, VITESSE MOYENNE; CALORIES BRÛLÉES, pendant l’exercice. Ces informations seront affichées deux fois toutes les cinq secondes.

SK LINE sportkoncept
29
Si durant l’affichage des informations relatives aux valeurs moyennes, aucune touche n’est appuyée, si l’utilisateur ne réalise pas d’exercice et s’il appuie sur la touche STOP, la machine passera au programme manuel.
MODE PROGRAMMES.- Le moniteur dispose des programmes suivants:1 programme de profil MANUEL; 8 PROGRAMMES avec profils préprogrammés, un profil programmable par l’utilisateur (USER); programmes TEST masculin et TEST féminin, programme de fréquence cardiaque constante(H.R.C.) et programme de watts constants (mod. H800 / H895) / programme réglage de la distance (mod. G930). Voir les graphiques des programmes pré-programmés dans les dernières pages du présent manuel.
P1 - P8 PROGRAMMES DES GRAPHIQUES.- Avec le moniteur allumé, l’écran général supérieur des LED (A) Fig.2 affichera le profil et la lettre “M” de manuel. L’affichage des différents profils préprogrammés s’effectue par l’intermédiaire des touches LEVEL▲ et LEVEL▼. Après avoir sélectionné un profil concret, appuyez sur la touche ENTER. L’écran général supérieur des LED (A) demandera d’introduire l’âge entre (10 et 99 ans), sélectionnez votre âge avec les touches numériques (F) Fig.3, appuyez sur ENTER. Ensuite, il vous sera demandé le poids entre (30 et 199 kg), sélectionnez votre poids par l’intermédiaire des touches numériques (F) Fig.3, appuyez sur ENTER. Ensuite, il sera demandé la durée de l’exercice entre (10 et 60 minutes), sélectionnez la durée par l’intermédiaire des touches numériques (F) Fig.3, appuyez sur ENTER et votre exercice débutera. L’utilisateur dispose de quatre niveaux (L1 L4) de difficulté dans chaque profil préprogrammé. Ces niveaux de difficulté sont à sélectionner par l’intermédiaire des touches LEVEL▲ et LEVEL▼ au cours de l’exercice. À la fin du programme de l’exercice en cours de réalisation, le moniteur aura calculé la moyenne des valeurs avec lesquelles l’exercice a été réalisé et les affichera à l’écran alphanumérique inférieur (B) Fig.2. En appuyant sur la touche STOP, le programme s’interrompt et l’écran alphanumérique inférieur (B) Fig.2, affiche la moyenne des valeurs: TEMPS D’EXERCICE, DISTANCE PARCOURUE, VITESSE MOYENNE; CALORIES BRÛLÉES réalisées pendant l’exercice. Ces valeurs seront affichées deux fois toutes les cinq secondes. Si durant l’affichage des informations relatives aux valeurs moyennes, aucune touche n’est appuyée, si l’utilisateur ne réalise pas d’exercice et s’il appuie sur la touche STOP, la machine passera au programme manuel.
P9 PROGRAMME UTILISATEUR ( USER ).- Avec le moniteur allumé, l’écran général supérieur des LED (A) Fig.2 affichera le profil et la lettre “M” de manuel. Pour voir les différents profils préprogrammés, appuyez sur les touches LEVEL▲ et LEVEL▼. Après avoir sélectionné le programme 9 (USER), appuyez sur la touche ENTER. Il sera demandé à l’écran général des LED (A) Fig.2 un âge entre (10 et 99 ans), sélectionnez votre âge avec les touches numériques (F) Fig.3, (si vous introduisez une valeur non comprise dans ces deux chiffres, l’écran affichera la valeur la plus proche). Appuyer sur ENTER. Ensuite, il vous sera demandé le poids entre (30 et 199 kg), sélectionnez votre poids par l’intermédiaire des touches numériques (F) Fig.3, appuyez sur ENTER. Il vous sera ensuite demandé une durée de réalisation de l’exercice entre (10 et 60 minutes), sélectionnez la durée avec les touches numériques (F), appuyez sur ENTER puis sur la touche RESET, le programme commence alors à dessiner le profil de résistance souhaité à l’écran général des LED (A). Le profil à dessiner est divisé en 21 étapes: les trois premières concernant les échauffements et n’atteignent qu’une valeur de quatre pour éviter d’éventuelles lésions. Le reste des étapes jusqu’à la 21 arrivent à la valeur maximale. Pour sélectionner la première étape, appuyez sur le touche RESET; les touches LEVEL▲ LEVEL▼, appuyez ensuite sur la touche ENTER et ainsi de suite jusqu’à la fin du graphique du programme sélectionné par vos soins. En cas d’erreur dans l’enregistrement d’une étape, appuyez sur la touche RESET et le programme reviendra à l’étape précédente. Ensuite, appuyez sur la touche ENTER et commencez l’exercice avec le profil dessiné. À la fin du programme de l’exercice en cours de réalisation, le moniteur aura calculé la moyenne des valeurs avec lesquelles l’exercice a été réalisé et les affichera à l’écran alphanumérique inférieur (B) Fig.2.
SK LINE sportkoncept
30
En appuyant sur la touche STOP, le programme s’interrompt et l’écran alphanumérique inférieur (B) Fig.2, affichera la moyenne des valeurs TEMPS DE L’EXERCICE, DISTANCE PARCOURUE, VITESSE MOYENNE; CALORIES BRÛLÉES, pendant l’exercice. Ces informations seront affichées deux fois toutes les cinq secondes. Si durant l’affichage des informations relatives aux valeurs moyennes, aucune touche n’est appuyée, si l’utilisateur ne réalise pas d’exercice et s’il appuie sur la touche STOP, la machine passera au programme manuel. NOTE: Les trois premières étapes du programme concernent des exercices d’échauffement réalisés à des niveaux de résistance bas pour éviter tous types de blessures.
P10 - P11 PROGRAMMES TEST HOMME-FEMME.- L’objectif de ce test est d’évaluer la forme physique de l’utilisateur. Pour ce faire, il faut maintenir un rythme de pédalage entre 70 et 80 tours par minute (T.P.M.) pendant 5 minutes. La différence entre les programmes homme et femme se trouve dans les watts: les valeurs pour l’homme sont de 150 W tandis que pour les femmes cette valeur est de 100 W. Avec le moniteur allumé, l’écran général supérieur des LED (A) Fig.2 affichera le profil et la lettre “M” de manuel. L’affichage des différents profils préprogrammés s’effectue par l’intermédiaire des touches LEVEL▲ et LEVEL▼. Après avoir sélectionné le programme TEST Homme ou TEST Femme, appuyez sur la touche ENTER. Ensuite, il sera demandé d’introduire l’âge (entre 10 et 99 ans) à l’écran alphanumérique inférieur (B) Fig.2, sélectionnez votre âge par l’intermédiaire des touches numériques (F) Fig.3 et appuyez sur ENTER. L’écran général supérieur des LED (A) Fig.2 affichera un cœur en train de clignoter, posez vos mains sur les senseurs de pouls (hand-grip) qui se trouvent sur le guidon ou si la machine dispose d’une sangle télémétrique pour mesurer le pouls, posez-la sur votre poitrine. Commencez le TEST avec un rythme de pédalage d’entre 70 et 80 T.P.M. pendant 5 minutes. Si le nombre de Tours par minute baisse, l’écran affichera: R.P.M�. Si les tours par minute sont dépassés, le display affichera: R.P.M�, et si le rythme de pédalage se maintient entre 70 et 80 t.p.m, le display affichera: OK. Au bout des 5 minutes que dure le test, l’écran affichera une évaluation entre 1 (très insuffisante) et 5 (excellente). L’écran affichera également une note 0 indiquant que le test n’a pas été réalisé correctement La cadence de pédalage de 75 t.p.m. n’a pas été respectée ou que la mesure de la fréquence cardiaque a été incorrectement effectuée. NOTE: Pour faire le test, il est obligatoire d’utiliser la mesure de la fréquence cardiaque en utilisant les senseurs manuels ou (hand-grip) ou la sangle de poitrine. Avant de faire le test, il convient de réaliser de petits exercices d’échauffement qui permettront d’éviter des blessures. Le nombre maximum de pulsations qu’une personne ne doit jamais dépasser est dénommé la fréquence maximale, celui-ci diminue d’ailleurs avec l’âge. La façon la plus simple pour la calculer est de soustraire au nombre 220 l’âge en années. Pour que l’exercice soit correct, la fréquence doit se trouver entre 65 et 85% de la fréquence cardiaque maximale et il est en outre recommandé de ne pas dépasser 85%. Si vos pulsations dépassent 85% de la fréquence cardiaque maximale, l’écran affichera un cœur clignotant et un bip retentira 2 secondes jusqu’à ce que vos pulsations descendent des 85% de votre fréquence cardiaque maximale. Pour des raisons de sécurité, il est recommandé de travailler sous 85% de la fréquence cardiaque maximale.
P12 PROGRAMME FRÉQUENCE CARDIAQUE CONSTANTE ( H R C ). Avant de réaliser le programme, il convient de réaliser de petits exercices d’échauffement afin d’éviter d’éventuelles blessures. Ce programme permet de réaliser l’exercice à une fréquence cardiaque entre 65 et 85% de la fréquence cardiaque maximale. La machine réglera le niveau de résistance requis pour que l’utilisateur puisse à tout moment avoir la fréquence cardiaque au niveau correspondant. Il est obligatoire d’utiliser la mesure de la fréquence cardiaque en utilisant la sangle du pouls télémétrique de poitrine et de ne pas dépasser 85 % de la fréquence cardiaque maximale. Avec le moniteur allumé, l’écran général supérieur des LED (A) Fig.2 affichera le profil et la lettre “M” de manuel. Pour voir les différents profils préprogrammés, appuyez sur les touches LEVEL▲ LEVEL▼. Après avoir sélectionné le programme HRC, appuyez sur la touche ENTER.

SK LINE sportkoncept
31
Appuyez sur ENTER pour modifier la fréquence cardiaque objectif et la fenêtre LED affichera (INTRODUISEZ CONSIGNE DE POULS <40-220>). Appuyez sur les chiffres et la fenêtre LED affichera (POULS= xxx) avec les valeurs introduites qui clignotent. Appuyez sur les chiffres pour modifier et introduire un nombre à trois chiffres (valeurs: 40 ~ 220). Si la valeur introduite n'est pas correcte, la fenêtre affichera le nombre supérieur ou inférieur. Introduisez un nombre adéquat et appuyez sur ENTER pour confirmer. Appuyez sur ENTER pour modifier le temps et la fenêtre LED affichera (INTRODUISEZ LE TEMPS D’EXERCICE <MINUTES>). La matrice de points affichera( ? 10 ) et le nombre clignotera. Appuyez sur les chiffres pour modifier et introduire un nombre à deux chiffres (valeurs: 10 ~ 60). Si la valeur introduite n’est pas correcte, la fenêtre affichera une valeur par défaut. Introduisez un chiffre adéquat et appuyez sur ENTER pour confirmer et démarrer le programme. Après le dernier réglage, toutes les valeurs s’accumulent. La résistance est le Niveau 1 et passe à la ligne suivante toutes les minutes. Si la vitesse (RPM/Tours-min.) n’est pas suffisante, la matrice de points affichera ( RPM↑ ) et le mode pause s’activera au bout de 15 secondes. Commencez l’exercice à un rythme de pédalage entre 70 et 80 T.P.M., posez les mains sur les senseurs de pouls (hand-grip) du guidon ou si vous disposez d’une sangle télémétrique pour mesurer le pouls, posez-la sur votre poitrine. Si le nombre de T.P.M. baisse, l’écran général des LED supérieur ( A ) Fig. 2 affichera: R.P.M. ↑, et si les tours sont dépassés, cet écran affichera : R.P.M. ↓. Pour éviter tous risques de blessures, il a été prévu un effort programmé pour les trois premières minutes. À partir de la troisième minute, l’ordinateur adapte automatiquement l’effort pour maintenir un pouls proche de la valeur préalablement programmée.
RÉGLAGE AUTOMATIQUE DE L’EFFORT Au commencement de l’exercice, la machine règle le niveau de résistance au minimum, 50 W, jusqu’à ce qu’elle réalise la première mesure de la fréquence du pouls. Une fois le pouls détecté, le programme réalise une estimation du rythme cardiaque toutes les X secondes (l'intervalle peut varier de 20 à 60 secondes, à l'intérieur du programme SPR). Le réglage de l’effort suivant les pulsations est détaillé ci-dessous. 1.- FRÉQUENCE CARDIAQUE CIBLE supérieure à la FRÉQUENCE CARDIAQUE RÉELLE: Quand la différence entre la FRÉQUENCE CARDIAQUE CIBLE et la FRÉQUENCE CARDIAQUE RÉELLE est égale ou supérieure à 15 P.P.M, le RÉGLAGE AUTOMATIQUE DE L’EFFORT s’effectuera en augmentant de 20 en 20 Watts. Si cette différence est inférieure à 15 P.P.M., le réglage sera effectué par tranches de 10 Watts jusqu’à régulation des deux fréquences cardiaques. 2.- FRÉQUENCE CARDIAQUE RÉELLE supérieure à la FRÉQUENCE CARDIAQUE CIBLE: Quand la différence entre la FRÉQUENCE CARDIAQUE RÉELLE et la FRÉQUENCE CARDIAQUE CIBLE est égale ou supérieure à 15 P.P.M., le RÉGLAGE AUTOMATIQUE DE L’EFFORT s’effectuera en diminuant par tranches de 20 Watts. Si cette différence est inférieure à 15 P.P.M., le réglage sera effectué par tranches de 10 Watts jusqu’à régulation des deux fréquences cardiaques. - Quand la différence entre la FRÉQUENCE CARDIAQUE RÉELLE et la FRÉQUENCE CARDIAQUE CIBLE est égale ou supérieure à 30 P.P.M., l’écran alphanumérique inférieur ( B ) affichera la phrase: BAISSER L’INTENSITÉ DE L’EXERCICE, VOTRE FRÉQUENCE CARDIAQUE EST TROP ÉLEVÉE et le réglage automatique de la machine baissera l’effort au minimum (50W). Si la fréquence cardiaque n’est pas détectée pendant la réalisation de l’exercice, l’écran affichera: Chiffre de la fréquence cardiaque en clignotant. Si cette situation se maintient pendant 60 secondes, le programme passe au mode manuel. NOTE: Le nombre maximum de pulsations qu’une personne ne doit jamais dépasser est dénommé la fréquence maximale, celui-ci diminue d’ailleurs avec l’âge. La méthode la plus simple pour la calculer est de soustraire au nombre 220 l’âge en années. Pour que l’exercice soit correct, la fréquence doit se trouver entre 65 et 85% de la fréquence cardiaque maximale et il est en outre recommandé de ne pas dépasser 85%. Pour des raisons de sécurité, il est recommandé de travailler sous 85% de la fréquence cardiaque maximale. Si vous n’utilisez pas un système de mesure de la fréquence cardiaque, l’écran affichera le symbole du cœur et un point d’interrogation. Si la machine ne reçoit toujours pas l’information relative à la fréquence cardiaque, le programme s’interrompt et il faudra effectuer une nouvelle sélection de programme.

SK LINE sportkoncept
32
P13 PROGRAMME WATTS CONSTANTS.- Ce programme permet de sélectionner le niveau de puissance en (watts) pour la réalisation de l’exercice. La puissance développée (watts) dépend de la vitesse et de l’effort avec lesquels l’exercice est effectué. La machine règle elle-même le niveau de l’effort pour que l’utilisateur puisse développer toujours la même puissance et ce indépendamment du rythme de pédalage de ce niveau. Pour éviter tous risques de blessures, il a été prévu un effort programmé pour les quarante premières secondes. À partir de la quarantième seconde, la machine commence à contrôler la résistance d’après le rythme de pédalage. Avant de réaliser le programme, il convient de réaliser de petits exercices d’échauffement qui permettront d’éviter des blessures. Avec le moniteur allumé, l’écran général supérieur des LED (A) Fig.2 affichera le profil et la lettre “M” de manuel. Pour voir les différents profils préprogrammés, appuyez sur les touches LEVEL▲ et LEVEL▼. Après avoir sélectionné le programme WATT, appuyez sur la touche ENTER. L’Écran alphanumérique inférieur (B) vous demandera la valeur de WATT (Watts) à laquelle vous souhaitez réaliser l’exercice. Sélectionnez avec les chiffres (F) Fig.3 entre (25 et 400 WATT Watts) et appuyez sur ENTER. Appuyez sur ENTER pour modifier le temps et la fenêtre LED affichera INTRODUISEZ LE TEMPS D’EXERCICE <MINUTES>). La matrice de points affichera ( ? 10 )et son nombre clignotera. Appuyez sur les chiffres pour modifier et introduire un nombre à deux chiffres (valeurs: 10 ~ 60). Si la valeur introduite est incorrecte, la matrice affichera la valeur par défaut. Introduisez un nombre adéquat et appuyez sur ENTER pour confirmer et démarrer le programme. Après le dernier réglage, appuyez sur Enter pour accumuler toutes les valeurs. La résistance est le niveau 1 et passe à la ligne suivante toutes les minutes. Si la vitesse (RPM- Tours/min.) n'est pas suffisante, la matrice de points affichera ( RPM↑ ) et le mode pause s’activera au bout de 15 secondes. Si pendant l’exercice, la consommation de Watts est inférieure à 25 W, l’écran général supérieur des LEDS (A) Fig.2 affichera: R.P.M.↑ et si la consommation est supériure á 450 W, l’écran affichera: R.P.M. ↓.
RÉGLAGE AUTOMATIQUE DE L’EFFORT.- Après démarrage du mode entraînement, le programme réalisera une estimation de WATT toutes les “X” secondes (La valeur “X” est réglée par l’utilisateur du programme SWR qui est incorporé au moniteur). La méthode de réglage des WATT est la suivante: 1.- Pendant l’entraînement, le programme comparera la valeur en WATT réelle à la valeur WATT objectif. Si la valeur des WATT réelle est inférieure ou égale à la valeur 75 des WATT objectif,le NIVEAU de résistance de la machine augmentera automatiquement de 3 en 3, jusqu'au NIVEAU 20. 2.- Pendant l’entraînement, le programme comparera la valeur en WATT réelle à la valeur WATT objectif. Si la valeur des WATT réelle est inférieure ou égale à la valeur 50 des WATT objectif, le NIVEAU de résistance de la machine augmentera automatiquement de 2 en 2, jusqu'au NIVEAU 20 3.- Pendant l’entraînement, le programme comparera la valeur en WATT réelle à la valeur WATT objectif. Si la valeur des WATT réelle est inférieure ou égale à la valeur 15 des WATT objectif, le NIVEAU de résistance de la machine augmentera automatiquement de 1 en 1 jusqu’au NIVEAU 20. 4.- Pendant l’entraînement, le programme comparera la valeur en WATT réelle à la valeur WATT objectif. Si la valeur des WATT réelle est supérieure ou égale à 15 des WATT objectif,le NIVEAU de résistance de la machine se réduira automatiquement de 1 en 1 jusqu’au NIVEAU 1. 5.- Pendant l’entraînement, le programme comparera la valeur en WATT réelle à la valeur WATT objectif. Si la valeur des WATT réelle est supérieure ou égale à 50 des WATT objectif,le NIVEAU de résistance de la machine se réduira automatiquement de 2 en 2 jusqu’au NIVEAU 1. 6.- Pendant l’entraînement, le programme comparera la valeur en WATT réelle à la valeur WATT objectif. Si la valeur des WATT réelle est supérieure ou égale à 75 des WATT objectif,le NIVEAU de résistance de la machine se réduira automatiquement de 3 en 3 jusqu’au NIVEAU 1.

SK LINE sportkoncept
33
NOTE: Quel que soit le moment du programme (le temps ne sera pas interrompu), il sera possible de modifier le niveau programmé des watts, par l’intermédiaire des touches LEVEL▲ et LEVEL▼. Le niveau programmé des watts clignotera à l’écran. Pour capter la fréquence cardiaque de l’utilisateur, la machine est équipée de senseurs manuels (hand-grip). Cependant, la machine est également compatible avec le système télémétrique basé dans un émetteur (sangle poitrine) et un récepteur intégré dans le moniteur électronique. Les senseurs manuels sont très faciles à utiliser: il suffit de les saisir durant la réalisation de l’exercice et d’attendre que la fréquence cardiaque soit affichée à l’écran prévu à cet effet. L’information de la fréquence cardiaque ne s’affiche pas immédiatement, il faut attendre 20 secondes avant l’affichage à l’écran de cette valeur. La sangle de poitrine transmet le pouls par contact avec la poitrine et envoie le signal au cadran qui l’affiche.
P13.- Mod. G930; G815; G818 PROGRAMME DE RÉGLAGE DE LA DISTANCE.- Ce programme vous permet de parcourir une distance déterminée au préalable. Avec l’écran allumé, l’écran de LED supérieur (A) Fig.2 affichera le profil et la lettre “M” de manuel ; pour visualiser les différents profils pré-programmés, on utilise les touches LEVEL▲ e t LEVEL▼. Une fois le programme DIST sélectionné, appuyez sur la touche ENTER. Sur l'écran alphanumérique apparaît le message INTRODUISEZ DISTANCE À PARCOURIR <0.1-99.9>. Appuyez sur les chiffres pour introduire la distance souhaitée. Si la valeur introduite est incorrecte, l’écran affichera la valeur supérieure ou inférieure. Introduisez un nombre adéquat et appuyez sur ENTER pour commencer l’exercice. La valeur de la distance introduite apparaît sur l’écran alphanumérique B et diminue au fur et à mesure du déroulement de l’exercice. La résistance est au niveau 9 et passe à la ligne suivante toutes les minutes. Si la vitesse (PRM- tours/min.) n’est pas suffisante, la matrice de points affichera (RPM↑) et le mode pause s’activera au bout de 15 secondes. La valeur de la résistance peut être modifiée en cours d'exercice en utilisant les touches LEVEL▲ e t LEVEL▼. PRÉCAUTION. Avant de commencer un quelconque programme d’exercice, il est vivement recommandé à l’utilisateur de consulter son médecin et de lui indiquer l’intensité avec laquelle il envisage de réaliser ces exercices. Si l’utilisateur porte un stimulateur cardiaque, il devra consulter son médecin avant d’utiliser la sangle de poitrine.
SIGNIFICATION DES SYMBOLES.- Une série de mots ou de symboles seront affichés à l’écran dont la signification est la suivante : Cœur et point d’interrogation: La sangle pectorale n’est pas mise en place ou elle est incorrectement placée. Clignotement du cœur: Ce symbole est uniquement affiché dans les tests. Le nombre maximum de battements qu’une personne ne doit jamais dépasser est appelé la fréquence cardiaque maximale qui d’ailleurs diminue avec l’âge. Pour calculer cette fréquence, il suffit de soustraire au nombre 220 l’âge de la personne concernée. Pour que l’exercice soit correct, la fréquence cardiaque doit se trouver entre 65 et 85% de la fréquence cardiaque maximale et ne doit pas dépasser 85%. Si vos battements dépassent 85% de la fréquence cardiaque maximale, un cœur clignotera et un sifflement retentira 2 secondes jusqu’à ce que vos battements ne dépassent plus le 85% de la fréquence cardiaque maximale. Par mesure de sécurité, il est recommandé de travailler en dessous de 85% de la fréquence cardiaque maximale. *0* : Ce symbole est affiché dans le test masculin et dans le test féminin et cela voudra dire qu’il a été effectué incorrectement (c’est-à- dire qu’il n’a pas été réalisé à 75 rpm ou que vous n’avez pas porté la sangle pectorale). Clé fixe: Panne mécanique. Éteindre la machine et l’allumer dans les 2 minutes suivantes.La machine dispose d’un système de correction automatique des pannes, cependant, si le problème persiste, faire appel au Service Technique.

SK LINE sportkoncept
34
Pour toute information complémentaire et en cas de doute sur le bon état de l’une quelconque partie de la machine, n’hésitez pas à appeler le Service d’Assistance Technique (SAT) au numéro de téléphone d’Assistance Clientèle qui figure à la dernière page de cette notice.
BH SE RESERVE LE DROIT DE MODIFIER LES CARACTÉRISTIQUES DE SES PRODUITS SANS PRÈAVIS.
1. “BIENVENUE A HI POWER” 2. “APPUYEZ SUR LES FLECHES POUR SELECTIONNER LE PROFIL” 3. “APPUYEZ SUR QUICK/START POUR DEMARRER” 4. “APPUYEZ SUR ENTREE POUR COMMERCER LE PROFIL” 5. “ERREUR” 6. “CONSULTEZ LE SERVICE TECHNIQUE” 7. “INTRODUIRE VOTRE AGE <10-99>”
8. “INTRODUIRE VOTRE POIDS <30-199> KG” “INTRODUIRE VOTRE POIDS <70-400> LB”
9. “INTRODUIRE LA DUREE DE L EXERCICE <10-60> MINUTES”
10. “INTRODUIRE LA CONSIGNE DE WATTS <25-400>” “WATTS=”
11. “AGE=” 12. “INTRODUIRE LA CONSIGNE DU POULS <40-220>” 13. “POULS=” 14. “APPUYEZ SUR PAUSE POUR CONTINUER L EXERCICE. APPUYEZ SUR STOP POUR ARRETER” 15. “DUREE DE L EXERCICE=” 16. “DISTANCE PARCOURUE=” 17. “VITESSE MOYENNE=” 18. “CALORIES CONSOMMEES=”
19. “APPUYEZ SUR ENTREE POUR ACCEPTER LE PROFIL ENREGISTRE. APPUYEZ SUR RESET POUR MODIFIER LE PROFIL”
20. “UTILISEZ LES FLECHES POUR SELECTIONNER L INTENSITE DE LA COLONNE ACTIVEE. APPUYEZ SUR ENTREE POUR PASSER A LA COLONNE SUIVANTE. APPUYEZ SUR RESET POUR REVENIR AU MODE MANUEL.”
21. “BAISSEZ L INTENSITE DE L EXERCICE. VOTRE FREQUENCE CARDIAQUE EST TROP ELEVEE” 22. “RESULTAT DU TEST=”

SK LINE sportkoncept
35
DEUTSCH
ALLGEMEINE HINWEISE Dieses Trainingsgerät ist mit einem elektrischen Stromgenerator ausgestattet, der die von dem Benutzer erzeugte Energie (während des Trainings) nutzt, den Elektromotor und Bremsregler des Geräts zu versorgen. Dies ist ein Touchscreen-Monitor, für die das Drücken einer Taste ist Auflegen des Fingers auf der Taste Signalisierung auf dem Bildschirm. Dieses Übungsgerät umfasst darüber hinaus eine Reihe von Batterien, die ausreichend Energie speichern, um den Elektronikmotor 60 Sekunden nach Beendigung des Trainings operativ zu halten. Sollte aufgrund eines Funktionsfehlers ein niedriger Batteriestand auftreten, kann die Batterie mit Hilfe des mitgelieferten Adapters geladen werden. Damit der Monitor in Betrieb geht, muss die Übung auf dem Gerät ausgeführt werden.
ACHTUNG: Der Adapter darf nur an eine geeigneten Stromanschluss geschlossen werden. Vergewissern Sie sich, dass die Spannung ihres Netzes mit der des mitgelieferten Adapters übereinstimmt. Der Elektromotor ist einfach zu bedienen. Die auf dem unteren Bildschirm (B) angegebenen Texte leiten den Benutzer während der Übung an. Wir empfehlen jedoch, dass der sportliche Betreuer diesen Abschnitt aufmerksam liest, um sich mit dem elektronischen Monitor vertraut zu machen und dem Benutzer dessen Funktionsweise verständlich beschreiben zu können.
WICHTIG: ZUR SICHERSTELLUNG DES EINWANDFREIEN BETRIEBS UND DER LEBENSDAUER DER BATTERIEN, EMPFEHLEN WIR, DIESE NUR MIT DEM MITGELIEFERTEN ADAPTER ZU LADEN.
MACHINE TYPE SELECTION -. Aus dem Hauptmenü, drücken Sie gleichzeitig die RESET-Taste und die Taste "0" für 6 Sekunden. Nach dem Einschalten des Monitors erscheint auf dem alphanumerischen Bildschirm (B) Fig.1 der Hinweis “FACTORY -- SETTINGS“. Drücken Sie "2" und wählen Sie den Maschinentyp E (elliptisch), B / R (Fahrrad / Liegerad) oder S (Stepper) mit LEVEL ▲ und ▼ Tasten. Wenn Sie den Personalisierungsmodus verlassen wollen, betätigen Sie bitte die STOP-Taste.
PERSONALISIERUNG DES ELEKTRONISCHEN MONITORS.- Um den Monitor-Modus Anpassung notwendig ist, geben Sie die folgenden Schritte aus: Aus dem Hauptmenü, drücken Sie gleichzeitig die RESET-Taste und die Taste "0" für 6 Sekunden. Nach dem Einschalten des Monitors erscheint auf dem alphanumerischen Bildschirm (B) Fig.1 der Hinweis “FACTORY -- SETTINGS“. Drücken Sie "ENTER".
PERSONALISIERUNG DES ELEKTRONISCHEN MONITORS.- Um den personalisierten Modus auf dem Monitor aufzurufen, gehen Sie bitte folgendermaβen vor: Betätigen Sie bei ausgeschaltetem Monitor gleichzeitig die RESET-Taste und die Taste O. Ohne die Tasten loszulassen, beginnen Sie mit der Übung.
1) UMSCHALTEN VON Km. auf Meilen.- Das Wort UNITS blinkt jetzt auf dem Bildschirm. Betätigen Sie erneut ENTER, das Wort METRIC blinkt nun. Wählen Sie die Maßeinheit für Ihre Geschwindigkeit mit den Tasten LEVEL▲ und LEVEL▼ (METRIC/Km. -- ENGLISH/Millas) und betätigen Sie dann ENTER. Auf dem Bildschirm blinkt erneut das Wort UNITS. Mit LEVEL▲ gehen Sie jetzt bitte auf Punkt (2 WHEELSIZE) des unteren Fensters. Wenn Sie den Personalisierungsmodus verlassen wollen, betätigen Sie bitte die STOP-Taste und es erscheint Display der LEDs (A) der manuellen Programms.
2) ECHSEL VON STRECKE AUF DREHZAHL.- Wenn der Begriff ‘WHEELSIZE’ blinkt, betätigen Sei bitte ENTER und die Ziffer zwischen 0 und 80 blinkt. Wählen Sie den Wert mit den Tasten LEVEL▲ und LEVEL▼ (Modelle H800; H895; G930 80 anwählen), betätigen Sie ENTER und das Wort “WHEELSIZE” erscheint erneut blinkend. Gehen Sie nun mit LEVEL▲ auf Punkt 3 (LANGUAGE) des unteren Fensters. Wenn Sie den Personalisierungsmodus verlassen wollen, betätigen Sie bitte die STOP-Taste.

SK LINE sportkoncept
36
3) ÄNDERN DER SPRACHE.- Wenn das Wort ‘LANGUAGE’ blinkt, betätigen Sie bitte ENTER, nun blinkt die Sprache. Wählen Sie Ihre Sprache mit den Tasten LEVEL▲ und LEVEL▼ und betätigen Sie ENTER. Nun blinkt das Wort “LANGUAGE” erneut. Mit der Taste LEVEL▲ gehen Sie bitte auf Punkt 4 (Power) im unteren Fenster. Wenn Sie den Personalisierungsmodus verlassen wollen, betätigen Sie bitte die STOP-Taste.
4) SELBSTVERSORGUNG ODER ELEKTRISCHER BETRIEB.- Wenn das Wort Power blinkt, betätigen Sie bitte die ENTER-Taste. Nun blinkt entweder das Wort ON oder OFF. Mit den Tasten LEVEL▲ und LEVEL▼ kann die blinkende Option angewählt werden. Bei Anwahl der Option ON ist der Monitor ständig eingeschaltet. Wird diese Option angewählt, muss das Gerät mit einem Adapter ans Netz geschlossen sein. Nach der Anwahl der Option betätigen Sie ENTER, um die Anwahl zu bestätigen und auf der Anzeige blinkt erneut das Wort Power. Hören Sie nun mit der Übung auf. Wenn Sie den Monitor in dieser Option abschalten Wollen, drücken Sie die STOP-Tasten solange gleichzeitig, bis ein Pfeifton zu hören ist. Warten Sie 45 Sekunden und die Option wechselt auf OFF. Da die Maschine über Selbstversorgung verfügt, schaltet der Monitor bei Anwahl der Option OFF ein, sobald man mit der Übung beginnt. Wenn Sie die Option angewählt haben, betätigen Sie die ENTER-Taste und das Wort Power beginnt zu blinken. Mit der Taste LEVEL▲ , gehen Sie auf den Punkt (5 SWR time) des unteren, nebenstehenden Fensters. Nach Bestätigen der Option (OFF) brauchen Sie lediglich die Übung zu unterbrechen, durch die der Monitor betrieben wurde, und dieser schaltet nach 45 Sekunden ab. Wenn Sie den personalisierten Modus verlassen wollen, betätigen Sie die STOP-Taste.
5) AUSDAUER IM WATT-PROGRAMM (SWR TIME, Mod; H800; H895).- Wenn der Begriff SWR time blinkt, ENTER betätigen. Es blinkt nun eine Ziffer zwischen 0 und 60 Sekunden. Mit den Tasten LEVEL▲ und LEVEL▼ die blinkende Option anwählen und mit ENTER bestätigen. Danach blinkt erneut der Begriff SWR time. Gehen Sie nun mit der Taste LEVEL▲ auf Punkt 6 (SPR time) in dem unteren Fenster. Wenn Sie den Personalisierungsmodus verlassen wollen, betätigen Sie bitte die STOP-Taste.
6) AUSDAUER IM H.R.C.PROGRAMM.- Wenn der Begriff SPR time blinkt, ENTER betätigen. Es blinkt nun eine Ziffer zwischen 20 und 60 Sekunden. Mit den Tasten LEVEL▲ und LEVEL▼ die blinkende Option anwählen und mit ENTER bestätigen. Danach blinkt erneut der Begriff SPR time. Gehen Sie nun mit der Taste LEVEL▲ auf Punkt 7 (Manual T) in dem unteren Fenster. Wenn Sie den Personalisierungsmodus verlassen wollen, betätigen Sie bitte die STOP-Taste.
7) MAX. TRAININGSDAUER.- Wenn der Begriff Manual T blinkt, ENTER betätigen. Es blinkt nun eine Ziffer zwischen 0 und 60 Sekunden. Mit den Tasten LEVEL▲ und LEVEL▼ die blinkende Option anwählen und mit ENTER bestätigen. Danach blinkt erneut der Begriff Manual T. Gehen Sie nun mit der Taste LEVEL▲ auf Punkt 8 (Text) in dem unteren Fenster. Wenn Sie den Personalisierungsmodus verlassen wollen, betätigen Sie bitte die STOP-Taste.
8) ÄNDERN DER BEGRÜSSUNGSFORMEL.- Wenn das Wort Text blinkt, ENTER betätigen. Nun blinkt das Wort ON oder OFF. Mit den Tasten LEVEL↑ und LEVEL↓ kann von einer auf die andere Option gewechselt werden. Wählt man ON an, kann die Begrüßungsformel des Monitors geändert werden. Ist die Option ON angewählt, betätigt man ENTER und auf dem alphanumerischen Bildschirm (B) erscheint ein blinkender Kursor. Mit den Tasten LEVEL▲ und LEVEL▼ gibt man danach Buchstabe für Buchstabe die Begrüßungsformel ein. Wenn der Text fertiggestellt ist, einige Sekunden lang ENTER betätigen. Danach blinkt das Wort Text. Mit der Taste LEVEL▲ wechselt man auf Punkt 9 (Sounds) auf dem unteren Fenster. Wenn Sie den Personalisierungsmodus verlassen wollen, betätigen Sie bitte die STOP-Taste.
9) ÄNDERN DES TONS Wenn das Wort Sounds blinkt, ENTER betätigen. Nun blinkt das Wort ON oder OFF. Mit den Tasten LEVEL▲ und LEVEL▼ kann von einer auf die andere Option gewechselt werden. Nach Anwahl der entsprechenden Option betätigt man zur Bestätigung ENTER und das Wort Sound blinkt. Betätigen Sie Stop, um die Personalisierungsparameter zu verlassen. Es erscheint die Anzeige der LEDs (A) des manuellen Programms. Beginnen Sie die Übung und vergewissern Sie sich, dass die Änderungen der Optionen ausgeführt wurden.

SK LINE sportkoncept
37
TABELLE DER PERSONALISIERBAREN DATE
Parameter Beschreibung 1) Metric Ändern der Geschwindigkeit von Km. / h auf Millas 2) Wheelsize Wechsel zwischen Upm und zurückgelegter Strecke
3) Language Definition der Sprache, in der die Hinweise des Monitors angezeigt werden. Optionen: Spanisch, Portugiesisch, Englisch, Französisch, Deutsch, Holländisch, Italienisch
4) Power
Definition der Funktionsweise des Geräts zwischen Eigenversorgung und Netzversorgung. Wird ON angewählt, muss das Gerät ans Netz geschlossen sein. Um den Monitor im ON-Modus auszuschalten, muss die STOP-Taste 4 Sekunden betätigt werden. Optionen: - OFF (Betrieb mit Batterien) - ON (Betrieb mit Netzanschluss). WICHTIG: Wird diese Option angewählt, muss das Gerät ans Netz geschlossen sein, anderenfalls kommt es zu Beeinträchtigungen bis hin zur definitiven Unbrauchbarkeit der Batterien.
5) SWR time
Legt den Berechnungsmodus für die Ausdauer im Programm konstante Leistung fest. Diese Option ist nur in Modellen verfügbar, die mit dem Programm für konstante Leistung ausgestattet sind. Optionen: Wert in Sekunden (mindestens 20, höchstens 60).
6) SPR time Legt den Berechnungsmodus für die Ausdauer im Programm konstanter Puls fest. Optionen: Wert in Sekunden (mindestens 20, höchstens 60).
7) Manual T
Festlegen der maximalen Dauer der Übung. Optionen: - 0 (Es wird keine Höchstzeit festgelegt) - Wert in Minuten der maximalen Übungsdauer (höchstens 60)
8) Text
Ermöglicht die Personalisierung der Begrüßungsformel, z.B. durch Eingabe des Namens des Fitness-Centers. Optionen: - OFF (Verwendung der vorgegebenen Begrüßungsformel) - ON (Möglichkeit zum Editieren der Begrüßungsformel)
9) Sounds Aktiviert bzw. deaktiviert die akustischen Meldungen des Elektronik-Monitors. Optionen: - ON (Aktiviert) - OFF (Deaktiviert)
ELEMENTE DES ELEKTRONIK-MONITORS (Fig.1).- Der Elektronikmonitor umfasst zwei klar unterscheidbare Bereiche: Oberer Bereich Fig.2 (A – B – C) mit der ANZEIGE . Unterer Bereich Fig.3 (D – F – G mit der TASTATUR.
ANZEIGE.- Dieser Bereich umfasst zwei Bildschirme. (A) Oberer LED-Bildschirm, auf dem das Belastungsniveau des jeweils angewählten Programms angezeigt wird. (B) Unterer alphanumerischer Bildschirm, der den Benutzer bei den Einstellungen und der Ausführung der Übung anleitet. Der obere Bildschirm (A) zeigt die verschiedenen vorprogrammierten Belastungsprofile (Programme), die angewählt werden können, sowie während der Übung das Belastungsniveau, das jeweils geleistet wird. Der untere alphanumerische Bildschirm (B) führt den Benutzer durch die Anwahl der auszuführenden Übung und während und nach dem Training Informationen zu demselben an. Die Anzeige-LEDs (C), die sich unterhalb des alphanumerischen Bildschirms befinden, zeigen gleichzeitig GESCHWINDIGKEIT/UPM; DAUER/STRECKE; KALORIEN/WATT; PULS an. Dabei wird angegeben, welche der Informationen jeweils angezeigt wird.

SK LINE sportkoncept
38
Die LEDs (C) zeigen während der Übung folgende Daten an: -SPEED - GESCHWINDIGKEIT. Es wird ein geschätzter Wert für die lineare Geschwindigkeit angegeben, mit der sich ein Fahrend mit der Pedalfrequenz des Benutzers fortbewegen würde. Dieser Wert wird in km/h angezeigt. -STEPS/MIN - GESCHWINDIGKEIT. Anzahl der Schritte pro Minute. -RPM: Anzeige der jeweiligen Pedalfrequenz während der Übung. Der angezeigte Wert entspricht der Anzahl vollständigen Pedalumdrehungen pro Minute (UPM). -TIME – DAUER : Während der Übung wird die Zeit angezeigt, die seit Beginn der Übung vergangen ist bzw., falls eine vorgegebene Trainingsdauer angewählt wurde, die Zeit, die noch bis zum Ende der Übung verbleibt. Die Zeit wird in Minuten und Sekunden (mm:ss) angezeigt. -DISTANCE – STRECKE: Anzeige der seit Beginn der Übung zurückgelegten Strecke. Diese Strecke wird auf der Grundlage der geschätzten linearen Geschwindigkeit (SPEED) berechnet und in Kilometern und Hektometern angezeigt. -CALORIES – KALORIEN: Es wird ein Schätzwert der bis zum jeweiligen Anzeigemoment verbrauchten Kalorien angezeigt. Diese Schätzung beruht auf der Energie, die jeweils erzeugt wird, sowie den vom Benutzer eingegebenen Daten zu Körpergewicht und Alter. -WATT – WATT: Anzeige des während der Übung jeweils erzeugten Energiewert. Diese Berechnung erfolgt auf der Grundlage des Widerstandsniveau, mit dem trainiert wird, sowie der Pedalfrequenz. Die Information wird in Watt angegeben. -PULSE – PULS : Anzeige des Herzrhythmus des Benutzers. Voraussetzung hierfür ist, dass dieser Wert verfügbar ist, d.h. die Handsensoren (Hand-Grip) oder das telemetrische Brustband verwendet werden. Werden beide Elemente benutzt, werden die Werte des Brustbands angezeigt. Für nähere Informationen zur Herzfrequenz siehe Abschnitt: Pulsmessung: Brustband und Hand-Grip.
TASTATUR.-
Nachfolgend finden Sie die Funktionen der einzelnen Tasten. Siehe Fig.3. Der elektronische Monitor verfügt über eine bedienerfreundliche Tastatur. Sie umfasst die numerischen Tasten (F) sowie die Funktionstasten (G). .- Numerische Tasten (F).- (1- 0) Mit diesen Tasten werden die Daten eingegeben, die der Monitor abfragt. .- Funktionstasten (G).- reset; level▼; level▲; enter; pause; stop; quick/start. Mit diesen Tasten wählt man die auszuführende Übung an, gibt die erforderlichen Daten ein, steuert das Widerstandsniveau der Übung und beendet diese.
-reset.- Annullierungstaste. Sie wird zum Loschen der Daten benutzt, die bei der Anwahl eines Programms in den Monitor eingegeben werden.
-level▼.- Taste, mit der das Belastungsniveau reduziert wird. Während der Übung wird mit dieser Taste der Widerstandsgrad des Geräts um einen Punkt reduziert. Bei der Anwahl der vorprogrammierten Profile wird mit der Taste das vorherige Profil auf dem Bildschirm angezeigt.
-level▲.- Taste, mit der das Belastungsniveau erhöht wird. Während der Übung wird mit dieser Taste der Widerstandsgrad des Geräts um einen Punkt erhöht. Bei der Anwahl der vorprogrammierten Profile wird mit der Taste das nächste Profil auf dem Bildschirm angezeigt.
-enter.- Anwahl- und Bestätigungstaste. Bei der Anwahl eines vorprogrammierten Profils dient sie dazu ein solches Profil anzuwählen, die einzugebenden Daten zu bestätigen und die Übung zu beginnen. Beim Programmieren des Anwenderprofils dient sie darüber hinaus dazu, das der jeweiligen Minute entsprechende Belastungsniveau zu bestätigen.
-pause.- Pausetaste. Wird diese während der Übung betätigt, wird diese Unterbrochen und das Chronometer der Übungsdauer gestoppt. Um das Chronometer wieder zu starten, muss die Pause-Taste erneut betätigt bzw. die Übung wieder aufgenommen werden. Die maximale Pausedauer beträgt 45 Sekunden. Nach Ablauf dieser Zeit wird die Übung als abgebrochen angesehen und der Monitor schaltet aus. Wird vom Pause-Modus aus die STOP-Taste betätigt, gilt die Übung als beendet.

SK LINE sportkoncept
39
-stop.- Stop-Taste. Wird diese während der Übung betätigt, gilt diese als beendet und das Widerstandsniveau geht auf minimale Stufe. Es wird eine Zusammenfassung der Übungsdaten angezeigt und der Anfangsbildschirm erscheint. Halten Sie im Start/Ready Modus die STOP-Taste 3 Sekunden gehalten und die Konsole schaltet automatisch auf den Aus-Status. Ist dabei die Option POWER im Projekt-Modus eingeschaltet, ertönt zusätzlich ein Geräusch.
-quick / start.- Sofort-Starttaste. Wenn die LED der Taste blinkt, beginnt bei Betätigen der Taste die Übung im manuellen Modus.
INBETRIEBNAHME Um den Monitor zu starten, muss das Gerät mit einer Pedalfrequenz von 45 Upm betätigt werden. Sobald diese Frequenz erreicht wird, schaltet der Monitor ein. Es stehen dann 60 Sekunden zur Programmierung zur Verfügung. Es ist ebenfalls möglich, den mitgelieferten Adapter ans Netz zu schließen. Dafür muss der entsprechende personalisierbare Parameter (Schritt 4 Power) auf ON gesetzt sein. Wenn der Monitor einschaltet, wird das LED-Display (A) Fig.2 angezeigt, das Profil und der Buchstabe “M” für manuellen Betrieb. Auf dem unteren alphanumerischen Bildschirm (B) erscheint die Begrüßungsformel “ Willkommen bei HI – POWER ”. Durch Betätigen der Taste QUICK/START wird das Programm im manuellen Modus gestartet und durch Betätigen der Tasten level▲ oder level▼ können Sie den Widerstand der Übung erhöhen bzw. reduzieren.
HINWEISE ZUR BENUTZUNG.- USB-ANSCHLUSS.- Dieses Gerät verfügt über eines Port-USB (D) für die mobile Ladung.
SLEEP-MODUS: Wird innerhalb eines Zeitraums von 45 Sekunden im Wartemodus keine UPM-Zahl eingegeben, wird der Sleep-Modus aktiviert. In diesem Modus wird kein Fenster angezeigt und die Fußplatte muss betätigt werden, um ein Signal zu geben und das Fenster neu zu starten. Wurde ein Adapter an den Rahmen geschlossen, kann die Konsole nicht auf den Sleep-Modus gehen, wenn die POWER-Option im Projektmodus eingeschaltet ist. Ohne Adapter geht die Konsole in Sleep-Modus, auch wenn sie eingeschaltet ist.
P0 MANUELLER MODUS.- Sobald der Monitor eingeschaltet ist, zeigt er auf dem oberen LED-Bildschirm (A) Fig.2 das Profil und den Buchstaben “M” für manuell an, auf dem unteren alphanumerischen Bildschirm (B) Fig.2 die Begrüßungsformel “WILLKOMMEN BEI HI – POWER”. Durch Betätigen der Taste QUICK / START wird das Programm im manuellen Modus gestartet. Auf dem oberen LED-Bildschirm (A) Fig.2 erscheint blinkend das Niveau, auf dem die Übung durchge-führt wird. Durch Betätigen der Tasten LEVEL▼ oder LEVEL▲ können Sie dieses Niveau im Rahmen der zur Verfügung stehenden zwanzig Widerstandsgrade erhöhen oder reduzieren. Auf dem unteren alphanumerischen Display (B) Fig.2 werden in einem Abstand von 10 Sekunden abwechselnd die Werte für: Geschwindigkeit (SPEED Mod. H800; H895; Metrisches System km/h, Britisches System Mª/h ;Schritte pro minute Mod.G930; Stepps/minute Mod.R250); Dauer (TIME); Kalorien (CALORIES) und Puls (PULSE) angezeigt; in einer weiteren Sequenz erscheinen Upm (Mod. H800; H895; Schritte von beginn Mod. G930); Strecke (DISTANCE); Watt (WATT) und Puls (PULSE). Betätigt man die Taste STOP, wird das Programm unterbrochen und auf dem unteren alphanumerischen Display (B) Fig.2 erscheinen Information zu den Werten für ÜBUNGSDAUER, STRECKE, DURCHSCHNITTSGESCHWINDIGKEIT, VERBRAUCHTE KALORIEN in Bezug auf die von Ihnen durchgeführte Übung. Die Anzeige erfolgt zwei Mal, in einem Abstand von 5 Sekunden. Wird während der Anzeigedauer der Werte keine Taste betätigt, keine Übung ausgeführt und die STOP-Taste betätigt, wird auf das manuelle Programm gewechselt.
PROGRAMM- MODUS.- Der Monitor verfügt über 1 Programm mit MANUELLEM Profil, 8 PROGRAMMEN mit vorprogrammierten Profilen, ein programmierbares Benutzerprofil (USER), TEST-Programm Männer, TEST-Programm Frauen; Programm konstanter Herzrhythmus (H.R.C.) und Programm konstante Wattzahl (mod. H800 / H895) / Streckenprogramm (mod. G930)

SK LINE sportkoncept
40
Siehe hierzu die Graphik der vorprogrammierten Programme auf den letzten Seiten dieses Handbuchs.
P1 - P8 GRAPHIKPROGRAMME.-
Wenn der Monitor eingeschaltet ist, erscheint auf dem oberen LED-Display (A) Fig.2 das Profil und der Buchstabe “M” für manuell. Um die verschiedenen vorprogrammierten Profile anzuzeigen, benutzen Sie bitte die Tasten LEVEL▲ und LEVEL▼. Wenn Sie ein bestimmtes Profil ausgewählt haben, betätigen Sie bitte die ENTER-Taste. Auf dem oberen LED-Display (A) werden Sie aufgefordert, ein Alter zwischen 10 und 99 Jahren einzugeben. Geben Sie Ihr Alter mit den numerischen Tasten (F) Fig.3 ein und betätigen Sie ENTER. Anschließend wird nach Ihrem Körpergewicht gefragt (zwischen 30 und 199kg). Geben Sie dieses mit den numerischen Tasten (F) Fig.3 ein und betätigen Sie ENTER. Nun sollen Sie die Dauer der Übung eingeben (zwischen 10 und 60 Minuten). Geben Sie auch diesen Wert mit den numerischen Tasten (F) Fig.3 ein und betätigen Sie ENTER. Damit beginnt Ihre Übung. Innerhalb jedes einzelnen vorprogrammierten Profils stehen vier verschiedene Schwierigkeitsniveaus (L1-L4) zur Verfügung. Die Auswahl eines dieser Profile erfolgt während der Übung mit Hilfe der Tasten LEVEL▲ und LEVEL▼. Wenn Sie das Programm, mit dem Sie die Übung ausgeführt haben, beendet haben, berechnet der Monitor die Durchschnittswerte für die ausgeführte Übung und zeigt diese auf dem unteren alphanumerischen Bildschirm (B) Fig.2 an. Betätigt man die STOP-Taste, wird das Programm unterbrochen und auf dem unteren alphanumerischen Bildschirm (B) Fig.2 erscheinen die ¨Durchschnittswerte für ÜBUNGSDAUER, STRECKE, GESCHWINDIGKEIT, VERBRAUCHTE KALORIEN, die während der Übung erreicht wurden. Sie werden zwei Mal in 5-sekündigem Abstand angezeigt. Wird während der Anzeigedauer der Werte keine Taste betätigt, keine Übung ausgeführt und die STOP-Taste betätigt, wird auf das manuelle Programm gewechselt.
P9 BENUTZERPROGRAMM (USER).-
Wenn der Monitor eingeschaltet ist, erscheint auf dem oberen LED-Display (A) Fig.2 das Profil und der Buchstabe “M” für manuell. Um die verschiedenen vorprogrammierten Profile anzuzeigen, benutzen Sie bitte die Tasten LEVEL▲ und LEVEL▼. Wenn Sie das Programm 9 (USER) ausgewählt haben, betätigen Sie bitte die ENTER-Taste. Auf dem oberen LED-Display (A) Fig.2 werden Sie aufgefordert, ein Alter zwischen 10 und 99 Jahren einzugeben. Geben Sie Ihr Alter mit den numerischen Tasten (F) Fig.3 ein und betätigen Sie ENTER. (Wird ein Wert außerhalb der angegebenen Ziffern eingegeben, wird der nächstliegende Wert gewählt.) Anschließend wird nach Ihrem Körpergewicht gefragt (zwischen 30 und 199 kg). Geben Sie dieses mit den numerischen Tasten (F) Fig.3 ein und betätigen Sie ENTER. Nun sollen Sie die Dauer der Übung eingeben (zwischen 10 und 60 Minuten). Geben Sie auch diesen Wert mit den numerischen Tasten (F) ein und betätigen Sie ENTER und anschließend RESET. Jetzt können Sie beginnen, auf dem LED-Display (A) das Widerstandsprofil zu erstellen, mit dem Sie die Übung ausführen wollen. Dieses Profil ist in 21 Schritte unterteilt, die ersten drei dienen dem Aufwärmen und sind auf den max. Wert 4 begrenzt, um möglichen Verletzungen vorzubeugen. Die übrigen Schritte reichen bis zum Maximalwert. Zum Einstellen betätigen Sie zunächst die RESET-Taste; die Tasten LEVEL▲, LEVEL▼ und anschließend ENTER. Tun Sie dies für jeden einzelnen der Schritte, bis das von Ihnen gewünschte Graphikprogramm vollständig ist. Sollte Sie sich bei einer Eingabe irren, betätigen Sie RESET und gehen damit zum vorherigen Schritt zurück. Anschließend betätigen Sie bitte die ENTER-Taste und beginnen Ihre Übung mit dem gewünschten Profil. Wenn das Programm, das Sie ausgeführt haben, abgelaufen ist, ermittelt der Monitor die Durchschnittswerte für die ausgeführte Übung und zeigt diese auf der unteren, alphanumerischen Anzeige an (B) Fig.2.

SK LINE sportkoncept
41
Betätigt man die STOP-Taste, wird das Programm unterbrochen und auf dem unteren alphanumerischen Bildschirm (B) Fig.2 erscheinen die ¨Durchschnittswerte für ÜBUNGSDAUER, STRECKE, GESCHWINDIGKEIT, VERBRAUCHTE KALORIEN, die während der Übung erreicht wurden. Sie werden zwei Mal in 5-sekündigem Abstand angezeigt. Wird während der Anzeigedauer der Werte keine Taste betätigt, keine Übung ausgeführt oder die STOP-Taste betätigt, wird auf das manuelle Programm gewechselt. ANMERKUNG: Die drei ersten Programmschritte dienen dem Aufwärmen bei niedrigem Widerstandsniveau, auf diese Weise lassen sich Verletzungen verhindern.
P10 - P11 TESTPROGRAMM MÄNNER - FRAUEN
Ziel dieses Tests ist es, die physische Kondition des Benutzers festzustellen. Zu diesem Zwecke muss 5 Minuten lang eine Pedalfrequenz zwischen 70 und 80 Umdrehungen pro Minute (UPM) beibehalten werden. Der Unterschied zwischen dem Testprogramm für Männer und Frauen liegt im Wattwert, für Männer liegt dieser bei 150 W, für Frauen bei 100 W. Wenn der Monitor eingeschaltet ist, erscheint auf dem oberen LED-Display (A) Fig.2 das Profil und der Buchstabe “M” für manuell. Um die verschiedenen vorprogrammierten Profile anzuzeigen, benutzen Sie bitte die Tasten LEVEL▲ und LEVEL▼. Wenn Sie ein das Programm Test Männer bzw. Frauen ausgewählt haben, betätigen Sie bitte die ENTER-Taste. Auf dem oberen LED-Display (A) werden Sie aufgefordert, ein Alter zwischen 10 und 99 Jahren einzugeben. Geben Sie Ihr Alter mit den numerischen Tasten (F) Fig.3 ein und betätigen Sie ENTER. Auf dem oberen LED-Display (A) Fig.2 erscheint ein blinkendes Herz-Symbol. Legen Sie nun Ihre Hände auf die Pulssensoren (Hand-Grips), die sich am Lenker befinden. Sollte ein telemetrisches Band zur Pulsmessung vorhanden sein, legen Sie dieses bitte um die Brust. Beginnen Sie den Test bei einem Rhythmus von 70 bis 80 UPM und halten Sie diesen fünf Minuten lang. Sollte er unter diesen Wert absinken, erscheint auf dem Display R.P.M ↑, wird die Drehzahl überstiegen, erscheint R.P.M ↓, wird der Rhythmus zwischen 70 und 80 UPM gehalten, zeigt der Bildschirm OK. Nach Abschluss des 5-minütigen Tests erscheint eine Bewertung zwischen 1 (sehr mangelhaft) und 5 (hervorragend). Sollte die Bewertung 0 erscheinen, wurde der Test nicht korrekt ausgeführt (der Pedalrhythmus von 75 Upm wurde nicht eingehalten oder die Messvorrichtungen für den Herzrhythmus wurden nicht korrekt benutzt. ANMERKUNG: Für die Ausführung des Tests ist die Benutzung der Herzrhythmusmessung zwingend notwendig. Dazu sind die manuellen Sensoren (Hand-Grip) oder das Brustband zu benutzen. Es ist ratsam, sich vor dem Test aufzuwärmen, um Verletzungen vorzubeugen. Der maximale Pulswert, den eine Person niemals übersteigen sollte, heißt maximaler Rhythmus und nimmt mit dem Alter ab. Eine einfache Berechnungsformel besteht darin, von der Zahl 220 das Alter in Jahren abzuziehen. Damit die Übung korrekt ist, muss sie sich innerhalb des Bereichs zwischen 65% und 85% des maximalen Herzrhythmus befinden. Es wird empfohlen, den Wert von 85% nicht zu übersteigen. Sollte Ihr Pulswert 85% des maximalen Herzrhythmus übersteigen, erschein ein blinkendes Herzsymbol und ein 2-sekündiges akustisches Signal, bis Ihr Pulswert wieder unter 85% des maximalen Herzrhythmus absinkt. Aus Sicherheitsgründen wird empfohlen, unterhalb von 85% des maximalen Herzrhythmus zu arbeiten.
P12 PROGRAMM KONSTANTER HERZRHYTHMUS ( H R C ).- Vor der Ausführung dieses Programms ist es empfehlenswert, sich aufzuwärmen, um Verletzungen vorzubeugen. Mit diesem Programm kann die Übung bei einem konstanten Herzrhythmus (zwischen 65 und 85% des maximalen Herzrhythmus) ausgeführt werden. Das Gerät passt das Widerstandsniveau so an, dass der Herzrhythmus des Benutzers stets das angewählte Niveau einhält. Dazu muss die Messung des Herzrhythmus mittels dem telemetrischen Brustband zwingend ausgeführt werden. 85% des maximalen Herzrhythmus dürfen nicht überschritten werden. Wenn der Monitor eingeschaltet ist, erscheint auf dem oberen LED-Display (A) Fig.2 das Profil und der Buchstabe “M” für manuell. Um die verschiedenen vorprogrammierten Profile anzuzeigen, benutzen Sie bitte die Tasten LEVEL▲ und LEVEL▼. Wenn Sie das HRC-Programm ausgewählt haben, betätigen Sie bitte die ENTER-Taste.

SK LINE sportkoncept
42
Betätigen Sie ENTER, um den eingegebenen Herzrhythmus zu ändern. Das LED-Fenster zeigt an: (PULSWERT EINGEBEN <40-220>). Betätigen Sie die numerischen Tasten und das LED-Fenster zeigt:(PULS= xxx) und die eingegebenen Werte blinken. Betätigen Sie die numerischen Tasten, um die Änderung vorzugeben und eine dreistellige Zahl (Werte: 40 ~ 220)einzugeben. Wird ein ungeeigneter Wert eingegeben, wird ein höherer bzw. niedrigerer Wert angezeigt. Geben Sie eine geeignete Zahl ein und betätigen Sie zum Bestätigen ENTER. Betätigen Sie ENTER, um die Dauer zu verändern. Das LED-Fenster zeigt:(ÜBUNGSDAUER EINGEBEN <MINUTEN>). Die Punktematrix zeigt? 10und die Ziffer blinkt. Betätigen Sie die numerischen Tasten, um ein zweistelligen Wert einzugeben (Werte: 10 ~ 60) . Wird ein ungeeigneter Wert eingegeben, wird ein Defaultwert angezeigt. Geben Sie eine geeignete Zahl ein und betätigen Sie zum Bestätigen und Starten des Programms ENTER. Nach der letzten Eingabe werden die Werte akkumuliert. Der Widerstand ist Niveau 1 und wechselt nach jeder Minute auf die nächste Linie. Wenn die Geschwindigkeit (UPM) nicht ausreichend ist, zeigt die Punktematrix (UPM↑) und geht nach 15 Sekunden auf den Pausemodus. Beginnen Sie die Übung mit einem Pedalrhythmus von 70 bis 80 UPM. Legen Sie Ihre Hände auf die Pulssensoren (Hand-Grip) am Lenker oder, falls sie über ein telemetrisches Band zur Pulsmessung verfügen, legen sie dieses um. Sollte der Wert der UPM absinken, erscheint auf dem oberen LED-Display R.P.M. ↑, wird die Drehzahl überstiegen, erscheint R.P.M. ↓. Während der ersten drei Minuten dieses Programms ist die Belastung programmiert, um möglichen Verletzungen vorzubeugen. Ab der dritten Minute passt der Computer die Belastung automatisch an, um den Puls auf dem zuvor programmierten Wert zu halten.
AUTOMATISCHE EINSTELLUNG DER BELASTUNG Bei Beginn der Übung funktioniert das Gerät auf der niedrigsten Widerstandsstufe, 50 W, bis die erste Pulsmessung durchgeführt wird. Sobald der Puls erfasst wird, nimmt das Programm alle X Sekunden eine Bewertung des Herzrhythmus vor (dieser Sekundenwert kann in dem SPR-Programm auf einen Wert zwischen 20 und 60 eingestellt werden). Nachfolgend wird die Anpassung der Belastung in Funktion des Pulswertes beschrieben. 1.- OBJEKTIVER HERZRHYTHMUS größer als TATSÄCHLICHER HERZRHYTHMUS: Wenn der Unterschied zwischen dem OBJEKTIVEN HERZRHYTHMUS und dem TATSÄCHLICHEN HERZRHYTHMUS gleich oder größer als 15 P.P.M. ist, erfolgt die AUTOMATISCHE EINSTELLUNG DER BELASTUNG in 20-Watt-Schritten. Ist der Unterschied kleiner als 15 P.P.M., erfolgt die Einstellung in 10 Watt-Schritten, bis beide Herzrhythmen übereinstimmen. 2.- TATSÄCHLICHER HERZRHYTHMUS größer als OBJEKTIVER HERZRHYTHMUS: - Wenn der Unterschied zwischen dem TATSÄCHLICHEN HERZRHYTHMUS und dem OBJEKTIVEN HERZRHYTHMUS gleich oder größer als 15 P.P.M. ist, erfolgt die AUTOMATISCHE EINSTELLUNG DER BELASTUNG in 20-Watt-Schritten. Ist der Unterschied kleiner als 15 P.P.M., erfolgt die Einstellung in 10 Watt-Schritten, bis beide Herzrhythmen übereinstimmen. - Wenn der Unterschied zwischen dem TATSÄCHLICHEN HERZRHYTHMUS und dem OBJEKTIVEN HERZRHYTHMUS gleich oder kleiner 30 P.P.M. ist, zeigt das Display des unteren alphanumerischen Bildschirms (B) die Meldung INTENSITÄT DER ÜBUNG REDUZIEREN, IHR HERZRHYTHMUS IST ZU HOCH und die automatische Einstellung des Geräts senkt die Belastung auf das Minimum (50W). Wenn während der Übung kein Herzrhythmus erfasst wird, erscheint die Meldung Wert Herzrhythmus ? und blink. Wenn diese Situation 60 Sekunden lang beibehalten wird, wird auf den manuellen Modus gewechselt. ANMERKUNG: Der maximale Pulswert, den eine Person niemals übersteigen sollte, heißt maximaler Herzrhythmus und nimmt mit dem Alter ab. Eine einfache Berechnungsformel besteht darin, von der Zahl 220 das Alter in Jahren abzuziehen. Damit die Übung korrekt ist, muss sie sich innerhalb des Bereichs zwischen 65% und 85% des maximalen Herzrhythmus befinden. Es wird empfohlen, den Wert von 85% nicht zu übersteigen.

SK LINE sportkoncept
43
Es wird empfohlen unterhalb von 85% des maximalen Herzrhythmus zu arbeiten. Wird kein System zur Herzrhythmusmessung verwendet, erscheint auf dem Bildschirm das Herzsymbol mit einem Fragezeichen. Erhält das Gerät auch weiterhin keine Angaben zum Herzrhythmus, wird des unterbrochen. Danach muss eine neue Programmanwahl ausgeführt werden.
P13 PROGRAMM KONSTANTER WATTWERT.-
Mit diesem Programm kann ein Leistungsniveau in Watt angewählt werden, bei dem die Übung ausgeführt werden soll. Die entwickelte Leistung (Watt) hängt von der Geschwindigkeit und der Belastung während der Übung ab. Das Gerät reguliert die Belastung, damit der Benutzer stets die gleiche Leistung erbringt, unabhängig von seinem Pedalrhythmus. Während der ersten vierzig Sekunden ist die Belastung dieses Programms programmiert, um möglichen Verletzungen vorzubeugen. Ab der vierzigsten Sekunde beginnt das Gerät den Widerstand in Abhängigkeit von dem Pedalrhythmus zu kontrollieren. Es ist ratsam, sich vor der Ausführung des Programms aufzuwärmen, so können Verletzungen vermieden werden. Wenn der Monitor eingeschaltet ist, erscheint auf dem oberen LED-Display (A) Fig.2 das Profil und der Buchstabe “M” für manuell. Um die verschiedenen vorprogrammierten Profile anzuzeigen, benutzen Sie bitte die Tasten LEVEL▲ und LEVEL▼. Wenn Sie das WATT-Programm ausgewählt haben, betätigen Sie bitte die ENTER-Taste. Auf dem Display des unteren alphanumerischen Bildschirms (B) muss der WATT-Wert (Watt) eingegeben werden, bei dem die Übung durchgeführt werden soll. Wählen Sie mit den numerischen Tasten (F) Fig.3 zwischen (25 und 400 WATT) und betätigen Sie dann ENTER. Um die Dauer zu ändern betätigten Sie bitte ENTER Das LED-Fenster zeigt: (ÜBUNGSDAUER EINGEBEN <MINUTEN>). Die Punktematrix zeigt(? 10) und die Ziffer blinkt. Betätigen Sie die numerischen Tasten, um ein zweistelligen Wert einzugeben (Werte: 10 ~ 60) . Wird ein ungeeigneter Wert eingegeben, wird ein Defaultwert angezeigt. Geben Sie eine geeignete Zahl ein und betätigen Sie zum Bestätigen und Starten des Programms ENTER. Nach der letzten Eingabe betätigen Sie ENTER, um die Werte zu akkumulieren. Der Widerstand ist Niveau 1 und wechselt nach jeder Minute auf die nächste Linie. Wenn die Geschwindigkeit (UPM) nicht ausreichend ist, zeigt die Punktematrix ( UPM↑)und geht nach 15 Sekunden auf den Pausemodus. Auf dem unteren alphanumerischen Bildschirm (B) werden Sie aufgefordert, den gewünschten WATT-Wert einzugeben, mit dem Sie die Übung durchführen wollen. Geben Sie diesen Wert über die numerischen Tasten (F) (Abb. 3) einen Wert zwischen 25 und 400 Watt ein und betätigen Sie ENTER. Wenn der Wattverbrauch während der Übung unter 25 W liegt, erscheint auf dem oberen LED-Bildschirm Fig.2 R.P.M. ↑, liegt er über 450 W, erscheint R.P.M. ↓.
AUTOMATISCHE EINSTELLUNG DER BELASTUNG.- Nach dem Start des Trainingsmodus nimmt das Programm alle “X” Sekunden eine Bewertung des WATT-Wertes vor (Der Wert “X” wird von dem Anwender in dem SWR-Programm des Monitors eingestellt). Die Methode zum Einstellen der WATT ist folgende: 1.- Während des Trainings vergleicht das Programm den tatsächlichen WATT-Wert mit dem Ziel-Watt-Wert. Wenn der tatsächliche WATT-Wert gleich oder kleiner als der Wert 75 des Ziel-WATT-Wertes ist, wird das NIVEAU des Widerstands des Gerätes automatisch in Schritten von 3 Niveaus bis zu NIVEAU 20 erhöht. 2.- Während des Trainings vergleicht das Programm den tatsächlichen WATT-Wert mit dem Ziel-Watt-Wert. Wenn der tatsächliche WATT-Wert gleich oder kleiner als 50 des Ziel-WATT-Wertes ist, wird das NIVEAU des Widerstands des Gerätes automatisch in Schritten von 2 Niveaus bis zu NIVEAU 20 erhöht. 3.- Während des Trainings vergleicht das Programm den tatsächlichen WATT-Wert mit dem Ziel-Watt-Wert. Wenn der tatsächliche WATT-Wert gleich oder kleiner als 15 des Ziel-WATT-Wertes ist, wird das NIVEAU des Widerstands des Gerätes automatisch in Schritten von 1 Niveau bis zu NIVEAU 20 erhöht. 4.- Während des Trainings vergleicht das Programm den tatsächlichen WATT-Wert mit dem Ziel-Watt-Wert. Wenn der tatsächliche WATT-Wert gleich oder größer als 15 des Ziel-WATT-Wertes ist, wird das NIVEAU des Widerstands des Gerätes automatisch in Schritten von 1 Niveau bis zu NIVEAU 1 reduziert. 5.- Während des Trainings vergleicht das Programm den tatsächlichen WATT-Wert mit dem Ziel-Watt-Wert. Wenn der tatsächliche WATT-Wert gleich oder größer als 50 des Ziel-WATT-Wertes ist, wird das NIVEAU des Widerstands des Gerätes automatisch in Schritten von 2 Niveaus bis zu NIVEAU 1 reduziert. 6.- Während des Trainings vergleicht das Programm den tatsächlichen WATT-Wert mit dem Ziel-Watt-Wert. Wenn der tatsächliche WATT-Wert gleich oder größer als 75 des Ziel-WATT-Wertes ist, wird das NIVEAU des Widerstands des Gerätes automatisch in Schritten von 3 Niveaus bis zu NIVEAU 1 reduziert.

SK LINE sportkoncept
44
ANMERKUNG: An jeder Stelle des Programms (die Zeit wird nicht gestoppt), kann das programmierte Wattniveau mit Hilfe der Tasten LEVEL▲ und LEVEL▼ geändert werden. Das programmierte Wattniveau erscheint blinkend auf dem Bildschirm. Das Gerät ist mit Handsensoren (Hand-Grip) ausgestattet, die den Herzrhythmus des Benutzers erfassen. Es ist jedoch auch mit dem telemetrischen System vereinbar, das aus einem Sender (Brustband) und einem im Monitor integrierten Empfänger besteht. Die Benutzung der Handsensoren ist sehr einfach. Diese müssen während der Ausführung der Übung lediglich angefasst werden. Warten Sie dann, bis der Herzrhythmus auf dem entsprechenden Display erscheint. Die Information zum Herzrhythmus erscheint nicht sofort, es dauert ca. 20 Sekunden, bis sie auf dem Bildschirm angezeigt wird. Das Brustband überträgt den Puls durch Kontakt mit der Brust und sendet das Signal zu dem Messgerät, das ihn dann anzeigt.
P13.- Mod. G930; G815; G818 STRECKENPROGRAMM.- Mit Hilfe dieses Programms können Sie eine zuvor eingegebene Strecke zurücklegen. Wenn der Monitor eingeschaltet ist, zeigt das obere LED-Display (A) Fig.2, das Profil und den Buchstaben “M” für manuell. Um die einzelnen vorprogrammierten Profile anzuzeigen, benutzen Sie bitte die Tasten LEVEL▲ und LEVEL▼. Nach Anwahl des Programms DIST betätigen Sie bitte ENTER. Auf dem alphanumerischen Bildschirm B erscheint die Meldung ZURÜCKZULEGENDE STRECKE EINGEBEN <0.1-99.9>. Betätigen Sie die numerischen Tasten, um die gewünschte Strecke einzugeben. Wird ein nicht geeigneter Wert eingegeben, erscheint der höhere bzw. niedrigere Wert. Geben Sie einen geeigneten Wert ein und betätigen Sie ENTER, um mit der Übung zu beginnen. Der eingegebene Wert für die Strecke erscheint auf dem alphanumerischen Bildschirm B und nimmt im Verlaufe der Übung ab. Der Widerstand hat Niveau 9 und wechselt jede Minute auf eine andere Linie. Ist die Geschwindigkeit (UPM) nicht ausreichend, zeigt die Punktematrix UPM↑ und es wird nach 15 Sekunden auf den Pause-Status gewechselt. Mit Hilfe der Tasten LEVEL▲ und LEVEL▼ kann der Widerstandswert während der Übung geändert werden. VORSICHT. Bevor Sie ein Übungsprogramm beginnen, besprechen Sie dies bitte mit Ihrem Arzt und teilen Sie ihm die Intensität des Trainings mit. Wenn Sie einen Herzschrittmacher benutzen, konsultieren Sie vor der Benutzung des Brustgurts bitte Ihren Arzt.
ERLÄUTERUNG DER SYMBOLE.- Auf dem Bildschirm können eine Reihe von Symbolen oder Begriffen erscheinen, die folgende Bedeutung haben:
Herzsymbol und Fragezeichen: Der Brustgurt wurde nicht oder nicht korrekt angelegt. Blinkendes Herzsymbol: Dieses Symbol erscheint nur in den Tests. Die höchste Pulszahl, die eine Person niemals überschreiten sollte, heißt maximaler Herzrhythmus. und nimmt mit dem Alter ab. Er lässt sich durch Abziehen des Lebensalters von 220 einfach berechnen. Damit die Übung korrekt ist, muss zwischen 65% und 85% des aximalen Herzrhythmus liegen, wobei 85% nicht überschritten werden sollen. Wenn Ihr Pulsschlag 85% des maximalen Herzrhythmus übersteigt, erscheint das Symbol des blinkenden Herzens und ein zweisekündiger Pfeifton,bis die Pulszahl wieder unter 85% Ihres maximalen Herzrhythmus absinkt. Aus Sicherheitsgründen empfehlen wir, unter 85% des maximalen Herzrhythmus zu arbeiten. *0*: Dieses Symbol erscheint in den Tests für Männer und Frauen und bedeutet, dass Sie den Test nicht korrekt ausgeführt haben (d.h., dass Sie die 75 Upm während des Tests nicht eingehalten oder den Brustgurt nicht angelegt haben). Schraubenschlüssel: Mechanische Störung. Schalten Sie das Gerät aus und nach 2 Minuten wieder ein. Die Maschine verfügt über eine automatische Störungskorrektur. Sollte das Problem weiter bestehen, setzen Sie sich bitte mit dem Kundendienst in Verbindung.

SK LINE sportkoncept
45
Sollten über den Zustand einer Komponente Zweifel bestehen, setzen Sie sich bitte mit dem (TKD) Technischen Kundendienst in Verbindung, indem Sie das Servicetelefon anrufen (siehe letzte Seite des Handbuchs). BH BEHALT SICH DAS RECHT VOR, ÄNDERUNGEN DER MODELL-ANGABEN OHRE VORHERIGE ANKÜNDIGUNG VORZUNEHMEN.
1. “WILLKOMMEN BEI HI POWER” 2. “PROFIL MIT PFEILTASTEN ANWAEHLEN” 3. “UM ZU BEGINNEN. QUICK/START BETAETIGEN” 4. “UM PROFIL ZU STARTEN. ENTER BETAETIGEN” 5. “FEHLER” 6. “TECHNISCHEN KUNDENDIENST KONSULTIEREN” 7. “ALTER EINGEBEN <10-99>”
8. “GEWICHT EINGEBEN <30-199> KG” “GEWICHT EINGEBEN <70-400> LB”
9. “DAUER DER UEBUNG EINGEBEN <10-60> MINUTEN”
10. “WATTWERT EINGEBEN <25-400>” “WATTS=”
11. “ALTER=” 12. “PULSWERT EINGEBEN <40-220>” 13. “PULS=” 14. “UM DIE UEBUNG FORTSETZEN ZU KOENNEN. PAUSE DRUECKEN. ZUM BEENDEN STOP BETAETIGEN” 15. “DAUER DER UEBUNG=” 16. “ZURUECKGELEGTE STRECKE=” 17. “DURCHSCHNITTSGESCHWINDIGKEIT=” 18. “KALORIENVERBRAUCH=”
19. “ZUM BESTAETIGEN DES GESPEICHERTEN PROFILS ENTER BETAETIGEN. ZUM MODIFIZIEREN DES PROFILS RESET BETAETIGEN.”
20. “DIE INTENSITAET DER AKTIVEN SPALTE MIT PFEILTASTEN ANWAEHLEN. UM DIE NAECHSTE SPALTE ANZUWAEHLEN. ENTER BETAETIGEN. UM AUF MANUELLEN MODUS ZU WECHSELN. RESET BETAETIGEN”
21. “VERRINGERN SIE DIE INTENSITAET DER UEBUNG. IHR HERZRHYTHMUS IST ZU SCHNELL” 22. “DAS TESTERGEBNIS LAUTET=”

SK LINE sportkoncept
46
PORTUGUÊS
INDICAÇÕES GERAIS.- Este aparato de exercício vem equipado com um gerador de corrente eléctrica, que aproveita a energia gerada pelo usuário (realizando o exercício), para alimentar o seu monitor electrónico e o seu regulador de travagem. Este ecrã monitor de é sensível ao toque; para carregar numa tecla, basta posicionar o dedo na indicação dessa tecla no ecrã. Este aparato de exercício também incorpora uma série de baterias que armazenam a energia suficiente para manter o monitor electrónico operativo durante 60 segundos depois de deixar de fazer o exercício. No caso da bateria ficar descarregada devido a alguma falha de funcionamento, esta pode voltar a carregar-se usando o adaptador que foi fornecido com o aparelho. Para a colocação em funcionamento do monitor é necessário realizar exercício sobre a máquina. ATENÇÃO: O adaptador deverá estar ligado a uma tomada apropriada. Comprove que a voltagem da sua instalação é compatível com a voltagem do adaptador que foi fornecido com a máquina. O monitor electrónico foi desenhado para ser utilizado de forma simples e intuitiva. Os textos que aparecem no ecrã inferior (B) guiarão o usuário durante a realização do exercício. No entanto, recomendamos que o preparador físico leia atentamente esta secção com a finalidade de conhecer a fundo o monitor electrónico e poder mostrar ao usuário o seu funcionamento duma forma efectiva.
IMPORTANTE: PARA UM CORRECTO FUNCIONAMENTO E LONGA DURAÇÃO DAS BATERIAS, RECOMENDAMOS RECARREGÁ-LAS COM O ADAPTADOR QUE FOI FORNECIDO AO RECEBER A MÁQUINA.
SELEÇÃO DE TIPO DE MÁQUINA.- No menu principal, pressione tanto a tecla RESET eo botão "0" durante 6 segundos. aparecer-lhe-á no ecrã alfanumérico (B) Fig.1, a palavra “FACTORY – SETTINGS”; pressione "2" e selecione o tipo de máquina E (elíptico), B / R (bicicletas / reclinada) ou S (Stepper) com chaves nível ▲ e ▼. Se desejar sair do modo personalização aperte a tecla STOP.
PERSONALIZAÇÃO DO MONITOR ELECTRÓNICO.- Para entrar no modo de personalização do monitor é necessário seguir os seguintes passos: No menu principal, pressione tanto a tecla RESET eo botão "0" durante 6 segundos. aparecer-lhe-á no ecrã alfanumérico (B) Fig.1, a palavra “FACTORY – SETTINGS”; pressione "ENTER".
1) MUDANÇA DE Km a Milhas.- Aparecer-lhe-á de forma intermitente UNITS; aperte a tecla ENTER e ficará intermitente METRIC; seleccione a medida da sua velocidade com as teclas LEVEL▲ e LEVEL▼ (METRIC / Km --ENGLISH / Milhas), aperte a tecla ENTER e voltará a ficar intermitente a palavra “UNITS”; com a tecla LEVEL▲, passe ao ponto (2 WHEELSIZE), do quadro inferior adjunto. Se desejar sair do modo personalização aperte a tecla STOP e poderá ver no display Matriz de LEDs (A) o programa manual.
2) MUDANÇA DE DISTÂNCIA POR REVOLUÇÃO.- Estando a palavra “WHEELSIZE” intermitente, aperte a tecla ENTER e ficará intermitente o algarismo entre 0 e 80; seleccione o valor com as teclas LEVEL▲ e LEVEL▼ (modelos H800; H895; G930 seleccione 80) aperte a tecla ENTER e voltará a ficar intermitente a palavra “WHEELSIZE”; com a tecla LEVEL▲, passe ao ponto (3 LANGUAGE), do quadro inferior adjunto. Se desejar sair do modo personalização aperte a tecla STOP.
3) MUDANÇA DE IDIOMA.- Estando a palavra “LANGUAGE” intermitente, aperte a tecla ENTER e ficará intermitente o idioma; seleccione o seu idioma com as teclas LEVEL▲ e LEVEL▼; aperte a tecla ENTER e voltará a ficar intermitente a palavra “LANGUAGE”; com a tecla LEVEL▲, passe ao ponto (4 Power), do quadro inferior adjunto. Se desejar sair do modo personalização aperte a tecla STOP.

SK LINE sportkoncept
47
4) ALIMENTAÇÃO AUTOGERADA OU ELÉCTRICA.- Estando a palavra Power a piscar, clique na tecla ENTER e piscará a palavra ON ou OFF; com as teclas LEVEL▲ e LEVEL▼ seleccione a opção que se mostra a piscar. A opção ON é para manter o monitor sempre aceso. Se escolheu a opção ON é necessário que a máquina esteja ligada com o adaptador à electricidade. Uma vez escolhida a opção, clique na tecla ENTER para confirmar e voltará a piscar a palavra Power; pare o exercício. Se deseja apagar o monitor nesta opção mantenha pressionadas ao mesmo tempo as teclas STOP, até que se ouça um apito; espere 45 segundos e passa à opção OFF. A opção OFF - porque a máquina é auto-gerada, o monitor por-se-á em funcionamento no momento que se comece a fazer o exercício; uma vez escolhida a opção, clique na tecla ENTER e piscará Power com a tecla LEVEL▲; passe ao ponto (5 SWR time) do quadro inferior adjunto. Uma vez validada a opção (OFF) basta deixar de fazer o exercício que manteve o monitor aceso e esperar os 45 segundos até que se apague. Se desejar sair do modo de personalização, clique na tecla STOP. 5) TEMPO DE RESISTÊNCIA NO PROGRAMA WATT (SWR TIME, Mod; H800; H895 ).- Estando a palavra SWR time intermitente, aperte a tecla ENTER e ficará intermitente o algarismo entre 0 e 60 Segundos; com as teclas LEVEL▲ e LEVEL▼ seleccione a opção que aparece intermitente; depois de ter escolhido a opção, aperte a tecla ENTER para confirmar e ficará intermitente a palavra SWR time; com a tecla LEVEL▲, passe ao ponto (6 SPR time), do quadro inferior adjunto. Se desejar sair do modo personalização, aperte a tecla STOP- 6) TEMPO DE RESISTÊNCIA NO PROGRAMA H.R.C. Estando a palavra SWR time intermitente, aperte a tecla ENTER e ficará intermitente o algarismo entre 20 e 60 Segundos; com as teclas LEVEL▲ e LEVEL▼ seleccione a opção que aparece intermitente; depois de ter escolhido a opção, aperte a tecla ENTER para confirmar e ficará intermitente a palavra SWR time; com a tecla LEVEL▲, passe ao ponto (7 Manual T), do quadro inferior adjunto. Se desejar sair do modo personalização, aperte a tecla STOP. 7) TEMPO MÁX. EXERCÍCIO.- Estando a palavra Manual T intermitente, aperte a tecla ENTER e ficará intermitente o algarismo entre 0 e 60 Minutos; com as teclas LEVEL▲ e LEVEL▼ seleccione a opção que aparece intermitente; depois de ter escolhido a opção, aperte a tecla ENTER para confirmar e ficará intermitente a palavra Manual T; com a tecla LEVEL▲, passe ao ponto (8 Text), do quadro inferior adjunto. Se desejar sair do modo personalização, aperte a tecla STOP. 8) MUDANÇA DA SAUDAÇÃO INICIAL Estando a palavra Text intermitente, aperte a tecla ENTER e ficará intermitente a palavra ON ou OFF; com as teclas LEVEL▲ e LEVEL▼ muda-se a opção que aparece intermitente. Escolhendo a palavra ON esta permitir-lhe-á mudar a mensagem da saudação inicial do monitor. Depois de ter escolhido a opção ON, aperte a tecla ENTER e poderá ver no ecrã alfanumérico (B) um cursor intermitente; com as teclas LEVEL▲ e LEVEL▼, seleccione letra a letra a mensagem da saudação inicial. Depois de ter terminado a mensagem, aperte a tecla ENTER durante uns segundos e ficará intermitente a palavra Text; com a tecla LEVEL▲, passe ao ponto (9 Sounds) do quadro inferior adjunto. Se desejar sair do modo personalização, aperte a tecla STOP.
9) MUDANÇA DE SOM.- Estando a palavra Sounds intermitente, aperte a tecla ENTER e ficará intermitente a palavra ON ou OFF; com as teclas LEVEL▲ e LEVEL▼ poderá mudar a opção que aparece intermitente; depois de ter escolhido a opção, aperte a tecla ENTER para confirmar e ficará intermitente a palavra Sounds. Aperte a tecla STOP para sair dos parâmetros personalizáveis e poderá ver no display Matriz de LEDs ( A ) o programa manual. Comece o exercício e observe se as mudanças de opções foram realizadas.

SK LINE sportkoncept
48
QUADRO DOS PARÂMETROS PERSONALIZÁVEIS Parâmetro Descrição 1) Metric Mudança da velocidade de Km / h a Milhas 2) Wheelsize Mudança da relação rpm – distância percorrida
3) Language Define o idioma no qual o monitor electrónico mostra as mensagens. Opções: Espanhol; Português; Inglês; Francês; Alemão; Holandês; Italiano
4) Power
Permite definir o modo de funcionamento do aparelho entre auto-gerador ou ligado à rede. No caso de estar no modo ON será necessário que a máquina esteja ligada à rede. Para apagar o monitor estando em modo ON só terá que manter apertada a tecla STOP durante 4 segundos. Opções: - OFF (Funcionamento com baterias) - ON (Funcionamento ligada à rede). IMPORTANTE: A máquina deverá estar ligada à rede eléctrica no caso de ter escolhido esta opção; caso contrário as baterias ficarão deterioradas, podendo deixar de servir).
5) SWR time
Estabelece a cadência de cálculo da resistência no programa de potência conste. Esta opção só está disponível nos modelos que incorporam o programa de potência constante. Opções: Valor em segundos (mínimo 20 e máximo 60)
6) SPR time Estabelece a cadência de cálculo da resistência no programa de pulsação constante. Opções: Valor em segundos (mínimo 20 e máximo 60)
7) Manual T
Estabelece um tempo máximo para a duração do exercício. Opções: - 0 (Não se estabelece um tempo máximo) - Valor em minutos do tempo máximo de duração do exercício (máximo 60)
8) Text
Opções: - OFF (Mostra-se a mensagem da saudação por defeito) ON (Permite editar a mensagem da saudação)
Permite personalizar a mensagem da saudação, incluindo, por exemplo, o nome do ginásio.
9) Sounds Habilita ou dá como não aptas as mensagem sonoras do monitor electrónico Opções:-ON (Habilitado) -OFF (Não aptas)
ELEMENTOS DO MONITOR ELECTRÓNICO (Fig.1).- O monitor electrónico está composto por duas zonas bem diferenciadas; A zona superior Fig. 2 ( A - B – C ) está a VISUALIZAÇÃO. Na zona inferior Fig. 3 ( D – F – G ) está o TECLADO.
VISUALIZAÇÃO.- Esta zona está composta por dois ecrãs. (A) Display Matriz de LEDs superior, onde se monitoriza o nível de esforço realizado no programa seleccionado em cada momento. (B) Display do Ecrã alfanumérico inferior, que guia o usuário durante a selecção e realização do exercício. O ecrã superior (A) mostrará os diferentes perfis previamente programados de esforço (programas) que podemos seleccionar e, durante o exercício, o nível de esforço que se realiza em cada momento. O ecrã alfanumérico inferior (B) encarrega-se de guiar o usuário durante a selecção do exercício a realizar e de mostrar informação sobre o exercício durante e depois da sua realização. Os LEDs indicadores (C) que se encontram por baixo do ecrã alfanumérico mostram simultaneamente a VELOCIDADE / R.P.M; TEMPO / DISTÂNCIA; CALORIAS/WATTS; PULSAÇÃO e indicam qual é a informação que se está a mostrar em cada momento do exercício.

SK LINE sportkoncept
49
Os dados que se mostram nos LEDs (C) durante a realização do exercício são os seguintes: -SPEED – VELOCIDADE: Mostra-se uma estimativa da velocidade linear à qual se deslocaria uma bicicleta com a cadência do pedalar do usuário. O valor mostra-se em quilómetros por hora (Km/h). -STEPS/MIN – VELOCIDADE: Mostra o número de passos por minuto. -RPM: Mostra-se a cadência do pedalar instantâneo durante o exercício. Indica o número de vezes que o pedalier realiza uma rotação completa num minuto (RPM). -TIME – TEMPO: Durante o exercício mostra-se o tempo transcorrido desde que este se começou ou, no caso de ter seleccionado um tempo de exercício previamente definido, o tempo que falta para acabar o exercício. O tempo aparece em minutos e segundos (mm:ss).
-DISTANCE – DISTÂNCIA: Mostra-se a distância que percorremos desde o início do exercício. A distância é calculada tendo em conta a estimativa da velocidade linear (SPEED) e as unidades são os quilómetros e hectómetros. -CALORIES – CALORIAS: Mostra-se uma estimativa das calorias que foram queimadas até esse momento. A estimativa realiza-se tendo em conta a energia que se está a realizar em cada momento e os dados de peso e idade introduzidos pelo usuário. -WATT – WATT: Mostra-se a quantidade de energia que está a ser gerada em cada momento do exercício. Este calculo é realizado tendo em conta o nível de resistência no qual se trabalha e a cadência do pedalar. A informação mostra-se em Watt. -PULSE – PULSAÇÃO: Mostra-se a frequência cardíaca do usuário, sempre que esta informação esteja acessível através dos sensores de mãos (Hand – Grip) ou da banda telemétrica de peito; quando se utilizam os dois juntos, dá-se prioridade à banda telemétrica de peito. Para mais informação sobre a frequência cardíaca, consultar a secção: Medida da pulsação; banda de peito e hand-grip.
TECLADO.- A seguir enumera-se a função de cada tecla. Ver Fig.3. O monitor electrónico inclui um teclado simples de usar. Este teclado está constituído pelas, teclas numéricas (F) e teclas função (G). - Teclas numéricas (F) .- ( 1 – 0 ) utilizam-se para introduzir os dados que o monitor solicite. - Teclas de função (G) .- reset; level▼; level▲; enter; pause; stop; quick / start. Estas teclas utilizam-se para seleccionar o exercício a realizar, introduzir os dados solicitados, controlar o nível de resistência do exercício e finalizar este último. -reset.- Tecla de anulação. Utiliza-se para apagar os dados que se introduzem no monitor no momento de seleccionar um programa.
-level▼.- Tecla para diminuir o nível de esforço. Durante a realização do exercício esta tecla diminui num ponto o grau de resistência da máquina. Durante a selecção dos perfis previamente programados utiliza-se para mostrar no ecrã o perfil anterior ao mostrado. -level▲.- Tecla de incremento nível de esforço. Durante a realização do exercício esta tecla aumenta num ponto o grau de resistência da máquina. Durante a selecção dos perfis previamente programados utiliza-se para mostrar no ecrã o perfil seguinte ao mostrado.
-enter.- Tecla de selecção e validez. Utiliza-se durante a selecção dum perfil previamente programado para seleccioná-lo, dar validez ao dados que irão introduzir-se e começar o exercício. Durante a programação do perfil do usuário também se utiliza para dar validez ao nível de esforço correspondente a cada minuto. -pause.- Tecla para pausa. Se for apertada durante a realização do exercício, este interrompe-se, detendo o cronómetro de duração do exercício. Para voltar a colocar em funcionamento o cronómetro da duração do exercício, aperte a tecla pause novamente ou volte a começar o exercício. O tempo limite do modo pausa é de 45 segundos, depois de ter transcorrido esse tempo o exercício considerar-se-á finalizado e apagar-se-á o monitor. Se estando em modo pausa, apertar a tecla STOP em exercício, este dar-se-á por finalizado.

SK LINE sportkoncept
50
-stop.- Tecla de paragem. Se for apertada durante a realização do exercício, este dar-se-á por finalizado e a resistência passará a ser a resistência mínima. Mostrar-se-á um resume com os dados do exercício e voltará ao ecrã do início. No modo Start/Ready, mantenha premida a tecla STOP durante 3 segundos e a consola mudará automaticamente para o estado de apagada emitindo um som se a opção POWER no modo de projecto estiver activada.
-quick / start.- Tecla de início imediato. Sempre que o LED da tecla estiver intermitente, ao apertar esta tecla começar-se-á o exercício em modo manual.
COLOCAÇÃO EM FUNCIONAMENTO.- Para a colocação em funcionamento do monitor, terá que estar sobre a máquina realizando o exercício com uma cadência do pedalar de 45 r.p.m. do pedalier ; ao chegar às 45 r.p.m. o monitor acende-se e terá um tempo de 60 segundos para poder programar. Também poderá ligar o adaptador que foi fornecido com a máquina a uma tomada de corrente eléctrica, se optou pôr o quadro de parâmetros personalizáveis ( passo 4 Power ) em On. Depois de ter o monitor aceso, o display de matriz de LEDs ( A ) Figura 2, mostrar-lhe-á o perfil e a letra “M” de manual e o display do ecrã alfanumérico inferior ( B ) mostrar-lhe-á a saudação de boas-vindas “BEM VINDO A HI-POWER”. Apertando a tecla QUICK / START põe-se em funcionamento o programa; em manual e apertando as teclas level▼ ou level▼, poderá aumentar ou diminuir a resistência do exercício.
INSTRUÇÕES DE FUNCIONAMENTO.-
PORTA USB.- Esta máquina possui no monitor uma porta USB (D) para a carga do celular.
MODO SLEEP: Se não se introduzir um sinal de RPM num período de 45 segundos em modo de espera, activa-se este modo. Neste modo, não se mostra nenhuma janela e deverá carregar-se na placa de pé para introduzir um sinal e reiniciar a janela. Se tiver ligado um adaptador ao bastidor, a consola não se pode pôr no modo Sleep quando a opção POWER no modo de projecto se acende. Sem adaptador, a consola pôr-se-á no modo Sleep, ainda que esteja em Aceso.
P0 MODO MANUAL.- Depois do monitor estar aceso, o display de matriz de LEDs superior (A) Fig.2, mostrar-lhe-á o perfil e a letra “M” de manual e no display do ecrã alfanumérico inferior (B) Fig.2 mostrar-lhe-á a saudação de boas-vindas “BEM VINDO A HI-POWER”. Apertando a tecla QUICK / SATRT põe-se em funcionamento o programa, em manual. O display de matriz de LEDs superior (A) Fig.2 indicar-lhe-á de forma intermitente o nível em que está a realizar exercício. Apertando as teclas level▼ ou level▲, poderá aumentar ou diminuir entre os vinte níveis de resistência do exercício. O display do ecrã alfanumérico inferior (B) Fig.2 irá mostrando-lhe cada 10 segundos alternadamente: Os valores de: A velocidade (SPEED Mod. H800; H895; Sistema Métrico Km/h, Sistema Britânico Mª/h; passos por minuto Mod. G930; degraus por minuto Mod. R250); O tempo (TIME); Calorias (CALORIES) e Pulsação (PULSE) e noutra sequência mostrar-lhe-á: r.p.m.Mod.H800; Mod.H895; numero total de pasos Mod.G930; Distância (DISTANCE); Watt (WATT) e Pulsação (PULSE). Apertando a tecla STOP, interrompe-se o programa e o display do ecrã alfanumérico inferior (B) Fig.2, informar-lhe-á sobre a média dos valores TEMPO DE EXERCÍCIO; DISTÂNCIA PERCORRIDA; VELOCIDADE MÉDIA; CALORIAS CONSUMIDAS, que realizou durante o exercício, mostrando-os duas vezes cada cinco segundos. Se durante o tempo em que transcorre a informação dos valores médios, não se toca nenhuma tecla, não se faz exercício e aperta-se a tecla STOP, passar-se-á ao programa manual.

SK LINE sportkoncept
51
MODO PROGRAMAS.- O monitor possui: 1 programa de perfil MANUAL; 8 PROGRAMAS com perfis previamente programados; um perfil programável pelo usuário (USER); programas TESTE masculino e TESTE feminino; programa de ritmo cardíaco constante (H. R. C) e programas de watts constantes (mod. H800 / H895) / programa de controlo de distância (mod. G930). Ver gráficos dos programas previamente programados nas páginas finais deste manual.
P1 – P8 PROGRAMAS DE GRÁFICOS.-
Estando o monitor aceso, o display de matriz de LEDs superior (A) Fig.2, mostrar-lhe-á o perfil e a letra “M” de anual. Para poder ver os diferentes perfis previamente programados utilizam-se as teclas LEVEL� e LEVEL▼. Depois de ter seleccionado um perfil em concreto, aperte a tecla ENTER. O display de matriz de LEDs superior (A) pedir-lhe-á a idade entre (10 e 99 anos); seleccione a sua idade com as teclas numéricas (F) Fig.3; aperte ENTER. A seguir, pedir-lhe-á o peso entre (30 e 199 Kg). seleccione o seu peso com as teclas numéricas (F) Fig.3; aperte ENTER. A seguir, pedir-lhe-á o tempo de duração do exercício entre (10 e 60 minutos); seleccione o tempo com as teclas numéricas (F) Fig.3; aperte ENTER e começará o seu exercício. Dentro de cada perfil previamente programado o usuário possui quatro níveis de dificuldade diferentes ( L1 – L4 ); para seleccionar qualquer um deles só terá que utilizar as teclas LEVEL� e LEVEL▼ durante a realização do exercício. Depois de ter terminado o programa no qual esteve a realizar o exercício, o monitor ter-lhe-á calculado a média dos valores nos quais realizou o exercício e estes aparecerão no ecrã alfanumérico inferior (B) Fig.2. Apertando a tecla STOP interromper-se-á o programa e o display do ecrã alfanumérico inferior (B) Fig.2, informar-lhe-á da média dos valores TEMPO DE EXERCÍCIO; DISTÂNCIA PERCORRIDA; VELOCIDADE MÉDIA; CALORIAS CONSUMIDAS, que foram realizados durante o exercício, mostrando-os duas vezes cada cinco segundos. Se durante o tempo em que transcorre a informação dos valores médios, não se toca nenhuma tecla, não se faz exercício e aperta-se a tecla STOP, passar-se-á ao programa manual.
P9 PROGRAMA USUÁRIO ( USER ).-
Estando o monitor aceso, o display de matriz de LEDs superior (A) Fig.2, mostrar-lhe-á o perfil e a letra “M” do manual; para poder ver os diferentes perfis previamente programados utilizam-se as teclas LEVEL▲ e LEVEL▼. Depois de ter seleccionado o programa 9 (USER), aperte a tecla ENTER. No display de matriz de LEDs (A) Fig.2 pedir-lhe-á a idade entre (10 e 99 anos) seleccione a sua idade com as teclas numéricas (F) Fig.3, (se introduzir um valor fora dos dois algarismos, aparecer-lhe-á o valor mais próximo). Aperte ENTER. A seguir, pedir-lhe-á o peso entre (30 e 199 Kg.); seleccione o seu peso com as teclas numéricas (F) Fig.3 e aperte ENTER. A seguir, pedir-lhe-á o tempo de duração do exercício entre (10 e 60 minutos); seleccione o tempo com as teclas numéricas (F) e aperte ENTER; a seguir aperte a tecla RESET e poderá começar a desenhar o perfil de resistência que deseja no display de matriz de LEDs (A). O perfil a desenhar está subdividido em 21 passos; os três primeiros passos são de aquecimento e só chegam ao valor limitado de quatro, para evitar possíveis lesões; o resto até 21 chegam ao máximo; para seleccionar o primeiro passo, aperte a tecla RESET; as teclas LEVEL▲ e LEVEL▼; a seguir aperte a tecla ENTER e assim sucessivamente até completar o gráfico do programa que deseja.Se enganou-se ao gravar algum passo, aperte a tecla RESET e voltará ao passo anterior. A seguir, aperte a tecla ENTER e comece o exercício com o perfil que desenhou. Uma vez tendo terminado o programa que realizou o exercício, o monitor terá calculado a média dos valores com que realizou o exercício e mostrar-los-á no ecrã alfanumérico inferior (B) Fig.2. Apertando a tecla STOP interromper-se-á o programa e o display do ecrã alfanumérico inferior (B) Fig.2, informar-lhe-á da média dos valores TEMPO DE EXERCÍCIO; DISTÂNCIA PERCORRIDA; VELOCIDADE MÉDIA; CALORIAS CONSUMIDAS, que foram realizados durante o exercício, mostrando-os duas vezes cada cinco segundos. Se durante o tempo em que transcorre a informação dos valores médios, não se toca nenhuma tecla, não se faz nenhum exercício ou se aperta a tecla STOP, passar-se-á ao programa manual. NOTA: Os três primeiros passos do programa são de aquecimento com uns níveis de resistência baixos; desta maneira evitaremos qualquer tipo de lesões.

SK LINE sportkoncept
52
P10 – P11 PROGRAMAS DO TESTE HOMEM – MULHER.- O objectivo do teste é o de valorar a forma física do usuário. Para isso deverá manter uma cadência do pedalar entre as 70 e as 80 revoluções por minuto (R.P.M.) durante 5 minutos. A diferença entre os programas de homem e mulher está nos Watts; o valor para os homens foi seleccionado 150 W e o programa de mulheres 100 W: Estando o monitor aceso, o display de matriz de LEDs superior (A) Fig.2, mostrar-lhe-á o perfil e a letra “M” de manual. Para poder ver os diferentes perfis previamente programados utilizam-se as teclas LEVEL▲ e LEVEL▼. Depois de ter seleccionado o programa TESTE Homem ou TESTE Mulher, aperte a tecla ENTER. A seguir, o display do Ecrã alfanumérico inferior (B) Fig.2 pedir-lhe-á a idade (entre os 10 e os 99 nos ). Seleccione a sua idade com as teclas numéricas (F) Fig.3 e aperte ENTER. No display de matriz de LEDs superior (A) Fig.2, aparecerá um coração intermitente; coloque as suas mãos sobre os sensores de pulsação (hand–grip) situados no guiador ou no caso de possuir a banda telemétrica para medir a pulsação, coloque-a no peito. Comece o TESTE com uma cadência do pedalar entre os 70 e os 80 R.P.M. durante 5 minutos; no caso de diminuir o número de R.P.M. aparecerá no display R.P.M.�; se ultrapassar as revoluções aparecerá nos display R.P.M.�; se a cadência se mantiver entre os 70 e os 80 r.p.m. aparecerá no display OK. Ao terminarem os 5 minutos de duração do teste, aparecerá uma avaliação que vai do 1 (bastante deficiente) ao 5 (excelente). Também poderá aparecer uma avaliação de 0 que significa que o teste não foi realizado de forma correcta (não foi respeitada a cadência do pedalar de 75 r.p.m. ou a medição do ritmo cardíaco não foi realizada de forma correcta). NOTA: É obrigatório, para poder realizar o teste, utilizar a medição do ritmo cardíaco, usando, para isso, os sensores manuais (hand-grip) ou a banda do peito. Será conveniente realizar um pequeno aquecimento antes de realizar o teste. Isto evitará lesões. O número máximo de pulsações que uma pessoa nunca deve ultrapassar denomina-se ritmo máximo e este diminui com a idade. Uma forma simples de calculá-lo é a de diminuir a 220 a idade em anos. O exercício, para que seja correcto, deverá manter-se entre os 65% e os 85% do ritmo cardíaco máximo e recomendamos não ultrapassar os 85%. Quando as suas pulsações ultrapassem os 85% do ritmo cardíaco máximo, aparecerá um coração intermitente e um apito durante 2 segundos até que as suas pulsações desçam dos 85% do seu ritmo cardíaco máximo. Recomendamos trabalhar por baixo dos 85% do ritmo cardíaco máximo por razões de segurança.
P12 PROGRAMA DO RITMO CARDÍACO CONSTANTE ( H R C ).- Será conveniente realizar um pequeno aquecimento antes de realizar o teste. Isto evitará possíveis lesões. Este programa permite fazer exercício a um ritmo cardíaco (entre os 65% e os 85% do ritmo cardíaco normal) e a máquina adaptará o nível de resistência para conseguir que em todo o momento o usuário mantenha o ritmo cardíaco no nível seleccionado. Será obrigatório utilizar a medição do ritmo cardíaco, usando para isso a banda telemétrica de pulsação para o peito, não podendo ultrapassar 85% do ritmo cardíaco máximo. Estando o monitor aceso, o display de matriz de LEDs superior (A) Fig.2, mostrar-lhe-á o perfil e a letra “M” do manual; para poder ver os diferentes perfis previamente programados utilizam-se as teclas LEVEL▲ e LEVEL▼. Depois de ter seleccionado o programa HRC, aperte a tecla ENTER. Carregue em ENTER para modificar o ritmo cardíaco objectivo e a janela LED mostrará (INTRODUZA CONSIGNA DE PULSAÇÃO <40-220>). Carregue nas teclas numéricas e a janela LED mostrará (PULSAÇÃO= xxx) e piscarão os valores introduzidos. Carregue nas teclas numéricas para modificar e introduzir um número de três dígitos (valores: 40 ~ 220). Se se introduzir um número inadequado, mostrar-se-á o número maior ou mais pequeno. Introduza um número adequado e carregue em ENTER para confirmar. Carregue em ENTER para modificar o tempo e a janela LED mostrará (INTRODUZA O TEMPO DE EXERCÍCIO <MINUTOS>). A matriz de pontos mostrará ( ? 10 ) e piscará o seu número. Carregue nas teclas numéricas para modificar e introduzir um número de dois dígitos (valores: 10 ~ 60). Se se introduzir um número inadequado, aparecerá o número por defeito. Introduza um número adequado e carregue em ENTER para confirmar e iniciar o programa. Após finalizar o último ajuste, acumulam-se todos os valores. A resistência é Nível 1 e muda a linha seguinte a cada minuto. Se a velocidade (RPM) não for suficiente, a matriz de pontos mostrará (RPM�) e passará ao modo de pausa depois de 15 segundos.

SK LINE sportkoncept
53
Comece o exercício com uma cadência do pedalar entre os 70 e os 80 R.P.M.; coloque as suas mãos sobre os sensores de pulsação (hand-grip) situados no guiador ou no caso de possuir a banda telemétrica para medir a pulsação, coloque-a no peito; no caso duma diminuição do número de R.P.M. aparecerá no display de matriz dos LEDs superior (A) Fig.2, R.P.M.� e se ultrapassar as revoluções aparecer-lhe-á no display R.P.M.�. Nos três primeiros minutos este programa tem um esforço programado para evitar qualquer tipo de lesões. A partir do terceiro minuto, o computador adequa automaticamente o esforço de forma a manter a pulsação á volta do valor previamente programado.
REGULAÇÃO AUTOMÁTICA DE ESFORÇO.- Ao iniciar o exercício, a máquina ajusta o nível de resistência para o mínimo (50 W) até que se realize a primeira medição de pulsação. Uma vez detectada a pulsação, o programa realiza uma valoração do ritmo cardíaco a cada X segundos (Estes segundos são variáveis entre 20 e 60, dentro do programa SPR). A regulação do esforço de acordo com as pulsações é indicada nos passos seguintes. 1.- RITMO CARDÍACO OBJECTIVO maior que RITMO CARDÍACO REAL: Quando a diferença entre o RITMO CARDÍACO OBJECTIVO e o RITMO CARDÍACO REAL for igual ou superior a 15 P.P.M., a REGULAÇÃO AUTOMÁTICA DO ESFORÇO efectuar-se-á aumentando de 20 em 20 Watts. Quando esta diferença for inferior a 15 P.P.M., a regulação passará a realizar-se de 10 em 10 Watts, até ajustar ambos ritmos cardíacos. 2.- RITMO CARDÍACO REAL maior que RITMO CARDÍACO OBJECTIVO: - Quando a diferença entre o RITMO CARDÍACO REAL e o RITMO CARDÍACO OBJECTIVO for igual ou superior a 15 P.P.M., a REGULAÇÃO AUTOMÁTICA DO ESFORÇO efectuar-se-á diminuindo de 20 em 20 Watts. Quando esta diferença for inferior a 15 P.P.M., a regulação passará a realizar-se de 10 em 10 Watts, até ajustar ambos ritmos cardíacos. - Quando a diferença entre o RITMO CARDÍACO REAL e o RITMO CARDÍACO OBJECTIVO for igual ou superior a 30 P.P.M., o display do Ecrã alfanumérico inferior ( B ) mostrar-lhe-á a frase DIMINUA A INTENSIDADE DO EXERCÍCIO, O SEU RITMO CARDÍACO É DEMASIADO ELEVADO e a regulação automática da máquina diminuirá o esforço ao mínimo (50 W). Se durante o exercício não for detectado o ritmo cardíaco, aparecerá Algarismo do ritmo cardíaco ? de forma intermitente; se esta situação se mantiver durante 60 segundos, passar-se-á ao modo manual. NOTA: O número máximo de pulsações que uma pessoa nunca deve ultrapassar denomina-se ritmo cardíaco máximo e este diminui com a idade. Uma forma simples de calculá-lo é a de diminuir a 220 a idade em anos. O exercício, para que seja correcto, deverá manter-se entre os 65% e os 85% do ritmo cardíaco máximo e recomendamos não ultrapassar os 85%. Recomendamos trabalhar por baixo dos 85% do ritmo cardíaco máximo por razões de segurança. Se não for usado um sistema para medir o ritmo cardíaco, no ecrã acender-se-á o símbolo do coração e uma interrogação; se a máquina continuar sem receber informação do ritmo cardíaco o programa parará e será necessário realizar uma nova selecção do programa.
P13 PROGRAMA DE WATTS CONSTANTES. Este programa permite seleccionar o nível de potência em (watts) no qual deseja realizar o exercício. A potência desenvolvida (watts) depende da velocidade e do esforço ao qual se realiza o exercício. A máquina encarregar-se-á de regular o nível de esforço de forma que o usuário sempre desenvolva a mesma potência independentemente do nível de cadência do seu pedalar. Nos quarenta primeiros segundos este programa tem um esforço programado para evitar qualquer tipo de lesões. A partir do segundo quarenta, a máquina começa a controlar a resistência em função da cadência do pedalar. Será conveniente realizar um pequeno aquecimento antes de realizar o programa. Isto evitará lesões. Estando o monitor aceso, o display de matriz de LEDs superior (A) Fig.2, mostrar-lhe-á o perfil e a letra “M” do manual; para poder ver os diferentes perfis previamente programados utilizam-se as teclas LEVEL▲ e LEVEL▼. Depois de ter seleccionado o programa WATT, aperte a tecla ENTER. No display do ecrã alfanumérico inferior (B), será pedido o valor dos WATT com que deseja fazer o exercício. Seleccione com as teclas numéricas (F) Fig.3 entre (25 e 400 WATT Watts) e carregue em ENTER. Carregue em ENTER para modificar o tempo e a janela LED mostrará (INTRODUZA O TEMPO DE EXERCÍCIO <MINUTOS>). A matriz de pontos mostrará ( ? 10 ) e piscará o seu número.

SK LINE sportkoncept
54
Carregue nas teclas numéricas para modificar e introduzir um número de dois dígitos (valores: 10 ~ 60). Se se introduzir um número inadequado, aparecerá o número por defeito. Introduza um número correcto e carregue em ENTER para confirmar e iniciar o programa. Após finalizar o último ajuste, carregue em Enter para acumular todos os valores. A resistência é Nível 1 e muda para a linha seguinte a cada minuto. Se a velocidade (RPM) não for suficiente, a matriz de pontos mostrará ( RPM�) e passará para o modo de pausa depois de 15 segundos. O display do Ecrã alfanumérico inferior (B) pedir-lhe-á o valor de WATT (Watts) ao qual deseja fazer o exercício. Seleccione com as teclas numéricas (F) Fig.3 entre (25 e 400 WATT) e aperte ENTER. Se ao realizar o exercício o consumo de Watts for inferior a 25 W, aparecerá no display de matriz de LEDs superior (A) Fig.2, R.P.M� e se for superior a 450 W, aparecerá R.P.M.�.
REGULAÇÃO AUTOMÁTICA DE ESFORÇO.- Após iniciar o modo de treino, o programa realizará uma estimativa dos WATT durante cada “X” segundos (O valor “X” é ajustado pelo utilizador no programa SWR incorporado no monitor). O método de ajuste dos WATT mostra-se do modo seguinte: 1.- Durante o treino, o programa comparará o valor em WATT real com o valor WATT objectivo. Se o valor dos WATT real for menor ou igual ao valor 75, nos WATT objectivo,o NÍVEL de resistência da máquina aumentará automaticamente de 3 em 3 níveis, até ao NÍVEL 20. 2.- Durante o treino, o programa comparará o valor em WATT real com o valor WATT objectivo. Se o valor dos WATT real for menor ou igual a 50, nos WATT objectivo, o NÍVEL de resistência da máquina aumentará automaticamente de 2 em 2 níveis até ao NÍVEL 20. 3.- Durante o treino, o programa comparará o valor em WATT real com o valor WATT objectivo. Se o valor dos WATT real for menor ou igual a 15, nos WATT objectivo,o NÍVEL de resistência da máquina aumentará automaticamente de 1 em 1 nível até ao NÍVEL 20. 4.- Durante o treino, o programa comparará o valor em WATT real com o valor WATT objectivo. Se o valor dos WATT real é maior ou igual a 15, nos WATT objectivo,o NÍVEL de resistência da máquina reduzir-se-á automaticamente de 1 em 1 nível até ao NÍVEL 1. 5.- Durante o treino, o programa comparará o valor em WATT real com o valor WATT objectivo. Se o valor dos WATT real for maior ou igual a 50, nos WATT objectivo,o NÍVEL de resistência da máquina reduzir-se-á automaticamente de 2 em 2 níveis até NÍVEL 1. 6.- Durante o treino, o programa comparará o valor em WATT real com o valor WATT objectivo. Se o valor dos WATT real for maior ou igual a 75, nos WATT objectivo,o NÍVEL de resistência da máquina reduzir-se-á automaticamente de 3 em 3 níveis até NÍVEL 1. NOTA: Em qualquer momento do programa (o tempo não parará) poderá variar-se o nível de watts programado, utilizando para isso as teclas LEVEL▲ e LEVEL▼. O nível de watts programado aparecerá no display de forma intermitente. A máquina vem equipada com sensores manuais (hand-grip) para a captação do ritmo cardíaco do usuário; no entanto, também é compatível com o sistema telemétrico baseado num transmissor (banda de peito) e um receptor incluído no monitor electrónico. A utilização dos sensores manuais é muito simples; só terá que agarrá-los durante a realização do exercício e esperar que o ritmo cardíaco apareça no display habilitado para tal fim. A informação do ritmo cardíaco não aparece de forma instantânea; será necessário esperar uns 20 segundos antes de que esta apareça no ecrã. A banda do peito transmite a pulsação por contacto com o peito e envia o sinal ao relógio que a mostra.
P13.- Mod. G930; G815; G818 PROGRAMA DE CONTROLO DE DISTÂNCIA.- Este programa permite-lhe percorrer uma distância determinada previamente seleccionada Estando o monitor aceso, aparecerá o display de matriz de LEDs superior (A) Fig.2, o perfil e a letra “M” de manual; para visualizar os diferentes perfis pré-programados, utilizam-se as teclas LEVEL▲ e LEVEL▼. Uma vez seleccionado o programa DIST, carregue na tecla ENTER. No ecrã alfanumérico B, aparecerá a mensagem INTRODUZA DISTÂNCIA A PERCORRER <0.1-99.9>. Carregue nas teclas numéricas para introduzir a distância desejada. Se se introduzir um número inadequado, mostrar-se-á o número maior ou mais pequeno. Introduza um número adequado e carregue em ENTER para começar o exercício. O valor da distância introduzido aparece no ecrã alfanumérico B e vai

SK LINE sportkoncept
55
diminuindo à medida que se faz exercício. A resistência é Nível 9 e muda na linha seguinte a cada minuto. Se a velocidade (RPM) não for suficiente, a matriz de pontos mostrará (RPM�) e passará ao modo de pausa depois de 15 segundos. Utilizando as teclas LEVEL▲ e LEVEL▼ pode modificar o valor da resistência durante o exercício. PRECAUÇÃO. Antes de começar qualquer programa de exercício, deverá consultar o seu médico e comunicar-lhe a intensidade do exercício. Se utiliza um marca-passos não deverá utilizar a banda do peito até ter consultado o seu médico.
SIGNIFICADO DOS SÍMBOLOS.- No ecrã poderão aparecer uma serie de símbolos ou de palavras com o seguinte significado: Símbolo do coração e uma interrogante: Não foi colocada a banda do peito ou não foi colocada adequadamente. Símbolo do coração intermitente: Este símbolo só aparecerá nos testes. O número máximo de pulsações que uma pessoa nunca deverá ultrapassar denominase ritmo máximo e este diminui com a idade. Uma simples fórmula para calculálo será subtrair a 220 a sua idade em anos.O exercício,para que seja correcto, deverá manterse entre os 65 e os 85 % do ritmo cardíaco máximo e recomendase não ultrapassar os 85%.Quando as suas pulsações ultrapassem os 85 % do ritmo cardíaco máximo, aparecerá um coração intermitente e um sinal sonoro durante 2 segundos até que as suas pulsações desçam dos 85 % do seu ritmo cardíaco máximo. Recomendase trabalhar por baixo dos 85% do ritmo cardíaco máximo por razões de segurança. *0*:
Este símbolo aparece nos testes masculino e feminino e significa que realizou mal o teste (isto é, não realizou o teste a 75 r.p.m. ou não colocou a banda do peito). Símbolo de Chave fixa: Avaria mecânica. Apagar a máquina e acendêla passados 2 minutos.A máquina possui um sistema de correcção de avarias automático,no entanto, se o problema persiste, ponhase em contacto como serviço técnico.
Para qualquier consulta, não hesite em contactar com o S.A.T - Serviço de Assistência Técnica - , telefonando para o serviço de apoio ao cliente (ver página final do presente manual). BH RESERVA O DIREITO DE MODIFICAR AS ESPECIFICAÇÕES DOS SEUS PRODUTOS SEM AVISAR PREVIAMENTE.
1. “BENVINDO A HI POWER” 2. “CARREGUE NAS SETAS PARA SELECCIONAR O PERFIL” 3. “CARREGUE INICIO/START PARA COMECAR” 4. “CARREGUE INSERIR PARA INICIAR O PERFIL” 5. “ERRO” 6. “CONSULTE O SERVICO TECNICO” 7. “INSIRA A SUA IDADE <10-99>”
8. “INSIRA O SEU PESO <30-199> KG” “INSIRA O SEU PESO <70-440> LB”
9. “INSIRA O TEMPO DE EXERCICIO <10-60> MINUTOS”
10. “INSIRA O REGISTO DE WATTS <25-400>” “WATTS=”
11. “IDADE=” 12. “INSIRA O REGISTO DE PULSO <40-220>” 13. “PULSO=” 14. “CARREGUE PAUSA PARA CONTINUAR O EXERCICIO. CARREGUE EM STOP PARA PARAR” 15. “TEMPO DE EXERCICIO=” 16. “DISTANCIA PERCORRIDA=” 17. “VELOCIDADE MEDIA=” 18. “CALORIAS CONSUMIDAS=”
19. “CARREGUE INSERIR PARA ACEITAR O PERFIL MEMORIZADO. CARREGUE RESET/REINICIAR PARA MODIFICAR O PERFIL”
20. “UTILIZE AS TECLAS PARA SELECCIONAR A INTENSIDADE PARA A COLUNA ACTIVA. CARREGUE INSERIR PARA PASSAR PARA A COLUNA SEGUINTE. CARREGUE RESET/REINICIAR PARA VOLTAR AO MODO MANUAL.”
21. “DIMINUA A INTENSIDADE DO EXERCICIO, O SEU RITMO CARDIACO E DEMASIADO ELEVADO” 22. “O RESULTADO DO TESTE E”

SK LINE sportkoncept
56
ITALIANO
INDICAZIONI GENERALI.- Quest’apparecchio per gli esercizi è dotato di un generatore a corrente elettrica, che approfitta l’energia sviluppata dall’utente (mentre esegue l’esercizio), per alimentare il monitor elettronico ed il regolatore di frenata allo stesso tempo. Lo schermo del presente monitore è tattile per cui per selezionare un tasto, si posiziona il dito sul segnale del tasto relativo sullo schermo. Quest’attrezzo per gli esercizi, è dotato anche di una serie di batterie che immagazzinano l’energia sufficiente a mantenere il monitor elettronico operativo durante 60 secondi dopo aver terminato di eseguire l’esercizio. Nel caso in cui la batteria si esaurisca per un eventuale guasto di funzionamento, questa può essere ricaricata con l’adattatore che si fornisce con l’attrezzo. Per avviare il monitor si deve realizzare un esercizio sulla macchina.
ATTENZIONE: L’adattatore deve essere collegato ad una presa appropriata. Assicurasi che il voltaggio dell’insta-llazione sia compatibile con il voltaggio dell’adattatore che si fornisce con la macchina. Il monitor elettronico è progettato per essere utilizzato in modo semplice ed intuitivo. I testi che appaiono sullo schermo inferiore (B) guideranno l’utente durante la realizzazione dell’esercizio. Nonostante ciò, si raccomanda l’allenatore di leggere attentamente questa sezione per conoscere a fondo il monitor elettronico e mostrare all’utente il suo funzionamento in modo effettivo.
IMPORTANTE: PER UN BUON FUNZIONAMENTO E DURATA DELLE BATTERIE, SI RACCOMANDA DI RICARICARLE CON L’ADATTATORE FORNITO INSIEME ALLA MACCHINA.
SELEZIONE TIPO MACCHINA -. Dal menu principale, premere contemporaneamente il tasto RESET e il tasto "0" per 6 secondi. Apparirà sullo schermo alfanumerico (B) Fig.1, la parola “FACTORY – SETTINGS”, premere il tasto "2" e selezionare il tipo di macchina E (ellittica), B / R (Bike / reclinata) o S (Stepper) con tasti LIVELLO▲ e Se si vuole uscire dal sistema personalizzazione premere il tasto STOP.
PERSONALIZZAZIONE DEL MONITOR ELETTRONICO.- Per entrare nella modalità di personalizzazione del monitor è necessario seguire i seguenti passi: Dal menu principale, premere contemporaneamente il tasto RESET e il tasto "0" per 6 secondi. Apparirà sullo schermo alfanumerico (B) Fig.1, la parola “FACTORY – SETTINGS”, premere il tasto "ENTER". 1) CAMBIO di Km a Miglia.- Una volta acceso il monitor apparirà sullo schermo alfanumerico (B) Fig.1, la parola “FACTORY – SETTINGS”, premere il tasto ENTER ed apparirà lampeggiando UNITS, premere il tasto ENTER e lampeggerà METRIC, selezionare il grado della velocità preferita con i tasti LEVEL▲ e LEVEL� (METRIC / Km. -- ENGLISH / Miglia) premere il tasto ENTER e lampeggerà di nuovo la parola “UNITS”, con il tasto LEVEL▲, passare al punto (2 WHEELSIZE), nel quadro inferiore aggiunto. Se si desidera uscire dal sistema personalizzazione premere il tasto STOP e si visualizzerà sul display Matrice a LEDs (A) il programma manuale.
2) CAMBIO DELLA DISTANZA PER RIVOLUZIONE.- Se la parola “WHEELSIZE” lampeggia, premere il tasto ENTER e lampeggerà la cifra tra 0 e 80, selezionare il valore con i tasti LEVEL▲ e LEVEL▼ (i modelli H800; H895; G930 selezionare 80) premere il tasto ENTER e lampeggerà di nuovo la parola “WHEELSIZE”, con il tasto LEVEL▲, passare la punto (3 LANGUAGE), del quadro inferiore aggiunto. Se si vuole uscire dal sistema personalizzazione premere il tasto STOP.
3) CAMBIO LINGUA.- Se la parola “LANGUAGE” lampeggia, premere il tasto ENTER e lampeggerà la lingua, selezionare la lingua con i tasti LEVEL▲ e LEVEL▼, premere il tasto ENTER e lampeggerà di nuovo la parola “LANGUAGE”, con il tasto LEVEL▲, passare al punto (4 Power), del quadro inferiore aggiunto Se si desidera uscire dal sistema personalizzazione premere il tasto STOP.

SK LINE sportkoncept
57
4) ALIMENTAZIONE AUTOGENERATA O ELETTRICA. Mentre lampeggia la parola Power, premere il tasto ENTER e lampeggerà la parola ON od OFF, con i tasti LEVEL▲ y LEVEL▼selezionare l’opzione che sta lampeggiando. L’opzione ON è per mantenere il monitor sempre acceso. Se si è scelta l’opzione ON è necessario che la macchina sia inserita insieme all’adattatore alla rete elettrica una volta scelta l’opzione premere il tasto ENTER per confermare e tornerà a lampeggiare la parola Power, terminate con l’esercizio. Se desiderate spegnere il monitor di questa opzione mantenere premute allo stesso tempo i tasti STOP, finché non si ascolta un suono, attendere 45 secondi e passare all’opzione OFF. L’opzione OFF essendo la macchina autogenerata il monitor inizierà a funzionare nel momento in cui s’inizi a realizzare l’esercizio, una volta scelta l’opzione premere il tasto ENTER e vi lampeggerà Power con il tasto LEVEL▲, passare al punto (5 SWR time), del quadro inferiore aggiunto. Una volta convalidata l’opzione (OFF) sarà sufficiente terminare di fare l’esercizio che ha mantenuto il monitor acceso ed attendere i 45 secondi finché questi si spenga. Se desiderate uscire dalla modalità di personalizzazione premere il tasto STOP. 5) TEMPO DI RESISTENZA NEL PROGRAMMA WATT (SWR TIME, Mod; H800; H895 ) Mentre la parola SWR time lampeggia, premere il tasto ENTER e lampeggerà la cifra tra 0 e 60 Secondi, con i tasti LEVEL▲ e LEVEL▼ selezionare l’opzione che appare lampeggiando, una volta scelta l’opzione premere il tasto ENTER per confermare e lampeggerà la parola SWR time, con il tasto LEVEL▲, passare al punto (6 SPR time), del quadro inferiore aggiunto. Se si desidera uscire dal sistema personalizzazione premere il tasto STOP. 6) TEMPO DI RESISTENZA NEL PROGRAMMA H.R.C. Mentre la parola SPR time lampeggia, premere il tasto ENTER e lampeggerà la cifra tra 20 e 60 Secondi, con i tasti LEVEL▲ e LEVEL▼ selezionare l’opzione che appare lampeggiando, una volta scelta l’opzione premere il tasto ENTER per confermare e lampeggerà la parola SPR time, con il tasto LEVEL▲, passare al punto (7 SPR T), del quadro inferiore aggiunto. Se si desidera uscire dal sistema personalizzazione premere il tasto STOP. 7) TEMPO MAX. ESERCIZIO.- Mentre la parola Manual T. lampeggia, premere il tasto ENTER e lampeggerà la cifra tra 0 e 60 Secondi, con i tasti LEVEL▲ e LEVEL▼ selezionare l’opzione che appare lampeggiando, una volta scelta l’opzione premere il tasto ENTER per confermare e lampeggerà la parola Manual T., con il tasto LEVEL▲, passare al punto (8 Text), del quadro inferiore aggiunto. Se si desidera uscire dal sistema personalizzazione premere il tasto STOP. 8) CAMBIO DEL SALUTO INIZIALE.- Se la parola Text lampeggia, premere il tasto ENTER e lampeggerà la parola ON o OFF, con i tasti LEVEL▲ e LEVEL▼ si cambia l’opzione che lampeggia. Scegliendo la parola ON si permette cambiare il messaggio di saluto iniziale del monitor. Una volta scelta l’opzione ON premere il tasto ENTER e si visualizzerà sullo schermo alfanumerico (B) un cursore lampeggiante, con i tasti LEVEL▲ e LEVEL▼, selezionare lettera per lettera il messaggio di saluto iniziale. Una volta che il messaggio è stato completato premere il tasto ENTER durante alcuni secondi e lampeggerà la parola Text, con il tasto LEVEL▲, passare al punto (9 Sounds) del quadro inferiore aggiunto. Se si desidera uscire dal sistema personalizzazione premere il tasto STOP. 9) CAMBIO DEL SUONO.- Mentre la parola Sounds lampeggia, premere il tasto ENTER e lampeggerà la parola ON o OFF, con i tasti LEVEL▲ e LEVEL▼ si cambia l’opzione che lampeggia, una volta scelta l’opzione premere il stasto ENTER per confermare e lampeggerà la parola Sounds. Premere il tasto STOP per uscire dai parametri personalizzabili e si visualizzerà sul display Matriz a LEDs (A) il programma manuale. Iniziare l’esercizio ed osservare che i cambi di opzioni si sono realizzati.
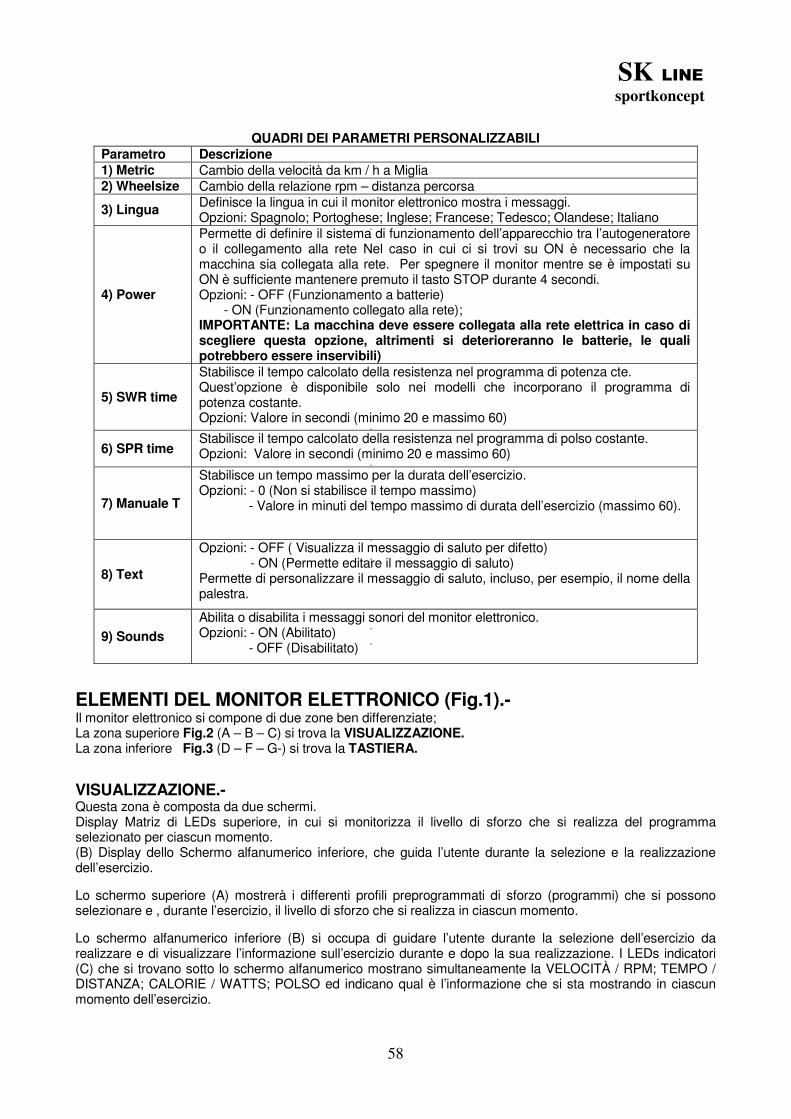
SK LINE sportkoncept
58
QUADRI DEI PARAMETRI PERSONALIZZABILI Parametro Descrizione 1) Metric Cambio della velocità da km / h a Miglia 2) Wheelsize Cambio della relazione rpm – distanza percorsa
3) Lingua Definisce la lingua in cui il monitor elettronico mostra i messaggi. Opzioni: Spagnolo; Portoghese; Inglese; Francese; Tedesco; Olandese; Italiano
4) Power
Permette di definire il sistema di funzionamento dell’apparecchio tra l’autogeneratore o il collegamento alla rete Nel caso in cui ci si trovi su ON è necessario che la macchina sia collegata alla rete. Per spegnere il monitor mentre se è impostati su ON è sufficiente mantenere premuto il tasto STOP durante 4 secondi. Opzioni: - OFF (Funzionamento a batterie) - ON (Funzionamento collegato alla rete); IMPORTANTE: La macchina deve essere collegata alla rete elettrica in caso di scegliere questa opzione, altrimenti si deterioreranno le batterie, le quali potrebbero essere inservibili)
5) SWR time
Stabilisce il tempo calcolato della resistenza nel programma di potenza cte. Quest’opzione è disponibile solo nei modelli che incorporano il programma di potenza costante. Opzioni: Valore in secondi (minimo 20 e massimo 60)
6) SPR time Stabilisce il tempo calcolato della resistenza nel programma di polso costante. Opzioni: Valore in secondi (minimo 20 e massimo 60)
7) Manuale T
Stabilisce un tempo massimo per la durata dell’esercizio. Opzioni: - 0 (Non si stabilisce il tempo massimo) - Valore in minuti del tempo massimo di durata dell’esercizio (massimo 60).
8) Text
Opzioni: - OFF ( Visualizza il messaggio di saluto per difetto) - ON (Permette editare il messaggio di saluto)
Permette di personalizzare il messaggio di saluto, incluso, per esempio, il nome della palestra.
9) Sounds
Abilita o disabilita i messaggi sonori del monitor elettronico. Opzioni: - ON (Abilitato) - OFF (Disabilitato)
ELEMENTI DEL MONITOR ELETTRONICO (Fig.1).- Il monitor elettronico si compone di due zone ben differenziate; La zona superiore Fig.2 (A – B – C) si trova la VISUALIZZAZIONE. La zona inferiore Fig.3 (D – F – G-) si trova la TASTIERA.
VISUALIZZAZIONE.- Questa zona è composta da due schermi. Display Matriz di LEDs superiore, in cui si monitorizza il livello di sforzo che si realizza del programma selezionato per ciascun momento. (B) Display dello Schermo alfanumerico inferiore, che guida l’utente durante la selezione e la realizzazione dell’esercizio. Lo schermo superiore (A) mostrerà i differenti profili preprogrammati di sforzo (programmi) che si possono selezionare e , durante l’esercizio, il livello di sforzo che si realizza in ciascun momento. Lo schermo alfanumerico inferiore (B) si occupa di guidare l’utente durante la selezione dell’esercizio da realizzare e di visualizzare l’informazione sull’esercizio durante e dopo la sua realizzazione. I LEDs indicatori (C) che si trovano sotto lo schermo alfanumerico mostrano simultaneamente la VELOCITÀ / RPM; TEMPO / DISTANZA; CALORIE / WATTS; POLSO ed indicano qual è l’informazione che si sta mostrando in ciascun momento dell’esercizio.

SK LINE sportkoncept
59
I dati che si visualizzano nei LEDs ( C) durante la realizzazione dell’esercizio sono i seguenti: -SPEED – VELOCITÀ: Si mostra un valore stimato della velocità lineare cui si muoverebbe una bicicletta con la cadenza della pedalata dell’utente. Il valore si mostra in chilometri per ora (km/h). -STEPS/MIN – VELOCITÀ: Indica il numero di passi al minuto. -RPM: Si mostra la cadenza della pedalata istantanea durante l’esercizio. Indica il numero di volte che il pedale realizza un giro completa in un minuto (RPM). -TIME – TEMPO: Durante l’esercizio si mostra il tempo che è passato dall’inizio che si comincia, o, nel caso in cui si è selezionato un tempo di esercizio predefinito, il tempo rimanente per terminare l’esercizio. Il tempo si mostra in minuti e secondi (mm:ss). -DISTANCE – DISTANZA: Si mostra la distanza che abbiamo percorso dall’inizio dell’esercizio. La distanza si calcola considerando la stima della velocità lineare (SPEED) e le unità sono i chilometri e gli ettometri. -CALORIES – CALORIE: Si mostra una stima delle calorie che sono state bruciate fino al momento. La stima si realizza prendendo in considerazione l’energia che si sta realizzando in ciascun momento ed i dati di peso ed età introdotti dall’utente. -WATT – WATT: Si mostra la quantità di energia che si sta generando in ciascun momento dell’esercizio. Questo calcolo si realizza considerando il livello di resistenza con il quale si lavora e la cadenza della pedalata. L’informazione si mostra in Watt. -PULSE – POLSO: Si mostra la frequenza cardiaca dell’utente, sempre che quest’informazione sia accessibile mediante i sensori di mano (Hand – Grip) o la fascia toracica telemetrica, quando si utilizzano entrambi contemporaneamente, si concede la priorità alla fascia toracica telemetrica per il petto. Per ulteriori informazioni sulla frequenza cardiaca, consultare la sezione: Misurazione del polso; fascia toracica per il petto ed hand-grip.
TASTIERA.-
Qui di seguito si enumera la funzione di ciascun tasto. Vedere figura 3. Il monitor elettronico include una tastiera facile da usare. Questa tastiera consta di tasti numerici (F) e di tasti di funzione (G). .- Tasti numerici (F). – (1-0) si utilizzano per introdurre i dati che il monitor richiede. .- Tasti di funzione (G).- reset; level▼; level▲; enter; pause; stop; quick/start. Questo tasti si utilizzano per selezionare l’esercizio da realizzare, introdurre i dati richiesti, controllare il livello di resistenza dell’esercizio e la sua finalizzazione.
-reset.- Tasto di annullamento. Si utilizza per cancellare i dati che si introducono nel monitor quando si seleziona un programma.
-level▼.- Tasto di diminuzione del livello di sforzo. Durante la realizzazione dell’esercizio questo tasto diminuisce in un punto il grado di resistenza della macchina. Durante la selezione dei profili preprogrammati si utilizza per mostrare sullo schermo il profilo anteriore a quello visualizzato.
-level▲.- Tasto di incremento del livello di sforzo. Durante la realizzazione dell’esercizio questo tasto aumenta in un punto il grado di resistenza della macchina. Durante la selezione dei profili preprogrammati si utilizza per mostrare sullo schermo il profilo successivo a quello visualizzato.
-enter.- Tasto di selezione e convalida. Si utilizza durante la selezione di un profilo preprogrammato per selezionarlo, convalidare i dati da introdurre ed iniziare l’esercizio. Durante la programmazione del profilo dell’utente si utilizza anche per convalidare il livello di sforzo corrispondente a ciascun minuto.
-pause.- Tasto pausa. Se si preme durante la realizzazione dell’esercizio, questo si interrompe, fermando il cronometro di durata dell’esercizio. Per riannodare il cronometro di durata dell’esercizio premere il tasto pause di nuovo o continuare con l’esercizio. Il tempo limite del modo pausa è di 45 secondi, una volta trascorso questo tempo l’esercizio si considererà terminato e si spegne il motore. Se, essendo impostato su modo pausa, si preme il tasto STOP durante l’esercizio questi, si considererà terminato.
-stop.- Tasto di fermata. Se si preme durante la realizzazione dell’esercizio, questi si considererà terminato e la resistenza si trasforma in resistenza minima. Si visualizza un riassunto con i dati dell’esercizio e si torna alla schermata iniziale.

SK LINE sportkoncept
60
Se vi trovate nel modo Start/Ready, mantenere premuto il tasto STOP per 3 secondi, e la consola cambierà automaticamente lo stato di spegnimento con un segnale acustico se l’opzione POWER nel modo di progetto è accesa.
-quick / start.- Tasto di avvio rapido. Quando il LED del tasto lampeggia, premendolo si comincia l’esercizio in modo manuale.
AVVIO.- Per avviare il monitor, bisogna eseguire un esercizio sulla macchina ad intervalli di pedalate di 45 r.p.m. dal pedale e quando si giunge alle 45 r.p.m. si accenderà il monitor, che avrà una durata di 60 secondi per effettuare la programmazione. Inoltre, si può collegare anche l’adattatore fornito insieme alla macchina ad una presa di corrente, se si è scelto di inserire nel quadro dei parametri personalizzabili (passo 4 Power) in ON. Una volta acceso il monitor si visualizzerà sul display di matrice del LEDs (A) Figura 2, il profilo e la lettera “M” di manuale, e nel display dello schermo alfanumerico inferiore (B) si mostrerà il saluto di benvenuto “BENVENUTO AD HI-POWER”. Premendo il tasto QUICK / START si avvia il programma, in modo manuale e premendo i tasti level▼ o level����, si può aumentare o diminuire la resistenza dell’esercizio.
ISTRUZIONE DI FUNZIONAMENTO.- PORTA USB.- Questa macchina dispone nel monitor di una porta USB (D) per la carica il cellulare.
MODO SLEEP: Se non s’inserisce un segnale di RPM durante un periodo di 45 secondi nello stato di attesa, si attiverà questa modalità. In questo stato, non appare nessuna finestra, e sarà necessario premere la lastra per il piede per inserire un segnale ed iniziare nuovamente la finestra. Se si è collegato un adattatore al telaio, la console non può passare al modo Sleep se l’opzione POWER nella modalità progetto si accende. Senza l’adattatore, la console cambierà nel modo Sleep, anche se è su Acceso.
P0 MODO MANUALE.- Una volta acceso il monitor, apparirà sul display di matrice a LEDs superiore (A) Fig.2 il profilo e la lettera “M” di manuale, e sul display dello schermo alfanumerico inferiore (B) Fig.2 si visualizzerà il saluto di benvenuto “BENVENUTO AD HI-POWE”. Premendo il tasto QUICK / START si avvia il programma, in manuale. Sul display di matrice a LEDs superiore (A) Fig.2 indicherà lampeggiando il livello in cui si trova l’esercizio. Premendo i tasti level▼ o level↑, si potrà aumentare o diminuire tra i venti livelli di resistenza dell’esercizio disponibili. Sul display dello schermo alfanumerico inferiore (B) Fig.2 si mostrerà ogni 10 secondi alternativamente: I valori di: la velocità (SPEED Mod. H800; Mod. H895; Sistema Metrico km./h, Sistema Britannico Mª/h; passi per minuto Mod. G930; scalini per minuto Mod. R250); Il tempo (r.p.m.Mod. H800; Mod.H895; numero totali di pasi Mod. G930) ; La Distanza (DISTANCE); I Watt (WATT) ed il Polso (POLSO). Premendo il tasto STOP si interrompe il programma ed il display dello schermo alfanumerico inferiore (B) Fig.2, vi informerà della media dei valori TEMPO DI ESERCIZIO; DISTANZA PERCORSA; VELOCITÀ MEDIA; CALORIE CONSUMATE; che si sono realizzati durante l’esercizio. Se durante il tempo che trascorre l’informazione dei valori medi, non si tocca nessun tasto, non si esegue alcun esercizio e si preme il tasto STOP si passerà al programma manuale.
MODO PROGRAMMI.- Il monitor dispone di: 1 programma di profilo MANUALE; 8 PROGRAMMI con profili preprogrammati; di un profilo programmabile per l’utente (USER); programmi TEST maschile, e TEST femminile; programma del ritmo cardiaco costante (H.R.C.) e programma a watt costanti (mod. H800 / H895) / programma del controllo della distanza (mod. G930). Vedere i grafici dei programmi preprogrammati nelle pagine finali dei questo manuale.

SK LINE sportkoncept
61
P1 - P8 PROGRAMAMI DI GRAFICI. Una volta acceso il monitor, apparirà sul display di matrice a LEDs superiore (A) Fig.2 il profilo e la lettera “M” di manuale. Per visualizzare i differenti profili preprogrammati si utilizzano i tasti LEVEL▲ e LEVEL▼. Una volta che si è selezionato un profilo in concreto premere il tasto ENTER. Sul display di matrice del LEDs superiore (A) si richiederà l’età tra (10 e 99 anni) selezionare l’età corrispondente con i tasti numerici (F) Fig.3, premere ENTER. Successivamente si richiederà il peso tra (30 e 199 kg.), selezionare il peso corrispondente con i tasti numerici (F) Fig.3, premere ENTER. Successivamente si richiederà il tempo di durata dell’esercizio tra (10 e 60 minuti), selezionare il tempo con i tasti numerici (F) Fig.3, premere ENTER e comincerà l’esercizio. All’interno di ciascun profilo preprogrammato l’utente dispone di quattro livelli differenti di difficoltà (L1 – L4), per selezionare uno qualsiasi di questi è sufficiente utilizzare i tasti LEVEL▲ y LEVEL▼ durante la realizzazione dell’esercizio. Una volta finalizzato il programma che ha realizzato l’esercizio il monitor avrà calcolato la media dei valori in cui è stato realizzato l’esercizio e li mostrerà sullo schermo alfanumerico inferiore (B) Fig.2. Premendo il tasto STOP si interrompe il programma e sul display dello schermo alfanumerico inferiore (B) Fig.2, vi informerà della media dei valori TEMPO DI ESERCIZIO; DISTANZA PERCORSA; VELOCITÀ MEDIA; CALORIE CONSUMATE; che si è realizzato durante l’esercizio, mostrandoli due volte ogni cinque secondi. Se durante il tempo che trascorre l’informazione dei valori medi, non si tocca nessun tasto, non si esegue alcun esercizio e si preme il tasto STOP si passerà al programma manuale.
P9 PROGRAMMA UTENTE ( USER ). Una volta acceso il monitor, apparirà sul display di matrice a LEDs superiore (A) Fig.2 il profilo e la lettera “M” di manuale, per visualizzare i differenti profili preprogrammati si utilizzano i tasti LEVEL▲ e LEVEL▼. Una volta che si è selezionato il programma 9 (USER), premere il tasto ENTER. Sul display di matrice a LEDs (A) Fig.2 si richiederà l’età tra (10 e 99 anni) selezionare l’età corrispondente con i tasti numerici (F) Fig.3, ( se si introduce il valore, al di fuori dei due digiti vi mostrerà il valore più vicino). Premere ENTER. Successivamente si richiederà il peso tra (30 e 199 kg.), selezionare il peso corrispondente con i tasti numerici (F) Fig.3, premere ENTER. In seguito si richiederà il tempo di durata dell’esercizio tra (10 e 60 minuti), selezionare il tempo con i tasti numerici (F) e premere ENTER in seguito premere il tasto RESET e si può iniziare a disegnare il profilo di resistenza che si preferisce sul display di matrice a LEDs (A). Il profilo da disegnare è suddiviso in 21 passi, i primi tre passi sono di riscaldamento e arrivano solo al valore limitato di quattro, per evitare eventuali lesioni, il resto fino a 21 arrivano al massimo. Per selezionare il primo passo, premere RESET; i tasti LEVEL▲, LEVEL▼, in seguito premere i tasti ENTER, e così successivamente fino a completare il grafico del programma che si preferisce. Se si produce un errore nella registrazione di qualche passo, premere il tasto RESET e si tornerà al passo precedente. Successivamente premere il tasto ENTER e iniziare l’esercizio relativo al profilo che si è disegnato. Una volta terminato il programma che realizzava l’esercizio il monitor avrà calcolato la media dei valori con cui si è realizzato l’esercizio e verranno mostrati sullo schermo alfanumerico inferiore (B), Fig.2. Premendo il tasto STOP si interrompe il programma ed il display dello schermo alfanumerico inferiore (B) Figura 2, vi informerà della media dei valori TEMPO DI ESERCIZIO; DISTANZA PERCORSA; VELOCITÀ MEDIA; CALORIE CONSUMATE; che si sono realizzati durante l’esercizio. Se durante il tempo in cui trascorre l’informazione dei valori medi non si tocca nessun tasto, non si esegue alcun esercizio e si preme il tasto STOP si passerà al programma manuale. NOTA: I primi tre passi del programma sono di riscaldamento con dei livelli di resistenza bassi, in questo modo eviteremo qualsiasi tipo di lesioni.

SK LINE sportkoncept
62
P10 – P11 PROGRAMMI DI TEST UOMO – DONNA.
L’obiettivo del test è dare un valore alla forma fisica dell’utente. Per questo bisogna mantenere una cadenza di pedalata tra 70 e 80 rivoluzioni per minuto (R.P.M.) durante 5 minuti. La differenza tra i programmi disegnati per uomo e donna è nei Watt, i valori per uomo è selezionato in 150 W. E nel programma donna in 100 W. Una volta acceso il monitor, sul display di matrice a LEDs superiore (A) Fig.2 apparirà il profilo e la lettera “M” di manuale. Per visualizzare i differenti profili preprogrammati si utilizzano i tasti LEVEL▲ e LEVEL▼. Una volta che si è selezionato il programma TEST Uomo o TEST Donna, premere il tasto ENTER. In seguito, il display dello Schermo alfanumerico inferiore (B) Fig.2 richiederà l’età (tra 10 e 99 anni). Selezionare l’età corrispondente con i tasti numerici (F) Fig.3, e premere ENTER. Sul display di matrice a LEDs superiore (A) Fig.2 si visualizzerà un cuore lampeggiante, collocare le mani sui sensori del polso (hand-grip) situato sulla maniglia o nel caso in cui si dispone di una fascia di misurazione del polso telemetrica collocarla sul petto. Iniziare il TEST con intervalli di pedalate tra le 70 e le 80 R.P.M. durante 5 minuti, se nel caso in cui decresce il numero di R.P.M. il display visualizzerà R.P.M.↑, se si superano le rivoluzioni sul display apparirà R.P.M.↓, se si mantiene il ritmo tra le 70 e le 80 r.p.m. sul display apparirà OK. Terminati i 5 minuti di durata del test si mostrerà una valorazione tra 1 (molto scarso) ed il 5 (eccellente). Inoltre può apparire una valorazione di 0 che significa che il test non è stato realizzato correttamente (Non si è rispettata la cadenza della pedalata di 75 r.p.m. oppure non si è utilizzato il misuratore del ritmo cardiaco (cardiofrequenzimetro) correttamente. NOTA: È obbligatorio per eseguire il test utilizzare la misurazione del ritmo cardiaco, e per fare ciò si utilizzano i sensori manuali (hand-grip) oppure la fascia toracica per il petto. È conveniente eseguire un breve riscaldamento prima di realizzare il test. Questo eviterà lesioni. Il numero massimo di pulsazioni che una persona non deve mai superare si denomina ritmo massimo e questo diminuisce con l’età. Una formula semplice per calcolare è sottrarre a 220 l’età in anni. L’esercizio, affinché sia corretto, deve mantenersi tra il 65% e l’85% del ritmo cardiaco massimo e si raccomanda di non superare l’85%. Quando le pulsazioni superano l’85% del ritmo cardiaco massimo apparirà un cuore lampeggiando ed un suono acuto per 2 secondi circa finché le pulsazioni non si abbassano all’85% del ritmo cardiaco massimo. Si raccomanda di lavorare al di sotto dell’85% del ritmo cardiaco massimo per ragioni di sicurezza.
P12 PROGRAMMA SUL RITMO CARDIACO COSTANTE (H R C).- Si consiglia di eseguire un breve esercizio di riscaldamento prima di realizzare il programma. Questo eviterà lesioni. Questo programma permette di fare esercizio ad un ritmo cardiaco (tra il 65 e l’85% del ritmo cardiaco massimo) e la macchina regolerà il livello di resistenza per far si che l’utente, in qualsiasi momento, mantenga il ritmo cardiaco secondo il livello selezionato. È obbligatorio utilizzare la misurazione del ritmo cardiaco, utilizzando la fascia toracica da polso telemetrica per il petto, e non superare l’85% del ritmo cardiaco massimo. Una volta acceso il monitor sul display di matrice a LEDs superiore (A) apparirà Fig. 2 il profilo e la lettera “M” di manuale, per visualizzare i differenti profili preprogrammati si utilizzano i tasti LEVEL▲ e LEVEL▼. Una volta che si è selezionato il programma HRC, premere il tasto ENTER. Premere ENTER per modificare il ritmo cardiaco oggettivo e la finestra LED indicherà (INSERIRE I VALORI DEL POLSO <40-220>). Premere i tasti numerici e la finestra del LED vi indicherà (POLSO= xxx ) e lampeggeranno i valori che sono stati inseriti. Premere i tasti numerici per modificare ed inserire un numero a tre cifre (valori: 40 ~ 220). Se s’introduce un numero adeguato, s’indicherà il numero maggiore o più piccolo. Inserire un numero adeguato e premere ENTER per confermare. Premere ENTER per modificare il tempo e la finestra del LED indicherà (INSERIRE IL TEMPO DI ESERCIZIO <MINUTI>). La matrice dei punti indicherà ( ? 10 ) e lampeggerà il numero corrispondente. Premere i tasti numerici per modificare ed inserire un numero a due cifre (valori: 10 ~ 60). Se s’introduce un numero adeguato,sarà indicato il numero per difetto. Inserire un numero adeguato e premere ENTER per confermare ed iniziare il programma. Dopo aver terminato l’ultimo adattamento, si accumuleranno tutti i valori. La resistenza è il Livello 1 e cambia alla linea successiva ogni minuto. Se la velocità (RPM) non è sufficiente, la matrice dei punti indicherà RPM� e si passerà in modalità pausa, trascorsi 15 secondi.

SK LINE sportkoncept
63
Iniziate l’esercizio con una cadenza della pedalata tra i 70 e gli 80 R.P.M., appoggiare le mani sui sensori da polso (hand-grip) situati sul manubrio oppure nel caso in cui si dispone di una fascia misuratrice del polso telemetrica collocarla sul petto, nel caso in cui diminuisce il numero di R.P.M. si visualizzerà sul display di matrice a LEDs superiore (A) Fig.2 R.P.M�, e se si superano le rivoluzioni sul display si visualizzerà R.P.M�. Durante i primi tre minuti di questo programma è programmato uno sforzo tale da evitare qualsiasi tipo di lesione. A partire dal terzo minuto, il computer adegua automaticamente lo sforzo per mantenere il polso intorno ai valori previamente programmati.
REGOLAZIONE AUTOMATICA DELLO SFORZO Quando s’inizia un esercizio, la macchina si regola al livello minimo di resistenza, 50 W, fino a quando si realizzerà la prima misurazione del polso. Una volta individuato il polso, il programma realizza una valutazione del ritmo cardiaco ogni X secondi (questi secondi variano tra i 20 ed i 60, all’interno del programma SPR). La regolazione dello sforzo, a seconda delle pulsazioni è specificata nei passi successivi. 1.- RITMO CARDIACO OGGETTIVO maggiore rispetto al BATTITO CARDIACO IN TEMPO REALE: Quando la differenza tra il BATTITO CARDIACO OGGETTIVO ed il BATTITO CARDIACO IN TEMPO REALE è uguale o superiore a 15 PPM, la REGOLAZIONE AUTOMATICA DELLO SFORZO si avrà aumentando di 20 in 20 Watt. Quando questa differenza sia inferiore a 15 PPM, la regolazione passerà a realizzarsi di 10 in 10 Watt fino ad equilibrare entrambi i ritmi cardiaci. 2.- RITMO CARDIACO IN TEMPO REALE maggiore che il RITMO CARDIACO OGGETTIVO: Quando la differenza tra il RITMO CARDIACO IN TEMPO REALE ed il RITMO CARDIACO OGGETTIVO è uguale o superiore a 15 P.P. M., la REGOLAZIONE AUTOMATICA DELLO SFORZO si ottiene diminuendo 20 Watt. Quando questa differenza è inferiore a 15 P.P.M, la regolazione passerà a realizzarsi di 10 in 10 Watt fino ad equilibrare entrambi i ritmi cardiaci. - Quando la differenza tra il RITMO CARDIACO IN TEMPO REALE ed il RITMO CARDIACO OGGETTIVO è uguale o superiore a 30 P.P.M., il display dello Schermo alfanumerico inferiore (B) vi mostrerà la frase DIMINUIRE L’INTENSITÀ DELL’ESERCIZIO, IL VOSTRO RITMO CARDIACO È TROPPO VELOCE e la regolazione automatica della macchina abbasserà lo sforzo al minimo (50W). Se durante l’esercizio non si rivela il ritmo cardiaco si visualizzerà Valore del ritmo cardiaco ? e lampeggerà, se questa situazione si mantiene durante 60 secondi, si passa al modo manuale. NOTA: Il numero massimo di pulsazioni che una persona non deve mai superare si denomina ritmo cardiaco massimo e questo diminuisce con l’età. Una formula semplice per calcolare è sottrarre a 220 l’età in anni. L’esercizio, per essere corretto, deve mantenersi tra il 65% e l’85% del ritmo cardiaco massimo e si raccomanda di non superare l’85%. Si raccomanda di lavorare al di sotto dell’85% del ritmo cardiaco massimo per ragioni di sicurezza. Se non si usa un sistema di misurazione del ritmo cardiaco, sullo schermo si accenderà il simbolo del cuore seguito da un punto interrogativo, se la macchina continua a non ricevere informazione circa il ritmo cardiaco il programma si sospende e sarà necessario realizzare una nuova selezione del programma.
P13 PROGRAMMA DI WATT COSTANTI. Questo programma permette selezionare il livello di potenza in (watt) con cui si desidera fare ginnastica. La potenza che si sviluppa (watt) dipende dalla velocità e lo sforzo con cui si realizza l’esercizio. La macchina si occuperà di regolare il livello di sforzo affinché l’utente sviluppi sempre la stessa potenza indipendentemente dal livello della cadenza della pedalata dello stesso. Durante i primi quaranta secondi questo programma è dotato di uno sforzo programmato tale da evitare qualsiasi tipo di lesione. A partire dal secondo numero quaranta, la macchina inizia a controllare la resistenza in funzione della cadenza della pedalata. Si consiglia di eseguire un breve esercizio di riscaldamento, prima di realizzare il programma. Questo eviterà lesioni. Una volta acceso il monitor apparirà sul display di matrice a LEDs superiore (A) Fig.2 il profilo e la lettera “M” di manuale. Per visualizzare i differenti profili preprogrammati si utilizzano i tasti LEVEL▲ e LEVEL▼. Una volta che si è selezionato il programma WATT, premere il tasto ENTER. Sul display dello Schermo alfanumerico inferiore (B) si richiederà il valore dei WATT (Watts) che si desidera realizzare durante l’esercizio. Selezionare con i tasti numerici (F) Fig.3 tra (25 e 400 WATT Watts) e premere ENTER. Premere ENTER per modificare il tempo e la finestra del LED indicherà ( INSERIRE IL TEMPO DI ESERCIZIO <MINUTI>).

SK LINE sportkoncept
64
La matrice dei punti indicherà ( ? 10 ) e lampeggerà il numero corrispondente. Premere i tasti numerici per modificare ed inserire un numero a due cifre (valori: 10 ~ 60). Se s’inserisce un numero adeguato, s’indicherà il numero per difetto. Inserire un numero adeguato e premere ENTER per confermare ed iniziare il programma. Dopo aver terminato l’ultima regolazione, si accumuleranno tutti i valori. La resistenza è il Livello 1 e cambia sulla linea successiva ogni minuto. Se la velocità (RPM) non è sufficiente, la matrice dei punti indicherà RPM↑ ) e si passerà alla modalità pausa, trascorsi 15 secondi. Sul display dello Schermo alfanumerico inferiore (B) vi verrà richiesto il valore di WATT (Watt) che desidera realizzare l’esercizio. Selezionare con i tasti numerici (F) Fig.3 tra (25 e 400 WATT Watt) e premere ENTER. Se mentre si realizza un esercizio il consumo di Watt è inferiore a 25W., apparirà sul display di matrice a LEDs superiore (A) Fig.2 R.P.M�, e se è superiore a 450 W., apparirà R.P.M�.
P13.- Mod. G930; G815; G818 PROGRAMMA DEL CONTROLLO DELLA DISTANZA Questo programma vi permetterà coprire una determinata distanza selezionata previamente. Se il monitor è acceso sarà mostrato il display di matrice di LEDs superiore (A) Fig.2 il profilo e la lettera “M” di manuale, per visualizzare i diversi profili preprogrammati si usano i tasti LEVEL▲ e LEVEL▼. Una volta che è stato già selezionato il programma DIST premere il tasto ENTER. Sullo schermo alfanumerico B, comparirà il messaggio INSERIRE DISTANZA DA PERCORRERE <0.1-99.9>. Premere i tasti numerici per inserire la distanza che si desidera. Se s’introduce un numero adeguato, sarà indicato il numero maggiore o più piccolo. Inserire un numero adeguato e premere ENTER per iniziare l’esercizio. Il valore della distanza inserita appare sullo schermo alfanumerico B ed inizia a diminuire nella misura in cui si procede a realizzare l’esercizio. La resistenza corrisponde al Livello 9 e cambia sulla linea successiva ogni minuto. Se la velocità (RPM) non è sufficiente, la matrice dei punti indicherà RPM↑ e si passerà alla modalità pausa, trascorsi 15 secondi. Usando i tasti LEVEL▲ e LEVEL▼. Si può modificare il valore della resistenza durante l’esercizio.
REGOLAZIONE AUTOMATICA DELLO SFORZO Dopo aver iniziato nella modalità di allenamento, il programma realizzerà una stima dei watt per ogni “X” secondi (il valore “X” è regolato dall’utente nel programma SWR incorporato nel monitor). Il metodo di regolazione dei WATT è indicato nel seguente modo: 1 – Durante l’allenamento, il programma realizzerà una comparazione del valore in WATT reale con il valore in WATT oggettivo. Se il valore reale dei WATT è minore oppure uguale al valore 75, dei WATT oggettivo, il LIVELLO di resistenza della macchina aumenterà automaticamente di 3 livelli ogni volta, fino al LIVELLO 20. 2 – Durante l’allenamento, il programma realizzerà una comparazione del valore reale in WATT con il valore in WATT oggettivo. Se il valore reale dei WATT è minore oppure uguale a 50, dei WATT oggettivo il LIVELLO di resistenza della macchina aumenterà automaticamente di 2 livelli ogni volta, fino al LIVELLO 20. 3 – Durante l’allenamento, il programma realizzerà una comparazione del valore in WATT reale con il valore in WATT oggettivo. Se il valore dei WATT reale è minore oppure uguale a 15, dei WATT oggettivo, il LIVELLO di resistenza della macchina aumenterà automaticamente di 1 livello ogni volta, fino al LIVELLO 20. 4 – Durante l’allenamento, il programma realizzerà una comparazione del valore in WATT reale con il valore in WATT oggettivo. Se il valore dei WATT reale è maggiore oppure uguale a 15, dei WATT oggettivo, il LIVELLO di resistenza della macchina diminuirà automaticamente di 1 livello ogni volta, fino al LIVELLO 1. 5 – Durante l’allenamento, il programma realizzerà una comparazione del valore in WATT reale con il valore in WATT oggettivo. Se il valore dei WATT reale è maggiore oppure uguale al valore 50, del valore oggettivo,dei WATT il LIVELLO di resistenza della macchina diminuirà automaticamente di 2 livelli ogni volta, fino al LIVELLO 1. 6 – Durante l’allenamento, il programma realizzerà una comparazione del valore reale in WATT con il valore oggettivo dei WATT. Se il valore reale dei WATT è maggiore oppure uguale a 75 del valore oggettivo, dei WATT il LIVELLO di resistenza della macchina diminuirà automaticamente di 3 livelli ogni volta, fino al LIVELLO 1.

SK LINE sportkoncept
65
NOTA: In qualsiasi momento del programma (il tempo non si fermerà) si potrà variare il livello di watt programmato, utilizzando per ottenere ciò LEVEL▲ e LEVEL▼. Il livello di watt programmato apparirà sul display lampeggiando. La macchina, è equipaggiata di sensori manuali (hand-grip) per la captazione del ritmo cardiaco dell’utente, però è anche compatibile con il sistema telemetrico che consta di un trasmissore (fascia toracica per il petto) ed un ricettore incluso nel monitor elettronico. L’uso dei sensori manuali è molto semplice, è sufficiente aggrapparsi a questi durante la realizzazione dell’esercizio ed attendere affinché il ritmo cardiaco appaia sul display abilitato all’effetto. L’informazione del ritmo cardiaco non appare in modo istantaneo, è necessario aspettare circa 20 secondi prima che questi appaia sullo schermo. La fascia toracica per il petto trasmette il polso per contatto con il petto ed invia il segnale all’orologio che lo visualizza. PRECAUZIONE. Prima di iniziare qualsiasi programma di esercizio, è necessario consultare il vostro medico e comunicargli l’intensità dell’esercizio. Se si utilizza un segnapasso cardiaco non utilizzare la fascia toracica per il petto senza aver consultato con il vostro medico.
SIGNIFICATO DEI SIMBOLI Nello schermo possono apparire una serie di simboli o di parole con il seguente significato: Simbolo del cuore ed un punto interrogativo: Non è stata collocata la cintura da torace o non è stata collocata correttamente.
Simbolo del cuore lampeggiando: Questo simbolo sollo apparirà nei test. Il numero massimo di pulsazioni che una persona mai deve sorpassare è denominato ritmo massimo e questo diminuisce con l’ età. Una semplice formula per calcolarlo è sottrarre a 220 l’ età in anni. L’ allenamento, per fare in modo che sia corretto, si deve mantenere fra il 65 e l’ 85 % del ritmo cardiaco massimo e si consiglia di non sorpassare l’ 85%. Quando le sue pulsazioni vadano oltre l’ 85 % del battito cardiaco massimo apparirà un cuore lampeggiando ed un fischio durante 2 secondi fino a che le sue pulsazioni non scendano all’ 85 % del suo battito cardiaco massimo. Si consiglia di lavorare al di sotto dell’ 85% del ritmo cardiaco massimo per motivi di sicurezza. *0*: Questo simbolo appare nei test maschile e femminile e significa che lei ha realizzato male il test (vale a dire lei non ha realizzato il test a 75 r.p.m. o non si è collocata la cintura da torace.) Simbolo di chiave fissa: Guasto meccanico.Spegnere la macchina e riaccenderla trascorsi 2 minuti.La macchina ha un sistema automatico per correggere i guasti, ciò nonostante se il problema persiste, si metta in contatto con il servizio tecnico.

SK LINE sportkoncept
66
Per qualsiasi domanda, non esitate a mettervi in contatto con il Servizio di Assistenza Tecnica, chiamando al telefono di attenzione al cliente (consultare l’ultima pagina del presente manuale). BH SI RISERVA IL DIRITTO A MODIFICARE LE SPECIFICAZIONE DEI SUOI PRODOTTI SENZA PREVIO AVVISO.
1. “BENVENUTO A HI POWER” 2. “PREMA LE FRECCE PER SCEGLIERE PROFILO” 3. “PREMA QUICK/START PER COMINCIARE” 4. “PREMA ENTER PER COMINCIARE IL PROFILO” 5. “ERRORE” 6. “CONTATTI IL SERVIZIO TECNICO” 7. “INTRODUCA LA SUA ETA <10-99>”
8. “INTRODUCA IL SUO PESO <30-199> KG” “INTRODUCA IL SUO PESO <70-440> LB”
9. “INTRODUCA IL TEMPO D ESERCIZIO <10-60> MINUTI”
10. “INTRODUCA I DATI DEI WATT <25-400>” “WATTS=”
11. “ETA=” 12. “INTRODUCA I DATI DI POLSO <40-220>” 13. “POLSO=” 14. “PREMA PAUSE PER CONTINUARE L ESERCIZIO. PREMA STOP PER FINIRE” 15. “TEMPO D ESERCIZIO=” 16. “DISTANZA PERCORSA=” 17. “VELOCITA MEDIA=” 18. “CALORIE CONSUMATE=” 19. “PREMA ENTER PER ACCETTARE IL PROFILO MEMORIZZATO. PREMA RESET PER MODIFICARE IL PROFILO”
20. “USI LE FRECCE PER SCEGLIERE L INTENSITA PER LA COLONNA ATTIVA. PREMA ENTER PER PASSARE ALLA PROSSIMA COLONNA. PREMA RESET PER TORNARE AL MODO MANUALE.”
21. “DIMINUISCA L INTENSITA DELL ESERCIZIO. IL SUO RITMO CARDIACO E TROPPO ELEVATO” 22. “IL RISULTATO DEL TEST E=”

SK LINE sportkoncept
67
NEDERLANDS
ALGEMENE INSTRUCTIES.- Dit gymnastiektoestel is uitgerust met een dynamo die gebruik maakt van de energie die geproduceerd wordt door de gebruiker (tijdens het beoefenen) om de elektronische monitor en de remcontrole van drijfkracht te voorzien. Het monitor scherm is drukgevoelig, dus om op een toets te drukken hoeft u slechts uw vinger op genoemde toets op het scherm te plaatsen. Dit gymnastiektoestel bezit ook een batterijset die voldoende energie opslaat om de elektronische motor gedurende 60 seconden nadat de beoefening gestopt is aan de gang te houden. Mocht de batterij uitgeput raken als gevolg van operationeel falen, dan kan ze opgeladen worden door de adapter te gebruiken die bij het gymnastiektoestel geleverd is. Als u de monitor wilt inschakelen, begint u te oefenen met het toestel. N.B.: De adapter moet in een passend stopcontact gestoken worden. Controleer of de netspanning compatibel is met de spanning van de bij het toestel geleverde adapter. De elektronische monitor is zodanig ontworpen dat hij gemakkelijk en intuïtief in het gebruik is. De boodschappen die op het onderste scherm (B) verschijnen, zullen de gebruiker gedurende de gehele beoefening begeleiden. Niettemin raden we de gymleraar aan deze sectie grondig door te lezen om volledig vertrouwd te raken met de elektronische monitor, zodat hij/zij de gebruiker kan voordoen hoe het toestel op de juiste manier te gebruiken.
BELANGRIJK: OM TE VERZEKEREN DAT DE BATTERIJEN OP DE JUISTE WIJZE FUNCTIONEREN EN LANGER MEEGAAN, WORDT AANBEVOLEN OM ZE OP TE LADEN MET DE BIJ HET TOESTEL GELEVERDE ADAPTER.
MACHINE TYPE SELECTIE -. Vanuit het hoofdmenu, druk op zowel de RESET-toets en de "0"-knop gedurende 6 seconden. verschijnen de woorden “FACTORY – SETTINGS” op het alfanumerieke scherm (B), Fig.1. Druk op "2" en selecteer het type machine E (elliptische), B / R (Fiets / Ligfiets) of S (Stepper) met LEVEL ▲ en ▼ toetsen. Om de aanpassing modus drukt u op de STOP-toets.
DE ELEKTRONISCHE MONITOR AANPASSEN.- Om de monitor mode maatwerk te voeren is het noodzakelijk om de onderstaande stappen te volgen: Vanuit het hoofdmenu, druk op zowel de RESET-toets en de "0"-knop gedurende 6 seconden. verschijnen de woorden “FACTORY – SETTINGS” op het alfanumerieke scherm (B), Fig.1. Druk op "ENTER".
DE ELEKTRONISCHE MONITOR AANPASSEN.- Volg onderstaande stappen om toegang te verkrijgen tot de aanpassingsmodus van de monitor: Terwijl de monitor uitgeschakeld is, drukt u tegelijkertijd op de RESET- en O-toets and houdt ze vast, waarna u de oefening begint zonder de toetsen los te laten.
1) WIJZIGEN VAN km in Mijlen.- Het woord UNITS verschijnt, druk op ENTER en het woord METRIC licht op, selecteer de snelheidseenheid door de toetsen LEVEL▲ en LEVEL▼ te gebruiken (METRIC/Km. -- ENGLISH/Miles ) druk op ENTER en het woord “UNITS” licht opnieuw op, ga verder naar de (2 WHEELSIZE) instelling op het aangrenzende onderste scherm door gebruik te maken van de toets LEVEL▲. Als u de aanpassingsmodus wenst te verlaten, druk op STOP, waarna het handleidingsprogramma op de LED-reeks (A) zal worden getoond.
2) WIJZIGEN AFSTAND PER OMWENTELING.- Terwijl het woord “WHEELSIZE” oplicht, druk op ENTER en een getal tussen 0 en 80 begint te knipperen. Selecteer de waarde door de toetsen LEVEL▲ En LEVEL▼ te gebruiken (H800- en H895-en G930 modellen, selecteer 80), druk op ENTER en het woord “WHEELSIZE” zal weer beginnen te knipperen, ga verder naar de (3 LANGUAGE) instelling op het aangrenzende onderste scherm door gebruik te maken van de toets LEVEL▲. Als u de aanpassingsmodus wenst te verlaten, druk op STOP.

SK LINE sportkoncept
68
3) WIJZIGEN TAAL
Terwijl het woord “LANGUAGE" oplicht, druk op ENTER en de huidige taal begint te knipperen. Selecteer uw taal door gebruik te maken van de toetsen LEVEL▲ en LEVEL▼, druk vervolgens op ENTER waarna het woord “LANGUAGE” weer zal beginnen te knipperen, ga verder naar de (4 POWER) instelling op het aangrenzende onderste scherm door gebruik te maken van de toets LEVEL▲. Als u de aanpassingsmodus wenst te verlaten, druk op STOP.
4) ZELF- OF ELEKTRISCH AANGEDREVEN Terwijl het woord “Power” knippert, drukt u op ENTER, waarna het woord ON of OFF begint te knipperen. Selecteer de optie die oplicht door gebruik te maken van de toetsen NIVEAU▲ en -LEVEL▼. De ON-optie wordt gebruikt om de monitor op elk tijdstip ingeschakeld te houden. Als de ON-optie wordt geselecteerd, is het noodzakelijk om te controleren of het toestel aangesloten is op de netvoeding door middel van de adapter. Als u een optie geselecteerd heeft, drukt u op ENTER om uw keuze te bevestigen, waarna het woord "POWER" weer zal beginnen te knipperen. Stoppen met oefenen. Als u de monitor wenst uit te schakelen met deze optie, drukt u op de STOP-toetsen en houdt die vast totdat u een piepje hoort. Wacht 45 seconden en de monitor zal overgaan op de OFF-optie. Met de OFF-optie wordt het toestel op eigen kracht aangedreven, wat betekent dat de monitor aangaat zogauw u begint met oefenen. Zodra u deze optie geselecteerd heeft, drukt u op ENTER, waarna het woord "POWER" zal beginnen te knipperen. Maak gebruik van de toets NIVEAU?-LEVEL? om verder te gaan naar de (5 SWR-tijd)-instelling op het aangrenzende onderste scherm. Als de OFF-optie geselecteerd is, zal de monitor zichzelf 45 seconden nadat u uw beoefening beëindigd hebt uitschakelen. Als u de aanpassingsmodus wenst te verlaten, drukt u op STOP.
5) STEADY WATT RATE TIME (SWR TIME, Mod; H800; H895 ).- Terwijl het woord “SWR time” oplicht, druk op ENTER en een getal tussen 0 en 60 seconden begint te knipperen. Selecteer de oplichtende waarde door gebruik te maken van de toetsen LEVEL▲ en LEVEL▼, druk vervolgens op ENTER om uw keuze te bevestigen, waarna het woord “SWR time” weer zal beginnen te knipperen, ga verder naar de (6 SPR time) instelling op het aangrenzende onderste scherm door gebruik te maken van de toets LEVEL▲. Als u de aanpassingsmodus wenst te verlaten, druk op STOP.
6) STEADY PULSE RATE TIME.- Terwijl het woord “SPR time” oplicht, druk op ENTER en een getal tussen 20 en 60 seconden begint te knipperen. Selecteer de oplichtende waarde door gebruik te maken van de toetsen LEVEL▲ en LEVEL▼, druk vervolgens op ENTER om uw keuze te bevestigen, waarna het woord “SPR time” weer zal beginnen te knipperen, ga verder naar de ( 7 MANUAL T ) instelling op het aangrenzende onderste scherm door gebruik te maken van de toets LEVEL▲. Als u de aanpassingsmodus wenst te verlaten, druk op STOP.
7) MAX. OEFENINGSTIJD.- Terwijl het woord “MANUAL T” oplicht, druk op ENTER en een getal tussen 0 en 60 minuten begint te knipperen. Selecteer de oplichtende waarde door gebruik te maken van de toetsen LEVEL▲ en LEVEL▼, druk vervolgens op ENTER om uw keuze te bevestigen, waarna het woord “MANUAL T” weer zal beginnen te knipperen, ga verder naar de (8 TEXT) instelling op het aangrenzende onderste scherm door gebruik te maken van de toets LEVEL▲. Als u de aanpassingsmodus wenst te verlaten, druk op STOP.
8) WIJZIGEN WELKOMSTBOODSCHAP.- Terwijl het woord “TEXT" oplicht, druk op ENTER en het woord ON of OFF begint te knipperen. Selecteer de optie die oplicht door gebruik te maken van de toetsen LEVEL▲ en LEVEL▼. Als u de ON-optie kiest, is het toegestaan de welkomstboodschap van de monitor te wijzigen. Zodra de ON-optie is geselecteerd, druk op ENTER en een knipperende cursor zal op het alfanumerieke scherm verschijnen (B). Gebruik de toetsen LEVEL▲ en LEVEL▼ om een welkomstboodschap letter voor letter in te voeren. Zodra u het invoeren van de boodschap heeft beëeindigd, druk een paar seconden op ENTER waarna het woord “TEXT” zal beginnen op te lichten. Gebruik de toets LEVEL▲ om verder te gaan naar de (9 SOUNDS) instelling op het aangrenzende onderste scherm. Als u de aanpassingsmodus wenst te verlaten, druk op STOP.
9) WIJZIGEN GELUID.- Terwijl het woord “SOUNDS" oplicht, druk op ENTER en het woord ON of OFF begint te knipperen. Selecteer de oplichtende waarde gebruik makend van de toetsen LEVEL▲ en LEVEL▼, druk vervolgens op ENTER om uw keuze te bevestigen, gebruik makend van de toets LEVEL▲ zal het woord “SOUNDS”.

SK LINE sportkoncept
69
Druk op STOP om de aanpassingsmodus te verlaten, waarna het handleidingsprogramma op de LED-reeks (A) zal worden getoond. Begin met oefenen en u zult zien dat de wijzigingen zijn aangebracht.
AANGEPAST INSTELLINGENPANEEL
Instelling Beschrijving 1) Metric Wijzig snelheidseenheid van km/uur tot mijl/uur 2) Wheelsize
Wijzig rpm / afgelegde afstand-ratio
3) Language Definieer de taal waarin boodschappen worden getoond op de monitor. Opties: Spaans, Portugees, Engels, Frans, Duits, Nederlands, Italiaans.
4) Power
Definieer de werkingsmethode van het toestel, kies uit aangedreven op eigen kracht of verbonden met de netspanning. Als de ON-modus wordt geselecteerd, moet het toestel aangesloten zijn op de netspanning. Om de monitor die in de ON-modus is uit te schakelen, houd de STOP-toets 4 seconden vast. Opties: - OFF (Werkend op batterijen) - ON (Werkend via netspanning). BELANGRIJK: Bij de ON-optie moet het toestel aangesloten zijn op de netspanning, anders raken de batterijen leeg en onbruikbaar.
5) SWR time
Stelt de berekeningsmaatstaf vast voor het steady watt rate-programma. Deze optie is alleen beschikbaar op modellen dat het steady watt rate-programma bezitten. Opties: Waarde in seconden (minimaal 20, maximaal 60)
6) SPR time Stelt de berekeningsmaatstaf vast voor het steady pulse rate-programma. Opties: Waarde in seconden (minimaal 20, maximaal 60)
7) Manual T
Stelt een maximale tijdslimiet vast voor de oefening. Opties: - 0 (Geen maximale tijdslimiet vastgesteld) - Oefeningstijdlimietwaarden in minuten (maximaal 60).
8) Text
Opties: - OFF (Welkomstboodschap wordt standaard weergegeven) - ON (Bewerken welkomstboodschap toegestaan)
Om de welkomstboodschap aan te passen, inclusief bijvoorbeeld de naam van de fitnessruimte.
9) Sounds Schakelt geluidsboodschappen uitgezonden door de monitor in of uit. Opties: -ON (Ingeschakeld) -OFF (Uitgeschakeld)
ELEMENTEN VAN DE ELEKTRONISCHE MONITOR (Fig.1).- De elektronische monitor bestaat uit twee aparte gebieden: Het bovenste gedeelte, Fig.2 (A – B – C ) voor het WEERGAVE. Het onderste gedeelte, Fig.3 (D – F – G ) voor het TOETSENBORD.
WEERGAVE Dit gebied bestaat uit twee schermen. (A) De bovenste LED-reeks die realtime inspanningsniveaus weergeeft die geproduceerd worden gedurende het geselecteerde programma. (B) Onderste alfanumerieke scherm die de selectie-opties en oefening van de gebruiker begeleidt. Het bovenste scherm (A) geeft de verschillende voorgeprogrammeerde oefeningsprofielen (programma’s) die geselecteerd kunnen worden weer, en huidige inspanningsniveaus gedurende beoefening. Het onderste alfanumerieke scherm (B) wordt zowel gebruikt om de gebruiker te begeleiden bij het selecteren van de uit te voeren oefening, als om informatie weer te geven over de oefening zowel gedurende als na de sessie. De LED-indicators (C) die onder het alfanumerieke scherm staan verschaffen een gelijktijdige aflezing van SPEED/R.P.M; TIME/DISTANCE; CALORIES/WATTS; PULSE RATE en ze geven aan welke informatie wordt weergegeven gedurende de hele oefening.

SK LINE sportkoncept
70
De gegevens die weer worden gegeven op de LED’s (C) gedurende de oefening zijn als volgt: -SPEED: Dit toont een geschatte waarde van de lineaire snelheid die een fiets zou hebben gebaseerd op de pedaalsnelheid van de gebruiker. De waarde wordt weergegeven in kilometers per uur (km/h). -STEPS/MIN: - STM: Dit geeft het aantal stappen per minuut weer. -RPM: Dit toont de huidige pedaalsnelheid gedurende de oefening. Het geeft het aantal volle rondes aan dat de krukas maakt in één minuut (RPM). -TIME: Dit toont de tijd die verstreken is sinds met de oefening begonnen is of, indien een tijdslimiet is vastgesteld, de hoeveelheid tijd die over is voordat de oefening op zijn einde loopt. De tijd wordt weergegeven in minuten en seconden (mm:ss). -DISTANCE: Dit geeft de afstand weer die is afgelegd sinds met de oefening begonnen is. De afstand wordt berekend door gebruik te maken van de geschatte lineaire snelheid (SPEED) en de weergegeven eenheden zijn in kilometers en hectometers -CALORIES: Dit toont het geschatte aantal calorieën die tot nu toe verbrand zijn. Deze berekening is gebaseerd op de energie die geproduceerd wordt en de gewichts- en leeftijdswaarden die de gebruiker opgegeven heeft. -WATTS: Dit toont de hoeveelheid energie die momenteel geproduceerd wordt tijdens de oefening. Deze berekening is gebaseerd op het inspanningsniveau waarop de gebruiker werkt en op de pedaalsnelheid. De informatie wordt weergegeven in Watts. -PULSE: Dit toont de hartfrequentie van de gebruiker, ervan uitgaande dat deze informatie verkregen kan worden via de handgreepsensoren of de telemetrische borstband. Als deze beiden gebruikt worden, heeft de telemetrische borstband prioriteit. Voor meer informatie over hartfrequentie, wordt verwezen naar de sectie met de titel: Pulsmeting; borstband en handgreep
TOETSENBORD. De functie van elke toets wordt hieronder behandeld. Zie Figuur 3. De elektronische monitor bezit een eenvoudig te gebruiken toetsenbord. Dit toetsenbord bestaat uit numerieke toetsen ( F ) en functietoetsen ( G ). - Numerieke toetsen (F) - (1- 0) worden gebruikt om de door de monitor verzochte gegevens in te voeren. - Functietoetsen (G) – reset; level▲; level▼; enter; pause; stop; quick / start. Deze toetsen worden gebruikt om de uit te voeren oefening te selecteren, de verzochte gegevens in te voeren, het weerstandsniveau van de oefening te regelen en deze te beëindigen.
-reset.- reset-toets. Deze wordt gebruikt om gegevens te wissen die in de monitor zijn ingevoerd bij het selecteren van een programma.
-level▼.- Toets voor het verlagen van het inspanningsniveau. Als hier op gedrukt wordt tijdens het oefenen, zal deze toets het inspanningsniveau met één verlagen volgens toestelinstelling. Tijdens de selectie van voorgeprogrammeerde profielen wordt deze toets gebruikt om naar het volgende profielscherm te gaan.
-level▲.- Toets voor het verhogen van inspanningsniveaus. Als hier op gedrukt wordt tijdens het oefenen, zal deze toets het inspanningsniveau met één verhogen volgens toestelinstelling. Tijdens de selectie van voorgeprogrammeerde profielen wordt deze toets gebruikt om naar het vorige profielscherm te gaan.
-enter.- Selectie- en validatietoets. Deze wordt gebruikt tijdens selectie van een voorgeprogrammeerd profiel om het profiel te selecteren, gegevens die ingevoerd zijn te bevestigen en de oefening te starten. Ook wordt deze toets gebruikt tijdens het programmeren van een gebruikersprofiel om de inspanningsniveau-instellingen voor elke minuut te bevestigen.
-pause.- Pauzetoets. Als tijdens een sessie hierop wordt gedrukt, wordt de oefening onderbroken en de oefeningschronometer wordt gestopt. Om de oefeningschronometer opnieuw te starten, druk opnieuw op de pause-toets of ga door met de oefening. In pauzemodus bestaat een tijdslimiet van 45 seconden, waarna de oefening als beëindigd zal worden beschouwd en de monitor zichzelf zal uitschakelen. Als in pauzemodus op STOP wordt gedrukt, wordt de oefening als beëindigd beschouwd.

SK LINE sportkoncept
71
-stop.- Stoptoets. Als tijdens de sessie hierop gedrukt wordt, zal de oefening als beëindigd beschouwd worden en zullen inspanningsinstellingen zakken naar een minimaal niveau. Een samenvatting van alle oefeningsgegevens zal worden weergegeven en daarna zal de monitor terugkeren naar het startscherm. Houd de STOP-toets 3 seconden naar beneden in de modus Start/Ready (Start/Gereed), waarna de console, als onder de projectmodus de optie POWER ingeschakeld is, met een biep automatisch uit zal gaan.
-quick / start.- Toets voor snel starten. Als op deze toets gedrukt wordt, mits de LED op de toets oplicht, zal de oefening beginnen op handbediening.
STARTEN.- Om de monitor in te schakelen is het noodzakelijk zodanig te fietsen dat de krukas ronddraait met 45 r.p.m, zodra de 45 r.p.m bereikt wordt, zal de monitor aangaan en 60 seconden aanblijven zodat u hem kunt programmeren. Tevens kunt u de adapter die bij het toestel geleverd is in een stopcontact steken, ervan uitgaande dat u de ON-optie hebt gekozen in de aangepaste instellingen (stap 4 POWER). Zodra de monitor aanstaat, zal het profiel en de letter “M” voor manueel op de LED-reeks (A) Fig.2 en de “WELCOME TO HI – POWER”-welkomstboodschap weergegeven worden op het onderste alfanumerieke scherm (B). U kunt het programma op handbediening starten door op de toets QUICK/START te drukken en vervolgens kunt de inspanningsniveaus verhogen of verlagen door op de toetsen level▼of level▲ te drukken.
USB-POORT.- De monitor op dit toestel is uitgerust met een haven usb (D) voor het opladen van de mobiele.
SLUIMERMODUS: Deze modus wordt geactiveerd als er in de stand-by-modus binnen 45 seconden geen RPM-signaal wordt ontvangen. Er worden geen vensters weergegeven in deze modus. U moet op de voetplaat gaan staan om een signaal te produceren en het weergavevenster opnieuw te openen. Als de adapter op het toestel is aangesloten, zal de console, als onder de projectmodus de optie POWER ingeschakeld is, niet overschakelen naar de sluimermodus. Als er geen adapter aangesloten is, zal de console overschakelen naar de sluimermodus zelfs als hij aan staat.
P0 HANDBEDIENING.- Zodra de monitor aanstaat, zal het profiel en de letter “M” voor manueel op de LED-reeks (A) Fig.2 en de “WELCOME TO HI – POWER”-welkomstboodschap weergegeven worden op het onderste alfanumerieke scherm (B) Fig.2. U kunt het programma op handbediening starten door op de toets QUICK/START te drukken. De oplichtende bovenste LED-reeks (A), Fig.2, zal het inspanningsniveau aangeven dat geproduceerd wordt tijdens het oefenen. Door op de toetsen level▼ of level▲ te drukken, kunt u de inspanningsniveaus verhogen of verlagen tussen twintig verschillende instellingen. Elke 10 seconden zal het alfanumerieke scherm (B), Fig.2, schakelen tussen weergegeven lezingen voor: Waarden met betrekking tot: SPEED (Mod.H800; Mod.H895; Metrisch systeem km/uur of Angelsaksisch systeem mijl/uur; stappen/min Mod.G930; treden per minuut Mod.R250); TIME ; CALORIES; PULSE RATE en in de tweede reeks: r.p.m.Mod.H800; Mod.H895; totaal aantal stappen Mod.G930; DISTANCE; WATT en PULSE RATE. Het programma kan onderbroken worden door op STOP te drukken, waarna het onderste alfanumerieke scherm (B), Fig.2, de gemiddelde waarden weer zal geven voor EXERCISE TIME; DISTANCE TRAVELLED; CALORIES CONSUMED gedurende de oefening. Deze waarden zullen twee keer per vijf seconden weergegeven worden. Als gedurende de tijd die het kost om deze gemiddelde waarden weer te geven geen toetsen aangeraakt worden en er wordt verder geen oefening meer gedaan en er wordt op de STOP-toets gedrukt, dan zal het toestel terugkeren naar het manuele programma.

SK LINE sportkoncept
72
PROGRAMMAMODUS.- De monitor heeft: 1 MANUAL-profielprogramma; 8 voorgeprogrammeerde PROGRAM-profielen; een profiel programmeerbaar door de gebruiker (USER), als ook een man-TEST, vrouw-TEST, steady pulse rate (H.R.C) en steady watt rate (mod. H800 / H895) / afstandscontrole (mod.G930) -programma’s. Zie voorgeprogrammeerde programmagrafieken aan het eind van deze handleiding.
P1 - P8 GRAFISCHE PROGRAMMA’S.-
Met de monitor ingeschakeld zal de bovenste LED-reeks (A), Fig.2, het profiel en de letter “M” voor manueel weergeven. De toetsen LEVEL▲ en LEVEL▼ worden gebruikt om de verschillende voorgeprogrammeerde profielen weer te geven. Zodra er een specifiek profiel geselecteerd is, druk op ENTER. De bovenste LED-reeks (A) zal om een leeftijdswaarde vragen (tussen 10 en 99), selecteer uw leeftijd door gebruik te maken van de getallentoetsen (F), Fig.3, en druk op ENTER. Vervolgens zal naar uw gewicht gevraagd worden (tussen 30 en 199 kg), selecteer uw gewicht door gebruik te maken van de getallentoetsen (F), Fig.3, en druk op ENTER. Dan zal er een tijdslimiet voor de oefening gevraagd worden (tussen 10 en 60 minuten), selecteer de tijd door gebruik te maken van de getallentoetsen (F), Fig.3, druk op ENTER en uw oefeningssessie zal aanvangen. Er zijn vier verschillende moeilijkheidsgraden (L1 – L4) binnen elk voorgeprogrammeerde profiel, om er één van te selecteren hoeft u slechts op de toetsen LEVEL▲ en LEVEL▼ te drukken tijdens de oefening. Zodra u het oefeningsprogramma hebt beëindigd, zal de monitor de gemiddelde waarden waarop u de oefening hebt uitgevoerd berekenen en deze tonen op het onderste alfanumerieke scherm (B), Fig.2. Het programma kan onderbroken worden door op STOP te drukken, waarna het onderste alfanumerieke scherm (B), Fig.2, de gemiddelde waarden weer zal geven voor EXERCISE TIME; DISTANCE TRAVELLED; AVERAGE SPEED; CALORIES CONSUMED gedurende de oefening. Deze waarden zullen twee keer per vijf seconden weergegeven worden. Als gedurende de tijd die het kost om deze gemiddelde waarden weer te geven geen toetsen aangeraakt worden en er wordt verder geen oefening meer gedaan en er wordt op de STOP-toets gedrukt, dan zal het toestel terugkeren naar het manuele programma.
P9 GEBRUIKERSPROGRAMMA (USER).- Met de monitor ingeschakeld zal de bovenste LED-reeks (A), Fig.2, het profiel en de letter “M” voor manueel weergeven. Gebruik de toetsen LEVEL▲ en LEVEL▼ om de verschillende voorgeprogrammeerde profielen weer te geven. Zodra programma 9 (USER) geselecteerd is, druk op ENTER. De bovenste LED-reeks (A), Fig.2, zal om een leeftijdswaarde vragen (tussen 10 en 99), selecteer uw leeftijd door gebruik te maken van de getallentoetsen (F), Fig.3 (als de ingevoerde waarde deze limieten overschrijdt, zal de meest toelaatbare waarde weergegeven worden). Druk op ENTER. Vervolgens zal naar uw gewicht gevraagd worden (tussen 30 en 199 kg), selecteer uw gewicht door gebruik te maken van de getallentoetsen (F), Fig.3, en druk op ENTER. Dan zal er een tijdslimiet voor de oefening gevraagd worden (tussen 10 en 60 minuten), selecteer de tijd door gebruik te maken van de getallentoetsen (F), en druk op ENTER. Druk nu op RESET, waarna u een aangepast oefeningsprofiel kunt beginnen te ontwerpen op de LED-reeks (A). Het te ontwerpen profiel wordt onderverdeeld in 21 stappen, de eerste 3 stappen zijn voor warming-up-doeleinden en bereiken alleen een beperkte waarde van 4 om mogelijk letsel te voorkomen, de overige van de 21 stappen bereiken het maximum. Om de eerste stap te selecteren, druk op RESET; de toetsen LEVEL▲, LEVEL▼ en druk vervolgens op ENTER, en daarna net zolang tot u de grafiek voor uw persoonlijke programma voltooid hebt. Als u een fout maakt tijdens het vastleggen van elke stap, druk op RESET en herhaal de vorige stap. Druk vervolgens op ENTER en begin te oefenen met uw aangepaste ontworpen programma. Zodra u het oefeningsprogramma beëindigd heeft, zal de monitor de gemiddelde oefeningswaarden berekenen en deze op het onderste alfanumerieke scherm weergeven (B), Fig.2. Het programma kan onderbroken worden door op STOP te drukken, waarna het onderste alfanumerieke scherm (B), Fig.2, de gemiddelde waarden weer zal geven voor EXERCISE TIME; DISTANCE TRAVELLED; CALORIES

SK LINE sportkoncept
73
P10 – P11 MAN - VROUW TESTPROGRAMMA’S.- Het doel van deze test is het conditieniveau van de gebruiker te beoordelen. Om dit te doen moet u een pedaalsnelheid kunnen handhaven van tussen de 70 tot 80 omwentelingen per minuut (r.p.m) gedurende 5 minuten. Het verschil tussen de Man- en Vrouwprogramma’s zit in de Watts. De waarde voor de Mantest is ingesteld op 150 W, terwijl de Vrouwtest is ingesteld op 100 W. Met de monitor ingeschakeld zal de bovenste LED-reeks (A), Fig.2, het profiel en de letter “M” voor manueel weergeven. De toetsen LEVEL▲ en LEVEL▼ worden gebruikt om de verschillende voorgeprogrammeerde profielen weer te geven. Zodra de Man-TEST of Vrouw-TEST geselecteerd is, druk op ENTER. Vervolgens zal het onderste alfanumerieke scherm (B), Fig.2, om een leeftijdswaarde vragen (tussen 10 en 99), selecteer uw leeftijd door gebruik te maken van de getallentoetsen (F), Fig.3, en druk op ENTER. De bovenste LED-reeks (A), Fig.2, zal een oplichtend hartsymbool weergeven. Plaats uw handen op de pulssensoren (handgreep) op het handvat of bevestig de telemetrische borstband op uw borst als u die heeft. Begin de TEST met een pedaalsnelheid van tussen 70 tot 80 R.P.M, fietsend gedurende 5 minuten. Zolang als u binnen de 70 tot 80 R.P.M-limiet blijft, zal de monitor “OK” weergeven, echter als u boven deze R.P.M. uitstijgt of eronder gaat, dan zal de monitor de prompt "R.P.M ?" weergeven. Aan het einde van de 5 minuten-test zal u een score toegekend worden tussen 1 (erg zwak) en 5 (uitstekend). Een 0-score kan ook verschijnen, wat betekent dat de test niet juist werd uitgevoerd (de pedaalsnelheid van 75 r.p.m werd niet gehandhaafd of de meetsensor van de hartfrequentie werd niet juist gebruikt). OPMERKING: Om de test te kunnen doen is het van belang hartfrequentiemeting te gebruiken, gebruik makend van ofwel de handgreepsensoren of de borstband. Het valt aan te bevelen een korte warming-up-sessie te doen alvorens aan de test te beginnen. Dit zal mogelijk letsel voorkomen. Het maximale aantal pulsaties dat een persoon nooit zou moeten passeren wordt het maximale ritme genoemd en dit vermindert bij toenemende leeftijd. Een simpele berekeningsformule is de leeftijd in jaren af te trekken van 220. De oefening, opdat deze correct verloopt, moet zich handhaven tussen 65% en 85% van het maximale hartritme en het wordt aanbevolen de 85% niet te overschrijden. Wanneer uw pulsaties 85% van het maximale hartritme overschrijden, zal een knipperend hart verschijnen en zal gedurende 2 seconden een geluid opklinken totdat uw pulsaties onder 85% van uw maximale hartritme komen. Uit veiligheidsoverwegingen wordt aanbevolen onder 85% van het maximale hartritme te oefenen.
P12 CONSTANT HARTRITMEPROGRAMMA (H R C).-
Het valt aan te bevelen een korte warming-up-sessie te doen alvorens dit programma te gebruiken. Dit zal mogelijk letsel voorkomen. Dit programma staat u toe een hartrime te selecteren (tussen 65% en 85% van het maximale hartritme) en het toestel zal automatisch inspanningsniveaus aanpassen om te verzekeren dat de gebruiker de geselecteerde hartritmewaarde handhaaft. Gebruik van hartrimemeting, gebruik makend van de telemetrische borstband, is verplicht en u moet de 85% van uw maximale hartritmewaarde niet overschrijden. Met de monitor ingeschakeld zal de bovenste LED-reeks (A), Fig.2, het profiel en de letter “M” voor manueel weergeven. Gebruik de toetsen LEVEL▲ en LEVEL▼ om de verschillende voorgeprogrammeerde profielen weer te geven. Zodra het HRC-programma geselecteerd is, druk op ENTER. Druk op ENTER om de doelhartfrequentie te wijzigen, waarna het LED-venster “ENTER PULSE SETTING <40-220>” (“Voer de pulsinstelling in <40-220>”) zal weergeven. Druk op de getallentoetsen, waarna het LED-venster “PULSE = xxx” (“puls = xxx”) zal weergeven en de gespecificeerde waarde zal gaan knipperen. Druk op de getallentoetsen om een 3-cijferig getal te wijzigen en in te voeren (waarden: 40 ~ 220). Als het getal buiten deze grenswaarden valt, zal een groter of lager getal weergegeven worden. Voer een waarde in binnen genoemde grenswaarden en druk op ENTER om te bevestigen. Druk op ENTER om de tijd te wijzigen, waarna het LED-venster “ENTER THE EXERCISE TIME <MINUTES>” (“Voer de oefeningstijd in <minuten>”) zal weergeven. De puntenmatrixweergave zal de prompt “? 10” weergeven en het getal dat u hebt ingevoerd zal gaan knipperen.

SK LINE sportkoncept
74
Druk op de getallentoetsen om een 2-cijferig getal te wijzigen en in te voeren (waarden: 10 ~ 60). Als het getal buiten deze grenswaarden valt, zal de standaard tijdsinstelling weergegeven worden. Voer een waarde in binnen genoemde grenswaarden en druk op ENTER om te bevestigen, waarna u het programma kunt starten. Nadat u de laatste instelling gespecificeerd hebt, worden alle waarden samen opgeslagen. Het inspanningsniveau is 1 en wordt elke minuut naar de volgende regel verplaatst. Als de snelheid (RPM) te traag is, zal de puntenmatrixweergave “RPM�” weergeven en na 15 seconden overgeschakeld worden naar de pauzemodus. Begin de oefening met een pedaalritme van tussen 70 tot 80 R.P.M., plaats uw handen op de pulssensoren (handgreep) op het handvat, of bevestig de telemetrische borstband, als u die heeft, op uw borst. Mocht u boven of onder deze R.P.M geraken, dan zal de bovenste LED-reeks (A), Fig.2, de prompt "R.P.M�" weergeven. Dit programma gebruikt een vooraf ingesteld inspanningsniveau gedurende de eerste drie minuten om elk type letsel te voorkomen. Na de derde minuut zal de computer de inspanningsinstelling automatisch aanpassen om het pulsritme op de vooraf geprogrammeerde waarde te houden.
INSTELLING AUTOMATISCHE INSPANNING.- Aan het begin van de oefening stelt het toestel het inspanningsniveau in op het minimum, d.w.z. 50W, totdat de eerste pulslezing gedaan wordt. Zodra de pulsfrequentie vastgesteld is, berekent het programma elke X seconden uw hartfrequentie (deze periode kan gewijzigd worden in een waarde tussen 20 tot 60 seconden binnen het SPR-programma). De inspanningsinstelling die gebaseerd is op de pulsfrequentie wordt in de volgende stappen uitgelegd. 1.- DOELHARTRITME groter dan WERKELIJKE HARTRITME: Als het verschil tussen het DOELHARTRITME en het WERKELIJKE HARTRITME gelijk is aan of groter dan 15 p.p.m., zal de AUTOMATISCHE INSPANNINGSCONTROLE starten, toenemend in stappen van 20 Watt. Als dit verschil minder is dan 15 p.p.m, zal de controle plaatsvinden in stappen van 10 Watt, totdat beide hartritmes aangepast zijn. 2.- WERKELIJKE HARTRITME groter dan DOELHARTRITME: Als het verschil tussen het WERKELIJKE HARTRITME en het DOELHARTRITME gelijk is aan of groter dan 15 p.p.m., zal de AUTOMATISCHE INSPANNINGSCONTROLE starten, afnemend in stappen van 20 Watt. Als dit verschil minder is dan 15 p.p.m., zal de controle plaatsvinden in stappen van 10 Watt, totdat beide hartritmes aangepast zijn. - Als het verschil tussen het WERKELIJKE HARTRITME en het DOELHARTRITME gelijk is aan of groter dan 30 p.p.m, zal het onderste alfanumerieke scherm (B) de boodschap “VERMINDER INSPANNINGSNIVEAU, UW HARTRITME IS TE HOOG” weergeven en de automatische controle van het toestel zal het inspanningsniveau laten zakken tot het minimum (50 W). Als er geen hartritme wordt geconstateerd gedurende de oefening, zal de boodschap “Hartritmewaarde?” oplichten; als deze situatie meer dan 60 seconden voortduurt, zal de machine terugkeren op handbediening. OPMERKING: Naar het maximale aantal hartslagen dat een persoon niet zou moeten overschrijden wordt verwezen als het maximale hartritme en deze waarde zakt met de leeftijd. Een simpele formule om deze waarde te berekenen is uw leeftijd, in jaren, af te trekken van 220. Het maximale hartritme voor juist oefenen zou gehouden moeten worden tussen 65% en 85%, het is niet aanbevelenswaardig om boven 85% uit te gaan. Uit veiligheidsoverwegingen valt het aan te bevelen om beneden 85% van het maximale hartritme te oefenen. Als u geen hartritmemeetsysteem gebruikt, zal het hartsymbool en een vraagteken op het scherm verschijnen; als het toestel daarna nog steeds geen enkele hartritme-informatie krijgt, zal het programma geannuleerd worden en zult u een nieuwe programmaselectie moeten maken.

SK LINE sportkoncept
75
P13 STEADY WATT RATE-PROGRAMMA.- Dit programma stelt u in staat het voedingsniveau (in Watt) waarop u wilt werken te selecteren. De kracht die ontwikkeld wordt (in Watt) is gebaseerd op de door u gemaakte inspanning en de snelheid waarmee u de oefening doet. Het toestel zal het inspanningsniveau automatisch regelen om te verzekeren dat de gebruiker altijd dezelfde krachtuitvoer ontwikkelt, onafhankelijk van het pedaalritme. Dit programma gebruikt een vooraf ingesteld inspanningsniveau gedurende de eerste veertig seconden om elk type letsel te voorkomen. Na de veerstigste seconde neemt het toestel de controle van de inspanningsinstellingen over, gebaseerd op het pedaalritme van de gebruiker. Het valt aan te bevelen een korte warming-up-sessie te doen alvorens dit programma te gebruiken. Dit zal mogelijk letsel voorkomen. Met de monitor ingeschakeld zal de bovenste LED-reeks (A), Fig.2, het profiel en de letter “M” voor manueel weergeven. Gebruik de toetsen LEVEL▲ en LEVEL▼ om de verschillende voorgeprogrammeerde profielen weer te geven. Zodra het WATT-programma geselecteerd is, druk op ENTER. Het onderste alfanumerieke weergavescherm (B) zal naar de WATT-waarde vragen waarop u de oefening wilt doen. Gebruik de getallentoetsen (F), Fig.3, om een waarde te selecteren tussen 25 en 400 Watts, en druk op ENTER. Druk op ENTER om de tijd te wijzigen, waarna het LED-venster “ENTER THE EXERCISE TIME <MINUTES>” (“Voer de oefeningstijd in <minuten>”) zal weergeven. De puntenmatrixweergave zal de prompt “? 10” weergeven en het getal dat u hebt ingevoerd zal gaan knipperen. Druk op de getallentoetsen om een 2-cijferig getal te wijzigen en in te voeren (waarden: 10 ~ 60) . Als het getal buiten deze grenswaarden valt, zal de standaard tijdsinstelling weergegeven worden. Voer een waarde in binnen genoemde grenswaarden en druk op ENTER om te bevestigen, waarna u het programma kunt starten. Nadat u de laatste instelling hebt gespecificeerd, drukt u op ENTER om alle waarden samen op te slaan. Het inspanningsniveau is 1 en wordt elke minuut naar de volgende regel verplaatst. Als de snelheid (RPM) te traag is, zal de puntenmatrixweergave “RPM�” weergeven en na 15 seconden overgeschakeld worden naar de pauzemodus. Het onderste alfanumerieke scherm (B) zal u vragen om de WATT-waarde waarop de oefening wenst te doen, gebruik de getallentoetsen (F), Fig.3, om een waarde te selecteren (tussen 25 en 400 WATT) en druk vervolgens op ENTER. Als er minder dan 25 W wordt geconsumeerd gedurende het oefenen, zal de bovenste LED-reeks (A), Fig.2, de boodschap “R.P.M ?” weergeven , idem als u 450 W overschrijdt.
INSTELLING AUTOMATISCHE INSPANNING.- Nadat u in de trainingsmodus bent gestart, zal het programma elke X seconden de WATT-waarde berekenen. (Deze "X"-waarde kan door de gebruiker gewijzigd worden in het SWR-programma op de monitor.) De methode voor het instellen van de WATT-waarde is als volgt: 1.- Gedurende de training zal het programma de werkelijke WATT-waarde vergelijken met de WATT-doelwaarde. Als de werkelijke WATT-waarde minder is dan of gelijk aan 75% van de WATT-doelwaarde, zal het inspanningsniveau automatisch verhoogd worden in stapjes van 3 tot maximaal NIVEAU 20. 2.- Gedurende de training zal het programma de werkelijke WATT-waarde vergelijken met de WATT-doelwaarde. Als de werkelijke WATT-waarde minder is dan of gelijk aan 50% van de WATT-doelwaarde, zal het inspanningsniveau automatisch verhoogd worden in stapjes van 2 tot maximaal NIVEAU 20. 3.- Gedurende de training zal het programma de werkelijke WATT-waarde vergelijken met de WATT-doelwaarde. Als de werkelijke WATT-waarde minder is dan of gelijk aan 15% van de WATT-doelwaarde, zal het inspanningsniveau automatisch verhoogd worden in stapjes van 1 tot maximaal NIVEAU 20. 4.- Gedurende de training zal het programma de werkelijke WATT-waarde vergelijken met de WATT-doelwaarde. Als de werkelijke WATT-waarde hoger is dan of gelijk aan 15% van de WATT-doelwaarde, zal het inspanningsniveau automatisch verlaagd worden in stapjes van 1 tot minimaal NIVEAU 1. 5.- Gedurende de training zal het programma de werkelijke WATT-waarde vergelijken met de WATT-doelwaarde. Als de werkelijke WATT-waarde hoger is dan of gelijk aan 50% van de WATT-doelwaarde, zal het inspanningsniveau automatisch verlaagd worden in stapjes van 2 tot minimaal NIVEAU 1. 6.- Gedurende de training zal het programma de werkelijke WATT-waarde vergelijken met de WATT-doelwaarde.

SK LINE sportkoncept
76
Als de werkelijke WATT-waarde hoger is dan of gelijk aan 75% van de WATT-doelwaarde, zal het inspanningsniveau automatisch verlaagd worden in stapjes van 3 tot minimaal NIVEAU 1. OPMERKING: U kunt de geprogrammeerde watt-waarde op elk moment gedurende de oefening wijzigen door gebruik te maken van de toetsen LEVEL▲ en LEVEL▼ (dit zal de tijdinstelling niet beïnvloeden). De geprogrammeerde watt-waarde zal knipperend op het weergavescherm getoond worden. Het toestel is uitgerust met handsensoren (handgrepen) om het pulsritme van de gebruiker te meten. Het kan ook met een telemetrisch systeem gebruikt worden gebaseerd op een zender (borstband) en een ontvanger die aan de elektronische monitor toegevoegd zijn. De handsensoren zijn gemakkelijk te gebruiken, u hoeft ze alleen maar te grijpen terwijl u de oefening doet en daarna te wachten totdat de hartritmelezing op het weergavescherm verschijnt. De pulsritmelezing zal niet onmiddellijk verschijnen, u zult ongeveer 20 seconden moeten wachten totdat die op het scherm verschijnt. De borstband is in contact met de borst en stuurt een hartritmesignaal naar de monitor, die dat vervolgens toont.
P13.- G930; G815; G818 AFSTANDSCONTROLEPROGRAMMA.- Dit programma biedt u de mogelijkheid om een ingestelde afstand die van tevoren geselecteerd is uit te voeren. Met de monitor ingeschakeld zal de bovenste LED-reeks (A), Fig.2, het profiel en de letter “M” voor manueel weergeven. Gebruik de toetsen LEVEL▲ en LEVEL▼ (NIVEAU) om de verschillende voorgeprogrammeerde profielen weer te geven. Zodra het programma voor de afstand geselecteerd is, druk op ENTER. De boodschap “ENTER DISTANCE TO RUN <0.1-99.9>” (“Voer de uit te voeren afstand in <0.1-99.9>”) zal op het alfanumerieke scherm B verschijnen. Gebruik de getallentoetsen om de gewenste afstand in te voeren. Als het getal buiten deze grenswaarden valt, zal een groter of lager getal weergegeven worden. Voer een waarde in binnen genoemde grenswaarden en druk op ENTER om met de oefening te beginnen. De waarde voor de gespecificeerde afstand wordt weergegeven op het alfanumerieke scherm B en zal verminderen naarmate u de oefening uitvoert. Het inspanningsniveau is 9 en wordt elke minuut naar de volgende regel verplaatst. Als de snelheid (RPM) te traag is, zal de puntenmatrixweergave “RPM�” weergeven en na 15 seconden overgeschakeld worden naar de pauzemodus. U kunt de toetsen LEVEL▲ en LEVEL▼ (NIVEAU) gebruiken om het inspanningsniveau gedurende de oefening te wijzigen. WAARSCHUWING Voordat u begint aan wat voor oefeningsprogramma dan ook, doet u er goed aan eerst uw arts te consulteren en te spreken over de aard van de oefening. Als u een pacemaker gebruikt, gebruik dan niet de borstband totdat u met uw arts heeft gesproken.
BETEKENIS VAN DE GEBRUIKTE SYMBOLEN.-
Op het scherm kunnen verschillende symbolen of woorden verschijnen en die hebben de volgende betekenis: Een hartje met een vraagteken: De borstband is niet of niet goed aangebracht. Een knipperend hartje: Dit symbool verschijnt alleen bij de tests. Het maximum aantal hartslagen dat een persoon nooit mag overschrijden, wordt het maximum ritme genoemdendat aantal neemt met de leeftijd af. Een eenvoudige manier om dat maximum te berekenen is de leeftijd af te trekken van het getal 220. Wanneer de slagen de 85% van de maximum hartslag overschrijden,verschijnt er en knipperende hartje en is er gedurende twee seconden een waarschuwingssignaal te horen en dat zolang uw slagen niet onder de 85% van uw maximum hartritme zakken. Om gezondheidsredenen wordtalgemeen aangeraden om onder de 85% van de maximum hartslag oefeningen te doen. *0*: Dit symbool verschijnt in de test voor mannen en voor vrouwen en betekent dat u de test niet goed heeft uitgevoerd (het ritme van 75 t/m is niet aangehouden of de borstband is niet geplaatst). Afbeelding van een steeksleutel:
Technisch defect.Zet het toestel af en schakel het na 2 minuten weer aan.Het toestel beschikt over een automatisch correctiesysteem bij defecten, als het probleem toch aanhoudt, neem dan contact op met de technische dienst.

SK LINE sportkoncept
77
Als u twijfels hebt over enig onderdeel van dit toestel, aarzel dan niet contact op te nemen met de technische bijstandsdienst door dienstverlening te bellen (zie laatste pagina van de handleiding). BH BEHOUDT ZICH HET RECHT VOOR OM DE SPECIFICATIES VAN HAAR PRODUKTEN ZONDER VOORAFGAANDE BEKENDMAKING TE WIJZIGEN
1. “WELKOM BIJ HI POWER” 2. “DRUK OP DE PIJLEN OM HET PROFIEL TE SELECTEREN” 3. “DRUK QUICK/START OM TE BEGINNEN” 4. “DRUK OP ENTER OM HET PROFIEL TE STARTEN” 5. “ERROR” 6. “NEEM CONTACT OP MET DE TECHNISCHE DIENST” 7. “GEEF UW LEEFTIJD IN <10-99>”
8. “GEEF UW GEWICHT IN <30-199> KG” “GEEF UW GEWICH IN <70-440> LB”
9. “GEEF DE DUUR VAN DE OEFENING IN <10-60> MINUTEN”
10. “GEEF DE WAARDE VOOR WATT IN <25-400>” “WATTS=”
11. “LEEFTIJD=” 12. “GEEF DE WAARDE VOOR DE POLSSLAG IN <40-220>” 13. “POLSSLAG=” 14. “DRUK OP PAUSE OM DE OEFENING VOORT TE ZETTEN. DRUK OP STOP OM” 15. “DUUR OEFENING=” 16. “AFGELEGDE AFSTAND=” 17. “GEMIDDELDE SNELHEID=” 18. “VERBRUIKTE CALORIEEN=”
19. “DRUK OP ENTER OM HET OPGESLAGEN PROFIEL TE BEVESTIGEN. DRUK OP RESET OM HET PROFIEL TE WIJZIGEN.”
20. “GEBRUIK DE PIJLEN OM DE INTENSITEIT VAN DE ACTIEVE KOLOM TE SELECTEREN. DRUK OP ENTER OM NAAR DE VOLGENDE KOLOM TE GAAN. DRUK OP RESET OM NAAR DE MANUELE STAND TERUG TE KEREN.”
21. “VERMINDER DE INTENSITEIT VAN DE OEFENING. UW HARTSLAG IS TE HOOG” 22. “HET RESULTAAT VAN DE TEST IS=”

SK LINE sportkoncept
78
(E) PERFILES DE LOS PROGRAMAS; (GB) PROGRAM PROFILES; (F) PROFILS DES PROGRAMMES ; (D) PROGRAMMPROFILE ; (P) PERFIS DOS PROGRAMAS ; (I) PROFILI DEI PROGRAMMI; (NL) PROGRAMMAPROFIELEN
H800 / H895 / H720 / H775 P-0 P-1 P-2 P-3
P-4 P-5 P-6 P-7
P-8 P-9 P-10 P-11
P-12 P-13
G930 / G815 / G818 P-0 P-1 P-2 P-3
P-4 P-5 P-6 P-7
P-8 P-9 P-10 P-11
P-12 P-13

SK LINE sportkoncept
79
R250
P0 P1 P2
P3 P4 P5
P6 P7 P8
P9 P10 P11
P12 P13

SK LINEsportkoncept
BH HIPOWER SPAIN EXERCYCLE,S.L. (Manufacturer) P.O.BOX 195 01080 VITORIA (SPAIN) Tel.: +34 945 29 02 58 Fax: +34 945 29 00 49 e-mail: [email protected] www.bhfitness.com
POST-VENTA
Tel: +34 945 292 012 / 902 170 258 Fax: +34 945 56 05 27 e-mail: [email protected]
BH HIPOWER NORTH AMERICA 20155 Ellipse Foothill Ranch CA 92610 Tel: + 1 949 206 0330 Toll free: +1 866 325 2339 Fax: +1 949 206 0013 e-mail: [email protected] www.bhnorthamerica.com
BH HIPOWER ASIA No.139, Jhongshan Rd. Daya Township Taichung 428, Taiwan. R.O.C. Tel.: +886 4 25609200 Fax: +886 4 25609280 e-mail: [email protected]
BH HIPOWER PORTUGAL MAQUINASPORT, S.A. Zona Industrial Giesteira Terreirinho 3750-325 Agueda (PORTUGAL) Tel.: +351 234 729 510 Fax: +351 234 729 519 e-mail: [email protected]
BH SERVICE PORTUGAL Tel.: +351 707 22 55 24 Fax: +351 234 729 519 e-mail: [email protected]
BH HIPOWER MEXICO BH Exercycle de México S.A. de CV Eje 132 / 136 Zona Industrial, 2A Secc. 78395 San Luis Potosí S:L:P: MÉXICO Tel.: +52 (444) 824 00 29 Fax: +52 (444) 824 00 31 www.bh.com.mx
BH HIPOWER CHINA BH China Co., Ltd. Block A, NO.68, Branch Lane 455, Lane 822, Zhen Nan RD., Li Zi Yuan, Putuo, Shanghai 200331, P.R.C. Tel: +86-021-5284 6694 Fax:+86-021-5284 6814 e-mail: [email protected]
BH HIPOWER UK Unit 12 Arlington Court Newcastle Staffs ST5 6SS UK 0844 3353988 International 00441782634703
AFTER SALES - UK
e-mail: [email protected]
BH HIPOWER FRANCE
SAV FRANCE Tel : +33 0810 000 301 Fax : +33 0810 000 290 [email protected]
BH Germany GmbH Altendorfer Str. 526 45355 Essen Tel: +49 201 450910-0 e-mail: [email protected] Kostenfreie Telefonnummer: 0800 0996655 Ersatzteile: www.homeactive.de
BH SE RESERVA EL DERECHO A MODIFICAR LAS ESPECIFICACIONES DE SUS PRODUCTOS SIN PREVIO AVISO. SPECIFICATIONS MAY BE CHANGED WITHOUT PRIOR NOTICE DUE TO OUR PROGRAMME OF CONTINUOUS PRODUCT DEVELOPMENT. BH SE RÉSERVE LE DROIT DE MODIFIER LES SPECIFICATIONS DE SES PRODUITS SANS PRÉAVIS. BH BEHALT SICH DAS RECHT VOR, ÄNDERUNGEN DER MODELL-ANGABEN OHRE VORHERIGE ANKÜNDIGUNG VORZUNEHMEN. DATI TECNICI E COMMERCIALI RELATIVI AGLI ARTICOLI DEL PRESENTE CATALOGO POSSONO ESSERE SOGGETIL A VARIAZIONI SENZA ALGUN PREAVVISO. BH SE RESERVA O DIREITO A MODIFICAÇÀO ESPECIFICAÇOES DOS SEUS PRODUCTOS SEM PRÉVIO AVISO. DOOR KONSTANTE PRODUKTVERNIEUWING EN VERBETERING HOUDEN WIJ ONS HET RECHT VAN WIJZIGING VOOR ZONDER VOORAFGAAND BERICHT.
v2


