Uncovering Application Runtime Expert - IBM i 7
54
© Copyright IBM Corp. 2011. All rights reserved. ibm.com/redbooks 1 Redpaper Uncovering Application Runtime Expert - IBM i 7.1 Introduction This IBM® Redpaper™ introduces IBM Application Runtime Expert for i, which is a new product that has the potential to revolutionize how you do application service and support. IBM Application Runtime Expert for i (ARE) can help you ensure consistent performance and deployment for any workload running on your system. ARE allows you to build and maintain an application knowledge base, one that can be used to automatically apply its knowledge to verify a system. ARE provides a GUI that allows you to collect and verify a customized set of information, system settings, and attributes about: Applications IBM i System Runtime Environment ARE collects the needed information and builds it into a template. This template can then be used in verifying the application and its environment on the same system where the template was built or on any other IBM i system. When you run a template against an IBM i system, the system will be verified against the information stored in the template, and the results are documented in a set of reports. These reports give a clear and concise view of what has changed or what is different. Templates can be updated easily to include new information and settings from the ARE GUI interface. This Redpaper provides guidance for using IBM Application Runtime Expert for i and discusses the product’s features. Ahmed Mansour Hernando Bedoya
Transcript of Uncovering Application Runtime Expert - IBM i 7

Redpaper
Uncovering Application Runtime Expert - IBM i 7.1
Introduction
This IBM® Redpaper™ introduces IBM Application Runtime Expert for i, which is a new product that has the potential to revolutionize how you do application service and support.
IBM Application Runtime Expert for i (ARE) can help you ensure consistent performance and deployment for any workload running on your system. ARE allows you to build and maintain an application knowledge base, one that can be used to automatically apply its knowledge to verify a system.
ARE provides a GUI that allows you to collect and verify a customized set of information, system settings, and attributes about:
� Applications� IBM i System� Runtime Environment
ARE collects the needed information and builds it into a template. This template can then be used in verifying the application and its environment on the same system where the template was built or on any other IBM i system.
When you run a template against an IBM i system, the system will be verified against the information stored in the template, and the results are documented in a set of reports. These reports give a clear and concise view of what has changed or what is different.
Templates can be updated easily to include new information and settings from the ARE GUI interface.
This Redpaper provides guidance for using IBM Application Runtime Expert for i and discusses the product’s features.
Ahmed MansourHernando Bedoya
© Copyright IBM Corp. 2011. All rights reserved. ibm.com/redbooks 1

Installing and updating ARE
This section describes the three stages of ARE installation:
� “Pre-installation” on page 2� “Installing ARE” on page 2� “Post-installation” on page 3
Pre-installation
ARE requires certain IBM i products and PTFs to be installed on the system before installing the product on the IBM i system.
Prerequisite productsTable 1 lists the required products on IBM i system.
Table 1 ARE requirements
Installing ARE
The IBM Application Runtime Expert for i product must be installed by a user profile that has a minimum of *ALLOBJ and *IOSYSCFG special authorities.
Installation stepsFollow the steps below to install ARE on IBM i system:
1. Insert the product CD into your system.
2. Run the command below, substituting OPT01 with the name of your optical drive device:
QSYS/RSTLICPGM LICPGM(5733ARE) DEV(OPT01) OPTION(*BASE) RSTOBJ(*ALL)
OS version Products PTF levels
IBM i 6.1 � 5761SS1 option 3 – Extended Base Directory Support
� 5761SS1 option 12 – Host Servers� 5761SS1 option 30 – QShell� 5761SS1 option 33 – PASE� 5761JV1 option 11 – J2SE 6 32 bit� 5761DG1 – IBM HTTP Server for i
� HTTP Group PTF SF99115 level 14 or later
� Java Group PTF SF99562 level 10 or later
IBM i 7.1 � 5770SS1 option 3 - Extended Base Directory Support
� 5770SS1 option 12 - Host Servers� 5770SS1 option 30 - QShell� 5770SS1 option 33 - PASE� 5761JV1 option 11 - J2SE 6 32 bit� 5770DG1 - IBM HTTP Server for i
� HTTP Group PTF SF99368 level 2 or later
� Java Group PTF SF99572 level 2 or later
Important: Make sure that all required software products are installed on your system, and that the products are updated to the correct PTF levels prior to installing ARE.
2 Uncovering Application Runtime Expert - IBM i 7.1

3. The product’s software license agreement is displayed. If the agreement is accepted, the product install will complete with no further actions required.
4. Upon successful completion of the product install, you will see the following message in the job log of the user profile that performed the install:
CPC3DC7 – Objects for product 5733ARE option *BASE release *FIRST restored
Verifying the installationTo do this:
1. Go to the Work with Licensed Programs menu:
GO LICPGM
2. Select option 10, Display installed licensed programs:
10. Display installed licensed programs
3. Verify that licensed program 5733ARE is in the displayed list (Figure 1).
Figure 1 License Program 5733ARE
Post-installation
After the product has been installed successfully, load and apply the latest PTFs for the 5733ARE product.
Information about the latest available PTFs can be found on the following ARE support web page:
http://www-03.ibm.com/systems/power/software/i/are/support.html
Starting and stopping ARE
After ARE is installed on the system, you can start using it. The following sections describe the process of starting and stopping ARE.
Starting server jobs
ARE is a web application that runs in an Integrated Web Application Server (IAS). You need to start the web application Server jobs to be able to use the web user interface.
Display Installed Licensed Programs System: MCV7R1 Licensed Product Program Option Description
5733ARE *BASE IBM Application Runtime Expert for i
Note: Periodically check for new ARE PTFs to benefit from the latest ARE enhancements and fixes.
Uncovering Application Runtime Expert - IBM i 7.1 3

Follow the steps below to start ARE:
1. Start ARE server jobs using the following command:
QSYS/STRTCPSVR SERVER(*HTTP) HTTPSVR(IBMARE)
2. Verify that ARE server jobs are started correctly using the following command:
QSYS/WRKACTJOB SBS(QHTTPSVR)
3. Four IBMARE jobs should be started under the QHTTPSVR subsystem (Figure 2).
Figure 2 IBMARE jobs under QHTTPSVR
Starting the Web GUI
After the ARE application server has been started, the web user interface is accessible using any of the following supported web browsers:
� Mozilla Firefox 3.5 or later (suggested)� Microsoft Internet Explorer 7 or 81
The ARE application can be accessed at the following URL:
http://system_name:12401/are
Where system_name is the name of your IBM i system where the ARE application server is running.
Current Opt Subsystem/Job User Type CPU % Function Status QHTTPSVR QSYS SBS .0 DEQW IBMARE QLWISVR BCI .0 JVM-com.ibm.lw THDW IBMARE QTMHHTTP BCH .0 PGM-QZHBMAIN SIGW IBMARE QTMHHTTP BCI .0 PGM-QZSRLOG SIGW IBMARE QTMHHTTP BCI .0 PGM-QZSRHTTP SIGW
1 Microsoft Internet Explorer 6 Web browser is not supported. Certain features in ARE graphical interface may not function correctly when using the Microsoft Internet Explorer 6 Web browser.
4 Uncovering Application Runtime Expert - IBM i 7.1

You must enter a user name and password to get access to the ARE Web GUI (Figure 3).
Figure 3 ARE Web logon
Stopping server jobs
If the ARE server needs to be stopped, stop it using the following command:
QSYS/ENDTCPSVR SERVER(*HTTP) HTTPSVR(IBMARE)
After stopping the server jobs you cannot access the ARE web interface anymore.
Deployment Template Editor
A deployment refers to a collection of information that describes the expected attributes about software, the environment, and the state of deployment.
Overview
A deployment template is used as the input to the ARE Core. The ARE Core compares the attributes of the deployment and its environment to the expected attribute and state information stored in the template. Any differences are recorded and included in a report that
Note: The ARE GUI requires that any user that logs in have *ALLOBJ special authority because building a deployment template using ARE often requires access to restricted resources.
Uncovering Application Runtime Expert - IBM i 7.1 5

summarizes differences between the expected and actual attributes of the deployment and its environment.
The following list shows common examples of deployments:
� Any IBM i product� Any application on the IBM i
– An ISV application– A WebSphere® Application Server– An integrated Web Application Server– An RPG application– A directory tree
� A custom selection of software products, system, and environment information
After logging into ARE you see the Deployment Template Editor page (Figure 4).
Figure 4 Deployment Template Editor
ARE version number
Note: The ARE version is displayed in the lower right corner of the Deployment Template Editor page (Figure 4).
6 Uncovering Application Runtime Expert - IBM i 7.1

Managing templates
You can perform the following template management actions from Deployment Template Editor page:
� Create new templates.� Import templates.� Export templates.� Edit existing templates.� Launch console, where you can use the templates to verify one or more systems.
Creating a templateTo create a new template:
1. Click Create.
2. Enter a template name.
3. Click Create (Figure 5).
Figure 5 Create new template
After completing the above steps, the Plugin Selection and Customization page displays to allow you to select and customize plug-ins for your template.
Importing a templateTo import an existing template:
1. Click Import.
2. Browse to the Template JAR file on the system.
3. Click Import (Figure 6).
Figure 6 Import template
Uncovering Application Runtime Expert - IBM i 7.1 7

After completing the above steps, the Plugin Selection and Customization page displays to show the template settings and allow further customization.
Exporting a templateYou can export any ARE template from the Web UI from Deployment Template Editor home page by taking the following steps:
1. Select the template name in the Manage templates table.
2. Click Actions Export (Figure 7). This action exports the selected template to a JAR file.
Figure 7 Export template
Other template management actionsYou can perform several actions to manage ARE templates from the Deployment Template Editor home page. The following actions can be done by selecting a template, clicking Actions (Figure 7), and then selecting the desired action:
� Copy: This action creates a copy of the selected template under a different name.
� Delete: This action deletes the selected template.
� Edit: This action opens the Plugin Selection and Customization page to allow you to customize the selected template.
� Rename: This action gives you the option to rename the selected template.
8 Uncovering Application Runtime Expert - IBM i 7.1

� Test: This action tests the selected template against the IBM i system that ARE is running on. It will give you the template test progress and resulting reports in a separate browser window (Figure 8).
� View log: This action shows the output log file that results from building the selected template.
Figure 8 Test template
Template creation and plugin customization
A deployment template represents the expected attributes, a state of a deployment and its environment. Typically, a deployment consists of application attributes as well as attributes of the environment that the application run in.
Uncovering Application Runtime Expert - IBM i 7.1 9

Overview
Users can customize different plugins by defining what information to include in the deployment template using the Deployment Template Editor. A plug-in is capable of checking and verifying an application or system attribute. You can tailor each plug-in to verify precisely what is needed for their deployment. The ability to customize what each plug-in verifies is one of the most powerful features of IBM ARE for i. It allows quick and easy creation of a template to verify any deployment, regardless of its structure or attributes.
You will need to go through the following stages to build your template:
1. Make sure that your deployment (application, system, and environment) is in a known good state.
2. Create a template from the Deployment Template Editor home page.
3. Select and customize plug-ins for the template from the Plugin Selection and Customization page.
4. Build your template from the Plugin Selection and Customization page.
The following sections walk you through the features available in ARE for plugin selection and customization ARE.
The plugins are grouped into five main categories:
� Files and directories� Software requirements� Network� System environment� Advanced
CollectionsA collection is a logical grouping of targets to be checked under the same rules. The purpose of a collection is to create a logical grouping of related items that need to be verified. The precise checks performed by a plugin are customizable on a per-collection basis. The items in one collection can be verified differently from items in another collection.
Figure 9 shows an example of two collections created under the File and Directory Attributes plugin.
Figure 9 Work with collections
10 Uncovering Application Runtime Expert - IBM i 7.1

Files and directories
You can customize the template to verify various file and directory settings:
� “File and directory attributes” on page 11� “File and Directory Authorities plugin” on page 13� “Configuration Files plugin” on page 14� “Resource Collector plugin” on page 16
Figure 10 shows the Files and Directories plugins in ARE. Using the Edit and Remove buttons, next to each plugin, you can edit and remove any of the plugins.
Figure 10 Files and directories
File and directory attributesThe File and Directory Attributes plugin verifies attributes such as existence, creation date, last modification date, size, and Code Character Set Identifier (CCSID). The precise file and directory attributes verified by this plugin are fully customizable.
The File and Directory Attributes plugin page (Figure 11) allows you to add, remove, update, and test collections.
Attributes can be verified for:
� Files and directories in IFS by clicking Add files/directories (Figure 11)� Objects in the Library file system by clicking Add libraries
Figure 11 File and Directory Attributes
Uncovering Application Runtime Expert - IBM i 7.1 11

Table 2 lists the available attributes.
Table 2 File and directory attributes
Additional attributes are available by clicking Advanced. For example, Figure 12 shows the additional attributes available for the File and Directory Attributes Add files/directories plugin.
Figure 12 Advanced attributes
Attribute For IFS For Library
Exists Verify that the file or directory exists. Verify that the object exists.
Type Verify that the file type is correcta.
a. For example, if a file is expected to be a symbolic link, but it is actually a file, verification will return an error.
Verify that the object type is correctb.
b. For example, verify that an object that is supposed to be a *PGM is really a program object.
Size Verify the size, in bytes, of the data in the file.
Verify the size, in bytes, of the object.
Last Modified Verify the date and time the file or directory was last changed.
Verify the date and time that the object was last changed.
CCSID Verify the CCSID attribute of the file.c
c. This attribute is not applicable for directory entries.
Verify the CCSID attribute of the object.
Creation time Verify the date and time that the file or directory was created.
Verify the date and time that the object was created.
12 Uncovering Application Runtime Expert - IBM i 7.1

File and Directory Authorities pluginThe File and Directory Authorities plugin verifies authority attributes such as owner, authorization list, primary group, data, and object authorities. The precise authority attributes verified by this plugin are fully customizable.
Attributes can be verified for:
� Files and directories in IFS by clicking Add files/directories� Objects in the Library file system by clicking Add libraries
Table 3 lists the authority attributes.
Table 3 Authority attributes
Attribute For IFS For Library
Data authority Verify user data authority to a file or directory (read, write, and execute).
Verify user data authority to an object (read, add, update, delete, and execute).
Object authority Verify user object authority to a file or directory (existence, management, alter, and reference).
Verify user object authority to an object (operational, management, existence, alter, and reference).
Owner Verify the owner of the file or directory.
Verify the owner of the object.
Primary group Verify the primary group for the file or directory.
Verify the primary group for the object.
Authorization list
Verify the authorization list for the file or directory.
Verify the authorization list for the object.
Uncovering Application Runtime Expert - IBM i 7.1 13
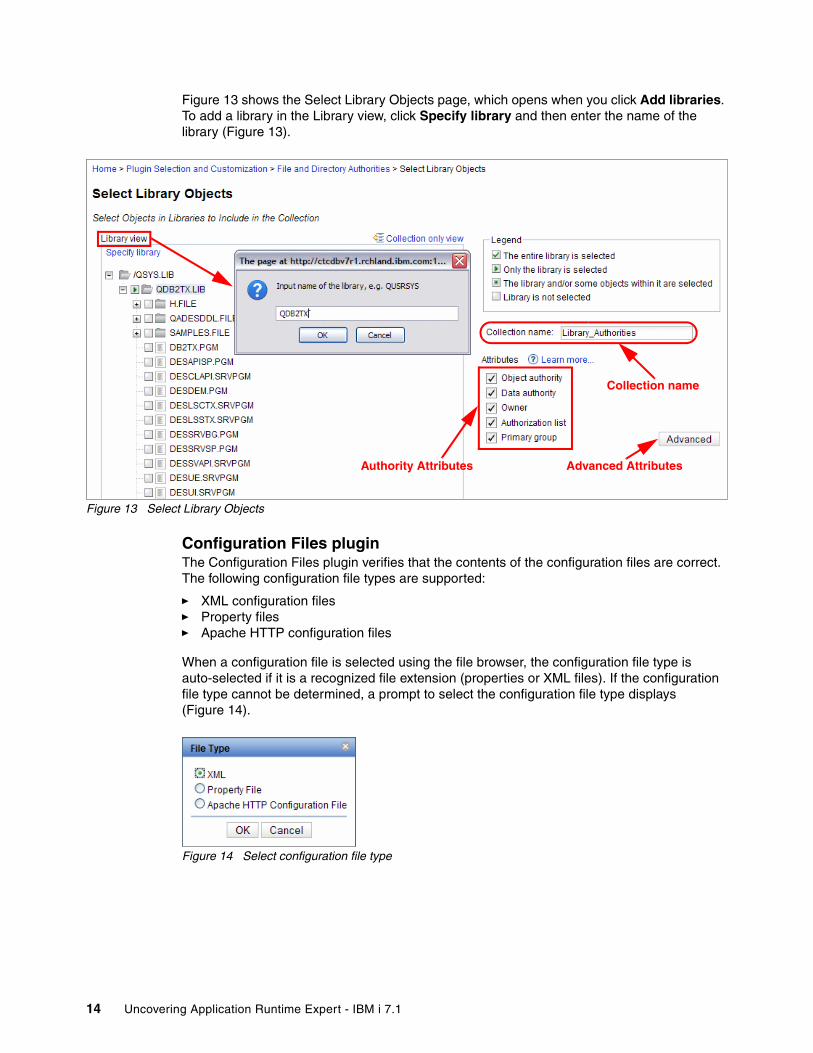
Figure 13 shows the Select Library Objects page, which opens when you click Add libraries. To add a library in the Library view, click Specify library and then enter the name of the library (Figure 13).
Figure 13 Select Library Objects
Configuration Files pluginThe Configuration Files plugin verifies that the contents of the configuration files are correct. The following configuration file types are supported:
� XML configuration files� Property files� Apache HTTP configuration files
When a configuration file is selected using the file browser, the configuration file type is auto-selected if it is a recognized file extension (properties or XML files). If the configuration file type cannot be determined, a prompt to select the configuration file type displays (Figure 14).
Figure 14 Select configuration file type
Authority Attributes
Collection name
Advanced Attributes
14 Uncovering Application Runtime Expert - IBM i 7.1

On the Configuration Files page, you can use the Add, Remove, and Update configuration files options (Figure 15).
Figure 15 Configuration Files plugin
Add new configuration file
Remove configuration file Update configuration files
Uncovering Application Runtime Expert - IBM i 7.1 15

The items to check in a configuration file are fully customizable, as well as the types of checks performed (equals, does not equal, contains, exists, exclude, and more) (Figure 16). The expected value for configuration items can also be customized.
Figure 16 Customize Configuration File
Resource Collector pluginThe Resource Collector plugin allows you to collect and package files and objects from the target system into an archive file for additional review. This feature allows ARE to collect the data needed to completely review and possibly debug an issue on a system.
The plugin allows you to:
� Collect and package specific files and directories from IFS into a single archive file.
� Gather native IBM i objects and libraries by saving them into SAVF objects that can then be included in the specified archive file.
Note: You can view the collected resources after verifying the target system by selecting Export all report files on the Console Resultpage. This function exports all report files and resource collector output.
16 Uncovering Application Runtime Expert - IBM i 7.1

Figure 17 shows the Configure Resource Collector plugin page.
Figure 17 Configure Resource Collector plugin
Software Requirements plugin
The Software Requirements plugin allows you to customize the template to verify various software requirements and prerequisites. It can be very helpful in verifying any specific product dependencies before installing it on IBM i.
The Software Requirements plugin allows you to verify:
� “IBM i Products” on page 18� “PTFs plugin” on page 18
Use this feature to specify a single file to collect
Use this feature to collect all of the files under the specific IFS directory
Use this feature to capture native IBM i objects using the native IBM i save method
Uncovering Application Runtime Expert - IBM i 7.1 17

IBM i ProductsThis feature allows you to select specific IBM i products from the list of all IBM i products. The selected products will be added to the list of products to verify in the template. Figure 18 shows the IBM i Products plugin.
Figure 18 Select IBM i products to verify
The CHKPRDOPT (Check Product Option) CL command can be used during product verification for providing useful, product-specific information. Select the CHKPRODOPT check box to enable this feature.
Figure 19 Filter IBM i Products
When a problem is found during product verification, the problem is added to the IBM i product verification section of the report. The severity of the problem, which determines how the problem is recorded in the report, can be customized for each product verified.
PTFs pluginThe PTFs plugin verifies the status of individual and group PTFs on an IBM i system. It also lists all group PTF levels on the system, which is equivalent to the information displayed by the WRKPTFGRP CL command.
List of products installed on the system
A selected list of products to verify on the target system
Note: To select an IBM i product that is not installed on the system, click Filter and choose Show all products supported by IBM i (Figure 19).
18 Uncovering Application Runtime Expert - IBM i 7.1

The specific PTFs and group PTFs verified are fully customizable. This plugin can verify that a group PTF level meets both a minimum and a suggested level.
Figure 20 shows the PTF groups to verify table on the PTFs plugin page. This table contains the current set of group PTFs installed on the system and their levels.
Figure 20 PTF groups to verify
All group PTFs in the table are added to the list of group PTFs to verify. You can customize the plugin by:
� Adding group PTFs to the table by clicking Add� Removing a group PTF from the table by clicking Remove
The PTF plugin allows you to verify the install status of individual PTFs. The list of PTFs presented is the list of all PTFs loaded on the system (Figure 21).
Figure 21 Verify individual PTFs
Uncovering Application Runtime Expert - IBM i 7.1 19

If a PTF needs to be verified, but is not loaded on the system, the PTF can be added manually by clicking Add Individual PTF.
You can customize the Expected Status for the PTF and the severity of PTF verification status.
Network
Using the following plugins, you can verify a variety of TCP/IP configuration settings, network characteristics, and ports status:
� “Network configuration” on page 20� “Ports” on page 21
Network configurationThe Network Configuration plugin (Figure 22) verifies a variety of TCP/IP configuration settings and network characteristics. Much of the TCP/IP configuration that is verified is the configuration settings viewable using the CFGTCP CL command.
There are several areas of the network configuration that are verified by this plugin:
� TCP/IP Configuration
– TCP/IP domain information
– TCP/IP host table entries
– TCP/IP interfaces
� DNS Lookup Performance and Correctness
– Verify the IP address for LOCALHOST and the response time.
– Verify the IP address for LOOPBACK.
– Verify that DNS lookup for LOOPBACK and LOCALHOST both return an IP address of 127.0.0.1.
Figure 22 Network Configuration plugin
20 Uncovering Application Runtime Expert - IBM i 7.1

PortsThe Port validation plugin verifies whether one or more specified ports are active or free on the system. The plugin is also capable of verifying whether one or more specified ports are restricted.
If an application requires a port that is already in use or that has been restricted, the application can fail to start or not work correctly.
The Ports plugin (Figure 23) is capable of verifying the following:
� Port status
During verification, all ports currently in use are listed. If the status of the port is not equal to the expected status, a problem is reported.
� Restricted port ranges
The IBM i system maintains a list of port ranges that are restricted from use. The plugin allows you to enter a starting port and an ending port number.
Figure 23 Ports plugin
System Environment
This feature allows you to verify the following system environment settings:
� “System Values and Network Attributes plugin” on page 21� “Environment Variables plugin” on page 24� “User IDs plugin” on page 25� “Scripts and Commands plugin” on page 26� “SQL Query Verifier plugin” on page 28
System Values and Network Attributes pluginThe System Values and Network Attributes plugin verifies that system values and network attributes are configured the way that a deployment expects.
Note: The specified port range is inclusive, meaning that if either the starting or ending port is within a restricted port range, a problem is reported.
Uncovering Application Runtime Expert - IBM i 7.1 21

Figure 24 shows the System Values and Network Attributes plugin page.
Figure 24 System Values and Network Attributes plugin
The list on the left in Figure 24 shows all system values on the IBM i system. This list is composed of two sets of values:
� System values
These values are equivalent to those displayed by the Work with System Values CL command:
WRKSYSVAL SYSVAL(*ALL)
� Network attributes
These attributes are equivalent to those displayed by the Display Network Attributes CL command:
DSPNETA
Editing expected valuesThe expected value for a system value or network attribute is customizable, including the capability to specify a single value, a list of possible values, a range of possible values, and more.
The list on the right side in Figure 24 shows the list of system values or network attributes to verify on the target system.
Clicking the Edit link next to the value opens the Edit Expected Value dialog (Figure 25 on page 23). The dialog provides a detailed configuration for how to verify a value.
22 Uncovering Application Runtime Expert - IBM i 7.1

The Edit Expected Value dialog allows you to select between two options:
� Report only
This option means that the value will not be verified on the target system. The value is printed in the detailed report generated by the ARE.
� Verify this value
This option will verify the value according to the detailed customized configuration. In this case, the Value type selection box specifies whether the value is treated as a number or a string. Each value type has its own set of comparisons. The comparison to use is specified by the Comparison selection box.
Figure 25 Edit Expected Value dialog
Note: The Report only feature is a useful mechanism for automating the collection of system configuration information.
Uncovering Application Runtime Expert - IBM i 7.1 23

Environment Variables pluginThe Environment Variables plugin (Figure 26) collects and optionally verifies system-wide environment variables. System-wide environment variables can affect the runtime attributes of any job on the system, so their existence, as well as their values, are an important part of the environment in which any application runs.
Figure 26 Environment Variables plugin
The Add Environment Variable dialog (Figure 27) allows you to customize the environment variable verification, including the capability to specify a single value, list possible values, and check CCSID.
Figure 27 Customize environment variable verification
There is also the option to list, but not check, an environment variable in the report, which is a useful mechanism for automating the collection of system-wide environment variables and their values.
24 Uncovering Application Runtime Expert - IBM i 7.1

You can enable this option by selecting Do not verify the environment variable value (Figure 28).
Figure 28 Do not verify environment variable
User IDs pluginThe User IDs plugin (Figure 29) verifies the attributes of one or more IBM i user profiles. Over 20 different attributes can be verified, such as special authorities, group profile, supplemental group, profile enabled, and more.
Figure 29 User IDs plugin
Uncovering Application Runtime Expert - IBM i 7.1 25

The attributes verified for each user ID in the User IDs to verify list can be customized by clicking Customize below the Attributes to verify list. Clicking Customize opens the Customize User ID Attributes dialog (Figure 30).
Figure 30 Customize User ID Attributes
Scripts and Commands pluginThe Scripts and Commands plugin allows you to verify the results of QShell scripts or CL commands on a remote system. This plugin provides a very powerful and simple way to extend the base verification function provided by Application Runtime Expert for i. The Scripts and Commands plugin (Figure 31) simplifies the way to validate additional features on IBM i without having to write a customized plugin.
Figure 31 Scripts and Commands plugin
26 Uncovering Application Runtime Expert - IBM i 7.1
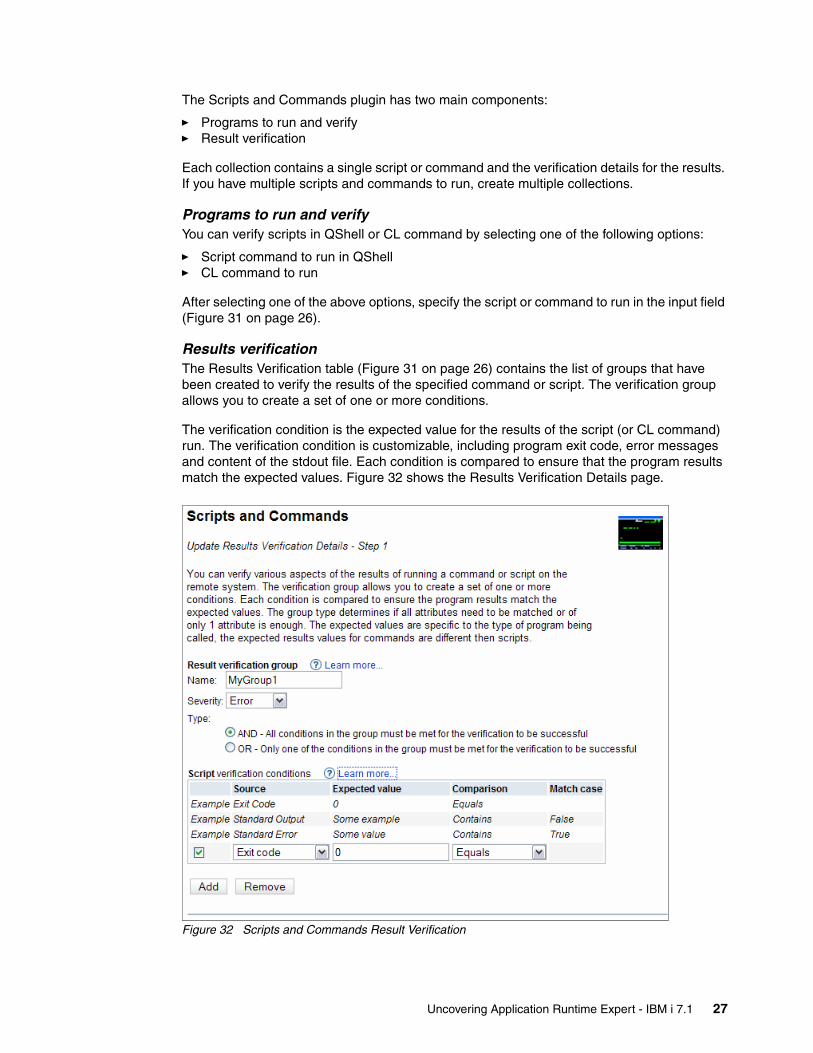
The Scripts and Commands plugin has two main components:
� Programs to run and verify� Result verification
Each collection contains a single script or command and the verification details for the results. If you have multiple scripts and commands to run, create multiple collections.
Programs to run and verifyYou can verify scripts in QShell or CL command by selecting one of the following options:
� Script command to run in QShell� CL command to run
After selecting one of the above options, specify the script or command to run in the input field (Figure 31 on page 26).
Results verificationThe Results Verification table (Figure 31 on page 26) contains the list of groups that have been created to verify the results of the specified command or script. The verification group allows you to create a set of one or more conditions.
The verification condition is the expected value for the results of the script (or CL command) run. The verification condition is customizable, including program exit code, error messages and content of the stdout file. Each condition is compared to ensure that the program results match the expected values. Figure 32 shows the Results Verification Details page.
Figure 32 Scripts and Commands Result Verification
Uncovering Application Runtime Expert - IBM i 7.1 27

SQL Query Verifier pluginThe SQL Query plugin can verify database information using SQL statements. An SQL statement can be specified to be run on the target system. The results of this SQL query can be verified. The verification of specific column data or the number of records returned can be done. Figure 33 shows the SQL Query Verifier page.
Figure 33 SQL Query Verifier
SQL Query Verifier allows you to:
� Check the number of records returned for the SQL query:
– Expected value: Input the expected number of records.
– Comparison: Four options are available:
• Equals• Does not equal• Greater than• Less than
– Severity: Three levels are available:
• Error• Warning• Info
� Set Column Value Verification Conditions: You can add several conditions on one or several columns of the table. You need to specify the following:
– Column name: The column to be checked.
– Check class: This could be String or Numeric.
– Expected value: The expected value for the specified column.
– Comparison: The comparison type, for example, Equals, Contains, Starts with, and so on.
28 Uncovering Application Runtime Expert - IBM i 7.1

– Result type: This selection box has two options:
• All: All records should pass the specified check.• Any: At least one record must pass the specified check.
– Match Case: True for case sensitive comparison, false otherwise.
– Severity: Three levels are available:
• Error• Warning • Info
– Description: Comment to describe the check.
� Print the result set of SQL query to the verification report.
The complete query results will be returned as part of the ARE report (Figure 34).
Figure 34 SQL Query Verifier Report sample
Uncovering Application Runtime Expert - IBM i 7.1 29

Advanced
ARE offers some advanced features for plugin customization:
� “Custom plugins” on page 30� “Other resources” on page 33� “3rd Party plugins” on page 33� “Plugin configuration” on page 34
Custom pluginsManage custom plugins that are included in the deployment template. Custom plugins are Java classes that can augment the verification performed by a deployment template. Anyone can write a custom plugin, and after the plugin is created it can be added to any deployment template.
A custom plugin plugs into an ARE for i environment and is run along with the other plugins selected and customized using the deployment template editor.
Custom plugins can be added or removed from the deployment template from the Custom Plugins page using the Add and Remove buttons (Figure 35).
Figure 35 Custom Plugins page
Note: For information about writing a custom plugin, refer to the following documentation:
http://www-03.ibm.com/systems/resources/systems_i_are_writing_custom_plugins.pdf
Use these buttons to Add and Remove Custom Plugins
30 Uncovering Application Runtime Expert - IBM i 7.1

Adding a custom pluginTo add a custom plugin, click Add and step through the wizard for adding a custom plugin:
1. Select a JAR file that contains the custom plugin (Figure 36).
Figure 36 Select Jar File
Uncovering Application Runtime Expert - IBM i 7.1 31

2. Select specific custom plugins that exist in the JAR file (Figure 37).
Figure 37 Select Plugins
3. Verify the selections and confirm the addition of the plugin to the deployment template (Figure 38).
Figure 38 Summary of custom panels
32 Uncovering Application Runtime Expert - IBM i 7.1

When you perform a verification using your template, the custom plugins that have been added to the template will automatically be run by the ARE core, and their results will be integrated into the same report as the rest of the plugins that you selected and customized when building your template.
Other resourcesManage other resources, which is anything that is not a custom plugin, that are included in the deployment template. Other resources are commonly needed in conjunction with a custom plugin. For example, a custom plugin might require several other Java classes for it to run. These additional Java classes can be added to the deployment template using the Other Resources page.
The Other Resources page (Figure 39) lists all non-plugin resources in the current template. Click Add to add a new resource. This displays a file browser window. Using the file browser, select the resource that you want to add to the template.
Figure 39 Other Resources page
3rd Party pluginsManage 3rd Party plugins included in the deployment template. 3rd Party plugins are plugins created and distributed by software vendors. The 3rd Party plugins can be added to any deployment template. Much like custom plugins, a 3rd Party plugin can augment the verification performed by a deployment template.
Note: The Other Resources page ensures that the resources are always available for use and that the template remains a self-contained jar file, with everything it needs in it.
Note: When adding other resources, JAR files are treated differently from normal files. If you select a JAR file, the entire contents of the JAR file (including any directory structure present in the jar) are added to the template.
Uncovering Application Runtime Expert - IBM i 7.1 33

The 3rd Party Plugins page (Figure 40) lists all of the third-party plugins installed on the system. Selected third-party plugins are packaged into the deployment template, where the plugin is configured to be run when the template is used to verify a system.
Figure 40 3rd Party Plugins page
Plugin configurationThere are several advanced plugin features that can be edited via the Plugin Configuration page. Additionally, any plugin that can be utilized by a template, including plugins that are not configured elsewhere in the GUI, can be configured and added to a template using the Plugin Configuration page.
Building the template
After completing plugin configuration and customization, the next step is to build your template.
This section describes the options available for editing the default template configuration, how to build a template, and a build template summary.
Template build options
You can edit the default template build options by clicking Template build options on the Plugin Selection and Customization page.
34 Uncovering Application Runtime Expert - IBM i 7.1

The Template Build Options page (Figure 41) allows you to edit the template build configuration.
Figure 41 Template Build Options page
You can edit the template build options from two aspects:
� Template details
� Build options
Template detailsThe Template details section allows you to edit the following template configuration:
� Template Description
� Template Version
� Auto Increment
This option is selected by default, and it auto increments the template version every time that the template is built.
Build optionsThe build options section allows you to edit an important template build configuration:
� Build template without runtime core
� Required Application Runtime Expert core version
� Build Integrated template
Uncovering Application Runtime Expert - IBM i 7.1 35

The following sections describe the above topics.
Build template without runtime core optionThe deployment template contains all of the information necessary to verify a system, but a template does not have the ability to use that information to verify a system. ARE core provides the ability to run the template and use the information provided by it to verify a system.
You can configure the build template to be built without ARE core by selecting the Build template without runtime core. Runtime will be on remote system by default option (Figure 41 on page 35).
Required Application Runtime Expert core versionDepending on what plugins are used by the template, a specific version level of the ARE core might be required. The “Runtime core version must be at or higher than” option (Figure 41 on page 35) allows you to specify a minimum level of ARE core version.
The deployment template editor knows what levels of the ARE core are required for each plugin selected and configured in the GUI. Therefore, this field is always set by the deployment template editor, and typically users do not need to modify it.
However, it might be required to manually set the required ARE core version. It is important to only edit this field if you fully understand what the minimum required version should be set to.
Building an integrated templateAn integrated template is a standalone entity, capable of verifying a system without the dependency on the ARE core being installed on the system. You can build an integrated template by choosing “Build template including the runtime core. The remote runtime will not be used” option (Figure 41 on page 35).
An integrated template differs from a standard template in that in addition to all of the XML files included in the template, an integrated template also includes all of the components of the ARE core that are necessary to use the information in the template to verify a system. It has components from the ARE core integrated directly into the template.
An integrated template has the following advantages:
� It eliminates a key software dependency, the ARE core, that is normally needed to verify a system using a template.
� It provides a complete and consistent solution for independent software vendors (ISVs) or those that have systems that do not keep up with the latest service levels.
Note: If a system does not have the required minimum ARE core, verification using the template is not performed, and a message detailing the reason is added into the verification report.
Important: Although an integrated template can verify a system even if ARE core is not installed, the integrated template still requires the IBM Toolbox for Java to be on the system.
36 Uncovering Application Runtime Expert - IBM i 7.1

There are also a few disadvantages that should be taken into consideration:
� ARE core installed on a system cannot use an integrated template to verify the system. The integrated template can only use the version of the ARE core components integrated in the template to perform verification.
� The standard ARE scripts cannot be used with an integrated template.
� The ARE core components are harvested from the ARE core installed on the system where the template is built. The version of the ARE core components integrated into the template is not updated unless a newer version of the ARE core is installed on the template build system and the template is re-built after the updated core.
� The size of an integrated template is approximately one megabyte (1 MB) larger than a standard template. This is due to all of the ARE core components that are added to the template.
� You need to start the integrated template using a Java command, rather than the runARE.sh script. This means that you might need to identify and specify a correct Java home, according to your system environment, if that is not set in your QSH environment. An example for using IBM J9 1.5 is:
export JAVA_HOME=/QOpenSys/QIBM/ProdData/JavaVM/jdk50/32bit
Template build optionsTwo additional options are available:
� Build template that has been modified: This is the default option for a template build.� Select and rebuild plugins based on the content of this system.
Uncovering Application Runtime Expert - IBM i 7.1 37
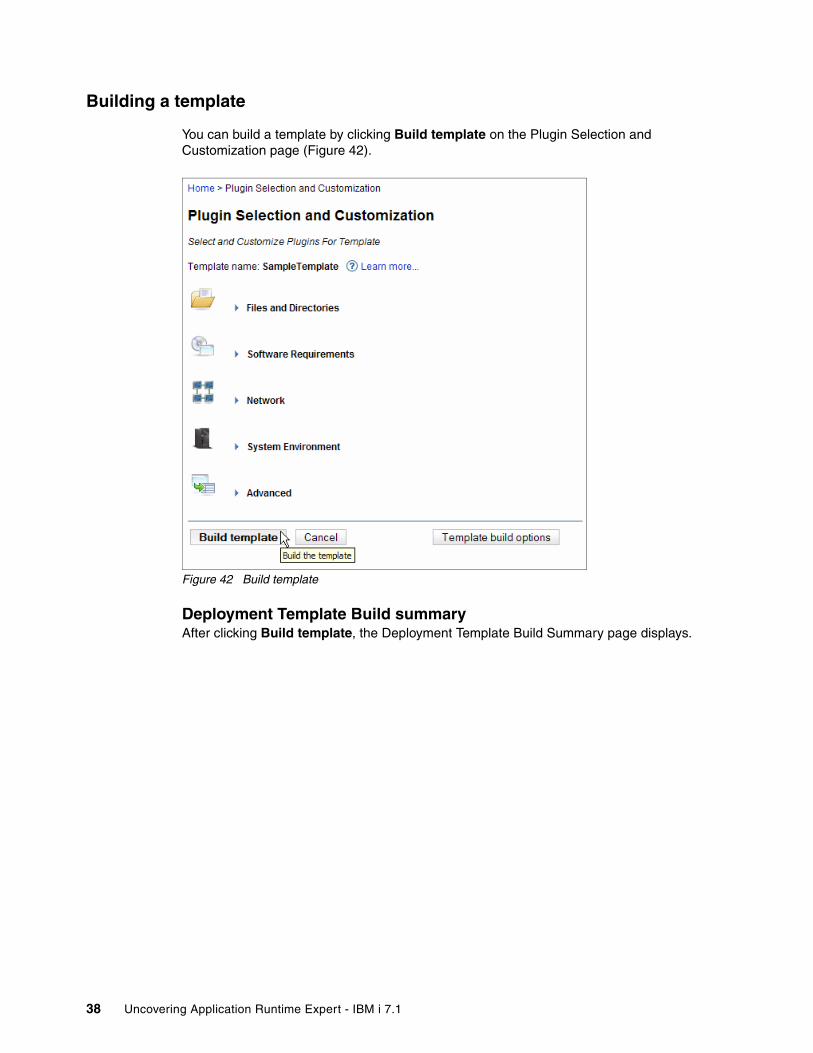
Building a template
You can build a template by clicking Build template on the Plugin Selection and Customization page (Figure 42).
Figure 42 Build template
Deployment Template Build summaryAfter clicking Build template, the Deployment Template Build Summary page displays.
38 Uncovering Application Runtime Expert - IBM i 7.1
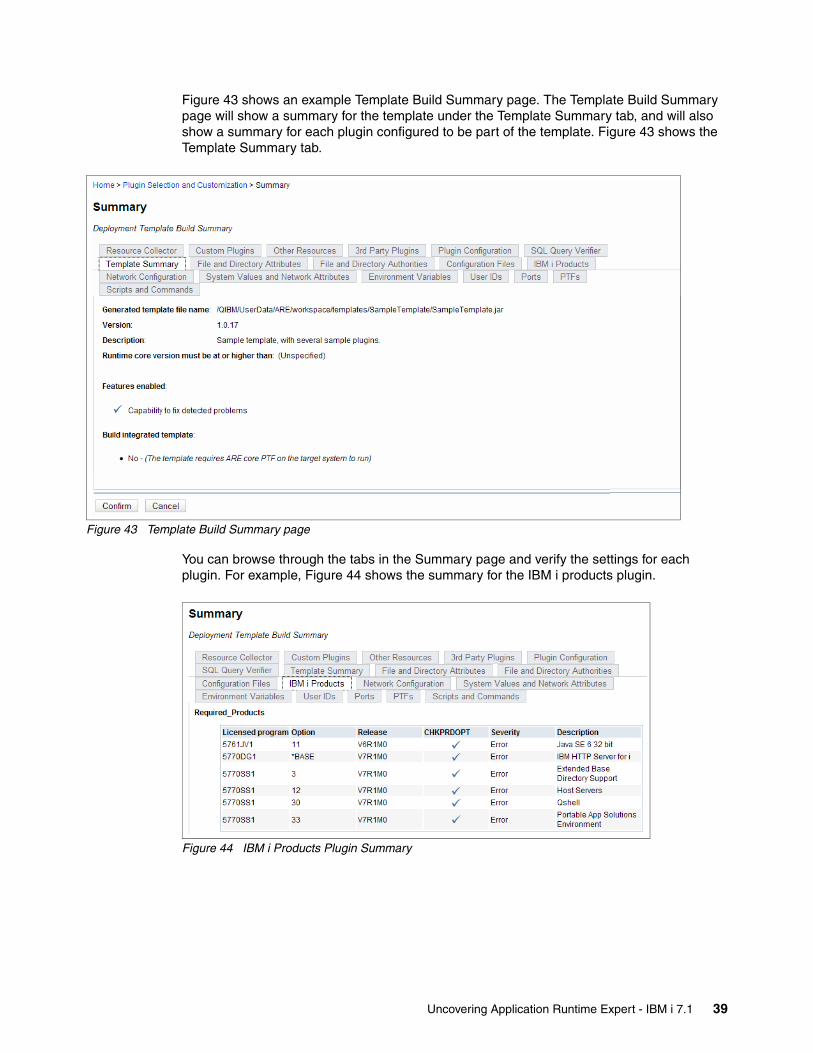
Figure 43 shows an example Template Build Summary page. The Template Build Summary page will show a summary for the template under the Template Summary tab, and will also show a summary for each plugin configured to be part of the template. Figure 43 shows the Template Summary tab.
Figure 43 Template Build Summary page
You can browse through the tabs in the Summary page and verify the settings for each plugin. For example, Figure 44 shows the summary for the IBM i products plugin.
Figure 44 IBM i Products Plugin Summary
Uncovering Application Runtime Expert - IBM i 7.1 39

Click Confirm on the Deployment Template Build Summary page to build the template. This displays a new page showing the build progress and status (Figure 45).
Figure 45 Template build progress
You can click View Log to see a detailed log file for the template build.
Clicking Home takes you back to the Deployment Template Editor page. Your template should appear now in the Manage templates table.
You can now Manage your template as explained in “Managing templates” on page 7.
40 Uncovering Application Runtime Expert - IBM i 7.1

Console
After you have finished building the template, you can start using it for verifying IBM i systems. ARE allows two ways for verifying the template against IBM i systems:
� Using the console web user interface� Using a script that can be run from QShell
This section describes using the console to verify IBM i systems.
The console is a web user interface that enables a system, or group of systems, to be verified using a deployment template that was created or imported using the deployment template editor.
Systems are verified by the following sequence of events:
1. The console remotely logs into the system.
2. The console invokes the ARE to perform the verification using the specified deployment template.
3. The results of the verification go back to the console so that they can be reviewed.
To open the console click Launch Console on the Deployment Template Editor page. This opens the Console page (Figure 46).
Figure 46 The console
Groups
Groups is a feature that provides a way to group one or more systems into a discrete entity. Groups are useful for creating different sets of systems to verify, especially when each set of systems needs a different deployment template for verification.
Note: A valid, enabled user profile name and password for the target system must be provided. The user profile must have *ALLOBJ special authority on the target system, because the verification of the target system might involve the inspection of many files, authorities, PTFs, user profiles, and other items.
Uncovering Application Runtime Expert - IBM i 7.1 41

You can manage your groups through the operations available from the Console page (Figure 47):
� Add group: Click Operations Add Enter Group Name.� Delete group: Select Group name Click Operations Delete.� Rename group: Select Group name Click Operations Rename Enter Name.� Copy group: Select Group name Click Operations Rename Enter Name.
Figure 47 Manage groups in the console
Systems to verify
Within each group in the console you can add one or several IBM i systems to verify.
For each system you need to specify the following:
� Target system name or IP that you want to verify.� User ID with appropriate authorities for the target system.� Password for the specified user ID.� Template name to verify on the system. You can choose from a list of available templates.
Figure 48 shows an example of the Systems to verify table. You can add systems to the table or remove systems from the table.
Figure 48 Systems to verify
42 Uncovering Application Runtime Expert - IBM i 7.1
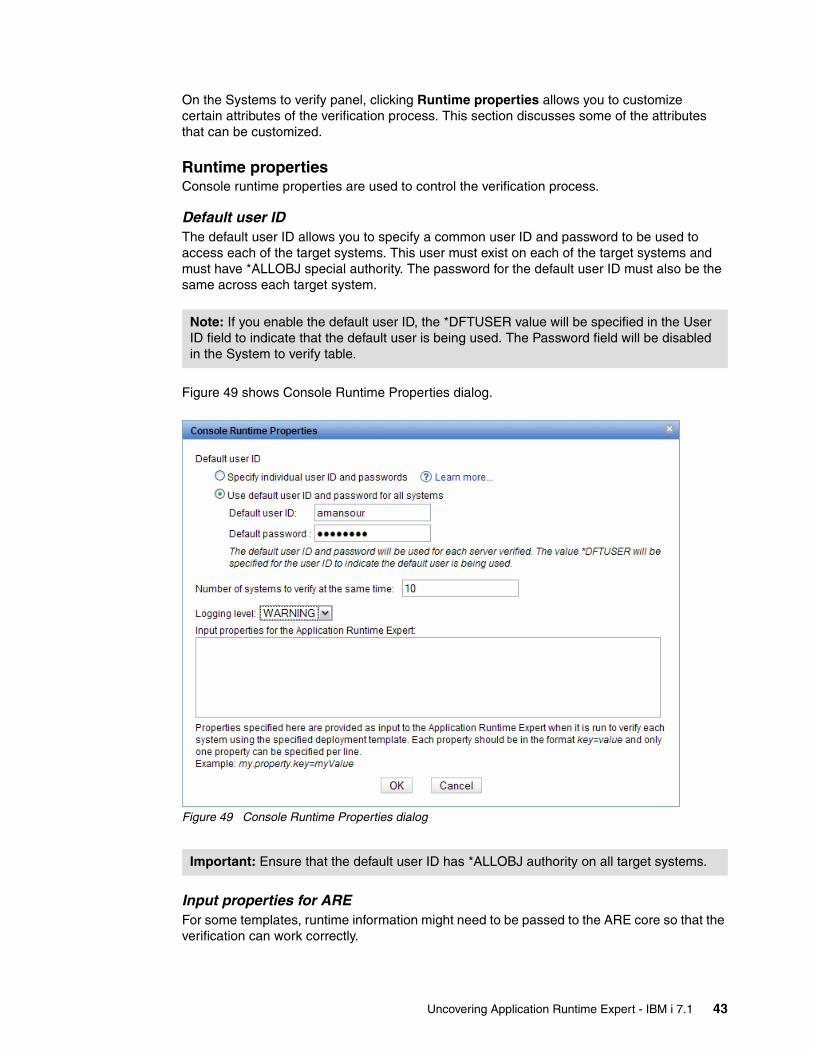
On the Systems to verify panel, clicking Runtime properties allows you to customize certain attributes of the verification process. This section discusses some of the attributes that can be customized.
Runtime propertiesConsole runtime properties are used to control the verification process.
Default user IDThe default user ID allows you to specify a common user ID and password to be used to access each of the target systems. This user must exist on each of the target systems and must have *ALLOBJ special authority. The password for the default user ID must also be the same across each target system.
Figure 49 shows Console Runtime Properties dialog.
Figure 49 Console Runtime Properties dialog
Input properties for AREFor some templates, runtime information might need to be passed to the ARE core so that the verification can work correctly.
Note: If you enable the default user ID, the *DFTUSER value will be specified in the User ID field to indicate that the default user is being used. The Password field will be disabled in the System to verify table.
Important: Ensure that the default user ID has *ALLOBJ authority on all target systems.
Uncovering Application Runtime Expert - IBM i 7.1 43

You can specify properties as the input for ARE when it run to verify the system. Each property should be in the format key=value, and only one property can be specified per line.
Other runtime propertiesAdditional configurations available from the Console Runtime Properties dialog are:
� You can also customize the number of systems to verify at the same time. The default value is 10 systems.
� Specify the logging level. The levels available are:
– OFF– SEVERE– WARNING– INFO– CONFIG– FINE– FINER– FINEST– ALL
Verifying systems
After you finish configuring the target systems to verify from the ARE console, you can start verifying the target systems by selecting the systems from the System to verify table and then clicking Verify systems.
System verification progressClicking Verify system starts the systems verification process and opens the Console Resultpage. This page (Figure 50) shows the system verification status. The page is updated automatically, but you can click Refresh to force a status refresh.
Figure 50 System verification progress
Important: Runtime properties settings are applied to all systems in the system group. If you require different runtime property settings for different systems, you can set these by creating multiple system groups, with each group having its own set of runtime properties.
44 Uncovering Application Runtime Expert - IBM i 7.1

System verification statusAfter the system verification is completed, the status column in the table will be updated to show a Completed status, and the verification result for each system will be shown in the Result column (Figure 51).
Figure 51 System verification status
If the template verification on the system was successful, you will see the status No Problems found in the Result column.
If ARE detected problems during template verification on the system, the Result column shows the description of the problem. For example, Figure 51 shows the number of errors, warnings, and info problems.
Problem severityEach check done during verification has a severity level associated with it. If a problem is detected, the problem is reported using the severity level associated with the check that detected the problem. Problems can be reported at three different severity levels:
� Error (highest severity)� Warning� Info (lowest severity)
“Reports” on page 47 describes how you can view the system verification reports and log files, and how to fix verification problems.
In the Summary Report GUI interface, each problem is prefixed with an icon showing the problem severity (Figure 52).
Figure 52 Summary report with detected problems
Uncovering Application Runtime Expert - IBM i 7.1 45

In the summary plain text and detailed report, each problem is prefixed with the problem severity. This allows you to differentiate between status messages and problem messages (Example 1 and Example 2).
Example 1 Error message in report
Running plugin Port VerifierERROR! Port 12401 was expected to be free, but it is currently in use. > Total number of port items checked: 2
Example 2 Error, warning, and info sample messages
Running plugin SampleReportERROR! This is an error sampleWarning: This is a warning sampleInfo: So it comes to info sampleERROR! Sample of using report contextDetails: This is the details of the error.
Running the integrated templateIn this section we show how to run the new template on an IBM i.
There are two ways to run an integrated template on an IBM i system:
� From QShell� From ARE Console interface
From QShellTake the following steps to run an integrated template from QSH on the remote system:
1. FTP or restore the template on to the target system.
2. Log on to your target system and start Qshell:
STRQSH
3. Because integrated template contains the complete ARE core, you cannot use the ARE runARE.sh script to run an integrated template. Start the integrated template as a typical Java Application using the following command:
java -jar /qibm/userdata/are/MyTemplate1.jar -outFile reportFile.txt
Where MyTemplate1.jar is your template.
From the ARE console interfaceAn integrated template can be used with the ARE console, but it is not required to use the integrated template in the console. The console will automatically take care of templates and run them on remote system in a smart way (after ARE GUI Version 1.7.8).
To use the console:
1. Click Launch console to launch the ARE console interface.2. Specify target systems with user names, passwords, and your integrated ARE template.3. Click Verify systems.
46 Uncovering Application Runtime Expert - IBM i 7.1

Reports
ARE provides a set of different types of reports to show the results of the systems verification. ARE has the following reports types:
� Summary report� Detailed report� XML report
There are two ways to use a template to verify a system:
� Use the console web user interface.� Use a script that can be run from QShell.
Both of these verification options result in the same three reports being generated. If you verify a system using the QShell script, three output files are generated. The names of the output files are based on input provided to the runARE.sh script.
Reports from the console
When verifying a system using the console web user interface, the user interface makes viewing the different reports very easy.
All three reports for each verified system are available by clicking the link in the Result column (Figure 53).
Figure 53 Verification report
You can also export all report files by clicking Export all report files. This exports all the report files for all verifies systems.
In addition to the reports, ARE provides the following log files:
� Runtime log� Remote runtime log� Remote stdout� Remote stderr
You can view the above log files by clicking the link in the Result column (Figure 53).
Uncovering Application Runtime Expert - IBM i 7.1 47

Additionally, you can view the console logs by clicking View console server logs (Figure 54).
Figure 54 Console logs
Summary reportThe console provides a user-friendly Web GUI for the summary report, which allows easy access and browsing through the verification status for each plugin (Figure 55).
Figure 55 Sample summary report
The summary report contains a summary of all problems detected during the verification of a system. Each row in the summary table contains the results for a specific plugin, such as the Authority Verifier or System Value Verifier plugins. The icon directly before the plugin name indicates the highest severity problem that was found by that plugin. The other items in each
48 Uncovering Application Runtime Expert - IBM i 7.1

row indicate the number of attributes verified by the plugin and the number of problems found at each severity level (error, warning, and info). The final item in each row, the Fix actions column, indicates how many of the detected problems can be fixed directly from the console web interface.
Detailed reportThe detailed report is a text report that contains every status and problem message reported during verification. This report is a complete record of everything that was checked during verification and the result of each check, even if the check did not detect a problem.
XML reportThe XML report is an XML formatted report that contains every status and problem message reported during verification. This report is a complete record of everything that was checked during verification and the result of each check, even if the check did not detect a problem. In this regard, the XML report is exactly like the detailed report, except in an XML format instead of plain text.
Reports from QShell
If you verify a system using the QShell script, three output files are generated. The names of the output files are based on input provided to the runARE.sh script. For example, if you ran a verification using the following command:
/QIBM/ProdData/OS/OSGi/healthcheck/bin/runARE.sh - template myTemplate1.jar -outFile report.out
Based on the value specified for the -outFile parameter, the following set of output files are generated:
� report.out: This is the detailed report.� report.out.summary.txt: This is the summary report.� report.out.xml: This is the XML report.
Fixing detected problems
IBM Application Runtime Expert for i offers an additional important feature, which is the ability to automatically fix problems detected by ARE.
The Fix actions column in the summary report allows certain problems that were detected during verification to be fixed directly from the console web interface. This is a convenient feature that allows you to solve certain problems without having to log into a different system.
Some of the problems that ARE can automatically fix are:
Note: You can still see a plain text summary report by clicking Summary report (plain text).
Note: The XML report includes information about how to fix detected problems. ARE core uses the XML report as a guide for automatically fixing detected problems.
Note: If only the file name is provided for the -outFile parameter, all output files will be placed in the current directory. If a fully qualified path and the file name are provided, then all output files will be placed in the location specified by that qualified path.
Uncovering Application Runtime Expert - IBM i 7.1 49

� Authority: This includes ownership, primary group, authorization list, and private authority.
� User profiles: Some, but not all, user profile attributes can be fixed.
� Symbolic links: If ARE detects that a symbolic link is missing, it has the capability to recreate the link.
Figure 56 shows a summary report in which the Authority Verifier plugin has a fix action available.
Figure 56 Fix actions
Clicking Fix action opens a new page that summarizes all of the problems detected by that plugin that can be fixed directly from the console. You can select which problems to fix using the check box that precedes each problem description, and then click Fix (Figure 57).
Figure 57 Fix Problems page
The console begins the process of fixing the selected problems on the target system. After the problems are fixed, a second table is displayed that shows the fix results.
Other than the console web user interface, ARE can also fix detected problems using a script. For more information see the areFix.sh script section in the following document:
http://www-03.ibm.com/systems/resources/systems_i_are_script_interfaces.pdf
Note: It is important to understand that only certain types of detected problems can be fixed directly from the console.
50 Uncovering Application Runtime Expert - IBM i 7.1

References
For additional Information about IBM Application Runtime Expert for i refer to the product web page:
http://www-03.ibm.com/systems/power/software/i/are/index.html
For IBM Application Runtime Expert for i product documentation refer to the following page:
http://www-03.ibm.com/systems/power/software/i/are/documentation.html
For IBM Application Runtime Expert for i support information refer to the following page:
http://www-03.ibm.com/systems/power/software/i/are/support.html
The team who wrote this paper
This paper was produced by a team of specialists from around the world working at the International Technical Support Organization, Rochester Center.
Ahmed Mansour is an IT Specialist and a PMI Project Manager Professional (PMP) at IBM Lab in Cairo, Egypt. Ahmed's areas of expertise include software development for IBM i, globalization and multicultural support for IBM products, and project management activities. He currently works with IBM Content Collector for SAP development team. He is also an IBM Certified Solution Advisor for Cloud Computing. Ahmed holds a Bachelor's degree in Computer Science from Cairo University, and has co-authored other IBM Redbooks® publications.
Hernando Bedoya is a Senior IT Specialist at STG Lab Services and Training in Rochester, Minnesota. He writes extensively and teaches IBM classes worldwide in all areas of DB2® for i. Before joining STG Lab Services he worked in the ITSO for nine years writing IBM Redbooks publications. He also worked for IBM Colombia as an IBM AS/400® IT Specialist doing presales support for the Andean countries. He has 25 years of experience in the computing field and has taught database classes in Colombian universities. His areas of expertise are database technology, performance, and data warehousing. He holds a master’s degree in Computer Science from EAFIT, Colombia.
Thanks to the following people for their contributions to this project:
Jenifer ServaisInternational Technical Support Organization, Rochester Center
Tim RoweRobert JacobsenIBM Rochester
Jiri SochrIBM Czech Republic
Uncovering Application Runtime Expert - IBM i 7.1 51

Matias Centeno LozadaIBM Argentina
Tom VernaillenIBM Belgium
Nan WangIBM China
Michael HarperIBM Australia
Now you can become a published author, too!
Here's an opportunity to spotlight your skills, grow your career, and become a published author—all at the same time! Join an ITSO residency project and help write a book in your area of expertise, while honing your experience using leading-edge technologies. Your efforts will help to increase product acceptance and customer satisfaction, as you expand your network of technical contacts and relationships. Residencies run from two to six weeks in length, and you can participate either in person or as a remote resident working from your home base.
Find out more about the residency program, browse the residency index, and apply online at:
ibm.com/redbooks/residencies.html
Stay connected to IBM Redbooks
� Find us on Facebook:
http://www.facebook.com/IBMRedbooks
� Follow us on Twitter:
http://twitter.com/ibmredbooks
� Look for us on LinkedIn:
http://www.linkedin.com/groups?home=&gid=2130806
� Explore new Redbooks publications, residencies, and workshops with the IBM Redbooks weekly newsletter:
https://www.redbooks.ibm.com/Redbooks.nsf/subscribe?OpenForm
� Stay current on recent Redbooks publications with RSS Feeds:
http://www.redbooks.ibm.com/rss.html
52 Uncovering Application Runtime Expert - IBM i 7.1

Notices
This information was developed for products and services offered in the U.S.A.
IBM may not offer the products, services, or features discussed in this document in other countries. Consult your local IBM representative for information on the products and services currently available in your area. Any reference to an IBM product, program, or service is not intended to state or imply that only that IBM product, program, or service may be used. Any functionally equivalent product, program, or service that does not infringe any IBM intellectual property right may be used instead. However, it is the user's responsibility to evaluate and verify the operation of any non-IBM product, program, or service.
IBM may have patents or pending patent applications covering subject matter described in this document. The furnishing of this document does not give you any license to these patents. You can send license inquiries, in writing, to: IBM Director of Licensing, IBM Corporation, North Castle Drive, Armonk, NY 10504-1785 U.S.A.
The following paragraph does not apply to the United Kingdom or any other country where such provisions are inconsistent with local law: INTERNATIONAL BUSINESS MACHINES CORPORATION PROVIDES THIS PUBLICATION "AS IS" WITHOUT WARRANTY OF ANY KIND, EITHER EXPRESS OR IMPLIED, INCLUDING, BUT NOT LIMITED TO, THE IMPLIED WARRANTIES OF NON-INFRINGEMENT, MERCHANTABILITY OR FITNESS FOR A PARTICULAR PURPOSE. Some states do not allow disclaimer of express or implied warranties in certain transactions, therefore, this statement may not apply to you.
This information could include technical inaccuracies or typographical errors. Changes are periodically made to the information herein; these changes will be incorporated in new editions of the publication. IBM may make improvements and/or changes in the product(s) and/or the program(s) described in this publication at any time without notice.
Any references in this information to non-IBM websites are provided for convenience only and do not in any manner serve as an endorsement of those websites. The materials at those websites are not part of the materials for this IBM product and use of those websites is at your own risk.
IBM may use or distribute any of the information you supply in any way it believes appropriate without incurring any obligation to you.
Information concerning non-IBM products was obtained from the suppliers of those products, their published announcements or other publicly available sources. IBM has not tested those products and cannot confirm the accuracy of performance, compatibility or any other claims related to non-IBM products. Questions on the capabilities of non-IBM products should be addressed to the suppliers of those products.
This information contains examples of data and reports used in daily business operations. To illustrate them as completely as possible, the examples include the names of individuals, companies, brands, and products. All of these names are fictitious and any similarity to the names and addresses used by an actual business enterprise is entirely coincidental.
COPYRIGHT LICENSE:
This information contains sample application programs in source language, which illustrate programming techniques on various operating platforms. You may copy, modify, and distribute these sample programs in any form without payment to IBM, for the purposes of developing, using, marketing or distributing application programs conforming to the application programming interface for the operating platform for which the sample programs are written. These examples have not been thoroughly tested under all conditions. IBM, therefore, cannot guarantee or imply reliability, serviceability, or function of these programs.
© Copyright International Business Machines Corporation 2011. All rights reserved.Note to U.S. Government Users Restricted Rights -- Use, duplication or disclosure restricted by GSA ADP Schedule Contract with IBM Corp. 53
®
Redpaper™
This document REDP-4805-00 was created or updated on October 31, 2011.
Send us your comments in one of the following ways:� Use the online Contact us review Redbooks form found at:
ibm.com/redbooks� Send your comments in an email to:
[email protected]� Mail your comments to:
IBM Corporation, International Technical Support OrganizationDept. HYTD Mail Station P0992455 South RoadPoughkeepsie, NY 12601-5400 U.S.A.
Trademarks
IBM, the IBM logo, and ibm.com are trademarks or registered trademarks of International Business Machines Corporation in the United States, other countries, or both. These and other IBM trademarked terms are marked on their first occurrence in this information with the appropriate symbol (® or ™), indicating US registered or common law trademarks owned by IBM at the time this information was published. Such trademarks may also be registered or common law trademarks in other countries. A current list of IBM trademarks is available on the Web at http://www.ibm.com/legal/copytrade.shtml
The following terms are trademarks of the International Business Machines Corporation in the United States, other countries, or both:
AS/400®DB2®IBM®
Redbooks®Redpaper™Redbooks (logo) ®
WebSphere®
The following terms are trademarks of other companies:
Microsoft, and the Windows logo are trademarks of Microsoft Corporation in the United States, other countries, or both.
Java, and all Java-based trademarks and logos are trademarks or registered trademarks of Oracle and/or its affiliates.
SAP, and SAP logos are trademarks or registered trademarks of SAP AG in Germany and in several other countries.
Intel, Intel logo, Intel Inside, Intel Inside logo, Intel Centrino, Intel Centrino logo, Celeron, Intel Xeon, Intel SpeedStep, Itanium, and Pentium are trademarks or registered trademarks of Intel Corporation or its subsidiaries in the United States and other countries.
Other company, product, or service names may be trademarks or service marks of others.
54 Uncovering Application Runtime Expert - IBM i 7.1


![Uncovering the Runtime Enterprise Architecture of a Large ...... · of Enterprise Architecture (EA) [29]. EA consists of principles, methods, and models to design and realize an enterprise’s](https://static.fdocuments.net/doc/165x107/5ed3cd46558ce84bfe1d3f3c/uncovering-the-runtime-enterprise-architecture-of-a-large-of-enterprise.jpg)