UF Projects Config84 mar182003 - University...
136
PeopleSoft Financials Version 8.4 Projects Configuration Workbook
Transcript of UF Projects Config84 mar182003 - University...

PeopleSoft Financials Version 8.4
Projects Configuration Workbook

2
TABLE OF CONTENTS
INTRODUCTION ...........................................................................................................................................................................................................................................................8
SECTION 1: PROJECTS SETUP ................................................................................................................................................................................................................................9 1.0 SETUP - BUSINESS UNIT RELATED 1.1 Create Projects - Projects Definition
1.1.1BUSINESS UNIT..............................................................................................................................................................................................................................................9 1.2 Define Project Options 1.2.1 DEFINE PROJECT OPTIONS
1.2.2 PROJECTS BU INTEREST 1.2.3 COPY TEMPLATE OPTION1 1.2.4 COPY TEMPLATE OPTION2 1.2.5 PROJECT DELETE UTILITY TABLES
2.0 SETUP - PRODUCT RELATED 2.1 Installation Options
2.1.1 ORGANIZATION HIERACY 2.1.2 SHARING OPTIONS
2.1.2.1 INSTALLATION OPTIONS -PROJECTS PAGE 2.1.2.2 INSTALLATION OPTIONS - PROJECTS INTEGRATION PAGE 2.1.3 USER PREFERENCES 2.2 Project Options
2.2.1 EVENTS 2.2.2 PHASE TYPES 2.2.3 PROJECT ROLES..........................................................................................................................................................................................................................................13 2.2.4 DEFINE PROJECT TYPES 2.2.5 PROJECT TYPE STATUS PATH 2.2.6 INTEGRATION TEMPLATES
2.2.7 Projects Integration 2.2.8 STATUS TYPES
2.2.9 STRUCTURE PROJECTS NAVIGATION 2.3 Activity Options 2.3.1 ACTIVITY TYPES 2.3.2 ACTIVITY TYPE STATUS PATH 2.3.3 QUALITY TYPES 2.4 Resources

3
2.4.1 DEFINE ANALYSIS TYPES........................................................................................................................................................................................................................63 2.4.2 DEFINE ANALYSIS GROUPS....................................................................................................................................................................................................................59 2.4.3 DEFINE RESOURCE TYPES ......................................................................................................................................................................................................................79 2.4.4 DEFINE RESOURCE CATEGORIES..........................................................................................................................................................................................................83 2.4.5 DEFINE RESOURCE SUB-CATEGORIES 2.4.6 DEFINE RESOURCE GROUPS...................................................................................................................................................................................................................86 2.4.7 RELATE RESOURCE TYPES TO RESOURCE CATEGORIES ...............................................................................................................................................................88 2.4.8 RELATE RESOURCE CATEGORIES TO RESOURCE SUB-CATEGORIES ..........................................................................................................................................95
2.5 GENERAL OPTIONS 2.5.1 ACCOUNTING RULES 2.5.2 ASSET PROFILE 2.5.3 BUDGET ITEMS 2.5.4 INTEREST TYPES 2.5.5 PERIOD CALCULATION FACTORS 2.5.6 SECURITY PROFILE 2.5.7 TRANS CODES 2.5.8 TRANS TYPES 2.6 Define Other Options 2.6.1 DEFINE SECURITY OPTIONS .........................................................................................................................................................................................................................79
2.6.2 DEFINE TABLE-SET RECORD GROUP CONTROL ..................................................................................................................................................................................117 2.6.3 DEFINE JOURNAL GENERATOR TEMPLATES........................................................................................................................................................................................120 2.6.4 DEFINE ACCOUNTING ENTRY DEFINITION...........................................................................................................................................................................................124 2.6.5 DEFINE ACCOUNTING ENTRY TEMPLATES...........................................................................................................................................................................................128
2.7 Define Pricing Structure 2.7.1 BURDEN PLANS 2.7.2 BURDEN TEMPLATES 2.7.3 RATE TEMPLATES 2.7.4 RATES BY EMPLOYEE 2.7.5 RATES BY JOB CODE 2.7.6 SHARING RATES
2.8 Third Party XML Definition 2.8.1 THRID PARTY SCHEDULING PRODUCT 2.8.2 RECORD LIST 2.8.3 FIELD DETAIL 2.8.4 TRANSACTION CATALOG

4
2.8.5 TRANSACTION TEMPLATES 2.8.6 TRANSACTION RECORDS
3.0 PROJECTS 3.1 Personalize 3.1.1 MY PROJECTS 3.1.2 FLEXIBLE ANALYSIS USER DEFAULT 3.1.3 FLEXIBLE ANALYSIS TEMPLATE 3.1.4 PREFERENCES 3.2 Projects 3.2.1 GENERAL INFORMATION 3.2.2 ORGANIZATION 3.2.3 STATUS 3.3.3 SUMMARY 3.3.4 TEAM 3.3.5 FUNDING 3.3 Activities 3.3.1 LIST BY PROJECT 3.3.2 GENERAL INFORMATION 3.3.3 TEAM 3.3.4 STATUS 3.3.5 ASSIGN TEAM FROM PROJECT 3.3.6 FUND DISTRIBUTION 3.3.7 WORK BREAKDOWN STRUCTURE 3.4 Resources 3.4.1 ADD RESOURCES 3.4.2 GENERAL INFORMATION 3.4.3 RESOURCE ADJUSTMENT 3.5 Employee Time Entry 3.5.1 JOB CODES 3.5.2 JOB RECORD 3.5.3 ENTER EMPLOYEE TIME 3.5.4 PROCESS EMPLOYEE TIME 3.5.5 EMPLOYEE TIME REPORT

5
3.6 Collect Costs 3.6.1 ENGAGEMENT PLANNING 3.6.2 EXPENSES 3.6.3 GL JOURNAL ADJUSTMENTS 3.6.4 INVENTORY 3.6.5 ORDER MANAGEMENT 3.6.6 PAYABLES 3.6.7 PURCHASING 3.6.8 PURCHASING ADJUSTMENT 3.6.9 TIME AND LABOR 3.6.10 RECALCULATE PRICING 3.7 Collect Revenue 3.7.1RETRIEVE BILLING ITEMS 3.7.2 SUMMARIZE REVENUE AND BILLING 3.7.3 RETRIEVE REVENUE FROM CONTRACT 3.7.4 RECEIVABLES ADJUSTMENT 3.8 Review Costs 3.8.1 SUMMARIZE BY ANALYSIS TYPE 3.8.2 SUMMARIZE BY RESOURCE CATEGORY 3.8.3 TIME AND LABOR INTERFACE 3.8.4 TIME BY ACTIVITY 3.8.5 TIME BY EMPLOYEE 3.9 Sharing Exceptions 3.9.1 SPECIFIC EMPLOYEE 3.9.2 EMPLOYEE ATTRIBUTE 3.9.3 PROJECT TEAM MEMBER 3.9.4 SPECIFIC PROJECT 3.9.5 PROJECT ATTRIBUTE 3.9.10 ORGANIZATION 3.10 Accounting 3.10.1 PROCESS ACCOUNTING 3.10.2 PENDING ACCOUNTING 3.10.3 ACCOUNTING HISTORY 3.11 Assets

6
3.11.1 DEFINE ASSETS 3.11.2 RELATE BY PROJECT 3.11.3 RELATE BY ASSET 3.11.4 DEFINE FILTER CRITERIA 3.11.5 ASSIGN RESOURCES TO ASSETS 3.11.6 REVIEW ASSET RESOURCES 3.11.7 SEND TO ASSET MANAGEMENT 3.11.8 REVIEW BY PROJECT 3.11.9 REVIEW BY ASSET 3.12 Budgeting 3.12.1 BUDGET SCENARIOS 3.12.2 BUDGET DETAILS 3.12.3 POST BUDGETS 3.13 Utilities 3.13.1 CALCULATE INTEREST 3.13.2 COMPRESS PROJECT DATA 3.13.3 CONVERT CURRENCY 3.13.4 RUN FUNDS DISTRIBUTION 3.13.5 COPY PROJECT 3.13.6 PROJECT DELETE UTILITY 3.13.7 PROJECT DELETE LOG 3.17.8REFRESH SUMMARY TABLES 3.18.9 RESOURCE DETAIL HISTORY 3.18.10RESOURCE SUMMARY HISTORY 3.14 Third Party Integration 3.14.1 PRIMAVERA 3.14.2 MICROSOFT PROJECT 3.14.3 LOAD PROJECTS AND ACTIVITIES 3.14.4 LOAD RESOURCE TRANSACTIONS 3.14.5 LOAD PROJECT FUNDING 3.14.6 EROOM 3.14.7 LOTUS QUICKPLACE 3.14.8 REVIEW FUNDING DETAILS 3.14.9 REVIEW PROJECT DETAILS 3.14.10 REVIEW ACTIVITY DETAILS 3.14.11REVIEW RESOURCE DETAILS 3.14.12 REVIEW TIMELINE DETAILS 3.14.13 BUILD XML FILE 3.14.14 EROOM XML

7
3.15 Investment Incentives 3.16.1 DEFINE THE INCENTIVE 3.16.2 ASSIGN TO PROJECT 3.16.3 CREATE RESOURCE INCENTIVE 3.16 Reports Definition Reports 3.16.1 ACTIVE ANALYSIS GROUP 3.16.2 ANALYSIS TYPES BY SETID 3.16.3 ACTIVITY TYPES BY SETID 3.16.4 LINKED RESOURCE ELEMENTS Summary Reports 3.16.5 RPO GROUPS 3.16.6 REPORTING OPTIONS 3.16.7 RESOURCE 3.16.8 FINANCE 3.16.9 TRANSACTION LEVEL REPORT Variance Reports 3.16.10 CONFIGURE SQR REPORTS 3.16.11 CREATE PROJECTS CUBE 3.17 Project Home

8
Introduction Background This document has been designed to assist in the configuration of PeopleSoft Projects V84. Information gathered during the Design phase of the project where each of the major ordering processes were analyzed and documented in Subject Matter Lead documents can be translated to PeopleSoft terminology through this document. Key business decisions that support values recorded to configure the PeopleSoft Project Costing module can be documented and this workbook will help with knowledge transfer and post implementation maintenance. How to use this document? This document has been designed to replicate most of the PeopleSoft pages that require configuration. The primary source for completing the tables in this workbook is the Subject Matter Specialist’s documents completed by key Projects users. Business decisions documented in the SMS’s along with PeopleSoft Project knowledge will be required to complete the tables in this workbook. Individuals completing this document should have a good understanding of the following: • Projects process at the University of Florida • High-Level functionality and data sources of the legacy application • General Accounting environment and functionality of PeopleSoft Projects
This document can also be used as a source in designing test scripts during the Acceptance testing phase of the implementation project. Recording the values assigned and configuration options selected by Time Warner Cable will help in post implementation maintenance. Sign-off
Name: Date Date
Name: Date
Name: Date

9
Section 1: Projects Setup
1.1 CREATE PROJECTS – PROJECT DEFINITION
1.1.1 CREATE PROJECTS BUSINESS UNIT Once you’ve mapped out your business structure and determined what TableSets you’ll use, you can add business units to your PeopleSoft Projects system. Keep the following in mind as you determine how many Projects business units you need to create:
• Each project tree is associated with a single business unit. Therefore, if you want to have a group of projects in one tree, be sure to place all of those projects in the same Projects business unit.
• A single Projects business unit can post to as many general ledger business units as necessary. • Each project tree has its own security. Using this security, you can keep users from seeing entire trees or just specific nodes.

10
Path: Set Up Financials/Supply Chain > Business Unit Related > Projects > Projects Definition > Add a New Value

11
Panel Field Panel Field Description • Unit • Description • Short Desc • Default SetID • Currency Code • Rate Type • Default Dynamic Edit Tables • Category Edit Option • SubCategory Edit Option • Calendar Id
• Enter the name of the business unit. • Enter a description for the business unit. • Enter a short description for the business unit you are creating. • Enter a record group SetID default. • Enter a Currency Code to establish the base currency for this business unit. • Enter a Rate Type to establish the default currency conversion rate for this business unit. • A default for currency processing. • Category Edit Option Determines whether category prompt lists will display all values in the system, or a subset of each based on dependencies established among resource types, categories, and subcategories. Select from one of the following options: Independent - All Categories in the system are available for selection. PeopleSoft Projects uses PROJ_CATG_TBL to populate prompt lists. Related - Categories available for selection are restricted by predefined relationships with Resource type. PeopleSoft Projects uses PROJ_TYPE_CATVW to populate prompt lists. Override - Categories available for selection are restricted by established criteria. PeopleSoft Projects uses the selected Category Edit Table to populate prompt lists. • SubCategory Edit Option Independent - All SubCategories in the system are available for selection. PeopleSoft Projects uses PROJ_SUBCAT_TBL to populate prompt lists. Related - SubCategories available for selection are restricted by predefined relationships with Resource Category type. PeopleSoft Projects uses PROJ_CAT_SUB_VW to populate prompt lists. Override - SubCategories available for selection are restricted by established criteria. PeopleSoft Projects uses the selected SubCategory Edit Table to populate prompt lists • Select the same calendar used in the GL (if utilizing allocations).

12
Unit Description Short
Desc Default SetID Currency
Code Rate Type
Default
TWC01 TWC NORTH USD CRRNT A Dynamic Edit Tables Options: Unit Category Edit
Option SubCategory Edit Option Accounting Periods –
Calendar ID TWC01 Independent Independent 01

13
1.2. DEFINE PROJECT OPTIONS The Projects Options tab of the Project Options group is designed to establish the resource fields that will be required when entering Projects-related information within your PeopleSoft feeder systems.
Path: Set Up Financials/Supply Chain > Business Unit Related > Projects > Projects Options
14
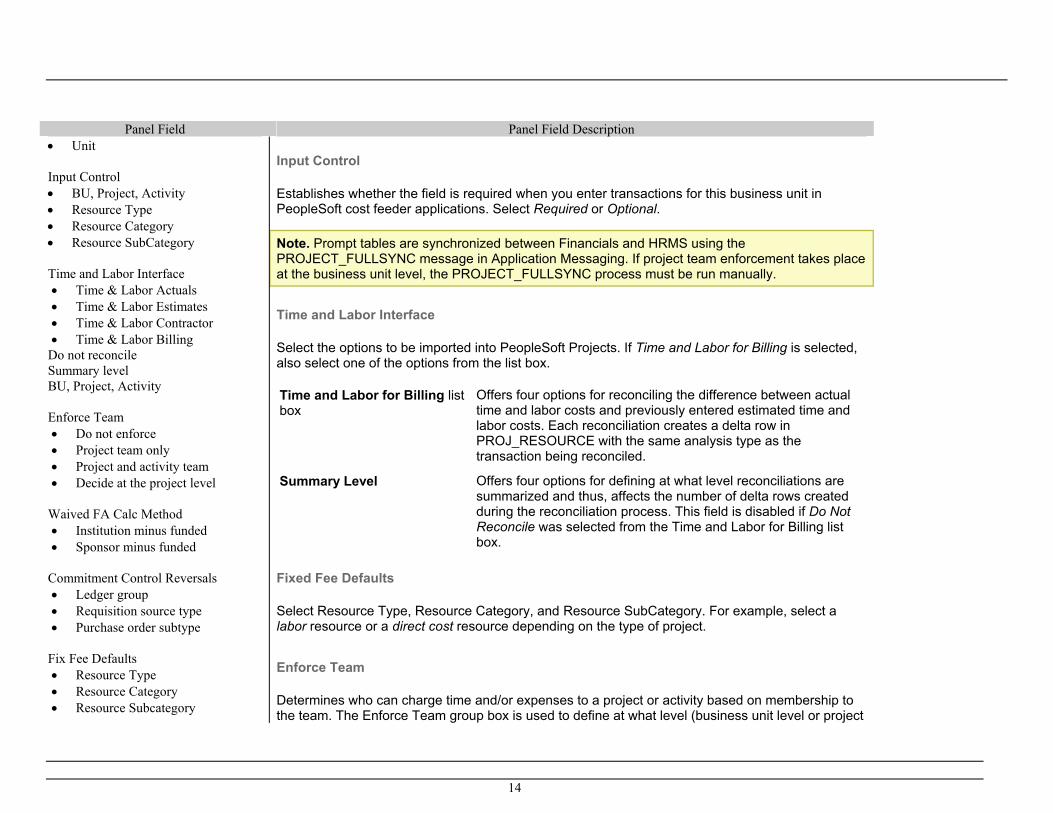
Panel Field Panel Field Description • Unit Input Control • BU, Project, Activity • Resource Type • Resource Category • Resource SubCategory Time and Labor Interface • Time & Labor Actuals • Time & Labor Estimates • Time & Labor Contractor • Time & Labor Billing
Do not reconcile Summary level BU, Project, Activity Enforce Team • Do not enforce • Project team only • Project and activity team • Decide at the project level
Waived FA Calc Method • Institution minus funded • Sponsor minus funded
Commitment Control Reversals • Ledger group • Requisition source type • Purchase order subtype
Fix Fee Defaults • Resource Type • Resource Category • Resource Subcategory
Input Control
Establishes whether the field is required when you enter transactions for this business unit in PeopleSoft cost feeder applications. Select Required or Optional.
Note. Prompt tables are synchronized between Financials and HRMS using the PROJECT_FULLSYNC message in Application Messaging. If project team enforcement takes place at the business unit level, the PROJECT_FULLSYNC process must be run manually.
Time and Labor Interface
Select the options to be imported into PeopleSoft Projects. If Time and Labor for Billing is selected, also select one of the options from the list box.
Time and Labor for Billing list box
Offers four options for reconciling the difference between actual time and labor costs and previously entered estimated time and labor costs. Each reconciliation creates a delta row in PROJ_RESOURCE with the same analysis type as the transaction being reconciled.
Summary Level Offers four options for defining at what level reconciliations are summarized and thus, affects the number of delta rows created during the reconciliation process. This field is disabled if Do Not Reconcile was selected from the Time and Labor for Billing list box.
Fixed Fee Defaults
Select Resource Type, Resource Category, and Resource SubCategory. For example, select a labor resource or a direct cost resource depending on the type of project.
Enforce Team
Determines who can charge time and/or expenses to a project or activity based on membership to the team. The Enforce Team group box is used to define at what level (business unit level or project
15
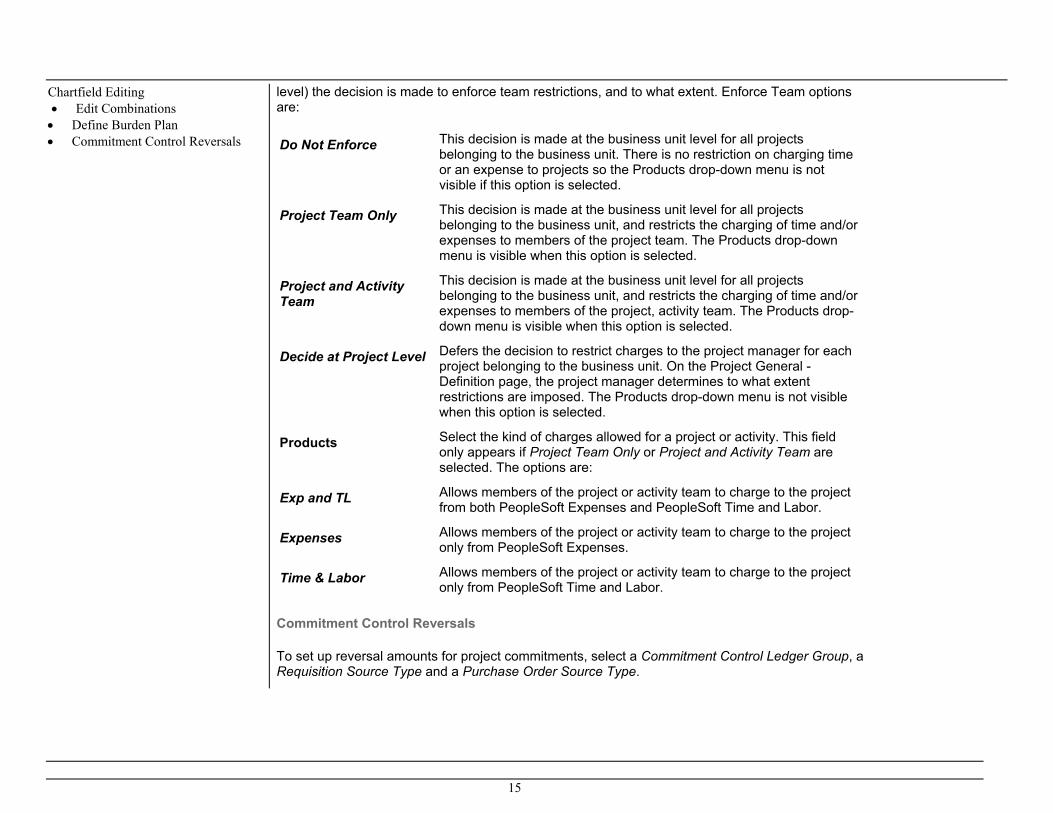
Chartfield Editing • Edit Combinations
• Define Burden Plan • Commitment Control Reversals
level) the decision is made to enforce team restrictions, and to what extent. Enforce Team options are:
Do Not Enforce This decision is made at the business unit level for all projects belonging to the business unit. There is no restriction on charging time or an expense to projects so the Products drop-down menu is not visible if this option is selected.
Project Team Only This decision is made at the business unit level for all projects belonging to the business unit, and restricts the charging of time and/or expenses to members of the project team. The Products drop-down menu is visible when this option is selected.
Project and Activity Team
This decision is made at the business unit level for all projects belonging to the business unit, and restricts the charging of time and/or expenses to members of the project, activity team. The Products drop-down menu is visible when this option is selected.
Decide at Project Level Defers the decision to restrict charges to the project manager for each project belonging to the business unit. On the Project General - Definition page, the project manager determines to what extent restrictions are imposed. The Products drop-down menu is not visible when this option is selected.
Products Select the kind of charges allowed for a project or activity. This field only appears if Project Team Only or Project and Activity Team are selected. The options are:
Exp and TL Allows members of the project or activity team to charge to the project from both PeopleSoft Expenses and PeopleSoft Time and Labor.
Expenses Allows members of the project or activity team to charge to the project only from PeopleSoft Expenses.
Time & Labor Allows members of the project or activity team to charge to the project only from PeopleSoft Time and Labor.
Commitment Control Reversals
To set up reversal amounts for project commitments, select a Commitment Control Ledger Group, a Requisition Source Type and a Purchase Order Source Type.

16
Define Burden Plan
Used to account for overhead or additional costs associated with specific resources.
Waived FA Calc Method
This field is only present if PeopleSoft Grants is installed.
Edit Combinations
Enables ChartField Combination editing
• Input Control Unit BU,Project,Activity Resource Type Resource Category Resource SubCategory TWC01 Required Required Optional Optional Enforce Project Team By Project By BU NO Time and Labor Interface Time & Labor Actuals
Time & Labor Estimates
Time & Labor Contractor
Time & Labor for Billing
Summary Level
Do Not Reconcile BU/Project/Activity Fixed Fee Defaults Resource Type Resource
Category Resource sub-category

17
Chartfield Editing Define Burden Plan Edit Combinations Edit Combinations Commitment Control Reversal Ledger Group Requisition Source Type Purchase Order Source Type

18
1.2.1 PROJECTS BU INTEREST PeopleSoft Projects enables you to set time periods for which a specific interest rate is viable, set the yearly interest rate, define more than one interest rate for a business unit, and exclude specific resource transactions from the cost accumulation process if necessary. This functionality is not being utilized by Time Warner Cable.

19
Panel Field Panel Field Description • Interest Type • Description • Calendar • Begin Date & End Date • Yearly • Periodic
• Analysis Group Target Interest Row Attributes • An Type • Resource Type • Resource Category • Subcategory • Resource Type • From/Thru Date
• Select an Interest types which enables you to calculate different types of interest for a project. For example, you could calculate both debt and equity interest for a project.
• Enter a description for the interest calculation • Select the general ledger Calendar for which you have set up period calculation factors • Enter the Begin Date and End Date of the date range for which the Interest Rate you are
entering is valid. • Enter a Yearly interest rate. The periodic interest rate will automatically be calculated
based on the yearly interest rate and general ledger calendar you entered. The following formula is used to determine the Periodic interest rate: Periodic Interest Rate = Yearly Interest Rate / # of Calendar Periods
• Select an Analysis Group which determines the Analysis Types that will be used as the basis for interest calculation. The Analysis Group will typically include all costs.
• Select an Analysis Type, a Resource Type, and a Resource Category in the Target Interest Row Attributes box. New rows generated by interest calculations will be identified by these attributes.
• Enter a Resource Type for each type of resource you want to exclude. You may exclude as
many resource types as you want. If you do not exclude Interest, you will be performing compound interest calculations.
• Enter From/Thru Dates for each resource type you exclude. This date range identifies the period of time for which a resource type should be excluded.
Unit Interest
Type Description Calendar Begin
Date End Date
Yearly Analysis Group
An Type Resource Type
Resource Category
Resource Type
From/ Thru Date

20
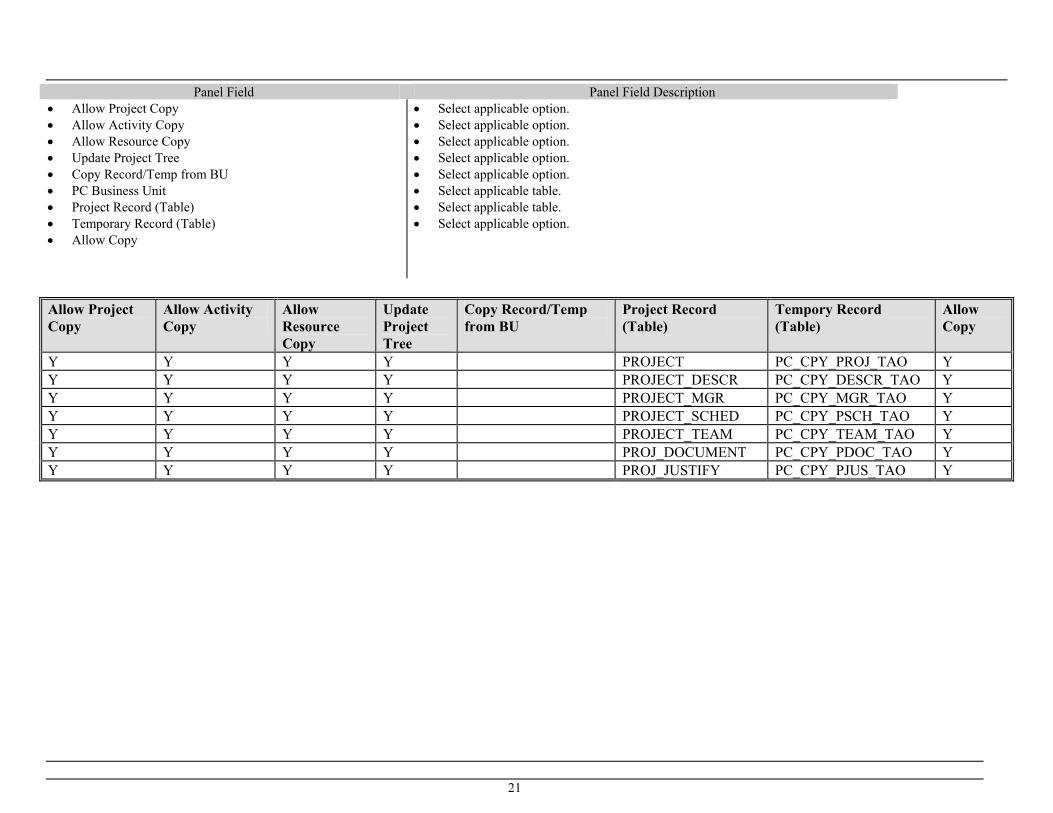
1.2.2 Copy Template Option 1 PeopleSoft Projects has delivered standard and temporary Project Records for template copy. The Copy Template Option 1 page is used to set the parameters for how projects are used as templates at the business unit level.
21
Panel Field Panel Field Description • Allow Project Copy • Allow Activity Copy • Allow Resource Copy • Update Project Tree • Copy Record/Temp from BU • PC Business Unit • Project Record (Table) • Temporary Record (Table) • Allow Copy
• Select applicable option. • Select applicable option. • Select applicable option. • Select applicable option. • Select applicable option. • Select applicable table. • Select applicable table. • Select applicable option.
Allow Project Copy
Allow Activity Copy
Allow Resource Copy
Update Project Tree
Copy Record/Temp from BU
Project Record (Table)
Tempory Record (Table)
Allow Copy
Y Y Y Y PROJECT PC_CPY_PROJ_TAO Y Y Y Y Y PROJECT_DESCR PC_CPY_DESCR_TAO Y Y Y Y Y PROJECT_MGR PC_CPY_MGR_TAO Y Y Y Y Y PROJECT_SCHED PC_CPY_PSCH_TAO Y Y Y Y Y PROJECT_TEAM PC_CPY_TEAM_TAO Y Y Y Y Y PROJ_DOCUMENT PC_CPY_PDOC_TAO Y Y Y Y Y PROJ_JUSTIFY PC_CPY_PJUS_TAO Y

22
1.2.3 Copy Template Option 2 PeopleSoft Projects enables integration with other PeopleSoft modules as well as Third Party applications. This functionality is not being utilized by The University of Florida

23
Panel Field Panel Field Description
• Project Record (Table) • Temporary Record (Table) • Allow Copy • Analysis Group • Resource Record (Table) • Temporary Record (Table) • Allow Copy
• Select applicable table. • Select applicable table. • Select applicable option. • Select applicable Analysis Group. • Select applicable table. • Select applicable table. • Select applicable option.
Project Record (Table)
Temporary Record (Table)
Allow Copy
Analysis Group Resource Record (Table)
Temporary Record (Table)
Allow Copy
PROJ_ACTIVITY PC_CPY_ACTY_TAO Y PROJ_ACT_DESCR PC_CPY_ADES_TAO Y PROJ_ACT_LOC PC_CPY_ALOC_TAO Y PROJ_ACT_STATUS PC_CPY_ASTA_TAO Y PROJ_QUALITY PC_CPY_QUAL_TAO Y

24
1.2.4 Project Delete Utilities Tables
Panel Field Panel Field Description • PC Business Unit • Delete project tree Node • Delete sec project list flag • Allow prj/act delete w/Resrces • Analysis Group
• Select applicable option. • Select applicable option. • Select applicable option. • Select applicable option. • Select applicable option.

25
• Project Record (Table) • Activity Record (Table)
• Select applicable table. • Select applicable table. • Select applicable option.

26
Schedule Integration PeopleSoft Projects enables integration with other PeopleSoft modules as well as Third Party applications. This functionality is not being utilized by the University of Florida.
Panel Field Panel Field Description • Allow Integration • Project Integration • Activity Integration • Default Project to Inactive • Default Activity to Inactive • Budget Analysis Type • Override Analysis Group • Forecast Analysis Type • Override Analysis Group • Forecast Option • Allow Forecast Option Override • Rate Template ID • Allow Rate Template Override
• Select if integration is desired. • Select “direction” of Project integration. • Select “direction” of Activity integration. • Select if desire is for Project ID is to be defaulted to Inactive upon integration. • Select if desire is for Project ID is to be defaulted to Inactive upon integration. • Select an Analysis Type. New rows generated by Budgets integration will be
identified by these attributes. • Select an Analysis Group. New rows generated by Budgets integration will be
identified by these attributes. • Select an Analysis Type. New rows generated by Budgets integration will be
identified by these attributes. • Select an Analysis Group. New rows generated by Budgets integration will be
identified by these attributes. • Select applicable option. • Select if applicable • Select the applicable rate template. • Select if applicable
Allow Integration Project Integration Activity Integration Default Project
To Inactive
Default Activity to Inactive
Budget Analysis Type
Override Analysis Group
Forecast Analysis Type
Override Analysis Group
Y Two Way Two Way Forecast Option Allow Forecast
Option Override Rate Template ID Allow
Rate Template Override
Y

27
2.0 SETUP – PRODUCT RELATED 2.1 Installation Options 2.1.1 ORGANIZATION HIERACY The first step in setting up Accounting for Projects that use transorganizational accounting and/or sharing is to define the organizational hierarchy. Hierarchies are used to determine which rules apply to a given situation. The organization can be as simple as a General Ledger Business Unit (GLBU, which is the minimum required), or it can be broken down further into four additional groups and subgroups using general ledger ChartFields to designate each organizational entity. This allows different rules to be applied (for accounting across or sharing between entities) to organizational entities depending on their size.
In the following example, the organization is defined first by the General Ledger Business Unit, then by operating unit and department.
Example of an organizational hierarchy
In determining the accounting rules that are applied to a human resource working on a project in another part of the company, the General Ledger Business Unit is always first in the organizational hierarchy. A human resource from one GLBU working in another GLBU always follows inter-business unit rules, regardless of the departments and operating units involved.
Using the example in the diagram above:

28
• If an employee from the Chicago operating unit works on a project in the London operating unit, inter-business unit accounting rules apply because the two operating units are in different GLBUs.
• If an employee from the Chicago operating unit works on a project in the Los Angeles operating unit, inter-operating unit accounting rules apply because the operating units are in the same GLBU.
• If an employee from the Human Resources department in Chicago works in the Financial department in Chicago, inter-department accounting rules apply because both departments belong to the same Operating Unit and to the same GLBU.
Installation Options – Organizational Hierarchy –

29
2.1.2 Sharing Options This panel is used to set defaults for specific PeopleSoft Projects fields. You must enter at least one record on this panel. Later in the Projects Operator Defaults panel you can change these defaults for specific users.

30
Path:–Set Up Financials/Supply Chain > Install > Installation Options > Projects
31
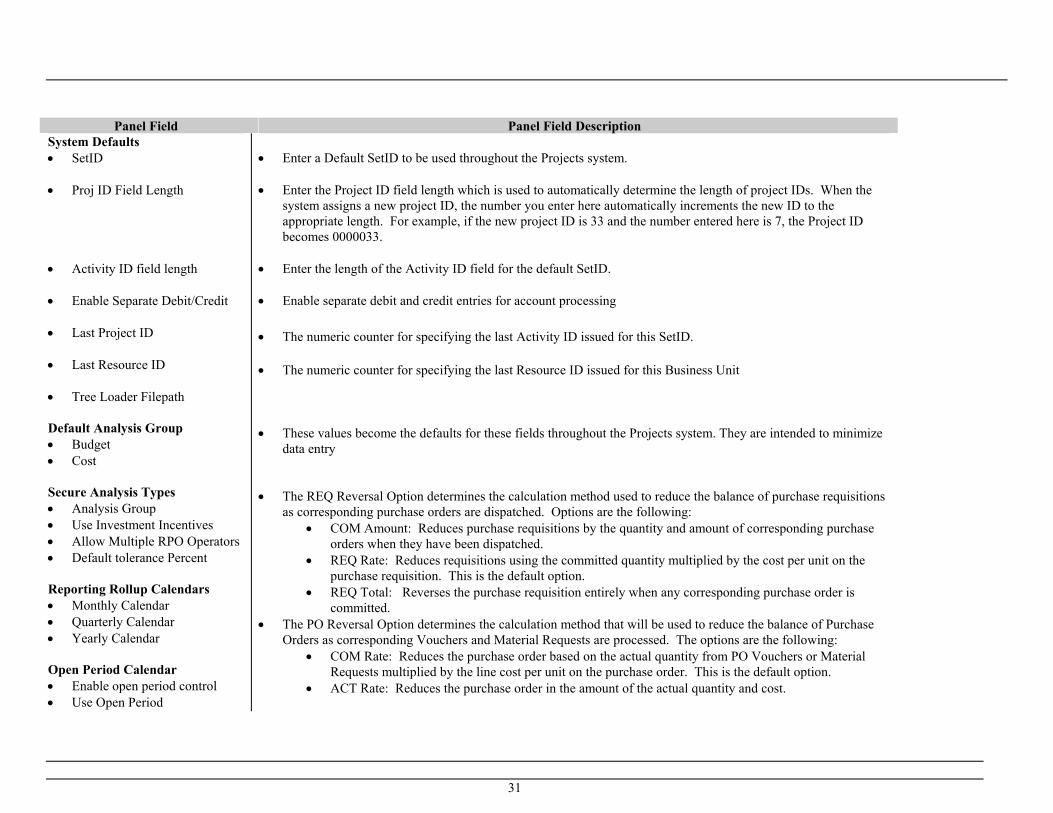
Panel Field Panel Field Description System Defaults • SetID • Proj ID Field Length • Activity ID field length • Enable Separate Debit/Credit • Last Project ID • Last Resource ID • Tree Loader Filepath Default Analysis Group • Budget • Cost Secure Analysis Types • Analysis Group • Use Investment Incentives • Allow Multiple RPO Operators • Default tolerance Percent Reporting Rollup Calendars • Monthly Calendar • Quarterly Calendar • Yearly Calendar Open Period Calendar • Enable open period control • Use Open Period
• Enter a Default SetID to be used throughout the Projects system. • Enter the Project ID field length which is used to automatically determine the length of project IDs. When the
system assigns a new project ID, the number you enter here automatically increments the new ID to the appropriate length. For example, if the new project ID is 33 and the number entered here is 7, the Project ID becomes 0000033.
• Enter the length of the Activity ID field for the default SetID. • Enable separate debit and credit entries for account processing • The numeric counter for specifying the last Activity ID issued for this SetID. • The numeric counter for specifying the last Resource ID issued for this Business Unit • These values become the defaults for these fields throughout the Projects system. They are intended to minimize
data entry • The REQ Reversal Option determines the calculation method used to reduce the balance of purchase requisitions
as corresponding purchase orders are dispatched. Options are the following: • COM Amount: Reduces purchase requisitions by the quantity and amount of corresponding purchase
orders when they have been dispatched. • REQ Rate: Reduces requisitions using the committed quantity multiplied by the cost per unit on the
purchase requisition. This is the default option. • REQ Total: Reverses the purchase requisition entirely when any corresponding purchase order is
committed. • The PO Reversal Option determines the calculation method that will be used to reduce the balance of Purchase
Orders as corresponding Vouchers and Material Requests are processed. The options are the following: • COM Rate: Reduces the purchase order based on the actual quantity from PO Vouchers or Material
Requests multiplied by the line cost per unit on the purchase order. This is the default option. • ACT Rate: Reduces the purchase order in the amount of the actual quantity and cost.

32
Purchasing Adjustment Options • REQ Reversal Option • From feed • PO Reversal Option • From feed Organization Sharing Option • Use Organization • Use Sharing • System Options • System Analysis Types • Req Reversal Option
Secured Analysis Types
Analysis Group Analysis types belonging to the selected analysis group will be secured. Resource rows of these analysis types will appear as read-only rows on the Project Resources page. Users are also prevented from adding or deleting a resource row that belongs to a secured analysis type.
Use Investment Incentives Add Investment Incentives to the Resource Detail pages. If not selected, it will not be displayed on the Show All Resource Details page.
Allow Multiple RPO Operators Check to refresh the PC_RPO table based on operator ID. If not checked, the PC_RPO table will be refreshed each time the RPO process is run.
Default Tolerance Percent
The Project Tolerance is used for Commitment Control budgets. The Default Tolerance Percent field rolls down to the Tolerance Percent setting at the Project level on the Project General - Definition page. The tolerance percent is the percent a project can go over budget before commitment control creates an exception.
Reporting Rollup Calendars
Specify how the PROJ_RESOURCE table is summarized—monthly, quarterly, or yearly. Select the Calendar_ID to use for each specified option.
Open Period Control
Enable Open Period Control Check to enable open-period validation of newly created project resource transactions. The accounting date on project resource transactions is validated against Projects' open periods or GL's open periods. Budget transactions are not validated. Also, if the accounting date does not fall within the open period, the date is overridden with closest, open-period date.
33
• PO Reversal Option Use Open Periods This field only appears if Enable Open Period Control has been checked. The options are:
Use PC: Open period validation based on a Projects business unit's calendar.
Use GL: Open period validation based on a General Ledger business unit's calendar.
Purchasing Adjustment Options
REQ Reversal Option Determines the calculation method used to reduce the balance of purchase requisitions as corresponding purchase orders are dispatched.
COM Amount: Reduces purchase requisitions by the quantity and amount of corresponding purchase orders when they have been dispatched.
REQ Rate: Reduces requisitions using the committed quantity multiplied by the cost per unit on the purchase requisition. This is the default option.
REQ Total: Reverses the purchase requisition entirely when any corresponding purchase order is committed.
PO Reversal Option Determines the calculation method that will be used to reduce the balance of Purchase Orders as corresponding Vouchers and Material Requests are processed.
COM Rate: Reduces the purchase order based on the actual quantity from PO Vouchers or Material Requests multiplied by the line cost per unit on the purchase order. This is the default option.
ACT Rate: Reduces the purchase order in the amount of the actual quantity and cost.
Organization/Sharing Options
Enhanced accounting features for Accounting for Projects are:
Use Organization Check to enable transorganizational accounting—charging transactions to an organizational entity that differs from that of the

34
resource creating them.
Use Sharing Check to allow sharing costs and revenue between a human resource's (employee or consultant) organization and the organization owning the project.
SetID Enable
Separate Debit/Credit
Proj ID Field Length
Activity Id Field Length
Last Project ID
Last Resource ID
Budget Cost
NORTH 15 15 BUD ACT Analysis Group
Use Investment Incentives
Allow Multiple RPO Operators
Default Percent
Monthly Calendar
Quarterly Calendar
Yearly Calendar
Yes 15.0000 01 QT YR Req Reversal Option
PO Reversal Option
REQ Rate COM Rate

35
System Analysis Types
Select an analysis type to associate with transactions coming into Projects from each of the feeder applications installed. Each application engine will reference the analysis type selected here during the integration process.
General Ledger Integration Specify an Analysis Group to be used for journal entry.
Load Time Automatically Check to have PeopleSoft Time and Labor to publish time and labor actuals to the PROJ_RESOURCE table as soon as payroll is done. If left unchecked, the PC_TL_TO_PC application engine must be run to load the data into the PROJ_RESOURCE table from a staging table.
Cost Type flows through Check to pull cost types from PROJ_RESOURCE instead of the Definition page.
Data Exchange Defaults

36
These settings are used for exchanging data between Projects and Primavera (P3e or TeamPlay) or Microsoft (Project 2000) scheduling applications.
Budgets Select the analysis group from which to assign an analysis type for budget rows being imported from the Primavera or Microsoft application. The analysis type from this group is later selected from the Resource Assignment page as part of the Third-Party Data Exchange process.
Actuals Select the analysis group by which all transaction rows with an analysis type belonging to the group will be sent from PeopleSoft Projects to the Primavera or Microsoft application. Only resource transactions with analysis types in the specified analysis group will be synchronized between PeopleSoft Projects and the third-party application.
UOM Select the unit of measure for budget rows brought into PeopleSoft Projects from the Primavera or Microsoft application. The default setting is man-hours (MHR).
Pricing Funds Distrib Options
Date Options Specify which date (Accounting or Transaction) to use for resolving rates for both Pricing (traditional pricing and costing without Contracts) and Funds Distribution. The rates for both of these processes are effective dated.
Reprice Deferrals Select to reprice a row that has been priced but not billed.
Use Funds Distribution Check to distribute costs among funding sources based on the details of the cost.
Data Exchange — Resources
These settings are used for exchanging data between Projects and Primavera scheduling applications.
Resource Type Select to populate the Primavera application's resource pool (Resource Dictionary in Primavera P3e) according to a resource type. During Resource synchronization, transactions of the specified Actuals analysis group belonging to a Resource Type, are written to Primavera's Resource Assignment table. Transactions not belonging to a Resource Type, are written to Primavera's Expenses table.
Resource EmplID Select to populate the Primavera application's resource pool (Resource Dictionary in Primavera P3e) according to employees' IDs. During Resource synchronization, transactions of the specified Actuals analysis group with an EmplId are written to Primavera's Resource Assignment table. Transactions without an EmplID, are written to Primavera's Expenses table.

37
2.2 Project Options 2.1.3 User Preferences — Projects page
Enter Tree Name, Tree EffDt, Parent Tree Node, Analysis Group, Business Unit, and Project ID. These become the defaults for this user ID throughout the application.
Currency Code Default transaction currency associated with this user.

38
Integration Sets the default integration template displayed on the Project General page.
Rate Type Set the default conversion rate for this user.
Flexible Analysis Template Select the template that determines how flexible analysis data is displayed on the Project Summary page.
Edit Project List Option Determines how projects are listed—by business unit (BYBU) or by project tree (BYTR)—for selection to the My Projects page.
The Date Default Values help to minimize data entry.
From Date and Thru Date Used on various pages to identify specific resource rows to be pulled into the page.
Trans Date and Acctg Date The accounting and a transaction dates are unnecessary here unless entry of a large number of resources with the same accounting and transaction dates is planned. Enter dates in these fields set the defaults for the project entry pages.

39
2.2.1 EVENTS A project event is defined as a change in the status of a project or an activity. For example, a change in status from Proposed to Approved can be defined as a project event that requires approval. A project event can be a change in status between two consecutive status types such as Proposed and Approved or two nonconsecutive status types such as Proposed and Closed. Status types must be defined before defining project events.

40
Panel Field Panel Field Description
• SetID • Project Event • Effective Date • Status • Description • From Status Type • To Status Type
• Enter the SetID for the phase type that is being created • Enter the name of the phase type • Enter an Effective Date for the phase type • Select a Status for each phase type. The status determines whether or not a phase type is available. • Enter a description of the phase type you are creating.

41
2.2.2 DEFINE PHASE TYPES When you enter dates in your project schedule, you often want to identify what phase of the project those dates represent. For example, if you create a phase type of clean-up, you can enter a begin clean-up date and an end clean-up date in your project schedule and track time spent specifically on clean-up.

42
Path: Set Up Financials/Supply Chain > Product Related > Projects > Project Options > Phase Types
Panel Field Panel Field Description • SetID • Schedule Type • Effective Date • Status • Description
• Enter the SetID for the phase type that is being created • Enter the name of the phase type • Enter an Effective Date for the phase type • Select a Status for each phase type. The status determines whether or not a
phase type is available. • Enter a description of the phase type you are creating.
SetID Schedule
Type Effective Date
Status Description Comments
NORTH ABSE 1967-01-01 A date adjusted engineering drawings submitted
NORTH ACOMP 1967-01-01 A partial material installation due prior
NORTH CAGE 1967-01-01 A cage ready NORTH CNCP 1967-01-01 A date installation to be
complete
NORTH CNST 1967-01-01 A date installation will start
NORTH ENGC 1967-01-01 A engineering complete

43
NORTH ENGS 1967-01-01 A engineering start NORTH ISVE 1967-01-01 A date site ready for
service
NORTH MOPAP 1967-01-01 A methods of procedures approved by ILEC
NORTH OPAC 1967-01-01 A test & acceptance complete
NORTH OPNM 1967-01-01 A work order authorized
NORTH RACOM 1967-01-01 A revised advance complete date
NORTH RCNCP 1967-01-01 A revised installation complete date
NORTH RCNST 1967-01-01 A revised installation start date
NORTH RSCHS 1967-01-01 A revised schedule set date
NORTH RSRVC 1967-01-01 A revised installation service date
NORTH SCHST 1967-01-01 A date structure to be set
NORTH SDIM 1967-01-01 A date engineering package sent to contractor
NORTH SRVC 1967-01-01 A installation service date
NORTH JCINV 1967-01-01 A job cost invoiced NORTH ACDLC 1967-01-01 A Cso final acceptance
of EDLC proj
NORTH APPST 1967-01-01 A
Agreed on EDLC placement for site
NORTH BATAC
1967-01-01 A
Performed battery acceptance test per XYZ COMPANY

44
NORTH BGEQP 1967-01-01 A
Bonded & grounded cables & equip
NORTH CBLTL 1967-01-01 A
Waterfall cable splicing tail lengths
NORTH CMFES 1967-01-01 A
Coordinated on-site meeting w/FT
NORTH CORIN
1967-01-01 A
Coordinated inspections to satisfy permits
NORTH EQPMT
1967-01-01 A
Mounted and sealed required equip on pads
NORTH FURMT 1967-01-01 A
Furnished complete list of material
NORTH INEQP 1967-01-01
A
installed all equip ordered through DLC models & options
NORTH INOSP 1967-01-01 A installed OSP, power and battery wiring
NORTH INSGR 1967-01-01 A installed ground grid NORTH INSHF 1967-01-01 A installed pre-
terminated fiber distribution
NORTH MSBLK 1967-01-01 A placed moisture blocks on cable, DPM Mod
NORTH PDQT 1967-01-01 A provided firm price quote within 1 week
NORTH PHYIN 1967-01-01 A performed physical inventory of all equip
NORTH PWREQ 1967-01-01 A powered equip at easement site
NORTH RCBAT 1967-01-01 A recorded battery identification numbers
NORTH RCDDL 1967-01-01 A received requisition from SCM for DLC

45
2.2.3 DEFINE PROJECT ROLES Project Roles help to separate the actual security definition from a User or Permission List. Once an access type (read/write access) is defined for a Role, all Users or Permission-Lists attached to that Role acquire that access type. Access to Projects, Activities and Analysis Groups can be defined at the Project Role level. In addition to no access and read/write access, read only access can also be defined for Projects and Activities which will enable you to view Project data but be restricted from modifying it. You can determine which resource transactions are visible throughout your Projects system by setting up security based on an Analysis Group. Analysis Group security is defined as part of the Project Role. At the Role level, you can select a list of Analysis Groups that users attached to the role have access to. This helps to secure the resource transactions. Navigation: Setup Financials/Supply Chain > Product Related > Projects > Project Options > Project Roles > Add a New Value

46
Page Field Page Field Description Page Shot
Project Roles
Set ID Project Role
Description Access to Project
Access to Activity Analysis Group
North Proj Engineer
Project Engineer
Read Only Read Only All Groups
North Project Accnt
Project Accountant
Read/Write Read/Write All Groups
North Project Project Read Only Read Only All Groups

47
Analyst Analyst North Project
Custom Project Customer
Read Only Read Only
North Project Manager
Project Manager
Read Only Read Only All Groups
North Project Admin
Project Administrator
Read Only Read Only All Groups

48
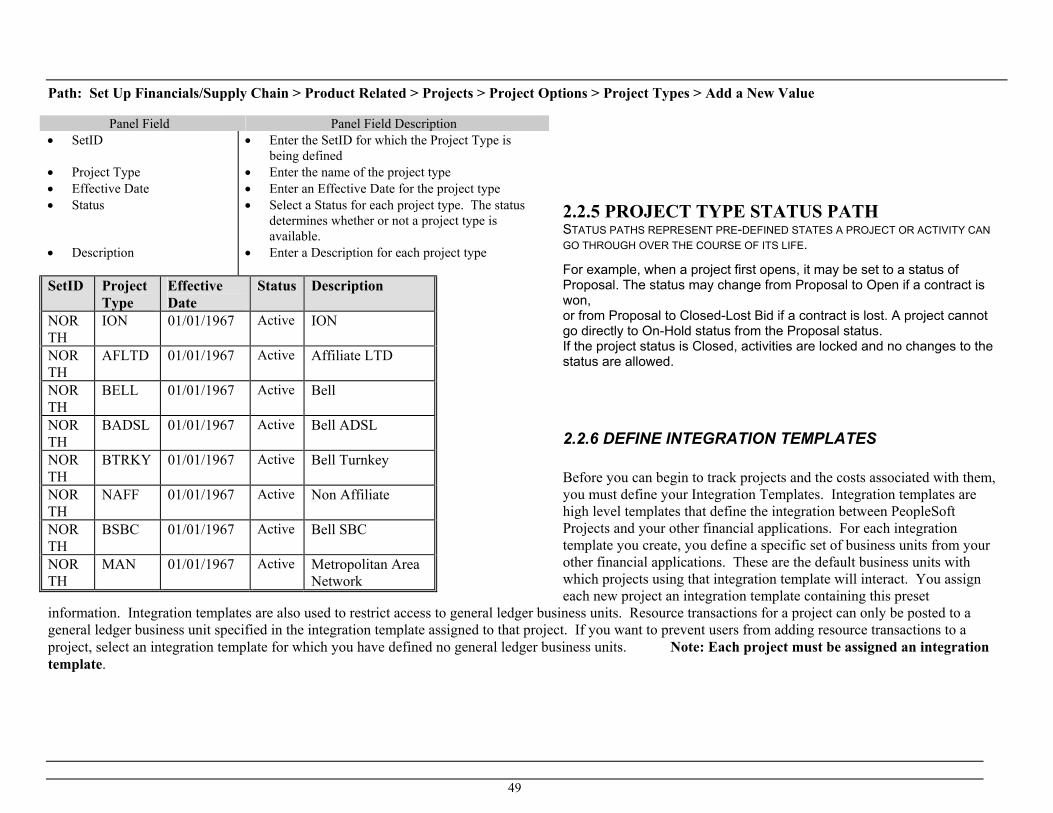
2.2.4 DEFINE PROJECT TYPES Project Types are labels for grouping projects. For example, you may have construction projects, maintenance projects, and capital projects. Setting up project types and assigning them to projects enables you to analyze all projects of a certain type in relation to one another and allows you to assign specific accounting entries for each project type.
49
Path: Set Up Financials/Supply Chain > Product Related > Projects > Project Options > Project Types > Add a New Value
2.2.5 PROJECT TYPE STATUS PATH STATUS PATHS REPRESENT PRE-DEFINED STATES A PROJECT OR ACTIVITY CAN GO THROUGH OVER THE COURSE OF ITS LIFE. For example, when a project first opens, it may be set to a status of Proposal. The status may change from Proposal to Open if a contract is won, or from Proposal to Closed-Lost Bid if a contract is lost. A project cannot go directly to On-Hold status from the Proposal status. If the project status is Closed, activities are locked and no changes to the status are allowed.
2.2.6 DEFINE INTEGRATION TEMPLATES Before you can begin to track projects and the costs associated with them, you must define your Integration Templates. Integration templates are high level templates that define the integration between PeopleSoft Projects and your other financial applications. For each integration template you create, you define a specific set of business units from your other financial applications. These are the default business units with which projects using that integration template will interact. You assign each new project an integration template containing this preset
information. Integration templates are also used to restrict access to general ledger business units. Resource transactions for a project can only be posted to a general ledger business unit specified in the integration template assigned to that project. If you want to prevent users from adding resource transactions to a project, select an integration template for which you have defined no general ledger business units. Note: Each project must be assigned an integration template.
Panel Field Panel Field Description • SetID • Project Type • Effective Date • Status • Description
• Enter the SetID for which the Project Type is being defined
• Enter the name of the project type • Enter an Effective Date for the project type • Select a Status for each project type. The status
determines whether or not a project type is available.
• Enter a Description for each project type
SetID Project Type
Effective Date
Status Description
NORTH
ION 01/01/1967 Active ION
NORTH
AFLTD 01/01/1967 Active Affiliate LTD
NORTH
BELL 01/01/1967 Active Bell
NORTH
BADSL 01/01/1967 Active Bell ADSL
NORTH
BTRKY 01/01/1967 Active Bell Turnkey
NORTH
NAFF 01/01/1967 Active Non Affiliate
NORTH
BSBC 01/01/1967 Active Bell SBC
NORTH
MAN 01/01/1967 Active Metropolitan Area Network

50
In the General Integration panel you identify the default business units in your Purchasing and Asset Management applications with which projects using this template will interact. These default business units will automatically be used when transactions are added from within Projects
Path: Set Up Financials/Supply Chain > Product Related > Projects > Project Options > Integration Templates > Add a New Value
Panel Field Panel Field Description • SetId • Integration • PO Business Unit • Asset Management Business
Unit
• Enter the SetID for which the integration template is being created
• Enter the name of the integration template being created
• Enter the default Business Unit that records activity for those projects using this integration template. These business units will be used as the defaults for online transactions.
• Enter the default Business Unit that records activity for those projects using this integration template. These business units will be used as the defaults for online transactions.

51
SetID Integration PO Business Unit Asset Management Business Unit NORTH TWC01 TWC01
52
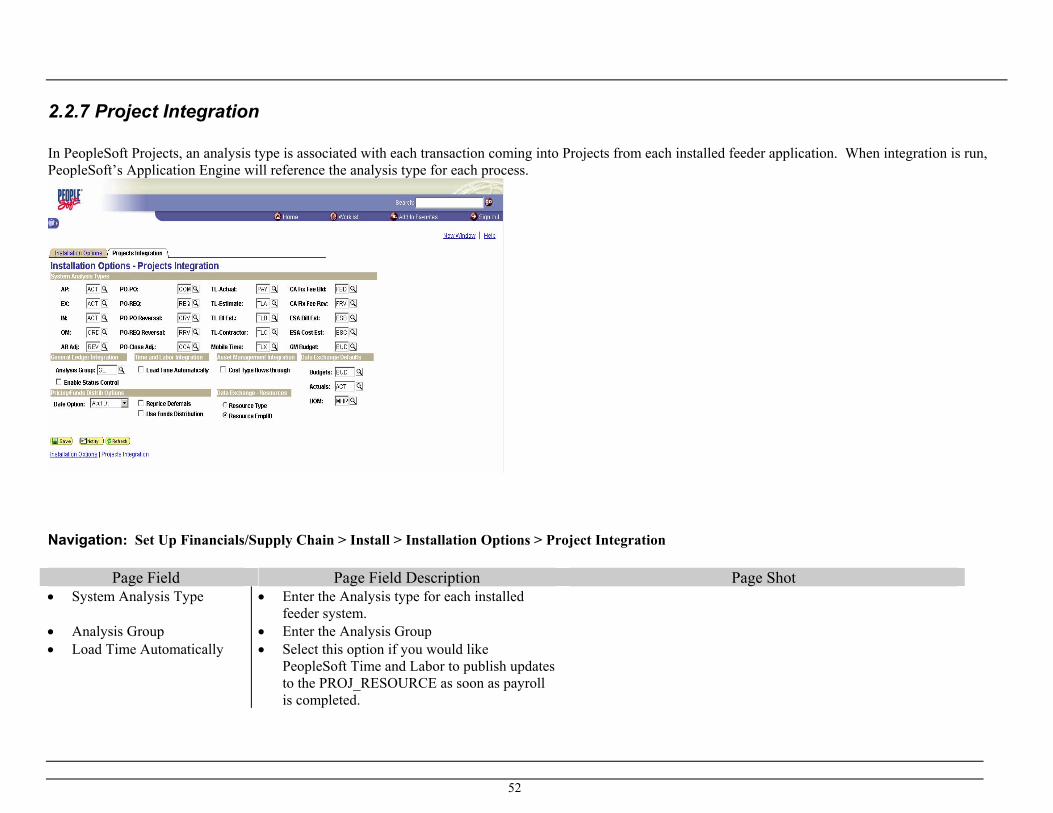
2.2.7 Project Integration In PeopleSoft Projects, an analysis type is associated with each transaction coming into Projects from each installed feeder application. When integration is run, PeopleSoft’s Application Engine will reference the analysis type for each process.
Navigation: Set Up Financials/Supply Chain > Install > Installation Options > Project Integration
Page Field Page Field Description Page Shot • System Analysis Type • Analysis Group • Load Time Automatically
• Enter the Analysis type for each installed feeder system.
• Enter the Analysis Group • Select this option if you would like
PeopleSoft Time and Labor to publish updates to the PROJ_RESOURCE as soon as payroll is completed.

53
• Cost Type flow through? • Date Option • Reprice Deferrals? • Reprice OLT’s
• Select this option to pull cost types from PROJ_RESOURCE instead of the definition page.
• Select a date option for pricing options. Option to choose from are Acct Date or Trans Date.
• Allow rows to be re-priced when rows are priced but are not billed.
• Enables optional re-pricing when rows have been sent to PeopleSoft Billing but returned as deferral or over limits.
System Analysis Types
GL integration Analysis Group
Enable Status
Control
Load Time
Automatically
Cost Type Flows
Through
Date Options
Reprice Deferrals
Reprice OLT’s
Defaults GL N N N Acct Dt N N

54
ENTER GL INTEGRATION DETAIL Use the GL Integration Detail panel to define the general ledger business unit or units for each integration template. From the GL Integration Detail panel you can assign a single general ledger business unit, multiple general ledger business units, or joint ventures. Joint ventures are projects in which costs are shared by more than one entity, internally or externally. Joint ventures require that more than one general ledger business unit be assigned to an integration template. Each project you create in Projects is assigned an integration template, and each resource transaction that you add to that project must contain the general ledger business unit if that transaction will eventually be posted to the general ledger. Resource transactions for a project can only be posted to a general ledger business unit specified in the integration template assigned to that project.
Panel Field Panel Field Description Panel Shot
• SetID • Integration • GL Business Unit • Commitment Control Ledger
Group • Description • Comments
• Enter the SetID for which the integration template is being created
• Enter the name of the integration template being created
• Select a general ledger business unit for the integration template
• Enter a description for the GL unit selected • Enter any comments about the GL unit selected

55
GL Integration Detail SetID Integration GL
Business Unit
Commitment Control Ledger Group
Description Comments
NORTH TWC01 TWC01 Time Warner Cable

56
2.2.8 DEFINE PROJECT STATUS TYPES Over the course of time, the status of your projects and activities changes. Status types are one character, alphanumeric identifiers used to track changes in the status of your projects and activities. You also use status types for defining Project Events which are the actual changes in status that require approval. In the Status Types panel you define the status types that you want to use for your projects and activities. Some examples of status types might be: proposed, open, closed, or on hold. You'll also use this panel to set control actions to limit transactions coming into Projects from cost feeder applications.
Path: Setup Financials/Supply Chain > Product Related > Projects > Project Options > Status Types > Add a New Value
Panel Field Panel Field Description • SetID • Project Status • Effective Date • Status • Description • An Type
• Enter the SetID for which the status type is being created • Enter one letter as the name of the status type • Enter an Effective Date for the status type • Select a Status for each Status Type. The status determines whether or not a status
type is available. • Enter a Description for each status type you create. • Select the analysis types used by each feeder application from the An Type drop-down
list. to limit transactions coming into Projects from cost feeder applications • Select a Project Control Action to associate with the analysis type. Valid choices
include:

57
• Project Control Action
• Warning: A warning will display before the system will accept the transaction.
• Reject: The transaction will be rejected. • None: No Project Control Action will occur.

58
SetID Project
Status Effective Date
Status Description An Type
Project Control Action
NORTH C 01/01/1967 Active Closed ACT BLD ORD COM PAY
Reject
NORTH O 01/01/1967 Active Open 2.2.9 STRUCTURE PROJECTS NAVIGATION

59
2.3 Activity Options
2.3.1 DEFINE ACTIVITY TYPES All projects you create will contain activities. Activity types are the labels to identify and group projects in PeopleSoft Projects. If activity types are assigned consistently throughout your Projects system, you can analyze and report on all similar activities across all projects company-wide.
Path: Set Up Financials/Supply Chain > Product Related > Projects > Activity Options > Activity Types > Add a New Value
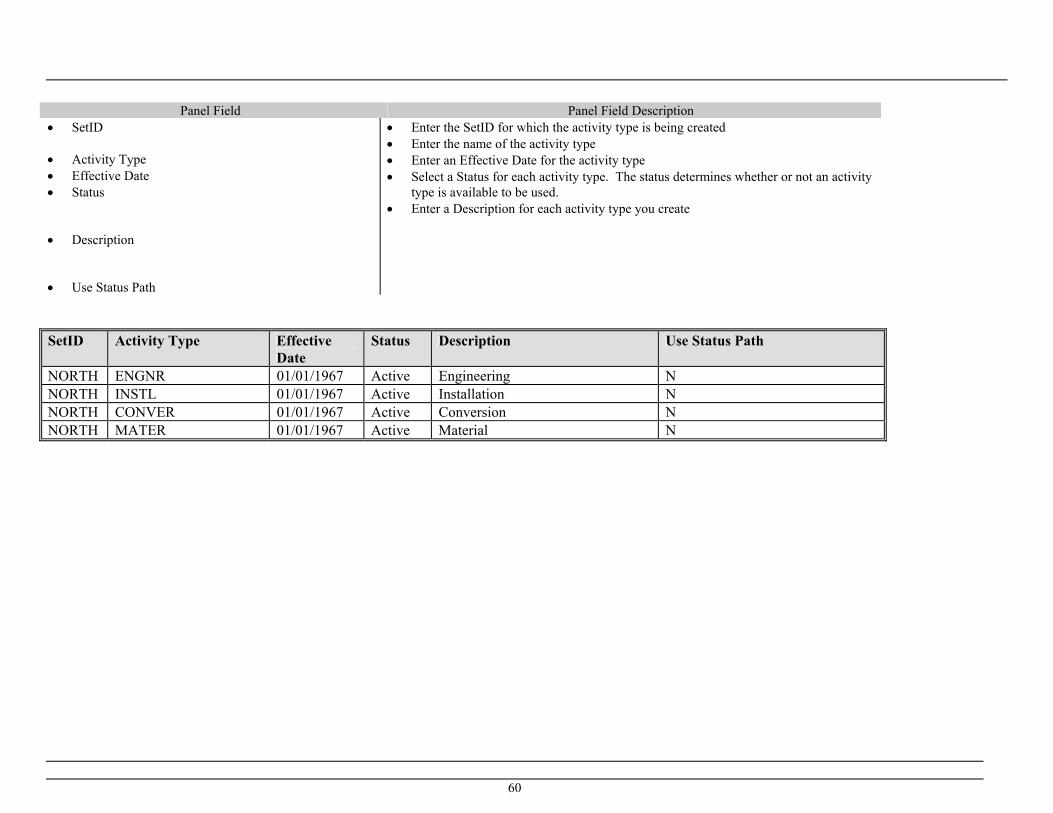
60
Panel Field Panel Field Description
• SetID • Activity Type • Effective Date • Status • Description • Use Status Path
• Enter the SetID for which the activity type is being created • Enter the name of the activity type • Enter an Effective Date for the activity type • Select a Status for each activity type. The status determines whether or not an activity
type is available to be used. • Enter a Description for each activity type you create
SetID Activity Type Effective
Date Status Description Use Status Path
NORTH ENGNR 01/01/1967 Active Engineering N NORTH INSTL 01/01/1967 Active Installation N NORTH CONVER 01/01/1967 Active Conversion N NORTH MATER 01/01/1967 Active Material N

61
2.3.2 ACTIVITY TYPE STATUS PATH

62
2.3.3 QUALITY TYPES

63
2.4 Resources
2.4.1 DEFINE ANALYSIS TYPES Analysis types enable you to differentiate types of transactions in your system for reporting and cost analysis purposes. Analysis types are one of the few required keys in your PeopleSoft Projects system. Analysis types are assigned to individual resource rows in order to track costs as they move through different stages of a project. Analysis types are essential for any type of reporting, analysis, or calculation you want to do with Projects, and are also required for integration between Projects and other PeopleSoft applications. PeopleSoft suggests that you utilize TableSet sharing to create one set of analysis types that is used throughout your Projects system.
Path: Setup Financials/Supply Chain > Product Related > Projects > Resources > Analysis Types > Add a New Value
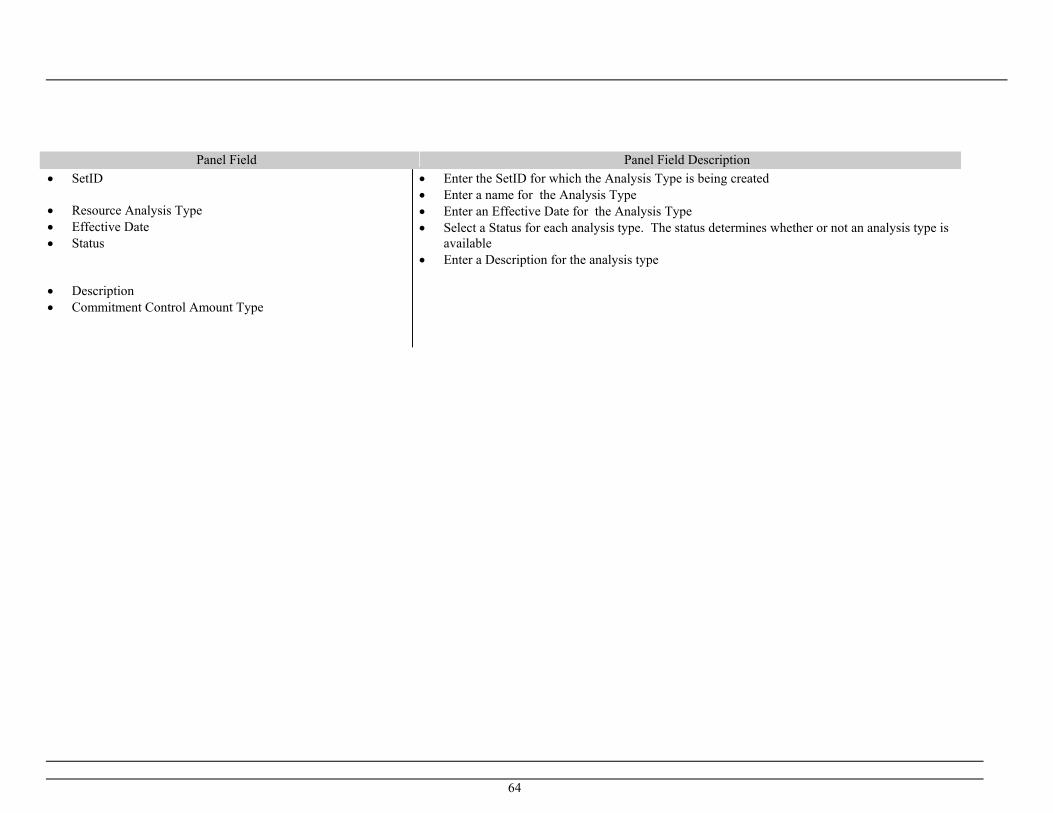
64
Panel Field Panel Field Description • SetID • Resource Analysis Type • Effective Date • Status • Description • Commitment Control Amount Type
• Enter the SetID for which the Analysis Type is being created • Enter a name for the Analysis Type • Enter an Effective Date for the Analysis Type • Select a Status for each analysis type. The status determines whether or not an analysis type is
available • Enter a Description for the analysis type

65
PeopleSoft states that if you choose not to implement these analysis types you must customize these features in order to ensure the functionality of all mass change definitions (i.e. predefined application engines use these Analysis Types). SetID Resource
Analysis Type
Effective Date
Status Description Commitment Control Amount Type
Comments
NORTH ACT 01/01/1967 Active Actual Cost • Delivered NORTH BAJ 01/01/1967 Active Billing Adjustment • Delivered
• Passed from A/P (and EX) • Used for all Actual Costs sent
from A/P • Basis for calculating expense
markup • Records direct costs billing
NORTH BD1 01/01/1967 Active Total Cost Budget - Scenario 1 • Delivered NORTH BD2 01/01/1967 Active Total Cost Budget - Scenario 2 • Delivered NORTH BD3 01/01/1967 Active
Total Cost Budget - Scenario 3 • Delivered
• Used to enter information for credit memo
NORTH BD4 01/01/1967 Active Total Cost Budget - Scenario 4 • Delivered NORTH BD5 01/01/1967 Active Total Cost Budget - Scenario 5 • Delivered NORTH BD6 01/01/1967 Active Total Cost Budget - Scenario 6 • Delivered
• “Billing” sends entries to G/L NORTH BD7 01/01/1967 Active Total Cost Budget - Scenario 7 • Delivered NORTH BD8 01/01/1967 Active Total Cost Budget - Scenario 8 • Delivered NORTH BIL 01/01/1967 Active Billable Amount • Delivered NORTH BLD 01/01/1967 Active Billed Amount • Delivered NORTH BRT 01/01/1967 Active Billing Retainage • Delivered NORTH BUD 01/01/1967 Active Total Cost Budget • Delivered NORTH CBA 01/01/1967 Active Cost Budget Adjustments • Delivered NORTH CCA 01/01/1967 Active Commitment Adjustments • Delivered NORTH CLS 01/01/1967 Active Asset Cost Summary • Delivered NORTH COM 01/01/1967 Active Commitment incl. PO &
Subcont • Delivered
• Pass from PO – Close Adj

66
SetID Resource Analysis Type
Effective Date
Status Description Comments
NORTH CRR 01/01/1967 Active Cost of Removal Cost Summary
• Delivered • Passed from PO-PO’s
NORTH COR 01/01/1967 Active Cost of Removal of Asset • Delivered NORTH CRV 01/01/1967 Active Commitment Reversals • Delivered
• Passed from PO-PO Reversal NORTH DEF 01/01/1967 Active Billing Deferral • Delivered NORTH DSC 01/01/1967 Active Billing Discount • Delivered NORTH EMP 01/01/1967 Active Employee Time • Delivered NORTH FBD 01/01/1967 Active Fixed Cost Billed Amount • Delivered NORTH FCC 01/01/1967 Active Completion Cost • Delivered
• Used for employee time entered directly to Projects (cost)
NORTH FRV 01/01/1967 Active Fixed Cost Revenue Amount • Delivered NORTH FTC 01/01/1967 Active Forecast To Complete • Delivered NORTH GLE 01/01/1967 Active GL Expense • Delivered NORTH GLR 01/01/1967 Active GL Revenue • Delivered
• Appropriation at which the case would be on budget
NORTH GNT 01/01/1967 Active Grant Reimbursement • Delivered NORTH OLT 01/01/1967 Active Over Limit • Delivered NORTH ORD 01/01/1967 Active Order • Delivered NORTH PAY 01/01/1967 Active Time and Labor Actual • Delivered NORTH PCA 01/01/1967 Active Profile Adjustment • Delivered NORTH PCL 01/01/1967 Active Profile Cost Summary • Delivered NORTH PFS 01/01/1967 Active Proceeds from Sale of Asset • Delivered
• Pass from T&L – Actual NORTH PSR 01/01/1967 Active Proceeds from Sale Summary • Delivered NORTH RAJ 01/01/1967 Active Released Retainage
Adjustment • Delivered
NORTH REB 01/01/1967 Active Rebate • Delivered

67
SetID Resource Analysis Type
Effective Date
Status Description Comments
NORTH REQ 01/01/1967 Active Requisition • Delivered NORTH RET 01/01/1967 Active Retirement Cost • Delivered NORTH REV 01/01/1967 Active Revenue • Delivered NORTH RRT 01/01/1967 Active Released Billing Retainage • Delivered NORTH RRV 01/01/1967 Active Requisition Reversals • Delivered
• Passed from PO - Req’s NORTH SUT 01/01/1967 Active Sales/Use Tax • Delivered NORTH TLA 01/01/1967 Active Time and Labor Estimate • Delivered NORTH TLB 01/01/1967 Active Time and Labor Est. for BI • Delivered NORTH TLC 01/01/1967 Active Time and Labor Contractors • Delivered
• Passed from PO – Req Reversal NORTH TLX 01/01/1967 Active Cost from Time Traveler • Delivered NORTH UAJ 01/01/1967 Active
Prepaid Utilization Adjustment • Delivered
• Passed from T&L – Estimate NORTH UTL 01/01/1967 Active
Prepaid Utilization (Billing) • Delivered
• Passed from T&L – BI Estimate NORTH VAR 01/01/1967 Active Variance • Delivered NORTH WTO 01/01/1967 Active Write Off • Delivered

68
2.4.2 DEFINE ANALYSIS GROUPS One of the most flexible tools within Projects for analyzing projects is analysis groups. With analysis groups you can group analysis types and define relationships among them in order to analyze the costs in a project. Once you have created your own custom analysis groups, use them with the Projects panels, queries or reports to analyze your projects. Creating an analysis group to be used for analyzing projects is basically a two-step process.
1. Group the analysis types that you want to include in your analysis of the project. 2. Apply the appropriate multiplier to each analysis type to create a relationship.
A multiplier determines how the amounts and quantities for a specific analysis type are to be factored into the analysis. The total quantities and amounts in all transactions identified by a specific analysis type are multiplied by the number you enter. For example, if you want to add the amounts to the analysis, enter a 1; if you want to subtract the costs from the analysis, enter a -1; if you only want to add half of the amounts to the analysis, enter .5. The easiest way to create analysis groups for analyzing projects is to start by writing out the equation you want to use. This often makes it easier to determine which multipliers you should assign to which analysis types. For instance, if you want to create an analysis group to determine whether or not you are over budget, you might write out the following equation: Budgets - Actuals = Budget to Actual Variance You would then assign a multiplier of -1 to the Actuals analysis type and a multiplier of 1 to the Budgets analysis type. When you use this analysis group for on-line analysis or reporting, all of the actual costs from the project you are analyzing are subtracted from the budgeted costs. If the result is a negative number you know that you are over budget. You could also set up the analysis group so that a positive number means that you are over budget. To do so you would simply reverse the multipliers so that the budgeted costs are subtracted from the actual costs. Multipliers can be applied to quantities for each analysis type that you include in an analysis group. For those analysis groups that you create for the purpose of analyzing your project costs you will probably want the multipliers to be the same for both the amount and the quantity.

69
Path: Setup Financials/Supply Chain > Product Related > Projects > Resources > Analysis Groups > Add a New Value

70
Panel Field Panel Field Description
• SetID • Analysis Group • Description • Grouping • Analysis Group Options • Analysis Type • Quantity • Amount Multiplier
• Enter a SetId for which the analysis group is being created • Enter the name of the Analysis Group • Enter a short Description for the analysis group • Select the Perform Grouping • Select the Analysis Group options Perform Multiplication options. • Enter the Analysis Types that you want to use in your analysis. • Enter the appropriate Quantity for each analysis type. • Enter the appropriate Amount multipliers for each analysis type.
71
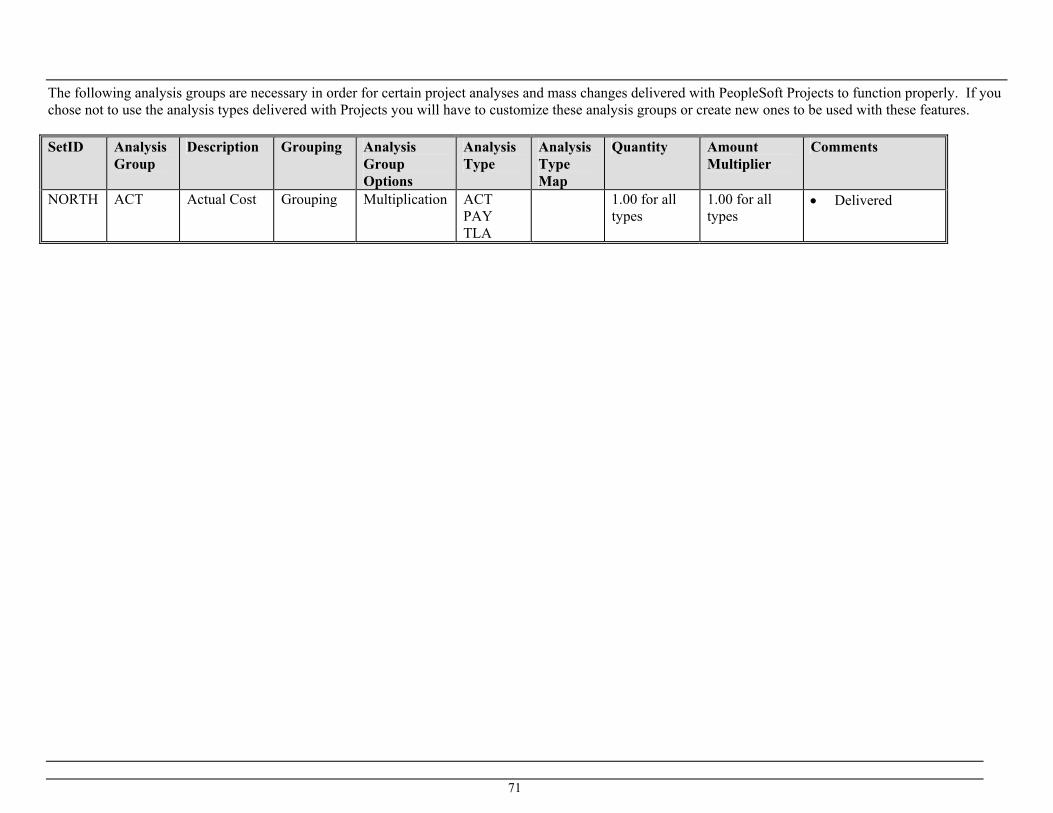
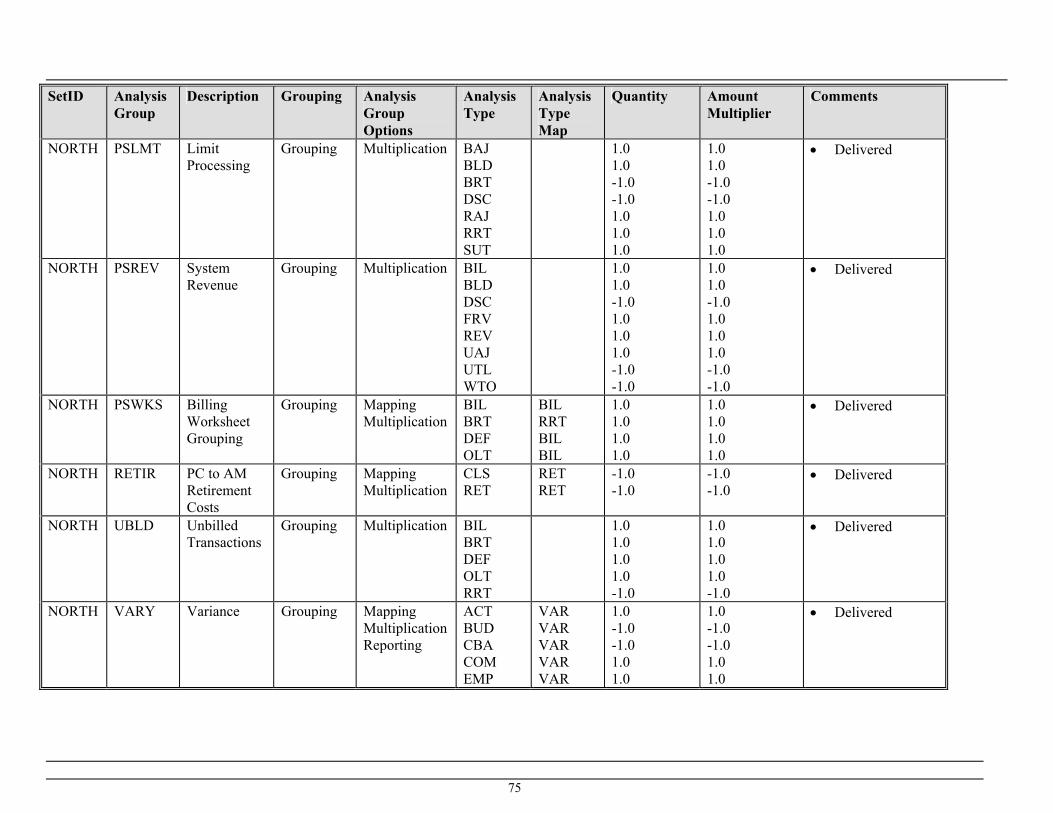
The following analysis groups are necessary in order for certain project analyses and mass changes delivered with PeopleSoft Projects to function properly. If you chose not to use the analysis types delivered with Projects you will have to customize these analysis groups or create new ones to be used with these features. SetID Analysis
Group Description Grouping Analysis
Group Options
Analysis Type
Analysis Type Map
Quantity Amount Multiplier
Comments
NORTH ACT Actual Cost Grouping Multiplication ACT PAY TLA
1.00 for all types
1.00 for all types
• Delivered

72
NORTH ALL All Analysis Types
Grouping Multiplication ACT BAJ BD1 BD2 BD3 BD4 BD5 BD6 BD7 BD8 BIL BLD BRT BUD CBA CCA CLS COM COR CRR CRV DEF DSC EMP FCC FTC GNT OLT ORD PAY PCA PCL PFS PSR REB REQ RET REV RRT RRV TLA
1.00 for all types
1.00 for all types
• Delivered

73
SetID Analysis Group
Description Grouping Analysis Group Options
Analysis Type
Analysis Type Map
Quantity Amount Multiplier
Comments
NORTH AMRET AM Retire Proceeds and Costs
Grouping Mapping Multiplication Reporting
COR CRR PFS PSR
CRR CRR PSR PSR
1.0 -1.0 1.0 -1.0
1.0 -1.0 1.0 -1.0
• Delivered
NORTH BLD Billed Transactions
Grouping Multiplication BAJ BLD BRT DSC RAJ RRT SUT UTL
1.0 1.0 -1.0 -1.0 1.0 1.0 1.0 -1.0
1.0 1.0 -1.0 -1.0 1.0 1.0 1.0 -1.0
• Delivered
NORTH BUD Budgets Grouping Multiplication Reporting
BD1 BD2 BD3 BUD
1.0 1.0 1.0 1.0
1.0 1.0 1.0 1.0
• Delivered
NORTH CLOSE PC to AM Asset Summary
Grouping Multiplication ACT CLS GNT
1.0 -1.0 -1.0
1.0 -1.0 -1.0
• Delivered
NORTH COPY Template Copy
Grouping Mapping Multiplication
ACT PAY
BUD BUD
1.0 1.2
1.0 1.2
• Delivered
NORTH COSTS Estimated & Actual Costs
Grouping Multiplication Reporting
ACT CCA COM CRV PAY REQ RRV
1.0 1.0 1.0 1.0 1.0 1.0 1.0
1.0 1.0 1.0 1.0 1.0 1.0 1.0
• Delivered
NORTH FOR2C Forecast Cost at Completion
Grouping Mapping Multiplication Reporting
ACT COM CRV EMP FTC
FCC FCC FCC FCC FCC
1.0 1.0 -1.0 1.0 1.0
1.0 1.0 -1.0 1.0 1.0
• Delivered

74
SetID Analysis Group
Description Grouping Analysis Group Options
Analysis Type
Analysis Type Map
Quantity Amount Multiplier
Comments
NORTH GL GL Analysis Type
GLE GLR
0 0
0 0
• Delivered
NORTH OPENC Open Commitment Balance
Grouping Mapping Multiplication
CCA COM CRV
CCA CCA CCA
-1.0 1.0 -1.0
-1.0 1.0 -1.0
• Delivered
NORTH PCADJ PC to AM Profile Adjustment
Grouping Mapping Multiplication
PCA PCL
PCA PCA
-1.0 -1.0
-1.0 -1.0
• Delivered
NORTH POADJ Purchasing Adjustments
Grouping Multiplication ACT CCA COM CRV REQ RRV
1.0 -1.0 1.0 -1.0 1.0 -1.0
1.0 -1.0 1.0 -1.0 1.0 -1.0
• Delivered
NORTH PRECL PC to AM Profile Summary
Grouping Multiplication ACT GNT PCL
1.0 -1.0 -1.0
1.0 -1.0 -1.0
• Delivered
NORTH PSBLD Billing to Projects
Grouping Mapping Multiplication
BAJ BIL BRT DEF DSC FBD OLT RAJ RRT SUT UAJ UTL WTO
BAJ BLD BRT DEF DSC FBD OLT RAJ RRT SUT UAJ UTL WTO
1.0 1.0 1.0 1.0 1.0 1.0 1.0 1.0 1.0 1.0 1.0 -1.0 1.0
1.0 1.0 -1.0 1.0 -1.0 1.0 1.0 1.0 1.0 1.0 1.0 -1.0 1.0
• Delivered
75
SetID Analysis Group
Description Grouping Analysis Group Options
Analysis Type
Analysis Type Map
Quantity Amount Multiplier
Comments
NORTH PSLMT Limit Processing
Grouping Multiplication BAJ BLD BRT DSC RAJ RRT SUT
1.0 1.0 -1.0 -1.0 1.0 1.0 1.0
1.0 1.0 -1.0 -1.0 1.0 1.0 1.0
• Delivered
NORTH PSREV System Revenue
Grouping Multiplication BIL BLD DSC FRV REV UAJ UTL WTO
1.0 1.0 -1.0 1.0 1.0 1.0 -1.0 -1.0
1.0 1.0 -1.0 1.0 1.0 1.0 -1.0 -1.0
• Delivered
NORTH PSWKS Billing Worksheet Grouping
Grouping Mapping Multiplication
BIL BRT DEF OLT
BIL RRT BIL BIL
1.0 1.0 1.0 1.0
1.0 1.0 1.0 1.0
• Delivered
NORTH RETIR PC to AM Retirement Costs
Grouping Mapping Multiplication
CLS RET
RET RET
-1.0 -1.0
-1.0 -1.0
• Delivered
NORTH UBLD Unbilled Transactions
Grouping Multiplication BIL BRT DEF OLT RRT
1.0 1.0 1.0 1.0 -1.0
1.0 1.0 1.0 1.0 -1.0
• Delivered
NORTH VARY Variance Grouping Mapping Multiplication Reporting
ACT BUD CBA COM EMP
VAR VAR VAR VAR VAR
1.0 -1.0 -1.0 1.0 1.0
1.0 -1.0 -1.0 1.0 1.0
• Delivered

76
The following analysis groups are necessary in order for certain project analyses and mass changes delivered with PeopleSoft Projects to function properly. If you have chosen not to use the analysis types delivered with Projects you will have to customize these analysis groups or create new ones to be used with these features. Analysis Group Type Description BIL Grouping Worksheet to Interface BI BLD Grouping Worksheet to PROJ_RESOURCE BUD Grouping Budgets CLOSE Analysis Projects to Asset Management Asset Summary FOR2C Analysis Forecast Cost at Completion OPENC Analysis Open Commitment Balance PCADJ Mapping Projects to Asset Management Profile Adjustment POADJ Grouping Purchasing Adjustments PRECL Analysis Projects to Asset Management Profile Summary RETIR Mapping Projects to Asset Management Retirement Costs VARY Analysis Variance WKS Analysis Billing Worksheet Grouping

77
ENTER DETAILED DESRIPTIONS FOR ANALYSIS GROUPS The Analysis Group Detail panel provides a place to enter additional details regarding the analysis groups you create. This is a good place to put a description of what the analysis group you have created should be used for, and if you are creating analysis groups for analyzing project costs, you should enter the equation that you are creating. For example, Budgets - Actuals = Budget to Actual Variance. This panel will not be populated during configuration.

78
Panel Field Panel Field Description • SetID • Analysis Group • Description • Long Description
• Enter a SetId for which the analysis group is being created • Enter the name of the Analysis Group • Enter a short Description for the analysis group • Enter a detailed Description for the analysis group
SetID Analysis Group Descriptions Long Description

79
2.4.3 DEFINE RESOURCE TYPES Resources are the heart and soul of your Projects system. They enable you to track, analyze, and report on all costs, both actual and planned, in your projects. Resource types are assigned to individual resources to identify what individual transactions are for. Your resource types may be as general or as specific as you like depending on your needs. For example, you can create a resource type of labor to track total labor costs in your projects, or you can create resource types of overtime labor and standard labor to track overtime and standard labor separately. Resource Categories and Resource Subcategories enable you to identify your resources at a very granular level. Therefore, you may want to create resource types that are more general. On the other hand, Resource Groups enable you to define your resource types very specifically and then group them together for reporting and analysis. Thoroughly map out your needs using Resource Types, Resource Categories, Resource Subcategories, and Resource Groups before actually creating them.
Path: Setup Financials/Supply Chain > Product Related > Projects > Resources > Resource Types > Add a New Value

80
Panel Field Panel Field Description • SetID
• Enter the SetID for which the resource type is being created

81
• Resource Type • Effective Date • Status • Description
• Enter the name of the resource type • Enter an Effective Date for the resource type • Select a Status for each resource type. The status
determines whether or not a resource type is available to be used.
• Enter a Description for each resource type you create

82
The following resource types are necessary in order for the resource groups, reports, and mass changes delivered with Projects to function properly. If you chose not to implement these resource types you must customize these features. SetID Resource Type Effective
Date Status Description Comments
NORTH MATER 01/01/1967 Active Materials Delivered NORTH LABOR 01/01/1967 Active Labor Delivered

83
2.4.4 DEFINE RESOURCE CATEGORIES Resource Categories and Resource Subcategories provide you with additional levels at which to define and track your resources. For example, you may have a general resource type of LABOR, but you want to track that labor more specifically. By creating resource categories you can track different types of labor such as architect labor, carpenter labor, plumber labor, and electrician labor. You could then create resource subcategories of standard labor and overtime labor. Using the resource types, resource categories, and resource subcategories in this example you could easily calculate total labor costs for a project, total overtime hours, architect overtime hours, or carpenter standard hours. Resource categories and resource subcategories are optional. How you identify your resources has a direct effect on how your transactions can be broken down for tracking and reporting purposes.
Path: Setup Financials/Supply Chain > Product Related > Projects > Resources > Resource Categories > Add a New Value

84
Panel Field Panel Field Description
• SetID • Resource Category • Effective Date • Status • Description
• Enter the SetID for which the resource category is being created • Enter the name of the resource category • Enter an Effective Date for the resource category • Select a Status for each resource category. The status determines whether or not a resource
category is available to be used. • Enter a Description for each resource category you create

85
SetID Resource
Category Effective Date
Status Description Comments
NORTH ORIGL 01/01/1967 Active Initial Order NORTH ENGR 01/01/1967 Active Engineering error NORTH CUST 01/01/1967 Active Customer error NORTH PRMGT 01/01/1967 Active Project Management error NORTH FPRMG 01/01/1967 Active Field Project Management
error
NORTH DC 01/01/1967 Active DC error NORTH AWT 01/01/1967 Active AWT error NORTH VEND 01/01/1967 Active vendor error NORTH CARR 01/01/1967 Active carrier lost NORTH CTRPO 01/01/1967 Active contractor PO order NORTH INVLN 01/01/1967 Active invoicing line order NORTH SCOPE 01/01/1967 Active scope of work change

86
2.4.5 DEFINE RESOURCE SUB-CATEGORIES Resource Categories and Resource Subcategories provide you with additional levels at which to define and track your resources. For example, you may have a general resource type of LABOR, but you want to track that labor more specifically. By creating resource categories you can track different types of labor such as architect labor, carpenter labor, plumber labor, and electrician labor. You could then create resource subcategories of standard labor and overtime labor. Using the resource types, resource categories, and resource subcategories in this example you could easily calculate total labor costs for a project, total overtime hours, architect overtime hours, or carpenter standard hours. Resource categories and resource subcategories are optional. How you identify your resources has a direct effect on how your transactions can be broken down for tracking and reporting purposes. We recommend that you thoroughly map out your needs using resource types, categories, and subcategories before actually creating them. Time Warner Cable will not be utilizing Resource Sub-Categories.
Path: Setup Financials/Supply Chain > Product Related > Projects > Resources > Resource SubCategories > Add a New Value

87
Panel Field Panel Field Description • SetID • Resource SubCategory • Effective Date • Status • Description
• Enter the SetID for which the resource subcategory is being created • Enter the name of the resource subcategory • Enter an Effective Date for the resource subcategory • Select a Status for each resource subcategory. The status determines whether or
not a resource subcategory is available to be used. • Enter a Description for each resource subcategory you create

88
2.4.6 DEFINE RESOURCE GROUPS Resource groups enable you to combine multiple resource types for project analysis and billing.
Path: Setup Financials/Supply Chain > Product Related > Projects > Resources > Resource Groups > Add a New Value

89
Panel Field Panel Field Description
• SetID • Resource Group • Description • Flexible Rate • Resource Type
• Enter the SetID for which the resource group is being created • Enter the name of the resource group being created • Enter a description for the resource group being created • Enter a Flexible Rate. The Flexible Rate enables you to create a special project view for
multiplying all of the resource types in this resource group by a specific rate. For example, if you need to mark up all materials used in a project by 1.5, you could create a resource group of MATER, enter a flex rate of 1.5, and reference the resource group and resource tables together when creating a project view or process.
• Enter the Resource Types that you want to group together.

90
The following resource groups are required by PeopleSoft in order for certain project analyses and processes delivered with Projects to function properly. If you have chosen not to use the resource types delivered with Projects you will have to customize these resource groups or create new ones to be used with these features. Items – Inventory Items Labor – Total Labor Mater – Total Materials Notes The above resource groups were not delivered. SetID Resource
Group Description Flexible Rate Resource Type Comments
NORTH ITEMS Inventory Items 1.0 MATER • Delivered NORTH LABOR Total Labor 1.0 LABOR • Delivered NORTH MATER Total Material 1.0 MATER • Delivered

91
ENTER RESOURCE GROUP DETAIL Detailed description information for analysis groups can also be entered in PeopleSoft

92
Panel Field Panel Field Description • SetID • Resource Group • Description • Flexible Rate • Description
• Enter the SetID for which the resource group is being created • Enter the name of the resource group being created • Enter a short description for the resource group being created • Enter a Flexible Rate. The Flexible Rate enables you to create a special project view for
multiplying all of the resource types in this resource group by a specific rate. For example, if you need to mark up all materials used in a project by 1.5, you could create a resource group of MATER, enter a flex rate of 1.5, and reference the resource group and resource tables together when creating a project view or process.
• Enter a detailed description for the resource group being created. Use the Description field to enter a definition or note regarding the resource groups you have created. This is a good place to put a description of what the resource group you have created should be used for.
SetID Resource
Group Description Flexible Rate Description Comments
NORTH ITEMS Inventory Items 1.0 • Delivered NORTH LABOR Total Labor 1.0 • Delivered NORTH MATER Total Material 1.0 • Delivered

93
2.4.7 RELATE RESOURCE TYPES TO RESOURCE CATEGORIES PeopleSoft Projects enables you to define relationships between the resource type and resource category fields to control data entry and limit errors. The relationships can be one to one or one to many. For example, you can relate multiple resource categories to a single resource type or a single resource category to a single resource type. Based on the values and use of Resource Type and Resource Category, Time Warner Cable will not relate the fields.
Path: Setup Financials/Supply Chain > Product Related > Projects > Resources > Relate Type/Category

94
Panel Field Panel Field Description Panel Shot • SetID • Resource Type • Category • Description
• Enter the SetID of the Resource Type • Enter the resource type for which relationships are
being defined • Enter a Resource Category that you want to relate
to the resource type shown. • Enter a description of the type/category
relationship you have just defined.

95
2.4.8 RELATE RESOURCE CATEGORIES TO RESOURCE SUB-CATEGORIES PeopleSoft Projects enables you to define relationships between these resource categories and subcategories to control data entry and limit errors. The relationships can be one to one or one to many. For example, you can relate multiple resource subcategories to a single resource category or a single resource subcategory to a single resource category. This functionality not needed for Time Warner Cable configuration.
Path: Setup Financials/Supply Chain > Product Related > Projects > Resources > Relate Category/Subcategory

96
Panel Field Panel Field Description
• SetID • Resource Category • SubCategory • Relationship Description
• Enter the SetId of the Resource Category • Enter the resource category for which relationships are being defined • Enter a Resource SubCategory that you want to relate to the resource category shown. • Enter a description of the category /subcategory relationship you have just defined.

97
2.5 General Options 2.5.1 Accounting Rules Access the Accounting Rules page.
Note. If the Use Organization is checked on the Projects Installation page, the project's GL Business Unit field appears underneath the PC Business Unit field.
Accounting Rules page
In the top section, define the criteria for an incoming transaction to follow these rules.
Resource GL Bus Unit General Ledger business unit that owns the human resource. This field cannot be left as a wildcard.
Journal Template Specify which journal template to attach to accounting entries when they are sent to the general ledger system. This field is required. For revenue-generating accounting rules controlled by PeopleSoft Contracts, the CA_PC journal template is recommended.
Ledger Group (optional) If left blank, the default Ledger Group of the general ledger business unit is used.
Copy Accounting Entries To...
Click to copy the Accounting Entries specified in the Accounting Entries group box for use with another set of header criteria.
See Also
PeopleSoft General Ledger PeopleBook, "Defining Your Operational Structure" Defining General Ledger Business Units
Inter-Organizational Level
This group box is used for setting up accounting rules for Transorganizational or Organizational-Sharing and is enabled by checking the Use Organization box on the Installation Options - Projects page. If defining accounting rules for straight accounting, leave the Use Organization box clear and ignore this section.
Use the Inter-Organizational Level section to further define accounting entries to be created.
For example, if the organization is defined to include GL Business Unit, Operating Unit, and Department in that order, the following options are available for selection:
98
Level 1 Inter-business unit. Accounting entries specified under this inter-organizational level are used when an employee is in a different general ledger unit than the project's general ledger unit.
Level 2 Inter-operating unit. Accounting entries specified under this inter-organizational level are used when an employee from one operating unit works on a project owned by another operating unit belonging to the same general ledger unit.
Level 3 Inter-department. Accounting entries specified under this inter-organizational level are used when an employee from one department works in another department and both the general ledger unit and operating unit are the same.
DFLT Default. Used when the human resource (employee or consultant) and project organizations are the same or when organizational levels do not need to be distinguished from one another. After analyzing the relationship between the project organization and the resource organization, the Accounting Rules Engine looks for a rule established for that relationship. If none exists, it uses the Default rule. If no default exists, no accounting entry lines are generated.
For example, when an employee working in another department within the same general ledger unit submits an expense transaction, the system checks to see if there is an accounting rule at the inter-department level. If no rule exists, the system checks to see if there is a default rule. It is recommended that a default accounting rule always be in place for inter-organizational level accounting entries.
See Also
Accounting Entries
Define the accounting debits and credits to create for the specified source transaction. There must be an equal number of debits and credits. When defining Accounting Rules for billable activity, one Unbilled Accounts Receivable (UAR) accounting distribution must be specified. This accounting distribution is stamped on the row when it is sent to PeopleSoft Billing. If no UAR is established, the row is not sent to the billing system.
During the Accounting Rules Engine process, all transactions are converted to currency based on the general ledger.
Entries are specified as follows:
Seq# (sequence number) The sequence in which these accounting lines are applied. The sequence number groups the DR/CR together and is used to determine whether InterUnit entries should be created. Note. Do not specify InterUnit entries on the Accounting Rules page Because it will result in double entries.
DR/CR (debit/credit) Designates whether this accounting line is a debit or credit.
Acct Type (account type) Select the type of accounting entry from the list of available options. UAR will be sent to Billing.
BI Unit (billing unit) This field appears only if the account type is UAR. Note: The selected Billing Business Unit must point to the GL unit used in the accounting entry, either the resource GL Unit or

99
Project GL Unit. This edit ensures that your receivables accounting entries are booked to the same General Ledger Business Unit as your unbilled receivables account.
Note. Prepaid Utilization rows—rows with an Analysis Type of UTL and UAJ—are not handled in the Accounting Rules setup. UTLs are generated by PeopleSoft Contracts and sent to the Billing Engine when a prepayment is utilized. PeopleSoft Billing generates UAJs. The accounting for utilization rows are handled separately by the Accounting Rules Engine. Deferred revenue is debited from the Prepaid Accounting setup and UAR is credited. The UAR is populated on the UTL and UAJ rows from the BIL rows that are sent to the billing system.
Note. Retainage (RRT, BRT), Deferrals (DEF) and Over the Limit (OLT) rows must be set up for these types of processing. These rows are not accounted for in the Accounting Rules Engine, but they require a UAR accounting distribution in order to be sent to PeopleSoft Billing.
2.5.2 Asset Profile
Asset Level Defaults
Asset Class Type of assets covered by this profile.
Acquisition Code Tracks how the asset was acquired.
Taggable

100
Capitalized Asset Check to indicate whether this profile is used for assets that are associated with cost and depreciation. Most assets in an asset management system are capitalized assets.
Taggable Asset Check if an asset is taggable. Most physical assets are assigned a numbered tag for tracking purposes. Some assets, such as buildings or leasehold improvements, are not tagged.

101
2.5.3 Budget Items Project managers can create budgets for their projects and perform budget-to-cost variance analysis over defined time spans. Creating a budget for a project is a four-step process:
1. Define budget items on the Budget Items page. Budget items provide a way of placing resource transactions into groups to be used when reviewing a project activity's budget-to-cost variance for a given period.
2. Create budget plans on the Project Budgets page. Use this page to enter budget scenarios for the project. This page provides high level definitions, in terms of time and total budget, of each project budget being considered.
3. Define each budget plan on the Budget Detail page. This page is used to define a specified project budget at a greater level of detail using the budget items created earlier.
4. Finalize a budget by choosing a single budget plan. This initiates the process of sending budget data from the plan to the PROJ_RESOURCE table
Personalize Click to open the Personalize Column and Sort Order page. The Personalize Column and Sort Order page is used to specify the
criteria and order in which each will appear on the Budget Items page.
Budget Items Each budget item must have a unique ID.

102
More than one budget plan can be created for a project on the Project Budgets page.
Plan ID Identifies a budget plan for a given project. Once the plan is saved, this field is display only.
Period The budget period identifies the interval in which the budget plan will be tracked.
Num Period Defines the number of periods for the budget plan. The maximum allowed is 52, regardless of the value in the Period field.
Status Plan status is a display only field and defaults to Inactive. The plan status is changed to Active when the finalization process is completed successfully. Only one budget plan may be active at any given time. If the user changes a budget plan after it has been finalized, the user must press the Re-Finalize button to send updated information to PROJ_RESOURCE. If the user presses Save instead of Re-Finalize, the status of the budget plan will be changed to Modified. This indicates that the budget plan has been modified and is no longer in sync with PROJ_RESOURCE information. In such cases, the budget plan should be re-finalized.
An Type Analysis type used when writing rows to PROJ_RESOURCE during the finalization process.
Detail Link to the Budget Detail page for the given plan.
Finalize/Re-Finalize Saves the data and initiates the finalization process for a completed budget plan.
Delete Only inactive plans may be deleted. When a plan is deleted, all corresponding budget detail data for the plan is also deleted.
Return to Project Summary Link to the Project Summary page. Only displayed if this page was accessed from the Project Summary page.

103
Defining a Budget Plan
Access the Budget Detail page. Select an Activity ID and click Modify Budget to view budgeted amounts for an activity according to budget items and time periods.
Activity General Link to the Activity General search page for the project. There the user can view or create an activity on the Activity Details page.
Budget Items link Click to create a new budget item on the Budget Items page.
Finalize / Re-Finalize Finalize the plan without returning to the Project Budgets page. If the budget plan is already active, the button will read Re-Finalize. Click Re-Finalize after making changes to an active budget.
Activity ID The activity associated with the project for which the budget amounts can be modified.

104
Modify Budget Loads existing budget amounts for the activity specified. The user can enter additional amounts and/or modify the existing ones. Budget amounts can only be added for one activity at a time.
Periods Click the appropriate link to display data for that particular time period range.
Budget Item Enter a budget item and corresponding amounts. Each activity's budget items must have a unique name and definition from other budget items belonging to the same activity. Within a single project budget plan, there cannot be two budget items with different names but identical definitions across activities.
Item Total Displays the budget item totals for all periods, not just those that are displayed.
Clear Click to clear the Budget Amounts, the amounts will not be saved unless Save was clicked first. To add or modify budget amounts for another activity, click Save to save the current Budget Amounts, click Clear, and enter the activity ID to display the budget amounts to be changed.
Copy Opens the Copy Budget Items secondary page to allow copying a budget item from any previously saved Budget Detail page.
Copying Budget Items
On the Copy Budget Items page, select the business unit, project, budget plan, and activity for the budget items that will be copied to the current budget plan. Check Copy Budget Amounts to copy amounts along with the budget items.
The following restrictions apply when copying budget items:
• The currency and the number of budget periods of the plan being copied must be the same as the current plan before amounts can be copied.
• A budget item (and its corresponding amounts, if applicable) will not be copied if an item with the same name or definition has already been specified for the current activity.
• Identically defined budget items must have the same name across all activities in the same budget plan. If not, the budget item may be renamed when copied from one budget plan to another.
Finalizing a Budget Plan
On the Budget Detail page, click Finalize to finalize a project's budget plan. The finalization process sets the budget plan's status to Active. All other plans for the same project are Inactive. Only one budget plan may be finalized per project, although that plan may be re-finalized if any changes are made to it.
Period start and end dates are defined for the plan that is being finalized. These dates are maintained in the PC_BUD_CAL table. The purpose of this calendar is to report budgets versus costs by period. The Start Date of the first period will always be the budget start date.
Re-Finalization

105
If the user saves a budget plan without pressing the Re-Finalize button, budget information is no longer synchronized with the PROJ_RESOURCE rows, and the plan status is changed to Modified, indicating that the budget plan was changed and not re-finalized.
If the analysis type is changed and the budget plan is re-finalized, PROJ_RESOURCE rows from the previous finalization process are not deleted. The updated budget data is written to PROJ_RESOURCE with the new analysis type. This allows the user to perform budget versus cost variance analysis for different budget plans as long as the analysis types are in different budget analysis groups. The user can run the Project Delete utility to delete any obsolete PROJ_RESOURCE rows.
Run a Budget-to-Cost Variance by Period report (PCY1050-.RPT) to perform budget versus cost analysis.
See Also
2.5.4 Interest Types Interest during construction—Allowance for Funds Used During Construction (AFUDC)—is calculated to capitalize the cost of company funds used over the course of a project. Interest is calculated based on the following formula:
Interest During Construction = Cost Accumulation* x Periodic Interest**
* Accumulated costs based on a specified method of accumulation
** Yearly interest rate divided by the number of periods in the fiscal year
2.5.5 Period Calculation Factors Access the Period Calculation Factor page.
From Date and Through Date Costs incurred during this period are used for calculating interest.
Period Factor Determines percentage of the costs incurred during the specified date range that are used in the interest calculation—usually 100% (1.0).

106
2.5.6 Security Profile Security Profile The project role for which the security profile is associated.
Access to Project and Access to Activity
Select an access type: No Access, Read Only, or Read/Write.
Analysis Group Select an analysis group to grant the security profile access to resource transactions with analysis types that belong to the analysis group. More than one analysis group can be assigned to a profile. Granting access to resource transactions automatically permits read and write permissions and the ability to add and delete rows, unless the analysis type is defined as a secured analysis type.
Secured Analysis Types
Use the Project Resources page to view, add, and update the resource transactions of an activity. You can place limits on the resource transactions that a user can update by setting up secured analysis types. If an analysis type is secured, the resource rows of that analysis type appear as read-only rows on the Project Resources page. Users are also prevented from adding or deleting a resource row that belongs to a secured analysis type.
Use the Installation Options - Projects page to secure analysis types.

107

108
2.5.7 DEFINE TRANSACTION CODES Transaction codes are optional. You can use transaction codes to deal with exceptions and specific cases without creating a specific transaction type for each individual case. You can add transaction codes to resource transactions as an additional key and then set up separate accounting entry templates for resource transactions containing those transaction codes. The accounting entry templates for those resource transactions can then use the same transaction types but specify different accounts. For example, you could use transaction codes to identify costs specifically for month end or year end processing. Transaction codes are optional.
Path: Setup Financials/Supply Chain > Product Related > Projects > General Options > Trans Codes > Add a New Value
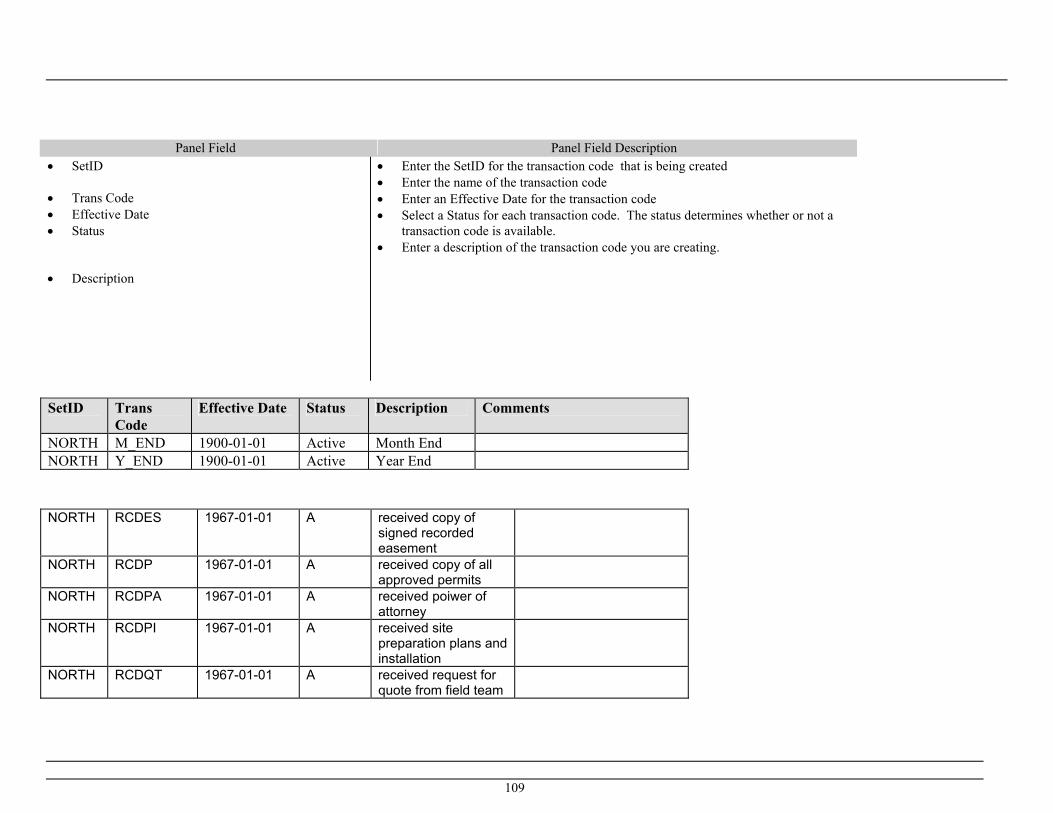
109
Panel Field Panel Field Description • SetID • Trans Code • Effective Date • Status • Description
• Enter the SetID for the transaction code that is being created • Enter the name of the transaction code • Enter an Effective Date for the transaction code • Select a Status for each transaction code. The status determines whether or not a
transaction code is available. • Enter a description of the transaction code you are creating.
SetID Trans
Code Effective Date Status Description Comments
NORTH M_END 1900-01-01 Active Month End NORTH Y_END 1900-01-01 Active Year End
NORTH RCDES 1967-01-01 A received copy of
signed recorded easement
NORTH RCDP 1967-01-01 A received copy of all approved permits
NORTH RCDPA 1967-01-01 A received poiwer of attorney
NORTH RCDPI 1967-01-01 A received site preparation plans and installation
NORTH RCDQT 1967-01-01 A received request for quote from field team

110
NORTH RSTST 1967-01-01 A restored site to meet easement and government
NORTH RUNFJ 1967-01-01 A run fiber jumpers as required
NORTH RVDLC 1967-01-01 A cso review and acceptance of delivered edlc
NORTH SLCON 1967-01-01 A sealed cable entrance conduits
NORTH SPDLC 1967-01-01 A supplied express dlc pad
NORTH SPLNT 1967-01-01 A splicing groups marked, neat and tied
NORTH STDLC 1967-01-01 A set express dlc NORTH TSCHR 1967-01-01 A tested charging
function of rectifier
NORTH TSCOT 1967-01-01 A performed continuity test from FDI
NORTH TSPWR 1967-01-01 A tested proper operation of power transfer
NORTH TSSLF 1967-01-01 A turned up power shelf per supplier documentation
NORTH TSTAL 1967-01-01 A performed alarm tests

111
2.5.8 DEFINE TRANSACTION TYPES Accounting entry templates are the tools you use to translate resource transactions into entries ready to be sent to your general ledger. Transaction types are the building blocks of accounting entry templates. In this table you name and define generic transactions that you will then use in your accounting entry templates. As part of the process of defining your accounting entry templates, you'll specify a transaction type. The transaction lines you've created for that transaction type are then transferred into the accounting entry template where you assign each transaction line a specific general ledger account. Defining your transaction types in a separate table saves time when it comes to creating your accounting entry templates and reduces errors. Standard transactions are transactions that involve moving money from one account to another within the same general ledger business unit. Intercompany transactions are transactions that involve moving money from an account in one general ledger business unit to an account in another general ledger business unit; additional transaction lines are required for intercompany transactions.
Path: Set Up Financials/Supply Chain > Product Related > Projects > General Options > Transaction Types > Add a New Value
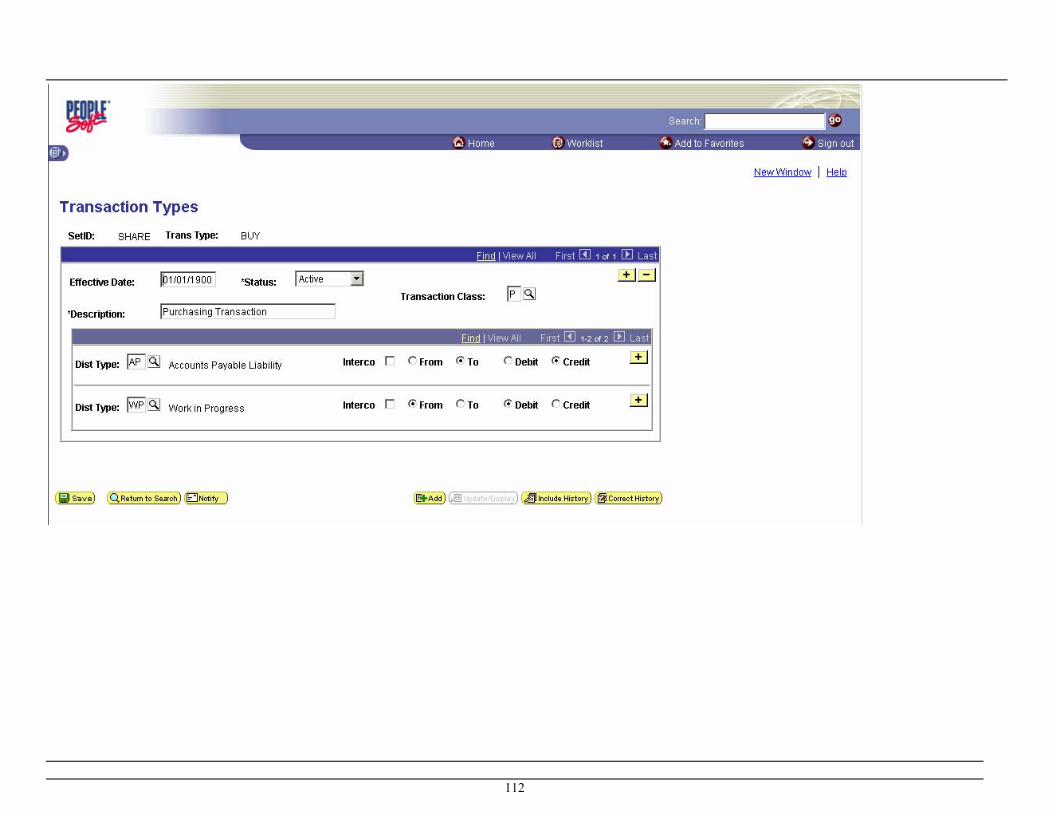
112
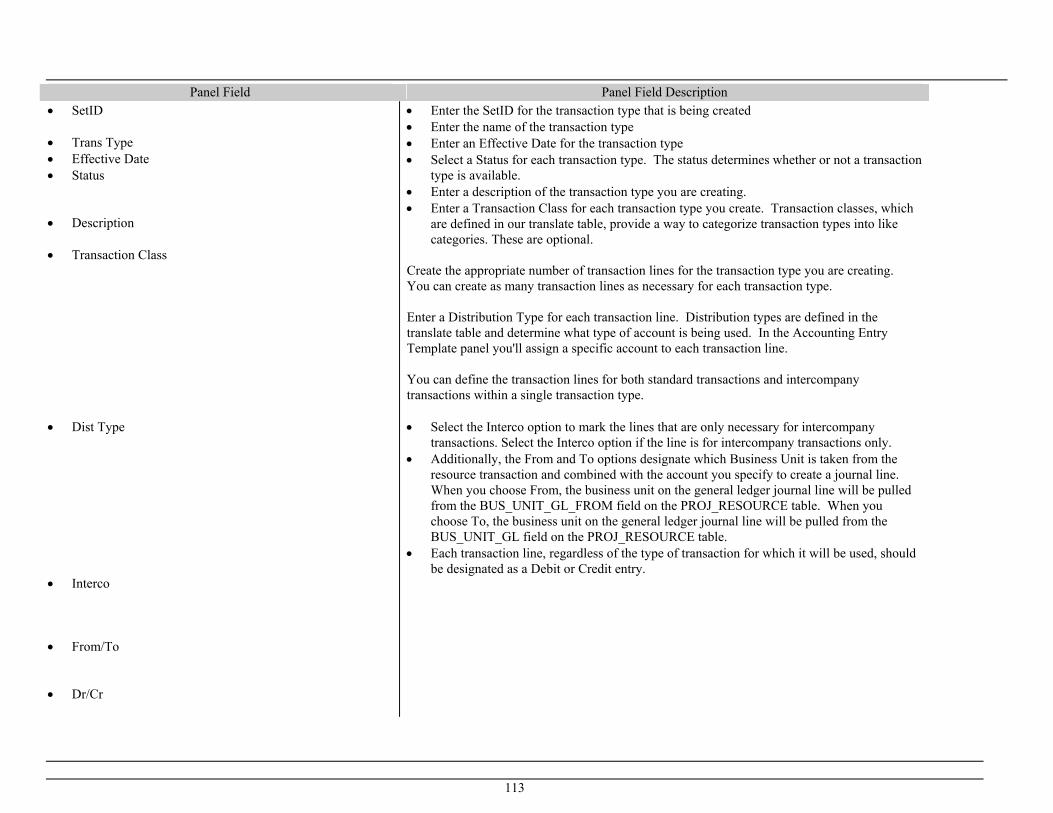
113
Panel Field Panel Field Description • SetID • Trans Type • Effective Date • Status • Description • Transaction Class • Dist Type • Interco • From/To • Dr/Cr
• Enter the SetID for the transaction type that is being created • Enter the name of the transaction type • Enter an Effective Date for the transaction type • Select a Status for each transaction type. The status determines whether or not a transaction
type is available. • Enter a description of the transaction type you are creating. • Enter a Transaction Class for each transaction type you create. Transaction classes, which
are defined in our translate table, provide a way to categorize transaction types into like categories. These are optional.
Create the appropriate number of transaction lines for the transaction type you are creating. You can create as many transaction lines as necessary for each transaction type. Enter a Distribution Type for each transaction line. Distribution types are defined in the translate table and determine what type of account is being used. In the Accounting Entry Template panel you'll assign a specific account to each transaction line. You can define the transaction lines for both standard transactions and intercompany transactions within a single transaction type. • Select the Interco option to mark the lines that are only necessary for intercompany
transactions. Select the Interco option if the line is for intercompany transactions only. • Additionally, the From and To options designate which Business Unit is taken from the
resource transaction and combined with the account you specify to create a journal line. When you choose From, the business unit on the general ledger journal line will be pulled from the BUS_UNIT_GL_FROM field on the PROJ_RESOURCE table. When you choose To, the business unit on the general ledger journal line will be pulled from the BUS_UNIT_GL field on the PROJ_RESOURCE table.
• Each transaction line, regardless of the type of transaction for which it will be used, should be designated as a Debit or Credit entry.
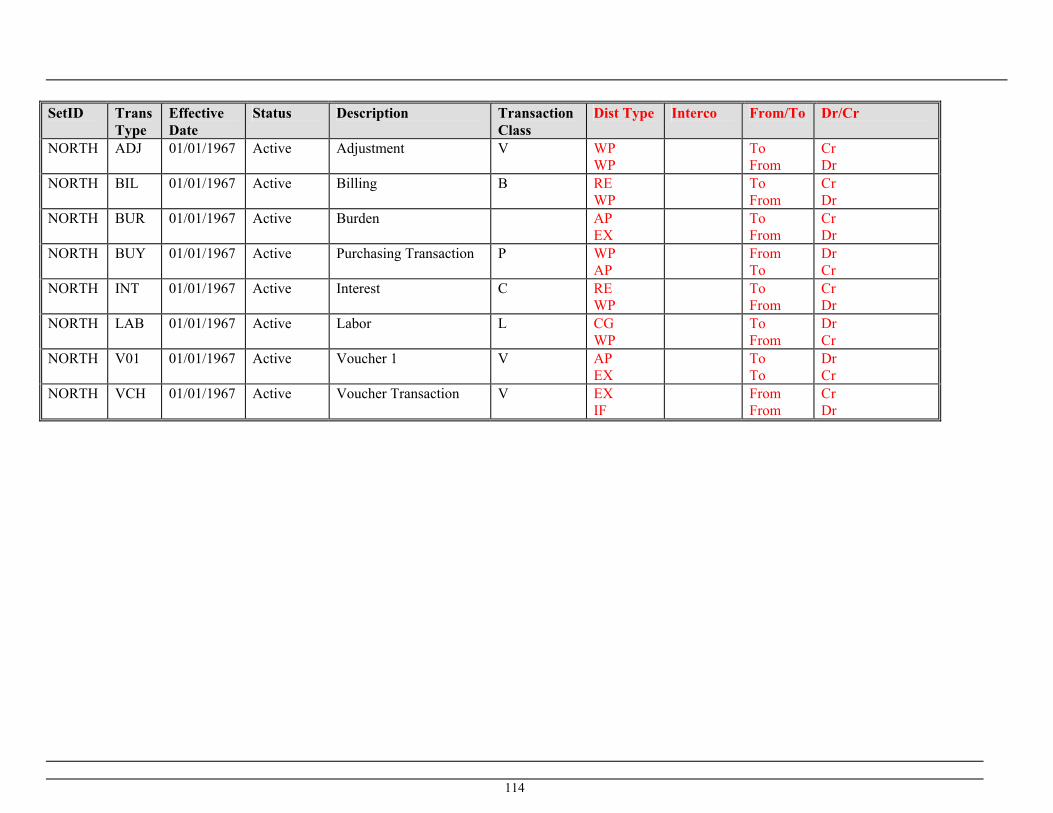
114
SetID Trans
Type Effective Date
Status Description Transaction Class
Dist Type Interco From/To Dr/Cr
NORTH ADJ 01/01/1967 Active Adjustment V WP WP
To From
Cr Dr
NORTH BIL 01/01/1967 Active Billing B RE WP
To From
Cr Dr
NORTH BUR 01/01/1967 Active Burden AP EX
To From
Cr Dr
NORTH BUY 01/01/1967 Active Purchasing Transaction P WP AP
From To
Dr Cr
NORTH INT 01/01/1967 Active Interest C RE WP
To From
Cr Dr
NORTH LAB 01/01/1967 Active Labor L CG WP
To From
Dr Cr
NORTH V01 01/01/1967 Active Voucher 1 V AP EX
To To
Dr Cr
NORTH VCH 01/01/1967 Active Voucher Transaction V EX IF
From From
Cr Dr

115
2.6 Define Other Options
2.6.1 DEFINE SECURITY OPTIONS From the Security Options page you can implement security for your projects system. There are three types of security available: none, User ID level, or Permission List Level security. Any level of security definition will implement system-wide security. When security is not implemented all components are accessible, project prompts show all projects, and analysis group prompts show all analysis groups available. Path: Set Up Financials/Supply Chain > Security > Security Options

116
Panel Field Panel Field Description • Type of Security • Secured fields
• Enter level of security to apply • Enter the name of the Analysis Group
Type of Security Secured Field Permission List Level Project Use List

117
2.6.2 DEFINE TABLE-SET RECORD GROUP CONTROL
Path: PeopleTools > Utilities > Administration > TableSet Control > Add a New Value

118
Panel Field Panel Field Description
• Set Control Value • Default SetID • SetID
• Enter the Set Control Value • Enter the default SetID • For each record group ID, select the appropriate SetID

119
Set Control Value
Default SetID
Record Group ID
SetID Definition SetID Short Description Comments
NORTH NORTH FS_08 NORTH Projects NORTH · Project record, Activity record NORTH NORTH PC_01 NORTH Accounting Driver Tables NORTH · Analysis Type, Analysis Group, Event,
Project Source, Status, Transaction Code, Transaction Type tables
NORTH NORTH PC_02 NORTH Project Types NORTH NORTH NORTH PC_03 NORTH Activity Types NORTH NORTH NORTH PC_04 NORTH Flexible Formula Group NORTH · Flexible Formula Class Type, Object,
Variable tables
NORTH NORTH PC_05 NORTH Project TimeSpans NORTH NORTH NORTH PC_06 NORTH Project Milestones NORTH · Milestone Code, Milestone Type tables NORTH NORTH PC_07 NORTH Project Employee Job Code NORTH NORTH NORTH PC_08 NORTH Project Work Order Types NORTH NORTH NORTH PC_09 NORTH Project Contracts NORTH · This is the Project Customer View only NORTH NORTH PC_10 NORTH Work Breakdown Structure NORTH NORTH NORTH PC_11 NORTH Project Quality NORTH NORTH NORTH PC_12 NORTH Project Report Tables NORTH NORTH NORTH PC_13 NORTH Project Interest NORTH · Interest Type table NORTH NORTH PC_14 NORTH Project Phases NORTH NORTH NORTH PC_15 NORTH Project Contract Line Type NORTH NORTH NORTH PC_16 NORTH Resources NORTH · Resource Type, Category,
Subcategory,Group, Type/Cat, Cat/Sub NORTH NORTH PC_17 NORTH Integration Templates NORTH · Distribution Template, Distribution Line
Template, Integration Template, Integration Template GL tables
NORTH NORTH PC_18 NORTH Projects Security NORTH

120
2.6.3 DEFINE JOURNAL GENERATOR TEMPLATES The first step in setting up PeopleSoft to generate journal entries for your general ledger is to define a journal source. The system uses the journal source as an identifier on the journal header line. You use the Journal Source ID when you set up journal templates and journal summarization options.
Path: General Ledger > Journals > Subsystem Journals > Journal Generator Template > Add a New Value
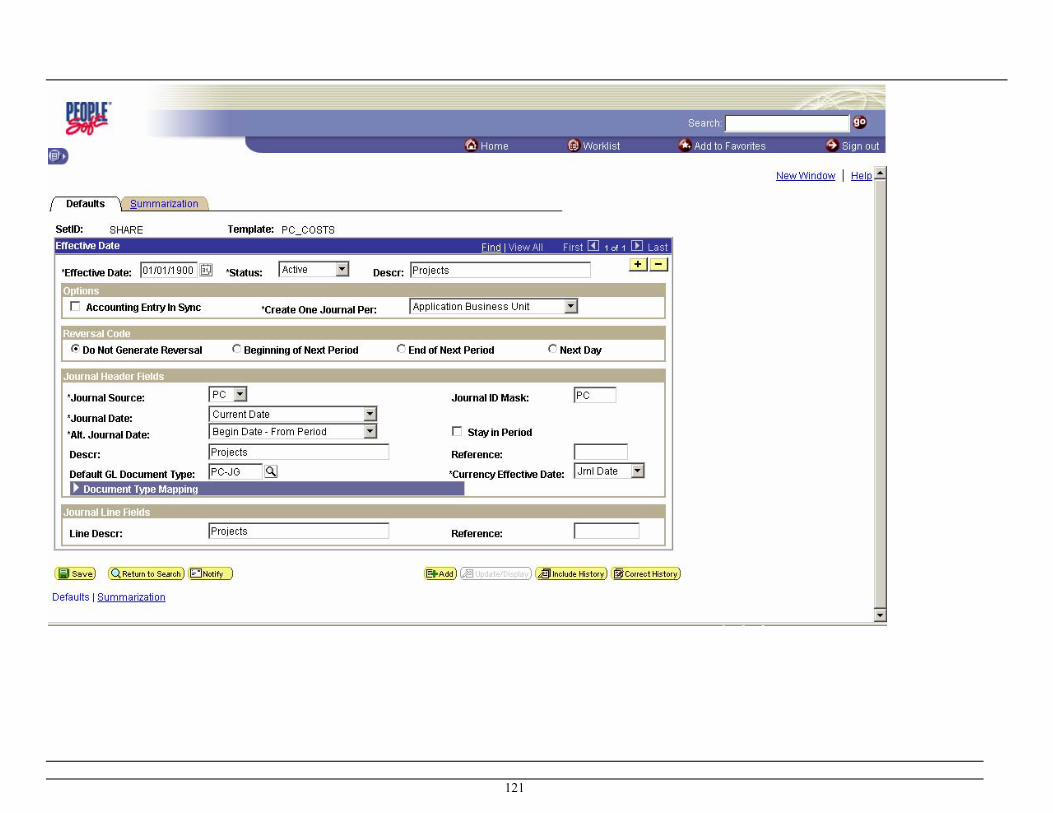
121

122
Panel Field Panel Field Description
• SetId • Template • Effective Date • Status
• Enter the SetID for the template that is being created • Enter the name of the template • Enter an Effective Date for the template • Select a Status for each template. The status determines whether or not a transaction type
is available.

123
Defaults SetID Journal
Template Description
NORTH PC_COSTS Projects NORTH PC_ADJUST Project Adjustments Effective Date / Options Journal Template
Effective Date
Status Accounting Entry in Sync
Create one Journal Per
PC_COSTS 01/01/1900 Active Yes Application Business Unit PC_ADJUST 01/01/1900 Active Yes Application Business Unit Reversal Code Reversal Code Do Not Generate Reversal Journal Header Fields Journal Template
Journal ID Mask
Source Journal Date Atl. Journal Date
Descr Stay in Period
Currency Effective Date
Reference
PC_COSTS PC PC Accounting Date on Transaction
Begin Date - From Period
Projects Yes Jrnl Date
PC_ADJUST PCA PC Accounting Date on Transaction
Begin Date - From Period
Project Adjustments
Yes Jrnl Date
Journal Line Fields Reference Line Descr Summarization Journal Template How Specified Option How Account Specified PC_COSTS Summarize to ChartField Level All Account Values PC_ADJUST Summarize to ChartField Level All Account Values

124
2.6.4 DEFINE ACCOUNTING ENTRY DEFINITION The Journal Generator can create journals in the general ledger for any PeopleSoft or non-PeopleSoft application. It uses accounting entry definitions to identify accounting entry layouts—specifically, it uses the record and field names to extract data from the Accounting Entry Table for creating the journal header and lines.
Path: General Ledger > Journals > Subsystem Journals > Accounting Entry Definition

125

126
Panel Field Panel Field Description
• SetId • Accounting Definition Name • Description
• Enter the SetID for the Accounting Entry Definition Name that is being created • Enter the Accounting Entry Definition Name • Enter a description for the Accounting Entry Definition Name

127
SetID Acctg
Definition Name
Description Accounting Entry Record
Accounting Entry Record Update
NORTH PCDEFN Projects Definition PC_DIST_LN PC_DIST_LN Acctg Definition Name
Monetary Amount Foreign Amount Statistical Amount Journal Ref Journal Descr Open Item Key
PCDEFN RESOURCE_AMOUNT FOREIGN_AMOUNT JRNL_LN_REF LINE_DESCR Acctg Definition Name System Source Cross Product Drill Down Panel Name PCDEFN JrnlGen-PC Yes PC_DIST_DRILL Acctg Definition Name Field Name Chartfield PCDEFN ACCOUNT
ALTACCT OPERATING_UNIT DEPTID PRODUCT PROJECT_ID AFFILIATE
ACCOUNT ALTACCT OPERATING_UNIT DEPTID PRODUCT PROJECT_ID AFFILIATE

128
2.6.5 DEFINE ACCOUNTING ENTRY TEMPLATES Each accounting entry template you create eventually determines the journal lines that are created from the resource transactions in your projects. Later, when you run the "PC: Accounting Distribution", the accounting entry templates you've defined are used to process the resource transactions from your projects, and create distribution lines. These distribution lines are then made into journal entries by the Journal Generator. Once you have set up all of your other PeopleSoft Projects tables, you are ready to define your accounting entry templates. Create one accounting entry template for each functional combination of the following elements: Required Optional Analysis Type Resource Category Resource Type Resource SubCategory Transaction Type Project Type Integration Template Transaction Code GL Business Units (from/to) At configuration, no journal entries from Projects had been identified. Warning! If you have not created an accounting entry template for a specific resource transaction, distribution lines will not be generated. PeopleSoft Projects is delivered with a query that will find all of these resource transactions for you-PCQ7200-Distribution Template.

129
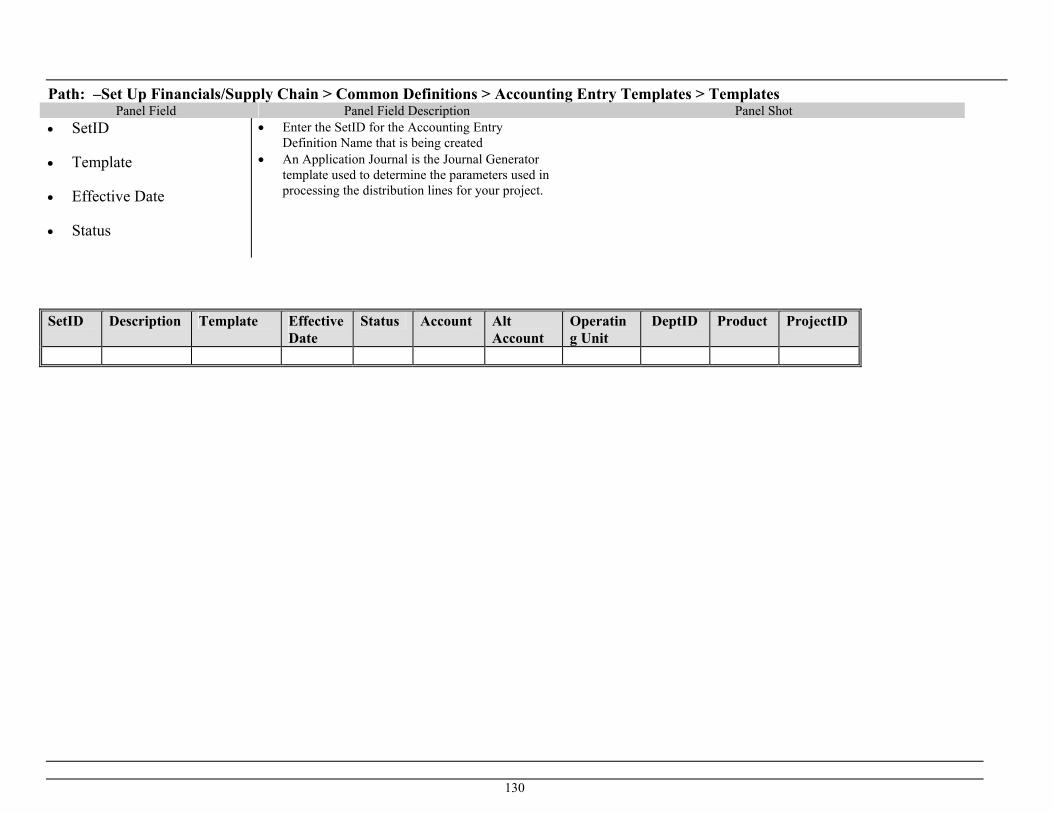
130
Path: –Set Up Financials/Supply Chain > Common Definitions > Accounting Entry Templates > Templates Panel Field Panel Field Description Panel Shot
• SetID • Template • Effective Date • Status
• Enter the SetID for the Accounting Entry Definition Name that is being created
• An Application Journal is the Journal Generator template used to determine the parameters used in processing the distribution lines for your project.
SetID Description Template Effective
Date Status Account Alt
Account Operating Unit
DeptID Product ProjectID

131
2.7 Define Pricing Structure
2.7.1 BURDEN PLANS
2.7.2 BURDEN TEMPLATES
2.7.3 RATE TEMPLATES
2.7.4 RATES BY EMPLOYEE
2.7.5 RATES BY JOB CODE
2.7.6 SHARING RATES
132
2.8 Third Party XML Definition
2.8.1 THIRD PARTY SCHEDULING PRODUCT
2.8.2 RECORD LIST
2.8.3 FIELD DETAIL
2.8.4 TRANSACTION CATALOG
2.8.5 TRANSACTION TEMPLATES
2.8.6 TRANSACTION RECORDS
133
3.0 PROJECTS 3.1 Personalize 3.1.1 MY PROJECTS 3.1.2 FLEXIBLE ANALYSIS USER DEFAULT 3.1.3 FLEXIBLE ANALYSIS TEMPLATE 3.1.4 PREFERENCES 3.2 Projects 3.2.1 GENERAL INFORMATION 3.2.2 ORGANIZATION 3.2.3 STATUS 3.3.3 SUMMARY 3.3.4 TEAM 3.3.5 FUNDING 3.3 Activities 3.3.1 LIST BY PROJECT 3.3.2 GENERAL INFORMATION 3.3.3 TEAM 3.3.4 STATUS 3.3.5 ASSIGN TEAM FROM PROJECT 3.3.6 FUND DISTRIBUTION 3.3.7 WORK BREAKDOWN STRUCTURE 3.4 Resources 3.4.1 ADD RESOURCES 3.4.2 GENERAL INFORMATION 3.4.3 RESOURCE ADJUSTMENT 3.5 Employee Time Entry 3.5.1 JOB CODES 3.5.2 JOB RECORD 3.5.3 ENTER EMPLOYEE TIME 3.5.4 PROCESS EMPLOYEE TIME 3.5.5 EMPLOYEE TIME REPORT

134
3.6 Collect Costs 3.6.1 ENGAGEMENT PLANNING 3.6.2 EXPENSES 3.6.3 GL JOURNAL ADJUSTMENTS 3.6.4 INVENTORY 3.6.5 ORDER MANAGEMENT 3.6.6 PAYABLES 3.6.7 PURCHASING 3.6.8 PURCHASING ADJUSTMENT 3.6.9 TIME AND LABOR 3.6.10 RECALCULATE PRICING 3.7 Collect Revenue 3.7.1RETRIEVE BILLING ITEMS 3.7.2 SUMMARIZE REVENUE AND BILLING 3.7.3 RETRIEVE REVENUE FROM CONTRACT 3.7.4 RECEIVABLES ADJUSTMENT 3.8 Review Costs 3.8.1 SUMMARIZE BY ANALYSIS TYPE 3.8.2 SUMMARIZE BY RESOURCE CATEGORY 3.8.3 TIME AND LABOR INTERFACE 3.8.4 TIME BY ACTIVITY 3.8.5 TIME BY EMPLOYEE 3.9 Sharing Exceptions 3.9.1 SPECIFIC EMPLOYEE 3.9.2 EMPLOYEE ATTRIBUTE 3.9.3 PROJECT TEAM MEMBER 3.9.4 SPECIFIC PROJECT 3.9.5 PROJECT ATTRIBUTE 3.9.10 ORGANIZATION 3.10 Accounting 3.10.1 PROCESS ACCOUNTING 3.10.2 PENDING ACCOUNTING 3.10.3 ACCOUNTING HISTORY 3.11 Assets
135
3.11.1 DEFINE ASSETS 3.11.2 RELATE BY PROJECT 3.11.3 RELATE BY ASSET 3.11.4 DEFINE FILTER CRITERIA 3.11.5 ASSIGN RESOURCES TO ASSETS 3.11.6 REVIEW ASSET RESOURCES 3.11.7 SEND TO ASSET MANAGEMENT 3.11.8 REVIEW BY PROJECT 3.11.9 REVIEW BY ASSET 3.12 Budgeting 3.12.1 BUDGET SCENARIOS 3.12.2 BUDGET DETAILS 3.12.3 POST BUDGETS 3.13 Utilities 3.13.1 CALCULATE INTEREST 3.13.2 COMPRESS PROJECT DATA 3.13.3 CONVERT CURRENCY 3.13.4 RUN FUNDS DISTRIBUTION 3.13.5 COPY PROJECT 3.13.6 PROJECT DELETE UTILITY 3.13.7 PROJECT DELETE LOG 3.17.8REFRESH SUMMARY TABLES 3.18.9 RESOURCE DETAIL HISTORY 3.18.10RESOURCE SUMMARY HISTORY 3.14 Third Party Integration 3.14.1 PRIMAVERA 3.14.2 MICROSOFT PROJECT 3.14.3 LOAD PROJECTS AND ACTIVITIES 3.14.4 LOAD RESOURCE TRANSACTIONS 3.14.5 LOAD PROJECT FUNDING 3.14.6 EROOM 3.15.7 LOTUS QUICKPLACE 3.15.8 REVIEW FUNDING DETAILS 3.15.9 REVIEW PROJECT DETAILS 3.15.10 REVIEW ACTIVITY DETAILS 3.15.11REVIEW RESOURCE DETAILS 3.15.12 REVIEW TIMELINE DETAILS 3.15.13 BUILD XML FILE 3.15.14 EROOM XML
136
3.16 Investment Incentives 3.16.1 DEFINE THE INCENTIVE 3.16.2 ASSIGN TO PROJECT 3.16.3 CREATE RESOURCE INCENTIVE 3.17 Reports Definition Reports 3.17.1 ACTIVE ANALYSIS GROUP 3.17.2 ANALYSIS TYPES BY SETID 3.17.3 ACTIVITY TYPES BY SETID 3.17.4 LINKED RESOURCE ELEMENTS Summary Reports 3.17.5 RPO GROUPS 3.17.6 REPORTING OPTIONS 3.17.7 RESOURCE 3.17.8 FINANCE 3.17.9 TRANSACTION LEVEL REPORT Variance Reports 3.17.10 CONFIGURE SQR REPORTS 3.17.11 CREATE PROJECTS CUBE 3.18 Project Home