Ubuntu 11.04 Essentials - · PDF file17.3 Entering Commands at the Prompt ... 17.4 Using the...
48
Transcript of Ubuntu 11.04 Essentials - · PDF file17.3 Entering Commands at the Prompt ... 17.4 Using the...

Ubuntu 11.04 Essentials
2
Ubuntu 11.04 Essentials
Ubuntu 11.04 Essentials
3
Ubuntu 11.04 Essentials – First Edition
© 2011 Payload Media. This eBook is provided for personal use only. Unauthorized use,
reproduction and/or distribution strictly prohibited. All rights reserved.
The content of this book is provided for informational purposes only. Neither the publisher nor
the author offers any warranties or representation, express or implied, with regard to the
accuracy of information contained in this book, nor do they accept any liability for any loss or
damage arising from any errors or omissions.
Ubuntu 11.04 Essentials
4
Table of Contents
Chapter 1. About Ubuntu 11.04 Essentials ............................................................................14
Chapter 2. The History of Ubuntu ..........................................................................................15
2.1 What exactly is Linux? .................................................................................................15
2.2 Who Created Linux? ....................................................................................................15
2.3 The History of Ubuntu .................................................................................................16
2.4 What does the word "Ubuntu" Mean? ........................................................................16
Chapter 3. How to Download and Try Ubuntu 11.04 .............................................................17
3.1 Ubuntu Download Options ..........................................................................................17
3.2 Writing the Ubuntu Image to a USB Flash Drive ..........................................................18
3.3 Try Ubuntu without Installing it...................................................................................19
3.4 Installing Ubuntu on a Disk Drive Containing Microsoft Windows ...............................22
3.5 Installing Ubuntu Inside a Windows Installation ..........................................................23
3.6 Performing a Clean Ubuntu Installation.......................................................................23
Chapter 4. Performing a Clean Ubuntu 11.04 Installation ......................................................24
4.1 Beginning the Ubuntu Installation ...............................................................................24
4.2 Booting Ubuntu for the First Time ...............................................................................28
4.3 Testing Hardware for Unity Compatibility ...................................................................29
4.4 Installing Unity 2D .......................................................................................................30
4.5 Running Unity within a VirtualBox Virtual Machine .....................................................31
4.6 Installing Updates .......................................................................................................32
Chapter 5. Installing Ubuntu 11.04 on a Windows System (Dual booting) .............................34
5.1 Beginning the Ubuntu Installation ...............................................................................34
5.2 Configuring Time Zone, User and Keyboard Information .............................................37
5.3 Booting Ubuntu for the First Time ...............................................................................38
5.4 Accessing the Windows Partition from Ubuntu ...........................................................39
Chapter 6. Installing Ubuntu 11.04 on a Windows Disk with Wubi ........................................42
6.1 What is Wubi?.............................................................................................................42
Ubuntu 11.04 Essentials
5
6.2 Downloading Wubi......................................................................................................42
6.3 Starting the Wubi Installer ..........................................................................................42
6.4 Completing the Ubuntu Installation ............................................................................43
6.5 Starting the Ubuntu System ........................................................................................44
6.6 Removing Ubuntu .......................................................................................................44
Chapter 7. Allocating an Existing Windows Partition to Ubuntu 11.04 ...................................46
7.1 Deleting the Windows Partition from the Disk ............................................................46
7.2 Formatting the Unallocated Disk Partition ..................................................................48
7.3 Updating the Boot Menu.............................................................................................49
7.4 Mounting the New Partition .......................................................................................50
Chapter 8. An Overview of the Ubuntu 11.04 Unity Desktop .................................................52
8.1 What is Unity?.............................................................................................................52
8.2 Unity vs. GNOME 3.0 ...................................................................................................53
8.3 Unity 3D vs. Unity 2D ..................................................................................................53
8.4 The Unity Desktop.......................................................................................................53
8.5 The Unity Launcher .....................................................................................................55
8.6 Launcher Item Quick Lists ...........................................................................................56
8.7 Workspace Switcher ...................................................................................................56
8.8 The Home Button ........................................................................................................57
8.9 The Application Menu .................................................................................................58
8.10 The Notification Area ..................................................................................................59
8.11 The MeMenu ..............................................................................................................60
8.12 The Power Button .......................................................................................................60
8.13 Applications Lens ........................................................................................................60
8.14 File & Folders Lens ......................................................................................................61
8.15 Window Controls ........................................................................................................62
8.16 The Desktop ................................................................................................................63
8.17 Summary.....................................................................................................................65
Ubuntu 11.04 Essentials
6
Chapter 9. Configuring the Ubuntu 11.04 Unity Launcher and Workspaces ...........................66
9.1 Adding and Removing Unity Launcher Items ...............................................................66
9.2 Changing the Location of a Launcher Item ..................................................................66
9.3 Changing the Size and Appearance of the Unity Launcher ...........................................67
9.4 Revealing a Hidden Launcher ......................................................................................69
9.5 Changing the Number of Workspaces .........................................................................69
9.6 Enabling Workspace Edge Flipping ..............................................................................70
9.7 Summary.....................................................................................................................71
Chapter 10. Changing the Ubuntu 11.04 Unity Desktop Background .......................................72
10.1 Changing the Ubuntu Unity Desktop Background ........................................................72
10.2 Selecting a Background from the Wallpaper List .........................................................73
10.3 Creating a Solid or Graded Background .......................................................................73
10.4 Specifying a Background Image ...................................................................................74
10.5 Summary.....................................................................................................................75
Chapter 11. Ubuntu 11.04 Unity Screensaver, Desktop Lock and Power Management
Configuration ............................................................................................................................76
11.1 The Desktop Screensaver ............................................................................................76
11.2 The Desktop Screen Lock.............................................................................................77
11.3 Ubuntu Power Management on Desktop Systems ......................................................77
11.4 Ubuntu Power Management on Laptop and Netbook Systems ...................................78
Chapter 12. Installing and Customizing Ubuntu 11.04 Unity Desktop Themes .........................79
12.1 What is a Desktop Theme? ..........................................................................................79
12.2 Changing the Unity Desktop Theme ............................................................................79
12.3 Customizing a Desktop Theme ....................................................................................80
12.4 Downloading and Installing a Theme ...........................................................................82
12.5 Creating a Custom Theme Package .............................................................................83
12.6 Summary.....................................................................................................................84
Chapter 13. Configuring Ubuntu 11.04 Unity Desktop Fonts ...................................................85
Ubuntu 11.04 Essentials
7
13.1 Font Options on Ubuntu .............................................................................................85
13.2 Changing Font Settings ................................................................................................85
13.3 Font Rendering Settings ..............................................................................................87
13.4 Advanced Font Rendering ...........................................................................................87
Chapter 14. Configuring Ubuntu 11.04 Wireless Networking...................................................89
14.1 Installing the Wireless Card .........................................................................................89
14.2 Configuring an Ubuntu Wireless Connection ...............................................................89
14.3 Configuring Wireless Network Access using NetworkManager ....................................90
14.4 Connecting to a Hidden Network ................................................................................92
14.5 Disabling a Wireless Connection .................................................................................93
14.6 Getting Information about a Wireless Connection ......................................................93
14.7 Editing Wireless Connection Settings ..........................................................................93
14.8 Troubleshooting an Ubuntu Wireless Connection .......................................................94
Chapter 15. Browsing Computer, Files and Folders on the Ubuntu 11.04 Unity Desktop .........96
15.1 Accessing Nautilus ......................................................................................................96
15.2 Nautilus and the Computer Icon..................................................................................97
15.3 Adding Emblems to Files and Folders ..........................................................................98
15.4 Changing File and Folder Permissions........................................................................ 100
15.5 Renaming and Deleting Files and Folders .................................................................. 101
15.6 Adding a Location to the Places Menu ...................................................................... 102
Chapter 16. Configuring the Ubuntu 11.04 Unity File Manager ............................................. 103
16.1 Changing the File Manager Background Pattern and Color ........................................ 103
16.2 Displaying Icons or Lists............................................................................................. 103
16.3 Configuring the List View .......................................................................................... 105
16.4 Configuring the Icon View ......................................................................................... 105
16.5 Configuring Media Settings ....................................................................................... 109
Chapter 17. Using the Bash Shell on Ubuntu 11.04 ................................................................ 111
17.1 What is a Shell? ......................................................................................................... 111
Ubuntu 11.04 Essentials
8
17.2 Gaining Access to the Shell ........................................................................................ 111
17.3 Entering Commands at the Prompt ........................................................................... 112
17.4 Using the sudo Command ......................................................................................... 112
17.5 Getting Information about a Command .................................................................... 112
17.6 Bash Command-line Editing ...................................................................................... 113
17.7 Working with the Shell History .................................................................................. 114
17.8 Filename Shorthand .................................................................................................. 114
17.9 File Name and Path Completion ................................................................................ 115
17.10 Input and Output Redirection ................................................................................ 115
17.11 Working with Pipes in the Bash Shell ..................................................................... 116
17.12 Configuring Aliases ................................................................................................ 117
17.13 Environment Variables .......................................................................................... 117
17.14 Writing Shell Scripts............................................................................................... 119
17.15 Summary ............................................................................................................... 120
Chapter 18. Ubuntu 11.04 Unity Desktop - Starting Applications on Login ............................ 121
18.1 Understanding Sessions ............................................................................................ 121
18.2 Configuring Desktop Startup Programs ..................................................................... 121
18.3 Saving the Current Session ........................................................................................ 123
Chapter 19. Ubuntu 11.04 Unity Desktop Keyboard Shortcuts .............................................. 124
19.1 Viewing Keyboard Shortcuts ..................................................................................... 124
19.2 Changing a Shortcut .................................................................................................. 125
19.3 Disabling a Keyboard Shortcut .................................................................................. 125
19.4 Adding a Custom Shortcut ......................................................................................... 125
Chapter 20. Configuring Ubuntu 11.04 Printers ..................................................................... 127
20.1 Installing a Directly Connected Printer ...................................................................... 127
20.2 Manually Installing a New Locally Connected Printer and Printer Driver ................... 128
20.3 Adding a Network Printer .......................................................................................... 129
20.4 Configuring a Printer Connected to a Windows System ............................................. 130
Ubuntu 11.04 Essentials
9
20.5 Configuring a Printer Connected to a Remote Linux System ...................................... 132
Chapter 21. Ubuntu 11.04 Firewall Basics ............................................................................. 133
21.1 Understanding Ports and Services ............................................................................. 133
21.2 Securing Ports and Services ....................................................................................... 133
21.3 Ubuntu Services and iptables Rules ........................................................................... 134
21.4 Well Known Ports and Services ................................................................................. 135
Chapter 22. Using gufw and ufw to Configure an Ubuntu 11.04 Firewall ............................... 140
22.1 An Overview of gufw and ufw ................................................................................... 140
22.2 Installing gufw on Ubuntu ......................................................................................... 140
22.3 Running, Unlocking and Enabling gufw ...................................................................... 140
22.4 The gufw Default Policy ............................................................................................. 141
22.5 Adding Preconfigured Firewall Rules ......................................................................... 142
22.6 Adding Simple Firewall Rules ..................................................................................... 143
22.7 Adding Advanced Rules ............................................................................................. 144
22.8 Enabling Logging ....................................................................................................... 145
22.9 Configuring the Firewall from the Command Line using ufw ..................................... 146
Chapter 23. Managing Ubuntu 11.04 Users and Groups ........................................................ 148
23.1 Adding a User to an Ubuntu System .......................................................................... 148
23.2 Adding a New User from the Command-line ............................................................. 150
23.3 Modifying User Account Settings .............................................................................. 150
23.4 Deleting a User from an Ubuntu System ................................................................... 153
23.5 Adding a New Group to an Ubuntu System ............................................................... 154
23.6 Modifying an Ubuntu Group ..................................................................................... 155
23.7 Deleting a Group from an Ubuntu System ................................................................. 155
Chapter 24. Configuring Ubuntu 11.04 Remote Access using SSH .......................................... 157
24.1 Installing SSH on an Ubuntu System .......................................................................... 157
24.2 Configuring the Ubuntu Firewall to Allow SSH Connections....................................... 157
24.3 Using SSH on Ubuntu 11.04 ....................................................................................... 158
Ubuntu 11.04 Essentials
10
24.4 Copying files using SSH .............................................................................................. 158
24.5 Disabling the SSH Server ........................................................................................... 159
Chapter 25. Remote Access to the Ubuntu 11.04 Unity Desktop ........................................... 160
25.1 Activating Unity Remote Desktop Access .................................................................. 160
25.2 Secure and Insecure Remote Desktop Access ............................................................ 162
25.3 Accessing a Remote Ubuntu Desktop using Vinagre .................................................. 162
25.4 Attaching to a Remote Unity Desktop using vncviewer ............................................. 164
25.5 Accessing a Remote Ubuntu Desktop from a Windows System ................................. 164
25.6 Establishing a Secure Remote Desktop Session ......................................................... 165
25.7 Establishing a Secure Remote Desktop Session from a Windows System .................. 166
25.8 Creating Additional Desktops .................................................................................... 168
Chapter 26. Displaying Ubuntu 11.04 Applications Remotely (X11 Forwarding) .................... 172
26.1 Requirements for Remotely Displaying Applications ................................................. 172
26.2 Remotely Displaying an Ubuntu Application .............................................................. 172
26.3 Trusted X11 Forwarding ............................................................................................ 173
26.4 Compressed X11 Forwarding ..................................................................................... 173
Chapter 27. Configuring an Ubuntu 11.04 Based Web Server ................................................ 174
27.1 Requirements for Configuring a Web Server ............................................................. 174
27.2 Installing the Apache Web Server on Ubuntu 11.04 .................................................. 174
27.3 Testing the Web Server ............................................................................................. 175
27.4 Configuring the Apache Web Server for Your Domain ............................................... 175
27.5 Web Server and Firewall Issues ................................................................................. 177
Chapter 28. Sharing Ubuntu 11.04 Folders with Remote Linux and UNIX Systems ................. 179
28.1 Installing NFS Services on Ubuntu 11.04 .................................................................... 179
28.2 Sharing Folders ......................................................................................................... 180
28.3 Configuring the Firewall ............................................................................................ 181
28.4 Mounting a Remote Ubuntu NFS Folder .................................................................... 181
28.5 Mounting an NFS File System on System Startup ...................................................... 182
Ubuntu 11.04 Essentials
11
28.6 Unmounting an NFS Mount Point.............................................................................. 182
Chapter 29. Sharing Ubuntu 11.04 Files and Folders with Windows Systems ........................ 184
29.1 Samba and Samba Client ........................................................................................... 184
29.2 Installing Samba Server on an Ubuntu System .......................................................... 184
29.3 Sharing Ubuntu Folders ............................................................................................. 185
29.4 Making Ubuntu based Printers Available to Windows Systems ................................. 188
29.5 Accessing Windows Shares from Ubuntu 11.04 ......................................................... 189
29.6 Summary................................................................................................................... 190
Chapter 30. Configuring an Ubuntu 11.04 Mail Client (Evolution) .......................................... 191
30.1 An Overview ............................................................................................................. 191
30.2 Configuring Evolution to Receive Mail from a Local Postfix Server ............................ 192
30.3 Configuring Evolution to Receive Mail from a Remote Server .................................... 193
30.4 Configuring Evolution to Send Mail ........................................................................... 193
Chapter 31. Sending and Receiving GMail Email on an Ubuntu 11.04 System ........................ 195
31.1 Configuring a GMail Account for POP Access ............................................................. 195
31.2 Configuring Evolution to Receive GMail Messages .................................................... 195
31.3 Configuring Evolution to Send GMail Messages ......................................................... 197
Chapter 32. An Overview of Ubuntu One .............................................................................. 199
32.1 Registering for Ubuntu One ...................................................................................... 199
32.2 The ~/Ubuntu One Folder .......................................................................................... 201
32.3 Synchronizing Folders with Ubuntu One.................................................................... 201
32.4 Viewing Ubuntu One Cloud Folders ........................................................................... 202
32.5 Ubuntu One Sharing .................................................................................................. 202
32.6 Publishing Files with Ubuntu One .............................................................................. 204
32.7 Synchronizing Contacts ............................................................................................. 205
32.8 Synchronizing Bookmarks ......................................................................................... 207
32.9 Summary................................................................................................................... 207
Chapter 33. Adding a New Disk Drive to an Ubuntu 11.04 System ......................................... 208
Ubuntu 11.04 Essentials
12
33.1 Getting Started ......................................................................................................... 208
33.2 Finding the New Hard Drive in Ubuntu ...................................................................... 208
33.3 Creating Linux Partitions ........................................................................................... 209
33.4 Creating a Filesystem on an Ubuntu 11.04 Disk Partition .......................................... 210
33.5 Mounting a File System ............................................................................................. 211
33.6 Configuring Ubuntu to Automatically Mount a Filesystem ........................................ 212
Chapter 34. Adding and Managing Ubuntu 11.04 Swap Space............................................... 213
34.1 What is Swap Space? ................................................................................................ 213
34.2 Identifying Current Swap Space Usage ...................................................................... 213
34.3 Adding a Swap File to an Ubuntu 11.04 System ......................................................... 214
Chapter 35. Installing and Configuring Ubuntu 11.04 KVM Virtualization .............................. 216
35.1 Full Virtualization vs. Para-Virtualization ................................................................... 216
35.2 KVM Hardware Requirements ................................................................................... 217
35.3 Preparing Ubuntu 11.04 for KVM Virtualization ........................................................ 218
35.4 Verifying the KVM Installation ................................................................................... 218
35.5 Building an Ubuntu KVM Virtual System.................................................................... 219
35.6 Configuring the KVM Virtual System ......................................................................... 221
35.7 Starting the KVM Virtual System ............................................................................... 225
Chapter 36. Creating an Ubuntu 11.04 KVM Networked Bridge Interface.............................. 227
36.1 Ubuntu Virtual Networks and Network Bridges ......................................................... 227
36.2 Installing the Network Bridge Package Requirements ............................................... 227
36.3 Configuring Network Administration Capabilities ...................................................... 227
36.4 Identifying Physical Network Connections ................................................................. 228
36.5 Configuring the Network Bridge ................................................................................ 229
36.6 Checking for the Presence of the Bridge .................................................................... 231
36.7 Configuring the Ubuntu Firewall for a Network Bridge .............................................. 232
36.8 Configuring a Virtual Machine to use the Network Bridge ......................................... 232
Chapter 37. Configuring a New Ubuntu 11.04 KVM Virtual Network ..................................... 234
Ubuntu 11.04 Essentials
13
37.1 Ubuntu 11.04 KVM Guest Networking Options ......................................................... 234
37.2 Identifying the Settings of an Existing Ubuntu 11.04 KVM Virtual Network ............... 234
37.3 Creating a New KVM Virtual Network on an Ubuntu 11.04 Host ............................... 235
37.4 Assigning the New Virtual Bridge during Virtual Machine Creation ........................... 238
37.5 Changing an Existing Virtual Machine to Use a new Virtual Network ......................... 239
Chapter 38. Installing an Ubuntu 11.04 KVM Guest OS from the Command-line (virt-install and
virsh) 240
38.1 Preparing the System for virt-install .......................................................................... 240
38.2 Running virt-install to build the KVM Guest System .................................................. 240
38.3 Example virt-install Command................................................................................... 246
38.4 Starting and Stopping a Virtual Machine from the Command Line ............................ 247
38.5 Creating a Virtual Machine from a Configuration File ................................................ 248
Chapter 39. Managing and Monitoring Ubuntu 11.04 based KVM Guest Systems ................. 251
39.1 Starting and Stopping KVM Guest Systems ................................................................ 251
39.2 Pausing a KVM Guest Operating System.................................................................... 252
39.3 Changing KVM Virtual Guest System Settings ............................................................ 252
39.4 Monitoring Virtual Machine Performance ................................................................. 254
Ubuntu 11.04 Essentials
14
Chapter 1. About Ubuntu 11.04 Essentials
On April 28, 2011 Canonical Ltd. released version 11.04 of the Ubuntu Linux distribution (also
referred to as the Natty Narwhal release). This latest version of Ubuntu proved to be one of the
more significant releases for a number of years, perhaps the most significant change being the
introduction of the Unity desktop environment. Whilst the classic GNOME desktop is still
available, Unity clearly defines the future direction of Ubuntu in terms of appearance and
usability.
The purpose of this book is to provide an overview of the essential knowledge required to use
and maintain an Ubuntu 11.04 system.
After covering the basics of installation in a variety of scenarios this book provides an in depth
tour of the new Unity desktop together with steps on configuring this new desktop
environment to match individual user needs. Other topics covered include the implementation
of wireless networking and Ubuntu One cloud synchronization through to tasks such as
configuring a firewall, setting up a web server, adding disk drives and swap space, configuring
KVM based virtualization and providing remote desktop access via an SSH tunnel.
Designed both as a learning tool and a reference guide, it is intended that Ubuntu 11.04 Essentials provide the reader with a sound basis of knowledge for installing, using and maintaining an Ubuntu 11.04 system.
Ubuntu 11.04 Essentials
15
Chapter 2. The History of Ubuntu
Ubuntu is one of a number of different flavors of the Linux operating system. The various
different brands of Linux are generally known as Linux Distributions (usually shortened to Linux
Distros by Linux experts). In terms of the history of Linux, Ubuntu is something of a newcomer.
In the relatively short period of time that it has been available, however, Ubuntu has rapidly
gained the respect of both experienced and novice Linux users throughout the world.
In this chapter we will briefly cover the history of Linux in general and the Ubuntu variant of
Linux in particular.
2.1 What exactly is Linux?
Linux is an operating system in much the same way that Windows is an operating system (and
there any similarities between Linux and Windows end). The term operating system is used to
describe the software that acts as a layer between the hardware in a computer and the
applications that we all run on a daily basis. When programmers write applications, they
interface with the operating system to perform such tasks as writing files to the hard disk drive
and displaying information on the screen.
Without an operating system, every programmer would have to write code to directly access
the hardware of the system. In addition, the programmer would have to be able to support
every single piece of hardware ever created to be sure the application would work on every
possible hardware configuration. Because the operating system handles all of this hardware
complexity, application development becomes a much easier task. Linux is just one of a number
of different operating systems available today.
2.2 Who Created Linux?
The origins of Linux can be traced back to the work and philosophies of two people. At the
heart of the Linux operating system is something called the kernel. This is the core set of
functions necessary for the operating system to function. The kernel manages the system's
resources and handles communication between the hardware and the applications. The Linux
kernel was developed by Linus Torvalds who needed an operating system but didn't want to
have to buy one. When he had finished the first version of the kernel he released it under an
open source license that enabled anyone to download the source code and freely use and
modify it without having to pay Linus any money.
Around the same time Richard Stallman at the Free Software Foundation, a strong advocate of
free and open source software, was working on an open source operating system of his own.
Rather than focusing initially on the kernel, Stallman decided to begin by developing all the
Ubuntu 11.04 Essentials
16
tools, utilities and compilers necessary to use and maintain an operating system. By the time he
had finished developing this infrastructure it seemed like the obvious solution was to combine
his work with the kernel Linus had written to create a full operating system. This combination
became known as GNU/Linux. Purists insist that Linux always be referred to as GNU/Linux (in
fact, at one time, Richard Stallman refused to give press interviews to publications that failed to
refer to Linux as GNU/Linux). This is not unreasonable given that the GNU tools developed by
the Free Software Foundation make up a significant and vital part of GNU/Linux. Unfortunately,
most people and publications simply refer to Linux as Linux and this will probably always
continue to be the case.
2.3 The History of Ubuntu
As mentioned previously, Ubuntu is one of a number of Linux distributions. The source code
that makes up the Ubuntu distribution originates from another, much older Linux distribution
known as Debian (so called because it was started by two people named Debra and Ian). Debian
is still a widely respected operating system but came under criticism for infrequent updates and
less than user friendly installation and maintenance (though these areas have shown
improvement recently).
A South African internet mogul named Mark Shuttleworth (who made his fortune selling his
company to VeriSign for around $500 million) decided it was time for a more user friendly
Linux. He took the Debian distribution and worked to make it a more human friendly
distribution which he called Ubuntu. He subsequently formed a company called Canonical Ltd
to promote and provide support for Ubuntu. In addition Shuttleworth has formed and funded
(to the tune of $10 million) a foundation to guarantee the future of Ubuntu.
The rest, as they say, is history. Ubuntu has since gone from strength to strength. Dell and other
hardware vendors now ship computers pre-loaded with Ubuntu and Ubuntu usually tops the
chart at DistroWatch.com (a web site that tracks the popularity of the various Linux
distributions).
If you are new to Linux, or already use Linux and want to try a different Linux distro it is unlikely
you will find a better option than Ubuntu.
2.4 What does the word "Ubuntu" Mean?
The word "Ubuntu" is an ancient Zulu and Xhosa word that means "humanity to others".
Ubuntu also means "I am what I am because of who we all are". It was chosen because these
sentiments precisely describe the spirit of the Ubuntu distribution.

Ubuntu 11.04 Essentials
17
Chapter 3. How to Download and Try Ubuntu 11.04
In order try out Ubuntu 11.04 you first need to obtain it. By far the best way to obtain Ubuntu is
to download it from the Ubuntu web site, though it is also possible to purchase a CDROM
containing Ubuntu if downloading is not a viable option.
There are, however, a number of options to consider in terms of the best download choice for
your needs.
3.1 Ubuntu Download Options
A variety of download of options are provided on the Ubuntu web site which is accessible at
http://www.ubuntu.com. Firstly, Ubuntu is provided in Desktop and Server editions:
Desktop Edition– This edition is intended for desktop, netbook and laptop computer
systems. It includes graphical desktop environments and a range of applications needed by
a typical user.
Server Edition – This edition is optimized for enterprise level server deployment. It contains
only those packages that are essential for server systems allowing for high performance
with minimal complexity and resource usage. Additional packages are then installed on an
as needed basis by the system administrator.
Though this book will cover aspects of Ubuntu that are common to both editions of the
operating system, the main focus will be on Ubuntu 11.04 Desktop Edition.
The next choice involves a decision about the architecture of the operating system. This can
take the form of either a 32-bit or 64-bit version of Ubuntu. If your computer contains a 32-bit
processor then you must use the 32-bit edition of Ubuntu. Alternatively, if you have a 64-bit
processor you can use either the 32-bit or 64-bit version of Ubuntu, though Canonical
recommends that the 64-bit edition of the operating system be installed on 64-bit hardware.
Another option is also available to use the Ubuntu Windows Installer to install Ubuntu within an
existing Windows installation. Details of this installation process are covered later in this book
in the chapter entitled Installing Ubuntu 11.04 on a Windows Disk with Wubi.
Having made an appropriate architecture choice the download may be initiated by clicking on
the Start download button. The download will take the form of a single ISO image file which
may then be burned onto a CDROM, written to a USB flash drive, or used as an image for a
network based or virtual machine installation.
Ubuntu 11.04 Essentials
18
Check the documentation for your preferred CD writing software or current operating system
for steps on how to write an ISO image file to a CD if you do not already know how to do this.
3.2 Writing the Ubuntu Image to a USB Flash Drive
As previously mentioned an alternative to booting from a CDROM is to write the Ubuntu image
to a USB flash drive and then boot from that. This has the advantage that the Ubuntu
distribution will boot and run in live mode much faster from a USB flash drive than from a
CDROM drive.
In order to write the Ubuntu image to a USB drive, the Pendrive Linux Universal USB Installer is
required. This tool is currently only available for Windows XP, Windows Vista and Windows 7
and can be downloaded from the Pendrive Linux web site at:
http://www.pendrivelinux.com/universal-usb-installer-easy-as-1-2-3/
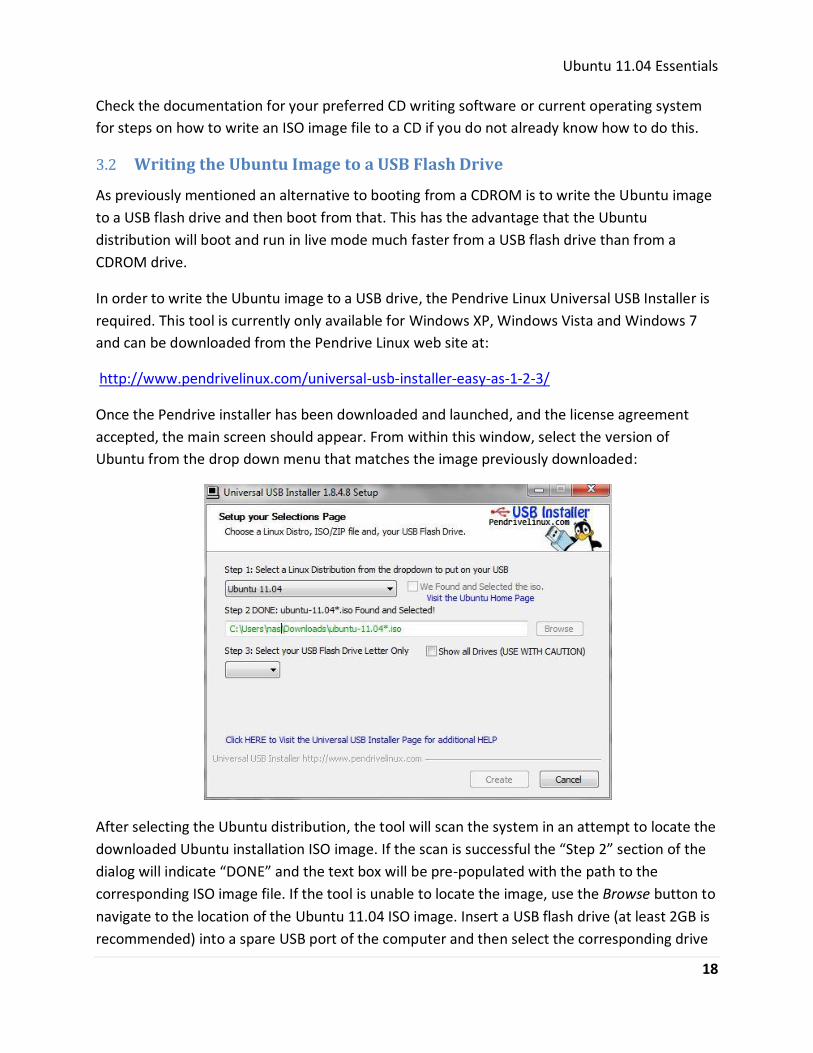
Once the Pendrive installer has been downloaded and launched, and the license agreement
accepted, the main screen should appear. From within this window, select the version of
Ubuntu from the drop down menu that matches the image previously downloaded:
After selecting the Ubuntu distribution, the tool will scan the system in an attempt to locate the
downloaded Ubuntu installation ISO image. If the scan is successful the “Step 2” section of the
dialog will indicate “DONE” and the text box will be pre-populated with the path to the
corresponding ISO image file. If the tool is unable to locate the image, use the Browse button to
navigate to the location of the Ubuntu 11.04 ISO image. Insert a USB flash drive (at least 2GB is
recommended) into a spare USB port of the computer and then select the corresponding drive
Ubuntu 11.04 Essentials
19
letter from the menu located in Step 3. If the USB device is not listed, try enabling the Show all
Drives option. Once the target drive has been selected, choose the option to format the USB
drive as part of the image creation process (the assumption is made here that any data already
on the drive is expendable).
Finally, select the amount of space on the USB drive to be allocated to store any user files
created from within the running Ubuntu system. The amount of persistent storage space to
allocate will depend on the capacity of the USB drive and the amount of data you feel you will
be likely to need to store on the drive whilst using Ubuntu from this boot device.
Clicking the Create button will begin the process of writing the image to the USB drive.
Once the Ubuntu ISO image is either burned to a CDROM or written to a flash drive it is time to
move on to the next step.
3.3 Try Ubuntu without Installing it
There is a good chance you already own a PC which is probably running Microsoft Windows. If
this is the case and you are new to Linux then there is also a good chance you don't want to
install Ubuntu until you've had a chance to try it out for a few hours, days or even weeks. If
you'd like to try Ubuntu without having to install you can easily do so. The Ubuntu image you
now (hopefully) have in your possession is able to run as a Live Image. This essentially means
that the operating system can be run from a CD or USB flash drive without having to be
installed on your hard disk drive.
To run Ubuntu from the CD or USB flash drive, simply insert the media into your computer and
reboot your system. If your system reboots once again as Windows then it is likely you will need
to change the boot order in your system BIOS. To achieve this, restart your system and watch
closely as the system boots. Early in the boot process the BIOS will display instructions to enter
BIOS Setup (which often, but not always, involves pressing DEL or a function key). Press
whichever key you are instructed to press and you should find yourself in the BIOS setup menu.
Find the setting for the boot sequence and, if it shows your hard disk as being the first device to
boot from, change this so that either your CD/DVD drive or USB device appears as the first
device in the boot order. Note that the BIOS firmware in some older systems does not support
booting from a USB connected device.
Select the "Save and Exit" option from the BIOS main menu and allow the system to boot. As
long as the Ubuntu CD or USB drive is still inserted, you should find that Ubuntu boots instead
of Windows. Once loaded, Ubuntu will provide the option to try out Ubuntu without installing,
or to perform an installation to a hard drive:
Ubuntu 11.04 Essentials
20
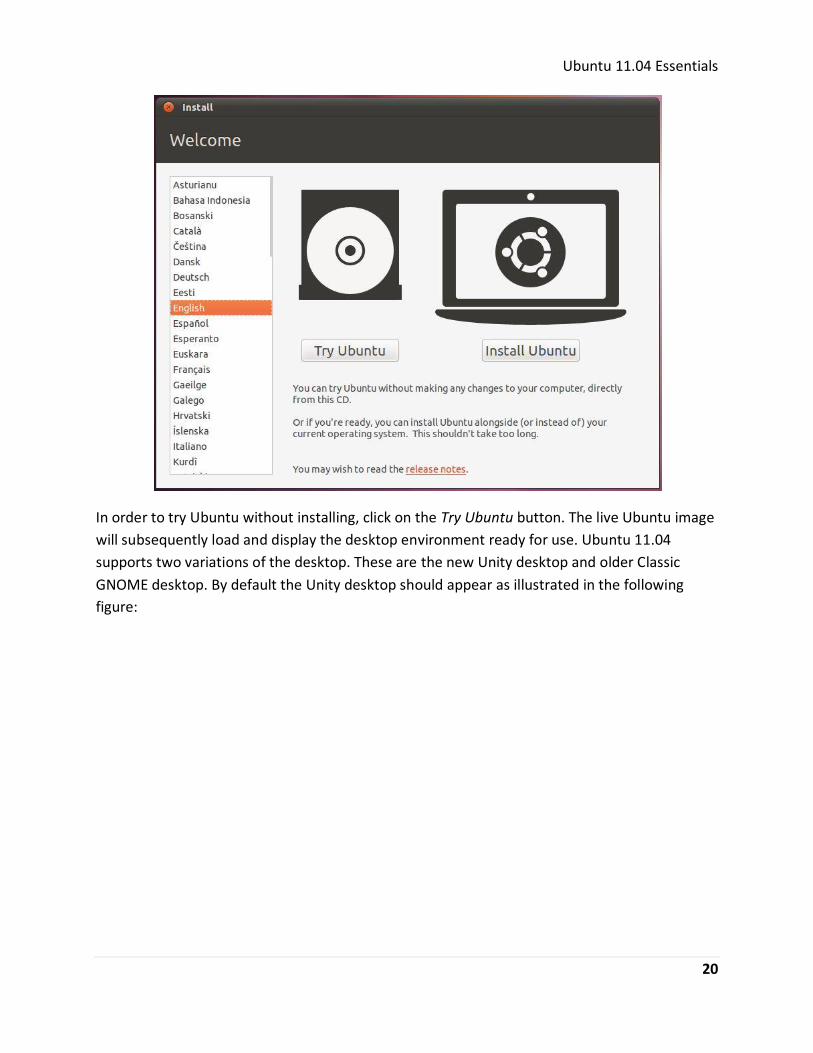
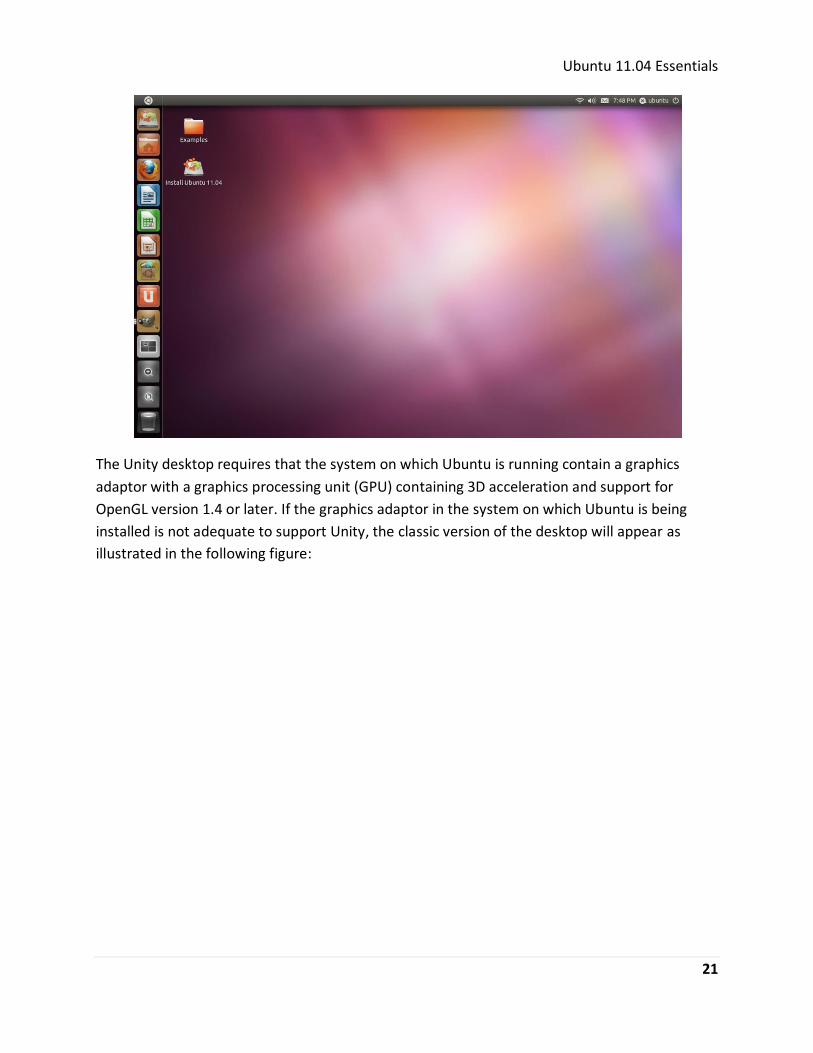
In order to try Ubuntu without installing, click on the Try Ubuntu button. The live Ubuntu image
will subsequently load and display the desktop environment ready for use. Ubuntu 11.04
supports two variations of the desktop. These are the new Unity desktop and older Classic
GNOME desktop. By default the Unity desktop should appear as illustrated in the following
figure:
Ubuntu 11.04 Essentials
21
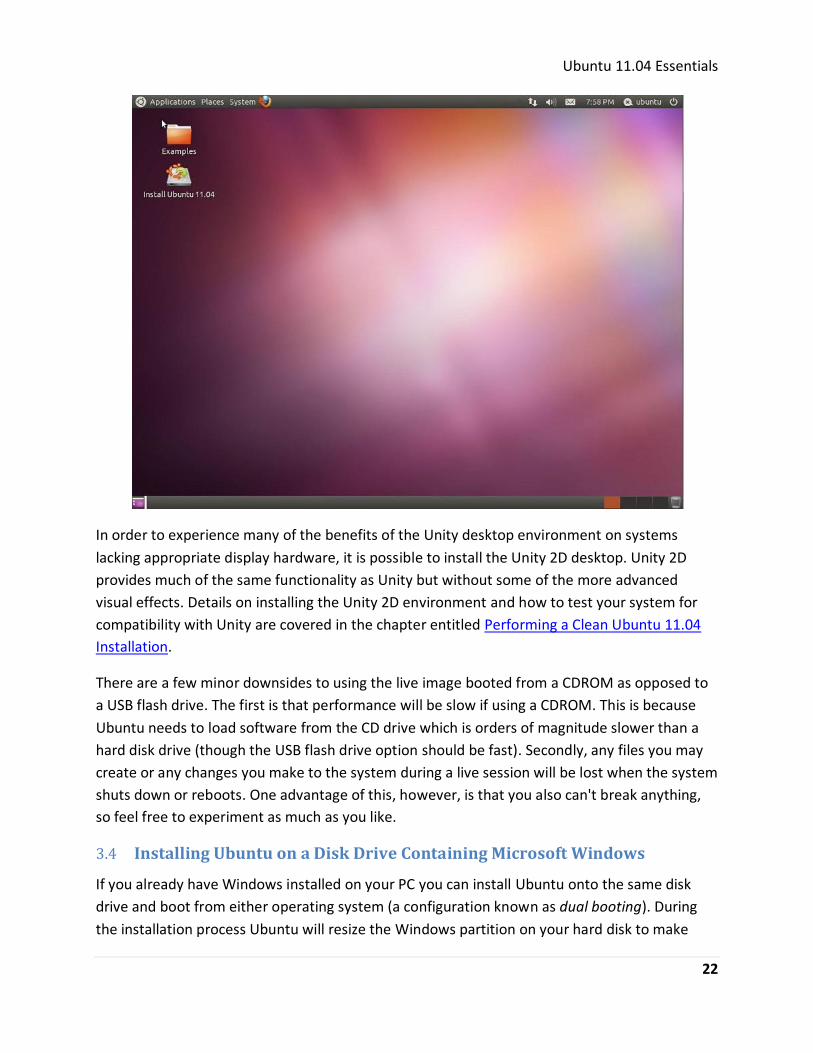
The Unity desktop requires that the system on which Ubuntu is running contain a graphics
adaptor with a graphics processing unit (GPU) containing 3D acceleration and support for
OpenGL version 1.4 or later. If the graphics adaptor in the system on which Ubuntu is being
installed is not adequate to support Unity, the classic version of the desktop will appear as
illustrated in the following figure:
Ubuntu 11.04 Essentials
22
In order to experience many of the benefits of the Unity desktop environment on systems
lacking appropriate display hardware, it is possible to install the Unity 2D desktop. Unity 2D
provides much of the same functionality as Unity but without some of the more advanced
visual effects. Details on installing the Unity 2D environment and how to test your system for
compatibility with Unity are covered in the chapter entitled Performing a Clean Ubuntu 11.04
Installation.
There are a few minor downsides to using the live image booted from a CDROM as opposed to
a USB flash drive. The first is that performance will be slow if using a CDROM. This is because
Ubuntu needs to load software from the CD drive which is orders of magnitude slower than a
hard disk drive (though the USB flash drive option should be fast). Secondly, any files you may
create or any changes you make to the system during a live session will be lost when the system
shuts down or reboots. One advantage of this, however, is that you also can't break anything,
so feel free to experiment as much as you like.
3.4 Installing Ubuntu on a Disk Drive Containing Microsoft Windows
If you already have Windows installed on your PC you can install Ubuntu onto the same disk
drive and boot from either operating system (a configuration known as dual booting). During
the installation process Ubuntu will resize the Windows partition on your hard disk to make

Ubuntu 11.04 Essentials
23
room for the Ubuntu installation (you will be asked how much of your disk drive you wish to
use for Linux) and set up a special boot manager that will allow you to choose whether to boot
Linux or Windows each time you power up your system. All of this is non-destructive, in that
your Windows partition and all the applications and data therein will be kept intact. All that will
happen is that the Windows part of the disk will be smaller than it was originally.
Another useful feature of a Windows/Ubuntu dual-boot configuration is that your Windows
logical drives (C:, D: etc) will be accessible from Ubuntu, so you will be able to access your
Windows data files from Linux. This means, for example, that you will be able to access your
Microsoft Word and Excel files using the Linux version of LibreOffice included with Ubuntu.
For detailed steps on creating a Windows/Ubuntu dual boot environment see Installing Ubuntu
11.04 on a Windows System (Dual booting).
3.5 Installing Ubuntu Inside a Windows Installation
Ubuntu also provides the ability to install Ubuntu onto the file system of an existing Windows
installation. This is similar to the dual booting approach outlined above with the exception that
the hard disk does not need to be repartitioned to create Linux partitions for the Ubuntu
installation. Instead, all the files which make up Ubuntu are installed in a new folder on the
Windows disk just like any other files. All that is required is enough disk space on a Windows
disk drive to accommodate the Ubuntu installation (around 8GB is recommended).
This type of installation is achieved using technology called the Ubuntu Windows Installer, or
Wubi for short. The process involves downloading and running the Wubi installation
executable, selecting a target disk drive, providing a user name and password for accessing the
Ubuntu installation and clicking an Install button. Wubi will then download the Ubuntu
distribution and perform the installation into a folder on the chosen Windows disk drive. When
the system is subsequently rebooted, the user is given the option to boot either Windows or
Ubuntu.
Refer to Installing Ubuntu 11.04 on a Windows Disk with Wubi for more details on this
installation option.
3.6 Performing a Clean Ubuntu Installation
If you are installing Ubuntu on a clean hard disk drive, or plan to overwrite the existing
Windows or other operating system installation on the drive then installing Ubuntu is
straightforward. Simply follow the steps in Performing a Clean Ubuntu 11.04 Installation to
install Ubuntu on the entire disk drive.
Ubuntu 11.04 Essentials
24
Chapter 4. Performing a Clean Ubuntu 11.04 Installation
In this chapter of Ubuntu 11.04 Essentials we will cover the steps necessary to install Ubuntu
11.04 on either a new system with no current operating installed, or a system containing an
existing operating system (such as Windows) which you plan to delete and overwrite with
Ubuntu. The steps outlined in this chapter also apply if you plan to install Ubuntu 11.04 on a
virtual disk as a guest inside a virtualization environment such as VirtualBox. If you already have
Windows installed on your hard disk drive and do not wish to overwrite it with Ubuntu you
should read Installing Ubuntu 11.04 on a Windows System (Dual booting) and Installing Ubuntu
11.04 on a Windows Disk with Wubi prior to starting the installation process.
This chapter assumes you already have the Ubuntu ISO image burned to a CDROM or written to
a USB flash drive. If you do not yet have this, first refer to How to Download and Try Ubuntu
11.04 for instructions and then return here to begin the installation process.
4.1 Beginning the Ubuntu Installation
To start the installation, place the Ubuntu CD into the CD-ROM or DVD drive or insert the USB
flash drive and reboot your computer system. If the system loads the old operating system, or
indicates that it cannot find an operating system to load you will need to change the boot order
in the system BIOS. To do this reboot again. Early in the boot process the BIOS will display a
message indicating which key should be pressed to enter Setup. Press the key indicated so that
the BIOS Setup menu appears. Navigate the menu system until you find the setting indicating
the boot order used by the BIOS. Change the order so that either the drive containing the
Ubuntu CDROM or the USB flash drive device is listed before the hard disk drive, then exit and
save the settings. Reboot once more and you should find that Ubuntu loads. Once Ubuntu has
loaded you will be presented with the following screen:
Ubuntu 11.04 Essentials
25
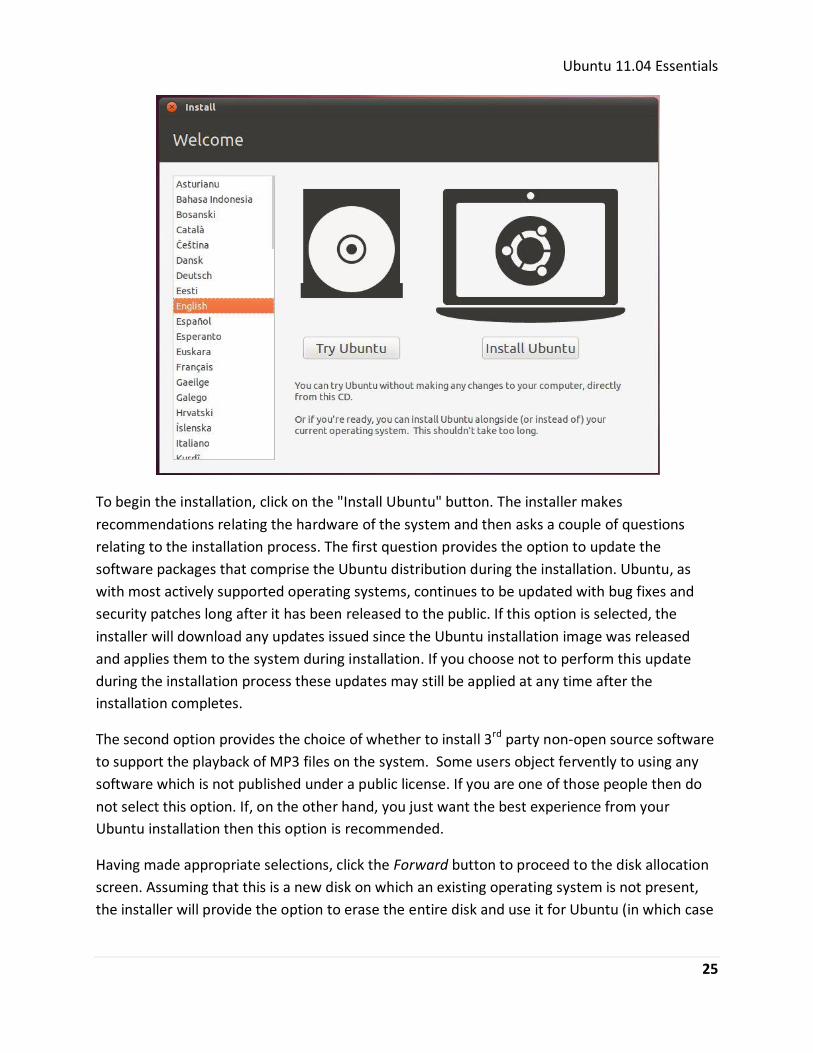
To begin the installation, click on the "Install Ubuntu" button. The installer makes
recommendations relating the hardware of the system and then asks a couple of questions
relating to the installation process. The first question provides the option to update the
software packages that comprise the Ubuntu distribution during the installation. Ubuntu, as
with most actively supported operating systems, continues to be updated with bug fixes and
security patches long after it has been released to the public. If this option is selected, the
installer will download any updates issued since the Ubuntu installation image was released
and applies them to the system during installation. If you choose not to perform this update
during the installation process these updates may still be applied at any time after the
installation completes.
The second option provides the choice of whether to install 3rd party non-open source software
to support the playback of MP3 files on the system. Some users object fervently to using any
software which is not published under a public license. If you are one of those people then do
not select this option. If, on the other hand, you just want the best experience from your
Ubuntu installation then this option is recommended.
Having made appropriate selections, click the Forward button to proceed to the disk allocation
screen. Assuming that this is a new disk on which an existing operating system is not present,
the installer will provide the option to erase the entire disk and use it for Ubuntu (in which case
Ubuntu 11.04 Essentials
26
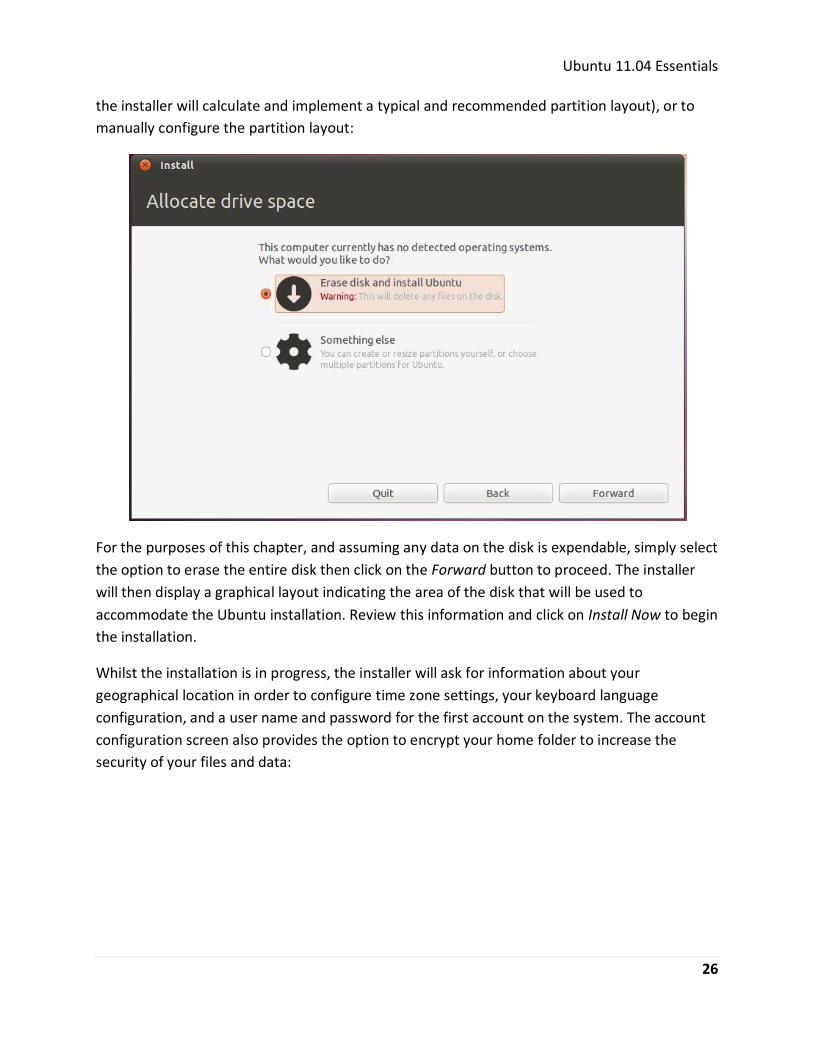
the installer will calculate and implement a typical and recommended partition layout), or to
manually configure the partition layout:
For the purposes of this chapter, and assuming any data on the disk is expendable, simply select
the option to erase the entire disk then click on the Forward button to proceed. The installer
will then display a graphical layout indicating the area of the disk that will be used to
accommodate the Ubuntu installation. Review this information and click on Install Now to begin
the installation.
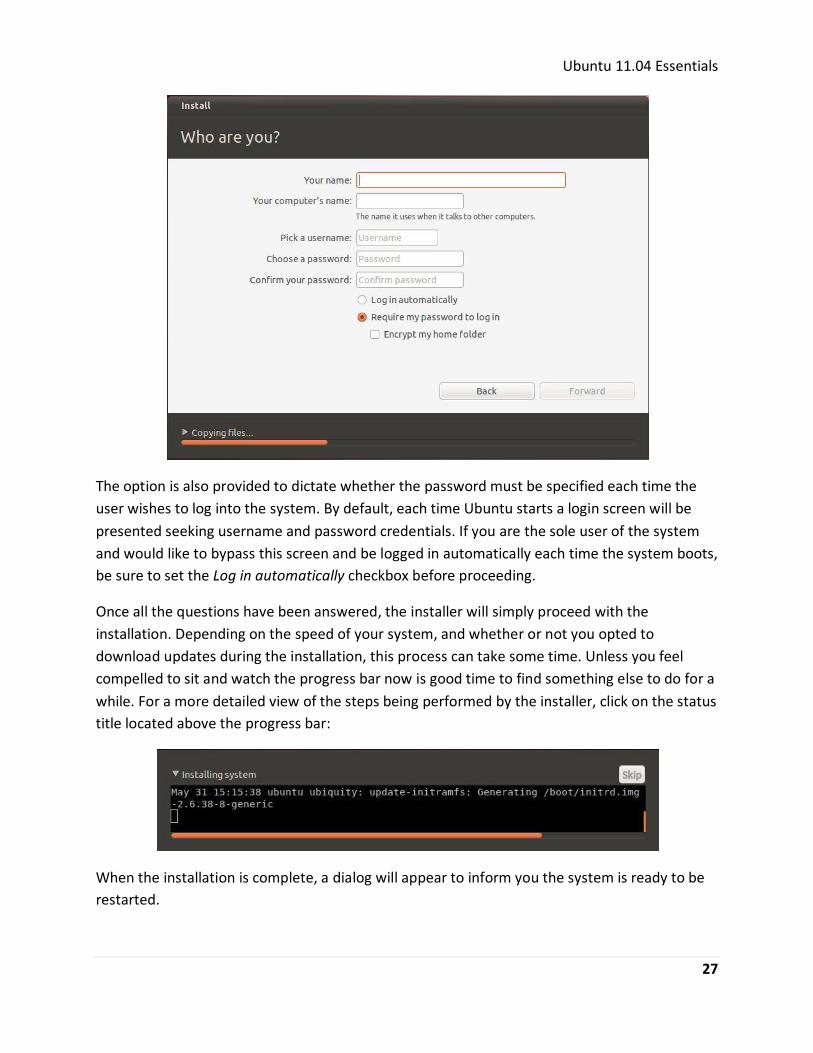
Whilst the installation is in progress, the installer will ask for information about your
geographical location in order to configure time zone settings, your keyboard language
configuration, and a user name and password for the first account on the system. The account
configuration screen also provides the option to encrypt your home folder to increase the
security of your files and data:
Ubuntu 11.04 Essentials
27
The option is also provided to dictate whether the password must be specified each time the
user wishes to log into the system. By default, each time Ubuntu starts a login screen will be
presented seeking username and password credentials. If you are the sole user of the system
and would like to bypass this screen and be logged in automatically each time the system boots,
be sure to set the Log in automatically checkbox before proceeding.
Once all the questions have been answered, the installer will simply proceed with the
installation. Depending on the speed of your system, and whether or not you opted to
download updates during the installation, this process can take some time. Unless you feel
compelled to sit and watch the progress bar now is good time to find something else to do for a
while. For a more detailed view of the steps being performed by the installer, click on the status
title located above the progress bar:
When the installation is complete, a dialog will appear to inform you the system is ready to be
restarted.

Ubuntu 11.04 Essentials
28
When you are ready to reboot, press the Restart Now button. The installer may prompt you to
remove the installation media and the system will take a few moments to shut down. At this
point remove the CDROM or USB flash drive (depending on which you used to perform the
installation) and press the Enter key to proceed.
4.2 Booting Ubuntu for the First Time
When the system reboots Ubuntu will load and the Ubuntu login screen will appear (unless you
selected the automatic login option during installation). Enter the user name and password you
set up during the installation process if prompted to do so and you will be logged into the
Ubuntu Unity Desktop environment:
In the event that the graphics display hardware on the system does not support the Unity
desktop, a dialog will appear notifying you of this limitation and the Ubuntu GNOME classic
desktop will load instead. This typically means that the graphics adapter installed in the system
Ubuntu 11.04 Essentials
29
does not meet the requirements to run Unity. The options at this point are either to continue
using the classic desktop environment, or to install and use the Unity 2D desktop environment.
Unity 2D provides much of the functionality of the full Unity environment, but without the
graphics effects that require the presence more advanced display hardware. Before doing so,
however, it is worth running a test to confirm that the hardware is incompatible with Unity.
4.3 Testing Hardware for Unity Compatibility
As previously discussed, the Ubuntu Unity desktop environment imposes certain requirements
in terms of the display adaptor and corresponding Graphics Processing Unit (GPU). If the Unity
desktop fails to run then hardware limitations are almost certainly the cause. In order to verify
this, and gain a better understanding of the missing display features, the following command
may be run within a Terminal window (accessed within the classic desktop via the Applications -
> Accessories -> Terminal menu option or by pressing Ctrl-Alt-T):
/usr/lib/nux/unity_support_test -p
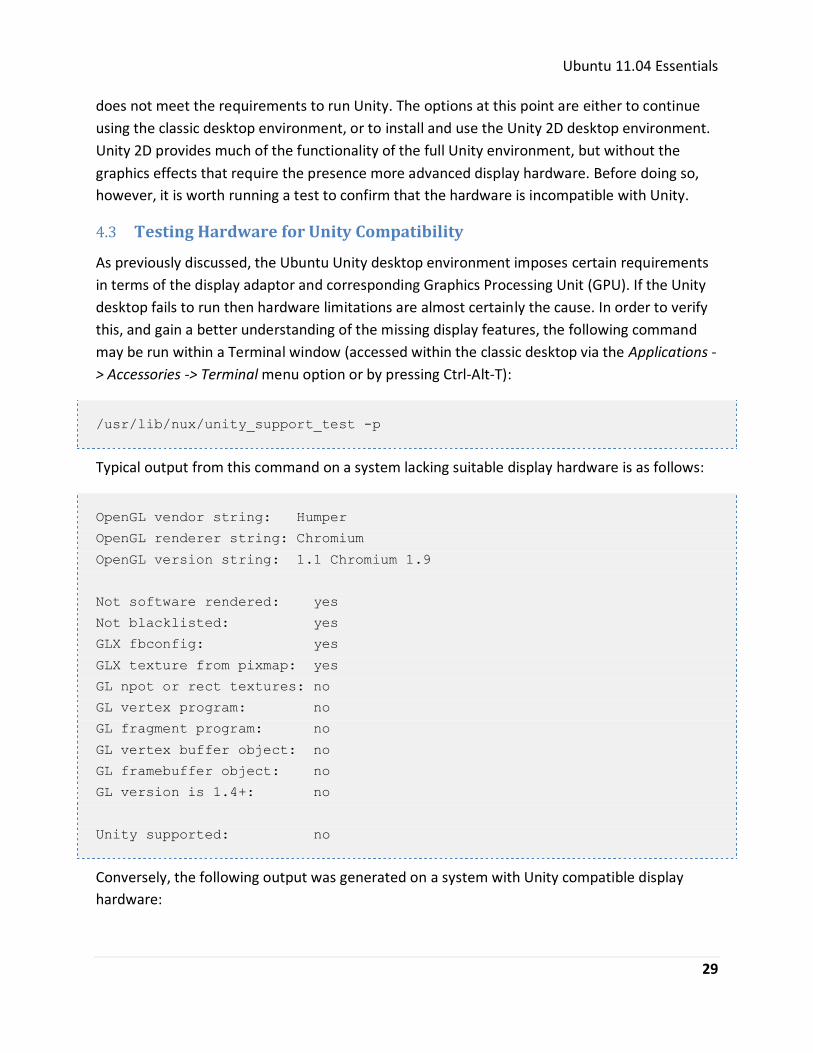
Typical output from this command on a system lacking suitable display hardware is as follows:
OpenGL vendor string: Humper
OpenGL renderer string: Chromium
OpenGL version string: 1.1 Chromium 1.9
Not software rendered: yes
Not blacklisted: yes
GLX fbconfig: yes
GLX texture from pixmap: yes
GL npot or rect textures: no
GL vertex program: no
GL fragment program: no
GL vertex buffer object: no
GL framebuffer object: no
GL version is 1.4+: no
Unity supported: no
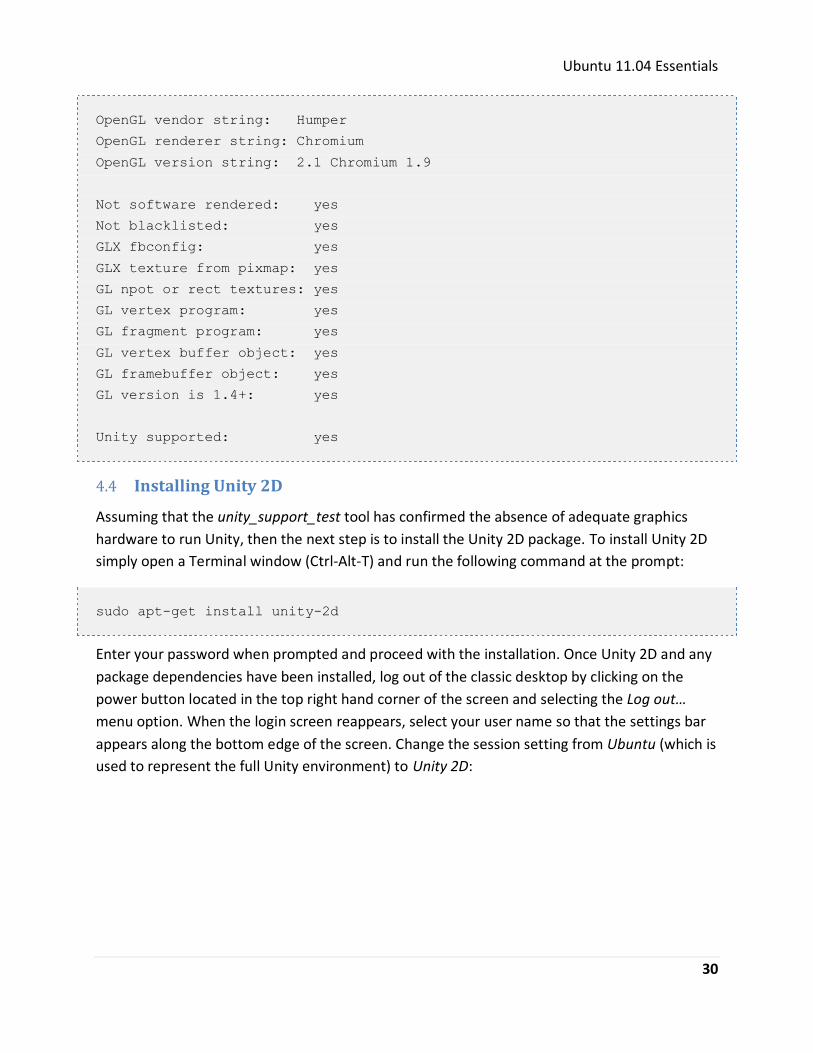
Conversely, the following output was generated on a system with Unity compatible display
hardware:
Ubuntu 11.04 Essentials
30
OpenGL vendor string: Humper
OpenGL renderer string: Chromium
OpenGL version string: 2.1 Chromium 1.9
Not software rendered: yes
Not blacklisted: yes
GLX fbconfig: yes
GLX texture from pixmap: yes
GL npot or rect textures: yes
GL vertex program: yes
GL fragment program: yes
GL vertex buffer object: yes
GL framebuffer object: yes
GL version is 1.4+: yes
Unity supported: yes
4.4 Installing Unity 2D
Assuming that the unity_support_test tool has confirmed the absence of adequate graphics
hardware to run Unity, then the next step is to install the Unity 2D package. To install Unity 2D
simply open a Terminal window (Ctrl-Alt-T) and run the following command at the prompt:
sudo apt-get install unity-2d
Enter your password when prompted and proceed with the installation. Once Unity 2D and any
package dependencies have been installed, log out of the classic desktop by clicking on the
power button located in the top right hand corner of the screen and selecting the Log out…
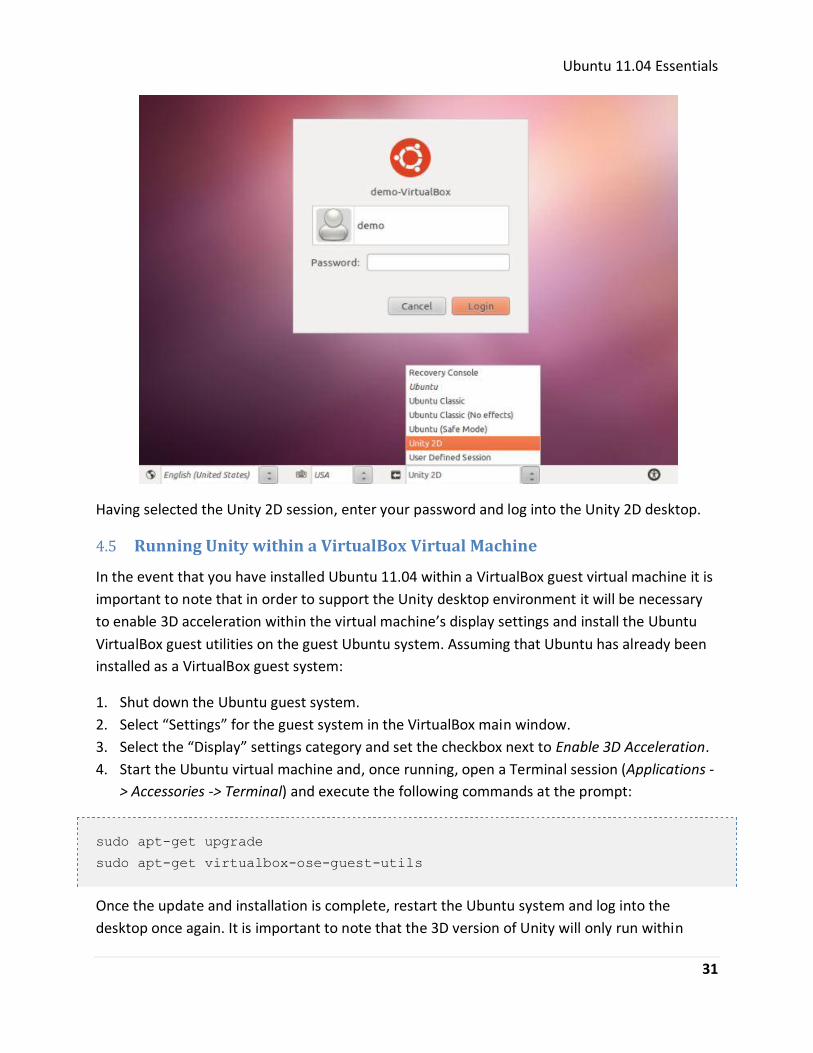
menu option. When the login screen reappears, select your user name so that the settings bar
appears along the bottom edge of the screen. Change the session setting from Ubuntu (which is
used to represent the full Unity environment) to Unity 2D:
Ubuntu 11.04 Essentials
31
Having selected the Unity 2D session, enter your password and log into the Unity 2D desktop.
4.5 Running Unity within a VirtualBox Virtual Machine
In the event that you have installed Ubuntu 11.04 within a VirtualBox guest virtual machine it is
important to note that in order to support the Unity desktop environment it will be necessary
to enable 3D acceleration within the virtual machine’s display settings and install the Ubuntu
VirtualBox guest utilities on the guest Ubuntu system. Assuming that Ubuntu has already been
installed as a VirtualBox guest system:
1. Shut down the Ubuntu guest system.
2. Select “Settings” for the guest system in the VirtualBox main window.
3. Select the “Display” settings category and set the checkbox next to Enable 3D Acceleration.
4. Start the Ubuntu virtual machine and, once running, open a Terminal session (Applications -
> Accessories -> Terminal) and execute the following commands at the prompt:
sudo apt-get upgrade
sudo apt-get virtualbox-ose-guest-utils
Once the update and installation is complete, restart the Ubuntu system and log into the
desktop once again. It is important to note that the 3D version of Unity will only run within
Ubuntu 11.04 Essentials
32
VirtualBox if the host system on which the virtual machine is running has a graphics adapter
capable of supporting the required 3D acceleration features. If the Unity desktop does not
appear after installing the guest utilities, the first step is to verify that the host’s graphics
adapter is supported by Unity by reviewing the requirements at:
https://wiki.ubuntu.com/DesktopExperienceTeam/UnityHardwareRequirements
If the host system does not support Unity then the best option is to install and use Unity 2D as
outlined in the previous section of this chapter.
4.6 Installing Updates
As with most operating systems today, each particular release of the Ubuntu distribution
continues to evolve after it has been released to the public. This generally takes the form of bug
fixes and security updates and, occasionally, new features that may be downloaded over the
internet and installed on your system.
Best practices dictate that the first step after installing Ubuntu is to make sure any available
updates are applied to the system. This can be achieved either through the desktop
environment or via the command-line prompt in a Terminal window.
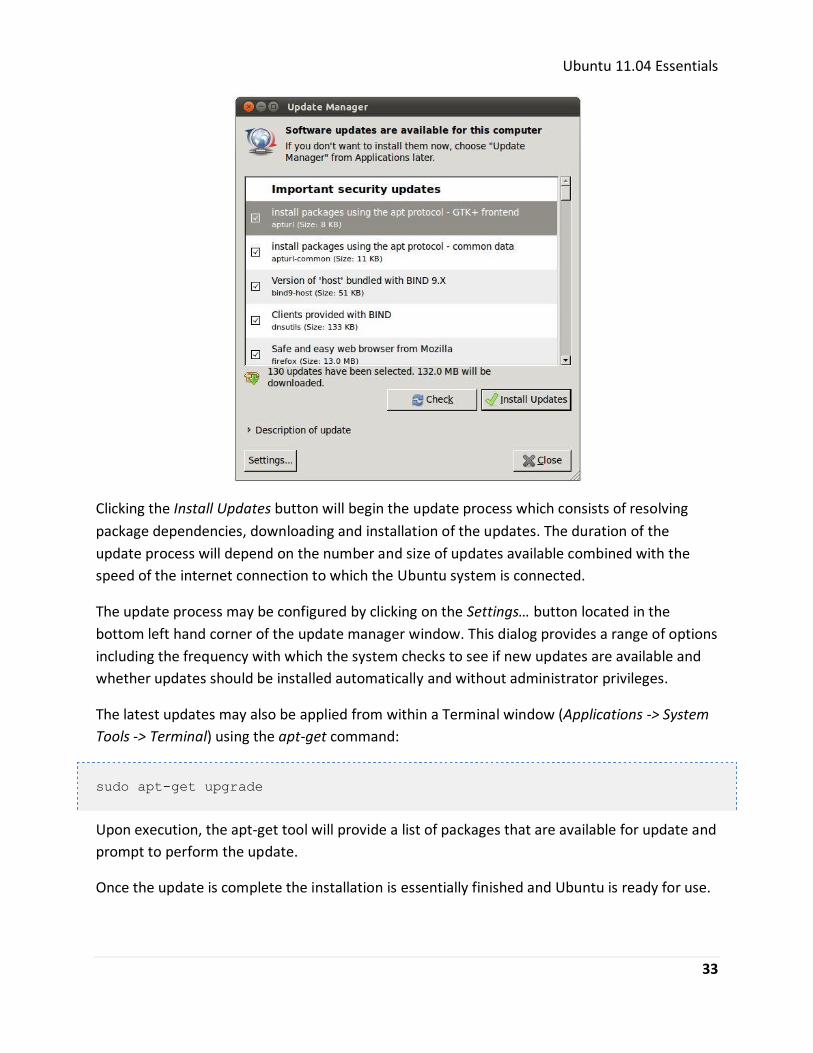
To check for updates using the graphical Update Manager tool, press Alt+F2, type update-
manager into the Run a command box and press Enter. Once invoked, the tool will provide a list
of the available updates together with references to more detailed information on each one
under the Description of update heading:
Ubuntu 11.04 Essentials
33
Clicking the Install Updates button will begin the update process which consists of resolving
package dependencies, downloading and installation of the updates. The duration of the
update process will depend on the number and size of updates available combined with the
speed of the internet connection to which the Ubuntu system is connected.
The update process may be configured by clicking on the Settings… button located in the
bottom left hand corner of the update manager window. This dialog provides a range of options
including the frequency with which the system checks to see if new updates are available and
whether updates should be installed automatically and without administrator privileges.
The latest updates may also be applied from within a Terminal window (Applications -> System
Tools -> Terminal) using the apt-get command:
sudo apt-get upgrade
Upon execution, the apt-get tool will provide a list of packages that are available for update and
prompt to perform the update.
Once the update is complete the installation is essentially finished and Ubuntu is ready for use.
Ubuntu 11.04 Essentials
34
Chapter 5. Installing Ubuntu 11.04 on a Windows System
(Dual booting)
Ubuntu, just like most Linux distributions, will happily co-exist on a hard disk drive with just
about any version of Windows. This is a concept known as dual-booting. Essentially, when you
power up your PC you will be presented with a menu providing the option to boot either
Ubuntu or Windows. Obviously you can only run one operating system at a time, but it is worth
noting that the files on the Windows partition of your disk drive will be available to you from
Ubuntu regardless of whether your Windows partition was formatted using NTFS, FAT16 or
FAT32.
During the installation process the Ubuntu installer will detect the Windows installation on the
drive and provide the option of deleting it and using the entire disk for Ubuntu, or sharing the
disk with Windows. In the latter case you will be able to specify the percentage of the disk to be
used for Ubuntu. According to the Ubuntu documentation, a minimum of 5 GB of disk space is
required for a full Ubuntu Desktop Edition installation, and more space to store any files you
may subsequently create. Ideally, however, at least 8 GB of disk space should be allocated to
the Ubuntu installation to avoid later problems. Once the disk space for Ubuntu has been
selected, the installer will resize the Windows partition (without destroying any data) and use
the remainder of the disk for Ubuntu.
5.1 Beginning the Ubuntu Installation
To start the installation, place the Ubuntu CD into the CD-ROM or DVD drive, or insert the USB
flash drive and reboot your computer system. If the system loads Windows again you will need
to change the boot order in your system BIOS so that the CD or DVD drive or USB device is
checked for bootable media before the primary hard disk drive. To do this reboot again. Early in
the boot process the BIOS will display a message indicating which key should be pressed to
enter Setup mode. Press the key indicated so that the BIOS Setup menu appears. Navigate the
menu system until you find the setting that indicates the boot order used by the BIOS. Change
the order so that the drive containing the Ubuntu CDROM or USB drive is listed before the hard
disk drive, then exit and save the settings. Reboot once more and you should find that Ubuntu
loads. Once Ubuntu has loaded you will be presented with the following screen:
Ubuntu 11.04 Essentials
35
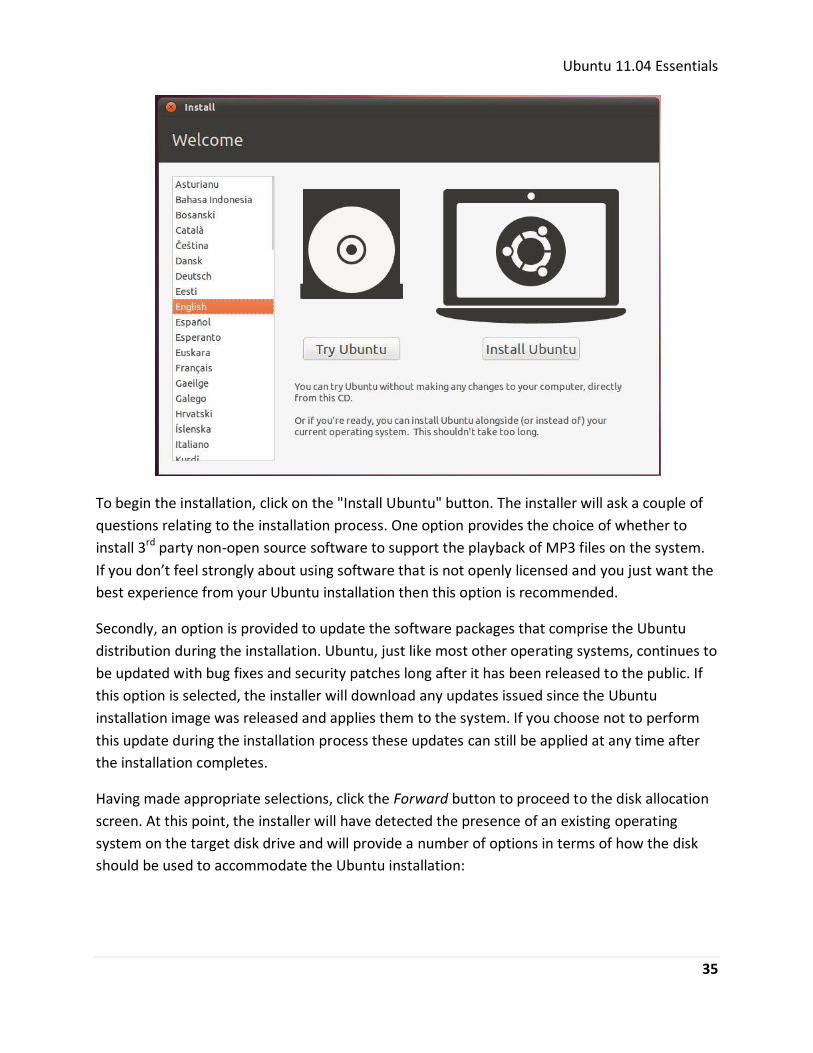
To begin the installation, click on the "Install Ubuntu" button. The installer will ask a couple of
questions relating to the installation process. One option provides the choice of whether to
install 3rd party non-open source software to support the playback of MP3 files on the system.
If you don’t feel strongly about using software that is not openly licensed and you just want the
best experience from your Ubuntu installation then this option is recommended.
Secondly, an option is provided to update the software packages that comprise the Ubuntu
distribution during the installation. Ubuntu, just like most other operating systems, continues to
be updated with bug fixes and security patches long after it has been released to the public. If
this option is selected, the installer will download any updates issued since the Ubuntu
installation image was released and applies them to the system. If you choose not to perform
this update during the installation process these updates can still be applied at any time after
the installation completes.
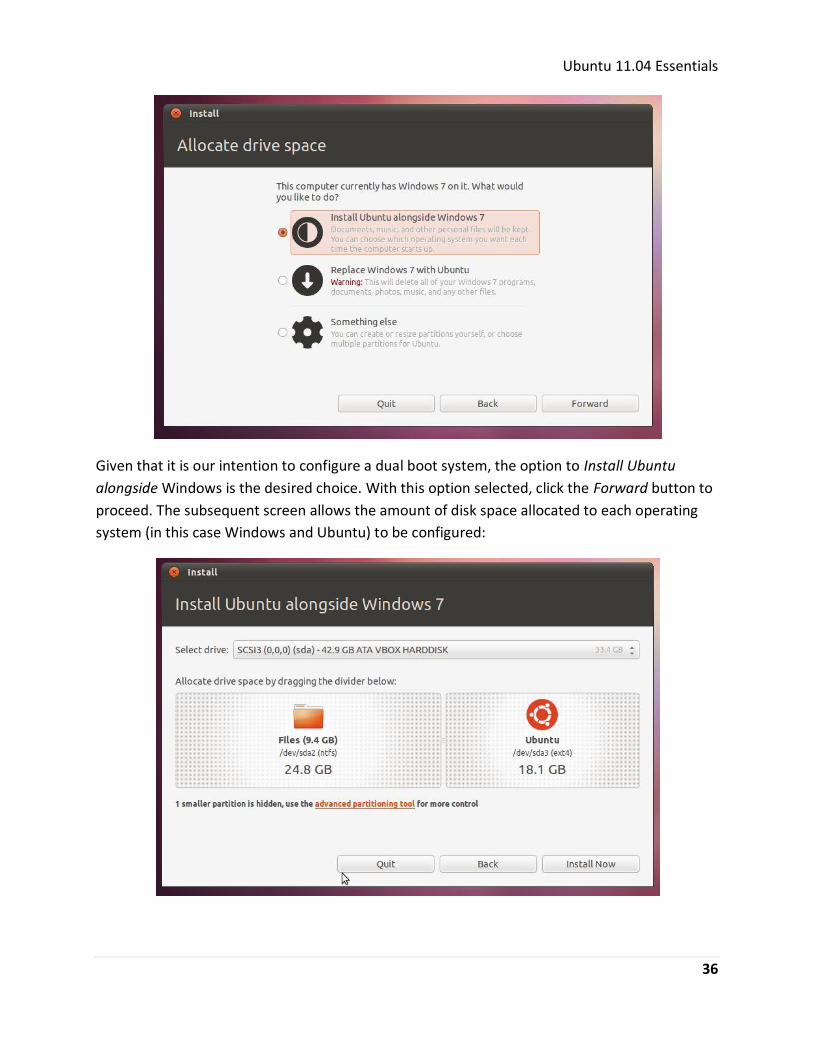
Having made appropriate selections, click the Forward button to proceed to the disk allocation
screen. At this point, the installer will have detected the presence of an existing operating
system on the target disk drive and will provide a number of options in terms of how the disk
should be used to accommodate the Ubuntu installation:
Ubuntu 11.04 Essentials
36
Given that it is our intention to configure a dual boot system, the option to Install Ubuntu
alongside Windows is the desired choice. With this option selected, click the Forward button to
proceed. The subsequent screen allows the amount of disk space allocated to each operating
system (in this case Windows and Ubuntu) to be configured:

Ubuntu 11.04 Essentials
37
At this point it is necessary to decide how much of your Windows partition you wish to donate
to the Ubuntu installation. Move the slider (positioned between the Windows and Ubuntu
partitions in the diagram) until the Ubuntu partition allocation is a size you are comfortable
with. As mentioned previously, at least 8 GB should be allocated to Ubuntu if possible.
When you have selected the size of the Ubuntu partition, click the Install Now button to
proceed with the installation. When the warning dialog appears read it carefully and click
Continue if you are sure you wish to proceed.
5.2 Configuring Time Zone, User and Keyboard Information
Whilst the installation is in progress, the installer will ask for information about your geographic
location in order to configure Timezone settings, your keyboard language configuration, and a
user name and password for the first account on the system. The account configuration screen
also provides the option to encrypt your home folder to increase the security of your files and
data:
The option is also provided to dictate whether the password must be specified each time the
user wishes to log into the system. By default, each time Ubuntu starts a login screen will be
presented seeking username and password credentials. If you are the sole user of the system
and would like to bypass this screen and be logged in automatically each time the system boots,
be sure to set the Log in automatically checkbox before proceeding.
Ubuntu 11.04 Essentials
38
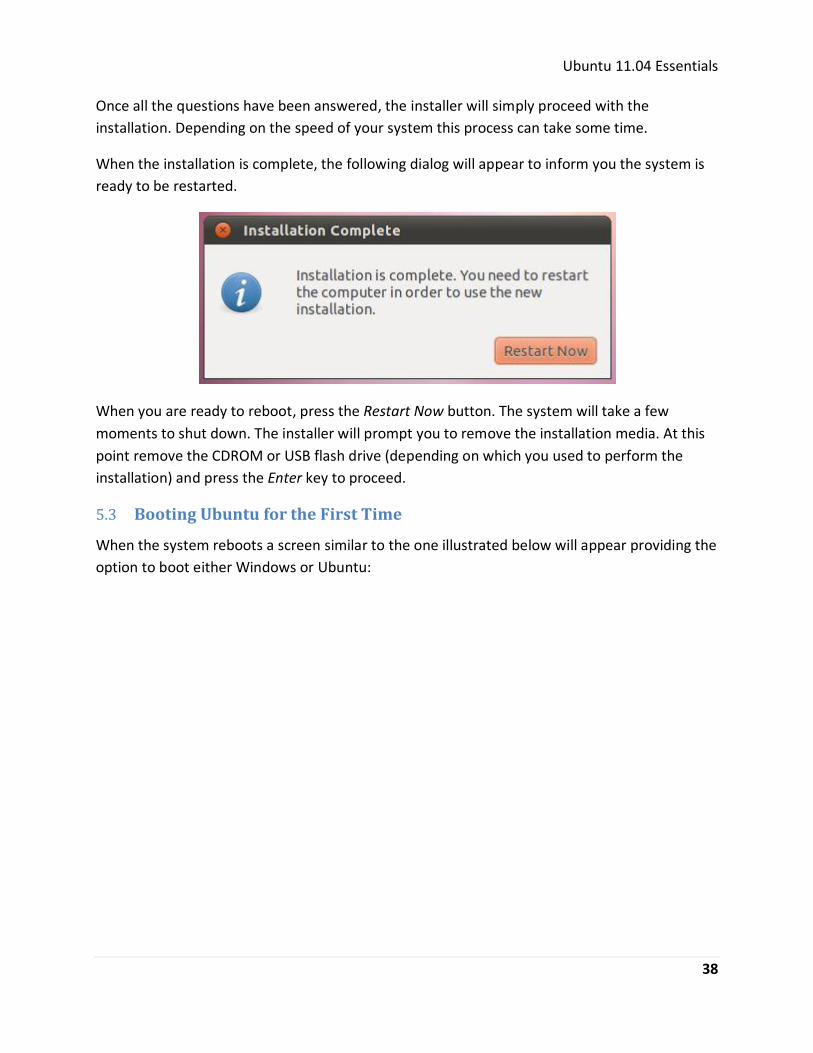
Once all the questions have been answered, the installer will simply proceed with the
installation. Depending on the speed of your system this process can take some time.
When the installation is complete, the following dialog will appear to inform you the system is
ready to be restarted.
When you are ready to reboot, press the Restart Now button. The system will take a few
moments to shut down. The installer will prompt you to remove the installation media. At this
point remove the CDROM or USB flash drive (depending on which you used to perform the
installation) and press the Enter key to proceed.
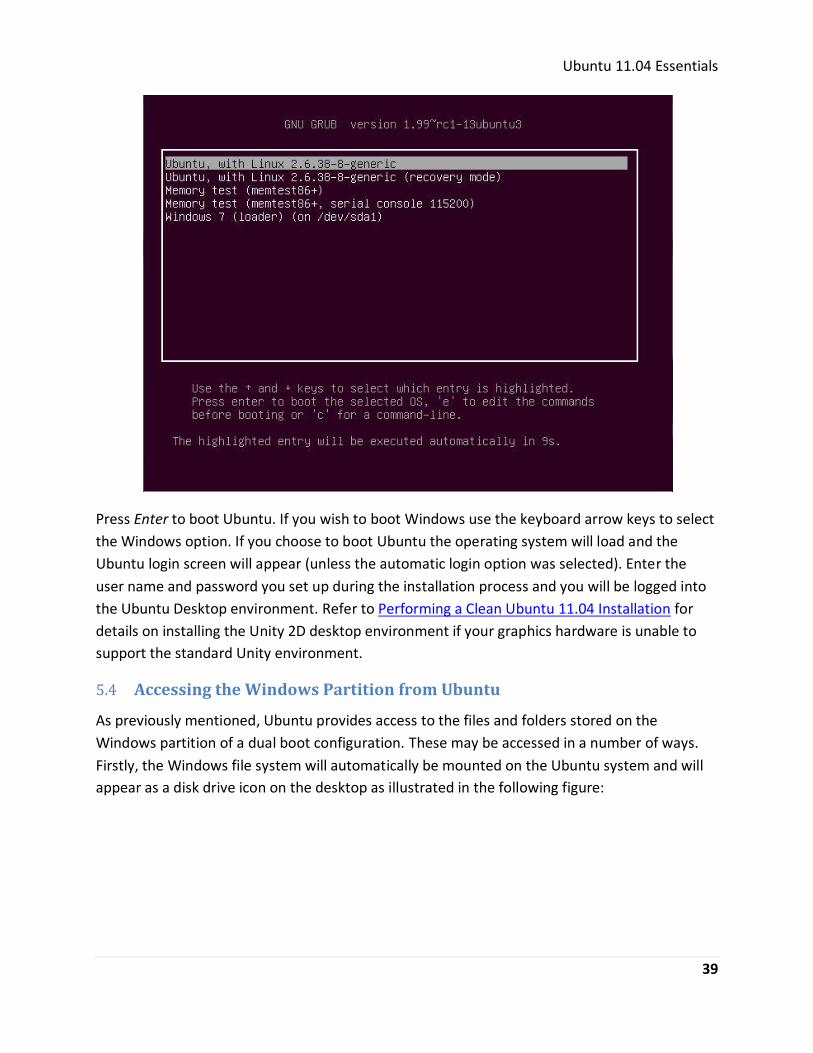
5.3 Booting Ubuntu for the First Time
When the system reboots a screen similar to the one illustrated below will appear providing the
option to boot either Windows or Ubuntu:
Ubuntu 11.04 Essentials
39
Press Enter to boot Ubuntu. If you wish to boot Windows use the keyboard arrow keys to select
the Windows option. If you choose to boot Ubuntu the operating system will load and the
Ubuntu login screen will appear (unless the automatic login option was selected). Enter the
user name and password you set up during the installation process and you will be logged into
the Ubuntu Desktop environment. Refer to Performing a Clean Ubuntu 11.04 Installation for
details on installing the Unity 2D desktop environment if your graphics hardware is unable to
support the standard Unity environment.
5.4 Accessing the Windows Partition from Ubuntu
As previously mentioned, Ubuntu provides access to the files and folders stored on the
Windows partition of a dual boot configuration. These may be accessed in a number of ways.
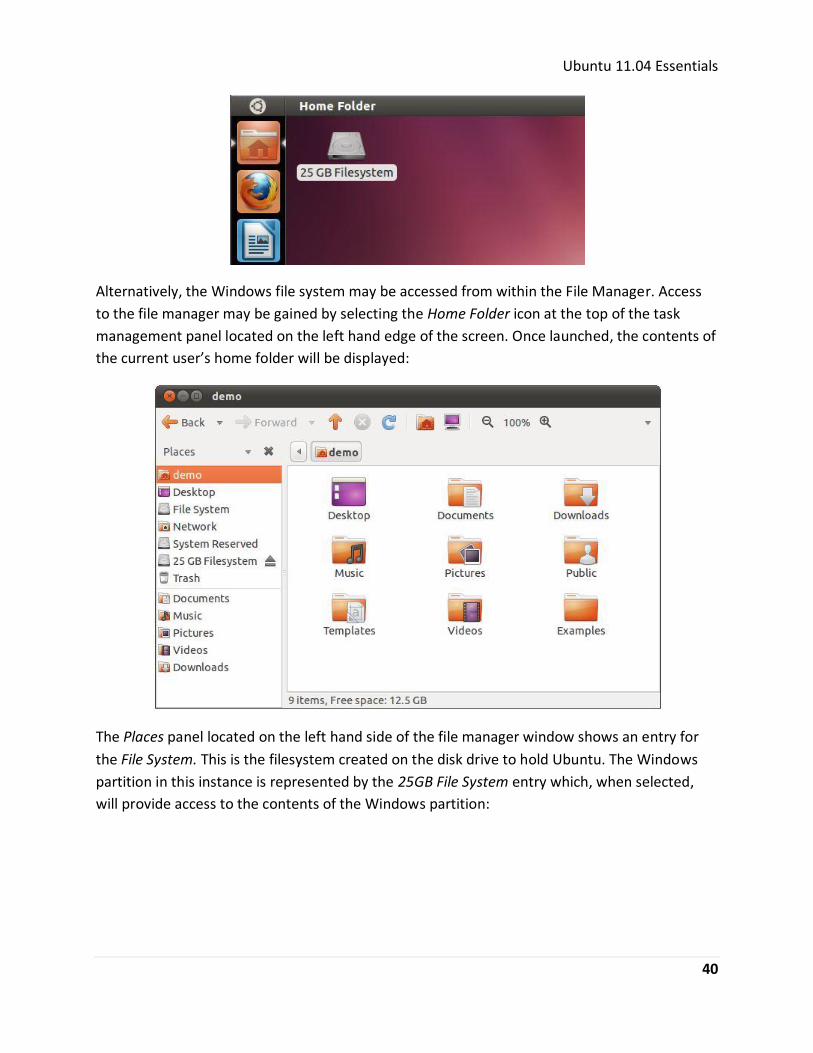
Firstly, the Windows file system will automatically be mounted on the Ubuntu system and will
appear as a disk drive icon on the desktop as illustrated in the following figure:
Ubuntu 11.04 Essentials
40
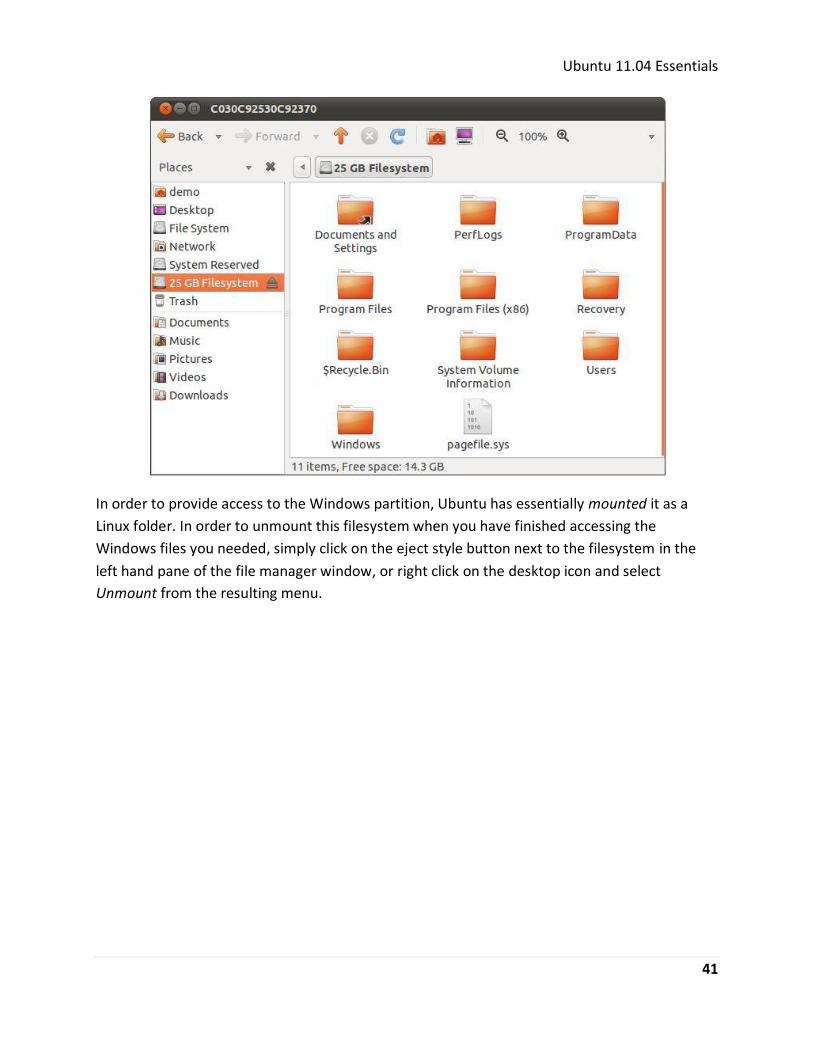
Alternatively, the Windows file system may be accessed from within the File Manager. Access
to the file manager may be gained by selecting the Home Folder icon at the top of the task
management panel located on the left hand edge of the screen. Once launched, the contents of
the current user’s home folder will be displayed:
The Places panel located on the left hand side of the file manager window shows an entry for
the File System. This is the filesystem created on the disk drive to hold Ubuntu. The Windows
partition in this instance is represented by the 25GB File System entry which, when selected,
will provide access to the contents of the Windows partition:
Ubuntu 11.04 Essentials
41
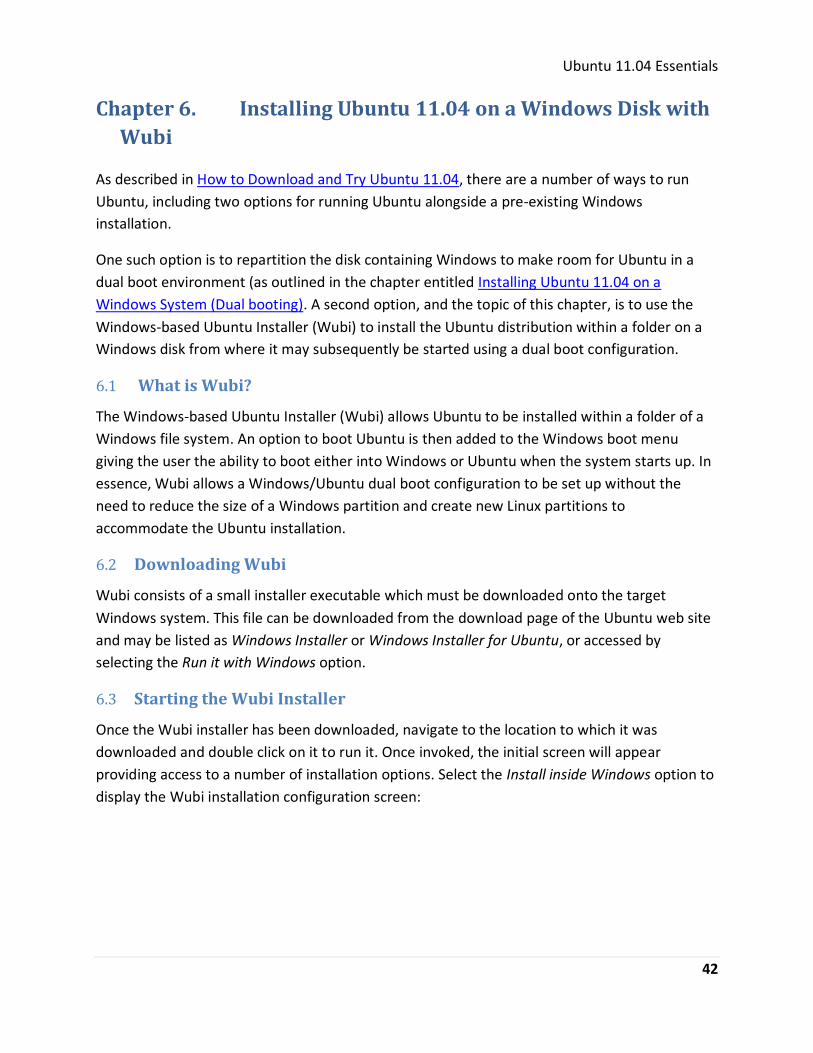
In order to provide access to the Windows partition, Ubuntu has essentially mounted it as a
Linux folder. In order to unmount this filesystem when you have finished accessing the
Windows files you needed, simply click on the eject style button next to the filesystem in the
left hand pane of the file manager window, or right click on the desktop icon and select
Unmount from the resulting menu.
Ubuntu 11.04 Essentials
42
Chapter 6. Installing Ubuntu 11.04 on a Windows Disk with
Wubi
As described in How to Download and Try Ubuntu 11.04, there are a number of ways to run
Ubuntu, including two options for running Ubuntu alongside a pre-existing Windows
installation.
One such option is to repartition the disk containing Windows to make room for Ubuntu in a
dual boot environment (as outlined in the chapter entitled Installing Ubuntu 11.04 on a
Windows System (Dual booting). A second option, and the topic of this chapter, is to use the
Windows-based Ubuntu Installer (Wubi) to install the Ubuntu distribution within a folder on a
Windows disk from where it may subsequently be started using a dual boot configuration.
6.1 What is Wubi?
The Windows-based Ubuntu Installer (Wubi) allows Ubuntu to be installed within a folder of a
Windows file system. An option to boot Ubuntu is then added to the Windows boot menu
giving the user the ability to boot either into Windows or Ubuntu when the system starts up. In
essence, Wubi allows a Windows/Ubuntu dual boot configuration to be set up without the
need to reduce the size of a Windows partition and create new Linux partitions to
accommodate the Ubuntu installation.
6.2 Downloading Wubi
Wubi consists of a small installer executable which must be downloaded onto the target
Windows system. This file can be downloaded from the download page of the Ubuntu web site
and may be listed as Windows Installer or Windows Installer for Ubuntu, or accessed by
selecting the Run it with Windows option.
6.3 Starting the Wubi Installer
Once the Wubi installer has been downloaded, navigate to the location to which it was
downloaded and double click on it to run it. Once invoked, the initial screen will appear
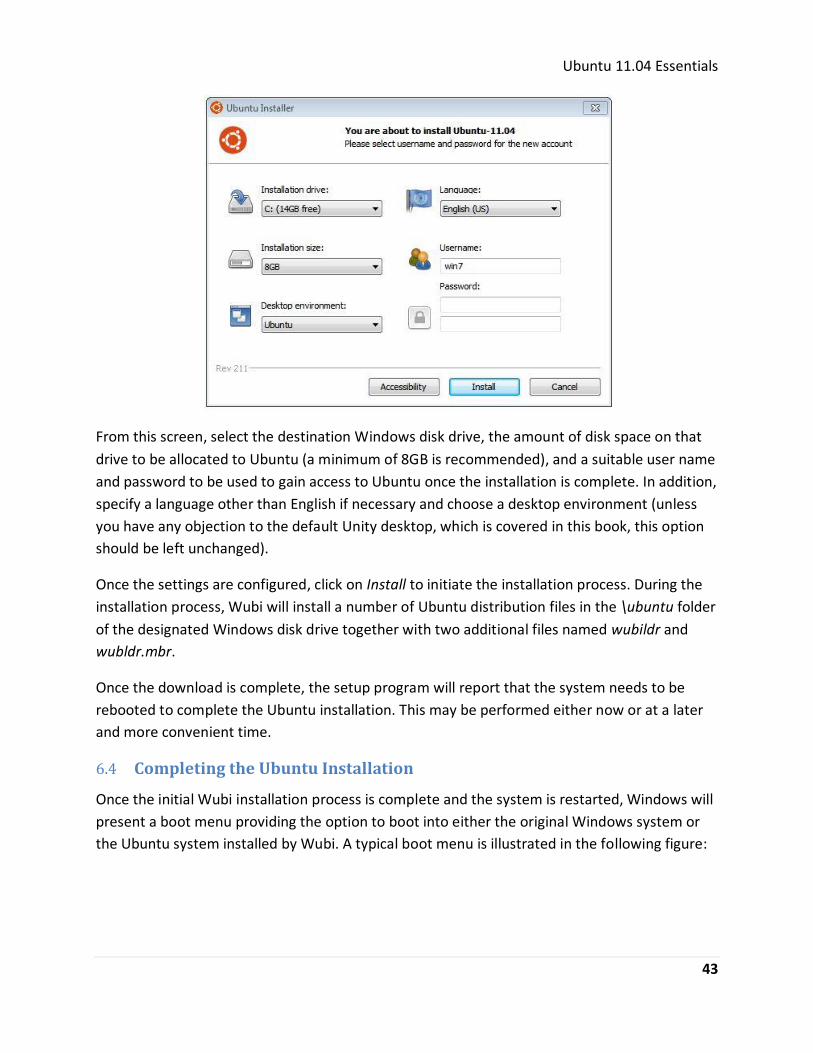
providing access to a number of installation options. Select the Install inside Windows option to
display the Wubi installation configuration screen:
Ubuntu 11.04 Essentials
43
From this screen, select the destination Windows disk drive, the amount of disk space on that
drive to be allocated to Ubuntu (a minimum of 8GB is recommended), and a suitable user name
and password to be used to gain access to Ubuntu once the installation is complete. In addition,
specify a language other than English if necessary and choose a desktop environment (unless
you have any objection to the default Unity desktop, which is covered in this book, this option
should be left unchanged).
Once the settings are configured, click on Install to initiate the installation process. During the
installation process, Wubi will install a number of Ubuntu distribution files in the \ubuntu folder
of the designated Windows disk drive together with two additional files named wubildr and
wubldr.mbr.
Once the download is complete, the setup program will report that the system needs to be
rebooted to complete the Ubuntu installation. This may be performed either now or at a later
and more convenient time.
6.4 Completing the Ubuntu Installation
Once the initial Wubi installation process is complete and the system is restarted, Windows will
present a boot menu providing the option to boot into either the original Windows system or
the Ubuntu system installed by Wubi. A typical boot menu is illustrated in the following figure:
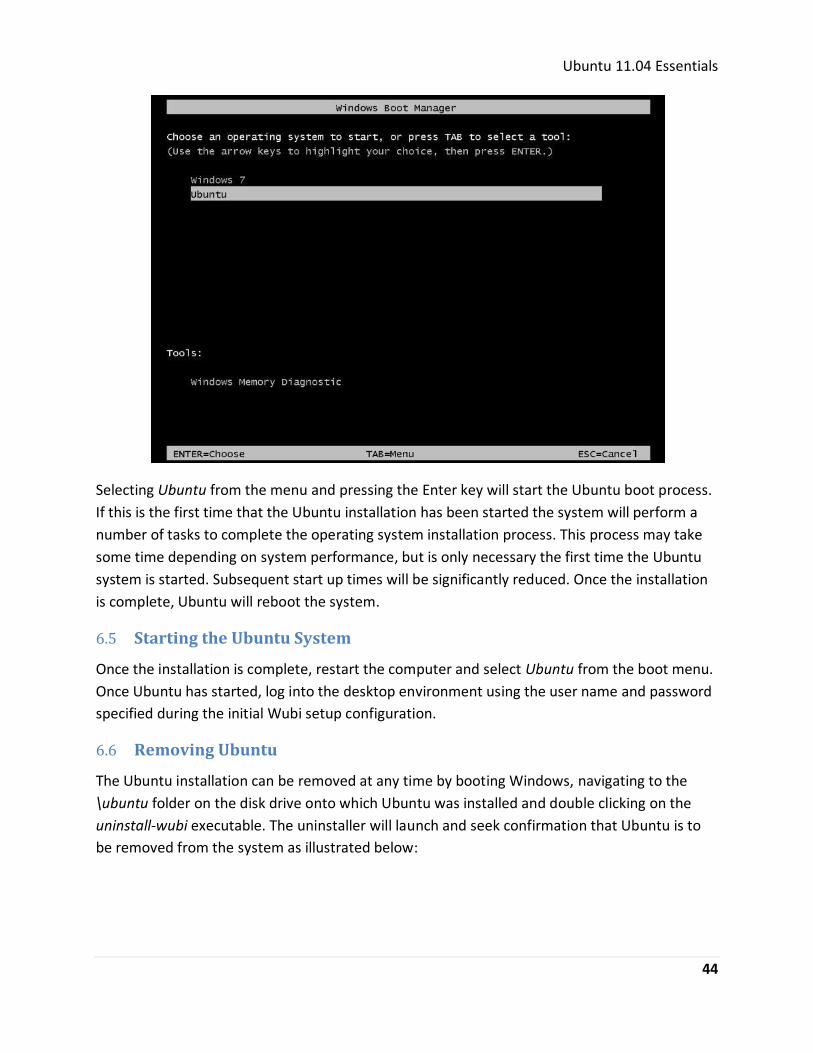
Ubuntu 11.04 Essentials
44
Selecting Ubuntu from the menu and pressing the Enter key will start the Ubuntu boot process.
If this is the first time that the Ubuntu installation has been started the system will perform a
number of tasks to complete the operating system installation process. This process may take
some time depending on system performance, but is only necessary the first time the Ubuntu
system is started. Subsequent start up times will be significantly reduced. Once the installation
is complete, Ubuntu will reboot the system.
6.5 Starting the Ubuntu System
Once the installation is complete, restart the computer and select Ubuntu from the boot menu.
Once Ubuntu has started, log into the desktop environment using the user name and password
specified during the initial Wubi setup configuration.
6.6 Removing Ubuntu
The Ubuntu installation can be removed at any time by booting Windows, navigating to the
\ubuntu folder on the disk drive onto which Ubuntu was installed and double clicking on the
uninstall-wubi executable. The uninstaller will launch and seek confirmation that Ubuntu is to
be removed from the system as illustrated below:
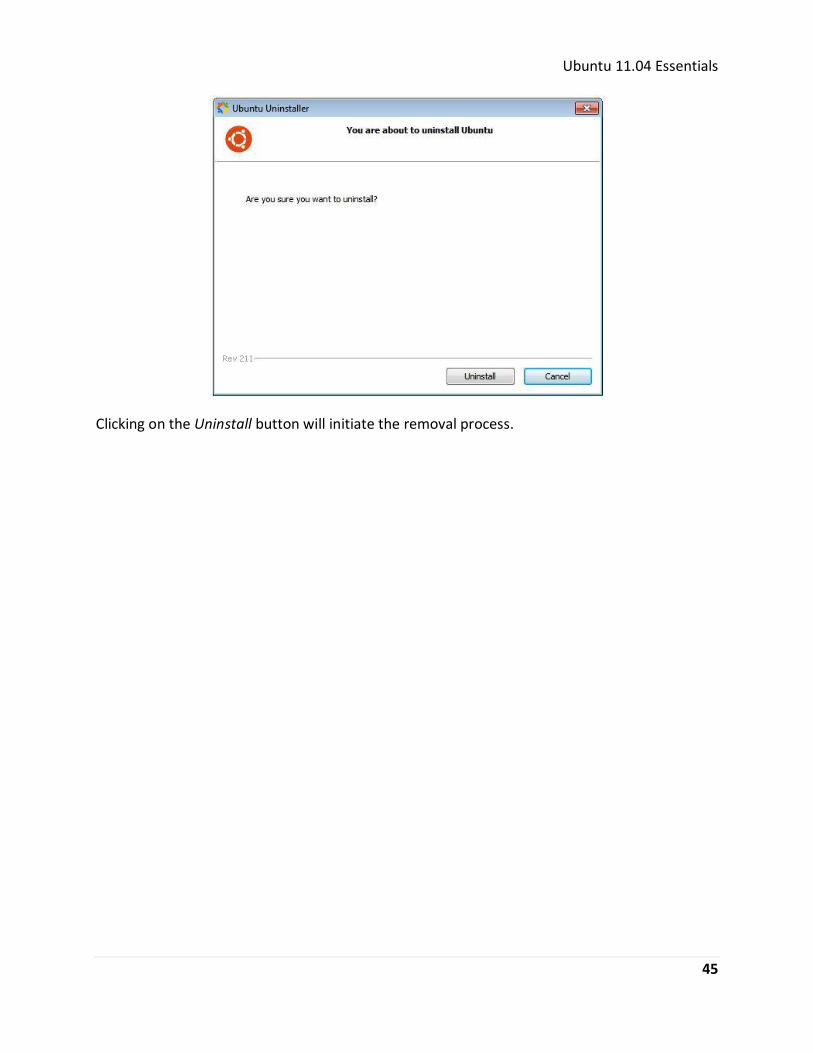
Ubuntu 11.04 Essentials
45
Clicking on the Uninstall button will initiate the removal process.
Ubuntu 11.04 Essentials
46
Chapter 7. Allocating an Existing Windows Partition to
Ubuntu 11.04
One of the most common configurations for a new Ubuntu installation involves reducing the
size of the pre-existing Windows partition on the disk drive and using the resulting space to
install Ubuntu. This so called "dual boot" configuration allows the user to have both operating
systems installed on the disk drive with the option to boot one or the other when the system is
powered on. Performing this type of installation was covered in Installing Ubuntu 11.04 on a
Windows System (Dual booting).
This chapter is intended for users who took this particular approach and have decided they like
Ubuntu enough to delete Windows entirely from the disk, and use the resulting space for Linux.
In this chapter, therefore, we will work through this process step by step.
7.1 Deleting the Windows Partition from the Disk
The first step in freeing up the Windows partition for use by Linux is to delete it. The Ubuntu
distribution includes a tool called GParted which is a graphical disk partitioning tool. This tool is
not, however, typically installed by default. The tool may be installed either from the command
prompt in a terminal window or using the Ubuntu Software Center.
To install using the Ubuntu Software Center, click on the Applications button on the launcher
panel (the magnifying glass containing the + sign) and enter gparted into the Search
Applications field of the resulting panel. If the GNU Partition Editor is shown in the Apps
Available for download section it will need to be installed on the system. Click on the icon and
wait for the software center to load and update with the GParted package information:
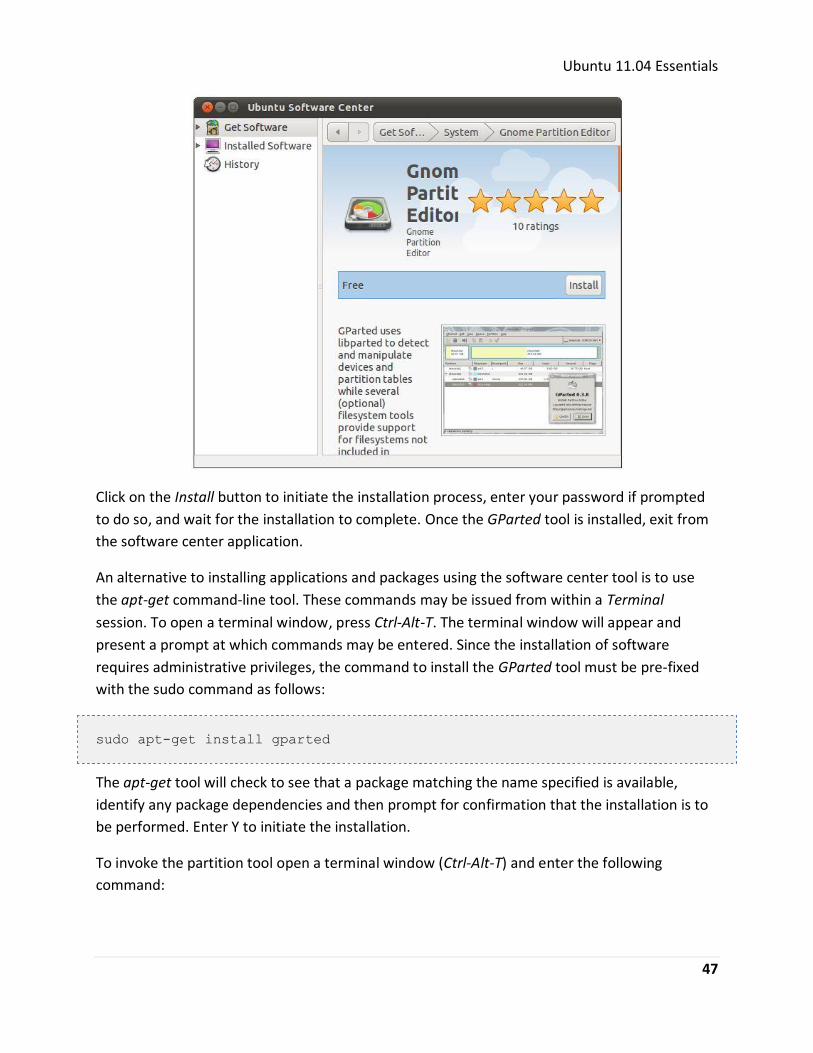
Ubuntu 11.04 Essentials
47
Click on the Install button to initiate the installation process, enter your password if prompted
to do so, and wait for the installation to complete. Once the GParted tool is installed, exit from
the software center application.
An alternative to installing applications and packages using the software center tool is to use
the apt-get command-line tool. These commands may be issued from within a Terminal
session. To open a terminal window, press Ctrl-Alt-T. The terminal window will appear and
present a prompt at which commands may be entered. Since the installation of software
requires administrative privileges, the command to install the GParted tool must be pre-fixed
with the sudo command as follows:
sudo apt-get install gparted
The apt-get tool will check to see that a package matching the name specified is available,
identify any package dependencies and then prompt for confirmation that the installation is to
be performed. Enter Y to initiate the installation.
To invoke the partition tool open a terminal window (Ctrl-Alt-T) and enter the following
command:
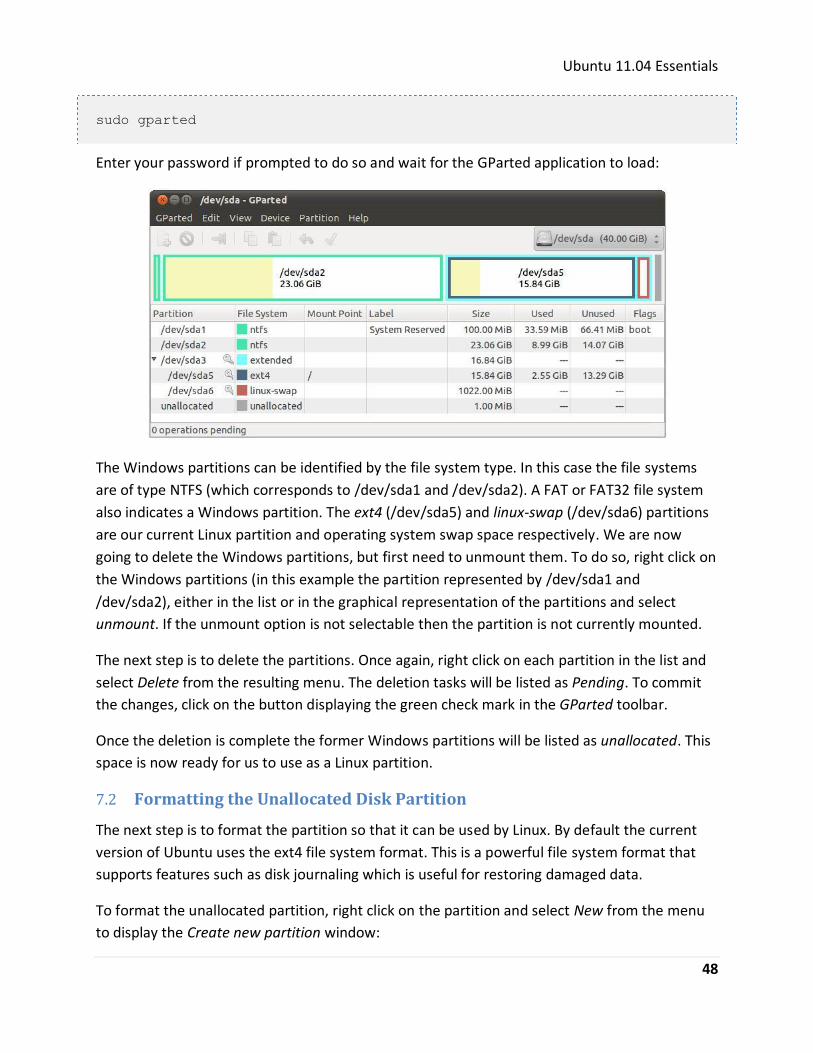
Ubuntu 11.04 Essentials
48
sudo gparted
Enter your password if prompted to do so and wait for the GParted application to load:
The Windows partitions can be identified by the file system type. In this case the file systems
are of type NTFS (which corresponds to /dev/sda1 and /dev/sda2). A FAT or FAT32 file system
also indicates a Windows partition. The ext4 (/dev/sda5) and linux-swap (/dev/sda6) partitions
are our current Linux partition and operating system swap space respectively. We are now
going to delete the Windows partitions, but first need to unmount them. To do so, right click on
the Windows partitions (in this example the partition represented by /dev/sda1 and
/dev/sda2), either in the list or in the graphical representation of the partitions and select
unmount. If the unmount option is not selectable then the partition is not currently mounted.
The next step is to delete the partitions. Once again, right click on each partition in the list and
select Delete from the resulting menu. The deletion tasks will be listed as Pending. To commit
the changes, click on the button displaying the green check mark in the GParted toolbar.
Once the deletion is complete the former Windows partitions will be listed as unallocated. This
space is now ready for us to use as a Linux partition.
7.2 Formatting the Unallocated Disk Partition
The next step is to format the partition so that it can be used by Linux. By default the current
version of Ubuntu uses the ext4 file system format. This is a powerful file system format that
supports features such as disk journaling which is useful for restoring damaged data.
To format the unallocated partition, right click on the partition and select New from the menu
to display the Create new partition window: