UAL AND Z INGLE AND Z INGLE AND Z · indemnification of telular corporation ("telular") you shall...
44
11/19/04 Part Number 56029901 Phonecell ® SX5T CDMA2000 ® 1X Fixed Wireless Terminal SX5T-505C/-535C DUAL-BAND 800/1900 MHZ CDMA SX5T-500C SINGLE-BAND 800 MHZ CDMA SX5T-500C SINGLE-BAND 1900 MHZ CDMA USER MANUAL
Transcript of UAL AND Z INGLE AND Z INGLE AND Z · indemnification of telular corporation ("telular") you shall...
11/19/04 Part Number 56029901
Phonecell® SX5T CDMA2000® 1XFixed Wireless Terminal
SX5T-505C/-535C DUAL-BAND 800/1900 MHZ CDMASX5T-500C SINGLE-BAND 800 MHZ CDMA
SX5T-500C SINGLE-BAND 1900 MHZ CDMA
USER MANUAL

Phonecell® SX5T CDMA2000 ii User Manual
Quick Connection Diagram
Before installing the Phonecell® SX5T, carefully remove the contents from the shipping carton andcheck for evidence of shipping damage. If damage is found, contact your Authorized TelularDistributor or shipping agent immediately.
CONTENTS
Phonecell® SX5T CDMA FWT Spike Antenna Power Supply or BBU
AC Power Cord GPS Antenna(Optional)
SX5T Fixed Wireless Terminal

Phonecell® SX5T CDMA2000 iii User Manual
SAFE OPERATION INSTRUCTIONSIMPORTANT! Before installing or operating this product, read the SAFETY INFORMATIONsection on page 36 of this manual.
• Install the unit indoors.
• Install the unit on a hard, flat surface for proper ventilation.
• Do not expose the unit to rain or moisture.
• Do not place the unit on or close to sources of heat.
IMPORTANT NOTICESTERMS AND CONDITIONS FOR USE OF PHONECELL® PRODUCTS ("Product")
These Terms and Conditions are a legal contract between you and Telular Corporation for the title toand use of the Product. BY RETAINING AND USING THE PRODUCTAFTER RECEIPT OF IT, YOU AGREE TO THE TERMS AND CONDITIONS INCLUDING WARRANTY DISCLAIMERS, LIMITATIONS OF LIABILITYAND INDEMNIFICATION PROVISIONS BELOW. IF YOU DO NOTAGREE TO THE TERMS AND CONDITIONS, DO NOT USE THE PRODUCTAND IMMEDIATELYRETURN THE UNUSED PRODUCT FOR ACOMPLETE REFUND. You agree to accept soleresponsibility for any misuse of the Product by you; and, in addition, any negligent or illegal act oromission of your or your agents, contractors, servants, employees, or other users of the Product solong as the Product was obtained from you, in the use and operation of the Product.
INDEMNIFICATION OF TELULAR CORPORATION ("TELULAR")YOU SHALL INDEMNIFY, DEFEND AND HOLD HARMLESS TELULAR FOR ANY OF THE COST, INCLUDINGREASONABLE ATTORNEYS' FEES, AND FROM CLAIMS ARISING OUT OF YOU, YOUR CLIENTS' OR OTHER THIRDPARTIES' USE OR OPERATION OF THE PRODUCT: (i) FOR MISUSE OR IN A MANNER NOT CONTEMPLATED BY YOUAND TELULAR OR INCONSISTENT WITH THE PROVISIONS OF THIS MANUAL; (ii) IN AN ILLEGAL MANNER ORAGAINST PUBLIC POLICY; (iii) IN A MANNER SPECIFICALLY UNAUTHORIZED IN THIS MANUAL; (iv) IN A MANNERHARMFUL OR DANGEROUS TO THIRD PARTIES; (v) FROM CLAIMS BY ANYONE RESPECTING PROBLEMS,ERRORS OR MISTAKES OF THE PRODUCT; OR (vi) COMBINATION OF THE PRODUCT WITH MATERIAL,MODIFICATION OF THE PRODUCT OR USE OF THE PRODUCT IN AN ENVIRONMENT NOT PROVIDED, ORPERMITTED, BY TELULAR IN WRITING. THE PARTIES SHALL GIVE EACH OTHER PROMPT NOTICE OF ANY SUCHCOST OR CLAIMS AND COOPERATE, EACH WITH THE OTHER, TO EFFECTUATE THIS INDEMNIFICATION,DEFENSE AND HOLD HARMLESS.
Telular Corporation
Corporate Headquarters647 North Lakeview Parkway
Vernon Hills, Illinois 60061, USATechnical Support
Tel: 847-247-9400 • Fax: 847-247-0021E-mail: [email protected] • http://www.telular.com
Part Number 56029901 ©2004 Telular Corporation, All Rights Reserved
PLEASE SEE THE IMPORTANT NOTICESAND SAFETYINFORMATION SECTIONSOF THIS MANUALFOR IMPORTANT INFORMATION ON USE ANDINDEMNIFICATION. FOR WARRANTYINFORMATION, PLEASE SEE THE LIMITEDCOMMERCIALWARRANTY CARD WHICH WAS PACKAGED WITH YOUR DEVICE.
Phonecell® SX5T CDMA2000 iv User Manual
Table of ContentsQuick Connection Diagram..................................................................................................iiSafe Operation Instructions................................................................................................iiiImportant Notices ................................................................................................................iiiSetup......................................................................................................................................1
RUIM Card Installation (RUIM Model Only) ....................................................................................1Connecting an SX5T Model With a Power Supply..........................................................................2Emergency Batteries .......................................................................................................................3Connecting an SX5T Model With a BBU (Backup Battery Unit) .....................................................4SX5T Location and Installation........................................................................................................5Wall Mounting ..................................................................................................................................5GPS Antenna Mounting (optional on SX5T-505C/-535C only)........................................................6Direct Connection: Phone, Fax and Data .......................................................................................7Connection via Wall Jacks...............................................................................................................7
Getting to Know Your SX5T.................................................................................................8LED Status Indicators ......................................................................................................................8Important Dial Tones........................................................................................................................9
Using the SX5T ...................................................................................................................10Making Calls ..................................................................................................................................10Receiving Calls ..............................................................................................................................10Ending Calls...................................................................................................................................10Using In-Call Features...................................................................................................................10Accessing Your Voicemail ..............................................................................................................11Making a Three-Way Call ..............................................................................................................11Using Call Forwarding....................................................................................................................11
Adjusting Your Phone’s Settings ......................................................................................12Volume Level .................................................................................................................................12Entering Configuration Mode.........................................................................................................12Changing the Lock Code...............................................................................................................12Audio Line Level ............................................................................................................................13Auto-Send Delay............................................................................................................................13Frequently Dialed Numbers (Zero Delay Dialing)..........................................................................13Call Barring ....................................................................................................................................13Call Restrict (SX5T-500C only)......................................................................................................14Dial Tone After Remote Disconnect (DTARD) ...............................................................................14Hotline............................................................................................................................................15One-Minute Alert............................................................................................................................15TTY Use.........................................................................................................................................15Voicemail Number..........................................................................................................................16One-Touch Voicemail Retrieval .....................................................................................................16Restore User Defaults ...................................................................................................................16
Using Additional Hardware Devices .................................................................................17Using an External Answering Machine..........................................................................................17Setting Up Data Transfer for a Digital Video Recorder (DVR) or Satellite Receiver.....................17Using a Fax Machine With Your SX5T ..........................................................................................17
Windows XP/Windows 2000 Setup for Data & PC Fax ...................................................18Windows 98 Setup for Data & PC Fax ..............................................................................24Sending/Receiving a PC Fax .............................................................................................28Sending/Receiving 1X Data ...............................................................................................29Sending/Receiving Circuit Switched Data........................................................................30SX5T-500C Advanced Programming Settings .................................................................31SX5T Troubleshooting........................................................................................................35Conformance Statements ..................................................................................................36Safety Information ..............................................................................................................36

Phonecell® SX5T CDMA2000 1 User Manual
SetupRUIM Card Installation (RUIM Model Only)
Consult your service provider to determine if your unit requires the use of a RUIM (Removable UserIdentity Module) card. If it is a RUIM model, your SX5T will only be able to make emergency calls untilyou install a RUIM card. It will not receive calls or allow non-emergency outgoing calls without theRUIM card installed.
1. Remove the power supply if it has already been connected. (The power supply must beremoved whenever a RUIM Card is removed or installed.) If your unit has emergency batteriesinstalled, make sure the AC/Batter Switch is in the AC Power position (see “Battery Operation”on page 3).
2. Remove the RUIM compartment cover - see Figure 1.
3. Open the RUIM compartment holder.
4. Line up the RUIM card with the arrow on the RUIM card holder - see Figure 2.
5. Gently insert the RUIM card in the slot of the RUIM card holder.
6. Close the RUIM card holder.
7. Reattach the RUIM compartment cover, closing it with the separate cover screw provided.
RUIMCompartment
Cover
RUIM CardHolder
RUIM Card
Cover Screw
Figure 2 - Install the RUIM Card.Figure 1 - RUIM Compartment.
Note: Do not force the RUIM card holder shut. Make sure the RUIM card is aligned properly with thedirectional arrow on the holder.

Phonecell® SX5T CDMA2000 2 User Manual
Connecting an SX5T Model With a Power SupplyYour SX5T has either a Power Supply (part #74007301) or a Battery Backup Unit (BBU; part #74006803). If your unit uses a Power Supply, please follow the instructions below to connect the SX5T to your AC power. If it uses a BBU, please see “Connecting an SX5TModel With a BBU” on page 4.
To connect an SX5T model with a Power Supply:
1. Connect the barrel connector of the power supply to the AC power input receptacle of the SX5T- see Figure 3.
2. Plug the AC power cord into the power supply.
3. Plug the AC power cord into the AC Power outlet.
4. Check the cellular signal strength and move the unit until you achieve the best signal possible - see LED Status Indicators on page 8 for more information.
Figure 3 – Connect the SX5T to AC Power.
AC Power
AC Power Position
Battery Position
AC Power Cord
PowerSupply
Barrel Connector
AC Power Input Receptacle
Hint: If there are no emergency batteries in the SX5T, it will only power on if the AC/Battery switch is in theAC power position - see Figure 5 on page 3 for a detailed view.

Phonecell® SX5T CDMA2000 3 User Manual
Emergency BatteriesIf your SX5T has a Power Supply, you may install emergency batteries to power the device in theevent of a power outage. Do not install emergency batteries if your SX5T has a BBU. The SX5Twill not automatically switch to battery if AC power fails; you must flip the AC/Battery switch to batteryoperation - see Figure 5.
To install emergency batteries:
1. Remove the battery access door screw located on the bottom of the unit - see Figure 4.
2. Press the battery access door tabs and remove the battery access door.
3. Install 4 “AA” alkaline batteries (not supplied) - see Figure 4.
4. Reinstall the battery access door using the screw.
Battery Operation
SX5T models with Power Supplies will not automatically switch from AC to battery upon loss of ACpower. The AC/Battery switch must be changed manually - see Figure 5. Battery power will provideup to 3.5 hours of standby or up to one hour of talk time, depending on the SX5T model.
Figure 5 – SX5T AC/Battery switch.
AC/Battery Switch
Battery Position AC Power Position
Note: If you use rechargeable “AA” batteries with the SX5T, they must be recharged externally (the unit willnot recharge them automatically).
BatteryAccessDoor
Battery AccessDoor Screw
Figure 4 – SX5T battery installation.
WARNING!
Only “AA” alkaline batteries should beused with the Phonecell® SX5T. Use of any other batteries may result infire and/or other damage to the unit.
Phonecell® SX5T CDMA2000 4 User Manual
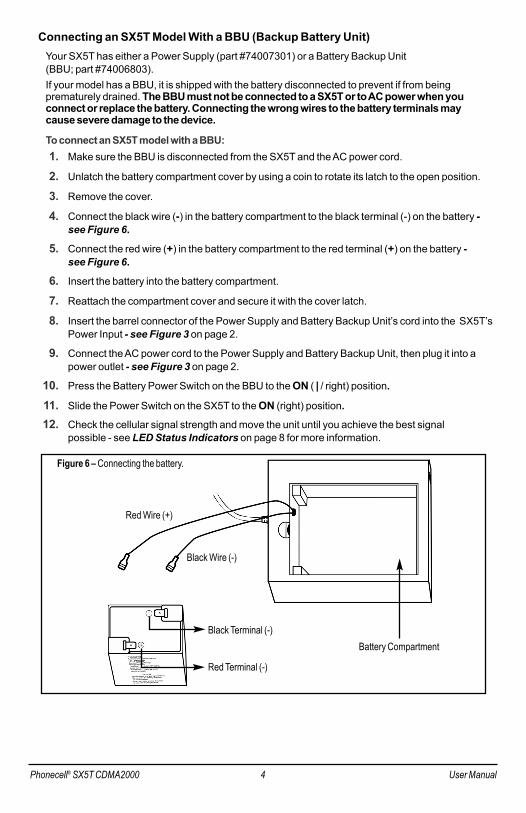
Connecting an SX5T Model With a BBU (Backup Battery Unit)Your SX5T has either a Power Supply (part #74007301) or a Battery Backup Unit (BBU; part #74006803).If your model has a BBU, it is shipped with the battery disconnected to prevent if from beingprematurely drained. The BBU must not be connected to a SX5T or to AC power when youconnect or replace the battery. Connecting the wrong wires to the battery terminals may cause severe damage to the device.
To connect an SX5T model with a BBU:1. Make sure the BBU is disconnected from the SX5T and the AC power cord.
2. Unlatch the battery compartment cover by using a coin to rotate its latch to the open position.
3. Remove the cover.
4. Connect the black wire (-) in the battery compartment to the black terminal (-) on the battery -see Figure 6.
5. Connect the red wire (+) in the battery compartment to the red terminal (+) on the battery - see Figure 6.
6. Insert the battery into the battery compartment.
7. Reattach the compartment cover and secure it with the cover latch.
8. Insert the barrel connector of the Power Supply and Battery Backup Unit’s cord into the SX5T’sPower Input - see Figure 3 on page 2.
9. Connect the AC power cord to the Power Supply and Battery Backup Unit, then plug it into apower outlet - see Figure 3 on page 2.
10. Press the Battery Power Switch on the BBU to the ON ( | / right) position.
11. Slide the Power Switch on the SX5T to the ON (right) position.
12. Check the cellular signal strength and move the unit until you achieve the best signal possible - see LED Status Indicators on page 8 for more information.
Figure 6 – Connecting the battery.
Red Wire (+)
Black Wire (-)
Battery Compartment
Red Terminal (-)
Black Terminal (-)

Phonecell® SX5T CDMA2000 5 User Manual
SX5T Location and InstallationThe SX5T comes with a standard spike antenna (TNC) - see Figure 7. For optimal signal strength,choose a location that is above ground and as close to windows (or exterior walls) as possible - seeFigure 8. Place the unit where you receive the best signal strength possible. (Cellular signal strengthis displayed by the Received Signal Strength Indicator [RSSI] LEDs on the unit - see LED StatusIndicators on page 8 for more information.)
1. Connect the antenna to the terminal - see Figure 7.
2. Finger-tighten the antenna. Do not over-tighten the antenna.
Wall Mounting1. Mark two hole locations 98.5 mm (3-7/8 inches) vertically apart and drill two holes into the wall.
2. Install the screws (not supplied) into the wall, leaving a gap (approximately 3 mm (1/8 inch))between screw head and wall.
3. Align the mounting holes with the screws and mount the SX5T onto the screws - see Figures 9and 10.
Figure 9 – SX5T mounting holes.
Mounting Holes
98,5
mm (3
7/8”
)
Figure 10 – Mount the SX5T onto the screws.
Figure 8 – Typical SX5T installations.
Wall Mount
Table Mount
GPS Brackets
Figure 7 – SX5T antenna connection.
Spikeantenna
TNC AntennaConnector
Phonecell® SX5T CDMA2000 6 User Manual
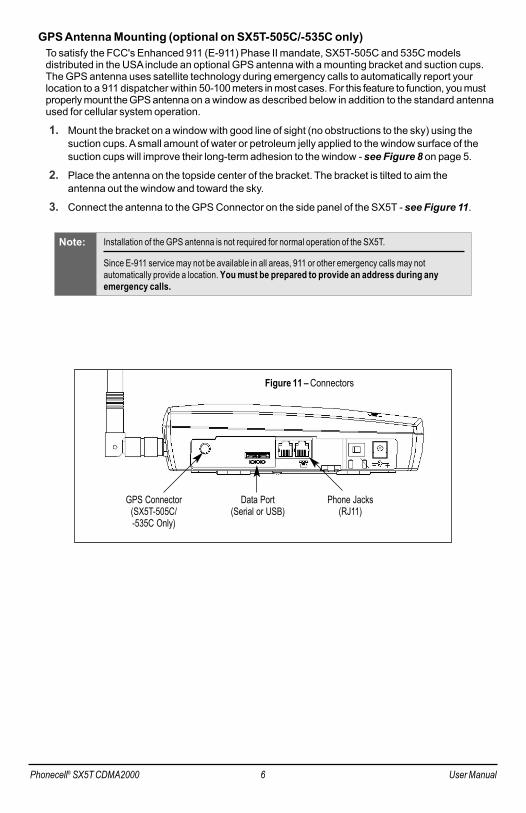
GPS Antenna Mounting (optional on SX5T-505C/-535C only)To satisfy the FCC's Enhanced 911 (E-911) Phase II mandate, SX5T-505C and 535C modelsdistributed in the USA include an optional GPS antenna with a mounting bracket and suction cups.The GPS antenna uses satellite technology during emergency calls to automatically report yourlocation to a 911 dispatcher within 50-100 meters in most cases. For this feature to function, you mustproperly mount the GPS antenna on a window as described below in addition to the standard antennaused for cellular system operation.
1. Mount the bracket on a window with good line of sight (no obstructions to the sky) using thesuction cups. Asmall amount of water or petroleum jelly applied to the window surface of thesuction cups will improve their long-term adhesion to the window - see Figure 8 on page 5.
2. Place the antenna on the topside center of the bracket. The bracket is tilted to aim the antenna out the window and toward the sky.
3. Connect the antenna to the GPS Connector on the side panel of the SX5T - see Figure 11.
GPS Connector(SX5T-505C/-535C Only)
Figure 11 – Connectors
Phone Jacks(RJ11)
Data Port(Serial or USB)
Note: Installation of the GPS antenna is not required for normal operation of the SX5T.
Since E-911 service may not be available in all areas, 911 or other emergency calls may notautomatically provide a location. You must be prepared to provide an address during anyemergency calls.

Phonecell® SX5T CDMA2000 7 User Manual
Direct Connection: Phone, Fax and Data 1. Connect a phone to either of your SX5T’s phone (RJ11) jacks using a standard telephone cord -
see Figure 11 on page 6.
2. If desired, connect your SX5T’s other phone (RJ11) jack to a second telephone or a fax machineusing a standard telephone cord - see Figure 11 on page 6.
3. If desired, connect a computer to the SX5T. You may either:· Use a Telular USB cable (part #1L01A043 or 81025901) to connect the computer’s USB port
to the SX5T’s data port;· Use a Telular serial cable (part #1L01A042 or 81025801) to connect the computer’s serial
port to the SX5T’s data port; · Or use a standard telephone cord to connect the computer’s modem out port to either of the
SX5T’s phone (RJ11) jacks.Contact your service provider to determine what wireless data transfer services are available.For more information on data connections, see “Windows XP/Windows 2000 Setup for Data &PC Fax” on page 18 or “Windows 98 Setup for Data & PC Fax” on page 24.
Connection via Wall JacksIf you do not have local phone service, you may use your SX5T to provide a connection to yourwireless service for devices that are plugged into your wall jacks.
1. Connect either of your SX5T’s phone (RJ11) jacks to any wall jack using a standard telephone cord - see Figure 11 on page 6.
2. If desired, connect your SX5T’s other phone (RJ11) jack to a telephone or fax machine using astandard telephone cord - see Figure 11 on page 6.
3. Connect additional phones, a fax machine and/or a computer modem to any available walljacks. Contact your service provider to determine what wireless data transfer services areavailable.
Important: DO NOT CONNECT YOUR SX5T TO A WALL JACK IF YOU HAVE OUTSIDE SERVICE (I.E., A DIAL TONE) AT YOUR WALL JACK. Your SX5T will not function properly and maybecome damaged if outside phone service has not been disconnected.

Phonecell® SX5T CDMA2000 8 User Manual
Getting to Know Your SX5TLED Status Indicators
The LED indicators are activated when the SX5T is powered on. The following tables describe themodes and operation of the indicators.
Service Indicator
*Contact your service provider to verify that service has been activated.
Signal Strength Indicator (Received Signal Strength Indicator – RSSI)
Signal Strength LEDs Activity Cellular Signal Strength
Signal Strength 1 (RSSI 1) Continuous Poor
Signal Strength 2 (RSSI 2)Flashing
ContinuousFair
Good
Signal Strength 3 (RSSI 3)Flashing
ContinuousVery Good
Best
LED Color Activity Description
Green Continuous Full Service
Amber Continuous or Flashing (network dependent) Roaming
Red Continuous No Service*
Signal Strength 3Signal Strength 2Signal Strength 1
Service Indicator
Call Activity Indicator
Message Indicator
AC Power/BatteryIndicator
Note: If you are getting no service, contact your service provider for more information.

Phonecell® SX5T CDMA2000 9 User Manual
Call Activity Indicator
Message Indicator
AC Power/Battery Indicator
Important Dial TonesYou may hear these tones through the receiver when your phone is off-hook:
Steady Tone (dial tone): Service – Indicates that your phone is ready for use.
Fast Beeping Tone: No Service – Indicates that there is no service available.
Short Tone: Call Waiting – During an active call, a short tone indicates that you have anotherincoming call.
Pulsed Dial Tone, followed by a Steady Dial Tone: Voicemail – Indicates that you have a newvoicemail message.
Color Activity Description
Green Continuous AC power applied
Amber Continuous Battery level good(battery switch on)
Amber/Green Alternating Battery level poor(battery switch on)
LED Color Activity Description
Green Flashing New voicemail
LED Color Activity Description
Green Flashing(phone will also be ringing) Incoming call
Green Continuous In an active call
Green Fast Flashing Processing data call
Amber Continuous Programming Mode

Phonecell® SX5T CDMA2000 10 User Manual
Using the SX5TOnce you have installed and activated your SX5T, you’ll be ready to make and receive calls, set upvoicemail, and send and receive faxes. This section explains how to use the features of the SX5T forall your communications.
Making CallsTo make a call:
1. Pick up the telephone handset. (The phone is now “off-hook.”)
2. Listen for a dial tone. (If you hear a No Service tone [fast beeping], hang up and try again. If theNo Service tone continues, contact your service provider to verify that cellular service isavailable.)
3. Dial a phone number. (When you have finished dialing, the call will be sent automatically.)
Receiving Calls• When the telephone rings, pick up the handset and begin talking.
Ending Calls• When you are finished with a call, hang up the phone by placing the handset back on the
telephone cradle or by pressing the Off or End button.
Using In-Call FeaturesTo place a call on hold:
• During a call, press the Flash key on your handset (if your phone doesn’t have a Flash key,press and release the switch-hook).
· If you hang up your phone when a call is on hold, the call will be disconnected.
To retrieve a call on hold:
• Press the Flash key on your phone (or press and release the switch-hook).
To answer a call waiting call:
• When you’re on an active call and a new incoming call arrives, you will hear a short tone on yourphone. To place the current call on hold and answer the incoming call, press the Flash key onyour phone (or press and release the switch-hook). (To switch between calls, simply repeat theprocess.)
To answer a call when you are dialing or with the phone off the hook:
• If a call comes in while you are dialing or when you have the phone off the hook, you will hear acall waiting tone on your phone. To answer the incoming call, press the Flash key on yourphone (or press and release the switch-hook).
Note: Call Hold and Call Waiting are not available with all service providers. These services may not beavailable if you are using your SX5T in a roaming area. To determine these services’ availability in yourarea, contact your service provider.
Tip: Pressing the Flash key or pressing and releasing the switch-hook after dialing a number will sendthe call immediately.

Phonecell® SX5T CDMA2000 11 User Manual
Accessing Your VoicemailWith your SX5T, you have two options for accessing your voicemail account from your phone: One-Touch Voicemail Retrieval and Direct Dial. (For more information about your voicemailsettings, see “Voicemail Number” and “One-Touch Voicemail Retrieval” on page 16. For informationabout your voicemail service, please contact your service provider.)
To access your voicemail using One-Touch Voicemail Retrieval:
• Press and hold the button on any home phone for two seconds.
To access your voicemail using Direct Dial:
1. Dial your phone number.
2. When your voicemail answers, press .
3. Follow the voice prompts to enter your voicemail pass code and retrieve your messages.
Clearing Your Voicemail Indicator
• The message light on your SX5T will flash when you have a new voicemail message. The indicator should clear after you have listened to all of your new messages. If your voicemail message indicator does not clear (or if you just want to clear it manually),press .
Making a Three-Way CallYour SX5T supports three-way calling, if it is supported by your service provider.
To make a three-way call:
1. Place or answer a call on your phone.
2. Once you have established the connection with the first caller, press Flash, enter the secondnumber you wish to call, then press Flash again. (This puts the first caller on hold and dials thesecond number.)
3. When you’re connected to the second party, press Flash again to begin your three-way call.If one of the people you called hangs up during your call, you and the remaining caller stayconnected. If you initiated the call and are the first to hang up, all three callers are disconnected.
Using Call ForwardingCall Forwarding lets you forward all your incoming calls to another phone number. You can continueto make calls from your phone when Call Forwarding is activated.
To activate call forwarding, contact your service provider for instructions.
Note: Certain cellular systems may use a different method to connect three-way calls. Please contact yourservice provider for more information.
#501*#
Note: If your phone doesn’t support a continuous tone (i.e., if you only hear a short tone when you press andhold a key), One-Touch Voicemail Retrieval will not work on your phone. To access your voicemail, youwill have to use the Direct Dial method of voicemail retrieval.
You may also use the Direct Dial method to retrieve your voicemail from any other phone.
*
1

Phonecell® SX5T CDMA2000 12 User Manual
Adjusting Your Phone’s SettingsVolume Level
If the volume level on your phone’s receiver is too high or too low during a call, you can adjust thelevels using the telephone keypad.
To increase the phone’s volume level:
• Press .
To decrease the phone’s volume level:
• Press .
Entering Configuration ModeMany device configuration settings require you to enter Configuration Mode – the device’sprogramming mode – before you may input the commands.
To enter Configuration Mode:
• Press <lock code> .
You will hear a steady tone indicating that you have entered Configuration Mode. When you pressany additional key, the tone will stop.
If you correctly enter a configuration sequence for any of the settings listed, the steady tone willreturn and the SX5T will have accepted the new setting. If you do not enter a valid sequence, you willhear three brief ascending tones followed by the steady tone (at which point you may re-enter yourconfiguration settings).
To exit Configuration Mode, simply hang up the phone.
Changing the Lock CodeYour SX5T is preconfigured with a lock code for use in entering Configuration Mode and to use with the Call Barring feature. The default lock code is the last four digits of the phone number.(If no number is programmed, the default is 0000).
You may use Configuration Mode to change your lock code to any 4-digit number.
To change the Lock Code:
• From Configuration Mode, press <old lock code><new lock code> <new lock code> .
(For example, to change the default lock code from 0000 to 5555, press
.)#55
55*5555*0000*34
1*#
#***341*#
Note: You may change multiple settings during a single Configuration Mode session. If you enter anincorrect sequence during a Configuration Mode session, only the setting you were entering will needto be re-entered; all previous changes will be retained.
#*0*#
Note: The SX5T volume setting allows you to adjust the volume three levels from the default setting. Theadjusted volume setting remains in effect for future calls until it is manually changed. When the SX5T’spower is turned Off and On, the default mid-range volume setting is restored.
3*#
8*#

Phonecell® SX5T CDMA2000 13 User Manual
Audio Line LevelIf using and does not provide satisfactory volume options foryou (see “Volume Level” on page 12), you may adjust your phone system’s audio line level.
To adjust your phone system’s audio line level:
• From Configuration Mode, press <0, 1, or 2> .
0 = Low1 = Normal (default)2 = High
Auto-Send DelayThe auto-send delay is the amount of time the SX5T waits to dial after you make an entry on thephone keypad. The default setting is 3 seconds and the valid range is 2-20 seconds.
To change the auto-send delay:
• From Configuration Mode, press < 2 - 20> , where youenter a number between 2 and 20 seconds. (For example, if you want the auto send delay to befive seconds, press .)
Frequently Dialed Numbers (Zero Delay Dialing)If you dial a phone number twice and stay connected for at least 15 seconds, the SX5T will rememberthat phone number in the future and automatically send it without the auto-send delay whenever yousubsequently dial the number. This feature is enabled by default.
To enable Zero Delay Dialing (default setting):
• From Configuration Mode, press .
To disable Zero Delay Dialing:
• From Configuration Mode, press .
Call BarringTo avoid inadvertent service charges, you may enable your device’s Call Barring feature to bar alloutgoing calls (except emergency calls).
To enable Call Barring:
• From Configuration Mode, press <lockcode> .
To disable Call Barring (default setting):
• From Configuration Mode, press <lockcode> .#
*0*241*#
#*1*241*#
#0*12*#
#1*12*#
#5*11*#
#*11*#
#*96*#
3*#8*#
Phonecell® SX5T CDMA2000 14 User Manual
Call Restrict (SX5T-500C only)Call Restrict allows you to determine which calls may or may not be placed through your SX5T. Whenthe Call Restrict level is set to Use Table, the Call Restrict feature checks outgoing calls againstuser-defined permit and deny tables to determine whether to permit or deny the outgoing call. Eachtable (permit and deny) may contain up to ten entries.
To set the Call Restrict level:
• From Configuration Mode, press <1, 2, 3, or 4> ,where <1, 2, 3, or 4> are as follows:
1 = No Restriction (default setting)2 = Use Table3 = Emergency Only (only emergency calls permitted; all other calls denied)
4 = Clear Table
To set the Call Restrict table entries:
• From Configuration Mode, press <0 or 1><index> <number> , where the options are as follows:
<0 or 1> = Table mode (0 = Deny table; 1 = Permit table)<index> = Table entry <number> = 10-digit phone number for the Call Restrict entry
(For example, if you wanted to add 555-123-4567 as the third entry in your Deny table, youwould press
)
Dial Tone After Remote Disconnect (DTARD)To allow you to place another call when a connection has been terminated remotely (when the otherparty has hung up the phone), you may elect to have the SX5T return to dial tone automatically. If youelect not to enable DTARD, you will need to hang up the phone before placing another call.
To enable Dial Tone After Remote Disconnect (to return to dial tone):
• From Configuration Mode, press .
To disable Dial Tone After Remote Disconnect:
• From Configuration Mode, press .
Note: If Dial Tone After Remote Disconnect is disabled, additional remote disconnect options may beavailable. See “Disconnect Tone” on page 33 for more information.
#0*8*#
#1*8*#
#7654321
555*3*0*641*#
#***641*#
#*541*#

Phonecell® SX5T CDMA2000 15 User Manual
HotlineThe Hotline feature allows you to program the SX5T to automatically dial a specific phone numberafter a selected timeout delay whenever you take the phone off-hook.
To program the Hotline phone number:
• From Configuration Mode, press <phone #> , where<phone #> is the phone number you want to dial automatically.
To enable the Hotline feature:
• From Configuration Mode, press <1 - 8> ,where <1 - 8> equals the selected timeout delay, in seconds.
(For example, if you wanted the phone to wait five seconds before dialing the hotline number,you would press fromconfiguration mode.)
To disable the Hotline feature (default setting):
• From Configuration Mode, press .
One-Minute AlertYou can keep track of your in-call duration by configuring your SX5T to sound a short beep at one-minute intervals during active calls.
To enable One-Minute Alerts:
• From Configuration Mode, press .
To disable One-Minute Alerts (default):
• From Configuration Mode, press .
TTY UseATTY device (also known as a TDD or Text Telephone) is a telecommunications device that allowspeople who are deaf, hard of hearing, or who have speech or language disabilities to communicateby telephone.
Your SX5T is compatible with select TTY devices. Please check with the manufacturer of your TTYdevice to ensure that it supports digital wireless transmission.
To establish TTY service, contact your cellular service provider.
To set your phone’s TTY mode:
• From Configuration Mode, press <0 or 3> , where <0 or 3> are as follows:
0 = TTY Off3 = TTYAlways
#*931*#
#0*99*#
#1*99*#
#1*0*711*#
#5*1*711*#
#*1*711*#
#*811*#
Phonecell® SX5T CDMA2000 16 User Manual
Voicemail NumberYou can use Configuration Mode to set the default voicemail number for your SX5T.
To set the default voicemail number:
• From Configuration Mode, press <voicemailnumber> .
For example, to set 555-123-4567 as your voicemail number, you would press .
If your voicemail access number includes a special character, such as an asterisk (*) or a pound sign(#), you can program it by adding an extra asterisk in front of the special character. Please refer to theexamples below:
To set *86 as the default voicemail number:
• From Configuration Mode, press .
To set #86 as the default voicemail number:
• From Configuration Mode, press .
One-Touch Voicemail RetrievalYou can configure your SX5T to connect to your voicemail box using one-touch voicemail retrieval,allowing you to retrieve messages by pressing and holding . (One-Touch Voicemail Retrievalis enabled by default.)
To enable One-Touch Voicemail Retrieval (default setting):
• From Configuration Mode, press .
To disable One-Touch Voicemail Retrieval:
• From Configuration Mode, press .
Restore User DefaultsTo restore your SX5T to its default settings after changing configuration settings:
• From Configuration Mode, press <0 or 1> , where 0 = Keep Current Settings and 1 = Restore to Default Settings.
#*701*#
Note: If your phone doesn’t support a continuous tone (i.e., if you only hear a short tone when you press andhold a key), One-Touch Voicemail Retrieval will not work on your phone. To access your voicemail, youwill have to use the Direct Dial method of voicemail retrieval (see page 11).
For more information about retrieving voicemail, see “Accessing Your Voicemail” on page 11. For information about your voicemail service, please contact your service provider.
#0*841*#
#1*841*#
1
#68#**101*#
#68***101*#
#7654321555*101*#
#*101*#
Note: The voicemail settings for your SX5T should have been configured prior to purchase. The instructionsfor Voicemail Number and One-Touch Voicemail Retrieval are mainly for your reference.

Phonecell® SX5T CDMA2000 17 User Manual
Using Additional Hardware DevicesUsing an External Answering Machine
The SX5T can be used with an external answering machine in place of voicemail. If you plan to usean external answering machine, be sure your service provider has not activated voicemail on youraccount.
Setting Up Data Transfer for a Digital Video Recorder (DVR) or Satellite ReceiverThe SX5T can be configured to dial out over your phone line so that a Digital Video Recorder (DVR)or a satellite receiver can send and receive the data required for its operation. Your DVR or satellitereceiver must also be configured to tell the SX5T that it needs to send data. You must insert the prefix
before the phone number that the DVR or satellite receiver dials. Consultyour DVR or satellite receiver manual or provider if you need further assistance with this feature.
Using a Fax Machine With Your SX5TYour SX5T supports sending and receiving faxes with a fax machine. You can connect your faxmachine to an existing wall phone (RJ11) jack or into either phone (RJ11) jack of the SX5T. In order tosend or receive a fax, the SX5T must be placed in fax mode, as it cannot automatically detect anincoming fax. (This is standard procedure for faxing over wireless networks.) You must disable any“turbo” fax modes or other non-standard transmission modes on your fax machine. Consult your faxmachine’s manual for more information.
The SX5T has two fax modes: 1-time fax mode and Always fax mode.
· 1-time fax mode will allow you to send or receive one fax, after which the SX5T will automatically return to voice mode.
· Always fax mode will keep the SX5T in fax mode until it is set back to voice mode.
To send a fax (1-time fax mode):
1. Lift up the fax machine handset or press the Fax button.
2. Press , then dial the fax number.
3. Press Start on the fax machine.
To receive a fax (1-time fax mode):
1. Set your fax machine to connect after the minimum number of rings allowed.
2. Press .
3. Notify the sender that you are prepared to receive the fax.
To set your device to “Always fax mode”:
• Press .
To make one voice call while in “Always fax mode”:
• Press .
To return your device to voice mode (default setting):
• Press .#7*#
#4*#
#5*#
#1*#
#1*#
Note: Contact your service provider to confirm the availability of fax service on your wireless account.
Note: Contact your service provider to confirm the availability of data transfer service on your wirelessaccount.
#2*#
Phonecell® SX5T CDMA2000 18 User Manual
Windows XP/Windows 2000 Setup for Data & PC FaxContact your service provider to determine data/PC fax service availability, then follow these steps.
1. Connect and Select Data Ports.
Serial Connection – default setting (Allows PC Fax, 1X Data and Circuit Switched Data)· Use a Telular serial cable (part #1L01A042 or 81025801) to connect the computer’s
serial port to the SX5T’s data port.· Enter Configuration Mode.
Press <lock code> .· Set the SX5T Data Port to Serial.
Press .
USB Connection (Allows PC Fax, 1X Data and Circuit Switched Data)
· Use a Telular USB cable (part #1L01A043 or 81025901) to connect the computer’sUSB port to the SX5T’s data port. (You will also need to run the Telular USB DriverCD to load the appropriate USB driver onto your PC.)
· Enter Configuration Mode. Press <lock code> .
· Set the SX5T Data Port to USB. Press .
Modem/Phone Connection (Allows PC Fax and Circuit Switched Data)
· Use a standard telephone cord to connect the computer’s modem out port to eitherof the SX5T’s phone (RJ11) jacks.
· Enter Configuration Mode. Press <lock code> .
· Set the SX5T Data Port to RJ11. Press .
2. Set Baud Speed.
· Enter Configuration Mode. Press <lock code> .
· For fax, set speed to 19200. Press .
· For data, set speed to 115200. Press .
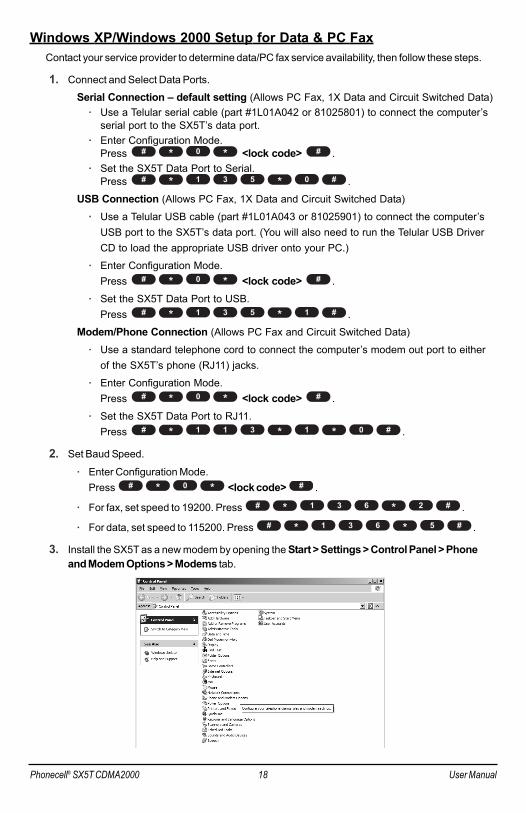
3. Install the SX5T as a new modem by opening the Start > Settings > Control Panel > Phoneand Modem Options > Modems tab.
#5*631*#
#2*631*#
#*0*#
#0*1*311*#
#*0*#
#1*531*#
#*0*#
#0*531*#
#*0*#

Phonecell® SX5T CDMA2000 19 User Manual
4. Click on Add….
5. Click on Don't detect my modem; I will select it from alist and click Next.
6. Select Standard 19200 bps modem and click Next.

Phonecell® SX5T CDMA2000 20 User Manual
7. Select the COM port to use (if a COM port does not display, all COM ports are currentlyallocated).
8. Click Finish.

Phonecell® SX5T CDMA2000 21 User Manual
9. Configure the SX5 modem interface using the Start > Settings > Control Panel > Phone andModem Options > Modems tab.
10. Select the 19200 bps Modem and click on Properties.
11. Select the Modem tab.
12. Change the Maximum port speed to 115200 (19200 when faxing) and click OK.

Phonecell® SX5T CDMA2000 22 User Manual
13. Configure the USB, Serial or Phone (RJ11) port using the Control Panel > System >Hardware > Device Manager > Ports tab.
14. Select the port used for the SX5T and right click on it. Select Properties from the resulting pop-up menu.
Phonecell® SX5T CDMA2000 23 User Manual
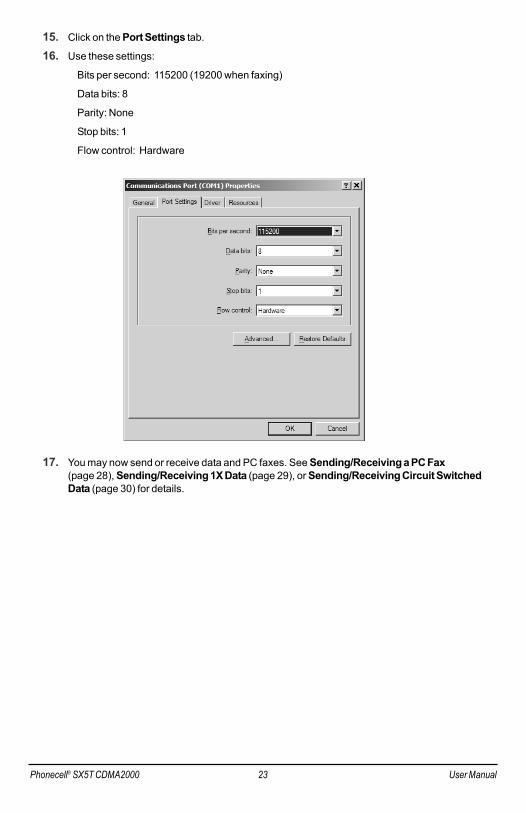
15. Click on the Port Settings tab.
16. Use these settings:
Bits per second: 115200 (19200 when faxing)
Data bits: 8
Parity: None
Stop bits: 1
Flow control: Hardware
17. You may now send or receive data and PC faxes. See Sending/Receiving a PC Fax(page 28), Sending/Receiving 1X Data (page 29), or Sending/Receiving Circuit SwitchedData (page 30) for details.

Phonecell® SX5T CDMA2000 24 User Manual
Windows 98 Setup for Data & PC FaxContact your service provider to determine data/PC fax service availability, then follow these steps.
1. Connect and Select Data Ports.
Serial Connection – default setting (Allows PC Fax, 1X Data and Circuit Switched Data)· Use a Telular serial cable (part #1L01A042 or 81025801) to connect the computer’s
serial port to the SX5T’s data port.· Enter Configuration Mode.
Press <lock code> .· Set the SX5T Data Port to Serial.
Press .
Modem/Phone Connection (Allows PC Fax and Circuit Switched Data)
· Use a standard telephone cord to connect the computer’s modem out port to eitherof the SX5T’s phone (RJ11) jacks.
· Enter Configuration Mode. Press <lock code> .
· Set the SX5T Data Port to RJ11. Press .
2. Set Baud Speed.
· Enter Configuration Mode. Press <lock code> .
· For fax, set speed to 19200. Press .
· For data, set speed to 115200. Press .
3. Install the SX5T as a new modem by opening the Start > Settings > Control Panel then clickingon the Modems phone icon.
#5*631*#
#2*631*#
#*0*#
Note: The SX5T supports data transfer over serial and modem/phone (RJ11) connections for Windows 98PCs. Data over USB is not supported for Windows 98.
#0*1*311*#
#*0*#
#0*531*#
#*0*#

Phonecell® SX5T CDMA2000 25 User Manual
4. Select Standard 19200 bps Modem and click on Properties.
5. Select the appropriate COM port and Maximum speed of 115,200 bps for data and 19,200 bpsfor PC Fax.
6. Select the Connection tab.

Phonecell® SX5T CDMA2000 26 User Manual
7. Set Connection Preferences to Data bits = 8, Parity = None and Stop bits = 1, then clickAdvanced.
8. Check the box for Use Control Flow, then click on Hardware (RTS/CTS), and then select OK.

Phonecell® SX5T CDMA2000 27 User Manual
9. Click on OK.
10. Click on Close.
11. You may now send or receive data and PC faxes. See Sending/Receiving a PC Fax (page 28),Sending/Receiving 1X Data (page 29), or Sending/Receiving Circuit Switched Data(page 30) for details.

Phonecell® SX5T CDMA2000 28 User Manual
Sending/Receiving a PC FaxAPC with a serial, USB, or phone (RJ11) connection to the SX5T can send and receive faxes usingthe SX5T. Your account with your service provider must support circuit switched data transfer for theSX5T’s PC fax function to work.
Set Your Computer’s Port and Modem Speeds for PC Fax
To send or receive faxes, you need to set the port and modem speeds your computer uses for theSX5T to 19200 bps. See Windows XP/2000 Setup (page 18) or Windows 98 Setup (page 24) fordetails.
Choose Fax Mode1. To receive one fax, enter Fax Next Call mode. Press .
Your SX5T will treat the next incoming call as a fax, then return to normal operation.If you are using an RJ11 port to receive the fax, you may skip the remaining steps.
2. To receive faxes indefinitely, enter Fax Always mode. Press .
(Your SX5T will treat all incoming calls as faxes. To resume receiving voice calls, you mustswitch back to Voice mode: Press . If you wish to make a single voicecall while remaining in Fax Always mode, press .)
If you are using an RJ11 port to receive the fax, you may skip the remaining steps.
3. To send a PC fax, set the Fax Port and Baud Rate, then use your computer’s fax software to dialthe receiving fax machine’s number. Whenever your software asks you what modem to use,select the Standard 19200 Modem.
Choose the SX5T’s Fax Port1. Enter Configuration Mode – Press <lock code> .
2. Select Data Port – Press .
– OR –
Select RJ11 Port – Press .
3. If you selected Data Port, select which Data port to use. Select Serial by pressing .
– OR –
Select USB by pressing (Windows XP/2000 only).
Set the SX5T’s Baud Rate for PC Fax
1. Enter Configuration Mode – Press <lock code> .
2. Select Baud Speed 19200 – Press .
Note: If you take the phone off-hook while sending or receiving a PC fax via serial or USB cable, you will heara busy tone; the fax data transmission or reception will not be disrupted.
If you take the phone off-hook while sending or receiving a PC fax using an RJ11 phone jackconnection, the fax data transmission/reception may be disrupted.
#2*631*#
#*0*#
#1*531*#
#0*531*#
#1*76*#
#0*76*#
#*0*#
#4*#
#7*#
#5*#
#1*#

Phonecell® SX5T CDMA2000 29 User Manual
Sending/Receiving 1X DataAPC with a serial or USB connection to the SX5T can send and receive 1X data using the SX5T; aPC with a phone (RJ11) connection cannot. Check with your service provider to see if your accountsupports 1X data transfer.
Set Your Computer’s Port and Modem Speeds for 1X Data
To send or receive circuit switched data, you need to set the port and modem speeds your computer uses for the SX5T to 115200 bps. See Windows XP/2000 Setup (page 1818) or Windows 98 Setup (page 24) for details. This is the communication speed between the computer and SX5T; actual data transfer rates will be slower.
Choose the SX5T’s Data Port
1. Enter Configuration Mode – Press <lock code> .
2. Select Data Port. Select Serial by pressing .
– OR –
Select USB by pressing (Windows XP/2000 only).
Set the SX5T’s Baud Rate for 1X Data
1. Enter Configuration Mode – Press <lock code> .
2. Select Baud Speed 115200 – Press .
To Send or Receive 1X Data
Follow your service provider’s directions for sending and receiving 1X data. Whenever yoursoftware asks you what modem to use, select the Standard 19200 Modem.
For Windows XP and Windows 2000, you can start by opening Control Panel > Network and DialUp Connections, then double-clicking on Make New Connection to start the Network ConnectionWizard.
For Windows 98, you can start by running Dial-Up Networking and double-clicking on Make NewConnection.
Tip: You can receive incoming voice calls on the SX5T during a dormant data session (a session becomesdormant after a period of inactivity determined by the network). When you are in an active data session(you are sending and receiving data), all incoming calls go to your voicemail.
Note: If you take the phone off-hook during a 1X data session, you will hear a busy tone; data transfer will notbe disrupted.
#5*631*#
#*0*#
#1*531*#
#0*531*#
#*0*#

Phonecell® SX5T CDMA2000 30 User Manual
Sending/Receiving Circuit Switched DataAPC with a serial, USB or phone (RJ11) connection to the SX5T can send and receive circuitswitched data using the SX5T. Check with your service provider to see if your account supportscircuit switched data transfer.
Set Your Computer’s Port and Modem Speeds for Circuit Switched DataTo send or receive circuit switched data, you need to set the port and modem speeds your computer uses for the SX5T to 115200 bps. See Windows XP/2000 Setup (page 18) or Windows 98 Setup (page 24) for details. This is the communication speed between the computer and SX5T; actual data transfer rates will be slower.
Choose Data Mode1. To receive one data transfer, enter Data Next Call mode. Press .
Your SX5T will treat the next incoming call as data, then return to normal operation.If you are using an RJ11 port to receive the data, you may skip the remaining steps.
2. To receive data indefinitely, enter Data Always mode. Press .
(Your SX5T will treat all incoming calls as data. To resume receiving voice calls, you must switchback to Voice mode: Press . If you wish to make a single voice call whileremaining in Data Always mode, press .)
If you are using an RJ11 port to receive the fax, you may skip the remaining steps.
3. To send circuit switched data, set the Data Port and Baud Rate, then follow your serviceprovider’s directions for sending circuit switched data. Whenever your software asks you whatmodem to use, select the Standard 19200 Modem.
(For Windows XP and Windows 2000, you can start by opening Control Panel > Network andDial Up Connections, then double-clicking on Make New Connection to start the NetworkConnection Wizard.)
(For Windows 98, you can start by running Dial-Up Networking and double-clicking on MakeNew Connection.)
Choose the SX5T’s Data Port
1. Enter Configuration Mode – Press <lock code> .
2. Select Data Port – Press .
– OR –
Select RJ11 Port – Press .
3. If you selected Data Port, select which Data port to use. Select Serial by pressing .
– OR –
Select USB by pressing (Windows XP/2000 only).
Set the SX5T’s Baud Rate for Circuit Switched Data
1. Enter Configuration Mode – Press <lock code> .
2. Select Baud Speed 115200 – Press .
Note: If you take the phone off-hook while sending or receiving circuit switched data via serial or USB cable,you will hear a busy tone; the data transmission/reception will not be disrupted.If you take the phone off-hook while sending or receiving circuit switched data using an RJ11 phonejack connection, the fax data transmission/reception may be disrupted.
#5*631*#
#*0*#
#1*531*#
#0*531*#
#0*1*311*#
#0*0*311*#
#*0*#
#4*#
#7*#
#6*#
#2*#

Phonecell® SX5T CDMA2000 31 User Manual
Advanced Programming Settings
Entering Configuration Mode (Advanced Settings)The following advanced programming settings require you to place the SX5T in configuration mode.(For more information, see “Entering Configuration Mode” on page 12.)
To enter Configuration Mode:
• Press <lock code> .
On-Hook Idle Voltage LevelThere are two pre-set levels available for the phone line voltage in idle state (when the phone is on-hook and there is no incoming call): Level 1 – High battery mode and low power standby(-48 VDC) is the standard telephone line voltage for most applications; Level 0 – Low battery modeand forward active (-17 VDC) is primarily used within certain payphone and PBX configurations.
To set the standard (default) on-hook idle voltage level (High battery):
• From Configuration Mode, press .
To set the on-hook idle voltage level 0 (Low battery):
• From Configuration Mode, press .
Line ReversalThe reversal of line polarity (line reversal) is a method by which the SX5T can signal the beginningand end of airtime usage (as opposed to connection time usage) for billing purposes. When linereversal is enabled, the SX5T reverses the line polarity as soon as a link has been established to theservice provider’s network (before the caller hears the other line ringing). If your service providerdoes not offer billing initiation signals, or if you wish to track your system’s airtime instead ofconnection time, you may enable line reversal for outgoing and/or incoming calls.
To enable line reversal for Outgoing calls:
• From Configuration Mode, press .
To disable line reversal for Outgoing calls (default setting):
• From Configuration Mode, press .
To enable line reversal for Incoming calls:
• From Configuration Mode, press .
To disable line reversal for Incoming calls (default setting):
• From Configuration Mode, press .
Note: If your service provider requires the use of line reversal, the SX5T will reverse the line polarity even ifyou have disabled line reversal through configuration mode.
#0*32*#
#1*32*#
#0*22*#
#1*22*#
#0*431*#
#1*431*#
Note: You may change multiple settings during a single Configuration Mode session. If you enter anincorrect sequence during a Configuration Mode session, only the setting you were entering will needto be re-entered; all previous changes will be retained.
#*0*#
Note: The SX5T advanced programming settings are intended primarily for advanced users and systemadministrators. It is strongly recommended that these settings be altered by qualified technicians only.

Phonecell® SX5T CDMA2000 32 User Manual
Ring FrequencyIf required by your system or equipment settings, you may adjust the frequency of the ring signal.
To adjust the ring frequency values:
• From Configuration Mode, press <0, 1, or 2> , where <0, 1, or 2> are as follows:
0 = 20 Hz – U.S. standard (default value)1 = 25 Hz2 = 50 Hz
Audio Input ImpedanceTo ensure optimal audio quality, it may be necessary to adjust the audio impedance of the SX5T’stelephone jack to match the level of the telephone equipment.
To adjust the audio input impedance:
• From Configuration Mode, press <0 or 1> , where <0 or 1> are as follows:
0 = 600 ohms (default value)1 = 900 ohms
Disconnect PulseYou may adjust or deactivate the default 700 millisecond disconnect pulse generated after a remotedisconnect.
To set or adjust the disconnect pulse value (default = 700ms):
• From Configuration Mode, press <1 – 65535> , where <1 – 65535> is the duration of the disconnect pulse, in milliseconds (default value is 700 ms).
To disable the disconnect pulse:
• From Configuration Mode, press .
Dial Tone Frequency (SX5T-500C only)If necessary to ensure compatibility with your equipment and/or service, you may change the unit’sdial tone frequency from the U.S. standard two-tone setting to select single- and dual-tone settingscommon in other regions.
To select a dial tone frequency:
• From Configuration Mode, press <0, 1, 2, or 3> , where <0, 1, 2, or 3> are as follows:
0 = Dual-tone U.S. standard: 350 Hz + 440 Hz (default setting)1 = Single-tone European standard: 425 Hz2 = Single-tone option: 450 Hz3 = Dual-tone option: 375.5 Hz + 412.5 Hz
#*08*#
#0*97*#
#*97*#
#*86*#
#*23*#
Phonecell® SX5T CDMA2000 33 User Manual
Caller ID Display Setting (SX5T-500C)The SX5T supports two types of caller ID devices: those that require the information to betransmitted to the caller ID device (phone) between the first and second rings (common in NorthAmerica), and those that require the information to be transmitted prior to the first ring (common incertain European countries). You can set your SX5T to transmit caller ID information as required byyour caller ID equipment.
To configure your Caller ID display:
• From Configuration Mode, press <0 or 1> , where <0 or 1> are as follows:
0 = Caller ID information transmitted between first and second ring (default)1 = Caller ID information transmitted prior to the first ring
Line Alert CadenceThe line alert cadence (also known as ring cadence), is the timing of the ring and silence periodsduring an incoming call (what you hear when the phone rings). If necessary for your systemconfiguration, you may adjust the line alert cadence for your SX5T.
To adjust the line alert cadence:
• From Configuration Mode, press <0, 1, 2, or 3> ,where <0, 1, 2, or 3> are as follows:
0 = off1 = North American standard (default setting)2 = United Kingdom standard3 = European standard
Disconnect ToneYou may adjust or disable your device’s handling of disconnect tones to suit your systemconfiguration. If you place a call and the remote party disconnects while you’re still on the line, youmay configure the SX5T to sound no tone (you need to hang up to disconnect the line and placeanother call) or to sound various standard busy tones (to alert your system that there has been aremote disconnect and the line is ready to be cleared).
To adjust the disconnect tone setting:
• From Configuration Mode, press <0, 1, 2, or 3> ,where <0, 1, 2, or 3> are as follows:
0 = no tone – default setting (user must hang up to close the open connection and place another call)
1 = North American standard busy tone2 = United Kingdom standard busy tone3 = European busy tone
#*941*#
Note: The disconnect tone setting is only in effect if Dial Tone After Remote Disconnect (DTARD) is off (seepage 14 for details).
#*001*#
#*48*#
Note: Caller ID Display is supported on all SX5T models; however, this advanced programming setting isavailable on the SX5T-500C models only.

Phonecell® SX5T CDMA2000 34 User Manual
Metering Pulse High Gain/Low GainIf required for your phone system application, you may adjust the metering pulse generated by yourSX5T from high gain (default setting) to low gain. The gain values are as follows:
For 12Khz systems: Low gain = -2dbm (+/- 2dbm)High gain (default) = 1dbm (+/- 2dbm)
For 16Khz systems: Low gain = -6dbm (+/- 2dbm)High gain (default) = -2dbm (+/- 2dbm)
To set the metering pulse to high gain (default setting):
• From Configuration Mode, press .
To set the metering pulse to low gain:
• From Configuration Mode, press .
Local Metering Pulse Override/Polarity Reversal (SX5T-500C)If your phone system application (PBX, Payphone, Public Calling Office) requires Polarity Reversalinstead of a metering pulse in order to initiate call billing, you may set your SX5T to generate PolarityReversal based on the CDMAsystem’s metering pulse signals.
For 12Khz systems: Low gain = -2dbm (+/- 2dbm)High gain (default) = 1dbm (+/- 2dbm)
For 16Khz systems: Low gain = -6dbm (+/- 2dbm)High gain (default) = -2dbm (+/- 2dbm)
To enable Local Meter Pulse Override (Polarity Reversal):
• From Configuration Mode, press .
To disable Local Meter Pulse Override (default setting):
• From Configuration Mode, press .
Note: This advanced programming setting is available on the SX5T-500C models only.
#0*451*#
#1*451*#
#0*051*#
#1*051*#

Phonecell® SX5T CDMA2000 35 User Manual
SX5T TroubleshootingTelephone Service is Not Working (Cannot make or receive calls)
• Make sure the SX5T powered on properly.
• Make sure any equipment that is externally connected to the SX5T is connected correctly.
• Test any externally connected equipment on a known system to verify its operation.
• Do you have the antenna connected? If not, connect the antenna.
• Is service established with a service provider? If so, is there any service provider issue? Yourservice may be disconnected or not functioning properly. Contact your service provider if youthink this is the problem.
Unable to Receive Calls• Is the handset on the cradle? If not, place the handset on the cradle and try again.
• Is the SX5T making a loud repetitive tone? This is the ROH (Receiver Off Hook) tone. Yourhandset may be off hook. Hang up and try again.
• Is the SX5T set for Fax Only or Data Only operation? If so, press to return to voice mode.
Unable to Make Calls• If you do not hear standard dial tone when your phone is off hook, then your service has a
problem. Contact your service provider if you think this is the problem.
• Do you have telephone extensions connected to the SX5T? If so, confirm that none of theextensions is off hook.
• Is the SX5T set for Fax Only or Data Only operation? If so, press to return to voice mode.
Unable to Send or Receive Analog Fax Calls• Do you have fax service on your wireless account? Contact your service provider for more
information.
• Do you have good signal strength? If your signal strength is low it may affect faxing. Tryrepositioning the unit or obtaining a directional high gain external antenna.
No Power• Is the power supply connected to the unit? Make sure power is available and that the power
supply is properly connected to the SX5T.
• If the SX5T is properly connected to the power supply, check to make sure the AC/Battery switchis in the correct position (see “Battery Operation” on page 3).
• If the power supply is connected but the unit still has no power, make sure power is beingdelivered to the power supply. Check your breaker and contact your power company. Power maybe off at your location.
#7*#
#7*#

Phonecell® SX5T CDMA2000 36 User Manual
Conformance StatementsThe SX5T 800/1900 MHz models are in conformance with all applicable FCC requirements.
FCC Part 15/Part 22/Part 24 Class B ComplianceThis Phonecell® SX5T model has been tested and found to comply with the limits for a Class B digital device, pursuant to Part 15, Part 22 and Part 24 of the FCC rules. Changes or modifications notexpressly approved by Telular Corporation will void your authority to operate the equipment per FCCpart 15 paragraph 15.21.These limits are designed to provide reasonable protection against harmfulinterference in a residential installation. This equipment generates, uses and can radiate radiofrequency energy and, if not installed and used in accordance with the instructions, may causeharmful interference to radio communications. However, there is no guarantee that interference willnot occur in a particular installation. If this equipment does cause harmful interference to radio ortelevision reception, which can be determined by turning the equipment OFF and ON, the user isencouraged to try to correct the interference by one or more of the following measures:
• Reorient or relocate the antenna.• Increase the separation between the equipment and the terminal.• Connect the equipment into an outlet on a circuit different from that to which the terminal is
connected.• Consult your Authorized Telular Distributor or an experienced radio/TV technician for help.
Safety InformationThe Phonecell® SX5T functions as both a radio transmitter and receiver. When it is ON, the SX5Treceives and sends out radio frequency (RF) energy. The SX5T CDMAunit operates in thefrequency ranges of 824 MHz to 894 MHz and / or 1850 MHz to 1910 MHz. When you use the SX5T,the cellular system handling your call controls the power level at which the unit transmits.
Exposure to RF (Radio Frequency) EnergyIn 1991, the Institute of Electrical and Electronics Engineers (IEEE), and in 1992, the AmericanNational Standards Institute (ANSI), updated the 1982 ANSI Standard for safety levels with respectto human exposure to RF energy. After reviewing the available body of research, more than 120scientists, engineers and physicians from universities, government health agencies and industrydeveloped this updated Standard. In March, 1993, the U.S. Federal Communications Commission(FCC) proposed the adoption of this updated Standard.The design of the Telular Phonecell® SX5T complies with this updated Standard. Of course, if youwant to limit RF exposure even further than the updated ANSI Standard, you may choose to controlthe duration of your calls and operate your phone in the most power-efficient manner.
Safe Operation RequirementThe Phonecell® SX5T must be either wall mounted or desk mounted and should not be operatedwhen any person is within 20 cm (8 inches) of the antenna.
Temperature EnvironmentOperating Temperature: From -10°C to +50°C ; Up to 95% relative humidity (non-condensing).
Storage Temperature: From -40°C to +60°C; Up to 95% relative humidity (non-condensing).
Antenna Care and ReplacementDo not use the Phonecell® SX5T with a damaged antenna. If a damaged antenna comes into contact with the skin, a minor burn may result. Replace a damaged antenna immediately. Use only aTelular-approved antenna. Unauthorized antennas, modifications, or attachments could damage the Phonecell® SX5T.

Phonecell® SX5T CDMA2000 37 User Manual
DrivingCheck the laws and regulations on the use of cellular products in the areas where you drive. Somejurisdictions prohibit use of a cellular device while driving a vehicle. Even if your jurisdiction does nothave such a law, we strongly suggest that, for safety reasons, the driver use extreme caution whenoperating the cellular device while the vehicle is in motion. Always obey the law.
Exposure to Electronic DevicesMost modern electronic equipment is shielded from RF energy. However, RF energy from cellulardevices may affect inadequately shielded electronic equipment. RF energy may affect improperlyinstalled or inadequately shielded electronic operating and entertainment systems in motor vehicles.Check with the manufacturer or its representative to determine if these systems are adequatelyshielded from external RF energy. You should also check with the manufacturer of any equipmentthat has been added to your vehicle. Consult the manufacturer of any personal medical devices (such as pacemakers, hearing aids, etc.)to determine if they are adequately shielded from external RF energy. Turn the Phonecell® SX5TOFF in health care facilities when any regulations posted in the areas instruct you to do so. Hospitalsor health care facilities may be using equipment that could be sensitive to external RF energy.
AircraftTurn OFF the Phonecell® SX5T before boarding any aircraft.
• Use it on the ground only with crew permission.
• Do not use it in the air.To prevent possible interference, U.S. Federal Aviation Administration (FAA) regulations require youto have permission from a crew member to use your cellular phone (or any other cellular product)while the plane is on the ground. To prevent interference with aircraft systems, FCC regulationsprohibit using your cellular device while the plane is in the air.
ChildrenTo prevent damage to the unit, do not allow children to play with the Phonecell® SX5T.
Blasting AreasConstruction crews often use remote control RF devices to set off explosives. Therefore, to avoidinterfering with blasting operations, turn the Phonecell® SX5T OFF when in a "blasting area" or inareas posted: "Turn off two-way radio."
Potentially Explosive AtmospheresTurn the Phonecell® SX5T OFF when in any area with a potentially explosive atmosphere. It is rare,but the Phonecell® SX5T or its accessories could generate sparks. Sparks in such areas could causean explosion or fire resulting in bodily injury or even death.Areas with a potentially explosive atmosphere are often, but not always, clearly marked. They includefueling areas such as gas stations; below deck on boats; fuel or chemical transfer or storage facilities;areas where the air contains chemicals or particles, such as grain, dust, or metal powders; and anyother area where you would normally be advised to turn off your vehicle engine.Do not transport or store flammable gas, liquid or explosives in the area of the Phonecell® SX5T oraccessories.Vehicles using liquefied petroleum gas (such as propane or butane) must comply with the National FireProtection Standard (FPA-58). For a copy of this standard, contact the National Fire ProtectionAssociation, One Batterymarch Park, Quincy, MA02269, Attn: Publications Sales Division.

Phonecell® SX5T CDMA2000 38 User Manual
PatentsTelular Corporation products are protected and manufactured under one or more of the followingU.S. patents and related international patents and patents pending relating thereto:
4,658,096 4,737,975 4,775,997 4,868,519 4,922,517 5,134,6515,361,297 5,469,494 5,046,085 5,715,296 6,775,522 6,778,8246,785,517.
TrademarksTelular Corporation owns the following registered trademarks: TELULAR and design, TELULAR,CELJACK, MAXJACK, TELCEL, HEXAGON LOGO, PHONECELL, CELSERV, TELGUARD, CPX,and AXCELL.Licensed by QUALCOMM Incorporated under one or more of the following Patents:
4,901,307 5,490,165 5,056,109 5,504,773 5,101,501 5,778,3385,506,865 5,109,390 5,511,073 5,228,054 5,535,239 5,710,7845,267,261 5,544,196 5,267,262 5,568,483 5,337,338 5,659,5695,600,754 5,414,796 5,657,420 5,416,797.
CDMA2000® is a registered trademark of the Telecommunications Industry Association (TIA-USA).

Phonecell® SX5T CDMA2000 39 User Manual

©2004 Telular Corporation, all rights reserved. Part Number 56029901
647 North Lakeview Parkway
Vernon Hills, Illinois 60061, USA
Tel: 847-247-9400 • Fax: 847-247-0021
E-mail: [email protected]
http://www.telular.com