U2 RESTful Web Services User Guide - Rocket...
104
U2 RESTful Web Services User Guide JAN2015 January 2015 DBT-JAN2015-RWS-UG-1
Transcript of U2 RESTful Web Services User Guide - Rocket...
U2 RESTful Web Services
User Guide
JAN2015
January 2015DBT-JAN2015-RWS-UG-1
2
NoticesEdition
Publication date: January 2015Book number: DBT-JAN2015-RWS-UG-1Product version: JAN2015
Copyright© Rocket Software, Inc. or its affiliates 2005-2015. All Rights Reserved.
Trademarks
Rocket is a registered trademark of Rocket Software, Inc. For a list of Rocket registered trademarks goto: www.rocketsoftware.com/about/legal. All other products or services mentioned in this documentmay be covered by the trademarks, service marks, or product names of their respective owners.
Examples
This information might contain examples of data and reports. The examples include the names ofindividuals, companies, brands, and products. All of these names are fictitious and any similarity tothe names and addresses used by an actual business enterprise is entirely coincidental.
License agreement
This software and the associated documentation are proprietary and confidential to Rocket Software,Inc. or its affiliates, are furnished under license, and may be used and copied only in accordance withthe terms of such license.
Note: This product may contain encryption technology. Many countries prohibit or restrict theuse, import, or export of encryption technologies, and current use, import, and export regulationsshould be followed when exporting this product.

3
Corporate informationRocket Software, Inc. develops enterprise infrastructure products in four key areas: storage, networks,and compliance; database servers and tools; business information and analytics; and applicationdevelopment, integration, and modernization.
Website: www.rocketsoftware.com
Rocket Global Headquarters77 4th Avenue, Suite 100Waltham, MA 02451-1468USA
To contact Rocket Software by telephone for any reason, including obtaining pre-sales informationand technical support, use one of the following telephone numbers.
Country Toll-free telephone number
United States 1-855-577-4323Australia 1-800-823-405Belgium 0800-266-65Canada 1-855-577-4323China 800-720-1170France 0800-180-0882Germany 08-05-08-05-62Italy 800-878-295Japan 0800-170-5464Netherlands 0-800-022-2961New Zealand 0800-003210South Africa 0-800-980-818United Kingdom 0800-520-0439
Contacting Technical Support
The Rocket Customer Portal is the primary method of obtaining support. If you have currentsupport and maintenance agreements with Rocket Software, you can access the Rocket CustomerPortal and report a problem, download an update, or find answers to in the U2 Knowledgebase.To log in to the Rocket Customer Portal or to request a Rocket Customer Portal account, go towww.rocketsoftware.com/support.
In addition to using the Rocket Customer Portal to obtain support, you can send an email [email protected] or use one of the following telephone numbers.
Country Telephone number
North America +1 800 729 3553United Kingdom/France +44 (0) 800 773 771 or +44 (0) 20 8867 3691Europe/Africa +44 (0) 20 8867 3692Australia +1 800 707 703 or +61 (0) 29412 5450New Zealand +0800 505 515

4
Contents
Notices................................................................................................................................................................................... 2
Corporate information......................................................................................................................................................... 3
Chapter 1: Getting started................................................................................................................................................... 7Welcome to the U2 RESTful Web Services help..................................................................................................... 7System requirements............................................................................................................................................... 7Installing U2 RESTful Web Services software......................................................................................................... 8
Installing and updating the DBTools using the Eclipse Update Manager.................................................8XTOOLSUB..................................................................................................................................................... 9
Installing XTOOLSUB for UniData on Windows.............................................................................. 9Installing XTOOLSUB for UniVerse on Windows........................................................................... 10Installing XTOOLSUB for UNIX/Linux for UniData........................................................................ 10Installing XTOOLSUB for UNIX/Linux on UniVerse........................................................................11Installing XTOOLSUB on Windows................................................................................................ 12
Chapter 2: U2 RESTful Web Services.................................................................................................................................14U2 RESTful Web Services....................................................................................................................................... 14U2 REST server........................................................................................................................................................15U2 RESTful Web Services resources...................................................................................................................... 16
U2 REST resource folders...........................................................................................................................17URI addresses in U2 REST resources........................................................................................................ 17U2 REST subroutine resources.................................................................................................................. 18
U2 REST supported HTTP methods...................................................................................................................... 19HTTP GET.................................................................................................................................................... 19HTTP POST.................................................................................................................................................. 23HTTP PUT.................................................................................................................................................... 25HTTP DELETE.............................................................................................................................................. 26
U2 REST connection pooling support................................................................................................................... 27U2 REST transaction support................................................................................................................................ 27
Chapter 3: U2 RESTful Web Services Developer...............................................................................................................29Available views in the developer...........................................................................................................................29U2 RESTful Web Services Developer..................................................................................................................... 31
U2 server definitions.................................................................................................................................. 32Creating U2 server definitions................................................................................................................... 32Editing U2 server definitions......................................................................................................................33Viewing or editing the advanced settings of a U2 server definition........................................................33
Specifying a command to run on connection.............................................................................. 34Connecting to U2 servers...........................................................................................................................34Disconnecting to U2 servers...................................................................................................................... 35Deleting U2 server definitions................................................................................................................... 35
Chapter 4: Tutorial..............................................................................................................................................................36Creating a U2 server entry..................................................................................................................................... 36Creating a REST server...........................................................................................................................................36Creating a resource folder..................................................................................................................................... 37Creating a data resource........................................................................................................................................39Testing a data resource......................................................................................................................................... 40(Optional) Linking multiple resources using a foreign key..................................................................................40Creating a REST subroutine resource................................................................................................................... 44Defining input parameters..................................................................................................................................... 46Defining output parameters.................................................................................................................................. 47Testing the REST subroutine service.....................................................................................................................49Manually testing the REST subroutine service..................................................................................................... 50
Contents
5
Chapter 5: U2 REST security.............................................................................................................................................. 53User authentication and authorization.................................................................................................................53Authorizing a user...................................................................................................................................................54Authenticating a user............................................................................................................................................. 56
Chapter 6: SB+ and RESTful web services........................................................................................................................ 58Accessing SB+ files..................................................................................................................................................58Modifying SB+ parameters.....................................................................................................................................58Regenerating files................................................................................................................................................... 59
Chapter 7: Deployment...................................................................................................................................................... 62Deployment environment requirements.............................................................................................................. 62Creating a deployment package........................................................................................................................... 62Exporting RESTful web services............................................................................................................................ 63Importing RESTful web services............................................................................................................................ 63Deploying a U2 RESTful server as a Windows service..........................................................................................64Generating a configuration file..............................................................................................................................65Deploying a RESTful server using the U2 REST deployment tool....................................................................... 67
Starting the U2 REST GUI deployment tool..............................................................................................67Defining security between the client and the REST server......................................................................69Defining user access................................................................................................................................... 70Defining the Resource folder properties in the GUI tool..........................................................................71
Deploying a REST server from the command line............................................................................................... 72Starting the U2 REST deployment tool from the command line.............................................................72Defining U2 RESTful server connection security from the command line.............................................. 74Defining Resource folder properties from the command line................................................................. 75Deploying a REST server from the command line................................................................................... 75
Deploying a REST server from a configuration file.............................................................................................. 76Updating the configuration file using the GUI tool.............................................................................................. 77Starting a RESTful service......................................................................................................................................77Stopping a RESTful service.................................................................................................................................... 78Remote servers....................................................................................................................................................... 78
Chapter 8: Code samples................................................................................................................................................... 79UniBasic code samples.......................................................................................................................................... 79
UniBasic HTTP GET.....................................................................................................................................79UniBasic HTTP POST.................................................................................................................................. 80UniBasic HTTP PUT.................................................................................................................................... 80UniBasic HTTP DELETE...............................................................................................................................82UniBasic REST subroutine..........................................................................................................................82UniBasic RETSUB........................................................................................................................................ 83UniBasic URLENC........................................................................................................................................84
UniVerse BASIC code samples............................................................................................................................... 84UniVerse BASIC HTTP GET......................................................................................................................... 84UniVerse BASIC HTTP POST.......................................................................................................................85UniVerse BASIC HTTP PUT......................................................................................................................... 86UniVerse BASIC HTTP DELETE................................................................................................................... 87UniVerse BASIC REST subroutine.............................................................................................................. 88UniVerse BASIC RETSUB.............................................................................................................................88UniVerse BASIC URLENC.............................................................................................................................89
Python for UniData code samples.........................................................................................................................89Python for UniData: HTTP GET..................................................................................................................89Python for UniData: HTTP POST............................................................................................................... 90Python for UniData: HTTP PUT................................................................................................................. 91Python for UniData: HTTP DELETE............................................................................................................92Python for UniData: REST subroutine.......................................................................................................92
Python for UniVerse code samples....................................................................................................................... 93
Contents
6
Python for UniVerse: HTTP GET.................................................................................................................93Python for UniVerse: HTTP POST.............................................................................................................. 94Python for UniVerse: HTTP PUT................................................................................................................ 94Python for UniVerse: HTTP DELETE.......................................................................................................... 95Python for UniVerse: REST subroutine..................................................................................................... 96
Authenticating a U2 REST server...........................................................................................................................96U2 Basic subroutine............................................................................................................................................... 97Output types........................................................................................................................................................... 98
Chapter 9: Troubleshooting............................................................................................................................................. 102Backing up the U2 REST Developer workspace................................................................................................. 102Adjusting Java heap space.................................................................................................................................. 102Adjusting Java heap space in a deployed environment.................................................................................... 103Defining the JRE_HOME environment variable.................................................................................................. 104
7
Chapter 1: Getting started
Welcome to the U2 RESTful Web Services helpThe help provides conceptual, task-based, and reference information about U2 RESTful Web Services(U2 REST).
You can search for a word or phrase in these help topics by selecting the Search tab and entering yoursearch topic. To narrow the search results to an exact phrase, enclose the phrase within quotationmarks, for example, “dictionary files.”
The help topics cover the following areas:
▪ U2 REST overview▪ System requirements▪ Installing U2 RESTful Web Services▪ Getting started▪ Security▪ SB+ and U2 REST▪ Deploying your U2 RESTful web services
After you install the product, you can learn about the product interface and take a tutorial by readingthe topics in the Getting started section.
Additional resources
For additional information about U2 products, training, and technical resources go to http://www.rocketsoftware.com/brand/rocket-u2.
System requirementsBefore you install U2 RESTful Web Services, make sure that the computer you are installing it on meetsthe requirements.
▪ You must install U2 RESTful Web Services Developer on a computer that is on the same network asthe server running UniData or UniVerse.
▪ The installation computer must be running Microsoft Windows 2008 or Windows 7.▪ UniData or UniVerse services must be currently running on either a local or remote server.▪ UniVerse 10.3 or later must be running on the server (UniVerse only).▪ UniData 7.2 or later must be running on the server (UniData only).▪ U2 RESTful web services use port number 9191 as the default port when the first RESTful web
service is created. Each subsequent web service port number will increase in increments of two.A second port number is also used when the U2 RESTful web service is started and it is always thedefined port number plus one. For example, 9191 and 9192.
▪ The default port number used by the U2 RESTful web service to communicate to the U2 databaseengine is always 31438 unless changed.
▪ Firewalls must be open for incoming and outgoing traffic on all defined ports.▪ A screen resolution of 1280x1024 or higher and a text setting of 100% is recommended for all U2
Eclipse-based applications.

Chapter 1: Getting started
8
▪ Java Runtime Environment (JRE) 1.6 must be installed on the target deployment platform.Currently, JRE 1.6 is the only version supported by U2 REST. Problems may occur if other versionsare used.
▪ The JRE_HOME environment variable must point to the location of the JRE installation directory.
Installing U2 RESTful Web Services softwareComplete the following steps to install U2 RESTful Web Services on Windows.
Review the system requirements before you install U2 RESTful Web Services.
1. From the U2 Database Tools Installation screen, select U2 RESTful Web Services and click Next.2. After accepting the licensing agreement, click Next.3. Click Next to install U2 RESTful Web Services in the default C:\U2\U2Tools\v3 folder, or click
Browse to select a different folder.4. By default, the installation process adds the Rocket U2 icon to the Program Folders list. Click
Next to accept this default, or select a different folder from the Existing Folders list and thenclick Next.
5. Review the information about the installation files listed in the Start Copying Files dialog box. Ifthe information is correct, click Next to begin copying files. If the information is not correct, clickBack to make changes.
6. Click Finish to complete the installation process.
Installing and updating the DBTools using the Eclipse Update Manager
You can update and install any of the U2 DBTools using the Update Manager in Eclipse.
Find the latest information about updates for U2 DBTools at http://updates.rocketsoftware.com/u2.
Procedure
1. Launch any U2 DBTools or base Eclipse installations (beginning with Galileo) on your computer.2. From the Eclipse Help menu, select Help → Install New Software.3. Click Add, enter a name for the site, such as U2 Update Site, and in the Work with field enter
http://updates.rocketsoftware.com/u2. Click OK.4. Allow the repository to load and then expand the tree for U2 DBTools. Select the updates that you
want to apply. You can also choose to install any other U2 DBTools into your existing workspace.5. Click Next and follow the installation wizard to complete the installation of updates.6. Updates will take effect the next time an updated tool is launched.
Note: Only tools that are installed through separate InstallShield installations will appear onthe Start menu. Tools installed using the Eclipse Update Manager are installed as individualperspectives in a single Eclipse instance. You can access the different perspectives by selectingWindow → Open Perspective and then selecting the appropriate tool.
Note: You can check for updates to the DBTools by selecting Help → Check for Updates. To usethis option, you must have previously defined the http://updates.rocketsoftware.com/u2 locationin the Install New Software dialog, as described in step 3.
XTOOLSUB
9
XTOOLSUB
This topic describes the XTOOLSUB program and how to upgrade to the latest version of XTOOLSUBon various operating systems.
Updating the XTOOLSUB Program
The XTOOLSUB program is a U2 database server-side BASIC program used by various U2 Client Tools.This includes U2 DataVu, U2 Web DE, Basic Developer's Toolkit (BDT), Extensible Administration Tool(XAdmin), Web Services Developer, and more. It also includes any tool that uses the U2 Resource View.
XTOOLSUB updates itself automatically. However, if something happens to the XTOOLSUB programyou can download the latest version from the public Tech Note site at:
https://u2tc.rocketsoftware.com/documentation/1410028.asp
The XTOOLSUB program contains several zip and tar files, and includes three or four files, dependingon the environment. The XTOOLSUB program is used by all the tools, but the other files included areonly used for the Basic Developer's Toolkit (BDT).
The XTOOLSUB_EXECPRE/XTOOLSUB_XPRE programs are for pre-execution functionality andXTOOLSUB_EXECPOST/XTOOLSUB_XPST are for post-execution functionality. These programs arediscussed further in the related public Tech Note, BDT Extensibility Details. If you have added your owncode to the pre- and post-functionality, copy those modified programs to the older database versionsrather than the pre- and post- files located here.
The files included for UniData are:
▪ XTOOLSUB▪ XTOOLSUB_EXECPRE▪ XTOOLSUB_EXECPOST▪ EDAMAPSUB (UniData 6.1 and lower)
The files included for UniVerse are:
▪ XTOOLSUB▪ XTOOLSUB_XPRE▪ XTOOLSUB_XPST▪ EDAMAPSUB (UniVerse 10.3 and lower)
Do not catalog the EDAMAPSUB subroutine when using UDT 7.1 or UV 11.1 and higher. This programalready exists on those versions.
There is a difference between the databases because UniVerse's catalog environment is a type 1 fileand has a 14–character file name limit.
Only extract the file that is needed for the database server/version and OS type you are using.The ...UX.tar (Unix) files come from AIX. You will need to run fnuxi/convcode if you use other UNIX/Linux operating systems. Files are not included for all operating systems in order to avoid unnecessaryconfusion. The files in the zip/tar files are the object code for the given programs; do not open them ina text editor.
Note: Log in as a root or administrator user when doing these steps to avoid any permissionserrors. If an overwrite message occurs, select "yes" to overwrite the file in question.
Installing XTOOLSUB for UniData on Windows
The XTOOLSUB program is installed and updated automatically through the U2 DBTools updates.However, if your version of XTOOLSUB somehow becomes unusable, you can install a new version.
Chapter 1: Getting started
10
Procedure
1. Download the latest version of XTOOLSUB from the public Tech Note site at https://u2tc.rocketsoftware.com/documentation/1410028.asp.
2. Copy the XTOOLSUB_UDT_NT.zip or XTOOLSUB_UDT_61_NT.zip file to a temporary directory onyour server (for example, c:\temp).
3. Extract the file to the c:\u2\ud##\sys\SYS_BP (where ## refers to the UniData major version. Forexample, 61, 71, 72, etc.) directory using your preferred unzipping utility. If UniData is installed inanother location, change the path accordingly.
4. Log in to the sys account using telnet or execute a udt shell command in the sys directory on theserver.
5. Catalog the three XTOOLSUB programs, as follows:
▪ CATALOG SYS_BP XTOOLSUB FORCE▪ CATALOG SYS_BP XTOOLSUB_EXECPRE FORCE▪ CATALOG SYS_BP XTOOLSUB_EXECPOST FORCE
Note: If you are using UniData 6.1 or lower, also run the CATALOG SYS_BP EDAMAPSUBFORCE command.
6. Connect with your U2 client tool to the U2 database server.
Installing XTOOLSUB for UniVerse on Windows
The XTOOLSUB program is installed and updated automatically through the U2 DBTools updates.However, if your version of XTOOLSUB somehow becomes unusable, you can install a new version.
Procedure
1. Download the latest version of XTOOLSUB from the public Tech Note site at https://u2tc.rocketsoftware.com/documentation/1410028.asp
2. Copy the XTOOLSUB_UV_NT.zip or XTOOLSUB_UV_103_NT.zip file to a temporary directory onyour server. For example, c:\temp.
3. Extract the file to the c:\u2\uv\BP.O directory using your preferred unzipping utility. If UniVerse isinstalled in another location, change the path accordingly.
4. Log in to the UV home account via Telnet. The account name is UV or uv in the UV.ACCOUNT file.5. Catalog the three XTOOLSUB programs, as follows:
▪ CATALOG SYS_BP XTOOLSUB FORCE▪ CATALOG SYS_BP XTOOLSUB_EXECPRE FORCE▪ CATALOG SYS_BP XTOOLSUB_EXECPOST FORCE
Note: You will receive a catalog error if you try to catalog all three programs on the samecommand line.
6. If you are using UniVerse 10.3 or later, also run CATALOG BP *EDAMAPSUB FORCE command.7. Connect with your U2 client tool to the U2 database server.
Installing XTOOLSUB for UNIX/Linux for UniData
The XTOOLSUB program is installed and updated automatically through the U2 DBTools updates.However, if your version of XTOOLSUB somehow becomes unusable, you can install a new version.
Installing XTOOLSUB for UNIX/Linux on UniVerse
11
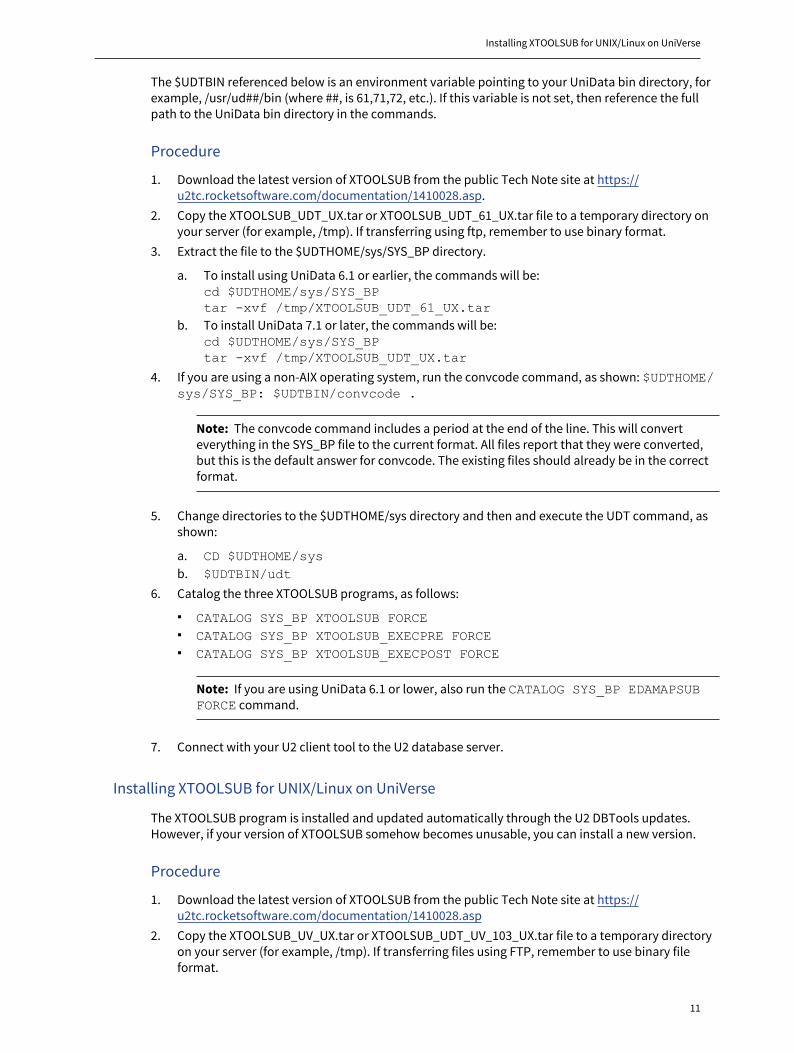
The $UDTBIN referenced below is an environment variable pointing to your UniData bin directory, forexample, /usr/ud##/bin (where ##, is 61,71,72, etc.). If this variable is not set, then reference the fullpath to the UniData bin directory in the commands.
Procedure
1. Download the latest version of XTOOLSUB from the public Tech Note site at https://u2tc.rocketsoftware.com/documentation/1410028.asp.
2. Copy the XTOOLSUB_UDT_UX.tar or XTOOLSUB_UDT_61_UX.tar file to a temporary directory onyour server (for example, /tmp). If transferring using ftp, remember to use binary format.
3. Extract the file to the $UDTHOME/sys/SYS_BP directory.
a. To install using UniData 6.1 or earlier, the commands will be:cd $UDTHOME/sys/SYS_BPtar -xvf /tmp/XTOOLSUB_UDT_61_UX.tar
b. To install UniData 7.1 or later, the commands will be:cd $UDTHOME/sys/SYS_BPtar -xvf /tmp/XTOOLSUB_UDT_UX.tar
4. If you are using a non-AIX operating system, run the convcode command, as shown: $UDTHOME/sys/SYS_BP: $UDTBIN/convcode .
Note: The convcode command includes a period at the end of the line. This will converteverything in the SYS_BP file to the current format. All files report that they were converted,but this is the default answer for convcode. The existing files should already be in the correctformat.
5. Change directories to the $UDTHOME/sys directory and then and execute the UDT command, asshown:
a. CD $UDTHOME/sysb. $UDTBIN/udt
6. Catalog the three XTOOLSUB programs, as follows:
▪ CATALOG SYS_BP XTOOLSUB FORCE▪ CATALOG SYS_BP XTOOLSUB_EXECPRE FORCE▪ CATALOG SYS_BP XTOOLSUB_EXECPOST FORCE
Note: If you are using UniData 6.1 or lower, also run the CATALOG SYS_BP EDAMAPSUBFORCE command.
7. Connect with your U2 client tool to the U2 database server.
Installing XTOOLSUB for UNIX/Linux on UniVerse
The XTOOLSUB program is installed and updated automatically through the U2 DBTools updates.However, if your version of XTOOLSUB somehow becomes unusable, you can install a new version.
Procedure
1. Download the latest version of XTOOLSUB from the public Tech Note site at https://u2tc.rocketsoftware.com/documentation/1410028.asp
2. Copy the XTOOLSUB_UV_UX.tar or XTOOLSUB_UDT_UV_103_UX.tar file to a temporary directoryon your server (for example, /tmp). If transferring files using FTP, remember to use binary fileformat.
Chapter 1: Getting started
12
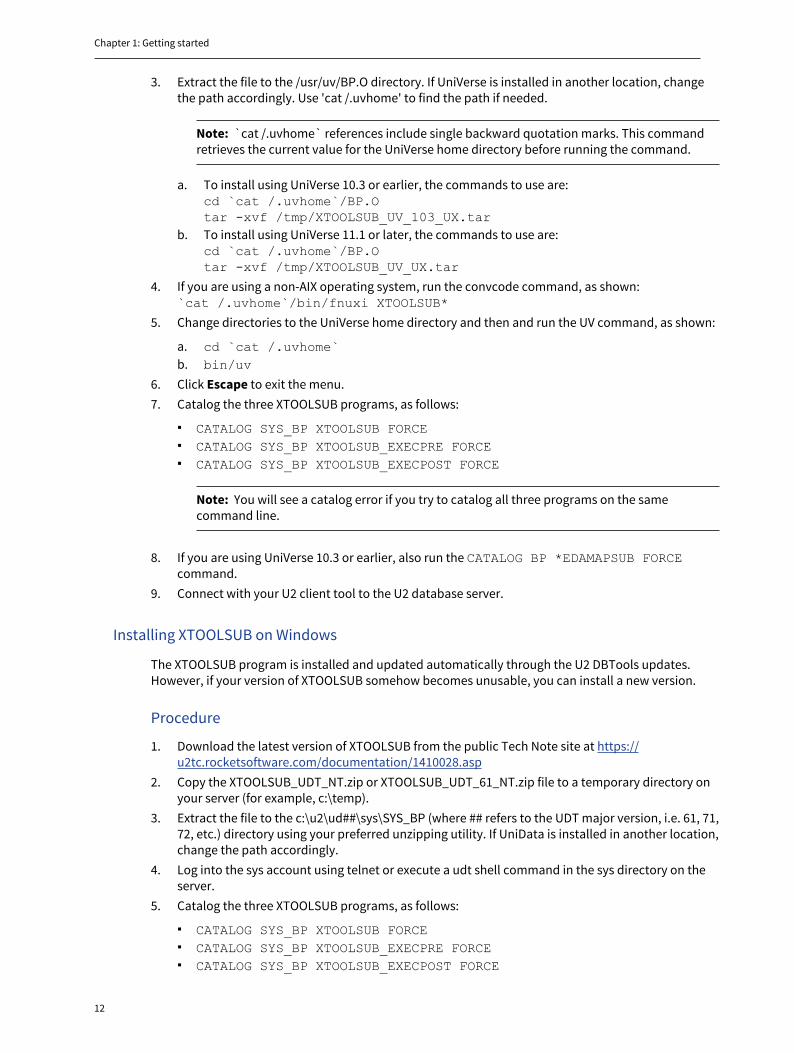
3. Extract the file to the /usr/uv/BP.O directory. If UniVerse is installed in another location, changethe path accordingly. Use 'cat /.uvhome' to find the path if needed.
Note: `cat /.uvhome` references include single backward quotation marks. This commandretrieves the current value for the UniVerse home directory before running the command.
a. To install using UniVerse 10.3 or earlier, the commands to use are:cd `cat /.uvhome`/BP.Otar -xvf /tmp/XTOOLSUB_UV_103_UX.tar
b. To install using UniVerse 11.1 or later, the commands to use are:cd `cat /.uvhome`/BP.Otar -xvf /tmp/XTOOLSUB_UV_UX.tar
4. If you are using a non-AIX operating system, run the convcode command, as shown:`cat /.uvhome`/bin/fnuxi XTOOLSUB*
5. Change directories to the UniVerse home directory and then and run the UV command, as shown:
a. cd `cat /.uvhome`b. bin/uv
6. Click Escape to exit the menu.7. Catalog the three XTOOLSUB programs, as follows:
▪ CATALOG SYS_BP XTOOLSUB FORCE▪ CATALOG SYS_BP XTOOLSUB_EXECPRE FORCE▪ CATALOG SYS_BP XTOOLSUB_EXECPOST FORCE
Note: You will see a catalog error if you try to catalog all three programs on the samecommand line.
8. If you are using UniVerse 10.3 or earlier, also run the CATALOG BP *EDAMAPSUB FORCEcommand.
9. Connect with your U2 client tool to the U2 database server.
Installing XTOOLSUB on Windows
The XTOOLSUB program is installed and updated automatically through the U2 DBTools updates.However, if your version of XTOOLSUB somehow becomes unusable, you can install a new version.
Procedure
1. Download the latest version of XTOOLSUB from the public Tech Note site at https://u2tc.rocketsoftware.com/documentation/1410028.asp
2. Copy the XTOOLSUB_UDT_NT.zip or XTOOLSUB_UDT_61_NT.zip file to a temporary directory onyour server (for example, c:\temp).
3. Extract the file to the c:\u2\ud##\sys\SYS_BP (where ## refers to the UDT major version, i.e. 61, 71,72, etc.) directory using your preferred unzipping utility. If UniData is installed in another location,change the path accordingly.
4. Log into the sys account using telnet or execute a udt shell command in the sys directory on theserver.
5. Catalog the three XTOOLSUB programs, as follows:
▪ CATALOG SYS_BP XTOOLSUB FORCE▪ CATALOG SYS_BP XTOOLSUB_EXECPRE FORCE▪ CATALOG SYS_BP XTOOLSUB_EXECPOST FORCE
Installing XTOOLSUB on Windows
13
Note: If you are using UniData 6.1 or lower, also run the CATALOG SYS_BP EDAMAPSUBFORCE command.
6. Connect with your U2 client tool to the U2 database server.
14
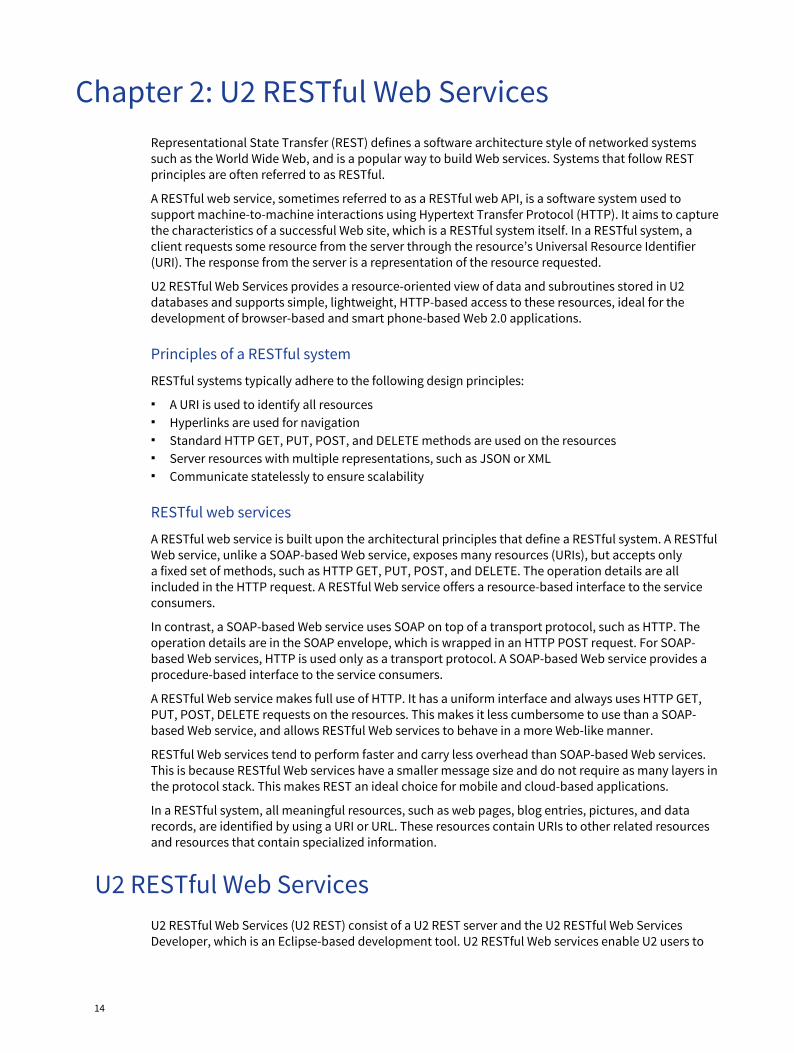
Chapter 2: U2 RESTful Web ServicesRepresentational State Transfer (REST) defines a software architecture style of networked systemssuch as the World Wide Web, and is a popular way to build Web services. Systems that follow RESTprinciples are often referred to as RESTful.
A RESTful web service, sometimes referred to as a RESTful web API, is a software system used tosupport machine-to-machine interactions using Hypertext Transfer Protocol (HTTP). It aims to capturethe characteristics of a successful Web site, which is a RESTful system itself. In a RESTful system, aclient requests some resource from the server through the resource’s Universal Resource Identifier(URI). The response from the server is a representation of the resource requested.
U2 RESTful Web Services provides a resource-oriented view of data and subroutines stored in U2databases and supports simple, lightweight, HTTP-based access to these resources, ideal for thedevelopment of browser-based and smart phone-based Web 2.0 applications.
Principles of a RESTful system
RESTful systems typically adhere to the following design principles:
▪ A URI is used to identify all resources▪ Hyperlinks are used for navigation▪ Standard HTTP GET, PUT, POST, and DELETE methods are used on the resources▪ Server resources with multiple representations, such as JSON or XML▪ Communicate statelessly to ensure scalability
RESTful web services
A RESTful web service is built upon the architectural principles that define a RESTful system. A RESTfulWeb service, unlike a SOAP-based Web service, exposes many resources (URIs), but accepts onlya fixed set of methods, such as HTTP GET, PUT, POST, and DELETE. The operation details are allincluded in the HTTP request. A RESTful Web service offers a resource-based interface to the serviceconsumers.
In contrast, a SOAP-based Web service uses SOAP on top of a transport protocol, such as HTTP. Theoperation details are in the SOAP envelope, which is wrapped in an HTTP POST request. For SOAP-based Web services, HTTP is used only as a transport protocol. A SOAP-based Web service provides aprocedure-based interface to the service consumers.
A RESTful Web service makes full use of HTTP. It has a uniform interface and always uses HTTP GET,PUT, POST, DELETE requests on the resources. This makes it less cumbersome to use than a SOAP-based Web service, and allows RESTful Web services to behave in a more Web-like manner.
RESTful Web services tend to perform faster and carry less overhead than SOAP-based Web services.This is because RESTful Web services have a smaller message size and do not require as many layers inthe protocol stack. This makes REST an ideal choice for mobile and cloud-based applications.
In a RESTful system, all meaningful resources, such as web pages, blog entries, pictures, and datarecords, are identified by using a URI or URL. These resources contain URIs to other related resourcesand resources that contain specialized information.
U2 RESTful Web ServicesU2 RESTful Web Services (U2 REST) consist of a U2 REST server and the U2 RESTful Web ServicesDeveloper, which is an Eclipse-based development tool. U2 RESTful Web services enable U2 users to
U2 REST server
15
quickly and easily expose U2 data and subroutines as RESTful resources accessible through HTTP GET,PUT, POST, and DELETE methods.
U2 data is natively accessed and requires no normalization. The U2 RESTful Web Services consist ofa Jetty-based REST server and an Eclipse-based development tool that lets users create, test (usingGET on data and subroutine resources), debug, and deploy U2 RESTful Web Services within a singleintegrated development environment (IDE).
U2 REST offers SSL support for secure communications, as well as HTTP-based user authenticationand authorization (Digest or Basic). Optimistic concurrency control and connection pooling are alsosupported to provide greater accessibility.
U2 REST supports the JavaScript Object Notation (JSON) data format, which is a lightweight data-interchange format and is part of the JavaScript language specification, supported by all Internetbrowsers. This process allows the REST server to transmit data between the client service and the U2RESTful Web services.
The U2 RESTful Web Services Developer lets you define and publish U2 resources, such as data filesand subroutines, to a U2 REST server so they can be accessed in a RESTful manner. The developerutilizes Eclipse-based tooling to enable the rapid development of U2 RESTful Web Services. Thedeveloper can also be used to start and stop a local RESTful server, and to stop a remote RESTfulserver. You can also manually start and stop the RESTful servers, using the provided .sh or .bat files.
A server log is provided to aid in debugging and tracing. You can quickly turn the server log on andoff in the U2 RESTful Web Services Developer, and the log results can be viewed directly from withinthe developer. If the server response is not what you expect, you can turn on the log and check theoperation.
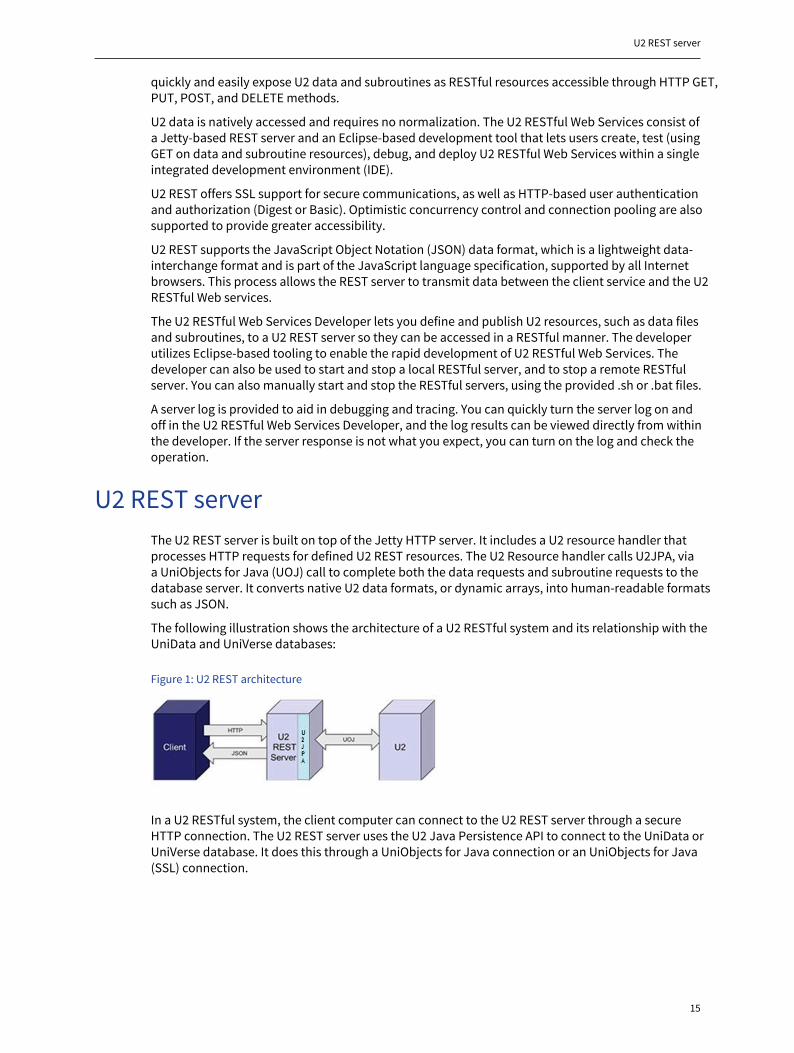
U2 REST serverThe U2 REST server is built on top of the Jetty HTTP server. It includes a U2 resource handler thatprocesses HTTP requests for defined U2 REST resources. The U2 Resource handler calls U2JPA, viaa UniObjects for Java (UOJ) call to complete both the data requests and subroutine requests to thedatabase server. It converts native U2 data formats, or dynamic arrays, into human-readable formatssuch as JSON.
The following illustration shows the architecture of a U2 RESTful system and its relationship with theUniData and UniVerse databases:
Figure 1: U2 REST architecture
In a U2 RESTful system, the client computer can connect to the U2 REST server through a secureHTTP connection. The U2 REST server uses the U2 Java Persistence API to connect to the UniData orUniVerse database. It does this through a UniObjects for Java connection or an UniObjects for Java(SSL) connection.

Chapter 2: U2 RESTful Web Services
16
U2 RESTful Web Services resourcesU2 RESTful Web Services (U2 REST) resources refer to resources that are defined on the U2 RESTserver and are accessible through HTTP requests. There are two types of U2 REST resources: Data andsubroutines.
U2 REST data resources
U2 RESTful Web Services (U2 REST) resources refer to resources that are defined on the U2 RESTserver and are accessible through HTTP requests. There are two types of U2 REST resources: Data andsubroutines.
U2 REST data resources
A U2 REST data resource is a resource that maps to U2 data. These resources are U2 Java PersistenceAPI (U2JPA) entities that map fully or partially to U2 data files.
U2JPA entities support only Java String type fields, so the value of any U2 REST data resource isalways a String value. This applies even when the U2 dictionary conversion code indicates the field isof a different type, such as a numeric type.
Subresources
There are two types of data resources: primary, top-level resources and sub-resources.
A primary resource corresponds to a U2 data file, while the sub-resources correspond to the data fileassociations. A primary resource typically contains collections of sub resources, or multi-subvalueassociations. Sub-resources may contain collections of other sub-resources, or multi-subvalueassociations.
For example, the UniVerse HS.SALES Customer resource is a primary resource that maps to theCUSTOMER file. It contains a collection of sub-resources, including the Order resource, whichcorresponds to the ORDER association. The Order resource, in turn, contains a collection of sub-resources, including Item, which represent all of the items in a single order and includes all of themulti-subvalue fields in the ORDER association.
Foreign resources
A referenced primary resource is a foreign resource to the host data source. Foreign resources cancontain references to other primary resources. The references correspond to the TRANS () virtual fieldsin the host U2 data file.
In the preceding example, the subresource Item references the primary resource Product, which ismapped to the PRODUCT data file that contains the detailed information about an ordered product.
Virtual fields
A U2 REST data resource can contain both D-type fields and V-type fields. The V-type fields, or virtualfields, contain virtual information that is calculated or otherwise derived from other attributes, otherfiles, or other information in the database. The result of a virtual attribute is information that does notactually exist in the data portion of a file.
In the example above, instead of referencing the Product resource, the sub-resource Item may includeseveral TRANS () virtual fields that read data from the PRODUCT data file. In a situation like this, theproduct information is already in the Item resource when it is read from the server, and there is noneed to read the Product resource itself to see the detailed product information.
U2 REST resource folders
17
U2 REST resource folders
U2 REST resources are grouped under the resource folders on the REST server. A resource folder mapsto a U2 account on the database server, which is where the REST server accesses the data and calls thesubroutines.
A resource folder contains properties such as the host server name or IP address, UniRPC servicename, UniRPC port number, account path, a database user name and password, and SSL options. Thisinformation is used by the U2 REST server to complete the database access request.
URI addresses in U2 REST resources
A U2 REST resource URI is designed to impart the resource location, the resource type (data orsubroutine), and any parent-child relationships. Each resource address contains three distinct parts:the REST server URI, the Resource folder name, and the relative path of the URI.
The three parts of the resource address are separated by a forward slash, “/”, and are described below:
▪ REST Server URI: Each REST server listens on a unique port number on the server machine. A RESTserver URI is an HTTP URL, and is formed by combining the host name or IP address with its portnumber, as shown:http://myserver:9191 or https://myserver:9191
Note: The REST server URI cannot be accessed directly.
▪ Resource folder name: The name of a resource folder that maps to a database account such asHS.SALES.The resource folder can be accessed via its URI using the HTTP GET method. This results in a list ofURIs of all the top-level data resources in the folder.
▪ Relative pathsFor data resources:
▫ For a collection-type resource, use the data resource name, as shown in the examples below:http://myserver:9191/HS_SALEShttp://myserver:9191/HS_SALES/CUSTOMERhttp://myserver:9191/HS_SALES/CUSTOMER/2/ORDERSEach of the above examples returns a list of the requested resources, such as CUSTOMER orORDERS, in JSON. In a single primary resource, add the ID value after the data resource name,as shown:http://myserver:9191/HS_SALES/CUSTOMER/2The above example returns a JSON object representing a Customer with an ID of 2. For a singlesub-resource, include the resource’s position in the association after its name, as shown:http://myserver:9191/HS_SALES/CUSTOMER/2/ORDERShttp://myserver:9191/HS_SALES/CUSTOMER/2/ORDERS/2Sub-resources must always be accessed under a single top-level resource.
▫ For Subroutines:In order to distinguish subroutines from data resources, the relative path of a subroutine mustalways begin with the word subroutine, followed by its name, as shown:http://myserver:9191/HS_SALES/subroutine/CalculateCharge
The HTTP POST method is the only method that can be used to call a subroutine. The U2 REST serverchecks for the HTTP POST method on a subroutine URI before further processing occurs.
URI encoding must be applied on the resource URI in the HTTP request to U2 REST server. This is toavoid having URI-reserved delimiters in the text contained in the resource URI.
Chapter 2: U2 RESTful Web Services
18
For example, if a resource ID contains any of the following characters:“:, /,?, #, &, space”then the URI must be URI-encoded before sending the HTTP request to the U2 REST server. The U2REST server decodes the URI to get the correct resource ID.
In the example below, the product ID contains an illegal “#” character:
http://myserver:9191/HS_SALES/CUSTOMER/Product/12#345
The U2 REST server sees the URI-reserved delimiter and decodes it using the standard %23replacement, as shown:
http://myserver:9191/HS_SALES/CUSTOMER/Product/12%23345
U2 REST subroutine resources
U2 subroutines implement all of the server-side business logic of U2 applications. A subroutine mustbe cataloged, either locally or globally, on the U2 server and then mapped on the REST server. Theresource then becomes a U2 REST subroutine resource and can be called by a service consumer. Youcan map a subroutine on the REST server by defining its parameters.
Subroutine parameters
You can use a subroutine parameter for input only, output only, or for both input and outputpurposes.
Subroutine parameters can be one of three data types: strings, dynamic arrays, or JSON. A string typeis a series of characters that is enclosed in double quotes. Dynamic array parameters must referencea dynamic array definition. A dynamic array definition describes the structure of the dynamic arraysit represents. In a U2 dictionary, it does this by specifying all the fields contained in the dynamic arrayand also their value types and associations. The input and output JSON objects that move to andfrom the subroutine must be correctly formed JSON objects. It is expected that the U2 Dynamic Object(UDO) will be used to consume and present the JSON object both to and from the subroutine, whichwill ensure the correct JSON format is used.
Refer to UniData UniBasic Extensions for more information about the U2 Dynamic Object.
Note: If connection pooling is enabled, any change to a cataloged subroutine requires theconnection pool to be restarted. It is suggested that connection pools be disabled during basicsubroutine development.
HTTP POST
The HTTP POST method is the only HTTP method that can be used to call a subroutine; however,for testing purposes you can issue a GET request and will be prompted for input to execute a POSTrequest. In a RESTful definition, you can use HTTP POST to create a resource on the server. You canalso use an HTTP specification to send information to a Web server, such as submitting a Web form.
If the requested subroutine has input parameters, including parameters for both input and outputpurposes, the content of the HTTP POST request must contain a JSON object that includes all of theinput parameters and their values. Missing input parameter values are treated as empty strings.
If the subroutine has output parameters, including parameters for both input and output purposes,the content of the HTTP response will contain a JSON object that includes all of the output parametersand their values.
U2 REST supported HTTP methods
19
Note: If you are using SSL and want to make a subroutine resource available in a new U2 RESTfulweb server, you must first create a dummy data resource for the RESTful service to work. Thisrequirement is a permanent restriction of the U2 Restful web service.
U2 REST supported HTTP methodsU2 REST supports four HTTP methods: GET (read), PUT (update), POST (create or call subroutine), andDELETE (delete).
The PUT, POST, and DELETE methods can only be used on a single data resource, not a collection. U2RESTful Web Services does not support batch operations, which groups multiple requests into oneHTTP POST request.
HTTP GET
The HTTP GET method can only be used on U2 REST data resources.
The following example illustrates a typical BASIC CallHTTP GET request. The request calls the U2 RESTserver using a GET statement, and then returns a customer record based on the requested CUSTID:
logfile = "restget"stat = protocolLogging(logfile, "ON", 10)PRINT "WHICH CUSTOMER record ID would you like to GET?"INPUT CUSTID** URL returned as html or json data* url="http://den-l-nk01.rocketsoftware.com:9191/HS_SALES/Customer/":CUSTID:"?tohtml=true"url="http://den-l-nk01.rocketsoftware.com:9191/HS_SALES/Customer/":CUSTIDmethod="GET"*stat = setHTTPDefault("VERSION", "1.1")stat = createRequest(url, method, restGET)stat = setRequestHeader(restGET, "Content-Type", "application/json;charset=utf-8")stat = submitRequest(restGET, 5000, "", Header, restData, httpStatus)* GET response parserrestData=CHANGE(restData, "{", "{":CHAR(10))restData=CHANGE(restData, ",", ",":CHAR(10))restData=CHANGE(restData, "}", "}":CHAR(10))*PRINT "Response status: ":httpStatusPRINT "Response headers:":HeaderPRINT "Response data:":CHAR(10):restData*a = protocolLogging(logfile, "OFF", 10)END
In the above example, we call our HTTP functions to perform the HTTP GET request. We then create asimple parser for display purposes. The output of our GET request, which displays the information forCUSTID 2, is shown below:
{@uri: http://den-l-aw03:9191/HS_SALES/Customer/2?tohtml=truestatename: "Massachusetts"state: "MA"
Chapter 2: U2 RESTful Web Services
20
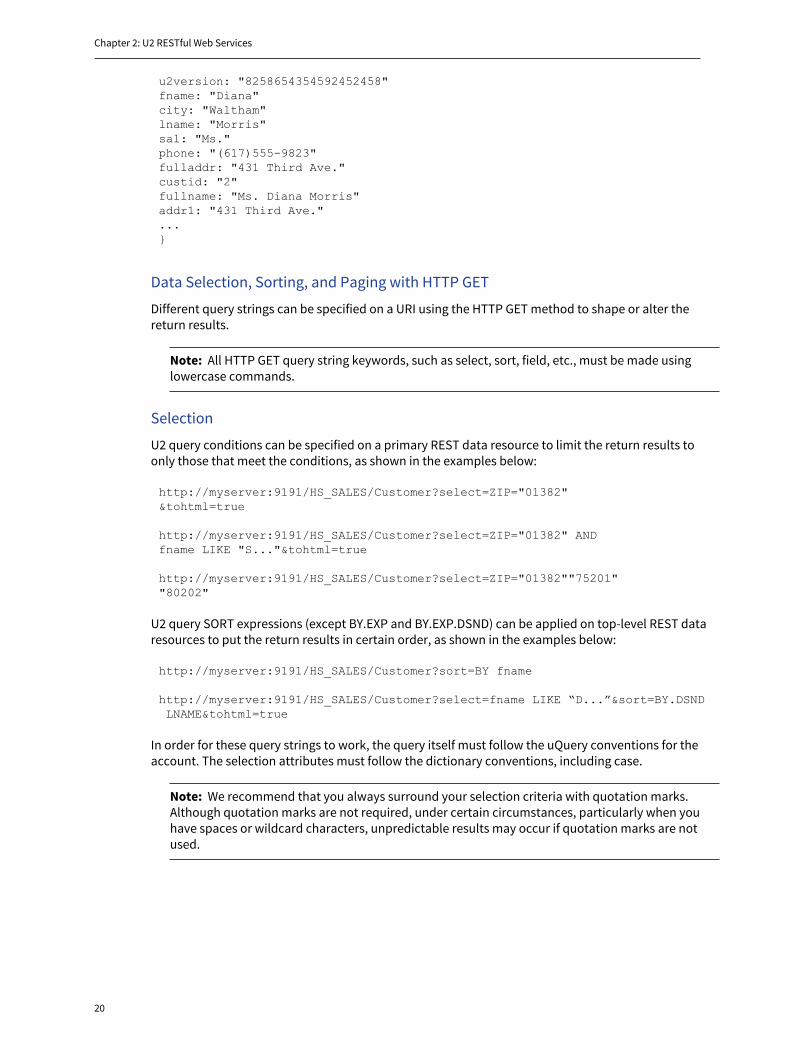
u2version: "8258654354592452458"fname: "Diana"city: "Waltham"lname: "Morris"sal: "Ms."phone: "(617)555-9823"fulladdr: "431 Third Ave."custid: "2"fullname: "Ms. Diana Morris"addr1: "431 Third Ave."...}
Data Selection, Sorting, and Paging with HTTP GET
Different query strings can be specified on a URI using the HTTP GET method to shape or alter thereturn results.
Note: All HTTP GET query string keywords, such as select, sort, field, etc., must be made usinglowercase commands.
Selection
U2 query conditions can be specified on a primary REST data resource to limit the return results toonly those that meet the conditions, as shown in the examples below:
http://myserver:9191/HS_SALES/Customer?select=ZIP="01382"&tohtml=true http://myserver:9191/HS_SALES/Customer?select=ZIP="01382" AND fname LIKE "S..."&tohtml=true http://myserver:9191/HS_SALES/Customer?select=ZIP="01382""75201""80202"
U2 query SORT expressions (except BY.EXP and BY.EXP.DSND) can be applied on top-level REST dataresources to put the return results in certain order, as shown in the examples below:
http://myserver:9191/HS_SALES/Customer?sort=BY fname http://myserver:9191/HS_SALES/Customer?select=fname LIKE “D...”&sort=BY.DSND LNAME&tohtml=true
In order for these query strings to work, the query itself must follow the uQuery conventions for theaccount. The selection attributes must follow the dictionary conventions, including case.
Note: We recommend that you always surround your selection criteria with quotation marks.Although quotation marks are not required, under certain circumstances, particularly when youhave spaces or wildcard characters, unpredictable results may occur if quotation marks are notused.
HTTP GET
21
Projection
Projection limits the return results on a data resource to only a few specified fields, instead of all ofthem, as shown below:
http://myserver:9191/HS_SALES/Customer?fields=lname, fname
Paging
Two sets of query string parameters can be used to specify the desired starting position and the size ofdata returned, described in the examples below. In the first example, we use the pageno and pagesizeparameters to specify that the default page size is 20 and the minimum pageno is 1, as shown:
http://myserver:9191/HS_SALES/Customer?pageno=3&pagesize=20
In this next example, we use the start and max parameters to specify that the default start value is 0,and the default max value is 20, as shown:
http://myserver:9191/HS_SALES/Customer?start=0&max=20
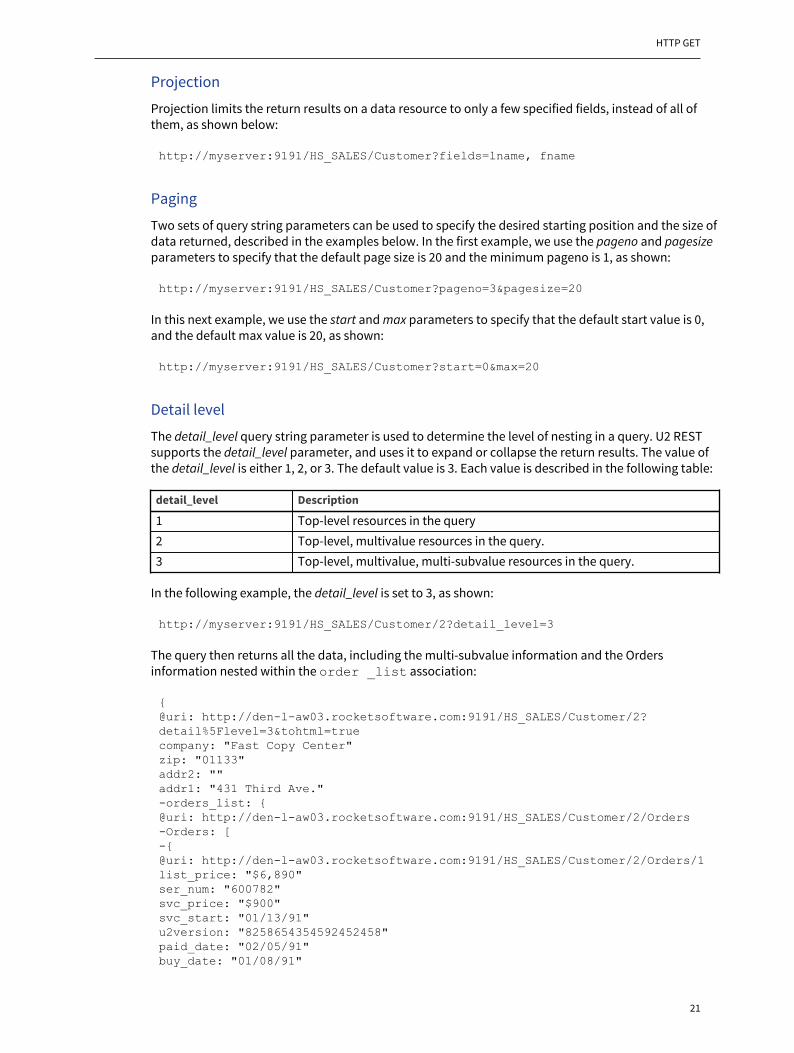
Detail level
The detail_level query string parameter is used to determine the level of nesting in a query. U2 RESTsupports the detail_level parameter, and uses it to expand or collapse the return results. The value ofthe detail_level is either 1, 2, or 3. The default value is 3. Each value is described in the following table:
detail_level Description
1 Top-level resources in the query2 Top-level, multivalue resources in the query.3 Top-level, multivalue, multi-subvalue resources in the query.
In the following example, the detail_level is set to 3, as shown:
http://myserver:9191/HS_SALES/Customer/2?detail_level=3
The query then returns all the data, including the multi-subvalue information and the Ordersinformation nested within the order _list association:
{@uri: http://den-l-aw03.rocketsoftware.com:9191/HS_SALES/Customer/2?detail%5Flevel=3&tohtml=truecompany: "Fast Copy Center"zip: "01133"addr2: ""addr1: "431 Third Ave."-orders_list: {@uri: http://den-l-aw03.rocketsoftware.com:9191/HS_SALES/Customer/2/Orders-Orders: [-{@uri: http://den-l-aw03.rocketsoftware.com:9191/HS_SALES/Customer/2/Orders/1list_price: "$6,890"ser_num: "600782"svc_price: "$900"svc_start: "01/13/91"u2version: "8258654354592452458"paid_date: "02/05/91"buy_date: "01/08/91"
Chapter 2: U2 RESTful Web Services
22
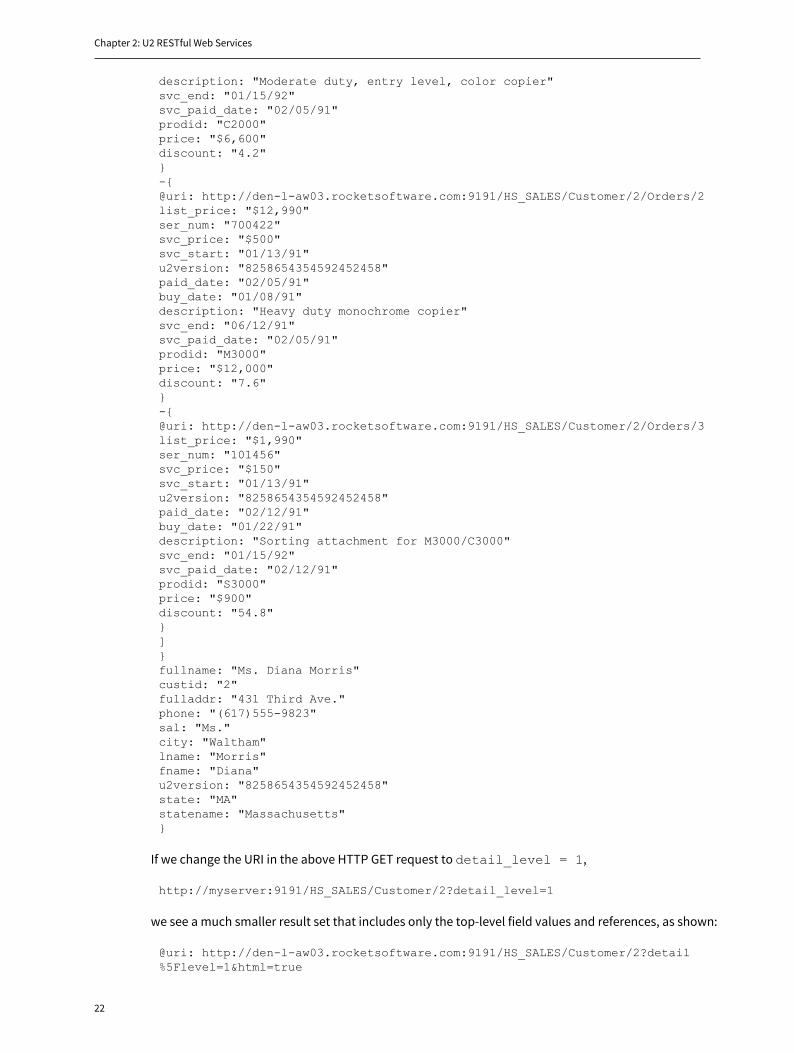
description: "Moderate duty, entry level, color copier"svc_end: "01/15/92"svc_paid_date: "02/05/91"prodid: "C2000"price: "$6,600"discount: "4.2"}-{@uri: http://den-l-aw03.rocketsoftware.com:9191/HS_SALES/Customer/2/Orders/2list_price: "$12,990"ser_num: "700422"svc_price: "$500"svc_start: "01/13/91"u2version: "8258654354592452458"paid_date: "02/05/91"buy_date: "01/08/91"description: "Heavy duty monochrome copier"svc_end: "06/12/91"svc_paid_date: "02/05/91"prodid: "M3000"price: "$12,000"discount: "7.6"}-{@uri: http://den-l-aw03.rocketsoftware.com:9191/HS_SALES/Customer/2/Orders/3list_price: "$1,990"ser_num: "101456"svc_price: "$150"svc_start: "01/13/91"u2version: "8258654354592452458"paid_date: "02/12/91"buy_date: "01/22/91"description: "Sorting attachment for M3000/C3000"svc_end: "01/15/92"svc_paid_date: "02/12/91"prodid: "S3000"price: "$900"discount: "54.8"}]}fullname: "Ms. Diana Morris"custid: "2"fulladdr: "431 Third Ave."phone: "(617)555-9823"sal: "Ms."city: "Waltham"lname: "Morris"fname: "Diana"u2version: "8258654354592452458"state: "MA"statename: "Massachusetts"}
If we change the URI in the above HTTP GET request to detail_level = 1,
http://myserver:9191/HS_SALES/Customer/2?detail_level=1
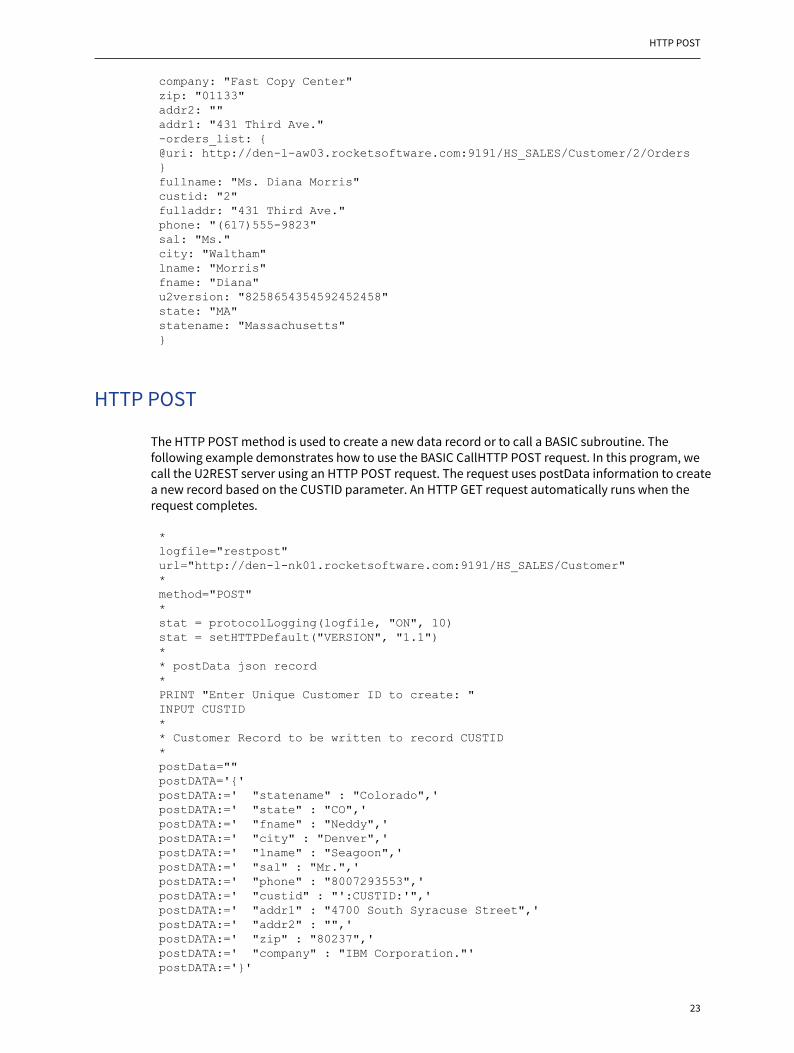
we see a much smaller result set that includes only the top-level field values and references, as shown:
@uri: http://den-l-aw03.rocketsoftware.com:9191/HS_SALES/Customer/2?detail%5Flevel=1&html=true
HTTP POST
23
company: "Fast Copy Center"zip: "01133"addr2: ""addr1: "431 Third Ave."-orders_list: {@uri: http://den-l-aw03.rocketsoftware.com:9191/HS_SALES/Customer/2/Orders}fullname: "Ms. Diana Morris"custid: "2"fulladdr: "431 Third Ave."phone: "(617)555-9823"sal: "Ms."city: "Waltham"lname: "Morris"fname: "Diana"u2version: "8258654354592452458"state: "MA"statename: "Massachusetts"}
HTTP POST
The HTTP POST method is used to create a new data record or to call a BASIC subroutine. Thefollowing example demonstrates how to use the BASIC CallHTTP POST request. In this program, wecall the U2REST server using an HTTP POST request. The request uses postData information to createa new record based on the CUSTID parameter. An HTTP GET request automatically runs when therequest completes.
*logfile="restpost"url="http://den-l-nk01.rocketsoftware.com:9191/HS_SALES/Customer"*method="POST"*stat = protocolLogging(logfile, "ON", 10)stat = setHTTPDefault("VERSION", "1.1")** postData json record*PRINT "Enter Unique Customer ID to create: "INPUT CUSTID** Customer Record to be written to record CUSTID*postData=""postDATA='{'postDATA:=' "statename" : "Colorado",'postDATA:=' "state" : "CO",'postDATA:=' "fname" : "Neddy",'postDATA:=' "city" : "Denver",'postDATA:=' "lname" : "Seagoon",'postDATA:=' "sal" : "Mr.",'postDATA:=' "phone" : "8007293553",'postDATA:=' "custid" : "':CUSTID:'",'postDATA:=' "addr1" : "4700 South Syracuse Street",'postDATA:=' "addr2" : "",'postDATA:=' "zip" : "80237",'postDATA:=' "company" : "IBM Corporation."'postDATA:='}'
Chapter 2: U2 RESTful Web Services
24
*CRTstat = createRequest(url, method, restPOST)stat = setRequestHeader(restPOST, "Content-Type", "application/json; charset=utf-8")stat = submitRequest(restPOST, 5000, postDATA, Header, restData, httpStatus)* POST responserestData=CHANGE(restData, "{", "{":CHAR(10))restData=CHANGE(restData, ",", ",":CHAR(10))restData=CHANGE(restData, "}", "}":CHAR(10))PRINT "Response status: ":httpStatusPRINT "Response headers:":HeaderPRINT "Response data:":CHAR(10):restData*stat = protocolLogging(logfile, "OFF", 10)restPOST=""END
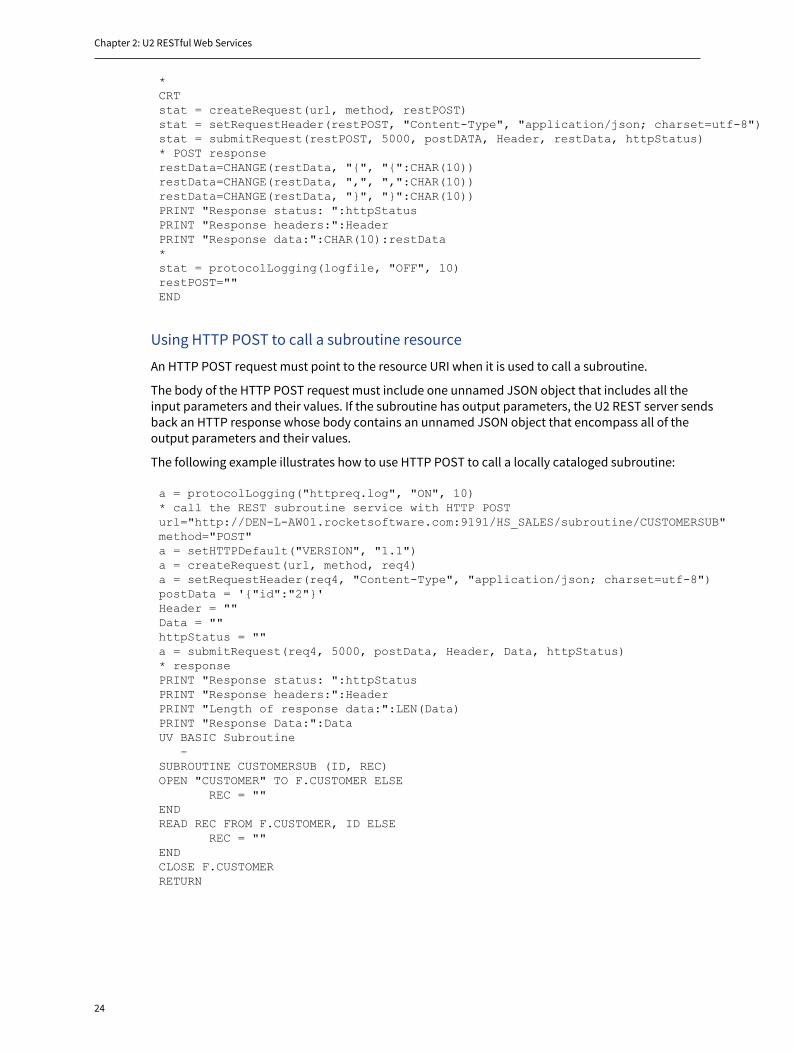
Using HTTP POST to call a subroutine resource
An HTTP POST request must point to the resource URI when it is used to call a subroutine.
The body of the HTTP POST request must include one unnamed JSON object that includes all theinput parameters and their values. If the subroutine has output parameters, the U2 REST server sendsback an HTTP response whose body contains an unnamed JSON object that encompass all of theoutput parameters and their values.
The following example illustrates how to use HTTP POST to call a locally cataloged subroutine:
a = protocolLogging("httpreq.log", "ON", 10)* call the REST subroutine service with HTTP POSTurl="http://DEN-L-AW01.rocketsoftware.com:9191/HS_SALES/subroutine/CUSTOMERSUB"method="POST"a = setHTTPDefault("VERSION", "1.1")a = createRequest(url, method, req4)a = setRequestHeader(req4, "Content-Type", "application/json; charset=utf-8")postData = '{"id":"2"}'Header = ""Data = ""httpStatus = ""a = submitRequest(req4, 5000, postData, Header, Data, httpStatus)* responsePRINT "Response status: ":httpStatusPRINT "Response headers:":HeaderPRINT "Length of response data:":LEN(Data)PRINT "Response Data:":DataUV BASIC Subroutine -SUBROUTINE CUSTOMERSUB (ID, REC)OPEN "CUSTOMER" TO F.CUSTOMER ELSE REC = ""ENDREAD REC FROM F.CUSTOMER, ID ELSE REC = ""ENDCLOSE F.CUSTOMERRETURN
HTTP PUT
25
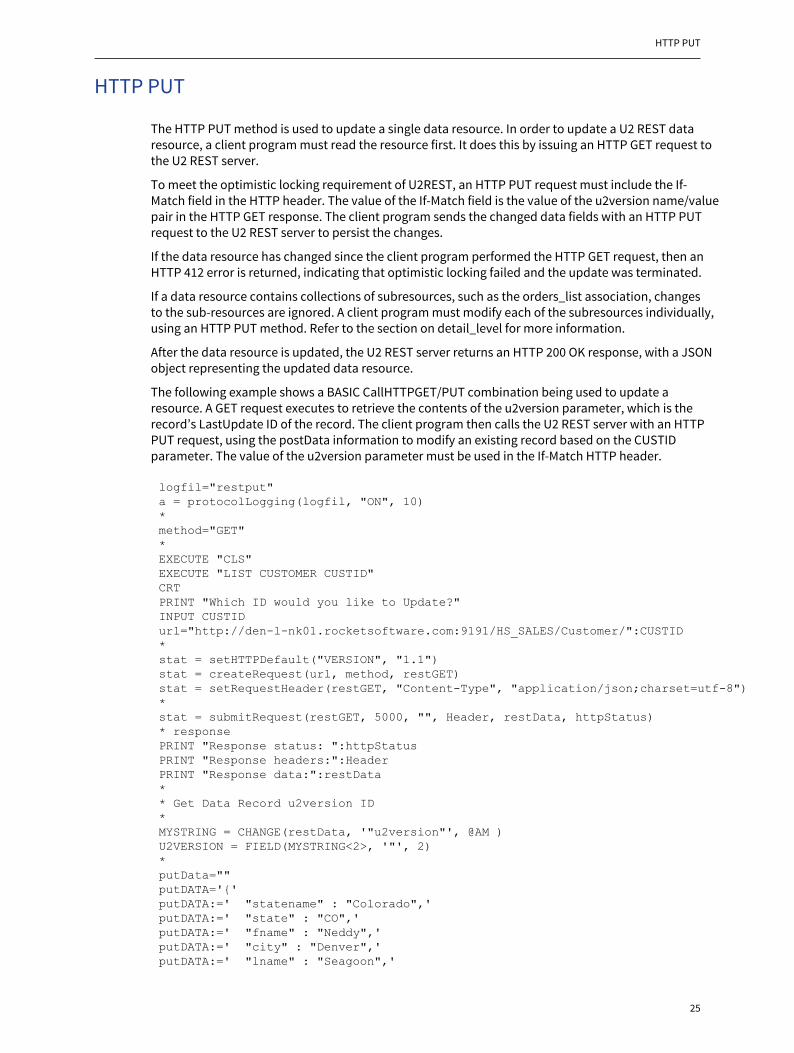
HTTP PUT
The HTTP PUT method is used to update a single data resource. In order to update a U2 REST dataresource, a client program must read the resource first. It does this by issuing an HTTP GET request tothe U2 REST server.
To meet the optimistic locking requirement of U2REST, an HTTP PUT request must include the If-Match field in the HTTP header. The value of the If-Match field is the value of the u2version name/valuepair in the HTTP GET response. The client program sends the changed data fields with an HTTP PUTrequest to the U2 REST server to persist the changes.
If the data resource has changed since the client program performed the HTTP GET request, then anHTTP 412 error is returned, indicating that optimistic locking failed and the update was terminated.
If a data resource contains collections of subresources, such as the orders_list association, changesto the sub-resources are ignored. A client program must modify each of the subresources individually,using an HTTP PUT method. Refer to the section on detail_level for more information.
After the data resource is updated, the U2 REST server returns an HTTP 200 OK response, with a JSONobject representing the updated data resource.
The following example shows a BASIC CallHTTPGET/PUT combination being used to update aresource. A GET request executes to retrieve the contents of the u2version parameter, which is therecord’s LastUpdate ID of the record. The client program then calls the U2 REST server with an HTTPPUT request, using the postData information to modify an existing record based on the CUSTIDparameter. The value of the u2version parameter must be used in the If-Match HTTP header.
logfil="restput"a = protocolLogging(logfil, "ON", 10)*method="GET"*EXECUTE "CLS"EXECUTE "LIST CUSTOMER CUSTID"CRTPRINT "Which ID would you like to Update?"INPUT CUSTIDurl="http://den-l-nk01.rocketsoftware.com:9191/HS_SALES/Customer/":CUSTID*stat = setHTTPDefault("VERSION", "1.1")stat = createRequest(url, method, restGET)stat = setRequestHeader(restGET, "Content-Type", "application/json;charset=utf-8")*stat = submitRequest(restGET, 5000, "", Header, restData, httpStatus)* responsePRINT "Response status: ":httpStatusPRINT "Response headers:":HeaderPRINT "Response data:":restData** Get Data Record u2version ID*MYSTRING = CHANGE(restData, '"u2version"', @AM )U2VERSION = FIELD(MYSTRING<2>, '"', 2)*putData=""putDATA='{'putDATA:=' "statename" : "Colorado",'putDATA:=' "state" : "CO",'putDATA:=' "fname" : "Neddy",'putDATA:=' "city" : "Denver",'putDATA:=' "lname" : "Seagoon",'
Chapter 2: U2 RESTful Web Services
26
putDATA:=' "sal" : "Ms.",'putDATA:=' "phone" : "(800)729-3553",'putDATA:=' "custid" : "':CUSTID:'",'putDATA:=' "addr1" : "4600 South Ulster Street.",'putDATA:=' "addr2" : "",'putDATA:=' "zip" : "80237",'putDATA:=' "company" : "Rocket Software, Inc."'putDATA:='}'** call the REST subroutine service with HTTP POSTurl="http://den-l-nk01:9191/HS_SALES/Customer/":CUSTIDmethod="PUT"*stat = createRequest(url, method, restPUT)stat = setRequestHeader(restPUT, "Content-Type", "application/json; charset=utf-8")stat = setRequestHeader(restPUT, "If-Match", U2VERSION)*stat = submitRequest(restPUT, 5000, putDATA, Header, restData, httpStatus)* put responserestData=CHANGE(restData, "{", "{":CHAR(10))restData=CHANGE(restData, ",", ",":CHAR(10))restData=CHANGE(restData, "}", "}":CHAR(10))PRINT "Response status: ":httpStatusPRINT "Response headers:":HeaderPRINT "Response data:":CHAR(10):restDataa = protocolLogging(logfil, "OFF", 10)END
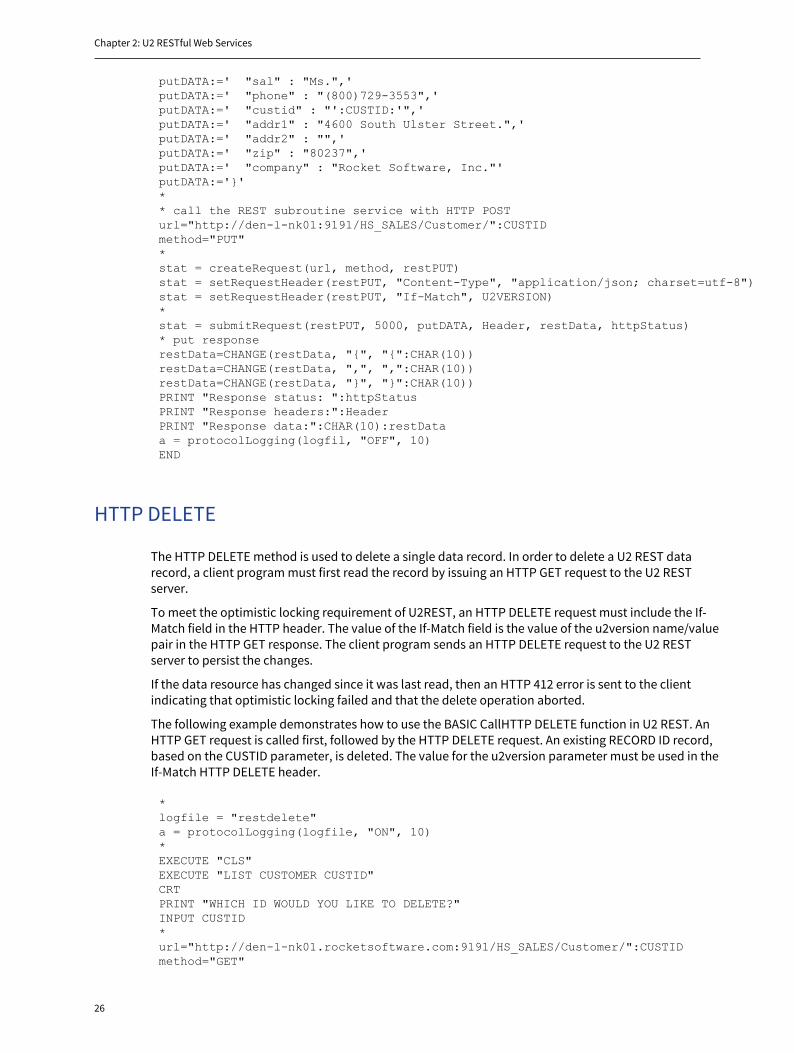
HTTP DELETE
The HTTP DELETE method is used to delete a single data record. In order to delete a U2 REST datarecord, a client program must first read the record by issuing an HTTP GET request to the U2 RESTserver.
To meet the optimistic locking requirement of U2REST, an HTTP DELETE request must include the If-Match field in the HTTP header. The value of the If-Match field is the value of the u2version name/valuepair in the HTTP GET response. The client program sends an HTTP DELETE request to the U2 RESTserver to persist the changes.
If the data resource has changed since it was last read, then an HTTP 412 error is sent to the clientindicating that optimistic locking failed and that the delete operation aborted.
The following example demonstrates how to use the BASIC CallHTTP DELETE function in U2 REST. AnHTTP GET request is called first, followed by the HTTP DELETE request. An existing RECORD ID record,based on the CUSTID parameter, is deleted. The value for the u2version parameter must be used in theIf-Match HTTP DELETE header.
*logfile = "restdelete"a = protocolLogging(logfile, "ON", 10)*EXECUTE "CLS"EXECUTE "LIST CUSTOMER CUSTID"CRTPRINT "WHICH ID WOULD YOU LIKE TO DELETE?"INPUT CUSTID*url="http://den-l-nk01.rocketsoftware.com:9191/HS_SALES/Customer/":CUSTIDmethod="GET"
U2 REST connection pooling support
27
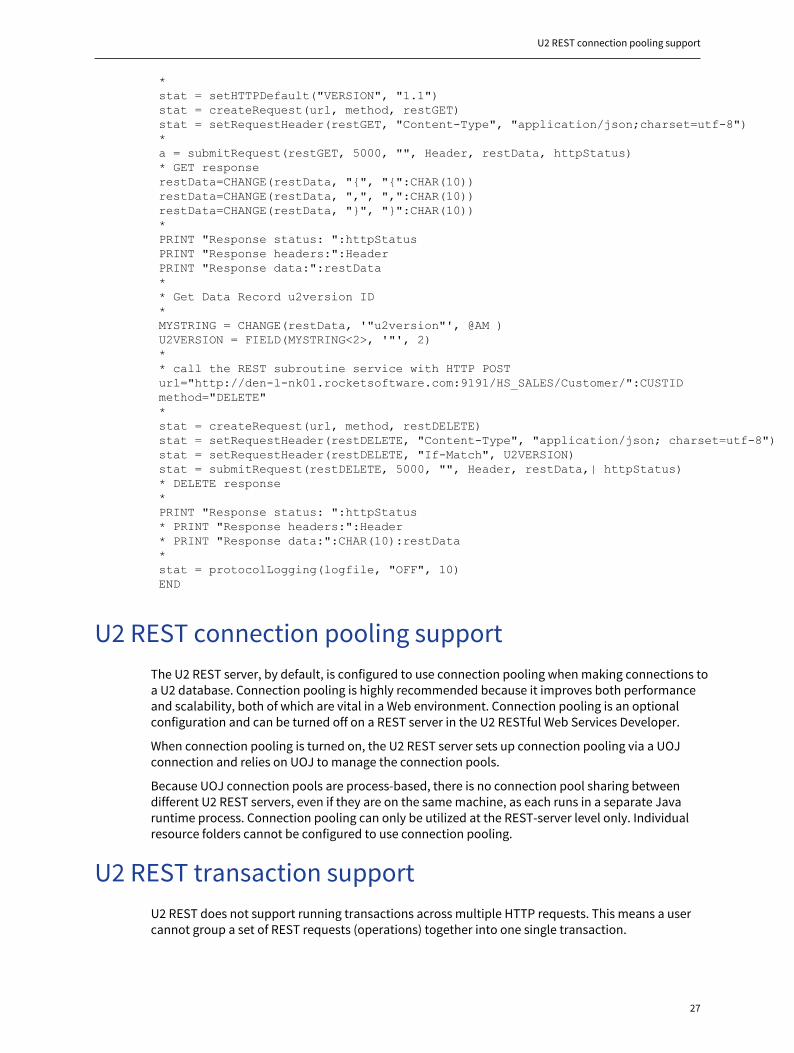
*stat = setHTTPDefault("VERSION", "1.1")stat = createRequest(url, method, restGET)stat = setRequestHeader(restGET, "Content-Type", "application/json;charset=utf-8")*a = submitRequest(restGET, 5000, "", Header, restData, httpStatus)* GET responserestData=CHANGE(restData, "{", "{":CHAR(10))restData=CHANGE(restData, ",", ",":CHAR(10))restData=CHANGE(restData, "}", "}":CHAR(10))*PRINT "Response status: ":httpStatusPRINT "Response headers:":HeaderPRINT "Response data:":restData** Get Data Record u2version ID*MYSTRING = CHANGE(restData, '"u2version"', @AM )U2VERSION = FIELD(MYSTRING<2>, '"', 2)** call the REST subroutine service with HTTP POSTurl="http://den-l-nk01.rocketsoftware.com:9191/HS_SALES/Customer/":CUSTIDmethod="DELETE"*stat = createRequest(url, method, restDELETE)stat = setRequestHeader(restDELETE, "Content-Type", "application/json; charset=utf-8")stat = setRequestHeader(restDELETE, "If-Match", U2VERSION)stat = submitRequest(restDELETE, 5000, "", Header, restData,| httpStatus)* DELETE response*PRINT "Response status: ":httpStatus* PRINT "Response headers:":Header* PRINT "Response data:":CHAR(10):restData*stat = protocolLogging(logfile, "OFF", 10)END
U2 REST connection pooling supportThe U2 REST server, by default, is configured to use connection pooling when making connections toa U2 database. Connection pooling is highly recommended because it improves both performanceand scalability, both of which are vital in a Web environment. Connection pooling is an optionalconfiguration and can be turned off on a REST server in the U2 RESTful Web Services Developer.
When connection pooling is turned on, the U2 REST server sets up connection pooling via a UOJconnection and relies on UOJ to manage the connection pools.
Because UOJ connection pools are process-based, there is no connection pool sharing betweendifferent U2 REST servers, even if they are on the same machine, as each runs in a separate Javaruntime process. Connection pooling can only be utilized at the REST-server level only. Individualresource folders cannot be configured to use connection pooling.
U2 REST transaction supportU2 REST does not support running transactions across multiple HTTP requests. This means a usercannot group a set of REST requests (operations) together into one single transaction.
Chapter 2: U2 RESTful Web Services
28
Optimistic concurrency control
U2 REST implements optimistic locking to prevent concurrent updates to the same data. Optimisticlocking is a means of ensuring that no locks are put on a resource when it is read. However, whenchanges to the resource are ready to be written back, U2 REST first locks it and then checks to seewhether the resource has been changed since it was first read. If a change occurs, an optimisticlocking violation error is thrown.
Since changes (including update, delete, and create requests) are generally much less frequent thanreads, this technique improves performance and scalability, while at the same time guaranteeing dataconsistency.
The u2version field
The u2version field holds a calculated value when a data resource is read and sent back to the clientas a name/value pair. When the client wants to make a change to the resource, the HTTP PUT or HTTPDELETE request must include the original u2version value in the If-Match HTTP header field. The U2REST server uses this value to check against the current data on the U2 server. If they match, it allowsthe update or delete request to be processed; otherwise, it sends back an HTTP 412 error indicatingan optimistic locking violation error has occurred. At this time, the client must re-read the data and trythe update again.
A data resource shares the same u2version value with all of its sub-resources. Thus, when you updatea sub resource, even though it may not have changed since first read, if the top-level resource or any ofits sub-resources has changed, the update fails. The same process is true for a top-level resource.
Transactions in subroutines
U2 database server supports traditional ACID transactions. A U2 REST-based application can carryout transactions by putting them in the subroutines and enabling the client to call these subroutines.The only requirement is that a top-level transaction must be completely embedded within a singlesubroutine because of the non-persistent database connection model of U2REST.
29
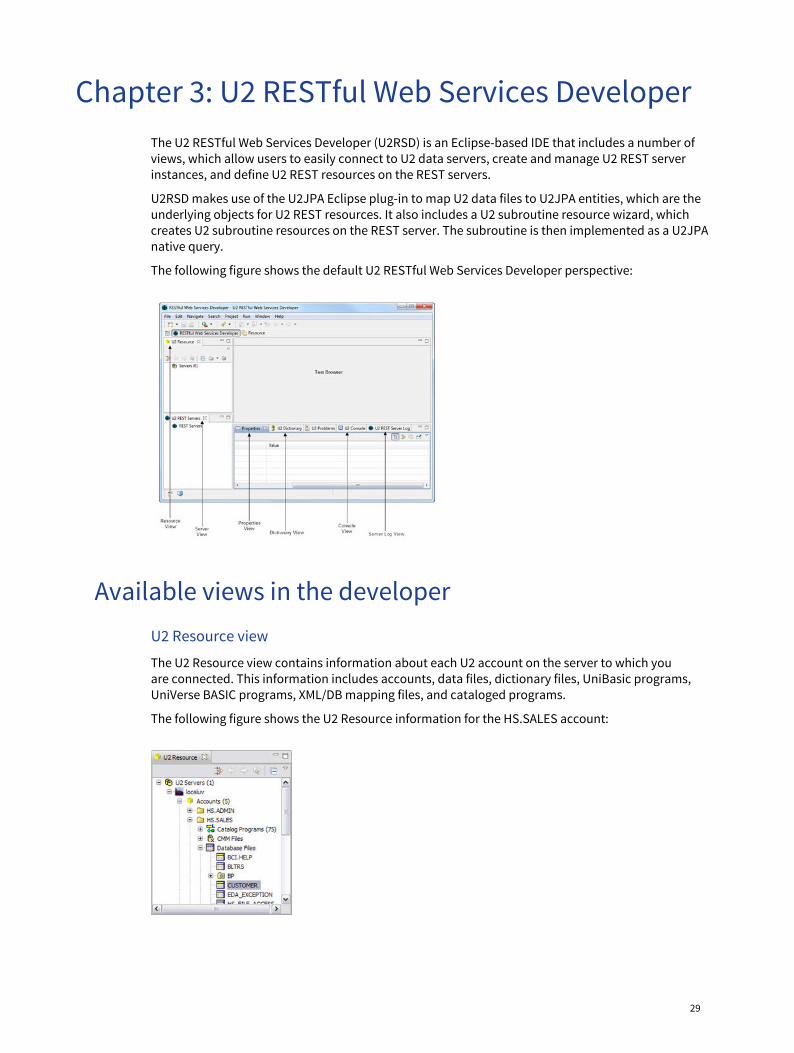
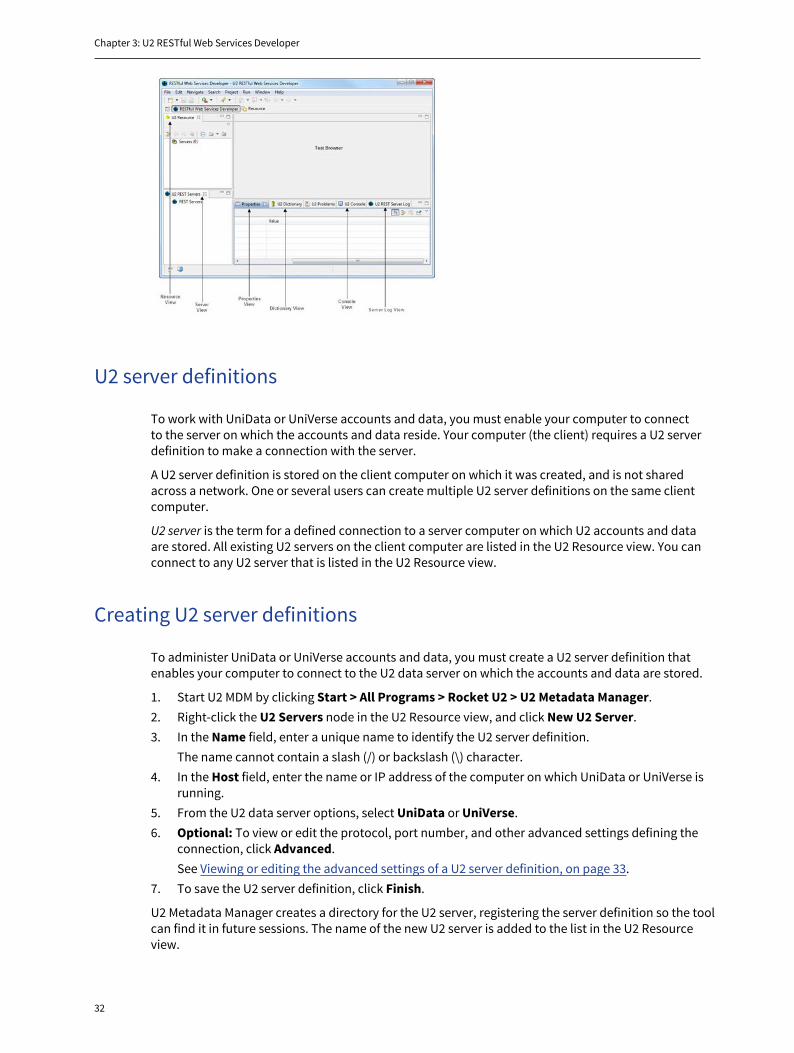
Chapter 3: U2 RESTful Web Services DeveloperThe U2 RESTful Web Services Developer (U2RSD) is an Eclipse-based IDE that includes a number ofviews, which allow users to easily connect to U2 data servers, create and manage U2 REST serverinstances, and define U2 REST resources on the REST servers.
U2RSD makes use of the U2JPA Eclipse plug-in to map U2 data files to U2JPA entities, which are theunderlying objects for U2 REST resources. It also includes a U2 subroutine resource wizard, whichcreates U2 subroutine resources on the REST server. The subroutine is then implemented as a U2JPAnative query.
The following figure shows the default U2 RESTful Web Services Developer perspective:
Available views in the developerU2 Resource view
The U2 Resource view contains information about each U2 account on the server to which youare connected. This information includes accounts, data files, dictionary files, UniBasic programs,UniVerse BASIC programs, XML/DB mapping files, and cataloged programs.
The following figure shows the U2 Resource information for the HS.SALES account:
Chapter 3: U2 RESTful Web Services Developer
30
Right-click on any of the nodes in this view to see the different options available to each node,including Open Dictionary.
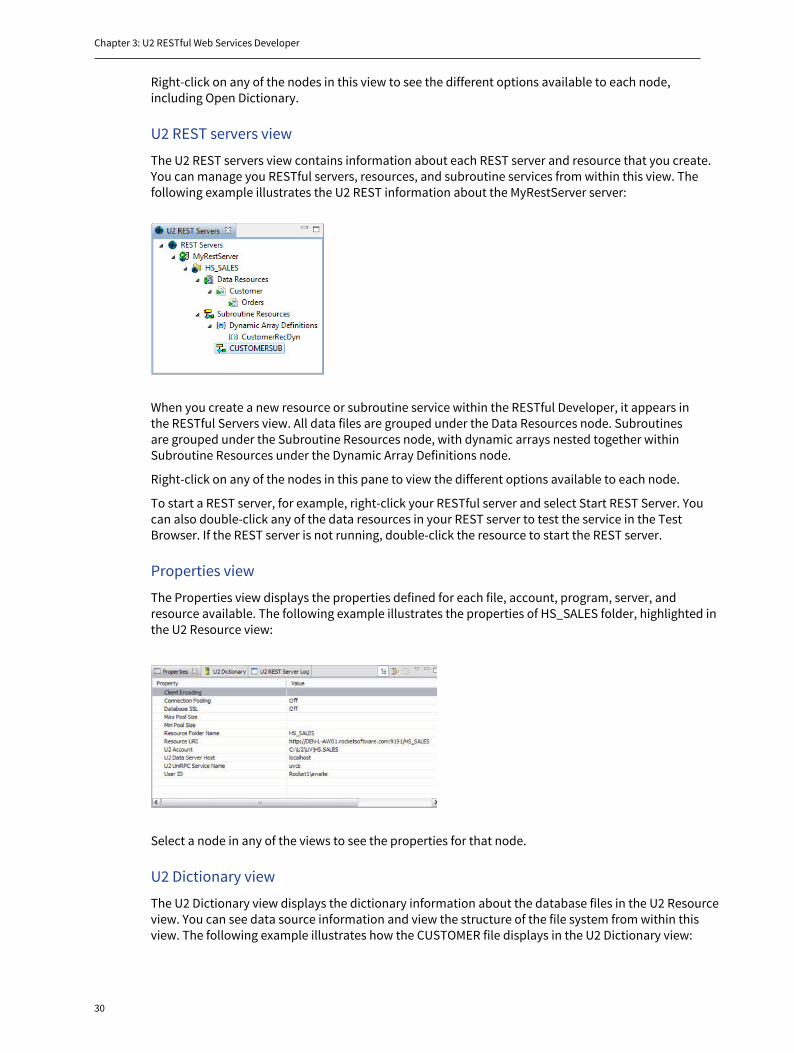
U2 REST servers view
The U2 REST servers view contains information about each REST server and resource that you create.You can manage you RESTful servers, resources, and subroutine services from within this view. Thefollowing example illustrates the U2 REST information about the MyRestServer server:
When you create a new resource or subroutine service within the RESTful Developer, it appears inthe RESTful Servers view. All data files are grouped under the Data Resources node. Subroutinesare grouped under the Subroutine Resources node, with dynamic arrays nested together withinSubroutine Resources under the Dynamic Array Definitions node.
Right-click on any of the nodes in this pane to view the different options available to each node.
To start a REST server, for example, right-click your RESTful server and select Start REST Server. Youcan also double-click any of the data resources in your REST server to test the service in the TestBrowser. If the REST server is not running, double-click the resource to start the REST server.
Properties view
The Properties view displays the properties defined for each file, account, program, server, andresource available. The following example illustrates the properties of HS_SALES folder, highlighted inthe U2 Resource view:
Select a node in any of the views to see the properties for that node.
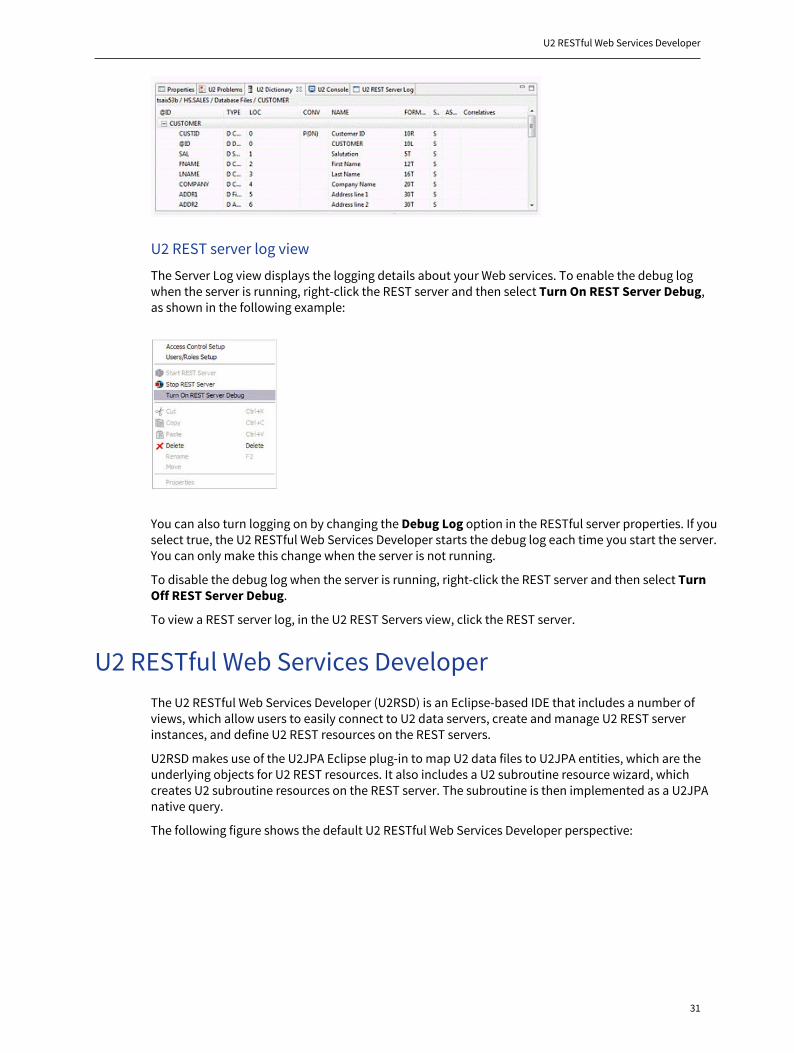
U2 Dictionary view
The U2 Dictionary view displays the dictionary information about the database files in the U2 Resourceview. You can see data source information and view the structure of the file system from within thisview. The following example illustrates how the CUSTOMER file displays in the U2 Dictionary view:
U2 RESTful Web Services Developer
31
U2 REST server log view
The Server Log view displays the logging details about your Web services. To enable the debug logwhen the server is running, right-click the REST server and then select Turn On REST Server Debug,as shown in the following example:
You can also turn logging on by changing the Debug Log option in the RESTful server properties. If youselect true, the U2 RESTful Web Services Developer starts the debug log each time you start the server.You can only make this change when the server is not running.
To disable the debug log when the server is running, right-click the REST server and then select TurnOff REST Server Debug.
To view a REST server log, in the U2 REST Servers view, click the REST server.
U2 RESTful Web Services DeveloperThe U2 RESTful Web Services Developer (U2RSD) is an Eclipse-based IDE that includes a number ofviews, which allow users to easily connect to U2 data servers, create and manage U2 REST serverinstances, and define U2 REST resources on the REST servers.
U2RSD makes use of the U2JPA Eclipse plug-in to map U2 data files to U2JPA entities, which are theunderlying objects for U2 REST resources. It also includes a U2 subroutine resource wizard, whichcreates U2 subroutine resources on the REST server. The subroutine is then implemented as a U2JPAnative query.
The following figure shows the default U2 RESTful Web Services Developer perspective:
Chapter 3: U2 RESTful Web Services Developer
32
U2 server definitions
To work with UniData or UniVerse accounts and data, you must enable your computer to connectto the server on which the accounts and data reside. Your computer (the client) requires a U2 serverdefinition to make a connection with the server.
A U2 server definition is stored on the client computer on which it was created, and is not sharedacross a network. One or several users can create multiple U2 server definitions on the same clientcomputer.
U2 server is the term for a defined connection to a server computer on which U2 accounts and dataare stored. All existing U2 servers on the client computer are listed in the U2 Resource view. You canconnect to any U2 server that is listed in the U2 Resource view.
Creating U2 server definitions
To administer UniData or UniVerse accounts and data, you must create a U2 server definition thatenables your computer to connect to the U2 data server on which the accounts and data are stored.
1. Start U2 MDM by clicking Start > All Programs > Rocket U2 > U2 Metadata Manager.2. Right-click the U2 Servers node in the U2 Resource view, and click New U2 Server.3. In the Name field, enter a unique name to identify the U2 server definition.
The name cannot contain a slash (/) or backslash (\) character.4. In the Host field, enter the name or IP address of the computer on which UniData or UniVerse is
running.5. From the U2 data server options, select UniData or UniVerse.6. Optional: To view or edit the protocol, port number, and other advanced settings defining the
connection, click Advanced.See Viewing or editing the advanced settings of a U2 server definition, on page 33.
7. To save the U2 server definition, click Finish.
U2 Metadata Manager creates a directory for the U2 server, registering the server definition so the toolcan find it in future sessions. The name of the new U2 server is added to the list in the U2 Resourceview.
Editing U2 server definitions
33
Editing U2 server definitions
You can modify the details of an existing U2 server definition, except for the name of the U2 server.However, you can create the U2 server again using a new name.
1. Start U2 MDM by clicking Start > All Programs > Rocket U2 > U2 Metadata Manager.2. Right-click the name of the U2 server definition in the U2 Resource view, and click Properties.3. In the Host field, enter the name or IP address of the computer on which UniData or UniVerse is
running.4. From the U2 data server options, select UniData or UniVerse.5. Optional: To view or edit the protocol, port number, and other advanced settings defining the
connection, click Advanced.See Viewing or editing the advanced settings of a U2 server definition, on page 33.
6. To save the U2 server definition, click Finish.
U2 Metadata Manager creates a directory for the U2 server, registering the server definition so the toolcan find it in future sessions. The name of the new U2 server is added to the list in the U2 Resourceview.
Viewing or editing the advanced settings of a U2 server definition
On the advanced settings page of the server definition, you can view or edit the protocol, port number,and other advanced settings that define the connection. You can also specify commands to run whenyou connect to the U2 server. The default values for advanced settings work best in most situations.Alter these settings only if necessary.
1. Click Advanced on the U2 Server Definitions page.The Protocol Type field displays TCP/IP as the communications protocol used by the UniDataor UniVerse to access the Internet. At this time, the only supported protocol is TCP/IP, and thissetting cannot be changed.
2. In the RPC Port # field, enter the port number of the UniRPC server running on the host.The default port number is 31438.
3. In the RPC Service Name field, enter the name of the remote procedure call (RPC) service on yoursystem.For UniData, the name is normally udcs; for UniVerse, the name is normally uvcs.
4. In the Login Account field, enter the full path to the account folder on the server running UniDataor UniVerse.You can enter just the account name if the account is defined in the UD.ACCOUNT or UV.ACCOUNThash file.
5. To enter a command to run on connection, click Add in the Commands to Execute group box.If you run a RetrieVe command, a saved paragraph, or a globally cataloged program every timeyou connect to the U2 server, you can save time by entering the command in the U2 serverdefinition. See Specifying a command to run on connection, on page 34.
6. In the Specify the session to run/debug your BASIC program on server side group box, enterdetails for connecting to the server in a debug session.
a. From the Protocol options, select the network protocol to use when you connect to the U2server in a debug session: Telnet or SSH.
b. In the Port Number field, enter the port number on which the Telnet or SSH service runs onthe server.The default Telnet port number is 23; the default SSH port number is 22.
Chapter 3: U2 RESTful Web Services Developer
34
c. If device licensing is supported on the server, select the Use Device License check box toconserve license usage in your debug session.While running or debugging BASIC programs, you can use multiple server connections tobrowse files, check data, update records, or perform other tasks. If device licensing is notenabled, your debug session consumes one U2 license for each connection. With devicelicensing enabled, your session consumes one U2 license and one device license for up to 10connections from a single device.
Tip: If you cannot establish a Telnet or SSH connection with the Use Device Licensecheck box selected, clear the check box and try again.
7. To save any changes to advanced settings and return to the main page, click Finish.
Specifying a command to run on connection
You can save time when connecting to the U2 server by specifying a RetrieVE command, the name of asaved paragraph, or the name of a globally cataloged program in the U2 server definition.
Prerequisite▪ Viewing or editing the advanced settings of a U2 server definition, on page 33
1. While still on the Advanced Settings page, in the Specify a command field, enter a RetrieVecommand, the name of a saved paragraph, or the name of a globally cataloged program to runwhen you connect to the U2 server.
2. To save your changes and return to the details page, click OK.
Connecting to U2 servers
You must open a U2 server connection to work with the accounts stored on the associated UniData orUniVerse (U2) data server computer. You can connect to any U2 server that is listed in the U2 Resourceview. If the U2 server is not listed, you can create a server definition that adds a new server to the view.
Prerequisite
Creating U2 server definitions, on page 32
1. Start U2 MDM by clicking Start > All Programs > Rocket U2 > U2 Metadata Manager.2. Double-click the name of the U2 server in the U2 Resource view.3. In the User ID field, enter your administrator user name or the user name of a valid user on the
server computer running UniData or UniVerse.4. In the Password field, enter the password for the administrator or user on the server computer.5. To store the password for future connections, select the Remember me check box.
With this check box selected, Microsoft Windows stores the encrypted password on the clientcomputer.
6. If you are using a proxy server, select the Use Proxy Server check box.
a. In the Proxy Host field, enter the name or IP address of the computer on which the proxyserver is running.
b. In the Proxy Port field, enter the number of the port on which the proxy server listens forcommunication from UniData or UniVerse.
Disconnecting to U2 servers
35
7. To connect to the U2 server, click Connect.
When the connection is established, the U2 Resource view displays a tree view of the U2 accounts andcatalog programs on the U2 data server to which you are connected.
Disconnecting to U2 servers
After completing tasks for a U2 account, you can disconnect from the U2 server. Disconnecting onlycloses your connection to the U2 server. It does not delete the U2 server definition or remove the U2server from the list in the U2 Resource view.
▪ In the U2 Resource view, right-click the name of the U2 server from which you want to disconnect,and click Disconnect.
Deleting U2 server definitions
If you no longer require access to the U2 accounts and catalog programs on a U2 data server, youcan delete the associated U2 server definition. It is not possible to change the name of an existing U2server. However, you can delete the U2 server definition and create it again using a new name.
▪ In the U2 Resource view, right-click the name of the U2 server definition that you want to delete,and click Delete.
The name of the U2 server and folders for its U2 accounts and catalog programs are removed from thelist in the U2 Resource view.
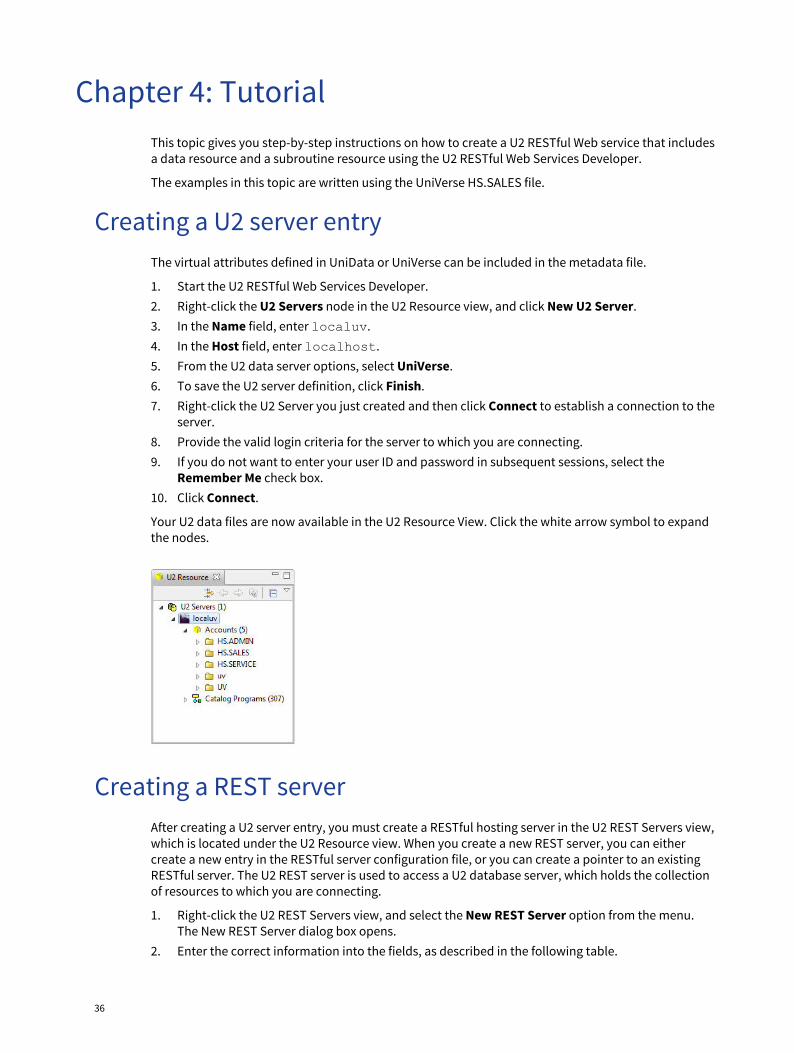
36
Chapter 4: TutorialThis topic gives you step-by-step instructions on how to create a U2 RESTful Web service that includesa data resource and a subroutine resource using the U2 RESTful Web Services Developer.
The examples in this topic are written using the UniVerse HS.SALES file.
Creating a U2 server entryThe virtual attributes defined in UniData or UniVerse can be included in the metadata file.
1. Start the U2 RESTful Web Services Developer.2. Right-click the U2 Servers node in the U2 Resource view, and click New U2 Server.3. In the Name field, enter localuv.4. In the Host field, enter localhost.5. From the U2 data server options, select UniVerse.6. To save the U2 server definition, click Finish.7. Right-click the U2 Server you just created and then click Connect to establish a connection to the
server.8. Provide the valid login criteria for the server to which you are connecting.9. If you do not want to enter your user ID and password in subsequent sessions, select the
Remember Me check box.10. Click Connect.
Your U2 data files are now available in the U2 Resource View. Click the white arrow symbol to expandthe nodes.
Creating a REST serverAfter creating a U2 server entry, you must create a RESTful hosting server in the U2 REST Servers view,which is located under the U2 Resource view. When you create a new REST server, you can eithercreate a new entry in the RESTful server configuration file, or you can create a pointer to an existingRESTful server. The U2 REST server is used to access a U2 database server, which holds the collectionof resources to which you are connecting.
1. Right-click the U2 REST Servers view, and select the New REST Server option from the menu.The New REST Server dialog box opens.
2. Enter the correct information into the fields, as described in the following table.
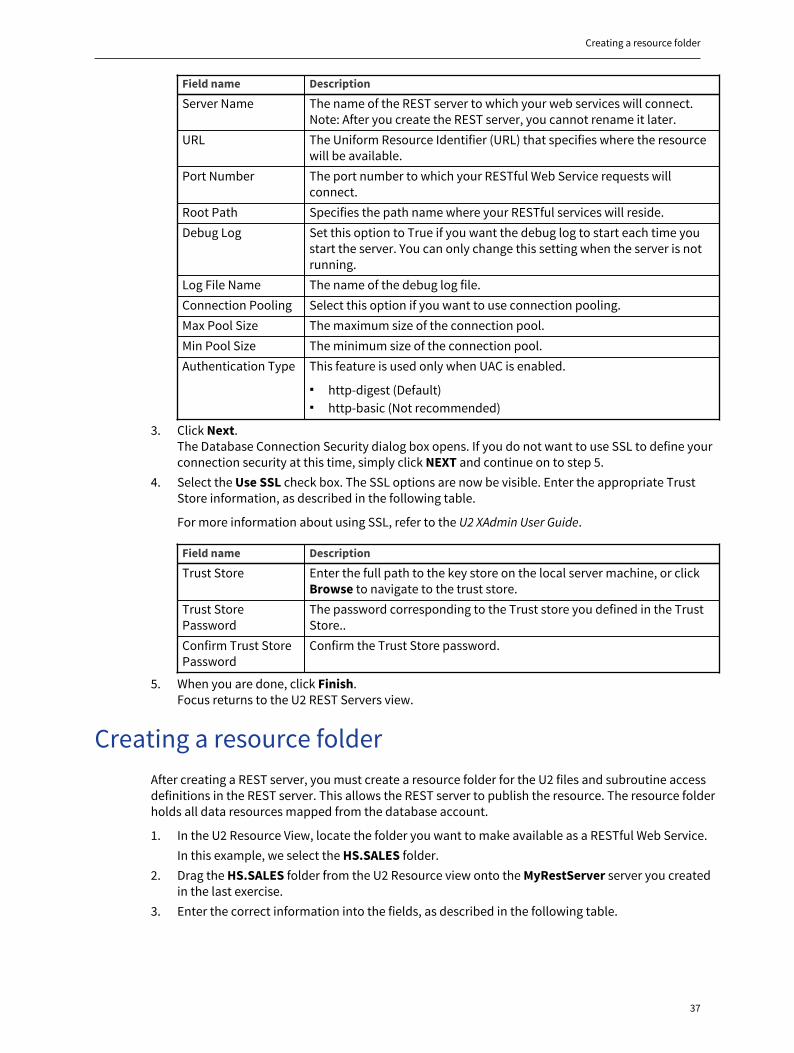
Creating a resource folder
37
Field name Description
Server Name The name of the REST server to which your web services will connect.Note: After you create the REST server, you cannot rename it later.
URL The Uniform Resource Identifier (URL) that specifies where the resourcewill be available.
Port Number The port number to which your RESTful Web Service requests willconnect.
Root Path Specifies the path name where your RESTful services will reside.Debug Log Set this option to True if you want the debug log to start each time you
start the server. You can only change this setting when the server is notrunning.
Log File Name The name of the debug log file.Connection Pooling Select this option if you want to use connection pooling.Max Pool Size The maximum size of the connection pool.Min Pool Size The minimum size of the connection pool.Authentication Type This feature is used only when UAC is enabled.
▪ http-digest (Default)▪ http-basic (Not recommended)
3. Click Next.The Database Connection Security dialog box opens. If you do not want to use SSL to define yourconnection security at this time, simply click NEXT and continue on to step 5.
4. Select the Use SSL check box. The SSL options are now be visible. Enter the appropriate TrustStore information, as described in the following table.
For more information about using SSL, refer to the U2 XAdmin User Guide.
Field name Description
Trust Store Enter the full path to the key store on the local server machine, or clickBrowse to navigate to the trust store.
Trust StorePassword
The password corresponding to the Trust store you defined in the TrustStore..
Confirm Trust StorePassword
Confirm the Trust Store password.
5. When you are done, click Finish.Focus returns to the U2 REST Servers view.
Creating a resource folderAfter creating a REST server, you must create a resource folder for the U2 files and subroutine accessdefinitions in the REST server. This allows the REST server to publish the resource. The resource folderholds all data resources mapped from the database account.
1. In the U2 Resource View, locate the folder you want to make available as a RESTful Web Service.In this example, we select the HS.SALES folder.
2. Drag the HS.SALES folder from the U2 Resource view onto the MyRestServer server you createdin the last exercise.
3. Enter the correct information into the fields, as described in the following table.
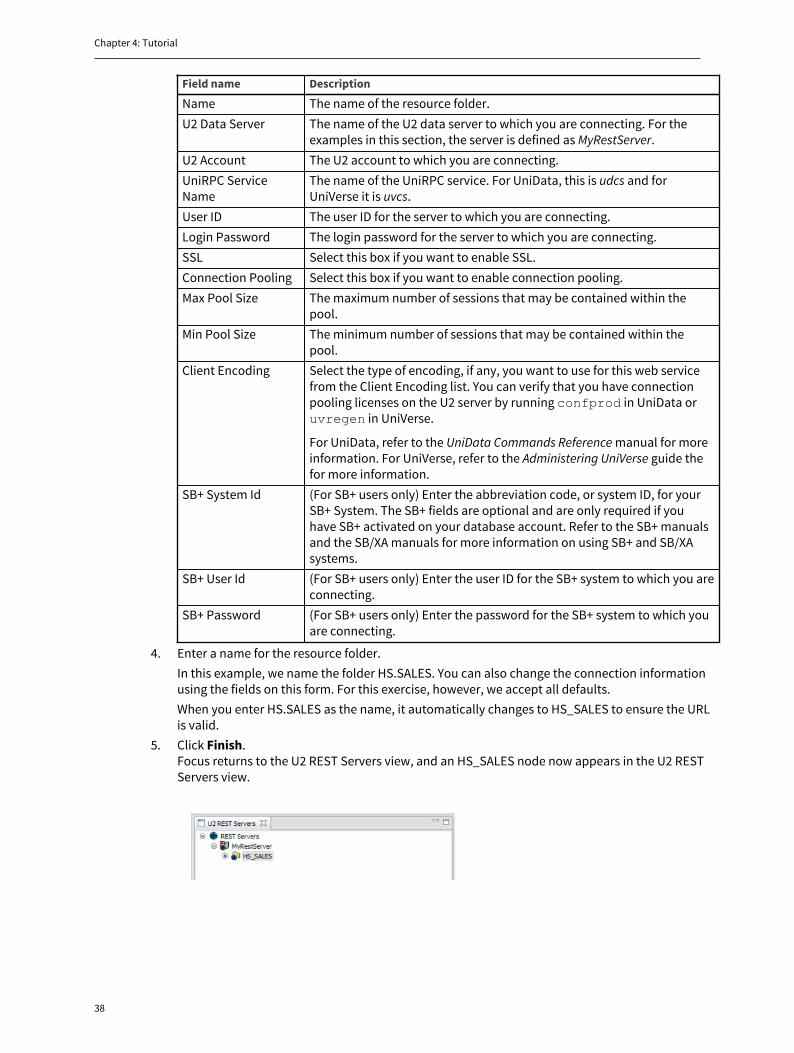
Chapter 4: Tutorial
38
Field name Description
Name The name of the resource folder.U2 Data Server The name of the U2 data server to which you are connecting. For the
examples in this section, the server is defined as MyRestServer.U2 Account The U2 account to which you are connecting.UniRPC ServiceName
The name of the UniRPC service. For UniData, this is udcs and forUniVerse it is uvcs.
User ID The user ID for the server to which you are connecting.Login Password The login password for the server to which you are connecting.SSL Select this box if you want to enable SSL.Connection Pooling Select this box if you want to enable connection pooling.Max Pool Size The maximum number of sessions that may be contained within the
pool.Min Pool Size The minimum number of sessions that may be contained within the
pool.Client Encoding Select the type of encoding, if any, you want to use for this web service
from the Client Encoding list. You can verify that you have connectionpooling licenses on the U2 server by running confprod in UniData oruvregen in UniVerse.
For UniData, refer to the UniData Commands Reference manual for moreinformation. For UniVerse, refer to the Administering UniVerse guide thefor more information.
SB+ System Id (For SB+ users only) Enter the abbreviation code, or system ID, for yourSB+ System. The SB+ fields are optional and are only required if youhave SB+ activated on your database account. Refer to the SB+ manualsand the SB/XA manuals for more information on using SB+ and SB/XAsystems.
SB+ User Id (For SB+ users only) Enter the user ID for the SB+ system to which you areconnecting.
SB+ Password (For SB+ users only) Enter the password for the SB+ system to which youare connecting.
4. Enter a name for the resource folder.In this example, we name the folder HS.SALES. You can also change the connection informationusing the fields on this form. For this exercise, however, we accept all defaults.When you enter HS.SALES as the name, it automatically changes to HS_SALES to ensure the URLis valid.
5. Click Finish.Focus returns to the U2 REST Servers view, and an HS_SALES node now appears in the U2 RESTServers view.
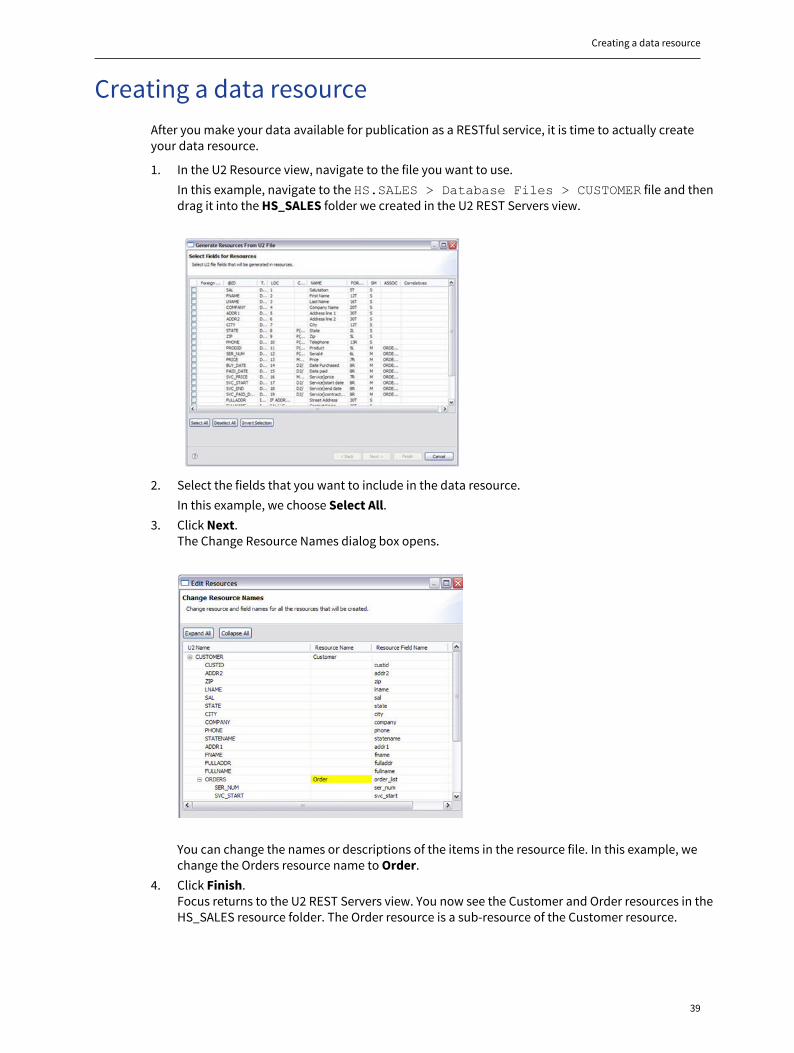
Creating a data resource
39
Creating a data resourceAfter you make your data available for publication as a RESTful service, it is time to actually createyour data resource.
1. In the U2 Resource view, navigate to the file you want to use.In this example, navigate to the HS.SALES > Database Files > CUSTOMER file and thendrag it into the HS_SALES folder we created in the U2 REST Servers view.
2. Select the fields that you want to include in the data resource.In this example, we choose Select All.
3. Click Next.The Change Resource Names dialog box opens.
You can change the names or descriptions of the items in the resource file. In this example, wechange the Orders resource name to Order.
4. Click Finish.Focus returns to the U2 REST Servers view. You now see the Customer and Order resources in theHS_SALES resource folder. The Order resource is a sub-resource of the Customer resource.
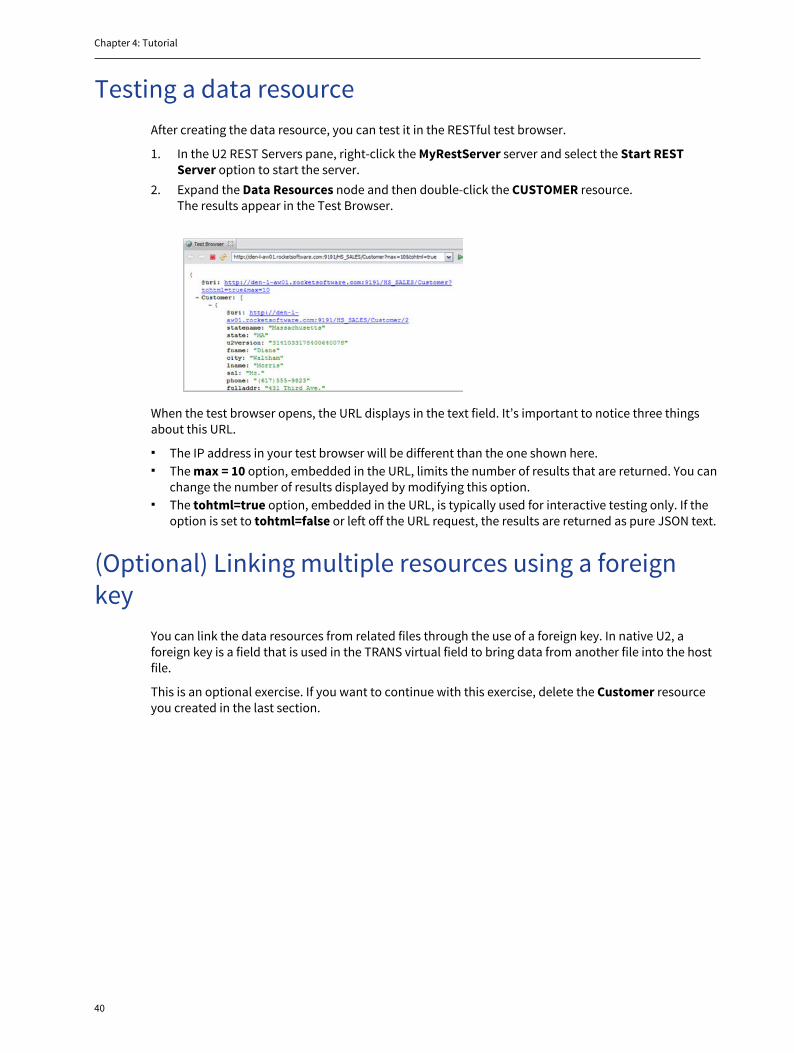
Chapter 4: Tutorial
40
Testing a data resourceAfter creating the data resource, you can test it in the RESTful test browser.
1. In the U2 REST Servers pane, right-click the MyRestServer server and select the Start RESTServer option to start the server.
2. Expand the Data Resources node and then double-click the CUSTOMER resource.The results appear in the Test Browser.
When the test browser opens, the URL displays in the text field. It’s important to notice three thingsabout this URL.
▪ The IP address in your test browser will be different than the one shown here.▪ The max = 10 option, embedded in the URL, limits the number of results that are returned. You can
change the number of results displayed by modifying this option.▪ The tohtml=true option, embedded in the URL, is typically used for interactive testing only. If the
option is set to tohtml=false or left off the URL request, the results are returned as pure JSON text.
(Optional) Linking multiple resources using a foreignkey
You can link the data resources from related files through the use of a foreign key. In native U2, aforeign key is a field that is used in the TRANS virtual field to bring data from another file into the hostfile.
This is an optional exercise. If you want to continue with this exercise, delete the Customer resourceyou created in the last section.
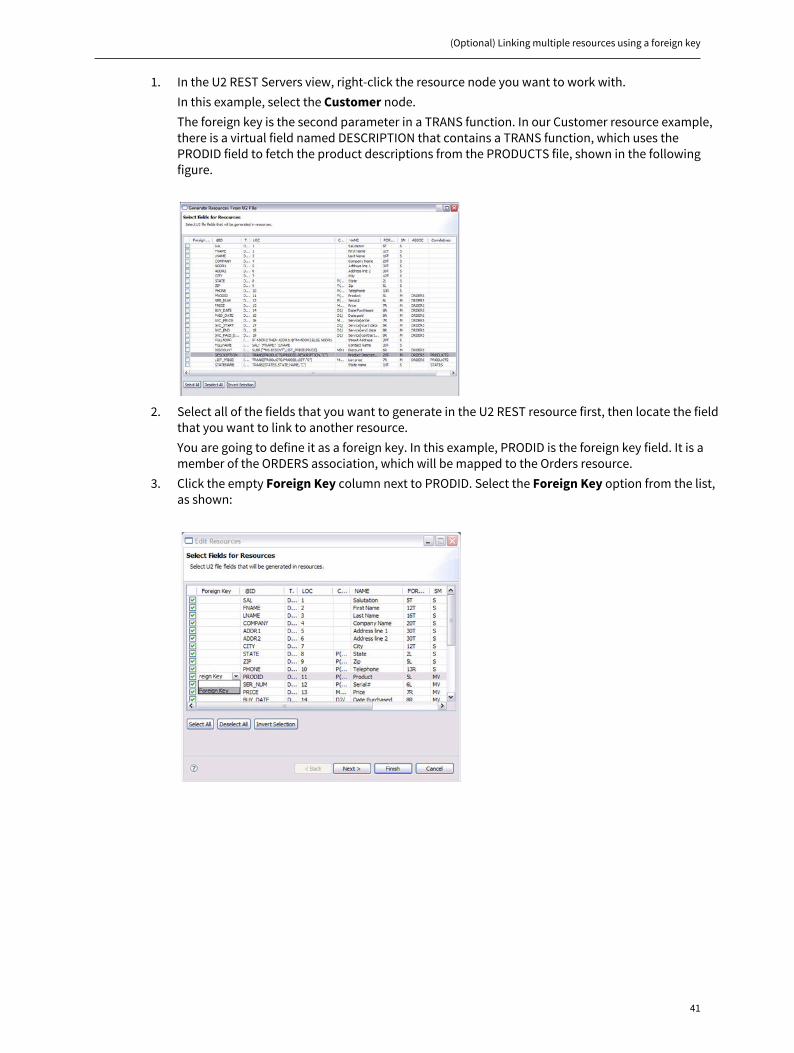
(Optional) Linking multiple resources using a foreign key
41
1. In the U2 REST Servers view, right-click the resource node you want to work with.In this example, select the Customer node.The foreign key is the second parameter in a TRANS function. In our Customer resource example,there is a virtual field named DESCRIPTION that contains a TRANS function, which uses thePRODID field to fetch the product descriptions from the PRODUCTS file, shown in the followingfigure.
2. Select all of the fields that you want to generate in the U2 REST resource first, then locate the fieldthat you want to link to another resource.You are going to define it as a foreign key. In this example, PRODID is the foreign key field. It is amember of the ORDERS association, which will be mapped to the Orders resource.
3. Click the empty Foreign Key column next to PRODID. Select the Foreign Key option from the list,as shown:
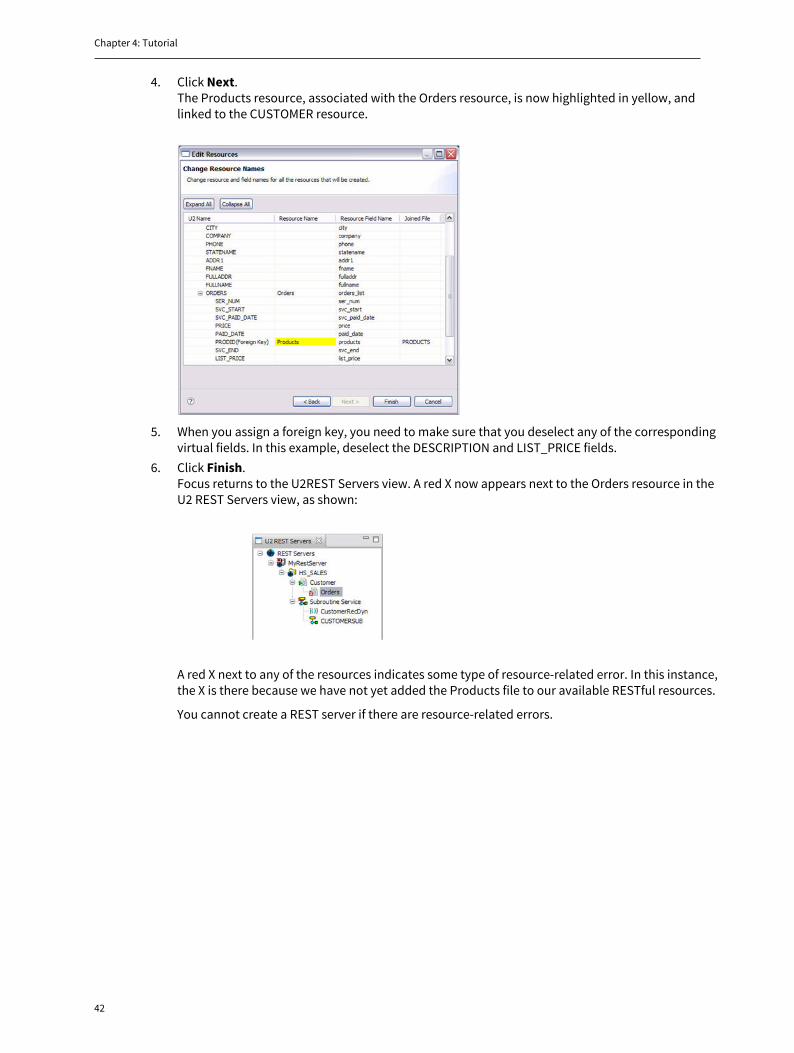
Chapter 4: Tutorial
42
4. Click Next.The Products resource, associated with the Orders resource, is now highlighted in yellow, andlinked to the CUSTOMER resource.
5. When you assign a foreign key, you need to make sure that you deselect any of the correspondingvirtual fields. In this example, deselect the DESCRIPTION and LIST_PRICE fields.
6. Click Finish.Focus returns to the U2REST Servers view. A red X now appears next to the Orders resource in theU2 REST Servers view, as shown:
A red X next to any of the resources indicates some type of resource-related error. In this instance,the X is there because we have not yet added the Products file to our available RESTful resources.
You cannot create a REST server if there are resource-related errors.
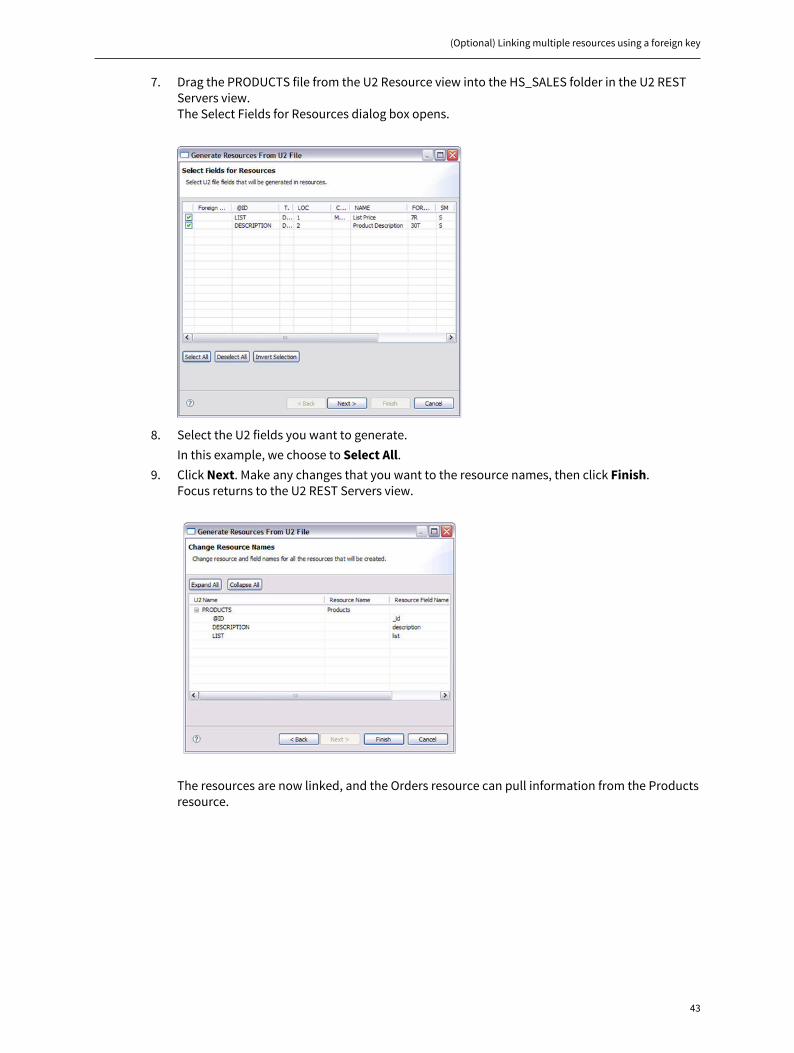
(Optional) Linking multiple resources using a foreign key
43
7. Drag the PRODUCTS file from the U2 Resource view into the HS_SALES folder in the U2 RESTServers view.The Select Fields for Resources dialog box opens.
8. Select the U2 fields you want to generate.In this example, we choose to Select All.
9. Click Next. Make any changes that you want to the resource names, then click Finish.Focus returns to the U2 REST Servers view.
The resources are now linked, and the Orders resource can pull information from the Productsresource.
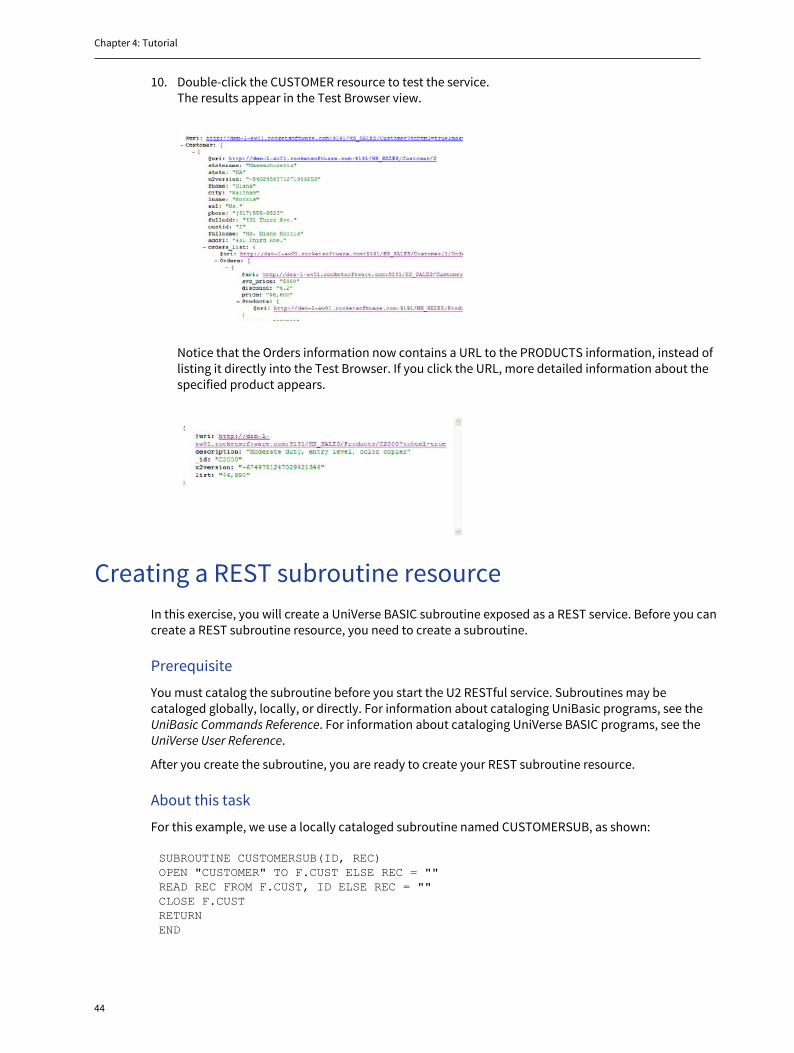
Chapter 4: Tutorial
44
10. Double-click the CUSTOMER resource to test the service.The results appear in the Test Browser view.
Notice that the Orders information now contains a URL to the PRODUCTS information, instead oflisting it directly into the Test Browser. If you click the URL, more detailed information about thespecified product appears.
Creating a REST subroutine resourceIn this exercise, you will create a UniVerse BASIC subroutine exposed as a REST service. Before you cancreate a REST subroutine resource, you need to create a subroutine.
Prerequisite
You must catalog the subroutine before you start the U2 RESTful service. Subroutines may becataloged globally, locally, or directly. For information about cataloging UniBasic programs, see theUniBasic Commands Reference. For information about cataloging UniVerse BASIC programs, see theUniVerse User Reference.
After you create the subroutine, you are ready to create your REST subroutine resource.
About this task
For this example, we use a locally cataloged subroutine named CUSTOMERSUB, as shown:
SUBROUTINE CUSTOMERSUB(ID, REC)OPEN "CUSTOMER" TO F.CUST ELSE REC = ""READ REC FROM F.CUST, ID ELSE REC = ""CLOSE F.CUSTRETURNEND
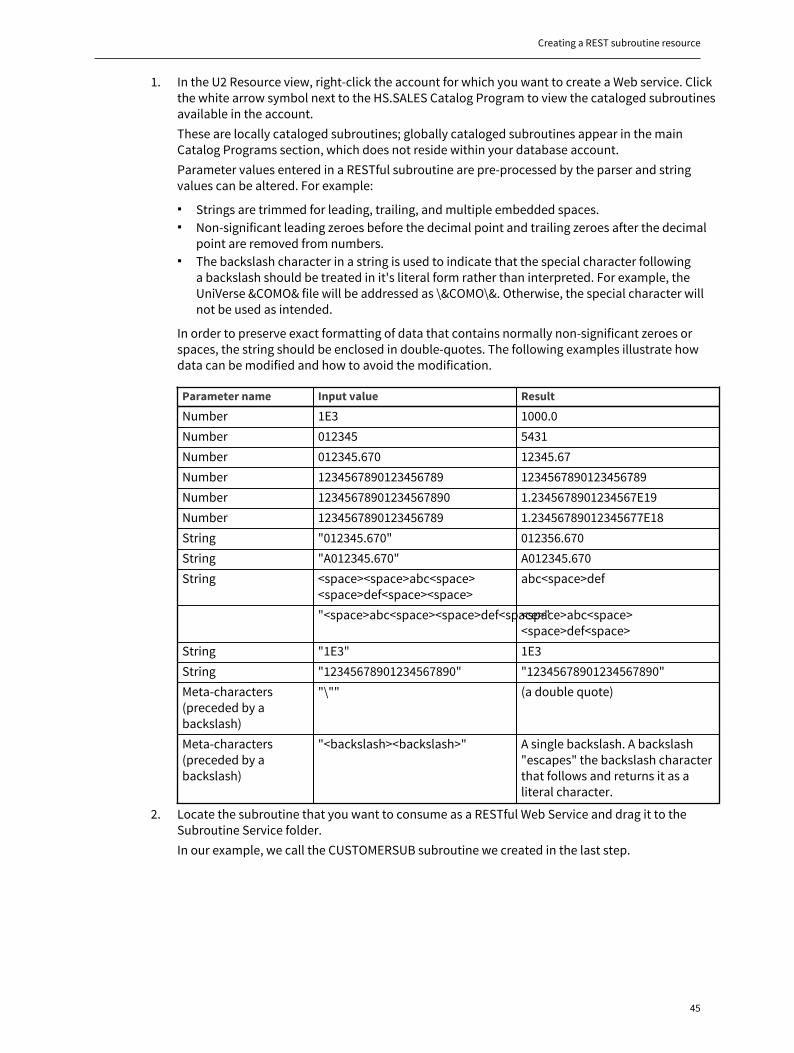
Creating a REST subroutine resource
45
1. In the U2 Resource view, right-click the account for which you want to create a Web service. Clickthe white arrow symbol next to the HS.SALES Catalog Program to view the cataloged subroutinesavailable in the account.These are locally cataloged subroutines; globally cataloged subroutines appear in the mainCatalog Programs section, which does not reside within your database account.Parameter values entered in a RESTful subroutine are pre-processed by the parser and stringvalues can be altered. For example:
▪ Strings are trimmed for leading, trailing, and multiple embedded spaces.▪ Non-significant leading zeroes before the decimal point and trailing zeroes after the decimal
point are removed from numbers.▪ The backslash character in a string is used to indicate that the special character following
a backslash should be treated in it's literal form rather than interpreted. For example, theUniVerse &COMO& file will be addressed as \&COMO\&. Otherwise, the special character willnot be used as intended.
In order to preserve exact formatting of data that contains normally non-significant zeroes orspaces, the string should be enclosed in double-quotes. The following examples illustrate howdata can be modified and how to avoid the modification.
Parameter name Input value Result
Number 1E3 1000.0Number 012345 5431Number 012345.670 12345.67Number 1234567890123456789 1234567890123456789Number 12345678901234567890 1.2345678901234567E19Number 1234567890123456789 1.23456789012345677E18String "012345.670" 012356.670String "A012345.670" A012345.670String <space><space>abc<space>
<space>def<space><space>abc<space>def
"<space>abc<space><space>def<space>"<space>abc<space><space>def<space>
String "1E3" 1E3String "12345678901234567890" "12345678901234567890"Meta-characters(preceded by abackslash)
"\"" (a double quote)
Meta-characters(preceded by abackslash)
"<backslash><backslash>" A single backslash. A backslash"escapes" the backslash characterthat follows and returns it as aliteral character.
2. Locate the subroutine that you want to consume as a RESTful Web Service and drag it to theSubroutine Service folder.In our example, we call the CUSTOMERSUB subroutine we created in the last step.
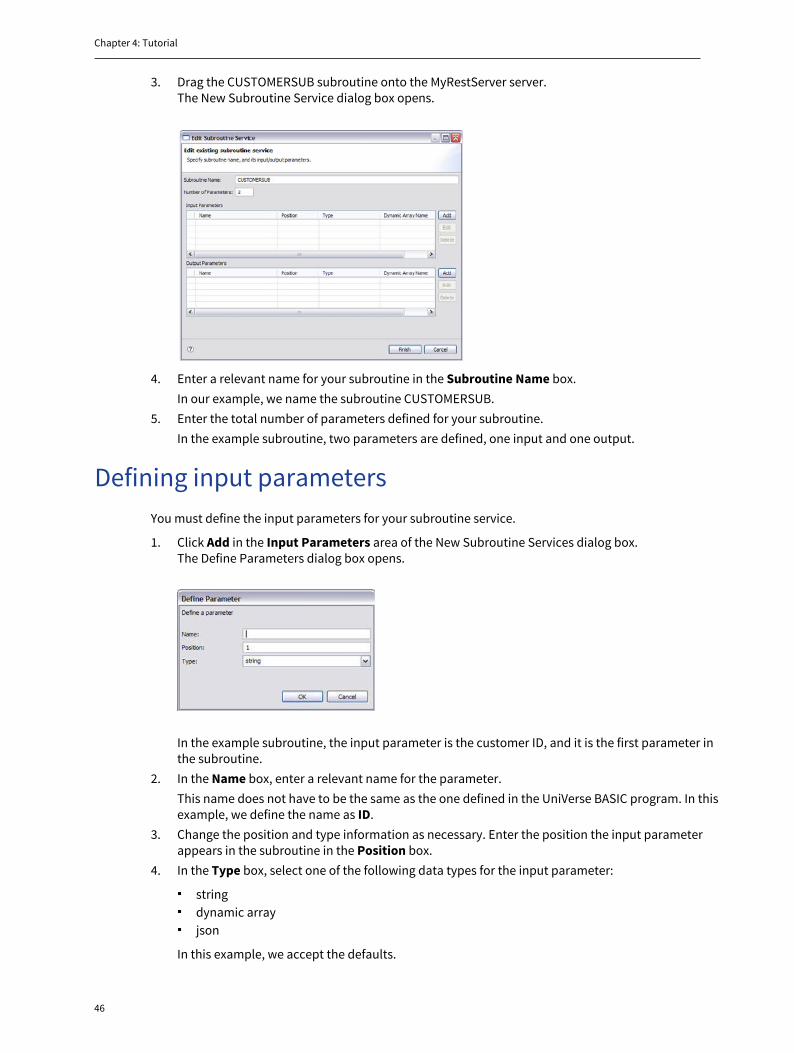
Chapter 4: Tutorial
46
3. Drag the CUSTOMERSUB subroutine onto the MyRestServer server.The New Subroutine Service dialog box opens.
4. Enter a relevant name for your subroutine in the Subroutine Name box.In our example, we name the subroutine CUSTOMERSUB.
5. Enter the total number of parameters defined for your subroutine.In the example subroutine, two parameters are defined, one input and one output.
Defining input parametersYou must define the input parameters for your subroutine service.
1. Click Add in the Input Parameters area of the New Subroutine Services dialog box.The Define Parameters dialog box opens.
In the example subroutine, the input parameter is the customer ID, and it is the first parameter inthe subroutine.
2. In the Name box, enter a relevant name for the parameter.This name does not have to be the same as the one defined in the UniVerse BASIC program. In thisexample, we define the name as ID.
3. Change the position and type information as necessary. Enter the position the input parameterappears in the subroutine in the Position box.
4. In the Type box, select one of the following data types for the input parameter:
▪ string▪ dynamic array▪ json
In this example, we accept the defaults.
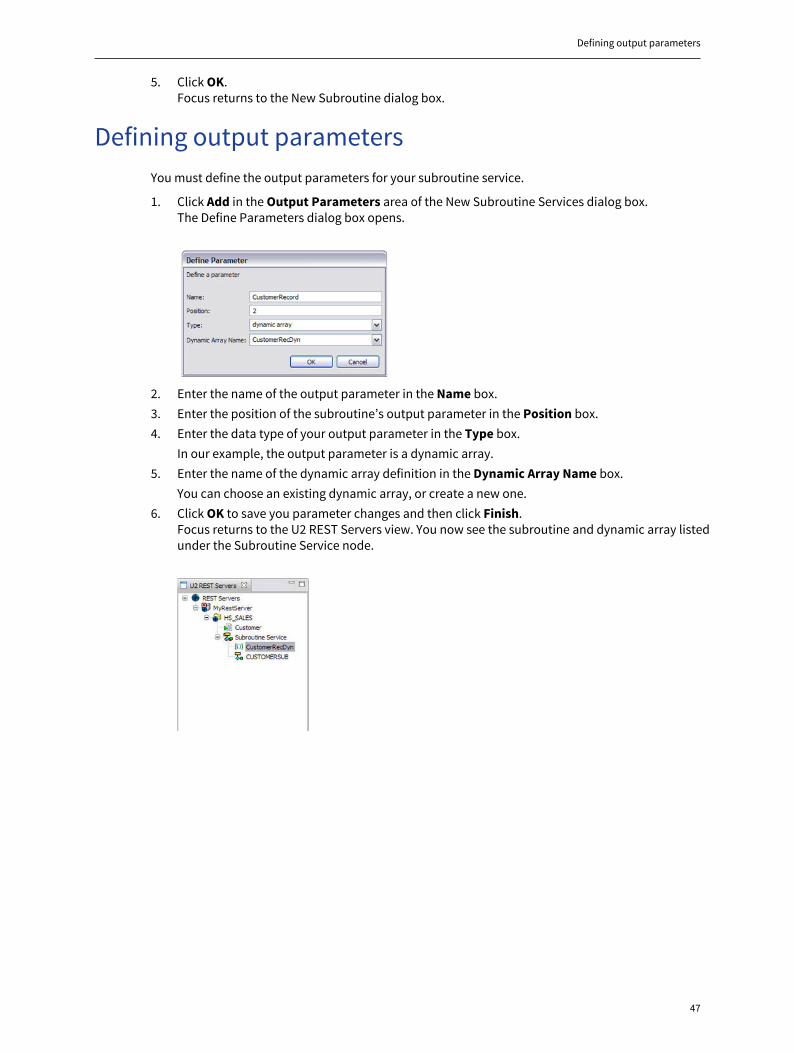
Defining output parameters
47
5. Click OK.Focus returns to the New Subroutine dialog box.
Defining output parametersYou must define the output parameters for your subroutine service.
1. Click Add in the Output Parameters area of the New Subroutine Services dialog box.The Define Parameters dialog box opens.
2. Enter the name of the output parameter in the Name box.3. Enter the position of the subroutine’s output parameter in the Position box.4. Enter the data type of your output parameter in the Type box.
In our example, the output parameter is a dynamic array.5. Enter the name of the dynamic array definition in the Dynamic Array Name box.
You can choose an existing dynamic array, or create a new one.6. Click OK to save you parameter changes and then click Finish.
Focus returns to the U2 REST Servers view. You now see the subroutine and dynamic array listedunder the Subroutine Service node.
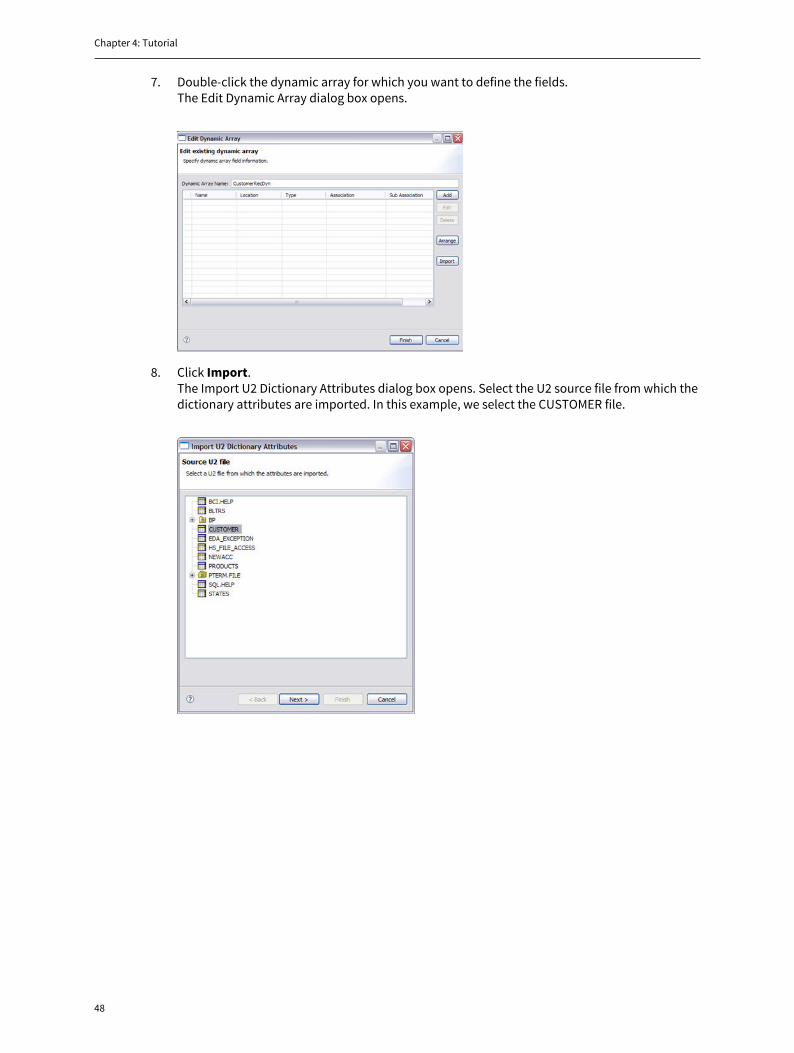
Chapter 4: Tutorial
48
7. Double-click the dynamic array for which you want to define the fields.The Edit Dynamic Array dialog box opens.
8. Click Import.The Import U2 Dictionary Attributes dialog box opens. Select the U2 source file from which thedictionary attributes are imported. In this example, we select the CUSTOMER file.
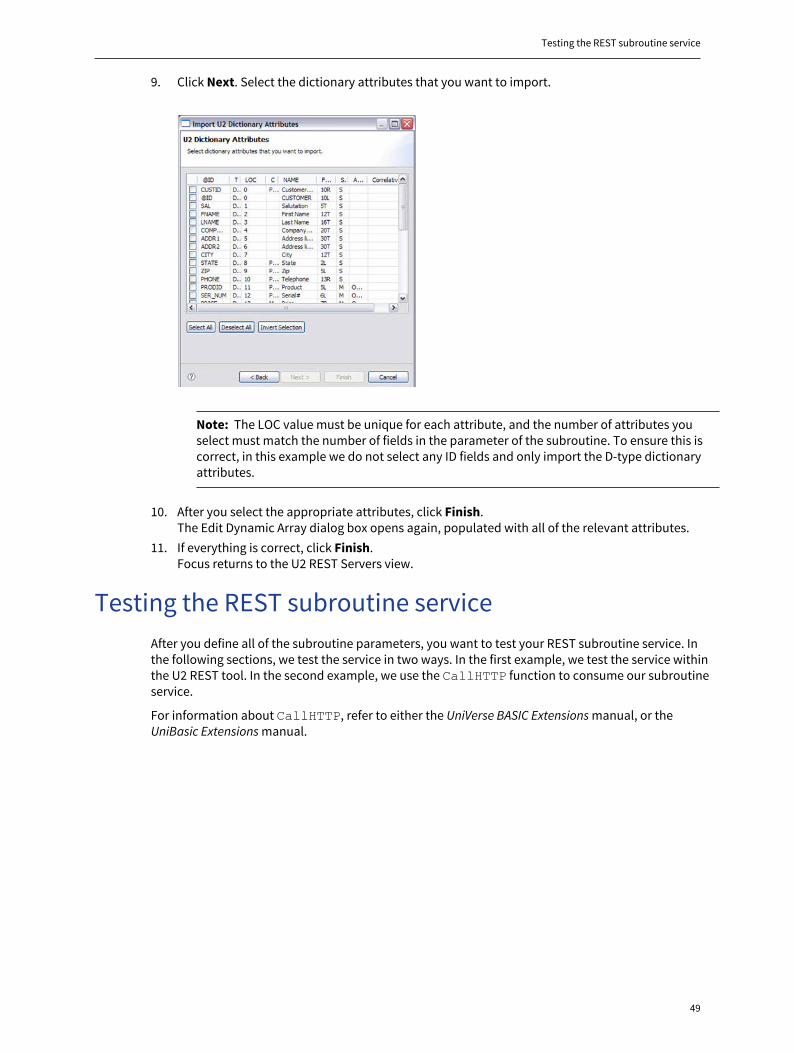
Testing the REST subroutine service
49
9. Click Next. Select the dictionary attributes that you want to import.
Note: The LOC value must be unique for each attribute, and the number of attributes youselect must match the number of fields in the parameter of the subroutine. To ensure this iscorrect, in this example we do not select any ID fields and only import the D-type dictionaryattributes.
10. After you select the appropriate attributes, click Finish.The Edit Dynamic Array dialog box opens again, populated with all of the relevant attributes.
11. If everything is correct, click Finish.Focus returns to the U2 REST Servers view.
Testing the REST subroutine serviceAfter you define all of the subroutine parameters, you want to test your REST subroutine service. Inthe following sections, we test the service in two ways. In the first example, we test the service withinthe U2 REST tool. In the second example, we use the CallHTTP function to consume our subroutineservice.
For information about CallHTTP, refer to either the UniVerse BASIC Extensions manual, or theUniBasic Extensions manual.
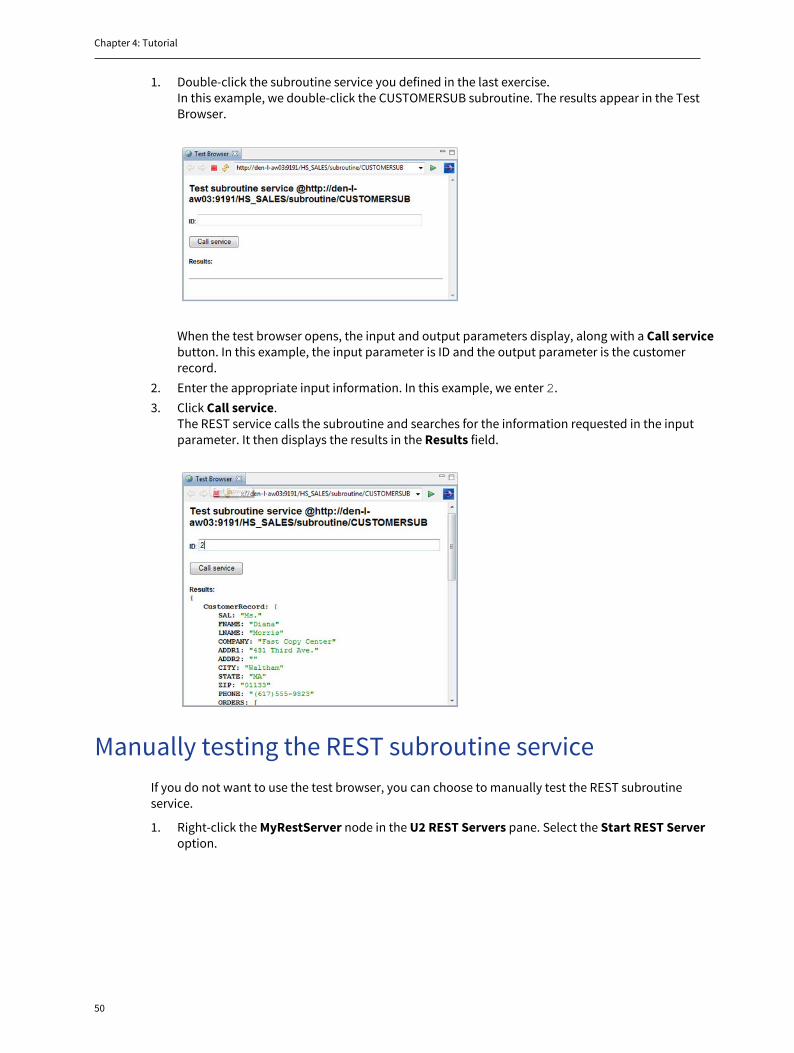
Chapter 4: Tutorial
50
1. Double-click the subroutine service you defined in the last exercise.In this example, we double-click the CUSTOMERSUB subroutine. The results appear in the TestBrowser.
When the test browser opens, the input and output parameters display, along with a Call servicebutton. In this example, the input parameter is ID and the output parameter is the customerrecord.
2. Enter the appropriate input information. In this example, we enter 2.3. Click Call service.
The REST service calls the subroutine and searches for the information requested in the inputparameter. It then displays the results in the Results field.
Manually testing the REST subroutine serviceIf you do not want to use the test browser, you can choose to manually test the REST subroutineservice.
1. Right-click the MyRestServer node in the U2 REST Servers pane. Select the Start REST Serveroption.
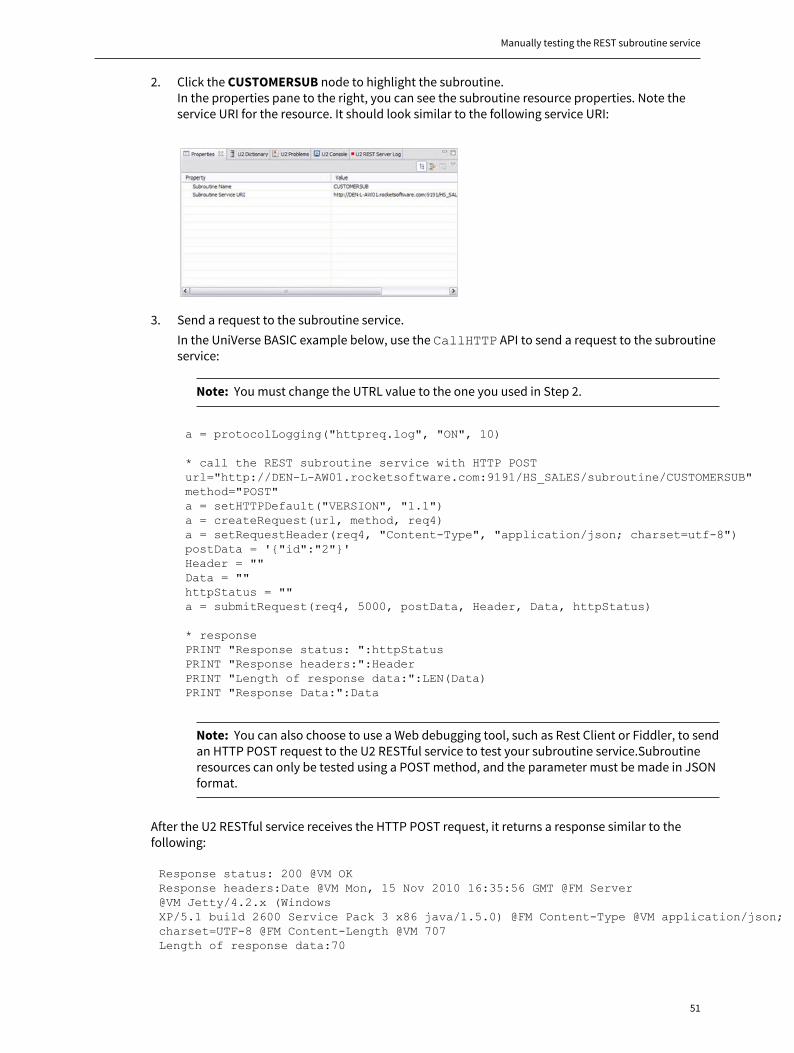
Manually testing the REST subroutine service
51
2. Click the CUSTOMERSUB node to highlight the subroutine.In the properties pane to the right, you can see the subroutine resource properties. Note theservice URI for the resource. It should look similar to the following service URI:
3. Send a request to the subroutine service.In the UniVerse BASIC example below, use the CallHTTP API to send a request to the subroutineservice:
Note: You must change the UTRL value to the one you used in Step 2.
a = protocolLogging("httpreq.log", "ON", 10)
* call the REST subroutine service with HTTP POSTurl="http://DEN-L-AW01.rocketsoftware.com:9191/HS_SALES/subroutine/CUSTOMERSUB"method="POST"a = setHTTPDefault("VERSION", "1.1")a = createRequest(url, method, req4)a = setRequestHeader(req4, "Content-Type", "application/json; charset=utf-8")postData = '{"id":"2"}'Header = ""Data = ""httpStatus = ""a = submitRequest(req4, 5000, postData, Header, Data, httpStatus) * responsePRINT "Response status: ":httpStatusPRINT "Response headers:":HeaderPRINT "Length of response data:":LEN(Data)PRINT "Response Data:":Data
Note: You can also choose to use a Web debugging tool, such as Rest Client or Fiddler, to sendan HTTP POST request to the U2 RESTful service to test your subroutine service.Subroutineresources can only be tested using a POST method, and the parameter must be made in JSONformat.
After the U2 RESTful service receives the HTTP POST request, it returns a response similar to thefollowing:
Response status: 200 @VM OKResponse headers:Date @VM Mon, 15 Nov 2010 16:35:56 GMT @FM Server @VM Jetty/4.2.x (WindowsXP/5.1 build 2600 Service Pack 3 x86 java/1.5.0) @FM Content-Type @VM application/json;charset=UTF-8 @FM Content-Length @VM 707Length of response data:70
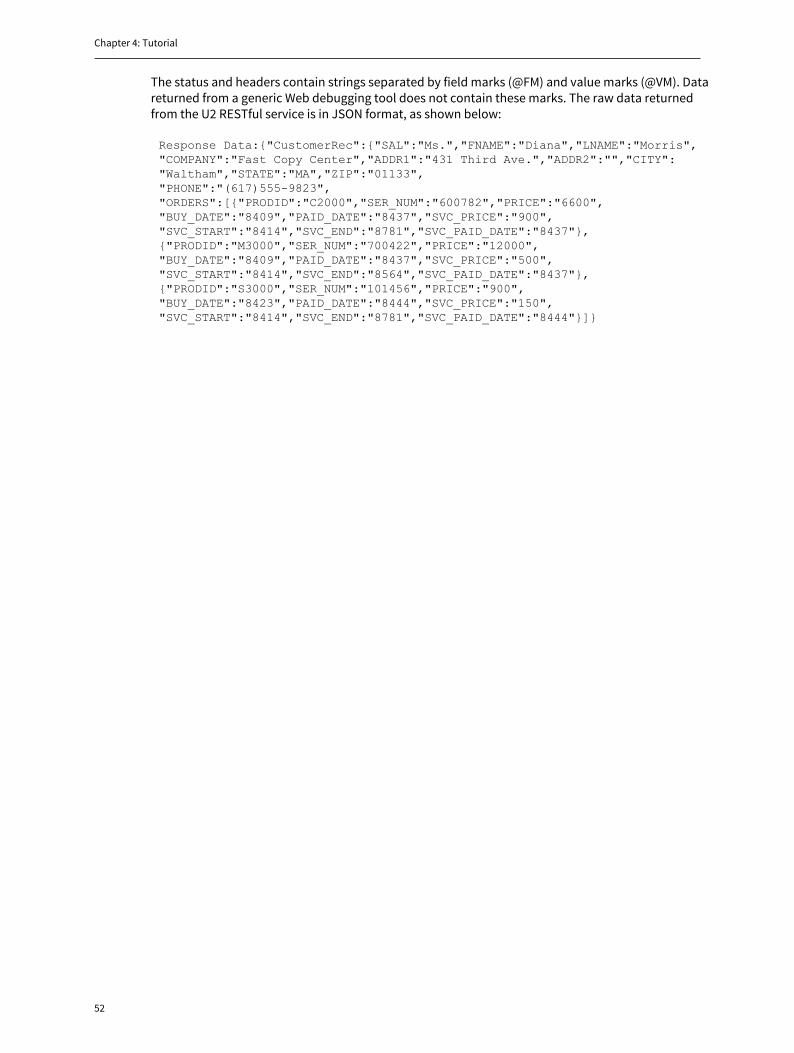
Chapter 4: Tutorial
52
The status and headers contain strings separated by field marks (@FM) and value marks (@VM). Datareturned from a generic Web debugging tool does not contain these marks. The raw data returnedfrom the U2 RESTful service is in JSON format, as shown below:
Response Data:{"CustomerRec":{"SAL":"Ms.","FNAME":"Diana","LNAME":"Morris","COMPANY":"Fast Copy Center","ADDR1":"431 Third Ave.","ADDR2":"","CITY":"Waltham","STATE":"MA","ZIP":"01133","PHONE":"(617)555-9823","ORDERS":[{"PRODID":"C2000","SER_NUM":"600782","PRICE":"6600","BUY_DATE":"8409","PAID_DATE":"8437","SVC_PRICE":"900","SVC_START":"8414","SVC_END":"8781","SVC_PAID_DATE":"8437"},{"PRODID":"M3000","SER_NUM":"700422","PRICE":"12000","BUY_DATE":"8409","PAID_DATE":"8437","SVC_PRICE":"500","SVC_START":"8414","SVC_END":"8564","SVC_PAID_DATE":"8437"},{"PRODID":"S3000","SER_NUM":"101456","PRICE":"900","BUY_DATE":"8423","PAID_DATE":"8444","SVC_PRICE":"150","SVC_START":"8414","SVC_END":"8781","SVC_PAID_DATE":"8444"}]}
53
Chapter 5: U2 REST securityU2 REST provides two methods of security for a RESTful Web project: communication security via aSecure Sockets Layer (SSL), and user authentication and authorization (Digest or Basic).
On Digest authentication, U2 REST server enforces a qop=auth quality of protection value. Therefore,your client software must support qop=auth. Refer to RFC-2617 for more information.
Communication security
U2 REST supports SSL connections between the U2 REST server and its clients. It also supportsconnections between the U2 REST server and the U2 database server. For instructions on how to setup and use SSL with U2, refer to the UniData Security Features manual or the UniVerse Security Featuresmanual.
Secure client HTTPS connections
When a U2 RESTful service is SSL enabled, the server connection and all of the resources under it arechanged from an HTTP connection to a secure HTTPS connection.
Secure U2 RESTful services are enabled using the U2 RESTful Web Services Developer.
Secure U2 database connections
You can create secure connections between the U2 REST server and the U2 database server.
1. Enable the U2 database server for SSL connection using XAdmin to secure the UOJ serviceconnection (uvcs or udcs).
2. Install the U2 database server certificates in the U2 REST server’s keystore file. The JRE directoryis located, by default, in the following location:$INSTALL_DIR/jre/jre/lib/security/cacertsYou can use tools such as Java keytool, the Java key and certificate management tool, to createand maintain the JRE. The keytool utility is installed with Oracle’s JDK.
3. Check the SSL property on the resource folder inside U2 RESTful Web Services Developer.
Note: For information about how to set up and use SSL with U2, refer to the UniData SecurityFeatures manual or the UniVerse Security Features manual. For more information on the Javakeytool, see http://download.oracle.com/javase/6/docs/technotes/tools/windows/keytool.html .
User authentication and authorizationU2 REST makes use of the Jetty HTTP server’s role-based user authentication and authorization toprovide secure access to the web services. This allows you to manage how and by whom different filesare accessed.
User authorization
User authorization, or user access control (UAC), is used to determine whether a user with the correctcredentials is allowed to access a specific U2 REST resource. This is done by restricting access ofcertain resources to a set of roles. For example, only users who are in the HR role can access theresources under the resource folder “Human Resources”.
In U2 REST, such restrictions are specified as a set of access control rules. Each rule has three parts:
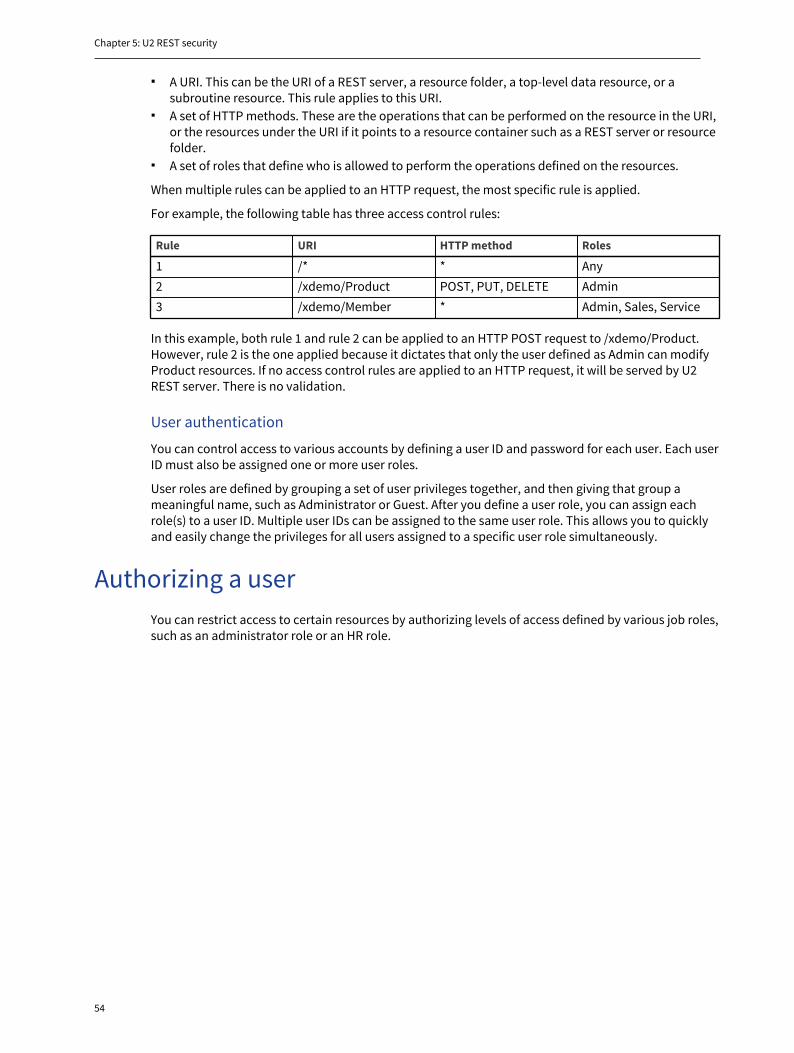
Chapter 5: U2 REST security
54
▪ A URI. This can be the URI of a REST server, a resource folder, a top-level data resource, or asubroutine resource. This rule applies to this URI.
▪ A set of HTTP methods. These are the operations that can be performed on the resource in the URI,or the resources under the URI if it points to a resource container such as a REST server or resourcefolder.
▪ A set of roles that define who is allowed to perform the operations defined on the resources.
When multiple rules can be applied to an HTTP request, the most specific rule is applied.
For example, the following table has three access control rules:
Rule URI HTTP method Roles
1 /* * Any2 /xdemo/Product POST, PUT, DELETE Admin3 /xdemo/Member * Admin, Sales, Service
In this example, both rule 1 and rule 2 can be applied to an HTTP POST request to /xdemo/Product.However, rule 2 is the one applied because it dictates that only the user defined as Admin can modifyProduct resources. If no access control rules are applied to an HTTP request, it will be served by U2REST server. There is no validation.
User authentication
You can control access to various accounts by defining a user ID and password for each user. Each userID must also be assigned one or more user roles.
User roles are defined by grouping a set of user privileges together, and then giving that group ameaningful name, such as Administrator or Guest. After you define a user role, you can assign eachrole(s) to a user ID. Multiple user IDs can be assigned to the same user role. This allows you to quicklyand easily change the privileges for all users assigned to a specific user role simultaneously.
Authorizing a userYou can restrict access to certain resources by authorizing levels of access defined by various job roles,such as an administrator role or an HR role.
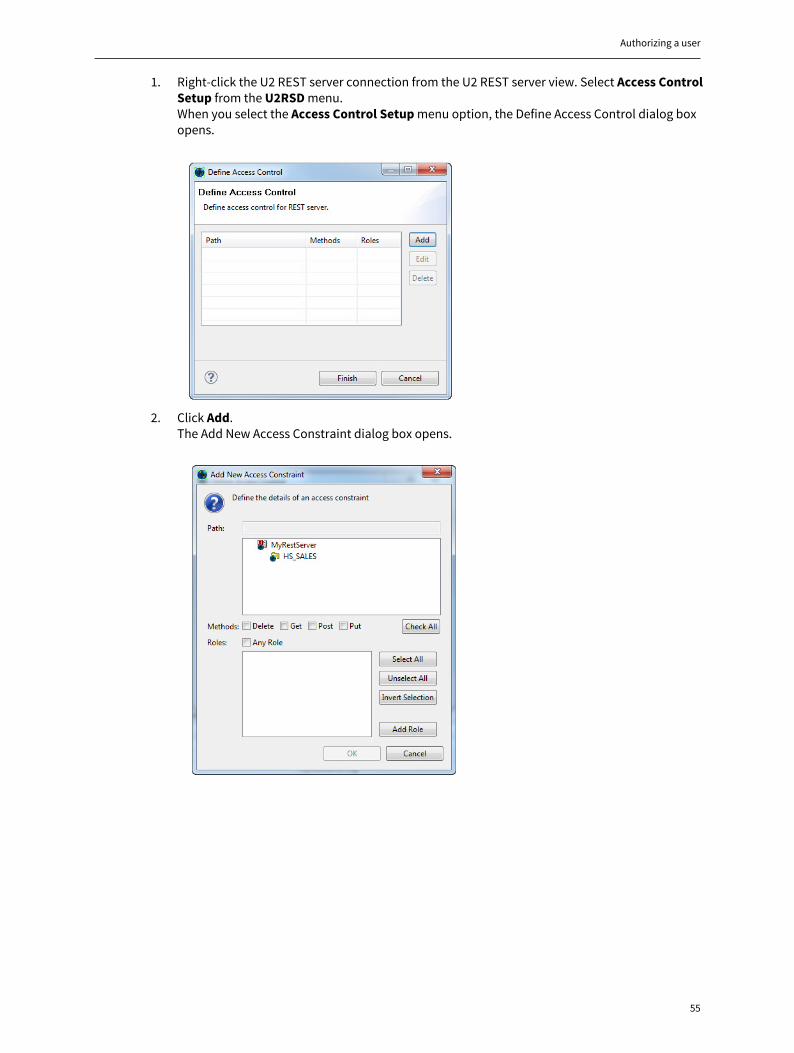
Authorizing a user
55
1. Right-click the U2 REST server connection from the U2 REST server view. Select Access ControlSetup from the U2RSD menu.When you select the Access Control Setup menu option, the Define Access Control dialog boxopens.
2. Click Add.The Add New Access Constraint dialog box opens.
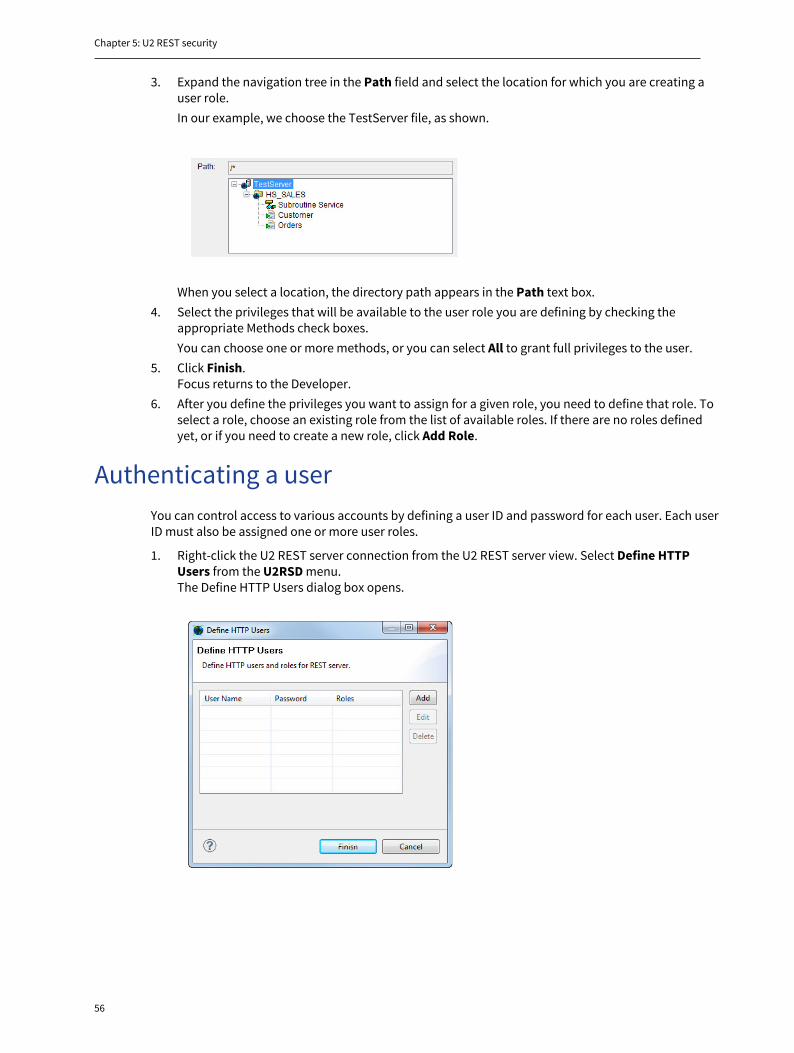
Chapter 5: U2 REST security
56
3. Expand the navigation tree in the Path field and select the location for which you are creating auser role.In our example, we choose the TestServer file, as shown.
When you select a location, the directory path appears in the Path text box.4. Select the privileges that will be available to the user role you are defining by checking the
appropriate Methods check boxes.You can choose one or more methods, or you can select All to grant full privileges to the user.
5. Click Finish.Focus returns to the Developer.
6. After you define the privileges you want to assign for a given role, you need to define that role. Toselect a role, choose an existing role from the list of available roles. If there are no roles definedyet, or if you need to create a new role, click Add Role.
Authenticating a userYou can control access to various accounts by defining a user ID and password for each user. Each userID must also be assigned one or more user roles.
1. Right-click the U2 REST server connection from the U2 REST server view. Select Define HTTPUsers from the U2RSD menu.The Define HTTP Users dialog box opens.
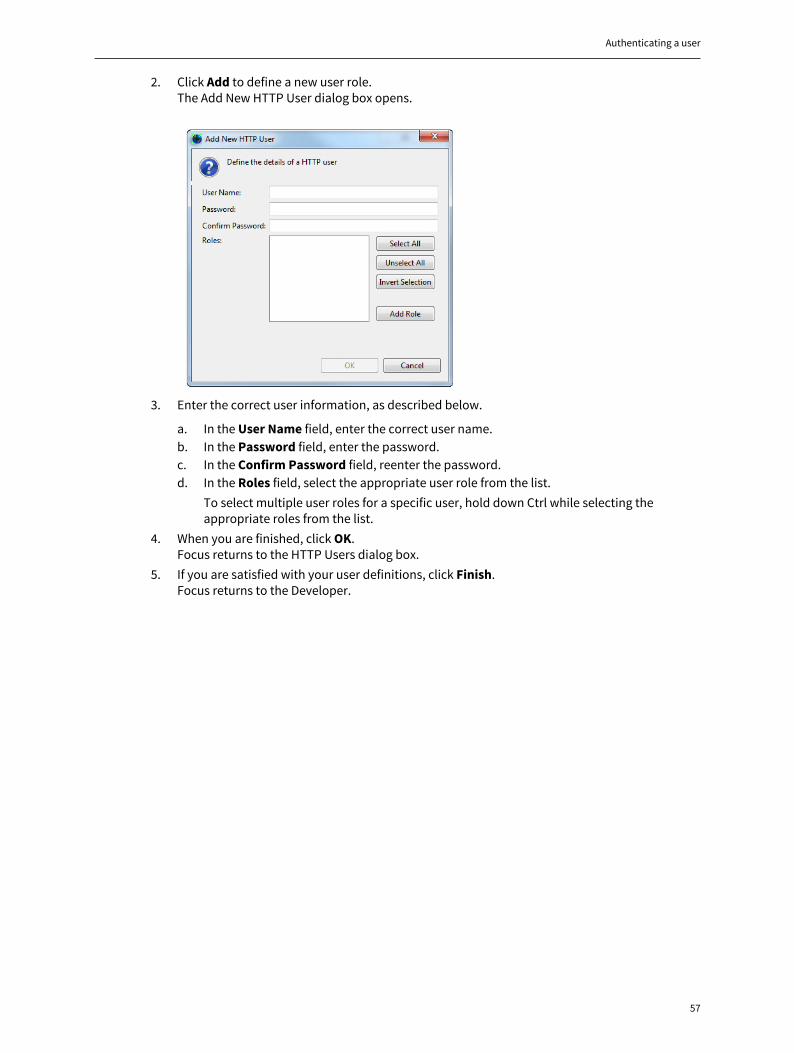
Authenticating a user
57
2. Click Add to define a new user role.The Add New HTTP User dialog box opens.
3. Enter the correct user information, as described below.
a. In the User Name field, enter the correct user name.b. In the Password field, enter the password.c. In the Confirm Password field, reenter the password.d. In the Roles field, select the appropriate user role from the list.
To select multiple user roles for a specific user, hold down Ctrl while selecting theappropriate roles from the list.
4. When you are finished, click OK.Focus returns to the HTTP Users dialog box.
5. If you are satisfied with your user definitions, click Finish.Focus returns to the Developer.
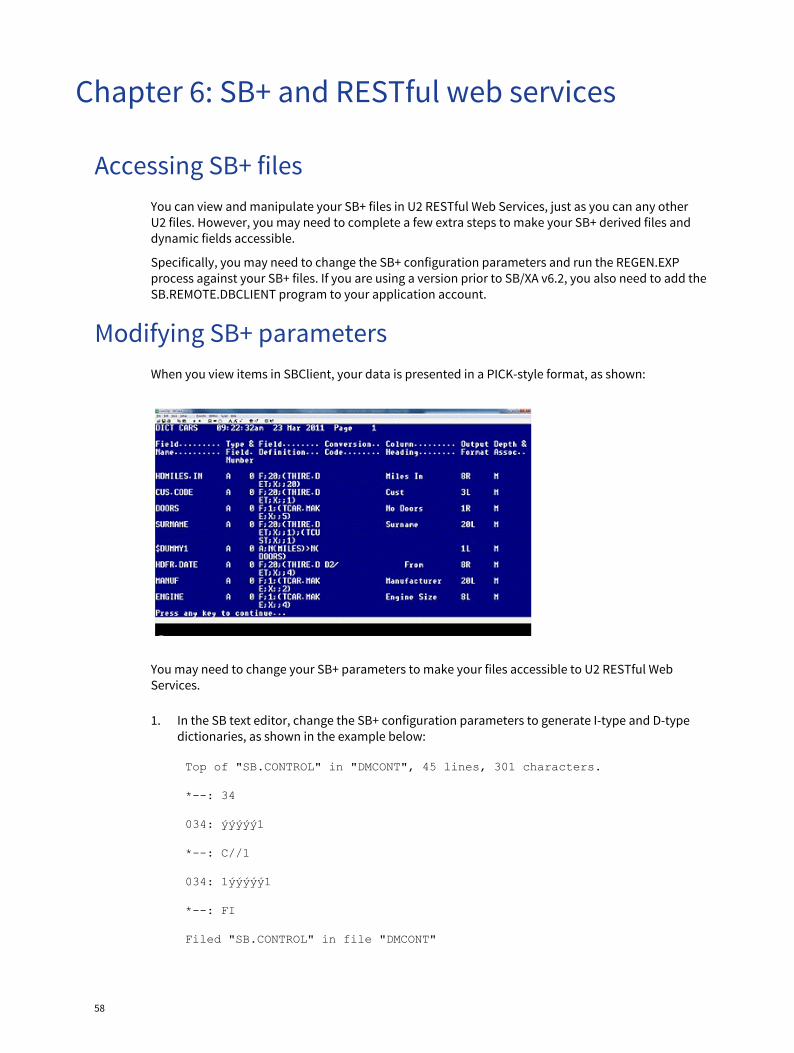
58
Chapter 6: SB+ and RESTful web services
Accessing SB+ filesYou can view and manipulate your SB+ files in U2 RESTful Web Services, just as you can any otherU2 files. However, you may need to complete a few extra steps to make your SB+ derived files anddynamic fields accessible.
Specifically, you may need to change the SB+ configuration parameters and run the REGEN.EXPprocess against your SB+ files. If you are using a version prior to SB/XA v6.2, you also need to add theSB.REMOTE.DBCLIENT program to your application account.
Modifying SB+ parametersWhen you view items in SBClient, your data is presented in a PICK-style format, as shown:
You may need to change your SB+ parameters to make your files accessible to U2 RESTful WebServices.
1. In the SB text editor, change the SB+ configuration parameters to generate I-type and D-typedictionaries, as shown in the example below:
Top of "SB.CONTROL" in "DMCONT", 45 lines, 301 characters.
*--: 34
034: ýýýýý1
*--: C//1
034: 1ýýýýý1
*--: FI
Filed "SB.CONTROL" in file "DMCONT"
Regenerating files
59
2. If you want to use subroutines in your dictionary, you need to ensure the Use Subroutines inDictionaries flag is set appropriately. If the Use Subroutines in Dictionaries flag is set to 0,change the flag to 1, as shown:
Top of "SB.CONTROL" in "DMCONT", 45 lines, 301 characters.
*--: 42
042: 0
*--: C/0/1
042: 1
*--: FI
Filed "SB.CONTROL" in file "DMCONT"
This allows you to use subroutines in your dictionaries.
Regenerating filesIf you change the SB+ parameters, you must regenerate your files to apply the changes.
Note: Before you run the REGEN.EXP process, make sure that you are aware of any third-partyprocesses that may be affected. For more information about how to use REGEN.EXP, refer to theSB/XA Application Server Reference manual.
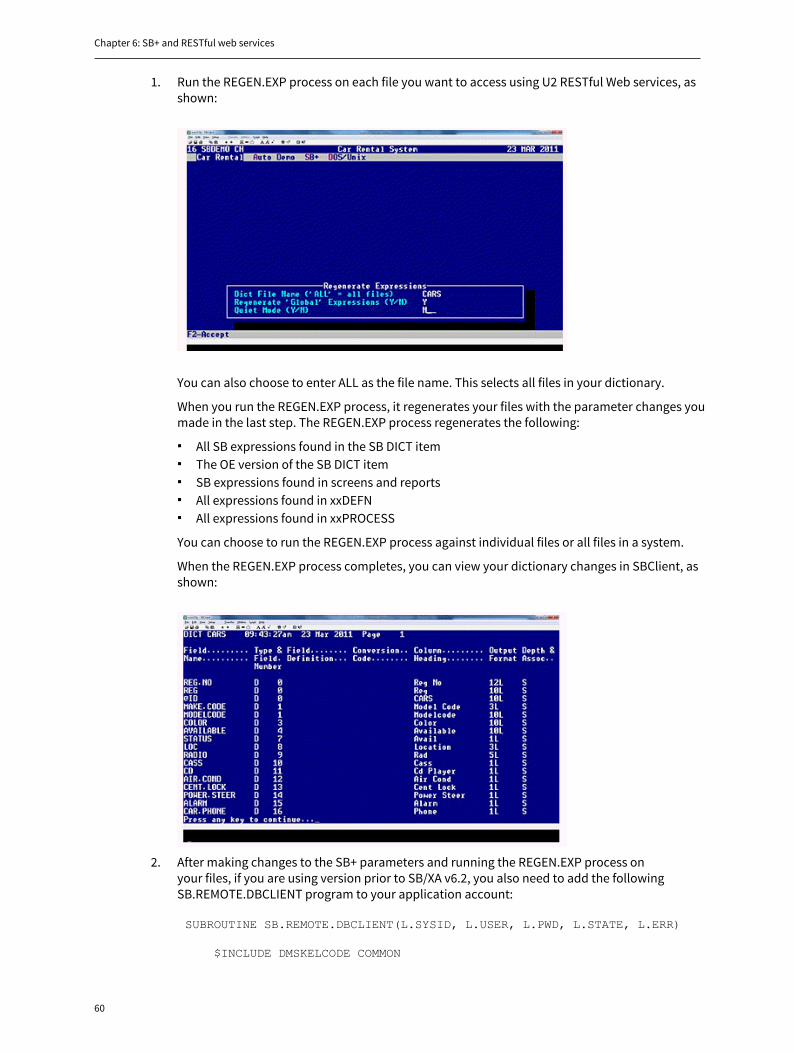
Chapter 6: SB+ and RESTful web services
60
1. Run the REGEN.EXP process on each file you want to access using U2 RESTful Web services, asshown:
You can also choose to enter ALL as the file name. This selects all files in your dictionary.
When you run the REGEN.EXP process, it regenerates your files with the parameter changes youmade in the last step. The REGEN.EXP process regenerates the following:
▪ All SB expressions found in the SB DICT item▪ The OE version of the SB DICT item▪ SB expressions found in screens and reports▪ All expressions found in xxDEFN▪ All expressions found in xxPROCESS
You can choose to run the REGEN.EXP process against individual files or all files in a system.
When the REGEN.EXP process completes, you can view your dictionary changes in SBClient, asshown:
2. After making changes to the SB+ parameters and running the REGEN.EXP process onyour files, if you are using version prior to SB/XA v6.2, you also need to add the followingSB.REMOTE.DBCLIENT program to your application account:
SUBROUTINE SB.REMOTE.DBCLIENT(L.SYSID, L.USER, L.PWD, L.STATE, L.ERR)
$INCLUDE DMSKELCODE COMMON
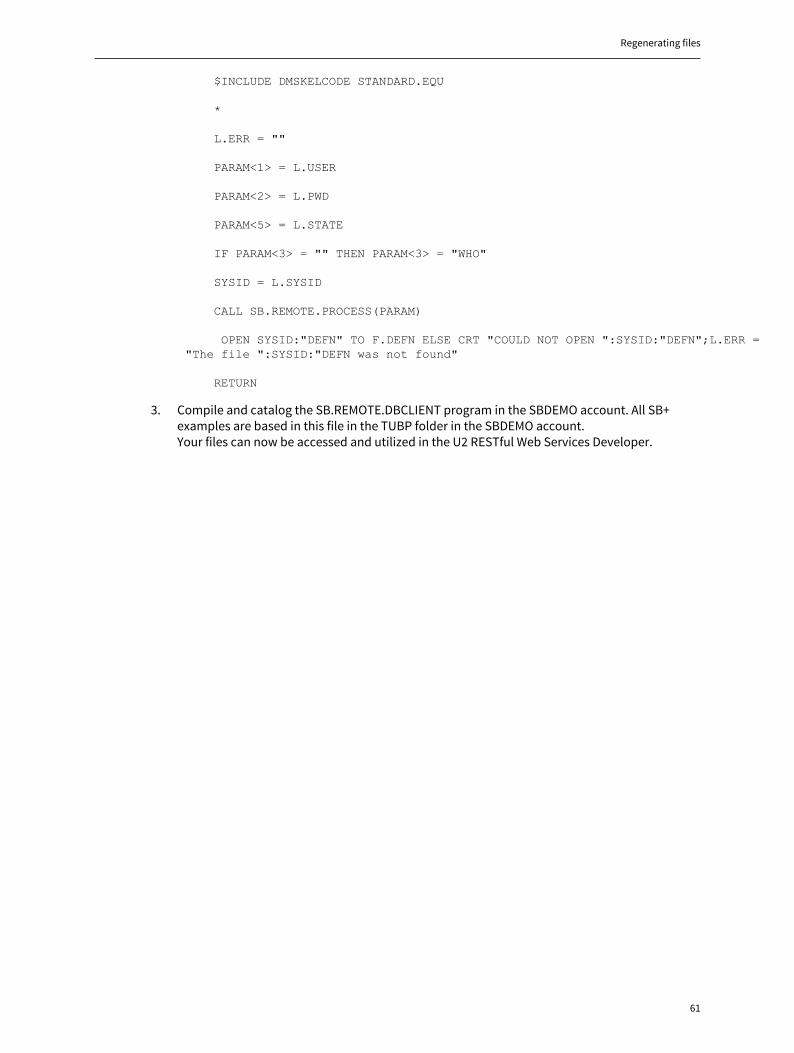
Regenerating files
61
$INCLUDE DMSKELCODE STANDARD.EQU
*
L.ERR = ""
PARAM<1> = L.USER
PARAM<2> = L.PWD
PARAM<5> = L.STATE
IF PARAM<3> = "" THEN PARAM<3> = "WHO"
SYSID = L.SYSID
CALL SB.REMOTE.PROCESS(PARAM)
OPEN SYSID:"DEFN" TO F.DEFN ELSE CRT "COULD NOT OPEN ":SYSID:"DEFN";L.ERR = "The file ":SYSID:"DEFN was not found"
RETURN
3. Compile and catalog the SB.REMOTE.DBCLIENT program in the SBDEMO account. All SB+examples are based in this file in the TUBP folder in the SBDEMO account.Your files can now be accessed and utilized in the U2 RESTful Web Services Developer.
62
Chapter 7: Deployment
Deployment environment requirementsBefore deploying U2 RESTful web services, make sure that the computer it is installed on meets therequirements.
▪ Java Runtime Environment (JRE) 1.6 must be installed on the target deployment platform.Currently, JRE 1.6 is the only version supported by U2 REST. Problems may occur if other versionsare used.
▪ The JRE_HOME environment variable must point to the location of the JRE installation directory.▪ At least 1GB of memory must be available prior to running the development environment.▪ The memory requirements for the deployment environment depend on a variety of variables,
including number of connections, tasks performed, and work load.▪ Connection pooling licenses on the database server if connection pooling is enabled.
Creating a deployment packageThe U2 RESTful Web Services Developer Export option enables you to generate a deployment packageof the selected RESTful web service.
Prerequisites▪ On Windows 7 and Windows 2008, you must run the Windows Command Prompt as an
administrator. To do this, click Start > Accessories > Command Prompt. Right-click the CommandPrompt option and select Run as administrator.
▪ Java Runtime Environment (JRE) 1.6 must be installed on the target deployment platform, and theJRE_HOME environment variable must point to the location of the JRE 1.6 installation directory.Currently, JRE 1.6 is the only version supported by U2 REST. Problems may occur if other versionsare used.
The deployment package is in the form of a zip file that contains the following:
▪ rundeploytool.bat▪ rundeploytool.sh▪ runrestserver.bat▪ runrestserver.sh▪ runtime▪ stoprestserver.bat▪ stoprestserver.sh▪ u2rest▪ U2REST_deploy.conf▪ u2rest_workspace▪ u2restservice.exe▪ vcredist_x86.exe
The zip file contains script files for Windows (.bat) and UNIX/Linux (.sh) files, which allow you todeploy the RESTful Web services on most platforms.
Exporting RESTful web services
63
Exporting RESTful web servicesYou must export your RESTful web services to a .zip file in order to deploy them.
1. Right-click the REST server that contains the REST service that you want to export.2. Select Export.3. In the Available REST Servers section, select the REST server(s) that you want to export.4. Enter the path for the zip file that you want to create in the Archive File field. By default, the zip
file is created in C:\U2\U2tools\v3\ImpTest.zip. Click Browse to choose a differentdirectory path or file name.
Note: Some computers, such as those running UNIX, cannot use zip files. In those cases,recompress the file with a non-zip extraction tool, such as 7zip, into a ZG-type file.
Importing RESTful web servicesAfter exporting a RESTful web service from the source development system, you can import it on thetarget RESTful Web Service system. The zip file must be extracted on the target system. For example c:\temp.
Prerequisite
Exporting RESTful web services, on page 63
Procedure
1. Right-click the REST server that contains the REST service that you want to import.2. Select Import.3. Click Browse to select the root directory for the REST server(s) that you want to import. For
example, C:\temp\ImpTest\u2restdeploy.
Caution:
You cannot change the name of the RESTful server after importing the web service. If a RESTserver with the same name already exists, it will be overwritten when the web service isimported.
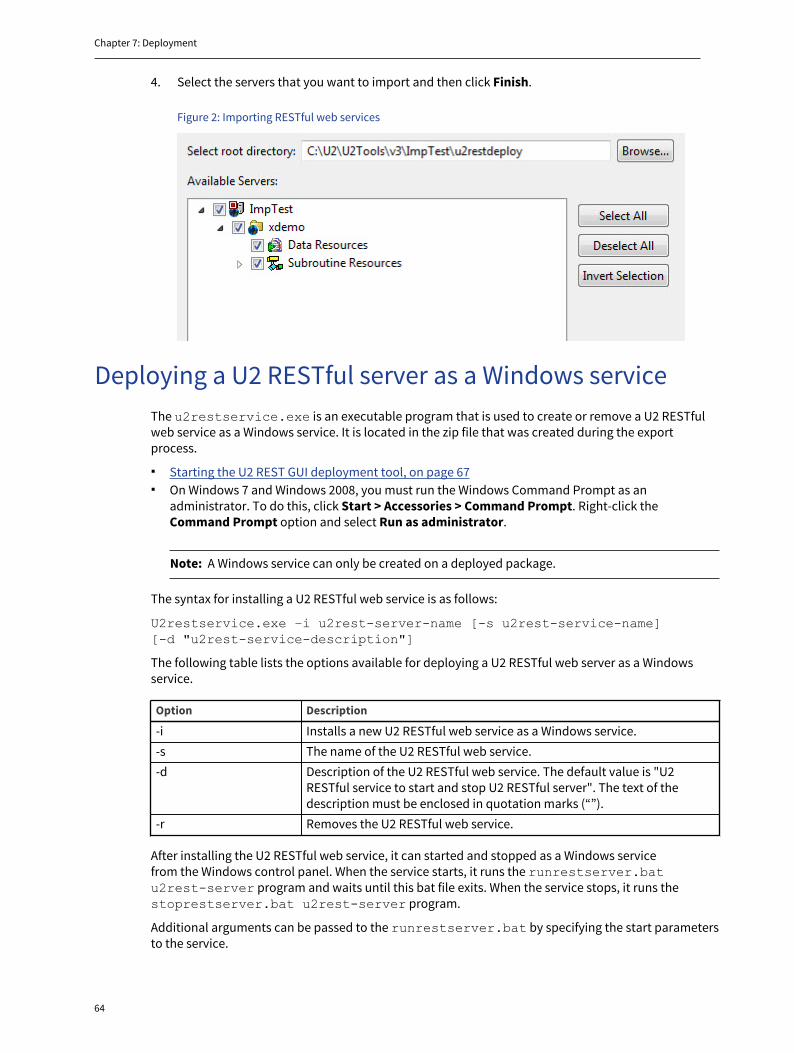
Chapter 7: Deployment
64
4. Select the servers that you want to import and then click Finish.
Figure 2: Importing RESTful web services
Deploying a U2 RESTful server as a Windows serviceThe u2restservice.exe is an executable program that is used to create or remove a U2 RESTfulweb service as a Windows service. It is located in the zip file that was created during the exportprocess.
▪ Starting the U2 REST GUI deployment tool, on page 67▪ On Windows 7 and Windows 2008, you must run the Windows Command Prompt as an
administrator. To do this, click Start > Accessories > Command Prompt. Right-click theCommand Prompt option and select Run as administrator.
Note: A Windows service can only be created on a deployed package.
The syntax for installing a U2 RESTful web service is as follows:
U2restservice.exe –i u2rest-server-name [-s u2rest-service-name][-d "u2rest-service-description"]
The following table lists the options available for deploying a U2 RESTful web server as a Windowsservice.
Option Description
-i Installs a new U2 RESTful web service as a Windows service.-s The name of the U2 RESTful web service.-d Description of the U2 RESTful web service. The default value is "U2
RESTful service to start and stop U2 RESTful server". The text of thedescription must be enclosed in quotation marks (“”).
-r Removes the U2 RESTful web service.
After installing the U2 RESTful web service, it can started and stopped as a Windows servicefrom the Windows control panel. When the service starts, it runs the runrestserver.batu2rest-server program and waits until this bat file exits. When the service stops, it runs thestoprestserver.bat u2rest-server program.
Additional arguments can be passed to the runrestserver.bat by specifying the start parametersto the service.
Generating a configuration file
65
Note: If you are creating a Windows service using the u2restservice.exe program and youget an error similar to the one shown below, you must run the vcredist_x86.exe programsupplied with the U2 REST product to ensure the Windows platform has the compatible MicrosoftVisual C++ 2005 redistributable runtime environment:Error: The application has failed to start because its side-by-side configuration is incorrect. Please seethe application event log for more detail.
To remove the service, use the following syntax:
U2restservice.exe –r u2rest-server
Generating a configuration fileUse the U2 RESTful deployment tool to generate a configuration file that can be used to deploy the U2RESTful server from the development computer to the deployment environment.
Prerequisite▪ Exporting RESTful web services, on page 63
Procedure
1. After exporting the U2 RESTful web services from within the U2 RESTful tool, extract the zip file onto the target machine.The contents of the zip file are extracted into the u2restdeploy folder, which should containthe following files:
▪ rundeploytool.bat▪ rundeploytool.sh▪ runrestserver.bat▪ runrestserver.sh▪ runtime▪ stoprestserver.bat▪ stoprestserver.sh▪ u2rest▪ U2REST_deploy.conf▪ u2rest_workspace▪ u2restservice.exe▪ vcredist_x86.exe
Tip: Some machines, such as those running UNIX, cannot use zip files. If this occurs,recompress the file with a non-zip extraction tool such as 7zip into a gz (gzip) type file.
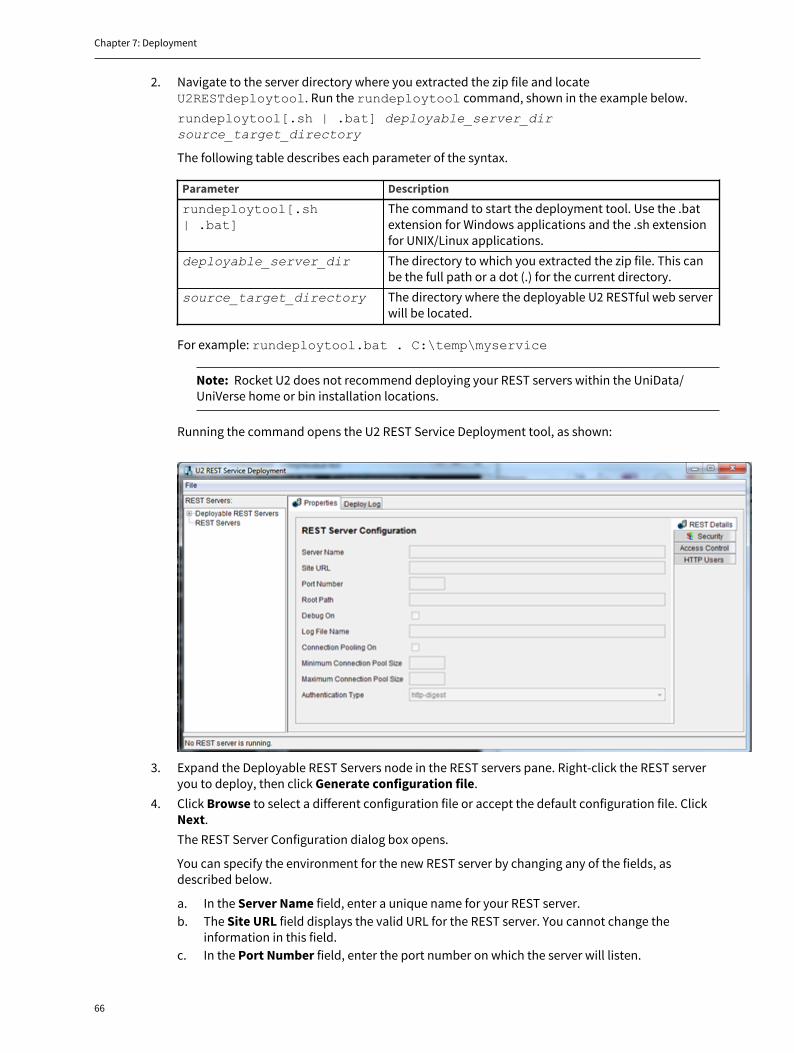
Chapter 7: Deployment
66
2. Navigate to the server directory where you extracted the zip file and locateU2RESTdeploytool. Run the rundeploytool command, shown in the example below.rundeploytool[.sh | .bat] deployable_server_dirsource_target_directory
The following table describes each parameter of the syntax.
Parameter Description
rundeploytool[.sh| .bat]
The command to start the deployment tool. Use the .batextension for Windows applications and the .sh extensionfor UNIX/Linux applications.
deployable_server_dir The directory to which you extracted the zip file. This canbe the full path or a dot (.) for the current directory.
source_target_directory The directory where the deployable U2 RESTful web serverwill be located.
For example: rundeploytool.bat . C:\temp\myservice
Note: Rocket U2 does not recommend deploying your REST servers within the UniData/UniVerse home or bin installation locations.
Running the command opens the U2 REST Service Deployment tool, as shown:
3. Expand the Deployable REST Servers node in the REST servers pane. Right-click the REST serveryou to deploy, then click Generate configuration file.
4. Click Browse to select a different configuration file or accept the default configuration file. ClickNext.The REST Server Configuration dialog box opens.
You can specify the environment for the new REST server by changing any of the fields, asdescribed below.
a. In the Server Name field, enter a unique name for your REST server.b. The Site URL field displays the valid URL for the REST server. You cannot change the
information in this field.c. In the Port Number field, enter the port number on which the server will listen.
Deploying a RESTful server using the U2 REST deployment tool
67
d. The Root Path field displays the path to the root directory where the definitions to the Webservice are stored. You cannot change the information in this field.
e. Select the Debug On option if you want to capture debugging information.f. In the Log File Name field, enter the name of the log file.g. Select the Connection Pooling On option if you want to use connection pooling.h. In the Minimum Connection Pool Size field, enter the minimum number of pooled
connections. The minimum size defaults to 1.i. In the Maximum Connection Pool Size field, enter the maximum number of pooled
connections. The minimum size defaults to 10.j. In the Authentication Type field, select the type of HTTP-based user authentication and
authorization. This feature is used only when UAC is enabled. The default type is http-digest.5. Click Next.
The REST Server Connection Security dialog box opens.6. Select the Specify Connection Security check box to make changes to the security settings. Click
Next to continue.For more information, see Defining security between the client and the REST server, on page69.
7. Click Add to add user access controls to the REST server. When you are done making changes,click Next to continue.For more information about user access controls, see Defining user access, on page 70.
8. Make any necessary changes to the Resource folder properties and then click Finish.For more information, see Defining the Resource folder properties in the GUI tool, on page 71.
Deploying a RESTful server using the U2 RESTdeployment tool
Starting the U2 REST GUI deployment tool
Use the U2 RESTful deployment tool to deploy the U2 RESTful server from the development computerto the deployment environment.
Prerequisite▪ Exporting RESTful web services, on page 63
1. After exporting the U2 RESTful web services from within the U2 RESTful tool, extract the zip file onto the target machine.The contents of the zip file are extracted into the u2restdeploy folder, which should containthe following files:
▪ rundeploytool.bat▪ rundeploytool.sh▪ runrestserver.bat▪ runrestserver.sh▪ runtime▪ stoprestserver.bat▪ stoprestserver.sh▪ u2rest▪ U2REST_deploy.conf
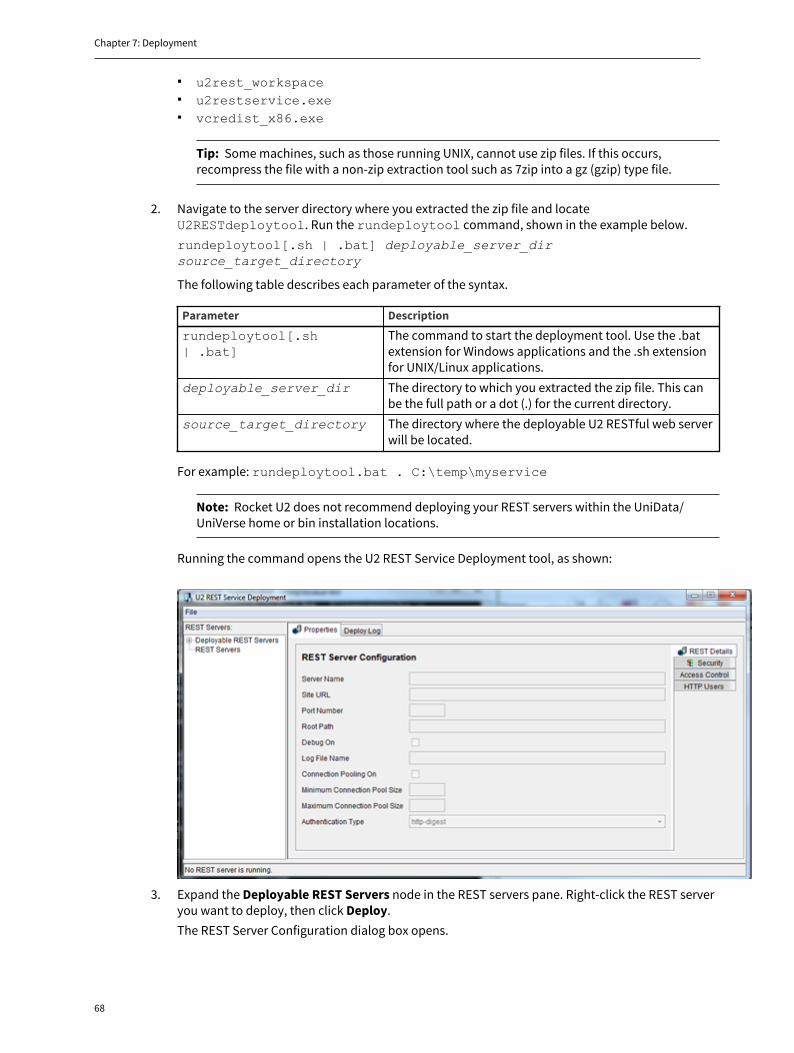
Chapter 7: Deployment
68
▪ u2rest_workspace▪ u2restservice.exe▪ vcredist_x86.exe
Tip: Some machines, such as those running UNIX, cannot use zip files. If this occurs,recompress the file with a non-zip extraction tool such as 7zip into a gz (gzip) type file.
2. Navigate to the server directory where you extracted the zip file and locateU2RESTdeploytool. Run the rundeploytool command, shown in the example below.rundeploytool[.sh | .bat] deployable_server_dirsource_target_directory
The following table describes each parameter of the syntax.
Parameter Description
rundeploytool[.sh| .bat]
The command to start the deployment tool. Use the .batextension for Windows applications and the .sh extensionfor UNIX/Linux applications.
deployable_server_dir The directory to which you extracted the zip file. This canbe the full path or a dot (.) for the current directory.
source_target_directory The directory where the deployable U2 RESTful web serverwill be located.
For example: rundeploytool.bat . C:\temp\myservice
Note: Rocket U2 does not recommend deploying your REST servers within the UniData/UniVerse home or bin installation locations.
Running the command opens the U2 REST Service Deployment tool, as shown:
3. Expand the Deployable REST Servers node in the REST servers pane. Right-click the REST serveryou want to deploy, then click Deploy.The REST Server Configuration dialog box opens.
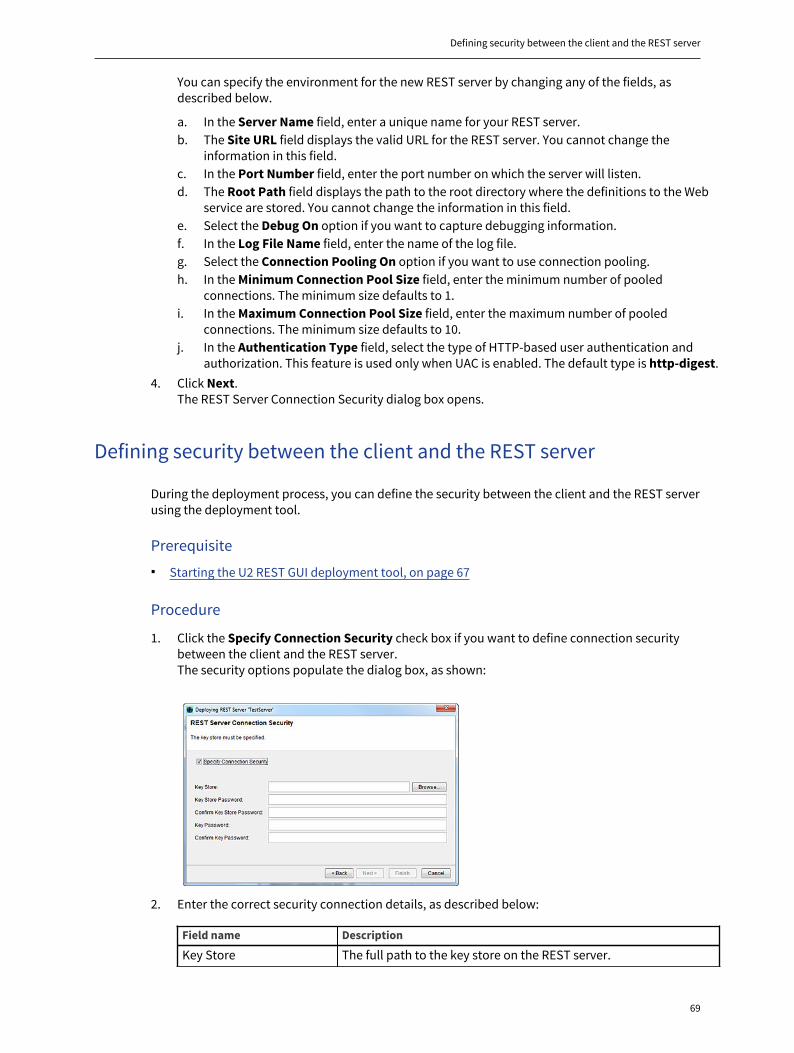
Defining security between the client and the REST server
69
You can specify the environment for the new REST server by changing any of the fields, asdescribed below.
a. In the Server Name field, enter a unique name for your REST server.b. The Site URL field displays the valid URL for the REST server. You cannot change the
information in this field.c. In the Port Number field, enter the port number on which the server will listen.d. The Root Path field displays the path to the root directory where the definitions to the Web
service are stored. You cannot change the information in this field.e. Select the Debug On option if you want to capture debugging information.f. In the Log File Name field, enter the name of the log file.g. Select the Connection Pooling On option if you want to use connection pooling.h. In the Minimum Connection Pool Size field, enter the minimum number of pooled
connections. The minimum size defaults to 1.i. In the Maximum Connection Pool Size field, enter the maximum number of pooled
connections. The minimum size defaults to 10.j. In the Authentication Type field, select the type of HTTP-based user authentication and
authorization. This feature is used only when UAC is enabled. The default type is http-digest.4. Click Next.
The REST Server Connection Security dialog box opens.
Defining security between the client and the REST server
During the deployment process, you can define the security between the client and the REST serverusing the deployment tool.
Prerequisite▪ Starting the U2 REST GUI deployment tool, on page 67
Procedure
1. Click the Specify Connection Security check box if you want to define connection securitybetween the client and the REST server.The security options populate the dialog box, as shown:
2. Enter the correct security connection details, as described below:
Field name Description
Key Store The full path to the key store on the REST server.
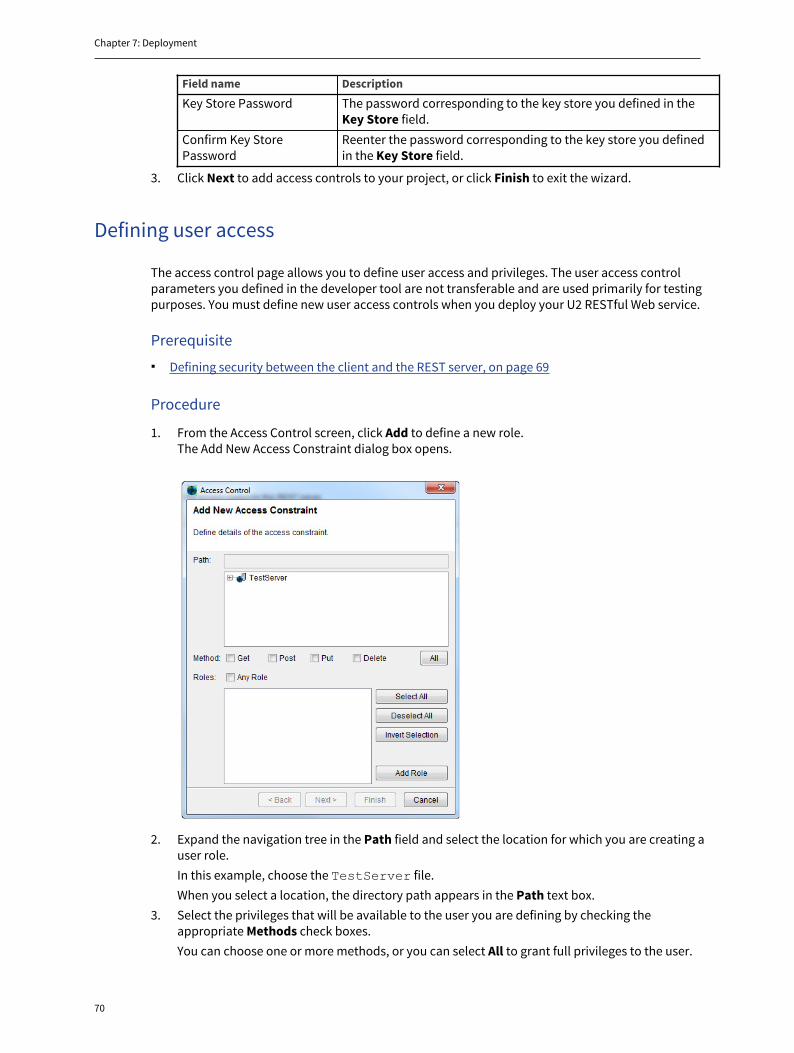
Chapter 7: Deployment
70
Field name Description
Key Store Password The password corresponding to the key store you defined in theKey Store field.
Confirm Key StorePassword
Reenter the password corresponding to the key store you definedin the Key Store field.
3. Click Next to add access controls to your project, or click Finish to exit the wizard.
Defining user access
The access control page allows you to define user access and privileges. The user access controlparameters you defined in the developer tool are not transferable and are used primarily for testingpurposes. You must define new user access controls when you deploy your U2 RESTful Web service.
Prerequisite▪ Defining security between the client and the REST server, on page 69
Procedure
1. From the Access Control screen, click Add to define a new role.The Add New Access Constraint dialog box opens.
2. Expand the navigation tree in the Path field and select the location for which you are creating auser role.In this example, choose the TestServer file.When you select a location, the directory path appears in the Path text box.
3. Select the privileges that will be available to the user you are defining by checking theappropriate Methods check boxes.You can choose one or more methods, or you can select All to grant full privileges to the user.
Defining the Resource folder properties in the GUI tool
71
4. After you define the privileges you want to assign for a given role, you need to define that role. Toselect a role, choose an existing role from the list of available roles. If there are no roles definedyet, or if you need to create a new role, click Add Role.
5. Enter a meaningful name for the new role you are creating.In our example, we create the admin role.
6. Click Finish.Focus returns to the Access Control dialog box.
7. Click Next.The HTTP Users dialog box opens.
8. Click Add to designate the users who will be assigned to the user role you just created.9. Enter the correct user information.
To select multiple user roles for a specific user, hold down the Ctrl key while selecting theappropriate roles from the list.
10. When you are done making changes, click Finish.Focus returns to the HTTP Users dialog box.
11. Click Next.The Resource Folder Properties window opens.
Tip: If you find that you need to make more changes to your deployment server, right-clickthe server name you want to change from the list of available REST servers and select theUpdate option.
Defining the Resource folder properties in the GUI tool
The Resource Folder Properties page allows you to define the properties for the selected resourcefolder.
Prerequisite▪ Defining user access, on page 70
Procedure
1. When the Resource Folder Properties dialog box opens, it displays the properties for the resourcefolder you defined for your RESTful server. You can edit the resource properties, as defined in thefollowing table:
Field name Description
Name Displays the name of the resource folder. You cannot edit this field.U2 Data Server The name of the U2 data server to which you are connecting.U2 Account The name of the U2 account to which you are connecting.UniRPC ServiceName
The name of the UniRPC service to which you are connecting.
UniRPC Port The port number to which you are connecting.User ID The correct user name.Password The correct password.SSL Select the check box if you want to use SSL.
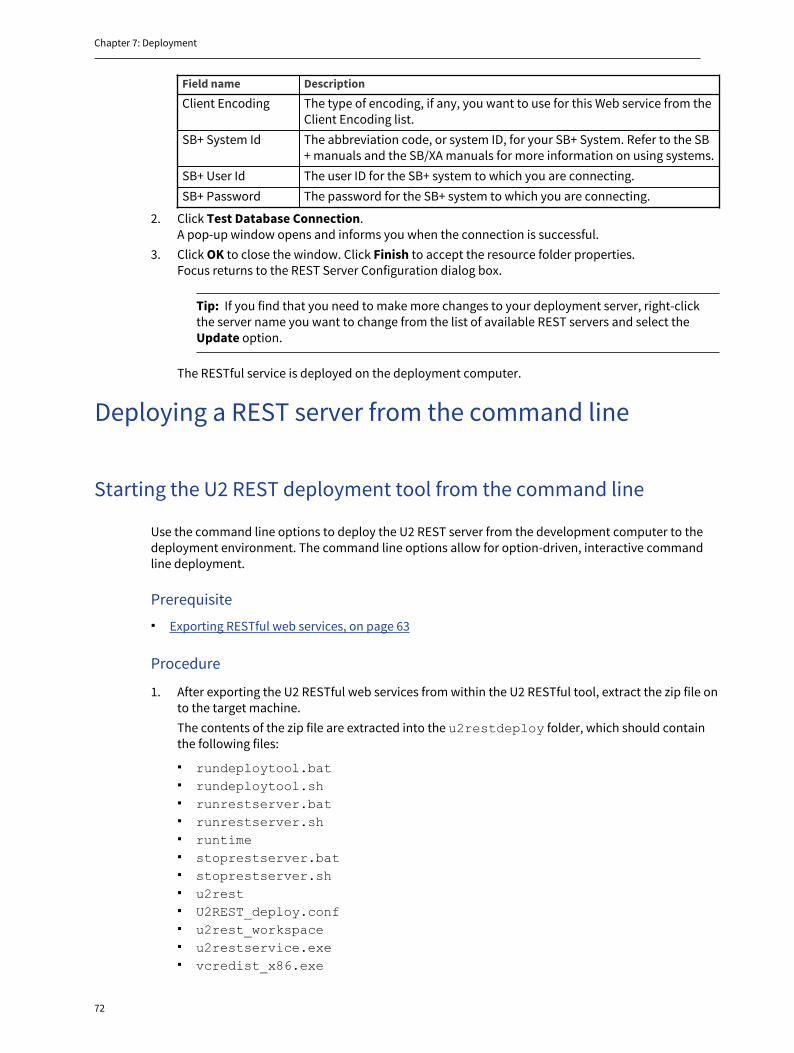
Chapter 7: Deployment
72
Field name Description
Client Encoding The type of encoding, if any, you want to use for this Web service from theClient Encoding list.
SB+ System Id The abbreviation code, or system ID, for your SB+ System. Refer to the SB+ manuals and the SB/XA manuals for more information on using systems.
SB+ User Id The user ID for the SB+ system to which you are connecting.SB+ Password The password for the SB+ system to which you are connecting.
2. Click Test Database Connection.A pop-up window opens and informs you when the connection is successful.
3. Click OK to close the window. Click Finish to accept the resource folder properties.Focus returns to the REST Server Configuration dialog box.
Tip: If you find that you need to make more changes to your deployment server, right-clickthe server name you want to change from the list of available REST servers and select theUpdate option.
The RESTful service is deployed on the deployment computer.
Deploying a REST server from the command line
Starting the U2 REST deployment tool from the command line
Use the command line options to deploy the U2 REST server from the development computer to thedeployment environment. The command line options allow for option-driven, interactive commandline deployment.
Prerequisite▪ Exporting RESTful web services, on page 63
Procedure
1. After exporting the U2 RESTful web services from within the U2 RESTful tool, extract the zip file onto the target machine.The contents of the zip file are extracted into the u2restdeploy folder, which should containthe following files:
▪ rundeploytool.bat▪ rundeploytool.sh▪ runrestserver.bat▪ runrestserver.sh▪ runtime▪ stoprestserver.bat▪ stoprestserver.sh▪ u2rest▪ U2REST_deploy.conf▪ u2rest_workspace▪ u2restservice.exe▪ vcredist_x86.exe
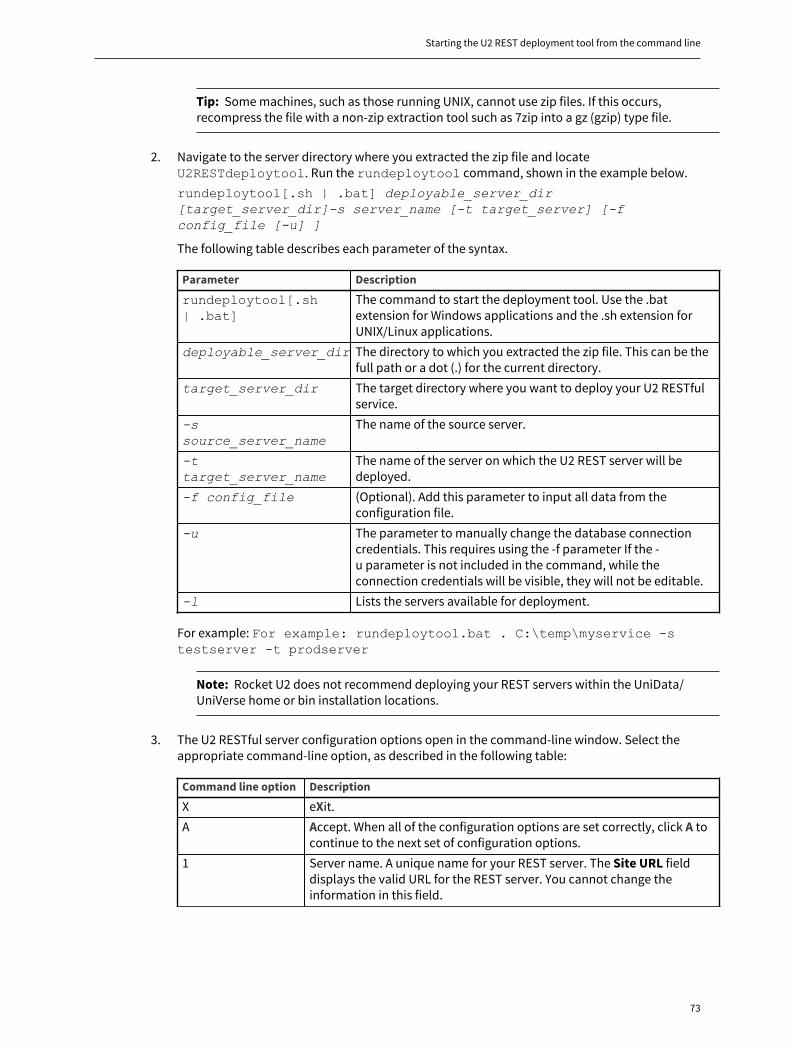
Starting the U2 REST deployment tool from the command line
73
Tip: Some machines, such as those running UNIX, cannot use zip files. If this occurs,recompress the file with a non-zip extraction tool such as 7zip into a gz (gzip) type file.
2. Navigate to the server directory where you extracted the zip file and locateU2RESTdeploytool. Run the rundeploytool command, shown in the example below.rundeploytool[.sh | .bat] deployable_server_dir[target_server_dir]-s server_name [-t target_server] [-fconfig_file [-u] ]
The following table describes each parameter of the syntax.
Parameter Description
rundeploytool[.sh| .bat]
The command to start the deployment tool. Use the .batextension for Windows applications and the .sh extension forUNIX/Linux applications.
deployable_server_dir The directory to which you extracted the zip file. This can be thefull path or a dot (.) for the current directory.
target_server_dir The target directory where you want to deploy your U2 RESTfulservice.
-ssource_server_name
The name of the source server.
-ttarget_server_name
The name of the server on which the U2 REST server will bedeployed.
-f config_file (Optional). Add this parameter to input all data from theconfiguration file.
-u The parameter to manually change the database connectioncredentials. This requires using the -f parameter If the -u parameter is not included in the command, while theconnection credentials will be visible, they will not be editable.
-l Lists the servers available for deployment.
For example: For example: rundeploytool.bat . C:\temp\myservice -stestserver -t prodserver
Note: Rocket U2 does not recommend deploying your REST servers within the UniData/UniVerse home or bin installation locations.
3. The U2 RESTful server configuration options open in the command-line window. Select theappropriate command-line option, as described in the following table:
Command line option Description
X eXit.A Accept. When all of the configuration options are set correctly, click A to
continue to the next set of configuration options.1 Server name. A unique name for your REST server. The Site URL field
displays the valid URL for the REST server. You cannot change theinformation in this field.
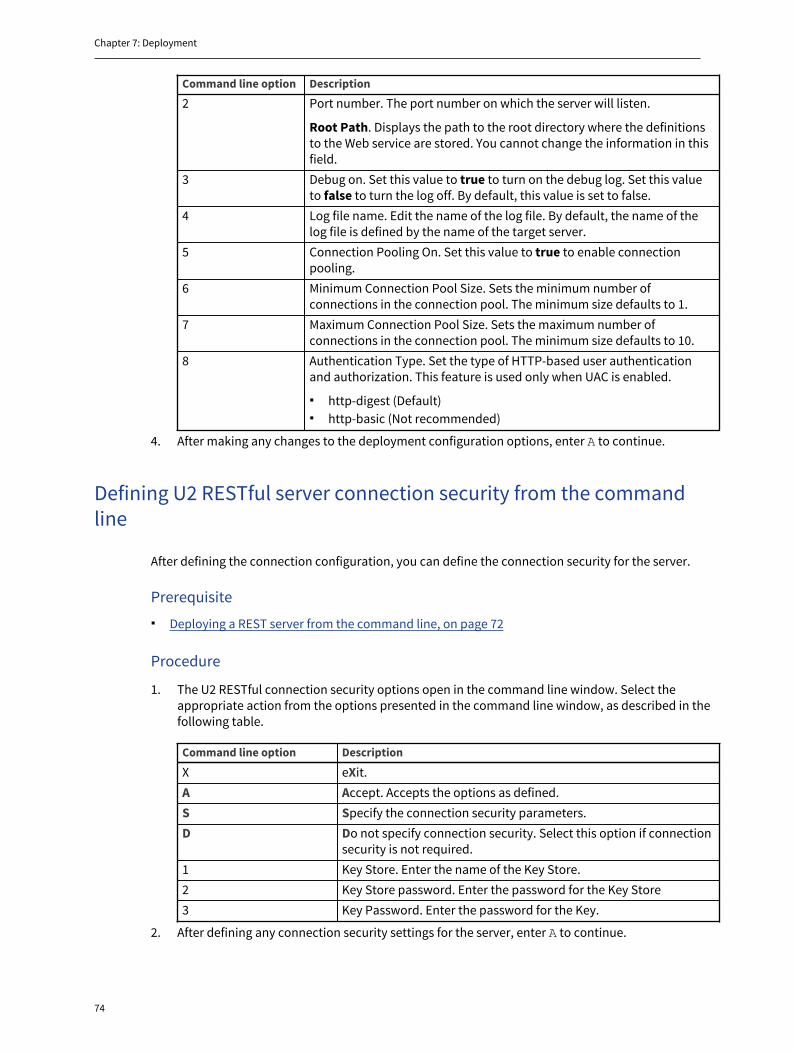
Chapter 7: Deployment
74
Command line option Description
2 Port number. The port number on which the server will listen.
Root Path. Displays the path to the root directory where the definitionsto the Web service are stored. You cannot change the information in thisfield.
3 Debug on. Set this value to true to turn on the debug log. Set this valueto false to turn the log off. By default, this value is set to false.
4 Log file name. Edit the name of the log file. By default, the name of thelog file is defined by the name of the target server.
5 Connection Pooling On. Set this value to true to enable connectionpooling.
6 Minimum Connection Pool Size. Sets the minimum number ofconnections in the connection pool. The minimum size defaults to 1.
7 Maximum Connection Pool Size. Sets the maximum number ofconnections in the connection pool. The minimum size defaults to 10.
8 Authentication Type. Set the type of HTTP-based user authenticationand authorization. This feature is used only when UAC is enabled.
▪ http-digest (Default)▪ http-basic (Not recommended)
4. After making any changes to the deployment configuration options, enter A to continue.
Defining U2 RESTful server connection security from the commandline
After defining the connection configuration, you can define the connection security for the server.
Prerequisite▪ Deploying a REST server from the command line, on page 72
Procedure
1. The U2 RESTful connection security options open in the command line window. Select theappropriate action from the options presented in the command line window, as described in thefollowing table.
Command line option Description
X eXit.A Accept. Accepts the options as defined.S Specify the connection security parameters.D Do not specify connection security. Select this option if connection
security is not required.1 Key Store. Enter the name of the Key Store.2 Key Store password. Enter the password for the Key Store3 Key Password. Enter the password for the Key.
2. After defining any connection security settings for the server, enter A to continue.
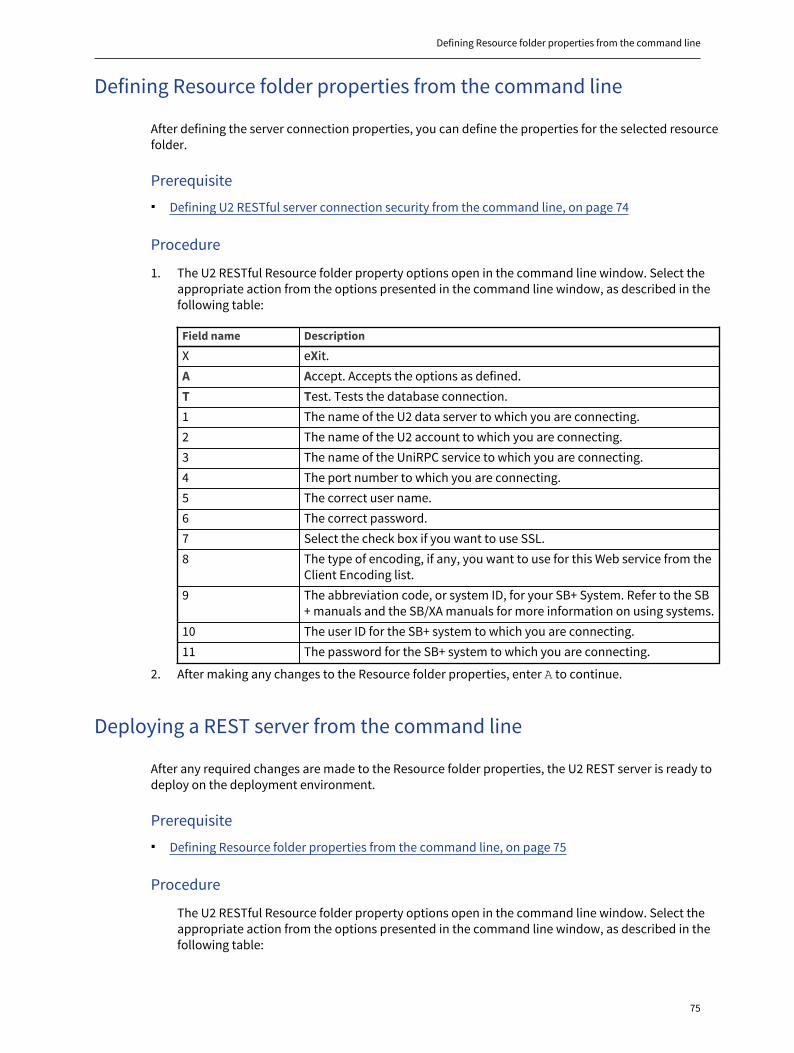
Defining Resource folder properties from the command line
75
Defining Resource folder properties from the command line
After defining the server connection properties, you can define the properties for the selected resourcefolder.
Prerequisite▪ Defining U2 RESTful server connection security from the command line, on page 74
Procedure
1. The U2 RESTful Resource folder property options open in the command line window. Select theappropriate action from the options presented in the command line window, as described in thefollowing table:
Field name Description
X eXit.A Accept. Accepts the options as defined.T Test. Tests the database connection.1 The name of the U2 data server to which you are connecting.2 The name of the U2 account to which you are connecting.3 The name of the UniRPC service to which you are connecting.4 The port number to which you are connecting.5 The correct user name.6 The correct password.7 Select the check box if you want to use SSL.8 The type of encoding, if any, you want to use for this Web service from the
Client Encoding list.9 The abbreviation code, or system ID, for your SB+ System. Refer to the SB
+ manuals and the SB/XA manuals for more information on using systems.10 The user ID for the SB+ system to which you are connecting.11 The password for the SB+ system to which you are connecting.
2. After making any changes to the Resource folder properties, enter A to continue.
Deploying a REST server from the command line
After any required changes are made to the Resource folder properties, the U2 REST server is ready todeploy on the deployment environment.
Prerequisite▪ Defining Resource folder properties from the command line, on page 75
Procedure
The U2 RESTful Resource folder property options open in the command line window. Select theappropriate action from the options presented in the command line window, as described in thefollowing table:
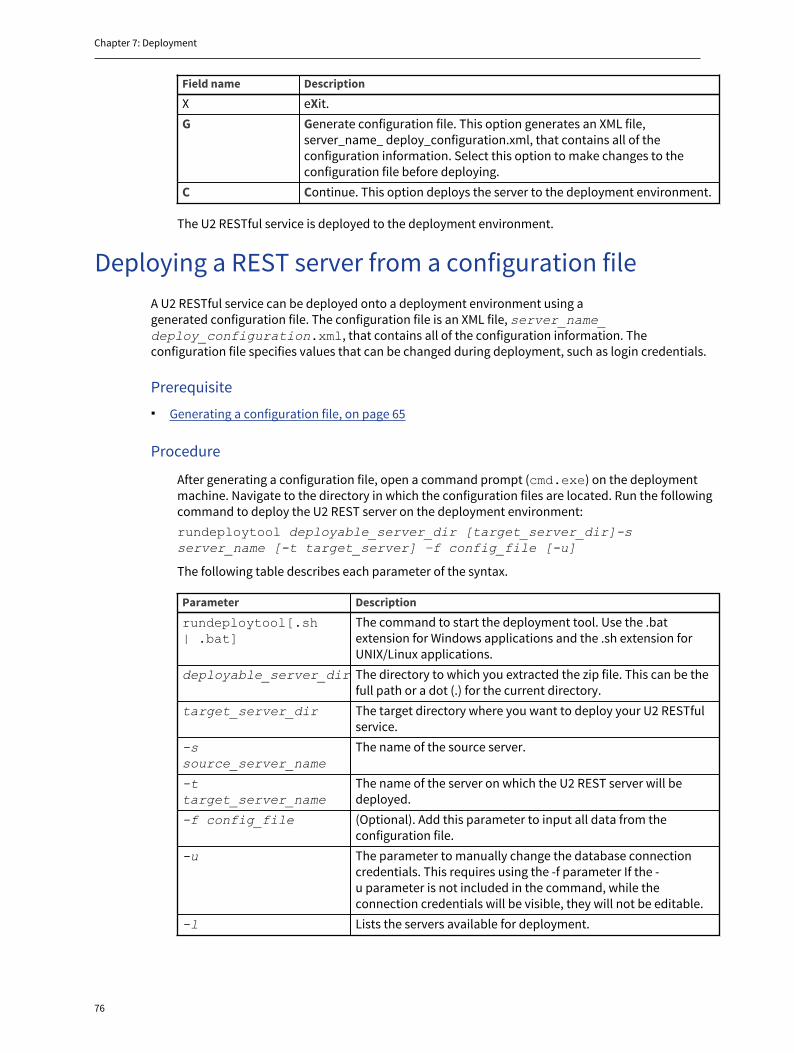
Chapter 7: Deployment
76
Field name Description
X eXit.G Generate configuration file. This option generates an XML file,
server_name_ deploy_configuration.xml, that contains all of theconfiguration information. Select this option to make changes to theconfiguration file before deploying.
C Continue. This option deploys the server to the deployment environment.
The U2 RESTful service is deployed to the deployment environment.
Deploying a REST server from a configuration fileA U2 RESTful service can be deployed onto a deployment environment using agenerated configuration file. The configuration file is an XML file, server_name_deploy_configuration.xml, that contains all of the configuration information. Theconfiguration file specifies values that can be changed during deployment, such as login credentials.
Prerequisite▪ Generating a configuration file, on page 65
Procedure
After generating a configuration file, open a command prompt (cmd.exe) on the deploymentmachine. Navigate to the directory in which the configuration files are located. Run the followingcommand to deploy the U2 REST server on the deployment environment:rundeploytool deployable_server_dir [target_server_dir]-sserver_name [-t target_server] –f config_file [-u]
The following table describes each parameter of the syntax.
Parameter Description
rundeploytool[.sh| .bat]
The command to start the deployment tool. Use the .batextension for Windows applications and the .sh extension forUNIX/Linux applications.
deployable_server_dir The directory to which you extracted the zip file. This can be thefull path or a dot (.) for the current directory.
target_server_dir The target directory where you want to deploy your U2 RESTfulservice.
-ssource_server_name
The name of the source server.
-ttarget_server_name
The name of the server on which the U2 REST server will bedeployed.
-f config_file (Optional). Add this parameter to input all data from theconfiguration file.
-u The parameter to manually change the database connectioncredentials. This requires using the -f parameter If the -u parameter is not included in the command, while theconnection credentials will be visible, they will not be editable.
-l Lists the servers available for deployment.
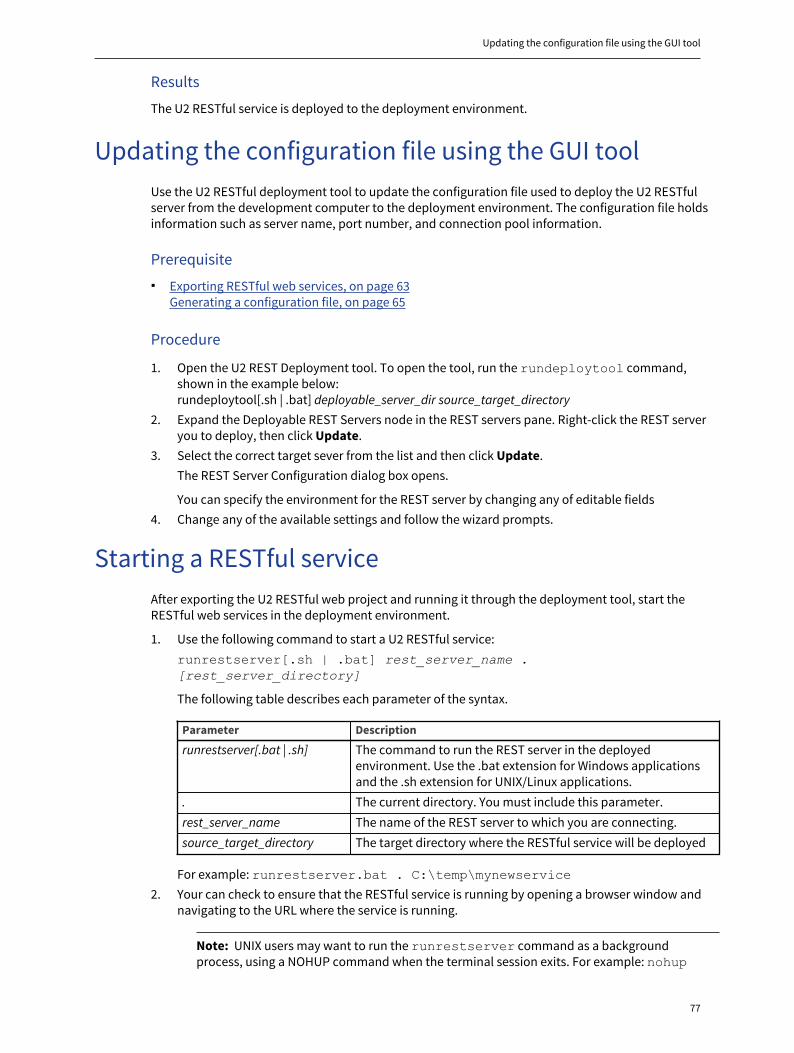
Updating the configuration file using the GUI tool
77
Results
The U2 RESTful service is deployed to the deployment environment.
Updating the configuration file using the GUI toolUse the U2 RESTful deployment tool to update the configuration file used to deploy the U2 RESTfulserver from the development computer to the deployment environment. The configuration file holdsinformation such as server name, port number, and connection pool information.
Prerequisite▪ Exporting RESTful web services, on page 63
Generating a configuration file, on page 65
Procedure
1. Open the U2 REST Deployment tool. To open the tool, run the rundeploytool command,shown in the example below:rundeploytool[.sh | .bat] deployable_server_dir source_target_directory
2. Expand the Deployable REST Servers node in the REST servers pane. Right-click the REST serveryou to deploy, then click Update.
3. Select the correct target sever from the list and then click Update.The REST Server Configuration dialog box opens.
You can specify the environment for the REST server by changing any of editable fields4. Change any of the available settings and follow the wizard prompts.
Starting a RESTful serviceAfter exporting the U2 RESTful web project and running it through the deployment tool, start theRESTful web services in the deployment environment.
1. Use the following command to start a U2 RESTful service:runrestserver[.sh | .bat] rest_server_name .[rest_server_directory]
The following table describes each parameter of the syntax.
Parameter Description
runrestserver[.bat | .sh] The command to run the REST server in the deployedenvironment. Use the .bat extension for Windows applicationsand the .sh extension for UNIX/Linux applications.
. The current directory. You must include this parameter.rest_server_name The name of the REST server to which you are connecting.source_target_directory The target directory where the RESTful service will be deployed
For example: runrestserver.bat . C:\temp\mynewservice2. Your can check to ensure that the RESTful service is running by opening a browser window and
navigating to the URL where the service is running.
Note: UNIX users may want to run the runrestserver command as a backgroundprocess, using a NOHUP command when the terminal session exits. For example: nohup
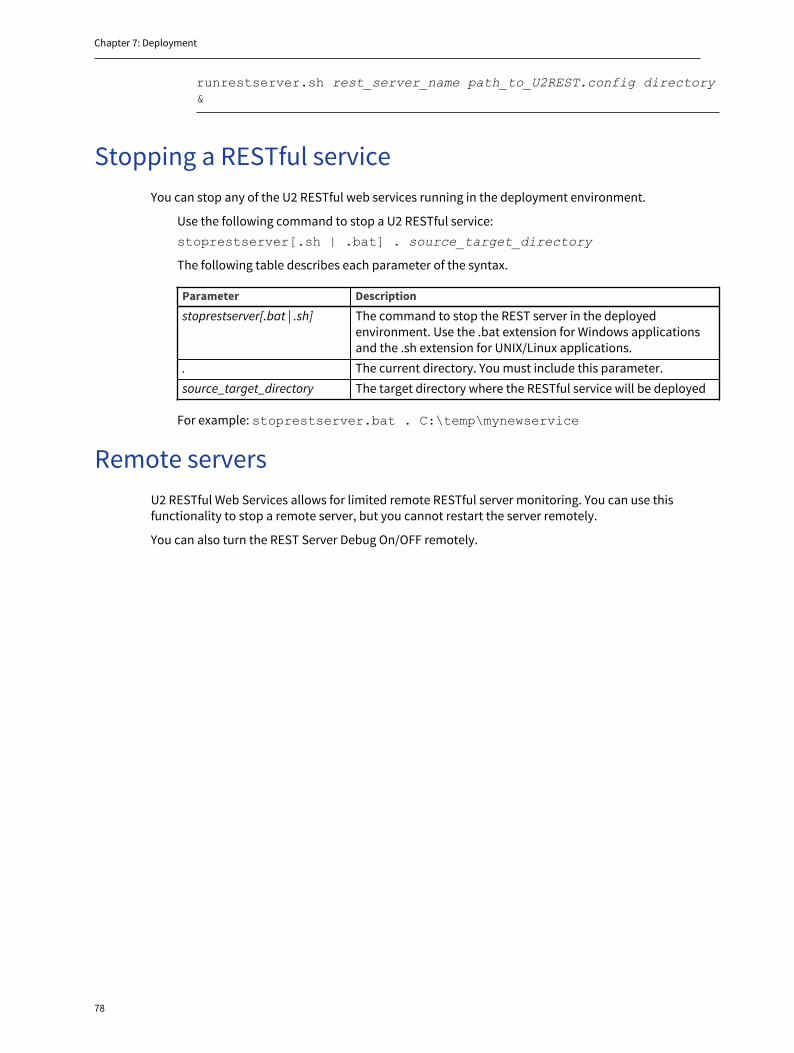
Chapter 7: Deployment
78
runrestserver.sh rest_server_name path_to_U2REST.config directory&
Stopping a RESTful serviceYou can stop any of the U2 RESTful web services running in the deployment environment.
Use the following command to stop a U2 RESTful service:stoprestserver[.sh | .bat] . source_target_directory
The following table describes each parameter of the syntax.
Parameter Description
stoprestserver[.bat | .sh] The command to stop the REST server in the deployedenvironment. Use the .bat extension for Windows applicationsand the .sh extension for UNIX/Linux applications.
. The current directory. You must include this parameter.source_target_directory The target directory where the RESTful service will be deployed
For example: stoprestserver.bat . C:\temp\mynewservice
Remote serversU2 RESTful Web Services allows for limited remote RESTful server monitoring. You can use thisfunctionality to stop a remote server, but you cannot restart the server remotely.
You can also turn the REST Server Debug On/OFF remotely.
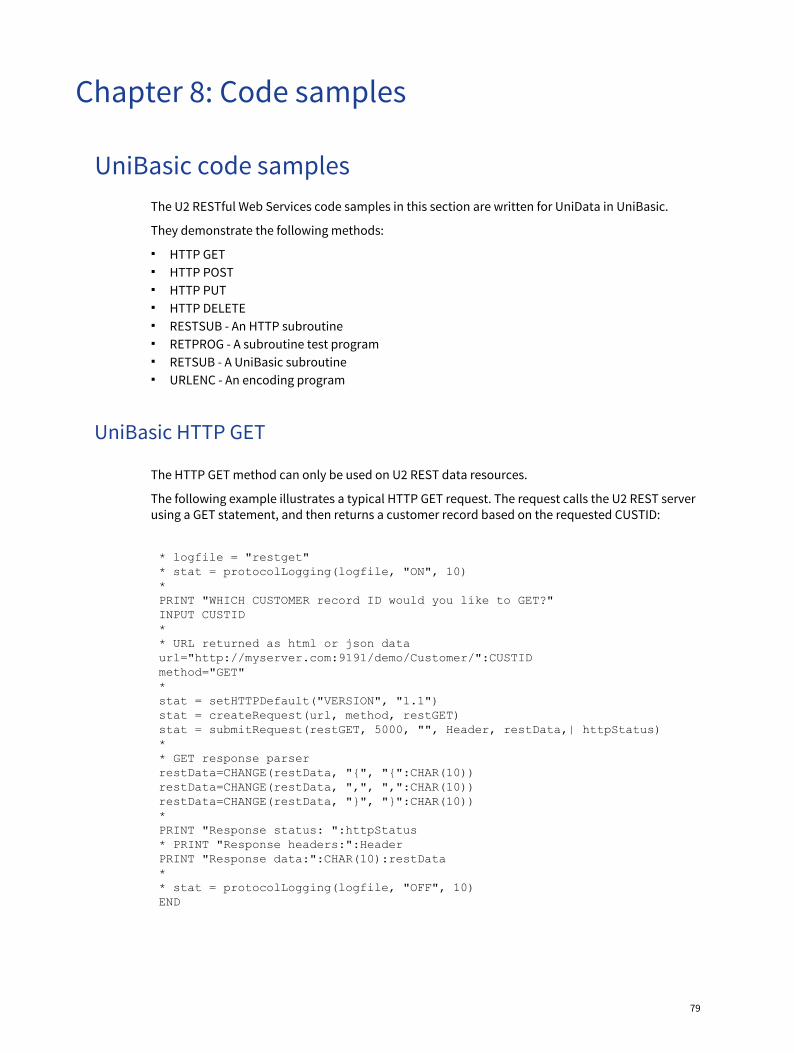
79
Chapter 8: Code samples
UniBasic code samplesThe U2 RESTful Web Services code samples in this section are written for UniData in UniBasic.
They demonstrate the following methods:
▪ HTTP GET▪ HTTP POST▪ HTTP PUT▪ HTTP DELETE▪ RESTSUB - An HTTP subroutine▪ RETPROG - A subroutine test program▪ RETSUB - A UniBasic subroutine▪ URLENC - An encoding program
UniBasic HTTP GET
The HTTP GET method can only be used on U2 REST data resources.
The following example illustrates a typical HTTP GET request. The request calls the U2 REST serverusing a GET statement, and then returns a customer record based on the requested CUSTID:
* logfile = "restget"* stat = protocolLogging(logfile, "ON", 10)*PRINT "WHICH CUSTOMER record ID would you like to GET?"INPUT CUSTID** URL returned as html or json dataurl="http://myserver.com:9191/demo/Customer/":CUSTIDmethod="GET"*stat = setHTTPDefault("VERSION", "1.1")stat = createRequest(url, method, restGET)stat = submitRequest(restGET, 5000, "", Header, restData,| httpStatus)** GET response parserrestData=CHANGE(restData, "{", "{":CHAR(10))restData=CHANGE(restData, ",", ",":CHAR(10))restData=CHANGE(restData, "}", "}":CHAR(10))*PRINT "Response status: ":httpStatus* PRINT "Response headers:":HeaderPRINT "Response data:":CHAR(10):restData** stat = protocolLogging(logfile, "OFF", 10)END
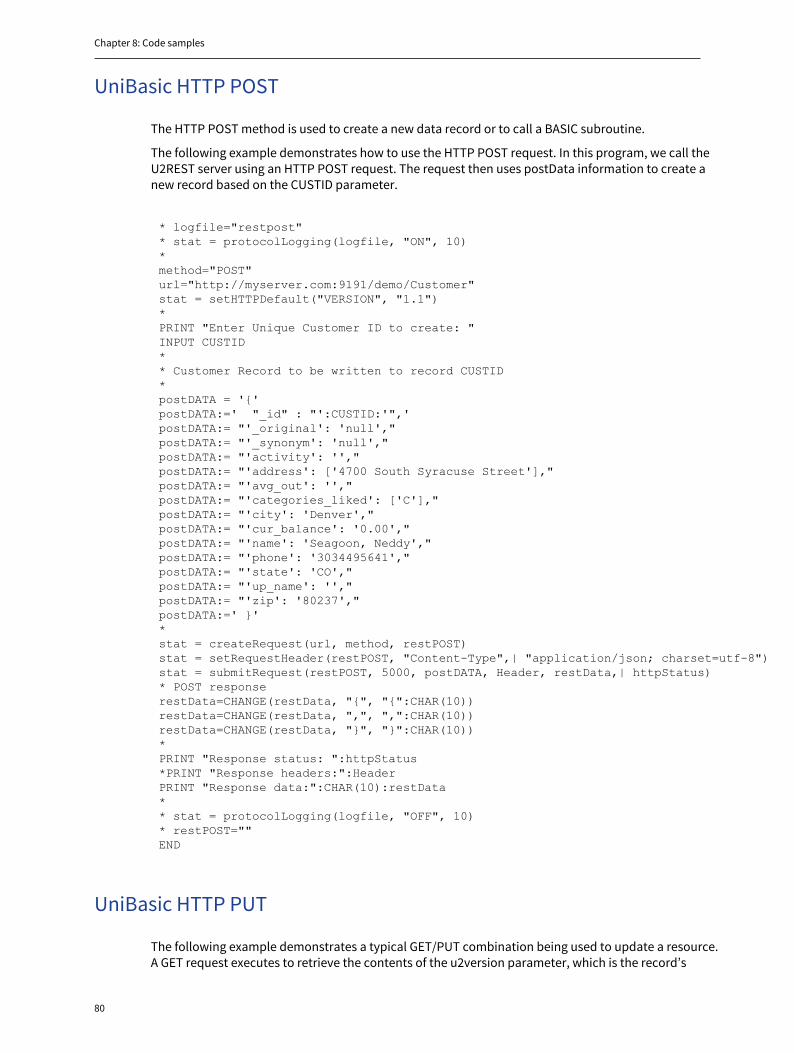
Chapter 8: Code samples
80
UniBasic HTTP POST
The HTTP POST method is used to create a new data record or to call a BASIC subroutine.
The following example demonstrates how to use the HTTP POST request. In this program, we call theU2REST server using an HTTP POST request. The request then uses postData information to create anew record based on the CUSTID parameter.
* logfile="restpost"* stat = protocolLogging(logfile, "ON", 10)*method="POST"url="http://myserver.com:9191/demo/Customer"stat = setHTTPDefault("VERSION", "1.1")*PRINT "Enter Unique Customer ID to create: "INPUT CUSTID** Customer Record to be written to record CUSTID*postDATA = '{'postDATA:=' "_id" : "':CUSTID:'",'postDATA:= "'_original': 'null',"postDATA:= "'_synonym': 'null',"postDATA:= "'activity': '',"postDATA:= "'address': ['4700 South Syracuse Street'],"postDATA:= "'avg_out': '',"postDATA:= "'categories_liked': ['C'],"postDATA:= "'city': 'Denver',"postDATA:= "'cur_balance': '0.00',"postDATA:= "'name': 'Seagoon, Neddy',"postDATA:= "'phone': '3034495641',"postDATA:= "'state': 'CO',"postDATA:= "'up_name': '',"postDATA:= "'zip': '80237',"postDATA:=' }'*stat = createRequest(url, method, restPOST)stat = setRequestHeader(restPOST, "Content-Type",| "application/json; charset=utf-8")stat = submitRequest(restPOST, 5000, postDATA, Header, restData,| httpStatus)* POST responserestData=CHANGE(restData, "{", "{":CHAR(10))restData=CHANGE(restData, ",", ",":CHAR(10))restData=CHANGE(restData, "}", "}":CHAR(10))*PRINT "Response status: ":httpStatus*PRINT "Response headers:":HeaderPRINT "Response data:":CHAR(10):restData** stat = protocolLogging(logfile, "OFF", 10)* restPOST=""END
UniBasic HTTP PUT
The following example demonstrates a typical GET/PUT combination being used to update a resource.A GET request executes to retrieve the contents of the u2version parameter, which is the record’s
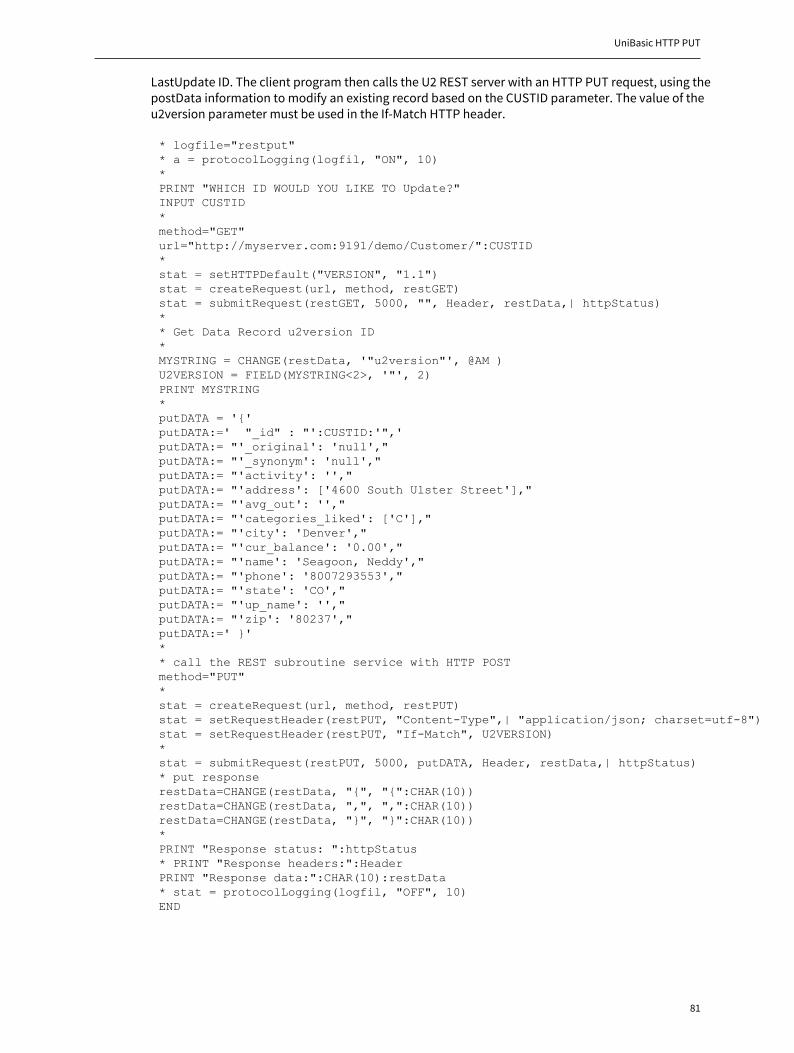
UniBasic HTTP PUT
81
LastUpdate ID. The client program then calls the U2 REST server with an HTTP PUT request, using thepostData information to modify an existing record based on the CUSTID parameter. The value of theu2version parameter must be used in the If-Match HTTP header.
* logfile="restput"* a = protocolLogging(logfil, "ON", 10)*PRINT "WHICH ID WOULD YOU LIKE TO Update?"INPUT CUSTID*method="GET"url="http://myserver.com:9191/demo/Customer/":CUSTID*stat = setHTTPDefault("VERSION", "1.1")stat = createRequest(url, method, restGET)stat = submitRequest(restGET, 5000, "", Header, restData,| httpStatus)** Get Data Record u2version ID*MYSTRING = CHANGE(restData, '"u2version"', @AM )U2VERSION = FIELD(MYSTRING<2>, '"', 2)PRINT MYSTRING*putDATA = '{'putDATA:=' "_id" : "':CUSTID:'",'putDATA:= "'_original': 'null',"putDATA:= "'_synonym': 'null',"putDATA:= "'activity': '',"putDATA:= "'address': ['4600 South Ulster Street'],"putDATA:= "'avg_out': '',"putDATA:= "'categories_liked': ['C'],"putDATA:= "'city': 'Denver',"putDATA:= "'cur_balance': '0.00',"putDATA:= "'name': 'Seagoon, Neddy',"putDATA:= "'phone': '8007293553',"putDATA:= "'state': 'CO',"putDATA:= "'up_name': '',"putDATA:= "'zip': '80237',"putDATA:=' }'** call the REST subroutine service with HTTP POSTmethod="PUT"*stat = createRequest(url, method, restPUT)stat = setRequestHeader(restPUT, "Content-Type",| "application/json; charset=utf-8")stat = setRequestHeader(restPUT, "If-Match", U2VERSION)*stat = submitRequest(restPUT, 5000, putDATA, Header, restData,| httpStatus)* put responserestData=CHANGE(restData, "{", "{":CHAR(10))restData=CHANGE(restData, ",", ",":CHAR(10))restData=CHANGE(restData, "}", "}":CHAR(10))*PRINT "Response status: ":httpStatus* PRINT "Response headers:":HeaderPRINT "Response data:":CHAR(10):restData* stat = protocolLogging(logfil, "OFF", 10)END
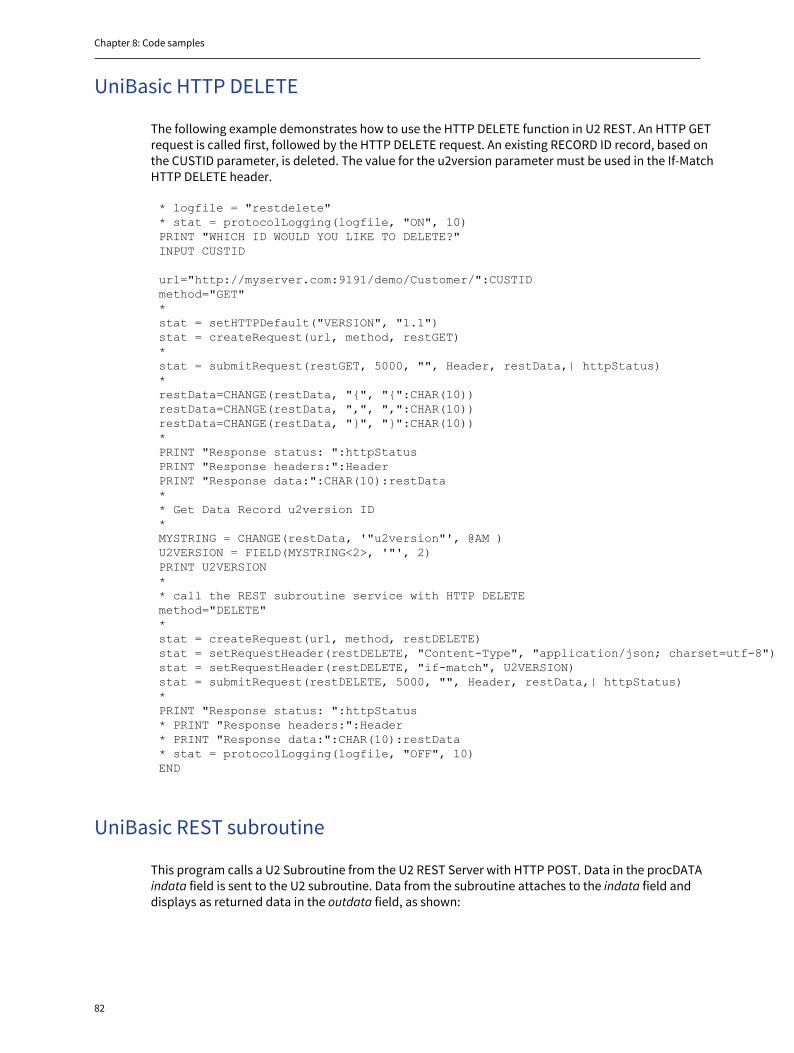
Chapter 8: Code samples
82
UniBasic HTTP DELETE
The following example demonstrates how to use the HTTP DELETE function in U2 REST. An HTTP GETrequest is called first, followed by the HTTP DELETE request. An existing RECORD ID record, based onthe CUSTID parameter, is deleted. The value for the u2version parameter must be used in the If-MatchHTTP DELETE header.
* logfile = "restdelete"* stat = protocolLogging(logfile, "ON", 10)PRINT "WHICH ID WOULD YOU LIKE TO DELETE?"INPUT CUSTID url="http://myserver.com:9191/demo/Customer/":CUSTIDmethod="GET"*stat = setHTTPDefault("VERSION", "1.1")stat = createRequest(url, method, restGET)*stat = submitRequest(restGET, 5000, "", Header, restData,| httpStatus)*restData=CHANGE(restData, "{", "{":CHAR(10))restData=CHANGE(restData, ",", ",":CHAR(10))restData=CHANGE(restData, "}", "}":CHAR(10))*PRINT "Response status: ":httpStatusPRINT "Response headers:":HeaderPRINT "Response data:":CHAR(10):restData** Get Data Record u2version ID*MYSTRING = CHANGE(restData, '"u2version"', @AM )U2VERSION = FIELD(MYSTRING<2>, '"', 2)PRINT U2VERSION** call the REST subroutine service with HTTP DELETEmethod="DELETE"*stat = createRequest(url, method, restDELETE)stat = setRequestHeader(restDELETE, "Content-Type", "application/json; charset=utf-8")stat = setRequestHeader(restDELETE, "if-match", U2VERSION)stat = submitRequest(restDELETE, 5000, "", Header, restData,| httpStatus)*PRINT "Response status: ":httpStatus* PRINT "Response headers:":Header* PRINT "Response data:":CHAR(10):restData* stat = protocolLogging(logfile, "OFF", 10)END
UniBasic REST subroutine
This program calls a U2 Subroutine from the U2 REST Server with HTTP POST. Data in the procDATAindata field is sent to the U2 subroutine. Data from the subroutine attaches to the indata field anddisplays as returned data in the outdata field, as shown:
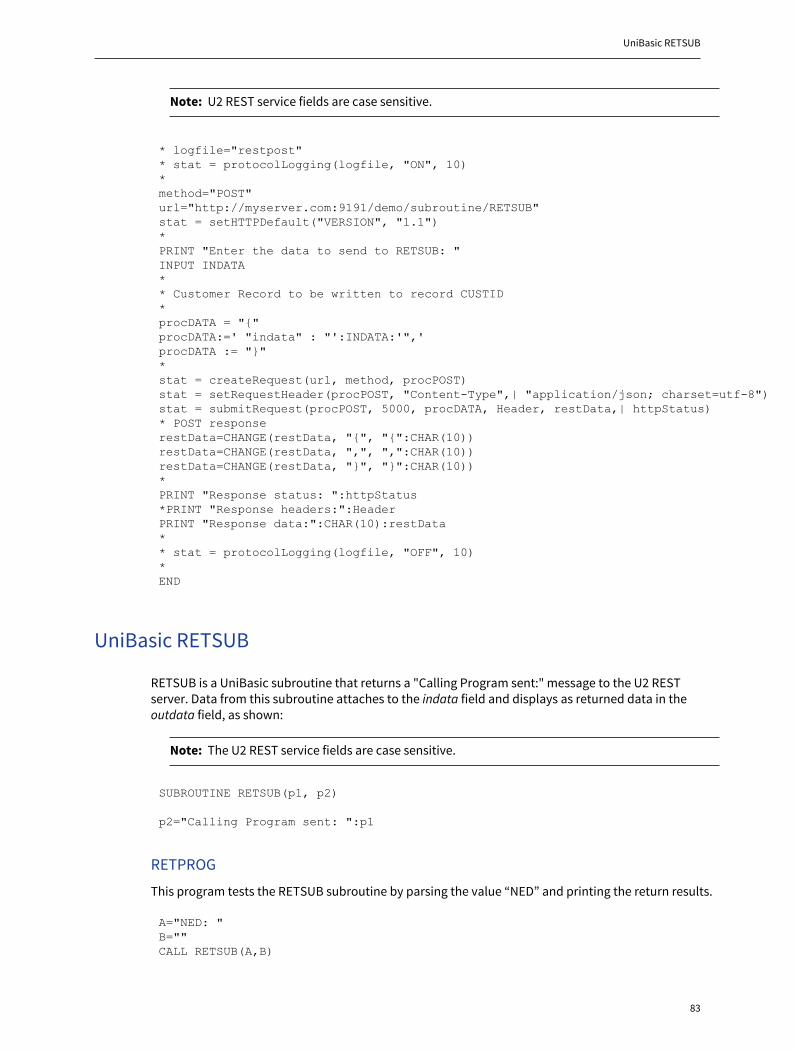
UniBasic RETSUB
83
Note: U2 REST service fields are case sensitive.
* logfile="restpost"* stat = protocolLogging(logfile, "ON", 10)*method="POST"url="http://myserver.com:9191/demo/subroutine/RETSUB"stat = setHTTPDefault("VERSION", "1.1")*PRINT "Enter the data to send to RETSUB: "INPUT INDATA** Customer Record to be written to record CUSTID*procDATA = "{"procDATA:=' "indata" : "':INDATA:'",'procDATA := "}"*stat = createRequest(url, method, procPOST)stat = setRequestHeader(procPOST, "Content-Type",| "application/json; charset=utf-8")stat = submitRequest(procPOST, 5000, procDATA, Header, restData,| httpStatus)* POST responserestData=CHANGE(restData, "{", "{":CHAR(10))restData=CHANGE(restData, ",", ",":CHAR(10))restData=CHANGE(restData, "}", "}":CHAR(10))*PRINT "Response status: ":httpStatus*PRINT "Response headers:":HeaderPRINT "Response data:":CHAR(10):restData** stat = protocolLogging(logfile, "OFF", 10)*END
UniBasic RETSUB
RETSUB is a UniBasic subroutine that returns a "Calling Program sent:" message to the U2 RESTserver. Data from this subroutine attaches to the indata field and displays as returned data in theoutdata field, as shown:
Note: The U2 REST service fields are case sensitive.
SUBROUTINE RETSUB(p1, p2)
p2="Calling Program sent: ":p1
RETPROG
This program tests the RETSUB subroutine by parsing the value “NED” and printing the return results.
A="NED: "B=""CALL RETSUB(A,B)
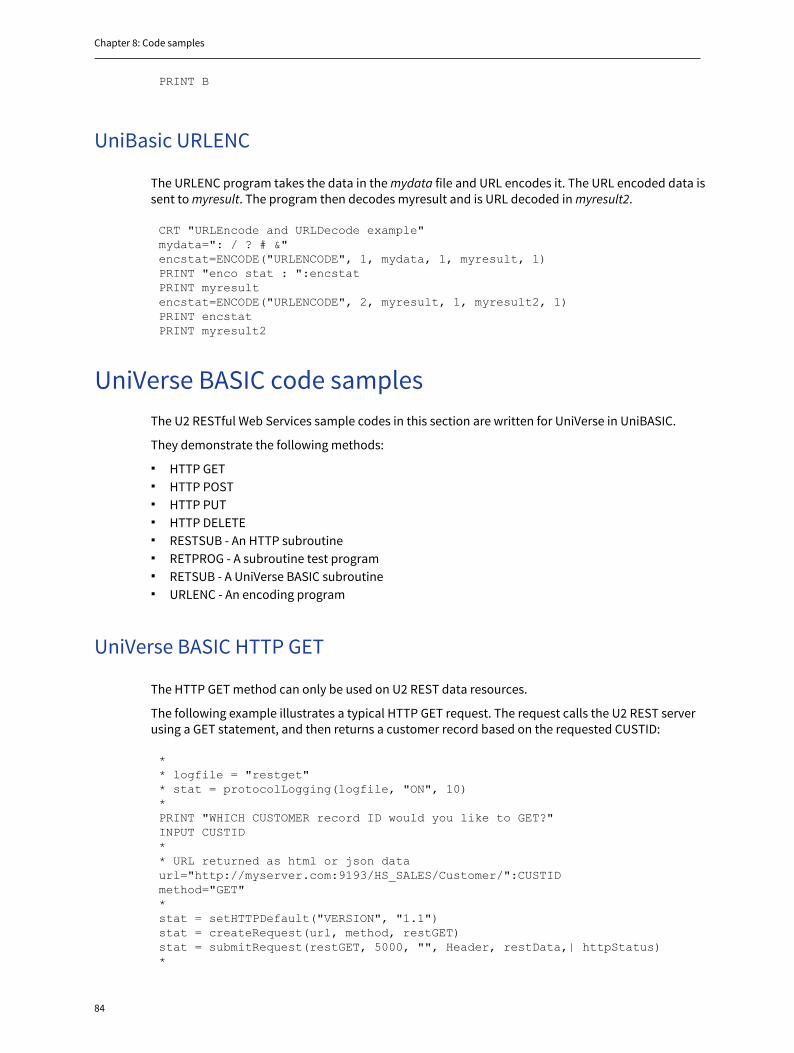
Chapter 8: Code samples
84
PRINT B
UniBasic URLENC
The URLENC program takes the data in the mydata file and URL encodes it. The URL encoded data issent to myresult. The program then decodes myresult and is URL decoded in myresult2.
CRT "URLEncode and URLDecode example"mydata=": / ? # &"encstat=ENCODE("URLENCODE", 1, mydata, 1, myresult, 1)PRINT "enco stat : ":encstatPRINT myresultencstat=ENCODE("URLENCODE", 2, myresult, 1, myresult2, 1)PRINT encstatPRINT myresult2
UniVerse BASIC code samplesThe U2 RESTful Web Services sample codes in this section are written for UniVerse in UniBASIC.
They demonstrate the following methods:
▪ HTTP GET▪ HTTP POST▪ HTTP PUT▪ HTTP DELETE▪ RESTSUB - An HTTP subroutine▪ RETPROG - A subroutine test program▪ RETSUB - A UniVerse BASIC subroutine▪ URLENC - An encoding program
UniVerse BASIC HTTP GET
The HTTP GET method can only be used on U2 REST data resources.
The following example illustrates a typical HTTP GET request. The request calls the U2 REST serverusing a GET statement, and then returns a customer record based on the requested CUSTID:
** logfile = "restget"* stat = protocolLogging(logfile, "ON", 10)*PRINT "WHICH CUSTOMER record ID would you like to GET?"INPUT CUSTID** URL returned as html or json dataurl="http://myserver.com:9193/HS_SALES/Customer/":CUSTIDmethod="GET"*stat = setHTTPDefault("VERSION", "1.1")stat = createRequest(url, method, restGET)stat = submitRequest(restGET, 5000, "", Header, restData,| httpStatus)*
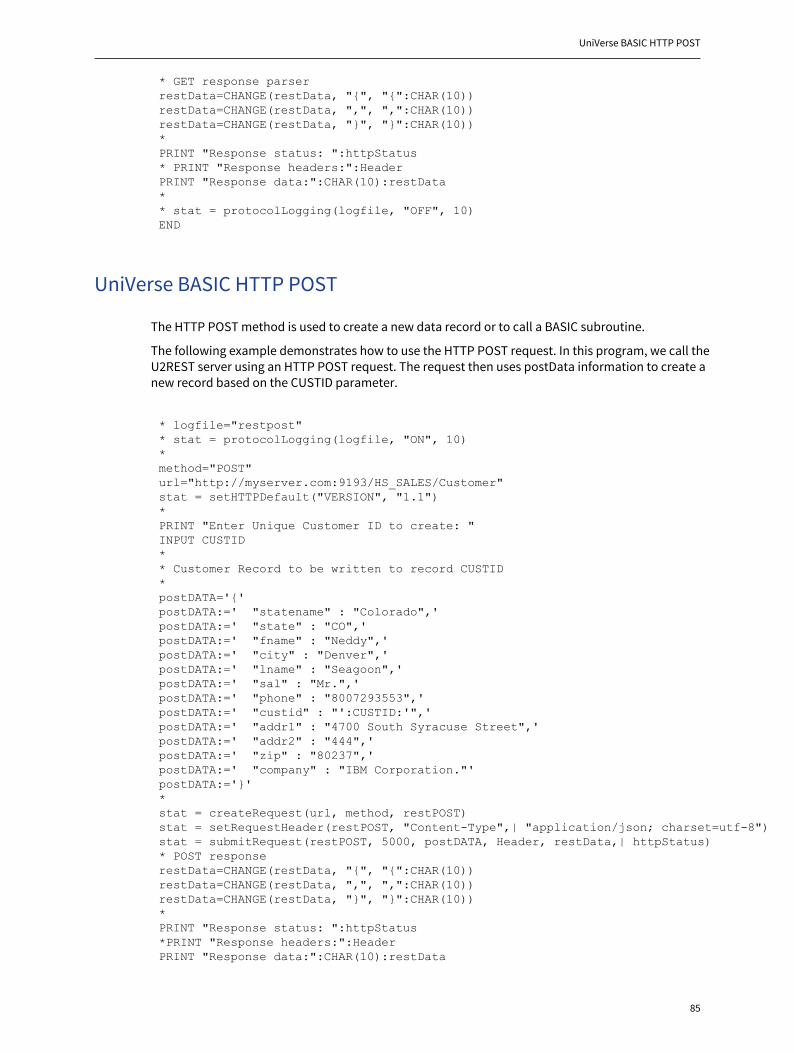
UniVerse BASIC HTTP POST
85
* GET response parserrestData=CHANGE(restData, "{", "{":CHAR(10))restData=CHANGE(restData, ",", ",":CHAR(10))restData=CHANGE(restData, "}", "}":CHAR(10))*PRINT "Response status: ":httpStatus* PRINT "Response headers:":HeaderPRINT "Response data:":CHAR(10):restData** stat = protocolLogging(logfile, "OFF", 10)END
UniVerse BASIC HTTP POST
The HTTP POST method is used to create a new data record or to call a BASIC subroutine.
The following example demonstrates how to use the HTTP POST request. In this program, we call theU2REST server using an HTTP POST request. The request then uses postData information to create anew record based on the CUSTID parameter.
* logfile="restpost"* stat = protocolLogging(logfile, "ON", 10)*method="POST"url="http://myserver.com:9193/HS_SALES/Customer"stat = setHTTPDefault("VERSION", "1.1")*PRINT "Enter Unique Customer ID to create: "INPUT CUSTID** Customer Record to be written to record CUSTID*postDATA='{'postDATA:=' "statename" : "Colorado",'postDATA:=' "state" : "CO",'postDATA:=' "fname" : "Neddy",'postDATA:=' "city" : "Denver",'postDATA:=' "lname" : "Seagoon",'postDATA:=' "sal" : "Mr.",'postDATA:=' "phone" : "8007293553",'postDATA:=' "custid" : "':CUSTID:'",'postDATA:=' "addr1" : "4700 South Syracuse Street",'postDATA:=' "addr2" : "444",'postDATA:=' "zip" : "80237",'postDATA:=' "company" : "IBM Corporation."'postDATA:='}'*stat = createRequest(url, method, restPOST)stat = setRequestHeader(restPOST, "Content-Type",| "application/json; charset=utf-8")stat = submitRequest(restPOST, 5000, postDATA, Header, restData,| httpStatus)* POST responserestData=CHANGE(restData, "{", "{":CHAR(10))restData=CHANGE(restData, ",", ",":CHAR(10))restData=CHANGE(restData, "}", "}":CHAR(10))*PRINT "Response status: ":httpStatus*PRINT "Response headers:":HeaderPRINT "Response data:":CHAR(10):restData

Chapter 8: Code samples
86
* stat = protocolLogging(logfile, "OFF", 10)END
UniVerse BASIC HTTP PUT
The following example demonstrates a typical GET/PUT combination being used to update a resource.
A GET request executes to retrieve the contents of the u2version parameter, which is the record’sLastUpdate ID. The client program then calls the U2 REST server with an HTTP PUT request, using thepostData information to modify an existing record based on the CUSTID parameter. The value of theu2version parameter must be used in the If-Match HTTP header.
* logfile="restput"* a = protocolLogging(logfile, "ON", 10)*PRINT "WHICH ID WOULD YOU LIKE TO Update?"INPUT CUSTID*method="GET"url="http://myserver.com:9193/HS_SALES/Customer/":CUSTID*stat = setHTTPDefault("VERSION", "1.1")stat = createRequest(url, method, restGET)stat = submitRequest(restGET, 5000, "", Header, restData,| httpStatus)** Get Data Record u2version ID*MYSTRING = CHANGE(restData, '"u2version"', @AM )U2VERSION = FIELD(MYSTRING<2>, '"', 2)*putDATA='{'putDATA:=' "statename" : "Colorado",'putDATA:=' "state" : "CO",'putDATA:=' "fname" : "Neddy",'putDATA:=' "city" : "Denver",'putDATA:=' "lname" : "Seagoon",'putDATA:=' "sal" : "Ms.",'putDATA:=' "phone" : "(800)729-3553",'putDATA:=' "custid" : "':CUSTID:'",'putDATA:=' "addr1" : "4600 South Ulster Street.",'putDATA:=' "addr2" : "",'putDATA:=' "zip" : "80237",'putDATA:=' "company" : "Rocket Software, Inc."'putDATA:='}'** call the REST subroutine service with HTTP POSTmethod="PUT"*stat = createRequest(url, method, restPUT)stat = setRequestHeader(restPUT, "Content-Type",| "application/json; charset=utf-8")stat = setRequestHeader(restPUT, "if-match", U2VERSION)*stat = submitRequest(restPUT, 5000, putDATA, Header, restData,| httpStatus)* put responserestData=CHANGE(restData, "{", "{":CHAR(10))restData=CHANGE(restData, ",", ",":CHAR(10))restData=CHANGE(restData, "}", "}":CHAR(10))*
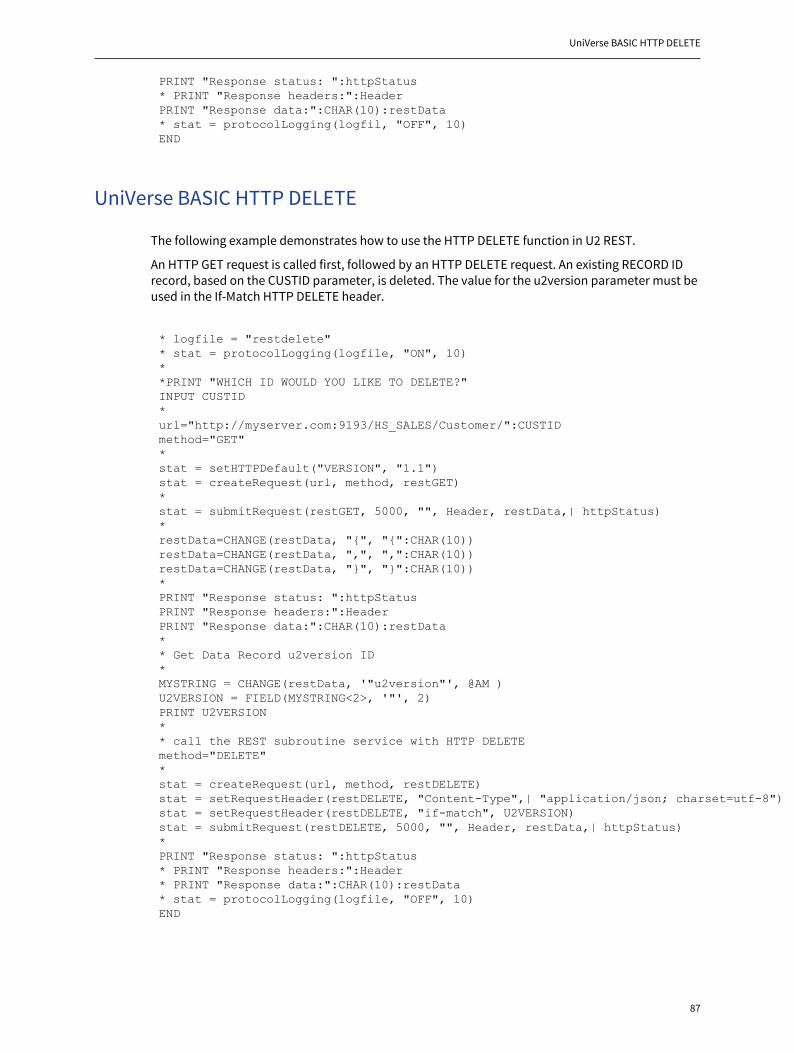
UniVerse BASIC HTTP DELETE
87
PRINT "Response status: ":httpStatus* PRINT "Response headers:":HeaderPRINT "Response data:":CHAR(10):restData* stat = protocolLogging(logfil, "OFF", 10)END
UniVerse BASIC HTTP DELETE
The following example demonstrates how to use the HTTP DELETE function in U2 REST.
An HTTP GET request is called first, followed by an HTTP DELETE request. An existing RECORD IDrecord, based on the CUSTID parameter, is deleted. The value for the u2version parameter must beused in the If-Match HTTP DELETE header.
* logfile = "restdelete"* stat = protocolLogging(logfile, "ON", 10)**PRINT "WHICH ID WOULD YOU LIKE TO DELETE?"INPUT CUSTID*url="http://myserver.com:9193/HS_SALES/Customer/":CUSTIDmethod="GET"*stat = setHTTPDefault("VERSION", "1.1")stat = createRequest(url, method, restGET)*stat = submitRequest(restGET, 5000, "", Header, restData,| httpStatus)*restData=CHANGE(restData, "{", "{":CHAR(10))restData=CHANGE(restData, ",", ",":CHAR(10))restData=CHANGE(restData, "}", "}":CHAR(10))*PRINT "Response status: ":httpStatusPRINT "Response headers:":HeaderPRINT "Response data:":CHAR(10):restData** Get Data Record u2version ID*MYSTRING = CHANGE(restData, '"u2version"', @AM )U2VERSION = FIELD(MYSTRING<2>, '"', 2)PRINT U2VERSION** call the REST subroutine service with HTTP DELETEmethod="DELETE"*stat = createRequest(url, method, restDELETE)stat = setRequestHeader(restDELETE, "Content-Type",| "application/json; charset=utf-8")stat = setRequestHeader(restDELETE, "if-match", U2VERSION)stat = submitRequest(restDELETE, 5000, "", Header, restData,| httpStatus)*PRINT "Response status: ":httpStatus* PRINT "Response headers:":Header* PRINT "Response data:":CHAR(10):restData* stat = protocolLogging(logfile, "OFF", 10)END

Chapter 8: Code samples
88
UniVerse BASIC REST subroutine
This program calls a U2 Subroutine from the U2 REST Server with HTTP POST. Data in the procDATAindata field is sent to the U2 subroutine. Data from the subroutine attaches to the indata field anddisplays as returned data in the outdata field, as shown:
Note: U2 REST service fields are case sensitive.
* logfile="restpost"* stat = protocolLogging(logfile, "ON", 10)*method="POST"url="http://myserver.com:9193/HS_SALES/subroutine/RETSUB"stat = setHTTPDefault("VERSION", "1.1")*PRINT "Enter the data to send to RETSUB: "INPUT INDATA** Customer Record to be written to record CUSTID*procDATA = "{"procDATA:=' "indata" : "':INDATA:'",'procDATA := "}"*stat = createRequest(url, method, procPOST)stat = setRequestHeader(procPOST, "Content-Type",| "application/json; charset=utf-8")stat = submitRequest(procPOST, 5000, procDATA, Header, restData,| httpStatus)* POST responserestData=CHANGE(restData, "{", "{":CHAR(10))restData=CHANGE(restData, ",", ",":CHAR(10))restData=CHANGE(restData, "}", "}":CHAR(10))*PRINT "Response status: ":httpStatus*PRINT "Response headers:":HeaderPRINT "Response data:":CHAR(10):restData** stat = protocolLogging(logfile, "OFF", 10)*END
UniVerse BASIC RETSUB
RETSUB is a UniBasic subroutine that returns a "Calling Program sent:" message to the U2 RESTServer. Data from this subroutine attaches to the indata field and displays as returned data in theoutdata field, as shown:
Note: Note: The U2 REST service fields are case sensitive.
*SUBROUTINE RETSUB(p1, p2)p2="Calling Program sent: ":p1* CONVERT @AM TO CHAR(10):CHAR(13) IN p2
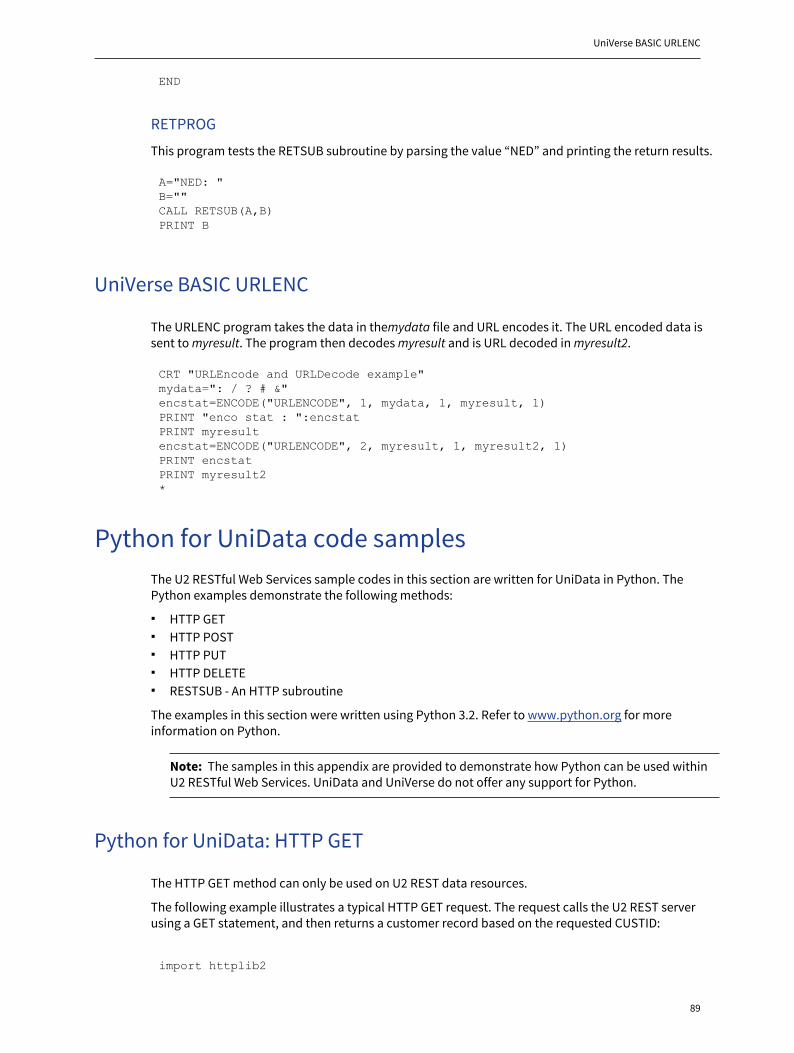
UniVerse BASIC URLENC
89
END
RETPROG
This program tests the RETSUB subroutine by parsing the value “NED” and printing the return results.
A="NED: "B=""CALL RETSUB(A,B)PRINT B
UniVerse BASIC URLENC
The URLENC program takes the data in themydata file and URL encodes it. The URL encoded data issent to myresult. The program then decodes myresult and is URL decoded in myresult2.
CRT "URLEncode and URLDecode example"mydata=": / ? # &"encstat=ENCODE("URLENCODE", 1, mydata, 1, myresult, 1)PRINT "enco stat : ":encstatPRINT myresultencstat=ENCODE("URLENCODE", 2, myresult, 1, myresult2, 1)PRINT encstatPRINT myresult2*
Python for UniData code samplesThe U2 RESTful Web Services sample codes in this section are written for UniData in Python. ThePython examples demonstrate the following methods:
▪ HTTP GET▪ HTTP POST▪ HTTP PUT▪ HTTP DELETE▪ RESTSUB - An HTTP subroutine
The examples in this section were written using Python 3.2. Refer to www.python.org for moreinformation on Python.
Note: The samples in this appendix are provided to demonstrate how Python can be used withinU2 RESTful Web Services. UniData and UniVerse do not offer any support for Python.
Python for UniData: HTTP GET
The HTTP GET method can only be used on U2 REST data resources.
The following example illustrates a typical HTTP GET request. The request calls the U2 REST serverusing a GET statement, and then returns a customer record based on the requested CUSTID:
import httplib2
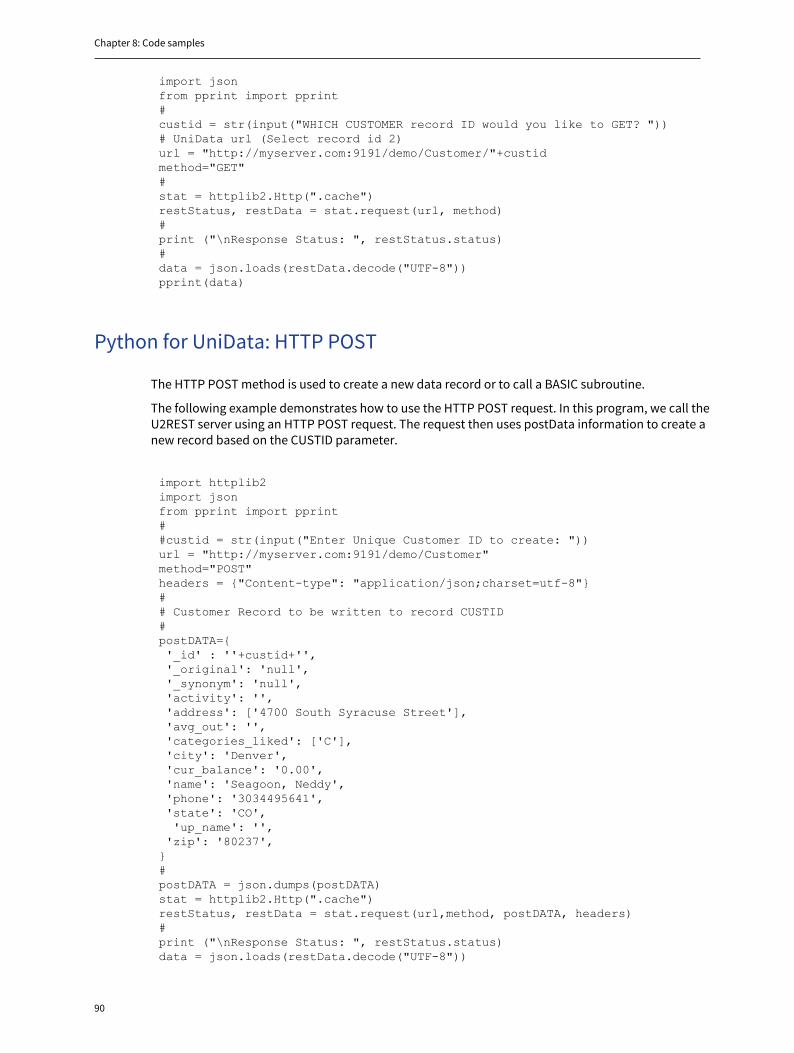
Chapter 8: Code samples
90
import jsonfrom pprint import pprint#custid = str(input("WHICH CUSTOMER record ID would you like to GET? "))# UniData url (Select record id 2)url = "http://myserver.com:9191/demo/Customer/"+custidmethod="GET"#stat = httplib2.Http(".cache")restStatus, restData = stat.request(url, method)#print ("\nResponse Status: ", restStatus.status)#data = json.loads(restData.decode("UTF-8"))pprint(data)
Python for UniData: HTTP POST
The HTTP POST method is used to create a new data record or to call a BASIC subroutine.
The following example demonstrates how to use the HTTP POST request. In this program, we call theU2REST server using an HTTP POST request. The request then uses postData information to create anew record based on the CUSTID parameter.
import httplib2import jsonfrom pprint import pprint##custid = str(input("Enter Unique Customer ID to create: "))url = "http://myserver.com:9191/demo/Customer"method="POST"headers = {"Content-type": "application/json;charset=utf-8"}## Customer Record to be written to record CUSTID#postDATA={ '_id' : ''+custid+'', '_original': 'null', '_synonym': 'null', 'activity': '', 'address': ['4700 South Syracuse Street'], 'avg_out': '', 'categories_liked': ['C'], 'city': 'Denver', 'cur_balance': '0.00', 'name': 'Seagoon, Neddy', 'phone': '3034495641', 'state': 'CO', 'up_name': '', 'zip': '80237',}#postDATA = json.dumps(postDATA)stat = httplib2.Http(".cache")restStatus, restData = stat.request(url,method, postDATA, headers)#print ("\nResponse Status: ", restStatus.status)data = json.loads(restData.decode("UTF-8"))
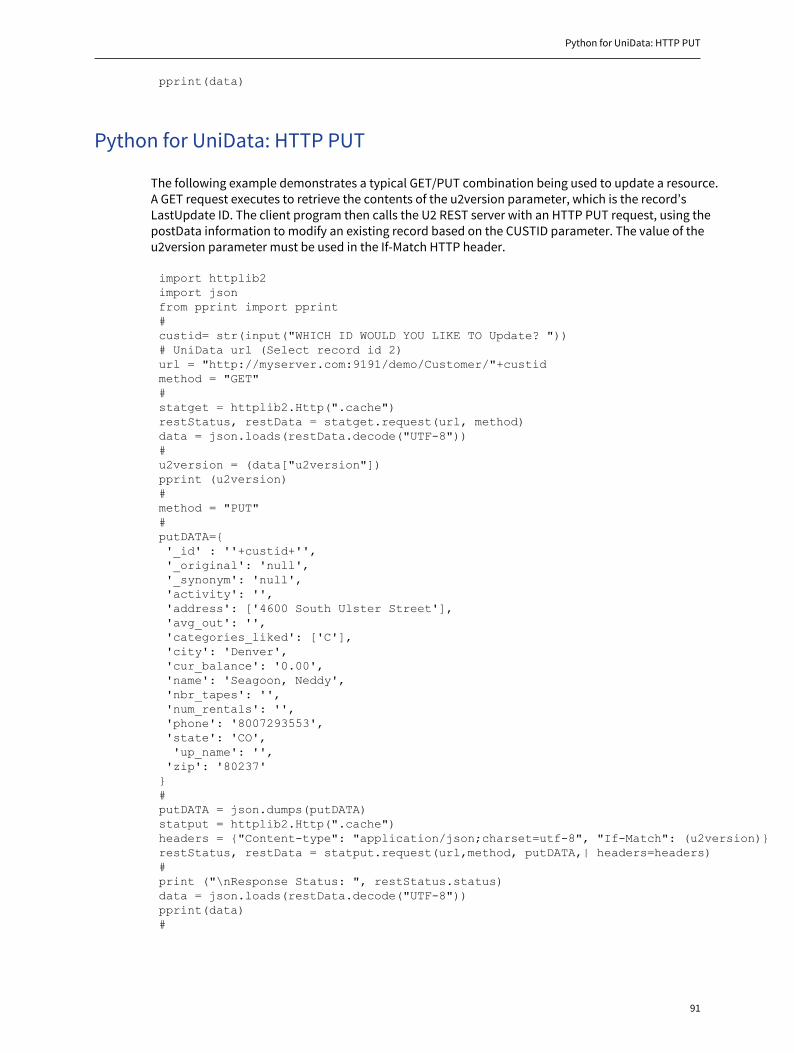
Python for UniData: HTTP PUT
91
pprint(data)
Python for UniData: HTTP PUT
The following example demonstrates a typical GET/PUT combination being used to update a resource.A GET request executes to retrieve the contents of the u2version parameter, which is the record’sLastUpdate ID. The client program then calls the U2 REST server with an HTTP PUT request, using thepostData information to modify an existing record based on the CUSTID parameter. The value of theu2version parameter must be used in the If-Match HTTP header.
import httplib2import jsonfrom pprint import pprint#custid= str(input("WHICH ID WOULD YOU LIKE TO Update? "))# UniData url (Select record id 2)url = "http://myserver.com:9191/demo/Customer/"+custidmethod = "GET"#statget = httplib2.Http(".cache")restStatus, restData = statget.request(url, method)data = json.loads(restData.decode("UTF-8"))#u2version = (data["u2version"])pprint (u2version)#method = "PUT"#putDATA={ '_id' : ''+custid+'', '_original': 'null', '_synonym': 'null', 'activity': '', 'address': ['4600 South Ulster Street'], 'avg_out': '', 'categories_liked': ['C'], 'city': 'Denver', 'cur_balance': '0.00', 'name': 'Seagoon, Neddy', 'nbr_tapes': '', 'num_rentals': '', 'phone': '8007293553', 'state': 'CO', 'up_name': '', 'zip': '80237'}#putDATA = json.dumps(putDATA)statput = httplib2.Http(".cache")headers = {"Content-type": "application/json;charset=utf-8", "If-Match": (u2version)}restStatus, restData = statput.request(url,method, putDATA,| headers=headers)#print ("\nResponse Status: ", restStatus.status)data = json.loads(restData.decode("UTF-8"))pprint(data)#
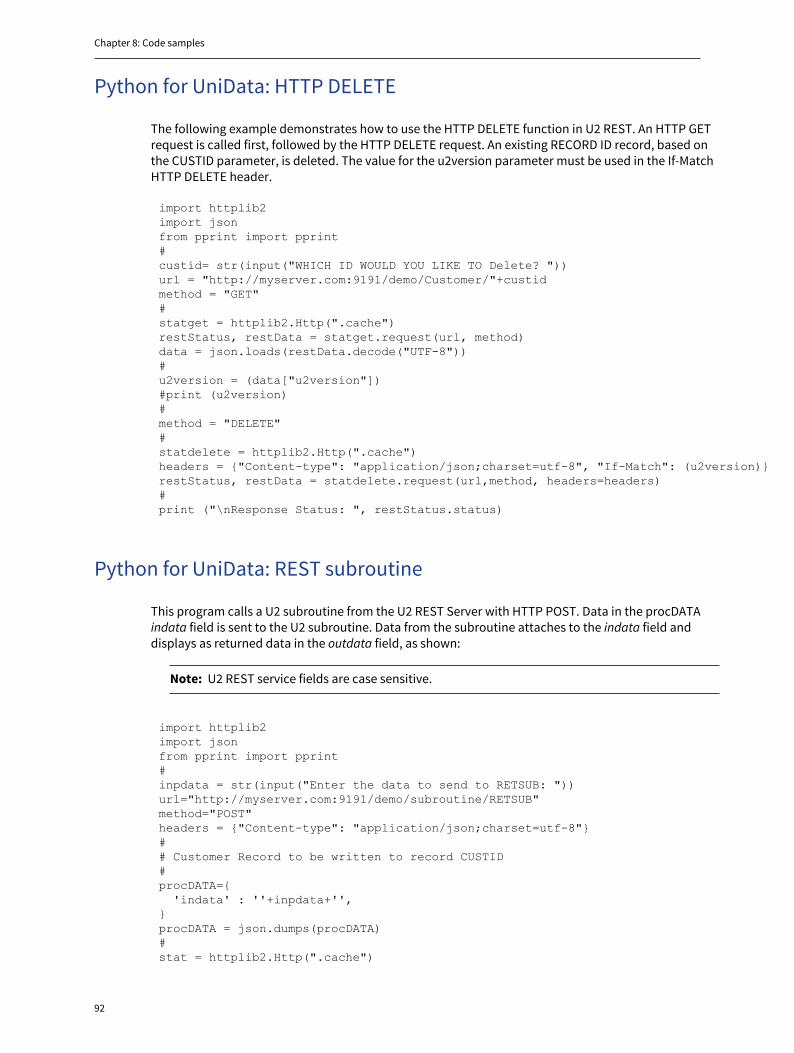
Chapter 8: Code samples
92
Python for UniData: HTTP DELETE
The following example demonstrates how to use the HTTP DELETE function in U2 REST. An HTTP GETrequest is called first, followed by the HTTP DELETE request. An existing RECORD ID record, based onthe CUSTID parameter, is deleted. The value for the u2version parameter must be used in the If-MatchHTTP DELETE header.
import httplib2import jsonfrom pprint import pprint#custid= str(input("WHICH ID WOULD YOU LIKE TO Delete? "))url = "http://myserver.com:9191/demo/Customer/"+custidmethod = "GET"#statget = httplib2.Http(".cache")restStatus, restData = statget.request(url, method)data = json.loads(restData.decode("UTF-8"))#u2version = (data["u2version"])#print (u2version)#method = "DELETE"#statdelete = httplib2.Http(".cache")headers = {"Content-type": "application/json;charset=utf-8", "If-Match": (u2version)}restStatus, restData = statdelete.request(url,method, headers=headers)#print ("\nResponse Status: ", restStatus.status)
Python for UniData: REST subroutine
This program calls a U2 subroutine from the U2 REST Server with HTTP POST. Data in the procDATAindata field is sent to the U2 subroutine. Data from the subroutine attaches to the indata field anddisplays as returned data in the outdata field, as shown:
Note: U2 REST service fields are case sensitive.
import httplib2import jsonfrom pprint import pprint#inpdata = str(input("Enter the data to send to RETSUB: "))url="http://myserver.com:9191/demo/subroutine/RETSUB"method="POST"headers = {"Content-type": "application/json;charset=utf-8"}## Customer Record to be written to record CUSTID#procDATA={ 'indata' : ''+inpdata+'',}procDATA = json.dumps(procDATA)# stat = httplib2.Http(".cache")
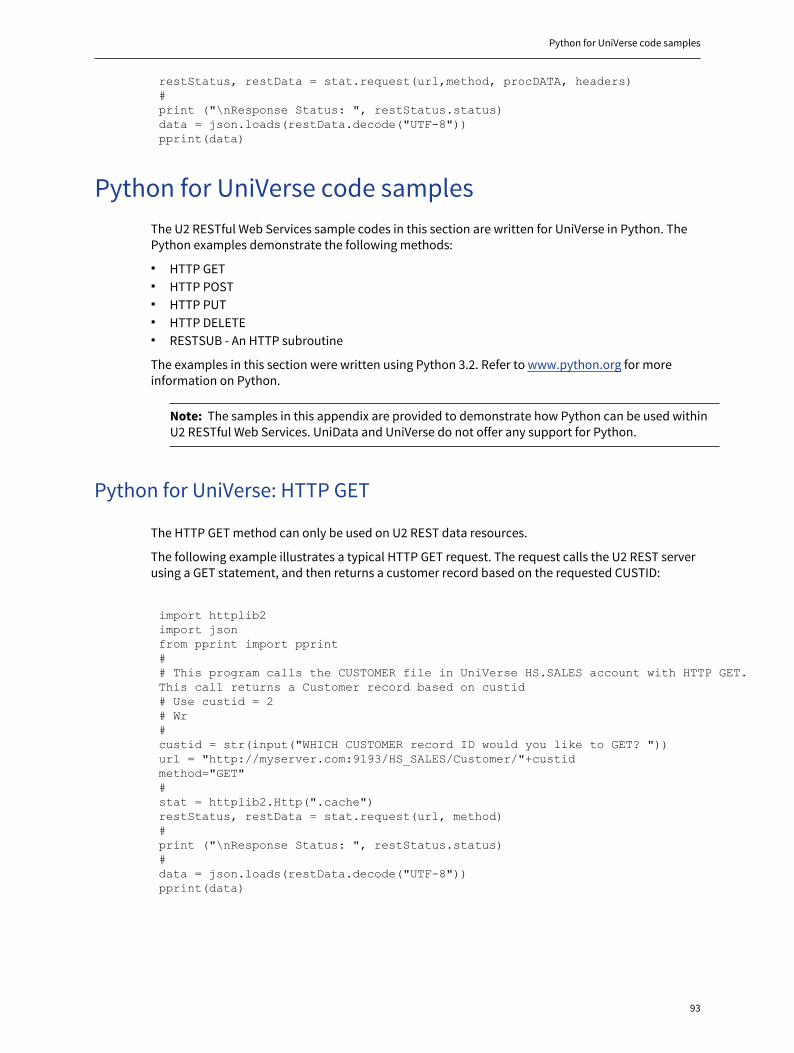
Python for UniVerse code samples
93
restStatus, restData = stat.request(url,method, procDATA, headers)#print ("\nResponse Status: ", restStatus.status)data = json.loads(restData.decode("UTF-8"))pprint(data)
Python for UniVerse code samplesThe U2 RESTful Web Services sample codes in this section are written for UniVerse in Python. ThePython examples demonstrate the following methods:
▪ HTTP GET▪ HTTP POST▪ HTTP PUT▪ HTTP DELETE▪ RESTSUB - An HTTP subroutine
The examples in this section were written using Python 3.2. Refer to www.python.org for moreinformation on Python.
Note: The samples in this appendix are provided to demonstrate how Python can be used withinU2 RESTful Web Services. UniData and UniVerse do not offer any support for Python.
Python for UniVerse: HTTP GET
The HTTP GET method can only be used on U2 REST data resources.
The following example illustrates a typical HTTP GET request. The request calls the U2 REST serverusing a GET statement, and then returns a customer record based on the requested CUSTID:
import httplib2import jsonfrom pprint import pprint## This program calls the CUSTOMER file in UniVerse HS.SALES account with HTTP GET. This call returns a Customer record based on custid# Use custid = 2# Wr#custid = str(input("WHICH CUSTOMER record ID would you like to GET? "))url = "http://myserver.com:9193/HS_SALES/Customer/"+custidmethod="GET"#stat = httplib2.Http(".cache")restStatus, restData = stat.request(url, method)#print ("\nResponse Status: ", restStatus.status)#data = json.loads(restData.decode("UTF-8"))pprint(data)
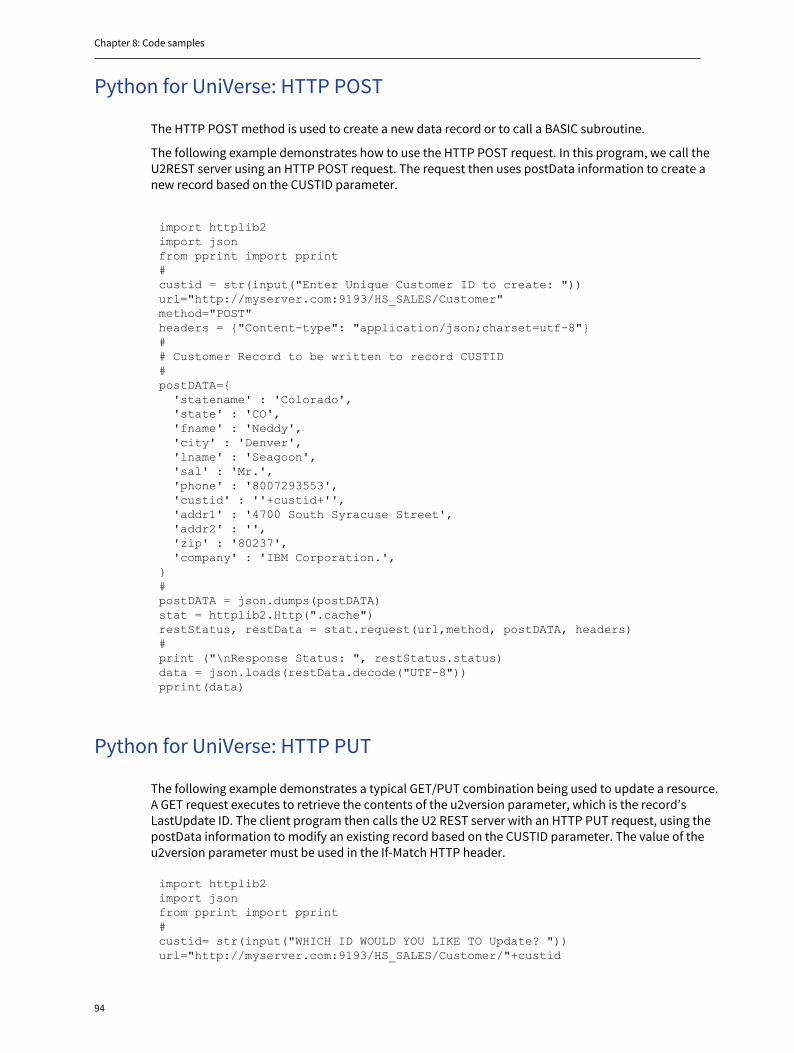
Chapter 8: Code samples
94
Python for UniVerse: HTTP POST
The HTTP POST method is used to create a new data record or to call a BASIC subroutine.
The following example demonstrates how to use the HTTP POST request. In this program, we call theU2REST server using an HTTP POST request. The request then uses postData information to create anew record based on the CUSTID parameter.
import httplib2import jsonfrom pprint import pprint#custid = str(input("Enter Unique Customer ID to create: "))url="http://myserver.com:9193/HS_SALES/Customer"method="POST"headers = {"Content-type": "application/json;charset=utf-8"}## Customer Record to be written to record CUSTID#postDATA={ 'statename' : 'Colorado', 'state' : 'CO', 'fname' : 'Neddy', 'city' : 'Denver', 'lname' : 'Seagoon', 'sal' : 'Mr.', 'phone' : '8007293553', 'custid' : ''+custid+'', 'addr1' : '4700 South Syracuse Street', 'addr2' : '', 'zip' : '80237', 'company' : 'IBM Corporation.',}#postDATA = json.dumps(postDATA)stat = httplib2.Http(".cache")restStatus, restData = stat.request(url,method, postDATA, headers)#print ("\nResponse Status: ", restStatus.status)data = json.loads(restData.decode("UTF-8"))pprint(data)
Python for UniVerse: HTTP PUT
The following example demonstrates a typical GET/PUT combination being used to update a resource.A GET request executes to retrieve the contents of the u2version parameter, which is the record’sLastUpdate ID. The client program then calls the U2 REST server with an HTTP PUT request, using thepostData information to modify an existing record based on the CUSTID parameter. The value of theu2version parameter must be used in the If-Match HTTP header.
import httplib2import jsonfrom pprint import pprint#custid= str(input("WHICH ID WOULD YOU LIKE TO Update? "))url="http://myserver.com:9193/HS_SALES/Customer/"+custid
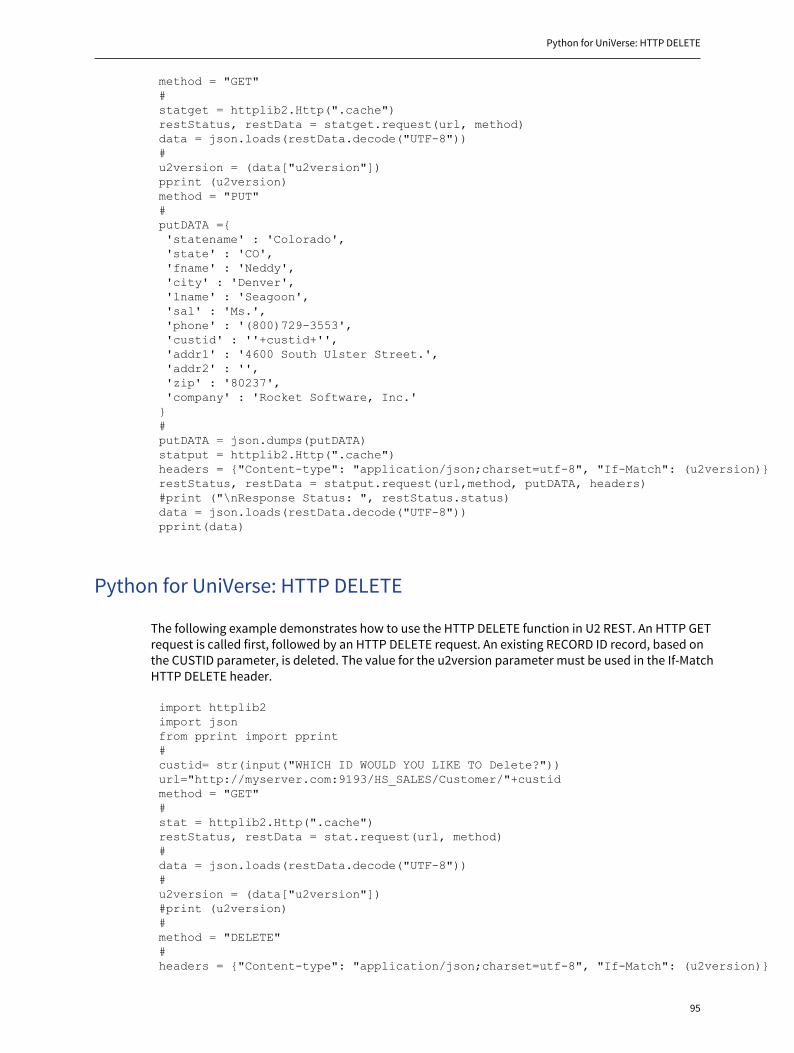
Python for UniVerse: HTTP DELETE
95
method = "GET"#statget = httplib2.Http(".cache")restStatus, restData = statget.request(url, method)data = json.loads(restData.decode("UTF-8"))#u2version = (data["u2version"])pprint (u2version)method = "PUT"#putDATA ={ 'statename' : 'Colorado', 'state' : 'CO', 'fname' : 'Neddy', 'city' : 'Denver', 'lname' : 'Seagoon', 'sal' : 'Ms.', 'phone' : '(800)729-3553', 'custid' : ''+custid+'', 'addr1' : '4600 South Ulster Street.', 'addr2' : '', 'zip' : '80237', 'company' : 'Rocket Software, Inc.'}#putDATA = json.dumps(putDATA)statput = httplib2.Http(".cache")headers = {"Content-type": "application/json;charset=utf-8", "If-Match": (u2version)}restStatus, restData = statput.request(url,method, putDATA, headers)#print ("\nResponse Status: ", restStatus.status)data = json.loads(restData.decode("UTF-8"))pprint(data)
Python for UniVerse: HTTP DELETE
The following example demonstrates how to use the HTTP DELETE function in U2 REST. An HTTP GETrequest is called first, followed by an HTTP DELETE request. An existing RECORD ID record, based onthe CUSTID parameter, is deleted. The value for the u2version parameter must be used in the If-MatchHTTP DELETE header.
import httplib2import jsonfrom pprint import pprint#custid= str(input("WHICH ID WOULD YOU LIKE TO Delete?"))url="http://myserver.com:9193/HS_SALES/Customer/"+custidmethod = "GET"#stat = httplib2.Http(".cache")restStatus, restData = stat.request(url, method)#data = json.loads(restData.decode("UTF-8"))#u2version = (data["u2version"])#print (u2version)#method = "DELETE"#headers = {"Content-type": "application/json;charset=utf-8", "If-Match": (u2version)}
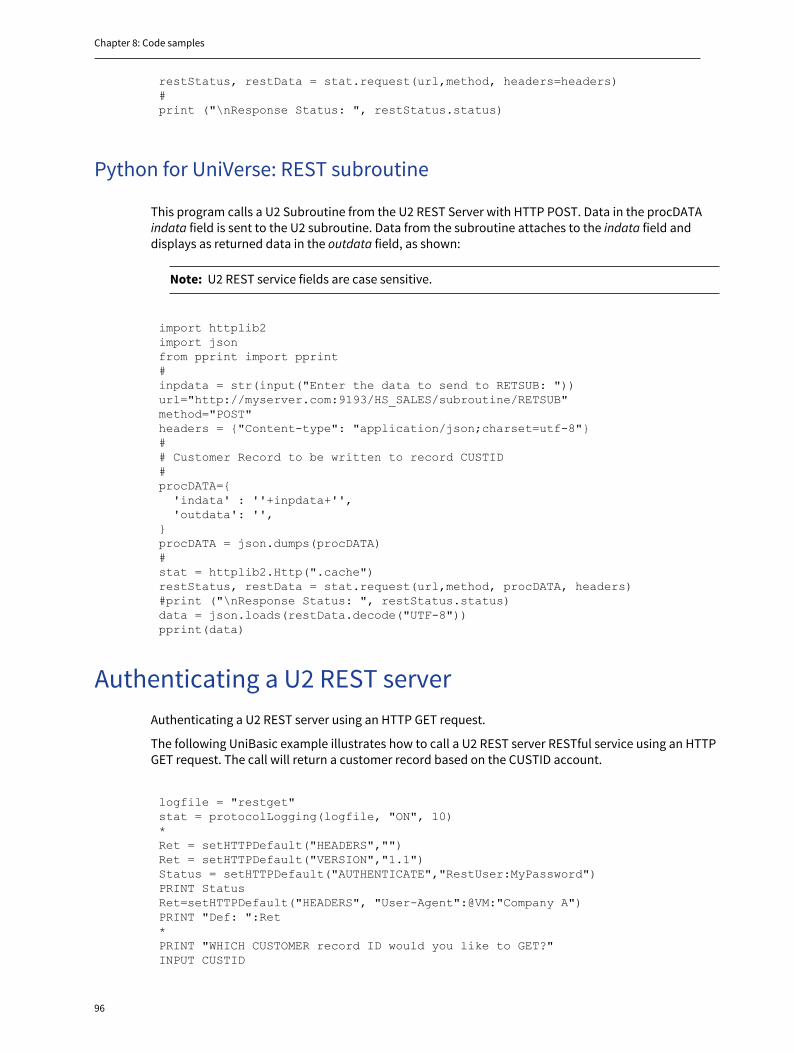
Chapter 8: Code samples
96
restStatus, restData = stat.request(url,method, headers=headers)#print ("\nResponse Status: ", restStatus.status)
Python for UniVerse: REST subroutine
This program calls a U2 Subroutine from the U2 REST Server with HTTP POST. Data in the procDATAindata field is sent to the U2 subroutine. Data from the subroutine attaches to the indata field anddisplays as returned data in the outdata field, as shown:
Note: U2 REST service fields are case sensitive.
import httplib2import jsonfrom pprint import pprint#inpdata = str(input("Enter the data to send to RETSUB: "))url="http://myserver.com:9193/HS_SALES/subroutine/RETSUB"method="POST"headers = {"Content-type": "application/json;charset=utf-8"}## Customer Record to be written to record CUSTID#procDATA={ 'indata' : ''+inpdata+'', 'outdata': '',}procDATA = json.dumps(procDATA)# stat = httplib2.Http(".cache")restStatus, restData = stat.request(url,method, procDATA, headers)#print ("\nResponse Status: ", restStatus.status)data = json.loads(restData.decode("UTF-8"))pprint(data)
Authenticating a U2 REST serverAuthenticating a U2 REST server using an HTTP GET request.
The following UniBasic example illustrates how to call a U2 REST server RESTful service using an HTTPGET request. The call will return a customer record based on the CUSTID account.
logfile = "restget"stat = protocolLogging(logfile, "ON", 10)*Ret = setHTTPDefault("HEADERS","")Ret = setHTTPDefault("VERSION","1.1")Status = setHTTPDefault("AUTHENTICATE","RestUser:MyPassword")PRINT StatusRet=setHTTPDefault("HEADERS", "User-Agent":@VM:"Company A")PRINT "Def: ":Ret*PRINT "WHICH CUSTOMER record ID would you like to GET?"INPUT CUSTID
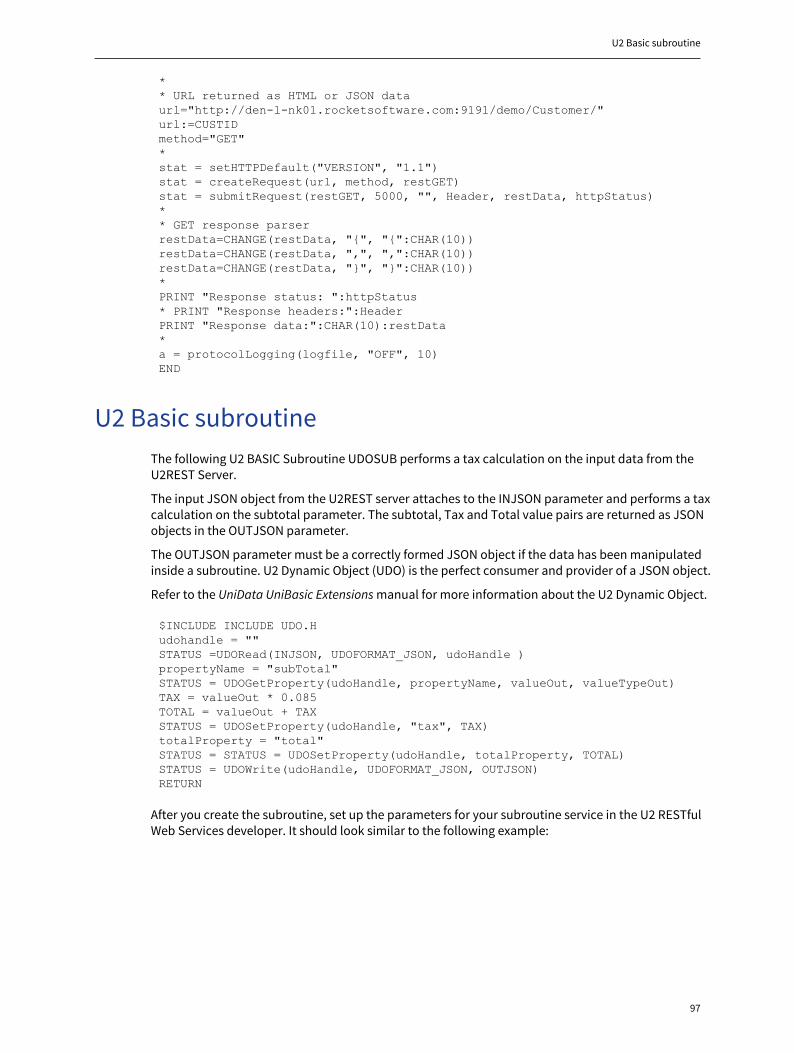
U2 Basic subroutine
97
** URL returned as HTML or JSON dataurl="http://den-l-nk01.rocketsoftware.com:9191/demo/Customer/"url:=CUSTIDmethod="GET"*stat = setHTTPDefault("VERSION", "1.1")stat = createRequest(url, method, restGET)stat = submitRequest(restGET, 5000, "", Header, restData, httpStatus)** GET response parserrestData=CHANGE(restData, "{", "{":CHAR(10))restData=CHANGE(restData, ",", ",":CHAR(10))restData=CHANGE(restData, "}", "}":CHAR(10))*PRINT "Response status: ":httpStatus* PRINT "Response headers:":HeaderPRINT "Response data:":CHAR(10):restData*a = protocolLogging(logfile, "OFF", 10)END
U2 Basic subroutineThe following U2 BASIC Subroutine UDOSUB performs a tax calculation on the input data from theU2REST Server.
The input JSON object from the U2REST server attaches to the INJSON parameter and performs a taxcalculation on the subtotal parameter. The subtotal, Tax and Total value pairs are returned as JSONobjects in the OUTJSON parameter.
The OUTJSON parameter must be a correctly formed JSON object if the data has been manipulatedinside a subroutine. U2 Dynamic Object (UDO) is the perfect consumer and provider of a JSON object.
Refer to the UniData UniBasic Extensions manual for more information about the U2 Dynamic Object.
$INCLUDE INCLUDE UDO.Hudohandle = ""STATUS =UDORead(INJSON, UDOFORMAT_JSON, udoHandle )propertyName = "subTotal"STATUS = UDOGetProperty(udoHandle, propertyName, valueOut, valueTypeOut)TAX = valueOut * 0.085TOTAL = valueOut + TAXSTATUS = UDOSetProperty(udoHandle, "tax", TAX)totalProperty = "total"STATUS = STATUS = UDOSetProperty(udoHandle, totalProperty, TOTAL)STATUS = UDOWrite(udoHandle, UDOFORMAT_JSON, OUTJSON)RETURN
After you create the subroutine, set up the parameters for your subroutine service in the U2 RESTfulWeb Services developer. It should look similar to the following example:
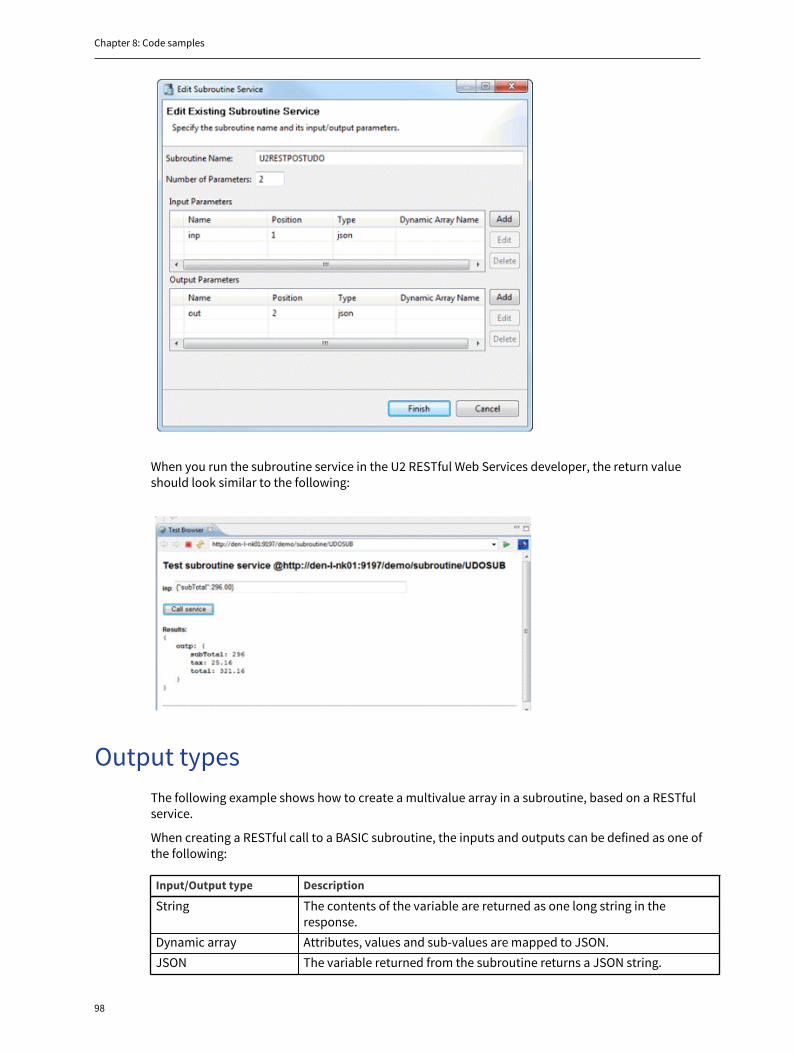
Chapter 8: Code samples
98
When you run the subroutine service in the U2 RESTful Web Services developer, the return valueshould look similar to the following:
Output typesThe following example shows how to create a multivalue array in a subroutine, based on a RESTfulservice.
When creating a RESTful call to a BASIC subroutine, the inputs and outputs can be defined as one ofthe following:
Input/Output type Description
String The contents of the variable are returned as one long string in theresponse.
Dynamic array Attributes, values and sub-values are mapped to JSON.JSON The variable returned from the subroutine returns a JSON string.
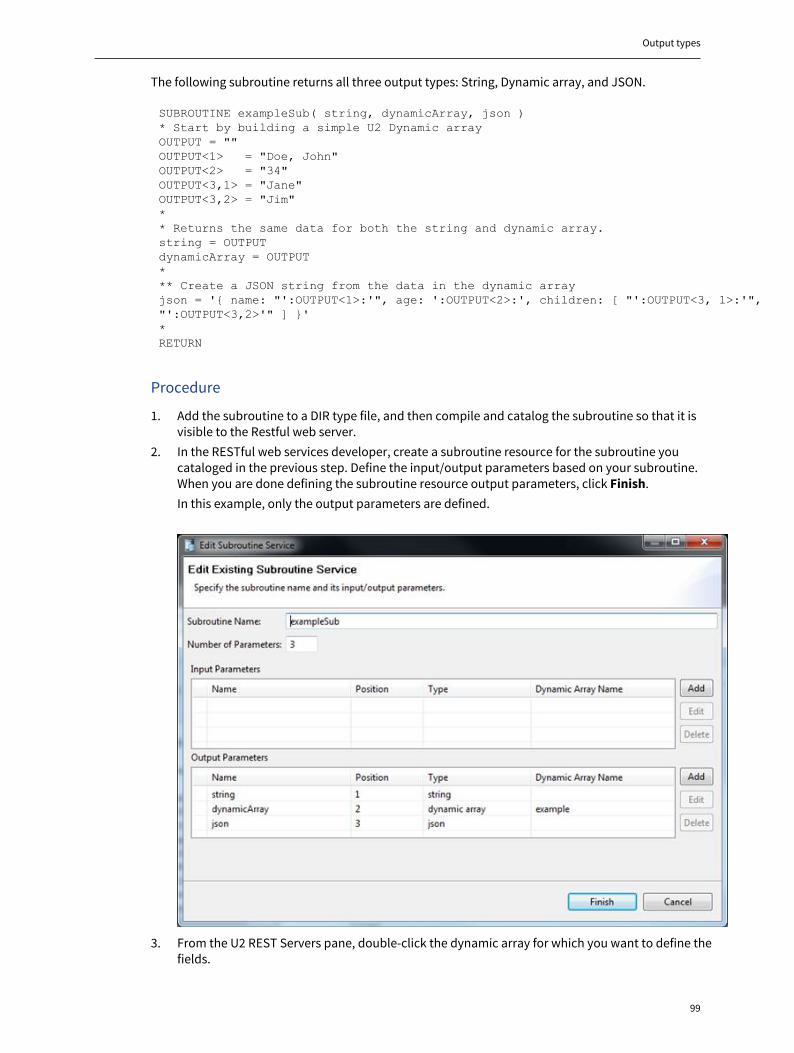
Output types
99
The following subroutine returns all three output types: String, Dynamic array, and JSON.
SUBROUTINE exampleSub( string, dynamicArray, json )* Start by building a simple U2 Dynamic arrayOUTPUT = ""OUTPUT<1> = "Doe, John"OUTPUT<2> = "34"OUTPUT<3,1> = "Jane"OUTPUT<3,2> = "Jim" ** Returns the same data for both the string and dynamic array.string = OUTPUTdynamicArray = OUTPUT*** Create a JSON string from the data in the dynamic arrayjson = '{ name: "':OUTPUT<1>:'", age: ':OUTPUT<2>:', children: [ "':OUTPUT<3, 1>:'","':OUTPUT<3,2>'" ] }'*RETURN
Procedure
1. Add the subroutine to a DIR type file, and then compile and catalog the subroutine so that it isvisible to the Restful web server.
2. In the RESTful web services developer, create a subroutine resource for the subroutine youcataloged in the previous step. Define the input/output parameters based on your subroutine.When you are done defining the subroutine resource output parameters, click Finish.In this example, only the output parameters are defined.
3. From the U2 REST Servers pane, double-click the dynamic array for which you want to define thefields.
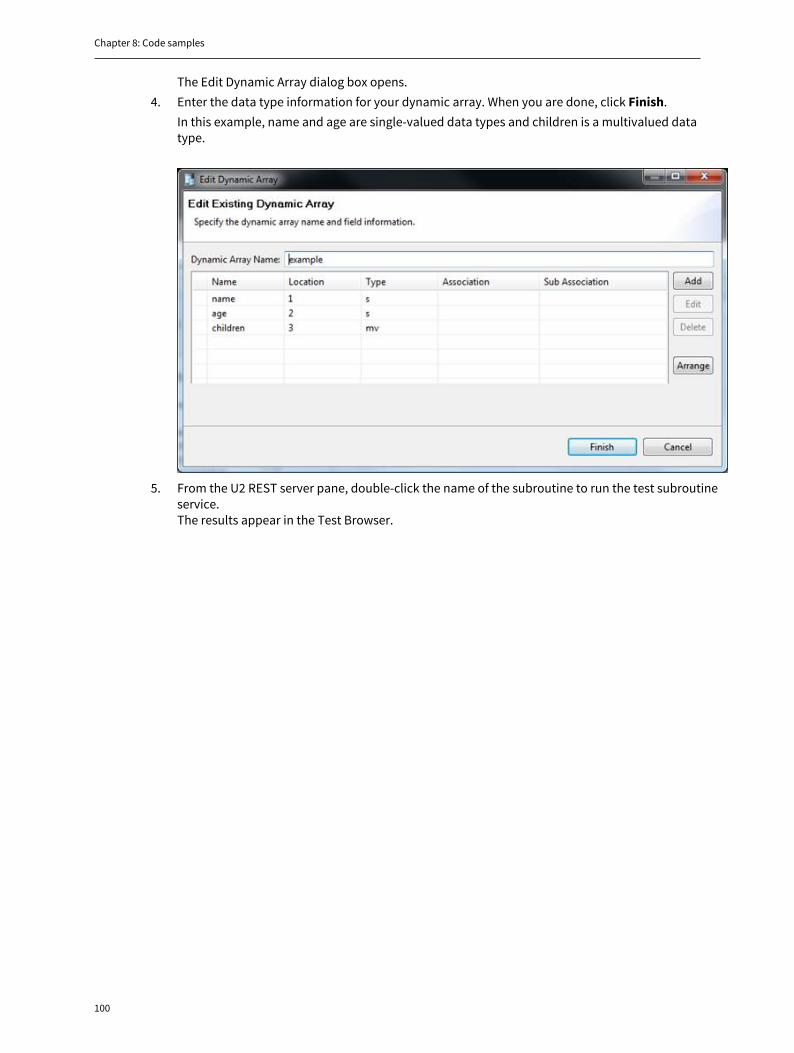
Chapter 8: Code samples
100
The Edit Dynamic Array dialog box opens.4. Enter the data type information for your dynamic array. When you are done, click Finish.
In this example, name and age are single-valued data types and children is a multivalued datatype.
5. From the U2 REST server pane, double-click the name of the subroutine to run the test subroutineservice.The results appear in the Test Browser.
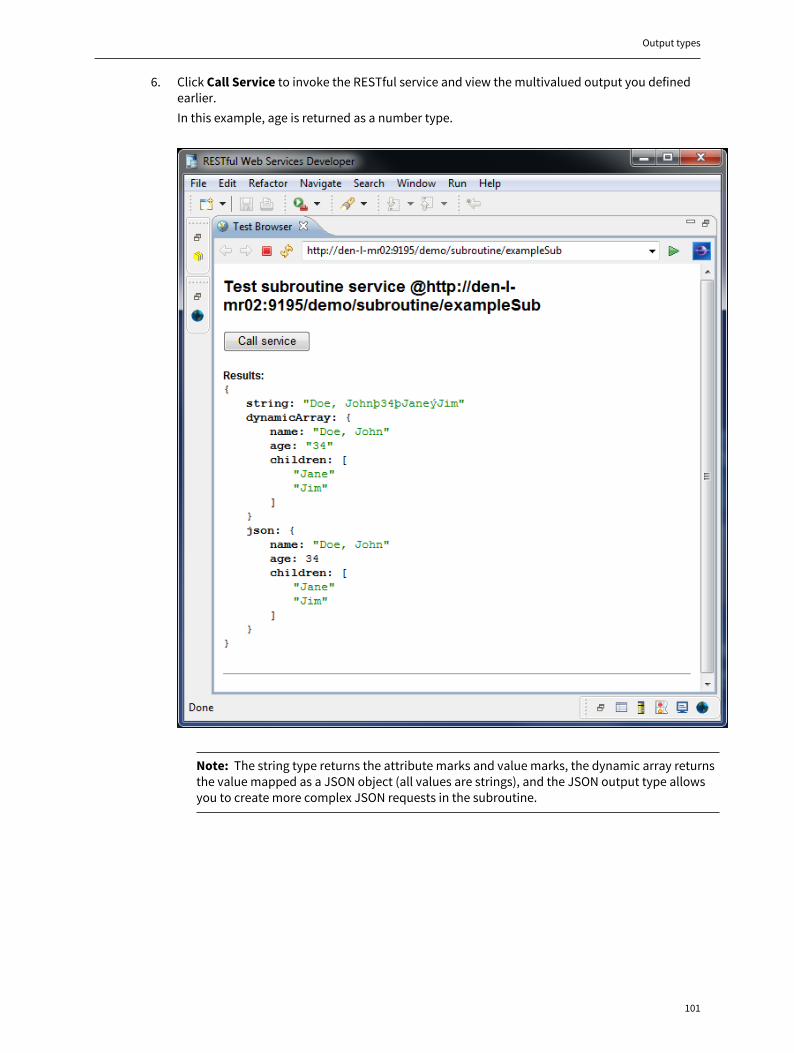
Output types
101
6. Click Call Service to invoke the RESTful service and view the multivalued output you definedearlier.In this example, age is returned as a number type.
Note: The string type returns the attribute marks and value marks, the dynamic array returnsthe value mapped as a JSON object (all values are strings), and the JSON output type allowsyou to create more complex JSON requests in the subroutine.
102
Chapter 9: Troubleshooting
Backing up the U2 REST Developer workspaceThere are two ways you can back up your U2 REST workspace: a complete backup and a partialbackup.
▪ To completely back up your workspace, navigate to the directory where the U2 REST Developer islocated and then backup the directory. By default, the developer located in C:\U2\U2Tools\v3.
▪ To partially back up your workspace, export the U2 REST server project and then back up theexported zip file. This solution backs up all the necessary components of the project.
Adjusting Java heap spaceThis topic describes how to modify the heap size for a Java virtual machine when starting a U2 RESTfulserver. This option is not enabled by default.
Under most conditions the U2 REST products work as expected. However, when moving extremelylarge amounts of data the Java Runtime engine may fail if the default memory limit is exceeded. If thisoccurs, you will see an out-of-memory error similar to the following:
java.lang.OutOfMemoryError: Java heap space
If you get this error, you must adjust the heap memory to a larger value. The default values are 256 MB(initial size) and 512 MB (maximum size).
A larger heap size will affect garbage collection, as it will run more frequently. This may affect theperformance of the application. Careful application design is important to ensure that this does notoccur.
Procedure
1. Open the U2 RESTful Web Services Developer.2. Navigate to Window → Preferences and then expand the UniData/UniVerse node.3. Select U2 RESTful Web Services Developer.
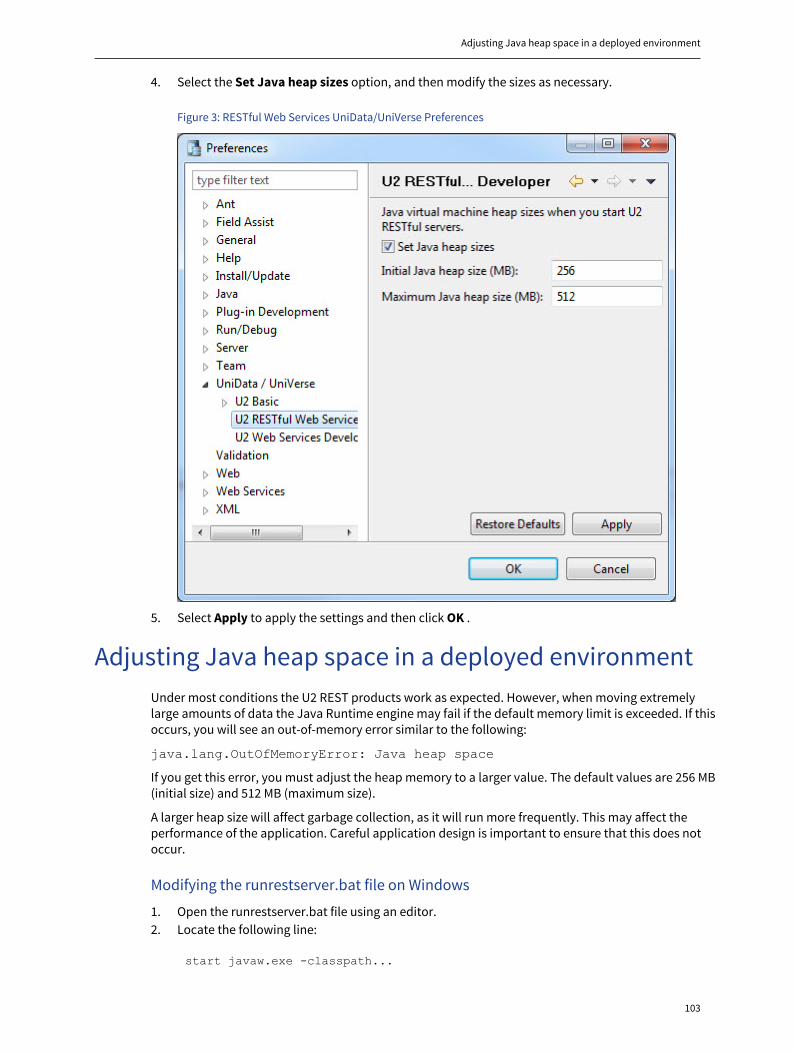
Adjusting Java heap space in a deployed environment
103
4. Select the Set Java heap sizes option, and then modify the sizes as necessary.
Figure 3: RESTful Web Services UniData/UniVerse Preferences
5. Select Apply to apply the settings and then click OK .
Adjusting Java heap space in a deployed environmentUnder most conditions the U2 REST products work as expected. However, when moving extremelylarge amounts of data the Java Runtime engine may fail if the default memory limit is exceeded. If thisoccurs, you will see an out-of-memory error similar to the following:
java.lang.OutOfMemoryError: Java heap space
If you get this error, you must adjust the heap memory to a larger value. The default values are 256 MB(initial size) and 512 MB (maximum size).
A larger heap size will affect garbage collection, as it will run more frequently. This may affect theperformance of the application. Careful application design is important to ensure that this does notoccur.
Modifying the runrestserver.bat file on Windows
1. Open the runrestserver.bat file using an editor.2. Locate the following line:
start javaw.exe -classpath...
Chapter 9: Troubleshooting
104
3. Modify the command to the following:
start javaw.exe -Xms512m -Xmx1024m -classpath...
4. Save the file and then restart the U2 REST server.
Modifying the runrestserver.sh file on UNIX
1. Open the runrestserver.sh file using an editor.2. Locate the following line:
start javaw -classpath...
3. Modify the command to the following:
start javaw -Xms512m -Xmx1024m -classpath...
4. Save the file and then restart the U2 REST server.
Note: The JVM startup parameters offer a variety of options for operating the JVM. For details anda complete list of the available JVM startup parameters, refer to www.oracle.com.
Defining the JRE_HOME environment variableTo deploy a U2 RESTful Server, you must set the JRE_HOME environment variable.
The JRE_HOME environment variable must point to the location of the JRE installation directory. Formore information about how to locate the JRE on your system, refer to the documentation at http://www.oracle.com/technetwork/documentation/index.html.
Defining the JRE_HOME variable in a UNIX environment
To locate the JREs on your system, run the find / -name java –print command. This will listall of the available JREs on your computer.
Set the value of the JRE_HOME environment variable to point to the appropriate path for your systemusing the correct UNIX shell command. For example, export JAVA_HOME=/usr/java6/jre.
Defining the JRE_HOME variable in a Windows environment
To locate the JREs on your system, run the C:\>dir /s "java.exe" command. This will list all ofthe available JREs on your computer.
Set the value of the JRE_HOME environment variable to point to the appropriate path for your system.For example, set JRE_HOME= C:\Program Files\Java\jre6.