Tychem® TK Instructions for Use - DuPont
20
BS\026\B\2019 Instructions for use of Limited-Use Gas-Tight Suit manufactured from Tychem ® TK EN 943-2:2002 TYPE 1a-ET EN ®DuPont registered trademark
Transcript of Tychem® TK Instructions for Use - DuPont

BS\026\B\2019
Instructions for use of Limited-Use Gas-Tight Suit
manufactured from Tychem®TK
EN 943-2:2002TYPE 1a-ET
EN®DuPont registered trademark

2
ContentsGeneral Information ............................................................................................ 1
Limitations & Warnings .................................................................................. 2
Physical Properties Of Tychem®TK. Suit Material ............................................. 3
Fitting Gloves Into The Respirex Locking Cuff ................................................... 4
Assembly Of Boot Into Detachable Boot System .............................................. 5
Removing Boot From Detachable Boot System ................................................ 6
Recommended Doffing Procedure ..................................................................... 8
Replacing Exhalation Valve Diaphragm .............................................................. 9
Removing Exhalation Valve Assembly................................................................ 10
Replacing Exhalation Valve Assembly ................................................................ 10
Decontamination ................................................................................................ 11
Cleaning Accessories ......................................................................................... 11
Storage ............................................................................................................... 11
Conducting An Internal Pressure Test ............................................................... 13
Permeation Performance.................................................................................... 15
Sizing .................................................................................................................. 16
EU DECLARATION OF CONFORMITY ............................................................... 17

1
General InformationYou have purchased a Respirex limited-use chemical protective gas-tight suit manufactured from Tychem®TK., a high-performance chemical protective clothing material developed by DuPont for protection against gaseous, liquid and solid chemicals. The suit is for use within certain contaminated environments only and you should carefully read and follow these operating instructions closely.All Respirex limited-use gas-tight suits are CE Marked to indicate compliance with European directives on personal protective equipment (PPE). The suit has been tested and marked in accordance with EN943-2:2002, this standard specifies performance requirements both for materials of construction and for the suit as a whole.Worn in conjunction with suitable gloves and safety boots, Respirex limited-use gas-tight suits manufactured from Tychem®TK. meet the performance requirements of a TYPE 1a-ET limited-use “gas-tight”chemical protective suit for emergency teams.Respirex limited-use gas-tight suits must be worn in conjunction with self-contained open-circuit compressed air breathing apparatus conforming to EN 137.® DuPont’s registered trademark
Suit FeaturesThe limited-use gas-tight suit is a one-piece coverall designed to enclose the wearer’s whole body and self-contained breathing apparatus (SCBA).A large semi-rigid visor is bonded to the suit produced from materials designed to be resistant to permeation against the chemicals listed in EN943-2:2002.Two exhalation valves are fitted which automatically release excess pressure that builds up inside the suit. This ensures that the pressure within the suit does not exceed 400 Pa, as required by EN 943-1:2015.A 120cm (48“) long gas-tight zipper is fitted to the right hand side of the suit which enables easy donning or doffing. The zipper is shrouded by two outer flaps which must be fastened together by means of a Velcro strip when the suit is in use.The legs of the suit are fitted with integral booties that are designed to be worn inside a suitable pair of safety boots. Outer splash guards that prevent liquid ingress into the wearer’s safety boots are also attached to the legs. Alternatively, highly chemically resistant safety boots conforming to EN 20345 (Type FPA) with steel toe cap and mid-soles can be either permanently bonded to the suit or fitted by means of the Respirex detachable boot system (see page 8).The limited-use gas-tight suit is supplied with a dual glove system that consists of a laminated inner glove with excellent resistance to permeation by chemicals (KemblokTM) bonded to an outer neoprene glove that provides a degree of protection against mechanical hazards. The outer neoprene glove also offers a limited amount of resistance to permeation by chemicals. The gloves are fitted to the suit by means of the Respirex locking cuff system.The waist of the suit is supported by means of an internal belt.As an option the suit can be fitted with an attachment that enables supplementary air to be passed to the ancillary airline connection of the wearer’s self-contained breathing apparatus, this can be via either,a). low pressure pass-thru b). high pressure pass-thru
Low Pressure Pass -ThruThis is a 360° swivel unit that will withstand the working pressure of a two-stage breathing apparatus. On the inside of the suit is a length of airline hose with a coupling that connects to the ancillary airline connection on the wearer’s self-contained breathing apparatus. The maximum working pressure of this unit is 10 bar.
High Pressure Pass -ThruAs low pressure pass-thru but will withstand the working pressure of a single-stage breathing apparatus set. The maximum working pressure of this unit is 10 bar.Accessory Attachment Points
The suit can be fitted with various accessory attachment points intended to carry life lines, personal lines, torches, distress signal units (DSU) etc.

2
Limitations & Warnings Respirex limited-use gas-tight suits should only be worn by persons who have been fully trained and are familiar with suit equipment. It is essential to ensure that the suit you are wearing is made from a material that will give you adequate protection against the chemical hazard you are about to encounter.Limited-use gas-tight suits manufactured from Tychem®TK. are designed to be worn until hygienic cleaning becomes necessary or limited use chemical contamination has occurred and disposal is required.If, after use, you consider that the suit has not been damaged and that the chemical exposure to the fabric surface is very limited, it would need to be decontaminated in the proper fashion before being re-packed for use. The decision to re-use the suit is a subjective one. A certain amount of professional assistance can be offered by Respirex but the end-user shall be the sole judge on whether or not the suit can be adequately cleaned or decontaminated for re-use.Respirex can offer advice on the breakthrough time for the chemical substance the suit has come into contact with to assist the end-user in deciding whether to re-use the garment.If the suit becomes heavily contaminated or mechanically damaged in any way itMUST NOT be reused and MUST be disposed of.Tychem®TK. material is made of polymers which do not contain halogens in their structural formula. Depending on the chemical nature and the amount of contamination on the garments, garments made from Tychem®TK. could be either incinerated after use, without any harm to the environment, or buried in a responsible way. On incineration of the garment itself, traces of halogens in combustion gases and ash are at the level of ordinary halogen contamination in any non-halogen containing industrial product. Restrictions to the disposal of used limited-use gas-tight suits manufactured from Tychem®TK. depends on the contaminant.Tychem®TK. material is designed specifically for limited-use garments. Excessive flexing or folding can lead to weaknesses in the structure of the material which may have an adverse effect on the chemical resistance offered by the suit. Nevertheless extensive operational use of garments manufactured from Tychem®TK. has demonstrated its durability beyond that of a single-use fabric.Caution: Tychem®TK. is a non-breathable material and the wearer‘s body temperature will rise whilst wearing the suit, particulary during periods of intense physical activity. Wherever possible operational procedures should be planned to minimise the risk of heat stress occuring. The wearer should leave the work area and disrobe the suit before becoming distressed.Tychem®TK. meets the resistance to ignition requirements of EN943-2: 2002 but is not flame resistant. Suits manufactured from Tychem®TK. should not be worn in potentially flammable or explosive environments. There is no anti-static treatment applied to Tychem®TK.The usable temperature range of Tychem®TK. material is -70°C to 90°C. Note : This usable temperature range is based on the evaluation of the physical properties of the material only. Users should note that resistance to permeation by chemicals varies with temperature.Continuous contact with certain chemicals can adversely affect the field of vision and protection offered by the visor. If any discolouration of the visor is apparent the suit MUST NOT be re-used.Always use compatible PPE, e.g. gloves and safety boots advised by Repirex.For any enquiries please contact the Respirex customer services department on Tel : +44 (0) 1737 778600, Fax : +44 (0) 1737 779441 or Email : [email protected].

3
Physical Properties Of Tychem®TK. Suit MaterialThe samples submitted were tested in accordance with clauses B.2.3, B.2.4, B.2.5, B.2.6, B.2.8, B.2.9, B.2.14 & B.3.5 of EN943-1:2002.
Property Test Method Property value of Tychem®TK.
Performance class of
Tychem®TK.
Minimum Performance
Class Required For
EN943-2:2002
Basis Weight ISO 536:1995 331 g/m2 N/A N/A
Thickness ISO 534:1998 730 µm N/A N/A
Abrasion resistance EN 530:1994 Meth 2 (inc. pressure drop) >2000 cycles 6 (out of 6) 4
Flex cracking resistance
ISO 7854:1995 Method B (inc. pressure drop)
>1000 cycles (MD) >1000 cycles (XD) 1 (out of 6) 1
Flex cracking resistance at low temperatures (-30°C)
Method B of EN ISO 7854:1997 at -30°C (inc. pressure drop)
>500 cycles 3 (out of 6) 2
Trapezoidal tear resistance ISO 9073-4:1989 164N (MD)
215N (XD) 5 (out of 5) 3
Puncture resistance EN 863:1995 49 N 2 (out of 5) 2*
Tensile Strength EN ISO 13934-1:1999 519.6 N (MD) 482.9 N (XD) 4 (out of 6) 4
Resistance to flameEN 13274-4:2001 Meth 3 modified (inc. pressure drop)
No part ignited or continued to burn on removal from the flame
2(out of 3) 1
Surface resistivity EN 1149:1995 1013 Ohm N/A N/A
Seam strength ISO 5082:1982 Annex A2† 607 N 5 (out of 5) 5
Seam strength ISO 5082:1982 Annex A2† 607 N 5 (out of 5) 5
Key: N/A=Not applicable MD=Machine direction XD=Cross direction* The suit may not be suitable for use where there is a high risk of puncture.

4
Fitting Gloves Into The Respirex Locking Cuff1. Turn the sleeves of the suit inside out.2. Carefully slide the tapered cone inside the Kemblok™/neoprene gloves so that they stretch over the cone (see
Figs1& 2).
3. Push the gloves and cone into the cuff body with the little finger of the gloves at 90° to the seam at the rear of the sleeve (see Fig 3).
4. Make sure that the gloves and cone are pushed into the cuff body with equal pressure all around its circumference (see Fig 4).
Fig. 1 Fig. 2
Fig. 3 Fig. 4
Fig. 5 Fig. 6
5. Locate the locking ring over the gauntlet of the gloves and screw into the cuff body (see Fig 5). If necessary the gauntlet section of the gloves can be cut down if they are causing interference with the locking ring.
6. Turn the sleeve the correct way out by carefully pulling on the glove (see Fig 6).
Check that there are no creases in the outer neoprene glove around the cuff seal. If there are any creases or the glove is pinched in any way it should be removed and re-fitted. If the cuff and gloves have been assembled as described there should now be a gas tight wrist seal.

5
Assembly Of Boot Into Detachable Boot System1. Fit the rubber ‘O’ ring (D00693) into the groove on the boot sealing collar. Locate the ‘O’ ring at the bottom of the
groove, Figs.7& 8.
2. If there is an ‘O’ ring already fitted, check that it is not damaged. If in doubt fit a new ‘O’ ring (D00693) to the boot sealing collar.
3. With the leg of the suit turned inside out, locate the boot through the leg sealing collar so that the ‘O’ ring can be seen in the groove. Ensure that the boot is facing in the correct direction, Fig.9.
4. Locate the retaining collar (B01603) around the top groove of the leg sealing collar and snap into position, Fig.10.5. When snapped into position the retaining collar should appear as shown in Fig.11.
Fig. 7 Fig. 8
Fig. 9
Fig. 11
Fig. 10
Fig. 12
6. Pull the boot sealing collar up so that the retaining collar is trapped in position as shown in Fig.12.7. Turn the PVC protective strip up over the stainless steel band as shown in Fig.13.

6
8. Pull the leg of the garment through. The final assembly of the boot into the detachable boot system should appear as shown in Fig.14.
Parts required:Rubber ‘O’ ring - Part number D00693, Retaining collar - Part number B01603
Removing Boot From Detachable Boot System1. Turn the leg of the suit inside out. Fold down the PVC protective strip then pull the leg sealing collar down so that
a gap appears under the retaining collar as shown in Fig. 15.
Fig. 13
Fig. 15 Fig. 16
Fig. 17
Fig. 14
2. Using a pair of external circlip pliers remove the retaining collar as shown in Fig. 16.3. Push the boot sealing collar through the leg sealing collar and remove the boot from the suit leg, Fig. 17.

7
Recommended Donning ProcedureDonning the limited-use gas-tight suit is a very simple matter, although it will be necessary for a dresser to assist the wearer in the donning procedure.1. Unzip the suit by pulling approximately 61cm (24“) at a time, keeping the zipper straight with one hand as you
pull the slider with the other. Repeat this exercise for the whole length of the zip. FAILURE TO FOLLOW THIS PROCEDURE MAY RESULT IN THE ZIP BECOMING JAMMED.
2. Fold up the outer splash guards approximately 20-23cms (8“-9“) and fold down the suit to expose the top of the integral booties. The wearer should step into the integral booties and then into a pair of safety boots. Fold the outer splash guards down over the exterior of the safety boots and with the aid of the dresser lift the suit to the waist, making sure the crotch is positioned comfortably. The suit waist belt should be fastened firmly ensuring that it is not twisted (see Figs 18 & 19). Note: Suits fitted with integral safety boots are not supplied with outer splash guards.
3. With the assistance of the dresser the wearer should now don a self-contained breathing apparatus set (SCBA) in the usual manner, but without starting up. Leave the face mask of the SCBA hanging on its strap around the wearer’s neck. The dresser should lift the pod at the rear of the suit up and over the SCBA cylinder. The wearer can now carry out all SCBA necessary pre-checks.
Fig. 18 Fig. 19
4. Next, the SCBA cylinder should be switched on in accordance with the manufacturer’s instructions and the face mask donned by the wearer. The dresser can assist the wearer to adjust the head straps of the face mask until comfortable. If required a fireman’s safety helmet can now also be donned by the wearer.

8
5. The wearer’s arms should be folded across the chest whilst the dresser lifts the suit up and over the wearer’s shoulders and head and fastens the zip carefully following the procedure outlined in stage 1. The wearer’s arms can now be slid down the sleeves and into the gloves (see Figs 20 & 21).
6. Finally the outer zip flaps should be sealed together using the Velcro fastening provided (Fig 22).
Recommended Doffing ProcedureFirstly the suit must be decontaminated sufficiently to safely remove the wearer from the garment (see Decontamination). It will be necessary for the dresser to aid the wearer to remove the suit (it is ESSENTIAL that the dresser wears suitable protective clothing).1. The wearer’s arms should be removed from the sleeves and folded across the chest.2. The dresser should unzip the suit carefully (following the procedure outlined in the dressing instructions).3. Fold the suit over the wearer’s head and off the SCBA down to the waist. The outer surface of the suit should be
kept away from the wearer at all time.4. Shut down the SCBA cylinder according to the manufacturer’s instructions having removed the wearer’s face
mask. With the assistance of the dresser the BA can now be removed in the usual way.5. Unfasten the suit waist belt.6. Fold the suit down to the top of the integral socks (or safety boots) so that the wearer can step out of the suit.
Fig. 20 Fig. 21 Fig. 22

9
Fig. 23
Fig. 24
Replacing Exhalation Valve Diaphragm1. Using a torque driver with a ‘T8’ Torx bit, loosen and remove the screw from the centre of the exhalation valve,
then remove the cap.2. Carefully slide the diaphragm up the central spigot and remove from the exhalation valve body.3. Check that there is no dust, debris or contamination of any kind in the exhalation valve body.4. Carefully slide a new diaphragm down the central spigot until it rests evenly on the valve body. Ensure the
diaphragm is correctly orientated with the ridged side uppermost (see Fig 24).5. Replace the exhalation valve cap and ensure the two location channels engage with the locating keys on either
side of the valve body. Note: When correctly located, the valve cap will not rotate independently on the valve body.6. Replace the centre screw, turn by hand two times to engage the thread with the valve body, then fully tighten
using a torque driver set to 23 ± 2 cNm.
Valve body
Diaphragm
Locating key
Valve cap
Locating channel
No4 x 1¼ ‘Torx’ C/sk screw
Ensure the diaphragm is seated evenly on the valve body with ridged side uppermost

10
Removing Exhalation Valve Assembly1. Lay the suit on a clean flat surface and open the zip to its fullest extent.2. Using a two pin wrench (Tool No. G01486) locate the pins into the two holes in the exhalation valve retaining ring
and unscrew.3. Remove the rubber sealing washer.4. Then from the outside of the suit carefully remove the exhalation valve assembly.
Two pin wrench.
Retaining ring.
Rubber sealing washer
Rubber sealing washer
Valve assembly
Replacing Exhalation Valve Assembly1. The new exhalation valve will have all the parts screwed together, so remove the retaining ring and one of the
rubber sealing washers.2. Check that the remaining rubber sealing washer is laying flat against the valve body.3. Locate the thread on the exhalation valve assembly through the hole in the back of the suit.4. Locate the second rubber sealing washer around the thread on the valve body so that it is laying flat against the
material of the suit .5. Hand tighten the retaining ring onto the exhalation valve.6. Check that the exhalation valve is orientated correctly (the Respirex lettering should be at the top of the valve and
the three slots under the cover must be at the bottom).7. Tighten the retaining ring using the two pin wrench (Tool No. G01486).
Fig. 25

11
DecontaminationThe end user shall be the sole judge for how long a limited-use gas-tight suit manufactured from Tychem®TK. can be worn on a specific application, and whether or not the garment can be sufficiently cleaned or decontaminated.Preliminary washing by means of a high pressure shower will remove most of the contaminate from the outer surfaces of the suit sufficient to allow the wearer to undress from the garment.Should you not have access to a high pressure shower, the suit can be sprayed with copious quantities of water and a suitable detergent and neutralizer for a minimum period of 5 minutes.If the garment has been used in acid the recommended neutralizer is a solution of bicarbonate of soda and water (6% bicarbonate of soda w/v). Water will neutralize alkali contamination.If you intend to re-use the garment it should now be removed for further cleaning.The inner surfaces should be sprayed with Synodor® to kill all bacteria within the garment.The outer surfaces can be cleaned using a diluted solution of Citrikleen (20 parts water to 1 part Citrikleen) applied using a soft cloth or soft brush if necessary. Never use a washing machine, spin or tumble drier.Remove all excess water and allow the suit to dry naturally.WarningsHAND WASH ONLY DO NOT SPINDO NOT DRY CLEAN DO NOT BLEACH DO NOT IRONDO NOT TUMBLE DRYDO NOT USE CLEANING SOLVENTDO NOT USE AGGRESSIVE CLEANING POWDERS DO NOT SCRUB THE SURFACE OF THE FABRIC
Cleaning AccessoriesThe outer surfaces of the suit can be cleaned with Citrikleen, Part No. F00938.The inner surfaces of the suit can be cleaned with Synodor® Odor San, Part No.F00936; this will neutralize any bacteria build-up within the suit.The visor can be cleaned with Respirex ‘Fog-Off’, Part No. F00934.The zip must be regularly lubricated with ‘Max-Wax™’, Part No. F00149.All these accessories are available from Respirex. Please contact our Customer Services Department on Tel: +44(0) 1737 778600.
StorageWhen not in use it is recommended that the suit is stored in the container supplied. An internal pressure test in accordance with EN464 : 1994 should be carried out after every use if it is deemed that the suit may be re-used. The suit must always be stored in a dry, decontaminated, clean condition with the zip fully waxed and closed leaving approximately 10cms (4“) open.Based on the results of accelerated ageing tests, the projected shelf life of Tychem®TK. is five years, as long as the material is not stored in sunlight or in excessive heat (>40°C). Additional research on Tychem®TK. material would suggest a possible shelf life of up to ten years.NOTE: The zip should always be waxed when in the fully closed position. This is to prevent wax blocking the inner portion of the zip teeth leading to possible failure of the zip.

12
How To Fill A Test RigTo do this insert the male instant air plug attached to the length of cord into the socket on the length of hose connected to the ‘SUIT’ socket on the test rig. Turn the switch to ‘TEST’. Place the black tube from the small filling bottle into the 60ml bottle filled with manometer liquid. Squeeze the small bottle and draw up manometer liquid. Once the small bottle is full remove the tube from the 60ml bottle and place into the top of the test rig with the end of the black tube level with the narrow Red band. Squeeze the bottle to empty the liquid into the test rig, repeat the operation until liquid is level with Red filling band. Should an air bubble form agitate the liquid until it clears. This may be done by leaving the valve set at ‘TEST’ and gently blowing and releasing to make the liquid move up and down in the tube. If the test rig is overfilled place the tube from the small filling bottle into the test rig and suck up any excess liquid. If for any reason the fluid needs ‘topping up’ repeat instructions as above.
SWITCH TO SELECT POSITION FOR INFLATE, SAFE OR TEST
CONNECTION FOR AIR SUPPLY
TEST SCALE IN mm H20
CONNECTION ONTO GAS SUIT(A BACK TO BACK ADAPTOR SHOULD BE USED IF THE AIR SUPPLY IS NOT A BROOMWADE)
Combinaison Conduite D‘Air
SAFEINFATE
200180170150
0

13
Conducting An Internal Pressure Test
1. Lay the suit out as flat as possible, away from any source of heat and/or currents of air. Seal the exhalation valves with the rubber bungs provided.Visually inspect the suit and remove any creases and folds as far as is practicable. Leave the suit at ambient temperature (20°C ± 5°C) for minimum of 1 hour.
2. Connect the black hose from the port marked ‘SUIT’ on the test rig to the airline coupling on the suit. Make certain that the rig selector valve is turned to ‘SAFE’. Connect a suitable compressed air source providing air at approx 15 PSI (1.03 bar) to the port marked ‘AIRLINE’ on the testrig.
3. Turn the rig selector valve to INFLATE. Inflate the suit carefully to a pressure of 1750 ± 50 Pa. Ensure that any creased areas are unfolded and that the suit takes up its full shape (see Fig 26).
4. Check the inflation level by turning the valve through ‘SAFE’ to ‘TEST’. When the pressure begins to approach the marks inflate a little at a time until the bottom of the red area is reached.
5. As the material stretches the pressure will drop. For 10 minutes keep adding sufficient air to keep the liquid in the Yellow area (1750 ± 50) Pa. After 10 minutes adjust the fluid level to the top of the Green area (1650 ± 50) Pa. Allow a further 6 minutes to elapse and record the drop in pascals. The pressure drop must not exceed 300 Pa to comply with EN 943-1 : 2002.
Fig. 26
Fig. 27
NOTEGas-tight suits that have a non-return valve fitted to the swivelling pass-thru must be inflated and tested through one of the exhalation valves by carrying out the following procedure.1. Using a 2mm hexagon key loosen the screw from the centre of the exhalation valve and remove the cap.2. Carefully stretch the diaphragm over the centre spigot to remove from the exhalation valve body.3. Push the inflation & test plug into the exhalation valve body until sealed (see Fig 27).4. Connect the inflation hose from the test rig onto the coupling fitted to the plug.5. Now carry out test procedures as previously described.6. After completing the test remove the inflation hose from the inflation & test plug.7. Remove the inflation & test plug from the exhalation valve and any other plugs that may have been fitted.

14
8. Carefully stretch the diaphragm over the centre spigot making sure that it is correctly orientated and that the hole in the diaphragm is located under the shoulder of the spigot.
9. Replace the exhalation valve cap making sure that the location channel on the cap is located over the location key on the exhalation valve body (the RESPIREX lettering should be at the top).
10. Replace the centre screw and hand tighten using a 2mm hexagon key.Note : If you are performing leak-tightness tests using the electrically operated Respirex automatic test unit please refer to the instructions supplied with the unit.If you currently use a manual test rig but are interested in purchasing an automatic test unit please contact our customer services department.
Chemical Permeation Testing At RespirexAt its headquarters at the Kingsfield Business Centre, Redhill, Respirex operate a chemical testing laboratory equipped with the latest technology. All the testing is carried out by fully qualified chemists who are able to test Respirex’s own fabrics against any challenge chemical that the customer requests. In this way the customer can be advised and recommended of the most suitable material to use against any challenging chemical encountered in the workplace.Permeation is the process by which a chemical moves through protective clothing material on a molecular level. The permeation tests are carried out according to both the European standards EN ISO 6529 and EN 374 as well as the American standard ASTM F739. The clothing material is exposed to the challenging chemical in a permeation cell so that breakthrough times and permeation rates can be measured. Breakthrough time is the time taken for the chemical to permeate through the material after continuous contact with the outer surface of a chemical protective suit. Permeation rates, measured in µg (min.cm²), are an indication of the amount of chemical reaching the wearer inside the suit after breakthrough occurs.For advice on chemical permeation or decontamination contact the Respirex laboratory on Tel: +44 (0)1737 778600 or Fax: +44 (0) 1737 779441, where our qualified staff will be happy to help you. Outside of normal working hours (9.00am-5.00pm) please leave details of your enquiry on the answering service so that laboratory staff can deal with your query with the minimum of delay.
15
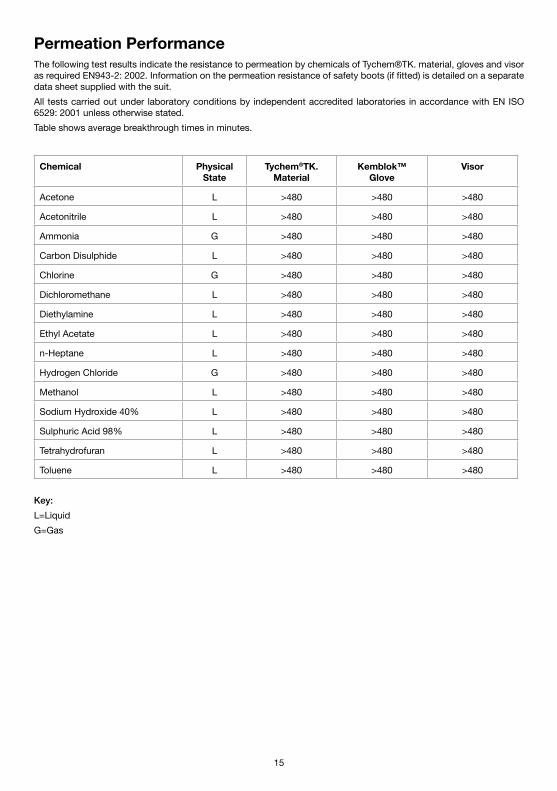
Permeation PerformanceThe following test results indicate the resistance to permeation by chemicals of Tychem®TK. material, gloves and visor as required EN943-2: 2002. Information on the permeation resistance of safety boots (if fitted) is detailed on a separate data sheet supplied with the suit.All tests carried out under laboratory conditions by independent accredited laboratories in accordance with EN ISO 6529: 2001 unless otherwise stated.Table shows average breakthrough times in minutes.
Chemical Physical State
Tychem®TK. Material
Kemblok™ Glove
Visor
Acetone L >480 >480 >480
Acetonitrile L >480 >480 >480
Ammonia G >480 >480 >480
Carbon Disulphide L >480 >480 >480
Chlorine G >480 >480 >480
Dichloromethane L >480 >480 >480
Diethylamine L >480 >480 >480
Ethyl Acetate L >480 >480 >480
n-Heptane L >480 >480 >480
Hydrogen Chloride G >480 >480 >480
Methanol L >480 >480 >480
Sodium Hydroxide 40% L >480 >480 >480
Sulphuric Acid 98% L >480 >480 >480
Tetrahydrofuran L >480 >480 >480
Toluene L >480 >480 >480
Key: L=Liquid G=Gas

16
Sizing
The following pictograms designate the range of height & chest sizes suitable for the limited-use gas-tight suit; check your body measurements to make sure you are suitable. Body measurements in cm (inch).
Suit Size Height Chest Size
Small 163-175 (5’4"-5’9") 88-96 (35"-38")
Medium 169-182 (5’6½"-5’11½") 96-104 (38"-41")
Large 176-188 (5’9"-6’2") 104-112 (41"-44")
X-Large 182-194 (5’11½"-6’4") 112-124 (44"-49")
XX-Large 188-200 (6’2"-6’7") 124-136 (49"-53½")
23
Sizing
The following pictograms designate the range of height & chest sizes suitable for the limited-use gas-tight suit; check your body measurements to make sure you are suitable. Body measurements in cm (inch).
Suit Size Height Chest Size Small 163-175 (5’4"-5’9") 88-96 (35"-38")
Medium 169-182 (5’6½"-5’11½") 96-104 (38"-41") Large 176-188 (5’9"-6’2") 104-112 (41"-44")
X-Large 182-194 (5’11½"-6’4") 112-124 (44"-49") XX-Large 188-200 (6’2"-6’7") 124-136 (49"-53½")
88-96 96-104 104-112
112-124 124-136

17
EU DECLARATION OF CONFORMITYRESPIREX INTERNATIONAL LTDUnit F Kingsfield Business Centre,
Philanthropic Road,Redhill,
Surrey RH1 4DPUnited Kingdom
Declares that the PPE described hereafter:
Respirex (logo) DuPont Tychem® TK “FB” Gas SuitsProduct code: TYFBManufactured from DuPont Tychem® TK (Respirex Part number: A00097).
Meets the minimum requirements specified by product standards:
EN 943-2:2002 Performance requirements for “gas-tight” (Type 1) chemical protective suits for emergency teams (ET) – Type 1A
is identical to the PPE which is subject of EU type‐examination certificate No GB05/65307 (Issue 1) issued by
SGS UK Ltd,Weston-super-Mare,
United Kingdom,BS22 6WA
SGS FIMKO OYP.O. Box 30 (Särkiniementie 3)
00211 HELSINKIFinland
is subject to the procedure set out in Module D of the European PPE Regulation (EU) 2016/425 under the supervision of the notified body:
BSIDavy Avenue, Knowhill,
Milton Keynes. MK5 8PP, United KingdomEC Notified Body No 0086
These garments are described in the manufacturer’s technical file TF049, Issue B.
Done at: RESPIREX, Redhill, Surrey, on 1st January 2019
Signed :…………………………..
Mark Bellas Simpson (Managing Director)
Respirex International LimitedUnit F, Kingsfield Business CentrePhilanthropic Road, Redhill,Surrey RH1 4DP.Tél : +44 (0) 1737 778600Fax : +44 (0) 1737 779441Email : [email protected] : www.respirex.com
Regisetered in England No. 592506 VAT No. GB 115 0754 43Directors : M. Bellas Simpson A.C.A. D.G. Mackie P.J. Wilson
FM 30801

RESPIREX INTERNATIONAL LTD,Unit F Kingsfield Business Centre,Philanthropic Road,Redhill,Surrey RH1 4DPENGLAND Tel.:+44 (0) 1737 778600Fax: +44(0) 1737 779441www.respirex.com
Module D examination by: BSi (0086), Kitemark Court, Davy Avenue, Knowhill, Milton Keynes MK5 8PP Royaume-UniEC Notified Body No. 0086
Type examination by: SGS United Kingdom Ltd (0120),Weston-super-Mare,Somerset BS22 6WAUnited Kingdom,
SGS FIMKO OYP.O. Box 30 (Särkiniementie 3) 00211 HELSINKIFinland