Twin Cycloneemanuals.nordson.com/finishing/files/stockport/768641_08.pdf · 2020-01-13 · Twin...
22
Twin Cyclone Customer Product Manual Part 768641-08 Issued 12/19 NORDSON DEUTSCHLAND GMBH For parts and technical support, call the Industrial Coating Systems Customer Support Center at (800) 433‐9319 or contact your local Nordson representative. This document is subject to change without notice. Check http://emanuals.nordson.com for the latest version.
Transcript of Twin Cycloneemanuals.nordson.com/finishing/files/stockport/768641_08.pdf · 2020-01-13 · Twin...

Twin Cyclone
Customer Product ManualPart 768641-08
Issued 12/19
NORDSON DEUTSCHLAND GMBH
For parts and technical support, call the Industrial CoatingSystems Customer Support Center at (800) 433‐9319 or
contact your local Nordson representative.
This document is subject to change without notice.Check http://emanuals.nordson.com for the latest version.

Part 768641_08 � 2019 Nordson Corporation
Contact Us
Nordson Corporation welcomes requests for information, comments, andinquiries about its products. General information about Nordson can befound on the Internet using the following address:http://www.nordson.com.
Address all correspondence to:
Nordson Deutschland GmbHHeinrich Hertz Strasse 4240699 Erkrath, Germany
Notice
This is a Nordson Corporation publication which is protected by copyright.Original copyright date 1998. No�part�of�this�document may bephotocopied, reproduced, or translated to another language without theprior written consent of Nordson�Corporation. The�information�containedin this publication is subject to change without notice.
Trademarks
Nordson and the Nordson logo are registered trademarks of NordsonCorporation.
HDLV - Encore are trademarks of Nordson Corporation.
All other trademarks are the property of their respective owners.

Change Record i
Part 768641_08� 2019 Nordson Corporation Manual
Change RecordRevision Date Change
08 10/07/2019 Part number corrections - 7035260 is 7035242 - 7035259 is 7035241

Change Recordii
Part 768641_08 � 2019 Nordson CorporationManual

Table of Contents I
Part 768641_08� 2019 Nordson Corporation
Table of Contents
Safety 1. . . . . . . . . . . . . . . . . . . . . . . . . . . . . . . . . . . . . . . . . . . . . . . . .Qualified Personnel 1. . . . . . . . . . . . . . . . . . . . . . . . . . . . . . . . . . .Intended Use 1. . . . . . . . . . . . . . . . . . . . . . . . . . . . . . . . . . . . . . . . .Regulations and Approvals 1. . . . . . . . . . . . . . . . . . . . . . . . . . . . .Personal Safety 2. . . . . . . . . . . . . . . . . . . . . . . . . . . . . . . . . . . . . . .Fire Safety 2. . . . . . . . . . . . . . . . . . . . . . . . . . . . . . . . . . . . . . . . . . .Grounding 3. . . . . . . . . . . . . . . . . . . . . . . . . . . . . . . . . . . . . . . . . . .Action in the Event of a Malfunction 3. . . . . . . . . . . . . . . . . . . . . .Disposal 3. . . . . . . . . . . . . . . . . . . . . . . . . . . . . . . . . . . . . . . . . . . . .
Description 4. . . . . . . . . . . . . . . . . . . . . . . . . . . . . . . . . . . . . . . . . . . .
Installation 5. . . . . . . . . . . . . . . . . . . . . . . . . . . . . . . . . . . . . . . . . . . .Setting up the unit 5. . . . . . . . . . . . . . . . . . . . . . . . . . . . . . . . . . . . .
Maintenance 6. . . . . . . . . . . . . . . . . . . . . . . . . . . . . . . . . . . . . . . . . . .Cleaning Process 6. . . . . . . . . . . . . . . . . . . . . . . . . . . . . . . . . . . . . .Cyclone Door Gasket Replacement 11. . . . . . . . . . . . . . . . . . . . . .
Troubleshooting 14. . . . . . . . . . . . . . . . . . . . . . . . . . . . . . . . . . . . . . .
Parts 15. . . . . . . . . . . . . . . . . . . . . . . . . . . . . . . . . . . . . . . . . . . . . . . . . .
Specifications 16. . . . . . . . . . . . . . . . . . . . . . . . . . . . . . . . . . . . . . . . .

Table of ContentsII
Part 768641_08 � 2019 Nordson Corporation

Twin Cyclone 1
Part 768641_08� 2019 Nordson Corporation
Twin Cyclone
Safety Read and follow these safety instructions. Task‐ and equipment‐specificwarnings, cautions, and instructions are included in equipmentdocumentation where appropriate.
Make sure all equipment documentation, including these instructions, isaccessible to all persons operating or servicing equipment.
Qualified Personnel
Equipment owners are responsible for making sure that Nordson equipmentis installed, operated, and serviced by qualified personnel. Qualifiedpersonnel are those employees or contractors who are trained to safelyperform their assigned tasks. They are familiar with all relevant safety rulesand regulations and are physically capable of performing their assignedtasks.
Intended Use
CAUTION: Use of Nordson equipment in ways other than those described inthe documentation supplied with the equipment may result in injury topersons or damage to property.
Some examples of unintended use of equipment include
� using incompatible materials
� making unauthorized modifications
� using incompatible or damaged parts
� using unapproved auxiliary equipment
� operating equipment in excess of maximum ratings
Regulations and Approvals
WARNING: Make sure all equipment is rated and approved for theenvironment in which it is used. Any approvals obtained for Nordsonequipment will be voided if instructions for installation, operation, and serviceare not followed.
All phases of equipment installation must comply with all local codes.

Twin Cyclone2
Part 768641_08 � 2019 Nordson Corporation
Personal Safety
To prevent injury, follow these instructions.
� Do not operate or service equipment unless you are qualified.
� Do not operate equipment unless safety guards, doors, or covers are
intact and automatic interlocks are operating properly. Do not bypass ordisarm any safety devices.
� Relieve (bleed off) pneumatic pressure before adjusting or servicing
pressurized systems or components. Disconnect, lock out, and tagswitches before servicing electrical equipment.
� Obtain and read Safety Data Sheets (SDS) for all materials used. Follow
the manufacturer's instructions for safe handling and use of materials,and use recommended personal protection devices.
� To prevent injury, be aware of less‐obvious dangers in the workplace that
often cannot be completely eliminated, such as hot surfaces, sharpedges and moving parts that cannot be enclosed or otherwise guardedfor practical reasons.
� By opening or closing inspection doors, including the surge hopper, there
is a risk of squeezing or trapping.
� Do not use the air blow gun to clean your body. Compressed air can
pierce the skin and if directed towards the face it could cause a severeeye injury.
Fire Safety
To avoid a fire or explosion, follow these instructions.
� Do not smoke, weld, grind, or use open flames where flammable
materials are being used or stored.
� Provide adequate ventilation to prevent dangerous concentrations of
volatile materials or vapors. Refer to local codes or your material SDS forguidance.
� Clean, maintain, test, and repair equipment according to the instructions
in your equipment documentation.
� Use only replacement parts that are designed for use with original
equipment. Contact your Nordson representative for parts informationand advice.

Twin Cyclone 3
Part 768641_08� 2019 Nordson Corporation
Grounding
WARNING: Operating faulty electrostatic equipment is hazardous and cancause electrocution, fire, or explosion. Make resistance checks part of yourperiodic maintenance program. If you receive even a slight electrical shockor notice static sparking or arcing, shut down all electrical or electrostaticequipment immediately. Do not restart the equipment until the problem hasbeen identified and corrected.
Grounding inside and around the booth openings must comply withEN16985, latest conditions.
� All electrically conductive objects in the spray areas shall be electrically
connected to ground with a resistance of not more than 1�ohm asmeasured with an appropriate instrument.
� Equipment to be grounded includes, but is not limited to, the floor of the
operator working area Personnel working in the spray area must begrounded.
� There is a possible ignition potential from the charged human body.
Personnel standing on a painted surface, such as an operator platform, orwearing non‐conductive shoes, are not grounded. Personnel must wearshoes with conductive soles or use a ground strap to maintain aconnection to ground.
� Operators must maintain skin‐to‐handle contact between their hand and
the air blow gun handle to prevent shocks. If gloves must be worn, cutaway the palm or fingers or wear electrically conductive gloves.
� Connect all disconnected equipment, ground cables, and wires after
servicing equipment.
Action in the Event of a Malfunction
Due to the intention of the product, there is no malfunction possible.
Disposal
Dispose of equipment and materials used in operation and servicingaccording to local codes.

Twin Cyclone4
Part 768641_08 � 2019 Nordson Corporation
Description
Figure 1 Twin Cyclone
The air is drawn through the cyclones by the fan situated in a Nordson after filter. The air and powder from thespray booth is drawn directly from the side or base of the booth canopy or through interconnecting ductwork,whereupon the powder-laden air is accelerated and directed towards the outer case of the cyclone walls.
Centrifugal force separates the powder from the air stream, the powder drops down the walls to the collectionhopper (surge hopper) below for transportation to disposal or reclaim.
The construction is robust and constructed in mild steel painted, capable of withstanding considerable internalforces in the event of an ignition within the structure.
Access for inspecting and cleaning is through the inspection doors located on the cone. The door is flushinternally so as not to create a pocket in which powder would collect. The cyclone is welded to a high standardfor ease of cleaning on colour change.

Twin Cyclone 5
Part 768641_08� 2019 Nordson Corporation
Installation
Setting up the unit
WARNING: Allow only qualified personnel to perform the following tasks.Follow the safety instructions in this document and all other relateddocumentation.
� Remove packaging materials
� Assemble the legs/frame, ready to mount the cyclone
� Lift the cyclone using certified slings and overhead hoist or similar
� Using the overhead hoist, position the cyclone assembly in the correct location. Align with the booth
and ductwork.
� Seal connection flanges using a non-silicone sealant, prior to bolting together
� Erect ductwork according to the drawings provided seal flanges with the same non-silicone sealant
� Run the system, check for airleaks at flanges and rectify if necessary, adjust clamps if required
CAUTION: Before adding powder for the first time, clean the inside of thecyclone using cleaning pellets - Part Number 771500. See the CleaningProcess section, starting from Step 2. Include Step 1 for all other cleaningoccasions after this initial start up.
Figure 2 Cleaning Pellets - P/No. 771500

Twin Cyclone6
Part 768641_08 � 2019 Nordson Corporation
Maintenance
Cleaning Process
NOTE: This process is particularly for thoroughly cleaning the internal wallsof the cyclone and remove impacted powder, it is not required everycolour change. The system can not be used for production during thecleaning process.
Step 1
Clean down the complete booth system and empty the cyclone surge hopper.
Figure 3 Surge Hopper
Step 2
Remove the powder transfer hose (1) from the outlet of the surge hopper and block using a plug or simply apiece of tied tubing (2).
121
Figure 4 Surge Hopper - blanking the outlet

Twin Cyclone 7
Part 768641_08� 2019 Nordson Corporation
Step 3
With Afterfilter running, open cyclone duct inspection door
CAUTION: High velocity air passing through the duct will cause a strongvacuum here
Figure 5 Cyclone Duct Inspection Door - closed & open
Step 4
Using your hand or a scoop, throw 1-2 kg of pellets upwards into the extract duct
CAUTION: Do not allow the plastic bag to go into the extract duct
Figure 6 Applying cleaning pellets into extract duct

Twin Cyclone8
Part 768641_08 � 2019 Nordson Corporation
Step 5
Close the extract duct inspection door and run the afterfilter for 1 hour
Figure 7 Extract duct door closed - ready to start cleaning
Step 6
After the cleaning cycle is completed, turn off the Afterfilter and wait for a few minutes for the exhaust fan tocompletely stop. Open the outlet at the bottom of the surge hopper to allow pellets to empty into a waste orbag. Dispose of the used pellets according to local regulations.
Figure 8 Draining used pellets from surge hopper
NOTE: Do not reuse the pellets as during the cleaning process their edges ware and the pellets lose theireffectiveness

Twin Cyclone 9
Part 768641_08� 2019 Nordson Corporation
Step 7
You may find the bottom 150mm of the cyclone needs cleaning with solvent as the velocity of pellets in thisarea is low.
Figure 9 Bottom of cyclone - inspect and clean
Step 8
Once the surge hopper has completely emptied all cleaning pellets, clean the internal area of the surgehopper using solvent.
Figure 10 Surge Hopper internal

Twin Cyclone10
Part 768641_08 � 2019 Nordson Corporation
Step 9
Reconnect the powder transfer hose to the surge hopper connector, ready for production.
Figure 11 Surge Hopper - reconnect powder transfer hose
NOTE: Regular cleaning of the cyclone and surge hopper in this way will maintain maximum efficiency of thesystem and help avoid any possibility of contamination

Twin Cyclone 11
Part 768641_08� 2019 Nordson Corporation
Cyclone Door Gasket Replacement
CAUTION: Prior to using the solvent or adhesive, read the Safety DataSheet for information about precautionary measures and safetyrecommendations.
Materials Required
� TERASON 2444 adhesive or equivalent
� TERASON VR20 solvent or equivalent
� Nordson Gasket Set (see parts list)
Tools Required
� Scraper (for removing old gasket)
� Wrench - 8 mm & 10 mm
� Utility knife (for cutting gasket)
� Wire brush (to clean and prepare surface)
� Brush (to apply the adhesive)
Step 1
Remove the old gasket from the door using thescraper
Step 2
Using the wire brush, clean any remaininggasket/adhesive from the surface. Then clean thesurface using solvent and cleaning cloth. Surfacesmust be clean, dry and free from all traces ofgrease, oil and dust.
Figure 12 Removing old seal and preparing the surface
Step 3
Prepare the new seals and verify that the new seals fit flush on the inside of the doors. If necessary, cut a small section from the new seals diagonally, using the utility knife, then rejoin accordingly toensure there are no gaps anywhere in the seal. See below.
Examples of how to cut for resizing if required
Figure 13 Verify fit of seals

Twin Cyclone12
Part 768641_08 � 2019 Nordson Corporation
Step 4
Loosen the nuts of the clamp indicated below, to reduce pressure between the door and cyclone.
Figure 14 Clamp adjustment
Step 5
Apply adhesive from the tube, onto the cyclone door, within the area where the gasket is to be placed. Use thebrush to evenly spread the adhesive as shown below. The width of the adhesive should be a minimum of 20mm to ensure the complete width of the gasket makes contact with it.
Figure 15 Applying adhesive
NOTE: The adhesive is workable for up to 15 minutes before it sets. Ensure the gaskets are fully in placebefore reaching the 15 minutes.

Twin Cyclone 13
Part 768641_08� 2019 Nordson Corporation
Step 6
When applying the new gasket, start on a corner and press onto the adhesive.
Follow the contour of the door, gently pressing the gasket onto the adhesive, until a complete loop around theface of the door is achieved.
Ensure the face of the gasket that is adhering to the surface of the door, is completely in contact with theadhesive.
Close the door of the cyclone to press the new gasket softly onto the surface.
Figure 16 New gasket fitted
Inspection can be made after a minimum of 60 minutes. Inspect to ensure the entire gasket is adhered to thesurface. If necessary, apply the same adhesive to any areas that are not adhered sufficiently.
Step 7
With the door open, adjust the nuts of the clamp indicated below, to increase pressure between the door andcyclone. Beware not to over-tighten, the clamp should close just by hand and not excessive force.
Figure 17 Clamp adjustment
Twin Cyclone14
Part 768641_08 � 2019 Nordson Corporation
Troubleshooting
WARNING: Allow only qualified personnel to perform the following tasks.Follow the safety instructions in this document and all other relateddocumentation.
These troubleshooting procedures cover only the most common problems. Ifyou cannot solve a problem with the information given here, contact yourlocal Nordson representative for help.
Problem Possible Cause Corrective Action
1. Low or no powderrecovery
Low air velocity Check for duct blockages or filterperformance
Cyclone seals leaking
High percentage of fine powderparticles
Repair/replace seals
Add fresh powder to the system.Contact your powder supplier ifproblem persists
2. Impact fusion Reactive powders Discuss with powder supplier
Mechanically or chemically removeregularly
3. Surge hopper notemptying
Pump supply pressure too low Reset at correct pressures accordingto pump manual
Blocked pump or powder hose Clear with compressed air ordisassemble pump to clean

Twin Cyclone 15
Part 768641_08� 2019 Nordson Corporation
Parts To order parts, call the Nordson Industrial Coating Systems Customer Support Center at(800) 433‐9319 or contact your local Nordson representative.
1
2
3
4
5
6
7
Figure 18 Twin Cyclone assembly
Item Part Description Quantity Note
1 7032368 HAND BLOW GUN, W/SPIRAL TUBE & FITTING 1 -
2 7033073 SURGE HOPPER,W/HINGE & FITTING,W/O LATCH 1 -
3 - HOSETAIL CONNECTOR, G1/2, FOR 13MM ID HOSE 1 -
4 7035261 SEAL, SURGE HOPPER 1 -
5 7035245 SEAL,DOOR,CYCLONE, PAIR - 7650 M3/HR 1 A, B
5 7035247 SEAL,DOOR,CYCLONE, PAIR - 10000 M3/HR 1 A, B
5 7035249 SEAL,DOOR,CYCLONE, PAIR - 12000 M3/HR 1 A, B
5 7035255 SEAL,DOOR,CYCLONE, PAIR - 16000 M3/HR 1 A, B
5 7035242 SEAL,DOOR,CYCLONE, PAIR - 20000 & 24000 M3/HR 1 A, B
5 7035251 SEAL,DOOR,CYCLONE, PAIR - 28000 M3/HR 1 A, B
5 7035253 SEAL,DOOR,CYCLONE, PAIR - 32000 M3/HR 1 A, B
6 7035246 SEAL,DOOR,INLET DUCT,7650 M3/HR 1 A, B
6 7035248 SEAL,DOOR,INLET DUCT,10000 M3/HR 1 A, B
6 7035250 SEAL,DOOR,INLET DUCT,12000 M3/HR 1 A, B
6 7035257 SEAL,DOOR,INLET DUCT,16000 M3/HR 1 A, B
6 7035241 SEAL,DOOR,INLET DUCT,20000 M3/HR 1 A, B
6 7035258 SEAL,DOOR,INLET DUCT,24000 M3/HR 1 A, B
6 7035252 SEAL,DOOR,INLET DUCT,28000 M3/HR 1 A, B
6 7035254 SEAL,DOOR,INLET DUCT,32000 M3/HR 1 A, B
7 771500 PELLETS,CLEANING,CYCLONE, 4 KG 1 -
NOTE A: Check what size of twin cyclone and inlet duct you have before ordering. See next page for dimensions.
B: This seal fits on the inside face of the door
AR: As Required
Twin Cyclone16
Part 768641_08 � 2019 Nordson Corporation
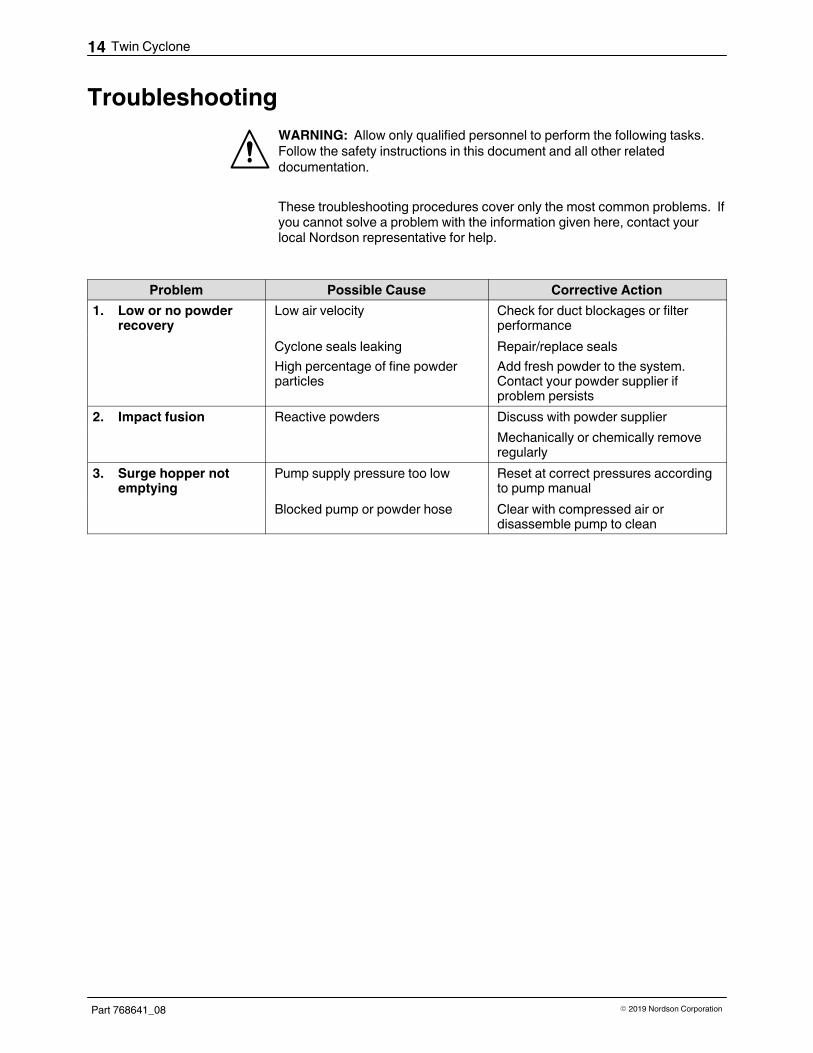
Specifications
Cyclone Door Seals - in mm Inlet Duct Door Seals - in mm
7650 m3/hour 422 * 335 * 3 7650 m3/hour 930 * 292 * 3
10000 m3/hour 449 * 382 * 3 10000 m3/hour 930 * 329 * 3
12000 m3/hour 451 * 393 * 3 12000 m3/hour 930 * 366 * 3
16000 m3/hour 507 * 428 * 3 16000 m3/hour 930 * 403 * 3
20000 m3/hour 503 * 423 * 3 20000 m3/hour 930 * 440 * 3
24000 m3/hour 503 * 423 * 3 24000 m3/hour 930 * 477 * 3
28000 m3/hour 503 * 421 * 3 28000 m3/hour 930 * 514 * 3
32000 m3/hour 506 * 420 * 3 32000 m3/hour 930 * 559 * 3
See Figure 18
Figure 19 Twin Cyclone dimensions
Description A B C D E
Twin cyclone 4500 cfm / 7650m3/hr 2881 2632 1185 2809 900
Twin cyclone 6000 cfm / 10000m3/hr 3118 2843 1185 3046 900
Twin cyclone 7500 cfm / 12750m3/hr 3343 3041 1185 3268 900
Twin cyclone 9000 cfm / 16000m3/hr 3504 3184 1185 3430 900
Twin cyclone 11250 cfm / 20000m3/hr 3777 3425 1185 3702 900
Twin cyclone 13500 cfm / 24000m3/hr 4017 3637 1185 3940 900
Twin cyclone 16500 cfm/28000m3/hr 4149 3749 1185 4075 900
Twin cyclone 19000 cfm/32000m3/hr 4436 3749 1185 4075 900
NOTE: All dimensions are in millimetres (mm)