Tutorial: Creating High-Detail FS Ground Polygons · Tutorial: Creating High-Detail FS Ground...
19
Tutorial: Creating High-Detail FS Ground Polygons Making truly immersive FS scenery encompasses several different types of design. There’s terrain modeling; using either aerial photos or the default FS vector codes to make a landscape that’s as close as possible to the real thing (rivers, coastlines, mountains, forests, etc.). Then you have object modeling, which is the creation of 3D models such as hangars, fuel pumps, buildings, and so forth. To make top-notch scenery, you have to join the terrain with the objects in a way that makes them appear as a unified whole, and that’s where a weird hybrid of terrain and object modeling comes in: ground polygon modeling. Disclaimer: The technique I’m about to show you is officially frowned upon by Microsoft, even though it’s used in some fashion in almost every detailed payware scenery available. Why? Because although this type of design works well, it uses methods native to FS2002, which is ancient by FS standards. The main reason we’re still doing things this way is the lack of an alternative, officially-sanctioned way to get the same effect. Now that we know FSX was the last version of a truly open flight sim from Microsoft, that doesn’t matter so much. Anyway, on with the show... Prerequisites for this Technique Before creating your own ground polys using this method, you’ll need a few things. Gmax 1.2 (available from http://www.turbosquid.com/gmax) The FS2002 (FS8) Gmax game pack. If you kept your FS2002 discs, and you have the “Pro” version, you’re in luck. Just look on the disc for the SDK bits and install the Gmax gamepack according to the instructions. Don’t have the FS2002 discs? Looks like you’re headed to Ebay to try and find a copy. If you can’t get the FS2002 game pack, you’ll have to use an another method of getting the raw X file into Make- MDL. For more info on that, see this FSDeveloper Wiki article. Image editing software that capable of generating alpha channels. I use Adobe Photoshop, although Paint Shop Pro will work as well. You could also use or the popular freeware tool GIMP. Regardless of which image editor you use, you’ll need to know how it works. My examples will use Photoshop, so you’ll need to be familiar enough with your editor to translate what I’m saying if you’re using some other software.
Transcript of Tutorial: Creating High-Detail FS Ground Polygons · Tutorial: Creating High-Detail FS Ground...

Tutorial: Creating High-Detail FS Ground Polygons
Making truly immersive FS scenery encompasses several different types of design. There’s terrain modeling; using
either aerial photos or the default FS vector codes to make a landscape that’s as close as possible to the real thing
(rivers, coastlines, mountains, forests, etc.). Then you have object modeling, which is the creation of 3D models
such as hangars, fuel pumps, buildings, and so forth. To make top-notch scenery, you have to join the terrain with
the objects in a way that makes them appear as a unified whole, and that’s where a weird hybrid of terrain and
object modeling comes in: ground polygon modeling.
Disclaimer: The technique I’m about to show you is officially frowned upon by Microsoft, even though it’s used
in some fashion in almost every detailed payware scenery available. Why? Because although this type of design
works well, it uses methods native to FS2002, which is ancient by FS standards. The main reason we’re still doing
things this way is the lack of an alternative, officially-sanctioned way to get the same effect. Now that we know
FSX was the last version of a truly open flight sim from Microsoft, that doesn’t matter so much. Anyway, on with
the show...
Prerequisites for this Technique
Before creating your own ground polys using this method, you’ll need a few things.
Gmax 1.2 (available from http://www.turbosquid.com/gmax)
The FS2002 (FS8) Gmax game pack. If you kept your FS2002 discs, and you have the “Pro” version, you’re in luck.
Just look on the disc for the SDK bits and install the Gmax gamepack according to the instructions. Don’t have the
FS2002 discs? Looks like you’re headed to Ebay to try and find a copy.
If you can’t get the FS2002 game pack, you’ll have to use an another method of getting the raw X file into Make-
MDL. For more info on that, see this FSDeveloper Wiki article.
Image editing software that capable of generating alpha channels. I use Adobe Photoshop, although Paint Shop
Pro will work as well. You could also use or the popular freeware tool GIMP. Regardless of which image editor you
use, you’ll need to know how it works. My examples will use Photoshop, so you’ll need to be familiar enough with
your editor to translate what I’m saying if you’re using some other software.

Basic Concepts
The technique I’m going to show you is based on the concept of building up realistic airport pavement using lay-
ers. The idea is to use high-resolution, tiling images (much as FS does by default) for the base pavement, then
adding layers of detailing and a low-res overlay to make the poly appear more realistic. I’ll use the apron and
runway of my most recent project, FSAddon’s “100 Dollar Burger: Plum Island” for my example.

Step 1: Getting the Runway Info
In order to create the base ground poly in Gmax, I need to know the dimensions of the runway, it’s location, and
its rotation. Fortunately, that’s all very easy to get using one of several freeware tools. I use Airport Design Editor
(ADE), available from the Avsim library. After choosing the “Open Stock Airport” option from the menu and speci-
fying the ICAO code “2B2” for Plum Island, ADE decompiles the requested BGL and shows me the airport’s layout.
I double-click the runway to get the properties dialog:
Using the info found here, I make a new text document and write down the lat/lon, heading, and height/width of
the runway. Be sure to note whether the dimensions are in feet or metres! Once the text file has been saved, I quit
ADE.

Step 2: Creating the Base Poly in Gmax
Now I open Gmax and the text file I just created. Using the height, width, and heading data, I create a plane with
the correct dimensions, pointed north. To avoid headaches later, I make my runways a couple of feet (half a metre
or so) bigger than the stock runway. That way, I know it’ll cover it up entirely in the sim.
I’ve found the quickest way to create the poly is to select the Plane primitive and choose “keyboard Entry” from
the rollout. Then I type in the length and width (in this case 642.1m x 15.7m) and click “Create”.
IMPORTANT: In FSX, the world finally is round! That’s great for visuals, but it creates a problem for ground poly
design—a long, flat plane like a runway doesn’t conform to the curvature of the virtual Earth. A runway that’s
aligned perfectly with the ground in the middle will potentially be raised considerably on either end. To avoid
this problem, the Aces added a feature into FSX SP1. If you tessellate (sub-divide) your ground polygons so that
there’s no more than 100m between any two vertices, the scenery engine will automatically warp your poly to fit
the curvature of the Earth. In this example, the runway is 642.1m long and 15.7m wide, so I subdivided the length
into 7 sections (642m / 100m and change).

Step 3: Adding the Tiling Pavement Texture
The beauty of the layered method of ground poly creation is that you can use the best attributes of several kinds
of texturing. For my base asphalt, the primary goal is to keep the image crisp and sharp. That can only be accom-
plished by making the ratio of texture pixels per inch (or centimeter) as large as possible. The only way to do that
effectively for such a long polygon is to have my texture sheet cover the smallest area possible and repeat (tile) it
for the length of the runway.
Here’s the base concrete image, showing the alpha channel for edge blending in red:

In Gmax, I made a standard material using the base asphalt texture, and applied it to the poly along with a UVW
Map modifier, set to “Plane”. I use the width of the runway for the mapping width and copy it into the height slot
as well. That gives me a 1024x1024 texture that tiles seamlessly down the length of the runway. Let’s do the math
on why that looks so good: 1024 pixels are spread over 16m, for a ratio of a little over 60px/m!

Step 4: Exporting the Runway BGL
Here’s where it gets fun--time to export it to FSX. Remember, this technique uses the FS2002 game pack for
Gmax. I open my TXT file with the lat/lon/hdg of the runway and put it to one side.
Then, I select my runway poly in Gmax, and click “File --> Export Selected”. In the save file dialog, I give the poly a
descriptive name (in this case “rwy_base.bgl”) then select the scenery folder of the project within FSX. After sav-
ing the file, the MakeMDL options box pops up, allowing me to enter the coordinates of the runway and the head-
ing. It looks like this:
Using the info from the TXT file, I fill in the lat/lon and the heading. For View Distance, I enter 30,000 meters, the
max distance allowed. For Image Complexity, I choose “Sparse”.

With that entered, I go to the Options tab for the most important detail. I check the Keep Files tickbox, and un-
check the Crash tickbox. This will allow MakeMDL to save the two ASM files along with the BGL, which is crucial
for the next step.

Step 5: Tweaking the ASM Files
Creating a ground poly that doesn’t flicker and accepts shadows without throwing a shadow of its own requires a
couple of tweaks to the ASM file. I go into my scenery folder where I just saved the object and delete the BGL file,
leaving only “rwy_base.asm” and “rwy_base_0.asm”.
The first tweak is opening rwy_base.asm using notepad and finding this entry:
OBJECT_0_START label word
IFIN1 OBJECT_0_FAIL, image_complex, 1, 32767
ADDOBJ OBJECT_0_SCALE
SHADOW_CALL OBJECT_0_SCALE
To get rid of the shadow and create a true ground poly, I change it to this:
OBJECT_0_START label word
IFIN1 OBJECT_0_FAIL, image_complex, 1, 32767
ADDCAT OBJECT_0_SCALE, 8
I deleted the SHADOW_CALL line altogether, changed “ADDOBJ” to “ADDCAT”, and gave my poly a layer number by
including “, 8” after OBJECT_0_SCALE. I usually make my base layer number 8, then increment in multiples of 4 as
a add layers. Higher layer numbers display over the top of lower layer numbers without flickering.
With that tweak out of the way, I save and close the ASM file, then open “rwy_base_0.asm”. This is the file that
controls the geometry and texturing of of the object. I find this entry:
runway_base_top label BGLCODE
BGL_BEGIN 0800h ; version = 8.00
TEXTURE_LIST_BEGIN
TEXTURE_DEF TEXTURE_BUILDING, <255,255,255,255>, 11.112889, “2B2_RUNWAY.DDS” ; 0
This tells FS to use the “2B2_RUNWAY.BMP” file for the texture. Using a find/replace in notepad, I change all in-
stances of “.BMP” to “.DDS” so the sim will use my FSX DDS files for the runway instead. Then I change all instanc-
es of “TEXTURE_AIRCRAFT” to “TEXTURE_BUILDING”. This corrects an old bug whereby the compiler assumes
every model is an aircraft, which can screw up texture display at certain viewing distances. When I’m done, the
texture list now looks like this:

runway_base_top label BGLCODE
BGL_BEGIN 0800h ; version = 8.00
TEXTURE_LIST_BEGIN
TEXTURE_DEF TEXTURE_BUILDING, <255,255,255,255>, 11.112889, “2B2_RUNWAY.DDS” ; 0
TEXTURE_LIST_END
I save and close the file, then compile it. I’ve saved a shortcut to “bglc_9.exe” in my “send to” folder, so I can right-
click on rwy_base.asm (not _0.asm) and choose Send To --> bglc_9.exe. This recompiles my tweaked asm files into
rwy_base.bgl.
For more info on the FS2002 ground poly method, see http://www.fsdeveloper.com/wiki/index.php?title=Ground_
polygons_(ASM_tweak).

Step 6: Converting the Textures
With the model compiled, the only thing left to get it into FSX is to convert the PSD textures to FSX-native DDS
files. I open the PSD in ImageTool and set its format to DXT3. I also create mipmaps, then I save it as a DDS file
in my scenery’s “texture” directory, using the same filename as the original PSD I used in Gmax but with a DDS
extension.
All that’s left is to fire up FSX! Here’s the custom base runway poly. As you can see, the pebbling in the asphalt is
well-defined, and the alpha channel gives it a softer edge than the default runways. Now lets add the markings.

Step 7: Adding Markings
This part is fairly simple. I want to create small polygons atop the runway to hold my numbers and centerline
stripes. I use an aerial photo of the real runway to get the right look for the markings and the approximate length
and number of stripes, then I create them by hand in Photoshop. Below are the markings texture for the Plum Is-
land runway. The diffuse layer is on top, the alpha channel is below, so I can show how they relate to one another.
With alphas, black renders as transparent, white as fully opaque. Notice how I added some black grunge around
the edges of the numbers and markings in Photoshop to give them a worn look in FS. There are two sets of “28”,
because the unused end of rwy 28 at Plum Island has a faded, barely visible set of numbers, which are repeated
more clearly at the point where the runway begins now. You can see the Plum Island text that’s painted on the
runway near the center as well, and a single centerline stripe.

To add the markings to the poly, I created a new plane object and mapped the above texture to it, then used the
Unwrap UVW modifier to fit the runway numbers and scale it properly. In Gmax, it looks like this with markings
added:

I do the same for the centerline stripes. When all the markings have been added as plane polygons, I select them
all and group them as “markings”. It’s easier to select just the markings when they’re grouped this way. With the
markings group selected, I do the same File --> Export Selected routine as in Step 4 using the filename “rwy_
marks.bgl”, then tweak the ASM and _0.ASM files as in Step 5. The markings layer should lie on top of the base
asphalt, so I give it a layer number of 12 (asphalt base is layer 8, + 4). Then I compile the rwy_marks.asm file using
BGLC_9.EXE.
Now the runway looks like this in FSX:
Definitely better. Now let’s scuff it up a little.

Step 8: Adding Cracks and Patches
The runway at Plum Island has to endure some pretty harsh winters, followed by hot, steamy summers. The result
is some pretty severely cracked hard-top with lots of tar patches. I drew some cracks and patches by hand in Pho-
toshop.
The cracks may look random, but they’re specifically designed in three groups, indicated by the yellow lines (the
lines are for display only, they’re not in the actual texture). My plan is to create three polygons and map them to
each of the segments, then duplicate the planes and place them randomly up and down the length of the runway
for that heavily used and abused look.
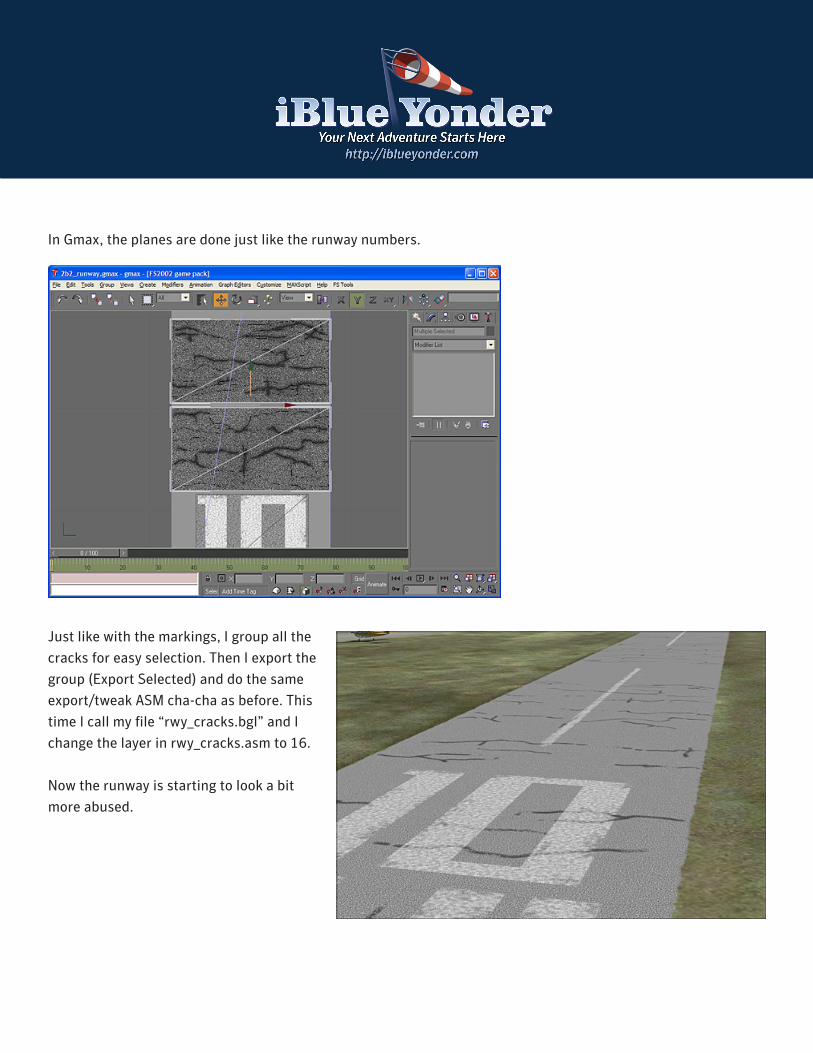
In Gmax, the planes are done just like the runway numbers.
Just like with the markings, I group all the
cracks for easy selection. Then I export the
group (Export Selected) and do the same
export/tweak ASM cha-cha as before. This
time I call my file “rwy_cracks.bgl” and I
change the layer in rwy_cracks.asm to 16.
Now the runway is starting to look a bit
more abused.

Step 9: Adding the Overlay
You can see from the image above that the runway looks fairly realistic now, but it still lacks the kind of shading
variation on the surface that you’d find on real surfaces. One of the main reasons for the layered technique I use
is to vary the levels of texture resolution to fit the task at hand. If I had wanted to make my base runway texture
show variation along its surface without the pattern visibly repeating, it would have taken an enormous tex-
ture – too big, in fact, for FS to display. My asphalt base was a 1024x1024 texture, covering a 16m square patch
of runway. To have an unbroken texture at this resolution for the whole runway length would have required a
1024x40960 image!
Fortunately, the variations in shading and color that are present in a real runway can be simulated at a much
lower resolution by placing a semi-transparent overlay on the high-res base.
To create my overlay, I started with an
aerial photo of the runway. It lacked
resolution, but it did have the proper
shading. In photoshop, I cropped the
image down to just the runway area,
then did a little sharpening and con-
trast enhancement to get the effect I
was after. Once it looked about right, I
chopped it into pieces horizontally so
I could arrange the narrow, long shape
into a set of slices that would fit on a
square texture. Remember, I subdivid-
ed the runway into sections when I first
made it, so each of these slices will
map to one of the subdivisions.
Here’s the texture I worked from. The
final texture had room left over at the
bottom, which I used for runway mark-
ings so I wouldn’t have to use another
sheet for them. The pink areas show
the alpha channel masking. Red equals
transparent in the Photoshop display.

In Gmax, I mapped the slices onto a copy of my base runway, one poly at a time, and named it “rwy_overlay”.
Here you can see a small piece of the overlay beneath the markings and cracks. In the actual model, the runway over-
laid all other layers, but it made it hard to demonstrate here, so I raised the cracks and markings above it by a little.
Selecting the “rwy_overlay” poly, I did the Export Selected two-step, again keeping the files. Then I edited the gener-
ated ASM files and gave the overlay a layer number of 20. To recap, the layers are:
Base runway: 8
Markings: 12
Cracks: 16
Overlay: 20

Once compiled with BGLC_9, the finished runway looks like this:
There you have it! It’s a hybrid of various texture resolutions, each purpose-built. When you’re on the runway, you
can clearly see the detailed pebbling in the asphalt, the wear and tear on the stripes and markings, and the cracks.
The somewhat blurry shading layer fools the eye and hides the repeating asphalt texture, giving it enough variation
in tone to make it seem as if it’s actually one huge texture. The shading overlay also maintains the illusion of a photo-
graphic texture when you’re at higher altitudes looking down.
That’s it! Technically, this isn’t a difficult method to master. It is, however, dependent on Photoshop artistry to create
the various layer elements. Once you’ve got the base polygon exported to FS and placed properly, the rest is just a
matter of adding layers, tweaking those ASM files, and recompiling.
To see more shots of Plum Island or to purchase, visit my blog at iblueyonder.com
Good luck!
Bill Womack


![Reconstructing Generalized Staircase Polygons with Uniform ... · For instance, spiral polygons [15] and tower polygons [8] (also called funnel polygons), can be reconstructed in](https://static.fdocuments.net/doc/165x107/5f649f88f0cc4c6c9f4cdf78/reconstructing-generalized-staircase-polygons-with-uniform-for-instance-spiral.jpg)

