Tutorial 3 Android Studio Github - Software Engineering at RITswen-101/projects/Tutorials/Tutorial 3...
14
SWEN-101: Software Engineering Freshman Seminar Tutorial 3: Android Studio – GitHub Intro 1 Android Studio – GitHub Intro Objectives: In this tutorial you will learn how to maintain your project using github. At the end of this session you will be able to: ● Create a git repository. ● Push code to git repo. ● Commit code changes to git repo. Part 1: Create a github account Github is a website for storing your project’s files. It is powered by Git, which, in its turn, is a version control system, a software to help you manage files in a versioned, distributed fashion and is optimized towards software source code files. It allows you to collaborate with other developers, review any changes they make and file or follow up with issues on the project’s files or resulting software’s behavior. Since Github is one of the Git repository hosting services which is most widely used, Android Studio provides built in Github integration. We will now upload our Hello World project to Github. 1. Go to ‘File’ - > ‘Settings’ -> ‘Version Control’ -> ‘GitHub’. 2. Since You don’t have a GitHub account, you will click on Sign Up link.
Transcript of Tutorial 3 Android Studio Github - Software Engineering at RITswen-101/projects/Tutorials/Tutorial 3...

SWEN-101: Software Engineering Freshman Seminar Tutorial 3: Android Studio – GitHub Intro
1
Android Studio – GitHub Intro
Objectives: In this tutorial you will learn how to maintain your project using github. At the end of this session you will be able to:
● Create a git repository. ● Push code to git repo. ● Commit code changes to git repo.
Part 1: Create a github account Github is a website for storing your project’s files. It is powered by Git, which, in its turn, is a version control system, a software to help you manage files in a versioned, distributed fashion and is optimized towards software source code files.
It allows you to collaborate with other developers, review any changes they make and file or follow up with issues on the project’s files or resulting software’s behavior.
Since Github is one of the Git repository hosting services which is most widely used, Android Studio provides built in Github integration. We will now upload our Hello World project to Github.
1. Go to ‘File’ - > ‘Settings’ -> ‘Version Control’ -> ‘GitHub’. 2. Since You don’t have a GitHub account, you will click on Sign Up link.

SWEN-101: Software Engineering Freshman Seminar Tutorial 3: Android Studio – GitHub Intro
2
3. Now click on ‘Sign Up’ button after which you should see above screen. 4. Fill in the form with your information (e.g. username, email, etc.) and click on ‘Create an
Account’.

SWEN-101: Software Engineering Freshman Seminar Tutorial 3: Android Studio – GitHub Intro
3
5. From this page select ‘Unlimited public repositories for free’. Note: Repository is nothing but a folder which will have all your project files. ‘Public Repository’ can be accessed by anyone where as ‘Private Repository’ can only be accessed by the user and authorized members. This difference is mainly for security purposes.

SWEN-101: Software Engineering Freshman Seminar Tutorial 3: Android Studio – GitHub Intro
4
6. This last step is fully optional, you can check the options which you want and submit or skip this step.
7. Now you should get this github welcome screen.
Note: Verify your email address before you proceed further. Log in to your email and check for email from GitHub requesting you to click on a link to verify the address, do it. #end_of_part_1

SWEN-101: Software Engineering Freshman Seminar Tutorial 3: Android Studio – GitHub Intro
5
Part 2: Connect your github account to Android Studio 1. Go to ‘Settings’ -> ‘Version Control’ -> ‘Github 2. Select Auth(Authentication) Type as ‘Password’ 3. Now enter your ‘Login’(Github Username) and Password 4. Click ‘Test’. 5. You will see ‘Connection Successful’ message in a pop-up window. Click ‘Ok’.
#end_of_part_2

SWEN-101: Software Engineering Freshman Seminar Tutorial 3: Android Studio – GitHub Intro
6
Part 3: Push your Project to Github 1. Click VCS in the menubar. 2. Go to ‘Import intro Version Control’ -> ‘Share Project on GitHub’
3. Now give a name to your Repository on github. You can also add description to your project. 4. Click on ‘Share’.
SWEN-101: Software Engineering Freshman Seminar Tutorial 3: Android Studio – GitHub Intro
7
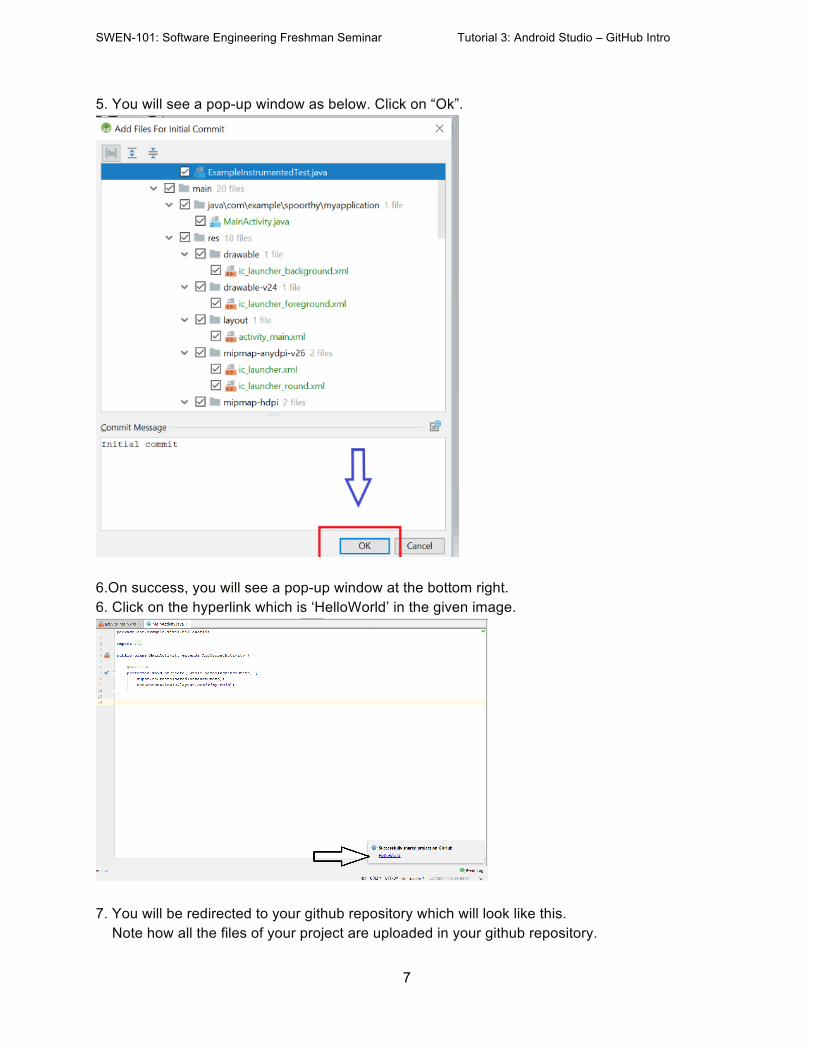
5. You will see a pop-up window as below. Click on “Ok”.
6.On success, you will see a pop-up window at the bottom right. 6. Click on the hyperlink which is ‘HelloWorld’ in the given image.
7. You will be redirected to your github repository which will look like this. Note how all the files of your project are uploaded in your github repository.

SWEN-101: Software Engineering Freshman Seminar Tutorial 3: Android Studio – GitHub Intro
8
#end_of_part_3

SWEN-101: Software Engineering Freshman Seminar Tutorial 3: Android Studio – GitHub Intro
9
Part 4: Saving changes to GitHub: Now that we’ve understood what repositories are, let's learn how to save (add, commit, and push) changes to a repository. First, go back to Android Studio.
1. Let’s make a change first. Open ‘activity_main.xml’ in Design Mode. 2. Double click on ‘Hello World’ text. Now you should see an ‘Attributes’ Window on the
right side of IDE. 3. Change the text to ‘Hello First Commit’ by typing in the box next to ‘text’ in ‘TextView’
and press enter.
Remember, this change won’t be automatically added to Github repository. The changes are saved in your local machine only. Committing in Github means saving all the changes you made in files at a particular time. To commit a change we need to first ‘add’ the file to ‘Staging Area’

SWEN-101: Software Engineering Freshman Seminar Tutorial 3: Android Studio – GitHub Intro
10
4. Right click on ‘Hello World’ and click on ‘Add’ as shown in the image. Now your change is ready for commit.

SWEN-101: Software Engineering Freshman Seminar Tutorial 3: Android Studio – GitHub Intro
11
5. Go to ‘Version Control’ tab -> ‘Local Changes’ tab. 6. Click on the ‘Commit’ button as shown in the image.

SWEN-101: Software Engineering Freshman Seminar Tutorial 3: Android Studio – GitHub Intro
12
7. The first section in ‘Commit Changes’ pop-up window shows the files in which you have made changes. You can select which files changes to get committed. By default all the files with changes will be selected. 8. Add a commit message which describes the commit in a meaningful way. 9. In “Diff” section you can see the difference between the same file’s state before and after you made the change. It is used to review your change before you finally commit it. 10. Click on ‘Commit’.
11. If you get following message just click on ‘Commit’ ignoring the warning. Since it is a very simple change, the warning won’t affect the functionality of the application and code.

SWEN-101: Software Engineering Freshman Seminar Tutorial 3: Android Studio – GitHub Intro
13
12. You should see a message at the bottom of the screen.
13. Click on ‘Log’. This will show you all the details about all the commits. To see details about a particular commit, double click on it.
14. Right click on the project name as shown in the image and go Git -> Repository -> 'Push'. This will upload all the changes to remote repository. Sometimes pushing takes time. You can see the progress at the bottom of the IDE (see below image). Once done you will get a pop-up message of successful push. To check if it had uploaded successfully or not, go to your github account, then go to your repository.

SWEN-101: Software Engineering Freshman Seminar Tutorial 3: Android Studio – GitHub Intro
14
#end_of_part_4 #end_of_tutorial_3