Turnitin Feedback Studio Guide - tsc.edu · 1 Turnitin Feedback Studio Guide Contents Enable...
12
1 Turnitin Feedback Studio Guide Contents Enable Turnitin Feedback Studio .................................................................................................................. 2 Elements of the Assignment Inbox ............................................................................................................... 3 Feedback Studio Interface ............................................................................................................................ 4 Page Navigation ............................................................................................................................................ 5 Feedback Layers ............................................................................................................................................ 5 Adding QuickMarks via Layers Panel ........................................................................................................ 5 Adding Feedback: Voice Comment ........................................................................................................... 6 Adding Feedback: Text Comment ............................................................................................................. 6 Deleting a Comment Made in Feedback Summary .................................................................................. 6 Commenting Tools ........................................................................................................................................ 7 Adding a QuickMark Comment ................................................................................................................. 7 Adding a Bubble Comment ....................................................................................................................... 8 Deleting Comments .................................................................................................................................. 9 Similarity Layers ............................................................................................................................................ 9 Match Percentage ................................................................................................................................... 10 All Sources ............................................................................................................................................... 10 Filter and Settings ................................................................................................................................... 10 Excluded Sources .................................................................................................................................... 11 Rubrics in Feedback Studio ......................................................................................................................... 11 Peer Review ............................................................................................................................................ 11 Gradebook Integration ............................................................................................................................... 12
Transcript of Turnitin Feedback Studio Guide - tsc.edu · 1 Turnitin Feedback Studio Guide Contents Enable...

1
Turnitin Feedback Studio Guide
Contents Enable Turnitin Feedback Studio .................................................................................................................. 2
Elements of the Assignment Inbox ............................................................................................................... 3
Feedback Studio Interface ............................................................................................................................ 4
Page Navigation ............................................................................................................................................ 5
Feedback Layers ............................................................................................................................................ 5
Adding QuickMarks via Layers Panel ........................................................................................................ 5
Adding Feedback: Voice Comment ........................................................................................................... 6
Adding Feedback: Text Comment ............................................................................................................. 6
Deleting a Comment Made in Feedback Summary .................................................................................. 6
Commenting Tools ........................................................................................................................................ 7
Adding a QuickMark Comment ................................................................................................................. 7
Adding a Bubble Comment ....................................................................................................................... 8
Deleting Comments .................................................................................................................................. 9
Similarity Layers ............................................................................................................................................ 9
Match Percentage ................................................................................................................................... 10
All Sources ............................................................................................................................................... 10
Filter and Settings ................................................................................................................................... 10
Excluded Sources .................................................................................................................................... 11
Rubrics in Feedback Studio ......................................................................................................................... 11
Peer Review ............................................................................................................................................ 11
Gradebook Integration ............................................................................................................................... 12
2
Enable Turnitin Feedback Studio 1. In the Assignment Details tab, change the submission type to External Tool and click Find.
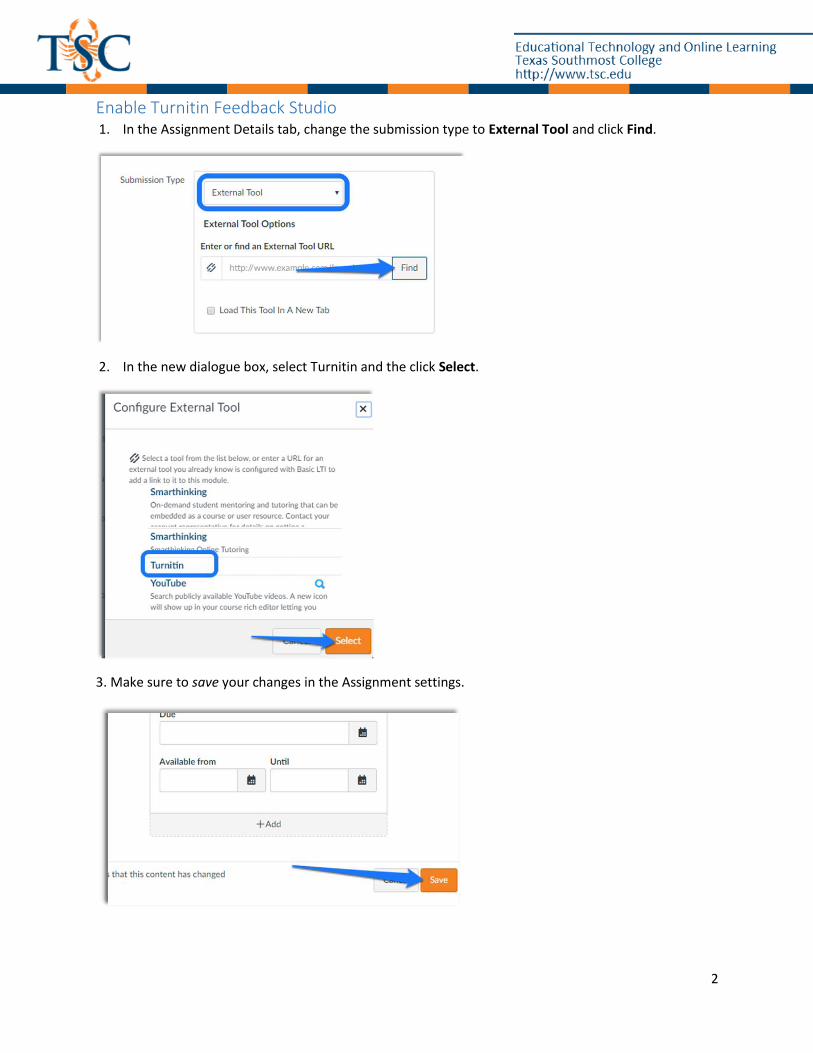
2. In the new dialogue box, select Turnitin and the click Select.
3. Make sure to save your changes in the Assignment settings.
3
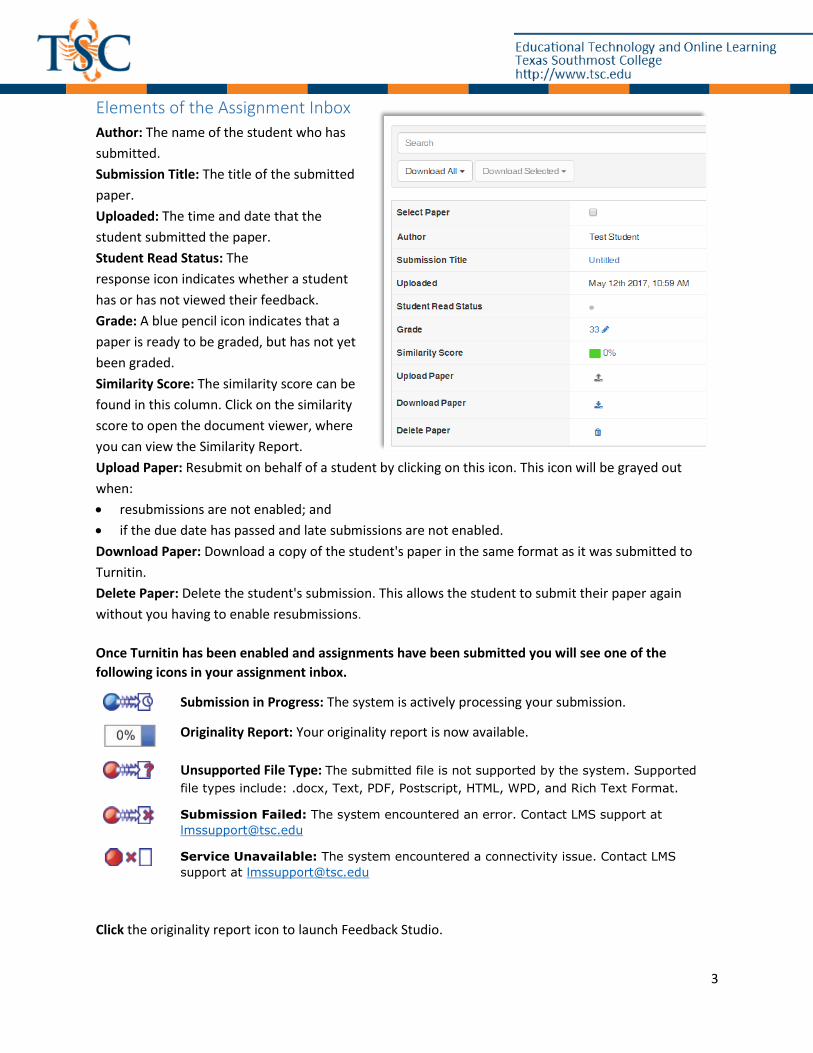
Elements of the Assignment Inbox
Author: The name of the student who has
submitted.
Submission Title: The title of the submitted
paper.
Uploaded: The time and date that the
student submitted the paper.
Student Read Status: The
response icon indicates whether a student
has or has not viewed their feedback.
Grade: A blue pencil icon indicates that a
paper is ready to be graded, but has not yet
been graded.
Similarity Score: The similarity score can be
found in this column. Click on the similarity
score to open the document viewer, where
you can view the Similarity Report.
Upload Paper: Resubmit on behalf of a student by clicking on this icon. This icon will be grayed out
when:
resubmissions are not enabled; and
if the due date has passed and late submissions are not enabled.
Download Paper: Download a copy of the student's paper in the same format as it was submitted to
Turnitin.
Delete Paper: Delete the student's submission. This allows the student to submit their paper again
without you having to enable resubmissions.
Once Turnitin has been enabled and assignments have been submitted you will see one of the
following icons in your assignment inbox.
Submission in Progress: The system is actively processing your submission.
Originality Report: Your originality report is now available.
Unsupported File Type: The submitted file is not supported by the system. Supported
file types include: .docx, Text, PDF, Postscript, HTML, WPD, and Rich Text Format.
Submission Failed: The system encountered an error. Contact LMS support at
Service Unavailable: The system encountered a connectivity issue. Contact LMS
support at [email protected]
Click the originality report icon to launch Feedback Studio.

4
Feedback Studio Interface Turnitin has released a major product upgrade that is now available at Texas Southmost College. The
new version of the service, called Turnitin Feedback Studio, offers all the functionalities of Turnitin, but
with a simplified, more intuitive interface designed for the modern classroom.
Main Components
1. Name: Student Name and file name.
2. Navigation: Used to switch between different assignments submitted for a particular Dropbox
basket. The arrows will take you to the next or previous assignment, the dropdown box allows you
to select a specific assignment.
3. Layers Panel: Used to toggle on/off the different viewing layers of Feedback Studio. Hides/shows
the different types of comments added to the submission.
4. Page Navigation: Used to change pages quickly. Click to expand a thumbnail gallery of each page.
5. Submission Information: contains submission date, word count, file extension, and other pertinent
information.
6. Page number and word count: Similar to MS Word.
Zoom In/Out, and Fit Page to screen.

5
Page Navigation You can toggle the page navigation view pane by clicking the tab on the left hand corner. This allows you
to view thumbnails of each page.
1. To changes pages, click on the desired thumbnail.
Feedback Layers In the blue Layers panel there are different options for adding feedback, these include QuickMarks,
Feedback Summary, and grading rubrics. The Layers panel is located on the right-hand side of the
screen.
QuickMark Tool (QM): Used for adding shortcut comments. (Ex. Citation Needed, Vague,
Del, etc.)
Feedback Summary: Used for adding a voice comment (3 minutes maximum) or general
text comment.
Rubric: Used for assigning a grading rubric. The default rubric includes elements such as,
development, audience, and cohesion.
Adding QuickMarks via Layers Panel 1. Click the icon in the Layers panel.
2. Drag the appropriate QuickMark onto a sentence, word, etc.
3. Optional: click on the new QM to add text description.
Click out of the QM text area to save the comment.

6
Adding Feedback: Voice Comment 1. Click the icon in the Layers panel.
2. Click on the icon to begin recording.
If prompted, allow turnitin.com to
enable your microphone.
3. The voice comment will be begin recording
automatically.
To pause the recording click the again.
To stop the recording click the icon.
To save the comment click the icon.
Adding Feedback: Text Comment 1. Select the icon in the Layers panel.
2. Click in the text comment field to begin typing.
3. Click out of the text field area to save your
comment.
Deleting a Comment Made in Feedback
Summary 1. Click the icon.
2. Click the icon on the feedback comment you
want to delete.

7
Commenting Tools The in-context marking tool allows you to choose between the different marking types that Turnitin has
to offer. To access the in-context marking tool click anywhere on the page and select the appropriate
tool.
QuickMark Tool (QM): Used for adding shortcut comments. (Ex. Citation Needed,
Vague, Del, etc.) More options are displayed below.
Comment Tool: Used for adding text comments, as you would using MS Word.
Comments created with this tool can be converted to QuickMarks.
In-Line Tool: Used for adding text over the document. Similar to adding a Text Box in MS
Word.
Strike Tool: Used for striking-through text. This tool will add a strike line through the text
selected.
Adding a QuickMark Comment 1. Select the text you wish to add the
comment to.
2. Click the icon.
3. Select on of the preset QM
comments or choose a specific
comment type from the dropdown menu.
8
4. Optional: Add text to the QM to clarify any adjustments needed.
To add text to a QM click in “Add comment” area and begin typing.
To add a hyperlink to text in the comment area, select the text you want to hyperlink and click
the icon. Copy and paste the URL address into the new dialog box. Click “OK”.
5. Click any area outside of the QM dialog box to apply the QM to the text.
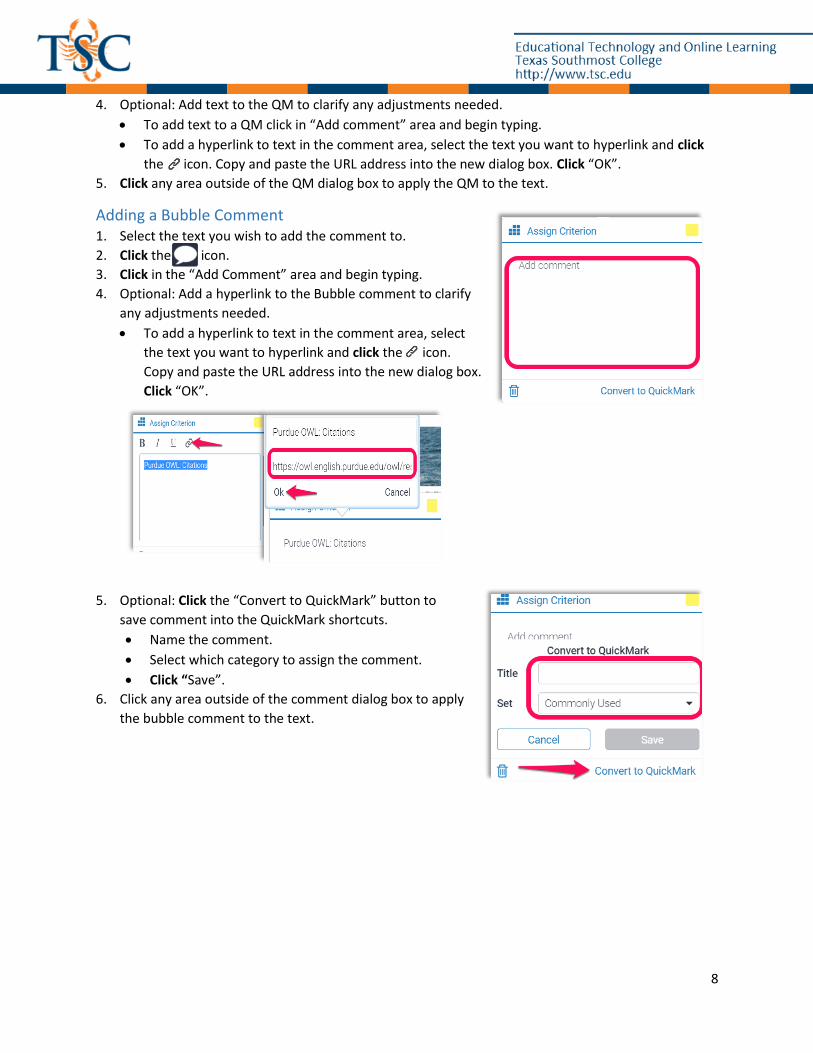
Adding a Bubble Comment 1. Select the text you wish to add the comment to.
2. Click the icon.
3. Click in the “Add Comment” area and begin typing.
4. Optional: Add a hyperlink to the Bubble comment to clarify
any adjustments needed.
To add a hyperlink to text in the comment area, select
the text you want to hyperlink and click the icon.
Copy and paste the URL address into the new dialog box.
Click “OK”.
5. Optional: Click the “Convert to QuickMark” button to
save comment into the QuickMark shortcuts.
Name the comment.
Select which category to assign the comment.
Click “Save”.
6. Click any area outside of the comment dialog box to apply
the bubble comment to the text.
9
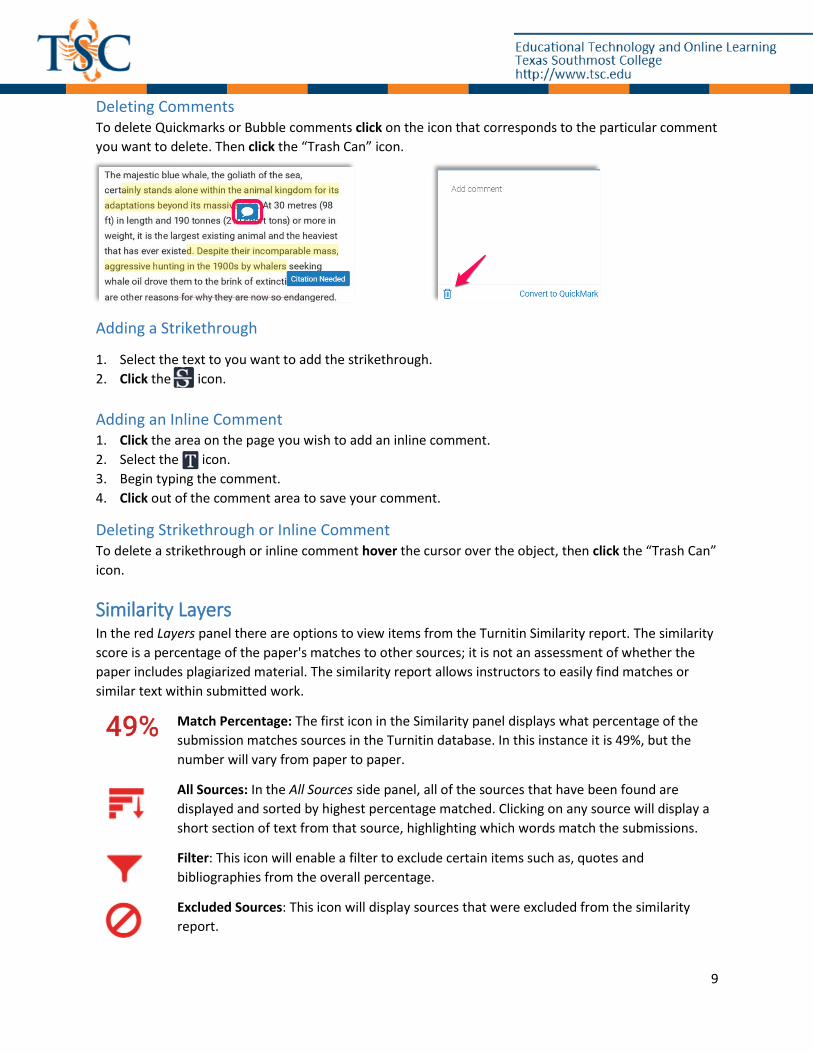
Deleting Comments To delete Quickmarks or Bubble comments click on the icon that corresponds to the particular comment
you want to delete. Then click the “Trash Can” icon.
Adding a Strikethrough
1. Select the text to you want to add the strikethrough.
2. Click the icon.
Adding an Inline Comment 1. Click the area on the page you wish to add an inline comment.
2. Select the icon.
3. Begin typing the comment.
4. Click out of the comment area to save your comment.
Deleting Strikethrough or Inline Comment To delete a strikethrough or inline comment hover the cursor over the object, then click the “Trash Can”
icon.
Similarity Layers In the red Layers panel there are options to view items from the Turnitin Similarity report. The similarity
score is a percentage of the paper's matches to other sources; it is not an assessment of whether the
paper includes plagiarized material. The similarity report allows instructors to easily find matches or
similar text within submitted work.
Match Percentage: The first icon in the Similarity panel displays what percentage of the
submission matches sources in the Turnitin database. In this instance it is 49%, but the
number will vary from paper to paper.
All Sources: In the All Sources side panel, all of the sources that have been found are
displayed and sorted by highest percentage matched. Clicking on any source will display a
short section of text from that source, highlighting which words match the submissions.
Filter: This icon will enable a filter to exclude certain items such as, quotes and
bibliographies from the overall percentage.
Excluded Sources: This icon will display sources that were excluded from the similarity
report.

10
** A hyperlink to the source is available in the pop-up box.
Match Percentage The text highlighted in red will appear in the overall percentage of non-original work.
All Sources The All Sources view pane will display the different sources where you can find matching text. A list of
sources will be displayed in descending order by percentage. Click the sources to view a segment of the
text source.
Filter and Settings The filter in Feedback Studio lets you exclude certain sources from
the overall similarity score. Check the box you want to add to the
filter. This will exclude the selected criterion from the originality
report.
1. Click on the icon.
2. Checkmark the criterion you want excluded.
3. Click “Apply Changes”.
4. Optional: Run a new originality report by
clicking “New Report”.
11
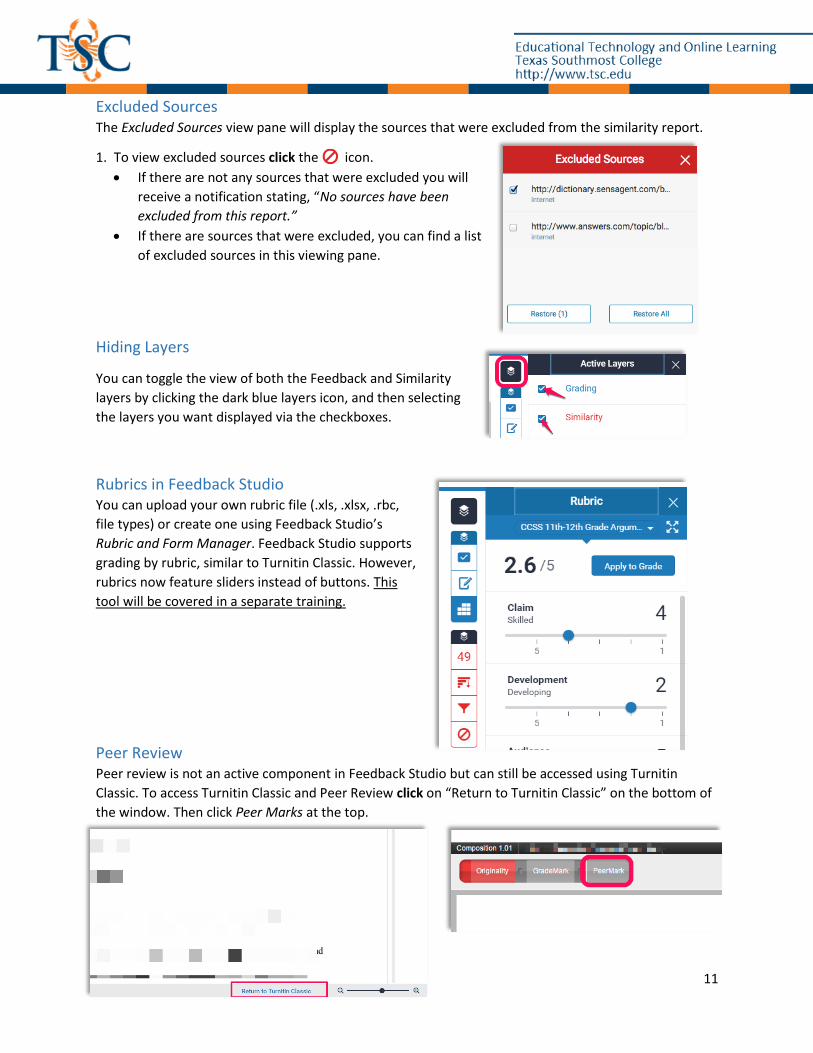
Excluded Sources The Excluded Sources view pane will display the sources that were excluded from the similarity report.
1. To view excluded sources click the icon.
If there are not any sources that were excluded you will
receive a notification stating, “No sources have been
excluded from this report.”
If there are sources that were excluded, you can find a list
of excluded sources in this viewing pane.
Hiding Layers
You can toggle the view of both the Feedback and Similarity
layers by clicking the dark blue layers icon, and then selecting
the layers you want displayed via the checkboxes.
Rubrics in Feedback Studio You can upload your own rubric file (.xls, .xlsx, .rbc,
file types) or create one using Feedback Studio’s
Rubric and Form Manager. Feedback Studio supports
grading by rubric, similar to Turnitin Classic. However,
rubrics now feature sliders instead of buttons. This
tool will be covered in a separate training.
Peer Review Peer review is not an active component in Feedback Studio but can still be accessed using Turnitin
Classic. To access Turnitin Classic and Peer Review click on “Return to Turnitin Classic” on the bottom of
the window. Then click Peer Marks at the top.

12
Gradebook Integration Feedback Studio is integrated into Canvas. This allows for all grade changes made in Feedback Studio to
be automatically import into Canvas. Any grade changes made in Feedback Studio should auto fill into
your gradebook. If this is not the case please try the following steps.
1. Click Speed Grader™ in your assignment settings.
2. Click the similarity report.
3. A new tab will open with Feedback Studio. Close this tab and refresh your Speed Grader™ page.
4. The grades should now be populated in your gradebook.
If you cannot make changes to grades in Feedback Studio you may need to setup the gradebook in Feedback Studio. For
assistance, contact ET&OL department at [email protected] .