TurningPoint®2008 - Nanyang Technological University · o Countdown –add a countdown timer to...
10
Page 1 of 10 TurningPoint®2008 Version 4.5.1.2243 CONTENTS INSTALLING TURNINGPOINT 2008 SOFTWARE ............................................. 2 INSERTING A SLIDE OR CREATING INTERACTIVE CONTENT ..................... 2 SETTING CORRECT ANSWERS ...................................................................... 5 ADJUSTING TURNINGPOINT SETTINGS .......................................................... 5 SETTING UP YOUR HARDWARE ...................................................................... 6 CHOOSING YOUR PARTICIPANT OPTIONS .................................................... 9 RUNNING A TURNINGPOINT PRESENTATION ............................................... 10
Transcript of TurningPoint®2008 - Nanyang Technological University · o Countdown –add a countdown timer to...

Page 1 of 10
TurningPoint®2008
Version 4.5.1.2243
CONTENTS
INSTALLING TURNINGPOINT 2008 SOFTWARE ............................................. 2
INSERTING A SLIDE OR CREATING INTERACTIVE CONTENT ..................... 2
SETTING CORRECT ANSWERS ...................................................................... 5
ADJUSTING TURNINGPOINT SETTINGS .......................................................... 5
SETTING UP YOUR HARDWARE ...................................................................... 6
CHOOSING YOUR PARTICIPANT OPTIONS .................................................... 9
RUNNING A TURNINGPOINT PRESENTATION ............................................... 10

Page 2 of 10
INSTALLING TURNINGPOINT 2008 SOFTWARE
TurningPoint 2008 version 4.5 can be installed by downloading the latest version from the Clickers website. 1. Before you start the installation you must ensure that you are logged onto your computer as a local
computer administrator. 2. You could download TurningPoint 2008 by going to the “Clickers” website,
http://www.ntu.edu.sg/cits/lsa/clickers/Pages/default.aspx 3. Click on the link to start downloading TurningPoint 2008. 4. A File Download window will appear, click on Save, then browse to a suitable location on your computer and
click Save to start the download. 5. When the download is complete, double-click the “Setup” icon to start the installation. 6. Select “Run” to start the InstallShield wizard. 7. A welcome screen will appear on the InstallShield wizard. 8. Click Next to continue with the installation. 9. If you accept the terms of the License Agreement, select the button labelled I accept the terms in the
license agreement. 10. Enter your User Name and Organisation in the customer information window and then click Next to
continue. 11. Click Install, TurningPoint will now begin installing. 12. Once TurningPoint has installed the required files, select Launch TurningPoint if you would like to
immediately open the program. To open TurningPoint at a later time, you will need to double-click on the TurningPoint icon on your desktop or open the program through your Start Menu.
13. Click Finish when the process is complete. 14. During the installation process, if you were prompted to install necessary components (i.e. Microsoft .NET
Framework), you will need to restart your computer.
INSERTING A SLIDE OR CREATING INTERACTIVE CONTENT
1. Open TurningPoint 2008 from the icon on your desktop or the Start Menu.
2. To access TurningPoint, open the TurningPoint 2008 Ribbon which is located on the far right of your Ribbon
menu (In the latest version, Office will switch to the TurningPoint tab automatically and appear as the first
tab).
Reset Data
Save Session Data
Convert to Picture Slide
Generate Reports, Import questions from Word and
Adjust TurningPoint Settings. Import pre-set MCQs from MS Word to TurningPoint Help
Display TurningPoint Licensing Information
Open an Existing Session
Insert a Question
Slide
Insert Chart, Response Counters, Answer Now
Indicators and Countdown
Displays Selected
Input Device
Manage Participant
Lists

Page 3 of 10
3. To add a TurningPoint slide to your presentation, select Insert Slide from the TurningPoint Ribbon.
4. Choose a slide from the menu that appears.
Your choices include:
Creating a basic question slide by choosing a chart
type.
Creating a competition by adding Leader Boards or a Team
Assignment slide
Pre-formatted questions and answers.
Using a TurningPoint Special Purpose slide to enhance a
presentation.

Page 4 of 10
5. To create a basic presentation, start by choosing one of the chart slides (in the top section of the menu.) This will insert the chosen slide into the presentation. You may now add a question and answer choices, accordingly.
6. You may enter up to 10 possible
answers. 7. You can add objects into your slide by using the Insert Object button on the TurningPoint Ribbon.
The Insert Object menu gives you the ability to add the following objects: o Charts – select this option to change the chart type on your slide.
o Animated 2D/3D Charts – change your chart to an animated chart.
o Countdown – add a countdown timer to your slide.
o Grid – add a table that will illustrate individual incoming responses.
o Answer Now – add an answer now indicator to your slide.
o Response Counter – add a counter that will count your incoming
responses to your slide.
o Correct Answer Indicator – demonstrate to your audience which
answer was correct before proceeding to the next slide.
o Stats – add statistical data to your slide.
o Text Message – this can be used with ResponseWare, to send a
text message to the audience.

Page 5 of 10
SETTING CORRECT ANSWERS
1. When entering answer choices, an Answer Values Task Pane displays a list of the answers and their
current answer values on the right side of the screen.
ADJUSTING TURNINGPOINT SETTINGS
1. You can adjust your TurningPoint Settings to customise your
presentation. Example: you can change chart colours, point
values or whatever you feel necessary. (See below images.)
2. Select a value from
the drop down menu
for each of the
answer options.
Your choices include:
No Value
Correct
Incorrect
NOTE:
If you choose correct or
incorrect, TurningPoint
will automatically assign
it the point value chosen
within the TurningPoint
Settings.

Page 6 of 10
2. Select the All Settings button from the bottom right of the Settings window if you want to view all the
available settings.
SETTING UP YOUR HARDWARE
1. Plug in your TurningPoint 2008 Receiver.
2. Open TurningPoint from the icon on the Desktop or the
Start menu.
3. Click on Tools.
4. Select Settings.
Note:
The receiver should always be connected
BEFORE you open TurningPoint.
Page 7 of 10
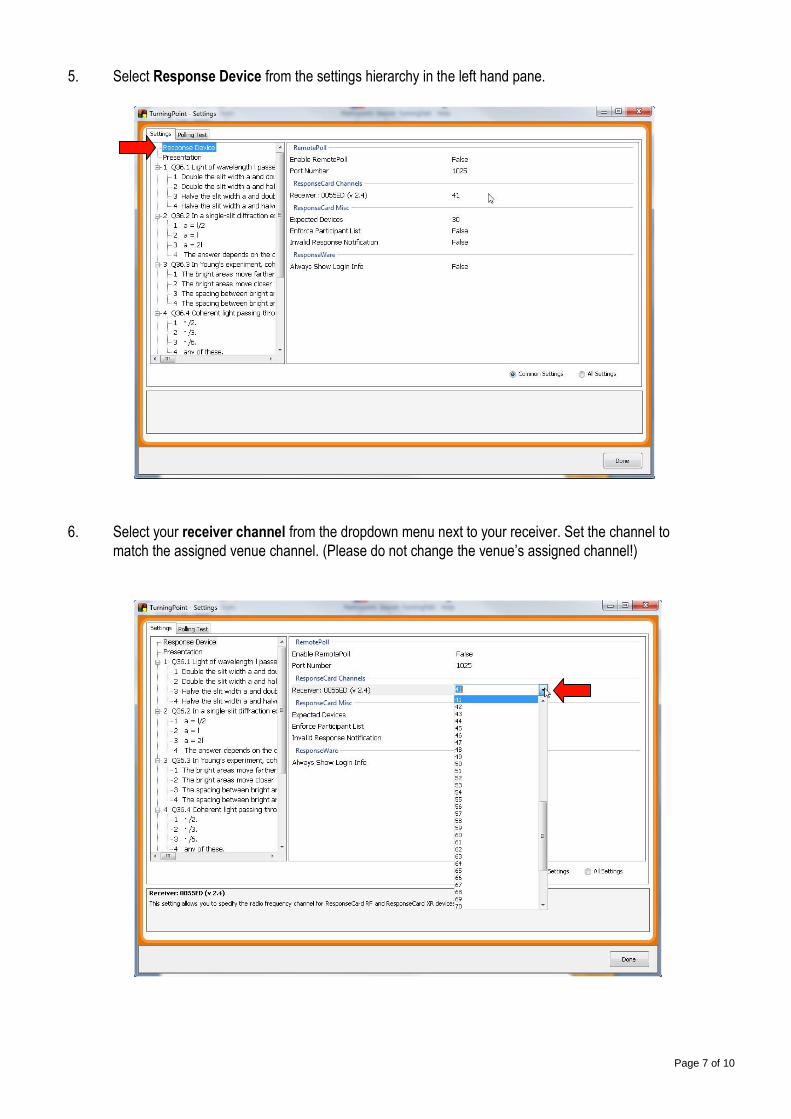
5. Select Response Device from the settings hierarchy in the left hand pane.
6. Select your receiver channel from the dropdown menu next to your receiver. Set the channel to
match the assigned venue channel. (Please do not change the venue’s assigned channel!)

Page 8 of 10
7. Select the Polling Test tab.
TurningPoint displays the Polling
Test screen. Use this screen to
verify that TurningPoint can
receive responses from the
devices.
8. Click Start Test button.
TurningPoint is now ready to
accept responses from the
response devices.
9. Press a key on each response
device to be used. TurningPoint displays the Device ID, Channel and the key entry from each response device in the order in which they were tested.
10. Select the End Test button. TurningPoint ends Polling Test.
11. Select the Done button. The response device testing is now complete
Page 9 of 10
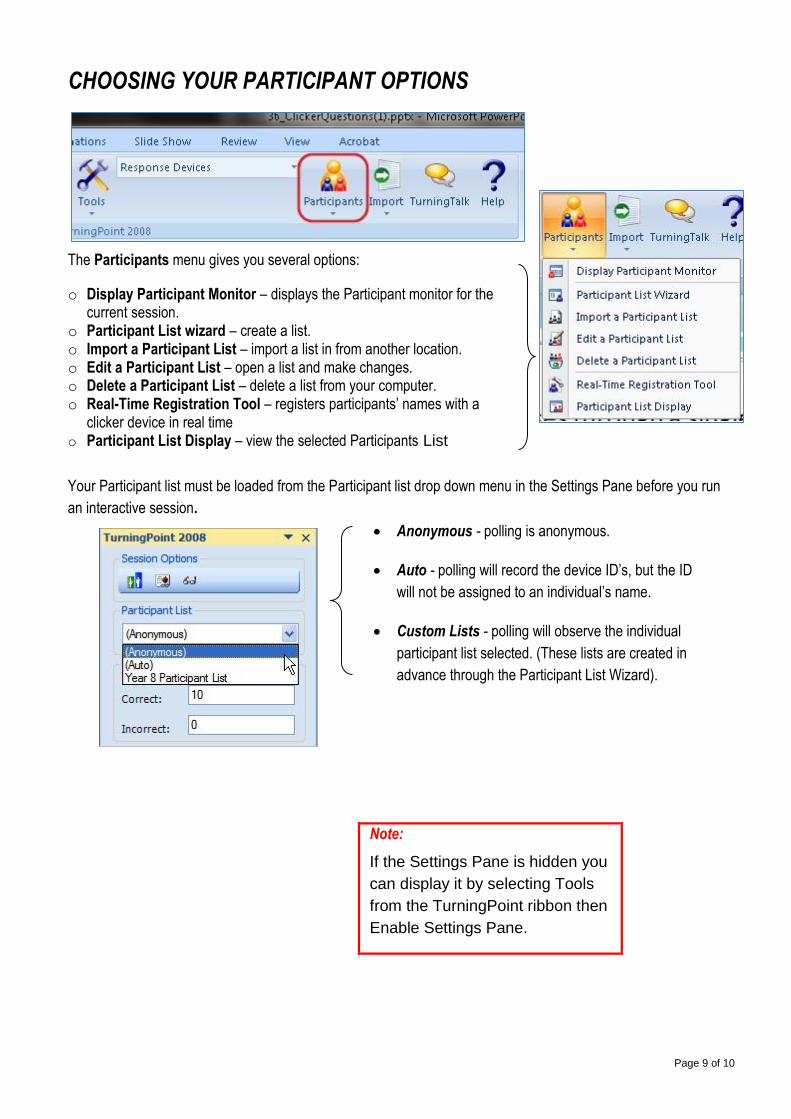
CHOOSING YOUR PARTICIPANT OPTIONS
Your Participant list must be loaded from the Participant list drop down menu in the Settings Pane before you run
an interactive session.
Anonymous - polling is anonymous.
Auto - polling will record the device ID’s, but the ID
will not be assigned to an individual’s name.
Custom Lists - polling will observe the individual
participant list selected. (These lists are created in
advance through the Participant List Wizard).
Note:
If the Settings Pane is hidden you
can display it by selecting Tools
from the TurningPoint ribbon then
Enable Settings Pane.
The Participants menu gives you several options:
o Display Participant Monitor – displays the Participant monitor for the current session.
o Participant List wizard – create a list. o Import a Participant List – import a list in from another location. o Edit a Participant List – open a list and make changes. o Delete a Participant List – delete a list from your computer. o Real-Time Registration Tool – registers participants’ names with a
clicker device in real time o Participant List Display – view the selected Participants List
Page 10 of 10
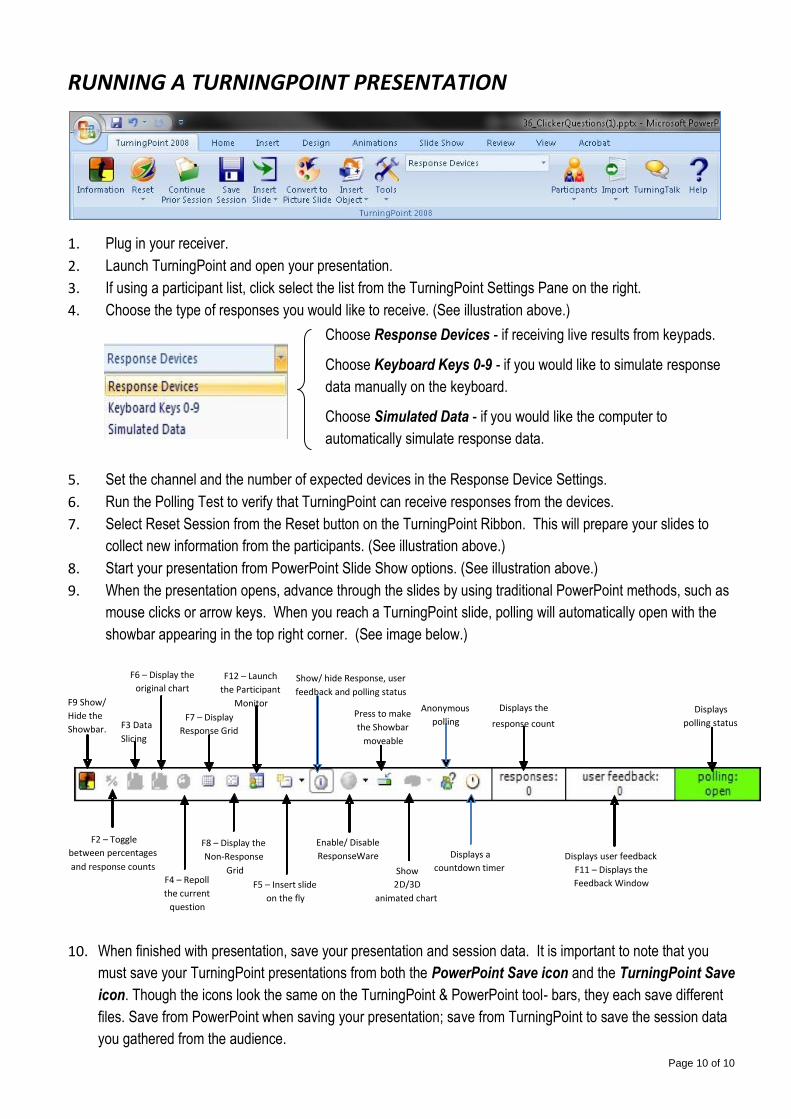
1. Plug in your receiver.
2. Launch TurningPoint and open your presentation.
3. If using a participant list, click select the list from the TurningPoint Settings Pane on the right.
4. Choose the type of responses you would like to receive. (See illustration above.)
Choose Response Devices - if receiving live results from keypads.
Choose Keyboard Keys 0-9 - if you would like to simulate response
data manually on the keyboard.
Choose Simulated Data - if you would like the computer to
automatically simulate response data.
5. Set the channel and the number of expected devices in the Response Device Settings.
6. Run the Polling Test to verify that TurningPoint can receive responses from the devices.
7. Select Reset Session from the Reset button on the TurningPoint Ribbon. This will prepare your slides to
collect new information from the participants. (See illustration above.)
8. Start your presentation from PowerPoint Slide Show options. (See illustration above.)
9. When the presentation opens, advance through the slides by using traditional PowerPoint methods, such as
mouse clicks or arrow keys. When you reach a TurningPoint slide, polling will automatically open with the
showbar appearing in the top right corner. (See image below.)
10. When finished with presentation, save your presentation and session data. It is important to note that you
must save your TurningPoint presentations from both the PowerPoint Save icon and the TurningPoint Save
icon. Though the icons look the same on the TurningPoint & PowerPoint tool- bars, they each save different
files. Save from PowerPoint when saving your presentation; save from TurningPoint to save the session data
you gathered from the audience.
RUNNING A TURNINGPOINT PRESENTATION
F9 Show/ Hide the Showbar. F3 Data
Slicing
F4 – Repoll the current
question
F5 – Insert slide on the fly
F2 – Toggle between percentages and response counts
F6 – Display the original chart
F7 – Display Response Grid
F8 – Display the Non-Response
Grid
Displays the response count
Displays polling status
Displays user feedback F11 – Displays the Feedback Window
Press to make the Showbar
moveable
F12 – Launch the Participant
Monitor
Show 2 D/3D
animated chart
Enable/ Disable ResponseWare
Show/ hide Response, user feedback and polling status
Anonymous polling
Displays a countdown timer