Turned Bottle Stoppers II - Central Illinois...
12
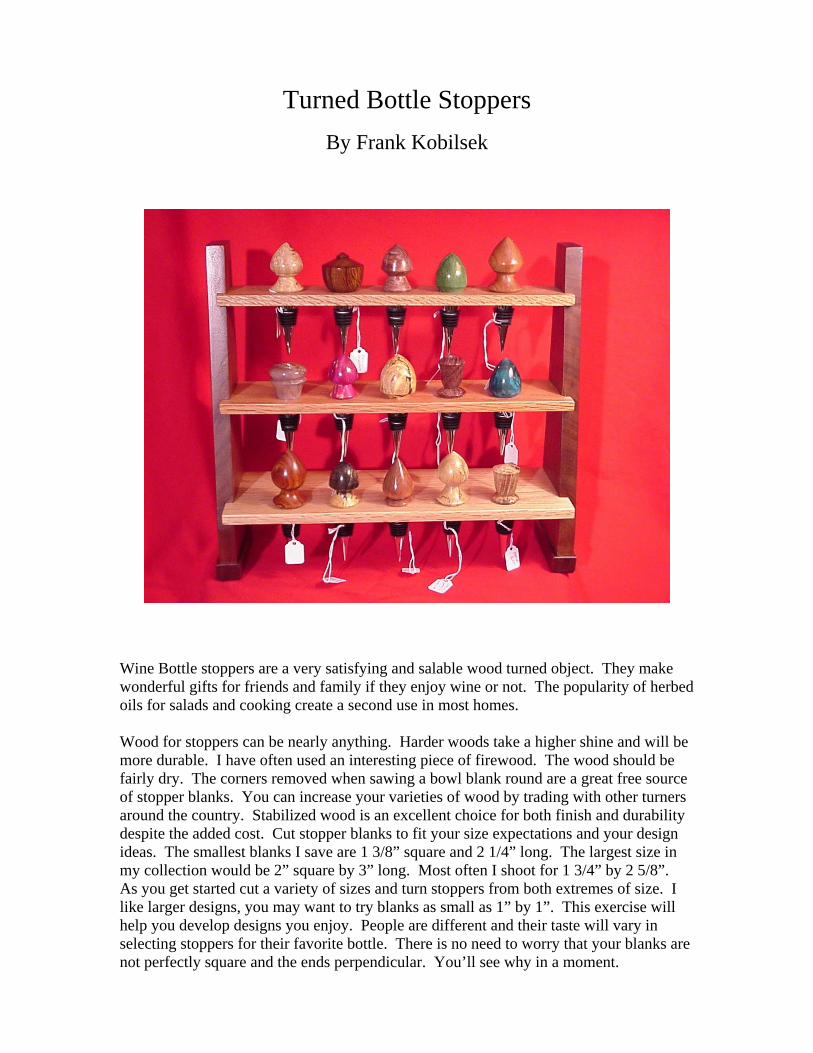
Turned Bottle Stoppers By Frank Kobilsek Wine Bottle stoppers are a very satisfying and salable wood turned object. They make wonderful gifts for friends and family if they enjoy wine or not. The popularity of herbed oils for salads and cooking create a second use in most homes. Wood for stoppers can be nearly anything. Harder woods take a higher shine and will be more durable. I have often used an interesting piece of firewood. The wood should be fairly dry. The corners removed when sawing a bowl blank round are a great free source of stopper blanks. You can increase your varieties of wood by trading with other turners around the country. Stabilized wood is an excellent choice for both finish and durability despite the added cost. Cut stopper blanks to fit your size expectations and your design ideas. The smallest blanks I save are 1 3/8” square and 2 1/4” long. The largest size in my collection would be 2” square by 3” long. Most often I shoot for 1 3/4” by 2 5/8”. As you get started cut a variety of sizes and turn stoppers from both extremes of size. I like larger designs, you may want to try blanks as small as 1” by 1”. This exercise will help you develop designs you enjoy. People are different and their taste will vary in selecting stoppers for their favorite bottle. There is no need to worry that your blanks are not perfectly square and the ends perpendicular. You’ll see why in a moment.
Transcript of Turned Bottle Stoppers II - Central Illinois...
Turned Bottle Stoppers
By Frank Kobilsek
Wine Bottle stoppers are a very satisfying and salable wood turned object. They make wonderful gifts for friends and family if they enjoy wine or not. The popularity of herbed oils for salads and cooking create a second use in most homes. Wood for stoppers can be nearly anything. Harder woods take a higher shine and will be more durable. I have often used an interesting piece of firewood. The wood should be fairly dry. The corners removed when sawing a bowl blank round are a great free source of stopper blanks. You can increase your varieties of wood by trading with other turners around the country. Stabilized wood is an excellent choice for both finish and durability despite the added cost. Cut stopper blanks to fit your size expectations and your design ideas. The smallest blanks I save are 1 3/8” square and 2 1/4” long. The largest size in my collection would be 2” square by 3” long. Most often I shoot for 1 3/4” by 2 5/8”. As you get started cut a variety of sizes and turn stoppers from both extremes of size. I like larger designs, you may want to try blanks as small as 1” by 1”. This exercise will help you develop designs you enjoy. People are different and their taste will vary in selecting stoppers for their favorite bottle. There is no need to worry that your blanks are not perfectly square and the ends perpendicular. You’ll see why in a moment.
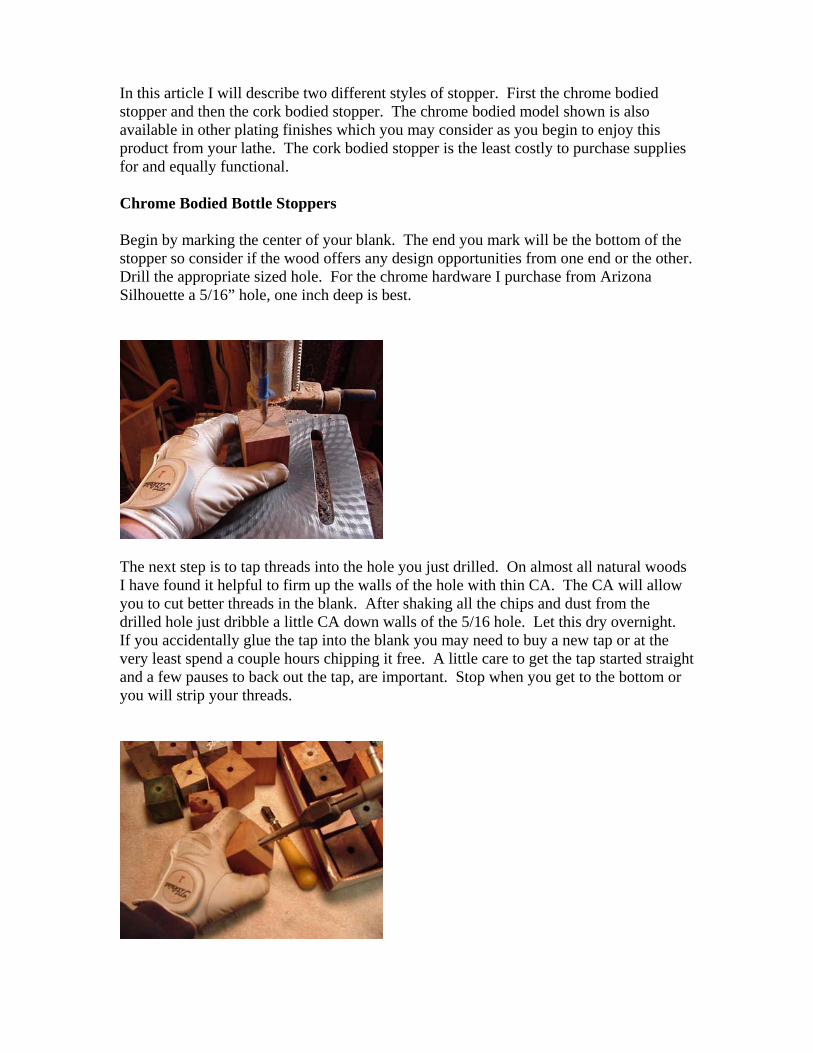
In this article I will describe two different styles of stopper. First the chrome bodied stopper and then the cork bodied stopper. The chrome bodied model shown is also available in other plating finishes which you may consider as you begin to enjoy this product from your lathe. The cork bodied stopper is the least costly to purchase supplies for and equally functional. Chrome Bodied Bottle Stoppers Begin by marking the center of your blank. The end you mark will be the bottom of the stopper so consider if the wood offers any design opportunities from one end or the other. Drill the appropriate sized hole. For the chrome hardware I purchase from Arizona Silhouette a 5/16” hole, one inch deep is best.
The next step is to tap threads into the hole you just drilled. On almost all natural woods I have found it helpful to firm up the walls of the hole with thin CA. The CA will allow you to cut better threads in the blank. After shaking all the chips and dust from the drilled hole just dribble a little CA down walls of the 5/16 hole. Let this dry overnight. If you accidentally glue the tap into the blank you may need to buy a new tap or at the very least spend a couple hours chipping it free. A little care to get the tap started straight and a few pauses to back out the tap, are important. Stop when you get to the bottom or you will strip your threads.
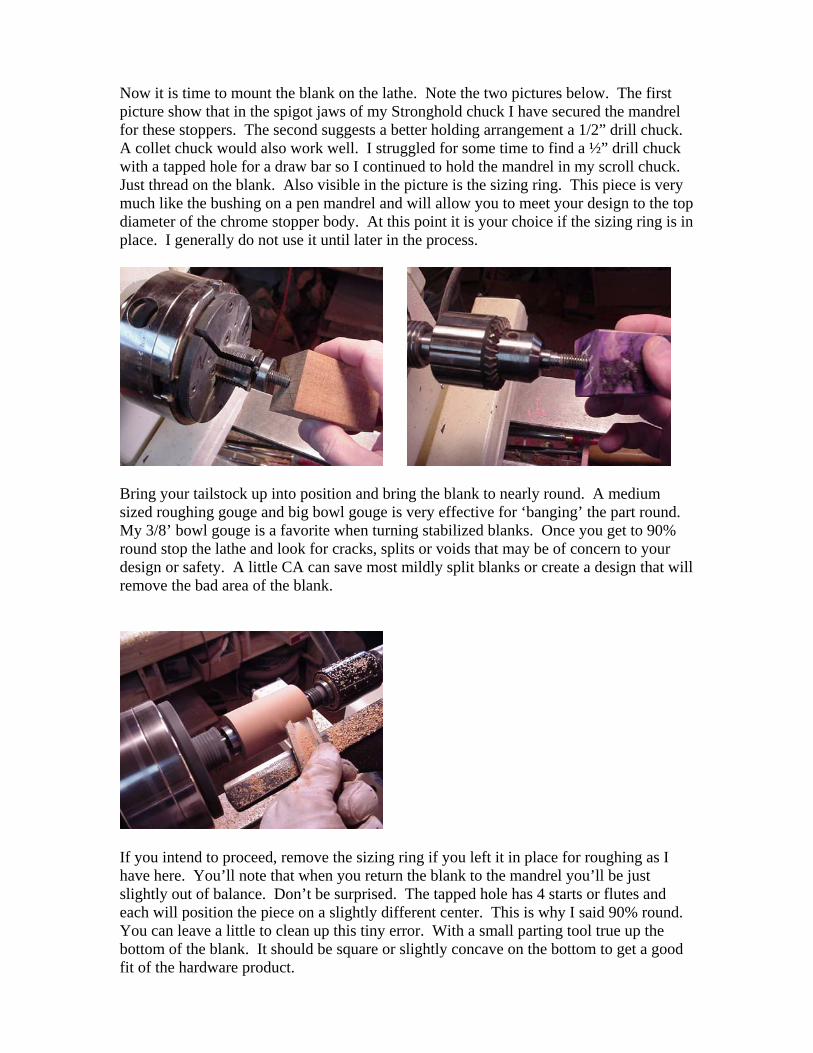
Now it is time to mount the blank on the lathe. Note the two pictures below. The first picture show that in the spigot jaws of my Stronghold chuck I have secured the mandrel for these stoppers. The second suggests a better holding arrangement a 1/2” drill chuck. A collet chuck would also work well. I struggled for some time to find a ½” drill chuck with a tapped hole for a draw bar so I continued to hold the mandrel in my scroll chuck. Just thread on the blank. Also visible in the picture is the sizing ring. This piece is very much like the bushing on a pen mandrel and will allow you to meet your design to the top diameter of the chrome stopper body. At this point it is your choice if the sizing ring is in place. I generally do not use it until later in the process.
Bring your tailstock up into position and bring the blank to nearly round. A medium sized roughing gouge and big bowl gouge is very effective for ‘banging’ the part round. My 3/8’ bowl gouge is a favorite when turning stabilized blanks. Once you get to 90% round stop the lathe and look for cracks, splits or voids that may be of concern to your design or safety. A little CA can save most mildly split blanks or create a design that will remove the bad area of the blank.
If you intend to proceed, remove the sizing ring if you left it in place for roughing as I have here. You’ll note that when you return the blank to the mandrel you’ll be just slightly out of balance. Don’t be surprised. The tapped hole has 4 starts or flutes and each will position the piece on a slightly different center. This is why I said 90% round. You can leave a little to clean up this tiny error. With a small parting tool true up the bottom of the blank. It should be square or slightly concave on the bottom to get a good fit of the hardware product.
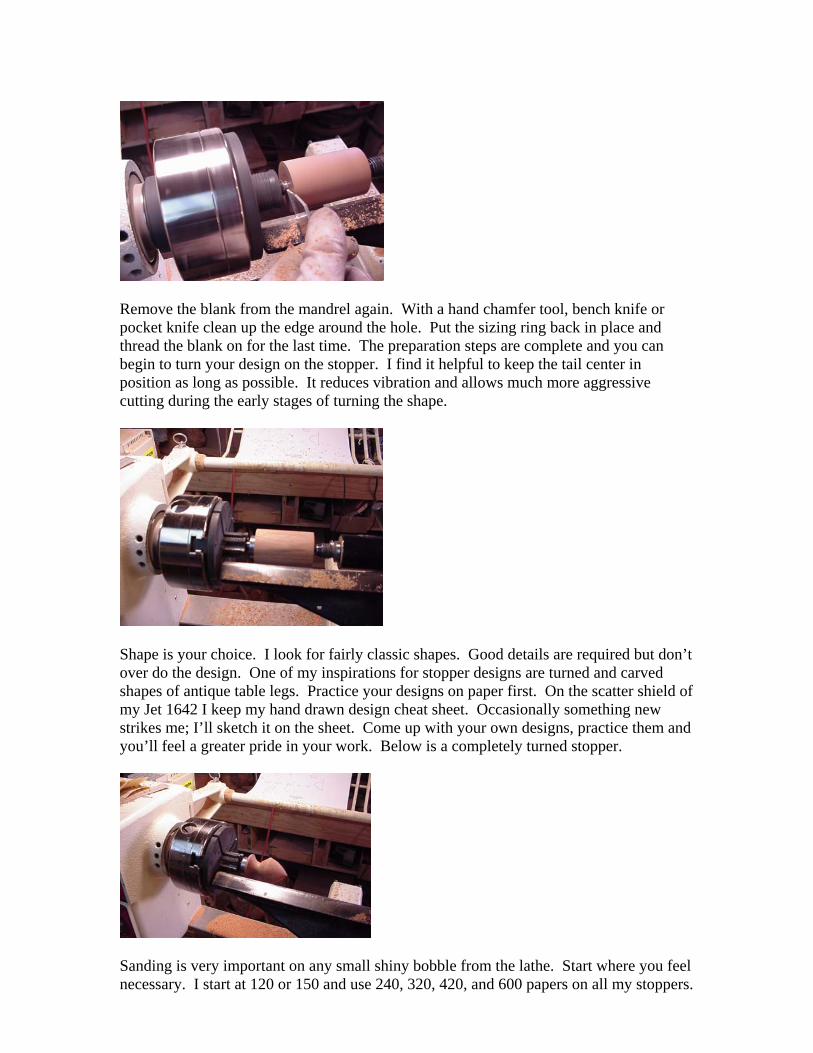
Remove the blank from the mandrel again. With a hand chamfer tool, bench knife or pocket knife clean up the edge around the hole. Put the sizing ring back in place and thread the blank on for the last time. The preparation steps are complete and you can begin to turn your design on the stopper. I find it helpful to keep the tail center in position as long as possible. It reduces vibration and allows much more aggressive cutting during the early stages of turning the shape.
Shape is your choice. I look for fairly classic shapes. Good details are required but don’t over do the design. One of my inspirations for stopper designs are turned and carved shapes of antique table legs. Practice your designs on paper first. On the scatter shield of my Jet 1642 I keep my hand drawn design cheat sheet. Occasionally something new strikes me; I’ll sketch it on the sheet. Come up with your own designs, practice them and you’ll feel a greater pride in your work. Below is a completely turned stopper.
Sanding is very important on any small shiny bobble from the lathe. Start where you feel necessary. I start at 120 or 150 and use 240, 320, 420, and 600 papers on all my stoppers.
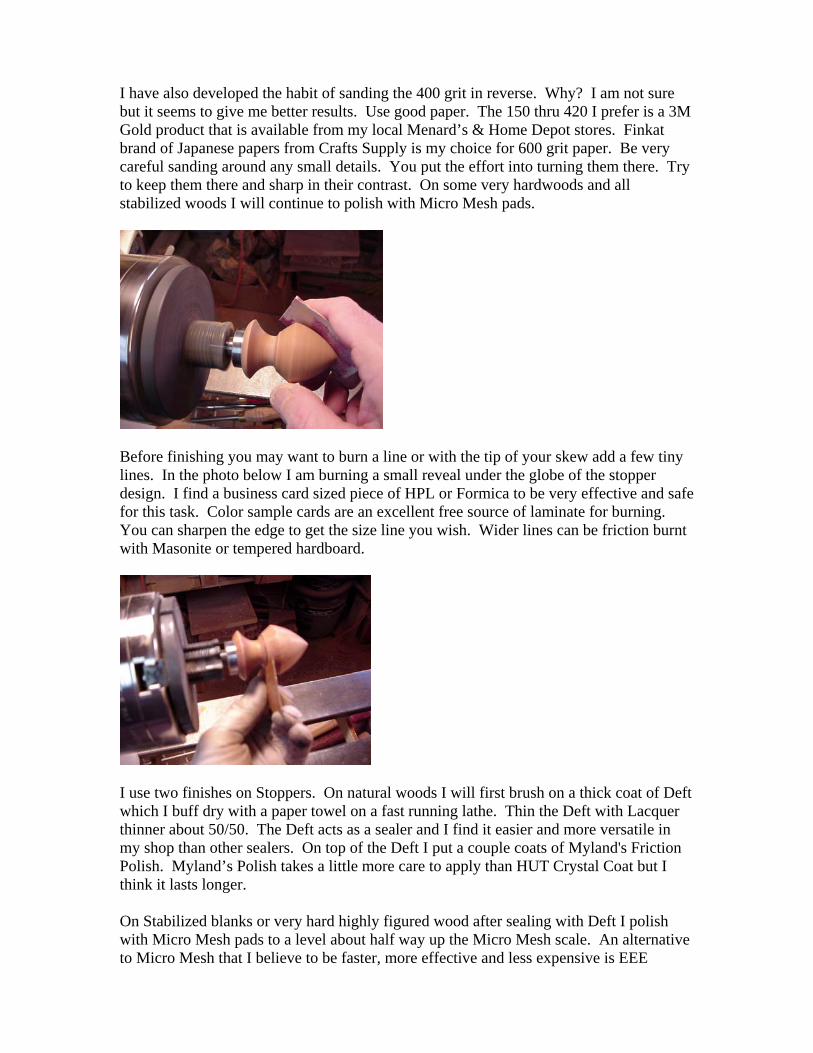
I have also developed the habit of sanding the 400 grit in reverse. Why? I am not sure but it seems to give me better results. Use good paper. The 150 thru 420 I prefer is a 3M Gold product that is available from my local Menard’s & Home Depot stores. Finkat brand of Japanese papers from Crafts Supply is my choice for 600 grit paper. Be very careful sanding around any small details. You put the effort into turning them there. Try to keep them there and sharp in their contrast. On some very hardwoods and all stabilized woods I will continue to polish with Micro Mesh pads.
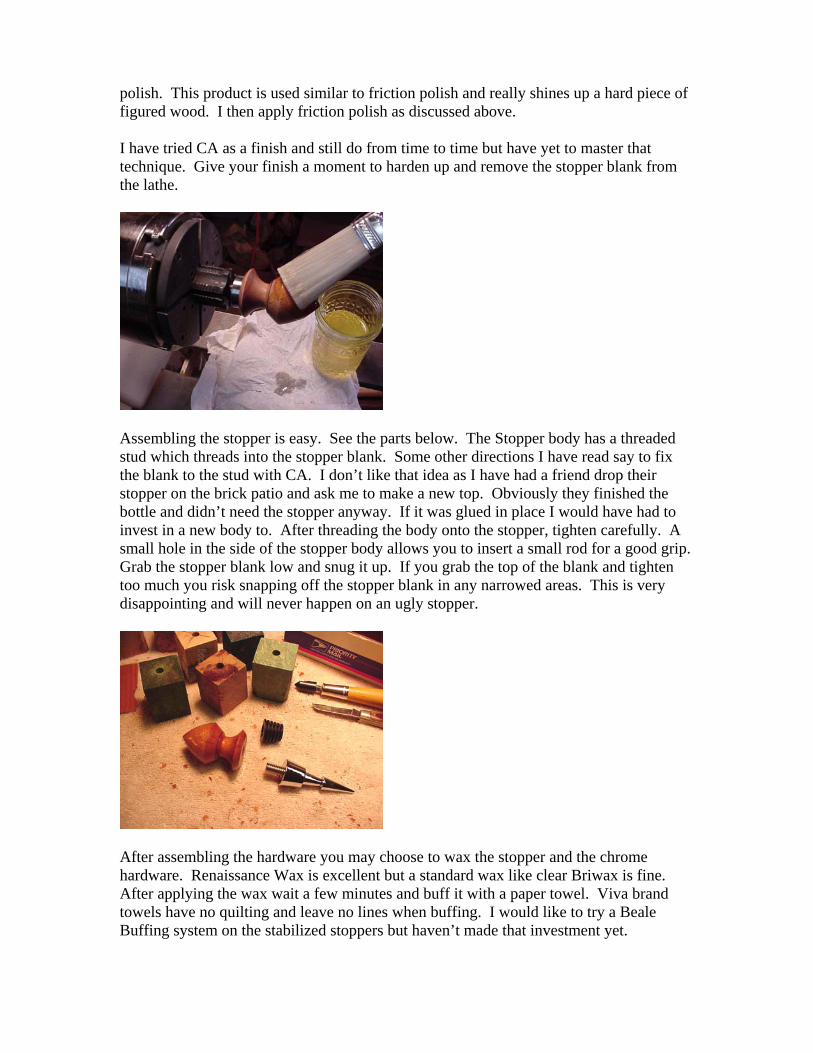
Before finishing you may want to burn a line or with the tip of your skew add a few tiny lines. In the photo below I am burning a small reveal under the globe of the stopper design. I find a business card sized piece of HPL or Formica to be very effective and safe for this task. Color sample cards are an excellent free source of laminate for burning. You can sharpen the edge to get the size line you wish. Wider lines can be friction burnt with Masonite or tempered hardboard.
I use two finishes on Stoppers. On natural woods I will first brush on a thick coat of Deft which I buff dry with a paper towel on a fast running lathe. Thin the Deft with Lacquer thinner about 50/50. The Deft acts as a sealer and I find it easier and more versatile in my shop than other sealers. On top of the Deft I put a couple coats of Myland's Friction Polish. Myland’s Polish takes a little more care to apply than HUT Crystal Coat but I think it lasts longer. On Stabilized blanks or very hard highly figured wood after sealing with Deft I polish with Micro Mesh pads to a level about half way up the Micro Mesh scale. An alternative to Micro Mesh that I believe to be faster, more effective and less expensive is EEE
polish. This product is used similar to friction polish and really shines up a hard piece of figured wood. I then apply friction polish as discussed above. I have tried CA as a finish and still do from time to time but have yet to master that technique. Give your finish a moment to harden up and remove the stopper blank from the lathe.
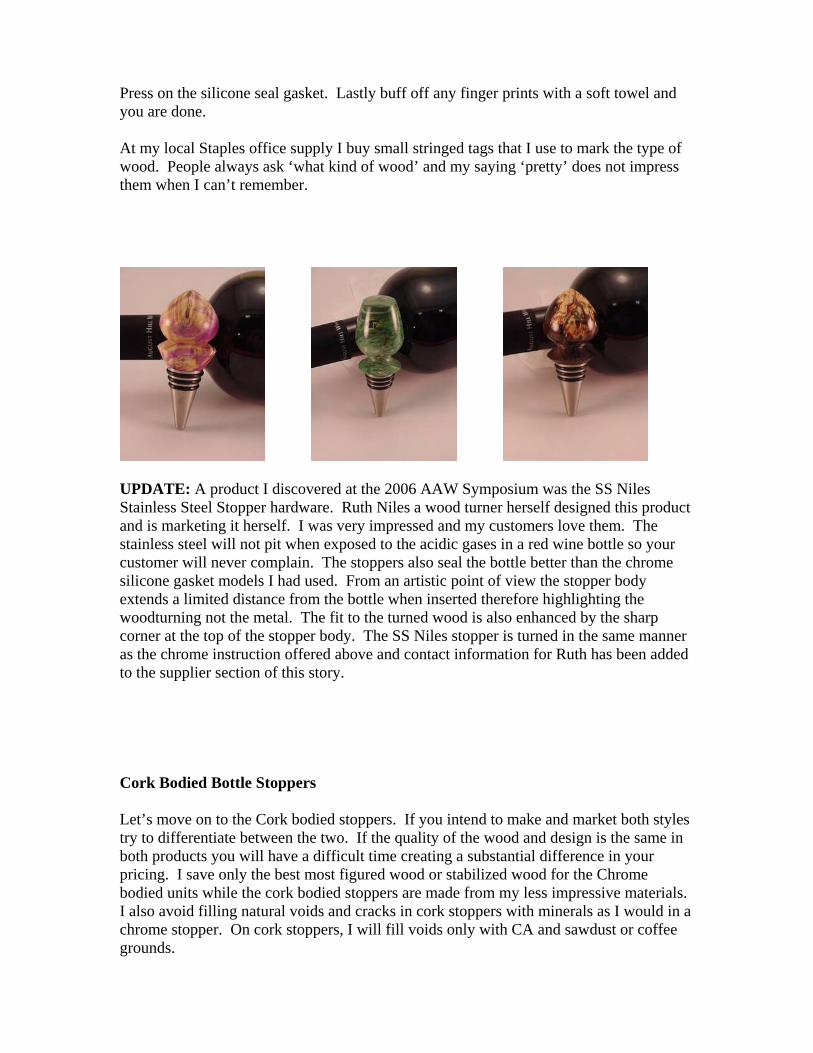
Assembling the stopper is easy. See the parts below. The Stopper body has a threaded stud which threads into the stopper blank. Some other directions I have read say to fix the blank to the stud with CA. I don’t like that idea as I have had a friend drop their stopper on the brick patio and ask me to make a new top. Obviously they finished the bottle and didn’t need the stopper anyway. If it was glued in place I would have had to invest in a new body to. After threading the body onto the stopper, tighten carefully. A small hole in the side of the stopper body allows you to insert a small rod for a good grip. Grab the stopper blank low and snug it up. If you grab the top of the blank and tighten too much you risk snapping off the stopper blank in any narrowed areas. This is very disappointing and will never happen on an ugly stopper.
After assembling the hardware you may choose to wax the stopper and the chrome hardware. Renaissance Wax is excellent but a standard wax like clear Briwax is fine. After applying the wax wait a few minutes and buff it with a paper towel. Viva brand towels have no quilting and leave no lines when buffing. I would like to try a Beale Buffing system on the stabilized stoppers but haven’t made that investment yet.
Press on the silicone seal gasket. Lastly buff off any finger prints with a soft towel and you are done. At my local Staples office supply I buy small stringed tags that I use to mark the type of wood. People always ask ‘what kind of wood’ and my saying ‘pretty’ does not impress them when I can’t remember.
UPDATE: A product I discovered at the 2006 AAW Symposium was the SS Niles Stainless Steel Stopper hardware. Ruth Niles a wood turner herself designed this product and is marketing it herself. I was very impressed and my customers love them. The stainless steel will not pit when exposed to the acidic gases in a red wine bottle so your customer will never complain. The stoppers also seal the bottle better than the chrome silicone gasket models I had used. From an artistic point of view the stopper body extends a limited distance from the bottle when inserted therefore highlighting the woodturning not the metal. The fit to the turned wood is also enhanced by the sharp corner at the top of the stopper body. The SS Niles stopper is turned in the same manner as the chrome instruction offered above and contact information for Ruth has been added to the supplier section of this story. Cork Bodied Bottle Stoppers Let’s move on to the Cork bodied stoppers. If you intend to make and market both styles try to differentiate between the two. If the quality of the wood and design is the same in both products you will have a difficult time creating a substantial difference in your pricing. I save only the best most figured wood or stabilized wood for the Chrome bodied units while the cork bodied stoppers are made from my less impressive materials. I also avoid filling natural voids and cracks in cork stoppers with minerals as I would in a chrome stopper. On cork stoppers, I will fill voids only with CA and sawdust or coffee grounds.
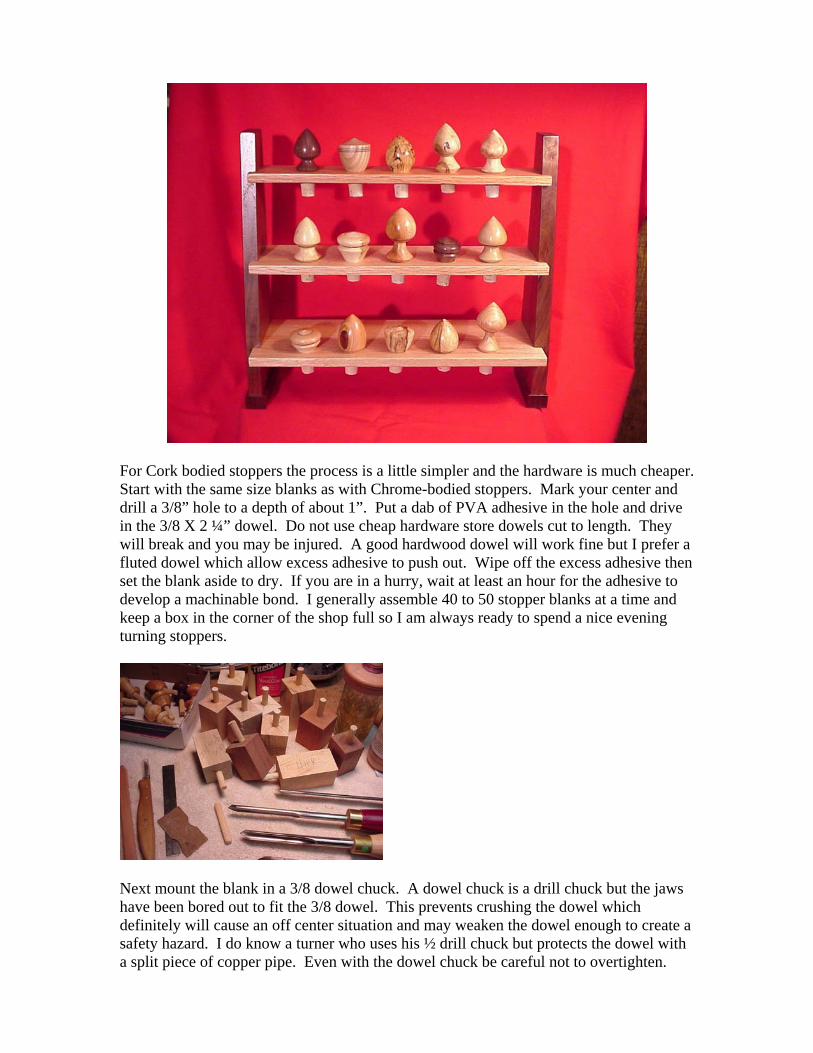
For Cork bodied stoppers the process is a little simpler and the hardware is much cheaper. Start with the same size blanks as with Chrome-bodied stoppers. Mark your center and drill a 3/8” hole to a depth of about 1”. Put a dab of PVA adhesive in the hole and drive in the 3/8 X 2 ¼” dowel. Do not use cheap hardware store dowels cut to length. They will break and you may be injured. A good hardwood dowel will work fine but I prefer a fluted dowel which allow excess adhesive to push out. Wipe off the excess adhesive then set the blank aside to dry. If you are in a hurry, wait at least an hour for the adhesive to develop a machinable bond. I generally assemble 40 to 50 stopper blanks at a time and keep a box in the corner of the shop full so I am always ready to spend a nice evening turning stoppers.
Next mount the blank in a 3/8 dowel chuck. A dowel chuck is a drill chuck but the jaws have been bored out to fit the 3/8 dowel. This prevents crushing the dowel which definitely will cause an off center situation and may weaken the dowel enough to create a safety hazard. I do know a turner who uses his ½ drill chuck but protects the dowel with a split piece of copper pipe. Even with the dowel chuck be careful not to overtighten.
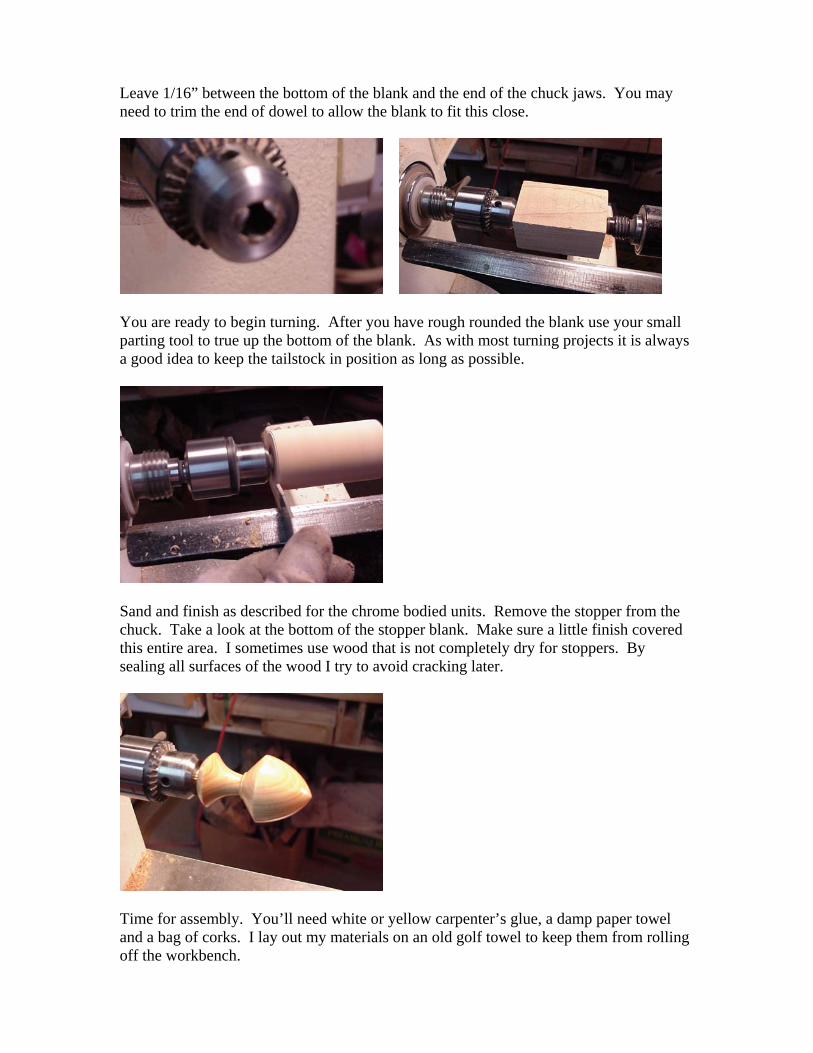
Leave 1/16” between the bottom of the blank and the end of the chuck jaws. You may need to trim the end of dowel to allow the blank to fit this close.
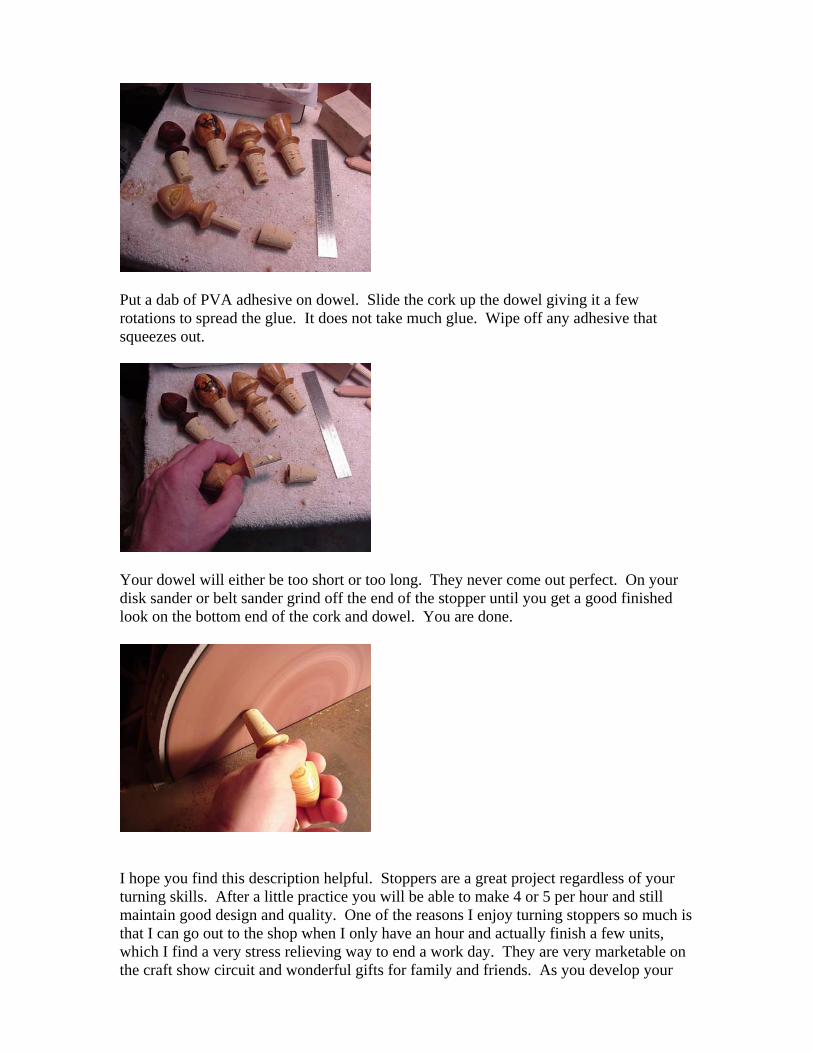
You are ready to begin turning. After you have rough rounded the blank use your small parting tool to true up the bottom of the blank. As with most turning projects it is always a good idea to keep the tailstock in position as long as possible.
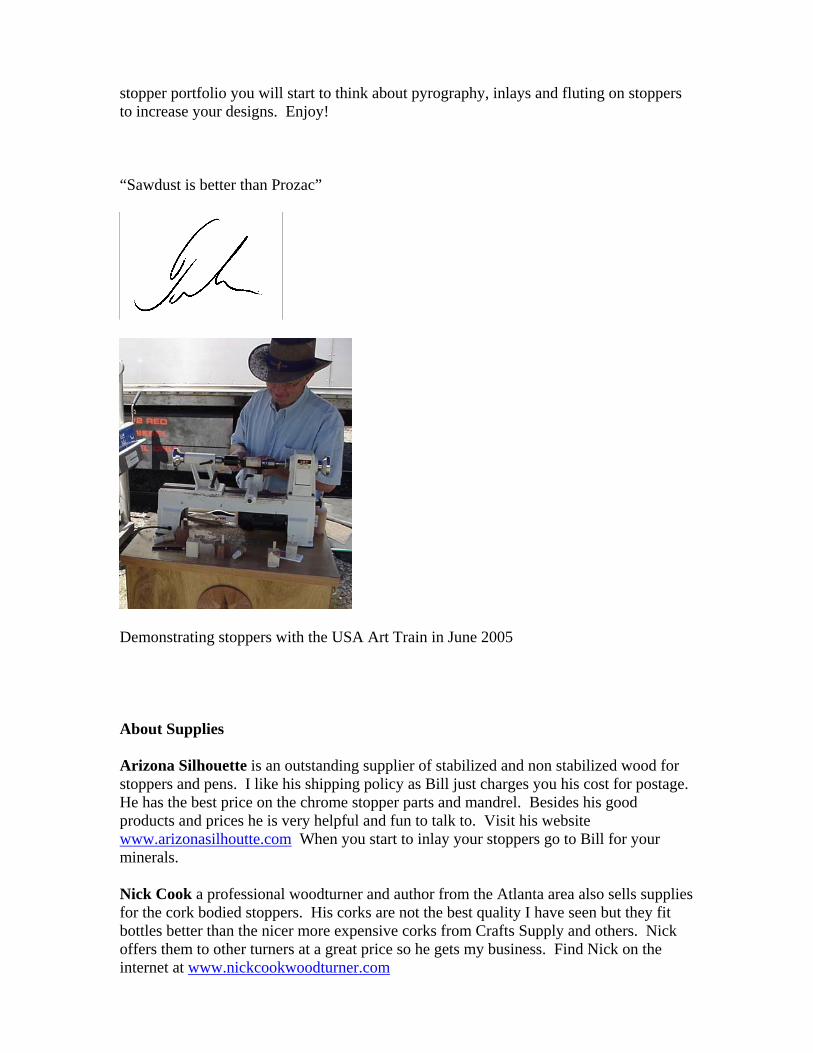
Sand and finish as described for the chrome bodied units. Remove the stopper from the chuck. Take a look at the bottom of the stopper blank. Make sure a little finish covered this entire area. I sometimes use wood that is not completely dry for stoppers. By sealing all surfaces of the wood I try to avoid cracking later.
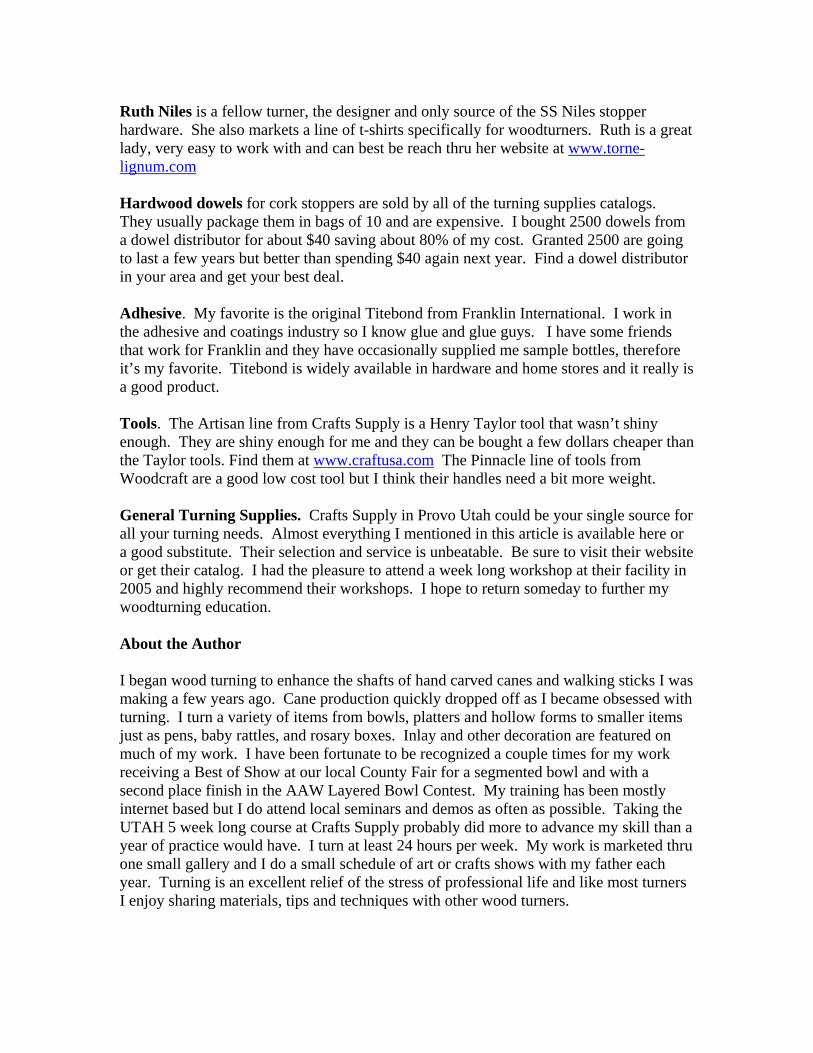
Time for assembly. You’ll need white or yellow carpenter’s glue, a damp paper towel and a bag of corks. I lay out my materials on an old golf towel to keep them from rolling off the workbench.
Put a dab of PVA adhesive on dowel. Slide the cork up the dowel giving it a few rotations to spread the glue. It does not take much glue. Wipe off any adhesive that squeezes out.
Your dowel will either be too short or too long. They never come out perfect. On your disk sander or belt sander grind off the end of the stopper until you get a good finished look on the bottom end of the cork and dowel. You are done.
I hope you find this description helpful. Stoppers are a great project regardless of your turning skills. After a little practice you will be able to make 4 or 5 per hour and still maintain good design and quality. One of the reasons I enjoy turning stoppers so much is that I can go out to the shop when I only have an hour and actually finish a few units, which I find a very stress relieving way to end a work day. They are very marketable on the craft show circuit and wonderful gifts for family and friends. As you develop your
stopper portfolio you will start to think about pyrography, inlays and fluting on stoppers to increase your designs. Enjoy! “Sawdust is better than Prozac”
Demonstrating stoppers with the USA Art Train in June 2005 About Supplies Arizona Silhouette is an outstanding supplier of stabilized and non stabilized wood for stoppers and pens. I like his shipping policy as Bill just charges you his cost for postage. He has the best price on the chrome stopper parts and mandrel. Besides his good products and prices he is very helpful and fun to talk to. Visit his website www.arizonasilhoutte.com When you start to inlay your stoppers go to Bill for your minerals. Nick Cook a professional woodturner and author from the Atlanta area also sells supplies for the cork bodied stoppers. His corks are not the best quality I have seen but they fit bottles better than the nicer more expensive corks from Crafts Supply and others. Nick offers them to other turners at a great price so he gets my business. Find Nick on the internet at www.nickcookwoodturner.com
Ruth Niles is a fellow turner, the designer and only source of the SS Niles stopper hardware. She also markets a line of t-shirts specifically for woodturners. Ruth is a great lady, very easy to work with and can best be reach thru her website at www.torne-lignum.com Hardwood dowels for cork stoppers are sold by all of the turning supplies catalogs. They usually package them in bags of 10 and are expensive. I bought 2500 dowels from a dowel distributor for about $40 saving about 80% of my cost. Granted 2500 are going to last a few years but better than spending $40 again next year. Find a dowel distributor in your area and get your best deal. Adhesive. My favorite is the original Titebond from Franklin International. I work in the adhesive and coatings industry so I know glue and glue guys. I have some friends that work for Franklin and they have occasionally supplied me sample bottles, therefore it’s my favorite. Titebond is widely available in hardware and home stores and it really is a good product. Tools. The Artisan line from Crafts Supply is a Henry Taylor tool that wasn’t shiny enough. They are shiny enough for me and they can be bought a few dollars cheaper than the Taylor tools. Find them at www.craftusa.com The Pinnacle line of tools from Woodcraft are a good low cost tool but I think their handles need a bit more weight. General Turning Supplies. Crafts Supply in Provo Utah could be your single source for all your turning needs. Almost everything I mentioned in this article is available here or a good substitute. Their selection and service is unbeatable. Be sure to visit their website or get their catalog. I had the pleasure to attend a week long workshop at their facility in 2005 and highly recommend their workshops. I hope to return someday to further my woodturning education. About the Author I began wood turning to enhance the shafts of hand carved canes and walking sticks I was making a few years ago. Cane production quickly dropped off as I became obsessed with turning. I turn a variety of items from bowls, platters and hollow forms to smaller items just as pens, baby rattles, and rosary boxes. Inlay and other decoration are featured on much of my work. I have been fortunate to be recognized a couple times for my work receiving a Best of Show at our local County Fair for a segmented bowl and with a second place finish in the AAW Layered Bowl Contest. My training has been mostly internet based but I do attend local seminars and demos as often as possible. Taking the UTAH 5 week long course at Crafts Supply probably did more to advance my skill than a year of practice would have. I turn at least 24 hours per week. My work is marketed thru one small gallery and I do a small schedule of art or crafts shows with my father each year. Turning is an excellent relief of the stress of professional life and like most turners I enjoy sharing materials, tips and techniques with other wood turners.