Tuff Scrub 3300 TM - Floor Equipment Parts · OPERATION Nobles Tuff Scrub 3300 (09–99) 3 SAFETY...
53
Rider Scrubber Tuff Scrub 3300 Model No.: 606993 606994 - Pac 609237 - Can. Pac Operator and Parts Manual 608596 Rev. 01 (06-00) CUSTOMER SERVICE: 1-800-365-6625 FAX: 1–800–678–4240 NOBLES 12875 RANSOM STREET HOLLAND MI 49424 U.S.A. TM
Transcript of Tuff Scrub 3300 TM - Floor Equipment Parts · OPERATION Nobles Tuff Scrub 3300 (09–99) 3 SAFETY...

Rider Scrubber
Tuff Scrub 3300
Model No.: 606993606994 - Pac609237 - Can. Pac
Operator and Parts Manual
608596Rev. 01 (06-00)
CUSTOMER SERVICE: 1-800-365-6625FAX: 1–800–678–4240
NOBLES 12875 RANSOM STREET HOLLAND MI 49424 U.S.A.
TM

OPERATION
2 Nobles� Tuff Scrub� 3300 (06–00)
This manual is furnished with each new model. Itprovides necessary operating and preventativemaintenance instructions and an illustrated parts list.
Read this manual completely and understand themachine before operating or servicing it.
When ordering replacement parts, use the parts listsection in this manual. Before ordering parts orsupplies, be sure to have your machine model numberand serial number available. Parts and supplies maybe ordered by phone or mail from any authorizedService Center or Distributor.
This machine will provide excellent service. However,the best results will be obtained at minimum costs if:
� The machine is operated with reasonable care.
� The machine is maintained regularly - per themachine maintenance instructions provided.
� The machine is maintained with manufacturersupplied or equivalent parts.
MACHINE DATA
Please fill out at time of installation for future reference.
Model No.-
Install. Date -
Serial No.-
�2000 Tennant Company Printed in U.S.A.
Nobles is a registered United States trademark of Tennant Company. Tuff Scrub is a United States trademark of Tennant Company.
TABLE OF CONTENTS
SAFETY PRECAUTIONS 3. . . . . . . . . . . . . . . . . . . . . . .
SAFETY LABELS 4. . . . . . . . . . . . . . . . . . . . . . . . . . . . . .
MACHINE COMPONENTS 5. . . . . . . . . . . . . . . . . . . . .
CONTROL CONSOLE SYMBOLS 6. . . . . . . . . . . . . .
MACHINE INSTALLATION 7. . . . . . . . . . . . . . . . . . . . . UNCRATING MACHINE 7. . . . . . . . . . . . . . . . . . . . . . . INSTALLING BATTERIES 7. . . . . . . . . . . . . . . . . . . . .
MACHINE SETUP 8. . . . . . . . . . . . . . . . . . . . . . . . . . . . . . ATTACHING SQUEEGEE ASSEMBLY 8. . . . . . . . . . ADJUSTING SQUEEGEE ASSEMBLY 8. . . . . . . . . . INSTALLING BRUSHES/PAD DRIVERS 9. . . . . . . . . FILLING SOLUTION TANK 10. . . . . . . . . . . . . . . . . . . .
MACHINE OPERATION 10. . . . . . . . . . . . . . . . . . . . . . . . PRE–OPERATION CHECKS 10. . . . . . . . . . . . . . . . . . . OPERATING MACHINE 10. . . . . . . . . . . . . . . . . . . . . . . EMERGENCY STOPPING 12. . . . . . . . . . . . . . . . . . . . . WHILE OPERATING MACHINE 12. . . . . . . . . . . . . . . . BATTERY METER 13. . . . . . . . . . . . . . . . . . . . . . . . . . . . MACHINE CIRCUIT BREAKERS 13. . . . . . . . . . . . . . . HOUR METER 13. . . . . . . . . . . . . . . . . . . . . . . . . . . . . . .
DRAINING TANKS 13. . . . . . . . . . . . . . . . . . . . . . . . . . . . . DRAINING RECOVERY TANK 13. . . . . . . . . . . . . . . . . DRAINING SOLUTION TANK 14. . . . . . . . . . . . . . . . . .
REMOVING BRUSHES/PAD DRIVERS 14. . . . . . . . .
CHARGING BATTERIES 15. . . . . . . . . . . . . . . . . . . . . . .
MACHINE MAINTENANCE 16. . . . . . . . . . . . . . . . . . . . . DAILY MAINTENANCE 16. . . . . . . . . . . . . . . . . . . . . . . . WEEKLY MAINTENANCE 16. . . . . . . . . . . . . . . . . . . . . MONTHLY MAINTENANCE 16. . . . . . . . . . . . . . . . . . . . QUARTERLY MAINTENANCE 17. . . . . . . . . . . . . . . . . BATTERY MAINTENANCE 17. . . . . . . . . . . . . . . . . . . . STEERING CHAIN MAINTENANCE 17. . . . . . . . . . . . . BRAKE ADJUSTMENT 18. . . . . . . . . . . . . . . . . . . . . . . .
JACKING MACHINE 18. . . . . . . . . . . . . . . . . . . . . . . . . . .
TRANSPORTING MACHINE 19. . . . . . . . . . . . . . . . . . .
STORING MACHINE 19. . . . . . . . . . . . . . . . . . . . . . . . . . .
RECOMMENDED STOCK ITEMS 19. . . . . . . . . . . . . . .
TROUBLESHOOTING 20. . . . . . . . . . . . . . . . . . . . . . . . . .
MACHINE SPECIFICATIONS 22. . . . . . . . . . . . . . . . . . . MACHINE DIMENSIONS 22. . . . . . . . . . . . . . . . . . . . . .
ELECTRICAL DIAGRAMS 23. . . . . . . . . . . . . . . . . . . . . LADDER DIAGRAM 23. . . . . . . . . . . . . . . . . . . . . . . . . . WIRE DIAGRAM 24. . . . . . . . . . . . . . . . . . . . . . . . . . . . .
PARTS LIST 26. . . . . . . . . . . . . . . . . . . . . . . . . . . . . . . . . . . SOLUTION TANK GROUP 26. . . . . . . . . . . . . . . . . . . . . CONTROL CONSOLE GROUP 28. . . . . . . . . . . . . . . . . ELECTRICAL PANEL GROUP 30. . . . . . . . . . . . . . . . . RECOVERY TANK GROUP 32. . . . . . . . . . . . . . . . . . . . SEAT GROUP 34. . . . . . . . . . . . . . . . . . . . . . . . . . . . . . . CHARGER AND BATTERY GROUP 36. . . . . . . . . . . . STEERING GROUP 38. . . . . . . . . . . . . . . . . . . . . . . . . . MAIN FRAME AND DRIVE GROUP 40. . . . . . . . . . . . . CONTROL GROUP 42. . . . . . . . . . . . . . . . . . . . . . . . . . . PAD DRIVER GROUP 44. . . . . . . . . . . . . . . . . . . . . . . . . SOLUTION GROUP 46. . . . . . . . . . . . . . . . . . . . . . . . . . SKIRT GROUP 48. . . . . . . . . . . . . . . . . . . . . . . . . . . . . . . SQUEEGEE CONTROL GROUP 50. . . . . . . . . . . . . . . SQUEEGEE GROUP 52. . . . . . . . . . . . . . . . . . . . . . . . .

OPERATION
Nobles� Tuff Scrub� 3300 (09–99) 3
SAFETY PRECAUTIONS
This machine is intended for industrial and commercialuse. It is suited to scrub hard floors in an indoorenvironment and is not constructed for any other use.Use only recommended pads, brushes and cleaningdetergents.
The following safety alert symbols are used throughoutthis manual as indicated in their description.
WARNING: To warn of hazards or unsafepractices which could result in severe personalinjury or death.
FOR SAFETY: To identify actions which must befollowed for safe operation of equipment.
The following information signals potentially dangerousconditions to the operator or equipment:
FOR SAFETY:
1. Do not operate machine:– Unless trained and authorized.– Unless operation manual is read and
understood.– In flammable or explosive areas unless
designed for use in those areas.
2. Before starting machine:– Make sure all safety devices are in place
and operate properly.– Check brakes and steering for proper
operation.
3. When using machine:– Go slow on inclines and slippery surfaces.– Use care when reversing machine.– Do not carry riders on machine.– Always follow safety and traffic rules.– Report machine damage or faulty
operation immediately.
4. Before leaving or servicing machine:– Stop on level surface.– Set parking brake.– Turn off machine and remove key.
5. When servicing machine:– Avoid moving parts. Do not wear loose
jackets, shirts, or sleeves.– Block machine tires before jacking
machine up.– Jack machine up at designated locations
only. Block machine up with jack stands.– Use hoist or jack of adequate capacity to
lift machine.– Wear eye and ear protection when using
pressurized air or water.– Disconnect battery connections before
working on machine.– Wear hand and eye protection when
handling batteries or battery cables.– Avoid contact with battery acid.– Use manufacturer supplied or approved
replacement parts.
WARNING: Batteries emit hydrogen gas.Explosion or fire can result. Keep sparks andopen flame away.
WARNING: Flammable materials can causean explosion or fire. Do not use flammablematerials in tank(s).
WARNING: Flammable materials or reactive metals can cause explosion or fire. Do not pick up.

OPERATION
4 Nobles� Tuff Scrub� 3300 (06–00)
SAFETY LABELS
The safety labels appear on the machine in thelocations indicated. Replace labels if they becomedamaged or illegible.
BATTERY CHARGING LABEL – Located on andunderneath battery compartment cover.
FOR SAFETY LABEL –Located on control console
WARNING: Batteries emithydrogen gas. Explosion orfire can result. Keep sparksand open flame away.
FOR SAFETY:Read manualbefore operatingmachine.
WARNING: Flammable materials cancause an explosion or fire. Do notuse flammable materials in tank(s).Flammable materials or reactive met-als can cause explosion or fire. Donot pick up.
FLAMMABLE MATERIALS/SPILLS LABEL – Locatednear solution tank fill port and onrecovery tank lid.

OPERATION
Nobles� Tuff Scrub� 3300 (06–00) 5
MACHINE COMPONENTS
13
1211
10 98 7 6 5 4
3 2
15
1617
14
119
2524
22
23
21
29
27
33
26
28
32
20
31
30
Steering wheel removed for clarity.
1
18
29
1. Control Console2. Key Switch3. Main Power Indicator Light4. Battery Meter5. Hour Meter6. Brush Pressure Meter7. Brush/solution ON/OFF Indicator Light8. Brush Switch9. Horn Button
10. Squeegee/Vacuum Switch11. Solution Control Knob12. Solution Low Indicator Light13. Power Kill Button14. Directional Pedal15. Brake Pedal16. Parking Brake Pedal17. Charger Plug18. Circuit Breaker Panel19. Steering Wheel
20. Seat Adjustment Lever21. Recovery Tank22. Recovery Tank Lid23. Recovery Tank Drain Hose24. Solution Tank25. Solution Fill Port26. Solution Tank Drain Hose27. Battery Compartment28. Squeegee Assembly29. Wall Rollers30. Scrub Head31. Scrub Head Skirt32. Drive Wheels33. Rear Wheels

OPERATION
6 Nobles� Tuff Scrub� 3300 (06–00)
CONTROL CONSOLE SYMBOLS
Main PowerIndicator Light
Brush Lower
Brush Down/Solution On
Brush Motor (RH)30A Circuit Breaker
Main Power 10ACircuit Breaker
Horn Brush Motor (LH)30A Circuit Breaker
Vacuum Motor 30ACircuit Breaker
Drive Motor 35ACircuit Breaker
Key Switch
Solution LowIndicator Light
Squeegee Raise
Vacuum On/Squeegee Lower
Brush Raise
Solution Flow

OPERATION
Nobles� Tuff Scrub� 3300 (09–99) 7
MACHINE INSTALLATION
UNCRATING MACHINE
1. Carefully check crate and machine for signs ofdamage. Report damages at once to carrier.
2. Check Machine Contents list, contact distributorfor missing items.
Machine Contents:
– 5 Battery Cables (stored in batterycompartment)
– Squeegee Assembly (bolted on shipping pallet)
– 6 Batteries, 335A 6V (included with Pac606994; not included with Pac 609237)
– Battery Charger (included with Pac 606994 &609237)
– 2 Pad Drivers (included with Pac 606994 &609237)
Scrub brushes and pads must be purchasedseparately (See PARTS LIST section).
3. To uncrate your machine:
a. Remove shipping straps.
b. Install batteries if not pre–installed (SeeINSTALLING BATTERIES)
c. Remove rear wheel block from pallet.
d. Position ramp (supplied) at rear of machine,release parking brake and carefully backmachine off pallet (See MACHINEOPERATION).
ATTENTION: Do not roll machine off pallet withoutusing ramp, machine damage may occur.
INSTALLING BATTERIES
WARNING: Batteries emit hydrogen gas.Explosion or fire can result. Keep sparks andopen flame away.
FOR SAFETY: When servicing machine, wearhand and eye protection when handling batteriesand battery cables. Avoid contact with batteryacid.
Recommended Battery Specifications:Six 6 volt, deep cycle, 335 amp. hour batteries.Maximum battery dimensions are 179 mm (7.00 in) Wx 296 mm (11.66 in) L x 424 mm (16.69 in) H.
1. Turn key to the off position.
2. Set parking brake pedal. Press brake pedalcompletely forward then press parking brake pedalwith toe to set (Fig. 1).
Figure 1
FOR SAFETY: Before leaving or servicingmachine, stop on level surface, set parking brake,turn off machine and remove key.
3. Hinge seat away from machine to access batterycompartment. Remove loose battery cables fromcompartment (Fig. 2).
Figure 2
4. Carefully install batteries into battery compartmentand arrange battery posts as shown (Fig. 3).
MachineFront
RED
BLACK
1 2
3
45
7
6
Figure 3
ATTENTION: Do not drop batteries intocompartment, battery and machine housingdamage may result. This damage is not coveredby warranty.

OPERATION
8 Nobles� Tuff Scrub� 3300 (06–00)
5. Before connecting battery cables, make sureterminals and posts are clean. Use a post cleanerand wire brush to clean posts and terminals.
6. Connect cables to battery posts in numerical orderas labeled, RED TO POSITIVE & BLACK TONEGATIVE (Fig. 3).
NOTE: Apply a light coating of non-metallic grease orprotective spray on the cable connections to preventbattery corrosion.
7. Check battery meter charge level. Machine mustbe in full operation for correct reading (SeeMACHINE OPERATION). Charge batteries ifnecessary.
MACHINE SETUP
ATTACHING SQUEEGEE ASSEMBLY
1. Turn key to the on position and raise squeegeemount bracket by pressing vacuum/squeegeeswitch (Fig. 4).
Figure 4
2. Turn key to the off position and set parking brake.Press brake pedal completely forward then pressparking brake pedal with toe to set (Fig. 1).
FOR SAFETY: Before leaving or servicingmachine, stop on level surface, set parking brake,turn off machine and remove key.
3. Loosen two thumb knobs on squeegee assembly.From underneath machine, slide squeegeeassembly into slots of squeegee mount bracket.Tighten thumb knobs securely (Fig. 5).
Figure 5
4. Attach vacuum hose to squeegee.
ADJUSTING SQUEEGEE ASSEMBLY
1. Lower squeegee to floor and drive machineslightly forward to deflect squeegee blade.
2. Leave squeegee down and turn machine off andset parking brake.
3. View squeegee blade deflection. Squeegee bladeshould slightly deflect evenly across the entirewidth of the squeegee as shown (Fig. 6).
Figure 6
If squeegee needs adjusting, perform the followinginstructions to achieve proper squeegee operation.
FOR SAFETY: Before leaving or servicingmachine, stop on level surface, set parking brake,turn off machine and remove key.

OPERATION
Nobles� Tuff Scrub� 3300 (06–00) 9
To Adjust Squeegee Blade Deflection (Down Pressure):
Turn the squeegee adjustment cams counter–clockwise to increase blade deflection or clockwise todecrease (Fig. 7).
Figure 7
To Level Squeegee Blade Assembly:
Loosen the squeegee mount knobs and jam nuts onthe leveling screws. Turn leveling screwscounter–clockwise to increase blade deflection at theends of squeegee or clockwise to decrease. Retightenknobs and jam nuts after leveling (Fig. 8).
Figure 8
INSTALLING BRUSHES/PAD DRIVERS
NOTE: Consult an authorized distributor for brush/padrecommendations.
1. Turn key to the on position and press brush switchto raise scrub head (Fig 9).
Figure 9
2. Turn key to the off position and set parking brake.Press brake pedal completely forward then pressparking brake pedal with toe to set (Fig. 1).
FOR SAFETY: Before leaving or servicingmachine, stop on level surface, set parking brake,turn off machine and remove key.
3. Unfasten two skirt latches and hinge open skirts toaccess motor hubs (Fig. 10).
Figure 10
4. Attach pads to pad drivers before installingdrivers. Secure pads with centerlock rings (Fig. 11).
Figure 11

OPERATION
10 Nobles� Tuff Scrub� 3300 (06–00)
5. To attach pad driver to machine, insert pad driver’smounting studs into drive plate slots. Hold driveplate with thumb and give the driver a quick turntoward the spring clip. Be certain that all threemounting studs are engaged before operatingmachine (Fig. 12).
NOTE: Make sure pad driver and motor hub surfacesare clean before installing drivers. Keeping surfacesclean allows for easy removal.
Figure 12
6. Close skirts and refasten latches.
FILLING SOLUTION TANK
1. Drive machine to filling station. Raise squeegeeand scrub head when traveling (See MACHINEOPERATION).
2. Turn machine power off and set parking brake.Press brake pedal completely forward then pressparking brake pedal with toe to set (Fig. 1)
FOR SAFETY: Before leaving or servicingmachine, stop on level surface, set parking brake,turn off machine and remove key.
3. Lift fill-port cover and fill solution tank with cleanwater, 60°C (140°F) maximum (Fig. 13). Solutiontank capacity is 151 L (40 gal).
Figure 13
WARNING: Flammable materials can causean explosion or fire. Do not use flammablematerials in tank(s).
4. Add a recommended cleaning detergent accordingto mixing instructions on bottle.
ATTENTION: Use only recommended cleaningdetergents, DO NOT use substitutes. Consult anauthorized distributor for cleaning detergentrecommendations.
MACHINE OPERATION
PRE–OPERATION CHECKS
1. Sweep and dust-mop floor.
2. Check battery meter, machine must be in fulloperation for correct reading.
3. Check that pads/brushes are installed.
4. Lower pads/brushes to floor and check that scrubskirt touches floor all the way around.
5. Check that squeegee is installed and blades are ingood condition.
OPERATING MACHINE
FOR SAFETY: Do not operate machine unlessoperation manual is read and understood.
1. Adjust operator seat to desired position. Movelever to the left and slide seat backward or forwardto adjust (Fig. 14).
Figure 14
2. Turn key to the on position.
NOTE: To operate machine without using cleaningfunctions move ahead to step 6.

OPERATION
Nobles� Tuff Scrub� 3300 (06–00) 11
3. Press brush switch to lower scrub head to floor.The brush/solution indicator light will turn on whenscrub head reaches floor (Fig. 15).
Figure 15
NOTE: The brushes and solution flow are activatedwhen directional pedal is pressed.
4. Press vacuum/squeegee switch to lowersqueegee to floor. The vacuum motor willautomatically turn on once squeegee is lowered(Fig. 16).
Figure 16
5. Turn solution control knob to maximum flow whenstarting out. Then adjust to a desired flow rateafter scrubbing speed is determined (Fig. 17).
Figure 17
6. Press brake pedal to release parking brake pedal(Fig. 18).
Figure 18
7. Press top of directional pedal to drive machineforward. Travel speed is controlled by the amountof pressure applied on pedal (Fig. 19).
NOTE: A safety switch is located under the seat. Ifthe operator is not seated the machine will not move ineither direction.
Figure 19
8. To operate machine in reverse, press bottom ofdirectional pedal with heel of foot (Fig. 20).
Figure 20
9. To stop machine, return directional pedal to theneutral position and/or press brake.

OPERATION
12 Nobles� Tuff Scrub� 3300 (06–00)
EMERGENCY STOPPING
In the event of an emergency while operating, strikethe power kill button on the control console to halt themachine. Turn button clockwise to reset (Fig. 21).
Figure 21
WHILE OPERATING MACHINE
1. Observe brush pressure meter. Meter should readwithin the green zone, press brush switch to adjustpressure (Fig. 22).
Figure 22
2. Scrub in straight paths overlapping each path by50 mm (2 in).
WARNING: Flammable materials or reactive metals can cause explosion or fire. Do not pick up.
3. Avoid bumping into walls or scraping the sides ofmachine.
4. Use caution when backing up and turning aroundcorners.
5. Use horn button located on control console to alertpeople of on coming machine.
6. Drive machine slowly on inclines (SeeTRANSPORTING MACHINE for ramp climbingpreparations).
FOR SAFETY: When using machine, go slow oninclines and slippery surfaces.
7. Keep machine moving to prevent damage to finishor floor.
8. Periodically observe recovery tank for excessivefoam. Pour a recommended foam control solutioninto recovery tank if excessive foam appears
ATTENTION: Do not allow foam or water to enterfloat shut-off screen, vacuum motor damage willresult; not covered by warranty. Foam will notactivate float shut-off screen.
9. Observe solution low indicator, located on controlconsole. When indicator light turns on, solutionlevel is low and is approaching time to refillsolution tank and drain recovery tank (SeeDRAINING TANKS) (Fig. 23).
Figure 23
10. For heavily soiled areas, double scrubbing isrecommended. First scrub area with squeegee up,let solution set for 15–20 minutes, then scrub areaa second time with squeegee down.
ATTENTION: Do not operate machine with padpressure meter in red zone, circuit breakers willtrip and floor damage may occur.
11. If machine is scrubbing poorly, stop scrubbing andrefer to the TROUBLE SHOOTING section in thismanual.
12. Stay clear of floor obstructions, such as electricalplates or grates, brush/pad damage will occur.
13. If squeegee leaves streaks, raise and wipe bladeswith a cloth. Pre-sweep area to prevent streaking.If squeegee needs adjustment, refer to theADJUSTING SQUEEGEE section in this manual.
14. Observe battery meter (See BATTERY METER).
15. After scrubbing, perform the Daily Maintenanceprocedures (See MACHINE MAINTENANCE).

OPERATION
Nobles� Tuff Scrub� 3300 (06–00) 13
BATTERY METER
The battery meter displays charge level. The indicatorlight will move from right to left as the batteriesdischarge. When the left side indicator light begins toflash, discharge level is approaching time to recharge.When two indicator lights flash alternately, stopscrubbing and recharge batteries immediately (Fig. 24).
Figure 24
MACHINE CIRCUIT BREAKERS
The machine is equipped with five resettable circuitbreakers to protect machine from damage. If a circuitbreaker should trip during operation, determine cause,allow motor to cool and then manually reset breaker.When replacing breakers, never substitute a higherbreaker than specified. Circuit breaker panel is locatedbelow control console (Fig. 25).
– 10A Main Circuit Breaker– 60A Drive Motor Circuit Breaker– 30A Vacuum Motor Circuit Breaker– 30A Brush Motor Circuit Breaker (2)
Figure 25
HOUR METER
The hour meter records number of scrubbing hours themachine has performed. Use hour meter to determinewhen to perform recommended maintenance proceduresand to record service history (Fig. 26).
Figure 26
DRAINING TANKS
When finished scrubbing, the recovery and solutiontanks should be drained and cleaned.
DRAINING RECOVERY TANK
Drain recovery tank:
– When solution tank is refilled.
– After each use.
– When squeegee starts trailing water.
– When float shut-off screen, located insiderecovery tank, is activated.
1. Drive machine to floor drain.
2. Turn key to the off position and set parking brake.
FOR SAFETY: Before leaving or servicingmachine, stop on level surface, set parking brake,turn off machine and remove key.
3. Remove drain hose from hose hook. Turn drainhose knob counter-clockwise and pull plug outwhile holding hose up. Then slowly lower hose tofloor drain (Fig. 27).
Figure 27
4. Remove recovery tank lid and flush tank out withclean water.

OPERATION
14 Nobles� Tuff Scrub� 3300 (06–00)
5. Replace drain hose plug securely.
6. When finished scrubbing, perform the DailyMaintenance procedures (See MACHINEMAINTENANCE).
DRAINING SOLUTION TANK
Drain unused solution after each use.
1. Drive machine to floor drain.
2. Turn key to the off position and set parking brake.
FOR SAFETY: Before leaving or servicingmachine, stop on level surface, set parking brake,turn off machine and remove key.
3. Remove drain hose from hose clip located underright side of machine (Fig. 28).
Figure 28
4. Turn drain hose cap counter-clockwise to remove(Fig. 29).
Figure 29
5. Flush out solution tank with clean water.
6. Replace drain hose plug securely and return hosein clip.
7. When finished scrubbing, perform the DailyMaintenance procedures (See MACHINEMAINTENANCE).
REMOVING BRUSHES/PAD DRIVERS
Brushes should be replaced when bristles are worn toa length of 10 mm (0.38 in). Pads should be replacedor cleaned daily.
NOTE: Always replace brushes and pads as a set.Never replace just one.
1. Turn key to the on position and press brush switchto raise scrub head.
2. Turn machine power off and set parking brake.
FOR SAFETY: Before leaving or servicingmachine, stop on level surface, set parking brake,turn off machine and remove key.
3. Unfasten two skirt latches and hinge open skirts toaccess motor hubs (Fig. 30).
Figure 30
4. Grip brush/pad driver and give it a quick turncounter-clockwise to release from spring clip (Fig. 31).
Figure 31
5. Install new brushes/pads (See MACHINESETUP).

OPERATION
Nobles� Tuff Scrub� 3300 (09–99) 15
CHARGING BATTERIES
NOTE: Recharge batteries ONLY after a total of 30minutes of use or more. This will prolong battery life.
The following charging instructions are intendedfor chargers supplied with machine. Only use abattery charger with the following specificationsto prevent battery damage.
BATTERY CHARGER SPECIFICATIONS:
� OUTPUT VOLTAGE - 36 VOLTS
� OUTPUT CURRENT - 36 AMPS
� AUTOMATIC SHUTOFF CIRCUIT
� FOR DEEP CYCLE BATTERY CHARGING
NOTE: For optimum machine operation, keepbatteries charged at all times. Never leave batteriesdischarged for lengthy periods.
WARNING: Batteries emit hydrogen gas.Explosion or fire can result. Keep sparks andopen flame away.
FOR SAFETY: When servicing machine, wearhand and eye protection when handling batteriesand battery cables. Avoid contact with batteryacid.
1. Drive machine to a well–ventilated area forcharging.
2. Park machine on a level surface, turn key to theoff position and set parking brake.
FOR SAFETY: Before leaving or servicingmachine, stop on level surface, set parking brake,turn off machine and remove key.
3. Hinge seat away from machine to access batterycompartment.
4. Check fluid level (A) in each battery cell beforecharging. If battery plates (B) are exposed, addjust enough distilled water to cover plates byapproximately 3 mm (0.13 in). DO NOTOVERFILL. Overfilled batteries will overflowduring charging due to fluid expansion. Replacecell caps before charging (Fig. 32).
A
B
Figure 32
5. With charger disconnected from machine, plugcharger’s power cord into a grounded wall outlet(Fig. 33).
Grounded
Grounding
Edge/hole
Grounded
3 Hole Outlet
Ground Pin
(120V) (230V)
Outlet
Figure 33
6. Connect battery charger to machine as shown(Fig. 34).
Figure 34
WARNING: Batteries emit hydrogen gas.Explosion or fire can result. Keep sparks andopen flame away.
NOTE: The machine becomes inoperable oncecharger is connected.
7. Charger will automatically begin charging and shutoff when fully charged.
8. When disconnecting charger, always unplugcharger from wall outlet first.
9. After charging, check battery fluid level. Fluid levelshould be within 3 mm (0.13 in) of full levelindicator. Add distilled water if needed. DO NOTOVERFILL.

OPERATION
16 Nobles� Tuff Scrub� 3300 (09–99)
MACHINE MAINTENANCE
To keep machine in good working condition, simplyfollow daily, weekly and monthly maintenanceprocedures.
FOR SAFETY: Before leaving or servicingmachine, stop on level surface, set parking brake,turn off machine and remove key.
FOR SAFETY: When servicing machine,disconnect battery connections before working onmachine.
ATTENTION: Contact an Authorized ServiceCenter for machine repairs. Machine repairsperformed by other than an authorized person willvoid your warranty.
DAILY MAINTENANCE (Every 4 Hours of Use)
1. Drain and flush out tanks with clean water (SeeDRAINING TANKS).
2. Remove and rinse float shut-off screen located inrecovery tank (Fig. 35).
Figure 35
3. Check brushes for entangled debris.
4. Change pads or brushes, replace if worn ordamaged (See REMOVING BRUSHES/PADDRIVERS).
5. Check scrub head skirt(s) for wear and adjustment.
6. Raise squeegee and wipe it down with a dry cloth.Store squeegee in the up position to preventsqueegee damage.
7. Check machine for water leaks and loose nuts andbolts.
8. Clean machine housing with an all purposecleaner and damp cloth.
ATTENTION: Do not power spray or hose offmachine. Electrical component damage due towater is not covered by warranty.
9. Recharge batteries (See CHARGINGBATTERIES).
NOTE: Recharge batteries ONLY after a total of 30minutes of use or more. This will prolong battery life.
WEEKLY MAINTENANCE (Every 20 Hours of Use)
1. Remove solution bowl filter and clean screen, filteris located behind scrub head under machine.Make sure solution tank is empty before removingfilter (Fig. 36).
Figure 36
2. Check fluid level in battery cells (See BATTERYMAINTENANCE).
3. Clean battery tops to prevent corrosion (SeeBATTERY MAINTENANCE).
4. Check for loose or corroded battery cables.
MONTHLY MAINTENANCE (Every 80 Hours of Use)
1. Flush solution system. Pour 11.3 L (3 gal) of hotwater into solution tank. Add an alkaline detergentaccording to mixing instructions. Position machineover a floor drain, turn travel speed knob toslowest setting and set parking brake. Now fullyoperate machine for 30 seconds. Turn key off andleave machine overnight. Next day, disperseremaining alkaline detergent and rinse solutionsystem.
2. Lubricate skirt caster with a water resistantgrease.
3. Lubricate all pivot points and rollers with siliconespray then coat with a water resistant grease tomaintain smooth operation.

OPERATION
Nobles� Tuff Scrub� 3300 (06–00) 17
QUARTERLY MAINTENANCE(Every 250 Hours of Use)
1. Check drive transaxle, vacuum and brush motorsfor carbon brush wear, replace brushes when wornto a length of 10 mm (0.38 in) or less.
Contact an Authorized Service Center for motormaintenance.
2. Check steering chain tension (See STEERINGCHAIN MAINTENANCE).
BATTERY MAINTENANCE
WARNING: Batteries emit hydrogen gas.Explosion or fire can result. Keep sparks andopen flame away.
FOR SAFETY: When servicing machine, wearhand and eye protection when handling batteriesand battery cables. Avoid contact with batteryacid.
1. Always follow proper charging instructions (SeeCHARGING BATTERIES).
2. After charging, check fluid level (A). Fluid levelshould be within 3 mm (0.13 in) of full levelindicator. Add distilled water if needed. DO NOTOVERFILL. Overfilled batteries will overflowduring charging due to fluid expansion (Fig. 37).
A
Figure 37
3. Keep battery tops and terminals clean and dry.To clean batteries:a. Mix a strong solution of baking soda and water
(Fig. 38).
Figure 38
b. Brush solution sparingly over battery tops,terminal and cable connectors.
NOTE: Do not allow baking soda solution to enterbattery cells.
c. Use wire brush to clean terminal post andcable connections.
d. After cleaning, apply a coating of clear batterypost protectant to terminals and cableconnections.
4. Check for loose or worn cables. Replace if worn.
STEERING CHAIN MAINTENANCE
The steering chain tension should be checked afterthe first 50 hours of operation and every 250 hoursthereafter.
FOR SAFETY: When servicing machine,disconnect battery connections before working onmachine.
1. To access steering chain, remove five floor panels,13 mm wrench and Phillips head screwdriverrequired (Fig. 39).
Figure 39
2. Measure amount of chain deflection at locationshown below. Proper chain deflection should beapproximately 25 mm (1.00 in) total (Fig. 40).
Idler SprocketAdjustmentScrew
Figure 40

OPERATION
18 Nobles� Tuff Scrub� 3300 (06–00)
3. To adjust chain tension, loosen jam nut on the idlersprocket adjustment screw and turn screwclockwise to increase tension. Retighten jam nutafter adjusting (Fig. 40).
4. Lubricate chain with a water resistant oil.
BRAKE ADJUSTMENT
If machine pulls in either direction while braking or ifmachine does not stop immediately, brake adjustmentmay by required.
FOR SAFETY: When servicing machine,disconnect battery connections before working onmachine.
1. Hinge open skirts to access brakes (Fig. 41).
Figure 41
2. Locate hex link brake adjusters in front of eachdrive wheel (Fig. 42).
Figure 42
3. To adjust brakes, loosen jam nut and turn hex linkadjuster as described below:
RIGHT SIDE – Turn hex link adjuster clockwise toincrease or counter-clockwise to reduce brakepressure. LEFT SIDE – Turn hex link adjuster counter–clockwise to increase or clockwise to reduce brakepressure.
NOTE: Brake adjustment should be made so thatbrake pads are loose; not rubbing disc. A .045” shimshould be used for proper adjustment between padand disc. Adjusting the brakes too tightly will create anextra load on the drive system and cause overloadingproblems.
JACKING MACHINE
Empty tanks prior to jacking. Stop machine on a flatlevel surface and block machine tires before jackingup machine.
Use designated location for jacking up machine. Use apiece of wood to distribute machine weight (Fig. 43).
Figure 43
FOR SAFETY: When servicing machine, blockmachine tires before jacking machine up.FOR SAFETY: When servicing machine, jackmachine up at designated locations only. Blockmachine up with jack stands.

OPERATION
Nobles� Tuff Scrub� 3300 (06–00) 19
TRANSPORTING MACHINE
When transporting machine by use of trailer or truck,be certain to follow tie–down procedures below:
FOR SAFETY: When using machine, go slow oninclines and slippery surfaces.
1. Empty solution and recovery tanks.
2. Remove squeegee assembly, scrub head skirtsand brushes/pads.
3. Raise scrub head.
4. Loosen (4) knobs holding front caster in place andremove caster (Fig, 44).
Figure 44
5. Load machine using a recommended loadingramp.
6. Position front of machine up against front of trailerof truck. Once machine is positioned, replacebrushes/pads and lower scrub head to floor.
7. Set parking brake and place a block behind eachdrive wheel and steering wheel.
8. Place tie–down straps over top of bumper wheelbrackets.
STORING MACHINE
1. Charge batteries before storing. Never storemachine with discharged batteries.
2. Drain and rinse tanks thoroughly.
3. Store machine in a dry area with squeegee andscrub head in the raised position.
4. Remove recovery tank lid to promote aircirculation.
ATTENTION: If storing machine in freezingtemperatures, be certain to drain machine of allwater. Damage due to freezing temperatures is notcovered by warranty.
ATTENTION: Do not expose machine to rain; storeindoors.
RECOMMENDED STOCK ITEMS
Refer to the Parts List section for recommended stockitems. Stock Items are clearly identified with a bulletpreceding the parts description. See example below:

OPERATION
20 Nobles� Tuff Scrub� 3300 (09–99)
TROUBLESHOOTING
PROBLEM CAUSE SOLUTION
Machine will not turn on Faulty key switch Contact Service Center
Seat safety switch not activated You must be seated
Batteries need charging See CHARGING BATTERIES
Faulty battery(s) Replace battery(s)
Loose battery cable Tighten loose cable
MAIN circuit breaker has tripped Determine cause and reset breaker
Power kill button activated Turn button clockwise to reset
Brush motors will not turn on Scrub head is not lowered Lower scrub head to floor
Directional pedal not pressed Press pedal
Faulty brush switch Contact Service Center
Brush circuit breaker has tripped Replace pad or adjust pad pressureand reset brush circuit breaker button
Faulty brush motor or wiring Contact Service Center
Worn carbon brushes Contact Service Center
Faulty brush solenoid Contact Service Center
Faulty scrub head switch Contact Service Center
Vacuum motor will not turn on Faulty vacuum/squeegee switch Contact Service Center
Squeegee is raised off floor Lower squeegee
Main circuit breaker has tripped Determine cause and reset circuitbreaker button
Vacuum motor circuit breaker hastripped
Determine cause and reset circuitbreaker button
Faulty vacuum motor or wiring Contact Service Center
Worn carbon brushes Contact Service Center
Faulty squeegee switch Contact Service Center
Little or no solution flow Scrub head is not lowered Lower scrub head to floor
Directional pedal not pressed Press directional pedal
Solution tank is empty Fill solution tank
Solution control knob not activated Turn solution flow knob
Loose set screw on solution controlknob
Calibrate knob and tighten screw
Clogged solution line or solution tankfilter
Remove hose and blow compressedair through it. Flush solution tank aftereach use
Clogged solution valve or solenoid Remove valve or solenoid and clean. Do not scratch inside of valve
Faulty solution solenoid Contact Service Center
Faulty scrub head switch Contact Service Center

OPERATION
Nobles� Tuff Scrub� 3300 (09–99) 21
TROUBLESHOOTING – Continued
PROBLEM CAUSE SOLUTION
Poor Scrubbing Performance Scrubbing speed too fast Scrub at a slower speed
Worn or improper brushes/pads Replace or use proper brushes/pads
Debris caught in brushes/pads Remove debris
Low battery charge Charge batteries
Incorrect brush/pad pressure Readjust brush/pad pressure
Poor water pickup Recovery tank is full and float shut–offscreen has been activated
Empty recovery tank
Float shut–off screen inside recoverytank is clogged
Remove screen and clean
Clogged squeegee Unclog squeegee
Dirty squeegee blade Clean squeegee blades, presweepfloor
Worn squeegee blades Replace squeegee blades
Loose squeegee thumbscrews Tighten thumbscrews
Vacuum hose connections are looseor hose has a hole
Push hose cuffs firmly on connections.Replace hose if damaged
Clogged vacuum hose Remove clogged debris
Recovery tank inlet is obstructed Empty recovery tank and tilt tank side-ways to access inlet hole, remove ob-struction
Worn tank lid gasket Replace gasket
Loose drain hose plug Tighten plug
Recovery tank lid not in place Properly position lid
Loose vacuum motor Contact Service Center
Battery charge level is low Charge batteries. Do not run machinewhen battery meter is in the red zone
Scrubbing speed too fast Reduce scrubbing speed
Short run time Batteries not fully charged Charge batteries
Defective batteries Replace battery
Batteries need maintenance See BATTERY MAINTENANCE
Faulty charger Repair or replace battery charger
Heavy brush/pad pressure Reduce brush/pad pressure

OPERATION
22 Nobles� Tuff Scrub� 3300 (06–00)
MACHINE SPECIFICATIONSMODEL Tuff Scrub � 3300
LENGTH 1905 mm (75 in)
WIDTH (without squeegee and skirts) 864 mm (34 in)
WIDTH (with squeegee and skirts) 1170 mm (46 in)
HEIGHT 1397 mm (55 in)
WEIGHT (with batteries) 680 Kg (1500 lb)
WEIGHT (w/ batteries, full solution tank and operator) 907 Kg (2000 lb)
CLEANING PATH WIDTH 838 mm (33 in)
RECOVERY TANK CAPACITY 189 L (50 Gal)
SOLUTION TANK CAPACITY 151 L (40 Gal)
SOLUTION FLOW RATE 3.8 L/min (1 Gal/min) nominal
DRIVE SYSTEM Transaxle, 36 V, 0.56 kw (0.75 hp)
MAXIMUM RATED CLIMB OR DESCENT Scrubbing: 4° Transporting: 12°
TURNING RADIUS 1295 mm (51 in)
SPEED Forward – 6.4km/h (0–4.0mph) Reverse – 2.4km/h (0–1.5mph)
CLEANING RATE, MAX. 5400 m2 (58,000 sq ft) per hour
PAD PRESSURE Variable 52–97 kg (115–215 lb)
BRUSH MOTOR Two – 0.56 kW (0.75 hp), 320 rpm (full load), 36 V, 21 A, 560 W
VACUUM MOTOR 0.67 kW (0.9 hp), three–stage 145 mm (5.7 in), 36 V, 21.2 A, 672 W
WATER LIFT 1880 mm (74 in)
BATTERIES Six – 6 V, 335 AH
BATTERY CHARGER 36 VDC, 36 A, 120 VAC
CONTINUOUS RUN TIME (average machine load) Up to 3.5 hours
TOTAL POWER CONSUMPTION (average machine load) 70 Amp
DECIBEL RATING AT OPERATOR’S EAR, INDOORS 76 dB(A)
MACHINE DIMENSIONS
1170 mm(46 in)
864 mm(34.0 in)
1905 mm(75.0 in)
1397 mm(55.0 in)

ELECTRICAL DIAGRAMS
Nobles� Tuff Scrub� 3300 (06–00) 23
-88-
LADDERDIAGRAM G
G
G
A
OPTIONAL LOW VOLTAGE
INTERRUPT
36V DCEMERGENCY
STOP SWITCHKEYSWITCH
CHARGERSAFETYSWITCH
ELECTRONICVOLTMETER
POWERINDICATOR
HORNBUTTON
SQUEEGEEACTUATOR
VACUUMSWITCH
VACUUMLIMIT
SWITCH
VACUUM MOTORCIRCUIT BREAKER
SCRUB HEADPOSITION SWITCH
SCRUB HEADPRESSURE
ADJUSTMENTSWITCH
SCRUB DECKPOSITION INDICATOR
SCRUB HEADACTUATOR
LOW SOLUTIONINDICATOR
SOLUTION TANK FLOAT
SWITCH
FLASHERRELAY
WARNING LIGHTS
RECYCLEFLOAT
SWITCH
RECYCLE PUMPSWITCH
WAND PUMP
SWITCH
WANDPUMP
RECYCLEPUMPTIME
DELAY
THROTTLE
DRIVECIRCUIT
BREAKER
HEAD DOWNSWITCH
HOURMETER
SOLUTIONSOLENOID
RIGHTBRUSH
BRUSHPRESSURE
GAUGE
RIGHT BRUSH CIRCUIT BREAKER
LEFT BRUSH CIRCUIT BREAKER LEFT BRUSH
T8
T3 T11
T1
T9T6
HORN
330
330
330
1 234
VACUUMMOTOR
WHT/BRN
GRN
O
R
G
BLK
BLK/
WHT
W
H
T
G
G
3
4
1
MAIN CIRCUITBREAKER
-3-BLK
-120-GRN
BLK
YEL
-124-BLU
-54-RED
-128-GRN
-56-
GRN
-140-GRN
-102-GRN
GRN
WHT
-52-RED
RED
ORG
RED
-46-RED
-36-RED
-59-BLK
-53-BLK
-15-BLK
-80-BLU
-122-BLU
-64- WHT
ORG
-32-BLU
-114- RED
-42-ORG
-38-RED
-44-RED
30A
30A
-68- GRN
60A
-98-PNK
-100- PUR
-26-GRN
-110- BLK / WHT -29- BLK
OPTIONAL EQUIPMENT
-92- RED
-82- GRN
-37- BLK
-39- BLK
-104- BRN
-23-BLK
-25-BLK
BLK
-43- BLK
BLK
-132-GRN
-90-GRN
-138-GRN
-16-GRN
-120-GRN
-12-GRN
-10-GRN
-14-GRN
-11-BLK
-52- RED
-59-BLK
-79-BLK
-48-TAN
-40-TAN
-134- GRY
-19- BLK
-75- BLK
-18-
GRN
-28-
YEL
-9- BLK
-66- ORG
-33- YEL
-60- PUR
30A
-1- BLK
-73- BLK
-27- BLK
-69- BLK
-130-RED
-4-RED
-2-RED
-8-GRN
-7-BLK
-31- BLU
-34- BRN
-20- GRN
-58- RED
-64- WHT
-86- BRN
-13- BLK
-7- BLK
-67- BLK
-6- GRN -17- BLK
-118- GRN
10A
YEL -62- BLU
-59-BLK
-62-BLU
-110- WHT
DIRECTIONRELAY
SAFETYSWITCH
SEAT
TRANSPORT MOTORSPEED CONTROLER
-35- WHT
-71- BLK
-41- BLK
-13D-
BLK-112-
-13C- BLK-21- BLK
-30- RED
-47 BLK
-13B- BLK
B+ M+ M- B-
-45- BLK
TRANSPORTMOTOR
M
M
M
M
M
M
M
M
BLKBLK-96- PNK
MAINCONTACTOR
BRUSHCONTACTOR

ELECTRICAL DIAGRAMS
Nobles� Tuff Scrub� 3300 (06–00)24
WIRE DIAGRAM
–33–
BLK
–138
–
–51–
BLK
–29–
BLK
–104
–P
NK
–110
–
GR
N
–61–
BLK
–112
–
BLK
BLK
/WH
T
WH
T
BLK
–15–
–108
–
–80–
BLU
BLK
–39–
OR
G–6
6–
GR
N
YE
L
–37–
BLK
RE
D
–37–
B
LK
–65–
B
LK
–54–
–37–
B
LK
–52–
R
ED
–65–
B
LK
–69–
B
LK
–19–
–48–
TAN
–28–
Y
EL
BLK
–67–
BLK
BLK
–11– –6
0–
–6–
GR
N
–44–
W
HT
–44–
WH
T–1
04–
PN
K
BLK
RE
D
OR
G–4
2–
–130
–
–17–
B
LK
BLK
PN
K
–15–
B
LK
B R N \ W H TG
RN
–128
–
R NG
B L K \ W H TR GO
L KB
–56–
G
RN
GR
N
–15–
BLU
–80–
BLK
BLK
H TW
–80–
B
LU
BLK
PU
R
–100
–P
UR
–88–
GR
N
–66–
OR
G
–102
– G
RN
–58–
R
ED
–42–
O
RG
–102
–
BLU
–15–
BLK
–80–
–17–
B
LK
–58–
R
ED
PU
R
–98–
PN
K–9
6–
RE
D
–64–
W
HT
–13–
B
LK
GR
N–2
0–
–60–
–6–
GR
N
–18–
GR
N
–22–
G
RN
–8–
GR
N–7
––2
2––7
3–
BLK
–34–
B
RN
–31–
B
LU
–1–
BLK
YE
LB
LK
–64–
WH
T
–56–
G
RN
RE
D
–138
– G
RN
GR
N–2
4–
–71–
B
LK
B
LK –68–
G
RN
B
LK–82–
G
RN
–132
– G
RN
–24–
G
RN
–90–
G
RN
–79–
B
LK
–88–
G
RN
–19–
B
LK
–102
– G
RN
–138
– G
RN
–86–
–9–
BLK –3
3–
–64–
–37–
WH
T
–66–
OR
G
BLK
–16–
–73–
BLK
–9–
GR
N
GR
N
–16–
BLK
GR
N
BLK
–12–
–86–
G
RN
–134
– G
RY
–10–
G
RN
–83–
BLU–1
4–
GR
N
–9–
BLK
–5–
BLK
–3–
GR
N–1
4– B
LK
–75–
B
LK
–1–
BLK
BLK
–68–
GR
N
–19–
GR
N–8
2–
BLK
GR
N–1
20–
–34–
–1–
BLK
–67–
BLU
BLK
GR
N–2
2–
–31–
BR
N
GR
Y–1
34–
GR
N–1
0–G
RN
–8–
GR
N–8
– G
RN
–22–
G
RN
CB
ED
AF
PU
MP
ES
CO
NTA
CT
OR
MA
IN
IND
ICAT
OR
PO
WE
R
SW
ITC
HK
EY
M
AIN
T1
30s
SW
ITC
H
SA
FE
TY
SE
AT
CO
NT
RO
L
TH
RO
TT
LE
TIM
ER
(OP
TIO
NA
L)
SW
ITC
H
WA
ND
ES
ME
TE
R
PR
ES
SU
RE
BR
US
H
21
ME
TE
R
HO
UR
T9
T11
T8
T3
T6
412 3
ME
TE
R
VO
LT
CO
NTA
CT
OR
VA
CU
UM
IND
ICAT
OR
SO
LUT
ION
RE
LAY
FLA
SH
ER
SW
ITC
H
FLO
AT
ES
330
330
WA
RN
ING
LIG
HT
S
IND
ICAT
OR
PO
SIT
ION
SC
RU
B D
EC
K
PR
ES
SU
RE
SW
ITC
H
BR
US
H
HO
RN
BU
TT
ON
LOW
SW
ITC
HF
LOA
TLE
VE
L
HO
RN
SW
ITC
HV
AC
UU
M
ST
OP
SW
ITC
H
EM
ER
GE
NC
Y
–50–
RE
D
LOW
1
43
–92–

ELECTRICAL DIAGRAMS
Nobles� Tuff Scrub� 3300 (06–00) 25
–60–
–138
–
–138
–
RE
D–1
30–
–104
–P
NK
–43–
B
LK
–30–
RE
DBLK
–21–
–122
– B
LU
BLU
OR
G–6
6–
–41–
BLK
–44–
WH
T
–42–
OR
G
RE
D–1
30–
BLK
–29–
BLK
–112
–B
LK
–13B
–
–114
– R
ED
–42–
O
RG
–29–
B
LK
–44–
W
HT
–47–
B
LK
BLK
–124
–
–13D
–
–13C
–B
LK
–39–
BLK
BLU
–35–
–45–
–62–
BLU
GR
N
BLK
–26A
–
–13A
–W
HT
–26B
–
–41–
BLK
–62–
BLU
–13A
–
–110
– W
HT
–62–
WH
T–3
5–P
URO
RG
–66–
–43–
B
LK
RE
D
–130
– R
ED
BLK
–53–
GR
N
YE
L–3
3–
–38–
RE
D
PU
R
WH
T
–60–
–44–
–32–
B
LU
–4–
RE
D
BLK–2
5–
–25–
B
LK
–23–
B
LK
BLK
BLK
BLK
–27–
RE
D
–32–
TAN
NO
TU
SE
D BLK
–43–
–40–
RE
D–4
–
–45–
RE
D
BLK
BLU
–29–
B
LK
–13B
– B
LK
–39–
B
LK
–38–
RE
D
–29–
B
LK
–114
– R
ED
–13A
– B
LK Y
EL
GR
N
OR
G
–13C
– B
LK
–31–
B
LU
BR
N–3
4–
–39–
B
LK
–120
– G
RN
–114
– R
ED
–47–
B
LK
–40–
TA
N
–55–
B
LK
BLK
–33–
YE
L
BLK
–53–
–65–
WH
T–6
4–
RE
D
RE
D
–36––8
0–
BLU
–15–
B
LK
–53–
B
LK
–46–
R
ED
–36–
R
ED
–59–
B
LK
–5
4–
RE
D
–48–
TA
N
RE
D
–80–
B
LU
BLK
BR
N
GR
N
BLU
–31–
YE
L–2
8–
–120
–
–34–
–32–
BLK
–2–
RE
D
–77–R
ED
–29–
BLU
YE
L
BLK
WA
ND
PU
MP
SO
LEN
OID
SO
LUT
ION
TR
AN
SP
OR
TM
OT
OR
DR
IVE
SC
RU
B D
EC
KP
OS
ITIO
NS
WIT
CH
BR
US
HM
OT
OR
SW
ITC
H
P1
B-
M-
M+
B+
TR
AN
SP
OR
T M
OT
OR
SP
EE
D C
ON
TR
OLL
ER
11
DIR
EC
TIO
NR
ELA
Y
CH
AR
GE
RP
LUG
SW
ITC
HS
AF
ET
YC
HA
RG
ER
MO
TO
RB
RU
SH
RIG
HT
MO
TO
RB
RU
SH
LEF
T
AC
TU
ATO
RM
OT
OR
MO
TO
RV
AC
UU
M
36 V
DC
10 A
MP.
MA
IN
MO
TO
RS
QU
EE
GE
ELIM
ITS
WIT
CH
VA
CU
UM
R. B
RU
SH
30 A
MP.
30 A
MP.
VA
CU
UM
30 A
MP.
L. B
RU
SH
NE
G.
STA
ND
OF
F
DR
IVE
60 A
MP.
CU
T-O
FF
LOW
VO
LTA
GE
(OP
TIO
NA
L)
CO
NTA
CT
OR
BR
US
H
BLK
–28–
–77–
–84–
NO
T U
SE
D

PARTS LIST
Nobles� Tuff Scrub� 3300 (09–99)26
SOLUTION TANK GROUP
29
1
32
4
5
617
18
9
10
78
11
14
15
16
1817
19
2124
2322
20
25 242322
2627
82728
3031
33
32
34
7
2
357
27
8
36
37
3130
2938
35
2
12
13
1718
3940
4149
50
51 52
53
4342
44
4546
4847
5655
54
57
58
59
60
61
55
60
56

PARTS LIST
Nobles� Tuff Scrub� 3300 (09–99) 27
SOLUTION TANK GROUP
REF PART # DESCRIPTION QTY.
1 600859 HOUSING, FRONT 1
2 140027 WASHER, 5/16 FLT 15
3 605079 SCREW, M8X1.25X35 15
4 608184 DECAL, NOBLES 1.62” X 9.5” 1
5 603440 LIGHT, SAFETY 36VDC 2
6 601977 SCREEN, FRONT LIGHTS 1
7 140015 WASHER, 5/16 SPLTLCK 19
8 140275 SCREW, M8X1.25X16 HXHDCP 15
9 600857 TANK, SOLUTION 1
10 600881 BRACKET, BUMPER WHEELS 4
11 630450 WHEEL, RUBBER 20
12 600915 PIN, CLEVIS 7/16X6 4
13 578421 PIN, COTTER, .12”X1.00”LG 4
14 607404 DECAL, ”TUFF SCRUB 3300” 1
15 607405 DECAL, CORE COVER 1
16 601979 CLIP, LATCH SOL COVER 1
17 140032 WASHER, #6 FLAT 8
18 140872 SCREW, #6X3/8 8
19 601978 GASKET, SOLUTION TANK COVER 1
20 601975 COVER, SOL TANK 1
21 601980 LATCH, SOL COVER 1
22 140007 WASHER, #8 FLT 4
23 140023 WASHER, #8 INT 4
24 20007034 SCREW, M4X.7X8 4
25 601981 HINGE, SOLUTION COVER 1
26 607033 PANEL, FLOOR LEFT FRONT 1
27 607036 PANEL, FLOOR CENTER FRONT 1
28 607070 PLATE, PARKING BRAKE LATCH 1
29 140000 WASHER, 1/4 FLT 8
30 140016 WASHER, 1/4 LCK 8
31 578187000 SCREW, M6X1.0X12 8
∇ ASSEMBLY
� INCLUDED IN ASSEMBLY
� RECOMMENDED STOCK ITEMS
REF PART # DESCRIPTION QTY.
32 607037 PANEL, FLOOR LEFT REAR 1
33 600993 PAD, NON SLIP SURFACING 4X10 2
34 607035 PANEL, FLOOR RIGHT REAR 1
35 575029000 SCREW, M8X1.25X20 4
36 140204 SCREW, 1/2–13X1–1/2 1
37 140509 NUT, 1/2–13 HXJM 1
38 607034 PANEL, FLOOR FRONT RIGHT 1
39 200630262 SCREW, M3X.5X10 FILPHL 1
40 140019 WASHER, #6 EXT 1
41 607131 SPRING, LEVER CHRG SHUTOUT 1
42 607132 PLATE, CHARGE PLUG 1
43 140284 NUT, M6X1.0 NYLCK 2
44 579211 NUT, M3 HEXLCK 2
45 601359 PLATE, SWITCH BACKING 1
46 600437 SWITCH, ROLLER 15A 1
47 601127000 WASHER, FLAT 2
48 578403000 SCREW, M3X.5X20 2
49 140016 WASHER, 1/4 LCK 2
50 200031436 SCREW, M6X1.0X16 2
51 140000 WASHER, 1/4 FLT 4
∇ 52 607141 ASM, CHARGE PLUG 1
� 069764608 �PLUG 1
53 200031444 SCREW, M6X1.0X30 2
54 069760096 SCREW, M8X1.25X10 2
55 140015 WASHER, 5/16 SPLTLCK 4
56 140027 WASHER, 5/16 FLT 4
57 607136 COVER, WIRING 1
58 607825 SENSOR, LIQUID LEVEL 1
59 140314 CLAMP, INSULATED 3/4” ID 1
60 200607491 SCREW, M8X1.25X25 3
61 600958 PLATE, HOUSING TIE 1

PARTS LIST
Nobles� Tuff Scrub� 3300 (06–00)28
CONTROL CONSOLE GROUP
1
135
4
6
7
8
9
11
10
14 16
17
15
18
14
19
20
21
12
2
22
3

PARTS LIST
Nobles� Tuff Scrub� 3300 (06–00) 29
CONTROL CONSOLE GROUP
REF PART # DESCRIPTION QTY.
1 607076 PANEL, DASH 1
2 607074 �GAUGE, BRUSH PRESSURE 1
3 610262 DECAL, TUFF SCRUB DASH 1
∇ 4 612462 �KEYSWITCH 1
� 069762236 �KEY 1
5 626114 �LIGHT, PILOT 36V GREEN 1
6 600832 �GAUGE, BATTERY 36V 1
7 630143 METER, HOUR, 18–60VDC 1
8 626114 �LIGHT, PILOT 36V GREEN 1
9 603399 �SWITCH, BRUSH PRESSURE 1
10 626128 �SWITCH, PUSHBUTTON 1
11 140756 SCREW, 6–32X1/4 2
12 607104 COVER, STEERING BEARING 1
∇ ASSEMBLY
� INCLUDED IN ASSEMBLY
� RECOMMENDED STOCK ITEMS
N/S NOT SHOWN
REF PART # DESCRIPTION QTY.
13 578187000 SCREW, M6X1.0X12 2
14 607977 �SWITCH, VAC & SQUEEGEE 1
15 607406 CABLE, SOLUTION CONTROL 1
16 626121 KNOB, WATER VALVE 1
17 140809 SCREW, 6–32X7/16 1
18 611148000 LIGHT, PILOT 32V AMBER 1
19 630100 �SWITCH, PUSHBUTTON 1
20 630097 �SWITCH, CONTACT BLOCK 1
21 611226000 SCREW, 6–32X1/4 TRS 7
22 630452 SPACER 1
N/S 607106 HARNESS, MAIN 1

PARTS LIST
Nobles� Tuff Scrub� 3300 (06–00)30
ELECTRICAL PANEL GROUP
1
23
4
56
7
8
9
1011
12 13
14
16 17
1819
20
21
2223
25
24
2627
3128
29
3032
34
3533
3738
39
15
36
442
40
42
41

PARTS LIST
Nobles� Tuff Scrub� 3300 (06–00) 31
ELECTRICAL PANEL GROUP
REF PART # DESCRIPTION QTY.
1 607069 PANEL, ELECTRICAL RH 1
2 610240 �CONTROLLER 36V 110A 1
3 140804 SCREW, 10–24X1 2
4 140519 NUT, 10–24 KEP 3
5 140553 SCREW, 1/4–20X1/2 1
6 140016 WASHER, 1/4 LOCK 1
7 607402 CABLE, #4 BLACK 1
8 578427 STANDOFF, TERMINAL 1
9 140195 SCREW, 1/4–20X1/2 1
10 578187000 SCREW, M6X1.0X12 4
11 140016 WASHER, 1/4 LOCK 4
12 140000 WASHER, 1/4 FLAT 4
13 582150 PLUG, ACCESSORY SWITCH 2
14 606105 DECAL, DO NOT SPRAY 1
15 140506 NUT, 5/16–18 HEX 2
16 601461 PANEL, ELECTRICAL LH 1
17 607836 DECAL, CIRCUIT BREAKERS RIDER 1
18 578187000 SCREW, M6X1.0X12 4
19 140016 WASHER, 1/4 LOCK 4
20 140000 WASHER, 1/4 FLAT 4
21 606780 BREAKER, CIRCUIT 30A 3
22 130739 BREAKER, CIRCUIT 60A 1
23 130737 BREAKER, CIRCUIT 10A 1
∇ ASSEMBLY
� INCLUDED IN ASSEMBLY
� RECOMMENDED STOCK ITEMS
N/S NOT SHOWN
REF PART # DESCRIPTION QTY.
24 100058 TAPE, ACRYLIC FOAM – 1” WIDE .08ft
25 603839 FLASHER, 36VDC 1
26 611157000 �CONTACTOR, 36VDC 100A 2
27 578321000 SCREW, M6X1.0X16 3
28 140000 WASHER, 1/4 FLAT 3
29 140284 NUT, M6X1.0 NYLCK 3
30 130733 �SOLENOID, SPNO 36 VOLT 1
31 578321000 SCREW, M6X1.0X16 2
32 140000 WASHER, 1/4 FLAT 2
33 140284 NUT, M6X1.0 NYLCK 2
34 606404 �ASM, DIODE W/RING TERMINALS 3
35 607401 CABLE, #4 RED 1
36 369702 HORN, 36VDC 1
37 575029000 SCREW, M8X1.25X20 2
38 140015 WASHER, 5/16 SPLTLCK 2
39 140027 WASHER, 5/16 FLT USS 2
∇ 40 610258 HARNESS, JUMPER ASM 1
� 222111 RELAY, 36V 1
� 57785 SOCKET, RELAY MODULE 1
41 140197 SCREW. 10–24X3/8 1
42 140011 WASHER, #10 3
N/S 607106 HARNESS, MAIN 1

PARTS LIST
Nobles� Tuff Scrub� 3300 (06–00)32
RECOVERY TANK GROUP
13
2
1
29
17
9
6
7
810
9 14
15
16
11
12
19 21
22
2617
18
11
23
38
1418
28
24
21
6
25
16
27
30
31
1817
33
32
37
36
35
34
17
18 20
18
3
4
5
29
3928
29

PARTS LIST
Nobles� Tuff Scrub� 3300 (06–00) 33
RECOVERY TANK GROUP
REF PART # DESCRIPTION QTY.
1 600863 TANK, RECOVERY 1
2 621324 PLUG, EXPANSION 1–1/2”DIA 1
3 578441 STRAP, DRAIN HOSE 1
4 630394 SLEEVE, DRAIN HOSE 1.5”ID 1
5 630068 �HOSE, DRAIN 1.5ID X20” 1
6 140308 CLAMP, HOSE 1–5/16 TO 2–1/4 2
7 0174..10 SEAT, NEOPRENE MOTOR 1
∇ 8 130413 �MOTOR, VAC 5.7DIA 3 STG.36VDC 1
�9 190162 �BRUSH, CARBON 2/PK 1
10 130096 TERMINAL, ML DSCNT 16–14 FI 2
11 130041 WIRE TIE, NYLON 11–1/2 X .190 2
12 600009 MUFFLER, VAC EXHAUST 1
13 607403 PLATE, VAC MOUNT 3
14 140000 WASHER, 1/4 FLAT 7
15 140212 SCREW, 1/4–20X1–1/2 HXHDCP 3
16 140016 WASHER, 1/4 LOCK 7
17 140015 WASHER, 5/16 SPLTLCK 9
18 140275 SCREW, M8X1.25X16 HXHDCP 18
19 600877 HINGE, RECOVERY TANK 1
20 140027 WASHER, 5/16 FLAT 9
∇ ASSEMBLY
� INCLUDED IN ASSEMBLY
� RECOMMENDED STOCK ITEMS
REF PART # DESCRIPTION QTY.
21 607072 GASKET 2
22 607130 COVER, ES 1
23 603259 �HOSE, 1.5X50” 90DEG CUFF 1
24 600872 TUBE, VAC INLET 1
25 200031441 SCREW, M6X1.0X25 HXHDCP 4
26 140960 CABLE, REC TANK SUPPORT 1
27 630056 STRAP, TANK COVER RETAINING 1
28 630390 WASHER, FLAT 5
29 140872 SCREW, #6X3/8 PANPHL 5
30 630367 �GASKET, REC TANK COVER 1
31 630055 COVER, TANK CLEANOUT 1
32 630420 DECAL, FLAMMABLE MATERIAL 1
33 222793 CLIP, HOSE HANGER 1
34 600871 STANDPIPE, RM–NAT 1
35 606088 FITTING, 1–1/2” NIPPLE 1
36 101714 GASKET 1
37 210240 NUT, 1–1/2 FPT FLANG 1
38 180613 �FLOAT, SHUT–OFF 1
39 231076 STRAP, FLOAT CAGE 1

PARTS LIST
Nobles� Tuff Scrub� 3300 (09–99)34
SEAT GROUP
1
2
34
5
6
7
8
910
11
12
13
1415
1717
18
19
2021
2223
24
25
16

PARTS LIST
Nobles� Tuff Scrub� 3300 (09–99) 35
SEAT GROUP
REF PART # DESCRIPTION QTY.
1 223077 SEAT 1
2 360369 RAIL, SLIDE SEAT 1
3 360370 RAIL, SLIDE SEAT W/LATCH 1
4 140219 SCREW, 5/16–18X1 4
5 140594 NUT, HEX 7/16–14 4
6 223078 �SWITCH, SEAT 1
7 600869 COVER, BATTERY HOUSING 1
8 607842 EDGING, PLASTIC 1/8” 1
9 140015 WASHER, 5/16 SPLTLCK 4
10 140506 NUT, 5/16–18 HEX 4
11 607404 DECAL, ”TUFF SCRUB 3300” 1
12 607834 DECAL, BATT HOOKUP 1
13 120649 DECAL,WARNING – BATTERY 1
� RECOMMENDED STOCK ITEMS
REF PART # DESCRIPTION QTY.
14 630420 DECAL, WARNING – BATTERY 1
15 607835 DECAL, FLAMMABLE MAT’L TXTLS 1
16 630476 GASKET 1
17 600865 HOUSING, BATTERIES 1
18 140275 SCREW, M8X1.25X16 HX 4
19 200160017 NUT, M8 HXL 4
20 140027 WASHER, 5/16 FLT 5
21 140275 SCREW, M8X1.25X16 5
22 140024 WASHER, 1/2 LCK 4
23 140204 SCREW, 1/2–13X1–1/2 4
24 607039 PLATE, SOL TANK SUPPORT 1
25 140506 NUT, 5/16–18 HEX 3

PARTS LIST
Nobles� Tuff Scrub� 3300 (09–99)36
CHARGER AND BATTERY GROUP
1
2
3
4
6
5

PARTS LIST
Nobles� Tuff Scrub� 3300 (09–99) 37
CHARGER AND BATTERY GROUP
REF PART # DESCRIPTION QTY.
1 602004 CHARGER, 36DC/36A/120V AC 1
∇ 2 601733 BATTERY, 6V 335AH 6
�3 140506 NUT, 5/16–18 HEX 12
∇ ASSEMBLY
� INCLUDED IN ASSEMBLY
REF PART # DESCRIPTION QTY.
4 611117000 CABLE, BATTERY 5
5 607402 CABLE, #4 BLACK 1
6 607401 CABLE, #4 RED 1

PARTS LIST
Nobles� Tuff Scrub� 3300 (09–99)38
STEERING GROUP
1
11
23
4
5
6
5
7
5
8
9
10
23
12
13
1412
16
15
17
18
19
2021
22
10
25
24
28
34
28
33
29
32
28
29
30
27
26
28
29
31
27
26
35
36
37
39
40
38
41 4243
10
28
44
PARTS LIST
Nobles� Tuff Scrub� 3300 (09–99) 39
STEERING GROUP
REF PART # DESCRIPTION QTY.
1 223075 STEERING WHEEL, 14 IN. DIA. 1
2 200102019 NUT, HEX 1
3 140045 WASHER, .510X1.25X.06 FLT 1
4 130009 LOOM, .75 DIA .38ft
5 140628 KEY, 3/16 3
6 223061 SHAFT, STEERING UPPER 1
7 223072 UNIVERSAL JOINT, 3/4ID 1
8 600898 SHAFT, STEERING LOWER 1
9 140632 KEY, 1/4 X 1” 1
10 240071 SPROCKET, DRIVE MOTOR 3
11 600864 CHASSIS, WELDMENT 1
12 140123 BEARING 2
13 600894 HOUSING, STEERING BEARING 1
14 600893 SPACER, BEARING 1
15 200160018 NUT, HEX LOCK 4
16 140028 WASHER, 3/8 FLT 1
17 140333 WASHER, M10 SPLTLCK 1
18 140276 SCREW, M10X1.5X16 1
19 140509 NUT, 1/2–13 JAM 2
20 140515 NUT, 3/8–16 NYLCK 1
21 607838 STUD, 3/8–16X4 1
22 140545 NUT, 3/8–16 FINJAM 1
23 200031541 SCREW, 10X25 1
REF PART # DESCRIPTION QTY.
24 607071 SPACER 1
25 600924 WASHER, BEARING 2
26 605943 SLEEVE, BEARING 2
27 600896 BUSHING 2
28 140045 WASHER, 1/2 FLAT 4
29 140024 WASHER, 1/2 LCK 3
30 140234 SCREW, 1/2–13X2–1/2 1
31 600666 SCREW, 1/2–13X1–3/4 1
32 140204 SCREW, 1/2–13X1–1/2 1
33 140137 BUSHING 1
34 600897 ARM, IDLER SPROCKET 1
35 606426 KIT, CHAIN & LINKS 2
N/S 240021 LINK, CONNECT 2
N/S 607040 SPACER 4
36 600930 CABLE, STEERING LINKAGE 2
37 600885 SPROCKET, REAR STEERING 1
38 140056 WASHER, 3/8IDX1.50OD FNDR 1
39 140333 WASHER, M10 SPLTLCK 1
40 140277 SCREW, M10X1.5X20 HXHDCP 1
41 607837 COVER, REAR SPROCKET 1
42 140018 WASHER, #10 INT 2
43 140268 SCREW, M5X.8X12 2
44 223065 BEARING, FLANGE 1
N/S NOT SHOWN

PARTS LIST
Nobles� Tuff Scrub� 3300 (06–00)40
MAIN FRAME AND DRIVE GROUP
40
3938
414244
414243
56
78
1312
141315
16
17
19
16
18
20
21
2322 24
2522
2627
28
30
3332
31
37
36
35
29
9
10
11
10
11
9
1
3
4
2
34

PARTS LIST
Nobles� Tuff Scrub� 3300 (06–00) 41
MAIN FRAME AND DRIVE GROUP
REF PART # DESCRIPTION QTY.
1 600864 CHASSIS, WELDMENT 1
2 140823 SCREW, 10–24X5/8 1
3 573073 CLIP, WAND 1
4 140519 NUT, 10–24 KEP 1
5 140277 SCREW, M10X1.5X20 4
6 600909 PLATE, STEERING STOP 2
7 140333 WASHER, M10 SPLTLCK 4
8 200031541 SCREW, 10X25 6
9 140027 WASHER, 5/16 FLT 4
10 140015 WASHER, 5/16 SPLTLCK 4
11 140275 SCREW, M8X1.25X16 4
12 2949.30 SCREW, 3/8–16X2–1/2 2
13 140045 WASHER, .510X1.25X.06 FLT 4
14 607833 WEIGHT 3
15 140515 NUT, 3/8–16 NYLCK 2
16 600951 BEARING 2
17 600889 HOUSING, WHEEL BEARING 1
18 200160018 NUT, HEX LOCK 6
19 600892 SPACER, BEARING 1
20 140632 KEY, 1/4 X 1” 1
21 600873 SPINDLE, WHEEL WELDMENT 1
22 601148 BEARING 4
23 600985 SPACER 2
24 606985 WHEEL, 10” REAR STEERING 2
25 140028 WASHER, 3/8 FLT 2
26 140333 WASHER, M10 SPLTLCK 2
REF PART # DESCRIPTION QTY.
27 140276 SCREW, M10X1.5X16 2
28 069767162 NUT, HEX 6
29 140024 WASHER, 1/2 LCK 6
30 606984 WHEEL, 12” DRIVE 2
31 600886 PLATE, BRAKE 2
32 140015 WASHER, 5/16 SPLTLCK 12
33 140275 SCREW, M8X1.25X16 12
34 140277 SCREW, M10X1.5X20 4
35 140333 WASHER, M10 SPLTLCK 4
36 605944 PLATE, TRANSAXLE RETAINER 2
∇ 37 609477 TRANSAXLE, W/MOTOR 36V 1
� 609781 MOTOR FOR TRANSAXLE 609477 1
� 610760 BRUSH, CARBON 4
� 610761 SPRING, CARBON BRUSH 4
� 610762 BEARING, BRUSH AND END DRIVE 2
� 130111 TERMINAL RING 5/16 2
� 610126 COUPLING W/URETHANE SPACER 1
� 610128 SHEILD STEEL SPACER COUPLING 1
38 140277 SCREW, M10X1.5X20 4
39 140333 WASHER, M10 SPLTLCK 4
40 601984 BRACKET, SUPPORT FRONT 1
41 140823 SCREW, 10–24X5/8 4
42 140916 CLAMP, CABLE 3
43 140519 NUT, 10–24 KEP 3
44 140552 NUT, 10–24 NYLOCK 1
∇ ASSEMBLY
� INCLUDED IN ASSEMBLY
PARTS LIST
Nobles� Tuff Scrub� 3300 (06–00)42
CONTROL GROUP
39
12
34
5
7
8
910
11
12
15
13
14
49
18 9
17
204
193
2121
2
2223
2425
27
26
28
22
37
35922
22
30
33
2236
22
29
31
4222
36
43
40
4138
637
32
34
16
36
3
44
44
45
47 46
4648
46

PARTS LIST
Nobles� Tuff Scrub� 3300 (06–00) 43
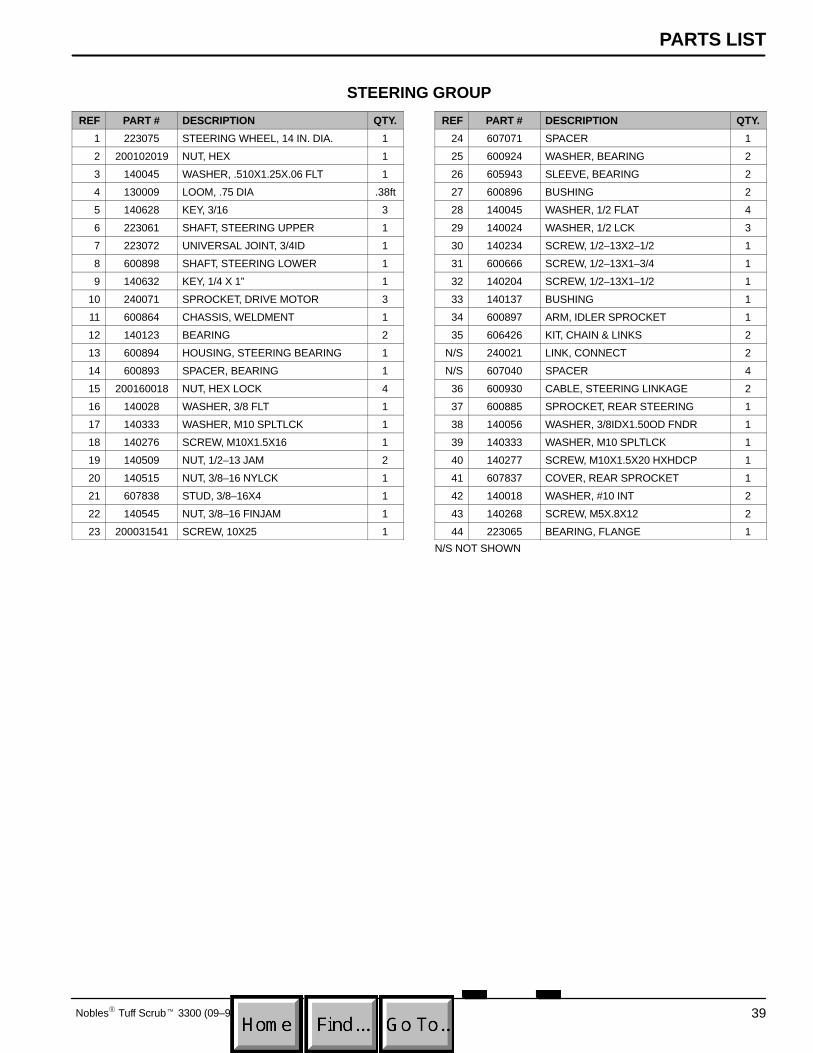
CONTROL GROUP
REF PART # DESCRIPTION QTY.
1 600882 PEDAL, SPEED CONTROL 1
2 607827 PAD, NONSLIP SURFACE 1.38X2.75 6
3 140045 WASHER, 510X1.25X.06 FLT 3
4 140024 WASHER, 1/2 LCK 2
5 140292 SCREW, 1/2–13X3 1
6 607022 BUSHING .502X.624X2.060 1
7 600884 LIFT, WELDMENT BRAKE 1
8 605320 SPRING 2
9 140333 WASHER, M10 SPLTLCK 6
10 200031544 SCREW, 10X30 1
11 600906 ROD, BRAKE LINK LH THRD 2
12 600908 LINK, BRAKE ADJUSTER 2
13 140506 NUT, 5/16–18 HEX 2
14 610161 ROD, LINK LOWER BRAKE 2
15 578421 PIN, COTTER 2
∇ 16 610186 BRAKE, ASM 2
� 610284 PAD, FRICTION BRAKE 4
17 610159 BRACKET, LH BRAKE MOUNT 1
610160 BRACKET, RH BRAKE MOUNT 1
18 140276 SCREW, M10X1.5X16 4
19 607023 BUSHING, .502X.624X1.056 1
20 140235 SCREW, 1/2–13X2 1
21 600883 PEDAL, BRAKE 1
22 140028 WASHER, 3/8 FLT 8
23 200031552 SCREW, M10X1.5X55 1
24 579082 SPACER, .38X.50X1.00 1
∇ ASSEMBLY
� INCLUDED IN ASSEMBLY
� RECOMMENDED STOCK ITEMS
REF PART # DESCRIPTION QTY.
25 604605 SPRING, TORSION 10# 1
26 610255 PEDAL, PARKING BRAKE 1
27 140285 NUT, HEX M10 X 1.5 1
28 600721 PAD, NON SLIP SURFACING 1
29 223094 �THROTTLE, ASM. ELECTRONIC 1
30 140018 WASHER, #10 INT 2
31 578141000 SCREW, M5X10 2
32 600927 ARM, THROTTLE CONTROL 1
33 200031436 SCREW, M6X1.0X16 1
34 600928 LINK, PEDAL CONTROL 1
35 140277 SCREW, M10X1.5X20 1
36 600929 BUSHING, .395X.499X.265 3
37 140525 NUT, 3/8–16 HEX 2
38 604495 SHAFT, THROTTLE CENTERING 1
39 140125 BEARING, BRUSH 1
40 607020 PLATE, THROTTLE CENTERING 1
41 578425 SPRING, EXT 0.63” 03.00 .063 1
42 140202 SCREW, 3/8–16X1 1
43 140515 NUT, 3/8–16 NYLCK 1
44 610237 PLATE, SPRING RETAINER 4
45 610238 SPRING 2
46 140027 WASHER, 5/16 FLAT 6
47 140546 NUT, 5/16–18 NYLOCK 2
48 140219 SCREW, 5/16–18X1 2
49 612254000 PIN, HAIRPIN 2

PARTS LIST
Nobles� Tuff Scrub� 3300 (06–00)44
PAD DRIVER GROUP
33
2
1
3
4
5
11
10
12
7
613
1415
16
17
8
9
18
19
20
2122
2325
23
26
2128
30
2326
32
35
34
36
37
38
40
39
41
23
34
23
42
43
4445
46
24
31
27
23
29
26
21
28
30
23
2326
23
23
23

PARTS LIST
Nobles� Tuff Scrub� 3300 (06–00) 45
PAD DRIVER GROUP
REF PART # DESCRIPTION QTY.
1 607409 BRACKET, BRUSH MOTOR MOUNT 1
∇ 2 069762432 �MOTOR, 36VDC .75HP, 320 2
� 190970 �BRUSH, CARBON 4
� 611283000 BRUSH, BOARD ASSY 1
3 140632 KEY, 1/4 X 1” (+.000/–.002) 2
4 621471 SPACER, .75X1.12 2
5 610288 PLATE, DRIVE 2
∇ 6 607824 �DRIVER, 17” PAD (PK/2) 1
�7 240238 LUGS, W/SCREWS (SET OF 3) 2
�8 100106 PLATE, PAD DRIVER BASE 2
�9 100107 RING, PAD RETAINER SNAP–IN 2
10 25732 WASHER, 1.25X.359X.093 FLT ZN 4
11 140015 WASHER, 5/16 SPLITLOCK 2
12 140219 SCREW, 5/16–18X1 2
13 140417 CLIP, SPRING 2
14 230651 CLAMP, BRUSH PLATE 2
15 230697 STOP, DRIVER RELEASE 2
16 140018 WASHER, #10 INT 8
17 140887 SCREW, 10–24X3/8 8
18 140554 SCREW, 1/4–20X3/4 8
19 140016 WASHER, 1/4 LCK 8
20 140000 WASHER, 1/4 FLT 8
21 607451 BEARING, FLANGE 8
22 607826 BUSHING, .503X.624X.933 2
23 140045 WASHER, .510X1.25X.06 FLT 26
24 200031441 SCREW, M6X1.0X25 2
25 140234 SCREW, 1/2–13X2–1/2 2
∇ ASSEMBLY
� INCLUDED IN ASSEMBLY
� RECOMMENDED STOCK ITEMS
N/S NOT SHOWN
REF PART # DESCRIPTION QTY.
26 140516 NUT, 1/2–13 NYLOCK 8
27 600919 ARM, HEAD PIVOT 4
28 140137 BUSHING, .499IDX.624ODX.53LG 6
29 600923 BEARING 2
30 140235 SCREW, 1/2–13X2 6
31 140284 NUT, M6X1.0 NYLCK 2
32 069762436 �ACTUATOR, 36VDC 1
33 630448 PIN, CLEVIS 1/2DIAX2–1/4 1
34 578421 PIN, COTTER,.12”X1.00”LG 2
35 607990 BRACKET, PRESSURE SPRING 1
36 600957 SPRING, COMPRESSION 1
37 607038 RETAINER, PRESSURE SPRING 1
38 25732 WASHER, 1.25X.359X.093 FLT 2
39 140016 WASHER, 1/4 LCK 1
40 140554 SCREW, 1/4–20X3/4 1
41 607828 PIN, CLEVIS 1/2DIAX3–1/2 1
42 607823 PLATE, LIMIT SWITCH MOUNT 1
43 069764009 �SWITCH, SNAP–LEVER 25A 2
44 140032 WASHER, #6 FLT 2
45 140757 SCREW, 6–32X2–1/4 2
46 140539 NUT, 6–32 KEP 2
N/S 240237 BRUSH, 17” DYNASCRUB (PK/2)OPTIONAL
1
N/S 240230 BRUSH, 17” POLYSCRUB (PK/2) OPTIONAL
1
N/S 240241 BRUSH, 17” STRATA GRIT SCRUB/STRIP (PK/2) OPTIONAL
1
Doink Doink
Doink Doink
610188
Doink Doink

PARTS LIST
Nobles� Tuff Scrub� 3300 (06–00)46
SOLUTION GROUP
12
3
4
5
7
6
910 11
14
13
8
15
16
17
18
19
20
2122
23
24
25
2
2
2
2
2
2
2
2
2
42
4229
3941
3841
39
41
28
27
26
36
42
35
4233
4034
37
42
42
31
30
32
12
41

PARTS LIST
Nobles� Tuff Scrub� 3300 (06–00) 47
SOLUTION GROUP
REF PART # DESCRIPTION QTY.
1 612146000 FITTING, 3/4M X 3/4H 1
2 608915 CLAMP, HOSE 1.03–1.09 2WIRE 10
3 160229 TUBING VINYL 3/4 ID X 1”OD .40ft
4 607831 FITTING, 3/4H TEE BARB 1
5 130041 WIRE TIE, NYLON 11–1/2 X .190 2
6 160229 TUBING, VINYL 3/4 ID X 1”OD 4.0ft
7 612146000 FITTING, 3/4M X 3/4H 1
8 130041 WIRE TIE, NYLON 11–1/2 X .190 1
9 612145000 SEAL, DRAIN CAP 1
10 601076000 WASHER, FLAT PLASTIC 3
11 200160014 NUT, M4 HXLCK 1
12 612158000 CAP, 0.75”NPT PLASTIC W/HOLE 1
13 621443 CHAIN, DRAIN PLUG 1
14 200055343 SCREW, M4X.7X12 1
15 160229 TUBING VINYL 3/4 ID X 1”OD .40ft
16 607831 FITTING, 3/4H TEE BARB 1
17 160229 TUBING VINYL 3/4 ID X 1”OD .64ft
18 612146000 FITTING, 3/4M X 3/4H 1
19 160229 TUBING VINYL 3/4 ID X 1”OD .75ft
20 607832 FITTING, 3/8MPT X 3/4H 1
21 607075 BRACKET, FILTER MOUNT 1
∇ ASSEMBLY
� INCLUDED IN ASSEMBLY
� RECOMMENDED STOCK ITEMS
REF PART # DESCRIPTION QTY.
22 140016 WASHER, 1/4 LCK 2
23 200031436 SCREW, M6X1.0X16 2
24 14884 FITTING, 3/8MX1/2H BARB 1
∇ 25 180615 STRAINER, INLINE CLEAR BOWL 1
�26 180616 SCREEN, REGULAR 80 MESH S/S 1
�27 180617 GASKET, VITON 1
�28 602000 BOWL, CLEAR 1
29 069764611 HOSE, CLEAR 1/2”ID X 15.44” 1
30 626121 KNOB, WATER VALVE 1
31 607406 CABLE, SOLUTION CONTROL 1
32 626100 �VALVE, LIQUID 1
33 200031436 SCREW, M6X1.0X16 2
34 140284 NUT, M6X1.0 NYLCK 2
35 606225 HOSE, 1/2ID X 1.79” 1
36 604317 ELBOW, 1/2”HB X 1/2”HB 90 DEG 1
37 578822000 HOSE, 1/2” ID X 16.84” 1
38 612149000 FITTING, 3/8HX3/8HX1/2H TEE 1
39 606667 HOSE, 3/8” ID X 10” 2
40 607822 PLATE, SOLUTION VALVE MOUNT 1
41 607775 CLAMP, HOSE .63–.66 2WIRE BLK 4
42 607776 CLAMP, HOSE .73–.77 2WIRE BLK 6
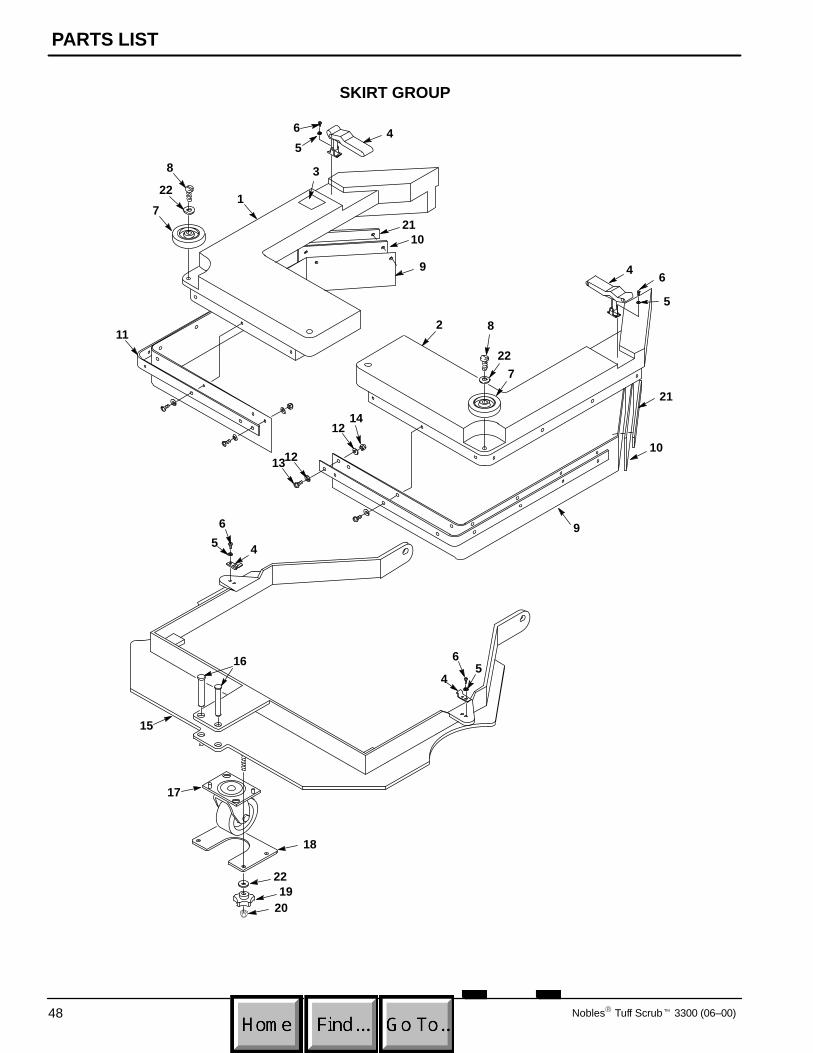
PARTS LIST
Nobles� Tuff Scrub� 3300 (06–00)48
SKIRT GROUP
1
2
3
45
6
7
8
10
9 46
5
7
11
16
2219
20
17
15
1312
1412
21
21
10
95
6
4
4
65
22
8
22
18

PARTS LIST
Nobles� Tuff Scrub� 3300 (06–00) 49
SKIRT GROUP
REF PART # DESCRIPTION QTY.
1 607008 SKIRT, HSG RIGHT 1
2 607007 SKIRT, HSG LEFT 1
3 607989 DECAL, NO STEP SYMBOL 1
4 140932 �LATCH, HOOD AND KEEPER 2
5 140023 WASHER, #8 INT 8
6 200070340 SCREW, M4X.7X8 8
7 630450 WHEEL, RUBBER 2
8 603154 SCREW, M8X1.25X40 2
9 607407 SPLASH GUARD, SKIRT 2
10 600911 BLADE, SKIRT SQUEEGEE 2
11 607408 STRAP, SPLASH GUARD 2
� RECOMMENDED STOCK ITEMS
REF PART # DESCRIPTION QTY.
12 140007 WASHER, #8 FLT 22
13 579237 SCREW, M4X.7X12 PANPHL 20
14 200633014 NUT, M4X.7 HEX 2
15 610187 FRAME, SKIRT SUPPORT 1
16 230943 �PIN, SKIRT 2
17 630002 CASTER, 4”DIA,1–3/8”W 1
18 610189 PLATE, CASTER RETAINER 1
19 605361 KNOB, 5/16–18 BLACK 4
20 140546 NUT, 5/16–18 NYLOCK 4
21 607830 STRAP, SPLASH GUARD REAR 2
22 140027 WASHER, 5/16 FLAT 6

PARTS LIST
Nobles� Tuff Scrub� 3300 (06–00)50
SQUEEGEE CONTROL GROUP
1
2
3
3
4
5
6
7
8
95
3
3
13
1211
28
14
1516
15
17
15
1517
638
19
20
2221
23
18
24
2526
27
73
5
6
29
10
30
31
30
16
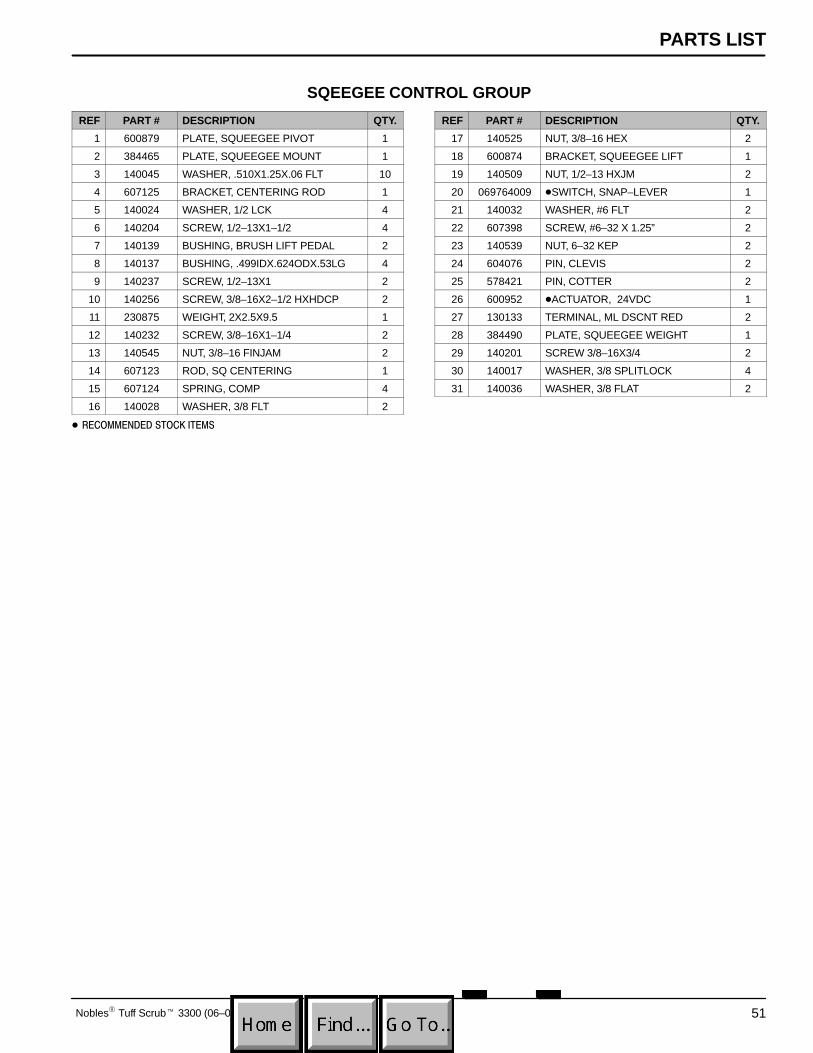
PARTS LIST
Nobles� Tuff Scrub� 3300 (06–00) 51
SQEEGEE CONTROL GROUP
REF PART # DESCRIPTION QTY.
1 600879 PLATE, SQUEEGEE PIVOT 1
2 384465 PLATE, SQUEEGEE MOUNT 1
3 140045 WASHER, .510X1.25X.06 FLT 10
4 607125 BRACKET, CENTERING ROD 1
5 140024 WASHER, 1/2 LCK 4
6 140204 SCREW, 1/2–13X1–1/2 4
7 140139 BUSHING, BRUSH LIFT PEDAL 2
8 140137 BUSHING, .499IDX.624ODX.53LG 4
9 140237 SCREW, 1/2–13X1 2
10 140256 SCREW, 3/8–16X2–1/2 HXHDCP 2
11 230875 WEIGHT, 2X2.5X9.5 1
12 140232 SCREW, 3/8–16X1–1/4 2
13 140545 NUT, 3/8–16 FINJAM 2
14 607123 ROD, SQ CENTERING 1
15 607124 SPRING, COMP 4
16 140028 WASHER, 3/8 FLT 2
� RECOMMENDED STOCK ITEMS
REF PART # DESCRIPTION QTY.
17 140525 NUT, 3/8–16 HEX 2
18 600874 BRACKET, SQUEEGEE LIFT 1
19 140509 NUT, 1/2–13 HXJM 2
20 069764009 �SWITCH, SNAP–LEVER 1
21 140032 WASHER, #6 FLT 2
22 607398 SCREW, #6–32 X 1.25” 2
23 140539 NUT, 6–32 KEP 2
24 604076 PIN, CLEVIS 2
25 578421 PIN, COTTER 2
26 600952 �ACTUATOR, 24VDC 1
27 130133 TERMINAL, ML DSCNT RED 2
28 384490 PLATE, SQUEEGEE WEIGHT 1
29 140201 SCREW 3/8–16X3/4 2
30 140017 WASHER, 3/8 SPLITLOCK 4
31 140036 WASHER, 3/8 FLAT 2

PARTS LIST
Nobles� Tuff Scrub� 3300 (06–00)52
SQUEEGEE GROUP
23
6
78
10
1
11
32
1314
15
16
17
1920
22
11
17
1717
16
8
20
20
19
19
23
14
12
23
13
15
6
10
7
1920
1920
29
18
30
25
9
27
2824
25
26
1920
29 27
28
9
18
30
25
24
2526
31
23
33
34
21
4 5

PARTS LIST
Nobles� Tuff Scrub� 3300 (06–00) 53
SQEEGEE GROUP
REF PART # DESCRIPTION QTY.
∇ 610707 SQUEEGEE ASM. 1
�1 222411 FRAME, SQUEEGEE 1
�2 222412 PLATE 1
�3 222413 �BLADE, SQUEEGEE FRONT 36” 1
�4 222416 �BLADE, SQUEEGEE REAR 36” 1
�5 222417 BAND, WLDT SQUEEGEE 36” 1
�6 222794 KNOB, 1/4–20X1–1/2 2
�7 82138 NUT, SPEED RETAINER 2
�8 222066 �WHEEL, 3.0 DIA. 2
�9 384466 PLATE, CORNER 2
�10 222268 WASHER, 1.25D NEOPRENE 2
�11 222244 CAM, SQUEEGEE 2
�12 610690 CHANNEL, WHEEL MOUNTING LH 1
�13 49914 PIN, CLEVIS .375” X 4.0 2
�14 222130 SPRING, TORSION 2
�15 140630 PIN, COTTER 3/32X3/4 2
�16 222497 BUSHING, .318”X.495”X1.25” 2
�17 370100 KNOB, 5/16 THD BLACK 4
∇ ASSEMBLY
� INCLUDED IN ASSEMBLY
� RECOMMENDED STOCK ITEMS
REF PART # DESCRIPTION QTY.
�18 384491 STRIP, SQUEEGEE CORNER PLATE 2
�19 140027 WASHER, 5/16 FLAT 6
�20 08713 NUT, M8X1.25 NYLOCK 6
�21 09767 SCREW, M8X1.25X70 HXHDCP 2
�22 140028 WASHER, 3/8 FLAT 2
�23 578717 SCREW, M8X1.25X50 HXHDCP 4
�24 630480 SCREW, 5/16DIAX1–1/4 SHLDER 2
�25 140027 WASHER, 5/16 FLAT 6
�26 579184 WHEEL, 2”X7/8” RUBBER 2
�27 140226 SCREW, 5/16–18X5/8 HXHDCP 2
�28 140027 WASHER, 5/16 FLAT 2
�29 630450 WHEEL, 3”X7/8” RUBBER 2
�30 140524 NUT, 1/4–20 KEP 2
�31 607989 DECAL, NO STEP SYMBOL 1
�32 610689 CHANNEL, WHEEL MOUNTING RH 1
33 130041 WIRE TIE, 11–1/2X.19 2
34 603259 HOSE VAC 1–1/2X50” 90DEG CUFF 1