TT K04 install final - FrankenTurbofrankenturbo.com/web-content/image_hosting/K04-install.pdfK04...
12
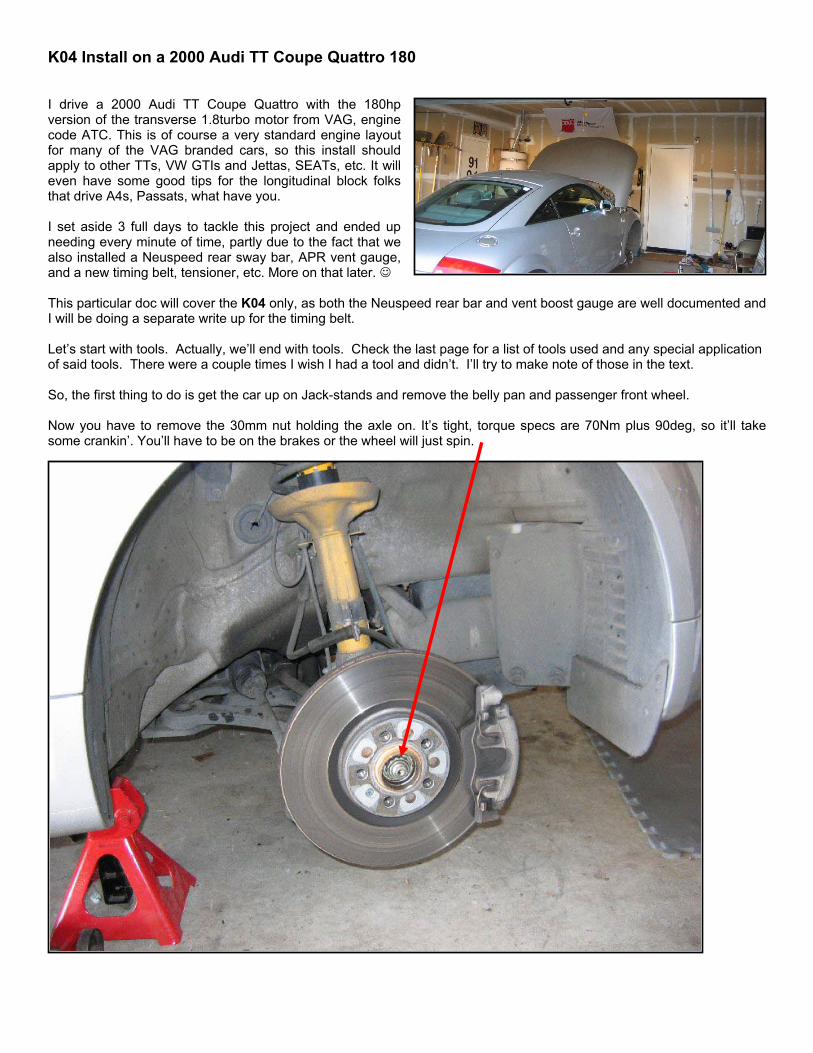
K04 Install on a 2000 Audi TT Coupe Quattro 180 I drive a 2000 Audi TT Coupe Quattro with the 180hp version of the transverse 1.8turbo motor from VAG, engine code ATC. This is of course a very standard engine layout for many of the VAG branded cars, so this install should apply to other TTs, VW GTIs and Jettas, SEATs, etc. It will even have some good tips for the longitudinal block folks that drive A4s, Passats, what have you. I set aside 3 full days to tackle this project and ended up needing every minute of time, partly due to the fact that we also installed a Neuspeed rear sway bar, APR vent gauge, and a new timing belt, tensioner, etc. More on that later. ☺ This particular doc will cover the K04 only, as both the Neuspeed rear bar and vent boost gauge are well documented and I will be doing a separate write up for the timing belt. Let’s start with tools. Actually, we’ll end with tools. Check the last page for a list of tools used and any special application of said tools. There were a couple times I wish I had a tool and didn’t. I’ll try to make note of those in the text. So, the first thing to do is get the car up on Jack-stands and remove the belly pan and passenger front wheel. Now you have to remove the 30mm nut holding the axle on. It’s tight, torque specs are 70Nm plus 90deg, so it’ll take some crankin’. You’ll have to be on the brakes or the wheel will just spin.
Transcript of TT K04 install final - FrankenTurbofrankenturbo.com/web-content/image_hosting/K04-install.pdfK04...
K04 Install on a 2000 Audi TT Coupe Quattro 180 I drive a 2000 Audi TT Coupe Quattro with the 180hp version of the transverse 1.8turbo motor from VAG, engine code ATC. This is of course a very standard engine layout for many of the VAG branded cars, so this install should apply to other TTs, VW GTIs and Jettas, SEATs, etc. It will even have some good tips for the longitudinal block folks that drive A4s, Passats, what have you. I set aside 3 full days to tackle this project and ended up needing every minute of time, partly due to the fact that we also installed a Neuspeed rear sway bar, APR vent gauge, and a new timing belt, tensioner, etc. More on that later. ☺ This particular doc will cover the K04 only, as both the Neuspeed rear bar and vent boost gauge are well documented and I will be doing a separate write up for the timing belt. Let’s start with tools. Actually, we’ll end with tools. Check the last page for a list of tools used and any special application of said tools. There were a couple times I wish I had a tool and didn’t. I’ll try to make note of those in the text. So, the first thing to do is get the car up on Jack-stands and remove the belly pan and passenger front wheel. Now you have to remove the 30mm nut holding the axle on. It’s tight, torque specs are 70Nm plus 90deg, so it’ll take some crankin’. You’ll have to be on the brakes or the wheel will just spin.

You have to separate these joints to get the axle out. The “recommended” way is to use a special tool which I ordered on-line and it came defective, so I had to use the old fashioned way; a hammer and a pry bar. It turns out these joints were very easy to separate. Once it’s removed, loosen the nuts on the tie rod end and on the suspension arm ball joints. Don’t remove them completely. Here is a photo of the lower a-arm joint.
Hit here or… Here Pry Here Be very careful of the rubber seals in the joints. You don’t want to replace them. ☺
Once the ball joints are off, you need to remove the 6 10mm Triple Square bolts holding the axle to the transmission housing. You will have to stand on the brakes to loosen each one and then turn the wheel to get the next one. This is one of the many reasons to have two people working on this project. Also, I had to pry the axle away from the transmission with a screwdriver to pop it loose. (Sorry for the bad picture, not much focal length)
Had to pry here
10mm Triple Square Notice the heat shield here. Three bolts hold it on, it needs to come out; after the axle is out. Once the triple square bolts are removed, the axle should slip right out with some wiggling from both ends. Be careful of the CV boots, don’t tear them. I had to pry the axle from the transmission with a screwdriver to get it loose and then it just popped right off. Once the axle is off, you can just leave the hub hanging.

From this picture, you can also see the lower intercooler tube and how it’s connected to the wheel well. Notice the plastic shield behind it; these both easily come out. Two nuts hold on the plastic shield and a single nut holds on the intercooler pipe along with two hose clamps. Get this stuff out of the way.
Intercooler piping Dirt shield
Now you need to crawl under the car and remove the nuts from the cat to the down-pipe and from the down-pipe to the turbo. Unfortunately, we didn’t take any pictures of the down-pipe connection to the cat, but here you can see the disconnected down-pipe and the O2 sensor wire. You need to make sure and unclip the wire from it’s clips in the heat shield and be careful as you maneuver the down-pipe so you don’t break that son-of-a-bitch; that’s a needless $200 expense.
Down-pipe
O2 sensor wire
We could not get the cat totally out of the car without removing the sub-frame brace, so we left it hanging as you see here in the picture. The Quattro cars have a lot more stuff in the way, and a FWD might be a different story. Regardless, if you get it pulled all the way down, it leaves plenty of room to operate and you don’t have to pull the O2 sensors out either. Of course, if you are replacing your down-pipe and cats…. You’ll be doing some extra work.

At this point, it’s a good idea to have your oil and coolant drained. We didn’t take pictures, but if you can’t drain your oil, maybe you shouldn’t be doing this, eh? The coolant valve is up front just behind the bumper on the driver’s side. It’s a twist and pull valve that took a pair of channel locks to loosen but then was no problem. Let it drain well before closing the valve. Once you are fluid-less, you can thread the oil plug back in as well, I replaced mine with a new one. Now you need to remove the brackets and lines from the block. A couple bolts hold the hard oil return line to the block and sump (this connection has a gasket). The coolant line into the block also needs to come off. It’s hidden here. These are all pretty straight forward.
Remove: Remove the two bolts and gasket at the sump connection. OK, it’s time to move up top. ☺ Remove the strut tower brace first by removing three nuts on either side plus one nut on each of the two brackets that brace to the firewall. Strut tower bracket (one on each side).
Remove all the engine covers. Remove the top half of the air box and unscrew it from the MAF. Disconnect the snorkel from the side. Pull out the oil breather, dvr, and n75. If you haven’t done these before, you will need replacement clamps. Remove the elbow from the turbo to the intercooler pipe.
Elbow
Oil Breather
DVR
N75

Now remove the turbo intake hose. This pic shows the manifold removed as well, but you can see where the hose attaches to the inlet pipe. There is a metal clip that you have to remove with a screwdriver and, if necessary, some needle-nose pliers.
Undo the bracket holding the intercooler piping in place and the piping should lift out. Make sure when you remove the heat shield fabric that you notice which one goes where, and how. They are kind of a pain to get back on correctly, and the snaps are tight.
Now you can start to remove the manifold. Remove the heat shield by removing the IC bracket and one other bolt near the driver’s side of the manifold. Undo this bolt as well that holds this coolant line in place, it will help you get to the lower manifold bolts a lot easier.
Undo as many nuts as you can. Mine looked brand new, so I didn’t have any problems breaking them loose, although it turned out one stud was broken...no, I didn’t do it. Here you can see a couple of the lower nuts that are easy to get to. All the top nuts are easy. There are thirteen in all, 8 on top and 5 on the bottom. Notice in this picture all the brackets are still in place. You should remove them before you remove the manifold; it makes the next step much easier. ☺

That leaves the two final lower nuts on the manifold. The driver’s side lower is easy, but the nut between the turbo and the manifold is a mutha. You have to undo the turbo to cat bolts so the turbo can drop down enough to get a socket and extension in between them to get at the last nut. You also have to loosen or remove the bottom bolt holding the turbo to
the block. It’s a serious pain. If you have as much as possible out of the way, it may be easier, but you’ll need a long extension and you have to feel around to get the socket on the head of the bolt. You can’t actually see it, but here is where it is: You can just see the copper colored bracket peeking through here. This is where the bolt is, right behind the oil return line.
If you have the oil and coolant lines disconnected from the sump and coolant lines up top, you can wiggle these out of the way to help get at the bolt. No matter how you do it, this one’s tricky. I would say if you can get it out completely it makes getting the last manifold nut out easier, as it will allow the turbo to drop down instead of just rotating down on it’s axis a little. When you drop the turbo out of the way, make sure you are gentle and do not drop it too far or you run the risk of kinking the hard oil line… Bad news! To get at the last manifold nut, drop the turbo as low as you can below the manifold without damaging anything. Now the last bolt is a little more accessible. We used a 12mm socket on a short 3 or 4 inch extension that slips in between the manifold and turbo. You’ll need small fingers and the ability to guide the socket onto the bolt by feel or with a partner looking up from under the car. Be very careful not to drop the nut and washer behind the turbo when you finally get them loose! This nut cost us probably an hour and a half or more because we dropped it. We ended up giving up on the search and using a new one. We also dropped the 12mm socket when we were attempting to remove it after putting the nut back on. That took us forever to find, that is if you can even find it. So…take your time with this one. It will save you time in the long run. We’ll point out where the socket ended up later. We might mention here that an extending magnet came in handy many times during this project. It’s a worthwhile and cheap purchase. So, the manifold is off, and everything is almost out!

The top of the turbo is now visible, where you can see the oil and coolant banjo fittings. Both of these need to be undone, so expect some more fluid leakage. A lot of coolant drained out of the turbo, so have a catch basin ready. The oil line stays in place, and the coolant line can be bent up out of the way.
The last bolt holding the turbo in is a 5mm hex bolt that bolts the lower oil line bracket to the turbo. Considering the major pain in the ass it is to remove, we decided it wasn’t needed on re-installation, especially since the line is bolted firmly to the turbo about two inches away: classic over-engineering. You can see that below the bolt there is no room to maneuver. There isn’t enough room to get a socket down there, nor is there room for a standard allen wrench. If you decide to spend the time to remove some of the other hoses to make some room, more power to you.☺ We used a ball end 5mm allen wrench and some cursing to get it out. That seemed to do the trick, but I can’t guarantee the cursing. We didn’t have one, but we would recommend a long screwdriver style ball end 5mm allen; the longer the better. That would make this sucker a lot easier.

The turbo is out! Ahh… Notice you can’t see the last manifold stud on top; that’s because it’s broken. You can see the stud between the turbo and manifold just above the oil fitting. Here you can also see just behind the bracket where everything has a tendency to fall. It ends up wedged between the transmission and the block right where you can’t see. The Bentley CD recommends you take this bracket off the block completely. On a Quattro car that is a serious pain. You can see here all the extra transmission bits that a Quattro has as compared to a FWD.

So the turbo is out. Remove the Turbo Inlet Pipe by undoing one 5mm allen bolt and twisting the pipe off. I re-used the TIP, as Samco has not shipped the hose for my motor yet. When they do, I’ll be replacing the TIP and intake hose. This should be pretty easy from the top. To start the next process, the oil and coolant lines come off the old turbo and go on the new one. Make extra sure to use new crush washers and gaskets here and to torque them correctly! Be sure to buy new turbo to down-pipe studs (4 of them). We hadn’t bought them, and they were a real pain to remove. We were lucky to get them off.
Make sure you have new gaskets and crush washers for EVERYTHING. This list should cover it:
• Turbo to manifold gasket • Turbo to down-pipe gasket • Manifold to block gasket • Oil line to oil sump gasket • Oil line to turbo gasket • O-ring if you reuse your TIP • Crush washers for banjo fittings on: (make sure
to get 3 or 4 extra of each size) Coolant line on bottom of turbo x2 Coolant line on top of turbo x3 Coolant line on block x2 Oil line on top of turbo x2
The install is pretty much just the reverse of the removal. Once you have the lines on the new turbo, fill it with oil and plug the ends so it doesn’t all leak out. I used the plastic plugs that came with the turbo; don’t use something that will shed fibers into your oil line. Also make sure you keep the caps on the turbo intakes and exit. We taped the manifold to turbo hole as well to prevent a dropped nut or something from falling in. With everything back on the turbo, including the TIP and O-Ring, slide the whole assembly back into place. Be careful of all the lines etc. The next few steps were the hardest. Remember the bracket holding the turbo to the block? And remember the last manifold nut between the turbo and manifold? Those two cannot be tight at the same time. If you insert the bracket bolt on the bottom of the turbo, the turbo/manifold clearance is so tight you can’t get the nut
back into place easily. If you tighten the manifold bolt and then bolt the turbo to it, the bracket may not line up properly, and you can’t reach the oil and coolant banjo fittings. You’ll also recall that the bracket bolt has to be done almost entirely by feel. Looking back, we think the best order for re-assembly would have been: 1. Put the turbo back into the car and replace the lower
bracket bolt and hand tighten to hold turbo steady. 2. Attach oil and coolant lines with new crush washers
and TORQUE PROPERLY! 1 3. Remove lower bracket bolt and let turbo sag slightly,
being careful of hard oil line kinks. 4. Re-install manifold with new gasket, being careful
not to drop washers & nuts (really, you don’t want to drop them). Torque the manifold into place.
5. Mate turbo to manifold with new gasket and hand tighten.
6. Re-attach the lower bracket bolt. This may be the trickiest part, as quarters are cramped and you are going mostly by feel. A long (12”) extension should help here. Tighten this bolt for good. You may have to tighten/loosen the turbo to manifold bolts to get it to slide into place.
1 We had put the turbo back in and hand-tightened the banjo fittings. My wife came out and called us for grub, and when we went back out to the car, we had forgotten that the oil and coolant weren’t torqued. We had the car completely re-assembled and fired it up for the first time. It started smoking and leaking oil and coolant. We were pissed. We had to remove everything up top and the manifold all over again, without the benefit of having wiggle room below, as the driveline and everything was

already in. We tightened the oil and coolant lines, and by this time, we were so worried that we had forgotten to torque the lines on the bottom of the turbo I was freaking out. Anyway, we got it all back together, which is MUCH harder without the room to work from below, and started it up. It burned off the oil that leaked from the earlier start for a good half hour. I was so worried that it was still leaking because it took forever to burn off. It cost us an extra six hours, but ended up alright. ☺ • Once the turbo is in, (did you remember to remove
all the plugs and tape?) bolt the down-pipe back in place top and bottom.
• Re-install the fabric heat shields at this point behind the turbo.
• Re-install the metal heat shield to the manifold. • Re-install all the brackets to the block, and the oil
line to the sump, with a new gasket. • Make sure all oil and coolant lines are tight and re-
install clamps and crush washers where needed. • Now is a good time to install the down-pipe, with
new studs in the Turbo, while you still have access from above and below. Be careful of the O2 sensor, and torque the four nuts into place. Torque the six lower bolts to the cats as well.
• Install intercooler piping, tighten hose clamps, install elbow from IC pipe to turbo.
• Install Turbo intake hose and re-install oil breather, DV, and N75. You will need new hose clamps.
• Re-assemble MAF and air box, don’t forget to plug the snorkel into the air box.
• Install the strut tower brace. (Unless you are doing the timing belt, too) Don’t forget the two firewall brace points.
• Back down below, make sure your lines and brackets are all in place.
• Replace the CV joint heat shield before replacing the axle.
• Install the axle. You’ll have to finger tighten each bolt, and then have a partner stand on the brakes to torque each bolt properly. Depending on your car, you may have to replace the outer axle nut. Check your Bentley for the correct procedure.
• Replace the dirt shield and lower intercooler pipe. There are a number of companies that make a freer flowing lower IC pipe for you VW owners if you don’t like the looks of the stock constricted piece.
• Re-install the suspension ball joints. Make sure these are torqued properly.
• Make sure your oil and coolant drain plugs are tight. • Fill your coolant and oil! I run 5-40 full synthetic
oil. I live in Sacramento where it never freezes and it’s 105 in the summer. The coolant needs to be mixed about 50-50 with water. There is a handy reference chart on the bottle for different climates.
• If you have a new ECU, now is the time to install it. If you want to start the car at this point to check for leaks, you can. Just make sure the jack-stands are secure and you are safe if you crawl under the car to look for leaks. I would not crawl under a running car
without somebody ready to kill the ignition immediately. Please be careful as spraying oil or coolant in your eyes can ruin your week. In fact, you should be wearing eye protection! Take a flashlight underneath and check for oil or coolant leaks. Do not rev the engine until it has run for a couple minutes. Give the new oil time to circulate and lubricate. If everything checks out, put the wheel back on and take her off the jack-stands. Don’t put the belly pan back on, as you still want to look for leaks after you test drive. Now you can go for a drive. I wouldn’t push hard yet. Take it around the block at a normal pace; remember your coolant and oil are not up to temp. Give it enough time for you engine temps to reach normal levels, then take it back to the garage and check for leaks. You might want to take some extra coolant with you; the thermostat doesn’t open until the engine is warm and you might all of a sudden be low on coolant. Back in the garage, check your fluid levels. If everything is ok, go for a little longer drive. Get in the boost a little. Take a cell phone. ☺ I ran without my belly pan for a couple days just to make any leaks more obvious. Check your fluids often; make sure you don’t have an internal leak. That’s it! Have fun!
That’s us… Happy to be done! Ben Hardt [email protected] David Thompson [email protected] Special thanks to mcgilla for his 10 commandments and tool list. We realize there are probably some incorrect bits, so just let us know and we’ll fix it!


Tools: • Metric Socket Set • Metric Deep Socket Set • Assorted Extensions • Torque Wrench • 10mm Triple Square Bit • Metric Allen Wrenches, long handled if possible • 30mm Socket (for axle nut) • Metric Box/Open End Wrench Set, including Shorty
Wrenches • Ball Joint Separator (we made do with hammer and
pry-bar) • Hose Clamp Tool (from Lyle Tools online, not
necessary, but if you can get a good deal, it’s sure helpful)
• Electrical Connection Separator (from Lyle Tools online, a very handy and inexpensive addition to my toolbox)
• Clamp light ($5 from Wal-Mart, soooo handy to have light you can aim wherever you want it)
• Jack and Jack-stands • Oil Filter Wrench • Channel Locks • Vise Grip Pliers • Screwdrivers • WD40 • Assorted Needle-nose Pliers • Side Cutters (to remove OEM one use hose clamps) • Extendable Magnet • Extendable mirror on a stick Major Parts List: K04 turbo, Kinetic Motorsport $795 N75 “H” valve, local dealer $52 4bar FPR, local dealer $60 Denso IK22 plugs, Neuspeed $44 Neuspeed Exhaust, Kinetic $599 Neuspeed Software, Neuspeed $459 Neuspeed and Kinetic treated me really well, sent me semi-custom software to work with the N75 and 4bar FPR. Good pricing from Kinetic, and excellent support from both shops. (I called a lot of different shops; most didn’t want to talk to me.) Thanks guys!
Torque Values: Components Nm Lb/ft Oil return line to sump 10 7.38 Oil return line to turbocharger
10 7.38
Coolant supply line to cylinder block
35 25.83
Turbocharger bracket to cylinder block
25 18.45
Oil supply line to turbocharger
30 22.14
Oil supply line retainer piece to turbocharger
10 7.38
Coolant return line to turbocharger
35 25.83
Turbocharger to exhaust manifold
30 22.14
Exhaust manifold to cylinder head
25 18.45
Front exhaust pipe to turbocharger
40 29.52
Drive axle heat shield to cylinder block
35 25.83
Nuts for clamp 40 29.52 Drive axle Hex bolt (x6) 70 51.66 Drive axle 12pt nut Varies,
see Bentley manual, pg 40-54