
Polaris Investor Presentation - Polaris Software is the world's ...

MT-316-07
Use with Model Numbers:TT-316-36AC
Operator’s Manual
The best way to go about your business
TT-316 AC Control System
Serial Numbers Starting: 212037 Ending: See introduction chapter
READ THIS MANUAL BEFORE OPERATION OR PERFORMING MAINTENANCE.This manual contains important information regarding the safe operation and maintenance of this vehicle. This manual should be kept with the vehicle.
WARNING
A
Your satisfaction is our #1 goal. If you have questions or concerns with your vehicle, please contact your Sales Representative or Service Advisor at your local dealership.Taylor-Dunn has a worldwide dealer and distribution network to provide replacement parts and service for our vehicles.Refer to our web site, www.taylor-dunn.com, for a dealer lookup application.
My Vehicle information
Serial Number: .
Date Purchased: .
Date Delivered: .
Dealer Purchased From: .
Salesman Name: .
Originally Published 9/8/2019Revision A, 9/8/2019, contents subject to change without noticeTaylor-Dunn® Mfg.2114 W. Ball Rd. Anaheim, CA 92804 (800)-688-8680(714) 956-4040 (FAX) (714) 956-0504
Visit our Web site: www.taylor-dunn.com

Page 3TT-316 Curtis AC System Operator Manual
TT-316-07
CONTACT INFORMATIONService, Parts, Sales:
Taylor-Dunn has a network of dealers distributed around the globe to support our vehicles. Information regarding vehicle sales, replacement parts, or service should be obtained through your local dealer. A dealer locator can be found on the Taylor-Dunn website at www.taylor-dunn.com.
If you do not have access to the internet, you can call the factory direct at:01 (714) 956-4040
Feedback regarding this or any Taylor-Dunn manual can be sent to:Taylor-Dunn ManufacturingAttn: Tech Writer2114 West Ball RoadAnaheim, CA 92804

Page 4 TT-316 Curtis AC System Operator Manual
TT-316-07
The Taylor-Dunn Corporation:Leading Provider of Commercial & Industrial Vehicles since 1949
Taylor-Dunn Manufacturing:From the day we shipped our first vehicle in 1949, we have pursued a singular goal: to build tough, rugged, dependable vehicles to help our customers move personnel, equipment, and materials. It’s that simple. For over sixty years, our standard and custom vehicles - Burden Carriers, Personnel Carriers, Stock Chasers, Electric Carts, Tow Tractors & more - have been the leading solution for customers in a broad range of industrial, commercial, and ground-support markets.Decades of experience are an invaluable asset, and it is an asset we cherish and protect. Our guiding principle is to provide application-specific solutions, which are reliable, efficient, and economical.Our domestic and international network of quality Taylor-Dunn Dealers and Parts & Service Support keeps our customers moving.
Tiger Tractor:Tiger manufacturing has become a leading manufacturer of internal combustion engine industrial tractors and ground support equipment. With tractor capacities ranging from 3,000 - 12,000 pounds drawbar pull, they are ideal for industrial applications as well as aircraft ground support. As with all Taylor-Dunn vehicles; quality, service, support and reliability are built into all Tiger Tractor products.
Shown below is just a small sample of what Taylor-Dunn has to offer to keep your business moving:

Page 5TT-316 Curtis AC System Operator Manual
TT-316-07
Table of ContentsContact Information ......................3The Taylor-Dunn Corporation: ....4
Introduction 7Who Should Read This Manual ........... 7About This Manual ............................... 7
Glossary of Terms ...........................8Conventions ....................................10
Signal Words and Their Definitions: ..... 10Safety Alert Message ........................... 10
Responsibilities ...............................11Of the Owner... ..................................... 11Of the Operator... ................................. 11Of the Passengers ... ........................... 11Of the Service Personnel... .................. 11
Vehicle Modifications .....................12Replacement Parts .........................13
Using Non-OEM Replacement Components ......................................... 13
About Your Vehicle 14Licensing Requirements ...................... 14Vehicle compliance .............................. 14Electric tow trucks: ............................... 14
How to Identify Your Vehicle ........15Data Plate ............................................ 15Where to Find Data Plate and Serial Number ................................................ 15
Taking Delivery of Your Vehicle 16
What To Do If a Problem is Found ...............................................16
Operator Training 17Driver Qualifications ............................. 17
Vehicle Controls 181: Start Switch ...................................... 183: System Status Indicator Gauge ....... 184: Headlight Switch .............................. 185: Foot Brake Pedal ............................. 186: Throttle Pedal ................................... 187: Horn Switch ...................................... 18Steering ................................................ 19Parking Brake ...................................... 19
Inching ................................................. 20Seat Adjustments ................................. 20
Vehicle Operation 24General Safety Guidelines ................... 24Starting ................................................. 26Driving .................................................. 27Material Handling Safety Light ............. 28Collisions or Accidents ......................... 29Loading Cargo ..................................... 30Vehicle Load Capacity, Definition ......... 30Transporting Pets ................................. 31
Towing .............................................31Draw Bar Pull (DBP), Definition ........... 31Towing the Vehicle ............................... 32Park Brake Bypass Switch ................... 32
Charging Your Vehicle 33
Generic Safety Guidelines .............33Charging Time ...................................... 34New Battery Break In ........................... 34AC Power Source ................................ 34
Storing and Returning to Service 35
Storing Your Vehicle ............................. 35Returning to Service ............................ 35
Vehicle Maintenance 36Daily Inspection .................................... 36Pre-Operation Inspection ..................... 36
Interlock Switch Inspection ...........37Start Switch ......................................... 37Operator Presence Switch ................... 37Brake Interlock Switch ......................... 37Battery Door Switch ............................. 38Maintenance Schedule ........................ 39Maintenance Guidelines for Severe Duty Applications .......................................... 39
Battery Maintenance ......................40Cleaning ............................................... 41Watering ............................................... 41
Removable Batteries ......................42Lift Out Battery ..................................... 42Side Extract Battery ............................. 43

Page 6 TT-316 Curtis AC System Operator Manual
TT-316-07
Tires .................................................44Air pressure .......................................... 44Tire Tread Wear ................................... 45Changing a Tire/Wheel assembly ........ 45Tire Rotation ......................................... 46Replacing a Tire ................................... 46
Brake Fluid Level ...........................47Cleaning ..........................................48
Seats .................................................... 48Interior .................................................. 48Exterior Body ....................................... 48Under Carriage .................................... 48Batteries ............................................... 48Control Panel ....................................... 48
Standard Specifications 49Index 50

Page 7TT-316 Curtis AC System Operator Manual
TT-316-07
IntroductionWho Should Read This ManualThis manual is intended for use by anyone operating or performing routine maintenance on this vehicle. Each person should be familiar with the parts of this manual that apply to their use of this vehicle.
About This ManualThis manual is valid only for the serial numbers listed on the front cover. If the ending serial number is blank, then this manual was for current production vehicles when printed. If you did not receive this manual with the vehicle, you should confirm this manual is valid for your serial number at the Taylor-Dunn web site. A place to record your vehicle information is provided on the inside front cover This manual is subject to change without notice. Updates are available through your dealer or the Taylor-Dunn web site at www.taylor-dunn.com.Taylor-Dunn is not to be held liable for errors in this manual or any consequential damage that results from the use of this manual.The purchase of this vehicle shows a belief in high quality products manufactured in the USA. Taylor-Dunn, a leading manufacturer of electric burden and personnel carriers since 1949, wants to be sure this vehicle provides years of reliable service. Please continue to read this manual and enjoy this high quality Taylor-Dunn vehicle.This manual is to serve as a guide for the operation and maintenance of your Taylor-Dunn vehicle. Taylor-Dunn has made every effort to include as much information as possible about the operation and maintenance of this vehicle.This manual contains information about the standard equipment and options available for this model. This vehicle may not be equipped with all available options. If you do not know which information applies to your vehicle, then you should contact your dealer.Included in this manual are:
• Vehicle Description• Safety Rules and Guidelines• Operational Information• Operator Responsibilities• Owner Responsibilities• Control Operation and Location Information• Maintenance Information
Before operating or performing maintenance on this or any other Taylor-Dunn vehicle, read the appropriate Taylor-Dunn manual. Please, be aware of all cautions, warnings, instructions, and notes contained in this manual.
The only personnel authorized to repair, modify, or adjust any part of this or any Taylor-Dunn vehicle is a factory authorized service technician. Repairs made by unauthorized personnel may result in damage to the vehicle’s systems which could lead to an unsafe condition resulting in severe bodily injury and/or property damage. Unauthorized repairs may also void the vehicle’s warranty.
WARNING

Page 8 TT-316 Curtis AC System Operator Manual
TT-316-07
Approved Opera to r PositionSit down vehicle
The operator shall be seated in the operator seat with back up against the operator seat back cushion. Additional back support may be added as needed. The back support shall be fastened to the operator seat back cushion to prevent it from falling off the vehicle or onto the seat cushion. The operator’s left foot shall be on the floorboard. The right foot should be positioned for easy access to the brake or throttle pedals. Both hands should be on the steering wheel while the vehicle is in motion.
Approved Opera to r PositionStand up vehicle
The operator shall be standing on the operator platform with weight about equally distributed between left and right feet. The left foot shall be placed on the left side of the operator platform to properly engage the operator presence switch. Both hands shall be on the steering wheel while the vehicle is in motion.
BDI Battery Discharge Indicator. Same as BSI:
BSI Battery Status Indicator. The gauge on the dash showing the battery charge level. Also can be referred to as BDI.
Caution (signal word) Refer to Signal Words and Their Definitions.
Danger (signal word) Refer to Signal Words and Their Definitions.
Direction Control Switch A switch typically located on the dash that is used to select the direction of travel.
DBP Draw Bar Pull (see below).
Draw bar pull The force seen by the trailer hitch at the rear of the vehicle.
Electrolyte The fluid inside of a battery.
Fault A “fault” is something that happens when the motor speed control system detects a problem with the vehicle. Some faults will prevent operation of the vehicle.
FLA battery Flooded Lead Acid Battery. A battery that requires regular maintenance of electrolyte level.
FS-1 Switch inside of the throttle module that starts the vehicle moving.
High/Low High speed, Low speed.
LOBB Lift Out Battery Box, a type of removable battery.
Moderate injury An injury treatable by first aid and/or follow up treatment by a doctor or other professional medical personnel.
Notice (signal word) Refer to Signal Words and Their Definitions.
OPS “Operator Protective Structure”: Steel cab or cage around the occupants.
Regen Short term for Regenerative Braking. “Regen” is the braking action provided by the motor. Similar to downshifting in an automobile. Energy created during regen is returned to the battery.
ROBB Roll Out Battery Box a type of removable battery.
Seating position: When used in the context of occupant seating positions, “seat” is defined as a single seat cushion or a span of 20 inches on a bench seat.
GLOSSARY OF TERMSThere are a number of words and phrases used in this document that may have a different, special, or specific definition when use in the context of this document.

Page 9TT-316 Curtis AC System Operator Manual
TT-316-07
Sequence Fault A type of fault that disables the vehicle. Occurs when the switches require to operate the vehicle are not operated in the correct order.
Service Brake The primary braking system used to stop the vehicle.
Severe bodily injury An injury that requires immediate treatment by a doctor or other professional medical personnel. Not first aid.
Signal word A word used to define hazards to operator, passengers, service technician, or personnel in the immediate vicinity of the vehicle.
SLA battery Sealed Lead Acid Battery. A battery that does not require maintenance of electrolyte level.
Small children Children that must be transported in a child seat as defined by federal or state motor vehicle standards.
SRO Static Return to Off. A fault action that disables the vehicle.
Start Switch A switch typically located on the dash that enables the vehicle for operation. This switch may, or may not require a key to operate.
Warning (signal word): Refer to Signal Words and Their Definitions.

Page 10 TT-316 Curtis AC System Operator Manual
TT-316-07
CONVENTIONSSymbols and/or words used to define Dangers, Warnings, Cautions, and Notices are found throughout this manual. The “Words” in this context will be referred to as “Signal words.” The words defined here as “signal words” may be used elsewhere in the text of this document without being a signal word. When used as a signal word, the signal word will be enclosed in a solid rectangle with white background (example below).
Signal Words and Their Definitions:DANGER: This signal word will be accompanied by the safety alert symbol (see below). “DANGER”
will indicate a hazard that, if not avoided, WILL result in death or serious bodily injury to yourself, the operator or passengers of the vehicle, or people in the immediate area of the vehicle.
WARNING: This signal word will be accompanied by the safety alert symbol (see below). “WARNING” will indicate a hazard that, if not avoided, may result in death or serious bodily injury to yourself, the operator or passengers of the vehicle, or people in the immediate area of the vehicle.
CAUTION: This signal word will be accompanied by the safety alert symbol (see below). “CAUTION” will indicate a hazard that, if not avoided, may result in minor or moderate injury to yourself, the operator or passengers of the vehicle, or people in the immediate area of the vehicle.
NOTICE: This signal word will not be accompanied by the safety alert symbol. “NOTICE” will indicate a condition that if not avoided may result in property damage. “Property” is defined and the vehicle, components in the vehicle and/or the surrounding area such as buildings, other vehicles, etc.
Safety alert symbol (see above).
High voltage hazard.
Explosion hazard.
Corrosive chemical hazard.
Fire hazard.
Poisonous chemical hazard.
Safety Alert MessageImportant information notifying you of any conditions that may result in hazards to yourself, persons nearby, and/or hazards to the vehicle will be presented in a text box with a black border and may include a signal word (see above). To the right is an example of a safety message.The safety message may include additional warning icons representing the type of hazard. Below is a list of these icons and what they represent. These icons may also be included on the various warning and information decals applied to the vehicle.
This is an example of a safety alert message. This message will contain information about a hazard and/or instructions on avoiding a hazard. The actual size, location, and signal word used for the message box may vary.
WARNING
Decals applied to the vehicle may have other icons representing their function. The icons and their definitions are listed below:
Read the operators manual.
Read the maintenance manual.
Keep arms and legs inside the vehicle.
Parking brake ON.
Parking brake OFF.
Do not get wet.
Do not spray wash.

Page 11TT-316 Curtis AC System Operator Manual
TT-316-07
RESPONSIBILITIESOf the Owner...
The owner of this or any Taylor-Dunn vehicle is responsible for the overall maintenance and repairs of the vehicle, as well as the training of operators.The owner is responsible for operator training. Refer to Driver Training section for details.The owner shall provide a copy of this manual if rented or loaned to another party and instruct the other party to read and understand the contents of this manual.The owner shall provide a copy of this manual when and if the vehicle is transferred to another party.
Of the Operator...All operators should complete an operator training course provided by the owner of the vehicle.The operator is responsible for the proper use of the vehicle on authorized roads, highways, and approved installations only.The operator is responsible to confirm that all passengers are properly seated and properly using the available restraints.The operator is responsible for the safe operation of the vehicle, preoperational and operational checks on the vehicle, and the reporting of any problems to service and repair personnel.
Of the Passengers ...The passengers are responsible to remain fully seated, keeping their hands, arms, and legs inside the vehicle at all times. Each passenger should be fully aware of the vehicle’s operation. All forms of recklessness are to be avoided.
Of the Service Personnel...The service personnel are responsible for the service and maintenance of the vehicle. At no time should a service person allow any untrained personnel to service or repair this or any Taylor-Dunn vehicle. For the purposes of training, a qualified service person may oversee the repairs or services being made to a vehicle by an individual in training. At no time should an untrained individual be allowed to service or repair a vehicle without supervision. This manual is not a training guide.Personnel performing service and repair should have knowledge of:
• Basic standard automotive repair procedures• Basic DC and AC electrical theory• AC motor speed control operation• Use of digital and analog multi-meters• Lead acid batteries
Personnel performing maintenance should have basic knowledge of standard automotive maintenance procedures and lead acid batteries.
The only personnel authorized to repair, modify, or adjust any part of this or any Taylor-Dunn vehicle is a factory authorized service technician. Repairs made by unauthorized personnel may result in damage to the vehicle’s systems which could lead to an unsafe condition resulting in severe bodily injury and/or property damage. Unauthorized repairs may also void the vehicle’s warranty.
WARNING
Page 12 TT-316 Curtis AC System Operator Manual
TT-316-07
VEHICLE MODIFICATIONSTaylor-Dunn vehicles are designed and manufactured in accordance with ANSI/ITSDF and OSHA regulations. Per ANSI/ITSDF and OHSA, modifications to the vehicle must be approved by the manufacturer. Listed below are the specific regulations:
ANSI/ITSDF 56.8-2006 Personnel and Burden CarriersParagraph 8.2q:
Modifications and additions which affect capacity and safe machine operation shall not be performed by the customer or user without manufacture’s prior written authorization; where authorized modifications have been made, the user shall ensure that capacity, operation, warning, and maintenance instructions plates, tags, or decals are changed accordingly.
Paragraph 8.2r:Care shall be taken to ensure that all replacement parts are interchangeable with the original parts and of a quality at least equal to that provided in the original equipment.
ANSI/ITSDF 56.9 – 2007 Safety Standard for Operator Controlled Industrial Tow Tractors
Paragraph 6.2.14:Modifications and additions which affect capacity and safe tow tractor operation shall not be performed without manufacture’s prior written approval. Capacity, operation, and maintenance instructions plates, tags, or decals are changed accordingly.
Code of Federal Regulations (CFR) Title 29, Subtitle B, Chapter Xvii OSHA, Part 1910.178 Powered Industrial Trucks (2011)
1910.178(a)(4) Modifications and additions which affect capacity and safe operation shall not be performed by the customer or user without manufacturers prior written approval. Capacity, operation, and maintenance instruction plates, tags, or decals shall be changed accordingly.
1910.178(q)(6)Industrial trucks shall not be altered so that the relative positions of the various parts are different from what they were when originally received from the manufacturer, nor shall they be altered either by the addition of extra parts not provided by the manufacturer or by the elimination of any parts, except as provided in paragraph (q)(12) of this section. Additional counterweighting of fork trucks shall not be done unless approved by the truck manufacturer.
Motor Speed Control ProgrammingTaylor-Dunn programmable motor speed controls are programmed at the factory for optimum safe, efficient, and smooth operation of the vehicle. The program settings are based on many factors including but not limited to: Vehicle Model, Maximum Safe Speed, System Voltage, Drive Axle Configuration, Vehicle Configuration, etc.Some of the parameters can be changed in the field Using PC software or handsets.Contact the factory for information regarding available alternate program settings.Taylor-Dunn will only authorize the use of settings obtained from the factory for a specific vehicle. Any other alterations to the programming ARE NOT AUTHORIZED and is at your own risk.DO NOT interchange program settings from different vehicle models or models with different configurations.
Improper programming may cause unexpected operation of the vehicle and/or damage the electrical components. This could result in severe bodily injury and/or property damage
WARNING

Page 13TT-316 Curtis AC System Operator Manual
TT-316-07
REPLACEMENT PARTS
Using Non-OEM Replacement ComponentsTo maintain peak performance, always use original Taylor-Dunn replacement parts intended for use on your vehicle.Taylor-Dunn components are designed and tested for use on specific Taylor-Dunn model vehicles. Only use the correct Taylor-Dunn replacement components for your Taylor-Dunn vehicle.
Electrical ComponentsElectrical components not tested by Taylor-Dunn (or intended for use on other Taylor-Dunn vehicles) may have unanticipated interaction and/or interference with the vehicle’s control system resulting in unsafe vehicle operation or damage to the electrical system.
Mechanical ComponentsMechanical components not tested by Taylor-Dunn (or from other model Taylor-Dunn vehicles) may have an undesirable affect on the operation of the vehicle, result in additional frame stress, or stress other components resulting in premature failure or an unsafe condition.Due to the unknown properties of non-Taylor-Dunn tested components or from components not originally equipped on the vehicle, we cannot approve their use in a Taylor-Dunn vehicle.
To maintain peak performance, always use original Taylor-Dunn replacement parts intended for use on your vehicle. Taylor-Dunn components are designed and tested for use on specific Taylor-Dunn model vehicles. Only use the correct Taylor-Dunn replacement components for your Taylor-Dunn vehicle.Do not modify your vehicle:
Modifications to this vehicle may have an undesirable effect on the operation of the vehicle, result in additional frame stress, or stress other components resulting in premature failure or an unsafe condition and may lead to an accident resulting in serious injury or death.
WARNING

Page 14 TT-316 Curtis AC System Operator Manual
TT-316-07
About Your VehicleThe purchase of your Taylor-Dunn vehicle shows a belief in high quality products manufactured in the USA. Your new vehicle operates entirely on electric battery power. It is an emissions free vehicle.Taylor-Dunn, a leading manufacturer of electric burden and personnel carriers since 1949, wants to be sure this vehicle provides years of reliable service. Please continue to read this manual and enjoy this high quality Taylor-Dunn vehicle.Each base model is available in numerous configurations depending on what options were requested when the vehicle was ordered.
Licensing RequirementsThis vehicle IS NOT approved for licensed operation on public roads and highways. This model conforms to:
• American National Standards Institute Controlled Personnel and Burden Carriers ANSI B56.8.
• O.S.H.A. Standard Section 1910.178, Powered Industrial Trucks Type E
Vehicle complianceThis vehicle complies with one of the following designations: E, G, LP, or D. The vehicle identification tag lists the specific compliance designation. Operate this vehicle only in environments consistent with the compliance designation. Operation in other more hazardous environments can cause injury or death. Vehicles complying with more stringent designations are labeled as to the designation. Type EE compliance vehicles will have the EE1 label applied.
Electric tow trucks:This vehicle is designed for operation on hard smooth road surfaces such as around warehouses or paved lots and may be operated on other hard surfaces such as smooth packed dirt or light gravel. Operating this vehicle on rough surfaces will result in premature failure of axles, wheel bearings and/or the vehicle frame.
1 Vehicles approved for EE operation will have a special “EE” decal applied.
This vehicle does not provide protection from lightning, flying objects, or other storm related hazards. If caught in a storm, immediately seek shelter in accordance with local safety guidelines for your area. Not seeking shelter may result in severe personal injury.
WARNING

Page 15TT-316 Curtis AC System Operator Manual
TT-316-07
HOW TO IDENTIFY YOUR VEHICLEData PlateTo identify the model series of your vehicle, refer to the vehicle data plate.
Where to Find Data Plate and Serial NumberThe vehicle identification number is in three locations as shown in the illustrations below:
Data plate Frame Serial Number Tag
Page 16 TT-316 Curtis AC System Operator Manual
TT-316-07
Taking Delivery of Your VehicleInspect the vehicle immediately after delivery. Use the following guidelines to help identify any obvious problems:
• Examine the contents of all packages and accessories that may have come in separate packages along with the vehicle.
• Make sure everything listed on the packing slip is there.• Check that all wire connections, battery cables, and other electrical connections are secure.• Check battery cells to be sure they are filled.• Check the tire pressure and tightness of the lug nuts• Check for any signs of damage.
Check the operation of each of the following controls:
WHAT TO DO IF A PROBLEM IS FOUNDIf there is a problem or damage as a result of shipping, note the damage or problem on the bill of lading and file a claim with the freight carrier. The claim must be filed within 48 hours of receiving the vehicle and its accessories. Also, notify your dealer of the claim.If there is any problem with the operation of the vehicle, DO NOT OPERATE THE VEHICLE. Immediately contact your dealer and report the problem. The report must be made within 24 hours of receiving the vehicle and its accessories. The only personnel authorized to repair, modify, or adjust any part of this or any Taylor-Dunn vehicle is a factory authorized service technician.
• Accelerator Pedal• Brake Pedal• Parking Brake• Key Switch• Direction Control Switch
• Reverse Warning Alarm (if equipped)• All lights• Steering Wheel• Horn
The only personnel authorized to repair, modify, or adjust any part of this or any Taylor-Dunn vehicle is a factory authorized service technician. Repairs made by unauthorized personnel may result in damage to the vehicle’s systems which could lead to an unsafe condition resulting in severe bodily injury and/or property damage. Unauthorized repairs may also void the vehicle’s warranty.
WARNING
NOTICENew front wheel bearing adjustment must be inspected after the first 24 hours of operation. This includes new vehicle installations. Failure to inspect the bearings after the break in period may result in premature failure of the bearings.

Page 17TT-316 Curtis AC System Operator Manual
TT-316-07
Operator TrainingPer the following regulations, the owner of this vehicle shall conduct an Operator Training program for all those who will be operating this vehicle:
• ANSI/ITSDF 56.8-2006 Personnel and Burden Carriers: Part II, Paragraph 6.2a.• ANSI/ITSDF 56.9 – 2007 Safety Standard for Operator Controlled Industrial Tow Tractors:
Part II, paragraph 4.11.• Code of Federal Regulations (CFR) Title 29, Subtitle B, Chapter Xvii OSHA, Part 1910.178
Powered Industrial Trucks (2011): 1910.178, Section (l).• Per OSHA Regulation, 29 CFR 1910.178 Powered Industrial Truck Operator Training, the
owner must keep a record of conducted training and maintenance performed on the vehicle. The training program shall not be condensed for those claiming to have previous vehicle operation experience. Successful completion of the Operator Training program shall be required for all personnel who operate this vehicle. The Operator Training program shall include the following:
• Operation of this vehicle under circumstances normally associated with your particular environment.
• Emphasis on the safety of cargo and personnel.• All safety rules contained within this manual.• Proper operation of all vehicle controls.• A vehicle operation and driving test.
Driver QualificationsOnly those who have successfully completed the Operator Training program are authorized to drive this vehicle. Operators must possess the visual, auditory, physical, and mental ability to safely operate this vehicle as specified in the American National Standards Institute Controlled Personnel and Burden Carriers ANSI B56.8.The following are minimum requirements necessary to qualify as an operator of this vehicle:• Demonstrate a working knowledge of each control.• Understand all safety rules and guidelines as presented in this manual.• Know how to properly load and unload cargo.• Know how to properly park this vehicle.• Recognize an improperly maintained vehicle.• Demonstrate the ability to handle this vehicle in all conditions.
www.taylor-dunn.com

Page 18 TT-316 Curtis AC System Operator Manual
TT-316-07
Vehicle Controls
1: Start SwitchThe Start switch turns the vehicle electrical control system ON. This switch may or may not require a key to operate. Rotate the switch clockwise to turn the vehicle system “ON” and counterclockwise to turn the vehicle system “OFF”. The vehicle will not run when in the OFF position.The switch should be in the “OFF” position whenever the operator leaves the driver’s seat.This switch is designed to secure and disable the vehicle. The key can only be removed when the switch is in the “OFF” position.
2: Directional Control SwitchThis switch determines the direction of travel. The switch has three positions:
• FORWARD: Rotate the switch clockwise to travel forward.
• REVERSE: Rotate the switch counter-clockwise to travel reverse.
• OFF: There is a center position between forward and reverse, this is the “direction” OFF position. The direction OFF position does NOT turn the vehicle control system OFF. Use the Start switch to turn the vehicle control system OFF. Refer to Start Switch in this section for details regarding turning the vehicle control system OFF.
Note: The OFF position IS NOT neutral and does NOT disconnect the motor from the drive train.
3: System Status Indicator GaugeDetailed description of operation can be found later in this section.
4: Headlight SwitchPush the forward side of the headlight switch down to turn the lights on. Push the opposite side of the switch down to turn the lights off.
5: Foot Brake PedalThe foot brake pedal is located to the left of the throttle pedal. This pedal is designed for operation with the drivers right foot. It works similar to the brake in an automobile. Applying pressure to the brake pedal slows the vehicle according to the amount of pressure applied. Relieving pressure from the pedal releases the braking action.
6: Throttle PedalThe throttle pedal is located to the right of the brake pedal. It controls the speed of the vehicle and operates similar to the throttle pedal in an automobile. Press the pedal to increase speed and release the pedal to decrease speed.
7: Horn SwitchPress the horn switch with your left foot to sound the horn, release it to turn it off.

Page 19TT-316 Curtis AC System Operator Manual
TT-316-07
SteeringTo turn right, turn the steering wheel clockwise. To turn left, turn the steering wheel counter-clockwise. The steering column has both tilt and telescoping features.
• Tilt: To tilt the steering up or down, loosen the locking lever, position the steering wheel as required and then retighten the lever.
• Telescoping: Pull or push on the steering wheel to extend or collapse the column. There is no locking mechanism for the telescoping feature of the steering column.
The park brake should be disabled for servicing or towing procedures only. Do not operate the vehicle while the automatic park brake is disabled. Operating the vehicle with the automatic park brake disabled could lead to severe bodily injury and/or property damage.
WARNING
Parking BrakeThis vehicle is equipped with an automatically actuated electromagnetic parking brake.During normal operation, the parking brake will be applied when the throttle pedal is released and the motor comes to a stop. The brake will release again when the throttle pedal is pressed.Unless in an emergency, do not turn the start switch OFF while the vehicle is in motion. Turing the start switch OFF will immediately apply the parking brake, stopping the vehicle and result in accelerated wear of the brake.
Parking Brake Bypass Switch:
Some motor control system faults will result in application of the parking brake or failure of the brake to release. Should this occur, Contact trained, authorized service personnel to repair the vehicle or tow the vehicle to a service center. Refer to Towing This Vehicle later in this manual.
The park brake bypass switch shall only be operated by properly trained and authorized service personnel.Improper usage of the bypass switch cause loss of control of the vehicle resulting in severe bodily injury and/or collision with property damageRefer to the vehicle service manual for detail.
WARNING

Page 20 TT-316 Curtis AC System Operator Manual
TT-316-07
InchingThe inching switches are optional.The inching buttons are located on the left side of the cargo area. The inching buttons will move the vehicle a short distance at a slow speed to facilitate connecting or disconnecting the trailer tongue.The inching buttons are active only when all of the following apply:
• The vehicle start switch is ON.• The direction control switch is in the center
OFF position.• The driver seat is not occupied.
To disconnect the trailer, release the tongue latching lever or pin and press the FORWARD inching button until the tongue is clear from the vehicle hitch.To connect the trailer, park the vehicle so that the hitch is close to and in line with the trailer tongue. Release the tongue latching lever and press the REVERSE inching button to move the vehicle hitch to engage the tongue. Make sure the hitch latching mechanism is properly engaged before operating the vehicle.
Seat Adjustments
This vehicle is equipped with 3-way adjustable seats.1) Seat Suspension Tension: The position of this lever changes the stiffness of the suspension spring in the seat cushion. There are 3 settings, the lever is shown in the center position. Move up for softer suspension of down for harder suspension.2) Seat Back Angle: Rotate the knob to change the angle of the seat back rest. Rotate clockwise to tilt back and counterclockwise to tilt forward.3) Seat Position: Allows the seat to move forward or back. Pull the lever to the right to unlock the seat and then move the seat to the desired position. Make sure the lever is securely locked in place before operating the vehicle.
DO NOT attempt to adjust the driver or passenger seats while the vehicle is in motion. Adjusting the seat while in motion could result in sudden and violent uncontrolled movement of the seat. The sudden movement of the seat could cause the driver to lose control of the vehicle or eject the occupant from the vehicle resulting in severe personal injury and/or property damage.
WARNING
Do not attempt to connect or disconnect a trailer while parked on a grade. This may result in the trailer uncontrolled travel down the grade or crushing the person between the trailer and vehicle.
WARNING
PINCH POINT. Keep hands clear of the hitch and trailer tongue while coupling or de-coupling. Fingers or hands may be crushed if pinched between the trailer and hitch.
WARNING
Page 21TT-316 Curtis AC System Operator Manual
TT-316-07
System Status Indicator
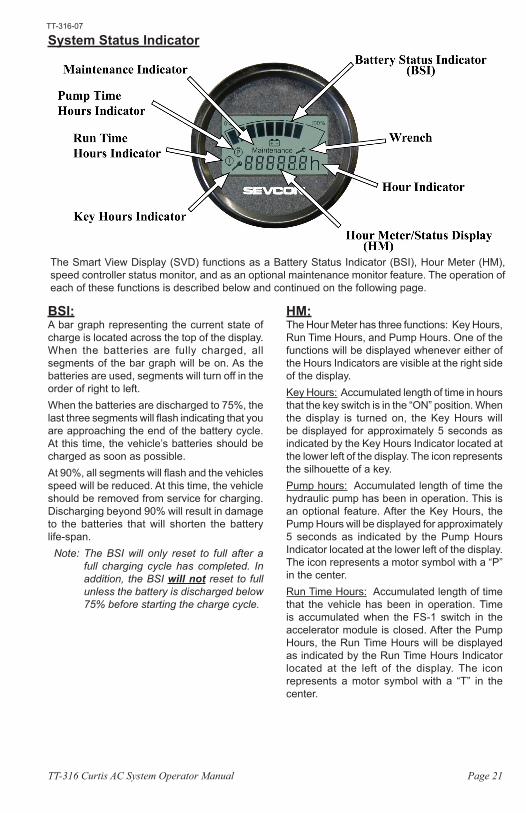
The Smart View Display (SVD) functions as a Battery Status Indicator (BSI), Hour Meter (HM), speed controller status monitor, and as an optional maintenance monitor feature. The operation of each of these functions is described below and continued on the following page.
BSI:A bar graph representing the current state of charge is located across the top of the display. When the batteries are fully charged, all segments of the bar graph will be on. As the batteries are used, segments will turn off in the order of right to left.When the batteries are discharged to 75%, the last three segments will flash indicating that you are approaching the end of the battery cycle. At this time, the vehicle’s batteries should be charged as soon as possible.At 90%, all segments will flash and the vehicles speed will be reduced. At this time, the vehicle should be removed from service for charging. Discharging beyond 90% will result in damage to the batteries that will shorten the battery life-span.
Note: The BSI will only reset to full after a full charging cycle has completed. In addition, the BSI will not reset to full unless the battery is discharged below 75% before starting the charge cycle.
HM:The Hour Meter has three functions: Key Hours, Run Time Hours, and Pump Hours. One of the functions will be displayed whenever either of the Hours Indicators are visible at the right side of the display.Key Hours: Accumulated length of time in hours that the key switch is in the “ON” position. When the display is turned on, the Key Hours will be displayed for approximately 5 seconds as indicated by the Key Hours Indicator located at the lower left of the display. The icon represents the silhouette of a key.Pump hours: Accumulated length of time the hydraulic pump has been in operation. This is an optional feature. After the Key Hours, the Pump Hours will be displayed for approximately 5 seconds as indicated by the Pump Hours Indicator located at the lower left of the display. The icon represents a motor symbol with a “P” in the center.Run Time Hours: Accumulated length of time that the vehicle has been in operation. Time is accumulated when the FS-1 switch in the accelerator module is closed. After the Pump Hours, the Run Time Hours will be displayed as indicated by the Run Time Hours Indicator located at the left of the display. The icon represents a motor symbol with a “T” in the center.

Page 22 TT-316 Curtis AC System Operator Manual
TT-316-07
Maintenance Monitor:Note: The Maintenance Monitor function is optional. The Maintenance Monitor function can be
turned ON or OFF by your dealer.Operation: The SVD notifies the operator 10 hours (standard) before a scheduled maintenance is due. During this warning period, the meter will continue to alert the operator. This should allow sufficient time for the operator to schedule the maintenance that is due, with minimal down time. If the scheduled maintenance is not performed before the warning period elapses, the vehicle’s maximum speed will be significantly reduced.Warning Period: The warning starts when the Maintenance Indicator is ON and the Wrench icon is flashing. The Wrench icon will continue to flash until the warning time has expired.Maintenance Due: Once the warning has expired and the maintenance is due, the Wrench icon will stop flashing and remain ON. Additionally, the vehicle’s maximum speed will be significantly reduced until the maintenance is performed and the display is reset. The display should only be reset by an authorized technician. Speed Controller Status: The display will indicate a Diagnostic Trouble Code (DTC) whenever the control system logic detects a problem with the control system. A DTC is being displayed whenever the DTC Indicator (the letter ‘F’) is visible at the left of the numeric display. Refer to the table below for a description of possible DTC’s.
DTC Flash Message Action
F10101 10 Unit in preoperational Refer to dealer for repair.
F15101 15 Vehicle Service Required Service the vehicle
F16010 6 Seat (warning) Operator presence switch is open. Confirm driver seat properly positioned.
F17001 7 BDI Warning Low battery voltage. Charge the batteries.
F17002 7 BDI Cutout Low battery voltage. Charge the batteries.
F17003 7 Low Battery Cut Low battery voltage. Charge the batteries.
F17004 7 High Battery Cut Refer to dealer for repair.
F17006 7 Vbat below rated min Low battery voltage. Charge the batteries.
F17007 7 Vbat above rated max Refer to dealer for repair.
F17009 7 Motor in low voltage cutback Warning only (not a fault) due to transient low voltage.
F18001 8 Device too cold Move to warmer location.
F18002 8 Device too hot Overloaded, allow controller to cool.
F18003 8 Motor in thermal cutback Overloaded, allow controller to cool.
F18004 8 Motor too cold Move to warmer location.

Page 23TT-316 Curtis AC System Operator Manual
TT-316-07
DTC Flash Message Action
F22001 2 Seat Fault Operator presence switch is open. Confirm driver seat properly positioned.
F22002 2 Two Direction Fault Refer to dealer for repair.
F22003 2 SRO Fault Throttle pedal pressed without direction selected.
F22004 2 Sequence Fault Throttle or direction selected at power up.
F22006 2 Inch Fault Inching switch active along with any drive switch, seat switch indicating operator present or handbrake switch active.
F26001 6 Throttle Fault Refer to dealer for repair.
F35002 5 Motor Open Circuit Fault Refer to dealer for repair.
F35003 5 No Motor Speed Signal Refer to dealer for repair.
F37003 7 Power Supply Critical Refer to dealer for repair.
F41101 11 DSP Encoder Fault Refer to dealer for repair.
F41102 11 DSP Overcurrent Fault Possible overloaded vehicle.
F41103 11 DSP Control Fault Refer to dealer for repair.
F41104 11 Motor Overspeed Fault Uncontrolled coasting down hill or towing at excessive speed.
F44001 4 Line Contactor o/c Refer to dealer for repair.
F44002 4 Line Contactor welded Refer to dealer for repair.
F46003 6 Analogue Output Over Current
Refer to dealer for repair.
F46006 6 Analogue Output Over Temperature
Refer to dealer for repair.
F47002 7 Capacitor Precharge Failure Refer to dealer for repair.
F48001 8 Heatsink overtemp Overloaded, allow controller to cool.
F53001 3 DSP Overvoltage Refer to dealer for repair.
F53002 3 DSP Powerframe Fault Possible overloaded vehicle.
F53003 3 MOSFET s/c M1>B+ Refer to dealer for repair.
F53004 3 MOSFET s/c M1>B- Refer to dealer for repair.
F53005 3 MOSFET s/c M2>B+ Refer to dealer for repair.
F53006 3 MOSFET s/c M2>B- Refer to dealer for repair.
F53007 3 MOSFET s/c M3>B+ Refer to dealer for repair.
F53008 3 MOSFET s/c M3>B- Refer to dealer for repair.

Page 24 TT-316 Curtis AC System Operator Manual
TT-316-07
Vehicle OperationGeneral Safety Guidelines
• Only qualified and trained operators with no physical, mental, or sensory disabilities may operate this vehicle or any of its components.
• Only licensed drivers shall operate this vehicle. • Before operating this vehicle, perform all Daily and Pre-operation checks as defined in the
Vehicle Maintenance section.• Confirm proper operation of all vehicle controls before operating the vehicle.• Wear closed toe low heel shoes when operating the vehicle.• No reckless driving.• Do not operate a motor vehicle while under the influence of alcohol or any drug that may
impair your ability to drive.• Keep all body parts (head, arms, legs) inside this vehicle while it is moving.• All occupants must remain seated, one passenger per seating position. No passengers are
allowed to be transported in the cargo area of the vehicle.• The operator shall confirm that all passengers are physically able to secure themselves
while being transported in this vehicle.• No occupants should exit the vehicle until the vehicle has come to a complete stop.• Do not transport small children. This vehicle is not designed to accommodate child seats.• Do not leave children unattended in the vehicle.• Keep a clear view ahead at all times. • Keep the vehicle under control at all times. • Observe all traffic regulations and speed limits.• The vehicle shall be equipped with head and tail lights if operated at night.
Your ability to operate a motor vehicle can be seriously impaired with blood alcohol levels far below the legal minimum.If you have been drinking alcohol, don’t drive. Ride with a designated non-drinking driver, call a cab, or use public transportation.
WARNING
The advanced technology built into the vehicle motor control has many systems to monitor the condition and operation of the vehicle to maintain safe operation.Even with advanced technology, it is not possible to change the laws of physics. Improper driving technique for the current conditions could result in loss of vehicle control.
WARNING
When leaving the approved operating position ALWAYS:1) Confirm park brake is applied.2) Place the direction control switch in the center OFF position.3) Turn the start switch OFF and remove the key.Failure to perform these operations may result in unexpected vehicle movement causing severe bodily injury and/or property damage.
WARNING

Page 25TT-316 Curtis AC System Operator Manual
TT-316-07
• This vehicle may overturn if turned sharply when driven at high speeds. • Drive slowly when making a turn, especially if the ground is wet or when driving on an
incline.• Yield right of way to pedestrians, ambulances, fire trucks, or other emergency vehicles.• Sound your horn when approaching pedestrians. DO NOT assume the pedestrian is aware
of your presence; before passing, slow down and allow sufficient clearance between the vehicle and pedestrian.
• Do not overtake another vehicle at intersections, blind spots, narrow isles, or other dangerous locations.
• Stop and sound horn at all intersections regardless if it is posted with a stop sign.• Do not operate this vehicle in areas at risk to falling objects.• Do not drive over loose objects, holes, or bumps.• Do not drive under any object that is less than 80 inches (203 cm) from the ground.• Do not drive off of curbs or other steep drop-offs more than 2 inches high.• Stay in your driving lane under normal conditions, maintaining a safe following distance from
other vehicles.• If equipped with doors, the doors must remain closed and latched while vehicle is in motion.• Driving through water or mud may affect brake performance. ALWAYS test brakes by
pressing the brake pedal after driving through water or mud.

Page 26 TT-316 Curtis AC System Operator Manual
TT-316-07
StartingBefore operating this vehicle: Refer to General Safety Guidelines at the beginning of this chapter.
Note: This vehicle is equipped with a driver seat interlock which disables the vehicle when the driver seat is not occupied. The driver must be properly seated for the vehicle to operate.
1. Sit in the driver seat and press the service brake pedal.
2. Place the Direction Control switch in the center OFF position.
3. Place the Start switch in the ON position and wait 1 second.
4. Select a direction of travel.5. Slowly press the throttle pedal to accelerate
to the desired speed.Note: In an emergency, the Start switch may be turned OFF to disable the motor speed control.
Refer to additional information regarding electromagnetic parking brake in the Driving section.
Refer to the Driving section for additional information regarding operation of your vehicle.
DO NOT exceed the maximum rated speed for your vehicle, locally imposed speed limits, or the safe operating speed for conditions. Exceeding any of these speed limits will increase the likelihood of an accident causing personal injury. In addition, exceeding the maximum rated speed for your vehicle may result in damage to the vehicle drive train and/or control system.
WARNING
The seat interlock switch is only one part of the vehicle safety system. The interlock switch should not be relied upon as the only safety feature used to disable or disengage this vehicle. Do not bypass or in any way disable the interlock. Doing so could result in unexpected movement of the vehicle causing severe bodily injury and/or property damage.
WARNING
DO NOT transport passengers in the cargo area. All passengers must be seated in the available seats, one passenger per seating position.
WARNING

Page 27TT-316 Curtis AC System Operator Manual
TT-316-07
DrivingBefore operating this vehicle:
• Perform all daily and pre-operation checks as defined in the Vehicle Maintenance section.• Refer to General Safety Guidelines at the beginning of this section.
Selecting Direction of TravelThe direction of travel is selected with the Direction Control switch. The direction of travel must be selected before pressing the throttle pedal. If the pedal is pressed before a direction is selected then a fault will occur. Release the pedal to reset the fault.Your vehicle may be equipped with a reverse or motion beeper.
• The motion beeper will sound in forward and reverse.• The reverse beeper will only sound when the reverse direction is selected.
Changing Direction of TravelThe direction selected by the Direction Control switch can be changed at any time but you may have to release the throttle pedal to reverse direction. If the vehicle is in motion when the direction is changed, the motor control system will reverse the current flow in the motor slowing the vehicle to a stop and then continue in the new direction selected.The throttle pedal must be released after selecting a new direction. If the pedal is not released, then a fault will occur. Release the pedal to reset the fault.
Driving in Forward1. Turn the start switch ON, then select FORWARD using the Direction Control switch.2. Slowly press the throttle pedal to accelerate to the desired speed.
Note: This vehicle is equipped with a driver seat interlock. The motor control system will be disabled unless the driver is properly seated
Driving in Reverse1. Check and confirm that there are no obstacles behind the vehicle before backing up.2. Turn the start switch ON, then select REVERSE using the Direction Control switch.3. Slowly press the throttle pedal to accelerate to the desired speed.
DO NOT exceed the maximum rated speed for your vehicle, locally imposed speed limits, or the safe operating speed for conditions. Exceeding any of these speed limits will increase the likelihood of an accident causing personal injury. In addition, exceeding the maximum rated speed for your vehicle may result in damage to the vehicle drive train and/or control system.
WARNING
DO NOT “ride the brakes” or drive with your left foot resting on the brake pedal.Riding the brakes will cause excessive heat build up and rapid wear in the brake system and could result in brake failure causing a collision or accident with severe injury.
WARNING

Page 28 TT-316 Curtis AC System Operator Manual
TT-316-07
StoppingRelease the throttle pedal and use your right foot to press the brake pedal. The amount of force required to stop the vehicle will vary depending on the environment and load on the vehicle.Unless in an emergency, do not turn the start witch OFF until the vehicle has come to a complete stop. This vehicle is be equipped with an optional electromagnetic park brake. Turning the start switch OFF will immediately engage the brake and abruptly stop the vehicle; If this is done while is still in motion then it will result in accelerated wear of the park brake.
Parking1. Bring the vehicle to a stop at an authorized parking space.2. Place the Direction Control switch in the center OFF position.3. Confirm the parking brake is applied.4. Turn the start switch OFF.5. Remove the key from the Start switch. The driver should keep the key in his/her possession.
Note: If parking this vehicle on an incline, turn the wheels to the curb, or block the wheels.
Material Handling Safety Light
This light is optional and may not be installed on your vehicle.The safety light is a blue light projected onto the ground in front of the vehicle. The light is projected and visible only when the forward direction is selected.The light helps in notifying others that a vehicle is approaching from behind or when crossing a blind intersection. The light is not visible outdoors in bright light. The distance of the projected light in front of the vehicle can be adjusted by pivoting the projector up or down.
Drivers should not become complacent when operating a vehicle equipped with the safety light.Always be aware of pedestrians and other vehicles in your lane of travel and stop at all blind intersections.Relying solely on the safety light for warning others in your path may result in collision with pedestrians or other vehicles causing severe bodily injury and/or property damage.
WARNING

Page 29TT-316 Curtis AC System Operator Manual
TT-316-07
Collisions or AccidentsA collision or accident may damage the electrical circuits or batteries resulting in a fire hazard or chemical spill. In the event of a collision or accident, immediately turn the Start switch OFF, set the park brake, then exit the vehicle.Call emergency personnel if there is any indication of smoke, burning smell, electrical arcing, or leaking fluid.
Tip OverIn the event of a tip over AND the vehicle is equipped with an Operator Protective Structure (OPS), stay inside the confines of the vehicle. Exit the vehicle after the vehicle has come to a complete stop.In the event of a tip over and the vehicle IS NOT equipped with OPS. Quickly exit the vehicle and quickly move out of its path.

Page 30 TT-316 Curtis AC System Operator Manual
TT-316-07
Vehicle Load Capacity, DefinitionThe rated maximum load capacity of a vehicle is the load carrying capacity of the standard model. The maximum load is on the vehicle’s data plate. Occupants and optional equipment added to the vehicle at time of manufacture or installed after delivery by the dealer or user reduces the capacity.Example: Standard Load Capacity = 3,000 pounds:3,000 - Driver (200) - Steel Cab/Doors Option (300) - Cargo Box (400) = 2,100 pounds maximum load on deck. Add a passenger and the maximum load is reduced to 1,900 pounds.The definition of maximum load is the maximum weight than can be carried on a vehicle under ideal conditions. There are many conditions that will reduce the maximum safe load a vehicle can carry.Some of these conditions are, but not limited to:
• Uneven road surface.• Tall loads.• Wide loads.• Long loads.
• Liquid loads (sloshing).• Traveling up or down grades.• Traveling across grades.
The rated capacity assumes the load has a low center of gravity and is centered on the deck. As example: A 20 foot tall, 3,000 pound statue on the deck of a 3,000 pound capacity vehicle is not approved.Liquid loads sloshing around in a tank will shift the center of gravity and may result in stability and braking issues. Liquid loads must be secured and have fluid baffles in the tank to help reduce shifting load weight due to sloshing.
Loading Cargo
• Before loading or unloading cargo:1. Place the Direction Control switch in the center
OFF position. 2. Turn the start switch OFF3. Confirm park brake is applied.
• Do not transport cargo that is wider than the vehicle.
• Do not load cargo in the passenger compartments. • Use only Taylor-Dunn approved cargo accessories.• Do not exceed the load capacity of the vehicle.• The standard designated cargo area is the rear deck. Only load cargo on the deck unless
the vehicle has been equipped with Taylor-Dunn approved alternative cargo storage areas. Make sure cargo loaded on the deck does not interfere with the operation of the manual hitch release lever.
• Cargo shall only be transported in the designated cargo area of the vehicle and evenly distributed with the center of gravity close to the center of the designated cargo area.
• All cargo shall be secured to prevent falling from the vehicle or shifting position while the vehicle is in motion.
• Our deck enclosures and covers such as cabs, fiberglass tops, surrey tops, cargo boxes, and similar structures are not designed to carry cargo or accessories unless equipped from the factory. Mounting additional weight on these structures may result in sudden failure of the cover and/or cover supports causing severe personal injury.
• Cargo consisting of fluid in tanks shall have fluid baffles in the tank to help reduce sloshing and shifting load weight.
DO NOT transport or load cargo in the front operator area or leave loose items on the front floorboard. Cargo placed in the front operator area may interfere with the driver causing loss of control of the vehicle and result in a collision or accident with severe injury.
WARNING
DO NOT transport passengers in the cargo area. All passengers must be seated in the available seats, one passenger per seating position.
WARNING

Page 31TT-316 Curtis AC System Operator Manual
TT-316-07
TOWINGTowing a Trailer
• Do not exceed the Draw Bar Pull capacity of the vehicle or maximum load of the vehicle.Note: Towingupordowngradeswillsignificantlyreducethecapacityofthevehicle.
• Do not exceed the load capacity of the trailer.• Do not exceed the capacity of the trailer hitch.• Only use Taylor-Dunn approved trailer hitches.• Cargo consisting of fluid in tanks shall have fluid baffles in the tank to help reduce shifting
load weight.• Make sure all cargo is securely tied down.• Do not back up when pulling more than one trailer.• Drive slowly when pulling trailers with high center of gravity.• When turning, be sure to allow for “corner cutting” of the trailer.• Allow for longer stopping distances when towing heavy loads.• Allow for longer stopping distances when driving down a grade.• Block the trailer wheels before disconnecting from the vehicle.• Do not disconnect a trailer while parked on a grade.
Draw Bar Pull (DBP), DefinitionDBP is a measure of pulling force required to move a load. The load may be a trailing load or a pushed load. It is normally expressed in pounds or Newtons.The DBP of a tow tractor is the horizontal force exerted on a load at its coupler while towing or pushing a load. To measure the DBP, a scale would be connected in line with the tractor coupler and the load. The scale will directly read the DBP as the tractor tows the load.Tow tractor DBP specifications, definition:
• Normal DBP: Highest DBP that can be sustained for a given duty cycle.• Ultimate DBP: Also referred to a Maximum DBP. Highest DBP achieved while traveling at
a minimum speed of approximately 0.5 mph (0.8 kph) for a minimum of 30 seconds. This specification is used in calculations for getting a load moving.
Notes: Tow tractor DBP specifications are based on:
• Road surface consisting of level dry clean asphalt, brushed concrete or equivalent.• Maximum battery weight installed per tow tractor battery specification.
Towing a load up any grade will significantly increase the DBP required.Most paved roads and parking lots have a drainage grade to allow water to run off. When operating a tow tractor at or near its maximum capacity, this drainage grade will significantly affect DBP required to pull the load and may result in exceeding the tractor specifications.
Transporting PetsPets should only be transported in a pet carrier that is securely tied down on the rear cargo deck.

Page 32 TT-316 Curtis AC System Operator Manual
TT-316-07
Towing the VehicleNote: This vehicle is equipped with an automatic electric park brake. The brake must be bypassed
or removed before towing the vehicle.Note: If at all possible, this vehicle should be placed on a carrier, rather than towing.
1. Attach a tow strap to the front bumper tow-bar.2. Turn the start switch off and place the direction control switch in the center off position.3. Flip the park brake bypass switch to the bypass position (see below).
• If the brake does not release then the brake must be removed or the vehicle put on dollies.
4. Use another driver to steer this vehicle while it is being towed. Be sure the driver uses the brakes when the towing vehicle slows or stops.
Park Brake Bypass Switch
This vehicle is equipped with an automatically applied electric parking brake. Under normal driving conditions, the parking brake will be applied when the start switch is turned off or the operator leaves the approved operator position. It will also be applied if the control system loses power such as when the battery is disconnected.The parking brake is powered by the vehicle battery. It will be applied whenever the battery is disconnected. It may be applied if the battery is severely discharged.There is a switch on or near the control panel that can be used to bypass the brake and allow the vehicle to be pushed or towed.
DO NOT tow a vehicle with a tow strap if the vehicle brakes are not working properly. Using a strap to tow a vehicle with no brakes may result in loss of control of both vehicles causing severe bodily injury and/or property damage.
WARNING
DO NOT tow the vehicle faster than 5 mph (8 kph) or its maximum designed speed, whichever is lower.Towing the vehicle faster than 5 mph may result in one or more of the following:• Loss of control of both vehicles causing severe bodily injury and/or property damage. • Damage to the towed vehicle drive train components and/or motor.
WARNING
Use extreme caution if towing a vehicle backwards and recommended ONLY to tow a short distance until able to connect to the front tow bar and tow forwards.If towed backwards, the towed vehicle may swing wide turning turns resulting in loss of control of both vehicles causing severe bodily injury and/or property damage
WARNING
The park brake bypass switch shall only be operated by properly trained and authorized service personnel.Improper usage of the bypass switch cause loss of control of the vehicle resulting in severe bodily injury and/or collision with property damageRefer to the vehicle service manual for detail.
WARNING

Page 33TT-316 Curtis AC System Operator Manual
TT-316-07
Charging Your VehicleGENERIC SAFETY GUIDELINES
• Explosive mixtures of Hydrogen gas are present within battery cells at all times. Do not work with or charge a battery in an area where open flames (including gas furnace or water heater pilots), sparks, cigarettes, or any other sources of combustion are present. Always provide ample ventilation in rooms where batteries are being charged. Failure to do so may result in severe bodily injury and/or property damage.
• DO NOT disassemble the charger. There are no user serviceable components in the charger. Refer all repairs to a qualified technician. Incorrect repair or reassembly of the charger can result in an explosion, electric shock, or fire.
• Use of extension cords is not recommended. Improper use of an extension cord may result in fire.
• Do not attempt to operate the vehicle while charging the battery. Operating the charger and vehicle at the same time may lead to damage to the charger and/or the vehicle resulting in personal injury and/or property damage.
• Do not charge any battery that is, or is suspected to be frozen. Charging a frozen battery may result in explosive rupturing of the case due to a build up of internal pressure. This may causing severe bodily injury and will cause property damage.
• The charger should not be used by children or any personnel with mental or sensory disabilities. Incorrect usage due to inability to understand operation may cause severe personal injury and/or property damage.
WARNING
The charger must be connected to a properly grounded AC receptacle. Improper connection will increase the risk of electric shock and can cause severe personal injury or death.
DANGER
NOTICEThe Start switch must be in the “OFF” position when charging the batteries. Failure to turn the Start switch “OFF” may result in damage to the vehicle’s electrical system.
NOTICECheck battery electrolyte before charging. Do not charge batteries with low electrolyte level. Charging with low electrolyte level will result in premature failure of the battery.

Page 34 TT-316 Curtis AC System Operator Manual
TT-316-07
Charging TimeAverage charging time is typically 8 to 10 hours. The time required to fully charge your battery will vary depending on:
• Capacity of the battery: Higher capacity battery requires longer charge time.• Output of the charger: Higher charger output requires less charge time.• Depth of discharge: The deeper a battery is discharged, the longer it takes to charge.• Temperature: Low temperatures require longer charge time.
It is not unusual for charge times to exceed 15-hours, especially with a new battery.
To Obtain the Maximum Battery LifeCharge the battery only after it reaches a normal discharge (20%) as indicated on the Battery Status Indicator (BSI). Failure to follow this guideline could result in the battery entering an overcharge state, which will reduce the life of the battery. If you find it necessary to charge the battery before it is completely discharged, we recommend waiting until it is discharged a minimum of 30% to reduce the possibility of overcharging. Refer to Vehicle Controls in this section for information on how to read the BSI.Do not discharge the battery beyond a normal discharge as indicated on the BSI. Discharging your battery too deep will result in premature failure of the battery. Refer to Vehicle Controls in this section for information on how to read the BSI.Check the battery electrolyte level once a week. Do not charge the battery if the battery electrolyte is low. Charging when the electrolyte is low will damage the batteries and shorten the life-span of the battery. Only authorized personnel should perform battery maintenance including maintaining the battery electrolyte level. Refer to the Battery Maintenance Section for battery maintenance information.It is not recommended to interrupt the charging cycle. Allow the charger to turn off before disconnecting the AC plug. Interrupting the charging cycle could lead to overcharging or discharging the batteries too deep. Both circumstances will result in premature failure of the battery.
New Battery Break InNew batteries require a break in period of up to 40-cycles. The batteries will not have their full capacity during this break in period and may result in longer charging times.
AC Power SourceThe AC power source required by the charger will vary depending on the charger used. Refer to the specifications printed on the charger for details.Use of extension cords is not recommended. If you find it necessary to use an extension cord, make sure the extension cord power rating exceeds the power requirements of the charger.The United States Federal, State or local regulations may require the use of a Ground Fault Interrupter (GFI) cable or AC outlet equipped with a GFI for charging your vehicle. A charger cord with an integral GFI is available through your Taylor-Dunn dealer.
U s e o f e x t e n s i o n c o r d s i s n o t recommended. Improper use of an extension cord may result in fire.
WARNING
NOTICEThe charger originally supplied with the vehicle is for use with the battery originally supplied with the vehicle. If installing a different charger or battery, consult the charger and/or battery manufacturer to confirm that the charger used is compatible with the battery. Use of an incorrect charger will result in damage and premature failure of the battery.

Page 35TT-316 Curtis AC System Operator Manual
TT-316-07
Storing and Returning to ServiceBoth storing your vehicle and returning it to service should only be performed by authorized personnel.
Storing Your Vehicle• Clean the batteries, then fill and charge before
putting the vehicle in storage. Do not store batteries in a discharged condition.
• Lube all grease fittings. • Clean, dry, and check all exposed electrical
connections.• Inflate the tires to proper pressure (if applicable).• For extended storage, the vehicle should be elevated
so that the tires are not touching the ground.If stored for a prolonged period, the battery should be charged as follows:
Returning to Service• Check the battery state of charge and charge if required.• Perform all applicable maintenance checks in the Maintenance Schedule.• Remove any blocks from the vehicle and/or place the vehicle down on to the ground.• Test drive before putting into normal service.
Storage Temperature (F)
Charging Interval (months)
Over 60 1
Between 40 and 60 2
Below 40 6
Storing batteries that are discharged or allowing stored batteries to discharge while in storage causes sulphation of the battery plates. This will result in reduced capacity and premature failure of the batteries.
NOTICE

Page 36 TT-316 Curtis AC System Operator Manual
TT-316-07
Vehicle MaintenanceDaily InspectionThe following items should be inspected once every day before the vehicle is put into service:
• External frame damage (body).• Operation of all lights and warning alarms or beepers.• Inspect for leaking fluids or grease.• Tire tread or sidewall damage.• Smooth and proper operation of all controls such as but not limited to:
• Throttle pedal• Brake pedal• Steering• Horn• Parking brake• Hitch release• Etc.
• Proper operation of all locking devices such as but not limited to:• Tool box• Removable battery trays• Battery doors• Etc.
• Proper operation of all interlocking switches such as but not limited to:• Start switch• Seat operator presence switch switch• Battery door switches• Etc.
Pre-Operation InspectionThe following items should be inspected every time before the vehicle is driven:
• Rear and side view mirror adjustments.• Steering operation.• Brake operation (service and park brake).• Tire pressure (visual inspection only).
Remove cargo before raising the vehicle, rasing or removing the deckboard, or servicing the vehicle. Failure to remove the cargo may result in cargo falling from the vehicle causing severe personal injury and/or property damage.
WARNING

Page 37TT-316 Curtis AC System Operator Manual
TT-316-07
INTERLOCK SWITCH INSPECTIONThe interlock switches should disable vehicle operation when activated. Perform the following to confirm proper operation. If any one test fails, then immediately remove the vehicle from service and refer repair to a qualified technician.
All procedures are done with the charger disconnected from its power source except for the procedure testing the charger interlock. If using a portable charger, disconnect the charger cable from the vehicle.If equipped with a battery disconnect switch, make sure it is in the run position before performing procedures.
Start Switch Sit in the operator position, select a direction, then slowly press the throttle pedal.
• The vehicle should not operate. Release the pedal and place the direction control switch in the center OFF position.Turn the start switch ON, select a direction and slowly press the throttle pedal.
• The vehicle should operate normally.
Operator Presence SwitchSit in the operator position, turn the start switch ON, select a direction, and slowly press the throttle pedal.
• The vehicle should operate normally.Release the throttle pedal, lift up off the driver seat and again slowly press the pedal.
• The vehicle should not operate.
Brake Interlock SwitchSit in the operator position, turn the start switch ON, select a direction, and slowly press the throttle pedal.
• The vehicle should operate normally.While operating at a slow speed; press the brake pedal with your left foot.
• The motor control system should turn off and a DTC should be displayed on the dash display.
These procedures may result in unexpected vehicle movement. • All procedures shall be performed in an area that allows for possible movement of the
vehicle and room to safely stop the vehicle if it moves. • DO NOT allow any personnel to stand in front or behind the vehicle while performing
these procedures.Failure to follow the above instructions may result in severe personal injury and/or property damage.
DO NOT bypass, modify, or disable any interlock switch. Doing so could result in unexpected movement of the vehicle causing severe bodily injury and/or property damage.
WARNING

Page 38 TT-316 Curtis AC System Operator Manual
TT-316-07
Battery Door SwitchRemove all battery access doors. Sit in the operator position, turn the start switch ON, select a direction, and slowly press the throttle pedal.
• The vehicle should not operate.Replace one door at a time and attempt to operate the vehicle after each door is installed.
• The vehicle should not operate until the last door is installed, then it should operate normally.

Page 39TT-316 Curtis AC System Operator Manual
TT-316-07
Maintenance ScheduleMost of these items should only be performed by a qualified technician. Details regarding the service procedures can be found in the vehicle service manual.Any problems found during an inspection should be repaired before the vehicle is put back into service.
Every Week• All daily items plus the following:
• Battery electrolyte level (all cells). • Tire air pressure.• Check all tires tread for debris.• Check tires for damage.
First 15 hours• Re-torque the wheel nuts.• Inspect all hardware for tightness.
Every Month or 160 hours• All weekly items plus the following:
• Check brake fluid level.• Check all tires for tread wear.• Clean the drive motor exterior.• Blow out park brake.• Inspect for fluid leaks.• Inspect steering linkages and hardware.• Re-torque steering column U-joint.• Wash battery / clean terminals.• Check all electrical interlocks for proper
operation.• Inspect wheel bearings.• Inspect fork collar bearings.• Inspect and tighten all hardware (first
160 hours then every 500)
Every 3 Months or 500 hours• All monthly items plus the following:
• Wash the battery compartment.• Inspect and tighten all hardware.• Clean battery compartment.• Clean motor control panel.• Re-torque the wheel nuts.• Inspect/adjust front wheel bearings.• Tighten all electrical connections.• Inspect electrical connections for signs
of overheating.• Inspect wiring for wear, cracks, fraying.• Adjust steering chains.• Lubricate the vehicle.
Every 6 Months or 1000 hours• All quarterly items plus the following:
• Inspect rear wheel bearings• Test the battery.• Rotate tires.• Inspect all suspension bushings.• Inspect frame for damage.
Every Year or 2,000 hours)• All 6 month items plus the following:
• Clean and lubricate motor coupler.• Clean and lube steering chains• Clean and repack front wheel bearings.• Flush and replace the brake fluid.• Inspect bakes for wear.
Every 2 Years or 4,000 hours• All yearly items plus the following:
• Clean and repack fork bearings.• Clean and lube steering chains.• Flush and replace the transaxle oil.
Maintenance Guidelines for Severe Duty ApplicationsThe above maintenance schedule is based on the average typical application. If the vehicle is operated under “severe conditions”, service procedures should be conducted more frequently than specified. The frequency of service under severe conditions is determined by the use of the vehicle. The owner/operator must evaluate the operating environment to determine the increase in maintenance frequency.In addition, the entire vehicle should be inspected monthly for signs of damage.The following list is meant as a guide and is not all-inclusive of a “severe duty” application.
• Operation in excess of 100 hours per month.
• Extreme temperature.• Bumpy, dusty, or ill maintained roads.• Excessively wet areas.• Corrosive or contaminated areas.• Frequent loading of the vehicle at/near
capacity.

Page 40 TT-316 Curtis AC System Operator Manual
TT-316-07
BATTERY MAINTENANCE
• Battery electrolyte will stain and corrode most surfaces. Immediately and thoroughly clean any surface outside of the battery that the battery electrolyte comes in contact with. Failure to clean may result in property damage.
• When torquing battery hardware, use a backup wrench on the battery bolt and tighten the nut. Failure to use a backup wrench may damage the battery post.
• DO NOT remove the caps on a maintenance free battery. Removing the caps will damage or destroy the battery seals resulting in premature battery failure.
• Do not operate or charge a vehicle equipped with moist charged batteries until the batteries have been filled with electrolyte. Operating or charging moist charged batteries before filling with electrolyte will damage the batteries resulting in premature failure of the batteries.
NOTICE
High Voltage is present in the battery compartment. DO NOT touch the battery terminals during servicing of the battery as this may result in severe electric shock and/or death.
WARNING
• Battery electrolyte is poisonous and corrosive. It contains sulfuric acid. Avoid contact with skin, eyes, or clothing. Wear rubber gloves and face safety shield while servicing batteries. DO NOT INGEST! This will result in severe bodily injury.
• Wear a full face shield when working on or around batteries. A full face shield will help protect your eyes from battery electrolyte. If battery electrolyte gets in your eyes, immediately flush your eyes with large amounts of water and seek medical attention.
• Wear heavy duty long rubber gloves when working on or around batteries. If battery electrolyte gets on your skin, immediately flush with large amounts of water to prevent chemical burns.
• Explosive mixtures of Hydrogen gas are present within battery cells at all times. Do not work with or charge batteries in an area where open flames (including gas furnace or water heater pilots), sparks, cigarettes, or any other sources of combustion are present. Always provide ample ventilation in rooms where batteries are being charged. Failure to do so may result in severe bodily injury and/or property damage.
• Lead is poisonous. Batteries and battery terminals contain lead and lead components. Avoid touching the battery terminals and always thoroughly wash hands after servicing the batteries.
• A battery is a live electrical source. It cannot be disconnected or neutralized. Do not drop any tool or conductive object onto the battery. A conductive object that comes in contact with the battery terminals will initiate a short circuit of the battery. This could cause the battery to explode resulting in severe bodily injury and/or property damage.
• Do not leave cables on batteries that have been removed from the vehicle. Cables left on batteries could cause a short circuit resulting in battery explosion, severe bodily injury and/or property damage.
DANGER

Page 41TT-316 Curtis AC System Operator Manual
TT-316-07
Cleaning
6. Dry dirt can be readily blown off with low-pressure air or brushed off. 7. Wetness or wet dirt on the battery indicates battery acid. Using a nonmetallic brush with
flexible bristles, wash the battery off with a strong solution of baking soda and hot water (one pound of soda to a gallon of water). Continue until all fizzing stops, which indicates that the acid has been neutralized. Then rinse thoroughly with clear water. DO NOT get any of the solution into the battery cells.
8. Remove the blocks from the wheels and test drive.
WateringNon-maintenance free batteries only.
Note: The electrolyte level in a battery rises while charging and will be close to its highest level aftertheendofachargingcycle.Itisrecommendedtofillthebatteryattheendofachargingcycle.Iftheelectrolyteisbelowthetopofthebatteryplatesthenfilljustenoughtocoverthe plates and then top off when the charging cycle is complete.
6. Clean the battery. Refer to Cleaning section for information on cleaning the battery.7. Check the electrolyte level in all battery cells. If low, fill to the correct level with distilled
water using part number 77-201-00 battery filler. Never add additional battery electrolyte to the batteries.
8. Remove the blocks from the wheels and test drive.
Do not overfill the batteries. Overfilling the batteries may cause the batteries to boil over and result in chemical burns and/or property damage.
CAUTION
1) Refer to battery warnings at the start of this chapter.2) Place the Direction Control switch in the center “OFF” position (neutral).3) Turn the Start switch OFF.4) Place blocks under the front or rear wheels to prevent vehicle movement.5) Disconnect the main battery plug.
WARNING
1) Refer to battery warnings at the start of this chapter.
2) Place the Direction Control switch in the center “OFF” position (neutral).
3) Turn the Start switch OFF.4) Place blocks under the front or rear wheels to
prevent vehicle movement.5) Disconnect the main battery plug.
WARNING

Page 42 TT-316 Curtis AC System Operator Manual
TT-316-07
REMOVABLE BATTERIESRemovable batteries can consist of a single large industrial battery or a pack of smaller batteries assembled on a removable tray.The removable battery can be of a type that slides or rolls out of the side of the vehicle (ROBB) or lifted out of the vehicle from above (LOBB).
Lift Out BatteryRemoving the LOBB will require an overhead hoist or forklift attachment not included with the vehicle. Refer to the manufacturer of the hoist or attachment for proper operation.
1. Unplug the battery connector.2. Attach the hook from the hoist or forklift attachment to the lifting eye on the battery box.3. Lift the LOBB until it is clear of the frame.4. Place the battery on the ground or battery storage platform.5. If the battery is to be moved away from the vehicle, then it should first be lowered as close
as practical to the ground before transporting.
• Use the proper equipment when handling and transporting removable batteries. Equipment that is used to lift and support removable batteries should be rated at a minimum of 1.5 times the total battery weight.
• Keep all body parts out from underneath any battery that is not installed and latched in the vehicle.
Failure to follow these rules may result in severe bodily injury and/or property damage.
WARNING
Before removing a battery pack or industrial battery:1) Park the vehicle on a level surface. If removing a ROBB, the vehicle should be
positioned as close as possible to the platform where the battery will be stored.2) Place the Direction Control switch in the center OFF position. 3) Make sure the Start switch is in the OFF position.4) Confirm park brake is applied.
WARNING
Page 43TT-316 Curtis AC System Operator Manual
TT-316-07
Side Extract Battery1. Position the vehicle as close as possible to the platform or dolly where the battery is to be
extracted.2. Turn the start switch OFF and set the park brake.3. Disconnect the battery cable connector.4. Remove the battery doors.5. Use a winch to pull the battery out or a hydraulic ram to push the battery from the opposite end.
Install1. Position the vehicle as close as possible to the platform or dolly where the battery is stored.2. Confirm the start switch is OFF and the parking brake is set.3. Use a winch to pull the battery into the vehicle or a hydraulic ram to push the battery from
the opposite end.4. Install the battery doors making sure that both door properly engage the door interlock
switches. Note: The vehicle will not operate unless the doors are properly installed.
5. Connect the battery cable connector.

Page 44 TT-316 Curtis AC System Operator Manual
TT-316-07
TIRES
Air pressureMaintaining the correct tire pressure is important to the safe operation of the vehicle as well as ensuring long tread life.
Under inflated tires result in:• Excessive tire side wall flexing that can result in sudden tire failure.• Excessive tread wear resulting in shortened tire life.
Over inflated tires result in:• Tire explosion due to excessive pressure.• Reduced road surface traction.• Increased vibration from the road surface.• Premature tread wear.
Unequal tire inflation may result in:• Uneven braking and loss of control of the vehicle.• Steering pulling to the left or right.
Only check the tire pressure when the tire is cold. When checking tire pressure, you must check all tires including your spare tire.The correct tire size and pressure can be found in the specifications list in the manual. The tire pressure shall only be adjusted when cold (i.e., “cold” is defined as the tires’ internal temperature matches the ambient temperature before the vehicle has been driven). Note: The front and rear tires may have a different tire pressure specification. Note: Thefrontandreartiresmayhaveadifferenttirepressurespecification.
Incorrect tire inflation can result in sudden failure of the tire and/or braking / steering problems leading to loss of control of the vehicle.Never exceed the maximum pressure as indicated on the side wall of the tire. Exceeding the maximum pressure may cause explosive failure of the tire resulting in severe bodily injury.
WARNING

Page 45TT-316 Curtis AC System Operator Manual
TT-316-07
Tire Tread Wear
It is important to periodically inspect the tread on each tire for wear. Driving with inadequate tread increases the risk of losing control of the vehicle due to hydroplaning on a wet road surface. It also increases the risk of a flat tire due to road debris. Extreme tire wear can result in sudden tire failure and loss of control of the vehicle.Refer to the maintenance schedule in this manual for the recommended tire inspection interval.Minimum recommended tread depth is 1/16 inch (1.5 mm). There are a series of tread depth wear indicators around the circumference of the tire. They will appear as 1/2 inch (13 mm) bands across the tread as the tire approaches its wear limit (see illustration). The tire should be replaced if any tread depth indicator can be seen or any part of the tread depth is 1/16 inch or less.
Changing a Tire/Wheel assembly
Note:Asparetire,jack,orlugwrenchisnotattachedtothevehicle.6. Loosen the wheel nuts (do not remove) before raising the tire off of the ground.7. Raise the tire to be changed off of the ground and support with a jack stand.8. Remove the wheel nuts and tire/wheel assembly.9. Install the replacement tire/wheel assembly.10. Install the wheel nuts and cross tighten per illustration to 85 foot pounds (115 Nm).11. Check the tire for proper inflation.12. Lower the vehicle to the ground and remove the blocks from the wheels.13. Wheel nuts should be checked for tightness after first 10 hours of operation.
1) Park the vehicle on a hard level surface off of any main road or highway.2) Make sure the Start switch is in the OFF position, then remove the key.3) Place the Direction Control switch in the center OFF position.4) Set the park brake.5) Block the wheels on the opposite side of the tire to be changed.
WARNING
When lifting the vehicle, always use a hoist with lifting strap, or a jack of adequate capacity. Use jack stands to support the vehicle before starting any repairs. Failure to use lifting and support devices of rated load capacity may result in severe bodily injury.
WARNING
If you have a flat tire while driving your vehicle, it is highly recommended that you slowly and carefully drive the vehicle off of any main road or highway before attempting to change the tire. Attempting to change a tire on a main road or highway exposes you to extreme danger of being run over by other vehicles.
WARNING
DO NOT operate a vehicle if the cord is visible on any tire (see illustration). A tire in this condition may suddenly fail at any time resulting in loss of control of the vehicle.
WARNING

Page 46 TT-316 Curtis AC System Operator Manual
TT-316-07
Tire RotationFront and rear tires as well as left and right tires can wear at different rates. It is important to periodically rotate your tires to extend your tire life. Refer to the maintenance schedule in this manual for the recommended interval.Use the following pattern for a vehicle with no spare tire:
• Front to Right Rear• Right Rear to Left Rear• Left Rear to Front
Replacing a Tire
Tire replacement should only be performed by an qualified technician trained in tire replacement.Improper tools or procedures can result in explosion of the tire/wheel assembly causing severe bodily injury or death.
WARNING
Never mix tire types, tire sizes, speed ratings, or load capacity.Only use the tire types and sizes approved for use on this model. Contact your authorized Taylor-Dunn dealer to confirm approved tire types and sizes.Mixing tires or installing a tire that is not approved may:• Cause handling problems with the vehicle.• Cause sudden tire failure due to mechanical interference.• Accelerated tire wear and premature failure.
Any of the above may cause loss of control of the vehicle resulting in a collision or accident with severe bodily injury.
WARNING
Torque Sequence

Page 47TT-316 Curtis AC System Operator Manual
TT-316-07
BRAKE FLUID LEVEL
• Only use DOT 3 brake fluid from a new sealed container.• DOT 3 brake fluid is corrosive and will damage paint finishes.• Dispose of brake fluid in accordance with local state and federal regulations.• Read and follow all warnings provided on the brake fluid container.• Wear protective gloves when handling brake fluid and thoroughly wash hands after
handling brake fluid.• Before removing the master cylinder cap, thoroughly clean the area around the master
cylinder cap. If any contaminates or debris enters the master cylinder then it may result in diminished and/or loss of braking power resulting in a collision or accident with severe bodily injury.
WARNING
Periodically visually inspect the brake fluid level in the master cylinder. Low fluid level could result in diminished and/or loss of braking power.The master cylinder is located underneath the floor board. Thoroughly clean the area around the master cylinder before removing the master cylinder cap. Refer to the maintenance schedule in this manual for the recommended inspection interval.Refer to illustrations for proper brake fluid level

Page 48 TT-316 Curtis AC System Operator Manual
TT-316-07
CLEANINGSeatsClean your seats with any standard automotive vinyl cleaner.
InteriorUse a mild liquid detergent in warm water to wipe down the interior of your vehicle.
Exterior Body
Use any standard automotive exterior car wash solution. Do not use any abrasive cloths or cleaners.Finish with a quality automotive wax to preserve the finish of your vehicle.
Under CarriageFor long life, it is important to keep the under carriage of the vehicle clean from caked on dirt, mud, or road salt. Any of these substances will cause accelerated corrosion of the frame and lead to premature failure.When cleaning the under carriage, be careful not to get any cleaning solutions or excessive water into any electrical compartments.
BatteriesRefer to the Battery Maintenance section.
Control Panel
The electrical control panel is located in the rear of the vehicle, under the deckboard. This compartment is not sealed and requires periodic cleaning. Refer to your maintenance schedule for the recommended cleaning interval.Remove the deckboard and use compressed air to blow out any debris.If the control panel has been contaminated with any chemicals, mud, excessive dirt, road salt, etc., then the panel should be removed from the vehicle and thoroughly cleaned by a qualified technician.
NOTICEDO NOT use an automated car wash facility of any type. This vehicle is not designed to fit in any automated car wash and it is likely that the vehicle will be damaged.
High Voltage is present in the control panel.• DO NOT touch any wiring or
components.• DO NOT use any liquid cleaners.
Failure to follow these instructions will lead to severe electric shock and/or death.
DANGER

Page 49TT-316 Curtis AC System Operator Manual
TT-316-07
Standard SpecificationsITEM SPECIFICATIONOccupancy 1 Driver, No PassengersDimensions 80.5 L x 36.5 W x ? 46.25 H Inches Height does not include light bar 204.4 L x 100.3 W x 117.4 H cmTurning Radius 70.5 Inches (179 Centimeters)Weight (without batteries) 1,150 pounds (520 kg)Battery 36 Volts 38W x 16L x 15H (96 x 40 x 38 cm) Lead position: A Lead length: 30 inches (76 cm) No cover Connector: SB350 gray Max weight: 1,250 pounds (567 km) Min weight: 500 pounds (227 kg)Maximum Load* (includes driver) 400 Pounds (181 kg)Towing 320 pounds (145 kg) Draw Bar Pull Max Tongue Weight 50 pounds (22.5 kg)Electrical System 36 Volts (traction) 12 Volts (accessories)Transmission Helical Gear, Oil Bath TransaxleMotor 4.5 kW (60 minute) 3-phase AC Maximum Speed 6 mph (9.65 kph)Brakes Hydraulic three wheel Disc. Automatic Parking Brake.Steering Automotive Ball Nut Worm Gear, 24:1Tires 4.80 x 8 Load Range C Pressure 90 psi (620 kpa)Frame Steel Unitized FrameInstrumentation Combination Dash Display (Battery Status Indicator, Hour Meter, System Status Monitor), Start Switch, Horn Switch, Direction Control Switch, Light SwitchLighting Accessories Front Head Light, Rear Tail Light
Specifications subject to change without notice.
*Maximum load weight specifications includes all occupants and optional items ordered with the vehicle. Load to be centered on the cargo deck.

Index 50
IndexA
Accidents 29Approved Operator Position 8
BBattery
Break In Period 34Cleaning 41Lift Out Battery Box 42Roll Out Battery Box 42Side Extract 43Watering 41
Battery filler 41Brake Bypass Switch 32Brake Fluid 47Brake Pedal 18BSI
Resetting 21
CCargo, Loading 30Charger
Extension cords 34Power Source 34
Charging Time 34Cleaning
Batteries 48Control Panel 48Exterior Body 48Interior 48
Collisions 29
DDaily Inspection 36Data plate 15Dealer List 2Decals 10Direction Control Switch 27Direction of travel 27Draw Bar Pull 31, 49Driver seat 26Driving 27Driving in Forward 27Driving in Reverse 27
EElectric parking brake 32Extension cords 34
FFind your dealer 2Foot brake pedal 18
GGauge
Status Indicator 18, 21GFI 34Glossary of Terms 8Ground Fault Interrupter 34
HHeadlight Switch 18Horn Switch 18
IInching 20Interlock, driver seat 26Interlock Switch Inspection 37
LLicensing 14Liquid loads 30Load Capacity 30
MMaintenance
Battery 40Pre-Operation Inspection 36Schedule 39Severe Duty 39
Maximum load capacity 30Modifications 12, 13
OOperator Training 17OPS 8
PParking 28Parking Brake 19
Bypass Switch 19, 32Pets 31Pets, Transporting 31Pre-Operation Inspection 36
RReturning to Service 35
SSafety Light 28Seat Adjustments 20Selecting a direction 27Severe Duty 39Side Extract Battery 43Signal Words
Caution 10Danger 10Notice 10Warning 10
Specifications 49Starting 26Start Switch 18Steering 19
Telescoping 19Tilt 19
Stopping 28Storing 35Switch Operation
Brake Bypass 32Headlight 18Horn 18Start 18
TThrottle pedal 18Tires
Air Pressure 44Changing 45Replacing 46Rotation 46Tread Wear 45
TowingTrailer 31Vehicle 32
VVehicle Controls
Headlight Switch 18Horn 18Park Brake 19Start Switch 18
Vehicle identification number 15Vehicle Operation 24
Changing Direction 27Driving 27Forward 27Loading Cargo 30Parking 28Reverse 27Starting 26Stopping 28Towing Trailers 31
WWarning icons 10Web Site 2Web site, Taylor-Dunn 2

Page 51TT-316 Curtis AC System Operator Manual
TT-316-07

Page 52 TT-316 Curtis AC System Operator Manual
TT-316-07
Taylor-Dunn® Mfg.2114 W. Ball Rd. Anaheim, CA 92804 (800)-688-8680(714) 956-4040 (FAX) (714) 956-0504
Visit our Web site: www.taylor-dunn.com
Operating, servicing and maintaining a passenger vehicle or off-highway motor vehicle can expose you to chemicals including engine exhaust, carbon monoxide, phthalates, and lead, which are known to the State of California to cause cancer and birth defects or other reproductive harm. To minimize exposure, avoid breathing exhaust, do not idle the engine except as necessary, service your vehicle in a well-ventilated area and wear gloves or wash your hands frequently when servicing your vehicle. For more information go to www.P65Warnings.ca.gov/passenger-vehicle.
WARNING