Tremetrics RA300 & RA300 Plus OPERATIONS...
32
Tremetrics RA300 & RA300 Plus OPERATIONS MANUAL
-
Upload
trinhxuyen -
Category
Documents
-
view
215 -
download
0
Transcript of Tremetrics RA300 & RA300 Plus OPERATIONS...

Tremetrics RA300 & RA300 Plus OPERATIONS MANUAL

i
WARRANTY
TREMETRICS, “Seller”, warrants the goods sold will conform to all pertinent specifications including performance specifications, drawings and approved samples, as furnished.
Seller also warrants said goods to be free of defective materials and workmanship.
This warranty is in lieu of all other warranties, express or implied. SELLER MAKES NO WARRANTY THAT SAID GOODS ARE FIT FOR ANY PARTICULAR PURPOSE, NOR ANY WARRANTY AS TO THE MERCHANTABILITY OR QUALITY OF GOODS SOLD EXCEPT AS HEREIN STATED.
All claims for alleged defects of goods under this warranty shall be deemed waived unless made in writing and delivered to Seller within twelve (12) months after date of shipment, unless otherwise specified herein below, and on any such claims, Seller has the option of inspecting the goods claimed defective at the Buyer’s place of business or having them returned to Seller for inspection.
Instrument parts that have been repaired or replaced during the warranty period are themselves warranted only for the remaining unexpired portion of the original warranty.
This warranty shall not apply where goods have been subject to misuse, neglect, accident or improper application or have been repaired or substantially altered by others, nor does this warranty apply to items consumed in the ordinary course of use of the goods, such as, but not limited to, fuses or batteries. This warranty shall not apply to calibration of the earphone transducers, which is subject to change through normal use.
Transportation charges covering returned goods are the buyer's responsibility. No returns will be accepted unless authorized by Seller.
SELLER’S LIABILITY SHALL BE LIMITED TO SELLER’S STATED SELLING PRICE PER UNIT OF ANY DEFECTIVE GOODS AND SHALL IN NO EVENT INCLUDE BUYER’S MANUFACTURING COST, LOST PROFITS, GOOD WILL OR ANY OTHER SPECIAL OR CONSEQUENTIAL DAMAGES.
Seller may, at its discretion, repair with new or factory refurbished parts, replace, or give Buyer credit for, such defective items.
Items produced by third party manufacturers shall carry that warranty provided to Seller by said third party manufacturers. Seller shall pass such warranty to the Buyer.
Tremetrics
9675 West 76th Street, Eden Prairie, Minnesota 55344
Telephone 800-825-0121

ii
TREMETRICS AUDIOMETER
This pure tone air conduction Audiometer manufactured by TREMETRICS was designed primarily for use in determining hearing threshold levels in comparison with standard reference threshold levels. The Audiometer is a screening device that, if properly operated, maintained, and calibrated, will allow the operator to screen subjects for shifts in hearing acuity. The Audiometer is used to record the subject’s current threshold, which may be affected from day to day by noise exposure, colds, sinus infections, or other problems.
Testing, as referred to in this manual, is the screening procedure used to establish thresholds (hearing levels) and is in no way trying to diagnose, monitor, or treat any medical problem, disease or injury. If a problem is suspected, the subject should be referred to an audiologist or medical doctor for evaluation.
The audiograms obtained from this screening procedure provide a way for records to be maintained for the subject and for the company where the subject works, in order that an audiologist or medical doctor may more fully evaluate and prevent major hearing problems.
To guarantee accuracy, each audiometer must be re-calibrated at least once each year and receive an exhaustive calibration every two years. Daily biological tests through the use of an Electro-Acoustic Ear (for daily comparisons to acoustic ear baseline obtained at time of calibration) and the operator listening to each frequency and verifying the attenuator operation, ensures accuracy and purity of the audiometer tones.

iii
Table of Contents
WARRANTY.................................................................................................................................. i TREMETRICS AUDIOMETER................................................................................................. ii Table of Contents ......................................................................................................................... iii SECTION I .....................................................................................................................................1
INTRODUCTION....................................................................................................................... 1 SECTION II ...................................................................................................................................2
A. OPERATION........................................................................................................................ 2 B. WHAT YOU NEED TO USE THE RA300......................................................................... 2 C. BASIC OPERATION........................................................................................................... 2 D. INITIAL SET UP.................................................................................................................. 2 E. COMPUTER OR PRINTER CONNECTION ..................................................................... 3 F. RUNNING AN AUTOMATIC TEST.................................................................................. 3 G. TEST ERRORS .................................................................................................................... 5 H. MANUAL/SEMI-AUTOMATIC MODE OF OPERATION .............................................. 6 I. ERROR KEY........................................................................................................................ 7 J. TALK-OVER *..................................................................................................................... 7 K. PRINT................................................................................................................................... 8
SECTION III..................................................................................................................................9 USING THE SPECIAL KEYS (0 - 20) ...................................................................................... 9
SPECIAL 0 - INITIALIZE AUDIOMETER........................................................................... 9 SPECIAL 1 - ENTER TODAY’S TIME AND DATE............................................................ 9 SPECIAL 2 - SELECT PULSED/CONTINUOUS MODE..................................................... 9 SPECIAL 3 - ENTER EXAMINER ID NUMBER................................................................. 9 SPECIAL 4 - TEST OTHER EAR FIRST .............................................................................. 9 SPECIAL 5 - SELECT PRINTER/COMPUTER FORMAT ................................................ 10 SPECIAL 6 - SELECT OR DELETE 8000 Hz ..................................................................... 10 SPECIAL 7 - SELECT BAUD RATE................................................................................... 10 SPECIAL 8 - TURN OFF OR ON THE AUDIO FEEDBACK FOR KEY PUSHES .......... 10 SPECIAL 9 - ACCELERATED LISTENING CHECK........................................................ 11 SPECIAL 10 - CHECK CALIBRATION DATE.................................................................. 11 SPECIAL 11 - RAM AND ROM MEMORY CHECK......................................................... 11 SPECIAL 12 - CALIBRATION MODE ............................................................................... 11 SPECIAL 13 - PRINTER TEST ROUTINE ......................................................................... 11 SPECIAL 14 - PRINTER CONTROL CHARACTERS ....................................................... 12 SPECIAL 15 - RS232C COMMUNICATIONS MODE....................................................... 12 SPECIAL 16 - DISPLAY BRIGHTNESS ADJUSTMENT ................................................. 13 SPECIAL 17 - DISPLAY SELECTED AUDIOGRAM ....................................................... 13 SPECIAL 18 - PRINT SELECTED AUDIOGRAM OR AUDIOGRAMS .......................... 13 SPECIAL 19 - DISPLAY SERIAL NUMBER and SOFTWARE VERSION NUMBER ... 13 SPECIAL 20 - FACTORY DEFAULTS ............................................................................... 13
SECTION IV ................................................................................................................................14 DETAILS OF OPERATION..................................................................................................... 14

iv
SECTION V..................................................................................................................................15 RA300 PLUS, ADDITIONAL FUNCTIONS .......................................................................... 15
A. MEMORY STORAGE.................................................................................................... 15 B. TALK-OVER FUNCTION ............................................................................................. 15 C. MULTIMEDIA ............................................................................................................... 15
SECTION VI ................................................................................................................................16 SYSTEM 3000 CONFIGURATION ........................................................................................ 16 HEARING TESTING WITH THE SYSTEM 3000 CONFIGURATION................................ 16
SECTION VII...............................................................................................................................19 PROBLEM SOLVING.............................................................................................................. 19
SECTION VIII .............................................................................................................................20 SETTING UP FOSHM TO PLAY THE SOUND FILES WITH RA300................................. 20
A. SELECTING THE RA300 .............................................................................................. 20 B. SETTING SOUND WAVE FILES TO PLAY ............................................................... 20 C. CONNECTING THE RA300 UP TO THE PC............................................................... 21
SECTION IX ................................................................................................................................22 MAINTENANCE...................................................................................................................... 22
APPENDIX A...............................................................................................................................23 SOUND WAVE FILE MESSAGES ......................................................................................... 23
APPENDIX B ...............................................................................................................................25 WHAT TO DO IF FOSHM AND THE RA300 ARE NOT COMMUNICATING.................. 25
DETAILED INSTRUCTIONS: ............................................................................................. 25

1
SECTION I
INTRODUCTION
The TREMETRICS RA300 Digital Microprocessor Screening Audiometer provides automatic pure-tone air conduction threshold testing. This low cost modular unit features a touch sensitive keyboard, a Vacuum Fluorescent display, interactive computer interface, a real-time clock, talk-over*, multimedia*, and audiogram storage*. Three modes of test administration: automatic, semi-automatic, and manual offer the operator enhanced flexibility. The reliability of this simplified, power-efficient design provides lower maintenance costs with less down time.
The standard RS232 computer interface allows the RA300 to print audiograms in several formats or to communicate with a computer. The multimedia feature of the RA300 Plus allows for computer interactive voice instruction in the native language of the subject. Software such as Tremetrics' FOSHM Occupational Health Management software is required. Remote testing and audiogram storage is possible with the RA300 Plus.
All initialization, setup parameters and the date and time will be retained in memory even while the power is off.
* Standard in RA300 Plus model.

2
SECTION II
A. OPERATION
This section is divided into several parts. Paragraphs A through F cover the most essential information for administering an automatic test. The remainder gives operational details for the many unique features of the RA300. For purposes of this instruction guide, keyboard keys will be enclosed by brackets[ ], while display messages will be enclosed by quotes " ". Special routines asking questions should be answered with the [YES] or [NO] keys. Numeric answers require using the number keys followed by the [ENTER] key.
B. WHAT YOU NEED TO USE THE RA300
The RA300 has automatic power compatibility from 90 to 240 volts AC, 50 to 60 Hz. Power line transient protection is included to protect the RA300 from power line spikes. The power receptacle should be marked "Hospital Grade" or "Hospital Only" to comply with safety regulations. The handswitch, earphones and OSCAR plugs should be inserted firmly into the indicated jacks on the rear panel of the audiometer. For easy identification, color-coded cable markers are included in the accessory kit for applying to the handswitch and earphone cables.
Be sure that the serial number of the earphones matches the serial number of the audiometer.
If an external computer or printer is to be used, the connection is made to the RS232C connector on the rear panel.
C. BASIC OPERATION
At power-on, the audiometer presents a momentary loud tone and displays the following message:
"RA300 COPYRIGHT 1996, 1998".
The audiometer is now ready for operation. If a computer error is discovered during the power-on computer check, the appropriate message will be displayed.
D. INITIAL SET UP
The Audiometer set up is accomplished using Special* routines. When the unit is turned on for the first time, the operator should do the following:
1. Verify the correct time and date using SPECIAL 0;
2. Continue by selecting Pulsed or Continuous stimulus;
3. Select whether you want the Audio Feedback for key pushes using SPECIAL 8;
4. Adjust the Display Brightness using SPECIAL 16;
5. Choose which Ear to Test First by using SPECIAL 4; and
6. Select or delete the option to test 8000 Hz using SPECIAL 6.
*The SPECIAL Keys are explained in detail in Section III.

3
E. COMPUTER OR PRINTER CONNECTION
The RA300 can easily be configured to work with a variety of printers or computers. Options available are:
1. Tremetrics' FOSHM Occupational Health Management Software.
2. RA400 emulating the data format of Tremetrics' RA400 Audiometer. Use this option for software that connects to the RA400.
3. RA500 emulating the data format of Tremetrics' RA500 Audiometer. Use this option for software that connects to the RA500.
4. Various printer formats. See Section III, SPECIAL 5 for details.
SPECIAL 5 can be used to select printer or computer preset serial communication parameters for the options listed above. Each parameter can also be adjusted individually by using SPECIAL 7 and 15.
*The SPECIAL Keys are explained in detail in Section III.
F. RUNNING AN AUTOMATIC TEST
The [NEW TEST] key is the starting point for administering the automatic test. To prohibit accidentally deleting audiogram information, the [YES] or [NO] keys are used. When the [NEW TEST] key is pressed “NEW TEST Y/N?” will be displayed. [NO] exits the new test routine leaving the current test unchanged while a [YES] prepares for a new audiogram. In the RA300, the previous test’s information is no longer available. In the RA300 Plus, the audiogram is automatically stored for future reference. A maximum of 64 audiograms can be stored before older audiograms are no longer available. Enter a SUBJECT ID NUMBER (1 to 9 digits) and press [ENTER] when complete. To start test, "PRESS RUN TEST" is displayed and awaits [RUN TEST] key press. For the first test after "audiometer turn-on", the audiometer reminds the operator to run the DAILY BIOLOGICAL TEST by displaying “TEST DAILY BIOLOGICAL Y/N?” If [NO] is pressed, the daily biological procedure is skipped. If [YES] is pressed, the “DAILY BIOLOGICAL ID” will be displayed where the ID number represents the OSCAR serial number. Another ID number can be entered if desired.
The display provides the operator with information about how the audiometric test is proceeding. The current test number is displayed on the top line while the frequency, hearing level and test modes are displayed on the second line. For the RA300 Plus, the test number indicates where the audiogram is stored. This test number can be used to recall for viewing or printing a stored audiogram utilizing SPECIAL 17 and SPECIAL 18.

4
The “1KTL” indicates the frequency of 1000 Hz when the left ear is being tested. The “50” indicates the hearing level and the AUTO indicates this is an automatic test. “TESTING” is displayed while testing is in progress. The hearing threshold level will be displayed as an HTL number or as a code indicating not tested (AA), deleted (DD), or error (Ex). An “M” in front of the HTL number indicates a manually entered value. A “T” and an “R” will be momentarily displayed indicating the presentation of the tone and the response of the subject. See Table 2-1 for the codes.
Code Error Status Required Action AA NOT TESTED Run Test
DD Frequency Deleted None
EA* Contralateral of 40 dB was recorded Test Continues Re-tests Automatically
EB** There is a > 15 dB shift in comparison to the baseline
Test Continues Re-tests Automatically
EC* There is a > 50 dB difference between adjacent frequencies
Test Continues Re-tests Automatically
ED* HTL > 90 dB or at 500 Hz > 30 dB Test Continues Re-tests Automatically
EE No Response Test Continues Re-tests Automatically
EF Unable to establish threshold in 25 presentations
Test continues to next frequency
Re-tests Automatically
E1 No Response at initial 1kHz test Test Stops Re-instruct Subject
E2 Unable to establish threshold in 25 presentations at initial 1kHz test
Test Stops Re-instruct Subject
E3 Failed to verify initial 1kHz threshold Test Stops Re-instruct Subject
E4 Handswitch Error, subject not releasing Handswitch
Test Stops Re-instruct Subject
E5 Subject Responding with no tone presented
Test Stops Re-instruct Subject
E6 Failed to establish threshold for the second time
Test Stops Re-instruct Subject
E7 Exceeded the maximum number of failed frequencies
Test Stops Re-instruct Subject and/or consider using Semi-Automatic or Manual Testing
E8 Equipment Error Seen only at turn on
Contract service technician
* Must be enabled from computer program. ** Must have baseline from computer.
Table 2-1 Operation and error codes
5
Testing starts when [RUN TEST] is pressed and “TESTING” is displayed. During the test, the frequency and hearing levels are displayed. Pressing [PAUSE] will pause or stop the test. The results can be viewed by repeatedly pressing [DISPLAY] until the desired frequency is displayed. Press any key other than [DISPLAY] or [ENTER] is required to exit the Display function. [RUN TEST] will resume the automatic testing process.
The automatic test is complete when all the selected frequencies for both ears are successfully tested. On completion, a tone will sound, and an “*” will be displayed next to the HTL. The test results can be displayed with the [DISPLAY] key or printed, if a printer is connected, by pressing [PRINT].
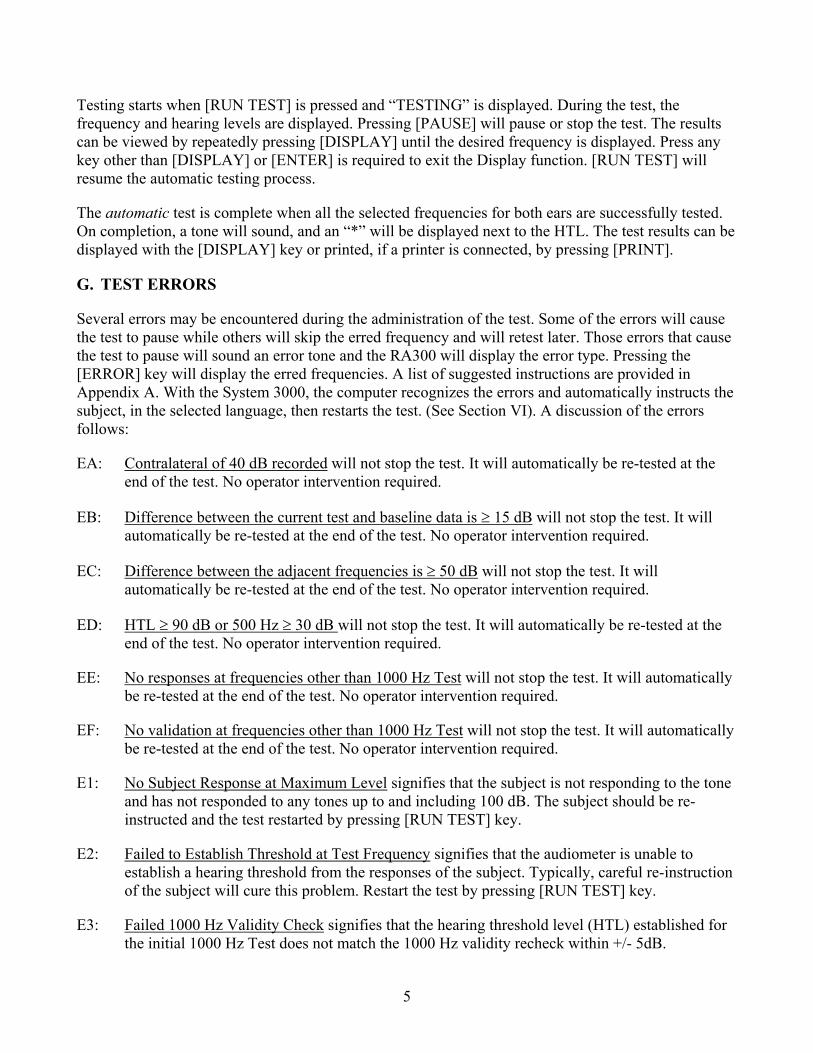
G. TEST ERRORS
Several errors may be encountered during the administration of the test. Some of the errors will cause the test to pause while others will skip the erred frequency and will retest later. Those errors that cause the test to pause will sound an error tone and the RA300 will display the error type. Pressing the [ERROR] key will display the erred frequencies. A list of suggested instructions are provided in Appendix A. With the System 3000, the computer recognizes the errors and automatically instructs the subject, in the selected language, then restarts the test. (See Section VI). A discussion of the errors follows:
EA: Contralateral of 40 dB recorded will not stop the test. It will automatically be re-tested at the end of the test. No operator intervention required.
EB: Difference between the current test and baseline data is ≥ 15 dB will not stop the test. It will automatically be re-tested at the end of the test. No operator intervention required.
EC: Difference between the adjacent frequencies is ≥ 50 dB will not stop the test. It will automatically be re-tested at the end of the test. No operator intervention required.
ED: HTL ≥ 90 dB or 500 Hz ≥ 30 dB will not stop the test. It will automatically be re-tested at the end of the test. No operator intervention required.
EE: No responses at frequencies other than 1000 Hz Test will not stop the test. It will automatically be re-tested at the end of the test. No operator intervention required.
EF: No validation at frequencies other than 1000 Hz Test will not stop the test. It will automatically be re-tested at the end of the test. No operator intervention required.
E1: No Subject Response at Maximum Level signifies that the subject is not responding to the tone and has not responded to any tones up to and including 100 dB. The subject should be re-instructed and the test restarted by pressing [RUN TEST] key.
E2: Failed to Establish Threshold at Test Frequency signifies that the audiometer is unable to establish a hearing threshold from the responses of the subject. Typically, careful re-instruction of the subject will cure this problem. Restart the test by pressing [RUN TEST] key.
E3: Failed 1000 Hz Validity Check signifies that the hearing threshold level (HTL) established for the initial 1000 Hz Test does not match the 1000 Hz validity recheck within +/- 5dB.

6
The 1000 Hz validity checks to ensure that a valid audiometric test is administered. Typically the abnormal threshold is the first 1000 Hz Test because the subject is unfamiliar with the testing procedure. When the E3 error occurs, the HTL determined for the second 1000 Hz Test will be stored in place of the initial 1000 Hz Test. The automatic administration of the test will be paused with the error E3 displayed if agreement is not obtained the second time.
E4: Handswitch Error signifies that the subject is not releasing the response switch. The subject should be re-instructed and the test restarted by pressing [RUN TEST] key.
E5: Response With No Tone signifies that the subject has responded at least three times when no tone or stimulus was present. It will be necessary to re-instruct the subject or test the subject manually.
E6: Failed Frequencies On Retest. After completion of testing of all selected frequencies for both ears, the RA300 will retest any failed frequencies automatically. If a HTL for a failed frequency cannot be determined, then the test is stopped and the error code E6 is displayed. Pressing [RUN TEST] will result in the RA300 trying again to test the failed frequency. Repeated failures can be tested manually.
E7: Excessive Errors. Failure to establish a threshold at 1000 Hz Test is the only frequency error that will stop the test. At other frequencies, the frequency will be skipped until later. If the number of failed frequencies exceeds six, the test is stopped and error code E7 is displayed. Pressing the [RUN TEST] key will result in the first failed frequency being retested. If it is completed successfully, the next frequency will be tested. Alternately, by using the MANUAL mode of operation, the failed frequency can be retested and the test continued.
H. MANUAL/SEMI-AUTOMATIC MODE OF OPERATION
While the automatic administration of the test by the RA300 results in a faster, consistent test, the manual mode of operation greatly extends the capability of the RA300 audiometer.
In the manual mode, the user can selectively test any frequency and either ear. The test can be administered by the computer or by the operator. The manual test can be entered before, after or in place of the automatic test. Automatically performing the test while in manual mode is known as a semi-automatic test.
The following examples may prove helpful:
Example #1: Assume that a new test was started but the audiometer was unable to establish a threshold at the initial 1000 Hz Test frequency, Error Code E2 was displayed. The operator re-instructs the subject and presses [RUN TEST] but receives the same result. The operator may now suspect that the subject is not attentive or has a problem with 1000 Hz. It may be wise to switch to manual mode, select another frequency and try testing the subject semi-automatically. To accomplish this, do the following: Press [MANUAL], [FREQUENCY] (up or down) for desired frequency, and [RUN TEST]. The other ear may be selected by pressing [CHANGE EAR].
7
Example #2: The subject is having difficulty understanding the instructions. You feel it would be easier to train the subject by presenting the test yourself in a very deliberate way. Go to Manual as before by pressing [MANUAL], select the ear to be tested with [CHANGE EAR], select frequency with [FREQUENCY] (up or down keys), and select the level to present [LEVEL] (up or down) for desired starting level. Pressing and holding the [TONE] key presents the stimulus (tone) to the subject. The “T” appearing in the display (top line) indicates a tone is present. The “T” will flash if the audiometer is in the pulse mode.
NOTE: There is no “Beep” when the [TONE] key is pushed.
If the subject responds with the handswitch then the “R” will be displayed on the (top line) as long as the handswitch is depressed. Following the established procedure you would then decrease the level by 10 dB and re-present the tone. If the subject responds, you would lower the level or raise the level if no response was indicated (-10 dB for good responses and +5 dB for no or bad responses). Once the HTL has been determined by repeated raising and lowering the HL then the HTL is stored by pressing [ENTER].
NOTE: An “M” is placed by the HTL indicating that this HTL was manually entered.
Other frequencies and either ear can be tested in this fashion. Also, by returning to the automatic mode by pressing [AUTO/MANUAL] key, the remaining untested frequencies can be tested automatically by pressing [RUN TEST]. In a similar procedure a test that was initially started automatically can be [PAUSE] changed to MANUAL with the [AUTO/MANUAL] key and any frequency or ear tested and then returned to the automatic mode to continue testing. Furthermore, the MANUAL procedure can be used on frequencies that were previously deleted. The procedure is the same, go to MANUAL, select frequency, ear, starting level, and then begin the test.
I. ERROR KEY
The [ERROR] key allows the operator a quick and easy way to review all previous errors of the current test. To review the errors press [PAUSE], if the test is in progress, and then [ERROR]. The previous error type and frequency will be displayed each time the key is pushed. When all errors have been displayed, the routine will start over. If no errors are indicated, then “NO ERROR” will be displayed.
NOTE: The error routine works in both AUTO and MANUAL modes.
J. TALK-OVER *
The RA300 Plus, talk-over function is controlled by the [TALK-OVER] key. Pressing the [TALK-OVER] key pauses, the test in progress and connects the TALK-OVER microphone to the subject's earphones. When the [TALK-OVER] key is released, one of two conditions exists.
1. If a test was in progress when the key was pushed, then the test will resume at the same frequency and ear at the starting HL.
2. If a test was not in progress, then the test is not resumed.
* Standard in RA300 Plus model.

8
K. PRINT
The [PRINT] key is used in conjunction with the RS232C for printing the audiogram. The [PRINT] key will send the current audiogram in the selected format to the printer connected to the RA300. Sample audiograms are shown below.

9
SECTION III
USING THE SPECIAL KEYS (0 - 20)
The Tremetrics RA300 Digital Screening Audiometer, through the use of SPECIAL routines, can perform many functions. Below are explanations of what each SPECIAL Key does:
SPECIAL 0 - INITIALIZE AUDIOMETER
Allows the operator to step through both SPECIAL 1 and 2 in sequence. This SPECIAL is used to initialize the audiometer. After entry, this information is permanently entered in memory and does not have to be re-entered at power on.
SPECIAL 1 - ENTER TODAY’S TIME AND DATE
The time and date are entered by pressing the numeric keys for information to be placed at the indicated location. As information is entered, the cursor will automatically move to the next position.
NOTE: The clock is a 24-hour clock. When all information is entered or if all information is acceptable, press [ENTER] to exit the routine. The RA300 clock is battery powered and does not require re-entry at power on. The expected life of the clock battery is approximately 10 years. Periodic time adjustment may be required.
SPECIAL 2 - SELECT PULSED/CONTINUOUS MODE
SPECIAL 2 displays and allows selection of the stimulus presentation mode. If a change is desired, simply press [NO]. To accept the current stimulus, press [YES] or [ENTER].
SPECIAL 3 - ENTER EXAMINER ID NUMBER
Up to nine digits may be entered for Examiner Identification. The cursor indicates the location of entry. Numbers step to the left as entered and the cursor remains at the bottom right. This Examiner Identification number is permanently retained in the audiometer until subsequently changed with SPECIAL 3. In order for management software to indicate who performed the exam, the Examiner Identification must be entered here.
SPECIAL 4 - TEST OTHER EAR FIRST
This SPECIAL 4 allows the operator to test the subject’s better ear first. When SPECIAL 4 is entered the following is displayed if the left ear is currently selected. Press [NO] to change and [YES] or [ENTER] to accept.
10
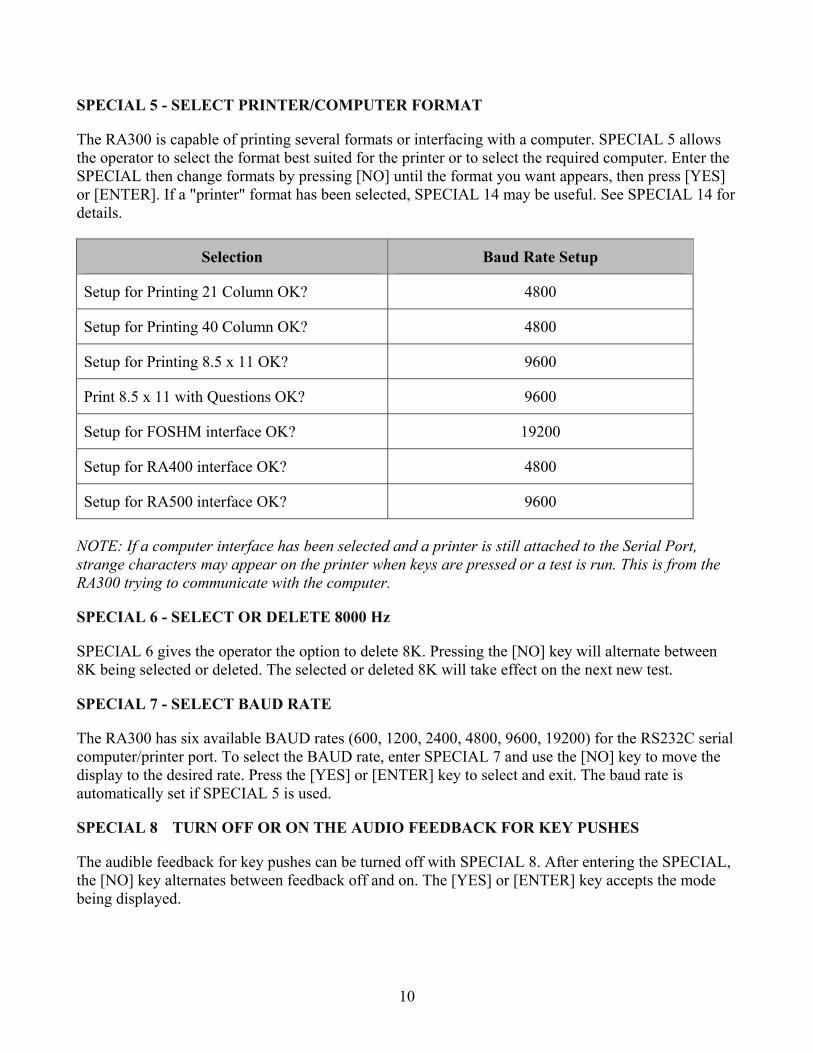
SPECIAL 5 - SELECT PRINTER/COMPUTER FORMAT
The RA300 is capable of printing several formats or interfacing with a computer. SPECIAL 5 allows the operator to select the format best suited for the printer or to select the required computer. Enter the SPECIAL then change formats by pressing [NO] until the format you want appears, then press [YES] or [ENTER]. If a "printer" format has been selected, SPECIAL 14 may be useful. See SPECIAL 14 for details.
Selection Baud Rate Setup
Setup for Printing 21 Column OK? 4800
Setup for Printing 40 Column OK? 4800
Setup for Printing 8.5 x 11 OK? 9600
Print 8.5 x 11 with Questions OK? 9600
Setup for FOSHM interface OK? 19200
Setup for RA400 interface OK? 4800
Setup for RA500 interface OK? 9600
NOTE: If a computer interface has been selected and a printer is still attached to the Serial Port, strange characters may appear on the printer when keys are pressed or a test is run. This is from the RA300 trying to communicate with the computer.
SPECIAL 6 - SELECT OR DELETE 8000 Hz
SPECIAL 6 gives the operator the option to delete 8K. Pressing the [NO] key will alternate between 8K being selected or deleted. The selected or deleted 8K will take effect on the next new test.
SPECIAL 7 - SELECT BAUD RATE
The RA300 has six available BAUD rates (600, 1200, 2400, 4800, 9600, 19200) for the RS232C serial computer/printer port. To select the BAUD rate, enter SPECIAL 7 and use the [NO] key to move the display to the desired rate. Press the [YES] or [ENTER] key to select and exit. The baud rate is automatically set if SPECIAL 5 is used.
SPECIAL 8 TURN OFF OR ON THE AUDIO FEEDBACK FOR KEY PUSHES
The audible feedback for key pushes can be turned off with SPECIAL 8. After entering the SPECIAL, the [NO] key alternates between feedback off and on. The [YES] or [ENTER] key accepts the mode being displayed.

11
SPECIAL 9 - ACCELERATED LISTENING CHECK
Good audiometric practice dictates that a daily biological check is made before audiometric tests are conducted. If the TREMETRICS OSCAR V Electro-acoustic ear is used to perform the biological test, a listening check must also be performed. SPECIAL 9 expedites this check. The operator should enter the routine, place the earphones on and listen to the presented tone. Each time the handswitch is pressed, the next tone is presented. The operator should listen for pure tones without distorted or odd sounds. The initial tone is at 30 dB. This level can be adjusted by using the [+5] or [-10] keys. Press the [ENTER] key to exit.
SPECIAL 10 - CHECK CALIBRATION DATE
The date the audiometer was calibrated can be read by simply pressing [SPECIAL], [1], [0], [ENTER]. The month and year of the last calibration is displayed. Press any key to exit.
SPECIAL 11 - RAM AND ROM MEMORY CHECK
SPECIAL 11 is a special diagnostic routine used to check memory for failures. The check does not change memory locations. “RA300 OK” is displayed if no error is detected. If an error is detected, the audiometer should not be used. Contact Tremetrics or your dealer for service.
SPECIAL 12 - CALIBRATION MODE
SPECIAL 12 is a calibration routine for authorized personnel only and requires a security code.
SPECIAL 13 - PRINTER TEST ROUTINE
SPECIAL 13 exercises the printer by printing a test pattern. Exit the routine by pressing [ENTER]. The printer should print a 50-character test pattern.

12
SPECIAL 14 - PRINTER CONTROL CHARACTERS
Special control or initialization commands can be sent to the printer. The operation manual for the printer will typically give values for the control characters. Many control characters are the same for different printers and can be found in the following table.
ASCII Decimal Description
CR 13 Carriage Return
LF 10 Line Feed
FF 12 Form Feed
SO 14 Select Double Wide Print
SI 15 Cancel Double Wide Print
ESC,@ 27, 64 Reset
ESC, E 27, 69 Select Emphasized Print
ESC, F 27, 70 Cancel Emphasized Print
Enter special command by using [SPECIAL] [1][4] [ENTER]. If commands are desired before printing, push the [YES] key and enter the decimal values of each command followed by the [ENTER] key. Pressing [ENTER] a second time will exit SPECIAL 14. If control commands are desired following the printout, use SPECIAL 14 and answer [NO] at the first display and [YES] at the second, enter the decimal values for each desired command followed by the [ENTER] key. Press [ENTER] again to exit.
SPECIAL 15 - RS232C COMMUNICATIONS MODE
Special RA300 hardware and software provisions are available to facilitate enhanced printing options. These options allow a wide variety of printers to be used with the RA300. The hardware function, DTR or Data Terminal Ready signal allows the printer to notify the audiometer when to send data. Since the format of the DTR control is not universal, RA300 software allows the control to be ignored, or selected in one of two modes. The accompanying printer manual will indicate if DTR is available and if it is normally high or low. If available, SPECIAL 15 will allow the DTR to be selected as normally “high” or “low”. The options are as follows:
1. Ignore Handshake
2. DTR Normal High
3. DTR Normal Low
If incorrectly selected the RA300 will wait approximately 30 seconds before displaying the error message “THERE HAS BEEN A RS232 INTERFACE PROB.”

13
SPECIAL 16 - DISPLAY BRIGHTNESS ADJUSTMENT
SPECIAL 16 selects one of the four steps of brightness for the RA300 display. Each time [NO] is pressed the brightness should change. Select the desired brightness and press the [YES] key.
SPECIAL 17 - DISPLAY SELECTED AUDIOGRAM
SPECIAL 17 allows the operator to select the audiogram to be displayed. Press the [DISPLAY] or [ENTER] key to see the next value. Press any key other than [DISPLAY] or [ENTER] to exit.
SPECIAL 18 - PRINT SELECTED AUDIOGRAM OR AUDIOGRAMS
SPECIAL 18 allows the operator to select an audiogram or a group of audiograms to print by entering a starting and ending number for the audiograms to be printed.
SPECIAL 19 - DISPLAY SERIAL NUMBER and SOFTWARE VERSION NUMBER
SPECIAL 19 will displays the audiometer serial number and Software Version.
SPECIAL 20 - FACTORY DEFAULTS
SPECIAL 20 resets the RA300 to the factory default settings. This Special should not be used unless instructed to do so by the dealer factory service engineer.

14
SECTION IV
DETAILS OF OPERATION
The RA300 Screening Audiometer uses the power of a very small digital microcomputer to manage the audiometric test administration.
For automatic testing of pure-tone air conduction, the RA300 presents either a one-second continuous tone or a one-second three-tone burst. Tone presentations are random, in order to lessen anticipated responses. Each tone presentation opens a valid response window for a period of 1.8 seconds during which the subject must press and release the handswitch for a valid response.
The operator may select either ear to test first using SPECIAL 4 allowing consistency with the standard audiometric practice of testing the better ear first. If no ear selection is made, the RA300 will begin the test with the last selection made with SPECIAL 4.
The automatic audiometric program begins with a trial test at 1000 HZ for the first ear selected. The starting intensity is a 30 dB Hearing Level for the trial 1000 Hz frequency. Subsequent frequencies start testing at a level 10 dB higher than the previous frequencies HTL on that ear.
A negative response or no response at the initial presentation will result in the audiometer increasing the HL by 20 dB. After this the intensity will increase by 10 dB until a positive response or 100 dB is reached. After the first positive or good response, the intensity is decreased by 10 dB for valid responses and raised 5 dB for invalid until a threshold is established. If at the initial presentation a positive response is obtained, the audiometer goes into the -10 +5 dB pattern immediately. This attenuator control pattern serves to minimize test time.
Two out of three ascending responses at the same HL, after the first good response, constitutes the hearing threshold for that frequency and ear. The test sequence for each ear is the 1000 Hz trial frequency followed by 500 Hz, a 1000 Hz retest, 2000 Hz, 3000 Hz, 4000 Hz, 6000 Hz, and 8000 Hz. The better result of the two 1000 Hz tests is used for calculations.
An explanation of how information is stored in the RA300 may help the operator to understand the audiometer’s operation. At the start of each test, initiated by pressing the [NEW TEST] and [YES] keys, a new information table is set up in the audiometer’s memory. This table is similar to the audiogram form used for recording results when doing tests manually. Initially the form or table would be blank. The operator would fill in subject information on the form. The operator does the same when entering information during the NEW TEST MODE. The time and date from the internal clock is automatically recorded for this test. When [RUN TEST] key is depressed, the RA300 starts at the top of the table and presents the first frequency, 1000 Hz validity test. When the hearing threshold is established, the HTL is entered into the table and the audiometer continues testing the next untested frequency in order.
Now to appreciate the power and programming of the RA300, consider that the operator can pause the automatic test, go to manual mode of operation, manually test any frequency and ear and the resulting HTLs are then added to the computer table. If and when the audiometer is returned to the automatic mode and [RUN TEST] is pressed, the audiometer again starts at the top of the table and, if the frequency has been tested successfully, continues through the table and will test any untested or erred frequencies. The operator can, at his or her discretion, retest any frequency manually, even frequencies that have been deleted from the automatic sequence or previously tested.

15
SECTION V
RA300 PLUS, ADDITIONAL FUNCTIONS
The RA300 Plus has memory storage for 64 audiograms, talk-over capability, and is ready for Multimedia operation.
A. MEMORY STORAGE
This RA300 Plus gives the operator the ability to save up to 64 audiograms. All saved audiograms can be batch-transferred to a computer or printer instead of transferring after each has been completed. This allows the RA300 to be carried to other sites (portable) for testing and returning before transferring information. No printer or computer needs to be carried with the RA300. Information that is stored with each test includes the subject identification, test start time, test date and examiner identification. The RA300 saves all information automatically; the operator does not have to remember to save the audiogram. This saves time and insures that information is not lost. The audiogram storage is arranged in a circular arrangement to further simplify operation. After 64 audiograms are stored, the RA300 replaces the oldest audiogram with the new test.
B. TALK-OVER FUNCTION
The Talk-over function is also a timesaving feature, which allows the operator to instruct the subject if an error occurs or to notify the subject that the test is complete. If the test is running when the [TALK-OVER] key is pressed, the test is automatically paused, the instructions given, and when the key is released, the audiometer will automatically begin testing again on the frequency and ear being tested.
C. MULTIMEDIA
The Multimedia portion of the RA300 Plus option is a new automatic feature. The RA300 Plus has an input audio jack that can accept prerecorded sounds or speech in any language. The sounds are passed through the audiometer’s earphones to the subject. The sounds are controlled by a computer that is communicating with the RA300 Plus for the purpose of instruction before, during or after an automatic test. This gives the operator a completely automated, hands-off, test using instructions in the subject’s native language. After the operator has placed the subject in the sound booth and adjusted the earphones, the instructions are given by the computer. The computer takes over for the completely automated test.

16
SECTION VI
SYSTEM 3000 CONFIGURATION
The System 3000 Configuration is a comprehensive interactive solution to hearing conservation testing and record keeping. The System 3000 Configuration consists of a Tremetrics' RA300 Plus audiometer, and FOSHM software. While each provides powerful capability, the two in conjunction provide impressive new features and benefits never before available in a hearing conservation system.
A few of the enhanced features found in the System 3000 Configuration are:
Automatic language instruction in five languages of your choice.
Data entry and test initiation at the audiometer OR the computer. These features alone save many steps when the audiometer is not located next to your computer.
Automatic set-up allows pre-configuration of the audiometer and the computer software. This feature makes a new installation a snap.
"Express Test" makes one-touch testing a reality -- from entering the subject's SSN to automatically printing the computer generated report when the test is over.
Automatic baseline comparison insures that HTLs different from the baseline are automatically re-tested.
Capture and storage of ancillary information, such as the employees' noise work environment and hearing protection, insures that your hearing conservation is totally comprehensive. The ability to include your sound room survey further fortifies your documentation of a quality hearing conservation program.
These and many more System 3000 features make the combination of Tremetrics FOSHM software used in conjunction with the RA300 Plus audiometer a truly remarkable answer to your hearing conservation requirements.
HEARING TESTING WITH THE SYSTEM 3000 CONFIGURATION
Hearing testing with the System 3000 starts with turning on the RA300 Plus and FOSHM. The interconnection of the two is automatic as you select the RA300 Plus interface from the FOSHM Device Selection screen. If an interconnection problem is encountered, helpful trouble shooting hints are displayed and are available for printing. The easy to understand FOSHM RA300 Plus interface screen provides real time easy to understand information about who is being tested and the progress of their test. From this screen the user can perform all the necessary hearing testing functions including talking to the subject, administering a manual test, printing and saving the results of the test. ALSO, for those locations where the audiometer is not located next to your computer, these very same functions can be performed at the audiometer console.

17
The following testing scenarios demonstrate how simple and powerful the System 3000 is to use:
SCENARIO #1: Using your mouse, click on the "New/Reset the Test" button, and select the subject to be tested. If your are working in a bilingual environment you select the native language of the subject and the test is off and running. System 3000 will instruct the subject, monitor the test, re-instruct if necessary and, when the test is over, ask the subject to remove their headphones and place them on the sound room cushion and leave the sound room. At the same time, the computer is printing a copy of the complete hearing test, which includes the subject's baseline, hearing protection, noise work environment and other relevant test information. Options exist that allow you to configure the level of automation.
SCENARIO # 2: A similar scenario can be played from the audiometer. Start by pressing the "New Test" button and answering YES to the prompt displayed on the audiometer display. Next, enter the SSN of the test subject. Following entry of the subject's SSN, the Name of the test subject is displayed on the audiometer display as confirmation that you have entered the correct SSN. Once confirmed, the test instructions are automatically played over the subject's earphone and the test is started. Upon test completion, the computer default report is printed and the subject is instructed to leave the sound room.
The System 3000 can also be flexible to meet your unique needs. You have the option to select the following:
Selectable Default Reports: Several formats are available for the automatic report that is printed upon test completion. Additionally, Report Wizards (a Wizard is a "techie" term for a program that guides you step by step through a procedure) are available that allow you to print a variety of reports to meet your hearing conservation reporting needs.
Letter Writer: The ability to custom tailor letters and simple reports to your specifications using a merge letter format.
PBI Selection: (Number of) Percent Binaural Impairment calculations are available.
Shift Warnings: STS shift warnings are clearly noted in color to call your attention to employees who have either a 10 or 25 dB shift. You also have the option to let the computer call attention to the shift by playing a recorded message over the computer speakers.
NRR Warning: The System 3000 compares the employee's work noise environment to the NRR value of the employee's issued hearing protection. If the protection is inadequate then a warning is issued. This information is also included on each audiogram printout.
In addition to configuring the System 3000 to meet your needs, the computer-generated instructions can also be changed to address your requirements. The System 3000 takes advantage of the Tremetrics-Patented multimedia process of using the ability of your computer to play pre-recorded messages via the audiometer earphones. The System 3000 Multimedia functions by commanding the computer to play selected sound files whose output is connected to the RA300 audiometer earphones. A number of different files are available in a variety of languages for each possible testing error or instructional need.

18
As an example, at the start of each test a sound file is played instructing the subject on how to take the test. A similar sound file is played on conclusion of the test. During the test, similar files are played in those instances where the subject has made an error that results in the test being unable to continue. After the appropriate "error" file is played then the test is restarted automatically. The System 3000 Multimedia features greatly reduces the number of interruptions that an operator may experience during a day of hearing testing. Also, you are assured that the same instructions are given to each subject insuring consistent results. While Tremetrics provides a selection of sound files in a variety of languages, you are not restricted to our selections. The adoption of standard sound file formats allows you to record and use your own messages. The text for the Tremetrics suggested messages are included in Appendix A.

19
SECTION VII
PROBLEM SOLVING
SYMPTOM SOLUTION
1. No Talk-over. Talk-over option not installed
2. Left and right tone on the same ear. Earphone jack not completely seated.
3. No tone on one ear. Sound room-cabling problem. Plug earphone into audiometer to check.
4. RESPONSE light stays on. Earphone plugged into handswitch jack.
Shorted handswitch jack. Unplug handswitch to check.
5. Audiometer does not function. Check fuse
Check power circuit.
6. Skips frequently during Auto Tests Deleted Specials.
7. Will not respond to [SPECIAL] key push.
Did not exit previous SPECIAL routines. Press SPECIAL.
8. Will not respond to [NEW TEST] key push. Did not exit previous SPECIAL routines.
9. Pressing [RUN TEST] causes Audiometer to beep – Display does not change.
All frequencies have been tested. Clear previous results with [NEW TEST] key.
10. Strange characters appear on the printer. Select the printer format, using SPECIAL 5.
11. Error message: "THERE HAS BEEN A RS232 INTERFACE PROB."
Try selecting other options on SPECIAL 15.
12. If FOSHM is not communicating with RA300.
See Appendix B, page 25
20
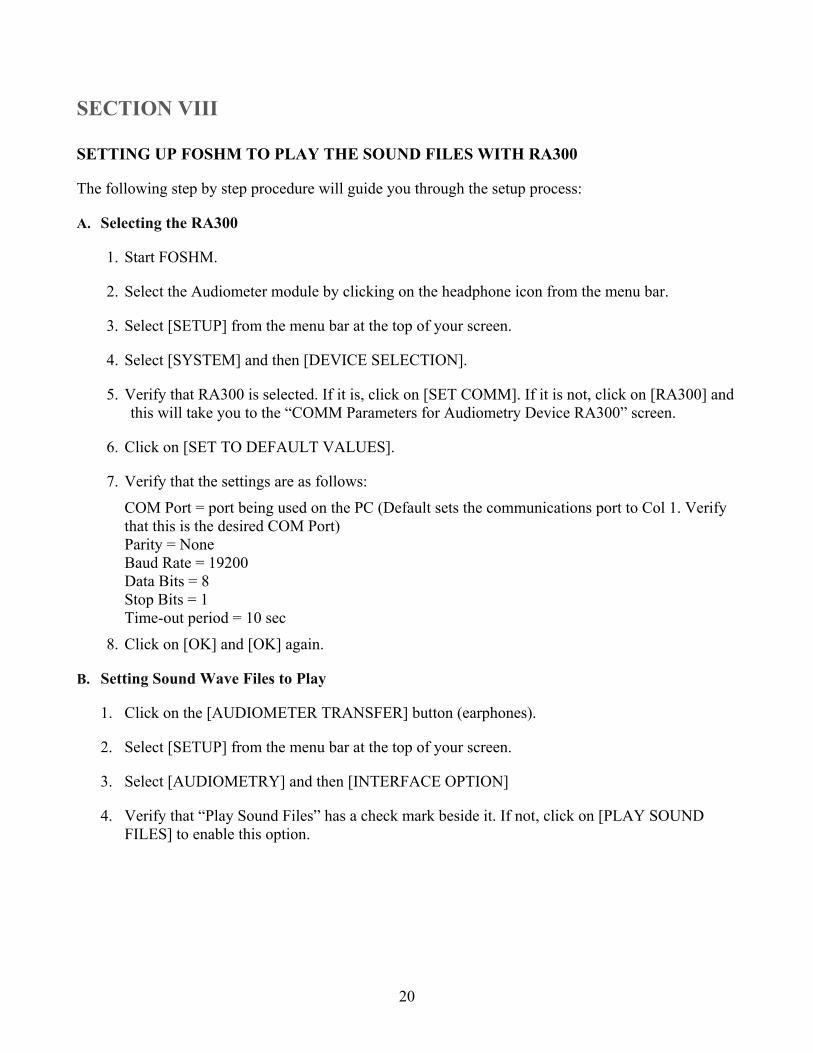
SECTION VIII
SETTING UP FOSHM TO PLAY THE SOUND FILES WITH RA300
The following step by step procedure will guide you through the setup process:
A. Selecting the RA300
1. Start FOSHM.
2. Select the Audiometer module by clicking on the headphone icon from the menu bar.
3. Select [SETUP] from the menu bar at the top of your screen.
4. Select [SYSTEM] and then [DEVICE SELECTION].
5. Verify that RA300 is selected. If it is, click on [SET COMM]. If it is not, click on [RA300] and this will take you to the “COMM Parameters for Audiometry Device RA300” screen.
6. Click on [SET TO DEFAULT VALUES].
7. Verify that the settings are as follows:
COM Port = port being used on the PC (Default sets the communications port to Col 1. Verify that this is the desired COM Port) Parity = None Baud Rate = 19200 Data Bits = 8 Stop Bits = 1 Time-out period = 10 sec
8. Click on [OK] and [OK] again.
B. Setting Sound Wave Files to Play
1. Click on the [AUDIOMETER TRANSFER] button (earphones).
2. Select [SETUP] from the menu bar at the top of your screen.
3. Select [AUDIOMETRY] and then [INTERFACE OPTION]
4. Verify that “Play Sound Files” has a check mark beside it. If not, click on [PLAY SOUND FILES] to enable this option.

21
C. Connecting The RA300 Up To The PC 1. Connect one end of the serial cable to the selected COM port of the PC and the other end to the
RA300. Note: 25-pin male connector connects to the RA300 and the 9 or 25 pin female connector connects to the PC.
2. From the RA300 display panel, verify that [Special] [5][ENTER] has “SETUP FOR FOSHMINTERFACE OK?” selected. If it does not show “FOSHM”, select [NO] until you reach “FOSHM”, select [YES] or [Enter] and try communicating again.
–OR-
3. If the FOSHM Interface selection is not available with SPECIAL 5, you will see the message “PRINT IS SET FOR COMPUTER OK?" You will then need to check the following:
Select [SPECIAL][7][Enter] to verify or to set the Baud Rate to 19200. Select “BAUD 19200 OK Y/N?” Use the [NO] key until “BAUD 19200 OK Y/N?”” is displayed. Press [Enter].
In addition, select [SPECIAL][15][Enter] to select “SEL RS232 COMMMODE / IGNOR HANDSHAKE Y/N?” Use the [NO] key until “SET RS232 COMM MODE / IGNOR HANDSHAKE Y/N?” is displayed. Press [YES] to proceed to the next step.
Select “SEND RA232 DATA AS / MESSAGE IS COMPLETED”. Use the [NO] key until “SEND RA232 DATA AS / MESSAGE IS COMPLETED?” is displayed. Press [Enter].
4. Plug the headset and handswitch into the RA300.
5. Place the headphones on your head.
6. From the FOSHM interface screen, select [NEW TEST] and [YES]. When asked if you want to play the start message, you should hear the start message in the earphones.
See Appendix A on page 23 for the Tremetrics’ Sound Wave File messages.

22
SECTION IX
MAINTENANCE
The Tremetrics RA300 Microprocessor Screening Audiometer is a precision instrument that will give years of dependable service. Like any sophisticated instrument, certain maintenance functions are necessary. The case and the touch-sensitive keyboard can be cleaned with any mild detergent. Chlorinated solvents must not be used.
Those users who fall under the guidelines of the Occupational Safety and Health Administration are required to have their audiometers checked every year and have an exhaustive calibration done every two years. The design of the RA300 is such that an exhaustive calibration does not require appreciable additional effort and, therefore, Tremetrics recommends that all users have their audiometers fully checked every year by a qualified audiometric technician.

23
APPENDIX A
SOUND WAVE FILE MESSAGES
The following table contains available messages suitable for instructing your employees. You may also want to record custom messages. You can do so by using the multimedia feature of your computer to record your own preferred messages.
Error File Name Text
AUDSTART (Option 1)
STRTM1.WAV While taking the hearing test you will be listening for a series of tones. Each time you hear a tone, “cut it off” by pressing and releasing the handswitch. No matter how faint the tone, cut it off, by pressing and releasing the handswitch.
AUDSTART (Option 2)
STRTM2.WAV We are going to test your hearing. You will hear a series of tones. Some will be loud, some soft. As soon as you hear the tone, quickly press and release the handswitch button. Listen carefully and make sure you hear the tone then quickly press and release the handswitch.
AUDSTART (Option 3)
*STRTM3.WAV
You will hear a series of tones at different pitches through your earphones. Each ear will be tested separately. As soon as you hear a tone, even if it is very faint, quickly press and release the handswitch button.
AUDSTART (Option 4)
STRTM4.WAV While taking the hearing test you will be listening for some tones. Each time you hear a tone cut it off by pressing and releasing the handswitch. No matter how faint the tone, quickly cut it off by pressing and releasing the handswitch.
E1 (Option 1)
ERR1M1.WAV You are not pushing the handswitch when you hear the tone. I will restart the test. Remember to push and release the handswitch as soon as you hear the tone.
E1 (Option 2)
ERR1M2.WAV You are not pushing the handswitch. As soon as you hear a tone, even if it is very faint, quickly press and release the handswitch.
E1 (Option 3)
*ERR1M3.WAV Listen carefully and make sure you hear the tone then quickly press and release the handswitch.
E2 (Option 1)
ERR2M1.WAV Press and release the handswitch button as soon as you hear a tone, even if the tone is very soft.
E2 (Option 2)
ERR2M2.WAV I will restart the test. Listen carefully and make sure you hear the tone then quickly press and release the handswitch.
E2 (Option 3)
*ERR2M3.WAV As soon as you hear a tone, even if it is very faint, quickly press and release the handswitch.
E3 (Option 1)
ERR3M1.WAV Press and release the handswitch button as soon as you hear a tone, even if the tone is very soft.

24
E3 (Option 2)
ERR3M2.WAV The test will restart. Remember listen carefully and make sure you hear the tone then quickly press and release the handswitch.
E3 (Option 3)
*ERR3M3.WAV
As soon as you hear a tone, even if it is very faint, quickly press and release the handswitch.
E4 (Option 1)
*ERR4M1.WAV
You are not releasing the handswitch quickly enough. Remember to press and release the handswitch button as soon as you hear a tone.
E4 (Option 2)
ERR4M2.WAV The handswitch button is being pressed for too long a time. As soon as you hear the tone quickly press and release the handswitch.
E4 (Option 3)
ERR4M3.WAV The handswitch button must be released quickly. Press and quickly release the handswitch button when you hear the tone.
E5 (Option 1)
ERR5M1.WAV You are pushing the handswitch when no tone is present. Be sure you hear the tone then press and release your handswitch quickly.
E5 (Option 2)
*ERR5M2.WAV Listen carefully and make sure you hear a tone before pressing the handswitch.
E5 (Option 3)
ERR5M3.WAV Be sure you hear the tone then press and release the handswitch quickly.
Error 6 no message
Error 7 no message
AUDDONE (Option 1)
ENDM1.WAV You have completed the hearing test. Thank you for your time. Please remove the headset and place the headset and handswitch on your chair, then exit the sound room.
AUDDONE (Option 2)
ENDM2.WAV You have completed the hearing test. Please sit quietly as the others finish their test.
AUDDONE (Option 3)
ENDM3.WAV The hearing test is complete. Sit quietly as the others finish their test. Thank you for your time.
AUDDONE (Option 4)
*ENDM4.WAV Please remove the headset and place the headset and handswitch on your chair, then exit the sound room.
*The default message

25
APPENDIX B
WHAT TO DO IF FOSHM AND THE RA300 ARE NOT COMMUNICATING
Checklist:
(Verify the following items)
____ Power
____ Cable
____ RA300 device selected – PC
____ Communication Port – PC
____ Communication Port – RA300
____ Baud Rate – PC
____ Baud Rate – RA300
____ SPECIAL 5 set to FOSHM (if available)
____ RA300 Communication Mode (SPECIAL 15)
Detailed Instructions:
1. Verify that the RA300 is turned on and operating. If not operating, turn the RA300 off for 10 seconds, turn back on, and try communicating again. Verify that the power outlet is functioning.
2. Verify that a RS232 cable (9 or 25 pin female connection for the PC and a 25 pin male connection for the RA300) is connected to both the PC and the RA300. If not, obtain a serial cable as described above, connect to both devices and try communicating again. See Page 12 --
3. In FOSHM, verify that the RA300 is the selected device and the Communication Port used on the PC is the same Port selected in the FOSHM settings (shown as COM 1, COM 2, etc.). To check settings, from the Menu Bar at the top, choose [Setup/System/Device Selection]; verify that you are on the Audiometry Tab with the RA300 device selected. If the RA300 is selected, then select [Set COMM] to verify the following information:
Baud Rate = 19200; Data bits = 8; Parity = None; and Stop Bits = 1. -- See Page 20 --
If any settings are incorrect or you are unsure if the Port is being used by another device (i.e.: a modem), contact your computer department for help, correct the settings and try communicating again.
4. From the RA300 display panel, verify that [SPECIAL][5][Enter] has “SETUP FOR FOSHM INTERFACE OK?” selected. If it does not show “FOSHM”, select [NO] until you reach “FOSHM”, select [YES] or [Enter] and try communicating again. -- See Page 10 --
-OR-

26
5. If the FOSHM Interface selection is not available with SPECIAL 5, you will see the message “PRINT IS SET FOR COMPUTER OK?” You will then need to check the following:
Select [SPECIAL][7][Enter] to verify or to set the Baud Rate to 19200. Select “BAUD 19200 OK Y/N?” Use the [NO] key until “BAUD 19200 OK Y/N?” is displayed. Press [Enter].
In addition, select [SPECIAL][15][Enter] to select “SEL RS232 COMM MODE / IGNOR HANDSHAKE Y/N?” Use the [NO] key until “SET RS232 COMM MODE / IGNOR HANDSHAKE Y/N?” is displayed. Press [YES] to proceed to the next step.
Select “SEND RA232 DATA AS / MESSAGE IS COMPLETED”. Use the [NO] key until “SEND RA232 DATA AS / MESSAGE IS COMPLETED?” is displayed. Press [Enter].
Try communicating again.
6. Reset both the PC and the RA300. To reset the RA300 turn it off and back on. Turn off the PC after properly shutting it down and turning it back on again. Try communicating again.
7. If you still are unable to establish communications, contact your RA300 dealer for help.

Information disclosed herein may not be reproduced in any form without the express permission of TREMETRICS
Copyright © 2002 TREMETRICS 1162-0201 Rev. A 3/02