TRBOnet Enterprise Quick Start Guides3.trbonet.com/download/docs/latest/Documentation/... ·...
15
World HQ Neocom Software 8th Line 29, Vasilyevsky Island St. Petersburg, 199004, Russia US Office Neocom Software 15200 Jog Road, Suite 202 Delray Beach, FL 33446, USA Internet Email: [email protected] WWW.TRBONET.COM Telephone EMEA: +44 203 608 0598 Americas: +1 872 222 8726 APAC: +61 28 6078325 TRBOnet Enterprise Quick Start Guide Version 5.2
Transcript of TRBOnet Enterprise Quick Start Guides3.trbonet.com/download/docs/latest/Documentation/... ·...

World HQ Neocom Software 8th Line 29, Vasilyevsky Island St. Petersburg, 199004, Russia
US Office Neocom Software 15200 Jog Road, Suite 202 Delray Beach, FL 33446, USA
Internet Email: [email protected] WWW.TRBONET.COM
Telephone EMEA: +44 203 608 0598 Americas: +1 872 222 8726 APAC: +61 28 6078325
TRBOnet Enterprise Quick Start Guide
Version 5.2


Notices This document is for informational purposes only. Neocom Software offers no warranties, express or implied, in this document. Neocom and the Neocom logo, TRBOnet and the TRBOnet logo are either registered trademarks or trademarks of Neocom Software, Ltd. MOTOROLA, MOTO, MOTOROLA SOLUTIONS and the Stylized M logo are trademarks or registered trademarks of Motorola Trademark Holdings, LLC. Intellectual property rights protect the voice coding technology embodied in this product including patent rights, copyrights and trade secrets of Digital Voice Systems, Inc. This voice coding technology is licensed solely for use within this communications equipment. U.S. Pat. Nos. 6,199,037, 5,870,405, 5,754,974, 5,664,051, 5,630,011, 5,517,511, 5,491,772, 5,247,579, 5,226,108, 5,226,084, 5,216,747 and 5,081,681. Microsoft, Windows, SQL Server and the .NET logo are either registered trademarks or trademarks of Microsoft Corporation in the United States and/or other jurisdictions. Other product or company names mentioned herein may be trademarks of their respective owners. © 2017 by Neocom Software, Ltd. All rights reserved. This document was last revised on August 11, 2017.

Contents
i
Contents 1 Introduction ........................................................................................................................................................ 1
1.1 About This Guide ................................................................................................................................ 1
1.2 About TRBOnet by Neocom Software ........................................................................................ 1
2 Hardware and Software Requirements .................................................................................................... 2
3 TRBOnet Enterprise Software and Dependencies Installation ......................................................... 3
3.1 Preparing and Updating the Base OS ......................................................................................... 3
3.2 Installing Microsoft SQL Server ..................................................................................................... 3
3.3 Installing .NET Components ........................................................................................................... 3
3.4 Installing TRBOnet Enterprise ........................................................................................................ 3
4 Initial TRBOnet Configuration ...................................................................................................................... 6
4.1 Creating New TRBOnet Database ................................................................................................ 6
4.2 Installing TRBOnet Service .............................................................................................................. 7
4.3 Connecting TRBOnet Server to Master Repeater ................................................................... 8
4.4 Connecting Dispatch Console to Server .................................................................................... 9


Introduction
1
1 Introduction 1.1 About This Guide
This document is intended for MOTOTRBO radio network administrators responsible for the dispatch operations. It provides guidance on the installation, configuration, and maintenance of the TRBOnet Server and Dispatch Console applications.
1.2 About TRBOnet by Neocom Software TRBOnet is a suite of professional applications for dispatch centers of MOTOTRBO™ radio networks developed by Neocom Software since 2008. TRBOnet manages voice, text and data communication paths to network endpoints and provides a unified graphical dispatcher workbench interface for all the messaging and workforce orchestration tasks. Recognized as the Best Radio Application Partner by Motorola Solutions, TRBOnet enjoys a proven track record of success in business-critical radio network deployments worldwide. The TRBOnet family of products deliver:
Flexible, connection type independent cross-patching of subscriber groups, both preconfigured by network designers and improvised by dispatchers with a drag-and-drop ease.
Extensive connectivity options for any mode MOTOTRBO networks with public phone, SIP and private VoIP interconnects, SMS and email gateways, intercom among multiple dispatchers.
Comprehensive location awareness features which include integration with a variety of online and offline map providers, indoor positioning, geofencing, route and speed control and GPS event-driven workflows.
Support for communication scenarios typical for key vertical markets, such as ‘lone worker’ monitoring, site alarms, job ticketing, RFID integration, field device telemetry collection and many others.
Full audio and activity logging complemented by a rich set of configurable built-in reports.
2 TRBOnet Enterprise — Quick Start Guide
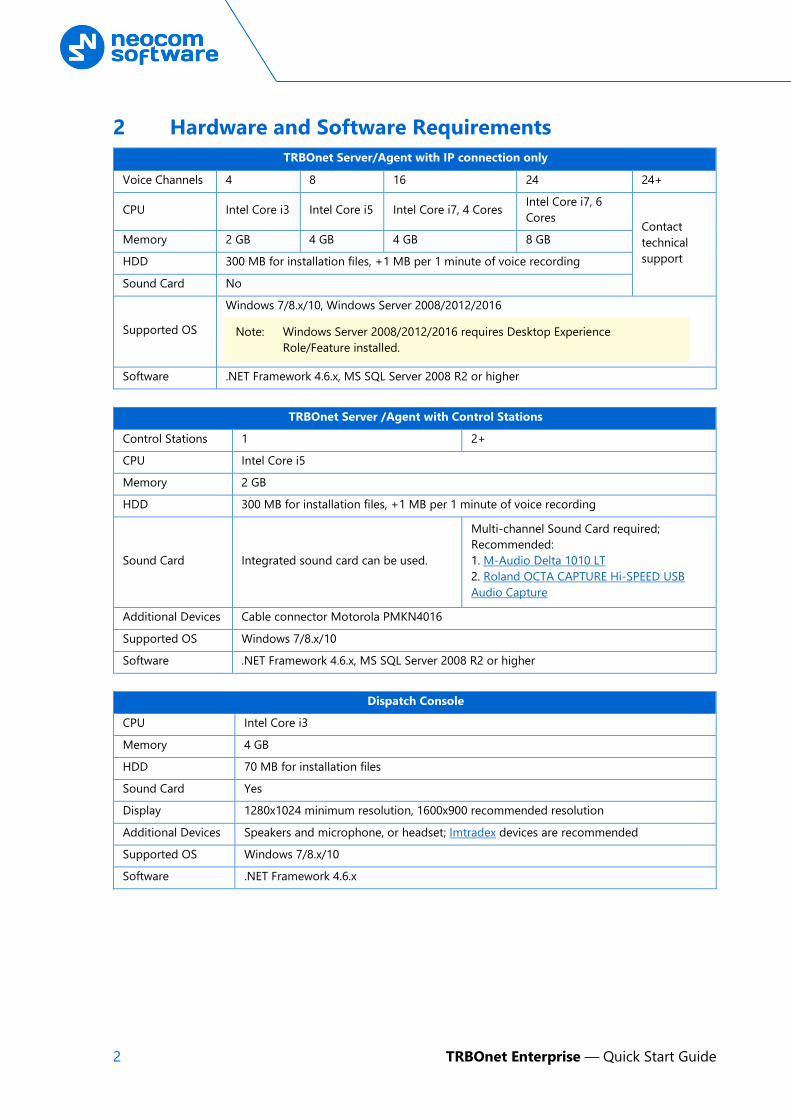
2 Hardware and Software Requirements TRBOnet Server/Agent with IP connection only
Voice Channels 4 8 16 24 24+
CPU Intel Core i3 Intel Core i5 Intel Core i7, 4 Cores Intel Core i7, 6 Cores
Contact technical support
Memory 2 GB 4 GB 4 GB 8 GB
HDD 300 MB for installation files, +1 MB per 1 minute of voice recording
Sound Card No
Supported OS
Windows 7/8.x/10, Windows Server 2008/2012/2016
Note: Windows Server 2008/2012/2016 requires Desktop Experience Role/Feature installed.
Software .NET Framework 4.6.x, MS SQL Server 2008 R2 or higher
TRBOnet Server /Agent with Control Stations
Control Stations 1 2+
CPU Intel Core i5
Memory 2 GB
HDD 300 MB for installation files, +1 MB per 1 minute of voice recording
Sound Card Integrated sound card can be used.
Multi-channel Sound Card required; Recommended: 1. M-Audio Delta 1010 LT 2. Roland OCTA CAPTURE Hi-SPEED USB Audio Capture
Additional Devices Cable connector Motorola PMKN4016
Supported OS Windows 7/8.x/10
Software .NET Framework 4.6.x, MS SQL Server 2008 R2 or higher
Dispatch Console
CPU Intel Core i3
Memory 4 GB
HDD 70 MB for installation files
Sound Card Yes
Display 1280x1024 minimum resolution, 1600x900 recommended resolution
Additional Devices Speakers and microphone, or headset; Imtradex devices are recommended
Supported OS Windows 7/8.x/10
Software .NET Framework 4.6.x

TRBOnet Enterprise Software and Dependencies Installation
3
3 TRBOnet Enterprise Software and Dependencies Installation
3.1 Preparing and Updating the Base OS TRBOnet runs on Windows 7/8/10. In the case of Windows 7, make sure that the latest Service Pack is installed. For the TRBOnet Enterprise Compatibility Table, see http://kb.trbonet.com/public.pl?Action=PublicFAQZoom;ItemID=73
3.2 Installing Microsoft SQL Server Download and install Microsoft SQL Server 2008 R2 or higher. You can download and install either a full-featured MS SQL Server or an Express edition of MS SQL Server. The Express edition of MS SQL Server is free, however, it has some technical restrictions (maximum database size of 10 GB, RAM usage, and others). For example, Microsoft SQL Server 2008 R2 SP2 - Express Edition (which is free) is available at: http://www.microsoft.com/en-us/download/details.aspx?id=30438
Note: We recommend that you download a version of SQL Server with Tools.
Select the 32-bit or 64-bit version depending on the underlying OS. Accept the defaults for the setup.
3.3 Installing .NET Components Windows 8 and later, as well as Windows Server 2012 and later, include the required .NET 4.6 components as part of the operating system. For the TRBOnet Enterprise Compatibility Table, see http://kb.trbonet.com/public.pl?Action=PublicFAQZoom;ItemID=73 The .NET Framework redistributables are available from Microsoft at: https://www.microsoft.com/en-us/download/search.aspx?q=.net%20framework
3.4 Installing TRBOnet Enterprise • Contact Neocom Software to obtain the latest installation package of the
TRBOnet Enterprise software, unzip, and run the setup file as a local administrator.
• When the TRBOnet Enterprise Setup wizard appears, click Next. • On the End User License Agreement page, accept the terms of the license,
and then click Next.

4 TRBOnet Enterprise — Quick Start Guide
• On the Choose Setup Type page, click one of the following options: TRBOnet Dispatch Console
Choose this option to install only TRBOnet Dispatch Console on your computer.
TRBOnet Server and Dispatch Console Choose this option to install both TRBOnet Server and TRBOnet Dispatch Console at once on your computer.
Custom Choose this option to select from the list one or more components to be installed.
For example, you may install only TRBOnet Server Instance:

TRBOnet Enterprise Software and Dependencies Installation
5
• Accept the defaults for the rest of the setup and complete the installation.

6 TRBOnet Enterprise — Quick Start Guide
4 Initial TRBOnet Configuration After all the required software packages are installed, some settings need to be configured. Follow the steps below to create a fully operational installation of TRBOnet that is ready for testing.
4.1 Creating New TRBOnet Database To start TRBOnet Server, click the corresponding shortcut on the desktop, or click Start > All Programs > Neocom Software > TRBOnet Server x.x
• In the Configuration pane, select Database.
• In the Database pane, specify the following database-related settings: SQL Server
Enter the location of the Microsoft SQL Server name and instance. For example, in the screenshot above, the default instance name of Microsoft SQL Server Express installed on the local computer is shown.
Database Enter the preferred name of the TRBOnet database.
Authentication Select the authentication method for the TRBOnet database. The default method is Windows Authentication.
Login and Password Enter a valid SQL Server login and password if the SQL Server Authentication is selected for the database;
Specify the path for database archives Select this option, and in the corresponding Path box enter the full path of the custom folder for database backups.
Use custom folder for audio files Select this option, and in the corresponding Path box enter the full path of the custom folder for audio recordings of the talk sessions.

Initial TRBOnet Configuration
7
Note: If you don't specify folder paths for the database archives and audio files, TRBOnet Server will use the following default paths: %ProgramData%\Neocom Software\TRBOnet Enterprise\Backups - for database archives. %ProgramData%\Neocom Software\TRBOnet Enterprise\Audio - for audio.
• When you finish configuring the required database parameters, click Create Database.
• After you create or upgrade a database, click Apply and then confirm to restart TRBOnet Server.
4.2 Installing TRBOnet Service • In the Configuration pane, select Service.
• In the Service pane, click Install Service.
• Click the Start Service link that appears in the right pane.

8 TRBOnet Enterprise — Quick Start Guide
4.3 Connecting TRBOnet Server to Master Repeater Now TRBOnet Server must be joined to your radio network.
• In the Digital Systems pane, click Add. Or, in the Configuration pane, right-click Digital Systems.
• In the drop-down menu, click Add MOTOTRBO System.
In the Repeater pane, specify the connection parameters. To ensure your connection parameters match the actual configuration of your radio network, you may need to use Motorola CPS or Config Advisor tools to determine the values. Contact your radio network administrator, if you do not have this information.
• System Name Enter a name for the repeater. This name will be displayed in the Dispatch Console.

Initial TRBOnet Configuration
9
• TRBOnet Peer ID Enter a Peer ID for TRBOnet Server. The Peer ID must be unique among the repeaters in the radio system. Consult your radio network administrator to enter the correct value.
• TRBOnet Radio ID Enter the Radio ID, which is a gateway for voice and data. The Radio ID must be unique in the radio system. Consult your radio network administrator to enter the correct value. The recommended value is 64250.
• TRBOnet Local Port Enter the local port number that will be used by TRBOnet Server to establish connections for the repeater. Use unique port numbers for each repeater connection if there are several repeaters connected.
• Master IP Address Enter the Ethernet IP address of the repeater.
Note: This value is programmed for a repeater via MOTOTRBO CPS, in Link Establishment>Master IP.
• Master UDP Port Enter the UDP port number of the master repeater.
Note: This value is programmed for a repeater via MOTOTRBO CPS, in Link Establishment>Master UDP Port.
• Authentication Key Enter the repeater's authentication key (if any).
Note: This value is programmed for a repeater via MOTOTRBO CPS, in Link Establishment>Authentication Key.
• System Type From the drop-down list, select the system type.
• Test Click this button to check the connection to your master repeater. If the test is successful, you'll see information on the repeater you are connected to, such as the serial number, firmware version, and other relevant information.
• System Identifier Leave this field blank.
• Use NAI Voice, Use NAI Data (MNIS and DDMS) Leave these options unselected.
Click OK after entering all the required values. A confirmation dialog will appear, prompting you to save the configuration and restart the TRBOnet Server service. You can also restart the service manually.
4.4 Connecting Dispatch Console to Server The console is a client application that must be connected to the server. When you first launch Dispatch Console (Start > All Programs > Neocom Software >

10 TRBOnet Enterprise — Quick Start Guide
TRBOnet Dispatch), a connection dialog is displayed. Enter the required connection settings as explained below. If the Server is hosted on the same computer, you can safely accept the defaults and click OK to connect.
Connect to:
• Address Enter the IP address of the TRBOnet Server to connect to.
• Port Enter the local port of the TRBOnet Server PC to accept connections from Dispatch Console. The default value is 4021.
Authentication:
Method From the drop-down list, select the Authentication method: • TRBOnet Authentication
Select this method to log on as a User registered in the TRBOnet Dispatch Console Users list.
• Windows Authentication Select this method to log on using the PC name. The system automatically shows the PC name as a User Name.
Note: The Windows user must be registered in the TRBOnet Dispatch Console Users list.
User Name/Password Enter the user name and password provided to you by the system administrator. The default credentials are admin/admin. Use the default account for the initial configuration and change the password later.
Connect on startup Select this option to launch Dispatch Console without typing User Name and Password every time. Use this option if you regularly connect to the same TRBOnet server and your workstation is in a secure location.