TRAINING MANUAL 04 CREATING & MANAGING ASSIGNMENTS …
32
1 [Date] TRAINING MANUAL 04– CREATING & MANAGING ASSIGNMENTS via GOOGLE FORMS Prepared by: Dr. Mehrosh Khalid
Transcript of TRAINING MANUAL 04 CREATING & MANAGING ASSIGNMENTS …

1 [Date]
TRAINING MANUAL
04– CREATING & MANAGING
ASSIGNMENTS via GOOGLE FORMS
Prepared by:
Dr. Mehrosh Khalid

INTERNATIONAL ISLAMIC UNIVERSITY, ISLAMABAD LMS TRAINING MANUAL
2
Contents 1. The Classwork: .................................................................................................................................... 5
2. Create Assignment: ............................................................................................................................. 5
2.1 Uploading Assignment File: ........................................................................................................... 5
2.2 Assignment Settings: ..................................................................................................................... 10
2.3 Assignment Link Posting: .................................................................................................................. 11
2.4 Assignment Rubric: ...................................................................................................................... 16
2.5 Posting an Assignment: ................................................................................................................ 19
3 View Assignment: .............................................................................................................................. 20
3.1 Assignment Statistics: ................................................................................................................... 20
3.2 Teacher’s View: ................................................................................................................................... 21
3.3 Student’s View: ............................................................................................................................. 22
4 Managing Submissions: .................................................................................................................... 24
4.1 Viewing Submissions: ................................................................................................................... 24
4.2 Assigning Grades and Returning Back Submissions:................................................................ 25
4.3 Communicating with the Students: ............................................................................................. 29
4.4 Collecting Responses in Google Sheets: ...................................................................................... 30
5. The Grades Section: .......................................................................................................................... 31

INTERNATIONAL ISLAMIC UNIVERSITY, ISLAMABAD LMS TRAINING MANUAL
3
List of Figures: Figure 1: Starting with creating an assignment ............................................................................................ 5
Figure 2: Adding Assignment Details ............................................................................................................ 6
Figure 3: A blank Google Form ...................................................................................................................... 6
Figure 4: Adding first question ...................................................................................................................... 7
Figure 5: Adding marks to the question ........................................................................................................ 7
Figure 6: Question Appearance on the Form................................................................................................ 8
Figure 7: Adding New Questions ................................................................................................................... 8
Figure 8: Answer type - File Upload option .................................................................................................. 9
Figure 9: File upload settings ........................................................................................................................ 9
Figure 10: Form Preview ............................................................................................................................. 10
Figure 11: Assignment Settings ................................................................................................................... 10
Figure 12: Assignment Settings -Quizzes Section ....................................................................................... 11
Figure 13: Assignment send options ........................................................................................................... 12
Figure 14: Adding Link to the assignment ................................................................................................... 12
Figure 15: Google Form assignment with link ............................................................................................ 13
Figure 16: Selecting multiple courses ......................................................................................................... 13
Figure 17: Selecting Students ...................................................................................................................... 14
Figure 18: Assignment Point Settings ......................................................................................................... 14
Figure 19: Assignment Due Date settings ................................................................................................... 14
Figure 20: Selecting due date from Calendar ............................................................................................. 15
Figure 21: Due-date and Time display ........................................................................................................ 15
Figure 22: Assignment Topic settings ......................................................................................................... 16
Figure 23: Creating Rubrics ......................................................................................................................... 16
Figure 24: Creating Rubric - General Settings ............................................................................................. 17
Figure 25:Creating Rubric - Scoring............................................................................................................. 18
Figure 26: Creating Rubric - Add new criterion........................................................................................... 18
Figure 27:Saved Rubric ............................................................................................................................... 19
Figure 28:Assignment Posting Options ....................................................................................................... 19
Figure 29:Posting Assignment - Scheduling Options .................................................................................. 20
Figure 30: Assignment View ........................................................................................................................ 20
Figure 31: View Assignment - Instructions page ......................................................................................... 21
Figure 32: View Assignment - Student work page ...................................................................................... 22
Figure 33: Viewing Assignment - Student's View ........................................................................................ 22
Figure 34: Student's View - Assignment Details ......................................................................................... 23
Figure 35: Student's Assignment View - Resubmit ..................................................................................... 24
Figure 36: Managing Assignment Submissions ........................................................................................... 24
Figure 37: Manage Submission - Viewing submitted assignment .............................................................. 25
Figure 38: Managing Submissions - Checking Assignment ......................................................................... 26
Figure 39: Managing Submissions - Making Comments in the assignment ............................................... 26
Figure 40: Manage Submissions - Assigning grades.................................................................................... 27
Figure 41: Grade sheet options ................................................................................................................... 27

INTERNATIONAL ISLAMIC UNIVERSITY, ISLAMABAD LMS TRAINING MANUAL
4
Figure 42: Assignment grades in Google Sheets ......................................................................................... 28
Figure 43: Grades Google Sheet sharing options ........................................................................................ 28
Figure 44: Assignment grades Google Sheets - Access rights ..................................................................... 29
Figure 45: Email to Students ....................................................................................................................... 29
Figure 46: Compose Email........................................................................................................................... 30
Figure 47: Response in Google Forms Assignment ..................................................................................... 30
Figure 48: Selecting options for Google Forms Assignment Responses ..................................................... 31
Figure 49: Google Sheet for collecting responses ....................................................................................... 31
Figure 50: The Grades Section .................................................................................................................... 32
Figure 51: Grades Section - View Submissions ........................................................................................... 32

INTERNATIONAL ISLAMIC UNIVERSITY, ISLAMABAD LMS TRAINING MANUAL
5
Google Classroom is an application designed to help students and teachers communicate,
collaborate, organize and manage assignments, go paperless, and much more. This guide is
chocked full of step-by-step instructions for creating assignments using Google Forms.
1. The Classwork: The classwork section of the Google classroom let you create assignments and manage them in
different ways. The assignments resources can be either:
Assigned immediately and will be reflected in the class stream section for the participants.
Can be scheduled for some later date. This will be shown as saved task to the teacher but
it will not be shown to the students, until the scheduled date and time.
Can be saved as draft and is only visible to the teacher until the draft is posted on the
stream.
2. Create Assignment: 1. In the classwork section, click on the “Create” button, then select “Quiz Assignment” to
create an assignment using Google Forms into the course.
Figure 1: Starting with creating an assignment
2.1 Uploading Assignment File:
1. On the assignment page, write the title of the assignment. This is mandatory, otherwise you
will not be allowed to post assignment.
2. Write instructions about the assignments for the students. This is optional but recommended to
provide assignment instructions here.
3. Click on “Blank Quiz” title in the attached Google Forms document as shown below:

INTERNATIONAL ISLAMIC UNIVERSITY, ISLAMABAD LMS TRAINING MANUAL
6
Figure 2: Adding Assignment Details
4. In the new tab of your browser window, a Google form will be opened with the title “Blank
Quiz” as shown below:
Figure 3: A blank Google Form
5. Change the title of the Google Form from “Blank Quiz” to “Assignment-2” (as an example).
6. Start typing in the Question. Select the type of the Question as paragraph as the answer will be
in paragraph format.

INTERNATIONAL ISLAMIC UNIVERSITY, ISLAMABAD LMS TRAINING MANUAL
7
Figure 4: Adding first question
7. You can see in the Figure 4, in the left bottom corner, highlighted in red, “Answer Key (0
points). It shows that no points have been yet set to this question. Click on the “Answer Key”
and a pop-up window will be open, where you can assign the points to this question as:
Figure 5: Adding marks to the question
8. Click on “Done” and the points will be added against this question. If it is desired to be set as
mandatory question, enable the required option, otherwise let it be disabled.

INTERNATIONAL ISLAMIC UNIVERSITY, ISLAMABAD LMS TRAINING MANUAL
8
Figure 6: Question Appearance on the Form
9. On the right of the question section, click on the “Add Question” icon in the vertical toolbar.
A new question window will be added.
Figure 7: Adding New Questions
10. Write in the question and select the type of the answer as “File Upload”

INTERNATIONAL ISLAMIC UNIVERSITY, ISLAMABAD LMS TRAINING MANUAL
9
Figure 8: Answer type - File Upload option
11. Click on the “Continue” button. Now set the file properties as:
a. Allow specific file types – enable this option if you want that student must submit
files of some particular type. Otherwise let it disabled.
b. Maximum number of files – how many maximum number of files a student can
submit in answer to this question
c. Maximum file size – what is the allowed maximum file size
Figure 9: File upload settings

INTERNATIONAL ISLAMIC UNIVERSITY, ISLAMABAD LMS TRAINING MANUAL
10
12. Repeat steps 7. and 8. to assign marks to this question. After step 8., the question will be
created:
13. Click on the “Preview” icon in the top right corner of the screen to preview the look and feel
of the assignment when it will be viewed by the students:
Figure 10: Form Preview
2.2 Assignment Settings:
1. Click on the wheel shaped “Setting” icon in the top right corner, on the left of the send button
and set assignment settings there:
Figure 11: Assignment Settings
2. Under the “General” tab, you can:
a. Restrict that only users with IIUI email addresses will submit answers

INTERNATIONAL ISLAMIC UNIVERSITY, ISLAMABAD LMS TRAINING MANUAL
11
b. Restrict the students to submit only once in response to the assignment.
c. Allow or disallow students to edit their responses after submitting the assignment.
d. Allow or disallow students to see summary charts and text responses.
3. Under the “Quizzes” tab, you can:
a. Release grade immediately to the students as soon as they submit the assignment
(provided that if an answer key is present or not) OR you will assign grades later after
manual review
b. Allow or disallow students to see missed questions
c. Allow or disallow students to see correct answers
d. Allow or disallow student to see scores for each question
Figure 12: Assignment Settings -Quizzes Section
2.3 Assignment Link Posting:
1. Click on the “Send” button in the top right corner, a pop-up window will be open showing you
different option for sending the assignment. The assignment can be sent via:
a. Email
b. Copy and sharing link
c. Embedding HTML code
2. Click on the “Link” icon. The link of the assignment will be created and shown in the pop-up
window.
3. Click on the “Copy link” button. The link will be copied.

INTERNATIONAL ISLAMIC UNIVERSITY, ISLAMABAD LMS TRAINING MANUAL
12
Figure 13: Assignment send options
4. Now come back to your Google Classroom, where you were uploading the assignment. Click
on “Add” and select the “Link” option:
Figure 14: Adding Link to the assignment
5. In the pop-up window appeared, paste the copied link and click on “Add link” button.
INTERNATIONAL ISLAMIC UNIVERSITY, ISLAMABAD LMS TRAINING MANUAL
13
6. The link will be added along with the Google Form in the Assignments section:
Figure 15: Google Form assignment with link
7. Select, other courses, if you want to post the same assignment in other courses as well. In the
For section, click on the drop-down arrow and select multiple courses as per the requirement.
Figure 16: Selecting multiple courses
8. Similarly, select whether you want to post this assignment for all of the students or some
particular students. Click on the drop-down arrow with the All Students. A list of enrolled students
will be pop-up. From here, check the check-boxes against the names of the students with whom,
you want to share the assignment. If the assignment is for all students, let the check box against
“All Students” checked.

INTERNATIONAL ISLAMIC UNIVERSITY, ISLAMABAD LMS TRAINING MANUAL
14
Figure 17: Selecting Students
9. In the points section, assign the total marks/points to this assignment. Click on the drop-down
arrow near points and add total points there. If you want to make this ungraded assignment, click
on the “Ungraded”.
Figure 18: Assignment Point Settings
10. In the Due section, click on the drop-down arrow to select a due date for the assignment. In the
pop-up window, click on the drop-down arrow on the right of the No due date, as shown below:
Figure 19: Assignment Due Date settings

INTERNATIONAL ISLAMIC UNIVERSITY, ISLAMABAD LMS TRAINING MANUAL
15
9. From the opened calendar, select the desired due date and set time as shown below:
Figure 20: Selecting due date from Calendar
The due date and time will be selected and displayed as:
Figure 21: Due-date and Time display
Note: If it is not required to assign any due date to the assignment, skip Step 8. and Step 9.
10. Select the topic(week) in which you want to place the assignment.

INTERNATIONAL ISLAMIC UNIVERSITY, ISLAMABAD LMS TRAINING MANUAL
16
Figure 22: Assignment Topic settings
2.4 Assignment Rubric:
A rubric is a scoring tool that explicitly represents the performance expectations for
an assignment or piece of work. A rubric divides the assigned work into component parts and
provides clear descriptions of the characteristics of the work associated with each component, at
varying levels of mastery.
Follow the following steps, if it is desired to create rubrics for thee assignment.
1. In the Rubric section, click on the rubric button:
Figure 23: Creating Rubrics
2. You will be provided with three options:
i. Create rubric – creating a new rubric measure

INTERNATIONAL ISLAMIC UNIVERSITY, ISLAMABAD LMS TRAINING MANUAL
17
ii. Reuse rubric – used an already existing rubric
iii. Import from sheets – If some rubric has been already created in Google sheets, we can
import it here.
Click on the “Create rubric” option:
3 A window will be opened where you can create rubric criterion(s) and assign scoring to them
as shown below:
Figure 24: Creating Rubric - General Settings
a. Use scoring – Enable this option, if it is desired to assign point scoring against rubric
criterion(s), otherwise disable this option
b. Criterion Title – Give title here
c. Criterion description – Give a short description describing the criterion, if required.
4 In the points section, assign the desired points against the criterion as shown below:

INTERNATIONAL ISLAMIC UNIVERSITY, ISLAMABAD LMS TRAINING MANUAL
18
Figure 25:Creating Rubric - Scoring
5 If you want to add more criterion, click on “Add a criterion” button and repeat the steps 3. and
4.
Figure 26: Creating Rubric - Add new criterion
6 Click on the “Save” button in the top right corner of the screen. The rubric will be created and
saved in the assignment.

INTERNATIONAL ISLAMIC UNIVERSITY, ISLAMABAD LMS TRAINING MANUAL
19
Figure 27:Saved Rubric
2.5 Posting an Assignment:
1. For posting an assignment in the course, after making all the desired settings, click on the
“Assign” button on the top right corner of the screen. When you will click on the drop-
down arrow on the right of the “Assign” button (before clicking it), you will be provided
with three options:
i. Assign – post the assignment immediately in the class.
ii. Schedule – select some date and time and schedule the assignment to be posted on
the scheduled date.
iii. Save draft – The assignment will be saved in your class. Only teacher can see the
saved assignment. The saved assignment as a draft is not the scheduled assignment.
When it is required to be posted, you have to post it.
Figure 28:Assignment Posting Options
2. For immediately posting the assignment, click on the “Assign” button and it will be
appeared in the classwork section as shown below:
3. If it is desired to schedule assignment for some later date, click on the “Schedule” option.
You will be provided to set the date and time as shown below:

INTERNATIONAL ISLAMIC UNIVERSITY, ISLAMABAD LMS TRAINING MANUAL
20
Figure 29:Posting Assignment - Scheduling Options
3 View Assignment: Once the assignment has been posted in the classwork section. You will be able to view the
assignment from multiple aspects and different statistics associated with it.
3.1 Assignment Statistics:
In the classwork section, the assignment posted will be shown as below:
Figure 30: Assignment View
Assignment Title
Assignment File
Rubrics
Assignment Due
date and Time
Number of
students who
have submitted Number of
students to whom
assignment has
been posted

INTERNATIONAL ISLAMIC UNIVERSITY, ISLAMABAD LMS TRAINING MANUAL
21
3.2 Teacher’s View:
1. Click on the “View Assignment” button in the assignment section as shown in Figure 30.
You will be directed to the Assignment Submissions section. This section contains two
sub-sections:
i. Instructions: - it will show the assignment details, instructions provided to the
students, total marks of the assignments and any comments made regarding to the
assignment.
Figure 31: View Assignment - Instructions page
ii. Student Work: - it will show the list of students, submission statistics, options for
checking assignments, grading and communicating with the students. All these
settings are discussed in the section 4.

INTERNATIONAL ISLAMIC UNIVERSITY, ISLAMABAD LMS TRAINING MANUAL
22
Figure 32: View Assignment - Student work page
3.3 Student’s View:
From the student’s perspective, student will be getting the assignment view in his/her classwork
section as given below:
Figure 33: Viewing Assignment - Student's View
1. The main page shows:

INTERNATIONAL ISLAMIC UNIVERSITY, ISLAMABAD LMS TRAINING MANUAL
23
a. Assignment title
b. Due date
c. The date on which assignment was posted
d. Whether the assignment has been graded yet or not
e. Rubrics
f. Assignment document
2. Click on the “View Assignment” button.
Figure 34: Student's View - Assignment Details
Student is able to:
a. View his/her obtained marks
b. View his/her submitted assignment document
c. View obtained marks against the rubric criterion
d. View the assignment document posted by the teacher
e. Teacher’s comment regarding the assignment
f. Resubmit the assignment or can add more files.
3. If the student wishes to resubmit, click on “Resubmit” button, student will be asked to
submit a new document:
Comment from
the Teacher
Obtained Marks
Obtained Marks
for rubrics
Submitted Assignment
document

INTERNATIONAL ISLAMIC UNIVERSITY, ISLAMABAD LMS TRAINING MANUAL
24
Figure 35: Student's Assignment View - Resubmit
4. Click on “Turn in” button and the assignment will be resubmitted to the teacher.
4 Managing Submissions: Teacher can view the submitted assignment, manage and grade the assignments. Click on the
“View Assignment” button in the classwork section for managing student submissions.
4.1 Viewing Submissions:
In the Student work section, teacher has many controls to manage student submissions. The
Student work section for a particular assignment will be shown as under:
Figure 36: Managing Assignment Submissions

INTERNATIONAL ISLAMIC UNIVERSITY, ISLAMABAD LMS TRAINING MANUAL
25
This section shows:
a. Total marks of the assignment
b. List of all the students – this list can be sorted by status, e.g., by students who have
submitted the assignments, by students whose assignments have been graded, or by
students who have not submitted the assignments yet.
c. Individual students’ graded marks – if no marks have been assigned yet you will see
_/10, means you have to assign marks to the student out of 10.
d. Turn in Number – Number of students who have submitted the assignments, but their
assignments are yet to be marked and graded.
e. Assigned Number – Number of students who have not yet submitted the assignments
f. Graded Number – Number of students whose assignments have been checked / graded
by the teacher.
g. Submitted assignment documents – by the student as a response.
4.2 Assigning Grades and Returning Back Submissions:
1. To check submitted assignment, click on the “Turn in” option. You will be get the details
of the documents submitted by the students in tiled view.
2. Click on a particular document to be viewed as shown below:
Figure 37: Manage Submission - Viewing submitted assignment
The document will be opened in a new tab as shown below:

INTERNATIONAL ISLAMIC UNIVERSITY, ISLAMABAD LMS TRAINING MANUAL
26
Figure 38: Managing Submissions - Checking Assignment
Teacher can:
a. Download or print the assignment
b. Add comments to the submitted assignment as shown below:
Figure 39: Managing Submissions - Making Comments in the assignment
c. Assign numbers to the student. The Figure 40, given below, shows in the highlighted red boxes
that:
a. Numbers have been assigned to the student but not yet returned / communicated back
to the student. These numbers/ marks have been saved as draft.

INTERNATIONAL ISLAMIC UNIVERSITY, ISLAMABAD LMS TRAINING MANUAL
27
Figure 40: Manage Submissions - Assigning grades
3. Click on the “Return” button, and the marks and added comments will be returned to the
student.
4. Click on the “Settings icon” in the top right corner of the screen, you will be provided with
the options to view all grades in Google sheets or download grades as .csv file.
Figure 41: Grade sheet options
5. Click on “Copy all grades to Google Sheets”. A Google Sheet will be created in your
Google drive and opened as:

INTERNATIONAL ISLAMIC UNIVERSITY, ISLAMABAD LMS TRAINING MANUAL
28
Figure 42: Assignment grades in Google Sheets
6. You can manage and work with in this Google Sheet just like you do in your simple
Excel Sheets.
7. Click on Share button, in the top right corner, you will be able to share this Google Sheet
with anyone in the IIUI.
8. In the “Share with others” dialogue box, type in the name of the person in IIUI and
his/her email address will be appeared:
Figure 43: Grades Google Sheet sharing options
9. Select the email addresses of the persons with whom you want to share the grades, and
set access rights by clicking on the drop-down arrow with the “pencil icon” as:

INTERNATIONAL ISLAMIC UNIVERSITY, ISLAMABAD LMS TRAINING MANUAL
29
Figure 44: Assignment grades Google Sheets - Access rights
10. Click on the “Send” button, and the sheet will be shared via email.
4.3 Communicating with the Students:
1. Check the check boxes for the students, with whom, teacher wishes to communicate. Either
they can be all students or some particular students.
2. Click on the “email icon”.
Figure 45: Email to Students

INTERNATIONAL ISLAMIC UNIVERSITY, ISLAMABAD LMS TRAINING MANUAL
30
3. An email window will be opened, including the email addresses of the students. Teacher
has just to compose the email message. There is no need of entering the email addresses.
Figure 46: Compose Email
4. Click on “Send” button. The email will be sent to all the selected students.
4.4 Collecting Responses in Google Sheets:
1. On the Google Form Assignment Page, click on the “Responses” tab to set the way how you
will be collecting responses for this assignment:
Figure 47: Response in Google Forms Assignment

INTERNATIONAL ISLAMIC UNIVERSITY, ISLAMABAD LMS TRAINING MANUAL
31
2. Click on the green-colored Google Sheet icon, a pop-up window will be appeared asking you to
either select a new Google Sheet for collecting responses or use some existing one:
Figure 48: Selecting options for Google Forms Assignment Responses
3. Select “Create a new spreadsheet” option and click on “Create” button. A new Google Sheet
will be created and opened in which student’s responses will be collected automatically and stored.
Figure 49: Google Sheet for collecting responses
4. When the students will respond to the assignment questions and click on the submit button, the
responses will be populated in this Google Sheet automatically.
5. The Grades Section: The grades section in the Google classroom let the teacher manage with the grade sheets of the
student.
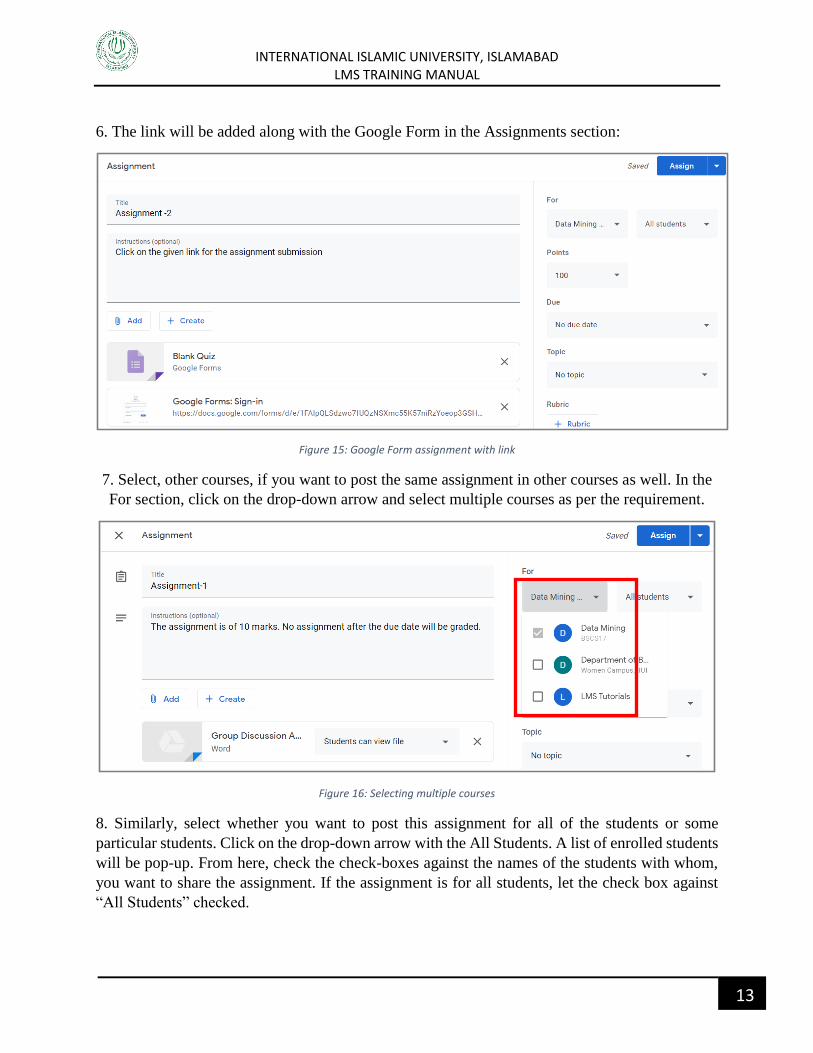
1. In the main course homepage, click on the “Grades” tab. The Grades section will be viewed
as shown below:
INTERNATIONAL ISLAMIC UNIVERSITY, ISLAMABAD LMS TRAINING MANUAL
32
Figure 50: The Grades Section
2. Here you can see the grades of all the students in each of the assigned graded assignment /
quiz and the class average scores.
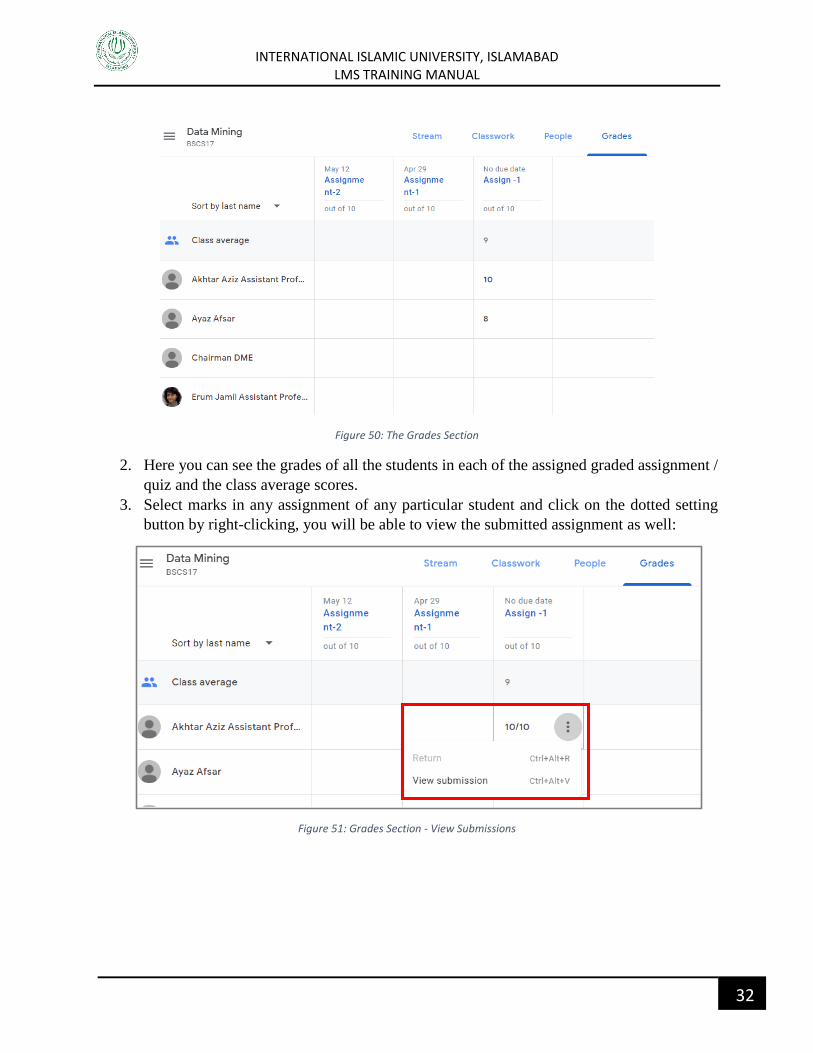
3. Select marks in any assignment of any particular student and click on the dotted setting
button by right-clicking, you will be able to view the submitted assignment as well:
Figure 51: Grades Section - View Submissions