Trade Finance Global - nordea.com · 4 1 Trade Finance Global (TFG) - Introduction TFG is an...
79
User Guide Trade Finance Global October 2015 For customers using Guarantees
Transcript of Trade Finance Global - nordea.com · 4 1 Trade Finance Global (TFG) - Introduction TFG is an...

5/8nordea.com/cm OR tradefinanceName of document
2015/V1
User Guide
Trade Finance Global
October 2015
For customers using Guarantees

2
Table of Contents 1 Trade Finance Global (TFG) - Introduction ................................................................................. 4
1.1 Main TFG Features ................................................................................................................. 4 1.2 Interaction between TFG and Nordea ..................................................................................... 4
1.2.1 Guarantee ..................................................................................................................... 4 1.2.2 Other Products .............................................................................................................. 5
1.3 Transaction Overview .............................................................................................................. 5 1.3.1 Launching Transactions ................................................................................................ 6
1.4 TFG Page Structure ................................................................................................................ 6 1.4.1 Header .......................................................................................................................... 6 1.4.2 Header Lower Line and Footer ..................................................................................... 7 1.4.3 Navigation Menu ........................................................................................................... 7 1.4.4 Guarantees Menu ......................................................................................................... 7 1.4.5 Inquiry Menu ................................................................................................................. 7 1.4.6 Reports Menu ............................................................................................................... 7 1.4.7 Customize Menu ........................................................................................................... 7 1.4.8 Inbox ............................................................................................................................. 8
1.5 Templates ................................................................................................................................ 8 1.6 Work Pages ............................................................................................................................. 9
1.6.1 Action buttons – Action buttons are located at the bottom of a transaction page. ...... 10 1.6.1.1 Save, Save &Exit ........................................................................................... 10
1.6.2 Deal Note .................................................................................................................... 10 1.7 Icons ...................................................................................................................................... 11
2 Trade Finance Global (TFG) - Customize .................................................................................. 13 2.1 Preferences ........................................................................................................................... 13
2.1.1 To Set User Preferences: ........................................................................................... 13 2.2 Customize User Notification .................................................................................................. 15
2.2.1 Deleting the Address .................................................................................................. 15 2.3 Banks ..................................................................................................................................... 15
2.3.1 To View the Banks Profile Window: ............................................................................ 16 2.4 Parties ................................................................................................................................... 16
2.4.1 To Access the Parties: ................................................................................................ 16 2.5 Clauses .................................................................................................................................. 19
2.5.1 To Display the Clauses Search Window: .................................................................... 19 2.5.2 To Add a Clause: ........................................................................................................ 20
2.6 Template ................................................................................................................................ 22 2.6.1 Creating a New Template ........................................................................................... 22 2.6.2 Updating a Template .................................................................................................. 22 2.6.3 Accessing the Templates ............................................................................................ 23
2.7 A Functionality of the Enter Key ............................................................................................ 24 2.7.1 ENTER for Saving ...................................................................................................... 24 2.7.2 ENTER for Searching ................................................................................................. 24 2.7.3 ENTER for Sending a Request ................................................................................... 24
3 Trade Finance Global (TFG) - Functions ................................................................................... 25 3.1 Common Functions ............................................................................................................... 25
3.1.1 User Notification ......................................................................................................... 25 3.1.2 Participants ................................................................................................................. 25
3.1.2.1 Additional party .............................................................................................. 26 3.1.2.2 Party Screen .................................................................................................. 26
3.1.3 Payment Details .......................................................................................................... 27 3.1.4 Attachments ................................................................................................................ 27 3.1.5 Text ............................................................................................................................. 29
3.1.5.1 Clause Library Window ................................................................................. 30 3.1.5.2 Incoming Correspondence in Amendments .................................................. 30
3.1.6 Signatures ................................................................................................................... 31 3.2 Deal Messages ...................................................................................................................... 32 3.3 Copy From ............................................................................................................................. 34 3.4 Wild card Search ................................................................................................................... 34
4 Trade Finance Global (TFG) - Inbox ........................................................................................... 36 4.1 Inbox Navigation .................................................................................................................... 36 4.2 Inbox Settings Configuration ................................................................................................. 36 4.3 Incoming Correspondence .................................................................................................... 37
4.3.1 Incoming Correspondence Bulk Operations ............................................................... 37

3
4.3.2 Registration of Additional Reference Data .................................................................. 38 4.4 Approval/Rejection ................................................................................................................ 40
4.4.1 Payment Instructions for Outgoing Guarantee ........................................................... 41 4.4.2 Extending an Outgoing Guarantee ............................................................................. 42 4.4.3 Approving/Rejecting Amendment ............................................................................... 43
4.5 Signature Required ................................................................................................................ 46 4.5.1 Signature Required Bulk Operations .......................................................................... 46
4.6 Transaction/Event in Process ................................................................................................ 47 4.7 Reminders ............................................................................................................................. 48
5 Trade Finance Global (TFG) - Guarantees................................................................................. 49 5.1 Application for a Guarantee ................................................................................................... 49
5.1.1 Initiating a New Guarantee Application ....................................................................... 49 5.1.2 Guarantee Tabs .......................................................................................................... 49
5.2 Guarantee from Nordea Standard Guarantees ..................................................................... 51 5.3 Guarantee Amendment ......................................................................................................... 53
5.3.1 Guarantee Amendment Tabs ..................................................................................... 53 5.3.2 Amending a Guarantee ............................................................................................... 53
5.4 Guarantee Claim ................................................................................................................... 54 5.4.1 Guarantee Claim Tabs ................................................................................................ 55 5.4.2 Claiming a Guarantee ................................................................................................. 55
5.5 Extend or Pay ........................................................................................................................ 58 5.5.1 Extend or Pay Guarantee Tabs .................................................................................. 58 5.5.2 Launching an Extend or Pay Demand ........................................................................ 58
6 Trade Finance Global (TFG) - Inquiries ..................................................................................... 61 6.1 Transaction Status Inquiry ..................................................................................................... 61
6.1.1 Local Equivalent ......................................................................................................... 64 6.2 Open Deals Inquiry ................................................................................................................ 64
6.2.1 Customizing Output Layout ........................................................................................ 66 6.3 Deal History ........................................................................................................................... 67
6.3.1 Viewing a Deal History ................................................................................................ 67 6.3.2 Deal History Search Results ....................................................................................... 68 6.3.3 Launching Transactions from the Deal History Page ................................................. 72 6.3.4 Adding or Changing Reference Number ..................................................................... 72
6.4 Deal Select ............................................................................................................................ 73 7 Trade Finance Global (TFG) - Reports ....................................................................................... 76
7.1 Deal Report ........................................................................................................................... 76 7.2 Deal Report Summarized ...................................................................................................... 78

4
1 Trade Finance Global (TFG) - Introduction
TFG is an Internet-based Trade Finance banking system which provides corporate and commercial
import and export customers an easy-to-use tool to manage all aspects of trade finance transactions,
mainly the interactive cooperation with the customer’s bank.
This guide contains an overview of the major TFG features, including:
Guarantees
Inquiries and reports
1.1 Main TFG Features
TFG provides Nordea’s Trade Finance customers with the following basic features:
Incoming Correspondence – As part of the deal processing, Nordea produces various documents
which are transmitted to TFG. The user can display and print all incoming correspondence.
Transaction initialization – Creation of various steps within a Trade Finance deal life cycle.
Examples are the application for a new or amendment of an existing Guarantee. Applications can
be composed using user-customized templates, including the attachment of deal supporting
documents. Completed and authorized transactions are transmitted to the customer’s bank.
Workflow control – New Transactions waiting for authorization before the transmission to Nordea
(Guarantee Claim) waiting for the customer’s approval or rejection are stored in a pending work
queue.
Online inquiries – Enables a wide range of online inquiries to help the customer manage trade
finance portfolios.
User notification – Upon receipt of incoming correspondence, TFG sends an e-mail notification to
the TFG user.
Deal Messages – Enables free text information transmission regarding a deal to Nordea.
Authorization Matrix – Enables the customer to define how many signatures are required from
which group of officers for any transaction to release it to Nordea. For each transaction, the
customer can define any number of amount tiers.
1.2 Interaction between TFG and Nordea
A new transaction is initiated from TFG. It is then transmitted to Nordea, where the transaction is
processed, for example a new Guarantee. Upon completion of the transaction, Nordea returns the
respective correspondence and deal summary to TFG.
The following sections illustrate the basic system workflow for the Trade Finance deal types, such as
D/C, guarantees and remittances.
1.2.1 Guarantee
A Guarantee comprises all outgoing guarantees requested by the customer.
A Guarantee application in TFG contains the Full Guarantee Text as required by the customer, and
all relevant charges and text.

5
Figure 1 – Guarantee Workflow
1. The customer establishes and sends a Guarantee application to Nordea.
2. Nordea generates the Guarantee, and sends the Guarantee in accordance with the instructions in
the application.
3. Nordea sends a summary of the Guarantee to the customer.
1.2.2 Other Products
In the case of other products processed by Nordea, such as Incoming Guarantee, which are not
initiated in TFG, TFG supplies the customer with Deal Summaries and Incoming Texts from Nordea.
The following workflow diagram includes all the deals that are carried out by Nordea but not directly
handled by TFG.
Figure 2 – Other Products Workflow
1. Nordea receives other product documents (Incoming Guarantee).
2. Summary information and texts are then sent to the customer.
1.3 Transaction Overview
The following TFG transactions must be performed in the listed order:
1. Transaction Initialization — each transaction initialization is made up of a number of data sections,
all of which must be completed in order to finalize the transaction. For example, there are four
sections involved in a Guarantee initialization: general details, participants, attachments and
additional text.
2. Transaction Authorization — once all transaction details are completed, the transaction must be
approved by the required number of authorization signatures before it is ready for transmission. The

6
customer determines the number and type of signatures required based on the value of the
transaction.
3. Transaction Transmission — when transaction details are completed, the transaction is
automatically transmitted to Nordea.
4. Status — all transactions have a status determining the current stage of the specific transaction,
starting with the creation until final release at Nordea.
1.3.1 Launching Transactions
Transactions can be launched in more than one way:
From the individual menus (Guarantee, etc.) on the Navigation Menu
From the Deal History page
1.4 TFG Page Structure
The TFG page has the following main components:
Header
Header Lower Line
Navigation Menu
Inbox
Footer
Figure 3 – Page Structure
1.4.1 Header
The header displayed under Nordea’s logo, includes an upper and lower line. The upper line contains
the following user details:
User Name – ID of the person entering TFG.
Customer – Name of Nordea customer with whom the user is currently working. The user
handles trade finance transactions for the customers defined in the user's group.
Change customers by clicking Customer in the Header and selecting a different customer
from a list of customers for which the current user is authorized.
When the user has authorization for one customer only, the link is disabled.
Date – The displayed date reflects the date from Nordea's web server computer and not the date
from the TFG user’s computer.

7
1.4.2 Header Lower Line and Footer
The lower line of the header and the footer at the bottom of every page includes the following
shortcuts:
Inbox
Home
What’s New – upon clicking this link, the user is routed to a page supplied by Nordea.
Feedback - Specifies the page (form) to which TFG links when the Feedback option is selected.
Help – Link to the user guides.
Figure 4 – Footer
1.4.3 Navigation Menu
The TFG Horizontal Navigation menu displays TFG functions across the top of the TFG window.
Only those functions authorized for the user are displayed.
The navigation choices differ for each user depending on the user’s level of authorization.
Supervisor level users have additional options unavailable to regular users.
Figure 5 – TFG Horizontal Navigation Menu
1.4.4 Guarantees Menu
The Guarantees menu enables the user to:
Apply for Guarantees.
Amend existing Guarantees.
Open a deal using the Copy From functionality
Send a Guarantee claim under an Incoming Guarantee (new)
Guarantee Extend or Pay (new)
Select a Guarantee from the Nordea Template Library (new)
Write a Deal Message to Nordea, available for existing deals in Nordea application
Note: Templates can be created and used for the creation of Guarantees.
1.4.5 Inquiry Menu
The Inquiry menu enables:
Searching for transactions based on user-defined criteria.
Criteria-based viewing of transaction status and history.
Request of reports from Nordea.
1.4.6 Reports Menu
The Reports menu enables:
Generating pre-formatted reports.
Accessing the Nordea Reports Centre
1.4.7 Customize Menu
The Customize menu enables customization of various definitions which are relevant for the usage of
TFG. The options vary according to the authorization of the user:

8
Regular User:
Define the Inbox settings
Change the operating language of TFG
Display and manage banks and parties used within the transactions
Create new and update existing Clauses and Templates.
Supervisor: has user level authorization and in addition can do the following:
Define the number of required signatures for each transaction
Manage the authorization level of users
Approve/Reject, Create event for Four-Eye Control
Define the Remind Period Prior to Payment and the local currency for each customer.
1.4.8 Inbox
The TFG Inbox is the large central area of the page, and includes the following sections:
Incoming Correspondence
Payment/Acceptance
Signature Required
Transactions in Process
Reminders
MO (Middle Office) Transactions.
Figure 6 – TFG Inbox
1.5 Templates
Templates are predefined transactions which include default values. Upon creating a new transaction
based on a template, the user receives the default value from the template in the new transaction.
To Use a Template:
1. From the TFG main menu, select the desired template to find a template for that transaction
type.
A template search window is displayed.
Figure 7 – Template Search window
Template Name Type the exact template name
Case Insensitive Select this checkbox to run a case insensitive search. The insensitive
search treats upper and lower case letters as equal while comparing.
2. Click Search.
A list of the existing templates for this transaction type is displayed.
After selecting the required template, the transaction data entry page is displayed with default values
from the template.

9
1.6 Work Pages
All Work Pages used for creating transactions follow the same conventions, which are detailed as
follows:
Figure 8 – Work Page
Sections: Many transaction pages are divided into sections. The title bars separating the tabs
have navigation arrows on their right side. When clicking the arrow, TFG jumps to the next,
previous, first and last section on the page. TFG jumps from tab to tab by clicking the
corresponding navigation icon on the title bar.
Tabs: Many transaction pages are divided into tabs. TFG jumps from tab to tab by clicking the
corresponding tab on the title bar.
Transaction Detail Zoom Links: Underlined data displayed as a table entry enables navigation to
the transaction details in Display mode.
Mandatory Data Entry Fields: A bold field title or heading indicates that the data entry fields are
mandatory for a transaction.
Inquiry Results Sorting: TFG displays many inquiry results in tables. When the sorting arrows
next to the table column heading are clicked , TFG sorts the results in the column.
10
Inquiry/Deal Reports Results Scrolling: Inquiry/Deal Report results display one page at a time
and include a fixed number of records on a page. At the bottom of each results page there are
scrolling links represented by either a page number or arrows (see Figure 9).
Figure 9 – Scrolling Links
Scrolling Link Action Function
Click the page number Jump to a specific page
Click < to the left of the page numbers View the previous page
Click > to the right of the page numbers View the next page
Click >> to the right of >
There are up to 19 pages in a group of pages.
The >> sign is only available if more groups of pages exist
View the next group of
pages
Click << to the left of >
The << sign is only available if the next group of pages is displayed
e.g. page 21.
View the previous group of
pages
1.6.1 Action buttons – Action buttons are located at the bottom of a transaction page.
Figure 10 – Import D/C action buttons
The following action buttons are common to most of the transactions:
Save (this is to save the data while remaining on the page)
Save&Exit (this is to save the data but exit the page – the transaction will move to the
Transactions in Process tab)
Sign
New Template/Update Template
Export (this is to create a draft in SWIFT format – it is available for Guarantee Issuance and
Amendment)
Deal Note (See below)
Cancel
1.6.1.1 Save, Save &Exit
At the bottom of each page the user has the option to:
Click Save to save the data and remain on the screen (Quick Save).
Or
Click Save&Exit to save the data, exit the screen, and place the item in the Transactions in
Process queue. (This works like the former Save button.)
When clicking Save&Exit, the page will also be validated. TFG will point to the mandatory page and
highlight the field.
Note: Mandatory fields are required only for signing the transaction, not when saving.
1.6.2 Deal Note
TFG allows the user to add notes to when creating or amending a transaction.

11
When clicking the Deal Note button, the Deal Note window pops up and the transaction data is saved
to the database. If the transaction does not contain a Reference Number, an error message is
displayed prompting the user to fill in the required field.
1.7 Icons
The user can activate various actions during the Transaction process by clicking the icons. The
following list explains the function of each action icon.
Icon Action Function
Down Directional Arrow Scroll down to the next section on a page
Up Directional Arrow Scroll up to the previous section on a page
Directional Arrow Scroll up or down between sections within the
current page
Directional Arrows Scroll to the previous and next sections or to the top
and bottom of the page
Add/Remove Arrows Add and Remove document types
Copy From Initiate a new transaction based on the existing
transaction/deal details
Reject Reject an Amendment under an Incoming
Guarantee
Pay/Approve Accept an Amendment under an Incoming
Guarantee or make a Payment under a Guarantee
for which an “Extend or Pay” request was received.
Print Print the current TFG form from the default printer
Reject Reject the signatures already present in the
transaction, enabling editing of the transaction
Sign List Display a list of required and executed signatures
Sign Approve the current transaction
Edit Edit the appropriate data
Delete (Trash) Delete and remove all transactions that have not
received signature approval from TFG
Extend The Extend or Pay demand is relevant to Outgoing
Guarantee transactions (electronic acceptance from
the customer).
Note: A message is received from the Advising
Bank requesting to extend the guarantee. The
message states that in case the applicant refuses to
extend, this message should be regarded as a claim.
Deal Note Add or update a note to the transaction
Draft/Export Generate a draft of the outgoing SWIFT message in
the notepad text format. Relevant for Guarantee
Issuance and Amendment.
Zoom In Zoom in to a specific record
Zoom Out Zoom out of the specific record

12
Open Clause Library Select clauses
Calendar Display the popup calendar
Dismiss Dismiss the selected item from the Reminder section
of the Inbox
Select Output Layout Customize result table columns of the Open Deals
inquiry

13
2 Trade Finance Global (TFG) - Customize
This topic covers the way in which to modify or customize TFG according to specified categories,
including:
Preferences
Banks
Parties
Clauses
Template
Figure 11 – Customize List: User view
Note: The availability of options to a specific user is dependent on the user authorization level.
2.1 Preferences
The user can configure the way in which the Inbox sections are displayed. The Inbox Settings give
the user control over opening and closing the four Inbox sections by default.
2.1.1 To Set User Preferences:
1. From the Customize menu, click Preferences.
The User Preferences window is displayed in update mode.
Figure 12 – User Preferences window: update mode
The following are options available in the preferences window:
User ID A unique description assigned to each user
User Name Full name of the user
Default Customer This is the customer on whose behalf the user will work when entering
TFG. In order to work on behalf of another customer for whom the user is
authorized, the user must click the Customer link at the top of each page.
The Choose Customer field allows the user to switch to another
customer.
Super User If this option is flagged, then the signature of this user alone is sufficient
to transmit any transaction to Nordea.
Supervisor Indicates that this user has supervisor functions as explained in Section
1.4.7

14
Group Inquiries Selecting this checkbox allows the user to run an inquiry on all the
customers that have been assigned to this user. This is relevant for the
following:
Deal Select
Transaction Status
Open Deals
Deal Report
The following are the available Inbox settings:
Inbox Layout Items Inbox items display as top down format, item by item.
Tables Inbox items display in table format, i.e. each Inbox item
is displayed in one single line, increasing the number of
items visible on the screen.
Inbox Default Tab Select the inbox tab to open when clicking the Inbox tab. The following
options are available:
Incoming Correspondence
Approval/Rejection
Signature Required
Transaction/Event in Process
MO (Middle Office) Transactions
Three checkboxes defining Reports Centre settings may also be available underneath the Inbox
settings.
The following are the available Reports Centre settings (Please refer to the Reports Centre Guide for
additional information):
:
Define Reports If the parallel switch in the Group Profile to which the user belongs is
checked, the “New”, “Save” and “Delete” icons, along with the “Definition”
and “Criteria” tabs, will be active for the user. Please note that as per
current policy, this option will not be made available for Nordea
customers.
Generate Reports If the parallel switch in the Group Profile to which the user belongs is
checked, the “Run” icon will be active for the user.
Distribute Reports If the parallel switch in the Group Profile to which the user belongs is
checked, the “Schedule/Properties” and “Deliveries” tabs will be active
for the user.
The following is the available Other setting:
Audit Trail Possible
values
Selected: the user has access to Audit Trail.
Cleared: the user does not have access to Audit Trail
Note: This option does not appear for Supervisors, as they already by
default have Audit Trail access.

15
2.2 Customize User Notification
Upon arrival of incoming correspondence and deal information from Nordea, TFG can notify the user
by e-mail.
In the User Preferences Window (Figure 12), click Set-Notif to Customize User Notification. TFG
displays a page comprising two parts:
Predefined legal information
Notification preferences
Predefined legal information appears in the window in protected mode. The user has to accept the
conditions by marking the Accept checkbox. After accepting the legal conditions, the lower
Transaction Notification fields are activated. This allows the user to select specific TFG transaction
events and choose who to e-mail notification for specific transaction types.
Figure 13 – e-mail Alert Notification information
The available fields are as follows:
e-Mail Alert The e-mail address where a notification message is to be sent
Transaction Name The name of the transaction or event against which notifications are to be
sent
2. Click Save to save the selected notification parameters.
TFG allows the user to delete the notification address. An error message appears when both the
Accept and Activate checkboxes are checked.
2.2.1 Deleting the Address
1. Select the Access checkbox.
2. In the e-Mail Alert field, delete the field value.
3. Clear the Activate checkbox.
2.3 Banks
The Banks Profile page lists information pertaining to every bank that has a dealing relationship with
the customer.

16
Note: TFG supports a preload of the banks found in existing Deals in Nordea related to the
customer. These banks comprise the basic list of banks included in TFG.
When a transaction is opened containing a new bank, the full name and address is entered. After
receiving the deal history from Nordea, the bank is added automatically to the bank profile list
together with the bank’s ID.
2.3.1 To View the Banks Profile Window:
1. From the Customize window, click Banks. The Banks profile window is displayed.
Figure 14 – Banks Profile Window
The Banks Profile window includes information on:
Bank ID The Bank code.
Branch The branch of the bank.
Name The bank branch name.
There may be several branches defined for a bank.
To define bank details for a new D/C, select a Branch code from the
dropdown list. The full bank name and address are displayed.
Street The bank branch street name.
City The bank branch city name.
Country The country where the bank branch is located.
Inactive Indicates that the merged banks are inactive. For any banks flagged as
“Inactive”, the Delete button is not available.
When searching for these inactive banks in any future deal, they do not
appear and it is not possible to select them.
Note: Only Nordea is able to modify the bank, although a bank can be deleted from the customer’s
bank list by highlighting a bank record and clicking the Delete icon.
2.4 Parties
The Parties profile window lists the parties, or Deal participants, that have a dealing relationship with
the customer and allow maintenance of customer parties.
2.4.1 To Access the Parties:
1. From the Customize menu, click Parties.
The Parties window is displayed.
17
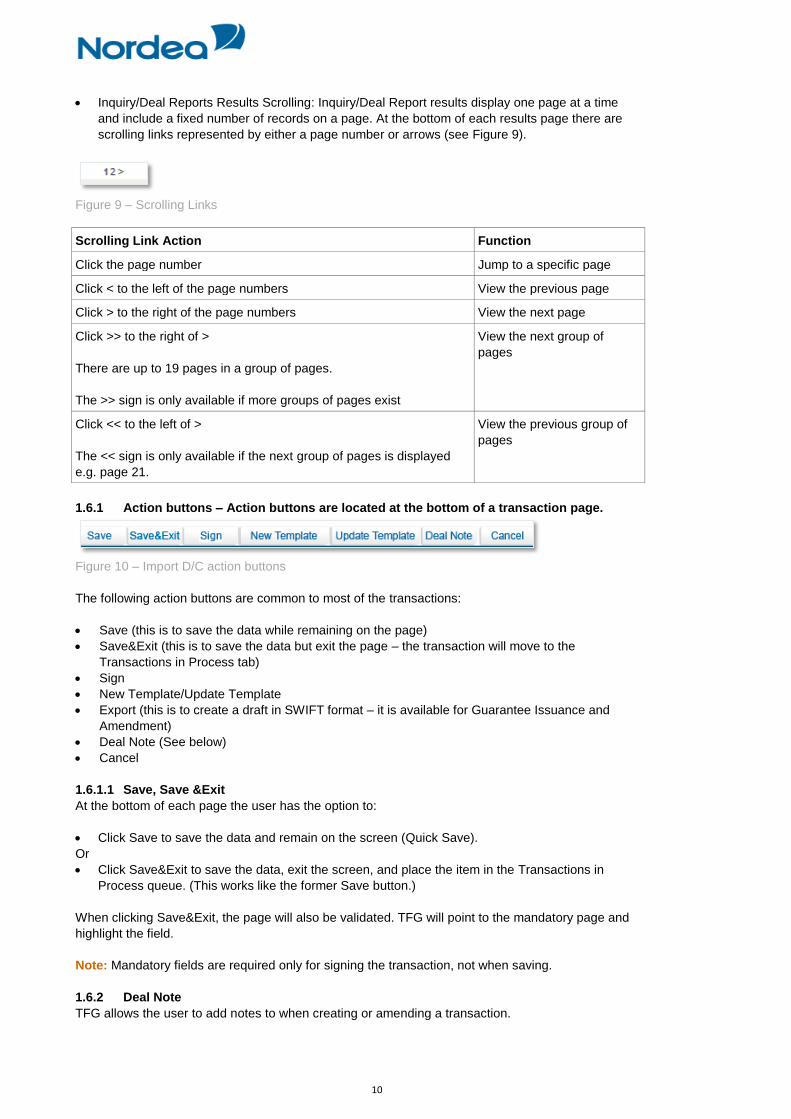
Figure 15 – Parties Profile List
The Parties window includes information on:
Party ID The Party code.
Branch The branch of the party.
Name The party branch name.
There may be several branches defined for a party.
To define party details for a new D/C, select a Branch code from the
dropdown list. The full party name and address are displayed.
Street The party branch street name.
City The party branch city name.
Country The country where the party branch is located.
Note: TFG supports a preload of all the parties found in existing Deals in Nordea related to the
customer. These parties comprise the basic list of parties included in TFG. When a transaction is
opened containing a new bank, the full name and address is entered.
2. Click Add to add a party. The Party Details maintenance window is displayed.
Figure 16 – Parties Details Maintenance Window

18
Party ID The party code as it is displayed in the participants list
Branch The branch code. TFG allows several branches of the same party
Name Full party name
Street Party address
City Party location
Country Party location
Rid Bolero Identification Key
Extension Bolero Extension
3. Click Save to add the participant.
Or
Click Cancel to return to the previous page without adding the participant. If the party is added, it
appears in the Party Profile list.
Or
4. Click the Get Deal Party button to add parties which have been downloaded by Nordea without
an ID to the parties list.
The Import Party Detail From Deal window is displayed.
Figure 17 – Import Party Details From Deal Page
5. Click the Import Party Detail from Deal icon to update the Party Details.
The Party details Maintenance page is displayed (see Figure 16
Figure 16). After assigning a Party ID and Branch and clicking Save, the party is added to the
parties list and will appear in the party search list within a transaction.
6. To edit a party, in the Party Profile list, click Edit to modify the details of a party. The Party
details Maintenance page is displayed (see Figure 16

19
7. Figure 16).
Note: The Edit icon is available only for parties which have been created by the user or parties which
have been downloaded by Nordea without an ID. Such parties may be updated after adding them to
the parties list via the Get Deal Party function, see Figure 15.
8. Click Save to save the modifications.
Or
Click Cancel to return to the previous page without saving the changes.
9. To delete a party, click Delete .
10. Once finished with party editing or deleting, click Cancel to return to the previous page without
saving the changes.
2.5 Clauses
The user is able to create clauses or a text library that can be used to facilitate the data entry in the
Text windows on the transaction.
The user creates the text of clauses and defines to which of the text windows and transactions each
clause is relevant.
Alternatively the user is able to use existing clause descriptions, which are already defined, instead
of the free text window and clause library. These defined clause descriptions are linked to the various
Text Windows by checkboxes (see Clause checkboxes in Figure 19).
The clauses created by the user are added to those defined as standard clauses by Nordea.
In the Texts section of the transaction, the Open Clause Library icon indicates that there are
clauses relevant to the window. When clicking this icon, a list of defined clauses relevant for the
window is displayed. After selecting the required clauses, the content of the clauses is copied to the
window.
2.5.1 To Display the Clauses Search Window:
1. From the Customize menu, click Clauses.
The Clauses Search window is displayed.

20
Figure 18 – Customize Clauses Window
The user is able to perform the following actions:
Create a new clause by clicking Add.
Search for a specific Clause by entering the Identification Code of the relevant Clause in the
Clause ID field and clicking Search.
Display a list of all existing clauses by leaving the Clause ID field empty and clicking Search.
The following icons enable the user to:
Edit an existing clause by clicking Edit .
Delete an existing clause by clicking Delete .
2.5.2 To Add a Clause:
1. In the Customize Clauses window, click Add.
The Clause Details window is displayed.

21
Figure 19 – Clause Details Window
2. Enter the values in the following mandatory fields:
Clause ID
Clause Description
Clause Text
If the text of the clause is more than twenty lines, click the Zoom Text icon to view or edit all the data.
3. In the Clause Availability section, select the relevant checkboxes.
This indicates in which window and in which transaction the clause is available.
4. Click Save & Exit.
22
2.6 Template
This topic covers searching, viewing, editing and deleting transaction templates.
2.6.1 Creating a New Template
Templates are predefined transactions which include default values. They can be used to easily
create new transactions without having to enter the details multiple times.
Note: Templates can be created from many of the menu screens. For a complete list of screens from
which templates can be created, see Templates.
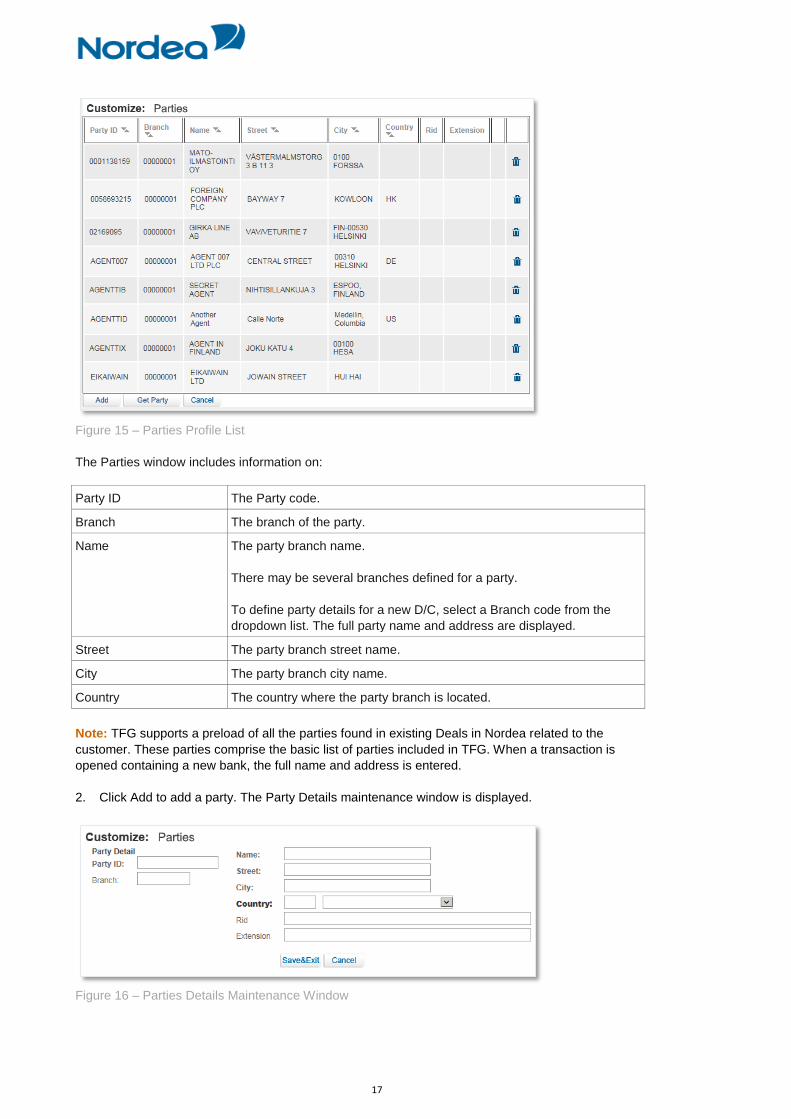
1. From the bottom of the transaction screen, click the New Template button.
The Save template popup window appears.
Figure 20 – Save Template As: Create Mode
2. Type the name of the newly created template and click Save.
Note: Depending on the transaction type and the details that have been entered, the ‘Save Template
As’ textbox may be filled in with a default value.
A window will appear asking for verification of the template name.
3. Click OK.
The Template has been created.
Note: If at least one template has been created for this transaction type, a new line containing the
name of the transaction, and the word “template” appears in the submenu under the original
transaction name.
It is possible to create multiple templates. Additional templates can be created in the same way from
the transaction screen.
2.6.2 Updating a Template
The TFG user may update any previously created template.
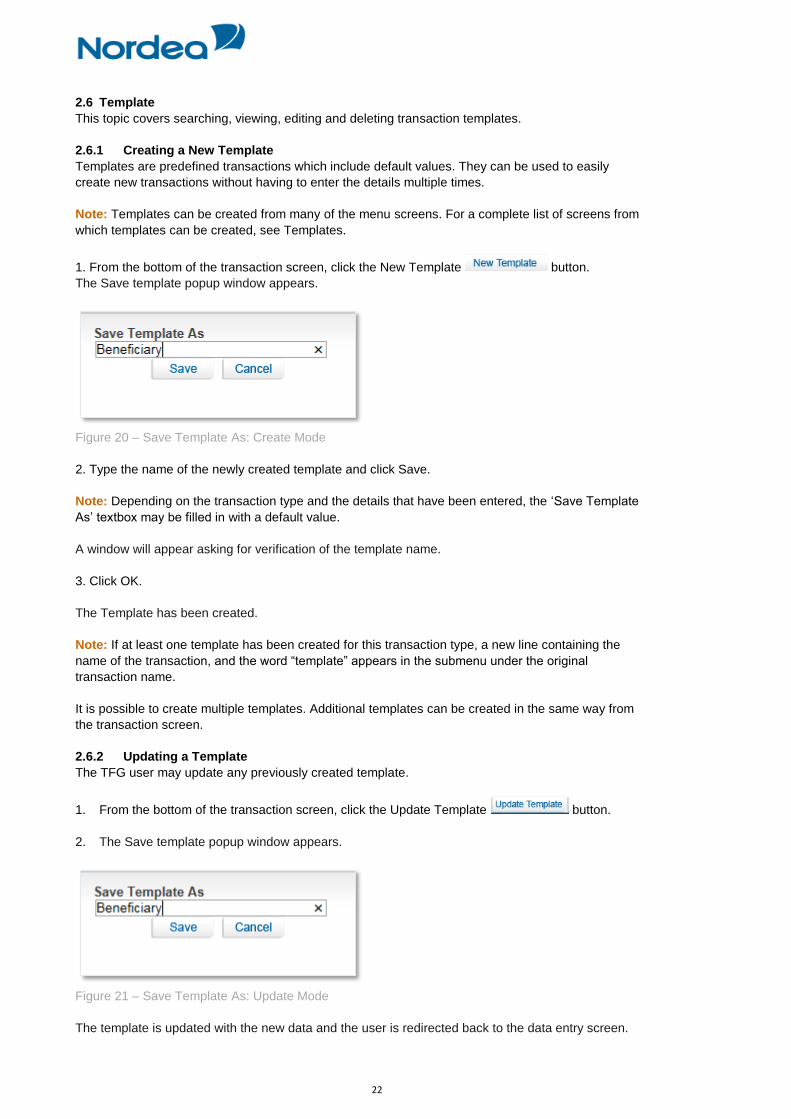
1. From the bottom of the transaction screen, click the Update Template button.
2. The Save template popup window appears.
Figure 21 – Save Template As: Update Mode
The template is updated with the new data and the user is redirected back to the data entry screen.

23
Note: The functionality to update a template is available in Issuance steps only.
2.6.3 Accessing the Templates
1. From the Customize menu, click Template.
The Template search window is displayed.
Figure 22 – Templates
The templates are grouped by transaction type. The Navigation menu options indicate which
transactions contain templates by showing a template icon next to the menu option.
2. From the Deal Type dropdown list, choose the required transaction type and click the Search
button. The search results list is displayed.
Figure 23 – Templates Search Results List
If no criterion is selected in the Deal Type field, by clicking Search, TFG displays all transactions.
3. To edit a template, click Edit .
The selected template details screen is displayed.

24
Figure 24 – General Details and Participants
4. To delete a template, click Delete .
5. To view a template, click the link to that template, indicated by a blue font and underlined.
2.7 A Functionality of the Enter Key
When the TFG user hits ENTER, depending on the screen the following occurs:
2.7.1 ENTER for Saving
1. In any transaction screen, hitting ENTER controls the Save button; the entered data will be saved
and the user will remain in the active screen.
Figure 25 – ENTER as Save Function
2.7.2 ENTER for Searching
In screens with the Search button, hitting ENTER will control the Search button and the current
search will be processed. See the Open Deals Inquiry screen below as an example.
Figure 26 – ENTER as Search Function
2.7.3 ENTER for Sending a Request
In the Inquiry request, hitting ENTER will control the Request button.
Figure 27 – ENTER as Request Function
Note: In TFG screens that do not have Save, Search or Send buttons, the ENTER key does not
have any specific function.

25
3 Trade Finance Global (TFG) - Functions
This is a description of various common functions available across TFG.
3.1 Common Functions
This section contains TFG functions shared in different deal transactions.
3.1.1 User Notification
TFG provides user notifications upon arrival of information in TFG for individually defined events. The
notification is received by e-mail.
TFG allows the customer to control the stages of deal development. Each time a new deal step is
transmitted from Nordea to TFG, the user is notified. For receiving the notification, the user should
define general parameters in which these services are available. The message is generated
automatically according to the previously defined text.
3.1.2 Participants
The Participants tab is common to all transactions and is intended for entering Deal participant data.
The user is able to define the Beneficiary and Advising Bank. The participants are displayed
according to the Counterparty type of the Deal.
To Fill In the Participants Tab:
1. In the title bar, click the Participants tab.
Figure 28 – Guarantee Application Page: Participants tab
The Participants tab enables the customer to specify the Beneficiary and Advising Bank details
relevant to the Guarantee. The user can select a party from a list or by filling in the name and
location details.
When a specific Beneficiary is selected from the list in the Participants section, the Advising Bank of
the last Deal using that Beneficiary and the same currency automatically displays in the Advising
Bank fields as the default value.
Note: The Beneficiary details are mandatory. If the Advising Bank details are not entered, the
Advising Bank is selected by Nordea.
The following are the available Participants tab fields:
Create Party form Deal
icon
On clicking the Deal icon the Parties screen pops up.
Note: Create Party is not available for banks, since TFG users cannot
update the list for this party type – they are received from Nordea.

26
Name The beneficiary or Advising Bank name. There may be several branches
defined for a beneficiary. To define participant details for a new
guarantee, enter the full Beneficiary or Advising Bank name or just enter
any included string of letters of the name in the search field.
Note: The user can identify a specific party or bank by entering any
number of characters in the Search by Name field. TFG can locate the
party or bank by any string entered, whether this represents the first
letters of the name or any string of characters within the name.
Street The street name where the Beneficiary or Advising Bank is located
City The city where the Beneficiary or Advising Bank is located.
Country The country where the Beneficiary or Advising Bank is located.
2. When relevant, define additional parties associated with the transaction by entering data in the
fields described below (see Figure 29).
3.1.2.1 Additional party
The customer can select an additional party by entering a code number or by filling in the name and
location details.
If the code is entered in the database, the name and location details are displayed automatically
when the code is keyed in.
If the required additional party code does not exist in the database, type the full name and
address of the additional party in the fields provided.
Party type The additional party's type. The user can key in the party type or select
from a dropdown list. Examples are, Agent, Insurance Company.
Name The additional party's branch name. There may be several branches
defined for a party. To define participant details for a new transaction,
enter the full party name.
Street The street name where the additional party is located.
City The city where the additional party is located.
Country The country where the additional party is located.
3.1.2.2 Party Screen
On clicking the Create Party from Deal icon , the Party screen pops up.
Figure 29 – Parties popup

27
Party ID The Party ID assigned to the new Party
Branch The optional Branch assigned to the Party.
Name Party name
Street Party street
City Party city
Country Party country
Fill in missing information and click Save.
The party is added to the Party register, the Party screen is closed and the user returns to the
Transaction screen.
3.1.3 Payment Details
In the Payment Details tab, the user enters data to instruct Nordea how to make payment for various
Guarantee items, such as bank commissions and charges. The user selects the items from the
dropdown lists.
Figure 30 – Payment Details
Up to three bank charges can be defined.
If data exists in the Payment Item field, a corresponding Account Number must be selected.
When there is a blank Payment Item field, any additional Payment Item and corresponding
Account Number can be selected.
3.1.4 Attachments
TFG provides the user with the facility of attaching files to any application for internal use at the user
site and for upload to Nordea. Documents pertaining to transactions can be attached and viewed
using the Attachments tab within the transaction page.
To Add or Modify Attachments to the Transaction:
1. In the title bar, click the Attachments tab.
Figure 31 – Defining Payment Details: Attachments Tab
2. Select the document type from the Document Type dropdown list.
3. Click Add. The Attachment window is displayed.

28
Figure 32 – Attachment: Browse to File Location
4. Click Browse and browse to where the file is located using the Windows dialog box.
When the customer click Open in the Choose file window, TFG checks that the file path and name
exists, and that the file format is one of the formats defined as supported formats.
5. Click Attach to attach the file to the Deal. A confirmation message is displayed.
Figure 33 – Attachment: Documents Location Confirmation
6. Click Save & Exit to save and complete the attachment process.
Or
Click Cancel to cancel the transaction.
After a successful attachment, the file is saved in the database connected to its document type, and
the previous screen is displayed.
Figure 34 – Attachment: Attached Document Added
When clicking a specific row in the attachment table, the respective file name appears in a field at the
bottom of the window.
7. Repeat Steps 2 through 5 to add additional documents.
8. To delete an attachment, select the attachment record, and click Delete.
Click OK in the confirm delete message. The document name is deleted from the list and the
attachment is deleted from the database.

29
9. To update an attached file to the Deal, select the required file and click Update.
10. To preview an attached file, select the required document and click Preview. The File Download
window is displayed:
Figure 35 – File Download Window
11. Click Open to display the attachment.
Note: When the attached document opens in an application that allows editing and performing
changes of the original file, those changes are not saved in TFG.
Note: In order to upload any specific attachment to Nordea, highlight the attachment, click on the
“Upload” checkbox and press the Update icon. Any attachments not flagged for upload will not be
received by Nordea and will serve only the local users.
The customer can print the attached document using the Preview functionality.
3.1.5 Text
The Text tab is included in different types of transactions from initiation up to Deal Messages. The
tab comprises a few text fields. The values from these fields are transferred to Nordea as part of the
deal and also can be mapped to the relevant field of the deal that will be generated in Nordea.
Filling in the Text Tab:
1. In the title bar, click Text.
The Text tab is displayed.
Figure 36 – Free Format Window
2. Use the Text tab to enter free text for specific categories and view and specify account details.
Enter information in the following categories and in other custom-defined categories:
Note: the process for entering text when the Template Library is used is different to the following and
is explained in Section 5.2.
Purpose of the
Guarantee
Provide here the contract number, contract date, goods description, offer
number for Bid Guarantees, tender number etc.
Guarantee Text Part 1 Enter here the text of the guarantee

30
Guarantee Text Part 2 Continue entering the text if all the data will not fit into the previous
window
Comments to Nordea Used to enter additional comments
Customer Instructions Used to enter any customer instructions to the transaction
Use the following icons to manage the Text’s free text field:
Zoom Text Enlarges the text box area enabling the user to edit or enter new data in
the enlarged text box.
Open Clause Library Displays a list of defined clauses relevant for the window. The user
copies the clause contents to the window by selecting the required
clause.
3.1.5.1 Clause Library Window
The clause library functionality allows the user to choose the predefined options. The Open Clause
Library icon is located on the Text tab and is shared among different deals.
Open Clause Library Displays a list of defined clauses relevant for the window. The user
copies the clause contents to the window by selecting the required
clause.
To Display a Clause for a Specific Text Field:
1. Click the Open Clause Library icon next to the relevant text window. The Clause Library popup
window is displayed.
Figure 37 – Clause Library
2. Select the relevant clauses by checking the appropriate checkbox and clicking Select.
Or
Include all the clauses listed in the Clause Library by checking the Clause ID checkbox at the top of
the column and clicking Select.
To view the detailed description of the Clause, return to the Text tab.
To remove a clause from the Text tab, delete the text of the clause from the relevant window.
3.1.5.2 Incoming Correspondence in Amendments
The customer users have quick access to all incoming correspondence received from Nordea during
the generation of an amendment transaction (i.e. Amendment of guarantee). When creating an
amendment for any type of product, the screen includes all correspondence which has been received
from Nordea; the user is able to immediately view any of the presented texts.

31
Figure 38 – Text Tab: Incoming Correspondence section
The section contains the Incoming Correspondence received from Nordea and belongs to the
selected deal.
3.1.6 Signatures
Transaction signatures are essential for the process of completing every TFG transaction and
sending it to Nordea. This process is relevant for initializing a new deal, amendment and payment,
and can include one or more TFG users depending on the TFG setup.
Figure 39 – Transaction signature buttons
The following buttons are located at the end of each transaction page:
Save Save transaction and remain on the page.
Save & Exit Save the transaction and exit the page. The transaction will move to the
Transaction / Event in Process Tab.
Sign Sign the transaction
New Template Allows the user to generate the template for further transaction initiation
based on a previously entered date. The transaction will not be sent to
Nordea
Update template Allows the user to update the data of an existing template. The
transaction will not be sent to Nordea.
Deal Note To add a Note to the transaction
Export To generate a draft of the Guarantee Issuance or Amendment in SWIFT
Format
Cancel Return to the previous page.
Click the appropriate button to end the transaction.
In TFG all transactions require signatures prior to transmission to Nordea for processing. Three types
of users are involved in the signature process:
Regular user: Can only view and sign authorized transactions.
Supervisor: Depending on whether the Supervisor Restriction option is in force, the Supervisor
can only authorize signature levels and the number of signatures required for each type of
transaction. If not restricted the Supervisor can sign transactions like regular users.
Super User: Can release any transaction by signing it overriding all other signature authorization
processes.
Within each signature level, the number of required signatures is defined. After the last signature, the
transaction is routed for processing to Nordea. The Signature Required section of the TFG Inbox,

32
displays transactions still requiring signatures according to the authorized level of each user. A
Supervisor level user sees all Deals pending signatures.
3.2 Deal Messages
TFG provides a Deal Message option for TFG transactions. Any message relating to a guarantee
transaction must be made from the Guarantee Deal Messages Section. The customer’s Deal
Messages are stored in Nordea as part of the deal history.
To Create a New Deal Message:
1. From the Guarantee Navigation menu, click Deal Message.
The Deal Message window is displayed.
Figure 40 – Deal Message: Select Deal
Note: The new deal message can be initiated only for open deals that do not contain any messages
unread by Nordea.
2. Select a specific transaction by keying in the Deal Number and/or Reference Number of the deal
that requires a Deal Message and click Search.
Or
Leave the Deal No. and Reference No. fields empty, click Search and select a specific transaction
from the list of existing Deals displayed in the Deal Message window.
Figure 41 – Deal Message: Result List
If required, click the required Deal title to view Deal details.
3. Click the Open icon next to the Deal for which the user wish to send a Deal Message to
Nordea. The chosen Deal Message is displayed.

33
Figure 42 – New Deal Message Window
4. Select from one of the following radio buttons:
Regular E- mail This deal message has no special priority.
Urgent E- mail This deal message will be handled by Nordea with high priority.
5. Enter relevant data in the following fields:
Topic A dropdown list which includes the topic of the deal message. It is used
for the navigation of the deal message by Nordea.
Title The title given to the message
Text The free text message area
6. Attach all relevant documents in the Attachments area.
The column headers are as follows:
Document Type A dropdown list of available document types, such as Proforma Invoice
and Packing List.
Owner The user who attaches the document.
Upload When this box is checked the attached documents will be uploaded to
Nordea along with the transaction.
If not checked the attached documents are intended for internal use only,
e.g. for display by the signing person.
7. Click Save to save the data and stay on the same screen.
Or
Click Save & Exit to send the message to the Transactions in Process section.
Or
Click Sign to send the message to be validated before it is sent on.
Or
Click Cancel to erase the message.

34
3.3 Copy From
TFG allows the user to initiate a new transaction based on an existing one even if it has not yet been
released. The user can select either a transaction that was initiated in TFG or Nordea’s authorized
transaction relevant for the Product, by selecting the Copy From option.
Note: Rejected transactions are also displayed in the Copy From screen. It is therefore possible to
use the Copy From functionality on these rejected transactions as well.
To Copy an Existing Transaction:
1. From the Navigation menu, click Copy from. The Copy from search window is displayed.
Figure 43 – Copy From: Search Window
2. To view all existing transactions leave all the fields empty and click Search.
Or
Search for a transaction by Deal Number, Transaction Name and/or Customer Reference and click
Search. The selected transaction is displayed.
Figure 44 – Copy From: Search for Transaction
3. Click the Copy From icon to display the relevant TFG application page containing the data from
the transaction it is based upon, excluding the Deal and Reference Number.
The data in the Establish By field indicates who created the transaction, the customer (the
transaction was initiated by the customer) or Nordea (the transaction was authorized by Nordea).
From this point on, the transaction is completed like a regular transaction.
3.4 Wild card Search
The wild card search option is available for all alphabetical searches in the TFG system and can be
applied in the following TFG search fields:
Party name
Reference number
Invoice Number
Deal Number
Template name
Counterparty Reference Number
Free Text

35
The wild card search can be conducted by typing the following strings in the relevant field:
*XXX
This search retrieves any party, which name ends with typed characters.
XXX*
This search retrieves any party, which name starts with typed characters.
XXX*YYY
This search retrieves any party, which name starts with typed characters and the name contains the
characters after the *
*text*
Search for any text entered in the Free Text Fields.

36
4 Trade Finance Global (TFG) - Inbox
The Inbox is the root screen of TFG. All current transactions can be updated or viewed from this
screen under the various folders. In addition all current Incoming correspondence can be viewed
from this screen.
4.1 Inbox Navigation
The Inbox page enables the user to easily display the content of the Inbox sections according to the
selected business unit like Import, Export, and Guarantees.
The Inbox is divided into the Navigation menu, located on the upper part of the page and the Work
page, located below.
From the Navigation menu, the user performs all the main functions of TFG including Open New
Deals, Go to Inquiry, Customize TFG and Build New Templates. The Work page displays the
following tabs:
Incoming Correspondence
Approval/Rejection
Signature Required
Transaction/Event in Process
MO Transactions
Reminders
By clicking the tabs, the user toggles between the various Inbox sections. When a tab is selected, its
colour changes to white.
4.2 Inbox Settings Configuration
From the Customize: Preferences link of the Navigation menu, the user is able to configure which
Inbox sections open by default when entering the Inbox.
Figure 45 – Inbox Settings
The Items and Tables radio buttons allow the user to define the layout of the items appearing in any
section of the Inbox, either displayed as single items or within a table.
Note: the “Tables” option has been defined as the default for TFG.
Figure 46 – Items in Inbox Displayed as Single Items

37
Figure 47 – Items in Inbox Displayed in Tables
The User also defines the e-mail Notification alert registration options from the Inbox Settings page
by clicking Set-Notification .
4.3 Incoming Correspondence
The Incoming Correspondence section contains all the documents and attachments sent from
Nordea to the user.
Next to each document, there are four icons that enable printing, deleting the document from the
arrival list, adding/modifying deal note and adding additional reference data. This typically happens
when the documents are no longer required in the Incoming Correspondence section. See Figure 46
Figure 46and Figure 47.
Note: Even though an incoming document has been removed from the Incoming Correspondence
section, it will still be available under the Deal History of the respective Deal.
Note: An option exists to NOT show a specific document type in the inbox, but to send this type
directly to the Deal History. For example, you might not want to see debit and credit advices in the
inbox. This configuration is made by Nordea based on a specific customer request.
Note: To maintain optimal performance, the inbox should contain the minimum number of documents
required for daily operations. Once you have viewed and acted on a specific document, it should be
deleted. Nordea have configured a specific number of documents which should be held in the inbox,
and if this number (currently set at 20) is exceeded, you will receive the following message each time
the inbox is accessed, and you will need to acknowledge the message each time it is generated.
4.3.1 Incoming Correspondence Bulk Operations
Bulk Operations has print and delete operations for a number of selected Incoming Correspondence
items at one time.
To Print or Delete a Number of Selections in Bulk Operations:

38
1. From the Incoming Correspondence tab, click Bulk Operations .
The Bulk Operations window is displayed.
Figure 48 – Incoming Correspondence Bulk Operations Window
2. Select the relevant radio button according to the following criteria:
All Both deleted and current correspondence items
Deleted Only correspondence deleted from the Incoming Correspondence list
Live Only correspondence that currently exists in the Incoming
Correspondence list
3. Select the required item by inserting data in one or more of the following fields or by selecting
data from the dropdown lists:
Transaction Name
Deal Type
Deal No.
Range Dates: A specific date range
4. Click Search. The list of Incoming Correspondence items matching the criteria is displayed.
Figure 49 – Incoming Correspondence Bulk Operations: Search Criteria List
5. Select the entries to be printed or deleted.
6. Click Delete or Print to perform the selected function on the checked entries.
4.3.2 Registration of Additional Reference Data
The location/timing on which a customer user enters the additional reference is upon the receipt of
information regarding new deals from Nordea. In TFG, this is upon the arrival of any incoming
correspondence from Nordea, which is available in the Inbox instantly. The Incoming
Correspondence screen contains a column, called “Ref” (see Figure 46 and Figure 47).
Upon clicking any Ref icon, the following screen is displayed:

39
Figure 50 – Additional Reference Number for deal coming from Nordea
Figure 51 – Additional Reference Number for deal generated by Customer
Deal No. This is the Deal No. assigned by Nordea.
Counterparty This is the name of the counterparty as downloaded from Nordea.
Customer Reference No. For transactions which are received from Nordea (e.g. Incoming
Guarantees), this field is available for input.
For transactions originated by the customer (e.g. Guarantees), the
field is protected with the data entered by the user in the transaction
creation. In order to update that reference number, use the “Change
Reference Number” option which can be launched from the foot of
the Deal History screen. In both cases, the new or amended
reference number is automatically uploaded to Nordea and will be
quoted on future correspondence.
Counterparty Name and
Address
For transactions received from Nordea (e.g. Incoming Guarantees),
the user can enter the counterparty’s name and address.
For transactions initiated by the customer (e.g. Guarantees), the
name and address fields are protected with the data from the
transaction creation
Counterparty Reference
No.
In this field, the user can assign the counterparty’s Reference No. It has
the same size and attributes as the customer Reference No. field in the
new Issuance transactions and can subsequently be used in various
inquiry searches.
A value entered in the respective field in the Deal History screen is
defaulted.

40
Save When clicking the Save button, the entered data is saved and the
window is closed.
Cancel When clicking the Cancel button, the entered data is not saved and the
window is closed.
The option to register the additional reference data is on an incoming correspondence level;
however, as multiple correspondences may be received from Nordea for the same or different steps
of the same deal, the registered additional reference data is stored at the deal level. As a result,
when clicking the Reference icon, the screen is displayed allowing to change the previously
registered information.
TFG will not allow the same customer Reference No. for more than one deal of the same type.
TFG allows the same counterparty Reference No. for different deal type; however, in case of
duplication TFG prompts a warning message to the user.
4.4 Approval/Rejection
For guarantees this tab is used for the following purposes:
To approve or reject amendments received under an Incoming Guarantee which require your
approval.
To respond to “Extend or Pay” requests which are received under guarantees issued on your
behalf. You may choose to either Pay or to Extend the guarantee. Non extension will be
considered as a claim.
For each item, there are icons used for the following purposes:
Pay/Approve
Reject
Extend
Deal Note
Figure 52 – Approval/Rejection tab
Transaction Name The nature of the transaction (i.e. Guarantee or Incoming Guarantee)
Reference No. Customer Reference Number if provided by the customer
Deal Number Nordea’s Deal Number
Amount The amount of the transaction
Principal For Incoming Guarantees this is the Applicant
Remitting Bank The Bank sending the transaction
Draw The Number of the claim/payments
Date Date of receipt
Pay/Approve Approve an Amendment under an Incoming Guarantee which has been
downloaded by Nordea and requires your approval or select to pay a
guarantee for which an “Extend or Pay” request was received by Nordea

41
Extend In case an Extend or Pay request is received under an Outgoing
Guarantee, it will appear in this tab, and you may select this icon in order
to extend it.
Reject Reject an Amendment under an Incoming Guarantee which has been
downloaded by Nordea and requires your approval
4.4.1 Payment Instructions for Outgoing Guarantee
As explained above, in case a message is received from the Advising Bank requesting to extend a
guarantee and if not extended consider it as a claim, the customer should extend or pay the outgoing
guarantee transaction (electronic acceptance from the customer).
To Pay an Outgoing Guarantee:
1. Click the Approval/Rejection tab heading.
2. Select the required outgoing guarantee transaction and click Pay .
The Payment Instruction for Guarantee window is displayed.
Figure 53 – Payment Instruction for Guarantee
General Details
Reference No The customer’s reference number
Amount The guarantee balance
Currency The guarantee currency
Payment
Amount/Currency
The guarantee balance/currency

42
Payment Items
The user can select various accounts and currencies
Attachments
The user can add attachments for internal use or upload to Nordea
On signing a PAY transaction, the item is removed from the TFG Approval/Rejection tab when the
user processes the item. In case the item is cancelled before a release, it will be returned to the
Approval/Rejection tab.
4.4.2 Extending an Outgoing Guarantee
In case a message is received from the Advising Bank requesting to extend the guarantee, the
customer should extend or pay the outgoing guarantee transaction (electronic acceptance from the
customer). The message states that in case the applicant refuses to extend, this message should be
regarded as a claim.
To Extend an Outgoing Guarantee:
1. Click the Approval/Rejection tab heading.
2. Select the required outgoing guarantee transaction and click Extend .
The Amend Guarantee window is displayed.
Figure 54 – Amend Guarantee
General Details
Expiry Date The current expiry date of the guarantee
Requested Expiry Date The expiry date, which has been requested by the beneficiary and
downloaded from Nordea.

43
Extend until Date The Requested Expiry Date is defaulted. The user can change the date;
however, the date must be greater than the current expiry and the
current date.
Attachments
Attach any documents you require as per standard attachment functionality
Text
Provide any required additional data in the provided windows
Upon clicking Save or Sign, TFG validates whether the date entered in the Expiry Date field is prior
to the Requested Expiry date and if so, the user will be forced to enter a reason in the Customers
Instructions free text field.
Note: For both PAY and Extend option, in case a step has already been processed in the TFG, when
the user clicks the Extend icon, an error message will be generated. It is only possible to
process the item when the previous step has been released by Nordea.
On signing an Extend (Amend) transaction, the item is removed from the TFG Approval/Rejection tab
when the user processes the item. In case the item is cancelled before a release, it will be returned
to the Approval/Rejection tab.
In case of Extend (Amend), TFG uploads the following dates:
Requested Expiry Date
Expiry Date
4.4.3 Approving/Rejecting Amendment
TFG allows the customer to accept or reject amendments received under an Incoming Guarantee
through TFG. Such approvals are only relevant for cases where the Amendment created by Nordea
requires the Beneficiary’s consent.
To Approve an Amendment:
1. Click the Approval/Rejection tab.
2. Select the required amendment Deal to be approved and click Pay . The Amendment Approval
window is displayed.

44
Figure 55 – Guarantee Amendment Approval screen
Reference No. The customer’s reference no., if assigned
Deal Number Nordea’s Deal Number
Amendment No Amendment No.
Attachments Customer may attach document(s) to the approval.
Comments Customer may add comments to the approval.
3. Complete the required fields in the Approve Amendment window.
4. Click as appropriate:
Save Save the transaction and remain on the page
Save & Exit Save the transaction and exit the page
Sign Sign the transaction
Deal Note Add a note to the transaction
Cancel Return to the previous page
When the transaction is signed in TFG, it is uploaded to Nordea where the amendment is approved
and required message transmitted to the Issuing Bank.
Note: In the Deal History screen, a new column has been added which displays the status of the
amendment, which can be:
Regular – No approval is required
Waiting for approval
Approved
Rejected

45
Note: In TFG, the download of the release of the transaction to Nordea removes the Waiting for
Approval indicator.
To Reject an Amendment:
1. Click the Approval/Rejection tab.
2. Select the required amendment Deal to be approved and click Reject . The Amendment
Rejection window is displayed.
Figure 56 – Guarantee Amendment Rejection Screen
Reference No. The customer’s reference no., if assigned
Deal Number Nordea’s Deal Number
Amendment No Amendment No.
Reject Reject checked field cannot be changed
Attachments Customer may attach document(s) to the rejection.
Comments to Nordea Customer must add comments to the rejection.
3. Complete the required fields in the Reject Amendment window.
4. Click as appropriate:
Save Save the transaction and remain on the page
Save & Exit Save the transaction and exit the page
Sign Sign the transaction
Deal Note Add a note to the transaction
Cancel Return to the previous page
When the transaction is rejected in TFG, it is uploaded to Nordea who transmits the required
message to the Issuing Bank.
46
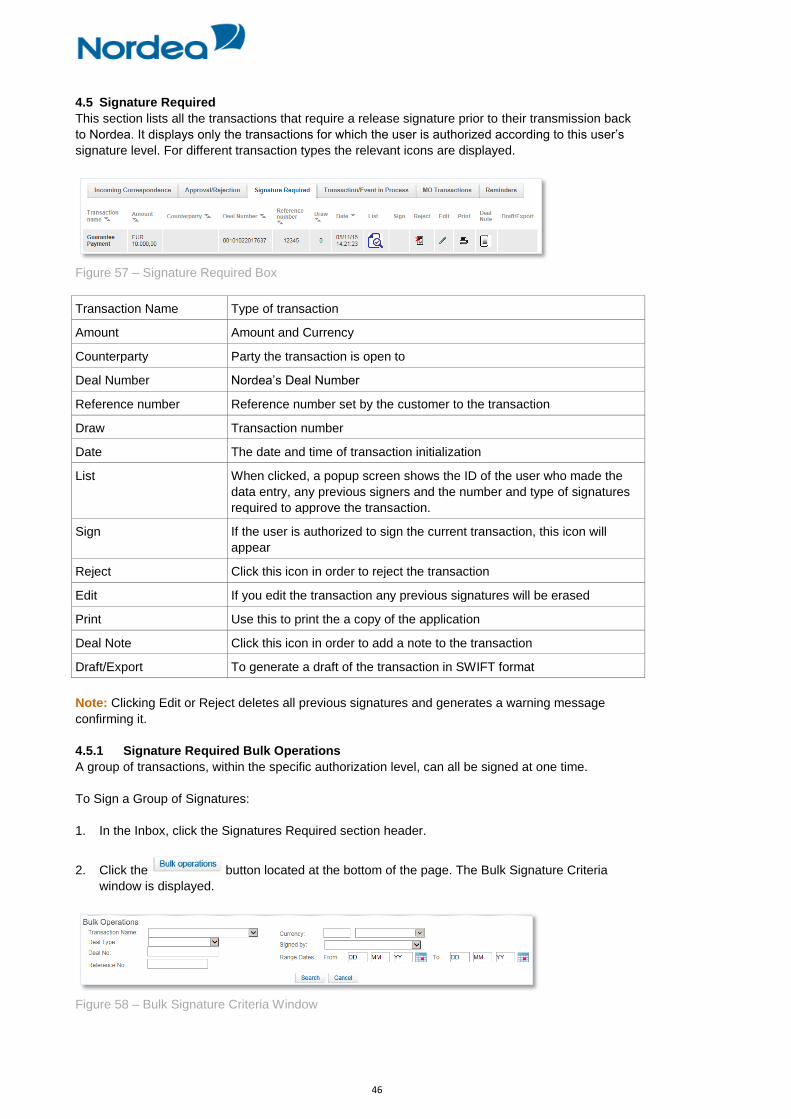
4.5 Signature Required
This section lists all the transactions that require a release signature prior to their transmission back
to Nordea. It displays only the transactions for which the user is authorized according to this user’s
signature level. For different transaction types the relevant icons are displayed.
Figure 57 – Signature Required Box
Transaction Name Type of transaction
Amount Amount and Currency
Counterparty Party the transaction is open to
Deal Number Nordea’s Deal Number
Reference number Reference number set by the customer to the transaction
Draw Transaction number
Date The date and time of transaction initialization
List When clicked, a popup screen shows the ID of the user who made the
data entry, any previous signers and the number and type of signatures
required to approve the transaction.
Sign If the user is authorized to sign the current transaction, this icon will
appear
Reject Click this icon in order to reject the transaction
Edit If you edit the transaction any previous signatures will be erased
Print Use this to print the a copy of the application
Deal Note Click this icon in order to add a note to the transaction
Draft/Export To generate a draft of the transaction in SWIFT format
Note: Clicking Edit or Reject deletes all previous signatures and generates a warning message
confirming it.
4.5.1 Signature Required Bulk Operations
A group of transactions, within the specific authorization level, can all be signed at one time.
To Sign a Group of Signatures:
1. In the Inbox, click the Signatures Required section header.
2. Click the button located at the bottom of the page. The Bulk Signature Criteria
window is displayed.
Figure 58 – Bulk Signature Criteria Window

47
3. Select the required items by entering data in one or more of the following fields, or by selecting
data from the dropdown lists:
Transaction Name
Deal Type
Deal No.
Reference No
Currency
Signed by
Range Dates
4. Click Search. The list of Signature items matching the criteria are displayed, as shown in Figure
59.
Figure 59 – Items Waiting for Signature List
If no value is entered into any of the fields, a list of all the transactions waiting for signatures is
displayed.
The Sum Total is a total of all the checked transactions on the list with the same currency. If more
than one currency is checked, no Sum Total is displayed.
5. Select the required transactions by selecting the checkbox before the transactions.
Or
Select all the transactions by selecting the checkbox at the top of the first column.
6. Click Sign. A screen will be presented showing the selected items and the Sign button should be
pressed to sign them:
Figure 60 – Signature required, Bulk Operation Sign page
Note: Access to the Bulk Signature Required function is determined according to Nordea’s setup.
4.6 Transaction/Event in Process
The Transaction/Event in Process Form allows the user to view all the incomplete transactions that
are open and require either a signature or the entry of additional data.

48
Figure 61 – Transaction/Event in Process Box
The following icons are available in the Transaction/Event in Process section:
Edit
Delete
Deal Note
Draft/Export
Note: If the transaction is open from the Transaction/Event in Process section, the Template button
is not displayed. Only Save, Sign and Cancel are available.
4.7 Reminders
The customer receives a list of reminders of upcoming events in the Inbox, sorted by date (from
closest to farthest).
Reminders show the following events:
Incoming Guarantee Expiry:
Limited – The ‘Before/After’ logic refers to the given expiry date
Unlimited – No reminder is generated.
Error! Reference source not found. shows a list of reminders in the Inbox Reminders tab.
Figure 62 – Inbox Reminders
Event Event type
Reference Number The reference allocated by the customer, if one exists.
Deal Number Deal number Clicking on this link opens the Deal History page
Action Date Date of the event
Events are sorted based on this field. The closest dates are on the top.
Print The customer can print the reminder.
Delete The customer can delete the reminder

49
5 Trade Finance Global (TFG) - Guarantees
In the Guarantees section, the user is able to perform the following actions:
Open, view, update and delete a Regular Guarantee
Guarantee from Template Library (Nordea Standard Guarantees) (New)
Amend Guarantee
Submit Guarantee Claim (New)
Submit an Extend or Pay request under an Incoming Guarantee (New)
Send a Deal Message
Open a deal using the Copy From functionality
Figure 63 – Guarantees menu
5.1 Application for a Guarantee
5.1.1 Initiating a New Guarantee Application
1 From the Guarantees menu, click Guarantee.
The Guarantee application is displayed. New applications can be initiated from this page. New
applications can be updated until they have been sent to Nordea.
5.1.2 Guarantee Tabs
The following tabs must be completed in order to establish a new Guarantee:
General Details
Participants
Documents & Terms
Attachments
Texts
Figure 64 – Guarantee Navigation Toolbar
Upon completing these tabs, the user signs the transaction to release it.
Note: The user accesses any of the tabs from anywhere in the application page by clicking the
desired tab on any heading of the title bars that precede each tab.
The General Details section is the first tab that is displayed on the screen.

50
Figure 65 – New Guarantee Page: General Details Tab
2 Enter data in the relevant fields.
Note: Some of these fields are mandatory. They are indicated in bold in the screen and in this User
Guide.
The following are the General Details tab fields:
Reference No. A unique deal identification number, decided by the TFG user. For
example, a contract number, a delivery order, and so on
Amount The amount of the Guarantee
Currency The currency of the Guarantee.
Deal No. The Deal Number created by Nordea.
Guarantee Type The predefined type of Guarantee, such as: Performance, Bid or
Payment Guarantees.
Expiry Date The date the Guarantee expires
Send Guarantee By The method by which the shipping company sends the guarantee.
Options include Courier, Mail, Registerd Mail and SWIFT The user
selects a method from the dropdown list.
3 Switch to the Participants tab and enter the Deal participant data in the relevant fields.
4 Scroll down to the Documents & Terms tab and enter relevant data in the following Term fields:
Each term has specific responses in the dropdown list next to the term. Select the appropriate
response for each term.
5 Switch to the Attachments tab to attach files to a regular Guarantee application to Nordea and
upload them.
6 Switch to the Texts tab to enter additional customized information and requirements to the
Guarantee.
Figure 66 – New Guarantee Page: Texts Tab

51
7 Enter additional Deal information by clicking the appropriate option in the toolbar, or by clicking
the directional button to view a preceding window.
8 To send the transaction, when you are finished entering all Guarantee details into the application
form, click Sign.
The system runs internal checks to make sure the information is entered correctly. If any errors exist,
you are notified about each error and prompted to correct it.
9 To release the transaction, click Sign.
10 If you do not want to send the transaction at the current moment, once you have amended the
appropriate information, click Save & Exit to update the Deal in the TFG database, Or
Click Cancel to return to the previous page without saving any action on the current page.
Note: When you want to save the updated application and apply the details to another application,
click Template.
5.2 Guarantee from Nordea Standard Guarantees
To Complete the Guarantee from Nordea Standard Guarantees:
1. From the Guarantees menu, click Guarantee from Template Library.
TFG routes you to the selection screen ‘Guarantee Text Selection’ where you can select the relevant
text template.
Figure 67 – Guarantee Text Library search page
2. Fill in filters to narrow the search and click the Search button.
The Guarantee Text Library results page appears.
Figure 68 – Guarantee Text Library search results page
Selection Fields The following logic applies:
Any combination of fields in any order can be selected.
The dropdown fields include all possible values. If there is no text
template available for the selected combination, the list will remain
empty and a warning message will be prompted to the user.
Customer Templates field will be displayed on the screen only if at
least one template exists.
Type The type of the template

52
Rules Accessory; Demand No Rules; or Demand URDG758
Language The language of the template
Domestic/International Indicates the guarantee type. Possible values:
Domestic
International
Customer Templates When selected, only templates, which are defined on the customer group
or customer level will be shown.
Action Buttons
Search When clicked, a list of text templates will be shown to the user
Cancel When clicked, the user will return to the Inbox.
3. Click the Preview icon.
The respective text is displayed as a PDF document including a watermark, e.g. DRAFT/SPECIMEN
and additional text, e.g. this is a non-negotiable guarantee/without liability of Nordea (see Error!
eference source not found.).
4. Click the Select icon to be routed to the Guarantee Transaction screen.
The guarantee form includes the regular fields and the variable fields which were defined in the
template.
5. Fill in the regular fields
Figure 69 – Guarantee Form – standard fields
6. Fill in the variable fields defined for this specific template.

53
Figure 70 – Guarantee Form – variable fields
Note: In case a guarantee is initiated via the Text Library option, the following text windows will only
be available:
Comments
Customer Instructions
All other text will be taken directly from the template.
5.3 Guarantee Amendment
Guarantees issued by Nordea are listed in the Amend Existing Guarantee window.
5.3.1 Guarantee Amendment Tabs
The following tabs must be completed in order to amend a Guarantee:
General Details
Attachments
Texts
Figure 71 – Amend Guarantee Navigation Toolbar
Upon completing these tabs, the user signs the transaction to release it.
Note: The user accesses any of the tabs from anywhere in the application page by clicking the
desired tab on any heading of the title bars that precede each tab.
5.3.2 Amending a Guarantee
1. From the Guarantees menu, click Amend Guarantee.
The Amend Guarantee search window is displayed.
Figure 72 – Amend Guarantee: Select Deal
2. Select a specific transaction by either:
Entering the Deal No. and/or Reference No. of the Guarantee that needs to be amended and
clicking Search.
Or
By leaving the Deal No. and Reference No. fields empty, clicking Search and selecting a specific
transaction from the list of existing Guarantees that are displayed in the Amend Guarantee
window.

54
To view the Deal details, click Deal title.
Note: No changes can be made to the Deal from the view mode.
3. Retrieve the relevant Guarantee in order to amend it by clicking Open next to the Deal.
The selected Deal is displayed with its application page completed.
Note: When editing a previously saved transaction, the amended fields are highlighted after the user
saves the changes.
The General Details tab is the first tab that is displayed on the screen.
4. Enter data in the relevant fields.
The following are the General Details tab fields:
5. Switch to the Attachments tab to attach files to an amended Guarantee application to Nordea
and upload them.
6. Switch to the Texts tab to enter additional customized information and requirements to the
Amend Guarantee.
7. Enter additional Deal information by clicking the appropriate option in the toolbar, or by clicking
the directional button to view a preceding window.
8. To send the transaction, when you are finished entering all the Amend Guarantee details into the
application form, click Sign.
The system runs internal checks to make sure the information is entered correctly. If any errors exist,
you are notified about each error and prompted to correct it.
9. To release the transaction, click Sign.
10. If you do not want to send the transaction now, once you have amended the appropriate
information, click Save & Exit to update the Deal in the TFG database, Or
Click Cancel to return to the previous page without saving any action on the current page.
5.4 Guarantee Claim
TFG allows the customers to send a claim including attachment of relevant documentation under an
existing incoming guarantee via TFG to Nordea.
Reference Number A unique deal identification number, decided by the TFG user. For
example, a contract number, a delivery order, and so on
Amount The amount of the Guarantee application
Increased Amount The amount the value of the guarantee has increased by.
Decreased Amount The amount the value of the guarantee has decreased by.
Currency The currency in which the guarantee is expressed
Deal Number A Deal Number specified by Nordea upon receiving the Guarantee
application. This field is a read-only field.
Guarantee Type The Guarantee type, predefined by Nordea. Examples include
Performance, Bid, or Payment Guarantees.
Expiry Date The date the Guarantee expires

55
5.4.1 Guarantee Claim Tabs
The following tabs must be completed in order to complete a post guarantee claim:
General Details
Attachments
Texts
Figure 73 – Claim Guarantee Navigation Toolbar
Upon completing these tabs, the user signs the transaction to release it.
Note: The user accesses any of the tabs from anywhere in the application page by clicking the
desired tab on any heading of the title bars that precede each tab.
5.4.2 Claiming a Guarantee
1. From the Guarantees menu, click Post Guarantee Claim.
The Claim Guarantee search window is displayed.
Figure 74 – Claim Guarantee: Select Deal
2. Select a specific transaction by either:
Entering the Deal No. and/or Reference No. of the Guarantee that needs to be claimed and
clicking Search, Or
By leaving the Deal No. and Reference No. fields empty, clicking Search and selecting a specific
transaction from the list of existing Guarantees that are displayed in the Claim Guarantee
window.
Note: If no search criteria have been entered, upon clicking the Search button, TFG retrieves all
deals which are not booked off and which have a positive balance, irrespective of the expiry date
(past or future).
A deal for which a claim is currently under process, is not included in the criteria result list (similar to
the Amend Guarantee search facility).
To view the Deal details, click Deal title.
Note: No changes can be made to the Deal from the view mode.
3. Retrieve the relevant Guarantee in order to claim it by clicking Open next to the Deal.
The selected Deal is displayed with its application page completed.

56
Figure 75 – Claim Guarantee window
The General Details tab is the first tab that is displayed on the screen.
4. Enter data in the relevant fields.
The following are the General Details tab fields:
Reference No. The customer’s reference number, if assigned
Deal No. Nordea’s deal number.
Claim Reference No. The customer’s reference number for this specific claim.
Note: In case of multiple claims, TFG validates the uniqueness of the
Claim Reference No. under the same deal. In case of duplication, TFG
prompts the error message “Duplicate Claim Reference No” to the user.
Currency Deal currency

57
Claim Amount The amount of this claim. TFG ensures that the entered amount is not
greater thank the deal balance. If yes, TFG prompts the error message
“Claim amount is greater than the deal balance” to the user.
Deal Balance Deal balance
Expiry Date The guarantee expiry date.
Note: In case of an unlimited guarantee, the word “Unlimited” is displayed.
5. Switch to the Attachments tab to attach files to a regular Guarantee application to Nordea and
upload them.
6. Switch to the Texts tab to enter additional customized information and requirements to the
Guarantee.
Note: It is mandatory to enter a reason in the Claim Reason window.
7. Enter additional Deal information by clicking the appropriate option in the toolbar, or by clicking
the directional button to view a preceding window.
8. To send the transaction, when you are finished entering all Claim details into the application
form, click Sign.
The system runs internal checks to make sure the information is entered correctly. If any errors exist,
you are notified about each error and prompted to correct it.
Figure 76 – Signature window
Transaction Type Incoming Guarantee Claim
Deal No. Nordea’s deal no.
CCY/Amount Deal currency and claim amount
Applicant Counterparty
Expiry Date Date of guarantee expiry
Date Date and time of the step creation; as per existing logic
Customer Deal Ref. The reference no. assigned by the customer to the deal
Customer Claim Ref. The reference no. assigned by the customer to this specific claim
Payment Item Account details
9. To release the transaction, click Sign.

58
10. If you do not want to send the transaction at the current moment, once you have amended the
appropriate information, click Save & Exit to update the Deal in the TFG database, Or
Click Cancel to return to the previous page without saving any action on the current page.
Note: When you want to save the updated application and apply the details to another application,
click Template.
5.5 Extend or Pay
The Extend or Pay demand functionality is TFG for Incoming Guarantee transactions. There are two
launch options in TFG:
Deal History Launch
Main Menu Launch
5.5.1 Extend or Pay Guarantee Tabs
The following tabs must be completed in order to establish an Extend or Pay Guarantee:
General Details
Attachments
Texts
Figure 77 – Guarantee Navigation Toolbar
Upon completing these tabs, the user signs the transaction to release it.
Note: The user accesses any of the tabs from anywhere in the application page by clicking the
desired tab on any heading of the title bars that precede each tab.
5.5.2 Launching an Extend or Pay Demand
1. From the Guarantees menu, click Guarantee Extend/Pay.
The Extend or Pay demand search window is displayed.
Figure 78 – Extend or Pay Guarantee: Select Deal
2. Select a specific transaction by either:
Entering the Deal No. and/or Reference No. of the Extend or Pay demand and clicking Search,
Or
By leaving the Deal No. and Reference No. fields empty, clicking Search and selecting a specific
transaction from the list of existing Guarantees that are displayed in the Extend/Pay Guarantee
window.
TFG presents a list of open Incoming Guarantees, which meet the following criteria:
Are not open ended (i.e. have an Expiry Date)
and
Have an open balance.
To view the Deal details, click Deal title.

59
Note: No changes can be made to the Deal from the view mode.
3. Retrieve the relevant Guarantee in order to initiate an Extend/Pay demand by clicking Open
next to the Deal.
The Extend or Pay demand for the selected Deal is displayed.
Figure 79 – Extend or Pay Instructions
4. Enter data in the relevant fields.
The following are the General Details tab fields:
Reference No. The reference number of the Issuing Bank.
Deal No. The Deal Number created by Nordea
Amount The amount of the Guarantee
Expiry Date The date the Guarantee expires
Currency The currency of the Guarantee.
Extend until Date An entered date must be later than the existing expiry date and greater
than the current date.
If the entered date is equal to or less than the existing expiry date or
less than the current date, an error message is generated on clicking
the Save &Exit or Sign button.
5. Switch to the Attachments tab to attach files to an Extend or Pay Guarantee demand to Nordea
and upload them.
6. Switch to the Texts tab to enter additional customized information and requirements to the
Guarantee.

60
7. To approve the transaction, when you are finished entering all the Extend or Pay Guarantee
details into the application form, click Sign.
The system runs internal checks to make sure the information is entered correctly. If any errors exist,
you are notified about each error and prompted to correct it.
8. To release the transaction, click Sign.
9. If you do not want to approve the transaction now, once you have completed the appropriate
information, click Save & Exit to update the Deal in the TFG database, Or
Click Cancel to return to the previous page without saving any action on the current page.

61
6 Trade Finance Global (TFG) - Inquiries
This topic includes details about making Deal inquiries according to user-defined criteria. The
following is a list of Inquiry types:
Transaction Status Inquiry
Open Deals Inquiry
Deal History
Deal Select
Inquiry Request
Payments
Figure 80 – Inquiry Navigation menu
6.1 Transaction Status Inquiry
The Transaction Status enables the user to view a list of customer-initiated transactions, tracking:
Current status of the transaction
Signature details required for a transaction
A list of the signatures signed on a transaction
To Establish a Transaction Status Inquiry:
1. From the Inquiry menu, click Transaction Status.
The Transaction Status Inquiry select form is displayed.
Figure 81 – Transaction Status Inquiry Window
Status inquiries are requested according to the following parameters:
Transaction: This section of the inquiry describes factors relating to the transaction itself.
Status: As each change affects a transaction’s status, this section reports when the transaction
changes to the current status. The following are the Transaction fields:
Status Limits the search to a specific transaction stage.
Transactions can be identified by the actions performed on them or in
light of what stage they were assigned, such as: In Process, Released or
Signature Required.

62
Name Transaction deal type and step.
Customer Reference No. Allows searching for a specific transaction according to the customer’s
Reference No. It is the Reference No., which the customer user has
entered either during the transaction creation or in the Additional
Reference Data screen.
Note: A wildcard search is available for this field.
Counterparty Reference
No.
Allows searching for a specific transaction according to the counterparty
Reference No., which the customer user has entered in the Additional
Reference Data screen.
Note: A wildcard search is available for this field.
The following are the Status fields:
Date From/To Restricts the search to a range of when the transaction changed to the
current status.
All Customers If checked, the inquiry includes all customers of the group of
customers for which the user has authorization.
If cleared the inquiry includes only transactions for which the user is
currently working on.
Note: The availability of this field is dependent on the user having
permission to activate inquiries at the group level.
Save Criteria When checked, the inquiry criteria are saved as the default for future
inquiries.
Note: To remove the saved criteria status, empty all fields except for
Save Criteria, and click Search.
2. Click one of the following action buttons:
Search Displays a list of transactions that conform to the retrieval criteria in the
Inquiry Results Table.
Excel Exports the list of inquiry results to Excel, which is automatically invoked
from the user’s browser.
The user can then manipulate the downloaded data, including saving it.
Cancel Returns the user to the previous page without saving any action on the
current page.
3. Click Search to display a list of transactions that conform to the retrieved criteria display in the
Inquiry Results Table.
The Transaction Status report is displayed.

63
Figure 82 – Transaction Status Search Results
The top of the report lists the search criteria that defined the report parameters. The bottom of the
report shows the search results.
4. Sort the inquiry result columns in ascending/descending order by using the arrows located in
the column headings.
5. In the Transaction Name column, click a transaction record to view that transaction.
6. In the Transaction Status column, if the transaction status is “Rejected”, the user is able to click
the status and a popup window appears showing the rejection reason, as displayed below.
Click OK to close the popup window.
Figure 83 – Rejection reason pop-up window
7. Click Signatures to view the Signature Details table and the list of those who have signed the
transaction. The Signature Requirement popup window is displayed.
Figure 84 – Signature Requirement popup window
The following information is provided in the Signature Requirements Table:
Signature List Provides details about the signatures affected on the transaction
including the following
User Name The user who signed the form
Level The authorization level of the user who signed
Note: The signature level of a Data Entry User is ‘D’.
Date/Time When the signature was entered

64
Required Signatures Information about the signature requirements for this transaction,
including:
Level The level of the officer signing the form
Number The number of users from level indicated whose
signature is required on the transaction.
6.1.1 Local Equivalent
All the reports available in the TFG online reporting menu (or created in the report generator) show
the local equivalent i.e. for each amount in foreign currency the local equivalent is also displayed.
Exchange rates are downloaded from Nordea to TFG: selling/buying/mid-rate/nominal rate. For the
daily calculation the local equivalent is calculated using mid-rate- online reports, but the end of month
uses the nominal rate to calculate.
The two relevant fields in the reports are:
Amount in Local Currency Field displaying amount in local currency.
Exchange Rate Exchange rate used for local equivalent calculation.
These fields can be selected or deselected for display using the Layout Customization page.
6.2 Open Deals Inquiry
The Open Deals Inquiry option enables the user to view and edit any Deal containing a balance.
Viewing the Open Deals Window:
1. From the Inquiry menu, click Open Deals. The Open Deals page is displayed.
Figure 85 – Open Deals Inquiry Window
Open Deal inquiries are made according to the following parameters:
Open Types The open types of transactions in the system that have not been
completed.
The option of selecting All Outstanding Deals also exists.
If records for the same deal exist in several types, the “All Outstanding
Deals” option will present all the records, according the criteria, entered
by the user.
For some of the transaction types such as collections, an expiry date
does not exist. In this case, when the user selects the option called “All
Outstanding Deals”, and at the same time enters criteria for the expiry
date, only transactions with an expiry date will be displayed (therefore
collections will be excluded from this type of report).
Deal Type The type of Deal and the step, including: Outgoing Guarantees and
Shipping Guarantees.
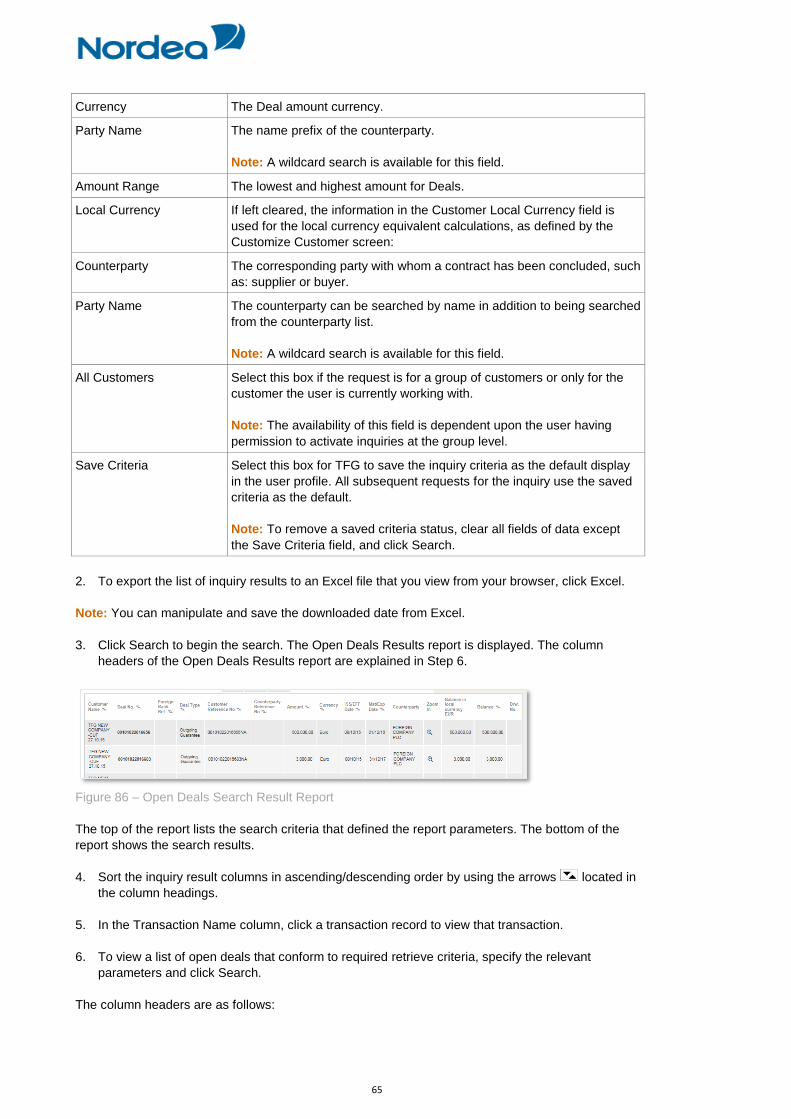
65
Currency The Deal amount currency.
Party Name The name prefix of the counterparty.
Note: A wildcard search is available for this field.
Amount Range The lowest and highest amount for Deals.
Local Currency If left cleared, the information in the Customer Local Currency field is
used for the local currency equivalent calculations, as defined by the
Customize Customer screen:
Counterparty The corresponding party with whom a contract has been concluded, such
as: supplier or buyer.
Party Name The counterparty can be searched by name in addition to being searched
from the counterparty list.
Note: A wildcard search is available for this field.
All Customers Select this box if the request is for a group of customers or only for the
customer the user is currently working with.
Note: The availability of this field is dependent upon the user having
permission to activate inquiries at the group level.
Save Criteria Select this box for TFG to save the inquiry criteria as the default display
in the user profile. All subsequent requests for the inquiry use the saved
criteria as the default.
Note: To remove a saved criteria status, clear all fields of data except
the Save Criteria field, and click Search.
2. To export the list of inquiry results to an Excel file that you view from your browser, click Excel.
Note: You can manipulate and save the downloaded date from Excel.
3. Click Search to begin the search. The Open Deals Results report is displayed. The column
headers of the Open Deals Results report are explained in Step 6.
Figure 86 – Open Deals Search Result Report
The top of the report lists the search criteria that defined the report parameters. The bottom of the
report shows the search results.
4. Sort the inquiry result columns in ascending/descending order by using the arrows located in
the column headings.
5. In the Transaction Name column, click a transaction record to view that transaction.
6. To view a list of open deals that conform to required retrieve criteria, specify the relevant
parameters and click Search.
The column headers are as follows:

66
No Row sequence Number
Customer Name The name of the customer for the current record
Open Types The open types of transactions in the system that have not been
completed, including: Acceptances, D/C, Collections, Payments and
Guarantees.
Deal Type The type of Deal and the step.
Deal No. Nordea’s deal number.
Foreign Bank Ref. The Reference Number of the Deal.
Drawing No. The Drawing Number or the Transaction Number indicates how many
actions have been performed on the Deal application process.
Amount The amount of the Deal.
Currency The currency of the Deal.
Zoom in Zoom in to a specific record.
Balance The remaining amount of the Deal to be paid
Amount in Local Currency The original amount of the Deal converted to local currency.
Balance in Local Currency The amount of the Deal balance converted to local currency
Counterparty The corresponding party with whom a contract has been concluded, such
as: supplier or buyer
6.2.1 Customizing Output Layout
When running an Open Deals Inquiry, it is possible to customize the output so as to view only
selected columns rather than all the columns according to the default parameters.
To Customize the Output:
1. In the Open Deals Inquiry window, click the Select Output Layout icon. The Personalize
Page Layout window is displayed.
Figure 87 – Personalize Page Layout Window
2. From the list of table fields, select the fields you want to display in your customized sort.
Click the right arrow to move your selection to the selected columns displayed in the right hand pane
of the window and use the Up and Down arrows to define the order of the displayed column.
3. Click Add to save your choice and return to the main Open Deals Inquiry window.
Or
Click Cancel to return to the Open Deals Inquiry without making any changes.
The results of the next Open Deals Inquiry you run display according to your customized layout.
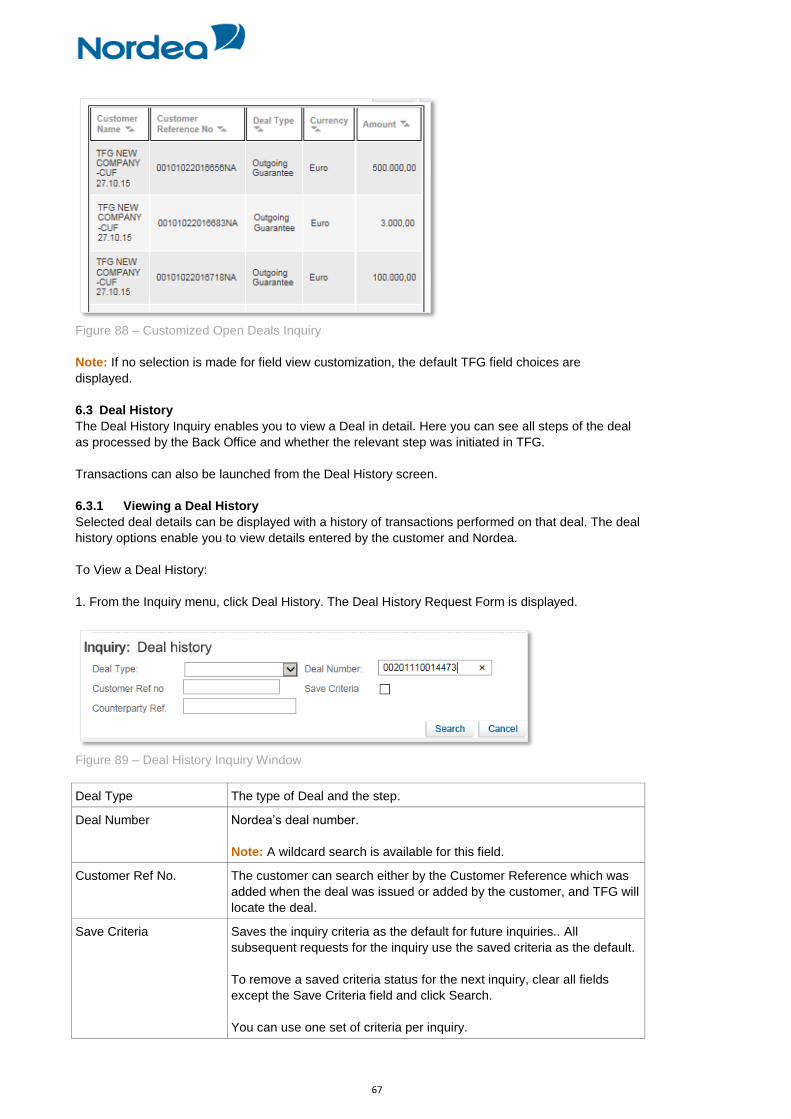
67
Figure 88 – Customized Open Deals Inquiry
Note: If no selection is made for field view customization, the default TFG field choices are
displayed.
6.3 Deal History
The Deal History Inquiry enables you to view a Deal in detail. Here you can see all steps of the deal
as processed by the Back Office and whether the relevant step was initiated in TFG.
Transactions can also be launched from the Deal History screen.
6.3.1 Viewing a Deal History
Selected deal details can be displayed with a history of transactions performed on that deal. The deal
history options enable you to view details entered by the customer and Nordea.
To View a Deal History:
1. From the Inquiry menu, click Deal History. The Deal History Request Form is displayed.
Figure 89 – Deal History Inquiry Window
Deal Type The type of Deal and the step.
Deal Number Nordea’s deal number.
Note: A wildcard search is available for this field.
Customer Ref No. The customer can search either by the Customer Reference which was
added when the deal was issued or added by the customer, and TFG will
locate the deal.
Save Criteria Saves the inquiry criteria as the default for future inquiries.. All
subsequent requests for the inquiry use the saved criteria as the default.
To remove a saved criteria status for the next inquiry, clear all fields
except the Save Criteria field and click Search.
You can use one set of criteria per inquiry.

68
Counterparty Ref. Similar to field Ref No., when entered the user must also select a value
in the Deal Type field, because the same Reference No. can be used for
different deal types.
Note: A wildcard search is available for this field.
2. Enter the Deal number or Customer Ref no
3. Click Search to view the Deal.
The Inquiry: Deal History page opens. Refer to Figure 90 below for an example of search results.
The selected deal details are displayed with a history of transactions performed on that deal. The
deal history options enable you to view details entered by the customer and Nordea.
6.3.2 Deal History Search Results
Figure 90 – Deal History Search Results: General Details Tab

69
To record a note – click the Deal Note icon, located in the General Details tab. The Deal Note
window pops up.
Note: If the note already exists, the Deal Note icon is marked with a tick sign . The user may
click the existing note and update it if needed.
Figure 91 – Deal Note window
This popup contains the deal/transaction identification data (Reference Number) and the Text Area to
the deal note text managing.
The following buttons are available in the Deal Note window:
Save – saves the Deal Note text in the database table.
Cancel – cancels creation/update of the Deal Note.
Delete – deletes the Deal Note entry from the database table.
Note: To delete the note, press the Delete button or delete the note text and press the Save button.
To display the original customer application – click the Original link in the Transaction Name
column. The Identifier application is displayed on the top of the page to differentiate between a
customer application and the final deal step issued by Nordea.
Figure 92 – Original Customer Application Link in the Deal History Page
To display Nordea’s final Deal step – click the transaction type link in the Transaction Name
column.
The following information is displayed with the Deal details, depending on the nature of the deal:
Original Transaction Details (initiated by the customer)
Deal Participants
Availability

70
Deal Texts
Note: The information that is available in the search results depends on the nature of the particular
transaction.
To view the original details – refer to the General Details tab table of the selected Deal (see
Figure 90).
Transaction Name The transaction Deal type and step.
Click the Original link to view the transaction as the user entered it and
sent it to Nordea.
Click the other link in the cell to view the response to this transaction as
received from Nordea
Drw No. The Drawing Number indicates the number of a specific business activity
like amendments or document presentation.
Amount The Deal amount
Currency Deal currency
Status Date The date and time the transaction changed to the current status.
Expiry Date The expiration date of a deal if defined.
Approval Status Relevant for Amendments
To view the additional reference data – click the Ref Data tab
Or
Scroll down to the Ref Data tab.
Figure 93 – Outgoing Guarantee Deal History: Additional Reference Data Tab
Figure 94 – Incoming Guarantee Deal History: Additional Reference Data Tab

71
Customer Reference No. In this field, the user can enter the customer’s Reference No. assigned to
this deal. It has the same size and attributes as the customer reference
no. field in new Issuance transactions.
Counterparty Name and
Address
In these fields, the user can enter the name and address of the
counterparty. The search option is identical to the same option in new
transactions.
For deals for which are initiated by the customer in TFG these fields
include the data entered in the Issuance transaction. The user cannot
change the data.
Counterparty Reference
No.
In this field, the user can assign the counterparty’s Reference No. It has
the same size and attributes as the customer Reference No. field in new
Issuance transactions. A value entered in the Additional Reference Data
screen from the Incoming Correspondence is defaulted and can be
updated.
TFG allows the same counterparty Reference No. for different deal types.
However, in case of duplication the system informs the user via a warning
message.
To view the deal participants – click the Participants tab.
Or
Scroll down to the Participants tab.
Figure 95 – Outgoing Guarantee Deal History: Participants Tab
Party Code The role of the party
Party Name The party’s name
Note: A wildcard search is available for this field.
Street, City Country The party’s address
To view all related texts for a Deal – click the Text tab or scroll down the Request Form until the
Texts tab is displayed.
Figure 96 – Outgoing Guarantee Deal History: Texts Tab
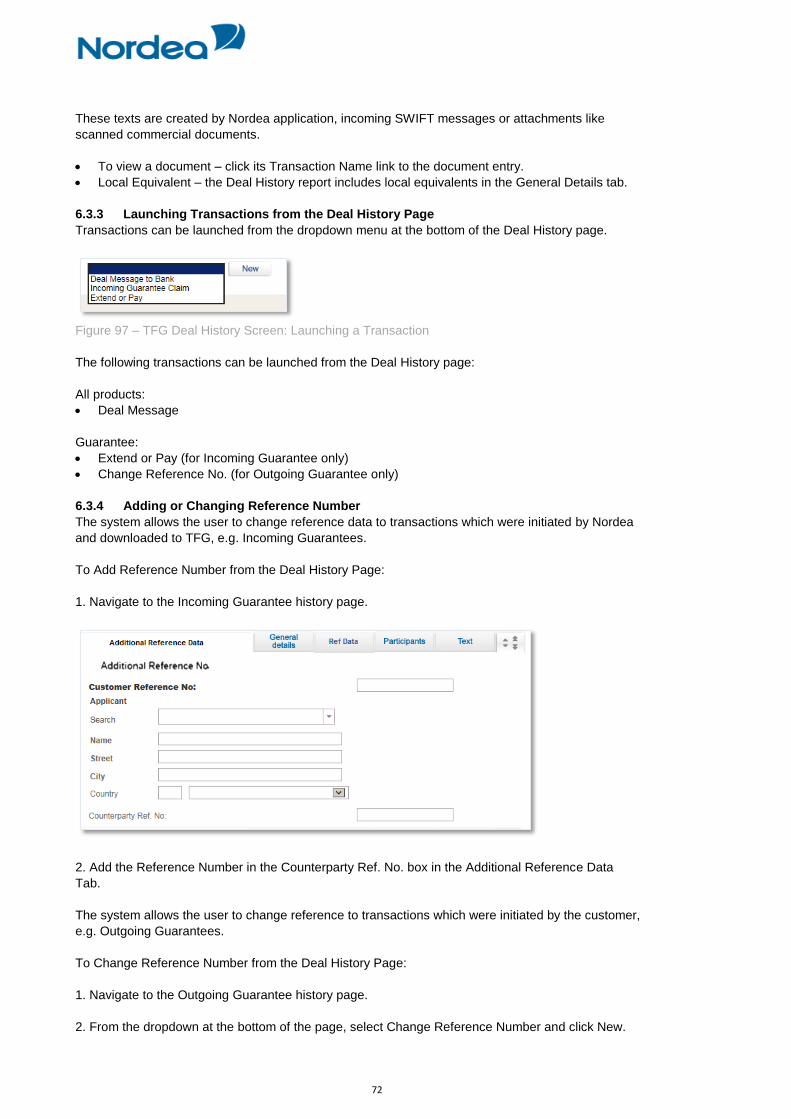
72
These texts are created by Nordea application, incoming SWIFT messages or attachments like
scanned commercial documents.
To view a document – click its Transaction Name link to the document entry.
Local Equivalent – the Deal History report includes local equivalents in the General Details tab.
6.3.3 Launching Transactions from the Deal History Page
Transactions can be launched from the dropdown menu at the bottom of the Deal History page.
Figure 97 – TFG Deal History Screen: Launching a Transaction
The following transactions can be launched from the Deal History page:
All products:
Deal Message
Guarantee:
Extend or Pay (for Incoming Guarantee only)
Change Reference No. (for Outgoing Guarantee only)
6.3.4 Adding or Changing Reference Number
The system allows the user to change reference data to transactions which were initiated by Nordea
and downloaded to TFG, e.g. Incoming Guarantees.
To Add Reference Number from the Deal History Page:
1. Navigate to the Incoming Guarantee history page.
2. Add the Reference Number in the Counterparty Ref. No. box in the Additional Reference Data
Tab.
The system allows the user to change reference to transactions which were initiated by the customer,
e.g. Outgoing Guarantees.
To Change Reference Number from the Deal History Page:
1. Navigate to the Outgoing Guarantee history page.
2. From the dropdown at the bottom of the page, select Change Reference Number and click New.

73
Figure 98 – Import D/C Deal History dropdown
Note: The link only appears in case the user is specifically authorized for processing the AMD step of
the relevant deal. Otherwise, it does not appear under that step for that user.
TFG routes the user to the Change Reference Number page.
Figure 99 – Change Reference Number page
Deal No The deal number from the Deal History screen
Open Date The date the deal Issuance Step was released by Nordea
Deal Type Outgoing Guarantee
Old Reference No. The original reference number allocated by the customer.
New Reference No. New reference number.
Note: The new reference number cannot be a number which has
previously been used by the customer in another deal of this type even if
it was subsequently changed.
Comments Your comments to Nordea.
Once the transaction has been completed, the user signs the transaction to release it. The new
reference number is added in Nordea’s system and will be quoted in future correspondence.
6.4 Deal Select
The Deal Selection inquiry allows you to display all the deals according to selected parameters and
combinations of parameters. For instance, if you want to display all the Guarantee deals processed
by the system, select “Outgoing” from the deal type dropdown list. If you need all deals entered with
currency USD, select currency from the Currency dropdown list and click the search button.
To View the Deal Selection Window:
1. From the Inquiry menu, select Deal Select. The Deal Select page is displayed.
Figure 100 – Deal Select Inquiry Window

74
Deal selection inquiries are made according to the following criteria:
Deal No. Nordea’s deal number.
Note: A wildcard search is available for this field.
Reference/Invoice No. Retrieves data from the following sources:
For deals initiated by TFG – the customer reference number supplied
when the deal was created.
For deals initiated by Nordea – either the Foreign Bank Reference
Number, or the Customer Reference number which was added by
the customer if it exists (whichever is entered by the customer).
Counterparty The corresponding party with whom a contract has been concluded, such
as: supplier or buyer.
Counterparty Ref: The reference number of the corresponding party
Note: A wildcard search is available for this field.
Party Name The name prefix of the counterparty.
Note: A wildcard search is available for this field.
Free Text Allows searching for text entered in free text windows in outgoing
guarantee transactions. To search for text, please use the format *text*
(where text represents the desired string).
Note: A maximum of 25 characters may be entered, case insensitive and
Multilanguage search are supported.
Deal Type The type of Deal and the step.
Currency The Deal amount currency.
Amount Low/High The lowest and highest amount.
All Customers Select this checkbox if the request is for a group of customers or only for
the customer the user is currently working with.
Note: The availability of this field is dependent upon the user having
permission to activate inquiries at the group level.
Save Criteria Select this checkbox for TFG to save the inquiry criteria as the default
display in the user profile.
All subsequent requests for the inquiry use the saved criteria as the
default.
Note: To remove a saved criteria status, clear all fields of data except
the Save Criteria field and click Search.
2. To activate the inquiry for a group of customers, select the All Customers checkbox.
If checked, an additional column, called “Customer Name” is displayed.
Customer Name The name of the customer for whom the transaction is opened.
Note: The availability of this field is dependent on the user having permission to activate inquiries at
the group level.

75
3. To save the inquiry criteria as the default display in the User Profile, select the Save Criteria
checkbox. All subsequent requests for the inquiry use the saved criteria as the default.
To remove a saved criteria status for the next default Transaction Status, clear all fields except
the Save Criteria field and click Search.
You are able to use one set of criteria per inquiry.
4. To view a list of deals, specify the relevant parameters and click Search.
5. To view all the deals sent to or received from Nordea, click Search without entering any of the
fields.
The Deal Select search window lists the deals according to the selected criteria.
Figure 101 – Deal Select Inquiry List
6. Sort the inquiry result columns in ascending/descending order by using the arrows located in
the column headings.
7. To view the details of a Deal, click the required deal in the Deal Type column.
The results of the search can be sorted by any of the table headers by double-clicking on the table
header.
8. To export the list of inquiry results to an Excel file that you view from your browser, click Excel.
Note: You can manipulate and save the downloaded date from Excel.

76
7 Trade Finance Global (TFG) - Reports
TFG provides the following ranges of reports that can be produced by the customer:
Deal Report – displays the individual amounts according to selected criteria.
Deal Report Summarized – displays the total amounts per customer according to selected
criteria.
Opens the Reports Centre tool for creating and managing reports.
Figure 102 – Reports Navigation Menu
The TFG user can choose to display reports in the following formats:
HTML
Excel
7.1 Deal Report
To Launch a Deal Report:
1. From the Reports menu, click Deal Report.
The Deal Report selection window is displayed, enabling the user to select a report according to
specific criteria.
Figure 103 – Deal Report Criteria
The following criteria are available:
Report Name Choices of report are displayed, including All Deals, Outstanding Deals
or Closed Deals. One must be selected.
Deal Type The Deal type selected for inclusion in the report.
Currency The currency for which deals are required.
Counterparty The corresponding party with whom a contract has been concluded, such
as: supplier or buyer.
Date Range Required range of Issuance Dates.
Local Currency The currency to which the amounts are converted. This is mostly used if
deals in different currencies are retrieved.
Order By Data Item Selectable High/Low or Low/High options for: Balance, Currency,
Customer Reference No, Deal Reference No, Expiry / Maturity Date,
Issuance Date, Original Amount.

77
Do Sub Totals The user can define whether the report should provide sub totals.
Note: Only relevant if Currency, Counterparty or Sight/Tenor are
selected in the Order By Data Item field.
All Customers When checked, all customers to which the user is authorized are
displayed in the Deal Report and an additional column called Customer
Name is added to the report.
Report Format The report can be produced either in HTML, EXCEL or PDF format. The
default value is HTML.
2. Select a Report Name from the dropdown list and click Preview.
The report is displayed. The following are examples of report outputs:
Figure 104 – Example of a Deal Report in Output: Preview (HTML Format)
Figure 105 – Example of a Deal Report Output: Excel
Figure 106 – Example of a Deal Report Output: PDF

78
Figure 107 – Example of a Deal Report Output: Sorted by Currency including sub-totals
7.2 Deal Report Summarized
This option provides the same input select criteria as the Deal Report option. However for this option
the results are summarized at a total amounts per customer level.
To Launch a Deal Report Summarized:
1. From the Reports menu, click Deal Report Summarized.
The Deal Report Summarized selection window is displayed.
Figure 108 – Deal Report Criteria
The following criteria are available:
Report Name Choices of report are displayed, including All Deals, Outstanding Deals
or Closed Deals. One must be selected.
Deal Type The Deal types selected for inclusion in the report.
Currency The Deal Report displays Deals for any currency allowed by Nordea.
Counterparty The corresponding party with whom a contract has been concluded, such
as: supplier or buyer.
Date Range The Deal Report displays Deals in the specified range of issuance dates.
Local Currency The Deal Report results currency.
Note: If the Local Currency field is left empty, the local currency
equivalent calculations use the information contained in the Customer
Local Currency field, if defined, from the Customize Customer window.
Order By Data Item Selectable High/Low or Low/High options for: currencies, Counter Parties
and Expiry Dates.
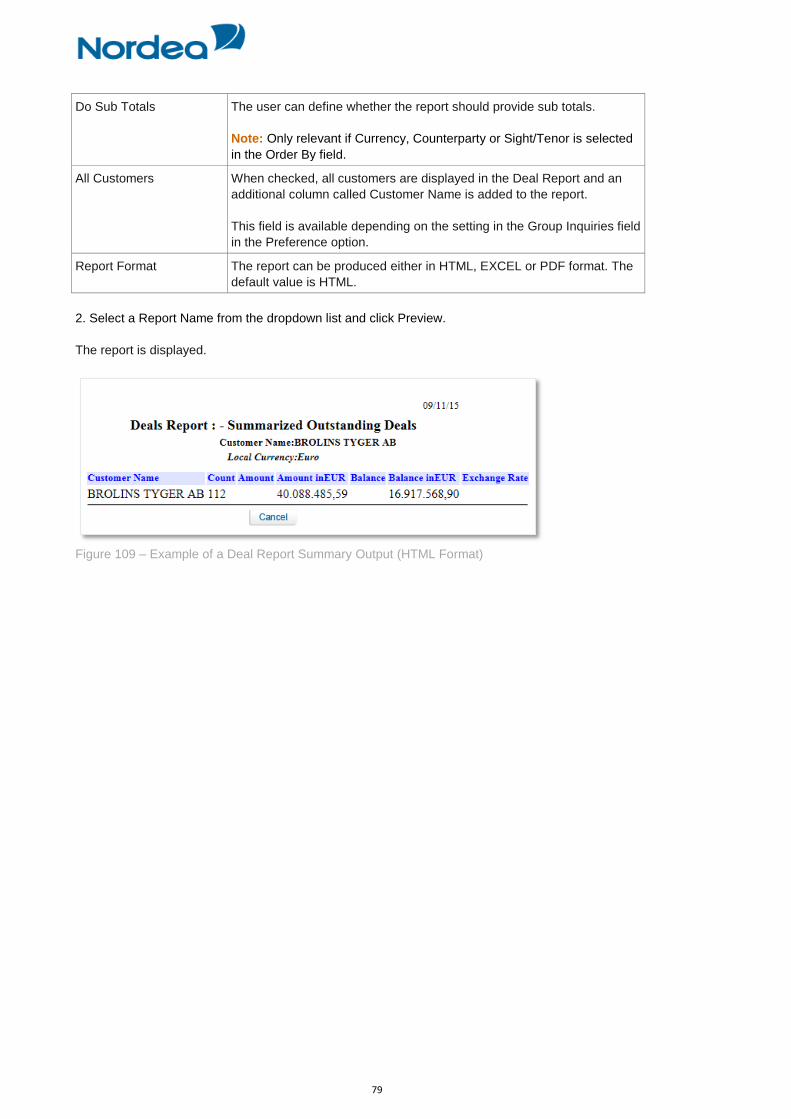
79
Do Sub Totals The user can define whether the report should provide sub totals.
Note: Only relevant if Currency, Counterparty or Sight/Tenor is selected
in the Order By field.
All Customers When checked, all customers are displayed in the Deal Report and an
additional column called Customer Name is added to the report.
This field is available depending on the setting in the Group Inquiries field
in the Preference option.
Report Format The report can be produced either in HTML, EXCEL or PDF format. The
default value is HTML.
2. Select a Report Name from the dropdown list and click Preview.
The report is displayed.
Figure 109 – Example of a Deal Report Summary Output (HTML Format)