TraceNetTM Control - Thermon...service and program this TraceNet heat tracing control panel as well...
58
TraceNet TM Control and Monitoring System TCM2 Installation, Start-Up, Operating and Maintenance Guide Thermon Manufacturing Company
Transcript of TraceNetTM Control - Thermon...service and program this TraceNet heat tracing control panel as well...

TraceNetTM Control
and Monitoring
System
TCM2
Installation, Start-Up,
Operating and Maintenance Guide
Thermon Manufacturing Company


i
TCM2
Installation, Start-Up, Operating and Maintenance Guide
©2017 Thermon Manufacturing Company. All Rights Reserved.
This guide, as well as the firmware described in it, is furnished under license and
may only be used or copied in accordance with the terms of such license. The
information in this guide is furnished for informational use only, is subject to
change without notice, and should not be construed as a commitment by
Thermon Manufacturing Company. Thermon Manufacturing Company assumes
no responsibility or liability for any errors or inaccuracies that may appear in this
guide.
This document may not, in whole or in part, be copied, photocopied, reproduced,
translated, or reduced to any electronic medium or machine-readable form
without prior consent in writing from Thermon Manufacturing Company. This
document is subject to change without notice.
Written and designed at Thermon Manufacturing Company,
100 Thermon Drive, San Marcos, TX 78667-0609, USA
This operating guide is designed solely for use by owners of TraceNetTM TCM Series
heat tracing control systems. This firmware and operating guide is considered
proprietary and is protected by copyright. Use by others without expressed written
consent of Thermon Manufacturing Company is strictly prohibited.
©Thermon 2017

ii
Contents
1 Introduction ................................................................................................................... 1
1.1 The Panel Location .................................................................................. 1
1.2 Initial Inspection and Handling ............................................................... 1
1.3 The TCM2 .................................................................................................. 3
1.4 Features ..................................................................................................... 3
2 Specifications ............................................................................................................... 5
Table 2.1: TCM2 Panel Specifications ............................................................. 5
Table 2.2: TCM2 Module Specifications .......................................................... 6
3 Module Connections & Wiring ................................................................................... 9
3.1 Bottom Side Connections ....................................................................... 9
3.2 Top Side Connections ........................................................................... 10
4 Field and Panel Wiring ............................................................................................. 12
4.1 Heat Trace and Insulation Installation ................................................. 12
4.2 RTD Installation and Wiring .................................................................. 12
4.3 Power Distribution Wiring and Breakers ............................................. 13
4.4 TraceNet Panel Wiring .......................................................................... 14
4.5 Serial Communication Wiring ............................................................... 14
5 Monitoring Heat Tracing Circuit Status .................................................................. 16
5.1 The Interface ........................................................................................... 16
5.2 Basic Navigation ..................................................................................... 18
5.3 Alarms ...................................................................................................... 18
5.4 Trips .......................................................................................................... 19
6 Accessing Control Settings ...................................................................................... 22
6.1 Password Protection .............................................................................. 22
6.2 Adjusting Set-points ............................................................................... 22
Table 6.1: Main Menu Options ..................................................................... 24
7 Heat Trace Control and Monitoring ........................................................................ 27
7.1 Control Method ....................................................................................... 27
7.2 Setting the Control Method ................................................................... 28

iii
7.3 The TCM2 in Process Sensing Applications ...................................... 28
7.4 The TCM2 in Ambient Sensing Applications ...................................... 29
7.5 Single-Circuit 3-Phase ........................................................................... 30
8 The TCM2 Data Highway Communications .......................................................... 31
9 System Start-Up ........................................................................................................ 33
9.1 Initial Start-Up Procedure ...................................................................... 33
9.2 Troubleshooting Tips ............................................................................. 33
10 Maintenance ............................................................................................................... 34
10.1 Safety Precautions ............................................................................. 34
11 Notes ........................................................................................................................... 35
12 Appendix A: Memory Map ........................................................................................ 36
13 Appendix B: Additional Information ........................................................................ 41
14 Appendix C: Troubleshooting Tips ......................................................................... 42

1
1 Introduction The following serves as a guide and overview of the installation, startup and
operation of a TraceNet TCM2 heat tracing control and monitoring system. This
guide shall be used in conjunction with the project specific control system
drawings and any other standard installation instructions/guides provided. In the
unlikely event that a conflict or uncertainty arises, contact the Thermon
engineering support personnel assigned to this project to clarify.
1.1 The Panel Location A wide variety of TraceNet TCM2 system configurations are possible. The TCM2
control panels are designed to operate in ambients ranging from -40°F (-40°C) to
104°F (40°C) and higher. TraceNet TCM2 heat trace control and monitoring
systems have been approved/certified for installation and operation in
ORDINARY LOCATIONS and CLASS I, DIV 2, GROUPS B, C, D, T4
HAZARDOUS LOCATIONS ONLY, Installation Category II, at altitudes up to
2000 m, and in locations where the Mains supply voltage can fluctuate up to
10%. The actual markings provided on the panel will detail the specific location
requirements for each design. The module may be used in pollution degree 2 or
better.
1.2 Initial Inspection and Handling Upon receiving the TraceNet TCM2 control panel, it is important to confirm that
the contents of the shipping containers agree with the shipping documents and
with the purchase order. Also, it is important to check the shipped container
exterior and packing materials for any possible freight damage. Where damage is
observed, take photos and notify the carrier as well as your nearest Thermon
engineering support center before proceeding further.
After carefully removing the panel from its shipping container, move the panel to
its selected location, either by utilizing the pallet base and the securement
strapping provided (using a lift truck/fork lift in the case of large panels), or by
lifting and mounting to a wall/rack for smaller panels. Where lifting eyes are
provided on the panel, they should be used when handling.
Where the panel has external heat sinks to dissipate the heat generated by solid
state relay switching, it is recommended that a minimum of 6” (150 mm) of
All installation personnel should be properly trained and qualified to safely install,
service and program this TraceNet heat tracing control panel as well as to operate
the associated heat tracing system. Service shall only be performed by a certified
technician. Equipment is located in enclosures whose doors can only be opened
through use of a tool.

2
clearance be allowed between heat sinks and walls or other panels to minimize
heat buildup at the heat sinks.
Where heat sinks are present on adjacent panels, allow 12” (300 mm) clearance
between heat sinks for sufficient natural air movement.
Adequate door clearance for service work entry and conduit panel entries should
be anticipated when establishing the exact panel location. The panel should be
positioned such that the operator can easily access any disconnecting breakers
or fuses. When the panel is located outdoors, the panel should be located at a
sufficient height to avoid potential standing water.
Once the panel has been properly located, refer to the project specific installation
details for the recommended floor mounting as well as wall mounting details.
Once bolted in place, the panel is ready for final configuration, wiring, and site
required assembly. Note that the TCM2 control and monitoring module is
normally shipped in special packaging to minimize any undue impact stress
during shipment. It should be removed from its packaging being attentive to any
shipping damage that may have occurred during its transit.
Warning: Heat Sink Temperatures May Exceed 60°C
WHEN USED IN A HAZARDOUS LOCATION THE FOLLOWING WILL APPLY.
WARNING – EXPLOSION HAZARD – DO NOT DISCONNECT EQUIPMENT
UNLESS POWER HAS BEEN SWITCHED OFF OR THE AREA IS KNOWN TO BE
NON-HAZARDOUS
AVERTISSEMENT – RISQUE D’EXPLOSION – AVANT DE DÉCONNECTER
L’EQUIPEMENT, COUPER LE COURANT OU S’ASSURER QUE L’EMPLACEMENT
EST DÉSIGNÉ NON DANGEREUX
WARNING – EXPLOSION HAZARD – SUBSTITUTION OF COMPONENTS MAY
IMPAIR SUITABILITY FOR CLASS I, DIVISION 2
AVERTISSEMENT – RISQUE D’EXPLOSION – LA SUBSTITUTION DE
COMPASANTS PEUT RENDRE CE MATÉRIEL INACCEPTABLE POUR LES
EMPLACEMENTS DE CLASSE I, DIVISION 2

3
1.3 The TCM2 The TCM2 is a microprocessor-based temperature control and monitoring
module developed specifically for heat tracing. Designed for use exclusively in
Thermon manufactured control systems, the TCM2 module provides a complete
control solution for up to two heat tracing circuits.
1.4 Features Features of the TCM2 module include the following
Bright Four-Line OLED Display
Resettable Minimum and Maximum Temperature Values
Alarm Functions
o High and Low
Temperature
o High and Low Current
o High Ground/Earth
Leakage Current
o Circuit Fault
o Damaged Temperature
Sensor
Trip Functions
o High Temperature
o High Current
o High Ground/Earth
Leakage Current
3-phase Current Monitoring1
The TCM2’s four-line display, tri-color status LEDs and four-button interface offer
the operator intuitive access to the heat tracing system operating parameters
including heat trace status, all set-points, temperature data, operational control
1 Factory configurable option. See Section 7.5 for more information
Each TCM2 module is supplied with all necessary connection hardware.
Substitutions may impair protections provided by the equipment.
Figure 1.1: TCM2 Control Module

4
parameters and communication settings. Tri-color LEDs on the front of the
TCM2 module indicate module status including power, system health, alarm and
trip status on a per-circuit basis.
The TCM2 module is provided with three 24 VDC digital outputs: TRIP, ALARM
and SYS. TRIP and ALARM are configurable to be normally on or normally off.
The TCM2 is also equipped with an isolated RS-485 port capable of ModBus
ASCII or RTU communications. Over a shielded two-wire twisted-pair physical
layer, the TCM2 communicates with Thermon’s TraceNet Command system as
well as distributed control systems (DCS) at data rates up to 57600 baud.
Ethernet connectivity is available with the factory addition of a serial to Ethernet
converter.
The TCM2 contains an internal 3.15 Amp, 250 V~ fuse that is designed to be
serviced only at the factory.
The TCM2 module can be utilized in a variety of TraceNet control and monitoring
systems. Specific wiring and equipment arrangement details are provided in
drawings included within the TCM2 Series panel at the time of shipment. The
TCM2 module is also backward compatible and may be used as an upgrade
within legacy HeatChek TC Series Systems formerly utilizing a TC202a, TC201a
or TC101a control and monitoring module.
The TCM2 module is intended for installation exclusively in Thermon designed TCM2 panels. The Mains feed to the TCM2 module shall be current limited, either by a
breaker or a fuse, with a current rating no higher than 15 A. The panel is designed such that the temperature internal to the enclosure does not exceed the maximum operating temperature of the TCM2 module. All wiring to the unit must conform to
local electrical codes.

5
2 Specifications
TCM2 control panels are available in a variety of configurations. The table below serves as general specification information for these control panels. Table 2.1: TCM2 Panel Specifications
Parameter Description
Heat Trace Mains Supply 100 to 600 V~, 50/60 Hz (See Table 2.2 for Control
Module supply information)
Control Points Up to 2 Heat Tracing Circuits
Heat Trace Current See Table 2.3: Maximum Heater Current Through
Each Solid State Relay
Temperature Inputs Up to Two per Control Point; Platinum RTDs 100 Ω
@ 32 °F (0 °C)
Temperature Control
Range -200 °F to 1112 °F (-129 °C to 600 °C)
Alarm Contact Relays 24 VDC, 200 mA
Communication RS-485 , ModBus ASCII or RTU, up to 57600 Baud
Control Methods On/Off MEC, On/Off SSR, Proportional, Ambient or
APCM
Display 4 Line, 20 Character, OLED
Relative Humidity 0 to 90% Non-Condensing
Exterior Panel Operating
Temperature -40 °F to 104 °F (-40 °C to 40 °C)
Interior Operating
Temperature -40 °F to 140 °F (-40 °C to 60 °C)
Storage Temperature -40 °F to 140 °F (-40 °C to 60 °C)
Dimensions (W x H x D) See Table 2.4

6
The table below serves as general specification information for the TCM2 control
module.
Table 2.2: TCM2 Module Specifications
Parameter Description
Mains Supply 100 to 240 V~, 50/60 Hz, Overvoltage Category II
Max. Input Current 740 mA
Power Consumption 95 VA max
Control Points Up to 2 Heat Tracing Circuits
Temperature Inputs Up to Two per Control Point; Platinum RTD’s 100 Ω
@ 32 °F (0 °C)
Temperature Control
Range -200 °F to 1112 °F (-129 °C to 600 °C)
Communication RS-485, ModBus ASCII or RTU, up to 57600 Baud
Accessory Power Output 9 W @ 24 VDC
Digital Alarm Outputs 3 x 24 VDC, 100 mA
Control Outputs 2 x 24 VDC, 100 mA or 2 x 12 VDC, 100 mA (user
selectable)
Control Methods On/Off MEC, On/Off SSR, Proportional, Ambient or
APCM
Display 4 Line, 20 Character, OLED
Operating Temperature -40 °F to 140 °F (-40 °C to 60 °C)
Storage Temperature -40 °F to 176 °F (-40 °C to 80 °C)
Dimensions (W x H x D)
4.7” x 4.65” x 3.25” (119mm x 118mm x 83mm)
Module should be mounted as seen in Figure 2.1
and include a minimum 2” (50 mm) clearance above
the module and 1.5” (38 mm) clearance below the
module.
Figure 2.1: TCM2 Module Dimensions

7
Table 2.3: Maximum Heater Current Through Each Solid State Relay
Note: For TCM2-x, the x denotes relay count. Double-pole relay or 2 single-pole relays required for 208VAC or 240VAC to break
both legs.
1 Relays in separate enclosure from control module. 2 Amperage values over 30 only apply to higher amperage relays such as Crydom HD60125. 3 60 A allowed only when using 1 or 2 relays.
Enclosure
Option
Module
Type
SSR30A
(single pole
relay)
SSR15A
(double pole
relay)
SSR30B
(single pole
relay)
SSR15B
(double pole
relay)
SSR50C
Up to 3 single
pole relays(1,2,3)
SSR30B/2R
(single pole
relay)
40°F
(4°C)
104°F
(40°C)
40°F
(4°C)
104°F
(40°C)
40°F
(4°C)
104°F
(40°C)
40°F
(4°C)
104°F
(40°C)
40°F
(4°C)
104°F
(40°C)
40°F
(4°C)
104°F
(40°C)
P2, SS2 TCM2-1 30 19 22 9 30 30 24 15 -- -- 30 25
P3, SS3 TCM2-1 30 24 24 12 30 30 24 15 -- -- 30 30
TCM2-2 30 12 19 6 30 30 24 14.75 -- -- -- --
SS3 TCM2-1 -- -- -- -- 46(1,2) 46(1,2) -- -- -- -- -- --
TCM2-2 -- -- -- -- 46(1,2) 46(1,2) -- -- -- -- -- --
SS4 TCM2-1 30 24 24 12 30 30 24 15 50/60 60/50 30 28
TCM2-2 30 24 24 12 30 30 24 15 60/50 60/50 -- --

8
Table 2.4: TCM2 System Enclosure Options
Enclosure
Option Material Type
Dimensions
(inches)
Dimensions
(mm)
P2 Fiberglass 4X (IP54) 12 x 14 x 6 305 x 356 x 152
SS2 Stainless Steel 4X (IP54) 12 x 14 x 6 305 x 356 x 152
P3 Fiberglass 4X (IP54) 16 x 14 x 6 406 x 356 x 152
SS3 Stainless Steel 4X (IP54) 16 x 14 x 6 406 x 356 x 152
SS4 Stainless Steel 4X (IP54) 36 x 30 x 16 914 x 762 x 406

9
3 Module Connections
& Wiring The TCM2 is intended for use exclusively in TraceNet TCM2 Control and
Monitoring System panels. Refer to Figures 3.1 and 3.2 for TCM2 Module
connections.
Design considerations within panel:
Control wiring is rated to 105°C
GFI test loop wires should be passed through their corresponding GFI
CT’s
Alarm digital outputs are intended to drive internal signal relays or lights
and should not be directly connected to field wiring
Care must be taken to avoid exceeding the temperature rating of the
TCM2. Refer to Table 2.3 for panel current ratings.
3.1 Bottom Side Connections
1. POWER: Mains supply input accepts 100 – 240 V~, at 50/60 Hz. L1 is
Line 1, L2 is Line 2 or Neutral, and the symbol is the protective
conductor/ground connection.
2. 24 VDC & DIGITAL OUTPUTS: A 24 VDC output is provided to power
accessories such as a serial to Ethernet converter. The output supplies
up to 9 W and is over-current protected. The Digital outputs provide
alarm functionality. Each 24 VDC output is current limited to 100 mA.
Figure 3.1: Bottom-Side Connections

10
The positive legs of each output are electrically connected. The outputs
may be used to drive indicators or audible alarms, etc., or may be used to
drive relays to connect to field wiring. TRIP and ALARM are configurable
to be normally on or normally off. The TRIP output activates if either
circuit trips for any reason. This requires a manual reset either at the
module or by the remote communication. The ALARM output activates if
either circuit experiences any type of alarm. The output deactivates when
acknowledged or when the alarm condition is no longer present. The
SYS alarm is hard wired to be normally on and to activate in the event of
a CPU fault. Note: These are open collector digital outputs not dry contact
relays. They should not be connected directly in parallel or series.
Digital outputs should not be directly connected to field wiring.
3. ACCESSORY: Reserved for future developments and for entering
factory test mode when connected to the isolated RS-485 (Right Pin > D-;
Middle Pin > S; Left Pin > D+).
4. AUX IN: Provides connection for optional factory-installed externally
mounted interface buttons (See Appendix B for wiring diagram).
5. FACTORY: This port is for factory programming only.
6. COMM LED: Indicates traffic on the isolated data highway RS-485.
3.2 Top Side Connections
RTD field wiring should be shielded and the shield grounded at one end.
Ground connections are provided in the panel for this purpose.
HEATER CT1, 2 and 3: In normal 2 circuit configuration, HEATER CT1 is
used for Circuit 1, HEATER CT2 is used for Circuit 2 and HEATER CT3 is
not used. When operating as a single-circuit 3-phase controller all three
CTs are used, one on each leg of the 3-Phase heater outputs (See
Section 7.5).
GFI CT1 & 2: These are connection points for the ground/earth fault CTs.
GFITL1 & 2: These are connections for the ground/earth fault interrupt
test loop. These wires should be routed through each corresponding
ground/earth fault CT. These wires are used to pass a small amount of
Figure 3.2: Top-Side Connections.

11
current (about 50 mA~) through the GFI CT to verify functionality on
command or at a user configurable interval.
CTRL OUT 1 & 2: These output signals control the power SSRs or
mechanical relays which energize the heat trace. Signal voltage defaults
to 12 VDC but can be changed to 24 VDC in the Factory Menu. Each
output is current limited to 100 mA.
REMOTE ACK: This isolated input allows acknowledgement of alarms
without opening the panel. It may be connected to a pushbutton switch or
to the contacts of a relay driven by a remote signal. The positive side
provides an isolated 5 VDC signal. When switched, the negative side
drives the diode of an opto-coupler to signal to the TCM2
acknowledgement of the alarm or trip.
RS-485 DATA HWY: D+ & D- are the differential bus lines for
communications. S is the common leg and is often connected to the
shield in a 2-wire twisted pair cable. Though this configuration is
common, ideally, S is connected to another wire within the cable and the
shield is grounded on one side only. See Section 8 for more information.

12
4 Field and Panel
Wiring For a successful installation of a TraceNet TCM series heat tracing control and
monitoring system, a number of equally critical parts of the system must be
installed properly. Areas requiring close attention are the heat trace and
insulation, the RTD temperature sensor installation, the distribution of the field
RTD and power wiring, and the installation and routing of wiring inside the
TraceNet TCM panel.
4.1 Heat Trace and Insulation Installation All heat trace circuits and insulation shall be installed in accordance with project
installation details provided. In addition, refer to the Electric Heat Tracing
Maintenance and Troubleshooting Guide (Thermon Form No. 20745) for general
procedures and installation tips.
4.2 RTD Installation and Wiring RTD control sensors should generally be installed on the process lines or in
ambient (where ambient sensing is applied) in a location that is most
representative of the entire heat trace circuit. In general, it is recommended that
the sensors not be located at heat sinks such as pipe supports, pumps, and
valves as the control system response needs to be based on the majority of the
process line. The RTD control sensor location on the process piping should
follow the installation guidelines detailed in Figure 4.1.
The heat tracing system installation shall be in accordance with the electrical area
classification requirements and as well shall conform to the latest requirements as
detailed in applicable heat tracing standards, the local Electrical Code and plant
standard practices. Where conflicts arise, contact the project engineer for resolution.
If the equipment is used in a manner not specified in this Guide, protections provided
by the equipment may be impaired.

13
Figure 4.1: RTD Sensor Location
Where RTD sensors are installed on the process piping, follow the guidelines
above. In special cases where the limiting temperature sensor is to be installed
on the heater itself, it is important to recognize that an offset should be
anticipated in the trip set-point to allow for sensor reading error and overshoot.
As a general rule, field RTD wiring and power wiring should not be routed in the
same conduit or proximity in a tray as the temperature signals can become
distorted and result in improper readings.
4.3 Power Distribution Wiring and Breakers All field power wiring materials used shall be suitable for the intended service and
shall be rated for insulation service temperatures up to and exceeding 221°F
(105°C) unless higher values are otherwise noted in project specifications.
Power supply wiring from the power transformers to the power distribution panel
and distribution wiring to the heat trace circuits shall be rated for the heat trace
use voltage or higher and shall be of a sufficiently large wire size to minimize
voltage drop. Heat trace circuit breakers should be selected based on the type of
heat trace used, the service voltage, and the circuit current draw characteristics.
It is especially important when using self-regulating trace heaters to make sure
that the circuit breaker response curve type is coordinated with the startup
characteristic of the trace heater in a cold start condition. TCM2 controller circuit
breakers should have current ratings no higher than 15 A. In addition to the
controller circuit breaker, every heat trace circuit shall be provided with a circuit
breaker as a means for disconnection. All circuit breakers shall be easily
identifiable and accessible. All distribution wiring connections should be
tightened using a torque indicating screw driver to the levels indicated in Table
4.1.
Table 4.1: Recommended Torque Values
Location of Terminals Torque Values (Typical)*
Distribution Equipment 13.2 to 15.9 in. lbs. 1.49 to 1.80 N-m

14
* Required torque values may vary depending on individual system designs and
size of terminals. Refer to project documentation for additional information.
4.4 TraceNet Panel Wiring TraceNet TCM Series panels are configured and prewired into an integrated heat
trace control and monitoring panel. Clean terminal strips are provided to facilitate
the field wiring into the panels. Refer to the project specific panel drawings when
installing the field wiring within the panel. Anticipated field wiring is
conventionally shown by dashed lines. All field power wiring materials used shall
be suitable for the intended service and shall be rated for insulation service
temperatures of at least 221°F (105°C) unless higher values are otherwise noted
in project specifications. All TraceNet component terminal block connections
should be tightened using a torque indicating screw driver to the levels indicated
in Table 4.1.
4.5 Serial Communication Wiring TraceNet TCM Series panels may be linked together for communications with an
RS-485 communication cable at distances up to 4000 ft (1200 m)1. In addition, a
120 Ohm termination module should be used at each end of the RS-485 network.
The recommended communication cables for use in the RS-485 network are as
given in Table 4.2.
1 Max length depends on site conditions and baud rate
Protective earth/ground connection is required. Ground/earth with minimum 12 AWG conductors to a known and proven plant ground or by grounding rods.

15
Table 4.2: Recommended RS-485 Cable Type
Cable Type Recommended
120 ohm, -20°C to +60°C (-4°F to +140°F)
22AWG FHDPE insulation PVC outer jacket
Belden 3107A or equal
120 ohm, -30°C to +80°C (-22°F to +176°F)
24AWG PE insulation PVC outer jacket
Belden 9842 or equal
120 ohm, -70°C to +200°C (-94°F to +392°F)
24AWG Teflon FEP insulation Teflon FEP outer
jacket
Belden 89842 or equal
Note: All these products are designated as 120 ohm impedance for balanced
line communication uses.

16
5 Monitoring Heat
Tracing Circuit
Status 5.1 The Interface Local interaction with the TCM2 panel takes place through the TCM2 module’s
simplified four-button membrane switch, four-line display and its three tri-color
LEDs. See Table 5.1 which follows for a complete explanation of the physical
interface. Upon power up, the TCM2 will display the start-up screen message
similar to that shown in Figure 5.1.
Figure 5.1: TCM2 User Interface at Start-Up
After this start-up message, the TCM2 will immediately begin normal operation
and display the Circuit Screen. Once the Circuit Screen is shown, the TCM2 will
control each enabled circuit according to its set-points. Figure 5.2 describes the
information shown on a typical Circuit Screen in normal operation with two RTD’s
on Circuit 1 and no alarms. If any alarms are present, a corresponding alarm
message will be displayed on the lowest line of the screen, the Alarm Line. If
multiple alarm events occur on a circuit, the TCM2 will display one alarm
message at a time until all have been cleared.
Figure 5.2: Typical Circuit Screen

17
Table 5.1: TCM2 Keypad and Indicators
Key/Indicator Description Function
Power LED
Green:
Red:
Power On
System Fault
I, II Circuit 1 and Circuit 2 LED
Off:
Green:
Flashing Yellow:
Solid Yellow:
Flashing Red:
Solid Red:
Heater OFF
No Alarms & Heater ON
One or more Unacknowledged ALARM Present
One or more Acknowledged ALARM Present
Unacknowledged TRIP or RTD fault
Acknowledged TRIP or RTD Fault
Main Menu
Enters Main Menu
Returns to Circuit Screen from Main Menu
Returns to Main Menu from Submenu
,
Up and Down Arrow Keys Navigation
Value Changes
Acknowledge/Accept Key
Acknowledge Alarms
Reset Trips
Enter Submenu
Accept Change

18
5.2 Basic Navigation At the Circuit Screen, alternate between circuits 1 and 2 using & .
Acknowledge Alarms and reset Trips using . Press to access the Main
Menu of the TCM2.
The Main Menu gives the user access to all set-points and configuration options.
Use & to navigate the Main Menu and to enter a submenu. For
submenus with circuit specific settings, for example, MAINTAIN TEMP or RTD
SETTINGS, use & to switch between circuits. In View Mode, where
editing is prohibited, simply returns to the Main Menu. In Program Mode,
selects a circuit for set-point editing.
Use & to change a value, then to accept the change and move on to
the next set-point or setting, or press to cancel the change and return to the
Main Menu. To return to the Circuit Screen from the Main Menu, press . See
Table 6.1, in Part 6: Accessing Control Settings for a list of Main Menu
Options.
5.3 Alarms In the event that the measured conditions of the heat trace circuit fall outside the
user-defined parameters, the TCM2 will notify the user in four ways, the Alarm
Line of the display, tri-color LEDs, digital outputs and through RS-485
communications. When an alarm condition first occurs, the corresponding tri-
color LED will flash yellow, the common alarm digital output will annunciate and
a message will appear on the Alarm Line of the corresponding Circuit Screen to
inform the user of the type of alarm present. Pressing will acknowledge the
alarm, deactivate the digital output, change the tri-color LED from flashing
yellow to solid yellow and “ACK” will be displayed after the alarm message on
the Alarm Line of the display. Alarms will automatically clear when the alarm
condition is no longer present.
Figure 5.3: Main Menu
Figure 5.4: Programming Maintain Temperature

19
5.4 Trips In the event that the measured conditions of the heat trace circuit go beyond the
TRIP settings of the circuit, the circuit will trip, i.e. turn off. When a circuit trips,
the circuit will be deactivated, the corresponding tri-color LED will flash red, the
common TRIP digital output will annunciate and a corresponding message will
be displayed on the Alarm Line of the display. A TRIP event is different from an
ALARM event in that the heat trace circuit is deactivated and will remain
deactivated until the circuit is manually reset by the user.
For Temperature TRIPS pressing once will acknowledge the TRIP causing
the circuit LED to stop flashing and stay solid red and the common TRIP digital
output to deactivate. To reset a high temperature TRIP and reactivate the
circuit, must be pressed again.
For heater current and ground/earth fault TRIPs, pressing will reset the TRIP,
cause the common TRIP digital output to deactivate, the circuit LED to stop
flashing red and the TCM2 will attempt to resume normal control.
If the conditions which caused the trip are still present, the circuit will TRIP
again.
All alarms, trips and acknowledgements are transmitted via RS-485.
Acknowledgements and resets can also be performed remotely from a TraceNet
Command system or through a plant DCS systems via ModBus commands.
See Appendix A for ModBus Memory Map.
See Table 5.2 for a comprehensive explanation of alarm messages.

20
Table 5.2: Alarm Messages
Message Explanation
RTD FAULT ALARM
An RTD reading is out of range when the resistance
exceeds 313 Ω or is less than 48 Ω. In either case, the
RTD has been damaged or has been disconnected in
service. NOTE: The TCM2 will continue to control off of a
second undamaged RTD when available.
LOW TEMP ALARM The measured temperature has fallen below a value
equal to the LOW TEMPERATURE ALARM set-point.
HIGH TEMP ALARM
The measured temperature has risen above a value
equal to the HIGH TEMPERATURE ALARM set-point but
has not yet risen above a value equal to the HIGH
TEMPERATURE TRIP/HIGH set-point.
HIGH TEMP TRIP
(HIGH HIGH TEMP)
If HIGH TEMPERATURE TRIP is ON (OFF), this
message will be displayed if the measured temperature
rises above a value equal to the HIGH TEMPERATURE
TRIP (HIGH) set-point.
HIGH GROUND CURR The measured ground/earth leakage current has risen
above the GROUND CURRENT ALARM set-point but not
above the GROUND CURRENT TRIP/ALARM2 set-point.
GROUND CURR TRIP
(HIGH HIGH GROUND)
If GROUND CURRENT TRIP is ON (OFF), this message
will be displayed if the measured ground/earth leakage
current rises above the GROUND CURRENT TRIP
(HIGH) set-point.

21
Table 5.2: Alarm Messages (Continued)
Message Explanation
LOW AMPS ALARM The measured heater current has fallen lower than
the LOW CURRENT ALARM set-point.
HIGH AMPS ALARM The measured heater current rise is higher than the
HIGH CURRENT ALARM set-point but not above
the HIGH CURRENT TRIP/HIGH.
HIGH AMPS TRIP
(HIGH HIGH AMPS)
If HIGH CURRENT TRIP is ON (OFF), this
message will be displayed if the measured heater
current is higher than the HIGH CURRENT TRIP
(HIGH) set-point.
CKT FAULT ALARM Indicates that a control relay was nonresponsive
during a SELF-TEST or that heater current was
detected when the circuit was off.

22
6 Accessing Control
Settings 6.1 Password Protection The TCM2 module features password protection for settings. The user has the
option to set a four-digit numerical password which must be entered in order to
authorize changes to any set-point or setting. Without the password, all setting
and set-points may be viewed, alarms/trips may be acknowledged and circuits
may be reset but no settings or set-points may be modified. When the correct
password is entered, the TCM2 enters Program Mode where changes are
authorized for 30 minutes. After the 30 minutes has passed, the password will
again be required. The default password is 0000.
Figure 6.1: Enter Password to enter Program Mode
By default, password protection is disabled. The first line of the Main Menu
displays whether the control module is in View Mode or Program Mode (See
Figure 6.1). To enable the password, enter the Main Menu and select
PASSWORD SETTINGS. Change PASSWORD from OFF to ON and enter a
password using & to change each number and to select the number
and confirm.
Figure 6.2: Enable/Disable Password or Change Password
6.2 Adjusting Set-points To adjust the control parameters of the TCM2 module, be sure first, to enter
Program Mode by entering the correct password or by disabling password
protection as per the previous section. Then, using & , navigate to the
desired submenu and press . Table 6.1 shows a complete listing of all
submenus as well as each set-point and setting contained within and their valid
ranges. For set-points or settings which apply only to one circuit, for example
MAINTAIN TEMP, the desired circuit must be selected upon entering the

23
submenu using & . Pressing , selects the circuit and advances the
cursor to the first set-point or setting available for editing. Use & to
change the value and to accept the new value and advance the cursor to the
next set-point or setting available for editing. When finished editing within a
submenu, use to return to the Main Menu. When finished making changes,
press to return to the Circuit Screen from the Main Menu.

24
Table 6.1: Main Menu Options
Menu Option Applies To Set-Point/Settings Available Range/Options Precision
MAINTAIN
TEMPERATURE
Individual
Circuit
MAINTAIN TEMPERATURE
-129°C to 600°C; -200°F to 1112°F (LOW
TEMP ALARM to HIGH TEMP ALARM)
*see Section 7.4 for Ambient setting
1°
BANDWIDTH (Control Band) 1°C to 300°C; or 1°F to 300°F 1°
RTD SETTINGS Individual
Circuit NUMBER OF RTDS 1 or 2
RTD FAULT POWER 0 – 100% 1 %
HIGH TEMP
ALARMS
Individual
Circuit
TRIP or HIGH (HIGH is a higher level
alarm if HIGH TEMP TRIP is OFF) HIGH TEMP ALARM to 1112°F or 600°C 1°
ALARM MAINTAIN TEMP+BANDWIDTH+1 to HIGH
TEMPERATURE TRIP (HIGH) 1°
HIGH TEMP SEEN RESET = Y or N 1°
LOW TEMP
ALARM
Individual
Circuit LOW TEMP ALARM -200°F or -200°C to MAINTAIN TEMP 1°
LOW TEMP SEEN RESET = Y or N 1°
GROUND
CURRENT
Individual
Circuit
GROUND CURRENT (real-time
ground/earth fault current
measurement)
0-225 mA 1 mA
TRIP or HIGH (HIGH is a higher level
alarm if GROUND CUR TRIP is OFF) GROUND CURRENT ALARM to 225 mA 1 mA
GROUND CURRENT ALARM 20 to GROUND CURRENT TRIP (HIGH) 1 mA
HEATER
CURRENT
Individual
Circuit
HEATER CURRENT (real-time heater
current measurement) 0.0 A to 240.0 A 0.1 A
HEATER POWER CLAMP (FOR
ON/OFF SSR only) 0 – 100% 1 %
HIGH CURRENT
ALARMS
Individual
Circuit
TRIP or HIGH (HIGH is higher level
alarm if HEATER CUR TRIP is OFF HIGH CURRENT ALARM to 245.0 A 0.1 A
ALARM 1.0 A to HIGH CURRENT TRIP (HIGH) 0.1 A

25
Table 6.1: Main Menu Options (Continued)
Menu Option Applies To Set-Point/Settings Available Range/Options Precision
LOW CURRENT ALARM Individual
Circuit ALARM 0.0 A to HIGH CURRENT ALARM -1.0A 0.1 A
HEATER ENABLE Individual
Circuit
HEATER ENABLED, FORCED ON or DISABLED
CONTROL (Control Method)
ON/OFF MEC, ON/OFF SSR,
PROPORTIONAL, AMBIENT, AMBIENT
APCM (See Section 7.1 for Control Method )
CONFIGURATION Both
Circuits
GROUND CUR TRIP ON or OFF
HEATER CUR TRIP ON or OFF
HIGH TEMP TRIP ON or OFF
ALARM ON (Digital Outputs
Activate On…) ALL ALARMS or TEMP ONLY
ALARM OUTPUT NRM (Alarm
Outputs Normally) ON or OFF
RTD UNITS (Temperature Units) °C or °F
APCM CYCLE TIME 20, 25 or 33 min
AUTO SELF TEST OFF or every 2 – 99 hours 1 hour
START UP DELAY 0-30 min 1 min
SOFT START 1 – 8 min 1 min
FIRST CIRCUIT NUMBER 0-99 1
SCREEN SAVER ON or OFF
LANGUAGE English, Spanish, Russian
SELF TEST for Self-test, for Ground Test

26
Table 6.1: Main Menu Options (Continued)
Menu Option Applies To Set-Point/Settings Available Range/Options Precision
DATA HIGHWAY Controller
NETWORK ID 1-247 1
MODBUS Protocol ASCII 7, 2, NP or RTU 8, 1, NP
BAUD RATE 9600, 19200, 38400, 57600
ENTER PASSWORD
Controller
in View
Mode
PASSWORD 0000 – 9999
PASSWORD SETTINGS
Controller
in Program
Mode
PASSWORD ON or OFF (enable or disable
password protection)
NEW PASSWORD 0000-9999 (DEFAULT = OLD
PASSWORD)
OTHER SETTINGS (See below) Seen after New Password Entered
OTHER SETTINGS Controller
FIRMWARE version Major.Minor version
HOURS IN USE Time on from manufacture
CID (Chip Identifier) Family# + Unique Identifier

27
7 Heat Trace Control
and Monitoring 7.1 Control Method To provide the most flexible and application specific heat trace solution, the
TCM2 is capable of controlling using several different algorithms or control
methods. These include ON/OFF MEC, ON/OFF SSR, Proportional and Ambient
Proportional Control (APC and APCM). Each circuit’s control method is
independently configurable.
ON/OFF MEC
The simplest form of control is ON/OFF MEC. This simply turns the heat trace
on when the RTD reading falls below the Maintain Temp and turns it off when the
RTD read is above the Maintain Temp plus the control band (bandwidth). This
control method is intended for use in applications using mechanical relays to
switch the heat trace.
ON/OFF SSR
ON/OFF SSR adds the Soft Start feature to ON/OFF control. This control
method takes advantage of the Solid-State Relay’s high switching life to
decrease temperature overshoot. Under ON/OFF SSR control, the heat trace
will turn on and off the same way it does in ON/OFF but will gradually increase
the duty cycle by way of cycle-omission from 18% to 100%. The duration of this
gradual increase, or Soft Start, can be adjusted in the Configuration submenu.
Proportional
In Proportional control, the heat trace is on at a 100% duty cycle below and up to
the Maintain Temp and the duty cycle decreases linearly to 18% at the Maintain
Temp plus the control band. This control method is ideal for process sensing
applications but is not suitable for applications using mechanical relays.
Ambient & Ambient APCM
See Section 7.4, The TCM2 in Ambient Sensing Applications for full
explanation of this control method.

28
7.2 Setting the Control Method Before attempting to change settings and set-points, be sure the TCM2 is in
Program Mode. To determine whether the control module is in View Mode or
Program Mode, check the first line of the Main Menu. If in View Mode, first enter
the password to enter Program Mode (see Section 6.1 Password Protection for
more information).
Figure 7.1: Main Menu in Program Mode
Then enter the HEATER ENABLE submenu. Use & to move to the circuit
in question and to select the circuit. This will move the cursor to the first
option, HEATER, which allows enabling, disabling or forcing ON a circuit.
Change the setting and press or just press to keep the current setting and
move to the next option, CONTROL. This sets the Control Method for this circuit.
See Section 7.1 for a complete explanation of the CONTROL options. Use &
to choose the desired Control Method and to accept the change and move
the cursor back to the top of this submenu. From here another circuit may be
selected or press to return to the Main Menu.
7.3 The TCM2 in Process Sensing Applications The control method which provides the most tightly controlled temperature and
highest energy efficiency is Proportional control with 1 or 2 RTDs per heat trace
circuit. When configured with two RTD sensors, the TCM2 will control off of the
lowest reading and alarm off of the highest reading. Both RTD readings will be
displayed on the Circuit Screen. In the case of process sensing control, one
must be aware of the normal flow directions within the process piping and only
group process piping having a common flow condition with the control sensors.
A failure to do so can result in non-flowing areas cooling and freezing when the
flowing portions have appropriately turned the heat trace circuit off.

29
7.4 The TCM2 in Ambient Sensing Applications The TCM2 may also be configured for Ambient Proportional Control (APC). One
or two RTD’s may be used to sense ambient temperatures in the process area.
Under the APC method, the HEATER 100% and HEATER OFF are shown in
place of MAINTAIN TEMP and BANDWIDTH. HEATER 100% should be set to
the lowest expected ambient temperature. HEATER OFF should be set to the
temperature at which the heat is no longer required.
Figure 7.2: APC Power vs Temperature
As shown in Figure 7.2, at the lowest expected ambient temperature the heat
trace will operate at 100% power and then ramp down to a 18% power level at
HEATER OFF. If the ambient rises above this value, the heat trace will then turn
off. So, for example, if the lowest expected ambient temperature around a given
process unit is -40°F (-40°C), then one would set the circuit to operate using
APC, and set HEATER 100% to -40°F (-40°C). HEATER OFF would be set to
50°F (10°C). A feature unique to the TCM2 among TraceNet controllers is the
capability of using mechanical relays for ambient control. When using
mechanical relays, the ambient algorithm changes the period over which duty
cycle is adjusted. Instead of using cycle-omission over a period of about one
second, the duty cycle period is set to a cycle time of 20, 25 or 33 minutes. This
control method may also be used in applications where, under AMBIENT control,
self-regulating cables operate in startup mode and can cause high current
readings and alarms. In certain applications, it may be desirable to have ambient
control but also to have one RTD sensor on the pipe for high temperature
alarming. This is possible without further configuration. Just set the HIGH TEMP
ALARM at the desired temperature. When using AMBIENT or AMBIENT APCM,
LOW TEMP ALARM is disabled but the HIGH TEMP ALARM remains active. It is
also possible to use a single RTD on both circuits by simply connecting both RTD
inputs to the same RTD (i.e. connecting A to A, B to B and B to B).

30
APC control is not recommended where steam outs and high exposure
temperature process conditions are expected and where the heat-trace due to its
inherent characteristics cannot be operated during such events.
7.5 Single-Circuit 3-Phase A new feature unique to the TCM2 among the TraceNet family of control and
monitoring systems is the ability to directly monitor all three phases of a 3-phase
system. In this single circuit 3-phase option, the TCM2 will monitor and display
all three current readings on the Circuit Screen. Once configured for 3-phase
operation there are no additional options to configure to begin normal operation.
A high or low current condition on any phase or ground/earth fault condition will
result in an alarm or trip as per the circuit settings and set-points. This is a
factory configuration.
Figure 7.3: Circuit Screen in Single-Circuit 3-Phase Operation

31
8 The TCM2 Data
Highway
Communications The TCM2 is provided with RS-485 communications. This allows for
communication via Modbus ASCII or RTU protocols to a TraceNet Command
System and/or to the facility’s Distributed Control System (DCS). The TCM2 is
also provided with an auxiliary 24 VDC power source which can an optional serial
to Ethernet converter for applications where Ethernet is preferred. Through
these communication links, all of the operating parameters which are
programmable at the module can be accessible at the central PC workstation or
DCS system console.
For communications linking information between the TCM2 and a PC
workstation, refer to the TraceNet Command Operating Guide. Through the
TraceNet Command System, the user has remote access to all the set-points
and settings in the TCM2, including the ability to remotely view all parameters in
real-time1, acknowledge alarms and reset tripped circuits. The TCM2 Data
Highway uses Modbus over RS-485, a world-wide standard in reliable industrial
communications. Available with two user selectable protocol configurations and
four common Baud rates, the TCM2 is ready to be integrated into the vast
majority of current user systems including Thermon legacy HeatChek® control
systems. Appendix A shows the memory map which should be used by DCS
programmers to integrate the TCM2 into the plant’s DCS. Current systems
utilizing Thermon’s TraceView or TraceView Network Explorer will require an
upgrade to the new TraceNet Command system.
To access the TCM2 communications settings, enter the DATA HIGHWAY
submenu (for help navigating to submenus see Basic Navigation in Section 5
of this manual.)
1Installations with high circuit counts may take longer to update circuit information
Figure 8.1: Data Highway submenu

32
The DATA HIGHWAY submenu allows the user to set the Network ADDRESS of
the TCM2 to a number between 1 and 247, the protocol configuration to either
RTU 8, 1, NP or ASCII 7, 2, NP and the baud rate to either 9600 (if used on the
same network as legacy Thermon HeatChek systems), 19200, 38400 or 57600.
For best results, a 120 Ω shielded twisted-pair cable is recommended. The Data
Highway port on the TCM2 is isolated to 5 kVrms with protection against ESD to
15 kV. For shielding to be effective, the shield should be grounded on one side
but not on both.
TCM2 panels can also be configured with reliable serial to Ethernet converters
for easy IP connectivity.

33
9 System Start-Up
All heat trace circuits should be properly terminated and meggered prior to
energizing the heat trace power distribution and control panels. In addition, all
pipes should be insulated and weather sealed to achieve the expected heat up
and temperature maintenance performance of the system.
9.1 Initial Start-Up Procedure Heat trace circuits are on independent circuit breakers from the TCM2 controller.
Any time that the TCM2 panel must be opened to gain access to the
programming of the controller, the installer shall verify that all heat trace circuits
are disconnected at the circuit breakers. This is done to provide protection from
higher voltages while maintaining power so that the installer may program the
controller.
9.2 Troubleshooting Tips When starting up a newly installed heat trace and control and monitoring system,
it is not uncommon to encounter numerous alarm and trip events. Data entry
errors, unanticipated temperature overshoots due to system inertia or too tight
control band settings, and incomplete installation details are just a few of the
many contributing factors to this result. A table of Troubleshooting Tips is
provided in Appendix C to assist during start-up.
If the equipment is used in a manner not specified in this Guide, protections provided
by the equipment may be impaired.

34
10 Maintenance Preventive maintenance consists of inspection, testing, checking connections
and general cleaning of equipment at scheduled intervals. The maintenance
recommendations that follow are intended to support and in some cases add to
those procedures detailed in the facility’s Planned Maintenance System (PMS).
In case of conflicts, contact the project engineer for resolution. When carrying
out the scheduled maintenance program, the following safety precautions should
be observed.
10.1 Safety Precautions The heat tracing can be powered by the project specified nominal voltages
ranging from 100 to 600 VAC. It is important that only authorized trained
personnel conduct these maintenance and service activities. Before conducting
any maintenance or service procedure, exercise required lockout and tag out
procedures at the appropriate circuit breakers. Additionally, test within the
control panel to ensure that the specific heat tracing and control circuit of interest
is fully de-energized and the equipment is grounded. See Section 9.1 for more
information.
If it becomes necessary to service or test live equipment, the following
instructions must be followed:
Use one hand when servicing the equipment. Accidental death or severe injury
may occur especially if a current path is created through the body from one hand
to the other.
First, de-energize the equipment. To de-energize any capacitors connected into
the circuits, temporarily ground the terminals where work is to be done.
Connect the multi-meter/instrument to the terminals of interest using a range
higher than the expected. Make sure that personnel are not grounded whenever
a need arises to adjust equipment or test circuit operation. Verify that all test
equipment used is properly maintained and safe for the intended use.
Without touching the multi-meter/instrument, energize the equipment and read
the values indicated on the multi-meter/instrument.
Remove the test leads after de-energizing the circuit of interest.
To avoid electrostatic discharge, clean the module only with a cloth dampened
with water.

35
11 Notes
36
12 Appendix A:
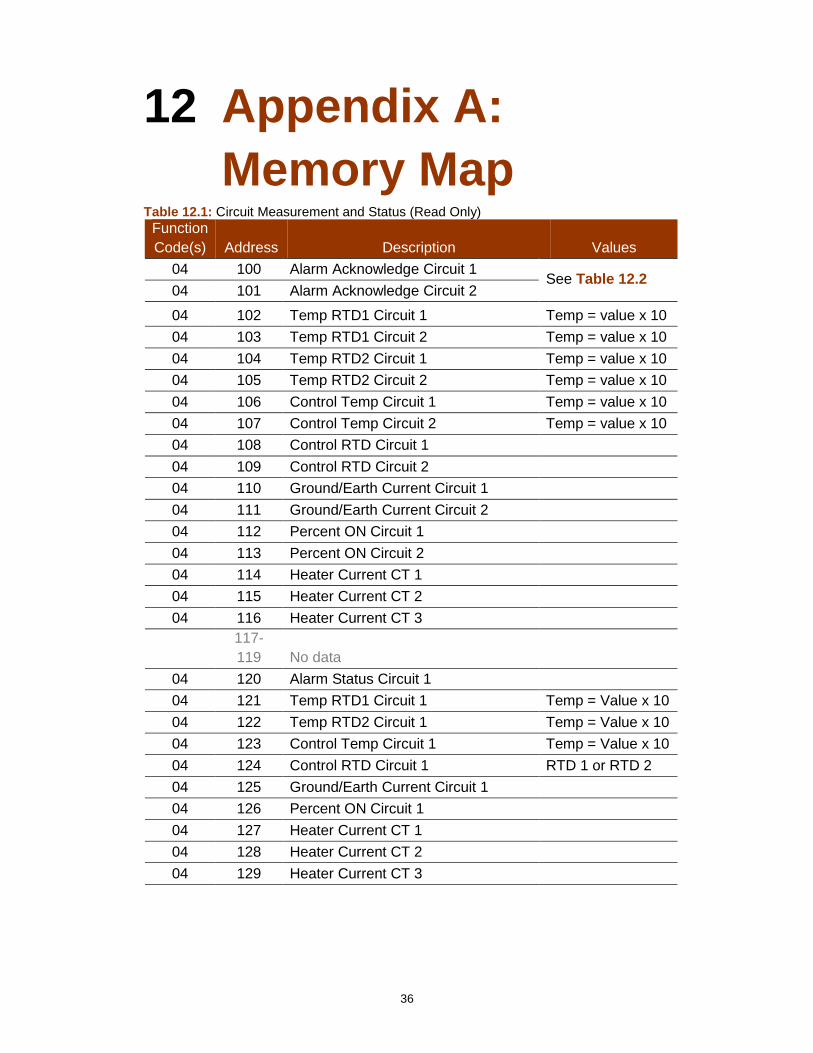
Memory Map Table 12.1: Circuit Measurement and Status (Read Only)
Function
Code(s) Address Description Values
04 100 Alarm Acknowledge Circuit 1 See Table 12.2
04 101 Alarm Acknowledge Circuit 2
04 102 Temp RTD1 Circuit 1 Temp = value x 10
04 103 Temp RTD1 Circuit 2 Temp = value x 10
04 104 Temp RTD2 Circuit 1 Temp = value x 10
04 105 Temp RTD2 Circuit 2 Temp = value x 10
04 106 Control Temp Circuit 1 Temp = value x 10
04 107 Control Temp Circuit 2 Temp = value x 10
04 108 Control RTD Circuit 1
04 109 Control RTD Circuit 2
04 110 Ground/Earth Current Circuit 1
04 111 Ground/Earth Current Circuit 2
04 112 Percent ON Circuit 1
04 113 Percent ON Circuit 2 04 114 Heater Current CT 1
04 115 Heater Current CT 2
04 116 Heater Current CT 3
117-
119 No data
04 120 Alarm Status Circuit 1
04 121 Temp RTD1 Circuit 1 Temp = Value x 10
04 122 Temp RTD2 Circuit 1 Temp = Value x 10
04 123 Control Temp Circuit 1 Temp = Value x 10
04 124 Control RTD Circuit 1 RTD 1 or RTD 2
04 125 Ground/Earth Current Circuit 1
04 126 Percent ON Circuit 1
04 127 Heater Current CT 1
04 128 Heater Current CT 2
04 129 Heater Current CT 3
37
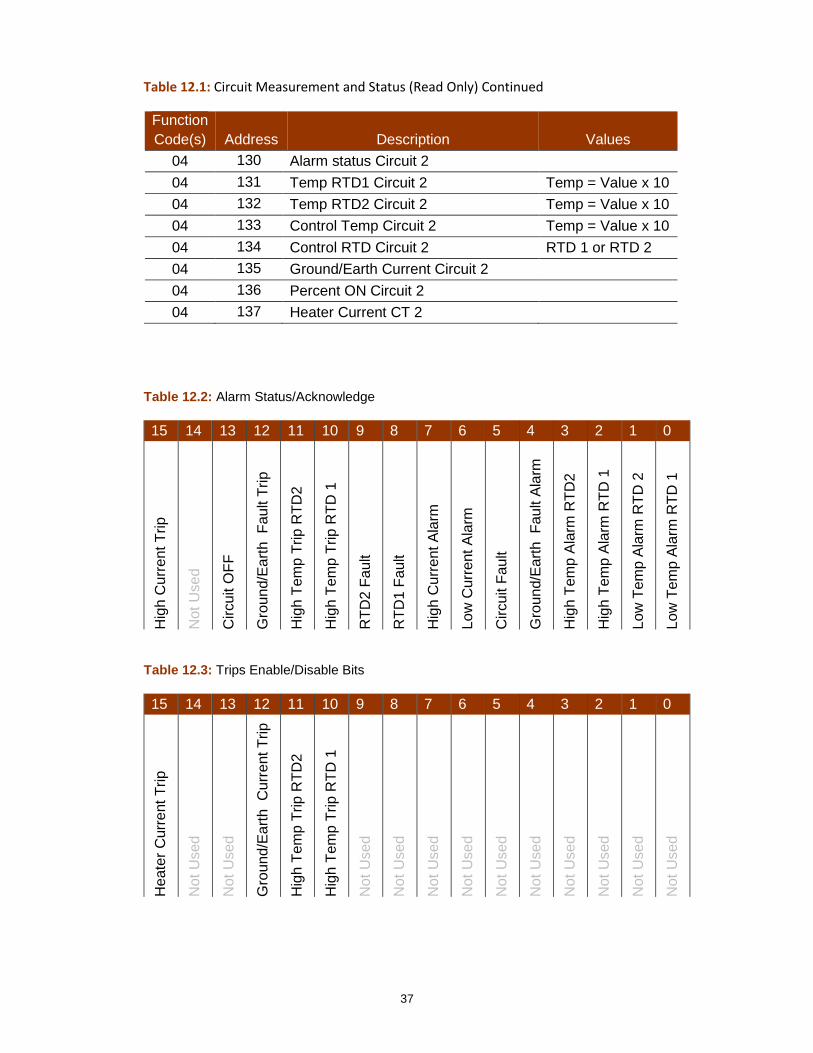
Table 12.1: Circuit Measurement and Status (Read Only) Continued
Function
Code(s) Address Description Values
04 130 Alarm status Circuit 2
04 131 Temp RTD1 Circuit 2 Temp = Value x 10
04 132 Temp RTD2 Circuit 2 Temp = Value x 10
04 133 Control Temp Circuit 2 Temp = Value x 10
04 134 Control RTD Circuit 2 RTD 1 or RTD 2
04 135 Ground/Earth Current Circuit 2
04 136 Percent ON Circuit 2
04 137 Heater Current CT 2
Table 12.2: Alarm Status/Acknowledge
Table 12.3: Trips Enable/Disable Bits
15 14 13 12 11 10 9 8 7 6 5 4 3 2 1 0
Hig
h C
urr
ent
Trip
No
t U
se
d
Circu
it O
FF
Gro
un
d/E
art
h F
au
lt T
rip
Hig
h T
em
p T
rip
RT
D2
Hig
h T
em
p T
rip
RT
D 1
RT
D2
Fa
ult
RT
D1
Fa
ult
Hig
h C
urr
ent A
larm
Low
Cu
rre
nt
Ala
rm
Circu
it F
au
lt
Gro
un
d/E
art
h F
au
lt A
larm
Hig
h T
em
p A
larm
RT
D2
Hig
h T
em
p A
larm
RT
D 1
Low
Tem
p A
larm
RT
D 2
Low
Tem
p A
larm
RT
D 1
15 14 13 12 11 10 9 8 7 6 5 4 3 2 1 0
He
ate
r C
urr
ent
Trip
No
t U
se
d
No
t U
se
d
Gro
un
d/E
art
h C
urr
ent T
rip
Hig
h T
em
p T
rip
RT
D2
Hig
h T
em
p T
rip
RT
D 1
No
t U
se
d
No
t U
se
d
No
t U
se
d
No
t U
se
d
Not
Used
No
t U
se
d
No
t U
se
d
No
t U
se
d
No
t U
se
d
No
t U
se
d

38
Table 12.4: Circuit Measurements/Status
Function
Code(s) Address Description Values
03 0 Alarm Acknowledge Circuit 1 See Table
12.2 03 1 Alarm Acknowledge Circuit 2
03 2 Maintain Temp Circuit 1 03 3 Maintain Temp Circuit 2 03 4 Control Band Circuit 1
03 5 Control Band Circuit 2
03 6 High Temp Trip RTD 1 Circuit 1
03 7 High Temp Trip RTD 1 Circuit 2
03 8 High Temp Trip RTD 2 Circuit 1
03 9 High Temp Trip RTD 2 Circuit 2
03 10 High Temp Alarm RTD 1 Circuit 1
03 11 High Temp Alarm RTD 1 Circuit 2
03 12 High Temp Alarm RTD 2 Circuit 1
03 13 High Temp Alarm RTD 2 Circuit 2
03 14 Low Temp Alarm RTD 1 Circuit 1
03 15 Low Temp Alarm RTD 1 Circuit 2
03 16 Low Temp Alarm RTD 2 Circuit 1
03 17 Low Temp Alarm RTD 2 Circuit 2
03 18 High Ground/Earth Current Trip Circuit 1
03 19 High Ground/Earth Current Trip Circuit 2
03 20 High Ground/Earth Current Alarm Circuit 1
03 21 High Ground/Earth Current Alarm Circuit 2
03 22 High Current Trip Circuit 1
03 23 High Current Trip Circuit 2
03 24 High Current Alarm Circuit 1
03 25 High Current Alarm Circuit 2
03 26 Low Current Alarm Circuit 1
03 27 Low Current Alarm Circuit 2
03 28 Circuit 1 Status See Table
12.5 03 29 Circuit 2 Status
03 30 Control Method Circuit 1
0 = ON/OFF MEC
1 = ON/OFF SSR
2 = Proportional
3 = Ambient
4 = Ambient APCM 03 31 Control Method Circuit 2
03 32 Number of RTD Circuit 1
03 33 Number of RTD Circuit 2
03 34 Power Clamp Circuit 1
03 35 Power Clamp Circuit 2

39
Figure 12.4: Circuit Measurements/Status (Continued)
Function
Code(s)
Address
Description Values Hex Decimal
03 0x0024 36 RTD Fault Clamp Circuit 1
03 0x0025 37 RTD Fault Clamp Circuit 2
03 0x0026 38 Trips Enable/Disable Circuit 1 See Table
12.3 03 0x0027 39 Trips Enable/Disable Circuit 2
03 0x0028 40 High Temp Seen RTD 1 Circuit 1
03 0x0029 41 High Temp Seen RTD 1 Circuit 2
03 0x002A 42 High Temp Seen RTD 2 Circuit 1
03 0x002B 43 High Temp Seen RTD 2 Circuit 2
03 0x002C 44 Low Temp Seen RTD 1 Circuit 1
03 0x002D 45 Low Temp Seen RTD 1 Circuit 2
03 0x002E 46 Low Temp Seen RTD 2 Circuit 1
03 0x002F 47 Low Temp Seen RTD 2 Circuit 2
Table 12.5: Circuit Status Bits
Bit Description
3 Forced OFF
2 Forced ON
1 Tripped
0 Enabled

40
Table 12.6: Read Only Controller Data
Function Code(s) Address Description Values
03 2008 Language 0 = English;
1 = Spanish;
2 = Russian; 03 2009 Password 0000 – 9999
03 2010 Password Enable 0 = Disabled;
1 = Enabled
03 2011 TCM2 Type 0 = 2-circuit (Default)
1 = 1-circuit, 1 CT;
2 = 1-Circuit, 2 CTs;
3 = 1-Circuit, 3 CTs
03 2012 Serial number low
03 2013 Serial number med
03 2014 Serial number high
2015 No Data Here
03 2016 Circuit Offset
2017 No Data Here
03 2018 Screen Saver 2019 Max Off Current
03 2020-2021 No Data Here
03 2022 Relay Output Voltage 0 = 12 V; 1 = 24 V 2023 No Data Here 2024 Hours in Use
03 2025 Start Up Delay 2026 Soft Start
03 2027 Ground/Earth Fault Sensitivity 0 = Most Sensitive;
3 = Least Sensitive 2028-2030 No Data Here
03 2031 Single Temp Alarms Should always = 0
03 2032 High Temp Alarm Delay 2033-2035 No Data Here
03 2036 Alarm Relay Type 0 = Normally OFF;
1 = Normally ON 2037 Alarm Relay Masking 2038 No Data Here
03 2039 Firmware Version Number 2040-2043 No Data Here
03 2044 Self-Test Hours 2045 Start self-Test Non-zero Starts a self-test
03 2046 Units 0 = F; 1 = C

41
13 Appendix B:
Additional
Information
Figure 13.1: Program Mode Menu
Figure 13.3: View Mode Menu
Figure 13.2: External Keypad Wiring Diagram

42
14 Appendix C:
Troubleshooting Tips Troubleshooting tips are provided here as a beginning point in correcting start-up issues and
clearing out alarm and trip events.
High Temperature Reading/Alarm
The following summarizes some of the possible causes and solutions for heat tracing high
temperature alarms.
Cause Possible Solutions
Temperature of product in process line is
above alarm set point or the expected reading
due to events other than heat tracing such
as high processing temperatures, steam-outs,
etc.
Let process return to normal
condition or adjust alarm set point (if
approved by project engineer) to
allow for this processing condition.
High alarm setting programmed or expected
reading did not consider natural temperature
overshoot associated with the control scheme.
Move control set point down to allow
for overshoot or raise the high
temperature alarm set point (if
approved by project engineer). It may
also be possible to decrease the control
band on the control circuit or adjust
the type of control from on-off to
proportional.
Improperly located RTD sensor. Is the RTD sensor installed next to a
heated tank or a steam jacketed pump
that might cause a higher than
expected reading? Is the RTD sensor
on the heater itself? Move the RTD
sensor to location more representative
of the majority of the piping. Is the
sensor location representative for
properly controlling under all flow
scenarios? Review location of the
RTD(s) with respect to the known
process flow patterns which occur and
change as appropriate.

43
Wrong insulation size, type, or thickness on all of the line being traced.
Measure circumference of insulation, divide by π, and compare to insulation diameter charts for proper over sizing. Check insulation type and thickness against design specification. Replace insulation or review system design for alternate operating possibilities.
Wrong insulation size, type, or thickness on part of the line being traced.
The insulation system should be as specified in the design for the entire circuit being traced. Having a lower heat loss on one part of the circuit and higher heat loss insulation on the other part of the circuit (perhaps where the RTD sensor is) will result in the better insulated line being too hot. Redo the insulation to assure uniformity and consistency.
Damaged RTD temperature sensor. Disconnect RTD sensor and measure resistance. Compare to resistance tables for corresponding value of temperature. Compare to pipe or equipment temperature known by another probe or sensor. If different, the RTD sensor may need replacement.
Heat tracing over designed in heat output and or/ due to cable availability or natural design selections available. This can result in higher than expected temperatures due to overshoot (especially when used with on-off control mode). This can also occur in an ambient sensing control modes.
Review design as well as installation instructions. Check heat tracing for presence of proper current. Since replacing the circuit may not be a desirable option here, the first approach should be to adjust the control method which the TraceNet control system has been configured in.
Heat tracing circuits are miswired such that the RTD for circuit 1 is controlling circuit 2, etc.
Trace and recheck field and panel wiring. Use circuit "turn-on" and "turn-off" technique or disconnect RTD’s one at a time to see if the proper RTD failure alarm occurs on the right circuit. Let process return to normal condition or adjust alarm set point (if approved by project engineer) to allow for this processing condition.

44
Low Temperature Reading/Alarm
The following summarizes some of the possible causes and solutions for heat tracing low
temperature readings/alarms.
Cause Possible Solutions
Temperature of product in process line is
below the alarm set point or expected reading
due to events other than heat tracing- low
pumping temperatures, etc.
Let process operations return to
normal conditions and then recheck
for alarms. Alternately adjust alarm
set point (with project engineers
approval) to allow for this process
condition.
Low temperature alarm programmed setting or expected reading did not consider natural temperature undershoot associated with control scheme.
Move control set point up to allow for natural undershoot or lower the low temperature alarm set point (when approved by project engineer).
Damaged, open, or wet thermal insulation does not allow the heat provided to hold the desired temperature.
Repair damage to insulation.
Wrong insulation size, type, or thickness on all
of circuit being traced.
Measure circumference of insulation,
divide by π, and compare to
insulation diameter charts for proper
over sizing. Check insulation type and
thickness against design specification.
Replace insulation or review system
design for alternate operating
possibilities which involve more heat
output.
Wrong insulation size, type, or thickness on
part of circuit being traced.
The insulation system should be as
specified in the design for the entire
circuit being traced. Having high heat
loss on one part of the circuit and
lower heat loss insulation on the
other part of the circuit (perhaps
where the sensor is) will result in the
not so well insulated line being too
cold. Redo the insulation to assure
uniformity and consistency.

45
Improperly located RTD temperature sensor. Is RTD sensor next to pipe support, equipment, or other heat sink? Move RTD sensor to location more representative of the majority of the piping.
Improperly installed RTD temperature sensor or RTD temperature probe.
Permanent RTD temperature sensors are most accurate when installed along the pipe or equipment with at least a foot of probe and sensor wire running along the pipe before exiting through the insulation. Permanent RTD sensors which enter the insulation at 90 degrees may be more sensitive to error associated with them depending on insulation installation or how well the sensor is physically attached. Adjust control set point to compensate for any accuracy offset. When using a 90 degree RTD probe for diagnostics, verify this measurement technique on a known pipe in the same general temperature range and insulation configuration.
Damaged RTD sensor.
Disconnect RTD sensor and measure resistance. Compare to resistance tables for corresponding value of temperature. Compare to pipe or equipment temperature known by another probe or sensor. If different, the RTD sensor may need replacement.
Heat tracing undersized, improperly installed or damaged.
Review design/installation. Check heat tracing for presence of proper current and also meg for dielectric resistance. Repair or replace heat tracing.
Heat tracing circuits are wired such that the RTD for circuit A is controlling circuit B, etc.
Trace and recheck field and panel wiring. Use circuit "turn-on" and "turn-off" technique or disconnect RTD’s one at a time to see if the proper RTD failure alarm occurs on the right circuit.

46
Heat tracing does not heat. Breaker has been switched off due to maintenance activities or has possibly malfunctioned.
As soon as maintenance activities cease and after conferring with operations manager, switch breaker back ON. Note that some period of time will elapse before the temperature alarm goes away (pipes and equipment take time to heat up).
RTD Sensor Alarm
The following summarizes some of the possible causes and solutions for a heat tracing RTD
sensor reading alarm.
Cause Possible Solutions
RTD connections are wired improperly or
have become loose.
Confirm wiring and connections are
correct.
RTD has failed open or has extremely high
resistance or RTD has failed shorted or has
very low resistance.
Has lightning damaged the sensor?
Maybe the piping has had some welding
going on nearby? Maybe the RTD has
gotten wet? Replace RTD.
Communications Alarm
The following summarizes some of the possible causes and solutions for heat tracing
communications alarms.
Cause Possible Solutions
Improperly set controller address, duplicate
addresses or improper configuration
firmware/software.
Change controller address or reconfigure
firmware/software.
Loose or open connection in RS485 line. Recheck for continuity in all communication
lines.
Too many modules in network. Check network limitations versus actual
configuration.
Too long of an accumulated communication
distance.
Consider the addition of a repeater.
Too many reflections of signal usually
caused by improper terminations in net-
work.
Add termination resistors as appropriate.

47
Circuit Fault Alarm
The following summarizes some of the possible causes and solutions for heat tracing
circuit fault alarms.
Cause Possible Solutions
Upon initial installation start-up, improper
wiring of the relay or low current in heater.
Confirm correct wiring and presence
of the heater. Where normal
operating amperage is in range of 0
to 250mA, disabling the Self-Test
function or adding multiple loops
through the current sensing toroid
may be required.
During daily operations; possibly indicates
relay contact failure.
If relay has failed, replace.
Breaker off. Turn on breaker after conferring with
operations manager.
High Current Readings/Alarms
The following summarizes some of the possible causes and solutions for heat tracing
high current readings or alarms.
Cause Possible Solutions
Self-regulating heater or power limiting
heater current may exceed set value during
normal operation or start-up operations.
Increase high current alarm set point
(if approved by project engineer).
For startup operation current alarm
nuisances, it may also be desirable to
increase the delay time (before a
current reading is done after turn on)
set in the controller.
Self-regulating or power limiting heater may
be operating at cooler than design pipe
temperatures due to processing conditions
and thus heaters may be drawing higher
current values.
Increase high current alarm set point
(if approved by project engineer).

48
Self-regulating or power limiting heater
may be operating in its cold start regime.
When reading current on one of these
type heaters, it is necessary to read
the current at steady state. One
may have to wait as long as 5
minutes for heater steady state
values. After five minutes the current
value will continue to drop as the
pipe or equipment begins to warm.
Heater circuit may be longer than
anticipated in the design stage.
Verify installed length (if possible)
and if different review design. If
length is different but performance-
wise the “as built” design is
acceptable, initiate “as built” drawing
change and change controller high
current setting.
Wrong heater wattage or heater resistance
may be installed.
Check heater set tags or markings on
heater cable against installation
drawings. As an additional check,
disconnect heater from power and
measure DC resistance.
Heat tracing may be powered on wrong
voltage.
Recheck heater supply voltage.
Current sensing circuitry may have
encountered a problem.
Use a different current clamp type
meter which is known to be
accurate and do a comparative
reading. Investigate current
measurement circuitry further. Note
that one should only read heater
currents when the heater is 100% on.
Field heater wiring is improperly labeled
and/or connected such that the heater and
the circuit number are not matched.
Trace out the circuit wiring from the
field back into the panel and
subsequently to the controller.
Wherever possible, turn the circuit
“off” and “on” and watch for an
appropriate response. If this is the
problem, redo the wiring.

49
Short circuit in a series resistance circuit
Disconnect heater from power, meg between each of the conductors and ground for proper dielectric rating. If okay, measure resistance of circuit for agreement with design values.
Low Current Readings/Alarms
The following summarizes the possible causes and solutions for heat tracing low
current readings/alarms.
Cause Possible Solutions
Self-regulating or power limiting heater may
be operating at higher than design pipe
temperatures due to processing conditions
and thus heaters may be drawing lower cur-
rent values.
Decrease low current alarm set-point
(if approved by project engineer).
Loss of a branch of the heat tracing circuit.
Measure total current and each branch
current. Compare to design values.
Check all connections.
Breaker off. Turn breaker back on after conferring
with operations manager.
Heat tracing cable may have been exposed to
temperatures in excess of their maximum
temperature ratings (excessive steam-out
temperatures or upset process temperature
events) and could have damaged the heater.
Replace heater.
Controller may be in error in reading current Use a different current clamp type
meter which is known to be
accurate and do a comparative
reading. If the current measuring
circuitry is in error, investigate
controls further. Note that one
should only read heater currents
when the heater is 100% on.

50
Heater circuit may be shorter than
anticipated in the design stage.
Verify installed length (if possible)
and if different review design. If
length is different but performance-
wise the “as built” design is
acceptable, initiate “as built” drawing
change and change controller low
current setting. Check heater set tags
or markings on heater cable against
installation drawings. As an
additional check, disconnect heater
from power and measure DC
resistance.
Wrong heater wattage or heater resistance
may be installed.
Measure pipe temperature and
measure steady-state heater current,
voltage, and length. Compare to
manufacturer’s rated power curve.
Replace heat tracing cable if
necessary.
Heat tracing may be powered on wrong
voltage.
Recheck heater supply voltage.
Current sensing circuitry may have
encountered a problem.
Use a different current clamp type
meter which is known to be
accurate and do a comparative
reading. Investigate current
measurement circuitry further. Note
that one should only read heater
currents when the heater is 100% on.
Field heater wiring is improperly labeled
and/or connected such that the heater and
the circuit number are not matched.
Trace out the circuit wiring from the
field back into the panel and
subsequently to the controller.
Wherever possible, turn the circuit
“off” and “on” and watch for an
appropriate response. If this is the
problem, redo the wiring.
Open circuit in a series resistance circuit. Disconnect heater from power, meg
between each of the conductors and
ground for proper dielectric rating.
If okay, measure resistance of circuit
for agreement with design values.
.

51
High Ground/Earth Current Alarm
The following summarizes some of the possible causes and solutions for heat tracing
high ground current alarm.
Cause Possible Solutions
Heat tracing is damaged.
Disconnect heat tracing circuit and
determine if alarm clears. If so, repair heat
tracing.
Wiring to heat tracing had high leakage
current.
Disconnect heat tracing and sequentially
disconnect power wiring until the alarm
ceases. Check last section removed for
damage.
Improper wiring of current sense wires
through torroid.
The current sensing toroid must have the
outgoing heater current lead and the return
current heater lead run through the toroid for
a proper ground leakage measurement. Redo
wire routing if only one wire has been run
through the current sensing toroid.
Heat tracing power wires in a multiple circuit
system improperly paired.
If the return current wire in the toroid is
from a different circuit the two heater
currents will not cancel and leave only leakage
to be measured. Correct wiring.
Heat tracing circuit has higher than
expected leakage due to circuit length or
higher voltage.
Replace the EPD breaker with a higher
ground/earth current trip device if
available. Where a controller (with variable
leakage trip functions) is doing the
ground/earth leakage detection function,
increase ground/earth leakage alarm set point
(if approved by project engineer).
If issues remain after exercising all these possible causes and solutions for heat
tracing alarms and trips, contact your nearest Thermon engineering center for
assistance and/or for arranging for field service.


Thermon Manufacturing Company 100 Thermon Drive ∙ San Marcos, TX 78666 ∙ U.S.A.
www.Thermon.com The information in this guide is subject to change without notice.
Thermon PN80514 Revision 4