TR-4067: Clustered Data ONTAP NFS Implementation Guide
181
RPC Technical Report NFS Best Practice and Implementation Guide Justin Parisi, NetApp July 2017 | TR-4067
-
Upload
truongcong -
Category
Documents
-
view
408 -
download
17
Transcript of TR-4067: Clustered Data ONTAP NFS Implementation Guide

RPC
Technical Report
NFS Best Practice and Implementation Guide Justin Parisi, NetApp
July 2017 | TR-4067

2 NFS Best Practice and Implementation Guide © 2017 NetApp, Inc. All Rights Reserved
Version History
Version Date Document Version History
Version 4.2 July 2017 Updated for ONTAP 9.2
Version 4.1 October 2016 Updated for ONTAP 9.1
Version 4.0 July 2016 Updated for ONTAP 9.0
Version 3.2 February 2016 Updated for ONTAP 8.3.2
Version 3.1 July 2015 Updated for ONTAP 8.3.1
Version 3.0 February 2015 Updated for ONTAP 8.3
Version 2.2 September 2014 Updated for ONTAP 8.2.2
Version 2.1 January 2014 Updated for ONTAP 8.2.1
Version 2.0 October 2013 Updated for ONTAP 8.2
Version 1.0 June 2013 Initial release
TABLE OF CONTENTS
Version History ........................................................................................................................................... 2
1 Introduction .............................................................................................................................................. 8
1.1 Scope ..............................................................................................................................................................8
1.2 Intended Audience and Assumptions ..............................................................................................................8
2 Overview of Clustered Data ONTAP ................................................................................................... 9
2.1 Business Challenges with Traditional Storage ................................................................................................9
2.2 Clustered Data ONTAP ...................................................................................................................................9
3 Architecture ......................................................................................................................................... 10
3.1 Important Components of Clustered Data ONTAP ....................................................................................... 10
3.2 NFS Options Explained ................................................................................................................................. 12
3.3 Cluster Namespace ...................................................................................................................................... 12
3.4 Steps to Bring Up a Clustered Data ONTAP NFS Server ............................................................................. 13
3.5 Data LIF Best Practices with NAS Environments .......................................................................................... 13
3.6 Dynamic NAS TCP Autotuning ..................................................................................................................... 16
3.7 NAS Flow Control ......................................................................................................................................... 17
3.8 Pseudo File Systems in Clustered Data ONTAP .......................................................................................... 19
3.9 Does Clustered Data ONTAP Support 32-Bit and 64-Bit File IDs? ............................................................... 26
4 Export Policies and Rules in Clustered Data ONTAP ..................................................................... 27
4.1 Export Policy Rule Options Explained ........................................................................................................... 28

3 NFS Best Practice and Implementation Guide © 2017 NetApp, Inc. All Rights Reserved
4.2 Export Policy Sharing and Rule Indexing ...................................................................................................... 28
4.3 UNIX Users and Groups ............................................................................................................................... 29
4.4 The Anon User .............................................................................................................................................. 31
4.5 The Root User ............................................................................................................................................... 31
4.6 Limiting Access to the SVM Root Volume ..................................................................................................... 38
4.7 Volume-Based Multitenancy Using Export Policies and Rules...................................................................... 40
4.8 Mapping All UIDs to a Single UID (squash_all) ............................................................................................. 45
4.9 Umask ........................................................................................................................................................... 48
4.10 Export Policy Rule Inheritance ...................................................................................................................... 50
4.11 The Export Policy Rule Index ........................................................................................................................ 54
4.12 Export Policy Rules: Clientmatch .................................................................................................................. 55
4.13 Export Policy Rule Caching........................................................................................................................... 56
4.14 Export Policy Rule Access Verification (exportfs -c) ..................................................................................... 58
5 Showmount in Clustered Data ONTAP ............................................................................................. 59
5.1 What Happens During Showmount? ............................................................................................................. 60
5.2 Showmount Plug-In for Clustered Data ONTAP ........................................................................................... 61
5.3 Showmount for Clustered Data ONTAP 8.3 and Later .................................................................................. 61
6 Name Services .................................................................................................................................... 62
6.1 Name Services Best Practices ...................................................................................................................... 63
7 Nondisruptive Operations (NDO) with NFS...................................................................................... 64
7.1 Replay/Reply Cache ..................................................................................................................................... 64
7.2 File Locking ................................................................................................................................................... 64
7.3 NFSv4.1 Sessions ........................................................................................................................................ 66
7.4 What Happens During LIF Migrations in NFSv4.x? ....................................................................................... 67
7.5 General Best Practices for NDO with NFS in Clustered Data ONTAP .......................................................... 67
8 NFSv3 in Clustered Data ONTAP ...................................................................................................... 68
9 NFSv4.x in Clustered Data ONTAP ................................................................................................... 75
9.1 Advantages of Using NFSv4.x ...................................................................................................................... 75
9.2 NFSv4.0 ........................................................................................................................................................ 77
NFSv4 User ID Mapping ....................................................................................................................................... 83
9.3 NFSv4.1 ...................................................................................................................................................... 107
9.4 Mount Option Best Practices with NFS ....................................................................................................... 111
10 NFS Auditing ..................................................................................................................................... 114
10.1 NFS Audit Setup ......................................................................................................................................... 114

4 NFS Best Practice and Implementation Guide © 2017 NetApp, Inc. All Rights Reserved
11 NFS on Nontraditional Operating Systems .................................................................................... 116
NFS Using Apple OS ........................................................................................................................................... 119
12 Multiprotocol User Mapping ............................................................................................................ 120
12.1 Credential Caching in Clustered Data ONTAP ............................................................................................ 120
12.2 User Name Mapping During Multiprotocol Access ...................................................................................... 123
13 NetApp FlexGroup Volumes ............................................................................................................ 137
13.1 Supported Features with NetApp FlexGroup ....................................................................................... 137
13.2 Ideal Use Cases .................................................................................................................................. 137
13.3 Nonideal Cases ................................................................................................................................... 137
14 Unified Security Style (Infinite Volumes) ....................................................................................... 138
14.1 What Is Unified Security Style? ................................................................................................................... 138
14.2 UNIX, NTFS, and Mixed Security Styles ..................................................................................................... 138
14.3 Unified Security Style Behavior in Clustered Data ONTAP ......................................................................... 142
14.4 Unreachable Attributes ............................................................................................................................... 147
14.5 Infinite Volume Export Policies .................................................................................................................... 147
15 NFS Events, Performance Monitoring, and Data Gathering ........................................................ 149
Appendix .................................................................................................................................................. 166
NFS Server Option List in Clustered Data ONTAP .............................................................................................. 166
Export Policy Rule Option List ............................................................................................................................. 174
NFSv3 Option Changes in Clustered Data ONTAP ............................................................................................. 176
NFSv4 Option Changes in Clustered Data ONTAP ............................................................................................. 177
NFSv3 Port Changes ........................................................................................................................................... 179
References ............................................................................................................................................... 180

5 NFS Best Practice and Implementation Guide © 2017 NetApp, Inc. All Rights Reserved
LIST OF BEST PRACTICES
Best Practices 1: NFS Server Options Recommendation (See Best Practices 2) ........................................................ 12
Best Practices 2: NFS Block Size Changes (See Best Practices 3) ............................................................................. 16
Best Practices 3: RPC Slot Maximum for RHEL 6.3 and Later (See Best Practices 4) ................................................ 18
Best Practices 4: Export Policy Rule Requirement (See Best Practices 5) .................................................................. 27
Best Practices 5: Protocol Services Recommendation (See Best Practices 6) ............................................................ 30
Best Practices 6: Name Services Recommendation (See Best Practices 7) ................................................................ 30
Best Practices 7: Configuration Management (See Best Practices 8) .......................................................................... 30
Best Practices 8: Hiding Snapshot Copies (See Best Practices 9) ............................................................................... 44
Best Practices 9: Export Policy Rules: Parent Volumes (See Best Practices 10) ......................................................... 53
Best Practices 10: Export Policy Rule Index Maximum (See Best Practices 11) .......................................................... 54
Best Practices 11: Export Policy Rule Index Ordering (See Best Practices 12) ........................................................... 55
Best Practices 12: Showmount Permissions Considerations (See Best Practices 13) ................................................. 61
Best Practices 13: Showmount Security Style Considerations (See Best Practices 14) .............................................. 61
Best Practices 14: NFSv3 and File Locking (See Best Practices 15) ........................................................................... 65
Best Practices 15: NDO Best Practices for NFS Environments (See Best Practices 16) ............................................. 68
Best Practices 16: Version Recommendations with NFSv4.x (See Best Practices 17) ................................................ 76
Best Practices 17: Use of v4-id-numerics (See Best Practices 18) .............................................................................. 78
Best Practices 18: Choosing a Security Style (See Best Practices 19) ........................................................................ 92
Best Practices 19: Using DENY ACEs (See Best Practices 20) ................................................................................... 94
Best Practices 20: Data LIF Locality (See Best Practices 21) .................................................................................... 104
Best Practices 21: pNFS Client Recommendation (See Best Practices 22) ............................................................... 108
Best Practices 22: NFSv4.x Version Recommendation (See Best Practices 23) ....................................................... 111
Best Practices 23: Audit ACE Recommendation (See Best Practices 24) ................................................................. 114
Best Practices 24: Name Mapping Recommendation (See Best Practices 25) .......................................................... 124
Best Practices 25: The Wheel Group (See Best Practices 26) ................................................................................... 129
Best Practices 26: Primary GIDs (See Best Practices 27).......................................................................................... 129
Best Practices 27: Local UNIX Users and Groups (See Best Practices 28) ............................................................... 130
Best Practices 28: Using File-Only Mode for Local UNIX Users and Groups (See Best Practices 29) ...................... 130
Best Practices 29: Local UNIX Users and Group Limits (See Best Practices 1) ........................................................ 133

6 NFS Best Practice and Implementation Guide © 2017 NetApp, Inc. All Rights Reserved
LIST OF TABLES
Table 1) Benefits of a cluster namespace. ................................................................................................................... 13
Table 2) Export examples. ............................................................................................................................................ 23
Table 3) Pros and cons for volume-based multitenancy based on design choice. ....................................................... 42
Table 4) Directory tree structure for volume-based multitenancy. ................................................................................ 42
Table 5) Export policy rule attributes. ........................................................................................................................... 46
Table 6) Supported authentication types for ro, rw, and superuser. ............................................................................. 47
Table 7) Octal values in umask. ................................................................................................................................... 49
Table 8) Caches and time to live (TTL). ....................................................................................................................... 58
Table 9) Replay/reply cache NDO behavior. ................................................................................................................ 64
Table 10) Lock state NDO behavior. ............................................................................................................................ 65
Table 11) 7-Mode NFS port defaults versus clustered Data ONTAP port defaults. ...................................................... 70
Table 12) NFSv4.x lock terminology. ............................................................................................................................ 81
Table 13) NFS lease and grace periods. .................................................................................................................... 102
Table 14) Referrals versus migration versus pNFS. ................................................................................................... 106
Table 15) NFSv4.1 delegation benefits. ..................................................................................................................... 110
Table 16) Limits on local users and groups in clustered Data ONTAP. ...................................................................... 133
Table 17) 7-Mode file to clustered Data ONTAP mapping.......................................................................................... 134
Table 18) 7-Mode to clustered Data ONTAP mapping. .............................................................................................. 135
Table 19) Examples of 7-Mode rules versus clustered Data ONTAP rule. ................................................................. 136
Table 20) List of supported ONTAP features in NetApp FlexGroup. .......................................................................... 137
Table 21) Limitations of existing security styles. ......................................................................................................... 139
Table 22) Mixed versus unified security style. ............................................................................................................ 140
Table 24) Mixed mode versus unified security style. .................................................................................................. 144
Table 25) Virtual machine statistic masks. ................................................................................................................. 154
Table 26) Common mount failures. ............................................................................................................................ 160
Table 27) Common access issues. ............................................................................................................................ 163
Table 28) Files written as “nobody” in NFSv4. ............................................................................................................ 164
Table 29) Stale file handle on NFS mount. ................................................................................................................. 165
Table 32) NFSv3 configuration options in clustered Data ONTAP. ............................................................................ 176

7 NFS Best Practice and Implementation Guide © 2017 NetApp, Inc. All Rights Reserved
LIST OF FIGURES
Figure 1) FlexGroup volume. ........................................................................................................................................ 11
Figure 2) Cluster namespace. ...................................................................................................................................... 12
Figure 3) Client request to mount a file system in NFSv4............................................................................................. 22
Figure 4) Server sends file handle to complete request. .............................................................................................. 22
Figure 5) Symlink example using vsroot. ...................................................................................................................... 26
Figure 6) Volume-based multitenancy using junctioned volumes. ................................................................................ 40
Figure 7) Volume-based multitenancy using qtrees. .................................................................................................... 41
Figure 8) UNIX permissions. ........................................................................................................................................ 48
Figure 9) RPC packet with 16 GIDs. ............................................................................................................................ 73
Figure 10) NFSv4.x read and write ops: no multiprocessor. ......................................................................................... 76
Figure 11) NFSv4.x read and write ops: with multiprocessor. ...................................................................................... 76
Figure 12) pNFS data workflow. ................................................................................................................................. 109
Figure 13) Example of setting NFSv4 audit ACE. ....................................................................................................... 115
Figure 14) Multiprotocol user mapping. ...................................................................................................................... 123
Figure 15) Mixed-style (left) and unified-style (right) mode bit display on Windows. .................................................. 140
Figure 16) UNIX permission in an NTFS ACL in unified style..................................................................................... 142
Figure 17) Top NAS clients view in OnCommand System Manager. ......................................................................... 156
Figure 18) Top files view for an ESXi environment in OnCommand System Manager. .............................................. 157
Figure 19) OnCommand Unified Manager 7.2 performance graphs. .......................................................................... 159
Figure 20) OnCommand Unified Manager 7.2 top performers. .................................................................................. 159

8 NFS Best Practice and Implementation Guide © 2017 NetApp, Inc. All Rights Reserved
1 Introduction
As more and more data centers evolve from application-based silos to server virtualization and scale-out
systems, storage systems have evolved to support this change. NetApp® clustered Data ONTAP®
provides shared storage for enterprise and scale-out storage for various applications, including
databases, server virtualization, and home directories. Clustered Data ONTAP provides a solution for
emerging workload challenges in which data is growing in size and becoming more complex and
unpredictable.
Clustered Data ONTAP is unified storage software that scales out to provide efficient performance and
support of multitenancy and data mobility. This scale-out architecture provides large scalable containers
to store petabytes of data. The architecture also upgrades, rebalances, replaces, and redistributes load
without disruption, which means that the data is perpetually alive and active.
1.1 Scope
This document covers the following topics:
• Introduction to clustered Data ONTAP
• Architecture of clustered Data ONTAP
• Setting up an NFS server in clustered Data ONTAP
• Configuring export policies and rules
• 7-Mode and clustered Data ONTAP differences and similarities for NFS access-cache implementation
• Multiprotocol user mapping
• Mapping of NFS options in 7-Mode to clustered Data ONTAP
• Configuration of NFS v4 features in clustered Data ONTAP, such as user ID mapping, delegations, ACLs, and referrals
Note: This document is not intended to provide information about migration from 7-Mode to clustered Data ONTAP; it is specifically about NFSv3 and NFSv4 implementation in clustered Data ONTAP and the steps required to configure it.
1.2 Intended Audience and Assumptions
This technical report is for storage administrators, system administrators, and data center managers. It
assumes basic familiarity with the following:
• NetApp FAS systems and the Data ONTAP operating system
• Network file sharing protocols (NFS in particular)
Note: This document contains advanced and diag-level commands. Exercise caution when using these commands. If there are questions or concerns about using these commands, contact NetApp Support for assistance.

9 NFS Best Practice and Implementation Guide © 2017 NetApp, Inc. All Rights Reserved
2 Overview of Clustered Data ONTAP
2.1 Business Challenges with Traditional Storage
• Capacity Scaling Capacity expansion in traditional storage systems might require downtime, either during physical installation or when redistributing existing data across the newly installed capacity.
• Performance Scaling Standalone storage systems might lack the I/O throughput to meet the needs of large-scale enterprise applications.
• Availability Traditional storage systems often have single points of failure that can affect data availability.
• Right-Sized SLAs Not all enterprise data requires the same level of service (performance, resiliency, and so on). Traditional storage systems support a single class of service, which often results in poor utilization or unnecessary expense.
• Cost With rapid data growth, storage is consuming a larger and larger portion of shrinking IT budgets.
• Complicated Management Discrete storage systems and their subsystems must be managed independently. Existing resource virtualization does not extend far enough in scope.
2.2 Clustered Data ONTAP
Clustered Data ONTAP helps achieve results and get products to market faster by providing the
throughput and scalability needed to meet the demanding requirements of high-performance computing
and digital media content applications. Clustered Data ONTAP also facilitates high levels of performance,
manageability, and reliability for large Linux, UNIX, and Microsoft Windows clusters.
Features of clustered Data ONTAP include:
• Scale-up, scale-out, and scale-down are possible with numerous nodes using a global namespace.
• Storage virtualization with storage virtual machines (SVMs) eliminates the physical boundaries of a single controller (memory, CPU, ports, disks, and so on).
• Nondisruptive operations (NDO) are available when you redistribute load or rebalance capacity combined with network load balancing options within the cluster for upgrading or expanding its nodes.
• NetApp storage efficiency features such as NetApp Snapshot® copies, thin provisioning, space-efficient cloning, deduplication, data compression, and NetApp RAID DP® technology are also available.
You can address solutions for the previously mentioned business challenges by using the scale-out
clustered Data ONTAP approach.
• Scalable Capacity Grow capacity incrementally, on demand, through the nondisruptive addition of storage shelves and growth of storage containers (pools, LUNs, file systems). Support nondisruptive redistribution of existing data to the newly provisioned capacity as needed using volume moves.
• Scalable Performance: Pay as You Grow Grow performance incrementally, on demand and nondisruptively, through the addition of storage controllers in small, economical (pay-as-you-grow) units.
• High Availability Leverage highly available pairs to provide continuous data availability in the face of individual component faults.

10 NFS Best Practice and Implementation Guide © 2017 NetApp, Inc. All Rights Reserved
• Flexible, Manageable Performance Support different levels of service and provide the ability to dynamically modify the service characteristics associated with stored data. You can do so by nondisruptively migrating data to slower, less costly disks and/or by applying quality-of-service (QoS) criteria.
• Scalable Storage Efficiency Control costs through the use of scale-out architectures that employ commodity components. Grow capacity and performance on an as-needed (pay-as-you-go) basis. Increase utilization through thin provisioning and data deduplication.
• Unified Management Provide a single point of management across the cluster. Leverage policy-based management to streamline configuration, provisioning, replication, and backup. Provide a flexible monitoring and reporting structure implementing an exception-based management model. Virtualize resources across numerous controllers so that volumes become simple-to-manage logical entities that span storage controllers for performance and dynamic redistribution of data.
3 Architecture
3.1 Important Components of Clustered Data ONTAP
Storage Virtual Machine (SVM)
• An SVM is a logical file system namespace capable of spanning beyond the boundaries of physical nodes in a cluster.
Clients can access virtual servers from any node in the cluster, but only through the associated logical interfaces (LIFs).
Each SVM has a root volume under which additional volumes are mounted, extending the namespace.
It can span several physical nodes.
It is associated with one or more logical interfaces; clients access the data on the virtual server through the logical interfaces that can live on any node in the cluster.
Logical Interface (LIF)
• A LIF is essentially an IP address with associated characteristics, such as a home port, a list of ports for failover, a firewall policy, a routing group, and so on.
Client network data access is through logical interfaces dedicated to the SVM.
An SVM can have more than one LIF. You can have many clients mounting one LIF or one client mounting several LIFs.
This means that IP addresses are no longer tied to a single physical interface.
Aggregates
• An aggregate is a RAID-level collection of disks; it can contain more than one RAID group.
Aggregates serve as resources for SVMs and are shared by all SVMs.

11 NFS Best Practice and Implementation Guide © 2017 NetApp, Inc. All Rights Reserved
Flexible Volumes
• A volume is a logical unit of storage. The disk space that a volume occupies is provided by an aggregate.
Each volume is associated with one individual aggregate, and therefore with one physical node.
In clustered Data ONTAP, data volumes are owned by an SVM.
Volumes can be moved from aggregate to aggregate with the NetApp DataMotion™ for Volumes feature, without loss of access to the client. This capability provides more flexibility to move volumes within a single namespace to address issues such as capacity management and load balancing.
FlexGroup Volumes
With the introduction of ONTAP® 9.1 came the inclusion of the FlexGroup volume. FlexGroup volumes
take the concept of the FlexVol® volume and uses ONTAP to create a single large container composed
of multiple FlexVol volume members. This allows for a true scale-out NAS file system that is able to
leverage all resources in a cluster while blending capacity, performance, and simplicity in its deployment.
Figure 1) FlexGroup volume.
For more information regarding FlexGroup volumes, see TR-4557: FlexGroup Volume Technical
Overview.

12 NFS Best Practice and Implementation Guide © 2017 NetApp, Inc. All Rights Reserved
3.2 NFS Options Explained
The appendix contains a table that covers the various options used for NFS servers, the version of
clustered Data ONTAP in which they are available, the privilege level, and their use. All NFS server
options can be viewed using the nfs server show command or through NetApp OnCommand®
System Manager.
Best Practices 1: NFS Server Options Recommendation (See Best Practices 2)
The best practice for setting NFS server options is to evaluate each option’s relevance in an
environment on a case-by-case basis. The defaults are recommended in most cases, particularly in
all NFSv3 environments. Some use cases might arise that require options to be modified, such as
enabling NFSv4.0 to allow NFSv4 access. There is not a “one-size-fits-all” configuration for all
scenarios, so each use case should be evaluated at the time of implementation.
3.3 Cluster Namespace
A cluster namespace is a collection of file systems hosted from different nodes in the cluster. Each SVM
has a file namespace that consists of a single root volume. This namespace starts at the location of “/”.
Subsequent volumes and qtrees all traverse “/” and have their mount points defined by the volume option
-junction-path. The SVM namespace consists of one or more volumes linked by means of junctions
that connect from a named junction inode in one volume to the root directory of another volume. A cluster
can have more than one SVM, but each SVM only has one vsroot and one “/,” which results in each SVM
having a unique set of file system IDs. This prevents volumes in different SVMs from sharing file system
IDs/file handles and avoids issues mounting NFS exports in multitenant environments.
All the volumes belonging to the SVM are linked into the global namespace in that cluster using the “/”
export path. The cluster namespace is mounted at a single point in the cluster. The top directory of the
cluster namespace within a cluster (“/”) is a synthetic directory containing entries for the root directory of
each SVM namespace in the cluster.
Figure 2) Cluster namespace.

13 NFS Best Practice and Implementation Guide © 2017 NetApp, Inc. All Rights Reserved
Table 1) Benefits of a cluster namespace.
Without a Cluster Namespace With a Cluster Namespace
• Change mapping for thousands of clients when moving or adding data
• Difficult to manage
• Very complex to change
• Doesn’t scale
• Namespace unchanged as data moves
• Much easier to manage
• Much easier to change
• Seamlessly scales to petabytes
3.4 Steps to Bring Up a Clustered Data ONTAP NFS Server
NetApp assumes that the following configuration steps were completed before you proceed with setting
up a clustered Data ONTAP NFS server.
• Clustered Data ONTAP installation and configuration
• Aggregate creation
• SVM creation
• LIF creation
• Volume creation
• Valid NFS license applied
Note: NFS server creation and options are explained in detail in the NetApp documentation for the version of clustered Data ONTAP being used.
3.5 Data LIF Best Practices with NAS Environments
Clustered Data ONTAP allows storage administrators to provide the following benefits:
• Seamless scale-out storage
• Multiprotocol unified access (NFS, CIFS, and SAN)
• Nondisruptive operations
This is done by way of a secure multitenant architecture with SVMs.

14 NFS Best Practice and Implementation Guide © 2017 NetApp, Inc. All Rights Reserved
Why SVMs?
SVMs are logical storage containers that own storage resources such as flexible volumes, logical
interfaces (LIFs), exports, CIFS shares, and so on. Think of them as a storage “blade center” in your
cluster. These SVMs share physical hardware resources in the cluster with one another, such as network
ports/VLANs, aggregates with physical disk, CPU, RAM, switches, and so on. As a result, load for SVMs
can be balanced across a cluster for maximum performance and efficiency or to leverage SaaS
functionality, among other benefits.
Cluster Considerations
A cluster can include several HA pairs of nodes (4 HA pairs/8 nodes with SAN, 12 HA pairs/24 nodes with
NAS). Each node in the cluster has its own copy of a replicated database with the cluster and SVM
configuration information. Additionally, each node has its own set of user space applications that handle
cluster operations and node-specific caches, not to mention its own set of RAM, CPU, disks, and so on.
So while a cluster operates as a single entity, it does have the underlying concept of individualized
components. As a result, it makes sense to take under consideration the physical hardware in a cluster
when implementing and designing.
Data LIF Considerations
Data LIFs can live on any physical port in a cluster that is added to a valid broadcast domain. These data
LIFs are configured with SVM-aware routing mechanisms that allow the correct pathing of Ethernet traffic
in an SVM, regardless of where a valid data LIF lives in the cluster. In versions earlier than 8.3, SVMs
routed at a node level, so traffic could travel only through the node that owned a data LIF. In clustered
Data ONTAP 8.3 and later, traffic routes from the data LIF even if it is a nonlocal path. This capability is
known as LIF sharing for outbound connections and is covered in detail in TR-4182: Ethernet Storage
Design Considerations and Best Practices for Clustered Data ONTAP Configurations.
However, despite this routing enhancement in clustered Data ONTAP 8.3 and later, it is still worth
considering the original best practice recommendation on page 104, which is to have one data LIF per
node, per SVM.
One Data LIF per Node per SVM
With the introduction of IP spaces in clustered Data ONTAP, the preceding recommendation is more of a
reality, because storage administrators no longer have to use unique IP addresses in the cluster for
SVMs. With IP spaces, IP addresses can be duplicated in the cluster on a per-SVM basis to allow true
secure multitenancy architecture. For more information about IP spaces, see TR-4182.
Data LIF Locality Recommendations
In ONTAP, you have the ability to leverage data locality features such as NFS referrals, CIFS
autolocation, and pNFS for NAS traffic regardless of where the volumes live in a cluster. These features
help balance load better, but also make use of local caches and fastpath mechanisms for NAS traffic.
• Ability to reduce cluster network traffic
Although cluster network traffic is generally not an issue (you are more likely to peg the CPU or disk before you saturate a 10gb or 40gb cluster network), it is better to limit the amount of traffic on a cluster network as much as possible.
• Ability to enable data locality in the event of a volume move
If you move a volume to another node, you can be certain you still have a local path to the data if every node has a data LIF for the SVM.
• Ability to spread the load across nodes and leverage all the available hardware (CPU, RAM, and so on)

15 NFS Best Practice and Implementation Guide © 2017 NetApp, Inc. All Rights Reserved
If you load up all your NAS traffic on one node through one data LIF, you are not realizing the value of the other nodes in the cluster. Spreading network traffic enables all available physical entities to be used. Why pay for hardware you do not use?
• Ability to balance network connections across multiple cluster nodes
Clusters are single entities, as are SVMs. But they do have underlying hardware that has its own maximums, such as number of connections and so on. For information about hardware maximums in clustered Data ONTAP, see the configuration information for your version of Data ONTAP.
• Ability to reduce the impact of storage failover (SFO)/givebacks
Fewer clients are affected when SFO events happen, whether they are planned or unplanned.
• Ability to leverage features such as on-box DNS
On-box DNS allows data LIFs to act as DNS servers and honor forwarded zone requests. After a zone request is received, the cluster determines the ideal node to service that request based on that node’s CPU and throughput. This capability provides intelligent DNS load balancing (as opposed to round-robin DNS, which is a serial and unaware process). For more information regarding on-box DNS (and how to configure it), see TR-4523: DNS Load Balancing in ONTAP.
Note: Keep in mind that the preceding points are merely recommendations and not requirements unless you use data locality features such as pNFS.
Data LIF Considerations When Dealing with a Large Number of NFS Clients
In environments with a large number of clients connecting through NFS, it is important to keep in mind
that, by default, the number of mount and NFS ports are limited to 1,024.
This number is controlled with the options:
mount-rootonly
nfs-rootonly
In some circumstances, the number of ports used to mount or for NFS operations might be exhausted,
which then causes subsequent mount and NFS operations to hang until a port is made available.
If an environment has thousands of clients that are mounted through NFS and generating I/O, it is
possible to exhaust all ports on an NFS server. For example, one scenario seen was with ESX using NFS
datastores, because some legacy best practices would call for a data LIF/IP address per datastore. In
environments with many volumes/datastores, this created a situation where NFS ports were overrun. The
remediation for this situation would be to disable the mount-rootonly and/or the nfs-rootonly options on
the NFS server. This removes the 1 to 1,024 port range limit and allows up to 65,534 ports to be used in a
NFS server.
For the most recent best practices for ESX/NFS datastores, see TR-4333: VMware vSphere 5 on NetApp
Clustered Data ONTAP.
This situation affects the source port (client-side) only: The mountd, portmapper, NFS, and nlm ports for
the NFS server are designated by the server (server side). In clustered Data ONTAP, they are controlled
by the following options:
cluster::*> nfs server show -fields nlm-port,nsm-port,mountd-port,rquotad-port -vserver NFS83
vserver mountd-port nlm-port nsm-port rquotad-port
------- ----------- -------- -------- ------------
NFS83 635 4045 4046 4049
Does Modifying rootonly Options Affect Security?
The short answer to that question is “Yes.”
The rootonly options are added to avoid untrusted client access. Untrusted clients (those not part of
the export rules) can potentially access data by using SSH tunneling to trusted clients. However, those

16 NFS Best Practice and Implementation Guide © 2017 NetApp, Inc. All Rights Reserved
requests would come from untrusted ports (ports greater than 1,024). This can provide a back door for
clients not intended to have access.
Therefore, the enabling or disabling of the rootonly options hinges upon need. Does the environment
require more ports to allow NFS to function properly? Or is it more important to prevent untrusted clients
from accessing mounts?
One potential compromise is to make use of NFSv4.x and/or Kerberos authentication for a higher level of
secured access to NFS exports. TR-4073: Secure Unified Authentication covers how to use NFSv4.x and
Kerberos in detail.
In these scenarios, using the mount-rootonly and/or nfs-rootonly options can alleviate these
issues.
To check port usage on the client:
# netstat -na | grep [IP address]
To check port usage on the cluster:
::> network connections active show -node [nodename] -vserver [vservername] -service nfs*
NFS Behind Network Address Translation (NAT)
NFS maintains a reply cache to keep track of certain operations to make sure that they have been
completed. This cache is based on the source port and source IP address. When NAT is used in NFS
operations, the source IP or port might change in flight, which could lead to data resiliency issues. If NAT
is used, static entries for the NFS server IP and port should be added to make sure that data remains
consistent.
In addition, NAT could also lead to issues with NFS mounts hanging due to how NAT handles idle
sessions. If using NAT, the configuration should take idle sessions into account and leave them open
indefinitely to prevent issues. NAT can also create issues with NLM lock reclamation.
Ultimately, the best practice for NAT with NFS would be to avoid using it if possible and instead create a
data LIF on the SVM. If NAT is necessary, work with the NAT vendor to configure it properly for NFS
operations.
3.6 Dynamic NAS TCP Autotuning
Clustered Data ONTAP introduces dynamic NAS TCP autotuning, which enables the NAS protocol stack
to adjust buffer sizes on the fly to the most optimal setting. This capability is needed because static
methods to set TCP buffer sizes do not consider the dynamic nature of networks nor the range of different
types of connections made to a system at one time. Autotuning is used to optimize the throughput of NAS
TCP connections by computing the application data read rate and the rate of the data being received by
the system to compute optimal buffer size. The feature is not configurable and only increases buffer
sizes; buffers never decrease. The starting value for this is 32K. Autotuning applies to individual TCP
connections, rather than on a global scale.
Best Practices 2: NFS Block Size Changes (See Best Practices 3)
If these values are adjusted, they affect only new mounts. Existing mounts maintain the block size
that was set at the time of the mount. If the sizes are changed, existing mounts can experience
rejections of write operations or smaller responses for reads than requested.
Whenever you change block size options, make sure that clients are unmounted and remounted to
reflect those changes. See bug 962596 for more information.

17 NFS Best Practice and Implementation Guide © 2017 NetApp, Inc. All Rights Reserved
These options are not the same as the max transfer size values included under the NFS server options:
-tcp-max-xfer-size
-v3-tcp-max-read-size
-v3-tcp-max-write-size
Note: The NFS TCP size settings can be modified (8.1 and later only), but NetApp generally does not recommend doing so.
Max Transfer Size Settings in ONTAP 9 and Later
In NetApp ONTAP® 9 and later, -v3-tcp-max-read-size and -v3-tcp-max-write-size have
been deprecated. The recommendation is to leverage the option -tcp-max-xfer-size instead. This
change also allows TCP transfer sizes of 1MB for both reads and writes. ONTAP versions prior to ONTAP
9 only allowed 1MB for reads.
Why Dynamic Window Size?
Most environments do not benefit from static TCP window sizes, because window sizes are generally
considered in the context of a single host or connection. On a server, such as NFS running on clustered
Data ONTAP, there are multiple connections to multiple hosts. Each connection has its own uniqueness
and requires varying degrees of throughput. With a static window, a server becomes extremely limited in
how it can handle the diversity of inbound connections. Participants in network infrastructures often
change and rarely are static; thus the TCP stack needs to be able to handle those participants in an
efficient and effective manner. Dynamic window sizes help prevent the caveats seen in static window
environments, such as overutilizing a network and creating a throughput collapse or underutilizing a
network and experiencing less operating efficiency over time.
3.7 NAS Flow Control
Clustered Data ONTAP also adds NAS flow control. This flow control mechanism is separate from the
TCP flow control enabled on the NICs and switches of the data network. It is always on and implemented
at the NAS protocol stack to prevent rogue clients from overloading a node in the cluster and creating a
denial of service (DoS) scenario. This flow control affects all NAS traffic (CIFS and NFS).
How It Works
When a client sends too many packets to a node, the flow control adjusts the window size to 0 and tells
the client to wait on sending any new NAS packets until the other packets are processed. If the client
continues to send packets during this “zero window,” then the NAS protocol stack flow control mechanism
sends a TCP reset to that client. The reset portion of the flow control and the threshold for when a reset
occurs are configurable per node as of clustered Data ONTAP 8.2 using the following commands:
cluster::> node run [nodename] options ip.tcp.fcreset_enable [on|off]
cluster::> node run [nodename] options ip.tcp.fcreset_thresh_high [numerical value]
Note: These values should be adjusted only if necessary and at the guidance of NetApp Support. “Necessary” in this case means “the option is causing production performance or disruption issues.” In most cases, the option can be left unmodified.
Viewing NAS Flow Control Statistics
To see how many packets have been affected by NAS flow control and its reset mechanisms, use the
netstat -p tcp command from nodeshell and look for the following (also known as “extreme flow
control”):

18 NFS Best Practice and Implementation Guide © 2017 NetApp, Inc. All Rights Reserved
cluster::> node run [nodename] netstat -p tcp
0 tcp send window based extreme flowcontrol
0 zero window increases, 0 send buffer size increases
0 connection resets in extreme flowcontrol (of 0 attempts)
0 sends, 0 receives max reset threshold reached for extreme flowcontrol
Note: The preceding output is not the complete output you would see from the command. The flow control portions have been isolated.
Run the command in increments to see if the numbers increase. Seeing packets in extreme flow control
does not necessarily signify a problem. Contact NetApp Technical Support if you suspect a performance
problem.
The Effect of nfs.ifc.rcv Values in Clustered Data ONTAP
In Data ONTAP operating in 7-Mode, there were occasions in which the NFS input flow control
mechanisms could erroneously cause NFS disconnects, timeouts, or performance issues under high
workloads. The issue was that the values set as the default for the nfs.ifc.rcv.high and
nfs.icf.rcv.low were not high enough (that is, they were too close to the
nfs.tcp.receivewindowsize) in Data ONTAP releases operating in 7-Mode before 8.2.x.
Because of the implementation of dynamic window sizes and NFS flow control autotuning, these values
no longer apply in clustered Data ONTAP.
RPC Slots Increased in RHEL 6.3 and Later
In versions earlier than RHEL 6.3, the number of RPC requests was limited to a default of 16, with a
maximum of 128 in-flight requests. In RHEL 6.3, RPC slots were changed to dynamically allocate,
allowing a much greater number of RPC slots. As a result, clients running RHEL 6.3 and later potentially
can overload a clustered Data ONTAP node’s NAS flow control mechanisms, causing potential outages
on the node.
Best Practices 3: RPC Slot Maximum for RHEL 6.3 and Later (See Best Practices 4)
To avoid potentially causing denial of service on a cluster node, modify clients running RHEL 6.3
and later to use, at most, 128 RPC slots. This number corresponds with the current maximum
number of RPCs available per TCP connection in ONTAP.
To do this, run the following on the NFS client (alternatively, edit the /etc/modprobe.d/sunrpc.conf
file manually to use these values):
# echo "options sunrpc udp_slot_table_entries=64 tcp_slot_table_entries=128
tcp_max_slot_table_entries=128" >> /etc/modprobe.d/sunrpc.conf
19 NFS Best Practice and Implementation Guide © 2017 NetApp, Inc. All Rights Reserved
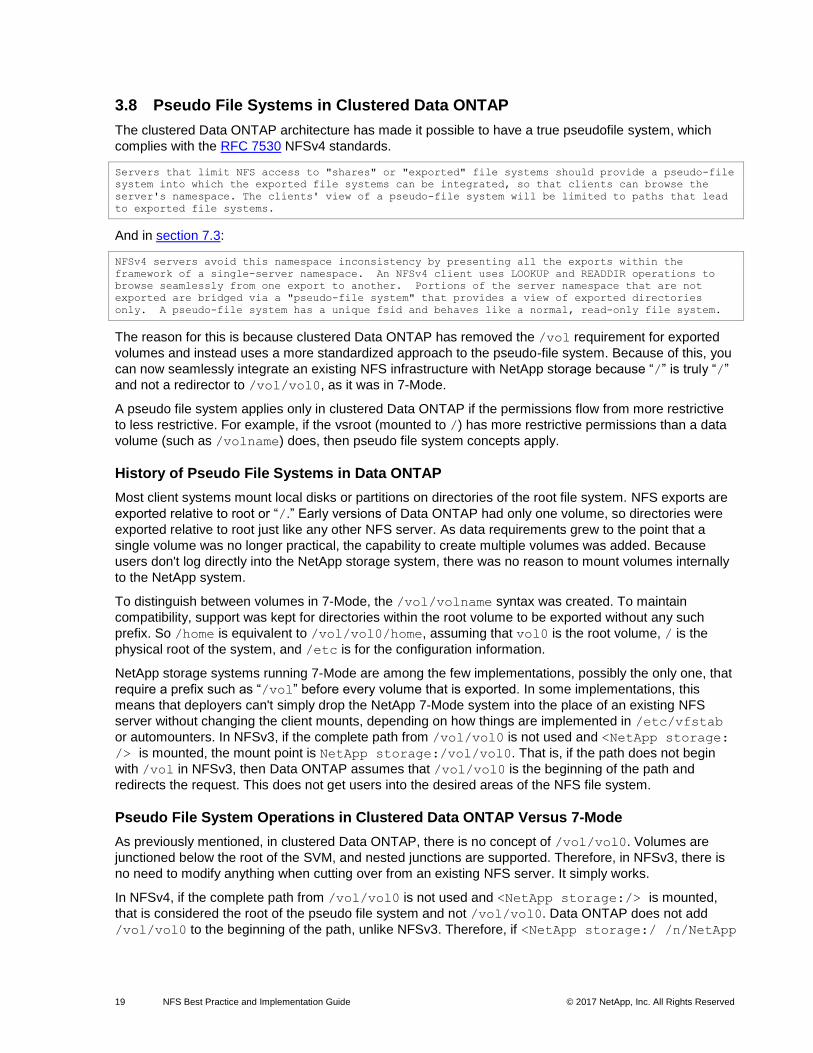
3.8 Pseudo File Systems in Clustered Data ONTAP
The clustered Data ONTAP architecture has made it possible to have a true pseudofile system, which
complies with the RFC 7530 NFSv4 standards.
Servers that limit NFS access to "shares" or "exported" file systems should provide a pseudo-file
system into which the exported file systems can be integrated, so that clients can browse the
server's namespace. The clients' view of a pseudo-file system will be limited to paths that lead
to exported file systems.
And in section 7.3:
NFSv4 servers avoid this namespace inconsistency by presenting all the exports within the
framework of a single-server namespace. An NFSv4 client uses LOOKUP and READDIR operations to
browse seamlessly from one export to another. Portions of the server namespace that are not
exported are bridged via a "pseudo-file system" that provides a view of exported directories
only. A pseudo-file system has a unique fsid and behaves like a normal, read-only file system.
The reason for this is because clustered Data ONTAP has removed the /vol requirement for exported
volumes and instead uses a more standardized approach to the pseudo-file system. Because of this, you
can now seamlessly integrate an existing NFS infrastructure with NetApp storage because “/” is truly “/”
and not a redirector to /vol/vol0, as it was in 7-Mode.
A pseudo file system applies only in clustered Data ONTAP if the permissions flow from more restrictive
to less restrictive. For example, if the vsroot (mounted to /) has more restrictive permissions than a data
volume (such as /volname) does, then pseudo file system concepts apply.
History of Pseudo File Systems in Data ONTAP
Most client systems mount local disks or partitions on directories of the root file system. NFS exports are
exported relative to root or “/.” Early versions of Data ONTAP had only one volume, so directories were
exported relative to root just like any other NFS server. As data requirements grew to the point that a
single volume was no longer practical, the capability to create multiple volumes was added. Because
users don't log directly into the NetApp storage system, there was no reason to mount volumes internally
to the NetApp system.
To distinguish between volumes in 7-Mode, the /vol/volname syntax was created. To maintain
compatibility, support was kept for directories within the root volume to be exported without any such
prefix. So /home is equivalent to /vol/vol0/home, assuming that vol0 is the root volume, / is the
physical root of the system, and /etc is for the configuration information.
NetApp storage systems running 7-Mode are among the few implementations, possibly the only one, that
require a prefix such as “/vol” before every volume that is exported. In some implementations, this
means that deployers can't simply drop the NetApp 7-Mode system into the place of an existing NFS
server without changing the client mounts, depending on how things are implemented in /etc/vfstab
or automounters. In NFSv3, if the complete path from /vol/vol0 is not used and <NetApp storage:
/> is mounted, the mount point is NetApp storage:/vol/vol0. That is, if the path does not begin
with /vol in NFSv3, then Data ONTAP assumes that /vol/vol0 is the beginning of the path and
redirects the request. This does not get users into the desired areas of the NFS file system.
Pseudo File System Operations in Clustered Data ONTAP Versus 7-Mode
As previously mentioned, in clustered Data ONTAP, there is no concept of /vol/vol0. Volumes are
junctioned below the root of the SVM, and nested junctions are supported. Therefore, in NFSv3, there is
no need to modify anything when cutting over from an existing NFS server. It simply works.
In NFSv4, if the complete path from /vol/vol0 is not used and <NetApp storage:/> is mounted,
that is considered the root of the pseudo file system and not /vol/vol0. Data ONTAP does not add
/vol/vol0 to the beginning of the path, unlike NFSv3. Therefore, if <NetApp storage:/ /n/NetApp
20 NFS Best Practice and Implementation Guide © 2017 NetApp, Inc. All Rights Reserved
storage> is mounted using NFSv3 and the same mount is mounted using NFSv4, a different file system
is mounted.
This is why Data ONTAP 7-Mode has the /vol prefix in the exported global namespace and that feature
represents an instance of the NFSv4 pseudo file system namespace. The traversal from the pseudo file
system namespace to those of actual exported volumes is marked by a change in file system ID (fsid). In
the Data ONTAP implementation of the NFSv4 pseudo file system, the paths "/" and "/vol" are always
present and form the common prefix of any reference into the pseudo file system. Any reference that
does not begin with /vol is considered invalid in 7-Mode.
In clustered Data ONTAP, the notion of a pseudo file system integrates seamlessly with junction paths
and the unified namespace, so no additional pathing considerations are needed when leveraging NFSv4.
The NFSv4 server has a known root file handle for the server’s available exported file systems that are
visible from this global server root by means of ordinary NFSv4 operations. For example, LOOKUP,
GETATTR is used within the pseudo file system. The mountd protocol is not used in NFSv4; it is replaced
by PUTROOTFH, which represents ROOT all the time. PUTFH represents the location of the pointer in the
directory tree under ROOT. When a request to mount a file system comes from the client, the request
traverses the pseudo file system (/ and /vol) before it gets to the active file system. While it is traversing
from the pseudo file system to the active file system, the FSID changes.
In clustered Data ONTAP, there is a diag-level option on the NFS server to enable preservation of the
FSID in NFSv4. This is on by default and should not be changed in most cases.
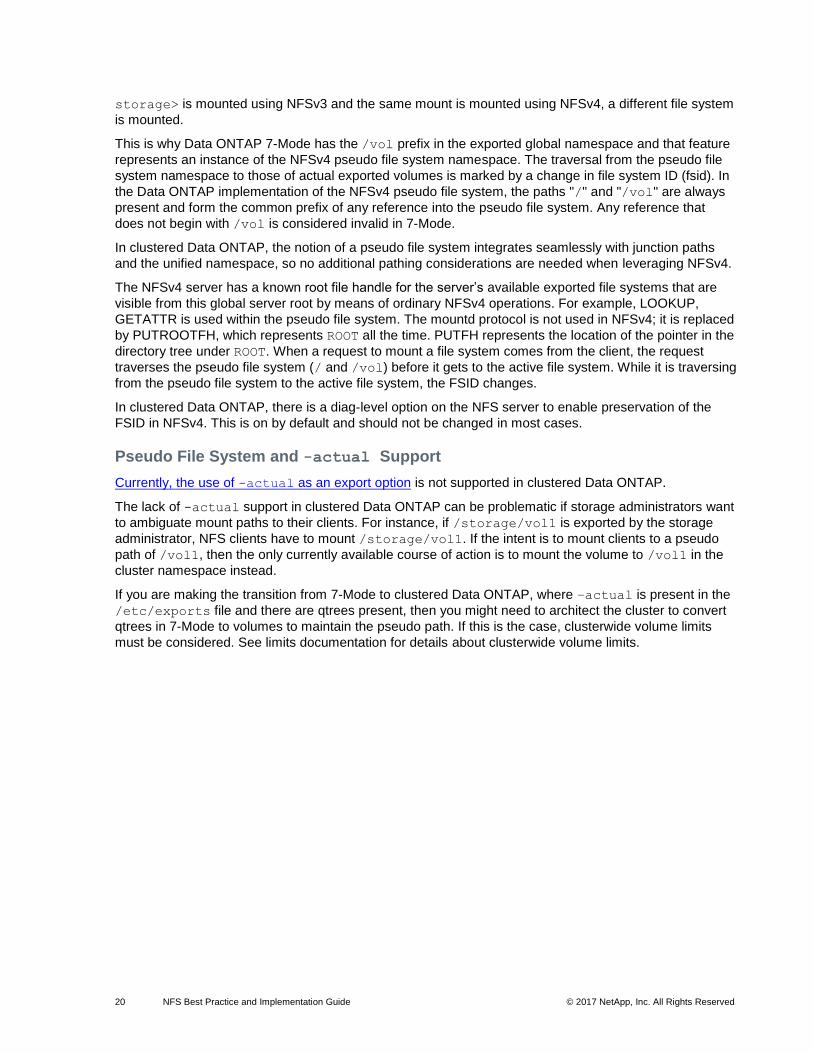
Pseudo File System and -actual Support
Currently, the use of -actual as an export option is not supported in clustered Data ONTAP.
The lack of -actual support in clustered Data ONTAP can be problematic if storage administrators want
to ambiguate mount paths to their clients. For instance, if /storage/vol1 is exported by the storage
administrator, NFS clients have to mount /storage/vol1. If the intent is to mount clients to a pseudo
path of /vol1, then the only currently available course of action is to mount the volume to /vol1 in the
cluster namespace instead.
If you are making the transition from 7-Mode to clustered Data ONTAP, where –actual is present in the
/etc/exports file and there are qtrees present, then you might need to architect the cluster to convert
qtrees in 7-Mode to volumes to maintain the pseudo path. If this is the case, clusterwide volume limits
must be considered. See limits documentation for details about clusterwide volume limits.

21 NFS Best Practice and Implementation Guide © 2017 NetApp, Inc. All Rights Reserved
What Happens During NFSv3 Mounts?
The following occurs when mounting a file system over NFSv3.
1. RPC is made to port 111 (portmapper) of the NFS server to attempt a TCP connection through the portmapper.
2. When the RPC call has been acknowledged, portmapper issues a GETPORT call to port 111 of the NFS server data LIF to obtain which port NFS is allowed on.
3. The NFS server returns the port 2049 (NFS) to the client.
4. The client then closes the connection to port 111.
5. A new RPC call is made to port 2049 of the NFS server data LIF.
6. The NFS server returns the call successfully, and the client sends an NFS NULL call to port 2049 of the NFS server’s data LIF. This checks whether the parent volume allows access to the mount. In this case, the parent volume is mounted to /, or the SVM root.
7. The NFS NULL call is returned successfully, and the client proceeds with the mount attempt.
8. Portmapper sends a GETPORT call to the NFS server’s data LIF asking for the mountd port and
provides the credentials, NFS version number, and whether the mount uses TCP or UDP.
9. The cluster checks the NFS settings and verifies whether the credentials supplied are allowed to mount based on the export policy rules. This is done through an RPC call from the NAS blade to the SecD process. If SecD is not functioning properly, this check fails, and the mount gets access
denied. If the NFS version or TCP/UDP is not allowed, the client reports the error.
10. The NFS server replies successfully if the version provided is supported and if the mount can use the specified TCP or UDP connection. It also replies if the AUTH security provider is supported (AUTH_SYS or AUTH_GSS, for example).
11. When the GETPORT call passes, the client issues a V3 MNT call to the junction path specified in the mount command through port 635 (mountd) of the NFS server data LIF.
12. The cluster uses the junction path provided by the client and searches for the path in the volume location database (vldb). If the entry exists, the cluster gathers the file handle information from the vldb.
13. The NFS server returns the file handle to the client, as well as replies which AUTH varieties are supported by the export policy rule. If the AUTH variety provided by the server matches what the client sent, the mount succeeds.
14. Portmapper from the client then sends another GETPORT call for NFS, this time providing the client’s host name.
15. The NFS server replies with port 2049, and the call succeeds.
16. Another NFS NULL call is made from the client over port 2049 of the NFS data LIF and is acknowledged by the NFS server.
17. A series of NFS packets with FSINFO and PATHCONF information is traded between the client and the NFS server.

22 NFS Best Practice and Implementation Guide © 2017 NetApp, Inc. All Rights Reserved
What Happens During NFSv4.x Mounts?
The following occurs when mounting a file system over NFSv4 (see Figure 3 and Figure 4).
1. A request from the client (SETCLIENTID) is sent from the client to the server to establish its identity.
2. After the server acknowledges (ACK) and the client’s identity is verified, the server checks whether there is a CALLBACK from the client using a CB_NULL command. This is done to check whether the client is eligible to be granted a DELEGATION.
3. Then the client sends a COMPOUND operation that includes PUTROOTFH, LOOKUP of the path that is requested to be mounted and GETFH (get a file handle) as a batch process to the server.
4. The server sends a file handle (FH), and if the client has access to mount the export using the export rules, the mount process is complete. The COMPOUND operation reduces RPC calls during this mount operation.
Figure 3) Client request to mount a file system in NFSv4.
Figure 4) Server sends file handle to complete request.
23 NFS Best Practice and Implementation Guide © 2017 NetApp, Inc. All Rights Reserved
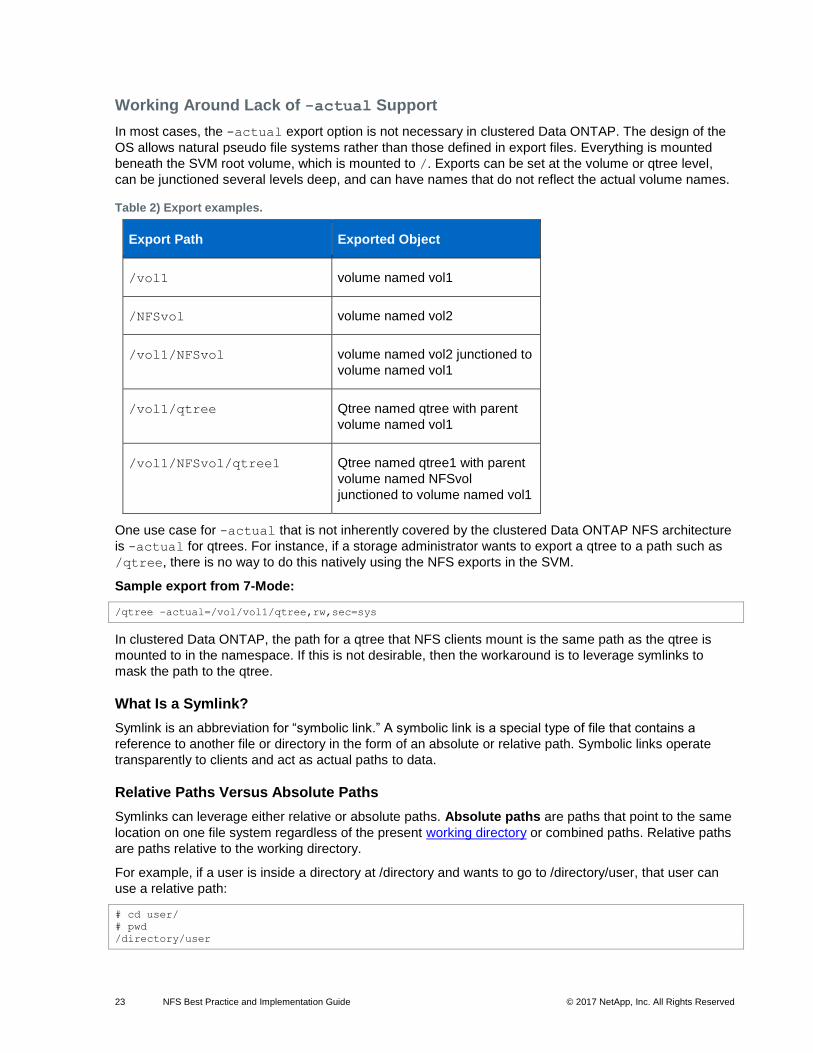
Working Around Lack of -actual Support
In most cases, the -actual export option is not necessary in clustered Data ONTAP. The design of the
OS allows natural pseudo file systems rather than those defined in export files. Everything is mounted
beneath the SVM root volume, which is mounted to /. Exports can be set at the volume or qtree level,
can be junctioned several levels deep, and can have names that do not reflect the actual volume names.
Table 2) Export examples.
Export Path Exported Object
/vol1 volume named vol1
/NFSvol volume named vol2
/vol1/NFSvol volume named vol2 junctioned to
volume named vol1
/vol1/qtree Qtree named qtree with parent
volume named vol1
/vol1/NFSvol/qtree1 Qtree named qtree1 with parent
volume named NFSvol
junctioned to volume named vol1
One use case for -actual that is not inherently covered by the clustered Data ONTAP NFS architecture
is -actual for qtrees. For instance, if a storage administrator wants to export a qtree to a path such as
/qtree, there is no way to do this natively using the NFS exports in the SVM.
Sample export from 7-Mode:
/qtree –actual=/vol/vol1/qtree,rw,sec=sys
In clustered Data ONTAP, the path for a qtree that NFS clients mount is the same path as the qtree is
mounted to in the namespace. If this is not desirable, then the workaround is to leverage symlinks to
mask the path to the qtree.
What Is a Symlink?
Symlink is an abbreviation for “symbolic link.” A symbolic link is a special type of file that contains a
reference to another file or directory in the form of an absolute or relative path. Symbolic links operate
transparently to clients and act as actual paths to data.
Relative Paths Versus Absolute Paths
Symlinks can leverage either relative or absolute paths. Absolute paths are paths that point to the same
location on one file system regardless of the present working directory or combined paths. Relative paths
are paths relative to the working directory.
For example, if a user is inside a directory at /directory and wants to go to /directory/user, that user can
use a relative path:
# cd user/
# pwd
/directory/user

24 NFS Best Practice and Implementation Guide © 2017 NetApp, Inc. All Rights Reserved
Or the user can use the absolute path:
# cd /directory/user
# pwd
/directory/user
When mounting a folder using NFS, it is better to use a relative path with symlinks, because there is no
guarantee that every user mounts to the same mount point on every client. With relative paths, symlinks
can be created that work regardless of what the absolute path is.
Using Symlinks to Simulate –actual Support
In clustered Data ONTAP, symbolic links can be used to simulate the same behavior that the export
option -actual provided in 7-Mode.
For example, if a qtree exists in the cluster, the path can look like this:
cluster::> qtree show -vserver flexvol -volume unix2 -qtree nfstree
Vserver Name: flexvol
Volume Name: unix2
Qtree Name: nfstree
Qtree Path: /vol/unix2/nfstree
Security Style: unix
Oplock Mode: enable
Unix Permissions: ---rwxr-xr-x
Qtree Id: 1
Qtree Status: normal
Export Policy: volume
Is Export Policy Inherited: true
The parent volume is unix2 (/unix/unix2), which is mounted to volume unix (/unix), which is
mounted to vsroot (/).
cluster::> vol show -vserver flexvol -volume unix2 -fields junction-path
(volume show)
vserver volume junction-path
------- ------ -------------
flexvol unix2 /unix/unix2
The exported path would be /parent_volume_path/qtree, rather than the
/vol/parent_volume_path/qtree seen earlier. The following is the output from a showmount -e
command using the showmount plug-in tool available in the support tool chest:
/unix/unix2/nfstree (everyone)
Some storage administrators might not want to expose the entire path of /unix/unix2/nfstree,
because it can allow clients to attempt to navigate other portions of the path. To allow the masking of that
path to an NFS client, a symlink volume or folder can be created and mounted to a junction path. For
example:
cluster::> vol create -vserver flexvol -volume symlinks -aggregate aggr1 -size 20m -state online
-security-style unix -junction-path /NFS_links
The volume size can be small (minimum of 20MB), but that depends on the number of symlinks in the
volume. Each symlink is 4k in size. Alternatively, create a folder under vsroot for the symlinks.
After the volume or folder is created, mount the vsroot to an NFS client to create the symlink.
# mount -o nfsvers=3 10.63.3.68:/ /symlink
# mount | grep symlink
10.63.3.68:/ on /symlink type nfs (rw,nfsvers=3,addr=10.63.3.68)
Note: If using a directory under vsroot, mount vsroot and create the directory.

25 NFS Best Practice and Implementation Guide © 2017 NetApp, Inc. All Rights Reserved
# mount -o nfsvers=3 10.63.3.68:/ /symlink
# mount | grep symlink
10.63.3.68:/ on /symlink type nfs (rw,nfsvers=3,addr=10.63.3.68)
# mkdir /symlink/symlinks
# ls -la /symlink | grep symlinks
drwxr-xr-x. 2 root root 4096 Apr 30 10:45 symlinks
To create a symlink to the qtree, use the -s option (s = symbolic). The link path needs to include a relative
path that directs the symlink to the correct location without needing to specify the exact path. If the link is
inside a folder that does not navigate to the desired path, then ../ needs to be added to the path.
For example, if a folder named NFS_links is created under / and the volume unix is also mounted under
/, then navigating to /NFS_links and creating a symlink cause the relative path to require a redirect to
the parent folder.
Example of a symlink created in a symlink volume mounted to /NFS_links:
# mount -o nfsvers=3 10.63.3.68:/ /symlink/
# mount | grep symlink
10.63.3.68:/ on /symlink type nfs (rw,nfsvers=3,addr=10.63.3.68)
# cd /symlink/NFS_links
# pwd
/symlink/NFS_links
# ln -s ../unix/unix2/nfstree LINK
# ls -la /symlink/unix/unix2/nfstree/
total 8
drwxr-xr-x. 2 root root 4096 May 15 14:34 .
drwxr-xr-x. 3 root root 4096 Apr 29 16:47 ..
-rw-r--r--. 1 root root 0 May 15 14:34 you_are_here
# cd LINK
# ls -la
total 8
drwxr-xr-x. 2 root root 4096 May 15 14:34 .
drwxr-xr-x. 3 root root 4096 Apr 29 16:47 ..
-rw-r--r--. 1 root root 0 May 15 14:34 you_are_here
# pwd
/symlink/NFS_links/LINK
Note that despite the fact that the symlink points to the actual path of /unix/unix2/nfstree, pwd
returns the path of the symlink, which is /symlink/NFS_links/LINK. The file you_are_here has the
same date and timestamp across both paths.
Note: Because the path includes ../, this symlink cannot be directly mounted.
Example of symlink created in vsroot:
# mount -o nfsvers=3 10.63.3.68:/ /symlink/
# mount | grep symlink
10.63.3.68:/ on /symlink type nfs (rw,nfsvers=3,addr=10.63.3.68)
# cd /symlink/
# pwd
/symlink
# ln -s unix/unix2/nfstree LINK1
# ls -la /symlink/unix/unix2/nfstree/
total 8
drwxr-xr-x. 2 root root 4096 May 15 14:34 .
drwxr-xr-x. 3 root root 4096 Apr 29 16:47 ..
-rw-r--r--. 1 root root 0 May 15 14:34 you_are_here
# cd LINK1
# ls -la
total 8
drwxr-xr-x. 2 root root 4096 May 15 14:34 .
drwxr-xr-x. 3 root root 4096 Apr 29 16:47 ..
-rw-r--r--. 1 root root 0 May 15 14:34 you_are_here
# pwd
/symlink/LINK1

26 NFS Best Practice and Implementation Guide © 2017 NetApp, Inc. All Rights Reserved
Again, despite the fact that the actual path is /unix/unix2/nfstree, we see an ambiguated path of
/symlink/LINK1. The file you_are_here has the same date and timestamp across both paths.
Additionally, the symlink created can be mounted instead of the vsroot path, adding an extra level of
ambiguity to the export path:
# mount -o nfsvers=3 10.63.3.68:/LINK1 /mnt
# mount | grep mnt
10.63.3.68:/LINK1 on /mnt type nfs (rw,nfsvers=3,addr=10.63.3.68
# cd /mnt
# pwd
/mnt
One use case for this setup is with automounters. Every client can mount the same path and never
actually know where in the directory structure they are. If clients mount the SVM root volume (/), be sure
to lock down the volume to nonadministrative clients.
For more information about locking down volumes to prevent listing of files and folders, see the section in
this document on how to limit access to the SVM root volume.
The following figure shows a sample of how a namespace can be created to leverage symlinks to create
ambiguation of paths for NAS operations.
Figure 5) Symlink example using vsroot.
Note: Export policies and rules can be applied to volumes and qtrees, but not symlinks. This fact should be taken into consideration when creating symlinks for use as mount points. Symlinks instead inherit the export policy rules of the parent volume in which the symlink resides.
3.9 Does Clustered Data ONTAP Support 32-Bit and 64-Bit File IDs?
Some applications require that NFS servers offer support for legacy 32-bit file ID lengths. RFC-1813
requires that NFSv3 return 8 bytes for the file ID (aka inode number) because it’s defined in the
specification as uint64 (XDR unsigned hyper). All RFC-1813-compliant NFSv3 vendors return 8 bytes. In
clustered Data ONTAP 8.3.x and prior, the operating system never returns anything in the upper 4 bytes

27 NFS Best Practice and Implementation Guide © 2017 NetApp, Inc. All Rights Reserved
of the NFSv3 file ID, so legacy 32-bit applications can operate normally. WAFL itself is still using 32-bit
inode numbers. As for 64-bit applications, the 32-bit architecture still fits nicely. Thus, neither 32-bit nor
64-bit applications have issues with the current clustered Data ONTAP architecture.
Enabling 64-Bit Identifiers
In ONTAP 9, a new NFS server option, -v3-64bit-identifiers, was added to offer the ability to use
only 64-bit FSID and file IDs for NFSv3 operations. The option is disabled by default, so ONTAP 9
operates as previous releases did out of the box. If disabling FSID changes in NFSv3, be sure to enable
this option to avoid file ID collisions.
This option can be found at the advanced privilege level.
[-v3-64bit-identifiers {enabled|disabled}] - Use 64 Bits for NFSv3 FSIDs and File IDs (privilege:
advanced)
This optional parameter specifies whether Data ONTAP uses 64 bits (instead of 32 bits) for file
system identifiers (FSIDs) and file identifiers (file IDs) that are returned to NFSv3 clients. If
you change the value of this parameter, clients must remount any paths over which they are using
NFSv3. When -v3-fsid-change is disabled, enable this parameter to avoid file ID collisions.
Note: Enabling this option is recommended with the ONTAP 9 feature NetApp FlexGroup Volumes.
4 Export Policies and Rules in Clustered Data ONTAP
Instead of the flat export files found in 7-Mode, clustered Data ONTAP offers export policies as containers
for export policy rules to control security. These policies are stored in the replicated database, thus
making exports available across every node in the cluster, rather than isolated to a single node. Volumes
that are created without specifying the policy get assigned the default policy. For up-to-date limits
information, including export policy and rules limits, see the clustered Data ONTAP limits information for
your specific platform.
A newly created SVM contains an export policy called “default.” This export policy cannot be deleted,
although it can be renamed or modified. Each volume created in the SVM inherits the “default” export
policy and the rules assigned to it. Because export policy rules are inherited by default, NetApp
recommends opening all access to the root volume of the SVM (vsroot) when a rule is assigned. Setting
any rules for the “default” export policy that restrict the vsroot denies access to the volumes created under
that SVM. That is because vsroot is “/” in the path to “/junction” and factors into the ability to mount and
traverse. To control access to read/write to vsroot, use the volume unix-permissions and/or ACLs. NetApp
recommends restricting the ability for nonowners of the volume to write to vsroot (at most, 0755
permissions). In clustered Data ONTAP 8.2 and later, 0755 is the default UNIX security set on volumes.
The default owner is UID 0 and the default group is GID 1. To control data volume access, separate
export policies and rules can be set for every volume under the vsroot. For more information about
configuring export policies and rules, as well as specific use cases for securing the vsroot volume, see
the section in this document detailing those steps.
Each volume has only one export policy, although numerous volumes can use the same export policy. An
export policy can contain several rules to allow granularity in access control. With this flexibility, a user
can choose to balance workload across numerous volumes, yet can assign the same export policy to all
volumes. Export policies are simply containers for export policy rules.
Best Practices 4: Export Policy Rule Requirement (See Best Practices 5)
If a policy is created with no rule, that policy effectively denies access to everyone. Always create a
rule with a policy to control access to a volume. Conversely, if you want to deny all access, remove the
policy rule.

28 NFS Best Practice and Implementation Guide © 2017 NetApp, Inc. All Rights Reserved
Export policy and export policy rule creation (including examples) is specified in detail in the “File Access
and Protocols Management Guide” for the version of clustered Data ONTAP being used. This document
and other documents can be found on the NetApp Support site.
• Use the vserver export-policy commands to set up export rules; this is equivalent to the
/etc/exports file in 7-Mode.
• All exports are persistent across system restarts, and this is why temporary exports cannot be defined.
• There is a global namespace per virtual server; this maps to the actual=path syntax in 7-Mode. In clustered Data ONTAP, a volume can have a designated junction path that is different from the volume name. Therefore, the -actual parameter found in the /etc/exports file is no longer
applicable. This rule applies to both NFSv3 and NFSv4. For more information, see the section on pseudo file systems and -actual support in this document.
• In clustered Data ONTAP, an export rule has the granularity to provide different levels of access to a volume for a specific client or clients, which has the same effect as fencing in the case of 7-Mode.
• Export policy rules affect CIFS access in clustered Data ONTAP by default versions earlier than 8.2. In clustered Data ONTAP 8.2 and later, export policy rule application to CIFS operations is disabled by default. However, if upgrading from 8.1.x to 8.2, export policies and rules still apply to CIFS until it is disabled. For more information about how export policies can be applied to volumes hosting CIFS shares, see the “File Access and Protocols Management Guide” for the version of clustered Data ONTAP being used.
Refer to Table 29) NFSv3 configuration options in clustered Data ONTAP.for NFSv3 config options that
are modified in clustered Data ONTAP.
Note: Older Linux clients (such as Fedora 8) might not understand AUTH_NULL as an authentication type for NFS mounts. Therefore, export policy rules must be configured using explicit authentication types, such as “sys,” to enable access to these clients.
Note: If using Kerberos with NFSv3, the export policy rule must allow ro and rw access to sys in addition to krb5 in versions of ONTAP prior to 8.2P6. See bug 756081 for details. This requirement is because of the need to allow NLM access to the export and the fact that NLM is not kerberized in krb5 mounts.
4.1 Export Policy Rule Options Explained
The appendix of this document includes a table that lists the various options used for export policy rules
and what they are used for. Most export policy rule options can be viewed using the export-policy
rule show command or using OnCommand System Manager.
4.2 Export Policy Sharing and Rule Indexing
Clustered Data ONTAP exports do not follow the 7-Mode model of file-based access definition, in which
the file system path ID is described first and then the clients who want to access the file system path are
specified. Clustered Data ONTAP export policies are sets of rules that describe access to a volume.
Exports are applied at the volume level, rather than to explicit paths as in 7-Mode.
Policies can be associated with one or more volumes.
For example, in 7-Mode, exports could look like this:
/vol/test_vol -sec=sys,rw=172.17.44.42,root=172.17.44.42
/vol/datastore1_sata -sec=sys,rw,nosuid

29 NFS Best Practice and Implementation Guide © 2017 NetApp, Inc. All Rights Reserved
In clustered Data ONTAP, export rules would look like this:
Policy Rule Access Client RO
Vserver Name Index Protocol Match Rule
------------ --------------- ------ -------- --------------------- ------------------
vs1_nfs3 nfs3_policy1 1 any 0.0.0.0/0 any
vs2_nfs4 nfs4_policy1 1 any 0.0.0.0/0 any
7-Mode supports subvolume or nested exports; Data ONTAP supports exporting /vol/volX and
/vol/volX/dir. Clustered Data ONTAP currently does not support subvolume or nested exports. The
concept of subvolume exports does not exist because the export path applicable for a particular client’s
access is specified at mount time based on the mount path.
Clustered Data ONTAP did not support qtree exports earlier than 8.2.1. In previous releases, a qtree
could not be a junction in the namespace independent of its containing volume because the "export
permissions" were not specified separately for each qtree. The export policy and rules of the qtree’s
parent volume were used for all the qtrees contained within it. This implementation is different from the 7-
Mode qtree implementation, in which each qtree is a point in the namespace where export policies can be
specified.
In 8.2.1 and later versions of clustered Data ONTAP 8.2.x, qtree exports are available for NFSv3 exports
only. Qtree exports in clustered Data ONTAP 8.3 support NFSv4.x. The export policy can be specified at
the qtree level or inherited from the parent volume. By default, the export policy is inherited from the
parent volume, so if it is not modified, the qtree behaves in the same way as the parent volume. Qtree
export policies and rules work exactly the way volume export policies and rules work.
4.3 UNIX Users and Groups
The UID and GID that a cluster leverages depend on how the SVM has been configured with regard to
name mapping and name switch. In clustered Data ONTAP 8.2 and earlier, the name service switch (ns-
switch) option for SVMs specifies the source or sources that are searched for network information and the
order in which they are searched. Possible values include nis, file, and ldap. This parameter provides the
functionality of the /etc/nsswitch.conf file on UNIX systems. The name mapping switch (nm-switch) option
for SVMs specifies the sources that are searched for name mapping information and the order in which
they are searched. Possible values include file and ldap.
In clustered Data ONTAP 8.3 and later, the ns-switch and nm-switch parameters have been moved under
the vserver services name-service command set:
cluster ::vserver services name-service>
dns ldap netgroup nis-domain ns-switch unix-group unix-user
For more information about the new name services’ functionality, see the section in this document
regarding name-service changes, TR-4379: Name Service Best Practice Guide, and/or TR-4073: Secure
Unified Authentication.
If NIS or LDAP is specified for name services and/or name mapping, then the cluster contacts the
specified servers for UID and GID information. Connectivity to NIS and LDAP attempts to use a data LIF
in the SVM by default. Therefore, data LIFs must be routable to name service servers in 8.2.x and earlier.
Versions of clustered Data ONTAP 8.3 and later introduce improved SecD routing logic, so it is no longer
necessary to have a LIF that routes to name services on every node. SecD figures out the data LIF to use
and passes traffic over the cluster network to the data LIF. Management LIFs are used in the event a data
LIF is not available to service a request. If data LIFs are not able to communicate with name service
servers, then there might be some latency in authentication requests that manifests as latency in data
access.
If desired, name service and name mapping communication can be forced over the management network
by default. This can be useful in environments in which an SVM does not have access to name service
and name mapping servers.

30 NFS Best Practice and Implementation Guide © 2017 NetApp, Inc. All Rights Reserved
To force all authentication requests over the management network in clustered Data ONTAP 8.2.x and
earlier only:
cluster::> set diag
cluster::> vserver modify -vserver vs0 -protocol-services-use-data-lifs false
Note: This option is no longer available in clustered Data ONTAP 8.3 and later.
Best Practices 5: Protocol Services Recommendation (See Best Practices 6)
NetApp recommends leaving this option as “true” because management networks are often more
bandwidth-limited than data networks (1Gb versus 10Gb), which can result in authentication latency in
some cases.
If local files are used, then the cluster leverages the unix-user and unix-group tables created for the
specified SVM. Because no remote servers are being used, there is little to no authentication latency.
However, in large environments, managing large lists of unix-users and groups can be daunting and
mistake prone.
Best Practices 6: Name Services Recommendation (See Best Practices 7)
NetApp recommends leveraging either NIS or LDAP (preferably LDAP) for name services in larger
environments for scalability considerations.
UNIX users and groups are not created by default when creating an SVM using the vserver create
command. However, using System Manager or the vserver setup command creates the default users
of root (0), pcuser (65534), and nobody (65535) and default groups of daemon (1), root (0), pcuser
(65534), and nobody (65535).
Example:
cluster::> unix-user show -vserver vs0
(vserver services unix-user show)
User User Group Full
Vserver Name ID ID Name
-------------- --------------- ------ ------ --------------------------------
vs0 nobody 65535 65535 -
vs0 pcuser 65534 65534 -
vs0 root 0 1 -
cluster::> unix-group show -vserver vs0
(vserver services unix-group show)
Vserver Name ID
-------------- ------------------- ----------
nfs daemon 1
nfs nobody 65535
nfs pcuser 65534
nfs root 0
Best Practices 7: Configuration Management (See Best Practices 8)
NetApp recommends using OnCommand System Manager when possible to avoid configuration
mistakes when creating new SVMs.

31 NFS Best Practice and Implementation Guide © 2017 NetApp, Inc. All Rights Reserved
Scaled/File-Only Mode for UNIX Users and Groups
ONTAP 9.1 introduces a method to increase the limits of how many local UNIX users and groups can be
used on a cluster with scaled/file-only mode. With this method, passwd and group files can be loaded into
the cluster to populate tables to bypass the need for external name services to manage large numbers of
users. For more information, see the section “Scaled Mode/File-Only Mode.”
4.4 The Anon User
The “anon” (anonymous) user ID specifies a UNIX user ID or user name that is mapped to client requests
that arrive without valid NFS credentials. This can include the root user. Clustered Data ONTAP
determines a user’s file access permissions by checking the user’s effective UID against the SVM’s
specified name-mapping and name-switch methods. After the effective UID is determined, the export
policy rule is leveraged to determine the access that UID has.
The –anon option in export policy rules allows specification of a UNIX user ID or user name that is
mapped to client requests that arrive without valid NFS credentials (including the root user). The default
value of –anon, if not specified in export policy rule creation, is 65534. This UID is normally associated
with the user name “nobody” or “nfsnobody” in Linux environments. NetApp appliances use 65534 as the
user “pcuser,” which is generally used for multiprotocol operations, Because of this difference, if using
local files and NFSv4, the name string for users mapped to 65534 might not match. This discrepancy
might cause files to be written as the user specified in the /etc/idmapd.conf file on the client (Linux)
or /etc/default/nfs file (Solaris), particularly when using multiprotocol (CIFS and NFS) on the same
datasets.
4.5 The Root User
The "root" user must be explicitly configured in clustered Data ONTAP to specify which machine has
"root" access to a share, or else "anon=0” must be specified. Alternatively, the -superuser option can be
used if more granular control over root access is desired. If these settings are not configured properly,
"permission denied" might be encountered when accessing an NFS share as the "root" user (0). If the –
anon option is not specified in export policy rule creation, the root user ID is mapped to the "nobody" user
(65534). There are several ways to configure root access to an NFS share.
AUTH Types
When an NFS client authenticates, an AUTH type is sent. An AUTH type specifies how the client is
attempting to authenticate to the server and depends on client-side configuration. Supported AUTH types
include:
• AUTH_NONE/AUTH_NULL This AUTH type specifies that the request coming in has no identity (NONE or NULL) and is mapped to the anon user. See http://www.ietf.org/rfc/rfc1050.txt and http://www.ietf.org/rfc/rfc2623.txt for details.
• AUTH_SYS/AUTH_UNIX This AUTH type specifies that the user is authenticated at the client (or system) and comes in as an identified user. See http://www.ietf.org/rfc/rfc1050.txt and http://www.ietf.org/rfc/rfc2623.txt for details.
• AUTH_RPCGSS This is kerberized NFS authentication.

32 NFS Best Practice and Implementation Guide © 2017 NetApp, Inc. All Rights Reserved
Squashing Root
The following examples show how to squash root to anon in various configuration scenarios.
Example 1: Root is squashed to the anon user using superuser for all NFS clients using sec=sys;
other sec types are denied access.
cluster::> vserver export-policy rule show –policyname root_squash -instance
(vserver export-policy rule show)
Vserver: vs0
Policy Name: root_squash
Rule Index: 1
Access Protocol: nfs only NFS is allowed (NFSv3 and v4)
Client Match Hostname, IP Address, Netgroup, or Domain: 0.0.0.0/0 all clients
RO Access Rule: sys only AUTH_SYS is allowed
RW Access Rule: sys only AUTH_SYS is allowed
User ID To Which Anonymous Users Are Mapped: 65534 mapped to 65534
Superuser Security Types: none superuser (root) squashed to anon user
Honor SetUID Bits in SETATTR: true
Allow Creation of Devices: true
cluster::> volume show -vserver vs0 -volume nfsvol -fields policy
vserver volume policy
------- ------ -----------
vs0 nfsvol root_squash
[root@nfsclient /]# mount -o nfsvers=3 cluster:/nfsvol /mnt
[root@nfsclient /]# cd /mnt
[root@nfsclient mnt]# touch root_squash
[root@nfsclient mnt]# ls -la
total 116
drwxrwxrwx. 3 root root 106496 Apr 24 2013 .
dr-xr-xr-x. 26 root root 4096 Apr 24 11:24 ..
drwxr-xr-x. 2 root daemon 4096 Apr 18 12:54 junction
-rw-r--r--. 1 nobody nobody 0 Apr 24 11:33 root_squash
[root@nfsclient mnt]# ls -lan
drwxrwxrwx. 3 0 0 106496 Apr 24 2013 .
dr-xr-xr-x. 26 0 0 4096 Apr 24 11:24 ..
drwxrwxrwx. 12 0 0 4096 Apr 24 11:05 .snapshot
drwxr-xr-x. 2 0 1 4096 Apr 18 12:54 junction
-rw-r--r--. 1 65534 65534 0 Apr 24 2013 root_squash
[root@nfsclient /]# mount -o sec=krb5 cluster:/nfsvol /mnt
mount.nfs: access denied by server while mounting cluster:/nfsvol

33 NFS Best Practice and Implementation Guide © 2017 NetApp, Inc. All Rights Reserved
Example 2: Root is squashed to the anon user using superuser for a specific client; sec=sys and
sec=none are allowed.
cluster::> vserver export-policy rule show –policyname root_squash_client -instance
(vserver export-policy rule show)
Vserver: vs0
Policy Name: root_squash_client
Rule Index: 1
Access Protocol: nfs only NFS is allowed (NFSv3 and v4)
Client Match Hostname, IP Address, Netgroup, or Domain: 10.10.100.25 just this client
RO Access Rule: sys,none AUTH_SYS and AUTH_NONE are allowed
RW Access Rule: sys,none AUTH_SYS and AUTH_NONE are allowed
User ID To Which Anonymous Users Are Mapped: 65534 mapped to 65534
Superuser Security Types: none superuser (root) squashed to anon user
Honor SetUID Bits in SETATTR: true
Allow Creation of Devices: true
cluster::> volume show -vserver vs0 -volume nfsvol -fields policy
vserver volume policy
------- ------ -----------
vs0 nfsvol root_squash_client
[root@nfsclient /]# mount -o nfsvers=3 cluster:/nfsvol /mnt
[root@nfsclient /]# cd /mnt
[root@nfsclient mnt]# touch root_squash_client
[root@nfsclient mnt]# ls -la
drwxrwxrwx. 3 root root 106496 Apr 24 2013 .
dr-xr-xr-x. 26 root root 4096 Apr 24 11:24 ..
drwxr-xr-x. 2 root daemon 4096 Apr 18 12:54 junction
-rw-r--r--. 1 nfsnobody nfsnobody 0 Apr 24 2013 root_squash_client
[root@nfsclient mnt]# ls -lan
drwxrwxrwx. 3 0 0 106496 Apr 24 2013 .
dr-xr-xr-x. 26 0 0 4096 Apr 24 11:24 ..
drwxrwxrwx. 12 0 0 4096 Apr 24 11:05 .snapshot
drwxr-xr-x. 2 0 1 4096 Apr 18 12:54 junction
-rw-r--r--. 1 65534 65534 0 Apr 24 2013 root_squash_client

34 NFS Best Practice and Implementation Guide © 2017 NetApp, Inc. All Rights Reserved
Example 3: Root is squashed to the anon user using superuser for a specific set of clients using
sec=krb5 (Kerberos) and only NFSv4 and CIFS are allowed.
cluster::> vserver export-policy rule show –policyname root_squash_krb5 -instance
(vserver export-policy rule show)
Vserver: vs0
Policy Name: root_squash_krb5
Rule Index: 1
Access Protocol: nfs4,cifs only NFSv4 and CIFS are allowed
Client Match Hostname, IP Address, Netgroup, or Domain: 10.10.100.0/24 just clients with
an IP address of 10.10.100.X
RO Access Rule: krb5 only AUTH_RPCGSSD is allowed
RW Access Rule: krb5 only AUTH_RPCGSSD is allowed
User ID To Which Anonymous Users Are Mapped: 65534 mapped to 65534
Superuser Security Types: none superuser (root) squashed to anon user
Honor SetUID Bits in SETATTR: true
Allow Creation of Devices: true
cluster::> volume show -vserver vs0 -volume nfsvol -fields policy
vserver volume policy
------- ------ -----------
vs0 nfsvol root_squash
[root@nfsclient /]# mount -o nfsvers=3 cluster:/nfsvol /mnt
mount.nfs: access denied by server while mounting cluster:/nfsvol
[root@nfsclient /]# mount -t nfs4 cluster:/nfsvol /mnt
mount.nfs4: Operation not permitted
[root@nfsclient /]# mount -t nfs4 -o sec=krb5 krbsn:/nfsvol /mnt
[root@nfsclient /]# cd /mnt
[root@nfsclient mnt]# touch root_squash_krb5
[root@nfsclient mnt]# ls -la
drwxrwxrwx. 3 root root 106496 Apr 24 2013 .
dr-xr-xr-x. 26 root root 4096 Apr 24 11:24 ..
drwxr-xr-x. 2 root daemon 4096 Apr 18 12:54 junction
-rw-r--r--. 1 nobody nobody 0 Apr 24 11:50 root_squash_krb5
[root@nfsclient mnt]# ls -lan
drwxrwxrwx. 3 0 0 106496 Apr 24 2013 .
dr-xr-xr-x. 26 0 0 4096 Apr 24 11:24 ..
drwxr-xr-x. 2 0 1 4096 Apr 18 12:54 junction
-rw-r--r--. 1 99 99 0 Apr 24 11:50 root_squash_krb5
Note: The UID of 99 in this example occurs in NFSv4 when the user name cannot map into the NFSv4 domain. A look at /var/log/messages confirms this:
Apr 23 10:54:23 nfsclient nfsidmap[1810]: nss_getpwnam: name 'pcuser' not found in domain
nfsv4domain.netapp.com'
In the preceding examples, when the root user requests access to a mount, it maps to the anon UID. In
this case, the UID is 65534. This mapping prevents unwanted root access from specified clients to the
NFS share. Because “sys” is specified as the rw and ro access rules in the first two examples, only clients
using sec=sys gain access. The third example shows a possible configuration using Kerberized NFS
authentication. Setting the access protocol to NFS allows only NFS access to the share (including NFSv3
and NFSv4). If multiprotocol access is desired, then the access protocol must be set to allow NFS and
CIFS. NFS access can be limited to only NFSv3 or NFSv4 here as well.
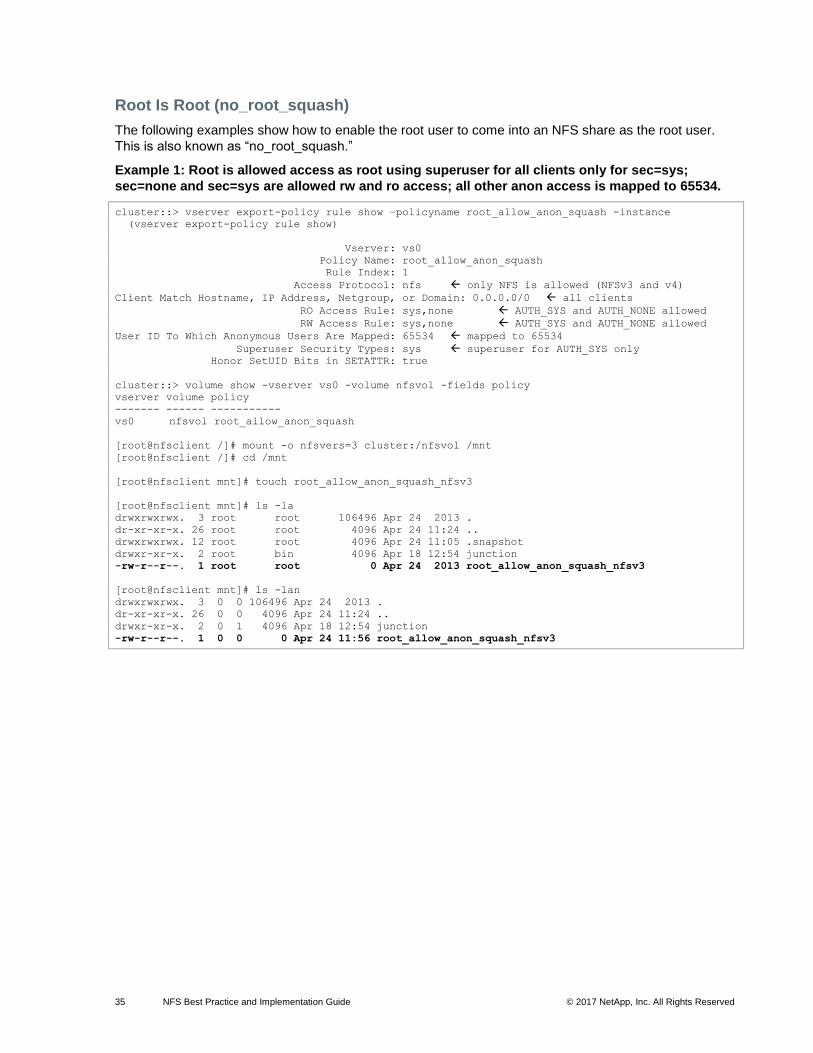
35 NFS Best Practice and Implementation Guide © 2017 NetApp, Inc. All Rights Reserved
Root Is Root (no_root_squash)
The following examples show how to enable the root user to come into an NFS share as the root user.
This is also known as “no_root_squash.”
Example 1: Root is allowed access as root using superuser for all clients only for sec=sys;
sec=none and sec=sys are allowed rw and ro access; all other anon access is mapped to 65534.
cluster::> vserver export-policy rule show –policyname root_allow_anon_squash -instance
(vserver export-policy rule show)
Vserver: vs0
Policy Name: root_allow_anon_squash
Rule Index: 1
Access Protocol: nfs only NFS is allowed (NFSv3 and v4)
Client Match Hostname, IP Address, Netgroup, or Domain: 0.0.0.0/0 all clients
RO Access Rule: sys,none AUTH_SYS and AUTH_NONE allowed
RW Access Rule: sys,none AUTH_SYS and AUTH_NONE allowed
User ID To Which Anonymous Users Are Mapped: 65534 mapped to 65534
Superuser Security Types: sys superuser for AUTH_SYS only
Honor SetUID Bits in SETATTR: true
cluster::> volume show -vserver vs0 -volume nfsvol -fields policy
vserver volume policy
------- ------ -----------
vs0 nfsvol root_allow_anon_squash
[root@nfsclient /]# mount -o nfsvers=3 cluster:/nfsvol /mnt
[root@nfsclient /]# cd /mnt
[root@nfsclient mnt]# touch root_allow_anon_squash_nfsv3
[root@nfsclient mnt]# ls -la
drwxrwxrwx. 3 root root 106496 Apr 24 2013 .
dr-xr-xr-x. 26 root root 4096 Apr 24 11:24 ..
drwxrwxrwx. 12 root root 4096 Apr 24 11:05 .snapshot
drwxr-xr-x. 2 root bin 4096 Apr 18 12:54 junction
-rw-r--r--. 1 root root 0 Apr 24 2013 root_allow_anon_squash_nfsv3
[root@nfsclient mnt]# ls -lan
drwxrwxrwx. 3 0 0 106496 Apr 24 2013 .
dr-xr-xr-x. 26 0 0 4096 Apr 24 11:24 ..
drwxr-xr-x. 2 0 1 4096 Apr 18 12:54 junction
-rw-r--r--. 1 0 0 0 Apr 24 11:56 root_allow_anon_squash_nfsv3

36 NFS Best Practice and Implementation Guide © 2017 NetApp, Inc. All Rights Reserved
Example 2: Root is allowed access as root using superuser for sec=krb5 only; anon access is
mapped to 65534; sec=sys and sec=krb5 are allowed, but only using NFSv4.
cluster::> vserver export-policy rule show –policyname root_allow_krb5_only -instance
(vserver export-policy rule show)
Vserver: vs0
Policy Name: root_allow_krb5_only
Rule Index: 1
Access Protocol: nfs4 only NFSv4 is allowed
Client Match Hostname, IP Address, Netgroup, or Domain: 0.0.0.0/0 all clients
RO Access Rule: sys,krb5 AUTH_SYS and AUTH_RPCGSS allowed
RW Access Rule: sys,krb5 AUTH_SYS and AUTH_RPCGSS allowed
User ID To Which Anonymous Users Are Mapped: 65534 mapped to 65534
Superuser Security Types: krb5 superuser via AUTH_RPCGSS only
Honor SetUID Bits in SETATTR: true
cluster::> volume show -vserver vs0 -volume nfsvol -fields policy
vserver volume policy
------- ------ -----------
vs0 nfsvol root_allow_krb5_only
[root@nfsclient /]# mount -o nfsvers=3 cluster:/nfsvol /mnt
mount.nfs: access denied by server while mounting cluster:/nfsvol
[root@nfsclient /]# mount -t nfs4 cluster:/nfsvol /mnt
[root@nfsclient /]# cd /mnt
[root@nfsclient mnt]# touch root_allow_krb5_only_notkrb5
[root@nfsclient mnt]# ls -la
drwxrwxrwx. 3 root root 106496 Apr 24 2013 .
dr-xr-xr-x. 26 root root 4096 Apr 24 11:24 ..
drwxr-xr-x. 2 root daemon 4096 Apr 18 12:54 junction
-rw-r--r--. 1 nobody nobody 0 Apr 24 2013 root_allow_krb5_only_notkrb5
[root@nfsclient mnt]# ls -lan
drwxrwxrwx. 3 0 0 106496 Apr 24 2013 .
dr-xr-xr-x. 26 0 0 4096 Apr 24 11:24 ..
drwxr-xr-x. 2 0 1 4096 Apr 18 12:54 junction
-rw-r--r--. 1 99 99 0 Apr 24 2013 root_allow_krb5_only_notkrb5
NOTE: Again, the UID of an unmapped user in NFSv4 is 99. This is controlled via /etc/idmapd.conf
in Linux and /etc/default/nfs in Solaris.
[root@nfsclient /]# mount -t nfs4 -o sec=krb5 cluster:/nfsvol /mnt
[root@nfsclient /]# kinit
Password for [email protected]:
[root@nfsclient /]# cd /mnt
[root@nfsclient mnt]# touch root_allow_krb5_only_krb5mount
[root@nfsclient mnt]# ls -la
drwxrwxrwx. 3 root root 106496 Apr 24 2013 .
dr-xr-xr-x. 26 root root 4096 Apr 24 11:24 ..
drwxr-xr-x. 2 root daemon 4096 Apr 18 12:54 junction
-rw-r--r--. 1 root daemon 0 Apr 24 2013 root_allow_krb5_only_krb5mount
[root@nfsclient mnt]# ls -lan
drwxrwxrwx. 3 0 0 106496 Apr 24 2013 .
dr-xr-xr-x. 26 0 0 4096 Apr 24 11:24 ..
drwxr-xr-x. 2 0 1 4096 Apr 18 12:54 junction
-rw-r--r--. 1 0 1 0 Apr 24 2013 root_allow_krb5_only_krb5mount

37 NFS Best Practice and Implementation Guide © 2017 NetApp, Inc. All Rights Reserved
Example 3: Root and all anonymous users are allowed access as root using anon=0, but only for
sec=sys and sec=krb5 over NFSv4.
cluster::> vserver export-policy rule show –policyname root_allow_anon0 -instance
(vserver export-policy rule show)
Vserver: vs0
Policy Name: root_allow_anon0
Rule Index: 1
Access Protocol: nfs4 only NFSv4 is allowed
Client Match Hostname, IP Address, Netgroup, or Domain: 0.0.0.0/0 all clients
RO Access Rule: krb5, sys AUTH_SYS and AUTH_RPCGSS allowed
RW Access Rule: krb5, sys AUTH_SYS and AUTH_RPCGSS allowed
User ID To Which Anonymous Users Are Mapped: 0 mapped to 0
Superuser Security Types: none superuser (root) squashed to anon user
Honor SetUID Bits in SETATTR: true
Allow Creation of Devices: true
cluster::> volume show -vserver vs0 -volume nfsvol -fields policy
vserver volume policy
------- ------ -----------
vs0 nfsvol root_allow_anon0
[root@nfsclient /]# mount -o nfsvers=3 cluster:/nfsvol /mnt
mount.nfs: access denied by server while mounting cluster:/nfsvol
[root@nfsclient /]# mount -t nfs4 cluster:/nfsvol /mnt
[root@nfsclient /]# cd /mnt
[root@nfsclient mnt]# touch root_allow_anon0
[root@nfsclient mnt]# ls -la
drwxrwxrwx. 3 root root 106496 Apr 24 2013 .
dr-xr-xr-x. 26 root root 4096 Apr 24 11:24 ..
drwxr-xr-x. 2 root daemon 4096 Apr 18 12:54 junction
-rw-r--r--. 1 root daemon 0 Apr 24 2013 root_allow_anon0
[root@nfsclient mnt]# ls -lan
drwxrwxrwx. 3 0 0 106496 Apr 24 2013 .
dr-xr-xr-x. 26 0 0 4096 Apr 24 11:24 ..
drwxr-xr-x. 2 0 1 4096 Apr 18 12:54 junction
-rw-r--r--. 1 0 1 0 Apr 24 2013 root_allow_anon0
[root@nfsclient /]# mount -t nfs4 -o sec=krb5 cluster:/nfsvol /mnt
[root@nfsclient /]# cd /mnt
[root@nfsclient mnt]# touch root_allow_anon0_krb5
[root@nfsclient mnt]# ls -la
drwxrwxrwx. 3 root root 106496 Apr 24 2013 .
dr-xr-xr-x. 26 root root 4096 Apr 24 11:24 ..
drwxr-xr-x. 2 root daemon 4096 Apr 18 12:54 junction
-rw-r--r--. 1 root daemon 0 Apr 24 2013 root_allow_anon0_krb5
[root@nfsclient mnt]# ls -lan
drwxrwxrwx. 3 0 0 106496 Apr 24 2013 .
dr-xr-xr-x. 26 0 0 4096 Apr 24 11:24 ..
drwxr-xr-x. 2 0 1 4096 Apr 18 12:54 junction
-rw-r--r--. 1 0 1 0 Apr 24 2013 root_allow_anon0_krb5

38 NFS Best Practice and Implementation Guide © 2017 NetApp, Inc. All Rights Reserved
4.6 Limiting Access to the SVM Root Volume
By default, when an SVM is created, the root volume is configured with 755 permissions and owner:group
of root (0): root (0). This means that:
• The user root (0) has effective permissions of “7,” or “Full Control.”
• The “group” and “others” permission levels are set to “5,” which is “Read & Execute.”
When this is configured, everyone who accesses the SVM root volume can list and read junctions
mounted below the SVM root volume, which is always mounted to “/” as a junction-path. In addition, the
default export policy rule that is created when an SVM is configured using System Manager or vserver
setup commands permits user access to the SVM root.
Example of the default export policy rule created by vserver setup:
cluster::> export-policy rule show -vserver nfs_svm -policyname default -instance
(vserver export-policy rule show)
Vserver: nfs_svm
Policy Name: default
Rule Index: 1
Access Protocol: any
Client Match Hostname, IP Address, Netgroup, or Domain: 0.0.0.0/0
RO Access Rule: any
RW Access Rule: any
User ID To Which Anonymous Users Are Mapped: 65534
Superuser Security Types: none
Honor SetUID Bits in SETATTR: true
Allow Creation of Devices: true
In the preceding export policy rule, all clients have “any” RO and RW access. Root is squashed to anon,
which is set to 65534.
For example, if an SVM has three data volumes, all would be mounted under “/” and could be listed with a
basic ls command by any user accessing the mount.
# mount | grep /mnt
10.63.3.68:/ on /mnt type nfs (rw,nfsvers=3,addr=10.63.3.68)
# cd /mnt
# ls
nfs4 ntfs unix
In some environments, this behavior might be undesirable, because storage administrators might want to
limit visibility to data volumes to specific groups of users. Although read and write access to the volumes
themselves can be limited on a per-data-volume basis using permissions and export policy rules, users
can still see other paths using the default policy rules and volume permissions.
To limit the ability to users to be able to list SVM root volume contents (and subsequent data volume
paths) but still allow the traversal of the junction paths for data access, the SVM root volume can be
modified to allow only root users to list folders in SVM root. To do this, change the UNIX permissions on
the SVM root volume to 0711 using the volume modify command:
cluster::> volume modify -vserver nfs_svm -volume rootvol -unix-permissions 0711
After this is done, root still has “Full Control” using the “7” permissions, because it is the owner. “Group”
and “others” get “Execute” permissions as per the “1” mode bit, which only allows them to traverse the
paths using cd.
When a user who is not the root user attempts an ls, that user has access denied:
sh-4.1$ ls
ls: cannot open directory .: Permission denied

39 NFS Best Practice and Implementation Guide © 2017 NetApp, Inc. All Rights Reserved
In many cases, NFS clients log into their workstations as the root user. With the default export policy rule
created by System Manager and vserver setup, root access is limited:
# id
uid=0(root) gid=0(root) groups=0(root) context=unconfined_u:unconfined_r:unconfined_t:s0-
s0:c0.c1023
# ls -la
ls: cannot open directory .: Permission denied
This is because the export policy rule attribute “superuser” is set to “none.” If root access is desired by
certain clients, this can be controlled by adding export policy rules to the policy and specifying the host IP,
name, netgroup, or subnet in the “clientmatch” field. When creating this rule, list it ahead of any rule that
might override it, such as a clientmatch of 0.0.0.0/0 or 0/0, which is “all hosts.”
Example of adding an administrative host rule to a policy:
cluster::> export-policy rule create -vserver nfs_svm -policyname default -clientmatch
10.228.225.140 -rorule any -rwrule any -superuser any -ruleindex 1
cluster::> export-policy rule show -vserver nfs_svm -policyname default -ruleindex 1
(vserver export-policy rule show)
Vserver: nfs_svm
Policy Name: default
Rule Index: 1
Access Protocol: any
Client Match Hostname, IP Address, Netgroup, or Domain: 10.228.225.140
RO Access Rule: any
RW Access Rule: any
User ID To Which Anonymous Users Are Mapped: 65534
Superuser Security Types: any
Honor SetUID Bits in SETATTR: true
Allow Creation of Devices: true
cluster::> export-policy rule show -vserver nfs_svm -policyname default
(vserver export-policy rule show)
Policy Rule Access Client RO
Vserver Name Index Protocol Match Rule
------------ --------------- ------ -------- --------------------- ---------
nfs_svm default 1 any 10.228.225.140 any
nfs_svm default 2 any 0.0.0.0/0 any
2 entries were displayed.
Now the client is able to see the directories as the root user:
# ifconfig | grep "inet addr"
inet addr:10.228.225.140 Bcast:10.228.225.255 Mask:255.255.255.0
inet addr:127.0.0.1 Mask:255.0.0.0
# id
uid=0(root) gid=0(root) groups=0(root) context=unconfined_u:unconfined_r:unconfined_t:s0-
s0:c0.c1023
# ls
nfs4 ntfs unix
Other clients are not able to list contents as root:
# ifconfig | grep "inet addr"
inet addr:10.228.225.141 Bcast:10.228.225.255 Mask:255.255.255.0
# id
uid=0(root) gid=0(root) groups=0(root) context=unconfined_u:unconfined_r:unconfined_t:s0-
s0:c0.c1023
# mount | grep mnt
10.63.3.68:/ on /mnt type nfs (rw,nfsvers=3,addr=10.63.3.68)
# ls /mnt
ls: cannot open directory .: Permission denied

40 NFS Best Practice and Implementation Guide © 2017 NetApp, Inc. All Rights Reserved
For more information about export policy rules and their effect on the root user, review the “Root User”
section of this document.
For more information about mode bits, see the following link: http://www.zzee.com/solutions/unix-
permissions.shtml.
4.7 Volume-Based Multitenancy Using Export Policies and Rules
In some cases, storage administrators might want to limit access to all users in a data volume to only
being able to mount and access specific volumes or qtrees. Use cases for this would be for volume-based
multitenancy, limiting access to .snapshot directories or more granular control over access to specific
folders.
Doing so can be done by either junctioned volumes or qtrees. The following diagram shows an example
of two volume-based multitenancy designs, one using volumes mounted under volumes and one using
qtrees. Each design would limit read access to all users to only the volumes or qtrees under the main
data volume (/data) and allow only the owner to have full access.
Figure 6) Volume-based multitenancy using junctioned volumes.
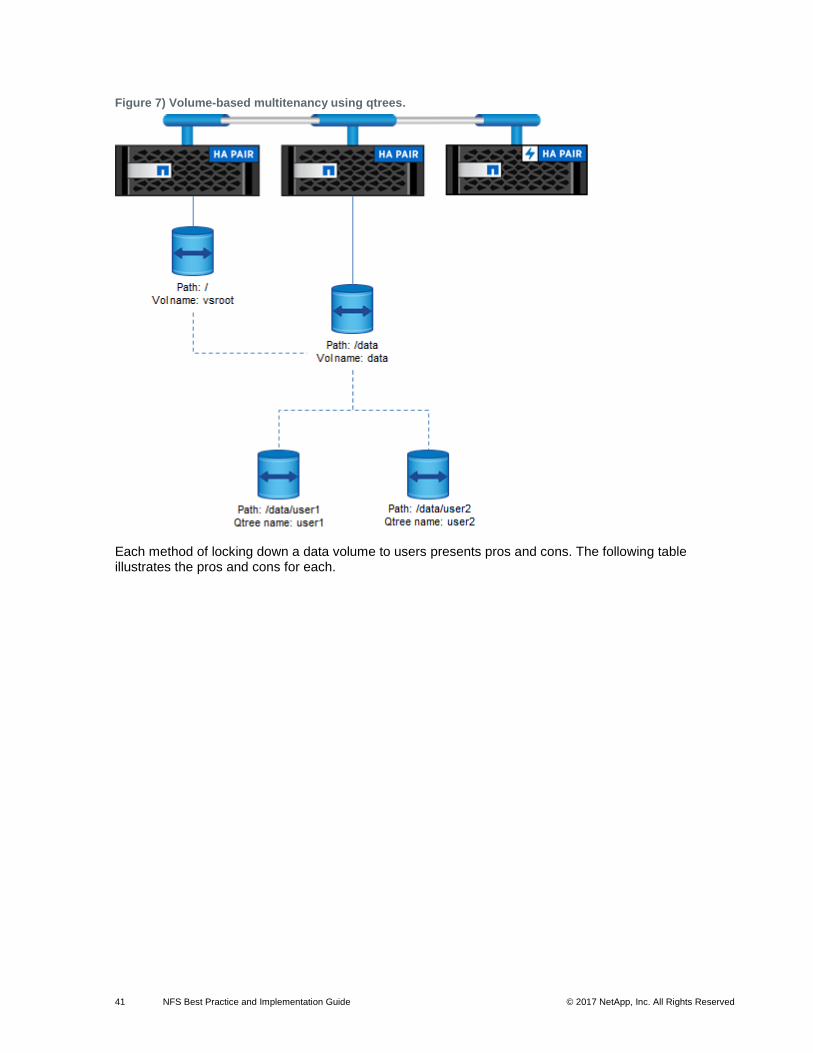
41 NFS Best Practice and Implementation Guide © 2017 NetApp, Inc. All Rights Reserved
Figure 7) Volume-based multitenancy using qtrees.
Each method of locking down a data volume to users presents pros and cons. The following table illustrates the pros and cons for each.

42 NFS Best Practice and Implementation Guide © 2017 NetApp, Inc. All Rights Reserved
Table 3) Pros and cons for volume-based multitenancy based on design choice.
Pros Cons
Using junctioned volumes • Data mobility by way of
volume moves.
• Ability to apply export policies to CIFS if desired.
• Ability to spread data volumes across multiple nodes.
• Ability to create qtrees inside volumes and provide even more security granularity using export policy rules.
• Volume limits per node are much lower than qtree limits.
Using qtrees • Ability to create many more
qtrees than volumes in a cluster.
• Ability to apply granular security at the qtree level.
• Volume moves move entire directory structure; no qtree-based moves.
• Cannot spread data across nodes when using qtrees; node-limited.
• No CIFS export policy support.
• NFSv4 export policy support only in 8.3 and later.
Export Policy Rules
For clients to be able to mount, a volume or qtree must at least allow read only (ro) access using the
export policy rule. If an export policy rule sets rorule to “never,” then no one is allowed to mount the
volume or contents below the volume. This includes qtrees and junctioned volumes.
Note: Export policies and rules cannot currently be applied to subdirectories.
Therefore, every volume in the directory tree must allow read access using export policy rules to the client
to allow the client to mount anything in the tree. However, only the export policy rule at the volume or
qtree level being mounted applies to the client.
Table 4) Directory tree structure for volume-based multitenancy.
Object Export Policy
Vsroot = / allow_readonly
Data volume = /data allow_readonly
Qtree = /data/qtree allow_access
In the preceding structure, a data volume is mounted under / and a qtree is mounted below the data
volume. The vsroot and data volumes have export policies assigned to allow readonly access. The qtree
allows normal access upon mount.

43 NFS Best Practice and Implementation Guide © 2017 NetApp, Inc. All Rights Reserved
After the data volume is mounted, the client is restricted to file-level permissions. Even though the
“allow_access” policy says that the client has read-write (rw) access, if the file-level permissions disallow
write access, then the file-level permissions override the export policy rule.
The following export policy rule examples show how to accomplish this. In addition to allowing only read
access, the rule also disallows the root user from being seen by the storage as “root” on the storage
objects where access is limited. Thus, while “root” users are allowed to mount the storage objects, the
file-level permissions are set to disallow those users to access anything, because they are squashed to
the anonymous UID set in the export policy rule. Squashing root is covered in detail in this document.
Export policy rule examples for volume-based multitenancy: read access on mounts only:
Vserver: SVM
Policy Name: allow_readonly
Rule Index: 1
Access Protocol: any
Client Match Hostname, IP Address, Netgroup, or Domain: 0.0.0.0/0
RO Access Rule: sys
RW Access Rule: never
User ID To Which Anonymous Users Are Mapped: 65534
Superuser Security Types: none
Honor SetUID Bits in SETATTR: true
Allow Creation of Devices: true
Export policy rule examples for volume-based multitenancy: root is root; read/write access:
Vserver: SVM
Policy Name: allow_access
Rule Index: 1
Access Protocol: nfs
Client Match Hostname, IP Address, Netgroup, or Domain: 0.0.0.0/0
RO Access Rule: any
RW Access Rule: any
User ID To Which Anonymous Users Are Mapped: 65534
Superuser Security Types: any
Honor SetUID Bits in SETATTR: true
Allow Creation of Devices: true
File-Level Permissions
When mounting a typical NFS export, a mount occurs at either the vsroot (/) or a data volume (/data).
Therefore, file-level permissions would have to allow users to at least traverse the volume. If read or write
access were required, then additional mode bits would have to be granted to the volume. If access to
these volumes requires that all users be denied all access, then the mode bit could be set to no access
(“0” access), provided the mount point is at a level that does not require the user to traverse. Thus, the
vsroot volume (/) and data volume hosting the multitenant folders (/data) could both be set to 700 to
allow only the owner of the volume access to do anything in the directory. Multitenant clients could then
access only their specified volumes or qtrees based on export policy rules and file-level permissions.
Locking Down the .snapshot Directory
Clustered Data ONTAP currently does not support the option of hiding the .snapshot directory (that is,
options nfs.hide_snapshot) when using NFS. Additionally, by design, the .snapshot directory
inherits the file-level permissions of the volume that hosts it. As a result, if access is allowed to a data
volume, then all users with access to the volume have access to the .snapshot directory.
If using qtrees for volume-based multitenancy, the .snapshot directory is not a factor if the parent volumes
are locked down properly, because the .snapshot directory appears only for the qtree.
Additionally, if using volumes in volume-based multitenancy, the subvolumes have access to only their
own .snapshot directories.

44 NFS Best Practice and Implementation Guide © 2017 NetApp, Inc. All Rights Reserved
Best Practices 8: Hiding Snapshot Copies (See Best Practices 9)
Currently the only way to hide Snapshot copies for NFS clients is to set the volume-level option
-snapdir-access to false.
Volume-Based Multitenancy in Action
The following example shows a scenario in which:
• Root can mount all objects in an export path.
• Root does not have access to volumes it should not have access to.
• Root cannot access the .snapshot directory.
• Root gets the proper access when mounting the proper export path.
• Other users get granted/denied access based on file-level permissions.
Note: The design used in this example is qtree-based.
Example of Volume-Based Multitenancy
Root and data volume permissions and paths:
cluster::> vol show -vserver SVM -volume noaccess -fields policy,unix-permissions,user
(volume show)
vserver volume policy user unix-permissions
------- -------- -------------- ---- ----------------
SVM noaccess allow_readonly 0 ---rwx------
cluster::> vol show -vserver SVM -volume rootvol -fields policy,unix-permissions,user
(volume show)
vserver volume policy user unix-permissions
------- ------- -------------- ---- ----------------
SVM rootvol allow_readonly 0 ---rwx------
Qtree permissions and path:
cluster::> qtree show -vserver SVM -volume noaccess -fields export-policy,unix-permissions
vserver volume qtree unix-permissions export-policy
------- -------- ----- ---------------- --------------
SVM noaccess "" ---rwx------ allow_readonly
SVM noaccess qtree ---rwxrwxrwx wideopen
2 entries were displayed.
Client behavior when mounting the SVM root volume:
[root@centos64 /]# mount -o nfsvers=3 10.63.3.68:/ /cdot
[root@centos64 /]# cd /cdot
-bash: cd: /cdot: Permission denied
[root@centos64 /]# cd /cdot/.snapshot
-bash: cd: /cdot/.snapshot: Permission denied
[root@centos64 /]# cd /cdot/noaccess/qtree
-bash: cd: /cdot/noaccess/qtree: Permission denied
[root@centos64 /]# su test
sh-4.1$ cd /cdot
sh: cd: /cdot: Permission denied

45 NFS Best Practice and Implementation Guide © 2017 NetApp, Inc. All Rights Reserved
Client behavior when mounting the SVM data volume:
[root@centos64 /]# mount -o nfsvers=3 10.63.3.68:/noaccess /cdot
[root@centos64 /]# cd /cdot
-bash: cd: /cdot: Permission denied
[root@centos64 /]# cd /cdot/.snapshot
-bash: cd: /cdot/.snapshot: Permission denied
[root@centos64 /]# cd /cdot/qtree
-bash: cd: /cdot/qtree: Permission denied
[root@centos64 /]# su test
sh-4.1$ cd /cdot
sh: cd: /cdot: Permission denied
Client behavior when mounting the specified qtree:
[root@centos64 /]# mount -o nfsvers=3 10.63.3.68:/noaccess/qtree /cdot
[root@centos64 /]# cd /cdot
[root@centos64 cdot]# ls -la
total 12
drwxrwxrwx. 2 root root 4096 Jul 29 14:14 .
dr-xr-xr-x. 43 root root 4096 Jul 22 13:47 ..
-rw-r--r--. 1 test domain users 0 Jul 25 10:06 file
-rw-r--r--. 1 root root 0 Jul 29 14:14 qtree_file
drwxrwxrwx. 11 root root 4096 Jul 29 15:05 .snapshot
[root@centos64 cdot]# cd .snapshot
[root@centos64 .snapshot]# ls
daily.2014-07-28_0010 hourly.2014-07-29_1005 hourly.2014-07-29_1205 hourly.2014-07-29_1405
weekly.2014-07-27_0015
daily.2014-07-29_0010 hourly.2014-07-29_1105 hourly.2014-07-29_1305 hourly.2014-07-29_1505
[root@centos64 .snapshot]# cd daily.2014-07-28_0010/
[root@centos64 daily.2014-07-28_0010]# ls
file
[root@centos64 /]# su test
sh-4.1$ cd /cdot
sh-4.1$ ls -la
total 12
drwxrwxrwx. 2 root root 4096 Jul 29 14:14 .
dr-xr-xr-x. 43 root root 4096 Jul 22 13:47 ..
-rw-r--r--. 1 test domain users 0 Jul 25 10:06 file
-rw-r--r--. 1 root root 0 Jul 29 14:14 qtree_file
drwxrwxrwx. 11 root root 4096 Jul 29 15:05 .snapshot
4.8 Mapping All UIDs to a Single UID (squash_all)
In some cases, storage administrators might want to control which UID (such as root) some or all users
map to when coming in through NFS to a UNIX-security-style volume. If a volume has NTFS security
style, doing so is as simple as setting a default Windows user in the NFS server options. However, when
the volume is UNIX security style, no name mapping takes place when coming in from NFS clients. To
control this situation, you can create an export policy rule.
Recall that export policy rules have the attributes listed in Table 5 in admin mode.

46 NFS Best Practice and Implementation Guide © 2017 NetApp, Inc. All Rights Reserved
Table 5) Export policy rule attributes.
Export Policy Rule Attribute What It Does
Rule index Controls the order in which an export policy rule is applied
Access protocol Controls the allowed access protocols. Options include any, nfs, nfs3,
nfs4, cifs.
Client match Controls who can access. Valid entries include host names, IP
addresses, IP subnets, netgroups, domains.
RO access Controls which authentication types can access the export in a read-
only capacity. Valid entries include any, none, never, krb5, ntlm, sys.
RW access Controls which authentication types can access the export in a read-
write capacity. Valid entries include any, none, never, krb5, ntlm, sys.
Anon UID The UID that anonymous users are mapped to.
Superuser Controls which authentication types can access the export with root
access. Valid entries include any, none, krb5, ntlm, sys.
Honor SetUID Bits in SETATTR This parameter specifies whether set user ID (suid) and set group ID
(sgid) access is enabled by the export rule. The default setting is
true.
Allow creation of devices This parameter specifies whether the creation of devices is enabled
by the export rule. The default setting is true.

47 NFS Best Practice and Implementation Guide © 2017 NetApp, Inc. All Rights Reserved
For authentication types that are allowed to access the export, the following are used.
Table 6) Supported authentication types for ro, rw, and superuser.
Authentication Type What It Does
None Squashes the user to anonymous (anon); uses AUTH_NONE.
Never (ro and rw only) Disallows access. Note: RO=never means that RW is disallowed as
well, regardless of RW setting, because the mount fails. Superuser
does not use this value.
Sys Allows AUTH_SYS or AUTH_UNIX only.
Krb5 Allows AUTH_GSS only. Applies to CIFS clients as well, provided the
CIFS server options are configured to use export policies.
NTLM Allows NTLM authentication only. Applies to CIFS clients only,
provided the CIFS server options are configured to use export
policies.
Any Allows all supported authentication types.
With these values, storage administrators can apply specific combinations to their export policy rules to
control access to clients on a granular level.
Squashing All UIDs to 65534 (squash_all)
The following export policy rule example shows how to force all UIDs (including root) coming into the
system from a specific subnet to use the 65534 UID. This rule can be used to create “guest” access
policies for users to limit access. This is done with the RO, RW, and superuser authentication type of
“none,” anon value of “65534,” and the clientmatch value specifying the subnet:
Vserver: nfs_svm
Policy Name: default
Rule Index: 1
Access Protocol: any
Client Match Hostname, IP Address, Netgroup, or Domain: 10.228.225.0/24
RO Access Rule: none
RW Access Rule: none
User ID To Which Anonymous Users Are Mapped: 65534
Superuser Security Types: none
Honor SetUID Bits in SETATTR: true
Allow Creation of Devices: true
Making All UIDs Root
The following export policy rule example shows how to force all UIDs (including root) coming into the
system from a specific subnet to use the UID associated with root (0). This rule can be used to allow full
access to users in a specific subnet to avoid overhead on permissions management. This access is
enabled with the RO and RW authentication type of “none,” superuser value of “none,” anon value of “0,”
and the clientmatch value specifying the subnet.

48 NFS Best Practice and Implementation Guide © 2017 NetApp, Inc. All Rights Reserved
Example:
Vserver: nfs_svm
Policy Name: default
Rule Index: 1
Access Protocol: any
Client Match Hostname, IP Address, Netgroup, or Domain: 10.228.225.0/24
RO Access Rule: none
RW Access Rule: none
User ID To Which Anonymous Users Are Mapped: 0
Superuser Security Types: none
Honor SetUID Bits in SETATTR: true
Allow Creation of Devices: true
4.9 Umask
In NFS operations, permissions can be controlled through mode bits, which leverage numerical attributes
to determine file and folder access. These mode bits determine read, write, execute, and special
attributes. Numerically, these are represented as:
• Execute = 1
• Read = 2
• Write = 4
Total permissions are determined by adding or subtracting a combination of the preceding.
For example:
4 + 2 + 1 = 7 (can do everything)
4 + 2 = 6 (rw) and so on…
Mode bits are set up as in the following figure and table.
Figure 8) UNIX permissions.

49 NFS Best Practice and Implementation Guide © 2017 NetApp, Inc. All Rights Reserved
Table 7) Octal values in umask.
Octal Value in Umask Prevents
7 Read/write/execute
6 Read and write
5 Read and execute
4 Read
3 Write and execute
2 Write
1 Execute
0 No permissions
For more information about UNIX permissions, visit the following link: http://www.zzee.com/solutions/unix-
permissions.shtml.
Umask is a functionality that allows an admin to restrict the level of permissions allowed to a client. By
default, the umask for most clients is set to 0022, which means that files created from that client are
assigned that umask. The umask is subtracted from the base permissions of the object. If a volume has
0777 permissions and is mounted using NFS to a client with a umask of 0022, objects written from the
client to that volume have 0755 access (0777 – 0022).
# umask
0022
# umask -S
u=rwx,g=rx,o=rx
However, many operating systems do not allow files to be created with execute permissions, but they do
allow folders to have the correct permissions. Thus, files created with a umask of 0022 might end up with
permissions of 0644.
The following is an example using RHEL 6.5:
# umask
0022
# cd /cdot
# mkdir umask_dir
# ls -la | grep umask_dir
drwxr-xr-x. 2 root root 4096 Apr 23 14:39 umask_dir
# touch umask_file
# ls -la | grep umask_file
-rw-r--r--. 1 root root 0 Apr 23 14:39 umask_file
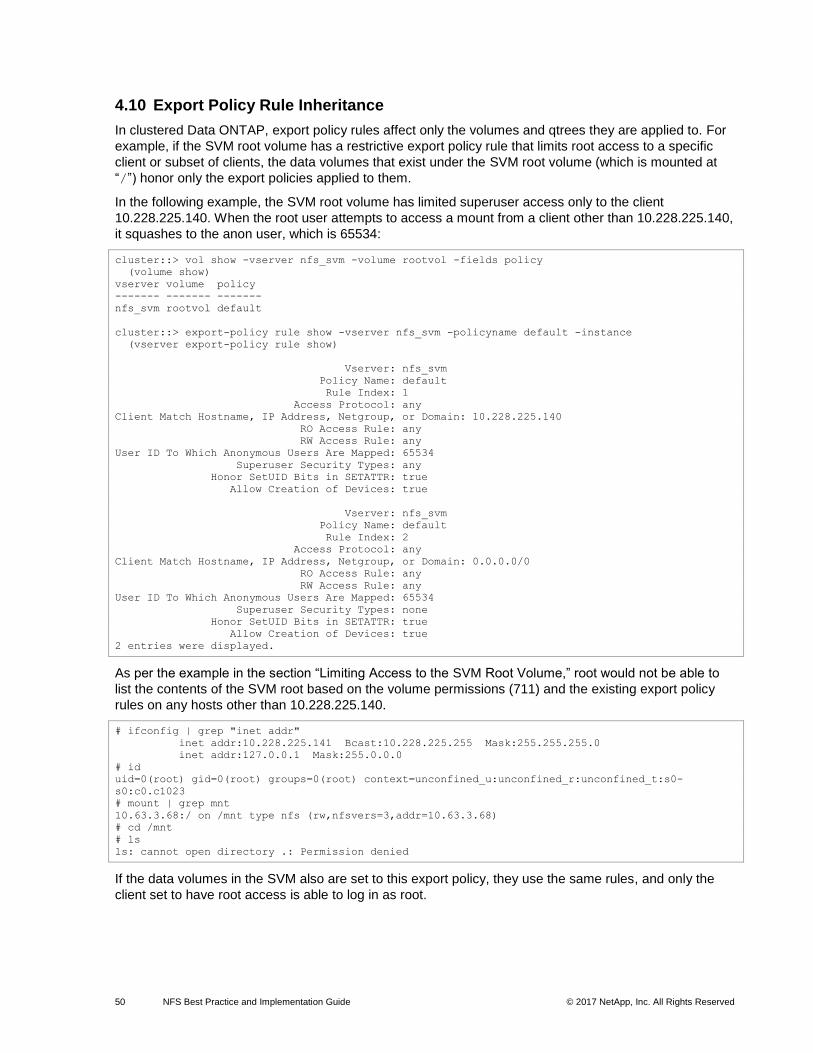
50 NFS Best Practice and Implementation Guide © 2017 NetApp, Inc. All Rights Reserved
4.10 Export Policy Rule Inheritance
In clustered Data ONTAP, export policy rules affect only the volumes and qtrees they are applied to. For
example, if the SVM root volume has a restrictive export policy rule that limits root access to a specific
client or subset of clients, the data volumes that exist under the SVM root volume (which is mounted at
“/”) honor only the export policies applied to them.
In the following example, the SVM root volume has limited superuser access only to the client
10.228.225.140. When the root user attempts to access a mount from a client other than 10.228.225.140,
it squashes to the anon user, which is 65534:
cluster::> vol show -vserver nfs_svm -volume rootvol -fields policy
(volume show)
vserver volume policy
------- ------- -------
nfs_svm rootvol default
cluster::> export-policy rule show -vserver nfs_svm -policyname default -instance
(vserver export-policy rule show)
Vserver: nfs_svm
Policy Name: default
Rule Index: 1
Access Protocol: any
Client Match Hostname, IP Address, Netgroup, or Domain: 10.228.225.140
RO Access Rule: any
RW Access Rule: any
User ID To Which Anonymous Users Are Mapped: 65534
Superuser Security Types: any
Honor SetUID Bits in SETATTR: true
Allow Creation of Devices: true
Vserver: nfs_svm
Policy Name: default
Rule Index: 2
Access Protocol: any
Client Match Hostname, IP Address, Netgroup, or Domain: 0.0.0.0/0
RO Access Rule: any
RW Access Rule: any
User ID To Which Anonymous Users Are Mapped: 65534
Superuser Security Types: none
Honor SetUID Bits in SETATTR: true
Allow Creation of Devices: true
2 entries were displayed.
As per the example in the section “Limiting Access to the SVM Root Volume,” root would not be able to
list the contents of the SVM root based on the volume permissions (711) and the existing export policy
rules on any hosts other than 10.228.225.140.
# ifconfig | grep "inet addr"
inet addr:10.228.225.141 Bcast:10.228.225.255 Mask:255.255.255.0
inet addr:127.0.0.1 Mask:255.0.0.0
# id
uid=0(root) gid=0(root) groups=0(root) context=unconfined_u:unconfined_r:unconfined_t:s0-
s0:c0.c1023
# mount | grep mnt
10.63.3.68:/ on /mnt type nfs (rw,nfsvers=3,addr=10.63.3.68)
# cd /mnt
# ls
ls: cannot open directory .: Permission denied
If the data volumes in the SVM also are set to this export policy, they use the same rules, and only the
client set to have root access is able to log in as root.

51 NFS Best Practice and Implementation Guide © 2017 NetApp, Inc. All Rights Reserved
If root access is desired to the data volumes, then a new export policy can be created and root access
can be specified for all hosts or a subset of hosts through subnet, netgroup, or multiple rules with
individual client IP addresses or host names.
The same concept applies to the other export policy rule attributes, such as RW.
For example, if the default export policy rule is changed to disallow write access to all clients except
10.228.225.140 and to allow superuser, then even root is disallowed write access to volumes with that
export policy applied:
cluster::> export-policy rule modify -vserver nfs_svm -policyname default -ruleindex 2 -rwrule
never -superuser any
cluster::> export-policy rule show -vserver nfs_svm -policyname default -instance
(vserver export-policy rule show)
Vserver: nfs_svm
Policy Name: default
Rule Index: 1
Access Protocol: any
Client Match Hostname, IP Address, Netgroup, or Domain: 10.228.225.140
RO Access Rule: any
RW Access Rule: any
User ID To Which Anonymous Users Are Mapped: 65534
Superuser Security Types: any
Honor SetUID Bits in SETATTR: true
Allow Creation of Devices: true
Vserver: nfs_svm
Policy Name: default
Rule Index: 2
Access Protocol: any
Client Match Hostname, IP Address, Netgroup, or Domain: 0.0.0.0/0
RO Access Rule: any
RW Access Rule: never
User ID To Which Anonymous Users Are Mapped: 65534
Superuser Security Types: any
Honor SetUID Bits in SETATTR: true
Allow Creation of Devices: true
2 entries were displayed.
# ifconfig | grep "inet addr"
inet addr:10.228.225.141 Bcast:10.228.225.255 Mask:255.255.255.0
inet addr:127.0.0.1 Mask:255.0.0.0
# id
uid=0(root) gid=0(root) groups=0(root) context=unconfined_u:unconfined_r:unconfined_t:s0-
s0:c0.c1023
# mount | grep mnt
10.63.3.68:/ on /mnt type nfs (rw,nfsvers=3,addr=10.63.3.68)
# cd /mnt
# touch rootfile
touch: cannot touch `rootfile': Read-only file system
When a new policy and rule are created and applied to the data volume, the same user is allowed to write
to the data volume mounted below the SVM root volume. This is the case despite the export policy rule at
the SVM root volume disallowing write access.

52 NFS Best Practice and Implementation Guide © 2017 NetApp, Inc. All Rights Reserved
Example:
cluster::> export-policy create -vserver nfs_svm -policyname volume
cluster::> export-policy rule create -vserver nfs_svm -policyname volume -clientmatch 0.0.0.0/0 -
rorule any -rwrule any -allow-suid true -allow-dev true -ntfs-unix-security-ops fail -chown-mode
restricted -superuser any -protocol any -ruleindex 1 -anon 65534
cluster::> export-policy rule show -vserver nfs_svm -policyname volume -instance
(vserver export-policy rule show)
Vserver: nfs_svm
Policy Name: volume
Rule Index: 1
Access Protocol: any
Client Match Hostname, IP Address, Netgroup, or Domain: 0.0.0.0/0
RO Access Rule: any
RW Access Rule: any
User ID To Which Anonymous Users Are Mapped: 65534
Superuser Security Types: any
Honor SetUID Bits in SETATTR: true
Allow Creation of Devices: true
::> volume modify -vserver flexvol -volume unix -policy volume
From the client:
# ifconfig | grep "inet addr"
inet addr:10.228.225.141 Bcast:10.228.225.255 Mask:255.255.255.0
inet addr:127.0.0.1 Mask:255.0.0.0
# id
uid=0(root) gid=0(root) groups=0(root) context=unconfined_u:unconfined_r:unconfined_t:s0-
s0:c0.c1023
# cd /mnt/unix
[root@linux-client unix]# ls
file
[root@linux-client unix]# touch rootfile
[root@linux-client unix]# ls -la | grep rootfile
-rw-r--r--. 1 root root 0 Apr 1 2014 rootfile
# cd ..
# ls
nfs4 ntfs unix
# touch rootdir
touch: cannot touch `rootdir': Read-only file system
However, the read-only attribute for the export policy rules needs to allow read access from the parent to
allow mounts to occur. Setting rorule to “never” or not setting an export policy rule in the parent
volume’s export policy (empty policy) disallows mounts to volumes underneath that parent.
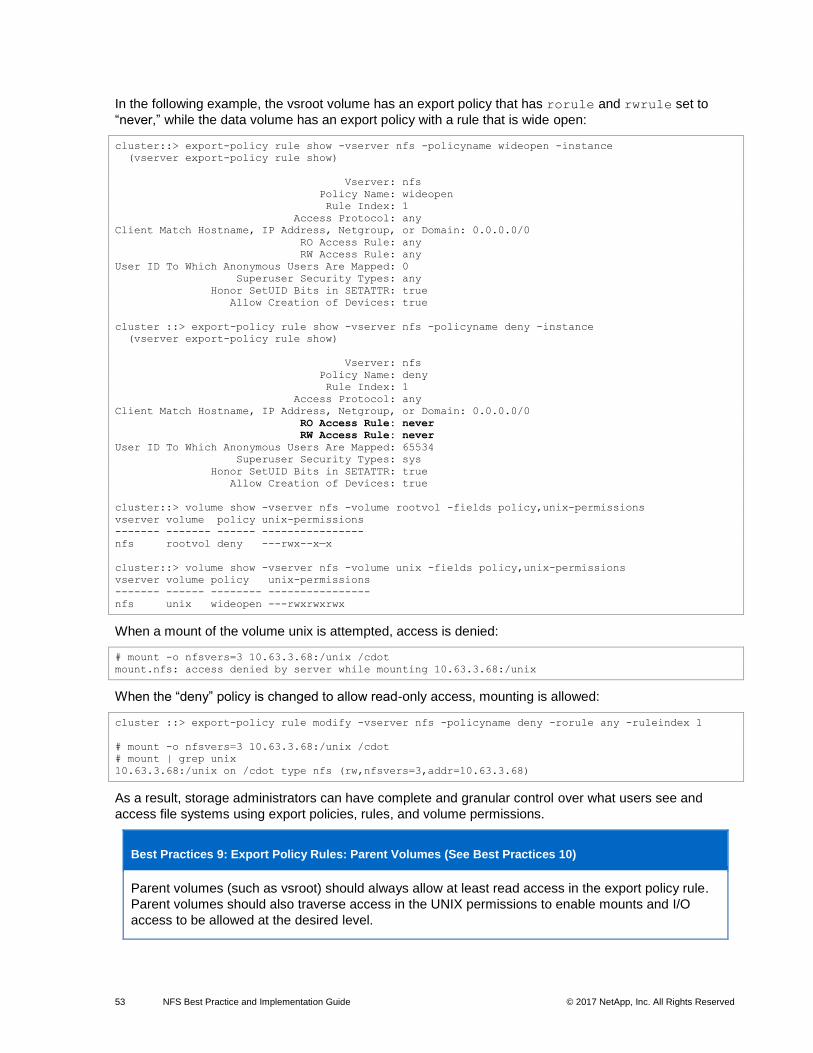
53 NFS Best Practice and Implementation Guide © 2017 NetApp, Inc. All Rights Reserved
In the following example, the vsroot volume has an export policy that has rorule and rwrule set to
“never,” while the data volume has an export policy with a rule that is wide open:
cluster::> export-policy rule show -vserver nfs -policyname wideopen -instance
(vserver export-policy rule show)
Vserver: nfs
Policy Name: wideopen
Rule Index: 1
Access Protocol: any
Client Match Hostname, IP Address, Netgroup, or Domain: 0.0.0.0/0
RO Access Rule: any
RW Access Rule: any
User ID To Which Anonymous Users Are Mapped: 0
Superuser Security Types: any
Honor SetUID Bits in SETATTR: true
Allow Creation of Devices: true
cluster ::> export-policy rule show -vserver nfs -policyname deny -instance
(vserver export-policy rule show)
Vserver: nfs
Policy Name: deny
Rule Index: 1
Access Protocol: any
Client Match Hostname, IP Address, Netgroup, or Domain: 0.0.0.0/0
RO Access Rule: never
RW Access Rule: never
User ID To Which Anonymous Users Are Mapped: 65534
Superuser Security Types: sys
Honor SetUID Bits in SETATTR: true
Allow Creation of Devices: true
cluster::> volume show -vserver nfs -volume rootvol -fields policy,unix-permissions
vserver volume policy unix-permissions
------- ------- ------ ----------------
nfs rootvol deny ---rwx--x—x
cluster::> volume show -vserver nfs -volume unix -fields policy,unix-permissions
vserver volume policy unix-permissions
------- ------ -------- ----------------
nfs unix wideopen ---rwxrwxrwx
When a mount of the volume unix is attempted, access is denied:
# mount -o nfsvers=3 10.63.3.68:/unix /cdot
mount.nfs: access denied by server while mounting 10.63.3.68:/unix
When the “deny” policy is changed to allow read-only access, mounting is allowed:
cluster ::> export-policy rule modify -vserver nfs -policyname deny -rorule any -ruleindex 1
# mount -o nfsvers=3 10.63.3.68:/unix /cdot
# mount | grep unix
10.63.3.68:/unix on /cdot type nfs (rw,nfsvers=3,addr=10.63.3.68)
As a result, storage administrators can have complete and granular control over what users see and
access file systems using export policies, rules, and volume permissions.
Best Practices 9: Export Policy Rules: Parent Volumes (See Best Practices 10)
Parent volumes (such as vsroot) should always allow at least read access in the export policy rule.
Parent volumes should also traverse access in the UNIX permissions to enable mounts and I/O
access to be allowed at the desired level.

54 NFS Best Practice and Implementation Guide © 2017 NetApp, Inc. All Rights Reserved
4.11 The Export Policy Rule Index
In clustered Data ONTAP, it is possible to set the priority for export policy rules so that they are honored
in a specific order. The policy is evaluated when access is attempted and the rules are read in order from
0 to 999999999.
Best Practices 10: Export Policy Rule Index Maximum (See Best Practices 11)
Keep in mind the export policy rule limits when creating export policies and rules. A rule index of
999999999 is an absolute maximum, but NetApp does not recommend it. Use more sensible
numbers for the index. In the following examples, 1 and 99 are used.
If a rule index with a higher number (such as 1) is read and has allowed access for a subnet but later a
host that is in that subnet is denied access through a rule at a lower index (such as 99), then that host is
granted access based on the rule that allows access being read earlier in the policy.
Conversely, if a client is denied access through an export policy rule at a higher index and then allowed
access through a global export policy rule later in the policy (such as 0.0.0.0/0 client match), then that
client is denied access.
In the following example, a client with the IP address of 10.228.225.140 (host name of centos64) has
been denied access to read a volume while all other clients are allowed access. However, the client rule
is below the “all access” rule, so mount and read are allowed.
Example:
cluster::> export-policy rule show -vserver NAS -policyname allow_all
Policy Rule Access Client RO
Vserver Name Index Protocol Match Rule
------------ --------------- ------ -------- --------------------- ---------
NAS allow_all 1 any 0.0.0.0/0 any
NAS allow_all 99 any 10.228.225.140 never
2 entries were displayed.
cluster::> vol show -vserver NAS -volume unix -fields policy
vserver volume policy
------- ------ ---------
NAS unix allow_all
[root@centos64 ~]# mount -o nfsvers=3 10.63.9.69:/vol/nfs /7mode
[root@centos64 ~]# mount 10.63.21.9:/unix /mnt
[root@centos64 ~]# cd /mnt
[root@centos64 mnt]# ls -la
total 12
drwxrwxrwx. 3 root root 4096 Dec 10 14:49 .
dr-xr-xr-x. 46 root root 4096 Dec 10 14:57 ..
drwxrwx---. 2 root root 4096 Dec 10 15:00 file
If those rules are flipped, the client is denied access despite the rule allowing access to everyone being in
the policy. Rule index numbers can be modified with the export-policy rule setindex command.
In the following example, rule #1 has been changed to rule #99. Rule #99 gets moved to #98 by default.

55 NFS Best Practice and Implementation Guide © 2017 NetApp, Inc. All Rights Reserved
cluster::> export-policy rule setindex -vserver NAS -policyname allow_all -ruleindex 1 -
newruleindex 99
cluster::> export-policy rule show -vserver NAS -policyname allow_all
Policy Rule Access Client RO
Vserver Name Index Protocol Match Rule
------------ --------------- ------ -------- --------------------- ---------
NAS allow_all 98 any 10.228.225.140 never
NAS allow_all 99 any 0.0.0.0/0 any
2 entries were displayed.
cluster::> export-policy cache flush -vserver NAS -cache all
Warning: You are about to flush the "all (but showmount)" cache for Vserver "NAS" on node
"node2", which will result in increased traffic to the name servers. Do you want to proceed with
flushing the cache? {y|n}: y
[root@centos64 /]# mount 10.63.21.9:/unix /mnt
mount.nfs: access denied by server while mounting 10.63.21.9:/unix
Note: Export-policy cache flush is a new command in clustered Data ONTAP 8.3. See Export Policy Rule Caching for more information regarding this command.
It is important to consider the order of the export policy rules when determining the access that is and is
not allowed for clients in clustered Data ONTAP.
Best Practices 11: Export Policy Rule Index Ordering (See Best Practices 12)
If you use multiple export policy rules, be sure that rules that deny or allow access to a broad range
of clients do not step on rules that deny or allow access to those same clients. Rule index ordering
factors in when rules are read; higher-number rules override lower-number rules in the index.
4.12 Export Policy Rules: Clientmatch
The clientmatch option in an export policy rule allows storage administrators to define an access list for
mounting NFS exports, as well as a way to control access permissions at a high level after a client is able
to mount the export.
Valid entries for the NFS export policy rule clientmatch include:
• IP addresses*
• Host names*
• Domains
• Subnets
• Netgroups
* In ONTAP 9.1 and later, it’s possible to define multiple comma-separated IP addresses or host names in
a single rule, rather than needing to create unique policy rules for each.
Example:
export-policy rule create -vserver SVM1 -policyname default -clientmatch 10.10.10.10,10.10.10.11
-rorule any -rwrule any -ruleindex 2 -protocol nfs -anon 65534 -superuser any

56 NFS Best Practice and Implementation Guide © 2017 NetApp, Inc. All Rights Reserved
ONTAP 9.1 also provides two new export-policy rule commands that allow for flexible management of
clientmatch values:
NAME
vserver export-policy rule add-clientmatches -- Add list of clientmatch strings to an existing
rule
AVAILABILITY
This command is available to cluster and Vserver administrators at the admin privilege level.
DESCRIPTION
The vserver export-policy rule add-clientmatches command adds a list of strings to the
clientmatch field of a specified export rule in a policy. This command only operates on the
clientmatch field; to modify other fields in a rule use the vserver export-policy modify command.
EXAMPLES
The following example adds match strings "2.2.2.2" and "3.3.3.3" to the clientmatch field of the
export rule with index number 3 in an export policy named default_expolicy on a Vserver named
vs0.
cluster1::> vserver export-policy rule add-clientmatches -vserver vs0 -policyname
default_expolicy -ruleindex 3 -clientmatches "2.2.2.2,3.3.3.3"
NAME
vserver export-policy rule remove-clientmatches -- Remove list of clientmatch strings from an
existing rule
AVAILABILITY
This command is available to cluster and Vserver administrators at the admin privilege level.
DESCRIPTION
The vserver export-policy rule remove-clientmatches command removes a list of strings from the
clientmatch field of a specified export rule in a policy. This command only operates on the
clientmatch field; to modify other fields in a rule use the vserver export-policy modify command.
EXAMPLES
The following example removes match strings "2.2.2.2" and "3.3.3.3" from the clientmatch field of
the export rule with index number 3 in an export policy named default_expolicy on a Vserver named
vs0.
cluster1::> vserver export-policy rule remove-clientmatches -vserver vs0 -policyname
default_expolicy -ruleindex 3 -clientmatches "2.2.2.2,3.3.3.3"
4.13 Export Policy Rule Caching
In 7-Mode, export policy rules were cached based on the following nfs options:
nfs.export.harvest.timeout
nfs.export.neg.timeout
nfs.export.pos.timeout
nfs.export.resolve.timeout
These options do not currently exist in clustered Data ONTAP at the node level as they did in 7-Mode.
However, new commands are available to control these values at advanced privilege level:
cluster::*> export-policy access-cache config show -vserver SVM
Vserver: SVM
TTL For Positive Entries (Secs): 3600
TTL For Negative Entries (Secs): 3600
Harvest Timeout (Secs): 86400
The caches can also be flushed manually.

57 NFS Best Practice and Implementation Guide © 2017 NetApp, Inc. All Rights Reserved
Additionally, at diag privilege level, there are commands to control export cache configurations from
mgwd and the NAS layer.
Note: Diag-level commands should be used with caution.
The following shows the entries for the NAS layer export caches:
cluster::*> diag exports nblade access-cache attributes show
Refresh Period for Positive Entries (secs): 3600
Max Refresh Interval for Positive Entries (secs): 1800
Min Refresh Interval for Positive Entries (msecs): 180
Refresh Period for Negative Entries (secs): 3600
Max Refresh Interval for Negative Entries (secs): 1800
Min Refresh Interval for Negative Entries (msecs): 1800
TTL for Entries with Failure (secs): 5
Harvest Timeout (secs): 86400
Max Outstanding RPCs to Mgwd: 64
The NAS layer access cache can also be queried for existing entries. This helps isolate mount issues for
clients on specific volumes/qtrees.
cluster::*> diag exports nblade access-cache show -node node2 -vserver SVM -policy nfs-full -
address 10.228.225.140
Node:node2
Vserver: SVM
Policy Name: nfs-full
IP Address: 10.228.225.140
Access Cache Entry Flags: has-usable-data
Result Code: 0
First Unresolved Rule Index: -
Unresolved Clientmatch: -
Number of Matched Policy Rules: 1
List of Matched Policy Rule Indexes: 1
Age of Entry: 82s
Access Cache Entry Polarity: positive
Time Elapsed since Last Use for Access Check: 7s
Time Elapsed since Last Update Attempt: 82s
Result of Last Update Attempt: 0
List of Client Match Strings: 0.0.0.0/0
MGWD caches host name to IP information, as well as netgroup membership information. To view the
attributes for these caches:
cluster::*> diag exports mgwd host-to-ip-cache attributes show
TTL (secs) Failure TTL (secs)
------------- ------------------
1800 1
cluster::*> diag exports mgwd netgroup-cache attributes show
Refresh Time (secs) IP Membership Cache TTL (secs)
------------------- ------------------------------
1800 1800
These caches can be modified and flushed if necessary, but this should only be done at the guidance of
NetApp Technical Support, and only if the caches are causing a problem in your environment.
Exportfs Support
7-Mode allowed exportfs commands to be used to clear export caches. In clustered Data ONTAP,
exportfs currently does not exist, but caches are flushed each time an export policy rule is updated. In
versions of clustered Data ONTAP prior to 8.2.3, these caches would be flushed for an entire policy.
Versions after 8.2.3 now only flush the individual rules. See bug 932333 for details. The cache is stored at
the NAS layer and ages out every 5 minutes if no export rule changes are made. The management
gateway in clustered Data ONTAP caches host name to IP resolution (1-minute TTL) and resolved

58 NFS Best Practice and Implementation Guide © 2017 NetApp, Inc. All Rights Reserved
netgroups (15-minute TTL). Clustered Data ONTAP 8.3 and later introduced a command to manually
flush the export policy caches as well as other related caches.
Flushing Export Policy Caches (and Other NFS-Related Caches)
In versions earlier than clustered Data ONTAP 8.3, export policy caches could be flushed only by making
changes to export policy rules. Now, clustered Data ONTAP offers a set of commands to allow manual
flushing of export caches without needing to change existing policies. This command set is similar to
exportfs -f, available in Data ONTAP operating in 7-Mode, and is performed on a per-node, per-SVM
basis.
cluster::> vserver export-policy cache flush -vserver vs0 -node node1 -cache
all access host id name netgroup showmount
Table 8 lists the different caches and their time to live (TTL).
Table 8) Caches and time to live (TTL).
Cache Name Type of Information TTL (in Minutes)
Access All export policy rules 5
Name Name to UID 1
ID ID to name 1
Host Host to IP 1
Netgroup Netgroup to IP 15
Showmount Export paths 5
4.14 Export Policy Rule Access Verification (exportfs -c)
Starting in clustered Data ONTAP 8.3, the ability to check access to specific clients has been added. This
functionality in 7-Mode was known as exportfs -c.
In clustered Data ONTAP, that command is now vserver export-policy check-access:
vserver export-policy check-... Data ONTAP 8.3 vserver export-policy check-...
NAME
vserver export-policy check-access -- Given a Volume And/or a Qtree, Check to See If the Client
Is Allowed Access
AVAILABILITY
This command is available to cluster and Vserver administrators at the admin privilege level.
DESCRIPTION
The vserver export-policy check-access command checks whether a specific client is allowed access
to a specific export path. This enables you to test export policies to ensure they work as
intended and to troubleshoot client access issues.

59 NFS Best Practice and Implementation Guide © 2017 NetApp, Inc. All Rights Reserved
Example of export-policy check-access:
cluster1::*> vserver export-policy check-access -vserver vs1 -client-ip 1.2.3.4 -volume flex_vol
-authentication-method sys -protocol nfs3 -access-type read
Policy Policy Rule
Path Policy Owner Owner Type Index Access
----------------------------- ---------- --------- ---------- ------ ----------
/ default vs1_root volume 1 read
/dir1 default vs1_root volume 1 read
/dir1/dir2 default vs1_root volume 1 read
/dir1/dir2/flex1 data flex_vol volume 10 read
4 entries were displayed.
5 Showmount in Clustered Data ONTAP
Clustered Data ONTAP earlier than 8.3 does not support the showmount command from NFS clients.
This limitation results from performance considerations. Clusters can potentially have thousands of export
rules, so a query for all exports can be process intensive. Additionally, exports are not in flat files and are
applied to volumes as rules, so the export path and export rules would live in two different places.
Example of showmount –e in 7-Mode:
[root@nfsclient /]# showmount -e 10.61.84.240
Export list for 10.61.84.240:
/vol/unix (everyone)
/vol/Test (everyone)
/vol/vol0/home (everyone)
/vol/vol0 (everyone)
/vol/Test2 (everyone)
/vol/mixed 10.61.179.164
Example of showmount –e in clustered Data ONTAP:
[root@nfsclient /]# showmount -e 10.61.92.34
Export list for 10.61.92.34:
/ (everyone)
When running a showmount in clustered Data ONTAP, the NFS server would be an SVM IP. The SVM
has a vsroot volume mounted to /, which is the volume returned in the showmount. All other volumes are
mounted below that mount point. In the preceding example, / is shown as allowing everyone. This is the
export policy rule for / in the SVM being queried:
cluster::> vol show -vserver vs0 -volume vsroot -fields policy
(volume show)
vserver volume policy
------- ----------- -------
vs0 vsroot default
cluster::> export-policy rule show -vserver vs0 -policyname default -instance
(vserver export-policy rule show)
Vserver: vs0
Policy Name: default
Rule Index: 1
Access Protocol: any
Client Match Hostname, IP Address, Netgroup, or Domain: 0.0.0.0/0
RO Access Rule: any
RW Access Rule: any
User ID To Which Anonymous Users Are Mapped: 65534
Superuser Security Types: any
Honor SetUID Bits in SETATTR: true
Allow Creation of Devices: true

60 NFS Best Practice and Implementation Guide © 2017 NetApp, Inc. All Rights Reserved
If the export policy rule is changed to allow just a host, the showmount –e output does not change:
cluster::> export-policy rule modify -vserver vs0 -policyname default -ruleindex 1 -clientmatch
10.61.179.164
(vserver export-policy rule modify)
cluster::> export-policy rule show -vserver vs0 -policyname default -instance
(vserver export-policy rule show)
Vserver: vs0
Policy Name: default
Rule Index: 1
Access Protocol: any
Client Match Hostname, IP Address, Netgroup, or Domain: 10.61.179.164
RO Access Rule: any
RW Access Rule: any
User ID To Which Anonymous Users Are Mapped: 65534
Superuser Security Types: any
Honor SetUID Bits in SETATTR: true
Allow Creation of Devices: true
[root@nfsclient /]# showmount -e 10.61.92.34
Export list for 10.61.92.34:
/ (everyone)
Thus, for clustered Data ONTAP, showmount is not really useful in some cases, especially for
troubleshooting access issues. To get similar functionality to showmount, leverage SSH or the Data
ONTAP SDK to extract the desired information. The fields to extract are:
• Junction path from the volume show command/ZAPI
• Policy from the volume show command/ZAPI
• Any desired fields from the export policy rule set in the policy assigned to the volume
5.1 What Happens During Showmount?
Showmount leverages the MOUNT protocol in NFSv3 to issue an EXPORT query to the NFS server. If
the mount port is not listening or blocked by a firewall, or if NFSv3 is disabled on the NFS server,
showmount queries fail:
# showmount -e 10.63.21.9
mount clntudp_create: RPC: Program not registered
The following shows output from a packet trace of the showmount command being run against a data LIF
in clustered Data ONTAP 8.3:
16 1.337459 10.228.225.140 10.63.21.9 MOUNT 170 V3 EXPORT Call (Reply In 17)
Mount Service
Program Version: 3
V3 Procedure: EXPORT (5)
17 1.340234 10.63.21.9 10.228.225.140 MOUNT 202 V3 EXPORT Reply (Call In 16)
Mount Service
Export List Entry: /unix ->
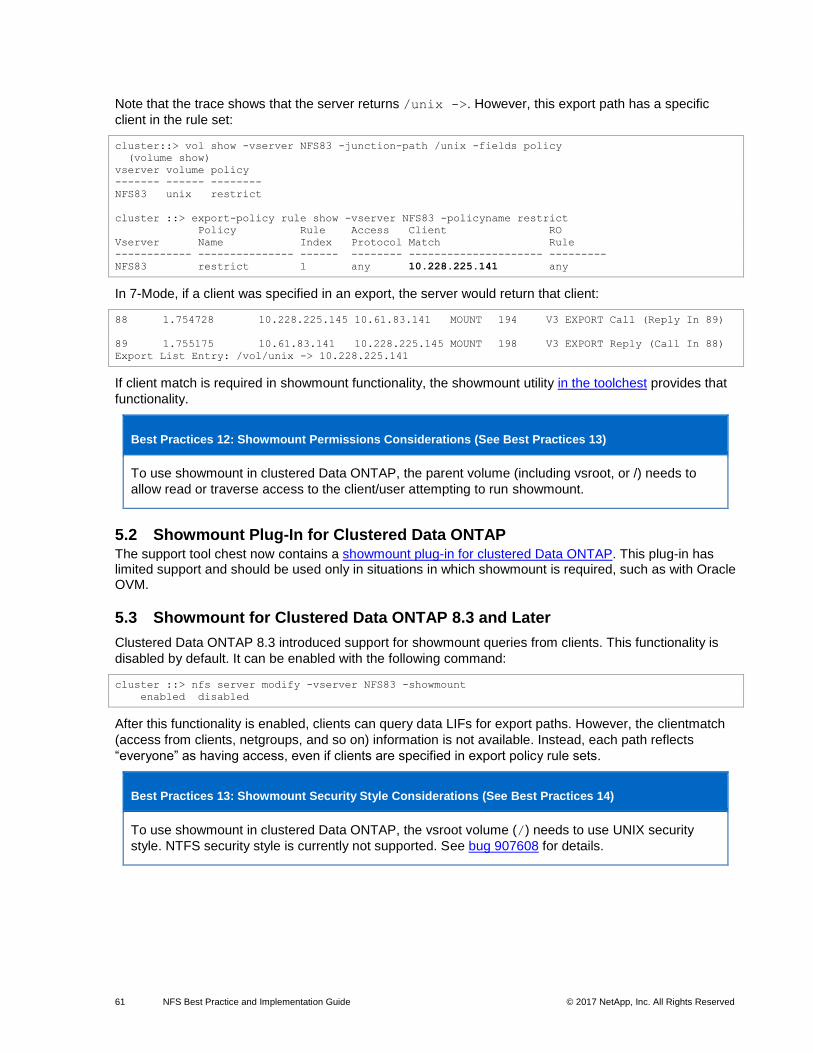
61 NFS Best Practice and Implementation Guide © 2017 NetApp, Inc. All Rights Reserved
Note that the trace shows that the server returns /unix ->. However, this export path has a specific
client in the rule set:
cluster::> vol show -vserver NFS83 -junction-path /unix -fields policy
(volume show)
vserver volume policy
------- ------ --------
NFS83 unix restrict
cluster ::> export-policy rule show -vserver NFS83 -policyname restrict
Policy Rule Access Client RO
Vserver Name Index Protocol Match Rule
------------ --------------- ------ -------- --------------------- ---------
NFS83 restrict 1 any 10.228.225.141 any
In 7-Mode, if a client was specified in an export, the server would return that client:
88 1.754728 10.228.225.145 10.61.83.141 MOUNT 194 V3 EXPORT Call (Reply In 89)
89 1.755175 10.61.83.141 10.228.225.145 MOUNT 198 V3 EXPORT Reply (Call In 88)
Export List Entry: /vol/unix -> 10.228.225.141
If client match is required in showmount functionality, the showmount utility in the toolchest provides that
functionality.
Best Practices 12: Showmount Permissions Considerations (See Best Practices 13)
To use showmount in clustered Data ONTAP, the parent volume (including vsroot, or /) needs to
allow read or traverse access to the client/user attempting to run showmount.
5.2 Showmount Plug-In for Clustered Data ONTAP The support tool chest now contains a showmount plug-in for clustered Data ONTAP. This plug-in has limited support and should be used only in situations in which showmount is required, such as with Oracle OVM.
5.3 Showmount for Clustered Data ONTAP 8.3 and Later
Clustered Data ONTAP 8.3 introduced support for showmount queries from clients. This functionality is
disabled by default. It can be enabled with the following command:
cluster ::> nfs server modify -vserver NFS83 -showmount
enabled disabled
After this functionality is enabled, clients can query data LIFs for export paths. However, the clientmatch
(access from clients, netgroups, and so on) information is not available. Instead, each path reflects
“everyone” as having access, even if clients are specified in export policy rule sets.
Best Practices 13: Showmount Security Style Considerations (See Best Practices 14)
To use showmount in clustered Data ONTAP, the vsroot volume (/) needs to use UNIX security
style. NTFS security style is currently not supported. See bug 907608 for details.
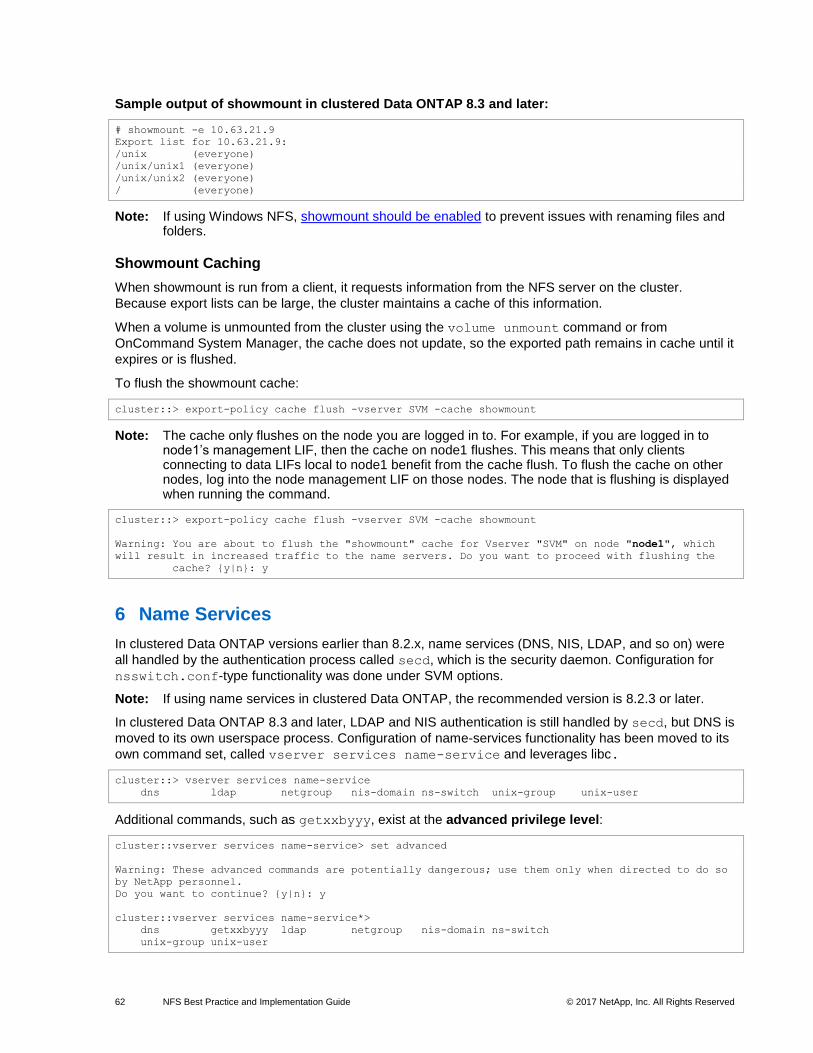
62 NFS Best Practice and Implementation Guide © 2017 NetApp, Inc. All Rights Reserved
Sample output of showmount in clustered Data ONTAP 8.3 and later:
# showmount -e 10.63.21.9
Export list for 10.63.21.9:
/unix (everyone)
/unix/unix1 (everyone)
/unix/unix2 (everyone)
/ (everyone)
Note: If using Windows NFS, showmount should be enabled to prevent issues with renaming files and folders.
Showmount Caching
When showmount is run from a client, it requests information from the NFS server on the cluster.
Because export lists can be large, the cluster maintains a cache of this information.
When a volume is unmounted from the cluster using the volume unmount command or from
OnCommand System Manager, the cache does not update, so the exported path remains in cache until it
expires or is flushed.
To flush the showmount cache:
cluster::> export-policy cache flush -vserver SVM -cache showmount
Note: The cache only flushes on the node you are logged in to. For example, if you are logged in to node1’s management LIF, then the cache on node1 flushes. This means that only clients connecting to data LIFs local to node1 benefit from the cache flush. To flush the cache on other nodes, log into the node management LIF on those nodes. The node that is flushing is displayed when running the command.
cluster::> export-policy cache flush -vserver SVM -cache showmount
Warning: You are about to flush the "showmount" cache for Vserver "SVM" on node "node1", which
will result in increased traffic to the name servers. Do you want to proceed with flushing the
cache? {y|n}: y
6 Name Services
In clustered Data ONTAP versions earlier than 8.2.x, name services (DNS, NIS, LDAP, and so on) were
all handled by the authentication process called secd, which is the security daemon. Configuration for
nsswitch.conf-type functionality was done under SVM options.
Note: If using name services in clustered Data ONTAP, the recommended version is 8.2.3 or later.
In clustered Data ONTAP 8.3 and later, LDAP and NIS authentication is still handled by secd, but DNS is
moved to its own userspace process. Configuration of name-services functionality has been moved to its
own command set, called vserver services name-service and leverages libc.
cluster::> vserver services name-service
dns ldap netgroup nis-domain ns-switch unix-group unix-user
Additional commands, such as getxxbyyy, exist at the advanced privilege level:
cluster::vserver services name-service> set advanced
Warning: These advanced commands are potentially dangerous; use them only when directed to do so
by NetApp personnel.
Do you want to continue? {y|n}: y
cluster::vserver services name-service*>
dns getxxbyyy ldap netgroup nis-domain ns-switch
unix-group unix-user

63 NFS Best Practice and Implementation Guide © 2017 NetApp, Inc. All Rights Reserved
To view the current ns-switch configuration:
cluster ::vserver services name-service*> ns-switch show -vserver NFS83
Source
Vserver Database Enabled Order
--------------- ------------ --------- ---------
NFS83 hosts true files,
dns
NFS83 group true files,
ldap
NFS83 passwd true files,
ldap
NFS83 netgroup true files,
ldap
NFS83 namemap true files,
ldap
5 entries were displayed.
Note that in the preceding, support for granular control over passwd, group, netgroup, and so on has
been added. Doing so makes the ns-switch functionality in clustered Data ONTAP 8.3 and later more
comparable to standard nsswitch.conf files.
In addition to ns-switch functionality, other new features have been added to name services:
• DNS and NIS statistics
• getxxbyyy support
• Improved NIS troubleshooting tools (tracing and showing bound servers)
• Name service queue status
• Name service configuration mirroring and repair
6.1 Name Services Best Practices
Large and complex name service environments can be challenged to deliver quick responses to file
servers such as NetApp FAS systems running clustered Data ONTAP. NetApp continues to enhance
name service algorithms to minimize the impact of external name service servers. However, in some
cases, environmental issues can affect name service resolution, which in turn can affect file service
authentication and mounting. The following recommendations can help reduce environmental issues. For
information about best practices for name services in clustered Data ONTAP, see TR-4379: Name
Services Best Practices.

64 NFS Best Practice and Implementation Guide © 2017 NetApp, Inc. All Rights Reserved
7 Nondisruptive Operations (NDO) with NFS
This section covers NDO with NFS in clustered Data ONTAP and scenarios with NDO behavior for NFS
clients. In some cases, even NFSv3 can be disrupted by specific planned and unplanned events. The
reason for this happening is that, even though NFSv3 is a stateless protocol, there are still underlying
mechanisms such as locking and NFS server-side caches that can come into play during disruptive
events.
7.1 Replay/Reply Cache
The replay (or reply) cache in clustered Data ONTAP is crucial to preventing NFS requests from trying
nonidempotent requests twice. Nonidempotent requests are requests that can change data structures.
For example, reading a document twice at the same time is an idempotent operation because it’s
harmless. Editing that document twice at the same time is a nonidempotent operation and can be harmful
if the document doesn’t have locking in place to protect it. The replay/reply cache in ONTAP helps keep
track of what operations have arrived to the storage in case a network issue causes a client to resend the
same operation. The cache is used to reply to the operation rather than retrying in the storage layer.
This cache is stored at the data layer with the volumes. When this cache is lost, CREATE operations can
fail with EEXIST and REMOVE operations can fail with ENOENT. If a locking mechanism is not in place,
data can be at risk when the replay cache is lost. The following table shows different scenarios in which
replay cache is kept or lost in clustered Data ONTAP 8.2.x and later.
Table 9) Replay/reply cache NDO behavior.
Operation NFSv3 NFSv4.x
Volume move Replay cache is moved with
volume.
Replay cache is moved with
volume.
Aggregate relocation or storage
giveback operation
Replay cache is lost. Replay cache is lost.
LIF migrate (same node) Replay cache remains intact. Replay cache remains intact.
LIF migrate (different node) Replay cache is lost. Replay cache is lost.
Unplanned takeover Replay cache is lost. Replay cache is lost.
Planned takeover Replay cache is lost. Replay cache is lost.
7.2 File Locking
File locking mechanisms were created to prevent a file from being accessed for write operations by more
than one user or application at a time. NFS leverages file locking either using the NLM process in NFSv3
or by leasing and locking, which is built in to the NFSv4.x protocols. Not all applications leverage file
locking, however; for example, the application “vi” does not lock files. Instead, it uses a file swap method
to save changes to a file.
When an NFS client requests a lock, the client interacts with the clustered Data ONTAP system to save
the lock state. Where the lock state is stored depends on the NFS version being used. In NFSv3, the lock
state is stored at the data layer. In NFSv4.x, the lock states are stored in the NAS protocol stack.

65 NFS Best Practice and Implementation Guide © 2017 NetApp, Inc. All Rights Reserved
Best Practices 14: NFSv3 and File Locking (See Best Practices 15)
Use file locking using the NLM protocol when possible with NFSv3.
To view or remove file locks in an SVM, use the following commands in advanced privilege:
cluster::> set advanced
cluster::*> vserver locks
break show
When potentially disruptive operations occur, lock states do not transfer in some instances. As a result,
delays in NFS operations can occur as the locks are reclaimed by the clients and reestablished with their
new locations. The following table covers the scenarios in which locks are kept or lost in clustered Data
ONTAP 8.2.x and later.
Table 10) Lock state NDO behavior.
Operation NFSv3 NFSv4.x
Volume move Lock state is moved with
volume.
Lock state is moved with
volume.
Aggregate relocation or storage
giveback operation
Lock state is not moved (same
behavior as in 7-Mode); up to
45s outage.
Lock state is not moved (same
behavior as in 7-Mode); up to
90s outage.
LIF migrate (same node) Lock state is not stored in NAS
protocol stack; no disruption.
Lock state remains intact; still on
local node; no disruption.
LIF migrate (different node) Lock state is not stored in NAS
protocol stack; nothing to move;
no disruption.
Lock state is not moved (same
behavior as in 7-Mode); up to
90s outage.
Unplanned takeover Lock state is not moved (same
behavior as in 7-Mode); up to
45s outage.
Lock state is not moved (same
behavior as 7-Mode); up to 90s
outage.
Planned takeover Lock state is not moved (same
behavior as in 7-Mode); up to
45s outage.
Lock state is not moved (same
behavior as in 7-Mode); up to
90s outage.
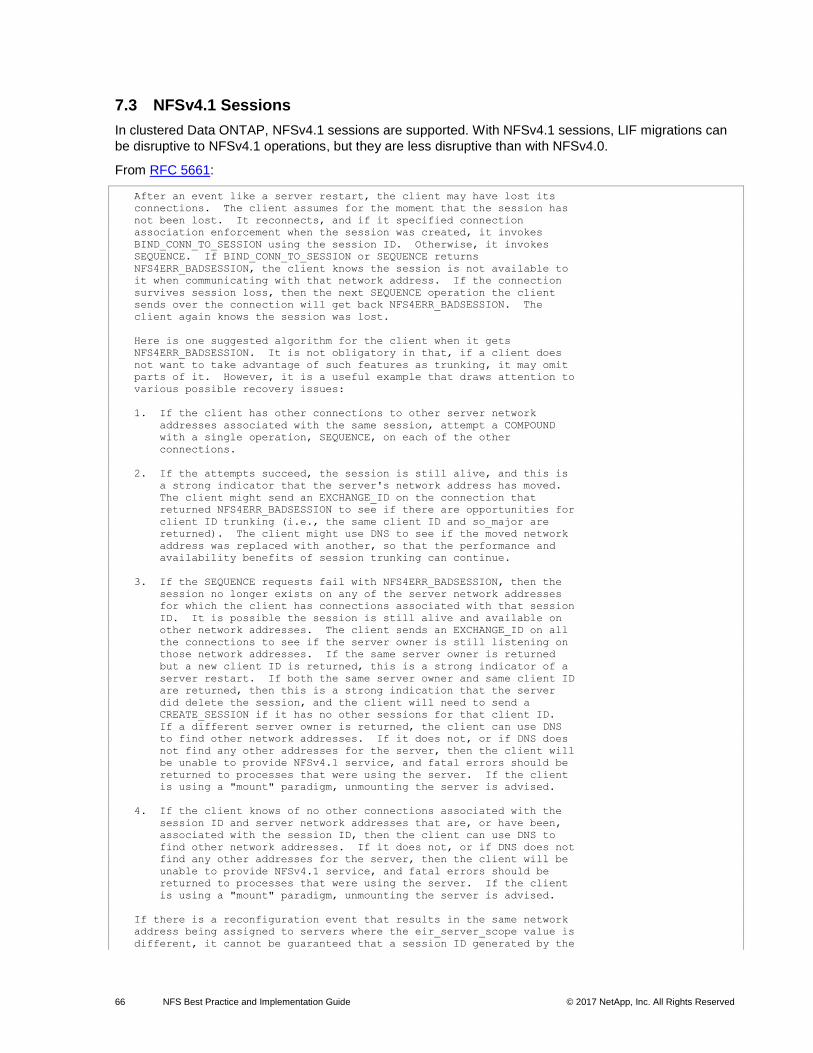
66 NFS Best Practice and Implementation Guide © 2017 NetApp, Inc. All Rights Reserved
7.3 NFSv4.1 Sessions
In clustered Data ONTAP, NFSv4.1 sessions are supported. With NFSv4.1 sessions, LIF migrations can
be disruptive to NFSv4.1 operations, but they are less disruptive than with NFSv4.0.
From RFC 5661:
After an event like a server restart, the client may have lost its
connections. The client assumes for the moment that the session has
not been lost. It reconnects, and if it specified connection
association enforcement when the session was created, it invokes
BIND_CONN_TO_SESSION using the session ID. Otherwise, it invokes
SEQUENCE. If BIND_CONN_TO_SESSION or SEQUENCE returns
NFS4ERR_BADSESSION, the client knows the session is not available to
it when communicating with that network address. If the connection
survives session loss, then the next SEQUENCE operation the client
sends over the connection will get back NFS4ERR_BADSESSION. The
client again knows the session was lost.
Here is one suggested algorithm for the client when it gets
NFS4ERR_BADSESSION. It is not obligatory in that, if a client does
not want to take advantage of such features as trunking, it may omit
parts of it. However, it is a useful example that draws attention to
various possible recovery issues:
1. If the client has other connections to other server network
addresses associated with the same session, attempt a COMPOUND
with a single operation, SEQUENCE, on each of the other
connections.
2. If the attempts succeed, the session is still alive, and this is
a strong indicator that the server's network address has moved.
The client might send an EXCHANGE_ID on the connection that
returned NFS4ERR_BADSESSION to see if there are opportunities for
client ID trunking (i.e., the same client ID and so_major are
returned). The client might use DNS to see if the moved network
address was replaced with another, so that the performance and
availability benefits of session trunking can continue.
3. If the SEQUENCE requests fail with NFS4ERR_BADSESSION, then the
session no longer exists on any of the server network addresses
for which the client has connections associated with that session
ID. It is possible the session is still alive and available on
other network addresses. The client sends an EXCHANGE_ID on all
the connections to see if the server owner is still listening on
those network addresses. If the same server owner is returned
but a new client ID is returned, this is a strong indicator of a
server restart. If both the same server owner and same client ID
are returned, then this is a strong indication that the server
did delete the session, and the client will need to send a
CREATE_SESSION if it has no other sessions for that client ID.
If a different server owner is returned, the client can use DNS
to find other network addresses. If it does not, or if DNS does
not find any other addresses for the server, then the client will
be unable to provide NFSv4.1 service, and fatal errors should be
returned to processes that were using the server. If the client
is using a "mount" paradigm, unmounting the server is advised.
4. If the client knows of no other connections associated with the
session ID and server network addresses that are, or have been,
associated with the session ID, then the client can use DNS to
find other network addresses. If it does not, or if DNS does not
find any other addresses for the server, then the client will be
unable to provide NFSv4.1 service, and fatal errors should be
returned to processes that were using the server. If the client
is using a "mount" paradigm, unmounting the server is advised.
If there is a reconfiguration event that results in the same network
address being assigned to servers where the eir_server_scope value is
different, it cannot be guaranteed that a session ID generated by the
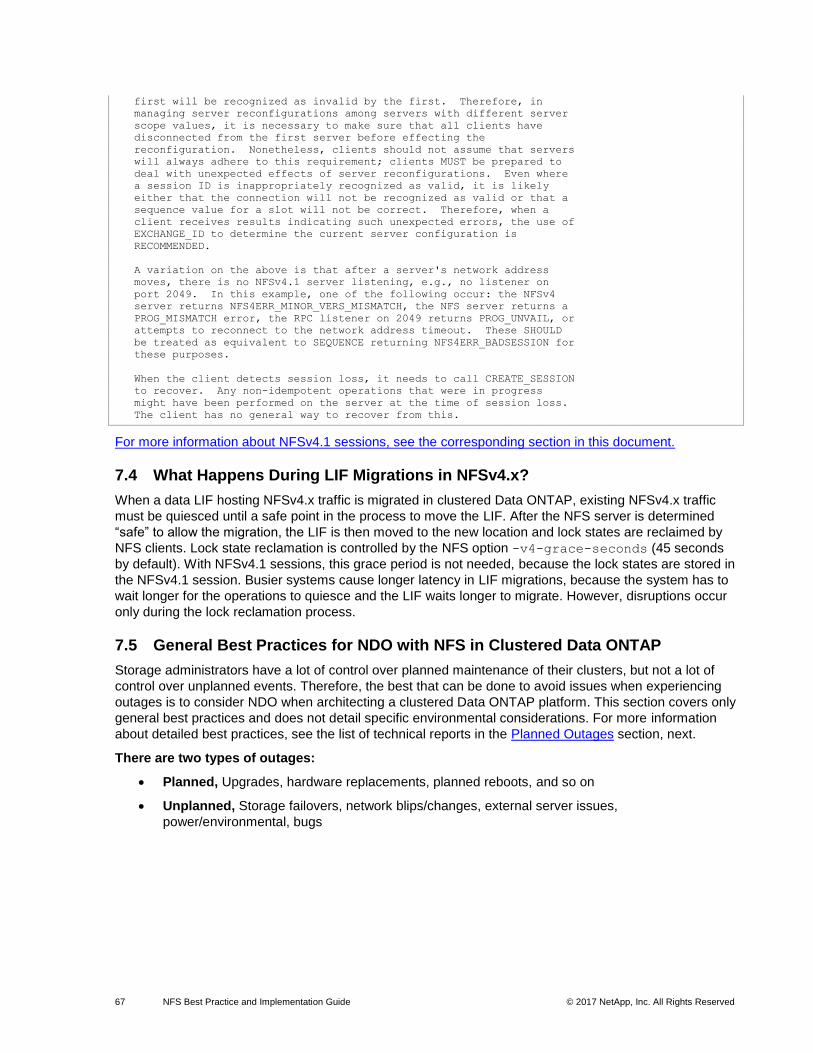
67 NFS Best Practice and Implementation Guide © 2017 NetApp, Inc. All Rights Reserved
first will be recognized as invalid by the first. Therefore, in
managing server reconfigurations among servers with different server
scope values, it is necessary to make sure that all clients have
disconnected from the first server before effecting the
reconfiguration. Nonetheless, clients should not assume that servers
will always adhere to this requirement; clients MUST be prepared to
deal with unexpected effects of server reconfigurations. Even where
a session ID is inappropriately recognized as valid, it is likely
either that the connection will not be recognized as valid or that a
sequence value for a slot will not be correct. Therefore, when a
client receives results indicating such unexpected errors, the use of
EXCHANGE_ID to determine the current server configuration is
RECOMMENDED.
A variation on the above is that after a server's network address
moves, there is no NFSv4.1 server listening, e.g., no listener on
port 2049. In this example, one of the following occur: the NFSv4
server returns NFS4ERR_MINOR_VERS_MISMATCH, the NFS server returns a
PROG_MISMATCH error, the RPC listener on 2049 returns PROG_UNVAIL, or
attempts to reconnect to the network address timeout. These SHOULD
be treated as equivalent to SEQUENCE returning NFS4ERR_BADSESSION for
these purposes.
When the client detects session loss, it needs to call CREATE_SESSION
to recover. Any non-idempotent operations that were in progress
might have been performed on the server at the time of session loss.
The client has no general way to recover from this.
For more information about NFSv4.1 sessions, see the corresponding section in this document.
7.4 What Happens During LIF Migrations in NFSv4.x?
When a data LIF hosting NFSv4.x traffic is migrated in clustered Data ONTAP, existing NFSv4.x traffic
must be quiesced until a safe point in the process to move the LIF. After the NFS server is determined
“safe” to allow the migration, the LIF is then moved to the new location and lock states are reclaimed by
NFS clients. Lock state reclamation is controlled by the NFS option -v4-grace-seconds (45 seconds
by default). With NFSv4.1 sessions, this grace period is not needed, because the lock states are stored in
the NFSv4.1 session. Busier systems cause longer latency in LIF migrations, because the system has to
wait longer for the operations to quiesce and the LIF waits longer to migrate. However, disruptions occur
only during the lock reclamation process.
7.5 General Best Practices for NDO with NFS in Clustered Data ONTAP
Storage administrators have a lot of control over planned maintenance of their clusters, but not a lot of
control over unplanned events. Therefore, the best that can be done to avoid issues when experiencing
outages is to consider NDO when architecting a clustered Data ONTAP platform. This section covers only
general best practices and does not detail specific environmental considerations. For more information
about detailed best practices, see the list of technical reports in the Planned Outages section, next.
There are two types of outages:
• Planned, Upgrades, hardware replacements, planned reboots, and so on
• Unplanned, Storage failovers, network blips/changes, external server issues,
power/environmental, bugs

68 NFS Best Practice and Implementation Guide © 2017 NetApp, Inc. All Rights Reserved
Planned Outages
With planned outages, clustered Data ONTAP has a number of mechanisms to help maintain uptime,
such as volume moves, LIF migrations, rolling upgrades, and so on. For more information about NDO
features and functionality, see the following technical reports:
• TR-4075: DataMotion for Volumes in Clustered Data ONTAP Overview and Best Practices
• TR-4100: Nondisruptive Operations and SMB File Shares for Clustered Data ONTAP
• TR-4146: Aggregate Relocate Overview and Best Practices for Clustered Data ONTAP
• TR-4186: Nondisruptive Operations (NDO) Overview
• TR-4277: Nondisruptively Replace a Complete Disk Shelf Stack with Clustered Data ONTAP
Unplanned Outages
Unplanned outages are considerably trickier to handle because of the nature of their being unplanned.
Therefore, for maximum NDO functionality with NFS and multiprotocol implementations, the following set
of NAS-specific best practices are worth consideration.
Best Practices 15: NDO Best Practices for NFS Environments (See Best Practices 16)
• Make sure that every node in the cluster has a data LIF that can be routed to external name services.
• If using name service servers (DNS, LDAP, NIS, and so on), make sure that there are multiple servers for redundancy and that those servers are on a fast connection and configured for use with the SVM as a client.
• Configure data LIFs properly as per TR-4182: Ethernet Storage Design Considerations and Best Practices for Clustered Data ONTAP Configurations.
• Configure automatic giveback for HA pairs in clustered Data ONTAP clusters.
• Spread data volumes across multiple nodes to avoid hardware bottlenecks.
• Use NFSv4.x (4.1 if possible) when appropriate to take advantage of stateful connections, integrated locking, and session functionality.
• Make sure that a DR copy of NAS data and configuration exists at a remote site through DP NetApp SnapMirror® and SVM peering. See TR-4015: SnapMirror Configuration and Best Practices Guide for Clustered Data ONTAP for details.
8 NFSv3 in Clustered Data ONTAP
NFSv3 is fully supported in clustered Data ONTAP. Its functionality follows the RFC 1813 specifications,
just as in 7-Mode, so any NFSv3 client that follows RFC 1813 is supported. There are some changes in
overall functionality in clustered Data ONTAP as opposed to 7-Mode, however. They are:
• Junction paths replace /vol/volname logic
• No support for -actual pathnames
• Showmount functionality change
• Different default ports for NFSv3
• Ability to enable/disable FSID changes in NFSv3
• Increased maximum auxiliary groups for AUTH_SYS and AUTH_GSS in 8.3 (1024 for both)
• Increased default maximum TCP read and write size (from 32K to 64K)

69 NFS Best Practice and Implementation Guide © 2017 NetApp, Inc. All Rights Reserved
Default Ports for NFSv3 in 7-Mode
The following are the default ports for NFSv3 operations in 7-Mode. NFS always uses port 2049.
filer> options rpc
rpc.mountd.tcp.port 4046
rpc.mountd.udp.port 4046
rpc.nlm.tcp.port 4045
rpc.nlm.udp.port 4045
rpc.nsm.tcp.port 4047
rpc.nsm.udp.port 4047
rpc.pcnfsd.tcp.port 4048
rpc.pcnfsd.udp.port 4048
rpc.rquotad.udp.port 4049
Default Ports for NFSv3 in Clustered Data ONTAP
In clustered Data ONTAP 8.3, the ability to change ports for NFSv3-specific operations was added. These
are the defaults that were the defaults in versions earlier than 8.3 as well. NFS always uses port 2049.
cluster::*> nfs server show -fields nlm-port,nsm-port,mountd-port,rquotad-port -vserver NFS83
vserver mountd-port nlm-port nsm-port rquotad-port
------- ----------- -------- -------- ------------
NFS83 635 4045 4046 4049
Using rpcinfo to View Open Ports
To view ports from a client, run rpcinfo -p against a data LIF IP address.
# rpcinfo -p 10.63.21.9
program vers proto port
100000 2 udp 111 portmapper
100000 2 tcp 111 portmapper
100000 3 udp 111 portmapper
100000 3 tcp 111 portmapper
100000 4 udp 111 portmapper
100000 4 tcp 111 portmapper
100003 3 udp 2049 nfs
100003 3 tcp 2049 nfs
100003 4 tcp 2049 nfs
100005 1 udp 635 mountd
100005 2 udp 635 mountd
100005 3 udp 635 mountd
100005 1 tcp 635 mountd
100005 2 tcp 635 mountd
100005 3 tcp 635 mountd
100021 4 udp 4045 nlockmgr
100021 4 tcp 4045 nlockmgr
100024 1 udp 4046 status
100024 1 tcp 4046 status
100011 1 udp 4049 rquotad

70 NFS Best Practice and Implementation Guide © 2017 NetApp, Inc. All Rights Reserved
Table 11) 7-Mode NFS port defaults versus clustered Data ONTAP port defaults.
NFS Service 7-Mode Port Clustered Data ONTAP Port Option to Change the Port
Mountd 4046 635 7-Mode:
rpc.mountd.tcp.port
rpc.mountd.udp.port
Clustered Data ONTAP:
-mountd-port
Portmapper 111 111 N/A – Cannot be changed
NLM 4045 4045 7-Mode:
rpc.nlm.tcp.port
rpc.nlm.udp.port
Clustered Data ONTAP:
-nlm-port
NSM 4047 4046 7-Mode:
rpc.nsm.tcp.port
rpc.nsm.udp.port
Clustered Data ONTAP:
-nsm-port
NFS 2049 2049 N/A: cannot be changed
PC NFS 4048 N/A 7-Mode:
rpc.pcnfsd.tcp.port
rpc.pcnfsd.udp.port
Rquota 4049 4049 7-Mode:
rpc.rquotad.udp.port
Clustered Data ONTAP:
-rquotad-port
Why Some Ports Changed Between 7-Mode and Clustered Data ONTAP
As seen in Table 11, a few of the ports changed between Data ONTAP operating in 7-Mode and
clustered Data ONTAP. In particular, the mountd port changed from 4046 to 635. This is because of the
notion of “rootonly ports,” where ports outside the range of 1 through 1024 can be considered insecure by
security teams and need special firewall rules. Because mountd is a critical port for NFSv3 operations
(whereas NLM, rquotad, and NSM are less critical), the port was changed to be within the range. Other
ports were removed, such as PC NFS, because they are no longer supported in clustered Data ONTAP,
and others cannot be changed at all (NFS, portmapper) because they are considered port standards.

71 NFS Best Practice and Implementation Guide © 2017 NetApp, Inc. All Rights Reserved
Effects of File System ID (FSID) Changes in Clustered Data ONTAP
NFS makes use of a file system ID (FSID) when interacting between client and server. This FSID lets the
NFS client know where data lives in the NFS server’s file system. Because clustered Data ONTAP can
span multiple file systems across multiple nodes by way of junction paths, this FSID can change
depending on where data lives. Some older Linux clients can have problems differentiating these FSID
changes, resulting in failures during basic attribute operations, such as chown, chmod, and so on.
An example of this issue can be found in bug 671319. If disabling the FSID change with NFSv3, be sure
to enable the new -v3-64bit-identifiers option in ONTAP 9, but keep in mind that this option could
affect older legacy applications that require 32-bit file IDs.
FSID changes in NFS versions 3/4 can be controlled with the following options in advanced privilege:
-v3-fsid-change
-v4-fsid-change
Note: NetApp does not recommend changing this option unless directed by support. If this option is changed with clients mounted to the NFS server, data corruption can take place.
How FSIDs Operate with Snapshot Copies
When a Snapshot copy of a volume is taken, a copy of a file’s inodes is preserved in the file system for
access later. The file theoretically exists in two locations.
With NFSv3, even though there are two copies of essentially the same file, the FSIDs of those files are
not identical. FSIDs of files are formulated using a combination of NetApp WAFL® (Write Anywhere File
Layout) inode numbers, volume identifiers, and Snapshot IDs. Because every Snapshot copy has a
different ID, every Snapshot copy of a file has a different FSID in NFSv3, regardless of the setting of the
option -v3-fsid-change. The NFS RFC spec does not require that FSIDs for a file are identical across
file versions.
With NFSv4, however, the FSID of a file across versions is identical if the option -v4-fsid-change is
enabled. That option makes sure that the WAFL inode number is returned as the FSID of a file instead of
a FSID created using Snapshot IDs. See bug 933937 for more information.
If your application requires that file versions maintain identical FSIDs, use NFSv4 and the -v4-fsid-
change option.
FSID Changes with Storage Virtual Machine Disaster Recovery (SVM DR)
Clustered Data ONTAP 8.3.1 introduced a new feature to enable disaster recovery for entire SVMs called
SVM DR. This feature is covered in TR-4015: SnapMirror Configuration and Best Practices Guide.
When SVM DR is used with NFS exports in versions prior to ONTAP 9.0, the FSID of those exports
changes, and clients have to remount the exports on the destination system. Otherwise, the clients show
“stale” for NFS operations on those mounts. If the mount’s FSID should be preserved by the SVM DR
relationship, then the destination SVM would need to be created with the -is-msid-preserve option
set to “true” in diag privilege mode. When this option is set, SnapMirror relationships used in SVM DR
show -msid-preserve as “true” in their snapmirror show output. This should be used with caution,
because SVM DR updates are asynchronous. The source SVM should be confirmed as down before
attempting to write to the destination SVM with the same FSID.

72 NFS Best Practice and Implementation Guide © 2017 NetApp, Inc. All Rights Reserved
Increased Maximums for AUTH_SYS and AUTH_GSS Groups
RPC has a specific limitation for the maximum number of auxiliary GIDs that can be honored in a single
NFS request. The maximum for AUTH_SYS/AUTH_UNIX is 16, and for AUTH_GSS (Kerberos) it is 32.
This is a protocol limitation that affects many NFS servers. Before clustered Data ONTAP 8.3, there was
no way to increase the maximum number of GIDs allowed by NFS operations. Clustered Data ONTAP 8.3
introduced the following options to set per NFS server to address this limitation:
auth-sys-extended-groups
extended-groups-limit
How It Works
The options to extend the group limitation work just the way that the manage-gids option for other NFS
servers works. Basically, rather than dumping the entire list of auxiliary GIDs a user belongs to, the option
does a lookup for the GID on the file or folder and returns that value instead.
From the man page for mountd:
-g or --manage-gids
Accept requests from the kernel to map user id numbers into lists of
group id numbers for use in access control. An NFS request will normally
except when using Kerberos or other cryptographic authentication) contains
a user-id and a list of group-ids. Due to a limitation in the NFS
protocol, at most 16 groups ids can be listed. If you use the -g flag, then
the list of group ids received from the client will be replaced by a list of
group ids determined by an appropriate lookup on the server.
In 7-Mode, the maximum number of GIDs supported was 256. In clustered Data ONTAP 8.3, that
maximum is increased (and configurable) to 1,024 for both AUTH_SYS and AUTH_GSS.
When an access request is made, only 16 GIDs are passed in the RPC portion of the packet.
Performance Impact of Extended GIDs
Extended groups have a minimal performance penalty, generally in the low single digit percentages.
Higher metadata NFS workloads would likely have more impact, particularly on the system’s caches.
Performance can also be impacted by the speed and workload of the name service servers. Overloaded
name service servers are slower to respond, causing delays in prefetching the GID.
For more information regarding name services, see TR-4379: Name Service Best Practices.

73 NFS Best Practice and Implementation Guide © 2017 NetApp, Inc. All Rights Reserved
Figure 9) RPC packet with 16 GIDs.
Any GID past the limit of 16 is dropped by the protocol. With the extended GID option in clustered Data
ONTAP 8.3, when an NFS request comes in, the SecD process requests information about the user’s
group membership by way of a new function called secd_rpc_auth_user_id_to_unix_ext_creds.
Extended GIDs can be used with external name services, or locally on the cluster if the users and groups
are configured properly. To make sure that a local UNIX user is a member of multiple groups, use the
unix-group adduser(s) command:
COMMANDS
adduser - Add a user to a local UNIX group
addusers - Add a list of users to a local UNIX group
Considerations for Active Directory LDAP
By default, in Microsoft Active Directory LDAP servers, the MaxPageSize attribute is set to a default of
1000. That means groups beyond 1000 would get truncated in LDAP queries. To enable full support with
the 1024 value for extended groups, the MaxPageSize attribute must be modified to reflect the 1024
value. For information about how to change that value, see the following Microsoft TechNet article:
How to view and set LDAP policy in Active Directory by using Ntdsutil.exe
Contact Microsoft support for concerns with modifying this value, as well as reviewing the following
TechNet library article:
https://technet.microsoft.com/en-us/library/aa998536(v=exchg.80).aspx
A Detailed Look
This function uses a LibC library call to do a credential lookup from the name service (for example, LDAP)
before the cluster replies to the NFS request with access denied or allowed. When the credentials are
fetched from the name service, then SecD populates the NAS credential cache with the appropriate group
membership for that user up to the extended group limit. The cluster then replies to the NFS request and
allows or denies access based on what is in the credential cache and not what was in the RPC packet.
Because of this, latency to the name services from the cluster should be low to enable the credential
caches to always be accurate. Otherwise, access results could vary from expected behaviors.
The following example shows the results of the same NFS request as seen earlier. Note how 18 GIDs are
discovered, as opposed to the 16 in the RPC packet.

74 NFS Best Practice and Implementation Guide © 2017 NetApp, Inc. All Rights Reserved
Example of NAS Credential Cache with Extended GIDs Enabled
cluster::*> diag nblade credentials show -node node2 -vserver NAS -unix-user-name seventeengids
Getting credential handles.
1 handles found....
Getting cred 0 for user.
Global Virtual Server: 5
Cred Store Uniquifier: 1
Cifs SuperUser Table Generation: 0
Locked Ref Count: 0
Info Flags: 1
Alternative Key Count: 0
Additional Buffer Count: 0
Creation Time: 4853460910 ms
Time Since Last Refresh: 492530 ms
Windows Creds:
Flags: 0
Primary Group: S-0-0
Unix Creds:
Flags: 1
Domain ID: 0
Uid: 2000
Gid: 513
Additional Gids:
Gid 0: 513
Gid 1: 2001
Gid 2: 2002
Gid 3: 2003
Gid 4: 2004
Gid 5: 2005
Gid 6: 2006
Gid 7: 2007
Gid 8: 2008
Gid 9: 2009
Gid 10: 2010
Gid 11: 2011
Gid 12: 2012
Gid 13: 2013
Gid 14: 2014
Gid 15: 2015
Gid 16: 2016
Gid 17: 2017
Gid 18: 10005
For more information about name services best practices, see the section in this document covering that
subject. For more information about LDAP in clustered Data ONTAP, see TR-4073.
75 NFS Best Practice and Implementation Guide © 2017 NetApp, Inc. All Rights Reserved
9 NFSv4.x in Clustered Data ONTAP
NFSv4.0 and NFSv4.1 were introduced in clustered Data ONTAP starting with Data ONTAP 8.1.
9.1 Advantages of Using NFSv4.x
The following are some advantages to using NFSv4.x in your environment. However, it is important that
you treat every specific use case differently. NFSv4.x is not ideal for all workload types. Be sure to test for
desired functionality and performance before rolling out NFSv4.x en masse.
• Firewall-friendly because NFSv4 uses only a single port (2049) for its operations
• Advanced and aggressive cache management, like delegations in NFSv4.x
• Strong RPC security choices that employ cryptography
• Internationalization
• Compound operations
• Works only with TCP
• Stateful protocol (not stateless like NFSv3)
• Kerberos configuration for efficient authentication mechanisms
Support for 3DES for encryption in clustered Data ONTAP 8.2.x and earlier
AES support in 8.3 and later.
• No NFSv4 replication support (see RFC 7530, section 8.4.1 for details)
• Migration (for dNFS) using referrals
• Support of access control that is compatible with UNIX and Windows
• String-based user and group identifiers
• Parallel access to data through pNFS (does not apply for NFSv4.0)
Performance Enhancements for NFSv4.x Operations
Clustered Data ONTAP 8.2.x and later introduced some major performance enhancements for NFSv4.x
operations. The following section covers these enhancements.
NFSv4.x Fastpath in Clustered Data ONTAP 8.2.x
Starting in clustered Data ONTAP 8.2, NFS fastpath was introduced to potentially improve NFSv4
performance for READs and WRITES. This improvement is made by bypassing the internal processing of
NFSv4 packets into clustered Data ONTAP centric packets when the data request is made on a LIF that
is local to the node hosting the volume. When combined with other features such as pNFS or referrals,
localized data can be guaranteed for each READ and WRITE request, thus allowing consistent use of the
NFSv4 fastpath. NFSv3 has always had an NFS fastpath concept. NFS fastpath is enabled by default.
NFSv4.x Multithreaded Operations in Clustered Data ONTAP 8.2.x
In clustered Data ONTAP 8.2 and later, multiprocessor support was added for NFSv4.x read and write
operations. Metadata operations, however, still use a single threaded approach. In previous releases,
NFSv4.x read and write operations were single threaded, thus allowing a potential bottleneck at the CPU
for the protocol domain. Using multiple processors for read and write operations can greatly increase
throughput on NetApp systems that contain more than one CPU for NFSv4.x workloads that are read and
write heavy.
Note: NFSv3 has always used multiple processors for reads and writes. NFSv3 also uses multiple processors for metadata operations.

76 NFS Best Practice and Implementation Guide © 2017 NetApp, Inc. All Rights Reserved
Best Practices 16: Version Recommendations with NFSv4.x (See Best Practices 17)
For NFSv4.x workloads, be sure to upgrade the cluster to the latest patched GA version of clustered
Data ONTAP 8.2.x or 8.3 and upgrade NFS clients to the latest patched release of the kernel.
The following diagrams illustrate the effect that a multiprocessor can have on NFSv4.x operations.
Figure 10) NFSv4.x read and write ops: no multiprocessor.
Figure 11) NFSv4.x read and write ops: with multiprocessor.

77 NFS Best Practice and Implementation Guide © 2017 NetApp, Inc. All Rights Reserved
9.2 NFSv4.0
NetApp Data ONTAP NFSv4.x implementation (clustered and 7-Mode) provides the following.
Write Order
The implementation provides the capability to write data blocks to shared storage in the same order as
they occur in the data buffer.
Synchronous Write Persistence
Upon return from a synchronous write call, Data ONTAP (clustered and 7-Mode) guarantees that all the
data has been written to durable, persistent storage.
Distributed File Locking
The implementation provides the capability to request and obtain an exclusive lock on the shared storage,
without assigning the locks to two servers simultaneously.
Unique Write Ownership
Data ONTAP (clustered and 7-Mode) guarantees that the file lock is the only server process that can write
to the file. After Data ONTAP transfers the lock to another server, pending writes queued by the previous
owner fail.
Transitioning from NFSv3 to NFSv4.x: Considerations
The following section covers some considerations that need to be addressed when migrating from NFSv3
to NFSv4.x. When choosing to use NFSv4.x after using NFSv3, you cannot simply turn it on and have it
work as expected. There are specific items to address, such as:
• Domain strings/ID mapping
• Storage failover considerations
• Name services
• Firewall considerations
• Export policy rule considerations
• Client support
• NFSv4.x features and functionality
For an in-depth look at the NFSv4.x protocol, including information about NFSv4.2, see the SNIA
overview of NFSv4.
Note: Clustered Data ONTAP currently supports only NFS versions 3 to 4.1.
ID Domain Mapping
While customers prepare to migrate their existing setup and infrastructure from NFSv3 to NFSv4, some
environmental changes must be made before moving to NFSv4. One of them is "id domain mapping."
In clustered Data ONTAP 8.1, a new option called v4-id-numerics was added. With this option
enabled, even if the client does not have access to the name mappings, numeric IDs can be sent in the
user name and group name fields. The server accepts them and treats them as representing the same
user as would be represented by a v2/v3 UID or GID having the corresponding numeric value.
Essentially, this approach makes NFSv4.x behave more like NFSv3. This approach also removes the
security enhancement of forcing ID domain resolution for NFSv4.x name strings; whenever possible, keep
this option as the default of disabled. If a name mapping for the user is present, however, the name string
is sent across the wire rather than the UID/GID. The intent of this option is to prevent the server from
sending “nobody” as a response to credential queries in NFS requests.

78 NFS Best Practice and Implementation Guide © 2017 NetApp, Inc. All Rights Reserved
Note: To access this command in versions earlier than clustered Data ONTAP 8.3, you must be in diag mode. Commands related to diag mode should be used with caution.
Best Practices 17: Use of v4-id-numerics (See Best Practices 18)
Although it is possible to allow the NFSv4.x server to return numeric IDs for NFS requests, it is best
to make sure that user names have appropriate name mappings on the client and server so that the
security feature of NFSv4.x is leveraged. This is easiest to accomplish when using name service
servers such as LDAP to connect to both client and server.
Some production environments have the challenge to build new naming service infrastructures like NIS or
LDAP for string-based name mapping to be functional in order to move to NFSv4. With the new
numeric_id option, setting name services does not become an absolute requirement. The numeric_id
feature must be supported and enabled on the server as well as on the client. With this option enabled,
the user and groups exchange UIDs/GIDs between the client and server just as with NFSv3. However, for
this option to be enabled and functional, NetApp recommends having a supported version of the client
and the server. For client versions that support numeric IDs with NFSv4, contact the OS vendor.
Note: Note that -v4-id-numerics should be enabled only if the client supports it.
Configuration step 1) Enabling numeric ID support for NFSv4 in clustered Data ONTAP.
Category Commands
Enable NFSv4.0.
cluster::> vserver nfs modify -vserver test_vs1 -access true -v4.0 enabled -tcp
enabled
Verification
cluster::> vserver nfs show -vserver test_vs1
Vserver: test_vs1
General NFS Access: true
NFS v3: enabled
NFS v4.0: enabled
UDP Protocol: enabled
TCP Protocol: enabled
Spin Authentication: disabled
Default Windows User: -
NFSv4.0 ACL Support: disabled
NFSv4.0 Read Delegation Support: disabled
NFSv4.0 Write Delegation Support: disabled
NFSv4 ID Mapping Domain: defaultv4iddomain.com
NFSv4.1 Minor Version Support: disabled
Rquota Enable: disabled
NFSv4.1 Parallel NFS Support: enabled
NFSv4.1 ACL Support: disabled
NFS vStorage Support: disabled
Set up NFSv4 user ID mapping.
Note:
On a clustered Data ONTAP system, the command to turn on the v4-id-numerics option
follows.

79 NFS Best Practice and Implementation Guide © 2017 NetApp, Inc. All Rights Reserved
cluster::> set diag
Warning: These diagnostic commands are for use by NetApp personnel only.
Do you want to continue? {y|n}: y
cluster::> vserver nfs modify -vserver testvs1 -v4-numeric-ids enabled
Verification
cluster::> vserver nfs show -vserver testvs1 -fields v4-numeric-ids
Vserver v4-numeric-ids
------- --------------
testvs1 enabled
If the v4-id-numerics option is disabled, the server accepts only the user name/group
name of the form user@domain or group@domain.
The NFSv4 domain name is a pseudodomain name that both the client and storage controller must agree upon before they can execute NFSv4 operations. The NFSv4 domain name might or might not be equal to the NIS or DNS domain name, but it must be a string that both the NFSv4 client and server understand.
This is a two-step process in which the Linux client and the clustered Data ONTAP system are configured with the NFSv4 domain name.
On the clustered Data ONTAP system:
The default value of the NFS option -v4-id-domain is defaultv4iddomain.com.
cluster::> vserver nfs modify -vserver test_vs1 -v4-id-domain
nfsv4domain.netapp.com
Verification
cluster::> vserver nfs show -vserver test_vs1 -fields v4-id-domain
Vserver v4-id-domain
-------- -------------------------------
test_vs1 nfsv4domain.netapp.com
This section describes how the domain name can be changed on the client.
Solaris. Edit the /etc/default/nfs file and change NFSMAPID_DOMAIN to that set
for the server. Reboot the client for the change to take effect.
Linux. Make the necessary adjustments to /etc/idmapd.conf. Restart the idmapd
process to have the change take effect. Note: Restarting idmapd varies per client. Rebooting the server is an option as well.
[root@nfsclient /]# vi /etc/idmapd.conf
[General]
Verbosity = 0
Pipefs-Directory = /var/lib/nfs/rpc_pipefs
Domain = nfsv4domain.netapp.com
[mapping]
Nobody-User = nobody
Nobody-Group = nobody

80 NFS Best Practice and Implementation Guide © 2017 NetApp, Inc. All Rights Reserved
[Translation]
Method = nsswitch
Create a UNIX group with GID 1 and assign it to the SVM.
Note: Whenever a volume is created, it is associated with UID 0 and GID 1 by default. NFSv3 ignores this, whereas NFSv4 is sensitive to the UID and GID mapping. If GID 1 was not previously created, follow these steps to create one.
cluster::> vserver services unix-group create -vserver test_vs1 -name daemon -id
1
Verification
cluster::> vserver services unix-group show -vserver test_vs1
Vserver Name ID
-------------- ------------------- ----------
test_vs1 daemon 1
test_vs1 root 0
2 entries were displayed.
Mount the client over NFSv4.
On the client:
[root@nfsclient /]# mkdir -p /home/root/mnt/nfs4/
[root@nfsclient /]# mount 172.17.37.135:/path01 /home/root/mnt/nfs4/
Verification
[root@nfsclient /]# mount
172.17.37.135:/path01 on /home/root/mnt/test_vs1 type nfs
(rw,vers=3,addr=172.17.37.135)
172.17.37.135:/path01 on /home/root/mnt/ nfs4 type nfs
(rw,vers=4,addr=172.17.37.135,clientaddr=172.17.44.42)
Note: Linux clients must mount the file system from the NetApp storage with a -t nfs4 option. However, RHEL 6.0 and later mount NFSv4 by default. Solaris 10 clients mount the file system over NFSv4 by default when NFSv4 is enabled on the NetApp storage appliance. For mounting over NFSv3, “vers=3” must be explicitly specified on the mounts.
Note: A volume can be mounted using NFSv3 and NFSv4.

81 NFS Best Practice and Implementation Guide © 2017 NetApp, Inc. All Rights Reserved
Storage Failover Considerations
NFSv4.x uses a completely different locking model than NFSv3. Locking in NFSv4.x is a lease-based
model that is integrated into the protocol rather than separated as it is in NFSv3 (NLM). From the Data
ONTAP documentation:
In accordance with RFC 3530, Data ONTAP "defines a single lease period for all state held by an
NFS client. If the client does not renew its lease within the defined period, all states
associated with the client's lease may be released by the server." The client can renew its lease
explicitly or implicitly by performing an operation, such as reading a file.
Furthermore, Data ONTAP defines a grace period, which is a period of special processing in which
clients attempt to reclaim their locking state during a server recovery.
Table 12) NFSv4.x lock terminology.
Term Definition (per RFC 3530)
Lease The time period in which Data ONTAP irrevocably grants a lock to a client
Grace period The time period in which clients attempt to reclaim their locking state from Data
ONTAP during server recovery
Lock Refers to both record (byte-range) locks as well as file (share) locks unless
specifically stated otherwise
For more information about locking, see the section in this document on NFSv4.x locking. Because of this
new locking methodology, as well as the statefulness of the NFSv4.x protocol, storage failover operates
differently as compared to NFSv3. For more information, see the section in this document about
nondisruptive operations with NFS in clustered Data ONTAP.
Name Services
When deciding to use NFSv4.x, it is a best practice to centralize the NFSv4.x users in name services
such as LDAP or NIS. Doing so allows all clients and clustered Data ONTAP NFS servers to leverage the
same resources and guarantees that all names, UIDs, and GIDs are consistent across the
implementation. For more information about name services, see TR-4073: Secure Unified Authentication
for Kerberos, LDAP, and NFSv4.x Information and TR-4379: Name Services Best Practices.
Firewall Considerations
NFSv3 required several ports to be opened for ancillary protocols such as NLM, NSM, and so on in
addition to port 2049. NFSv4.x requires only port 2049. If you want to use NFSv3 and NFSv4.x in the
same environment, open all relevant NFS ports. These ports are referenced in this document.

82 NFS Best Practice and Implementation Guide © 2017 NetApp, Inc. All Rights Reserved
Volume Language Considerations
In NetApp Data ONTAP, volumes can have specific languages set. This capability is intended to be used
for internationalization of file names for languages that use characters not common to English, such as
Japanese, Chinese, German, and so on. When using NFSv4.x, RFC 3530 states that UTF-8 is
recommended.
11. Internationalization
The primary issue in which NFS version 4 needs to deal with
internationalization, or I18N, is with respect to file names and
other strings as used within the protocol. The choice of string
representation must allow reasonable name/string access to clients
which use various languages. The UTF-8 encoding of the UCS as
defined by [ISO10646] allows for this type of access and follows the
policy described in "IETF Policy on Character Sets and Languages",
[RFC2277].
If you intend to migrate to clustered Data ONTAP from a 7-Mode system and use NFSv4.x, use some
form of UTF-8 language support, such as C.UTF-8 (which is the default language of volumes in clustered
Data ONTAP). If the 7-Mode system does not already use a UTF-8 language, then it should be converted
before you transition to clustered Data ONTAP or when you intend to transition from NFSv3 to NFSv4.
The exact UTF-8 language specified depends on the specific requirements of the native language to
make sure of proper display of character sets.
Data ONTAP operating in 7-Mode allowed volumes that hosted NFSv4.x data to use C language types.
Clustered Data ONTAP does not do so, because it honors the RFC standard recommendation of UTF-8.
TR-4160: Secure Multitenancy Considerations covers language recommendations in clustered Data
ONTAP. When changing a volume's language, every file in the volume must be accessed after the
change to make sure that they all reflect the language change. Use a simple ls -lR to access a
recursive listing of files.
For more information about transitioning to clustered Data ONTAP, see TR-4052: Successfully
Transitioning to Clustered Data ONTAP.
Potential Issues with UTF-8 Characters
In some instances, UTF-8 file names with character representation containing 0x80 (octal \0200) are not
able to be managed using NFS mounts. Many of these characters occur in the Unicode General
Punctuation block. For example, the name 'test•file' is encoded as 'test\xe2\x80\xa2file' and
that name might be affected because it contains 0x80 in the UTF-8 sequence. See bug 998468 for
details.
This issue only affects the following versions of ONTAP:
• For 7-Mode 8.2x or clustered Data ONTAP 8.2x, files created before 8.2.4P2
• For clustered Data ONTAP 8.3x, files created before 8.3.2
In clustered Data ONTAP, the new option -v3-search-unconverted-filename has been added in
ONTAP 9 to avoid this issue.
[-v3-search-unconverted-filename {enabled|disabled}] - Lookup for the filename in unconverted
language if converted language lookup fails (privilege: advanced)
This optional parameter specifies whether to continue the search with unconverted name while
doing lookup in a directory.

83 NFS Best Practice and Implementation Guide © 2017 NetApp, Inc. All Rights Reserved
Export Policy Rules
In clustered Data ONTAP, it is possible to specify which version of NFS is supported for an exported file
system. If an environment was configured for NFSv3 and the export policy rule option –protocol was
limited to allow NFSv3 only, then the option needs to be modified to allow NFSv4. Additionally, policy
rules could be configured to allow access only to NFSv4.x clients.
Example:
cluster::> export-policy rule modify -policy default -vserver NAS -protocol nfs4
For more information, consult the product documentation for your specific version of clustered Data
ONTAP.
Client Considerations
When you use NFSv4.x, clients are as important to consider as the NFS server. Follow the client
considerations below when implementing NFSv4.x. Other considerations might be necessary. Contact the
OS vendor for specific questions about NFSv4.x configuration.
• NFSv4.x is supported.
• The fstab file and NFS configuration files are configured properly. When mounting, the client negotiates the highest NFS version available with the NFS server. If NFSv4.x is not allowed by the client or fstab specifies NFSv3, then NFSv4.x is not used at mount.
• The idmapd.conf file is configured with the proper settings.
• The client either contains identical users and UID/GID (including case sensitivity) or uses the same name service server as the NFS server/clustered Data ONTAP SVM.
• If using name services on the client, the client is configured properly for name services (nsswitch.conf, ldap.conf, sssd.conf, and so on) and the appropriate services are started, running, and configured to start at boot.
• The NFSv4.x service is started, running, and configured to start at boot.
Note: TR-4073: Secure Unified Authentication covers some NFSv4.x and name service considerations as they pertain to clients.
NFSv4.x Features and Functionality
NFSv4.x is the next evolution of the NFS protocol and enhances NFSv3 with new features and
functionality, such as referrals, delegations, pNFS, and so on. These features are covered throughout this
document and should be factored in to any design decisions for NFSv4.x implementations.
NFSv4 User ID Mapping
Clustered Data ONTAP supports "numeric-ids," which can be enabled using the following command at
the SVM level.
cluster::> set diag
cluster::*> vserver nfs modify -vserver vs0 -v4-numeric-ids enabled
cluster::*> vserver nfs show -vserver vs0 –fields v4-numeric-ids
vserver v4-numeric-ids
------- --------------
vs0 enabled
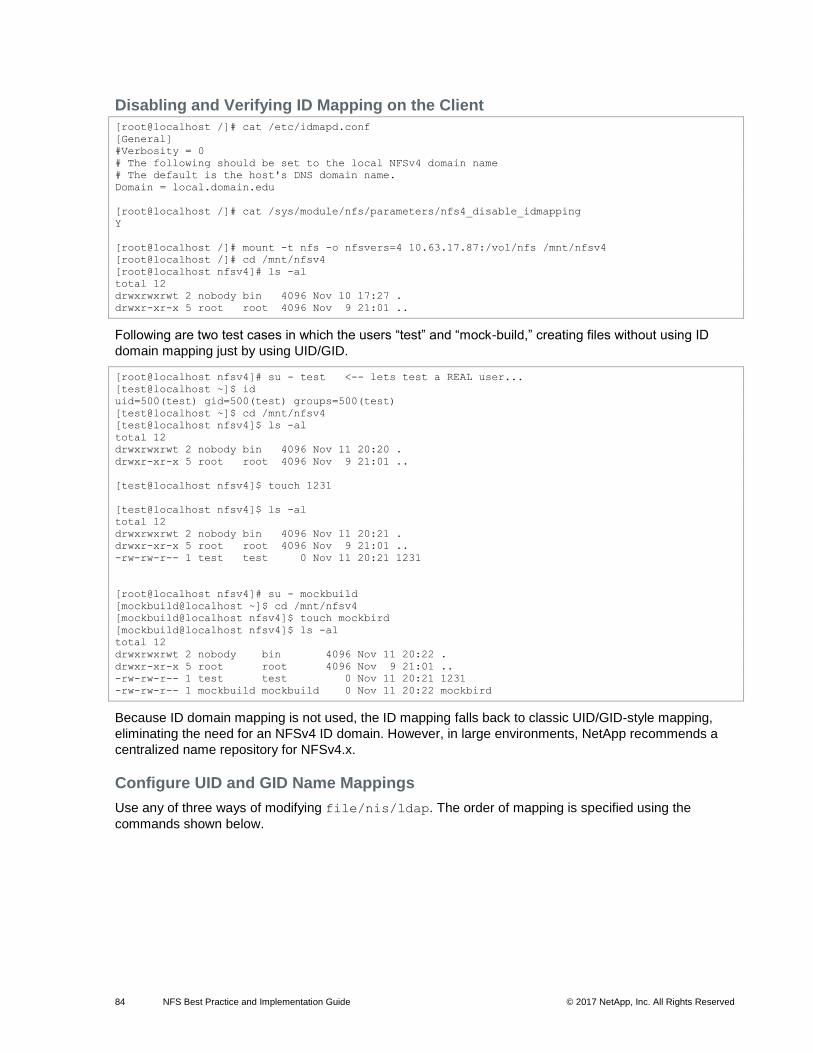
84 NFS Best Practice and Implementation Guide © 2017 NetApp, Inc. All Rights Reserved
Disabling and Verifying ID Mapping on the Client
[root@localhost /]# cat /etc/idmapd.conf
[General]
#Verbosity = 0
# The following should be set to the local NFSv4 domain name
# The default is the host's DNS domain name.
Domain = local.domain.edu
[root@localhost /]# cat /sys/module/nfs/parameters/nfs4_disable_idmapping
Y
[root@localhost /]# mount -t nfs -o nfsvers=4 10.63.17.87:/vol/nfs /mnt/nfsv4
[root@localhost /]# cd /mnt/nfsv4
[root@localhost nfsv4]# ls -al
total 12
drwxrwxrwt 2 nobody bin 4096 Nov 10 17:27 .
drwxr-xr-x 5 root root 4096 Nov 9 21:01 ..
Following are two test cases in which the users “test” and “mock-build,” creating files without using ID
domain mapping just by using UID/GID.
[root@localhost nfsv4]# su - test <-- lets test a REAL user...
[test@localhost ~]$ id
uid=500(test) gid=500(test) groups=500(test)
[test@localhost ~]$ cd /mnt/nfsv4
[test@localhost nfsv4]$ ls -al
total 12
drwxrwxrwt 2 nobody bin 4096 Nov 11 20:20 .
drwxr-xr-x 5 root root 4096 Nov 9 21:01 ..
[test@localhost nfsv4]$ touch 1231
[test@localhost nfsv4]$ ls -al
total 12
drwxrwxrwt 2 nobody bin 4096 Nov 11 20:21 .
drwxr-xr-x 5 root root 4096 Nov 9 21:01 ..
-rw-rw-r-- 1 test test 0 Nov 11 20:21 1231
[root@localhost nfsv4]# su - mockbuild
[mockbuild@localhost ~]$ cd /mnt/nfsv4
[mockbuild@localhost nfsv4]$ touch mockbird
[mockbuild@localhost nfsv4]$ ls -al
total 12
drwxrwxrwt 2 nobody bin 4096 Nov 11 20:22 .
drwxr-xr-x 5 root root 4096 Nov 9 21:01 ..
-rw-rw-r-- 1 test test 0 Nov 11 20:21 1231
-rw-rw-r-- 1 mockbuild mockbuild 0 Nov 11 20:22 mockbird
Because ID domain mapping is not used, the ID mapping falls back to classic UID/GID-style mapping,
eliminating the need for an NFSv4 ID domain. However, in large environments, NetApp recommends a
centralized name repository for NFSv4.x.
Configure UID and GID Name Mappings
Use any of three ways of modifying file/nis/ldap. The order of mapping is specified using the
commands shown below.
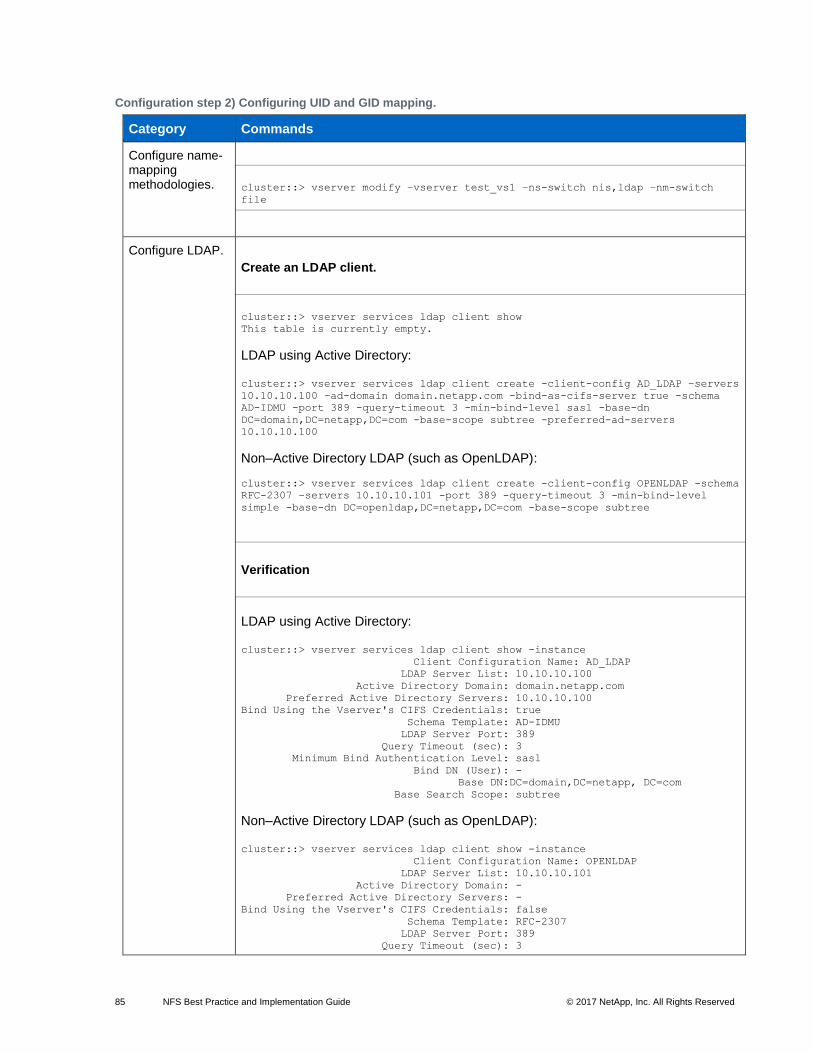
85 NFS Best Practice and Implementation Guide © 2017 NetApp, Inc. All Rights Reserved
Configuration step 2) Configuring UID and GID mapping.
Category Commands
Configure name-mapping methodologies.
cluster::> vserver modify –vserver test_vs1 –ns-switch nis,ldap –nm-switch
file
Configure LDAP.
Create an LDAP client.
cluster::> vserver services ldap client show
This table is currently empty.
LDAP using Active Directory: cluster::> vserver services ldap client create -client-config AD_LDAP –servers
10.10.10.100 –ad-domain domain.netapp.com -bind-as-cifs-server true -schema
AD-IDMU -port 389 -query-timeout 3 -min-bind-level sasl -base-dn
DC=domain,DC=netapp,DC=com -base-scope subtree -preferred-ad-servers
10.10.10.100
Non–Active Directory LDAP (such as OpenLDAP):
cluster::> vserver services ldap client create -client-config OPENLDAP -schema
RFC-2307 –servers 10.10.10.101 -port 389 -query-timeout 3 -min-bind-level
simple -base-dn DC=openldap,DC=netapp,DC=com -base-scope subtree
Verification
LDAP using Active Directory: cluster::> vserver services ldap client show -instance
Client Configuration Name: AD_LDAP
LDAP Server List: 10.10.10.100
Active Directory Domain: domain.netapp.com
Preferred Active Directory Servers: 10.10.10.100
Bind Using the Vserver's CIFS Credentials: true
Schema Template: AD-IDMU
LDAP Server Port: 389
Query Timeout (sec): 3
Minimum Bind Authentication Level: sasl
Bind DN (User): -
Base DN:DC=domain,DC=netapp, DC=com
Base Search Scope: subtree
Non–Active Directory LDAP (such as OpenLDAP): cluster::> vserver services ldap client show -instance
Client Configuration Name: OPENLDAP
LDAP Server List: 10.10.10.101
Active Directory Domain: -
Preferred Active Directory Servers: -
Bind Using the Vserver's CIFS Credentials: false
Schema Template: RFC-2307
LDAP Server Port: 389
Query Timeout (sec): 3

86 NFS Best Practice and Implementation Guide © 2017 NetApp, Inc. All Rights Reserved
Minimum Bind Authentication Level: sasl
Bind DN (User): -
Base DN:DC=openldap,DC=netapp, DC=com
Base Search Scope: subtree
Create an LDAP server.
cluster::> vserver services ldap show
This table is currently empty.
cluster::> vserver services ldap create -vserver test_vs1 -client-config
ldapclient1 -client-enabled true
Verification
cluster::> vserver services ldap show
Client Client
Vserver Configuration Enabled
-------------- ------------- -------
test_vs1 ldapclient1 true
Configure NIS.
cluster::> vserver services nis-domain create -vserver test_vs1 -domain
nisdom.netapp.com -active true -servers 10.10.10.110
Verification
cluster::> vserver services nis-domain show
NIS
Vserver Domain Active Server
------------- ------------------- ------ -----------------------------
test_vs1 nisdom.netapp.com true 10.10.10.110

87 NFS Best Practice and Implementation Guide © 2017 NetApp, Inc. All Rights Reserved
Viewing Active NFS Connections in the Cluster
In clustered Data ONTAP, it is possible to view active NFS connections across all SVMs and nodes in the
cluster using the network connections active show command. This command allows filtering of
IPs, services, and other features to provide more useful and granular information. The command can be
used in place of classic netstat commands found in 7-Mode.
Example:
cluster::> network connections active show
show show-clients show-lifs show-protocols show-services
cluster::> network connections active show -node node1 -service nfs*
Vserver Interface Remote
CID Ctx Name Name:Local Port Host:Port Protocol/Service
--------- --- --------- ----------------- -------------------- ----------------
Node: node1
286571835 6 vs0 data:2049 10.61.179.164:763 TCP/nfs
cluster::> network connections active show -node node2 -service nfs*
There are no entries matching your query.
Additionally, it is possible to view network connections in a LISTEN state with network connections
listening show.
Example:
cluster::> network connections listening show -node node22 -vserver NAS
Vserver Name Interface Name:Local Port Protocol/Service
---------------- ------------------------------------- -----------------------
Node: node2
NAS data1:40001 TCP/cifs-msrpc
NAS data1:135 TCP/cifs-msrpc
NAS data1:137 UDP/cifs-nam
NAS data1:139 TCP/cifs-srv
NAS data1:445 TCP/cifs-srv
NAS data1:4049 UDP/unknown
NAS data1:2050 TCP/fcache
NAS data1:111 TCP/port-map
NAS data1:111 UDP/port-map
NAS data1:4046 TCP/sm
NAS data1:4046 UDP/sm
NAS data1:4045 TCP/nlm-v4
NAS data1:4045 UDP/nlm-v4
NAS data1:2049 TCP/nfs
NAS data1:2049 UDP/nfs
NAS data1:635 TCP/mount
NAS data1:635 UDP/mount
NAS data2:40001 TCP/cifs-msrpc
NAS data2:135 TCP/cifs-msrpc
NAS data2:137 UDP/cifs-nam
NAS data2:139 TCP/cifs-srv
NAS data2:445 TCP/cifs-srv
NAS data2:4049 UDP/unknown
NAS data2:2050 TCP/fcache
NAS data2:111 TCP/port-map
NAS data2:111 UDP/port-map
NAS data2:4046 TCP/sm
NAS data2:4046 UDP/sm
NAS data2:4045 TCP/nlm-v4
NAS data2:4045 UDP/nlm-v4
NAS data2:2049 TCP/nfs
NAS data2:2049 UDP/nfs
NAS data2:635 TCP/mount
NAS data2:635 UDP/mount
34 entries were displayed.

88 NFS Best Practice and Implementation Guide © 2017 NetApp, Inc. All Rights Reserved
Viewing NFS Usage
In clustered Data ONTAP 8.3.x and later, you can see how many RPC calls have been issued per NFS
version on a local node. The values are persistent and clear only when the node reboots. This command
is available only from diagnostic privilege level and must be issued on the local node.
cluster::> set diag
cluster::*> diag nblade nfs usage show
Node: node2
v3: 120
v4: 2076
NFSv4 Access Control Lists (ACLs)
The NFSv4 protocol can provide access control in the form of NFSv4 Access Control Lists (ACLs), which
are similar in concept to those found in CIFS. An NFSv4 ACL consists of individual Access Control
Entries (ACEs), each of which provides an access control directive to the server. Clustered Data ONTAP
8.2 and later support a maximum of 1,024 ACEs.
Benefits of Enabling NFSv4 ACLs
The benefits of enabling NFSv4 ACLs include the following:
• Granular control of user access to files and directories
• Better NFS security
• Improved interoperability with CIFS
• Removal of the NFS limitation of 16 groups per user with AUTH_SYS security
ACLs bypass the need for GID resolution, which effectively removes the GID limit.
Compatibility Between NFSv4 ACLs and Windows (NTFS) ACLs
NFSv4 ACLs are different from Windows file-level ACLs (NTFS ACLs), but Data ONTAP can map NFSv4
ACLs to Windows ACLs for viewing on Windows platforms.
Note: Currently this works only for Infinite Volumes and Unified security styles.
Permissions displayed to NFS clients for files that have Windows ACLs are "display" permissions, and the
permissions used for checking file access are those of the Windows ACL.
Note: Data ONTAP does not support POSIX ACLs.
How NFSv4 ACLs Work
When a client sets an NFSv4 ACL on a file during a SETATTR operation, the NetApp storage system sets
that ACL on the object, replacing any existing ACL. If there is no ACL on a file, then the mode
permissions on the file are calculated from OWNER@, GROUP@, and EVERYONE@. If there are any
existing SUID/SGID/STICKY bits on the file, they are not affected.
When a client gets an NFSv4 ACL on a file during the course of a GETATTR operation, the NetApp
system reads the NFSV4 ACL associated with the object, constructs a list of ACEs, and returns the list to
the client. If the file has an NT ACL or mode bits, then an ACL is constructed from mode bits and is
returned to the client.
Access is denied if a DENY ACE is present in the ACL; access is granted if an ALLOW ACE exists.
However, access is also denied if neither of the ACEs is present in the ACL.
A security descriptor consists of a Security ACL (SACL) and a Discretionary ACL (DACL). When NFSv4
interoperates with CIFS, the DACL is one-to-one mapped with NFSv4 and CIFS. The DACL consists of
the ALLOW and the DENY ACEs.

89 NFS Best Practice and Implementation Guide © 2017 NetApp, Inc. All Rights Reserved
Configuration step 3) Enabling NFSv4 access control lists.
Category Commands
Modify the NFSv4 server to enable ACLs by enabling the –
v4.0-acl
option.
cluster::> vserver nfs modify -vserver test_vs1 -v4.0-acl enabled
Verification
cluster::> vserver nfs show -vserver test_vs1 -fields v4.0-acl,v4.0
Vserver v4.0 v4.0-acl
-------- ------- --------
test_vs1 enabled enabled
On a Linux client
Note: After you enable ACLs on the server, the nfs4_setfacl and nfs4_getfacl
commands are required on the Linux client to set or get NFSv4 ACLs on a file or directory, respectively. To avoid problems with earlier implementations, use RHEL 5.8 or RHEL 6.2 and later for using NFSv4 ACLs in clustered Data ONTAP. The following example illustrates the use of the -e option to set the ACLs on the file or directory from the client. To learn
more about the types of ACEs that can be used, refer to the following links:
www.linuxcertif.com/man/1/nfs4_setfacl/145707/
http://linux.die.net/man/5/nfs4_acl
[root@nfsclient /]# mount 172.17.37.135:/path01 /home/root/mnt/nfs4/
[root@nfsclient /]# mount
172.17.37.135:/path01 on /home/root/mnt/ nfs4 type nfs
(rw,vers=4,addr=172.17.37.135,clientaddr=172.17.44.42)
[root@nfsclient /]# cd /home/root/mnt/nfs4
[root@nfsclient nfs4]# ls –al
total 8
drwxr-xr-x. 2 root root 4096 Jul 27 12:56 ./
drwxr-xr-x. 3 root root 4096 Jul 27 12:56 ../
[root@linux nfs4] # touch aa
[root@linux nfs4] # nfs4_setfacl –e aa
## Editing NFSv4 ACL for file: /home/root/mnt/ nfs4/aa:
A::OWNER@:rwatTnNcCy
D::OWNER@:x
A:g:GROUP@:rtncy
D:g:GROUP@:waxTC
A::EVERYONE@:rtncCy
D::EVERYONE@:waxT
Verification
[root@nfsclient nfs4] # nfs4_getfacl aa
A::OWNER@:rwatTnNcCy
D::OWNER@:x
A:g:GROUP@:rtncy
D:g:GROUP@:waxTC
A::EVERYONE@:rtncCy
D::EVERYONE@:waxT

90 NFS Best Practice and Implementation Guide © 2017 NetApp, Inc. All Rights Reserved
A client using NFSv4 ACLs can set and view ACLs for files and directories on the system. When a new
file or subdirectory is created in a directory that has an ACL, the new file or subdirectory inherits all ACEs
in the ACL that have been tagged with the appropriate inheritance flags. For access checking, CIFS users
are mapped to UNIX users. The mapped UNIX user and that user’s group membership are checked
against the ACL.
If a file or directory has an ACL, that ACL is used to control access no matter which protocol—NFSv3,
NFSv4, or CIFS—is used to access the file or directory. The ACL is also used even if NFSv4 is no longer
enabled on the system.
Files and directories inherit ACEs from NFSv4 ACLs on parent directories (possibly with appropriate
modifications) as long as the ACEs have been tagged with the correct inheritance flags. This process can
be controlled using the following command:
cluster::> nfs server modify –vserver vs0 -v4-acl-max-aces [number up to 1024]
In versions earlier than clustered Data ONTAP 8.2, the maximum ACE limit was 400. If reverting to a
version of Data ONTAP earlier than 8.2, files or directories with more than 400 ACEs have their ACLs
dropped, and the security reverts to mode-bit style.
When a file or directory is created as the result of an NFSv4 request, the ACL on the resulting file or directory depends on whether the file creation request includes an ACL or only standard UNIX file access permissions. The ACL also depends on whether the parent directory has an ACL.
• If the request includes an ACL, that ACL is used.
• If the request includes only standard UNIX file access permissions and the parent directory does not have an ACL, the client file mode is used to set standard UNIX file access permissions.
• If the request includes only standard UNIX file access permissions and the parent directory has a noninheritable ACL, a default ACL based on the mode bits passed into the request is set on the new object.
• If the request includes only standard UNIX file access permissions but the parent directory has an ACL, the ACEs in the parent directory's ACL are inherited by the new file or directory as long as the ACEs have been tagged with the appropriate inheritance flags.
Note: A parent ACL is inherited even if -v4.0-acl is set to off.
NFSv4 ACL Behavior with umask and ACL Inheritance
NFSv4 ACLs provide the ability to offer ACL inheritance. ACL inheritance means that files or folders
created beneath objects with NFSv4 ACLs set can inherit the ACLs based on the configuration of the ACL
inheritance flag.
Umask is used to control the permission level at which files and folders are created in a directory. For
example, if my directory has 0777 permissions and my umask is 0022, the files are created at a
permission level of 0644. Linux does not allow files to be created with execute permissions, which is why
6 is the most permissive access allowed with umask.
In Data ONTAP operating in 7-Mode, umask would be ignored when NFSv4 ACL inheritance was used.
However, as per RFC 5661, the behavior in 7-Mode was not standard. Clustered Data ONTAP currently
allows umask to override inherited ACLs, which is expected behavior as per RFC 5661; client-mode bits
override inherited ACLs. See bug 952771 for details.
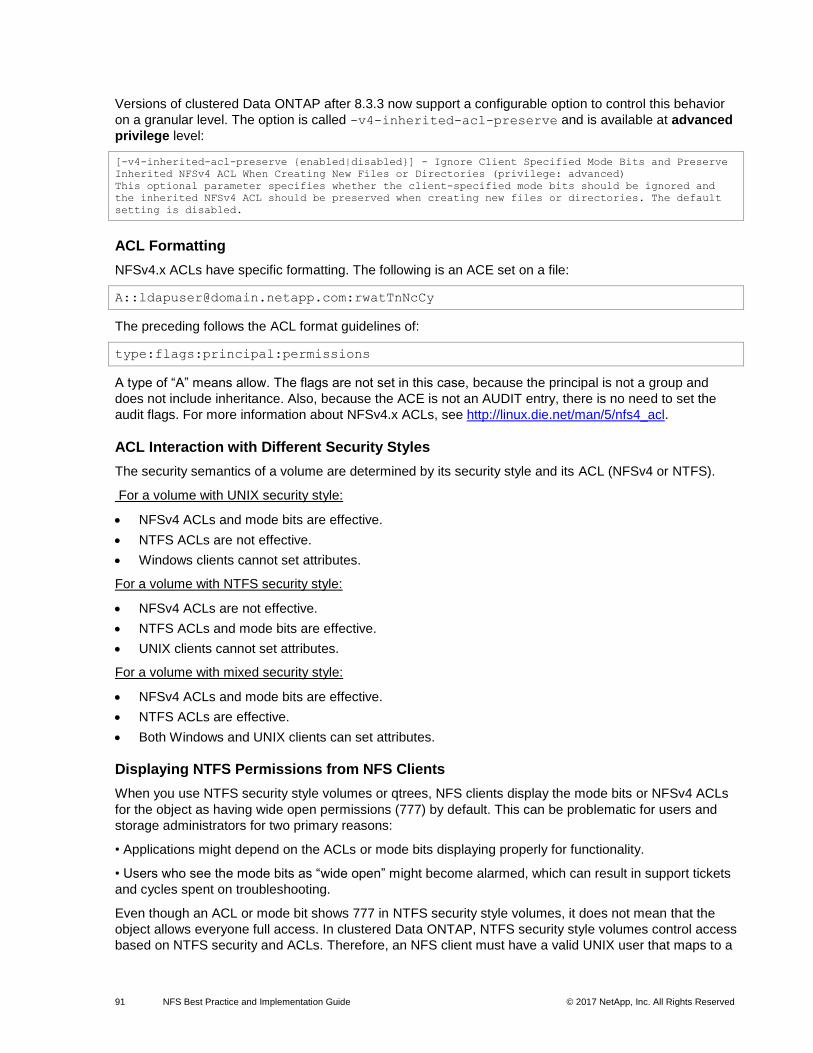
91 NFS Best Practice and Implementation Guide © 2017 NetApp, Inc. All Rights Reserved
Versions of clustered Data ONTAP after 8.3.3 now support a configurable option to control this behavior
on a granular level. The option is called -v4-inherited-acl-preserve and is available at advanced
privilege level:
[-v4-inherited-acl-preserve {enabled|disabled}] - Ignore Client Specified Mode Bits and Preserve
Inherited NFSv4 ACL When Creating New Files or Directories (privilege: advanced)
This optional parameter specifies whether the client-specified mode bits should be ignored and
the inherited NFSv4 ACL should be preserved when creating new files or directories. The default
setting is disabled.
ACL Formatting
NFSv4.x ACLs have specific formatting. The following is an ACE set on a file:
A::[email protected]:rwatTnNcCy
The preceding follows the ACL format guidelines of:
type:flags:principal:permissions
A type of “A” means allow. The flags are not set in this case, because the principal is not a group and
does not include inheritance. Also, because the ACE is not an AUDIT entry, there is no need to set the
audit flags. For more information about NFSv4.x ACLs, see http://linux.die.net/man/5/nfs4_acl.
ACL Interaction with Different Security Styles
The security semantics of a volume are determined by its security style and its ACL (NFSv4 or NTFS).
For a volume with UNIX security style:
• NFSv4 ACLs and mode bits are effective.
• NTFS ACLs are not effective.
• Windows clients cannot set attributes.
For a volume with NTFS security style:
• NFSv4 ACLs are not effective.
• NTFS ACLs and mode bits are effective.
• UNIX clients cannot set attributes.
For a volume with mixed security style:
• NFSv4 ACLs and mode bits are effective.
• NTFS ACLs are effective.
• Both Windows and UNIX clients can set attributes.
Displaying NTFS Permissions from NFS Clients
When you use NTFS security style volumes or qtrees, NFS clients display the mode bits or NFSv4 ACLs
for the object as having wide open permissions (777) by default. This can be problematic for users and
storage administrators for two primary reasons:
• Applications might depend on the ACLs or mode bits displaying properly for functionality.
• Users who see the mode bits as “wide open” might become alarmed, which can result in support tickets
and cycles spent on troubleshooting.
Even though an ACL or mode bit shows 777 in NTFS security style volumes, it does not mean that the
object allows everyone full access. In clustered Data ONTAP, NTFS security style volumes control access
based on NTFS security and ACLs. Therefore, an NFS client must have a valid UNIX user that maps to a

92 NFS Best Practice and Implementation Guide © 2017 NetApp, Inc. All Rights Reserved
valid Windows user to be able to access the volume at all (authentication). After the initial authentication,
the mapped user is then used to determine access based on the granular NTFS ACLs.
Clustered Data ONTAP 8.3.1 and later introduced an option called ntacl-display-permissive-
perms. The default value for the option is “disabled,” which allows the approximation of interpreted NTFS
ACLs on NFS clients mounting NTFS objects, thereby displaying permissions based on minimum access,
more closely approximating the real NTFS permissions of the current user in UNIX terms. This helps
alleviate concerns and address application compatibility and feature parity from Data ONTAP operating in
7-Mode.
The option allows the user accessing the NTFS security–style volume to see the approximate
permissions provided based on the user accessing the share. Therefore, users accessing the object
might see differing results based on the NTFS security access.
Also, because of the vast difference between NTFS and UNIX-style ACLs, the approximation of
permissions might not be exact. For example, if a user has a granular permission provided only in NTFS
security semantics, then the NFS client cannot interpret that properly.
The default value for the option is “disabled,” which allows the approximation of interpreted NTFS ACLs
on NFS clients mounting NTFS objects.
To disable this functionality, modify the option to “enabled.”
Mixed Security Style Considerations
Mixed qtree styles can cause issues with permissions if they are not set up properly. Mixed styles can
also cause confusion about which permissions are set on a file or folder when using mixed security style,
because NFS or CIFS clients might not display the ACLs properly. Mixed security style can get messy
when clients modify permissions, even with identity management in place.
Best Practices 18: Choosing a Security Style (See Best Practices 19)
Choose either NTFS- or UNIX-style security unless there is a specific recommendation from an
application vendor to use mixed mode.
ACL Behaviors
• For any NT user, the user's SID is mapped to a UNIX ID and the NFSv4 ACL is then checked for access for that UNIX ID. Regardless of which permissions are displayed, the actual permissions set on the file take effect and are returned to the client.
• If a file has an NT ACL and a UNIX client does a chmod, chgrp, or chown, the NT ACL is dropped.
In versions earlier than clustered Data ONTAP 8.1, run the following command on the node that owns the
data volume:
cluster::> node run –node [nodename that owns data volume] “fsecurity show /vol/volname”
In clustered Data ONTAP 8.2 and later, use the following command:
cluster::> vserver security file-directory show -vserver vs0 -path /junction-path

93 NFS Best Practice and Implementation Guide © 2017 NetApp, Inc. All Rights Reserved
Explicit DENY
NFSv4 permissions may include explicit DENY attributes for OWNER, GROUP, and EVERYONE. That is
because NFSv4 ACLs are “default-deny,” which means that if an ACL is not explicitly granted by an ACE,
then it is denied.
Example:
sh-4.1$ nfs4_getfacl /mixed
A::[email protected]:ratTnNcCy
A::OWNER@:rwaDxtTnNcCy
D::OWNER@:
A:g:GROUP@:rxtncy
D:g:GROUP@:waDTC
A::EVERYONE@:rxtncy
D::EVERYONE@:waDTC
DENY ACEs should be avoided whenever possible, because they can be confusing and complicated.
When DENY ACEs are set, users might be denied access when they expect to be granted access. This is
because the ordering of NFSv4 ACLs affects how they are evaluated.
The preceding set of ACEs is equivalent to 755 in mode bits. That means:
• The owner has full rights.
• Groups have read only.
• Others have read only.
However, even if permissions are adjusted to the 775 equivalent, access can be denied because of the
explicit DENY set on EVERYONE.
For example, the user “ldapuser” belongs to the group “Domain Users.”
sh-4.1$ id
uid=55(ldapuser) gid=513(Domain Users) groups=513(Domain Users),503(unixadmins)
context=unconfined_u:unconfined_r:unconfined_t:s0-s0:c0.c1023
Permissions on the volume “mixed” are 775. The owner is root and the group is “Domain Users”:
[root@nfsclient /]# nfs4_getfacl /mixed
A::OWNER@:rwaDxtTnNcCy
D::OWNER@:
A:g:GROUP@:rwaDxtTnNcy
D:g:GROUP@:C
A::EVERYONE@:rxtncy
D::EVERYONE@:waDTC
[root@nfsclient /]# ls -la | grep mixed
drwxrwxr-x. 3 root Domain Users 4096 Apr 30 09:52 mixed
Because “ldapuser” is a member of Domain Users, it should have write access to the volume, and it does:
sh-4.1$ cd /mixed
sh-4.1$ ls -la
total 12
drwxrwxr-x. 3 root Domain Users 4096 Apr 30 09:52 .
dr-xr-xr-x. 28 root root 4096 Apr 29 15:24 ..
drwxrwxrwx. 6 root root 4096 Apr 30 08:00 .snapshot
sh-4.1$ touch newfile
sh-4.1$ nfs4_getfacl /mixed
sh-4.1$ ls -la
total 12
drwxrwxr-x. 3 root Domain Users 4096 Apr 30 09:56 .
dr-xr-xr-x. 28 root root 4096 Apr 29 15:24 ..
drwxrwxrwx. 6 root root 4096 Apr 30 08:00 .snapshot
-rw-r--r--. 1 ldapuser Domain Users 0 Apr 30 09:56 newfile

94 NFS Best Practice and Implementation Guide © 2017 NetApp, Inc. All Rights Reserved
However, if the ACLs are reordered and the explicit DENY for EVERYONE is placed ahead of group, then
“ldapuser” is denied access to write to the same volume it just had access to write to:
[root@nfsclient /]# nfs4_getfacl /mixed
A::OWNER@:rwaDxtTnNcCy
D::OWNER@:
A::EVERYONE@:rxtncy
D::EVERYONE@:waDTC
A:g:GROUP@:rwaDxtTnNcy
[root@nfsclient /]# su ldapuser
sh-4.1$ cd /mixed
sh-4.1$ ls -la
total 12
drwxrwxr-x. 3 root Domain Users 4096 Apr 30 09:56 .
dr-xr-xr-x. 28 root root 4096 Apr 29 15:24 ..
drwxrwxrwx. 6 root root 4096 Apr 30 08:00 .snapshot
-rw-r--r--. 1 ldapuser Domain Users 0 Apr 30 09:56 newfile
sh-4.1$ touch newfile2
touch: cannot touch `newfile2': Permission denied
If the explicit DENY rule is removed, the desired access is restored:
[root@nfsclient /]# nfs4_getfacl /mixed
A::OWNER@:rwaDxtTnNcCy
D::OWNER@:
A::EVERYONE@:rxtncy
A:g:GROUP@:rwaDxtTnNcy
[root@nfsclient /]# su ldapuser
sh-4.1$ cd /mixed
sh-4.1$ ls -la
total 12
drwxrwxr-x. 3 root Domain Users 4096 Apr 30 09:56 .
dr-xr-xr-x. 28 root root 4096 Apr 29 15:24 ..
drwxrwxrwx. 6 root root 4096 Apr 30 08:00 .snapshot
-rw-r--r--. 1 ldapuser Domain Users 0 Apr 30 09:56 newfile
sh-4.1$ touch newfile2
sh-4.1$ ls -la
total 12
drwxrwxr-x. 3 root Domain Users 4096 Apr 30 10:06 .
dr-xr-xr-x. 28 root root 4096 Apr 29 15:24 ..
drwxrwxrwx. 6 root root 4096 Apr 30 08:00 .snapshot
-rw-r--r--. 1 ldapuser Domain Users 0 Apr 30 09:56 newfile
-rw-r--r--. 1 ldapuser Domain Users 0 Apr 30 10:06 newfile2
Best Practices 19: Using DENY ACEs (See Best Practices 20)
It is a best practice to set DENY ACEs only when absolutely necessary.

95 NFS Best Practice and Implementation Guide © 2017 NetApp, Inc. All Rights Reserved
NFSv4 ACL Preservation
By default, NFSv4 ACLs can be affected by setting mode bits on a file or folder. If an NFSv4 ACE has
been configured and a chmod is used, the ACE is removed. This behavior can be avoided by setting the
following on the NetApp storage system:
cluster::> set diag
cluster::*> nfs server modify -vserver vs0 -v4-acl-preserve enabled
NetApp recommends this option in environments using NFSv3 and NFSv4 on the same NFS exports.
ACL Preservation in Action
This is a newly created UNIX-style volume:
cluster::> volume show -vserver vs0 -volume unix -fields security-style,
unix-permissions,user,group
vserver volume user group security-style unix-permissions
------- ------ ---- ----- -------------- ----------------
vs0 unix 0 1 unix ---rwxr-xr-x
cluster ::> vserver security file-directory show -vserver vs0 -path /unix
Vserver: vs0
File Path: /unix
Security Style: unix
Effective Style: unix
DOS Attributes: 10
DOS Attributes in Text: ----D---
Expanded Dos Attributes: -
Unix User Id: 0
Unix Group Id: 1
Unix Mode Bits: 755
Unix Mode Bits in Text: rwxr-xr-x
ACLs: -
In the preceding example, the volume (/unix) has 755 permissions. That means that the owner has ALL
access, the owning group has READ/EXECUTE access, and everyone else has READ/EXECUTE
access.
Even though there are no NFSv4 ACLs in the fsecurity output, there are default values set that can be
viewed from the client:
[root@nfsclient /]# mount -t nfs4 krbsn:/unix /unix
[root@nfsclient /]# ls -la | grep unix
drwxr-xr-x. 2 root daemon 4096 Apr 30 11:24 unix
[root@nfsclient /]# nfs4_getfacl /unix
A::OWNER@:rwaDxtTnNcCy
A:g:GROUP@:rxtncy
A::EVERYONE@:rxtncy
The NFSv4 ACLs earlier show the same: the owner has ALL access, the owning group has
READ/EXECUTE access, and everyone else has READ/EXECUTE access. The default mode bits are
tied to the NFSv4 ACLs.
When mode bits are changed, the NFSv4 ACLs are also changed:
[root@nfsclient /]# chmod 775 /unix
[root@nfsclient /]# ls -la | grep unix
drwxrwxr-x. 2 root daemon 4096 Apr 30 11:24 unix
[root@nfsclient /]# nfs4_getfacl /unix
A::OWNER@:rwaDxtTnNcCy
A:g:GROUP@:rwaDxtTnNcy
A::EVERYONE@:rxtncy
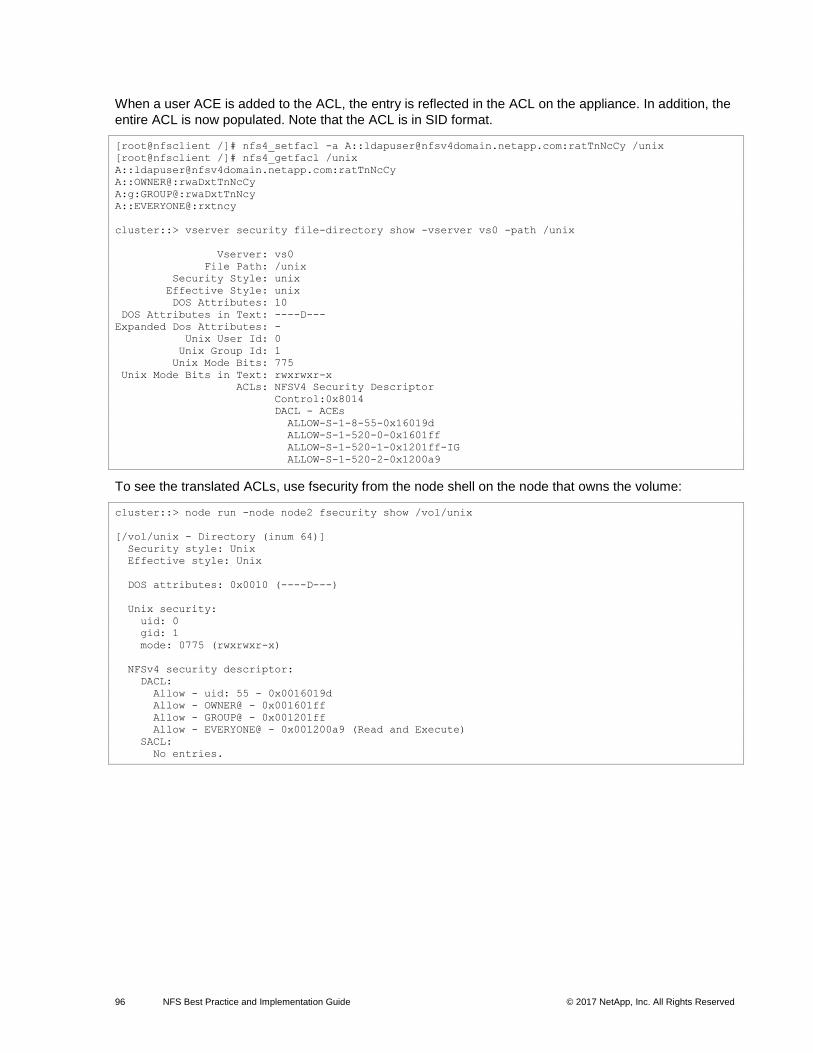
96 NFS Best Practice and Implementation Guide © 2017 NetApp, Inc. All Rights Reserved
When a user ACE is added to the ACL, the entry is reflected in the ACL on the appliance. In addition, the
entire ACL is now populated. Note that the ACL is in SID format.
[root@nfsclient /]# nfs4_setfacl -a A::[email protected]:ratTnNcCy /unix
[root@nfsclient /]# nfs4_getfacl /unix
A::[email protected]:ratTnNcCy
A::OWNER@:rwaDxtTnNcCy
A:g:GROUP@:rwaDxtTnNcy
A::EVERYONE@:rxtncy
cluster::> vserver security file-directory show -vserver vs0 -path /unix
Vserver: vs0
File Path: /unix
Security Style: unix
Effective Style: unix
DOS Attributes: 10
DOS Attributes in Text: ----D---
Expanded Dos Attributes: -
Unix User Id: 0
Unix Group Id: 1
Unix Mode Bits: 775
Unix Mode Bits in Text: rwxrwxr-x
ACLs: NFSV4 Security Descriptor
Control:0x8014
DACL - ACEs
ALLOW-S-1-8-55-0x16019d
ALLOW-S-1-520-0-0x1601ff
ALLOW-S-1-520-1-0x1201ff-IG
ALLOW-S-1-520-2-0x1200a9
To see the translated ACLs, use fsecurity from the node shell on the node that owns the volume:
cluster::> node run -node node2 fsecurity show /vol/unix
[/vol/unix - Directory (inum 64)]
Security style: Unix
Effective style: Unix
DOS attributes: 0x0010 (----D---)
Unix security:
uid: 0
gid: 1
mode: 0775 (rwxrwxr-x)
NFSv4 security descriptor:
DACL:
Allow - uid: 55 - 0x0016019d
Allow - OWNER@ - 0x001601ff
Allow - GROUP@ - 0x001201ff
Allow - EVERYONE@ - 0x001200a9 (Read and Execute)
SACL:
No entries.

97 NFS Best Practice and Implementation Guide © 2017 NetApp, Inc. All Rights Reserved
When a change is made to the mode bit when NFSv4 ACLs are present, the NFSv4 ACL that was just set
is wiped by default:
[root@nfsclient /]# chmod 755 /unix
[root@nfsclient /]# ls -la | grep unix
drwxr-xr-x. 2 root daemon 4096 Apr 30 11:24 unix
[root@nfsclient /]# nfs4_getfacl /unix
A::OWNER@:rwaDxtTnNcCy
A:g:GROUP@:rxtncy
A::EVERYONE@:rxtncy
cluster::> node run -node node2 fsecurity show /vol/unix
[/vol/unix - Directory (inum 64)]
Security style: Unix
Effective style: Unix
DOS attributes: 0x0010 (----D---)
Unix security:
uid: 0
gid: 1
mode: 0755 (rwxr-xr-x)
No security descriptor available.
To control this behavior in clustered Data ONTAP, use the following diag-level option:
cluster::> set diag
cluster::*> nfs server modify -vserver vs0 -v4-acl-preserve [enabled|disabled]

98 NFS Best Practice and Implementation Guide © 2017 NetApp, Inc. All Rights Reserved
After the option is enabled, the ACL stays intact when mode bits are set.
[root@nfsclient /]# nfs4_setfacl -a A::[email protected]:ratTnNcCy /unix
[root@nfsclient /]# ls -la | grep unix
drwxr-xr-x. 2 root daemon 4096 Apr 30 11:24 unix
[root@nfsclient /]# nfs4_getfacl /unix
A::[email protected]:ratTnNcCy
A::OWNER@:rwaDxtTnNcCy
A:g:GROUP@:rxtncy
A::EVERYONE@:rxtncy
cluster::> vserver security file-directory show -vserver vs0 -path /unix
Vserver: vs0
File Path: /unix
Security Style: unix
Effective Style: unix
DOS Attributes: 10
DOS Attributes in Text: ----D---
Expanded Dos Attributes: -
Unix User Id: 0
Unix Group Id: 1
Unix Mode Bits: 755
Unix Mode Bits in Text: rwxr-xr-x
ACLs: NFSV4 Security Descriptor
Control:0x8014
DACL - ACEs
ALLOW-S-1-8-55-0x16019d
ALLOW-S-1-520-0-0x1601ff
ALLOW-S-1-520-1-0x1200a9-IG
ALLOW-S-1-520-2-0x1200a9
cluster::> node run -node node2 fsecurity show /vol/unix
[/vol/unix - Directory (inum 64)]
Security style: Unix
Effective style: Unix
DOS attributes: 0x0010 (----D---)
Unix security:
uid: 0
gid: 1
mode: 0755 (rwxr-xr-x)
NFSv4 security descriptor:
DACL:
Allow - uid: 55 - 0x0016019d
Allow - OWNER@ - 0x001601ff
Allow - GROUP@ - 0x001200a9 (Read and Execute)
Allow - EVERYONE@ - 0x001200a9 (Read and Execute)
SACL:
No entries.

99 NFS Best Practice and Implementation Guide © 2017 NetApp, Inc. All Rights Reserved
Note that the ACL is still intact after mode bits are set:
[root@nfsclient /]# chmod 777 /unix
[root@nfsclient /]# ls -la | grep unix
drwxrwxrwx. 2 root daemon 4096 Apr 30 11:24 unix
[root@nfsclient /]# nfs4_getfacl /unix
A::[email protected]:ratTnNcCy
A::OWNER@:rwaDxtTnNcCy
A:g:GROUP@:rwaDxtTnNcy
A::EVERYONE@:rwaDxtTnNcy
cluster::> vserver security file-directory show -vserver vs0 -path /unix
Vserver: vs0
File Path: /unix
Security Style: unix
Effective Style: unix
DOS Attributes: 10
DOS Attributes in Text: ----D---
Expanded Dos Attributes: -
Unix User Id: 0
Unix Group Id: 1
Unix Mode Bits: 777
Unix Mode Bits in Text: rwxrwxrwx
ACLs: NFSV4 Security Descriptor
Control:0x8014
DACL - ACEs
ALLOW-S-1-8-55-0x16019d
ALLOW-S-1-520-0-0x1601ff
ALLOW-S-1-520-1-0x1201ff-IG
ALLOW-S-1-520-2-0x1201ff
cm6080-rtp2::*> node run -node node2 fsecurity show /vol/unix
[/vol/unix - Directory (inum 64)]
Security style: Unix
Effective style: Unix
DOS attributes: 0x0010 (----D---)
Unix security:
uid: 0
gid: 1
mode: 0777 (rwxrwxrwx)
NFSv4 security descriptor:
DACL:
Allow - uid: 55 - 0x0016019d
Allow - OWNER@ - 0x001601ff
Allow - GROUP@ - 0x001201ff
Allow - EVERYONE@ - 0x001201ff
SACL:
No entries.
NFSv4 Delegations
NFSv4 introduces the concept of delegations that provide an aggressive cache, which is different from
the ad hoc caching that NFSv3 provides. There are two forms of delegations: read and write. Delegations
provide more cache correctness rather than improving performance. For delegations to work, a supported
UNIX client is required along with the right delegation options enabled on the NetApp controller. These
options are disabled by default.
When a server determines to delegate a complete file or part of the file to the client, the client caches it
locally and avoids additional RPC calls to the server. This reduces GETATTR calls in case of read
delegations because there are fewer requests to the server to obtain the file’s information. However,
delegations do not cache metadata. Reads can be delegated to numerous clients, but writes can be
delegated only to one client at a time. The server reserves the right to recall the delegation for any valid

100 NFS Best Practice and Implementation Guide © 2017 NetApp, Inc. All Rights Reserved
reason. The server determines to delegate the file under two scenarios: a confirmed call-back path from
the client that the server uses to recall a delegation if needed and when the client sends an OPEN
function for a file.
Why Use Read or Write Delegations?
Delegations can be used to improve the read and write performance of certain applications. For example,
web applications that have numerous readers of one or more files on the same client and across clients
that also generate copious amounts of metadata operations like GETATTRs and LOOKUPs could request
read delegations from the NetApp controller for local access to improve performance and response time.
Delegating the whole file or certain ranges of bytes to the client's local memory avoids additional RPC
calls over the wire for metadata operations.
If the file or byte offset is rewritten during the delegation, the delegation is recalled. Although this process
is necessary to acquire updates, the delegation recall can affect read performance. Therefore, write
delegations are typically granted for single writer applications. Read and write delegations can improve
I/O performance, but that depends on the client hardware and operating system. For instance, low-
memory client platforms do not handle delegations very well.
In 7-Mode, read and write delegations are set using the following commands:
option.nfs.v4.read_delegation on
option.nfs.v4.write_delegation on
In clustered Data ONTAP, read or write delegations can be set during the creation of the NFS server or
when modifying an existing NFS server. There is no production impact when enabling delegations on an
existing NFS server other than the features delegations bring.
Configuration step 4) Enabling or disabling NFSv4 read file delegations.
Goal How To
Enable read file delegations vserver nfs modify -vserver vserver_name –
v4.0-read-delegation enabled
Disable read file delegations vserver nfs modify -vserver vserver_name -
v4.0-read-delegation disabled
Configuration step 5) Enabling or disabling NFSv4 write file delegations.
Goal How To
Enable write file delegations vserver nfs modify -vserver vserver_name –
v4.0-write-delegation enabled
Disable write file delegations vserver nfs modify -vserver vserver_name -
v4.0-write-delegation disabled
Note: Both the file read and write delegation options take effect as soon as they are changed. There is no need to reboot or restart NFS.
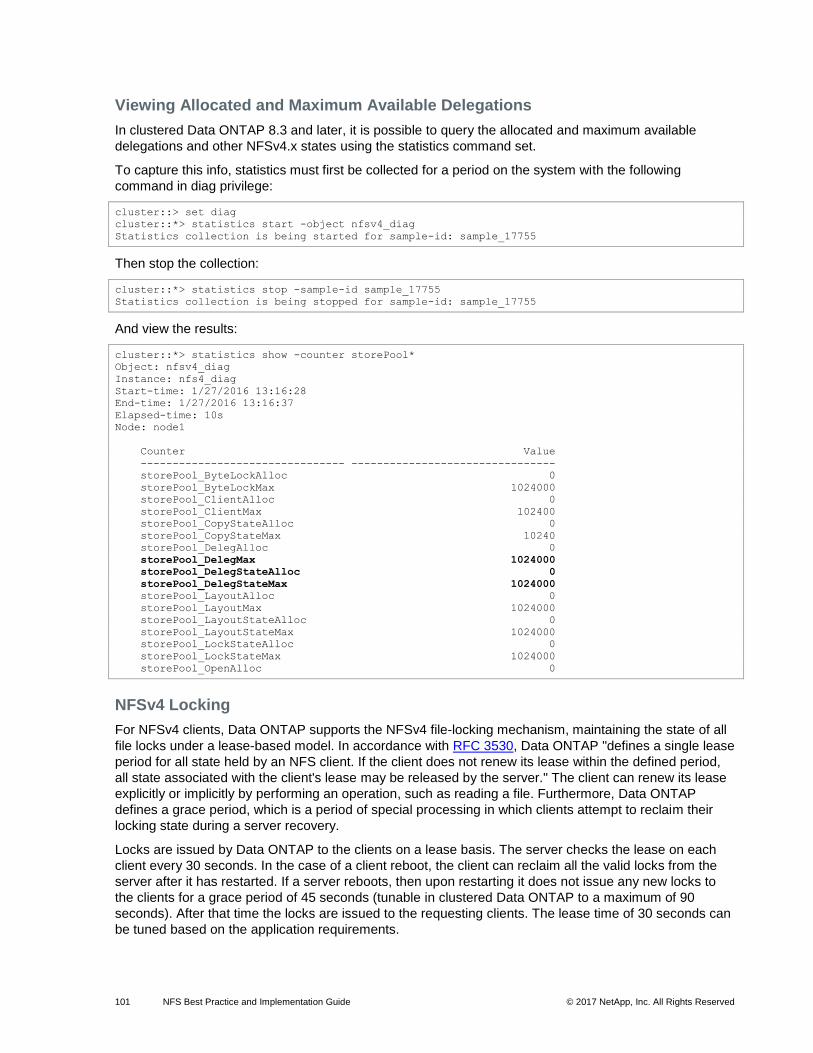
101 NFS Best Practice and Implementation Guide © 2017 NetApp, Inc. All Rights Reserved
Viewing Allocated and Maximum Available Delegations
In clustered Data ONTAP 8.3 and later, it is possible to query the allocated and maximum available
delegations and other NFSv4.x states using the statistics command set.
To capture this info, statistics must first be collected for a period on the system with the following
command in diag privilege:
cluster::> set diag
cluster::*> statistics start -object nfsv4_diag
Statistics collection is being started for sample-id: sample_17755
Then stop the collection:
cluster::*> statistics stop -sample-id sample_17755
Statistics collection is being stopped for sample-id: sample_17755
And view the results:
cluster::*> statistics show -counter storePool*
Object: nfsv4_diag
Instance: nfs4_diag
Start-time: 1/27/2016 13:16:28
End-time: 1/27/2016 13:16:37
Elapsed-time: 10s
Node: node1
Counter Value
-------------------------------- --------------------------------
storePool_ByteLockAlloc 0
storePool_ByteLockMax 1024000
storePool_ClientAlloc 0
storePool_ClientMax 102400
storePool_CopyStateAlloc 0
storePool_CopyStateMax 10240
storePool_DelegAlloc 0
storePool_DelegMax 1024000
storePool_DelegStateAlloc 0
storePool_DelegStateMax 1024000
storePool_LayoutAlloc 0
storePool_LayoutMax 1024000
storePool_LayoutStateAlloc 0
storePool_LayoutStateMax 1024000
storePool_LockStateAlloc 0
storePool_LockStateMax 1024000
storePool_OpenAlloc 0
NFSv4 Locking
For NFSv4 clients, Data ONTAP supports the NFSv4 file-locking mechanism, maintaining the state of all
file locks under a lease-based model. In accordance with RFC 3530, Data ONTAP "defines a single lease
period for all state held by an NFS client. If the client does not renew its lease within the defined period,
all state associated with the client's lease may be released by the server." The client can renew its lease
explicitly or implicitly by performing an operation, such as reading a file. Furthermore, Data ONTAP
defines a grace period, which is a period of special processing in which clients attempt to reclaim their
locking state during a server recovery.
Locks are issued by Data ONTAP to the clients on a lease basis. The server checks the lease on each
client every 30 seconds. In the case of a client reboot, the client can reclaim all the valid locks from the
server after it has restarted. If a server reboots, then upon restarting it does not issue any new locks to
the clients for a grace period of 45 seconds (tunable in clustered Data ONTAP to a maximum of 90
seconds). After that time the locks are issued to the requesting clients. The lease time of 30 seconds can
be tuned based on the application requirements.

102 NFS Best Practice and Implementation Guide © 2017 NetApp, Inc. All Rights Reserved
Table 13) NFS lease and grace periods.
Term Definition (See RFC 3530 for More Information)
Lease The time period in which Data ONTAP irrevocably grants a lock to a client
Grace period The time period in which clients attempt to reclaim their locking state from Data ONTAP during server recovery
Specifying the NFSv4 Locking Lease Period
To specify the NFSv4 locking lease period (the time period in which Data ONTAP irrevocably grants a
lock to a client), you can modify the -v4-lease-seconds option. By default, this option is set to 30. The
minimum value for this option is 10. The maximum value for this option is the locking grace period, which
you can set with the locking.lease_seconds option.
NFSv4.x Referrals
Clustered Data ONTAP 8.1 introduced NFSv4.x referrals. A referral directs a client to another LIF in the
SVM. The NFSv4.x client uses this referral to direct its access over the referred path to the target LIF
from that point forward. Referrals are issued when there is a LIF in the SVM that resides on the cluster
node where the data volume resides. In other words, if a cluster node receives an NFSv4.x request for a
nonlocal volume, the cluster node is able to refer the client to the local path for that volume by means of
the LIF. Doing so allows clients faster access to the data using a direct path and avoids extra traffic on
the cluster network.
How They Work
When a mount request is sent, the request acts as a normal NFSv4.x mount operation. However, after
the DH LOOKUP call is made, the server (NetApp cluster) responds with the GETFH status of
“NFS4ERR_MOVED” to notify the client that the volume being accessed does not live where the LIF
being requested lives. The server then sends a LOOKUP call to the client, notifying it of the IP (using the
fs_location4 value) on the node where the data volume lives. This process works regardless of whether a
client is mounting using a DNS name or IP. However, the client reports that it is mounted to the IP
specified rather than the IP returned to the client from the server.

103 NFS Best Practice and Implementation Guide © 2017 NetApp, Inc. All Rights Reserved
For example:
The data volume lives on node1:
cluster::> volume show -vserver vs0 -volume nfsvol -fields node
vserver volume node
------- ------ -------------
vs0 nfsvol node1
The data LIF lives on node2:
cluster::> net int show -vserver vs0 -lif data2 -fields curr-node,home-node
(network interface show)
vserver lif home-node curr-node address
------- ----- ------------- ------------- -----------
vs0 data2 node2 node2 10.61.92.37
There is also a data LIF on node1:
cluster::> net int show -vserver vs0 -curr-node node1 -role data
(network interface show)
Logical Status Network Current Current Is
Vserver Interface Admin/Oper Address/Mask Node Port Home
----------- ---------- ---------- ------------------ ------------- ------- ----
vs0
data1 up/up 10.61.92.34/24 node1 e0a true
The client makes a mount request to the data LIF on node2, at the IP address 10.61.92.37:
[root@nfsclient /]# mount -t nfs4 10.61.92.37:/nfsvol /mnt
The mount location looks to be at the IP address specified by the client:
[root@nfsclient /]# mount | grep /mnt
10.61.92.37:/nfsvol on /mnt type nfs4 (rw,addr=10.61.92.37,clientaddr=10.61.179.164)
But the cluster shows that the connection was actually established to node1, where the data volume
lives. No connection was made to node2:
cluster::> network connections active show -node node1 -service nfs*
Vserver Interface Remote
CID Ctx Name Name:Local Port Host:Port Protocol/Service
--------- --- --------- ----------------- -------------------- ----------------
Node: node1
286571835 6 vs0 data:2049 10.61.179.164:763 TCP/nfs
cluster::> network connections active show -node node2 -service nfs*
There are no entries matching your query.
Because clients might become “confused” about which IP address they are actually connected to as per
the mount command, NetApp recommends using host names in mount operations.

104 NFS Best Practice and Implementation Guide © 2017 NetApp, Inc. All Rights Reserved
Best Practices 20: Data LIF Locality (See Best Practices 21)
NetApp highly recommends that there be at least one data LIF per node per SVM so that a local
path is always available to data volumes. This process is covered in Data LIF Best Practices with
NAS Environments in this document.
If a volume moves to another aggregate on another node, the NFSv4.x clients must unmount and
remount the file system manually if volume locality is desired. Remounting makes sure that the client is
referred to the new location of the volume. If the manual mount/unmount process is not followed, the
client can still access the volume in its new location, but I/O requests would then take a remote path.
However, remote I/O requests might not be impactful enough to an environment to matter enough to
remount clients, which is a disruptive and potentially involved operation. The decision to remount clients
should be made on a case-by-case basis.
Note: NFSv4.x referrals were introduced in RHEL as early as 5.1 (2.6.18-53), but NetApp recommends using no kernel older than 2.6.25 with NFS referrals and no version earlier than 1.0.12 of nfs-utils.
If a volume is junctioned below other volumes, the referral uses the volume being mounted to refer to as
the local volume. For example:
• A client wants to mount vol2.
• Vol2’s junction is /vol1/vol2.
• Vol1 lives on node1; vol2 lives on node2.
• A mount is made to cluster:/vol1/vol2.
• The referral returns the IP address of a LIF that lives on node2, regardless of what IP address is returned from DNS for the host name “cluster.”
• The mount uses the LIF local to vol2 on node2.
In a mixed client environment, if any of the clients do not support referrals, then the -v4.0-referrals
option should not be enabled. If the option is enabled and a clients that does not support referrals gets a
referral from the server, that client is unable to access the volume and experiences failures. See RFC
3530 for more details about referrals.

105 NFS Best Practice and Implementation Guide © 2017 NetApp, Inc. All Rights Reserved
Configuration step 6) Configuring NFSv4.x referrals.
Category Commands
Configure NFSv4.x referrals.
To enable referrals on an SVM requires advanced privilege.
cluster::> set advanced
Warning: These advanced commands are potentially dangerous; use them only when
directed to do so by NetApp personnel.
Do you want to continue? {y|n}: y
For NFSv4.0:
cluster::*> vserver nfs modify -vserver test_vs1 -v4.0-referrals enabled -v4-
fsid-change enabled
For NFSv4.1:
cluster::*> vserver nfs modify -vserver test_vs1 -v4.1-referrals enabled -v4-
fsid-change enabled
Verification
cluster::*> vserver nfs show -vserver test_vs1 -fields v4.0-referrals,v4-fsid-
change
Vserver v4-fsid-change v4.0-referrals
-------- -------------- --------------
test_vs1 enabled enabled
cluster::*> vserver nfs show -vserver test_vs1 -fields v4.1-referrals,v4-fsid-
change
Vserver v4-fsid-change v4.1-referrals
-------- -------------- --------------
test_vs1 enabled enabled
Refer to Table 33) NFSv4 configuration options in clustered Data ONTAP. for more information.

106 NFS Best Practice and Implementation Guide © 2017 NetApp, Inc. All Rights Reserved
NFSv4.x Stateless Migration
NFSv4 referrals also brought NFSv4 stateless migration support in clustered Data ONTAP 8.1 and later
and include support only for Oracle dNFS.
Migration is an NFSv4.x feature that allows a file system to move from one server to another without client
disruption. Migration enablement requires enabling referrals and the option -v4-fsid-change on the NFS
server. Migration is a diag-level option. Enabling migration assumes the following about the solution:
• All clients accessing the NFSv4.x server on the SVM are stateless.
• All clients accessing the NFSv4.x server on the SVM support migrations.
• The NFSv4.x clients do not use the following:
Locking
Share reservations
Delegations
OPEN for file access
• The NFSv4.x clients do use the following:
READ, WRITE, and SETATTR with special stateid of all bits 0
OPEN only to create a file and close it right away
• The NFSv4.x clients do not have a state established on the NFS server.
NFS migration support can be useful in the following scenarios in clustered Data ONTAP:
• Volume moves
• LIF migration/failover
Table 14) Referrals versus migration versus pNFS.
Referrals Stateless Migration pNFS
When does redirect take
place?
At mount Any operation (I/O and
metadata)
I/O only (READ, WRITE)
Traffic that is redirected All traffic All traffic I/O only (READ, WRITE)
Use case Automounter Oracle dNFS Guaranteed data locality
for I/O
Drawback Only on mount Only stateless operations
(no lock state)
Non-I/O traffic is not
redirected

107 NFS Best Practice and Implementation Guide © 2017 NetApp, Inc. All Rights Reserved
Snapshot Copies with NFSv4.x
In previous versions of NFS (v2/v3), the .snapshot directory was visible to clients. This was exposed at
the mount point and was visible at every directory. However, because NFSv4.x does not use the MOUNT
protocol, the .snapshot directory is not visible, but it is accessible from anywhere in the NFSv4.x mount.
To access Snapshot copies using NFSv4.x, simply navigate to the .snapshot directory manually.
For example:
[root@nfsclient ~]# mount -t nfs4 10.61.92.37:/nfsvol /mnt
[root@nfsclient ~]# cd /mnt
[root@nfsclient mnt]# ls -la | grep snapshot
[root@nfsclient mnt]# cd .snapshot
[root@nfsclient .snapshot]# ls -la
drwxrwxrwx. 12 root root 4096 Apr 25 16:05 .
drwxrwxrwx. 3 root root 106496 Apr 24 16:01 ..
drwxrwxrwx. 4 root root 106496 Apr 18 14:50 daily.2013-04-24_0010
drwxrwxrwx. 2 root root 106496 Mar 12 19:54 weekly.2013-04-14_0015
drwxrwxrwx. 4 root root 106496 Apr 18 14:50 weekly.2013-04-21_0015
9.3 NFSv4.1
NFSv4.1 support began in clustered Data ONTAP 8.1. NFSv4.1 is considered a minor version of NFSv4.
Even though the NFSv4.1 RFC 5661 suggests that directory delegations and session trunking are
available, there is currently no client support, nor is there currently support in clustered Data ONTAP.
To mount a client using NFSv4.1, there must be client support for NFSv4.1. Check with the client vendor
for support for NFSv4.1. Mounting NFSv4.1 is done with the minorversion mount option.
Example:
# mount -o nfsvers=4,minorversion=1 10.63.3.68:/unix /unix
# mount | grep unix
10.63.3.68:/unix on /unix type nfs
(rw,nfsvers=4,minorversion=1,addr=10.63.3.68,clientaddr=10.228.225.140)
Configuration step 7) Enabling NFSv4.1.
Category Commands
Enable NFSv4.1.
cluster::> vserver nfs modify -vserver test_vs1 -v4.0 enabled -v4.1 enabled
Verification: Note that v4.0 and v4.1 are both enabled.
cluster::> vserver nfs show -vserver test_vs1 -fields v4.0,v4.1
Vserver v4.0 v4.1
-------- ------- -------
test_vs1 enabled enabled

108 NFS Best Practice and Implementation Guide © 2017 NetApp, Inc. All Rights Reserved
Parallel Network File System (pNFS)
Parallel NFS (pNFS) is a new part of NFS version 4.1 standards. NFSv4.1, which follows Request for
Comments (RFC) 5661, is a minor release of NFSv4. NFSv4.1 does not modify any NFSv4 features and
functionalities. With traditional NFS versions 3, 4, and 4.1, the metadata and data shared the same I/O
path. With pNFS, there is now an NFS feature that handles metadata and data on different I/O paths. A
metadata server handles all the metadata activities from the client, while the data servers provide a direct
path for data access. As explained in RFC 5661:
“Parallel data access is controlled by recallable objects known as ‘layouts,’ which are integrated into the
protocol locking model. Clients direct requests for data access to a set of data servers specified by the
layout using a data storage protocol which may be NFSv4.1 or may be another protocol.”
pNFS support began in clustered Data ONTAP 8.1 for files only and continues with enhancements in
clustered Data ONTAP 8.2. There is no Data ONTAP 7G/7-Mode support for pNFS, nor will there ever be.
Current client support for pNFS is very limited, but NetApp does support all clients that support pNFS and
follow the RFC specifications. By default the pNFS option is enabled, but it is only active if both NFSv4.0
and NFSv4.1 support also is enabled. By default NFSv4.1 is disabled. It can be enabled by specifying the
-v4.1 option as seen above and setting it to enabled when creating an NFS server.
pNFS requires a client that also supports pNFS. RHEL 6.4 was the first commercial Linux distribution that
had full pNFS support. However, other client OS vendors have added pNFS support. NetApp supports all
client OS vendors that support pNFS as per the RFC 5661 specifications.
Best Practices 21: pNFS Client Recommendation (See Best Practices 22)
NetApp highly recommends using the latest patched general-availability release of the client OS to
leverage the advantages of any and all pNFS bug fixes.
How pNFS Works
pNFS defines the notion of a device that is generated by the server (that is, a NetApp NFS server running
on clustered Data ONTAP) and sent to the client. This process helps the client locate the data and send
requests directly over the path local to that data. Data ONTAP generates one pNFS device per flexible
volume. The metadata path does not change, so metadata requests might still be remote. In a clustered
Data ONTAP pNFS implementation, every data LIF is considered an NFS server, so NetApp strongly
recommends that each node owns at least one data LIF per NFS SVM. Doing otherwise negates the
benefits of pNFS and the clustered Data ONTAP nondisruptive-operations philosophy.
The device contains information about the following:
• Volume constituents
• Network location of the constituents
The device information is cached to the local node’s NAS Volume Location Database for improved
performance.

109 NFS Best Practice and Implementation Guide © 2017 NetApp, Inc. All Rights Reserved
To see pNFS devices in the cluster, use the following diag-level command:
cluster::> set diag
cluster::*> vserver nfs pnfs devices cache show
There are three main components of pNFS:
• Metadata server
Handles all nondata traffic such as GETATTR, SETATTR, and so on
Responsible for maintaining metadata that informs the clients of the file locations
Located on the NetApp NFS server
• Data server
Stores file data and responds to READ and WRITE requests
Located on the NetApp NFS server
Inode information also resides here
• Clients
These components leverage three different protocols. The control protocol is the way the metadata and
data servers stay in sync. The pNFS protocol is used between clients and the metadata server. pNFS
supports file, block, and object-based storage protocols, but NetApp currently only supports file-based
pNFS.
Figure 12) pNFS data workflow.
pNFS Performance Results
There are a number of documents available on how well pNFS performs with clustered Data ONTAP in
specific workloads and environments. The following documents cover pNFS use cases, specifically with
EDA and chip manufacturing workloads:
http://www.netapp.com/us/media/tr-4239.pdf
http://www.netapp.com/us/media/tr-4299.pdf
http://www.netapp.com/us/media/tr-4270.pdf
http://www.netapp.com/us/media/tr-4324.pdf

110 NFS Best Practice and Implementation Guide © 2017 NetApp, Inc. All Rights Reserved
NFSv4.1 Delegations
In clustered Data ONTAP 8.2, support for NFSv4.1 delegations was added. NFSv4.1 delegations are very
similar to NFSv4.0 delegations, but are part of the v4.1 protocol rather than v4.0. The following is a table
that covers the new additions to NFSv4.1 and how they benefit an environment over NFSv4.0. These
additions are covered in detail in RFC 5661.
Table 15) NFSv4.1 delegation benefits.
NFSv4.1 Delegation Feature Benefit Versus NFSv4.0 Delegation
EXCHANGE_ID is used In NFSv4.0, SETCLIENTID was used.
EXCHANGE_ID replaces
SETCLIENTID and enables a client ID
to be assigned before any other client
operations take place. As per RFC
5661, "The only NFSv4.1 operations
possible before a client ID is
established are those needed to
establish the client ID.”
Callbacks use the same TCP connection as the forechannel In NFSv4.0, callbacks use different
TCP connections than the
forechannel. Using the same TCP
connection for callbacks provides
better performance for delegations
and is more firewall friendly.
New OPEN request options:
• OPEN4_SHARE_ACCESS_WANT_DELEG_MASK
• OPEN4_SHARE_ACCESS_WANT_NO_PREFERENCE
• OPEN4_SHARE_ACCESS_WANT_READ_DELEG
• OPEN4_SHARE_ACCESS_WANT_WRITE_DELEG
• OPEN4_SHARE_ACCESS_WANT_ANY_DELEG
• OPEN4_SHARE_ACCESS_WANT_NO_DELEG
NFSv4.1 provides more precise
control to clients for acquisition of
delegations than NFSv4.0. These new
options enable more OPEN scenarios
to be covered to prevent problems
issuing or reclaiming delegations.
For information regarding pNFS with RHEL 6.4, see TR-4063: Parallel Network File System Configuration
and Best Practices for Clustered Data ONTAP.

111 NFS Best Practice and Implementation Guide © 2017 NetApp, Inc. All Rights Reserved
NFSv4.1 Sessions
NFSv4.1 sessions have been available since clustered Data ONTAP 8.1. As per RFC 5661:
A session is a dynamically created, long-lived server object created by a client and used over time from
one or more transport connections. Its function is to maintain the server's state relative to the
connection(s) belonging to a client instance. This state is entirely independent of the connection itself,
and indeed the state exists whether or not the connection exists. A client may have one or more sessions
associated with it so that client-associated state may be accessed using any of the sessions associated
with that client's client ID, when connections are associated with those sessions. When no connections
are associated with any of a client ID's sessions for an extended time, such objects as locks, opens,
delegations, layouts, and so on, are subject to expiration. The session serves as an object representing a
means of access by a client to the associated client state on the server, independent of the physical
means of access to that state.
A single client may create multiple sessions. A single session MUST NOT serve multiple clients.
Best Practices 22: NFSv4.x Version Recommendation (See Best Practices 23)
Use NFSv4.1 with clustered Data ONTAP when possible. Performance, NDO, and features in
NFSv4.1 surpass those in NFSv4.0.
9.4 Mount Option Best Practices with NFS
When specifying a mount, you can apply a variety of mount options to help resiliency and performance.
The following is a list of some of those options, as well as information to assist with setting these options.
Keep in mind that some application and/or OS vendors might have different recommendations for mount
option best practices. It is important to consult with the application and/or OS vendors so that the correct
options are used. For example, Oracle mount best practices are covered in TR-3633: Oracle Databases
on Data ONTAP. This technical report focuses on a general catch-all configuration.
Mount Options
The following is a list of typical mount options and suggestions on how to apply them with NetApp storage
using NFS (v3 and v4.x). In most cases, mount options are standardized. Mount options might vary
depending on the version and variety of Linux being used. Always consult the man pages of the Linux
kernel being used to verify that the mount options exist for that version.
Mount options are specified using the -o flag. Mount options such as noacl and nolock do not apply to
NFSv4 and NetApp does not recommend them.
If NFSv4 is enabled on the NetApp storage system, then newer clients negotiate NFSv4 on their own
without mount options. Older clients use NFSv3 unless specified. If NFSv4 is disabled on the NetApp
storage system, clients fall back to using NFSv3.
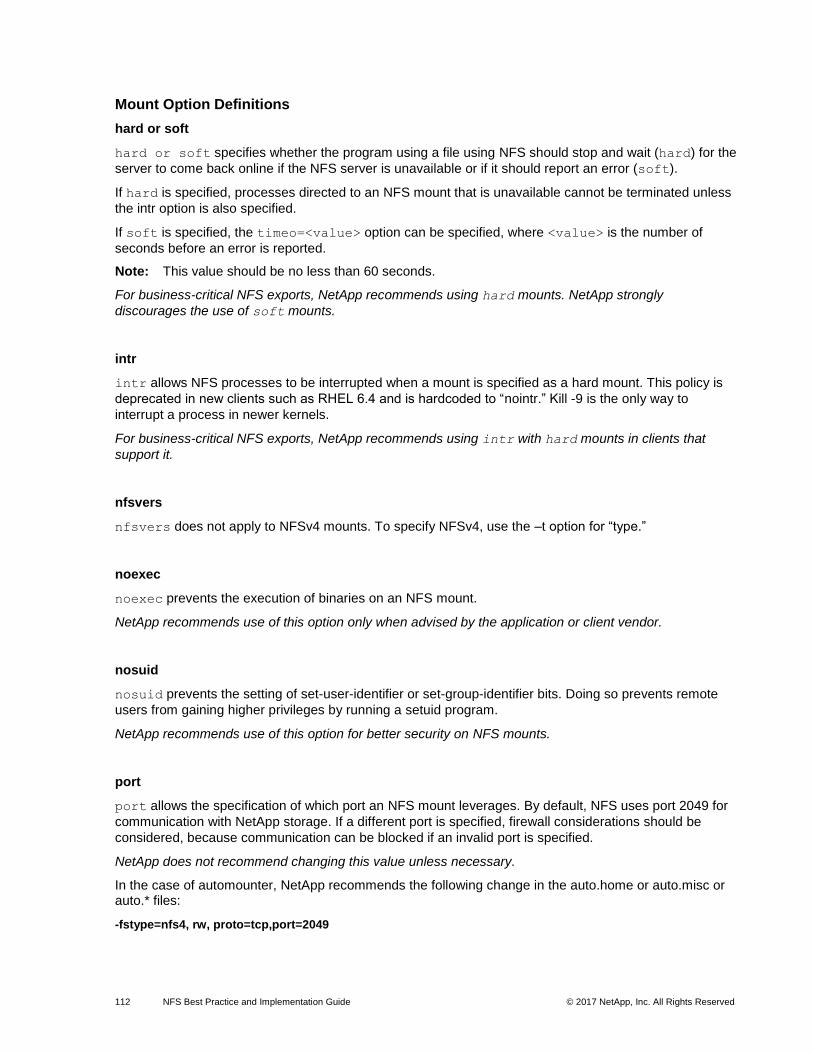
112 NFS Best Practice and Implementation Guide © 2017 NetApp, Inc. All Rights Reserved
Mount Option Definitions
hard or soft
hard or soft specifies whether the program using a file using NFS should stop and wait (hard) for the
server to come back online if the NFS server is unavailable or if it should report an error (soft).
If hard is specified, processes directed to an NFS mount that is unavailable cannot be terminated unless
the intr option is also specified.
If soft is specified, the timeo=<value> option can be specified, where <value> is the number of
seconds before an error is reported.
Note: This value should be no less than 60 seconds.
For business-critical NFS exports, NetApp recommends using hard mounts. NetApp strongly
discourages the use of soft mounts.
intr
intr allows NFS processes to be interrupted when a mount is specified as a hard mount. This policy is
deprecated in new clients such as RHEL 6.4 and is hardcoded to “nointr.” Kill -9 is the only way to
interrupt a process in newer kernels.
For business-critical NFS exports, NetApp recommends using intr with hard mounts in clients that
support it.
nfsvers
nfsvers does not apply to NFSv4 mounts. To specify NFSv4, use the –t option for “type.”
noexec
noexec prevents the execution of binaries on an NFS mount.
NetApp recommends use of this option only when advised by the application or client vendor.
nosuid
nosuid prevents the setting of set-user-identifier or set-group-identifier bits. Doing so prevents remote
users from gaining higher privileges by running a setuid program.
NetApp recommends use of this option for better security on NFS mounts.
port
port allows the specification of which port an NFS mount leverages. By default, NFS uses port 2049 for
communication with NetApp storage. If a different port is specified, firewall considerations should be
considered, because communication can be blocked if an invalid port is specified.
NetApp does not recommend changing this value unless necessary.
In the case of automounter, NetApp recommends the following change in the auto.home or auto.misc or auto.* files:
-fstype=nfs4, rw, proto=tcp,port=2049

113 NFS Best Practice and Implementation Guide © 2017 NetApp, Inc. All Rights Reserved
rsize=num and wsize=num
rsize and wsize are used to speed up NFS communication for reads (rsize) and writes (wsize) by
setting a larger data block size, in bytes, to be transferred at one time. Be careful when changing these
values; some older Linux kernels and network cards do not work well with larger block sizes.
NetApp recommends use of this option only when advised by the application or client vendor. NetApp
highly recommends using 64k rsize and wsize for better performance.
sec
sec specifies the type of security to utilize when authenticating an NFS connection.
sec=sys is the default setting, which uses local UNIX UIDs and GIDs by means of AUTH_SYS to
authenticate NFS operations.
sec=krb5 uses Kerberos V5 instead of local UNIX UIDs and GIDs to authenticate users.
sec=krb5i uses Kerberos V5 for user authentication and performs integrity checking of NFS operations
using secure checksums to prevent data tampering.
sec=krb5p uses Kerberos V5 for user authentication and integrity checking and encrypts NFS traffic to
prevent traffic sniffing. This is the most secure setting, but it also involves the most performance
overhead.
Data ONTAP 7-Mode supports all security varieties specified.
Clustered Data ONTAP supports sys, krb5, krb5i (as of clustered Data ONTAP 8.3.1 and later), and krb5p
(as of ONTAP 9).
NetApp recommends using sec only when clients have been configured to use the specified security
mode.
tcp or udp
tcp or udp is used to specify whether the mount uses TCP or UDP for transport.
NFSv4 only supports TCP, so this option does not apply to NFSv4.
NetApp recommends TCP for all mounts, regardless of version, provided the client supports mounting using TCP.

114 NFS Best Practice and Implementation Guide © 2017 NetApp, Inc. All Rights Reserved
10 NFS Auditing
NFS auditing is new in clustered Data ONTAP 8.2. In 7-Mode, NFS auditing required CIFS to function
properly. That is no longer the case in clustered Data ONTAP. NFS auditing can now be set up
independently and does not require a CIFS license.
The following section covers the setup and use of NFS auditing.
10.1 NFS Audit Setup
The use of NFS auditing does not require CIFS, but does require the use of NFSv4.x ACLs. Therefore,
this option must be enabled on the SVM, along with NFSv4.x. This is because of the need to set an
AUDIT type ACE on the file or directory to enable NFS auditing. After the AUDIT ACE is set, auditing
takes place for NFSv3 and NFSv4.x operations.
Enabling Auditing on Clustered Data ONTAP System
To enable NFSv4.x and NFSv4.x ACLs, see the sections on NFSv4.x and NFS ACLs.
After NFSv4.x and NFSv4.x ACLs are enabled, enable NFS auditing with the following command:
cluster::> vserver audit create -vserver nfs -destination /unix -rotate-size 100MB
This command enables auditing for NFS and CIFS access on the junction path “/unix” for the SVM named
“nfs.”
After auditing is enabled on the clustered Data ONTAP system, the AUDIT ACEs should be created.
Best Practices 23: Audit ACE Recommendation (See Best Practices 24)
If using inheritable audit ACEs, be sure to create at least one inheritable allow or deny ACE on the
parent directory to avoid access issues. See bug 959337 for details.
Creating NFSv4 AUDIT ACEs
To create an NFSv4 AUDIT ACE, mount the volume on which auditing was enabled using NFSv4.x. After
the volume is mounted, create an AUDIT ACE on the volume, files, and/or directories where auditing is
required.
An AUDIT ACE can be used to track ALLOW or DENY for a variety of operations, including:
• Read
• Write
• Execute
• Append
• Delete
For information about all of the ACE permissions in NFSv4, see http://linux.die.net/man/5/nfs4_acl.
Each Linux client uses a different method of assigning NFSv4.x ACEs. In RHEL/CentOS/Fedora, the
commands nfs4_setacl and nfs4_getacl are used.
An AUDIT ACE leverages flags to specify if auditing should be for successes, failures, or both. AUDIT
ACEs use the ACE type of U.

115 NFS Best Practice and Implementation Guide © 2017 NetApp, Inc. All Rights Reserved
Figure 13) Example of setting NFSv4 audit ACE.
After the AUDIT ACE is applied and the user that is being audited attempts access, the events get logged
to an XML file on the volume.
Example of an Audit Event Logged
- <Event>
- <System>
<Provider Name="Netapp-Security-Auditing" />
<EventID>4663</EventID>
<EventName>Get Object Attributes</EventName>
<Version>1</Version>
<Source>NFSv3</Source>
<Level>0</Level>
<Opcode>0</Opcode>
<Keywords>0x8020000000000000</Keywords>
<Result>Audit Success</Result>
<TimeCreated SystemTime="2013-08-08T20:36:05.011243000Z" />
<Correlation />
<Channel>Security</Channel>
<Computer>e284de25-3edc-11e2-92d0-123478563412/525c9a2c-dce2-11e2-b94f-123478563412</Computer>
<Security />
</System>
- <EventData>
<Data Name="SubjectIP" IPVersion="4">10.61.179.150</Data>
<Data Name="SubjectUnix" Uid="10000" Gid="503" Local="false" />
<Data Name="ObjectServer">Security</Data>
<Data Name="ObjectType">Directory</Data>
<Data Name="HandleID">00000000000453;00;00000040;3a2cada4</Data>
<Data Name="ObjectName">/</Data>
<Data Name="InformationRequested">File Type; File Size; Last Accessed Time; Last Metadata
Modfied Time; Last Modified Time; Unix Mode; Unix Owner; Unix Group;</Data>
</EventData>
</Event>
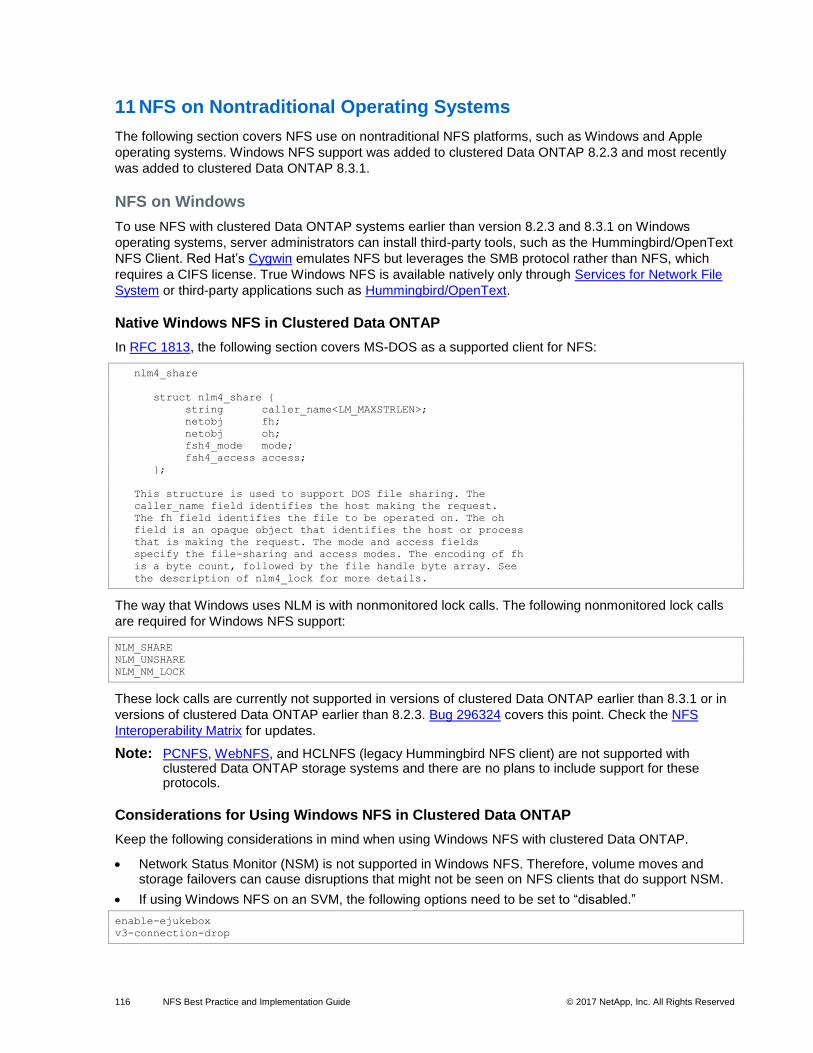
116 NFS Best Practice and Implementation Guide © 2017 NetApp, Inc. All Rights Reserved
11 NFS on Nontraditional Operating Systems
The following section covers NFS use on nontraditional NFS platforms, such as Windows and Apple
operating systems. Windows NFS support was added to clustered Data ONTAP 8.2.3 and most recently
was added to clustered Data ONTAP 8.3.1.
NFS on Windows
To use NFS with clustered Data ONTAP systems earlier than version 8.2.3 and 8.3.1 on Windows
operating systems, server administrators can install third-party tools, such as the Hummingbird/OpenText
NFS Client. Red Hat’s Cygwin emulates NFS but leverages the SMB protocol rather than NFS, which
requires a CIFS license. True Windows NFS is available natively only through Services for Network File
System or third-party applications such as Hummingbird/OpenText.
Native Windows NFS in Clustered Data ONTAP
In RFC 1813, the following section covers MS-DOS as a supported client for NFS:
nlm4_share
struct nlm4_share {
string caller_name<LM_MAXSTRLEN>;
netobj fh;
netobj oh;
fsh4_mode mode;
fsh4_access access;
};
This structure is used to support DOS file sharing. The
caller_name field identifies the host making the request.
The fh field identifies the file to be operated on. The oh
field is an opaque object that identifies the host or process
that is making the request. The mode and access fields
specify the file-sharing and access modes. The encoding of fh
is a byte count, followed by the file handle byte array. See
the description of nlm4_lock for more details.
The way that Windows uses NLM is with nonmonitored lock calls. The following nonmonitored lock calls
are required for Windows NFS support:
NLM_SHARE
NLM_UNSHARE
NLM_NM_LOCK
These lock calls are currently not supported in versions of clustered Data ONTAP earlier than 8.3.1 or in
versions of clustered Data ONTAP earlier than 8.2.3. Bug 296324 covers this point. Check the NFS
Interoperability Matrix for updates.
Note: PCNFS, WebNFS, and HCLNFS (legacy Hummingbird NFS client) are not supported with clustered Data ONTAP storage systems and there are no plans to include support for these protocols.
Considerations for Using Windows NFS in Clustered Data ONTAP
Keep the following considerations in mind when using Windows NFS with clustered Data ONTAP.
• Network Status Monitor (NSM) is not supported in Windows NFS. Therefore, volume moves and storage failovers can cause disruptions that might not be seen on NFS clients that do support NSM.
• If using Windows NFS on an SVM, the following options need to be set to “disabled.”
enable-ejukebox
v3-connection-drop
117 NFS Best Practice and Implementation Guide © 2017 NetApp, Inc. All Rights Reserved
Note: These options are enabled by default. Disabling them does not harm other NFS clients, but might cause some unexpected behavior.
• Always mount Windows NFS using the mount option mtype=hard.
• When using Windows NFS, the showmount option should be enabled. Otherwise, renames of files and folders on Windows NFS clients might fail.
cluster::> nfs server modify -vserver SVM -showmount enabled
• Windows NFS clients are not able to properly see the used space and space available through the df
commands.
Example of mounting NFS in Windows:
C:\>mount -o mtype=hard \\10.63.3.68\unix Z:
Z: is now successfully connected to \\10.63.3.68\unix
The command completed successfully.
Enabling Windows NFS Support
In clustered Data ONTAP, there is a specific NFS server option that needs to be toggled to “enabled” to
allow Windows NFS clients. This option is disabled by default. If reverting from a clustered Data ONTAP
version that supports Windows NFS, this option must be disabled prior to attempting the revert.
cluster::> nfs server show -vserver nfs_svm -fields v3-ms-dos-client
vserver v3-ms-dos-client
------- ----------------
nfs_svm disabled
Windows NFS Use Cases
Windows NFS can be used to provide access to NetApp storage devices on Windows operating systems
in lieu of a CIFS license. Additional use cases include:
• Applications that run on Windows and require NFS connectivity and/or Linux-style commands and functions (such as GETATTR, SETATTR, and so on)
• When a user wants to leverage the NFS protocol rather than CIFS
• Where a user wants to avoid multiprotocol connectivity
Although Windows can be used to leverage NFS connectivity, it might make more sense to use CIFS and
the newer features of the latest SMB version that Windows provides for performance and NDO
functionality. Additionally, using Windows NFS with clustered Data ONTAP requires some considerations,
covered later.
Options for Using Windows NFS with Clustered Data ONTAP
As mentioned, nonmonitored locks are not supported earlier than clustered Data ONTAP 8.2.3 and 8.3.1.
These locks are provided by the NLM protocol. As a result, there are two options to get Windows NFS to
work with clustered Data ONTAP versions that do not support Windows NFS natively:
• Disable NLM (and thus, locking with NFSv3).
• Use NFS version 4.
Considerations for Disabling NLM with NFSv3
NFSv3 does not provide its own locking mechanisms. By its nature, NFSv3 is a stateless protocol. When
an NFS server restarts, locks are managed by NLM, not NFS. If NLM is disabled, no locks are granted,
which means that files can be accessed and written to when other users have them open. This is not
118 NFS Best Practice and Implementation Guide © 2017 NetApp, Inc. All Rights Reserved
preferred for production file environments. Consult the application vendor for a recommendation on
disabling NLM.
Scenarios in Which NFSv3 Locking Is Not Required
In some scenarios, NFSv3 locking is not required:
• Files that are accessed and written to by only one user or application
• Exports that are locked down to only one user or application
• Applications for which disabling locking is recommended
Note: There might be other scenarios in which NLM is not required. Contact the OS and/or application vendor for recommendations.
Enabling Single-Writer Access
In clustered Data ONTAP, export policies and rules can be used, along with volume permissions, to
control access to files and folders for single-writer status. For example, an export policy rule can be
configured to allow access only to a specific client, thereby enabling only that client to have NFS
connectivity to the NFS export.
The following is an example of a policy configured to allow only single-client access to an export using the
-clientmatch option in the export policy rule.
cluster ::> export-policy rule show -vserver SVM -policyname default -ruleindex 1
(vserver export-policy rule show)
Vserver: SVM
Policy Name: default
Rule Index: 1
Access Protocol: any
Client Match Hostname, IP Address, Netgroup, or Domain: 10.228.225.140
RO Access Rule: any
RW Access Rule: any
User ID To Which Anonymous Users Are Mapped: 65534
Superuser Security Types: any
Honor SetUID Bits in SETATTR: true
Allow Creation of Devices: true
In the preceding example, access is granted only to the 10.228.225.140 client. All other clients are unable
to mount using NFS. If control over CIFS access to the export is desired, then export policy rules can be
enabled for CIFS shares using the following command in advanced privilege:
cluster::> set advanced
cluster::*> cifs options modify -vserver SVM -is-exportpolicy-enabled true
Why Using NFS Version 4 (NFSv4) Works
NFSv4 is another option for bypassing the nonmonitored locking issue with NFSv3 in clustered Data
ONTAP versions prior to 8.2.3. The reason NFSv4 in Windows works natively with clustered Data ONTAP
is because NFSv4 incorporates locking and leasing in the protocol. For more information about NFSv4,
see TR-3580: NFSv4 Enhancements and Best Practices Guide: Data ONTAP Implementation and/or
RFC 3530.
Considerations for Using NFSv4 with Windows for NFS
The following section covers the considerations for using NFSv4 with Windows for NFS.
Lack of Support/Testing
Native Windows NFS does not provide the ability to mount using NFSv4. Thus, it is only possible to
mount using NFSv4 with third-party clients. The Center for Information Technology Integration (CITI) at
119 NFS Best Practice and Implementation Guide © 2017 NetApp, Inc. All Rights Reserved
the University of Michigan had been developing an NFSv4.1 client for Windows, but development has
ceased on that project. NetApp does not recommend using that utility because it does not have support
from Microsoft, NetApp, or CITI.
Requirements for Name Services or the Equivalent
NFSv4 offers greater security through the name@v4-id-domain requirement for file and folder access.
When a user name or group name does not have a valid entry in the NFSv4 ID domain configured on the
NFS server, access is denied, and the user and group are squashed to the “nobody” user specified in the
NFSv4 idmapd configuration file on the client. NFSv4 security benefits are covered in more detail in TR-
3580: NFSv4 Enhancements and Best Practices Guide: Data ONTAP Implementation.
Because NFSv4 requires strict 1:1 name and group mappings for access, a name service (such as LDAP)
or local users must be created to allow valid access. These user names must match exactly, including
case. For more information about this, refer to TR-4073: Secure Unified Authentication.
For information about configuring OpenText with Windows clients, see TR-4321: Windows NFS in
Clustered Data ONTAP.
NFS Using Apple OS
NFS mounts are also possible using Apple OS using the Finder or terminal windows. For complete mount
options in the Apple OS, use the man mount_nfs command in a terminal window. When using Apple
clients for NFS, there are some things to keep in mind.
Dynamic Versus Static UIDs
When using a Mac with Active Directory, the default behavior of the Mac is to dynamically create a
UID/GID based on the Windows SID of the user. In many cases, this is sufficient, but if control over the
UIDs and GIDs is needed (such as integration with an existing LDAP server), then static UIDs can be
leveraged. For information about best practices for using Apple OS with Active Directory, see the white
paper called Best Practices for Integrating OS X with Active Directory.
Apple OS Disables Root by Default
Apple disables the root user (UID 0) by default in its OS. Users are instead required to log in with a user
name other than root and use sudo if performing root-level tasks. It is possible to reenable the root user.
Apple UIDs Start at 501
The Apple UID structure starts at UID 501. This UID is not a default UNIX user in clustered Data ONTAP,
nor does it exist in most name service servers. This situation is the same for every Apple OS client in an
environment, so it is possible that multiple users exist with the same UID. The options to handle this are
as follows:
• Create a user on the cluster or in a name service server with UID 501 to authenticate all Apple users.
• Change the UID on the Apple OS for each user who intends to use NFS on Apple.
Use of Apple NFS with NTFS Security–Style Volumes
Apple NFS handles NTFS security–style volumes differently than Linux NFS clients. Therefore,
copies/writes to an NFS mount using Finder applications fail by default when NTFS security style is used.
This issue occurs when the Apple client attempts an EXCLUSIVE CREATE operation on the file, which is
only allowed by SMB clients in clustered Data ONTAP.
As a workaround, the NFS server option –ntfs-unix-security-ops can be set to ignore to allow
NTFS security–style volumes to work properly with NFS mounts on Apple. See bug 723115 for more
information.

120 NFS Best Practice and Implementation Guide © 2017 NetApp, Inc. All Rights Reserved
NFS Rootonly Operations Do Not Work as Expected with Apple OS
In clustered Data ONTAP 8.2, the NFS server options –mount-rootonly and –nfs-rootonly were
introduced. By default, mount-rootonly is enabled, and nfs-rootonly is disabled. Apple OS behavior when
mounting using NFS defaults is to always use reserved ports for the MOUNT protocol and nonreserved
ports for the NFS protocol. The Linux NFS mount option of resvport/noresvport applies in the Apple OS,
but noresvport does not control the client’s MOUNT port sent to the cluster. Therefore, Apple NFS clients
always use ports in range <1024 for MOUNT.
There presently is not a known method to change this behavior, so Apple technical support would need to
be engaged to use nonreserved ports for NFS MOUNT calls. For NFSv4.x mounts, this does not matter,
because NFSv4.x does not leverage the MOUNT protocol. NFS client ports for NFS operations (port
2049) can be controlled using the resvport/noresvport mount options, but the NFS server option on the
cluster would need to be toggled to honor the client behavior. Doing so would affect all versions of NFS.
Additionally, when attempting to mount with the resvport option specified in the Apple OS, the sudo
command would need to be used, because root is disabled and the -users option is not specified by
default.
Note: When using the Finder to mount NFS, mount options cannot be specified.
12 Multiprotocol User Mapping
Multiprotocol functionality includes the ability to map UNIX user identities (UIDs) to NT identities (SIDs).
This mapping involves contacting an NT domain controller to do name-to-SID lookups. Because this
translation is time consuming and must be performed for every NFS access of a file with NT security,
these mappings are cached. In clustered Data ONTAP, credentials are cached in two locations: the NAS
protocol stack and the Security Daemon (SecD).
12.1 Credential Caching in Clustered Data ONTAP
The following sections cover how clustered Data ONTAP caches identities and credentials for users and
groups to enable better performance during authentication requests.
NAS Protocol Caching
The NAS protocol stack is unique per node and handles the translation of NAS protocol packets into
cluster-aware packets to be passed through the cluster network on to WAFL (Write Anywhere File
System). The NAS protocol stack credential cache did not age out earlier than clustered Data ONTAP
8.2, but it now refreshes every 20 minutes (pre-8.2.3) or 120 minutes (8.2.3 and later). This action takes
place so that stale credentials are not kept on the system. The NAS credential cache can be viewed and
flushed manually through diag-level commands. As of ONTAP 8.3.1, the cache can be modified using the
NFS server options -cached-cred-positive-ttl and -cached-cred-negative-ttl and is set
to 24 hours for positive entries (2 hours for negative) to match the SecD cache. Keep in mind that to flush
a NAS cache for a specific node one must be logged in to a management interface local to that node
(such as the node management LIF). NAS protocol caches are flushed as a whole per SVM. After a
credential is flushed, it must be repopulated into cache, which can affect latency on new connections.
Existing connections are not affected by flushing this cache. However, NetApp recommends flushing
caches only at the direction of NetApp Support.
Note: Diag-level commands must be used with caution.

121 NFS Best Practice and Implementation Guide © 2017 NetApp, Inc. All Rights Reserved
Example in 8.1:
cluster::> set diag
cluster::*> diag nblade cifs credentials show -vserver vs0 -unix-user-name root
Getting credential handles.
1 handles found....
Getting cred 0 for user.
Global Virtual Server: 8
Cred Store Uniquifier: 23
Cifs SuperUser Table Generation: 0
Locked Ref Count: 0
Info Flags: 1
Alternative Key Count: 0
Additional Buffer Count: 0
Allocation Time: 0 ms
Hit Count: 0 ms
Locked Count: 0 ms
Windows Creds:
Flags: 0
Primary Group: S-0-0
Unix Creds:
Flags: 0
Domain ID: 0
Uid: 0
Gid: 1
Additional Gids:
cluster::*> diag nblade cifs credentials flush -vserver vs0
FlushCredStore succeeded flushing 2 entries
In 8.2.x and later:
cluster::> set diag
cluster::*> diag nblade credentials show -vserver vs0 -unix-user-name root
Getting credential handles.
1 handles found....
Getting cred 0 for user.
Global Virtual Server: 8
Cred Store Uniquifier: 23
Cifs SuperUser Table Generation: 0
Locked Ref Count: 0
Info Flags: 1
Alternative Key Count: 0
Additional Buffer Count: 0
Allocation Time: 0 ms
Hit Count: 0 ms
Locked Count: 0 ms
Windows Creds:
Flags: 0
Primary Group: S-0-0
Unix Creds:
Flags: 0
Domain ID: 0
Uid: 0
Gid: 1
Additional Gids:
cluster::*> diag nblade credentials flush -vserver vs0
FlushCredStore succeeded flushing 2 entries

122 NFS Best Practice and Implementation Guide © 2017 NetApp, Inc. All Rights Reserved
NFS/Name Service Database (NSDB) Caches
In addition to NAS layer caches, ONTAP has the concept of NFS caches when name services are
involved, particularly when using the extended groups option. Rather than constantly needing to reach out
to name service servers (such as NIS or LDAP) and fetch credentials, the NSDB cache keeps NFS
credentials for 30 minutes. The NSDB cache can also be cleared starting in ONTAP 8.3.1 with the diag
privilege command diag nblade nfs nsdb-cache clear. Starting in ONTAP 9.0, the cache can
be viewed with diag nblade nfs nsdb-cache show.
cluster::> set diag
cluster::*> diag nsdb-cache show -node node3 -vserver SVM -unix-user-name nfs_user
(diag nblade nfs nsdb-cache show)
Node: node3
Vserver: SVM
Unix user name: nfs_user
Creation time: 2146204100
Last Access time: 2146261100
Number of hits: 19
SecD Caching
SecD is a user space application that runs on a per-node basis. The SecD application handles name
service lookups such as DNS, NIS, and LDAP, as well as credential queries, caching, and name
mapping. Because SecD is responsible for so many functions, caching plays an important role in its
operations. SecD contains two types of caches: LRU and DB style.
LRU-Style Caches
LRU caches are “Least Recently Used” cache types and age out individual entries at a specified timeout
value based on how long it has been since the entry was last accessed. LRU cache timeout values are
viewable and configurable using diag-level commands in the cluster.
In the following example, the “sid-to-name” cache (responsible for Windows SID to UNIX user name
caching) allows a default of 2,500 max entries, which stay in cache for 86.400 seconds:
cluster::> set diag
cluster::*> diag secd cache show-config –node node1 –cache-name sid-to-name
Current Entries: 0
Max Entries: 2500
Entry Lifetime: 86400
Caches can be manually flushed, but can only be flushed one at a time on a per-SVM basis:
cluster::> set diag
cluster::*> diag secd cache clear –node node1 –vserver vs0 –cache-name sid-to-name
DB-Style Caches
DB-style caches are caches that time out as a whole. These caches do not have maximum entries
configured and are rarer than LRU-style caches.
Caches can be flushed in their entirety rather than per node, but both methods involve disrupting the
node. One way to flush is to reboot the node using storage failover/giveback. The other method is to
restart the SecdD process using the following diag-level command:
cluster::> set diag
cluster::*> diag secd restart –node node1
NetApp does not recommend adjusting SecD caches unless directed by NetApp Support.

123 NFS Best Practice and Implementation Guide © 2017 NetApp, Inc. All Rights Reserved
Figure 14) Multiprotocol user mapping.
12.2 User Name Mapping During Multiprotocol Access
Data ONTAP performs a number of steps when attempting to map user names. Name mapping can take
place for one of two reasons:
• The user name needs to be mapped to a UID.
• The user name needs to be mapped to a Windows SID.
Name Mapping Functionality
The method for user mapping depends on the security style of the volume being accessed. If a volume
with UNIX security style is accessed using NFS, then a UID needs to be translated from the user name to
determine access. If the volume is NTFS security style, then the UNIX user name needs to map to a
Windows user name/SID for NFS requests because the volume uses NTFS-style ACLs. All access
decisions are made by the NetApp device based on credentials, group membership, and permissions on
the volume.
By default, NTFS security–style volumes are set to 777 permissions, with a UID and a GID of 0, which
generally translates to the “root” user. NFS clients see these volumes in NFS mounts with this security
setting, but users do not have full access to the mount. The access is determined by which Windows user
the NFS user is mapped to.
The cluster use the following order of operations to determine the name mapping:
Note: 1:1 implicit name mapping
a. Example: WINDOWS\john maps to UNIX user john implicitly.
b. In the case of LDAP/NIS, this generally is not an issue.
Note: Vserver name-mapping rules
a. If no 1:1 name mapping exists, SecD checks for name mapping rules.
b. Example: WINDOWS\john maps to UNIX user unixjohn.

124 NFS Best Practice and Implementation Guide © 2017 NetApp, Inc. All Rights Reserved
Note: Default Windows/UNIX user
a. If no 1:1 name mapping and no name mapping rule exist, SecD checks the NFS server for a default Windows user or the CIFS server for a default UNIX user.
b. By default, pcuser is set as the default UNIX user in CIFS servers when created using System Manager 3.0 or vserver setup.
c. By default, no default Windows user is set for the NFS server.
Note: If none of the preceding exists, then authentication fails.
a. In most cases in Windows, this failure manifests as the error “A device attached is not functioning.”
b. In NFS, a failed name mapping manifests as access or permission denied.
Name mapping and name switch sources depend on the SVM configuration. See the “File Access and
Protocols Management Guide” for the specified version of clustered Data ONTAP for configuration
details.
Best Practices 24: Name Mapping Recommendation (See Best Practices 25)
It is a best practice to configure an identity management server such as LDAP with Active Directory
for large multiprotocol environments. See TR-4073: Secure Unified Authentication for more
information about LDAP.
Configuration step 8) Configuring CIFS for multiprotocol access.
Category Commands
Add CIFS license.
Note: None of the CIFS-related operations can be initiated without adding the CIFS license key.
cluster::> license add -license-code XXXXXXXXXXXXXXX
Enable CIFS.
cluster::> vserver modify -vserver test_vs1 -allowed-protocols nfs,cifs
Verification
cluster::> vserver show -instance -vserver test_vs1
vserver: test_vs1
vserver Type: cluster
vserver UUID: 51fdb806-b862-11e0-9980-
123478563412
Root Volume: test_vs1
Aggregate: aggr1_Cluster01
Name Service Switch: file, ldap
Name Mapping Switch: file
NIS Domain: -
Root Volume Security Style: unix

125 NFS Best Practice and Implementation Guide © 2017 NetApp, Inc. All Rights Reserved
Category Commands
LDAP Client: ldapclient1
Language: C
Snapshot Policy: default
Comment:
Anti-Virus On-Access Policy: default
Quota Policy: default
List of Aggregates Assigned: -
Limit on Maximum Number of Volumes allowed: unlimited
vserver Admin State: running
Allowed Protocols: nfs, cifs
Disallowed Protocols: fcp, iscsi
Configure DNS server.
A DNS server must be created and configured properly to provide the name services to resolve the LIF names assigned to the network ports.
cluster::> vserver services dns create -vserver test_vs1 -domains
domain.netapp.com -state enabled -timeout 2 -attempts 1 -name-servers
172.17.32.100
Verification
cluster::> vserver services dns show -vserver test_vs1
Vserver: test_vs1
Domains: domain.netapp.com
Name Servers: 172.17.32.100
Enable/Disable DNS: enabled
Timeout (secs): 2
Maximum Attempts: 1
Create CIFS server.
cluster::> cifs create -vserver test_vs1 -cifs-server test_vs1_cifs -domain
domain.netapp.com
Verification
cluster::> cifs server show
Server Domain/Workgroup Authentication
vserver Name Name Style
----------- --------------- ---------------- --------------
test_vs1 TEST_VS1_CIFS DOMAIN domain
Create CIFS share.
cluster::> cifs share create -vserver test_vs1 -share-name testshare1 -path
/testshare1
Verification

126 NFS Best Practice and Implementation Guide © 2017 NetApp, Inc. All Rights Reserved
Category Commands
cluster::> vserver cifs share show -vserver test_vs1 -share-name testshare1
vserver: test_vs1
Share: testshare1
CIFS Server NetBIOS Name: TEST_VS1_CIFS
Path: /testshare1
Share Properties: oplocks
browsable
changenotify
Symlink Properties: -
File Mode Creation Mask: -
Directory Mode Creation Mask: -
Share Comment: -
Share ACL: Everyone / Full Control
File Attribute Cache Lifetime: -
Make sure that the default UNIX user is set to pcuser.
Make sure that the default UNIX user is set to a valid existing user. In clustered Data ONTAP 8.2 and later, this user is set to pcuser by default. Previous versions of clustered Data ONTAP need to be set manually.
cluster::> cifs options show –vserver test_vs1
vserver: test_vs1
Default Unix User: - ------- not mapped to pcuser
Read Grants Exec: disabled
WINS Servers: -
Create the UNIX group pcuser.
cluster::> unix-group create -vserver test_vs1 -name pcuser -id 65534
Verification:
cluster::> unix-group show -vserver test_vs1
(vserver services unix-group show)
vserver Name ID
-------------- ------------------- ----------
test_vs1 daemon 1
test_vs1 pcuser 65534
test_vs1 root 0
3 entries were displayed.
Create the UNIX user pcuser.
cluster::> unix-user create -vserver test_vs1 -user pcuser -id 65534 -primary-
gid 65534 -full-name pcuser
Verification:
cluster::> unix-user show -vserver test_vs1
(vserver services unix-user show)

127 NFS Best Practice and Implementation Guide © 2017 NetApp, Inc. All Rights Reserved
Category Commands
vserver Name ID
-------------- ------------------- ----------
test_vs1 pcuser 65534
test_vs1 root 0
2 entries were displayed.
Map the default UNIX user to pcuser.
cluster::> cifs options modify -vserver test_vs1 -default-unix-user pcuser
Verification:
cluster::> cifs options show –vserver test_vs1
Vserver: test_vs1
Default Unix User: pcuser ------- mapped to pcuser
Read Grants Exec: disabled
WINS Servers: -
Attempt to map the CIFS share.

128 NFS Best Practice and Implementation Guide © 2017 NetApp, Inc. All Rights Reserved
Category Commands
For more information
Before you attempt name mapping, verify that the default UNIX user is mapped to “pcuser.” By default, no UNIX user is associated with the Vserver. For more information, including how to create name mapping rules, see the “File Access and Protocols Management Guide” for the specified version of clustered Data ONTAP.
Using Local Files for Authentication
In clustered Data ONTAP, there is no concept of /etc/passwd, /etc/usermap.cfg or other flat files.
Instead, everything is contained within database table entries that are replicated across all nodes in the
cluster for consistency and locality.
For local file authentication, users are created and managed at an SVM level for multitenancy. For
instance, if there are two SVMs in a cluster, both SVMs have independent UNIX user and group lists. To
manage these lists, the commands vserver services unix-user and vserver services unix-
group are leveraged.
These commands control the following:
• User name
• UID/GID
• Group membership (primary and auxiliary)
Users and groups can be either created manually or loaded from the URI. For information about the
procedure to load from the URI, see the “File Access and Protocol Guide” for the release of clustered
Data ONTAP running on the system.
Note: UID and GID numbers can use a range of 0 to 4,294,967,295 (the largest 32-bit unsigned integer possible).
Example of Creating Local UNIX User

129 NFS Best Practice and Implementation Guide © 2017 NetApp, Inc. All Rights Reserved
cluster::> vserver services unix-user create -vserver vs0 -user testuser -id 101 -primary-gid 101
Example of Creating Local UNIX Group
cluster::> vserver services unix-group create -vserver vs0 -name testgroup -id 101
Example of Adding a Local UNIX User to a Local UNIX Group
cluster::> vserver services unix-group adduser -vserver vs0 -name testgroup -username testuser
Using local users and groups can be beneficial in smaller environments with a handful of users, because
the cluster would not need to authenticate to an external source. This prevents latency for lookups, as
well as the chance of failed lookups due to failed connections to name servers.
Handling the Root User in Multiplatform Linux Environments
One use case for adding a user to local groups is for the root user. The root user is local to the cluster
SVM by default and might not be included in name services (such as LDAP or NIS). This situation can
prove to be problematic in environments that use multiple Linux platforms (that is, Solaris, AIX, HP-UX,
RHEL, and so on). The default root group on some platforms is 0 (root), while it is 1 (daemon) on others.
In clustered Data ONTAP, root defaults to a primary GID of 1.
This situation can create issues, especially in NFSv4, because the client’s primary group for root might
differ from the primary group for the cluster. This difference might cause a scenario in which the
permissions display as root:nobody.
To address these environments, it might make sense to add the root user to both the root (GID 0) and
daemon (GID 1) groups in the SVM’s local unix-user and unix-group database.
The Wheel Group and NFSv4
The “wheel” group is a common UNIX user group that is used to provide users with the ability to use su
on commands. This group generally uses GID 10. One commonly used application that makes use of the
wheel group is tar. When you use tar in NFSv4, if the wheel group is not present in name services, you
might see failures because the group does not map into the NFSv4 ID domain.
Best Practices 25: The Wheel Group (See Best Practices 26)
If you use NFSv4.x, it makes sense to create a local group for wheel on the clustered Data ONTAP
SVM using GID 10 (or whichever GID wheel is used on your clients). Doing so helps prevent issues
with resolving the wheel group.
For larger environments, NetApp recommends using a name server such as NIS or LDAP to service
UID/GID translation requests.
Best Practices 26: Primary GIDs (See Best Practices 27)
UNIX users always have primary GIDs. When specifying a primary GID, whether with local users or
name services, be sure that the primary GID exists in the specified nm-switch and ns-switch
locations. Using primary GIDs that do not exist can cause authentication failures in clustered Data
ONTAP 8.2 and earlier.

130 NFS Best Practice and Implementation Guide © 2017 NetApp, Inc. All Rights Reserved
Local User and Groups
In versions earlier than clustered Data ONTAP 8.3, there was no set limit for local users and groups.
Potentially, a storage administrator could create as many local users and groups as that administrator
saw fit. However, as local users and groups are created, the replicated database tables that make
clustered Data ONTAP run properly grow in size. If these database tables grow to the point of memory
exhaustion when reading/writing the tables, cluster outages can occur. Therefore, 8.3 introduced a hard
limit on local users and groups. This limit is cluster-wide and affects all SVMs and is known as nonscaled
mode. In ONTAP 9.1 and later, a new way of managing large numbers of local users and groups was
introduced called scaled mode or file-only mode.
Best Practices 27: Local UNIX Users and Groups (See Best Practices 28)
In versions earlier than clustered Data ONTAP 8.3, there was no hard limit on local users and
groups. However, that does not mean that there is no actual limit. NetApp highly recommends not
exceeding the local UNIX user and group limits as defined in the following table when using
clustered Data ONTAP versions earlier than 8.3.
Note: This limit is for local UNIX users and groups. Local CIFS users and groups (vserver cifs users-and-groups) have an independent limit and are not affected by this limit.
Scaled Mode/File-Only Mode
Scaled mode/file-only mode for local users and groups in ONTAP 9.1 allows storage administrators to
expand the limits of local users and groups by enabling a diag-level name service option and then using
the load-from-uri functionality to load files into the cluster to provide higher numbers of users and groups.
Scaled mode/file-only mode also can add performance improvements to name service lookups, because
there is no longer a need to have external dependencies on name service servers, networks, and so on.
However, this performance comes at the expense of ease of management of the name services, because
file management adds overhead to the storage management and introduces more potential for human
error. Additionally, local file management must be done per cluster, adding an extra layer of complexity.
Best Practices 28: Using File-Only Mode for Local UNIX Users and Groups (See Best Practices 29)
Be sure to evaluate your options at length and make the appropriate decision for your environment
and consider file-only mode only if you require a name service environment that needs more than
64k users/groups.
131 NFS Best Practice and Implementation Guide © 2017 NetApp, Inc. All Rights Reserved
To enable this option for users and groups, use the vserver services name-service unix-user
file-only and vserver services name-service unix-group file-only commands:
NAME
vserver services name-service unix-user file-only modify -- Change configuration for UNIX-user
file download
AVAILABILITY
This command is available to cluster and Vserver administrators at the diagnostic privilege
level.
DESCRIPTION
The vserver services name-service unix-user file-only modify command enables you to load UNIX
user files with large number of UNIX users beyond the maximum configurable limit of 65536 for the
cluster. Once it is enabled, individual operations on UNIX users are not allowed, and the users
can only be managed using the vserver services name-service unix-user load-from-uri command.
PARAMETERS
-vserver <vserver name> - Vserver
Use this parameter to specify the Vserver for which you want to modify the file-only mode.
[-is-enabled {true|false}] - Is File-Only Download Enabled?
Use this parameter with value true to enable the file-only mode. This field is set to false by
default.
After the mode is enabled, use the following command to load the user and group file from URI:
cluster::*> vserver services name-service unix-user load-from-uri
Note: If loading files larger than 10MB for users and 25MB for groups, use the –skip-file-size-check option.
When using file-only mode, individual operations on users and groups are not allowed. This configuration
is not currently supported in MetroCluster™ or SVM disaster recovery (SVM DR) scenarios.
When issuing this command, some warnings are issued:
cluster::*> vserver services name-service unix-user file-only modify -vserver SVM1 -is-enabled
true
Warning: Do not enable the file-only configuration if you are using, or plan to use, MetroCluster
or Vserver Async DR.
If you enable the file-only configuration:
- Modifying individual user entries will not be possible.
- Local Unix-users must be managed by downloading a file using the "vserver services
name-service unix-user load-from-uri" command.
- Downloading the users will replace all existing users. The standard set of users must
be present in the file. If the users "root", "pcuser" and "nobody" are not defined, a data
serving interruption might occur.
This command may take some time to complete.
Do you want to continue? {y|n}: y
To check the status of local user and group files, use:
cluster ::*> vserver services unix-user file status
Vserver Node Load Time Hash Value
--------- --------------- ------------------- --------------------------------
Hash Value DB File Size
-------------------------------- -----------
SVM1
node-01
10/11/2016 10:55:27 6b617f426b0646df581fe94b0d20b7cc
1e0e62ca1bd18174174e9f562f1aea88 75B
node-02
10/11/2016 10:55:27 6b617f426b0646df581fe94b0d20b7cc
1e0e62ca1bd18174174e9f562f1aea88 75B

132 NFS Best Practice and Implementation Guide © 2017 NetApp, Inc. All Rights Reserved
Can You Still Use External Name Services?
File-only mode does not mean you cannot use LDAP or NIS as a name service; it means that
management of local users and groups is done with files only. In the following example, file-only mode is
enabled on the SVM, and LDAP can still be used to perform name lookups:
cluster ::*> name-service ns-switch show -vserver SVM1
(vserver services name-service ns-switch show)
Source
Vserver Database Order
--------------- ------------ ---------
SVM1 hosts files,
dns
SVM1 group files,
ldap
SVM1 passwd files,
ldap
SVM1 netgroup files
SVM1 namemap files
5 entries were displayed.
cluster::*> vserver services unix-user file-only show -vserver SVM1
Vserver: SVM1
Is File-Only Download Enabled?: true
cluster ::*> getxxbyyy getpwbyname -node ontap9-tme-8040-01 -vserver SVM1 -username ldapuser
-show-source true
(vserver services name-service getxxbyyy getpwbyname)
Source used for lookup: LDAP
pw_name: ldapuser
pw_passwd:
pw_uid: 1108
pw_gid: 513
pw_gecos:
pw_dir: /home/ldapuser
pw_shell: /bin/sh
Keep in mind that when file-only is enabled, the default local users of root, pcuser, and nobody are
removed if the file being loaded does not have the users. Be sure to include the local users and groups in
your passwd/group files when using file-only.
cluster::*> unix-user show -vserver SVM1
Error: show failed: File-only configuration is enabled. Use the command "vserver services name-
service unix-user file show" instead.
cluster::*> vserver services name-service unix-user file show -vserver SVM1
Line No File content
---------- ----------------
1 nobody:*:65535:65535::::::
2 pcuser:*:65534:65534::::::
3 root:*:0:1::::::
Limits
The following section covers the limits for using local users and groups in ONTAP. These limits are
cluster-wide.

133 NFS Best Practice and Implementation Guide © 2017 NetApp, Inc. All Rights Reserved
Table 16) Limits on local users and groups in clustered Data ONTAP.
Local UNIX User/Group Limits in 8.3 and Later
(Default and Max, Nonscaled Mode, Cluster-
Wide)
Tested Local UNIX User /Group Limits in 9.1 and Later
(Default and Max, Scaled Mode/File-Only, per SVM)
32,768 (default)
65,536 (max)
Passwd file size (users): 10MB*
Group file size: 25MB*
*group and passwd file sizes can be overridden with –
skip-file-size-check but larger file sizes have not
been tested
Users: 400K
Groups: 15k
Group memberships: 3000k
SVMs: 6
As previously mentioned, the local UNIX user and group limits are cluster-wide and affect clusters with
multiple SVMs. Thus, if a cluster has 4 SVMs, then the maximum number of users in each SVM must add
up to the maximum limit set on the cluster.
For example:
• SVM1 has 2,000 local UNIX users.
• SVM2 has 40,000 local UNIX users.
• SVM3 has 20 local UNIX users.
• SVM4 would then have 23,516 local UNIX users available to be created.
Any attempted creation of any UNIX user or group beyond the limit would result in an error message.
Example:
cluster::> unix-group create -vserver NAS -name test -id 12345
Error: command failed: Failed to add "test" because the system limit of {limit number}
"local unix groups and members" has been reached.
The limits are controlled by the following commands in the advanced privilege level:
cluster::*> unix-user max-limit
modify show
Best Practices 29: Local UNIX Users and Group Limits (See Best Practices 1)
If a cluster requires more than the allowed limit of UNIX users and groups, an external name service
such as LDAP should be leveraged. Doing so bypasses the limits on the cluster and allows a
centralized mechanism for user and group lookup and management.

134 NFS Best Practice and Implementation Guide © 2017 NetApp, Inc. All Rights Reserved
Default Local Users
When an SVM is created using vserver setup or System Manager, default local UNIX users and groups
are created, along with default UIDs and GIDs.
The following shows these users and groups:
cluster::> vserver services unix-user show -vserver vs0
User User Group Full
Vserver Name ID ID Name
-------------- --------------- ------ ------ --------------------------------
nfs nobody 65535 65535 -
nfs pcuser 65534 65534 -
nfs root 0 0 -
cluster::> vserver services unix-group show -vserver vs0
Vserver Name ID
-------------- ------------------- ----------
nfs daemon 1
nfs nobody 65535
nfs pcuser 65534
nfs root 0
Note: When using file-only mode, be sure the preceding users exist in the files being used to manage the cluster. After file-only is enabled, the default users are removed if the uploaded file does not include them.
User Mapping Information in 7-Mode Versus Clustered Data ONTAP
The following section covers how user mapping rules convert from 7-Mode to ONTAP running in clustered
configurations. Name mapping in ONTAP occurs in NAS operations to provide an initial authentication
into the file system to provide two qualifiers:
• Users are who they say they are.
• Users map to users based on volume/qtree security style to properly translate security ACLs.
Name mapping rules are covered in detail in the product documentation. Review the documentation for
your ONTAP version for additional information.
Local Files Versus Replicated Databases
In ONTAP running in 7-Mode, local users, groups, and name mappings were sourced from local flat files
located on the storage system’s root volume found in /vol/vol0/etc. With ONTAP running in clustered
mode, the concept of local files for users/groups/mappings is moved to a replicated database (RDB) that
gets copied across all nodes in a cluster and added into tables. Replicating these tables allows local
access from every node for speed of access. In ONTAP 9.1, the addition of file-only scaled UNIX users
and groups incorporates more of a classic 7-Mode management feature, but name mappings are still
sourced from a replicated database for local entries.
Note: It is possible to source users, groups, and name mapping rules from external servers.
Table 17) 7-Mode file to clustered Data ONTAP mapping.
7-Mode File Clustered Data ONTAP RDB Table
/etc/passwd unix_users
/etc/group unix_groups
/etc/usermap.cfg namemappings
Translating Name Mapping Rules from 7-Mode to Clustered Data ONTAP

135 NFS Best Practice and Implementation Guide © 2017 NetApp, Inc. All Rights Reserved
ONTAP operating in 7-Mode could use external services (such as LDAP) to serve name mapping rules
or, more commonly, local files. In 7-Mode, the local file used was /etc/usermap.cfg.
The 7-Mode usermap.cfg file used a specific format for name mapping rules, using a combination of
descriptors (<,>,=) to define what in direction a name mapping is performed.
The following table shows the translation between 7-Mode style name mapping rules and name mapping
rules in clustered Data ONTAP.
Table 18) 7-Mode to clustered Data ONTAP mapping.
7-Mode Mapping Clustered Data ONTAP
-direction -pattern -replacement -position
X => Y Win-UNIX X Y –
X <= Y UNIX-Win Y X –
X == Y UNIX-Win/
Win-UNIX
X/Y Y/X –
Note: For further information about CIFS configuration and name mapping, refer to TR-4191: Best Practices Guide for Clustered Data ONTAP 8.2.x and 8.3 Windows File Services.
Note: 1:1 name mappings do not require specific rules in clustered Data ONTAP (such as X == Y). This implicit name mapping is done by default. Additionally, as of clustered Data ONTAP 8.2.1, trusted domain name mapping is supported. For more information, see the File Access and Protocol Guides.

136 NFS Best Practice and Implementation Guide © 2017 NetApp, Inc. All Rights Reserved
Table 19) Examples of 7-Mode rules versus clustered Data ONTAP rule.
Direction 7-Mode Versus Clustered Data ONTAP Rules
Windows to UNIX
7-Mode:
root => DOMAIN\administrator
Clustered Data ONTAP:
vserver name-mapping create -vserver SVM -direction win-unix
-position 1 -pattern DOMAIN\\administrator -replacement root
UNIX to Windows
7-Mode:
root <= DOMAIN\administrator
Clustered Data ONTAP:
vserver name-mapping create -vserver SVM -direction unix-win
-position 1 –pattern root -replacement DOMAIN\\administrator
Windows = UNIX 7-Mode:
root == DOMAIN\administrator
Clustered Data ONTAP:
vserver name-mapping create -vserver SVM -direction win-unix
-position 1 -pattern DOMAIN\\administrator -replacement root
vserver name-mapping create -vserver SVM -direction unix-win
-position 1 –pattern root -replacement DOMAIN\\administrator
Kerberos SPN to UNIX (for NFS Kerberos)
7-Mode:
N/A
Clustered Data ONTAP:
vserver name-mapping create -vserver SVM1 -direction krb-unix
-position 1 -pattern nfs/fqdn.netapp.com -replacement root
Host Name/IP Address/Subnet to Name Mapping Support
ONTAP 9.1 introduces support for IP or host name to UNIX name mappings. This functionality was
present in 7-Mode, and now ONTAP 9.1 provides feature parity. This allows storage administrators to
map host names, IP addresses, or entire subnets to a specific UNIX or Windows user with the new name
mapping rule options -address and -hostname.
[-address <IP Address/Mask>] - IP Address with Subnet Mask
This optional parameter specifies the IP address that can be used to match the client's
workstation IP address with the pattern.
[-hostname <text>] } - Hostname
This optional parameter specifies the hostname that can be used to match the corresponding
client's workstation IP address with the list of IP addresses with the pattern.

137 NFS Best Practice and Implementation Guide © 2017 NetApp, Inc. All Rights Reserved
13 NetApp FlexGroup Volumes
Beginning in ONTAP 9.1, a new way to present storage to NAS (CIFS/SMB and NFS) clients was
introduced: NetApp FlexGroup.
A NetApp FlexGroup volume is intended to provide the following benefits:
• Immense capacity for a single mount point (up to 20PB, 400 billion files)
• Performance gains over FlexVol® by way of concurrency of ingest operations
• Ease of deployment and management
13.1 Supported Features with NetApp FlexGroup
The following table shows the current list of supported ONTAP features for NetApp FlexGroup. Consider
anything not listed in this table as not currently supported. For questions on supported features not listed,
e-mail [email protected].
Table 20) List of supported ONTAP features in NetApp FlexGroup.
Supported ONTAP Features in NetApp FlexGroup
• NFSv3
• SMB2.x/3.x (RC2 and later)
• All Flash FAS
• NetApp Snapshot™ and SnapMirror®
• OnCommand System Manager and OnCommand Performance Manager
• Factory configuration templates
• Postprocess deduplication
• Aggregate inline deduplication
• Data compaction
• Inline compression
• Inline data deduplication
• Thin provisioning
• Quota reporting
• Constituent volume move
• RAID Triple Erasure Coding
• Per-aggregate CPs
• NetApp Volume Encryption (NVE)
13.2 Ideal Use Cases
A FlexGroup volume works best with workloads that are heavy on ingest (a high level of new data
creation), heavily concurrent, and evenly distributed among subdirectories:
• Electronic design automation
• Log file repositories
• Software build/test environments (such as GIT)
• Seismic/oil and gas
• Media assets or HIPAA archives
• File streaming workflows
• Unstructured NAS data (such as home directories)
• Big data (Hadoop with the NetApp NFS connector)
13.3 Nonideal Cases
The general guidance for workloads that currently should not be used on a FlexGroup volume include:
• Very large files (multiple TBs in size)
• Large files that grow over time (such as databases)
• Virtualized workloads that require cloning and copy offload functionality

138 NFS Best Practice and Implementation Guide © 2017 NetApp, Inc. All Rights Reserved
• Workloads that require striping
• Workloads that require specific control over the layout of data to FlexVol relationships
For more information regarding NetApp FlexGroup volumes, see TR-4557: NetApp FlexGroup Technical
Overview.
14 Unified Security Style (Infinite Volumes)
Infinite Volumes were introduced in clustered Data ONTAP 8.1.1 with support for NFSv3. Unified security
style was introduced in clustered Data ONTAP 8.2 to support CIFS and NFSv4 for Infinite Volumes.
Unified security style is intended to provide ubiquitous access control in a multiprotocol environment
rather than prioritizing behavior on a particular protocol.
Infinite Volumes use only unified security style. This style is not currently available for NetApp FlexVol
volumes.
For detailed information about Infinite Volumes, see TR-4037: Introduction to NetApp Infinite Volume and
TR-4178: Infinite Volume Deployment and Implementation Guide.
14.1 What Is Unified Security Style?
Unified security style consolidates file permission management for both UNIX and Windows users and
groups. Windows and UNIX users can view and manage permissions on files regardless of the current
effective style and regardless of the protocol previously used to set permissions on those files.
14.2 UNIX, NTFS, and Mixed Security Styles
Data ONTAP operating in 7-Mode and clustered Data ONTAP support three security styles for FlexVol
volumes: UNIX, NTFS, and mixed. These security styles prioritize the network protocol when managing
permissions, but at the expense of other protocols. For example, Windows clients cannot change UNIX-
style ACLs, and UNIX clients cannot change NTFS ACLs. In mixed style, although both UNIX and
Windows clients can set ACLs, these clients are currently unable to view ACLs set by the other. Also,
when an ACL is set, it blindly overwrites the existing permissions. Table 21 describes the behavior and
limitations of each security style.

139 NFS Best Practice and Implementation Guide © 2017 NetApp, Inc. All Rights Reserved
Table 21) Limitations of existing security styles.
Security Style Limitations
UNIX • Windows clients cannot set attributes.
• NTFS-style ACLs are not effective; only NFSv4 ACLs and mode bits are effective.
• UNIX mode bits can be merged into an NFSv4 ACL.
NTFS • UNIX clients cannot set attributes.
• Only NTFS-style ACLs are effective; NFSv4 ACLs and mode bits are not effective.
Mixed • Both Windows and UNIX clients can set attributes.
• UNIX mode bits can be merged into an NFSv4 ACL, but they cannot be merged into an NTFS ACL.
• Only one style of ACL can be honored on an object.
Applying UNIX-style ACLs drops NTFS-style ACLs.
Applying NTFS-style ACLs drops UNIX-style ACLs.
Note: These limitations apply to all objects in NetApp storage (files, directories, volumes, qtrees, and LUNs).
Contrasting the Clustered Data ONTAP Security Styles
Unified security style in clustered Data ONTAP eliminates many of the caveats and restrictions imposed
by the UNIX, NTFS, and mixed security styles. The intent of unified security style is to provide ubiquitous
access control and management for both UNIX and Windows clients.
In unified security style:
• UNIX and Windows clients can view ACLs and permissions regardless of the on-disk effective security style; that is, regardless of the protocol previously used to set ownership or permissions.
• UNIX and Windows clients can modify ACLs and permissions regardless of the on-disk effective security style; that is, regardless of the protocol previously used to set ownership or permissions.
• UNIX mode bits can be merged into an existing ACL regardless of the on-disk effective security style; that is, regardless of whether the ACL is an NFSv4 ACL or an NTFS ACL.
• ACEs in NTFS ACLs can represent UNIX or Windows principals (users or groups).
Current NFSv4 clients and servers support a single NFSv4 domain, and all principals must be mapped into that NFSv4 domain. For this reason, NFSv4 ACLs set by NFSv4 clients contain only NFSv4 principals.

140 NFS Best Practice and Implementation Guide © 2017 NetApp, Inc. All Rights Reserved
Mixed Security Style Versus Unified Security Style
The main differences between the mixed and unified security styles are illustrated in Table 22.
Table 22) Mixed versus unified security style.
Mixed Security Style Unified Security Style
• NFS clients cannot view an existing NTFS ACL.
• NFS clients can only blindly overwrite an existing NTFS ACL.
• NFS mode bits cannot be merged into an existing NTFS ACL.
• NFS principals (users/groups) cannot be represented in an NTFS ACL.
• Windows clients cannot view an existing NFSv4 ACL.
• Windows clients can only blindly overwrite an existing NFSv4 ACL.
• NFS clients can view/modify existing NTFS ACLs.
Group mapping has been added to support NFSv4 clients. Both Windows users and Windows groups can be mapped into the NFSv4 domain.
If an NFS client saves mode bits, the mode bits can be merged into an existing NFS ACL or NTFS ACL.
• Windows clients can view/modify existing NFSv4 ACLs.
UNIX principals might appear in NTFS ACLs.
UNIX principals are distinguished by a user-
or group- prefix.
The NFS well-known principals (OWNER@, GROUP@, and EVERYONE@) are supported.
The following figure illustrates the NFS well-known principals (OWNER@, GROUP@, and
EVERYONE@) in unified style (on the right), contrasted with mixed style (on the left).
Figure 15) Mixed-style (left) and unified-style (right) mode bit display on Windows.

141 NFS Best Practice and Implementation Guide © 2017 NetApp, Inc. All Rights Reserved
The NFS well-known principals (OWNER@, GROUP@, and EVERYONE@) are defined in the NFSv4
specification. There is a significant difference between these principals in an ACL and the UNIX mode
classes (owner, owning group, and other). The NFS well-known principals are defined in Table 23.
Table 23) NFS well-known principal definitions.
Who Description
OWNER@ The owner of the file
GROUP@ The group associated with the file
EVERYONE@ The world, including the owner and owning group
The UNIX mode classes are specific and exclusive. For example, permissions granted to “other” exclude
the owner and the owning group. Thus a mode mask of 007 grants rwx permission to everyone except
members of the owning group and the owner.
The well-known NFS principals are inclusive, and an ACL is processed in order to determine the sum of
the permissions granted to each principal. Thus an ACL granting FullControl to EVERYONE@ results in a
mode mask of 777.
While recognizing that it is not possible to represent the entirety of an ACL in mode bits, the NFSv4.1
specification provided clarification to potential ambiguities in the original NFSv4 specification:
• Interpreting EVERYONE@ as equivalent to UNIX “other” does not follow the intent of the EVERYONE@ definition. The intent of EVERYONE@ is literally everyone, which includes the owner and owning group.
• A server that supports both mode and ACL must take care to synchronize the mode bits with OWNER@, GROUP@, and EVERYONE@. This way, the client can see semantically equivalent access permissions whether the client asks for the mode attributes or the ACL.
NTFS Security Style Versus Unified Security Style
There are two main features of NTFS security style that merit discussion when contrasting its behavior
with unified security style.
• NTFS security style explicitly blocks attempts to change ownership or permissions using NFS.
• NTFS security style always displays the most permissive mode permissions possible to NFS clients,1 which are calculated by summing all the permissions granted across the ACL. Thus NFS clients often display 777 regardless of the actual permissions on a file.
Unified security style:
• The ability of the superuser (root) or regular users to change file ownership can be controlled and restricted using the -superuser and -chown-mode options, which are described in subsequent
sections of this document.
• It is not currently possible to completely block permission changes using NFSv3, but the capability of an NFSv3 client to change an ACL is limited. An NFSv3 client can only affect (add, remove, modify) the NFS well-known principal ACEs (OWNER@, GROUP@, and EVERYONE@). It is not possible for an NFSv3 client to add, remove, or modify any Windows ACE in the ACL.
1 There was an option in Data ONTAP 7-Mode to generate “least permissive” mode bits in NTFS security style but that option is not available in clustered Data ONTAP.

142 NFS Best Practice and Implementation Guide © 2017 NetApp, Inc. All Rights Reserved
• Permissions are calculated as directed in the NFSv4.1 specification. The algorithm uses the NFS well-known principal ACEs (OWNER@, GROUP@, and EVERYONE@), the Windows owner, and the Windows Everyone group when calculating the UNIX mode. Thus an NTFS ACL that grants FullControl to OWNER@ and Read+Execute to GROUP@ would generate a mode of 750.
• The generated mode might be 000 if an ACL contains Windows group ACEs but no Windows Everyone ACE and none of the NFS well-known principals.
• If a mode of 000 is disconcerting or undesirable, the OWNER@ ACE can be included in an NTFS ACL with little or no impact on access control on the file because the UNIX owner always has the right to read and change permissions. Note that this unconditional right permitting the UNIX owner to read and change permissions does not automatically result in an OWNER@ ACE being included in an ACL.
Figure 16 illustrates an NTFS ACL in unified security style containing both NFS well-known principals and
Windows groups.
Figure 16) UNIX permission in an NTFS ACL in unified style.
14.3 Unified Security Style Behavior in Clustered Data ONTAP
Unified security style in clustered Data ONTAP eliminates many of the caveats and restrictions imposed
by the UNIX, NTFS, and mixed security styles. Unified security style provides ubiquitous access control
and management for both UNIX and Windows clients.
In unified security style:
• ACLs and permissions can be viewed by UNIX and Windows clients regardless of the on-disk
effective security style; that is, regardless of the protocol previously used to set ownership or
permissions.
• ACLs and permissions can be modified by UNIX and Windows clients regardless of the on-disk
effective security style; that is, regardless of the protocol previously used to set ownership or
permissions.

143 NFS Best Practice and Implementation Guide © 2017 NetApp, Inc. All Rights Reserved
• UNIX mode bits can be merged into an existing ACL regardless of the on-disk effective security style;
that is, regardless of whether the ACL is an NFSv4 ACL or an NTFS ACL.
• ACEs in NTFS ACLs can represent UNIX or Windows principals (users or groups).
o Current NFSv4 clients and servers support a single NFSv4 domain, and all principals must be
mapped into that NFSv4 domain. For this reason, NFSv4 ACLs set by NFSv4 clients contain only
NFSv4 principals.
To control the NFSv4 ACL preservation option, use the following command:
cluster::> set advanced
cluster::*> nfs server modify -vserver [SVM] -v4-acl-preserve enabled
In clustered Data ONTAP, it is possible to view the effective security style and ACLs of an object in
storage by using the vserver security file-directory command set. Currently, the command
does not autocomplete for SVMs with content repository enabled, so the SVM name must be entered
manually.
Example:
cluster::> vserver security file-directory show -vserver infinite -path /infinitevolume/CIFS
Vserver: infinite
File Path: /infinitevolume/CIFS
Security Style: mixed
Effective Style: ntfs
DOS Attributes: 10
DOS Attributes in Text: ----D---
Expanded Dos Attributes: -
Unix User Id: 500
Unix Group Id: 512
Unix Mode Bits: 777
Unix Mode Bits in Text: rwxrwxrwx
ACLs: NTFS Security Descriptor
Control:0x8504
Owner:DOMAIN\Administrator
Group:DOMAIN\Domain Users
DACL - ACEs
ALLOW-S-1-520-0-0x1f01ff-OI|CI
ALLOW-S-1-520-1-0x1201ff-OI|CI
ALLOW-S-1-520-2-0x1201ff-OI|CI
ALLOW-DOMAIN\unified1-0x1f01ff-OI|CI
ALLOW-DOMAIN\Administrator-0x1f01ff-OI|CI
ALLOW-DOMAIN\unifiedgroup-0x1f01ff-OI|CI
cluster::> vserver security file-directory show -vserver infinite -path /infinitevolume/NFS
Vserver: infinite
File Path: /infinitevolume/NFS
Security Style: mixed
Effective Style: unix
DOS Attributes: 10
DOS Attributes in Text: ----D---
Expanded Dos Attributes: -
Unix User Id: 100059
Unix Group Id: 10008
Unix Mode Bits: 777
Unix Mode Bits in Text: rwxrwxrwx
ACLs: NFSV4 Security Descriptor
Control:0x8014
DACL - ACEs
ALLOW-S-1-8-10001-0x16019f
ALLOW-S-1-520-0-0x1601ff
ALLOW-S-1-520-1-0x1201ff-IG
ALLOW-S-1-520-2-0x1201ff
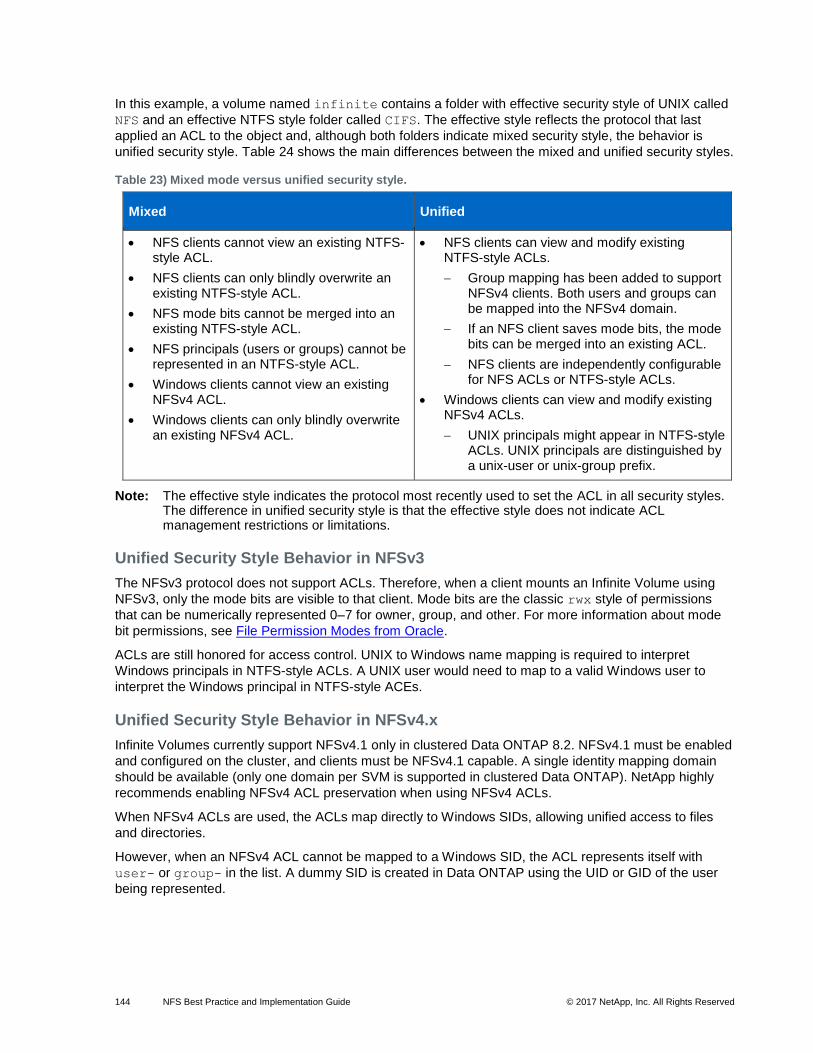
144 NFS Best Practice and Implementation Guide © 2017 NetApp, Inc. All Rights Reserved
In this example, a volume named infinite contains a folder with effective security style of UNIX called
NFS and an effective NTFS style folder called CIFS. The effective style reflects the protocol that last
applied an ACL to the object and, although both folders indicate mixed security style, the behavior is
unified security style. Table 24 shows the main differences between the mixed and unified security styles.
Table 23) Mixed mode versus unified security style.
Mixed Unified
• NFS clients cannot view an existing NTFS-style ACL.
• NFS clients can only blindly overwrite an existing NTFS-style ACL.
• NFS mode bits cannot be merged into an existing NTFS-style ACL.
• NFS principals (users or groups) cannot be represented in an NTFS-style ACL.
• Windows clients cannot view an existing NFSv4 ACL.
• Windows clients can only blindly overwrite an existing NFSv4 ACL.
• NFS clients can view and modify existing NTFS-style ACLs.
Group mapping has been added to support NFSv4 clients. Both users and groups can be mapped into the NFSv4 domain.
If an NFS client saves mode bits, the mode bits can be merged into an existing ACL.
NFS clients are independently configurable for NFS ACLs or NTFS-style ACLs.
• Windows clients can view and modify existing NFSv4 ACLs.
UNIX principals might appear in NTFS-style ACLs. UNIX principals are distinguished by a unix-user or unix-group prefix.
Note: The effective style indicates the protocol most recently used to set the ACL in all security styles. The difference in unified security style is that the effective style does not indicate ACL management restrictions or limitations.
Unified Security Style Behavior in NFSv3
The NFSv3 protocol does not support ACLs. Therefore, when a client mounts an Infinite Volume using
NFSv3, only the mode bits are visible to that client. Mode bits are the classic rwx style of permissions
that can be numerically represented 0–7 for owner, group, and other. For more information about mode
bit permissions, see File Permission Modes from Oracle.
ACLs are still honored for access control. UNIX to Windows name mapping is required to interpret
Windows principals in NTFS-style ACLs. A UNIX user would need to map to a valid Windows user to
interpret the Windows principal in NTFS-style ACEs.
Unified Security Style Behavior in NFSv4.x
Infinite Volumes currently support NFSv4.1 only in clustered Data ONTAP 8.2. NFSv4.1 must be enabled
and configured on the cluster, and clients must be NFSv4.1 capable. A single identity mapping domain
should be available (only one domain per SVM is supported in clustered Data ONTAP). NetApp highly
recommends enabling NFSv4 ACL preservation when using NFSv4 ACLs.
When NFSv4 ACLs are used, the ACLs map directly to Windows SIDs, allowing unified access to files
and directories.
However, when an NFSv4 ACL cannot be mapped to a Windows SID, the ACL represents itself with
user- or group- in the list. A dummy SID is created in Data ONTAP using the UID or GID of the user
being represented.

145 NFS Best Practice and Implementation Guide © 2017 NetApp, Inc. All Rights Reserved
Example:
cluster::> vserver security file-directory show -vserver infinite -path /infinitevolume/NFS
Vserver: infinite
File Path: /infinitevolume/NFS
Security Style: mixed
Effective Style: unix
DOS Attributes: 10
DOS Attributes in Text: ----D---
Expanded Dos Attributes: -
Unix User Id: 100059
Unix Group Id: 10008
Unix Mode Bits: 777
Unix Mode Bits in Text: rwxrwxrwx
ACLs: NFSV4 Security Descriptor
Control:0x8014
DACL - ACEs
ALLOW-S-1-8-10001-0x16019f
ALLOW-S-1-520-0-0x1601ff
ALLOW-S-1-520-1-0x1201ff-IG
ALLOW-S-1-520-2-0x1201ff
cluster::> set diag
cluster::*> diag secd authentication translate -node node1 -vserver infinite -sid S-1-8-10001
domain\user-test (User)
cluster::*> diag secd authentication translate -node node1 -vserver infinite -win-name
domain\user-test
S-1-8-10001

146 NFS Best Practice and Implementation Guide © 2017 NetApp, Inc. All Rights Reserved
The other NFSv4 ACLs listed on the object are the default EVERYONE@, GROUP@, and OWNER@
ACLs.
cluster::*> diag secd authentication translate -node node1 -vserver infinite -sid S-1-520-0
OWNER@ (Well known group)
cluster::*> diag secd authentication translate -node node1 -vserver infinite -sid S-1-520-1
GROUP@ (Well known group)
cluster::*> diag secd authentication translate -node node1 -vserver infinite -sid S-1-520-2
EVERYONE@ (Well known group)
These default ACLs get set on every object and reflect the mode bit translation for NFSv3 backward
compatibility.
Example:
# ls -la | grep NFS
drwxrwxrwx. 2 unified1 unifiedgroup 4096 Nov 1 13:46 NFS
# nfs4_getfacl /infinitevol/NFS
A::[email protected]:rwatTnNcCy
A::OWNER@:rwaDxtTnNcCy
A:g:GROUP@:rwaDxtTnNcy
A::EVERYONE@:rwaDxtTnNcy
# chmod 755 NFS
# ls -la | grep NFS
drwxr-xr-x. 2 unified1 unifiedgroup 4096 Nov 1 13:46 NFS
# nfs4_getfacl /infinitevol/NFS
A::[email protected]:rwatTnNcCy
A::OWNER@:rwaDxtTnNcCy
A:g:GROUP@:rxtncy
A::EVERYONE@:rxtncy
Unified Security Style Behavior in NFSv4 ID Domain
Unified security style leverages the NFSv4 ID domain attribute on the NFS server to formulate unified
ACLs. The default value of this is defaultv4iddomain.com. Therefore, users might appear with the
following format, even if NFSv4.x is not used:

147 NFS Best Practice and Implementation Guide © 2017 NetApp, Inc. All Rights Reserved
To avoid this behavior, set the v4-id-domain option in the NFS server even if NFSv4.x is not being
used.
Example:
cluster::> nfs server modify -vserver infinite -v4-id-domain domain.win2k8.netapp.com
Unified Security Style Behavior in CIFS
Infinite Volumes currently support SMB version 1.0 only. NTFS-style ACLs are supported and operate
identically to FlexVol volumes. With unified security style, however, NTFS ACLs are retained when UNIX
mode bits are applied. This behavior is similar to the NFSv4 ACL preserve option, but it cannot be
managed from the command line.
14.4 Unreachable Attributes
If an Infinite Volume data constituent is offline, the unreachable-attr-action attribute on the volume
controls how data access behaves for inaccessible attributes.
There are two options: return-generated and wait.
• Return-generated returns default values for the attributes, which appear to the client as a file size of 0 and timestamps that are in the past. This is the default setting.
• Wait causes the volume to return a RETRY error, which can cause some clients to appear to hang because they retry the request indefinitely.
14.5 Infinite Volume Export Policies
When SVMs are created for Infinite Volumes, several default export policies are created. These policies
contain default rules, which are applied to the volume in the SVM. In clustered Data ONTAP 8.2, export
policies apply only to NFS by default. Previous versions of clustered Data ONTAP used export policies for
CIFS access as well.
The following default polices are created when an SVM is created for an Infinite Volume:
default
repos_root_readonly_export_policy
When an Infinite Volume is added, two additional policies are also created:
default
repos_namespace_export_policy
repos_restricted_export_policy
repos_root_readonly_export_policy

148 NFS Best Practice and Implementation Guide © 2017 NetApp, Inc. All Rights Reserved
These policies have the following default rules:
Vserver: IV
Policy Name: repos_namespace_export_policy
Rule Index: 1
Access Protocol: any
Client Match Hostname, IP Address, Netgroup, or Domain: 0.0.0.0/0
RO Access Rule: any
RW Access Rule: any
User ID To Which Anonymous Users Are Mapped: 0
Superuser Security Types: any
Honor SetUID Bits in SETATTR: true
Allow Creation of Devices: true
NTFS Unix Security Options: fail
Vserver NTFS Unix Security Options: -
Change Ownership Mode: restricted
Vserver Change Ownership Mode: -
Vserver: IV
Policy Name: repos_namespace_export_policy
Rule Index: 2
Access Protocol: any
Client Match Hostname, IP Address, Netgroup, or Domain: ::0/0
RO Access Rule: any
RW Access Rule: any
User ID To Which Anonymous Users Are Mapped: 0
Superuser Security Types: any
Honor SetUID Bits in SETATTR: true
Allow Creation of Devices: true
NTFS Unix Security Options: fail
Vserver NTFS Unix Security Options: -
Change Ownership Mode: restricted
Vserver Change Ownership Mode: -
Vserver: IV
Policy Name: repos_root_readonly_export_policy
Rule Index: 1
Access Protocol: any
Client Match Hostname, IP Address, Netgroup, or Domain: 0.0.0.0/0
RO Access Rule: any
RW Access Rule: never
User ID To Which Anonymous Users Are Mapped: 0
Superuser Security Types: any
Honor SetUID Bits in SETATTR: true
Allow Creation of Devices: true
NTFS Unix Security Options: fail
Vserver NTFS Unix Security Options: -
Change Ownership Mode: restricted
Vserver Change Ownership Mode: -
Vserver: IV
Policy Name: repos_root_readonly_export_policy
Rule Index: 2
Access Protocol: any
Client Match Hostname, IP Address, Netgroup, or Domain: ::0/0
RO Access Rule: any
RW Access Rule: never
User ID To Which Anonymous Users Are Mapped: 0
Superuser Security Types: any
Honor SetUID Bits in SETATTR: true
Allow Creation of Devices: true
NTFS Unix Security Options: fail
Vserver NTFS Unix Security Options: -
Change Ownership Mode: restricted
Vserver Change Ownership Mode: -
Note: The policies named “default” and “repos_restricted_export_policy” do not contain any rules by default.

149 NFS Best Practice and Implementation Guide © 2017 NetApp, Inc. All Rights Reserved
For information about how these rules affect access, see section 3.4, “Translation of NFS Export Policy
Rules from 7-Mode to Clustered Data ONTAP.”
Infinite Volume Junction Paths
By default, if no junction path is specified when creating an Infinite Volume, the path is /NS. This behavior
differs from FlexVol behavior, in which a junction path is created only if one has been specified. To control
this behavior, either specify the junction path at volume creation or unmount and remount the Infinite
Volume to the desired path.
Configuring the Change Ownership Policy
Chown-mode can be set on a storage virtual machine or in an NFS export rule to control the ability of
regular users to change file ownership. There are two values: restricted and unrestricted. Unrestricted
allows a regular user who owns a file to change the ownership of that file. When restricted, such attempts
to change ownership are denied. Note that privileged root (-superuser=any) can still change the
ownership of any file.
The chown-mode option is restricted by default and only available at advanced privilege.
cluster::> set advanced
cluster::*> vserver nfs modify -vserver [SVM] –chown-mode
<resticted|unrestricted|use_export_policy>
If the Vserver-level chown-mode option is set to use_export_policy, the restricted/unrestricted behavior is
controlled using an export-policy rule.
cluster::*> export-policy rule modify -vserver [SVM] –policyname repos_namespace_export_policy
-chown-mode <restricted|unrestricted>
Configuring ACL Preserve on Mode Change
In unified security style, preserving ACLs on mode change applies to all (NTFS and NFSv4) ACLs.2
When v4-acl-preserve is enabled, it is not possible to affect (add, modify, or remove) Windows ACEs
using NFSv3. A chmod command can manipulate the NFS well-known principal ACEs (OWNER@,
GROUP@, and EVERYONE@), but it cannot manipulate any other ACEs in the ACL.
When v4-acl-preserve is disabled, a chmod command replaces an existing NTFS or NFSv4 ACL with the
mode bits specified by the command.
The v4-acl-preserve option is enabled by default and only available at advanced privilege.
cluster::> set advanced
cluster::> vserver nfs modify -vserver [SVM] –v4-acl-preserve <enable|disable>
15 NFS Events, Performance Monitoring, and Data Gathering
In clustered Data ONTAP, EMS messages are viewed differently than they are in 7-Mode. In 7-Mode, the
/etc/messages file located in /vol/vol0 can be viewed using CLI with rdfile or using NFS or CIFS.
2 In UNIX or mixed security style, this option applies only to NFSv4 ACLs. This option is not relevant in NTFS security style because NFS permission change operations are blocked.

150 NFS Best Practice and Implementation Guide © 2017 NetApp, Inc. All Rights Reserved
Clustered Data ONTAP currently does not provide NAS protocol visibility for logs. However, there are
various ways to view the log files.
Viewing Log Files
To view EMS errors:
cluster::> event log show
SecD Troubleshooting
SecD provides a number of diag-level commands to troubleshoot authentication and permissions issues.
The following information shows examples of commands to use for various scenarios. All commands are
at the diagnostic level (denoted by * in the CLI prompt). Exercise caution while at the diagnostic level.
Check name mapping functionality:
cluster::*> diag secd name-mapping show -node node1 -vserver vs0 -direction unix-win -name
ldapuser
ldapuser maps to WIN2K8\ldapuser
Translate user names and groups into SIDs or UIDs:
cluster::*> diag secd authentication translate -node node1 -vserver vs0 -unix-user-name ldapuser
55
cluster::*> secd authentication translate -node node1 -vserver vs0 –win-name DOMAIN\ldapuser
S-1-5-21-2216667725-3041544054-3684732124-1123
cluster::*> secd authentication translate -node node1 -vserver vs0 –unix-group-name unixadmins
503
Enable/disable debug-level logging in SecD:
cluster::*> diag secd trace set -node <nodename> -trace-all [yes|no]

151 NFS Best Practice and Implementation Guide © 2017 NetApp, Inc. All Rights Reserved
Check user name credentials and group membership as SecD sees them:
cluster::*> diag secd authentication show-creds -node node1 -vserver vs0 -unix-user-name ldapuser
-list-name true -list-id true
UNIX UID: 55 (ldapuser) <> Windows User: S-1-5-21-2216667725-3041544054-3684732124-1123
(DOMAIN\ldapuser (Domain User))
GID: 513 (Domain Users)
Supplementary GIDs:
503 (unixadmins)
Windows Membership:
S-1-5-21-2216667725-3041544054-3684732124-513 DOMAIN\Domain Users (Domain group)
S-1-5-21-2216667725-3041544054-3684732124-1108 DOMAIN\unixadmins (Domain group)
S-1-5-32-545 BUILTIN\Users (Alias)
User is also a member of Everyone, Authenticated Users, and Network Users
Privileges (0x80):
Restart SecD process (Note: This is a disruptive operation):
cluster::*> diag secd restart -node <nodename>
Note: Restarting SecD is not necessary in most cases and should be done only as a last resort. Restarting SecD is not needed to set log tracing. It is used only to clear all caches at once, fix configuration replay issues, or clear a hung process.
Performance Monitoring in Clustered Data ONTAP 8.1 and Earlier
In 7G, nfsstat -d was a common and popular command to provide information about NFS operations.
In clustered Data ONTAP, nfsstat –d does not exist. However, the statistics command can be
used with a variety of parameters to get details about NFS metadata operations at the individual cluster
node level. These commands are available at advanced privilege.
cluster::> statistics show-periodic -node node1
-object nfs3 -interval 1
The following command provides information from each individual volume about NFS workload and
latency.
cluster::*> statistics show-periodic -node node1
-object volume -instance vs2_nfs4_data3
The following command identifies the type of protocol in use and the details of the RPC calls. These are
available in advanced privilege.

152 NFS Best Practice and Implementation Guide © 2017 NetApp, Inc. All Rights Reserved
cluster::*> statistics oncrpc show-rpc-calls -node node1 -protocol tcp
Node: node1
Transport Protocol: tcp
Bad Procedure Calls: 0 -
Bad Length Calls: 0 -
Bad Header Calls: 8 0/s:16s
Bad Calls: 8 0/s:16s
Bad Program Calls: 0 -
Total Calls: 116491426 58/s:16s
Per-client statistics are also available to identify which client IP addresses are generating what NFS traffic
in clustered Data ONTAP. These are available in advanced privilege.
cluster::> set advanced
cluster::*> statistics settings modify -client-stats enabled
Warning: System performance may be significantly impacted. Are you sure?
Do you want to continue? {y|n}: y
cluster::*> statistics show -object client
We can also drill down to details for a single client.
cluster::*> statistics show -object client -instance 172.17.44.106
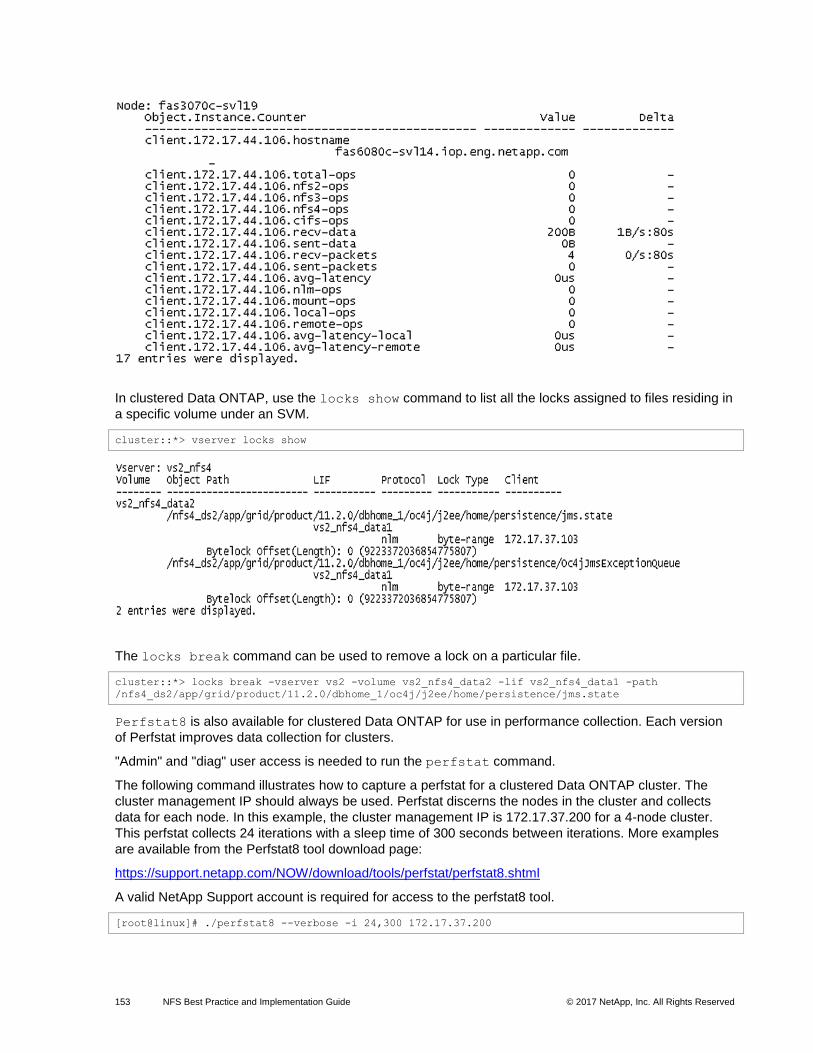
153 NFS Best Practice and Implementation Guide © 2017 NetApp, Inc. All Rights Reserved
In clustered Data ONTAP, use the locks show command to list all the locks assigned to files residing in
a specific volume under an SVM.
cluster::*> vserver locks show
The locks break command can be used to remove a lock on a particular file.
cluster::*> locks break -vserver vs2 -volume vs2_nfs4_data2 -lif vs2_nfs4_data1 -path
/nfs4_ds2/app/grid/product/11.2.0/dbhome_1/oc4j/j2ee/home/persistence/jms.state
Perfstat8 is also available for clustered Data ONTAP for use in performance collection. Each version
of Perfstat improves data collection for clusters.
"Admin" and "diag" user access is needed to run the perfstat command.
The following command illustrates how to capture a perfstat for a clustered Data ONTAP cluster. The
cluster management IP should always be used. Perfstat discerns the nodes in the cluster and collects
data for each node. In this example, the cluster management IP is 172.17.37.200 for a 4-node cluster.
This perfstat collects 24 iterations with a sleep time of 300 seconds between iterations. More examples
are available from the Perfstat8 tool download page:
https://support.netapp.com/NOW/download/tools/perfstat/perfstat8.shtml
A valid NetApp Support account is required for access to the perfstat8 tool.
[root@linux]# ./perfstat8 --verbose -i 24,300 172.17.37.200

154 NFS Best Practice and Implementation Guide © 2017 NetApp, Inc. All Rights Reserved
Performance Monitoring in Clustered Data ONTAP 8.2
In clustered Data ONTAP 8.2, performance monitoring commands changed slightly because the
underlying performance monitoring subsystems got an overhaul. As a result, legacy performance
commands use the statistics-v1 command set, while the newer performance monitoring commands
leverage the statistics command.
Note: For a complete list of performance counters, objects, and instances, use the statistics catalog command, found at advanced privilege.
Keep the following points in mind for performance commands in clustered Data ONTAP 8.2:
• NFS per-client statistics do not exist under statistics in 8.2; they exist only under statistics-
v1.
• In 8.2.1, per-client statistics work properly with the regular statistics commands.
• Regular statistics commands can implement multiple counters. These are separated by a pipe symbol rather than comma-separated, as seen in previous versions of clustered Data ONTAP.
Example:
cluster::> statistics show -object zapi|aggregate
• Per-client statistics currently do not resolve IP addresses to names.
Note: Currently there is no way to sort “top clients” in per-client statistics. Newer releases of clustered Data ONTAP introduce new performance improvements and bug fixes so that statistics-v1 is no longer necessary.
For more information regarding performance in clustered Data ONTAP, see TR-4211: NetApp Storage
Performance Primer for Clustered Data ONTAP 8.2.
Determining What Type of Virtual Machine Is Hosted on NFS
In clustered Data ONTAP 8.3 and later, it is possible to determine what type of virtual machine is
accessing the storage using statistics captured in the counter manager. Use the following commands to
show the statistics. These are available in diagnostic privilege.
cluster::> set diag
cluster::*> statistics show -object wafl -counter wafl_nfs_application_mask -raw
The output of these statistics shows masks for specific virtual machines. The masks are described later.
Table 24) Virtual machine statistic masks.
VM Type Mask
None 0
ESX/ESXi 1
Citrix Xen 2
Red Hat KVM 4
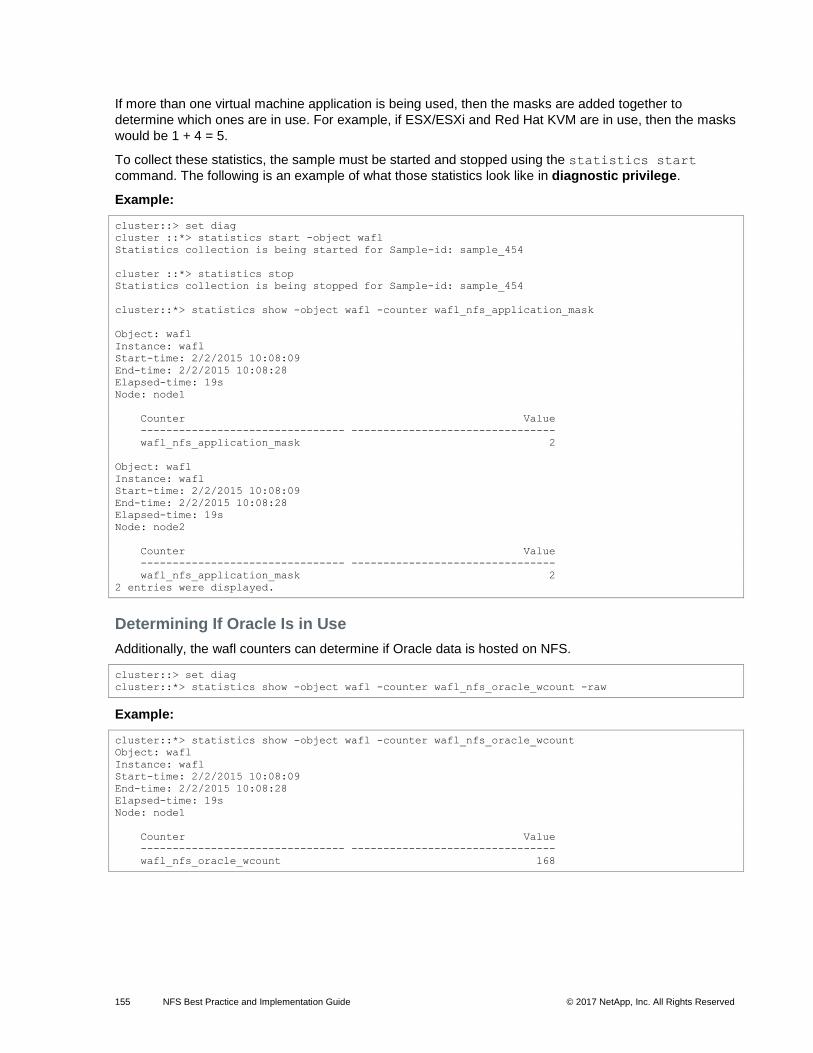
155 NFS Best Practice and Implementation Guide © 2017 NetApp, Inc. All Rights Reserved
If more than one virtual machine application is being used, then the masks are added together to
determine which ones are in use. For example, if ESX/ESXi and Red Hat KVM are in use, then the masks
would be 1 + 4 = 5.
To collect these statistics, the sample must be started and stopped using the statistics start
command. The following is an example of what those statistics look like in diagnostic privilege.
Example:
cluster::> set diag
cluster ::*> statistics start -object wafl
Statistics collection is being started for Sample-id: sample_454
cluster ::*> statistics stop
Statistics collection is being stopped for Sample-id: sample_454
cluster::*> statistics show -object wafl -counter wafl_nfs_application_mask
Object: wafl
Instance: wafl
Start-time: 2/2/2015 10:08:09
End-time: 2/2/2015 10:08:28
Elapsed-time: 19s
Node: node1
Counter Value
-------------------------------- --------------------------------
wafl_nfs_application_mask 2
Object: wafl
Instance: wafl
Start-time: 2/2/2015 10:08:09
End-time: 2/2/2015 10:08:28
Elapsed-time: 19s
Node: node2
Counter Value
-------------------------------- --------------------------------
wafl_nfs_application_mask 2
2 entries were displayed.
Determining If Oracle Is in Use
Additionally, the wafl counters can determine if Oracle data is hosted on NFS.
cluster::> set diag
cluster::*> statistics show -object wafl -counter wafl_nfs_oracle_wcount -raw
Example:
cluster::*> statistics show -object wafl -counter wafl_nfs_oracle_wcount
Object: wafl
Instance: wafl
Start-time: 2/2/2015 10:08:09
End-time: 2/2/2015 10:08:28
Elapsed-time: 19s
Node: node1
Counter Value
-------------------------------- --------------------------------
wafl_nfs_oracle_wcount 168

156 NFS Best Practice and Implementation Guide © 2017 NetApp, Inc. All Rights Reserved
Performance Monitoring Enhancements in ONTAP 9.0 and Later
ONTAP 9.0 and later have introduced some performance monitoring enhancements that can aid storage
administrators in performance monitoring and proactive performance management.
Note: For a complete list of performance counters, objects, and instances, use the statistics catalog command, found at advanced privilege.
Top Clients
ONTAP provides the ability to track the top NAS clients writing data to a cluster using the new ONTAP 9
feature called “top clients.” This feature tracks the overall incoming operations and lists the client IP
address, NAS protocol being used, total IOPS, node being accessed, and the SVM to which the client is
connecting. This information can be accessed from the CLI or the OnCommand System Manager GUI.
In OnCommand System Manager, the splash screen you see when you first log in shows the top clients
at the bottom of the page. Simply select the drop box and choose “Top Clients” and then the “Objects” tab
for a point-in-time look.
Figure 17) Top NAS clients view in OnCommand System Manager.
You can also watch the top clients in real time using the command line with the admin privilege
command statistics top client show. This command allows you to specify a minimum of 30-second
intervals, number of iterations to show, as well as the maximum number of clients that should be
displayed. In the following example, a Python file create script was run from two clients to a NetApp
FlexGroup volume over NFSv3 to show an example of what to expect from the command’s output.
cluster::> statistics top client show -interval 30 -iterations 5 -max 10
cluster : 6/26/2017 17:42:27
*Estimated
Total
IOPS Protocol Node Vserver Client
---------- -------- ------------------ ------- -------------
23010 nfs ontap9-tme-8040-01 DEMO 10.193.67.233
20006 nfs ontap9-tme-8040-02 DEMO 10.193.67.211
17 cifs ontap9-tme-8040-02 ch-svm-smb1
10.63.223.221
ontap9-tme-8040 : 6/26/2017 17:42:56
22832 nfs ontap9-tme-8040-01 DEMO 10.193.67.233
20056 nfs ontap9-tme-8040-02 DEMO 10.193.67.211
12 cifs ontap9-tme-8040-02 ch-svm-smb1
10.63.223.221
By default, the CLI orders by IOPS. It’s also possible to order by throughput by using the -sort-key
option. For example:

157 NFS Best Practice and Implementation Guide © 2017 NetApp, Inc. All Rights Reserved
cluster::> statistics top client show -interval 30 -iterations 5 -max 10 -sort-key write_data
cluster : 6/26/2017 18:04:53
*Estimated
Write
Data (Bps) Protocol Node Vserver Client
---------- -------- ------------------ ------- -------------
154968 nfs ontap9-tme-8040-01 DEMO 10.193.67.233
150400 nfs ontap9-tme-8040-02 DEMO 10.193.67.211
Hot Files
In addition to exposing the top clients accessing a cluster, ONTAP can also show the top files in use on a
cluster. This can be particularly useful when dealing with ESX/virtualized environments, where a single
ESX server might be hosting hundreds of virtual machines on a single NFS mounted datastore. In that
scenario, the “top clients” feature would not be as useful as knowing which files are doing the most work.
ONTAP can expose that information all the way down to the VMDK level.
In the following example, this ONTAP cluster is hosting a number of ESXi 6.0 VMs on an NFS mounted
datastore. Again, we can see this information in OnCommand System Manager, as well as in the CLI.
In OnCommand System Manager, the top files can be accessed in the bottom graph, by selecting the
appropriate drop-down option and the Objects tab.
In Figure 18, the OnCommand Unified Manager VM (stme-ocum-01) is using up the most throughput.
Figure 18) Top files view for an ESXi environment in OnCommand System Manager.

158 NFS Best Practice and Implementation Guide © 2017 NetApp, Inc. All Rights Reserved
From the CLI, the command is statistics top file show at admin privilege. In the following
example, we still see OnCommand Unified Manager VMDK as the top consumer of write throughput and
IOPS:
ontap-tme-prod::> statistics top file show -interval 30 -iterations 1
ontap-tme-prod : 6/26/2017 18:01:21
*Estimated
Total
IOPS Node Vserver Volume File
---------- ----------------- ------- ---------- ----------------------------------------
48 ontap-tme-prod-03 vmware datastore1 /stme-ocum-01_1/stme-ocum-01_2-flat.vmdk
31 ontap-tme-prod-03 vmware datastore1 /OCUM722-MP/OCUM722-MP_2-flat.vmdk
ontap-tme-prod::> statistics top file show -interval 30 -iterations 1 -max 10 -sort-key
write_data
ontap-tme-prod : 6/26/2017 18:05:04
*Estimated
Write
Data (Bps) Node Vserver Volume File
---------- ----------------- ------- ---------- --------------------------------------------
685600 ontap-tme-prod-03 vmware datastore1 /Parisi OCUM 7.2/Parisi OCUM 7.2_2-flat.vmdk
159475 ontap-tme-prod-03 vmware datastore1 /stme-ocum-01_1/stme-ocum-01_2-flat.vmdk
Note: The above is a lab environment. Results vary depending on workload.
QoS Maximums and Minimums
ONTAP 8.2 introduced the QoS maximums, where a performance cap could be applied to a volume, qtree, LUN, or file (QoS for files also include virtual machines). QoS max allows an admin to cap the maximum amount of IOPS or Mbps/Gbps to which the object maximum is being applied. The purpose of doing this is to stop a capped workload from starving other workloads in a shared environment. Information for use of QoS in a virtualization use case can be found in TR-4597: VMware vSphere with ONTAP.
ONTAP 9.2 introduces QoS minimums, which allow storage administrators to apply a performance floor to
volumes, LUNs, or files (only blocks, so in effect these are LUNs). In ONTAP 9.2 QoS min is available on
All Flash FAS only, and only for use with SAN or block protocols. This allows ONTAP to guarantee that an
object with the QoS min applied receives guaranteed prioritized resources up to the minimum specified
regardless of any resource contention. The minimum does not reserve resources, so it only prioritizes
traffic being offered. Other processes can use those resources in the absence of offered load, regardless
of other workloads on the system, which allows SLAs to be honored. For more information about QoS
minimums, see the ONTAP product documentation for your version of ONTAP.
Note: QoS minimums are currently only available for SAN; NAS will be available in a future release.
OnCommand Unified Manager: Truly Unified
Prior to OnCommand 7.2, there was a requirement for two separate OVAs for OnCommand Unified
Manager and OnCommand Performance Manager. OnCommand 7.2 combines the two OVAs into a
single OVA. In addition, a number of performance monitoring improvements have been made in
OnCommand Performance Manager’s interface over the lifetime of the product to provide a free method
to monitor your storage performance, including NFS operations.
More information about QoS min/max, OnCommand System Manager, and OnCommand Unified Manager can be found in TR-4211: NetApp Storage Performance Primer.

159 NFS Best Practice and Implementation Guide © 2017 NetApp, Inc. All Rights Reserved
Figure 19) OnCommand Unified Manager 7.2 performance graphs.
OnCommand Performance Manager also provides visibility into the top 10 performers in a cluster to allow
storage administrators to quickly narrow down issues to volumes, aggregates, and SVMs. Choose from a
list of metrics from latency to performance capacity to help isolate performance issues.
Figure 20) OnCommand Unified Manager 7.2 top performers.
You can find the latest OnCommand Unified Manager on the NetApp Support site.
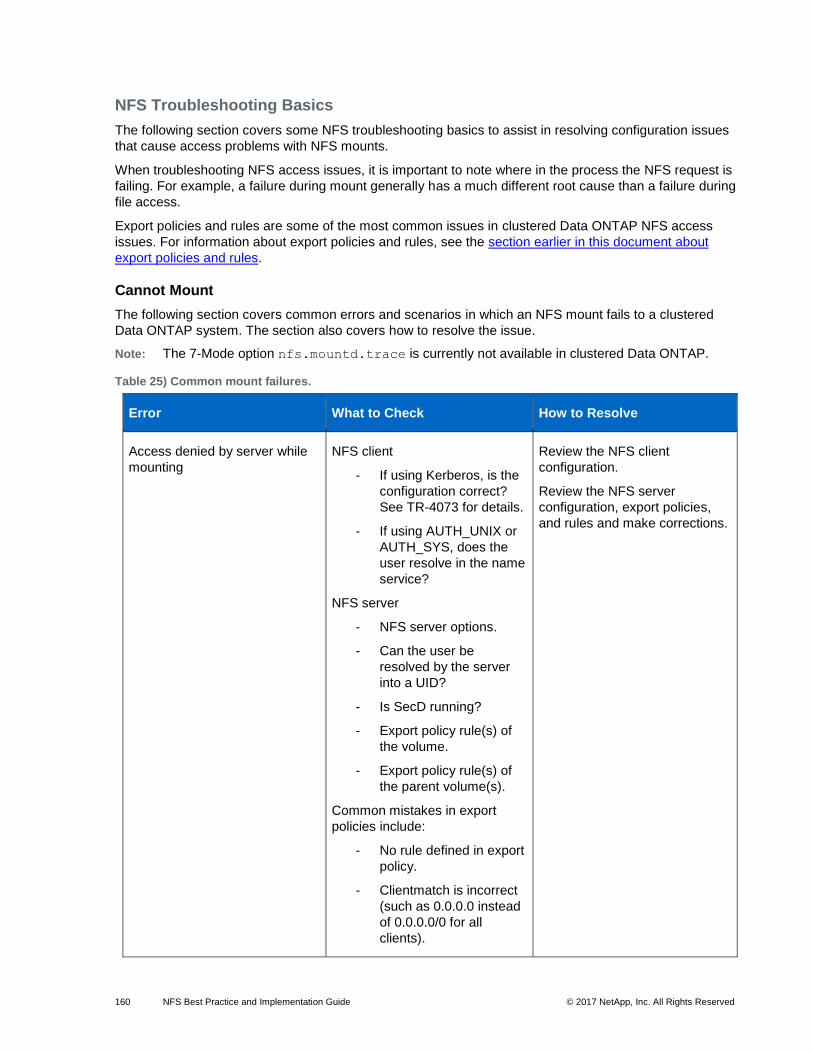
160 NFS Best Practice and Implementation Guide © 2017 NetApp, Inc. All Rights Reserved
NFS Troubleshooting Basics
The following section covers some NFS troubleshooting basics to assist in resolving configuration issues
that cause access problems with NFS mounts.
When troubleshooting NFS access issues, it is important to note where in the process the NFS request is
failing. For example, a failure during mount generally has a much different root cause than a failure during
file access.
Export policies and rules are some of the most common issues in clustered Data ONTAP NFS access
issues. For information about export policies and rules, see the section earlier in this document about
export policies and rules.
Cannot Mount
The following section covers common errors and scenarios in which an NFS mount fails to a clustered
Data ONTAP system. The section also covers how to resolve the issue.
Note: The 7-Mode option nfs.mountd.trace is currently not available in clustered Data ONTAP.
Table 25) Common mount failures.
Error What to Check How to Resolve
Access denied by server while
mounting
NFS client
- If using Kerberos, is the
configuration correct?
See TR-4073 for details.
- If using AUTH_UNIX or
AUTH_SYS, does the
user resolve in the name
service?
NFS server
- NFS server options.
- Can the user be
resolved by the server
into a UID?
- Is SecD running?
- Export policy rule(s) of
the volume.
- Export policy rule(s) of
the parent volume(s).
Common mistakes in export
policies include:
- No rule defined in export
policy.
- Clientmatch is incorrect
(such as 0.0.0.0 instead
of 0.0.0.0/0 for all
clients).
Review the NFS client
configuration.
Review the NFS server
configuration, export policies,
and rules and make corrections.

161 NFS Best Practice and Implementation Guide © 2017 NetApp, Inc. All Rights Reserved
- Client match does not
allow client attempting
access.
- Access protocol does
not allow NFS.
- RO policy is set to
incorrect value.
- User is squashed to the
anon user, which does
not have permissions to
the volume.
NFS server options that could
cause access-denied errors
during mount include:
- NFS mount root only.
Requested NFS version or
transport protocol is not
supported
NFS server
- NFS server options for
the NFS version.
- TCP/UDP settings.
- NFS server is running.
Network/firewall
- Verify that the firewall is
not blocking NFS or
related ports.
- Verify that the data LIF
allows NFS.
SVM
- Verify that the SVM
allows NFS as a
protocol.
Review the NFS server
configuration to verify that the
protocol and NFS version are
enabled and the server is
running.
Review the network settings and
data LIFs to verify that NFS is
allowed.
Review the SVM to verify that
NFS is allowed.
Mount hangs indefinitely Network
- Is the LIF up? Can it be
pinged?
- Is the DNS entry
correct?
- Is the LIF at home? Are
failover groups
configured properly?
- Is the firewall blocking
any of the NFS ports?
Review the network settings.
Review the data LIFs on the
cluster.

162 NFS Best Practice and Implementation Guide © 2017 NetApp, Inc. All Rights Reserved
Mounting failed, reason given by
server: No such file or directory
Mount syntax
- Is the right mount path
specified?
NFS server
- Is the junction the same
as the mount path?
- Is the volume mounted?
- If using LS mirrors, have
they been updated?
NFS client
- If volume permission
changes have been
made, has the volume
been remounted?
- Is the volume mounted
with no access cache?
Review the mount syntax.
Review the NFS volume.
Mount point is busy or already
mounted
NFS client
- Is something already
mounted to that mount
point?
Review the output of the mount
command.
Mount point/test does not exist NFS client
- Does the mount point
exist?
Use a valid mount point.
Only root can do that NFS client
- Does the user have
permission to mount?
NFS server
- Is root-only mount set?
Check client and server
configuration.
Operation not permitted NFS client
- Does the user have root
access?
NFS server
- Does the client export as
root?
- Is superuser set
properly?
Check export policies and rules.
Check client configuration for
root access.

163 NFS Best Practice and Implementation Guide © 2017 NetApp, Inc. All Rights Reserved
For information regarding mount issues using NFS Kerberos, see TR-4073: Secure Unified Authentication
for more details.
Permission Denied/Access Issues
The following section covers issues in which an NFS mount succeeds but accessing the mount fails. The
section also covers how to resolve the issue. Not all scenarios are covered.
Table 26) Common access issues.
Error What to Check How to Resolve
Permission denied (while
accessing mount/reading/writing)
NFS server
- Do the data volume’s
security settings permit
the user access?
- Do the parent volume’s
security settings permit
the user access?
- What is the volume’s
security style? Does the
user attempting access
map to a valid Windows
user if the security style
is NTFS?
- If able to cd but not able
to read or write, but
UNIX permissions seem
to allow access to all
users, does the cluster
know the user
attempting access?
Verify and modify the volume’s
security.
Verify and modify the export
policy rule to allow access.
Verify that the user can map
properly into name service.
Verify that the user exists in
name service.
Permission denied (while
attempting chmod/chown/chgrp)
Operation not permitted (while
chown/chmod/chgrp)
NFS server
- Is chown allowed by
anyone other than root?
- Is the user the owner of
the file?
NFS client
- Is the user root?
Change the NFS server and
export policy rule options for
chown to “unrestricted.”
Not a directory (when traversing
Snapshot directory)
NFS client
- Check the kernel
version.
See Bugzilla 798809.

164 NFS Best Practice and Implementation Guide © 2017 NetApp, Inc. All Rights Reserved
Files Written as “Nobody”
The following section covers issues in which NFSv4 clients show file ownership as the “nobody” user. The
section also covers how to resolve the issue. Not all scenarios are covered.
A stale file handle error occurs when the server file system has changed and the file handle is no longer
valid. For example: Client A opens file xxx.yyy for edit, Client B deletes this file, Client A goes to save the
edit, Client A gets a stale file handle error.
This situation can occur not just for operations on individual files, but also because of changes in directory
structure.
Table 27) Files written as “nobody” in NFSv4.
Error What to Check How to Resolve
No error; files written as the
“nobody” user (or some other
unexpected user)
NFS client
- /var/log/messages file.
- Is the NFSv4 domain
specified in
/etc/idmapd.conf?
- What is the user name
attempting access? Can
the client resolve the
name in the name
service?
NFS server
- Can the cluster translate
the user name to a UID?
- Is the NFSv4 domain
set?
- If the user writing the file
is root, does the export
policy squash root to the
anon user (superuser =
none)?
- Is the name service
working properly?
Fix the NFSv4 domain ID.
Verify that the user name
matches the NFSv4 domain
user name exactly (case
sensitive).
Verify that the client and cluster
can resolve the user name.
Adjust the export policy rule to
allow superuser access if
desired.

165 NFS Best Practice and Implementation Guide © 2017 NetApp, Inc. All Rights Reserved
Stale File Handle on NFS Mount
The following section covers scenarios in which a stale file handle error might occur and how to resolve
them. Not all scenarios are covered.
Table 28) Stale file handle on NFS mount.
Error What to Check How to Resolve
mount.nfs: Stale file handle NFS server
- Did the junction path for
the volume change?
- Is the volume mounted?
- Does the volume still
exist?
NFS client
- Is the mount already
mounted somewhere
else on the client?
Verify and remount the volume
from the client.
Mount the volume from the
cluster if it is not mounted.
Cannot open directory: Stale file
handle
NFS server
- Was the fsid-change
option modified?
Remount the volume from the
client.
Was not found in /proc/mounts NFS client
- Does the mount show
up in /proc/mounts?
- Does the mount show
(deleted) in the output?
Reboot the client.

166 NFS Best Practice and Implementation Guide © 2017 NetApp, Inc. All Rights Reserved
Appendix
NFS Server Option List in Clustered Data ONTAP
Table 30) NFS options in clustered Data ONTAP.
NFS Option Version Privilege
Level
Definition
NFS Access (-access) All Admin Access allowed or not.
NFSv3 (-v3) All Admin Enable/disable NFSv3.
NFSv4 (-v4.0) 8.1 and
later
Admin Enable/disable NFSv4.
UDP (-udp) All Admin Enable/disable UDP.
TCP (-tcp) All Admin Enable/disable TCP.
Spin Authentication
(-spinauth)
All Admin Enable/disable spinauth; deprecated.
Default Windows User
(-default-win-user)
All Admin Specify the default Windows user for
multiprotocol access.
NFSv4.0 ACL Support
(-v4.0-acl)
8.1 and
later
Admin Enable/disable NFSv4 ACL support.
NFSv4.0 Read Delegation
(-v4.0-read-delegation)
NFSv4.0 Write Delegation
(-v4.0-write-delegation)
8.1 and
later
Admin Enable/disable NFSv4 read and write
delegations.
NFSv4 ID Mapping Domain
(-v4-id-domain)
8.1 and
later
Admin Specify the NFSv4 ID domain.
NFSv4.1 Minor Version Support
(-v4.1)
8.1 and
later
Admin Enable/disable NFSv4.1 minor version
support.
Rquota Enable
(-rquota)
8.1 and
later
Admin Enable/disable rquota support.
pNFS Support
(-v4.1-pnfs)
8.1 and
later
Admin Enable/disable pNFS support.
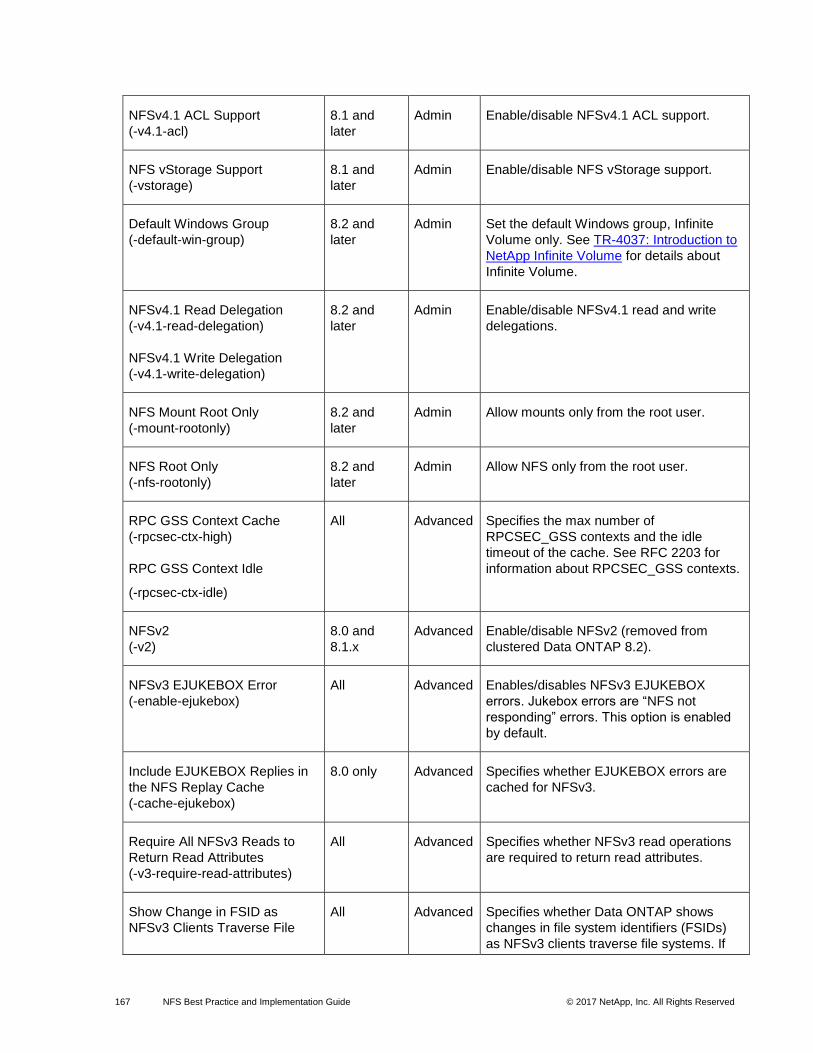
167 NFS Best Practice and Implementation Guide © 2017 NetApp, Inc. All Rights Reserved
NFSv4.1 ACL Support
(-v4.1-acl)
8.1 and
later
Admin Enable/disable NFSv4.1 ACL support.
NFS vStorage Support
(-vstorage)
8.1 and
later
Admin Enable/disable NFS vStorage support.
Default Windows Group
(-default-win-group)
8.2 and
later
Admin Set the default Windows group, Infinite
Volume only. See TR-4037: Introduction to
NetApp Infinite Volume for details about
Infinite Volume.
NFSv4.1 Read Delegation
(-v4.1-read-delegation)
NFSv4.1 Write Delegation
(-v4.1-write-delegation)
8.2 and
later
Admin Enable/disable NFSv4.1 read and write
delegations.
NFS Mount Root Only
(-mount-rootonly)
8.2 and
later
Admin Allow mounts only from the root user.
NFS Root Only
(-nfs-rootonly)
8.2 and
later
Admin Allow NFS only from the root user.
RPC GSS Context Cache
(-rpcsec-ctx-high)
RPC GSS Context Idle
(-rpcsec-ctx-idle)
All Advanced Specifies the max number of
RPCSEC_GSS contexts and the idle
timeout of the cache. See RFC 2203 for
information about RPCSEC_GSS contexts.
NFSv2
(-v2)
8.0 and
8.1.x
Advanced Enable/disable NFSv2 (removed from
clustered Data ONTAP 8.2).
NFSv3 EJUKEBOX Error
(-enable-ejukebox)
All Advanced Enables/disables NFSv3 EJUKEBOX
errors. Jukebox errors are “NFS not
responding” errors. This option is enabled
by default.
Include EJUKEBOX Replies in
the NFS Replay Cache
(-cache-ejukebox)
8.0 only Advanced Specifies whether EJUKEBOX errors are
cached for NFSv3.
Require All NFSv3 Reads to
Return Read Attributes
(-v3-require-read-attributes)
All Advanced Specifies whether NFSv3 read operations
are required to return read attributes.
Show Change in FSID as
NFSv3 Clients Traverse File
All Advanced Specifies whether Data ONTAP shows
changes in file system identifiers (FSIDs)
as NFSv3 clients traverse file systems. If

168 NFS Best Practice and Implementation Guide © 2017 NetApp, Inc. All Rights Reserved
Systems
(-v3-fsid-change)
you change the value of this parameter,
clients must remount any paths over which
they use NFSv3.
Enable the Dropping of a
Connection When an NFSv3
Request Is Dropped
(-v3-connection-drop)
All Advanced Option to enable/disable connection drops
if an NFSv3 connection is dropped; useful
for older clients that might not handle
connection drops properly; enabled by
default.
NFS Response Trace Enabled
(-trace-enabled)
NFS Response Trigger
(-trigger)
All Advanced Specifies whether Data ONTAP logs NFS
requests when they exceed the NFS
response trigger time, which is defined by
the –trigger parameter.
UDP Maximum Transfer Size
(-udp-max-xfer-size)
TCP Maximum Transfer Size
(-tcp-max-xfer-size)
All Advanced Specifies the maximum transfer size (in
bytes) that the storage system negotiates
with the client for TCP and UDP
connections. Range for UDP is 8192 to
57344. Range for TCP is 8192 to 65536.
NFSv3 TCP Maximum Read
Size
(-v3-tcp-max-read-size)
NFSv3 TCP Maximum Write
Size
(-v3-tcp-max-write-size)
8.1 and
later
Advanced Specifies the maximum transfer size (in
bytes) that the storage system negotiates
with the client for TCP transport of data for
NFSv3 read and write requests. The range
is 8192 to 1048576 for reads and 8192 to
65536 for writes. The default setting is
65536 when created. Number specified
depends on the application vendor’s
recommendation.
Show Change in FSID as
NFSv4 Clients Traverse File
Systems
(-v4-fsid-change)
8.1 and
later
Advanced Specifies whether Data ONTAP shows
changes in file system identifiers (FSIDs)
as NFSv4 clients traverse file systems. If
you change the value of this parameter,
clients must remount any paths over which
they use NFSv4.
NFSv4.0 Referral Support
(-v4.0-referrals)
8.1 and
later
Advanced Specifies whether Data ONTAP supports
NFSv4.0 referrals. The default setting is
disabled when created. You can set this
parameter to Enabled only if the -v4-
fsid-change option is also set to
Enabled. If clients accessing the node do
not support NFSv4.0 referrals, set this
option to Disabled; otherwise, those clients
are not able to access the file system. This
parameter is not supported for SVMs with
Infinite Volume.

169 NFS Best Practice and Implementation Guide © 2017 NetApp, Inc. All Rights Reserved
NFSv4 Validate UTF-8
Encoding of Symbolic Link Data
(-v4-validate-symlinkdata)
8.1 and
later
Advanced Specifies whether Data ONTAP validates
the UTF-8 encoding of symbolic link data.
The default setting is Disabled when
created. This is useful for international
implementations of NFSv4.
NFSv4 Lease Timeout Value
(-v4-lease-seconds)
NFSv4 Grace Timeout Value
(-v4-grace-seconds)
8.1 and
later
Advanced Specifies the locking lease and grace
reclaim timeouts.
Preserves and Modifies NFSv4
ACL
(-v4-acl-preserve)
8.1 and
later
Advanced Enables/disables preservation of the
NFSv4 ACL in the event a chmod is
performed.
NFSv4.1 Implementation ID
Domain
(-v4.1-implementation-domain)
NFSv4.1 Implementation ID
Name
(-v4.1-implementation-name)
NFSv4.1 Implementation ID
Date
(-v4.1-implementation-date)
8.1 and
later
Advanced
Specifies the NFSv4.1 implementation
information.
NFSv4.1 Referral Support
(-v4.1-referrals)
8.1 and
later
Advanced Specifies whether Data ONTAP supports
NFSv4.1 referrals. The default setting is
Disabled when created. You can set this
parameter to Enabled only if the -v4-fsid-
change option is also set to Enabled. If
clients accessing the node do not support
NFSv4.1 referrals, set this option to
Disabled; otherwise, those clients are not
able to access the file system. This
parameter is not supported for SVMs with
Infinite Volume.
Number of Slots in the NFSv4.x
Session Slot Tables
(-v4.x-session-num-slots)
Size of the Reply That Will Be
Cached in Each NFSv4.x
Session Slot
(-v4.x-session-slot-reply-cache-
size)
8.2 and
later
Advanced Specifies the number of session slot tables
and the size of those slots. Adjusting these
values depends on the application and OS
using them and can affect performance
(positively or negatively). For details about
slot tables, see RFC 5661.

170 NFS Best Practice and Implementation Guide © 2017 NetApp, Inc. All Rights Reserved
Maximum Number of ACEs per
ACL
(-v4-acl-max-aces)
8.2 and
later
Advanced Specifies the maximum number of allowed
ACEs per ACL. Default is 400. The range is
192 to 1,024. Setting the value higher than
the default can affect performance, so set
only when necessary.
Validation of Qtree IDs for Qtree
File Operations
(-validate-qtree-export)
8.2.1 and
later
Advanced This optional parameter specifies whether
clustered Data ONTAP performs an
additional validation on qtree IDs. The
default setting is Enabled. This parameter
is only effective when a qtree is assigned
an export policy.
Showmount Enabled
(-showmount)
8.3 and
later
Advanced This optional parameter specifies whether
to allow or disallow clients to see all of the
Vserver's NFS exports list using the
showmount -e command. The default
setting is Disabled.
AUTH_SYS and
RPCSEC_GSS Auxiliary
Groups Limit
(-extended-groups-limit)
8.3 and
later
Advanced This optional parameter specifies the
maximum number of auxiliary groups
supported over RPC security options
AUTH_SYS and RPCSEC_GSS in Data
ONTAP. The range is 32 to 1,024. The
default value is 32.
AUTH_SYS Extended Groups
Enabled
(-auth-sys-extended-groups)
8.3 and
later
Advanced This optional parameter specifies whether
Data ONTAP supports fetching auxiliary
groups from a name service rather than
from the RPC header. The default setting is
Disabled.
Set the Protocol Used for Name
Services Lookups for Exports
(-name-service-lookup-protocol)
8.3 and
later
Advanced This optional parameter specifies the
protocol to use for doing name service
lookups. The allowed values are TCP and
UDP. The default setting is UDP.
Permitted Kerberos Encryption
Types
(-permitted-enc-types)
8.3 and
later
Advanced This optional parameter specifies the
permitted encryption types for Kerberos
over NFS. The default setting is
des,des3,aes-128,aes-256.
NFS Mount Daemon Port
(-mountd-port)
8.3 and
later
Advanced This optional parameter specifies which
port the NFS mount daemon (mountd)
uses. The default setting is 635.
Network Lock Manager Port
(-nlm-port)
8.3 and
later
Advanced This optional parameter specifies which
port the network lock manager (NLM) uses.
The default setting is 4045.

171 NFS Best Practice and Implementation Guide © 2017 NetApp, Inc. All Rights Reserved
Network Status Monitor Port
(-nsm-port)
8.3 and
later
Advanced This optional parameter specifies which
port the network status monitor (NSM)
uses. The default setting is 4046.
NFS Quota Daemon Port
(-rquotad-port)
8.3 and
later
Advanced This optional parameter specifies which
port the NFS quota daemon (rquotad) uses.
The default setting is 4049.
Set the Protocol Used for Name
Services Lookups for Exports
(-name-service-lookup-protocol)
8.3.1 and
later
Advanced This optional parameter specifies the
protocol to use for doing name service
lookups. The allowed values are TCP and
UDP. The default setting is UDP.
NFSv3 MS-DOS Client Support
(-v3-ms-dos-client)
8.2.3 and
later; 8.3.1
and later
Admin This optional parameter specifies whether
to enable access for NFSv3 MS-DOS
clients. The default setting is disabled at
the time of creation. This parameter is not
supported for Vservers with Infinite Volume.
Time to Live Value (in msecs) of
a Positive Cached Credential
(-cached-cred-positive-ttl)
8.3.1 and
later
Advanced This optional parameter specifies the age
of the positive cached credentials after
which they are cleared from the cache. The
value specified must be from 60000
through 604800000. The default setting is
86400000.
Time to Live Value (in msecs) of
a Negative Cached Credential
(-cached-cred-negative-ttl)
8.3.1 and
later
Advanced This optional parameter specifies the age
of the negative cached credentials after
which they are cleared from the cache. The
value specified must be from 60000
through 604800000. The default setting is
7200000.
Skip Permission Check for NFS
Write Calls from Root/Owner
(-skip-root-owner-write-perm-
check)
8.3.1 and
later
Advanced This optional parameter specifies if
permission checks are to be skipped for
NFS WRITE calls from root/owner. For
copying read-only files to a destination
folder that has inheritable ACLs, this option
must be enabled.
Warning: When enabled, if an NFS client
does not make use of an NFS ACCESS
call to check for user-level permissions and
then tries to write onto read-only files, the
operation succeeds. The default setting is
disabled.
Display maximum NT ACL
Permissions to NFS Client
8.3.1 and
later
Advanced This optional parameter controls the
permissions that are displayed to NFSv3
and NFSv4 clients on a file or directory that

172 NFS Best Practice and Implementation Guide © 2017 NetApp, Inc. All Rights Reserved
(-ntacl-display-permissive-
perms)
has an NT ACL set. When true, the
displayed permissions are based on the
maximum access granted by the NT ACL to
any user. When false, the displayed
permissions are based on the minimum
access granted by the NT ACL to any user.
The default setting is false.
Trust No-Match Result from Any
Name Service Switch Source
During Netgroup Lookup
(-netgroup-trust-any-ns-switch-
no-match)
8.3.1 and
later
Advanced This optional parameter specifies if you can
consider a no-match result from any of the
netgroup ns-switch sources to be
authoritative. If this option is enabled, then
a no-match response from any of the
netgroup ns-switch sources is deemed
conclusive even if other sources could not
be searched. The default setting is
“disabled,” which causes all netgroup ns-
switch sources to be consulted before a no-
match result is deemed conclusive.
DNS Domain Search Enabled
During Netgroup Lookup
(-netgroup-dns-domain-search)
8.3.1 and
later
Advanced If you enable this optional parameter,
during client access check evaluation in a
netgroup, Data ONTAP performs an
additional verification so that the domain
returned from DNS for that client is listed in
the DNS configuration of the Vserver.
Doing so enables you to validate the
domain when clients have the same short
name in multiple domains. The default
setting is enabled.
Map Unknown UID to Default
Windows User
(-map-unknown-uid-to-default-
windows-user)
8.3.1 and
later
Advanced If you enable this optional parameter,
unknown UNIX users that do not have a
name mapping to a Windows user are
mapped to the configured default Windows
user. This allows all unknown UNIX users
access with the credentials of the default
Windows user. If you disable it, all unknown
UNIX users without name mapping are
always denied access. By default, this
parameter is enabled.
Ignore the NT ACL Check for
NFS User 'root'
(-ignore-nt-acl-for-root)
8.3.1 and
later
Advanced This optional parameter specifies whether
Windows ACLs affect root access from
NFS. If this option is enabled, root access
from NFS ignores the NT ACL set on the
file or directory. If auditing is enabled for
the Vserver and there is no name-mapping
present, then a default SMB credential
(Builtin\administrator) is used for auditing
and an EMS warning is generated. The

173 NFS Best Practice and Implementation Guide © 2017 NetApp, Inc. All Rights Reserved
default setting is “disabled,” which causes
NFS “root” to be mapped to a Windows
account, like any other NFS user.
Use 64 Bits for NFSv3 FSIDs
and File IDs
(-v3-64bit-identifiers)
ONTAP 9.0
and later
Advanced This optional parameter specifies whether
ONTAP uses 64 bits (instead of 32 bits) for
file system identifiers (FSIDs) and file
identifiers (file IDs) that are returned to
NFSv3 clients. If you change the value of
this parameter, clients must remount any
paths over which they are using NFSv3.
When -v3-fsid-change is disabled, enable
this parameter to avoid file ID collisions.
Ignore Client Specified Mode
Bits and Preserve Inherited
NFSv4 ACL When Creating
New Files or Directories
(-v4-inherited-acl-preserve)
ONTAP 9.0
and later
Advanced This optional parameter specifies whether
the client-specified mode bits should be
ignored and the inherited NFSv4 ACL
should be preserved when creating new
files or directories. The default setting is
disabled.
Lookup for the filename in
unconverted language if
converted language lookup fails
(-v3-search-unconverted-
filename)
ONTAP 9.0
and later
Advanced This optional parameter specifies whether
to continue the search with unconverted
name while doing lookup in a directory.
I/O Count to Be Grouped as a
Session
(-file-session-io-grouping-count)
ONTAP 9.2
and later
Advanced This optional parameter specifies the
number of read or write operations on a file
from a single client that are grouped and
considered as one session for event
generation applications, such as FPolicy.
The event is generated on the first read or
write of a file, and subsequently the event
is generated only after the specified -file-
session-io-grouping-count. The default
value is 5000.
Duration for I/O to Be Grouped
as a Session (Secs)
(-file-session-io-grouping-
duration)
ONTAP 9.2
and later
Advanced This optional parameter specifies the
duration for which the read or write
operations on a file from a single client are
grouped and considered as one session for
event generation applications, such as
FPolicy. The default value is 120 seconds.
Enable or disable Checksum for
Replay-Cache
(-checksum-for-replay-cache)
ONTAP 9.2
and later
Advanced This optional parameter specifies whether
to enable replay cache checksum for NFS
requests. The default value is enabled.

174 NFS Best Practice and Implementation Guide © 2017 NetApp, Inc. All Rights Reserved
Export Policy Rule Option List
Table 31) Export policy rule options.
Export Policy Rule Option Privilege Level What It Does
Policy Name
(-policyname)
Admin Shows/sets policy name.
Rule Index
(-ruleindex)
Admin Sets the rule index for the export
policy rule. This is the order in
which the rules are applied.
Access Protocol
(-protocol)
Admin Shows/sets the protocols
allowed by an export policy rule.
Client Match
(-clientmatch)
Admin Shows/sets the host name, IP,
netgroups, subnet, or domain
allowed to access using the
export policy rule. Starting in
ONTAP 9.1, multiple host names
or IP addresses can be specified
in a single rule when comma
separated.
RO Access/RW Access Rule
(-rorule)
(-rwrule)
Admin Shows/sets the values for which
the AUTH option (such as krb,
sys, and so on) is allowed RW
and RO access. None causes
users to come in as anon. Never
denies access.
User ID to Which Anonymous
Users Are Mapped
(-anon)
Admin Shows/sets the user ID to which
anonymous users are mapped.
Superuser
(-superuser)
Admin Determines the AUTH option
that allows root/superuser
access. None squashes root to
anon.
Honor SetUID Bits in SETATTR
(-allow-suid)
Admin Specifies whether set user ID
(suid) and set group ID (sgid)
access is enabled by the export
rule.

175 NFS Best Practice and Implementation Guide © 2017 NetApp, Inc. All Rights Reserved
Allow Creation of Devices
(-allow-dev)
Admin Specifies whether the creation of
devices is enabled by the export
rule.
NTFS UNIX Security Options
(-ntfs-unix-security-ops)
Advanced Specifies whether UNIX-type
permission changes on NTFS
(Windows) volumes are
prohibited (fail) or allowed
(ignored) when the request
originates from an NFS client.
Vserver NTFS UNIX Security
Options
(-ntfs-unix-security-ops-vs)
Advanced Shows the SVM-wide setting for
this option; can only be modified
at the NFS server level.
Change Ownership Mode
(-chown-mode)
Advanced Controls whether or not users
other than the superuser can
chown. Can be overridden by
the SVM-wide policy (see
below).
Vserver Change Ownership
Mode
(-chown-mode-vs)
Advanced Shows the SVM-wide setting for
this option; can only be modified
at the NFS server level. Must be
set to “unrestricted” to allow the
export policy rule to apply in
NFSv4.

176 NFS Best Practice and Implementation Guide © 2017 NetApp, Inc. All Rights Reserved
NFSv3 Option Changes in Clustered Data ONTAP
Table 32 shows how to apply the 7-Mode options for NFSv3 in clustered Data ONTAP.
Table 29) NFSv3 configuration options in clustered Data ONTAP.
7-Mode Option How to Apply Remark
nfs.response.trace vserver nfs modify -vserver
vs0vs0 -trace-enabled If this option is “on,” it forces all NFS requests that have exceeded the time set in nfs.response.trigger to be
logged. If this option is "off,” only one message is logged per hour.
nfs.rpcsec.ctx.high vserver nfs modify -vserver
vs0vs0 -rpcsec-ctx-high If set to a value other than zero, it sets a high-water mark on the number of stateful RPCSEC_GSS (see RFC 2203) authentication contexts. (Only Kerberos V5 currently produces a stateful authentication state in NFS.) If it is zero, then no explicit high-water mark is set.
nfs.rpcsec.ctx.idle vserver nfs modify -vserver
vs0vs0 -rpcsec-ctx-idle This is the amount of time, in seconds, that an RPCSEC_GSS context (see the description for the nfs.rpcsec.ctx.high option) is permitted to be unused before it is deleted.
nfs.tcp.enable vserver nfs modify -vserver
vs0vs0 -tcp enabled When this option is enabled, the NFS server supports NFS over TCP.
nfs.udp.xfersize vserver nfs modify -vserver
vs0vs0 -udp-max-xfer-size
32768
This is the maximum transfer size (in bytes) that the NFSv3 mount protocol should negotiate with the client for UDP transport.
nfs.v3.enable vserver nfs modify -vserver
vs0vs0 -v3 enabled When enabled, the NFS server supports NFS version 3.

177 NFS Best Practice and Implementation Guide © 2017 NetApp, Inc. All Rights Reserved
NFSv4 Option Changes in Clustered Data ONTAP
The following table shows how to apply the 7-Mode options for NFSv4 in clustered Data ONTAP.
Table 33) NFSv4 configuration options in clustered Data ONTAP.
7-Mode Option How to Apply Remark
nfs.v4.enable vserver nfs modify -vserver
vs0 -v4 enabled
When this option is enabled, the NFS server supports NFS version 4.
nfs.v4.read_delegation vserver nfs modify -vserver
vs0 -v4-read-delegation
When this option is enabled, read delegations are supported for NFS version 4.
nfs.v4.write_delegation vserver nfs modify -vserver
vs0 -v4-write-delegation
When this option is enabled, write delegations are supported for NFS version 4.
nfs.tcp.xfersize vserver nfs modify -vserver
vs0 -tcp-max-xfer-size
This is the maximum transfer size (in bytes) that the NFS mount protocol should negotiate with the client for TCP transport.
nfs.v4.acl.enable vserver nfs modify -vserver
vs0 -v4-acl
Enable NFSv4 ACL support.
nfs.v4.reply_drop vserver nfs modify -vserver
vs0 -v4-reply-drop
This is a debugging operation to cause requests to be dropped to test client/server resiliency.
nfs.v4.id.domain vserver nfs modify -vserver
vs0 -v4-id-domain
This option controls the domain portion of the string form of user and group names as defined in the NFS version 4 protocol. The domain name is normally taken from the NIS domain in use or otherwise from the DNS domain. However, if this option is set, it overrides this default behavior.
locking.grace_lease_seconds vserver nfs modify -vserver
vs0 -v4-grace-seconds This optional parameter specifies the time period in which clients attempt to reclaim their locking state from Data ONTAP during server recovery. By default, the grace period is 45 seconds. The minimum value is 1 more than the value of the -v4-lease-seconds parameter. The maximum value is 90.
nfs.v4.snapshot.active.fsid.enable vserver nfs modify -vserver
vs0 -v4-fsid-change
This affects the behavior of the fsid used for the .snapshot
directory and entities in the .snapshot directory. The
default behavior is that they use a different fsid than the active

178 NFS Best Practice and Implementation Guide © 2017 NetApp, Inc. All Rights Reserved
7-Mode Option How to Apply Remark
copy of the files in the file system. When this option is enabled, the fsid is identical to that for files in the active file system. "On" by default.
kerberos.file_keytab.principal vserver nfs kerberos-config
modify -vserver vs0 -spn
kerberos.file_keytab.realm vserver nfs kerberos-config
modify -vserver vs0 -spn
nfs.kerberos.enable on/off vserver nfs kerberos-config
modify -vserver vs0 -
kerberos enable/disable
kerberos.file_keytab.enable on/off kerberos.file_keytab.enable
= on:
'vserver services
kerberos-realm modify -kdc-
vendor Other'
In this case, the keytab file must be added to the clustered Data ONTAP configuration:
'vserver nfs kerberos-
config modify -keytab-uri'
kerberos.file_keytab.enable
= off:
'vserver services
kerberos-realm modify -kdc-
vendor Microsoft'

179 NFS Best Practice and Implementation Guide © 2017 NetApp, Inc. All Rights Reserved
NFSv3 Port Changes
In clustered Data ONTAP, the mountd port changed from 4046 to 635. The status port also changed from
4047 to 4046. The following shows an example of rpcinfo –p showing a 7-Mode and a clustered Data
ONTAP system.
7-Mode rpcinfo:
[root@nfsclient ~]# rpcinfo -p 10.61.84.240
program vers proto port service
100003 4 tcp 2049 nfs
100011 1 udp 4049 rquotad
100024 1 tcp 4047 status
100024 1 udp 4047 status
100021 4 tcp 4045 nlockmgr
100021 3 tcp 4045 nlockmgr
100021 1 tcp 4045 nlockmgr
100021 4 udp 4045 nlockmgr
100021 3 udp 4045 nlockmgr
100021 1 udp 4045 nlockmgr
100005 3 tcp 4046 mountd
100003 3 tcp 2049 nfs
100005 2 tcp 4046 mountd
100005 1 tcp 4046 mountd
100003 2 tcp 2049 nfs
100005 3 udp 4046 mountd
100003 3 udp 2049 nfs
100005 2 udp 4046 mountd
100005 1 udp 4046 mountd
100003 2 udp 2049 nfs
100000 2 tcp 111 portmapper
100000 2 udp 111 portmapper
Clustered Data ONTAP rpcinfo:
[root@nfsclient ~]# rpcinfo -p 10.61.92.34
program vers proto port service
100000 2 udp 111 portmapper
100000 2 tcp 111 portmapper
100000 3 udp 111 portmapper
100000 3 tcp 111 portmapper
100000 4 udp 111 portmapper
100000 4 tcp 111 portmapper
100003 3 udp 2049 nfs
100003 3 tcp 2049 nfs
100003 4 tcp 2049 nfs
400010 1 tcp 2049
100005 1 udp 635 mountd
100005 2 udp 635 mountd
100005 3 udp 635 mountd
100005 1 tcp 635 mountd
100005 2 tcp 635 mountd
100005 3 tcp 635 mountd
100021 4 udp 4045 nlockmgr
100021 4 tcp 4045 nlockmgr
100024 1 udp 4046 status
100024 1 tcp 4046 status
100011 1 udp 4049 rquotad

180 NFS Best Practice and Implementation Guide © 2017 NetApp, Inc. All Rights Reserved
References
Request for Comments
• RFC 2203: RPCSEC_GSS Protocol Specification
• RFC 3530: Network File System (NFS) Version 4 Protocol
• RFC 5661: Network File System (NFS) Version 4 Minor Version 1 Protocol
• RFC 5331: RPC: Remote Procedure Call Protocol Specification Version 2
Technical Reports
• TR-3580: NFSv4 Enhancements and Best Practices Guide: Data ONTAP Implementation
• TR-4073: Secure Unified Authentication
• TR-4182: Ethernet Storage Best Practices for Clustered Data ONTAP Configurations
• TR-4191: Best Practices Guide for Clustered Data ONTAP 8.2.x and 8.3 Windows File Services
• TR-4211: NetApp Storage Performance Primer
• TR-4239: Synopsys VCS Performance Validation with NFSv4.1/pNFS
• TR-4229: Optimizing Build and Verification with Cadence Incisive
• TR-4270: Optimizing Standard Cell Library Characterization with Cadence Virtuoso Liberate
• TR-4324: Electronic Device Automation Verification Workloads and All Flash FAS (AFF) Arrays
• TR-4379: Name Services Best PracticesTR-4523: DNS Load Balancing in ONTAP
• TR-4543: SMB Best Practices, ONTAP 9.x
• TR-4557: NetApp FlexGroup Volume Technical Overview
• TR-4571: NetApp FlexGroup Volume Best Practices and Implementation Guide

181 NFS Best Practice and Implementation Guide © 2017 NetApp, Inc. All Rights Reserved
Refer to the Interoperability Matrix Tool (IMT) on the NetApp Support site to validate that the exact product and feature versions described in this document are supported for your specific environment. The NetApp IMT defines the product components and versions that can be used to construct configurations that are supported by NetApp. Specific results depend on each customer’s installation in accordance with published specifications.
Copyright Information
Copyright © 2013–2017 NetApp, Inc. All rights reserved. Printed in the U.S. No part of this document covered by copyright may be reproduced in any form or by any means—graphic, electronic, or mechanical, including photocopying, recording, taping, or storage in an electronic retrieval system—without prior written permission of the copyright owner.
Software derived from copyrighted NetApp material is subject to the following license and disclaimer:
THIS SOFTWARE IS PROVIDED BY NETAPP “AS IS” AND WITHOUT ANY EXPRESS OR IMPLIED WARRANTIES, INCLUDING, BUT NOT LIMITED TO, THE IMPLIED WARRANTIES OF MERCHANTABILITY AND FITNESS FOR A PARTICULAR PURPOSE, WHICH ARE HEREBY DISCLAIMED. IN NO EVENT SHALL NETAPP BE LIABLE FOR ANY DIRECT, INDIRECT, INCIDENTAL, SPECIAL, EXEMPLARY, OR CONSEQUENTIAL DAMAGES (INCLUDING, BUT NOT LIMITED TO, PROCUREMENT OF SUBSTITUTE GOODS OR SERVICES; LOSS OF USE, DATA, OR PROFITS; OR BUSINESS INTERRUPTION) HOWEVER CAUSED AND ON ANY THEORY OF LIABILITY, WHETHER IN CONTRACT, STRICT LIABILITY, OR TORT (INCLUDING NEGLIGENCE OR OTHERWISE) ARISING IN ANY WAY OUT OF THE USE OF THIS SOFTWARE, EVEN IF ADVISED OF THE POSSIBILITY OF SUCH DAMAGE.
NetApp reserves the right to change any products described herein at any time, and without notice. NetApp assumes no responsibility or liability arising from the use of products described herein, except as expressly agreed to in writing by NetApp. The use or purchase of this product does not convey a license under any patent rights, trademark rights, or any other intellectual property rights of NetApp.
The product described in this manual may be protected by one or more U.S. patents, foreign patents, or pending applications.
RESTRICTED RIGHTS LEGEND: Use, duplication, or disclosure by the government is subject to restrictions as set forth in subparagraph (c)(1)(ii) of the Rights in Technical Data and Computer Software clause at DFARS 252.277-7103 (October 1988) and FAR 52-227-19 (June 1987).
Trademark Information
NETAPP, the NETAPP logo, and the marks listed at http://www.netapp.com/TM are trademarks of NetApp, Inc. Other company and product names may be trademarks of their respective owners. TR-4067-0717