TP9KF Two-Post Floor Plate Lift · TP9KF Two-Post Floor Plate Lift ... With the shims and anchor...
24
July 2015 TP9KF Two-Post Floor Plate Lift (Symmetric) (9,000 lbs. Capacity) ASSEMBLY & OPERATION INSTRUCTION MANUAL
Transcript of TP9KF Two-Post Floor Plate Lift · TP9KF Two-Post Floor Plate Lift ... With the shims and anchor...

July 2015
TP9KF Two-Post Floor Plate Lift
(Symmetric)
(9,000 lbs. Capacity)
ASSEMBLY & OPERATION
INSTRUCTION MANUAL

2 TP9KF
July 2015-A
IMPORTANT NOTES
READ THE INSTALLATION AND OPERATION MANUAL IN ITS ENTIRETY BEFORE
ATTEMPTING TO INSTALL THE LIFT.
• Do not install this lift on any surface other than concrete, confirming to minimum specifications.
• Do not install this lift over expansion joints or cracks. Check with building architect.
• Do not install this lift on a second floor with a basement beneath without written authorization from
building architect.
• Do not install this lift outdoors unless special consideration has been made to protect the power unit from
inclement weather conditions.
• A level floor is recommended for proper installation and operation. Concrete should be a minimum of 4”
thickness and 3,000 psi tensile strength with steal or fiber mesh reinforcement.
• The lift is intended to raise the entire body of the vehicle. Do not attempt to lift only part of the vehicle.
Improper use of this equipment could result in damage to the lift, yourself or other property.
• The lift is intended to lift vehicles only. It is not designed to lift any person or equipment containing
persons.
• Users of this equipment should be qualified, responsible and should follow the operation and safety
guidelines set forth in this manual.
• For specifications on concrete pads, please call for technical assistance.
• Improper installation can cause damage or injury. The Manufacturer will NOT assume liability for loss or
damage of any kind, expressed or implied, resulting from improper installation to use of this product.
DEFINITION
Surface Mounted, Two-Post, Floor Plate / Open Top Lift, Hydraulic ‘chain-over’ Drive, 9,000 lbs.
Capacity.
The name / model number is designated below:
• Model number TP9KF - Symmetric Swing Arms configuration
BASIC SPECIFICATIONS
Model Description
Floor Plate
Capacity Lifting Time Overall
Height
Overall
Width
Lifting
height
Between
Posts
TP9KF Symmetric 9000lbs 50 Sec 111-15/16” 141”” 72” 110”

3 TP9KF
July 2015-A
PREPARATION The installation of this lift is relatively simple and can be accomplished by 2 men in a few hours. The following
tools and equipment are needed:
• 12 quarts of Non-Detergent / Non-Foaming Hydraulic Oil - SAE-10, AW 32 or equivalent
• Chalk line and 12’ Tape Measure
• 4ft. Level
• Rotary Hammer Drill with 3/4” Masonry Drill Bit. (Core Drill Rebar Cutter also recommended)
• Hammer and Hex Key ‘Allen’ Wrench Set
• Metric Sockets and Open Wrench set - 13mm-30mm
• Medium Crescent Wrench and Medium Pipe Wrench
• Crow Bar for Shim Installation and Medium Flat Screwdriver
• Vise Grips, Needle Nose and Snap Ring Pliers
GENERAL INFORMATION
1. Carefully remove the crating and packing materials.
CAUTION! Be careful when cutting steel banding material as items may become loose and fall causing personal
harm or injury.
2. Identify the components and check for damage or shortages.
Please contact your distributor immediately, if any damages or shortages are discovered.
Packing:
* The lift assembly is packaged into two columns as one piece, as shown in (Fig.1).
* Every column comes with its cylinder, carriage, cables & chains, upright, lifting arms, pad with holders, hoses
and drive-over base plate with the hardware box located in one of the columns.
* The electric-hydraulic motor pump is packaged separately and banded to lift – (not shown).
Fig. 1

4 TP9KF
July 2015-A

5 TP9KF
July 2015-A
INSTALLATION INSTRUCTIONS
STEP 1: (Selecting Site) Before installing your new lift, check the following:
1. LIFT LOCATION: Always use architects plans when available. Check layout dimension against floor plan
requirements making sure that adequate space is available (Fig. 2 & Fig. 3).
Fig. 2 (TP9KF - Symmetric Lift)
Fig. 3 (Column / Floor Layout)

6 TP9KF
July 2015-A
2. OVERHEAD OBSTRUCTIONS: The area where the lift located should be free of overhead obstructions
such as heaters, building supports, electrical lines etc (Fig. 4).
Fig. 4
3. DEFECTIVE CONCRETE: Visually inspect the site where the lifts will be installed and check for cracked or
defective concrete. (Details on Page 4)
4. FLOOR REQUIREMENTS: The lift should be installed on a 3000 PSI concrete with minimum of 4” thickness.
The Floor should be level with-in gradients of ≦1/4” within area of the two columns = 135” x 18”).
(See Details for Foundation Anchoring Requirements & Anchoring Tips on Page 4)

7 TP9KF
July 2015-A
STEP 2: (Unloading and Unpacking)
1. After unloading the lift, place it near the intended installation location.
2. Remove the shipping bands and packing materials from the unit.
3. Remove the packing brackets and bolts holding the two columns together. (Do not discard bolts, they may
be used in the assembling of the lift )
4. Take out the up-rights, lifting arms, pads, accessory box, hoses, etc, from the column. Check the quantity of
every item with the parts list. If any missing, please contact with your dealer at once.
STEP 3: (Site Layout)
1. Determine which side will be the approach side.
2. Now determine which side you prefer the power unit to be located on. The MAIN
column has the power-unit mounting bracket attached to the side (Fig. 5).
Note: the power unit column can be located on either side. It is helpful to try and
locate the power side on the driver side of the vehicle when loaded on the lift, in
order to save steps during operation.
3. Once a location is determined, use a carpenter’s chalk line to layout a grid for
the post locations. (See Fig. 3)
Fig. 5
4. After the post locations are marked, use a chalk or crayon to make an outline of the posts on the floor at
each location using the post base plates as a template.
5. Double check all dimensions and make sure that the layout is perfectly square.
STEP 4: (Installing the MAINSIDE Column)
1. Before proceeding, double check measurements and make certain
that the bases of each column are square and aligned with the chalk
line.
2. Assemble the top plate to the column. Raise the column to a vertical
position (See Fig.6 )
Fig. 6

8 TP9KF
July 2015-A
3. Using the base plate on the MAINSIDE column as a guide, drill each anchor hole in the concrete
approximately 51/2” deep using a rotary hammer drill and 3/4” concrete drill-bit. To assure full holding power,
do not ream the hole or allow the drill to wobble. (See Anchoring Details on Page 4)
4. After drilling, remove dust thoroughly from each hole using compressed air and/or wire brush. Make certain
that the column remains aligned with the chalk line during this process.
5. Assemble the washers and nuts on the anchors then tap into each hole with a block of wood or rubber
hammer until the washer rests against the base plate. Be sure that if shimming is required that enough
threads are left exposed.
6. Using a level, check column plumb for every side (Fig. 8). If shimming is required, use 3/4” washers or shim
stock, placing shims as close as possible to the hole locations. This will prevent bending the column base
plates.
7. With the shims and anchor bolts in place, tighten by securing the nut to the
base then turning 2-3 full turns clockwise. Or tighten anchor bolts to 130 ft-lbs.
of torque. DO NOT use an impact wrench for this procedure.
Fig. 9
Fig. 8
STEP 5: (Mounting the OFFSIDE Column and the Drive-Over Base Plate)
1. Position the OFFSIDE column at the designated chalk locations.
2. Using the Drive-Over Base Plate bolts provided, make sure that the distance between the two columns is
correct (Fig.9).
3. Using a tape measure to measure the distance between the opposite corners of the base plate on the
columns. Equal values will ensure the lifting arms will be square.
Note: Test fitting the Drive-Over Base is recommended to ensure proper column spacing, alignment & fit.
4. Set Drive-Over Base Plate aside, it is to be mounted after hose & cable installations in STEPS 7 & 8.
5. Secure OFFSIDE column to the floor following the same procedures as outlined in STEP 4.

9 TP9KF
July 2015-A
STEP 6: (Mounting the POWER UNIT)
1. Attach the power unit to the POWERSIDE COLUMN using bolts, nuts and washers supplied (Fig. 10).
2. Remove the vent plug from the power unit and fill the reservoir with
hydraulic oil. Make sure the funnel used to fill the power unit is clean.
Suggestion: Use AW 32, or 46 Non-Detergent Non-Foaming Anti-Wear
Hydraulic Oil SAE-10 (Texaco HD46 or equal). The unit will
holds approximately ten quarts of fluid.
Fig. 10
STEP 7: (Routing the EQUALIZER CABLES)
1. Raise and lock each carriage on the first safety latch engagement. It is approximately 30” high.
2. Make sure that the safety locks on each column are fully engaged before attempting to route equalizer
cables.
3. Be sure each carriage is at the same height by measuring from the top of the base to the bottom of the
carriage. This difference should be within 1/4”.
4. Route the first cable. (See Figs. 11-13) Screw the nut on the cable stud so that half thread pass through the
nut. Pull the other end of the cable and screw the nut on it also. Then tighten both nuts.
Fig. 11 Fig. 12

10 TP9KF
July 2015-A
Cable Route Diagram
Fig. 13
5. Repeat above for the second cable.
6. Adjust each equalizer cable to approximately 1/2” side-to-side play. Ensure that each cable has equal
tension. Also, check the carriage height to ensure both carriages are sitting on the same latch.
STEP 8: (Connecting the Hydraulic Hoses)
As shown on Figs. 12 & 14-16, connect the
hydraulic hoses.
When routing the hydraulic hose, make sure
that the hose is clear of any moving parts. It
is necessary to route hose through the
retaining rings or tie hose clear by using
nylon tie straps or wire.
Fig. 14 Fig. 15

11 TP9KF
July 2015-A
Hose Route Diagram
Fig. 18
Fig. 16
STEP 9: (Installing Lifting Arms & Arm Restraints)
Install the lifting swing arms on the
carriages using the included 1-1/2”
diameter pins. Check for proper
engagement of the arm restraint. The
rack on the arm restraints should fully
engage the gear on the arm (Figs. 17-19).
Fig.17 Fig. 18
STEP 10: Mount Drive-Over Base Plate at this time, using bolts provided (Fig 9 & 19).

12 TP9KF
July 2015-A
Fig. 19
STEP 11: (Electrical connection)
Make the Electrical hookup to the power unit (220V Single Phase).
Important: the wiring must comply with local code. Have a certified electrician make the electrical hook-up to the
power unit. Use separate circuit for each power unit. Protect each circuit with time delay fuse or circuit breaker.
For 208V-230V single phase, use 20 amp fuse.
Warning: Never operate the motor in line voltage less than 208V. Motor damage may occur. Also, Motor
cannot run on 50hz without a physical change to motor.
STEP 12: (Checking running)
Do not place any vehicle on the lift at this moment. Cycle the lift up
and down several times to ensure latches click together and all air is
removed from the hydraulic system. To lower the lift, both latch
releases must be manually released (Fig. 20). Latches will
automatically reset once the lift ascends approximately 17"from
base. If latches click out of sync, tighten the equalization cable on the
one that clicks first.
Fig. 20
THE LIFT IS NOW READY FOR USE.

13 TP9KF
July 2015-A
PERFORMANCE
RAISE LIFT
1. Read operating and safety manuals before using lift.
2. Always lift a vehicle according to the manufacturers recommended lifting points
3. Position vehicle between columns.
4. Adjust swing arms so that the vehicle is positioned with the center of gravity midway between pads.
5. Use truck adapters as needed. Never exceed 9” of pad height.
6. Raise the lift by pressing button on power unit until support contacts underside of the vehicle. Recheck to
make sure vehicle is secure.
7. Raise vehicle to desired working height. The latch mechanism will ‘trip over’ when the lift raises and drop into
each latch stop. But, to lock the lift you must press the Lower level to relieve the hydraulic pressure and let
the latch set tight in a safety position.
Always lock the lift before going under the vehicle. Never allow anyone to go under the lift when raising or
lowering. Read the safety procedures in the manual.
Note: It is normal for an empty lift to lower slowly-it may be necessary to add weight.
LOWER LIFT
1. Be sure tool trays , stands or personal are removed from under vehicle.
2. First to raise the lift until the latch clears.
3. Pull latch release cables on both sides
WARNING: ALWAYS RELEASE BOTH SIDES
4. Press the lever at the power unit to lower the lift.
5. Before removing vehicle from lift area, position lift arms and supports to provide an unobstructed exit.
WARNING: NEVER DRIVE OVER LIFT ARMS

14 TP9KF
July 2015-A
SAFETY PROCEDURES
� Never allow unauthorized persons to operate lift. Thoroughly train new employees in the operation and care of lift.
� Caution: the power unit operates at high pressure.
� Remove passengers before raising vehicle.
� Prohibit unauthorized persons from being in shop area while lift is in use.
� Total lift capacity is 9000Lbs with 2250lbs per arm pad. Never exceed the capacity.
� When approaching the lift with a vehicle, center the vehicle between the columns so that the tires will clear the
swing arms easily. Slowly drive the vehicle up between the posts. Have some one outside the vehicle guide the
driver.
� Always lift vehicle using all four arms. Never use lift to raise one end or one side of vehicle.
� Prior to lifting vehicle, walk around the lift and check for any objects that might interfere with the operation of lift
and safety latches; tools, air hoses, shop equipment.
� Raise vehicles about 3” and check stability by rocking.
� Prior to lowering vehicle, walk around the lift and check for any objects that might interfere with the operation of lift
and safety latches; tools, air hoses, shop equipment. Swing the arms out of the path and slowly drive the vehicle
out. Have some one outside the vehicle guide the driver.
ALWAYS LOCK THE LIFT BEFORE GOING UNDER THE VEHICLE.
NEVER ALLOW ANYONE TO GO UNDER THE LIFT WHEN RAISING OR LOWERING.

15 TP9KF
July 2015-A
MAINTENANCE SCHEDULE
The following periodic maintenance is the suggested minimum requirements and minimum intervals; accumulated
hours or monthly period, which ever comes sooner. If you hear a noise or see any indication of impending failure -
cease operation immediately – inspect, correct and / or replace parts as required.
WARNING OSHA AND ANSI REQUIRE USERS TO INSPECT LIFTING EQUIPMENT AT THE
START OF EVERY SHIFT. THESE AND OTHER PERIODIC INSPECTIONS ARE THE
RESPONSIBILITY OF THE USER.
DAILY PRE-OPERATION CHECK (8 HOURS)
The user should perform daily check. ATTENTION! LOOK OUT! Daily check of safety latch system is very
important-the discovery of device failure before needed could save you from expensive property damage, lost
production time, serious personal injury and even death.
� Check safety lock audibly and visually while in operation
� Check safety latches for free movement and full engagement with rack.
� Check hydraulic connections, and hoses for leakage.
� Check cables connections- bends, cracks-and looseness
� Check for frayed cables in both raised and lowered position.
� Check snap rings at all rollers and sheaves.
� Check anchors, bolts, nut, and screws and tighten them.
� Check wiring & switches for damage.
� Keep base plate free of dirt, grease or any other corrosive substances.
� Check floor for stress cracks near anchor bolts.
� Check swing arm restraints.
WEEKLY MAINTENANCE (40 HOURS)
� Check anchor bolts torque to 11 Kg*m for the 18mm anchor bolts. Do not use impact wrench.
� Check floor for stress cracks near anchor bolts.
� Check hydraulic oil level.
� Check and tighten bolts and nuts, and screws.
� Check cylinder for free movement.
� Check cable pulley for free movement and excessive ware.
16 TP9KF
July 2015-A
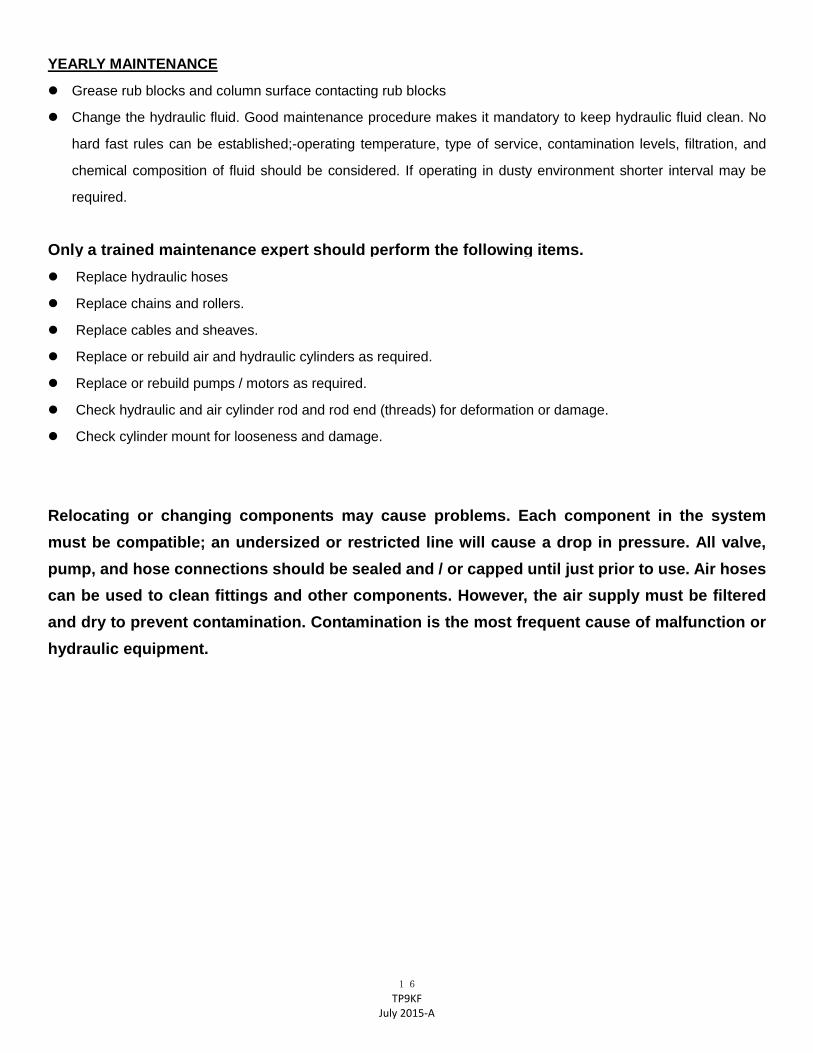
YEARLY MAINTENANCE
� Grease rub blocks and column surface contacting rub blocks
� Change the hydraulic fluid. Good maintenance procedure makes it mandatory to keep hydraulic fluid clean. No
hard fast rules can be established;-operating temperature, type of service, contamination levels, filtration, and
chemical composition of fluid should be considered. If operating in dusty environment shorter interval may be
required.
Only a trained maintenance expert should perform the following items.
� Replace hydraulic hoses
� Replace chains and rollers.
� Replace cables and sheaves.
� Replace or rebuild air and hydraulic cylinders as required.
� Replace or rebuild pumps / motors as required.
� Check hydraulic and air cylinder rod and rod end (threads) for deformation or damage.
� Check cylinder mount for looseness and damage.
Relocating or changing components may cause problems. Each component in the system
must be compatible; an undersized or restricted line will cause a drop in pressure. All valve,
pump, and hose connections should be sealed and / or capped until just prior to use. Air hoses
can be used to clean fittings and other components. However, the air supply must be filtered
and dry to prevent contamination. Contamination is the most frequent cause of malfunction or
hydraulic equipment.

17 TP9KF
July 2015-A
TROUBLE SHOOTING
1. Motor does not run:
A. Breaker or fuse blown
B. Faulty wiring connections. Call electrician.
C. Defective up button. Call electrician for checking.
D. Defective Capacitor. Call electrician for checking.
2. Motor runs but will not raise:
A. Oil level to low. Oil level should be just under the vent cap port when the lift is down!!!
B. Check the clearance in the plunger valve of the lowering handle.
C. Remove the check valve cover and clean ball and seat.
D. A piece of trash is under check valve. Push handle down and push the up button at the same time. Hold for
10-15 seconds. This should flush the system.
3. Oil blows out breather of power unit:
A. Oil reservoir overfilled.
B. Lift lowered too quickly while under a heavy load.
4. Motor hums and will not run:
A. Lift overloaded--- remove excessive weight from lift
B. Bad capacitor------call electrician
C. Low voltage------call electrician
D. Faulty wiring------call electrician
5. Lift jerks going up and down:
A. Air in hydraulic system------Raise lift all the way to top and return to floor. Repeat 4-6 times with interval at
least 2 min. Ensure to NOT overheat power unit.
6. Oil leaks
A. Power unit------If the power unit leaks hydraulic oil around the tank-mounting flange, check the oil level in the
tank. The level should be two inches below the flange of the tank. Check with a screwdriver.
B. Rod end of cylinder------The rod seal of the cylinder is out. Rebuild or replace the cylinder.
C. Breather end of the cylinder------the piston seal of the cylinder is out. Rebuild or replace the cylinder.

18 TP9KF
July 2015-A
7. Lift makes excessive noise.
A. Carriage of the lift is dry and requires grease. Grease corners of columns.
B. Cylinder pulley assembly or cable pulley assembly is not moving freely. Check and grease it.
C. May have excessive wear on pins or cylinder yoke. Check and replace them.
D. Seals are dry in hydraulic Cylinder(s).
OWNER / EMPLOYER RESPONSIBILITIES
The Owner / Employer:
• Shall establish procedures to periodically maintain, inspect and care for the lift in accordance with the
manufactures recommended procedures to ensure its’ continued safe operations.
• Shall provide necessary lockout of energy sources per ANSIZ244.1 –1982 before beginning any lift repairs.
• Shall not modify the lift in any manner without prior written consent of the manufacture.

19 TP9KF
July 2015-A
PARTS DRAWING
Fig. A-1

20 TP9KF
July 2015-A
PARTS DRAWING
Fig. A-2

21 TP9KF
July 2015-A
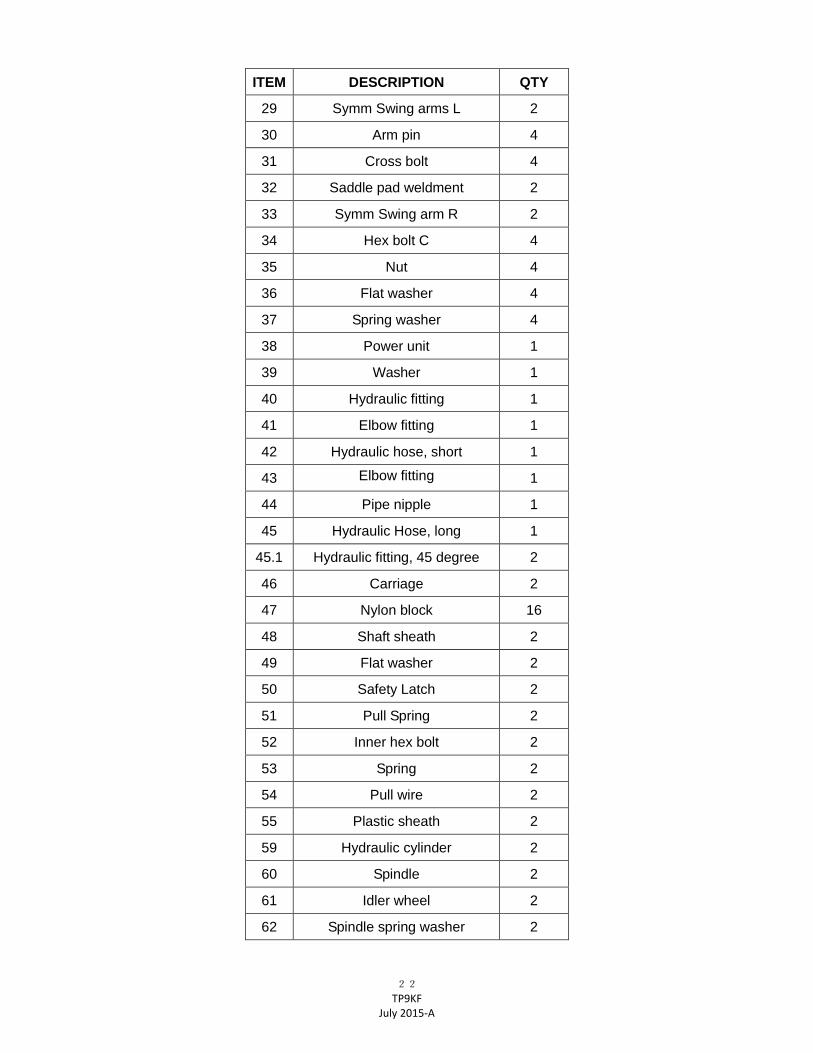
PARTS LIST
ITEM DESCRIPTION QTY
1 Column jointing (L,R) 2
2 Pulley 6
3 Spindle spring washer 6
4 Cover 2
5 Cross bolt 4
6 Hex bolt C 8
7 Nut 8
8 Flat washer 8
9 Spring washer 8
10 Top plate 2
11 Bushing 6
12 Flat washer C 2
13 Spindle spring washer A 2
13.1 Drive-Over Base Plate 1
13.2 Inner Hex bolt 4
13.3 Flat washer 4
14 Rack spindle 4
15 Shaft sheath 4
16 Flat washer A 4
17 Spring 4
18 Rack board 4
19 Ramp board 4
20 Nut 4
21 Flat washer 4
22 Spring washer 4
23 Ball handle 4
24 Bolt 8
8 25 Rubber pad 4
26 Pad weldment 4
27 Low adaptor 4
27.1 High adaptor 4
28 Nut 8
22 TP9KF
July 2015-A
ITEM DESCRIPTION QTY
29 Symm Swing arms L 2
30 Arm pin 4
31 Cross bolt 4
32 Saddle pad weldment 2
33 Symm Swing arm R 2
34 Hex bolt C 4
35 Nut 4
36 Flat washer 4
37 Spring washer 4
38 Power unit 1
39 Washer 1
40 Hydraulic fitting 1
41 Elbow fitting 1
42 Hydraulic hose, short 1
43 Elbow fitting
1
44 Pipe nipple 1
45 Hydraulic Hose, long 1
45.1 Hydraulic fitting, 45 degree 2
46 Carriage 2
47 Nylon block 16
48 Shaft sheath 2
49 Flat washer 2
50 Safety Latch 2
51 Pull Spring 2
52 Inner hex bolt 2
53 Spring 2
54 Pull wire 2
55 Plastic sheath 2
59 Hydraulic cylinder 2
60 Spindle 2
61 Idler wheel 2
62 Spindle spring washer 2

23 TP9KF
July 2015-A
ITEM DESCRIPTION QTY
63 Spindle 4
64 Chain 2
65 Steel cable 1
66 Steel cable 1
67 Nut 8
24 TP9KF
July 2015-A