THE LEXUS GS 450h - Amazon S3 LEXUS GS 450h. K?< GLIJL@K F= G
Towing and
Road Service Guide
For
2013 Lexus GS
Quality and Education Services AAA Automotive 1000 AAA Drive
Heathrow, FL 32746
March 5, 2012
Index
General Towing Information
Special Precautions 1 Car Carrier Loading and Transporting 2 Shifter Lock Override 6 Electronic Parking Brake Override 7
Wheel-Lift Towing Procedure 10 Emergency Road Service Information
Jacking 11 Tire Service 12
Out of Fuel 13 Jump-Start Procedures 14 Keyless Ignition Operation 15 Keyless Entry Operation 17
1
AAA Towing and Roadside Assistance Guide
for the 2013 Lexus GS Series
March 5, 2012
GENERAL TOWING INFORMATION
SPECIAL PRECAUTIONS:
Lexus 2013 GS Series vehicles are sold in three configurations; a standard GS 350, a GS 350 F Sport and a GS 450h Hybrid. The GS 350 and 350 F Sport are only available in both rear wheel drive and all wheel drive while the GS 450h Hybrid is only available in rear wheel drive.
Wheel-lift or car carrier equipment are authorized methods of towing this vehicle. A car carrier is the preferred method of transporting these vehicles; however, when wheel-lift equipment is used, a dolly is recommended under the front axle as trailing end clearances will be limited without. THERE IS NO APPROVED PROCEDURE FOR THE USE OF SLING-TYPE EQUIPMENT ON THIS VEHICLE.
When loading or pulling the 2013 Lexus GS Series, DO NOT USE HOOKS OF ANY TYPE ON THE LOWER CONTROL ARMS OR ANY OTHER STEERING OR SUSPENSION COMPONENT. Follow only the approved loading procedures specified in the following pages.
In an emergency situation where the vehicle will not roll or must be moved for towing access, wheel-jacking equipment, such as Go-Jacks are recommended.
When parking this vehicle ensure that the transmission is in “PARK” and the parking brake is properly set. This vehicle does not use a conventional ignition key or key cylinder so the vehicle can be shut off and the transponder/fob removed from the car without putting the transmission into the “PARK” position.
2
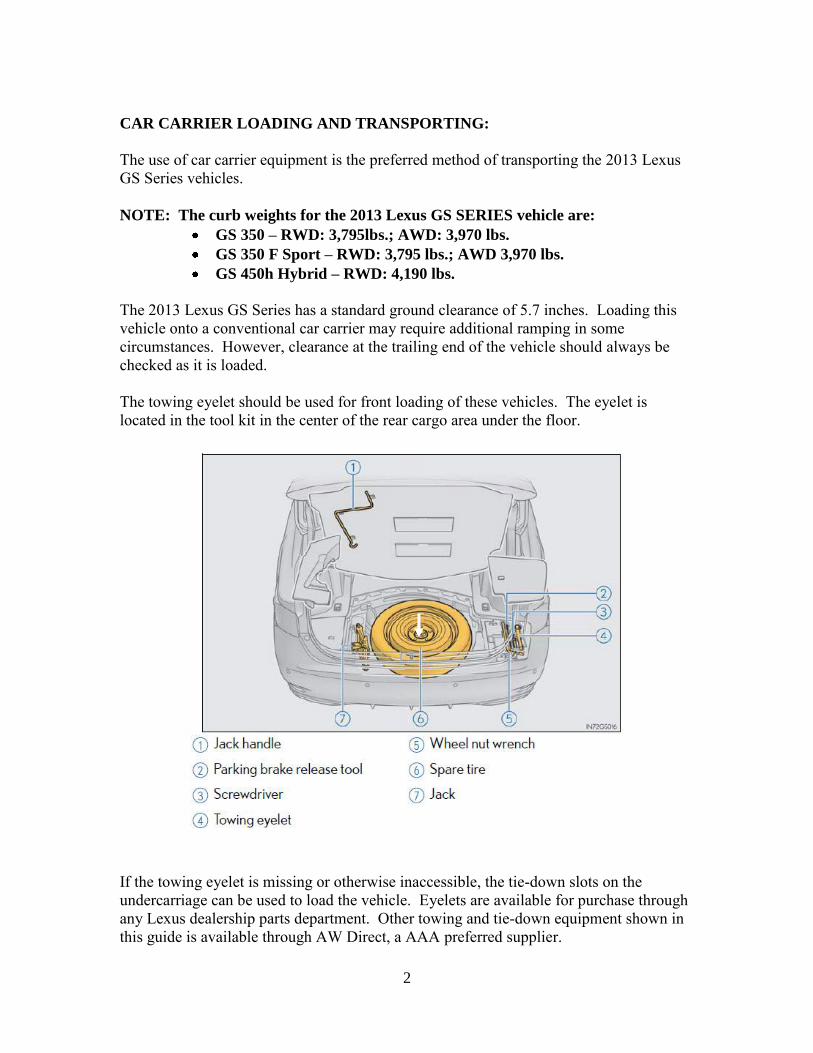
CAR CARRIER LOADING AND TRANSPORTING:
The use of car carrier equipment is the preferred method of transporting the 2013 Lexus GS Series vehicles. NOTE: The curb weights for the 2013 Lexus GS SERIES vehicle are:
GS 350 – RWD: 3,795lbs.; AWD: 3,970 lbs.
GS 350 F Sport – RWD: 3,795 lbs.; AWD 3,970 lbs.
GS 450h Hybrid – RWD: 4,190 lbs.
The 2013 Lexus GS Series has a standard ground clearance of 5.7 inches. Loading this vehicle onto a conventional car carrier may require additional ramping in some circumstances. However, clearance at the trailing end of the vehicle should always be checked as it is loaded. The towing eyelet should be used for front loading of these vehicles. The eyelet is located in the tool kit in the center of the rear cargo area under the floor.
If the towing eyelet is missing or otherwise inaccessible, the tie-down slots on the undercarriage can be used to load the vehicle. Eyelets are available for purchase through any Lexus dealership parts department. Other towing and tie-down equipment shown in this guide is available through AW Direct, a AAA preferred supplier.

3
To install the eyelet correctly on this vehicle, start by carefully removing the eyelet receiver cap from the front bumper. If a sharp, metal object like a screwdriver is used as shown, use a cloth or piece of paper to protect the painted surfaces from scratches. Although the receiver cap cover has a string type piece that holds it to the vehicle when it is removed, it is always a good idea to remove the assembly completely from the bumper. Stow the receiver cap in the vehicle either in the trunk, where the eyelet was stowed, or in a cup holder in the center console, so that it does not blow off the vehicle or get lost during transport.
4
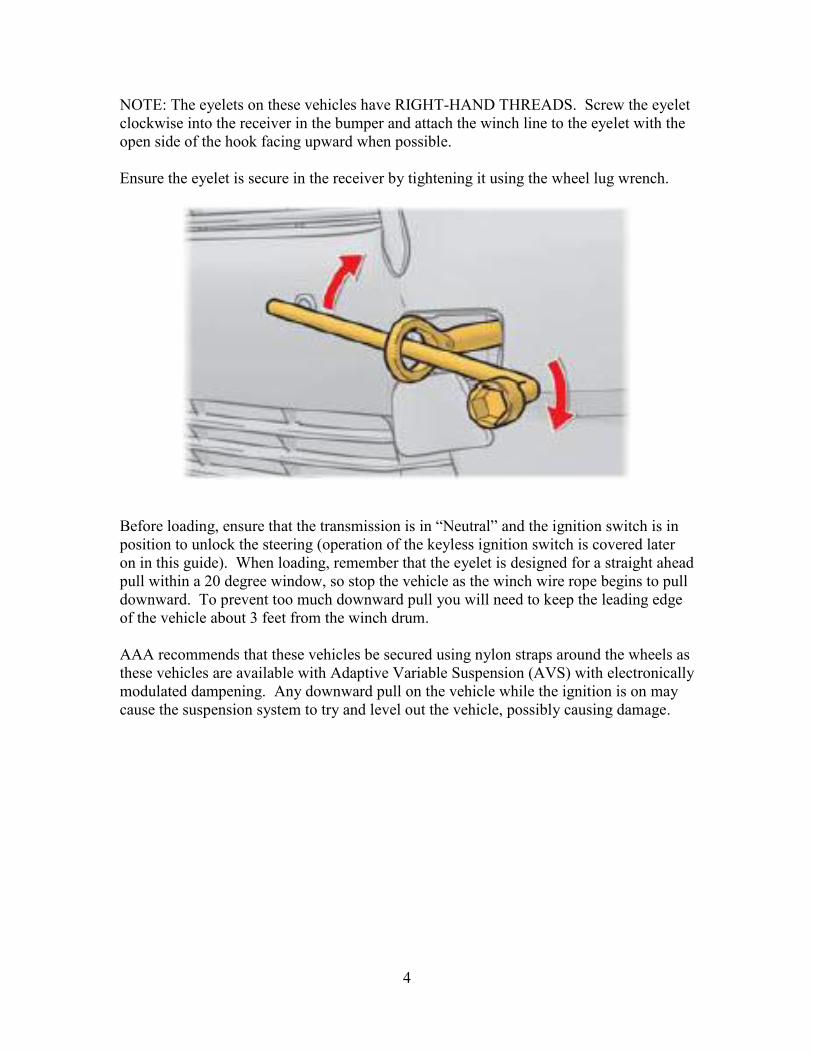
NOTE: The eyelets on these vehicles have RIGHT-HAND THREADS. Screw the eyelet clockwise into the receiver in the bumper and attach the winch line to the eyelet with the open side of the hook facing upward when possible. Ensure the eyelet is secure in the receiver by tightening it using the wheel lug wrench.
Before loading, ensure that the transmission is in “Neutral” and the ignition switch is in position to unlock the steering (operation of the keyless ignition switch is covered later on in this guide). When loading, remember that the eyelet is designed for a straight ahead pull within a 20 degree window, so stop the vehicle as the winch wire rope begins to pull downward. To prevent too much downward pull you will need to keep the leading edge of the vehicle about 3 feet from the winch drum. AAA recommends that these vehicles be secured using nylon straps around the wheels as these vehicles are available with Adaptive Variable Suspension (AVS) with electronically modulated dampening. Any downward pull on the vehicle while the ignition is on may cause the suspension system to try and level out the vehicle, possibly causing damage.
5
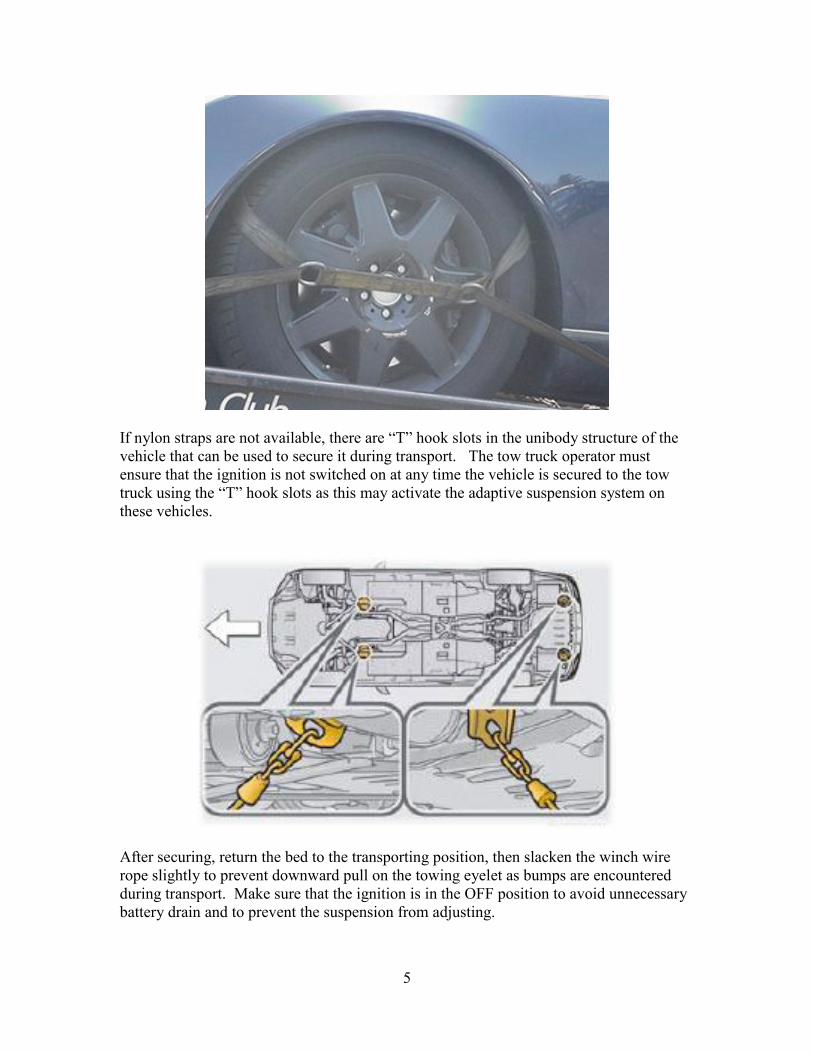
If nylon straps are not available, there are “T” hook slots in the unibody structure of the vehicle that can be used to secure it during transport. The tow truck operator must ensure that the ignition is not switched on at any time the vehicle is secured to the tow truck using the “T” hook slots as this may activate the adaptive suspension system on these vehicles.
After securing, return the bed to the transporting position, then slacken the winch wire rope slightly to prevent downward pull on the towing eyelet as bumps are encountered during transport. Make sure that the ignition is in the OFF position to avoid unnecessary battery drain and to prevent the suspension from adjusting.
6
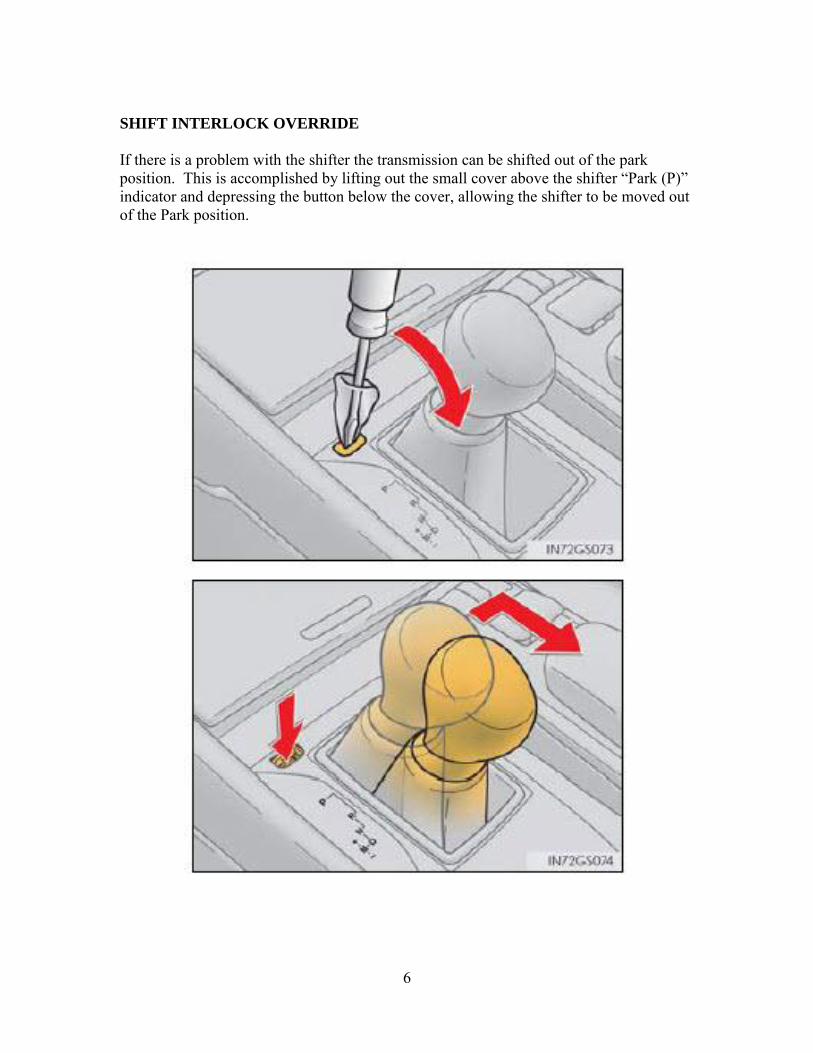
SHIFT INTERLOCK OVERRIDE
If there is a problem with the shifter the transmission can be shifted out of the park position. This is accomplished by lifting out the small cover above the shifter “Park (P)” indicator and depressing the button below the cover, allowing the shifter to be moved out of the Park position.
7
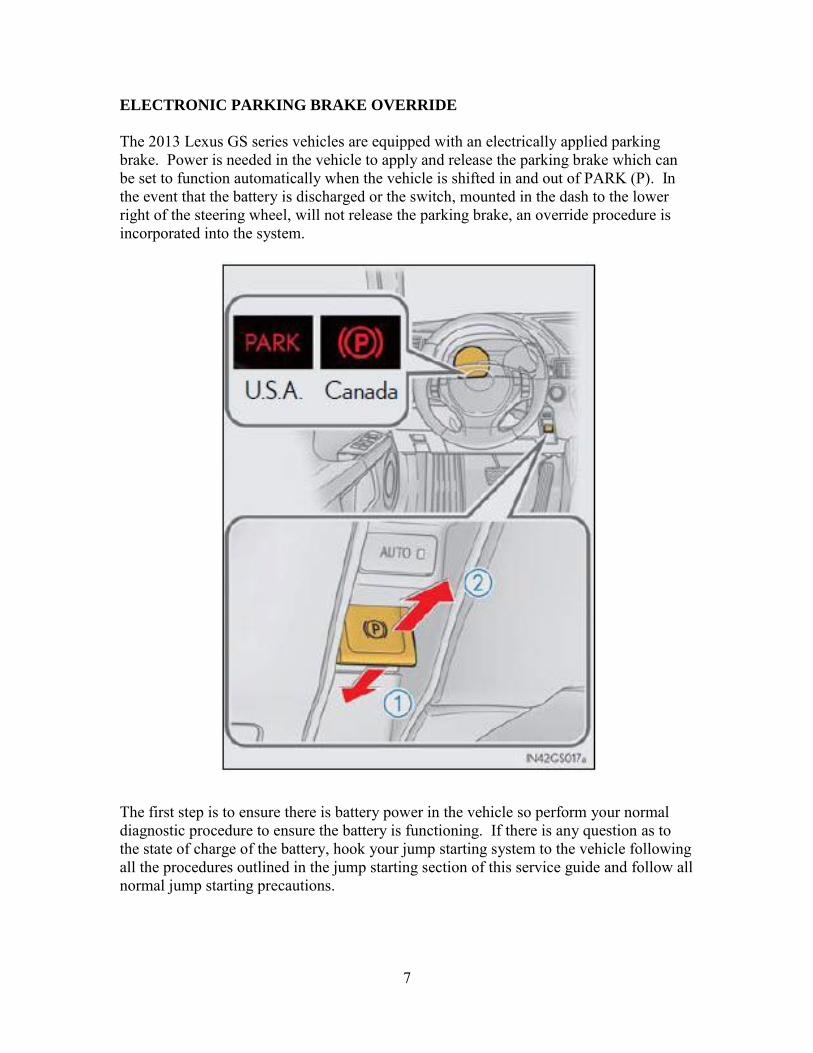
ELECTRONIC PARKING BRAKE OVERRIDE
The 2013 Lexus GS series vehicles are equipped with an electrically applied parking brake. Power is needed in the vehicle to apply and release the parking brake which can be set to function automatically when the vehicle is shifted in and out of PARK (P). In the event that the battery is discharged or the switch, mounted in the dash to the lower right of the steering wheel, will not release the parking brake, an override procedure is incorporated into the system.
The first step is to ensure there is battery power in the vehicle so perform your normal diagnostic procedure to ensure the battery is functioning. If there is any question as to the state of charge of the battery, hook your jump starting system to the vehicle following all the procedures outlined in the jump starting section of this service guide and follow all normal jump starting precautions.
8
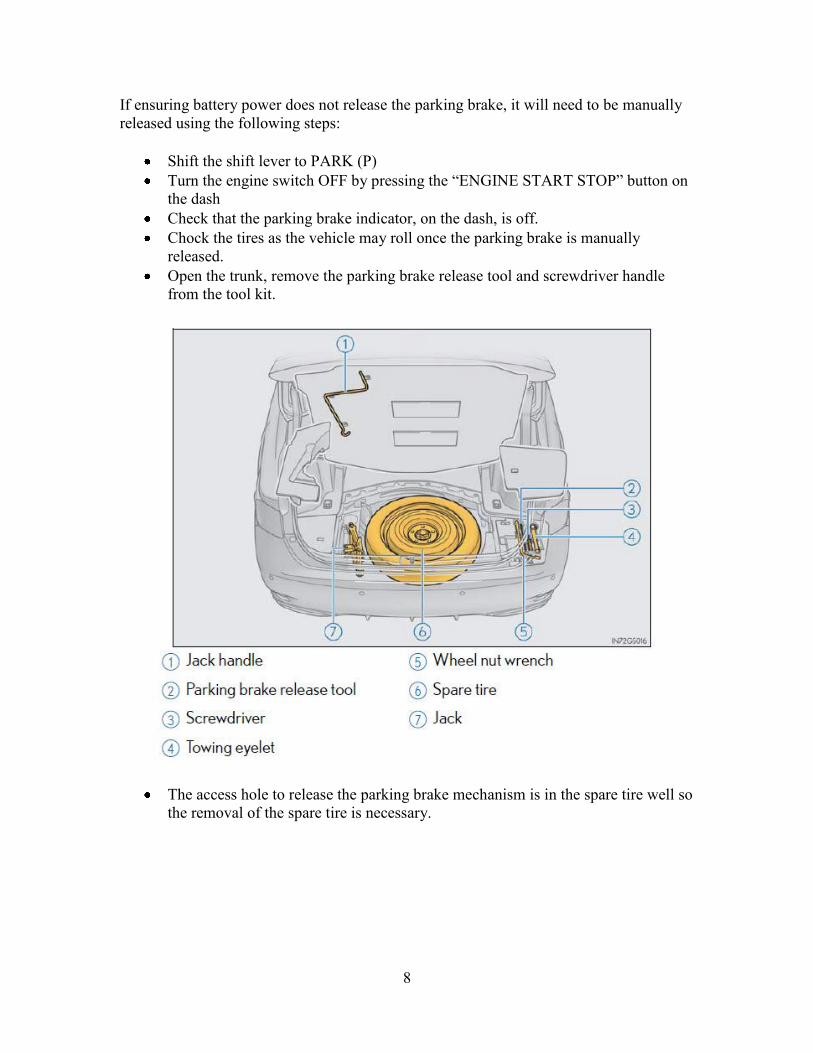
If ensuring battery power does not release the parking brake, it will need to be manually released using the following steps:
Shift the shift lever to PARK (P) Turn the engine switch OFF by pressing the “ENGINE START STOP” button on
the dash Check that the parking brake indicator, on the dash, is off. Chock the tires as the vehicle may roll once the parking brake is manually
released. Open the trunk, remove the parking brake release tool and screwdriver handle
from the tool kit.
The access hole to release the parking brake mechanism is in the spare tire well so the removal of the spare tire is necessary.
9
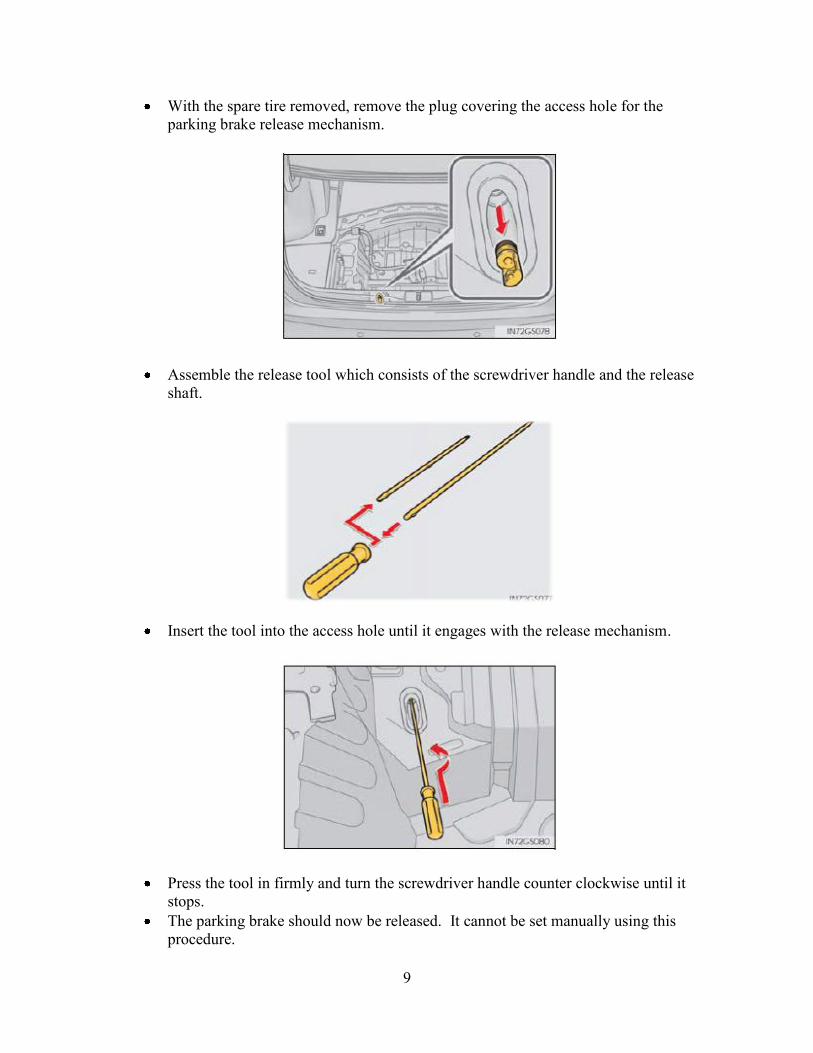
With the spare tire removed, remove the plug covering the access hole for the parking brake release mechanism.
Assemble the release tool which consists of the screwdriver handle and the release shaft.
Insert the tool into the access hole until it engages with the release mechanism.
Press the tool in firmly and turn the screwdriver handle counter clockwise until it stops.
The parking brake should now be released. It cannot be set manually using this procedure.
10
WHEEL-LIFT TOWING PROCEDURE:
If a wheel-lift is used, the procedures shown below must be used with no exceptions.
CAUTION: The 2013 Lexus GS Series vehicles are available in a rear wheel drive or
an all wheel drive configuration. The drive wheels MUST be lifted during towing to
prevent damage to the drive system on this vehicle.
The 2013 Lexus GS Series vehicles have limited clearance on the front valance under the front bumper so it is recommended that a towing dolly should be installed under the trailing wheels when towing these vehicles with a wheel lift. To tow the GS Series with a wheel-lift and dolly, observe the following:
Secure the one set of wheels firmly to the wheel-lift and the other set of wheels firmly to the dolly.
After loading the GS Series onto the dolly and wheel-lift, place the transmission selector in Park and set the parking brake.
Use a steering wheel securing device to prevent possible excessive load on the steering column lock.
Attach safety chains and tow lights to the vehicle being careful not to damage the painted surface with the tow lights.
Ensure that the ignition switch is turned OFF to prevent unnecessary battery drain.
11
EMERGENCY ROAD SERVICE PROCEDURES
JACKING:
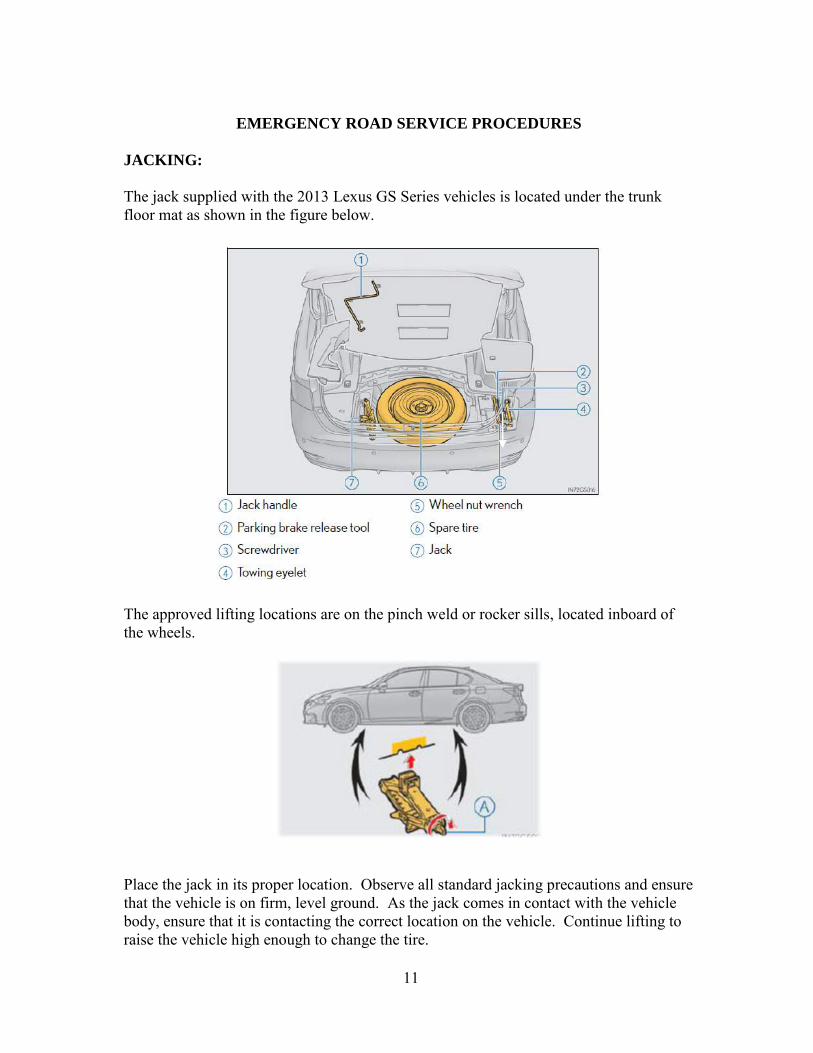
The jack supplied with the 2013 Lexus GS Series vehicles is located under the trunk floor mat as shown in the figure below.
The approved lifting locations are on the pinch weld or rocker sills, located inboard of the wheels.
Place the jack in its proper location. Observe all standard jacking precautions and ensure that the vehicle is on firm, level ground. As the jack comes in contact with the vehicle body, ensure that it is contacting the correct location on the vehicle. Continue lifting to raise the vehicle high enough to change the tire.
12
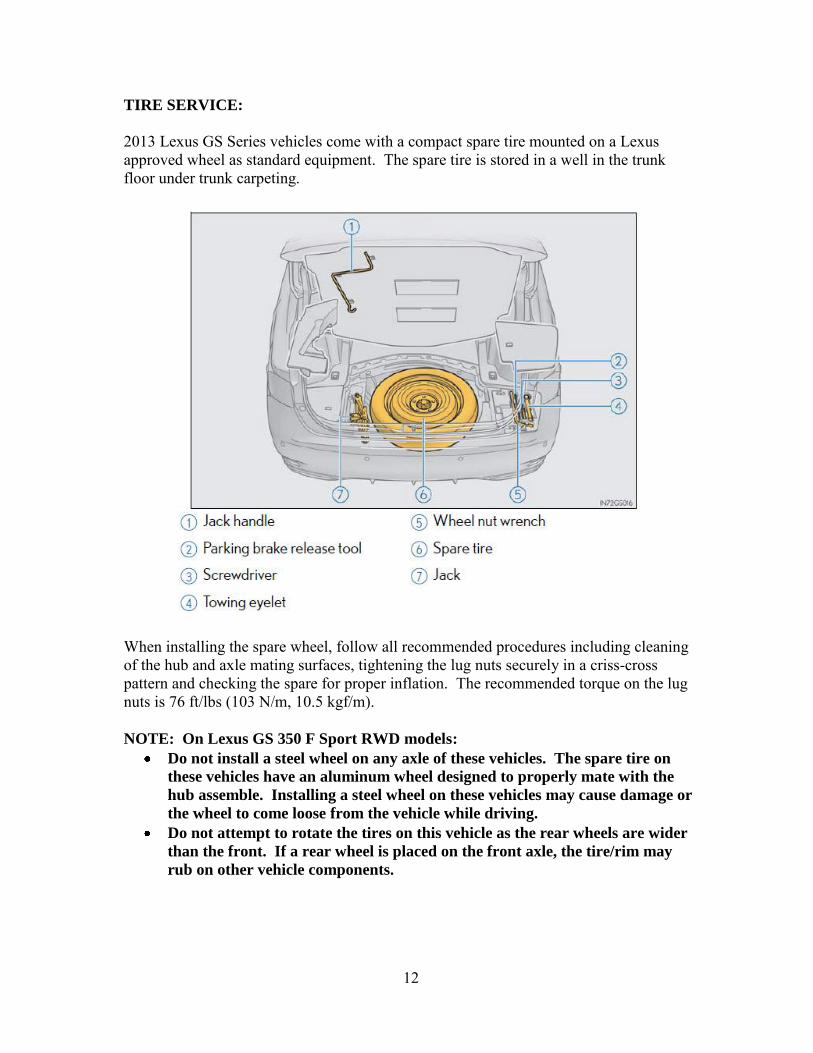
TIRE SERVICE:
2013 Lexus GS Series vehicles come with a compact spare tire mounted on a Lexus approved wheel as standard equipment. The spare tire is stored in a well in the trunk floor under trunk carpeting.
When installing the spare wheel, follow all recommended procedures including cleaning of the hub and axle mating surfaces, tightening the lug nuts securely in a criss-cross pattern and checking the spare for proper inflation. The recommended torque on the lug nuts is 76 ft/lbs (103 N/m, 10.5 kgf/m). NOTE: On Lexus GS 350 F Sport RWD models:
Do not install a steel wheel on any axle of these vehicles. The spare tire on
these vehicles have an aluminum wheel designed to properly mate with the
hub assemble. Installing a steel wheel on these vehicles may cause damage or
the wheel to come loose from the vehicle while driving.
Do not attempt to rotate the tires on this vehicle as the rear wheels are wider
than the front. If a rear wheel is placed on the front axle, the tire/rim may
rub on other vehicle components.
13
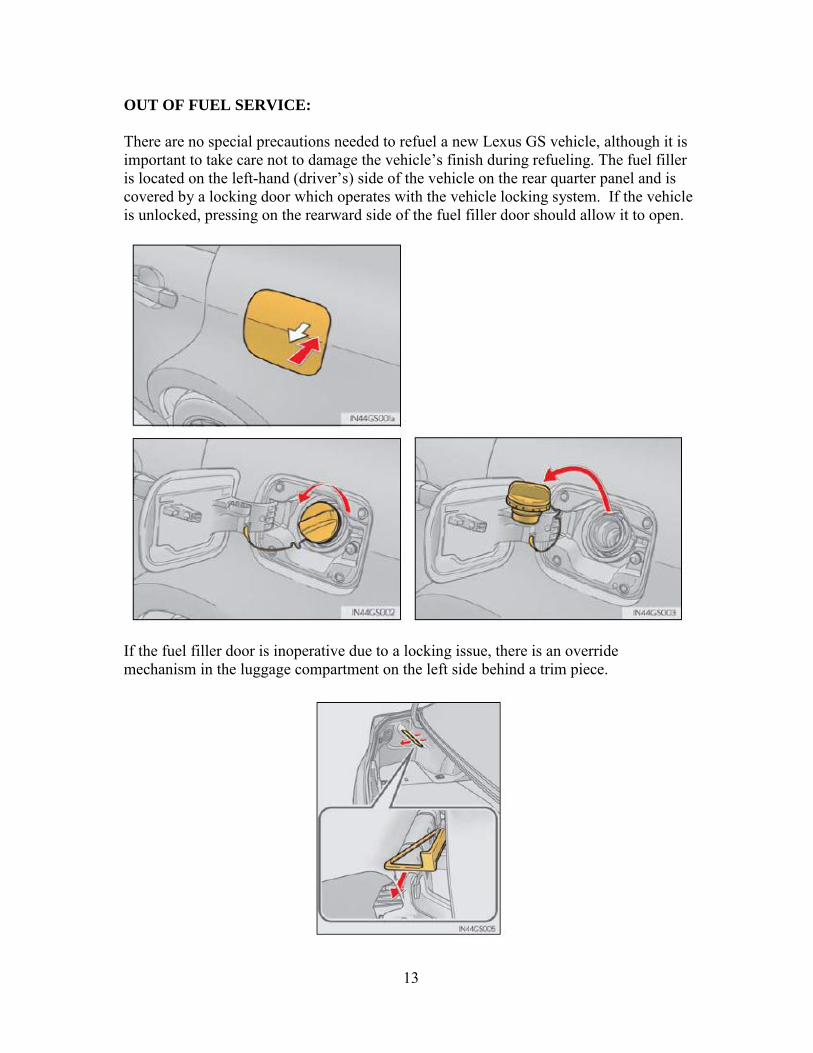
OUT OF FUEL SERVICE:
There are no special precautions needed to refuel a new Lexus GS vehicle, although it is important to take care not to damage the vehicle’s finish during refueling. The fuel filler is located on the left-hand (driver’s) side of the vehicle on the rear quarter panel and is covered by a locking door which operates with the vehicle locking system. If the vehicle is unlocked, pressing on the rearward side of the fuel filler door should allow it to open.
If the fuel filler door is inoperative due to a locking issue, there is an override mechanism in the luggage compartment on the left side behind a trim piece.
14
JUMP-STARTING:
The following jump-starting procedures should be followed when rendering assistance to a 2013 Lexus GS Series.
Never use jump-starting equipment that can exceed normal 12-volt charging system voltage.
Ensure that all electrical accessories and the ignition is turned OFF and all aftermarket electronics are disconnected before connecting jumper cables or a jumper box to the discharged vehicle.
NOTE: If the battery has gone discharged with the ignition switch in a position
other than “OFF” the on-board computer will retain this setting. Once power
is restored to the vehicle, the ignition switch will default back to its last position.
This may result in the jump-start connections being made with the ignition in
the “ON” position. Question the vehicle operator about the last known position
of the ignition switch
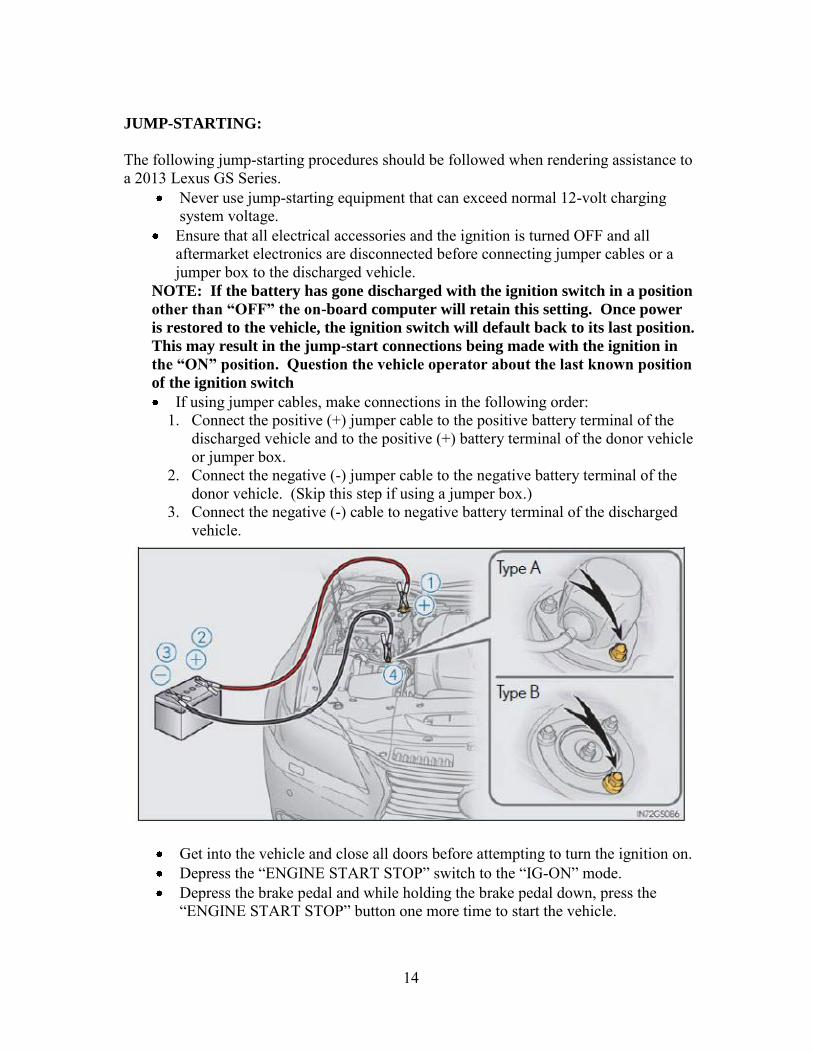
If using jumper cables, make connections in the following order: 1. Connect the positive (+) jumper cable to the positive battery terminal of the
discharged vehicle and to the positive (+) battery terminal of the donor vehicle or jumper box.
2. Connect the negative (-) jumper cable to the negative battery terminal of the donor vehicle. (Skip this step if using a jumper box.)
3. Connect the negative (-) cable to negative battery terminal of the discharged vehicle.
Get into the vehicle and close all doors before attempting to turn the ignition on. Depress the “ENGINE START STOP” switch to the “IG-ON” mode. Depress the brake pedal and while holding the brake pedal down, press the
“ENGINE START STOP” button one more time to start the vehicle.
15
NOTE: When the battery becomes discharged or disconnected on these vehicles the tire pressure monitoring system may need to be reset. To reset the system, park the vehicle in a safe location and turn the engine off. Ensure that the tires are at their proper pressure settings. Start the engine. Press and hold the tire pressure warning reset switch, located on the lower side of the dash to the right of the steering wheel, for at least 3 seconds. The tire pressure warning light will flash 3 times and a message with be displayed in the dash to indicate that the system initialization has begun. Wait a few minutes until the information display shows the pressure for the vehicles tires, once it does, the system has been reset.
KEYLESS IGNITION OPERATION:
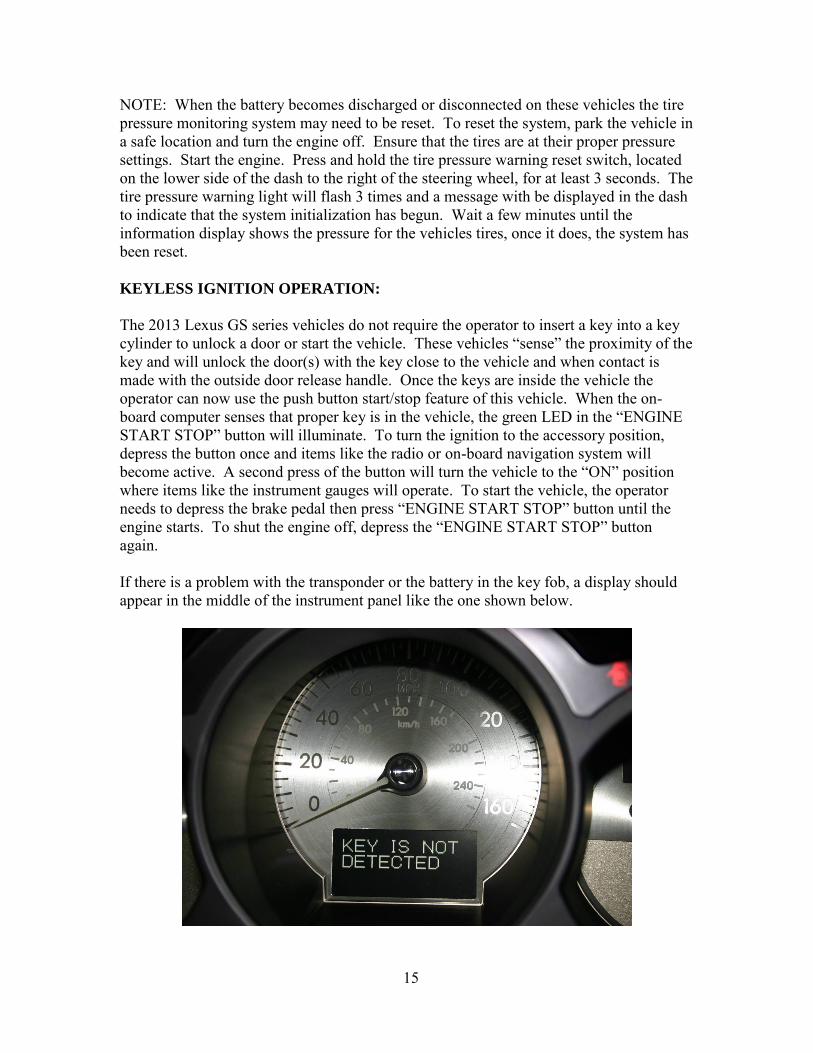
The 2013 Lexus GS series vehicles do not require the operator to insert a key into a key cylinder to unlock a door or start the vehicle. These vehicles “sense” the proximity of the key and will unlock the door(s) with the key close to the vehicle and when contact is made with the outside door release handle. Once the keys are inside the vehicle the operator can now use the push button start/stop feature of this vehicle. When the on-board computer senses that proper key is in the vehicle, the green LED in the “ENGINE START STOP” button will illuminate. To turn the ignition to the accessory position, depress the button once and items like the radio or on-board navigation system will become active. A second press of the button will turn the vehicle to the “ON” position where items like the instrument gauges will operate. To start the vehicle, the operator needs to depress the brake pedal then press “ENGINE START STOP” button until the engine starts. To shut the engine off, depress the “ENGINE START STOP” button again. If there is a problem with the transponder or the battery in the key fob, a display should appear in the middle of the instrument panel like the one shown below.

16
If this is occurring on a vehicle you encounter, ensure the vehicle is in “PARK”, hold the key fob against the chrome ring around the “ENGINE START STOP” button, depress the brake pedal then depress the “ENGINE START STOP” button to start the vehicle. If the vehicle starts, ensure the operator knows to hold the key fob against the chrome ring to start the vehicle and then direct the operator to take the vehicle to the closest Lexus dealer to have the problem repaired.
If this procedure does not work, there may be a problem with the engine start switch. The procedure for attempting to start the vehicle if this occurs is:
Set the parking brake Shift the shift lever into Park (P) Turn the engine switch to the Accessory (ACC) mode. Radio and navigation
systems should come on. Press and hold the brake pedal and press and hold the engine start switch for 15
seconds The engine should start

17
KEYLESS ENTRY OPERATION:
If there is a problem with the keyless entry system, there is a key cylinder in the driver’s side door and one in the trunk lid. To operate either of these locks, insert the removable metal key from the end of the key fob into to the key cylinder and turn to unlock the vehicle.