·TOUCH FOR HEALTH MIDDAY-MIDNIGHT LAW by GORDON STOKES with ... we re-balance blocked energy flows...
29
·TOUCH FOR HEALTH MIDDAY-MIDNIGHT LAW AND THE 5 ELEMENTS - RE- BALANCING \ \, ~-- _/ !::.~ {GALL '. \ BLADDER by Gordon Stokes with Daniel Whiteside
Transcript of ·TOUCH FOR HEALTH MIDDAY-MIDNIGHT LAW by GORDON STOKES with ... we re-balance blocked energy flows...
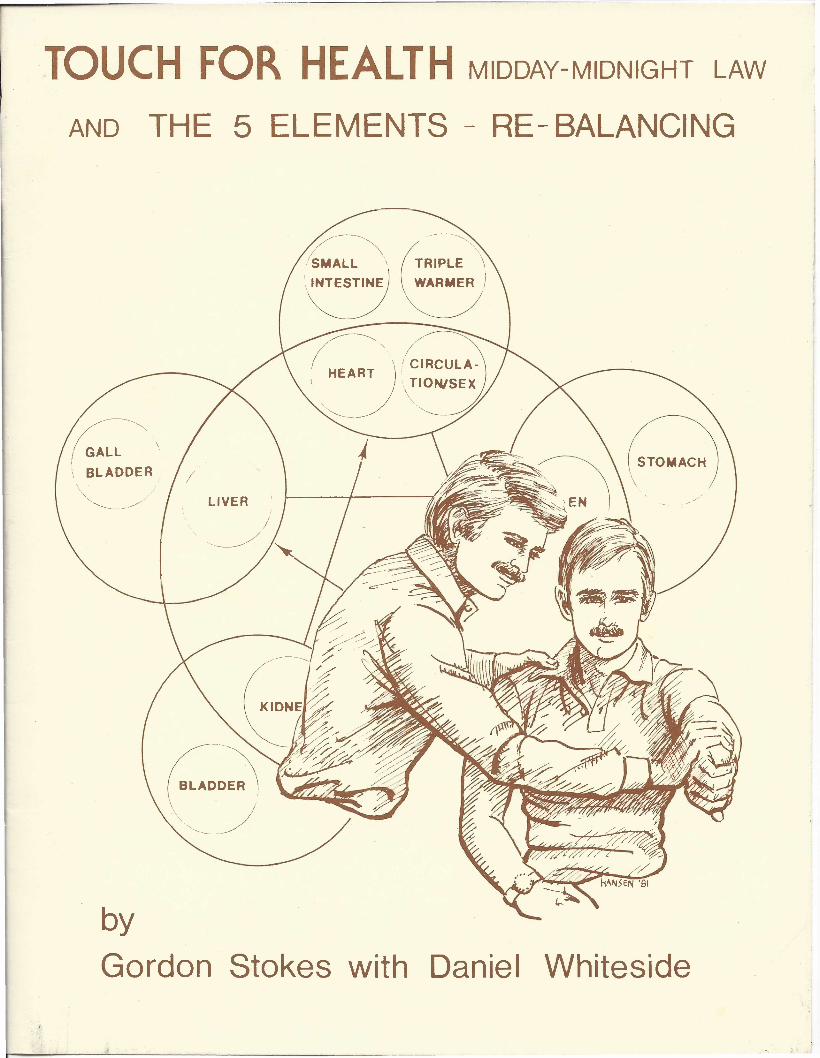
·TOUCH FOR HEALTH MIDDAY-MIDNIGHT LAW
AND THE 5 ELEMENTS - RE - BALANCING
\ \, ~-- _/
!::.~ {GALL '. \ BLADDER
by Gordon Stokes with Daniel Whiteside

HOW TO USE THE
TOUCH FOR HEALTH 5-ELEMENT AND MIDDAY/MIDNIGHT
CHART by
GORDON STOKES with
DANIEL WHITESIDE
SPECIAL NOTE: If you're not familiar with muscle testing and re-balancing per se, read TOUCH FOR HEALTH by Dr. John Thie. This book gives you the necessary background with which to make the best use of the TOUCH FOR HEAL TH/ 5-ELEMENT CHART
If you are familiar with the TOUCH FOR HEALTH skills already, the CHART will make you even more effective in basic re-balancing. It's the best available visual of where to start with corrections.

Copyright © 1981, by the TOUCH FOR HEALTH FOUNDATION
T.H.Enterprises, Publishers 1200 North Lake Avenue Pasadena, CA 91104

INTRODUCTION A fine artist always takes care of fundamentals before using the latest techniques. The canvas must be carefully primed, the pigments properly prepared and mixed. Without these essentials, whatever is painted may crack, fade, discolor or otherwise ruin the finished work.
Just so with TOUCH FOR HEALTH - since that, too, is an art, in everything from the way we muscle test to how we teach foresight and prevention, rather than treatment of health problems.
Our expertise in TOUCH FOR HEALTH is in recognizing the first stages of energy imbalance before it shows up as health problems. Once recognized, we re-balance blocked energy flows to prevent 'dis-ease.'
Our purpose is to deal with source, not side effects. Leave the disease model to those trained to handle such pathologies.
For these reasons, stick to basics when you muscle test or re-balance another person
ALWAYS begin by asking permission to test - in case the person being tested has a condition you're not aware of, such as a recent back injury, a trick knee or arthritis, etc.
Once you've received permission, GO THROUGH THE COMPLETE TESTING/RE-BALANCING PROCEDURE before using the more advanced techniques. Remember, you're dealing with the WHOLE person. It's a waste of time to approach correction 'piecemeal.' Our re-balancing procedure is the most important service TOUCH FOR HEALTH provides.
Now, let's move on to discuss how to make the best use of this TOUCH FOR HEALTH/5-ELEMENT CHART
LIFE ENERGY AND ACUPUNCTURE POINTS
MERIDIAN ABBREVIATIONS
BASIC RE-BALANCE PROCEDURE
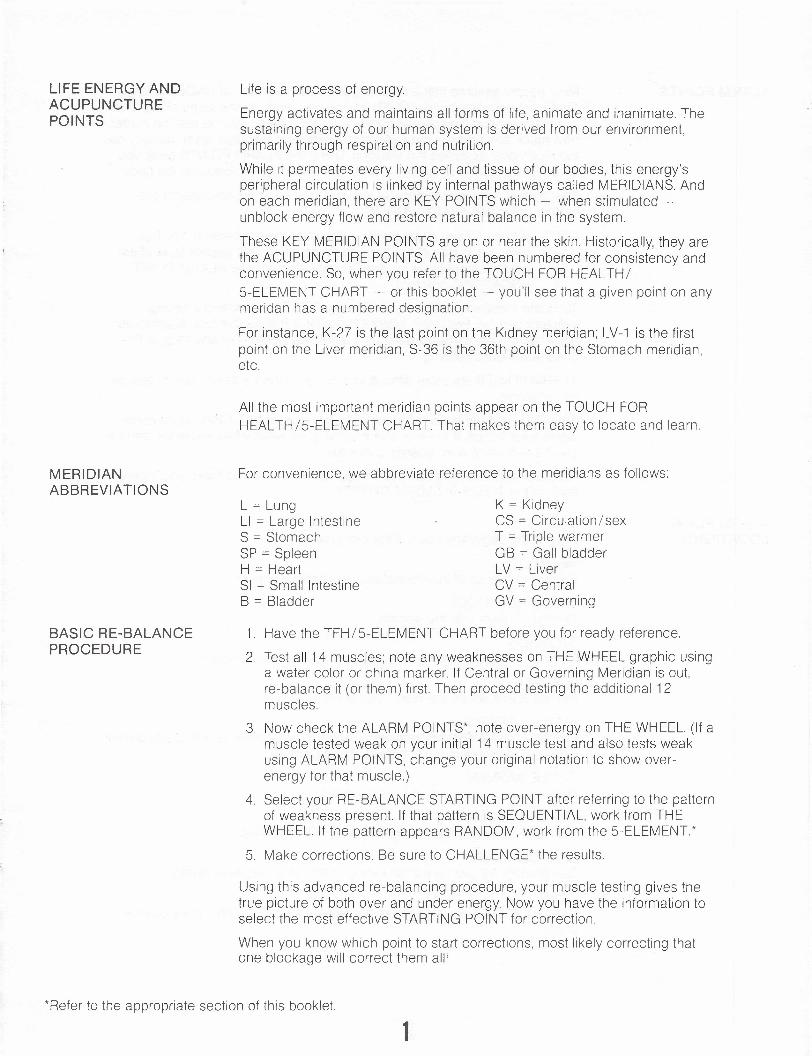
Life is a process of energy.
Energy activates and maintains all forms of life, animate and inanimate. The sustaining energy of our human system is derived from our environment, primarily through respiration and nutrition.
While it permeates every living cell and tissue of our bodies, this energy's peripheral circulation is linked by internal pathways called MERIDIANS. And on each meridian, there are KEY POINTS which - when stimulated - unblock energy flow and restore natural balance in the system
These KEY MERIDIAN POINTS are on or near the skin. Historically, they are the ACUPUNCTURE POINTS. All have been numbered for consistency and convenience. So, when you refer to the TOUCH FOR HEALTH/ 5-ELEMENT CHART - or this booklet - you'll see that a given point on any meridan has a numbered designation.
For instance, K-27 is the last point on the Kidney meridian; LV-1 is the first point on the Liver meridian, S-36 is the 36th point on the Stomach meridian, etc.
All the most important meridian points appear on the TOUCH FOR HEALTH/5-ELEMENT CHART That makes them easy to locate and learn.
For convenience, we abbreviate reference to the meridians as follows:
L = Lung LI = Large Intestine S = Stomach SP = Spleen H = Heart SI = Small Intestine B = Bladder
K = Kidney CS = Circulation/sex T = Triple warmer GB = Gall bladder LV = Liver CV = Central GV = Governing
1. Have the TFH/5-ELEMENT CHART before you for ready reference.
2. Test all 14 muscles; note any weaknesses on THE WHEEL graphic using a water color or china marker. If Central or Governing Meridian is out, re-balance it (or them) first Then proceed testing the additional 12 muscles.
3. Now check the ALARM POINTS*; note over-energy on THE WHEEL. (If a muscle tested weak on your initial 14 muscle test and also tests weak using ALARM POINTS, change your original notation to show over energy for that muscle.)
4. Select your RE-BALANCE STARTING POINT after referring to the pattern of weakness present If that pattern is SEOUENTIAL, work from THE WHEEL. If the pattern appears RANDOM, work from the 5-ELEMENT*
5. Make corrections. Be sure to CHALLENGE* the results.
Using this advanced re-balancing procedure, your muscle testing gives the true picture of both over and under energy. Now you have the information to select the most effective STARTING POINT for correction.
When you know which point to start corrections, most likely correcting that one blockage will correct them all'
*Refer to the appropriate section of this booklet
1

ALARM POINTS Most people assume that a muscle goes weak because of UNDER energy. That's not necessarily true. OVER energy can produce the same effect. This is a major reason why people continue to get a 'weak muscle test' no matter how much correction is done. Adding energy to a meridian which already has too much only multiplies the situation. Using the ALARM POINTS gives you an accurate picture of where - and how - energy is blocked in the body.
This is invaluable information. So, expand your basic muscle testing pro cedure to include ALARM POINTS.
NOTE: When you test alarm points, remember they're bilateral. You'll be testing one side of the body, then the other. This applies to all alarm points except those on the Central Meridian (see ALARM POINT LOCATIONS graphic).
To locate meridians that are over-energy: FIRST, find and test a strong indicator muscle. Pectoralis Major Clavicular is fine for this test Alternatives are Anterior Deltoid, Supraspinatus, Latissimus Dorsi - or any muscle that gives you a good reading.
ALARM POINTS are more difficult to pick up on than a basic muscle test on some people.
SECOND, with the hand not involved in the muscle test, lightly touch each alarm point'in turn. If the indicator muscle goes weak while you're touching a given alarm point, over-energy is indicated.
Note all indicators (you can use an appropriate marker to make your notes right on the TFH/5-ELEMENT CHART).
ALARM POINT LOCATIONS
LUNG Lung 1; the beginning point of the Lung meridian.
HEART Central 14; the tip of the xiphoid process below sternum.
CIRCULATION/SEX Central 17; level with the nipples.
STOMACH Central 12; halfway between the xiphoid process and umbilicus.
BLADDER Central 3; just above the symphysis pubis.
SMALL INTESTINE Central 4; divide distance between Central 3 and umbilicus with 2 equidistant points - Central 4 is the first point above Central 3.
TRIPLE WARMER Central 5; the next point up from Central 4.
LARGE INTESTINE Stomach 25; on stomach meridian, level with umbilicus.
GALL BLADDER Gall Bladder 24; just below the joining of 9th rib and coastal border.
LIVER Liver 14; where a plumbline from the nipple crosses the rib cage's coastal border.
2

USING THE WHEEL
SPLEEN Liver 13; just anterior to tip of 11 th rib (the first 'floating' rib).
KIDNEY Gall Bladder 25; just anterior to the top of the 12th rib.
Circ./Sex 'i \ .. ~~ Heart Liver Stomach __.: Gall Bladder ~ Kidney Spleen ............ Lg. Intestine 1 Triple warmer __'~---
Sm. Intestine 1 '\ Bladder - 'C
ALARM POINTS
During a 24 hour period, each of the 12 meridians in turn has dominant energy emphasis.
This flow of dominance follows a path from one meridian to another, as illustrated on THE WHEEL graphic. THE WHEEL model represents SURFACE energy, that is: energy flowing just under the surface of the skin.
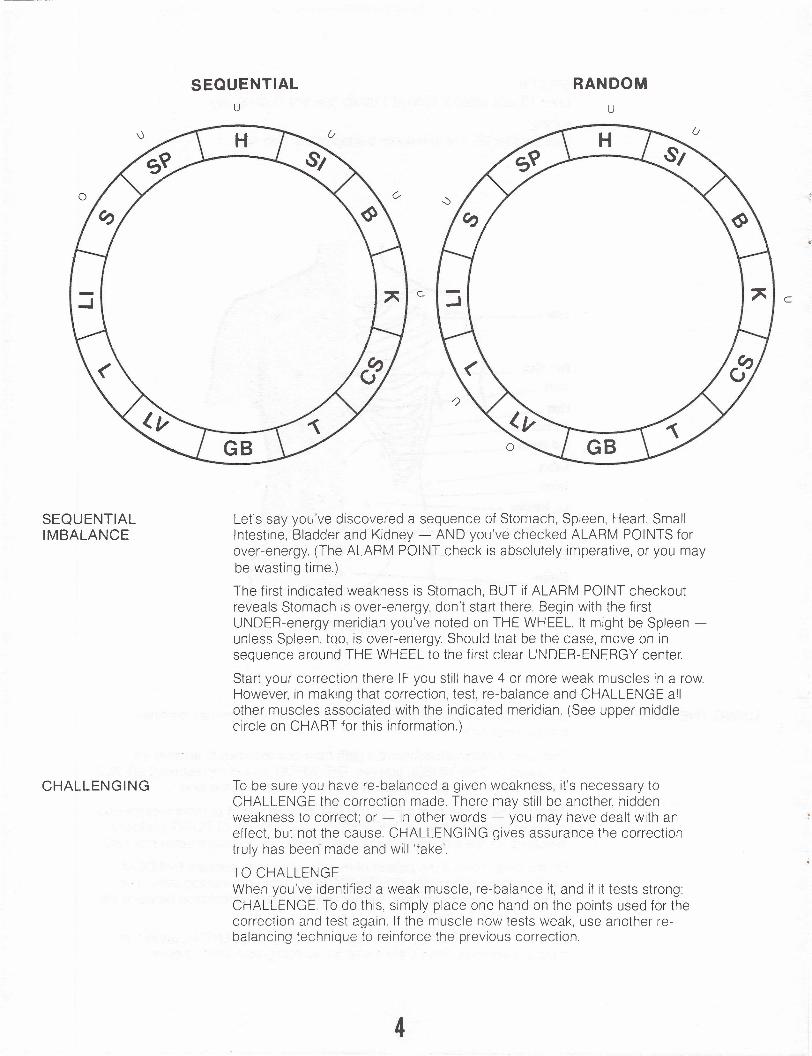
If muscle testing reveals a SEQUENTIAL pattern, with 4 or more weaknesses one right after the other on THE WHEEL, your STARTING POINT is clearly indicated: it's the first in that weak muscle sequence, always going clockwise.
On the other hand, if the pattern of muscle weakness appears RANDOM, you'll profit by going to the 5-ELEMENT model for your starting point The 5-ELEMENT model indicates deeper internal energy interaction between the body's organic functions
Let's assume, for illustration, that you've found a SEQUENTIAL pattern of muscle weakness. Here's the model for selecting your starting point.
3
SEQUENTIAL u
RANDOM u
c c
Let's say you've discovered a sequence of Stomach, Spleen, Heart, Small Intestine, Bladder and Kidney - AND you've checked ALARM POINTS for over-energy. (The ALARM POINT check is absolutely imperative, or you may be wasting time.)
The first indicated weakness is Stomach, BUT if ALARM POINT checkout reveals Stomach is over-energy, don't start there. Begin with the first UNDER-energy meridian you've noted on THE WHEEL. It might be Spleen - unless Spleen, too, is over-energy. Should that be the case, move on in sequence around THE WHEEL to the first clear UNDER-ENERGY center.
Start your correction there IF you still have 4 or more weak muscles in a row. However, in making that correction, test, re-balance and CHALLENGE all other muscles associated with the indicated meridian. (See upper middle circle on CHART for this information.)
SEQUENTIAL IMBALANCE
To be sure you have re-balanced a given weakness, it's necessary to CHALLENGE the correction made. There may still be another, hidden weakness to correct; or - in other words - you may have dealt with an effect, but not the cause. CHALLENGING gives assurance the correction truly has been- made and will 'take'.
TO CHALLENGE When you've identified a weak muscle, re-balance it, and if it tests strong: CHALLENGE. To do this, simply place one hand on the points used for the correction and test again. If the muscle now tests weak, use another re balancing technique to reinforce the previous correction.
CHALLENGING
4
An alternative: have the person being re-balanced place his or her hand on the correction points and test. If the muscle now tests weak, re-balance using another technique.
For instance, if you used the Neuro-Iymphatics to re-balance and - when challenged - muscle weakness is apparent, go to the Neuro-vasculars for correction. Having re-balanced, once more challenge and re-test.
Meridians can be challenged by holding either end of a given meridian. Accu pressure holding points can be challenged by holding any of the 'FIRST points involved in the tonification/sedation illustrations on the CHART
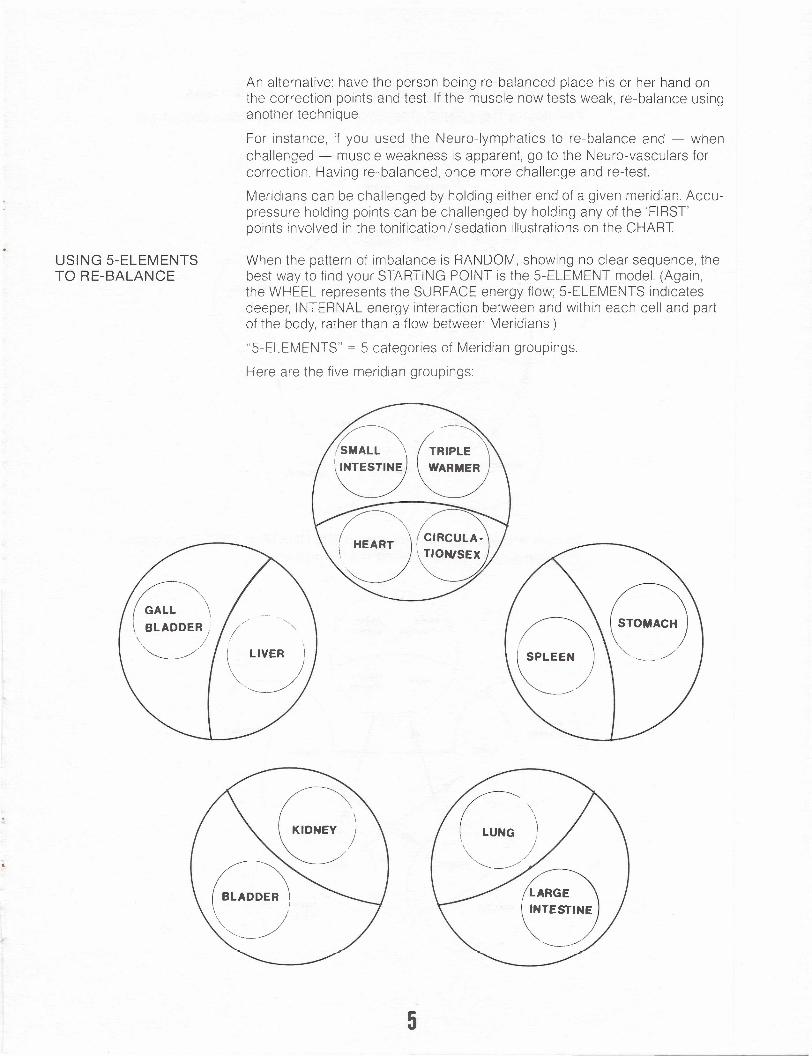
When the pattern of imbalance is RANDOM, showing no clear sequence, the best way to find your STARTING POINT is the 5-ELEMENT model. (Again, the WHEEL represents the SURFACE energy flow; 5-ELEMENTS indicates deeper, INTERNAL energy interaction between and within each cell and part of the body, rather than a flow between Meridians.)
"5-ELEMENTS" = 5 categories of Meridian groupings.
Here are the five meridian groupings:
USING 5-ELEMENTS TO RE-BALANCE
GALL \ BLADDER)
'''------_//
5
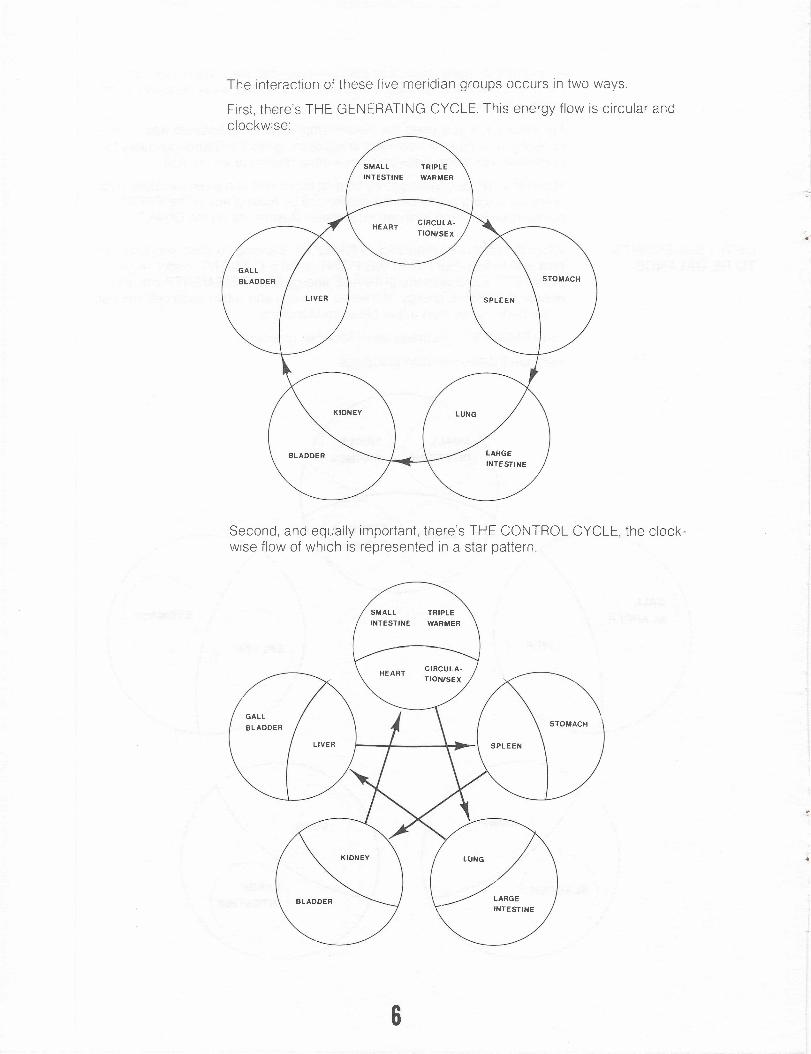
The interaction of these five meridian groups occurs in two ways.
First, there's THE GENERATING CYCLE. This energy flow is circular and clockwise:
SMALL TRIPLE
BLADDER LARGE INTESTINE
Second, and equally important, there's THE CONTROL CYCLE, the clock wise flow of which is represented in a star pattern.
GALL BLADDER
6
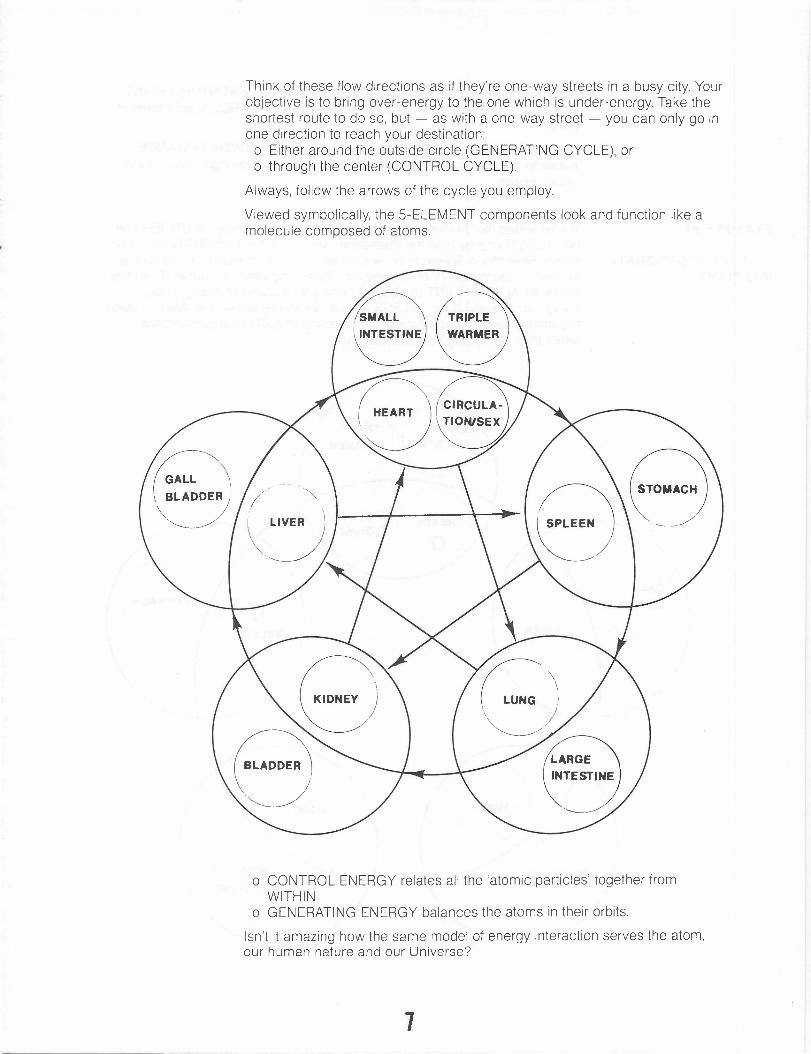
Think of these flow directions as if they're one-way streets in a busy city. Your objective is to bring over-energy to the one which is under-energy. Take the shortest route to do so, but - as with a one-way street - you can only go in one direction to reach your destination: o Either around the outside circle (GENERATING CYCLE), or o through the center (CONTROL CYCLE).
Always, follow the arrows of the cycle you employ.
Viewed symbolically, the 5-ELEMENT components look and function like a molecule composed of atoms.
o CONTROL ENERGY relates all the 'atomic particles' together from WITHIN
o GENERATING ENERGY balances the atoms in their orbits.
Isn't it amazing how the same model of energy interaction serves the atom, our human nature and our Universe?
7

When using the 5-ELEMENT MODEL to establish your STARTING POINT, keep the individual nature of GENERATING and CONTROL flows clearly in mind.
The basic principle is: TAKE THE SHORTEST CLOCKWISE DISTANCE between the over-and-under energy. You're always working to correct the under -energy.
EXAMPLE #1 You've tested the 14 muscles and the alarm points. If Spleen is UNDER and Heart OVER energy (see the illustration), you'd use the GENERATING FLOW model. Strengthen Spleen to draw excess energy from Heart. (You'd do this as always, using NL, NV or running the Spleen meridian, of course. Then test the Heart ALARM POINT to double check your transfer of energy.) You always draw from MORE to LESS - and clockwise, remember. Also - using this model, you'll almost always b.e correcting UNDER energy meridians rather than dispersing the OVER energy.
USING THE GENERAT ING FLOW
GALL
\ BLADDER)
',,-----____.-/
8

EXAMPLE #2 Another for instance. As in the illustration, Spleen is UNDER and Liver OVER energy. Here CONTROL gives the shortest clockwise distance between the two points, straight across the 5-ELEMENT circle. Using NL, NV (or what ever), you'd strengthen Spleen to draw excess energy from Liver. Now CHALLENGE and check ALL muscles of the affected meridian (as you'd do with any correction). Check the ALARM POINT to be sure the energy's been transferred.
USING THE CONTROL FLOW
GALL \ BLADDER)
',,-----____.-/
9

EXAMPLE #3 Now comes expertise. UNDER energy on Spleen and OVER energy on Lungs. In this case - (see the illustration) there's no direct connection between the two points going clockwise on either GENERATING or CONTROL. We need an intermediary and CONTROL's flow gives it to us, using a 'billiard ball' effect First we strengthen Spleen. This draws energy from Liver (directly across the 5-ELEMENT circle). Now, having created an ARTIFICIAL imbalance in Liver - which you check by testing the Pectoralis Major Sternal (which may show weak) - follow through and strengthen Liver. This draws OVER energy from Lungs into Liver and puts the system back in balance.
Important rule: whenever you are applying the 5-ELEMENT method always take supplementing action on the Meridian with the deficiency, whether the deficiency has occurred of itself or has been artificially created by you. And remember, surplus energy travels only in the direction indicated by the arrows.
THE 'BILLIARD BALL' APPROACH USING THE CONTROL FLOW
" "
" "//Q\
( L;"G ) "'.~.
10
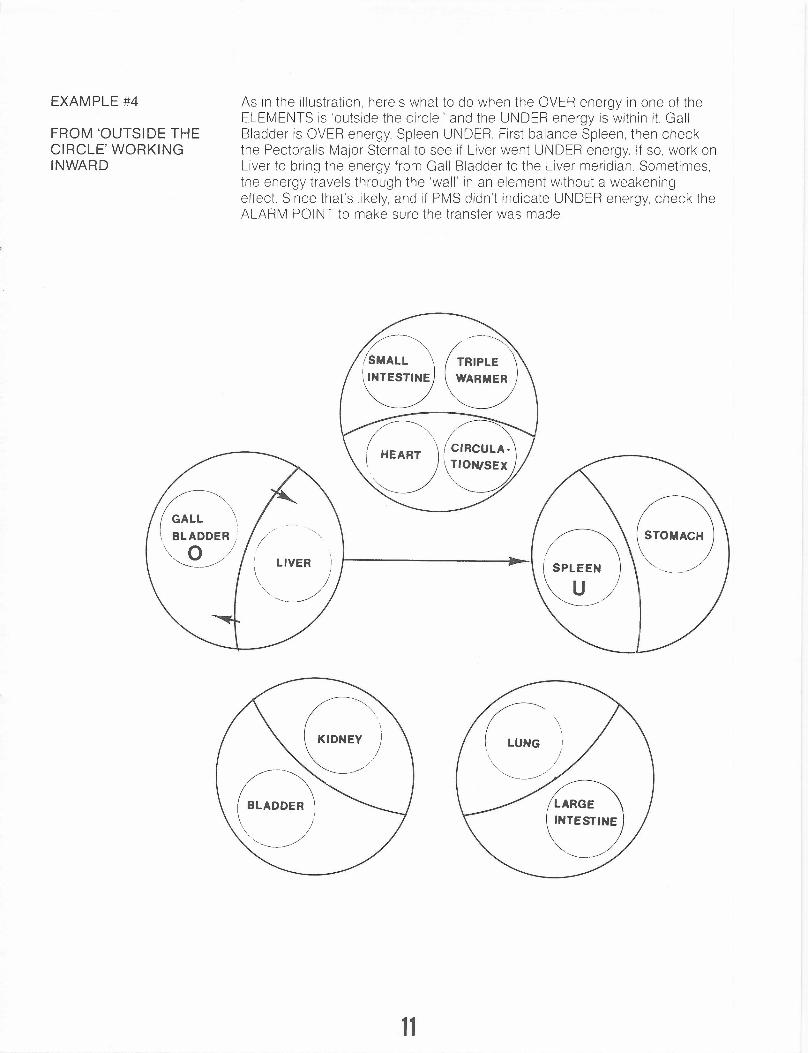
EXAMPLE #4 As in the illustration, here's what to do when the OVER energy in one of the ELEMENTS is 'outside the circle,' and the UNDER energy is within it Gall Bladder is OVER energy, Spleen UNDER. First balance Spleen, then check the Pectoralis Major Sternal to see if Liver went UNDER energy. If so, work on Liver to bring the energy from Gall Bladder to the Liver meridian. Sometimes, the energy travels through the 'wall' in an element without a weakening effect. Since that's likely, and if PMS didn't indicate UNDER energy, check the ALARM POINT to make sure the transfer was made.
FROM 'OUTSIDE THE CIRCLE' WORKING INWARD
11

EXAMPLE #5
WORKING 'OUTSIDE THE CIRCLE' USING THE CONTROL FLOW
As shown in the illustration, here's how to handle OVER energy on Stomach and UNDER on Small Intestine. Both are 'outside the circle'. The most direct flow is shown by the arrows in diagram. Using your TFH correction tech niques, first work on Small Intestine, then on Heart, finally on Kidney. Small Intestine will draw energy from Heart Then strengthen Heart to draw excess energy from Spleen. NOTE: energy may transfer from Stomach through Spleen WITHOUT WEAKENING Spleen. Check out by muscle testing, each step of the way.)
WHEN YOU HAVE MANY MERIDIANS UNDER ENERGY AND SEVERAL OVER ENERGY take the SIMPLEST flow first - either GENERATING or CONTROL. If you have the opportunity to do so, START on one of the meridians that shows UNDER energy INSIDE THE CIRCLE. The meridians on the inside are yin meridians and have to do with the storage and distribu tion of energy. And, the organs they are related to work ALL THE TIME, whereas the yang organs on the outside of the circle work on a part-time basis.
Many times, this will trigger total correction, since our body is designed to re balance itself whenever possible.
GALL \ BLADDER)
<c>
12

JUNCTION POINTS NOTE In some texts, the JUNCTION POINTS are referred to as 'passage points'.
Like blood which is not limited to arteries and veins in its circulation through the body, energy is not limited to meridian pathways. While meridians are its main channels (as arteries and veins represent the main paths of blood cir culation), this inner energy unites the body's organic action as a whole.
It is this deep interaction of organs and energy we deal with when we use the 5-ELEMENT approach.
Between the inner organic circulation and surface circulation (represented by the WHEEL pattern of the 12 meridians), there are specific connective channels between coupled meridians within each of the 5-ELEMENT circles. These are called JUNCTION POINTS.
JUNCTION POINTS are used to balance two coupled meridians (meaning: the meridians within the same element!grouping) when one is under-energy and the other is over-energy. Stimulation of the under-energy meridian on THE JUNCTION POINT draws the over energy to it to bring it into re-balance.
EXAMPLE:.Say that one element! grouping is out of balance - not out of balance with another element! grouping, but within itself. For instance, the Stomach meridian shows over-energy, the Spleen shows under-energy. (As on the CHART, both meridians are within the same element! grouping.) To make the energy-transfer, stimulate the JUNCTION POINT SPLEEN 4. What you're doing i~ to draw energy either from the inside to the outside of that element! grouping's division, or vice versa.
Now you'd stimulate (either hold or use light fingertip massage) SPLEEN 4. Remember, these JUNCTION POINTS are bilateral, so having stimulated SPLEEN 4 on one foot, be sure to repeat the stimulation on the other.
***
THE BODY INCH In locating these important junction points, the unit of measurement is 'THE BODY INCH.' This measurement is consistent when you're dealing with children or adults, because it relates directly to the individual's own structure.
THE BODY INCH is the greatest width of the thumb above the joint.
13

THE 12 BILATERAL JUNCTION POINTS
LUNG 7 2 body inches above the first crease on the wrist at base of the hand, on the Lung meridian.
LARGE INTESTINE 6 3 body inches above the wrist crease at base of hand on the Large Intestine meridian.
STOMACH 40 On outside of leg, midway between ankle bone and knee cap, on the Stomach meridian. -.
SPLEEN 4 4 body inches from the nail root of the big toe back toward the ankle, on the Spleen meridian.
HEART 5 1 body inch above the wrist crease at base of hand, on the Heart meridian.
SMALL INTESTINE 7 5 body inches above the wrist flexure (outside of arm), on the Small Intestine meridian.
BLADDER 58 Side of leg, near bottom of gastrocnemius (calf), on Bladder meridian.
KIDNEY 4 Anterior to Achilles Tendon and on same level as middle of ankle bone, on Kidney meridian.
CIRCULATION/SEX 6 2 body inches above wrist crease at base of hand on Circulation/Sex meridian.
TRIPLE WARMER 5 On wrist flexure on Triple Warmer meridian.
GALL BLADDER 37 5 body inches above the outside ankle bone on Gall Bladder meridian.
LIVER 5 5 body inches above the inside ankle bone, on Liver meridian.
14

FOOD AS A RE BALANCING TECHNIQUE
After doing the 14 muscle and ALARM POINTS and you find all affected meridians with under-energy, diet may be the cause.
A muscle which is continually 'out' over many re-balancings may be relating to a dietary problem also. This is common today, but careful attention to what you put into your system can bring back vitality and enough energy to re balance the 'under' meridians. A valuable source for back-up dietary informa tion is the TOUCH FOR HEALTH text, the TFH Folio and the TFH Chart These all list the foods associated with given meridians/ muscle groups.
TOUCH FOR HEALTH also uses food as a re-balancing technique.
For instance: After you've checked the 14 muscles around THE WHEEL and find under-energy in Kidney, Circulation/Sex, Triple Warmer, Gall Bladder and Liver - Kidney could be your starting point. To re-balance with food, look in Dr. John Thie's TOUCH FOR HEALTH book (or on the Folio or TFH Chart). There you'll find the specific foods related to the Kidney meridian. (In this case, the foods containing vitamins A and E are important - such as parsley, green pepper and peas, green leafy vegetables, and wheat germ. Also, it's vital to drink water on a regular basis.)
Now, pick one of the suggested foods. Have the person put it in his or her mouth. With the food in that person's mouth, re-test the Psoas muscle (Kidney). If it still tests weak, try another food from the TFH list When you get a strong test, re-test the other muscles which showed 'weak' and go to the TFH resource for THEI R food indicators. Repeat the process until the entire 14 muscles are strong.
TO CHALLENGE on such food testing, have the person clear his or her mouth by rinsing with water. Re-check the 14 muscles. If all show strong, then whatever foods were used had what that person's system needed more of at that time. If any muscles show weak, that person needs another food (or combination of foods) to re-balance the system. Repeat the testing process by referring to your TOUCH FOR HEALTH resource.
You'll have a successful re-balance when the person has rinsed his or her mouth clear of all foods and the affected muscles stay strong.
Because the body is a dynamic organism, be aware that foods which re balance TODAY aren't necessarily the foods which will re-balance a week from now. It's to our advantage - as well as to the advantage of those we re-balance - to examine diet as a means to become more consistently in balance, and enjoy greater vitality. This is especially true for those who re peatedly have under-energy and no over-energy as related to specific meridians and muscle groups or who have a muscle that constantly goes 'out' after re-balancing the energy.
FOOD TESTING DOs AND DON'Ts
o Put food in the mouth, not on the body (as, for instance, having the person hold the substance in his or her hand). The oriental belief is that the food's color and odor feeds the body's energy system and the actual composition of that food feeds body tissue. You can get an indication by putting the food substance on the body, but you may get a different response when that substance is in the person's mouth - so, test with the food in the mouth.
15
I've seen people put a pound of coffee on a person's body and the muscle went weak. A whole pound of coffee would 'blowout' anybody! A small mouthful might give an entirely different reading.
o Have the person chew the food being tested, and hold that food in the mouth without swallowing while you test the affected meridian/muscle. After the test, the person can swallow the food or spit it out Rinse out the mouth with water. Now that person's system is ready for another food test
o Demonstrating food testing, most people like to use refined sugar to produce a weakening effect. Be advised: if a person has low blood sugar at the time of the test, the muscle may go even stronger! Or, if the person has been eliminating sugar from the diet, he or she may be able to tolerate the amount of sugar used in the test, and the muscle reads 'strong'. Use foods we eat all the time - such as nuts, bananas, oranges, vegetables, etc.
o Only test supplements with your immediate family. And remember, food testing is only giving you an educated guess as to what you need or don't need. For specific problems see a professional. Start with a WEAK MUSCLE. The true needs of that system will be reflected when whatever dosaqernakes that weak muscle strong. Usually, it's a relatively small amount. Beware of starting with a strong muscle and adding to the dosage being tested until the muscle goes weak. Many do test this way, however, and it can be a problem - adding tablet after tablet until the muscle goes weak, then backing off one and announcing, "This is the quantity you need!" Not so; the person may be taking a toxic dose food/ supplement testing this way. ALWAYS START WITH A WEAK MUSCLE, FOR SUPPLEMENT TESTING, AND ADD TO THE SUPPLEMENT QUANTITY UNTIL THAT MUSCLE GOES STRONG.
16

TONIFICATION/SEDA TION POINTS
These are shown in the illustration at the bottom of the chart The points are found between fingertips and elbow, and between toe-tips and the knee. How ever, use them only when you're not getting results from the other TOUCH FOR HEALTH procedures:
o stimulation of the Neuro-Iymphatic system o stimulation of the Neuro-vascular system o stimulation of the Meridians - running your hand over the meridian
pathway.
If these procedures have not corrected the imbalance, then use the tonification/ sedation points. Doing so moves the energy of three meridians.
Here's what to do:
Hold the "FI RST" two points on the same side of the body; then hold the "SECOND" two points on that side of the body. Now, move to the opposite side of the body and hold the "FIRST", then "SECOND" points.
LOCATION TON I FI CATI ON/SEDA TION POINTS * Meridian LUNG
TONIFY
FIRST L-9 radial artery on wrist crease. (fig. 1)
SP-3 inner side of foot, posterior to head of 1 st metatarsal. (fig. 2)
H-8 where meridian crosses first major line below base of little finger, palm of hand.
SECOND (fig. 3)
L -10 palmar aspect of hand on vertical thumb flexion. (fig. 1)
SEDATE
K-10 popliteal crease at knee, inside. (fig. 4) FIRST L-5 where meridian crosses over the elbow
fold. (fig. 5)
SECOND H-8 same as above
L-10 same as above * Meridian
TONIFY
LARGE INTESTINE
FIRST LI-11 elbow fold, lateral extremity. (fig. 6)
S-36 A 'body hand width' from bottom of knee cap, between tibula and fibula. (fig. 7)
SI-5
SECOND above head of ulna where wrist bends. (fig. 8)
LI-S between extensor policis longus and policis brevis (center of hollow known as 'ana tomical snutt box') (fig. 8)
17
Figure 1
SP-1 SP-2 SP-3
Figure 2
K-3
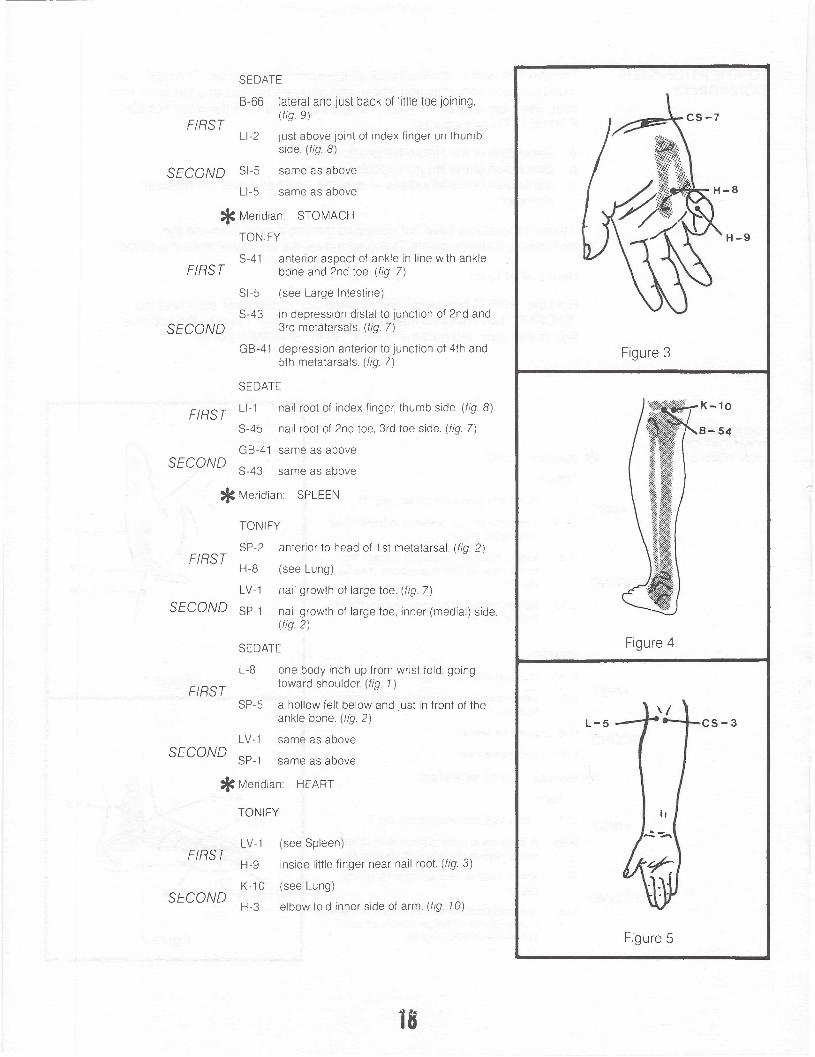
SEDATE
FIRST
lateral and just back of little toe joining (f/g. 9)
LI-2 just above joint of index finger on thumb side. (f/g 8)
B-66
SECOND SI-S same as above
LI-S same as above
* Meridian STOMACH
TONIFY I \ I \ __./\ ,- 'H-9
anterior to head of 1 st metatarsal. (f/g. 2)
(see Lung)
nail growth of large toe. (f/g. 7)
nail growth of large toe, inner (medial) side. (f/g.2)
SEDATE I Figure 4
FIRST anterior aspect 01 ankle in line with ankle bone and 2nd toe. (f/g. 7)
SI-S (see Large Intestine)
S-41
S-43 in depression distal to junction 01 2nd and SECOND 3rd metatarsals. (f/g. 7)
GB-41 depression anterior to junction 01 4th and Sth metatarsals. (f/g. 7)
SEDATE
FIRST LI-1 nail root of index linger, thumb side. (fIg. 8)
S-45 nail root of 2nd toe, 3rd toe side. (f/g. 7)
GB-41 same as above SECOND S-43 same as above * Meridian SPLEEN
TONIFY
SP-2 FIRST H-8
LV-1
SECOND SP-1
L-8 one body inch up from wrist fold, going
FIRST toward shoulder. (f/g. 1)
SP-S a hollow lelt below and just in front 01 the ankle bone. (fIg. 2)
LV-1 same as above SECOND
SP-1 same as above * Meridian HEART
TONIFY
LV-1 (see Spleen) FIRST
H-9 inside little linger near nail root. (f/g. 3)
K-10 (see Lung) SECOND
H-3 elbow fold inner side of arm. (f/g. 10)
18
Figure 3
8-54
Figure 5

SEDATE
GB-41 (see Stomach) FIRST SI-3 about one inch up from knuckle of little
finger on lateral side. (fig. 8)
(see Large Intestine) SECOND B-66
SI-2 lateral of knuckle of little finger. (fig. 8) * Meridian SMALL INTESTINE
TONIFY
FIRST SI-3 (see Heart)
GB-41 (see Stomach)
SECOND B-66 (see Large Intestine)
SI-2 (see Heart)
SEDATE
S-36 (see Large Intestine) FIRST
SI-8 on "funny bone" on elbow. (fig. 11)
SECOND B-66 (see Large Intestine)
SI-2 (see Heart) * Meridian BLADDER
TONIFY
FIRST B-67 lateral side of little toe on nail root. (fig. 9)
(see Stomach)
(see Large Intestine)
back of knee, center on popliteal fold. (fig. 4)
SEDATE
LI-1
SECOND S-36 B-54
GB-41 (see Stomach) FIRST B-65 posterior/inferior to head of 5th metatarsal.
(fig. 9)
(see Large Intestine)
same as above
S-36 SECOND B-54 * Meridian KIDNEY
TONIFY
K-7 half-way between bottom of calf muscle and ankle bone. (fig. 12)
(see Spleen)
(see Lung)
FIRST
SECOND
L-8
SP-3
K-3 just in front of Achilles Tendon level with top of ankle bone. (Fig 12)
SEDATE
LV-1 (see Spleen) FIRST
K-1 ball of foot. (fig. 13)
SP-3 (see Lung) SECOND
K-3 same as above
19
Figure 6
S-36
5-41
GB-41 ----r GB-43 GB-44
SP-1
S-4S LV-1
Figure 7
Figure 8
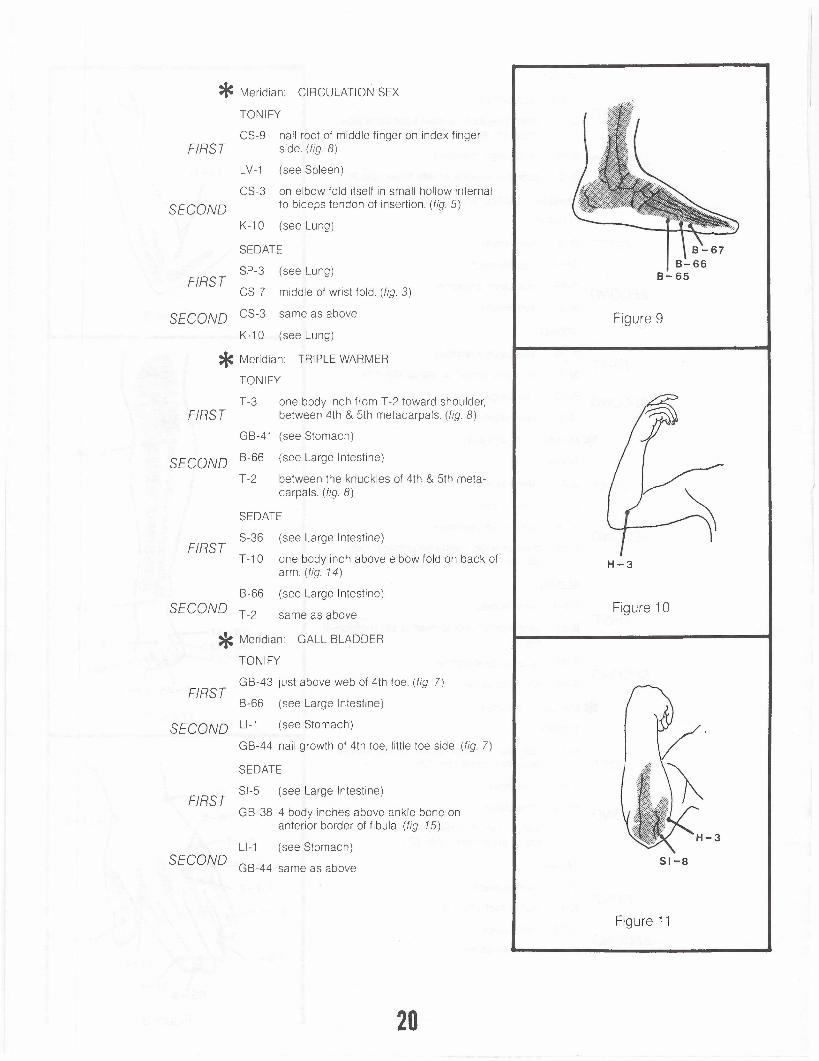
* Meridian CIRCULATION SEX
TONIFY
CS-g nail root of middle finger on index finger FIRST side. (fig. 8)
LV-1 (see Spleen)
CS-3 on elbow fold itself in small hollow internal SECOND to biceps tendon of insertion. (fig. 5)
K-10 (see Lung)
SEDATE
SP-3 (see Lung) FIRST
CS- 7 middle of wrist fold. (fig. 3)
SECOND CS-3 same as above
K-10 (see Lung) * Meridian TRIPLE WARMER
TONIFY
T-3 FIRST
one body inch from T -2 toward shoulder, between 4th & 5th metacarpals. (fig. 8)
GB-41 (see Stomach)
SECOND B-66 (see Large Intestine)
T-2 between the knuckles of 4th & 5th meta carpals. (fig. 8)
SEDATE
S-36 (see Large Intestine) FIRST
T-10 one body inch above elbow fold on back of arm. (fig. 14)
B-66 (see Large Intestine) SECOND T-2 same as above
* Meridian GALL BLADDER
TONIFY
GB-43 just above web of 4th toe. (fig. 7) FIRST
B-66 (see Large Intestine)
SECOND LI-1 (see Stomach)
GB-44 nail growth of 4th toe. little toe side. (fig. 7)
SEDATE
FIRST SI-5 (see Large Intestine)
SECOND
GB-38 4 body inches above ankle bone on anterior border of fibula. (fig. 15)
LI-1 (see Stomach)
GB-44 same as above
20
8-66 8:' 65
Figure 9
H-3
Figure 10
SI-8
Figure 11

* Meridian LIVER
TONIFY
LV-8 level of popliteal fold inside leg. (fig. 12)
FIRST K-l0 (see Lung)
L-8 (see Spleen)
SECOND LV . h f insid kl b -4 one body Inc rom msi e an e one. (fig. 16)
SEDATE
H-8 (see Lung) FIRST LV-2 in space between 1 st two toes, close to
large toe. (fig. 16)
L-8 (see Spleen) SECOND
LV-4 same as above
Figure 16
LV-4
LV-2
LV-1
Figure 15
Figure 12
( \
TW-10
Figure 13
Figure 14
21

PAIN TAPPING: USING THE TONIFI CATION POINTS TO REDUCE PAIN
PAIN TAPPING - AS TAUGHT IN THE TFH INSTRUCTOR TRAIN ING WORKSHOPS
The sensation of pain transmits directly into the spinal cord. From there it's relayed to the brain. Unless the nerve relay circuitry is broken, we become conscious of pain.
Correct stimulation of appropriate Tonification Points provides a short-circuit of the pain process. It works because at the point nerve fibers enter the spinal cord's grey rr latter, an inter-neuron elects which sensation will be relayed on to the brain. TOUCH, of the proper kind, supersedes pain in terms of nervous system priority. Thus, when given a choice of incoming sensations, the inter neuron inhibits pain in preference to touch stimulation. In other words, if one set of fibers is carrying a strong TOUCH STIMULATION at the same time another set is relaying PAIN, the INHIBITORY SWITCH stays 'ON', effectively cancelling the transmission of pain.
We call this procedure PAIN TAPPING. It's an excellent way to TOUCH FOR HEALTH and can be used with both acute, immediate pain and chronic pain from old injuries.
But before we go into an outline of how to PAIN TAP, here are some impor tant considerations. As a matter of fact, the following applies to using ANY kind of pain control for best results. Although PAIN TAPPING may not com pletely get rid of the pain with 100% success, it works wonders in most every instance to reduce the pain.
o Don't PAIN TAP unless you can re-balance the person. If you can't do a re-balancing, use the MERIDIAN APPROACH to pain control (see the TOUCH FOR HEALTH BOOK, page 119).
o Short -circuiting the pain message will give significant (often complete) re lief, but we're only dealing with effects, not cause. The apparent pain re lief may then mask a very real problem.
Here's a for instance: Recently at a Touch For Health Instructor Training Workshop, an attendee's young daughter fell, hurting her ankle badly. The pain was so great, the girl couldn't bear even the lightest touch upon her ankle. Her mother used PAIN TAPPING with amazing success. But, later, when a doctor examined the daughter, he concluded no bones had been broken because the girl said she had no pain. Now the mother had second thoughts: what if PAIN TAPPING covered up something far more serious? What if bones really had been broken? She insisted on having an X-ray taken. No bones were broken, but they could have been. So, use common sense.
Always have the cause-condition checked out as soon as possible. Never be content with simply alleviating pain; it's only an effect. What we want is the restoration of the body's balance and good health.
With these considerations in mind, here is the model for using:
1. HAVE THE PERSON LOCATE AND EVALUATE THE PAIN'S INTENSITY
It's convenient to use a scale of 1 to 10, with 10 being worst. Once the person has evaluated the pain before PAIN TAPPING begins, he or she will be able to recognize how much this procedure alleviates that pain.
2. RE-BALANCE THE PERSON
Make all appropriate corrections.
22

3. USE THE PULSES TO CHECK FOR OVER-ENERGY
Check the Pulse Points three at a time. First with the person holding them with light pressure, then with deep, while you test using a strong indicator muscle. If that muscle goes weak, you have missed something in your re balancing. Go back and balance again. The indicator muscle should stay strong at this point to indicate a successful re-balancing. (See illustration for pulse rnodel.)
LEFT HAND RIGHT HAND
large Intestine Stomach
Triple-warmer
-- If _EEP TOUCH lungs Spleen Circutation-Sex
Heart liver Kidneys
Small Intestine Gall Bladder
Bladder
Diagram showing the positions of the pulses.
4. NOW, HAVE THE PERSON RE-EVALUATE THE PAIN
The re-balance alone has probably decreased the pain some. If it has gone completely: STOPI Continue on only if pain is still present.
5. STIMULATE THE PAIN AREA
Have the person touch the area (or you touch it) to increase the pain. Since pain is over-energy, increasing it helps detect the meridian through which that pain is surging. Having increased the pain, immediately:
6. RE-CHECK THE PULSES
Using a strong indicator (such as quadriceps) to test, check the Pulses as before, three at a time. If the indicator muscle weakens, have the person hold the pulses (with the pressure appropriate to that which caused the weakness), but this time have the person hold them one at a time. The indicator will go weak at one of the three points. Now you know the meri dian through which the pain is passing. (Our experience has been that only one meridian will be involved. If two or more pulse points indicate weakness, check your balancing.)
23

7. LOCATE THE APPROPRIATE TONIFICATION POINT
Go to the TFH/5-ELEMENT CHART Find the FIRST Tonification Points. The point on the indicated meridian is the correct one to use.
(Example: If indicator muscle tested weak when Lung Pulse is touched with deep pressure, on the CHART's illustration of Lung tonification - one of the FIRST points goes to L-9, the other to SP-3. The point you want is L-9.)
You want the point on the meridian indicated by your testing. Apply a little pressure to that point. Usually it will be tender. This is the point where you're going to PAIN TAP
8. PERFORM THE PAIN TAPPING PROCEDURE
Tap the Tonification Point on THE SIDE OF THE BODY OPPOSITE THE PAIN (not on 'the pain side'). This is traditional Oriental practice and it works best this way. TAP, using a firm tap. Continue tapping for 30 seconds. Your rhythm should be that of a ticking clock.
Now, take a break and have the person RE-EVALUATE THE PAIN. If the pain's gone, stopl
If the pain has not gone, repeat the tapping on the same point for 30 seconds; then, re-evaluate. If the pain's gone, stop. If not, repeat a third time and re-evaluate.
Should the pain still be there after this third repetition, go to the 'pain side', locate the appropriate FIRST Tonification point, and begin tapping there (following the process indicated above). You'll have a good idea whether pain tapping is working on this individual as the pain will decrease some each time you tap for the 30 second intervals.
WHEN THE PAIN STOPS, YOU STOPI
9. REMEMBER, THE PAIN'S CAUSE MAY NEED FURTHER ATTENTION.
You may have alleviated the effect - but it's wise to be sure the cause is taken care of. If that pain returns - in a few hours, or a day - be sure you recommend that person see the appropriate health specialist. As a matter of fact, that should be your standard operating procedure even if the pain does not recur.
** *
24

S Touch THE'CYf.lD If ;';;!,!;.:::. eJ ~ and more ...
'Thinking Tools for your library and office'
TOUCH FOR HEALTH/AK Ofouch for Health - (john F. Thie, DC) Ofouch for Health Reference Folio - (Drs. John Thie, George Goodheart,
Alan Beardall, Orvall Ladd and Leroy Perry, Jr.) Ofouch for Health Reference Chart - laminated. Ofouch for Health Meridian Acupuncture Reference Chart -
laminated Ofouch for Health Midday-Midnight Law and the 5 Elements - (Gordon
Stokes and Daniel Whiteside) .. Ofouch for Health Workbook (Mary Marks, DC) Ofouch for Health Reference Cards - G udith Pagnotta) . Ofuned up Touch - Vol 1. cassette - (phillip Crockford and Patrick
Clark) .
$12.95
$12.95 $20.0(1
$14.50
$ 6.00 $ 9.95 $17.50
$ 8.98
KINESIOLOGY/APPLIED KINESIOLOGY DApplied Kinesiology - Vol. 1 (David Walther, DC) no discount. DKinesiology, Scientific Basis of Human Movement - (Luttgens and Wells)
no discount . . . . . . . . . . . . . . . . . DYour Body Doesn't Lie - (john Diamond) DMuscle Testing Techniques of Manual Examination - (Daniels and Wor-
thingham) no discount. . . . . . . . . . . . . . . . . . . . . . . $14.95 DThe Body Says Yes, Muscle Testing - (priscilla Kapel) . . . . . . .. $17.95 DStructural Kinesiology - Gerry Barham and Edna Wooten) no
discount. . . . . . . . . . . . . . . . . . . . . DMuscles and Movements, a Basis for Human Kinesiology - (MacConaill
and Basmajian) no discount . . . . . . . . . . . . . . . . . DMuscle Testing, Your Way to Health - (Biokinesiology Inst.) .. DClinical Kinesiology - (Singne Brunnstrom) no discount. DMuscles Testing and Function - (Kendall, Kendall and Wadsworth) no
discount. . . . . . . . . . . . DHuman Walking - (Inman, Ralston and Todd) no discount DUnderstanding The Scientific Bases of Human Movement - (Barbara
Gowitzke and Morris Milner) no discount . . . . . . . . . . . . $28.50 DManual of Structural Kinesiology - (Clem Thompson) no discount. $14.95 DDr. Deal's Basic A K Workshop Manual - (Gordon Stokes and $ 9.95
Mary Marks. DC) . . . . . .. . . .. .. . . . . .. $24.95 THEnterprises STORE 1200 North Lake Avenue Pasadena. California 91104
$65.00
$29.95 $ 2.50
$23.95
$23.50 $ 5.95 $15.95
$29.95 $27.00
OSend me Touch For Health/Applied Kinesiology course information Name ___
Street Address
City/State/Zip
Phone: area code _
(818) 798-7893 In a hurry? COD/UPS 0 MCIV1SA 0 OEnclosed is $ payment in fulL You pay shipping and handling fees.
ShippIng - AdO S, .50 for the 151 OOOk, 50« e acn aod.trco a r one. AOd $2.25 for the lSI cnar t
or ot-ter Item, Sue e ece
CA Residents add 6.5 '7e sale, tax.
TOUCH FOR HEALTH FOL~TIATIO~ ME.\1BERS MAY USE YOUR DlSCOUl\'T PRIVILEGES
P.yabito in l'S "" rre ncy.