(Totaliser/Checkweigher) Digital Indicator Operator Manual · Rinstrum - 5200 Operator Manual Rev...
20
5200 (Totaliser/Checkweigher) Digital Indicator Operator Manual For use with Software Versions 1.0 and above 0025-607-120
Transcript of (Totaliser/Checkweigher) Digital Indicator Operator Manual · Rinstrum - 5200 Operator Manual Rev...

5200(Totaliser/Checkweigher)Digital Indicator
Operator ManualFor use with Software Versions 1.0 and above
0025-607-120

Rinstrum - 5200 Operator Manual Rev 1.2
Page 2 0025-607-120
Copyright
All Rights Reserved. No part of this document may be copied, reproduced, republished, uploaded, posted, transmitted,
distributed, stored in or introduced into a retrieval system in any form, or by any means (electronic, mechanical, photocopying, recording or otherwise)
whatsoever without prior written permission of Rinstrum Pty Ltd.
Disclaimer
Rinstrum Pty Ltd reserves the right to make changes to the products contained in this manual in order to improve design, performance or reliability.
The information in this manual is believed to be accurate in all respects at the time of publication, but is subject to change without notice. Rinstrum Pty Ltd assumes no
responsibility for any errors or omissions and disclaims responsibility for any consequences resulting from the use of the information provided herein.
“Everything should be made as simple as possible, but not simpler.”
- Albert Einstein -

Rinstrum - 5200 Operator Manual Rev 1.2
0025-607-120 Page 3
Table Of Contents 1. INTRODUCTION....................................................................................................... 4
1.1. Approvals........................................................................................................ 4 1.2. Features.......................................................................................................... 4 1.3. Manuals .......................................................................................................... 4
2. SAFETY .................................................................................................................... 5 2.1. Operating Environment ................................................................................... 5 2.2. Electrical Safety .............................................................................................. 5 2.3. Cleaning.......................................................................................................... 5
3. TERMINOLOGY........................................................................................................ 5
4. BASIC OPERATION................................................................................................. 6 4.1. User Interface Display and Controls ............................................................... 6 4.2. Operation Keys ............................................................................................... 6 4.3. Alphanumeric Keypad Keys............................................................................ 8 4.4. Auxiliary Display............................................................................................ 10 4.5. Status Annunciators...................................................................................... 10
5. OPERATOR PROCEDURES.................................................................................. 11 5.1. Managing Product Names ............................................................................ 11
5.1.1. Create New Product Name............................................................................11 5.1.2. Delete Product Name ....................................................................................11 5.1.3. Search and Select Existing Product Name....................................................12
5.2. Managing Targets and User Strings ............................................................. 12 5.2.1. Setting Targets for Each Product (via the Operator Menu ............................12 5.2.2. Setting User Strings (via the Operator Menu.................................................13
5.3. Totalising Procedures ................................................................................... 13 5.3.1. Add Weight to Product Total..........................................................................13 5.3.2. Search for Product Name / Add Weight to Product Total (Combined Steps)13 5.3.3. Undo the Last Add to the Current Product Total ...........................................14 5.3.4. Viewing Totals and Displaying Other Totalising Information .........................14
5.4. Checkweigh Procedures ............................................................................... 14 5.4.1. Checkweigh Using Weight Trigger ................................................................14 5.4.2. Checkweigh Using Input Trigger ...................................................................14 5.4.3. Change Checkweigh Display.........................................................................15 5.4.4. Viewing Totals and Displaying Other Checkweigh Total Information ............15
5.5. Clearing Totals.............................................................................................. 16 5.5.1. Clear Product Total........................................................................................16 5.5.2. Clear Session Total .......................................................................................16 5.5.3. Clear Grand Total ..........................................................................................17
6. ERROR MESSAGES .............................................................................................. 18
7. DIAGNOSTIC ERRORS.......................................................................................... 19

Rinstrum - 5200 Operator Manual Rev 1.2
Page 4 0025-607-120
1. Introduction The Rinstrum 5200 is a precision digital indicator using the latest Sigma-Delta A/D converter to ensure extremely fast and accurate weight readings. The 5200 can be used as a general purpose indicator but also specialises in Product Totalising and Checkweighing (Catchweighing).
1.1. Approvals • C-tick approved • CE, OIML and NSC approved
1.2. Features • 20mm alpha-numeric LCD display • Single Product Totalising is available as a standard feature • Multiple Product Totalising and Checkweighing available with purchase
of the "Smart" Software Option • Product, Session and Grand Totalisation • Checkweighing setpoints and grade limits kept for each product • Real Time Clock and Calendar
1.3. Manuals
For more information on the 5200 Totaliser/Checkweigher, refer to the 5200 Reference Manual, 5200 Quick Start Manual, 5200 Applications Manual or the 5200 Communications Manual (available from www.rinstrum.com).

Rinstrum - 5200 Operator Manual Rev 1.2
0025-607-120 Page 5
2. Safety
2.1. Operating Environment • Operating Temperature: –10 to 50°C • Humidity: <90% non-condensing • Operating Voltage: Shown on Rating Plate
2.2. Electrical Safety • For your protection all mains electrical hardware must be rated to the
environmental conditions of use. • Pluggable equipment must be installed near an easily accessible power
socket outlet. • To avoid the possibility of electric shock or damage to the instrument,
always switch off or isolate the instrument from the power supply before maintenance is carried out.
2.3. Cleaning
To clean the instrument, never use harsh abrasive cleaners or solvents on the keyboard. Wipe the instrument with a soft cloth slightly dampened with either methylated spirits or warm soapy water.
3. Terminology
Product Totals
A product is a type of item to be weighed. For each product, a separate product total is kept. In addition to the totals information, each product also stores preset tare, setpoint targets and counting sample information. This information is used when the product is active. Only a single product is active at any time. The 5200 can totalise up to 100 different products.
Session Total
The session total totalises all product adds regardless of the active product. It can be cleared independently of the product and grand totals.
Grand Total
The grand total totalises all product adds regardless of the active product or session. It can not be cleared independently of the product totals. Therefore, the Grand Total weight is always the sum of the product total weights.

Rinstrum - 5200 Operator Manual Rev 1.2
Page 6 0025-607-120
4. Basic Operation
4.1. User Interface Display and Controls
4.2. Operation Keys
Key Description
ZERO: When an empty scale has drifted away from a true zero reading, the <ZERO> key is used to perform a zero adjustment on the scale display. The zero adjustment is stored by the 5200 when power is removed and is re-used when next powered up. The amount of weight that may be cancelled by the <ZERO> key is limited via a setting in the Setup of the instrument. De-Zero: A two second press of the <ZERO> key clears the zero setting. This function is not available in Trade mode.

Rinstrum - 5200 Operator Manual Rev 1.2
0025-607-120 Page 7
Key Description
TARE: This key is used to temporarily set the scale to zero (such as cancelling the weight of a container before performing a filling operation). The display will show the NET weight and the NET annunciator will be lit. The <TARE> key can operate over the entire valid range of the display. In Trade Mode the <TARE> key will not operate if the displayed gross weight is less than or equal to zero. A negative tare is permitted in Industrial Mode. The weight tared is deducted from the allowable range of the scale, reducing the maximum weight that can be displayed. Preset Tare Entry: To enter a Tare weight directly, enter the weight value using the numeric keys and then press the <TARE> key. The display will flash while the tare weight is being edited, and then show the preset tare value with the auxiliary display showing PT. It is also possible to enter multiple Tare values by pressing and holding the <TARE> key for two seconds after entering the tare value. In this way it is possible to add numerous values to the preset tare. To clear a preset tare either return the display to gross mode via the <GROSS/NET> key, or enter a zero value for the preset tare.
This key toggles the weight display between the Gross weight and the Net weight (provided that a Tare has previously been acquired). When switching from gross to net, the preset tare value is shown for one second.
PRINT: The <PRINT> key is used to add weighings to the currently selected product. (Note: The <PRINT> key will not add to totals if there is no current active product.) If a printer or computer has been attached to the 5200 and the manual print function selected, the <PRINT> key will also trigger an output according to the selected print format. While viewing totals the <PRINT> key is used to print totals.

Rinstrum - 5200 Operator Manual Rev 1.2
Page 8 0025-607-120
Key Description
OK (FRONT FUNCTION) Key: When leaving the factory, the <FRONT> function key is blank and has no primary function pre-programmed. The primary role of this key can be selected from a number of different functions including peak-hold, counting, etc. Each primary function has an associated overlay sticker that should be applied to the function key to label the function. Long Press: A long press of the function key may be used for certain functions depending on the primary function of the key. The <OK> function of this key is used to accept commands and continue to the next step.
4.3. Alphanumeric Keypad Keys
Key Description
Product, Session or Grand (Total Keys) Short Press(s): Where data entry is required, short press(s) of these keys will cycle through the alphanumeric characters on the key (eg. 2, A, B, C). Long Press: A long press of these keys displays the totals information for the current product, session or grand totals respectively. The display will alternate between the total name and the total weight. Press the <FIND> key to step through the other available information of the selected total.
TARGET This key is used to adjust setpoint targets for the current product. The 5200 calculates a trip point based on the values of target and direction of operation. The function of this key can be restricted by the use of an Operator Passcode. The default for all targets is set to 0 (zero). Targets may be entered as positive or negative values. Short Press(s): Where data entry is required, this key will cycle through the alphanumeric characters on the key. Long Press: A long press of the <TARGET> key is used to adjust setpoint targets. Pressing the <FIND> key will cycle through the configured targets. • Active Setpoints: LIM.1 to LIM.4 • Checkweigh Setpoints: CHK 1 to CHK 4

Rinstrum - 5200 Operator Manual Rev 1.2
0025-607-120 Page 9
Key Description
ID: The <ID> key is used to view User String Names and to set up to three User-defined Strings. These user strings can be used with printouts. The strings consist of two parts, a String Name (which identifies the string) and a User String (which is the data identified by the String Name). Each User String can consist of up to six alphanumeric characters. The default User Strings are blank. User String Names can only be changed in setup. The default String Names are S1, S2 and S3. Short Press(s): Where data entry is required, this key will cycle through the alphanumeric characters on the key. Long Press: A long press of the <ID> key will access the User String settings. Pressing the <FIND> key will cycle through the String Names. With each String Name the display will alternate with the current User String setting (if one has been set).
FIND: The <FIND> key has multiple uses depending on the procedure. Refer to Operator Procedures starting on page 11 for specific uses. Short Press: • Searching for and selecting product names. • Display other information relating to the type of total (ie. Product,
Session or Grand Total). • When in keypad setup this key can toggle between the character
and it’s hexadecimal value when entering alphanumeric characters.
• When entering numeric characters (eg. Targets) this key can be used to change to a negative value
Long Press: • Create (add) new products names.
Escape/Clear Key The <ESC/C> key has multiple uses depending on the procedure. Refer to Operator Procedures starting on page 11 for specific uses. Short Press: • Used as an undo key during editing and any point in the process
the <ESC/C> key will cancel the last operation. • Used to perform a backspace function when entering numbers. Long Press: • During normal operation this key is used in conjunction with
other keys to clear entries or totals and/or delete Products.

Rinstrum - 5200 Operator Manual Rev 1.2
Page 10 0025-607-120
4.4. Auxiliary Display Code Description CNT Count GR- or GRn Grade Number (where n is the Grade number)
GR- stands for No Grade Name HLD Hold N-n User String Name (where n is the User String Name
number). PK Peak Hold P-nn Product Total, Session Total or Grand Total Index Number
(where nn is the Product Index Number). PT Preset Tare S-n User String (where n is the User String number). SPT Setpoint Target TOT Total
Zero Band: Lit when the displayed weight is within the zero 'dead' band setting.
4.5. Status Annunciators
Status Annunciators are a number of small triangles that show the status of the displayed reading.
Annunciator Meaning ZERO Lit when the displayed reading is within ± ¼ of a
division of true zero. GROSS Lit when the display reading represents GROSS
weight. NET Not used in the 5200. MOTION Lit when the displayed reading is not stable.

Rinstrum - 5200 Operator Manual Rev 1.2
0025-607-120 Page 11
5. Operator Procedures This section describes the keypad method for performing common operator procedures.
5.1. Managing Product Names
The procedures in this section apply to both Totalising and Checkweighing. 5.1.1. Create New Product Name
Valid names can include up to six alphanumeric characters and spaces. The Product Name must be unique to other IDs. An attempt to duplicate a name will result in the PROD EXISTS error message. A maximum of 100 Product Names can be created. • Press and hold the <FIND> key for two seconds. The instrument
will display dashes (ie. - - - - - -).
• Enter the Product Name. • Press the <OK> key to create the Product Name. When the
Product Name has been created successfully the instrument will display the message DONE and then return to the normal display.
5.1.2. Delete Product Name
A Product Name can only be deleted via the keypad if the total weight is zero. Refer to Clear Grand Total page 17. The error message NOT CLEAR will display if an attempt is made to delete a Product Name where the total weight is not zero. • Search for and select a Product Name. Refer to Search and Select
Existing Product Name page 12. • Press and hold the <PRODUCT> key for two seconds. The
selected Product Name and the current total weight reading for that product will flash alternately.
• Press and hold the <ESC/C> key for two seconds. Note: The product cannot be deleted unless the total weight is zero.
• The instrument will prompt to delete the Product Name with DEL N. Use the <FIND> key to switch between DEL N (No) and DEL Y (Yes).
• To delete the Product Name, display DEL Y and then press the <OK> key. The instrument will return to normal operation.
• To abort the procedure, display DEL N and then press the <OK> key. The selected Product Name and the current total weight reading for that product (ie. 0) will flash alternately. Press the <OK> key to return to normal operation.
Rinstrum - 5200 Operator Manual Rev 1.2
Page 12 0025-607-120
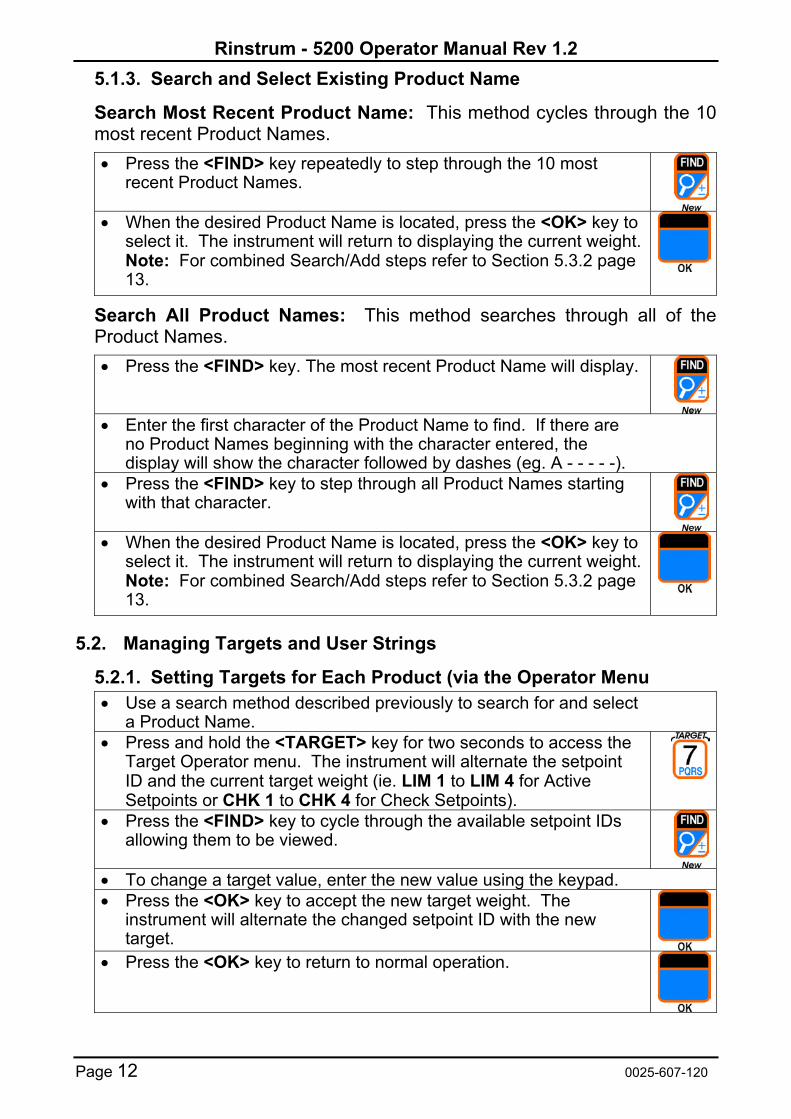
5.1.3. Search and Select Existing Product Name
Search Most Recent Product Name: This method cycles through the 10 most recent Product Names. • Press the <FIND> key repeatedly to step through the 10 most
recent Product Names.
• When the desired Product Name is located, press the <OK> key to select it. The instrument will return to displaying the current weight. Note: For combined Search/Add steps refer to Section 5.3.2 page 13.
Search All Product Names: This method searches through all of the Product Names. • Press the <FIND> key. The most recent Product Name will display.
• Enter the first character of the Product Name to find. If there are no Product Names beginning with the character entered, the display will show the character followed by dashes (eg. A - - - - -).
• Press the <FIND> key to step through all Product Names starting with that character.
• When the desired Product Name is located, press the <OK> key to select it. The instrument will return to displaying the current weight. Note: For combined Search/Add steps refer to Section 5.3.2 page 13.
5.2. Managing Targets and User Strings
5.2.1. Setting Targets for Each Product (via the Operator Menu • Use a search method described previously to search for and select
a Product Name. • Press and hold the <TARGET> key for two seconds to access the
Target Operator menu. The instrument will alternate the setpoint ID and the current target weight (ie. LIM 1 to LIM 4 for Active Setpoints or CHK 1 to CHK 4 for Check Setpoints).
• Press the <FIND> key to cycle through the available setpoint IDs allowing them to be viewed.
• To change a target value, enter the new value using the keypad. • Press the <OK> key to accept the new target weight. The
instrument will alternate the changed setpoint ID with the new target.
• Press the <OK> key to return to normal operation.

Rinstrum - 5200 Operator Manual Rev 1.2
0025-607-120 Page 13
5.2.2. Setting User Strings (via the Operator Menu
Only the user string (not the string name) can be altered from the <ID> key on the keypad. • Press and hold the <ID> key for two seconds to access the ID
Operator menu. The instrument will alternate the first string name, (eg. S1 or BUYER, etc.) and the current user string (eg. " " or BOB, etc.).
• Press the <FIND> key to cycle through the currently set String Names (eg. BUYER, SELLER, AGENT) allowing them to be viewed.
• To change a User String, enter the new user string using the keypad (maximum six alphanumeric characters).
• Press the <OK> key to accept the new User String. The instrument will alternate the String Name (eg. BUYER) with the new User String (eg. FRANK)
• Press the <OK> key to return to normal operation.
5.3. Totalising Procedures
Each of these procedures assumes the 5200 has been set up for product totalising.
5.3.1. Add Weight to Product Total • Use a search method described previously to search for and select
a Product. • Place weight on the scale. • Press the <PRINT> key.
• The instrument will flash the message ADDED when the weight has been successfully added. The message ADD FAILED will flash if unsuccessful. Adds can fail because there was motion on the scale, the interlock criteria has not been met or due to a system error.
5.3.2. Search for Product Name / Add Weight to Product Total (Combined Steps)
• Place weight on the scale. • Use the <FIND> key (as described in the previous search methods)
to locate the desired Product.
• When the desired Product is located, press the <PRINT> key.
• The instrument will flash the message ADDED when the weight has been successfully added. The message ADD FAILED will flash if unsuccessful. Adds can fail because there was motion on the scale, the interlock criteria has not been met or due to a system error.

Rinstrum - 5200 Operator Manual Rev 1.2
Page 14 0025-607-120
5.3.3. Undo the Last Add to the Current Product Total
This function is used to undo the most recently added weight and count from the selected Product total. This function can be performed only when the user assignable function on the keypad has been set to TOTAL. • Ensure the keypad <FUNCTION> key has been set to <TOTAL>. • To undo the most recently added weight and count, press and hold
the <TOTAL> key for two seconds.
5.3.4. Viewing Totals and Displaying Other Totalising Information • Press and hold either the <PRODUCT>,
<SESSION> or <GRAND> key for two seconds.
• Press the <FIND> key to cycle through other information relating to the specific type of total.
• When Totalising, the display will cycle through the following: 1. Product Name / Total Weight: For example, Apples (P-02) and 19 kg (TOT) which indicates the total weight for Product 2 Apples is 19 kg. 2. Product Name / Total Current Count: For example, Apples (P-02) and 8 c (TOT) which indicates that 8 adds have been performed for Product 2 Apples. Note: Other information may be available depending on the system setup.
• Press <OK> to return to the normal display.
5.4. Checkweigh Procedures
Each of these procedures assumes the 5200 has been set up for checkweighing.
5.4.1. Checkweigh Using Weight Trigger • Place weight on the scale. • The weight will automatically trigger the checkweigh.
5.4.2. Checkweigh Using Input Trigger • Place weight on the scale. • Press the Checkweigh Input button to trigger the
checkweigh. Depending on the setup, the Checkweigh Input button could be either the <FRONT> Function Key or a Remote Input.
or or Remote Input

Rinstrum - 5200 Operator Manual Rev 1.2
0025-607-120 Page 15
5.4.3. Change Checkweigh Display
This procedure is used to cycle through the three Display Options (ie. Normal, Weight and Grade). The last shown Display Option will remain in effect until the instrument is powered down. It is important to note that this procedure will not alter the default start-up Display Option (ie. when the instrument is next powered up the default Display Option, saved in Setup, will be used.) • After a checkweigh has been triggered, press and hold the
Checkweigh Input button for two seconds. Note: This function is available for the <FRONT> function key only.
or• The display will show the normal weight, the last checkweight (auxiliary
display is CHK) or the Grade Name for the last checkweight (auxiliary display is CHK).
5.4.4. Viewing Totals and Displaying Other Checkweigh Total
Information • Press and hold either the <PRODUCT>, <SESSION> or
<GRAND> key for two seconds.
• Press the <FIND> key to cycle through other information relating to the specific type of total.
• When Checkweighing, the display will cycle through the following: 1. Product Name / Total Weight: For example, Apples (P-02) and 19 kg (TOT) which indicates the total weight for Product 2 Apples is 19 kg. 2. Product Name / Total Current Count: For example, Apples (P-02) and 8 c (TOT) which indicates that 8 adds have been performed for Product 2 Apples. 3. Product Name / Total Current Grade Number Count: For example, Apples (P-02) and 3 c (GR2) which indicates that 3 adds, falling into the Grade 2 range, have been performed for Product 2 Apples. Note: When the Total Current Grade Number Count shows GR- in the auxiliary display it indicates the add(s) fell in a range below the target for Grade 1.

Rinstrum - 5200 Operator Manual Rev 1.2
Page 16 0025-607-120
5.5. Clearing Totals
The procedures in this section apply to both Totalising and Checkweighing. 5.5.1. Clear Product Total
Product totals cannot be cleared individually or separately from the Grand Total. 5.5.2. Clear Session Total
Session totals can be cleared without affecting the individual Product Totals or the Grand Total.
Method 1 (Print and Clear): • Press and hold the <PRINT> key for two seconds. Depending on
the print configuration of the instrument, the Session Total will print.
• The instrument will display the message CLEAR SES.T ? and then prompt to clear the Session Total with CLR N. Use the <FIND> key to switch between CLR N (No) and CLR Y (Yes).
• To clear the Session Total and return to normal operation, display CLR Y and then press the <OK> key.
• To abort the procedure and return to normal operation, display CLR N and then press the <OK> key.
Method 2 (Clear Only): • Press and hold the <SESSION> key for two seconds. The
instrument will alternate the message SES.TOT and the current Session Total weight reading.
• Press and hold the <ESC/C> key for two seconds.
• The instrument will then prompt to clear the Session Total with CLR N. Use the <FIND> key to switch between CLR N (No) and CLR Y (Yes).
• To clear the Session Total, display CLR Y and then press the <OK> key. The instrument will alternate the message SES.TOT and the cleared Session Total weight (ie. 0).
• To abort the procedure, display CLR N and then press the <OK> key. The instrument will alternate the message SES.TOT and the current Session Total weight.
• Press the <OK> key to return to normal operation.

Rinstrum - 5200 Operator Manual Rev 1.2
0025-607-120 Page 17
5.5.3. Clear Grand Total
Clearing the Grand Total clears the Grand Total as well as Product Totals and the current Session Total. • Press and hold the <GRAND> key for two seconds. The instrument
will alternate the message GRAND.T and the current Grand Total weight reading.
• Press and hold the <ESC/C> key for two seconds.
• The instrument will then prompt to clear the Totals with CLR N. Use the <FIND> key to switch between CLR N (No) and CLR Y (Yes).
• To clear the Grand Total, display CLR Y and then press the <OK> key. The instrument will alternate the message GRAND.T and the cleared Grand Total weight (ie. 0).
• To abort the procedure, display CLR N and then press the <OK> key. The instrument will alternate the message GRAND.T and the current Grand Total weight.
• Press the <OK> key to return to normal operation.

Rinstrum - 5200 Operator Manual Rev 1.2
Page 18 0025-607-120
6. Error Messages
Error Description Resolution (U - - - - -) Weight is below the minimum
allowable weight reading. Increase weight or check setup.
(O - - - - -) Weight is above maximum allowable weight reading.
Check the condition of load cell connections. Check for damaged load cell.
(ZERO) (ERROR)
Weight is beyond limit set for Zero operation.
Use the TARE function instead or check setup.
(STABLE) (ERROR)
Scale motion has prevented a <ZERO>, <TARE> or <PRINT> operation from occurring on command.
Try the operation again once the scale is stable.
(PRINT) (ERROR)
A printer problem has prevented the printout from being completed.
Look for loss of printer power, no paper or cable fault.
(QA) (DUE)
Quality assurance testing is due. Press any key to clear the warning for one hour.

Rinstrum - 5200 Operator Manual Rev 1.2
0025-607-120 Page 19
7. Diagnostic Errors
Error Description Resolution (E 0001) The power supply voltage is too low. Check supply (E 0002) The power supply voltage is too high. Check scale /
cables (E 0004) The load cell excitation voltage is too low. Check scale /
supply (E 0008) The load cell excitation voltage is too high. Check scale /
supply (E 0010) The temperature is outside of allowable
limits. Check location
(E 0020) Scale build is incorrect. The number of graduations has been set less than 100 or greater than 100000.
Fix up scale build
(E 0040) The positive sense line is not connected. Check connection (E 0080) The negative sense line is not connected. Check connection (E 00C0) Neither sense line is connected Check connection (E 0100) The digital setup information has been
lost. Re-enter setup
(E 0200) The calibration information has been lost. Re-calibrate (E 0300) All setup information has been lost Enter setup and
calibrate (E 0400) The factory information has been lost. Service (E 0800) The EEPROM memory storage chip has
failed Service
(E 2000) The Clock calendar chip has failed. Service (E 4000) The battery backed RAM has lost data. Re-enter setup (E 8000) The EPROM memory storage chip has
failed. Service
The E type error messages are additive. For example, E0005 (0001+0004) indicates that both Excitation and Power Supply Voltage are low. The numbers add in hexadecimal as follows:
1 - 2 - 3 - 4 - 5 - 6 - 7 - 8 - 9 - A - B - C - D - E - F (For example, 2 + 4 = 6, or 4 + 8 = C)