Total Station -...
46
Total Station Quick Start Reference Guide for FieldGenius total station setup and workflows. MicroSurvey FieldGenius 9
Transcript of Total Station -...

Contents
Total Station Quick Start
Reference Guide for FieldGenius total station setup and workflows.
MicroSurvey FieldGenius 9
Contents
Page 1 of 45
MicroSurvey and FieldGenius are registered with the U.S. Patent and Trademark Office by MicroSurvey Software Inc. © 2018 MicroSurvey Software Inc.
Contents Part 1 - Create a New Project ............................................................................................................................ 3
Part 2 – First Time Total Station Setup .............................................................................................................. 4
Create Instrument Connection Profile (Total Station) ..................................................................................... 4
Model and Communication............................................................................................................................. 6
Part 3 – Program Options and Interface ............................................................................................................ 8
Toolbars ......................................................................................................................................................... 8
Display Toolbar .......................................................................................................................................... 8
Observation Toolbar ................................................................................................................................... 9
Total Station Toolbar .................................................................................................................................. 9
Topo Toolbar ............................................................................................................................................ 15
Mini Toolbar .............................................................................................................................................. 16
Main Menu Toolbar ................................................................................................................................... 16
Map Select Toolbar .................................................................................................................................. 17
Point Toolbar ............................................................................................................................................ 17
Line Toolbar ............................................................................................................................................. 17
Alignment Toolbar .................................................................................................................................... 18
Configuring Program Options ....................................................................................................................... 19
Interface Options ...................................................................................................................................... 19
User Input Options .................................................................................................................................... 19
Point Attributes Options ............................................................................................................................ 20
Map Configurations Options ..................................................................................................................... 20
Total Station Options ................................................................................................................................ 21
Staking Options ........................................................................................................................................ 21
Part 4 - Measure Modes .................................................................................................................................. 23
Workflows ........................................................................................................................................................ 23
Coordinates Upload ..................................................................................................................................... 23
Total Station Setup ...................................................................................................................................... 24
Sideshot ....................................................................................................................................................... 28
Multi-Set....................................................................................................................................................... 29
Offset Measurement..................................................................................................................................... 32
Staking ......................................................................................................................................................... 33
Appendix ......................................................................................................................................................... 39
Online Manual .............................................................................................................................................. 39
Movies ......................................................................................................................................................... 39
Contents
Page 2 of 45
MicroSurvey and FieldGenius are registered with the U.S. Patent and Trademark Office by MicroSurvey Software Inc. © 2018 MicroSurvey Software Inc.
Helpdesk ...................................................................................................................................................... 39
Automap Libraries ........................................................................................................................................ 39
Project Settings ............................................................................................................................................ 40
Units and Scale ........................................................................................................................................ 40
Coordinate System ................................................................................................................................... 41
Project Files .............................................................................................................................................. 43
Project Information ................................................................................................................................... 44
Leica Prism Constant Offset vs. Actual Prism Constant Offset ..................................................................... 45

Part 1 – Create a New Project
Page 3 of 45
MicroSurvey and FieldGenius are registered with the U.S. Patent and Trademark Office by MicroSurvey Software Inc. © 2018 MicroSurvey Software Inc.
Part 1 - Create a New Project The Project Manager in FieldGenius is used to open, create, and delete projects.
Create a New Project
1. From the Project Manager choose “New Project”
Configure New Project
2. Enter a name for your project 3. Review the Project Settings 4. Modify the Project Settings if required
Project Settings
A FieldGenius project is created with some default settings. It is important to set the defaults to suit your most frequent requirements. These defaults typically will only need to be configured once. For more details on Project settings please see page 40.
Part 2 – First Time Total Station Setup Part 2 – First Time Total Station Setup
Page 4 of 45
MicroSurvey and FieldGenius are registered with the U.S. Patent and Trademark Office by MicroSurvey Software Inc. © 2018 MicroSurvey Software Inc.
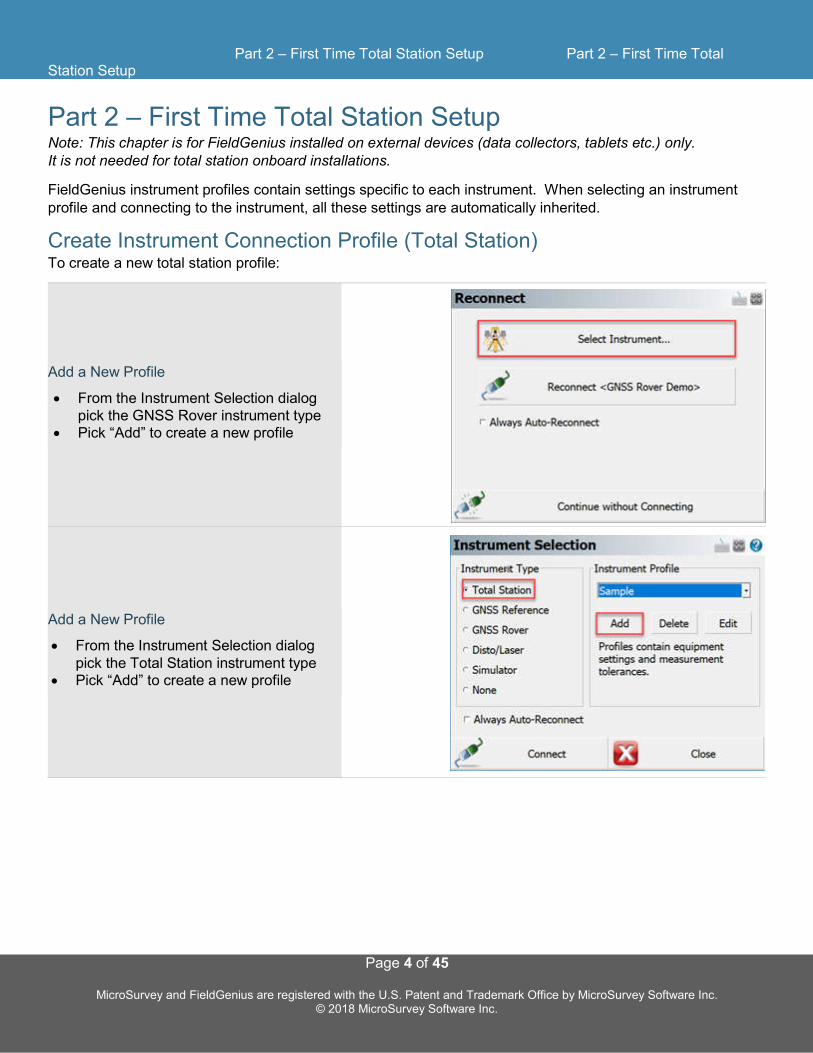
Part 2 – First Time Total Station Setup Note: This chapter is for FieldGenius installed on external devices (data collectors, tablets etc.) only. It is not needed for total station onboard installations.
FieldGenius instrument profiles contain settings specific to each instrument. When selecting an instrument profile and connecting to the instrument, all these settings are automatically inherited.
Create Instrument Connection Profile (Total Station) To create a new total station profile:
Add a New Profile
From the Instrument Selection dialog pick the GNSS Rover instrument type
Pick “Add” to create a new profile
Add a New Profile
From the Instrument Selection dialog pick the Total Station instrument type
Pick “Add” to create a new profile
Part 2 – First Time Total Station Setup Part 2 – First Time Total Station Setup
Page 5 of 45
MicroSurvey and FieldGenius are registered with the U.S. Patent and Trademark Office by MicroSurvey Software Inc. © 2018 MicroSurvey Software Inc.
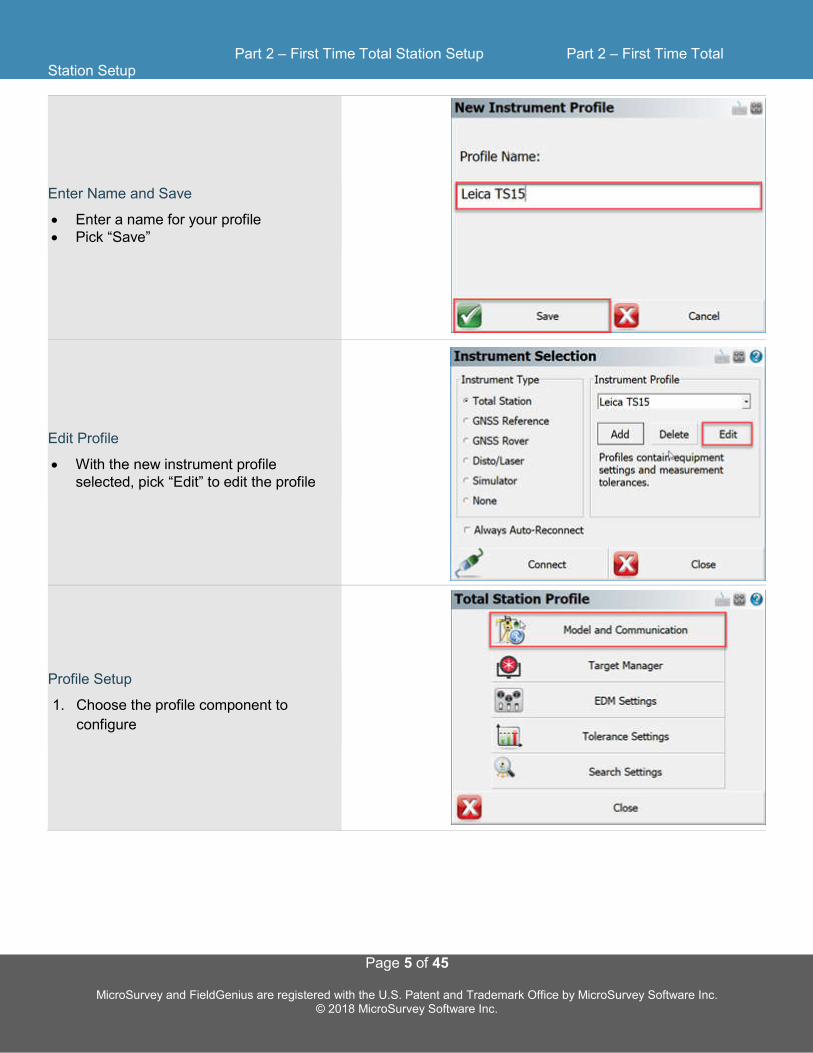
Enter Name and Save
Enter a name for your profile Pick “Save”
Edit Profile
With the new instrument profile selected, pick “Edit” to edit the profile
Profile Setup
1. Choose the profile component to
configure
Part 2 – First Time Total Station Setup Part 2 – First Time Total Station Setup
Page 6 of 45
MicroSurvey and FieldGenius are registered with the U.S. Patent and Trademark Office by MicroSurvey Software Inc. © 2018 MicroSurvey Software Inc.
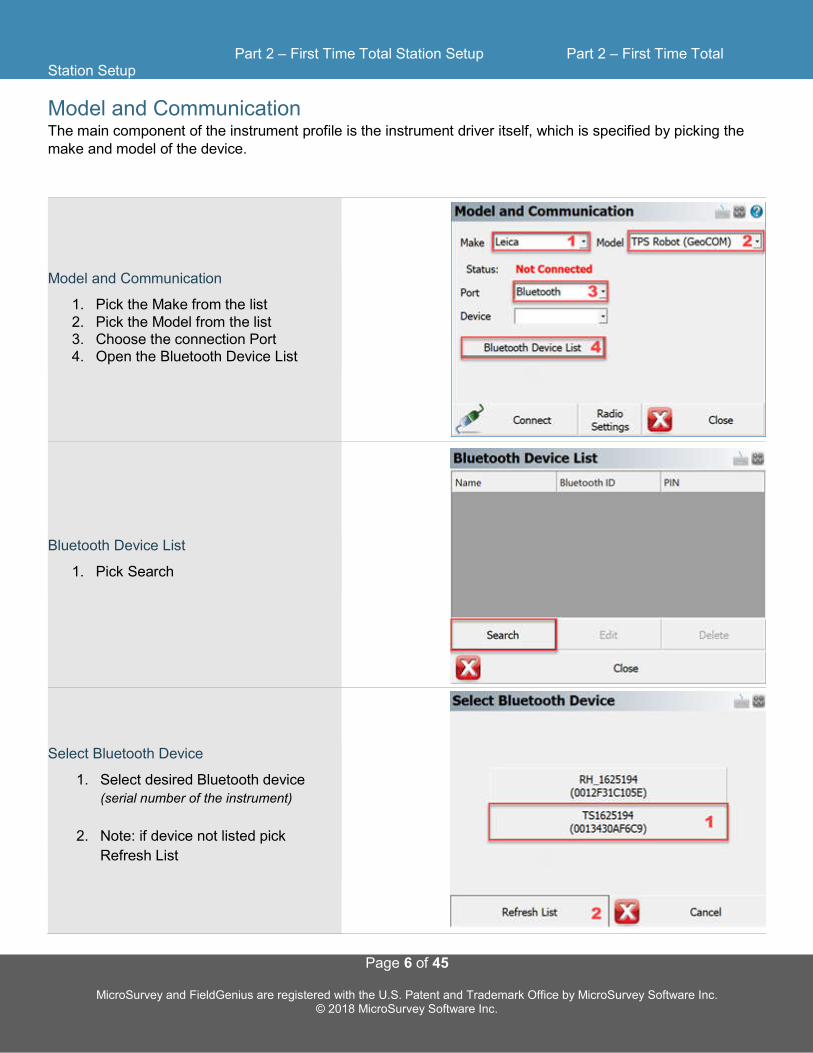
Model and Communication The main component of the instrument profile is the instrument driver itself, which is specified by picking the make and model of the device.
Model and Communication
1. Pick the Make from the list 2. Pick the Model from the list 3. Choose the connection Port 4. Open the Bluetooth Device List
Bluetooth Device List
1. Pick Search
Select Bluetooth Device
1. Select desired Bluetooth device (serial number of the instrument)
2. Note: if device not listed pick
Refresh List
Part 2 – First Time Total Station Setup Part 2 – First Time Total Station Setup
Page 7 of 45
MicroSurvey and FieldGenius are registered with the U.S. Patent and Trademark Office by MicroSurvey Software Inc. © 2018 MicroSurvey Software Inc.
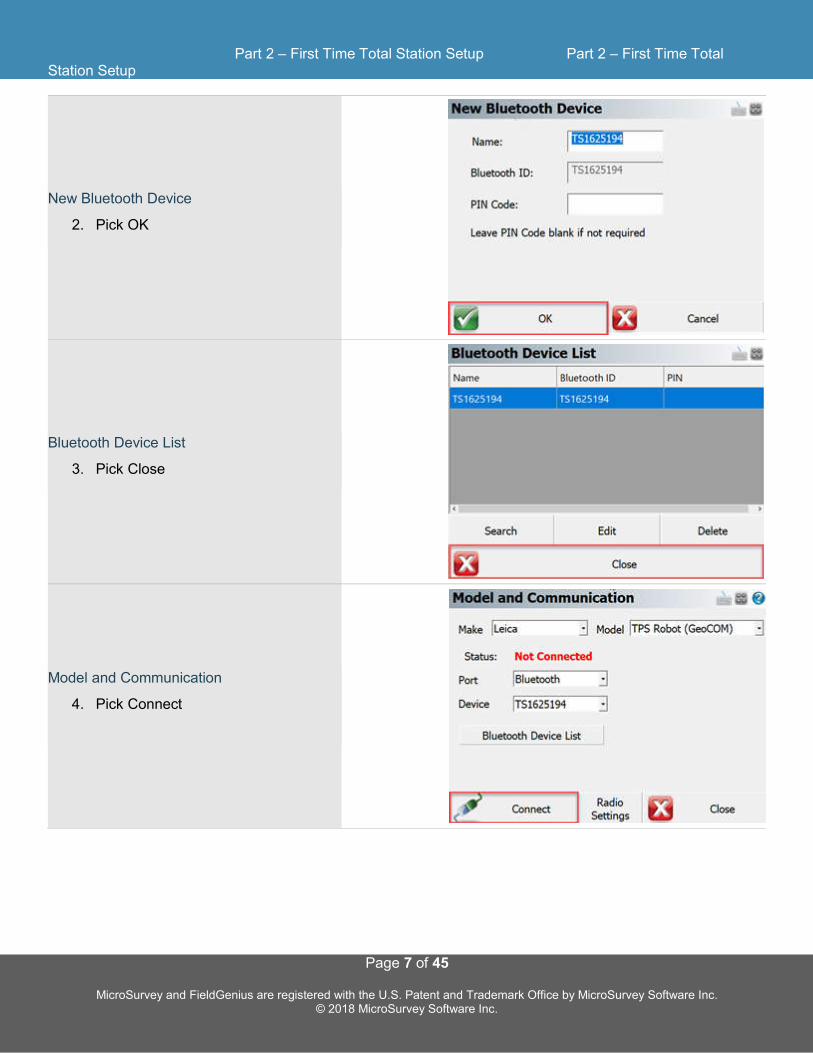
New Bluetooth Device
2. Pick OK
Bluetooth Device List
3. Pick Close
Model and Communication
4. Pick Connect
Part 3 – Program Options and Interface
Page 8 of 45
MicroSurvey and FieldGenius are registered with the U.S. Patent and Trademark Office by MicroSurvey Software Inc. © 2018 MicroSurvey Software Inc.
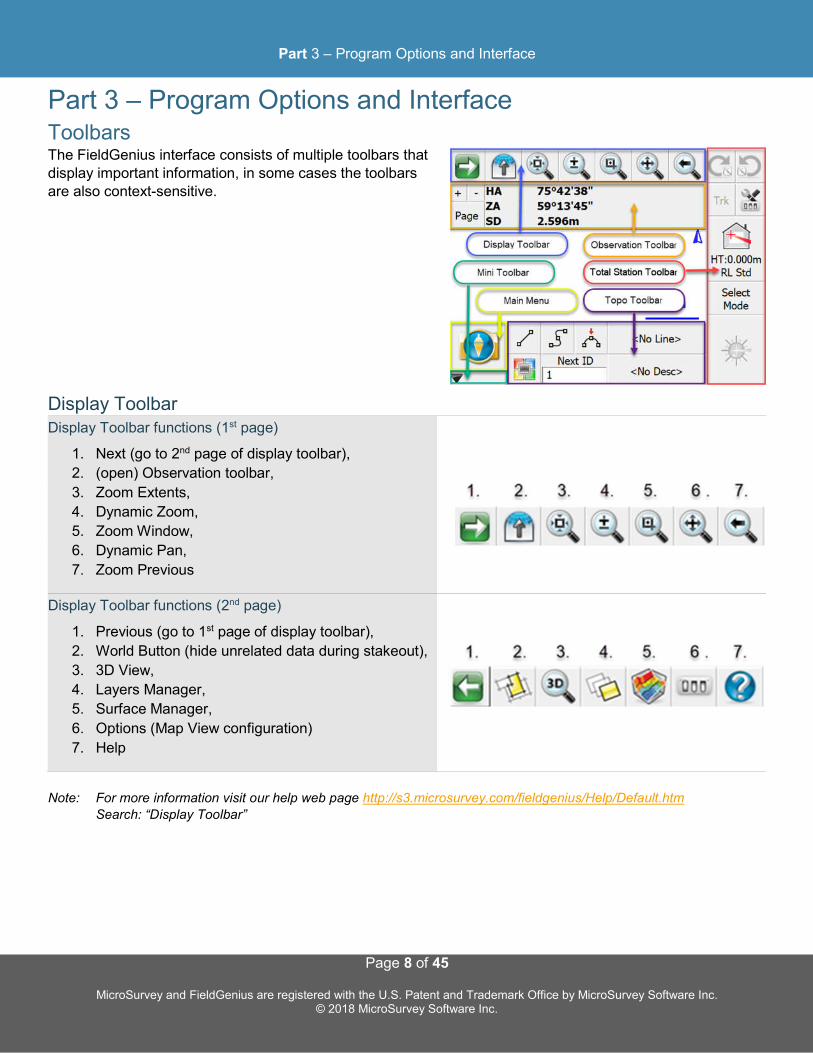
Part 3 – Program Options and Interface Toolbars The FieldGenius interface consists of multiple toolbars that display important information, in some cases the toolbars are also context-sensitive.
Display Toolbar Display Toolbar functions (1st page)
1. Next (go to 2nd page of display toolbar),
2. (open) Observation toolbar,
3. Zoom Extents,
4. Dynamic Zoom,
5. Zoom Window,
6. Dynamic Pan,
7. Zoom Previous
Display Toolbar functions (2nd page)
1. Previous (go to 1st page of display toolbar),
2. World Button (hide unrelated data during stakeout),
3. 3D View,
4. Layers Manager,
5. Surface Manager,
6. Options (Map View configuration)
7. Help
Note: For more information visit our help web page http://s3.microsurvey.com/fieldgenius/Help/Default.htm
Search: “Display Toolbar”
Part 3 – Program Options and Interface
Page 9 of 45
MicroSurvey and FieldGenius are registered with the U.S. Patent and Trademark Office by MicroSurvey Software Inc. © 2018 MicroSurvey Software Inc.
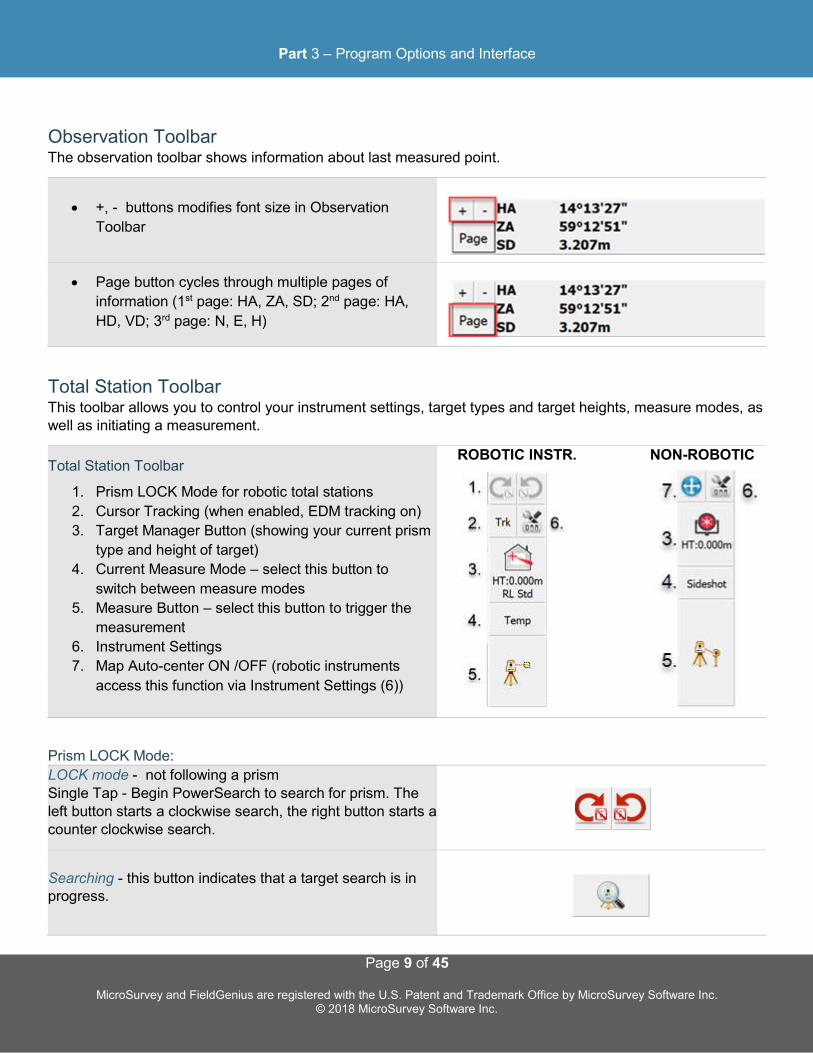
Observation Toolbar The observation toolbar shows information about last measured point.
+, - buttons modifies font size in Observation
Toolbar
Page button cycles through multiple pages of
information (1st page: HA, ZA, SD; 2nd page: HA,
HD, VD; 3rd page: N, E, H)
Total Station Toolbar This toolbar allows you to control your instrument settings, target types and target heights, measure modes, as well as initiating a measurement.
Total Station Toolbar
1. Prism LOCK Mode for robotic total stations
2. Cursor Tracking (when enabled, EDM tracking on)
3. Target Manager Button (showing your current prism
type and height of target)
4. Current Measure Mode – select this button to
switch between measure modes
5. Measure Button – select this button to trigger the
measurement
6. Instrument Settings
7. Map Auto-center ON /OFF (robotic instruments
access this function via Instrument Settings (6))
ROBOTIC INSTR. NON-ROBOTIC
Prism LOCK Mode:
LOCK mode - not following a prism Single Tap - Begin PowerSearch to search for prism. The left button starts a clockwise search, the right button starts a counter clockwise search.
Searching - this button indicates that a target search is in progress.
Part 3 – Program Options and Interface
Page 10 of 45
MicroSurvey and FieldGenius are registered with the U.S. Patent and Trademark Office by MicroSurvey Software Inc. © 2018 MicroSurvey Software Inc.
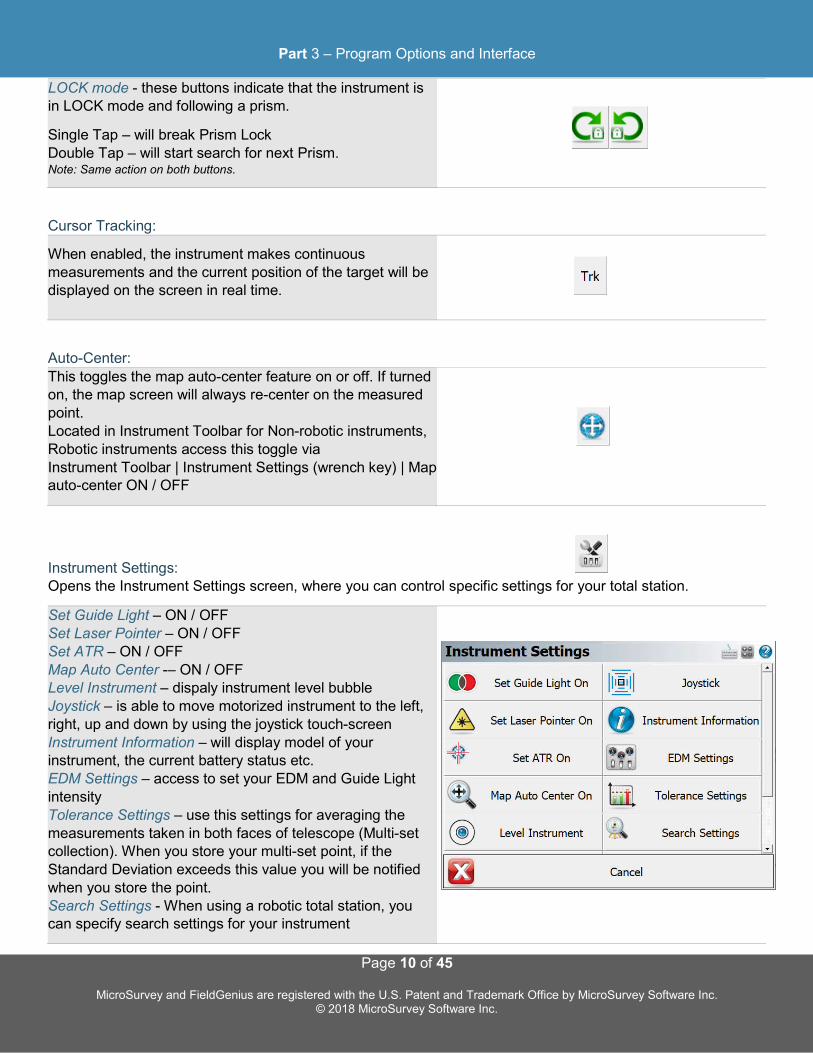
LOCK mode - these buttons indicate that the instrument is in LOCK mode and following a prism.
Single Tap – will break Prism Lock Double Tap – will start search for next Prism. Note: Same action on both buttons.
Cursor Tracking:
When enabled, the instrument makes continuous measurements and the current position of the target will be displayed on the screen in real time.
Auto-Center:
This toggles the map auto-center feature on or off. If turned on, the map screen will always re-center on the measured point. Located in Instrument Toolbar for Non-robotic instruments, Robotic instruments access this toggle via Instrument Toolbar | Instrument Settings (wrench key) | Map auto-center ON / OFF
Instrument Settings: Opens the Instrument Settings screen, where you can control specific settings for your total station.
Set Guide Light – ON / OFF Set Laser Pointer – ON / OFF Set ATR – ON / OFF Map Auto Center -– ON / OFF Level Instrument – dispaly instrument level bubble Joystick – is able to move motorized instrument to the left, right, up and down by using the joystick touch-screen Instrument Information – will display model of your instrument, the current battery status etc. EDM Settings – access to set your EDM and Guide Light intensity Tolerance Settings – use this settings for averaging the measurements taken in both faces of telescope (Multi-set collection). When you store your multi-set point, if the Standard Deviation exceeds this value you will be notified when you store the point. Search Settings - When using a robotic total station, you can specify search settings for your instrument

Part 3 – Program Options and Interface
Page 11 of 45
MicroSurvey and FieldGenius are registered with the U.S. Patent and Trademark Office by MicroSurvey Software Inc. © 2018 MicroSurvey Software Inc.
Target Manager: The Target Manager is a place where you can manage your EDM (electronic distance measurement) targets. You can create, edit and delete targets.
Leica Geosystems uses a different method for determining prism offsets for Leica prisms as they have a value called a Leica Constant. Leica prism offset differ 34.4 mm from actual prism offset. Please see more details on page 45.
Select the Current Target icon to enter the Target
Manager screen
Target Manager (1st page)
Configure your Backsight and Foresight Targets
1. Select current Target to change the prism type
2. Set Target Height
3. Select EDM Mode
4. Select OK to confirm and return to Map View
Target Manager (2nd page) - select target as shown on previous figure (1).
1. Select one of the predefined targets
or
2. Select Target List to create new target
Part 3 – Program Options and Interface
Page 12 of 45
MicroSurvey and FieldGenius are registered with the U.S. Patent and Trademark Office by MicroSurvey Software Inc. © 2018 MicroSurvey Software Inc.
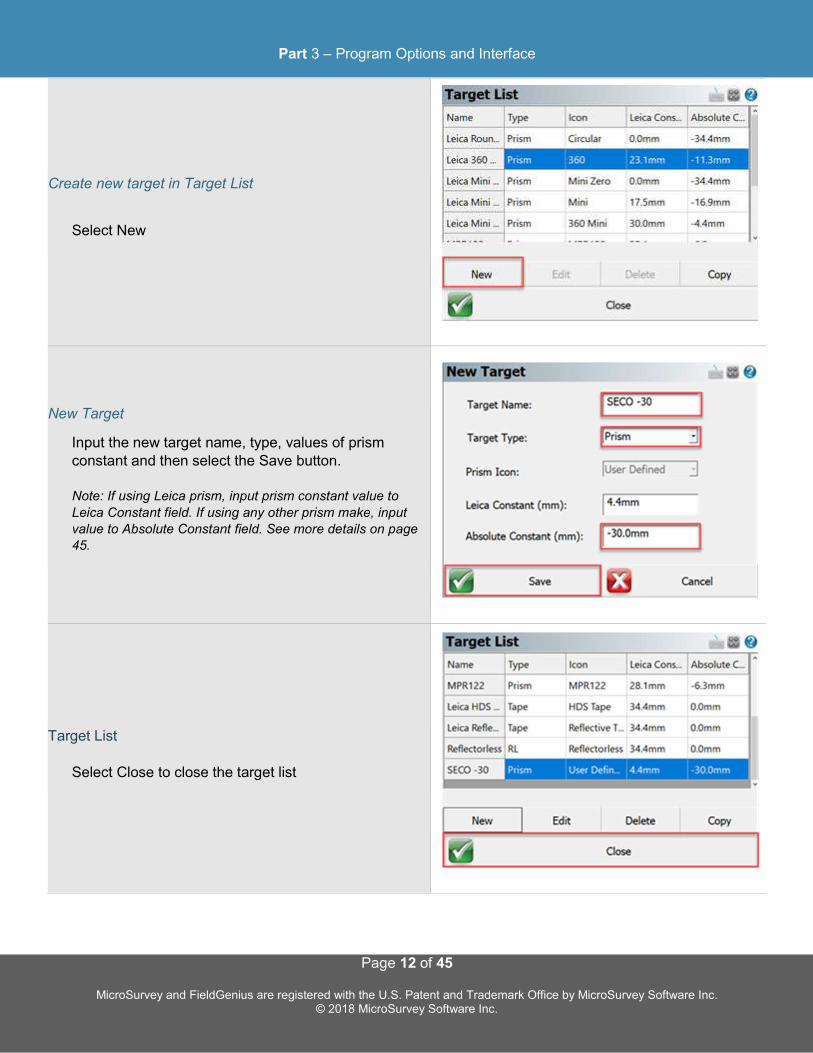
Create new target in Target List
Select New
New Target
Input the new target name, type, values of prism constant and then select the Save button. Note: If using Leica prism, input prism constant value to
Leica Constant field. If using any other prism make, input value to Absolute Constant field. See more details on page 45.
Target List
Select Close to close the target list
Part 3 – Program Options and Interface
Page 13 of 45
MicroSurvey and FieldGenius are registered with the U.S. Patent and Trademark Office by MicroSurvey Software Inc. © 2018 MicroSurvey Software Inc.
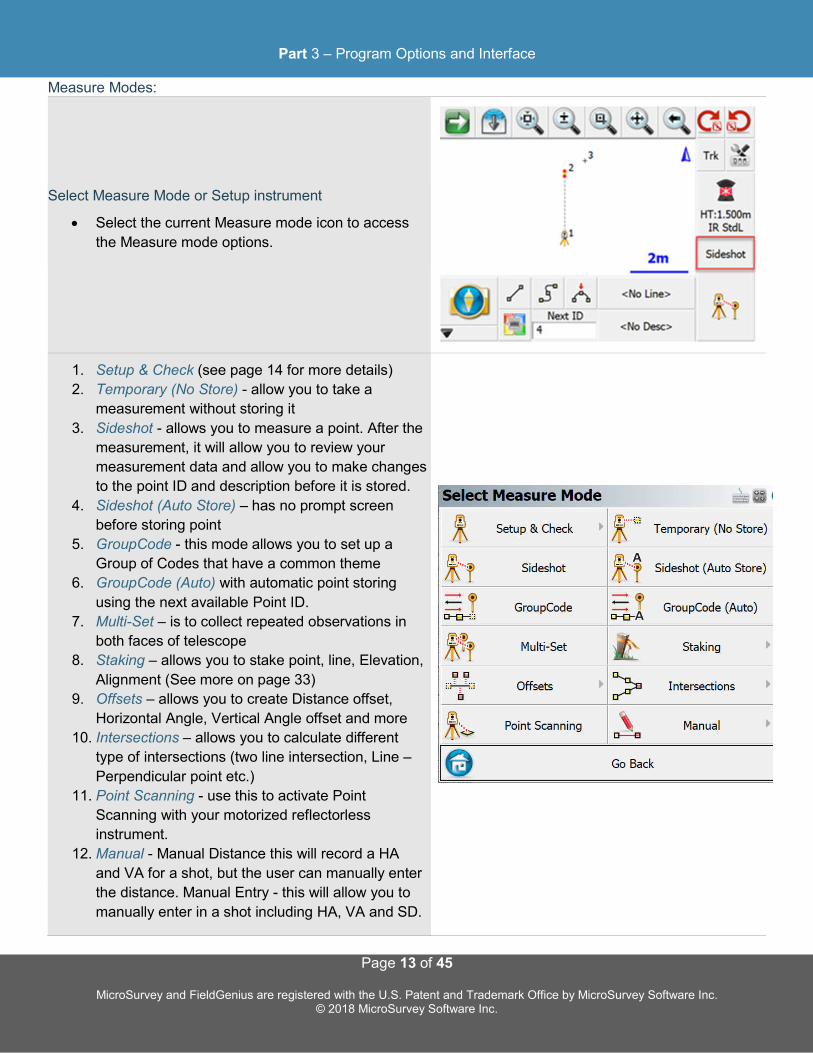
Measure Modes:
Select Measure Mode or Setup instrument
Select the current Measure mode icon to access
the Measure mode options.
1. Setup & Check (see page 14 for more details)
2. Temporary (No Store) - allow you to take a
measurement without storing it
3. Sideshot - allows you to measure a point. After the
measurement, it will allow you to review your
measurement data and allow you to make changes
to the point ID and description before it is stored.
4. Sideshot (Auto Store) – has no prompt screen
before storing point
5. GroupCode - this mode allows you to set up a
Group of Codes that have a common theme
6. GroupCode (Auto) with automatic point storing
using the next available Point ID.
7. Multi-Set – is to collect repeated observations in
both faces of telescope
8. Staking – allows you to stake point, line, Elevation,
Alignment (See more on page 33)
9. Offsets – allows you to create Distance offset,
Horizontal Angle, Vertical Angle offset and more
10. Intersections – allows you to calculate different
type of intersections (two line intersection, Line –
Perpendicular point etc.)
11. Point Scanning - use this to activate Point
Scanning with your motorized reflectorless
instrument.
12. Manual - Manual Distance this will record a HA
and VA for a shot, but the user can manually enter
the distance. Manual Entry - this will allow you to
manually enter in a shot including HA, VA and SD.
Part 3 – Program Options and Interface
Page 14 of 45
MicroSurvey and FieldGenius are registered with the U.S. Patent and Trademark Office by MicroSurvey Software Inc. © 2018 MicroSurvey Software Inc.
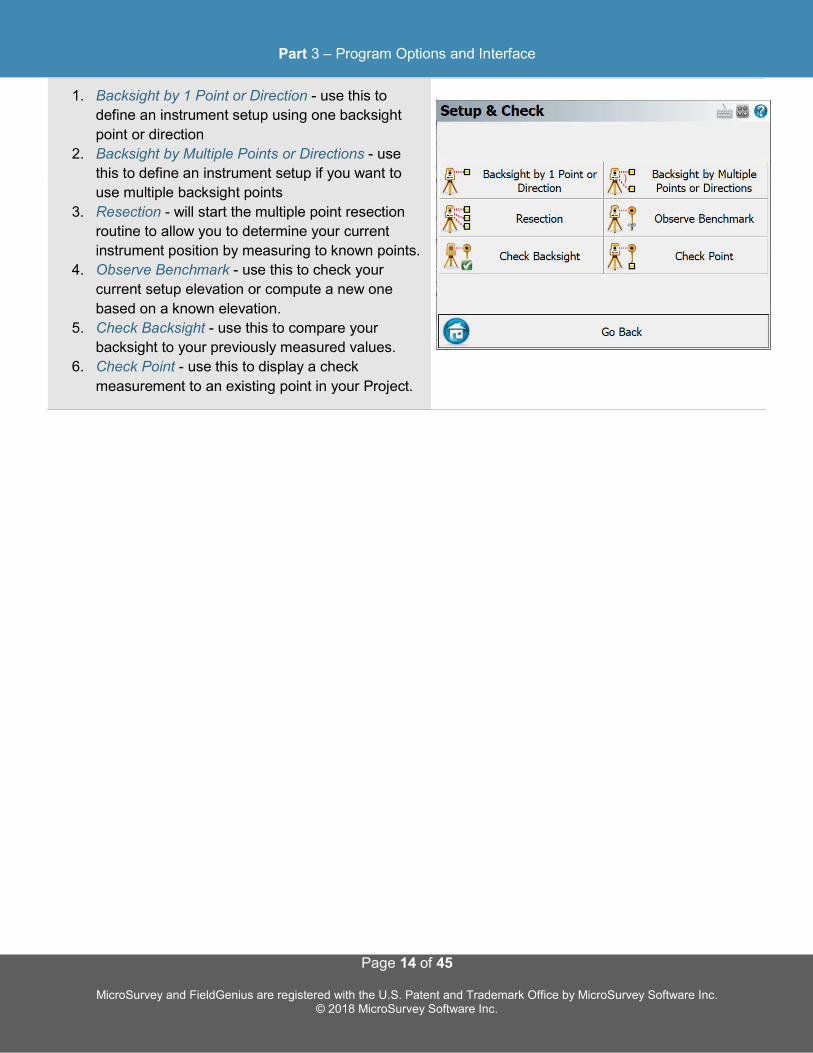
1. Backsight by 1 Point or Direction - use this to
define an instrument setup using one backsight
point or direction
2. Backsight by Multiple Points or Directions - use
this to define an instrument setup if you want to
use multiple backsight points
3. Resection - will start the multiple point resection
routine to allow you to determine your current
instrument position by measuring to known points.
4. Observe Benchmark - use this to check your
current setup elevation or compute a new one
based on a known elevation.
5. Check Backsight - use this to compare your
backsight to your previously measured values.
6. Check Point - use this to display a check
measurement to an existing point in your Project.
Part 3 – Program Options and Interface
Page 15 of 45
MicroSurvey and FieldGenius are registered with the U.S. Patent and Trademark Office by MicroSurvey Software Inc. © 2018 MicroSurvey Software Inc.
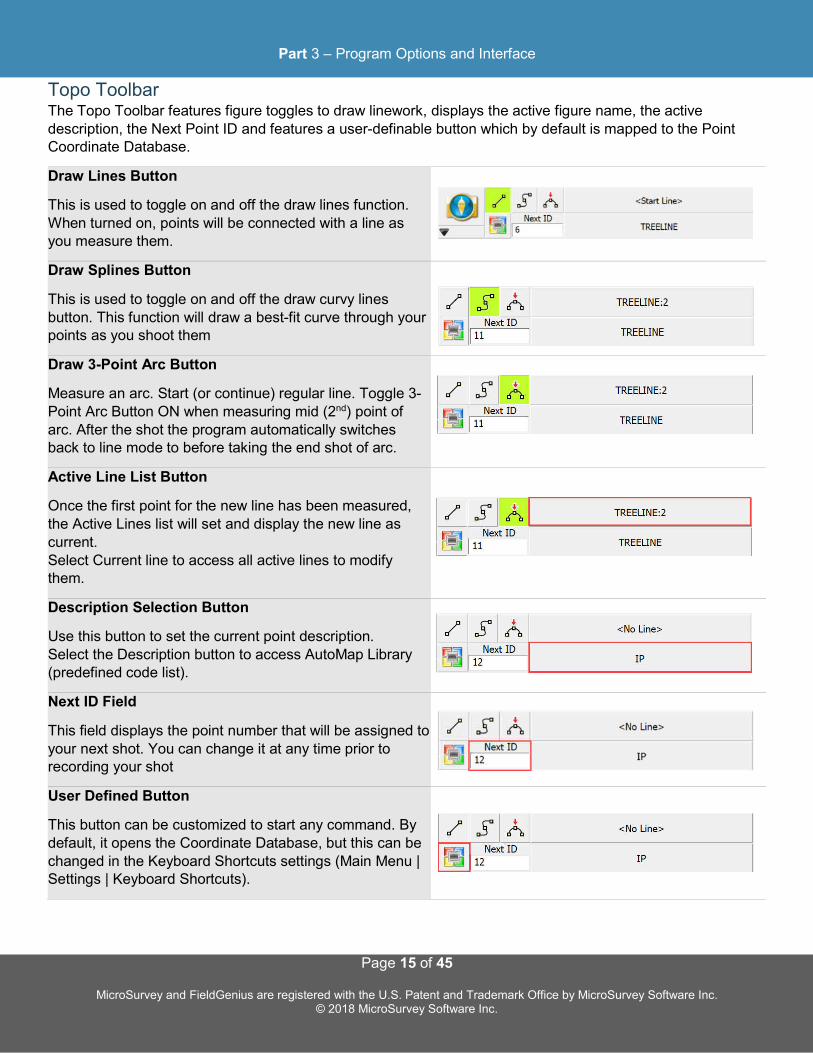
Topo Toolbar The Topo Toolbar features figure toggles to draw linework, displays the active figure name, the active description, the Next Point ID and features a user-definable button which by default is mapped to the Point Coordinate Database.
Draw Lines Button
This is used to toggle on and off the draw lines function. When turned on, points will be connected with a line as you measure them.
Draw Splines Button
This is used to toggle on and off the draw curvy lines button. This function will draw a best-fit curve through your points as you shoot them
Draw 3-Point Arc Button
Measure an arc. Start (or continue) regular line. Toggle 3-Point Arc Button ON when measuring mid (2nd) point of arc. After the shot the program automatically switches back to line mode to before taking the end shot of arc.
Active Line List Button
Once the first point for the new line has been measured, the Active Lines list will set and display the new line as current. Select Current line to access all active lines to modify them.
Description Selection Button
Use this button to set the current point description. Select the Description button to access AutoMap Library (predefined code list).
Next ID Field
This field displays the point number that will be assigned to your next shot. You can change it at any time prior to recording your shot
User Defined Button
This button can be customized to start any command. By default, it opens the Coordinate Database, but this can be changed in the Keyboard Shortcuts settings (Main Menu | Settings | Keyboard Shortcuts).

Part 3 – Program Options and Interface
Page 16 of 45
MicroSurvey and FieldGenius are registered with the U.S. Patent and Trademark Office by MicroSurvey Software Inc. © 2018 MicroSurvey Software Inc.
Mini Toolbar
The Mini Toolbar can be used to maximize the map screen size by hiding any/all unwanted toolbars
This is Mini Toolbar in collapsed version. By default,
Observation Toolbar ( ) and Total Station Tollbar
( ) is ON. Toggle OFF these buttons to maximize Map screen.
Main Menu Toolbar
This button takes you into the Main Menu.
Project Manager - to create, open or delete project
Settings – access features such as FieldGenius Options, Unit & Scale, Coordinate System, Keyboard Shortcuts, Language, Code List Options, Project Information, Info about FieldGenius
Measure Modes - access all available measuring methods
Survey Tools – access features such as manually creating new points, deleting/undoing the previously measured point, or viewing the raw file.
Calculations – access manual calculation options such as COGO, inversing or transformation.
Staking - access staking functions. Please see the Staking topic for more information (page 33).
Disconnect – use this button to safely end your work with FieldGenius (only when using external devices such as tablets or data collectors).
Import/Export - to import or export ASCII files, and to export DXF, XML, and other files.
Data Manager - manage points, DXF files, and surfaces
Roads Manager - execute tools that will help you create or edit alignments, templates, and profiles. Map View - close the main menu and take you back to the map view
Exit - close FieldGenius application
Part 3 – Program Options and Interface
Page 17 of 45
MicroSurvey and FieldGenius are registered with the U.S. Patent and Trademark Office by MicroSurvey Software Inc. © 2018 MicroSurvey Software Inc.
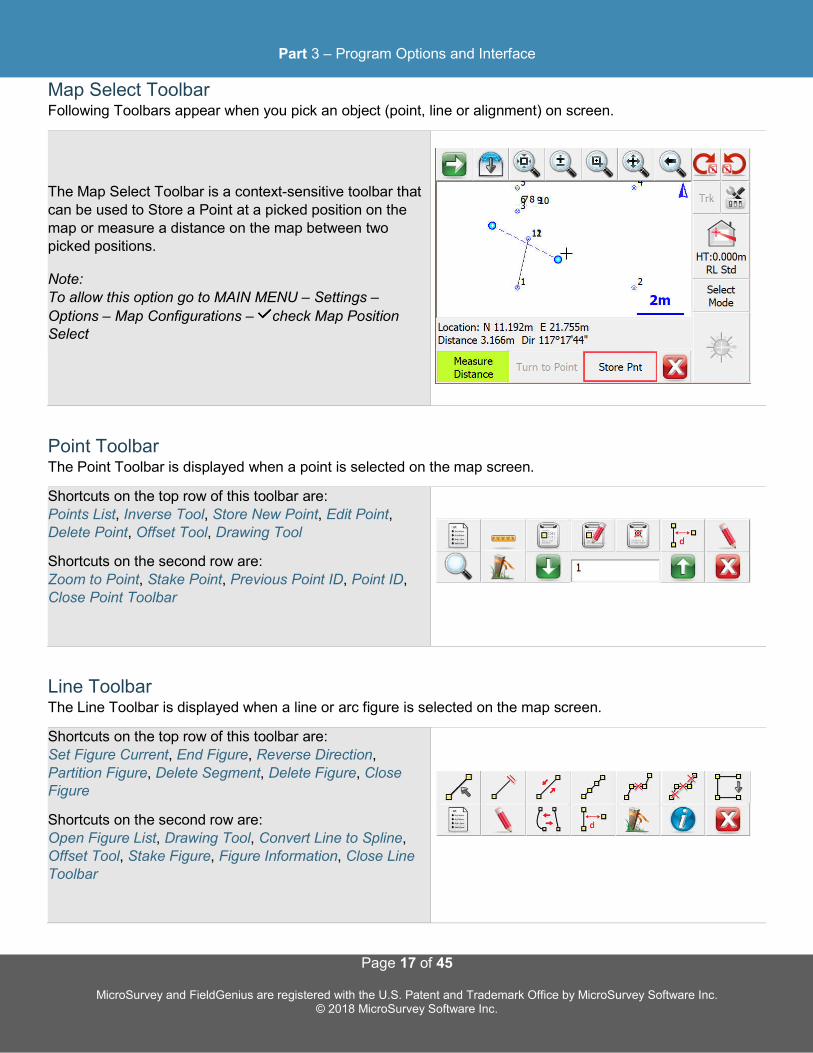
Map Select Toolbar Following Toolbars appear when you pick an object (point, line or alignment) on screen.
The Map Select Toolbar is a context-sensitive toolbar that can be used to Store a Point at a picked position on the map or measure a distance on the map between two picked positions.
Note: To allow this option go to MAIN MENU – Settings –
Options – Map Configurations – check Map Position Select
Point Toolbar The Point Toolbar is displayed when a point is selected on the map screen.
Shortcuts on the top row of this toolbar are: Points List, Inverse Tool, Store New Point, Edit Point, Delete Point, Offset Tool, Drawing Tool
Shortcuts on the second row are: Zoom to Point, Stake Point, Previous Point ID, Point ID, Close Point Toolbar
Line Toolbar The Line Toolbar is displayed when a line or arc figure is selected on the map screen.
Shortcuts on the top row of this toolbar are: Set Figure Current, End Figure, Reverse Direction, Partition Figure, Delete Segment, Delete Figure, Close Figure
Shortcuts on the second row are: Open Figure List, Drawing Tool, Convert Line to Spline, Offset Tool, Stake Figure, Figure Information, Close Line Toolbar
Part 3 – Program Options and Interface
Page 18 of 45
MicroSurvey and FieldGenius are registered with the U.S. Patent and Trademark Office by MicroSurvey Software Inc. © 2018 MicroSurvey Software Inc.
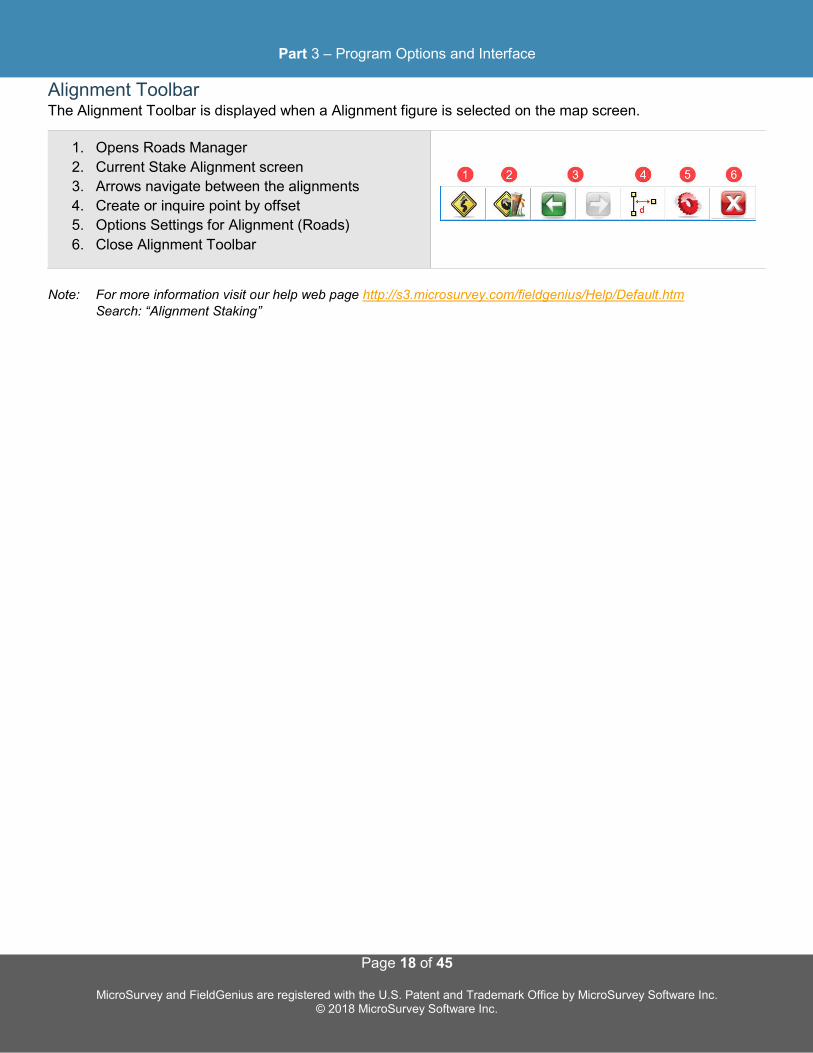
Alignment Toolbar The Alignment Toolbar is displayed when a Alignment figure is selected on the map screen.
1. Opens Roads Manager
2. Current Stake Alignment screen
3. Arrows navigate between the alignments
4. Create or inquire point by offset
5. Options Settings for Alignment (Roads)
6. Close Alignment Toolbar
Note: For more information visit our help web page http://s3.microsurvey.com/fieldgenius/Help/Default.htm Search: “Alignment Staking”
Part 3 – Program Options and Interface
Page 19 of 45
MicroSurvey and FieldGenius are registered with the U.S. Patent and Trademark Office by MicroSurvey Software Inc. © 2018 MicroSurvey Software Inc.
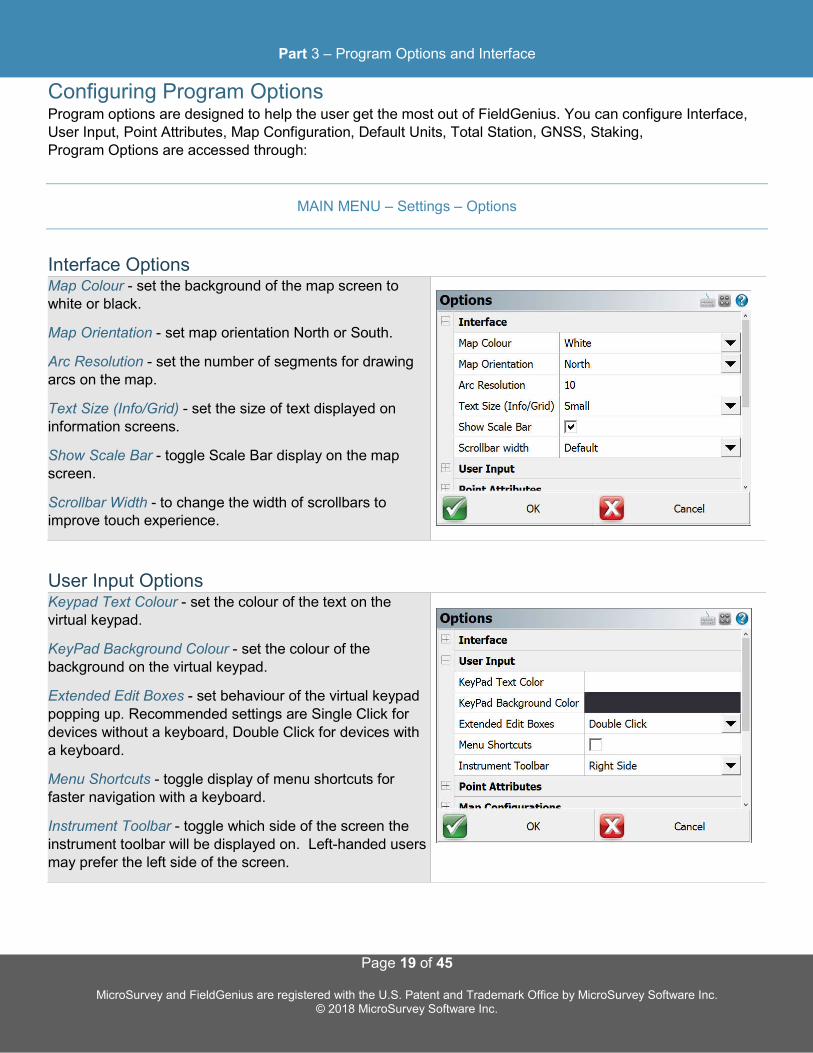
Configuring Program Options Program options are designed to help the user get the most out of FieldGenius. You can configure Interface, User Input, Point Attributes, Map Configuration, Default Units, Total Station, GNSS, Staking, Program Options are accessed through:
MAIN MENU – Settings – Options
Interface Options Map Colour - set the background of the map screen to white or black.
Map Orientation - set map orientation North or South.
Arc Resolution - set the number of segments for drawing arcs on the map.
Text Size (Info/Grid) - set the size of text displayed on information screens.
Show Scale Bar - toggle Scale Bar display on the map screen.
Scrollbar Width - to change the width of scrollbars to improve touch experience.
User Input Options Keypad Text Colour - set the colour of the text on the virtual keypad.
KeyPad Background Colour - set the colour of the background on the virtual keypad.
Extended Edit Boxes - set behaviour of the virtual keypad popping up. Recommended settings are Single Click for devices without a keyboard, Double Click for devices with a keyboard.
Menu Shortcuts - toggle display of menu shortcuts for faster navigation with a keyboard.
Instrument Toolbar - toggle which side of the screen the instrument toolbar will be displayed on. Left-handed users may prefer the left side of the screen.

Part 3 – Program Options and Interface
Page 20 of 45
MicroSurvey and FieldGenius are registered with the U.S. Patent and Trademark Office by MicroSurvey Software Inc. © 2018 MicroSurvey Software Inc.
Point Attributes Options Coordinate Order - select the coordinate order for display and ASCII Import/Export
Alphanumeric IDs - to allow Alphanumeric Point IDs
Alphanumeric Case Sensitive - check if Point ID is unique while storing a point. When enabled a1 and A1 are handled as different values. This setting does not apply to coordinate imports.
Point ID Range – Minimum - enter a minimum value for a Point ID. Can be used to ensure Points are stored within a specific range.
Point ID Range – Maximum - enter a maximum value for a Point ID. A blank value will allow any maximum.
Point ID Intervals - auto-increment Point IDs by this interval.
LandXML Export – Prefix IDs - prefix Point ID with description during LandXML Export.
New Description Prompt - toggle whether to prompt to create a new Automap entry when using a point description that is not in the project’s Automap library.
Time Stamp Saved Points - toggle to write a time stamp in the raw file when points are stored.
Write Notes to Raw Files - toggle to write text notes in the raw file if entered for a point.
Map Configurations Options Show ID / Description / Elevation - select the Point attributes to display on the map screen.
Level of Detail - toggle smart filter of Point information based on zoom level.
Text Size (Map View) - text size of Point information on the map screen.
Map Position Select - toggle ability to tap on the screen to store a point or other options from the Map Select Toolbar.
Map Point / Line / DXF Select - select which types of objects can be selected on the map screen.

Part 3 – Program Options and Interface
Page 21 of 45
MicroSurvey and FieldGenius are registered with the U.S. Patent and Trademark Office by MicroSurvey Software Inc. © 2018 MicroSurvey Software Inc.
Total Station Options Default Measure Mode - specify your Default Measure Mode, either Sideshot or Sideshot (Auto).
Quick Measure Modes - when enabled, it will force the instrument to take a measurement instantly (it will skip the measure screen).
Traverse Reciprocate - when enabled, you will be able to use the Reciprocate Traverse option on the Backsight Summary screen.
Display Use Last Setup Screen - when enabled,you will be offered to the choice to use the last instrument occupied point when for an existing Project is opened.
Use Assistant on Open - the Total Station Assistant suggests workflow shortcuts when opening a Project.
Staking Options Tolerance - the distance tolerance where staking residuals willl be shown as green text versus red text.
Orientation – GNSS - choose the Staking direction orientation.
Compass Switch Threshold- the distance from a point where the Compass will automatically switch to a grid display.
Attached User ID - value to add to Point ID when storing Staked Points.
Line Mode - method to use for calculating navigation distances.
Cut and Fill Slope (X:1) - slopes to use for Slope Staking.
DTM Staking - surface name for Surface Staking.
Fade Staked-Out Points - option to display staked points differently on the screen.
Display Point Staking Screen - toggle to show the Point Staking Screen when choosing the Point to stake.
Display Stake Results Screen -toggle to show the results of the Point Stake. This screen will always display if the results are outside of tolerance settings.

Part 3 – Program Options and Interface
Page 22 of 45
MicroSurvey and FieldGenius are registered with the U.S. Patent and Trademark Office by MicroSurvey Software Inc. © 2018 MicroSurvey Software Inc.
Store Stake Point - prompt to store Staked Point.
Show Staked-Stored Points - option to show Staked-Stored Points on the map screen.
Use Stake List - toggle to use a staking list to stake a predetermined list of points.
Find Next Nearest - toggle to automatically let FieldGenius search for the next nearest point to stake and suggest the Point for the next position to stake.
Part 4 - Measure Modes
Page 23 of 45
MicroSurvey and FieldGenius are registered with the U.S. Patent and Trademark Office by MicroSurvey Software Inc. © 2018 MicroSurvey Software Inc.
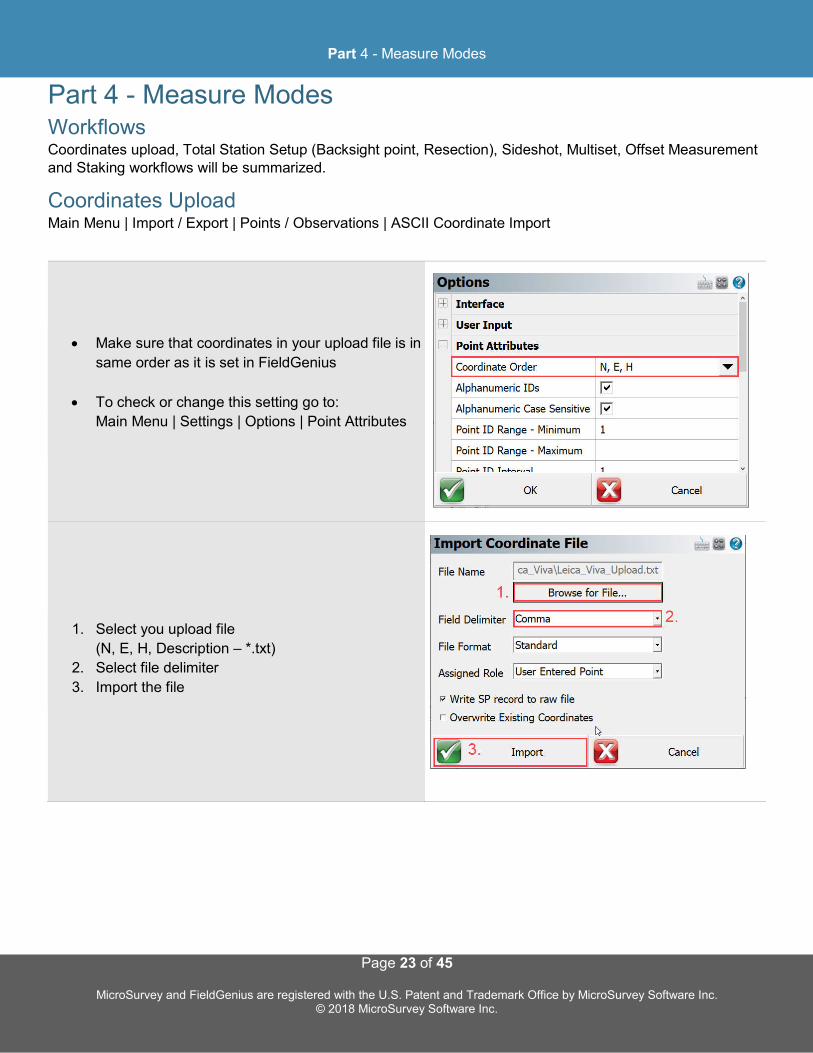
Part 4 - Measure Modes Workflows Coordinates upload, Total Station Setup (Backsight point, Resection), Sideshot, Multiset, Offset Measurement and Staking workflows will be summarized.
Coordinates Upload Main Menu | Import / Export | Points / Observations | ASCII Coordinate Import
Make sure that coordinates in your upload file is in
same order as it is set in FieldGenius
To check or change this setting go to:
Main Menu | Settings | Options | Point Attributes
1. Select you upload file
(N, E, H, Description – *.txt)
2. Select file delimiter
3. Import the file

Part 4 - Measure Modes
Page 24 of 45
MicroSurvey and FieldGenius are registered with the U.S. Patent and Trademark Office by MicroSurvey Software Inc. © 2018 MicroSurvey Software Inc.
4. Import status
To check if the coordinates have been imported correctly open point database
by selecting User’s define button in
the Map View
or go to
Main Menu | Data Manager | Point Database
Total Station Setup Backsight by 1 point or Direction Use this command to specify the instrument location and orientation. You will be asked to specify the point your instrument is occupying, an instrument height and if you will be assuming a backsight direction or sighting an existing point. After you have established your setup and backsight, FieldGenius will graphically show you your setup points.
To access the function: MAIN MENU | Measure Modes | Setup & Check | Backsight by 1 point or Direction or Current Measure Mode | Measure Modes | Setup & Check | Backsight by 1 point or Direction

Part 4 - Measure Modes
Page 25 of 45
MicroSurvey and FieldGenius are registered with the U.S. Patent and Trademark Office by MicroSurvey Software Inc. © 2018 MicroSurvey Software Inc.
Use this command to specify the instrument location and orientation.
1. Specify the point number your instrument is
occupying
2. Specify instrument height
3. Specify the Backsight point number
4. Specify the Backsight Height of Target
5. Open Target Manager Dialog to specify you
Backsight Target (See more details on page 11)
6. Select OK
Observe Backsight
Check your Target settings in Total Station
Toolbar (Currently used Leica Circle Prism,
Height of target 20 cm, EDM mode: IR Standard)
Toggle Measure Button from Total Station Toolbar
to trigger the measurement
Note: If the instrument is currently locked to
the wrong target, you can double click the green
arrows and the instrument will search for next available
target.
If you want to manually aim the target, single click on
green arrows will break the lock to the current target.
Orientation Result
1. Review your Backsight Observation such as
Horizontal Angle, Zenit Angle, Slope Distance,
Horizontal Distance, Height of Instrument, Height
of Target)
2. Check Backsight Errors
3. Set the Instrument plate reading
(Set to Direction, Set to Zero, Do Not Modify)
4. Accept (or Observe Again if needed)
Total Station setup completed. Instrument is ready for sideshots surveying (page 28).
Part 4 - Measure Modes
Page 26 of 45
MicroSurvey and FieldGenius are registered with the U.S. Patent and Trademark Office by MicroSurvey Software Inc. © 2018 MicroSurvey Software Inc.
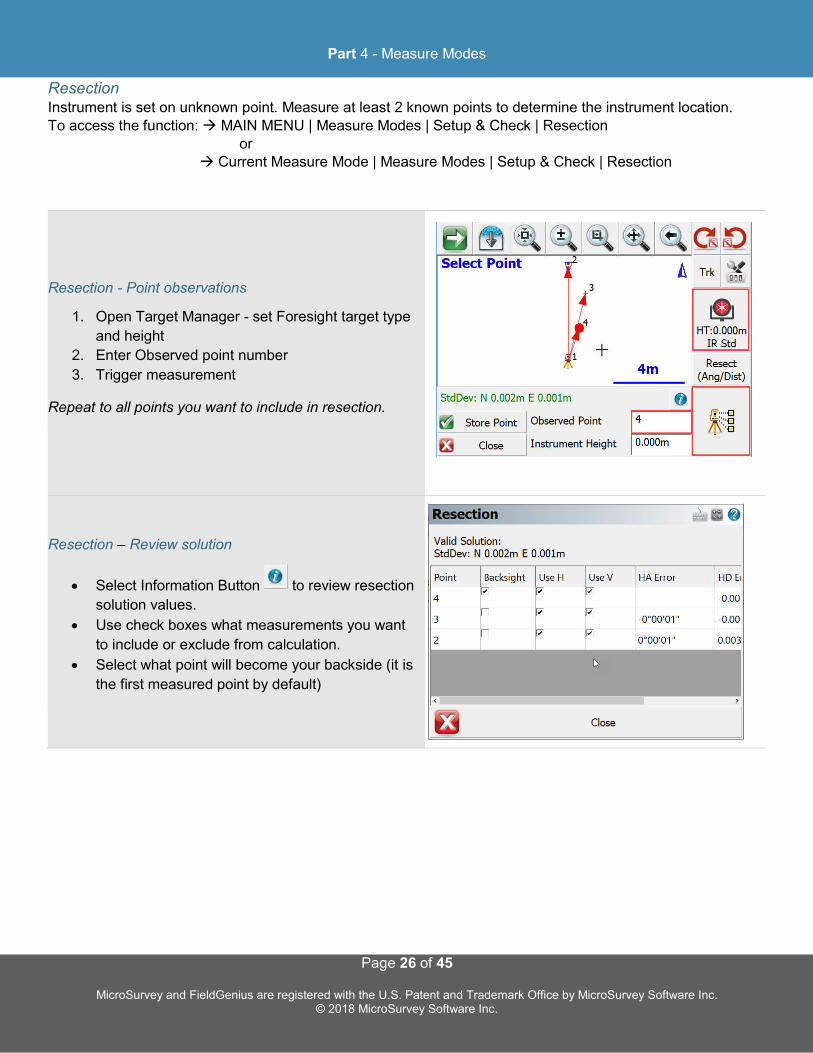
Resection Instrument is set on unknown point. Measure at least 2 known points to determine the instrument location. To access the function: MAIN MENU | Measure Modes | Setup & Check | Resection or Current Measure Mode | Measure Modes | Setup & Check | Resection
Resection - Point observations
1. Open Target Manager - set Foresight target type
and height
2. Enter Observed point number
3. Trigger measurement
Repeat to all points you want to include in resection.
Resection – Review solution
Select Information Button to review resection
solution values.
Use check boxes what measurements you want
to include or exclude from calculation.
Select what point will become your backside (it is
the first measured point by default)
Part 4 - Measure Modes
Page 27 of 45
MicroSurvey and FieldGenius are registered with the U.S. Patent and Trademark Office by MicroSurvey Software Inc. © 2018 MicroSurvey Software Inc.
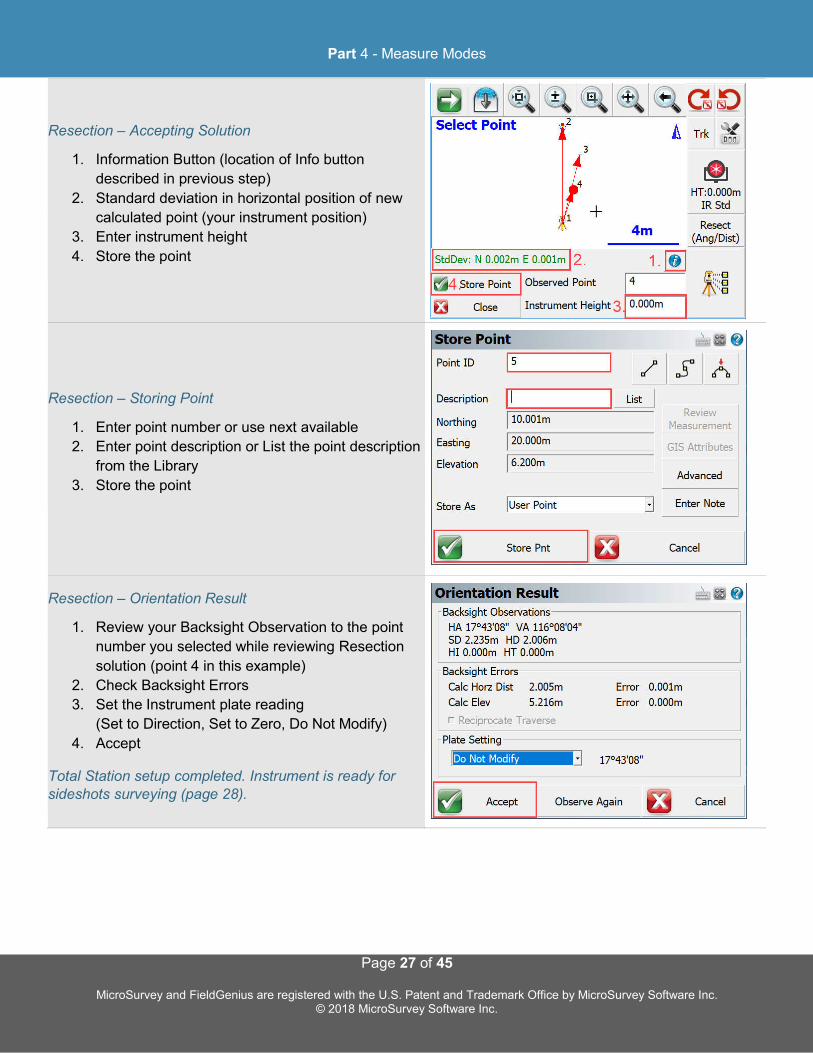
Resection – Accepting Solution
1. Information Button (location of Info button
described in previous step)
2. Standard deviation in horizontal position of new
calculated point (your instrument position)
3. Enter instrument height
4. Store the point
Resection – Storing Point
1. Enter point number or use next available
2. Enter point description or List the point description
from the Library
3. Store the point
Resection – Orientation Result
1. Review your Backsight Observation to the point
number you selected while reviewing Resection
solution (point 4 in this example)
2. Check Backsight Errors
3. Set the Instrument plate reading
(Set to Direction, Set to Zero, Do Not Modify)
4. Accept
Total Station setup completed. Instrument is ready for sideshots surveying (page 28).
Part 4 - Measure Modes
Page 28 of 45
MicroSurvey and FieldGenius are registered with the U.S. Patent and Trademark Office by MicroSurvey Software Inc. © 2018 MicroSurvey Software Inc.
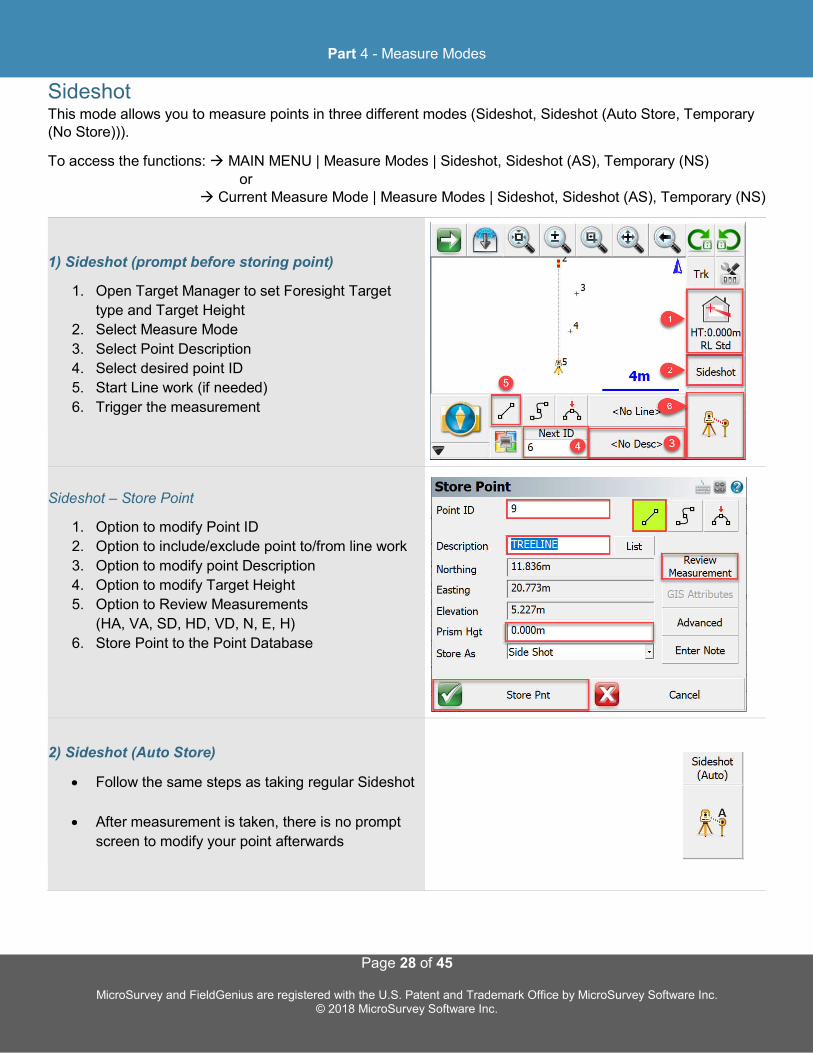
Sideshot This mode allows you to measure points in three different modes (Sideshot, Sideshot (Auto Store, Temporary (No Store))).
To access the functions: MAIN MENU | Measure Modes | Sideshot, Sideshot (AS), Temporary (NS) or Current Measure Mode | Measure Modes | Sideshot, Sideshot (AS), Temporary (NS)
1) Sideshot (prompt before storing point)
1. Open Target Manager to set Foresight Target
type and Target Height
2. Select Measure Mode
3. Select Point Description
4. Select desired point ID
5. Start Line work (if needed)
6. Trigger the measurement
Sideshot – Store Point
1. Option to modify Point ID
2. Option to include/exclude point to/from line work
3. Option to modify point Description
4. Option to modify Target Height
5. Option to Review Measurements
(HA, VA, SD, HD, VD, N, E, H)
6. Store Point to the Point Database
2) Sideshot (Auto Store)
Follow the same steps as taking regular Sideshot
After measurement is taken, there is no prompt
screen to modify your point afterwards
Part 4 - Measure Modes
Page 29 of 45
MicroSurvey and FieldGenius are registered with the U.S. Patent and Trademark Office by MicroSurvey Software Inc. © 2018 MicroSurvey Software Inc.
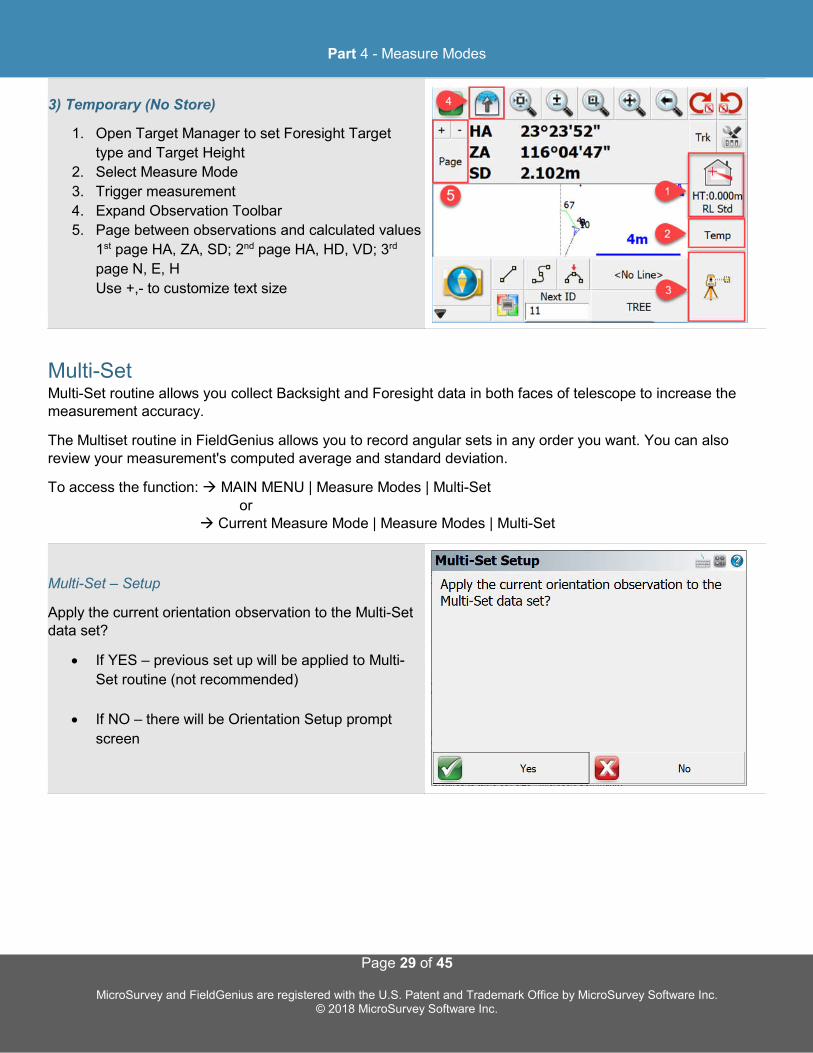
3) Temporary (No Store)
1. Open Target Manager to set Foresight Target
type and Target Height
2. Select Measure Mode
3. Trigger measurement
4. Expand Observation Toolbar
5. Page between observations and calculated values
1st page HA, ZA, SD; 2nd page HA, HD, VD; 3rd
page N, E, H
Use +,- to customize text size
Multi-Set Multi-Set routine allows you collect Backsight and Foresight data in both faces of telescope to increase the measurement accuracy.
The Multiset routine in FieldGenius allows you to record angular sets in any order you want. You can also review your measurement's computed average and standard deviation.
To access the function: MAIN MENU | Measure Modes | Multi-Set or Current Measure Mode | Measure Modes | Multi-Set
Multi-Set – Setup
Apply the current orientation observation to the Multi-Set data set?
If YES – previous set up will be applied to Multi-
Set routine (not recommended)
If NO – there will be Orientation Setup prompt
screen

Part 4 - Measure Modes
Page 30 of 45
MicroSurvey and FieldGenius are registered with the U.S. Patent and Trademark Office by MicroSurvey Software Inc. © 2018 MicroSurvey Software Inc.
Multi-Set – Orientation Setup
Option NO (not to apply Orientation Setup) was selected.
1. Specify the point number your instrument is
occupying
2. Specify Instrument height
3. Specify the Backsight point number
4. Specify the Backsight height of Target
5. Select Continue Multi-Set
Multi-Set – Point List
Add Foresight point(s) to the point list.
1. Next button - gives next available point ID
2. Add button – add point(s) to the point list
3. Check Auto Turn (robotic instruments only) to
automatically rotate between faces
4. Select (highlight) the point row to you want to
measure first
5. Notice that there are no observations recorded
(F1 – Face I, F2 – Face II)
6. Select Measure to go to Measure Screen
Multi-Set – Backsight Observation
1. Check Map screen for point ID before taking shot
2. Option to use PowerSearch to find the target
3. Set your prism type and target height
4. Trigger the measurement
After the shot is taken, FieldGenius will automatically open MultiSet Point List Screen.
Part 4 - Measure Modes
Page 31 of 45
MicroSurvey and FieldGenius are registered with the U.S. Patent and Trademark Office by MicroSurvey Software Inc. © 2018 MicroSurvey Software Inc.
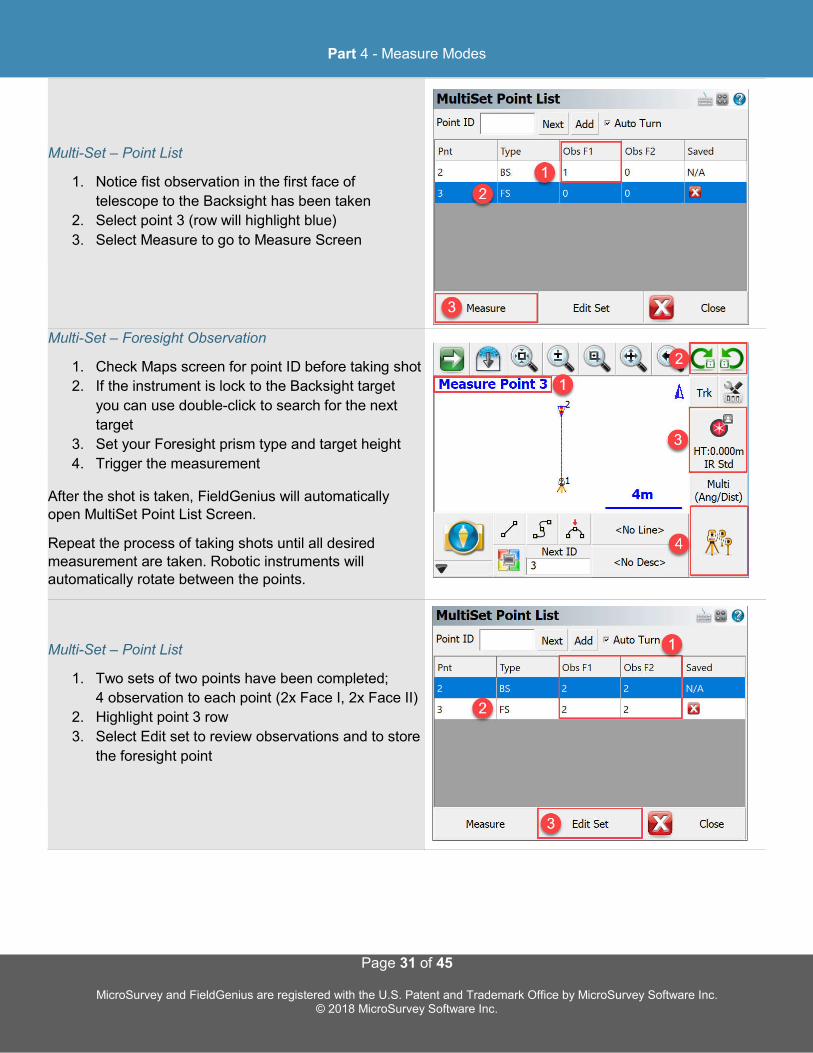
Multi-Set – Point List
1. Notice fist observation in the first face of
telescope to the Backsight has been taken
2. Select point 3 (row will highlight blue)
3. Select Measure to go to Measure Screen
Multi-Set – Foresight Observation
1. Check Maps screen for point ID before taking shot
2. If the instrument is lock to the Backsight target
you can use double-click to search for the next
target
3. Set your Foresight prism type and target height
4. Trigger the measurement
After the shot is taken, FieldGenius will automatically open MultiSet Point List Screen.
Repeat the process of taking shots until all desired measurement are taken. Robotic instruments will automatically rotate between the points.
Multi-Set – Point List
1. Two sets of two points have been completed;
4 observation to each point (2x Face I, 2x Face II)
2. Highlight point 3 row
3. Select Edit set to review observations and to store
the foresight point
Part 4 - Measure Modes
Page 32 of 45
MicroSurvey and FieldGenius are registered with the U.S. Patent and Trademark Office by MicroSurvey Software Inc. © 2018 MicroSurvey Software Inc.
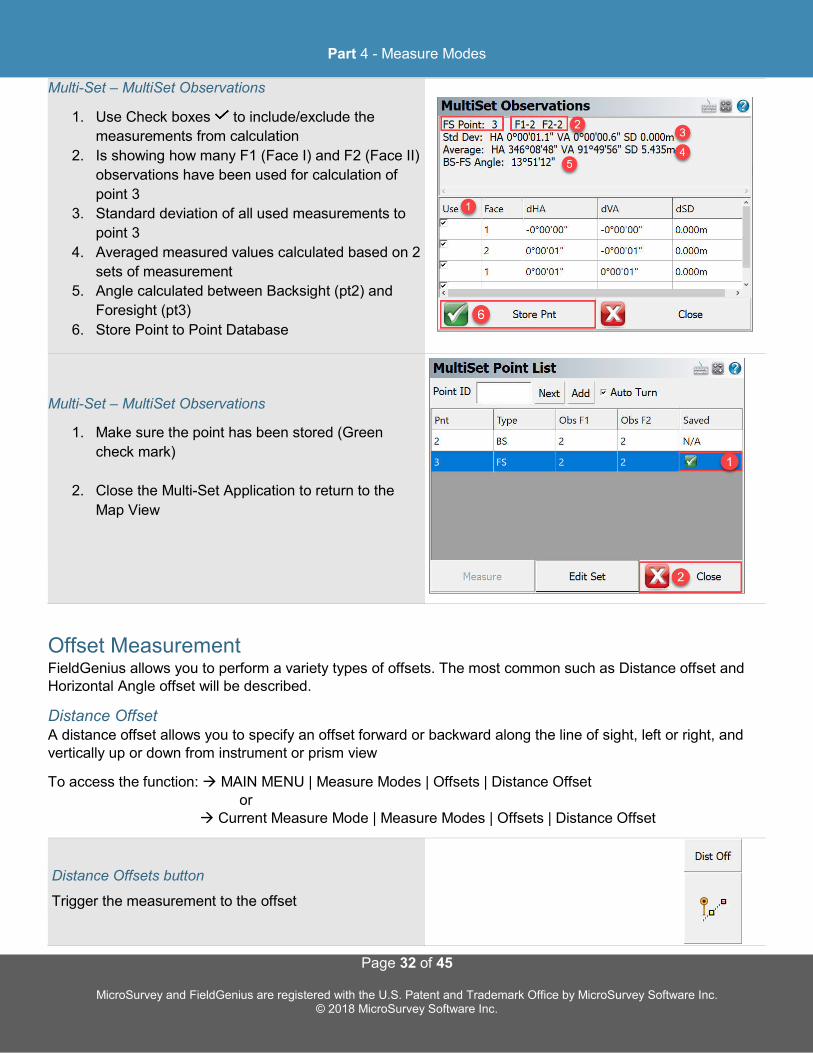
Multi-Set – MultiSet Observations
1. Use Check boxes to include/exclude the
measurements from calculation
2. Is showing how many F1 (Face I) and F2 (Face II)
observations have been used for calculation of
point 3
3. Standard deviation of all used measurements to
point 3
4. Averaged measured values calculated based on 2
sets of measurement
5. Angle calculated between Backsight (pt2) and
Foresight (pt3)
6. Store Point to Point Database
Multi-Set – MultiSet Observations
1. Make sure the point has been stored (Green
check mark)
2. Close the Multi-Set Application to return to the
Map View
Offset Measurement FieldGenius allows you to perform a variety types of offsets. The most common such as Distance offset and Horizontal Angle offset will be described.
Distance Offset A distance offset allows you to specify an offset forward or backward along the line of sight, left or right, and vertically up or down from instrument or prism view
To access the function: MAIN MENU | Measure Modes | Offsets | Distance Offset or Current Measure Mode | Measure Modes | Offsets | Distance Offset
Distance Offsets button
Trigger the measurement to the offset
Part 4 - Measure Modes
Page 33 of 45
MicroSurvey and FieldGenius are registered with the U.S. Patent and Trademark Office by MicroSurvey Software Inc. © 2018 MicroSurvey Software Inc.
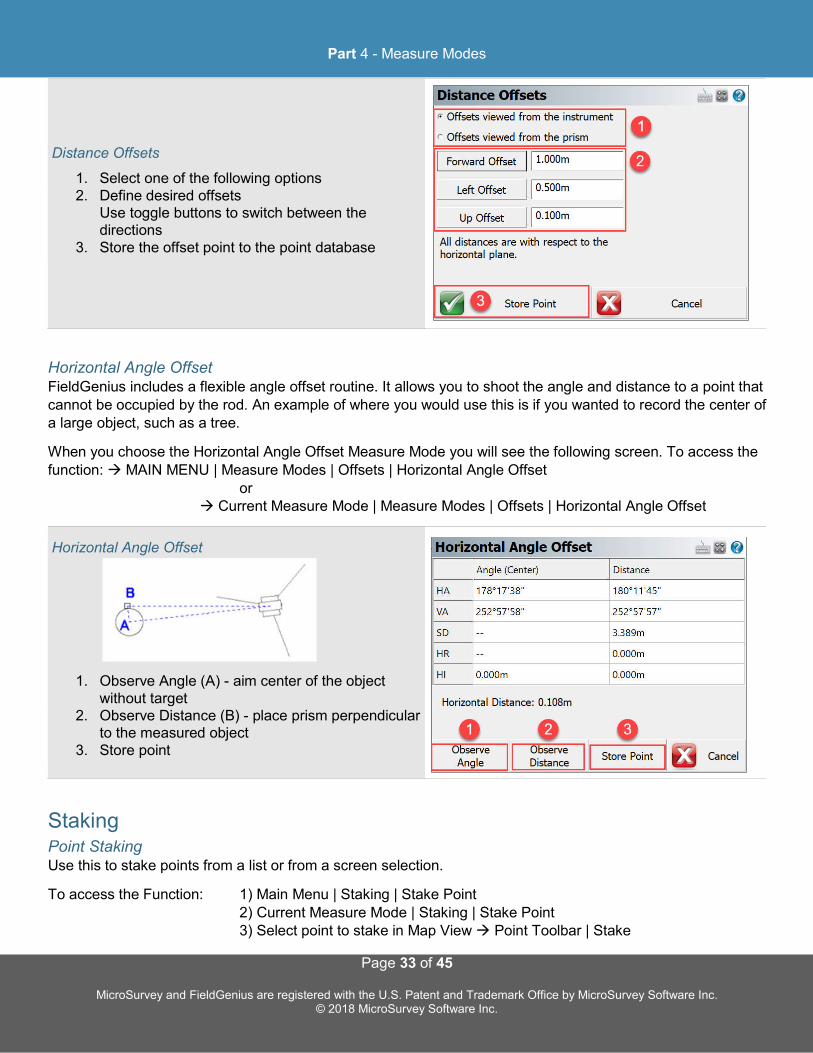
Distance Offsets
1. Select one of the following options 2. Define desired offsets
Use toggle buttons to switch between the directions
3. Store the offset point to the point database
Horizontal Angle Offset FieldGenius includes a flexible angle offset routine. It allows you to shoot the angle and distance to a point that cannot be occupied by the rod. An example of where you would use this is if you wanted to record the center of a large object, such as a tree.
When you choose the Horizontal Angle Offset Measure Mode you will see the following screen. To access the function: MAIN MENU | Measure Modes | Offsets | Horizontal Angle Offset or Current Measure Mode | Measure Modes | Offsets | Horizontal Angle Offset
Horizontal Angle Offset
1. Observe Angle (A) - aim center of the object without target
2. Observe Distance (B) - place prism perpendicular to the measured object
3. Store point
Staking Point Staking Use this to stake points from a list or from a screen selection.
To access the Function: 1) Main Menu | Staking | Stake Point 2) Current Measure Mode | Staking | Stake Point 3) Select point to stake in Map View Point Toolbar | Stake
Part 4 - Measure Modes
Page 34 of 45
MicroSurvey and FieldGenius are registered with the U.S. Patent and Trademark Office by MicroSurvey Software Inc. © 2018 MicroSurvey Software Inc.
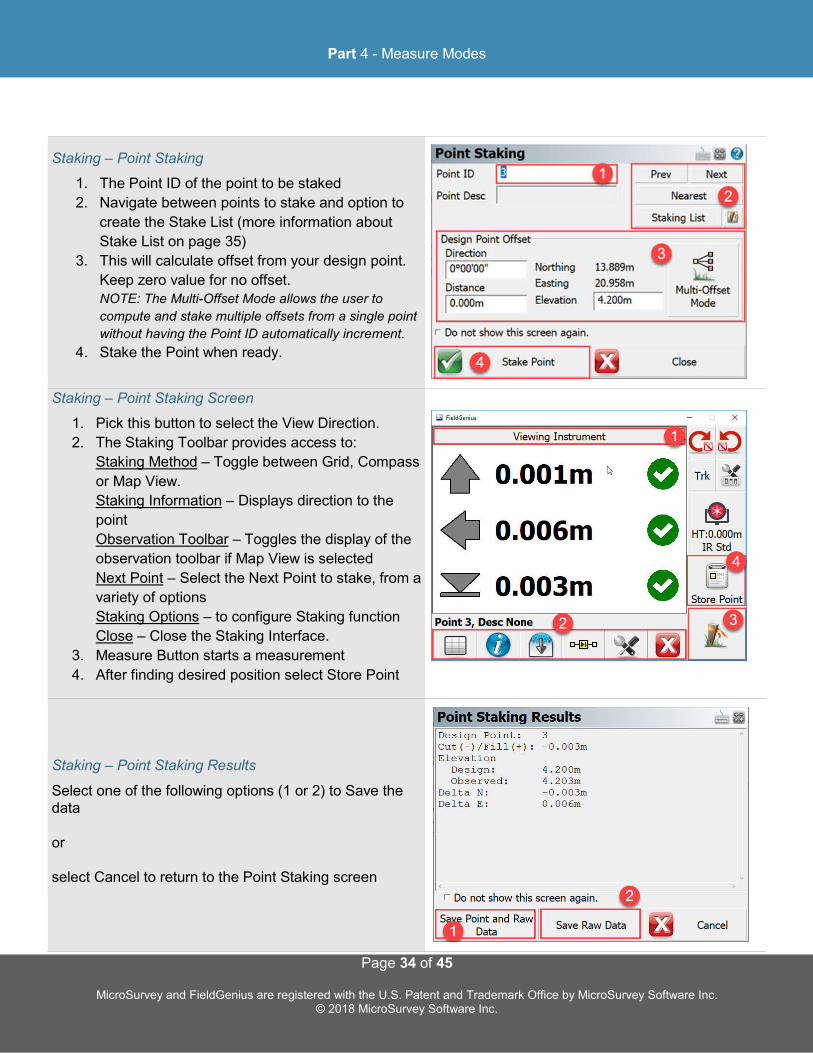
Staking – Point Staking
1. The Point ID of the point to be staked
2. Navigate between points to stake and option to
create the Stake List (more information about
Stake List on page 35)
3. This will calculate offset from your design point.
Keep zero value for no offset. NOTE: The Multi-Offset Mode allows the user to
compute and stake multiple offsets from a single point
without having the Point ID automatically increment.
4. Stake the Point when ready.
Staking – Point Staking Screen
1. Pick this button to select the View Direction.
2. The Staking Toolbar provides access to:
Staking Method – Toggle between Grid, Compass
or Map View.
Staking Information – Displays direction to the
point
Observation Toolbar – Toggles the display of the
observation toolbar if Map View is selected
Next Point – Select the Next Point to stake, from a
variety of options
Staking Options – to configure Staking function
Close – Close the Staking Interface.
3. Measure Button starts a measurement
4. After finding desired position select Store Point
Staking – Point Staking Results
Select one of the following options (1 or 2) to Save the data or select Cancel to return to the Point Staking screen
Part 4 - Measure Modes
Page 35 of 45
MicroSurvey and FieldGenius are registered with the U.S. Patent and Trademark Office by MicroSurvey Software Inc. © 2018 MicroSurvey Software Inc.
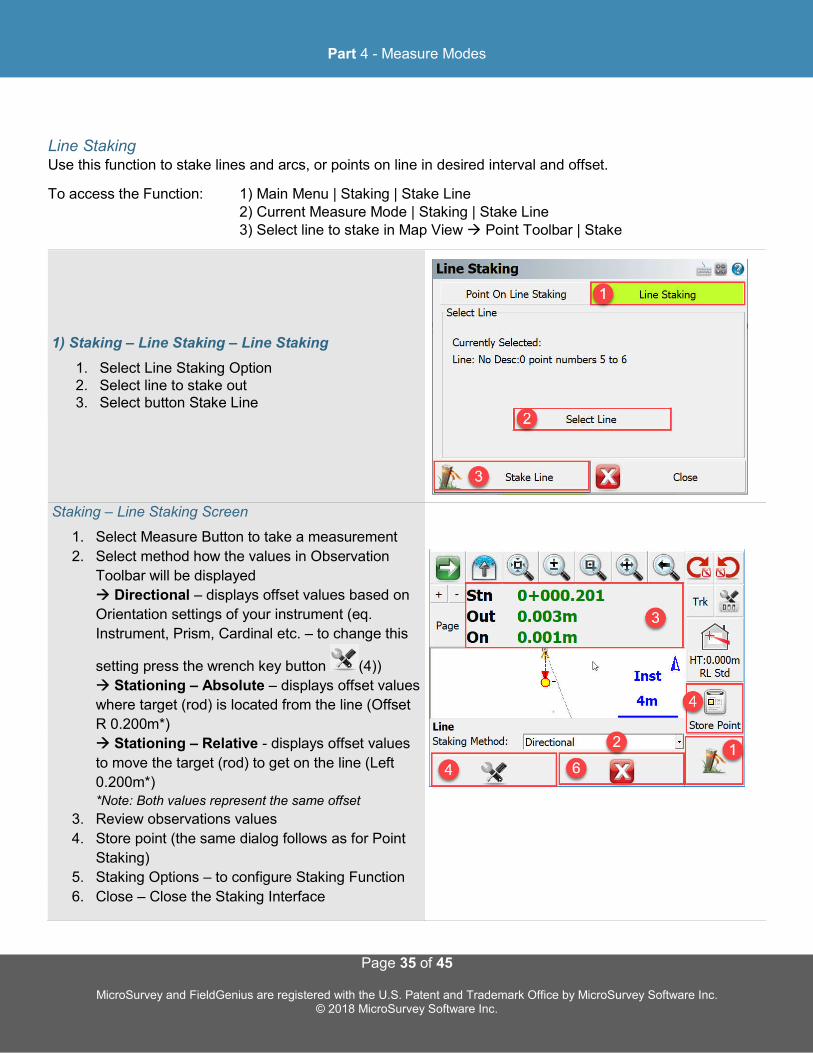
Line Staking Use this function to stake lines and arcs, or points on line in desired interval and offset.
To access the Function: 1) Main Menu | Staking | Stake Line 2) Current Measure Mode | Staking | Stake Line 3) Select line to stake in Map View Point Toolbar | Stake
1) Staking – Line Staking – Line Staking
1. Select Line Staking Option 2. Select line to stake out 3. Select button Stake Line
Staking – Line Staking Screen
1. Select Measure Button to take a measurement
2. Select method how the values in Observation
Toolbar will be displayed
Directional – displays offset values based on
Orientation settings of your instrument (eq.
Instrument, Prism, Cardinal etc. – to change this
setting press the wrench key button (4))
Stationing – Absolute – displays offset values
where target (rod) is located from the line (Offset
R 0.200m*)
Stationing – Relative - displays offset values
to move the target (rod) to get on the line (Left
0.200m*) *Note: Both values represent the same offset
3. Review observations values
4. Store point (the same dialog follows as for Point
Staking)
5. Staking Options – to configure Staking Function
6. Close – Close the Staking Interface
Part 4 - Measure Modes
Page 36 of 45
MicroSurvey and FieldGenius are registered with the U.S. Patent and Trademark Office by MicroSurvey Software Inc. © 2018 MicroSurvey Software Inc.
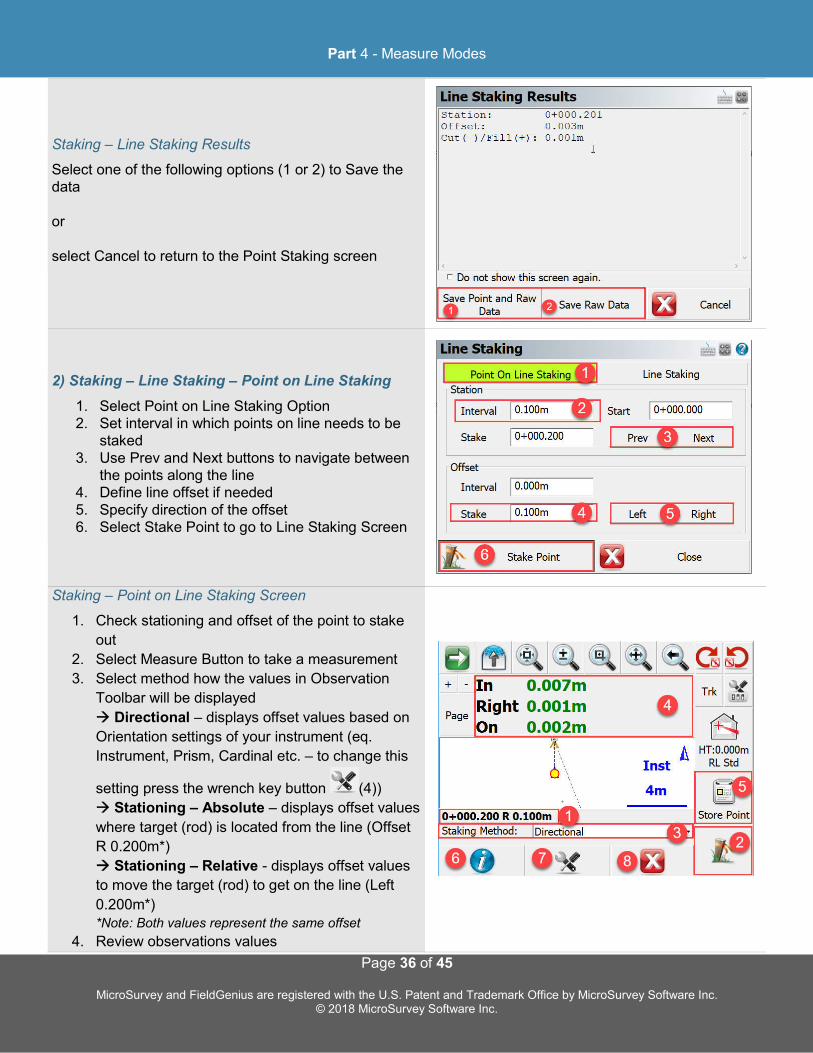
Staking – Line Staking Results
Select one of the following options (1 or 2) to Save the data or select Cancel to return to the Point Staking screen
2) Staking – Line Staking – Point on Line Staking
1. Select Point on Line Staking Option 2. Set interval in which points on line needs to be
staked 3. Use Prev and Next buttons to navigate between
the points along the line 4. Define line offset if needed 5. Specify direction of the offset 6. Select Stake Point to go to Line Staking Screen
Staking – Point on Line Staking Screen
1. Check stationing and offset of the point to stake
out
2. Select Measure Button to take a measurement
3. Select method how the values in Observation
Toolbar will be displayed
Directional – displays offset values based on
Orientation settings of your instrument (eq.
Instrument, Prism, Cardinal etc. – to change this
setting press the wrench key button (4))
Stationing – Absolute – displays offset values
where target (rod) is located from the line (Offset
R 0.200m*)
Stationing – Relative - displays offset values
to move the target (rod) to get on the line (Left
0.200m*) *Note: Both values represent the same offset
4. Review observations values
Part 4 - Measure Modes
Page 37 of 45
MicroSurvey and FieldGenius are registered with the U.S. Patent and Trademark Office by MicroSurvey Software Inc. © 2018 MicroSurvey Software Inc.
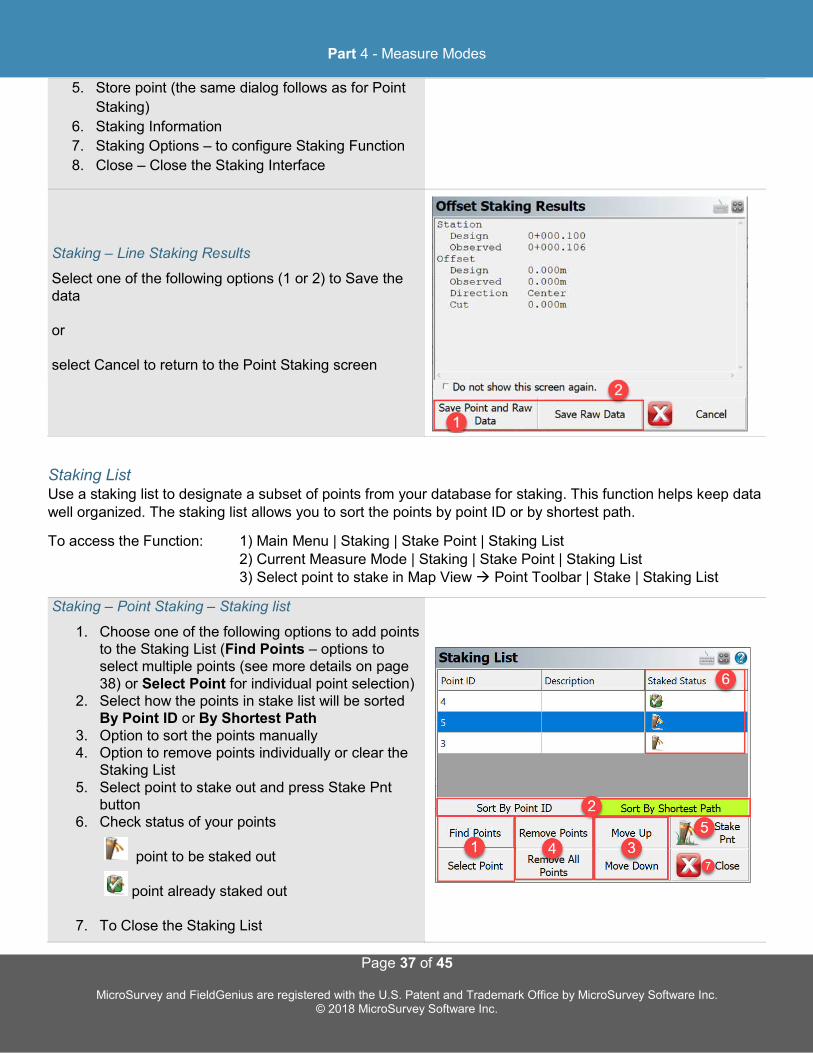
5. Store point (the same dialog follows as for Point
Staking)
6. Staking Information
7. Staking Options – to configure Staking Function
8. Close – Close the Staking Interface
Staking – Line Staking Results
Select one of the following options (1 or 2) to Save the data or select Cancel to return to the Point Staking screen
Staking List Use a staking list to designate a subset of points from your database for staking. This function helps keep data well organized. The staking list allows you to sort the points by point ID or by shortest path.
To access the Function: 1) Main Menu | Staking | Stake Point | Staking List 2) Current Measure Mode | Staking | Stake Point | Staking List 3) Select point to stake in Map View Point Toolbar | Stake | Staking List
Staking – Point Staking – Staking list
1. Choose one of the following options to add points to the Staking List (Find Points – options to select multiple points (see more details on page 38) or Select Point for individual point selection)
2. Select how the points in stake list will be sorted By Point ID or By Shortest Path
3. Option to sort the points manually 4. Option to remove points individually or clear the
Staking List 5. Select point to stake out and press Stake Pnt
button 6. Check status of your points
point to be staked out point already staked out
7. To Close the Staking List
Part 4 - Measure Modes
Page 38 of 45
MicroSurvey and FieldGenius are registered with the U.S. Patent and Trademark Office by MicroSurvey Software Inc. © 2018 MicroSurvey Software Inc.
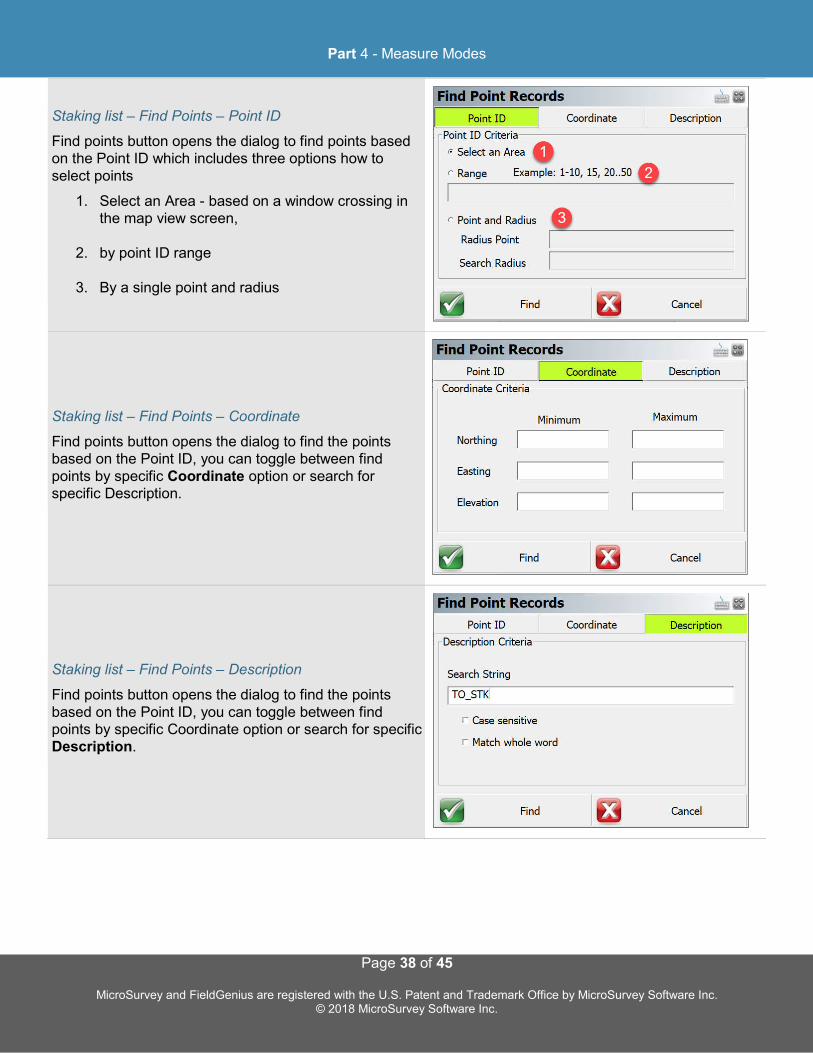
Staking list – Find Points – Point ID
Find points button opens the dialog to find points based on the Point ID which includes three options how to select points
1. Select an Area - based on a window crossing in the map view screen,
2. by point ID range
3. By a single point and radius
Staking list – Find Points – Coordinate
Find points button opens the dialog to find the points based on the Point ID, you can toggle between find points by specific Coordinate option or search for specific Description.
Staking list – Find Points – Description
Find points button opens the dialog to find the points based on the Point ID, you can toggle between find points by specific Coordinate option or search for specific Description.

Appendix
Page 39 of 45
MicroSurvey and FieldGenius are registered with the U.S. Patent and Trademark Office by MicroSurvey Software Inc. © 2018 MicroSurvey Software Inc.
Appendix Additional Resources for FieldGenius.
Online Manual A version of the complete FieldGenius manual is available online at:
http://s3.microsurvey.com/fieldgenius/Help/Default.htm
Movies A selection of instructional videos for FieldGenius are available online at:
http://helpdesk.microsurvey.com/index.php?/Knowledgebase/Article/View/149
Helpdesk Contact MicroSurvey Support through the MicroSurvey Helpdesk at:
http://helpdesk.microsurvey.com/
Automap Libraries The Automap system is used in MicroSurvey field and office software:
http://helpdesk.microsurvey.com/index.php?/Knowledgebase/Article/View/1306
http://helpdesk.microsurvey.com/index.php?/Knowledgebase/Article/View/1350
Appendix
Page 40 of 45
MicroSurvey and FieldGenius are registered with the U.S. Patent and Trademark Office by MicroSurvey Software Inc. © 2018 MicroSurvey Software Inc.
Project Settings A FieldGenius project is created with some default settings. It is important to set the defaults to suit your most frequent requirements. These defaults typically will only need to be configured once.
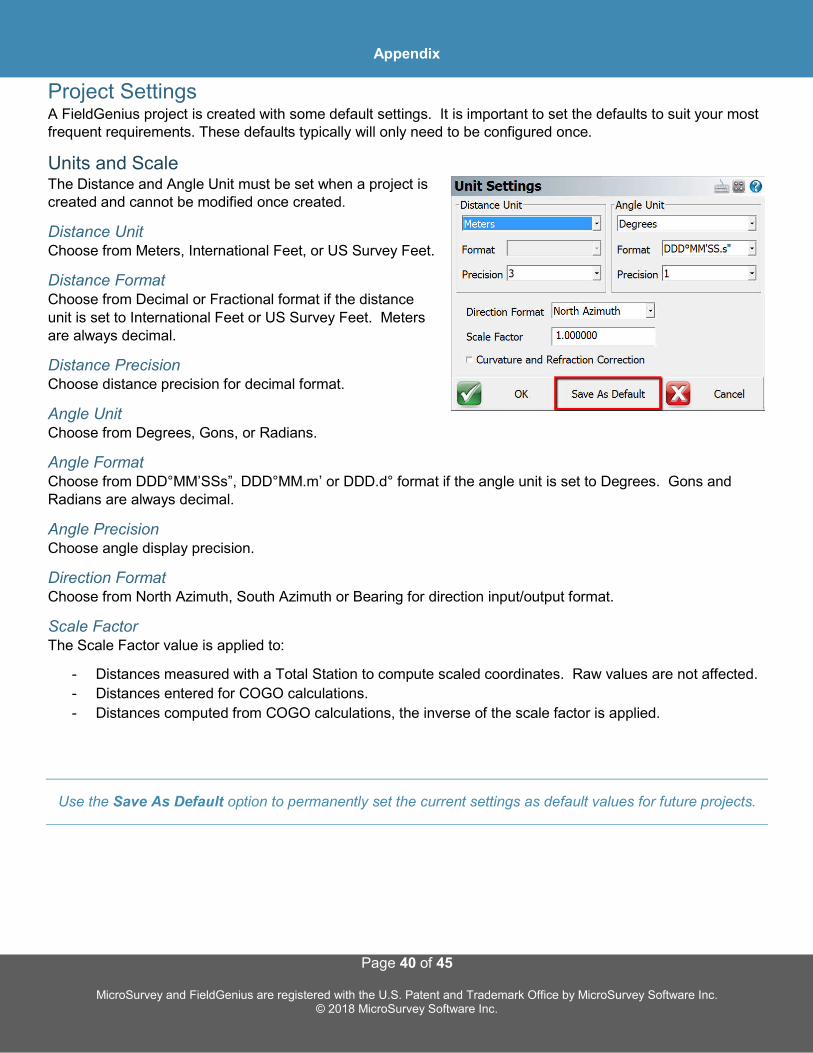
Units and Scale The Distance and Angle Unit must be set when a project is created and cannot be modified once created.
Distance Unit Choose from Meters, International Feet, or US Survey Feet.
Distance Format Choose from Decimal or Fractional format if the distance unit is set to International Feet or US Survey Feet. Meters are always decimal.
Distance Precision Choose distance precision for decimal format.
Angle Unit Choose from Degrees, Gons, or Radians.
Angle Format Choose from DDD°MM’SSs”, DDD°MM.m’ or DDD.d° format if the angle unit is set to Degrees. Gons and Radians are always decimal.
Angle Precision Choose angle display precision.
Direction Format Choose from North Azimuth, South Azimuth or Bearing for direction input/output format.
Scale Factor The Scale Factor value is applied to:
- Distances measured with a Total Station to compute scaled coordinates. Raw values are not affected.
- Distances entered for COGO calculations.
- Distances computed from COGO calculations, the inverse of the scale factor is applied.
Use the Save As Default option to permanently set the current settings as default values for future projects.
Appendix
Page 41 of 45
MicroSurvey and FieldGenius are registered with the U.S. Patent and Trademark Office by MicroSurvey Software Inc. © 2018 MicroSurvey Software Inc.
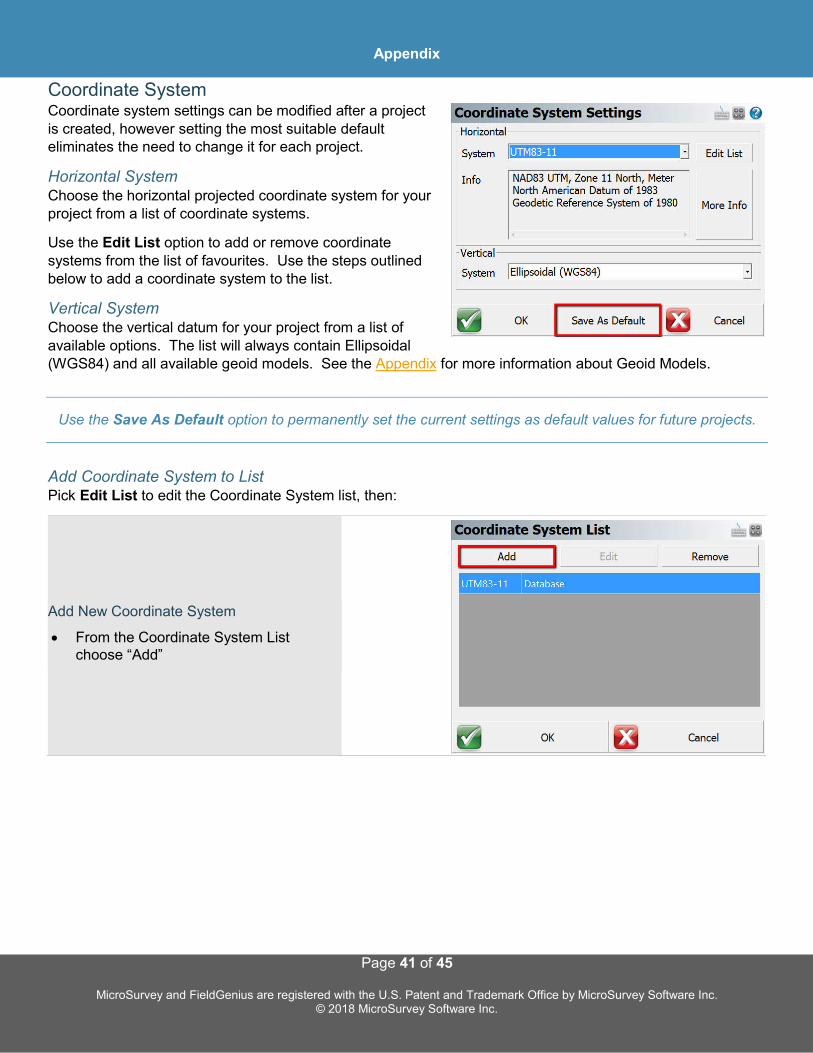
Coordinate System Coordinate system settings can be modified after a project is created, however setting the most suitable default eliminates the need to change it for each project.
Horizontal System Choose the horizontal projected coordinate system for your project from a list of coordinate systems.
Use the Edit List option to add or remove coordinate systems from the list of favourites. Use the steps outlined below to add a coordinate system to the list.
Vertical System Choose the vertical datum for your project from a list of available options. The list will always contain Ellipsoidal (WGS84) and all available geoid models. See the Appendix for more information about Geoid Models.
Use the Save As Default option to permanently set the current settings as default values for future projects.
Add Coordinate System to List Pick Edit List to edit the Coordinate System list, then:
Add New Coordinate System
From the Coordinate System List choose “Add”
Appendix
Page 42 of 45
MicroSurvey and FieldGenius are registered with the U.S. Patent and Trademark Office by MicroSurvey Software Inc. © 2018 MicroSurvey Software Inc.
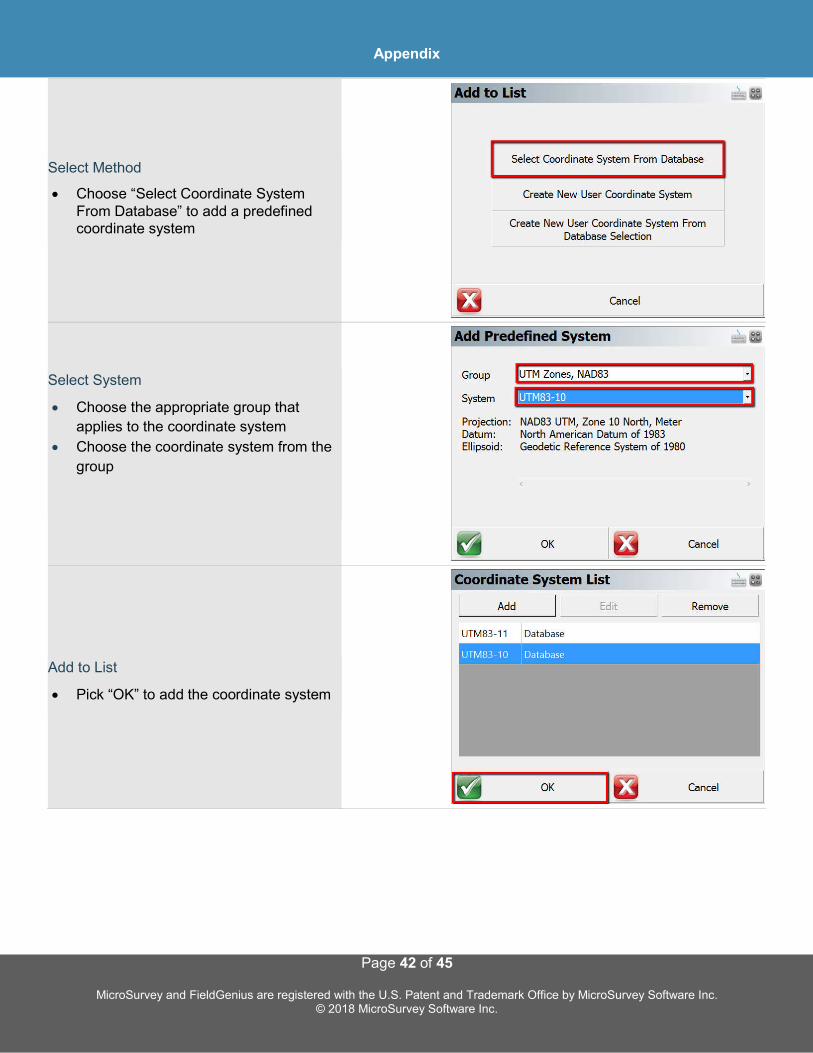
Select Method
Choose “Select Coordinate System From Database” to add a predefined coordinate system
Select System
Choose the appropriate group that
applies to the coordinate system
Choose the coordinate system from the
group
Add to List
Pick “OK” to add the coordinate system

Appendix
Page 43 of 45
MicroSurvey and FieldGenius are registered with the U.S. Patent and Trademark Office by MicroSurvey Software Inc. © 2018 MicroSurvey Software Inc.
Project Files Each FieldGenius project is made up of multiple files, some of which can be copied from templates and/or another project. For many users, it may not be necessary to change any of these options when creating a new project.
Active Raw File The active raw file is used to write all measured observation values in real time. It is possible to have many raw files associated with a project, for example a new file for each day on a site. The Generate New Name button can be used to append the date and time string to the project name.
The raw file can be Encrypted so only MicroSurvey desktop software can read the files. The encryption toggle is retained until manually changed.
An existing raw file can be copied from another project and optionally point coordinates generated from that raw file.
Project Automap Automap libraries contain predefined point descriptions with associated point symbols, colour, layer, linework and DTM properties. FieldGenius includes a sample Automap file to demonstrate the system (survey.csv). It is suggested to create a template that can be used for all projects, or a few templates for different categories of projects. See the Appendix for more information about Automap libraries.
Feature File Adding a feature file to a project allows GIS feature and attribute collection for points and figures. See the Appendix for more information about feature files.
Project Files Descriptions FieldGenius projects are folders containing at least 7 files as described below.
ProjectName.cdx Index file of coordinate database ProjectName.dbf Coordinate database ProjectName.ini Project Settings and Information ProjectName.raw or ProjectName.rae
Raw measurement observations, encrypted raw files have a rae extension. Note: Projects can have multiple raw files.
ProjectName _figures.cdx Index file for the figures database ProjectName _figures.dbf Figures database ProjectName _automap.csv Automap Library for the project

Appendix
Page 44 of 45
MicroSurvey and FieldGenius are registered with the U.S. Patent and Trademark Office by MicroSurvey Software Inc. © 2018 MicroSurvey Software Inc.
Project Information The Project Information dialog is used to record information relevant to the project. This information is simply for record keeping.

Appendix
Page 45 of 45
MicroSurvey and FieldGenius are registered with the U.S. Patent and Trademark Office by MicroSurvey Software Inc. © 2018 MicroSurvey Software Inc.
Leica Prism Constant Offset vs. Actual Prism Constant Offset
1. If you are using Leica Total station with Non-Leica prism, you need to use:
Leica Offset = Absolute Offset + 34.4 mm
2. If you are using non-Leica Total Station with Leica prism, you need to use:
Absolute Offset = Leica Offset - 34.4 mm
Photo Credit: https://www.lasersurveyingequipment.com.au/latest-news/42/leica-prism-constant-explained.html