TopSURV: Working with Point Lists · July 2010 Point List, defined TopSURV: Working with Point...
32
TopSURV: Working with Point Lists Oscar R. Cantu’ July 2010
Transcript of TopSURV: Working with Point Lists · July 2010 Point List, defined TopSURV: Working with Point...

TopSURV: Working with Point Lists
Oscar R. Cantu’July 2010

July 2010
• At anytime during today’s webinar, if you have any questions, please type them within the Questions section of your webinar software.
• All questions and answers will be posted as a PDF along with all webinar supporting files on the Topcon University website.
Have a Question?TopSURV: Working with Point Lists

July 2010
• For access to previously offered webinars and supporting documentation, please go to:
http://www.topconuniversity.com/
Topcon University WebsiteTopSURV: Working with Point Lists

July 2010
Webinar Agenda• Point List function, defined• Creating and Managing a Point List• Using a Point List for Stakeout, plus options• Using a Point List for Area calculations• Transferring a Point List
TopSURV: Working with Point Lists

July 2010
Point List, defined
TopSURV: Working with Point Lists
• Within TopSURV data collection software, Point Lists are a method of isolating a group of points to be used later. How we group them is up to us.
• Within a typical field job, there are various type of points. ..there are Stored Stake Out points, Calculated points, Offset points, etc.
• Each has its own unique Point Name (Point Number) and unique Descriptor Code, possibly a String Identifier, and position (Latitude / Longitude or Northing / Easting).
• It is through these unique point properties that we can identify and group points. Once done, we can recall and use them in a Point List.
July 2010
Point List, defined
TopSURV: Working with Point Lists
• There are limitless examples of why we would want to use a Point List in TopSURV. Perhaps our field job has points of Benchmarks (example shown above) that surround our project site.
• Their geodetic positions are correct. However, it is not convenient for us to walk from point to point they way that they are listed, alphabetically. Instead, it is easier for us to walk from a particular point to an other of our choosing. That is where a Point List comes in.
• We will create a custom Point List in the order that we want to encounter these points in the field.

July 2010
Creating a Point List
TopSURV: Working with Point Lists
• Scenario: We have already created a field job in TopSURV with the proper options. Our control points (benchmarks) have been imported from a text file or from Topcon Tools office software.
• From the main menu, tap the Edit Job icon and select Point Lists. Tap the Add button to create a point list.

July 2010
Creating a Point List
TopSURV: Working with Point Lists
• For your convenience and by default, the initial name of a Point List is PointList1. The name of a Point List is customizable.
• For this example, we will declare a name of Control Path to support the scenario of wanting to walk to our control points in a certain sequence.
• Tap the Select Points button to see a listing of point selection options.

July 2010
Creating a Point List, Options
TopSURV: Working with Point Lists
• By Range – select a series of points using a “from / to” approach. For example, if you wanted to include all points from point 1 to 100, you would input a range of, 1-100. Commas can also be used to exclude. For example, if you wanted to purposefully exclude point number 50 within the range of 1 to 100, you would declare 1-49,51-100.
• By Code – select all points that have the same descriptor code. For example, you could select all points with the code of BM - Benchmark, regardless of their point number or any other property.
• By Code String – a continuation of By Code method where you can be even more specific. You can declare a selection of points whose descriptor code is, for example, BOC – Back of Curb AND whose String Identifier is C1.
• By Radius – select all points within a customizable radius from a specific point in your field job.
• From Map – select multiple points graphically from the field job’s Map View.
• From List – select points from the field job’s existing point listing.
• From Layer – select all points that are on a specific layer.

July 2010
Creating a Point List, Options
TopSURV: Working with Point Lists
• For this example, we will use the From Map selection option. Selecting this method will instantly open a Map View of our current field job.
• Since we came into this screen using the From Map selection option, TopSURV is expecting you to tap a series of points.
July 2010
TopSURV: Working with Point Lists
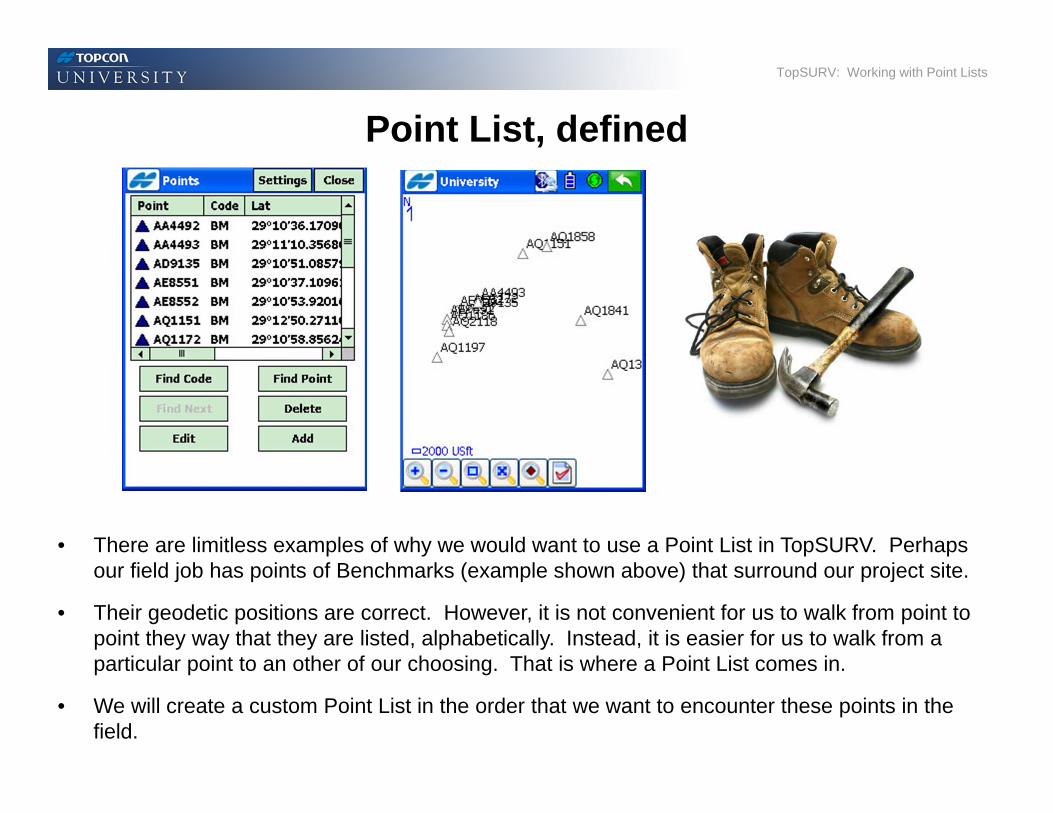
• The sequence is important here. The order in which you select these points will be the order that you will be navigated to them. ..feel free to pan around and zoom as needed.
• As you select your series of points, TopSURV will automatically draw a “bread crumb trail” connecting them for visual confirmation. If the trail does not look right, tap the point again to deselect and continue. Easy.
Creating a Point List, Options

July 2010
Creating a Point List, Options
TopSURV: Working with Point Lists
• When done, TopSURV will show you the results of your map selection. Within the List of Points column, are the points that were chosen in the order that they were selected.
• You have the option here to change their order by using the Up or Down arrows. You can remove a point from the selection list using the X button as well.
• As you select a point within the listing, it is also highlighted graphically within the Map View.
Options:• Map is clickable for full
view• Using X button, you can
remove points from the list
• List of Points can be bumped up or down to change order you will encounter them.
• Right Arrow will temporarily hide the map preview to see Codes

July 2010
Creating a Point List, Options
TopSURV: Working with Point Lists
• Lastly, the named Point List will appear in your List of Point Lists column.
• Shown above are some options within this screen that can be helpful.
• Multipurpose. Point Lists are sometimes used to specifically find or “see” points that may have a bad (or unintentional) elevation. ..just include the suspect points within a Point List and view within the Cross Section map. Options.
Options:• Top map view is
“bird’s eye” looking down
• Bottom map view is cross section of all points
• Both map views are clickable to expand to full screen

July 2010
Using a Point List for Stakeout
TopSURV: Working with Point Lists
• To being the process of staking out a defined Point List, tap the Stake icon and select Point List.
• From the Point List screen, tap the list icon (red arrow) to see a listing of existing Point Lists within your field job.
July 2010
Using a Point List for Stakeout
TopSURV: Working with Point Lists
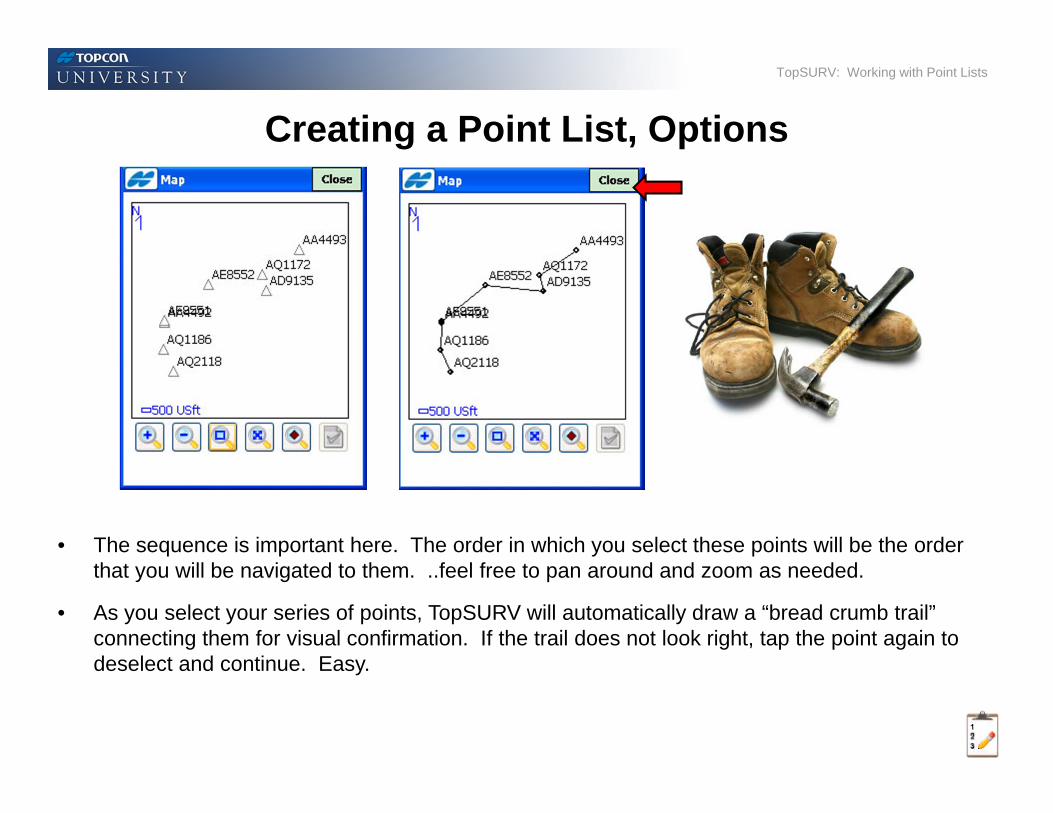
• Select the existing Point List that you want to stakeout (labeled as Control Path in this example).
• Tap the Stake button to being navigation to the first point within your Point List. ..then the next, then the next.
• Notice that, for this example, the first point is named AQ2118.

July 2010
Using a Point List for Stakeout, plus options
TopSURV: Working with Point Lists
• Using the “Point Advance / Point Back“ toggle buttons (red box), you have the option of being navigated to the remaining points in your custom Point List at anytime.
• As you toggle through your Point List, all navigation instructions (Right, Forward, Azimuth, Horizontal Distance, etc.) will update automatically.

July 2010
Using a Point List for Stakeout, plus options
TopSURV: Working with Point Lists
• Did you know that within the initial Stake >> Point List screen, you can also check on the Reverse Order checkbox?
• This option will still navigate you to the first point within your Point List. However, instead of proceeding to the next successive point (AQ1186 in this example), you will be navigated in regressive order.
It’s just like the first way! ..except the exact opposite.

July 2010
TopSURV: Working with Point Lists
Questions?

July 2010
Using a Point List for Area calculations
TopSURV: Working with Point Lists
• For this example, we are going to determine the Area of four points that define our area of interest. …working sketch of an property boundary, limits of construction, etc.
• To calculate an area in TopSURV, you must first create a quick Point List.
• From the main menu, tap the COGO (Coordinate Geometry) icon and select Area to begin the process.

July 2010
Using a Point List for Area calculations
TopSURV: Working with Point Lists
• Within this Compute Area screen, you have the convenient option of using the Context Menu(Topcon logo at upper left corner) to jump over to the Edit Point List routine. There, we will quickly group our four points into a Point List. Once finished, we will be returned to the Compute Area dialog to finish our work. Efficient.
• Tap the Context Menu and select Edit Point Lists to see the familiar options of creating a Point List.
• Tap the Add button to begin the process of creating a custom Point List.

July 2010
Using a Point List for Area calculations
TopSURV: Working with Point Lists
• For this example, we will name this custom Point List, Area Calc. Tap the Select Points button and select By Range to declare which points will be included using their point numbers.
• Since we know that the four points we want to use are numbered 1 to 4, we will declare a Range of Points of 1-4.

July 2010
Using a Point List for Area calculations
TopSURV: Working with Point Lists
• Done. A Point List now exists that includes our four points of interest. After tapping the Closebutton, we are instantly returned to the same Compute Area routine that we started with.
• We can now declare that we want to, “compute the area of the point list that we just made labeled Area Calc”. Once selected, we are prompted with a graphical preview.
• Tap the Calc (calculate) have TopSURV derive an area of the selected Point List.

July 2010
Using a Point List for Area calculations
TopSURV: Working with Point Lists
• Within the Results tab we see the resulting area calculation of our Point List.
• Notice that you are given area results in square feet (current distance units for this example), acreage, hectares, as well as being offered the figure’s perimeter length.
• By tapping the Map tab, we can see the four points that are being used as well as any automatic closing of the figure that TopSURV may have to do.

July 2010
Using a Point List for Area calculations
TopSURV: Working with Point Lists
• As an export option, you can return to the Results tab and tap the To File button. This will prompt you with file location and file naming options.
• A simple text file will be created that includes area computation results for the selected Point List.

July 2010
TopSURV: Working with Point Lists
Questions?

July 2010
TopSURV: Working with Point Lists
Transferring a Point List
• Once a Point List is created in TopSURV, it is a property / entity within that field job. It can then be transferred (imported / exported) between job to job.
• For this example, we will create a new TopSURV field job named <ahem> New Job.
• Once created, we will then use the Import >> From Job option to transfer an existing point list.

July 2010
Transferring a Point List
TopSURV: Working with Point Lists
• From the main menu, tap the Import icon and select From Job.
• This will automatically bring up a Select Job dialog where you can choose which “existing” job you want to import something from. For this example, we will use the field job named Area Calculations.
• By tapping the Select button, TopSURV will begin to inventory that existing job. ..so that TopSURV can learn what is available to be imported from it.

July 2010
Transferring a Point List
TopSURV: Working with Point Lists
• Here we see that items such as a Code Library, a Localization, and at least one Point Listare available to be imported from the existing field job. Items that are ghosted grey are not available within the existing field job.
• For this example, we will check and select all three properties as well as All Points. Next!
• Since it is possible to have limitless Point Lists within a field job, you are prompted to include / exclude which one(s) you want to import. Tap Finish when done.

July 2010
Transferring a Point List
TopSURV: Working with Point Lists
• Within the Import Status screen, we see that we have successfully imported all layers and codes (from the host job’s Code Library), five total points (four local and one WGS-84 observation), one Point List (what we just made), and one Localization (pairing of local point 1 and WGS-84 point 101). ..excellent.
• For confirmation, tap the Edit Job icon and select Point Lists to see a listing of what is now available within this current / new field job.

July 2010
Size 28
TopSURV: Working with Point Lists
• Instantly, we see within the List of Point Lists column that our Area Calc grouping is now there.
• After tapping the Edit button, we can see / confirm the points that make up this Point List as well.

July 2010
TopSURV: Working with Point Lists
Questions?

TopSURV: Working with Point Lists
July 2010


![TOPCON - SKCIC GPT7500_user... · 2018. 2. 23. · Topcon Topsurv 使用說明書 廣盈儀器有限公司 5 電話:06-2600575 網址: TopSURV 第一章 說明 1.1 特殊按鍵 [ENT]](https://static.fdocuments.net/doc/165x107/60e5842cb55a4d3a505f7837/topcon-skcic-gpt7500user-2018-2-23-topcon-topsurv-ce-coee.jpg)