TopSURV 8 - Working with Stake Reports - …€¦ · TopSURV 8: Working with Stake Reports • At...
35
TopSURV 8: Working with Stake Reports Oscar R. Cantu’ April 2011
Transcript of TopSURV 8 - Working with Stake Reports - …€¦ · TopSURV 8: Working with Stake Reports • At...
TopSURV 8: Working with Stake Reports
Oscar R. Cantu’ April 2011

April 2011
TopSURV 8: Working with Stake Reports
• At anytime during today’s webinar, if you have any questions, please type them within the Questions section of your webinar software.
April 2011
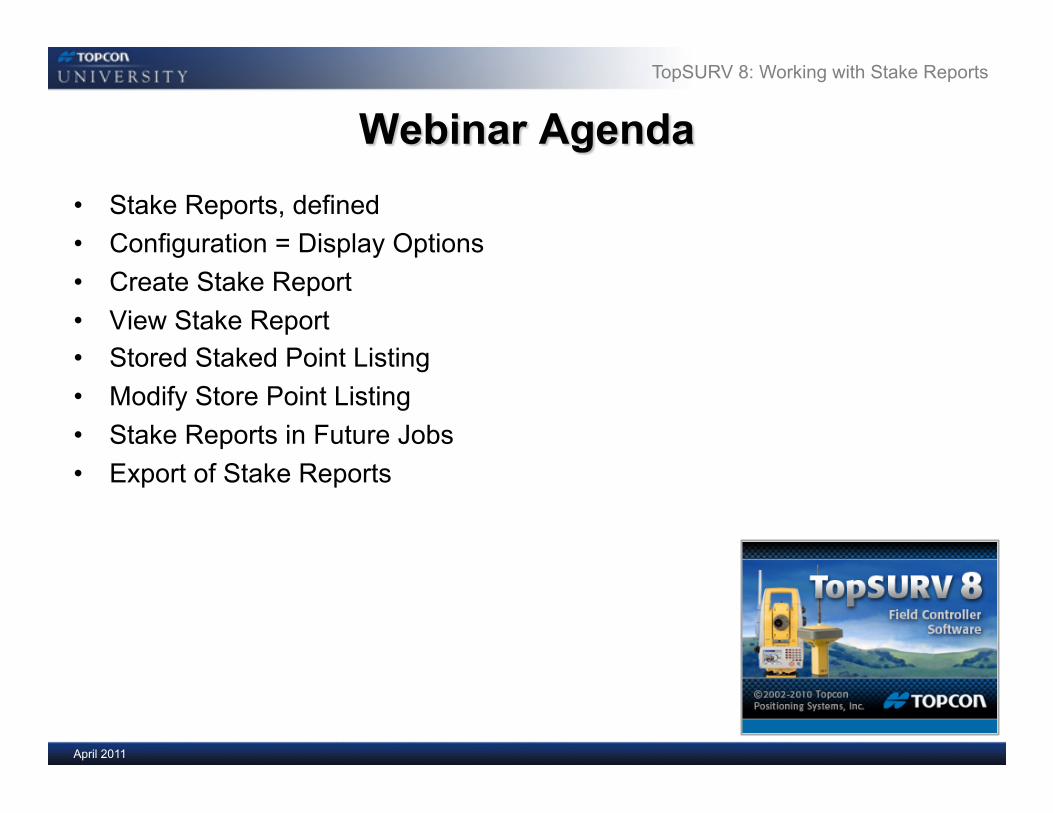
• Stake Reports, defined • Configuration = Display Options • Create Stake Report • View Stake Report • Stored Staked Point Listing • Modify Store Point Listing • Stake Reports in Future Jobs • Export of Stake Reports
TopSURV 8: Working with Stake Reports
April 2011
TopSURV 8: Working with Stake Reports
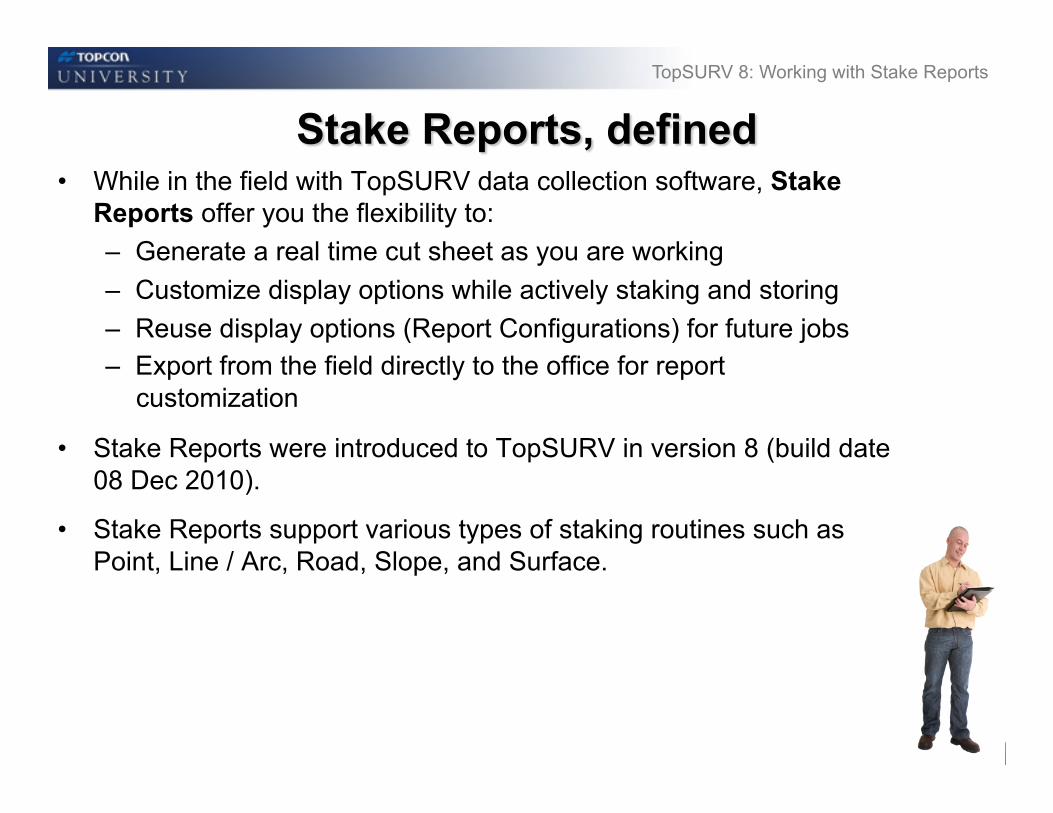
• While in the field with TopSURV data collection software, Stake Reports offer you the flexibility to: – Generate a real time cut sheet as you are working – Customize display options while actively staking and storing – Reuse display options (Report Configurations) for future jobs – Export from the field directly to the office for report
customization
• Stake Reports were introduced to TopSURV in version 8 (build date 08 Dec 2010).
• Stake Reports support various types of staking routines such as Point, Line / Arc, Road, Slope, and Surface.
April 2011
TopSURV 8: Working with Stake Reports
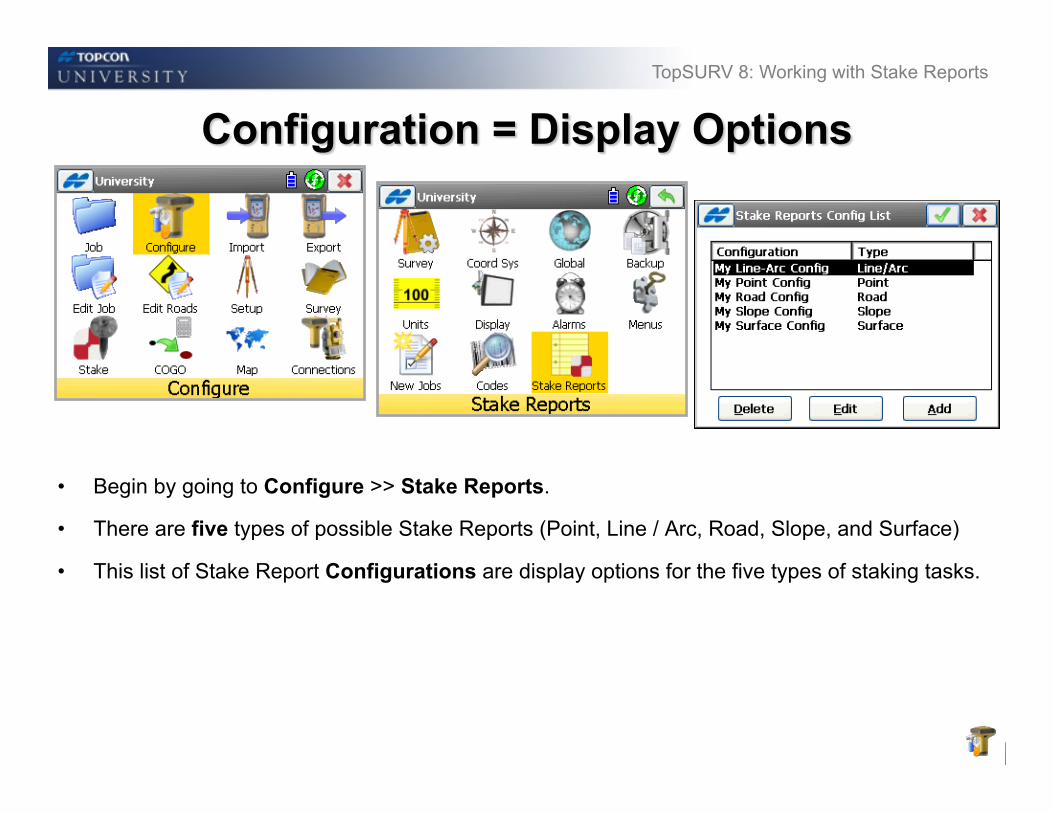
• Begin by going to Configure >> Stake Reports.
• There are five types of possible Stake Reports (Point, Line / Arc, Road, Slope, and Surface)
• This list of Stake Report Configurations are display options for the five types of staking tasks.
April 2011
TopSURV 8: Working with Stake Reports
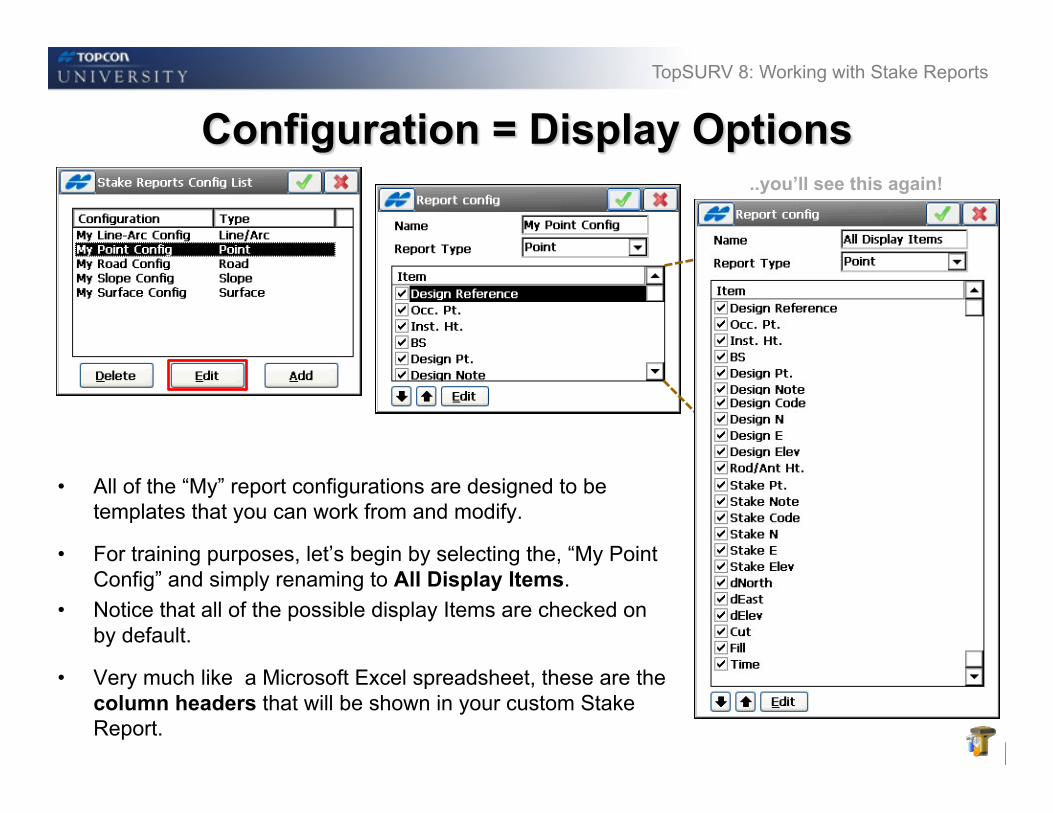
• All of the “My” report configurations are designed to be templates that you can work from and modify.
• For training purposes, let’s begin by selecting the, “My Point Config” and simply renaming to All Display Items.
• Notice that all of the possible display Items are checked on by default.
• Very much like a Microsoft Excel spreadsheet, these are the column headers that will be shown in your custom Stake Report.
..you’ll see this again!
April 2011
TopSURV 8: Working with Stake Reports
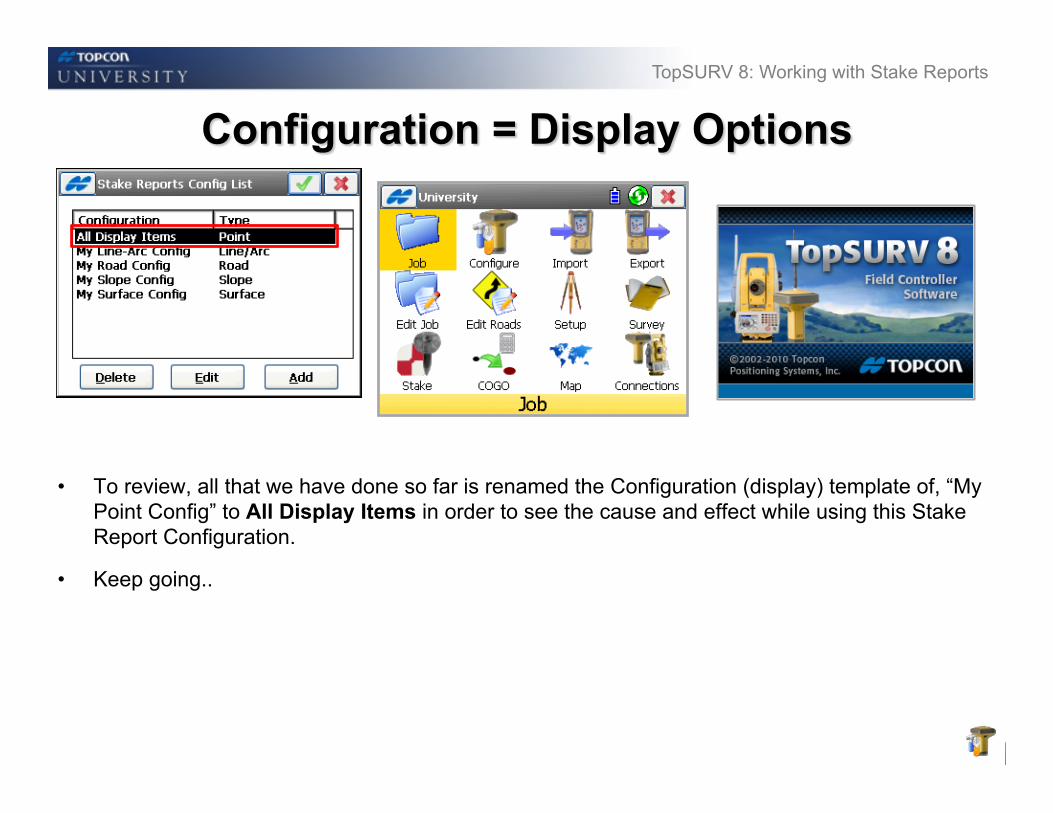
• To review, all that we have done so far is renamed the Configuration (display) template of, “My Point Config” to All Display Items in order to see the cause and effect while using this Stake Report Configuration.
• Keep going..
April 2011
TopSURV 8: Working with Stake Reports
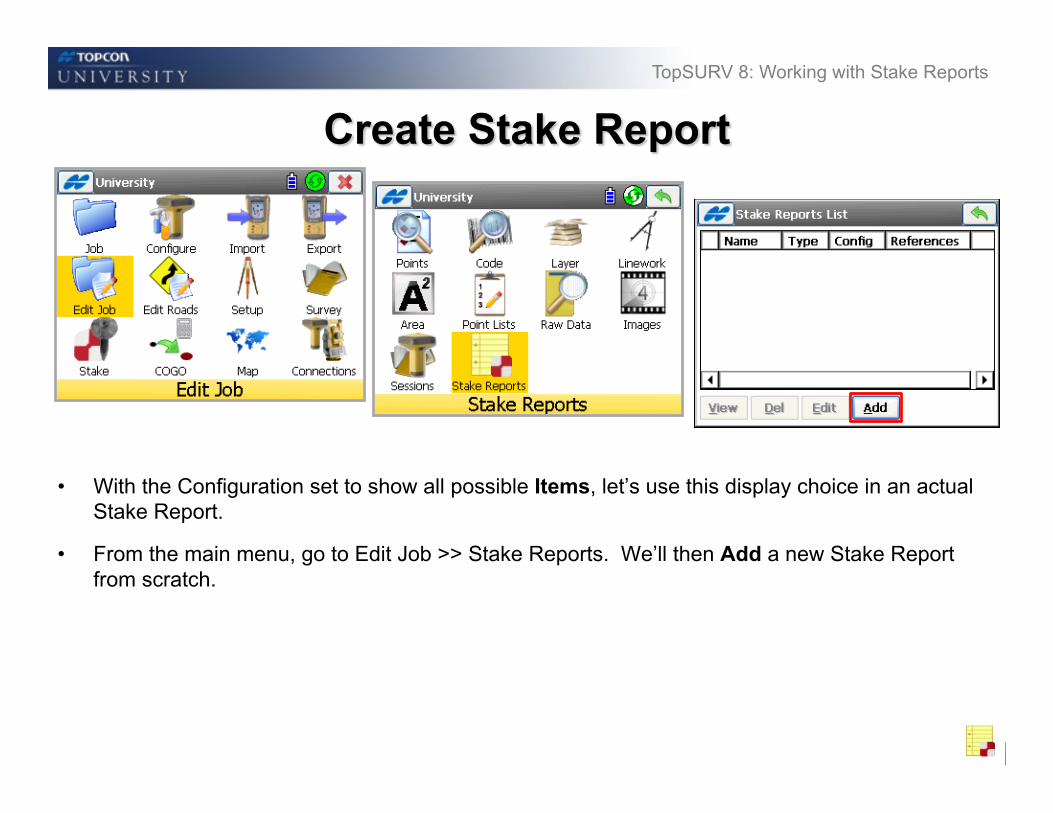
• With the Configuration set to show all possible Items, let’s use this display choice in an actual Stake Report.
• From the main menu, go to Edit Job >> Stake Reports. We’ll then Add a new Stake Report from scratch.
April 2011
TopSURV 8: Working with Stake Reports
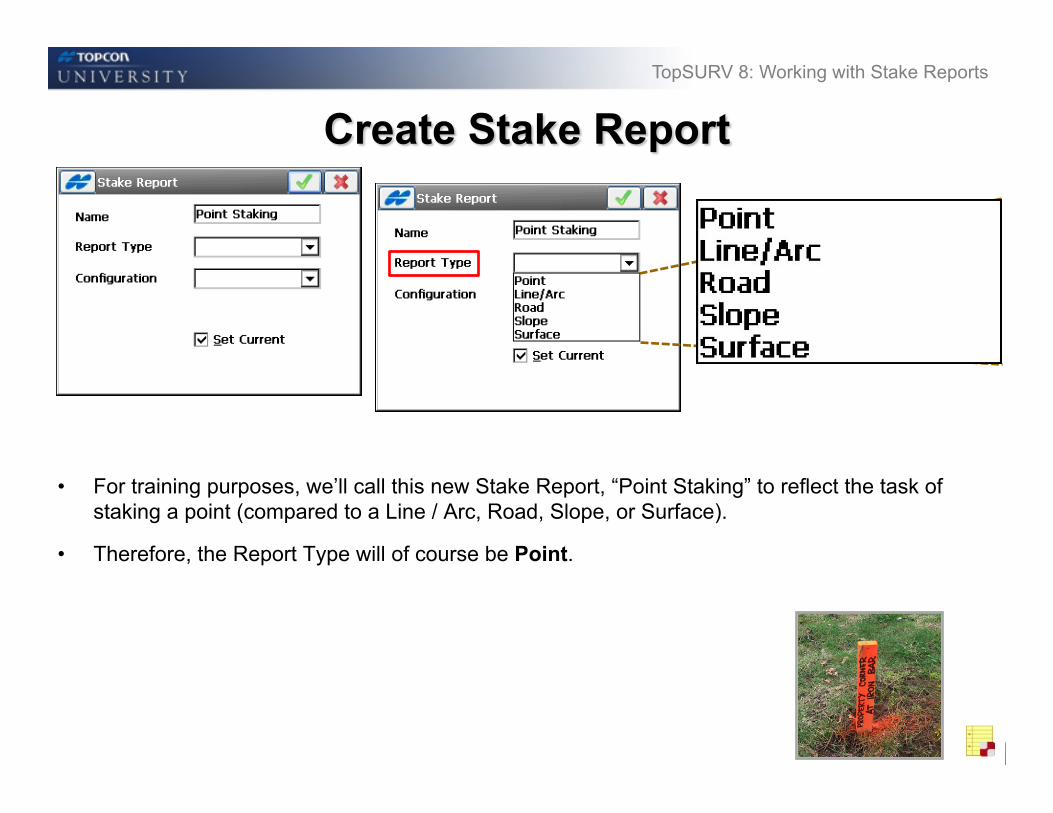
• For training purposes, we’ll call this new Stake Report, “Point Staking” to reflect the task of staking a point (compared to a Line / Arc, Road, Slope, or Surface).
• Therefore, the Report Type will of course be Point.
April 2011
TopSURV 8: Working with Stake Reports
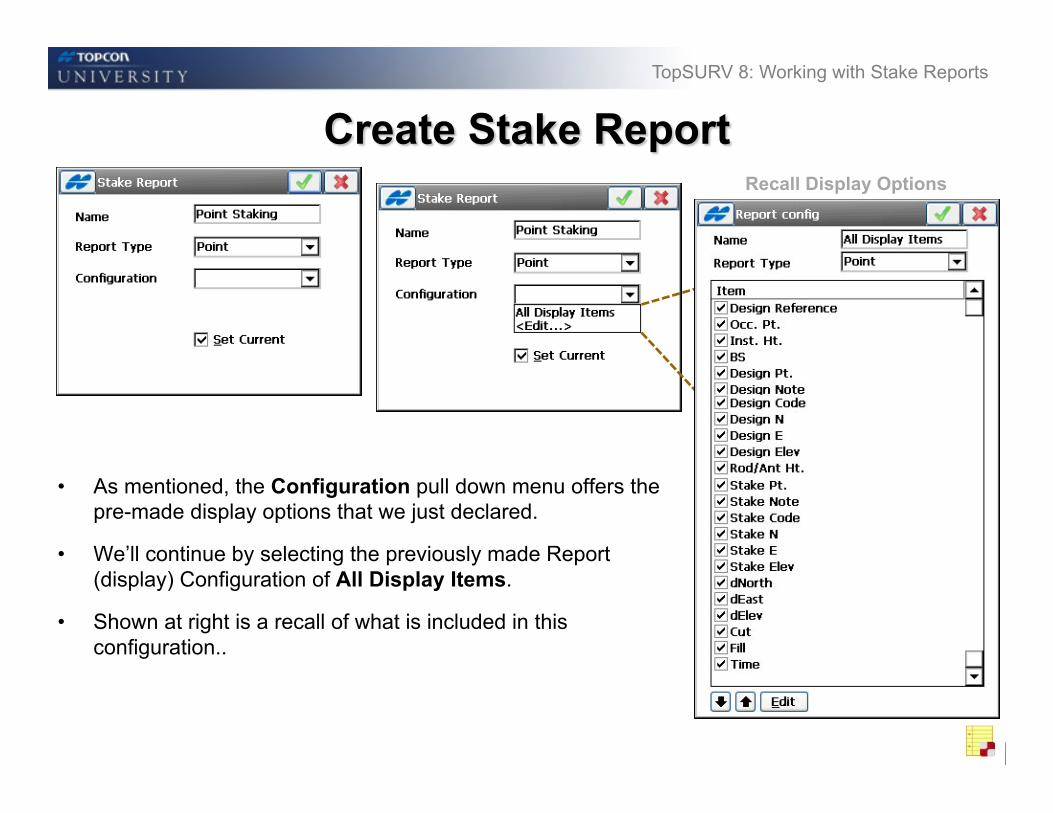
• As mentioned, the Configuration pull down menu offers the pre-made display options that we just declared.
• We’ll continue by selecting the previously made Report (display) Configuration of All Display Items.
• Shown at right is a recall of what is included in this configuration..
Recall Display Options
April 2011
TopSURV 8: Working with Stake Reports
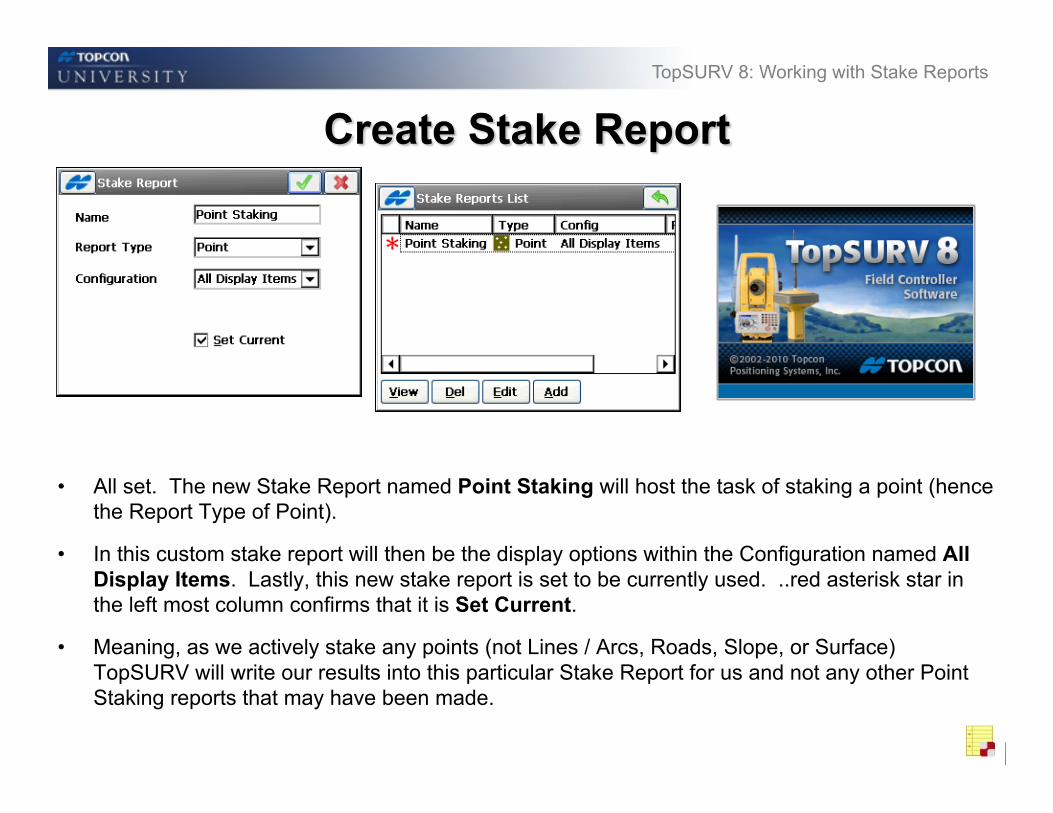
• All set. The new Stake Report named Point Staking will host the task of staking a point (hence the Report Type of Point).
• In this custom stake report will then be the display options within the Configuration named All Display Items. Lastly, this new stake report is set to be currently used. ..red asterisk star in the left most column confirms that it is Set Current.
• Meaning, as we actively stake any points (not Lines / Arcs, Roads, Slope, or Surface) TopSURV will write our results into this particular Stake Report for us and not any other Point Staking reports that may have been made.
April 2011
TopSURV 8: Working with Stake Reports
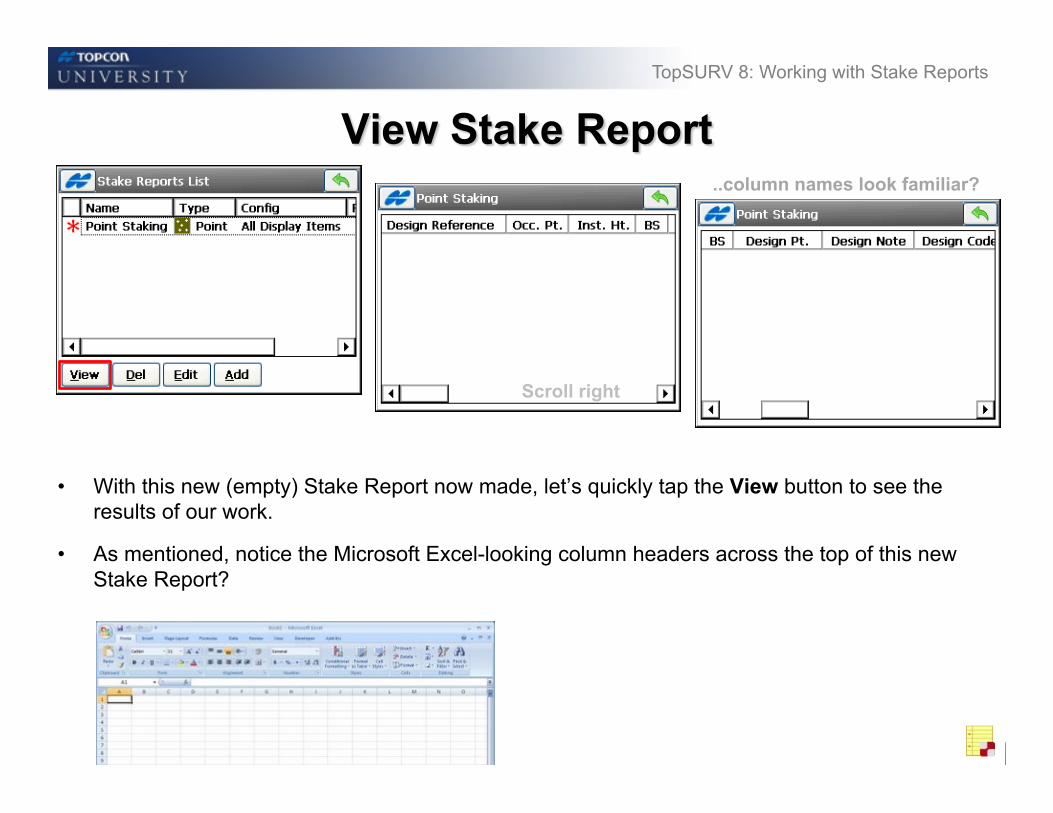
• With this new (empty) Stake Report now made, let’s quickly tap the View button to see the results of our work.
• As mentioned, notice the Microsoft Excel-looking column headers across the top of this new Stake Report?
..column names look familiar?
Scroll right
April 2011
TopSURV 8: Working with Stake Reports
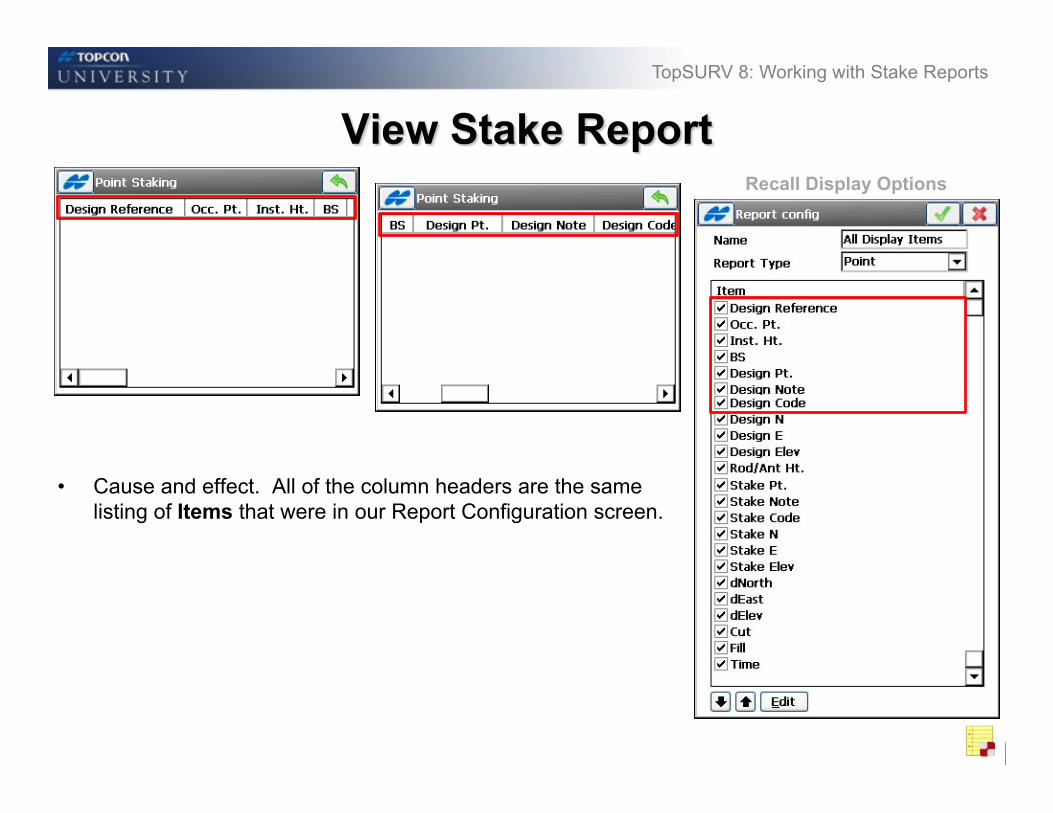
• Cause and effect. All of the column headers are the same listing of Items that were in our Report Configuration screen.
Recall Display Options

April 2011
TopSURV 8: Working with Stake Reports
April 2011
TopSURV 8: Working with Stake Reports
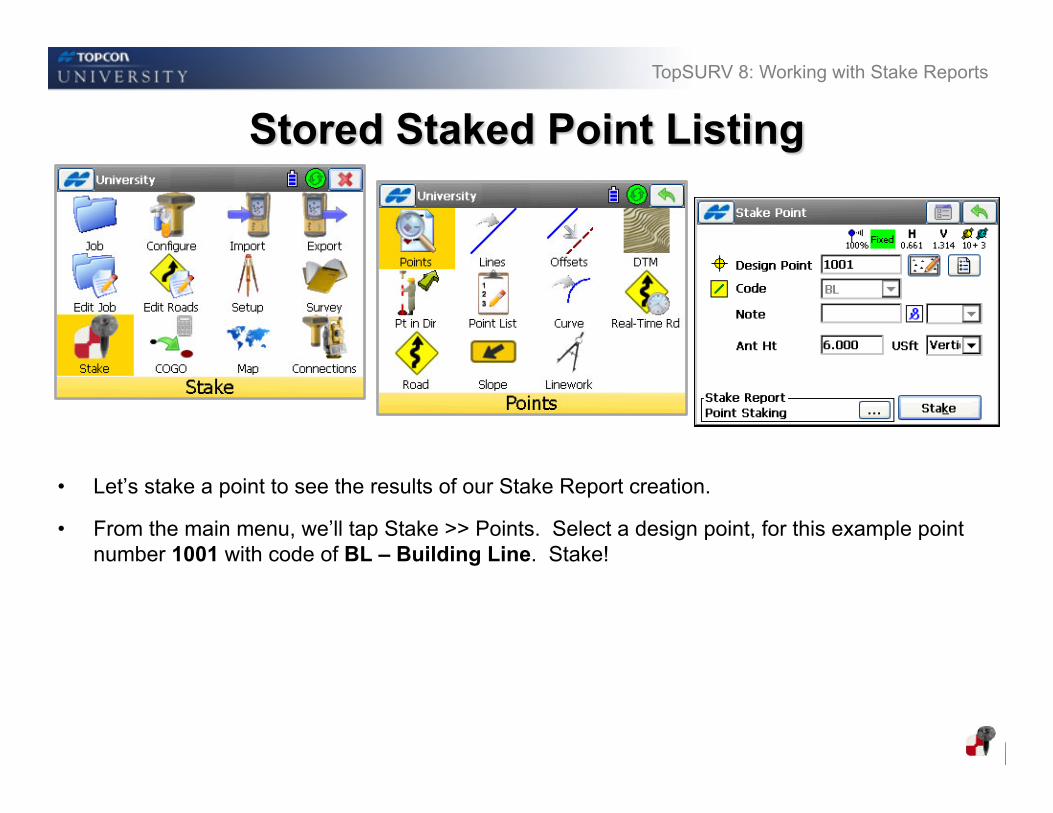
• Let’s stake a point to see the results of our Stake Report creation.
• From the main menu, we’ll tap Stake >> Points. Select a design point, for this example point number 1001 with code of BL – Building Line. Stake!
April 2011
TopSURV 8: Working with Stake Reports
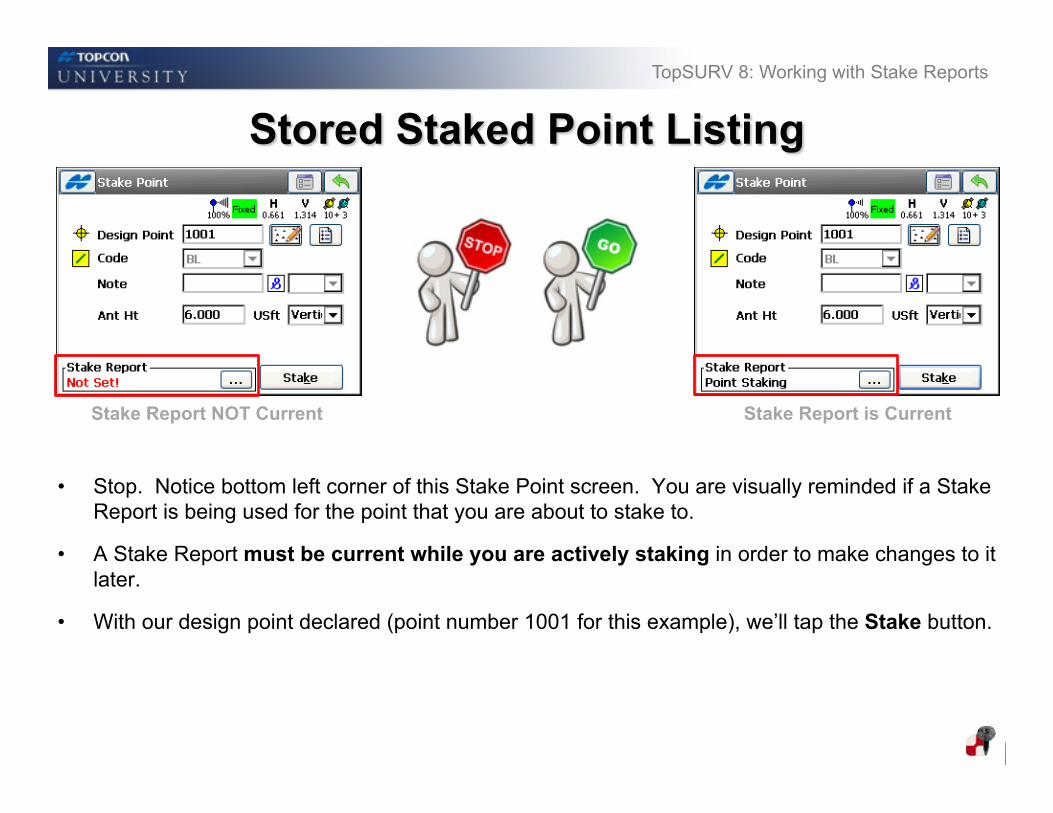
• Stop. Notice bottom left corner of this Stake Point screen. You are visually reminded if a Stake Report is being used for the point that you are about to stake to.
• A Stake Report must be current while you are actively staking in order to make changes to it later.
• With our design point declared (point number 1001 for this example), we’ll tap the Stake button.
Stake Report is Current Stake Report NOT Current
April 2011
TopSURV 8: Working with Stake Reports
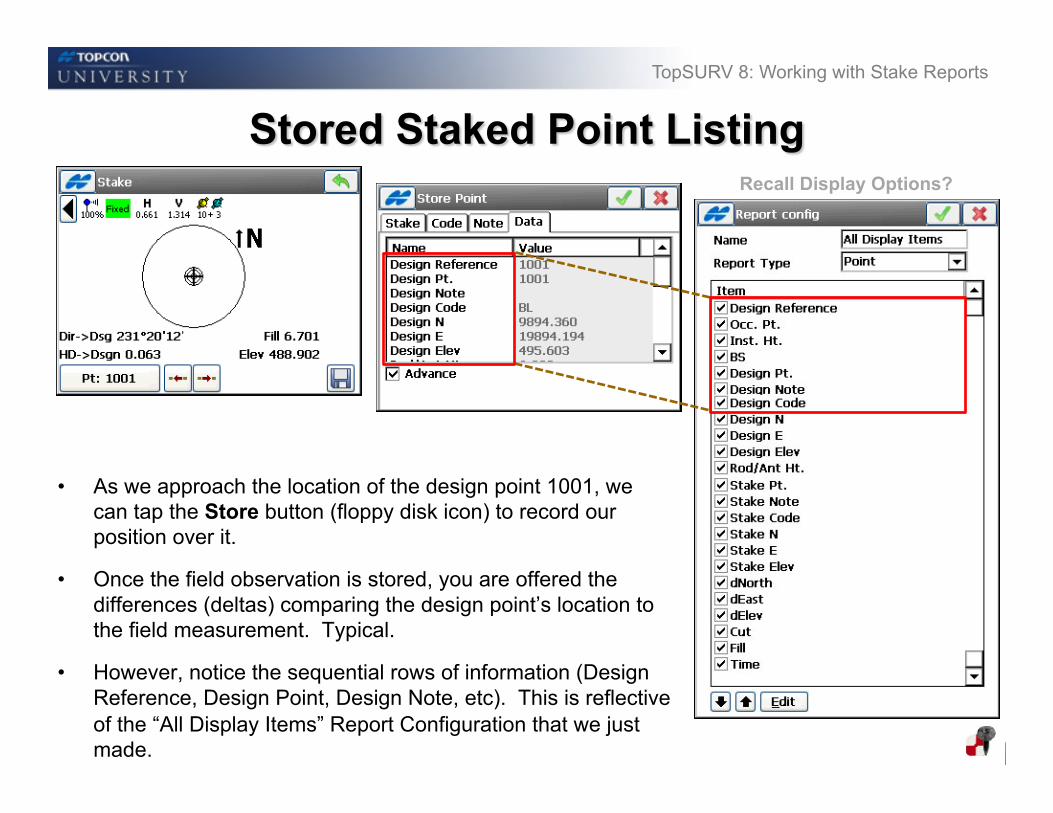
• As we approach the location of the design point 1001, we can tap the Store button (floppy disk icon) to record our position over it.
• Once the field observation is stored, you are offered the differences (deltas) comparing the design point’s location to the field measurement. Typical.
• However, notice the sequential rows of information (Design Reference, Design Point, Design Note, etc). This is reflective of the “All Display Items” Report Configuration that we just made.
Recall Display Options?
April 2011
TopSURV 8: Working with Stake Reports
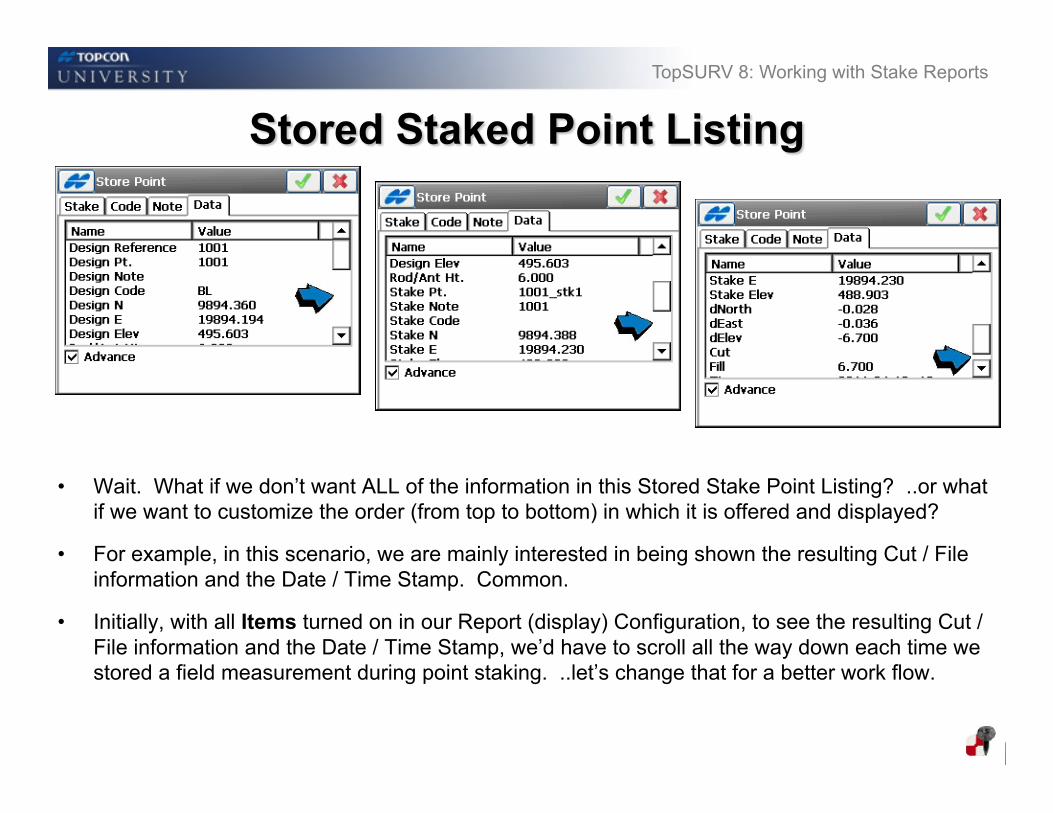
• Wait. What if we don’t want ALL of the information in this Stored Stake Point Listing? ..or what if we want to customize the order (from top to bottom) in which it is offered and displayed?
• For example, in this scenario, we are mainly interested in being shown the resulting Cut / File information and the Date / Time Stamp. Common.
• Initially, with all Items turned on in our Report (display) Configuration, to see the resulting Cut / File information and the Date / Time Stamp, we’d have to scroll all the way down each time we stored a field measurement during point staking. ..let’s change that for a better work flow.
April 2011
TopSURV 8: Working with Stake Reports
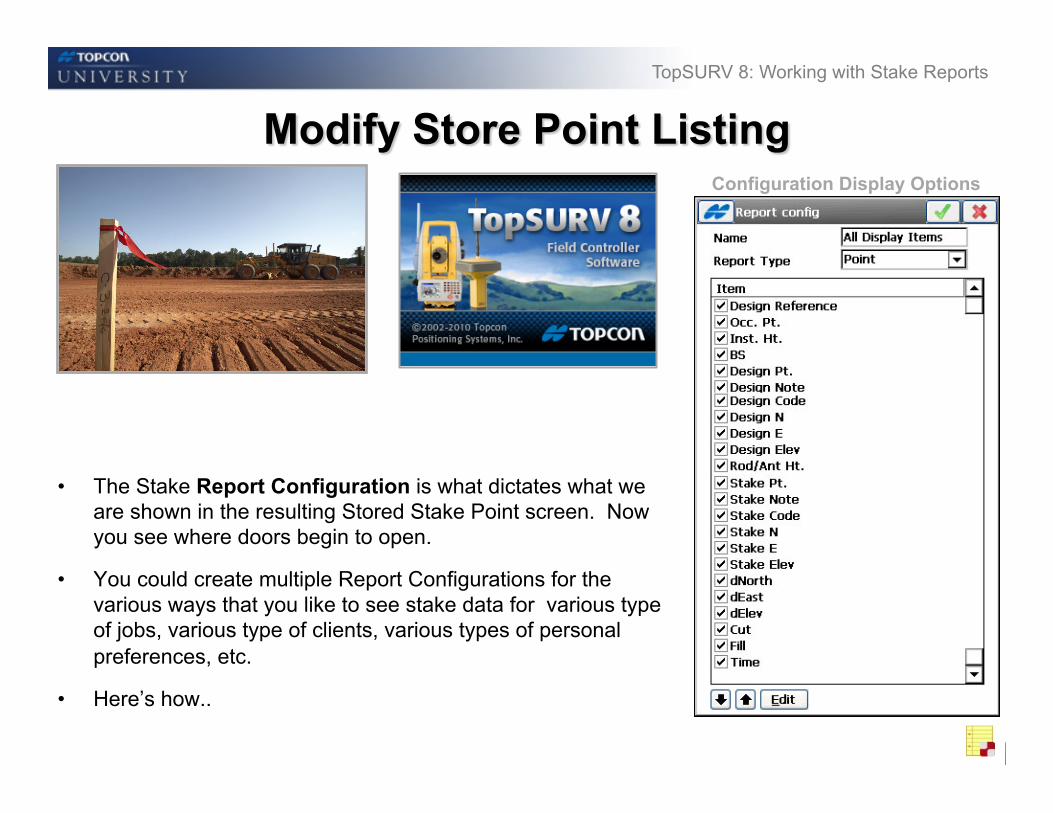
• The Stake Report Configuration is what dictates what we are shown in the resulting Stored Stake Point screen. Now you see where doors begin to open.
• You could create multiple Report Configurations for the various ways that you like to see stake data for various type of jobs, various type of clients, various types of personal preferences, etc.
• Here’s how..
Configuration Display Options
April 2011
TopSURV 8: Working with Stake Reports
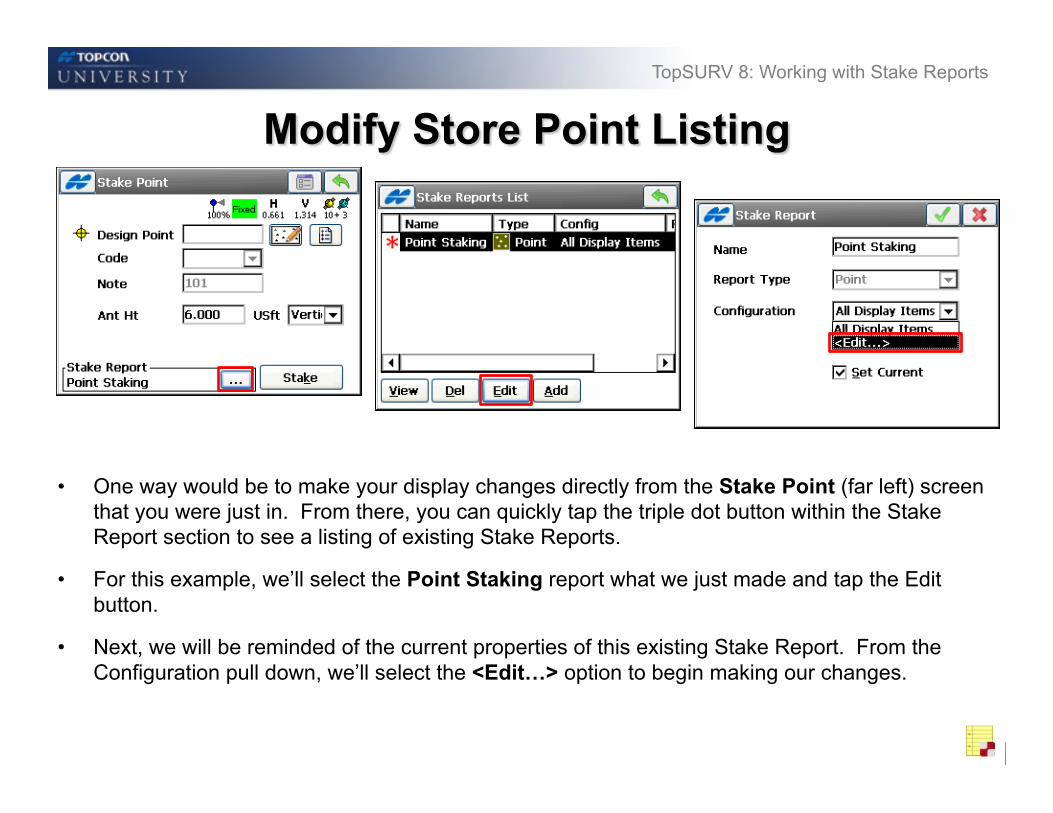
• One way would be to make your display changes directly from the Stake Point (far left) screen that you were just in. From there, you can quickly tap the triple dot button within the Stake Report section to see a listing of existing Stake Reports.
• For this example, we’ll select the Point Staking report what we just made and tap the Edit button.
• Next, we will be reminded of the current properties of this existing Stake Report. From the Configuration pull down, we’ll select the <Edit…> option to begin making our changes.
April 2011
TopSURV 8: Working with Stake Reports
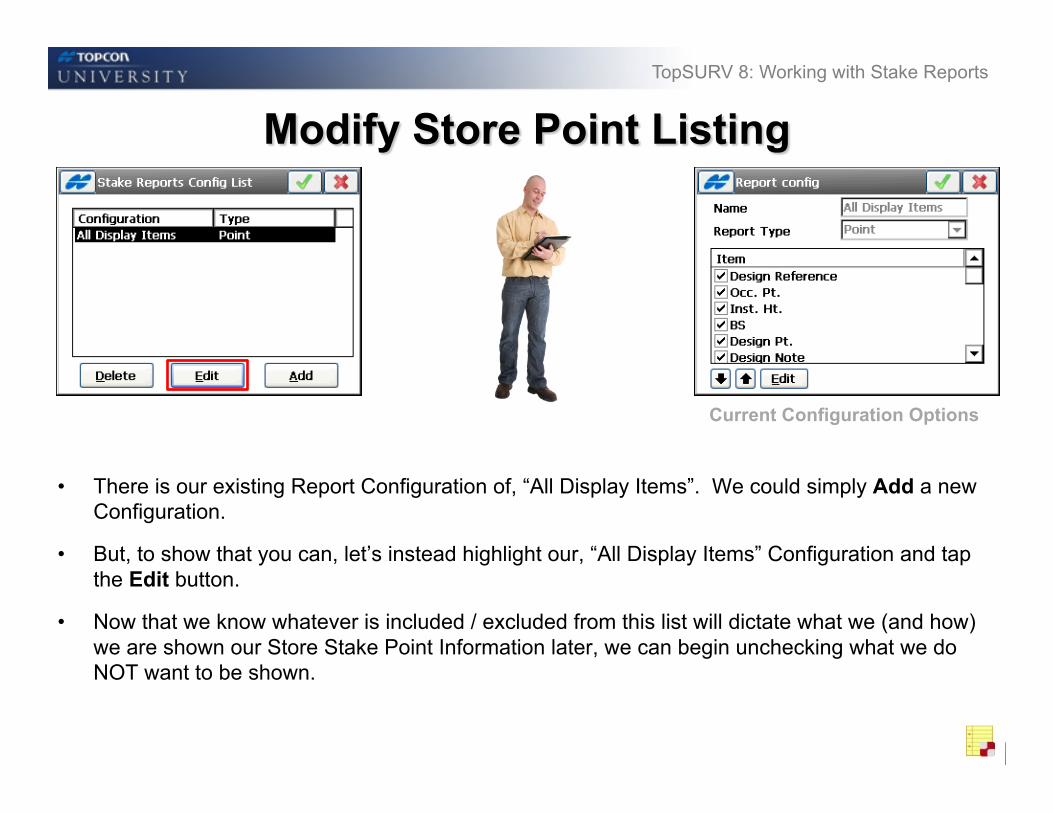
• There is our existing Report Configuration of, “All Display Items”. We could simply Add a new Configuration.
• But, to show that you can, let’s instead highlight our, “All Display Items” Configuration and tap the Edit button.
• Now that we know whatever is included / excluded from this list will dictate what we (and how) we are shown our Store Stake Point Information later, we can begin unchecking what we do NOT want to be shown.
Current Configuration Options
April 2011
TopSURV 8: Working with Stake Reports
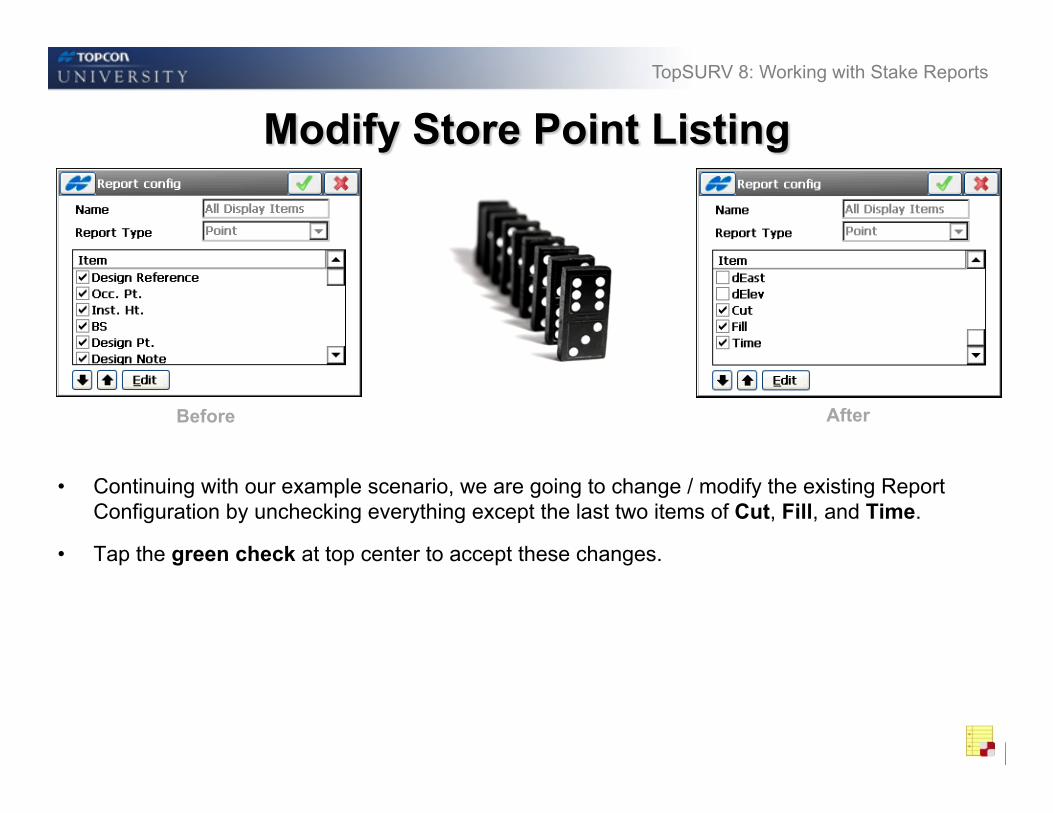
• Continuing with our example scenario, we are going to change / modify the existing Report Configuration by unchecking everything except the last two items of Cut, Fill, and Time.
• Tap the green check at top center to accept these changes.
Before After
April 2011
TopSURV 8: Working with Stake Reports
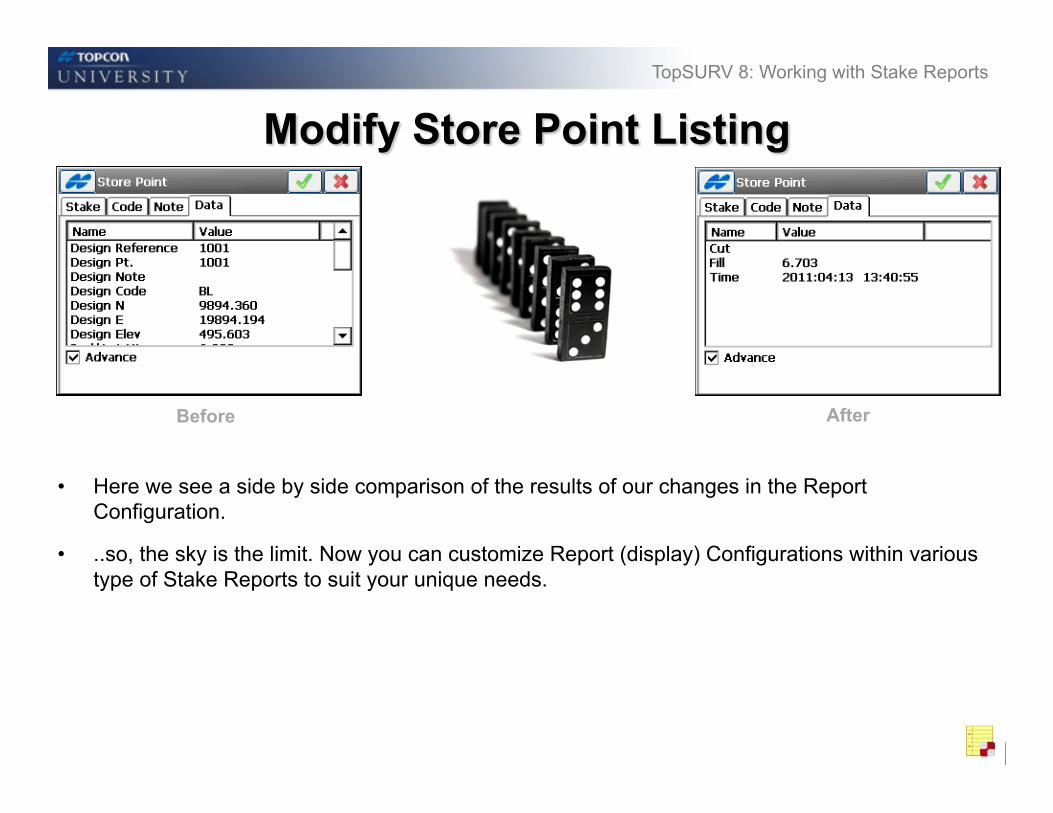
• Here we see a side by side comparison of the results of our changes in the Report Configuration.
• ..so, the sky is the limit. Now you can customize Report (display) Configurations within various type of Stake Reports to suit your unique needs.
Before After

April 2011
TopSURV 8: Working with Stake Reports
April 2011
TopSURV 8: Working with Stake Reports
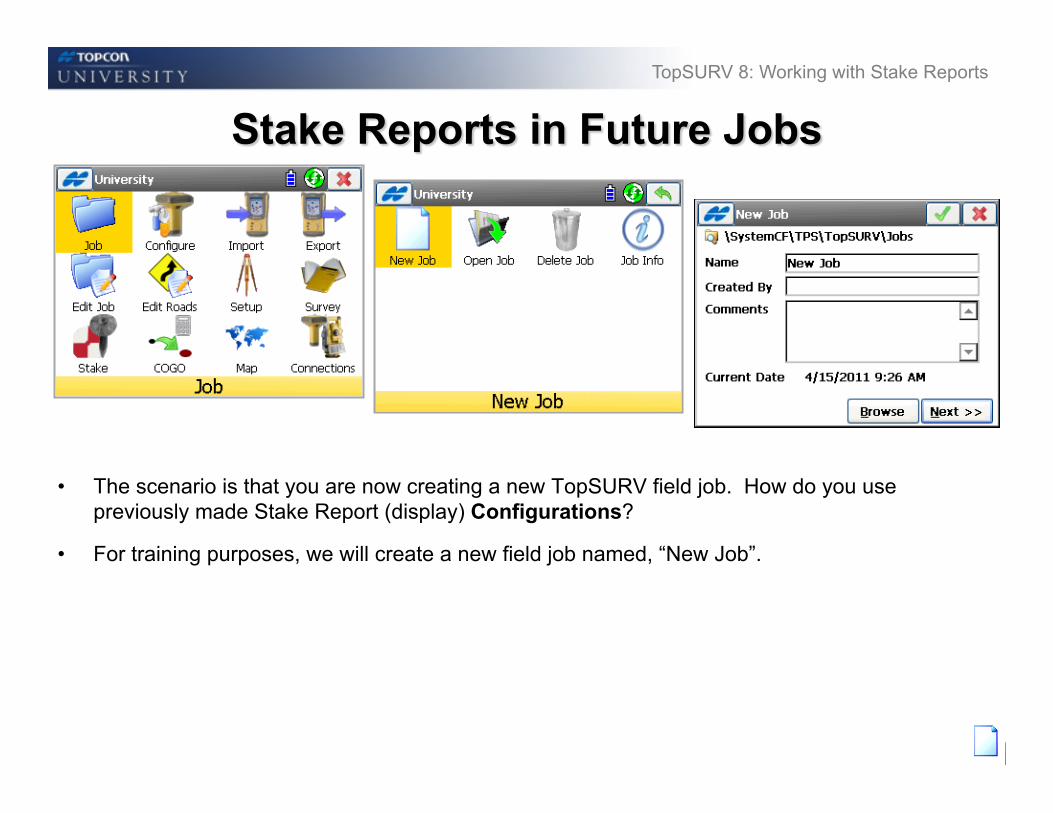
• The scenario is that you are now creating a new TopSURV field job. How do you use previously made Stake Report (display) Configurations?
• For training purposes, we will create a new field job named, “New Job”.

April 2011
TopSURV 8: Working with Stake Reports
• In this new field job, we have already gone through the Setup >> Occupation Backsight routine or Start Base or connected to a Real Time GNSS Network.
• ..we are ready to begin our point staking by tapping Stake >> Points.
April 2011
TopSURV 8: Working with Stake Reports
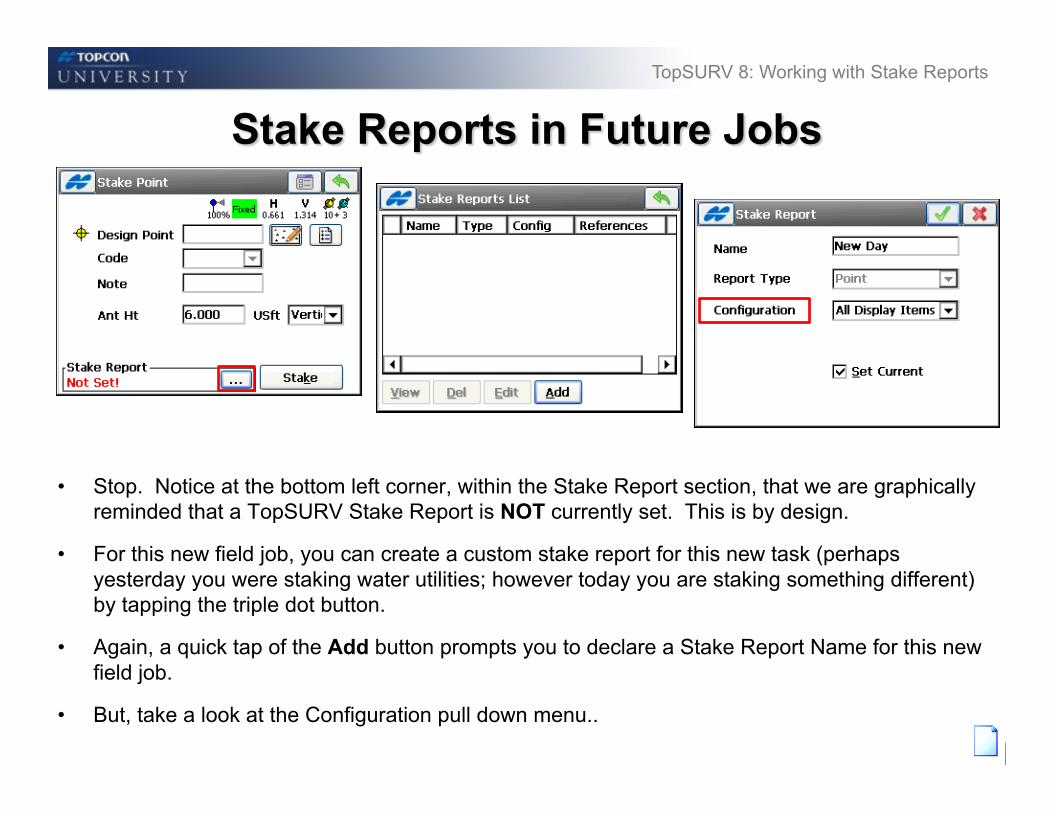
• Stop. Notice at the bottom left corner, within the Stake Report section, that we are graphically reminded that a TopSURV Stake Report is NOT currently set. This is by design.
• For this new field job, you can create a custom stake report for this new task (perhaps yesterday you were staking water utilities; however today you are staking something different) by tapping the triple dot button.
• Again, a quick tap of the Add button prompts you to declare a Stake Report Name for this new field job.
• But, take a look at the Configuration pull down menu..
April 2011
TopSURV 8: Working with Stake Reports
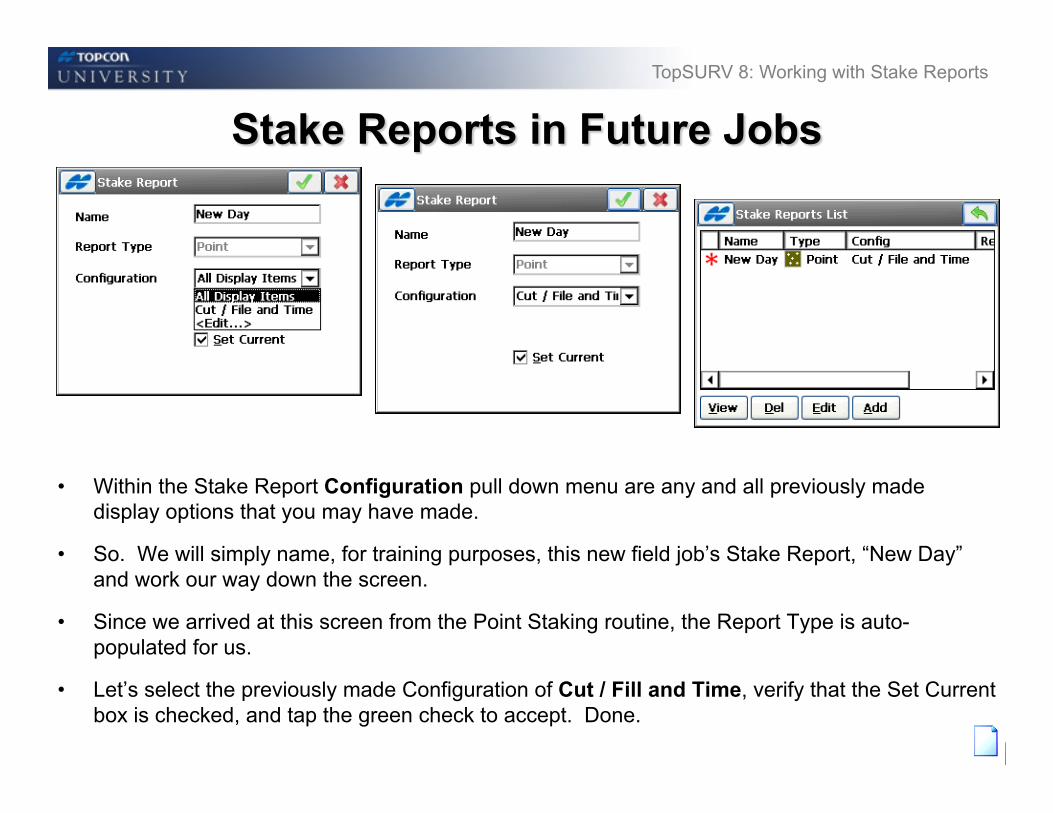
• Within the Stake Report Configuration pull down menu are any and all previously made display options that you may have made.
• So. We will simply name, for training purposes, this new field job’s Stake Report, “New Day” and work our way down the screen.
• Since we arrived at this screen from the Point Staking routine, the Report Type is auto-populated for us.
• Let’s select the previously made Configuration of Cut / Fill and Time, verify that the Set Current box is checked, and tap the green check to accept. Done.
April 2011
TopSURV 8: Working with Stake Reports
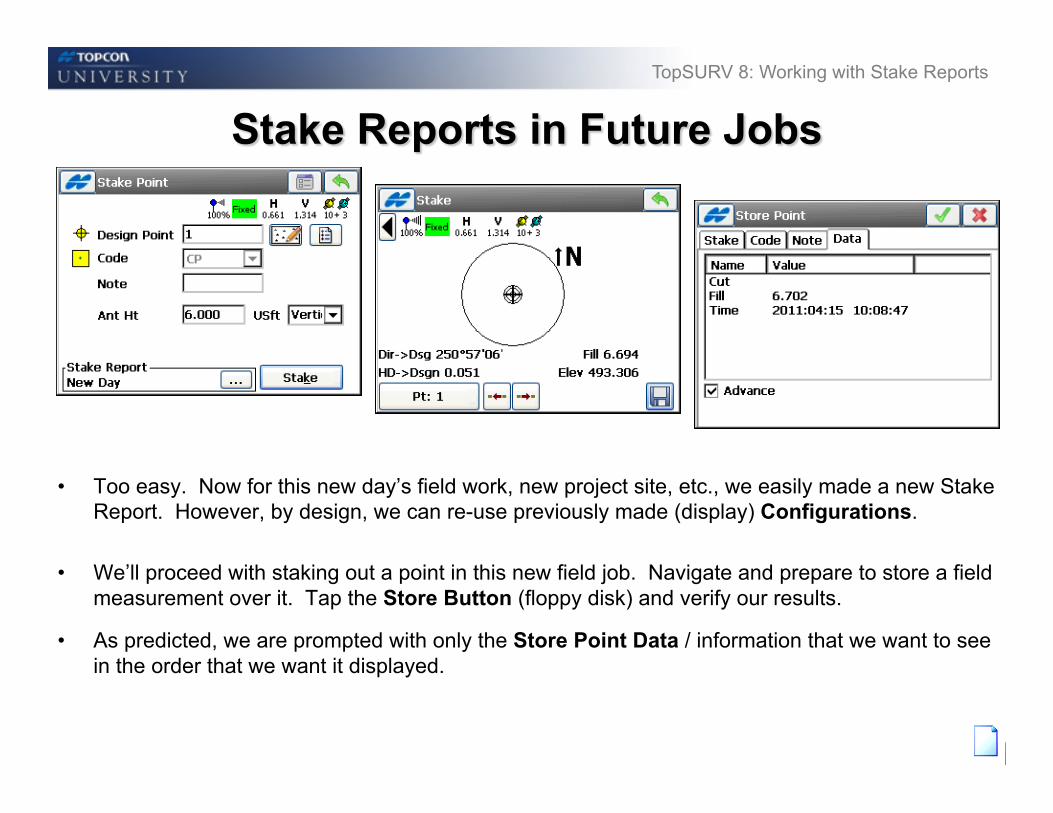
• Too easy. Now for this new day’s field work, new project site, etc., we easily made a new Stake Report. However, by design, we can re-use previously made (display) Configurations.
• We’ll proceed with staking out a point in this new field job. Navigate and prepare to store a field measurement over it. Tap the Store Button (floppy disk) and verify our results.
• As predicted, we are prompted with only the Store Point Data / information that we want to see in the order that we want it displayed.

April 2011
TopSURV 8: Working with Stake Reports
April 2011
TopSURV 8: Working with Stake Reports
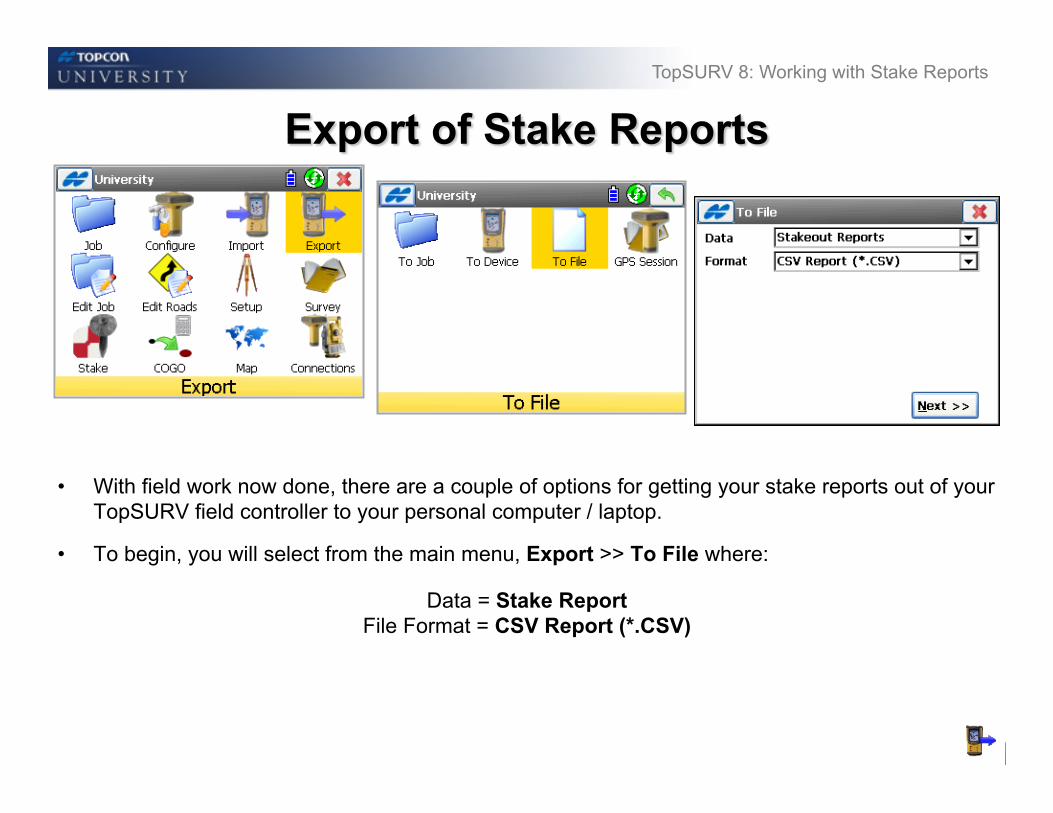
• With field work now done, there are a couple of options for getting your stake reports out of your TopSURV field controller to your personal computer / laptop.
• To begin, you will select from the main menu, Export >> To File where:
Data = Stake Report File Format = CSV Report (*.CSV)
April 2011
TopSURV 8: Working with Stake Reports
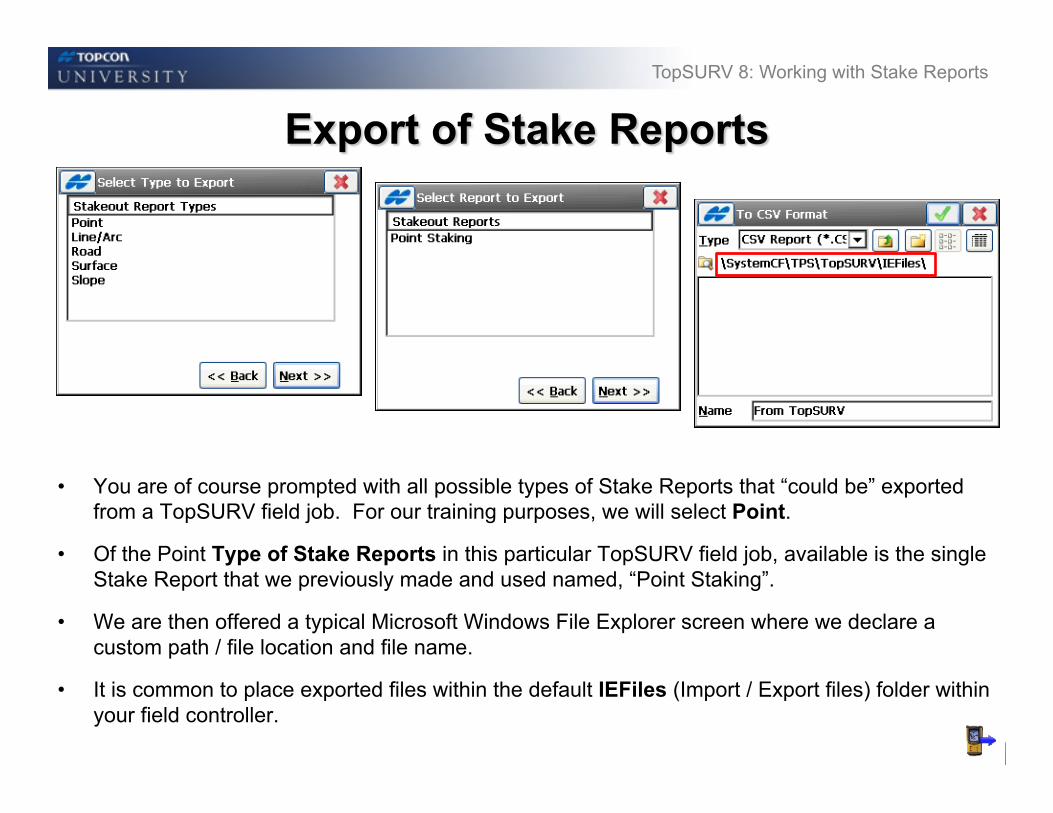
• You are of course prompted with all possible types of Stake Reports that “could be” exported from a TopSURV field job. For our training purposes, we will select Point.
• Of the Point Type of Stake Reports in this particular TopSURV field job, available is the single Stake Report that we previously made and used named, “Point Staking”.
• We are then offered a typical Microsoft Windows File Explorer screen where we declare a custom path / file location and file name.
• It is common to place exported files within the default IEFiles (Import / Export files) folder within your field controller.
April 2011
TopSURV 8: Working with Stake Reports
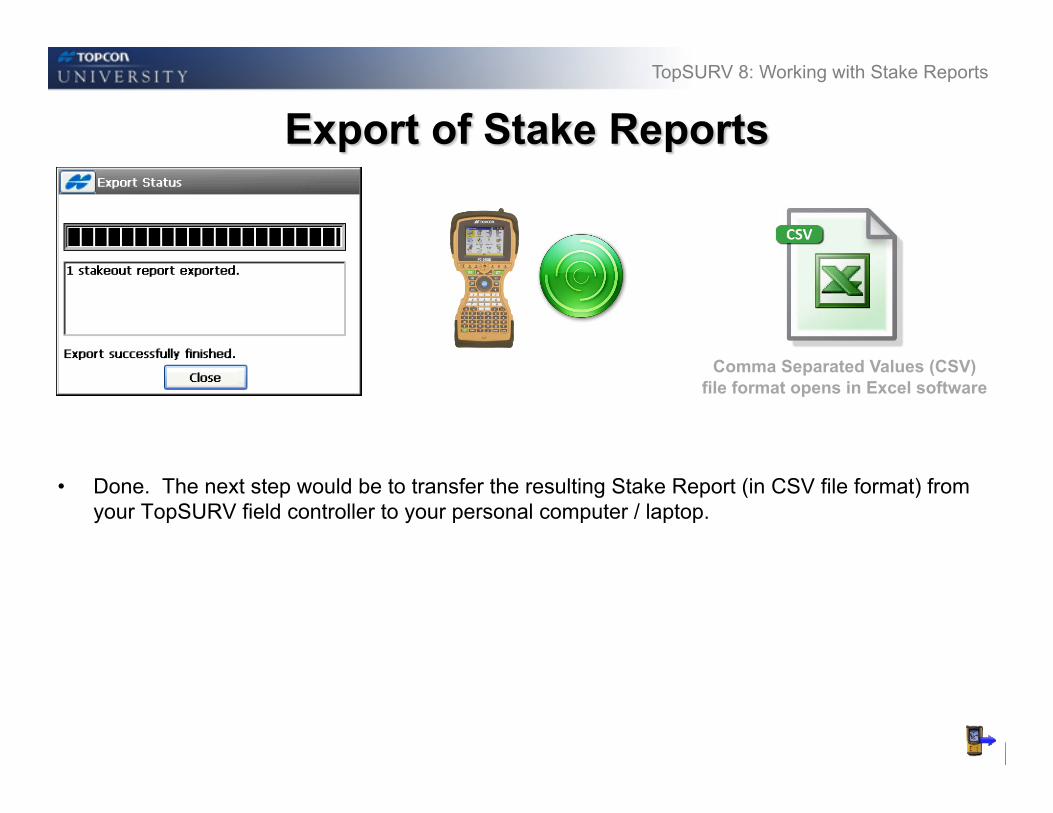
• Done. The next step would be to transfer the resulting Stake Report (in CSV file format) from your TopSURV field controller to your personal computer / laptop.
Comma Separated Values (CSV) file format opens in Excel software

April 2011
TopSURV 8: Working with Stake Reports
TopSURV 8: Working with Stake Reports
April 2011