To Usersemegroup.vn/download/DELIXI/CDI-E Series User... · Thank you for choosing E Series...
266
To Users To Users ——Notices of Onsite Installation and Operation Respectful User: Thanks for your Option of E Series Frequency inverter manufactured by Delixi (Hangzhou) Inverter Co., Ltd. In order that you can better use the product, please pay attention to the following: 1. After frequency inverter is installed and commissioned, fasten the components, especially connecting bolt of the line, which shall cause fire accident due to heat at the connection if not fastened. 2. Design of installation on the site should be reasonable to maintain excellent ventilation. 3. In and out lines of the frequency inverter should not be connected reversely. Otherwise, it shall lead to frequency inverter explosion. 4. Starting and stopping the motor directly by power-on and power-off the main circuit of the frequency inverter shall cause frequent jumping faults to the frequency inverter. 5. When selecting frequency inverter type, configure the frequency inverter as per actual load power (load working current). When there is heavy load, type selection can be magnified by 1 to 2 shifts. Smaller type shall cause overcurrent or overload jumping faults to the frequency inverter. 6. Protection level of the frequency inverter is IP20, that is, it can prevent a foreign matter with a diameter of 12.5mm or greater from completely entering, without waterproof function. 7. Frequency inverter if stored for more than half a year should be powered with a voltage regulator to increase voltage gradually. Otherwise, there is danger of electric shock and explosion. 8. If line connecting the frequency inverter to the motor exceeds 50m, it is required to add AC output inductor. Otherwise, the frequency inverter and the motor are in danger of damage In order that you can use the product safely for a long time, you need to carefully inspect the product, regularly power off it to clean and maintain. For any trouble in process of inspection, please notify us by phone or mail. Our service hotline is 0571-85243785. We shall send professional to your site as per your trouble to assist you in solving the trouble and ensure the product is operated safely and reliably.
Transcript of To Usersemegroup.vn/download/DELIXI/CDI-E Series User... · Thank you for choosing E Series...

To Users
To Users
——Notices of Onsite Installation and Operation
Respectful User:
Thanks for your Option of E Series Frequency inverter manufactured by Delixi (Hangzhou) Inverter Co., Ltd. In
order that you can better use the product, please pay attention to the following:
1. After frequency inverter is installed and commissioned, fasten the components, especially connecting bolt of
the line, which shall cause fire accident due to heat at the connection if not fastened.
2. Design of installation on the site should be reasonable to maintain excellent ventilation.
3. In and out lines of the frequency inverter should not be connected reversely. Otherwise, it shall lead to
frequency inverter explosion.
4. Starting and stopping the motor directly by power-on and power-off the main circuit of the frequency inverter
shall cause frequent jumping faults to the frequency inverter.
5. When selecting frequency inverter type, configure the frequency inverter as per actual load power (load
working current). When there is heavy load, type selection can be magnified by 1 to 2 shifts. Smaller type shall
cause overcurrent or overload jumping faults to the frequency inverter.
6. Protection level of the frequency inverter is IP20, that is, it can prevent a foreign matter with a diameter of
12.5mm or greater from completely entering, without waterproof function.
7. Frequency inverter if stored for more than half a year should be powered with a voltage regulator to increase
voltage gradually. Otherwise, there is danger of electric shock and explosion.
8. If line connecting the frequency inverter to the motor exceeds 50m, it is required to add AC output inductor.
Otherwise, the frequency inverter and the motor are in danger of damage
In order that you can use the product safely for a long time, you need to carefully inspect the product, regularly
power off it to clean and maintain. For any trouble in process of inspection, please notify us by phone or mail. Our
service hotline is 0571-85243785. We shall send professional to your site as per your trouble to assist you in
solving the trouble and ensure the product is operated safely and reliably.


Content
I
Content
Foreword ............................................................................................................................................................... IV
Chapter 1 Safety Operation and Notices............................................................................................................... 1
1.1 Examination and Acceptance .......................................................................................................................... 1
1.2 Precautions for safe operation: ....................................................................................................................... 2
Chapter 2 Product Information ............................................................................................................................. 4
2.1 Nameplate data and naming rule .................................................................................................................... 4
2.2 Technical Specifications ................................................................................................................................. 5
2.3 Product List ..................................................................................................................................................... 9
2.4 Appearance and installation size ..................................................................................................................... 12
2.5 Routine maintenance ...................................................................................................................................... 17
Chapter 3 Installation and Connection of Frequency inverter .............................................................................. 20
3.1 Option of the Site and Space for Installation .................................................................................................. 20
3.2 Wiring of the Peripherals and Optional parts .................................................................................................. 22
3.3 Wiring of the main circuit ............................................................................................................................... 23
3.3.1 Wiring diagram for the main circuit and precautions .................................................................................. 23
3.3.2 Precautions for wiring the input side of the main circuit ............................................................................. 25
3.3.3 Precautions for wiring the output side of the main circuit ........................................................................... 26
3.3.4 Wiring and Supporting Peripherals for Main Circuits with Reference to the Table below .......................... 28
3.4 Connection of control circuit .......................................................................................................................... 30
3.4.1 Arrangement and connection of controlling circuit terminals ..................................................................... 30
3.4.2 Function of control circuit terminal: ............................................................................................................ 33
3.4.3 Wiring Instruction for Control Circuit ......................................................................................................... 34
3.5 Grounding ....................................................................................................................................................... 38
Chapter 4 Keyboard Operation and Running ....................................................................................................... 39
4.1 Option of operating mode ............................................................................................................................... 39
4.2 Test run and inspection ................................................................................................................................... 39
4.2.1 Precautions and inspection before test run................................................................................................... 39
4.2.2 Test run ........................................................................................................................................................ 39
4.2.3 Operating inspection .................................................................................................................................... 40
4.3 Operating method of keyboard. ...................................................................................................................... 40
4.3.1 Keys on keyboard and their functions ......................................................................................................... 40
4.3.2 Data Monitoring Mode ................................................................................................................................ 45
4.3.3 Use of Multi- Function Key JOG ................................................................................................................ 45
4.3.4 Parameter check and set methods (using digital keyboard) ......................................................................... 46
4.4 Function Code Display Mode ......................................................................................................................... 47
Chapter 5 Tables of Function Parameters ............................................................................................................. 48
5.1 P0 Group - Basic Function ............................................................................................................................. 49

Content
II
5.2 Group P1 - Motor Control Parameter ............................................................................................................. 53
5.3 Group P2 - Input/Output Terminal Function................................................................................................... 55
5.4 Group P3 - Programmable Function ............................................................................................................... 62
5.5 Group P4 - Pid Control And Communication Control .................................................................................... 69
5.6 Group P5 - Keyboard Display ........................................................................................................................ 71
5.7 Group P6 - Fault Display and Protection ........................................................................................................ 74
5.8 Group P7 - User Function Customization ....................................................................................................... 78
5.9 Group P8 - Manufacturer Function ................................................................................................................. 79
5.10 Group P9 - Monitoring Parameter ................................................................................................................ 79
Chapter 6 Description of Parameters .................................................................................................................... 81
6.1 Group 0 - Basic Function ................................................................................................................................ 81
6.2 Group P1 - Motor Control Parameter ............................................................................................................. 98
6.3 Group P2 - Input/Output Terminal Function................................................................................................... 110
6.4 Group P3 - Programmable Function ............................................................................................................... 132
6.5 Group P4 - Pid Control And Communication Control .................................................................................... 143
6.6 Group P5 - Keyboard Display ........................................................................................................................ 150
6.7 Group P6 - Fault Display and Protection Control ........................................................................................... 163
6.8 Group P7 - User Function Customization ....................................................................................................... 164
6.9 Group P8 - Manufacturer Function ................................................................................................................. 165
6.10 Group P9 - Monitoring Parameter ................................................................................................................ 167
Chapter 7 Common Function and Application Case ............................................................................................. 169
7.1 Common Function .......................................................................................................................................... 169
7.1.1 Start and Stop Control .................................................................................................................................. 169
7.1.2 Start and Stop Mode .................................................................................................................................... 171
7.1.3 Acceleration and Deceleration Mode ........................................................................................................... 174
7.1.4 Jogging Function ......................................................................................................................................... 174
7.1.5 Running Frequency Control ........................................................................................................................ 174
7.1.6 Multi-speed Function ................................................................................................................................... 176
7.1.7 Simple PLC .................................................................................................................................................. 176
7.1.8 Timing Function .......................................................................................................................................... 177
7.1.9 Fixed-length Function .................................................................................................................................. 178
7.1.10 Counting Function ..................................................................................................................................... 179
7.1.11 Distance Control Function ......................................................................................................................... 180
7.1.12 Simple Internal Relay Programmable Function ......................................................................................... 181
7.1.13 Internal Timer Function ............................................................................................................................. 184
7.1.14 Internal Operation Module Function ......................................................................................................... 185
7.1.15 PID FUNCTION ........................................................................................................................................ 188
7.1.16 Wobbulating Function ................................................................................................................................ 188
7.1.17 Analog Input/Output Use ........................................................................................................................... 190
7.1.18 Digital Input/Output Use ........................................................................................................................... 191

Content
III
7.1.19 Communication of Upper Computer ......................................................................................................... 193
7.1.20 Parameter Identification ............................................................................................................................. 194
7.2 Application Cases ........................................................................................................................................... 196
7.2.1 Switching function of dual-pump .............................................................................................................. 196
7.2.2 PID control for Water Supply at Permanent Pressure .................................................................................. 199
7.2.3 Ball mill ....................................................................................................................................................... 202
7.2.4 Injection Molding Machine ......................................................................................................................... 205
7.2.5 Local/ Remote Control ................................................................................................................................ 208
Chapter 8 E Series Frequency inverter RS-485 Communication ......................................................................... 212
Chapter 9 Fault Handling...................................................................................................................................... 220
9.1 Frequency inverter Fault and Exclusion Measure .......................................................................................... 220
9.2 Motor Fault and Exclusion Measure ............................................................................................................... 225
Appendix 1 Regular Maintenance and Inspection Methods ................................................................................. 226
Appendix 2 Guideline for Option of Optional parts ............................................................................................. 228
A2.1 Alternative Current Reactor (ACL) ............................................................................................................. 228
A2.2 DC reactor .................................................................................................................................................... 229
A2.3 Radio noise filter .......................................................................................................................................... 229
A2.4 Remote Operation Keyboard ....................................................................................................................... 230
A2.5 Energy Consumption Brake Unit and Brake Resistance .............................................................................. 230
Appendix 3 E180-IO Expansion Card .................................................................................................................. 233
Appendix 4 E180 Encoder Expansion Card ......................................................................................................... 235
Appendix 5 Expansion Card of RS485 Communication ...................................................................................... 237
Appendix 6 E180 Expansion Card of Injection Molding Machine ...................................................................... 238
Appendix 7 E180-DP Expansion Card ................................................................................................................. 234
Appendix 8 E180-WSP Expansion Card .............................................................................................................. 237

Foreword
IV
Foreword
Thank you for choosing E Series Frequency inverter manufactured by Delixi (Hangzhou) Inverter Co., Ltd. It
includes CDI-E100 Series, E102 Series and CDI-E180 Series.
Before using it, please read this manual carefully so as to guarantee correct operation. Erroneous operation might
result in malfunction, faults or shortened life span of the equipment, or even personal injury. Therefore, users are
advised to read carefully this manual and abide by it during operation. The manual is a standard attached
document. Please keep it for maintenance and repair in the future.
Aside from operation instructions, this manual also presents some wiring diagrams for your reference. If you have
any difficulty or special demands for using the frequency inverter, please contact our offices or distributors. You
may also contact the customer service centre of our head office for our quality service. The manual noted that its
content might change without further notice.
Please confirm following content during unpackaging:
1. If the product is damaged during process of transportation, if parts are damaged and dropped, or if main body
is bruised.
2. If rated value marked on nameplate is consistent with your order requirement, or if there are ordered Unit,
acceptance certificate, operation manual and guarantee shed in package.
The Company strictly complies with quality system during production and packaging, for any inspection miss,
please contact our Company or supplier for settlement.
People should not reprint,
transmit, and use the manual or
content relating to it without
written permission of the
Company, who will assume legal
responsibility for damage caused
in violation of the item.

Chapter 1 Safety Operation and Notices
1
Chapter 1 Safety Operation and Notices
Please read the manual carefully before install, operate, maintain or check E Series Frequency inverter.
To protect yourself, the equipment, and the property from any possible harm, please do read this chapter before
using our E Series Frequency inverters. Precautions relevant to operation safety are categorized as “Warning” and
“attention”.
: Potentially dangerous condition, which maybe cause severe body injuries or dead if
relevant requirement is ignored.
: Potentially dangerous condition, which maybe cause middle, light injuries or device
damage if relevant requirement is ignored, it also applies to unsafe operation.
1.1 Examination and Acceptance
Items to be examined are as follows:
Items Note
1. Does the model conform to your order? Check the Model indicated on the nameplate on one side
of the frequency inverter.
2. Is there any damage to the components? Survey the external appearance of the frequency inverter
and make sure that no damage has occurred during
transportation
3. Are the components properly fastened? Remove the front cover and examine all visible
components with appropriate tools.
4. Do you have the user’s manual, the quality
certificate and the warranty claims form?
Check for the user’s manual, the quality certificate and the
warranty claims form
If any of the above items is problematic, please contact us or our distributors.
Warning
Attention

Chapter 1 Safety Operation and Notices
2
1.2 Precautions for safe operation:
Warning
Electro Static
Discharge
(ESD)
1. Installation and maintenance should be performed by professional only.
2. Verify that rated voltage of the frequency inverter should conform with voltage level of AC
power supply. Otherwise it shall cause hurt to human body or fire accident.
3. Do not make supply power of AC loop connect with outputting terminal U, V and W.
The connection will damage converser, thus guarantee card should be nonserviceable.
4. Only connect it to input power supply after the panel is well installed. Do not remove the
external lid when it is powered; otherwise it may cause electric shock.
5. Forbid touching high voltage terminal inside the frequency inverter when it is powered on;
otherwise, there is danger of electric shock.
6. Because there is an amount of capacitance stored electric energy inside the frequency inverter,
maintenance should be implemented at least 10 minutes after the power is off. At this time,
charging indicator should be off thoroughly or positive or negative Bus line voltage is confirmed
to be below 36V; otherwise there is danger of electric shock.
7. Do not turn on or off line and connector when the circuit is powered on; otherwise it can cause
hurt to human body.
8. Electric elements can be easily damaged by static electricity. Do not touch electric elements.
9. This frequency inverter should not undergo voltage withstand test, which might result in
damages to the semiconductor devices in it.
10. Before switching on the power supply, please put the cover board in position. Otherwise,
electric shock or explosion might occur.
11. Never confuse the input terminals. Otherwise, explosion or damage to the property might
occur.
12. For frequency inverter of which storage period exceeds half year, please increase the input
voltage gradually by using regulator, to prevent from electric shock and explosion.
13. Do not operate the frequency inverter with wet hand; otherwise, there is danger of electric
shock.
14. All parts should be replaced by professional only. It is strictly prohibitive to remain stub or
metal object in machine, to prevent from fire.
15. After replaced control board, please perform relevant parameter setting before operation to
prevent from damage of materials.
Foreword
3
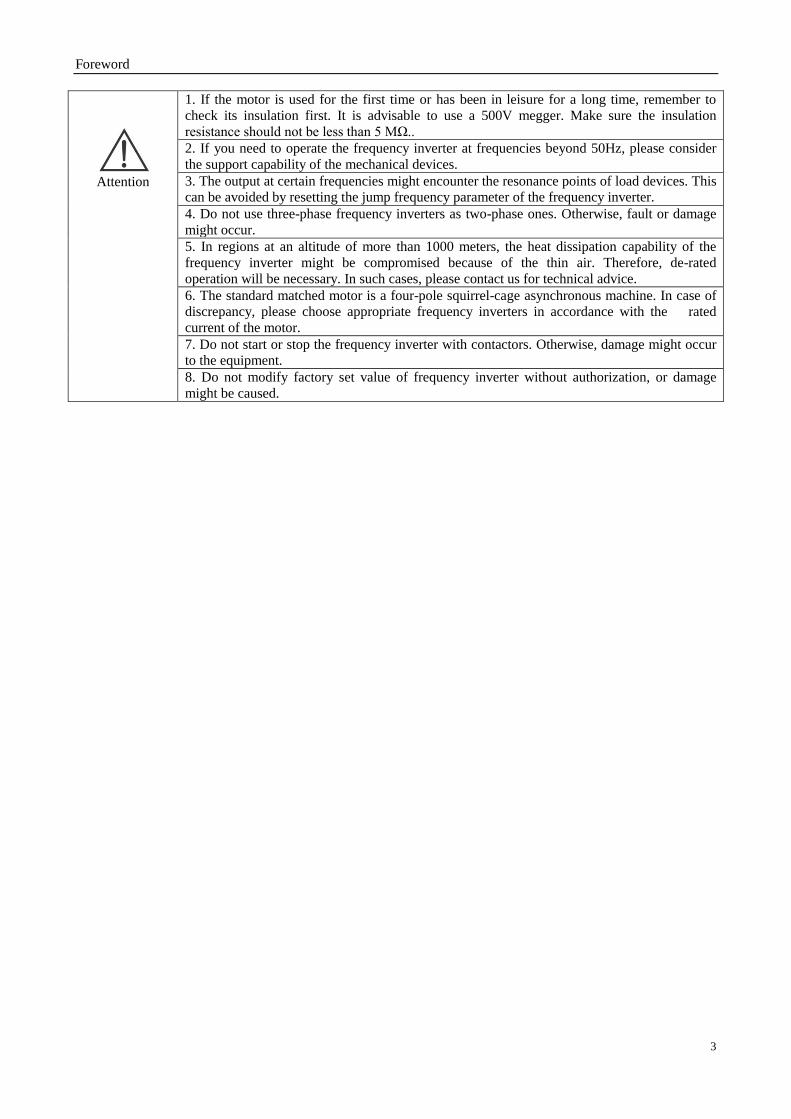
Attention
1. If the motor is used for the first time or has been in leisure for a long time, remember to
check its insulation first. It is advisable to use a 500V megger. Make sure the insulation
resistance should not be less than 5 MΩ..
2. If you need to operate the frequency inverter at frequencies beyond 50Hz, please consider
the support capability of the mechanical devices.
3. The output at certain frequencies might encounter the resonance points of load devices. This
can be avoided by resetting the jump frequency parameter of the frequency inverter.
4. Do not use three-phase frequency inverters as two-phase ones. Otherwise, fault or damage
might occur.
5. In regions at an altitude of more than 1000 meters, the heat dissipation capability of the
frequency inverter might be compromised because of the thin air. Therefore, de-rated
operation will be necessary. In such cases, please contact us for technical advice.
6. The standard matched motor is a four-pole squirrel-cage asynchronous machine. In case of
discrepancy, please choose appropriate frequency inverters in accordance with the rated
current of the motor.
7. Do not start or stop the frequency inverter with contactors. Otherwise, damage might occur
to the equipment.
8. Do not modify factory set value of frequency inverter without authorization, or damage
might be caused.

Chapter 2 Product Information
4
Chapter 2 Product Information
2.1 Nameplate data and naming rule
Nameplate data: for example CDI-E180G011/P015T4BHL:

Chapter 2 Product Information
5
2.2 Technical Specifications
Item Specification
Control
Control mode
V/F Control
Open-loop Vector Control (SVC)
Closed-loop Vector Control (VC)( Invalid CDI-E100 Series)
Frequency
Resolution
Digital: 0.02%
Analog: 0.1%
V/F curve Linear, square root, random V/F
Overload
Capability
G Model: 60s for 150% of the rated current; 3s for 180% of the rated current;
P Model: 60s for 120% of the rated current; 3s for 150% of the rated current;
Start
Torque
G Model: 0.5Hz/150% (SVC); 0Hz/180% (VC)
P Model: 0.5Hz/100%
Speed Regulation
Range 1:100(SVC) 1:1000(VC)
Stable Speed
Accuracy ±0.5%(SVC) ±0.02%(VC)
Torque Control
Accuracy ±5%(VC)
Torque
Compensation Manual torque compensation (0.1%~30.0%), automatic torque compensation
Configuration
Control
power
supply
P24V
E100 Max. Output Current 300mA with current-limiting protection
E102 Max. Output Current 300mA without current-limiting protection
E180 Max. Output Current 300mA with current-limiting protection
Input
Terminal
E100
6-way Digital Input Terminal (DI1~DI6), in which D16 can access to high-speed
Impulse Input (both built-in and external power supply are available).
2-way Analog Input Terminal (VF1, VF2), which can be used as voltage
(0V~10V) or current (0/4mA~20mA) input. It can be used as Digital Input
Terminal through reference.
E102
5-way Digital Input Terminal (DI1~DI6), in which D16 can access to high-speed
Impulse Input (only internal power supply is available)
2-way Analog Input Terminal (VF1, VF2), which can be used as voltage
(0V~10V) or current (0/4mA~20mA) input. It can be used as Digital Input
Terminal through reference.
E180
6-way Digital Input Terminal (DI1~DI6),in which DI6 can access to high-speed
Impulse Input. Through external I/O expansion card, it can be expanded to
4-way(DI7~DI10).
2-way Analog Input Terminal (VF1, VF2), which can be used as voltage
(0V~10V) or current (0/4mA~20mA) input. It can be used as Digital Input
Terminal through setting
NOTE: Both internal power supply and external power supply can be used
for DI1~DI6, only internal power supply can be used for DI7~DI10.

Chapter 2 Product Information
6
Item Specification
Configuration Output
Terminal
E100
2-way Analog Input Terminal (FM1, FM2), which can not only be used as output
voltage (0V~10V),but output current (0mA~20mA)
1-way open collector output (YO), DC 48V 50Ma below
1-way Impulse output (FMP), Frequency Range between 0.01kHz~100.00kHz
2-way Relay Output (T1, T2), DC 30V/3A below and AC 250V/3A below
Note: YO and FMP are common YO/FMP terminal, but only one can be used
at the same time.
E102
1-way Analog Input Terminal FM1, which can not only be used as output voltage
(0V~10V),but output current (0mA~20mA).
1-way Relay Output T1, DC 30V/3A below and AC 250V/3A below
E180
2-way Analog Input Terminal (FM1, FM2), which can not only be used as output
voltage (0V~10V),but output current (0mA~20mA)
1-way open collector output (YO), DC 48V 50Ma below. Additional 2-way open
collector output (YO1, YO2) can be added through external IO expansion card.
1-way Impulse output (FMP), Frequency Range between 0.01kHz~100.00kHz
2-way Relay Output (T1, T2), DC 30V/3A below w and AC 250V/3A below
Note: YO and FMP are common YO/FMP terminal, but only one can be used
at the same time.
Running
Operating
mode Keyboard, terminal, RS485 communication
Frequency
Source
14 kinds of main frequency sources and 14 kinds of auxiliary sources. Adopt
various combination modes to switch. Diversification to Each Frequency Source
Input Mode: keyboard potentiometer, external analog, digital reference, impulse
reference, Multiplex Directive, simple PLC, communication, arithmetic results, etc.
Torque Source 14 kinds of Torque Sources, including digital reference, external analog, impulse
reference, Multiplex Directive, communication, arithmetic results, etc.
Acceleration
and
Deceleration
Time
Four groups of straight lines (select the terminal to switch through acceleration and
deceleration time), S Curve 1 and S Curve 2
Emergency
stop Interrupt output of frequency inverter.
Multiplex
Speed
16 speed is allowable to set at most and use various combination of multiplex
directive terminal to switch
Simple PLC
Function
Continuously run 16-phase speed and independently set acceleration and
deceleration time and running time
Jogging
Control
Independently set Jogging frequency and jogging acceleration and deceleration
time, additionally, set the unit under running state and confirm whether the jogging
is preferential
Rotating
Speed
Tracking
Frequency inverter starts operation by tracking the load speed
Fixed-length
and
Fixed-distance
Control
Realize fixed-length and fixed-distance control function through Impulse Input

Chapter 2 Product Information
7
Item Specification
Running
Control mode Realize counting function through Impulse Input
Wobbulating
Function Apply for textile winding equipment
Built-in PID Realize process control closed loop system
AVR
Function When the gird voltage fluctuates, ensure constant output
DC Braking Realize fast and stable shut-down
Slip
Compensation Compensate the speed deviation caused by the increase of load
Hopping
Frequency Prevent resonance from occurring with load
Sagged
Function Balance the load of multiple motors with same load
Timing
Control
Be able to realize automatic shutdown of the frequency inverter when reaching
given time
Built-in
Virtual Delay
Relay
Realize simple logic Programming to multi-functional output terminal function
and digital input terminal signal, the logic results can not only be equivalent to
digital input terminal function, but can be output through multi-functional terminal
output
Built-in Timer Build in 2 timers and acquire the timing input signal to realize timing signal
output. Use alone or in combination
Operation
Module
Built-in
Operation
Module
One built-in 4-way Operation Module to realize simple addition, subtraction,
multiplication and division, size judgment and integral operation
Communication
E100 The control panel is directly equipped with RS485 Communication Interface and
supports Standard MODBUS Protocol
E102
The control panel is not equipped with built-in RS485 Communication Interface,
so external communication expansion card is required. It supports Standard
MODBUS Protocol (External Connection of E102-485 Expansion Card)
E180
The control panel is not equipped with built-in RS485 Communication Interface,
so external communication expansion card is required. It supports Standard
MODBUS Protocol (External Connection of E180-485 Expansion Card)
Encoder
E100
Be able to connect the encoder through Terminal DI5 & DI6 on control panel,
such an encoder connection method can realize simple closed-loop control
through PID Control and used for occasions without high requirements to control
accuracy.
E102 Only connect to 1-way pulse signal of encoder (DI6)
E180
The control panel is not equipped with encoder interface, so external encoder
expansion card is required. It supports ABZ Incremental Encoder, UVW
Incremental Encoder and Rotary Transformer. This encoder connection method
can realize high-performance closed-loop vector control and be used for occasions
with high requirements to control accuracy.
Type of Motor
E100 Only be equipped with asynchronous motor
E102 Only be equipped with asynchronous motor
E180 Not only be equipped with asynchronous motor, but synchronous motor

Chapter 2 Product Information
8
Item Specification
Display
Running
informati
on
Given frequency, output current, output voltage, Bus line voltage, input signal, feedback
value, module temperature, output frequency, motor synchronous speed, etc.
Through >> Key, display 32 loops at most
Error
informati
on
Save the historical information of 3 faults under running state of fault protection. Every
piece of fault information includes frequency, current, Bus line voltage and input/output
terminal status when fault happens.
Protection
Frequenc
y
inverter
protectio
n
Overcurrent, overvoltage, module fault protection, undervoltage, overload, external
fault protection, EEPROM fault protection, ground protection, default phase,etc.
Frequenc
y
inverter
alarm
Locked protection, overload alarm
Instantan
eous
power-of
f
Lower than 15 ms: Continuous operation
Bigger than 15 ms: Automatic restart is allowable
Environment
Ambient
temperat
ure -10~40
Storage
temperat
ure -20~65
Ambient
humidity 90 % RH in max .(no dewing)
Height/v
ibration Below 1,000 m, below 5.9m/sec² (=0.6g)
Applicati
on
position
No corrosive gas, inflammable gas, oil mist, dust and others
Cooling Air-blast cooling

Chapter 2 Product Information
9
2.3 Product List
One. E100 Series
(1) Type list
Frequency inverter type Rated capacity
(KVA)
Rated input current
(A)
Rated output current
(A)
Matchable
Motor
(kW)
S2 (Single-phase 220V, 50/60Hz) (Built-in Brake Unit)
CDI-E100G0R4S2B 0.8 5.0 2.0 0.4
CDI-E100G0R75S2B 1.5 9 4.0 0.75
CDI-E100G1R5S2B 2.7 15.7 7.0 1.5
CDI-E100G2R2S2B 3.8 27 10.0 2.2
T2 (Three-phase 220V, 50/60Hz) (Built-in Brake Unit)
CDI-E100G0R4T2B 0.8 2.3 2.0 0.4
CDI-E100G0R75T2B 1.5 6 4.0 0.75
CDI-E100G1R5T2B 2.7 8.8 7.0 1.5
CDI-E100G2R2T2B 3.8 12.5 10.0 2.2
T4 (Three-phase 380V, 50/60Hz) (15kW and below the standard built-in brake unit) CDI-E100G0R75T4B 1.5 3.4 2.3 0.75
CDI-E100G1R5T4B 3.0 5.0 3.7 1.5
CDI-E100G2R2T4B 4.0 5.8 5.1 2.2
CDI-E100G3R7T4B 5.9 10.5 8.8 3.7
CDI-E100G5R5/P7R5T4B 8.5/11 15.5/20.5 13/17 5.5/7.5
CDI-E100G7R5/P011T4B 11/17 20.5/26 17/25 7.5/11
CDI-E100G011/P015T4BL 17/21 26/35 25/32 11/15
CDI-E100G015/P018.5T4BL 21/24 35/38.5 32/37 15/18.5
CDI-E100G018.5/P022T4 24/30 38.5/46.5 37/45 18.5/22 CDI-E100G022T4 30 46.5 45 22
(2)Type configuration
Frequency inverter type Brake unit D.C. reactor LCD keyboard
T4(Three-phase 380V, 50/60Hz)
CDI-E100G0R75T4B
Built-in as
standard
configuration
N/A
N/A
CDI-E100G1R5T4B
CDI-E100G2R2T4B
CDI-E100G3R7T4B
CDI-E100G5R5/P7R5T4B
CDI-E100G7R5/P011T4B
CDI-E100G011/P015T4BL Built-in as standard
configuration CDI-E100G015/P018.5T4BL
CDI-E100G018.5/P022T4 Built-in as
option
configuration
Built-in as option
configuration CDI-E100G022T4
Two E102 Series
(1) Type list
Frequency inverter type Rated capacity
(KVA)
Rated input current
(A)
Rated output current
(A)
Matchable
Motor
(kW)
S2 (Single-phase 220V, 50/60Hz) (Built-in Brake Unit)
CDI-E102G0R4S2B 0.8 5.0 2.0 0.4
CDI-E102G0R75S2B 1.5 9 4.0 0.75
CDI-E102G1R5S2B 2.7 15.7 7.0 1.5
CDI-E102G2R2S2B 3.8 27 10.0 2.2
T2 (Three-phase 220V, 50/60Hz) (Built-in Brake Unit)

Chapter 2 Product Information
10
CDI-E102G0R4T2B 0.8 2.3 2.0 0.4
CDI-E102G0R75T2B 1.5 6 4.0 0.75
CDI-E102G1R5T2B 2.7 8.8 7.0 1.5
CDI-E102G2R2T2B 3.8 12.5 10.0 2.2
T4 (Three-phase 380V, 50/60Hz) (15kW and below the standard built-in brake unit)
CDI-E102G0R75T4B 1.5 3.4 2.3 0.75
CDI-E102G1R5T4B 3.0 5.0 3.7 1.5
CDI-E102G2R2T4B 4.0 5.8 5.1 2.2
CDI-E102G3R7T4B 5.9 10.5 8.8 3.7
CDI-E102G5R5/P7R5T4B 8.5/11 15.5/20.5 13/17 5.5/7.5
CDI-E102G7R5/P011T4B 11/17 20.5/26 17/25 7.5/11
CDI-E102G011/P015T4BL 17/21 26/35 25/32 11/15
CDI-E102G015/P018.5T4BL 21/24 35/38.5 32/37 15/18.5 CDI-E102G018.5/P022T4 24/30 38.5/46.5 37/45 18.5/22 CDI-E102G022T4 30 46.5 45 22
(2) Type configuration
Frequency inverter type Brake unit D.C. reactor LCD keyboard
T4(Three-phase 380V, 50/60Hz)
CDI-E102G0R75T4B
Built-in as
standard
configuration
N/A
N/A
CDI-E102G1R5T4B
CDI-E102G2R2T4B
CDI-E102G3R7T4B
CDI-E102G5R5/P7R5T4B
CDI-E102G7R5/P011T4B
CDI-E102G011/P015T4BL Built-in as standard
configuration CDI-E102G015/P018.5T4BL
CDI-E102G018.5/P022T4 Built-in as
option
configuration
Built-in as option
configuration CDI-E102G022T4

Chapter 2 Product Information
11
Three. E180 Series
(1) Type list
Frequency inverter type Rated capacity
(KVA)
Rated input current
(A)
Rated output current
(A)
Matchable
Motor
(kW)
T2(Three-phase 220V, 50/60Hz)
CDI-E180G0R4T2B 1.5 3.4 2.0 0.4
CDI-E180G0R75T2B 3 5.0 4.0 0.75
CDI-E180G1R5T2B 4 5.8 7.0 1.5
CDI-E180G2R2T2B 5.9 10.5 10 2.2
CDI-E180G3R7T2B 8.5 15.5 17 3.7
CDI-E180G5R5T2B 17 26 25 5.5
CDI-E180G7R5T2BL 21 35 32 7.5
CDI-E180G011T2 30 46.5 45 11
CDI-E180G015T2 40 62 60 15
CDI-E180G018.5T2 50 76 75 18.5
CDI-E180G022T2 60 92 90 22
CDI-E180G030T2 72 113 110 30
T4(Three-phase 380V, 50/60Hz)
CDI-E180G0R75T4B 1.5 3.4 2.3 0.75
CDI-E180G1R5T4B 3 5.0 3.7 1.5
CDI-E180G2R2T4B 4 5.8 5.0 2.2
CDI-E180G3R7/P5R5T4B 5.9/8.5 10.5/15.5 8.8/13 3.7/5.5
CDI-E180G5R5MT4B 8.5 15.5 13 5.5
CDI-E180G5R5/P7R5T4B 8.5/11 15.5/20.5 13/17 5.5/7.5
CDI-E180G7R5/P011T4B 11/17 20.5/26 17/25 7.5/11
CDI-E180G011MT4B 17 26 25 11
CDI-E180G011/P015T4BL 17/21 26/35 25/32 11/15
CDI-E180G015/P018.5T4BL 21/24 35/38.5 32/37 15/18.5
CDI-E180G018.5/P022T4 24/30 38.5/46.5 37/45 18.5/22
CDI-E180G022/P030T4 30/40 46.5/62 45/60 22/30
CDI-E180G030/P037T4 40/50 62/76 60/75 30/37
CDI-E180G037/P045T4 50/60 76/92 75/90 37/45
CDI-E180G045/P055T4 60/72 92/113 90/110 45/55
CDI-E180G055/P075T4 72/100 113/157 110/152 55/75
CDI-E180G075/P093T4 100/116 157/180 152/176 75/93
CDI-E180G093/P110T4 116/138 180/214 176/210 93/110
CDI-E180G110/P132T4 138/167 214/256 210/253 110/132
CDI-E180G132/P160T4 167/200 256/305 253/300 132/160
CDI-E180G160/P185T4 200/224 305/344 300/340 160/185
CDI-E180G185/P200T4 224/250 344/383 340/380 182/200
CDI-E180G200/P220T4L 250/276 383/425 380/420 200/220
CDI-E180G220T4L 276 425 420 220
CDI-E180P250T4L 316 484 480 250
CDI-E180G250/P280T4L 316/355 484/543 480/540 250/280
CDI-E180G280/P315T4L 355/395 543/605 540/600 280/315
CDI-E180G315/P355T4L 395/467 605/714 600/680 315/355
CDI-E180G355/P375T4L 447/467 683/714 680/710 355/375
CDI-E180G375T4L 467 714 710 375
CDI-E180P400T4L 494 753 750 400
CDI-E180G400T4L 494 753 750 400
CDI-E180P500T4L 612 934 930 500
CDI-E180G500T4L 612 934 930 500
CDI-E180G630T4L 790 1206 1200 630
T6(Three-phase 690V, 50/60Hz)
CDI-E180G022/P030T6 36/48 30/40 28/38 22/30
CDI-E180G030/P037T6 48/59 40/49 38/46 30/37

Chapter 2 Product Information
12
CDI-E180G037/P045T6 59/70 49/59 46/56 37/45
CDI-E180G045/P055T6 70/86 59/72 56/68 45/55
CDI-E180G055/P075T6 86/116 72/97 68/92 55/75
CDI-E180G075/P093T6 116/139 97/116 92/110 75/93
CDI-E180G093/P110T6 139/166 116/139 110/132 93/110
CDI-E180G110/P132T6 166/195 139/163 132/155 110/132
CDI-E180G132/P160T6L 195/227 163/190 155/180 132/160
CDI-E180G160/P185T6L 227/264 190/221 180/210 160/185
CDI-E180G185/P220T6L 264/308 221/258 210/245 185/220
CDI-E180G220/P250T6L 308/347 258/290 245/275 220/250
CDI-E180G250/P280T6L 347/383 290/321 275/305 250/280
CDI-E180G280/P315T6L 383/435 321/364 305/345 280/315
CDI-E180G315/P355T6L 435/491 364/411 345/390 315/355
CDI-E180G355/P400T6L 491/541 411/453 390/430 355/400
CDI-E180G400T6L 541 453 430 400
CDI-E180P500T6L 680 569 540 500
CDI-E180G500T6L 680 569 540 500
CDI-E180P600T6L 793 664 630 600
CDI-E180G600T6L 664 664 630 600
CDI-E180P700T6L 905 758 720 700
CDI-E180G700T6L 905 758 720 700

Chapter 2 Product Information
13
(2) Type configuration
Frequency inverter type Brake unit D.C. reactor LCD keyboard
T2(Three-phase 220V, 50/60Hz)
CDI-E180G0R4T2B
Built-in as
standard
configuration
N/A
Option configuration
CDI-E180G0R75T2B
CDI-E180G1R5T2B
CDI-E180G2R2T2B
CDI-E180G3R7T2B
CDI-E180G5R5T2B
CDI-E180G7R5T2BL Built-in as standard
configuration
CDI-E180G011T2 Built-in as
option
configuration Built-in as option
configuration
CDI-E180G015T2
CDI-E180G018.5T2 External
connection as
option
configuration
CDI-E180G022T2
CDI-E180G030T2
T4(Three-phase 380V, 50/60Hz)
CDI-E180G0R75T4B
Built-in as
standard
configuration
N/A
Option configuration
CDI-E180G1R5T4B
CDI-E180G2R2T4B
CDI-E180G3R7/P5R5T4B
CDI-E180G5R5MT4B
CDI-E180G5R5/P7R5T4B
CDI-E180G7R5/P011T4B
CDI-E180G011MT4B
CDI-E180G011/P015T4BL Built-in as
standard
configuration CDI-E180G015/P018.5T4BL
CDI-E180G018.5/P022T4 Built-in as
option
configuration Built-in as option
configuration
CDI-E180G022/P030T4
CDI-E180G030/P037T4
CDI-E180G037/P045T4
External
connection as
option
configuration
CDI-E180G045/P055T4
CDI-E180G055/P075T4
CDI-E180G075/P093T4
External
connection as
option
configuration
CDI-E180G093/P110T4
CDI-E180G110/P132T4
CDI-E180G132/P160T4
CDI-E180G160/P185T4
CDI-E180G185/P200T4
CDI-E180G200/P220T4L
Built-in as
standard
configuration
CDI-E180G220T4L
CDI-E180P250T4L
CDI-E180G250/P280T4L
CDI-E180G280/P315T4L
CDI-E180G315/P355T4L
CDI-E180G355/P375T4L
CDI-E180G375T4L
CDI-E180P400T4L
CDI-E180G400T4L
CDI-E180P500T4L

Chapter 2 Product Information
14
CDI-E180G500T4L
CDI-E180G630T4L
T6(Three-phase 690V, 50/60Hz)
CDI-E180G022/P030T6
External
connection as
option
configuration
External
connection as
option
configuration
Option configuration
CDI-E180G030/P037T6
CDI-E180G037/P045T6
CDI-E180G045/P055T6
CDI-E180G055/P075T6
CDI-E180G075/P093T6
CDI-E180G093/P110T6
CDI-E180G110/P132T6
CDI-E180G132/P160T6L
Built-in as
standard
configuration
CDI-E180G160/P185T6L
CDI-E180G185/P220T6L
CDI-E180G220/P250T6L
CDI-E180G250/P280T6L
CDI-E180G280/P315T6L
CDI-E180G315/P355T6L
CDI-E180G355/P400T6L
CDI-E180G400T6L
CDI-E180P500T6L
CDI-E180G500T6L
CDI-E180P600T6L
CDI-E180G600T6L
CDI-E180P700T6L
CDI-E180G700T6L
CDI-E180G022/P030T6
CDI-E180G030/P037T6
CDI-E180G037/P045T6
CDI-E180G045/P055T6
CDI-E180G055/P075T6
CDI-E180G075/P093T6
CDI-E180G093/P110T6
CDI-E180G110/P132T6
CDI-E180G132/P160T6L
CDI-E180G160/P185T6L
NOTE: For externally-connected brake unit refers to A2.5, and for externally-connected D.C. reactor refers
to A2.2.
Order explanation: During order, please enter type, specification of the product, and provide parameter, load type, or other
information relating to the motor as much as possible. For any special requirement, please consult with technology
department of the Company.

Chapter 2 Product Information
15
2.4 Appearance and installation size
(1) E100, E102 Series

Chapter 2 Product Information
16
Note: the dimension of E102 is same as E100 series

Chapter 2 Product Information
17
Model 3
Model
Unit: mm
Note:
The ordering of the terminals is subject to material object
Model 3
Unit: mm
Note:
The ordering of the terminals is subject to material object
Note: the dimension of E102 is same as E100 series
Three-phase input
Connect power supply
Three-phase output
Connect motor
Brake Resistance
Earthing
Three-phase input
Connect power supply
Three-phase output
Connect motor
Brake Resistance
Earthing
Model

Chapter 2 Product Information
18
(3) E180 Series
Model 1
Unit: mm
Note:
The ordering of the terminals is subject to material object
Model 2
Unit: mm
Note:
The ordering of the terminals is subject to material object
Model 3
Unit: mm
Note:
The ordering of the terminals is subject to material object
Three-phase input
Connect power supply
Three-phase output
Connect motor
Brake Resistance
Earthing
Three-phase input
Connect power supply
Three-phase output
Connect motor
Brake Resistance
Earthing
Three-phase input
Connect power supply
Three-phase output
Connect motor
Brake Resistance
Earthing
Model
Model
Model

Chapter 2 Product Information
19

Chapter 2 Product Information
20

Chapter 2 Product Information
21
2.5 Routine maintenance
(1) Routine maintenance
Under influence of temperature, humidity, dust and vibration, internal elements of frequency inverter should be
aged, which should cause potential fault, or decrease service life of frequency inverter. Therefore, it is significant
to perform routine maintenance and regular inspection with the frequency inverter.
Routine maintenance item:
A. If running sound of motor is abnormal.
B. If vibration is created during operation of motor.
C. If installing condition of frequency inverter is changed.
D. If radiating fan of frequency inverter works normally.
E. If frequency inverter is in state of overheat.
Daily cleanness:
A. Keep cleanness of frequency inverter.
B. Remove dust from surface of frequency inverter effectively, to prevent frequency inverter from incursion of
dust, or metal dust.
C. Remove oil sludge form radiating fan of frequency inverter effectively.
(2) Regular inspection
Please inspect corner pockets of frequency inverter regularly.
Regular inspection item:
A. Inspect air flue, and clean it regularly.
B. Inspect if screw is loosened.
C. Inspect if frequency inverter is corrosive.
D. Inspect if there is arc on surface connecting terminal.
E. Insulated test of major loop
Note: Please disconnect major loop and frequency inverter while testing insulation resistance by using
megohmmeter (500V DC megohmmeter). Do not measure insulation of control loop with megohmmeter. And
high voltage test is needless (finished in ex works).
(3) Replacement of wearing parts
Wearing parts of frequency inverter includes cooling fan, filter ELCC, of which service life depend on operating
environment and maintenance condition closely.
User could confirm replacement period according to the operating time.
A. Cooling fan
Potential damage reason: Shaft abrasion and vane aging.
Critical standard: If there is crack on vane of fan, or if abnormal sound occurs during starting.
B. Filter ELCC
Potential damage reason: Bad input power, higher ambient temperature, frequent load switch, or aging of
electrolyte. Critical standard: If liquid leaks, if safety valve bulged out, measure of static capacitance, and measure
of insulated resistance.

Chapter 2 Product Information
22
(4) Storage of frequency inverter
After purchased the device, please pay attention to following points while storing it:
A. Please store it in original package as much as possible.
B. Long term storage should cause aging of ELCC, please electrify it for 5 hours above twice a year during
storing, in mode of raising voltage to rated voltage slowly via transformer.
(5) Guarantee of frequency inverter
Maintenance free is limited to the frequency inverter only.
The Company will provide guaranteed repair for fault or damage occurs during normal application. For device
sold, shall be repaired in China in reference to the bar code date, and for exported device (not included China)
shall be repaired at purchase site if the date is within six months after delivery.
For products manufactured by the Company, we will provide paid service for life anytime, or anywhere applied it.
All sale, product, and agent units of the Company should provide products with after sale service, of which
service terms include:
A. Provide “Class Ⅲ” inspection service at site of the unit. (Include fault elimination)
B. Refer to after sell service contract concluded between the Company and agents.
C. Request for compensated after-sell service from the agent of the Company (without reference to guaranteed
repair).
Our Company should take responsibility of guaranteed repair, guaranteed exchange, and guaranteed return for
quality and accident responsibility relating to the product, but user could affect insurance for further responsibility
compensation guarantee from insurance agent.
Guarantee term of the product should be effective in 18 months after Bar code date.
For fault caused in following reason, user could obtain compensated maintenance only even guarantee term is
effective:
A. Problem caused in incorrect operation (based on user’s manual) or repair, modification without authorization.
B. Problem caused in violation of critical requirement.
C. Damage caused in undeserved transportation after purchased.
D. Aging or fault caused in bad environment.
E. Damage caused in earthquake, fire, disaster, lightning strike, abnormal voltage or other natural disaster and
incidental disaster.
F. Damage occurs in transportation. (Note: transportation mode should be appointed by user of themselves, the
Company should assist agent to conduct transfer of goods).
G. Brand, trade mark, SN, nameplate marked by manufacturer is damaged or unjustifiable.
H. Failure to pay off fund according to purchase contract.
I. Failure to describe actual conditions relating to installation, distribution, operation, maintenance, or other
condition to the Company.
The Company should carry out responsibility of “Three guarantee” abovementioned only after received the
returned goods, and confirmed responsibility attribution.

Chapter 2 Product Information
23
Should it involve an unpaid or untimely settlement due to the buyer, the ownership hereof still belongs to the
supplier. In addition, the latter will assume no liability hereinabove, and the buyer shall have no disagreement.
All relevant service fees shall be calculated in accordance with the identical standards of the factory. In the event
that an agreement or a contract exist, its priority shall be performed.

Chapter 3 Installation and Connection of Frequency inverter
24
Chapter 3 Installation and Connection of Frequency inverter
3.1 Option of the Site and Space for Installation
Option of installing position:
Warning
1. Prevent from sunniness; Don’t use in the open air directly.
2. Don’t use in the corrosive gas and liquid environment.
3. Don’t use in the oil fog and splash environment.
4. Don’t use in the salt spray environment.
5. Don’t use in the moist and rain environment.
6. Please equip the unit with filters device if metal dust or fiber wadding existing in air.
7. Do not use the unit in mechanical shock or vibration condition.
8. It is necessary to adopt cooling measure if ambient temperature is higher than 40.
9. It is recommended to use the unit in temperature range of -10~+40 because fault
maybe occur in overcool or overheat condition.
10. Keep the unit away from power supply noise, high-power application, such as electric
welder should impact application of the unit.
11. Emissive material should impact application of the unit.
12. Keep the unit away from combustible material, attenuant and solvent.
For ensuring perfect performance and long-term service life, please comply with the abovementioned advices
while installing E Series Frequency inverter to prevent the unit from damage.

Chapter 3 Installation and Connection of Frequency inverter
25
Option of the installation space:
For vertical installation of E Series Frequency inverters, adequate cooling room should be left, so as to ensure
effective cooling
Installation space of E frequency inverters
Attention
1. The spaces to be left above/below and on the two sides of the frequency inverter are required
both for the model with open bracket (IP00) and that with closed bracket (IP20)
2. Permissible temperature at the air inlet: -10 ~ +40
3. Adequate cooling spaces should be reserved both above and below the frequency inverter, so
as to facilitate gas admission and emission.
4. Do not drop anything into the air passage during installation. Otherwise the fan might be
damaged.
5. Mount filtering devices at the air inlet in cases of floating fiber or cotton or heavy dust.

Chapter 3 Installation and Connection of Frequency inverter
26
3.2 Wiring of the Peripherals and Optional parts
The standard method to connect E Series Peripheral Equipment and Optional Components is as below:
E Series Frequency inverter
Peripherals and Optional parts Description
Moulded Case Circuit Breaker
(MCCB)
Be used for rapidly cutting off the fault
current of the frequency inverter and
preventing fault of power supply from
the frequency inverter and its line fault
Electromagnetic Contactor
(MC)
When the frequency inverter breaks
down, cut off main power supply and
prevent restart after power off and fault
AC Reactor
(ACL)
Be used for improving input power
factor, reduce upper harmonics and
restrain the power surge
Radio Noise Filter
(NF)
Be used for reducing radio noise filter
of the frequency inverter
Regenerative Brake Unit
(Ub)
When the brake torque is unable to meet
the requirements, this is selected and
used for occasions with large inertia
load or frequent brake or rapid stop
(CDI-E100, E102 Series has built in
brake unit. Built-in brake unit for
CDI-E180 Series with power below
15Kw and option for the models with
power 18.5 kW ~ 30 kW)
Regenerative Brake Resistance
(Rb)
DC Reactor
(DCL)
Be used for improving power factor and
restraining current peak (E100, T102
has no this connection terminal)
Radio Noise Filter
(NF)
Be used for reducing radio noise filter
of the frequency inverter
Three-phase AC
power supply

Chapter 3 Installation and Connection of Frequency inverter
27
3.3 Wiring of the main circuit
3.3.1 Wiring diagram for the main circuit and precautions
This section describes connection of main circuit of E frequency inverters.
Dangerous
1. Do not make power supply of AC main loop connect with output terminal U, V, and W.
2. Please connect unit only after shut down the power supply.
3. Verify if the crating voltage of frequency inverter is same as the input voltage of it.
4. Do not perform withstand test with frequency inverter.
5. Fasten terminal screw with appointed fasten torque.
Attention
1. Please check if grounding terminal is grounded before connect main loop. (Refer to 3.5)
2. Terminal sequence should base on actual object.
3. Rated input voltage:
220V (AC single phase), frequency: 50/60Hz
220V (AC three-phase), frequency: 50/60Hz
380V (AC three-phase), frequency: 50/60Hz
690V (AC three-phase), frequency: 50/60Hz
4. Allowable fluctuation voltage: +10% (fluctuation ±15%)
Allowable fluctuation Frequency: ±2%
Wiring Diagram of Main Circuit of Model 1 of Machine Type E100, E102.
Wiring Diagram of Main Circuit of Model 2 of Machine Type E100, E102
Wiring Diagram of Main Circuit of Model 3, 4 of Machine Type E100, E102
Input
Output
Connect
power
supply Earthing
Input
Output
Connect
power
supply
Earthing
Brake Resistance
Earthing
Three-phase input
to power supply
Brake Resistance Three-phase
output
Three-phase
output
Three-phase output
to the motor
Brake Resistance

Chapter 3 Installation and Connection of Frequency inverter
28
Wiring Diagram of Main Circuit of Model 1 of Machine Type E180
Wiring Diagram of Main Circuit of Model 2, 3 of Machine Type E180
Wiring Diagram of Main Circuit of Model 4 of Machine Type E180
Wiring Diagram of Main Circuit of Model 5 of Machine Type E180
Wiring Diagram of Main Circuit of Model 6 of Machine Type E180
Wiring Diagram of Main Circuit of Model 7 of Machine Type E180
Wiring Diagram of Main Circuit of Model 8 and 9 of Machine Type E180
Grounding 3-phase input
To power supply
3-phase output
To the motor
Brake resistor
Grounding 3-phase input
To power supply
3-phase output
To the motor
Brake resistor
Grounding
3-phase input
To power supply
3-phase output
To the motor
Brake resistor
Brake unit
Grounding 3-phase input
To power supply 3-phase output
To the motor Brake unit
Grounding 3-phase input
To power supply 3-phase output
To the motor Brake unit
3-phase input
To power supply 3-phase output
To the motor Brake unit D.C. reactor
3-phase input
To power supply 3-phase output
To the motor

Chapter 3 Installation and Connection of Frequency inverter
29
3.3.2 Precautions for wiring the input side of the main circuit
1. Installation for Circuit Breaker (MCCB)
To protect the circuit, a MCCB or fuse should be installed between the power supply of the AC main circuit and
the input terminals of R, S, or T.
2. Residual current circuit breaker
When selecting residual current circuit breakers for connection to input terminals of R, S, or T, the one that is not
affected by Highest Frequency is preferred, in order to avoid any possible misoperation.
For example: NV series (manufactured in 1988 or later on) by Mitsubishi Electric;
EG and SG series (manufactured in 1984 or later on) by Fuji Electric;
CDM1 Series Circuit Breakers made by DELIXI Group Co., Ltd.
3. Installation of the electromagnetic contactor (MC)
The frequency inverter may be used even if no electromagnetic contactor is installed on the power supply side.
Electromagnetic contactor can take the place of MCCB for the sequence break of the main circuit. However, when
the primary side is switched off, the regeneration brake will not function and the motor will stop running.
When the primary side is closed/open, the electromagnetic contactor can cause loads to start/stop, but frequent
close/open will lead to frequency inverter fault. Therefore, while using the brake resistor unit, you can always
realize sequential control through the trip contact of the overload relay when the electromagnetic contactor is
switched off.
4. Phase sequence connection of the terminals
The phase lines of the input power supply can be connected to any one of the terminals R, S or T on the terminal
board, regardless of phase sequences.
5. AC reactor
When an frequency inverter is connected to a large-capacity power transformer (600KVA or beyond), or when a
phase lead capacitor (power factor compensator) is connected or disconnected, the peak current through the input
power circuit will be so strong that it will damage the rectifier-frequency inverter. Installing a DC reactor
(optional) in the frequency inverter or adding an AC reactor (optional) at the input end can effectively improve the
power factors at the power supply side.
6. Surge absorber
If a perceptual load (such as electromagnetic contactor, relay, solenoid valve, electromagnetic coil,
electromagnetic brake and so on) is connected in the adjacent area, a surge suppressor should also be used while
operating the frequency inverter.
7. Setting of a noise filter at the power supply side
Noise filter can be used to reduce the high-frequency noise flowing from the frequency inverter to the power
supply.
Wiring example 1: please use noise filters exclusively designed for frequency inverters.
It is set as follows:
Power supply Noise filter
Other devices
Motor Frequency
inverter

Chapter 3 Installation and Connection of Frequency inverter
30
3.3.3 Precautions for wiring the output side of the main circuit
1. Connection of the output terminals to the load
Connect the output terminals U, V and W respectively to the leading-out wires U, V and W of the motor. Use the
forward rotation instruction for verification. (CCW: observed from the load side, the motor runs
counterclockwise). If the motor is not running in the right direction, switch any two of terminals U, V and W.
2. It is absolutely forbidden to connect input power supply to terminals U, V or W!!!
3. Short circuit or grounding of the output circuit is forbidden.
Refrain from directly touching the output circuit or bringing the output wire in contact with the chassis of the
frequency inverter. Otherwise, electric shock or grounding fault might occur. In addition, always guard the output
wire against short circuit.
4. It is forbidden to connect phase-lead capacitors or LC/RC noise filters
Do not connect phase-lead capacitor or LC/RC noise filters to the output circuit.
5. Refrain from installing magnetic starter
If a magnetic starter or electromagnetic contactor is connected to the output circuit, the frequency inverter will
trigger the operation of over-current protection circuit because of the surge current resultant from the frequency
inverter’s connection to the load. The magnetic contactor should not operate until the frequency inverter has
stopped outputting.
6. Installation of thermal overload relay
The frequency inverter consists of an electronic overload protection mechanism. Admittedly, a thermal over-load
relay should be installed when an frequency inverter is used in driving several motors or when a multi-pole motor
is used. In addition, the rated current of the thermal over-load relay should be the same as the current indicated on
the nameplate of the motor.
7. Setting of noise filter on the output side
Mounting a special-purpose noise filter on the output side of the frequency inverter can reduce radio noise and
interfering noise.
Interfering noise: because of electromagnetic interference, the noise might affect the signal line and result in the
misoperation of the controller.
Radio noise: the noise can be produced from radio transmitters because of high-frequency waves emitted from the
frequency inverter or cables.
8. Countermeasures for interfering noise
Aside from using noise filters, threading all the connecting wires into a ground metal pipe can also restrain
interfering noise generated at the output terminal. If we put signal lines over 30cm away, the effect of interfering
noise will be abated.
9. Countermeasures for radio noise
Aside from input and output wires, the frequency inverter itself also emits noise. It will help to handle the problem
if we install noise filters at the input and output sides of the frequency inverter or apply shielded lines to the iron
case of the frequency inverter. It is also very important to make sure that the connecting wire between the
frequency inverter and the motor should be as short as possible

Chapter 3 Installation and Connection of Frequency inverter
31
10. The wire distance between the frequency inverter and the motor
If the total wire length between the frequency inverter and the motor is too long or the carrier frequency of the
frequency inverter (primary IGBT switch frequency) is rather high, the harmonic leakage current from the cables
will exert negative influence on the frequency inverter and other external devices.
If connection line between the frequency inverter and the motor is too long, carrier frequency of the frequency
inverter can be reduced as below. The carrier frequency can be given by Function Code P1.0.22.
Table of wire distance between the frequency inverter and the motor
Wire distance between the frequency inverter and the
motor
Carrier frequency (P)
Not exceeding 50m 10KHz or lower
Not exceeding 100m 5KHz or lower
Beyond 100m 3KHz or lower
Output reactors should be installed when the wire distance exceeds 50 meters. Otherwise, the motor may get burnt
down.
External thermal relays may cause unnecessary operations due to the Highest Frequency current from the
distributed capacitance in the output lines of the frequency inverter. As far as Low-capacity models of the 400V
Series (especially those below 7.5KW) is concerned, the ratio of their current to the rated current of the frequency
inverter will become bigger if their wiring lines are rather long (over 50m). As a result, external thermal relays
may carry out unnecessary operations.

Chapter 3 Installation and Connection of Frequency inverter
32
3.3.4 Wiring and Supporting Peripherals for Main Circuits
(1) E100、E102 Series
Type of Frequency inverter
Main Circuit
Wire Gage
(mm2)
Control Circuit
Wire Gage
(mm2)
Use-free air
breaker
MCCB(A)
Electromagnetic
contactor
MC(A)
S2 (Single Phase 220V)
CDI-E100G0R4S2B 2.5 1.0 16 10
CDI-E100G0R75S2B 2.5 1.0 16 10
CDI-E100G1R5S2B 2.5 1.0 20 16
CDI-E100G2R2S2B 4.0 1.0 32 20
T2 (Three-phase 220V)
CDI-E100G0R4T2B 2.5 1.0 10 10
CDI-E100G0R75T2B 2.5 1.0 16 10
CDI-E100G1R5T2B 2.5 1.0 16 10
CDI-E100G2R2T2B 4.0 1.0 25 16
T4 (Three-phase 380V)
CDI-E100G0R75T4B 2.5 1.0 10 10
CDI-E100G1R5T4B 2.5 1.0 16 10
CDI-E100G2R2T4B 2.5 1.0 16 10
CDI-E100G3R7T4B 4.0 1.0 25 16
CDI-E100G5R5/P7R5T4B 4.0 1.0 32 25
CDI-E100G7R5/P011T4B 4.0 1.0 40 32
CDI-E100G011/P015T4BL 4.0 1.0 63 40
CDI-E100G015/P018.5T4BL 6.0 1.0 63 40 CDI-E100G018.5/P022T4 6.0 1.0 63 40
CDI-E100G022T4 10 1.0 100 63
Note: The peripheral configurations of E102 series inverter described in the Table above are same as those
of E100 series inverter.

Chapter 3 Installation and Connection of Frequency inverter
33
(2) E180 Series
Type of Frequency inverter
Main
Circuit
Wire Gage
(mm2)
Control
Circuit
Wire Gage
(mm2)
Use-free air
breaker
MCCB(A)
Electromagnetic
contactor
MC(A)
T2(Three-phase 220V, 50/60Hz)
CDI-E180G0R4T2B 2.5 1.0 10 10
CDI-E180G0R75T2B 2.5 1.0 16 10
CDI-E180G1R5T2B 2.5 1.0 16 10
CDI-E180G2R2T2B 4.0 1.0 25 16
CDI-E180G3R7T2B 4.0 1.0 32 25
CDI-E180G5R5T2B 4.0 1.0 63 40
CDI-E180G7R5T2BL 6.0 1.0 63 40
CDI-E180G011T2 10 1.5 100 63
CDI-E180G015T2 16 1.5 125 100
CDI-E180G018.5T2 16 1.5 160 100
CDI-E180G022T2 25 1.5 200 125
CDI-E180G030T2 35 1.5 200 125
T4(Three-phase 380V, 50/60Hz)
CDI-E180G0R75T4B 2.5 1.0 10 10
CDI-E180G1R5T4B 2.5 1.0 16 10
CDI-E180G2R2T4B 2.5 1.0 16 10
CDI-E180G3R7/P5R5T4B 4.0 1.0 25 16
CDI-E180G5R5MT4B 4.0 1.0 32 25
CDI-E180G5R5/P7R5T4B 4.0 1.0 32 25
CDI-E180G7R5/P011T4B 4.0 1.0 40 32
CDI-E180G011MT4B 4.0 1.0 63 40
CDI-E180G011/P015T4BL 4.0 1.0 63 40
CDI-E180G015/P018.5T4BL 6.0 1.0 63 40
CDI-E180G018.5/P022T4 6.0 1.5 100 63
CDI-E180G022/P030T4 10 1.5 100 63
CDI-E180G030/P037T4 16 1.5 125 100
CDI-E180G037/P045T4 16 1.5 160 100
CDI-E180G045/P055T4 25 1.5 200 125
CDI-E180G055/P075T4 35 1.5 200 125
CDI-E180G075/P093T4 50 1.5 250 160
CDI-E180G093/P110T4 70 1.5 250 160
CDI-E180G110/P132T4 120 1.5 350 350
CDI-E180G132/P160T4 150 1.5 400 400
CDI-E180G160/P185T4 185 1.5 500 400
CDI-E180G185/P2004 185 1.5 500 400
CDI-E180G200/P220T4L 300 1.5 600 600
CDI-E180G220T4L 300 1.5 600 600
CDI-E180G250/P280T4L 370 1.5 800 600
CDI-E180G280/P315T4L 370 1.5 800 800
CDI-E180G315/P355T4L 450 1.5 800 800
CDI-E180G355/P375T4L 450 1.5 800 800
CDI-E180G375T4L 600 1.5 1000 800
CDI-E180P400T4L 600 1.5 1000 1000
CDI-E180G400T4L 600 1.5 1000 1000
CDI-E180P500T4L 600 1.5 1600 1000
CDI-E180G500T4L 600 1.5 1600 1000
CDI-E180G630T4L 600 1.5 1600 1600
T6(Three-phase 690V, 50/60Hz)
CDI-E180G022/P030T6 4.0 1.0 63 40
CDI-E180G030/P037T6 6.0 1.0 63 40

Chapter 3 Installation and Connection of Frequency inverter
34
CDI-E180G037/P045T6 6.0 1.5 100 63
CDI-E180G045/P055T6 10 1.5 100 63
CDI-E180G055/P075T6 16 1.5 125 100
CDI-E180G075/P093T6 25 1.5 200 125
CDI-E180G093/P110T6 35 1.5 200 160
CDI-E180G110/P132T6 50 1.5 250 200
CDI-E180G132/P160T6L 50 1.5 250 200
CDI-E180G160/P185T6L 70 1.5 300 250
CDI-E180G185/P220T6L 120 1.5 350 350
CDI-E180G220/P250T6L 150 1.5 400 400
CDI-E180G250/P280T6L 150 1.5 400 400
CDI-E180G280/P315T6L 185 1.5 500 400
CDI-E180G315/P355T6L 300 1.5 600 500
CDI-E180G355/P400T6L 300 1.5 600 600
CDI-E180G400T6L 300 1.5 600 600
CDI-E180P500T6L 370 1.5 800 600
CDI-E180G500T6L 450 1.5 1000 800
CDI-E180P600T6L 450 1.5 1000 800
CDI-E180G600T6L 450 1.5 500 800
CDI-E180P700T6L 600 1.5 500 1000
CDI-E180G700T6L 600 1.5 600 1000
3.4 Connection of control circuit
3.4.1 Arrangement and connection of controlling circuit terminals
(1) E100 Series
The wiring diagrams or E100 Main Circuit and Control Circuit are as below: (not connecting to L3 for Model S2)
CDI-E100 Series control panel

Chapter 3 Installation and Connection of Frequency inverter
35
Brake Resistance
Circuit Breaker Three-phase
Asynchronous Motor
CDI-E100 Series
Speed Regulator
The default is to
use 24V Power
Supply Analog Signal
Output 1
0~10V/0~20mA Digital Input 1
Digital Input 2
Digital Input 3
Digital Input 4
Digital Input 5
Digital Input 6
Common Terminal
Analog Signal
Output 2
0~10V/0~20mA
Dig
ital
In
pu
t
Ter
min
al
YO(P2.1.20=1):
Multi-functional Collector Output
DC48V 50mA
FMP(P2.1.20=0)
Impulse Output
0.01KHz~100.00KHz
Relay Output 1
AC 250V 3A below
DC 30V 3A below
Relay Output 2
AC 250V 3A below
DC 30V 3A below
Digital signal power supply can
externally provide 24V power supply
and has Max. Current of 300mA
RS485
Communication
Interface
Digital Signal
Common
Terminal External
Potentiometer
Analog Signal Power
Supply
Analog Signal Input 1
Analog Signal Input 2
Analog Signal Ground

Chapter 3 Installation and Connection of Frequency inverter
36
(2) E102 Series
The wiring diagrams or E102 Main Circuit and Control Circuit are as below: (not connecting to L3 for Model S2)
CDI-E102 Series control panel
Brake Resistance
Circuit Breaker Three-phase
Asynchronous
Motor
CDI-E102 Series
Speed Regulator
Analog Signal
Output 1
0~10V/0~20m
A
Digital Input 2
Digital Input 3
Digital Input 4
Digital Input 5
Digital Input 6
Common Terminal
Dig
ital
In
put
Ter
min
al
Multi-function Relay
Output 1
AC 250V 3A below
DC 30V 3A below
Digital signal power supply
can externally provide 24V
power supply and has Max.
Current of 300mA RS485
Communication
Interface
Digital Signal Common
Terminal External Potentiometer
Analog Signal Power Supply
Analog Signal Input 1
Analog Signal Input 2
Analog Signal Ground
E102-485
Communicat
ion Interface
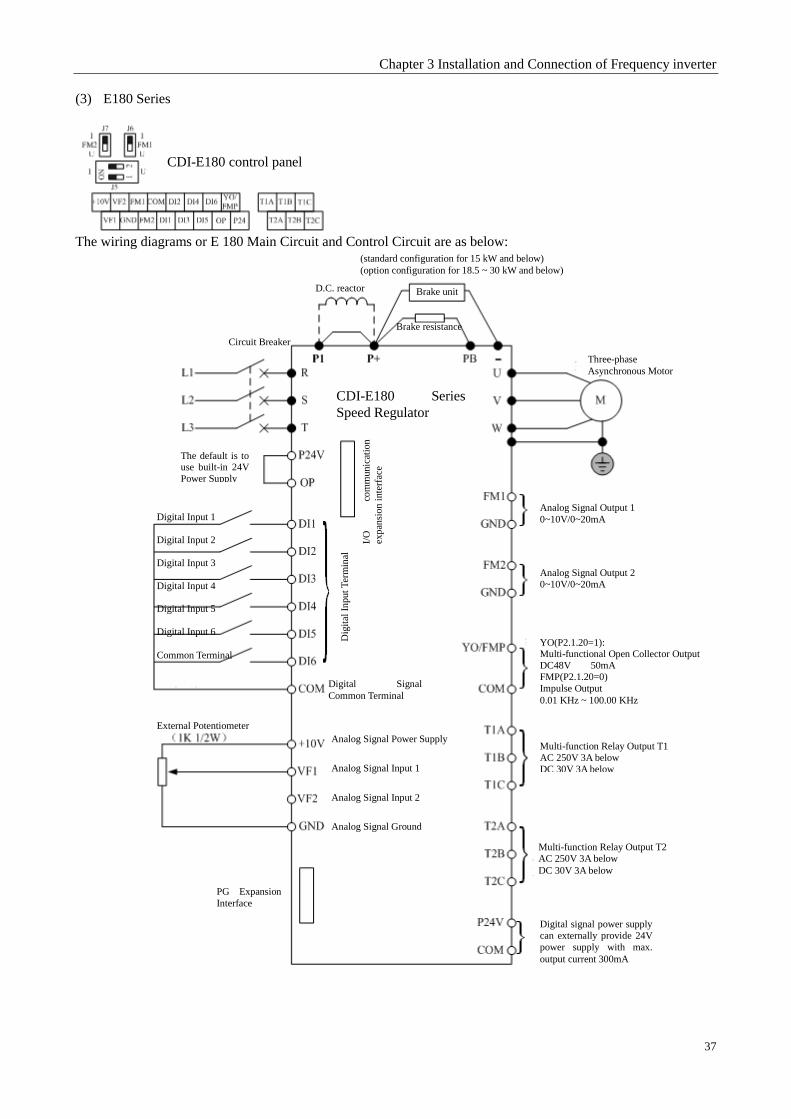
Chapter 3 Installation and Connection of Frequency inverter
37
(3) E180 Series
The wiring diagrams or E 180 Main Circuit and Control Circuit are as below:
CDI-E180 control panel
Circuit Breaker
Three-phase
Asynchronous Motor
CDI-E180 Series
Speed Regulator
The default is to use built-in 24V
Power Supply
Analog Signal Output 1
0~10V/0~20mA Digital Input 1
Digital Input 2
Digital Input 3
Digital Input 4
Digital Input 5
Digital Input 6
Common Terminal
Analog Signal Output 2
0~10V/0~20mA
Dig
ital
In
put
Ter
min
al
Multi-function Relay Output T1
AC 250V 3A below
DC 30V 3A below
Multi-function Relay Output T2
AC 250V 3A below
DC 30V 3A below
Digital signal power supply
can externally provide 24V
power supply with max.
output current 300mA
PG Expansion
Interface
Digital Signal
Common Terminal
External Potentiometer
Analog Signal Power Supply
Analog Signal Input 1
Analog Signal Input 2
Analog Signal Ground
Brake resistance
(standard configuration for 15 kW and below)
(option configuration for 18.5 ~ 30 kW and below)
D.C. reactor
I/O
co
mm
unic
atio
n
exp
ansi
on
inte
rfac
e
YO(P2.1.20=1): Multi-functional Open Collector Output
DC48V 50mA
FMP(P2.1.20=0)
Impulse Output
0.01 KHz ~ 100.00 KHz
Brake unit

Chapter 3 Installation and Connection of Frequency inverter
38
3.4.2 Function of control circuit terminal
Following sheet summarize function of control circuit terminal, which is connected according to function
respectively.
Category Terminal Name of
Terminal Description of Function
Digital Input
Terminal
OP External Power
Input
Take P24V short circuit by factory default.
When adopting external power to drive the digital input
terminal, disconnect OP and P24V and connect with external
power
DI1-OP(COM) Digital Input 1 Terminals are equipped on E Series Control Panel, in which
Terminal D16 can be used for high-speed Impulse Input and has
maximum input frequency of 100kHz. Specific function refers to
the description for use of Function Code P2.0.00~P2.0.05.
Note: Terminal DI1 is not available on E102 Series.
DI2-OP(COM) Digital Input 2
DI3-OP(COM) Digital Input 3
DI4-OP(COM) Digital Input 4
DI5-OP(COM) Digital Input 5
DI6-OP(COM) Digital Input 6
DI7-COM Digital Input 7 Refer to the terminals on CDI-E180 Series I/0 expansion card,
and such terminals are not available on E100 and E102 Series.
Specific function refers to the description for use of Function
Code P2.0.06 and P2.0.09
Note: Only internal power supply is applicable
DI8-COM Digital Input 8
DI9-COM Digital Input 9
DI10-COM Digital Input 10
Multi-functio
nal Output
Terminal
T1A Multi-functiona
l Relay T1
Output
TA-TB is normally open
TA-TC is normally closed
Drive Capability:
AC250V 3A below
DC30V 3A below
Note: Terminal T2 is not available on E102 Series
T1B
T1C
T2A Multi-functiona
l Relay T2
Output
T2B
T2C
YO1 Multi-functiona
l Open
Collector
Output 1
Refer to the terminal on E180 Series I/0 expansion card, and
such terminals are not available on E100 and E102 Series.
Specific function refers to the description for use of Function
Code P2.0.28 and P2.0.31
Drive Capability: DC48V 50mA below
CME
YO2 Multi-functiona
l Open
Collector
Output 2 CME
Analog Input
Signal
10V 10V Power
Output
Provide DC 10V supply voltage externally and generally adopt it
as working power for external potentiometer
Drive Capability: 50mA below GND
VF1-GND Analog Input
Terminal 1 Be used for receiving external analog signal input, 0V~10V
voltage signal or 0/4mA~20mA current signal VF2-GND
Analog Input
Terminal 2
VF3-GND Analog Input
Terminal 3
Refer to the terminals on E180 Series I/0 expansion card and are
controlled by J9 on expansion card. They can not be used
together with keyboard potentiometer. E100 & E102 Series
don’t have these terminals. Only voltage signal: 0V~10V, the
function is same as potentiometer.

Chapter 3 Installation and Connection of Frequency inverter
39
Category Terminal Name of Terminal Description of Function
Analog Output Signal
FM1-GND Analog Output
Terminal 1 Output 0~10V voltage or 0~20mA current
Note: Terminal FM2 is not available on E102
Series FM2-GND
Analog Output
Terminal 2
Dual-purpose
Terminal
YO/FMP
Multi-functional
Open Collector
Output and Common
Terminal for Impulse
Output
Note: Such terminal
is not available on
E102 Series
When P2.1.20=1, this terminal is used as
multi-functional collector output YO
Drive Capability: DC48V 50mA below
COM
When P2.1.20=0, this terminal is used as Impulse
Output FMP
Impulse frequency: 0.01kHz~100.00kHz
24V Power
COM
24V Power Output
Provide DC 24V supply voltage externally and
generally adopt it digital input terminal or as
working power for external low-voltage
equipments
Drive Capability: Max. Output Current 300mA P24
Communication
Terminal
SG+
Positive Signal
Terminal of RS485
Communication E100 Series directly has two terminals on control
panel. E102 and E180 Series are not equipped
with such two terminals on control panel, but on
communication expansion card SG-
Negative Signal
Terminal of RS485
Communication
3.4.3 Wiring Instruction for Control Circuit
To avoid interfere, please distribute control loop apart from main loop and heavy current loop (relay contact, 220V
loop), the Shielded Twisted Cable or Shielded Twisted Pair should be used in wiring the control circuit; the
shielding sheath should be connected to terminal PE of the frequency inverter and the wire distance should be less
than 50 meters to prevent misoperation from interference.
1. Description for Circuit Wiring of Analog Input Terminal
J5-1 controls VF1 channel to select voltage/current signal input. When current signal input is selected, switch of
J5 is at I side; when voltage signal input is selected, switch of J5 is at U side.
J5-2 controls VF2 channel to select voltage/current signal input. When current signal input is selected, switch of
J5 is at I side; when voltage signal input is selected, switch of J5 is at U side.
2. Description for Circuit Wiring of Analog Output Terminal
J6 controls FM1 channel to select voltage/current signal input. When current signal input is selected, switch of J6
is at I side; when voltage signal input is selected, switch of J6 is at U side.
J7 controls FM1 channel to select voltage/current signal input. When current signal input is selected, switch of J7
is at I side; when voltage signal input is selected, switch of J7 is at U side.

Chapter 3 Installation and Connection of Frequency inverter
40
3. Description for Circuit Wiring of Digital Input Terminal
Shielded Cable or Shielded Twisted Pair should be used for digital input at the maximum possibility to avoid
interference from external signal and the wire distance should be less than 50 meters.
(1) E100 and E180 Series
The wiring diagram on digital input circuit control panel is as below
1.2K
1000pF
1.2K
OP
DI1
DI2
1000pF
1.2K 1.2K
Dry Contact Common Cathode Wiring Method
Dry Contact Common Anode Wiring Method
Adopt internal power
24V and must be
shorted with OP
Adopt external power
24V and disconnect
with OP
Fre
qu
ency
in
ver
ter
Con
trol
Pan
el
Internal supply
power 10V-30V
Fre
qu
ency
in
ver
ter
Con
trol
Pan
el
Adopt internal power
24V and disconnect with
OP, and OP is shorted
with COM
External supply
power 10V-30V
Adopt external
power 24V and
disconnect with OP
Fre
qu
ency
in
ver
ter
Con
trol
Pan
el
Fre
qu
ency
in
ver
ter
Con
trol
Pan
el

Chapter 3 Installation and Connection of Frequency inverter
41
Leaking-type Wiring Method
Source-type Wiring Method
(2) E102 Series
1.2K
1000pF
1.2KDI1
DI2
1000pF
1.2K 1.2K
P24V
The wiring diagram on digital input
circuit control panel is as below
Wiring method
Adopt internal power 24V
and be shorted with OP
Signal Signal
Internal supply
power
Ex
tern
al C
ontr
oll
er
Ex
tern
al C
ontr
oll
er
Fre
qu
ency
in
ver
ter
Con
trol
Pan
el
Fre
qu
ency
in
ver
ter
Con
trol
Pan
el
Adopt external power 24V
and disconnect with OP
Adopt internal power 24V
and P24V must be shorted
with OP
Signal Signal
Ex
tern
al C
ontr
oll
er
Ex
tern
al C
ontr
oll
er
Fre
qu
ency
in
ver
ter
Con
trol
Pan
el
Fre
qu
ency
in
ver
ter
Con
trol
Pan
el
Internal
supply power
10V-30V
OP is shorted with
COM
Fre
qu
ency
in
ver
ter
Con
trol
Pan
el
Adopt external power 24V
and disconnect with OP

Chapter 3 Installation and Connection of Frequency inverter
42
4. Description for Circuit Wiring of Multi-functional Output Terminal
AC Circuit
The AC Circuit can only be used for multi-functional relay output terminal. If it is to drive inductive load (e.g.
electromagnetic relay and contactor), the surge voltage absorber shall be installed, e.g. RC Absorber (the leakage
current shall be less than the holding current of controlled contactor or relay), as shown in the figure below:
DC Circuit
The DC Circuit can not only be used for multi-functional open collector output terminal (attention for wiring
polarity), but for multi-functional relay output terminal. If it is to drive DC Magnetic Circuit, the fly-wheel diode
(attention for polarity), as shown in the figure below:
5. Description for Circuit Wiring of Impulse Output Terminal (E102 invalid)
When the function code is P2.1.20=0, Terminal YO/FMP is used as Impulse Output Terminal. The default circuit
is passive impulse output. If the active impulse is required to output, the users need to match the power (internal
power or external power of the frequency inverter available) and pull-up resistor. Note: allowable limit of
internal circuit: DC48V 50mA below
Contactor or Relay Coil
Multi-functional Relay
Output Terminal
RC Resistance-capacitance
Absorption Circui
R: 100~500Ω
C:0.1~0.2μF
Contactor or Relay Coil
Multi-functional
Output Terminal
DC Absorption
Circuit
Internal P24V Power Supply or
External P24V Power Supply
Dotted line is user configuration, the output
is passive pulsewithout this part.
E Series
frequency
inverter
Pow
er s
upp
ly
Puls
e o
utp
ut Power supply
Resistor

Chapter 3 Installation and Connection of Frequency inverter
43
3.5 Grounding
1. Grounding resistance value:
200V level: 100Ω or value below it
400V level: 10Ω or value below it
660V level: 5Ω or value below it
2. Prevent E frequency inverter, welding machine, motor or other huge current electrical equipment from
earthing. Ensure all earthing lines and wires of huge current electrical equipment are separately laid inside the
pipe.
3. Please use approved grounding wire of which length should be as shorter as possible.
4. When several E frequency inverters are used in parallel, please ground the device as shown by Figure (a),
instead of Figure (c) which may form a loop.
5. Grounding of frequency inverters and motor can be connected as per Figure (d).
(a) Correct (b) Incorrect (c) Non-recommended
(d) Correct (e) Non-recommended
6. Connection inspection:
Please perform following items if installation and connection are completed.
A If connection is correct.
B If stub or screw remains in device.
C If screws are fastened firmly.
D If bare conductor on terminal contacts with other terminals.

Chapter 4 Keyboard Operation and Running
44
Chapter 4 Keyboard Operation and Running
4.1 Option of operating mode
E Series Frequency inverters provide 3 control modes, including keyboard operation, terminal operation and
communication operation. The user can select relative control mode as per onsite circumstances and working
requirements. See 7.1 for specific selection.
4.2 Test run and inspection
4.2.1 Precautions and inspection before test run
Dangerous
1. Input power can be connected only after front lid is installed. Do not remove external lid
when powered, otherwise it may lead to electric shock.
2. Do not get close to the frequency inverter or the load when selecting re-start because it
may suddenly restart after being stopped just a moment ago. (Even though the frequency
inverter can restart, its mechanical system can safeguard individual safety) otherwise it may
cause hurt to human body.
3. Because function setting can defunction the stop button, it is required to install an
independent emergency button; otherwise it may cause hurt to human body.
Attention
1. Do not touch the radiator or resistor because its temperature is very high; otherwise it may
lead to burn.
2. Because low speed can be easily changed to high speed, it is required to confirm safe
working scope of the motor and mechanical equipment before operation; otherwise it may
cause hurt to human body and damage to equipment.
3. If necessary, separately install a contracting brake; otherwise it may cause hurt to human
body.
4. Do not change connection during operation; otherwise the equipment or frequency
inverter may be damaged.
For ensuring operation safety, please relieve mechanical connector before first operation to separate motor from
mechanical equipment and prevent from dangerous. Please perform following inspection before test run:
A. If connection between lead and terminal is correct.
B. If lead thrum cause short circuit.
C. If screw terminal is fastened firmly.
D. If motor is installed firmly.
4.2.2 Test run
After preparation, connect to power supply and inspect if frequency frequency inverter works normally.
After connected to power supply, indicator of number keyboard is luminous.
Please cut off power supply immediately if any problem abovementioned occurs.

Chapter 4 Keyboard Operation and Running
45
4.2.3 Operating inspection
Please verify following items during operation:
A. If motor rotates smoothly.
B. If rotation direction of motor is correct.
C. If abnormal vibration or noise occurs accompanying with operation of motor.
D. If acceleration and deceleration are smooth.
E. If current match with load value.
F. If LED state indicator and number keyboard displays correctly.
4.3 Operating method of keyboard.
4.3.1 Keys on keyboard and their functions
(1) E100 and E102 Series LED Keyboard
Installation Dimension of Operation Keyboard Function of Indicator
NO Name Description of Function
1 FWD
When rotating in the forward direction,
the indicator lights up, but when
rotating in the backward direction, the
indicator doesn’t work,
2 TUNE
When the parameter identification
function operates, the light flickers.
The light is normally on at torque
control mode
3 RUN The frequency inverter lights up under
running state
4 V Indicate voltage value
5 A Indicate current value
6 Hz Indicate frequency
7 V-%-A Indicate percentage
8 A-RPM
-Hz Indicate rotating speed
Installation dimension of Keyboard Booth:99*70mm Outer dimesion of Keyboard Booth: 107*80mm
When use the parameters to
set the mode, read and store
the setting parameters
1. Display the setting value of
every function code 2. Output monitoring value
Multifunction Key
Potentiometer adjusts the
frequency 1. Monitoring mode and scroll display of the data 2. When selecting and setting the parameters, move the position of the data modification
Stop/Fault Reset Key
Run Key
1. Switch display mode 2. Cancel data
modification
1. Function Code Option 2. Data +/- Setting 3. When presetting the
keyboard frequency, set the
frequency +/-
Running State and Unit Display

Chapter 4 Keyboard Operation and Running
46
(2) E180 series keypad
Installation Dimension of Operation Keyboard Function of Indicator
Installation dimension of Keyboard Booth:97*59mm Outer dimesion of Keyboard Booth: 105*67mm
NO Name Description of Function
1 FWD
When rotating in the forward direction, the
indicator lights up, but when rotating in the
backward direction, the indicator doesn’t work,
2 RUN The frequency inverter lights up under running state
3 V Indicate voltage value
4 A Indicate current value
5 Hz Indicate frequency
6 V-%-A Indicate percentage
7 A-RPM-Hz Indicate rotating speed
Running State and Unit
Display
2. Cancel data modification
1. Function Code Option 2. Data +/- Setting 3. When presetting the keyboard
frequency, set the frequency +/-
1. Monitoring mode and scroll
display of the data 2. When selecting and setting the
parameters, move the position of the
data modification
1. Display the setting value
of every function code 2. Output monitoring value
Potentiometer adjusts the
frequency
When use the parameters to set
the mode, read and store the
setting parameters
Run Key
Multifunction Key
Stop/Fault Reset Key
Note: E180 series LED keypad is equipped by default on the
E180 series inverter type 1, 2 and 3.

Chapter 4 Keyboard Operation and Running
47
(3) E180 series primary keypad
Installation Dimension of Operation Keyboard Function of Indicator
NO Name Description of Function
1 FWD
When rotating in the forward
direction, the indicator lights up,
but when rotating in the
backward direction, the indicator
doesn’t work,
2 TUNE
When the parameter
identification function operates,
the light flickers. The light is
normally on at torque control
mode
3 RUN The frequency inverter lights up
under running state
4 V Indicate voltage value
5 A Indicate current value
6 Hz Indicate frequency
7 V-%-A Indicate percentage
8 A-RPM-Hz Indicate rotating speed
Installation dimension of Keyboard Booth:136*72mm Outer dimesion of Keyboard Booth: 142*78mm
Running State and
Unit Display
1. Display the setting value
of every function code 2. Output monitoring value
1. Switch display mode 2. Cancel data modification
1. Function Code Option
2. Data +/- Setting
3. When presetting the keyboard
frequency, set the frequency +/-
Potentiometer adjusts the
frequency
when use the parameters to
set the mode, read and store
the setting parameters
Run Key
Multifunction Key
Stop/Fault Reset Key
Monitoring mode and scroll
display of the data When selecting and setting the
parameters, move the position
of the data modification
Note: E180 series LED primary keypad is equipped by default on the
E180 series inverter type 4 and above.

Chapter 4 Keyboard Operation and Running
48
(4) E180 series LCD keypad
Installation dimension of Keyboard Booth:97*59mm Outer dimesion of Keyboard Booth: 105*67mm
Statement: the maximum four lines can be simultaneously displayed under surveillance screen. Specific displayed
contents are determined by Function Code P5.0.06~P5.0.13 (Details refer to the Description for P5.0.06~P5.0.13).
Press Key >> and select one line. If the parameter attribute is writable, press Key ENTER and directly enter into
parameter modification page, after completing the modification, press ENTER and return to surveillance screen.
Note: E180 series LCD keypad is optional on the E180 series inverter type 1, 2 and 3.
Monitoring window
displays four lines at most
Running Frequency
Set Frequency
Running Current
Output Voltage
1. Switch display mode
2. Cancel data modification
1. Function Code Option 2. Data +/- Setting 3. When presetting the
keyboard frequency, set the
frequency +/-
Stop/Fault Reset Key
Multifunction Key
when use the parameters to set the mode,
read and store the setting parameters
1. Monitoring mode and scroll display of the data
2. When selecting and setting the parameters,
move the position of the data modification
Multifunction Key
Run Key
Running Frequency
Set Frequency
Running Current
Output Voltage

Chapter 4 Keyboard Operation and Running
49

Chapter 4 Keyboard Operation and Running
50
(5) E180 series primary keypad
Installation dimension of Keyboard Booth:136*72mm Outer dimesion of Keyboard Booth: 142*78mm
Note: E180 series LCD primary keypad is optional on the E180 series inverter type 4 and above.
Monitoring window
displays four lines at most
Running Frequency
Set Frequency
Running Current
Output Voltage
1. Switch display mode
2. Cancel data modification
When use the parameters to set the mode,
read and store the setting parameters
Multifunction Key
1. Monitoring mode and scroll
display of the data 2. When selecting and setting the
parameters, move the position of the
data modification
Running Indicator
Run Key
Stop/Fault Reset Key
1. Function Code Option 2. Data +/- Setting 3. When presetting the
keyboard frequency, set the
frequency +/-
Running Frequency Set Frequency
Running Current
Output Voltage

Chapter 4 Keyboard Operation and Running
51
4.3.2 Data Monitoring Mode
1. Cycle Monitor Mode
In Monitor Mode, press Key >> per time and change one display item to check current state information of the
frequency inverter
In shut-down state, the contents for 16 downtimes can be cycled at most, and specific contents shown in the cycle
shall be determined by Function Code P5.0.05 (Details refer to the Description for P5.0.05)
Under running state, the contents for 32 running surveillance can be cycled at most, and specific contents shown
in the cycle shall be determined by Function Code P5.0.02 and P5.0.03 (Details refer to the Description for
P5.0.02 and P5.0.03).
2. Fault/Alarm Monitor Mode
A. Under state of running monitor, the unit should display information relating to fault and warning if fault and
alarm occurs.
B. Reset fault by press STOP/RESET if fault disappears.
C. Please cut off power supply and reset the unit if serious fault occurs.
D. Keyboard should display fault code continuously until fault is eliminated (refer to Chapter IX).
4.3.3 Use of Multi- Function Key JOG
Upon the demand of the users, set Function Code P5.0.00 and realize the definition of the users to Function Key
JOG, and the Key JOG can choose dead and forward rotation jogging running, reverse rotation jogging running
and switch between forward rotation and reverse rotation, in which forward rotation jogging running and reverse
rotation jogging running are valid under any running control, and the switch between forward rotation and reverse
rotation is only valid under keyboard control mode.
LED Shutdown
Monitoring Content 1
LED Shutdown
Monitoring Content 2
LED Shutdown Monitoring Content 3
. . LED Shutdown Monitoring Content 16
Press Key >> Press Key >>
Press Key >>
LED Run Monitoring
Content 1
Press Key >>
LED Run Monitoring Content 2
LED Run Monitoring Content 3
. .
LED Run Monitoring Content 32
Press Key >> Press Key >>

Chapter 4 Keyboard Operation and Running
52
4.3.4 Parameter check and set methods (using digital keyboard)
Note: And it is impossible to modify data under following conditions.
1.It is impossible to adjust parameter during operation of frequency inverter. (Refer to function sheet)
2.Start parameter protection in P5.0.18 (parameter write-in protection)
Running under monitoring
Press down MODE key to
Parameter setting mode, the
keyboard shall display
parameter code, like
P0.0.00
Press>>key to move the
cursor; press , to
change parameter code, for
example, change to P0.0.01
Press ENTER key one time
to display current value of
the parameter, for example:
0
Press , , >> to
change value of the
parameter, for instance,
change to 1; Press ENTER
to confirm, if do not
change, press MODE key to
return
Press ENTER to confirm
the change and return to
parameter display state
P0.0.02 (after confirmed,
parameter code shall
automatically increase by
1); at this time, value of
parameter P0.0.01 has been
changed to 1.
Press MODE once to return
to monitoring mode.
Example: the following is an example to change value
of P0.0.10 from 010.0 to 016.1:
1 50.00 Display set frequency 50.00Hz; Press
MODE key to enter parameter setting
mode
2 P0.0.00 Parameter P0.0.00 appears, at the same
time the pointer points to the last
digital bit “0” and twinkles. Press >>
to select parameter code to set; press
,key to move the data bit.
3 P0.0.10 Press ,,>> to change value
displayed to P0.0.10, the ENTER
4 010.0 Check whether factory-set, value of
the parameter is 010.0; at the same
time the pointer points to the last
digital bit “0”.
5 016.0 Press ,,>> to change value
displayed to 016.1, then ENTER.
6 P0.0.12 Data storage writes in 016.0; the
parameter displays that the
acceleration time is changed to 016.0
from 010.0, and then it is to return to
the parameter that displays P0.0.12 at
this time
7 P0.0.10 If directly press MODE instead of
ENTER is step 5, the keyboard shall
return to display P0.0.10, and the data
changed is not stored. acceleration
times is still 010.0.
8 50.00 Then press MODE again return to
running under monitoring mode to
display the set frequency.

Chapter 4 Keyboard Operation and Running
53
4.4 Function Code Display Mode
E Series Frequency inverter provides three kinds of Function Code Display Modes: Basic Mode, User Mode and
Verification Mode.
Basic Mode (P0.0.01=0)
In basic mode, the function code has the prefix with ‘P’. At this time, the Function Code P5.0.17 determines what
parameters of the function codes are specifically displayed. Its ones, tens, hundreds and thousands respectively
correspond to each function code group. Refer to the following table for explanation of specific meaning.
Function Code Setting scope Explanation
Function parameter displays the
Option of P5.0.17
Ones 0 Only display basic parameter group
1 Display the menus at all levels
Tens
0 Don’t display Group P7
1 Display Group P7
2 Reserve
Hundreds 0 Don’t display verification group
1 Display verification group
Thousands 0 Don’t display code group
1 Display code group
User Mode (P0.0.01=1)
Only display customization parameters of user function and use Function Code of Group P7.0 to determine what
parameters of the function codes (with maximum quantity is 30) are specifically displayed by the frequency
inverter. In user mode, the function code has the prefix with ‘U’.
Function Code Setting scope Explanation
Function parameter
displays the Option of
Group P7.0
P7.0.00 U0.0.01 When the parameter of function code is
set, it is deemed that this function code
is selected as user customization
function code. 30 parameters of
function codes can be selected and set at
most.
…… U0.0.00~UX.X.XX (except
for group P7 and P8)
P7.0.29 U0.0.00~UX.X.XX (except
for group P7 and P8)
Verification Mode (P0.0.01=2)
Only display the modified parameters (in case of any difference of function code between reference value and
factory set value, it is deemed that the parameters are changed), the function code has the prefix with ‘C in
verification mode.

Chapter 5 Tables of Function Parameters
54
Chapter 5 Tables of Function Parameters
Description for Tables of Function Parameters
1. Function parameters of E Series Frequency inverter are divided into 9 groups as per the functions. Each
group includes several sub-groups and each sub-group includes several function codes, which can be set with
different values.
2. P××.×× in function sheet or other section of the manual denotes “××” function code of sort “××”; For
example, “P0.0.01” denotes function code 01 of sort P0.0.
3. Content explanation of function sheet:
Column 1 “Function Code”: serial number of function code parameter; Column 2 “Function Name”: full name of
function parameter; Column 3 “Setting Scope”: scope of valid set value of function parameters; Column 4
“Factory Setting”: original set value of function parameters when delivered out of the factory; Column 5 “Change
Limit”: change property of function parameters (that is, whether change and changing conditions are allowed);
Column 6 “Reference Page”: page refers to detailed decription of function code parameters.
Modification limit of parameter is explained as below:
“”: Denote that the set value of the parameter is modifiable under stop or running state of the frequency
inverter;
“”: Denote that the set value of the parameter is not modifiable under running state of the frequency inverter;
“”: Denote that the value of the parameter is actual testing value and not modifiable;
“”: Denote that this parameter is allowed to be modified only at P5.0.18=2
“”: Denote that this function in E100 Series is invalid and not allowed to be modified
“”: Denote that this function in E102 Series is invalid and not allowed to be modified.
Explanation 1: E102 Series is a simple version of E100. The hardware of E102 is simpfied, so the invalid function on E100 Series
is also invalid on E102. But the performance and function (without hardware support is not considered) of E102
are same as E100 Series
Explanation 2: Please read the manual carefully while modifying parameter of frequency inverter. And contact our Company for
any problem occurs during operation. No data submits to customer modification, violation of it maybe causes
serious fault, or significant property loss, of which consequences should be born by User!

Chapter 5 Tables of Function Parameters
55
5.1 P0 Group - Basic Function
Function
code Function name Setting scope
Factory set
value
Modifica
tion limit
Refere
nce
page
Group P0.0 Basic Group
P0.0.00 Type of Frequency
inverter
1. G Type (constant torque load
type)
2. P Type (fans and water pump load
type)
Machine type
80
P0.0.01 Display Mode
0: Basic Mode (Prefix with ‘P’)
1: User Mode (Prefix with ‘U’)
2: Verification Mode(Prefix with
‘C’)
0
P0.0.02 Control Mode
0: V/F Control
1: Open-loop Vector Control (SVC)
2: Closed-loop Vector Control
(Invalid E100)
0
81
P0.0.03 Option of operation
control mode
0: Keyboard Control
1: Terminal Control
2: Communication Control
0
P0.0.04 Option of A Frequency
Source
0: Keyboard Reference (No
Power-off Memory)
1: Keyboard Reference (Power-off
Memory)
2: Keyboard Potentiometer
Reference
3: External Terminal VF1 Reference
4: External Terminal VF2 Reference
5: PULS Reference (DI6)
6: Multiplex Directive Reference
7: Simple PLC Reference
8: PID Control Reference
9: Communication Reference
10: Operation Result 1
11: Operation Result 2
12: Operation Result 3
13: Operation Result 4
02 82
P0.0.05 Keyboard Frequency
Reference 000.00~ maximum frequency 050.00 83
P0.0.06 Running Direction
0: Default Direction
1: Negation of Direction
2: Determined by multi-funtion
input terminal
0
84 P0.0.07 Maximum frequency 050.00Hz~320.00Hz 050.00
P0.0.08 Upper frequency Lower frequency ~ highest
frequency 050.00
P0.0.09 Lower frequency 000.00~ Upper frequency 000.00
P0.0.10 Lower frequency
operation mode
0: Running at lower limit frequency
1: Stop
2: Zero-speed Running
0 85

Chapter 5 Tables of Function Parameters
56
P0.0.11 Acceleration Time 0000.0~6500.0s Machine type
P0.0.12 Deceleration Time 0000.0~6500.0s Machine type

Chapter 5 Tables of Function Parameters
57
Function
code Function name Setting scope
Factory set
value
Modificati
on limit
Reference
page
P0.0.13 Type of Motor
0: Common Motor
1: Variable Frequency Motor
2: Synchronous Motor (Valid E100)
0
86
P0.0.14 Motor rated power 0000.1kW ~ 1000.0kW Machine type
P0.0.15 Motor rated
frequency 000.01Hz ~ Highest frequency 050.00
P0.0.16 Motor rated voltage 0001V~2000V Machine type
P0.0.17 Motor rated current
000.01A ~ 655.35A (power inverter <
75kW)
0000.1A ~ 6553.5A (power
inverter≥75kW)
Machine
P0.0.18 Motor Rated Rotating
Speed 00001rpm~65535rpm Machine
P0.0.19 Stator resistance of
asynchronous motor
00.001 ~ 65.535 (power
inverter≥75kW)
0.0001 ~ 6.5535 (power
inverter≥75kW)
Machine
P0.0.20 Rator resistance of
asynchronous motor
00.001 ~ 65.535 (power
inverter≥75kW)
0.0001 ~ 6.5535 (power
inverter≥75kW)
Machine
P0.0.21
Leakage inductance
of asynchronous
motor
000.01mH ~ 655.35mH (power
inverter≥75kW)
00.001mH ~ 65.535mH (power
inverter≥75kW)
Machine
87
P0.0.22 Mutual inductance of
asynchronous motor
0000.1mH ~ 6553.5mH (power
inverter≥75kW)
000.01mH ~ 655.35mH (power
inverter≥75kW)
Machine
P0.0.23 Non-load current of
asynchronous motor
000.01A~Motor rated current (power
inverter≥75kW)
0000.1A~Motor rated current (power
inverter≥75kW)
Machine
P0.0.24 Parameter
Identification Control
00: No action
01: Static identification
02: Complete identification
11: Synchronous motor on-load
identification (Invalid E100)
12: Synchronous motor non-load
identification (Invalid E100)
00

Chapter 5 Tables of Function Parameters
58
Function code
Function name Setting scope Factory set
value
Modification limit
Reference page
P0.1 Group: Expansion Group
P0.1.00 Option of Frequency Source
0: Frequency Source A 1: Frequency Source B 2: Frequency Source A+B 3: Frequency Source A-B 4: Max. Value of A & B 5: Min. Value of A & B 6: Standby Frequency Source 1 7: Standby Frequency Source 2 8: Switch of Terminal among the above 8 kinds
0 88
P0.1.01 Option of Frequency Source B
0: Keyboard Reference (No Power-off Memory) 1: Keyboard Reference (Power-off Memory) 2: Keyboard Potentiometer Reference 3: External Terminal VF1 Reference 4: External Terminal VF2 Reference 5: PULS Reference (DI6) 6: Multiplex Directive Reference 7: Simple PLC Reference 8: PID Control Reference 9: Communication Reference 10: Operation Result 1 11: Operation Result 2 12: Operation Result 3 13: Operation Result 4
00
89
P0.1.02
Adjustment Volume of: Frequency Source B at superposition
000%~150% 100%
P0.1.03 Upper Limit Frequency Source
0: Digital Reference (P0.0.08) 1: External Terminal VF1 Reference 2: External Terminal VF2 Reference 3: Multiplex Directive Reference 4: PULS Reference (DI6) 5: Communication Reference 6: Operation Result 1 7: Operation Result 2 8: Operation Result 3 9: Operation Result 4
0
P0.1.04 Upper Limit Frequency Offset
000.00~Highest Frequency 000.00
91
P0.1.05
Keyboard Reference frequency Shut-down Memory Selection
0: No Memory 1: Memory
0
P0.1.06
Keyboard Reference frequency Action Benchmark at running
0: Running Frequency 1: Reference frequency
0
P0.1.07
Benchmark frequency of accelerating and Deceleration time
0: Highest Frequency 1: Reference frequency 2: 100Hz
0 92

Chapter 5 Tables of Function Parameters
59
Function
code Function name Setting scope
Factory set value
Modification limit
Reference page
P0.1.08 Jogging running frequency 000.00~Highest Frequency 002.00
92
P0.1.09 Jogging Acceleration time 0000.0s~6500.0s 0020.0 P0.1.10 Jogging Deceleration time 0000.0s~6500.0s 0020.0
P0.1.11 Acceleration time 2 0000.0s~6500.0s Machine type
P0.1.12 Deceleration time 2 0000.0s~6500.0s Machine type
P0.1.13 Acceleration time 3 0000.0s~6500.0s Machine type
P0.1.14 Deceleration time 3 0000.0s~6500.0s Machine type
P0.1.15 Acceleration time 4 0000.0s~6500.0s Machine type
P0.1.16 Deceleration time 4 0000.0s~6500.0s Machine type
P0.1.17 Frequency Switch Point between Acceleration time 1 and Acceleration time 2
000.00Hz~Highest Frequency 000.00
93 P0.1.18 Frequency Switch Point between Deceleration time 1 and Deceleration time 2
000.00Hz~Highest Frequency 000.00
P0.1.19 Acceleration and Deceleration Mode
0: Straight Line 1: Curve S 1 2: Curve S 2
0
P0.1.20 Percentage of Starting Phase of Curve S
000.0%~100.0% 030.0
94 P0.1.21
Percentage of Ending Phase of Curve S
000.0%~100.0% 030.0
P0.1.22 Hopping Frequency 1 000.00Hz~Highest Frequency 000.00 P0.1.23 Hopping Frequency 2 000.00Hz~Highest Frequency 000.00 P0.1.24 Hopping Frequency scope 000.00Hz~Highest Frequency 000.00 P0.1.25 Jogging Priority 0: Invalid 1: Valid 0
95 P0.1.26 Type of Encoder
0: ABZ Incremental Encoder 1: UVW Incremental Encoder (Invalid E100) 2: Rotary Transformer (Invalid E100) 3~9: Reservation 10: Distance Control (Open Collector)
00 /
P0.1.27 Line Number of Encoder 00001~65535 01024 /

Chapter 5 Tables of Function Parameters
60
P0.1.28 ABZ phase sequence 0: Forward Direction 1: Reverse Direction
0 /
P0.1.29 Encoder Disconnection Testing Time
No action 00.1s~10.0s
00.0 /
96
P0.1.30 Stator Resistance of Synchronous motor
00.001 ~ 65.535 (inverter power<75kW) 0.0001~6.5535 (inverter power<75kW)
Machine type
/
P0.1.31 Back EMF of Synchronous motor
0000.0V~6553.5V Machine type
/
P0.1.32 UVW Phase Sequence 0: Forward Direction 1: Reverse Direction
Machine type
/
P0.1.33 UVW Encoder Angle 000.0~359.9 Machine type
/
P0.1.34 Pole-pairs of Rotary Transformer
00001~65535 Machine type
/
5.2 Group P1 - Motor Control Parameter
Function
code Function name Setting scope
Factory set
value
Modificati
on limit
Reference
page
Sort P1.0: Basic Group
P1.0.00 V/F Curve Mode
0: Straight Line
1: Multi-point Broken Line
2: Square V/F Curve 1
3: Square V/F Curve 2
4: Square V/F Curve 3
0
97
P1.0.01 Torque Boost
00.0% (Automatic Torque
Boost)
00.1%~30.0%
04.0
P1.0.02 Cutoff Frequency of
Torque Boost
000.00Hz~Highest
Frequency 050.00
P1.0.03 V/F Slip Compensation
Gain 000.0%~200.0% 000.0
98
P1.0.04 Velocity Loop
Proportional Gain 1 001~100 030
P1.0.05 Velocity Circulation
Integral Time 1 00.01~10.00 00.50
P1.0.06 Switching Frequency 1 000.00Hz~P1.0.09 005.00
P1.0.07 Velocity Loop
Proportional Gain 2 001~100 020
P1.0.08 Velocity Circulation
Integral Time 2 00.01~10.00 01.00
P1.0.09 Switching Frequency 2 P1.0.06~Highest Frequency 010.00
P1.0.10 Start Mode
0: Direct Start
1: Speed Tracking Mode
2: Brake and Restart
0
99
P1.0.11 Speed Tracking Mode
0: Start from Shutdown
Frequency
1: Start from Zero Speed
2: Start from Highest
Frequency
0

Chapter 5 Tables of Function Parameters
61
P1.0.12 Start Frequency 00.00Hz~10.00Hz 00.00
P1.0.13
Hold Time of Start
Frequency 000.0s~100.0s 000.0
P1.0.14 Starting DC Brake
Current 000%~100% 000
100
P1.0.15 Starting DC Brake Time 000.0s~100.0s 000.0
P1.0.16 Stop Mode 0: Stop by Deceleration
1: Free Stop 0
P1.0.17 Stop DC Braking Initial
Frequency 000.00Hz ~ Highest
Frequency 000.00
P1.0.18 Stop DC Braking Waiting
Time 000.0s~100.0s 000.0
P1.0.19 Stop DC Braking Current 000%~100% 000
P1.0.20 Stop DC Braking Time 000.0s~100.0s 000.0
P1.0.21 Braking Use Rate 000%~100% 100
101
P1.0.22 Carrier Frequency 00.5kHz~16.0kHz 06.0
P1.0.23 Fan Control
0: Rotate at running
1: Continuous Running
2: Control based on
Temperature
0
Function code Function name Setting scope Factory set value Modification limit Reference page
P1.0.24 Motor Overload Protection
0: Prohibition
1: Curve 1
2: Curve 2
3: Curve 3
1
102
P1.0.25 Motor Overload Protection Level 00.20~10.00 01.00
P1.0.26 Motor Overload Alarm System 050%~100% 080
Group P1.1: Extension Group
P1.1.00 Broken Line V/F Point 1 Frequency 000.00Hz~P1.1.02 000.00
103
P1.1.01 Broken Line V/F Point 1 Voltage 000.0%~100.0% 000.0
P1.1.02 Broken Line V/F Point 2 Frequency P1.1.00~P1.1.04 000.00
P1.1.03 Broken Line V/F Point 2 Voltage 000.0%~100.0% 000.0
P1.1.04 Broken Line V/F Point 3 Frequency P1.1.02~Motor rated frequency 000.00
P1.1.05 Broken Line V/F Point 3 Voltage 000.0%~100.0% 000.0
P1.1.06 V/F Overexcited Gain 000~200 120

Chapter 5 Tables of Function Parameters
62
P1.1.07 Vector Control Torque Upper Frequency
0: Digital Reference (P1.1.08)
1: External Terminal VF1 Reference
2: External Terminal VF2 Reference
3: Multiplex Directive Terminal Reference
4: PULS Reference (DI6)
5: Communication Reference
6: MIN (VF1, VF2)
7: MAX (VF1, VF2)
8: Operation Result 1
9: Operation Result 2
10: Operation Result 3
11: Operation Result 4
00 104
P1.1.08 Torque Upper Limit Reference 000.0%~200.0% 150.0
105 P1.1.09 Inversion Control Enable 0: Allow 1: Prohibit 0
P1.1.10 Forward and Reverse Dead Time 0000.0s~3000.0s 0000.0
P1.1.11 Power-on Running Selection 0: Running
1: Not Running 0
106 P1.1.12 Droop Control 00.00Hz~10.00Hz 00.00
P1.1.13 Speed/Torque Control Mode Selection 0: Speed Control
1: Torque Control 0
Function code Function name Setting scope Factory set
value
Modification
limit
Referenc
e page
P1.1.14 Torque Reference
Source
0: Digital Reference (P1.1.15)
1: External Terminal VF1 Reference
2: External Terminal VF2 Reference
3: Multiplex Directive Terminal
Reference
4: PULS Reference (DI6)
5: Communication Reference
6: MIN (VF1, VF2)
7: MAX (VF1, VF2)
8: Operation Result 1
9: Operation Result 2
10: Operation Result 3
11: Operation Result 4
12: Standby Torque Source 1
13: Standby Torque Source 2
00 106

Chapter 5 Tables of Function Parameters
63
P1.1.15 Torque Digital
Reference -200.0%~200.0%
150.0
108 P1.1.16
Torque Control FWD
Frequency Limit 000.00Hz~Highest Frequency 050.00
P1.1.17 Torque Control REV
Frequency Limit 000.00Hz~Highest Frequency 050.00
P1.1.18 Torque Acceleration
Time 0000.0s~6500.0s 0000.0
P1.1.19 Torque Deceleration
Time 0000.0s~6500.0s 0000.0
5.3 Group P2 - Input/Output Terminal Function
Function
code Function name Setting scope
Factory set
value
Modification
limit
Reference
page
Group P2.0: Basic Group
P2.0.00 DI1Terminal Function O: No Function
1: Forward (FWD)
2: Reverse (REV)
3: Three-wire Running Control
4: Forward Jogging
5: Reverse Jogging
6: Terminal UP
7: Terminal DOWN
8: Free Stop
9: Multiplex Directive Terminal
1
10: Multiplex Directive
Terminal 2
11. Multiplex Directive Terminal
3
12: Multiplex Directive
Terminal 4
13: Fault Reset (RESET)
14: Running Pause
15: External Fault Input
16: Acceleration & Deceleration
Time Selection Terminal 1
01 /
109
P2.0.01 DI2 Terminal
Function 02
P2.0.02 DI3 Terminal
Function 09
P2.0.03 DI4 Terminal
Function 10
P2.0.04 DI5 Terminal
Function 11
P2.0.05 DI6 Terminal
Function 08
P2.0.06 DI7 Terminal
Function 00 /
P2.0.07 DI8 Terminal
Function 00 /
P2.0.08 DI9 Terminal
Function 00 /
P2.0.09 DI2 Terminal
Function 00 /

Chapter 5 Tables of Function Parameters
64
Function code Function name Setting scope Factory set value Modification
limit
Refere
nce
page
17: Acceleration & Deceleration Time
Selection Terminal 2
18: Frequency Source Selection Terminal
1
19: Frequency Source Selection Terminal
2
20: Frequency Source Selection Terminal
3
21: Running Command Selection
Terminal 1
22: Running Command Selection
Terminal 2
23: UP/DOWN Reference Reset
24: Prohibition of Acceleration &
Deceleration
25: PID Pause
26: PLC State Reset
27: Wobbulating Pause
28: Counter Input
29: Counter Reset
30: Length Counting Input
31: Length Reset
32: Torque Control Prohibition
33: PULS Impulse Input
34: Immediate DC Brake
35: External Fault Normally-closed Input
36: Frequency Modification Enable
37: PID Action Direction Negation
38: External Stop Terminal 1
39: External Stop Terminal 2
40: PID Integral Stop
41: PID Parameter Switch
42: Speed Control/Torque Control Switch
43: Emergency Stop
44: Deceleration DC Brake
45: User-Defined Fault 1
46: User-Defined Fault 2
47: Running Time Reset
48: Timer Input Terminal 1
49: Timer Input Terminal 2
50: Timer Reset Terminal 1
51: Timer Reset Terminal 2
52: Encoder Phase A Input
53: Encoder Phase B Input
54: Distance Reset
55: Integral Computation Reset
56: User Function 1
57: User Function 2
58: User Function 3
59: User Function 4
60: Start by tracing its rpm is prohibitied
110

Chapter 5 Tables of Function Parameters
65
Function
code Function name Setting scope
Factory
set value
Modifica
tion limit
Reference
page
P2.0.10 DI Filtering time 0.000s~1.000s 0.010
114 P2.0.11
External Terminal Running
Control Mode
0: Two-line Type 1
1: Two- line Type 2
2: Three- line Type 1
3: Three-line Type 2
0
P2.0.12 UP/DOWN Terminal Change Rate 00.001Hz/s~65.535Hz/s 01.000
115
P2.0.13 Minimum Input of Curve 1 00.00V~P2.0.15 00.00
P2.0.14 Corresponding reference for
Minimum Input of Curve 1 -100.0%~100.0% 000.0
P2.0.15 Maximum Input of Curve 1 P2.0.13~10.00V 10.00
P2.0.16 Corresponding reference for
Maximum Input of Curve 1 -100.0%~100.0% 100.0
P2.0.17 VF1 Filtering time 00.00s~10.00s 00.10
P2.0.18 Minimum Input of Curve 2 00.00V~P2.0.20 00.00
P2.0.19 Corresponding reference for
Minimum Input of Curve 2 -100.0%~100.0% 000.0
P2.0.20 Maximum Input of Curve 2 P2.0.18~10.00V 10.00
P2.0.21 Corresponding reference for
Maximum Input of Curve 2 -100.0%~100.0% 100.0
P2.0.22 VF2 Filtering time 0.00s~10.00s 00.10
P2.0.23 Minimum Input of PULS 0.00kHz~ P2.0.25 000.00
116
P2.0.24 Corresponding reference for
Minimum Input of PULS -100.0%~100.0% 000.0
P2.0.25 Maximum Input of PULS P2.0.23~100.00kHz 050.00
P2.0.26 Corresponding reference for
Maximum Input of PULS -100.0%~100.0% 100.0
P2.0.27 PULS Filtering time 00.00s~10.00s 00.10
P2.0.28 Expansion Card YO1 Function
Selection
O: No Function
1: Frequency inverter under
Running
2: Fault Stop Output
3: Frequency Level Testing
FDT1 Output
4: Frequency Reached
5: Zero-speed Running (no
output when shut down)
6: Motor Overload Pre-alarm
7: Frequency inverter
Overload Pre-alarm
8: Reference Count Value
Reached
9: Designated Count Value
Reached
10: Length Reached
11: PLC circulation cycle
completed
12: Accumulative Running
Time Reached
13: Frequency Limit
14: Torque Limit
15: Ready for Running
16: VF1>VF2
17: Upper Frequency Reached
00 /
P2.0.29 T1 Relay Function Selection 01
P2.0.30 T2 Relay Function Selection 02 /
P2.0.31 Expansion Card YO2 Function
Selection 00 /
P2.0.32
YO Function Selection
(Use Terminal YO/FMP as
YO,i.e.P2.1.20=1)
00 /
Administrator
Highlight

Chapter 5 Tables of Function Parameters
66
Function
code
Function
name Setting scope
Factory set
value
Modification
limit
Reference
page
18: Lower Frequency Reached (no output when
shut down)
19: Undervoltage state output
20: Communication Reference
21: VF1 Output less than Lower Limit
22: VF1 Output more Upper Limit
23: Zero-speed Running 2 (also output when
shut down)
24: Accumulative Power-on Time Reached
25: Frequency Level Testing FDT2 Output
26: Frequency 1 Reaches Output
27: Frequency 2 Reaches Output
28: Current 1 Reaches Output
29: Current 2 Reaches Output
30: Timing Reaches Output
31: VF1 Input Overlimit
32: In Off-load
33: In Reverse Running
34: Zero-current State
35: Module Temperature Reached
36: Output Current Overlimit
37: Lower Frequency Reached (also output
when shut down)
38: Alarm Output
39: PLC Phase Completed
40: Current Running Time Reached
41: Fault Output (Not Output for Undervoltage)
42: Time of Timer 1 Reached
43: Time of Timer 2 Reached
44: Time of Timer 1 Reached but Time of
Timer 2 not Reached
45: User Function 1
46: User Function 2
47: User Function 3
48: User Function 4
49: User Function 5
50: Synchronization Intermediate Relay M1
51: Synchronization Intermediate Relay M2
52: Synchronization Intermediate Relay M3
53: Synchronization Intermediate Relay M4
54: Synchronization Intermediate Relay M5
55: Distance over Zero
56: Distance Set value 1 Reached
57: Distance Set value 2 Reached
58: Operation Result 2 greater than 0
59: Operation Result 4 greater than 0
117

Chapter 5 Tables of Function Parameters
67
Function code Function name Setting scope Factory set value Modification limit Reference page
P2.0.33 Analog Output FM1 Reference 0: Running Frequency
1: Reference frequency
2: Output Current
3: Output Torque (Absolute Value of Torque)
4: Output Power 5: Output Voltage
6: Impulse Input
7: VF1 Voltage
8: VF1 Voltage
9: Keyboard Potentiometer Voltage
10: Actual Length Value
11: Actual Counting Value 12: Communication Reference
13: Motor Speed
14: Output Current
15: Bus line voltage
16: Output Torque
17: Operation Result 1
18: Operation Result 2
19: Operation Result 3 20: Operation Result 4
00
120
P2.0.34 Analog Output FM2 Reference 01 /
P2.0.35 FMP Output Reference (Use Terminal YO/FMP as FMP, i.e.P2.1.20=0)
00 /
P2.0.36 Analog FM1 Output Offset -100.0%~100.0% 000.0
121 P2.0.37 Analog FM1 Output Gains -10.00~10.00 01.00
P2.0.38 Analog FM2 Output Offset -100.0%~100.0% 000.0 /
P2.0.39 Analog FM2 Output Gains -10.00~10.00 01.00 /
Group P2.1: Extension Group
P2.1.00 Valid Model Selection 1 of Terminal DI 1
0: Active High Level
1: Active Low Level
Ones: DI1 (E102 invalid)
Tens: DI2
Hundreds: DI3 Thousands: DI4
Ten Thousands: DI5
00000
121
P2.1.01 Valid Model Selection 2 of Terminal DI
0: Active High Level
1: Active Low Level
Ones: DI6
Tens: DI7 (Invalid E100)
Hundreds: DI8 (Invalid E100)
Thousands: DI9 (Invalid E100)
Ten Thousands: DI10 (Invalid E100)
00000

Chapter 5 Tables of Function Parameters
68
Function code Function name Setting scope Factory
set value
Modification
limit Reference page
P2.1.02 Analog Input Curve Selection
Ones: Curve selected for VF1
Tens: Curve selected for VF2
1: Curve 1 2: Curve 2
3: Curve 3 4: Curve 4
Hundreds: VF1 Input resolution
Thousands: VF2 Input resolution
Ten Thousands: Keyboard
Potentiometer input resolution
0:00.01Hz 1:00.02Hz
2:00.05Hz 3:00.10Hz
4:00.20Hz 5:00.50Hz
6:01.00Hz(Keyboard
Potentiometer is invalid)
00021
122 P2.1.03 Selection for Curve less than
Min. Reference
0: Corresponding Min. Input
Reference
1: 0.0%
Ones: VF1
Tens: VF2
H.00
P2.1.04 Min. Input of Curve 3 00.00V~P2.1.06 00.00
P2.1.05 Corresponding reference for
Min. Input of Curve 3 -100.0%~100.0% 000.0
P2.1.06 Curve 3 Inflection Point 1 Input P2.1.04~P2.1.08 03.00
P2.1.07 Corresponding reference for
Curve 3 Inflection Point 1 Input -100.0%~100.0% 030.0
P2.1.08 Curve 3 Inflection Point 2 Input P2.1.06~P2.1.10 06.00
P2.1.09 Corresponding reference for
Curve 3 Inflection Point 2 Input -100.0%~100.0% 060.0
P2.1.10 Max. input of Curve 3 P2.1.08~10.00V 10.00
P2.1.11 Corresponding reference for
Max. input of Curve 3 -100.0%~100.0% 100.0
P2.1.12 Min. Input of Curve 4 00.00V~P2.1.14 00.00
123
P2.1.13 Corresponding reference for
Min. Input of Curve 4 -100.0%~100.0% -100.0
P2.1.14 Curve 4 Inflection Point 1 Input P2.1.12~P2.1.16 03.00
P2.1.15 Corresponding reference for
Curve 4 Inflection Point 1 Input -100.0%~100.0% -030.0
P2.1.16 Curve 4 Inflection Point 2 Input P2.1.14~P2.1.18 06.00
P2.1.17 Corresponding reference for
Curve 4 Inflection Point 2 Input -100.0%~100.0% 030.0
P2.1.18 Max. input of Curve 4 P2.1.16~10.00V 10.00
P2.1.19 Corresponding reference for
Max. input of Curve 4 -100.0%~100.0% 100.0
P2.1.20 YO/FMP Terminal Function 0: Impulse output (FMP)
1: Open Collector Output (YO) 1 /
P2.1.21 Highest Frequency of FMP
Output 000.01KHz~100.00KHz 050.00 /
P2.1.22 Valid Sate of Multi-functional
Output Terminal
0: Positive Logic
1: Negative Logic
Ones: YO(E102 invalid)
Tens: T1
Hundreds: T2(E102 invalid)
Thousands: Expansion Card
YO1 (Invalid E100)
Ten Thousands: Expansion
Card YO2 (Invalid E100)
00000
124
P2.1.23 VF1 Terminal Function as
Digital Input
00: Use as Normal Analog
01 ~ 59: Digital Input Terminal
Function
00
P2.1.24 VF2 Terminal Function as
Digital Input
00: Use as Normal Analog
01~59: Digital Input Terminal
Function
00

Chapter 5 Tables of Function Parameters
69
Function
code Function name Setting scope
Factory set
value
Modifica
tion limit
Reference
page
P2.1.25 Valid State Option of VF
0: Active High Level
1: Active Low Level
Ones: VF1
Tens: VF2
00 124
P2.1.26 DI1 Delay 0.0s~3600.0s 0000.0 /
125
P2.1.27 DI2 Delay 0.0s~3600.0s 0000.0
P2.1.28 DI3 Delay 0.0s~3600.0s 0000.0
P2.1.29 YO Delay 0.0s~3600.0s 0000.0 /
P2.1.30 T1 Delay 0.0s~3600.0s 0000.0
P2.1.31 T2 Delay 0.0s~3600.0s 0000.0 /
Administrator
Highlight

Chapter 5 Tables of Function Parameters
70
Group P2.2 Auxiliary Group
P2.2.00 Accumulative Power-on Reaches
Reference Time 00000h~65000h 00000
125
P2.2.01 Accumulative Running Reaches
Reference Time 00000h~65000h 00000
P2.2.02 The reference frequency reaches
test width 000.0%~100.0% 000.0
126 P2.2.03 Frequency Test FDT1
000.00Hz ~ Highest
Frequency 050.00
P2.2.04 FDT1 Lagged Value 000.0%~100.0% 005.0
P2.2.05 Frequency Test FDT2 000.00Hz ~ Highest
Frequency 050.00
127
P2.2.06 FDT2 Lagged Value 000.0%~100.0% 005.0
P2.2.07 Any reached frequency tested
value 1 000.00Hz ~ Highest
Frequency 050.00
P2.2.08 Any reached frequency 1 test
width 000.0%~100.0% 000.0
P2.2.09 Any reached frequency tested
value 2 000.00Hz ~ Highest
Frequency 050.00
P2.2.10 Any reached frequency 2 test
width 000.0%~100.0% 000.0
P2.2.11 Zero Current Test Level
000.0%~300.0%
(100.0% correspond to rated
current of motor)
005.0
128 P2.2.12 Delay Time for Zero Current Test 000.01s~600.00s 000.10
P2.2.13 Output Current Overlimit Value 00.0: No Test
000.1%~300.0% 200.0
P2.2.14 Delay Time for Current Overlimit
Test 000.00s~600.00s 000.00
P2.2.15 Current Level Test 1 000.0%~300.0% 100.0 129
P2.2.16 Test Width of Current Level 1 000.0%~300.0% 000.0
P2.2.17 Current Level Test 2 000.0%~300.0% 100.0
130
P2.2.18 Test Width of Current Level 2 000.0%~300.0% 000.0
P2.2.19 VF1 Input Lower Limit 00.00V~P2.2.20 03.10
P2.2.20 VF1 Input Upper Limit P2.2.19~11.00V 06.80
P2.2.21 Model Temperature Reaches
Reference 000~100 075
P2.2.22 Current Running Reaches
Reference Time 0000.0 min~6500.0 min 0000.0
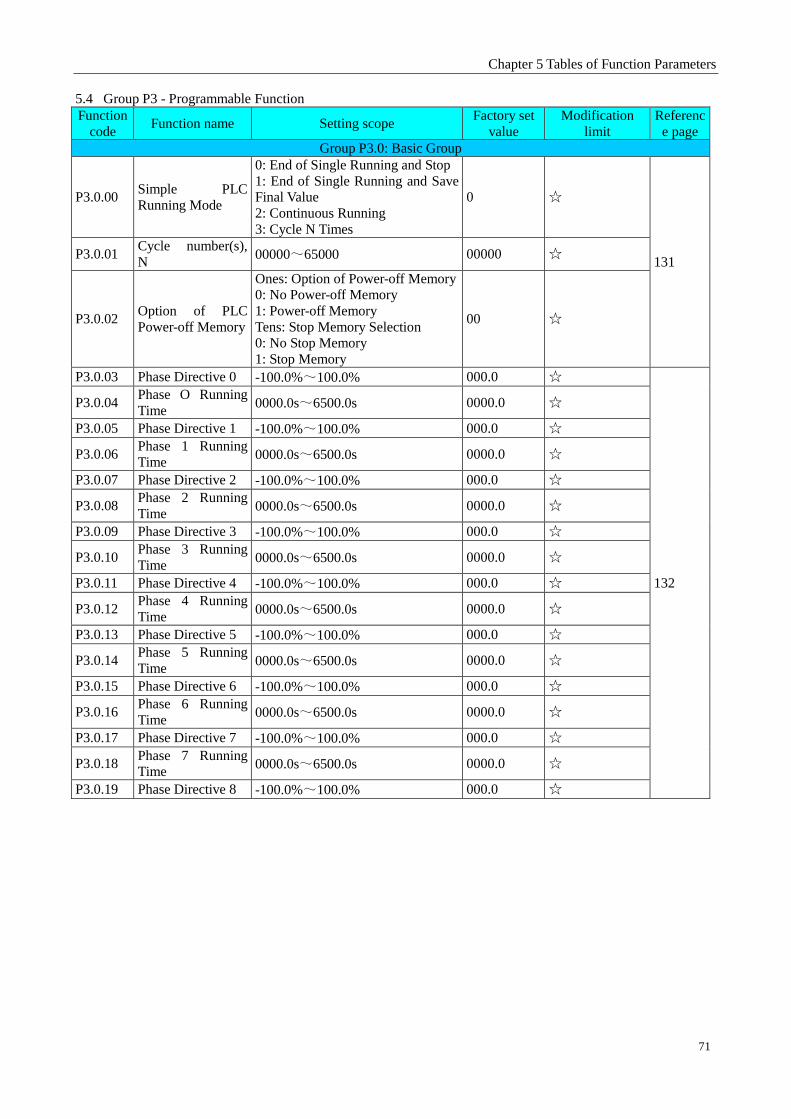
Chapter 5 Tables of Function Parameters
71
5.4 Group P3 - Programmable Function
Function
code Function name Setting scope
Factory set
value
Modification
limit
Referenc
e page
Group P3.0: Basic Group
P3.0.00 Simple PLC
Running Mode
0: End of Single Running and Stop
1: End of Single Running and Save
Final Value
2: Continuous Running
3: Cycle N Times
0
131 P3.0.01
Cycle number(s),
N 00000~65000 00000
P3.0.02 Option of PLC
Power-off Memory
Ones: Option of Power-off Memory
0: No Power-off Memory
1: Power-off Memory
Tens: Stop Memory Selection
0: No Stop Memory
1: Stop Memory
00
P3.0.03 Phase Directive 0 -100.0%~100.0% 000.0
132
P3.0.04 Phase O Running
Time 0000.0s~6500.0s 0000.0
P3.0.05 Phase Directive 1 -100.0%~100.0% 000.0
P3.0.06 Phase 1 Running
Time 0000.0s~6500.0s 0000.0
P3.0.07 Phase Directive 2 -100.0%~100.0% 000.0
P3.0.08 Phase 2 Running
Time 0000.0s~6500.0s 0000.0
P3.0.09 Phase Directive 3 -100.0%~100.0% 000.0
P3.0.10 Phase 3 Running
Time 0000.0s~6500.0s 0000.0
P3.0.11 Phase Directive 4 -100.0%~100.0% 000.0
P3.0.12 Phase 4 Running
Time 0000.0s~6500.0s 0000.0
P3.0.13 Phase Directive 5 -100.0%~100.0% 000.0
P3.0.14 Phase 5 Running
Time 0000.0s~6500.0s 0000.0
P3.0.15 Phase Directive 6 -100.0%~100.0% 000.0
P3.0.16 Phase 6 Running
Time 0000.0s~6500.0s 0000.0
P3.0.17 Phase Directive 7 -100.0%~100.0% 000.0
P3.0.18 Phase 7 Running
Time 0000.0s~6500.0s 0000.0
P3.0.19 Phase Directive 8 -100.0%~100.0% 000.0

Chapter 5 Tables of Function Parameters
72
P3.0.20 Phase 8 Running
Time 0000.0s~6500.0s 0000.0
P3.0.21 Phase Directive 9 -100.0%~100.0% 000.0
P3.0.22 Phase 9 Running
Time 0000.0s~6500.0s 0000.0
P3.0.23 Phase Directive 10 -100.0%~100.0% 000.0
P3.0.24 Phase 10 Running
Time 0000.0s~6500.0s 0000.0
P3.0.25 Phase Directive 11 -100.0%~100.0% 000.0
P3.0.26 Phase 11 Running
Time 0000.0s~6500.0s 0000.0
Function
code Function name Setting scope
Factory set
value
Modification
limit
Reference
page
P3.0.27 Phase Directive 12 -100.0%~100.0% 000.0
132
P3.0.28 Phase 12 Running Time 0000.0s~6500.0s 0000.0
P3.0.29 Phase Directive 13 -100.0%~100.0% 000.0
P3.0.30 Phase 13 Running Time 0000.0s~6500.0s 0000.0
P3.0.31 Phase Directive 14 -100.0%~100.0% 000.0
P3.0.32 Phase 14 Running Time 0000.0s~6500.0s 0000.0
P3.0.33 Phase Directive 15 -100.0%~100.0% 000.0
P3.0.34 Phase 16 Running Time 0000.0s~6500.0s 0000.0
P3.0.35 Phase 0 attribution Ones: Acceleration & Deceleration
Time Selection (Invalid Multiplex
Directive)
0: Acceleration & Deceleration Time 1
1: Acceleration & Deceleration Time 2
2: Acceleration & Deceleration Time 3
3: Acceleration & Deceleration Time 4
Tens: Frequency Source Selection
(Valid Multiplex Directive)
0: Current Phase Directive
1: Keyboard Potentiometer
2: Keyboard Frequency Reference
3: VF1 Input
4: VF2 Input
5: PULS Reference (DI6)
6: PID Reference
7: Operation Result 1
8: Operation Result 2
9: Operation Result 3
A: Operation Result 4
Hundreds unit: running direction
0: Default direction
1: Reversed direction
H.000
133
P3.0.36 Phase 1 attribution H.000
P3.0.37 Phase 2 attribution H.000
P3.0.38 Phase 3 attribution H.000
P3.0.39 Phase 4 attribution H.000
P3.0.40 Phase 5 attribution H.000
P3.0.41 Phase 6 attribution H.000
P3.0.42 Phase 7 attribution H.000
P3.0.43 Phase 8 attribution H.000
P3.0.44 Phase 9 attribution H.000
P3.0.45 Phase 10 attribution H.000
P3.0.46 Phase 11 attribution H.000
P3.0.47 Phase 12 attribution H.000
P3.0.48 Phase 13 attribution H.000
P3.0.49 Phase 14 attribution H.000
P3.0.50 Phase 15 attribution H.000
P3.0.51 Simple PLC Running
Time Unit
0: Second
1: Hour
2: Minute
0

Chapter 5 Tables of Function Parameters
73
Group P3.1: Expansion Group
P3.1.00 Timing Function
Selection 0: Invalid 1: Valid 0
134 P3.1.01
Fixed Running Time
Selection
0: Digital Reference (P3.1.02)
1: External Terminal VF1 Reference
2: External Terminal VF2 Reference
(Analog input range corresponds to
P3.1.02)
0
P3.1.02 Fixed Running Time 0000.0min~6500.0min 0000.0
Function
code Function name Setting scope
Factory
set
value
Modification
limit
Reference
page
P3.1.03 Wobbulating Reference Mode
0: Relative to Reference
frequency
1: Relative to Highest Frequency
0
134
P3.1.04 Wobbulating Range 000.0%~100.0% 000.0
P3.1.05 Kicking Range 00.0%~50.0% 00.0
P3.1.06 Wobbulating Cycle 0000.1s~3000.0s 0010.0
P3.1.07 Rise Time of Wobbulating
Triangular Wave 000.1%~100.0% 050.0
P3.1.08 Reference Length 00000m~65535m 01000
P3.1.09 Actual Length 00000m~65535m 00000
P3.1.10 Impulse Count per meter 0000.1~6553.5 0100.0
P3.1.11 Reference Count Value 00001~65535 01000
P3.1.12 Designated Count Value 00001~65535 01000
P3.1.13 Distance Set value 1 -3200.0~3200.0 0000.0
P3.1.14 Distance Set value 2 -3200.0~3200.0 0000.0
P3.1.15 Impulse Count per Distance 000.00~600.00 000.00

Chapter 5 Tables of Function Parameters
74
Group P3.2: Built-in Logic PLC Function Group
P3.2.00 Intermediate Delay Relay
Control
0: the input of this relay is
determined by this Relay
Control Word A
1: the input of this relay is
determined by this Relay
Control Word B
2: the input of this relay is
determined by this Relay
Control Word C
Ones: Relay 1 (M1)
Tens: Relay 2 (M2)
Hundreds: Relay 3 (M3)
Thousands: Relay 4 (M4)
Ten Thousands: Relay 5(M5)
00000
135
P3.2.01 Intermediate Relay Control
Word A
0: Reference 0
1: Reference 1
Ones: M1
Tens: M2
Hundreds: M3
Thousands: M4
Ten Thousands: M5
00000
Function
code Function name Setting scope
Factory set
value
Modific
ation
limit
Referenc
e page
P3.2.02
Intermediate Delay
Relay M1 Control Word
B
Ones: Control Logic
0: Input 1
1: Input 1 and NOT
2: Input 1 and Input 2 AND
3: Input 1 and Input 2 OR
4: Input 1 and Input 2 XOR
5: the valid reference of Input 1 is valid
the valid Reference of Input 2 is invalid
6. Valid reference of Input 1 Rise Edge is
valid
Valid reference of Input 2 Rise Edge is
invalid
7: Reverse valid signal of Input 1 Rising
Edge
8: Input 1 Rise Edge is valid and output a
impulse signal with width of 200ms
9: Input 1 Rise Edge and Input 2 AND
00000
136
P3.2.03
Intermediate Delay
Relay M2 Control Word
B
00000
P3.2.04
Intermediate Delay
Relay M3 Control Word
B
00000
P3.2.05
Intermediate Delay
Relay M4 Control Word
B
00000
P3.2.06
Intermediate Delay
Relay M5 Control Word
B
00000

Chapter 5 Tables of Function Parameters
75
P3.2.07
Intermediate Delay
Relay M1 Control Word
C
Tens Ones:00~59
Output Function 00~59 Corresponding to
Digital Input Terminal
Thousands Hundreds
Output Function 00~59 Corresponding to
Multi-functional Output Terminal
0000
137
P3.2.08
Intermediate Delay
Relay M2 Control Word
C
0000
P3.2.09
Intermediate Delay
Relay M3 Control Word
C
0000
P3.2.10
Intermediate Delay
Relay M4 Control Word
C
0000
P3.2.11
Intermediate Delay
Relay M5 Control Word
C
0000
Function
code Function name Setting scope
Factory set
value
Modification
limit
Referenc
e page
P3.2.12 M1 Connection Delay Time 0.0s~3600.0s 0000.0
137
P3.2.13 M2 Connection Delay Time 0.0s~3600.0s 0000.0
P3.2.14 M3 Connection Delay Time 0.0s~3600.0s 0000.0
P3.2.15 M4 Connection Delay Time 0.0s~3600.0s 0000.0
P3.2.16 M5 Connection Delay Time 0.0s~3600.0s 0000.0
P3.2.17 M1 Disconnection Delay
Time 0.0s~3600.0s 0000.0
P3.2.18 M2 Disconnection Delay
Time 0.0s~3600.0s 0000.0
P3.2.19 M3 Disconnection Delay
Time 0.0s~3600.0s 0000.0

Chapter 5 Tables of Function Parameters
76
P3.2.20 M4 Disconnection Delay
Time 0.0s~3600.0s 0000.0
P3.2.21 M5 Disconnection Delay
Time 0.0s~3600.0s 0000.0
P3.2.22 Valid State Option of
Intermediate Relay
0: Not Negation
1: Negation
Ones: M1
Tens: M2
Hundreds: M3
Thousands: M4
Ten Thousands: M5
00000
P3.2.23 Internal Timer Control
Word
Ones: Timing Control 1 of Timer Tens: Timing Control 2 of Timer 0: Timer Running 1: Controlled by Timer Input Terminal 1 2: Negation Control of Timer Input Terminal 1 3: Controlled by Timer Input Terminal 2 4: Negation Control of Timer Input Terminal 2 Hundreds: Timer 1 Reset Control Thousands: Timer 2 Reset Control 0: Controlled by Timer Reset Terminal 1 1: Controlled by Timer Reset Terminal 2 Ten Thousands: Timing Unit 0: Second 1: Minute
2: Hour
00000
138
P3.2.24 Timing Time of Timer 1 0.0s~3600.0s 0000.0
P3.2.25 Timing Time of Timer 2 0.0s~3600.0s 0000.0

Chapter 5 Tables of Function Parameters
77
Function
code
Function
name Setting scope
Factory set
value
Modification
limit
Reference
page
P3.2.26 Operation
Module
0: No Operation
1: Add Operation
2: Subtraction Operation
3: Multiply Operation
4: Division Operation
5: Greater than Judgment
6: Equal to Judgment
7: Equal to or Greater than Judgment
8: Integration
9~F: Reservation
Ones: Operation 1
Tens: Operation 2
Hundreds: Operation 3
Thousands: Operation 4
H.0000
139
P3.2.27
Operation Setting Coefficient Property
0: Operate the Setting Coefficient by
multiplication without decimal
1: Operate the Setting Coefficient by
multiplication with one decimal
2: Operate the Setting Coefficient by
multiplication with two decimals
3: Operate the Setting Coefficient by
multiplication with three decimals
4: Operate the Setting Coefficient by
multiplication with four decimals
5: Operate the Setting Coefficient by
division without decimal
6: Operate the Setting Coefficient by
division with one decimal
7: Operate the Setting Coefficient by
division with two decimals
8: Operate the Setting Coefficient by
division with three decimals
9: Operate the Setting Coefficient by
division with four decimals A: Operate the Setting Coefficient by division without decimal B: Operate the Setting Coefficient by division with one decimal C: Operate the Setting Coefficient by division with two decimals D: Operate the Setting Coefficient by division with three decimals E: Operate the Setting Coefficient by division with four decimals (The setting coefficient of A, B, C, D, E is the address number of function code) Ones: Operation 1
Tens: Operation 2
Hundreds: Operation 3
Thousands: Operation 4
H.0000
P3.2.28 Input A of
Operation 1
Thousands, Hundreds, Tens and Ones:
express address of Input A of Operation 1
Ten Thousands: express input operation
model
0: Input is operation by unsigned number
1: Input is operation by signed number
00000 140

Chapter 5 Tables of Function Parameters
78
Function
code Function name Setting scope
Factory
set value
Modification
limit
Refere
nce
page
P3.2.29 Input B of Operation
1
Thousands, Hundreds, Tens and Ones:
express address of Input B of Operation 1
Ten Thousands: express input operation
model
0: Input is operation by unsigned number
1: Input is operation by signed number
00000
140 P3.2.30 Setting Coefficient of
Operation 1 00000~65535 00001
P3.2.31 Input A of Operation
2
Thousands, Hundreds, Tens and Ones:
express address of Input A of Operation 2
Ten Thousands: express input operation
model
0: Input is operation by unsigned number
1: Input is operation by signed number
00000
P3.2.32 Input B of Operation
2
Thousands, Hundreds, Tens and Ones:
express address of Input B of Operation 1
Ten Thousands: express input operation
model
0: Input is operation by unsigned number
1: Input is operation by signed number
00000
141
P3.2.33 Setting Coefficient of
Operation 2 00000~65535 00001
P3.2.34 Input A of Operation
3
Thousands, Hundreds, Tens and Ones:
express address of Input A of Operation 3
Ten Thousands: express input operation
model
0: Input is operation by unsigned number
1: Input is operation by signed number
00000
P3.2.35 Input B of Operation
3
Thousands, Hundreds, Tens and Ones:
express address of Input B of Operation 3
Ten Thousands: express input operation
model
0: Input is operation by unsigned number
1: Input is operation by signed number
00000
P3.2.36 Setting Coefficient of
Operation 3 00000~65535 00001
P3.2.37 Input A of Operation
4
Thousands, Hundreds, Tens and Ones:
express address of Input A of Operation 4
Ten Thousands: express input operation
model
0: Input is operation by unsigned number
1: Input is operation by signed number
00000
P3.2.38 Input B of Operation
4
Thousands, Hundreds, Tens and Ones:
express address of Input B of Operation 4
Ten Thousands: express input operation
model
0: Input is operation by unsigned number
1: Input is operation by signed number
00000
P3.2.39 Setting Coefficient of
Operation 4 00000~65535 00001
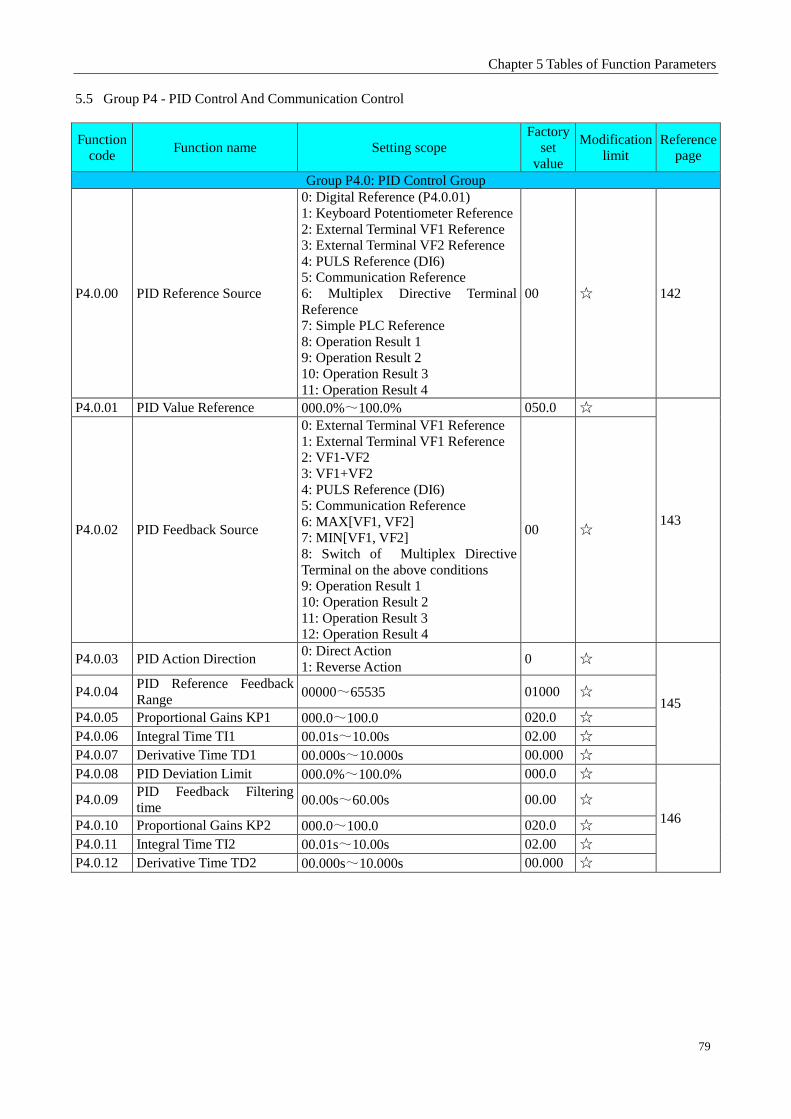
Chapter 5 Tables of Function Parameters
79
5.5 Group P4 - PID Control And Communication Control
Function
code Function name Setting scope
Factory
set
value
Modification
limit
Reference
page
Group P4.0: PID Control Group
P4.0.00 PID Reference Source
0: Digital Reference (P4.0.01)
1: Keyboard Potentiometer Reference
2: External Terminal VF1 Reference
3: External Terminal VF2 Reference
4: PULS Reference (DI6)
5: Communication Reference
6: Multiplex Directive Terminal
Reference
7: Simple PLC Reference
8: Operation Result 1
9: Operation Result 2
10: Operation Result 3
11: Operation Result 4
00 142
P4.0.01 PID Value Reference 000.0%~100.0% 050.0
143 P4.0.02 PID Feedback Source
0: External Terminal VF1 Reference
1: External Terminal VF1 Reference
2: VF1-VF2
3: VF1+VF2
4: PULS Reference (DI6)
5: Communication Reference
6: MAX[VF1, VF2]
7: MIN[VF1, VF2]
8: Switch of Multiplex Directive
Terminal on the above conditions
9: Operation Result 1
10: Operation Result 2
11: Operation Result 3
12: Operation Result 4
00
P4.0.03 PID Action Direction 0: Direct Action
1: Reverse Action 0
145 P4.0.04
PID Reference Feedback
Range 00000~65535 01000
P4.0.05 Proportional Gains KP1 000.0~100.0 020.0
P4.0.06 Integral Time TI1 00.01s~10.00s 02.00
P4.0.07 Derivative Time TD1 00.000s~10.000s 00.000
P4.0.08 PID Deviation Limit 000.0%~100.0% 000.0
146
P4.0.09 PID Feedback Filtering
time 00.00s~60.00s 00.00
P4.0.10 Proportional Gains KP2 000.0~100.0 020.0
P4.0.11 Integral Time TI2 00.01s~10.00s 02.00
P4.0.12 Derivative Time TD2 00.000s~10.000s 00.000

Chapter 5 Tables of Function Parameters
80
Function
code Function name Setting scope
Factory
set value
Modification
limit
Reference
page
P4.0.13 PID Switch Conditions
0: No Switch
1: Switch through Terminals
2: Switch through Deviation
0 146
P4.0.14 PID Switch Deviation 1 000.0%~P4.0.15 020.0
147
P4.0.15 PID Switch Deviation 2 P4.0.14~100.0% 080.0
P4.0.16 PID Initial Value 000.0%~100.0% 000.0
P4.0.17 PID Initial Value Hold
Time 000.00~650.00s 000.00
P4.0.18 PID Feedback Loss Test
000.0%: No Judgment on
Feedback Loss
000.1%~100.0%
000.0
P4.0.19 PID Feedback Loss Test
Time 00.0s~20.0s 00.0
P4.0.20 PID Stop Operation 0: No Operation
1: Operation 0 148
Group P4.1: Communication Group
P4.1.00 Baud Rate
Ones unit: MODBUS baud rate 0: 1200
1: 2400
2: 4800
3: 9600
4: 19200
5: 38400
6: 57600 Tens unit: PROFIBUS baud rate
0: 115200 1: 208300 2: 256000 3: 512000
3
148
P4.1.01 Data Format
0: No Verification (8-N-2)
1: Even Parity Verification (8-E-1)
2: Odd Parity Verification (8-O-1)
3: No Verification (8-N-1)
0
P4.1.02 Local Machine Address 000: Broadcast Address
001~249 001
P4.1.03 Response Delay 00~20ms 02
P4.1.04 Communication Timeout 00.0 (Invalid)
00.1s~60.0s 00.0
P4.1.05 Data Transmission
Format
Ones unit: MODBUS data format
0: ASCII Mode (Reservation)
1: RTU Mode Tens unit: PROFIBUS data format
0: PPO1 1: PPO2 2: PPO3 3: PPO5
1
P4.1.06 MODBUS
communication data
reply or not
0: Reply 1: No reply 0
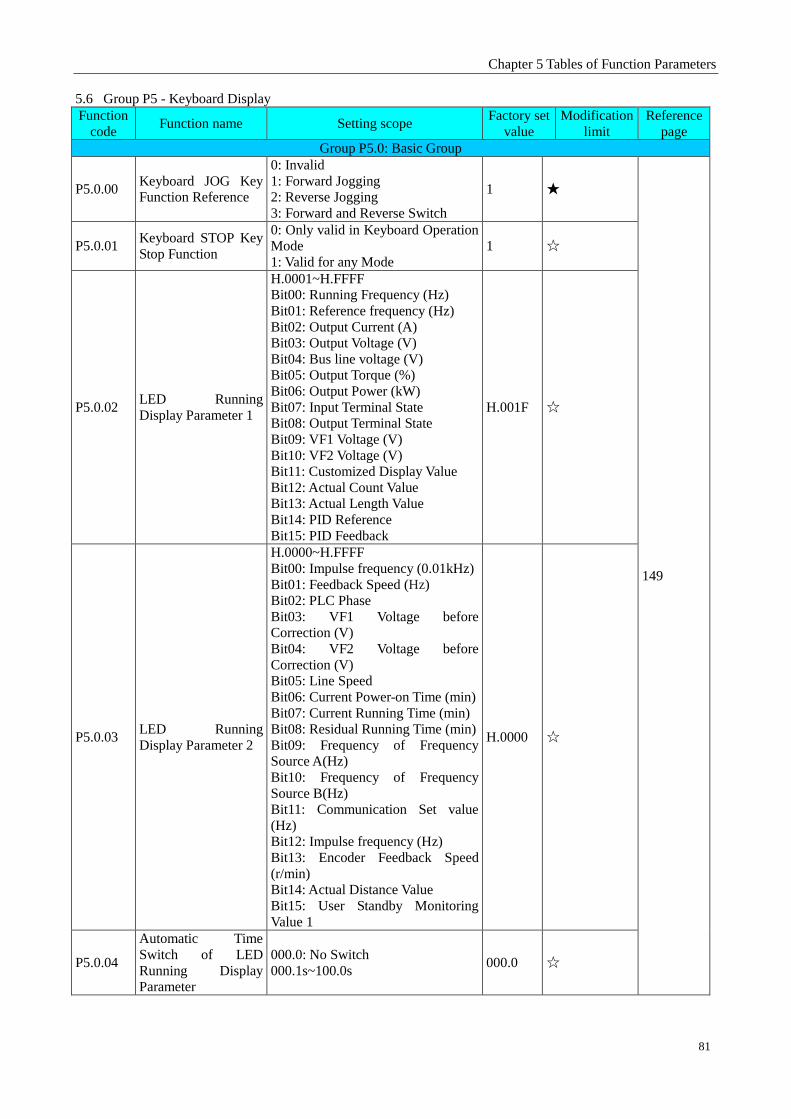
Chapter 5 Tables of Function Parameters
81
5.6 Group P5 - Keyboard Display
Function
code Function name Setting scope
Factory set
value
Modification
limit
Reference
page
Group P5.0: Basic Group
P5.0.00 Keyboard JOG Key
Function Reference
0: Invalid
1: Forward Jogging
2: Reverse Jogging
3: Forward and Reverse Switch
1
149
P5.0.01 Keyboard STOP Key
Stop Function
0: Only valid in Keyboard Operation
Mode
1: Valid for any Mode
1
P5.0.02 LED Running
Display Parameter 1
H.0001~H.FFFF
Bit00: Running Frequency (Hz)
Bit01: Reference frequency (Hz)
Bit02: Output Current (A)
Bit03: Output Voltage (V)
Bit04: Bus line voltage (V)
Bit05: Output Torque (%)
Bit06: Output Power (kW)
Bit07: Input Terminal State
Bit08: Output Terminal State
Bit09: VF1 Voltage (V)
Bit10: VF2 Voltage (V)
Bit11: Customized Display Value
Bit12: Actual Count Value
Bit13: Actual Length Value
Bit14: PID Reference
Bit15: PID Feedback
H.001F
P5.0.03 LED Running
Display Parameter 2
H.0000~H.FFFF
Bit00: Impulse frequency (0.01kHz)
Bit01: Feedback Speed (Hz)
Bit02: PLC Phase
Bit03: VF1 Voltage before
Correction (V)
Bit04: VF2 Voltage before
Correction (V)
Bit05: Line Speed
Bit06: Current Power-on Time (min)
Bit07: Current Running Time (min)
Bit08: Residual Running Time (min)
Bit09: Frequency of Frequency
Source A(Hz)
Bit10: Frequency of Frequency
Source B(Hz)
Bit11: Communication Set value
(Hz)
Bit12: Impulse frequency (Hz)
Bit13: Encoder Feedback Speed
(r/min)
Bit14: Actual Distance Value
Bit15: User Standby Monitoring
Value 1
H.0000
P5.0.04
Automatic Time
Switch of LED
Running Display
Parameter
000.0: No Switch
000.1s~100.0s 000.0

Chapter 5 Tables of Function Parameters
82
Function
code Function name Setting scope
Factory set
value
Modification
limit
Reference
page
P5.0.05 LED Stop Display
Parameter
H.0001~H.FFFF
Bit00: Reference frequency (Hz)
Bit01: Bus line voltage (V)
Bit02: Input Terminal State
Bit03: Output Terminal State
Bit04: VF1 Voltage (V)
Bit05: VF2 Voltage (V)
Bit06: Actual Count Value
Bit07: Actual Length Value
Bit08: PLC Phase
Bit09: Customized Display Value
Bit10: PID Reference
Bit11: PID Feedback
Bit12: Impulse frequency (Hz)
Bit13: User Standby Monitoring Value 1
Bit14: Reservation
Bit15: Reservation
H.0033
151
P5.0.06 LCD Line 1 Display
at Running 0000~9399 9001
P5.0.07 LCD Line 2 Display
at Running 0000~9399 9000
P5.0.08 LCD Line 3 Display
at Running 0000~9399 9002
P5.0.09 LCD Line 4 Display
at Running 0000~9399 9003
P5.0.10 LCD Line 1 Display
at Stop 0000~9399 9001
152
P5.0.11 LCD Line 2 Display
at Stop 0000~9399 9000
P5.0.12 LCD Line 3 Display
at Stop 0000~9399 9004
P5.0.13 LCD Line 4 Display
at Stop 0000~9399 0000

Chapter 5 Tables of Function Parameters
83
P5.0.14
LCD
Chinese/English
Display Switch
0: Chinese 1: English 0
P5.0.15 Customized Display
of Coefficient 0.0001~6.5000 1.0000
P5.0.16 User-defined display
control word.
Ones unit: user-defined decimal place displaying
0: zero decimal place
1: one decimal place
2: two decimal places
3: three decimal places
Tens unit: source of user-defined display value
0: determined by hundreds place of user-defined
display control word.
1: determined by set value of P5.0.15, and 0.0000~
0.0099 corresponds to P9.0.00 ~ P9.0.99 of P9
Group.
Hundreds unit: selection of user-defined displaying
coefficient
0: user-defined displaying coefficient is P5.0.15.
1: user-defined displaying coefficient is calculation
result 1
2: user-defined displaying coefficient is calculation
result 2
3: user-defined displaying coefficient is calculation
result 3
4: user-defined displaying coefficient is calculation
result 4
001
Function
code Function name Setting scope
Factory
set value
Modification
limit
Reference
page
P5.0.17
Selection Display of
Function Parameter
Group
Ones:
0: Only display basic group
1: Display the menus at all
levels
Tens
0: Don’t display Group P7
1: Display Group P7
2: Reservation
Hundreds:
0: Don’t display correction
parameter group
1: Display correction parameter
group
Thousands:
0: Don’t display code group
1: Display code group
Ten Thousands: Reservation
00011 153
P5.0.18 Function Password
Protection
0: Modifiable
1: Non-modifiable
2: Allowable Modification to GP
Type
0 154

Chapter 5 Tables of Function Parameters
84
P5.0.19 Parameter Initialization
00: No Operation
01: Clearance of Record
Information
09: Recover Factory set value,
excluding motor parameter,
correction group, password
group
19: Recover Factory set value,
excluding motor parameter,
password group
30: Users Current Parameter
Backup
60: User Backup Parameters
Recovery
100~999: User factory set
values recovery
000
P5.0.20 User Password 00000~65535 00000 155
Group P.5.1 Expansion Group
P5.1.00 Accumulative Running
Time 00000h~65000h
155
P5.1.01 Accumulative Power On
Time 00000h~65000h
P5.1.02 Accumulative Power
Consumption 00000~65000
P5.1.03 Module Temperature 000~100
P5.1.04 Hardware Version No. 180.00
P5.1.05 Software Version No. 001.00
P5.1.06 Program Nonstandard
Label 0000~9999

Chapter 5 Tables of Function Parameters
85
5.7 Group P6 - Fault Display and Protection
Function
code Function name Setting scope
Factory
set value
Modification
limit
Reference
page
Group P6.0: Fault Display Group
P6.0.00 Fault Record 1 (Last
Time)
0: No Fault
1: Constant Overcurrent
2: Accelerated Overcurrent
3: Decelerated Overcurrent
4: Constant Overvoltage
5: Accelerated Overvoltage
6: Decelerated Overvoltage
7: Module Fault
8: Undervoltage
9: Frequency inverter Overload
10: Motor Overload
11: Input Default Phase
12: Output Default Phase
13: External Fault
14: Communication Abnormity
15: Frequency inverter Overheat
16: Frequency inverter
Hardware Fault
17: Motor-to-ground Short
Circuit
18: Motor Identification Error
19: Motor Off-load
20: PID Feedback Loss
21: User Customerized Fault 1
22: User Customerized Fault 2
23: Power-on Time Reached
24: Running Time Reached
25: Encoder Fault
26: Parameter Read-Write
Abnormity
27: Motor Overheat
28: Larger Speed Deviation
29: Motor Overspeed
30: Initial Position Error
31: Current Test Fault
32: Contactor
33: Abnormity of Current Test
34: Fast Current-limiting
Timeout
35: Motor Switch at Running
36: 24V Power Fault 37: Driving power supply fault 38~39: Reservation 40: Buffer Resistance Fault
156
P6.0.01 Fault Record 2
P6.0.02 Fault Record 3

Chapter 5 Tables of Function Parameters
86
Function
code Function name
Setting
scope
Factory set
value
Modification
limit Reference page
P6.0.03 Fault Frequency 1
156
P6.0.04 Fault Current 1
P6.0.05 Bus line voltage 1 when at Fault
P6.0.06 Input Terminal State 1 when at fault
P6.0.07 Output Terminal State 1 when at fault
P6.0.08 Frequency inverter State 1 when at fault
P6.0.09 Power-on Time 1 when at fault
P6.0.10 Running Time 1 when at fault
P6.0.11 Fault Frequency 2
157
P6.0.12 Fault Current 2
P6.0.13 Bus line voltage 2 when at Fault
P6.0.14 Input Terminal State 2 when at fault
P6.0.15 Output Terminal State 2 when at fault
P6.0.16 Frequency inverter State 2 when at fault
P6.0.17 Power-on Time 2 when at fault
P6.0.18 Running Time 2 when at fault
P6.0.19 Fault Frequency 3
P6.0.20 Fault Current 3
P6.0.21 Bus line voltage 3 when at Fault
P6.0.22 Input Terminal State 3 when at fault
P6.0.23 Output Terminal State 3 when at fault
P6.0.24 Frequency inverter State 3 when at fault
P6.0.25 Power-on Time 3 when at fault
P6.0.26 Running Time 3 when at fault
Group 6.1: Protection Control Group
P6.1.00 Input Default Phase Protection
0:
Prohibite
d 1:
Allowed
1
157
P6.1.01 Output Default Phase Protection
0:
Prohibite
d 1:
Allowed
1
P6.1.02 Overvoltage Stall Protection Sensitivity 0~100 5
158
P6.1.03 Overvoltage Stall Protection Voltage Point 120% ~150%
130
P6.1.04 Overcurrent Stall Protection Sensitivity 0~100 020
P6.1.05 Overcurrent Stall Protection current 100% ~200%
150
P6.1.06 Fault Auto Reset Number 0~20 00
P6.1.07 Waiting Interval Time of Fault Auto Reset 0.1s ~100.0s
001.0

Chapter 5 Tables of Function Parameters
87
Function
code Function name Setting scope
Factory
set value
Modification
limit
Reference
page
P6.1.08 Fault Protective Action
Selection 1
0: Free Stop
1: Stop by its Mode
2: Continuous Running
Ones: Motor Overload
Tens: Input Default Phase
Hundreds: Output Default Phase
Thousands: External Default
Ten Thousands: Communication
Abnormality
00000
159
P6.1.09 Fault Protective Action
Selection 2
0: Free Stop
1: Stop by its Mode
2: Continuous Running
Ones: Motor Overload
Tens: Feedback Loss
Hundreds: User Customerized Fault
1
Thousands: User Customerized Fault
2
Ten Thousands: Power-on Time
Reached
00000
P6.1.10 Fault Protective Action
Selection 3
Ones: Running Time Reached
0: Free Stop
1: Stop by its Mode
2: Continuous Running
Tens: Encoder Abnormality
0: Free Stop
Hundreds: Parameter Read-Write
Abnormity
0: Free Stop
1: Stop by its Mode
Thousands: Motor Overhear
0: Free Stop
1: Stop by its Mode
2: Continuous Running
Ten Thousands: Fault of 24V Power
Supply
0: Free Stop
1: Stop by its Mode
00000
P6.1.11 Fault Protective Action
Selection 4
0: Free Stop
1: Stop by its Mode
2: Continuous Running
Ones: Larger Speed Deviation
Tens: Motor Overspeed
Hundreds: Initial Position Error
Thousands: Reservation
Ten Thousands: Reservation
00000

Chapter 5 Tables of Function Parameters
88
Function
code Function name Setting scope
Factory set
value
Modification
limit
Reference
page
P6.1.12
Continuous
Running
Frequency
Selection when at
Fault
0: Running at Current Frequency
1: Running at Reference frequency
2: Running at Upper Frequency
3: Running at Lower Frequency
4: Running at Back Frequency for
Abnormality
0
160
P6.1.13
Backup
Frequency for
Abnormality 000.0%~100.0% 100.0
P6.1.14
Action Selection
for Momentary
Interruption
0: Invalid
1: Deceleration
2: Stop by Deceleration
0
161
P6.1.15
Judgment Time
of Momentary
Interruption
Voltage Recovery
000.00s~100.00s 000.50
P6.1.16
Voltage Judgment
for Momentary
Interruption
Action
60.0%~100.0% (Standard Bus line
voltage) 080.0
P6.1.17
Voltage Judgment
for Suspension of
Momentary
Action
80.0%~100.0% (Standard Bus line
voltage) 090.0
P6.1.18
Off-load
Protection
Selection
0: Valid 1: Invalid 0
162
P6.1.19 Off-load Test
Level 000.0%~100.0% 010.0
P6.1.20 Off-load Test
Time 00.0s~60.0s 01.0
P6.1.21 Overspeed Test 00.0%~50.0% 20.0
P6.1.22 Overspeed Test
Time
00.0: No Test
00.1s~60.0s 01.0
P6.1.23
Speed Deviation
greater than Test
Value 00.0%~50.0% 20.0
P6.1.24
Speed Deviation
greater than Test
Time
00.0: No Test
00.1s~60.0s 05.0
P6.1.25
Fault Output
Terminal Action
Selection during
Fault Auto Reset
Period
0: No Action
1: Action 0
P6.1.26
Input Default
Phase Protection
Sensitivity
01~10 (The smaller it is, the more
sensitivity it is) 05 157

Chapter 5 Tables of Function Parameters
89
5.8 Group P7 - User Function Customization
Function
code Function name Setting scope
Factory set
value
Modification
limit
Reference
page
Group P7.0: Basic Group
P7.0.00 User Function 0 U0.0.01 U0.001
163
P7.0.01 User Function 1 U0.0.00~UX.X.XX (exclude P7, P8) U0.002
P7.0.02 User Function 2 U0.0.00~UX.X.XX (exclude P7, P8) U0.003
P7.0.03 User Function 3 U0.0.00~UX.X.XX (exclude P7, P8) U0.007
P7.0.04 User Function 4 U0.0.00~UX.X.XX (exclude P7, P8) U0.008
P7.0.05 User Function 5 U0.0.00~UX.X.XX (exclude P7, P8) U0.017
P7.0.06 User Function 6 U0.0.00~UX.X.XX (exclude P7, P8) U0.018
P7.0.07 User Function 7 U0.0.00~UX.X.XX (exclude P7, P8) U0.000
P7.0.08 User Function 8 U0.0.00~UX.X.XX (exclude P7, P8) U0.000
P7.0.09 User Function 9 U0.0.00~UX.X.XX (exclude P7, P8) U0.000
P7.0.10 User Function 10 U0.0.00~UX.X.XX (exclude P7, P8) U0.000
P7.0.11 User Function 11 U0.0.00~UX.X.XX (exclude P7, P8) U0.000
P7.0.12 User Function 12 U0.0.00~UX.X.XX (exclude P7, P8) U0.000
P7.0.13 User Function 13 U0.0.00~UX.X.XX (exclude P7, P8) U0.000
P7.0.14 User Function 14 U0.0.00~UX.X.XX (exclude P7, P8) U0.000
P7.0.15 User Function 15 U0.0.00~UX.X.XX (exclude P7, P8) U0.000

Chapter 5 Tables of Function Parameters
90
P7.0.16 User Function 16 U0.0.00~UX.X.XX (exclude P7, P8) U0.000
P7.0.17 User Function 17 U0.0.00~UX.X.XX (exclude P7, P8) U0.000
P7.0.18 User Function 18 U0.0.00~UX.X.XX (exclude P7, P8) U0.000
P7.0.19 User Function 19 U0.0.00~UX.X.XX (exclude P7, P8) U0.000
P7.0.20 User Function 20 U0.0.00~UX.X.XX (exclude P7, P8) U0.000
P7.0.21 User Function 21 U0.0.00~UX.X.XX (exclude P7, P8) U0.000
P7.0.22 User Function 22 U0.0.00~UX.X.XX (exclude P7, P8) U0.000
P7.0.23 User Function 23 U0.0.00~UX.X.XX (exclude P7, P8) U0.000
P7.0.24 User Function 24 U0.0.00~UX.X.XX (exclude P7, P8) U0.000
P7.0.25 User Function 25 U0.0.00~UX.X.XX (exclude P7, P8) U0.000
P7.0.26 User Function 26 U0.0.00~UX.X.XX (exclude P7, P8) U0.000
P7.0.27 User Function 27 U0.0.00~UX.X.XX (exclude P7, P8) U0.000
P7.0.28 User Function 28 U0.0.00~UX.X.XX (exclude P7, P8) U0.000
P7.0.29 User Function 29 U0.0.00~UX.X.XX (exclude P7, P8) U0.000

Chapter 5 Tables of Function Parameters
91
5.9 Group P8 - Manufacturer Function
Function
code Function name Setting scope
Factory set
value Modification limit
Reference
page
Group P8.0: Manufacturer Function Group
P8.0.00 Manufacturer Code 00000~65535 00000 164
Sort P8.1: Parameter Correction Sort
P8.1.00 Voltage Input of Potentiometer
Correction Point 1 00.00V~P8.1.02 00.00
164
P8.1.01 Corresponding reference of
Potentiometer Correction Point 1 -100.0%~100.0% 000.0
P8.1.02 Voltage Input of Potentiometer
Correction Point 2 P8.1.00~10.00V 10.00
P8.1.03 Corresponding reference of
Potentiometer Correction Point 2 -100.0%~100.0% 100.0
P8.1.04 Filtering time of potentiometer 00.00s~10.00s 00.10
P8.1.05 VF1 actual voltage 1 0.500V~4.000V 2.000
P8.1.06 VF1 indicated voltage 1 0.500V~4.000V 2.000
P8.1.07 VF1 actual voltage 2 6.000V~9.999V 8.000
P8.1.08 VF1 indicated voltage 2 6.000V~9.999V 8.000
P8.1.09 VF2 actual voltage 1 0.500V~4.000V 2.000
P8.1.10 VF2 indicated voltage 1 0.500V~4.000V 2.000
P8.1.11 VF2 actual voltage 2 6.000V~9.999V 8.000
P8.1.12 VF2 indicated voltage 2 6.000V~9.999V 8.000
P8.1.13 FM1 target voltage 1 0.500V~4.000V 2.000
165
P8.1.14 FM1 actual voltage 1 0.500V~4.000V 2.000
P8.1.15 FM1 target voltage 2 6.000V~9.999V 8.000
P8.1.16 FM1 target voltage 2 6.000V~9.999V 8.000
P8.1.17 FM2 target voltage 1 0.500V~4.000V 2.000 /
P8.1.18 FM2 target voltage 1 0.500V~4.000V 2.000 /
P8.1.19 FM2 target voltage 2 6.000V~9.999V 8.000 /
P8.1.20 FM2 target voltage 2 6.000V~9.999V 8.000 /
5.10 Group P9 - Monitoring Parameter
Function code Function Name Setting scope Factory set value Modification limit Reference page
Sort P9.0: Basic Monitoring Parameter
P9.0.00 Running Frequency
166
P9.0.01 Reference frequency
P9.0.02 Output Current
P9.0.03 Output Voltage
P9.0.04 Bus line voltage
P9.0.05 Output Torque

Chapter 5 Tables of Function Parameters
92
Function code Function Name Setting scope Factory set value Modification limit Reference page
P9.0.06 Output Power
166
P9.0.07 Input Terminal Status
P9.0.08 Output Terminal Status
P9.0.09 VF1 Voltage
P9.0.10 VF2 Voltage
P9.0.11 Custom Display Value
P9.0.12 Actual Counting Value
P9.0.13 Actual Length Value
P9.0.14 PID Reference
P9.0.15 PID Feedback
P9.0.16 PULS Impulse frequency
P9.0.17 Feedback Speed
P9.0.18 PLC Phase
P9.0.19 Voltage before VF1 Correction
P9.0.20 Voltage before VF2 Correction
P9.0.21 Line Speed
P9.0.22 Current Power-on Time
P9.0.23 Current Running Time
P9.0.24 Residual Running Time
P9.0.25 Frequency of Frequency Source A
P9.0.26 Frequency of Frequency Source B
167
P9.0.27 Communication Set value
P9.0.28 Impulse frequency
P9.0.29 Encoder Feedback Speed
P9.0.30 Actual Distance Value
P9.0.31~
P9.0.45 Reservation
P9.0.46 Operation Result 1
P9.0.47 Operation Result 2
P9.0.48 Operation Result 3
P9.0.49 Operation Result 4
P9.0.50 User Standby Monitoring Value 1
P9.0.51 User Standby Monitoring Value 2
P9.0.52 User Standby Monitoring Value 3
P9.0.53 User Standby Monitoring Value 4
P9.0.54 User Standby Monitoring Value 5

Chapter 6. Description of Parameters
93
Chapter 6. Description of Parameters 6.1 Group 0 - Basic Function
P0.0 Group – Basic Group
Function code Function Name Setting scope Factory set value
P0.0.00 Type of Frequency inverter 1:G Type (constant torque load type)
2:P Type (fans and water pump load type) Type
This function code is only for the users to check the factory type of the frequency inverter and is generally not
allowed to be modified by the users. If modification is required, the function code P5.0.18 must be first changed
to 2.
1: G Type applicable for constant torque load 80
2: P Type applicable for fans and water pump load
Function code Function Name Setting scope Factory set value
P0.0.01 Display Mode
0:Basic Mode (Prefix with ‘P’)
1:User Mode (Prefix with ‘U’)
2:Verification Mode (Prefix with ‘C’)
0
This function code is used for confirming what a kind of display modes is selected for inventor
0: Basic Mode (Prefix with ‘P’)
The frequency inverter specifically displays what parameters of the function codes are determined by Function
Code P5.0.17 (Refer to the description for Function Code P5.0.17 for more details)
1: User Mode (Prefix with ‘U’)
Only display customization parameters of user function and use Function Code of Group P7.0 to determine what
parameters of the function codes are specifically displayed by the frequency inverter (Refer to the description for
Group P7.0 for more details). In user mode, the function code has the prefix with ‘U’.
2: Verification Mode (Prefix with ‘C’)
Only display the modified parameters (in case of any difference of function code between reference value and
factory set value, it is deemed that the parameters are changed), the function code has the prefix with ‘C at this
time.
Note: no matter what the prefix is, ‘P’ or ‘U’ or ‘C’, the meaning of their relative parameters
is the same and the prefix is only for distinguishing the display mode.

Chapter 6. Description of Parameters
94
Function code Function Name Setting scope Factory set value
P0.0.02 Control Mode
0:V/F Control
1: Open-loop Vector Control (SVC)
2: Closed-loop Vector Control (Invalid
E100)
0
0:V/FC control
Be applicable for the occasions without high requirements to load or where one set of frequency inverter drives
more than one set of motor.
1: SVC
Don’t need to externally connect the encoder as speed feedback and be applicable for general and high-powered
occasions, one set of frequency inverter only drives one set of motor.
2: VC
Need to externally connect the encoder as speed feedback and be applicable for occasions with high-precision
speed control or torque control, one set of frequency inverter only drives one set of motor. This function is not
available on E100 and E102 Series, and a connected-externally encoder expansion card is required for E180
Series.
If the load motor is permanent magnet synchronous motor, the VC shall be selected.
Note: if the vector control mode is selected, it is better to identify the parameters of the motor, only precise
parameters of the motor can give play to the advantages of VC Mode.
Function code Function Name Setting scope
Factory set value
P0.0.03 Option of operation control mode
0: Keyboard Control
1: Terminal Control
2: Communication Control
0
0: Keyboard Control
Key RUN, STOP and JOG on operating panel control start, stop and FWD& REV switch of the frequency inverter
1: Terminal Input
Use the digital input terminal to control FWD, REV and stop of the frequency inverter
2: Communication Control
Use the principal computer to control l FWD, REV, stop, jog and reset (Refer to Chapter VIII for more details)
Detailed methods for the above three kinds of control methods refer to 7.1.1

Chapter 6. Description of Parameters
95
Function code Function Name Setting scope Factory set value
P0.0.04 Option of A Frequency Source
0: Keyboard Reference (No
Power-off Memory)
1: Keyboard Reference (Power-off
Memory)
2: Keyboard Potentiometer
Reference
3: External Terminal VF1
Reference
4:External Terminal VF2 Reference
5:PULS Reference (DI6)
6: Multiplex Directive Reference
7:Simple PLC Reference
8:PID Control Reference
9:Communication Reference
10:Operation Result 1
11:Operation Result 2
12:Operation Result 3
13:Operation Result 4
02
0:Keyboard Reference (No Power-off Memory)
The initial value of the reference frequency is the value set by Function Code P0.0.05, and it can be changed
through Key& on the keyboard or Terminal UP/DOWN, which can be set by Function Code P0.1.05 to save
such shut-down change (keyboard reference frequency shut-down memory selection). After the frequency inverter
powers on again after power off, the reference frequency is set to value set by P0.0.05.
1: Keyboard Reference (Power-off Memory)
The initial value of the reference frequency is the value set by Function Code P0.0.05, and it can be changed
through Key & on the keyboard or Terminal UP/DOWN, which can be set by Function Code P0.1.05 to save
such shut-down change (keyboard reference frequency shut-down memory selection). After the frequency inverter
powers on again after power off, the reference frequency is the frequency at the time of power off, and it can be
saved through Key & on the keyboard or Terminal UP/DOWN.
2: Keyboard Potentiometer Reference
The reference frequency is given by the potentiometer on operation panel. The impact of zero-offset or voltage
attenuation caused by overlong keyboard lines can be adjusted through Function Code P8.1.00~P8.1.04.
3: External Terminal VF1 Reference
4: External Terminal VF2 Reference
The reference frequency is given by the analog input terminal. E Series Frequency inverter provides 2-way analog
input terminal (VF1, VF2). VF1 and VF2 can input 0V~10V voltage or 0/4mA~20mA current. As for
corresponding relation curve between the input of VF1 and VF2 and the reference frequency, the users can freely
choose from four kinds of the relation curves through function code P2.1.02, in which Curve 1 and Curve 2 are
linear relationship able to be set through Function Code P2.0.13~P2.0.22, and Curve 3 and Curve 4 are broken
line relationship with two inflection points able to be set through Function Code P2.1.04~P2.1.19. The deviation
between actual voltage and sampling voltage of the analog input terminal can be adjusted through Function Code
P8.1.05~P8.1.12.

Chapter 6. Description of Parameters
96
5: PULS Reference (DI6)
The frequency reference is given by high-speed impulse frequency of digital input terminal D16 (the terminal
function is not defined). The corresponding relationship between high-speed impulse frequency and torque upper
limit value can be set through Function Code P2.0.23~P2.0.26, that is, line relationship.
6: Multiplex Directive Terminal Reference
The reference frequency is given by different composite state of Multiplex Directive Terminal. E Series Frequency
inverter is able to set four Multiplex Directive Terminals (Terminal Function 9~12, refer to the Description for
Multiplex Directive Terminal Function of P2.0.00~P2.0.09 for more details)
7: Simple PLC Reference
The reference frequency is given by Simple PLC Function, the running frequency of the frequency inverter can
be switched among 1~16 arbitrary frequency directives, the sources, hold time and acceleration & deceleration
time of each frequency directive can be set through Function Code 3.0.03~P3.0.50.
8: PID Control Reference
The reference frequency is given by the frequency calculated from PID Control. When setting the frequency
calculated from PID Control, it is required to setting related parameters of “PID Control Group”
(P4.0.00~P4.0.20).
9: Communication Reference
The reference frequency is given by the principal computer through communication mode (Refer to Chapter VIII
for more details)
10: Operation Result 1
11: Operation Result 2
12: Operation Result 3
13: Operation Result 4
The reference frequency is determined by the operation results after setting calculation of the internal operation
module. Refer to the Description of Function Code P3.2.26~P3.2.39 for more details of the operation module. The
operation results can be viewed through Function Code 9.0.46~P9.0.49.
Function code Function name Setting scope Factory set value
P0.0.05 Keyboard Frequency Reference 000.00~ maximum frequency 050.00
When the Function Code P0.0.04 or P0.1.01 is set to 0 or 1, the initial value of the reference frequency is given by
this function code.

Chapter 6. Description of Parameters
97
Function code Function name Setting scope Factory set value
P0.0.06 Running Direction
0: Default Direction
1: Negation of Direction
2: Determined by multi-function
input terminal
0
The modification on this function code can realize the purpose of changing the motor steering without changing
the connection of the motor and its role is equivalent to adjust any two lines of Motor U, V and W to realize the
shifting of the steering direction of the motors. This function code is valid in any running control mode. When
P0.0.06 is set to 2, the running direction is determined by multi-function input terminal. The function code of
multi-function input terminal is 37, and if the terminal signal is valid and the reversed direction is adopted.
Note: Recover Factory set values, the running direction of the motor can restore to original state. It should
be used with caution for occasions that forbid from changing the motor steering after completing the
debugging of the system.
Function code Function name Setting scope Factory set value
P0.0.07 Maximum frequency 050.00Hz~320.00Hz 050.00
The highest frequency refers to the maximum frequency that the frequency inverter allows to output.
When the analog input, PULS Impulse Input, multiplex directive input and simple PLC in E Series Frequency
inverter are adopted as frequency source, each percentage is set based on the value given by corresponding
function code.
Note: the modification to this set value can change the data which takes the set value of this function code
as calibration.
Function code Function name Setting scope Factory set value
P0.0.08 Upper frequency Lower frequency ~ highest frequency 050.00
P0.0.09 Lower frequency 000.00~ Upper frequency 000.00
The upper limit frequency is the Highest Frequency allowed to run set by the users. At P0.1.03=0, the set value of
Function Code P0.0.08 determines the Highest Frequency that the frequency inverter allows to run.
The lower limit frequency is the minimum frequency allowed to run set by the users.
The relationship among Highest Frequency, Upper Limit Frequency and Lower Limit Frequency are shown in the
figure below:
Output frequency
Frequency Directive
HF: Highest Frequency UF:Upper Frequency LF:Lower Frequency

Chapter 6. Description of Parameters
98
Function code Function name Setting scope Factory set
value
P0.0.10 Lower frequency operation mode
0:Running at lower limit frequency
1: Stop
2: Zero-speed Running
0
0: Run at lower limit frequency
When the reference frequency is less than the lower limit frequency (value set by P0.0.09), the frequency inverter
runs at lower limit frequency
1: Stop
When the reference frequency is less than the lower limit frequency, the frequency inverter stops
2: Zero-speed Running
When the reference frequency is less than the lower limit frequency, the frequency inverter runs at 0Hz
Note: when running at 0Hz, the frequency inverter can output a certain voltage, so special attention shall be
paid when in use.
If no voltage output when inverter runs at 0 Hz, should set function code P0.0.09=000.05, P3.2.00=00002,
and P3.2.07=3714.
Function code Function name Setting scope Factory set value
P0.0.11 Acceleration Time 0000.1s~6500.0s Machine type
P0.0.12 Deceleration Time 0000.1s~6500.0s Machine type
The acceleration time refers to time required to raise the frequency inverter from zero frequency to reference
frequency of the acceleration and deceleration time (set by Function Code P0.1.07).
The deceleration time refers to time required to reduce the frequency inverter reference frequency of the
acceleration and deceleration time to zero frequency.
See the Description of the Figure below:
Output frequency
Time
Actual acceleration time Actual deceleration time
Actual acceleration time Actual deceleration time
Reference frequency of acceleration
and deceleration time
Set frequency

Chapter 6. Description of Parameters
99
Function code Function name Setting scope Factory set
value
P0.0.13 Type of Motor
0:Common motor
1:Varible frequency motor
2: Synchronous Motor (Invalid E100)
0
This function code is used to set the type of the load motor equipped with the frequency inverter.
0: Common motor
Because heat radiation effect of the common motor becomes worse when running at low speed, relative electronic
thermal protection value should be adjusted properly; low speed compensating performance of motor protection
mode is to lower protection threshold of motor overload when running frequency is less than 30Hz.
1: Variable frequency motor
Variable frequency motor uses forced air cooling, so that radiating effect is not affected by the rotating speed.
Hence, it is not required to lower protection threshold when running at low speed.
2: Synchronous Motor
If it is synchronous motor, the control mode is set to closed-loop vector control (i.e. P0.0.02=2). CDI-E100, E102
Series can’t support synchronous motor.
Function
code
Function Name Setting scope Factory set
value
P0.0.14 Motor rated power 0000.1kW ~ 1000.0kW Machine
type
P0.0.15 Motor rated frequency 000.01Hz ~ Highest frequency 050.00
P0.0.16 Motor rated voltage 0001V ~ 2000V Machine
type
P0.0.17 Motor rated current 000.01A ~ 655.35A (inverter power < 75kW
0000.1A ~ 6553.5A (inverter power≥75kW)
Machine
type
P0.0.18 Motor Rated Rotating Speed 00001rpm ~ 65535rpm Machine
type
P0.0.19 Stator resistance of asynchronous
motor
00.001 ~ 65.535 (inverter power <
75kW)
0.0001 ~ 6.5535 (inverter
power≥75kW)
Machine
type
P0.0.20 Rator resistance of asynchronous
motor
00.001 ~ 65.535 (inverter power <
75kW)
0.0001 ~ 6.5535 (inverter
power≥75kW)
Machine
type

Chapter 6. Description of Parameters
100
Function
code Function name Setting scope
Factory set
value
P0.0.21 Leakage inductance
of asynchronous motor
000.01mH ~ 655.35mH (inverter power <
75kW)
00.001mH ~ 65.535mH (inverter power≥75kW)
Machine
type
P0.0.22 Mutual inductance
of asynchronous motor
0000.1mH ~ 6553.5mH (inverter power <
75kW)
000.01mH ~ 655.35mH (inverter power≥75kW)
Machine
type
P0.0.23 No-load current of asynchronous
motor
000.01A ~ Motor rated current (inverter power <
75kW)
0000.1A ~ Motor rated current (inverter power ≥
75kW)
Machine
type
Function code P0.0.14~P0.0.23 are intrinsic parameters of AC asynchronous motor, no matter what is adopted,
V/F control or vector control, all have certain requirements to the parameters of the motor, especially for vector
control, it requires that value of P0.0.19~P0.0.23 must be very close to the intrinsic parameters of the motor, the
more the precision of the value is , the better the performance of the vector control is, therefore, when using the
vector control, it is better to identify the motor through Function Code P0.0.24. If the identification cannot be
made on site, according to the parameters provided by the motor manufacturer, it is to input them into the above
corresponding function code.
Function code Function name Setting scope Factory set value
P0.0.24 Parameter Identification
Control
00: No action
01: Static identification
02: Complete identification
11: Synchronous machine on-load
identification (Invalid E100)
12: Synchronous machine non-load
identification (Invalid E100)
00
Refer to 7.1.20 for more details (Parameter Identification)

Chapter 6. Description of Parameters
101
P0.1: Expansion Group
Function code Function Name Setting scope Factory set value
P0.1.00 Option of Frequency Source
0: Frequency Source A
1: Frequency Source B
2: Frequency Source A+B
3: Frequency Source A-B
4: Max. Value of A & B
5: Min. Value of A & B
6: Standby Frequency Source 1
7: Standby Frequency Source 2
8: Switch of Terminal among the
above 8 kinds
0
0: Frequency Source A
The reference frequency is given by Frequency Source A (P0.0.04).
1: Frequency Source B
The reference frequency is given by Frequency Source B (P0.1.01).
2: Frequency Source A+B
The reference frequency is given by Frequency Source A+B.
3: Frequency Source A-B
The reference frequency is given by A-B Frequency, if A-B Frequency is negative value; the frequency inverter
runs in opposite direction
4: Max. Value of A & B
The reference frequency is determined by the maximum value between Frequency Source A and B.
5: Min. Value of A & B
The reference frequency is determined by the minimum value between Frequency Source A and B.
6: Standby Frequency Source 1
7: Standby Frequency Source 2
Standby Frequency Source 1 and Standby Frequency Source 2 are reserved by the manufacturer as frequency
sources used for special occasions in future, so the users may ignore them as usual.
8: Switch of Terminal among the above 8 kinds
The reference frequency is switched among the above 8 kinds of frequency sources by selecting different
composite state of the terminals. E Series Frequency inverter can set 3 kinds of frequency sources to choose the
terminals (Terminal Function 18~20, refer to the instruction for Terminal Selection Function of Frequency Source
P2.0.00~P2.0.09 for more details)

Chapter 6. Description of Parameters
102
Function code Function Name Setting scope Factory set value
P0.1.01 Option of Frequency Source B
0:Keyboard Reference (No
Power-off Memory)
1:Keyboard Reference (Power-off
Memory)
2:Keyboard Potentiometer
Reference
3: External Terminal VF1
Reference
4:External Terminal VF2 Reference
5:PULS Reference (DI6)
6: Multiplex Directive Reference
7:Simple PLC Reference
8:PID Control Reference
9:Communication Reference
10:Operation Result 1
11:Operation Result 2
12:Operation Result 3
13:Operation Result 4
00
This function case has the same function with “Option of Frequency Source A” (P0.0.04), if it is needed to use,
please refer to the setting method for Function Code P0.0.04 to set.
Function code Function name Setting scope Factory set value
P0.1.02 Adjustment Volume of: Frequency
Source B at superposition 000%~150% 100
When the reference frequency of frequency inverter is given by Frequency Source A+B and Frequency Source
A-B, it defaults A to main reference and B to auxiliary Reference. This function code determines the regulation
size of Frequency Source B, which is the percentage relative to the scope of Frequency Source B (set by Function
Code P0.2.01)
At P0.2.01=0, the frequency of Frequency Source B is regulated relative to Highest Frequency.
At P0.2.01=1, the frequency of Frequency Source B is regulated relative to frequency of Frequency Source A.
Function code Function name Setting scope Factory set value
P0.1.03 Upper Limit Frequency Source
0: Digital Reference (P0.0.08)
1: External Terminal VF1 Reference
2: External Terminal VF2 Reference
3: Multiplex Directive Reference
4: PULS Reference (DI6)
5: Communication Reference
6: Operation Result 1
7: Operation Result 2
8: Operation Result 3
9: Operation Result 4
0

Chapter 6. Description of Parameters
103
This function code determines the source of the upper limit frequency.
0: Digital Reference (P0.0.08)
The upper limit frequency is determined by the value set by Function Code P0.0.08.
1: External Terminal VF1 Reference
2: External Terminal VF2 Reference
The upper limit frequency is given by the analog input terminal. E Series Frequency inverter provides 2-way
analog input terminal (VF1, VF2). VF1 and VF2 can input 0V~10V voltage or 0/4mA~20mA current. As for
corresponding relation curve of the input of VF1 and VF2 and the upper limit frequency, the users can freely
choose from four kinds of the relation curves through function code P2.1.02, in which Curve 1 and Curve 2 are
linear relationship able to be set through Function Code P2.0.13~P2.0.22, and Curve 3 and Curve 4 are broken
line relationship with two inflection points able to be set through Function Code P2.1.04~P2.1.19. The deviation
between actual voltage and sampling voltage of the analog input terminal can be adjusted through Function Code
P8.1.05~P8.1.12.
3: Multiplex Directive Terminal Reference
The upper limit frequency is set by different composite state of Multiplex Directive Terminal. E Series Frequency
inverter is able to set four Multiplex Directive Terminals (Terminal Function 9~12, refer to the Description for
Multiplex Directive Terminal Function of P2.0.00~P2.0.09 for more details)
4: PULS Reference
The upper limit frequency is set by high-speed impulse frequency of digital input terminal D16 (the terminal
function is not defined). The corresponding relationship between high-speed impulse frequency and upper limit
frequency can be set through Function Code P2.0.23~P2.0.26, that is, linear relationship.
5: Communication Reference
The upper limit frequency is set by the upper computer through communication mode (refer to Chapter VIII for
more details).
6: Operation Result 1
7: Operation Result 2
8: Operation Result 3
9: Operation Result 4
The upper limit frequency is determined by data after setting calculation of the internal operation module. Refer to
the Description of Function Code P3.2.26~P3.2.39 for more details of the operation module. The operation results
can be viewed through Function Code 9.0.46~P9.0.49.
Note: the upper limit frequency cannot be set to negative value, but if it is the negative value, the upper
limit frequency is invalid.

Chapter 6. Description of Parameters
104
Function code Function name Setting scope Factory set value
P0.1.04 Upper Limit Frequency Offset 000.00~Highest Frequency 000.00
The set value of this function code is the offset of the upper frequency, and the superposition of this offset and
upper frequency set by Function Code P0.1.03 is adopted as final set value of upper frequency.
Function code Function name Setting scope Factory set value
P0.1.05 Keyboard Reference frequency
Shut-down Memory Selection
0: No Memory
1: Memory 0
0: No Memory
After the frequency inverter stops, the reference frequency is recover the value given by Function Code P0.0.05,
and the frequency allowance, which is conducted through Key&on the keyboard or Terminal UP/DOWN, is
cleared .
1: Memory
After the frequency inverter stops, the reference frequency is the frequency set before stop, and the frequency
allowance, which is conducted through Key&on the keyboard or Terminal UP/DOWN, is saved.
Note: this function code is valid only when the frequency source is set by the keyboard.
Function code Function name Setting scope
Factory set value
P0.1.06 Keyboard Reference frequency
Action Benchmark at running
0: Running Frequency
1: Reference frequency 0
When this function code is adopted to determine the action of Key&on the keyboard or Terminal UP/DOWN,
it is to confirm what a kind of mode is adopted to correct the frequency and the increase & decrease shall be done
on the basis of running frequency or reference frequency .
0: Running Frequency
The regulation shall be made on the basis of running frequency
1: Reference frequency
The regulation shall be made on the basis of reference frequency
The difference between two settings is obvious when the frequency inverter is in the process of acceleration and
deceleration, namely, when the running frequency differs from the reference frequency, different Option of
parameters leads to great difference.
Note: this function code is valid only when the frequency source is set by the keyboard.

Chapter 6. Description of Parameters
105
Function code Function name Setting scope Factory set value
P0.1.07
Benchmark frequency of
accelerating and Deceleration
time
0: Highest Frequency
1: Reference frequency
2: 100Hz
0
0: Highest Frequency
The acceleration and deceleration time refers to the time from frequency 0 to highest frequency, and it can change
with the change of the highest frequency at this time.
1: Reference frequency
The acceleration and deceleration time refers to the time from frequency 0 to highest frequency, and it can change
with the change of the reference frequency at this time.
2: 100Hz
The acceleration and deceleration time refers to the time from frequency 0 to 100Hz, and it is a fixed value at this
time.
Note: the jogging acceleration and deceleration time is also subject to its control.
Function code Function name Setting scope Factory set value
P0.1.08 Jogging running frequency 000.00~Highest Frequency 002.00
P0.1.09 Jogging Acceleration time 0000.0s~6500.0s 0020.0
P0.1.10 Jogging Deceleration time 0000.0s~6500.0s 0020.0
The function codes above define the reference frequency and acceleration and deceleration time when the
frequency inverter is at jogging running.
Function code Function name Setting scope Factory set value
P0.1.11 Acceleration time 2 0000.0s~6500.0s Machine type
P0.1.12 Deceleration time 2 0000.0s~6500.0s Machine type
P0.1.13 Acceleration time 3 0000.0s~6500.0s Machine type
P0.1.14 Deceleration time 3 0000.0s~6500.0s Machine type
P0.1.15 Acceleration time 4 0000.0s~6500.0s Machine type
P0.1.16 Deceleration time 4 0000.0s~6500.0s Machine type
The function codes above have the same definitions with P0.0.11 and P0.0.12; refer to the Description of P0.0.11
and P0.0.12 for more details
E Series Frequency inverter totally provides 4 groups of acceleration and deceleration time of the straight line,
which can switch among 4 groups of acceleration and deceleration time through different composite state of
acceleration and deceleration time selection terminals. It can set 2 acceleration and deceleration time selection
terminals (terminal function 16~17, refer to the Description of Code P2.0.00~P2.0.09 for Acceleration and
Deceleration Time Selection Terminal Function of Function for more details)

Chapter 6. Description of Parameters
106
Function code Function name Setting scope Factory set value
P0.1.17
Frequency Switch Point between
Acceleration time 1 and
Acceleration time 2
000.00Hz~Highest Frequency 000.00
P0.1.18
Frequency Switch Point between
Deceleration time 1 and
Deceleration time 2
000.00Hz~Highest Frequency 000.00
The function codes above are adopted to set the frequency of the switch point of acceleration and deceleration
time 1 and acceleration and deceleration time 2. When the running frequency of the frequency inverter is less than
the set value of these two function codes, the acceleration and deceleration time 2 is adopted, otherwise the
acceleration and deceleration time 1 is adopted.
Note: when using this function, the acceleration and deceleration time 1 and acceleration and deceleration
time 2 cannot be set to 0s.
Function code Function name Setting scope Factory set value
P0.1.19 Acceleration and Deceleration Mode
0:Straight Line
1:Curve S 1
2:Curve S 2
0
0: Acceleration and Deceleration of the Straight Line
The output frequency increases or decreases by the straight line. E Series Frequency inverter provides 4 groups of
acceleration and deceleration time of the straight line, namely, P0.0.11 and P0.0.12, P0.1.11 and P0.1.12, P0.1.13
and P0.1.14 and P0.1.15 and P0.1.16. The switch can be selected through different composite state of acceleration
and deceleration time selection terminals.
1: Curve S 1
The output frequency increases or decreases by Curve S 1. Curve S 1 is used for occasions required for gradual
start or stop. Parameter P0.1.20 and P0.1.21 respectively defines the time scale of starting point and ending point
of Curve S 1.
2: Curve S 2
In the Curve S 2, the rated frequency of the motor is always the inflection point of Curve S, as shown in the figure
below. Generally, it applies for the occasions that the high-speed area above the rated frequency requires to rapidly
accelerate and decelerate.
Run Time
Output Frequency
Set Frequency
Rated Frequency
When the set frequency is below rated frequency,
the acceleration and deceleration time is as below:
t= (4/9 X (Set Frequency/Rated Frequency)2 + 5/9) XT

Chapter 6. Description of Parameters
107
Function code Function name Setting scope Factory set value
P0.1.20 Percentage of Starting Phase of
Curve S 000.0%~100.0% 030.0
P0.1.21 Percentage of Ending Phase of Curve
S 000.0%~100.0% 030.0
Parameter P0.1.20 and P0.1.21 respectively defines the time scale of starting point and ending point of Curve S 1.
These two parameters need to meet P0.1.20+P0.1.21≤100.0%, refer to the Description for the figure below:
Run Time
T1 is the value set by Function Code P0.1.20, the slope of the output frequency gradually increases from zero
within this period of time.
T2 is the value set by Function Code P0.1.21, the slope of the output frequency gradually decreases to zero within
this period of time.
Within the time between T1 and T2, the change on slope of the output frequency keeps constant.
Function code Function name Setting scope Factory set
value
P0.1.22 Hopping Frequency 1 000.00Hz~Highest Frequency 000.00
P0.1.23 Hopping Frequency 2 000.00Hz~Highest Frequency 000.00
P0.1.24 Hopping Frequency scope 000.00Hz~Highest Frequency 000.00
The hopping frequency function is set so that running frequency of the frequency inverter can avoid load
resonance band of the driving system. E Series Frequency inverter can set two hopping frequency points, after
setting, even the reference frequency is within load resonance band, the output frequency of the frequency
inverter will also be automatically adjusted out of load resonance band to avoid running on resonant frequency,
refer to the Description for the figure below:
Hoping Frequency 1
Hoping Frequency 2
Reference Frequency
Output Frequency
Rated Frequency
Output Frequency
Range of 1/2 Hoping Frequency
Range of 1/2 Hoping Frequency
Range of 1/2 Hoping Frequency
Range of 1/2 Hoping Frequency

Chapter 6. Description of Parameters
108
Function Code Function name Setting Scope
Factory set value
P0.1.25 Jogging Priority 0:Invalid 1:Valid 0
This function code is used to set whether the priority of the jogging function is the highest. The jogging function
includes Keyboard Jogging Function and Terminal Jogging Function.
When at P0.1.25=1, if the jogging command occurs in the running process, the switch of frequency inverter is the
jogging running state. The target frequency is the jogging frequency and the acceleration and deceleration time is
the jogging acceleration and deceleration time.
Function code Function name Setting scope Factory set value
P0.1.26 Type of Encoder
0: ABZ Incremental Encoder
1: UVW Incremental Encoder (E100 Invalid)
2: Rotary Transformer (E100Invalid)
3~9: Reservation
10: Distance Control (Open Collector)
0
This function code is used to set the selected type of the Encoder.
CDI-E180 Series Frequency inverter supports various types of the encoders. Different encoder needs to configure
different encoder expansion card, when in use, the correct encoder expansion card shall be selected and ordered.
The synchronous motor may select any one of three types of the encoders in the table above, while the
asynchronous motor generally selects and uses ABZ incremental encoder and rotary transformer.
After completing the installation of the encoder, the value of Function Code P0.1.27 shall be correctly set based
on actual conditions, or the frequency inverter may not run normally.
Note: when the open collector-type encoder is adopted to realize the distance control, the function code
must be set to P0.1.26=10.
Function code Function name Setting scope Factory set value
P0.1.27 Line Number of Encoder 00001~65535 01024
This function code is used for the number of pulses per revolution to set ABZ or UVW incremental encoder.
In closed-type vector control mode, the line number of the encoder must be correctly set, or the frequency inverter
will not run normally.
Function code Function name Setting scope Factory set
value
P0.1.28 ABZ phase sequence 0: Forward Direction
1: Reverse Direction 0
This function code is only valid for ABZ incremental encoder, namely, it is valid at P0.1.26=0, and used to set the
phase sequence of ABZ Incremental Encoder AB Signal. It is valid for synchronous motor and asynchronous
motor, when the asynchronous motor is completely tuned or the synchronous motor is tuned, the AB Phase
Sequence is acquired for ABZ Encoder.

Chapter 6. Description of Parameters
109
Function code Function Name Setting scope Factory set value
P0.1.29 Encoder Disconnection Testing Time 00: No action
00.1s~10.0s 00.0
When the test time of the encoder disconnection fault is set to 00.0, the frequency inverter can’t detect the
disconnection fault of encoder. When the frequency inverter has been detected with disconnection fault and the
duration is over the time set by Function Code P0.1.29, then the frequency inverter gives an alarm of Fault Err25.
Function
code Function Name Setting scope
Factory
set
value
P0.1.30 Stator resistance of synchronous motor 00.001 ~ 65.535 (inverter power < 75kW)
0.0001 ~ 6.5535 (inverter power ≥ 75kW)
Machine
type
P0.1.31 Back EMF of Synchronous motor 0000.0V ~ 6553.5V Machine
type
The above parameters are intrinsic parameters of synchronous motor, the load motor equipped with the frequency
inverter refers to synchronous motor, it requires that value of P0.1.30~P0.1.31 must be very close to the intrinsic
parameters of the motor, the more the precision of the value is , the better the performance of the vector control is.
The motor parameters are identified through Function Code P0.0.24. If the identification cannot be made on site,
according to the parameters provided by the motor manufacturer, it is to input them into the above corresponding
function code.
Function code Function Name Setting scope Factory set value
P0.1.32 UVW Phase Sequence 0: Forward Direction
1: Reverse Direction Machine type
P0.1.33 UVW Encoder Angle 000.0~359.9 Machine type
The above function codes are only valid when the synchronous motor adopts UVW incremental encoder.
These two parameters are more important for the running of the synchronous motor, so it is better to acquire these
two parameters of the synchronous motor through identification by Function Code P0.0.24 after completing initial
installation.
Function code Function name Setting scope Factory set value
P0.1.34 Pole-pairs of Rotary Transformer 00001~65535 Machine type
When the encoder is rotary transformer (i.e. P0.1.26=2), this function code is used to set its pole-pairs.

Chapter 6. Description of Parameters
110
6.2 Group P1 - Motor Control Parameter
Group P1.0 - Basic Group
Function code Function name Setting scope Factory set value
P1.0.00 V/F Curve Mode
0: Straight Line
1: Multi-point Broken Line
2: Square V/F Curve 1
3: Square V/F Curve 2
4: Square V/F Curve 3
0
0: Straight Line V/F
Applicable for common constant torque load
1: Multi-point Broken Line
VF Relation Curve of any broken lines can be acquired through setting Function Code P1.1.00 ~ P1.1.05.
2: Square V/F
Applicable for centrifugal loads of fans, water pumps, etc.
3: Square V/F Curve 2
4: Square V/F Curve 3
Refer to relation curve between straight line V/F and square V/F
Each curve is shown in the figure below:
Output Voltage Multi-pint Broken Line
Straight Line
Square V/F Curve.1
Square V/F Curve.2
Square V/F Curve.3
Output Frequency
Function code Function name Setting scope Factory set value
P1.0.01 Torque Boost 00.0% (Automatic Torque Boost)
00.1%~30.0% 04.0
P1.0.02 Cutoff Frequency of Torque
Boost 000.00Hz~Highest Frequency 050.00

Chapter 6. Description of Parameters
111
In order to compensate the property of controlling the lower frequency torque by V/F, the boosting compensation
is conducted for output voltage in low-frequency working area. Under normal circumstances, the factory set value
can meet the requirements, if the compensation is too great, the current fault may occur. When the load is heavier
and the low-frequency torque of the motor is not enough, it suggests increasing this parameter. When the load is
lighter, this parameter can be reduced.
The frequency inverter is automatic torque boost when the torque boost is set at 00.0%, the frequency inverter can
automatically calculate the required torque boost value based on the parameters of the motor as stator, resistance,
etc.
Torque Boost Cut-off Frequency: when the output frequency is below this set value, the torque boost is valid, in
case of exceeding this set value, the torque boost is invalid
Function code Function name Setting scope Factory set value
P1.0.03 V/F Slip Compensation Gain 000.0%~200.0% 000.0
This function code is only valid for asynchronous motor and the percentage relative to rated slip of motor. When it
is the slip that is compensated by the motor for rated load, the rated slip of the motor can be calculated and
acquired based on rated frequency of the motor and rated speed. V/F Slip Compensation can compensate
asynchronous motor for the speed deviation of the motor occurred from load increase so as to make the speed able
to basically keep stable.
Function code Function name Setting scope Factory set
value
P1.0.04 Velocity Loop Proportional Gain 1 001~100 030
P1.0.05 Velocity Circulation Integral Time 1 00.01~10.00 00.50
P1.0.06 Switching Frequency 1 000.00Hz~P1.0.09 005.00
P1.0.07 Velocity Loop Proportional Gain 2 001~100 020
P1.0.08 Velocity Circulation Integral Time 2 00.01~10.00 01.00
P1.0.09 Switching Frequency 2 P1.0.06~Highest Frequency 010.00
The above parameters can realize that the frequency inverter may select the parameters of different Velocity Loop
PI at different running frequency. When the running frequency is less than the switch frequency 1(P1.0.06), the
parameters of Velocity Loop PI are adjusted to P1.0.04 and P1.0.05.
When the running frequency is greater that the switch frequency 2 (P1.0.09), the parameters of Velocity Loop are
P1.0.07 and P1.0.08.
The parameters of Velocity Loop PI between switch frequency 1 and switch frequency 2 are the linear switch of
two groups of PI parameters.
PI Parameter
Switching Frequency.1 Switching Frequency.2
The increase of proportional gain P can speed up the dynamic response of the system, but if P is too great, it may
easily vibrate. The decrease of integration time I can speed up the dynamic response of the system, but if I is too
small, it may have large overshoot and easily vibrate. Generally, the proportional gain P is first adjusted so as to
increase P as possible under the preconditions of ensuring non-vibration of the system, and then it is to adjust the
integration time I to make the system not only have rapid response property, but small overshoot.
Velocity Loop Proportional Gain 1
Velocity Circulation Integral Time 1
Velocity Loop Proportional Gain 2
Velocity Circulation Integral Time 2 Running Frequency

Chapter 6. Description of Parameters
112
Function code Function name Setting scope Factory set value
P1.0.10 Start Mode
0: Direct Start
1: Speed Tracking Mode
2: Brake and Restart
0
0: Direct Start
The frequency inverter starts running from start frequency.
1: Rotating Speed before Start
The frequency inverter shall first judge the rotating speed and direction of the motor and then track down the start
frequency of motor, the rotating motor smoothly starts without any surge. It is applicable for momentary
interruption restart of the high inertia loads. In order to ensure the performance of rotating speed before start,
accurate setting of the motor parameters is required.
2: Brake before Start
First conduct DC braking and them start running from start frequency.
Function code Function name Setting scope Factory set value
P1.0.11 Speed Tracking Mode
0: Start from Shutdown Frequency
1: Start from Zero Speed
2: Start from Highest Frequency
0
0: Start from Stop Frequency
Track down from the frequency at the moment of stop and adopt this method as usual.
1: Start from Zero Speed
Track up from zero frequency and adopt this method when start after longer stop time.
2: Start from Highest Frequency
Track down from highest frequency
Note: this function code is only valid when the start mode is speed tracking start (i.e. P1.0.10=1)
Function code Function name Setting scope Factory set value
P1.0.12 Start Frequency 00.00Hz~10.00Hz 00.00
P1.0.13 Hold Time of Start Frequency 000.0s~100.0s 000.0
Start Frequency: refer to running frequency when the frequency inverter starts.
In order to ensure that the motor has a certain start torque, proper start frequency shall be given. If the setting is
too great, the overcurrent may occur. When the reference frequency is less than start frequency, the frequency
inverter cannot start and is at ready mode (when jogging, it is not subject to the impact of start frequency).
Hold Time of Start Frequency: refer to the running time of starting the frequency during the process of start.

Chapter 6. Description of Parameters
113
Function code Function name Setting scope Factory set value
P1.0.14 Starting DC Brake Current 000%~100% 000
P1.0.15 Starting DC Brake Time 000.0s~100.0s 000.0
Starting DC Brake Current: refer to the output current in the process of starting DC brake, which is the percentage
relative to rated current of the motor, the larger the starting DC brake current, the greater the braking force is.
Starting DC Brake Time: refer to duration time of outputting the start DC brake current in the process of starting
the frequency inverter.
Function code Function name Setting scope Factory set value
P1.0.16 Shutdown mode 0: Reducing speed to shut down
1: Shut down freely 0
0: Stop by Speed Deceleration
After the stop command is effective, the frequency inverter reduces the output frequency based on deceleration
time and stops after the frequency is reduced to 0.
1: Free Stop
After the stop command is effective, the frequency inverter immediately stops outputting and the motor stops
freely based on mechanical inertia at this time.
Function code Function name Setting scope Factory set value
P1.0.17 Stop DC Braking Initial Frequency 000.00Hz~Highest Frequency 000.00
P1.0.18 Stop DC Braking Waiting Time 000.0s~100.0s 000.0
P1.0.19 Stop DC Braking Current 000%~100% 000
P1.0.20 Stop DC Braking Time 000.0s~100.0s 000.0
When the output frequency is reduced to the frequency set by P1.0.17 in the stopping process by reducing the
speed, after Stop DC Braking Waiting Time set by P1.0.18, it starts to output braking current set by P1.0.19 and
conduct DC brake process, until satisfy DC brake time set by P1.0.20 and the inverter stops DC brake.
Properly set Stop DC Braking Waiting Time (P1.0.18) to prevent the faults as overcurrent arising from start DC
brake at higher speed. Stop DC Braking Current (P1.0.19) refers to the percentage relative to rated current of the
motor. The higher the stop DC braking current is, the larger the brake force is. When Stop DC Braking Waiting
Time is set at 000.0, the stop DC brake function is invalid.
Note: P1.0.17 and P1.0.18 also have climbing function. It can improve the instability of braking. During the
process of braking, after reducing speed to the frequency set by P1.0.17 and pausing the time set by P1.0.18,
deacceleration continues until braking. Generally, P1.0.17 is set as 0.05Hz and P1.0.18 is set as 0.1s.

Chapter 6. Description of Parameters
114
Function code Function name Setting scope Factory set value
P1.0.21 Braking Use Rate 000%~100% 100
This function code is only valid for the frequency inverter of the built-in brake unit. CDI-E100, E102 Series has
complete built-in brake units, but CDI-E180 Series 15Kw and below has built-in brake units. but it is option
configuration for E180 Series 18.5~30kW.
As for duty ratio of adjusting the brake units, the higher the brake usage rate is, the higher the duty ratio of the
brake unit action is and the stronger the brake effect is, but the Bus line voltage fluctuation of the frequency
inverter is greater in the brake process.
Function code Function name Setting scope Factory set value
P1.0.22 Carrier Frequency 0.50kHz~16.0kHz 06.0
This function code is used to regulate the carrier frequency of the frequency inverter. The regulation of the carrier
frequency can lower the noise of the motor and reduce the line-to-ground leakage current and the interference
arising from the frequency inverter. When the carrier frequency is lower, the high-order harmonic components of
output current increase, the losses of motor increase and the temperature of the motor rises. When the carrier
frequency is higher, the losses of motor are reduced and the temperature rise of the motor decreases, but the losses
of the frequency inverter increase and the temperature of the frequency inverter rise, so the interference is
enhanced.
The regulation of the carrier frequency can influence the following performance:
Carrier Frequency Low → High
Noise of Motor Large → Small
Output Current Waveform Bad → Good
Temperature Rise of Motor High → Low
Temperature Rise of Frequency inverter Low → High
Current Leakage Small → Large
External Radiation Interference Small → Large
Function code Function name Setting scope Factory set
value
P1.0.23 Fan Control
0: Rotate at running
1: Continuous Running
2: Control based on Temperature
0
Refer to action mode used for selecting the cooling fan.
When at P1.0.23=0, the fans of the frequency inverter run at running state and can’t run at stop state.
When at P1.0.23=1, the fans keep running after power on.
When at P1.0.23=2, the fans run when the temperature of the radiator is higher than 35, but can’t run when
lower than 35.

Chapter 6. Description of Parameters
115
Function code Function name Setting scope Factory set value
P1.0.24 Motor Overload Protection
0: Prohibition
1 :Curve 1
2 :Curve 2
3 :Curve 3
1
P1.0.25 Motor Overload Protection
Level 00.20~10.00 01.00
P1.0.26 Motor Overload Alarm System 050%~100% 080
When at 1.0.24=0, the frequency inverter hasn’t had overload protection function to the motor, it suggests heating
the relay between frequency inverter and motor.
When at P1.0.24=1,2 or 3, the frequency inverter shall judge whether the motor is overload or not based on
inverse-time characteristic curve of the overload protection of the motor.
The users need to correctly set the value of P1.0.25 based on actual overload capability and load conditions of the
motor, if the set value is too small, it is easy to report the motor overload fault (Err10), while the set value is too
large, the motor may have the risk of being burnt, especially for the conditions that the rated current of the
frequency inverter is larger than the rated current of the motor. When at P1.0.25=01.00, it means that the motor
overload protection level is 100% rated current of the motor.
Function Code P1.0.26 is used to define when the early alarm is given before overload fault protection of the
motor. The larger the value is, the smaller the early alarm lead is. When the accumulative output current of the
frequency inverter is larger than product of multiplying overload inverse time curve by P1.0.26, the
multi-functional output terminal of the frequency inverter outputs Signal ON, and the corresponding
multi-functional output terminal is overload pre-alarm of the motor (6).
The overload inverse-time characteristic curve of E Series Frequency inverter is shown in the figure below:
Time
4mins
2mins
1mins Curve 1
30s Curve 2
10s Curve 3
Overload inverse-time characteristic curve
Output
Current

Chapter 6. Description of Parameters
116
Group P1.1 - Expansion Group
Function code Function name Setting scope Factory set
value
P1.1.00 Broken Line V/F Point 1 Frequency 000.00Hz~P1.1.02 000.00
P1.1.01 Broken Line V/F Point 1 Voltage 000.0%~100.0% 000.0
P1.1.02 Broken Line V/F Point 2 Frequency P1.1.00~P1.1.04 000.00
P1.1.03 Broken Line V/F Point 2 Voltage 000.0%~100.0% 000.0
P1.1.04 Broken Line V/F Point 3 Frequency P1.1.02~Motor rated frequency 000.00
P1.1.05 Broken Line V/F Point 3 Voltage 000.0%~100.0% 000.0
The above functions define V/F Curve with multi-point broken line, and the voltage of the above broken points is
the percentage relative to the rated voltage of the motor. V/F Curve with multi-point broken line is given based on
the load characteristics of the motor, but attention shall be paid that the relationship between three voltage points
and frequency points must meet: P1.1.00<P1.1.02<P1.1.04, P1.1.01<P1.1.03<P1.1.05, refer to the Description in
the figure below:
Note: the voltage cannot be set too large when at low frequency, or the frequency inverter may have
overcurrent fault or its motor may be burnt.
Function code Function name Setting scope Factory set value
P1.1.06 V/F Overexcited Gain 000~200 064
In the deceleration process of the frequency inverter, the pumping voltage can make DC Bus line voltage rise, the
overexcited control can restrain the rise of DC Bus line voltage to avoid occurrence of overvoltage fault. The
larger the overexcited gain is, the stronger the restraint effect is, but if the overexcited gain is too large, it is easy
to lead to increase of the output current, even overcurrent fault. As for the occasions where the rise of DC Bus line
voltage is not great or have brake resistance, it suggests setting the overexcited gain at 0.
Note: this function code is only valid when the control mode is V/F Control (i.e. P0.0.02=0).
Voltage%
Frequency
Rated Frequency

Chapter 6. Description of Parameters
117
Function code Function name Setting scope Factory set value
P1.1.07
Vector Control
Torque Upper
Frequency
0: Digital Reference (P1.1.08)
1: External Terminal VF1 Reference
2: External Terminal VF2 Reference
3: Multiplex Directive Terminal Reference
4: PULS Reference (DI6)
5: Communication Reference
6: MIN (VF1, VF2)
7: MAX (VF1,VF2)
8: Operation Result 1
9: Operation Result 2
10: Standby Torque Source 3
11: Standby Torque Source 4
0
0: Digital Reference (P1.1.08)
The upper limit of the vector control torque is given by the value at based on Function Code P1.1.08.
1: External Terminal VF1 Reference
2: External Terminal VF2 Reference
The vector control torque is given by the analog input terminal. E Series Frequency inverter provides 2-way
analog input terminal (VF1, VF2). VF1 and VF2 can input 0V~10V voltage or 0/4mA~20mA current. As for
corresponding relation curve between the input of VF1 and VF2 and the upper limit of torque, the users can freely
choose from four kinds of the relation curves through function code P2.1.02, in which Curve 1 and Curve 2 are
linear relationship able to be set through Function Code P2.0.13~P2.0.22, and Curve 3 and Curve 4 are broken
line relationship with two inflection points able to be set through Function Code P2.1.04~P2.1.19. The deviation
between actual voltage and sampling voltage of the analog input terminal can be adjusted through Function Code
P8.1.05~P8.1.12.
3: Multiplex Directive Terminal Reference
The vector control is given by different composite state of Multiplex Directive Terminal. E Series Frequency
inverter is able to set four Multiplex Directive Terminals (Terminal Function 9~12, refer to the Description for
Multiplex Directive Terminal Function of P2.0.00~P2.0.09 for more details)
4: PULS Reference (DI6)
The vector control is set by high-speed impulse frequency of digital input terminal D16 (the terminal function is
not defined). The corresponding relationship between high-speed impulse frequency and torque upper limit value
can be set through Function Code P2.0.23~P2.0.26, that is, linear relationship.
5: Communication Reference
The upper limit of vector control torque is set by the upper computer through communication mode (refer to
Chapter VIII for more details).

Chapter 6. Description of Parameters
118
6: MIN (VF1, VF2)
The upper limit of vector control torque is set by the input value of VF1 and VF2, whichever is lower.
7: MAX (VF1, VF2)
The upper limit of vector control torque is set by the input value of VF1 and VF2, whichever is larger.
8: Operation Result 1
9: Operation Result 2
10: Operation Result 3
11: Operation Result 4
The reference frequency is determined by the operation results after setting calculation of the internal operation
module. Refer to the Description of Function Code P3.2.26~P3.2.39 for more details of the operation module. The
operation results can be viewed through Function Code 9.0.46~P9.0.49.
Note: when the upper limit of the vector control torque is set by VF1 &VF2, multiplex directive, PULSE,
communication and operation results, the corresponding range is the value set by P1.1.08.
Function code Function name Setting scope Factory set value
P1.1.08 Torque Upper Limit Reference 000.0%~200% 150.0
When at P1.1.07=0, the set value of this function code determines the upper limit of the vector control torque,
which is the percentage relative to the rated torque of the motor.
Function code Function name Setting scope Factory set value
P1.1.09 Inversion Control Enable 0: Allow 1: Prohibit 0
This function code is used to set whether the frequency inverter is allowed to run at reverse state.
When at P1.1.09=0, the frequency inverter is allowed to run at reversal state.
When at P1.1.09=1, the frequency inverter is prohibited to run at reversal state, which is mainly used for the
occasions that the load is unable to reverse.
Note: the director of this function code is defined by the set value relative to running direction (P0.0.06)
Function code Function name Setting scope Factory set value
P1.1.10 Forward and Reverse Dead Time 0000.0s~3000.0s 0000.0
This function code is used to set the duration time of outputting OHz when the frequency inverter is in the process
of forward and reverse switch

Chapter 6. Description of Parameters
119
Function code Function name Setting scope Factory set value
P1.1.11 Power-on Running Selection 0: Running 1: Not Running 0
This function code is used to set when the frequency inverter runs in response to valid running command at the
moment of power-on.
When at P1.1.11=0, the frequency inverter directly responds to the running
When at P1.1.11=1, frequency inverter can’t respond to the running. It cannot run until the running command is
valid again after it is cancelled.
Function code Function name Setting scope Factory set value
P1.1.12 Droop Control 00.00Hz~10.00Hz 00.00
When more than one motor drive the same load, the uneven distribution of the load may occur. The droop control
decreases the output frequency along the increase of the load so as to realize even load of more than one motor.
The set value of this function code is the frequency value declined at rated load.
Function code Function name Setting scope Factory set value
P1.1.13 Speed/Torque Control Mode Selection 0: Speed Control
1: Torque Control 0
This function code is used to set what kind of running mode of the frequency inverter is adopted, speed control
mode or torque control mode.
When at P1.1.13=0, the speed control mode is adopted
When at P1.1.13=1, the torque control mode is adopted
Function code Function name Setting scope Factory set value
P1.1.14 Torque Reference Source
0: Digital Reference (P1.1.15)
1: External Terminal VF1 Reference
2: External Terminal VF2 Reference
3: Multiplex Directive Terminal Reference
4: PULS Reference (DI6)
5: Communication Reference
6: MIN (VF1,VF2)
7: MAX (VF1,VF2)
8: Operation Result 1
9: Operation Result 2
10: Operation Result 3
11: Operation Result 4
12: Standby Torque Source 1
13: Standby Torque Source 2
00

Chapter 6. Description of Parameters
120
0: Digital Reference (P1.1.15)
The upper limit of the vector control torque is given by the value at based on Function Code P1.1.15.
1: External Terminal VF1 Reference
2: External Terminal VF2 Reference
The torque Reference is given by the analog input terminal. E Series Frequency inverter provides 2-way analog
input terminal (VF1, VF2). VF1 and VF2 can input 0V~10V voltage or 0/4mA~20mA current. As for
corresponding relation curve between the input of VF1 and VF2 and the torque set value, the users can freely
choose from four kinds of the relation curves through function code P2.1.02, in which Curve 1 and Curve 2 are
linear relationship able to be set through Function Code P2.0.13~P2.0.22, and Curve 3 and Curve 4 are broken
line relationship with two inflection points able to be set through Function Code P2.1.04~P2.1.19. The deviation
between actual voltage and sampling voltage of the analog input terminal can be adjusted through Function Code
P8.1.05~P8.1.12.
3: Multiplex Directive Terminal Reference
The torque reference is given by different composite state of Multiplex Directive Terminal. E Series Frequency
inverter is able to set four Multiplex Directive Terminals (Terminal Function 9~12, refer to the Description for
Multiplex Directive Terminal Function of P2.0.00~P2.0.09 for more details)
4: PULS Reference (DI6)
The torque reference is given by high-speed impulse frequency of digital input terminal D16 (the terminal
function is not defined). The corresponding relationship between high-speed impulse frequency and torque upper
limit value can be set through Function Code P2.0.23~P2.0.26, that is, line relationship.
5: Communication Reference
The torque reference is given by the upper computer through communication mode (refer to Chapter VIII for more
details).
6: MIN (VF1, VF2)
The torque reference is given by the input value of VF1 and VF2, whichever is lower.
7: MAX (VF1, VF2)
The torque reference is given by the input value of VF1 and VF2, whichever is larger.
8: Operation Result 1
9: Operation Result 2
10: Operation Result 3
11: Operation Result 4
The torque reference is determined by the operation results after setting calculation of the internal operation
module. Refer to the Description for Function Code P3.2.26~P3.2.39 for more details of the operation module.
The operation results can be viewed through Function Code 9.0.46~P9.0.49.

Chapter 6. Description of Parameters
121
12: Standby Torque Source 1
13: Standby Torque Source 2
Standby Torque Source 1 and Standby Torque Source 2 are reserved by the manufacturer as frequency sources
used for special occasions in future, so the users may ignore them as usual.
Note: when the torque is set by VF1 &VF2, multiplex directive, PULSE, communication and operation
results, the corresponding range is the value set by P1.1.15.
Function code Function name Setting scope Factory set value
P1.1.15 Torque Digital Reference -200.0%~200.0% 150.0
When at P1.1.14=0, the set value of this function code determines the torque reference, which is the percentage
relative to the rated torque of the motor.
Function code Function Name Setting scope Factory set
value
P1.1.16 Torque Control FWD Frequency Limit 000.00Hz~Highest Frequency 050.00
P1.1.17 Torque Control REV Frequency Limit 000.00Hz~Highest Frequency 050.00
This function code is used to set the highest frequency in forward and reverse running when the frequency inverter
runs in torque control mode (i.e. P1.1.13=1).
Function code Function name Setting scope Factory set value
P1.1.18 Torque Acceleration Time 0000.0s~6500.0s 0000.0
P1.1.19 Torque Deceleration Time 0000.0s~6500.0s 0000.0
These two function codes are used to set the acceleration time of the torque rise and the deceleration time of the
torque decline when running in torque control mode (i.e. P1.1.13=1). They may be set to 0 for the occasions
requiring rapid response.

Chapter 6. Description of Parameters
122
6.3 Group P2 - Input/Output Terminal Function
Group P2.0 - Basic Group The input and output terminals of CDI-E100 Series, E102 Series and E180 Series are configured as below:
CDI-E100 Series CDI-E102 Series CDI-E180 Series
6-way digital input terminal
(DI1~DI6), in which D16 can
connect high-speed Impulse Input
5-way digital input terminal
(DI1~DI6), in which D16 can
connect high-speed Impulse Input
6-way digital input terminal (DI1~DI6), in
which DI6 can connect high-speed
Impulse Input. Additional 4-way digital
input terminal (DI7~DI10) is added
through externally connected I/O
expansion card
2-way Analog Input (VF1 & VF2) 2-way Analog Input (VF1 & VF2) Additional 1-way (VF3) is added through
externally connected IO expansion card
for 2-way analog imput (VF1, VF2)
2-way Analog Input (FM1 &
FM2)
1-way Analog Input FM1 2-way Analog Input (FM1 & FM2)
One-way Collector Output (YO)
(Use Terminal YO/FMP as YO)
N/A One-way Collector Output (YO) (Use
Terminal YO/FMP as YO) can add
additional 2-way (YO1 and YO2) through
externally connected I/O expansion card
Two-way Relay Output (T1 &T2) 1-way Relay Output (T1 &T2) 2-way Relay Output (T1 &T2)
One-way Impulse Output
Terminal FMP)
(Use Terminal YO/FMP as FMP)
N/A
One-way Impulse Output Terminal (FMP)
(Use Terminal YO/FMP as FMP)
Note: YO/FMP Terminal is common terminal of YO and FMP, but only one can be used at the same time
(select through function code P2.1.20).
Function code Function Name Setting scope Factory set value
P2.0.00 DI1Terminal Function 0~59 01 ( FWD Running)
P2.0.01 DI2 Terminal Function 0~59 04 (REV Jogging)
P2.0.02 DI3 Terminal Function 0~59 09 (Multiplex Directive Terminal 1)
P2.0.03 DI4 Terminal Function 0~59 12 (Multiplex Directive Terminal 4)
P2.0.04 DI5 Terminal Function 0~59 13 (Fault Reset)
P2.0.05 DI6 Terminal Function 0~59 00
P2.0.06 DI7 Terminal Function 0~59 00
P2.0.07 DI8 Terminal Function 0~59 00
P2.0.08 DI9 Terminal Function 0~59 00
P2.0.09 DI10 Terminal Function 0~59 00

Chapter 6. Description of Parameters
123
The above function codes are used to set the functions of digital input terminals and the functions for option are
shown in the table below:
Set value Function Description
0 No Function Define the not in-service terminals as “Unused” to prevent
malfunctions.
1 Forward Running (FWD) Control FWD and REV of the frequency inverter through these two
terminals. 2 Reverse Running (REV)
3 3-line Running Control
Confirm that the running mode of the frequency inverter is three-line
control mode through this terminal. Refer to the Description for
Terminal Control in 7.1.1.
4 Forward Jogging Control FWD Jogging and REV Jogging through of the frequency
inverter through these two terminals and be valid for any running
control mode. The running frequency and acceleration &
deceleration time of the inching refer to the description
for0.1.08,P0.1.09 and P0.1.10 .
5 Reverse Jogging
6 Terminal UP When the reference frequency is given by the keyboard, increase or
decreases the reference frequency through these two terminals. 7 Terminal DOWN
8 Free Stop
When the terminal state is valid, the frequency inverter is blocked to
output, the shut-down of the motor is not subject to the control of the
frequency inverter at this moment. This mode has same meaning of
free stop described in P1.0.16.
9 Multiplex Directive
Terminal 1
Realize the references of 16 kinds of the directive through 16 kinds
of states of these four terminals.
10 Multiplex Directive
Terminal 2
11 Multiplex Directive
Terminal 3
12 Multiplex Directive
Terminal 4
13 Fault Reset (RESET) Realize remote fault reset through this terminal and have same
function with RESET Key on Keyboard.
14 Running Pause
When this terminal state is valid, the terminal slows down and stops,
but all running parameter are memorized. When this terminal state is
invalid, the frequency inverter is resets to running state before stop.
15 External Fault Input
When this terminal state is valid, the frequency inverter gives an
alarm of Err13, and then the fault is handled based on fault protection
action mode.
16
Acceleration &
Deceleration Time
Selection Terminal 1 Realize the switch among four groups of straight acceleration and
deceleration time, refer to Appendix 3 for more details.
17
Acceleration &
Deceleration Time
Selection Terminal 2
18 Frequency Source
Selection Terminal 1 When at P0.1.00=8, the functions of these terminals are valid.
Realize the switch among 8 kinds of frequency sources through 8
kinds of state of these three terminals.
19 Frequency Source
Selection Terminal 2
20 Frequency Source
Selection Terminal 3
21 Running Command
Selection Terminal 1 Realize the switch among running control modes through close/open
state of these two terminals 22
Running Command
Selection Terminal 2

Chapter 6. Description of Parameters
124
Set value Function Description
23 UP/DOWN Reference
Reset
When the reference frequency is given by the keyboard, this
terminal can remove the frequency allowance adjusted by Terminal
UP/DOWN or Key & on Keyboard to reset the reference
frequency to the value given by P0.0.05.
24
Prohibition of
Acceleration &
Deceleration
When this terminal state is valid, the output frequency of the
frequency inverter is not impacted by the signal (except for stop
command)
25 PID Pause
PID Control fails temporarily, the frequency inverter maintains the
running of current output frequency and can’t conduct PID
Regulation of the frequency source.
26 PLC State Reset
During executing process of PLC, the frequency inverter is reset
the frequency inverter to initial state of Simple PLC through this
terminal
27 Wobbulating Pause The frequency inverter outputs in central frequency and the
wobbulating function suspends.
28 Counter Input Be used for defining the output terminal of count impulse. If it is
high-speed pulse, connect Terminal DI6.
29 Counter Reset Conduct reset handling to counter.
30 Length Counting Input Be used for defining the output terminal of length count impulse. If
it is high-speed pulse, connect Terminal D16.
31 Length Reset Conduct reset handling to length.
32 Torque Control
Prohibition
Prohibit the frequency inverter from running in torque control
mode, and the frequency inverter only can run in speed control
mode.
33 PULS Impulse Input Define PULS Impulse Input Terminal and connect Terminal DI6.
34 Immediate DC Brake When this terminal state is valid, the frequency inverter is directly
switched to DC Switch State.
35 External Fault
Normally-closed Input
When this terminal state is invalid, the frequency inverter gives an
alarm of Err13, and then the fault is handled based on fault
protection action mode.
36 Frequency Modification
Enable
When this terminal state is invalid, the frequency inverter cannot
respond the modification to frequency.
When this terminal state is valid, the frequency inverter responds
the modification to frequency.
37 PID Action Direction
Negation
When this terminal state is valid, the direction of PID Action is
opposite to the direction given by P4.0.03. Additionally, when
P0.0.06=2, the terminal is valid and the running direction adopts
reversed direction.
38 External Stop Terminal
1
When the running control mode is keyboard control (P0.0.03=0),
the terminal can stop through this terminal.
39 External Stop Terminal
2
In any of running control modes, the frequency inverter can slow
down and stop at deceleration time 4 through this terminal.
40 PID Integral Stop
When the units digit of P4.2.08 is 1 (i.e. the integral separation is
valid and this terminal is valid, the functions of integral regulation
of PID stops temporarily, but the functions of proportional
regulation and integral regulation of PID are still valid.

Chapter 6. Description of Parameters
125
Set value Function Description
41 PID Parameter
Switch
When the switch conditions of PID parameters are the terminal
(P4.0.13=1), this terminal state is invalid, adopt PID Parameter 1.
When this terminal state is valid, adopt PID Parameter 2.
42
Speed
Control/Torque
Control Switch
Realize the switch of the frequency inverter between torque control
mode and speed control mode. This terminal state is invalid, the
frequency inverter runs in setting mode of P1.1.13 (Speed/Torque
Control Mode), when this terminal state is valid, it is switched to another
mode.
43 Emergency Stop When this terminal is valid, the frequency inverter outputs the voltage in
enclosed mode and freely stops by inertia.
44 Deceleration DC
Brake
When the terminal state is valid, the frequency inverter slows down to
Start Frequency of Stop DC Brake and then is switched to Stop DC
Brake State.
45 User-Defined Fault 1 When: User-Defined Fault 1 and 2 are valid, the frequency inverter
respectively give an alarm of Err21 and Err22 and then the faults are
handled based on fault protection action mode. 46 User-Defined Fault 2
47 Running Time Reset
During the running process, it is to conduct reset handling for current
running time, current running time can be viewed through Function
Code P9.0.23.
48 Timer Input Terminal
1
When internal timer is controlled by this terminal, this terminal controls
the start or stop of the timer, refer to the Description of Function Code
P3.2.23.
49 Timer Input Terminal
2
When internal timer is controlled by this terminal, this terminal controls
the start or stop of the timer, refer to the Description of Function Code
P3.2.23.
50 Timer Reset
Terminal 1
When internal timer reset is controlled by this terminal, this terminal
state is valid, the timer resets, refer to the Description of Function Code
P3.2.23.
51 Timer Reset
Terminal 2
When internal timer reset is controlled by this terminal, this terminal
state is valid, the timer resets, refer to the Description of Function Code
P3.2.23.
52 Encoder Phase A
Input
Define the signal input terminal of Encoder A and B. Terminal D15 and
D16 of CDI-E100 Series can connect high-speed impulse of the encoder,
the impulse frequency of the encoder of other terminals is not greater
than 200Hz. The impulse frequency of CDI-E180 Series encoder must
be less than 200Hz. 53
Encoder Phase B
Input
54 Distance Reset Conduct reset handling to the distance
55 Integral Computation
Reset Reset the integral computation in operation module
56~59 User Function 1~4 Reservation
60 Start by tracing its
rpm is prohibited
When setting as starting by tracing its rpm(P1.0.10=1), the terminal is
effective and switches to start directly.

Chapter 6. Description of Parameters
126
Appendix 1 Description for Functions of Multiplex Directive Terminals
Terminal 4 Terminal 3 Terminal 2 Terminal 1 Multiplex Directive Reference Corresponding
parameter
OFF OFF OFF OFF Multiplex Directive 0 P3.0.03
OFF OFF OFF ON Multiplex Directive 1 P3.0.05
OFF OFF ON OFF Multiplex Directive 2 P3.0.07
OFF OFF ON ON Multiplex Directive 3 P3.0.09
OFF ON OFF OFF Multiplex Directive 4 P3.0.11
OFF ON OFF ON Multiplex Directive 5 P3.0.13
OFF ON ON OFF Multiplex Directive 6 P3.0.15
OFF ON ON ON Multiplex Directive 7 P3.0.17
ON OFF OFF OFF Multiplex Directive 8 P3.0.19
ON OFF OFF ON Multiplex Directive 9 P3.0.21
ON OFF ON OFF Multiplex Directive 10 P3.0.23
ON OFF ON ON Multiplex Directive 11 P3.0.25
ON ON OFF OFF Multiplex Directive 12 P3.0.27
ON ON OFF ON Multiplex Directive 13 P3.0.29
ON ON ON OFF Multiplex Directive 14 P3.0.31
ON ON ON ON Multiplex Directive 15 P3.0.33
Explanation: when the multiplex directive corresponds to frequency, the corresponding parameter is the
percentage relative to highest frequency.
When the multiplex directive corresponds to torque, the corresponding parameter is the percentage relative
to digital reference torque.
When the multiplex directive corresponds PID, the corresponding parameter is the percentage relative to
PID Reference Feedback range.
Appendix 2 Description for Functions of Frequency Source Selection Terminals
Terminal 3 Terminal 2 Terminal 1 Option of frequency source
OFF OFF OFF Frequency source A (correspond to P0.1.00=0)
OFF OFF ON Frequency source B (correspond to P0.1.00=1)
OFF ON OFF Frequency source A+B (correspond to P0.1.00=2)
OFF ON ON Frequency source A-B (correspond to P0.1.00=3)
ON OFF OFF Max. value of A & B (correspond to P0.1.00=4)
ON OFF ON Min. value of A & B (correspond to P0.1.00=5)
ON ON OFF Backup frequency source 1 (correspond to P0.1.00=6)
ON ON ON Backup frequency source 2 (correspond to P0.1.00=7)

Chapter 6. Description of Parameters
127
Appendix 3 Description for Functions of Acceleration and Deceleration Time Selection Terminals
Terminal 2 Terminal 1 Option of acceleration/ deceleration time Corresponding parameters
OFF OFF Acceleration/ deceleration time 1 P0.0.11, P0.0.12
OFF ON Acceleration/ deceleration time 2 P0.0.11, P0.0.12
ON OFF Acceleration/ deceleration time 3 P0.1.13, P0.1.14
ON ON Acceleration/ deceleration time 4 P0.1.15, P0.1.16
Appendix 4 Description for Functions of Running Command Selection Terminals
Current Running Control Mode Terminal 2 Terminal 1 Running Control Mode
Keyboard Control
(P0.0.03=0)
OFF ON Terminal Control
ON OFF Communication Control
ON ON Communication Control
Terminal Control
(P0.0.03=1)
OFF ON Keyboard Control
ON OFF Communication Control
ON ON Keyboard Control
Communication Control
(P0.0.03=2)
OFF ON Keyboard Control
ON OFF Terminal Control
ON ON Keyboard Control
Note: when Terminal 1 and Terminal 2 are OFF, it is the running control mode set by Function Code
P0.0.03
Function code Function name Setting scope Factory set value
P2.0.10 DI Filtering time 0.000s~1.000s 0.010
This function code is used to set the software filtering time of terminal DI input state. If the occasions, which use
Terminal DI Input, are easily to lead to false operation by interference, this parameter can be increased to enhance
the anti-interference ability, but the increase of the filtering time may cause slow response of Terminal DI.
Function code Function name Setting scope Factory set value
P2.0.11 External Terminal Running
Control Mode
0: Two-line Type 1
1: Two- line Type 2
2: Three- line Type 1
3: Three-line Type 2
0
This function code defines that when the control running mode is terminal control (i.e. P0.0.03=1), there are four
different modes to control the running of the frequency inverter. Refer to Terminal Control in 7.1.1 for more
details.

Chapter 6. Description of Parameters
128
Function code Function name Setting scope Factory set value
P2.0.12 UP/DOWN Terminal Change Rate 00.001Hz/s~65.535Hz/s 01.000
The function code defines that when Terminal UP/DOWN is used to regulate the reference frequency , set the rate
of frequency variation.
When P0.2.04 (Decimal Point of Frequency) is 2, the value range is 00.001Hz/s~65.535Hz/s.
When P0.2.04 (Decimal Point of Frequency) is 1, the value range is 000.01Hz/s~655.35Hz/s.
Function code Function name Setting scope Factory set value
P2.0.13 Minimum Input of Curve 1 00.00V~P2.0.15 00.00
P2.0.14 Corresponding reference for Minimum
Input of Curve 1 -100.0%~100.0% 000.0
P2.0.15 Maximum Input of Curve 1 P2.0.13~10.00V 10.00
P2.0.16 Corresponding reference for Maximum
Input of Curve 1 -100.0%~100.0% 100.0
P2.0.17 VF1 Filtering time 00.00s~10.00s 00.10
The above function codes are used to set the relation between analog input and corresponding reference value,
that is, straight line relationship.
When the voltage of analog input is greater than the given “Max. Input of Curve 1” (P2.0.15), the analog is
calculated at “Max. Input of Curve 1”; similarly when the voltage of analog input is lower than the given “Min.
Input of Curve 1” (P2.0.13), the calculation shall be at min. input or 0.0% according to the setting of “ Curve
below Mix. Input Reference Selection”.
VF1 Input Filtering Time is used to set the software filtering time of VF1, when the on-site analog is easily to be
disturbed, the filtering time shall be increased to make the tested analog input to be stable, but the greater filtering
time makes the response speed of the analog test become slow, so how to balanceset needs is based on actual
situations of the applications.
Explanation: when the analog inputs corresponding frequency, the corresponding given value is the
percentage relative to highest frequency.
When the analog inputs corresponding torque, the corresponding given value is the percentage relative to
digital reference torque.
When the analog inputs corresponding PID, the corresponding reference value is the percentage relative to
PID Reference Feedback range.
When the analog inputs corresponding time, the corresponding given value is the percentage relative to
running time (P3.1.02).
NOTE: The default value of inverter’s analog input is 0V ~ 10V. If the input is 0mA ~ 20mA, it will remain
0V ~ 10V; if the input is 4mA ~ 20mA, it will remain 2V ~ 10V.
Function code Function name Setting scope Factory set
value
P2.0.18 Minimum Input of Curve 2 00.00V~P2.0.20 00.00
P2.0.19 Corresponding reference for Minimum Input of
Curve 2 -100.0%~100.0% 000.0
P2.0.20 Maximum Input of Curve 2 P2.0.18~10.00V 10.00
P2.0.21 Corresponding reference for Maximum Input of
Curve 2 -100.0%~100.0% 100.0
P2.0.22 VF2 Filtering time 00.00s~10.00s 00.10
The functions and use methods of Curve 2 refer to the Description of Curve 1.

Chapter 6. Description of Parameters
129
Function code Function name Setting scope Factory set
value
P2.0.23 Minimum Input of PULS 0.00kHz~ P2.0.25 000.00
P2.0.24 Corresponding reference for Minimum Input of PULS -100.0%~100.0% 000.0
P2.0.25 Maximum Input of PULS P2.0.23~100.00kHz 050.00
P2.0.26 Corresponding reference for Maximum Input of PULS -100.0%~100.0% 100.0
P2.0.27 PULS Filtering time 00.00s~10.00s 00.10
The above function codes are used to set the relation between PULS Impulse Frequency and corresponding
reference value, that is, straight line relationship.
When the input impulse frequency is greater than the given “Max. PULS Input”(P2.0.25),the impulse frequency is
calculated at “Max. PULS Input”; similarly, when the input impulse frequency is lower than the given “Min.
PULS Input”(P2.0.23),the impulse frequency is calculated at “Min. PULS Input”.
PULS Input Filtering time is used to set the software filtering time of PULS Impulse Frequency, when the on-site
impulse is easily to be disturbed, the filtering time shall be increased to make the tested impulse frequency trend
to be stable, but the greater filtering time makes the response speed of detecting the impulse frequency become
slow, so how to balanceset needs is based on actual situations of the applications.
Note: when the PULS Impulse Frequency inputs corresponding frequency, the corresponding given value is
the percentage relative to highest frequency.
When the PULS Impulse Frequency inputs corresponding torque, the corresponding given value is the
percentage relative to digital reference torque.
When the PULS Impulse Frequency inputs corresponding PID, the corresponding given value is the
percentage relative to PID Reference feedback range.
Function code Function name Setting scope Factory set
value
P2.0.28 Expansion Card YO1 Function Selection (Invalid E100)
0~59
00
P2.0.29 T1 Relay Function Selection 01
P2.0.30 T2 Relay Function Selection (Invalid E102) 02
P2.0.31 Expansion Card YO2 Function Selection (Invalid E100) 00
P2.0.32 YO Function Selection (Use Terminal YO/FMP as
YO,i.e.P2.1.20=1) (Invalid E102) 00
The above five function codes are used to select the functions of five multi-functional output terminals.
The Descriptions of multi-functional output terminals are as below:
Set value Function Description
0 No Function Multi-functional output terminals have no any functions.
1 Frequency inverter
under Running
When the frequency inverter is at running state, have output
frequency (able to be zero) and output Signal ON.
2 Fault Stop Output When the frequency inverter breaks down and shuts down, output
Signal ON.
3 Frequency Level
Testing FDT1 Output Refer to the Description for Function Code P2.2.03 and P2.2.04.

Chapter 6. Description of Parameters
130
Set value Function Description
4 Frequency Reached Refer to the Description for Function Code P2.2.02.
5 Zero-speed Running (no
output when shut down)
When the frequency inverter is at running state and the output
frequency is 0Hz, output Signal ON.
6 Motor Overload Pre-alarm
Before overload protection action of the motor, the judgment can
be made according to the threshold value of early alarm to
overload, after exceeding the threshold value of early alarm,
output Signal ON. Refer to the Description for Function Code
P1.0.25 and P1.0.26.
7 Frequency inverter
Overload Pre-alarm
The frequency inverter outputs Signal ON 10s prior to occurrence
of overload protection.
8 Reference Count Value
Reached
When actual accounting value reaches the set value of Function
Code P3.1.11, output Signal ON.
9 Designated Count Value
Reached
When actual accounting value reaches the set value of Function
Code P3.1.12, output Signal ON.
10 Length Reached When actual length(P9.0.13) reaches the length set by Function
Code P3.1.08,output Signal ON.
11 PLC circulation cycle
completed
When simple PLC running completes a cycle, output the impulse
signal with the width of 250ms.
12 Accumulative Running
Time Reached
When the accumulative running time of the frequency inverter
reaches the time set by Function Code P2.2.01, output Signal ON.
13 Frequency Limit When the output frequency of the frequency inverter reaches
upper frequency or lower frequency, output Signal ON.
14 Torque Limit When the output torque of frequency inverter reaches limit value
of the torque in speed control mode, output Signal ON.
15 Ready for Running
When main circuits and control circuit power of the frequency
inverter have been stable and the inventor hasn’t defected out any
fault information, and the frequency inverter is in running state,
output Signal ON.
16 VF1>VF2 When the input value of VF1 is greater than the input value of
VF2, output Signal ON.
17 Upper Frequency Reached When the output frequency reaches upper frequency, output
Signal ON.
18
Lower Frequency Reached
(no output when shut
down)
When the output frequency reaches lower frequency and the
frequency inverter is in running state, output Signal ON.
19 Undervoltage state output When the frequency inverter is in undervoltage state, output
Signal ON.
20 Communication Reference Refer to the Description of Chapter 8.
21 VF1 Output less than
Lower Limit
When the value of the Analog VF1 Input is less than the value set
by Function Code P2.2.19 (Lower Limit of VF1 Input), output
Signal ON.
22 VF1 Output more Upper
Limit
When the value of the Analog VF1 Input is greater than the value
set by Function Code P2.2.20 (Upper Limit of VF1 Input), output
Signal ON.

Chapter 6. Description of Parameters
131
Set value Function Description
23 Zero-speed Running 2 (also output
when shut down)
When the output frequency of the frequency inverter is
0Hz, output Signal ON. In Stop Mode, this signal is ON.
24 Accumulative Power-on Time
Reached
When the accumulative power-on time of the frequency
inverter reaches the time set by Function Code P2.2.00,
output Signal ON.
25 Frequency Level Testing FDT2
Output
Refer to the Description of Function Code P2.2.05 and
P2.2.06.
26 Frequency 1 Reaches Output Refer to the Description of Function Code P2.2.07 and
P2.2.08
27 Frequency 2 Reaches Output Refer to the Description of Function Code P2.2.09 and
P2.2.10.
28 Current 1 Reaches Output Refer to the Description of Function Code P2.2.15 and
P2.2.16.
29 Current 2 Reaches Output Refer to the Description of Function Code P2.2.17 and
P2.2.18.
30 Timing Reaches Output
When the timing function selection (P3.1.00=1) is valid,
this running time reaches the given timing time, the
frequency inverter automatically shuts down, output
Signal ON in the process of shutdown and stop.
31 VF1 Input Overlimit
When the value of the analog input is greater than the
value (Upper Limit of VF1 Input)set by Function Code
P2.2.20 or less than the value (Lower Limit of VF1
Input)set by Function Code P2.2.19, output Signal ON
32 In Off-load In off-load state, the frequency inverter outputs Signal
ON.
33 In Reverse Running In reverse running state, the frequency inverter outputs
Signal ON.
34 Zero-current State Refer to the Description of Function Code P2.2.11 and
P2.2.12.
35 Module Temperature Reached
When the radiator temperature of the module of the
frequency inverter reaches the temperature set by
Function Code P2.2.21, output Signal ON.
36 Output Current Overlimit Refer to the Description of Function Code P2.2.13 and
P2.2.14.
37 Lower Frequency Reached (also
output when shut down)
When the output frequency reaches lower frequency or
the reference frequency is less than the lower frequency
in stop state, output Signal ON.
38 Alarm Output
When the frequency inverter fails, if the fault handling
mode is continuous running, output Signal ON. If the
fault handling mode is shutdown by speed reduction,
output Signal ON in the process of shutdown by speed
reduction.
39 PLC Phase Completed When each phase of simple PLC is completed, output an
impulse signal with the width of 200ms.
40 Current Running Time Reached
When current running time of the frequency inverter
exceeds the value set by Function Code P2.2.22, output
Signal ON and the frequency inverter cannot shut down.
41 Fault Output (Not Output for
Undervoltage)
When the frequency inverter fails and shuts down, output
Signal ON. Output Signal OFF in undervoltage state.
42 Time of Timer 1 Reached When the time of Timer 1 reaches the time set by
Function Code P3.2.24, output Signal ON.

Chapter 6. Description of Parameters
132
Set value Function Description
43 Time of Timer 2 Reached When the time of Timer 2 reaches the time set by Function
Code P3.2.25, output Signal ON.
44
Time of Timer 1 Reached
but Time of Timer 2 not
Reached
When the time of Timer 1 reaches the time set by Function
Code P3.2.24 and the time of Timer 2 fails to reach the time set
by Function Code P3.2.25, output Signal ON.
45 User Function 1 Reservation
46 User Function 2 Reservation
47 User Function 3 Reservation
48 User Function 4 Reservation
49 User Function 5 Reservation
50 Synchronization
Intermediate Relay M1 Have the same action with M1
51 Synchronization
Intermediate Relay M2 Have the same action with M2
52 Synchronization
Intermediate Relay M3 Have the same action with M3
53 Synchronization
Intermediate Relay M4 Have the same action with M4
54 Synchronization
Intermediate Relay M5 Have the same action with M5
55 Distance over Zero When actual distance (P9.0.30) is greater than 0, output Signal
ON.
56 Distance Set value 1
Reached
When actual distance (P9.0.30) reaches the distance set by
Function Code P3.1.13, output Signal ON.
57 Distance Set value 2
Reached
When actual distance (P9.0.30) reaches the distance set by
Function Code P3.1.14, output Signal ON.
58 Operation Result 2 greater
than 0
When the result 2 of the operation module is greater than 0,
output Signal ON.
59 Operation Result 4 greater
than 0
When the result 4 of the operation module is greater than 0,
output Signal ON.

Chapter 6. Description of Parameters
133
Function code Function Name Setting scope Factory set value
P2.0.33 Analog Output FM1 Reference
0~20
00
P2.0.34 Analog Output FM2 Reference (E102 invalid) 01
P2.0.35 FMP Output Reference (Use Terminal YO/FMP
as FMP, i.e. P2.1.20=0) (E102 invalid) 00
Function Code P2.0.33 and P2.0.34 respectively define the functions of Analog Output FM1 and FM2. Function
Code P2.0.35 defines FMP Impulse Output Function.
The output range of Analog Output FM1 and FM2 is 0V~10V voltage signal or 0mA~20mA current signal. The
deviation between actual output voltage and target output voltage of the analog output terminal can be adjusted
through Function Code P8.1.13~P8.1.20.
The range of FMP Output Impulse Frequency is 0.01kHz~P2.1.21 (Highest Frequency of FMP Output ), P2.1.21
can be set among 0.01kHz~100.00kHz.
The calibration relation between range of impulse output or analog output and corresponding functions are shown
in the table below:
Set value Function Corresponding Function of Impulse or Analog Output
0.0%~100.0%
0 Running Frequency 0~Max. Output Frequency
1 Output Current 0~Max. Output Frequency
2 Output Torque (Absolute Value of
Torque) 0~2 Times of Rated Current of the Motor
3 Output Torque 0~2 Times of Rated Torque of the Motor
4 Output Power 0~2 Times of Rated Power
5 Output Voltage 0~1.2 Times of Rated Voltage of the Frequency inverter
6 PULSE Impulse Input 0.01kHz~100.00kHz
7 VF1 Voltage 0V~10V (or 0/4mA~20mA)
8 VF2 Voltage 0V~10V (or 0/4mA~20mA)
9 Keyboard Potentiometer Voltage 0V~10V
10 Actual Length Value 0~Reference Length Value (Set value of Function Code
P3.1.08)
11 Actual Counting Value 0~Designated Count Value (Set value of Function Code
P3.1.12)
12 Communication Reference Refer to the Description of Chapter VIII.
13 Motor Speed 0~Corresponding Speed of Max. Output Frequency
14 Output Current 0.0A~1000.0A
15 Bus line voltage 0.0V~1000.0V
16 Output Torque -2 Times of Rated Torque of the Motor ~ 2 Times of Rated
Torque of the Motor
17 Operation Result 1 -1000~1000
18 Operation Result 2 0~1000
19 Operation Result 3 -1000~1000
20 Operation Result 4 0~1000

Chapter 6. Description of Parameters
134
Function code Function name Setting scope Factory set value
P2.0.36 Analog FM1 Output Offset -100.0%~100.0% 000.0
P2.0.37 Analog FM1 Output Gains -10.00~10.00 01.00
P2.0.38 Analog FM2 Output Offset (E102 invalid) -100.0%~100.0% 000.0
P2.0.39 Analog FM2 Output Gains (E102 invalid) -10.00~10.00 01.00
The above function codes are generally used for correcting zero drift of analog output and deviation of output
amplitude, but also can be used to customize the required analog output curve.
Actual Analog Output= Standard Analog Output × Analog Output Gain+ Analog Output Offset
Standard Analog Output refers to the output analog value without offset and gain correction. Namely, voltage
output is 0 ~ 10V and cureent output is 0 ~ 20mA
The analog output bias is percentage of the max. voltage 10 V or current 20mA of standard analog output
For example: if output current signal is 4 ~ 20mA, analog output bias is set to 20% and analog output gain is set to
0.8.
Group P2.1 Expansion Group
Function code Function name Setting scope Factory set value
P2.1.00 Valid Model Selection 1 of
Terminal DI
0: Active High Level
1: Active Low Level
Ones: DI1 (E102 invalid)
Tens: DI2
Hundreds: DI3
Thousands: DI4
Ten Thousands: DI5
00000
P2.1.01 Valid Model Selection 2 of
Terminal DI
0: Active High Level
1: Active Low Level
Ones: DI6
Tens: DI7 (Invalid E100)
Hundreds: DI8 (Invalid E100)
Thousands: DI9 (Invalid E100)
Ten Thousands: DI10 (Invalid E100)
00000
Be used for setting valid state mode of digital input terminal.
When selecting active high level, it is not valid until corresponding Terminal DI is connected, and the
disconnection is invalid.
When selecting active low level, it is not valid until corresponding Terminal DI is connected, and the
disconnection is invalid.
Note: DI7~DI10 are the terminals of CDI-E180 Series on Expansion Card I/0, but invalid for CDI-E100 and
E102 Series.
DI1 is invalid for E102 Series.

Chapter 6. Description of Parameters
135
Function code Function name Setting scope Factory set value
P2.1.02 Analog Input Curve
Selection
Ones: Curve Selected for VF1
Tens: Curve Selected for VF2
1: Curve 1
2: Curve 2
3: Curve 3
4: Curve 4
Hundreds: VF1 input resolution
Thousands: VF2 input resolution
Ten Thousands: Keyboard Potentiometer
input resolution
0:00.01Hz
1:00.02Hz
2:00.05Hz
3:00.10Hz
4:00.20Hz
5:00.50Hz
6:01.00Hz(Keyboard Potentiometer is invalid)
00021
The ones and tens of this function code are respectively used to select corresponding given curve of analog. Two
analog inputs can respectively select any one of four kinds of the curves. Curve 1 and Curve 2 are linear
relationship, refer to the setting of P2.0.13~P2.0.22 for more details, while Curve 3 and Curve 4 are broken line
relationship with two inflection points, refer to the setting of P2.1.04~P2.1.19 for more details. Hundreds,
thousands and ten thousands are used to select the input frequency resolution, minimum fluactuation value, of
VF1, VF2 and keyboard potentionmeter.
Function code Function name Setting scope Factory set value
P2.1.03 Selection for Curve less than Min.
Reference
Ones: VF1 less than Min. Input
Tens: VF2 less than Min. Input
0: Corresponding Min. Input Reference
1: 0.0%
H.00
This function code is used to set how to determine the corresponding reference of the analog when the analog
input is less than the given “Min. Input”.
The ones and tens of this function code respectively correspond to VF1 and VF2. If it is 0, when VF input is lower
than“ Min. Input”, this corresponding reference of this analog is “Corresponding reference of Min. Input”
(P2.0.14, P2.0.19, P2.1.05, P2.1.13) of the selected curve. If it is 1, when VF input is lower than “Min. Input”, this
corresponding reference of this analog is 0.0%.
Function code Function name Setting scope Factory set
value
P2.1.04 Min. Input of Curve 3 00.00V~P2.1.06 00.00
P2.1.05 Corresponding reference for Min. Input of Curve 3 -100.0%~100.0% 000.0
P2.1.06 Curve 3 Inflection Point 1 Input P2.1.04~ P2.1.08 03.00
P2.1.07 Corresponding reference for Curve 3 Inflection Point 1
Input -100.0%~100.0% 030.0
P2.1.08 Curve 3 Inflection Point 2 Input P2.1.06~ P2.1.10 06.00
P2.1.09 Corresponding reference for Curve 3 Inflection Point 2
Input -100.0%~100.0% 060.0
P2.1.10 Max. Input of Curve 3 P2.1.08~10.00V 10.00
P2.1.11 Corresponding reference for Max. Input of Curve 3 -100.0%~100.0% 100.0
The functions and use methods of Curve 3 is roughly the same with Curve 1 and Curve 2 (refer to the Description
of Curve 1), the difference is that Curve 1 and Curve 2 are linear relationship without inflection point, but curve 3
is broken line relationship with two inflection point in the middle, refer to the Description in the figure below:

Chapter 6. Description of Parameters
136
Function code Function name Setting scope Factory set value
P2.1.12 Min. Input of Curve 4 00.00V~P2.1.14 00.00
P2.1.13 Corresponding reference for Min. Input of Curve
4 -100.0%~100.0% -100.0
P2.1.14 Curve 4 Inflection Point 1 Input P2.1.12~P2.1.16 03.00
P2.1.15 Corresponding reference for Curve 4 Inflection
Point 1 Input -100.0%~100.0% -030.0
P2.1.16 Curve 4 Inflection Point 2 Input P2.1.14~P2.1.18 06.00
P2.1.17 Corresponding reference for Curve 4 Inflection
Point 2 Input -100.0%~100.0% 030.0
P2.1.18 Max. Input of Curve 4 P2.1.16~10.00V 10.00
P2.1.19 Corresponding reference for Max. Input of Curve
4 -100.0%~100.0% 100.0
As for the functions and use methods of Curve 4, refer to the Description of Curve 3.
Function code Function name Setting scope Factory set value
P2.1.20 YO/FMP Terminal Function (E102
invalid)
0: Impulse output (FMP)
1: Open Collector Output (YO) 1
This function code is used to define that the Terminal YO/FMP is used as impulse output function or open
collector function.
Corresponding Set
VF Input

Chapter 6. Description of Parameters
137
If it is used as impulse output (i.e.P2.1.20=0), specific function refers to the Description for Function Code
P2.0.35, and the high frequency of the output impulse is determined by the set value of Function Code P2.1.21 at
the moment.
If it is used as open collector function (i.e.P2.1.20=1), specific function refers to the Description for Function
Code P2.0.32.
Function Code Function name Setting Scope Factory set value
P2.1.21 Highest Frequency of FMP Output (E102
invalid) 000.01kHz~100.00kHz 050.00
This function code is used to set the highest frequency of output impulse when Terminal YO/FMP is used as
impulse output (i.e.P2.1.20=0)
Function code Function name Setting scope Factory set value
P2.1.22
Valid Sate of
Multi-functional
Output Terminal
0: Positive Logic
1: Negative Logic
Ones: YO (Invalid E102)
Tens: T1
Hundreds: T2 (Invalid E102)
Thousands: Expansion Card YO1 (Invalid E100)
Ten Thousands: Expansion Card YO2 (Invalid E100)
00000
The ones, tens, hundreds, thousands and ten thousands of this function code respectively define the output logic of
Output Terminal YO, T1, T2, Expansion Card YO1 and YO2.
0: Positive Logic
When the output signal is valid, the multi-functional output terminal is connected. But When the output signal is
invalid, the multi-functional output terminal is disconnected.
1: Negative Logic
When the output signal is invalid, the multi-functional output terminal is connected. But when the output signal is
valid, the multi-functional output terminal is disconnected.
Function code Function name Setting scope Factory set value
P2.1.23 VF1 Terminal Function as
Digital Input
00: Use as Normal Analog
01~59: Digital Input Terminal Function 00
P2.1.24 VF2 Terminal Function as
Digital Input
00: Use as Normal Analog
01~59: Digital Input Terminal Function 00

Chapter 6. Description of Parameters
138
This group of function codes is used to set the functions when the analog input terminal VF is used as digital input
terminal DI. When VF is used as DI, VF and 10V are connected, VF Terminal State is high level, when VF and
10V are disconnected, and VF Terminal State is low level. the setting refers to the use and Description of the
functions refer to Function Code P2.0.00~P2.0.09.
Function code Function name Setting scope Factory set value
P2.1.25 Valid State Option of VF
0: Active High Level
1: Active Low Level
Ones: VF1
Tens: VF2
00
This function code is used to confirm that the analog input terminal VF is used as digital input terminal DI , VF
Terminal State is active high level or active low level. Ones and Tens respectively represent VF1 and VF2.
Active High Level: the connection of VF and 10V is valid, but disconnection is invalid.
Active Low Level: the connection of VF and 10V is valid, but disconnection is invalid.
Function code Function Name Setting scope Factory set value
P2.1.26 DI1 Delay (E102 invalid) 0.0s~3600.0s 0000.0
P2.1.27 DI2 Delay 0.0s~3600.0s 0000.0
P2.1.28 DI3 Delay 0.0s~3600.0s 0000.0
The above functions are used to set the delayed time arising from the impact of the signal on frequency inverter
when changes occur in signal DI1, DI2 and DI3.
Function code Function Name Setting scope Factory set value
P2.1.29 YO Delay (E102 invalid) 0.0s~3600.0s 0000.0
P2.1.30 T1 Delay 0.0s~3600.0s 0000.0
P2.1.31 T2 Delay (E102 invalid) 0.0s~3600.0s 0000.0
The above function codes are used to set the delayed time of the frequency inverter from generating signal YO, T1
and T2 to output signal YO, T1 and T2.
Group P2.2 - Auxiliary Group
Function code Function name Setting scope Factory set value
P2.2.00 Accumulative Power-on Reaches Reference Time 0h~65000h 00000
This function code is used to set accumulative power-on time of the frequency inverter from the date of leaving
the factory. When actually accumulative power-on time reaches the value set by Function Code P2.2.00, the
multi-functional output terminals of the frequency inverter output Signal ON. The corresponding function of
multi-functional output terminals is accumulative power-on Time Reached (24). The frequency inverter gives an
alarm of Fault Err23. If the setting is 0, the accumulative power-on time is not limited. Actually accumulative
power-on time can be viewed through Function Code P5.1.01.

Chapter 6. Description of Parameters
139
Note: Only when actually accumulative power-on time (P5.1.01) is less than the value set by Function Code
P2.2.00, the frequency inverter can enter into normal running, if the setting is 0, the accumulative power-on
time is not limited.
Function code Function name Setting scope Factory set value
P2.2.01 Accumulative Running Reaches Reference Time 0h~65000h 00000
This function code is used to set accumulative running time of the frequency inverter. When actually accumulative
running time reaches the value set by Function Code P2.2.01, the multi-functional output terminals of the
frequency inverter output Signal ON and the frequency inverter shuts down automatically. The corresponding
function of multi-functional output terminals is accumulative running Time Reached (12). The frequency inverter
gives an alarm of Fault Err24. Actually accumulative running time can be viewed through Function Code P5.1.00.
Note: Only when actually accumulative running time (P5.1.00) is less than the value set by Function Code
P2.2.01, the frequency inverter can enter into normal running, if the setting is 0, the accumulative running
time is not limited.
Function code Function name Setting scope Factory set
value
P2.2.02 The reference frequency reaches test width 000.0%~100.0% 000.0
When the running frequency of frequency inverter is within positive and negative frequency with test width of the
reference frequency, the multi-functional output terminals of the frequency inverter output Signal ON. The
reference value of this function code is the percentage relative to the high reference frequency. Corresponding
function of multi-functional output terminals is Frequency Reached (4), refer to the Description of the figure
below:
Test width Frequency= The reference frequency reaches test width (P2.2.02) × Highest Frequency (P0.0.07)
Function code Function name Setting scope Factory set value
P2.2.03 Frequency Test FDT1 000.00Hz~Highest Frequency 050.00
P2.2.04 FDT1 Lagged Value 000.0%~100.0% 005.0
When the output frequency of the frequency inverter exceeds one value, the multi-functional output terminals of
the frequency inverter output Signal ON, this value is called as Tested Frequency FDT1. When the output
frequency of the frequency inverter is lower than a certain value of Tested Frequency FDT1, the multi-functional
output terminals of the frequency inverter output Signal OFF, this value is called as Lagged FDT1 Frequency
Value. Corresponding function of multi-functional output terminals is Detected FDT1 Output of Frequency Level
(3), refer to the Description of the figure below:
Output
frequency
Set
frequency
Frequency
reaches test signal
Detected Width Frequency
Detected Width Frequency
Time
Time

Chapter 6. Description of Parameters
140
Lagged FDT1 Frequency Value= Tested Frequency FDT1 (P2.2.03) × Lagged Value of FDT1
Function code Function name Setting scope Factory set value
P2.2.05 Frequency Test FDT2 000.00Hz~Highest Frequency 050.00
P2.2.06 FDT2 Lagged Value 000.0%~100.0% 005.0
FDT2 has the same function with FDT1, refer to the Description for FDT1 (P2.2.03 and P2.2.04)for more details.
Corresponding function of multi-functional output terminals is Frequency Level Test FDT2 (25).
Function code Function name Setting scope Factory set value
P2.2.07 Any reached frequency tested value 1 000.00Hz~Highest Frequency 050.00
P2.2.08 Any reached frequency 1 test width 000.0%~100.0% 000.0
When the running frequency of the frequency inverter is within any positive and negative frequency with test
width of the reference frequency that reaches at Tested Frequency Value 1, the multi-functional output terminals
of the frequency inverter output Signal ON. When the running frequency of the frequency inverter is beyond any
positive and negative frequency with test width of the reference frequency that reaches at Tested Frequency Value
1, the multi-functional output terminals of the frequency inverter output Signal OFF. Corresponding function of
the multi-functional output terminals is Frequency 1 Reaches Output (26), refer to the Description of the figure
below:
Output
frequency
FDT1
Frequency reaches
test signal
Lagged Frequency
Value of FDT1
Time
Time

Chapter 6. Description of Parameters
141
Test width Frequency = Any reached frequency 1 test width (P2.2.08) × Highest Frequency (P0.0.07)
Function code Function name Setting scope Factory set
value
P2.2.09 Any reached frequency tested value 2 000.00Hz~Highest Frequency 050.00
P2.2.10 Any reached frequency 2 test width 000.0%~100.0% 000.0
The above function codes have the same function with Function Code P2.2.07 and P2.2.08, refer to the
Description of P2.2.07 and P2.2.08 for more details. Corresponding function of the multi-functional output
terminals is Frequency 2 Reaches Output (27).
Function code Function name Setting scope Factory set value
P2.2.11 Zero Current Test Level 000.0%~300.0%
(100.0% correspond to rated current of motor) 005.0
P2.2.12 Delay Time for Zero
Current Test 000.01s~600.00s 000.10
When the running current of the frequency inverter is less than or equal to zero-current test level and the duration
exceeds the delay time of zero-current test, the multi-functional output terminals of the frequency inverter output
Signal ON, once the running current resets to the current test level larger than zero, the multi-functional output
terminals of the frequency inverter output Signal OFF. Corresponding function of the multi-functional output
terminals is zero-current state (34), refer to the Description of the figure below:
Any reached frequency
tested value
Any reached frequency
tested signal
Test Width Frequency
Test Width Frequency
Time
Time
Running
current
Output
frequency

Chapter 6. Description of Parameters
142
Current Test Delay Time when T at O
Function code Function name Setting scope Factory set value
P2.2.13 Output Current Overlimit Value 00.0: No Test
000.1%~300.0% 200.0
P2.2.14 Delay Time for Current Overlimit Test 000.00s~600.00s 000.00
When the running current of the frequency inverter is greater than the value set by Function Code P2.2.13 and the
duration exceeds the value set by Function Code P2.2.14, the multi-functional output terminals of the frequency
inverter output Signal ON, once the running current resets to the value less than and equal to overlimit of output
current, the multi-functional output terminals of the frequency inverter output Signal OFF. Corresponding function
of the multi-functional output terminals is output current overlimit (36), refer to the Description of the figure
below:
Zero-current
detection level
Zero-current
detected signal
Time
Time

Chapter 6. Description of Parameters
143
The output current overlimit is the percentage of rated current of the motor. T refers to the delay time of detecting
out current overlimit.
Function code Function name Setting scope Factory set value
P2.2.15 Current Level Test 1 000.0%~300.0% 100.0
P2.2.16 Test Width of Current Level 1 000.0%~300.0% 000.0
When the running current of the frequency inverter is within positive and negative frequency with test width of
the current level test 1, the multi-functional output terminals of the frequency inverter output Signal ON. When
the running current of the frequency inverter is beyond positive and negative test width of current level test 1, the
multi-functional output terminals of the frequency inverter output Signal OFF. Corresponding function of the
multi-functional output terminals is Current 1 Reaches Output (28), refer to the Description of the figure below:
Current Level Test 1 and Test Width of Current Level 1 are the percentage of the rated current of the motor.
Running
current
Output current
overlimit
Output current
overlimit detected
signal
Time
Time
Output
current
Current level
detection 1
Current level
detected signal
Detection width of current level 1
Detection width of current level 1
Time
Time

Chapter 6. Description of Parameters
144
Function code Function name Setting scope Factory set value
P2.2.17 Current Level Test 2 000.0%~300.0% 100.0
P2.2.18 Test Width of Current Level 2 000.0%~300.0% 000.0
The above function codes have the same functions with Function Code P2.2.15 and P2.2.16, refer to the
Description of Function Code P2.2.15 and P2.2.16 for more details. Corresponding function of the
multi-functional output terminals is Current 2 Reaches Output (29).
Function code Function name Setting scope Factory set value
P2.2.19 VF1 Input Lower Limit 00.00V~P2.220 03.10
P2.2.20 VF1 Input Upper Limit P2.219~11.00V 06.80
When the input value of Analog VF1 is less than the value set by Function Code P2.2.19, the multi-functional
output terminals of the frequency inverter output Signal ON. Corresponding function of the multi-functional
output terminals is VF Input less than lower limit (21) or above limit (31).
When the input value of Analog VF1 is less than the value set by Function Code P2.2.20, the multi-functional
output terminals of the frequency inverter output Signal ON. Corresponding function of the multi-functional
output terminals is VF Input less than lower limit (22) or above limit (31).
Function code Function name Setting scope Factory set
value
P2.2.21 Model Temperature Reaches Reference 000~100 075
The module temperature of the frequency inverter reaches the value set by Function Code P2.2.21, the
multi-functional output terminals of the frequency inverter output Signal ON. Corresponding function of the
multi-functional output terminals is Module Temperature Reached (35).Actual module temperature can be viewed
through Function Code P5.1.03.
Function code Function name Setting scope Factory set value
P2.2.22 Current Running Reaches Reference Time 0000.0~6500.0min 0000.0
The frequency inverter needs to restart timing for every start, when reaching the value set by Function Code
P2.2.22, the frequency inverter continues to run and the multi-functional output terminals of the frequency
inverter output Signal ON. Corresponding function of multi-functional output terminals is Current Running Time
Reached (40). If the set is 0, current running time is not limited. Actual time of current running can be viewed
through Function Code P9.0.23 (when the frequency inverter shuts down, the display value of P9.0.23
automatically resets to 0).

Chapter 6. Description of Parameters
145
6.4 Group P3 - Programmable Function
Group P3.0 - Basic Group Function code Function name Setting scope Factory set value
P3.0.00 Simple PLC
Running Mode
0: End of Single Running and Stop
1: End of Single Running and Save Final Value
2: Continuous Running
3: Cycle N Times
0
0: Stop after End of Single Cycle
The frequency inverter stops automatically according to the stopping method set by P1.0.16 after completing one
cycle.
1: Keep Final Value after End of Single Running
The frequency inverter runs at reference frequency of final phase after completing one cycle.
2: Continuous Cycle
The frequency inverter continues to run until the stop command is given.
3: N Times of Cycle
The frequency inverter stops automatically after cycling N times. N is set by reference value of Function Code
P3.0.01.
Function code Function name Setting scope Factory set value
P3.0.01 Cycle number(s), N 00000~65000 00000
This function code is used to set the times of cycle running at Function Code P3.0.00=3.
Function code Function name Setting scope Factory set
value
P3.0.02 Option of PLC
Power-off Memory
Ones: Option of Power-off Memory
0: No Power-off Memory
1: Power-off Memory
Tens: Stop Memory Selection
0: No Stop Memory
1: Stop Memory
00
PLC Power-off Memory means running phase and running frequency of PLC before memory power-off, when
powering on next time, the frequency inverter continues to run from memory phase. If it is selected not to memory,
every power-on needs to restart the process of PLC.
PLC Stop Memory means running phase and running frequency of PLC before memory shutdown, when running
next time, the frequency inverter continues to run from memory phase. If it is selected not to memory, every start
needs to restart the process of PLC.
In addition, PLC recyling times can be realized memorizing by selecting this function.

Chapter 6. Description of Parameters
146
Function code Function name Setting scope Factory set value
P3.0.03 Phase Directive 0 -100.0%~100.0% 000.0
P3.0.04 Phase O Running Time 0000.0s~6553.5s 0000.0
P3.0.05 Phase Directive 1 -100.0%~100.0% 000.0
P3.0.06 Phase 1 Running Time 0000.0s~6553.5s 0000.0
P3.0.07 Phase Directive 2 -100.0%~100.0% 000.0
P3.0.08 Phase 2 Running Time 0000.0s~6553.5s 0000.0
P3.0.09 Phase Directive 3 -100.0%~100.0% 000.0
P3.0.10 Phase 3 Running Time 0000.0s~6553.5s 0000.0
P3.0.11 Phase Directive 4 -100.0%~100.0% 000.0
P3.0.12 Phase 4 Running Time 0000.0s~6553.5s 0000.0
P3.0.13 Phase Directive 5 -100.0%~100.0% 000.0
P3.0.14 Phase 5 Running Time 0000.0s~6553.5s 0000.0
P3.0.15 Phase Directive 6 -100.0%~100.0% 000.0
P3.0.16 Phase 6 Running Time 0000.0s~6553.5s 0000.0
P3.0.17 Phase Directive 7 -100.0%~100.0% 000.0
P3.0.18 Phase 7 Running Time 0000.0s~6553.5s 0000.0
P3.0.19 Phase Directive 8 -100.0%~100.0% 000.0
P3.0.20 Phase 8 Running Time 0000.0s~6553.5s 0000.0
P3.0.21 Phase Directive 9 -100.0%~100.0% 000.0
P3.0.22 Phase 9 Running Time 0000.0s~6553.5s 0000.0
P3.0.23 Phase Directive 10 -100.0%~100.0% 000.0
P3.0.24 Phase 10 Running Time 0000.0s~6553.5s 0000.0
P3.0.25 Phase Directive 11 -100.0%~100.0% 000.0
P3.0.26 Phase 11 Running Time 0000.0s~6553.5s 0000.0
P3.0.27 Phase Directive 12 -100.0%~100.0% 000.0
P3.0.28 Phase 12 Running Time 0000.0s~6553.5s 0000.0
P3.0.29 Phase Directive 13 -100.0%~100.0% 000.0
P3.0.30 Phase 13 Running Time 0000.0s~6553.5s 0000.0
P3.0.31 Phase Directive 14 -100.0%~100.0% 000.0
P3.0.32 Phase 14 Running Time 0000.0s~6553.5s 0000.0
P3.0.33 Phase Directive 15 -100.0%~100.0% 000.0
P3.0.34 Phase 16 Running Time 0000.0s~6553.5s 0000.0
When the tens for each phase property of the multiplex directive is 0, the corresponding reference value of Simple
PLC Running and each phase of the multiplex directive are the percentage relative to the highest frequency.
The phase running time is the duration of PLC running at the frequency of each phase (including acceleration and
deceleration time and FWD and REV Dead Time).

Chapter 6. Description of Parameters
147
Function code Function name Setting scope Factory set
value
P3.0.35 Phase 0 Attribution Ones: Acceleration & Deceleration Time
Selection (Invalid Multiplex Directive)
0: Acceleration & Deceleration Time 1
1: Acceleration & Deceleration Time 2
2: Acceleration & Deceleration Time 3
3: Acceleration & Deceleration Time 4
Tens: Frequency Source Selection (Valid
Multiplex Directive)
0: Current Phase Directive
1: Keyboard Potentiometer
2: Keyboard Frequency Reference
3: VF1 Input
4: VF2 Input
5: PULS Reference (DI6)
6: PID Reference
7: Operation Result 1
8: Operation Result 2
9: Operation Result 3
A: Operation Result 4
Hundreds unit: running direction
0: Default Direction
1: Reversed Direction
H.00
P3.0.36 Phase 1 Attribution H.00
P3.0.37 Phase 2 Attribution H.00
P3.0.38 Phase 3 Attribution H.00
P3.0.39 Phase 4 Attribution H.00
P3.0.40 Phase 5 Attribution H.00
P3.0.41 Phase 6 Attribution H.00
P3.0.42 Phase 7 Attribution H.00
P3.0.43 Phase 8 Attribution H.00
P3.0.44 Phase 9 Attribution H.00
P3.0.45 Phase 10 Attribution H.00
P3.0.46 Phase 11 Attribution H.00
P3.0.47 Phase 12 Attribution H.00
P3.0.48 Phase 13 Attribution H.00
P3.0.49 Phase 14 Attribution H.00
P3.0.50 Phase 15 Attribution H.00
The ones of the phase property determine the acceleration and deceleration time of Simple PLC running at each
phase and the tens of phase property determine the frequency source of Simple PLC Running or Multiplex
Directive at each phase. The hundreds unit of phase attribute is determined by running direction of simple PLC at
each phase.
Function Code Function name Setting Scope Factory set value
P3.0.51 Simple PLC Running Time Unit
0: Second
1: Hour
2: Minute
0
Refer to the unit of phase running time when the frequency inverter is at Simple PLC Running.

Chapter 6. Description of Parameters
148
Function code Function Name Setting scope Factory set value
P3.1.00 Timing Function
Selection 0: Invalid 1: Valid 0
P3.1.01 Fixed Running Time
Selection
0: Digital Reference (P3.1.02)
1: External Terminal VF1 Reference
2: External Terminal VF2 Reference
(Analog input range corresponds to P3.1.02)
0
P3.1.02 Fixed Running Time 0000.0min~6500.0min 0000.0
The above function codes are used to complete the timing run function of the frequency inverter. Refer to 7.1.8 for
more details (Timing Function).
Function code Function name Setting scope Factory set value
P3.1.03 Wobbulating Reference
Mode
0: Relative to Reference frequency
1: Relative to Highest Frequency 0
P3.1.04 Wobbulating Range 000.0%~100.0% 000.0
P3.1.05 Kicking Range 00.0%~50.0% 00.0
P3.1.06 Wobbulating Cycle 0000.1s~3000.0s 0010.0
P3.1.07 Rise Time of Wobbulating
Triangular Wave 000.1%~100.0% 050.0
The above function codes are used for wobbulating function. Refer to 7.1.16 for more details (wobbulating
function).
Function code Function name Setting scope Factory set value
P3.1.08 Reference Length 00000m~65535m 01000
P3.1.09 Actual Length 00000m~65535m 00000
P3.1.10 Impulse Count per meter 0000.1~6553.5 0100.0
The above function codes are used for fixed-length control. Refer to 7.1.9 for more details (fixed-length function).
Function code Function name Setting scope Factory set value
P3.1.11 Reference Count Value 00001~65535 01000
P3.1.12 Designated Count Value 00001~65535 01000
The above function codes are used for counting control. Refer to 7.1.10 for more details (Counting Function).
Function code Function name Setting scope Factory set value
P3.1.13 Distance Set value 1 -3200.0~3200.0 0000.0
P3.1.14 Distance Set value 2 -3200.0~3200.0 0000.0
P3.1.15 Impulse Count per Distance 000.00~600.00 000.00
The above function codes are used for distance control. Refer to 7.1.11 for more details (Distance Control
Function).

Chapter 6. Description of Parameters
149
P3.2 Built-in Logic PLC Function
Function code Function Name Setting scope Factory set
value
P3.2.00
Intermediate
Delay Relay
Control
0: the input of this relay is determined by this Relay
Control Word A
1: the input of this relay is determined by this Relay
Control Word B
2: the input of this relay is determined by this Relay
Control Word C
Ones: Relay 1 (M1)
Tens: Relay 2 (M2)
Hundreds: Relay 3 (M3)
Thousands: Relay 4 (M4)
Ten Thousands: Relay 5 (M5)
00000
This function is used to set which control word determines the Intermediate Delay Relay.
When at 0, the Intermediate Delay Relay is determined by Control Word A, refer to the Description for Function
Code P3.2.01.
When at 1, the Intermediate Delay Relay is determined by Control Word B, refer to the Description for Function
Code P3.2.02~P3.2.06.
When at 2, the Intermediate Delay Relay is determined by thousands and hundreds of Control Word C, refer to the
Description for Function Code P3.2.07~P3.2.11.
Refer to the explanation for 7.1.12 (Simple Internal Relay Programmable Function).
Function code Function Name Setting scope Factory set value
P3.2.01 Intermediate Relay Control
Word A
0: Reference 0
1: Reference 1
Ones: M1
Tens: M2
Hundreds: M3
Thousands: M4
Ten Thousands: M5
00000
When which digit of Function Code P3.2.00 is 0, this function Code is used to compulsorily set corresponding
relay of this digit at 0 or 1. Refer to 7.1.12 for more details (Simple Internal Relay Programmable Function).

Chapter 6. Description of Parameters
150
Function
code Function Name Setting scope Factory set value
P3.2.02 Intermediate Delay Relay M1
Control Word B
Ones: Control Logic
0: Input 1
1: Input 1 and NOT
2: Input 1 and Input 2 AND
3: Input 1 and Input 2 OR
4: Input 1 and Input 2 XOR
5: the valid reference of Input 1 is valid the
valid Reference of Input 2 is invalid
6: Valid reference of Input 1 Rise Edge is
valid
Valid reference of Input 2 Rise Edge is invalid
7: Reverse valid signal of Input 1 Rising Edge
8:Input 1 Rise Edge is valid and output a
impulse signal with width of 200ms
9: Input 1 Rise Edge and Input 2 AND
Hundreds and Tens: Input 1 Selection
0~9:DI1~DI10
10~14: M1~M5
15~16: VF1,VF2
17~19: Standby
20~79: Output Function 00~59 Corresponding
to Multi-functional Output Terminal
Ten Thousands: Input 2 Selection
0~9: DI1~DI10
10~14: M1~M5
15~16: VF1,VF2
17~19: Standby
20~59: Output Function 00~39 Corresponding
to Multi-functional Output Terminal
00000
P3.2.03 Intermediate Delay Relay M2
Control Word B 00000
P3.2.04 Intermediate Delay Relay M3
Control Word B 00000
P3.2.05 Intermediate Delay Relay M4
Control Word B 00000
P3.2.06 Intermediate Delay Relay M5
Control Word B 00000
When which digit of Function Code P3.2.00 is 1, the relay of this digit is controlled by the above corresponding
function code. The ones of the above function codes are used to set the logic operation function of Input 1 and
Input 2. The hundreds and tens are used to set the option for Input 1. Ten Thousands and Thousands are used to set
the option for Input 2. The Intermediate Delay Relay M is the result from simple logic operation of Input 1 and
Input 2.
M=Logic Operation (Input 1 and Input 2)
Refer to 7.1.12 for more details (Simple Internal Relay Programmable Function)

Chapter 6. Description of Parameters
151
Function code Function Name Setting scope Factory set value
P3.2.07 Intermediate Delay Relay M1
Control Word C Tens Ones: 00~59
Output Function 00~59
Corresponding to Digital Input
Terminal
Thousands Hundreds: 00~59
Output Function 00~59
Corresponding to
Multi-functional Output Terminal
0000
P3.2.08 Intermediate Delay Relay M2
Control Word C 0000
P3.2.09 Intermediate Delay Relay M3
Control Word C 0000
P3.2.10 Intermediate Delay Relay M4
Control Word C 0000
P3.2.11 Intermediate Delay Relay M5
Control Word C 0000
The tens and ones of the above function codes are used to set the action destination of acquiring the Intermediate
Delay Relay after logic operation results, that is, action to be performed ( it can correspond to any one kind of
digital input functions), and the thousands and hundreds are used to control corresponding relay when which digit
of Function Code P3.2.00 is 2 (it can correspond to any one kind of multi-functional output terminal
functions).Refer to 7.1.12 for more details(Simple Internal Relay Programmable Function)
Function code Function Name Setting scope Factory set value
P3.2.12 MI Connection Delay Time 0.0s~3600.0s 0000.0
P3.2.13 M2 Connection Delay Time 0.0s~3600.0s 0000.0
P3.2.14 M3 Connection Delay Time 0.0s~3600.0s 0000.0
P3.2.15 M4 Connection Delay Time 0.0s~3600.0s 0000.0
P3.2.16 M5 Connection Delay Time 0.0s~3600.0s 0000.0
P3.2.17 M1 Disconnection Delay Time 0.0s~3600.0s 0000.0
P3.2.18 M2 Disconnection Delay Time 0.0s~3600.0s 0000.0
P3.2.19 M3 Disconnection Delay Time 0.0s~3600.0s 0000.0
P3.2.20 M4 Disconnection Delay Time 0.0s~3600.0s 0000.0
P3.2.21 M5 Disconnection Delay Time 0.0s~3600.0s 0000.0
The above function codes are used to set the delay time of connecting or disconnecting the Intermediate Delay
Relays.
Function code Function Name Setting scope Factory set value
P3.2.22 Valid State Option of Intermediate
Relay
0: Not Negation
1: Negation
Ones: M1
Tens: M2
Hundreds: M3
Thousands: M4
Ten Thousands: M5
00000
This function code is used to set valid state of the Intermediate Delay Relay.
If which digit is 0, it means that the relay of this digit will output the signal of acquired results.
If which digit is 1, it means that the relay of this digit will invert the signal of acquired results and output it.

Chapter 6. Description of Parameters
152
Function code Function Name Setting scope Factory set
value
P3.2.23 Internal Timer
Control Word
Ones: Timing Control 1 of Timer
Tens: Timing Control 2 of Timer
0: Timer Running
1: Controlled by Timer Input Terminal 1
2: Negation Control of Timer Input Terminal 1
3: Controlled by Timer Input Terminal 2
4: Negation Control of Timer Input Terminal 2
Hundreds: Timer 1 Reset Control
Thousands: Timer 2 Reset Control
0: Controlled by Timer Reset Terminal 1
1: Controlled by Timer Reset Terminal 2
Ten Thousands: Timing Unit
0: Second
1: Minute
2: Hour
00000
The ones and tens of this function code is used to set the timing control of Timer 1 and Timer 2 respectively.
0: Indicate that the timer is uncontrollable and continuously counting.
1: Conduct control by Timer Input Terminal 1, when this terminal state is valid, the timer starts counting, when the
terminal state is invalid, the timer stops counting and keeps current value.
2: Conduct inverse control by Timer Input Terminal 1, when this terminal state is invalid , the timer starts counting,
when the terminal state is valid, the timer stops counting and keeps current value.
3~4: Refer to Description for 1 and 2.
The hundreds and thousands of this function code are respectively used to set reset control of Timer 1 and Timer
2.
0: Control by Timer Reset Terminal 1, when this terminal state is valid, the timing value of the timer is recover
zero.
1: Control by Timer Reset Terminal 2, when this terminal state is valid, the timing value of the timer is recover
zero.
The ten thousands of this function is used to set the timing unit. 0 indicates second, 1 indicates minute and 2
indicates hour respectively.
Refer to the explanation of 7.1.13 (Internal Timer Function).
Function code Function Name Setting scope Factory set value
P3.2.24 Timing Time of Timer 1 0.0s~3600.0s 00000
P3.2.25 Timing Time of Timer 2 0.0s~3600.0s 00000
Function Code P3.2.24 and P3.2.25 are respectively used to set the time of Timer 1 and Timer 2.

Chapter 6. Description of Parameters
153
Function
code Function Name Setting scope
Factory set
value
P3.2.26 Operation Module Operation Module
0: No Operation
1: Add Operation
2: Subtraction Operation
3: Multiply Operation
4: Division Operation
5: Greater than Judgment
6: Equal to Judgment
7: Equal to or Greater than Judgment
8: Integration
9~F: Reservation
Ones: Operation 1
Tens: Operation 2
Hundreds: Operation 3
Thousands: Operation 4
H.0000
The ones, tens, hundreds and thousands of this function code respectively correspond to one-way operation. Each
operation can select different operation methods. Refer to the explanation of 7.1.14 for more details (Internal
Operation Function).
Function
code
Function
name Setting scope
Factory
set
value
P3.2.27
Operation
Setting
Coefficient
Property
0: Operate the Setting Coefficient by multiplication without decimal
1: Conduct setting at one decimal fraction to system by multiplication
algorithm
2: Conduct setting at two decimal fractions to system by multiplication
algorithm
3: Conduct setting at three decimal fractions to system by multiplication
algorithm
4: Conduct setting at four decimal fractions to system by multiplication
algorithm
5: Conduct setting at no decimal fraction to system by division algorithm
6: Conduct setting at one decimal fractions to system by division
algorithm
7: Conduct setting at two decimal fractions to system by division
algorithm
8: Conduct setting at three decimal fractions to system by division
algorithm
9: Conduct setting at four decimal fractions to system by division
algorithm
A: Conduct setting at one decimal fractions to system by division
algorithm
B: Conduct setting at two decimal fractions to system by division
algorithm
C: Conduct setting at three decimal fractions to system by division
algorithm
D: Conduct setting at four decimal fractions to system by division
algorithm
(The setting coefficient of A, B, C, D, E is the address number of function
code)
Ones: Operation 1
Tens: Operation 2
Hundreds: Operation 3
Thousands: Operation 4
0000

Chapter 6. Description of Parameters
154
The scope of the operation results is not certainly equal to the setting scope of the function codes of the frequency
inverter, so a setting coefficient is required to set the scope of the operation results to the setting scope of the
function codes of the frequency inverter. When the set value is 0~9, the operation setting coefficient is a number
which can be included in operation directly. When the set value is A~E, the operation setting coefficient is a
address number of function code and only the number in the address of function code can be included in operation.
This function code is used to set the functions of the setting coefficient. The ones, tens, hundreds and thousands of
this function code respectively correspond to one-way operation. Refer to the Description of 7.1.14 for more
details (Internal Operation Function).
Functio
n code Function Name Setting scope
Factory set
value
P3.2.28 Input A of
Operation 1
Thousands, Hundreds, Tens and Ones: express address of Input A of
Operation 1
Ten Thousands: express input operation model
0: Input is operation by unsigned number
1: Input is operation by signed number
00000
P3.2.29 Input B of
Operation 1
Thousands, Hundreds, Tens and Ones: express address of Input B of
Operation 1
Ten Thousands: express input operation model
0: Input is operation by unsigned number
1: Input is operation by signed number
00000
P3.2.30
Setting
Coefficient of
Operation 1
00000~65535 00001
The above function codes are used to set input address and setting coefficient of Operation 1. The thousands,
hundreds, tens and ones of Function Code P3.2.28 and Function Code P3.2.29 represent the address of Input A of
Operation 1 and Input B of Operation 1 respectively. The input address corresponds to all function codes, e.g.
Address 0005 corresponds to Function Code P0.0.05. If the input address has no corresponding function code, the
default value in the input address is 0. The ten thousands in P3.2.28 and P3.2.29 indicate the operation mode of
the digital value in input address. 0 means the operation by unsigned number and 1 means the operation by signed
number.
Function Code P3.2.30 is used to set the setting coefficient of Operation 1. When the ones unit of P3.2.27 is set to
0~9, the numbers in function code P3.2.30 can be included in operation directly; when the ones unit of P3.2.27 is
set to A ~ E, only the numbers which are the address numbers of function code P3.2.30 can be included in
operation, namely indirect addressing.

Chapter 6. Description of Parameters
155
Function
code Function name Setting scope
Factor
y set
value
P3.2.31 Input A of
Operation 2
Thousands, Hundreds, Tens and Ones: express address of Input A of
Operation 2
Ten Thousands: express input operation model
0: Input is operation by unsigned number
1: Input is operation by signed number
00000
P3.2.32 Input B of
Operation 2
Thousands, Hundreds, Tens and Ones: express address of Input B of
Operation 1
Ten Thousands: express input operation model
0: Input is operation by unsigned number
1: Input is operation by signed number
00000
P3.2.33
Setting
Coefficient of
Operation 2
00000~65535 00001
P3.2.34 Input A of
Operation 3
Thousands, Hundreds, Tens and Ones: express address of Input A of
Operation 3
Ten Thousands: express input operation model
0: Input is operation by unsigned number
1: Input is operation by signed number
00000
P3.2.35 Input B of
Operation 3
Thousands, Hundreds, Tens and Ones: express address of Input B of
Operation 3
Ten Thousands: express input operation model
0: Input is operation by unsigned number
1: Input is operation by signed number
00000
P3.2.36
Setting
Coefficient of
Operation 3
00000~65535 00001
P3.2.37 Input A of
Operation 4
Thousands, Hundreds, Tens and Ones: express address of Input A of
Operation 4
Ten Thousands: express input operation model
0: Input is operation by unsigned number
1: Input is operation by signed number
00000
P3.2.38 Input B of
Operation 4
Thousands, Hundreds, Tens and Ones: express address of Input B of
Operation 4
Ten Thousands: express input operation model
0: Input is operation by unsigned number
1: Input is operation by signed number
00000
P3.2.39
Setting
Coefficient of
Operation 4
00000~65535 00001
The above function codes are used to set the input address and setting coefficient of Operation 2, 3, 4. Refer to the
explanation of Function Code P3.2.28~P3.2.30 for more details.

Chapter 6. Description of Parameters
156
6.5 GROUP P4 PID CONTROL AND COMMUNICATION CONTROL
P4.0 PID Control Group
Function code Function Name Setting scope Factory set
value
P4.0.00 PID Reference Source
0: Digital Reference (P4.0.01)
1: Keyboard Potentiometer Reference
2: External Terminal VF1 Reference
3: External Terminal VF2 Reference
4: PULS Reference (DI6)
5: Communication Reference
6: Multiplex Directive Terminal Reference
7: Simple PLC Reference
8: Operation Result 1
9: Operation Result 2
10: Operation Result 3
11: Operation Result 4
00
0: Digital Reference (P4.0.01)
PID Reference Value is determined by the value by Function Code P4.0.01.
1: Keyboard Potentiometer Reference
PID Reference Value is determined by Keyboard Potentiometer.
1: External Terminal VF1 Reference
2: External Terminal VF2 Reference
PID Reference Value is set by the analog input terminal. E Series Frequency inverter provides 2-way analog input
terminal (VF1, VF2). VF1 and VF2 can input 0V~10V voltage or 0/4mA~20mA current. As for corresponding
relation curve between the input value of VF1 and VF2 and PID value, the users can freely choose from four kinds
of the relation curves through function code P2.1.02, in which Curve 1 and Curve 2 are linear relationship able to
be set through Function Code P2.0.13~P2.0.22, and Curve 3 and Curve 4 are broken line relationship with two
inflection points able to be set through Function Code P2.1.04~P2.1.19. The deviation between actual voltage and
sampling voltage of the analog input terminal can be adjusted through Function Code P8.1.05~P8.1.12.
4: PULS Reference (DI6)
PID Reference Value is set by high-speed impulse frequency of digital input terminal D16 (the terminal function is
not defined). The corresponding relationship between high-speed impulse frequency and PID value can be set
through Function Code P2.0.23~P2.0.26, that is, linear relationship.
5: Communication Reference
PID Reference Value is set by the upper computer through communication mode (refer to Chapter VIII for more
details).

Chapter 6. Description of Parameters
157
6: Multiplex Directive Terminal Reference
PID Reference Value is given by different composite state of Multiplex Directive Terminal. E Series Frequency
inverter is able to set four Multiplex Directive Terminals (Terminal Function 9~12, refer to the explanation for
Multiplex Directive Terminal Function of P2.0.00~P2.0.09 for more details)
7: Simple PLC Reference
PID Reference Value is given by Simple PLC Function, PID Reference of the frequency inverter can be switched
among 1~16 arbitrary frequency directives, the sources, hold time and acceleration & deceleration time of each
frequency directive can be set through Function Code 3.0.03~P3.0.50.
8: Operation Result 1
9: Operation Result 2
10: Operation Result 3
11: Operation Result 4
PID Reference Value is determined by the operation results after setting calculation of the internal operation
module. Refer to the Description of Function Code P3.2.26~P3.2.39 for more details of the operation module. The
operation results can be viewed through Function Code 9.0.46~P9.0.49.
Function code Function Name Setting scope Factory set
value
P4.0.01 PID Value Reference 000.0%~100.0% 050.0%
When at Function Code P4.0.00=0, PID Reference is determined by the value set by this function code.
Function code Function Name Setting scope Factory set
value
P4.0.02 PID Feedback Source
0: External Terminal VF1 Reference
1: External Terminal VF1 Reference
2: VF1-VF2
3: VF1+VF2
4: PULS Reference (DI6)
5: Communication Reference
6: MAX[VF1,VF2]
7: MIN[VF1,VF2]
8: Switch of Multiplex Directive Terminal on
the above conditions
9: Operation Result 1
10: Operation Result 2
11: Operation Result 3
12: Operation Result 4
00

Chapter 6. Description of Parameters
158
0: External Terminal VF1 Reference
1: External Terminal VF2 Reference
PID Feedback Value is set by the analog input terminal.
2: VF1-VF2
PID Feedback Value is set by the analog VF1-VF2 input.
3: VF1+VF2
PID Feedback Value is set by the analog F1+VF2 input.
4: PULS Reference
PID Reference Value is set by high-speed impulse frequency of digital input terminal DI6 (the terminal function is
not defined). The corresponding relationship between high-speed impulse frequency and corresponding PID value
can be set through Function Code P2.0.23~P2.0.26, that is, linear relationship.
5: Communication Reference
PID Reference Value is set by the upper computer through communication mode (refer to Chapter VIII for more
details).
6: MAX[VF1, VF2]
PID Feedback Source is set by maximum value between Analog VF1 and VF2 Input.
7: MIN[VF1, VF2]
PID Feedback Source is set by minimum value between Analog VF1 and VF2 Input.
8: Multiplex directive terminal switches among the above among the above conditions
PID Reference Value switches among the above 8 kinds of conditions by different composite state of Multiplex
Directive Terminal. E Series Frequency inverter is able to set four Multiplex Directive Terminals, when in use, it
is to take three terminal functions (Terminal Function 9~11), refer to the table below for more details:
Terminal 3 Terminal 2 Terminal 1 Feedback channel
0 0 0 VF1 (correspond to P4.0.02=0)
0 0 1 VF2 (correspond to P4.0.02=1)
0 1 0 VF1-VF2 (correspond to P4.0.02=2)
0 1 1 VF1+VF2 (correspond to P4.0.02=3)
1 0 0 PULS reference (correspond to P4.0.02=4)
1 0 1 Communication Reference (correspond to P4.0.02=5)
1 1 0 MAX[VF1,VF2] (correspond to P4.0.02=6)
1 1 1 MIN[VF1,VF2] (correspond to P4.0.02=7)

Chapter 6. Description of Parameters
159
9: Operation Result 1
10: Operation Result 2
11: Operation Result 3
12: Operation Result 4
PID Reference Value is determined by the operation results after setting calculation of the internal operation
module. Refer to the explanation of Function Code P3.2.26~P3.2.39 for more details of the operation module. The
operation results can be viewed through Function Code 9.0.46~P9.0.49.
Function code Function Name Setting scope Factory set value
P4.0.03 PID Action Direction 0: Direct Action 1: Reverse Action 0
This function code is used to set the change conditions of the frequency with the feedback quantity.
0: Direct Action
The output frequency of the frequency inverter is in proportion to its feedback quantity, when the feedback
quantity is less than the given quantity, the output frequency of the frequency inverter rises to make the feedback
quantity rise accordingly and final feedback quantity equal to the given quantity.
1: Reverse Action
The output frequency of the frequency inverter is in inverse proportion to its feedback quantity, when the feedback
quantity is greater than the given quantity, the output frequency of the frequency inverter rises to make the
feedback quantity decline accordingly and final feedback quantity equal to the given quantity.
Function code Function Name Setting scope Factory set value
P4.0.04 PID Reference Feedback Range 00000~65535 01000
The feedback range of PID Reference is dimensionless unit, which is the range of PID Reference showing P9.0.14
and PID Feedback showing P9.0.15. If P4.0.04 is set at 5000, when the feedback value of PID is 100.0%, PID
Feedback showing P9.0.15 is 5000. PID Reference and Feedback are set based on this parameter.
Function code Function Name Setting scope Factory set value
P4.0.05 Proportional Gains KP1 000.0~100.0 020.0
P4.0.06 Integral Time TI1 00.01s~10.00s 02.00
P4.0.07 Derivative Time TD1 00.000s~10.000s 00.000
The greater the value of proportional gain KPI is, the larger the adjustment volume is and the faster the response is,
but the too large value can generate the system oscillation, the smaller the value of KPI is, the more stable the
system is and the slower the response is.
The greater the value of Integral Time TI1 is, the slower the response is and the more stable the output is, the
worse the fluctuation control ability of the feedback quantity is, the smaller the value of TI1 is, the faster the
response is and the greater the output fluctuation is, the too small value can generate the oscillation.
The Derivative Time TD1 can set the limit for gain provided by the derivator to ensure that a pure derivative gain
can be obtained at low frequency and a constant derivative gain can be obtained at high frequency. The longer the
derivative time is, the greater the adjusting strength is.

Chapter 6. Description of Parameters
160
Function code Function Name Setting scope Factory set value
P4.0.08 PID Deviation Limit 000.0%~100.0% 000.0
This function code is used to determine whether PID is adjusted to prevent unstable output frequency when the
deviation between reference and feedback is small.
When the deviation between reference quantity and feedback quantity is less than the value set by P4.0.08, stop
the adjustment to PID and the frequency inverter keeps stable output.
When the deviation between reference quantity and feedback quantity is greater than the value set by
P4.0.08,adjust PID.
Function code Function Name Setting scope Factory set value
P4.0.09 PID Feedback Filtering time 00.00~60.00s 00.00
VF1 Input Filtering time is used to set the software filtering time of VF1, when the on-site analog is easily to be
disturbed, the filtering time shall be increased to make the tested analog trend to be stable, but the greater filtering
time makes the response speed of the analog test become slow, so how to balanceset needs is based on actual
situations of the applications.
Function code Function Name Setting scope Factory set value
P4.0.10 Proportional Gains KP2 000.0~100.0 020.0
P4.0.11 Integral Time TI2 00.01s~10.00s 02.00
P4.0.12 Derivative Time TD2 00.000s~10.000s 00.000
The above function codes have the same functions with Function Code P4.0.05~P4.0.07, refer to the Description
for P4.0.05~P4.0.07.
Function code Function Name Setting scope Factory set value
P4.0.13 PID Switch Conditions
0: No Switch
1: Switch through Terminals
2: Switch through Deviation
0
In some occasions of special applications, better PID Parameter is required to be adopted for control under
different conditions. This function code is used to set under what condition PID Parameter is required to be
switched.
0: No Switch
Adopt PID parameters of P4.0.05~P4.0.07 by default.
1: Switch through Terminal
The switch is made through digital input terminal (set this terminal function at 41: switch of PID parameter).
When the terminal signal is valid, adopt PID parameters of P4.0.05~P4.0.07. When the terminal signal is valid,
adopt PID parameters of this group of P4.0.10~P4.0.12.
2: Switch based on Deviation
The switch is made based on set value of Function Code P4.0.14 and P4.0.15, refer to the Description of Function
Code P4.0.14 and P4.0.15.

Chapter 6. Description of Parameters
161
Function code Function Name Setting scope Factory set value
P4.0.14 PID Switch Deviation 1 000.0%~P4.0.15 020.0
P4.0.15 PID Switch Deviation 2 P4.0.14~100.0% 080.0
When at P4.0.13=2, it is to determine whether the switch of PID parameters needs to be done through these two
function codes. The set value of these two function codes is the percentage relative to Function Code P4.0.04 (PID
Reference Feedback Range).
When the deviation between reference and feedback is less than PID Switch Deviation 1, adopt PID Parameter of
P4.0.05~P4.0.07. When the deviation between reference and feedback is greater than PID Switch Deviation 2,
adopt PID Parameter of P4.0.10~P4.0.12. When the deviation between reference and feedback is between PID
Switch Deviation 1 and PID Switch Deviation 2, PID Parameter is the linear interpolation value of these two
groups of PID Parameters, refer to the description of the figure below:
PID Parameter
PID Parameter 1
PID Parameter 2
PID Deviation
Function code Function Name Setting scope Factory set value
P4.0.16 PID Initial Value 000.0%~100.0% 000.0
P4.0.17 PID Initial Value Hold Time 000.00~650.00s 000.00
When the frequency inverter starts, first speed it up to initial value of PID at acceleration time and then keep
running at initial state of PID, after the duration of time reaches the time given by P4.0.17, conduct regulation to
PID. Initial Value of PID is the percentage relative to the highest frequency, refer to the description of the figure
below:
Output frequency
PID Initial Value
Time
Hold Time of PID Initial Value
Function code Function Name Setting scope Factory set
value
P4.0.18 PID Feedback Loss Test 000.0%: No Judgment on Feedback Loss
000.1%~100.0% 000.0
P4.0.19 PID Feedback Loss Test Time 00.0s~20.0s 00.0

Chapter 6. Description of Parameters
162
These two function codes are used to judge whether the feedback signal of PID is missing.
When at P4.0.18=0.0%, no judgment is made for whether the feedback signal of PID is missing.
When at P4.0.18>0.0%, actual PID Feedback Value is less than the value given by P4.0.18 and the duration of
time exceeds the time given by P4.0.19, the frequency inverter gives an alarm of Err20 Fault, it is deemed that the
feedback signal of PID is missing
Function code Function Name Setting scope Factory set value
P4.0.20 PID Stop Operation 0: No Operation
1: Operation 0
This function code is used to set whether PID operates when the frequency inverter is in shutdown state.
0: No Operation
When the frequency inverter runs, PID operates; when the frequency inverter shuts down, PID can’t operate
(choose this under general conditions)
1: Operation
No matter what the state of the frequency inverter is, running state or shutdown state, PID operates.
P4.1 Communication Group
Function code Function Name Setting scope Factory set value
P4.1.00 Baud Rate
0: 1200
1: 2400
2: 4800
3: 9600
4: 19200
5: 38400
6: 57600
3
P4.1.01 Data Format
0: No Verification (8-N-2)
1: Even Parity Verification (8-E-1)
2: Odd Parity Verification (8-O-1)
3: No Verification (8-N-1)
0
P4.1.02 Local Machine Address 000: Broadcast Address
001~249 001
P4.1.03 Response Delay 00~20ms 02
P4.1.04 Communication Timeout 00.0 (Invalid)
00.1s~60.0s 00.0
P4.1.05 Data Transmission Format 0: ASCII Mode (Reservation)
1: RTU Mode 1
When E Series inverter realizes the communication with other equipments through communication terminal
RS-485, it is required to set the above function codes. Refer to Communication RS-485 of E Series Frequency
inverter in Chapter VIII for more details.

Chapter 6. Description of Parameters
163
6.6 Group P5 Keyboard Display
P5.0 Basic Group
Function code Function Name Setting scope Factory set
value
P5.0.00 Keyboard JOG Key
Function Reference
0: Invalid
1: Forward Jogging
2: Reverse Jogging
3: Forward and Reverse Switch
1
This function code is used to set the function of Multi-functional Key JOG.
When at P5.0.00=0, the function of Key JOG is invalid
When at P5.0.00=1, the function of Key JOG is forward jogging function
When at P5.0.00=2, the function of Key JOG is reverse jogging function
When at P5.0.00=3, the function of Key JOG is forward and reverse switch function
Note: Forward Jogging Function and Reserve Jogging Function are valid under any running control mode,
but the forward and reverse switch function is only valid under keyboard control mode (i.e. P0.0.03=0)
Function code Function Name Setting scope Factory set value
P5.0.01 Keyboard STOP Key Stop Function
0: Only valid in keyboard
operation mode
1: Valid for any mode
1
This function code is used to set shutdown function of Key Stop.
When at P5.0.01=0, the shutdown function is only valid under Keyboard Control Mode (i.e. P0.0.03=0)
When at P5.0.01=1, the shutdown function is valid under any running control modes.
Note : The fault reset function is always valid.
Function code Function Name Setting scope Factory set value
P5.0.02 LED Running Display Parameter 1 H.0001~H.FFFF H.001F
P5.0.03 LED Running Display Parameter 2 H.0000~H.FFFF H.0000
P5.0.04 Automatic Time Switch of LED Running
Display Parameter
000.0: No Switch
000.1s~100.0s 000.0
Function Code P5.0.02 and P5.0.03 determine the contents displayed by LED when the frequency inverter is at
running state.
Function Code P5.0.04 determines the length of time that displays Parameter 1 and Parameter 2. When setting this
to 0, only shown the display parameter given by P5.0.02, or it is to switch between display parameter set by
P5.0.02 and display parameter set by P5.0.03 based on the Reference Time.

Chapter 6. Description of Parameters
164
The format for specific display contents is as below:
Running Display Parameter 1 of LED
Running Frequency (Hz)
Set Frequency (Hz)
Output Current (A)
Output Voltage (V)
Bus line voltage (V)
Output Torque (%)
Output Power (kW)
Output Terminal State
Input Terminal State
VF1 Voltage (V)
VF2 Voltage (V)
Customized Display Value
Actual counting value (m)
PID Set
PID Feedback
In operation, if it is required to display each parameter above, set corresponding position to 1, after
transfer binary system to hexadecimal system, set at P5.0.02.
Running Display Parameter 2 of LED
PULSE Impulse Frequency (kHz)
Feedback Speed (Hz)
PLC Stage (A)
Voltage before VF1 Correction (V)
Voltage before VF2Correction (V)
Line Speed (m/min)
Current Power-on Time (min)
Current Running Time (min)
Residual Running Time (min)
Frequency Source A (Hz)
Frequency Source B (Hz)
Communication Set value (%)
PULSE Impulse Frequency (Hz)
Encoder Feedback Speed (Hz)
Actual Speed Value
User Standby Monitoring Value 1
In operation, if it is required to display each parameter above, set corresponding position to 1, after
transfer binary system to hexadecimal system, set at P5.0.03.
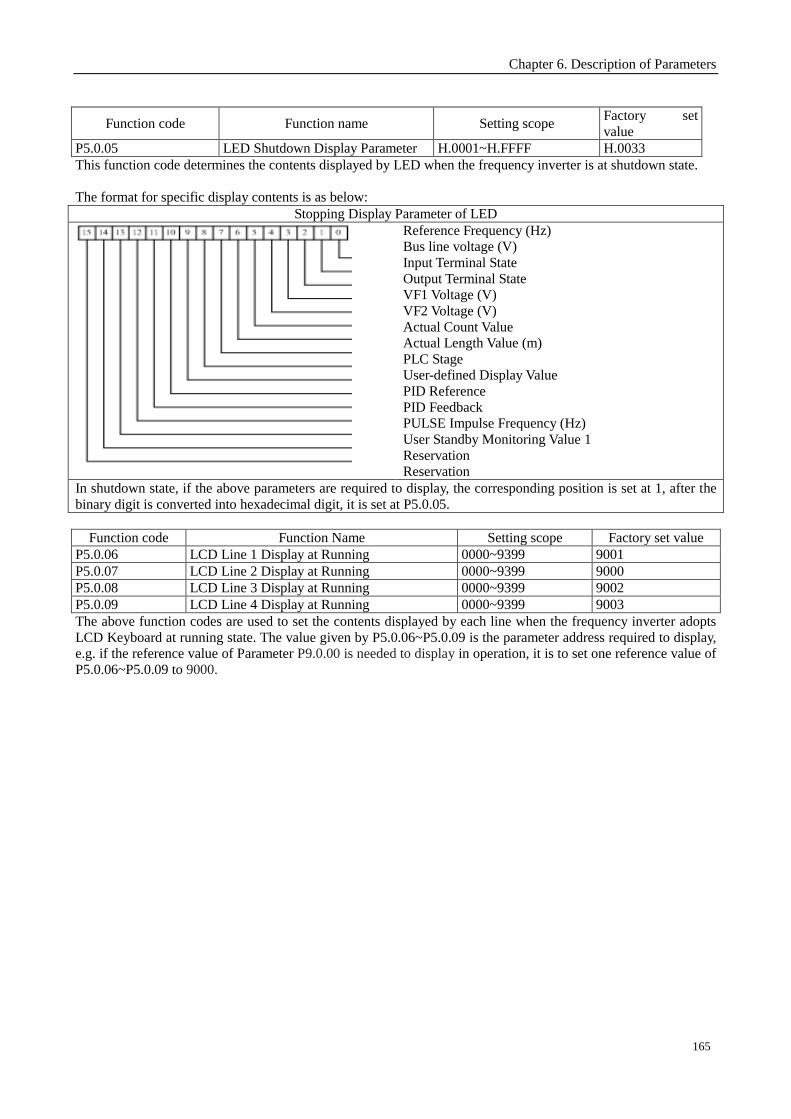
Chapter 6. Description of Parameters
165
Function code Function name Setting scope Factory set
value
P5.0.05 LED Shutdown Display Parameter H.0001~H.FFFF H.0033
This function code determines the contents displayed by LED when the frequency inverter is at shutdown state.
The format for specific display contents is as below:
Stopping Display Parameter of LED
Reference Frequency (Hz)
Bus line voltage (V)
Input Terminal State
Output Terminal State
VF1 Voltage (V)
VF2 Voltage (V)
Actual Count Value
Actual Length Value (m)
PLC Stage
User-defined Display Value
PID Reference
PID Feedback
PULSE Impulse Frequency (Hz)
User Standby Monitoring Value 1
Reservation
Reservation
In shutdown state, if the above parameters are required to display, the corresponding position is set at 1, after the
binary digit is converted into hexadecimal digit, it is set at P5.0.05.
Function code Function Name Setting scope Factory set value
P5.0.06 LCD Line 1 Display at Running 0000~9399 9001
P5.0.07 LCD Line 2 Display at Running 0000~9399 9000
P5.0.08 LCD Line 3 Display at Running 0000~9399 9002
P5.0.09 LCD Line 4 Display at Running 0000~9399 9003
The above function codes are used to set the contents displayed by each line when the frequency inverter adopts
LCD Keyboard at running state. The value given by P5.0.06~P5.0.09 is the parameter address required to display,
e.g. if the reference value of Parameter P9.0.00 is needed to display in operation, it is to set one reference value of
P5.0.06~P5.0.09 to 9000.

Chapter 6. Description of Parameters
166
Function code Function Name Setting scope Factory set value
P5.0.10 LCD Line 1 Display at stop 0000~9399 9001
P5.0.11 LCD Line 2 Display at stop 0000~9399 9000
P5.0.12 LCD Line 3 Display at stop 0000~9399 9004
P5.0.13 LCD Line 4 Display at stop 0000~9399 0000
The above function codes are used to set the contents displayed by each line when the frequency inverter adopts
LCD Keyboard at shutdown state. The value given by P5.0.10~P5.0.13 is the parameter address required to
display, e.g. if the reference value of Parameter P9.0.01 is needed to display when shut down , it is to set one
reference value of P5.0.10~P5.0.13 to 9001.
Function code Function name Setting scope Factory set value
P5.0.14 LCD Chinese/English Display Switch 0: Chinese 1: English 0
When the above function codes are used to set either Chinese Display or English Display when the frequency
inverter adopts LCD Keyboard.
Function
code Function name Setting scope
Factory set
value
P5.0.15 Customized Display of
Coefficient 0.0001~6.5000 1.0000
P5.0.16
User-defined Display control
word.
Ones unit: user-defined decimal place displaying
0: 0-digit Decimal Point
1: 1-digit Decimal Point
2: 2-digit Decimal Point
3: 3-digit Decimal Point Tens unit: source of user-defined display value 0: determined by hundreds place of user-defined Display control word. 1: determined by set value of P5.0.15, and 0.0000 ~ 0.0099 corresponding to P9.0.00 ~ P9.0.99 of P9 Group. Hundreds unit: selection of user-defined displaying
coefficient 0: user-defined displaying coefficient is P5.0.15. 1: user-defined displaying coefficient is calculation result 1 2: user-defined displaying coefficient is calculation result 2 3: user-defined displaying coefficient is calculation result 3 4: user-defined displaying coefficient is calculation
result 4
001
In some conditions, the users want to let the frequency inverter not display the frequency, but some values that
have linear relationship with frequency. The users can adjust the corresponding relation between display value and
frequency of the frequency inverter through modification to Function Code P5.0.15, P5.0.16. This display value is
called user-defined display value. Additionally, if want to display any parameter of Group P9, it can be modified
through P5.0.15 & P5.0.16.

Chapter 6. Description of Parameters
167
The ones unit of P5.0.16 is used to set up the decimal places of user-defined display value.
The tens unit of P5.0.16 is used to set up the source of user-defined display value. If set up to 0, display value will
be a number in relation with frequency; if set up to 1, display value will be a number in relation with P9 Group,
see details as follows:
Tens unit of P5.0.16 Display control word Description
0 Hundreds unit of
P5.0.16
0 Display value = Frequency ×P5.0.15
1 Display value = Frequency × Calculation Result 1 ÷
10000
2 Display value = Frequency × Calculation Result 2 ÷
10000
3 Display value = Frequency × Calculation Result 3 ÷
10000
4 Display value = Frequency × Calculation Result 4 ÷
10000
1 P5.0.15 The set value 0.0000~0.0099 of P5.0.15 coresponds to
P9.0.00~P9.0.99 of P9 Group.
Example: if P5.0.15=0.0002, display value is the value of
P9.0.02.
Note: places of decimal of user-defined decimal are not considered for the above operation
Example: The user-defined displaying coefficient of P5.0.15 is 0.5000, the user-defined display control word of
P5.0.16 is 003, and the frequency is 20.00Hz, the user-defined display value shall be 2000*0.5000 = 1.000
(display three decimal places).
If the user-defined display control word of P5.0.16 is 003, and the frequency is 20.00Hz, the user-defined display
value shall be 2000*0.5000 = 1.000 (display three decimal places).
If user-defined control word P5.0.16 is 013, P5.0.15 is 0.0002 and P9.0.02=1000, the user-defined display value is
1.000 (display three decimal places).
Function code Function name Setting scope Factory set value
P5.0.17
Selection Display of
Function Parameter
Group
Ones:
0: Only display basic group
1: Display the menus at all levels
Tens
0: Don’t display Group P7
1: Display Group P7
2: Reservation
Hundreds:
0: Don’t display correction parameter group
1: Display correction parameter group
Thousands:
0: Don’t display code group
1: Display code group
Ten Thousands: Reservation
00011
When the function code is at P0.0.01=0, its function determine what the parameters of the function code is
displayed in detail.

Chapter 6. Description of Parameters
168
Function code Function name Setting scope Factory set value
P5.0.18 Function Password
Protection
0: Modifiable
1: Non-modifiable
2: Allowable Modification to GP Type
0
This function code is used to set whether the parameters of the frequency inverter can be modified.
When at P5.0.18=0, the parameters of all function codes can be modified;
When at P5.0.18=1, the parameters of all function codes can only be viewed but not be modified, such a way can
effectively prevent the parameters of the function from incorrect modification.
When at P5.0.18=2, Function Code P0.0.00 is allowed to modify.
Function code Function name Setting scope Factory set value
P5.0.19 Parameter
Initialization
00: No Operation
01: Clearance of Record Information
09 Recover Factory set value, excluding motor
parameter, correction group, password group
19: Recover Factory set value, excluding motor
parameter, password group
30: Users Current Parameter Backup
60: User Backup Parameters Recovery
100~999: User factory set values recovery
000
0: No Operation
1: Clearance of Record Information
Clear fault record information, accumulative running time, accumulative power-on time and accumulative power
consumption of the frequency inverter
9: Recover factory set value, excluding motor parameter, correction group, password group
The frequency inverter resets to factory set value, excluding motor parameter, correction group, password group.
19: Recover Factory set value, excluding motor parameter, password group
The frequency inverter resets to factory set value, excluding motor parameter, password group.
30: Users Current Parameter Backup
Back up all current function parameters of the users to the memory, after the parameters adjustment in disorder,
the user can easily reset the disordered parameters to backup function parameters.

Chapter 6. Description of Parameters
169
60: User Backup Parameters Recovery
Recover the backup user parameters last time, i.e. recover the parameters that are backed up last time when
P5.0.19 is set at 30.
100~999: User factory set values recovery
This function is used to reset special tailor-made factory set value of the users. Generally, the users cannot conduct
operation to this reset.
Function code Function name Setting scope Factory set value
P5.0.20 User Password 00000~65535 00000
P5.0.20 is the user password reference, that is, any non-zero five digits, the password protection function becomes
effective. When enter into the menu next time, if display “-----”, input correct password and then view and modify
the function parameters. P5.0.20 parameter has modification enable control. Only when P5.0.18 parameter is
equal to 2, P5.0.20 can be changed.
If you want to cancel the password protection, only use the password to enter into system and then change P5.0.20
into 00000, the password protection function becomes invalid.
P5.1 Expansion Group
Function code Function name Description of parameter Display scope
P5.1.00 Accumulative Running Time Display accumulated running time of
frequency inverter 0h~65000h
P5.1.01 Accumulative Power On Time Display accumulated electrifying time of
frequency inverter since exworks 0h~65000h
P5.1.02 Accumulative Power
Consumption
Display accumulated power consumption of
frequency inverter up to now 0~65000
P5.1.03 Module Temperature Display current temperature of the module 000~100
P5.1.04 Hardware Version No. Hardware version number 180.00
P5.1.05 Software Version No. Software version number 001.00
P5.1.06 Program Nonstandard Label Version number of dedicated program 0000~9999

Chapter 6. Description of Parameters
170
6.7 Fault Display and Protection Control Group P6
P6.0 Fault Display Group
Function code Function name Setting scope Factory set value
P6.0.00 Fault Record 1 (Last Time) 0~40 00
P6.0.01 Fault Record 2 0~40 00
P6.0.02 Fault Record 3 0~40 00
The above function codes record the fault types in the last three times, 0 indicates no fault. Concerning possible
cause of each fault code and solutions, refer to related explanation of Chapter IX.
Function code Function name Description for Parameters
P6.0.03 Fault Frequency 1 Frequency of the fault in the last time
P6.0.04 Fault Current1 Current of the fault in the last time
P6.0.05 Bus line voltage 1
when at Fault Bus line voltage of the fault in the last time
P6.0.06 Input Terminal State 1
when at fault
Input terminal state of the fault in the last time with the sequence as
below DI1DI2DI3DI4DI5DI6DI7DI8DI9DI10VF1VF2
When the input terminal is ON and its corresponding binary digit is 1.
OFF is 0, it is to convert binary digit into denary digit.
P6.0.07 Output Terminal State
1 when at fault
Input terminal state of the fault in the last time with the sequence as
below
YOT1T2YO1YO2M1M2M3M4M5
When the input terminal is ON and its corresponding binary digit is 1.
OFF is 0, it is to convert binary digit into denary digit.
P6.0.08 Frequency inverter
State 1 when at fault Use of manufacturer
P6.0.09 Power-on Time 1
when at fault Current power-on time of the fault in the last time
P6.0.10 Running Time 1 when
at fault Current running time of the fault in the last time

Chapter 6. Description of Parameters
171
Function code Function name Description of parameter
P6.0.11 Fault Frequency 2
Same as P6.0.03~P6.0.10
P6.0.12 Fault Current2
P6.0.13 Bus line voltage 2 when at Fault
P6.0.14 Input Terminal State 2 when at fault
P6.0.15 Output Terminal State 2 when at fault
P6.0.16 Frequency inverter State 2 when at fault
P6.0.17 Power-on Time 2 when at fault
P6.0.18 Running Time 2 when at fault
P6.0.19 Fault Frequency 3
Same as P6.0.03~P6.0.10
P6.0.20 Fault Current3
P6.0.21 Bus line voltage 3 when at Fault
P6.0.22 Input Terminal State 3 when at fault
P6.0.23 Output Terminal State 3 when at fault
P6.0.24 Frequency inverter State 3 when at fault
P6.0.25 Power-on Time 3 when at fault
P6.0.26 Running Time 3 when at fault
P6.1 Protection Control Group
Function code Function Name Setting scope Factory set value
P6.1.00 Input Default Phase Protection 0: Prohibited 1: Allowed 1
This function code is used to set whether the frequency inverter protects the input default phase.
When at P6.1.00=0, the frequency inverter can’t provide protection to input default phase.
When at P6.1.00=1, if the input default phase or three-phase input imbalance is detected out, the frequency
inverter gives an alarm of Fault Err11.The allowable degree of three-phase input imbalance is determined by
Function Code P6.1.26,the higher the value is, the duller the response is and the higher the allowed degree of
three-phase imbalance is. Attention shall be paid that if the frequency inverter cannot operate or the load of the
motor is lighter, even the set value of P6.1.26 is set smaller, it is possible that no alarm is given.
Function code Function Name Setting scope Factory set value
P6.1.01 Output Default Phase Protection 0: Prohibited 1: Allowed 1

Chapter 6. Description of Parameters
172
This function code is used to set whether the frequency inverter protects the output default phase.
When at P6.1.01=0, the frequency inverter can’t provide protection to output default phase.
When at P6.1.01=1, if the output default phase or three-phase input imbalance is detected out, the frequency
inverter gives an alarm of Fault Err12.
Function code Function Name Setting scope Factory set value
P6.1.02 Overvoltage Stall Protection
Sensitivity
000: without protection to overvoltage
and stalling speed
001~100
000
P6.1.03 Overvoltage Stall Protection
Sensitivity 120%~150% 130
In the deceleration process of the frequency inverter, after the DC Bus line voltage exceeds over-voltage stall
protection voltage point, the frequency inverter stops reducing the speed and keeps current running frequency
until the Bus line voltage is reduced to below over-voltage stall protection voltage point and then the frequency
inverter continues to reduce the speed. The set value of Function Code P6.1.03 is the percentage relative to normal
Bus line voltage.
Over-voltage stall protection sensitivity is used to adjust the ability of the frequency inverter on suppressing the
overvoltage. The higher this value is, the stronger the ability of suppressing the overvoltage is.
Function code Function Name Setting scope Factory set value
P6.1.04 Overvoltage Stall Protection
Voltage Point
000: without protection to
overcurrent and stalling speed
001~100
020
P6.1.05 Overcurrent Stall Protection
Sensitivity 100%~200% 150
In the acceleration and deceleration process of the frequency inverter, after the output current exceeds the
overcurrent stall protection current, the frequency inverter stops the acceleration and deceleration process and
keeps current running frequency, and then continues to accelerate and decelerate after the decline of the output
current. The set value of the function code P6.1.05 is the percentage relative to rated current of the motor.
The Overcurrent Stall Protection Sensitivity is used to adjust the capability of the frequency inverter on restraining
the overcurrent in its acceleration and deceleration process. The greater this value is, the stronger the capability of
restraining the overcurrent is, under the precondition that no overcurrent fault occurs, the smaller the set value is,
and the better it is.
Function code Function Name Setting scope Factory set
value
P6.1.06 Fault Auto Reset Number 00: no auto-reset under failure
01~20 00
P6.1.07 Waiting Interval Time of Fault Auto
Reset 000.1s~100.0s 001.0
When at P6.1.06=0, the frequency inverter keeps fault state for there is no automatic fault reset function.
When at P6.1.06>0, the frequency inverter selects the times of automatic fault reset. In case of exceeding the
selected times, the frequency inverter keeps fault state.
Function P6.1.07 refers to the waiting time from fault alarm of the frequency inverter to automatic fault reset.

Chapter 6. Description of Parameters
173
Function code Function Name Setting scope Factory set value
P6.1.08 Fault Protective
Action Selection 1
0: Free Stop
1: Stop by its Mode
2: Continuous Running
Ones: Motor Overload
Tens: Input Default Phase
Hundreds: Output Default Phase
Thousands: External Default
Ten Thousands: Communication Abnormality
00000
P6.1.09 Fault Protective
Action Selection 2
0: Free Stop
1: Stop by its Mode
2: Continuous Running
Ones: Motor Overload
Tens: Feedback Loss
Hundreds: User Customerized Fault 1
Thousands: User Customerized Fault 2
Ten Thousands: Power-on Time Reached
00000
P6.1.10 Fault Protective
Action Selection 3
Ones: Running Time Reached
0: Free Stop
1: Stop by its Mode
2: Continuous Running
Tens: Encoder Abnormality
0: Free Stop
Hundreds: Parameter Read-Write Abnormity
0: Free Stop
1: Stop by its Mode
Thousands: Motor Overhear
0: Free Stop
1: Stop by its Mode
2: Continuous Running
Ten Thousands: Fault of 24V Power Supply
0: Free Stop
1: Stop by its Mode
00000
P6.1.11 Fault Protective
Action Selection 4
0: Free Stop
1: Stop by its Mode
2: Continuous Running
Ones: Larger Speed Deviation
Tens: Motor Overspeed
Hundreds: Initial Position Error
Thousands: Reservation
Ten Thousands: Reservation
00000

Chapter 6. Description of Parameters
174
The function codes P6.1.08~P6.1.11 are used to set the actions of the frequency inverter after fault alarm. Each
digit among the options for fault protection action corresponds to a kind of fault protection, if it is 0, it indicates
that the frequency inverter stops freely; if it is 1, it indicates that the frequency inverter shuts down in stop mode
after fault alarm; if it is 2, it indicates that the frequency inverter continues to run at frequency selected by
Function Code P6.1.12 after fault alarm.
Function code Function Name Setting scope Factory set
value
P6.1.12
Continuous Running
Frequency Selection
when at Fault
0: Running at Current Frequency
1: Running at Reference frequency
2: Running at Upper Frequency
3: Running at Lower Frequency
4: Running at Back Frequency for Abnormality
0
When the frequency inverter breaks down in the running process, if the handling mode of this fault is continuous
running, the frequency inverter displays A** (A** is its fault code), it continues to run at frequency selected by
P6.1.12.If the handling mode of this fault is shut-down by reducing the speed, the frequency inverter displays A**
in the process of deceleration, the stop state display Err**.
0: Run at Current Frequency
When the frequency inverter gives an alarm of fault, run at current frequency
1: Run at Reference Frequency
When the frequency inverter gives an alarm of fault, run at reference frequency
2: Run at Upper Frequency
When the frequency inverter gives an alarm of fault, run at upper frequency
3: Run at Lower Frequency
When the frequency inverter gives an alarm of fault, run at lower frequency
4: Run at Standby Frequency for Abnormality
When the frequency inverter gives an alarm of fault, run at frequency set by Function Code P6.1.13.
Function code Function Name Setting scope Factory set value
P6.1.13 Backup Frequency for Abnormality 000.0%~100.0% 100.0
When at Function Code P6.1.12=4, the set value of this function code determines the running frequency when the
frequency inverter gives an alarm of fault, which is the percentage relative to highest frequency.

Chapter 6. Description of Parameters
175
Function code Function Name Setting scope Factory set value
P6.1.14 Action Selection for Momentary
Interruption
0: Invalid
1: Deceleration
2: Stop by Deceleration
0
P6.1.15 Judgment Time of Momentary
Interruption Voltage Recovery 000.00s~100.00s 000.50
P6.1.16 Voltage Judgment for Momentary
Interruption Action
60.0%~100.0% (Standard Bus line
voltage) 080.0
P6.1.17 Voltage Judgment for Suspension of
Momentary Action
80.0%~100.0% (Standard Bus line
voltage) 090.0
When at P6.1.14=0, the frequency inverter continues to run at current frequency in interrupt power-supply or
sudden reduction of voltage.
When at P6.1.14=1, in case of interrupt power-supply or sudden reduction of voltage, after the Bus line voltage
reduces to corresponding voltage of the set value of P6.1.16 below, the frequency inverter slows down and runs;
after the Bus line voltage resets to corresponding voltage of the set value of P6.1.16 above and the duration of
time exceeds the time set by P6.1.15, the frequency inverter runs after it is normally accelerated to reference
frequency. In the process of deceleration, if the Bus line voltage resets to corresponding voltage of the set value of
P6.1.17, the frequency inverter stops slowing down and keeps running at current frequency.
When at P6.1.14=2, in case of interrupt power-supply or sudden reduction of voltage, after the Bus line voltage
reduces to below corresponding voltage of the set value of P6.1.16, the frequency inverter slows down and runs;
after it slows down to 0Hz and the Bus line voltage hasn’t recovered, the frequency inverter stops.

Chapter 6. Description of Parameters
176
Bus line voltage
Running Frequency
Running Frequency
Function code Function Name Setting scope Factory set value
P6.1.18 Off-load Protection Selection 0: Valid 1: Invalid 0
P6.1.19 Off-load Test Level
00.0%~100.0% (Motor Rated Rotating
Speed)
010.0
P6.1.20 Off-load Test Time 0.0s~60.0s 01.0
The Function Code P6.1.18 is sued to set whether the off-load protection function is valid, 0 and 1 respectively
indicates invalid and valid.
If the off-load protection function is valid and the fault handling mode is continuous run or stop by speed
reduction, when the output current of the frequency inverter is less than corresponding current value of off-load
test level of P6.1.19 and the duration is over off-load test level of P6.1.20, the output frequency of the frequency
inverter automatically reduces to 7% of rated frequency, the frequency inverter gives an alarm of A19 in running
or decelerating state; in shutdown state, the frequency inverter gives an alarm of Err19, if the load is recovered,
the frequency inverter is automatically recovered to run at reference frequency.
Function code Function Name Setting scope Factory set value
P6.1.21 Overspeed Test 0.0%~50.0% (maximum frequency) 20.0
P6.1.22 Overspeed Test Time 0.0s~60.0s 01.0
This function is only valid when the frequency inverter runs with speed sensor vector control. When the frequency
inverter detects out actual speed of the motor over reference frequency and the exceeding value is greater than
corresponding speed of speed test value P6.1.21 and the duration is over speed test value P6.1.22, the frequency
inverter gives an alarm of Fault Err29 and the handling to fault is conducted based on fault protection action
mode.
Voltage Judgment for Suspension
of Momentary Action
Voltage Judgment for
Suspension of
Momentary Action
Voltage Judgment for
Suspension of
Momentary Action
Deceleration
Process
Deceleration
Process
Shutdown by Deceleration
Acceleration Process
Deceleration
Time
Time
Time
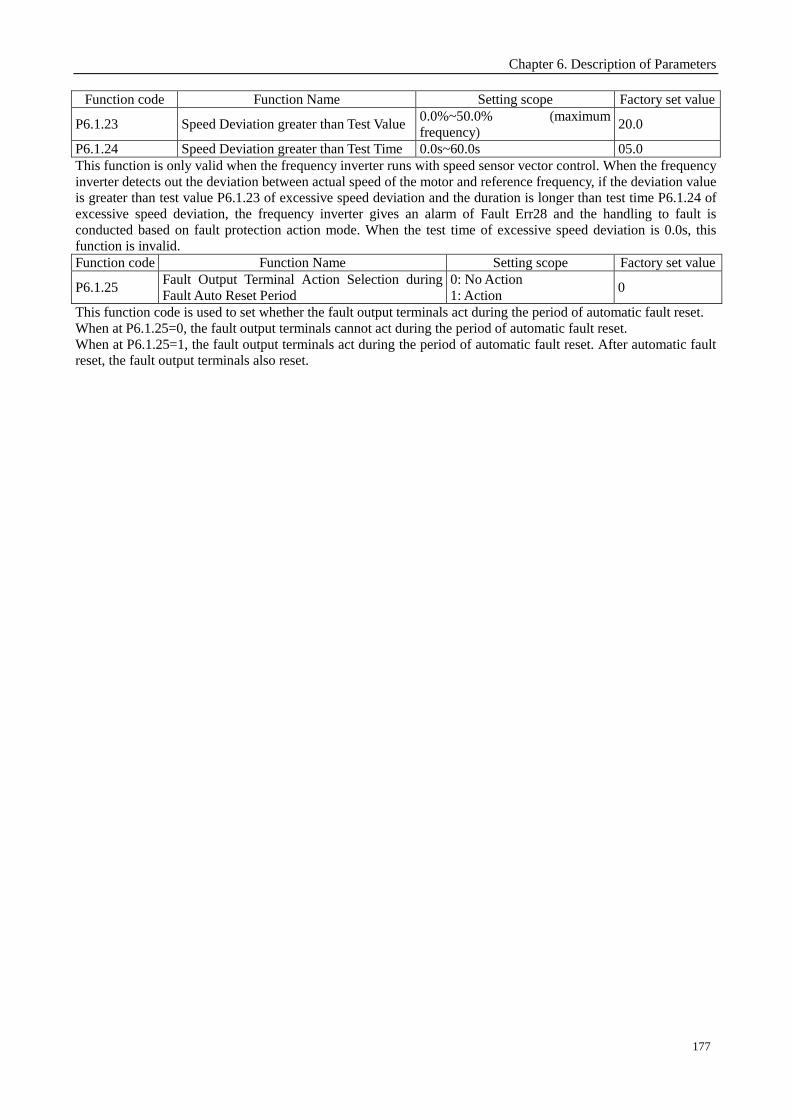
Chapter 6. Description of Parameters
177
Function code Function Name Setting scope Factory set value
P6.1.23 Speed Deviation greater than Test Value 0.0%~50.0% (maximum
frequency) 20.0
P6.1.24 Speed Deviation greater than Test Time 0.0s~60.0s 05.0
This function is only valid when the frequency inverter runs with speed sensor vector control. When the frequency
inverter detects out the deviation between actual speed of the motor and reference frequency, if the deviation value
is greater than test value P6.1.23 of excessive speed deviation and the duration is longer than test time P6.1.24 of
excessive speed deviation, the frequency inverter gives an alarm of Fault Err28 and the handling to fault is
conducted based on fault protection action mode. When the test time of excessive speed deviation is 0.0s, this
function is invalid.
Function code Function Name Setting scope Factory set value
P6.1.25 Fault Output Terminal Action Selection during
Fault Auto Reset Period
0: No Action
1: Action 0
This function code is used to set whether the fault output terminals act during the period of automatic fault reset.
When at P6.1.25=0, the fault output terminals cannot act during the period of automatic fault reset.
When at P6.1.25=1, the fault output terminals act during the period of automatic fault reset. After automatic fault
reset, the fault output terminals also reset.

Chapter 6. Description of Parameters
178
6.8 Group P7 User Function Customization
P7.0 Basic Group
Function code Function Name Setting scope Factory set value
P7.0.00 User Function 0 U0.0.01 U0.0.01
P7.0.01 User Function 1 U0.0.00~UX.X.XX (exclude P7, P8) U0.0.02
P7.0.02 User Function 2 U0.0.00~UX.X.XX (exclude P7, P8) U0.0.03
P7.0.03 User Function 3 U0.0.00~UX.X.XX (exclude P7, P8) U0.0.07
P7.0.04 User Function 4 U0.0.00~UX.X.XX (exclude P7, P8) U0.0.08
P7.0.05 User Function 5 U0.0.00~UX.X.XX (exclude P7, P8) U0.0.17
P7.0.06 User Function 6 U0.0.00~UX.X.XX (exclude P7, P8) U0.0.18
P7.0.07 User Function 7 U0.0.00~UX.X.XX (exclude P7, P8) U0.0.00
P7.0.08 User Function 8 U0.0.00~UX.X.XX (exclude P7, P8) U0.0.00
P7.0.09 User Function 9 U0.0.00~UX.X.XX (exclude P7, P8) U0.0.00
P7.0.10 User Function 10 U0.0.00~UX.X.XX (exclude P7, P8) U0.0.00
P7.0.11 User Function 11 U0.0.00~UX.X.XX (exclude P7, P8) U0.0.00
P7.0.12 User Function 12 U0.0.00~UX.X.XX (exclude P7, P8) U0.0.00
P7.0.13 User Function 13 U0.0.00~UX.X.XX (exclude P7, P8) U0.0.00
P7.0.14 User Function 14 U0.0.00~UX.X.XX (exclude P7, P8) U0.0.00
P7.0.15 User Function 15 U0.0.00~UX.X.XX (exclude P7, P8) U0.0.00
P7.0.16 User Function 16 U0.0.00~UX.X.XX (exclude P7, P8) U0.0.00
P7.0.17 User Function 17 U0.0.00~UX.X.XX (exclude P7, P8) U0.0.00
P7.0.18 User Function 18 U0.0.00~UX.X.XX (exclude P7, P8) U0.0.00
P7.0.19 User Function 19 U0.0.00~UX.X.XX (exclude P7, P8) U0.0.00
P7.0.20 User Function 20 U0.0.00~UX.X.XX (exclude P7, P8) U0.0.00
P7.0.21 User Function 21 U0.0.00~UX.X.XX (exclude P7, P8) U0.0.00
P7.0.22 User Function 22 U0.0.00~UX.X.XX (exclude P7, P8) U0.0.00
P7.0.23 User Function 23 U0.0.00~UX.X.XX (exclude P7, P8) U0.0.00
P7.0.24 User Function 24 U0.0.00~UX.X.XX (exclude P7, P8) U0.0.00
P7.0.25 User Function 25 U0.0.00~UX.X.XX (exclude P7, P8) U0.0.00
P7.0.26 User Function 26 U0.0.00~UX.X.XX (exclude P7, P8) U0.0.00
P7.0.27 User Function 27 U0.0.00~UX.X.XX (exclude P7, P8) U0.0.00
P7.0.28 User Function 28 U0.0.00~UX.X.XX (exclude P7, P8) U0.0.00
P7.0.29 User Function 29 U0.0.00~UX.X.XX (exclude P7, P8) U0.0.00
The function codes of this group are User Customized Parameter Group. The users can summarize the parameters
of the function codes (except Group P7 and P8) selected from function codes for display to Group P7.0 as User
Customized Parameter for easy operation as view and medication, and the User Customized Parameter Group is
not more than 30.

Chapter 6. Description of Parameters
179
6.9 Group P8 Manufacturer Function
P8.0 Manufacturer Function
Function code Function Name Setting scope Factory set value
P8.0.00 Manufacturer Code 00000~65535 00000
This function code is the manufacturer password entry and displays dedicated function code of the manufacturer,
the users don’t operate it.
P8.1 Correction Group
Function code Function Name Setting scope Factory set value
P8.1.00 Voltage Input of Potentiometer Correction Point 1 00.00V~P8.1.02 00.00
P8.1.01 Corresponding reference of Potentiometer Correction
Point 1 -100.0%~100.0% 000.0
P8.1.02 Voltage Input of Potentiometer Correction Point 2 P8.1.00~10.00V 10.00
P8.1.03 Corresponding reference of Potentiometer Correction
Point 2 -100.0%~100.0% 100.0
P8.1.04 Filtering time of potentiometer 00.00s~10.00s 00.10
The function codes of this group are used to correct the potentiometer to get rid of the impact of zero-offset or
voltage attenuation caused by overlong keyboard lines. When leaving the factory, the function parameters of this
group have been corrected, when resetting to factory set value, the reset value is the value after factory correction.
Generally, the application site is not required to conduct correction.
If adopts potentiometer instead of VF3, the above function codes can be used to correct VF3 as well.
Function code Function Name Setting scope Factory set value
P8.1.05 VF1 actual voltage 1 0.500V~4.000V 2.000
P8.1.06 VF1 indicated voltage 1 0.500V~4.000V 2.000
P8.1.07 VF1 actual voltage 2 6.000V~9.999V 8.000
P8.1.08 VF1 indicated voltage 2 6.000V~9.999V 8.000
P8.1.09 VF2 actual voltage 1 0.500V~4.000V 2.000
P8.1.10 VF2 indicated voltage 1 0.500V~4.000V 2.000
P8.1.11 VF2 actual voltage 2 6.000V~9.999V 8.000
P8.1.12 VF2 indicated voltage 2 6.000V~9.999V 8.000

Chapter 6. Description of Parameters
180
The function codes of this group are used to correct analog input VF to get rid of the impact of VF input
zero-offset or gain. When leaving the factory, the function parameters of this group have been corrected, when
resetting to factory set value, the reset value is the value after factory correction. Generally, the application site is
not required to conduct correction.
Actual Voltage: use the measuring instruments to measure the voltage between terminal VF and terminal GND,
such as multi-meter, etc.
Voltage Display: the voltage display value from the sampling of the frequency inverter refers to voltage (P9.0.19,
P9.0.20)display before VF correction of Group P9.
When correcting, input two voltage values on each VF input terminal and then input actually measured voltage
value and display voltage to corresponding function codes, the frequency inverter can conduct correction
automatically.
Function code Function Name Setting scope Factory set value
P8.1.13 FM1 target voltage 1 0.500V~4.000V 2.000
P8.1.14 FM1 actual voltage 1 0.500V~4.000V 2.000
P8.1.15 FM1 target voltage 2 6.000V~9.999V 8.000
P8.1.16 FM1 actual voltage 2 6.000V~9.999V 8.000
P8.1.17 FM2 target voltage 1 (E102 invalid) 0.500V~4.000V 2.000
P8.1.18 FM2 actual voltage 1 (E102 invalid) 0.500V~4.000V 2.000
P8.1.19 FM2 target voltage 2 (E102 invalid) 6.000V~9.999V 8.000
P8.1.20 FM2 actual voltage 2 (E102 invalid) 6.000V~9.999V 8.000
The function codes of this group are used to correct analog output FM. If the correction has been done when
leaving the factory, when resetting to factory set value, the reset value is the value after factory correction.
Generally, the application site cannot need to conduct correction.
Actually Measured Voltage: use the measuring instruments to measure the voltage between terminal VF and
terminal GND, such as multi-meter, etc.
Target Voltage: refer to theoretical voltage value of the frequency inverter based on corresponding relationship of
analog output.
When correcting, output two voltage values on each FM terminal and then input actually measured voltage value
and target voltage to corresponding function codes, the frequency inverter can conduct correction automatically.

Chapter 6. Description of Parameters
181
6.10 Group P9 Monitoring Parameter
P9.0 Basic Monitoring Parameter
P9 Parameter Group is used to monitor running state information of the frequency inverter, the users can set
corresponding parameter as required, which can not only be rapidly viewed through panel for easy debugging and
maintenance on site, but also read through communication for monitoring of upper computer.
Function code Function name Description Unit
P9.0.00 Running Frequency Output frequency when the frequency inverter runs 0.01Hz
P9.0.01 Reference frequency Reference frequency of the frequency inverter 0.01Hz
P9.0.02 Output Current Output current when the frequency inverter runs 0.01A
P9.0.03 Output Voltage Output current when the frequency inverter runs 1V
P9.0.04
Bus line voltage Voltage on DC Bus of the frequency inverter 0.1V
P9.0.05 Output Torque When the frequency inverter runs, the output torque is
the percentage of rated torque of the motor 0.1%
P9.0.06 Output Power Output frequency when the frequency inverter runs 0.1kW
P9.0.07 Input Terminal Status Check whether the input terminal has signal input
P9.0.08 Output Terminal Status Check whether the output terminal has signal output
P9.0.09 VF1 Voltage Check the voltage between VF1 and GND 0.01V
P9.0.10 VF2 Voltage Check the voltage between VF2 and GND 0.01V
P9.0.11 Custom Display Value
Display coefficient P5.0.15 and the value after
conversion of Decimal Point P5.0.16 through
customerization
P9.0.12 Actual Counting Value View actual counting value of the frequency inverter for
counting function 1
P9.0.13 Actual Length Value View actual counting value of the frequency inverter for
fixed-length function 1m
P9.0.14 PID Reference Product of PID reference value and PID reference
feedback quantity
P9.0.15 PID Feedback Product of PID feedback value and PID reference
feedback rang
P9.0.16 PULS Impulse
frequency View the frequency of PULSE Impulse Input 0.01kHz
P9.0.17 Feedback Speed Actual output frequency when the frequency inverter
runs 0.1Hz
P9.0.18 PLC Stage Display which stage the Simple PLC runs at 1
P9.0.19 Voltage before VF1
Correction Voltage between VF1 and GND before VF1 correction 0.001V
P9.0.20 Voltage before VF2
Correction Voltage between VF2 and GND before VF2 correction 0.001V
P9.0.21 Line Speed The sampling line speed of DI6 impulse is equal to the
acquisition of impulse count per minute/ per meter 1m/min
P9.0.22 Current Power-on Time Length of current power-on time 1min
P9.0.23 Current Running Time Length of current running time 0.1min
P9.0.24 Residual Running Time Residual running time at Timing Function of P3.1.00 0.1min
P9.0.25 Frequency of
Frequency Source A View the frequency given by Frequency A 0.01Hz

Chapter 6. Description of Parameters
182
Function code Function name Description Unit
P9.0.26 Frequency of
Frequency Source B View the frequency given by Frequency B 0.01Hz
P9.0.27 Communication Set
value
The value set by corresponding communication address
A001 is the percentage of the highest frequency %
P9.0.28 Impulse frequency View the frequency of PULSE Impulse Input 1Hz
P9.0.29 Encoder Feedback
Speed
Actual running frequency of the motor from feedback of the
encoder 0.01Hz
P9.0.30 Actual Distance Value View actual distance value of the distance value of the
frequency inverter
P9.0.31~
P9.0.45 Reservation
P9.0.46 Operation Result 1 Check the value of operation result 1
P9.0.47 Operation Result 2 Check the value of operation result 2
P9.0.48 Operation Result 3 Check the value of operation result 3
P9.0.49 Operation Result 4 Check the value of operation result 4
P9.0.50 User Standby
Monitoring Value 1 Check the value of user special function
P9.0.51 User Standby
Monitoring Value 2 Check the value of user special function
P9.0.52 User Standby
Monitoring Value 3 Check the value of user special function
P9.0.53 User Standby
Monitoring Value 4 Check the value of user special function
P9.0.54
User Standby
Monitoring Value 5
Check the value of user special function
Corresponding Relationship of Input and Output Terminal State
Whether the vertical line of the digital tube of each digit lights on, it indicates that whether the input and output
terminal of each digit has the signal or not. If it lights on, it indicates that corresponding input terminal of this
vertical line has signal input or the output terminal has signal output.

Chapter 6. Description of Parameters
183
The display rules of Function Code P9.0.07 are shown as below:
The display rules of Function Code P9.0.08 are shown as below:
(M is internal Intermediate Delay Relay)
YO
T1
T2
YO1
YO2
M1
M2
M3
M4
M5
Potentiometer

Chapter 7 Common Function and Application Case
184
E Series
Frequency
inverter
E Series
Frequency
inverter
Chapter 7 Common Function and Application Case
7.1 Common Function
7.1.1 Start and Stop Control E Series Frequency inverter has three kinds of start and stop control modes: keyboard control, terminal control
and communication control.
1. Keyboard Control (Set P0.0.03=0)
Press “RUN” Key on the keyboard, the frequency inverter starts; press “Stop” Key on the keyboard, the frequency
inverter stops; the running direction is controlled by Function Code P0.0.06, it is forward rotation when at
P0.0.06=0 and it is reverse rotation when at P0.0.06=1.
2. Terminal Control (Set P0.0.03=1) Provide four kinds of terminal start and stop modes for option of the users: two-line mode 1, two-line mode 2,
three-line mode 1 and three-line mode 2. Specific use methods are as below:
Two-line Mode 1 (Set P2.0.11=0)
Any two terminals of DIx and DIy among multifunctional terminals are used to determine forward and reverse
running of the more and all are the active level. The terminal function references are as below:
Terminal Reference Value Description
DIx 1 Forward Running (FWD)
DIy 2 Reverse Running (REV)
Run Command
Stop
REV
FWD
Stop
Two-line Mode 2 (Set P2.0.11=1)
Any two terminals of DIx and DIy among multifunctional terminals are used to determine forward and reverse
running of the motor, in which Terminal DIx is used as running enable terminal and DIy is used as terminal of
confirming the running direction, all are the active level. The terminal function references are as below:
Terminal Reference Value Description
DIx 1 Forward Running (FWD)
DIy 2 Reverse Running (REV)
Run Command
Stop
Stop
REV
FWD

Chapter 7 Common Function and Application Case
185
E Series
Frequency
inverter
Three-line Mode 1 ( Set P2.0.11=2)
Any three terminals of Dix, DIy and DIn among multifunctional terminals are used to determine forward and
reverse running of the motor, in which Terminal DIx is used as running enable terminal and DIx & DIy are used as
terminal of confirming the running direction, Din is the active level and DIx & DIy are the active PLS. When the
running is needed, the Terminal DIn must be closed at first and then the PLS of DIx or DIy are used to realize
forward or reverse control of the motor. When the shutdown is needed, it is realized through disconnecting the
signal of Terminal Din. The terminal function references are as below:
Terminal Reference Value Description
DIx 1 Forward Running (FWD)
DIy 2 Reverse Running (REV)
DIn 3 3-line Running Control
SB1 is the button of normally opened forward running, SB2 is the button of normally opened reverse running and
SB3 is the button of normally closed stop.
3-line Control Mode 2 (Set P2.0.11=3)
Any three terminals of Dix, DIy and DIn among multifunctional terminals are used to determine forward and
reverse running of the motor, in which Terminal DIn is used as enable terminal, DIx is used as running terminal
and DIy is used as terminal of confirming the running direction, Din and Dix are the active level and DIy is the
active PLS. When the running is needed, the Terminal DIn must be closed at first and then the PLS of DIx is used
to realize the running of the motor and the state of DIy is used to determine the running direction. When the
shutdown is needed, it needs to be realized through disconnecting the signal of Terminal Din. The terminal
function references are as below:
Terminal Reference Value Description
DIx 1 Forward Running (FWD)
DIy 2 Reverse Running (REV)
DIn 3 3-line Running Control
Running
Direction REV FWD
E Series
Frequency
inverter

Chapter 7 Common Function and Application Case
186
SB1 is the button of normally opened forward running, SB3 is the button of normally closed stop and K is the
button of running direction option
3. Communication Control (Set P0.0.03=2)
The start, stop, FWD and REV of the frequency inverter is realized by the upper computer through
Communication Mode RS-485. E Series Frequency inverter supports Standard MODBUS Protocol, refer to
Chapter VIII Communication RS-485 for more details.
7.1.2 Start and Stop Mode
1. Start Mode E Series Frequency inverter has three kinds of start modes: direct start, speed tracking start and start after brake.
Direct Start (Set P1.0.10=0)
The frequency inverter starts according to given start frequency (P1.0.12) and start frequency hold time
(P1.0.13)and then speeds up to the reference frequency according to the selected acceleration time.
Output Frequency
Direct Start
Set Frequency
Factory set value
Start Frequency
Time
Speed Tracking Start (Set P1.0.10=1)
The frequency inverter starts the speed tracking according to the speed tracking mode given by speed tracking
mode P1.0.11 to track the running speed of the motor at which the frequency inverter starts until being accelerated
or decelerated to reference frequency. When the motor hasn’t stopped stably or is unable to stop, this function
shall be adopted.
Output Frequency
Speed Tracking Start
Set Frequency
Speed Tracking Start (Set P1.0.10=2)
Before starting the motor normally, the frequency converter firstly deploys DC braking in accordance with the
data set up in the parameters about starting DC braking current (P1.0.14) and starting DC braking time (P1.0.15).
If the motor rotates reversely at low speed before starting, this function shall be used when starting the motor by
rotating it forward.
Running
Command
Hold Time
of Start
Frequency
Acceleration
Time
Acceleration
Time
Time
Running
Command
Automatic Speed
Tracking Detection
Initial Speed of
Load Motor

Chapter 7 Common Function and Application Case
187
Output Frequency
Start after Brake
Set Frequency Factory set value
Start Frequency
2. Stop Mode
E Series Frequency inverter has two kinds of shutdown modes: Deceleration Stop and Free Stop
Deceleration Stop (Set P1.0.16=0)
After the stop command is effective, the frequency inverter reduces the output frequency according to the selected
deceleration time, and it stops when the output frequency is reduced to 0.
When it is required to prevent the frequency inverter from sliding and jittering when it quickly stops or stops at
low speed, the stop DC brake function can be used, after the frequency inverter is reduced to frequency given by
P1.0.17, it is to wait for the time given by P1.0.18 and start DC brake at current given by P1.0.19 until the time
given by P1.0.20 is reached and then the frequency inverter stops DC brake.
When it is required to quickly stop at high speed, the dynamic braking shall be adopted. The built-in brake units of
E Series Frequency inverter 15kW and below set the parameters of brake utilization rate P1.0.21 and externally
connect brake resistance to adopt dynamic braking; the frequency inverters with power above 15kW can adopt
dynamic braking only when they are configured with brake units and brake resistance .Refer to Appendix A2.5 for
externally configured brake units and brake resistance.
Output Frequency Factory set value
Set Frequency
DC Brake Time
No Output Time
Deceleration Time
Shutdown Command
Free Stop (Set P1.0.16=1)
Running
Command
Running
Command
Start DC
Brake
Time
Hold Time
of Start
Frequency
Acceleration
Time
Time
Shutdown DC Brake
Start Frequency
Shutdown DC
Brake Waiting
Time
Shutdown by
Deceleration

Chapter 7 Common Function and Application Case
188
After the stop command is effective, the frequency inverter immediately terminates the output and the motor stop
freely by mechanical inertia. The users haven’t had the stop requirements for load or when the load itself has the
brake function, the function of free stop can be selected.
Output Frequency
Free Stop
Set Frequency Shutdown of Load Speed upon Inertia
Time
Stop Command
7.1.3 Acceleration and Deceleration Mode
Different load characteristics have different requirements for acceleration and deceleration time, E Series
Frequency inverter provides three kinds of acceleration and deceleration modes: Straight Line, Curve S 1 and
Curve S 2, which are selected through Function Code P0.1.19. Additionally, the acceleration and deceleration time
unit can be adjusted and set through Function Code P0.2.03.
Straight Line (Set P0.1.19=0)
Start the linear speed from start frequency to reference frequency. E Series Frequency inverter provides four kinds
of linear acceleration and deceleration modes, which can be switched among different terminal combinations that
are selected through acceleration and deceleration time.
Curve S 1 (Set P0.1.19=1)
The output frequency increases or decrease by Curve S. Curve S is the used for occasions required gentle start or
stop. Parameter P0.1.20 and P0.1.21 respectively define the time scale of starting period and ending period of
Curve S 1.
Curve S 2 (Set P0.1.19=2)
In acceleration and deceleration of Curve S, the rated frequency of the motor is always the inflection point of
Curve S. Generally, it is used for occasions that the high-speed areas above rated frequency require acceleration
and deceleration.
7.1.4 Jogging Function
E Series Frequency inverter provides two kinds of the modes to realize jogging function: Keyboard Control and
Terminal Control.
Keyboard Control
Set the function of multi-functional Key JOG as forward jogging or reverse jogging (P5.0.00=1or 2).The
frequency inverter can use Key JOG to realize Jogging Function when it stops,and the jogging running frequency
and acceleration and deceleration time can be set through Function Code P0.1.08~P0.1.10.
Terminal Control
Set the function of multi-functional Dix and DIy as forward jogging or reverse jogging. When the frequency
inverter stops, it can use Dix and DIy to realize Jogging Function,and the jogging running frequency and
acceleration and deceleration time can be set through Function Code P0.1.08~P0.1.10.

Chapter 7 Common Function and Application Case
189
Note: The jogging function of the above reference modes is the jogging effect when the frequency inverter is
at stop state. If the frequency inverter is required to be at running state and the priority is given to the
effect of Jogging Function, it is to set Function Code P0.1.25=1.
7.1.5 Running Frequency Control E Series Frequency inverter provides two Frequency Source Input Channels, that is, Frequency Source A and
Frequency Source B respectively, they not only can work independently, but in combination mode through
computer. Each frequency source has 14 kinds of references for option, so the optional requirements for different
frequencies at different sites can be greatly satisfied. The factory default of the frequency inverter is Frequency
Source A Reference. When two frequency sources are combined, Frequency Source A is main channel and
Frequency Source B is auxiliary channel by default
Detailed explanation for realization process of frequency selection is shown as the figure below:

Chapter 7 Common Function and Application Case
190

Chapter 7 Common Function and Application Case
191
7.1.6 Multi-speed Function
E Series Frequency inverter can realize the switch of 16-stage speed at most through different combination state of
multiplex directive terminal. As for missing set digit, the calculation is made at state 0.
7.1.7 Simple PLC
E Series Frequency inverter can automatically run at 16-stage speed at most, the acceleration and deceleration
time and the length of running time of each stage can be set independently (refer to Function Code
P3.0.03~P3.0.50). Additionally, the times of cycle required can be set through P3.0.00 and P3.0.01.
Mu
ltip
lex
dir
ecti
ve
term
inal
in
pu
t Terminal
combination
Frequency 0:
Frequency 1:
Frequency 2:
Frequency 13:
Frequency 14:
Frequency 15:
Multiplex
directive
terminal
Frequency
option
Target
frequency
Highest
Frequency
Stage 0
Rerun Restart after
Power Off
Stage 1 Stage 14 Stage 15
Simple
PLC Run
Mode
Run from
Power Off
Continuous
Run
Continuous
Run N Times
Run at
Frequency of
Last Stage
Free
Stop
True
False
Frequency
inverter
Start

Chapter 7 Common Function and Application Case
192
7.1.8 Timing Function
Function Code Function name Setting Scope Factory set value
P3.1.00 Timing Function Selection 0: Invalid 1: Valid 0
P3.1.01 Tinning Running Time
Selection
0: Digital Reference (P3.1.02)
1: External Terminal VF1 Reference
2: External Terminal VF2 Reference
(Analog input range corresponds to
P3.1.02)
0
P3.1.02 Tinning Running Time 0000.0min~6500.0min 0000.0
E Series Frequency inverter has built-in Timing Function to complete its timing running.
Function Code P3.1.00 determines whether the timing function is valid.
Function Code P3.1.01 determines the source of fixed running time.
When at P3.1.01=0, the fixed running time is given by the value set by Function Code P3.1.02.
When at P3.1.01=1 or 2, the fixed running time is given by external analog input terminal. E Series Frequency
inverter provides 2-way analog input terminal (VF1, VF2). VF1 and VF2 can input 0V~10V voltage or
0/4mA~20mA current. As for corresponding relation curve between the input of VF1 and VF2 and fixed running
time, the users can freely choose from four kinds of the relation curves through function code P2.1.02, in which
Curve 1 and Curve 2 are linear relationship able to be set through Function Code P2.0.13~P2.0.22, and Curve 3
and Curve 4 are broken line relationship with two inflection points able to be set through Function Code
P2.1.04~P2.1.19. At this time, the analog input range corresponds to the value given by Function Code P3.1.02.
When the Timing Function is effective, the frequency inverter needs to restart timing for every start, when
reaching the Reference Time, the frequency inverter stops automatically. During the process of stop, the
multi-functional output terminals of the frequency inverter output Signal ON. When the stop process ends,
multi-functional output terminals output Signal OFF. Corresponding multi-functional output terminals are Timing
Reaches Output (30). When the Reference Time is 0, the fixed time is not limited. Actual time of current running
can be viewed through Function Code P9.0.23 (when the frequency inverter shuts down, the display value of
P9.0.23 automatically resets to 0).
Option for
Timing Run
Time
Timing Run Time
VF1 Input
( Range
Percentage)
VF2 Input
( Range
Percentage)
Option for Timing
Function Running
Time
Reached
Free
Stop
Multi-functional Output
Terminal Output

Chapter 7 Common Function and Application Case
193
7.1.9 Fixed-length Function
Function Code Function name Setting Scope Factory set value
P3.1.08 Reference Length 00000m~65535m 01000
P3.1.09 Actual Length 00000m~65535m 00000
P3.1.10 Impulse Count per meter 0000.1~6553.5 0100.0
E Series Frequency inverter has built-in fixed-length function to realize fixed-length control. In the application,
corresponding digital input terminal is required to be set as “Length Counting Input” (Function 30). When the
input impulse frequency is higher, Terminal DI16 must be adopted. The formula for length calculation is as below:
Actual Length= Total Impulses from Acquisition of Terminal/ Impulses per meter
When actual length reaches the reference length (value set by P3.1.08), the multi-functional output terminals of
the frequency inverter can output Signal ON. Corresponding multi-functional output terminal function is Length
Reached (10).
In the process of fixed-length control, the reset operation to actual length can be realized through digital input
terminal. Corresponding digital input terminal function is Length Reset (31).
Actual length can be viewed through Function Code P3.1.09 or P9.0.13.
Length
Impulse
Length
Reset
Length Impulse
Input Length Reached
Length Reset Input
Total Length Impulses/ Impulses
per Meter (P3.1.10)
Length Reset
Set Length
Actual Length Length Reached
Multi-functional Output
Terminal Output

Chapter 7 Common Function and Application Case
194
7.1.10 Counting Function
Function Code Function name Setting Scope Factory set value
P3.1.11 Reference Count Value 00001~65535 01000
P3.1.12 Designated Count Value 00001~65535 01000
The counting function of E Series Frequency inverter has two-level signal output, that is, reference counting Value
Reached and designated counting Value Reached. In the application, corresponding digital input terminal function
is required to be set as “Counter Input” (Function 28). When the impulse frequency is higher, Terminal DI6 must
be adopted.
When actual counting value reaches the reference value (set by P3.1.11), the multi-functional output terminals of
the frequency inverter can output Signal ON. Corresponding multi-functional output terminal function is
Reference Counting Value Reached (8).
When actual counting value reaches the reference value (set by P3.1.12), the multi-functional output terminals of
the frequency inverter can output Signal ON. Corresponding multi-functional output terminal function is
Reference Counting Value Reached (9).
In the counting process, the reset operation to actual counting value can be realized through digital input terminal.
Corresponding digital input terminal function is Counter Reset (29)
Actual counting value can be viewed through Function Code P9.0.12.
Count
Impulse Count Impulse
Input Terminal
Input Function 28
Count
Reset Count Reset
Count Impulse Input
Count Reset Input
Reference Count
Reached Output
Designated Count
Reached Output
Reference
Counting Value
Actual
Counting value
Designated
Counting Value
Reference Counting Value Reaches
Multi-functional Output Terminal
Output
Designated Counting Value
Reaches
Multi-functional Output
Terminal Output

Chapter 7 Common Function and Application Case
195
7.1.11 Distance Control Function
Function Code Function name Setting Scope Factory set value
P3.1.13 Distance Set value 1 -3200.0~3200.0 0000.0
P3.1.14 Distance Set value 2 -3200.0~3200.0 0000.0
P3.1.15 Impulse Count per Distance 000.00~600.00 000.00
E Series Frequency inverter has built-in Distance Control Function. In the application, corresponding digital input
terminal function is required to be set as “Encoder A Input” (Function 52) and “Encoder B Input” (Function 53).
Terminal DI5 and DI6 of CDI-E100 Series can connect high-speed impulse of the encoder, the impulse frequency
of the encoder of other terminals is not allowed more than 200Hz. The impulse frequency of CDI-E102 Series
encoder is not allowed more than 200Hz. The impulse frequency of CDI-E180 Series encoder is not allowed more
than 200Hz.In case of exceeding 200Hz, the open-collector encoder expansion card is required to be configured
(set P0.1.26=10). The phase sequence of the encoder determines the plus-minus of actual distance.
Actual Distance= ±Total Impulses from Acquisition of Terminal/ Impulses per distance
For the digital tube has five digits, when the distance is less than-999.9, all displayed decimal points of the digital
tube completely indicate minus value, e.g. “1.0.1.0.0” means -1010.0。
When actual distance reaches the set value 1 (value set by P3.1.13), the multi-functional output terminals of the
frequency inverter can output Signal ON. Corresponding multi-functional output terminal function is the Distance
Set Value 1 Reached (56).
When actual distance reaches the set value 2 (value set by P3.1.14), the multi-functional output terminals of the
frequency inverter can output Signal ON. Corresponding multi-functional output terminal function is the Distance
Set Value 2 Reached (57).
In the process of distance control, the reset operation to actual distance can be realized through digital input
terminal. Corresponding digital input terminal function is the Distance Reset (54).
Actual distance can be viewed through Function Code P9.0.30.
Count
Impulse
Distance
Reset
Total Distance Impulses/Impulses
per Distance (P3.1.15)
Distance Reset
Distance Set Value 1
Encoder Phase
A Input
Encoder Phase
B Input
Count Impulse
Set Value 1
Reached
Set Value 2
Reached
Distance Set Value 2
Actual Set Value
Distance Set Value 1
Reached
Multi-functional Output
Terminal Output
Distance Set Value 2
Reached
Multi-functional Output
Terminal Output

Chapter 7 Common Function and Application Case
196
7.1.12 Simple Internal Relay Programmable Function
E Series Frequency inverter has five built-in virtual Intermediate Delay Relays, which not only can collect the
physical signals of digital input terminal of the frequency inverter, but virtual signals of multi-functional output
terminals (00~59). And then it is to conduct simple logic running and output the results to multi-functional output
terminals or equivalent digital input terminal.
Description for Control Logic Function of Intermediate Delay Relay Control Word B
Function code Set value for
unit’s digit Function Description
P3.2.02
P3.2.03
P3.2.04
P3.2.05
P3.2.06
0 Input 1 If input 1 is true, the logic result is true,
If input 1 is false, the logic result is false
1 Input 1 and NOT If input 1 is true, the logic result is false
If input 1 is false, the logic result is true
2 Input 1 and Input 2
AND
If Input 1 and Input 2 are true, the logic result is true
or false
3 Input 1 and Input 2 OR Any one of Input 1 and Input 2 is true, the logic
result is true,
4 Input 1 and Input 2
XOR
If Input 1 and Input 2 are opposite logic, the logic
result is true
If Input 1 and Input 2 have same logic, the logic
result is false
5
The valid reference of
Input 1 is valid
The valid Reference of
Input 2 is invalid
If input 1 is true, the logic result is true,
If input 2 is true and input 1 is false, the logic result
is true, the logic result is false
Input 1
( Hundreds and
Tens of Control
Word B)
Input 2 (Ten
Thousands and
Thousands of
Control Word B)
Input 2 (Ten
Thousands and
Thousands of
Control Word B)
Input
(Control
Word B)
The
correspondin
g digit in
P3.2.00 is 0
The
correspondin
g digit in
P3.2.00 is 1
The
correspondin
g digit in
P3.2.00 is 2
Apply Input 1 and
Input 2 to logic
operation ( Ones of
Control Word B)
Input (Thousands and
hundreds of Control
Word C. Function 0-59
of corresponding
multi-functional output terminal)
Interm
ediate
Delay
Relay Contro
l
Delay Time Option for
Valid State
Output (Tens and
Ones of Control Word
C. Corresponding
Digital Input Terminal Function
00-59)
Output
(Multifunctional
Output Terminal
Output, corresponding
function is50-54)

Chapter 7 Common Function and Application Case
197
Function
code
Set value for unit’s
digit Function Description
P3.2.02
P3.2.03
P3.2.04
P3.2.05
P3.2.06
6
Valid reference of Input 1
Rise Edge is valid
Valid reference of Input 2
Rise Edge is invalid
If Input 1 Rising Edge is true, the logic result is true
If Input 2 Rising Edge is true, the logic result is false
7 Reverse valid signal of
Input 1 Rising Edge
If Input 1 Rising Edge is true, the logic result is
reverse
8
Input 1 Rise Edge is valid
and output a impulse
signal with width of
200ms
If Input 1 Rising Edge is true, the logic result is true,
after keeping it 200ms, the logic result becomes false
9 Input 1 Rise Edge and
Input 2 AND
If Input 1 Rising Edge and Input 2 Rising Edge are
true, the logic result is true or false
E.g. in case of setting Function Code P3.2.00 (Intermediate Delay Relay Control)=00112, we can learn from
referring to the explanation of Function Code P3.2.00 that Relay 5 (M5) & Relay 5 (M5) are determined by
Control Word A and Relay 3 (M3) & Relay 2 (M2) are determined by Control Word B, and Relay 1 (M1) is
determined by thousands and hundreds of Control Word C, as shown in the figure below:
In combination with the example above, in case of setting P3.2.01 (Intermediate Delay Relay Control Word
A))=10111, it is to compulsively set M5=1 and M4=0.
For M3, M2 and M1 are not determined by Control Word A, so the setting of P3.2.01 to M3, M2 and M1 is
invalid.
Corresponding M5 is
controlled by Control Word A
Corresponding M4 is
controlled by Control Word A
Corresponding M3 is
controlled by Control Word B
Corresponding M1 is controlled by
thousands and hundreds of Control
Word C
Corresponding M2 is controlled by
Control Word B
Corresponding M5 is
compulsively set at 1
Corresponding M4 is
compulsively set at 0
Invalid

Chapter 7 Common Function and Application Case
198
In combination with the example above, in case of setting P3.2.03 (Control Word B of Corresponding M2)=01022,
we can learn from referring to the explanation of Function Code P3.2.03 that M2=DI2&&DI3, as shown in the
figure below:
Equivalent as shown in the figure below:
DI2 DI3 M2
In combination with the example above, in case of setting the tens and ones of P3.2.08 (Control Word C of
Corresponding M2)at 01 (input terminal function of corresponding digital), it indicates that the function of M2 is
forward running. If 51(Synchronous Intermediate Relay M2) is set among P2.0.28~P2.0.32 at the same time,
corresponding multi-functional output terminal outputs the signal.
The Intermediate Relay can not only respectively preset the delay time for its connection and disconnection
through Function Code P3.2.12~P3.2.16 and P3.2.17~P3.2.21, but preset whether the reverse operation is
conducted for output signals through Function Code P3.2.22. In combination with the example above, in case of
setting P3.2.13 (delay time of corresponding M2 connection) =10.0s and P3.2.18 (delay time of corresponding M2
disconnection)=5.0s, when DI2 and DI3 are connected, M2 is not immediately connected, but connected after
waiting for 10.0s. Similarly, when one of DI2 or DI3 is disconnected, M2 is not immediately disconnected, but
disconnected after waiting for 5.0s.
Input 2 is DI2
Input 1 is DI3 Input 1 and
Input 2 AND
FWD Run
(Corresponding Digital Input
Terminal Function)
Delay Time of
Connection
Delay Time of
Disconnection
Normal M2 Signal
Reserve M2 Signal

Chapter 7 Common Function and Application Case
199
7.1.13 Internal Timer Function
E Series Frequency inverter has two built-in timers, their start, shutdown timing and timer reset can be realized
through digital input terminal. The fixed Time Reached can output the signals through multi-functional output
terminal.
When the signal of the output terminal of the timer (terminal function 48~49)is valid, the timer starts timing.
When the signal of the input terminal of the timer is invalid, the timer stops timing and keeps current value.
When actual timing value of Timer 1 reaches the value set by P3.2.24, the multi-functional output terminals of the
frequency inverter can output Signal ON. Corresponding multi-functional output terminal function is the Time of
Timer 1 Reached (42).
When actual timing value of Timer 2 reaches the value set by P3.2.25, the multi-functional output terminals of the
frequency inverter can output Signal ON. Corresponding multi-functional output terminal function is the Time of
Timer 2 Reached (43).
When actual timing value of Timer 1 reaches the value set by P3.2.24, but actual timing value of Timer 2 fails to
reach the value set by P3.2.25, the multi-functional output terminals of the frequency inverter output Signal ON.
When actual timing value of Timer 2 reaches the value set by P3.2.25, the multi-functional output terminals of the
frequency inverter output Signal OFF. Corresponding multi-functional output terminal function is Time of Timer 1
is reached, but Time of Timer 2 is not reached (44).
In the process of timing, the reset operation to actual timing value can be realized through digital input terminal.
Corresponding digital input terminal function is the Timer Reset Terminal (50~51).
Timer Input Terminal
Terminal Function
48-49
Timer Reset Terminal
Terminal Function
50-51
Timer 1 (Ones of
P3.2.23)
Timer 2 (Tens of
P3.2.23)
Timer 1 (Hundreds
of P3.2.23)
Timer 2 (Thousands
of P3.2.23)
Timing Unit (Ten
Thousands of P3.2.23)
Start and Stop
Timing of
Timer
Timer
Reset
Timing
Unit
Internal
Timer
Control
Word
The count time of
Timer 1 reaches the
value set by P3.2.24
The count time of
Timer 2 reaches the
value set by P3.2.25
The count time of
Timer 1 reaches the
value set by P3.2.24
The count time of
Timer 2 fails to
reach the value set
by P3.2.25
Timer 1 Time Reached
(Multifunctional Output
Terminal Function 42)
Time of Timer 2 Reached
(Multifunctional Output
Terminal Function 43)
Time of Timer 1 is
reached but Time of
Timer 2 is not reached
((Multifunctional Output
Terminal Function 44)
Timer Input Terminal
Signal
Timer Reset Terminal
Signal
Time of Timer 1 reaches
signal
Time of Timer 2 reaches
signal
Time of Timer 1 reaches
signal but Time of Timer
2 does not reach signal
Fixed Time of Timer 1
Fixed Time of Timer 2

Chapter 7 Common Function and Application Case
200
7.1.14 Internal Operation Module Function E Series Frequency inverter has four built-in operation modules, which collect the data of two function codes of
the frequency inverter (remove the value after the decimal point) to conduct simple operation and finally output
the operation results into special use occasions .Certainly, the operation results can also be used to realize the
actions of multi-functional output terminals and the output of the analog signal.
Control Explanation for Operation Module
Function code Corresponding set
value Function Description
P3.2.26
0 No Operation No operation conducted
1 Add Operation Address A data + Address B data
2 Subtraction Operation Address A data - Address B data
3 Multiply Operation Address A data × Address B data
4 Division Operation Address A data ÷ Address B data
5 Greater than
Judgment
If Address A data>Address B data, the
non-setting operation result is 1, or it is 0.
6 Equal to Judgment If Address A data=Address B data, the
non-setting operation result is 1, or it is 0.
7 Equal to or Greater
than Judgment
If Address A data>=Address B data, the
non-setting operation result is 1, or it is 0.
8 Integration
Time of every Address B Data (ms as unit)
means Address A Data added to non-setting
operation result, e.g. If Address A Data is 100
and Address B Data is 1000, it indicates that 10
is added to non-setting operation result per
1000ms. The scope of the operation results is
-32767~32767. When the operation results is
less than -9999, all displayed decimal points of
the digital tube completely indicate minus
value, e.g. “1.0.1.0.0” means -10100.
9~F Reservation Reservation
Operation Input A Address
Operation Input B Address
Operation
Module
Control Non-setti
ng
Operation
Result
Setting
Coefficient
Property of
Operation
Setting
Coefficient
of Operation
Operation
Result
Special Occasions for
Output ( setting source is
operation result)
Operation Result 2 Greater than 0 (the multi-functional
output terminal function is 58) Operation Result 4 Greater than 0 (the multi-functional
output terminal function is 59)
Analog Output
( Corresponding operation
result of output setting)

Chapter 7 Common Function and Application Case
201
Explanation for Setting Coefficient Property of Operation
Function code Corresponding set value Function Description
P3.2.27
0
Conduct setting at no
decimal fraction to system
by multiplication
algorithm
Non-setting Operation Result × Setting Coefficient of
Operation
1
Operate the Setting
Coefficient by
multiplication with one
decimal
Non-setting Operation Result × Setting Coefficient of
Operation÷10
2
Operate the Setting
Coefficient by
multiplication with two
decimals
Non-setting Operation Result × Setting Coefficient of
Operation÷100
3
Operate the Setting
Coefficient by
multiplication with three
decimals
Non-setting Operation Result × Setting Coefficient of
Operation÷1000
4
Operate the Setting
Coefficient by
multiplication with four
decimals
Non-setting Operation Result × Setting Coefficient of
Operation÷10000
5
Operate the Setting
Coefficient by division
without decimal
Non-setting Operation Result ÷ Setting Coefficient of
Operation
6
Operate the Setting
Coefficient by division
with one decimal
Non-setting Operation Result ÷ Setting Coefficient of
Operation ×10
7
Operate the Setting
Coefficient by division
with two decimals
Non-setting Operation Result ÷ Setting Coefficient of
Operation ×100
8
Operate the Setting
Coefficient by division
with three decimals
Non-setting Operation Result ÷ Setting Coefficient of
Operation ×1000
9
Operate the Setting
Coefficient by division
with four decimals
Non-setting Operation Result ÷ Setting Coefficient of
Operation ×10000
A
Operate the Setting
Coefficient by division
without decimal
Non-setting operation result ÷ number of function
code corresponding to operation setting coefficient
B
Operate the Setting
Coefficient by division
with one decimal
Non-setting operation result ÷ number of function
code corresponding to operation setting coefficient × 10
C
Operate the Setting
Coefficient by division
with two decimals
Non-setting operation result ÷ number of function
code corresponding to operation setting coefficient ×
100
D
Operate the Setting
Coefficient by division
with three decimals
Non-setting operation result ÷ number of function
code corresponding to operation setting coefficient ×
1000
E
Operate the Setting
Coefficient by division
with four decimals
Non-setting operation result ÷ number of function
code corresponding to operation setting coefficient ×
10000
Note: 5~9 are operation setting coefficients and can be directly included in the operation, and A~E are not operation setting
coefficients and cann’t be directly included in the operation. The operation setting coefficient is used to point to a function
code number and only the number of function code can be included in the operation.

Chapter 7 Common Function and Application Case
202
Control Explanation for Operation Results
Operation Results oriented Scope of Operation Results
Operation Results Oriented Reference Frequency -Highest Frequency~Highest Frequency (Remove
Decimal Point)
Operation Results Oriented Reference Upper Frequency 0~Highest Frequency (Remove Decimal Point)
Operation Results Oriented PID Reference -1000~1000 means -100.0%~100.0%
Operation Results Oriented PID Feedback -1000~1000 means -100.0%~100.0%
Operation Results Oriented Torque Reference -1000~1000 means -100.0%~100.0%
Operation Results Oriented Analog Output
Operation Result 1: -1000~1000
Operation Result 2: 0~1000
Operation Result 3: -1000~1000
Operation Result 4: 0~1000
The operation result 1 can be reviewed through Function Code P9.0.46.
The operation result 2 can be reviewed through Function Code P9.0.47.
The operation result 3 can be reviewed through Function Code P9.0.48.
The operation result 4 can be reviewed through Function Code P9.0.49.
e.g. the sum of VF1 Reference and VF2 Reference can be used to torque reference through operation. When the
scope of torque reference is 0.0%~100.0%,the desired scope of operation results is 0~1000. For the scope of
reference voltage of VF1 and VF2 is 00.00~10.00m, the scope of the non-setting operation results of Operation 2
is 0~2000, but the desired scope of operation results can be reached through division by two. The parameters of
the function code are required to be set as below:
Function code Function name Set value Explanation
P1.1.14 Torque Reference Source 9 Torque Reference Source from Operation
Result 2
P3.2.26 Operation Module H.0010 Select addition operation for operation 2
P3.2.27 Operation Setting Coefficient
Property H.0050
Operate the setting coefficient by division
without decimals
P3.2.31 Input A of Operation 2 09009 Operate corresponding Function Code
P9.0.09 by unsigned number
P3.2.32 Input B of Operation 2 09010 Operate corresponding Function Code
P9.0.10 by unsigned number
P3.2.33 Setting Coefficient of Operation
2 2 The setting coefficient is 2
The above description means:
Operation result = (number in P9.0.09 + number in P9.0.10) ÷2
If P3.2.27= H.00A0, the above description means:
Operation result = (number in P9.0.09 + number in P9.0.10) ÷ number in P0.0.02
If P0.0.02=1,
Operation result = (number in P9.0.09 + number in P9.0.10) ÷ 1

Chapter 7 Common Function and Application Case
203
7.1.15 PID FUNCTION
E Series Frequency inverter has built-in PID Regulator, which is configured with the option for signal reference
channel and signal feedback channel, the users can easily realize automatic regulation of process control and
control applications on constant voltage, constant flow, constant temperature, tension, etc. When in use of PID
Frequency Closed-loop Control, the users need to preset the running frequency and reference mode and select
P0.0.04 as 8 (PID Control), that is, PID Automatic Regulation on Output Frequency, related parameters of PID are
given in Group P4 and the use methods of PID are as below:
The frequency inverter has 2 built-in equivalent PID computing units ,the performance parameters can be preset
separately to realize optimum usage of regulating speed and accuracy, the users can use multi-functional terminals
or setting deviation adjustment to freely switch different regulation performance required by different stage.
7.1.16 Wobbulating Function
Function code Function name Setting scope Factory set
value
P3.1.03 Wobbulating Reference Mode 0: Relative to Reference frequency
1: Relative to Highest Frequency 0
P3.1.04 Wobbulating Range 000.0%~100.0% 000.0
P3.1.05 Kicking Range 00.0%~50.0% 00.0
P3.1.06 Wobbulating Cycle 0000.1s~3000.0s 0010.0
P3.1.07 Rise Time of Wobbulating
Triangular Wave 000.1%~100.0% 050.0
In some occasions, the Wobbulation can improve the control performance of the equipments, e.g. winding
equipments in textile, fiber, etc., the use of the Wobbulating Function can improve the uniform tightness of the
winding of spindle. Through setting Function Code P3.1.03~P3.1.07,it is to realize the reference frequency as
wobbulating performance of the central frequency.
The Function Code P3.1.03 is used to confirm the reference quantity of amplitude. The Function Code P3.1.04 is
used to determine the size of the amplitude The Function Code P3.1.05 is used to confirm the size of mutation
frequency of the wobbulation.
PID Value Reference
Option for Reference
Source
Reference Quantity
Display
Feedback Quantity
Display
PID Action
Direction
Deviation
Limit
Switch Condition
Feedback Filtering
time
PID Parameter 1: Proportional Gain P4.0.05
Integral Time P4.0.06
Derivative Time P4.0.07
PID Parameter 2: Proportional Gain P4.0.10
Integral Time P4.0.11
Derivative Time P4.0.12
PID Output
Property
Feedback
Source
Frequency
Superposition
Option for Frequency
Source Drive
Motor
Feedback
Signal Disposal
Controlle
d Target
Transmitter
Detection
Built-in PID regulator

Chapter 7 Common Function and Application Case
204
When at P3.1.03=0, the amplitude is variable amplitude system in relative to reference frequency, which will
change along the reference frequency
Amplitude = Reference Frequency ×Amplitude of Wobbulation
Mutation Frequency = Reference Frequency ×Amplitude of Wobbulation ×Sudden Jump of Amplitude
When at P3.1.03=1, the amplitude is fixed amplitude system in relative to reference frequency, which is a fixed
amplitude.
Amplitude = Reference Frequency ×Amplitude of Wobbulation
Mutation Frequency = Reference Frequency ×Amplitude of Wobbulation ×Sudden Jump of Amplitude
Wobbulating Cycle: refer to the time value of a complete wobbulating cycle.
Triangular Wave Rise Time of Wobbulation: refer to the percentage of Triangular Wave Rise Time relative to
wobbulating cycle(P3.1.06).
Triangular Wave Rise Time = Wobbulating Cycle×Triangular Wave Rise Time of Wobbulation, Unit: Second.
Triangular Wave Fall Time = Wobbulating Cycle×(1-Triangular Wave Rise Time of Wobbulation), Unit:
Second.
Refer to the figure below for explanation:
Wobbulating Run of
Frequency inverter
Pendulum Bar
Motor
Reciprocating Running
Gear
Wobbulating No Wobbulating
Winding motor
Uniform line-speed
rotation

Chapter 7 Common Function and Application Case
205
Note: the output frequency of wobbulation is subject to upper frequency and lower frequency
7.1.17 Analog Input/Output Use
1. Analog Input
E Series Frequency inverter support 2-way analog input, which can be voltage signal or can also be current signal.
Input
VF1
Voltage
source Shift switch J5-1 to U side, which enable to receive the signal at 0V~10V DC.
Current
source Shift switch J5-1 to I side, which enable to receive the signal at 0/4mA~20mA.
VF2
Voltage
source Shift switch J5-2 to U side, which enable to receive the signal at 0V~10V DC.
Current
source Shift switch J5-2 to I side, which enable to receive the signal at 0/4mA~20mA.
When the frequency inverter uses the analog input as frequency source reference, torque reference, PID reference
or feedback, corresponding curve can be chosen for the relationship between the voltage or current value and
reference value or feedback quantity through function code P2.1.02, and the corresponding curve parameters are
set. The sampling value of Terminal VF can be viewed through Function Code P9.0.09 and P9.0.10. Refer to the
figure below for explanation:
Output
Frequency
Central
Frequency
Running
Command
Amplitude
Mutation
Frequency
Amplitude
Mutation
Frequency
Acceleration
Time
Rise Time of
Triangular Wave
Fall Time of
Triangular Wav
Wobbulating Cycle
Deceleration Time
Time
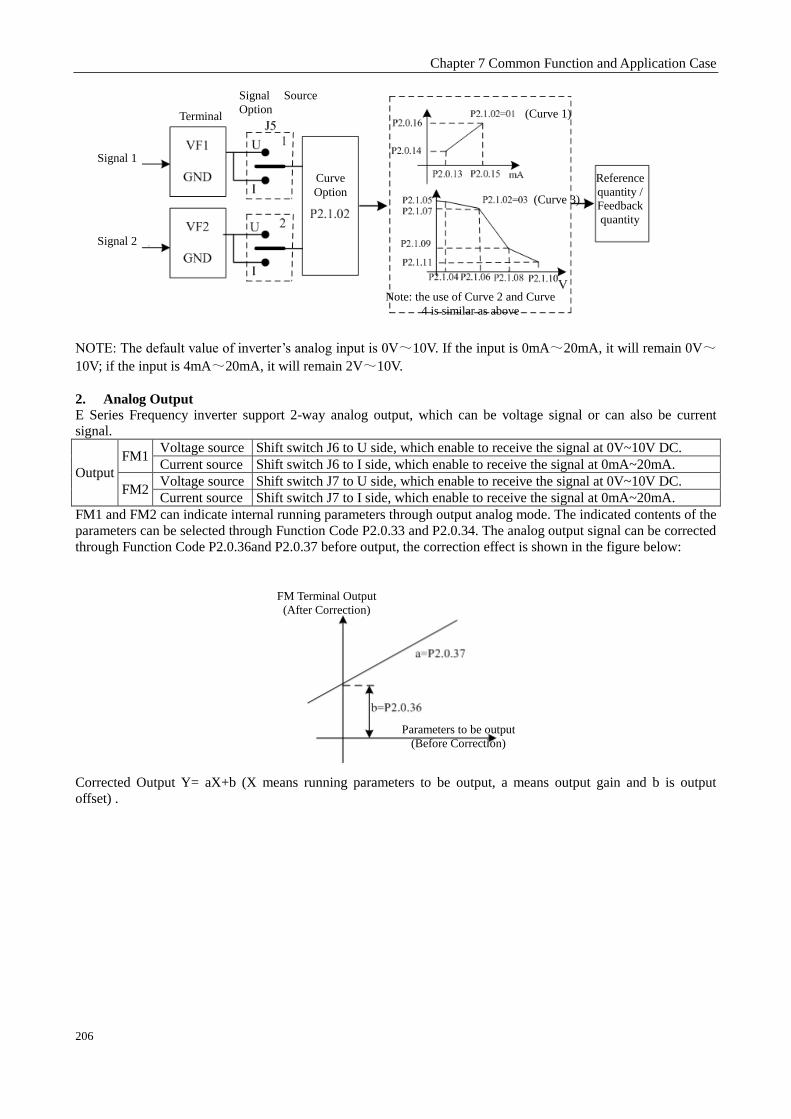
Chapter 7 Common Function and Application Case
206
NOTE: The default value of inverter’s analog input is 0V~10V. If the input is 0mA~20mA, it will remain 0V~
10V; if the input is 4mA~20mA, it will remain 2V~10V.
2. Analog Output
E Series Frequency inverter support 2-way analog output, which can be voltage signal or can also be current
signal.
Output
FM1 Voltage source Shift switch J6 to U side, which enable to receive the signal at 0V~10V DC.
Current source Shift switch J6 to I side, which enable to receive the signal at 0mA~20mA.
FM2 Voltage source Shift switch J7 to U side, which enable to receive the signal at 0V~10V DC.
Current source Shift switch J7 to I side, which enable to receive the signal at 0mA~20mA.
FM1 and FM2 can indicate internal running parameters through output analog mode. The indicated contents of the
parameters can be selected through Function Code P2.0.33 and P2.0.34. The analog output signal can be corrected
through Function Code P2.0.36and P2.0.37 before output, the correction effect is shown in the figure below:
Corrected Output Y= aX+b (X means running parameters to be output, a means output gain and b is output
offset) .
Terminal
Signal Source
Option
Signal 1
Signal 2
Curve
Option
(Curve 1)
(Curve 3)
Reference
quantity /
Feedback
quantity
Note: the use of Curve 2 and Curve
4 is similar as above
FM Terminal Output
(After Correction)
Parameters to be output
(Before Correction)

Chapter 7 Common Function and Application Case
207
7.1.18 Digital Input/Output Use
1. Digital Input CDI-E100 Series Frequency inverter has 6 digital input terminals with No. DI1~DI6, in which DI6 is high speed
input terminal. CDI-E102 Series Frequency inverter has 5 digital input terminals with No. DI2~DI6, in which
DI6 is high speed input terminal. CDI-E180 Series Frequency inverter is configured with 6 digital input terminals
with No.DI1~DI6, in which DI6 is high speed input terminal. Besides, it can externally connect IO Expansion
Card and additional 4 IO Expansion Cards with No.DI7~DI10 can be adopted. VF1 and VF2 can also be set as
digital input through Function Code P2.1.23 and P2.1.24.
The digital input terminal adopts internal power by factory default, which is valid for short circuit to Terminal
COM (indicated as 1) and invalid for disconnection (indicated as 0), it also can make its indicated effect reverse
through setting Function Code P2.1.00 and P2.1.01. When VF is used as digital input, the short circuit of 10V
Power Terminal of the frequency inverter and VF is valid, but invalid for disconnection, and the indicated effect
can also be reversed through Function Code P2.1.25.
Terminal DI1~DI3 can also be used to set the delay effect time through Function Code P2.1.26~P2.1.2 and
available for the occasions that require to delay the signal effect.
T is the delayed time
2. Digital Output CDI-E100 Series Frequency inverter has three multi-functional output terminals, that is, YO, T1 and T2. E102
Series inverter has only one multi-function putput terminal, i.e. T1. CDI-E180 Series Frequency inverter is
configured with three multi-functional output terminals, that is, YO, T1 and T2. Besides, it can externally connect
IO Expansion Card and then additional two IO Expansion Cards can be adopted, that is, YO1 and YO2.
Name of
Terminal
Function
Code
Configuration Description for Output
YO1 P2.0.28 E180 Expansion
Card
Transistor; drive capability: 48VDC, 50mA below
T1 Relay P2.0.29 E Series Control
Panel
Relay: drive capability: 250VAC, 3A below or 30VDC, 1A
below
T2 Relay P2.0.30 E Series Control
Panel (E102
invalid)
Relay: drive capability: 250VAC, 3A below or 30VDC, 1A
below
YO2 P2.0.31 E180 Expansion
Card
Transistor; drive capability: 48VDC, 50mA below
FMP(YO/FMP)
(P2.1.20=0)
P2.0.35
P2.1.21
E Series Control
Panel
(E102 invalid)
Transistor; able to output high-frequency impulse
0.01kHz~100kHz; drive capability: 24VDC, 50mA below
YO(YO/FMP)
(P2.1.20=1)
P2.0.32 E Series Control
Panel
(E102 invalid)
Transistor; drive capability: 48VDC, 50mA below
Signal Input
Time Point Signal Action
Time Point
Setting for Terminal
Delay Time

Chapter 7 Common Function and Application Case
208
Output Terminal YO, T1 and T2 can also be used to set the delay effect time through Function Code
P2.1.29~P2.1.31 and available for the occasions that require to delay the signal effect.
T is the delayed time
7.1.19 Communication of Upper Computer As the automation control is more widely used, the applications on controlling the running of the frequency
inverter the upper computer through communication mode have been too much, so the use of Network RS485 can
conduct communication with E Series Frequency inverter of Delixi. CDI-E100 Series Frequency inverter has
communication interface terminal on control panel, that is, SG+ and SG-, so the communication can be realized
by connecting the communication line and programming on upper computer. While E180 Series Frequency
inverter hasn’t had communication interface terminal on control panel, so the communication can be realized by
externally connecting the expansion card and programming on upper computer.
E Series Frequency inverter adopts MODBUS-RTU Protocol, which can only be used as slave station, namely, it
can only handle and reply the data from upper computer, but not initiatively send the data. When communicating,
it is required to set the parameters of Function Code P4.1.00~P4.1.05. These parameters need to be set based on
actual conditions, if the setting is improper, it may cause the communication unable to be done or abnormal
communication. When the communication timeout (P4.1.04)is set at non-zero data, the frequency inverter
automatically shuts down after the fault of communication timeout to avoid the frequency inverter from running
without control to lead to adverse consequence when the communication or upper computer breaks down. As for
specific use of Communication Protocol, refer to the Description of Chapter VIII for more details. The figures
below are communication diagram of E100, E102 and E180.
Generation
Time Point of
Output Signal
Output Time
Point of Output
Signal
Setting for Terminal
Delay Time

Chapter 7 Common Function and Application Case
209
7.1.20 Parameter Identification
When the control mode of the frequency inverter is vector control mode (P0.0.02=1 or 2), the accuracy for the
parameters of motor of P0.0.19~P0.0.23 directly effects the control performance of the frequency inverter, if the
frequency inverter has good control performance and running efficiency, the frequency inverter must acquire the
accurate parameters of the controlled motor. If exact parameters of motor have been acquired, the parameters of
motor can be manually input into P0.0.19~P0.0.23, or the Parameter Identification Control Function is required to
be used.
The Parameter Identification Control Modes include Static Identification, Complete Identification, Load
Synchronous Machine Identification and Non-load Synchronous Machine Identification. As for Parameter
Identification Control of the asynchronous motor, it suggests using the Complete Identification Mode at on-load
run. (P0.0.24=2)
Upper Computer
Communication Protocol
E100 Frequency
inverter
Communication Setting (set based on actual
conditions)
Baud Rate P4.1.00 Data format P4.1.01 Local format P4.1.02
Response delay P4.1.03 Communication Timeout
P4.1.04 Data Transmission Format
P4.1.05
Communication Function
Upper Computer
Communication Protocol
Expansion Card for E102
Communication
Communication Setting (set based on actual
conditions)
Baud Rate P4.1.00 Data format P4.1.01 Local format P4.1.02
Response delay P4.1.03 Communication Timeout
P4.1.04 Data Transmission Format
P4.1.05
Communication Function
E102 Frequency
inverter
Upper Computer
Communication Protocol
Expansion Card for E180
Communication
Communication Setting (set based on actual
conditions)
Baud Rate P4.1.00 Data format P4.1.01 Local format P4.1.02
Response delay P4.1.03 Communication Timeout
P4.1.04 Data Transmission Format
P4.1.05
Communication Function
E180 Frequency
inverter

Chapter 7 Common Function and Application Case
210
Parameter Identification
Control Mode Applicable Occasions
Identification
Effect
Static Identification Only applicable for occasions not convenient to separate the motor
and rotating system from asynchronous motor Worse
Complete Identification Only applicable for occasions able to completely separate the
motor and rotating system from asynchronous motor Best
Load Synchronous
Machine Identification
Only applicable for occasions not convenient to separate the motor
and rotating system from synchronous motor Not bad
Non-load Synchronous
Machine Identification
Only applicable for occasions able to completely separate the
motor and rotating system from synchronous motor Best
As for the occasions hard to separate the asynchronous motor and rotating system, the motor with same brand and
type can be used, after complete identification, the parameters for properties of the motor are copied to
corresponding parameter of P0.0.19~P0.0.23.
Function code Function name Setting scope Factory set
value
P0.0.24 Parameter Identification
Control
00: No action
01: Static identification
02: Complete identification
11: Synchronous machine on-load identification
(Invalid E100)
12: Synchronous machine non-load identification
(Invalid E100)
00
CDI-E100, E102 Series only supports Static Identification and Complete Identification, but not Load Synchronous
Machine Identification and Non-load Synchronous Machine Identification. While E180 Series supports all modes.
0: No Action
When the frequency inverter is under normal operating state, the parameter identification is not required to be
done.
1: Static Identification
When the load cannot completely separate from the asynchronous motor, this mode can be adopted. Before
conducting the identification, the parameter value of P0.0.13~P0.0.18 must be set correctly. After completing the
setting and pressing Key RUN, the frequency inverter operates the static identification, the completion of the
identification only can acquire three parameter values of P0.0.19~P0.0.21.
2: Complete Identification
When the load completely separates from the asynchronous motor, this mode can be adopted (if the conditions
allow, please try to adopt this mode, for it has better effect). Before conducting the identification, the parameter
value of P0.0.13~P0.0.18 must be set correctly. After completing the setting and pressing Key RUN, the frequency
inverter operates the complete identification, the completion of the identification only can acquire five parameter
values of P0.0.19~P0.0.23.
11: Load Synchronous Machine Identification
When the load cannot completely separate from the synchronous motor, this mode can be adopted. Before
conducting the identification, the parameter value of P P0.0.13~P0.0.18, P0.1.26, P0.1.27 and P0.1.34 must be set
correctly. After completing the setting and pressing Key RUN, the frequency inverter operates the Load
Synchronous Machine Identification, the completion of the identification can acquire initial position angle of the
synchronous, and the initial position angle is the necessary conditions for normal operation of the synchronous
motor, so the first use of the synchronous motor must conduct identification.

Chapter 7 Common Function and Application Case
211
12: Non-load Synchronous Machine Identification
When the load completely separates from the synchronous motor, this mode can be adopted (if the conditions
allow, please try to adopt this mode, for it has better effect), such a mode can acquire accurate parameters of the
motor so as to achieve better running performance of the synchronous motor. Before conducting the identification,
the parameter value of 0.0.13~P0.0.18, P0.1.26, P0.1.27 and P0.1.34 must be set correctly.
Steps for Motor Parameter Identification: 1. If the motor can completely separate from the load, please confirm its state and the motor cannot influence
other related devices when the motor is rotating.
2. After power-on, please confirm that the Parameter P0.0.13~P0.0.18 of the frequency inverter is the same with
corresponding parameter on the nameplate of the motor.
3. Please confirm that when the running control mode of the frequency inverter is at P0.0.03=0, the panel
control is adopted (i.e. only Key RUN on the control panel can identify the running signal).
4. Set Function Code P0.0.24 and select the mode of parameter identification. If the Complete Identification is
selected, the Function Code is at P0.0.24=2, press Key “ ENTER” and then press Key “RUN”, the keyboard
displays “ ”,the indicator of“RUN” lights on and the indicator of “TUNE” keeps flashing. The parameter
identification continues running about 30s~60s, when the display of “ ” disappears, the indicator
of“TUNE” lights off, such a condition means the end of parameter identification, the frequency inverter can
automatically store the identified the characteristic parameters of the motor into corresponding function code.
When CDI-E180 Series Frequency inverter drives the synchronous motor, the feedback signal of the encoder is
required, before identification, the parameters of the encoder must be set correctly. In the process of identifying
the synchronous motor, the rotating action is required, the best identification mode is no-load dynamic
identification, if the conditions don’t allow, and the load dynamic identification can be conducted.

Chapter 7 Common Function and Application Case
212
7.2 Application Cases
7.2.1 Switching function of dual-pump
General parameters of dual-pump function (when you debug dual-pump function, please input 100 for
function code P5.0.19)
Function
code Name
Set
value Description
P0.0.03 Option for Running Control
Mode
0 Start via Run key on Control Panel (default)
1 Start via External Terminal DI1 (P2.0.00=01)
P3.0.00 Simple PLC Running mode
0 End of Single Running and Stop
1 End of Single Running and Save Final Value
2 Continuous Running (default)
3 N cycles
P3.0.01 Cycle number(s), N 0 Switching times of dual-pump cycle when at P3.0.00=3
P3.0.02 Option of PLC Power-off
Memory 11 Memory for shutdown and power-off
P3.2.13 Pump Switching Time Point 22.0s The set value is larger than actual deceleration time of the
inverter
P3.2.17 Restart Time Point 24.0s The set value is larger than the set value of P3.2.13
P3.0.04 Pump 1 Running time 0 Operation time of pump #1
P3.0.06 Pump 2 Running time 0 Operation time of pump #2
P3.0.35 Frequency resource of pump
#1
H.010 Determined by keyboard potentiometer (default)
H.020 Determined by keyboard frequency
H.030 VF1 input
H.040 VF2 input
Power supply
Circuit Breaker
CDI-E Series
inverter
Motor
Start through
terminal Multi-function relay output T1
Two contactors for motor
switching control
Multi-function relay output T2
Default is reference parameter
for failure indication
Referenced parameter: P2.0.30

Chapter 7 Common Function and Application Case
213
P3.0.36 Frequency resource of pump
#2
H.010 Determined by keyboard potentiometer (default)
H.020 Determined by keyboard frequency
H.030 VF1 input
H.040 VF2 input
P3.0.51 Pump Running time Unit
0 Second
1 Hour
2 Minute
P5.0.19 Factory set values Recovery
00 No Operation
30 Users Current Parameter Backup
60 User Backup Parameters Recovery
100 Factory set values of dual-pump function recovery
Factory set values (used for internal function test and no modification is allowed)
Function code Set value Function code Set value
P0.0.04 7 P3.2.03 00100
P2.0.29 52 P3.2.04 00117
P3.2.00 112 P3.2.07 3914

Chapter 7 Common Function and Application Case
214
7.2.2 PID control for Water Supply at Permanent Pressure
1. Diagram of wiring connection
Note: if it is the remote pressure gauge, put J5-1 (VF1 DIP switch) to U side, and if it is the pressure transmitter,
put J5-1 to I side.
2. Control Diagram of one-driving-two pump-increasing
Power supply
Circuit Breaker
Motor CDI-E
Series
inverter
Start through terminal
Remote
pressure
gauge
PID
feedback
Dual-line
pressure
transmitter
Note: select
one out of
two
Multi-function relay
output T1
Default is running signal
Referenced parameter: P2.0.29
Pump-increasing control
CDI-E series inverter Unlock Interlock
Pump-increasing control
Fuse
Control power
Power indication
Mini circuit breaker
Pump 1# variable frequency
START/STOP
Pump 2# working frequency
Direct START/STOP
Pump 2# working frequency
Operation indication
Pump 2# working frequency
Interlock START/STOP
Pump 1 Pump 2
Terminal for external
connection
Connect to remote
pressure gauge

Chapter 7 Common Function and Application Case
215
General parameters of permanent water supply (when user debugs the function of permanent water supply,
please input 101 to function code P5.0.19)
Function code Function name Set value Description
P0.0.03 Option for Running Control
Mode
0 Start Key Run on Control Panel (default)
1 Start the External Terminal DI1(P2.0.00=01)
P0.0.09 Lower frequency 10.00 Set based on actual conditions
P0.0.11 Acceleration Time Machine type Set based on actual conditions
P0.0.12 Deceleration Time Machine type Set based on actual conditions
P4.0.00 PID Reference Source 0 The reference source is given from P4.0.01
P4.0.01 PID Value Reference 50.0%
The reference value is given by the users based
on actual needs, which is the percentage
relative to P4.0.04.
P4.0.02 PID Feedback Source 0 The feedback source inputs from Terminal VF1
P4.0.03 PID Action Direction
0 PID Direct Action. The bigger feedback is, the
smaller the frequency is. (default)
1 PID Reverse Action. The smaller the feedback
is, the smaller the frequency is.
P4.0.04 PID Given Feedback Range 1000 Set based on actual feedback range (1000
means 1MPa)
P3.2.24 PID Sleep Threshold Value 90.0%
The reference value is given by the users based
on actual needs, which is the percentage
relative to P4.0.04.
P3.2.25 PID Wake-up Threshold
Value 10.0%
The reference value is given by the users based
on actual needs, which is the percentage
relative to P4.0.04.
P3.2.12 Time of Delayed Sleep 5.0 Set based on actual conditions
P9.0.14 PID Reference
(Display Value) Display PID Reference
P9.0.15 PID Feedback
(Display Value) Display PID Feedback
P5.0.19 Factory set values Recovery
00 No Operation
30 Current User Parameters Backup
60 User Backup Parameters Recovery
101 Recovery of Factory set values of Permanent
Pressure Water Supply Function
Control Parameters of Pump-increasing
P2.0.30 Pump-increasing function 00 Enable pump-increasing function
54 Disable pump-increasing function
P3.2.15 Pump-increasing
Connection Delay Time 5.0
Increased pump will be connected after user
delay the set value once upper frequency is
reached.
P3.2.20 Pump-increasing
Disconnection Delay Time 5.0
Increased pump will be disconnected after user
delay the set value once lower frequency is
reached.

Chapter 7 Common Function and Application Case
216
Performance parameters of permanent water supply Function code
Name Set value
Description
P2.1.02 Analog Input Curve Selection
H.21 Define VF1 Select Curve 1
P2.0.13 Minimum Input of Curve 1
00.00V
Define the relation curve between VF1 Input and PID Feedback NOTE: The default value of inverter’s analog input is 0V~10V. If the input is 0 mA~20 mA, it will remain 0V~10V; if the input is 4 mA~20 mA, it will remain 2V~10V.
P2.0.14
Corresponding
reference for
Minimum Input of
Curve 1
000.0%
P2.0.15 Maximum Input of
Curve 1 10.00V
P2.0.16
Corresponding
reference for
Maximum Input of
Curve 1
100.0%
P2.0.17 VF1 Filtering time 00.10s
When the site analog is easily disturbed, please increase the
filtering time to make the detected analog tend to be stable, but the
longer the filtering time is, the response speed to the analog test
gets slow as the filtering time become longer.
P4.0.05 Proportional Gains
KP1 020.0
The greater the value of proportional gain KPI is, the larger the
adjustment volume is and the faster the response is, but the too
large value can generate the system oscillation, the smaller the
value of KPI is, the more stable the system is and the slower the
response is.
P4.0.06 Integral Time TI1 02.00
The greater the value of Integral Time TI1 is, the slower the
response is and the more stable the output is, the worse the
fluctuation control ability of the feedback quantity is, the smaller
the value of TI1 is, the faster the response is and the greater the
output fluctuation is, the too small value can generate the
oscillation.
P4.0.07 Derivative Time TD1 00.000
The Derivative Time TD1 can set the limit for gain provided by
the derivator to ensure that a pure derivative gain can be obtained
at low frequency and a constant derivative gain can be obtained at
high frequency. The longer the derivative time is, the greater the
adjusting strength is.
Generally, no setup is required for the optimized parameters of permanent water supply. If any, please
refer to the description of related function code. Function code
Name Set value Description
P4.0.08 PID Deviation Limit 000.0
Refer to the description of related function code
P4.0.09 PID Feedback Filtering time 00.00
P4.0.10 Proportional Gains KP2 020.0
P4.0.11 Integral Time TI2 02.00
P4.0.12 Derivative Time TD2 00.000
P4.0.13 PID Switch Conditions 0
P4.0.14 PID Switch Deviation 1 020.0
P4.0.15 PID Switch Deviation 2 080.0
P4.0.16 PID Initial Value 000.0
P4.0.17 PID Initial Value Hold Time 000.00
P4.0.18 PID Feedback Loss Test 000.0
P4.0.19 PID Feedback Loss Test Time 00.0
P4.0.20 PID Stop Operation 0

Chapter 7 Common Function and Application Case
217
Monitoring contents under non-operation status:
Monitoring contents under operation status:
Factory set values (used for internal function test and no modification is allowed)
Function code Set value Function code Set value
P0.0.04 8 P3.2.28 04004
P3.2.00 11111 P3.2.29 3224
P3.2.02 780 P3.2.30 1000
P3.2.03 790 P3.2.31 9015
P3.2.04 11106 P3.2.32 9046
P3.2.05 38376 P3.2.34 4004
P3.2.06 1132 P3.2.35 3225
P3.2.09 14 P3.2.36 1000
P3.2.26 H.7353 P3.2.37 9048
P3.2.27 H.0505 P3.2.38 9015
P5.0.05 H.0C02 P5.0.02 H.C015
Bus line
voltage
PID given
value
PID feedback
Press >>
Press >>
Press >>
Press >> Press >>
Press >>
Press >> Press >>
Running
frequency
Output
current
PID feedback
Bus line
voltage
PID given
value

Chapter 7 Common Function and Application Case
218
7.2.3 Ball mill
General parameters of ball mill (when you debug ball mill, please input 102 for function code P5.0.19)
Function
code
Name Given scope Factory set
value
P0.0.01 Type of Inverter
0: Basic Mode (Prefix with ‘P’)
1: User Mode (Prefix with ‘U’)
2: Verification Mode(Prefix with ‘C’)
1
P0.0.02 Display Mode
0: V/F Control
1: Open-loop Vector Control (SVC)
2: Closed-loop Vector Control (Invalid
E100)
0
P0.0.03 Option for Running Control
Mode
0: Keyboard Control
1: Terminal Control
2: Communication Control
0
P0.0.11 Acceleration Time 0000.0~6500.0s Machine type
P0.0.12 Deceleration Time 0000.0~6500.0s Machine type
P0.1.16 Deceleration Timing 0000.0~6500.0s Machine type
P3.0.00 Cycle Running Mode
0: End of Single Running and Stop
1: End of Single Running and Save Final
Value
2: Continuous Running
3: Cycle N Times
2
P3.0.01 Cycle number (s), N 00000~65000 00000
P3.0.02 Option of PLC Power-off
Memory
Memory for shutdown and power-off
Ones: Option of Power-off Memory
0: No memory (not saved)
1: Memory (saved)
Tens: Option of Shutdown
0: No memory (not saved)
1: Memory (saved)
00
Power supply
Circuit Breaker
Motor CDI-E
Series
inverter Start through terminal
Multi-function relay output T1
Default is running signal
Referenced parameter: P2.0.29
Multi-function relay output T2
Default is reference parameter
for failure indication
Referenced parameter: P2.0.30

Chapter 7 Common Function and Application Case
219
Function code Name Given scope Factory set
value
P3.0.04 Phase 0 Running time 0000.0~6500.0 min. 100.0
P3.0.06 Phase 1 Running time 0000.0~6500.0 min. 100.0
P3.0.35 Phase 0 Running direction H.010: default direction
H.110: reversed direction H.010
P3.0.36 Phase 1 Running direction H.010: default direction
H.110: reversed direction H.010
P3.0.51 Running Time Unit
0: Second
1: Minute
2: Hour
2
P3.2.11 Control of timed running 4200: not timed
4239: timed 4200
P3.2.17 Waiting Interval Time 0.0~3600.0 sec. 0000
P3.2.24 Total running time 0.0~3600.0 min. 1000.0
P5.0.15 Customized Display of
Coefficient 0.0001~6.5000
0.288
P5.0.19 Factory set values Recovery
00: No Operation
30: Current User Parameters Backup
60: User Backup Parameters Recovery
102: Recovery of Factory set values of
Ball Mill
00
Notes:1. The system can be stopped automatally either through cycle numbers or through timing
2. Only the above parameters will be displayed and other parameters will be hided when you switch to
user mode (P0.0.01=1).
3. If the running direction of Phase 0 and Phase 1 is same, which means single direction running; if the
running direction of Phase 0 and Phase 1 is opposite, which means alternative direction running
4. If vector control, please refer to User Manual (default is V/F control) of motor parameters setting and
parameters idendification.
Illustration of system running
Running direction of Phase 0 and Phase 1 is same.
If the running is not timed, the system will run one cycle after one cycle untile a stop instruction is received. If the
running is timed, the system will stop automatically once the total running time is reached.
One complete cycle
Running time
of Phase 0
Interval of
waiting time
Running time
of Phase 1
Interval of
waiting time
Total running time

Chapter 7 Common Function and Application Case
220
Running direction of Phase 0 and Phase 1 is opposite.
If the running is not timed, the system will run one cycle after one cycle untile a stop instruction is received. If the
running is timed, the system will stop automatically once the total running time is reached.
Method of rotating speed indicating
If you want to display rotating speed, you can calculate the customized display consitent according to the
following formula and set the calculation result in P5.0.15. And then press >>, once V, A, Hz on the keyboard
panel are black out, the figure displayed is rotating speed.
Customized display consitent = Rated rotating speed / (rated frequency*100)/ speed ratio
For example: the rated rotating speed of motor is 1444 rpm, rated frequency is 50.00Hz and the speed ratio of
machine is 2, so Customized display consitent =1440/(50.00*100)/ 2 = 0.144
Monitoring contents under shutdown status
Monitoring contents under running status:
Factory set values (used for internal function test and no modification is allowed)
Function code Set value Function code Set value Function code Set value
P0.0.04 7 P3.2.09 0048 P3.2.04 21113
P3.2.00 21112 P3.2.05 121 P5.0.05 H.0203
P3.2.07 3914 P3.2.10 0050 P5.0.02 H.081F
P3.2.03 00100 P3.2.23 10001
P3.2.18 1.0 P3.0.51 2
One complete cycle
Running time
of Phase 0
Interval of
waiting time
Running time
of Phase 1
Interval of
waiting time
Total running time
Press >>
Press >>
Press >>
Set frequency Bus line voltage
Set rotating speed
Running
frequency
Press >> Set
frequency Output current Press >>
Press >> Press >>
Press >> Press >>
Rotating speed of
running Bus line voltage Output voltage

Chapter 7 Common Function and Application Case
221
7.2.4 Injection Molding Machine
Note: if analog input is 0~10V, then voltage signal will switch J5-1 & J5-2 (VF1, VF2 DIP switch) to U side; if
analog input is 4~20mA, then voltage signal will switch J5-1 & J5-2 to I side; if analog input is 0~1A current
signal, you should increase an E180-ZS expansion card to convert current signal into 0~10V voltage signal.
Please see Appendix 6 for the use instruction of E180-ZS expansion card.
Wiring connection of main circuit of variable frequency (VF) energy-saving reconstruction of Injection
Molding Machine
As for Injection Molding Machine with direct START/STOP oil pump motor, the wiring connection is as
follows:
When make reconstruction, connect the power cable from the back of circuit breaker to in-line terminal of inverter,
and connect in-line terminal of electromagnetic switch to out-line terminal of inverter.
DC reactor
Braking resistor
Braking unit Circuit Breaker
Power
supply
Motor
CDI-E 180
Series inverter
Forward running
Upper frequency1
Upper frequency2
Upper frequency3
Upper frequency4
Public terminal
Multi-function relay output T1
Default is running signal Referenced parameter: P2.0.29
Multi-function relay output T2
Default is reference parameter for failure indication
Referenced parameter: P2.0.30
Pressure signal
Flow signal
Circuit breaker Inverter Electromagneti
c switch Oil pump motor

Chapter 7 Common Function and Application Case
222
As for Injection Molding Machine with oil pump motor via reduced-voltage START, the wiring connection
is as follows:
When make reconstruction, connect the power cable from the front of bus line of START device with
reduced-voltage or back of circuit breaker to in-line terminal of inverter, and connect out-line terminal of inverter
to in-line terminal of main circuit of START device with reduced-voltage.
General parameters of Injection Molding Machine (when you debug Injection Molding Machine, please
input 103 for function code P5.0.19)
Function code
Name Set value Description
P0.1.00 Option of Frequency Source
0 VF1 (default)
1 VF2
2 VF1+ VF2
4 MAX[VF1, VF2]
P0.0.09 Lower frequency 10.00Hz The lowest running frequency is allowed by
inverter
P0.0.11 Acceleration Time Machine type
P0.0.12 Deceleration Time Machine type
P2.1.04 Min. Input of VF1 00.00V
Relation curve of VF input and corresponding
reference. The corresponding reference means
percentage of the highest frequency.
P2.1.05 Corresponding reference for Min.
Input of VF1 000.0%
P2.1.10 Max. Input of VF1 10.00V
P2.1.11 Corresponding reference for Max.
Input of VF1 100.0%
P2.1.12 Min. Input of VF2 00.00V
P2.1.13 Corresponding reference for Min.
Input of VF2 000.0%
P2.1.18 Max. Input of VF2 10.00V
P2.1.19 Corresponding reference for Max.
Input of VF2 100.0%
P6.1.06 Fault Auto Reset Number 00 No automatic fault reset
P6.1.07 Waiting Interval Time of Fault
Auto Reset 001.0s
Refer to the waiting time of automatic fault
reset after the inverter gives an alarm of fault.
P3.2.08 Limitless Fault Auto Reset
0200 Invalid
0213 Valid
P3.2.13
Waiting Interval Time of Limitless
Fault Auto Reset
001.0s Refer to the waiting time of automatic fault
reset after the inverter gives an alarm of fault.
P5.0.19 Factory set values Recovery
00 No Operation
30 Current User Parameters Backup
60 User Backup Parameters Recovery
103 Recovery of Factory set values of Injection
Molding Machine
Circuit breaker Inverter Start device with
reduced-voltage Oil pump motor
Corresponding
given value
VF input

Chapter 7 Common Function and Application Case
223
Performance Parameters of Injection Molding Machine
P2.1.06 VF1 Inflection Point 1 Input 03.00V
Relation curve of VF input and corresponding
reference. The corresponding reference means
percentage of the highest frequency.
P2.1.07 Corresponding reference for
VF1 Inflection Point 1 Input 030.0%
P2.1.08 VF1 Inflection Point 2 Input 06.00V
P2.1.09 Corresponding reference for
VF1 Inflection Point 2 Input 060.0%
P2.1.14 VF2 Inflection Point 1 Input 03.00V
P2.1.15 Corresponding reference for
VF2 Inflection Point 1 Input 030.0%
P2.1.16 VF2 Inflection Point 2 Input 06.00V
P2.1.17 Corresponding reference for
VF2 Inflection Point 2 Input 060.0%
P3.0.03 Phase directive 0 100.0% Upper frequency when DI5, DI4, DI3, DI2 are
disconnected (percentage of the highest frequency)
P3.0.05 Phase directive 1 090.0% Upper frequency only when DI2 is connected (ditto)
P3.0.07 Phase directive 2 080.0% Upper frequency only when DI3 is connected (ditto)
P3.0.11 Phase directive 4 070.0% Upper frequency only when DI4 is connected (ditto)
P3.0.19 Phase directive 8 060.0% Upper frequency only when DI5 is connected (ditto)
P2.0.17 VF1 Filtering time 0.10s sec. when the on-site analog is easily to be disturbed, the
filtering time shall be increased to make the tested
analog input to be stable, but the greater filtering time
makes the response speed of the analog test become
slow. P2.0.22 VF2 Filtering time 0.10 sec.
Factory set values (used for internal function test and no modification is allowed)
Function code Set value Function code Set value
P0.0.03 1 P2.0.02 10
P0.0.04 3 P2.0.03 11
P0.1.01 4 P2.0.04 12
P0.0.07 50.00Hz P2.1.02 H.43
P0.0.10 0 P3.2.00 00022
P0.1.03 3 P3.2.07 3714
P2.0.00 01 P2.0.01 9
Corresponding
given value
VF input

Chapter 7 Common Function and Application Case
224
7.2.5 Local/ Remote Control
Notes: 1. VF1 is local analog input 2. VF2 is remote analog input 3. DI1 is local button of START/ STOP(START is connected while STOP is disconnected) 4. DI2 is remote button of START/ STOP(START is connected while STOP is disconnected) 5. DI3 is switch button of LOCAL/ REMOTE (REMOTE is connected while LOCAL is
disconnected)
General parameters for local/ remote control (when you debug local/ remote control, please input 104 for
function code P5.0.19)
Function code Description
P0.0.03
Running command control method: P0.0.03=1 and P3.2.07=0021: keyboard control of local and terminal DI2 control for remote (default) P0.0.03=1 and P3.2.07=0000: Terminal DI1 control for local and terminal DI2 control for remote P0.0.03=2 and P3.2.07=0021: keyboard control of local and communication control for remote P0.0.03=2 and P3.2.07=0022: Terminal DI1 control for local and communication control for remote
P0.0.04 Local frequency resource method selection 0~13, 02: Keyboard potentiometer (default) P0.1.01 Remote frequency resource method selection l0~13, 04: VF2 (default)
P5.0.19 30: Users Current Parameter Backup 60: User Backup Parameters Recovery 104: Factory set values of Local/ Remote function recovery
Factory set values (used for internal function test and no modification is allowed) Function code Set value Function code Set value Function code Set value P0.0.03 1 P2.0.01 00 P3.2.03 00102 P0.1.00 8 P2.0.02 18 P3.2.04 01022 P0.1.01 4 P3.2.00 1111 P3.2.05 11123 P2.0.00 0 P3.2.02 00021 P3.2.10 01
Circuit
breaker
CDI-E series
inverter
Motor
Running signal
Failure indication

Chapter 8 E Series Frequency Inverter RS-485 Communication
225
Chapter 8 E Series Frequency Inverter RS-485 Communication
1 Explanation for E Series Frequency inverter RS-485 Communication Terminal
CDI-E180 Series Frequency inverter hasn’t had RS-485 Communication Terminal on control panel.
SG+:485 Signal Positive
SG-:485 Signal Negative
CDI- E102, E180 Series Frequency inverter hasn’t had RS-485 Communication Terminal on control panel. If the
communication is required, the external expansion card must be connected.
2 Explanation for E Series Frequency inverter Communication Parameter
Before the use of RS-485 Communication, must use the keyboard to set “Baud Rate”, “Data Format” and
“Communication Address”.
Function code Function name Setting scope Factory set value
P4.1.00 Baud Rate
0:1200
1:2400
2:4800
3:9600
4:19200
5:38400
6:57600
3
P4.1.01 Data Format
0:No Verification (8-N-2)
1:Even Parity Verification (8-E-1)
2:Odd Parity Verification (8-O-1)
3:No Verification (8-N-1)
0
P4.1.02 Local Machine Address 000:Broadcast Address
001~249 1
P4.1.03 Response Delay 00~20ms 2
P4.1.04 Communication Timeout 00.0 (Invalid)
00.1s~60.0s 0.0
P4.1.05 Data Transmission Format 0:ASCII Mode (Reservation)
1:RTU Mode 1
P4.1.06 MODBUS communication data
reply or not
0: Reply 1: No reply 0
Response Delay: when the frequency inverter receives the data and after the time set by Function Code P4.1.03 is
delayed, the frequency inverter starts recovering the data.
Communication Timeout: the interval between data frames received by the frequency inverter is over the time set
by Function Code P4.1.04, the frequency inverter gives an alarm of Fault Err14, it is deemed as abnormal
communication. If it is set at 0.0, the communication timeout is invalid.

Chapter 8 E Series Frequency Inverter RS-485 Communication
226
3 Description for Standard MODBUS Communication Format
3.1 String Structure
(8-N-2, P4.1.01=0)
Start Bit Data Bit Stop Bit Stop Bit
(8-E-1, P4.1.01=1)
Start Bit Data Bit Stop Bit
(8-O-1, P4.1.01=2)
Start Bit Data Bit Stop Bit
(8-N-1, P4.1.01=3)
Start Bit Data Bit Stop Bit
Even Parity Verification
Odd Parity
Verification

Chapter 8 E Series Frequency Inverter RS-485 Communication
227
3.2 Communication Data Structure
ADR
Slave Machine (Frequency inverter) Address
The address scope of the frequency inverter is (001~249), ( 8-digit hexadecimal number)
Note: When the address is ADR=000H, it is valid for all slave machines and all slave machines
can’t respond message (broadcast mode)
CMD Function Code of Data Package (06: write the contents of a register; 03: read out the contents of
one or more than one register(s)) (8-digit hexadecimal number)
ADRESS
Sending of Host Machine: when at Function Code 06, it means data address (16-digit
hexadecimal number); when at Function Code 03, it means data initial address (16-digit
hexadecimal number)
Slave Station Responds: refer to data address when at function code 06 (16-digit hexadecimal
number); refer to data number when at function code 03
DATA
Sending of Host Machine: when at Function Code 06, it means data address (16-digit
hexadecimal number); when at Function Code 03, it means data initial address (16-digit
hexadecimal number)
Slave Station Responds: when at Function Code 06, it means data address (16-digit
hexadecimal number); when at Function Code 03, it means data initial address (16-digit
hexadecimal number in N)
CRC CHK (CHECKSUM) (16-digit hexadecimal number)
RTU adopts CRC CHK (CHECKSUM), which is calculated as per the following steps:
Step 1: Load 16-digit register with content of FFFFH (CRC Register).
Step 2: Conduct XOR operation for the first byte of the communication data and the contents of CRC Register and
store the results into CRC Register.
Step 3: Move 1bit of the contents of CRC Register to the minimum significant bit and fill in 0 to the maximum
significant bit, and check the minimum significant bit of CRC Register.
Step 4: If the minimum significant bit is 1, the CRC Register and preset value conduct XOR operation. If the
minimum significant bit is 0, no action is taken.
Step 5: After repeat 8 times of Step 3 and 4, the handling to this byte is finished.
Step 6: Repeat Step 2-5 for next byte of the communication data until the handling to all bytes are completed, the
final content of CRC Register is the value of CRC. When transmitting CRC Value, first add the low byte and then
high byte, that is, the low byte is first transmitted.

Chapter 8 E Series Frequency Inverter RS-485 Communication
228
In case of any fault of the communication, the slave machine responds the data of ADRESS and DATA are as
below:
ADRESS DATA Description ADRESS DATA Description
FF01 0001 Invalid address FF01 0005 Invalid parameter
FF01 0002 CRC Check Error FF01 0006
Invalid
Modification to
Parameter
FF01 0003 Read and Write
Command Error FF01 0007 System Lock
FF01 0004 Password Error FF01 0008 Parameter under
Storage
The master station writes the command string format:
Name of
Character
Slave Station Write Command
06H
Function Code
Address
Data content CRC Check
Length of
Character
1Byte 1Byte 2Byte 2Byte 2Byte
Example 01H 06 H 0005 H 1388H 949DH
The slave station responds the command string format:
Name of
Character
Slave Station Write Command
06H
Function Code
Address
Data content CRC Check
Length of
Character
1Byte 1Byte 2Byte 2Byte 2Byte
Example 01H 06 H 0005 H 1388H 949DH
The master station reads the command string format:
Name of
Character
Slave Station Read Command
03H
Initial Address of
Function Code
Data content CRC Check
Length of
Character
1Byte 1Byte 2Byte 2Byte 2Byte
Example 01H 03 H 9000 H 0003H 28CBH
The slave station responds the read command string format:
Name of
Character
Slave
Station
Read
Command 03H
Data content
1
Data
content 2
Data content
3
CRC Check
Length of
Character
1Byte 1Byte 2Byte 2Byte 2Byte 2Byte
Example 01H 03 H 0000H 0000H 0000H 2175H
The slave station responds the write command error string format:
Name of
Character
Slave Station Write Command
06H
Read and Write
Error Mark
Read and Write
Error Type
CRC Check
Length of
Character
1Byte 1Byte 2Byte 2Byte 2Byte
Example 01H 03 H FF01 H 0005H 281DH

Chapter 8 E Series Frequency Inverter RS-485 Communication
229
The slave station responds the read command error string format:
Name of
Character
Slave Station Read Command
03H
Read and Write
Error Mark
Read and Write
Error Type
CRC Check
Length of
Character
1Byte 1Byte 2Byte 2Byte 2Byte
Example 01H 03 H FF01H 0005H E41DH
4 Definition for Parameter Address of Communication Protocol
E Series Frequency inverter not only has many multifunctional function code parameters, but some non-
multifunctional function code parameters. Specific read and write properties are as below:
Function Code Parameter P1~P8 Readable, writable
P9 Only Readable
Non-function Code
Parameter
A000H, A001H, A002H, A003H, A004H, A005H,
A010H, A011H Only writable
B000H, B001H Only Readable
Explanation for Read and Write Address of Function Code Parameters:
High-order parameter address is composed of groups and levels by the function code parameters.
For the service life of EEPROM is limited, the EEPROM cannot be stored frequently in the process of
communication. Therefore, some function codes don’t need to be stored in EEPROM in the process of
communication, but only need to modify the value in RAM.
If it is required to write them into EEPROM, the high-order parameter address adopts the hexadecimal number
and low parameter address adopts decimal number that then is converted to the hexadecimal number. And then the
high-order and low-order parameter address constitutes a four-digit hexadecimal number.
E.g. The address of writing P2.1.12 to EEPROM is as below:
High-order address is 21 by hexadecimal system and lower-order address is 12 by decimal system, which is 0C
after conversion into hexadecimal system, so the address indicates 0x210C.
If it is not required to write it into EEPROM, the high-order parameter address adopts hexadecimal number and
adds 4 digits, and low-order parameter address adopts decimal number then is converted to the hexadecimal
number. And then the high-order and low-order parameter address constitutes a four-digit hexadecimal number.
E.g. The address of not writing P2.1.12 to EEPROM is as below:
High-order address is 21 by hexadecimal system and then adds 4 digits, that is, 25. The lower-order address is 12
by decimal system, which is 0C after conversion into hexadecimal system, so the address indicates 0x250C.

Chapter 8 E Series Frequency Inverter RS-485 Communication
230
Table of Definitions for Non-functional Function Code Parameter Address
Definition Function
Code
Parameter
Address Description for Function
Command to
Frequency
inverter
06H
A000H
0001H Forward Run
0002H Reverse Run
0003H Forward Jogging
0004H Reverse Jogging
0005H Free Stop
0006H Shutdown By Speed Reduction
0007H Fault Rest
A001H
Frequency Command or Upper Frequency Source (refer to the
percentage of the highest frequency without storage)
(00.00~100.00 indicates 00.00%~100.00%)
A002H
BIT0
Multi-functional Output Terminal YO1
(valid only when E180 adds I/O expansion card,
E100 is invalid)
BIT1
Multi-functional Output Terminal YO2
(valid only when E180 adds I/O expansion card,
E100 is invalid)
BIT2 Multi-functional Output Terminal T1
BIT3 Multi-functional Output Terminal T2
BIT4
Multi-functional Output Terminal YO (when
Terminal YO/FMP is used as YO, that is,
P2.1.20=1)
If it is required to make multi-functional output terminal valid,
set corresponding position to 1, after transfer binary system to
hexadecimal system, send it to address A002.
A003H FM1 Output Address
(00.0~100.0 indicates 00.0%~100.0%)
A004H FM2 Output Address
(00.0~100.0 indicates 00.0%~100.0%)
A005H
FMP Output Address (when Terminal YO/FMP is used as FMP,
that is, P2.1.20=0)
(0000H~7FFFH indicates 0.00%~100.00%)
A010H PID Reference Value
AO11H PID Feedback Value
Running status
of monitoring
frequency
inverter
03H B000H
0001H Forward Run
0002H Reverse Run
0003H Stop

Chapter 8 E Series Frequency Inverter RS-485 Communication
231
Table of Definitions for Non-functional Function Code Parameter Address
Definition Function Code Parameter
Address Description for Function
Monitoring to
Fault of
Frequency
inverter
03H B001H
00 No fault
01 Over-current at constant speed
02 Over-current at acceleration
03 Over-current at deceleration
04 Over-voltage at constant speed
05 Over-voltage at acceleration
06 Over-voltage at deceleration
07 Module Fault
08 Undervoltage
09 Frequency inverter Overload
10 Motor Overload
11 Input Default Phase
12 Output Default Phase
13 External Fault
14 Abnormal Communication
15 Frequency inverter Overheat
16 Hardware Fault of Frequency inverter
17 Motor Earthing Short Circuit
Motor
18 Motor Identification Error
19 Motor Off-load
20 PID Feedback Loss
21 User-Defined Fault 1
22 User-Defined Fault 2
23 Accumulative Power-on Time Reached
24 Accumulative Running Time Reached
25 Encoder Fault
26 Parameter Read-Write Abnormity
27 Motor Overheat
28 Larger Speed Deviation
29 Motor Overspeed
30 Initial Position Error
31 Current Test Fault
32 Contactor
33 Abnormity of Current Test
34 Fast Current-limiting Timeout
35 Motor Switch at Running
36 24V Power Fault
37 Driving Power Supply Fault
40 Buffer Resistance Fault
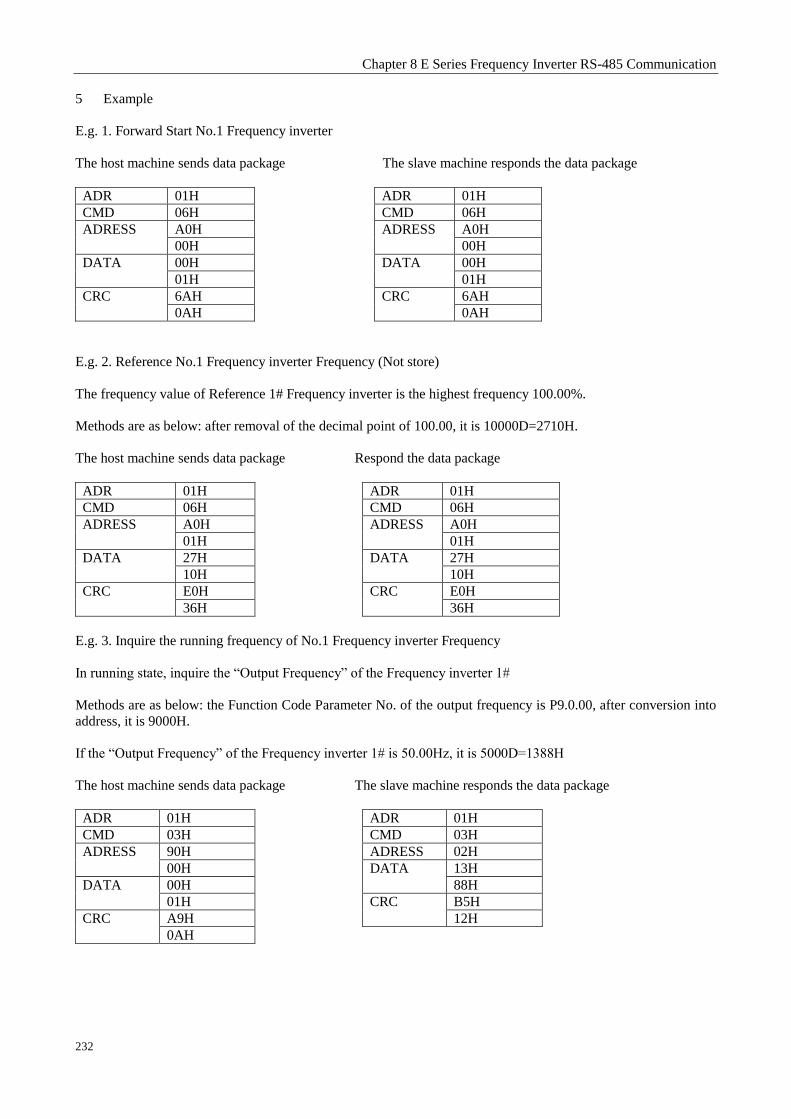
Chapter 8 E Series Frequency Inverter RS-485 Communication
232
5 Example
E.g. 1. Forward Start No.1 Frequency inverter
The host machine sends data package The slave machine responds the data package
ADR 01H ADR 01H
CMD 06H CMD 06H
ADRESS A0H ADRESS A0H
00H 00H
DATA 00H DATA 00H
01H 01H
CRC 6AH CRC 6AH
0AH 0AH
E.g. 2. Reference No.1 Frequency inverter Frequency (Not store)
The frequency value of Reference 1# Frequency inverter is the highest frequency 100.00%.
Methods are as below: after removal of the decimal point of 100.00, it is 10000D=2710H.
The host machine sends data package Respond the data package
ADR 01H ADR 01H
CMD 06H CMD 06H
ADRESS A0H ADRESS A0H
01H 01H
DATA 27H DATA 27H
10H 10H
CRC E0H CRC E0H
36H 36H
E.g. 3. Inquire the running frequency of No.1 Frequency inverter Frequency
In running state, inquire the “Output Frequency” of the Frequency inverter 1#
Methods are as below: the Function Code Parameter No. of the output frequency is P9.0.00, after conversion into
address, it is 9000H.
If the “Output Frequency” of the Frequency inverter 1# is 50.00Hz, it is 5000D=1388H
The host machine sends data package The slave machine responds the data package
ADR 01H ADR 01H
CMD 03H CMD 03H
ADRESS 90H ADRESS 02H
00H DATA 13H
DATA 00H 88H
01H CRC B5H
CRC A9H 12H
0AH

Chapter 9 Fault Handling
233
Chapter 9 Fault Handling
9.1 Frequency inverter Fault and Exclusion Measure
Fault display Description Details Fault elimination
Err00 No Fault
Err01
Over-current
at constant
speed
The output current exceeds the
over-current value while the
frequency inverter is running at a
constant speed
Check whether the output circuit of the
frequency inverter has short circuit;
Check whether the input voltage is
relatively low;
Check whether the load has mutation;
Conduct parameter identification or
improve low frequency torque
compensation;
Check whether the rated power of the
motor or frequency inverter is large
enough;
Err02 Over-current
at acceleration
When the frequency inverter
accelerates, output current
exceeds overcurrent
Check whether the motor is and its lines
are short circuit, grounded or too long;
Check whether the input voltage is
relatively low;
Delay the acceleration time
Conduct parameter identification or
improve low frequency torque
compensation or adjust V/F Curve;
Check whether the load has mutation;
Check whether it is to select speed
tracking or start after the motor stops
stably;
Check whether the rated power of the
motor or frequency inverter is large
enough;
Err03
Over-current
at
deceleration
When the frequency inverter
decelerates, output current
exceeds overcurrent
Check whether the motor is and its lines
are short circuit, grounded or too long;
Conduct parameter identification
Delay the deceleration time;
Check whether the input voltage is
relatively low;
Check whether the load has mutation;
Install additional brake unit and brake
resistance;
Err04
Over-voltage
at constant
speed
When the frequency inverter runs
at constant speed, DC voltage of
the main circuit exceeds this set
value.
Detected DC overvoltage value:
Level T2 : 400V
Level T4: 750V
Level T6: 1300V
Check whether the input voltage is too
high;
Check whether the Bus line voltage
display is normal;
Check whether the motor is dragged to run by
external force in the running process;

Chapter 9 Fault Handling
234
Fault display Description Details Fault elimination
Err05 Over-voltage
at acceleration
When the frequency inverter runs at
constant speed, DC voltage of the main
circuit exceeds this set value. The tested
overvoltage value is the same as above.
Check whether the input voltage is too
high;
Check whether the Bus line voltage
display is normal;
Delay the deceleration time;
Check whether the motor is dragged to
run by external force in the process of
deceleration;
Install additional brake unit and brake
resistance;
Err06 Over-voltage
at deceleration
When the frequency inverter runs at
constant speed, DC voltage of the main
circuit exceeds this set value. The tested
overvoltage value is the same as above.
Check whether the input voltage is too
high;
Check whether the Bus line voltage
display is normal;
Delay the deceleration time;
Check whether the motor is dragged to
run by external force in the process of
deceleration;
Install additional brake unit and brake
resistance;
Err07 Module fault External fault has triggered automatic
module protection
Check the coil resistance of the motor;
Check the isolation of the motor;
Damage by inverse module
breakdown;
Err08 Under-voltage
Under-voltage in the main circuit, check
the electric level:
Test DC undervoltage value:
Level T2 : 190V
Level T4: 380V
Level T6: 700V
Check the lines of supply power
contact well;
Check whether the incoming voltage is
within regulated scope;
Check whether there is momentary
interruption;
Check whether the display of the Bus
line voltage is normal;
Check whether the setting bridge and
charge resistance are normal;
Err09
Frequency
inverter
overloaded
Motor and current exceed the rated load
Check whether the motor is in
locked-rotor conditions or the load to motor
needs to be reduced;
Replace the frequency inverter with
larger power;
Err10 Motor
overload
Motor and current exceed the rated
current
Check the protection parameter
P1.0.25 Reference of the motor is proper;
Check whether the motor is in
locked-rotor conditions or the load to motor
needs to be reduced;
Correctly preset the rated current of
the motor;
Replace the frequency inverter with
larger power;
Err11 Missing phase Error of missing phase or unbalanced
three phases
Check main circuit voltage whether it
is missing phase or unbalanced three phases
Check whether the connecting terminal
is loosing.
Seek technical support

Chapter 9 Fault Handling
235
Fault
display Description Details Fault elimination
Err12 Output Default
Failure
Output Default Failure or
3-phase Imbalance Fault
Check whether the output circuit has output
default failure or 3-phase imbalance fault
Check whether the wiring terminals are loose
Seek technical support
Err13 External Fault Fault caused by External
Control Circuits
Check the signal input circuit of external fault
Reset Run
Err14 Abnormal
Communication
Abnormity for
communication of
frequency inverter and other
equipments
Check external communication lines
The upper computer doesn’t work normally
The setting for communication parameter is not
correct
The communication protocol is inconsistent
Err15
Frequency
inverter
Overheat
Radiator temperature ≥ oh
Test Value (about 80,to
temperature switch)
Check the running state of the fan and ventilation
state
Check whether the surrounding temperature is
too high and the cooling measures are required to
be taken;
Check whether the thermistor or temperature
switch is damaged;
Clear the dirt on the exterior of radiator and air
intake;
Err16
Hardware Fault
of Frequency
inverter
In case of overcurrent or
overvoltage existed in
frequency inverter, it is
judged as hardware fault
Handle as overcurrent and overvoltage fault
Err17 Motor-to-groun
d short circuit
Motor-to-ground short
circuit
Check whether the output line or motor of the
frequency inverter has ground short circuit
Err18
Motor
Identification
Error
When conducting the
parameter identification, the
fault occurs in motor
Check whether the motor parameter is consistent
with the nameplate of the motor
Whether the frequency inverter and main cable
of the motor are connected well;
Err19 Motor Off-load
Refer to the value of running
current less than off-load
current P6.1.19 and duration
of P6.1.20
Check whether the load separates;
Check whether the value set by Parameter
P6.1.19 and P6.1.20
Err20 PID Feedback
Loss
Refer to the value of PID
feedback value less than
value of P4.0.18 and
duration of P4.0.19
Check whether PID Feedback Signal is normal
Check whether the value set by Parameter
P4.0.18 and P4.0.19 meets actual running
conditions;

Chapter 9 Fault Handling
236
Fault
display Description Details Fault elimination
Err21 User-Defined
Fault 1
Fault 1 Signal given by the users
through multi-functional
terminals or PLC Programming
Function
Check whether the User-Defined Fault
1 is removed and then run after reset;
Err22 User-Defined
Fault 2
Fault 2 Signal given by the users
through multi-functional
terminals or PLC Programming
Function
Check whether the User-Defined Fault
2 is removed and then run after reset;
Err23
Accumulative
Power-on Time
Reached
Refer to the time given by
accumulative power-on Time
Reached P5.1.01 of the
frequency inverter
Use the parameter initialization function
to clear the record information
Err24
Accumulative
Running Time
Reached
Refer to the time given by
accumulative power-on Time
Reached P5.1.00 of the
frequency inverter
Use the parameter initialization function
to clear the record information
Err25 Encoder Fault The frequency inverter is unable
to identify the data of the encoder
Check whether the type of the encoder
matches
Check whether the wiring connection of
the encoder is correct
Check whether the encoder or PG card
is damaged;
Err26
Parameter
Read-Write
Abnormity
Damage of EEPROM Chip Change main control panel
Err27 Motor Overheat Test on excessive temperature of
the motor
Check whether the temperature of the
motor is too high;
Check whether the temperature sensor
is damaged or its wirings are loose;
Err28 Larger Speed
Deviation
Refer to the value of speed
deviation larger than P6.1.23 and
duration of P6.1.24
Check whether the parameters of the
encoder is set correctly;
Check whether P6.123 and P6.124 are
set rationally;
Check whether the motor parameter
identification has been conducted;
Err29 Motor
Overspeed
Refer to the value of motor speed
over P6.1.21 and duration of
P6.1.22
Check whether the parameters of the
encoder is set correctly;
Check whether P6.121 and P6.122 are
set rationally;
Check whether the motor parameter
identification has been conducted;
Err30 Initial Position
Error
Large deviation between motor
parameters and actual parameters
Check whether the motor parameters
are correct, especially for rated current
of the motor;

Chapter 9 Fault Handling
237
Fault display Description Details Fault elimination
Err31 Current Test
Fault Circuit fault after current test
Check whether the Hall device has
defaults;
Check whether the circuit has fault after
test of the driver board;
Check whether the driver board has
fault;
Err32 Contactor
Abnormal power supply of
driver board caused by the fault
of the contactor
Check whether the contactor is normal;
Check whether the power supply of the
driver board is normal;
Err33 Abnormity of
Current Test
Circuit fault after current test
leads to abnormal current test
value
Check whether the Hall device has
defaults;
Check whether the circuit has fault after
test of the driver board;
Check whether the driver board has
fault;
Err34
Fast
Current-limiti
ng Timeout
The running current of the
frequency inverter continues to
be larger, which exceeds
allowable current–limit time
Check whether the load is too large or is
stalled;
Check whether the size of the frequency
inverter is too small;
Err35 Motor Switch
at Running
Conduct motor switch in the
running process of the
frequency inverter
Conduct the switch operation of the
motor after shutdown of the frequency
inverter;
Err36 Power Fault
External 24V power supply is
short circuit or the load of
External 24V power supply is
too large
Check whether external 24V power
supply is short circuit;
Reduce the load of external 24V power
supply;
Err37 Driving Power Supply Fault
Driving Power Supply Fault for
Model G250T4 and above Check whether driving power supply in
driver board is normal;
Err40 Buffer
Resistance
The Bus line voltage fluctuates
strongly
Check whether the contactor is normal;
Check the fluctuations of incoming
voltage;

Chapter 9 Fault Handling
238
9.2 Motor Fault and Exclusion Measure
If any of the faults below occurs to your motor, find out the causes and take corresponding corrective measures. If
the fault persists, please contact your DELIXI distributor immediately.
Motor Fault and Its Elimination:
Fault Tips for checking Corrective measures
The motor does not
rotate.
Has the power voltage been delivered to the
terminals R, S and T?
Switch on the power supply;
switch it off and on again; check
power voltage; make sure the
terminal bots have been
tightened
Measure the voltages of terminals U, V and W with
a rectifier-type voltmeter. Are they right?
Cut off power supply and switch
it on again
Has the motor been locked due to overload? Reduce load and lift the lock
Is there any fault information displayed on the
monitor of the operator?
Check the fault according to the
table of faults
Has the instruction for forward or reverse rotation
been fed in? Check the wiring
Has the frequency-setting signal been fed in? Change the wiring, check the
frequency-setting voltage
Has the running mode been set up correctly? Put in the correct setup
The motor rotates in
opposite direction Is the wiring of terminals U, V and W correct?
Wire them to the lead wires U, V
and W of the motor in
accordance with the phase
sequence
Is the input signal connection right for the
forward/backward rotation? Change the wiring
The motor rotates, but
is incapable of speed
changing.
Is the wiring of the frequency reference circuit
correct? Change the wiring
Has the operation mode been correctly set up? Check the selected running
mode with an operator
Is the load too much? Reduce load
The rotation speed
(rpm/min) of the motor
is too high or too low.
Are the rated values (number of poles, voltage)
right?
Check the technical data on the
nameplate of the motor
Is the acceleration/deceleration gear shifting ratio
of the gear wheel right?
Checking the shifting gears (like
the gear wheel and so on)
Has the maximum output frequency been correctly
set up?
Check the set value of the
maximum output frequency
Check the voltage between the terminals of the
motor with a rectifier-type voltmeter. Is there too
much voltage drop?
Check the V/F characteristic
value
The rotation speed of
the running motor is
unsteady
Is the load too much? Reduce load
Is the change of load too much?
Reduce load change, increase
the motor capacity of the
frequency inverter
What about the power supply. Is it a 3-phase or a
single-phase one? If it is a 3-phase one, is there any
phase loss?
Check the wiring of the 3-phase
power supply for possible phase
loss.

Appendix 1 Regular Maintenance and Inspection Methods
239
Appendix 1 Regular Maintenance and Inspection Methods
Inspection location
Items for inspection
Description
Period Inspection method Criteria
Measuring instrument
Daily Yearly Biennial
Exterior
Surroundings
Is there any dust? Are the ambient temperature and humidity appropriate?
√
See the precautions
Temperature: -10~+40; no dust; humidity: below 90% and no dew formation
Thermometer, hygrometer and a recorder
Equipment
Is there any abnormal vibration or noise?
√
Look, see No abnormality
Input voltage
Is the input voltage of the main circuit normal?
√
Measure the voltage between the terminals R, S and T
Digital AVO meter/ tester
Main Circuit
The entire operating site
Megger examination (of the resistance between the main circuit and earth) for any loosened parts. Overheat on any parts? Clean?
√
Disconnect the frequency inverter, Short-circuit the terminals R,S,T,U,V,W and measure the resistance between them and the earth. Tighten the bolts Check with naked eyes
Over 5 MΩ and fault free
DC 500V-type megger
Conductor wiring
Conductor rusty? Wire sheath damaged?
√ Check with naked eyes
No fault
Terminals Any damage?
√ Check with naked eyes
No Fault
IGBT module / diode
Check the impedance between terminals
√
Disconnect the frequency inverter, and measure with a tester the resistance between the group of R, S, T<-> +, - and the group of U, V, W <-> +, - respectively
Digital AVO meter / analog measuring meter
Insulation resistance
Megohmmeter inspection (between output terminal and grounding terminal)
√
Release connection of U, V and W and fasten motor wire
Exceed 5MΩ 500V type megohmmeter

Appendix 1 Regular Maintenance and Inspection Methods
240
Inspecti
on
location
Items for
inspection Description
Period Inspection
method Criteria
Measuring
instrument Daily Yearly Biennial
Main
Circuit
Filter
capacitor
Is there any liquid
seepage? Is the
safety hole
bulging out?
Is the capacitor
bulging out?
√ √
Check with
naked eyes
Measure with
capacitance
meters
No fault
exceeds 85%
of the rated
capacity
Devices for
measuring
capacitance
Relay
Any wobbling
noise during
operation? Any
damage to the
contacts?
√
Listen
Check with
naked eyes.
No fault
Resistance
Whether
resistance
insulation is
damaged
Whether resistor
wire is damaged
(open circuit)
√
Visual
inspection
Disconnect one
and measure it
with test
instrument.
There is no
fault
Error must be
within ±10%
of resistance
value
Digital
multimeter/sim
ulation test
instrument
Protecti
on
circuit
and
control
circuit
Operation
check
Is the output
voltage balanced
for all the phases?
After executing
sequential
protection, there
should be no fault
in the display
circuit
√
Measure the
voltage among
terminals U, V
and W Short
circuit and open
frequency
inverter
protection
circuit output
For
200V(400)
model, the
difference in
the voltage of
each phase
should not
exceed
4V(8V)
Digital AVO
meter/
calibrating
voltmeter
Cooling
system Cooling fan
Any abnormal
vibration or noise?
Any loosened
connections?
√
√
Turn the
tightening
connection of
the fan after
switching off
the power
supply
Rotation
smooth and
no fault
Display Meter
Is the displayed
value correct? √ √
Check the
reading of the
meter outside
the panel
Check the set
values
Voltmeter/
ammeter
Motor
The entire
operating
site
Any abnormal
vibration or noise?
Any abnormal
smells? √
Check with
your ears, nose,
and eyes;
Check for
overheat or
damage
No fault
Note: the values in brackets apply to 400V-type frequency inverters.

Appendix 2 Guideline for Option of Optional parts
241
Appendix 2 Guideline for Option of Optional parts
Users of this series product can choose to install additional peripherals in accordance with the operating
conditions and needs.
A2.1 Alternative Current Reactor (ACL)
Alternative current reactor can be used to suppress the high-order harmonic of the input current from the
frequency inverter, thus improve its power factors. It is recommended for the following situations:
1 The ratio of the capacity of the power source to that of the frequency inverter exceeds 10:1.
2 Silicon controlled load or power factor compensation devices with switch control is wired to the same power
supply.
3 The 3-phase power has a high degree of voltage unbalance. (≥3%)
Table of Matching Alternating Current Reactors:
S2/T2 Series
Power (kW) Current (A) Inductance
(mH) Power (kW) Current (A)
Inductance
(mH)
0.4 2.0 4.6 2.2 10 1.0
0.75 4.0 2.4 3.7 16 0.6
1.5 7.0 1.6
T4 Series
Power (kW) Current (A) Inductance
(mH) Power (kW) Current (A)
Inductance
(mH)
0.75 2.3 7.6 93 176 0.11
1.5 3.7 4.8 110 210 0.09
2.2 5.0 3.2 132 253 0.08
3.7 8.8 2.0 160 300 0.06
5.5 13 1.5 185 340 0.06
7.5 17 1.2 200 380 0.05
11 25 0.8 220 420 0.05
15 32 0.6 250 480 0.04
18.5 37 0.5 280 540 0.04
22 45 0.42 315 600 0.03
30 60 0.32 355 680 0.03
37 75 0.26 375 710 0.03
45 90 0.21 400 750 0.03
55 110 0.18 500 930 0.02
75 152 0.13 630 1200 0.02
T6 Series
Power (kW) Current (A) Inductance
(mH) Power (kW) Current (A)
Inductance
(mH)
22 28 0.47 55 68 0.23
30 38 0.35 75 92 0.18
37 46 0.28 93 110 0.15
45 56 0.28 110 132 0.12
132 155 0.094 315 345 0.042
160 180 0.07 355 390 0.036
185 210 0.07 400 430 0.028
220 245 0.055 500 540 0.023
250 275 0.048 600 630 0.021

Appendix 2 Guideline for Option of Optional parts
242
280 305 0.042 700 720 0.019

Appendix 2 Guideline for Option of Optional parts
243
A2.2 DC reactor
When the capacity of the power grid far exceeds that of the frequency inverter or when the power capacity is
beyond 1000KVA, or when the user expects greatly improved power factor of the power supply, direct current
reactors will be necessary. Direct current reactors can be used simultaneously with alternating current reactors,
which is effective in reducing higher-order harmonic input.
Table of Matching Direct Current Reactors:
T4 Series
Power
KW
Current
A
μHInductance
μH
Power
KW
Current
A
Inductance
μH
18.5~30 75 600 110~132 280 140
37~55 150 300 160~185 370 110
75~90 220 200
A2.3 Radio noise filter
Radio noise filters are used to restrain the transmission of electromagnetic interfering noises generated by the
frequency inverter. They can also be used to restrain interference with the motor from external radio,
instantaneous impact and surges.
Table of matching 3-phase 3-wire Radio Noise Filters:
Voltage
(V)
Motor power
(kW)
Voltage
(V)
Motor power
(kW) Filter model
Key filter parameters
Common-mode input loss dB Derivation-mode input loss dB
0.1MHz 1MHz 30MHz 0.1MHz 1MHz 30MHz
220
0.4~0.75
380
0.75~1.5 DL-5EBT1 75 85 55 55 80 60
1.5~2.2 2.2~3.7 DL-10EBT1 70 85 55 45 80 60
3.7 5.5~7.5 DL-20EBT1 70 85 55 45 80 60
5.5~7.5 11~15 DL-35EBT1 70 85 50 40 80 60
11 18.5~22 DL-50EBT1 65 85 50 40 80 50
15~18.5 30~37 DL-80EBT1 50 75 45 60 80 50
22 45 DL-100EBK1 50 70 50 60 80 50
30 55~75 DL-150EBK1 50 70 50 60 70 50
0.4~0.75 93~110 DL-150EBK1 50 70 60 60 70 50
In situations requiring stronger anti-radio interference capability or conformity to CE, UL, or CSA standards, or
when there are devices with poor anti-interference capabilities in the vicinity, filters should be installed. While
installing, make sure the wiring is as short as possible, that is, the filter should be as close to the frequency
inverter as possible.

Appendix 2 Guideline for Option of Optional parts
244
A2.4 Remote Operation Keyboard
Our series frequency inverters have all been equipped with operation keyboards, exquisitely designed and easily
operated. If you wish to use it away from the frequency inverter or other places, an extended cable would serve
the purpose. You just need to demand it when you place an order. Since the serial communication mode is
employed to link the keyboard and the frame, you can remove the keyboard to work area as far as 10 meters away.
Or if you want to or need to work father away, then you can buy a remote operation keyboard from the suppliers
concerned, or from our company.
A2.5 Energy Consumption Brake Unit and Brake Resistance
All E100 Series and E102 Series frequency inverters are equipped with built-in brake unit, if the brake torque is
required to be increased, it is to directly connect the brake resistance. CDI-E180 Series frequency inverters with
power 15kW and below are equipped with built-in brake unit. The types with power 18.5~30kW are not
equipped with built-in brake unit, if the brake torque is required to be increased, it is required to externally
connect brake resistance. The built-in brake unit is not equipped on the inverters above 30 Kw, if the brake torque
is required to be increased, it is required to externally connect brake unit and brake resistance.
The formula for simple calculation for brake unit and brake resistance is as below:
Generally, the brake current is 1/2 I of the rated current of the motor, the generated brake torque is approximately
equal to the rate torque of the motor. Therefore, proper brake current IB shall be selected based on requirements of
load inertia and shutdown time. The greater the load inertia is, the shorter the shutdown time requires and the
greater the selected brake current IB is.
IB = (1/2~3/2)*I
According to brake current, the value of resistance to brake unit and brake resistance can be selected.
The peak current of the brake unit (only aim at brake unit of Delixi) is larger than IB.
Size of Brake Resistance Value
RB=U/IB (in S2 and T2 Series, U takes 400V; in T4 Series, U takes800V)
Size of Brake Resistance Power
PB=K*U*U/RB
In formula, K indicates braking coefficient with range of 0.1~0.5, and the braking coefficient shall be selected
based on requirements of load inertia and shutdown time. The greater the load inertia is, the shorter the shutdown
time requires and the greater the selected braking coefficient K is. General load can select 0.1~0.2 and the large
load inertia selects 0.5.
The following sizing table is available when ID is approximately equal to 1/2I and K is between 0.1~0.2. The
greater the load inertia is, the shorter the shutdown time requires, and proper adjustment shall be made according
to the formula above.

Appendix 2 Guideline for Option of Optional parts
245
1. E100 、E102 Series
Type of Frequency inverter Type of Brake Unit
Brake Resistance
Value
(Ω)
Brake Resistance
Power
(W)
S2 (Single Phase 220V)
CDI-E100G0R4S2B Built-in, allowable Max. Current 8A 400 80
CDI-E100G0R75S2B Built-in, allowable Max. Current 8A 200 160
CDI-E100G1R5S2B Built-in, allowable Max. Current
15A
120 250
CDI-E100G2R2S2B Built-in, allowable Max. Current
15A
80 400
T2 (Three-phase 220V)
CDI-E100G0R4T2B Built-in, allowable Max. Current 8A 400 80
CDI-E100G0R75T2B Built-in, allowable Max. Current 8A 200 160
CDI-E100G1R5T2B Built-in, allowable Max. Current
15A
120 250
CDI-E100G2R2T2B Built-in, allowable Max. Current
25A
80 400
T4 (Three-phase 380V)
CDI-E100G0R75T4B Built-in, allowable Max. Current 8A 600 160
CDI-E100G1R5T4B Built-in, allowable Max. Current 8A 400 250
CDI-E100G2R2T4B Built-in, allowable Max. Current
15A
250 400
CDI-E100G3R7T4B Built-in, allowable Max. Current
15A
150 600
CDI-E100G5R5/P7R5T4B Built-in, allowable Max. Current
40A
100 1000
CDI-E100G7R5/P011T4B Built-in, allowable Max. Current
40A
75 1200
CDI-E100G011/P015T4BL Built-in, allowable Max. Current
50A
50 2000
CDI-E100G015/P018.5T4BL Built-in, allowable Max. Current
75A
40 2500
CDI-E100G018.5/P022T4
Built-in, allowable Max. Current
50A
Externally-connect CDI-BR-50
30 4000
CDI-E100G022/P030T4
Built-in, allowable Max. Current
50A
Externally-connect CDI-BR-50
30 4000
Note: The brake components of E102 series inverter types are same as those of E100 series inverter.

Appendix 2 Guideline for Option of Optional parts
246
2. E180 Series
Type of Frequency inverter Type of Brake Unit
Brake
Resistance
Value
(Ω)
Brake
Resistance
Power
(W)
T2 (Three-phase 220V)
CDI-E180G0R4T2B Built-in, allowable Max. Current 10A 350 160
CDI-E180G0R75T2B Built-in, allowable Max. Current 10A 200 160
CDI-E180G1R5T2B Built-in, allowable Max. Current 25A 100 250
CDI-E180G2R2T2B Built-in, allowable Max. Current 25A 75 400
CDI-E180G3R7T2B Built-in, allowable Max. Current 40A 45 600
CDI-E180G5R5T2B Built-in, allowable Max. Current 50A 30 1000
CDI-E180G7R5T2BL Built-in, allowable Max. Current 75A 20 1200
CDI-E180G011T2 Built-in, allowable Max. Current 50A
Externally-connect CDI-BR-50 16 2000
CDI-E180G015T2 Built-in, allowable Max. Current 75A
Externally-connect CDI-BR-50 12 2500
CDI-E180G018.5T2 CDI-BR-100 20/2 4000
CDI-E180G022T2 CDI-BR-100 16/2 4000
CDI-E180G030T2 CDI-BR-100 13.6/2 6000
T4 (Three-phase 380V)
CDI-E180G0R75T4B Built-in, allowable Max. Current 10A 600 160
CDI-E180G1R5T4B Built-in, allowable Max. Current 10A 400 250
CDI-E180G2R2T4B Built-in, allowable Max. Current 15A 250 400
CDI-E180G3R7/P5R5T4B Built-in, allowable Max. Current 25A 150 600
CDI-E180G5R5MT4B Built-in, allowable Max. Current 40A 100 1000
CDI-E180G5R5/P7R5T4B Built-in, allowable Max. Current 40A 100 1000
CDI-E180G7R5/P011T4B Built-in, allowable Max. Current 40A 75 1200
CDI-E180G011MT4B Built-in, allowable Max. Current 50A 50 2000
CDI-E180G011/P015T4BL Built-in, allowable Max. Current 50A 50 2000
CDI-E180G015/P018.5T4BL Built-in, allowable Max. Current 75A 40 2500
CDI-E180G018.5/P022T4 Built-in, allowable Max. Current 50A
Externally-connect CDI-BR-50 30 4000
CDI-E180G022/P030T4 Built-in, allowable Max. Current 50A
Externally-connect CDI-BR-50 30 4000
CDI-E180G030/P037T4 Built-in, allowable Max. Current 75A
Externally-connect CDI-BR-50 20 6000
CDI-E180G037/P045T4 CDI-BR-100 16 9000
CDI-E180G045/P055T4 CDI-BR-100 13.6 9000
CDI-E180G055/P075T4 CDI-BR-100 20/2 12000
CDI-E180G075/P093T4 CDI-BR-200 13.6/2 18000
CDI-E180G093/P110T4 CDI-BR-200 20/3 18000
CDI-E180G110/P132T4 CDI-BR-200 20/3 18000
CDI-E180G132/P160T4 CDI-BR-200 20/4 24000
CDI-E180G160/P185T4 CDI-BR-400 13.6/4 36000
CDI-E180G185/P200T4 CDI-BR-400 13.6/5 45000
CDI-E180G200/P220T4L CDI-BR-400 13.6/5 45000
CDI-E180G220T4L CDI-BR-400 13.6/6 54000
CDI-E180P250T4L CDI-BR-400 13.6/6 54000
CDI-E180G250/P280T4L CDI-BR-400 13.6/6 54000
CDI-E180G280/P315T4L CDI-BR-400 13.6/6 54000
CDI-E180G315/P355T4L CDI-BR-400 13.6/6 54000
CDI-E180G355/P375T4L CDI-BR-600 13.6/7 63000
CDI-E180G375T4L CDI-BR-600 13.6/7 63000
CDI-E180P400T4L CDI-BR-600 13.6/8 72000
CDI-E180G400T4L CDI-BR-600 13.6/8 72000
CDI-E180P500T4L CDI-BR-600 13.6/9 81000

Appendix 2 Guideline for Option of Optional parts
247
CDI-E180G500T4L CDI-BR-600 13.6/9 81000
CDI-E180G630T4L 2*CDI-BR-400 13.6/10 90000
Note: 13.6/2 means two resistances of 13.6 used in parallel connection;
2*CDI-BR-400 means two CDI-BR-400 brake units used in parallel connection, in this case, the brake resistance
will be assigned to two brake units equally, otherwise the brake units will be damaged.

Appendix 3 E180 I/O Expansion Card
248
Appendix 3 E180 I/O Expansion Card
1. Introduction
Expansion Card E180-IO is developed by Delixi (Hangzhou) Inverter Co., Ltd and is applied for CDI-E180 Series
Terminal I/O. It is devided into: E180-IO1 and E180-IO2. Its specific configuration is as below:
Spec. Function name Description
E180-IO1 E180-IO1 Expansion Card
4-way Digital Input (DI7~DI10)
1-way Analog Input (VF3)
2-way Multi-functional Open Collector Output (YO1、YO2)
RS-485 Communication Interface (SG+,SG-)
E180-IO2 E180-IO2 Expansion Card
4-way Digital Input (DI7~DI10)
1-way Analog Input (VF3)
2-way Multi-functional Open Collector Output (YO1、YO2)
2. Mechanical Installation
The frequency inverter shall be installed when it switched off completely.
Align IO expansion card with expansion card interface and positioning hole on the control panel of the frequency
inverter and then fix them with screws.
Installation Method of IO
Expansion Card
E180-IO1 Appearance E180-IO2 Appearance
IO
Expansion
Card

Appendix 3 E180 I/O Expansion Card
249
3. Description for Control Terminal
Category Terminal Name of Terminal Explanation for Function
Digital Input Terminal
DI7-COM Digital Input 7 Specific functions refer to explanation
for use of Function Code
P2.0.06~P2.0.09
Note: Only internal power supply is
applicable
DI8-COM Digital Input 8
DI9-COM Digital Input 9
DI10-COM Digital Input 10
Multi-functional Output
Terminal
YO1 Multi-functional Open
Collector Output 1 Specific functions refer to explanation
for use of Function Code
P2.0.08~P2.0.31
Drive Capability: DC48V 50mA below
CME
YO2 2 Multi-functional Open
Collector Output 2 CME
Analog Input Terminal VF3-GND Analog Input Terminal 3
Be used for receiving external analog
signal input, which is voltage signal
0V~10V or current signal 0/4mA~20mA
24V Power Supply
COM
24V Power Supply Output
Externally provide DC 24V Supply
Voltage, which is generally used for
digital input terminal or working power
supply of external low-voltage devices.
Drive Capability: Max. Output Current
300mA
P24
Communication
Terminal
SG+ Positive Signal Terminal of
RS485 Communication Support MODBUS-RTU Protocol
SG- Negative Signal Terminal of
RS485 Communication
Note: if Terminal VF3 is adopted, it is to short J9 on IO expansion card. At this moment, the function of
keyboard potentiometer will be replaced by the function of Terminal VF3.

Appendix 4 E180 Encoder Expansion Card
250
Appendix 4 E180 Encoder Expansion Card
1. Introduction
CDI-E180 Series can realize Closed-loop Vector Control against different load motor, which is required to
different encoder. Accordingly, there are many various expansion cards of the encoder with specific types as
below:
Type Name Description
E180-PG1 E180 Encoder Expansion Card 1
Support A, B, Z differential input without frequency
division output
Max.Speed:100kHz
Differential Input Signal Amplitude: ≤7V
E180-PG2 E180 Encoder Expansion Card 2
Support A, B, Z, U, V, W differential input without
frequency division output
Max.Speed:100kHz
Differential Input Signal Amplitude: ≤7V
E180-PG3 E180 Encoder Expansion Card 3 Support A, B, Z open collector input
Max speed: 100kHz
E180-PG4 E180 Rotary Transformer
Expansion Card 4
Support Rotary Transformer
10kHz 7VRMS excitation output
12-digit resolution
Without frequency division output
2. Mechanical Installation
The frequency inverter shall be installed when it switched off completely.
Align expansion card with expansion card interface and positioning hole on the control panel of the frequency
inverter and then fix them with screws.
Installation method of PG
Expansion Card
PG Card

Appendix 4 E180 Encoder Expansion Card
251
Appearance of E180-PG1 Appearance of E180-PG2 Appearance of E180-PG3 Appearance of E180-PG4
3. Definition Description of Connection Terminal Signal
Definition for E180-PG1 Connection Terminal Signal
Name of Terminal Description
A+ Positive Encoder A Signal
A- Negative Encoder A Signal
B+ Positive Encoder B Signal
B- Negative Encoder B Signal
Z+ Positive Encoder Z Signal
Z- Negative Encoder Z Signal
5V Externally provide Power 5V and Max. output current is 100mA
COM Power Ground
Definition for E180-PG2 Connection Terminal Signal
Name of Terminal Description
A+ Positive Encoder A Signal
A- Negative Encoder A Signal
B+ Positive Encoder B Signal
B- Negative Encoder B Signal
Z+ Positive Encoder Z Signal
Z- Negative Encoder Z Signal
U+ Positive Encoder U Signal
U- Negative Encoder U Signal
V+ Positive Encoder V Signal
V- Negative Encoder V Signal
W+ Positive Encoder W Signal
W- Negative Encoder W Signal
5V Externally provide Power 5V and Max. output current is 100mA
COM Power Ground

Appendix 4 E180 Encoder Expansion Card
252
Definition for E180-PG3 Connection Terminal Signal
Name of Terminal Description
A Encoder A signal
B Encoder B signal
Z Encoder Z signal
24V Externally provide Power 24V and Max. output current is 100mA
COM Power Ground
Definition for E180-PG4 Connection Terminal Signal
Name of Terminal Description
EXC+ Rotary transformer excitation positive (+)
EXC- Rotary transformer excitation negative (-)
SIN+ Rotary transformer feedback SIN positive (+)
SIN- Rotary transformer feedback SIN negative (-)
COS+ Rotary transformer feedback COS positive (+)
COS- Rotary transformer feedback COS negative (-)

Appendix 5 Expansion Card of RS485 Communication
253
Appendix 5 Expansion Card of RS485 Communication
1. Introduction
For CDI-E180 Series and E102 are not configured with communication function, if communication required, the
expansion card for communication needs to be added. Specific types are as below:
Type Name Description
E180-485 E180 Communication Expansion
Card
SG+: Positive Signal Terminal of RS485
Communication
SG-: Negative Signal Terminal of RS485
Communication
Support MODBUS-RTU Protocol
E102-485 E102 Communication Expansion
Card
SG+: Positive Signal Terminal of RS485
Communication
SG-: Negative Signal Terminal of RS485
Communication
Support MODBUS-RTU Protocol
2. Mechanical Installation
The frequency inverter shall be installed when it switched off completely.
Align RS485 Communication with expansion card interface and positioning hole on the control panel of the
frequency inverter and then fix them with screws.
E180-485 Installation Method E102-485 Installation Method
Appearance of E180-485 Appearance of E102-485

Appendix 6 Expansion Card of E180 Injection Molding Machine
254
Appendix 6 Expansion Card of E180 Injection Molding Machine
1. Introduction
E180-ZS Expansion Card is developed by Delixi (Hangzhou) Inverter Co., Ltd and applied for CDI-E180 Series
Terminal ZS, its specific configuration is as below:
Type Name Description
E180-ZS
E180 Expansion
Card of Injection
Molding
Machine
2-way Digital Input Terminal (DI7~DI8)
Refer to Description for use of specific functions of Function Code
P2.0.06~P2.0.07
Note: Only internal power supply is applicable
2-way Analog Input Terminal (G1-S1, G2-S2)
G1:Connect proportional flow signal negative S1:Connect proportional
flow signal positive
G2:Connect proportional voltage signal negative S2:Connect proportional
voltage signal positive
Note: proportional flow and proportional voltage signal are DC Current
Signal 0~1A, and corrective wiring shall be made according to the flow
of circuit current
2. Mechanical Installation
The frequency inverter shall be installed when it switched off completely.
Align Expansion Card E180-ZS with expansion card interface and positioning hole on the control panel of the
frequency inverter and then fix them with screws.
E180-ZS Installation Method Appearance of E180-ZS

Appendix 7 E180-DP Expansion Card
255
Appendix 7 E180-DP Expansion Card
1. Introduction
E180-DP Expansion Card is developed by Delixi (Hangzhou) Inverter Co., Ltd. and used for E180 Series inverters
and realizing PROFIBUS communication to PROFIBUS-DP master station.
Description: The E180-DP card is only supported by the E180 series inverter with the model number
including DP and the power above 3.7kW, the user shall pay special attention to the requirement. For
example: CDI-E180G3R7/P5R5T4B(DP). 2. Installation
Please cut off power supply of inverter before installation of E180-DP expansion card, so as to ensure the
installation can be conducted only when LED indicator of power charing of inverter is black out completely. See
the below figure for detailed installation method. Please fasten the relevant screws after the E180-DP is inserted
into inverter.
Installation schematic
diagram of E180-DP
Appearance of
E180-DP card
Outer cable of
E180-DP card
3. Parameter setting of inverter
Function
Code Name Setting range Description
P4.1.00 Baud rate of
inverter
Tens: control PROFIBUS
communication
0: 115200
1: 208300
2: 256000
3: 512000
When PROFIBUS communication is adopted, you
can select baud rate same as inverter through the
1st and 2
nd digit of DIP switch of E180-DP.
P4.1.02 Local IP address 1-126
P4.1.05 Data transmission
format
Tens: control PROFIBUS
communication
0: PPO1
1: PP02
2: PP03
3: PP05
The data format shall be same as the format
selected by PROFIBUS master station

Appendix 6 Expansion Card of E180 Injection Molding Machine
256
4. Definition and description of connection terminal signal
DIP No. Function Description
1 ,2
E180-DP card and
inverter communication
baud rate selection
The 1st digit The 2
nd digit Baud rate
OFF OFF 115200
OFF ON 208300
ON OFF 256000
ON ON 512000
3~8
Address of E180-DP
communication slave
station
Total 64 addresses are comprised of 6-digit binary system, and
for the addresses over 64 can be set up through function code.
The examples of DIP switich setting amd corresponding address
are as follows:
Setting of DIP switch Address
000001 1
011110 30
Wire jumper
No. Description of function
J1 Selection of matched resistor for PROFIBUS terminal
5. Description of 9-pin standard interface of outer cable
Syboml Name of terminal Function description
3 Data cable B Positive pole (+) of data cable
4 RTS Request transferring signal
5 GND Insulation 5V power supply grounding
6 +5V Insulation 5V power supply
8 Data cable A Negative pole (-) of data cable
Data cable B
Data cable A

Appendix 7 E180-DP Expansion Card
257
6. LED indicator
LED indicator Name Description
LED1 (red) LED indicator for power
supply The indicator shall be constant ON, after E180-DP card
connects to inverter properly and inverter is electrified.
LED2 (green)
LED indicator for
communication established
between PROFIBUS master
station and E180-DP card
After E180-DP card connects to inverter properly, the
indicator shall be constant ON, if flicker, means improper
connection (on-again & off-again), if black-out, means failure
connection to PROFIBUS station (check slave station address,
data format and programming cable).
LED3 (yellow)
LED indicator for
communication established
between inverter and
E180-DP card
After E180-DP card connects to inverter properly, the
indicator shall be constant ON, if flicker, means improper
connection (on-again & off-again), if black-out, means failure
connection to inverter (check baud rate).
6. Description and solution to failure
LED1
(red)
LED2
(green)
LED3
(yellow) Description of failure Corresponding solution
Black Black Black No power supply on
E180-DP card
Check whether the interface with inverter is connected
properly?
Bright Black Black
No communication is
established to PROFIBUS
master station
Check whether the setup of PROFIBUS master station,
address of slave station and data format are correct; check
whether the connection of PROFIBUS cable is OK?
Bright Bright Black No communication
established to inverter Check whether the baud rate of inverter is same as
E180-DP DIP switch?
Bright Bright Bright Communication established

Appendix 6 Expansion Card of E180 Injection Molding Machine
258
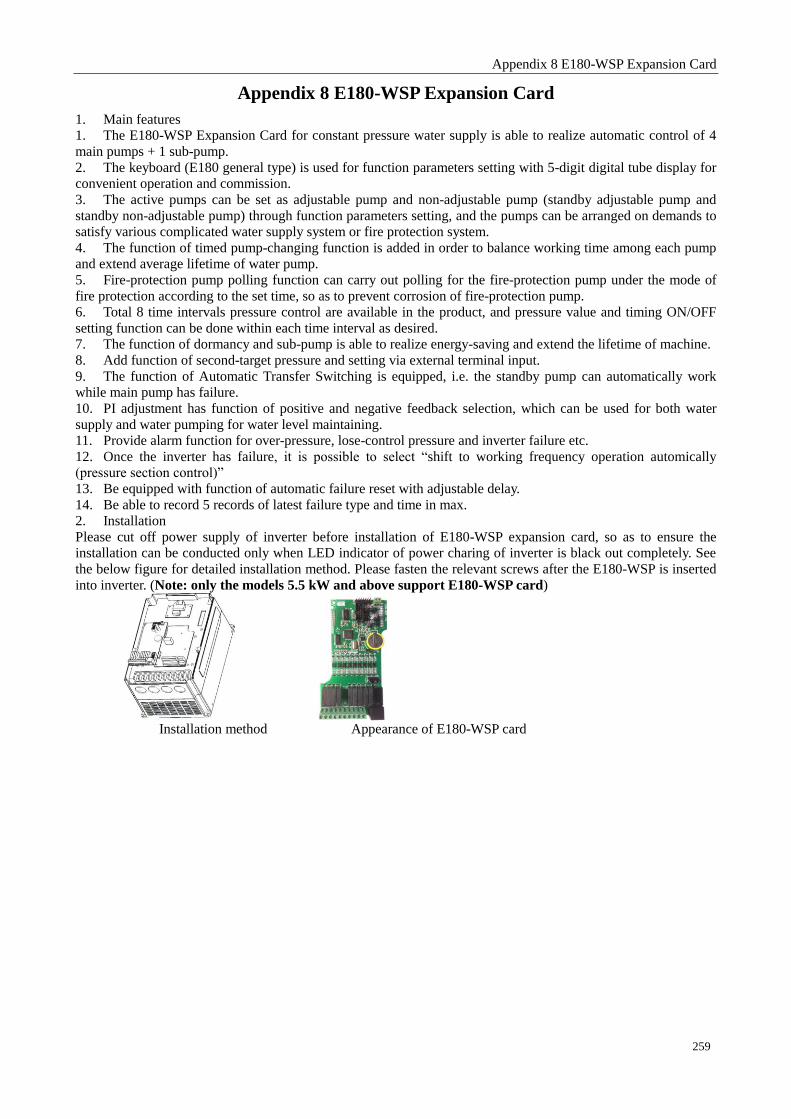
Appendix 8 E180-WSP Expansion Card
259
Appendix 8 E180-WSP Expansion Card
1. Main features
1. The E180-WSP Expansion Card for constant pressure water supply is able to realize automatic control of 4
main pumps + 1 sub-pump.
2. The keyboard (E180 general type) is used for function parameters setting with 5-digit digital tube display for
convenient operation and commission.
3. The active pumps can be set as adjustable pump and non-adjustable pump (standby adjustable pump and
standby non-adjustable pump) through function parameters setting, and the pumps can be arranged on demands to
satisfy various complicated water supply system or fire protection system.
4. The function of timed pump-changing function is added in order to balance working time among each pump
and extend average lifetime of water pump.
5. Fire-protection pump polling function can carry out polling for the fire-protection pump under the mode of
fire protection according to the set time, so as to prevent corrosion of fire-protection pump.
6. Total 8 time intervals pressure control are available in the product, and pressure value and timing ON/OFF
setting function can be done within each time interval as desired.
7. The function of dormancy and sub-pump is able to realize energy-saving and extend the lifetime of machine.
8. Add function of second-target pressure and setting via external terminal input.
9. The function of Automatic Transfer Switching is equipped, i.e. the standby pump can automatically work
while main pump has failure.
10. PI adjustment has function of positive and negative feedback selection, which can be used for both water
supply and water pumping for water level maintaining.
11. Provide alarm function for over-pressure, lose-control pressure and inverter failure etc.
12. Once the inverter has failure, it is possible to select “shift to working frequency operation automically
(pressure section control)”
13. Be equipped with function of automatic failure reset with adjustable delay.
14. Be able to record 5 records of latest failure type and time in max.
2. Installation
Please cut off power supply of inverter before installation of E180-WSP expansion card, so as to ensure the
installation can be conducted only when LED indicator of power charing of inverter is black out completely. See
the below figure for detailed installation method. Please fasten the relevant screws after the E180-WSP is inserted
into inverter. (Note: only the models 5.5 kW and above support E180-WSP card)
Installation method Appearance of E180-WSP card

Appendix 6 Expansion Card of E180 Injection Molding Machine
260
CM1 B1 D1 B2 D2 B3 D3 B4 D4 XB
Connection terminal of E180-WSP expansion card
Name Description
CM1 Public terminal of pump output relay
B1 Variable frequency pump control point of pump No. 1
D1 Working frequency pump control point of pump No. 1
B2 Variable frequency pump control point of pump No. 2
D2 Working frequency pump control point of pump No. 2
B3 Variable frequency pump control point of pump No. 3
D3 Working frequency pump control point of pump No. 3
B4 Variable frequency pump control point of pump No. 4
D4 Working frequency pump control point of pump No. 4
XB Control point of sub-pump (water supply pump)