Tips and Tricks of Injector Maintenance 080509.ppt - Agilent · Tips and Tricks of Injector...
55
Abby Folk Agilent GC Technical Support Tips and Tricks of Injector Maintenance Agilent GC Technical Support August 2009 Injector Maintenance
Transcript of Tips and Tricks of Injector Maintenance 080509.ppt - Agilent · Tips and Tricks of Injector...

Abby Folk Agilent GC Technical Support
Tips and Tricks of Injector Maintenance Agilent GC Technical Support
August 2009Injector Maintenance

Typical Gas Chromatographic System
Have to be able to get things to their
Mol-SieveTraps
FixedRestrictors
g ggas state
Key to starting the Chromatographic process right
Flow
RegulatorsInjection
Port Detector Electrometer
process right.
Column
FlowController
gen
Gas
Recorder/Integrator
Air
Hyd
rog
Car
rier G
Cylinders or Generators

Influence of Injection Efficiency
ShortConcentrated
Solute Bands
LongDiffuse
Same column, same chromatographic conditions

Injectors
Split
SplitlessSplitless

Split InjectorFlow Path
Septum
Flow Path
Carrier gassource p
purge
Split ventSplit vent
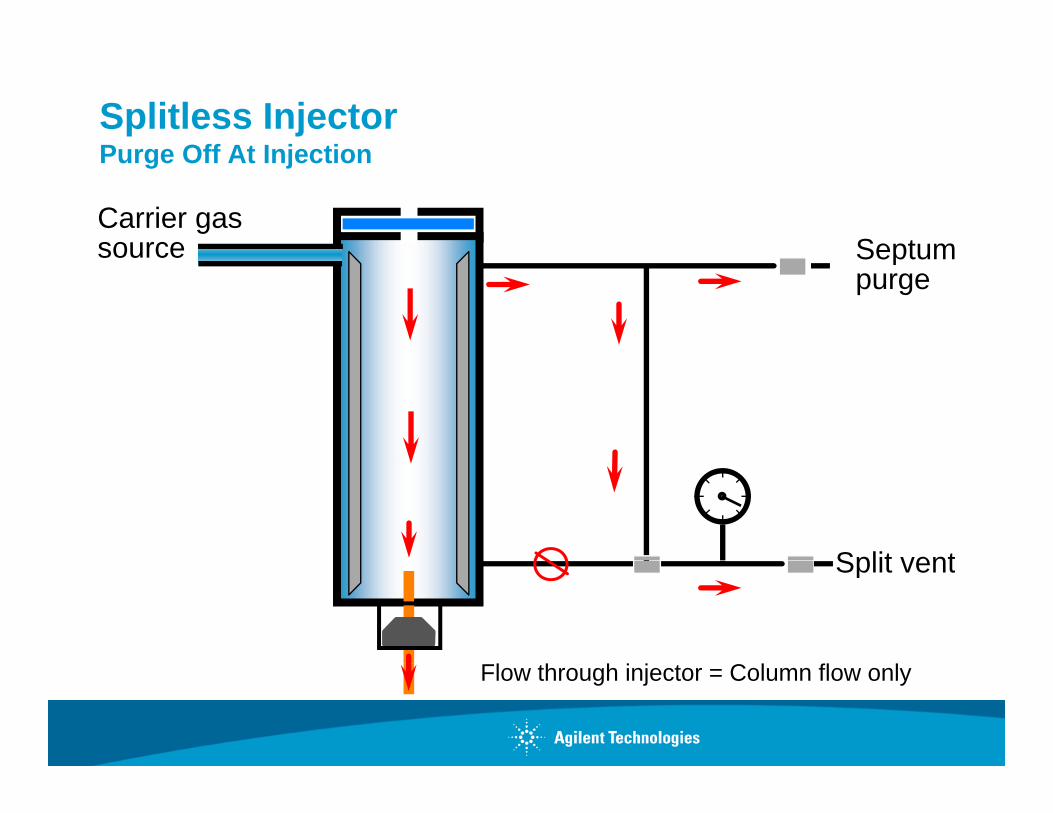
Splitless InjectorPurge Off At InjectionPurge Off At Injection
Carrier gassource Septumsource Septum
purge
Split ventSplit vent
Flow through injector = Column flow only
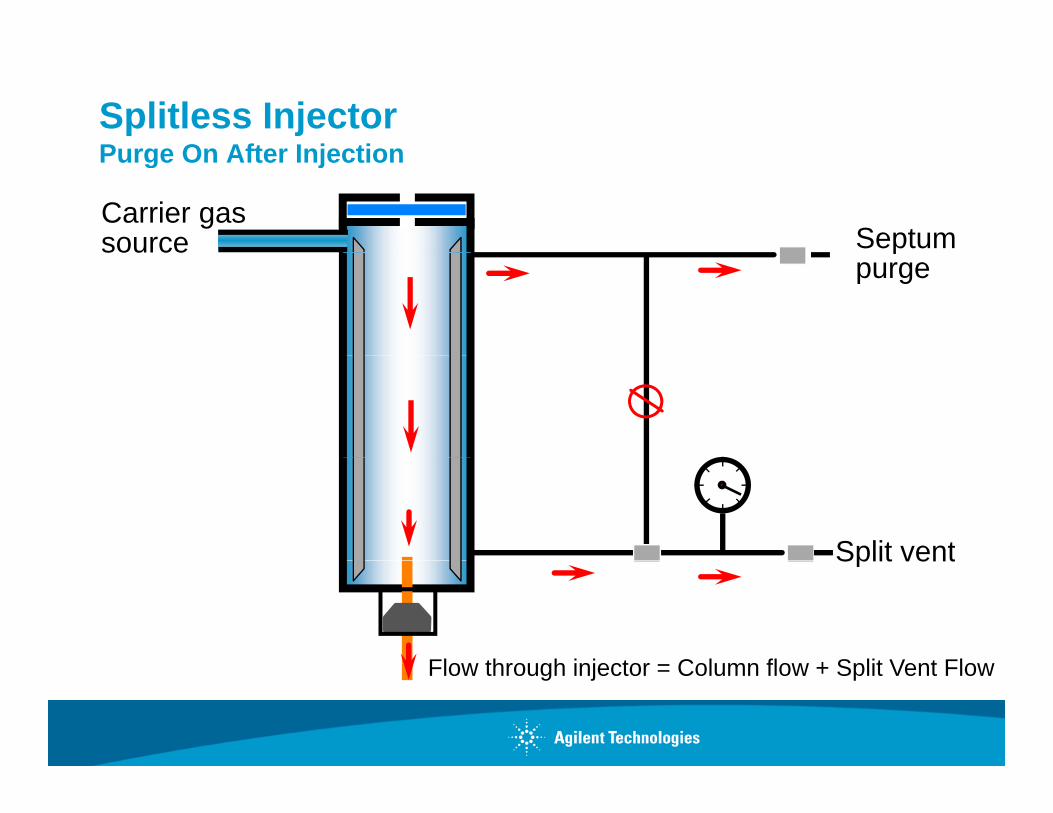
Splitless Injector Purge On After InjectionPurge On After Injection
Carrier gassource Septump
purge
Split vent
Flo thro gh injector Col mn flo + Split Vent Flo
Split vent
Flow through injector = Column flow + Split Vent Flow
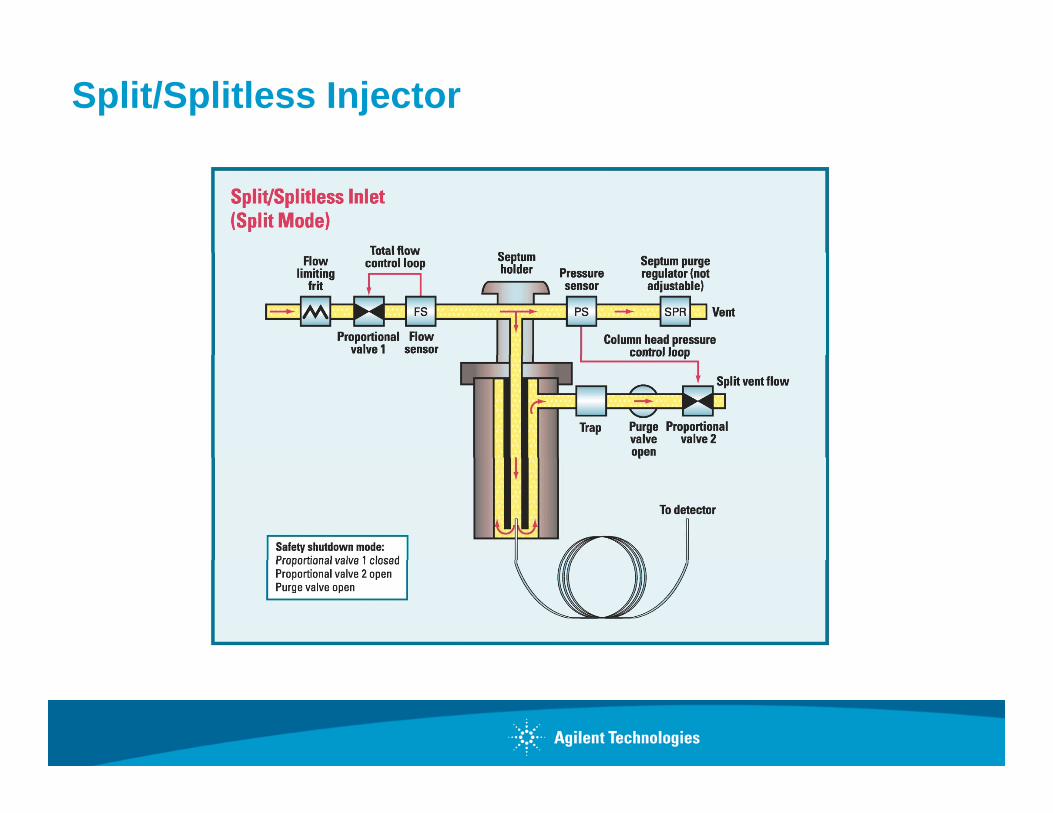
Split/Splitless Injector
So, Why Do I Have To Do Maintenance?
1 Thi i f l i1. Things wear out – septa, syringes, nuts, ferrules, o-rings, etc.
2. Things get dirty – liners, column, gas lines, traps, etc.

Agilent’s Gold Standard GC Autosampler Syringes New syringe Pub #5990-3563ENNew syringe Pub #5990 3563EN
Improved Quality
I d P k iImproved Packaging
More value!
BUT Th D ’t L t FOREVER!!BUT…They Don’t Last FOREVER!!

Split/Splitless Injector PartsInjector Parts
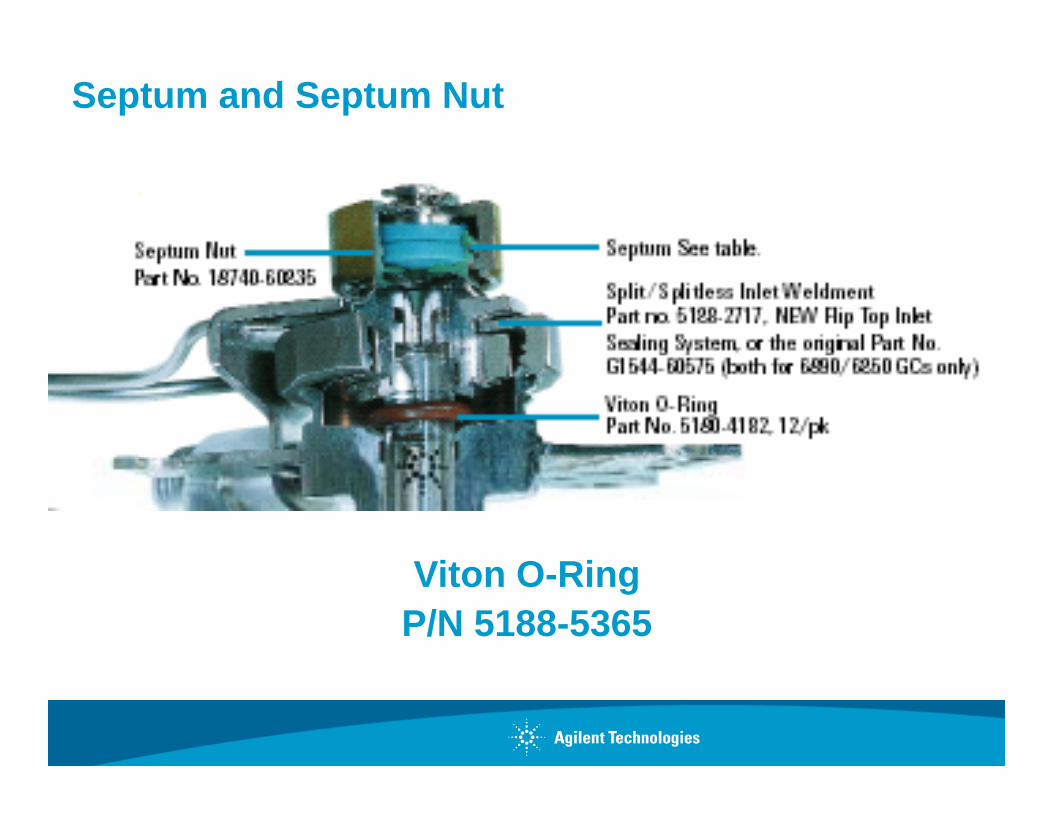
Septum and Septum Nut
Vi O RiViton O-RingP/N 5188-5365

Gold Seal & Washer
Column Ferrule & NutColumn Ferrule & Nut

Redesigned packaging:Agilent Convenience Dial packsAgilent Convenience Dial packs
Individual packaging
Maintains cleanlinessEasy access to one at a timeDoesn’t go flying all over the floorDoesn’t go flying all over the floorStores nicely in drawer
Inlet O-rings P/N 5188-5365Inlet O-ring Flip Top 5188-5366

Leak CheckingG3388A leak detectorG3388A leak detectorAvoids loss of gases, damage to column and detector
• Portable, handheld unit shown is lightweight – only 310g/11oz
• Simple and easy to use• Simple and easy to use• Fast detection – 1 second• Audible and visual alerts for 12 gases• Minimum detection limit of 0.01 mL/minute for hydrogen and helium
• One year warrantyR HS li t• RoHS compliant
• Rechargeable NiMH battery with over 5 hours of life
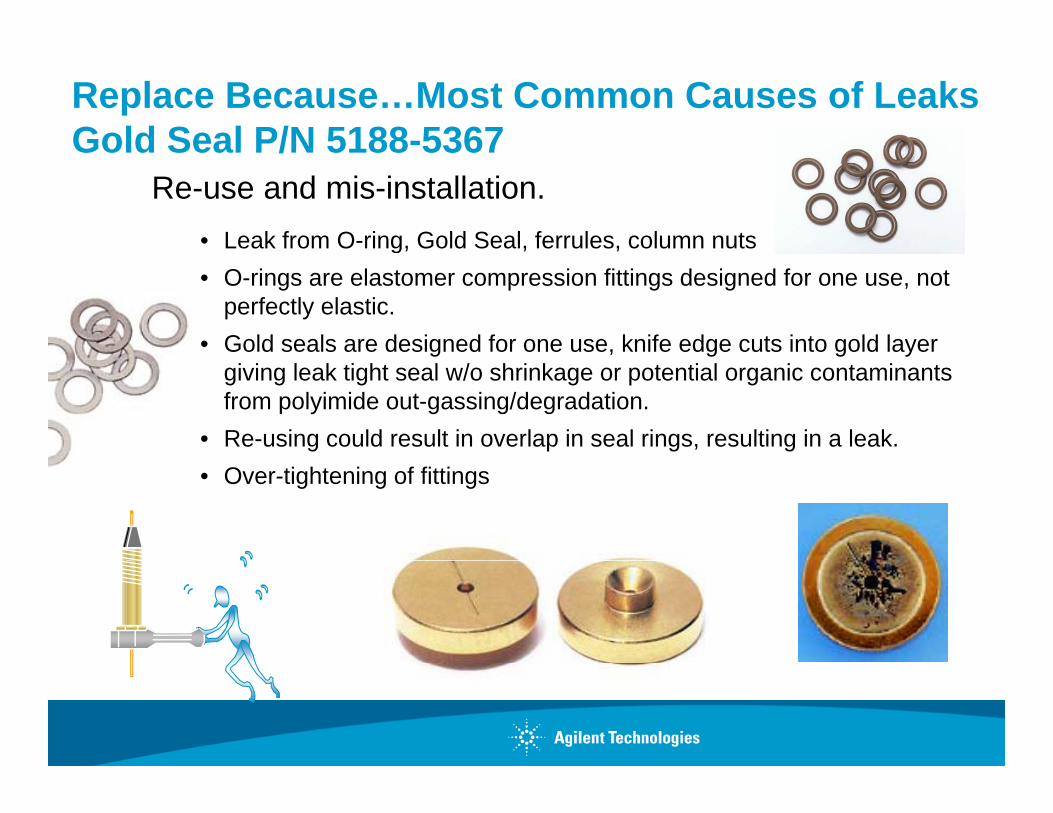
Replace Because…Most Common Causes of LeaksGold Seal P/N 5188-5367Gold Seal P/N 5188 5367
Re-use and mis-installation.• Leak from O-ring, Gold Seal, ferrules, column nutsg• O-rings are elastomer compression fittings designed for one use, not
perfectly elastic. • Gold seals are designed for one use, knife edge cuts into gold layer g g g y
giving leak tight seal w/o shrinkage or potential organic contaminants from polyimide out-gassing/degradation.
• Re-using could result in overlap in seal rings, resulting in a leak.• Over-tightening of fittings

Why Are There Different Gold Seals?High Split FlowsHigh Split Flows
•Limited by flow controller•Limited by flow controller
R ll 1 200 t 1 1000•Range usually 1:200 to 1:1000
Gold plated inlet seal with cross, p/n 5182-9652, p

Leaks Due to Septum Nut
• With repeated use, conical needle guide gets worn, out of round, and needs replacement as septum can begin to “bulge” out, especially with p g g p yexcessive tightening,
• Septa fail faster because needle is not guided with as much precision.
• Under or Over tightening—tighten nut until c-clamp on top stops turning, then ½ to ¾ turn more.
• Non-Agilent septa may be too thin, too thick, or out of round like die-cut septa and may not seal as well.
• “Use Environments” that decrease lifetime, like using non-Agilent Autosamplers (ours are precisely aligned), manual injection larger gauge syringesmanual injection, larger gauge syringes
• Replace septum nut annually for peace of mind.

Tips to Maximize Septum Life, Minimize Septum Leaksp
– Use Agilent Gold Standard, HP Point, 23-26 gauge taper syringes. The point style cores septa significantly less when y g p y p g yused with CenterGuide Septa. Taper minimizes septum coring/wear. HP-Point Style
– Use Agilent CenterGuide Septa. The molded hole minimizes septa coring, counter-intuitive, but true.p g, ,
Solid Septum CenterGuide Septum
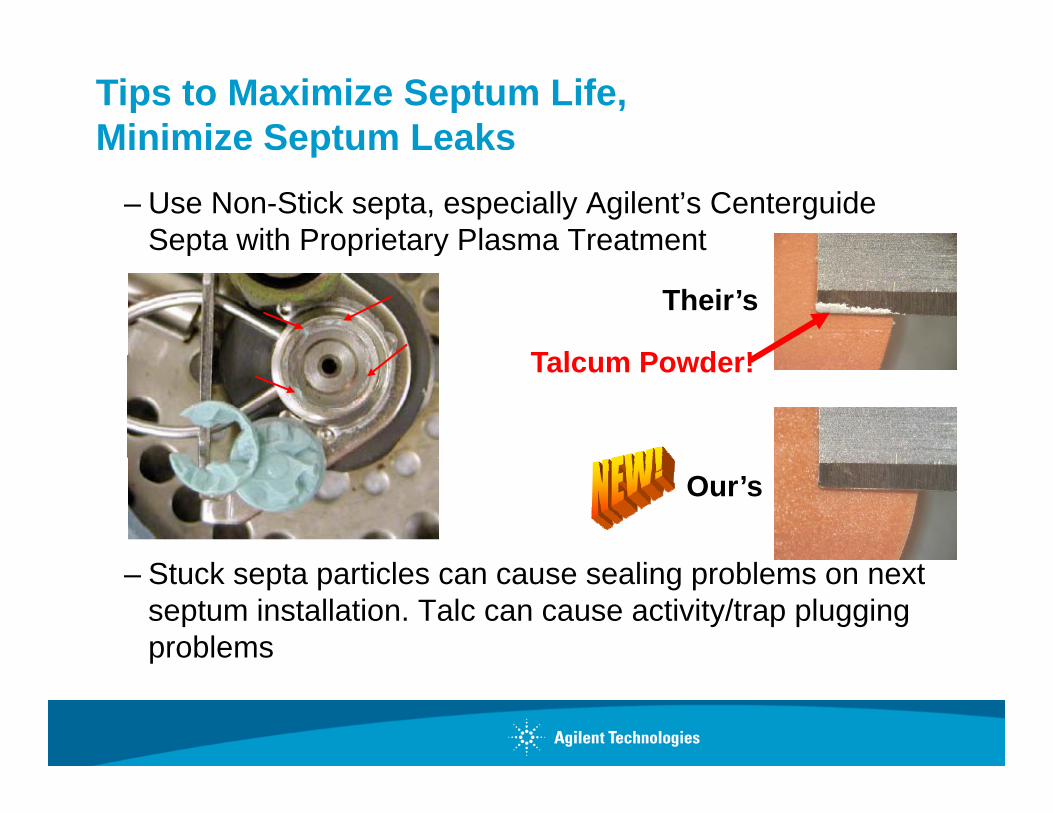
Tips to Maximize Septum Life, Minimize Septum Leaks
– Use Non-Stick septa, especially Agilent’s Centerguide Septa with Proprietary Plasma Treatment
p
p p y
Their’s
T l P d !Talcum Powder!
Our’s
– Stuck septa particles can cause sealing problems on next septum installation. Talc can cause activity/trap plugging problemsp

Tips to Maximize Septum Life, Minimize Septum Leaks
Other Benefits of Agilent’s “Centerguide”
p
Septa– Packaging eliminates contamination of septa,
– “first is as good as the last”
– Less Strain on Syringe compared to solid septa– Bleed/Temperature Optimized, (to 400C, trace analysis), p/n 5183-p p , ( , y ), p
4757– Advanced Green, (to 350C, good for general purpose), p/n 5183-4759
Long Life (to 350C more injections before failure) p/n 5183 4761– Long Life, (to 350C, more injections before failure), p/n 5183-4761– Above are 50 packs, 100 packs also available.
Septa vs GC Column Costs
• Typical cost of 1 Premium Septum (list), $1.25
• Typical cost of 1 GC Column, 30 m x 0.25 mm ID, $450.
• No accurate leak rate detector at sub 1 mL/min flow rates.
• “Don’t step over a dollar to pick up a dime!”
• Proactively change inlet septa.

Or Go Septumless! – Merlin Microseal
Low bleed, longer life alternative to standard septa for split/splitless injection
More than 2000 injections, depending on samples and operating conditions
Almost zero downtime for septa changes andAlmost zero downtime for septa changes and injection port liner changes due to septa particulates
Double O-ring type seal around the syringe needle
Spring assisted duckbill to seal the injection port p g j p
So, Why Do I Have To Do Maintenance?
1 Thi i f l i1. Things wear out – septa, syringes, nuts, ferrules, o-rings, etc.
2. Things get dirty – liners, column, gas lines, traps, etc.

The BIGGEST Problem in GC is…
There are more things that DON’T go through a GC than DO!
….therefore, don’t inject anything and you’ll never have problemsproblems.
OK i j t b t li th t thi j t t di t d l ith it!OK, inject, but realize that everything just got dirty…deal with it!

Where Does it Get Dirty?
Here
Here
Here
HereHere
Here

Liner Maintenance
•Liners become contaminated with use, collecting non volatiles salts excess reagentscollecting non-volatiles, salts, excess reagents, etc., or become damaged/cracked.
•Should inspect and replace liners often.p p
•Handle with gloves and forceps.
•Insert into or remove liners only from cool yinjection ports.
•Replacing with a new liner is recommended, to d ibilitensure reproducibility

Split Liners – What’s What?
Straighttube
Straighttube withl l
Invertedcup
BaffleFixed glasswoolglass wool

Split LinerPacked with Glass Wool
C10 Peak Area Ration-C40/n-C10 = 0.64
C40
C10Without Glass Wool Packing
Peak Area Ration-C40/n-C10 = 0 37
C40
n C40/n C10 0.37

Split LinerPacked with Glass Wool
C10 Peak Area Ration-C40/n-C10 = 0.64
C40
C10Without Glass Wool Packing
Peak Area Ration-C40/n-C10 = 0 37
C40
n C40/n C10 0.37
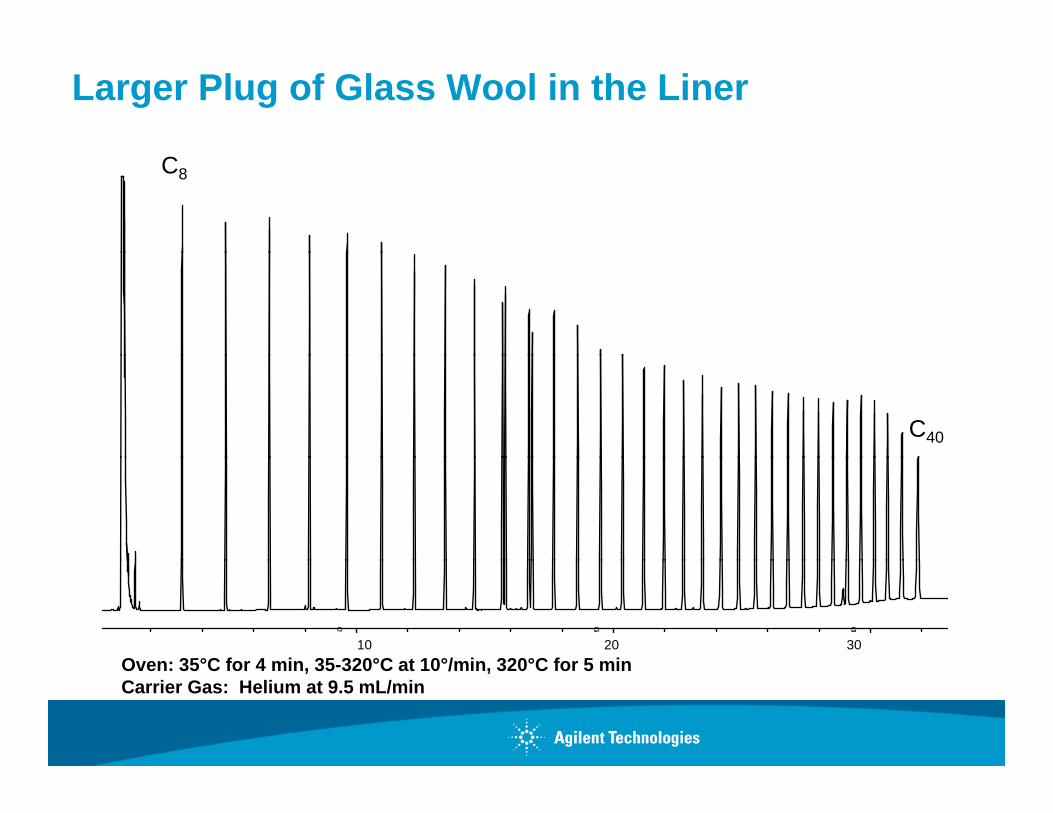
Larger Plug of Glass Wool in the Liner
C8
C40
Oven: 35°C for 4 min 35 320°C at 10°/min 320°C for 5 min10 20 30
10 20 30
Oven: 35°C for 4 min, 35-320°C at 10°/min, 320°C for 5 minCarrier Gas: Helium at 9.5 mL/min
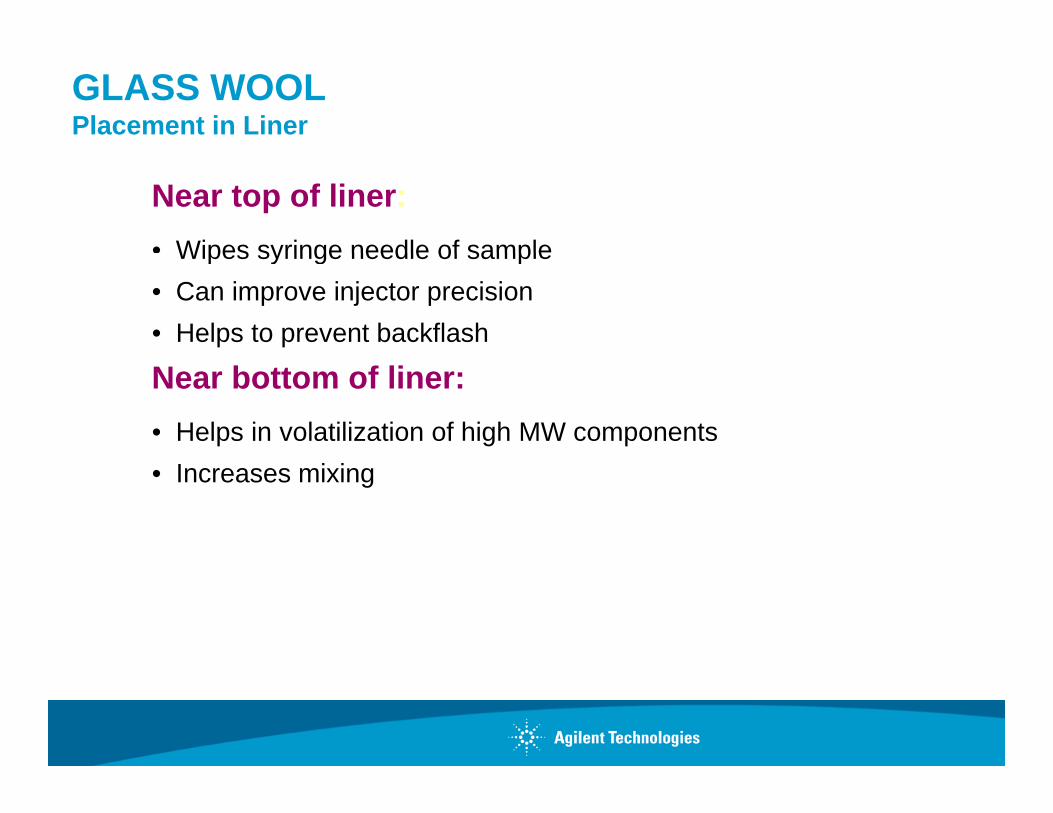
GLASS WOOLPlacement in Liner
Near top of liner:• Wipes syringe needle of sampleWipes syringe needle of sample• Can improve injector precision• Helps to prevent backflash
Near bottom of liner:• Helps in volatilization of high MW components• Increases mixing

GLASS WOOLLiner Packing Recommendations
•Amount, size and placement must be consistent for consistent results
• Can be broken upon installation into the liner, exposing active sites
•Liner deactivation with glass wool plug in place is idealg p g p

Splitless Injection Liners
Liner Part No. CommentsSingle taper, deactivated, 900μLvolume. Taper isolatessample
5181-3316Single taper, deactivated, 900μL volume. Taper isolates samplefrom metal seal, reducing breakdown of compounds that areactive with metals. For trace samples, general application.Single taper, deactivated, with glass wool, 900μL volume.
5062-3587g p , , g , μ
Glass wool aides volatilization and protects column. For trace(dirty) samples.Double taper, deactivated, 800μL volume. Taper on inlet
5181-3315μ
reduces chance for backflash into carrier gas lines. Highefficiency liner for trace, active samples.Direct connect liners, single and dual taper, deactivated.
G1544-80730G1544-80700
Capillary column press fits into liner end, eliminating sampleexposure to inlet. Ultimate protection for trace, active samples.Side hole permits use with EPC.Side hole

Do liner types really matter?
They do, especially for active compounds like:
phenolsorganic acidspesticidesaminesd f b tdrugs of abuse, etc.
Phenols for example in a separation of EPA method 8270Phenols, for example….in a separation of EPA method 8270 compounds

Cool On-Column-FID Injectionof 11 Analyte Test Mix
From “Improvements in the Agilent 6890/5973 GC/MSD System for Use with USEPAof 11 Analyte Test Mix
1 N-Nitrosodimethylamine 7 Pentachlorophenol ISTD 1 Dichlorobenzene-d42 Aniline 8 Benzidine ISTD 2 Naphthalene-d8
System for Use with USEPA Method 8270”, Agilent Application Note 5988-3072EN
p3 2,4-Dinitrophenol 9 3,3-Dichlorobenzidine ISTD 3 Acenaphthene-d104 4-Nitrophenol 10 Benzo(b)fluoranthene ISTD 4 Phenanthrene-d105 4,6-Dinitro-2-methylphenol 11 Benzo(k)fluoranthene ISTD 5 Chrysene-d126 4-Aminobiphenyl ISTD 6 Perylene-d12
pA
1400
1600
2
ISTD 5, 9
6
10,11
800
1000
1200
1
8
7
6
ISTD 6ISTD 1
ISTD 4ISTD 3
ISTD 2
3
200
400
600 5473
4 6 8 10 12 14 16 180

Splitless Inlet Liners Tested
5062-3587 Single-taper, deactivated, with glass wool
5181-3316 Single-taper, deactivated (open top)
G1544-80730 Direct Connect, single-taper, deactivated
5181-3315 Dual-taper, deactivated (closed top)
G1544-80700 Direct Connect, Dual-taper, deactivated
G1544 80730 Direct Connect, single taper, deactivated
Vendor X Unknown proprietary deactivation
Hole for EPC

Liner ComparisonExperimental:Agilent 6890 with FIDColumn = HP-5MS 30m x 0.25mm x 0.5μmCompared COC to various liners
2,4-Dinitrophenol Response Factors
160 80 20 5 ng injected
p0.75 min Splitless time, 3mL/min column flowOven: Temp programmed per 8270 methodInj. 250°C, Det. 300°C, Sample: 1μL 8270 mix
1.200
1.400
0.311
0.325 (3%)Avg RF (RSD)
0.260 (12%)
0.280 (18%)0.263 (9%) 0.278
0.310 (7%)
0.800
1.000
onse
Fac
tor
0 0720.167 (38%)
0.332
0.125
0.191 (22%)
0.253
0.216
0.280
0.207
0.261
0.229
0.316
0.400
0.600
Res
po
0.197
0.170
0.072
0.328
0.218
0.214
0.2840.303
0.2770.318
0.000
0.200
Cool On-Col mn
0.2280.331
5062-3587
0.207
5181-3316 5181-3315 Vendor X G1544-80730 G1544-80700
0.287 0.328 0.285 0.328
Si l t Si l t D l t Di t C t Di t C t
PittCon 2006
ColumnSingle-taper(with wool)
Single-taper(no wool)
Dual-taper Direct ConnectSingle-taper
Direct ConnectDual-taper

DIRECT CONNECTVaporization Linerp
Pulled backSide hole for EPC pressure Pulled back
1 mm for flowEPC pressure feedback

Pressure Flow Calculatorhttp://www.chem.agilent.com/en-US/Support/Downloads/Utilities/Pages/GcPressureFlow.aspx

For Easy Liner Maintenance on 5890/6890/6850Fli T f S lit/S litlFlip Top for Split/Splitlessinjection ports
30 li h t•30 sec liner change out
•No more hunting for that “f l ki ” h!“funny looking” wrench!
•Saves fingers from getting b dburned
•Increases instrument up titime
For a limited time only – Send an email to [email protected] August 31st and get your Flip Top for $180 (a 64% discount)

Turn Top Inlet Sealing System on NEW 7890
- Fast/Easy Split/Splitless Inlet Maintenance
changing liners has never been easierchanging liners has never been easier… changing liners has never been easier… changing liners has never been easier

Common Care and Maintenance Scheme for GC Columns
1. Bake out the column for no more than 2 hours.
2. Cut off 6”-1ft of the inlet end of the column.
3. Cut off more column. (repeat as necessary)

Cleaning the Split/Splitless Injector“Caution” 38 caliber brass gun barrel brush
Carrier gas flow off Disconnect split vent lineReplace split vent trap
38-caliber brass gun barrel brush
Injector body
GC Off
Remove column, reducing nut, gold seal, washer and liner
AcetoneMeCl2

Cleaning the Split/Splitless Injector“Caution”Carrier gas flow off Disconnect split vent line
Replace split vent trap
Injector body
GC Off
Remove column, reducing nut, gold seal, washer and liner
AcetoneMeCl2

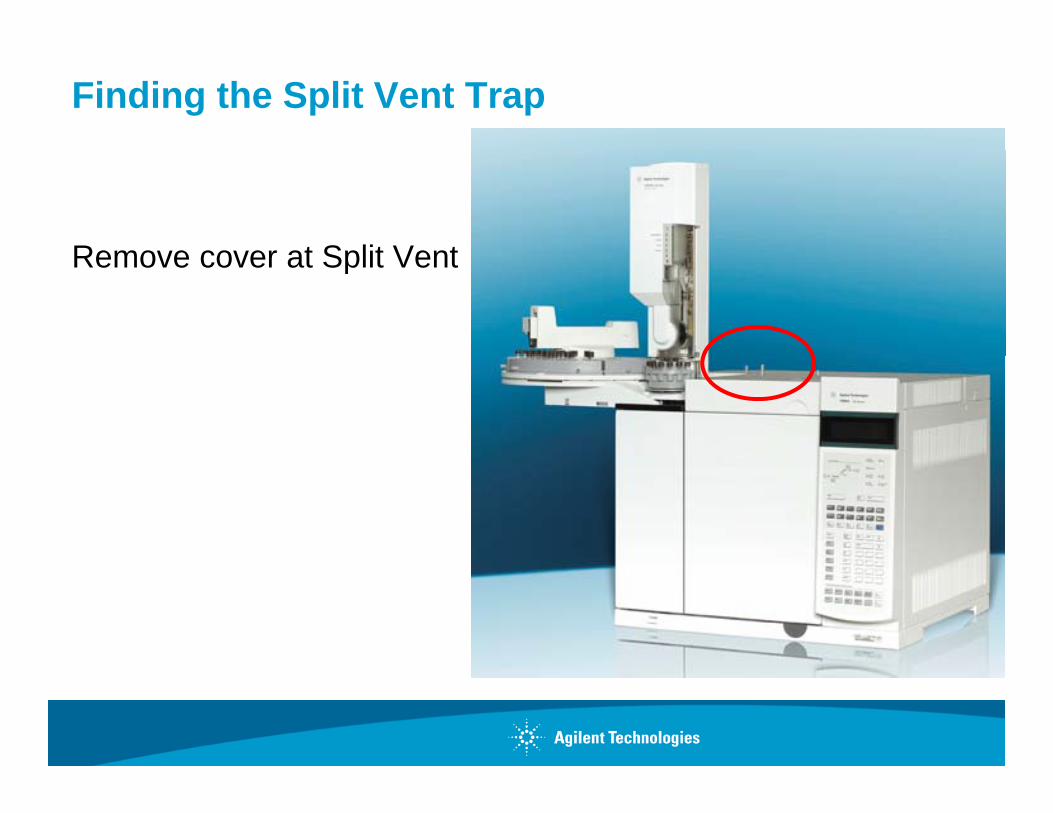
Finding the Split Vent Trap
Follow the split vent line back to the EPC
Finding the Split Vent Trap
Remove cover at Split VentRemove cover at Split Vent

Replacing the Split Vent Trap
Finger Tight Knurled Nut
G1544 80530G1544-80530
Be Careful When Doing Maintenance…
You may be the CONTAMINATOR!

Contamination of system by residue on fingers during column installationg
Column: DB-5ms, 30m x 0.25mm, 0.25umCarrier: H2 60 cm/sec constant flowCarrier: H2, 60 cm/sec, constant flowInjector: split 1:20, 250oCDetector: FID, 320oC, N2 makeup gasOven: 40oC for 0.75 min, 40-325oC at 20oC/min,
325oC for 30 min
Red: French Fry
Blue: system blank
Procedure:(1) Held French fry for 5 seconds.(2) Fingertip was wiped with paper towel to remove as much of the offending material as possible.(3) Lightly touched the part of the column sticking up above the ferrule.(4) Installed column into injector.(5) Set oven temperature to 40oC(5) Set oven temperature to 40oC.(6) Started oven temperature program as soon as oven reached 40oC.

Contamination from Liquid Soap
Column: DB-5ms, 30m x 0.25mm, 0.25umCarrier: H2 60 cm/sec constant flowCarrier: H2, 60 cm/sec, constant flowInjector: split 1:20, 250CDetector: FID, 320C, N2 makeup gasOven: 40C for 0.75 min, 40-325C at 20C/min,
325C for 30 min
Red: Liquid Soap
Blue: system blank
Procedure:(1) One very small drop of liquid soap placed on one fingertip.(2) Fingertip was wiped with paper towel to remove as much of the offending material as possible.(3) Lightly touched the part of the column sticking up above the ferrule.(4) Installed column into injector.(5) Set oven temperature to 40C(5) Set oven temperature to 40C.(6) Started oven temperature program as soon as oven reached 40C.

Contamination from Hand Lotion
Column: DB-5ms, 30m x 0.25mm, 0.25umCarrier: H2 60 cm/sec constant flowCarrier: H2, 60 cm/sec, constant flowInjector: split 1:20, 250CDetector: FID, 320C, N2 makeup gasOven: 40C for 0.75 min, 40-325C at 20C/min,
325C for 30 min
Red: Hand Lotion
Blue: system blank
Procedure:(1) One very small drop of hand lotion placed on one fingertip.(2) Fingertip was wiped with paper towel to remove as much of the offending material as possible.(3) Lightly touched the part of the column sticking up above the ferrule.(4) Installed column into injector.(5) Set oven temperature to 40C(5) Set oven temperature to 40C.(6) Started oven temperature program as soon as oven reached 40C.
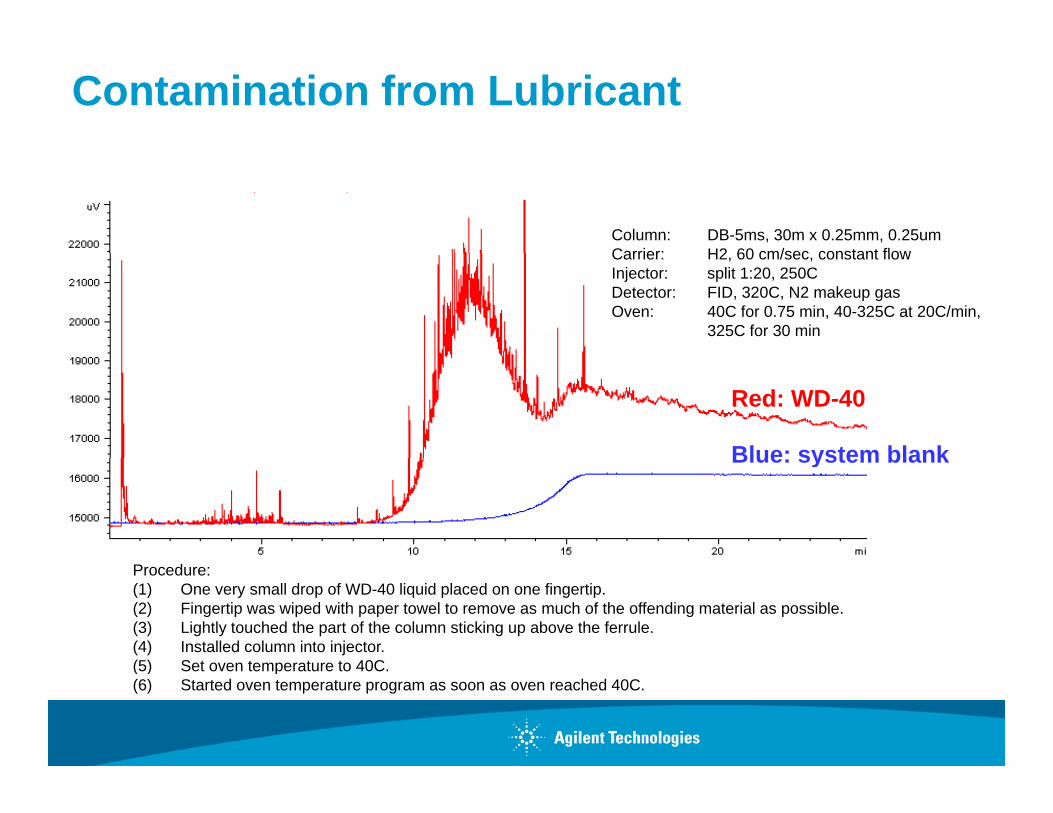
Contamination from Lubricant
Column: DB-5ms, 30m x 0.25mm, 0.25umCarrier: H2 60 cm/sec constant flowCarrier: H2, 60 cm/sec, constant flowInjector: split 1:20, 250CDetector: FID, 320C, N2 makeup gasOven: 40C for 0.75 min, 40-325C at 20C/min,
325C for 30 min
Red: WD-40
Blue: system blankBlue: system blank
Procedure:(1) One very small drop of WD-40 liquid placed on one fingertip.(2) Fingertip was wiped with paper towel to remove as much of the offending material as possible.(3) Lightly touched the part of the column sticking up above the ferrule.(4) Installed column into injector.(5) Set oven temperature to 40C(5) Set oven temperature to 40C.(6) Started oven temperature program as soon as oven reached 40C.

Root Causes of Inlet Performance Degradation, and Consequencesand Consequences
Accumulation of Sample Residues
• Loss of response, tailing on active analytes, split vent trap fouling and inaccurate EPC flow control
Accumulation of consumables wear particles
• Same as above, plus “bleed peaks”Leak in Septum Nut, Septum
D t O iti d t t i ibl d t l• Damage to O2 sensitive detectors, irreversible damage to columnNon-Optimized Set-up
• O-ring, Gold Seal, Ferrules, Column Nuts• Faster inlet performance degradation between maintenance sessions

Agilent J&W Scientific Technical Support
• 800-227-9770 (phone: US & Canada)*
•Select option 3, then 3, then 1.
• www.agilent.com/chem