TIBCO Business Studio ActiveMatrix Decisions Add … Business Studio ActiveMatrix Decisions Add-in...
19
TIBCO Business Studio™ ActiveMatrix ® Decisions Add-in Tutorial Software Release 1.1.1 May 2014 Two-Second Advantage ®
-
Upload
trinhxuyen -
Category
Documents
-
view
216 -
download
1
Transcript of TIBCO Business Studio ActiveMatrix Decisions Add … Business Studio ActiveMatrix Decisions Add-in...
Two-Second Adv
TIBCO Business Studio™
ActiveMatrix® Decisions Add-in
TutorialSoftware Release 1.1.1May 2014
antage®
Important Information
SOME TIBCO SOFTWARE EMBEDS OR BUNDLES OTHER TIBCO SOFTWARE. USE OF SUCH EMBEDDED OR BUNDLED TIBCO SOFTWARE IS SOLELY TO ENABLE THE FUNCTIONALITY (OR PROVIDE LIMITED ADD-ON FUNCTIONALITY) OF THE LICENSED TIBCO SOFTWARE. THE EMBEDDED OR BUNDLED SOFTWARE IS NOT LICENSED TO BE USED OR ACCESSED BY ANY OTHER TIBCO SOFTWARE OR FOR ANY OTHER PURPOSE.USE OF TIBCO SOFTWARE AND THIS DOCUMENT IS SUBJECT TO THE TERMS AND CONDITIONS OF A LICENSE AGREEMENT FOUND IN EITHER A SEPARATELY EXECUTED SOFTWARE LICENSE AGREEMENT, OR, IF THERE IS NO SUCH SEPARATE AGREEMENT, THE CLICKWRAP END USER LICENSE AGREEMENT WHICH IS DISPLAYED DURING DOWNLOAD OR INSTALLATION OF THE SOFTWARE (AND WHICH IS DUPLICATED IN THE LICENSE FILE) OR IF THERE IS NO SUCH SOFTWARE LICENSE AGREEMENT OR CLICKWRAP END USER LICENSE AGREEMENT, THE LICENSE(S) LOCATED IN THE “LICENSE” FILE(S) OF THE SOFTWARE. USE OF THIS DOCUMENT IS SUBJECT TO THOSE TERMS AND CONDITIONS, AND YOUR USE HEREOF SHALL CONSTITUTE ACCEPTANCE OF AND AN AGREEMENT TO BE BOUND BY THE SAME.This document contains confidential information that is subject to U.S. and international copyright laws and treaties. No part of this document may be reproduced in any form without the written authorization of TIBCO Software Inc.TIBCO, Two-Second Advantage, TIBCO Administrator, TIBCO ActiveMatrix, and TIBCO BusinessEvents are either registered trademarks or trademarks of TIBCO Software Inc. in the United States and/or other countries.All other product and company names and marks mentioned in this document are the property of their respective owners and are mentioned for identification purposes only.All other product and company names and marks mentioned in this document are the property of their respective owners and are mentioned for identification purposes only.THIS SOFTWARE MAY BE AVAILABLE ON MULTIPLE OPERATING SYSTEMS. HOWEVER, NOT ALL OPERATING SYSTEM PLATFORMS FOR A SPECIFIC SOFTWARE VERSION ARE RELEASED AT THE SAME TIME. SEE THE README FILE FOR THE AVAILABILITY OF THIS SOFTWARE VERSION ON A SPECIFIC OPERATING SYSTEM PLATFORM.THIS DOCUMENT IS PROVIDED “AS IS” WITHOUT WARRANTY OF ANY KIND, EITHER EXPRESS OR IMPLIED, INCLUDING, BUT NOT LIMITED TO, THE IMPLIED WARRANTIES OF MERCHANTABILITY, FITNESS FOR A PARTICULAR PURPOSE, OR NON-INFRINGEMENT.THIS DOCUMENT COULD INCLUDE TECHNICAL INACCURACIES OR TYPOGRAPHICAL ERRORS. CHANGES ARE PERIODICALLY ADDED TO THE INFORMATION HEREIN; THESE CHANGES WILL BE INCORPORATED IN NEW EDITIONS OF THIS DOCUMENT. TIBCO SOFTWARE INC. MAY MAKE IMPROVEMENTS AND/OR CHANGES IN THE PRODUCT(S) AND/OR THE PROGRAM(S) DESCRIBED IN THIS DOCUMENT AT ANY TIME.THE CONTENTS OF THIS DOCUMENT MAY BE MODIFIED AND/OR QUALIFIED, DIRECTLY OR INDIRECTLY, BY OTHER DOCUMENTATION WHICH ACCOMPANIES THIS SOFTWARE, INCLUDING BUT NOT LIMITED TO ANY RELEASE NOTES AND "READ ME" FILES.Copyright © 2004-2014 TIBCO Software Inc. ALL RIGHTS RESERVED.TIBCO Software Inc. Confidential Information
| 1
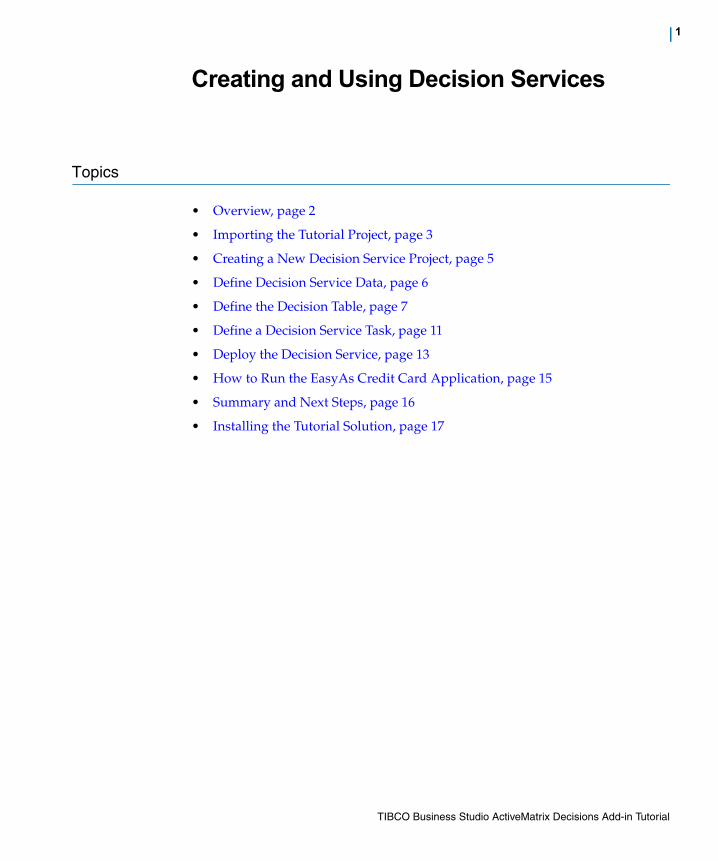
Creating and Using Decision Services
Topics
• Overview, page 2
• Importing the Tutorial Project, page 3
• Creating a New Decision Service Project, page 5
• Define Decision Service Data, page 6
• Define the Decision Table, page 7
• Define a Decision Service Task, page 11
• Deploy the Decision Service, page 13
• How to Run the EasyAs Credit Card Application, page 15
• Summary and Next Steps, page 16
• Installing the Tutorial Solution, page 17
TIBCO Business Studio ActiveMatrix Decisions Add-in Tutorial
2 | Creating and Using Decision Services
Overview
This tutorial shows you how to use TIBCO Business Studio to create a decision service and deploy it to TIBCO ActiveMatrix Decisions IT.
You should work through each section in turn to complete the tutorial.
The tutorial represents a complex example that randomly creates form input data. For the purposes of this tutorial, a single input and output data field is used to demonstrate a thread through the Decisions product. The ’Age’ parameter is used as the input and the ’Rules Fired’ parameter is used to display the output, which will be either ’Age meets minimum requirement’ or ’Age fails minimum requirement’.
Key Points Before you start this tutorial, you can become familiar with TIBCO Business Studio by completing the initial WelcomeUsers tutorials.
Next Step Importing the Tutorial Project
TIBCO Business Studio ActiveMatrix Decisions Add-in Tutorial
Importing the Tutorial Project | 3
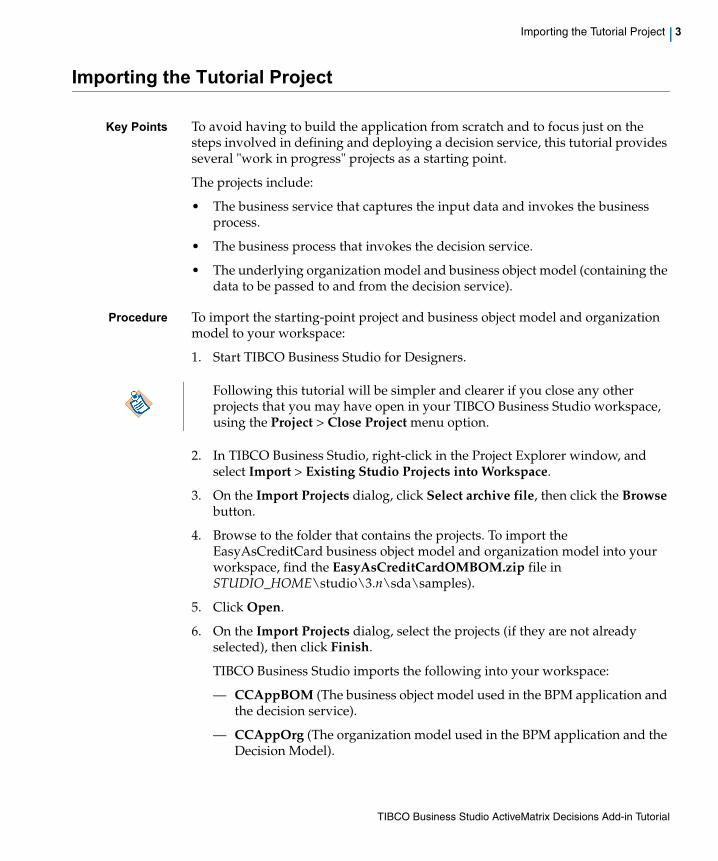
Importing the Tutorial Project
Key Points To avoid having to build the application from scratch and to focus just on the steps involved in defining and deploying a decision service, this tutorial provides several "work in progress" projects as a starting point.
The projects include:
• The business service that captures the input data and invokes the business process.
• The business process that invokes the decision service.
• The underlying organization model and business object model (containing the data to be passed to and from the decision service).
Procedure To import the starting-point project and business object model and organization model to your workspace:
1. Start TIBCO Business Studio for Designers.
2. In TIBCO Business Studio, right-click in the Project Explorer window, and select Import > Existing Studio Projects into Workspace.
3. On the Import Projects dialog, click Select archive file, then click the Browse button.
4. Browse to the folder that contains the projects. To import the EasyAsCreditCard business object model and organization model into your workspace, find the EasyAsCreditCardOMBOM.zip file in STUDIO_HOME\studio\3.n\sda\samples).
5. Click Open.
6. On the Import Projects dialog, select the projects (if they are not already selected), then click Finish.
TIBCO Business Studio imports the following into your workspace:
— CCAppBOM (The business object model used in the BPM application and the decision service).
— CCAppOrg (The organization model used in the BPM application and the Decision Model).
Following this tutorial will be simpler and clearer if you close any other projects that you may have open in your TIBCO Business Studio workspace, using the Project > Close Project menu option.
TIBCO Business Studio ActiveMatrix Decisions Add-in Tutorial
4 | Creating and Using Decision Services
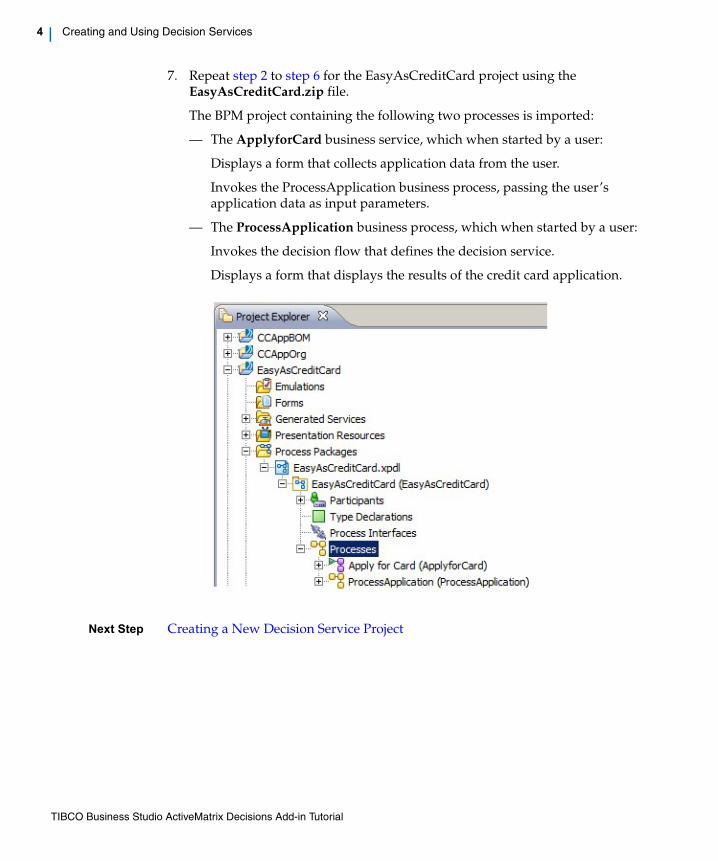
7. Repeat step 2 to step 6 for the EasyAsCreditCard project using the EasyAsCreditCard.zip file.
The BPM project containing the following two processes is imported:
— The ApplyforCard business service, which when started by a user:
Displays a form that collects application data from the user.
Invokes the ProcessApplication business process, passing the user’s application data as input parameters.
— The ProcessApplication business process, which when started by a user:
Invokes the decision flow that defines the decision service.
Displays a form that displays the results of the credit card application.
Next Step Creating a New Decision Service Project
TIBCO Business Studio ActiveMatrix Decisions Add-in Tutorial
Creating a New Decision Service Project | 5
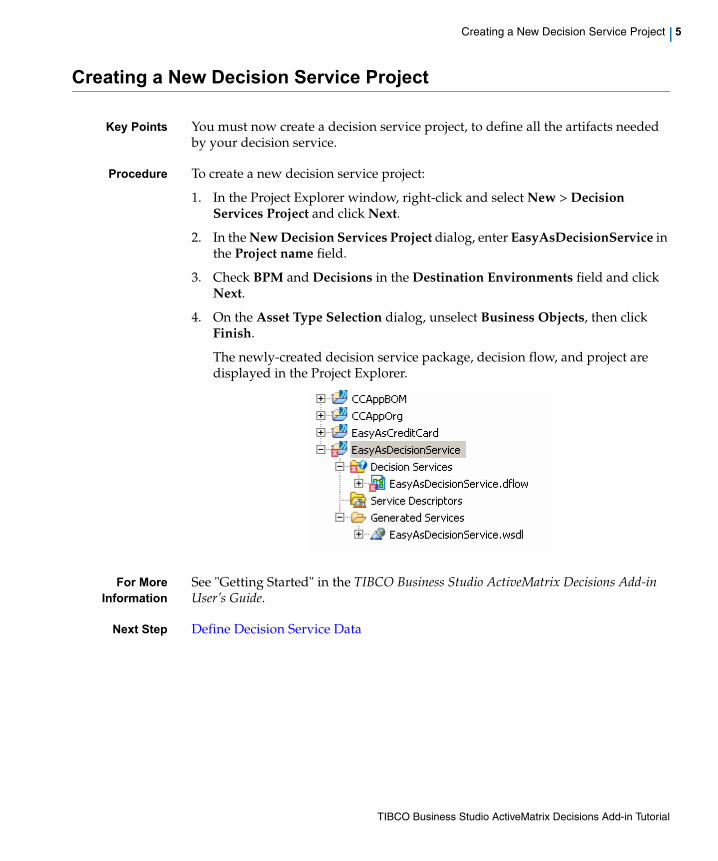
Creating a New Decision Service Project
Key Points You must now create a decision service project, to define all the artifacts needed by your decision service.
Procedure To create a new decision service project:
1. In the Project Explorer window, right-click and select New > Decision Services Project and click Next.
2. In the New Decision Services Project dialog, enter EasyAsDecisionService in the Project name field.
3. Check BPM and Decisions in the Destination Environments field and click Next.
4. On the Asset Type Selection dialog, unselect Business Objects, then click Finish.
The newly-created decision service package, decision flow, and project are displayed in the Project Explorer.
For MoreInformation
See "Getting Started" in the TIBCO Business Studio ActiveMatrix Decisions Add-in User’s Guide.
Next Step Define Decision Service Data
TIBCO Business Studio ActiveMatrix Decisions Add-in Tutorial

6 | Creating and Using Decision Services
Define Decision Service Data
Key Points Data is input to a decision service using parameters. You must specify the data you want to pass between the business process and the decision service. This is achieved by defining parameters that reference the business object model where the data objects are defined and mapping them to the corresponding parameters in the decision service.
Procedure To pass data from the business process to the decision service, you must define the parameters that reference the data objects.
1. Double-click EasyAsDecisionService-DecisionFlow to open the decision flow in the editor:
Note that the problem indicators are because of an empty decision table.
2. In the Properties view, select the Parameters tab.
3. Click the plus sign to the right of the Parameters tab. A new parameter displays.
4. Click in the Label column and change the label from the default "Parameter" to "Application".
5. Select the External Reference field, then click the browse button to the right of the field. This allows you to map the field to an object defined outside the decision flow, in this case to a class in the business object model.
6. On the Select Type dialog, select the Application class and click OK.
7. Click Yes when you are prompted to add CCAppBOM as a reference project.
8. Save the changes you have made to the project.
For MoreInformation
See "Working with Decision Flow Parameters" in the TIBCO Business Studio ActiveMatrix Decisions Add-in User’s Guide.
Next Step Define the Decision Table
TIBCO Business Studio ActiveMatrix Decisions Add-in Tutorial
Define the Decision Table | 7
Define the Decision Table
Key Points Decision tables provide a method of building complex business rules. A decision table rule is a row in the decision table. It has one or more conditions and one or more actions. Each condition cell is equivalent to one condition in the decision table. Similarly each action cell is equivalent to one action in the decision table.
Procedure To define a decision table, you must define the conditions and actions:
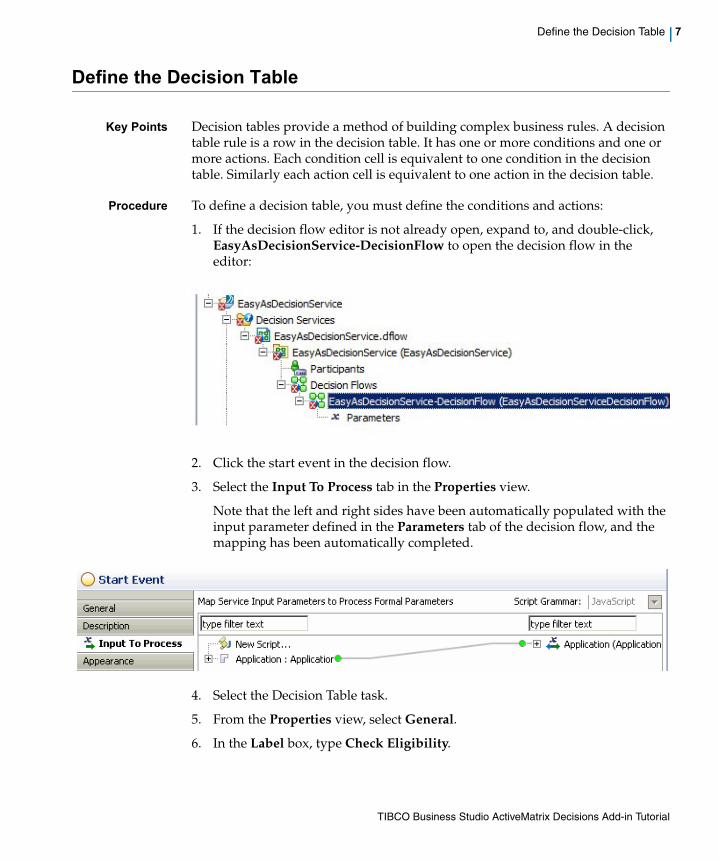
1. If the decision flow editor is not already open, expand to, and double-click, EasyAsDecisionService-DecisionFlow to open the decision flow in the editor:
2. Click the start event in the decision flow.
3. Select the Input To Process tab in the Properties view.
Note that the left and right sides have been automatically populated with the input parameter defined in the Parameters tab of the decision flow, and the mapping has been automatically completed.
4. Select the Decision Table task.
5. From the Properties view, select General.
6. In the Label box, type Check Eligibility.
TIBCO Business Studio ActiveMatrix Decisions Add-in Tutorial
8 | Creating and Using Decision Services
7. Click Edit Decision Table (or double-click on the Check Eligibility task). The Decision Table Editor is displayed.
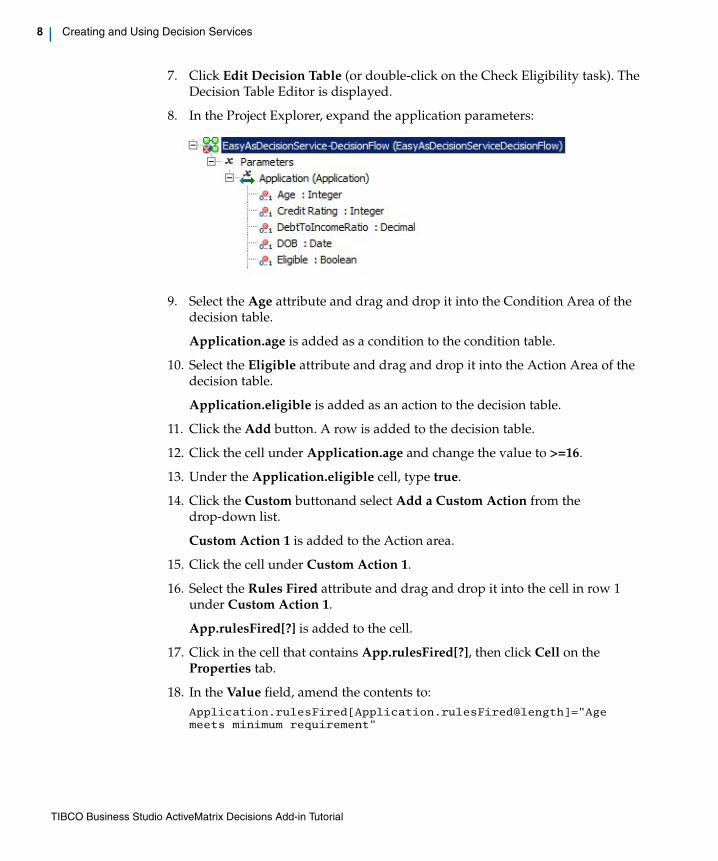
8. In the Project Explorer, expand the application parameters:
9. Select the Age attribute and drag and drop it into the Condition Area of the decision table.
Application.age is added as a condition to the condition table.
10. Select the Eligible attribute and drag and drop it into the Action Area of the decision table.
Application.eligible is added as an action to the decision table.
11. Click the Add button. A row is added to the decision table.
12. Click the cell under Application.age and change the value to >=16.
13. Under the Application.eligible cell, type true.
14. Click the Custom buttonand select Add a Custom Action from the drop-down list.
Custom Action 1 is added to the Action area.
15. Click the cell under Custom Action 1.
16. Select the Rules Fired attribute and drag and drop it into the cell in row 1 under Custom Action 1.
App.rulesFired[?] is added to the cell.
17. Click in the cell that contains App.rulesFired[?], then click Cell on the Properties tab.
18. In the Value field, amend the contents to:Application.rulesFired[Application.rulesFired@length]="Age meets minimum requirement"
TIBCO Business Studio ActiveMatrix Decisions Add-in Tutorial

Define the Decision Table | 9
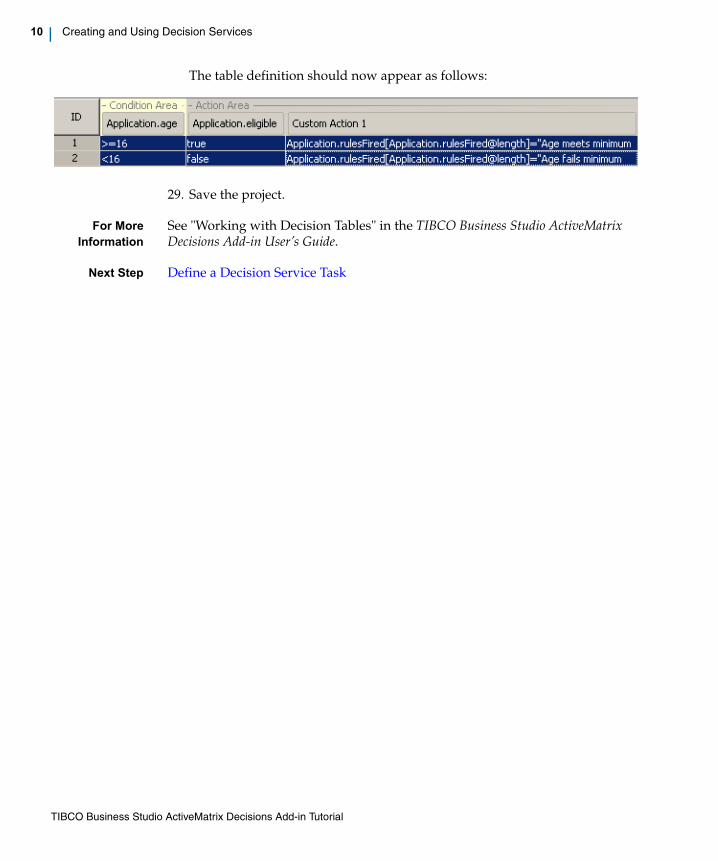
The table definition should now appear as follows:
19. Click Apply (you may need to scroll down to see this).
20. Click the Add button to add a second row to the decision table.
21. In the Application.age column, click the cell in row 2 to select it and type <16.
22. In the Application.eligible column, click the cell in row 2 to select it and type false.
23. Click the cell in row 2 under Custom Action 1.
24. Select the Rules Fired attribute and drag and drop it into the cell in row 2 under Custom Action 1.
App.rulesFired[?] is added to the cell.
25. Click in the cell to which you just added App.rulesFired[?], then click Cell on the Properties tab.
26. In the Value field, amend the contents to:Application.rulesFired[Application.rulesFired@length]="Age fails minimum requirement"
27. Click Apply (you may need to scroll down to see this).
28. Click the Fit Content button so that you can see all of the content.
TIBCO Business Studio ActiveMatrix Decisions Add-in Tutorial
10 | Creating and Using Decision Services
The table definition should now appear as follows:
29. Save the project..
For MoreInformation
See "Working with Decision Tables" in the TIBCO Business Studio ActiveMatrix Decisions Add-in User’s Guide.
Next Step Define a Decision Service Task
TIBCO Business Studio ActiveMatrix Decisions Add-in Tutorial
Define a Decision Service Task | 11
Define a Decision Service Task
Key Points To call a decision service from a process you use a Service task of type Decision Service.
Procedure To call a decision service from a process, you must:
• Add a service task of Decision Service implementation type in your business process.
• Add the data to the decision service. To do this, you must map the input and output parameters from the business process to corresponding parameters in the decision service.
Task A Add a Decision Service Task to Your Business Process
1. Open the ProcessApplication process in the EasyAsCreditCard project.
2. Select the Check Eligibility task.
3. On the Properties view, General tab, set the Activity Type to Service Task.
4. In the right pane, select Decision Service from the the Service Type drop-down list.
5. Click the Open Decision-Flow link.
6. On the Select Decision Flow dialog, select the EasyAsDecisionService decision flow and click OK.
7. Respond Yes when asked about adding EasyAsDecisionService as a reference project.
The decision service details are automatically completed in the General tab of the Properties view.
Task B Set up the Data Inputs and Data Outputs for the Decision Service
1. In the Properties view for the decision service task (Check Eligibility), click Map to Decision Flow. Note that the right-hand and left-hand sides have been automatically populated with the input parameter defined in the Interface tab of the decision service task (Application).
2. Click Application on the left, and drag the parameter on to the Application input parameter on the right to create a data mapping. When the Process
TIBCO Business Studio ActiveMatrix Decisions Add-in Tutorial

12 | Creating and Using Decision Services
Application process calls the Check Eligibility decision service, the value of Application will be passed to the decision service.
3. Click Map From Decision Flow. Click Application on the right and drag the parameter to the Application input parameter on the left to create a data mapping. When the Check Eligibility decision service has completed, the value of Application will be passed back to the Process Application process.
4. Save the project.
For MoreInformation
See "Invoking Decision Services From a BPM Application" of TIBCO Business Studio ActiveMatrix Decisions Add-in User’s Guide.
Next Step Deploy the Decision Service
TIBCO Business Studio ActiveMatrix Decisions Add-in Tutorial
Deploy the Decision Service | 13
Deploy the Decision Service
Key Points Once you have developed a decision service, its constituent elements must be deployed so that the decision service can be run as an application.
Procedure To deploy the decision service, you must do the following:
• Create and connect to a BPM deployment server. See the How to Implement and Deploy the WelcomeUsers Application tutorial for more information.
• Deploy the EasyAs Credit Card organization model to a node using a deployment server
• Deploy your BPM application to a node using a deployment server
• Deploy your decision service to a node using a deployment server
Task A Deploy BPM projects
To deploy the CCAppOrg organization model:
1. In the Deployment Server view, right-click the name of the deployment server and select Deploy Module.
2. On the Select Module Type dialog, select Deploy BPM Project and click Next.
3. Select CCAppOrg as the module to deploy and click Next.
4. On the Administrator Configuration dialog, click Finish.
A progress dialog displays while deployment takes place. If you select the Close Dialog checkbox, the dialog closes when it is completed. If not, click the
button or click Close when deployment has completed.
In addition, a Console view opens. This view also displays progress messages.
5. Expand the Deployment Server view (Deployment Server > Server > BPM Environment > Application). CCAppOrg appears as a deployed application
6. Perform the steps above to deploy the EasyAsCreditCard project.
Task B Deploy the Decisions project
1. For your decisions runtime, find out the name of the decisions application. By default this is "com.tibco.adec.service.daa". If a different name is used, you will need to change your name to match it. To do this, go to Window > Preferences > Decisions and edit the Decisions Product Application Name.
TIBCO Business Studio ActiveMatrix Decisions Add-in Tutorial

14 | Creating and Using Decision Services
2. Perform the steps described in Deploy BPM projects again, but at step 2, select Deploy Decisions Project and follow the steps to deploy the EasyAsDecisionService project.
For MoreInformation
See "Deploying a Decision Service" in the TIBCO Business Studio ActiveMatrix Decisions Add-in User’s Guide.
Next Step How to Run the EasyAs Credit Card Application
TIBCO Business Studio ActiveMatrix Decisions Add-in Tutorial
How to Run the EasyAs Credit Card Application | 15
How to Run the EasyAs Credit Card Application
Procedure To run the EasyAs Credit Card Application:
1. Contact your system administrator to find out how to start Openspace. You may need to enter a specific URL in your browser, or click a link from a specific web page.
Use the Organization Browser in Openspace to map a user (in this case, Clint Hill) to the Credit Card Officer position (as this is the position to which the displayed work item will be offered).
2. Enter a User Name of "Clint Hill" with a Password of "tibco123", then click Login. The main Openspace user interface is displayed.
3. Click the Business Services pane.
4. Expand All Categories > EasyAsCreditCard.
5. Double-click ApplyForCard in the right hand pane and enter a value in the box for ’Age’ to test the rules set up earlier in the tutorial (Age>=16 and Age<16). Click Submit.
The decision service will be used to check the age of the applicant for a credit card, and decide whether they are eligible based on their age.
6. Click ToDo List. You should see the work item.
7. Click the work item. The Rules Fired field on the form indicates that the service has been invoked and has processed the request by showing the text of ’Age meets minimum requirement’ or ’Age fails minimum requirement’ rule.
The password "tibco123" is a default defined in the LDAP.
TIBCO Business Studio ActiveMatrix Decisions Add-in Tutorial
16 | Creating and Using Decision Services
Summary and Next Steps
You have now completed this tutorial.
Summary You should now be familiar with:
• creating and deploying a decision service
• configuring a business process to invoke a decision service
Next Steps You can now:
• install the solution to this Tutorial and compare it with your version. See the instructions in Installing the Tutorial Solution for how to do this.
• use the "For More Information" links in this chapter to explore particular topics in more detail.
TIBCO Business Studio ActiveMatrix Decisions Add-in Tutorial

Installing the Tutorial Solution | 17
Installing the Tutorial Solution
Procedure If you want to install the solution to this tutorial:
1. Find the EasyAsCreditCardSolution.zip file, in STUDIO_HOME\studio\3.n\sda\samples).
2. In TIBCO Business Studio, right-click in the Project Explorer window, and select Import > Existing Studio Projects into Workspace. The Import Projects page is displayed.
3. Click Select archive file: and click on the Browse button.
4. Browse to the folder that contains the projects and click Open. The projects are displayed in the Import wizard.
5. Select all the projects (if they are not already selected).
6. Click Finish. TIBCO Business Studio imports the projects to your workspace.
TIBCO Business Studio ActiveMatrix Decisions Add-in Tutorial