Throne of Darkness eguide cvr - ia600704.us.archive.org
217
primagames.com ® ™ This game has received the follow- ing rating from the ESRB
Transcript of Throne of Darkness eguide cvr - ia600704.us.archive.org

primagames.com®
™
TThhiiss ggaammee hhaass rreecceeiivveedd tthhee ffoollllooww--iinngg rraattiinngg ffrroomm tthhee EESSRRBB

Prima’s Official Strategy Guide
An Incan Monkey God StudiosProduction
Prima GamesA Division of Random House, Inc.
3000 Lava Ridge CourtRoseville, CA 95661
(800) 733-3000www.primagames.com

Prima’s Official Strategy Guide
2 primagames.com
Incan Monkey God Studiosand the IMGS logo are trademarks of IMGS, Inc.www.incanmonkey.com
TM
®
ISBN: 0-7615-2801-6Library of Congress Catalog Card Number: 200100768
Credits
The Prima Games logo is a registered trademark of Random House, Inc., registered in the United States and other countries.Primagames.com is a registered trademark of Random House, Inc., registered in the United States.
© 2001-2004 by Prima Games. Allrights reserved. No part of thisbook may be reproduced or trans-mitted in any form or by anymeans, electronic or mechanical,including photocopying, recording,or by any information storage orretrieval system without writtenpermission from Prima Games.Prima Games is a division ofRandom House, Inc.
All products and characters mentioned in this book are trademarks of their respectivecompanies.
Important:Prima Games has made every effort to determine that the information contained in thisbook is accurate. However, the publisher makes no warranty, either expressed orimplied, as to the accuracy, effectiveness, or completeness of the material in this book;nor does the publisher assume liability for damages, either incidental or consequential,that may result from using the information in this book. The publisher cannot provideinformation regarding game play, hints and strategies, or problems with hardware orsoftware. Questions should be directed to the support numbers provided by the gameand device manufacturers in their documentation. Some game tricks require precisetiming and may require repeated attempts before the desired result is achieved.
TM © 2001-2004 Sierra On-Line, Inc. All Rights Reserved. Sierra, the “S” logo, Throne of Darkness and the Throne ofDarkness logo are trademarks of Sierra On-Line, Inc. Click Entertainment and the Click logo are registeredtrademarks of Click Entertainment. ® designated trademarks registered in the U.S.A., which may be registeredin certain other countries.
Writer Chris McCubbin
Editor and Stat Monkey David Ladyman
Design Sharon Freilich
Production Catherine Cantieri, Sharon Freilich and Raini Madden
Art Ben Haas, Victor Lee (Direction); Aaron Akagi, Mike Badillo,Jon Bodenshot, Tim Brannon, Kim Cogan, Erik Cufino, Anthony Doe, Eugene Galang, Ivetta Harte, Jae cheol Hong, Victor Lee, Edwin Loo, Eric Queen, George Schmidt,Patrick Tougas, Herman Wong, Dean Yuen
Folks at Click and Sierra Leif Jensen, Erik Cufino, Anthony Doe, Adam Fossa, Evan Salomon, Tom Thompson, Baris Yaman
Special thanks! Erik Cufino, who pieced all the maps together!

Your SamuraiINTRODUCTION . . . . . . . . . . . . . . . . . . . . . . . .5LEADER . . . . . . . . . . . . . . . . . . . . . . . . . . . . . . .6ARCHER . . . . . . . . . . . . . . . . . . . . . . . . . . . . . . .7BRICK . . . . . . . . . . . . . . . . . . . . . . . . . . . . . . . . .8NINJA . . . . . . . . . . . . . . . . . . . . . . . . . . . . . . . . .9WIZARD . . . . . . . . . . . . . . . . . . . . . . . . . . . . . . .10SWORDSMAN . . . . . . . . . . . . . . . . . . . . . . . . .11BERSERKER . . . . . . . . . . . . . . . . . . . . . . . . . . .12
Samurai SpellsINTRODUCTION . . . . . . . . . . . . . . . . . . . . . . .13EARTH SPELLS . . . . . . . . . . . . . . . . . . . . . . . .14FIRE SPELLS . . . . . . . . . . . . . . . . . . . . . . . . . .17LIGHTNING SPELLS . . . . . . . . . . . . . . . . . . . .20WATER SPELLS . . . . . . . . . . . . . . . . . . . . . . . .23LEADER’S SPELL TREES . . . . . . . . . . . . . . . .27ARCHER’S SPELL TREES . . . . . . . . . . . . . . . .28BRICK’S SPELL TREES . . . . . . . . . . . . . . . . . .29NINJA’S SPELL TREES . . . . . . . . . . . . . . . . . . .30WIZARD’S SPELL TREES . . . . . . . . . . . . . . . . .31SWORDSMAN’S SPELL TREES . . . . . . . . . . . .32BERSERKER’S SPELL TREES . . . . . . . . . . . . .33TABLE OF SAMURAI SPELLS . . . . . . . . . . . . .34
Strategy & CombatCOMBAT RESOLUTION . . . . . . . . . . . . . . . . .37TACTICS . . . . . . . . . . . . . . . . . . . . . . . . . . . . . .39
Centipede, Lizard . . . . . . . . . . . . . . . . . . . . .40Scorpion, Dragon . . . . . . . . . . . . . . . . . . . . .41Mantis, Snake . . . . . . . . . . . . . . . . . . . . . . . .42Fox, Monkey . . . . . . . . . . . . . . . . . . . . . . . .43Tiger, Frog . . . . . . . . . . . . . . . . . . . . . . . . . .44Phoenix, Turtle . . . . . . . . . . . . . . . . . . . . . . .45
GENERAL STRATEGY . . . . . . . . . . . . . . . . . . .46Money Management . . . . . . . . . . . . . . . . . . .46Character Advancement . . . . . . . . . . . . . . . . .47Party Advancement . . . . . . . . . . . . . . . . . . . .48Miscellany . . . . . . . . . . . . . . . . . . . . . . . . . .49
MULTIPLAYER: AN INTRODUCTION . . . . . .51Playing Dark . . . . . . . . . . . . . . . . . . . . . . . .51Shrine Room Attacks . . . . . . . . . . . . . . . . . .52
EquipmentSTATS . . . . . . . . . . . . . . . . . . . . . . . . . . . . . . . .53FACTORS THAT DETERMINE COSTS . . . . .53AMULETS . . . . . . . . . . . . . . . . . . . . . . . . . . . . .54
Jewels . . . . . . . . . . . . . . . . . . . . . . . . . . . . .54Medicine Cases . . . . . . . . . . . . . . . . . . . . . .54Prayer Beads . . . . . . . . . . . . . . . . . . . . . . . .55Talismans . . . . . . . . . . . . . . . . . . . . . . . . . . .55
MASKS . . . . . . . . . . . . . . . . . . . . . . . . . . . . . . .56GOLD . . . . . . . . . . . . . . . . . . . . . . . . . . . . . . . .58POTIONS . . . . . . . . . . . . . . . . . . . . . . . . . . . . .58ARMOR . . . . . . . . . . . . . . . . . . . . . . . . . . . . . . .59
Body Armor . . . . . . . . . . . . . . . . . . . . . . . . .59Head Armor . . . . . . . . . . . . . . . . . . . . . . . . .62Arm Armor . . . . . . . . . . . . . . . . . . . . . . . . .65Leg Armor . . . . . . . . . . . . . . . . . . . . . . . . . .67
WEAPONS . . . . . . . . . . . . . . . . . . . . . . . . . . . . .68Bows . . . . . . . . . . . . . . . . . . . . . . . . . . . . . .68Polearms . . . . . . . . . . . . . . . . . . . . . . . . . . .70Swords . . . . . . . . . . . . . . . . . . . . . . . . . . . .75Throwing Weapons . . . . . . . . . . . . . . . . . . . .80
UNIQUE WEAPONS AND ARMOR . . . . . . . . .83QUEST ITEMS . . . . . . . . . . . . . . . . . . . . . . . . .84COMPONENTS . . . . . . . . . . . . . . . . . . . . . . . .85
Stacking Limits . . . . . . . . . . . . . . . . . . . . . . .85Naming . . . . . . . . . . . . . . . . . . . . . . . . . . . .85Gem Components . . . . . . . . . . . . . . . . . . . . .85Magic Item Design . . . . . . . . . . . . . . . . . . . .86Component Chart . . . . . . . . . . . . . . . . . . . . .88Earth Components . . . . . . . . . . . . . . . . . . . .90Fire Components . . . . . . . . . . . . . . . . . . . . .92Lightning Components . . . . . . . . . . . . . . . . .93Water Components . . . . . . . . . . . . . . . . . . . .95Gems . . . . . . . . . . . . . . . . . . . . . . . . . . . . . .97Component Prefixes . . . . . . . . . . . . . . . . . . .98Component Suffixes . . . . . . . . . . . . . . . . . .100
COMBINATIONS . . . . . . . . . . . . . . . . . . . . . .102
primagames.com 3
Table of Contents

MonstersStages . . . . . . . . . . . . . . . . . . . . . . . . . . . .103Other Monster Variations, Stats . . . . . . . . . .104Loot . . . . . . . . . . . . . . . . . . . . . . . . . . . . . .105Defaults . . . . . . . . . . . . . . . . . . . . . . . . . . .107
BAKE YOROI . . . . . . . . . . . . . . . . . . . . . . . . . .108Byakko, Go-No, Yoroinushi
DARK SAMURAI NPCS . . . . . . . . . . . . . . . . .111Dark Warlord
DEAD FOOT SOLDIER . . . . . . . . . . . . . . . . .113DEBU . . . . . . . . . . . . . . . . . . . . . . . . . . . . . . . .114EVIL FEMALE NINJA . . . . . . . . . . . . . . . . . . .116EVIL PRIEST . . . . . . . . . . . . . . . . . . . . . . . . . .118
Daimajutsuou EVIL PRIESTESS . . . . . . . . . . . . . . . . . . . . . .120EVIL WIZARD . . . . . . . . . . . . . . . . . . . . . . . . .122
Sabaki, Majutsu-O, Tenkai Dai-IngeiFALLEN HERO FOOT SOLDIERS . . . . . . . . .124
Gaiya-jiro, Machuro, OruteFALLEN NINJA . . . . . . . . . . . . . . . . . . . . . . . .127
Kagero, Koga BakamaruFALLEN WIZARD . . . . . . . . . . . . . . . . . . . . . .130GAKI . . . . . . . . . . . . . . . . . . . . . . . . . . . . . . . .131
MushaGUARDIAN DRAGON . . . . . . . . . . . . . . . . . .133KAPPA . . . . . . . . . . . . . . . . . . . . . . . . . . . . . . .134
Small Kappa, Baku, Suigetsu, SuizanKIHEI . . . . . . . . . . . . . . . . . . . . . . . . . . . . . . . .138NEANDERSKULL . . . . . . . . . . . . . . . . . . . . . .140ONI . . . . . . . . . . . . . . . . . . . . . . . . . . . . . . . . .141
Daikaioniou, Ichi-no, Kijin, Tessa-ikiSCORPION DRAGON . . . . . . . . . . . . . . . . . . .146
Gero-mon, San-noSHADOW COMMANDER . . . . . . . . . . . . . . .149
Buaku the Blade, Dekabutsu, Taiboku, TaishoSHADOW SOLDIER . . . . . . . . . . . . . . . . . . . .153SKELETON ARCHER . . . . . . . . . . . . . . . . . . .154SPIDER WITCH . . . . . . . . . . . . . . . . . . . . . . .156
Hashi-hime, Ni-noTENGU . . . . . . . . . . . . . . . . . . . . . . . . . . . . . .158
Arishimaru, FuukakuWINGED SERPENT KOKURYU . . . . . . . . . . .160WOLF CLAN (ROUZUKO, YAMA-INU) . . . . .161
JyuGa, Shi-noMONSTER SPELLS . . . . . . . . . . . . . . . . . . . .165MONSTER GLOSSARY . . . . . . . . . . . . . . . . .166
Walkthrough & MapsYOUR CITADEL . . . . . . . . . . . . . . . . . . . . . . .169
The Exterior . . . . . . . . . . . . . . . . . . . . . . . .170Monster Populations . . . . . . . . . . . . . . . . . .171
Citadels and Wilderness . . . . . . . . . . . . . . . . . .171Mountainsides and Dark Warlord’s Cave . . . . .171
The Four Citadels . . . . . . . . . . . . . . . . . . . .173Mori Citadel . . . . . . . . . . . . . . . . . . . . . . . . . . .173Oda Citadel . . . . . . . . . . . . . . . . . . . . . . . . . . .175Tokugawa Citadel . . . . . . . . . . . . . . . . . . . . . . .177Toyotomi Citadel . . . . . . . . . . . . . . . . . . . . . . . .179
Subsequent Castles . . . . . . . . . . . . . . . . . . .179THE CLAN WILDERNESSES . . . . . . . . . . . . .180
Common Features . . . . . . . . . . . . . . . . . . . .180Individual Wildernesses . . . . . . . . . . . . . . . .185
Mori Wilderness . . . . . . . . . . . . . . . . . . . . . . . .185Oda Wilderness . . . . . . . . . . . . . . . . . . . . . . . .189Tokugawa Wilderness . . . . . . . . . . . . . . . . . . . .191Toyotomi Wilderness . . . . . . . . . . . . . . . . . . . . .195
Personal Quests . . . . . . . . . . . . . . . . . . . . .196Mori Berserker, Yagyu Jubei . . . . . . . . . . . . . . .196Mori Leader, Takeda Shingen . . . . . . . . . . . . . .196Oda Leader, O-ishi Kuranosuke . . . . . . . . . . . .197Oda Ninja, Kajiwara Kagesue . . . . . . . . . . . . .197Tokugawa Archer, Tijima Kenzaburo . . . . . . . .197Toyotomi Ninja, Fjiwara Jutaro . . . . . . . . . . . .198Toyotomi Wizard, Ootani Yoshitsugu . . . . . . . . .198
THE MOUNTAIN . . . . . . . . . . . . . . . . . . . . . .199Caves . . . . . . . . . . . . . . . . . . . . . . . . . . . .199Northeast Face . . . . . . . . . . . . . . . . . . . . . .200
Mountain Valley . . . . . . . . . . . . . . . . . . . . . . . .201Southeast Face . . . . . . . . . . . . . . . . . . . . . .202
Mountain Valley . . . . . . . . . . . . . . . . . . . . . . . .203Southwest Face . . . . . . . . . . . . . . . . . . . . . .204Northwest Face . . . . . . . . . . . . . . . . . . . . . .206Personal Quests . . . . . . . . . . . . . . . . . . . . .208
Mori Wizard, Hojo Sooun . . . . . . . . . . . . . . . .208Oda Swordsman, Imagawa Yoshimoto . . . . . . .208Tokugawa Brick, Akage Toshiro . . . . . . . . . . . .208Tokugawa Wizard, Sugawara Michizane . . . . .209Toyotomi Berserker, Miyamoto Musashi . . . . . .209
The Dark Warlord’s Cavern . . . . . . . . . . . .211THE DARK WARLORD’S CITADEL . . . . . . . .213
The Approach . . . . . . . . . . . . . . . . . . . . . .213The Courtyard . . . . . . . . . . . . . . . . . . . . . .213The Castle . . . . . . . . . . . . . . . . . . . . . . . . .213The Final Battle . . . . . . . . . . . . . . . . . . . . .216
Prima’s Official Strategy Guide
4 primagames.com

This chapter gives the basic statistical out-line of each of your seven Samurai. Thestats should be read as follows:
Starting value is a 1st level Samurai’sscore in that stat. Max is the maximumvalue that Samurai can ever achieve in thestat, through any combination of experi-ence and magic.
Hit points are normally twice Vitality,except in the case of the Berserker, wherethey are 2.5 times Vitality. Likewise KiPoints are normally 2 times Ki, except inthe case of the Wizard, who gets 2.5 timesKi. There is no hard ceiling on Hit Pointsor Ki Points — they are limited only bywhat you can earn, find and use.
Strength Damage Bonus is the amountof damage added to each melee andranged attack (but not magical spells)from your Strength. It is equal to 10% ofyour current Strength, rounded down.
Charisma Discount is the percentagethat the Blacksmith and Priest take offtheir charges for goods and services whendealing with you. It is based on 10% ofyour current Charisma, rounded down.
Base unarmed damage is the baseamount upon which all your unarmedattacks are figured. The total in parenthe-ses is your actual unarmed damage at firstlevel, after your Strength Damage Bonus isadded in.
Knockback Force is an arbitrary valueused to determine your chance to knockan enemy away from you in combat (seepage 38 for more on Knockback).
Weapon skills are determined by theSamurai’s base value, plus a percentage ofhis current Dexterity (normally 10%, butthe Archer gets 15% in Bow and ThrownWeapon, the Ninja gets 15% in ThrownWeapon, and the Swordsman gets 15% inall melee weapons). The Starting Valuesshown are based on the Samurai’s basevalue with that weapon, plus the bonusfor their starting Dexterity.
Weapon skill maximums are absolute,and can never be raised beyond that levelregardless of total Dexterity or magicemployed.
primagames.com 5
YOUR SAMURAI
Your Samurai earn one point of experience for each point of damage they do to an enemy.
For each level beyond 40, take the threshold for the previous level times 1.15. Thus the threshold for level 41 is 597292 x 1.15, or 686886.
Level XP1 02 5003 15004 39005 44856 5157
Level XP7 59318 68219 784410 902011 1037412 11930
Level XP13 1371914 1577715 1814416 2086517 2399518 27595
Level XP19 3173420 3649421 4196822 4826423 5550324 63829
Level XP25 7340326 8441427 9707628 11163829 12838330 147641
Level XP31 16978732 19525533 22454434 25822535 29695936 341503
Level XP37 39272938 45163839 51938440 597292
Samurai Experience Levels

The Leader’s specialty is commerce.Thanks to his Charisma he gets, by far, thebest deals from the Priest and Blacksmith.If the Leader is allowed to handle all suchtransactions (and he should be), none ofthe other Samurai need even think abouttheir Charisma scores.
There is a tendency to write the Leader offas a combatant. However, with a little spe-cial attention he can be developed into arespectable all-around front line combat-ant (see Party Advancement, p. 48).Except for the Swordsman, none of theother Samurai can do as much with a two-handed sword as the Leader can in thelong run.
Prima’s Official Strategy Guide
6 primagames.com
Stats
Leader
Weapon Skills
SpellsEach Samurai can cast up to 40spells. Which spells each can cast,what they do, and at what levelsthey can be cast are all detailed inSamurai Spells, pp. 13-36.
Stat Starting Value MaxStrength 50 350Dexterity 50 350Vitality 75 350Ki 25 300Charisma 150 500Hit Points 150 –Ki Points 50 –Strength Damage Bonus 5 35Charisma Discount 15 50Base Unarmed Damage 2 – 5 (7 – 10)Knockback Force 1
Weapon Base Value Starting Value MaxSword 55 60 85Polearm 50 55 80Bow 40 45 75Unarmed 50 55 70

The Archer delivers damage to the enemyat range, and right from the start of thegame he pretty much never misses. Evenwith a low-to-mid-level bow the Archer canpump out an amazing amount of damage.His drawback is that once the enemy doesclose with him, he can’t stay up for long.
Something to think about in developing anArcher — sure, you can pump his Dexterityall the way up to 500, but why do youneed to? At Dexterity 200 you can useevery bow in the game, and your Bow skillis already maxed out. In fact, betweenmagic items and stat-buffing spells, it’sactually fairly easy to get the Archer’sDexterity and Ki as high as they’ll everneed to be. Save your hard-earned experi-ence for maxing out your Strength and rais-ing your Vitality as much as possible.
Your Samurai
primagames.com 7
Archer
Stats Weapon Skills
Stat Starting Value MaxStrength 25 200Dexterity 150 500Vitality 50 350Ki 50 300Charisma 25 400Hit Points 100 –Ki Points 100 –Strength Damage Bonus 2 20Charisma Discount 2 40Base Unarmed Damage 1–3 (3-5)Knockback Force 1
Weapon Base Value Starting Value MaxSword 45 60 75Bow 70 92 95Throwing 55 77 80Unarmed 40 55 70

The Brick’s specialty is dealing out mas-sive amounts of Damage with every hit.Give him a good polearm, and pack asmuch damage-enhancing magic as youcan afford on it (a few bonuses to weaponskill wouldn’t hurt either). He’ll also needgood armor, because you’re going to wanthim right up in the middle of things.
Strength really is the most important statfor the Brick to develop, followed byDexterity and Vitality (plus enough Ki thathe can wear magic items with decentElemental Resistances).
Prima’s Official Strategy Guide
8 primagames.com
Brick
Stats Weapon Skills
Stat Starting Value MaxStrength 100 500Dexterity 50 200Vitality 100 500Ki 25 300Charisma 25 200Hit Points 200 –Ki Points 50 –Strength Damage Bonus 10 50Charisma Discount 2 20Base Unarmed Damage 3 – 7 (13 – 17)Knockback Force 2
Weapon Base Value Starting Value MaxSword 40 45 85Dual Sword 45 50 75Polearm 70 75 95Unarmed 60 65 85

The Ninja is your back-up ranged com-bat specialist. While he’s not quite asdeadly as the Archer offensively, hedoes tend to stay alive significantlylonger in combat, making him probablythe more dangerous fighter overall.
Like the Archer, Dexterity 200 will givethe Ninja all the Dex he’ll ever need,and his Ki is already almost as high asit ever needs to get, unless you plan onseriously leaning on spellcasting incombat. Once you get his Dex up to apoint where his Throwing skill is maxedout, concentrate on maxing outStrength, and then put everything leftover into Vitality.
Your Samurai
primagames.com 9
Ninja
Stats Weapon Skills
Stat Starting Value MaxStrength 50 200Dexterity 100 450Vitality 75 350Ki 75 350Charisma 25 350Hit Points 150 –Ki Points 150 –Strength Damage Bonus 5 20Charisma Discount 2 35Base Unarmed Damage 1 – 3 (6 – 8)Knockback Force 1
Weapon Base Value Starting Value MaxSword 50 60 85Bow 60 70 85Throwing 70 85 95Unarmed 50 60 75

The Wizard is a physical wimp. Expecthim to lag significantly behind the otherSamurai until at least level 20 or so. Buthe is worth the effort it takes to keep himalive and progressing, because at theupper levels his powerful spells and plenti-ful Ki points make him indispensable incombat.
In the long run, it would be nice if youcould work your Wizard’s Dex up to 150or so, and his Strength up to 130, to givehim access to decent armor and weaponslate in the game. But the really importantthing for the wizard is to give him as muchKi as possible, and enough Vitality to stayalive long enough to use it.
Prima’s Official Strategy Guide
10 primagames.com
Wizard
Stats Weapon Skills
Stat Starting Value MaxStrength 25 150Dexterity 50 400Vitality 25 150Ki 100 500Charisma 25 450Hit Points 50 –Ki Points 250 –Strength Damage Bonus 2 15Charisma Discount 2 45Base Unarmed Damage 1 – 2 (3 – 4)Knockback Force .75
Weapon Base Value Starting Value MaxSword 35 40 75Bow 35 40 75Throwing 40 45 80Unarmed 30 35 70

The Swordsman isn’t your toughest ormost intimidating fighter, but the thingabout him is he nearly always hits, and hecan dish out an amazing amount of dam-age if you can keep him alive. Give himswords with lots of damage potential and areally good set of armor and watch him goto town.
Like the Archer, there’s no reason to raisethe Swordsman’s Dexterity up past 200.You definitely want to get his Strength uparound 200 or so, plus enough Ki for somedecent resistances, and give him as muchVitality as you can afford.
primagames.com 11
Swordsman
Stats Weapon Skills
Stat Starting Value MaxStrength 60 400Dexterity 100 350Vitality 50 400Ki 25 250Charisma 750 350Hit Points 100 –Ki Points 50 –Strength Damage Bonus 6 40Charisma Discount 7 35Base Unarmed Damage 3 – 6 (9 – 12)Knockback Force 1
Weapon Base Value Starting Value MaxSword 75 90 95Dual Sword 65 80 85Bow 50 60 80Unarmed 55 70 80
Your Samurai

The thing about the Berserker is, he nevergoes down. It seems as though he justabsorbs damage like a sponge. For somereal fun, give the Berserker armor with lotsof Reflection and a weapon with decentHealth Leech, and watch the bad guysshred themselves while they’re ineffectual-ly pounding on him.
In the long term, you want to get theBerserker’s Strength and Dexterity each upbetween 150 and 200, and then just keeppumping points into Vitality.
Prima’s Official Strategy Guide
12 primagames.com
Berserker
Stats Weapon Skills
Stat Starting Value MaxStrength 75 450Dexterity 75 300Vitality 100 450Ki 25 200Charisma 25 200Hit Points 250 –Ki Points 50 –Strength Damage Bonus 7 45Charisma Discount 2 20Base Unarmed Damage 4 – 8 (11 – 15)Knockback Force 2
Weapon Base Value Starting Value MaxSword 45 52 80Dual Sword 50 57 85Polearm 60 67 90Unarmed 75 82 95

primagames.com 13
SAMURAI SPELLS(C). Spells marked with a (C) are continuously in effect — you don’t have to keepthem active and they cost no ki to maintain.
(A). Spells marked with an (A) are in effect as long as you keep them active. As withContinuous spells, they cost nothing to maintain, but each samurai can only haveone active spell at a time.
Area-Effect Targets. The maximum number of targets you can hit with any area-effect spell is 20 (although some spells have lower specific limits). If there are moretargets available than you can hit with one spell, the nearest targets take the damage.
Kanji Range. The area of effect for any of the Kanji spells is about 20 feet (just aboutthe size of your screen), centered on the caster.
Seeker spells follow a straight line until they detect an enemy. They check for ene-mies every 1 or 2 seconds. The higher the level of your seeker spell, the more maneu-verable it is (that is, the better it can turn to attack an enemy).
Multiple Projectiles. If a spell casts more than one projectile, it will cast:
Spell level 1 or 2 3 projectiles
Spell level 3+ 5 projectiles
Of course, wall and wave spells cast many more than 5 projectiles. The damage listedis for each projectile.
Leech Spells. A leech spell boosts the caster with a fraction of the damage he inflicts.At the first level, the caster gains 5% — 1 hit point (Blood Leech) or 1 ki (Ki Leech)— for every 20 full points of actual damage inflicted (in a single blow). This damagecan be of any type, or combination of types, but damage absorbed by armor or resis-ted by your target doesn’t count. At higher levels, you gain a higher percentage of thedamage you inflict (so you don’t have to cause as much damage to gain a benefitfrom this spell).
Monster Spells. Monsters can cast samurai spells, as well as a few other spells.Spells that only monsters cast are listed on page 165.

Prima’s Official Strategy Guide
14
Earth SpellsBlood Leech (A)
Leeches health from enemyHealth drained 5%, +5% / level
Samurai CastersArcher 22 / 5Wizard 5 / 6
Brimstone
Shoots multiple Earth ballsKi Cost 9, +2 / levelEarth Damage 5 – 10, +3 / levelKnockback (force) 3, +0.5 / levelDuration 10Speed 25Seek Radius 10, +1 / level
Samurai CastersLeader 24 / 16Archer 22 / 17Swordsman 24 / 20Berserker 26 / 17
Earth Dragon
Creates an Earth dragon that attacksenemyKi Cost 15, +5 / level
Dragon’s StatsEarth Damage 1 – 5, +1 – 2 / levelKnockback (force) 2, +1 / levelDuration 10, +5 / levelRange 50Speed 50Seeking Radius 10, +1 / level
Samurai CastersWizard 10 / 25
Earth Kanji
Inflicts Earth Kanji on enemiesKi Cost 20, +2 / levelEarth Damage 10 – 15, +5 / levelNumber of Enemies 4, +1 / level
Samurai CastersWizard 20 / 35
Earth Spear
Sends spikes to the targetKi Cost 10, +3 / levelEarth Damage 5 – 10, +5 / level
Samurai CastersLeader 13 / 12Swordsman 8 / 7Berserker 16 / 7
Earth Strike
Shoots an Earth strikeKi Cost 10, +5 / levelEarth Damage 7 – 14, +7 / levelKnockback (force) 3, +0.5 / level
Samurai CastersArcher 12 / 10Wizard 5 / 15Swordsman 24 / 12
Entomb
Decreases target’s Earth resistanceKi Cost 10, +1 / levelEarth Resistance -10, -10 / levelDuration 10, +5 / levelRadius 10, +1 / level
Samurai CastersArcher 6 / 5Ninja 1 / 6Wizard 10 / 5primagames.com

Granite Barrier
Increases Earth ResistanceKi Cost 10, +2 / levelDuration 10, +5 / levelEarth Resistance 5%, +5% / levelReflection 5, +2 / level
Samurai CastersLeader 10 / 5Archer 12 / 5Brick 1 / 5Ninja 10 / 5Wizard 1 / 6Swordsman 10 / 5Berserker 3 / 6
Impenetrable (C)
Permanently increases armor classBoost Armor Class 5, +5 / level
Samurai CastersLeader 5 / 7Brick 13 / 5Swordsman 3 / 4Berserker 5 / 4
Lava Blade (A)
Adds Earth damage to the total attackEarth Damage 1 – 5, +5 / level
Samurai CastersLeader 8 / 5Archer 8 / 4Brick 14 / 5Ninja 5 / 5Swordsman 8 / 5Berserker 10 / 5
Lava Ring
Shoots lava balls in all directionsKi Cost 19, +2 / levelEarth Damage 10 – 20, 10 – 15 / levelKnockback (force) 3, +0.5 / level
Samurai CastersBrick 35 / 17Ninja 22 / 15Wizard 10 / 15
Lava Seeker
Shoots a homing lava ballKi Cost 7, +2 / levelEarth Damage 5 – 10, +2 / levelKnockback (force) 2, +0.5 / levelDuration 10Speed 25Seek Radius 10, +1 / level
Samurai CastersArcher 1 / 7Ninja 6 / 13
Lava Wave
Shoots a spike waveKi Cost 15, +3 / levelEarth Damage 5 – 10, +5 / levelSpeed 40
Samurai CastersArcher 12 / 12Brick 35 / 10Ninja 12 / 13Swordsman 16 / 12Berserker 17 / 7
Earth Spells
primagames.com 15

Meteor
Shoots an Earth ballKi Cost 9, +4 / levelEarth Damage 5 – 10, +5 / levelKnockback (force) 2, +0.5 / level
Samurai CastersBrick 14 / 5Wizard 1 / 10Berserker 26 / 10
Petrify
Paralyzes the targetKi Cost 7, +2 / levelFreeze
Duration 10, +5 / levelRadius 2, +1 / levelChance 50%, +10% / level
Samurai CastersBrick 28 / 7Ninja 22 / 20Wizard 20 / 30
Resist Earth (A)
Increases Earth ResistanceEarth Resistance 5%, +5% / level
Samurai CastersLeader 2 / 6Archer 2 / 5Brick 6 / 6Wizard 5 / 5Swordsman 5 / 5Berserker 10 / 5
Skill Bonus (C)
Increases skill for all weaponsSkill Bonus 5, +1 / level
Samurai CastersLeader 3 / 5Ninja 6 / 5
Spike Trap
Creates a wall of spikesKi Cost 30, +2 / levelEarth Damage 5 – 10, +5 / level
Samurai CastersLeader 16 / 12Archer 6 / 7Brick 28 / 7Ninja 12 / 13Swordsman 16 / 12
Stonebolt
Shoots a stone boltKi Cost 4, +2 / levelEarth Damage 1 – 5, +1 – 2 / levelKnockback (force) 1, +0.5 / level
Samurai CastersLeader 1 / 7Ninja 1 / 10Swordsman 1 / 7Berserker 1 / 6
Strength Increase (C)
Permanently increases strengthBoost Strength 5, +5 / level
Samurai CastersLeader 24 / 5Brick 3 / 6Berserker 8 / 5
Prima’s Official Strategy Guide
16 primagames.com

Fire Spells
primagames.com 17
Fire SpellsBlastwave
Shoots a flame waveKi Cost 15, +3 / levelFire Damage 5 – 10, +5 / levelSpeed 40
Samurai CastersArcher 12 / 12Brick 35 / 10Ninja 12 / 13Swordsman 16 / 12Berserker 17 / 7
Fear
Causes monsters to retreat and stops themfrom attackingKi Cost 10, +5 / levelTerror
Duration 3, +1 / levelRadius 2, +1 / levelChance 50%, +10% / level
Samurai CastersBrick 28 / 7Berserker 1 / 10
Fire Darts
Shoots multiple fire ballsKi Cost 15, +2 / levelFire Damage 5 – 10, +5 / levelKnockback (force) 1, + / level 0.2Duration 10Speed 25Seeking Radius 10, +1 / level
Samurai CastersLeader 24 / 16Archer 22 / 17Wizard 10 / 15Swordsman 24 / 12
Fire Dragon
Creates a fire dragon that attacks enemyKi Cost 15, +5 / level
Dragon’s StatsFire Damage 1 – 5, +1 – 2 / levelDuration 10, +5 / levelRange 50Speed 50Seeking Radius 10, +1 / level
Samurai CastersWizard 10 / 25
Fire Kanji
Inflicts fire Kanji on enemiesKi Cost 20, +2 / levelFire Damage 10 – 15, +5 / levelNumber of Enemies 4, +1 / level
Samurai CastersNinja 22 / 20Wizard 20 / 35
Fire Seeker
Shoots a homing fire ballKi Cost 15, +2 / levelFire Damage 5 – 10, +3 / levelKnockback (force) 1, + 0.2 / levelDuration 10Speed 25Seeking Radius 10, +1 / level
Samurai CastersLeader 3 / 10Archer 1 / 7Brick 14 / 5Ninja 6 / 13Wizard 5 / 15

Fire Storm
Creates a fire stormKi Cost 30, +2 / levelFire Damage 15 – 25, +5 – 15 / level
Samurai CastersBerserker 16 / 7
Flame Barrier
Increases fire resistanceKi Cost 10, +2 / levelDuration 10, +5 / levelFire Resistance 5%, +5% / levelReflection 5, +2 / level
Samurai CastersLeader 10 / 5Archer 12 / 5Brick 3 / 5Ninja 10 / 5Wizard 1 / 6Swordsman 10 / 5Berserker 3 / 6
Flame Blade (A)
Adds fire damage to the total attackFire Damage 1 – 5, +5 / level
Samurai CastersLeader 8 / 5Archer 8 / 4Brick 14 / 5Ninja 5 / 5Swordsman 8 / 5Berserker 8 / 5
Flame Dart
Shoots a flame dartKi Cost 4, +2 / levelFire Damage 1 – 5, +1 – 2 / level
Samurai CastersLeader 1 / 7Brick 1 / 6Ninja 1 / 10Swordsman 1 / 7Berserker 10 / 5
Immolate
Shoots a fire ballKi Cost 15, +2 / levelFire Damage 5 – 10, +5 / levelKnockback (force) 1, +0.2 / level
Samurai CastersWizard 1 / 10Swordsman 7 / 8Berserker 26 / 10
Incinerate
Shoots fire balls in all directionsKi Cost 40, +2 / levelFire Damage 10 – 20, +10 – 15 / levelKnockback (force) 2, + 0.2 / level
Samurai CastersLeader 24 / 20Brick 35 / 17Ninja 22 / 15Wizard 20 / 30Swordsman 24 / 20
Prima’s Official Strategy Guide
18 primagames.com

Inferno Strike
Shoots a fire strikeKi Cost 10, +5 / levelFire Damage 7 – 14, +7 / levelKnockback (force) 2, + 0.2 / level
Samurai CastersLeader 13 / 12Archer 12 / 10Berserker 26 / 17
Inflammable
Decreases target’s fire resistanceKi Cost 10, +1 / levelFire Resistance -10%, -10% / levelDuration 10, +5 / levelRadius 10, +1 / level
Samurai CastersArcher 6 / 5Ninja 1 / 6Wizard 10 / 5
Resist Fire (A)
Increases fire resistanceFire Resistance 5%, +5% / level
Samurai CastersLeader 2 / 6Archer 2 / 5Brick 6 / 6Wizard 5 / 5Swordsman 5 / 5Berserker 10 / 5
Sunshard
Creates a wall of flamesKi Cost 30, +2 / levelFire Damage 5 – 10, +5 / level
Samurai CastersLeader 16 / 12Archer 6 / 7Brick 28 / 7Ninja 12 / 13Swordsman 16 / 12
Vitality Increase (C)
Permanently increases vitalityBoost Vitality 5, +5 / level
Samurai CastersLeader 5 / 5Archer 22 / 5Brick 13 / 5Ninja 6 / 5Wizard 5 / 5Swordsman 3 / 5Berserker 5 / 6
Fire Spells
primagames.com 19

Lightning SpellsArc Wall
Creates a wall of lightning arcsKi Cost 30, +2 / levelLightning Damage 5 – 10, +5 / level
Samurai CastersLeader 16 / 12Brick 28 / 7Swordsman 16 / 12Berserker 26 / 10
Ball Lightning
Shoots a lightning ballKi Cost 15, +2 / levelLightning Damage 5 – 10, +5 / level
Samurai CastersBerserker 10 / 5
Conductive
Decreases target’s lightning resistanceKi Cost 10, +1 / levelLightning Resistance -10%, -10% / levelDuration 10, +5 / levelRadius 10, +1 / level
Samurai CastersArcher 6 / 5Ninja 1 / 6Wizard 10 / 5
Dexterity Increase (C)
Permanently increases dexterityBoost Dexterity 5, +5 / level
Samurai CastersLeader 5 / 5Archer 6 / 7Ninja 6 / 6Swordsman 3 / 5
Flash Strike
Increases melee attack speedKi Cost 30Melee Speed x2Duration 5, +1 / level
Samurai CastersLeader 3 / 5Brick 13 / 5Ninja 12 / 4Swordsman 8 / 5Berserker 6 / 5
Forked Lightning
Creates a stream of lightning that aimsmultiple enemiesKi Cost 15, +3 / levelLightning Damage 1 – 10, +1 – 5 / levelNumber of Enemies 3, +1 / level
Samurai CastersLeader 24 / 20Wizard 20 / 30Berserker 26 / 17
Prima’s Official Strategy Guide
20 primagames.com

Furious Attack
Increases ranged attack speedKi Cost 30Ranged Speed x2Duration 5, +1 / level
Samurai CastersArcher 22 / 5Ninja 6 / 4
Lightning Bolt
Creates a stream of lightningKi Cost 10, +2 / levelLightning Damage 1 – 10, +1 – 5 / level
Samurai CastersLeader 1 / 7Brick 3 / 6Ninja 1 / 10Wizard 1 / 10Swordsman 1 / 10Berserker 3 / 6
Lightning Burst
Shoots lightning balls to all directionsKi Cost 40, +20 / levelLightning Damage 10 – 20, +10 – 15 / levelKnockback (force) 1, +1 / level
Samurai CastersNinja 22 / 15Wizard 10 / 15Swordsman 24 / 20
Lightning Kanji
Inflicts lightning Kanji on enemiesKi Cost 20, +2 / levelLightning Damage 10 – 15, +5 / levelNumber of Enemies 4, +1 / level
Samurai CastersWizard 20 / 35
Lightning Shield
Increases lightning resistanceKi Cost 10, +2 / levelLightning Resistance 5%, +5% / levelReflection 5, +2 / levelDuration 10, +5 / level
Samurai CastersLeader 10 / 5Archer 12 / 5Brick 1 / 5Ninja 10 / 5Wizard 1 / 6Swordsman 10 / 5Berserker 1 / 6
Lightning Strike
Shoots a lightning strikeKi Cost 10, +5 / levelLightning Damage 7 – 14, +7 / levelKnockback (force) 1, +1 / level
Samurai CastersLeader 13 / 12Archer 12 / 10Brick 28 / 7Wizard 5 / 15
Lightning Spells
primagames.com 21

Lightning Wave
Shoots a lightning waveKi Cost 15, +3 / levelLightning Damage 15 – 10, +5 / levelSpeed 40
Samurai CastersArcher 12 / 12Brick 35 / 10Swordsman 16 / 12
Resist Lightning (A)
Increases lightning resistanceLightning Resistance 10%, +10% / level
Samurai CastersLeader 2 / 6Archer 2 / 5Brick 6 / 6Wizard 5 / 5Swordsman 5 / 5Berserker 10 / 5
Shock Blade (A)
Adds lightning damage to the total attackLightning Damage 1 – 5, +5 / level
Samurai CastersLeader 8 / 5Archer 8 / 4Brick 14 / 5Ninja 5 / 5Swordsman 8 / 5Berserker 8 / 5
Spark Seeker
Shoots a homing spark ballKi Cost 15, +2 / levelLightning Damage 1 – 10, +3 / levelKnockback (force) 1, +1 / levelDuration 10Speed 25Seeking Radius 10, +1 / level
Samurai CastersArcher 1 / 7Brick 14 / 5Wizard 5 / 15Berserker 16 / 7
Spark Storm
Shoots multiple lightning ballsKi Cost 15, +2 / levelLightning Damage 1 – 10, +3 / levelDuration 10Speed 25Seeking Radius 10, +1 / level
Samurai CastersLeader 24 / 16Archer 22 / 17Brick 35 / 17Ninja 22 / 20Swordsman 24 / 12
Prima’s Official Strategy Guide
22 primagames.com

Thunder Dragon
Creates a lightning dragon that attacksenemyKi Cost 15, +5 / level
Samurai CastersWizard 10 / 25
Dragon’s StatsLightning Damage 1 – 5, +1 – 2 / levelDuration 10, +5 / levelRange 50Speed 50Seeking Radius 10, +1 / level
Thunder Storm
Creates a thunder stormKi Cost 30, +2 / levelLightning Damage 15 – 25, +5 – 15 / level
Samurai CastersNinja 12 / 15Berserker 17 / 7
Water SpellsAvalanche
Shoots an ice waveKi Cost 15, +3 / levelWater Damage 5 – 10, +5 / levelFreeze
Chance 40%, +5% / levelDuration 3, +2 / level
Speed 40
Samurai CastersArcher 12 / 12Brick 35 / 10Swordsman 16 / 12Berserker 17 / 7
Blizzard
Shoots multiple ice ballsKi Cost 15, +2 / levelWater Damage 1 – 10, +5 / levelKnockback
Chance 40%, +5% / levelForce 2, + 0.2 / level
Duration 10Speed 25Seeking Radius 10, +1 / level
Samurai CastersLeader 24 / 16Archer 22 / 17Wizard 10 / 15Swordsman 24 / 12Berserker 26 / 17
Water Spells
primagames.com 23

Comet
Shoots an ice ballKi Cost 15, +2 / levelWater Damage 5 – 10, +5 / levelKnockback
Chance 50%, +5% / levelForce 1, +0.2 / level
FreezeChance 30%, +5% / levelDuration 5, +2 / level
Samurai CastersWizard 1 / 10Swordsman 8 / 7Berserker 26 / 10
Drown
Decreases target’s water resistanceKi Cost 10, +1 / levelWater Resistance -10, -10 / levelDuration 10, +5 / levelRadius 10, +1 / level
Samurai CastersArcher 6 / 5Ninja 1 / 6Wizard 10 / 5
Freeze
Freezes the targetKi Cost 7, +3 / levelFreeze
Duration 4, +1 / levelRadius 2, +1 / levelChance 50%, +10% / level
Samurai CastersNinja 22 / 15Wizard 20 / 30
Frostbolt
Shoots a frost boltKi Cost 8, +1 / levelWater Damage 1 – 5, +1 – 2 / level
Samurai CastersLeader 1 / 7Brick 3 / 6Ninja 1 / 10Swordsman 1 / 7Berserker 10 / 5
Ice Blade (A)
Adds water damage to the total attackWater Damage 1 – 5, +5 / level
Samurai CastersLeader 8 / 5Archer 8 / 4Brick 14 / 5Ninja 5 / 5Swordsman 8 / 5Berserker 8 / 5
Ice Kanji
Inflicts ice Kanji on enemiesKi Cost 20, +2 / levelWater Damage 10 – 15, +5 / levelNumber of Enemies 4, +1 / level
Samurai CastersWizard 20 / 35
Prima’s Official Strategy Guide
24 primagames.com

Ice Seeker
Shoots a homing ice ballKi Cost 15, +2 / levelWater Damage 1 – 10, +3 / levelKnockback
Chance 50%,+5% / levelForce 1, +0.2 / level
FreezeChance 30%, +5% / levelDuration 5, +2 / level
Speed 25Seeking Radius 10, +1 / level
Samurai CastersArcher 1 / 7Brick 14 / 5Ninja 6 / 13
Ice Spears
Sends ice spikes to the targetKi Cost 15, +3 / levelWater Damage 1 – 10, +5 / levelFreeze
Chance 40%, +5% / levelDuration 5, +2 / level
Samurai CastersLeader 13 / 12Berserker 16 / 7
Ice Trap
Creates a wall of ice spikesKi Cost 30, +2 / levelWater Damage 5 – 10, +5 / levelFreeze
Chance 40%, +5% / levelDuration 2, +1 / level
Samurai CastersLeader 16 / 12Archer 6 / 7Brick 28 / 7Ninja 12 / 13Swordsman 16 / 12
Icy Barrier
Increases water resistanceKi Cost 10, +2 / levelWater Resistance 5%, +5% / levelDuration 10, +5 / levelReflection 5, +2 / level
Samurai CastersLeader 10 / 5Archer 12 / 5Brick 1 / 5Ninja 10 / 5Wizard 1 / 6Swordsman 10 / 5Berserker 3 / 6
Ki Barrier
Creates a magic shield to stop damageKi Cost 20Duration 30, +5 / level
Samurai CastersLeader 5 / 6Ninja 6 / 5Wizard 5 / 7Berserker 5 / 4
Ki Leech (A)
Leeches magic from enemyKi drained 5, +5 / level
Samurai CastersLeader 24 / 5Ninja 22 / 6Wizard 5 / 6
Water Spells
primagames.com 25

Kyudo (C)
Permanently boosts normal damageBoost Normal Damage 5, +5 / level
Samurai CastersArcher 22 / 7Ninja 12 / 5
Resist Water (A)
Increases water resistanceWater Resistance 5%, +5% / level
Samurai CastersLeader 2 / 6Archer 2 / 5Brick 6 / 6Wizard 5 / 5Swordsman 5 / 5Berserker 10 / 5
Suido
Reflects a portion of received damageKi Cost 20, +5 / levelReflection 10, +10 / levelDuration 15, +2 / level
Samurai CastersLeader 3 / 6Brick 13 / 5Swordsman 3 / 5Berserker 1 / 6
Tidal Wave
Shoots ice balls in all directionsKi Cost 40, +2 / levelWater Damage 10 – 20, +10 – 15 / levelKnockback
Chance 50%, +5% / level
Force 2, +0.4 / levelFreeze
Chance 30%, +5% / levelDuration 5, +2 / level
Samurai CastersBrick 35 / 17Swordsman 24 / 20
Water Dragon
Creates a water dragon that attacks enemyKi Cost 15, +5 / level
Dragon’s StatsWater Damage 1 – 5, +1 – 2 / levelFreeze
Chance 5%Duration 5, +1 / level
Duration 10, +5 / levelRange 50Speed 50 (missile speed)Seeking Radius 10, +1 / level
Samurai CastersWizard 10 / 25
Water Strike
Shoots a water strikeKi Cost 20, +5 / levelWater Damage 7 – 14, +7 / levelKnockback
Chance 50%,+5% / levelForce 3, +0.2 / level
FreezeChance 30%, +5% / levelDuration 8, +3 / level
Samurai CastersArcher 12 / 10Brick 28 / 7
Prima’s Official Strategy Guide
26 primagames.com

Spell Trees
primagames.com 27
Leader’s Spell Trees
Flame Dart1 / 7
Fire Seeker3/10
Flame Blade 8 / 5
Inferno Strike13/12
Fire Darts24/16
Sunshard 16 / 12
Resist Fire2/6
VitalityIncrease
5/5
FlameBarrier
10/5Incinerate 24 / 20
Frostbolt1/7
Suido3/6
Ice Blade 8 / 5
Ice Spears13/12
Blizzard24/16
Ice Trap 16 / 12
Resist Water2/6
Ki Barrier5/6
Icy Barrier10/5
Ki Leech 24 / 5
Stonebolt 1/7
Skill Bonus 3/5
Lava Blade 8 / 5
Earth Spear 13/12
Brimstone24/16
Spike Trap 16 / 12
Resist Earth2/6
Impenetrable5/7
GraniteBarrier
10/5Strength Increase
24 / 5
LightningBolt 1/7
Flash Strike3/5
Shock Blade 8 / 5
LightningStrike 13/12
Spark Storm24/16
Arc Wall 16 / 12
ResistLightning
2/6
DexterityIncrease 5/5
LightningShield
10/5Forked Lightning
24 / 20

Prima’s Official Strategy Guide
28 primagames.com
Archer’s Spell Trees
Fire Seeker1/7
Sunshard6/7
Flame Blade 8 / 4
Inferno Strike12/10
Fire Darts22/17
Blastwave 12 / 12
Resist Fire2/5
Inflammable6/5
FlameBarrier
12/5Vitality Increase 22 / 5
Ice Seeker1/7
Ice Trap6/7
Ice Blade 8 / 4
Water Strike12/10
Blizzard 22/17
Avalanche 12 / 12
ResistWater
2/5
Drown6/5
Icy Barrier12/5
Kyudo 22 / 7
Lava Seeker1/7
Spike Trap6/7
Lava Blade 8 / 4
Earth Strike12/10
Brimstone22/17
Lava Wave 12 / 12
Resist Earth2/5
Entomb6/5
GraniteBarrier
12/5Blood Leech 22 / 5
SparkSeeker 1/7
DexterityIncrease6/7
Shock Blade 8 / 4
LightningStrike 12/10
Spark Storm22/17
Lightning Wave12 / 12
ResistLightning
2/5
Conductive6/5
LightningShield
12/5Furious Attack
22 / 5

Spell Trees
primagames.com 29
Brick’s Spell Trees
Flame Dart1/6
Fire Seeker14/5
Flame Blade 14 / 5
Sunshard28/7
Blastwave35/10
Fear 28 / 7
FlameBarrier
3/5
Resist Fire6/6
VitalityIncrease
13/5Incinerate 35 / 17
Frostbolt 3 /6
Ice Seeker14 / 5
Ice Blade 14 / 5
Ice Trap28 / 7
Avalanche35/10
Water Strike 28 / 7
Icy Barrier1/5
Resist Water6/6
Suido 13/5
Tidal Wave 35 / 17
StrengthIncrease3/6
Meteor14/5
Lava Blade 14 / 5
Spike Trap28/7
Lava Wave35/10
Petrify 28 / 7
GraniteBarrier 1/5
Resist Earth6/6
Impenetrable13/5
Lava Ring 35 / 17
LightningBolt 3/6
SparkSeeker14/5
Shock Blade 14 / 5
Arc Wall28/7
LightningWave 35/10
Lightning Strike 28 / 7
LightningShield 1/5
ResistLightning
6/6
Flash Strike13/5
Spark Storm 35 / 17

Prima’s Official Strategy Guide
30 primagames.com
Ninja’s Spell Trees
Flame Dart1/10
Fire Seeker6/13
Vitality Increase6 / 5
Sunshard12/13
Incinerate22/15
Blastwave 12 / 13
Inflammable1/6
Flame Blade5/5
FlameBarrier
10/5
Fire Kanji 22 / 20
Frostbolt1/10
Ice Seeker6/13
Ki Barrier 6 / 5
Ice Trap12/13
Freeze22 / 15
Kyudo 12 / 5
Drown1/6
Ice Blade5/5
IcyBarrier
10/5
Ki Leech 22 / 6
Stonebolt1/10
Lava Seeker6/13
Skill Bonus 6 / 5
Spike Trap12/13
Lava Ring22/15
Lava Wave 12 / 13
Entomb1/6
Lava Blade5/5
GraniteBarrier
10/5Petrify 22 / 20
LightningBolt 1/10
DexterityIncrease6/6
Furious Attack 6 / 4
Flash Strike12/4
LightningBurst 22/15
Thunder Storm12 / 15
Conductive1/6
ShockBlade
5/5
LightningShield
10/5Spark Storm 22 / 20

Spell Trees
primagames.com 31
Wizard’s Spell Trees
Immolate1/10
VitalityIncrease5/5
Fire Seeker 5 / 15
Fire Darts10/15
Incinerate20/30
Fire Dragon 10 / 25
FlameBarrier
1/6
Resist Fire5/5
Inflammable10/5
Fire Kanji 20 / 35
Comet1/10
Ki Barrier5/7
Ki Leech 5 / 6
Blizzard10/15
Freeze20/30
Water Dragon10 / 25
Icy Barrier1/6
Resist Water5/5
Drown 10/5
Ice Kanji 20 / 35
Meteor1/10
EarthStrike 5/15
Blood Leech 5 / 6
Lava Ring10/15
Petrify20/30
Earth Dragon 10 / 25
GraniteBarrier
1/6
Resist Earth5/5
Entomb 10/5
Earth Kanji 20 / 35
LightningBolt 1/10
LightningStrike 5/15
Spark Seeker 5 / 15
LightningBurst 10/15
ForkedLightning20/30
Thunder Dragon10 / 25
LightningShield 1/6
ResistLightning
5/5
Conductive10/5
Lightning Kanji20 / 35

Prima’s Official Strategy Guide
32 primagames.com
Swordsman’s Spell Trees
Flame Dart1/7
Flame Blade8/5
Immolate 7 / 8
Sunshard16/12
Fire Darts24/12
Blastwave 16 / 12
VitalityIncrease
3/5
Resist Fire5/5
FlameBarrier
10/5
Incinerate 24 / 20
Frostbolt1/7
Ice Blade 8/5
Comet 8 / 7
Ice Trap16/12
Blizzard24/12
Avalanche 16 /12
Suido 3/5
ResistWater
5/5
IcyBarrier
10/5
Tidal Wave 24 / 20
Stonebolt1/7
Lava Blade8/5
Earth Spear 8 / 7
Spike Trap16/12
Earth Strike24/12
Lava Wave 16 / 12
Impenetrable3/4
ResistEarth
5/5
GraniteBarrier
10/5
Brimstone 24 / 20
Lightning Bolt1/10
Shock Blade8/5
Flash Strike 8 / 5
Arc Wall16/12
Spark Storm24/12
Lightning Wave16 / 12
DexterityIncrease
3/5
ResistLightning
5/5
LightningShield
10/5
Lightning Burst 24 / 20

Spell Trees
primagames.com 33
Berserker’s Spell Trees
Fear 1/10
Flame Dart10/5
Flame Blade8 / 5
Fire Storm16/7
Immolate26/10
Blastwave 17 / 7
FlameBarrier
3/6
VitalityIncrease
5/6
Resist Fire1/5
Inferno Strike 26 / 17
Stonebolt1/6
Lava Blade10/5
Strength Increase8 / 5
Earth Spear16/7
Meteor26/10
Lava Wave 17 / 7
GraniteBarrier
3/6
Impenetrable5/4
Resist Earth\10/5
Brimstone 26 / 17
Lightning Bolt3/6
BallLightning10/5
Shock Blade 8 / 5
Spark Seeker16/7
Arc Wall26/10
Thunder Storm17 / 7
LightningShield
1/6
Flash Strike6/5
ResistLightning
10/5
Forked Lightning 26 / 17
Suido1/6
Frostbolt10/5
Ice Blade 8 / 5
Ice Spears16/7
Comet26/10
Avalanche 17 / 7
Icy Barrier3/6
Ki Barrier5/4
Resist Water10/5
Blizzard 26 / 17

Prima’s Official Strategy Guide
34 primagames.com
TABLE OF SAMURAI SPELLS
Leader Archer Brick Ninja Wizard Swordsman Berserker
Earth SpellsBlood Leech (A) – 22 / 5 – – 5 / 6 – –Brimstone 24 / 16 22 / 17 – – – 24 / 20 26 / 17Earth Dragon – – – – 10 / 25 – –Earth Kanji – – – – 20 / 35 – –Earth Spear 13 / 12 – – – – 8 / 7 16 / 7Earth Strike – 12 / 10 – – 5 / 15 24 / 12 –Entomb – 6 / 5 – 1 / 6 10 / 5 – –Granite Barrier 10 / 5 12 / 5 1 / 5 10 / 5 1 / 6 10 / 5 3 / 6Impenetrable (C) 5 / 7 – 13 / 5 – – 3 / 4 5 / 4Lava Blade (A) 8 / 5 8 / 4 14 / 5 5 / 5 – 8 / 5 10 / 5Lava Ring – – 35 / 17 22 / 15 10 / 15 – –Lava Seeker – 1 / 7 – 6 / 13 – – –Lava Wave – 12 / 12 35 / 10 12 / 13 – 16 / 12 17 / 7Meteor – – 14 / 5 – 1 / 10 – 26 / 10Petrify – – 28 / 7 22 / 20 20 / 30 – –Resist Earth (A) 2 / 6 2 / 5 6 / 6 – 5 / 5 5 / 5 10 / 5Skill Bonus (C) 3 / 5 – – 6 / 5 – – –Spike Trap 16 / 12 6 / 7 28 / 7 12 / 13 – 16 / 12 –Stonebolt 1 / 7 – – 1 / 10 – 1 / 7 1 / 6Strength Increase (C) 24 / 5 – 3 / 6 – – – 8 / 5
Fire SpellsBlastwave – 12 / 12 35 / 10 12 / 13 – 16 / 12 17 / 7Fear – – 28 / 7 – – – 1 / 10Fire Darts 24 / 16 22 / 17 – – 10 / 15 24 / 12 –Fire Dragon – – – – 10 / 25 – –Fire Kanji – – – 22 / 20 20 / 35 – –Fire Seeker 3 / 10 1 / 7 14 / 5 6 / 13 5 / 15 – –Fire Storm – – – – – – 16 / 7Flame Barrier 10 / 5 12 / 5 3 / 5 10 / 5 1 / 6 10 / 5 3 / 6Flame Blade (A) 8 / 5 8 / 4 14 / 5 5 / 5 – 8 / 5 8 / 5Flame Dart 1 / 7 – 1 / 6 1 / 10 – 1 / 7 10 / 5Immolate – – – – 1 / 10 7 / 8 26 / 10Incinerate 24 / 20 – 35 / 17 22 / 15 20 / 30 24 / 20 –Inferno Strike 13 / 12 12 / 10 – – – – 26 / 17Inflammable – 6 / 5 – 1 / 6 10 / 5 – –Resist Fire (A) 2 / 6 2 / 5 6 / 6 – 5 / 5 5 / 5 10 / 5Sunshard 16 / 12 6 / 7 28 / 7 12 / 13 – 16 / 12 –Vitality Increase (C) 5 / 5 22 / 5 13 / 5 6 / 5 5 / 5 3 / 5 5 / 6

Table of Samurai Spells
primagames.com 35
Leader Archer Brick Ninja Wizard Swordsman Berserker
Lightning SpellsArc Wall 16 / 12 – 28 / 7 – – 16 / 12 26 / 10Ball Lightning – – – – – – 10 / 5Conductive – 6 / 5 – 1 / 6 10 / 5 – –Dexterity Increase (C) 5 / 5 6 / 7 – 6 / 6 – 3 / 5 –Flash Strike 3 / 5 – 13 / 5 12 / 4 – 8 / 5 6 / 5Forked Lightning 24 / 20 – – – 20 / 30 – 26 / 17Furious Attack – 22 / 5 – 6 / 4 – – –Lightning Bolt 1 / 7 – 3 / 6 1 / 10 1 / 10 1 / 10 3 / 6Lightning Burst – – – 22 / 15 10 / 15 24 / 20 –Lightning Kanji – – – – 20 / 35 – –Lightning Shield 10 / 5 12 / 5 1 / 5 10 / 5 1 / 6 10 / 5 1 / 6Lightning Strike 13 / 12 12 / 10 28 / 7 – 5 / 15 – –Lightning Wave – 12 / 12 35 / 10 – – 16 / 12 –Resist Lightning (A) 2 / 6 2 / 5 6 / 6 – 5 / 5 5 / 5 10 / 5Shock Blade (A) 8 / 5 8 / 4 14 / 5 5 / 5 – 8 / 5 8 / 5Spark Seeker – 1 / 7 14 / 5 – 5 / 15 – 16 / 7Spark Storm 24 / 16 22 / 17 35 / 17 22 / 20 – 24 / 12 –Thunder Dragon – – – – 10 / 25 – –Thunder Storm – – – 12 / 15 – – 17 / 7
Water SpellsAvalanche – 12 / 12 35 / 10 – – 16 / 12 17 / 7Blizzard 24 / 16 22 / 17 – – 10 / 15 24 / 12 26 / 17Comet – – – – 1 / 10 8 / 7 26 / 10Drown – 6 / 5 – 1 / 6 10 / 5 – –Freeze – – – 22 / 15 20 / 30 – –Frostbolt 1 / 7 – 3 / 6 1 / 10 – 1 / 7 10 / 5Ice Blade (A) 8 / 5 8 / 4 14 / 5 5 / 5 – 8 / 5 8 / 5Ice Kanji – – – – 20 / 35 – –Ice Seeker – 1 / 7 14 / 5 6 / 13 – – –Ice Spears 13 / 12 – – – – – 16 / 7Ice Trap 16 / 12 6 / 7 28 / 7 12 / 13 – 16 / 12 –Icy Barrier 10 / 5 12 / 5 1 / 5 10 / 5 1 / 6 10 / 5 3 / 6Ki Barrier 5 / 6 – – 6 / 5 5 / 7 – 5 / 4Ki Leech (A) 24 / 5 – – 22 / 6 5 / 6 – –Kyudo (C) – 22 / 7 – 12 / 5 – – –Resist Water (A) 2 / 6 2 / 5 6 / 6 – 5 / 5 5 / 5 10 / 5Suido 3 / 6 – 13 / 5 – – 3 / 5 1 / 6Tidal Wave – – 35 / 17 – – 24 / 20 –Water Dragon – – – – 10 / 25 – –Water Strike – 12 / 10 28 / 7 – – – –

Prima’s Official Strategy Guide
36 primagames.com

Armor Class. Your Armor Class is figuredby adding the AC value of each of yourfour armor slots (body, head, arms, legs).If you have an Armor Class of 60, it does-n’t matter if you have an armor value of15 in each slot, or 40 in body and 5 ineach of the others. It’s still an Armor Classof 60 that provides exactly the same pro-tection (but see Armor Damage, below).
This process becomes a bit more compli-cated, however, when the various sorts ofspecial attack are taken into account.
Elemental Damage. If your weapon doeselemental damage, that damage is figuredrandomly (again, based on the possiblerange), then modified by the target’s resist-ances (see Resistances, below). The result-ing number is added to your damage total.Armor does not offer any protection againstelemental damage — only elemental resist-ances can reduce elemental damage.
Resistances. Resistances show the per-centage of an elemental attack blocked bymagical protection. So, if you have 30%Fire Resistance, and a monster hits you for10 points of fire damage, your FireResistance will absorb three points of thatdamage, and seven will get through.
Leech Attacks. These attacks figure a per-centage of the damage you do to a target(that is, total damage that gets througharmor/resistances), and return it to you inthe form or Health or Ki. If you have 5%Ki Leech and 10% Health Leech, and youhit an enemy for 20 points, you get onepoint of Ki and two points of Health.Note, however, that the leech bonuses arerounded down very strictly. If you did 19points of damage to the target instead of20, you’d get no Ki and only 1 Healthfrom the attack.
Freezing. If you have a freezing attack,the game checks to freeze the opponentevery time you do damage. It doesn’t mat-ter if 1 point or 50 get through the target’sarmor; the chance to freeze is the same.
The duration of the freeze is related to thechance to freeze. The most common freezeitem, the Pearl, has an 8% chance tofreeze, and if successful, freezes the targetfor one second. If a weapon had twoPearls, it would have a 16% chance tofreeze for two seconds. If it had two Pearlsand a jewel (doubling the effect of thePearls) it would have a 32% chance offreezing for four seconds, and so on.
primagames.com 37
STRATEGY &COMBAT
Combat ResolutionCombat in Throne of Darkness is resolved in a straightforward fashion. Your character’sweapon skill is his percentage chance to hit. If the hit is successful, damage is calculatedrandomly based on the possible range for that weapon, and reduced by a number equalto 1/10th of your target’s Armor Class. Your target takes whatever’s left as damage.

(Durations involving the rare Red KappaEgg, with a 50% chance to freeze, are pro-portionate.)
Very powerful named creatures (and, bythe way, your Samurai as well) can’t befrozen immobile. Instead, a successfulfreeze slows them down significantly.
Creatures that are reduced to zero hitpoints while frozen (but not while slowed),shatter spectacularly, instead of the usualdeath animation. This is mostly just avisual special effect, but shattering is use-ful against Rouzuko, as it prevents themfrom transforming into Yama-inu.
Poison. If any damage whatsoever from apoisoned weapon gets through the target’sarmor, the target is poisoned. There is noresistance against poison, and no chancethat a successful attack from a poisonedweapon will fail to poison. Once the targetis poisoned, it will take the base damagefrom that poison every second for 10 sec-onds. (Samurai, of course, can cancel theeffects of all current poisonings at any timeby using a Remedy potion.) Furthermore,poison damage is stackable. If you hit atarget with a poisoned weapon, then hit itagain, it will take poison damage from bothhits for ten seconds each.
The base damage from a poison attackcan be increased by using more poisoncomponents (mostly Scorpion DragonStingers) on a weapon, and by using jew-els to multiply the effects of ScorpionDragon Stingers.
For more on Poison damage, seeArmor/Weapon Damage, below.
Knockback is just what it sounds like —the chance to knock an opponent backaway from you in combat. Knockbackdoes no additional damage, and depend-
ing on the circumstances of the moment itcan be either an asset or an annoyancewhen it occurs against an enemy.
Each character and monster in the gamehas a mass, and some have a base chanceto knockback. The attacker’s chance toknockback is compared against thedefender’s mass to determine whether theenemy is knocked back by any givenattack. Magic items that enhance knock-back increase the attacker’s basic knock-back value by the indicated percentage.
Armor/Weapon Damage. Every attackthat gets through armor has a chance todamage your armor or weapon. Thechance to take damage from a given attackis exactly the same, regardless of howmany hit points you take from it, and thedamage from a given attack is always onedurability point to your active weapon or apiece of armor. There is no “hit location”in Throne of Darkness; if armor/weapondamage occurs it has an equal chance ofaffecting any armor location or your activeweapon, determined randomly.
You may notice that you tend to take a lotmore equipment damage when you’re poi-soned. This can be rationalized by sayingthat the poisons used in the world ofThrone are extremely corrosive. What’sactually happening is that poison inflictsdamage every second for 10 seconds (asexplained under Poison, above). Eachtime the poison damages you, the gamechecks for equipment damage (and if youare suffering from multiple poisonings, thegame will be checking each one, separate-ly, every second). Obviously, this makes ita lot more likely that significant equip-ment damage will occur.
Prima’s Official Strategy Guide
38 primagames.com

There are two very important things tokeep in mind when using the game’sTactics Editor.
First of all, all of the Tactics and Roles inthe game are fully customizable — as infully. So if you want to think of the 12default Tactics as 12 empty slots for yourown original Tactics, feel free.
Second, whether you use the defaults ordesign your own, you’re better off usingTactics than not using Tactics. Tactics vir-tually eliminate the problem of one ofyour Samurai chasing off after some dis-tant foe and getting cut off and surround-ed. And Roles just plain make your char-acter smarter. With no Tactics, a characterwill stick with whatever attack he last useduntil he’s told to do something different or(in the case of spells) runs out of Ki —after which he won’t go back to castingunless specifically ordered to, even if hisKi is replenished. A caster using Roles,however, will cast the set spell as long ashis Ki holds out, then switch to weapons,then go back to spells if he finds more Ki.
There are a few things to keep in mindwhen using Tactics. First of all, the RoleEditor always assumes that all Samuraihave their best melee weapon in their left
weapon slot and their best ranged weaponin the right weapon slot. Your Samuraidon’t necessarily have to carry both aranged and a melee weapon at all times(some Samurai can’t use ranged weaponsat all). But this is a good reason to keepyour best weapon in the appropriate slot— it’s really annoying to realize you’vebeen using your old shibata instead ofyour supercharged go-shinpo-yumi for thelast three battles because you had them inthe wrong slots.
Also, remember to reset your Tactics anytime you send a Samurai to or grab aSamurai from the Shrine Room.
There are also several key combinationsthat will make your use of Tactics muchmore efficient. First, remember that youcan program up to four Tactics intohotkeys 5 through 8. Second, F is ahuge time saver for getting your tacticalformation pointed in the right direction.Another important key to remember is R— as long as you hold it down, yourSamurai will hold their current position,even if they’re set to Aggressive.
The paragraphs that follow give advice onhow best to use each of the 12 presetTactics in combat.
Strategy & Combat
primagames.com 39
Tactics

CentipedeThis formation organizes your meleefighters to protect a central spellcast-er in a fairly tight formation. It’s agood all-purpose Tactic for travelingand defense. It also works well whenyou want your primary offense tocome from your caster’s powerfularea-effect spells.
LizardThis is a linear formation, making itperfect for going through doors andnarrow passages. Because your fore-most Samurai is a defender, with themore mobile neutral characters inback, you can also use this forma-tion to plug doors and other narrowcheckpoints, which can be an effec-tive Tactic against rooms full of largenumbers of slightly weaker targets.
Prima’s Official Strategy Guide
40 primagames.com
Centipede
Lizard

ScorpionThis is a very powerful and versatileTactic, with your melee fighters upfront, and a caster defended by anarcher bringing up the rear. It’s goodfor large numbers of weaker enemiesin open terrain, and particularlygood for charging massed archers. Italso allows a high-level spellcaster towork at full advantage. Its maindrawback is that it requires a lot ofspace … you may want to program asomewhat more compact variation touse indoors.
DragonYour ranged fighters form a line,while a single melee fighter rangesaggressively in front, causing asmuch damage as possible. ThisTactic offers a good balance ofoffense and defense. It’s also goodfor ambushes, if you put the meleefighter under your direct control sohe doesn’t go running off madly andgiving away the whole thing.
Strategy & Combat
primagames.com 41
Scorpion
Dragon

MantisForward melee fighters protectarchers to the rear. This is good fordefending against groups of more-or-less equally matched foes coming inhand-to-hand.
SnakeTwo melee fighters range aggressive-ly up front, while a third hangs backto defend your caster. This formationworks well when your caster wantsto concentrate on energy-efficient,targeted spells. It’s also a goodTactic for fighting small groups ofvery tough monsters, like Kappa.
Prima’s Official Strategy Guide
42 primagames.com
Mantis
Snake

FoxThe Fox works a lot like the Mantis,only the formation is much tighter.This is an excellent Tactic for use incitadels, caves, villages, cemeteriesand other areas where movement isrestricted by terrain.
MonkeyThis is an all-out melee assault,with everybody aggressive. It’s a lotlike the way your characters operateunder the no-Tactics default, butsurvivability is a bit better, due tothe guidance provided by yourSamurais’ Roles.
Strategy & Combat
primagames.com 43
Fox
Monkey

TigerYou know what a massed group ofskeleton archers or priestesses cando to your party? This formationallows you to do the same thing tocharging enemies. Basically, it putsyour archers in a line and lets themattack aggressively against anybodywho gets into range.
FrogWith two casters up front guardedby two bowmen, this is another for-mation that’s ideal against chargingenemies. Give your casters theirmost powerful area-effect spells, andwatch the enemy crash against asolid wall of deadly magical force.
Prima’s Official Strategy Guide
44 primagames.com
Tiger
Frog

PhoenixMasses all your spellcasters againstthe enemy. Put two fighter-types withlow Ki up front, and your two bestoffensive casters in back with a cou-ple of Ki potions. When the low-Kibruisers have exhausted their magicagainst the enemies’ initial charge,they’ll automatically draw theirswords and defend the rear castersas they continue to pummel the foewith magic.
TurtlePretty self-explanatory. Everybodydraws hand-weapons and stays in atight formation. Good for wadinginto a crowd of enemies with yourbest swordsmen. Also, if you sud-denly have to go to the bathroom oranswer the phone and you’re not100% sure the area is secure, this isan excellent formation in which toleave your party waiting.
Strategy & Combat
primagames.com 45
Phoenix
Turtle

Money ManagementThere’s only so much money in the game.Your task is to make it stretch right to theend. The “big ticket” items in the game arecustomized magic items (especially high-level armor, while high-level polearms canbe pretty pricey as well). Magic items arebalanced so that it’s entirely possible todesign an ultra-super-charged item thatyou can’t build because the price tag ismore gold than you’ll ever see at one time.
The secret to money management comesdown to two equally important factors,Charisma and gold bonuses.
Charisma is pretty easy. Your Leader hasthe best Charisma in the party, and there-fore the best Charisma discount. Let himhold all the money and do all the buyingof items, repairs, IDs, and so forth fromthe Priest and Blacksmith. Make sure hehas a Talisman with the best possibleCharisma bonus.
However, the Leader should be prettymuch the only character in the party whoeven thinks about Charisma. For every-body else, the key is Gold bonuses.
Gold bonuses come from talismans andfrom the Gold Soul Shard component (andfrom the unique War Fan item). The waythey work is that when a monster is killedor a container is opened, the game deter-mines how much gold it would yield nor-mally. It then totals up all the gold bonus-es for the specific character who eitheradministered the death blow to the mon-ster or opened the container, and thedetermined amount of gold is increased bythat percentage.
The maximum total gold bonus possiblefor any one character is 250%, which isactually an entirely reachable number inthe later stages of the game.
Always know which character has the bestgold bonus in your current party, and letthat character open all chests, barrels,boxes, and so forth. Also, try to make surethat the character with the best goldbonus is one of your most dangerousfront-line fighters, since they’re likely toadminister the most death blows.
The War Fan is a unique item that givesone character a +50 to Charisma and a100% gold bonus. The character that endsup with the War Fan is likely to becomeboth the party’s primary trader and pri-mary treasure gatherer.
Prima’s Official Strategy Guide
46 primagames.com
General Strategy

CharacterAdvancementBelow are some “magic numbers” to keepin mind when developing your Samurai’sstats. These stat thresholds will allow yourcharacters to use their very best weaponsand armor at the highest levels of thegame. (Remember that the weapons andarmor discussed below may also haveadditional stat and level prerequisites aswell.)
Dexterity 150 The Dexterity necessaryto use the Nage-Yari, the best thrownweapon in the game.
Dexterity 200 The Dexterity necessaryto use the Iai-To, the best normalweapon in the game, and the Go-Shinpo-Yumi, the best bow in thegame.
Strength 170 The Strength necessaryto wear Kunimichi, the best bodyarmor in the game.
Strength 250 The Strength necessaryto use the Tetsu-Bo, the best polearmin the game.
Ki 80 The Ki which will allow you towear any mask or amulet found inthe game.
These numbers suggest that you shouldtry to get your Samurai up to the followingstat thresholds by around Level 20 or so,to give them access to the best stuff late inthe game.
Leader. Strength 170 and Dexterity 200,for access to the Iai-To and Kunimichi. Kiof 80. Get as much Vitality as you canafford. While your Leader’s Charisma isimportant, it’s more efficient to raise itwith magic (via the best Talisman you canfind) than to use earned experience.
Archer/Swordsman/Berserker. Strength170 and Dexterity 200, for access to theIai-To (or, for the Archer, Go-Shinpo-Yumi)and Kunimichi. Ki of 80. As much Vitalityas you can afford, and don’t even worryabout Charisma.
Brick. Strength 250, for access to theTetsu-Bo (while the Iai-To does more dam-age than the Tetsu-Bo, the Brick’s maxi-mum skill with polearms is higher than hismax with swords — he should hit moreoften with the Tetsu Bo than with an Iai-To to make up the difference). Dexterity atleast 90 to use all polearms, or Dexterityof 100 to 150, to use two-handed-swordswhile working your way up to the Tetsu-Bo. Ki of 80. As much Vitality as you canafford; don’t worry about Charisma.
Ninja. Dexterity 150 for access to Nage-Yari, Strength 170 for access to Kunimichi,Ki 80. As much Vitality as you can afford;don’t worry about Charisma.
Wizard. Dexterity 150 for access to Nage-Yari. Strength 130 allows you to wearTriple Scale, the second-best armor in thegame (your maximum Strength of 150 putsKunimichi armor out of your reach). Asmuch Ki and Vitality as you can afford,and don’t worry about Charisma.
Strategy & Combat
primagames.com 47

Party AdvancementGaining experience in Throne of Darknessis extremely straightforward. You get onepoint of experience for every point of actu-al damage you inflict on an enemy. That’sit. With seven Samurai and only fouractive slots, one of the most fundamentalquestions of the game becomes, “Who doI train up, and which one first?”
You might prefer to give everybody anequal shot, playing one Samurai until hegoes up a level, then rotating a lower-levelcharacter in for him. This gives you a ver-satile and well-balanced party, but it lagsbehind a bit in terms of maximum level.Or you might go to the opposite extreme,pick your four favorite Samurai, and playthem all the time, ignoring the other three.This gives you four characters who havetaken full advantage of all the experiencein the game, but leaves you without theversatility and margin for error that a fullcomplement of seven gives you.
There are also options that split the differ-ence. You can keep one or two Samurai inplay most of the time, and rotate the restthrough the remaining slots. This insuresthat one or two characters are getting thebenefit of all the experience the gameoffers, while still keeping the rest of yourparty in fighting trim. If you decide toselect specific characters for maximumexperience, you might choose your tough-est characters (Berserker, Brick) to makethem as awesome as possible, or chooseto make your less powerful charactersmore competitive. By giving your Leaderfirst pick of armor and weapons and by
keeping him in play more often to givehim a four or five level advantage over theother Samurai, he becomes a very viablefront-line fighter, and he’s always availablewhen you need to buy a Repair orIdentify.
You can also keep a character constantlyon the front line for a more limited time, toachieve a specific experience goal. TheWizard, for example, tends to lag behindthe rest of the party until level 20 or so(after which his more powerful spells allowhim to keep pace with the pack easily).One of the ways to minimize this experi-ence deficit is to keep the Wizard activemost of the time in the first half of thegame.
It’s also possible to come at the sameproblem from the opposite direction. Atthe very start of the game it’s much harderto keep the Leader, Archer and Wizardalive than it is to keep the Brick,Swordsman, Berserker and Ninja going. Ifyou find this frustrating, try running yourfront-line fighters exclusively until they hitlevel 8 or so, then start rotating in theLeader, Wizard and Archer as rangedweapon support. You’ll be amazed at howfast they catch up with the front-line fight-ers running interference for them.
Prima’s Official Strategy Guide
48 primagames.com

MiscellanyThe Automap. There’s only one thing thatneeds to be said about the automap: Useit! In the first half of the game in gives youinformation that you can’t get anywhereelse — the lines that show you the mostdirect routes between the citadels (gold),and the direct route to the mountain(blue). And throughout the game it’s yourbest tool for keeping track of the relativeposition of your Samurai. (Remember, ifyour group gets spread out you can callthem back to you with R.)
Hot Keys. Remember that you canhotkey up to four spells. The drawback isthat there’s no way to map the hotkey to aspecific Samurai — a hotkey calls thatspell for every active Samurai that has it.Because of this, the best use of the spellhotkeys is probably for protective spells,so you can quickly protect your wholegroup against powerful magic from a spe-cific element.
Giving and Offering Items. The benefitsof giving mundane items to the Blacksmithand of offering magic items to the Priestare determined by the value rating of theitem (see pp. 53-102) and its associatedmagical components.
The benefit of offering magic to the gods isobvious. This is really the only way for theWizard to get a decent roster of maxed-out, powerful spells. The benefit of givingnormal items to the Blacksmith is a bitmore subtle. Basically, what this does isallow the smith to create more powerfulitems. The higher the total in each of thethree categories, the better the selectionavailable when you need an item made.
The Daimyo and the Shrine Room.Your Daimyo’s Ki is a resource that is easy
to neglect. On the one hand, it renewsconstantly and quite quickly. On the otherhand, when you need it, you really needit.
A resurrection uses up exactly half of theDaimyo’s maximum Ki. A teleport (incom-ing or outgoing) uses up 5% of theDaimyo’s maximum Ki. That means thatin a tough battle you can expect theDaimyo to be able to teleport casualtiesout and replacements in, but save the res-urrections for after the battle. A newly-raised Samurai isn’t much good in a hotand heavy battle anyway, unless he has apotion or two handy, in which case heprobably wouldn’t have dropped in thefirst place.
Incidentally, if your whole party is in theShrine Room, there’s no cost to moveSamurai from active to inactive, sincethere’s no teleporting involved. If you’regoing to need to move several of yourSamurai in and out of active status fairlyquickly (for example, to redistribute yourinventory), take a portal gate back to theshrine room and get organized.
Characters in the Shrine Room regain onehit point and one Ki point every second.This is true of both active and inactivecharacters, which is another reason to por-tal gate back to the Shrine Room forinventory control or other non-combatoperations.
If you have items you don’t want to aban-don, but you don’t want to carry aroundeither, you can cache them in the ShrineRoom. However this works much better insingle player than in multiplayer games —you do not want the word to get out in amultiplayer game that you leave valuablestuff lying around in your Shrine Room.
Strategy & Combat
primagames.com 49

Following and Running. The game hasto keep all the active characters closeenough so that it can keep track of every-body. So if one of the active Samurai wan-ders too far from the active character incombat, at a certain point the game tellshim to turn around and go back to thegroup. Sometimes, if the distance is partic-ularly great, or the terrain especially com-plicated, the game will actually teleportthe straying Samurai closer to the controlcharacter. You can use this to your benefitin combat. Say you open a door in acitadel onto a situation that you just don’twant to deal with. If you turn and runaway, the monsters will often just followyou. But if you get just one character(your control character) outside the room,slam the door and run away, in a few sec-onds the rest of the party will teleport outof the room and return to the control char-acter, leaving the monsters still trapped inthe original room, hopefully a bit weakerthan they were before.
Prima’s Official Strategy Guide
50 primagames.com

Spoiler WarningThis section contains information about thefinal battle with the Dark Warlord and itsaftermath. Players who want to finish thesingle-player game before trying multiplay-er, and who don’t want to spoil the surprisesat the end of the game, may want to givethis section a pass.
******You can play multiplayer over a LAN, inwhich case you can use your charactersfrom the single-player game, if you wantto. This is a good way to beef up yourSamurai a bit before the end game. Youcan play over the internet, in which caseyour characters are stored on the game’sservers and are completely different fromyour single-player characters. You canplay cooperatively either over a LAN or onthe net, with each player taking one or twocharacters. The most exciting form of mul-tiplayer play, however, is head-to-headclan vs. clan play over the internet.
Regardless of which style of multiplayeryou chose, there are some fundamentaldifferences from the single-player game.
One of the more basic is that in multiplay-er there are no quests, either personal orstrategic. (Which also means there are noquest-specific items or monsters.)
Also, in multiplayer, all wilderness andmountainside portal gates are open at alltimes, allowing you to move around themap freely. Citadel portals are also open,but you can only gate into your own cas-
tle’s portals. (You can gate out from anycitadel gate.)
If your entire active party is killed, yourgame doesn’t end — instead, your wholeparty is returned to your Shrine Room.
In multiplayer, you can keep the samecharacters coming back for game aftergame. The maximum possible level thatyour characters can achieve is level 257,by which time of course they will havelong since maxed out their stats andspells.
Perhaps the most profound differencebetween the multiplayer and single playergame is that the multiplayer game doesn’tend when you kill the Dark Warlord.Instead, your party continues on, as DarkSamurai (until your own Dark Warlord isslain).
Playing DarkWhen you kill the Dark Warlord, youhave only a few seconds to grab the loothe drops. This includes the MagmaSphere, a unique and powerful magiccomponent that is not available anywhereelse in either the multiplayer or the single-player game.
After the first time you kill the DarkWarlord and go Dark yourself, you canchoose whenever you join a new gamewhether to play as Dark or normalSamurai. This is important, because therecan be only one team of Dark Samurai inany given game. If you are playing the
Strategy & Combat
primagames.com 51
Multiplayer: An IntroductionMultiplayer Throne of Darkness — particularly head-to-head network play — is a verydifferent experience from the single-player game. This section provides a brief summaryof the main differences.

Dark Samurai, and another player man-ages to kill the Dark Warlord and go Dark,you are booted from that game.
While you’re playing Dark, many of theDark Warlord’s servants won’t attack you,and you can’t attack them. This includesmonsters in all citadels, guarding PortalGates, and manning the wilderness sup-ply-depot/ambush points. You can, howev-er, fight and kill the caged creatures in theDark Warlord’s torture chamber.
Shrine Room AttacksAs we’ve already noted, a multiplayergame doesn’t end when your active party iskilled in the wilderness. You can, however,be booted out of a multiplayer game ifanother player successfully invades yourShrine Room and kills all the Samurai in it.
When another player’s forces enter yourcitadel, you get a message warning youthat you are being invaded. At that point,you’re well advised to get back as quicklyas you can to defend your Daimyo.
Inactive Samurai waiting in the ShrineRoom will fight (using AI) to defend theDaimyo against invading clans. This is agood reason to keep all your multiplayercharacters in fighting trim, rather than justconcentrating on grabbing experience foryour four favorite Samurai. A good emer-gency tactic in case of Shrine Room inva-sion is to teleport three of your active char-acters back to the Shrine Room while thefinal Samurai makes a dash for the nearestportal gate. In multiplayer, you always wantto know exactly where the nearest PortalGate is, and the quickest way to get there.
If your characters get booted out of a mul-tiplayer game, they’re still on the serverand they can be used for other games inthe future.
Prima’s Official Strategy Guide
52 primagames.com
The Lightning TrapThe Elder Kappa Shell is probably themost powerful commonly availabledefensive component in the game, but itcomes at a cost. Each Kappa Shell youuse conveys a negative 10% to LightningResistance. In single-player, this is nor-mally just a minor annoyance, since rela-tively few monsters use Lightningattacks. In multiplayer, however, you’replaying against real people who knowabout this weakness and who are willingto turn it into an edge.
An experienced multiplayer competitorwill tend to use Lightning attacks againstmid-level opponents, on the assumptionthat there will be at least a few KappaShells in the party, lowering resistance.Because of this, smart players limit thenumber of Kappa Shells they incorporateinto their armor, and tend to stockpileextra Lightning defenses as well, in theform of masks and rosaries. Because ofthis, of course, some players avoidLightning attacks against opponents whoseem to know what they’re doing, on theassumption that they’ll be extra-well-pre-pared against them. It can turn into aninteresting “Does he know that I knowthat he knows …?” situation.
Multiplayer Stages
In multiplayer, all four citadels areequal, with Stage 1 monsters. The Moriwilderness is Stage 1, Oda wilderness isStage 2, Tokagawa is Stage 3, andToyotomi is Stage 4. The open portalgates make it easy to get to the wilder-ness area best suited to your currentexperience.

primagames.com 53
StatsAC. How much the item adds to yourSamurai’s Armor Class.
Damage. How much normal damage theItem inflicts.
Dexterity. The minimum Dexterityrequired to use the item.
Durability. The item’s Durability.
Enhancements. How many enhancementsthe item has.
Ki. The minimum Ki required to use it.
Level. The minimum experience levelrequired to use it.
Q. This item is only found on a quest.
Slots. How many magic components canbe used to enhance the item.
Strength. The minimum Strength requiredto use or wear the item.
U. This item is unique. U1, U2 and U3refer to where you might find the item. The greater the number, the later the itemwill be found in the game.
Value. A range of numbers (0 – 100) thathelp determine which random item a monster might be carrying. See Monsters,p. 103, for more details.
EQUIPMENT
Factors That Determine Equipment CostsHow do your Priest and Blacksmith decide how much something’s worth? It depends onwhat they’re evaluating. Here are a few rules of thumb.
Type of Item Factors that affect its worth
Amulets Ki Required Magic Slots Magic Value of Components
Armor Durability Armor Class Magic Slots Magic Value of Components
Masks * Durability Magic Slots Magic Value of Components
Weapons Durability Normal Damage Magic Slots Magic Value of Components
Components Magic Value
Gems Nothing alone, but they multiply cost when they multiply an item’s power
Combinations Figure cost based on the combination’s magic value, not the values of itscomponents
* All other things being equal, a mask costs much more than other comparable items.

Prima’s Official Strategy Guide
54 primagames.com
AmuletsAll Amulets are 1 x 1 in size.
Jewels
Possible Enhancement: Dexterity +3Magic Value 2
Possible Enhancement: Strength +3Magic Value 2
Jewel Enh Ki Level ValueChipped Ka-ho 1 25 5.6Chipped Shinki 2 25 11.1Chipped Magatama 3 25 16.7Flawed Ka-ho 4 25 22.2Flawed Shinki 5 25 27.8Flawed Magatama 6 25 33.3Ka-ho 7 30 38.9Shinki 8 30 7 44.4Magatama 9 30 8 50.0Ancient Ka-ho 10 30 9 55.6Ancient Shinki 11 30 10 61.1Ancient Magatama 12 30 11 66.7Noble Ka-ho 13 40 12 72.2Noble Shinki 14 40 13 77.8Noble Magatama 15 40 14 83.3Demon Ka-ho 16 50 15 88.9Demon Shinki 17 50 16 94.4Demon Magatama 18 50 17 100.0
Medicine Cases
Possible Enhancement: Vitality +3Magic Value 2
Case Enh Ki Level ValueRotting Cedar Case 1 30 5.6Rotting Lacquer Case 1 30 11.1Rotting Inro 2 30 16.7Cracked Cedar Case 2 30 22.2Cracked Lacquer Case 2 30 27.8Cracked Inro 3 30 33.3Cedar Case 3 30 7 38.9Lacquer Case 4 30 9 44.4Inro 5 30 11 50.0Quality Cedar Case 5 40 10 55.6Quality Lacquer Case 6 40 12 61.1Quality Inro 7 40 14 66.7Ancient Cedar Case 7 50 13 72.2Ancient Lacquer Case 8 50 15 77.8Ancient Inro 9 50 17 83.3Demon Cedar Case 8 65 16 88.9Demon Lacquer Case 10 65 18 94.4Demon Inro 12 75 20 100.0
EnhancementsEnhancements for masks and amuletsare the benefits that those items canconvey broken down to the smallestbasic unit. An amulet or mask willalways have the indicated number ofenhancements drawn, at random, fromtheir possible enhancements.For example, a Flawed Ka-Ho Jewelwill always have 4 enhancements. They might come in the form of:+12 to Dexterity,+3 to Strength and +9 to Dexterity,+6 to Strength and +6 to Dexterity,+9 to Strength and +3 to Dexterity, or+12 to Strength.

Amulets
primagames.com 55
Prayer Beads
Possible Enhancement: Fire, Earth,Water or Lightning Resistance +3%Magic Value 1
Possible Enhancement: Ki +5Magic Value 2
Prayer Beads Enh Ki Level ValueCracked Jyuzu 1 30 4.2Cracked Shinjyu 2 30 8.3Cracked Kongou 3 30 12.5Flawed Jyuzu 4 30 16.7Flawed Shinjyu 5 30 20.8Flawed Kongou 6 30 25.0Jyuzu 7 30 7 29.2Shinjyu 8 30 8 33.3Kongou 10 35 9 37.5Quality Kongou 11 35 10 41.7Quality Jyuzu 12 35 11 45.8Quality Shinjyu 13 35 12 50.0Perfect Kongou 45 15 13 54.2Perfect Jyuzu 16 45 14 58.3Perfect Shinjyu 17 45 15 62.5Ancient Kongou 18 45 16 66.7Ancient Jyuzu 13 55 17 70.8Ancient Shinjyu 14 55 18 75.0Noble Kongou 16 55 19 79.2Noble Jyuzu 17 55 20 83.3Noble Shinjyu 20 65 21 87.5Demon Kongou 22 65 22 91.7Demon Jyuzu 24 65 23 95.8Demon Shinjyu 26 65 24 100.0
Betrothal Necklace (Q) (U 20 150 10Prayer Beads (Q) (U) 0 25
Water Res. +25%
Betrothal Necklace (Q) (U)In the Tokugawa Wizard quest, a female ghost gives youthis Betrothal Necklace.Size 1 x 1Enhancements 20Minimum Ki Required 150Minimum Experience Level 10
Prayer Beads (Q) (U)In the Mori Leader quest, the dying priest gives you thesePrayer Beads.Size 1 x 1Minimum Ki Required 25Water Resistance +25%
Talismans
Possible Enhancement: Charisma +5Magic Value 1
Possible Enhancement: Gold +10%Magic Value 1
Talisman Enh Ki Level ValueTorn Omamori 1 25 6.7Torn Kamifuda 2 25 13.3Torn Hamafuda 3 25 20.0Omamori 4 25 26.7Kamifuda 5 25 33.3Hamafuda 6 25 40.0Ancient Omamori 7 25 8 46.7Ancient Kamifuda 8 25 9 53.3Ancient Hamafuda 9 25 10 60.0Noble Omamori 10 25 12 66.7Noble Kamifuda 11 25 13 73.3Noble Hamafuda 12 25 14 80.0Demon Omamori 13 25 16 86.7Demon Kamifuda 14 25 17 93.3Demon Hamafuda 15 25 18 100.0

Prima’s Official Strategy Guide
56 primagames.com
MasksAll Masks are 2 x 2 in size.
Possible Enhancement: Fire, Earth, Water or Lightning Resistance +5%Magic Value 2
Possible Enhancement: Damage Reflection +5%Magic Value 3
Mask Enh Dur Ki Level ValueAyakashi 4 2 30 9.1Akujo-Beshimi 6 4 35 18.2O-beshimi 8 6 40 27.3Han-nya 10 8 45 8 36.4Ko-beshimi 12 10 50 10 45.5O-akujyo 14 12 55 12 54.5Fu-do 16 14 60 14 63.6Ko-jishi 18 16 65 16 72.7Shi-kami 20 18 70 18 81.8Shishi-guchi 22 20 75 20 90.9O-jishi 24 22 80 22 100.0
Clan Mask 18 50 18 All Elemental Res. +25%(four variations) (Q) (U)
Akujo-BeshimiTotal Enhancements 6Durability 4Minimum Ki Required 35
AyakashiTotal Enhancements 4Durability 2Minimum Ki Required 30
Fu-doTotal Enhancements 16Durability 14Minimum Ki Required 60Minimum Experience Level 14
Han-nyaTotal Enhancements 10Durability 8Minimum Ki Required 45Minimum Experience Level 8

Ko-beshimiTotal Enhancements 12Durability 10Minimum Ki Required 50Minimum Experience Level 10
Ko-jishiTotal Enhancements 18Durability 16Minimum Ki Required 65Minimum Experience Level 16
Mask of the Mori/Oda/Tokugawa/Toyotomi Clan (Q) (U)Durability 18Minimum Ki Required 50Minimum Experience Level 18Earth Resistance +25%Fire Resistance +25%Lightning Resistance +25%Water Resistance +25%
O-akujyoTotal Enhancements 14Durability 12Minimum Ki Required 55Minimum Experience Level 12
O-beshimiTotal Enhancements 8Durability 6Minimum Ki Required 40
O-jishiTotal Enhancements 24Durability 22Minimum Ki Required 80Minimum Experience Level 22
Shi-kamiTotal Enhancements 20Durability 18Minimum Ki Required 70Minimum Experience Level 18
Shishi-guchiTotal Enhancements 22Durability 20Minimum Ki Required 75Minimum Experience Level 20
Masks
primagames.com 57

Prima’s Official Strategy Guide
58 primagames.com
Gold
Size 1 x 1
PotionsAll Potions are 1 x 1 in size.
Remedy
RemedyCost 30Halts all current poison
Health
Light HealthCost 25Restores 20% of Max HPs
HealthRestores 50% of Max HPsCost 50
Full HealthCost 100Restores full HPs
Ki
Light KiCost 50Restores 20% of Max Ki
KiCost 100Restores 50% of Max Ki
Full KiCost 200Restores full Ki
Restorative
Light RestorativeCost 100Restores 20% of Max Ki and HPs
RestorativeCost 200Restores 50% of Max Ki and HPs
Full RestorativeCost 400Restores full Ki and HPs

Body Armor
primagames.com 59
ArmorBody Armor
All Body Armor is 2 x 3 in size.Item Slots Dur AC Str Level ValueCloth 0 12 – 15 20 1 5.9Silk Cloth 0 1 – 10 10 – 12 15 1 11.8Heavy Cloth 0 5 – 10 15 – 18 30 1 17.6Layered Cloth 2 5 – 10 18 – 24 30 1 23.5Lacquered Cloth 4 10 – 15 24 – 28 35 1 29.4Plated Cloth 6 10 – 15 28 – 32 35 1 35.3Kozane 10 15 – 20 32 – 34 35 1 41.2Single Scale 8 15 – 20 34 – 36 40 1 47.1Nagamichi 14 15 – 20 36 – 39 45 1 52.9Lacquered Scale 16 15 – 20 39 – 42 55 1 58.8Overlap Scale 20 15 – 25 42 – 47 65 6 64.7Iyozane 21 20 – 25 56 – 61 65 6 70.6Haruta 22 20 – 25 67 – 72 65 10 76.5Munesuke 23 20 – 30 79 – 88 75 12 82.4Double Scale 24 20 – 30 99 – 104 100 12 88.2Triple Scale 25 20 – 30 119 – 125 130 16 94.1Kunimichi 25 20 – 30 140 – 150 170 18 100
Hiromi (U1) 4 50 100 60 1 Dam. Refl. +15%, Dex +10, Str +25Kobara (U3) 24 100 200 60 15 HP +50Kagetora’s Armor (Q) (U) 32 99 – 104 140 – 150 100 10Yuzan (U3) 32 157 – 165 140 – 150 170 20 All Elemental Res. +30%, HP +30
ClothMagic Slots 0Durability 1 – 5Armor Class 12 – 15Minimum Strength Required 20Minimum Experience Level 1
Double ScaleMagic Slots 24Durability 20 – 30Armor Class 99 – 104Minimum Strength Required 100Minimum Experience Level 12
HarutaMagic Slots 22Durability 20 – 25Armor Class 67 – 72Minimum Strength Required 65Minimum Experience Level 10

Prima’s Official Strategy Guide
60 primagames.com
Heavy ClothMagic Slots 0Durability 5 – 10Armor Class 15 – 18Minimum Strength Required 30Minimum Experience Level 1
Hiromi (U1)Magic Slots 4Durability 50Armor Class 100Minimum Strength Required 60Minimum Experience Level 1Damage Reflection +15%Dexterity Bonus +10Strength Bonus +25
IyozaneMagic Slots 21Durability 20 – 25Armor Class 56 – 61Minimum Strength Required 65Minimum Experience Level 6
Kagetora’s Armor (Q) (U)At the conclusion of the OdaLeader quest, the ghost ofKagetora gives you this armor.
Magic Slots 32Durability 99 – 104Armor Class 140 – 150Minimum Strength Required 100Minimum Experience Level 10
Kobara (U3)The Kobara Armor is the finestsuit of armor in the game. It canonly be obtained as randomtreasure from powerful monsters.
Magic Slots 24Durability 100Armor Class 200Minimum Strength Required 60Minimum Experience Level 15Hit Point Bonus +50
KozaneMagic Slots 10Durability 15 – 20Armor Class 32 – 34Minimum Strength Required 35Minimum Experience Level 1
KunimichiKunimichi Armor is the best suitof armor the Blacksmith can pro-vide. Every Samurai in the gameshould work to get his Strengthup to a level where he can wearKunimichi.
Magic Slots 25Durability 20 – 30Armor Class 140 – 150Minimum Strength Required 170Minimum Experience Level 18

Body Armor
primagames.com 61
Lacquered ClothMagic Slots 4Durability 10 – 15Armor Class 24 – 28Minimum Strength Required 35Minimum Experience Level 1
Lacquered ScaleMagic Slots 16Durability 15 – 20Armor Class 39 – 42Minimum Strength Required 55Minimum Experience Level 1
Layered ClothMagic Slots 2Durability 5 – 10Armor Class 18 – 24Minimum Strength Required 30Minimum Experience Level 1
MunesukeMagic Slots 23Durability 20 – 30Armor Class 79 – 88Minimum Strength Required 75Minimum Experience Level 12
NagamichiMagic Slots 14Durability 15 – 20Armor Class 36 – 39Minimum Strength Required 45Minimum Experience Level 1
Overlap ScaleMagic Slots 20Durability 15 – 25Armor Class 42 – 47Minimum Strength Required 65Minimum Experience Level 6
Plated ClothMagic Slots 6Durability 10 – 15Armor Class 28 – 32Minimum Strength Required 35Minimum Experience Level 1
Silk ClothMagic Slots 0Durability 1 – 10Armor Class 10 – 12Minimum Strength Required 15Minimum Experience Level 1
Single ScaleMagic Slots 8Durability 15 – 20Armor Class 34 – 36Minimum Strength Required 40Minimum Experience Level 1

Prima’s Official Strategy Guide
62 primagames.com
Triple ScaleThe second-best normal armor in the game, TripleScale is the best armor the Wizard character can everwear, due to his Strength restrictions.
Magic Slots 25Durability 20 – 30Armor Class 119 – 125Minimum Strength Required 130Minimum Experience Level 16
Yuzan (U3)Magic Slots 32Durability 157 – 165Armor Class 140 – 150Minimum Strength Required 170Minimum Experience Level 20Fire Resistance +30%Earth Resistance +30%Lightning Resistance +30%Water Resistance +30%Hit Point Bonus +30
Head ArmorAll Head Armor is 2 x 2 in size (except the Plated Band).Item Slots Dur AC Str Level ValueLacquer Guard 0 10 – 14 5 – 7 25 1 6.7Plated Band 0 5 – 10 1 – 3 20 1 13.3Hachi-maki 1 9 – 11 5 – 10 30 1 20.0Heavy Guard 1 12 – 15 8 – 11 43 1 26.7Noroi-bachi 2 12 – 14 9 – 14 35 1 33.3Hoshi-bachi 6 16 – 19 12 – 15 45 6 40.0Riveted Helmet 5 20 – 24 9 – 13 75 6 46.7Plate Guard 2 21 – 27 9 – 13 33 1 53.3Kan-muri 4 12 – 16 16 – 23 60 3 60.0Hammered Helmet 6 16 – 22 17 – 21 55 6 66.7Kaga 6 20 – 24 16 – 19 60 6 73.3Yoshimichi 6 20 – 25 20 – 23 100 6 80.0Plated Helmet 7 20 – 25 24 – 30 110 10 86.7Kabuto 8 25 – 30 28 – 31 125 12 93.3Matsutaka 10 25 – 30 32 – 35 135 15 100
Kan-muri of Protection (U1) 0 15 25 30 1 Minimum Ki required 40, HP +10, Fire, Earth Res. +20%, Dam. Reflection +25
Onizuka (U2) 6 50 60 120 10 Vitality +25, Lightning Res. +30%Saika-bachi (U1) 0 20 – 30 40 30 1 Ki +10, Dam. Reflection +15%,
All Elemental Res. +10%Sakura-bachi (U2) 0 50 50 60 10 Dex +25, HP +25Taka-eboshi (U1) 0 20 20 50 1 Minimum Ki required 30,
HP +20, Str +10, Ki +10

Head Armor
primagames.com 63
Hachi-makiMagic Slots 1Durability 9 – 11Armor Class 5 – 10Minimum Strength Required 30Minimum Experience Level 1
Hammered HelmetMagic Slots 6Durability 16 – 22Armor Class 17 – 21Minimum Strength Required 55Minimum Experience Level 6
Heavy GuardMagic Slots 1Durability 12 – 15Armor Class 8 – 11Minimum Strength Required 43Minimum Experience Level 1
Hoshi-bachiMagic Slots 6Durability 16 – 19Armor Class 12 – 15Minimum Strength Required 45Minimum Experience Level 6
KabutoMagic Slots 8Durability 25 – 30Armor Class 28 – 31Minimum Strength Required 125Minimum Experience Level 12
KagaMagic Slots 6Durability 20 – 24Armor Class 16 – 19Minimum Strength Required 60Minimum Experience Level 6
Kan-muriMagic Slots 4Durability 12 – 16Armor Class 16 – 23Minimum Strength Required 60Minimum Experience Level 3
Kan-muri of Protection (U1)Magic Slots 0Durability 15Armor Class 25Minimum Strength Required 30Minimum Ki Required 40Minimum Experience Level 1Hit Point Bonus +10Fire Resistance +20%Earth Resistance +20%Damage Reflection +25
Lacquer GuardMagic Slots 0Durability 10 – 14Armor Class 5 – 7Minimum Strength Required 25Minimum Experience Level 1
MatsutakaMagic Slots 10Durability 25 – 30Armor Class 32 – 35Minimum Strength Required 135Minimum Experience Level 15

Prima’s Official Strategy Guide
64 primagames.com
Noroi-bachiMagic Slots 2Durability 12 – 14Armor Class 9 – 14Minimum Strength Required 35Minimum Experience Level 1
Onizuka (U2)Magic Slots 6Durability 50Armor Class 60Minimum Strength Required 120Minimum Experience Level 10Vitality Bonus +25Lightning Resistance +30%
Plate GuardMagic Slots 2Durability 21 – 27Armor Class 9 – 13Minimum Strength Required 33Minimum Experience Level 1
Plated BandSize 2 x 1Magic Slots 0Durability 5 – 10Armor Class 1 – 3Minimum Strength Required 20Minimum Experience Level 1
Plated HelmetMagic Slots 7Durability 20 – 25Armor Class 24 – 30Minimum Strength Required 110Minimum Experience Level 10
Riveted HelmetMagic Slots 5Durability 20 – 24Armor Class 9 – 13Minimum Strength Required 75Minimum Experience Level 6
Saika-bachi (U1)Magic Slots 0Durability 20 – 30Armor Class 40Minimum Strength Required 30Minimum Experience Level 1Ki Bonus +10Damage Reflection +15%Lightning Resistance +10%Water Resistance +10%Earth Resistance +10%Fire Resistance +10%
Sakura-bachi (U2)Magic Slots 6Durability 50Armor Class 50Minimum Strength Required 60Minimum Experience Level 10Dexterity Bonus +25Hit Point Bonus +25
Taka-eboshi (U1)Magic Slots 0Durability 20Armor Class 20Minimum Strength Required 50Minimum Ki Required 30Minimum Experience Level 1Hit Point Bonus +20Strength Bonus +10Ki Bonus +10
YoshimichiMagic Slots 6Durability 20 – 25Armor Class 20 – 23Minimum Strength Required 100Minimum Experience Level 6

Arm Armor
primagames.com 65
Bakudan (U2)Magic Slots 10Durability 30Armor Class 20Minimum Strength Required 30Minimum Experience Level 10Charisma Bonus +20Magic Point Bonus +10
ClothMagic Slots 0Durability 3 – 7Armor Class 3 – 7Minimum Strength Required 30Minimum Experience Level 1
Heavy Kyudo GlovesMagic Slots 2Durability 5 – 15Armor Class 5 – 8Minimum Strength Required 30Minimum Experience Level 1
Jibaku (U2)Magic Slots 4Durability 35Armor Class 30Minimum Strength Required 50Minimum Experience Level 10Water Resistance +20%Ki Bonus +30
Karashi (U2)Magic Slots 10Durability 50Armor Class 42Minimum Strength Required 90Minimum Experience Level 15Damage Reflection +25%Dexterity Bonus +30
Kyudo GlovesMagic Slots 1Durability 5 – 15Armor Class 3 – 5Minimum Strength Required 25Minimum Experience Level 1
Arm ArmorAll Arm Armor is 2 x 2 in size.Item Slots Dur AC Str Level ValueCloth 0 3 – 7 3 – 7 30 1 8.3Kyudo Gloves 1 5 – 15 3 – 5 25 1 16.7Heavy Kyudo Gloves 2 5 – 15 5 – 8 30 1 25.0Tekko 0 5 – 15 8 – 12 40 1 33.3Yugake 3 5 – 15 14 – 18 60 6 41.7Mesh 4 12 – 15 16 – 19 65 6 50.0Lacquered Mesh 5 12 – 15 18 – 22 75 9 58.3Plated Mesh 6 15 – 20 20 – 24 85 12 66.7Ude-gane 7 15 – 20 21 – 28 95 12 75.0Plate 8 15 – 20 24 – 30 105 15 83.3Lacquered Plate 9 15 – 20 28 – 34 110 17 91.7Ude-yoroi 10 15 – 25 32 – 39 120 20 100.0
Bakudan (U2) 10 30 20 30 10 Cha. +20, Ki +10Jibaku (U2) 4 35 30 50 10 Water Res. +20%, Ki +30Karashi (U2) 10 50 42 90 15 Damage Refl. +25%, Dex +30

Prima’s Official Strategy Guide
66 primagames.com
Lacquered MeshMagic Slots 5Durability 12 – 15Armor Class 18 – 22Minimum Strength Required 75Minimum Experience Level 9
Lacquered PlateMagic Slots 9Durability 15 – 20Armor Class 28 – 34Minimum Strength Required 110Minimum Experience Level 17
MeshMagic Slots 4Durability 12 – 15Armor Class 16 – 19Minimum Strength Required 65Minimum Experience Level 6
PlateMagic Slots 8Durability 15 – 20Armor Class 24 – 30Minimum Strength Required 105Minimum Experience Level 15
Plated MeshMagic Slots 6Durability 15 – 20Armor Class 20 – 24Minimum Strength Required 85Minimum Experience Level 12
TekkoMagic Slots 0Durability 5 – 15Armor Class 8 – 12Minimum Strength Required 40Minimum Experience Level 1
Ude-ganeMagic Slots 7Durability 15 – 20Armor Class 21 – 28Minimum Strength Required 95Minimum Experience Level 12
Ude-yoroiMagic Slots 10Durability 15 – 25Armor Class 32 – 39Minimum Strength Required 120Minimum Experience Level 20
YugakeMagic Slots 3Durability 5 – 15Armor Class 14 – 18Minimum Strength Required 60Minimum Experience Level 6

Leg Armor
primagames.com 67
Ashi-makiMagic Slots 5Durability 19 – 25Armor Class 19 – 23Minimum Strength Required 70Minimum Experience Level 6
Cloth WrapMagic Slots 0Durability 8 – 11Armor Class 1 – 3Minimum Strength Required 25Minimum Experience Level 1
Kabocha (U2)Magic Slots 10Durability 50Armor Class 30Minimum Strength Required 50Minimum Experience Level 10Strength Bonus +30Lightning Resistance +25%
Ka-eru (U2)Magic Slots 10Durability 40Armor Class 40Minimum Strength Required 90Minimum Experience Level 10Charisma Bonus +30
Lacquered MeshMagic Slots 2Durability 19 – 23Armor Class 15 – 19Minimum Strength Required 60Minimum Experience Level 1
Lacquered PlateMagic Slots 7Durability 18 – 25Armor Class 25 – 29Minimum Strength Required 95Minimum Experience Level 12
Leg ArmorAll Leg Armor is 2 x 2 in size.
Item Slots Dur AC Str Level ValueCloth Wrap 0 8 – 11 1 – 3 25 1 11.1Silk Wrap 0 9 – 11 4 – 7 35 1 22.2Layered Cloth 0 7 – 12 8 – 11 35 1 33.3Mesh 2 12 – 15 12 – 15 45 1 44.4Lacquered Mesh 2 19 – 23 15 – 19 60 1 55.6Ashi-maki 5 19 – 25 19 – 23 70 6 66.7Lacquered Plate 7 18 – 25 25 – 29 95 12 77.8Plated 6 24 – 27 23 – 25 80 9 88.9Sune-yoroi 8 20 – 30 30 – 35 100 15 100
Kabocha (U2) 10 50 30 50 10 Str +30, Lightning Res. +25%Ka-eru (U2) 10 40 40 90 10 Cha +30Suika (U2) 6 30 22 30 10 Dex +20, HP +35

Prima’s Official Strategy Guide
68 primagames.com
Layered ClothMagic Slots 0Durability 7 – 12Armor Class 8 – 11Minimum Strength Required 35Minimum Experience Level 1
MeshMagic Slots 2Durability 12 – 15Armor Class 12 – 15Minimum Strength Required 45Minimum Experience Level 1
PlatedMagic Slots 6Durability 24 – 27Armor Class 23 – 25Minimum Strength Required 80Minimum Experience Level 9
Silk WrapMagic Slots 0Durability 9 – 11Armor Class 4 – 7Minimum Strength Required 35Minimum Experience Level 1
Suika (U2)Magic Slots 6Durability 30Armor Class 22Minimum Strength Required 30Minimum Experience Level 10Dexterity Bonus +20Hit Point Bonus +35
Sune-yoroiMagic Slots 8Durability 20 – 30Armor Class 30 – 35Minimum Strength Required 100Minimum Experience Level 15
WeaponsBows
All bows are 2 x 3 in size.
Weapon Slots Dur Str Dex Level Dam ValueHalf Bow 1 15 – 20 25 50 1 3 – 7 11.1Han-kyu 1 15 – 20 25 75 1 5 – 10 22.2Lacquered Bow 4 15 – 20 35 100 1 7 – 15 33.3Nisun-nobi 5 15 – 20 40 120 1 10 – 17 44.4Shibata 7 15 – 20 40 130 6 12 – 20 55.6Togari 10 15 – 25 45 150 8 15 – 25 66.7Broad-head 10 25 – 30 50 170 12 17 – 30 77.8Hassun-nobi 14 25 – 30 55 180 16 20 – 35 88.9Go-shinpo Yumi 20 25 – 30 60 200 20 20 – 40 100
Aizu (U2) 10 50 45 130 10 13 – 34 Skill Pts. +20%, Vit. +20Ryushi (U3) 32 50 65 180 20 25 – 64 Earth Dam. 10 – 24, Ki +30

Bows
primagames.com 69
Aizu (U2)Magic Slots 10Durability 50Normal Damage 13 – 34Minimum Strength Required 45Minimum Dexterity Required 130Minimum Experience Level 10Skill Point Bonus +20%Vitality Bonus +20
Broad-headMagic Slots 10Durability 25 – 30Minimum Strength Required 50Minimum Dexterity Required 170Minimum Experience Level 12Normal Damage 17 – 30
Go-shinpo YumiMagic Slots 20Durability 25 – 30Minimum Strength Required 60Minimum Dexterity Required 200Minimum Experience Level 20Normal Damage 20 – 40
Half BowMagic Slots 1Durability 15 – 20Minimum Strength Required 25Minimum Dexterity Required 50Minimum Experience Level 1Normal Damage 3 – 7
Han-kyuMagic Slots 1Durability 15 – 20Minimum Strength Required 25Minimum Dexterity Required 75Minimum Experience Level 1Normal Damage 5 – 10
Hassun-nobiMagic Slots 14Durability 25 – 30Minimum Strength Required 55Minimum Dexterity Required 180Minimum Experience Level 16Normal Damage 20 – 35
Lacquered BowMagic Slots 4Durability 15 – 20Minimum Strength Required 35Minimum Dexterity Required 100Minimum Experience Level 1Normal Damage 7 – 15
Nisun-nobiMagic Slots 5Durability 15 – 20Minimum Strength Required 40Minimum Dexterity Required 120Minimum Experience Level 1Normal Damage 10 – 17
Ryushi (U3)Durability 50Magic Slots 32Minimum Strength Required 65Minimum Dexterity Required 180Minimum Experience Level 20Normal Damage 25 – 64Earth Damage 10 – 24Ki Bonus +30

Prima’s Official Strategy Guide
70 primagames.com
ShibataMagic Slots 7Durability 15 – 20Minimum Strength Required 40Minimum Dexterity Required 130Minimum Experience Level 6Normal Damage 12 – 20
TogariMagic Slots 10Durability 15 – 25Minimum Strength Required 45Minimum Dexterity Required 150Minimum Experience Level 8Normal Damage 15 – 25
PolearmsWeapon Slots Dur Str Dex Level Dam ValueTe-boko 1 30 – 35 50 50 1 5 – 12 6.3Short Spear 1 30 – 35 75 50 1 7 – 15 12.5Long Spear 1 35 – 40 80 55 1 10 – 20 18.8Yari 3 35 – 40 85 60 1 10 – 25 25.0Kama 6 40 – 45 90 65 6 15 – 30 31.3Scythe Pole 8 40 – 45 100 70 6 10 – 35 37.5Masa-kari 10 45 – 50 120 70 9 15 – 40 43.8Axe Pole 12 45 – 50 140 75 9 15 – 45 50.0Nagamaki 14 55 – 60 150 75 12 15 – 45 56.3Ju-monji Yari 18 55 – 60 170 75 12 25 – 50 62.5Thresher 16 60 – 65 160 75 12 18 – 48 68.8Naginata 20 55 – 60 180 75 14 20 – 55 75.0Kata-kama Yari 22 60 – 65 190 75 16 25 – 55 81.3Great Spear 24 65 – 70 200 80 16 25 – 60 87.5Zanba-to 24 70 – 75 220 90 18 30 – 60 93.8Tetsu-bo 24 80 – 85 250 90 20 35 – 70 100
Bo-Staff 32 40 – 45 50 50 6 10 – 40 Minimum Ki required 75Butcher’s Spear (U3) 32 50 150 110 25 51 – 72 Ki Leech +15%, Ki +30Imperial Harpoon (U3) 32 50 165 120 25 55 – 83 Pois. Dam. 1 – 20, Cha. +40Ro-zoku Yari (Q) (U) 32 50 – 55 200 70 15 30 – 45Spear (Q) (U) 12 35 – 40 75 55 2 10 – 30Spirit Spear (U1) 1 30 – 35 60 55 1 7 – 15 Fire, Lightning Dam. 1 – 5,
Health Leech +25%, Dam. Refl. +5%Tsunami Spear (U1) 0 35 – 40 80 55 1 10 – 20 Water Dam. 5 – 15, Skill Pts. +10, HP +20Winged Yari (U2) 10 50 135 85 15 37 – 59 Ki Leech +15%, Str +30Kitsune-bi (U1) 0 30 – 35 50 50 1 5 – 15 Fire Dam. 5 – 10, HP +25

Polearms
primagames.com 71
Axe PoleSize 2 x 3Magic Slots 12Durability 45 – 50Minimum Strength Required 140Minimum Dexterity Required 75Minimum Experience Level 9Normal Damage 15 – 45
Bo-Staff
The Bo-Staff in found on deadpriests. It’s a normal polearm,although unusual in that it can’tbe made by the Blacksmith, it hasa minimum ki, and it can take aremarkable amount of magicalenhancement.
Size 2 x 3Magic Slots 32Durability 40 – 45Minimum Strength Required 50Minimum Dexterity Required 50Minimum Ki Required 75Minimum Experience Level 6Normal Damage 10 – 40
Butcher’s Spear (U3)Size 2 x 3Magic Slots 32Durability 50Minimum Strength Required 150Minimum Dexterity Required 110Minimum Experience Level 25Normal Damage 51 – 72Ki Leech +15%Ki Bonus +30
Great SpearSize 2 x 3Magic Slots 24Durability 65 – 70Minimum Strength Required 200Minimum Dexterity Required 80Minimum Experience Level 16Normal Damage 25 – 60
Imperial Harpoon (U3)Size 2 x 3Magic Slots 32Durability 50Minimum Strength Required 165Minimum Dexterity Required 120Minimum Experience Level 25Normal Damage 55 – 83Poison Damage 1 – 20Charisma Bonus +40
Ju-monji YariSize 2 x 3Magic Slots 18Durability 55 – 60Minimum Strength Required 170Minimum Dexterity Required 75Minimum Experience Level 12Normal Damage 25 – 50

Prima’s Official Strategy Guide
72 primagames.com
KamaSize 2 x 3Magic Slots 6Durability 40 – 45Minimum Strength Required 90Minimum Dexterity Required 65Minimum Experience Level 6Normal Damage 15 – 30
Kata-kama YariSize 2 x 3Magic Slots 22Durability 60 – 65Minimum Strength Required 190Minimum Dexterity Required 75Minimum Experience Level 16Normal Damage 25 – 55
Kitsune-bi (U1)Size 1 x 3Magic Slots 0Durability 30 – 35Minimum Strength Required 50Minimum Dexterity Required 50Minimum Experience Level 1Normal Damage 5 – 15Fire Damage 5 – 10Hit Point Bonus +25
Long SpearSize 2 x 3Magic Slots 1Durability 35 – 40Minimum Strength Required 80Minimum Dexterity Required 55Minimum Experience Level 1Normal Damage 10 – 20
Masa-kariSize 2 x 3Durability 45 – 50Magic Slots 10Minimum Strength Required 120Minimum Dexterity Required 70Minimum Experience Level 9Normal Damage 15 – 40
NagamakiSize 2 x 3Magic Slots 14Durability 55 – 60Minimum Strength Required 150Minimum Dexterity Required 75Minimum Experience Level 12Normal Damage 15 – 45

Polearms
primagames.com 73
NaginataSize 2 x 3Magic Slots 20Durability 55 – 60Minimum Strength Required 180Minimum Dexterity Required 75Minimum Experience Level 14Normal Damage 20 – 55
Ro-zoku Yari (Q) (U)Size 2 x 3Magic Slots 32Durability 50 – 55Minimum Strength Required 200Minimum Dexterity Required 70Minimum Experience Level 15Normal Damage 30 – 45
Scythe PoleSize 2 x 3Magic Slots 8Durability 40 – 45Minimum Strength Required 100Minimum Dexterity Required 70Minimum Experience Level 6Normal Damage 10 – 35
Short SpearSize 1 x 3Magic Slots 1Durability 30 – 35Minimum Strength Required 75Minimum Dexterity Required 50Minimum Experience Level 1Normal Damage 7 – 15
Spear of Bishamon (Q) (U)Size 2 x 3Required Components Spear parts
from Tokugawa Brick quest Magic Slots 12Durability 35 – 40Minimum Strength Required 75Minimum Dexterity Required 55Minimum Experience Level 2Normal Damage 10 – 30Fire Damage 2 – 5Earth Damage 2 – 5Water Damage 2 – 5Lightning Damage 2 – 5Possible Suffix of Bishamon (1+)
Spirit Spear (U1)Size 1 x 3Magic Slots 1Durability 30 – 35Minimum Strength Required 60Minimum Dexterity Required 55Minimum Experience Level 1Normal Damage 7 – 15Fire Damage 1 – 5Lightning Damage 1 – 5Health Leech +25%Damage Reflection +5%
Te-bokoSize 1 x 3Magic Slots 1Durability 30 – 35Minimum Strength Required 50Minimum Dexterity Required 50Minimum Experience Level 1Normal Damage 5 – 12

Prima’s Official Strategy Guide
74 primagames.com
Tetsu-boSize 2 x 3Magic Slots 24Durability 80 – 85Minimum Strength Required 250Minimum Dexterity Required 90Minimum Experience Level 20Normal Damage 35 – 70
ThresherSize 2 x 3Magic Slots 16Durability 60 – 65Minimum Strength Required 160Minimum Dexterity Required 75Minimum Experience Level 12Normal Damage 18 – 48
Tsunami Spear (U1)Size 2 x 3Magic Slots 0Durability 35 – 40Minimum Strength Required 80Minimum Dexterity Required 55Minimum Experience Level 1Normal Damage 10 – 20Water Damage 5 – 15Skill Point Bonus +10Hit Point Bonus +20
Winged Yari (U2)Size 1 x 3Magic Slots 10Durability 50Minimum Strength Required 135Minimum Dexterity Required 85Minimum Experience Level 15Normal Damage 37 – 59Ki Leech +15%Strength Bonus +30
YariSize 2 x 3Magic Slots 3Durability 35 – 40Minimum Strength Required 85Minimum Dexterity Required 60Minimum Experience Level 1Normal Damage 10 – 25
Zanba-toSize 2 x 3Magic Slots 24Durability 70 – 75Minimum Strength Required 220Minimum Dexterity Required 90Minimum Experience Level 18Normal Damage 30 – 60

Swords
primagames.com 75
SwordsWeapon Slots Dur Str Dex Level Dam ValueTanto 1 10 – 15 25 50 1 1 – 10 7.7Mimamori 1 10 – 15 25 40 1 5 – 10 15.4Hachi-wari 2 15 – 20 40 75 1 7 – 12 23.1 AC +5Koshi-mono 3 15 – 20 45 75 1 10 – 15 30.8 AC +10Waki-zashi 5 15 – 20 55 75 1 15 – 20 38.5Edo Waki-zashi 7 15 – 20 60 85 1 15 – 25 46.2Edo Katana 9 20 – 25 65 90 1 17 – 25 53.8Tachi 12 20 – 25 75 100 6 15 – 30 61.5Shin-ken 13 20 – 25 75 120 10 15 – 40 69.2Nodachi 15 25 – 30 75 125 10 20 – 45 76.9Great Nodachi 18 25 – 30 80 130 12 20 – 50 84.6Kabu-tsuchi 20 25 – 30 90 150 15 25 – 55 92.3Iai-to 15 20 – 25 100 200 20 75 – 150 100
Assassin’s Blade (U1) 0 20 – 25 50 80 1 10 – 25 Poison Dam. 1 – 5, AC +10Blood Drinker (U1) 0 15 – 20 50 80 1 10 – 25 AC +10, Fire Dam. 5 – 10,
Health Leech +25%Buaku’s Blade (Q) (U) 0 15 – 15 50 80 1 10 – 20 Fire Dam. 1 – 10,
Dam. Refl. +5%Dekabutsu’s Wakizashi (Q) (U) 0 20 55 80 5 15 – 25 Earth, Water Dam. 1 – 5,
Health Leech +10%,Knockback 10%, 1
Echigo Kodachi (U2) 10 50 60 80 12 11 – 26 Cha +20, Ki +10Hidari-no (U3) 32 50 90 120 15 14 – 46 Fire Dam. 2 – 8, Ki +15Katana 0 5 – 10 – – 1 5 – 10Kumakichi’s Kabu-tsuchi (Q) (U) 0 25 – 30 85 120 15 25 – 55 Fire, Water, Lightning Dam.
5 – 10, Knockback 15%, 2, Skill Pts. +20%
Migi-no (U3) 32 50 80 110 20 17 – 53 Water Dam. 3 – 10, Vit +35Shikome’s Banisher (U1) 0 15 – 20 55 80 1 15 – 25 Water, Lightning Dam. 1 – 5,
Dam. Refl. +10%, HP +25Sword of the Mori (Q) (U) 0 15 – 20 60 100 10 10 – 40 Water Dam. 5 – 15,
Dam. Refl. +10%, HP +25,Water Res. +25%
Sword of the Oda (Q) (U) 0 15 – 20 60 100 10 10 – 40 Fire Dam. 5 – 15, Dam. Refl.+10%, HP +25, Fire Res. +25%
Sword of the Tokugawa (Q) (U) 0 15 – 20 60 100 10 10 – 40 Earth Dam. 5 – 15, Dam. Refl.+10%, HP +25, Earth Res. 25%
Sword of the Toyotomi (Q) (U) 0 15 – 20 60 100 10 10 – 40 Lightning Dam. 5 – 15, Dam. Refl. +10%, HP +25,Lightning Res. +25%
Taiboku’s Nodachi (Q) (U) 0 30 75 100 10 20 – 45 Fire Dam. 5 – 10, Dam. Refl. +15%, Health Leech +25%, Str +20
Tamiya Batto (U2) 10 50 70 90 15 13 – 31 Lightning Dam. 5 – 20, Dex +30
Tsubame (U3) 32 50 100 125 25 24 – 67 Skill Pts +80%

Prima’s Official Strategy Guide
76 primagames.com
Assassin’s Blade (U1)Size 1 x 2Magic Slots 0Durability 20 – 25Armor Class 10Minimum Strength Required 50Minimum Dexterity Required 80Minimum Experience Level 1Normal Damage 10 – 25Poison Damage 1 – 5
Blood Drinker (U1)Size 1 x 2Magic Slots 0Durability 15 – 20Armor Class 10Minimum Strength Required 50Minimum Dexterity Required 80Minimum Experience Level 1Normal Damage 10 – 25Fire Damage 5 – 10Health Leech +25%
Buaku’s Blade (Q) (U)Size 1 x 3Durability 15 – 15Minimum Strength Required 50Minimum Dexterity Required 80Minimum Experience Level 1Normal Damage 10 – 20Fire Damage 1 – 10Damage Reflection +5%
Dekabutsu’s Wakizashi (Q) (U)Size 1 x 2Durability 20Minimum Strength Required 55Minimum Dexterity Required 80Minimum Experience Level 5Normal Damage 15 – 25Earth Damage 1 – 5Water Damage 1 – 5Health Leech +10%Knockback (chance, force) 10%, 1
Echigo Kodachi (U2)Size 1 x 2Magic Slots 10Durability 50Minimum Strength Required 60Minimum Dexterity Required 80Minimum Experience Level 12Normal Damage 11 – 26Charisma Bonus +20Magic Point Bonus +10
Edo KatanaSize 1 x 3Magic Slots 9Durability 20 – 25Minimum Strength Required 65Minimum Dexterity Required 90Minimum Experience Level 1Normal Damage 17 – 25
Edo Waki-zashiSize 1 x 2Magic Slots 7Durability 15 – 20Minimum Strength Required 60Minimum Dexterity Required 85Minimum Experience Level 1Normal Damage 15 – 25
Great NodachiSize 2 x 3Magic Slots 18Durability 25 – 30Minimum Strength Required 80Minimum Dexterity Required 130Minimum Experience Level 12Normal Damage 20 – 50
Hachi-wariSize 1 x 2Magic Slots 2Durability 15 – 20Armor Class 5Minimum Strength Required 40Minimum Dexterity Required 75Minimum Experience Level 1Normal Damage 7 – 12

Swords
primagames.com 77
Hidari-no (U3)Size 1 x 3Magic Slots 32Durability 50Minimum Strength Required 90Minimum Dexterity Required 120Minimum Experience Level 15Normal Damage 14 – 46Fire Damage 2 – 8Ki Bonus +15
Iai-to
Unquestionably the finestweapon in the game, with a basedamage almost twice any othernormal weapon. Note thatdespite its compact size, the Iai-To is a two-handed weapon, andcannot be used with DuelWeapon Attack.
Size 1 x 3Magic Slots 15Durability 20 – 25Minimum Strength Required 100Minimum Dexterity Required 200Minimum Experience Level 20Normal Damage 75 – 150
Kabu-tsuchiSize 2 x 3Magic Slots 20Durability 25 – 30Minimum Strength Required 90Minimum Dexterity Required 150Minimum Experience Level 15Normal Damage 25 – 55
Katana
This is the “newbie” katana thatyou begin the game with. It’s notfound anywhere else, but sinceit’s the worst weapon in the game,who cares?
Size 1 x 3Magic Slots 0Durability 5 – 10Normal Damage 5 – 10
Koshi-monoSize 1 x 2Magic Slots 3Durability 15 – 20Minimum Strength Required 45Minimum Dexterity Required 75Minimum Experience Level 1Normal Damage 10 – 15Armor Class +10
Kumakichi’s Kabu-tsuchi (Q) (U)Size 2 x 3Durability 25 – 30Minimum Strength Required 85Minimum Dexterity Required 120Minimum Experience Level 15Normal Damage 25 – 55Fire Damage 5 – 10Lightning Damage 5 – 10Water Damage 5 – 10Knockback (chance, force) 15%, 2Skill Point Bonus +20%

Prima’s Official Strategy Guide
78 primagames.com
Migi-no (U3)Size 2 x 3Magic Slots 32Durability 50Minimum Strength Required 80Minimum Dexterity Required 110Minimum Experience Level 20Normal Damage 17 – 53Water Damage 3 – 10Vitality Bonus +35
MimamoriSize 1 x 2Magic Slots 1Durability 10 – 15Minimum Strength Required 25Minimum Dexterity Required 40Minimum Experience Level 1Normal Damage 5 – 10
NodachiSize 2 x 3Magic Slots 15Durability 25 – 30Minimum Strength Required 75Minimum Dexterity Required 125Minimum Experience Level 10Normal Damage 20 – 45
Shikome’s Banisher (U1)Size 1 x 3Magic Slots 0Durability 15 – 20Minimum Strength Required 55Minimum Dexterity Required 80Minimum Experience Level 1Normal Damage 15 – 25Lightning Damage 1 – 5Water Damage 1 – 5Damage Reflection +10%Hit Point Bonus +25
Shin-kenSize 1 x 3Magic Slots 13Durability 20 – 25Minimum Strength Required 75Minimum Dexterity Required 120Minimum Experience Level 10Normal Damage 15 – 40
Sword of the Mori (Q) (U)Size 1 x 3Durability 15 – 20Minimum Strength Required 60Minimum Dexterity Required 100Minimum Experience Level 10Normal Damage 10 – 40Water Damage 5 – 15Damage Reflection +10%Hit Point Bonus +25Water Resistance +25%
Sword of the Oda (Q) (U)Size 1 x 3Durability 15 – 20Minimum Strength Required 60Minimum Dexterity Required 100Minimum Experience Level 10Normal Damage 10 – 40Fire Damage 5 – 15Damage Reflection +10%Hit Point Bonus +25Fire Resistance +25%

Swords
primagames.com 79
Sword of the Tokugawa (Q) (U)Size 1 x 3Durability 15 – 20Minimum Strength Required 60Minimum Dexterity Required 100Minimum Experience Level 10Normal Damage 10 – 40Earth Damage 5 – 15Damage Reflection +10%Hit Point Bonus +25Earth Resistance 25%
Sword of the Toyotomi (Q) (U)Size 1 x 3Durability 15 – 20Minimum Strength Required 60Minimum Dexterity Required 100Minimum Experience Level 10Normal Damage 10 – 40Lightning Damage 5 – 15Damage Reflection +10%Hit Point Bonus +25Lightning Resistance +25%
TachiSize 1 x 3Magic Slots 12Durability 20 – 25Minimum Strength Required 75Minimum Dexterity Required 100Minimum Experience Level 6Normal Damage 15 – 30
Taiboku’s Nodachi (Q) (U)Size 2 x 3Durability 30Minimum Strength Required 75Minimum Dexterity Required 100Minimum Experience Level 10Normal Damage 20 – 45Fire Damage 5 – 10Damage Reflection +15%Health Leech +25%Strength Bonus +20
Tamiya Batto (U2)Size 1 x 3Magic Slots 10Durability 50Minimum Strength Required 70Minimum Dexterity Required 90Minimum Experience Level 15Normal Damage 13 – 31Lightning Damage 5 – 20Dexterity Bonus +30
TantoSize 1 x 2Magic Slots 1Durability 10 – 15Minimum Strength Required 25Minimum Dexterity Required 50Minimum Experience Level 1Normal Damage 1 – 10

Prima’s Official Strategy Guide
80 primagames.com
Tsubame (U3)Size 2 x 3Magic Slots 32Durability 50Minimum Strength Required 100Minimum Dexterity Required 125Minimum Experience Level 25Normal Damage 24 – 67Skill Point Bonus +80%
Waki-zashiSize 1 x 2Magic Slots 5Durability 15 – 20Minimum Strength Required 55Minimum Dexterity Required 75Minimum Experience Level 1Normal Damage 15 – 20
Throwing WeaponsWeapon Slots Dur Str Dex Level Dam ValueKabuto-wari 0 10 – 15 25 50 1 1 – 7 9.1Throwing Dagger 1 10 – 15 25 50 1 1 – 7 18.2Cross Shuriken 2 10 – 15 50 75 1 1 – 10 27.3Shuriken 4 10 – 15 50 85 1 1 – 12 36.4Iron Shuriken 6 10 – 15 55 100 1 5 – 12 45.5Steel Shuriken 8 10 – 15 55 100 6 5 – 15 54.5Kunai 10 15 – 20 60 105 8 7 – 20 63.6Iron Kunai 12 15 – 20 60 110 8 7 – 25 72.7Steel Kunai 14 20 – 25 60 110 10 10 – 30 81.8Barbed Dart 16 20 – 25 65 140 12 10 – 35 90.9Nage-yari 20 25 – 30 75 150 14 10 – 40 100
Kamui (U2) 10 50 45 125 15 15 – 25 Ki Leech +10%, Dex +25Koga Shuriken (Q) (U) 5 30 50 110 9 15 – 30 Lightning Dam. 1 – 5,
Fire Dam. 1 – 5, Skill Pts +20%, Ki +10
Saru-Tobi (U3) 32 50 65 150 15 25 – 30 Health Leech +10%, Str +20

Throwing Weapons
primagames.com 81
Barbed DartSize 1 x 2Magic Slots 16Durability 20 – 25Minimum Strength Required 65Minimum Dexterity Required 140Minimum Experience Level 12Normal Damage 10 – 35
Cross ShurikenSize 1 x 1Magic Slots 2Durability 10 – 15Minimum Strength Required 50Minimum Dexterity Required 75Minimum Experience Level 1Normal Damage 1 – 10
Iron KunaiSize 1 x 2Magic Slots 12Durability 15 – 20Minimum Strength Required 60Minimum Dexterity Required 110Minimum Experience Level 8Normal Damage 7 – 25
Iron ShurikenSize 1 x 1Magic Slots 6Durability 10 – 15Minimum Strength Required 55Minimum Dexterity Required 100Minimum Experience Level 1Normal Damage 5 – 12
Kabuto-wariSize 1 x 1Magic Slots 0Durability 10 – 15Minimum Strength Required 25Minimum Dexterity Required 50Minimum Experience Level 1Normal Damage 1 – 7
Kamui (U2)Size 1 x 1Durability 50Magic Slots 10Minimum Strength Required 45Minimum Dexterity Required 125Minimum Experience Level 15Normal Damage 15 – 25Ki Leech +10%Dexterity Bonus +25
Koga Shuriken (Q) (U)If you kill Koga Bakamaru on theToyotomi Ninja quest, you get theKoga Shuriken.
Size 1 x 1Magic Slots 5Durability 30Minimum Strength Required 50Minimum Dexterity Required 110Minimum Experience Level 9Normal Damage 15 – 30Lightning Damage 1 – 5Fire Damage 1 – 5Skill Point Bonus +20%Ki Bonus +10
KunaiSize 1 x 2Magic Slots 10Durability 15 – 20Minimum Strength Required 60Minimum Dexterity Required 105Minimum Experience Level 8Normal Damage 7 – 20
Nage-yariSize 1 x 2Magic Slots 20Durability 25 – 30Minimum Strength Required 75Minimum Dexterity Required 150Minimum Experience Level 14Normal Damage 10 – 40

Saru-Tobi (U3)Size 1 x 2Magic Slots 32Durability 50Minimum Strength Required 65Minimum Dexterity Required 150Minimum Experience Level 15Normal Damage 25 – 30Health Leech +10%Strength Bonus +20
ShurikenSize 1 x 1Magic Slots 4Durability 10 – 15Minimum Strength Required 50Minimum Dexterity Required 85Minimum Experience Level 1Normal Damage 1 – 12
Steel KunaiSize 1 x 2Magic Slots 14Durability 20 – 25Minimum Strength Required 60Minimum Dexterity Required 110Minimum Experience Level 10Normal Damage 10 – 30
Steel ShurikenSize 1 x 1Magic Slots 8Durability 10 – 15Minimum Strength Required 55Minimum Dexterity Required 100Minimum Experience Level 6Normal Damage 5 – 15
Throwing DaggerSize 1 x 2Magic Slots 1Durability 10 – 15Minimum Strength Required 25Minimum Dexterity Required 50Minimum Experience Level 1Normal Damage 1 – 7
Prima’s Official Strategy Guide
82 primagames.com

Unique Weapons and Armor
primagames.com 83
ArmorBakudan (Arm Armor) (U2) (p. 65)Hiromi (Body Armor) (U1) (p. 60)Jibaku (Arm Armor) (U2) (p. 65)Kabocha (Leg Armor) (U2) (p. 67)Ka-eru (Leg Armor) (U2) (p. 67)Kan-muri of Protection (Head Armor) (U1) (p. 63)Karashi (Arm Armor) (U2) (p. 65)Kobara (Body Armor) (U3) (p. 60)Onizuka (Head Armor) (U2) (p. 64)Saika-bachi (Head Armor) (U1) (p. 64)Sakura-bachi (Head Armor) (U2) (p. 64)Suika (Leg Armor) (U2) (p. 68)Taka-eboshi (Head Armor) (U1) (p. 64)Yuzan (Body Armor) (U3) (p. 62)
WeaponsAizu (Bow) (U2) (p. 69)Assassin’s Blade (Sword) (U1) (p. 76)Blood Drinker (Sword) (U1) (p. 76)Butcher’s Spear (Polearm) (U3) (p. 71)Echigo Kodachi (Sword) (U2) (p. 76)Hidari-no (Sword) (U3) (p. 77)Imperial Harpoon (Polearm) (U3) (p. 71)Kamui (Throwing Weapon) (U2) (p. 81)Kitsune-bi (Polearm) (U1) (p. 72)Migi-no (Sword) (U3) (p. 78)Ryushi (Bow) (U3) (p. 69)Saru-Tobi (Throwing Weapon) (U3) (p. 82)Shikome’s Banisher (Sword) (U1) (p. 78)Spirit Spear (Polearm) (U1) (p. 73)Tamiya Batto (Sword) (U2) (p. 79)Tsubame (Sword) (U3) (p. 80)Tsunami Spear (Polearm) (U1) (p. 74)Winged Yari (Polearm) (U2) (p. 74)
Unique Weapons and ArmorU1, U2 and U3 indicate when you might find each weapon and piece of armor. The greater the number, the later in the game the item appears.

Quest ItemsAshura Statue (2 x 3) (Q) (U) (see next column)Betrothal Necklace (Prayer Beads) (Q) (U) (p. 55)Blood of Buddha (Fire) (Q) (p. 92)Buaku’s Blade (Sword) (Q) (U) (p. 76)Buddha’s Tear (Water) (Q) (p. 95)Dekabutsu’s Wakizashi (Sword) (Q) (U) (p. 76)Dragon Parts (Earth) (Q) (p. 90)Hemp (Earth) (Q) (p. 90)Kagetora’s Armor (Body Armor) (Q) (U) (p. 60)Kaname Stone (2 x 3) (Q) (see next column)Koga Shuriken (Throwing Weapon) (Q) (U) (p. 81)Kumakichi’s Kabu-tsuchi (Sword) (Q) (U) (p. 77)Magma Sphere (Fire) (Q) (p. 93)Mask of the Mori Clan (Q) (U) (p. 57)Mask of the Oda Clan (Q) (U) (p. 57)Mask of the Tokugawa Clan (Q) (U) (p. 57)Mask of the Toyotomi Clan (Q) (U) (p. 57)Patience of Buddha (Earth) (Q) (p. 91)Prayer Beads (Prayer Beads) (Q) (U) (p. 55)Purple Kappa Egg (Earth) (Q) (p. 91)Red Kappa Egg (Water) (Q) (p. 96)Ro-zoku Yari (Polearm) (Q) (U) (p. 73)Scroll (2 x 2) (Q) (see next column)Soul of Buddha (Lightning) (Q) (p. 94)Spear of Bishamon (Polearm) (Q) (U) (p. 73)Spear Shaft (Lightning) (Q) (U) (p. 94)Spearhead (Fire) (Q) (U) (p. 93)Stone Bamboo (Earth) (Q) (p. 91)Suigetsu’s Shell (Water) (Q) (p. 96)Sword of the Mori (Q) (U) (p. 78)Sword of the Oda (Q) (U) (p. 78)Sword of the Tokugawa (Q) (U) (p. 79)Sword of the Toyotomi (Q) (U) (p. 79)Taiboku’s Nodachi (Sword) (Q) (U) (p. 79)Taisho’s Head (2 x 2) (Q) (see next column)Tear of Buddha (Water) (Q) (p. 96)Tessa-iki’s Teeth (Earth) (Q) (p. 92)Tsuba (Earth) (Q) (p. 92)War Fan (2 x 2) (see next column)
Ashura Statue (2 x 3) (Q) (U)
In the Mori Leader quest, if you kill Suizan you getthe Ashura Statue. You get 8 spell points (for a singleelement) when you give it to your priest.
Kaname Stone (2 x 3) (Q)
In the Toyotomi Wizard quest, touching the statuereveals the Kaname Stone.
Scroll (2 x 2) (Q)
In the Toyotomi Ninja quest, a Fallen Ninja gener-ates this Scroll that can be used to gain entrance tothe lair of the Koga Ninja.
Taisho’s Head (2 x 2) (Q)
In the Oda Leader quest, killing the shadow com-mander separates Taisho’s head from his body; youthen show it to your dearly departed friend.
War Fan (2 x 2)
Charisma Bonus +50; Gold Bonus +100%; bonusesapply anytime the fan is in a Samurai’s inventory.
Prima’s Official Strategy Guide
84 primagames.com

Components
primagames.com 85
ComponentsStacking LimitsMost components of a type (as well asgold) can be stacked in a Samurai’s inven-tory. However, the larger the component,the fewer that can stack together. Thestacking limits are:
2 x 3 5 per stack
2 x 2 8 per stack
1 x 3 10 per stack
1 x 2 16 per stack
1 x 1 32 per stack
Gold Unlimited
NamingWhat’s in a name? Can an item’s namegive you any indication of its powers?Sometimes it can.
The strongest single component (as deter-mined by how many there are of it times itsMagic Value) determines an item’s prefix,while the second strongest determines itssuffix. How many of each particular com-ponent in the item determines which of thatcomponent’s prefixes or suffixes to use.
For example, Yama-inu Blood has MagicValue 10, while Cho-gokin Ore has MagicValue 8. If we craft a new item with threeCho-gokin Ores and two Yama-inu Bloodin it, the “strongest component” is theCho-gokin Ore (8 x 3 = 24), and the sec-ond strongest is the Yama-inu Blood(10 x 2 = 20). Therefore, the Cho-gokinOre determines its prefix, while the Yama-inu Blood determines its suffix.
If two or more components have an equal“strength,” the first one added determineswhich prefix (or suffix) is used.
There are three possible Cho-gokin Ore pre-fixes (“Masterpiece,” “Handa” andGennai”). “Masterpiece” is used if there areno more than three pieces of ore enhancingthe item. There are three possible Yama-inuBlood suffixes; use the one correspondingto the amount of Yama-inu Blood in thisitem (two), resulting in the suffix “of theYouki.” Thus our newly crafted item is the“Masterpiece X of the Youki.”
So when you find a “Masterpiece X of theYouki,” you can know several things. Ithas exactly two Yama-inu Blood in it(because “of the Youki” is only used ifthere are two Yama-inu Blood). The Cho-gokin Ore in it is even stronger (since theore determined the prefix), so it has atleast three pieces of Cho-gokin Ore(remember that the base Magic Value ofCho-gokin Ore is lower than that of Yama-inu Blood). Since “Masterpiece” indicatesno more than three pieces of ore, this itemhas exactly three pieces. That means thatwhile you’re using it, it adds 30 to yourArmor Class (from the ore), while adding10 to your Ki and giving a 10% Ki Leech(from the blood).
Gem ComponentsGem components are fully described on page 97.
Gem Affects SizeCinnabar Kenjya Stone Fire, Water 2x2Gold Kenjya Stone Earth, Fire, 2x2
Lightning, WaterMercury Glob Lightning 1x2Quartz Water 1x2Sapphire Kenjya Stone Lightning, Water 2x2Silver Ingot Earth 1x2Silver Kenjya Stone Earth, Lightning 2x2Steel Kenjya Stone Earth, Fire, Water 2x2Sulfur Fire 2x2Sulfurous Kenjya Stone Fire, Earth 2x2

The basics of magic item design — orCustomization, as it’s called on theBlacksmith interface — are covered in themanual. This section presents a few addi-tional tips to make your magic item designmore efficient and effective.
Don’t use the good stufftoo early.There are two things to avoid in designingmagic items. The first is the temptation tothrow everything you find together as soonas possible for as long as the gold holdsout. You need strong magic items most inthe late game. That’s when the best stuff isavailable, but it’s also when good itemsare most expensive. Keep your magicitems in the early game cheap and mod-est, saving up to go all out at the end.
Don’t use the good stufftoo late.The other trap is the reverse. Don’t thinkyou have to hoard every component thathappens to fall your way, just in case. Youprobably never really need more than onestack of any particular magic item any-where in your Samurais’ inventories atany one time. Spider-Witch Cobwebs,Yamu-Ina Blood and Kappa Blood areespecially prone to stack up, so use themfreely.
Customized or General-Purpose Design?One question you’ll have to answer foryourself is whether you prefer to carefullytailor the item to the user (for example,loading the Berserker up with damagereflection, while buffing the Brick’s damageto the max), or to go for a more general,all-purpose item that can be handedaround the party (a suit of armor thatstarts out with the Swordsman, then goesto the Ninja, and finally ends up with theWizard as better and better stuff becomesavailable).
Fill your weapon slotswisely.You’ll find, particularly late in the game,that weapon components tend to stack upin your inventory a lot more than armorcomponents. This is because there aresimply a lot more armor slots availablethan weapon slots (plus your Samurai willtend to settle on a favorite weapon a bitearlier than they’ll find the perfect set ofarmor). However, because there aren’tnearly as many weapon slots to playaround with, it’s important to make themcount. With weapons, make extra sureyou’re not throwing something mediocreinto an otherwise-awesome weapon just tomax it out. Be patient, and build the per-fect weapon one component at a time.
Prima’s Official Strategy Guide
86 primagames.com
Magic Item Design

Other NotesUse stat-buffing components freelyearly on in the game. In the late gameyou’ll get far more benefit out of compo-nents that directly enhance damage anddefense.
Watch out for Elder Kappa Shells inarmor. While they’re temptingly powerfuland relatively plentiful, too many of themin the party can leave you with a fataloverall weakness to Lightning damage.This can be particularly deadly in multi-player games.
Use gems wisely and efficiently (see p. 97 for more on gems), and be aware ofthe benefits of combinations (see p. 102),particularly for heavy magic users.
Magic Item Design
primagames.com 87

Prima’s Official Strategy Guide
88 primagames.com
Component ChartComponent Element Bonus Size Affects PageBlood of Buddha Fire Fire Resistance +25% 1x1 Armor 92Blue Soul Shard Water Health Points +5 1x1 Armor 95Buddha’s Tear Water Water Resistance +25% 1x1 Armor 95Cho-gokin Ore Lightning Armor Class +10 2x2 Armor 93Coral Fire Fire Damage 1-3 2x2 Weapons 92
Water Damage 1-3Debu Blubber Earth Durability +5 2x2 Weapons 90
Strength +5Health Leech 5%Knockback chance 10%
Dragon Parts Earth Normal Damage +10 2x3 Bows 90Earth Damage 5-10Lightning Damage 5-10
Elder Kappa Shell Water Armor Class +10 2x3 Armor 95Durability +10Fire Resistance +5%Water Resistance +10%Lightning Resistance -10%
Forest Oni Horn Lightning Lightning Damage 2-5 2x1 Weapons 93Forest Oni Ichor Earth Fire Resistance +5% 2x2 Armor 90
Earth Resistance +5%Gaki Bones Lightning Armor Class +3 1x1 Armor 94
Durability +2Ghost Armor Plates Lightning Armor Class +15 2x3 Armor 94
Durability +5Gold Soul Shard Earth Extra Gold +15% 1x1 Armor 90Green Soul Shard Earth Earth Damage 1-3 1x1 Weapons 90Guardian Dragon Head Fire Fire Damage 2-5 2x2 Weapons 92
Lightning Damage 2-5Guardian Dragon Skin Lightning Damage Reflection 5% 2x2 Armor 94
IndestructibilityGuardian Dragon Wing Earth Fire Resistance +10% 2x2 Armor 90
Water Resistance -5%Lightning Resistance +10%
Hairpin Water Health Leech 5% 1x2 Weapons 95Hemp Earth Indestructibility 1x2 Armor 90
WeaponsJade Earth Damage Reflection +3% 1x2 Armor 91Kappa Blood Fire Strength +5 2x2 Armor 92
Vitality +5 WeaponsKappa Claw Water Strength +5 1x3 Weapons 95
Knockback chance +5%Magma Sphere Fire Fire Damage 1-10 1x1 Weapons 93
Earth Damage 1-10Oni Bones Earth Durability +5 1x2 Armor 91
Vitality +5 Weapons

Component Chart
primagames.com 89
Component Element Bonus Size Affects PageOni Claw Earth Strength +5 2x1 Weapons 91
Earth Damage 1-5Oni Fangs Water Health Leech 5% 1x2 Weapons 95Patience of Buddha Earth Earth Resistance +25% 1x1 Armor 91Pearl Water Freeze chance +8% 2x2 Weapons 96Purple Kappa Egg Earth Knockback chance +50% 2x2 Weapons 91Purple Soul Shard Lightning Weapon Skill +5 1x1 Weapons 94Red Kappa Egg Water Freeze chance 50% 2x2 Weapons 96Red Soul Shard Fire Ki Points +5 1x1 Armor 93Scorpion Dragon Stinger Earth Poison Damage 1 1x2 Weapons 91Soul of Buddha Lightning Lightning Resistance +25% 1x1 Armor 94Spear Shaft Lightning No effect 2x3 Polearms 94Spearhead Fire No effect 2x3 Polearms 93Spider Witch Cobwebs Lightning Durability +3 1x2 Armor 94
Damage Reflection 5%Stone Bamboo Earth Indestructibility 1x3 Armor 91
WeaponsSuigetsu’s Shell Water Strength +25 2x3 Armor 96
Vitality +10Knockback chance +10%Water Resistance +15%
Tear of Buddha Water Water Resistance +25% 1x1 Armor 96Tengu Feathers Lightning Dexterity +5 1x2 Armor 94
WeaponsTessa-iki’s Teeth Earth Indestructibility 2x2 Weapons 92Tsuba Earth Health Leech 5% 1x1 Swords 92
Damage Reflection +25%Winged Serpent Scales Fire Fire Resistance +10% 1x2 Armor 93
Water Resistance +10%Earth Resistance +10%Lightning Resistance +10%
Yama-inu Blood Fire Ki +5 2x2 Weapons 93Ki Leech 5% Armor
Yama-inu Pelt Water Armor Class +5 2x2 Armor 96Water Resistance +5%Earth Resistance +5%

Prima’s Official Strategy Guide
90 primagames.com
EarthComponents
Debu BlubberAny Debu can produce Debu Blubber.Size 2 x 2Affects WeaponMagic Value 12Knockback (chance, force) 10%, 2 Strength Bonus +5Durability Bonus +5Health Leech +5%Possible Prefixes Confusion (1)
Knockout (2)Containment (3+)
Possible Suffixes of Konran (1)of Atemi (2)
of Fusegi (3+)
Dragon Parts (Q)In the Tokugawa Archer quest, Gero-mon produces Dragon Parts. Don’twaste these on an inferior bow, savethem until you can put them in a qualityGo-Shinpo-Yumi.Size 2 x 3Affects BowMagic Value 20Damage Bonus 10Earth Damage 5 – 10Lightning Damage 5 – 10
Forest Oni IchorSize 2 x 2Affects ArmorMagic Value 8Earth Resistance +5%Fire Resistance +5%Possible Prefixes Asp (1)
Viper (2)Tsuchinoko (3+)
Possible Suffixes of the Habu (1)of the Mamushi (2)
of the Tsuchinoko (3+)
Gold Soul ShardSize 1 x 1Affects Armor
WeaponMagic Value 1Gold Bonus +15%Possible Prefixes Hotei (1-3)
Daikoku (4-6)Benten (7+)
Possible Suffixes of Hotei (1-3)of Daikoku (4-6)
of Benten (7+)
Green Soul ShardSize 1 x 1Affects WeaponMagic Value 1Earth Damage 1 – 3Possible Prefixes Volcano (1-3)
Stone Spirit (4-6)Ookuniniushi (7+)
Possible Suffixes of the Kazan (1-3)of the Ganseki (4-6)of Ookuniniushi (7+)
Guardian Dragon WingSize 2 x 2Affects ArmorMagic Value 8Fire Resistance +10%Lightning Resistance +10%Water Resistance -5%Possible Prefixes Sage (1)
Buddha (2)Kannon (3+)
Possible Suffixes of the Sennin (1)of Hotoke (2)
of Kannon (3+)
Hemp (U)This is the only unique item in the gamethat’s always available in every game;you just have to look in the right place(see p. 195, if you want to know).Size 1 x 2Affects Armor
WeaponMagic Value 18
IndestructiblePossible Prefix Indestructible (1+)Possible Suffix of Katabira (1+)

Earth Components
primagames.com 91
JadeSize 1 x 2Affects ArmorMagic Value 3Damage Reflection +3%Possible Prefixes Yamma (1-2)
Orochi (3-4)Yammabushi (5+)
Possible Suffixes San (1-2)of Orochi (3-4)
of Yammabushi (5+)
Oni BonesSize 1 x 2Affects Armor
WeaponMagic Value 6Durability Bonus +5Vitality Bonus +5Possible Prefixes Ta-ke (1-11)
Sakura (12-22)Matsu (23+)
Possible Suffixes of the Ta-ke (1-11)of the Sakura (12-22)
of the Matsu (23+)
Oni ClawSize 2 x 1Affects WeaponMagic Value 6Strength Bonus +5Earth Damage 1 – 5Possible Prefixes Tiger (1-5)
Dragon (6-10)Demon (11+)
Possible Suffixes of the Tora (1-5)of the Ryu (6-10)of the Oni (11+)
Patience of Buddha (Q)Size 1 x 1Affects ArmorMagic Value 20Earth Resistance +25%Possible Prefix Blessed (1+)Possible Suffix of Buddha (1+)
Purple Kappa Egg (Q)Size 2 x 2Affects WeaponMagic Value 24Knockback (chance, force) +50%, 5Possible Prefixes Suigetsu (1)
Suizan (2+)Possible Suffixes of Suigetsu (1)
of Suizan (2+)
Scorpion Dragon StingerSize 1 x 2Affects WeaponMagic Value 8Poison Damage 1Possible Prefixes Spider (1-2)
Centipede (3-4)Scorpion (5+)
Possible Suffixes of the Kumo (1-2)of the Mukade (3-4)
of the Sasori (5+)
Stone Bamboo (Q)In the Oda Swordsman quest, the bam-boo “chest” contains Stone Bamboo.Size 1 x 3Affects Armor
WeaponMagic Value 18
IndestructiblePossible Prefixes Tiger (1-5)
Dragon (6-10)Demon (11+)
Possible Suffixes of the Tora (1-5)of the Ryu (6-10)of the Oni (11+)

Prima’s Official Strategy Guide
92 primagames.com
Tessa-iki’s Teeth (Q)Tessa-iki produces Tessa-iki’s Teeth inthe Toyotomi Berserker quest.Size 2 x 2Affects WeaponMagic Value 18
IndestructiblePossible Prefixes Tiger (1-5)
Dragon (6-10)Demon (11+)
Possible Suffixes of the Tora (1-5)of the Ryu (6-10)of the Oni (11+)
Tsuba (Q)Tsuba is collected on the MoriBerserker quest.Size 1 x 1Affects SwordMagic Value 10Damage Reflection +25%Health Leech +5%
FireComponents
Blood of Buddha (Q)Size 1 x 1Affects ArmorMagic Value 20Fire Resistance +25%Possible Prefix Blessed (1+)Possible Suffix of Buddha (1+)
CoralSize 2 x 2Affects WeaponMagic Value 8Fire Damage 1 – 3Water Damage 1 – 3Possible Prefixes Blaze (1-3)
Phoenix (4-6)Amaterasu (7+)
Possible Suffixes of the Honou (1-3)of the Houtou (4-6)of Amaterasu (7+)
Guardian Dragon HeadSize 2 x 2Affects WeaponMagic Value 12Fire Damage 2 – 5Lightning Damage 2 – 5Possible Prefixes Inferno (1)
Fire Serpent (2)Himiko (3+)
Possible Suffixes of the Saiga (1)of the Enjya (2)
of Himiko (3+)
Kappa BloodSize 2 x 2Affects Armor
WeaponMagic Value 8Strength Bonus +5Vitality Bonus +5Possible Prefixes Red (1)
Otokodate (2)Kachikachi-yamma (3+)
Possible Suffixes of Blood (1)of the Otokodate (2)
of Kachikachi-yamma (3+)

Fire & Lightning Components
primagames.com 93
Magma Sphere (Q)The Magma Sphere is obtained only whenyou kill the Dark Warlord. Consequently,it’s pretty much impossible to find it andput it to use in a single-player game. It’sreally designed for multiplayer use.Size 1 x 1Affects WeaponMagic Value 24Fire Damage 1 – 10Earth Damage 1 – 10Possible Prefixes Fire Storm (1)
Inferno (2)Meteor (3+)
Possible Suffixes of the Hannya (1)of the Tsuina (2)of Sarugaku (3+)
Red Soul ShardSize 1 x 1Affects ArmorMagic Value 1Ki Bonus +5Possible Prefixes Eclipse (1-3)
Comet (4-6)Constellation (7+)
Possible Suffixes of the Gesshoku (1-3)of the Suisei (4-6)
of the Seiza (7+)
Spearhead (Q) (U)Size 2 x 3Affects PolearmMagic Value 12The pieces that make up the Spear ofBishamon are found in the TokugawaBrick quest.
Winged Serpent ScalesSize 1 x 2Affects ArmorMagic Value 12Lightning Resistance +10%Water Resistance +10%Fire Resistance +10%Earth Resistance +10%Possible Prefixes Inferno (1)
Fire Serpent (2)Himiko (3+)
Possible Suffixes of the Saiga (1)of the Enjya (2)
of Himiko (3+)
Yama-inu BloodSize 2 x 2Affects Armor
WeaponMagic Value 10Ki Bonus +5Ki Leech +5%Possible Prefixes Soul Drinker (1)
Supernatural (2)Mononoke (3+)
Possible Suffixes of the Kyukonki (1)of the Youki (2)
of the Mononoke (3+)
LightningComponents
Cho-gokin OreSize 2 x 2Affects ArmorMagic Value 8Armor Class Bonus +10Possible Prefixes Masterpiece (1-3)
Handa (4-6)Gennai (7+)
Possible Suffixes of the Meisaku (1-3)of Handa (4-6)of Gennai (7+)
Forest Oni HornSize 2 x 1Affects WeaponMagic Value 6Lightning Damage 2 – 5Possible Prefixes Yukimitsu (1-2)
Kuniyoshi (3-4)Murasame (5+)
Possible Suffixes of Yukimitsu (1-2)of Kuniyoshi (3-4)of Murasame (5+)

Prima’s Official Strategy Guide
94
Gaki BonesSize 1 x 1Affects ArmorMagic Value 2Armor Class Bonus +3Durability Bonus +2Possible Prefixes Lightning (1-4)
Thunderclap (5+)Possible Suffixes of the Ikazuchi (1-4)
of the Raimei (5+)
Ghost Armor PlatesThese powerful components areextremely rare. Don’t hold your breath. Size 2 x 3Affects ArmorMagic Value 12Armor Class Bonus +15Durability Bonus +5Possible Prefixes Ultimate (1)
Immortal (2)Invincible (3)
Possible Suffixes of the Saikyo (1)of the Fujimi (2)
of the Muteki (3)
Guardian Dragon SkinSize 2 x 2Affects ArmorMagic Value 20Damage Reflection +5%IndestructiblePossible Prefixes Copper (1)
Platinum (2)Gold (3+)
Possible Suffixes of the Dou (1)of the Ghin (2)of the Kin (3+)
Purple Soul ShardSize 1 x 1Affects WeaponMagic Value 1Skill Point Bonus +5%Possible Prefixes Quick Strike (1-3)
Death Strike (4-6)Unyou (7+)
Possible Suffixes of Hayawaza (1-3)of Hitsatsuwaza (4-6)
of Unyou (7+)
Soul of Buddha (Q)Size 1 x 1Affects ArmorMagic Value 20Lightning Resistance +25%Possible Prefix Blessed (1+)Possible Suffix of Buddha (1+)
Spear Shaft (Q) (U)Size 2 x 3Affects PolearmMagic Value 12The pieces that make up the Spear ofBishamon are found in the TokugawaBrick quest.
Spider Witch CobwebsSize 1 x 2Affects ArmorMagic Value 8Durability Bonus +3Damage Reflection +5%Possible Prefixes Tensai (1-2)
Shikome (3-4)Tsuchigumo (5+)
Possible Suffixes of the Tensai (1-2)of the Shikome (3-4)of Tsuchigumo (5+)
Tengu FeathersSize 1 x 2Affects Armor, WeaponMagic Value 6Dexterity Bonus +5Possible Prefixes Dragonfly (1-2)
Falcon (3-4)Tengu (5+)
Possible Suffixes of the Tombo (1-2)of the Hayabusa (3-4)
of the Tengu (5+)primagames.com

Lightning & Water Components
primagames.com 95
WaterComponents
Blue Soul ShardSize 1 x 1Affects ArmorMagic Value 1Hit Point Bonus +5Possible Prefixes Boar (1-3)
Wolf (4-6)Bear (7+)
Possible Suffixes of the Inoshishi (1-3)of the Ookami (4-6)
of the Kuma (7+)
Buddha’s Tear (Q)Size 1 x 1Affects ArmorMagic Value 16Water Resistance +25%Buddha’s Tear is obtained from theToyotomi Wizard quest. It is functionallyidentical to the Tear of Buddha (p. 96),which is obtained from the sorcerer inthe fourth citadel.
Elder Kappa ShellAlthough they’re the most powerfulcommonly available armor enhance-ments in the game, beware of the vul-nerability to Lightning attacks they con-vey. Try not to use more than one percharacter, or less in Multiplayer (seeThe Lightning Trap, p.52).Size 2 x 3Affects ArmorMagic Value 16Armor Class Bonus +10Durability Bonus +10Water Resistance +10%Fire Resistance +5%Lightning Resistance -10%Possible Prefixes Shark (1)
Orca (2)Whale (3+)
Possible Suffixes of the Wani (1)of the Shachi (2)of the Kujira (3+)
HairpinSize 1 x 2Affects WeaponMagic Value 6Health Leech +5%Possible Prefixes Spider (1-2)
Centipede (3-4)Scorpion (5+)
Possible Suffixes of the Kumo (1-2)of the Mukade (3-4)
of the Sasori (5+)
Kappa ClawSize 1 x 3Affects WeaponMagic Value 8Strength Bonus +5Knockback (chance, force) +5%, 1Possible Prefixes Yasha (1-2)
Shoki (3-4)Jinmen (5+)
Possible Suffixes of Yasha (1-2)of Shoki (3-4)
of Jinmen (5+)
Oni FangsSize 1 x 2Affects WeaponMagic Value 6Health Leech +5%Possible Prefixes Blood Drinker (1-5)
Revival (6-11)Regeneration (12+)
Possible Suffixes of the Kyuketsuki (1-5)of Kaifuku (6-11)
of Kyusei (12+)

Prima’s Official Strategy Guide
96 primagames.com
PearlSize 2 x 2Affects WeaponMagic Value 8Stun (chance, duration) +8%, 1 secPossible Prefixes Storm (1-3)
Tsunami (4-6)Susano-o (7+)
Possible Suffixes of the Arashi (1-3)of the Tsunami (4-6)
of Susano-o (7+)
Red Kappa Egg (Q)Size 2 x 2Affects WeaponMagic Value 24Stun (chance, duration) +50%, 5 sec.Possible Prefixes Suigetsu (1)
Suizan (2+)Possible Suffixes of Suigetsu (1)
of Suizan (2+)
Suigetsu’s Shell (Q)Suigetsu’s kappa shell is taken in theOda Ninja quest.Size 2 x 3Affects ArmorMagic Value 24Water Resistance +15%Strength Bonus +25Vitality Bonus +10Knockback (chance, force) +10%, 2Possible Prefixes Snow (1-2)
Blizzard (3)Glacier (4+)
Possible Suffixes of Yuki (1-2)of the Fubuki (3)
of the Hyoga (4+)
Tear of Buddha (Q)Size 1 x 1Affects ArmorMagic Value 20Water Resistance +25%Possible Prefix Blessed (1+)Possible Suffix of Buddha (1+)
Yama-inu PeltSize 2 x 2Affects ArmorMagic Value 8Armor Class Bonus +5Earth Resistance +5%Water Resistance +5%Possible Prefixes Snow (1)
Blizzard (2)Glacier (3+)
Possible Suffixes of Yuki (1)of the Fubuki (2)
of the Hyoga (3+)

Gems
primagames.com 97
GemsGems double the powersof any components of theindicated type, as long asthe components and thegem(s) are put on the itemat the same time. You can’tretroactively double anitems power by shoving aKenjya stone in its onlyfour remaining slots.
Gems are an extremelypowerful tool for increas-ing the power of a magicitem, but they can alsopowerfully increase thecost of customizing theitem. Don’t try to fill upmost of a 32-slot suit ofarmor with the most pow-erful components you canafford, and then toss in acouple gems to quadrupleeverything. Sadly, youwon’t be able to afford it.Instead, use gems selec-tively to multiply the mostimportant abilities on anitem.
Cinnabar Kenjya StoneSize 2 x 2Affects Fire
WaterMagic Value 1
Gold Kenjya StoneSize 2 x 2Affects Earth
FireLightning
WaterMagic Value 1
Sapphire Kenjya StoneSize 2 x 2Affects Lightning
WaterMagic Value 1
Silver Kenjya StoneSize 2 x 2Affects Earth
LightningMagic Value 1
Steel Kenjya StoneSize 2 x 2Affects Earth
FireWater
Magic Value 1
Sulfurous Kenjya StoneSize 2 x 2Affects Fire
EarthMagic Value 1
Mercury GlobSize 1 x 2Affects LightningMagic Value 1
QuartzSize 1 x 2Affects WaterMagic Value 1
Silver IngotSize 1 x 2Affects EarthMagic Value 1
SulfurSize 2 x 2Affects FireMagic Value 1

Prima’s Official Strategy Guide
98 primagames.com
Component PrefixesAmaterasu (3+) Fire Combination Fire 102
Amaterasu (7+) Coral Fire 92
Asp (1) Forest Oni Ichor Earth 90
Bear (7+) Blue Soul Shard Water 95
Benten (7+) Gold Soul Shard Earth 90
Blaze (1-3) Coral Fire 92
Blessed (1+) Blood of Buddha Fire 92
Blessed (1+) Patience of Buddha Earth 91
Blessed (1+) Soul of Buddha Lightning 94
Blessed (1+) Tear of Buddha Water 96
Blizzard (2) Yama-inu Pelt Water 96
Blizzard (3) Suigetsu’s Shell Water 96
Blood Drinker (1-5) Oni Fangs Water 95
Boar (1-3) Blue Soul Shard Water 95
Buddha (2) Guardian Earth 90Dragon Wing
Centipede (3-4) Hairpin Water 95
Centipede (3-4) Scorpion Earth 91Dragon Stinger
Comet (4-6) Red Soul Shard Fire 93
Confusion (1) Debu Blubber Earth 90
Constellation (7+) Red Soul Shard Fire 93
Containment (3+) Debu Blubber Earth 90
Copper (1) Guardian Lightning 94Dragon Skin
Daikoku (4-6) Gold Soul Shard Earth 90
Death Strike (4-6) Purple Soul Shard Lightning 94
Deidarabotchi (2) Earth Combination Earth 102
Demon (11+) Oni Claw Earth 91
Demon (11+) Stone Bamboo Earth 91
Demon (11+) Tessa-iki’s Teeth Earth 92
Dragon (6-10) Oni Claw Earth 91
Dragon (6-10) Stone Bamboo Earth 91
Dragon (6-10) Tessa-iki’s Teeth Earth 92
Dragon God (1) Lightning Lightning 102Combination
Dragonfly (1-2) Tengu Feathers Lightning 94
Eclipse (1-3) Red Soul Shard Fire 93
Enma (2) Fire Combination Fire 102
Falcon (3-4) Tengu Feathers Lightning 94
Fire Serpent (2) Guardian Fire 92Dragon Head
Fire Serpent (2) Winged Fire 93Serpent Scales
Fire Storm (1) Magma Sphere Fire 93
Gennai (7+) Cho-gokin Ore Lightning 93
Glacier (3+) Yama-inu Pelt Water 96
Glacier (4+) Suigetsu’s Shell Water 96
Gold (3+) Guardian Lightning 94Dragon Skin
Handa (4-6) Cho-gokin Ore Lightning 93
Himiko (3+) Guardian Fire 92Dragon Head
Himiko (3+) Winged Fire 93Serpent Scales
Hotei (1-3) Gold Soul Shard Earth 90
Immortal (2) Ghost Armor Plates Lightning 94
Indestructible (1+) Hemp Earth 90
Inferno (1) Guardian Fire 92Dragon Head
Inferno (1) Winged Fire 93Serpent Scales
Inferno (2) Magma Sphere Fire 93
Invincible (3) Ghost Armor Plates Lightning 94
Jinmen (5+) Kappa Claw Water 95
Kachikachiyamma (3+) Kappa Blood Fire 92
Kannon (3+) Guardian Earth 90Dragon Wing
Kappa (1+) Kappa Combination Water 102
Knockout (2) Debu Blubber Earth 90
Kuniyoshi (3-4) Forest Oni Horn Lightning 93
Lightning (1-4) Gaki Bones Lightning 94
Lightning God (2) Lightning Lightning 102Combination
Masterpiece (1-3) Cho-gokin Ore Lightning 93
Matsu (23+) Oni Bones Earth 91

Component Prefixes
primagames.com 99
Meteor (3+) Magma Sphere Fire 93
Mononoke (3+) Yama-inu Blood Fire 93
Mountain God (1) Earth Combination Earth 102
Murasame (5+) Forest Oni Horn Lightning 93
Okuninushi (3+) Earth Combination Earth 102
Ookuniniushi (7+) Green Soul Shard Earth 90
Orca (2) Elder Kappa Shell Water 95
Orochi (3-4) Jade Earth 91
Otokodate (2) Kappa Blood Fire 92
Phoenix (4-6) Coral Fire 92
Platinum (2) Guardian Lightning 94Dragon Skin
Quick Strike (1-3) Purple Soul Shard Lightning 94
Raiden (3+) Lightning Lightning 102Combination
Red (1) Kappa Blood Fire 92
Regeneration (12+) Oni Fangs Water 95
Revival (6-11) Oni Fangs Water 95
Sage (1) Guardian Earth 90Dragon Wing
Sakura (12-22) Oni Bones Earth 91
Scorpion (5+) Hairpin Water 95
Scorpion (5+) Scorpion Earth 91Dragon Stinger
Shark (1) Elder Kappa Shell Water 95
Shikome (3-4) Spider Witch Lightning 94Cobwebs
Shoki (3-4) Kappa Claw Water 95
Snow (1) Yama-inu Pelt Water 96
Snow (1-2) Suigetsu’s Shell Water 96
Soul Drinker (1) Yama-inu Blood Fire 93
Spider (1-2) Hairpin Water 95
Spider (1-2) Scorpion Earth 91Dragon Stinger
Stone Spirit (4-6) Green Soul Shard Earth 90
Storm (1-3) Pearl Water 96
Suigetsu (1) Purple Kappa Egg Earth 91
Suigetsu (1) Red Kappa Egg Water 96
Suizan (2+) Purple Kappa Egg Earth 91
Suizan (2+) Red Kappa Egg Water 96
Sun (1) Fire Combination Fire 102
Supernatural (2) Yama-inu Blood Fire 93
Susano (3+) Water Water 102Combination
Susano-o (7+) Pearl Water 96
Ta-ke (1-11) Oni Bones Earth 91
Tengu (5+) Tengu Feathers Lightning 94
Tensai (1-2) Spider Witch Lightning 94Cobwebs
Thunderclap (5+) Gaki Bones Lightning 94
Tiger (1-5) Oni Claw Earth 91
Tiger (1-5) Stone Bamboo Earth 91
Tiger (1-5) Tessa-iki’s Teeth Earth 92
Tsuchigumo (5+) Spider Witch Lightning 94Cobwebs
Tsuchinoko (3+) Forest Oni Ichor Earth 90
Tsunami (4-6) Pearl Water 96
Ultimate (1) Ghost Lightning 94Armor Plates
Unyou (7+) Purple Soul Shard Lightning 94
Viper (2) Forest Oni Ichor Earth 90
Volcano (1-3) Green Soul Shard Earth 90
Water God (2) Water Combination Water 102
Water Spirit (1) Water Combination Water 102
Whale (3+) Elder Kappa Shell Water 95
Wolf (4-6) Blue Soul Shard Water 95
Yamma (1-2) Jade Earth 91
Yammabushi (5+) Jade Earth 91
Yasha (1-2) Kappa Claw Water 95
Yukimitsu (1-2) Forest Oni Horn Lightning 93

Prima’s Official Strategy Guide
100 primagames.com
Component Suffixesof Amaterasu (7+) Coral Fire 92
of the Amaterasu (3+) Fire Combination Fire 102
of the Arashi (1-3) Pearl Water 96
of Atemi (2) Debu Blubber Earth 90
of Benten (7+) Gold Soul Shard Earth 90
of Bishamon (1+) Spear of Bishamon Water 73
of Blood (1) Kappa Blood Fire 92
of Buddha (1+) Blood of Buddha Fire 92
of Buddha (1+) Patience of Buddha Earth 91
of Buddha (1+) Soul of Buddha Lightning 94
of Buddha (1+) Tear of Buddha Water 96
of Daikoku (4-6) Gold Soul Shard Earth 90
of Deidarabotchi (2) Earth Combination Earth 102
of the Dou (1) Guardian Lightning 94Dragon Skin
of the Enjya (2) Guardian Fire 92Dragon Head
of the Enjya (2) Winged Serpent Fire 93Scales
of Enma (2) Fire Combination Fire 102
of the Fubuki (2) Yama-inu Pelt Water 96
of the Fubuki (3) Suigetsu’s Shell Water 96
of the Fujimi (2) Ghost Armor Plates Lightning 94
of Fusegi (3+) Debu Blubber Earth 90
of the Ganseki (4-6) Green Soul Shard Earth 90
of Gennai (7+) Cho-gokin Ore Lightning 93
of the Gesshoku (1-3) Red Soul Shard Fire 93
of the Ghin (2) Guardian Lightning 94Dragon Skin
of the Habu (1) Forest Oni Ichor Earth 90
of Handa (4-6) Cho-gokin Ore Lightning 93
of the Hannya (1) Magma Sphere Fire 93
of the Hayabusa (3-4) Tengu Feathers Lightning 94
of Hayawaza (1-3) Purple Soul Shard Lightning 94
of Himiko (3+) Guardian Fire 92Dragon Head
of Himiko (3+) Winged Serpent Fire 93Scales
of Hitsatsuwaza (4-6) Purple Soul Shard Lightning 94
of Hotei (1-3) Gold Soul Shard Earth 90
of the Honou (1-3) Coral Fire 92
of Hotoke (2) Guardian Earth 90Dragon Wing
of the Houtou (4-6) Coral Fire 92
of the Hyoga (3+) Yama-inu Pelt Water 96
of the Hyoga (4+) Suigetsu’s Shell Water 96
of the Ikazuchi (1-4) Gaki Bones Lightning 94
of the Inoshishi (1-3) Blue Soul Shard Water 95
of Jinmen (5+) Kappa Claw Water 95
of Kachikachiyamma (3+) Kappa Blood Fire 92
of Kaifuku (6-11) Oni Fangs Water 95
of Kannon (3+) Guardian Earth 90Dragon Wing
of the Kappa (1+) Kappa Combination Water 102
of Katabira (1+) Hemp Earth 90
of the Kazan (1-3) Green Soul Shard Earth 90
of the Kin (3+) Guardian Lightning 94Dragon Skin
of Konran (1) Debu Blubber Earth 90
of the Kujira (3+) Elder Kappa Shell Water 95
of the Kuma (7+) Blue Soul Shard Water 95
of the Kumo (1-2) Hairpin Water 95
of the Kumo (1-2) Scorpion Earth 91Dragon Stinger
of Kuniyoshi (3-4) Forest Oni Horn Lightning 93
of the Kyuketsuki (1-5) Oni Fangs Water 95
of the Kyukonki (1) Yama-inu Blood Fire 93
of Kyusei (12+) Oni Fangs Water 95
of the Mamushi (2) Forest Oni Ichor Earth 90
of the Matsu (23+) Oni Bones Earth 91
of the Meisaku (1-3) Cho-gokin Ore Lightning 93
of the Mononoke (3+) Yama-inu Blood Fire 93
of the Mukade (3-4) Hairpin Water 95
of the Mukade (3-4) Scorpion Earth 91Dragon Stinger

Component Suffixes
primagames.com 101
of Murasame (5+) Forest Oni Horn Lightning 93
of the Muteki (3) Ghost Armor Plates Lightning 94
of Okuninushi (3+) Earth Combination Earth 102
of the Oni (11+) Oni Claw Earth 91
of the Oni (11+) Stone Bamboo Earth 91
of the Oni (11+) Tessa-iki’s Teeth Earth 92
of the Ookami (4-6) Blue Soul Shard Water 95
of Ookuniniushi (7+) Green Soul Shard Earth 90
of Orochi (3-4) Jade Earth 91
of the Otokodate (2) Kappa Blood Fire 92
of Raiden (3+) Lightning Lightning 102Combination
of the Raijin (2) Lightning Lightning 102Combination
of the Raimei (5+) Gaki Bones Lightning 94
of the Ryu (6-10) Oni Claw Earth 91
of the Ryu (6-10) Stone Bamboo Earth 91
of the Ryu (6-10) Tessa-iki’s Teeth Earth 92
of the Ryujin (1) Lightning Lightning 102Combination
of the Saiga (1) Guardian Fire 92Dragon Head
of the Saiga (1) Winged Serpent Fire 93Scales
of the Saikyo (1) Ghost Armor Plates Lightning 94
of the Sakura (12-22) Oni Bones Earth 91
San (1-2) Jade Earth 91
of Sarugaku (3+) Magma Sphere Fire 93
of the Sasori (5+) Hairpin Water 95
of the Sasori (5+) Scorpion Earth 91Dragon Stinger
of the Seirei (1) Water Combination Water 102
of the Seiza (7) Red Soul Shard Fire 93
of the Sennin (1) Guardian Earth 90Dragon Wing
of the Shachi (2) Elder Kappa Shell Water 95
of the Shikome (3-4) Spider Witch Lightning 94Cobwebs
of Shoki (3-4) Kappa Claw Water 95
of Suigetsu (1) Purple Kappa Egg Earth 91
of Suigetsu (1) Red Kappa Egg Water 96
of the Suijin (2) Water Combination Water 102
of the Suisei (4-6) Red Soul Shard Fire 93
of Suizan (2+) Purple Kappa Egg Earth 91
of Suizan (2+) Red Kappa Egg Water 96
of Susano (3+) Water Combination Water 102
of Susano-o (7+) Pearl Water 96
of the Taiyo (1) Fire Combination Fire 102
of the Ta-ke (1-11) Oni Bones Earth 91
of the Tengu (5+) Tengu Feathers Lightning 94
of the Tensai (1-2) Spider Witch Lightning 94Cobwebs
of the Tombo (1-2) Tengu Feathers Lightning 94
of the Tora (1-5) Oni Claw Earth 91
of the Tora (1-5) Stone Bamboo Earth 91
of the Tora (1-5) Tessa-iki’s Teeth Earth 92
of Tsuchigumo (5+) Spider Witch Lightning 94Cobwebs
of the Tsuchinoko (3+) Forest Oni Ichor Earth 90
of the Tsuina (2) Magma Sphere Fire 93
of the Tsunami (4-6) Pearl Water 96
of Unyou (7+) Purple Soul Shard Lightning 94
of the Wani (1) Elder Kappa Shell Water 95
of the Yamanokami (1) Earth Combination Earth 102
of Yammabushi (5+) Jade Earth 91
of Yasha (1-2) Kappa Claw Water 95
of the Youki (2) Yama-inu Blood Fire 93
of Yuki (1) Yama-inu Pelt Water 96
of Yuki (1-2) Suigetsu’s Shell Water 96
of Yukimitsu (1-2) Forest Oni Horn Lightning 93

CombinationsCombinations are special bonuses you getwhen a single Samurai is using a specificset of components all at the same time.The components don’t have to be in a single weapon or other item, they just allhave to be in active use by the Samurai atthe same time.
The following Combinations are in effectas of the game’s initial release. More maybecome available in future patches andadd-ons from Click.
Earth CombinationRequired Components Jade
Debu BlubberOni Claw
Magic Value 8Earth Spell Level Bonus 1Possible Prefixes Mountain God (1)
Deidarabotchi (2)Okuninushi (3+)
Possible Suffixes of the Yamanokami (1)of Deidarabotchi (2)
of Okuninushi (3+)
Fire CombinationRequired Components Coral
Kappa BloodYama-inu Blood
Magic Value 8Fire Spell Level Bonus 1Possible Prefixes Sun (1)
Enma (2)Amaterasu (3+)
Possible Suffixes of the Taiyo (1)of Enma (2)
of the Amaterasu (3+)
Lightning CombinationRequired Components Cho-gokin Ore
Tengu FeathersSpider Witch Cobwebs
Magic Value 8Lightning Spell Level Bonus 1Possible Prefixes Dragon God (1)
Lightning God (2)Raiden (3+)
Possible Suffixes of the Ryujin (1)of the Raijin (2)
of Raiden (3+)
Water CombinationRequired Components Pearl
Kappa ClawOni Fangs
Magic Value 8Water Spell Level Bonus 1Possible Prefixes Water Spirit (1)
Water God (2)Susano (3+)
Possible Suffixes of the Seirei (1)of the Suijin (2)of Susano (3+)
Kappa CombinationA Water CombinationRequired Components Kappa Blood
Kappa ClawElder Kappa Shell
Magic Value 8Knockback (chance, force) +25%, 3Freeze (chance, duration) 25%, 3 sec.Possible Prefix Kappa (1+)Possible Suffix of the Kappa (1+)
Prima’s Official Strategy Guide
102 primagames.com

StagesAs you play through Throne of Darkness,things keep getting harder and harder.(Isn’t that always the way it is?) This bookdescribes the increasing difficulty with“stages.” Your first citadel and wildernessarea (regardless of which clan you chooseand where you begin play) are Stage 1.The second citadel and wilderness Stage2. The third and fourth citadels andwildernesses are Stage 3 and 4. The fourmountainsides are all Stage 5, and theDark Warlord’s citadel is Stage 6.
In general, the monsters you run into aredetermined by your current stage — youtend to meet Stage 1 monsters during thefirst stage, and so forth. For most mon-sters, there are six ever-stronger varieties,running from Stage 1 through Stage 6.Therefore, most of the monster descrip-tions in this chapter have six columns,one for each stage. If a monster doesn’tappear in a stage, that column will beblank. Some monsters only appear in asingle citadel or wilderness, but since anyof the citadels and wildernesses can beyour first stage, your decision on whereyou start determines how soon you runinto the monster and whether you meet itin its Stage 1, Stage 2, Stage 3 or Stage 4incarnation.
That’s also why the monsters with specificnames (mostly, the various leaders) havethe same names for Stages 1 – 4. There’sonly one leader with a given name, andhe’ll only be in one citadel or wildernessarea, but you might meet him at Stage 1,2, 3 or 4, and so this book lists stats for all4 stages.
Some monsters play specific roles in par-ticular quests, especially the personalquests. However, you only get three of thetwelve personal quests (determined by theclan you select) in any particular gameyou play. Monsters who are importantadversaries in a personal quest tend tostill live in the same area even when thatquest is not part of the game you’re cur-rently playing. For example, Gaiya-jiro (p. 125) plays an important role in theMori Berserker quest. However, Gaiya-jirois still in the game, still in the Oda wilder-ness, even if you’re playing some otherclan. However, his stats will be different,so when you meet him while you’re play-ing one of the other clans, use the statsthat match your current stage, not hisQuest stats.
When a monster doesn’t appear in one ofthe stages, that column is left blank.When the columns don’t correspond tothe six stages in the game, that differenceis usually marked. A number in parenthe-ses (for example, the (5)s and (6)s by theBake Yoroi leader names on page 109)indicate a stage as well. In this case, thereare Bake Yoroi leaders only in stages 5and 6. (In fact, there’s probably just oneBake Yoroi leader in each of these stages— having multiple leaders for a singlestage usually means that only one of theleaders is selected each time you play thegame, to make it more fun.)
primagames.com 103
MONSTERS

Other MonsterVariationsAssault Troops (*). Some monstersnever attack with spells, even if they’reavailable. They’d rather attack you direct-ly. Assault troops are marked with anasterisk (*). They tend to have bettertreasure, including higher odds of magicalarmor or weapons. Occasionally, anassault troop stat will vary from a regularmonster stat. In those cases, the assaulttroop stat is marked with another *, and isusually in parentheses.
Snipers (S). Some monsters (especiallyhumanoid monsters) include snipers.Snipers stay in one spot and continueattacking, regardless of what your Samuraido. Snipers tend to have lower Vitality andless loot than their fellow monsters.
A, B, C. There are three possible leaders formost types of monsters. When all threeleaders are similar, stats for all three are list-ed in one column. In those cases, any dif-ferences among them are labeled with “A”,“B” and “C”. (Most of the time these labelsindicate the different spells that each leadercan cast.) As might be expected, “A” refersto the leader listed first, “B” to the leaderlisted second, and (you guessed it), “C”refers to the leader listed third.
For example, in the Evil Female Ninjaleaders, Kage-Hime, Majo, and Otokugoroshi are all leader “A” (at variousstages), Reikoku and Makaze are allreferred to as leader “B”, while Ansatsujois leader “C”. If you look at the beginningof the lines that list the spells these lead-ers cast (near the bottom of their stats, onpage 117), you’ll see which spells thatleaders “A”, “B” and “C” can cast.
StatsMost of the stats are pretty clear.
Remember that you double the Vitalitynumber to get a monster’s hit points.
Mass relates to Knockback (see below).
Immobility Resistance describes howwell a monster resists your attempt tofreeze it. A monster with 70% ImmobilityResistance can still move at 70% speedeven when it’s hit by a freeze spell.
Might retreat if under … describeswhether the monster might try to run awayif sufficiently damaged. If it has fewer thanthe listed percentage of its hit pointsremaining, it has about a 50/50 chance oftrying to turn and run. For example, if thisnumber is 30%, the monster might try torun if it has less than 30% of its hit pointsremaining.
Melee/Ranged Chances describes howoften the monster attacks in melee asopposed to from a distance. A monsterwith Melee/Ranged Chances of 75% / 25%attacks 75% of the time in melee, and 25%of the time from a distance (usually with aspell).
Attack Chance (non-spell) lists thechance the monster will hit when itstrikes. A monster with an Attack Chanceof 85% will hit you 85% of the time. (Thisnumber doesn’t apply to spell-casting.)
Poison Damage lists how much poisondamage the monster can inflict with eachstrike. These numbers seem low until yourealize that the poison damage is inflictedevery second for ten seconds, or until aRemedy is applied. Once a poison has runits course, the damage is no different fromany other damage, and can be healed inthe same way as other damage.
Prima’s Official Strategy Guide
104 primagames.com

Knockback (chance, force) lists thechance that the monster will knock youbackwards if it hits you in melee, and theforce it can put behind that blow. Theforce of the monster’s knockback blow iscompared to its target’s mass to decidehow far back the target is driven. (If amonster has a mass of 1, that figure isn’tlisted in these stats; only the non-standardmasses are listed.)
Stun (chance, duration) lists the chancethat a monster will stun you into immobil-ity if it hits you, and how long that stunwill last (in seconds).
Spell Chance (if at range) / SpellChance (if in melee) describes how like-ly it is that the monster will cast a spellwhen at a distance or when in melee.Most monsters only cast spells when at adistance, and some only shoot an arrow ormake some other physical ranged attack.Only those who can both fire a weaponand cast a spell will have this stat.
Spell Names. If a monster can cast a spell,its possible spells are listed, along with thespell level at which it’ll cast the spell andthe percentage chance it will select thatspell instead of one of the others availableto it. If it only has one spell, no percentageis listed. (For example, the Bake Yoroileader Chou-riki has the spell “InfernoStrike (8;50%)”; the numbers mean that hecan cast it at spell level 8, and will pick it50% of the time when he’s casting a spell.The Bake Yoroi leader Dai-majin has thespell “Ice Spears (11)”; the number meansthat he can cast it at spell level 11. With noother spell listed, he’ll cast it every time hedecides to cast a spell.
LootIn Throne of Darkness, nearly every mon-ster gets at least one “draw” from the lootpile, but no monster will have more thantwo pieces of loot. (A few monsters haveno loot at all.) Let’s use the bake yoroi asour example. Note that the first line underBake Yoroi Loot (p. 108) is “First Item.”The next several lines indicate what abake yoroi’s first item might be. The firstthing to notice is that there’s a 5% chancethat the first item will be nothing. There’salso a 5% chance that it’s a mask, and a45% chance of either armor or a weapon.If it’s a weapon, there’s a 45% chance thatit’s a polearm, and a 55% chance that it’sa sword. (If there’s no number after anitem or type of item, it will always be theone selected, 100% of the time.)
But which mask, armor or sword? Thatdepends on the bake yoroi you just killed.Look toward the bottom of the bake yoroistats, just under the “Loot” heading. Thefirst line lists a Value for each type ofbake yoroi. For example, the Value for aGhost Armor (Stage 2) bake yoroi is 25 –40. If you kill a Ghost Armor bake yoroi,and the first item (determined randomly)is a mask, then check the Mask table onpage 56. Note the “Value” column at thefar right of the table — it runs from 0 to100. (Well, it starts with the Ayakashi’sValue of 9.1, but that means that theAyakashi mask covers the Value rangefrom 0 to 9.1. The next mask, the Akujo-Beshimi, covers the range from 9.2 to18.2, and so on.) Now, remember theGhost Armor’s Value of 25 – 40? Comparethat range to the Mask Values. Whenpicking which particular mask that aGhost Armor bake yoroi has, Throne ofDarkness picks a random number between
Monsters
primagames.com 105

25 and 40. If it’s between 25 and 27.3, theGhost Armor gets an O-beshimi. If it’sbetween 27.4 and 36.4, it gets a Han-nya.And if it’s between 36.5 and 40, it gets aKo-beshimi. (Note that in this case, theHan-nya is more likely than the other twomasks combined.)
Every time a monster has a randomamulet, mask, potion, weapon or piece ofarmor, the monster’s Value is used to nar-row down which items it might have, andthen one more random decision is madeto pick the particular item from that nar-rowed list. Components and any otherpossible loot don’t have a Value assignedto them; the monster’s loot list specificallylists any such items, rather than referringto another table.
Once the first item has been determined(even if it is nothing), there is the possibil-ity of a second item. Note that the BakeYoroi Loot line beginning with “SecondItem” ends with “(25% chance)”. Thatmeans that there’s a 25% chance that theGhost Armor you killed might have a sec-ond item. (However, there’s a 75% chancethat this second item is nothing.) If themonster has a second item, the sameseries of random selections is made todetermine what the item is. In addition, ifthe first item was “nothing” the monsteralways gets a shot at the second item list.
Gold Loot. When a monster has gold, theloot list tells you how much gold it mighthave. However, the listed range of gold ona list covers all related monsters who usethat list, and the most gold is reserved forthe toughest monsters. For example, theDead Foot Soldier Loot list (p. 113), givesa range of 1 – 350 for gold. However, thegold that a Stage 1 Dead Foot Soldiermight have falls at the very beginning of
this range — he will never have more than5 gold. It’s the Stage 6 monsters and theirleaders who tend to have the most gold.(Are you surprised?)
Also remember that the actual amount ofgold the monster yields will be modifiedby the gold bonus (if any) of the playerwho killed it. See p. 46.
Armor Loot. In general, if a piece ofarmor is picked, there is a 50% chancethat it is body armor, and a 1/6 chance(each) that it is head, arm or leg armor.(There are a few loot lists which specifyother odds for particular types of armor.)
Potion Loot. In general, if a potion ispicked, there is a 40% chance (each) thatit is a Health or Ki potion, and a 10%chance (each) that it is a Remedy orRestorative potion. (There are a few lootlists which specify other odds for particu-lar potions.) “Larger” means that its likeli-er one of the complete-fix potions will befound. “Smaller” means that a light potionis more likely.
Armor/Weapon is Magic? For somemonsters, if one of their items is a weaponor a piece of armor, that weapon or armormight be magic. This number gives thepercentage chance that a weapon or armoris magic.
Magic Slots Filled in A/W. If part of amonster’s loot is a weapon or armor, and ifit’s magic, it’ll have magic slots (unless itsunique; see the next paragraph). Some ofthose slots will already be filled — thisnumber describes how many of theweapon or armor’s slots already have amagic component (round down, minimumone slot filled).
Magic A/W is Unique? If it’s magic, itmight be unique; the list of Unique
Prima’s Official Strategy Guide
106 primagames.com

Weapons and Armor that you might findin this way is on page 83. The name ofeach unique weapon or piece of armor onthis list is followed by (U1), (U2) or (U3).Items marked with (U1) tend to be foundearlier in the game, and are weaker. Itemsmarked with (U3) tend to be found laterand are more powerful. When the gamedetermines that a monster has a uniqueweapon or piece of armor, the parentheti-cal “U” number narrows down the list ofpossible weapons or armor that it mighthave.
Magic A/W is Cursed? Yep, this is thechance that the magic weapon or armoryou just picked off a dead monster iscursed.
DefaultsGreat effort has been made to fill all theholes, but there might still be a few. Inmost cases, where a stat isn’t listed, thedefault applies — the number given forthe base Stage 1 monster. If that version ofthe monster also doesn’t have the statyou’re looking for, it falls back on the gen-eral monster defaults. They include:
Speed 16
Range 1
Mass 1
Might retreat if under 50%
Magic Slots Filled in A/W 32%
Magic A/W is Unique? 0%
Magic A/W is Cursed? 5%
Monsters
primagames.com 107

Prima’s Official Strategy Guide
108 primagames.com
Bake Yoroi
* Bake * Ghost * Spectre * Wraith * Demon * Hell Yoroi Armor˙ Armor Armor Armor Armor
StatsVitality 25 – 35 50 – 70 80 – 120 110 – 170 160 – 240 200 – 300Speed 16 16 17 17 17 17Range 5 5 5 5 5 5Fire Resistance 90%Water Resistance 80%Lightning Resistance 70% 100%Immobility Resistance 50% 100% 40% 80%Might retreat if under 30% 20% 20% 20% 20% 10%
AttackMelee/Ranged Chances 100% / 0% 100% / 0% 75% / 25% 75% / 25% 50% / 50% 50% / 50%Attack Chance (non-spell) 70% 75% 80% 85% 85% 90%
MeleeNormal Damage 10 – 25 15 – 35 20 – 40 25 – 50 25 – 50 35 – 60Poison Damage 1 1 – 2 2 – 3 3 3 – 4 4Knockback (chance, force) 75%, 2 80%, 3 80%, 3 85%, 4 100%, 4 100%, 5
RangedBall L. 5 W. Strike 5 F. Seeker 14 Lightning 11
LootValue 15 – 30 25 – 40 40 – 65 65 – 80 80 – 100 100Armor/Weapon is Magic? 2% (*10%) 2% (*25%) 5% (*20%) 5% (*25%) 30% (*10%) 5% (*40%)Magic Slots Filled in A/W 10% 10% 15% 25% 30% (*35%) 40% (*30%)Magic A/W is Cursed? 5% 15% 5% 10% 5% 5%
Bake Yoroi LootFirst Item
Nothing (5%)Mask (5%)Armor (45%)Weapon (45%)
Polearm (45%)Sword (55%)
Second Item (25% Chance)Nothing (75%)Component (25%)
Ghost Armor Plates (1%)Purple Soul Shard (90%)Red Soul Shard (9%)

Bake Yoroi LeadersKa-riki (5) Chou-riki (6)Dai-majin (5) Techkamen (6)Ka-riki (5)
StatsVitality 1100 – 1300 1350 – 1650Speed 17 17Range 5 5Fire Resistance 50% 100%Water Resistance 50% 60%Earth Resistance 50% 100%Lightning Resistance 100% 60%Immobility Resistance 90% 75%Might retreat if under 20% 10%
AttackMelee/Ranged Chances (A) 90% / 10% 90% / 10%
(B) 75% / 25% 75% / 25%(C) 50% / 50% 50% / 50%
Attack Chance (non-spell) 85% 90%
MeleeNormal Damage 45 – 65 50 – 75Poison Damage 5 6Knockback (chance, force) 100%, 4 100%, 5Stun (chance, duration) 50%, 2 sec. 50%, 2 sec.
RangedA Forked L. 11 Inferno Strk. 8;50%A E. Strike 8;50%B Ice Spr. 11 Blastwave 11;30%B E. Spear 11;70%C W. Strike 7
LootFirst, Second Items: See Bake Yoroi Loot listValue 80 – 100 100Armor/Weapon is Magic? 100% 60%Magic Slots Filled in A/W 50% 100%Magic A/W is Unique? 5% (U3) 10% (U3)Magic A/W is Cursed? 65% 65%
ByakkoStatsVitality 2400Speed 17Range 6Fire Resistance 60%Water Resistance 60%Earth Resistance 60%Lightning Resistance 100%Immobility Resistance 90%Never Retreats
AttackMelee/Ranged Chances 75% / 25%Attack Chance (non-spell) 85%
MeleeNormal Damage 55 – 70Poison Damage 2 – 4
RangedL. Strike 9;90%Conduct. 9;10%
LootFirst, Second Items: See Bake Yoroi Loot listValue 100Armor/Weapon is Magic? 60%Magic Slots Filled in A/W 100%Magic A/W is Unique? 10% (U3)Magic A/W is Cursed? 65%
Monsters: Bake Yoroi
primagames.com 109

Go-noStatsVitality 8000Range 5Speed 18Fire Resistance 100%Water Resistance 60%Earth Resistance 60%Lightning Resistance 60%Immobility Resistance 90%
AttackMelee/Ranged Chances 35% / 65%Attack Chance (non-spell) 99%
MeleeNormal Damage 50 – 90Poison Damage 8 – 10Knockback 100%, 10Spell Chance (if in melee) 70%
Forked L. 17;60%Arc Wall 18;30%Conduct. 10;10%
RangedForked L. 17;60%Arc Wall 18;30%Conduct. 10;10%
Loot
First ItemGold (35%) (500 – 1000)Gem (30%)Ghost Armor Plates (35%)
Second ItemSword (45%)Armor (45%)Potion (10%) (Larger)
Remedy (25%)Health (25%)Ki (25%)Restorative (25%)
Value 50 – 100Armor/Weapon is Magic? 100%Magic Slots Filled in A/W 50%Magic A/W is Unique? 100% (U1)
YoroinushiStatsVitality 1500Speed 17Range 5Fire Resistance 40%Water Resistance 100%Earth Resistance 40%Lightning Resistance 40%Immobility Resistance 70%Might retreat if under 10%
AttackMelee/Ranged Chances 40% / 60%Attack Chance (non-spell) 85%
MeleeNormal Damage 50 – 80Knockback (chance, force) 85%, 4Stun (chance, duration) 90%, 3 sec.
RangedAvalanche 12;85%Drown 6;15%
LootFirst, Second Items: See Bake Yoroi loot listValue 65 – 80Armor/Weapon is Magic? 100%Magic Slots Filled 40%Chance that Above is Unique 15% (U2)Chance that Magic is Cursed 55%
Note. Bake Yoroi are just about the onlysource of Ghost Armor Plates. This isprobably the best non-unique, randomlyavailable armor components in the game,and they are certainly the rarest. If you getGhost Armor Plates, hang on to them untilyou find armor that’s worthy of them.(Note that the Bake Yoroi leader Go-nohas a one-in three chance of yieldingGhost Armor Plates. It may well be worthreverting to a previous save and vanquish-ing Go-no several times, until he yieldsthis treasure.)
Prima’s Official Strategy Guide
110 primagames.com

Dark Samurai NPCs
Dark Dark Dark DarkArcher Berserker Brick Leader
StatsVitality 4400 4750 4000 4200Speed 15 17 12 14Range 3 4 4 3Mass 15Fire Resistance 70% 80% 80% 70%Water Resistance 70% 80% 80% 70%Earth Resistance 90% 80% 80% 70%Lightning Resistance 70% 80% 80% 70%Immobility Resistance 100% 100% 100% 100%Never Retreats
AttackMelee/Ranged Chances 35% / 65% 75% / 25% 35% / 65% 75% / 25%Attack Chance (non-spell) 90% 90% 95% 90%
MeleeNormal Damage 70 – 100 70 – 100 80 – 120 70 – 100Poison Damage 10Knockback 100%, 2 100%, 6 100%, 8 100%, 5Stun (chance, duration) 100%, 5 sec.Spell Chance (if in melee) 70% 45% 80%
Brimstone 16;50% Lava Wv. 20;40% Blastwave 20;55%Lava Ring 9;40% Ice Kanji 17;50% Thunder Drag. 25;35%Entomb 10;10% Drown 10;10% Inflammable 10;10%
RangedBrimstone 16;50% Lava Wv. 20;40% Ice Skr. 20;70% Blastwave 20;55%Lava Ring 9;40% Ice Kanji 17;50% Avalanche 13;20% Thunder Drag. 25;35%Entomb 10;10% Drown 10;10% Drown 11;10% Inflammable 10;10%
Dark Samurai Loot
Monsters: Bake Yoroi, Dark Samurai
primagames.com 111
First ItemGem (25%)Amulet (25%)
Jewel (50%)Medicine Case (25%)Talisman (25%)
Gold (50%) (500 – 2500)
Second ItemWeapon
Sword (25%)Polearm (25%)Bow (25%)Thrown (25%)
Value 80 – 100Armor/Weapon is Magic? 100%Magic Slots Filled in A/W 32%Magic A/W is Unique? 10% (U3)Magic A/W is Cursed? 5%

Dark Dark Dark ZanshinNinja Swordsman Wizard the Dark Warlord
StatsVitality 5500 4500 5000 10,000Speed 16 14 15 17Range 3 3 3 10Mass 15 200Fire Resistance 70% 80% 70% 80%Water Resistance 70% 80% 70% 70%Earth Resistance 70% 70% 70% 60%Lightning Resistance 80% 70% 70% 90%Immobility Resistance 100% 100% 100% 100%Never Retreats
AttackMelee/Ranged Chances 50% / 50% 50% / 50% 40% / 60% 40% / 60%Attack Chance (non-spell) 90% 90% 100%
MeleeNormal Damage 70 – 110 65 – 80 80 – 120Poison Damage 8Knockback 100%, 6 100%, 2 100%, 16Stun (chance, duration) 100%, 5 secSweep Attack Range 20Spell Chance (if in melee) 100% 50% 80% 15%
E. Kanji 17;45% F. Darts 15;50% Ltng Burst 10;40% Elemental Rage 3;40%L. Wave. 17;45% Blizzard 15;40% Forked Ltng 18;60% Elemental Stun 1;30%Conduct. 11;10% Inflamm. 10;10% Elemental Burst 1;30%
RangedE. Kanji 17;45% F. Darts 15;50% L. Burst 10;10% Elemental Rage 3;50%L. Wave 17;45% Blizzard 15;40% Immolate 30;40% Elemental Burst 1;50%Conduct. 11;10% Inflamm. 10;10% Forked L. 18;40%
Conduct. 10;10%
Dark Warlord LootFirst Item
Gold (10,000 – 15,000)
Second ItemMagma Sphere (Cursed)
Magic Slots Filled: 100%
Prima’s Official Strategy Guide
112 primagames.com
Note. Zanshin is the only source in the game for theMagma Sphere, a powerful but compact magic compo-nent. Since killing the Dark Warlord ends the single-player game, the Magma Sphere is effectively nonexis-tant in these games. Zanshin’s treasure becomesimportant in multiplayer games, where the same partycan meet and destroy Zanshin many times.
Even in multiplayer, you have only a few seconds tograb Zanshin’s loot, before your party is cycled to thenext game.

Dead Foot Soldier
* Dead Foot * Honor * Death * Blood * Shadow Soldier Guard Squad Squad Guard
StatsVitality 5 – 10 65 – 75 125 – 135 140 – 160 200 – 300Speed 10 12 13 13 13Range 2 2 2 2 2Fire Resistance 60%Water Resistance 70%Earth Resistance 80% 100%Immobility Resistance 100% 60% 80%Never Retreats
Attack (Melee)Attack Chance (non-spell) 65% 75% 80% 85% 90%Normal Damage 3 – 5 10 – 15 20 – 25 30 – 35 30 – 40
Loot (only * Assault Troops have a chance of Magic Armor or Weapons)Value 0 – 20 10 – 20 20 – 30 30 – 40 50 – 60Armor/Weapon is Magic? 35% 35% 35% 35% 30%Magic Slots Filled in A/W 10% 10% 20% 20% 35%Magic A/W is Cursed? 5% 5% 25% 25% 25%
Dead Foot Soldier LootFirst Item
Nothing (60%)Armor (20%)Weapon (20%)
Sword (75%)Throwing (25%)
Second Item (10% Chance)Nothing (25%)Gold (73%) (1 – 350)Component (2%)
Blue Soul Shard (5%)Purple Soul Shard (20%)Red Soul Shard (5%)Cho-gokin Ore (20%)Gold Soul Shard (10%)Coral (20%) Pearl (10%)Green Soul Shard (10%)
Monsters: Dark Samurai, Dead Foot Soldier
primagames.com 113

Debu
* Debu * Maru * Kitano-umi * Hyakkan Mushashi-maru
StatsVitality 315 – 385 500 630 – 770 900 – 1100 560 – 840Range 5 5 5 5 5Speed 12 12 12 12 12Mass 50 50 2 50 2Fire Resistance 20% 80% 40% 50%Water Resistance 20% 30% 40% 50% 50%Earth Resistance 20% 30% 90% 50%Lightning Resistance 70% 30% 40% 100%Immobility Resistance 70% 55% 80% 85% 100%Might retreat if under 30% 30% 30% 30% 10%
Attack (Melee)Attack Chance (non-spell) 80% 85% 85% 100% 100%Normal Damage 20 – 30 25 – 40 35 – 50 45 – 60 55 – 90Knockback 100%, 7 100%, 8 100%, 9 100%, 6 100%, 8
LootDebu Loot list Debu Loot list Debu Loot list Debu Loot list Mushashi-
maru Loot list
Debu LootFirst Item
Nothing (5%)Debu Blubber (95%)
Second Item (25% Chance)Amulet (10%)
Jewel (50%)Talisman (50%)
Gem (10%)Debu Blubber (80%)
Value 25 – 50
Prima’s Official Strategy Guide
114 primagames.com

Mushashi-maru LootFirst Item
Nothing (5%)Gold (75%) (1 – 500)Amulet (10%)
Jewel (50%)Talisman (50%)
Gem (10%)
Second Item (25% Chance)Polearm
Value 50 – 100 Armor/Weapon is Magic? 50%Magic Slots Filled in A/W 50%Magic A/W is Unique? 5% (U3)Magic A/W is Cursed? 5%
Debu Leaders (Stage 6)Hyakkan
Kitano-umi
StatsVitality 2700 – 3300Range 5Speed 12Mass 20Fire Resistance 60%Water Resistance 100%Earth Resistance 60%Lightning Resistance 60%Immobility Resistance 100%Might retreat if under 20%
AttackMelee/Ranged Chances 50% / 50%Attack Chance (non-spell) 95%
MeleeNormal Damage 70 – 140Knockback 100%, 12
RangedAvalanche 12;25%W. Strike 10;75%
LootDebu Leader Loot
Debu Leader LootFirst Item
Nothing (5%)Debu Blubber (95%)
Second ItemPolearm
Value 75 – 100Armor/Weapon is Magic? 100%Magic Slots Filled in A/W 20%Magic A/W is Unique? 5% (U2)Magic A/W is Cursed? 5%
Monsters: Debu
primagames.com 115

Evil Female Ninja
(S) * Ninja (S) * Black (S) * Death (S) * Shadow * Pain * DarkMaiden Wind Maiden Stalker Slayer Mistress
StatsVitality 25 – 35 50 – 70 80 – 120 110 – 170 160 – 240 200 – 300Vitality (Sniper) 15 – 25 40 – 60 65 – 95 95 – 145Speed 14 14 15 15 16 16Range 4 4 4 4 4 4Mass 0.25Fire Resistance 90%Water Resistance 60% 100%Earth Resistance 80% 90% 100%Lightning Resistance 70%Immobility Resistance 100% 50% 60% 40% 100%Might retreat if under 25% 25% 25% 25% 25% 25%
AttackMelee/Ranged Chances 100% / 0% 35% / 65% 35% / 65% 30% / 70% 30% / 70% 30% / 70%Attack Chance (non-spell) 70% 75% 80% 85% 85% 90%
MeleeNormal Damage 8 – 15 18 – 25 28 – 35 38 – 45 45 – 55 55 – 65Knockback (chance, force) 100%, 2 100%, 2
Ranged(S only) FireW. 1 FireW. 1 FireW. 1 FireW. 2 FireW. 4;70% FireW. 5;70%
E. Spear 9;20% Ice Spr. 11;20%Entomb 9;10% Drown 11;10%
Loot (only * Assault Troops have a chance of Magic Armor or Weapon)Value 5 – 30 25 – 45 45 – 60 65 – 80 70 – 95 75 – 100Armor/Weapon is Magic? 10% 10% 10% 10% 10% 35%Magic Slots Filled in A/W 20% 20% 20% 30% 40% 50%
Prima’s Official Strategy Guide
116 primagames.com

Evil Female Ninja Loot
Evil Female Ninja LeadersKage-Hime Kage-Hime Kage-Hime Kage-Hime Majo Otokugoroshi
Reikoku Reikoku Reikoku Reikoku Reikoku MakazeAnsatsujo Ansatsujo Ansatsujo Ansatsujo
StatsVitality 250 400 600 850 1200 1500Speed 15 15 15 16 16 16Range 4 4 4 4 4 4Mass 0.25Fire Resistance 10% 20% 30% 90% 50% 100%Water Resistance 60% 20% 30% 40% 100% 60%Earth Resistance 10% 20% 80% 40% 50% 100%Lightning Resistance 10% 70% 30% 40% 100% 60%Immobility Resistance 100% 75% 80% 65% 100% 75%Might retreat if under 25% 25% 25% 25% 25% 25%
AttackMelee/Ranged Chances 35% / 65% 35% / 65% 35% / 65% 30% / 70% 30% / 70% 30% / 70%Attack Chance (non-spell) 70% 75% 80% 85% 85% 90%
MeleeNormal Damage 15 – 30 25 – 40 35 – 50 45 – 60 50 – 70 60 – 80Knockback (chance, force) 100%, 2 100%, 2
RangedA FireW. 1 FireW. 2 FireW. 3 FireW. 4;80% FireW. 5;70% FireW. 6;70%A Inf. Str. 7;20% Ice Spr. 11;20% Sp. Tr. 15;20%A Drown 9;10% Entomb 11;10%B FireW. 1 FireW. 2 FireW. 3 FireW. 4;80% FireW. 5;70% FireW. 6;70%B F. Seeker 16;20% Ice Spr. 11;20% Sp. Tr. 15;20%B Drown 9;10% Entomb 11;10%C FireW. 1 FireW. 2 FireW. 3 FireW. 5;80%C Immolate 9;20%
LootFirst, Second Items: Use Evil Female Ninja Loot listValue 15 – 35 25 – 45 45 – 70 65 – 80 70 – 95 75 – 100Armor/Weapon is Magic? 25% 25% 100% 100% 100% 100%Magic Slots Filled in A/W 20% 20% 30% 40% 50% 75%Magic A/W is Unique? 1% (U1) 1% (U1) 1% (U2) 5% (U2) 10% (U3) 10% (U3)Magic A/W is Cursed? 5% 5% 5% 25% 25% 25%
Monsters: Evil Female Ninja
primagames.com 117
First ItemNothing (20%)Mask (5%)Amulet (10%)
Jewel (25%)Medicine Case (25%)Prayer Beads (25%)Talisman (25%)
Armor (30%)Arm (25%)Body (40%)Head (10%)Leg (25%)
Weapon (35%)Bow (30%)Sword (20%)Throwing (50%)
Second Item (50% Chance)Nothing (10%)Gem (5%)Potion (40%) (Average/Larger)
Remedy (20%)Health (80%)
Gold (40%) (1 – 500)Component (5%)
Gold Soul Shard (70%)Green Soul Shard (30%)

Evil Priest
(S) * Evil (S) * Twisted (S) * Deranged (S) * Killer (S) * Demonic (S) * DarkPriest Priest Priest Priest Priest Abbot
StatsVitality 20 – 30 40 – 60 70 – 110 95 – 145 145 – 205 175 – 265Vitality (Sniper) 15 – 25 30 – 50 55 – 85 80 – 120 110 – 170 160 – 240Range 4 4 4 4 4 4Speed 14 14 14 15 15 15Fire Resistance 100%Water Resistance 70% 90%Earth Resistance 60% 90%Lightning Resistance 80% 100%Immobility Resistance 100% 60% 100% 50%
AttackMelee/Ranged Chances 100% / 0% 75% / 25% 75% / 25% 75% / 25% 50% / 50% 50% / 50%Attack Chance (non-spell) 65% 70% 75% 80% 85% 90%
MeleeNormal Damage 8 – 15 15 – 20 25 – 30 30 – 35 40 – 45 50 – 55Knockback (chance, force) 100%, 1 100%, 1 100%, 1.5 100%, 2 100%, 2 100%, 2.5
Ranged(S only) Pr. Bane 1 Pr. Bane 1 Pr. Bane 2 Pr. Bane 3;80% Sp. Tr. 9;20% L. Strike 7;30%
Lightning 7;20% Pr. Bane 4;70% Cond. 11;10%Entomb 9;10% Pr. Bane 5;60%
LootValue 0 – 20 10 – 40 20 – 60 30 – 80 40 – 100 50 – 100Armor/Weapon is Magic? 25% 25% 25% 25% 25% 25%Magic Slots Filled in A/W 60% 60% 60% 60% 60% 60%Magic A/W is Unique? 5% (U1) 5% (U1) 5% (U2) 5% (U2) 5% (U1) 5% (U3)Magic A/W is Cursed? 5% 5% 5% 5% 5% 5%Chance of Second Item 25% 25% 25% 25% 25% 25%
Evil Priest Loot
Prima’s Official Strategy Guide
118 primagames.com
First ItemNothing (40%)Amulet (25%)
Medicine Case (25%)Prayer Beads (50%)Talisman (25%)
Polearm (25%)Component (10%)
Green Soul Shard (40%)Jade (20%)Blue Soul Shard (20%)Red Soul Shard (20%)
Second Item (variable)Nothing (10%)Mask (5%)Potion (35%) (Average)Gold (50%) (1 – 1500)

Evil Priest LeadersHozo-in Hozo-in Hozo-in Hozo-in Ikkyu Taku-anFudo-in Fudo-in Fudo-in Fudo-in Ikkaku Tanuki
Chozo-in Chozo-in Chozo-in Chozo-in Bo-Uzu
StatsVitality 250 425 600 850 1200 1500Range 4 4 4 4 4 4Speed 14 14 14 15 15 15Fire Resistance 10% 20% 80% 40% 50% 100%Water Resistance 10% 70% 30% 40% 100% 60%Earth Resistance 60% 20% 30% 40% 50% 100%Lightning Resistance 10% 20% 30% 90% 100% 60%Immobility Resistance 70% 100% 60% 85% 100% 75%
AttackMelee/Ranged Chances (A) 100% / 0% 75% / 25% 75% / 25% 75% / 25% 50% / 50% 50% / 50%Melee/Ranged Chances (B,C) 40% / 60%Attack Chance (non-spell) 70% 70% 75% 80% 85% 90%
MeleeNormal Damage 15 – 30 25 – 40 35 – 50 45 – 60 50 – 70 60 – 80Knockback (chance, force) 100%, 1 100%, 1 100%, 1.5 100%, 2 100%, 2 100%, 2.5
RangedAll Pr. Bane 2 Pr. Bane 3;80% Pr. Bane 4;80% Pr. Bane 5;70% Entomb 11;10%A Immolate 7;20% Conduct. 9;10% Lv. Wv. 12;20%A Forked L. 11;20% Pr. Bane 6;70%A, B L. Strike 7;20%B, C Pr. Bane 1 Immolate 7;20% Ice Spr. 11;20% Sp. Tr. 12;30%B, C Drown 9;10% Pr. Bane 6;60%C Lightning 9;20%
LootFirst Item
Nothing 75% 75% 50% 50% 25% 5%Bo-Staff 25% 25% 50% 50% 75% 95%
Second Item: See Evil Priest Loot listValue 34 – 35 34 – 35 34 – 35 34 – 35 34 – 35 34 – 35Armor/Weapon is Magic? 100% 100% 100% 100% 100% 100%Magic Slots Filled in A/W 60% 60% 60% 60% 60% 60%Magic A/W is Unique? 5% (U1) 5% (U1) 5% (U2) 5% (U2) 5% (U3) 5% (U3)Magic A/W is Cursed? 5% 5% 5% 5% 5% 5%Chance of Second Item 100% 100% 100% 100% 100% 100%
Daimajutsuou
Monsters: Evil Priest
primagames.com 119
StatsVitality 1750Range 4Speed 15Fire Resistance 90%Water Resistance 40%Earth Resistance 40%Lightning Resistance 40%Immobility Resistance 85%
AttackMelee/Ranged Chances 35% / 65%Attack Chance (non-spell) 90%
MeleeNormal Damage 50 – 75Knockback (chance, force) 100%, 2
Ranged Pr. Bane 6;50%F. Darts 15;40%Inflammable 6;10%
LootFirst Item
Nothing 50%Bo-Staff 50%
Second Item: See Evil Priest Loot listValue 34 – 35Armor/Weapon is Magic? 100%Magic Slots Filled in A/W 60%Magic A/W is Unique? 5% (U2)Magic A/W is Cursed? 5%Chance of Second Item 100%

Evil Priestess
(S) * Priestess (S) * Dark (S) * Witch (S) * Devil (S) * Witch (S) * DarkShamaness Queen Lady Mistress Concubine
StatsVitality 25 – 35 50 – 70 80 – 120 110 – 170 160 – 240 200 – 300Vitality (Sniper) 15 – 25 30 – 50 55 – 85 90 – 130 120 – 180 160 – 240Speed 12 12 13 13 14 15Range 5 5 5 5 5 5Mass 0.25 0.25 0.25 0.25 0.25 0.25Fire Resistance 100%Water Resistance 60% 90%Earth Resistance 80% 100%Lightning Resistance 70% 90%Immobility Resistance 100% 50% 60% 100% 50%
Attack (Ranged)Attack Chance (non-spell) 70% 70% 75% 80% 85% 90%Normal Damage 8 – 12 12 – 17 10 – 15 15 – 20Fire Damage 20 – 27Water Damage 17 – 22Earth Damage 10 – 15 20 – 27Lightning Damage 5 – 10 17 – 22Knockback 100%, 1 100%, 1 100%, 2 100%, 2.5 100%, 3 100%, 4Spell Chance (if at range) 10% 10% 10%
Meteor 7 W. Strike 6 Brimstone 9
Loot(S) Evil Priestess Snipers carry no loot.Value 0 – 20 20 – 40 40 – 60 60 – 80 60 – 100 80 – 100Armor/Weapon is Magic? 10% 15% 20% 25% 30% 35%Magic A/W is Cursed? 10% 10% 10% 10% 10% 10%Magic Slots Filled in A/W 50% 50% 50% 50% 50% 50%
Evil Priestess Loot
Prima’s Official Strategy Guide
120 primagames.com
First ItemNothing (1%)Mask (2%)Amulet (5%)
Jewel (20%)Medicine Case (20%)Prayer Beads (40%)Talisman (20%)
Bow (30%)Gold (62%) (1 – 1000)
Second Item (1% Chance; 100% for leaders)Nothing (1%)Potion (30%) (Average/Larger)Component (69%)
Pearl (25%)Hairpin (45%)Jade (10%)Blue Soul Shard (10%)Red Soul Shard (10%)

Evil Priestess LeadersOtaki Murasaki Shitakirimusume Nishinfu Kuchisake MatsumiShijo Shijo Shijo Shijo Baishunfu Akudoku-Geisha
Yumi-Onna Yumi-Onna Yumi-Onna Yumi-Onna Daimakai-Hime
StatsVitality 250 400 600 850 1200 1500Speed 12 12 13 13 14 15Range 5 5 5 5 5 5Mass 0.25 0.25 0.25 0.25 0.25 0.25Fire Resistance 10% 70% 30% 40% 50% 100%Water Resistance 60% 20% 30% 40% 50% 30%Earth Resistance 10% 20% 80% 40% 100% 60%Lightning Resistance 10% 20% 30% 90% 100% 60%Immobility Resistance 100% 55% 80% 85% 90% 100%
Attack (Ranged)Attack Chance (non-spell) 70% 70% 75% 80% 85% 90%Normal Damage 10 – 15 10 – 20 20 – 30Fire Damage 10 – 15 25 – 35Water Damage 8 – 10 20 – 27 25 – 35Earth Damage 10 – 15 22 – 32Lightning Damage 20 – 27 22 – 32Knockback 100%, 1 100%, 1 100%, 2 100%, 2.5 100%, 3 100%, 4Spell Chance (if at range) 10% 15% 15% 15%A Stonebolt 19 Lightning 9 E. Strike 8 F. Darts 13B Lava Skr. 19 Spark Skr. 24 E. Strike 8 Inf. Str. 10C Meteor 7 Lightning 9 F. Darts 13
LootFirst, Second Items: use Evil Priestess Loot listValue 15 – 30 20 – 40 40 – 60 60 – 80 60 – 100 80 – 100Armor/Weapon is Magic? 100% 100% 100% 100% 100% 100%Magic A/W is Unique? 5% (U1) 5% (U1) 5% (U2) 5% (U2) 5% (U3) 5% (U3)Magic A/W is Cursed? 50% 50% 50% 50% 50% 50%
Monsters: Evil Priestess
primagames.com 121

Evil Wizard
Sabaki (3) Majutsu-O (4) Evil Wizard Sniper
StatsVitality 280 – 420 280 – 420 175 – 265Speed 14 14 14Range 1 1 1Mass 15Lightning Resistance 100% 100% 90%Immobility Resistance 80% 80% 70%Never Retreats
AttackMelee/Ranged Chances 35% / 65% 35% / 65% 35% / 65%
MeleeSpark Skr. 6;70% Spark Skr. 6;80% Spark Skr. 9;50%Forked L. 6;30% Forked L. 6;20% Forked L. 9;50%
RangedForked L. 14;60% Forked L. 14;70% Forked L. 9;70%
Spark Storm 15;30% Spark Storm 15;20% Spark Storm 8;30%Conduct. 7;10% Conduct. 7;10%
LootValue 60 – 90 80 – 100 No LootArmor/Weapon is Magic? 50% 50%Magic Slots Filled in A/W 60% 80%Magic A/W is Unique? 10% (U2) 5% (U2)Magic A/W is Cursed? 50% 5%
Evil Wizard Loot
Prima’s Official Strategy Guide
122 primagames.com
First ItemNothing (50%)Gem (10%)Amulet (40%)
Jewel (50%)Medicine Case (25%)Talisman (25%)
Second ItemGold (60%) (1 – 2500)Component (20%)
Jade (30%)Blue Soul Shard (20%)Red Soul Shard (30%)Gold Soul Shard (20%)
Weapon (20%)Sword (30%)Polearm (30%)Bow (30%)Thrown (10%)

Sabaki, Majutsu-O (Evil Wizard Leaders – 6)StatsVitality 1100 – 1300Speed 14Range 1Mass 15Fire Resistance 10%Water Resistance 10%Earth Resistance 10%Lightning Resistance 60%Never Retreats
AttackMelee/Ranged Chances 35% / 65%
MeleeSpark Skr. 15;50%Forked L. 12;50%
RangedForked L. 12;70%Spark Storm 12;30%
LootFirst, Second Items: Use Evil Wizard Loot listValue 40 – 60Armor/Weapon is Magic? 100%Magic Slots Filled in A/W 25%Magic A/W is Unique? 5% (U1)Magic A/W is Cursed? 5%
Tenkai Dai-IngeiStatsVitality 4000Speed 14Range 1Mass 10
AttackMelee/Ranged Chances 20% / 80%
MeleeL. Burst 5
RangedIce Trap 15;30%W. Dragon 40;5%L. Burst 5;25%Spark Storm 15;30%Drown 9;10%
Loot
First ItemArmor (50%)Weapon (50%)
Bow (25%)Polearm (25%)Sword (25%)Throwing (25%)
Second ItemMask (10%)Amulet (10%)
Jewel (25%)Medicine Case (25%)Prayer Beads (25%)Talisman (25%)
Component (10%)Ghost Armor Plates (10%)Jade (10%)Blue Soul Shard (10%)Purple Soul Shard (10%)Red Soul Shard (10%)Cho-gokin Ore (10%)Gold Soul Shard (10%)Coral (10%)Pearl (10%)Green Soul Shard (10%)
Gem (10%)Potion (10%) (Larger)Gold (50%) (500 – 1000)
Value 70 – 100Armor/Weapon is Magic? 100%Magic Slots Filled in A/W 80%Magic A/W is Unique? 100% (U3)Magic A/W is Cursed? 100%
Monsters: Evil Wizard
primagames.com 123

Fallen Hero Foot Soldiers
* Fallen * Fear * Death * Inflictor * Decapitator * DarkHero Foot Champion Warrior Champion
StatsVitality 30 – 40 75 – 85 110 – 130 155 – 215 175 – 265 210 – 310Range 5 5 5 5 5 5Fire Resistance 60% 100%Water Resistance 80%Earth Resistance 90%Lightning Resistance 70%Immobility Resistance 50% 100% 70% 70%
AttackMelee/Ranged Chances 100% / 0% 95% / 5% 95% / 5% 95% / 5% 95% / 5% 95% / 5%Attack Chance (non-spell) 70% 70% 75% 80% 85% 90%
MeleeNormal Damage 8 – 12 15 – 23 24 – 33 30 – 43 43 – 55 50 – 62
RangedImmolate 2 Ball L. 3 Comet 4 Meteor 5 Immolate 6
LootValue 15 – 25 20 – 40 40 – 60 60 – 80 80 – 100 90 – 100Armor/Weapon is Magic? 5% 5% 5% 5% 5% 5%Magic Slots Filled in A/W 5% 5% 5% 5% 5% 5%Magic A/W is Cursed? 5% 5% 5% 1% 1% 1%Chance of Second Item 10% 10% 20% 20% 20% 20%
Fallen Hero Foot Loot
Prima’s Official Strategy Guide
124 primagames.com
First ItemArmor (30%)Weapon (30%)
Sword (75%)Throwing (25%)
Health Potion (30%) (Smaller/Average)
Nothing (10%)
Second Item (10% Chance)Nothing (35%)Gold (49%) (1 – 2000)Jewel (5%)
Component (10%)Blue Soul Shard (5%)Purple Soul Shard (25%)Red Soul Shard (5%)Cho-gokin Ore (20%)Gold Soul Shard (10%)Coral (25%)Pearl (5%)Green Soul Shard (5%)
Gem (1%)

Gaiya-jiroStage 1 Stage 2 Stage 3 Stage 4 Quest
StatsVitality 335 – 415 550 – 650 800 – 1000 1120 – 1380 550 – 650Speed 12 13 13 13 13Range 5 5 5 5 5Fire Resistance 60% 70% 80% 90% 70%Water Resistance 60% 70% 80% 90% 70%Earth Resistance 80% 90% 100% 100% 100%Lightning Resistance 30% 40% 50% 60% 60%Immobility Resistance 80% 85% 90% 95% 75%
AttackMelee/Ranged Chances 35% / 65% 35% / 65% 35% / 65% 35% / 65% 35% / 65%Attack Chance (non-spell) 70% 75% 80% 85% 70%
MeleeNormal Damage 24 – 31 33 – 41 42 – 52 53 – 63 30 – 40Knockback (chance, force) 100%, 3 100%, 3 100%, 3 100%, 3 100%, 4
RangedMeteor 6;60% Meteor 8;60% Meteor 10;60% Meteor 12;60% Meteor 8;60%E. Kanji 3;40% E. Kanji 4;40% E. Kanji 5;40% E. Kanji 6;40% E. Kanji 4;40%
Loot for Gaiya-jiro, Machuro and OruteFirst, Second Item: See Fallen Hero Foot Loot listValue 90 – 100 40 – 60 60 – 80 80 – 100 90 – 100Armor/Weapon is Magic? 80% 80% 80% 80% 80%Magic A/W is Cursed? 50% 50% 50% 50% 50%Magic Slots Filled in A/W 25% 10% 15% 20% 25%Chance of Second Item 10% 50% 50% 50% 10%Magic A/W is Unique? 15% (U3) 15% (U3)
Monsters: Fallen Hero Foot Soldier
primagames.com 125

MachuroStage 1 Stage 2 Stage 3 Stage 4 Quest
StatsVitality 340 – 460 600 – 800 850 – 1150 110 – 1550 700Speed 15 15 15 15 15Range 5 5 5 5 5Fire Resistance 70% 70% 70% 70% 70%Water Resistance 70% 70% 70% 70% 70%Earth Resistance 100% 100% 100% 100% 100%Lightning Resistance 40% 40% 40% 40% 40%Immobility Resistance 80% 85% 90% 95% 75%
AttackMelee/Ranged Chances 50% / 50% 50% / 50% 50% / 50% 50% / 50% 50% / 50%Attack Chance (non-spell) 90% 90% 90% 90% 90%
MeleeNormal Damage 15 – 25 25 – 35 35 – 45 45 – 55 30 – 40Knockback (chance, force) 100%, 4 100%, 4 100%, 4 100%, 4 100%, 4
RangedLava Skr. 6 Lava Skr. 10 Lava Skr. 14 Lava Skr. 18 Lava Skr. 10
Loot See list on page 125.
OruteStage 1 Stage 2 Stage 3 Stage 4 Quest
StatsVitality 320 – 480 520 – 780 750 – 1150 1050 – 1550 650Speed 18 18 18 18 18Range 5 5 5 5 5Fire Resistance 40% 40% 40% 40% 40%Water Resistance 100% 100% 100% 100% 100%Earth Resistance 70% 70% 70% 70% 70%Lightning Resistance 70% 70% 70% 70% 70%Immobility Resistance 100% 100% 100% 100% 100%
AttackAttack Chance (non-spell) 75% 80% 85% 90% 90%Normal Damage 30 – 40 40 – 50 50 – 60 60 – 70 30 – 50Stun (chance, duration) 100%, 3 sec. 100%, 3 sec. 100%, 3 sec. 100%, 3 sec. 100%, 3 sec.
Loot See list on page 125.
Prima’s Official Strategy Guide
126 primagames.com

Fallen Ninja
Fallen Shadow Quick Ninja * ImperialNinja Blade Death Champion Assassin
StatsVitality 25 – 35 50 – 70 80 – 120 110 – 170 320 – 480Speed 14 14 15 15 17Range 2 2 2 2 2Mass 0.5 0.5 0.5 0.5 0.5Fire Resistance 60%Water Resistance 70% 70%Earth Resistance 70%Lightning Resistance 80%Immobility Resistance 100% 60% 100%Never Retreats
AttackMelee/Ranged Chances 100% / 0% 40% / 60% 35% / 65% 35% / 65% 30% / 70%Attack Chance (non-spell) 70% 70% 75% 80% 90%
MeleeNormal Damage 8 – 15 15 – 25 25 – 35 35 – 45 50 – 95Knockback 100%, 2 100%, 2
RangedImmolate 3 W. Strike 4 Forked L. 7 Ice Skr. 11;90%
Drown 11;10%
LootValue 15 – 30 35 – 50 45 – 65 65 – 80 75 – 100Armor/Weapon is Magic? 10% 1 – 100Magic Slots Filled in A/W 15% 50%Magic A/W is Cursed? 5% 5%
Monsters: Fallen Hero Foot, Fallen Ninja
primagames.com 127

Fallen Ninja Loot
KageroStage 1 Stage 2 Stage 3 Stage 4 Quest
StatsVitality 550 – 650 900 – 1100 1250 – 1550 1800 – 2200 2000Speed 18 18 18 18 18Range 2 2 2 2 2Mass 1 1 1 1 1Fire Resistance 60% 70% 90% 50% 50%Water Resistance 10% 20% 40% 100% 100%Earth Resistance 10% 20% 40% 50% 50%Lightning Resistance 10% 20% 40% 50% 50%Immobility Resistance 50% 60% 70% 100% 100%
AttackMelee/Ranged Chances 75% / 25% 75% / 25% 50% / 50% 50% / 50% 50% / 50%Attack Chance (non-spell) 90% 90% 90% 90% 90%
MeleeNormal Damage 15 – 30 25 – 40 30 – 50 40 – 60 45 – 60Poison Damage 3 4 5 6 6Knockback 100%, 3 100%, 3 100%, 3 100%, 3 100%, 3Stun (chance, duration) 20%, 1 sec.
RangedImmolate 5 Immolate 7 Immolate 9 Avalanche 11;90% Avalanche 11;90%
Drown 7;10% Drown 7;10%
LootFirst, Second Items: Use Fallen Ninja Loot listValue 35 – 60 45 – 75 65 – 90 70 – 95 ScrollMagic Slots Filled in A/W 20% 30% 40% 100%Armor/Weapon is Magic? 100% 100% 100% 50%Magic A/W is Unique? 5% (U1) 5% (U1) 5% (U2) 5% (U3)Magic A/W is Cursed? 50% 50% 50% 50%
Prima’s Official Strategy Guide
128 primagames.com
First ItemNothing (30%)Mask (5%)Amulet (10%)
Jewel (25%)Medicine Case (25%)Prayer Beads (25%)Talisman (25%)
Armor (30%)Weapon (25%)
Polearm (20%)Sword (30%)Throwing (50%)
Second Item (10% Chance)Nothing (10%)Gem (5%)Potion (25%) (all sizes)
Remedy (10%)Health (50%)Ki (40%)
Gold (50%) (1 – 250)Component (10%)
Gold Soul Shard (70%)Green Soul Shard (30%)
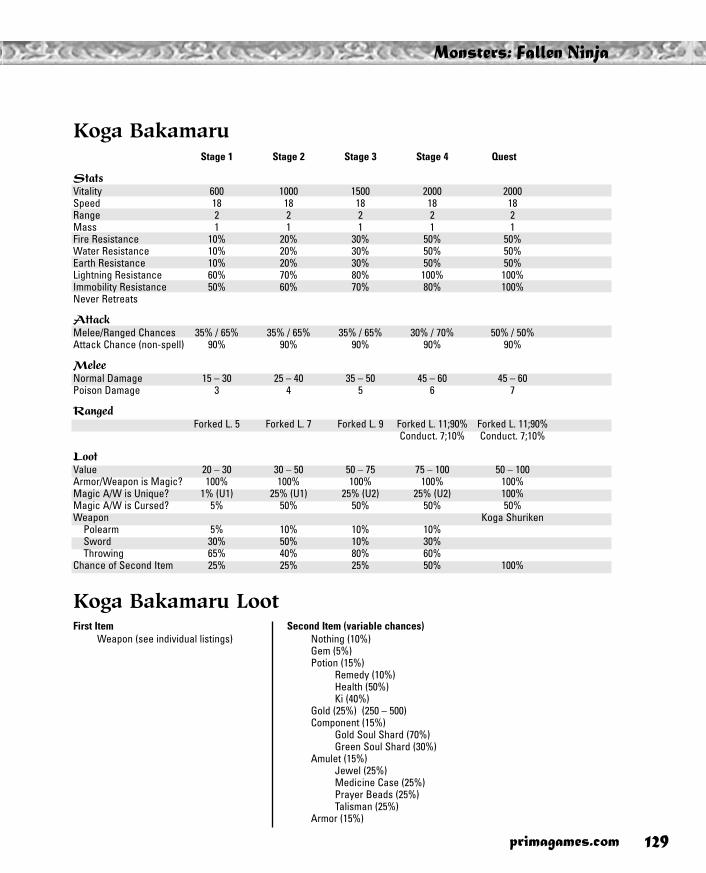
Koga BakamaruStage 1 Stage 2 Stage 3 Stage 4 Quest
StatsVitality 600 1000 1500 2000 2000Speed 18 18 18 18 18Range 2 2 2 2 2Mass 1 1 1 1 1Fire Resistance 10% 20% 30% 50% 50%Water Resistance 10% 20% 30% 50% 50%Earth Resistance 10% 20% 30% 50% 50%Lightning Resistance 60% 70% 80% 100% 100%Immobility Resistance 50% 60% 70% 80% 100%Never Retreats
AttackMelee/Ranged Chances 35% / 65% 35% / 65% 35% / 65% 30% / 70% 50% / 50%Attack Chance (non-spell) 90% 90% 90% 90% 90%
MeleeNormal Damage 15 – 30 25 – 40 35 – 50 45 – 60 45 – 60Poison Damage 3 4 5 6 7
RangedForked L. 5 Forked L. 7 Forked L. 9 Forked L. 11;90% Forked L. 11;90%
Conduct. 7;10% Conduct. 7;10%
LootValue 20 – 30 30 – 50 50 – 75 75 – 100 50 – 100Armor/Weapon is Magic? 100% 100% 100% 100% 100%Magic A/W is Unique? 1% (U1) 25% (U1) 25% (U2) 25% (U2) 100%Magic A/W is Cursed? 5% 50% 50% 50% 50%Weapon Koga Shuriken
Polearm 5% 10% 10% 10%Sword 30% 50% 10% 30%Throwing 65% 40% 80% 60%
Chance of Second Item 25% 25% 25% 50% 100%
Koga Bakamaru Loot
Monsters: Fallen Ninja
primagames.com 129
First ItemWeapon (see individual listings)
Second Item (variable chances)Nothing (10%)Gem (5%)Potion (15%)
Remedy (10%)Health (50%)Ki (40%)
Gold (25%) (250 – 500)Component (15%)
Gold Soul Shard (70%)Green Soul Shard (30%)
Amulet (15%)Jewel (25%)Medicine Case (25%)Prayer Beads (25%)Talisman (25%)
Armor (15%)

Fallen Wizard
Majin Cho-Sei Abe-No-Seimei Hoshin * Kyokugeisha KarimaFu-sei
(6 Leaders)
StatsVitality 350 600 900 1200 200 – 300 1350 – 1650Speed 20 20 20 20 20 20Range 1 1 1 1 10 10Mass 6 6 6 6 6 6Fire Resistance 20% 30% 40% 100% 100%Water Resistance 20% 30% 40% 50% 60%Earth Resistance 20% 30% 90% 50% 100% 60%Lightning Resistance 70% 80% 40% 50% 100% 100%Immobility Resistance 70% 75% 80% 65% 100% 75%Might retreat if under 15% 15% 15% 15%
Attack (Always Attacks with Spells)All Spark Skr. 8;60% F. Barbs 2;45% Lava Skr. 12;40% F. Storm 3;8% Spark Skr. 20;85% F. Barbs 6;45%A F. Barbs 1;40% L. Strike 4;45% Lava Ring 2;8% F. Skr. 15;37% E. Dragon 29;15% Blastwv 15;45%A Arc Wall 6;10% F. Barbs 3;52% F. Barbs 4;55% F. Drag. 30;10%B L. Kanji 11;45%B Conduct. 7;10%
LootValue 15 – 25 30 – 40 30 – 40 40 – 50 60 – 70 60 – 70Armor/Weapon is Magic? 70% 100%Magic Slots Filled in A/W 40% 40%Magic A/W is Unique? 5% (U3) 10% (U3)Magic A/W is Cursed? 10%Second Item Soul of Budd. Blood of Budd. Patience of Budd. Tear of Budd. use list use listChance of Second Item 100% 100% 100% 100% 75% 100%
Fallen Wizard Loot
Prima’s Official Strategy Guide
130
First ItemNothing (45%)Gem (5%)Component (25%)
Jade (30%)Blue Soul Shard (20%)Red Soul Shard (30%)Gold Soul Shard (20%)
Amulet (25%)Jewel (50%)Medicine Case (25%)Talisman (25%)
Second Item (see each Wizard; variable chance)Gold (60%) (1 – 300)Component (20%)
Jade (30%)Blue Soul Shard (20%)Red Soul Shard (30%)Gold Soul Shard (20%)
Weapon (20%)Sword (30%)Polearm (30%)Bow (30%)Thrown (10%)
primagames.com

Gaki
* Gaki * Moldy * Blood * Slime * Infected * AccursedGaki Gaki Gaki Gaki Gaki
StatsVitality 15 – 25 35 – 45 60 – 90 90 – 130 120 – 180 160 – 240Speed 18 18 19 19 20 20Range 0.25 0.25 0.25 0.25 0.25 0.25Fire Resistance 80%Water Resistance 70%Earth Resistance 90%Lightning Resistance 100%Immobility Resistance 100% 30% 70% 80%Might retreat if under 35% 30% 25% 20% 15% 10%
AttackMelee/Ranged Chances 100% / 0% 100% / 0% 95% / 5% 95% / 5% 90% / 10% 90% / 10%Attack Chance (non-spell) 65% 65% 75% 75% 80% 80%
MeleeNormal Damage 3 – 10 5 – 15 12 – 22 10 – 30 20 – 40 25 – 45
RangedFrostbolt 9 Flame Dart 13 Meteor 7 Ball L. 8
Loot (only * Assault Troops might have Magic Weapons or Armor)Value 0 – 10 0 – 10 0 – 10 0 – 10 0 – 10 0 – 10Armor/Weapon is Magic? 15% 15% 15% 15% 15% 15%Magic Slots Filled in A/W 30% 30% 30% 30% 30% 30%Magic A/W is Cursed? 5% 5% 5% 5% 5% 5%
Gaki LootFirst Item
Nothing (10%)Weapon (20%)
Sword (75%)Polearm (25%)
Gold (70%) (1 – 500)
Second Item (30% Chance)Nothing (60%)Gem (5%)Gaki Bones (35%)
Monsters: Fallen Wizard, Gaki
primagames.com 131
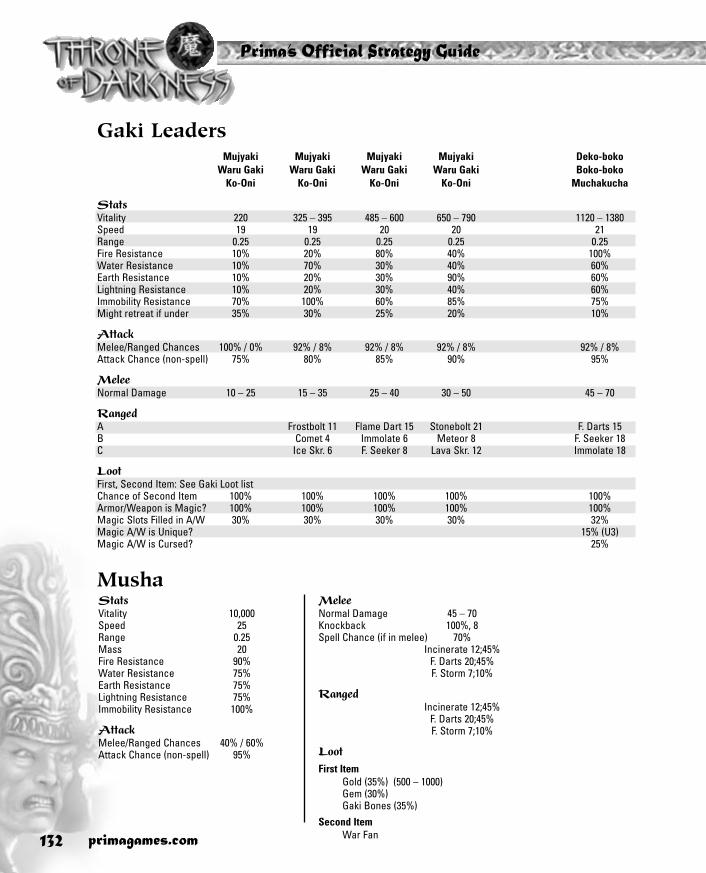
Gaki LeadersMujyaki Mujyaki Mujyaki Mujyaki Deko-boko
Waru Gaki Waru Gaki Waru Gaki Waru Gaki Boko-bokoKo-Oni Ko-Oni Ko-Oni Ko-Oni Muchakucha
StatsVitality 220 325 – 395 485 – 600 650 – 790 1120 – 1380Speed 19 19 20 20 21Range 0.25 0.25 0.25 0.25 0.25Fire Resistance 10% 20% 80% 40% 100%Water Resistance 10% 70% 30% 40% 60%Earth Resistance 10% 20% 30% 90% 60%Lightning Resistance 10% 20% 30% 40% 60%Immobility Resistance 70% 100% 60% 85% 75%Might retreat if under 35% 30% 25% 20% 10%
AttackMelee/Ranged Chances 100% / 0% 92% / 8% 92% / 8% 92% / 8% 92% / 8%Attack Chance (non-spell) 75% 80% 85% 90% 95%
MeleeNormal Damage 10 – 25 15 – 35 25 – 40 30 – 50 45 – 70
RangedA Frostbolt 11 Flame Dart 15 Stonebolt 21 F. Darts 15B Comet 4 Immolate 6 Meteor 8 F. Seeker 18C Ice Skr. 6 F. Seeker 8 Lava Skr. 12 Immolate 18
LootFirst, Second Item: See Gaki Loot listChance of Second Item 100% 100% 100% 100% 100%Armor/Weapon is Magic? 100% 100% 100% 100% 100%Magic Slots Filled in A/W 30% 30% 30% 30% 32%Magic A/W is Unique? 15% (U3)Magic A/W is Cursed? 25%
Musha
Prima’s Official Strategy Guide
132 primagames.com
StatsVitality 10,000Speed 25Range 0.25Mass 20Fire Resistance 90%Water Resistance 75%Earth Resistance 75%Lightning Resistance 75%Immobility Resistance 100%
AttackMelee/Ranged Chances 40% / 60%Attack Chance (non-spell) 95%
MeleeNormal Damage 45 – 70Knockback 100%, 8Spell Chance (if in melee) 70%
Incinerate 12;45%F. Darts 20;45%F. Storm 7;10%
RangedIncinerate 12;45%
F. Darts 20;45%F. Storm 7;10%
LootFirst Item
Gold (35%) (500 – 1000)Gem (30%)Gaki Bones (35%)
Second ItemWar Fan

Guardian Dragon
Nishino Kitano Higashino Touno
StatsVitality 3600 – 4400 3600 – 4400 3600 – 4400 3600 – 4400Speed 28 28 28 28Range 8 8 8 8Mass 30 30 30 30Fire Resistance 50% 80% 50% 50%Water Resistance 50% 50% 80% 50%Earth Resistance 80% 50% 50% 50%Lightning Resistance 50% 50% 50% 80%Immobility Resistance 90% 90% 100% 85%Might retreat if under 50% 50% 50% 50%
AttackMelee/Ranged Chances 95% / 5% 95% / 5% 95% / 5% 95% / 5%Attack Chance (non-spell) 98% 98% 98% 98%
MeleeNormal Damage 60 – 80 60 – 80 60 – 80 60 – 80Earth Damage 10 – 20 10 – 20 10 – 20 10 – 20Knockback 100%, 7 100%, 7 100%, 7 100%, 7Spell Chance (if in melee) 80% 80% 80% 80%
Lava Ring 5;60% Inciner. 5;60% Tidal Wv. 5;60% L. Burst 5;60%Brimstone 5;30% F. Darts 5;30% Blizzard 5;30% Spark Storm 5;30%
Entomb 5;10% Inflamm. 5;10% Drown 5;10% Conduct. 5;10%
RangedLava Ring 5;60% Inciner. 5;60% Tidal Wv. 5;60% L. Burst 5;60%Brimstone 5;40% F. Darts 5;40% Blizzard 5;40% Spark Storm 5;40%
LootGuardian Dragon Loot (all)
Guardian Dragon LootFirst Item
Guardian Dragon Head
Second ItemGem (5%)Gold (45%) (500 – 2000)Guardian Dragon Wing (25%)Guardian Dragon Skin (25%)
Monsters: Gaki, Guardian Dragon
primagames.com 133

Kappa
* Kappa * Dark * Kappa * Ancient * LegendaryKappa Lord Kappa Kappa
StatsVitality 65 – 95 120 – 180 200 – 300 320 – 480 500 – 700Speed 8 8 9 9 10Range 9 9 10 11 12Mass 30 35 40 45 50Immobility Resistance 50% 60% 70%
Attack (Melee)Attack Chance (non-spell) 70% 75% 80% 85% 90%Normal Damage 15 – 30 25 – 40 35 – 50 45 – 60 50 – 70Poison Damage 1 2 3 4 5Knockback (chance, force) 100%, 5 100%, 5.5 100%, 6 100%, 7 100%, 8
LootValue 0 – 40 25 – 50 35 – 65 45 – 75 55 – 85Armor/Weapon is Magic? 1% 15% 20% 25% 30%Armor/Weapon is Magic? (*) 50% 25% 25% 25% 25%Magic Slots Filled in A/W 10% (* 15%) 15% 20% 25% 30%Magic A/W is Cursed? 5% 5% 5% 5% 5%
Kappa LootFirst Item
Nothing (60%)Gold (35%) (1 – 2000)Gem (5%)
Second Item (25% Chance)Nothing (25%)Component (60%)
Elder Kappa Shell (30%)Kappa Claw (30%)Kappa Blood (30%)Pearl (10%)
Potion (15%) (all sizes)Remedy (25%)Health (25%)Ki (25%)Restorative (25%)
Prima’s Official Strategy Guide
134 primagames.com

Small Kappa
* Small * Wild * Rogue * Dark * KillerKappa Kappa Kappa Kappa Kappa
StatsVitality 15 – 25 35 – 45 60 – 90 90 – 130 120 – 180Speed 16 16 17 17 18Range 0.25 0.25 0.25 0.25 0.25Immobility Resistance 50% 60% 70%
Attack (Melee)Attack Chance (non-spell) 65% 70% 75% 85% 90%Normal Damage 8 – 15 15 – 20 20 – 25 30 – 35 35 – 45
Loot Small Kappa Loot (all)
Small Kappa LootFirst Item
Nothing (90%)Component (10%)
Kappa Claw (45%)Kappa Blood (45%)Pearl (10%)
Second Item (1% Chance)Nothing (60%)Gold (39%) (5 – 250)Gem (1%)
Monsters: Kappa
primagames.com 135
BakuStatsVitality 9000Speed 14Range 12Mass 90Fire Resistance 65%Water Resistance 90%Earth Resistance 65%Lightning Resistance 50%Immobility Resistance 100%
Attack (Melee)Attack Chance (non-spell) 95%Normal Damage 60 – 100Fire Damage 10Water Damage 10Earth Damage 10Lightning Damage 10Poison Damage 10Knockback (chance, force) 100%, 12Stun (chance, duration) 100%, 6 sec.
Loot
First ItemGold (35%) (250 – 500)Gem (30%)Elder Kappa Shell (35%)
Second ItemRed Kappa Egg (50%)Purple Kappa Egg (50%)

Kappa LeadersSuima Suima Suima Suima Suishin
Umagoroshi Umagoroshi Umagoroshi Umagoroshi SuikoIwanage Iwanage Iwanage Iwanage
StatsVitality 225 – 275 450 – 550 700 – 900 1170 – 1430 1600 – 2000Speed 8 8 9 9 10Range 9 9 10 11 12Mass 30 35 40 45 50Fire Resistance 10% 20% 30% 40% 50%Water Resistance 10% 20% 30% 40% 50%Earth Resistance 10% 20% 30% 40% 50%Lightning Resistance 10% 20% 30% 40% 50%Immobility Resistance 70% 75% 80% 85% 90%
Attack (Melee)Attack Chance (non-spell) 70% 75% 80% 85% 90%Normal Damage 25 – 40 35 – 50 45 – 60 55 – 70 60 – 80Poison Damage 1 – 2 2 – 3 3 – 4 4 – 5 5 – 6Knockback (chance, force) 100%, 5 100%, 5.5 100%, 6 100%, 7 100%, 8
LootFirst, Second Items: use Kappa Loot list (with exceptions listed below)Value 0 – 40 25 – 50 35 – 65 45 – 75 55 – 85Armor/Weapon is Magic? 100% 100% 100% 100% 100%Magic Slots Filled in A/W 15% 15% 20% 25% 30%Magic A/W is Unique? 10% (U1) 10% (U1) 10% (U1) 10% (U1)Magic A/W is Cursed? 5% 5% 5% 50% 50%Chance of Second Item 25% 25% 100% 100% 100%Component Chances (second item)
Elder Kappa Shell 30% 30% 40% 50% 75%Kappa Claw 30% 30% 30% 20% 15%Kappa Blood 30% 30% 20% 20% 10%Pearl 10% 10% 10% 10%
Suigetsu Loot (Oda Ninja quest)
Suigetsu Loot (otherwise)
Prima’s Official Strategy Guide
136 primagames.com
First ItemSuigetsu’s Shell
Second ItemGold (80%)Potion (20%)
Remedy (25%)Health (25%)Ki (25%)Restorative (25%)
First ItemComponent
Elder Kappa Shell (80%)Kappa Claw (10%)Kappa Blood (10%)
Second ItemGold (50%) (100 – 1000)Weapon (50%)
Sword (50%)Polearm (50%)

SuigetsuStage 1 Stage 2 Stage 3 Stage 4 Quest
StatsVitality 700 1500 2500 3500 1500Speed 10 10 10 10 10Range 12 12 12 12 12Fire Resistance 20% 20% 20% 20% 20%Water Resistance 100% 100% 100% 100% 100%Earth Resistance 40% 40% 40% 40% 40%Lightning Resistance 60% 60% 60% 60% 60%Immobility Resistance 100% 100% 100% 100% 100%Might retreat if under 30% 30% 30% Never retreats Never retreats
AttackAttack Chance (non-spell) 85% 85% 85% 85% 85%Water Damage 20 – 40 30 – 50 40 – 60 50 – 70 30 – 50Poison Damage 3 4 5 6 4Knockback (chance, force) 100%, 4 100%, 4 100%, 4 100%, 4 100%, 4
LootValue 10 – 40 25 – 50 45 – 75 60 – 100 n.a.Armor/Weapon is Magic? 30% 30% 50% 100%Magic A/W is Unique? 5% (U1) 5% (U1) 10% (U2) 50% (U2)Magic Slots Filled in A/W 20% 30% 30% 40%
SuizanStage 1 Stage 2 Stage 3 Stage 4 Quest
StatsVitality 800 1600 2600 3600 800Speed 10 10 10 10 10Range 12 12 12 12 12Mass 30 30 30 30 30Fire Resistance 20% 30% 40% 50% 20%Water Resistance 20% 30% 40% 50% 20%Earth Resistance 20% 30% 40% 50% 20%Lightning Resistance 20% 30% 40% 50% 20%Immobility Resistance 70% 75% 80% 85% 70%
AttackAttack Chance (non-spell) 75% 80% 80% 80% 70%Normal Damage 10 – 30 20 – 40 30 – 50 40 – 60 10 – 30Water Damage 10 – 20 10 – 20 10 – 25 10 – 30 10 – 20Knockback 100%, 8 100%, 8 100%, 8 100%, 8 100%, 8Stun (chance, duration) 90%, 2 sec. 90%, 2 sec. 90%, 2 sec. 90%, 2 sec. 90%, 2 sec.
LootSuizan has the Ashura Statue if encountered on the Mori Leader quest. Otherwise, Suizan is a Kappa Leader; see the appro-priate Kappa Leader loot (Stage 1 – 4), on previous page.
Monsters: Kappa
primagames.com 137

Kihei
* Kihei * Fear Knight * Doom Charger * Knightmare Shadow Rider * Black Cavalier
StatsVitality 65 – 75 155 – 185 225 – 275 225 – 275 300 – 450 350 – 470Speed 20 20 20 20 20 20Range 5 5 5 5 5 5Mass 6 6 6 6 6 6Fire Resistance 60% 90%Water Resistance 70%Earth Resistance 50% 100%Lightning Resistance 80%Immobility Resistance 100% 60% 40% 80%
Attack (Always Attacks with Spells)Stonebolt 1;60% Immolate 2;60% Comet 3;60% Ball L. 4;60% Immolate 5;60% Meteor 6;60%Entomb 1;40% Inflamm. 2;40% Drown 3;40% Conduct. 4;40% Inflamm. 5;40% Entomb 6;40%
LootValue 15 – 25 20 – 40 40 – 60 55 – 75 80 – 100 80 – 100Armor/Weapon is Magic? 10% 15% 20% 25% 30% 35%Magic Slots Filled in A/W 10% 10% 20% 20% 25% 30%Chance of Second Item 10% 10% 20% 20% 20% 20%Magic A/W is Cursed? 5% 5% 5% 5% 5% 5%
Kihei Loot
Prima’s Official Strategy Guide
138 primagames.com
First ItemNothing (25%)Mask (5%)Armor (30%)Weapon (40%)
Sword (75%)Throwing (25%)
Second Item (10% Chance)Nothing (10%)Gold (40%) (1 – 25)Gem (5%)Health (20%)Jewel (15%)Component (10%)
Blue Soul Shard (5%)Purple Soul Shard (25%)Red Soul Shard (5%)Cho-gokin Ore (20%)Gold Soul Shard (10%)Coral (25%)Pearl (5%)Green Soul Shard (5%)

Kihei LeadersKotsu-ba Kotsu-ba Kotsu-ba Kotsu-ba OtafukuKoku-ba Koku-ba Koku-ba Koku-ba OkashiRai-ba Rai-ba Rai-ba Rai-ba Azari
Satujin-ba
StatsVitality 250 – 310 425 – 575 550 – 650 680 – 1020 1200 – 1800Speed 22 22 22 22 22Range 5 5 5 5 5Mass 6 6 6 6 6Fire Resistance 60% 20% 40% 90% 70%Water Resistance 10% 70% 40% 40% 70%Earth Resistance 30% 35% 30% 50% 100%Lightning Resistance 30% 35% 80% 50% 60%Immobility Resistance 50% 100% 80% 65% 95%
Attack (Always Attacks with Spells)A F. Darts 2;90% Ice Skr. 3;90% Spark Skr. 4;90% F. Seeker 5;90% Lava Skr. 7;90%B F. Seeker 2;90% Ice Skr. 3;90% Spark Skr. 4;90% F. Seeker 5;90% Lava Skr. 7;90%C (& D) Immolate 2;90% Comet 3;90% Ball L. 4;90% Immolate 5;90% Meteor 7;90%All Inciner. 2;10% Tidal Wv. 3;10% L. Burst 4;10% Inciner. 5;10% Lava Ring 7;10%
LootFirst, Second Items: Use Kihei Loot listValue 15 – 25 20 – 40 40 – 60 55 – 75 80 – 100Armor/Weapon is Magic? 10% 15% 20% 25% 35%Magic Slots Filled in A/W 10% 10% 20% 20% 30%Chance of Second Item 10% 10% 20% 20% 20%Magic A/W is Cursed? 5% 5% 5% 5% 5%
Monsters: Kihei
primagames.com 139

Neanderskull
Neanderskull Thunderskull Darkskull Dreadskull Demonskull
StatsVitality 55 – 65 170 – 190 225 – 275 290 – 350 400 – 480Speed 8 8 8 8 8Range 10 10 10 10 10Immobility Resistance 50% 100% 80%
Attack (Melee)Attack Chance (non-spell) 70% 75% 75% 80% 85%Normal Damage 9 – 15 18 – 28 28 – 42 38 – 55 70 – 100Knockback (chance, force) 100%, 3 100%, 3 100%, 3 100%, 3 100%, 3
LootValue 0 – 20 0 – 30 25 – 50 40 – 75 60 – 100Magic Slots Filled in A/W 30% 30% 30% 20% 40%Magic A/W is Cursed? 15% 15% 15% 15% 15%Chance of Second Item 10% 10% 20% 20% 30%
Nothing 25% 25% 25% 25% 25%Gold 70% 65% 60% 60% 60%Component 5% 5% 5% 5% 5%Talisman 10% 10% 10% 10%
Neanderskull Loot Neanderskull Leaders
Prima’s Official Strategy Guide
140 primagames.com
DaikotsuMatsushima
Rokuden
StatsVitality 1300 – 1900Speed 12Range 10Immobility Resistance 95%
AttackAttack Chance (non-spell) 90%Normal Damage 80 – 120Knockback (chance, force) 100%, 3
LootFirst, Second Items: UseNeanderskull Loot listValue 60 – 100Gold 200 – 500Armor/Weapon is Magic? 70%Magic A/W is Cursed? 50%Magic Slots Filled in A/W 60%Magic A/W is Unique? 5% (U1)Chance of Second Item 70%
First ItemNothing (50%)Armor (35%)Weapon (15%)
Polearm (85%)Sword (15%)
Second Item (see individual listings)Nothing (see individual listings)Gold (see individual listings) (1 – 500)Component (see individual listings)
Purple Soul Shard (30%)Cho-gokin Ore (30%)Gold Soul Shard (10%)Coral (10%)Pearl (10%)Green Soul Shard (10%)
Talisman (see individual listings)

Oni
Greater Oni
Oni Blood Lightning Ice * Earth Oni BlackOni Oni Oni (* = wild Oni) Oni
StatsVitality 70 – 110 110 – 170 160 – 240 200 – 300 320 – 480 640 – 960Range 15 15 20 15 20 15Mass 20 20 20 20 20 20Fire Resistance (not *) 90%Water Resistance 80% 100%Earth Resistance 90%Lightning Resistance 70% 100%Immobility Resistance 30% 40% 50% 100% 40% 100%
AttackMelee/Ranged Chances 100% / 0% 100% / 0% 40% / 60% 40% / 60% 35% / 65% 40% / 60%Attack Chance (non-spell) 70% 70% 75% 80% 85% 90%
MeleeNormal Damage 10 – 20 20 – 30 30 – 45 40 – 60 45 – 65 50 – 80Fire Damage 5 – 20Water Damage (not B) 5 – 20Earth Damage 5 – 20Lightning Damage 10 – 20Poison Damage (* only) 5Knockback 100%, 2 100%, 3 100%, 4 100%, 5 100%, 6 100%, 8Stun (chance, duration) 60%, 2 sec. 80%, 2 sec.
RangedSpark Skr. 8 Ice Spr. 10 Lava Skr. 18;35% L. Wave 14
F. Seeker 18;35%Inflammable 1;15%
Entomb 1;15%
LootValue 20 – 30 60 – 100 40 – 60 60 – 80 80 – 100 90 – 100Armor/Weapon is Magic? 10% 20% 30% 40% 50% 60%Magic Slots Filled in A/W 30% 30% 30% 30% 30% 30%
Monsters: Neanderskull, Oni
primagames.com 141

Lesser Oni
* Forest Oni * Lava Oni * Frost Oni * Oni Lord * Wild Oni
StatsVitality 50 – 70 80 – 120 80 – 120 110 – 170 160 – 240Speed 11 4 4 4 4Range 4 11 11 12 13Mass 15 15 15 15 15Fire Resistance 90%Water Resistance 70%Lightning Resistance 80%Immobility Resistance 100% 60% 40%Never Retreats
AttackMelee/Ranged Chances 100% / 0% 100% / 0% 90% / 10% 90% / 10% 90% / 10%Attack Chance (non-spell) 70% 70% 75% 80% 85%
MeleeNormal Damage 10 – 15 18 – 25 28 – 35 38 – 45 45 – 55Poison Damage 1 1 1 – 2 1 – 3 2 – 3Knockback (chance, force) 100%, 2 100%, 2 100%, 2.5 100%, 3 100%, 3.5
RangedFrostbolt 14 Ball L. 7 Immolate 12
LootLesser Oni Loot (all)
Greater Oni LootFirst Item
Nothing (50%)Amulet (10%)
Jewel (50%)Talisman (50%)
Polearm (25%)Component (15%)
Oni Bones (70%)Oni Fangs (30%)
Second Item (25% Chance)Nothing (50%)Gem (5%)Potion (10%) (Average/Larger)
Health (40%)Ki (40%)Restorative (20%)
Gold (35%) (1 – 700)
Prima’s Official Strategy Guide
142 primagames.com
Lesser Oni LootFirst Item
Nothing (50%)Gold (50%) (1 – 350)
Second Item (30% Chance)Nothing (95%) (50% chance for Assault Troops and Leaders)Component (5%) (45% chance for Assault Troops and Leaders)
Forest Oni Ichor (30%)Oni Claw (30%)Forest Oni Horn (40%)
Gem (0%) (5% chance for Assault Troops and Leaders)

Oni LeadersSugari Sugari Sugari Sugari Yuki Otoko
Bakemono Bakemono Bakemono Bakemono OnirokuTatari Tatari Tatari Tatari Mononoke
StatsVitality 250 400 600 850 1100 – 1300Speed 11 11 11 12 16Range 4 4 4 4 20Mass 15 15 15 15 10Fire Resistance 20% 30% 90% 50%Water Resistance 70% 30% 40% 100%Earth Resistance 20% 30% 40% 50%Lightning Resistance 20% 80% 40% 100%Immobility Resistance 70% 100% 80% 65% 100%Never Retreats
AttackMelee/Ranged Chances (A) 100% / 0% 100% / 0% 100% / 0% 100% / 0% 50% / 50%
(B) 100% / 0% 90% / 10% 90% / 10% 90% / 10% 90% / 10%(C) 100% / 0% 90% / 10% 90% / 10% 90% / 10% 75% / 25%
Attack Chance (non-spell) 70% 70% 75% 80% 85%
MeleeNormal Damage 15 – 30 25 – 40 35 – 50 45 – 60 55 – 75Fire Damage 5 – 20Earth Damage 5 – 20Poison Damage 1 – 2 1 – 3 2 – 3 2 – 4Knockback (chance, force) 100%, 2 100%, 2 100%, 2.5 100%, 3 100%, 6
RangedA Ice Spr. 12;70%A L. Wave 12;30%B Frostbolt 16 Ball L. 8 Flame Dart 26 Ice Skr. 18;70%B Spark Storm 12;30%C Comet 7 Spark Skr. 8 F. Seeker 12 W. Strike 9;50%C L. Strike 9;50%
LootLesser Oni Loot (Stage 1 – 4) Greater Oni Leader Loot
Monsters: Oni
primagames.com 143

Greater Oni Leader LootFirst Item
Nothing (10%)Amulet (10%)
Magic Slots Filled: 30%Jewel (50%)Talisman (50%)
Polearm (25%)
Second ItemNothing (5%)Gem (5%)Potion (10%) (Larger)
Health (40%)Ki (40%)Restorative (20%)
Gold (30%) (300 – 1000)Component (50%)
Oni Bones (70%)Oni Fangs (30%)
Value (Kijin, Daikaioniou) 90 – 100Value (Stage 5 Leaders) 80 – 100Armor/Weapon is Magic? 100%Magic Slots Filled in A/W 30%Magic A/W is Unique? 5% (3)Magic A/W is Cursed? 5%
Daikaioniou (Dai-Oni)StatsVitality 4000Range 20Mass 10Fire Resistance 60%Water Resistance 60%Earth Resistance 100%Lightning Resistance 60%Immobility Resistance 75%
AttackMelee/Ranged Chances 35% / 65%Attack Chance (non-spell) 95%
MeleeNormal Damage 70 – 120Earth Damage 10 – 30Knockback 100%, 12
RangedBrimstone 15;50%Lava Ring 6;35%Entomb 6;15%
LootGreater Oni Leader Loot
Ichi-noStatsVitality 4000Speed 18Range 15Mass 20Fire Resistance 100%Water Resistance 60%Earth Resistance 100%Lightning Resistance 60%Immobility Resistance 90%
AttackMelee/Ranged Chances 40% / 60%Attack Chance (non-spell) 95%
MeleeNormal Damage 50 – 70Fire Damage 10 – 20Lightning Damage 10 – 20Knockback 100%, 10Spell Chance (if in melee) 70%
F. Darts 15;50%Brimstone 15;50%
RangedF. Darts 15;50%
Brimstone 15;50%
Loot
First ItemGold (35%)Gem (30%) (250 – 500)Component (35%)
Oni Claw (30%)Oni Bones (40%)Oni Fangs (30%)
Second ItemWeapon (45%)
Polearm (70%)Sword (30%)
Armor (45%)Potion (10%) (Larger)
Remedy (25%)Health (25%)Ki (25%)Restorative (25%)
Value 50 – 100Armor/Weapon is Magic? 100%Magic Slots Filled in A/W 50%Magic A/W is Unique? 20% (U3)
Prima’s Official Strategy Guide
144 primagames.com

KijinStatsVitality 3500Speed 13Range 15Fire Resistance 30%Water Resistance 80%Earth Resistance 50%Lightning Resistance 50%Immobility Resistance 100%
AttackMelee/Ranged Chances 30% / 70%Attack Chance (non-spell) 90%
MeleeNormal Damage 20 – 40Water Damage 20 – 40Knockback 100%, 12Stun (chance, duration) 100%, 4 sec.
RangedIce Skr. 20;70%
W. Dragon 20;30%
LootGreater Oni Leader Loot
Tessa-ikiStatsVitality 3200Speed 19Range 15Mass 30Fire Resistance 100%Water Resistance 60%Earth Resistance 100%Lightning Resistance 60%Immobility Resistance 70%
Attack (Always Attacks with Spells)Blastwave 15;60%Incinerate 6;20%Lava Ring 6;20%
Tessa-iki Loot(Toyotomi Berserker quest)
First ItemTessaiki’s Teeth
Second ItemGold (50%) (250 – 500)Potion (25%) (Larger)Component (25%)
Blue Soul Shard (20%)Purple Soul Shard (20%)Red Soul Shard (20%)Gold Soul Shard (20%)Green Soul Shard (20%)
(otherwise)
First ItemArmor (50%)Weapon (50%)
Second ItemNothing (5%)Potion (35%) (Larger)Gold (60%) (250 – 500)
Value 20 – 30Armor/Weapon is Magic? 100%Magic A/W is Unique? 100% (U3)Magic Slots Filled in A/W 100%
Monsters: Oni
primagames.com 145

Scorpion Dragon
* Scorpion * Poison * Death * Kill * Fang * DeathDragon Drake Strike Claw Razor
StatsVitality 50 – 70 80 – 120 120 – 180 175 – 265 255 – 385 320 – 480Speed 18 18 19 19 20 20Range 8 8 8 8 8 8Mass 15 15 15 15 15 15Fire Resistance 60% 100%Water Resistance 70% (* only) 90%Lightning Resistance 80% 90%Immobility Resistance 100% 60% 100% 50%Never Retreats
AttackMelee/Ranged Chances 100% / 0% 40% / 60% 40% / 60% 35% / 65% 35% / 65% 30% / 70%Attack Chance (non-spell) 70% 75% 80% 80% 85% 90%
MeleeNormal Damage 10 – 20 20 – 30 30 – 40 40 – 50 45 – 60 60 – 70Poison Damage 1 1 1 – 2 2 – 3 2 – 4 3 – 4Knockback (chance, force) 100%, 5 100%, 5.5 100%, 6 100%, 6.5 100%, 7 100%, 7.5
RangedDrag. Flame 1 Drag. Flood 1 L. Strike 5;20% Drag. Str. 4;70% Drag. Fl. 5;60%
Drag. Str. 2;80% Forked L. 9;20% Inf. Str. 9;30%Conduct. 9;10% Inflamm. 11;10%
LootScorpion Dragon Loot (all)
Scorpion Dragon LootFirst Item
Nothing (80%)Gem (15%)Remedy Potion (5%) (Larger)
Second Item (100% Chance for Leaders; 20% Chance for all others)Nothing (50%)Component (10%)
Scorpion Dragon Stinger (80%)Purple Soul Shard (20%)
Gold (40%) (1 – 1500)
Prima’s Official Strategy Guide
146 primagames.com

Scorpion Dragon LeadersSasori-Ryu Sasori-Ryu Sasori-Ryu Sasori-Ryu Satsuki RaijuKanumaru Kanumaru Kanumaru Kanumaru Chokki KanumaruMou-doku Mou-doku Mou-doku Mou-doku
StatsVitality 250 400 600 850 1200 1500Speed 18 18 19 19 20 20Range 8 8 8 8 8 8Mass 15 15 15 15 15 15Fire Resistance 60% 20% 30% 40% 100% 60%Water Resistance 10% 20% 30% 40% 50% 60%Earth Resistance 10% 20% 30% 90% 50% 60%Lightning Resistance 10% 20% 80% 40% 50% 100%Immobility Resistance 50% 100% 80% 85% 70% 100%Never Retreats
AttackMelee/Ranged Chances 100% / 0% 40% / 60% 40% / 60% 35% / 65% 35% / 65% 35% / 65%Attack Chance (non-spell) 70% 75% 80% 80% 85% 90%
MeleeNormal Damage 15 – 30 30 – 40 40 – 50 45 – 60 55 – 70 65 – 80Poison Damage 1 1 – 2 2 – 3 2 – 4 3 – 4 3 – 5Knockback (chance, force) 100%, 5 100%, 5.5 100%, 6 100%, 6.5 100%, 7 100%, 7.5
RangedAll Drag. Flood 1 Drag. Str. 2;80% Drag. Stn. 3;70% Drag. Fl. 4;70% Drag Str. 5;60%A Lightning 7;20% Stoneblt 14;30% Immol. 11;30% Forkd L. 13;30%A Cond. 11;10%B L. Strike 5;20% E. Strike 6;30% Inf. Str. 8;30% Ice Skr. 12;30%B Drown 11;10%C Ball L. 7;20% Meteor 9;30%
LootScorpion Dragon Loot (all)
Monsters: Scorpion Dragon
primagames.com 147

Gero-monStatsVitality 2200Speed 22Range 10Mass 15Fire Resistance 50%Water Resistance 50%Earth Resistance 50%Lightning Resistance 100%Immobility Resistance 85%
AttackMelee/Ranged Chances 50% / 50%Attack Chance (non-spell) 85%
MeleeNormal Damage 50 – 70Poison Damage 5 – 8Knockback 100%, 10
RangedForked L. 13;20%
Drag. Strike 5;70%Conduct. 9;10%
LootDragon Parts
San-noStatsVitality 6000Speed 22Range 5Mass 15Fire Resistance 60%Water Resistance 60%Earth Resistance 60%Lightning Resistance 100%Immobility Resistance 100%
AttackMelee/Ranged Chances 40% / 60%Attack Chance (non-spell) 90%
MeleeNormal Damage 60 – 80Poison Damage 7Knockback 100%, 10Spell Chance (if in melee) 75%
Drag. Strike 6;70%L. Wave 18;30%
RangedDrag. Strike 6;70%
L. Wave 18;30%
Loot
First ItemGold (35%) (500 – 1000)Gem (30%)Dragon Stinger (35%)
Second ItemWeapon (45%)
Sword (70%)Polearm (30%)
Armor (45%)Potion (10%) (Larger)
Remedy (25%)Health (25%)Ki (25%)Restorative (25%)
Value 50 – 100Armor/Weapon is Magic? 100%Magic Slots Filled in A/W 50%Magic A/W is Unique? 20% (U3)
Prima’s Official Strategy Guide
148 primagames.com

Shadow Commander
Shadow Vanguard Dark Blood * ShadowCommander Leader Commander Lord Knight
StatsVitality 15 – 35 65 – 95 95 – 145 155 – 215 255 – 385Speed 13 14 15 15 16Range 5 5 5 5 5Mass 3 3 3 3 3Water Resistance 100%Earth Resistance 80%Lightning Resistance 70%Immobility Resistance (Wild only) 30% (Wild only) 40% 50% 60% 100%Might retreat if under 30% 25% 20% 20% 10%
AttackMelee/Ranged Chances 100% / 0% 100% / 0% 75% / 25% 50% / 50% 27% / 73%Attack Chance (non-spell) 70% 75% 80% 85% 95%
MeleeNormal Damage 10 – 24 20 – 35 30 – 45 40 – 60 60 – 90Knockback 100%, 3 100%, 3 100%, 4 100%, 4 100%, 6Stun (chance, duration) 50%, 2 sec. 80%, 2 sec.
RangedForked L. 8;75% E. Strike 7 Blizzard 15;30%Conduct. 3;25% Ice Skr. 17;70%
LootValue 20 – 30 20 – 50 35 – 65 50 – 80 80 – 100Armor/Weapon is Magic? 10% 15% 5% 10% 20%Magic Slots Filled in A/W 25% 25% 25% 25% 25%
First ItemNothing 50% 50% 25% 25% 25%Mask 1% 1% 15%Armor 25% 25% 35% 40% 30%Weapon 25% 25% 39% 34% 30%
Chance of Second Item 20% 20% 40% 25% 40%Amulet 10% 10% 10%Gold 50% 50% 50% 50% 50%Potion 20% 20% 20% 20% 20%Component 30% 30% 20% 20% 20%
Monsters: Scorpion Dragon, Shadow Commander
primagames.com 149

Shadow Commander LootFirst Item
Nothing (see individual listings)Armor (see individual listings)Weapon (see individual listings)
Sword (85%)Throwing (15%)
Second Item (see individual listings)Gold (see individual listings) (1 – 1000)Potion (see individual listings) (all sizes)Amulet (see individual listings)
Jewel (50%)Medicine Case (25%)Talisman (25%)
Component (see individual listings)Blue Soul Shard (10%)Purple Soul Shard (20%)Red Soul Shard (10%)Cho-gokin Ore (20%)Gold Soul Shard (10%)Coral (10%)Pearl (10%)Green Soul Shard (10%)
Shadow Commander Leader LootFirst Item
Nothing (50%)Armor (25%)Weapon (25%)
Sword (85%)Throwing (15%)
Second Item (see individual lists)Gold (50%) (1 – 1000)Potion (20%) (all sizes)Component (30%)
Blue Soul Shard (10%)Purple Soul Shard (20%)Red Soul Shard (10%)Cho-gokin Ore (20%)Gold Soul Shard (10%)Coral (10%)Pearl (10%)Green Soul Shard (10%)
Prima’s Official Strategy Guide
150 primagames.com
Shadow Commander LeadersNakagawa (6) Yasuhira (6)
StatsVitality 1600 – 2000 1600 – 2000Speed 17 17Range 5 5Mass 3 3Fire Resistance 100% 100%Water Resistance 60% 60%Earth Resistance 60% 60%Lightning Resistance 60% 60%Immobility Resistance 75% 75%Might retreat if under 10% 10%
AttackMelee/Ranged Chances 75% / 25% 50% / 50%Attack Chance (non-spell) 98% 98%
MeleeNormal Damage 70 – 100 70 – 100Knockback (chance, force) 100%, 7 100%, 7Stun (chance, duration) 80%, 3 sec. 80%, 3 sec.
RangedF. Darts 17 F. Seeker 30;50%
Inferno Str. 12;50%
LootValue 80 – 100 80 – 100Armor/Weapon is Magic? 80% 80%Magic Slots Filled in A/W 60% 60%Magic A/W is Unique? 1% (U3) 1% (U3)Magic A/W is Cursed? 10% 10%Chance of Second Item 80% 80%

Buaku the BladeStatsVitality 200Speed 13Range 5Mass 4
Attack (Melee)Attack Chance (non-spell) 80%Normal Damage 20 – 45Knockback (chance, force) 100%, 4Spell Chance (if in melee) 25%
Inferno Strike 5
Loot
First ItemBuaku’s Blade (Cursed)
Magic Slots Filled 10%
Second ItemGold (50%) (50 – 250)Potion (25%) (Larger)Component (25%)
Blue Soul Shard (10%)Purple Soul Shard (20%)Red Soul Shard (10%)Cho-gokin Ore (20%)Gold Soul Shard (10%)Coral (10%)Pearl (10%)Green Soul Shard (10%)
DekabutsuStatsVitality 350Speed 14Range 5Mass 4
Attack (Melee)Attack Chance (non-spell) 85%Normal Damage 30 – 55Knockback 100%, 5Spell Chance (if in melee) 50%
F. Seeker 8;55%Blastwave 8;35%
Inflammable 3;10%
Loot
First ItemDekabutsu’s Waki-zashi (Cursed)
Magic Slots Filled: 40%
Second ItemGold (50%) (250 – 500)Potion (20%)Component (30%)
Blue Soul Shard (10%)Purple Soul Shard (20%)Red Soul Shard (10%)Cho-gokin Ore (20%)Gold Soul Shard (10%)Coral (10%)Pearl (10%)Green Soul Shard (10%)
Monsters: Shadow Commander
primagames.com 151
TaibokuStatsVitality 550Speed 15Range 5Mass 4
Attack (Melee)Attack Chance (non-spell) 90%Normal Damage 40 – 70Knockback 100%, 6Spell Chance (if in melee) 55%
Incinerate 1;50%F. Kanji 1;20%
Blastwave 1;20%Inflammable 1;10%
Loot
First ItemTaiboku’s Nodachi (Cursed)
Second ItemGold (50%) (250 – 500)Potion (20%)Component (30%)
Blue Soul Shard (10%)Purple Soul Shard (20%)Red Soul Shard (10%)Cho-gokin Ore (20%)Gold Soul Shard (10%)Coral (10%)Pearl (10%)Green Soul Shard (10%)

TaishoStage 1 Stage 2 Stage 3 Stage 4 Quest
StatsVitality 560 – 840 800 – 1200 1200 – 1800 1750 – 2650 2200Speed 15 15 15 15 15Range 5 5 5 5 5Mass 3 3 3 3 3Fire Resistance 100% 100% 100% 100% 100%Water Resistance 30% 30% 30% 30% 40%Earth Resistance 50% 50% 50% 50% 60%Lightning Resistance 50% 50% 50% 50% 60%Immobility Resistance 60% 65% 70% 75% 55%Might retreat if under 10% 10% 10% 10% 10%
Attack (Always Attacks with Spells)Fire Seeker 4;80% 8;80% 12;80% 16;80% 16;80%Inflammable 2;20% 3;10% 4;10% 5;10% 6;10%Incinerate 3;10% 4;10% 5;10% 6;10%
LootFirst, Second Items: Use Shadow Commander Leader Loot listValue 20 – 50 35 – 65 35 – 65 60 – 100 Taisho’s HeadArmor/Weapon is Magic? 50% 50% 80% 80% (no other loot)Magic Slots Filled in A/W 25% 30% 40% 50%Magic A/W is Unique? 1% (U1) 1% (U2) 1% (U2) 1% (U3)Magic A/W is Cursed? 10% 10% 10% 10%Chance of Second Item 50% 50% 50% 50%
Prima’s Official Strategy Guide
152 primagames.com

Shadow Soldier
Shadow Soldier Vanguard Dark Guard Blood Guard * Shadow Elite
StatsVitality 5 – 10 65 – 75 115 – 125 140 – 160 240 – 260Speed 10 12 13 13 13Range 5 5 5 5 5Fire Resistance 60%Water Resistance 70%Earth Resistance 80% 100%Immobility Resistance 100% 60% 80%Might retreat if under 15%
AttackMelee/Ranged Chances 100% / 0% 70% / 30% 70% / 30% 70% / 30% 70% / 30%Attack Chance (non-spell) 65% 75% 80% 85% 90%
MeleeNormal Damage 3 – 5 10 – 15 20 – 25 30 – 35 30 – 40
RangedFlame Dart 2 Frostbolt 3 Stonebolt 4 Stonebolt 6
LootValue 0 – 10 10 – 20 20 – 30 30 – 40 50 – 60
Shadow Soldier LootFirst Item
Nothing (50%)Armor (25%)Weapon (25%)
Polearm (75%)Sword (25%)
Second Item (10% Chance)Nothing (25%)Gold (65%) (1 – 75)Component (10%)
Blue Soul Shard (5%)Purple Soul Shard (20%)Red Soul Shard (5%)Cho-gokin Ore (20%)Gold Soul Shard (10%)Coral (20%)Pearl (10%)Green Soul Shard (10%)
Monsters: Shadow Commander, Soldier
primagames.com 153

Skeleton Archer
Skeleton Arrow Arrow Arrow Arrow ArrowArcher Master Sage Elite Champion Lord
StatsVitality 10 – 15 30 – 50 55 – 85 80 – 120 110 – 170 160 – 240Vitality (Sniper) 10 – 20 30 – 50 50 – 80 80 – 120 105 – 155 150 – 230Speed 8 9 10 11 12 13Mass 0.25 0.25 0.25 0.25 0.35 0.4Range 2 2 2 2 2 2Fire Resistance 70%Water Resistance 80% 100%Earth Resistance 100%Lightning Resistance 90%Immobility Resistance 100% 70% 100%
Attack (Ranged)Attack Chance (non-spell) 60% 65% 70% 75% 85% 90%Normal Damage 8 – 10 10 – 15 10 – 12 12 – 18Fire Damage 6 – 8 14 – 18Water Damage 8 – 10 15 – 22Earth Damage 15 – 22Lightning Damage 14 – 18Knockback 100%, .2 100%, .2 100%, .3 100%, .4 100%, .5 100%, .5
LootValue 0 – 10 10 – 20 20 – 40 40 – 50 50 – 65 65 – 75(S) Skeleton Archer Snipers appear in all stages. They have mass 0.4 and carry no loot.
Prima’s Official Strategy Guide
154 primagames.com

Skeleton Archer LootFirst Item
Nothing (50%)Armor (25%)Weapon (25%)
Bow (90%)Sword (10%)
Second Item (10% Chance)Nothing (25%)Gold (70%) (1 – 75)Component (5%)
Blue Soul Shard (5%)Purple Soul Shard (20%)Red Soul Shard (5%)Cho-gokin Ore (20%)Gold Soul Shard (10%)Coral (20%)Pearl (10%)Green Soul Shard (10%)
Skeleton ArcherLeaders (6)
SumiyoshiTsujikawa
StatsVitality 1400Speed 13Mass 0.4Range 2Fire Resistance 100%Earth Resistance 100%Immobility Resistance 75%
Attack (Ranged)Attack Chance (non-spell) 90%Water Damage 25 – 35Earth Damage 25 – 35Knockback 100%, .5Spell Chance (if at range) 15%
Flame Dart 39
LootFirst, Second Items: Use Skeleton Archer Loot listValue 65 – 75
Monsters: Skeleton Archer
primagames.com 155

Spider Witch
* Spider * Black * Web * Hell * Shadow * BroodWitch Widow Temptress Hag Mistress Mother
StatsVitality 25 – 35 50 – 70 80 – 120 110 – 170 160 – 240 200 – 300Range 3 3 3 3 3 3Speed 13 13 13 14 15 15Mass 0.5 0.5 0.5 0.5 0.5 0.5Fire Resistance 70% 90%Water Resistance 80%Earth Resistance 100%Lightning Resistance 60%Immobility Resistance 100% 40% 100%
Attack (Ranged)Sp. Burn 1 Sp. Brew 1 Sp. Burn 2;70% Sp. Brew 3;70% Sp. Burn 4;60% Sp. Brew 6;60%
E. Spear 5;30% Comet 7;30% Immolate 9;30% E. Spear 11;30%Inflamm. 9;10% Entomb 11;10%
Spider Witch LootFirst Item
Nothing (25%)Mask (1%)Amulet (25%)
Jewel (50%)Prayer Beads (50%)
Component (49%)Spider Witch Cobwebs (60%)Red Soul Shard (25%)Coral (15%)
Second Item (20% Chance; 100% for leaders)Nothing (15%)Gem (5%)Potion (40%) (Average)
Remedy (30%)Health (30%)Ki (30%)Restorative (10%)
Gold (40%) (1 – 1500)
Prima’s Official Strategy Guide
156 primagames.com

Spider Witch Leaders (6)TsuboneOni-baba
StatsVitality 1500Range 3Speed 15Mass 0.5Fire Resistance 100%Water Resistance 60%Earth Resistance 60%Lightning Resistance 60%Immobility Resistance 75%
Attack (Ranged)Both Sp. Burn 5;70%Both Inflammable 11;10%A Blastwave 13;20%B F. Darts 13;20%
LootUse Spider Witch Loot list
Hashi-himeStatsVitality 2400Speed 17Range 3Fire Resistance 100%Water Resistance 60%Earth Resistance 60%Lightning Resistance 60%Immobility Resistance 70%
Attack (Ranged)Sp. Burn 6;60%
Inferno Strike 9;30%Inflammable 9;10%
No Loot
Ni-noStatsVitality 5000Speed 20Range 3Fire Resistance 60%Water Resistance 100%Earth Resistance 60%Lightning Resistance 60%Immobility Resistance 100%
Attack (Ranged)Attack Chance (non-spell) 85%Normal Damage 50 – 80Knockback 100%, 3
Sp. Brew 7;60%Blizzard 17;40%
Loot
First ItemGold (35%) (500 – 1000)Gem (30%)Component (35%)
Spider Witch Cobwebs (60%)Red Soul Shard (25%)Coral (15%)
Second ItemWeapon (45%)
Bow (70%)Throwing (30%)
Armor (45%)Potion (10%) (Larger)
Remedy (25%)Health (25%)Ki (25%)Restorative (25%)
Value 50 – 100Armor/Weapon is Magic? 100%Magic Slots Filled in A/W 50%Magic A/W is Unique? 20% (U3)
Monsters: Spider Witch
primagames.com 157

Tengu
* Tengu * Ice Clan * Wind Clan * Death Clan * Storm ClanTengu Tengu Tengu Tengu
StatsVitality 35 – 45 75 – 95 125 – 155 180 – 220 190 – 290Speed 16 16 16 16 16Range 3 3 3 3 3Water Resistance 60% 80%Lightning Resistance 70% 90%Immobility Resistance 100% 50% 100% 80%
AttackMelee/Ranged Chances 100% / 0% 60% / 40% 30% / 70% 30% / 70% 30% / 70%Attack Chance (non-spell) 70% 75% 78% 80% 90%
MeleeNormal Damage 5 – 9 18 – 21 21 – 32 38 – 42 43 – 50
RangedFrostbolt 9;70% Lightning 6;70% Comet 8;70% Forked L. 7;80%Drown 2;30% Conduct. 3;30% Drown 4;30% Conduct. 5;20%
LootValue 0 – 50 25 – 50 35 – 75 50 – 75 50 – 100Only Assault Troops might have Magic Weapons or ArmorArmor/Weapon is Magic? 80% 100% 100% 100% 100%Magic Slots Filled in A/W 30% 30% 30% 30% 30%Magic A/W is Unique? 5% (U1) 5% (U1) 10% (U2) 10% (U2) 10% (U3)Magic A/W is Cursed? 5% 15% 5% 25% 35%
Arashimaru
Prima’s Official Strategy Guide
158 primagames.com
StatsVitality 2400Speed 20Range 3Fire Resistance 60%Water Resistance 60%Earth Resistance 60%Lightning Resistance 100%Immobility Resistance 90%
AttackMelee/Ranged Chances 50% / 50%Attack Chance (non-spell) 90%
MeleeNormal Damage 55 – 70Poison Damage 2 – 4
Ranged Spark Skr. 20;50%Forked L. 13;40%Conduct. 9;10%
LootFirst, Second Items: Use Tengu Loot listValue 75 – 100Armor/Weapon is Magic? 100%Magic Slots Filled in A/W 30%Magic A/W is Unique? 10% (U3)Magic A/W is Cursed? 35%

Tengu Loot
Tengu LeadersTonbi Tonbi Tonbi Tonbi KazehikiFujin Fujin Fujin Fujin Fujin
Yukai Akunin Yukai Akunin Yukai Akunin Yukai Akunin
StatsVitality 180 – 220 340 – 460 440 – 660 535 – 805 680 – 1020Speed 18 18 18 18 18Range 3 3 3 3 3Fire Resistance 10% 35% 30% 50% 50%Water Resistance 60% 35% 80% 50% 100%Earth Resistance 30% 20% 40% 40% 60%Lightning Resistance 30% 70% 40% 90% 60%Immobility Resistance 100% 75% 100% 85% 100%
AttackMelee/Ranged Chances 60% / 40% 60% / 40% 60% / 40% 60% / 40% 60% / 40%Attack Chance (non-spell) 75% 78% 80% 90% 95%
MeleeNormal Damage 18 – 21 21 – 32 38 – 42 43 – 50 56 – 63
RangedAll Conduct. 3;30% Drown 4;30% Conduct. 5;30% Drown 6;30%A Blizzard 2 Spark Storm 3;70%Blizzard 4;70%Spark Storm 5;70%Blizzard 6;70%B Ice Skr. 2 Spark Skr. 3;70% Ice Skr. 4;70% Spark Skr. 5;70% Ice Skr. 6;70%C Comet 2 Forked L. 3;70% Comet 4;70% Forked L. 5;70%
LootFirst, Second Items: Use Tengu Loot listValue 30 – 50 25 – 50 35 – 75 50 – 75 50 – 100Armor/Weapon is Magic? 10% 35% 25% 25% 25%Magic Slots Filled in A/W 30% 30% 40% 40% 50%Magic A/W is Unique? 5% (U2) 5% (U2) 5% (U3)
Fuukaku
Monsters: Tengu
primagames.com 159
First ItemNothing (1%)Mask (1%)Amulet (9%)
Jewel (40%)Medicine Case (20%)Prayer Beads (10%)Talisman (30%)
Armor (29%)
Weapon (50%)Bow (5%)Sword (70%)Throwing (25%)
Tengu Feathers (10%)
Second Item (25% Chance)Nothing (10%)Gold (45%) 1 – 20Gem (5%)Potion (40%) (Larger)
Remedy (5%)Health (40%)Ki (40%)Restorative (15%)
StatsVitality 600Speed 20Range 3Fire Resistance 30%Water Resistance 30%Earth Resistance 30%Lightning Resistance 30%Immobility Resistance 75%
AttackMelee/Ranged Chances 100% / 0%Attack Chance (non-spell) 90%
MeleeNormal Damage 20 – 40Knockback 100%, 2
LootFirst, Second Items: Use Tengu Loot listValue 25 – 50Armor/Weapon is Magic? 100%Magic Slots Filled in A/W 30%Magic A/W is Unique? 5% (U1)Magic A/W is Cursed? 15%

Winged Serpent Kokuryu
StatsVitality 3000Speed 10Range 15Mass 40Fire Resistance 100%Water Resistance 60%Earth Resistance 100%Lightning Resistance 60%Immobility Resistance 70%
AttackMelee/Ranged Chances 50% / 50%Attack Chance (non-spell) 90%
MeleeNormal Damage 50 – 70Poison Damage 6 – 9Knockback (chance, force) 100%, 9
RangedBrimstone 13;50%Blastwave 13;50%
Loot
First ItemWinged Serpent Scales
Second ItemGold (34%) (1000 – 2500)Weapon (33%)
Sword (25%)Polearm (25%)Bow (25%)Thrown (25%)
Armor (33%)Value 0 – 100Armor/Weapon is Magic? 100%Magic Slots Filled in A/W 100%Magic A/W is Unique? 100% (U3)Magic A/W is Cursed? 5%
Prima’s Official Strategy Guide
160 primagames.com
Note. Koku-ryu always yields the very rareWinged Serpent Scales components. He alsohas a one-in-three chance of yielding a decentamount of gold, but a two-in-three chance ofyielding a unique weapon or armor of thehighest type. This may be one battle where it’sworthwhile reverting to a previous save andtrying again, if you don’t get something you’rereally excited about the first time.

Wolf Clan (Human; Rouzuko)/(Wolven: Yama-inu)
Wolf Clan (Human; Rouzuko)* Wolf * Lightning * Ice * Forest * Storm * DarkClan Wolf Clan Wolf Clan Wolf Clan Wolf Clan Wolf Clan
StatsVitality 20 – 30 75 – 85 110 – 130 155 – 205 175 – 265 400 – 600Speed 15 15 15 15 15 15Range 8 8 8 8 8 8Fire Resistance 90%Water Resistance 70%Earth Resistance 100%Lightning Resistance 60% 80%Immobility Resistance 100% 60% 40% 80%Never Retreats
AttackMelee/Ranged Chances 100% / 0% 95% / 5% 95% / 5% 95% / 5% 95% / 5% 95% / 5%Attack Chance (non-spell) 65% 70% 75% 80% 85% 95%
MeleeNormal Damage 8 – 12 18 – 23 24 – 33 38 – 43 47 – 56 55 – 80Poison Damage 6
RangedBall L. 2 Comet 3 Ball L. 4 Immolate 5 Meteor 15
At “death” becomes wolf from Ice Wolf Clan L. Wolf Clan Ice Wolf Clan Forest Wolf Clan Storm Wolf Clan Dark Wolf Clan
LootValue 10 – 30 10 – 60 35 – 55 50 – 75 75 – 90 85 – 100Armor/Weapon is Magic? 5% 5% 5% 5% 5% 5%Magic Slots Filled in A/W 30% 30% 30% 30% 30% 30%Magic A/W is Cursed? 5% 5% 5% 5% 5% 5%
Monsters: Winged Serpent, Wolf Clan
primagames.com 161

Wolf Clan (Human) Loot
Human Wolf Clan LeadersKawari Kawari Kawari Kawari Soshin-Ga HoshiHenkai Henkai Henkai Henkai O-Ken
Domo-ken Domo-ken Domo-ken Domo-ken
StatsVitality 225 – 275 340 – 460 400 – 600 520 – 780 640 – 960 950 – 1450Speed 15 15 15 15 15 15Range 8 8 8 8 8 8Fire Resistance 30% 20% 40% 90% 60% 60%Water Resistance 30% 70% 40% 40% 60% 100%Earth Resistance 10% 35% 30% 50% 100% 70%Lightning Resistance 60% 35% 80% 50% 50% 70%Immobility Resistance 70% 100% 80% 65% 90% 100%Never Retreats
AttackMelee/Ranged Chances 60% / 40% 60% / 40% 60% / 40% 60% / 40% 60% / 40% 60% / 40%Attack Chance (non-spell) 65% 70% 75% 80% 85% 90%
MeleeNormal Damage 8 – 22 19 – 33 28 – 43 39 – 53 49 – 63 58 – 72
RangedA Spark Skr. 2 Ice Skr. 3 Spark Skr. 4 F. Seeker 5 Lava Skr. 6 Ice Skr. 7B Spark Storm 2 Blizzard 3 Spark Storm 4 F. Darts 5 Brimstone 6C L. Strike 2 W. Strike 3 L. Strike 4 Inf. Strike 5
At “death” each leader takes a wolven form (see corresponding Wolven Wolf Clan Leaders, p. 164)
LootFirst, Second Items: Use Wolf Clan (Human) Loot listValue 10 – 30 25 – 40 35 – 55 50 – 75 75 – 90 85 – 100Armor/Weapon is Magic? 100% 100% 100% 100% 100% 100%Magic A/W is Unique? 5% (U1) 5% (U3)Magic A/W is Cursed? 5% 5% 5% 5% 5% 100%
Prima’s Official Strategy Guide
162 primagames.com
First ItemNothing (50%)Amulet (10%)
Medicine Case (25%)Talisman (75%)
Armor (15%)Weapon (15%)
Polearm (85%)Sword (15%)
Component (10%)Yama-inu Pelt (40%)Yama-inu Blood (40%)Green Soul Shard (20%)
Second Item (25% Chance; 100% for leaders)Nothing (5%)Potion (25%) (Smaller/Average)Gold (70%) (1 – 1500)

Monsters: Wolf Clan
primagames.com 163
JyuGaStatsVitality 2400Range 6Speed 17Fire Resistance 100%Water Resistance 60%Earth Resistance 100%Lightning Resistance 60%Immobility Resistance 70%Never Retreats
AttackMelee/Ranged Chances 75% / 25%Attack Chance (non-spell) 85%
MeleeNormal Damage 55 – 70
RangedF. Seeker 13;90%
Inflammable 9;10%At death becomes wolf from Dark Wolf Clan
LootFirst, Second Items: Use Wolf Clan (Human) Loot listValue 85 – 100Armor/Weapon is Magic? 100%Magic A/W is Unique? 5% (U3)Magic A/W is Cursed? 100%
Wolf Clan (Wolven) LootFirst Item
Nothing (90%)Amulet (5%)
Talisman (30%)Jewel (30%)Prayer Beads (25%)Medicine Case (15%)
Component (5%)Yama-inu Blood (75%)Yama-inu Pelt (25%)
Second Item (1% Chance)Nothing (50%)Gold (50%) (5 – 100)
Shi-noStatsVitality 7000Speed 20Range 5Fire Resistance 60%Water Resistance 80%Earth Resistance 100%Lightning Resistance 100%Immobility Resistance 90%
AttackMelee/Ranged Chances 40% / 60%Attack Chance (non-spell) 90%
MeleeNormal Damage 50 – 80Water Damage 10 – 30Knockback 100%, 8Stun (chance, duration) 100%, 4 sec.Spell Chance (if in melee) 70%
Spells (Melee or Ranged)Lava Wave 20;50%E. Dragon 30;50%
At death becomes wolf fromDark Wolf Clan
Loot
First ItemGold (35%) (500 – 1000)Gem (30%)Component (35%)
Yama-inu Pelt (50%)Yama-inu Blood (50%)
Second ItemRo-zoku Yari

Prima’s Official Strategy Guide
164 primagames.com
Wolf Clan (Wolf; Yama-inu)* Ice * L.ightning * Ice * Forest * Storm Dark
Wolf Clan Wolf Clan Wolf Clan Wolf Clan Wolf Clan Wolf Clan
StatsVitality 20 – 30 45 – 55 80 – 100 125 – 155 145 – 205 160 – 240Speed 18 18 18 18 18 18Range 6 6 6 6 6 6Fire Resistance 90%Water Resistance 70%Earth Resistance 100%Lightning Resistance 60% 80%Immobility Resistance 100% 60% 40% 80%
AttackMelee/Ranged Chances 100% / 0% 90% / 10% 90% / 10% 90% / 10% 90% / 10% 90% / 10%Attack Chance (non-spell) 70% 75% 80% 85% 88% 90%
MeleeNormal Damage 8 – 14 17 – 23 26 – 33 32 – 42 34 – 42 56 – 62
RangedBall L. 2 Comet 3 Ball L. 4 Immolate 5 Meteor 6
LootValue 1 – 30 25 – 40 35 – 60 50 – 75 65 – 90 80 – 100Magic Slots Filled in A/W 10% 5% (* 15%) 10% (* 20%) 15% (* 20%) 25% 25%
Wolven Wolf Clan LeadersDomo-Ken Domo-Ken Domo-Ken Domo-Ken Soshin-Ga Hoshi
Kawari Kawari Kawari Kawari O-KenHenkai Henkai Henkai Henkai
StatsVitality 90 – 110 180 – 220 240 – 360 335 – 505 500 – 700 560 – 840Speed 18 18 18 18 18 18Range 6 6 6 6 6 6Fire Resistance 30% 20% 40% 90% 60% 70%Water Resistance 30% 70% 40% 40% 60% 70%Earth Resistance 10% 35% 30% 50% 100% 100%Lightning Resistance 60% 35% 80% 50% 50% 60%Immobility Resistance 70% 100% 80% 65% 90% 95%
AttackMelee/Ranged Chances 90% / 10% 90% / 10% 90% / 10% 90% / 10% 90% / 10% 90% / 10%Attack Chance (non-spell) 70% 75% 80% 85% 88% 90%
MeleeNormal Damage 9 – 23 19 – 33 29 – 43 38 – 52 47 – 62 58 – 72
RangedA Spark Skr. 2 Ice Skr. 3 Spark Skr. 4 F. Seeker 5 Lava Skr. 6 Lava Skr. 7B Spark Storm 2 Blizzard 3 Spark Storm 4 F. Darts 5 Brimstone 6C L. Strike 2 W. Strike 3 L. Strike 4 Inf. Strike 5
Loot First, Second Items: Use Wolf Clan (Wolven) Loot listValue 1 – 30 25 – 40 35 – 60 50 – 75 65 – 90 80 – 100Magic Slots Filled in A/W 10% 5% 10% 15% 25% 25%
primagames.com

Monsters: Wolf Clan, Spells
primagames.com 165
Monster SpellsDragon FlameFire Damage 10 – 20, +5 / levelPoison 1, +1 / levelDuration 10Speed 25Seeking Radius 10, +1 / level
Dragon FloodWater Damage 10 – 20, +5 / levelPoison 1, +1 / levelDuration 10Speed 25Seeking Radius 10, +1 / level
Dragon StoneEarth Damage 10 – 20, +5 / levelPoison 1, +1 / levelDuration 10Speed 25Seeking Radius 10, +1 / level
Dragon StrikeLightning Damage 10 – 20, +5 / levelPoison 1, +1 / levelDuration 10Speed 25Seeking Radius 10, +1 / level
Elemental BurstFire Damage 20 – 30Earth Damage 20 – 30Water Damage 20 – 30Lightning Damage 20 – 30Poison 1
Elemental RageFire Damage 10 – 25Earth Damage 10 – 25Water Damage 10 – 25Lightning Damage 10 – 25Knockback (odds, force) 90%, 4.0Duration 10Speed 25Seeking Radius 15
Elemental StunNumber of Enemies 8Fire Damage 20 – 30Earth Damage 20 – 30Water Damage 20 – 30Lightning Damage 20 – 30Freeze
Chance 90%Radius 35Duration 10
Fire Barbs2 – 5, +2 / level2 – 5, +2 / level2 – 5, +2 / level2 – 5, +2 / levelKnockback (force) 1.5, +0.5 / levelDuration 10Speed 25Seek Radius 10, +1 / level
FirewaterFire Damage 6 – 10, +3 / levelWater Damage 6 – 10, +3 / levelDuration 10Speed 25Seeking Radius 10, +1 / level
Priest’s BaneShoots a lightning ballMana Cost 12, +5 / levelFire Damage 1 – 5, +2 / levelWater Damage 1 – 5, +2 / levelEarth Damage 1 – 5, +2 / levelLightning Damage 1 – 5, +2 / level
Spider BrewWater Damage 5 – 10, +3 / levelPoison 1 – 2, +1 / levelDuration 10Speed 25Seeking Radius 10, +1 / level
Spider BurnFire Damage 5 – 10, +3 / levelPoison 1 – 2, +1 / levelDuration 10Speed 25Seeking Radius 10, +1 / level

Prima’s Official Strategy Guide
166 primagames.com
Monster Name Monster Type PageAbe-No-Seimei Fallen Wizard individual 130Accursed Gaki Gaki 131Akudoku-Geisha Evil Priestess Leader 121Ancient Kappa Kappa 134Ansatsujo Evil Female Ninja Leader 117Arashimaru Tengu individual 158Arrow Champion Skeleton Archer 154Arrow Elite Skeleton Archer 154Arrow Lord Skeleton Archer 154Arrow Master Skeleton Archer 154Arrow Sage Skeleton Archer 154Azari Kihei Leader 139Baishunfu Evil Priestess Leader 121Bake Yoroi Bake Yoroi 108Bakemono Oni Leader 143Baku Kappa individual 135Black Cavalier Kihei 138Black Oni Oni, Greater 141Black Widow Spider Witch 156Black Wind Evil Female Ninja 116Blood Gaki Gaki 131Blood Guard Shadow Soldier 153Blood Lord Shadow Commander 149Blood Oni Oni, Greater 141Blood Squad Dead Foot Soldier 113Boko-boko Gaki Leader 132Bo-Uzu Evil Priest Leader 119Brood Mother Spider Witch 156Buaku the Blade Shadow Commander individual 151Byakko Bake Yoroi individual 109Chokki Scorpion Dragon Leader 147Cho-Sei Fallen Wizard individual 130Chou-riki Bake Yoroi Leader 109Chozo-in Evil Priest Leader 119Daikaioniou Oni individual 144Daikotsu Neanderskull Leader 140Dai-majin Bake Yoroi Leader 109Daimajutsuou Evil Priest individual 119Daimakai-Hime Evil Priestess Leader 121Dark Abbot Evil Priest 118Dark Archer Dark Samurai 111Dark Berserker Dark Samurai 111Dark Brick Dark Samurai 111Dark Champion Fallen Hero Foot Soldier 124Dark Commander Shadow Commander 149Dark Concubine Evil Priestess 120
Monster Name Monster Type PageDark Guard Shadow Soldier 153Dark Kappa Kappa 134Dark Kappa Kappa, Small 135Dark Leader Dark Samurai 111Dark Mistress Evil Female Ninja 116Dark Ninja Dark Samurai 112Dark Shamaness Evil Priestess 120Dark Swordsman Dark Samurai 112Dark Warlord Dark Samurai 112Dark Wizard Dark Samurai 112Dark Wolf Clan Wolf Clan (Human) 161Dark Wolf Clan Wolf Clan (Wolf) 164Darkskull Neanderskull 140Dead Foot Soldier Dead Foot Soldier 113Death Clan Tengu Tengu 158Death Maiden Evil Female Ninja 116Death Razor Scorpion Dragon 146Death Squad Dead Foot Soldier 113Death Strike Scorpion Dragon 146Death Warrior Fallen Hero Foot Soldier 124Debu Debu 114Decapitator Fallen Hero Foot Soldier 124Dekabutsu Shadow Commander individual 151Deko-boko Gaki Leader 132Demon Armor Bake Yoroi 108Demonic Priest Evil Priest 118Demonskull Neanderskull 140Deranged Priest Evil Priest 118Devil Lady Evil Priestess 120Domo-ken Wolf Clan Leader, Human 162Domo-Ken Wolf Clan Leader, Wolven 164Doom Charger Kihei 138Dreadskull Neanderskull 140Earth Oni Oni, Greater 141Evil Priest Evil Priest 118Evil Wizard Sniper Evil Wizard 122Fallen Hero Foot Fallen Hero Foot Soldier 124Fallen Ninja Fallen Ninja 127Fang Scorpion Dragon 146Fear Champion Fallen Hero Foot Soldier 124Fear Knight Kihei 138Forest Oni Oni, Lesser 142Forest Wolf Clan Wolf Clan (Human) 161Forest Wolf Clan Wolf Clan (Wolf) 164Frost Oni Oni, Lesser 142Fudo-in Evil Priest Leader 119
Monster GlossaryWould a Debu by any other name smell as foul? In Throne of Darkness, each type ofmonster goes by a variety of names, and it isn’t always obvious what type of monsteryou’re looking at. And even if you know what type of monster you’re fighting, you maynot know for sure where it’s listed in this book. When in doubt, get its name, then look itup on this list.

Monsters: Glossary
primagames.com 167
Monster Name Monster Type PageFujin Tengu Leader 159Fu-sei Fallen Wizard Leader 130Fuukaku Tengu individual 159Gaiya-jiro Fallen Hero Foot Soldier individual 125Gaki Gaki 131Gero-mon Scorpion Dragon individual 148Ghost Armor Bake Yoroi 108Go-no Bake Yoroi individual 110Hashi-hime Spider Witch individual 157Hell Armor Bake Yoroi 108Hell Hag Spider Witch 156Henkai Wolf Clan Leader, Human 162Henkai Wolf Clan Leader, Wolven 164Higashino Guardian Dragon individual 133Honor Guard Dead Foot Soldier 113Hoshi Wolf Clan Leader, Human 162Hoshi Wolf Clan Leader, Wolven 164Hoshin Fallen Wizard individual 130Hozo-in Evil Priest Leader 119Hyakkan Debu 114Hyakkan Debu Leader 115Ice Clan Tengu Tengu 158Ice Oni Oni, Greater 141Ice Wolf Clan Wolf Clan (Human; Rouzuko) 161Ice Wolf Clan Wolf Clan (Wolf; Yama-inu) 164Ichi-no Oni individual 144Ikkaku Evil Priest Leader 119Ikkyu Evil Priest Leader 119Imperial Assassin Fallen Ninja 127Infected Gaki Gaki 131Inflictor Fallen Hero Foot Soldier 124Iwanage Kappa Leader 136JyuGa Wolf Clan (Human; Rouzuko) 163Kage-Hime Evil Female Ninja Leader 117Kagero Fallen Ninja individual 128Kanumaru Scorpion Dragon Leader 147Kappa Lord Kappa 134Kappa Kappa 134Ka-riki Bake Yoroi Leader 109Karima Fallen Wizard Leader 130Kawari Wolf Clan Leader, Human 162Kawari Wolf Clan Leader, Wolven 164Kazehiki Tengu Leader 159Kihei Kihei 138Kijin Oni individual 145Kill Claw Scorpion Dragon 146Killer Kappa Kappa, Small 135Killer Priest Evil Priest 118Kitano Guardian Dragon individual 133Kitano-umi Debu 114Kitano-umi Debu Leader 115Knightmare Kihei 138Koga Bakamaru Fallen Ninja individual 129Koku-ba Kihei Leader 139Kokuryu Winged Serpent 160Ko-Oni Gaki Leader 132
Monster Name Monster Type PageKotsu-ba Kihei Leader 139Kuchisake Evil Priestess Leader 121Kyokugeisha Fallen Wizard 130Lava Oni Oni, Lesser 142Legendary Kappa Kappa 134Lightning Oni Oni, Greater 141Lightng. Wolf Clan Wolf Clan (Human) 161Lightng. Wolf Clan Wolf Clan (Wolf) 164Machuro Fallen Hero Foot Soldier individual 126Majin Fallen Wizard individual 130Majo Evil Female Ninja Leader 117Majutsu-O Evil Wizard 122Majutsu-O Evil Wizard Leader 123Makaze Evil Female Ninja Leader 117Maru Debu 114Matsumi Evil Priestess Leader 121Matsushima Neanderskull Leader 140Moldy Gaki Gaki 131Mononoke Oni Leader 143Mou-doku Scorpion Dragon Leader 147Muchakucha Gaki Leader 132Mujyaki Gaki Leader 132Murasaki Evil Priestess Leader 121Musha Gaki individual 132Mushashi-maru Debu 114Nakagawa Shadow Commander Leader 150Neanderskull Neanderskull 140Ninja Champion Fallen Ninja 127Ninja Maiden Evil Female Ninja 116Ni-no Spider Witch individual 157Nishinfu Evil Priestess Leader 121Nishino Guardian Dragon individual 133Okashi Kihei Leader 139O-Ken Wolf Clan Leader, Human 162O-Ken Wolf Clan Leader, Wolven 164Oni Oni, Greater 141Oni Lord Oni, Lesser 142Oni-baba Spider Witch Leader 157Oniroku Oni Leader 143Orute Fallen Hero Foot Soldier individual 126Otafuku Kihei Leader 139Otaki Evil Priestess Leader 121Otokugoroshi Evil Female Ninja Leader 117Pain Slayer Evil Female Ninja 116Poison Drake Scorpion Dragon 146Priestess Evil Priestess 120Quick Death Fallen Ninja 127Rai-ba Kihei Leader 139Raiju Scorpion Dragon Leader 147Reikoku Evil Female Ninja Leader 117Rogue Kappa Kappa, Small 135Rokuden Neanderskull Leader 140Rouzuko Wolf Clan (Human) 161-163Sabaki Evil Wizard 122Sabaki Evil Wizard Leader 123San-no Scorpion Dragon 148

Prima’s Official Strategy Guide
168 primagames.com
Monster Name Monster Type PageSasori-Ryu Scorpion Dragon Leader 147Satsuki Scorpion Dragon Leader 147Satujin-ba Kihei Leader 139Scorpion Dragon Scorpion Dragon 146Shadow Blade Fallen Ninja 127Shadow Cmdr Shadow Commander 149Shadow Elite Shadow Soldier 153Shadow Guard Dead Foot Soldier 113Shadow Knight Shadow Commander 149Shadow Mistress Spider Witch 156Shadow Rider Kihei 138Shadow Soldier Shadow Soldier 153Shadow Stalker Evil Female Ninja 116Shijo Evil Priestess Leader 121Shi-no Wolf Clan (Human) 163Shitakirimusume Evil Priestess Leader 121Skeleton Archer Skeleton Archer 154Slime Gaki Gaki 131Small Kappa Kappa, Small 135Soshin-Ga Wolf Clan Leader, Human 162Soshin-Ga Wolf Clan Leader, Wolven 164Spectre Armor Bake Yoroi 108Spider Witch Spider Witch 156Storm Clan Tengu Tengu 158Storm Wolf Clan Wolf Clan (Human) 161Storm Wolf Clan Wolf Clan (Wolf) 164Sugari Oni Leader 143Suigetsu Kappa individual 137Suiko Kappa Leader 136Suima Kappa Leader 136Suishin Kappa Leader 136Suizan Kappa individual 137Sumiyoshi Skeleton Archer Leader 155Taiboku Shadow Commander individual 151
Monster Name Monster Type PageTaisho Shadow Commander individual 152Taku-an Evil Priest Leader 119Tanuki Evil Priest Leader 119Tatari Oni Leader 143Techkamen Bake Yoroi Leader 109Tengu Tengu 158Tenkai Dai-Ingei Evil Wizard individual 123Tessa-iki Oni individual 145Thunderskull Neanderskull 140Tonbi Tengu Leader 159Touno Guardian Dragon individual 133Tsubone Spider Witch Leader 157Tsujikawa Skeleton Archer Leader 155Twisted Priest Evil Priest 118Umagoroshi Kappa Leader 136Vanguard Shadow Soldier 153Vanguard Leader Shadow Commander 149Waru Gaki Gaki Leader 132Web Temptress Spider Witch 156Wild Kappa Kappa, Small 135Wild Oni Oni, Lesser 142Wind Clan Tengu Tengu 158Winged Serpent Winged Serpent 160Witch Mistress Evil Priestess 120Witch Queen Evil Priestess 120Wolf Clan Wolf Clan (Human) 161Wraith Armor Bake Yoroi 108Yama-inu Wolf Clan (Wolven) 163-164Yasuhira Shadow Commander Leader 150Yoroinushi Bake Yoroi individual 110Yukai Akunin Tengu Leader 159Yuki Otoko Oni Leader 143Yumi-Onna Evil Priestess Leader 121Zanshin Dark Samurai 112

The first samurai you’ll meet is theSwordsman, two flights of stairs down,and you can probably get to him withoutfacing any enemies. When you see theSwordsman, click on him, then wait forhim to heal up in the Shrine Room andcall him back into the party, for a full com-plement of four in your active party.
Now go back up and start to clear out thewhole castle, from top to bottom. You’llhave to face undead soldiers first, soon tobe followed by skeleton archers. As youwork your way further down through the
castle, you’ll start to encounter command-ers, and finally neanderskulls.
Break every barrel, look in every chest,and pick up everything you find. Sinceyou don’t yet have access to theBlacksmith, you can’t repair damageditems, so expect to have to replace someof your items and weapons as theybecome useless.
It’s very important, throughout the gamebut especially at the very start, to killevery monster that challenges you andpick up every bit of cash that falls yourway. Otherwise you could find yourselfwith a fatal deficiency of either cash orexperience fairly early in the game.
At the bottom of your castle you’ll have toface the commander of the invadingforces, Buaku the Blade. Try to clear outevery other area of the castle interiorbefore moving into Buaku’s territory, soyou’ll have the best possible items andmaybe an extra level of experience forsome of your party. When he’s defeatedhe’ll yield Buaku’s Blade, a magic weaponthat should be the best available to yourparty for the next few levels of experience.
primagames.com 169
QUEST: Secure the Castle
LEADER: My lord, we haveslowed the enemy’s advance intothe castle.
DAIMYO: Now is our chance tosweep the citadel of the invaders.Gather the remaining samurai andsecure the castle.
WALKTHROUGH &MAPS
Your CitadelYou begin in the shrine room of your home castle, with your Leader, Archer and Brickready to go. Each is armed with a generic “newbie” katana, a couple of light healingpotions, and no armor whatsoever. Once the Daimyo finishes giving you your firstquest, you can start out. There are a couple of boxes in the shrine room that maycontain useful items. Activate the room’s portal gate (but if you forget, it will activateautomatically once you leave).

Once Buaku’s dead, the Daimyo gives youthe next part of the first quest, to find thesorcerer who’s in the courtyard trying totake control of your portal gate, and killhim before he can bring in reinforcements.
The ExteriorWhen you venture out into the courtyardsof your citadel, you’ll be assaulted byroughly equal numbers of soldiers, cap-tains, archers and neaderskulls. Just keeppushing forward. If you start to take heavycasualties, don’t hesitate to pull the sur-vivors back into the castle, where it’s safe.Running away not only gives you life-sav-ing breathing room, but also has a chanceof dividing your enemy up into smaller,more manageable groups as they chaseyou.
In the courtyard you’ll find the tiny templewhere the priest hangs out, and the forgein the stables where the blacksmith works.Both are now empty, of course. That’swhen the Daimyo gives you your nextquest … to find these missing dignitaries.
First, though, you’ll have to deal with thesorcerer Majin. You’ll find him hangingout near the courtyard portal gate, whichis just inside the main gates to the citadel.He’s by far the toughest character you’vefaced yet, plus he’s well guarded by aforce of skeleton archers, and a handful ofsoldiers and commanders.
To take out the sorcerer, try to be cagey.Avoid the part of the courtyard where he’sstanding, if possible, and work the perime-ter, trying to draw off and take out the sol-diers and commanders guarding him. Thecircle of archers surrounding the sorcereris extremely deadly if you’re concentratingon the boss, but while the sorcerer himselfif highly mobile, his archers don’t move.What you need here is a feint. Chargestraight at the sorcerer, then withdraw tosome relatively quiet corner of the court-yard as soon as you’ve got his attention.With luck, you’ll be able to draw himaway from his archers, making him mucheasier to kill, and the archers veritablecake once he’s gone. Divide and conquer.
When the sorcerer is dead, he’ll drop theSoul of Buddha, a rare magic component.
Prima’s Official Strategy Guide
170 primagames.com
QUEST: Part 2: Kill theSorcerer
DAIMYO: You have destroyedtheir leader. Find the Sorcerer inthe Outer Citadel and stop himbefore he summons reinforcements.
QUEST: Blacksmith &Priest
DAIMYO: The Blacksmith andPriest fled the citadel during theattack. They will aid us greatly inour fight against the Dark Warlord.Find them.

Once the sorcerer is done for (or possiblybefore … it can be handy to dive throughthe gate into the shrine room if the battle’sgoing against you) activate the portal gate.
Go out the gates of the citadel. On the“porch” of the citadel, you’ll find theBlacksmith. Click on him to finish the firstpart of your quest. He promises to getback to work, and gives you some infoabout the Priest.
There are no enemies whatsoever betweenthe citadel gates and the entrance to thefirst wilderness area. You’ll find the Priestat the start of the first wilderness area,well before you have to face any bad guys.
With the Blacksmith and Priest now backon duty, you can identify any magic itemsyou may have found, repair your bestarmor and weapons, and donate all left-overs to the Blacksmith for the benefit ofthe war effort.
Monster PopulationsThe lists of monsters found in each areado not (for the most part) include mon-sters you encounter on quests or in caves.In particular, these lists don’t include one-of-a-kind monsters. You’ll have to findthem by adventuring. These lists alsodon’t include the Gaki that are guardingeach Debu Mill (see p. 180).
Most leaders are drawn from the designat-ed “Leader” lists in the Monsters chapter.However, a few “non-commissioned mon-sters” (NCMs) lead a group from time totime. When an NCM is serving as aleader, he, she or it is flagged with“(leader)” in these lists (note the lower-case “l”). When a normal leader is lead-ing, that monster is flagged with“(Leader)”.
Citadels and WildernessMonsters in the first Citadel andWilderness you enter are Stage 1 unlessnoted otherwise. Assuming you continueadventuring clockwise, monsters in thesecond Citadel and Wilderness are Stage2, in the third Citadel and Wilderness areStage 3, and in the fourth Citadel andWilderness are Stage 4.
Mountainsides and Dark Warlord’s CaveMonsters on the mountainsides are Stage5 unless noted otherwise.
Walkthrough: Your Citadel
primagames.com 171
QUEST: Part 2
BLACKSMITH: I am in your debtfor saving me, and shall return tomy forge. The Priest has gone outto help the villagers. You may findhim in the wilderness to the [clock-wise direction from current location].

Prima’s Official Strategy Guide
172 primagames.com
Mori Citadel
abcdefghijklmnopqrstuvwxyzabcdefghijklmnopqrstuvwxyz
abcdefghijklmnopqrstuvwxyzabcdefghijklmnopqrstuvwxyz
Commander
Temple
Smithy
Outbuilding
Sorcerer
Portal Gate

Walkthrough: Mori Citadel
primagames.com 173
Mori CitadelThe castle is a very straightforward five-story tower, with the boss commander hid-ing out in the back of the storehouse sec-tion of the lowest floor. The path from thecastle door to the main gate is very linear,with the temple just outside the door, thesmithy on a bit further, and the portal gatejust before the final exit.
One unique feature of this citadel is theoutbuilding in the courtyard between theportal and the smithy, where some archershave set up an ambush on the roof. Youcan run through the door of the buildingto get to the balcony, but some of thearchers are on the roof and can’t be hitwith hand-to-hand weapons, so limber upthose ranged weapons for a firefight.
ghijklmnoabcswfgpqrstuvwx
Mori Citadel MonstersDead Foot Soldier
Neanderskull
Shadow Commander
Shadow Soldier
Skeleton Archer
ghijklmnoabcswfgpqrstuvwx
The Four CitadelsThe preceding section applied more or less equally, regardless of which castle you startin. Below are some notes on the unique features of each of the citadels.
QUEST: VisitingNeighbors
DAIMYO: Our forces have beengreatly weakened. Go to the[clockwise direction] to [the nextcastle]. Ask their Daimyo forassistance.

Prima’s Official Strategy Guide
174 primagames.com
Oda Citadel
abcdefghijklmnopqrstuvwxyzabcdefghijklmnopqrstuvwxyz
abcdefghijklmnopqrstuvwxyzabcdefghijklmnopqrstuvwxyz
Commander
Sorcerer /Portal Gate
Smithy
Temple

Oda CitadelThe castle is another straightforwardtower. The boss commander is in thekitchens, in the room to the right of whereyou enter.
Oda citadel is completely surrounded bymoats, and you get from one courtyard toanother via bridges. Whereas Mori hadfour exterior courtyards, Oda has onlythree, but the innermost is very long andwraps around the building. The temple islocated in a small (but well guarded) sidecourtyard.
The outer courtyard contains thesmithy/stables, with the portal gate (andthe sorcerer) tucked away between it andthe back wall. You have a lot of goodcover and concealment in this courtyard.
ghijklmnoabcswfgpqrstuvwx
Oda Citadel MonstersDead Foot Soldier
Neanderskull
Shadow Commander
Shadow Soldier
Skeleton Archer
ghijklmnoabcswfgpqrstuvwx
Walkthrough: Oda Citadel
primagames.com 175
QUEST: Death to Traitors
DAIMYO: The [next] clan hasbetrayed us! Go to their castle andexecute them!

Prima’s Official Strategy Guide
176 primagames.com
Tokugawa Citadel
abcdefghijklmnopqrstuvwxyzabcdefghijklmnopqrstuvwxyz
abcdefghijklmnopqrstuvwxyzabcdefghijklmnopqrstuvwxyz
Temple
Commander
Smithy
Sorcerer /Portal Gate

Tokugawa CitadelArchitecturally, this is probably the mostinteresting castle. Instead of a tower, it’sbuilt on terraces. The three central “floors”are separated, not by stairs, but by narrowcourtyards.
The boss commander is found in the tiledroom to the left of the entrance.
Outside, there’s basically one really bigcourtyard, which the sorcerer can (andprobably will) take full advantage of to runyou ragged. The smithy is near the maingate and the portal gate, while the templeis way off in the most remote corner of thecomplex.
ghijklmnoabcswfgpqrstuvwx
Tokugawa Citadel MonstersDead Foot Soldier
Neanderskull
Shadow Commander
Shadow Soldier
Skeleton Archer
ghijklmnoabcswfgpqrstuvwx
Walkthrough: Tokugawa Citadel
primagames.com 177
QUEST: The Last Hope
DAIMYO: The [final clan] are ourlast hope for help. Go to their cas-tle to the [clockwise direction] andsearch for survivors.

Prima’s Official Strategy Guide
178 primagames.com
Toyotomi Citadel
abcdefghijklmnopqrstuvwxyzabcdefghijklmnopqrstuvwxyz
abcdefghijklmnopqrstuvwxyzabcdefghijklmnopqrstuvwxyz
Commander
Garden
Sorcerer /Portal Gate
Temple
Smithy

Toyotomi CitadelThe castle is another five-story tower. Theboss commander is located in the suite ofwell-appointed rooms just opposite theentrance.
Outside, a narrow courtyard wraps aroundthe building. This is another water-basedfortress, with bridges reaching from onecourtyard/island to the next. One bridgeleads to a small ornamental garden withno exit (other than the way you came in,of course). On the way out you’ll passthrough a courtyard containing the temple,then a final courtyard containing both thesmithy and the portal gate.
ghijklmnoabcswfgpqrstuvwx
Toyotomi Citadel MonstersDead Foot Soldier
Neanderskull
Shadow Commander
Shadow Soldier
Skeleton Archer
ghijklmnoabcswfgpqrstuvwx
Subsequent CastlesIf you’re trying to get into one of the cas-tles, rather than out of it, you’ll find yourexperience rather different. For one thing,all the castles were designed primarilywith the thought that they’d be used bystarting characters and players just gettingused to the game, trying to make their wayfrom the Shrine Room out. Consequently,there are fewer and weaker creatures(regardless of how far along in the gameyou are) the closer to the Shrine Roomyou get. The second, third and fourth cas-tles are pretty much the only maps in thegame that get easier the further into themyou get.
The order of the castle quests never varies,regardless of where you start. In the sec-ond castle you find the Daimyo murdered.The third castle has turned traitor, and theDaimyo commits seppuku (ritual suicide)when you confront him for vengeance(when he dies, you’ll be able to take theMask of his clan, a good magic item). Inthe fourth, the Daimyo is defeated but stillbarely alive. He gives you his sword to usein avenging his death.
The bosses in the castles also appear inthe same order. Each boss commanderyou kill yields a progressively more buffweapon, while each of the sorcerers yieldsa different one of the rare “Buddha” com-ponents.
Walkthrough: Toyotomi Citadel
primagames.com 179
Castle Commander Commander’s Weapon Sorcerer Unique Component Daimyo’s ItemFirst Buaku Buaku’s Blade Majin Soul of Buddha NoneSecond Dekabutsu Dekabutsu’s Wakazashi Cho-Sei Blood of Buddha NoneThird Taiboku Taiboku’s Nodachi Abe-No-Seimei Patience of Buddha Mask of [his clan]Fourth Kumakichi Kumakichi’s Kabu-Tsuchi Hoshin Tear of Buddha Sword of the [clan]
Citadel Information

It helps, in envisioning the world ofThrone of Darkness, to remember thatJapan is a series of islands. The layout ofthe map makes the most sense if youthink of the adventure being set on aroughly circular island with a large moun-tain in the middle (like Mt. Fuji, on themain island of Hokado in real-worldJapan). The four citadels are locatedaround the perimeter of the island, at thefour compass points, with the DarkWarlord’s forces occupying the top of thecentral mountain.
Connecting each of the four citadels is aroad winding through the Japanese coun-tryside. The wilderness areas between thecitadels are where much of the first half ofthe game takes place.
Like the citadels, the wilderness areas aredesigned to be explored in any order. Themonsters get tougher as you progressthrough the game, but the basic featuresof each of the wildernesses are similar.
Common FeaturesDEBU MILL. Debu are strong, fat, brutaldemons used by Zanshin to grind the millsthat turn the corpses of innocent victimsinto the undead troops of the DarkWarlord. Each of the wilderness areas hasa debu mill near one of the village areas,but only the first and third (depending onwhere you start) actually have debu (andtheir live victims) in residence. The secondhas a peasant who will point you towardthe second debu quest, and the fourtharea is just abandoned. All four of thedebu mills have lots of Gaki hangingaround, however.
There’s a single debu on duty at the firstmill, while a pair are working the third.Both of these mills are additionally guard-ed by a force of gaki. The debu are tough,but they’re not hard to kill, since you’re alot faster than they are. Their mills arelocated behind a fence of thorns, and yourarchers and spellcasters can do a gooddeal of damage over the fence while adebu makes his cumbersome way aroundto the entrance.
Prima’s Official Strategy Guide
180 primagames.com
QUEST: Free The Women
HEADSMAN: Please, help us.Our wives and daughters werecaptured by the Dark Warlord’sarmy. Hurry. They are to be fed tohis monsters!
SAMURAI: We will save them. Iwill send you back to the citadel;you’ll find refuge there.
QUEST: More Debu
DYING VILLAGER: The DarkWarlord’s army murdered every-one. The evil monsters havemoved on to the next village. Savethem from my fate...
SAMURAI: May your soul rest.We will do what we can.
The Clan Wildernesses

PORTAL GATES. Each of the wildernessareas has two portal gates, one near theentrance and another near the exit. Theportals allow you to quickly revisit anyother gate that you’ve already cleared,right back to your own Shrine Room.When you activate all eight of the wilder-ness gates, you’ve completed the PortalQuest.
CENTRAL AMBUSH (SUPPLYDEPOTS). In the middle of each wilder-ness area, Zanshin has set up an ambushconsisting of a mass of skeleton warriorsbehind barricades, plus other assortednasties. To get through the ambushes, tryto work the perimeters, taking the archersout one barricade at a time. If you letyourself get lured out into the middle ofthe action, you’ll be pincushioned in notime. Archers and offensive spellcastersare extremely useful against the ambush-es. The enemy also uses these ambushpoints as supply depots, so once you dotake one down there should be plenty ofloot for the taking.
CEMETERY. There are cemeteries in allfour wilderness areas. When you enter thefourth (and final) wilderness area(whichever that may be based on yourstarting point), you’ll be confronted by aghost. Your honored ancestor will give youa quest to go to the cemetery in thatregion,\ and stop one of Zanshin’s priestsfrom performing a ritual to raise the dead.When you get to the cemetery, killing thepriest will complete the ritual (oops) andyou’ll have to fight the revived heroes aswell. As quests go, this is actually one ofthe easier ones.
One of the Toyotomi personal quests alsoinvolves a visit to the Toyotomi cemetery(see p. 198).
Walkthrough: The Clan Wildernesses
primagames.com 181
QUEST: Recapture thePortal Gates
DAIMYO: As I suspected, theDark Warlord is using the wilder-ness portal gates to out-flank ourforces. If we are to have any hopeof defeating him, we will need tocontrol all of the portal gates. QUEST: Disrupt the Ritual
SAMURAI: Ancestor! What hasdisturbed your rest?
GHOST: Magic … dark magic hasawakened me!
DAIMYO: Zanshin is trying toraise the dead heroes. Find wherethis ritual is taking place and stop it!

Prima’s Official Strategy Guide
182 primagames.com

Walkthrough: The Clan Wildernesses
primagames.com 183
MOUNTAIN PATH. In each of the fourwilderness areas there’s a side path thatleads to the mountain. This path ismarked by a blue line on your automap.Just before the point where the wildernessmap actually meets the mountain map,there’s a force of evil wizards and high-level skeleton archers posted by Zanshinto bar your way.
These guards are tough, and their powerlevel does not increment as you progressfrom wilderness to wilderness. The guardsare equally powerful in each of the fourareas, regardless of where you start. Theirfunction is to see to it that you don’t enterthe dangerous mountain maps before
you’re ready for them.
In the first and second wilderness area,your party basically doesn’t have a prayer.In the third, you might win out if you’revery persistent, but don’t bother … you’restill not ready for the mountain. By thetime you get to the fourth wilderness, thefight should be quite winnable.
In the first three areas, the Daimyo willwarn you if you get too close to theambush. If you’re following the blue lineand you get his “Zanshin’s forces are fullyentrenched” speech, stop dead right there,turn around and go back the way youcame.

Prima’s Official Strategy Guide
184 primagames.com
Mori Wildernessabcdefghijklmnopqrstuvwxyzabcdefghijklmnopqrstuvwxyz
abcdefghijklmnopqrstuvwxyzabcdefghijklmnopqrstuvwxyz
Mori Portal Gates
Morino Village Monsters: Skeleton Archers
Mogami River Monsters: Evil Priestesses
Mori Caves
1. The Abyss
2. The Lair of Suizan, the Kappa King
Debu Mill
Portal Gates
Central Ambush
Cemetery
Mountain Path
Village
Cave
�
�
�
�
A
B
C
D
�
�
�
�
� 12
�1

Walkthrough: Mori Wilderness
primagames.com 185
Area ABake Yoroi
Evil Female Ninja
Evil Priest
Evil Priestess
Evil Wizard(Sniper)
Fallen Hero Foot
Gaki
Kihei
Lesser Oni
Scorpion Dragon
Skeleton Archer(Sniper) (5)
Tengu
Wolf Clan(Human)
Wolf Clan (Wolf)
Area BBake Yoroi
Evil Female Ninja
Fallen Hero Foot
Kappa
Kappa (leader)
Kappa (Leader)
Kappa (Small)
Tengu
Area CBake Yoroi
Evil Female Ninja
Evil Priestess
Evil Priestess(Leader)
Fallen Hero Foot
Kihei
Lesser Oni
Scorpion Dragon
Skeleton Archer
Tengu
Wolf Clan(Human)
Area DBake Yoroi
Evil Female Ninja
Evil Priest
Evil Priestess
Fallen Hero Foot
Gaki
Kappa
Kappa (Small)
Kihei
Lesser Oni
Scorpion Dragon
Tengu
Wolf Clan(Human)
Wolf Clan (Wolf)
Individual Wildernesses
Mori WildernessThe Mori wilderness is a straightforward map, with minimal opportunities to stray fromthe main path. The village (with the Debu mill in the eastern corner) is right at the startof the path. Low-level parties may want to avoid the village until everybody’s up to atleast third level or so, and ready to take on the Debu. The graveyard is near the firstbridge.
Mori Wilderness Monsters
abcdefghijklmnopqrstuvwxyzabcdefghijklmnopqrstuvwxyz
abcdefghijklmnopqrstuvwxyzabcdefghijklmnopqrstuvwxyz

Prima’s Official Strategy Guide
186 primagames.com

Walkthrough: Mori Wilderness
primagames.com 187
Just past the second portal gate is a smallBuddhist temple (1) that figures promi-nently in the Mori Leader’s personal quest(see p. 196).
There are two caves in the second half ofthe map. The southern cave is called TheAbyss, and is the home to a varied assort-ment of subterranean monsters.
The other cave, just north of the secondportal gate, is the Lair of Suizan, theKappa King. Its entrance is concealedbehind a waterfall, and as the name sug-gests, it’s populated primarily by Kappas,including old Suizan himself. This cavealso plays a starring role in the MoriLeader’s quest.
The first portal gate, Morino Village, isconvenient to the foot of the mountain,and would be an excellent place to startthat portion of the game.
Lair of Suizan, the Kappa King
The Abyss
�
�

Prima’s Official Strategy Guide
188 primagames.com
Oda Wilderness
abcdefghijklmnopqrstuvwxyzabcdefghijklmnopqrstuvwxyz
abcdefghijklmnopqrstuvwxyzabcdefghijklmnopqrstuvwxyz
Oda Portal Gates
Yagyu Munenori’s MansionMonsters: Skeleton Archers
Tengu ForestMonsters: Evil Priests
Oda Cave
1. Pit of Torment
Pit of Torment
A
B
C
D
Debu Mill
Portal Gates
Central Ambush
Cemetery
Mountain Path
Village
Cave
�
�
�
�
�
� �
� 1
23
�1
�

Walkthrough: Oda Wilderness
primagames.com 189
Oda WildernessThe most unique feature of this map is that it’s “village” is actually the sprawling estate ofa rich nobleman. The Debu mill is located in the far western corner of the estate, behindthe fields.
In the northeastern corner of the map, there’s a hidden path that runs through a grove ofbamboo (1). Highlight the bamboo and click on it to open the path. Likewise, in thesoutheastern portion of the map, there’s a ford across a stream (2) with only one visiblestepping stone. Click on the stone to make the rest of the stones appear (be ready for thevery tough legendary Kappa on the other side).
Oda Wilderness Monsters
abcdefghijklmnopqrstuvwxyzabcdefghijklmnopqrstuvwxyz
Area ABake Yoroi
Fallen Hero Foot
Gaki
Kappa
Kappa (Small)
Lesser Oni
Tengu
Wolf Clan(Human)
Wolf Clan (Wolf)
Area BEvil Female Ninja
Fallen Hero Foot
Kihei
Scorpion Dragon
Skeleton Archer
Tengu
Wolf Clan(Human)
Area CBake Yoroi
Evil Female Ninja
Evil Priest
Evil Priest(Leader)
Evil Wizard(Sniper)
Scorpion Dragon
Scorpion Dragon(Leader)
Skeleton Archer(Sniper) (5)
Tengu
Area DEvil Priestess
Fallen Hero Foot
Gaki
Kappa (Small)
Kihei
Kihei (Leader)
Wolf Clan (Wolf)
bcdefghijklmnopqrstuvwxyzabcdefghijklmnopqrstuvwxyz
The only cave on this map, The Pit ofTorment, is located just before the centralambush.
In the far south of the map is the hauntedgrove of the thousand-year maple (3),where the Mori Berserker’s quest takesplace. Just beyond it is the graveyard.

Prima’s Official Strategy Guide
190 primagames.com
Tokugawa Wildernessabcdefghijklmnopqrstuvwxyzabcdefghijklmnopqrstuvwxyz
abcdefghijklmnopqrstuvwxyzabcdefghijklmnopqrstuvwxyz
Tokugawa Portal Gates
Border StationMonsters: Skeleton Archers
Kusunoki ForestMonsters: Evil Female Ninjas
Tokugawa Caves
1. Koga Ninja’s Hideout
2. Cave of the Black Oni
3. Lair of Suigetsu
AB
C
D
Debu Mill
Portal Gates
Central Ambush
Cemetery
Mountain Path
Village
Cave
�
�
�
�
�
��
�
�2
�3
�1

Walkthrough: Tokugawa Wilderness
primagames.com 191
Tokugawa WildernessWith two villages and three caves, this sprawling wilderness is one of the busier maps inthe game. The debu mill is located in the northeast corner of the northern village, withthe graveyard due west, across the road.
Tokugawa Wilderness Monsters
abcdefghijklmnopqrstuvwxyzabcdefghijklmnopqrstuvwxyz
Area ABake Yoroi
Evil Female Ninja
Evil Priest
Evil Priestess
Fallen Hero Foot
Gaki
Kappa
Kappa (Small)
Kihei
Lesser Oni
Scorpion Dragon
Tengu
Wolf Clan(Human)
Wolf Clan(Human)(leader)
Wolf Clan(Human)(Leader)
Wolf Clan (Wolf)
Area BBake Yoroi
Evil Female Ninja
Fallen Hero Foot
Gaki
Kappa
Kihei
Scorpion Dragon
Skeleton Archer
Tengu
Area CBake Yoroi
Evil Priest
Evil Priestess
Evil Wizard(Sniper)
Fallen Hero Foot
Gaki
Kappa (Small)
Lesser Oni
Lesser Oni(Leader)
Skeleton Archer(Sniper)(5)
Tengu
Wolf Clan (Wolf)
Area DEvil Female Ninja
Evil Female Ninja(Leader)
Evil Priest
Evil Priestess
Gaki
Kappa
Kappa (Small)
Kihei
Scorpion Dragon
Wolf Clan(Human)
Wolf Clan (Wolf)
bcdefghijklmnopqrstuvwxyzabcdefghijklmnopqrstuvwxyz

Prima’s Official Strategy Guide
192 primagames.com
The first cave you’ll come to is the Cave ofthe Black Oni, a huge and impressivecomplex inhabited by some very toughmonsters.
Beyond that, just before you reach thecentral ambush, is the lair of the KogaNinja. This is the site of the ToyotomiNinja’s personal quest, but whether you’replaying the Toyotomi samurai or not, thiscave leads up to an encounter with theKoga Ninja themselves.
Koga Ninja’s Hideout
Cave of the Black Oni
�
�

Walkthrough: Tokugawa Wilderness
primagames.com 193
The third and final cave is the Lair ofSuigetsu, and is located just behind thesecond (southern) village. This cave iswhere the Oda Ninja completes his quest.
Lair ofSuigetsu
�

Prima’s Official Strategy Guide
194
Toyotomi Wilderness
abcdefghijklmnopqrstuvwxyzabcdefghijklmnopqrstuvwxyz
abcdefghijklmnopqrstuvwxyzabcdefghijklmnopqrstuvwxyz
A
B
C
D
�
�
�
�
1
2
Toyotomi Portal Gates
Ta-Ke ForestMonsters: Evil Priests
Momiki ForestMonsters: Skeleton Archers
Toyotomi Caves
None
primagames.com
Debu Mill
Portal Gates
Central Ambush
Cemetery
Mountain Path
Village
Cave
�
�
�
�

Toyotomi WildernessThe Toyotomi wilderness is the only wilderness map in the game with no caves, butthere’s still plenty going on.
For example, when you cross the bridge of the first (southern) river, turn left and followthe river as far as you can to the northwest. When you’ve gone as far as you can alongthe riverbank, turn around … you should see a small stand of trees just behind you (1).Highlight these trees and click on them to get the Hemp, a unique component that hasthe power to make one weapon or armor completely indestructible. Once again, theHemp is unique, so save it for something you really, really like.
The village on this map is located far from the road, just a short distance from the foot ofthe mountain. The debu mill is on the southeast side of the village, just beyond the fields.
A large graveyard can play a starring role in either the Toyotomi Wizard’s personal questor in the normal graveyard quest (see p. 198).
Just over the river and down the road a bit from the graveyard is a riverside clearing dom-inated by an impressively huge pagoda (2). This is the site of the climax of the OdaLeader’s personal quest.
Toyotomi Wilderness Monsters
Walkthrough: Toyotomi Wilderness
primagames.com 195
Area ABake Yoroi
Evil Priest
Evil Priest(Leader)
Evil Priestess
Fallen Hero Foot
Kappa
Kappa (Small)
Kihei
Lesser Oni
Scorpion Dragon
Tengu
Wolf Clan(Human)
Wolf Clan (Wolf)
Area BBake Yoroi
Evil Female Ninja
Evil Priestess
Evil Wizard(Sniper)
Fallen Hero Foot
Gaki
Gaki (Leader)
Kappa
Kihei
Lesser Oni
Scorpion Dragon
Skeleton Archer(Sniper) (5)
Wolf Clan(Human)
Wolf Clan (Wolf)
Area CBake Yoroi
Evil Female Ninja
Evil Priest
Fallen Hero Foot
Kappa
Kihei
Lesser Oni
Scorpion Dragon
Skeleton Archer
Wolf Clan(Human)
Area DEvil Priest
Evil Priestess
Gaki
Kappa
Kappa (Small)
Kihei
Lesser Oni
Scorpion Dragon
Tengu
Tengu (Leader)
Wolf Clan(Human)
Wolf Clan (Wolf)
abcdefghijklmnopqrstuvwxyzabcdefghijklmnopqrstuvwxyz
bcdefghijklmnopqrstuvwxyzabcdefghijklmnopqrstuvwxyz

Mori Berserker, Yagyu JubeiWhere does it happen? In the Odawilderness. Receive the quest from a peas-ant standing near the bridge over thesouthern river, and fulfill it at theThousand-Year Maple.
What do I have to do? You have rashlyaccepted the challenge of the Black StarTrinary, three champions from the DarkWarlord’s honor guard. You (and yourcompanions) must meet the Trinary at theThousand Year Maple and fight them andtheir troops to the death.
What do I get? Three very high qualityitems – armor or weapons. You probablywon’t be able to use any of these for sever-al levels yet, but once you get there they’lldefinitely come in handy.
Mori Leader, Takeda ShingenWhere does it happen? In the Moriwilderness. Receive the quest from thedying priest in the riverside temple andfulfill it in Suizan’s cave behind the water-fall.
What do I have to do? When you checkon the priests that raised you, you findthey’ve been murdered by Suizan, theKappa King. With his dying breath, thehead priest tells you to find Suizan in hislair behind the waterfall, and recover thetemple’s sacred Buddha statue, which theKappa stole.
What do I get? The dying priest givesyou a unique set of prayer beads (WaterResistance 25%). When you kill Suizanand give the Buddha statue to your priest(by Offering it through the Priest interface)you receive a significant bonus to spellpoints in whatever element you make theoffering.
Prima’s Official Strategy Guide
196 primagames.com
Personal QuestsThe personal quests listed below all take place primarily in the four wilderness areas.Quests that take place primarily on the mountain are listed on pages 208-209.
Two of the personal quests, those of the Tokugawa Wizard and the Toyotomi Berserker,start in the wilderness but finish up on the mountain. These quests are described withthe other mountain quests, since that’s where most of the action is.
��������������������������

Oda Leader, O-ishi KuranosukeWhere does it happen? In the Toyotomiwilderness, at the pagoda.
What do I have to do? You encounterthe ghost of Kagetora, an old friend whocharges you to go to the pagoda anddestroy the Shadow Commander whomurdered him. When the commander isdead you must take his head back to theghost to prove the deed is done.
What do I get? When you return thefiend’s head to the ghost, you getKagetora’s Armor.
Oda Ninja, Kajiwara KagesueWhere does it happen? In the TokugawaWilderness. You receive the quest by thebridge over the northern river (if theNinja’s in the party), and complete it inSugetsu’s Lair.
What do I have to do? If the Ninja iswith the party when you cross the north-ern bridge, he’ll notice some strangekappa tracks in the mud of the riverbankand realize they belong to Suigetsu, thekiller kappa. From their you just have totrack Suigetsu to his lair, find him and killhim.
What do I get? Suigetsu’s Shell, a uniqueand extra-powerful variant on the ElderKappa Shell component.
Tokugawa Archer, Tejima KenzaburoWhere does it happen? In the OdaWilderness, near the foot of the mountain.
What do I have to do? Fight and kill thedragon Gero-mon, who lurks in this partof the wilderness.
What do I get? The Dragon Parts, aunique and very powerful component thatcan really soup up a bow, adding 15-20points of damage to every hit.
Walkthrough: Personal Quests (Wilderness)
primagames.com 197

Prima’s Official Strategy Guide
198 primagames.com
Toyotomi Ninja, Fujiwara JutaroWhere does it happen? In the Tokugawawilderness, at the cave of the Koga Ninja.
What do I have to do? Fight the ninjaguarding the approach to the cave to getthe scroll that will allow you to enter.Once inside, clear out the evil ninja clan,including the ultra powerful Koga Ninjathemselves.
What do I get? When you kill the KogaNinja you get the powerful Koga Shuriken.
Toyotomi Wizard, Ootani YoshitsuguWhere does it happen? In the Toyotomiwilderness, in the village and the grave-yard.
What do I have to do? A peasant sendsyour party to recover a sacred statue thathas been stolen by servants of the DarkWarlord. If the statue is not returned to itsresting place in a shrine in the graveyard,it will allow Zanshin to open a Gate toHell (which is not a good thing). Once youhave the statue, Ootani himself must takeit and place it in its proper resting place.
What do I get? When you return thestatue to its shrine, the gods give youBuddha’s Tear, a very rare component.

Walkthrough: The Mountain
primagames.com 199
The MountainOnce you purge all four citadels and allfour wilderness areas between them,you’re about halfway through the game,and you’re ready to move on to themountain. It doesn’t matter at all whichface of the mountain you tackle first;they’re all pretty much the same story— a portal gate, an entrance to the DarkWarlord’s Cavern (see p. 211), a coupleother caves, and lots of tough monsters.
The remainder of the game is a gooddeal more open-ended then the first halfwas in terms of where you can go next.In order to make your game go assmoothly as possible, we recommendthat you avoid the various shortcuts thatwill become available to you and takethe rest of the game in the followingorder:
• All four mountainsides (and theirlesser caves)
• The Dark Warlord’s Cavern
• The courtyard of the Dark Warlord’sCitadel
• Inside the Dark Warlord’s Citadel
CavesIn addition to the Dark Warlord’s Cavern(see p. 211), there are nine caves on themountain.

Prima’s Official Strategy Guide
200 primagames.com
Northeast Face (entered from Mori Wilderness)
ghijklmnopqrstuvwxyz
Northeast Face Monsters
Area ABake Yoroi
Evil Female Ninja
Fallen Hero Foot
Skeleton Archer
Tengu
Wolf Clan (Human)
Wolf Clan (Human) (leader)
Wolf Clan (Human) (Leader)
Wolf Clan (Wolf)
Area BBake Yoroi
Evil Female Ninja
Evil Priestess
Evil Priestess (Leader)
Fallen Hero Foot
Kappa
Kihei
Lesser Oni
Scorpion Dragon
Tengu
A
B
ghijklmnopqrstuvwxyz
Debu Mill
Portal Gates
Central Ambush
Cemetery
Mountain Path
Village
Cave
�
�
�
�
�
�*
�2
�1

Walkthrough: Northeast Face
primagames.com 201
1. Den of Hokori. This small cave near thefoot of the mountain is home to a family ofKappa.
2. Passage of the Serpent. This winding cav-ern leads to a secluded mountain valley.
* Dark Warlord’s Cavern Den of Hokori
Passage of the Serpent
Bake Yoroi
Evil Female Ninja
Evil Priest
Evil Priestess
Fallen Hero Foot
Gaki
Kappa
Kappa (Small)
Kihei
Lesser Oni
Scorpion Dragon
Tengu
Wolf Clan(Human)
Wolf Clan (Wolf)
Mountain Valley
��������������������������
bcdefghijklmrstuoprstuvwxyz
bcdefghijklmnoopqrstuwxyz
Mountain Valley Monsters
�
�
to valley
entry�
�

Prima’s Official Strategy Guide
202 primagames.com
Southeast Face (entered from Oda Wilderness)
ghijklmnopvwxyz
Southeast FaceMonsters
Area ABake Yoroi
Evil Female Ninja
Evil Priest
Evil Priest (Leader)
Fallen Hero Foot
Kappa
Kihei
Lesser Oni
Scorpion Dragon
Wolf Clan (Human)
Area BEvil Priestess
Gaki
Kappa
Kappa (Small)
Kihei
Lesser Oni
Scorpion Dragon
Tengu
Tengu (Leader)
Wolf Clan (Human)
Wolf Clan (Wolf)
A
B
ghijklmnrstuvwxyz
Debu Mill
Portal Gates
Central Ambush
Cemetery
Mountain Path
Village
Cave
�
�
�
�
�
�*
�2�1

Walkthrough: Southeast Face
primagames.com 203
1. Cave of Tessa-iki the Oni. TheOda Berserker must face Tessa-iki toaccomplish his personal quest.
2. Black Mountain Pass. Like thePassage of the Serpent, above, theBlack Mountain Pass leads to an other-wise inaccessible mountain valley. Thisvalley must be visited as part of theTokugawa Brick’s quest.
* Dark Warlord’s Cavern
Cave of Tessa-iki the Oni
Black Mountain Pass
��������������������������
Mountain Valley
Bake Yoroi
Evil Female Ninja
Evil Priest
Evil Priestess
Fallen Hero Foot
Gaki
Kappa
Kappa (Small)
Kihei
Lesser Oni
Scorpion Dragon
Tengu
Wolf Clan(Human)
Wolf Clan (Wolf)
bcdefghijklmrstuoprstuvwxyz
bcdefghijklmnoopqrstuwxyz
Mountain Valley Monsters
�
��
�
�
to valley
entry

Prima’s Official Strategy Guide
204 primagames.com
Southwest Face (entered from Tokugawa Wilderness)
ghijklmnopvwxyz
Southwest FaceMonsters
Area AKappa
Kappa (leader)
Kappa (Leader)
Kappa (Small)
Skeleton Archer
Area BBake Yoroi
Bake Yoroi (Leader)
Evil Priest
Evil Priestess
Gaki
Kihei
Lesser Oni
Scorpion Dragon
Wolf Clan (Human)
Wolf Clan (Wolf)
A
B
ghijklmnrstuvwxyz
Debu Mill
Portal Gates
Central Ambush
Cemetery
Mountain Path
Village
Cave
�
�
�
�
��*
�2
�1

Walkthrough: Southwest Face
primagames.com 205
1. Lair of Hashi-Hime the Spider Queen.The name says it all, really. Make sure tobring along plenty of Remedies.
2. The Bowels of Madness. This labyrinthof twisty little passages is the home to acommunity of creatures considerably lesstough than most you face on the mountain.There is, however, still plenty of generoustreasure in the cave, so think of this cave asa way to replenish your purse with a mini-mum of trouble.
* Dark Warlord’s Cavern
Lair of Hashi-hime
Bowels of Madness
�
�

Prima’s Official Strategy Guide
206 primagames.com
Northwest Face (entered from Toyotomi Wilderness)
A
B
C
ghijklmnopvwxyz
Northwest FaceMonsters
Area AEvil Female Ninja
Evil Female Ninja(Leader)
Evil Priest
Evil Priestess
Gaki
Kappa
Kappa (Small)
Kihei
Lesser Oni
Wolf Clan (Human)
Wolf Clan (Wolf)
Area BKappa
Lesser Oni
Scorpion Dragon
Scorpion Dragon(Leader)
Area CBake Yoroi
Evil Priest
Evil Priestess
Fallen Hero Foot
Gaki
Kappa (Small)
Kihei
Tengu
Wolf Clan (Human)
Wolf Clan (Wolf)
ghijklmnrstuvwxyz
Debu Mill
Portal Gates
Central Ambush
Cemetery
Mountain Path
Village
Cave
�
�
�
�
�
�2�3
�*
�1

Walkthrough: Northwest Face
primagames.com 207
1. Cave of the StoneBamboo. This cave isnamed for a unique artifact,which can be found there aspart of the Oda Swordsman’squest.
2. Test of the Hojo Clan.This is one of the mostunique caves in the game.There are seven rooms, andeach room is home to onepowerful monster — anoni, a spider witch, a scorpi-on dragon, a rouzuko, abake yoroi, a kappa and anevil priestess. The roomsalso present a good chancefor some valuable treasure,including the rare GhostArmor Plates component,and the unique War Fan(see p. 84).
3. Catacombs of theAncient Heroes. Anothercave in which large numbersof tough and annoyed kappaplay a starring role.
* Dark Warlord’s Cavern
Cave ofthe
StoneBamboo
Test of theHojo Clan
Catacombs of theAncient Heroes
�
�
�

Prima’s Official Strategy Guide
208 primagames.com
Mori Wizard, Hojo SoounWhere does it happen? On the south-east slope of the mountain, in the Test ofthe Hojo Clan cave.
What do I have to do? As your familyhas done for generations, you must con-quer the cavern called the Test of the HojoClan. When this cave is entered as part ofthe wizard’s quest, he must be alive andactive for the party to pass the entrance orany of the doors between rooms.
What do I get? In addition to the neatstuff that every party gets going throughthe cave, Hojo Sooun gets an instantboost in level upon completion.
Oda Swordsman, Imagawa YoshimotoWhere does it happen? On the north-west slope of the mountain, in the Cave ofthe Stone Bamboo.
What do I have to do? Your ancestorsknew the secret of stone bamboo. Youmust enter the cave where it is hidden andrecover some of the precious stuff.
What do I get? The unique StoneBamboo component, which has the powerto make whatever item it enhances invul-nerable.
Tokugawa Brick, Akage ToshiroWhere does it happen? On the south-east slope of the mountain.
What do I have to do? The mysticalSpear of Bishamon has been divided intothree parts and hidden within three boul-ders on the mountain. Only you can breakthe boulders. Two are located off the roadon the southeast slope, the third in thesmall valley behind the Black MountainPass cave on the southeast slope. Eachtime you break one of the stones, you willhave to fight a monster that challengesyou for it — a rouzuko, a bake yoroi, andan oni.
What do I get? When you have all threeparts you can reassemble the Spear ofBishamon.
Personal QuestsFive of the 12 personal quests in the game take place on the mountain slopes.
��������������������������

Tokugawa Wizard,Sugawara MichizaneWhere does it happen? You receive thequest in the Toyotomi wilderness, and ful-fill it on the northwest slope.
What do I have to do? In one of thegame’s saddest quests, you are passingthrough your home village, which hasbeen utterly destroyed, when the ghost ofyour beloved wife confronts you. She tellsyou that the town was murdered by thewinged serpent Koko-Ryu, and chargesyou to avenge their deaths. You must findthe monster on the mountainside anddestroy it.
What do I get? Koko-Ryu is the onlywinged serpent in the game, so this is youronly chance to get the Winged SerpentScale component. When the creature isdead your wife re-appears to you on themountainside and gives you the BetrothalNecklace, a unique set of prayer beads.
Toyotomi Berserker,Miyamoto MusashiWhere does it happen? Receive thequest in the Oda wilderness and fulfill iton the southeast slope of the mountain, inthe Cave of Tessa-iki.
What do I have to do? While you arevisiting the Oda wilderness, theBlacksmith tells you of a legendary itemthat can make your weapon or armorinvulnerable. (This is triggered the firsttime the Berserker gives the Blacksmith aweapon to repair, after entering the Odawilderness.) Unfortunately, the item inquestion is the teeth of an Oni namedTessaiki, and he’s still using them. Youmust find the creature’s lair and kill him.
What do I get? The unique Teeth ofTessaiki component, which has the powerto make the item it enhances invulnerable.
Walkthrough: Personal Quests (Mountain)
primagames.com 209

Prima’s Official Strategy Guide
210 primagames.com
The DarkWarlord’sCavern
ghijklmnopvwxyz
Dark Warlord’sCavern Monsters
Evil Priest
Evil Priestess
Gaki
Kappa (Small)
Greater Oni
Greater Oni (Leader)
Spider Witch
Wolf Clan (Human)
Wolf Clan (Wolf)
ghijklmnrstuvwxyz
�
�
�
�NortheastMountain
SoutheastMountain
DarkWarlord’sCitadel
SouthwestMountain
SoutheastMountain
�
�

Walkthrough: The Dark Warlord’s Cavern
primagames.com 211
This vast cavern underlies the mountain.It connects to all four slopes, and alsoconnects directly with the interior of theDark Warlord’s citadel.
The cavern is a tough challenge, butthere’s nothing especially tricky about it.Four very long “arms” lead out to each ofthe four slopes of the mountain. There’s aportal gate right in the middle of the maincavern, and the Dai Oni hangs out nearby.A long, narrow, climbing passage ends in asmall side chamber on the ground floor ofthe Dark Warlord’s castle. This room isopen to the surrounding area, so you canexpect to come under attack as soon asyou enter it.
The entire cavern is packed tightly withtough creatures (mostly oni and wolves,plus lots of lesser kappa), but clearing outthe passages, fulfilling the quest and acti-vating the portal are all completelystraightforward tasks.
If you want to go straight from theentrance to the Dark Warlord’s citadel bythe most direct route possible, go ahead,
but we strongly recommend you clean outthe entire cavern for the experience andtreasure, then approach the citadel fromone of the mountainsides.
And just for the record, don’t set too muchstore by the Daimyo’s comment about “therest should be easy,” when you kill theDai Oni. You get the same number ofmonsters to fight regardless of when youfulfill the quest.
It bears repeating one more time — unlessyou’re deliberately trying to make thingsmore difficult for yourself, we recommendthat you take on the final half of the gameby clearing all four mountain slopes (withtheir associated small caves) first, thenclear out the Dark Warlord’s Cavern, thenclear the courtyard of the citadel, thenenter the castle itself. Shortcuts do nothingfor you except put you face to face withenemies that you may not be fully pre-pared for yet.
Quest: Kill the Dai Oni
DAIMYO: Zanshin has woken theevil spirits under the mountain.You must destroy them before theyescape.
The Dark Warlord’s Cavern

Prima’s Official Strategy Guide
212 primagames.com
The Dark Warlord’s Citadel Approach, Courtyard and First Floor
abcdefghijklmnopqrstuvwxyzabcdefghijklmnopqrstuvwxyz
abcdefghijklmnopqrstuvwxyzabcdefghijklmnopqrstuvwxyz
Debu Mill
Portal Gates
Central Ambush
Cemetery
Mountain Path
Village
Cave
�
�
�
�
�
�
�
�
�
�

Walkthrough: The Dark Warlord’s Citadel
primagames.com 213
The ApproachOutside the walls of his citadel, Zanshinhas placed one guardian dragon on eachof the four paths that lead to the fourmountain slopes. These creatures are youronly source of the three Guardian Dragonmagical components (Head, Wings andSkin), so these can be lucrative encoun-ters — don’t forget to go after all four.The dragons are the only creatures you’llmeet until you’re within the walls of thecitadel.
The CourtyardThe courtyard of Zanshin’s palace is abustling place, and the business the citi-zens are engaged in is trying to kill you. Inaddition to a horde of archers, soldiers,commanders and other nasties, the court-yard also contains a working Debu mill,and the game’s last portal gate.
Zanshin’s questionable taste in home dec-oration is obvious right from the start.Those leathery corpses artfully drapedaround the courtyard? They’re not justobject’s d’art. They’re also handy-dandystorage spaces for useful home necessitieslike potions, gold and weapons. MarthaStewart would be proud.
The CastleInside the castle, in addition to a myriadof guards and demons and lots of priest-esses (the macabre harem of the DarkWarlord), you’ll find the seven DarkSamurai. These evil mockeries have beencreated to match the abilities of eachmember of your party. Fortunately, theDark Samurai don’t attack in a pack —instead they’re spread out through thecitadel, from the first floor to the doorstepof Zanshin’s inner sanctum.
The Dark Warlord’s CitadelCongratulations, you’ve successfully cleared the land of the Dark Warlord’s forces anddriven him back to his castle. But your job isn’t over yet. Now you must enter Zanshin’splace of power, his very castle, and destroy the demonic creature for all time.
��������������������������
ghijklmnopabcfgrjjvwxyz
Dark Warlord’s Citadel Monsters(Stage 6, unless otherwise noted)
Outer AreaFallen Hero Foot
Kihei
Kihei (Leader)
Skeleton Archer
Ground FloorDark Brick (leader)
Dead Foot Soldier
Evil Priestess
Evil Priestess (Leader)
Neanderskull
Neanderskull (Leader)
Shadow Soldier
ghijklmnabcdefgrstuvwxyz

Prima’s Official Strategy Guide
214 primagames.com
Dining Room
abcdefghijklmnopqrstuvwxyzabcdefghijklmnopqrstuvwxyz
abcdefghijklmnopqrstuvwxyzabcdefghijklmnopqrstuvwxyz
Labyrinth of Confusion
TortureChamber
Tenkai’sLair
ShrineRoom

Walkthrough: The Dark Warlord’s Citadel
primagames.com 215
On the second floor you’ll notice a dis-turbing change in the décor. Except forZanshin’s habit of using human remainsfor decorations, for most of the first twolevels the place had a rather gothic butstill elegant look to it. But with one roomon the second floor that changes, and thewalls become, well, meat. It’s not pretty.
The third floor is a confusing labyrinth ofsquare islands on a sea of, well, best notto ask, really. Of course, since both theway up and the way down are located inthe central room of the maze, you don’treally have to worry about getting frompoint A to point B. You just have to findthe monsters that haunt the maze, and killthem for the experience.
The fourth floor is Zanshin’s torture cham-ber, a huge open room full of monsters.
(Some of which are caged, awaiting cor-rection — but don’t expect them to begrateful if you let them free). This levelalso contains a one-way passage leadingback down to one of the more remote cor-ners of the maze below. This corner willonly connect to the rest of the maze ifapproached from this side.
Quest: Kill Tenkai
Daimyo: It is Tenkai’s magic thatmakes the Dark Warlord immortal.Find the evil wizard and break hiscontrol over Zanshin!
Dining RoomDark Leader (leader)
Evil Female Ninja
Evil Female Ninja (Leader)
Evil Priest
Evil Priest (Leader)
Shadow Commander
Shadow Commander(Leader)
Labyrinth of ConfusionBake Yoroi
Bake Yoroi (Leader)
Dark Archer (leader)
Dark Swordsman (leader)
Fallen Wizard
Fallen Wizard (Leader)
Gaki
Gaki (Leader)
Skeleton Archer
Skeleton Archer (Leader)
Torture ChamberDark Berserker
Gaki
Gaki (Leader)
Scorpion Dragon
Spider Witch
Spider Witch (Leader)
Tenkai’s LairTenkai
Dark Wizard (leader)
Evil Priest
EvilWizard (3)
EvilWizard (4)
Wolf Clan (Human)
Wolf Clan (Human)(Leader)
Shrine RoomDark Ninja
Debu
Evil Priestess
Evil Priestess Sniper
Fallen Ninja
abcdefghijklmnopqrstuvwxyzabcdefghijklmnopqrstuvwxyz
bcdefghijklmnopqrstuvwxyzabcdefghijklmnopqrstuvwxyz
Dark Warlord’s Citadel Monsters(Stage 6, unless otherwise noted)

Prima’s Official Strategy Guide
216 primagames.com
The fifth floor is the lair of Tenkai,Zanshin’s major domo and court wizard.To get to the Dark Warlord, you have tokill Tenkai and his assistants, then flip thesix switches (click on the large statues) inthe well guarded rooms along the corri-dors. When you accomplish this, it willactivate the Dark Portal that is the onlyentrance to Zanshin’s inner sanctum, hisShrine Room.
Before you step through the portal, take afew minutes to prepare. Make sure every-body is fully healed, with a good stock ofhealing and Ki potions. If you’ve beenholding back any really good components,waiting for the perfect items to use them in,now’s the time to stop waiting and find themost useful place for them. Go ahead andspend most of your gold (you may want tohold back a little cash for more potionslater, but there will be some treasure avail-able beyond the Dark Portal as well).
There are three rooms to Zanshin’s sanc-tum. The first is small and holds the otherend of the Dark Portal. In the second,things get interesting. You’ll be attackedby roughly a zillion debu, supported by asubstantial force of priestesses and a fewultra-quick evil ninja (led by the last of theDark Samurai, the Dark Ninja).
Don’t expect to kill everyone your firsttime in. Be prepared to duck back throughthe Dark Portal as many times as it takes,to heal up and stock up for the nextassault. Try not to let the heaving crowdsof debu cut off your line of retreat to theDark Portal.
Once the crowd in the outer room is dis-posed of, you’re finally ready to get face-to-face with Zanshin. The fight is as toughas you’d expect, and once again, don’texpect to win outright in the first engage-ment — remain ready to retreat and healup from time to time.
Powerful hand weapons will do moredamage to the Dark Warlord than magicspells, but spells do have their place in abattle, to slow and distract Zanshin. Pickyour most dangerous Samurai, put themin a tactical formation that best suitsthem, and move in. Good luck.
The Final Battle
Quest: Destroy the DarkWarlord
Daimyo: Now is the time to act!Attack Zanshin, The DarkWarlord, and destroy him!
��������������������������