Thermostat Manual
24
Installation, Operation & Application Guide LIA265-1 Group: WSHP Supercedes: LIA217 Date: 12-19-08 Programmable Electronic Thermostat 2 Heat/2 Cool , 7-Day Programmable, Hardwired Part No. 668375301 For replacement parts call 1-800-377-2787 ©2008 McQuay International • www.mcquay.com • 800-432-1342 • Programmable and Configurable • Single/Dual Stage Heat/Cool Systems • Backlit Display • Auto Changeover • Simpleset ® 7 Day Programming • Title 24 Compliant/No Batteries Required • Relay Outputs (minimum voltage drop in thermostat) • Ideally Suited for: – Light Commercial/Residential (New Construction/Replacement)
-
Upload
matt-awesomnovski-von-schnitzeldorf-longname -
Category
Documents
-
view
266 -
download
2
description
Â
Transcript of Thermostat Manual

Installation,Operation&ApplicationGuide LIA265-1
Group: WSHPSupercedes: LIA217Date: 12-19-08
ProgrammableElectronicThermostat2 Heat/2 Cool, 7-Day Programmable, HardwiredPart No. 668375301
For replacement parts call 1-800-377-2787©2008 McQuay International • www.mcquay.com • 800-432-1342
• Programmable and Configurable• Single/Dual Stage Heat/Cool Systems• Backlit Display• Auto Changeover• Simpleset® 7 Day Programming• Title 24 Compliant/No Batteries Required• Relay Outputs (minimum voltage drop in thermostat)• Ideally Suited for:
– Light Commercial/Residential (New Construction/Replacement)
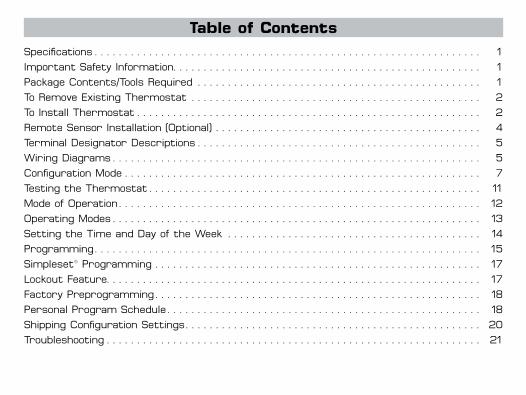
Table of ContentsSpecifications . . . . . . . . . . . . . . . . . . . . . . . . . . . . . . . . . . . . . . . . . . . . . . . . . . . . . . . . . . . . . . . . 1
ImportantSafetyInformation . . . . . . . . . . . . . . . . . . . . . . . . . . . . . . . . . . . . . . . . . . . . . . . . . . . 1
PackageContents/ToolsRequired . . . . . . . . . . . . . . . . . . . . . . . . . . . . . . . . . . . . . . . . . . . . . . . 1
ToRemoveExistingThermostat . . . . . . . . . . . . . . . . . . . . . . . . . . . . . . . . . . . . . . . . . . . . . . . . 2
ToInstallThermostat . . . . . . . . . . . . . . . . . . . . . . . . . . . . . . . . . . . . . . . . . . . . . . . . . . . . . . . . . 2
RemoteSensorInstallation(Optional) . . . . . . . . . . . . . . . . . . . . . . . . . . . . . . . . . . . . . . . . . . . . 4
TerminalDesignatorDescriptions . . . . . . . . . . . . . . . . . . . . . . . . . . . . . . . . . . . . . . . . . . . . . . . 5
WiringDiagrams . . . . . . . . . . . . . . . . . . . . . . . . . . . . . . . . . . . . . . . . . . . . . . . . . . . . . . . . . . . . . 5
ConfigurationMode . . . . . . . . . . . . . . . . . . . . . . . . . . . . . . . . . . . . . . . . . . . . . . . . . . . . . . . . . . . 7
TestingtheThermostat . . . . . . . . . . . . . . . . . . . . . . . . . . . . . . . . . . . . . . . . . . . . . . . . . . . . . . . 11
ModeofOperation . . . . . . . . . . . . . . . . . . . . . . . . . . . . . . . . . . . . . . . . . . . . . . . . . . . . . . . . . . . . 12
OperatingModes . . . . . . . . . . . . . . . . . . . . . . . . . . . . . . . . . . . . . . . . . . . . . . . . . . . . . . . . . . . . . 13
SettingtheTimeandDayoftheWeek . . . . . . . . . . . . . . . . . . . . . . . . . . . . . . . . . . . . . . . . . . 14
Programming . . . . . . . . . . . . . . . . . . . . . . . . . . . . . . . . . . . . . . . . . . . . . . . . . . . . . . . . . . . . . . . . 15
Simpleset®Programming . . . . . . . . . . . . . . . . . . . . . . . . . . . . . . . . . . . . . . . . . . . . . . . . . . . . . . 17
LockoutFeature . . . . . . . . . . . . . . . . . . . . . . . . . . . . . . . . . . . . . . . . . . . . . . . . . . . . . . . . . . . . . . 17
FactoryPreprogramming . . . . . . . . . . . . . . . . . . . . . . . . . . . . . . . . . . . . . . . . . . . . . . . . . . . . . . 18
PersonalProgramSchedule . . . . . . . . . . . . . . . . . . . . . . . . . . . . . . . . . . . . . . . . . . . . . . . . . . . . 18
ShippingConfigurationSettings . . . . . . . . . . . . . . . . . . . . . . . . . . . . . . . . . . . . . . . . . . . . . . . . . 20
Troubleshooting . . . . . . . . . . . . . . . . . . . . . . . . . . . . . . . . . . . . . . . . . . . . . . . . . . . . . . . . . . . . . . 21

�
Electrical rating: •24VAC/VDC(18-30VAC/VDC) •1ampmaximumperterminal •4ampmaximumtotalloadTemperature control range: 45°Fto90°F(7°Cto32°C)Accuracy:±1°F(±0.5°C)System configurations:2-stageheat,2-stagecoolTerminations:-C,+R,W1,Y1,W2,Y2,G,S1,S2
Specifications
WARNING!: Always turn off power at the main power supply before installing, cleaning, or removing thermostat.
•Thisthermostatisfor24VAC/VDCapplicationsonly;donotuseonvoltagesover30VAC/VDC•Donotshortacrossterminalsofgasvalveorsystemcontroltotestoperation;thiswilldamageyour
thermostatandvoidyourwarranty•Allwiringmustconformtolocalandnationalelectricalandbuildingcodes•Donotuseairconditioningwhentheoutdoortemperatureisbelow50degrees;thiscandamageyour
A/Csystemandcausepersonalinjuries•Usethisthermostatonlyasdescribedinthismanual
Important Safety Information
Package includes: McQuayprogrammablethermostatonbase,labeledthermostatcover,wiringlabels,screwsandwallanchors,Owner’sManual,Installation,OperationandApplicationGuide.
Tools required for installation:Drillwith3/16”bit,hammer,screwdriver.
Package Contents/Tools Required
�
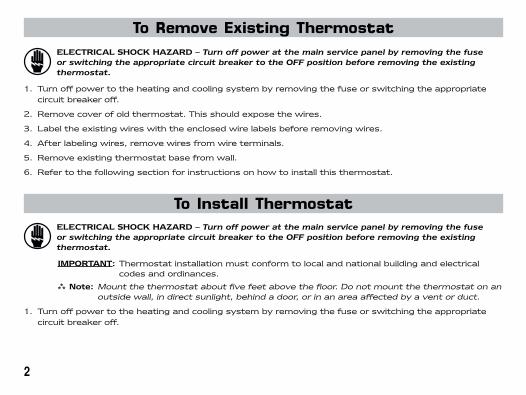
ELECTRICAL SHOCK HAZARD –Turn off power at the main service panel by removing the fuse or switching the appropriate circuit breaker to the OFF position before removing the existing thermostat.
1. Turnoffpowertotheheatingandcoolingsystembyremovingthefuseorswitchingtheappropriatecircuitbreakeroff.
2. Removecoverofoldthermostat.Thisshouldexposethewires.
3. Labeltheexistingwireswiththeenclosedwirelabelsbeforeremovingwires.
4. Afterlabelingwires,removewiresfromwireterminals.
5. Removeexistingthermostatbasefromwall.
6. Refertothefollowingsectionforinstructionsonhowtoinstallthisthermostat.
To Remove Existing Thermostat
ELECTRICAL SHOCK HAZARD –Turn off power at the main service panel by removing the fuse or switching the appropriate circuit breaker to the OFF position before removing the existing thermostat.
IMPORTANT:Thermostatinstallationmustconformtolocalandnationalbuildingandelectricalcodesandordinances.
Note:Mountthethermostataboutfivefeetabovethefloor.Donotmountthethermostatonanoutsidewall,indirectsunlight,behindadoor,orinanareaaffectedbyaventorduct.
1. Turnoffpowertotheheatingandcoolingsystembyremovingthefuseorswitchingtheappropriatecircuitbreakeroff.
To Install Thermostat

�
To Install Thermostat (continued)
2. Toremovecover,insertandtwistacoinorscrewdriverintheslotsonthesidesofthethermostat.
3. Putthermostatbaseagainstthewallwhereyouplantomountit(Besurewireswillfeedthroughthewireopeninginthebaseofthethermostat).
4. Marktheplacementofthemountingholes.
5. Setthermostatbaseandcoverawayfromworkingarea.
6. Usinga3/16”drillbit,drillholesintheplacesyouhavemarkedformounting.
7. Useahammertotapsuppliedanchorsinmountingholes.
8. Alignthermostatbasewithmountingholesandfeedthecontrolwiresthroughwireopening.
9. Usesuppliedscrewstomountthermostatbasetowall.
10. Insertstripped,labeledwiresinmatchingwireterminals.See“WiringDiagrams”sectionofthismanual(Pages5&6).Ifusingoptionalremotesensor,see“RemoteSensorInstallation”(Page4).
CAUTION!:Besureexposedportionofwiresdoesnottouchotherwires.
11. Tightenscrewsonterminalblock.Gentlytugwiretobesureofproperconnection.Doublecheckthateachwireisconnectedtotheproperterminal.
12. Sealholeforwiresbehindthermostatwithnon-flammableinsulationorputty.
13. Replacecoveronthermostatbysnappingitinplace.
14. Turnonpowertothesystematthemainservicepanel.
15. Testthermostatoperationasdescribedin“TestingtheThermostat”(Page11).

�
1.Removecoverfromremotesensorhousing.
2.Selectanappropriatelocationformountingtheremotesensor.
3.Mountremotesensorunitusinghardwareprovided.
4.Installtwostrandshieldedwirebetweenremotesensorandthermostat.Shieldedwiremustbeused.Donotrunremotesensorwireinconduitwithotherwires.
• Wire 1shouldrunbetweentheS1terminalonthethermostatandtheS1terminalontheremotesensor
• Wire 2shouldrunbetweentheS2terminalonthethermostatandtheS2terminalontheremotesensor
• ConnecttheshieldingofthewiretotheS2terminalonthethermostat
5.Disablethemainsensor(R12)onthethermostatbycuttingitfromthecircuitboard.
Remote Sensor Installation (Optional)Requires McQuay Remote Sensor Part Number 667720401

�
-C Y2W2Y1W1+R
ELECTRONIC THERMOSTAT
W
2G
W
1Y
1
FE
LU
AP
V+ R
- CO
McQUAY SINGLE CIRCUIT
Ma
rk IV
Bo
ard
Low
Vo
ltag
e Te
rmin
al B
oa
rd
Terminal Designator Descriptions
Wiring Diagrams
G

�
-C GY2W2Y1W1+R
McQUAY DUAL CIRCUITM
ark
IV B
oa
rd C
ircui
t 1Lo
w V
olta
ge
Term
ina
l Bo
ard
Ma
rk IV
Bo
ard
Circ
uit 2
Low
Vo
ltag
e Te
rmin
al B
oa
rd
ELECTRONIC THERMOSTAT
W
2G
W
1Y
1
FE
LU
AP
V+ R
- CO
W
2G
W
1Y
1
FE
LU
AP
V+ R
- CO

�
TheconfigurationmodeisusedtosettheSC3801tomatchyourheating/coolingsystem.TheSC3801functionswithheatpump,airconditioning,gas,oil,orelectricheatsystems.
1. Toentertheconfigurationmode,simultaneouslyholddownthe and buttonswhiletheSC3801isinOFFmode.
2. Pressthe or buttontochangesettingswithineachscreen.
3. Pressthe buttontoadvancetothenextscreen.
Note:The buttonwillreturnyoutothepreviousscreen.
4. Toexitconfigurationmode,holdinthe buttonfor6seconds.
Configuration Mode SettingsThesetupscreensforconfigurationmodeareasfollows:
1. Heatpump–Pressthe or buttontoconfigureasheatpumpornon-heatpumpsystem.
•ON=Heatpumpsystem
•OFF=Non-heatpumpsystem
Pressthe buttontoadvancetothenextscreen.
2. Reversingvalve–appearsonlyifheatpumpissetto“ON”.
Pressthe or buttontosetreversingvalve.
Ifyourreversingvalveisenergizedinheatmode,setto“b.”Ifthereversingvalveisenergizedincoolmode,setto“o.”
Pressthe buttontoadvancetothenextscreen.
3. HEAT,ELECTRIC,orGAS/OIL–appearsonlyifheatpumpsettingis“OFF”.
Pressthe or buttontosetheattype.
•Forelectricheat(interlocked),set“ELC”ON
•Forgasoroilheat(non-interlocked),toggle“ELC”OFF
Pressthe buttontoadvancetothenextscreen.
Configuration Mode

�
Configuration Mode Settings (continued)
5. Stage1Differential(1°Fto3°F)(1°Cto2°C)–Setthenumberofdegreesbetweenyour“turnon”temperatureandyour“setpoint”temperature.
Pressthe or buttontosetdifferentialvalue. Pressthe buttontoadvancetothenextscreen.
7. Deadband(1°Fto9°F)(1°Cto5°C)–Settheminimumnumberofdegreesbetweenyourheatingsystemactivationandyourcoolingsystemactivation.
Pressthe or buttontosetdeadbandvalue. Pressthe buttontoadvancetothenextscreen.
6. Stage2Differential(1°Fto6°F)(1°Cto3°C)–SetthenumberofdegressbetweenwhenStage1turnsonandwhenStage2turnson.
Pressthe or buttontosetdifferentialvalue. Pressthe buttontoadvancetothenextscreen.
4. Temperaturescale(ForC)–ChooseFahrenheitorCelsius. Pressthe or buttontoselect. Pressthe buttontoadvancetothenextscreen.
8. Stagedoffoutputs–Selectwhethertheoutputsforheatingandcoolingarestagedoffindependentlyoraresatisfiedsimultaneously.
1=EconomyMode–Outputsarestagedonandoffinaccordancewithsetpointanddifferential.
0=ComfortMode– Outputsarestagedonandallstagescycleoffsimultaneouslywhensetpointissatisfied.
Pressthe or buttontoselect. Pressthe buttontoadvancetothenextscreen.
9. FanONDelay–HEATcycle(0-120seconds)–TimefanisdelayedturningONatstartofheatcycle.Fornodelay,setto0:00(appearsonlyforheatpumporelectricheatsystems).
Pressthe or buttontosetdelay.
CAUTION!:Changing from the default of 0:00 may permanently damage your system. Pressthe buttontoadvancetothenextscreen.

�
10. FanOFFDelay–HEATcycle(0-240seconds)–TimefanisdelayedturningOFFafterheatcycle.Fornodelay,setto0:00.
Note:Thisappearsonlyforheatpumporelectricheatsystems.
Pressthe or buttontosetdelay.
CAUTION!:Changing from the default of 0:00 may permanently damage your system.
Pressthe buttontoadvancetothenextscreen.
Configuration Mode Settings (continued)
13. Maximumruncyclesallowedperhour(d,2-6).
d=asmanyasneeded,2-6=maximumcycles/hour
Pressthe or buttontoselect.
Pressthe buttontoadvancetothenextscreen.
11. FanONDelay–COOLcycle(0-120seconds)–TimefanisdelayedturningONatstartofcoolcycle.Fornodelay,setto0:00.
Pressthe or buttontosetdelay.
CAUTION!:Changing from the default of 0:00 may permanently damage your system.
Pressthe buttontoadvancetothenextscreen.
12. FanOFFDelay–COOLcycle(0-240seconds)–TimefanisdelayedturningOFFaftercoolcycle.Fornodelay,setto0:00.
Pressthe or buttontosetdelay.
CAUTION!:Changing from the default of 0:00 may permanently damage your system.
Pressthe buttontoadvancetothenextscreen.
14. AuxiliaryDelayON–(0-30minutes)–Forheatpumpsystemsonly.Setthedelaytimeinminutesforauxiliaryheattobelockedoutafteracallforsecondstage.
Pressthe or buttontoselect.
Pressthe buttontoadvancetothenextscreen.

�0
Configuration Mode Settings (continued)15. Statusindicator(0,1,2)–ChoosewhenstatusindicatorLED(green,red)illuminates.
0=Statusindicatorneveron 1=Statusindicatoronwithfirststage 2=Statusindicatoronwithsecondstage
Pressthe or buttontoselect.
Pressthe buttontoadvancetothenextscreen.
16. Lockout(0°Fto8°F,NITE,COOL-HEAT)–SelectthenumberofdegreessettemperaturecanbechangedduringkeypadlockoutorselecttolockoutduringNITEperiodonly.COOL-HEATlockoutallowsadjustmentofthesettemperaturestothemaximumheatsettemperatureselectedinStep17andminimumcoolsettemperatureselectedinStep18.
Note:Themodecannotbechangedwhenthethermostatislocked.
Pressthe or buttontoselect.
Pressthe buttontoadvancetothenextscreen.
19. RoomTemperatureOffset(+9°Fto-9°F)(+5°Cto-5°C)
Adjusttocalibratedisplayedroomtemperaturetomatchactualroomtemperature.
Pressthe or buttontoselect.
ToexitConfigurationMode,holdinthe buttonfor6seconds.
17. MaximumHeatSetpoint(45°Fto90°F)(7°Cto32°C)
AdjusttocontrolthemaximumHeatsettemperatureallowed.
Pressthe or buttontoselect.
Pressthe buttontoadvancetothenextscreen.
18. MinimumCoolSetpoint(45°Fto90°F)(7°Cto32°C)
AdjusttocontroltheminimumCoolsettemperatureallowed.
Pressthe or buttontoselect.
Pressthe buttontoadvancetothenextscreen.

��
Testing the ThermostatOncethethermostatisinstalled,itshouldbethoroughlytested.
CAUTION!:Do not energize the air conditioning system when the outdoor temperature is below 50 degrees. It can result in equipment damage or personal injury.
Cool Test1. Pressmode buttonuntilcoolmodescreenisdisplayed.2. Adjustsettemperaturesoitis5degreesbelowroomtemperature.3. Airconditioningshouldcomeonwithinafewseconds.4. Adjustthesettemperature2degreesabovetheroomtemperatureandthe
A/Cshouldturnoff.Theremaybeafandelayonyoursystem. Note:Thereisafourminutetimedelaytoprotectthecompressor
afteritturnsoff.Totemporarilybypassthefourminutedelay,pressthe buttonfourtimes.
Heat Test1. Pressmode buttonuntilheatmodescreenisdisplayed.2.Adjustthesettemperaturesoitis5degreesabovetheroomtemperature.3. Heatshouldcomeonwithinafewseconds.4. Adjustthesettemperaturesoitis2degreesbelowtheroom
temperatureandtheheatshouldturnoff.Theremaybeafandelayonyoursystem.

��
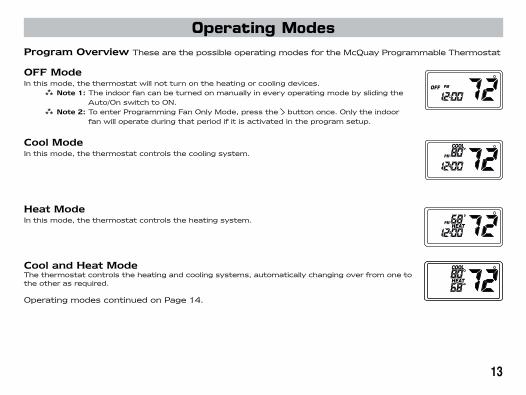
TheMcQuayProgrammableThermostatisanautochangeover,twostageheat,twostagecoolthermostat.
Thethermostatactivatesaheatingappliancewhentheroomtemperatureisbelowthesetheattemperature(bythedifferentialtemperature).Theredstatusindicatormaycomeonwithfirstorsecondstage,dependingonconfiguration.Whenitdropsanothertwodegrees,thesecondstage(auxiliary)heatisactivated.Theheatingisstagedoffwhentheroomtemperatureincreases.
Whentheroomtemperatureisgreaterthanthesetcooltemperature(bythedifferentialtemperature),thefirststagecoolingdeviceisactivated.Thegreenstatusindicatormaycomeonwithfirstorsecondstage,dependingonconfiguration.Iftheroomtemperatureincreasestwomoredegrees,thesecondstagecoolingdevicewillbeactivated.Thecoolingisstagedoffwhentheroomtemperaturedecreases.
Thethermostathasthefollowingoperatingmodes:OFF,Heat,Cool,CoolandHeat,andProgrammode.InOFFmode,thethermostatwillnotturnonheatingorcoolingdevices.Theindoorfancanbeturnedoninalloperatingmodesusingthefanswitch.IntheHeatmode,thethermostatcontrolstheheatingsystem.IntheCoolmode,thethermostatcontrolsthecoolingsystem.IntheCoolandHeatmode,thethermostatcontrolsboththecoolingandheatingsystems.InProgrammode,thethermostatwillautomaticallybecontrolledbythesetprogram.ProgrammodecanfunctionwithHeatmode,Coolmode,CoolandHeatmodeorOFFmode(forProgrammablefanoptiononly).TheclockdisplayalternateswiththesettemperaturedisplayforCoolandHeatmode.
Theprogramschedulecanbeoverriddenbychangingthesettemperature( or ).Thisputsthethermostatintoa2-hourtemporaryhold.After2hours,itwillautomaticallyreturntotheprogramschedule.
Thethermostatalsohasabuttonlockoutfeature.Thisenablesthethermostattobesettothepropermodeandtemperatureandlockedsoitcannotbetamperedwith.
Mode of Operation
��
Program Overview ThesearethepossibleoperatingmodesfortheMcQuayProgrammableThermostat
OFF ModeInthismode,thethermostatwillnotturnontheheatingorcoolingdevices. Note 1:Theindoorfancanbeturnedonmanuallyineveryoperatingmodebyslidingthe
Auto/OnswitchtoON. Note 2:ToenterProgrammingFanOnlyMode,pressthe buttononce.Onlytheindoor
fanwilloperateduringthatperiodifitisactivatedintheprogramsetup.
Operating Modes
Cool and Heat ModeThethermostatcontrolstheheatingandcoolingsystems,automaticallychangingoverfromonetotheotherasrequired.
OperatingmodescontinuedonPage14.
Heat ModeInthismode,thethermostatcontrolstheheatingsystem.
Cool ModeInthismode,thethermostatcontrolsthecoolingsystem.

��
Operating Mode (continued)Program ModeInthismode,theprogramfunctionison,andthethermostatwillautomaticallybecontrolledbythesetprogram.ProgrammodecanfunctionwithHeatmode,Coolmode,CoolandHeatmodeorOFFmode(forProgrammablefanoptiononly).
Pressthe buttontoenterandexitprogrammode.
Program Mode HoldTheprogramschedulecanbeoverriddenbychangingthesettemperature( or ).After2hours,theprogramschedulewillautomaticallyberesumed.Toreturntotheprogramschedulemanually,pressthe buttontwice.
Setting the Time and Day of the Week
5. Pressthe buttonwhilethetimeisdisplayed.Thedisplayshowsthedaycurrentlysetonthethermostat(1=Monday,2=Tuesday,etc).
6. Pressthe or buttontosetthecorrectdayoftheweekthattodayis. Note:Pressthe buttoninfor5secondstolockvaluesintomemoryor
pressthe buttononcetoenterprogramming.
Thetimeanddayoftheweekmustbesetforyourprogramscheduletooperatecorrectly.
1. Verifythermostatisinnon-programmablemode(usethe buttontoexitprogmode).2. Pressandrelease buttonuntilOFFmodedisplays.
3. Pressthe buttoninfor6seconds.4. Pressthe or buttontoadjustthetime.

��
Program OverviewTheMcQuayProgrammableThermostathasfourperiods(MORN,DAY,EVE,NITE)thatarecustomizableforeachdayoftheweek.Eachperiodwillhaveastarttime,heattemperature,cooltemperatureandprogrammablefan.Thethermostatmonitorsthedayandtime,whilemaintainingthespecificconditionsyouhavechosenforeachperiodinyourprogram.
1. Verifythermostatisinnon-programmablemode(usethe buttontoexitprogmode).
2. Pressandreleasethe buttonuntilOFFmodedisplays.3. Pressthe buttonfor6seconds.4. Pressthe buttontwice.
•Dayisdisplayed(1-7)
5. Pressthe or buttontochangethedayyouwanttoprogram(1=Monday,2=Tuesday,etc).
6. Pressthe buttontoadvancetothenextscreen. Note:Youcanalwayspressthe buttontoreturntothe
previousscreen.
•Periodisdisplayed(MORN,DAY,EVE,NITE)
7. Pressthe or buttontochangeperiodofday.8. Pressthe buttontoadvancetothenextscreen.
Programming

��
Programming (continued)
•Settimeisdisplayed
9. Pressthe or buttontochangesettime.10. Pressthe buttontoadvancetothenextscreen. Note:Transitionsrequiredafter11:59PMmustbeprogrammedinthenext
day’sMORNperiod.
•Heattemperatureisdisplayed(50°Fto90°F)
11. Pressthe or buttontoadjustheatsettemperature.12. Pressthe buttontoadvancetothenextscreen.
•Cooltemperatureisdisplayed(45°Fto85°F)
13. Pressthe or buttontoadjustcoolsettemperature.14. Pressthe buttontoadvancetothenextscreen.
•Programmablefanisdisplayed
15. Pressthe or buttontoturnON/OFFcontinuousindoorfanforthatperiod.16. Pressthe buttontoadvancetothenextscreen.
Repeatsteps1-16toprogrameachdayoftheweekindividuallyorusetheSimpleset®feature(seePage17)toprogrameverydaythesameasMonday.
Pressthe buttonfor5secondstoexitprogrammingandreturntotheOFFmode.
Pressthe buttontoselectthecorrectoperatingmode.
Pressthe buttontoenterandexitprogrammode.

��
Simpleset®programmingisaconvenientmethodofprogrammingthethermostat.OncetheentireMonday(Day1)scheduleisset,Simpleset®programmingwillcopytheMondayscheduletoeverydayoftheweek.AfterthecompleteMondayscheduleisset(seeProgrammingonPage16),youareattheDay2screen:1.Pressthe buttononce.Day1screendisplays.2.Pressthe buttonfor2seconds.
•Thedaysoftheweekwillcountdownfrom7to1andthiswilllockthesettingsintomemory.
•Oncethescheduleislockedin,youcangothrougheachdayandmakeanychangesyourequire.Thisfeaturespeedsuptheprogrammingofthestandardweekday/weekendschedule.
3.Press buttonfor5secondstoexitProgrammode.
Simpleset® Programming
TheMcQuayProgrammableThermostathasabuttonlockoutfeaturesothemodecannotbechangedandthetemperatureadjustmentislimited.SelecttheappropriatelockoutfromConfigurationModeSettings,Step13,Page10ofthisguide.
ToactivatetheLOCfeature:
1.Pressthe buttonandholditin.2.Alsopress buttonandkeepbothdepressedfor10seconds.3.LOCwilldisplayandtheLockoutFunctionwillbeenabled.
TodeactivatetheLOCfeature,repeatsteps1&2above(inthissection).
Lockout Feature

��
MORN DAY EVE NITEHEAT HEAT HEAT HEATCOOL COOL COOL COOLFAN* ON/OFF FAN* ON/OFF FAN* ON/OFF FAN* ON/OFF
TUESDAY
2
TheMcQuayProgrammableThermostatcomespreprogrammedwiththefollowingschedule:
MORN 6:00 AM DAY 8:00 AM EVE 6:00 PM NITE 10:00 PMHEAT 70°F HEAT 62°F HEAT 70°F HEAT 62°FCOOL 78°F COOL 85°F COOL 78°F COOL 82°FFAN* ON/OFF FAN* ON/OFF FAN* ON/OFF FAN* ON/OFF
MONDAYthru
SUNDAY
*Programmablefanoption
Factory Preprogramming
Usethefollowingpersonalprogramscheduletorecordyoursettings:
MORN DAY EVE NITEHEAT HEAT HEAT HEATCOOL COOL COOL COOLFAN* ON/OFF FAN* ON/OFF FAN* ON/OFF FAN* ON/OFF
MONDAY
1
Personal Program Schedule
WEDNES-
DAY
3
MORN DAY EVE NITEHEAT HEAT HEAT HEAT
COOL COOL COOL COOL
FAN* ON/OFF FAN* ON/OFF FAN* ON/OFF FAN* ON/OFF
*Programmablefanoption

��
Personal Program Schedule (continued)
THURSDAY
4MORN DAY EVE NITEHEAT HEAT HEAT HEAT
COOL COOL COOL COOL
FAN* ON/OFF FAN* ON/OFF FAN* ON/OFF FAN* ON/OFF
FRIDAY
5MORN DAY EVE NITEHEAT HEAT HEAT HEAT
COOL COOL COOL COOL
FAN* ON/OFF FAN* ON/OFF FAN* ON/OFF FAN* ON/OFF
SATURDAY
6MORN DAY EVE NITEHEAT HEAT HEAT HEAT
COOL COOL COOL COOL
FAN* ON/OFF FAN* ON/OFF FAN* ON/OFF FAN* ON/OFF
SUNDAY
7MORN DAY EVE NITEHEAT HEAT HEAT HEAT
COOL COOL COOL COOL
FAN* ON/OFF FAN* ON/OFF FAN* ON/OFF FAN* ON/OFF

�0
McQuay 7-Day Programmable Thermostat Factory Defaults
NOTE:FollowingarethefactorydefaultsettingsfortheMcQuaythermostat:1. Heat Pump OFF
2. Reversing Valve O/B N/A
3. Heat Electric ON
4. F/C F
5. Differential Stage 1 1
6. Differential Stage 2 2
7. Deadband 5
8. Staged Off Outputs ON
9. Heat Fan Delay on 0:00
10. Heat Fan Delay off 0:00
11. Cool Fan Delay on 0:00
12. Cool Fan Delay off 0:00
13. Cycles Per Hour d
14. Auxiliary Delay on N/A
15. LED indicator 1
16. Key Pad Lockout 0
17. Maximum Heat Setpoint 90
18. Minimum Cool Setpoint 45
19. Calibration 0

��
Symptom RemedyNodisplay Checkfor24VAC/VDCatthermostat;displayisblankwhen24VAC/VDCis
notpresent
Systemfandoesnotcomeonproperly Verifywiringiscorrect,checkelectricheatsetupinconfiguration(see“ConfigurationMode,”Page7)
Programscheduleactivatesatthewrongtime
Checktime(AM/PM)setonthermostat(see“SettingtheTime,”Page14)
Thermostatturnsonandofftoofrequently
Adjusttemperaturedifferential(see“Differential,”ConfigurationModeSetting4,Page8)
Thermostatdoesnotfollowprogram VerifyitisoperatinginProgrammode(PROGdisplays);checktime(AM/PM)
Fanrunscontinuously CheckfanOn/Autoswitch;checkprogrammablefansettinginprogram;checkfansettingsinconfiguration(see“ConfigurationMode”Pages7-10)
Roomtemperatureisnotcorrect Verifywallholeispluggedwithputtyorinsulation;checkwiringandlocationforremotesensorifused
LOCdisplayswhenanybuttonispressedorthermostatbuttonsareinoperative
Thermostathasthebuttonlockoutfunctionactivated(see“LockoutFeature,”Page17)
Verylimitedsetpointadjustment Thermostathasthebuttonlockoutfunctionactivated(see“LockoutFeature,”Page17)Checkconfigurationmodesettings,Pages7-10
Problemnotlistedabove PressResetbuttononce*
* Reset Button Function Time,dayandmodechangedtolastsavedsettings(savedafterpowerlossorwhenexitingprogramsetup),configurationandprogramsettingsareunchanged.
Troubleshooting

McQuayTrainingandDevelopmentNow that you have made an investment in modern, efficient McQuay equipment, its care should be a high priority. For training information on all McQuay HVAC products, please visit us at www.mcquay.com and click on training, or call 540-248-9646 and ask for the Training Department.
WarrantyAll McQuay equipment is sold pursuant to its standard terms and conditions of sale, including Limited Product Warranty. Consult your local McQuay Representative for warranty details. Refer to Form 933-43285Y. To find your local McQuay Representative, go to www.mcquay.com.
This document contains the most current product information as of this printing. For the most up-to-date product information, please go to www.mcquay.com.
For replacement parts call 1-800-377-2787©2008 McQuay International • www.mcquay.com • 800-432-1342 LIA265-1 / Version A: 12-19-08