
Thermo-Bob 3! Installation on a 2015-and-newer Versys 650 · Thermo-Bob 3!" Installation on a...
8
Thermo-Bob 3™ Installation on a 2015-and-newer Versys 650 Thank you for purchasing the Thermo-Bob 3™ radiator bypass system for the Kawasaki Versys 650. Proper installation is critical: if you are not familiar with or feel uncomfortable with heated, pressurized liquid cooling systems, you should have a professional install the kit. Improper installation can cause engine overheating and possible engine damage. Read through these instructions completely to familiarize yourself with the hardware names and installation procedure. This will also allow the bike to cool off if ridden recently. ALL REFERENCES TO 'LEFT' AND 'RIGHT' IN THIS MANUAL ARE FROM THE RIDER'S PERSPECTIVE, WHILE SITTING ON THE MOTORCYCLE. Your first task is to remove the left and right fairings (each held with two small screws near the gas-tank, and a larger one near the bottom), and the bottom right fairing held with three larger screws as shown in Figure 1. Gently lift the fairings away, noting there are 5 protrusions that are engaged with hidden rubber grommets in the upper fairings (See Figure 15). Figure 1. Screws that retain plastic bodywork. Next you will want to drain the coolant, via a small plug at the 6 o’clock position of the coolant pump. The engine needs to have completely cooled off, or you could burn yourself. Recognize that the radiator overflow bottle, which is on the right side of the fuel tank, is ABOVE the radiator cap, so the bottle must be removed and tilted so that the overflow bottle's outlet is ABOVE the coolant level in the bottle, or it will drain TOO! Therefore, you want to move the bottle as shown in Figure 2.
Transcript of Thermo-Bob 3! Installation on a 2015-and-newer Versys 650 · Thermo-Bob 3!" Installation on a...

Thermo-Bob 3™ Installation on a2015-and-newer Versys 650
Thank you for purchasing the Thermo-Bob 3™ radiator bypass system for the Kawasaki Versys650. Proper installation is critical: if you are not familiar with or feel uncomfortable withheated, pressurized liquid cooling systems, you should have a professional install the kit.Improper installation can cause engine overheating and possible engine damage.
Read through these instructions completely to familiarize yourself with the hardware names andinstallation procedure. This will also allow the bike to cool off if ridden recently. ALLREFERENCES TO 'LEFT' AND 'RIGHT' IN THIS MANUAL ARE FROM THE RIDER'SPERSPECTIVE, WHILE SITTING ON THE MOTORCYCLE.
Your first task is to remove the left and right fairings (each held with two small screws near thegas-tank, and a larger one near the bottom), and the bottom right fairing held with three largerscrews as shown in Figure 1. Gently lift the fairings away, noting there are 5 protrusions thatare engaged with hidden rubber grommets in the upper fairings (See Figure 15).
Figure 1. Screws that retain plastic bodywork.
Next you will want to drain the coolant, via a small plug at the 6 o’clock position of the coolantpump. The engine needs to have completely cooled off, or you could burn yourself. Recognizethat the radiator overflow bottle, which is on the right side of the fuel tank, is ABOVE theradiator cap, so the bottle must be removed and tilted so that the overflow bottle's outlet isABOVE the coolant level in the bottle, or it will drain TOO! Therefore, you want to move thebottle as shown in Figure 2.

Figure 2.Overflow bottle tilted so that it won't drain when coolant system is emptied.
Next, place a catch pan under the right side of the bike and remove the coolant drain plug,shown in Figure 3. The antifreeze will drip out until you remove the radiator cap, at whichpoint it will STREAM out, so be ready with your catch pan / container. Once the system hasdrained, reinstall the drain plug (with its factory crush washer) and torque to only 106 INCH-POUNDS. Be careful, that is less than 9 foot-pounds!
Figure 3. Coolant system drain plug is inthe bottom of the coolant pump housing.

Removing the radiator is next, and be prepared for more antifreeze to come out. Remove bothfactory radiator hoses from the left and right radiator tank nipples as shown in Figures 4 and 5.The radiator is secured by two round pins on the left side, and one bolt on the right as shown inFigure 6. (Be careful with this bolt, as it threads into the Aluminum of the radiator, and requiresonly 70 INCH-POUNDS of torque when re-tightening.)
Figures 4, 5 and 6. Removal of Radiator.
The cooling-fan harness goes thru a rubber heat-shield that goes over the top of the radiator, andis secured on the right side just below the voltage regulator. This must be unplugged, andremoved from the fitting on the frame.
Figure 7. Cooling Fan Harness Plug.

Set the radiator and fan assembly aside as shown in Figure 8.
Figure 8. Radiator and fan assembly.
With the radiator removed, the area is much more accessible as shown below in Figure 9.
Figure 9.Your work area viewed from the right side, now that the radiator has been removed.
It is now easy to remove the right-side radiator hose from the coolant pump, which you will findis just over 6.5 inches long. Cut away the bottom 1.5 inches of the hose and place that 1.5 inchsection back onto the coolant pump nipple. You will eventually slide the Thermo-Bob 3 on tothis piece of hose... just not yet. Set the 5 inch piece of hose aside, we'll use it later.
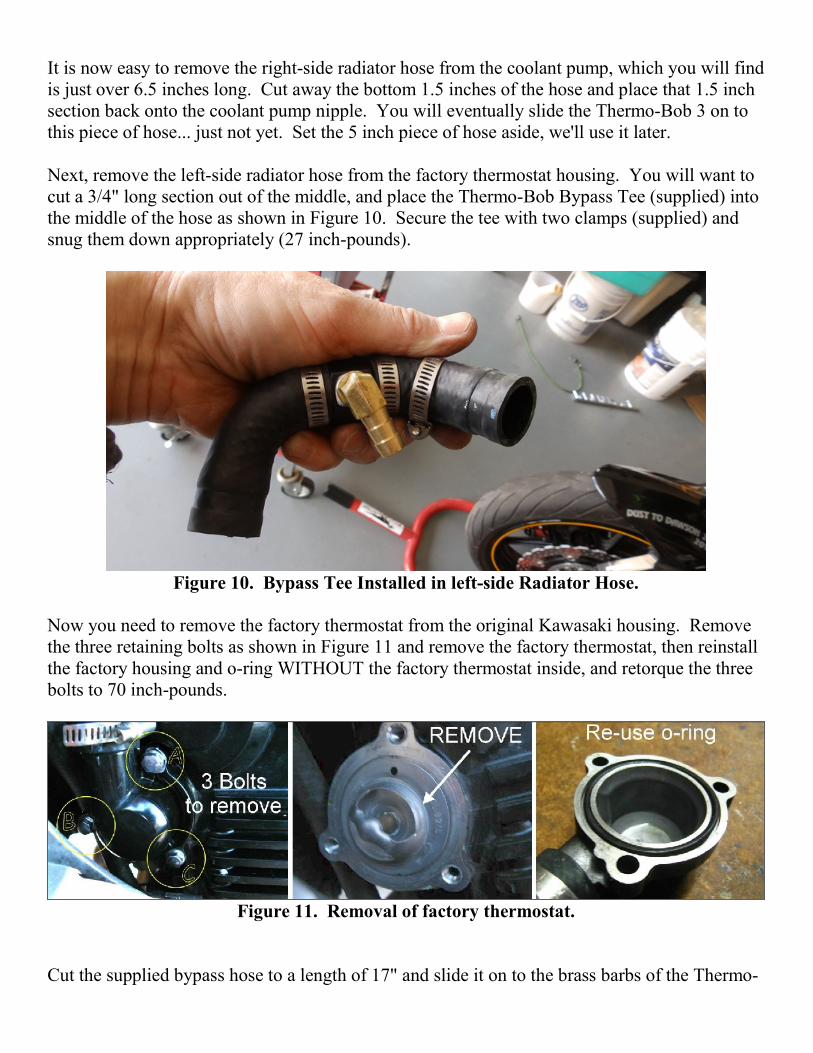
Next, remove the left-side radiator hose from the factory thermostat housing. You will want tocut a 3/4" long section out of the middle, and place the Thermo-Bob Bypass Tee (supplied) intothe middle of the hose as shown in Figure 10. Secure the tee with two clamps (supplied) andsnug them down appropriately (27 inch-pounds).
Figure 10. Bypass Tee Installed in left-side Radiator Hose.
Now you need to remove the factory thermostat from the original Kawasaki housing. Removethe three retaining bolts as shown in Figure 11 and remove the factory thermostat, then reinstallthe factory housing and o-ring WITHOUT the factory thermostat inside, and retorque the threebolts to 70 inch-pounds.
Figure 11. Removal of factory thermostat.
Cut the supplied bypass hose to a length of 17" and slide it on to the brass barbs of the Thermo-

Bob 3 and Bypass Tee. Place a small clamp (supplied) over each brass barb and tighten to 20inch-pounds. Install the left-side radiator hose back onto the factory thermostat housing's nippleon the left side of the engine, and slide the Thermo-Bob 3 onto the short hose that you installedon the coolant pump on the right side of the engine. Tighten all clamps to 27 inch-pounds.The installation should look like Figure 12 below. You can install the supplied zip-tie to providesome support for the bypass hose if you wish. Your goal is to keep the bypass hose at least 3/4"away from the exhaust pipes.
Figure 12. Thermo-Bob 3 and bypass hose installed.
Re-install the radiator (don't forget to hook up the radiator fan wiring!!) from the left side bysliding the two rubber grommets over the protruding hollow pins, then install the right-sideradiator bolt shown in Figure 6. Re-connect the left side hose from the engine (that has thebypass tee now in it) to the left side radiator tank nipple, and verify that the two large clamps(one at the factory thermostat housing, one on the left side radiator tank nipple) are torqued to27 inch-pounds.
It is time to install the final radiator hose, connecting the open end of the Thermo-Bob 3 to theright side radiator tank's lower nipple. Take the remaining 5-inch section of the factory rightside radiator hose that we sat aside a while back, and cut away an appropriate amount (a little

under 2 inches) to then connect the Thermo-Bob 3 to the right side radiator tank nipple. Verifythat all four clamps (Coolant pump, radiator nipple and 2 on Thermo-Bob 3) are tightened to 27inch-pounds. Installation should look like Figure 13 below.
Figure 13. Thermo-Bob 3 installed in right-side radiator hose.
It is time to refill the cooling system with coolant. The first half of the antifreeze goes inquickly, then you’ll add a bit, wait awhile, add more, etc, until it’s full. Take your time, it'seasy to overfill and spill, and then you'll smell coolant for the next week when riding, and thinkyou have a leak somewhere. Slow and steady here!
Figure 14. Time to refill the coolingsystem.
Once the radiator is full, reinstall the radiator cap and do not yet move the overflow bottle fromits 'tilted' position. Start the engine and monitor for leaks as the engine heats and starts to

pressurize the cooling system. Let the bike idle for 5 minutes, then shut it off and completelylet the bike cool off, then remove the radiator cap and top off the radiator with fresh coolant.Reinstall the radiator cap.
Now it is time to tilt the overflow bottle back to normal and re-mount it to the bike in it's correctposition. This will allow the system to stay topped off after every heat cycle. Keep in mindthat if you NOW take off the radiator cap, that coolant will gravity drain out of the bottle, andall over your hands and radiator. This is why we did all the "radiator cap off" work with theoverflow bottle on the odd angle.
Reinstall all of your factory bodywork. Start with the one left side fairing, then the two rightside ones. You might consider putting a little WD40 onto your finger and rub it around theFIVE grommets per side on the upper fairings as shown in Figure 15 to make installation a littleeasier. Don’t forget the “push-pins”, one per side under the nose.
Figure 15. Five grommet locations for engagement of fairing protrusions.
Installation is complete. Enjoy your stable operating temperatures! The recommendedthermostat replacement interval is every 5 years or 40,000 miles. If you have any questions,contact me at [email protected].


