The Victorian Bus & Truck Drivers’ Handbook · The Victorian Bus & Truck Drivers’ Handbook....
116
The Victorian Bus & Truck Drivers’ Handbook
Transcript of The Victorian Bus & Truck Drivers’ Handbook · The Victorian Bus & Truck Drivers’ Handbook....

VR
PN
0012
3 0
7.13
9835
0
vicroads.vic.gov.au Th
e Victo
rian B
us &
Tru
ck Drivers’ H
and
bo
ok
The Victorian Bus & Truck Drivers’ Handbook

More informationFor further information please phone 13 11 71 or visit vicroads.vic.gov.au
Latest information on road lawsRoad laws change from time to time. So, tests for the road laws will change as well. Check that you have the most recent edition of this book by visiting vicroads.vic.gov.au. If you are in doubt, check with any of the Customer Service Centres.
CopyrightThis work is copyright. Apart from uses permitted under the Copyright Act 1968, no part may be reproduced, in whole or in part, by any process without written permission from VicRoads. Permission is hereby given to copy and distribute parts of this work (within the limitations specified in the Copyright Act) for the purposes of bona fide research and instruction, provided such copies are made available free of charge.
Publication informationAuthorised and published by VicRoads 60 Denmark Street, Kew, Victoria 3101
ISBN 9789 0 7311 9165 9
First published July 1988
Reprinted with amendments July 2013
© Crown Copyright
Roads Corporation, Victoria, Australia.
ARARATShop 2, 56 High StreetARARAT 3377
BAIRNSDALE535 Princes HighwayBAIRNSDALE 3875
BALLARAT88 Learmonth RoadWENDOUREE 3355
BENALLA50-52 Clarke StreetBENALLA 3672
BENDIGO53-61 Lansell StreetBENDIGO 3550
BROADMEADOWSCnr Pearcedale Parade/Johnstone StreetBROADMEADOWS 3047
BUNDOORA8 Graduate RoadUniversity HillBUNDOORA 3083
BURWOOD EAST12 Lakeside Drive,BURWOOD EAST 3151
CAMBERWELL3 Prospect Hill RoadCAMBERWELL 3124
CARLTON459 Lygon StreetCARLTON 3053
COBRAMShop 1, 39 Station StreetCOBRAM 3644
COLAC10 Scott StreetCOLAC 3250
DANDENONG72-74 Greens RoadDANDENONG SOUTH 3175
DROMANAShop 11, Dromana Central143 Point Nepean RoadDROMANA 3936
ECHUCA55 Mundarra RoadECHUCA 3564
FRANKSTON71 Hartnett DriveSEAFORD 3198
GEELONG180 Fyans StreetSOUTH GEELONG 3220
HAMILTONRiley StreetHAMILTON 3300
HOPPERS CROSSING64 Old Geelong Road(Spotlight Centre)HOPPERS CROSSING 3029
HORSHAM14 O‘Callaghans ParadeHORSHAM 3400
KYNETON2 Beauchamp StreetKYNETON 3444
LEONGATHAAnderson Street(South Gippsland Highway)LEONGATHA 3953
MELTON267 High StreetMELTON 3337
MILDURA109-111 Orange AvenueMILDURA 3500
MORWELL87 Princes DriveMORWELL 3840
OAKLEIGH SOUTH1 Eskay RoadOAKLEIGH SOUTH 3167
PORTLAND114A Percy StreetPORTLAND 3305
SALE28-32 Princes HighwaySALE 3850
SEYMOUR5 Crawford StreetSEYMOUR 3660
SHEPPARTON231-239 Corio StreetSHEPPARTON 3630
SUNBURY7/36 Macedon StreetSUNBURY 3429
SUNSHINE499 Ballarat RoadSUNSHINE 3020
SWAN HILLShop1, 1 McNeill CourtSWAN HILL 3585
WANGARATTA62-68 Ovens StreetWANGARATTA 3677
WARRAGULUnit 5, 131 North RoadWARRAGUL 3820
WARRNAMBOOL29 Jamieson StreetWARRNAMBOOL 3280
WODONGA82-86 Elgin BoulevardWODONGA 3690
Customer Service Centres
For further information ring 13 11 71

1
Table of contents
Introduction – What this handbook is about and how to use it 2
Chapter 1 – Driver licences 6
Chapter 2 – The law 14
Chapter 3 – Ready to drive: driver health and safety 22
Chapter 4 – Vehicle checks 28
Chapter 5 – Controlling your vehicle 36
Chapter 6 – Driving on the road: planning and observing 44
Chapter 7 – Communicating with other drivers and how to judge safe speed 60
Chapter 8 – Vehicle emergencies 68
Chapter 9 – Crashes 80
Chapter 10 – Dimensions and load limits 82
Chapter 11 – Heavy vehicle signs 90
Chapter 12 – Coupling and uncoupling trailers 96
Chapter 13 – Skills required to drive a bus 102
Words that heavy vehicle drivers need to know 106
Index 110

2
Introduction - What this handbook is about and how to use it
This chapter includes: » why you should read this
handbook
» which parts of this handbook you need to know for the test
» the driving test
» how to use this handbook
» why there is a national system
» special needs of heavy vehicle drivers
» some technical words you should know
» accredited providers
» medical eligibility
Why you should read this handbook This handbook tells you about some of the legal requirements for drivers of heavy vehicles in Victoria. It is intended as a guide only and does not set out in full all the requirements of the law.Before you read this handbook you need a general knowledge of road law. Road law information is contained in the ‘Road to Solo Driving’ handbook available at VicRoads Customer Service Centres, RACV offices and some newsagents. The ‘Road to Solo Driving’ handbook can be viewed from the VicRoads website at vicroads.vic.gov.auThe legal requirements described in this handbook change from time to time. To understand your legal rights and obligations, you should refer to the Road Safety Act 1986 (Vic) and related regulations, as well as the Transport Act 1983 (Vic).All information in this handbook is provided without liability and without responsibility for its accuracy. VicRoads does not accept any responsibility for any loss incurred by any person as a result of relying on information contained in this handbook.The Road Safety Act and associated Road Safety Regulations can be viewed at legislation.vic.gov.au
Which parts of this handbook you need to know for the testYou should read all chapters of this handbook to prepare for the test. The knowledge tests that you must pass to get a heavy vehicle licence are based on the material in this handbook. Multi Combination (MC) and Heavy Combination (HC) applicants must pass a knowledge test based on information presented during the training course. The Knowledge Test must be passed once for the rigid vehicle requirements and once for the articulated vehicle requirements. The Knowledge Test must be passed before the applicant is permitted to commence the Competency Test or the Final Competency Assessment.

3
Introduction
The driving test
The driving test may cover:
A. Vehicle Inspections » pre-trip » exterior » external safety » engine bay » operator controls
B. Controlling the Vehicle » acceleration » steering » cutting-in » steering in reverse » shifting gears » double-clutching » braking
C. Loading » dimensions (height, width, length, mass) » projecting loads
D. Trailer use (if applicable) » coupling » uncoupling
A handbook cannot provide driving experience, so heavy vehicle licence applicants need on-road and off-road driving training from experienced heavy vehicle drivers.
Refer to the list below for topics your instructor should cover before your knowledge and practical tests. The practical test has been designed to closely assess the driving skill of heavy vehicle licence applicants.
This handbook provides information on what is expected of a successful licence applicant. The practical test will assess your skill in:
» Pre-operational check
» Cabin drill
» Start, move off, shut down and secure
» Steering
» Gears
» Manages brakes
» Manages accelerator
» Create and maintain Crash Avoidance Space
» Protect Crash Avoidance Space
» Road rules and directions
» Reverse
» Hill stop/start
» Load securing
» Coupling/uncoupling (articulated vehicles only)
» Bus stop procedure (bus only)

4
How to use this handbook This handbook will help you to understand some of the special rules and regulations that apply to driving a heavy vehicle.
If there is something specific you need to know about, you can look it up in the index at the back of this handbook (page 108).
At the start of each chapter, there is an information box telling you what is in the chapter.
At the end of each chapter is a section called Test Yourself Questions. These help you check if you’ve understood important material in the chapter.
Why there is a national system It makes sense for each state and territory in Australia to have the same licence and vehicle categories. The national system does this.
What this means for you, is that you can drive in any state and territory, with the same vehicle and the same licence.
Special needs of heavy vehicle drivers Heavy vehicle drivers are professionals who spend most of their working hours on the road.
Heavy vehicle drivers usually drive further than car drivers and drive for longer hours than other drivers. So there is a greater chance of them being involved in crashes.
Heavy vehicles accelerate more slowly than passenger cars and take longer to stop, so more judgement and driving skill is required to drive heavy vehicles.
Crashes which involve heavy vehicles are more likely to cause severe injury and greater damage than crashes which involve only cars.
Car drivers can make heavy vehicle driving more difficult when they do not know about the slower acceleration, braking and space needed by heavy vehicles.
The community expects professional drivers to have a higher standard of knowledge and skill.
The language of heavy vehiclesThere are many words that have a technical or special meaning for heavy vehicles. You’ll find them used frequently throughout this handbook.
Check the list at page 106 for a description of these industry-specific terms.
Accredited providers In Victoria accredited providers conduct all heavy vehicle licence tests on behalf of VicRoads. Visit the VicRoads website vicroads.vic.gov.au for a list of organisations that are accredited by VicRoads to conduct heavy vehicle training and testing.
If you pass your licence test with an accredited provider, you will be issued with a VicRoads Certificate of Competence. You will need to take the certificate to your nearest VicRoads Customer Service Centre to get your licence.
For more information about VicRoads accredited providers call VicRoads on 13 11 71 or visit vicroads.vic.gov.au
5
Introduction
Medical eligibility There is a wide range of medical, hearing and eyesight conditions which will prevent the issue of a heavy vehicle licence.
Some common conditions that may affect the issue of a heavy vehicle licence include:
» visual defects, including loss of vision in one eye
» hearing defects
» angina, heart disease/surgery/hypertension, having a pacemaker
» some psychiatric disorders
» epilepsy
» diabetes
» sleep apnoea
» head injuries, dementia, stroke
» Parkinson’s disease, multiple sclerosis
» physical disabilities/partial or complete loss of limbs.
If you are concerned that you may not be eligible, you should speak to your doctor or contact VicRoads on 13 11 71 and ask to speak to the Medical Review area.
Having these conditions does not necessarily prevent the issue of a licence but will require careful evaluation. In some cases a restricted licence may be considered.
It is advised that prior to undertaking training or testing you should seek clarification from VicRoads. If you have any medical condition, it is in your own interest to ensure that it is appropriate for you to apply for the category of vehicle in which you are interested.
There is a legal obligation for all drivers to notify VicRoads if they have or develop a medical condition that may impact on their ability to drive safely.
In addition to the appropriate licence, you must obtain a Driver Accreditation to drive a vehicle carrying passengers for hire and reward. Strict eyesight requirements apply to Driver Accreditation applicants. See page 9 for Driver Accreditation enquiries.

6
Chapter 1 – Driver licences
This chapter includes: » driver licences
» penalties for unlicensed driving
» learning to drive a heavy vehicle
» national heavy vehicle licence classification
» carrying dangerous goods
» mobile equipment
» vehicles for which you need special permits to drive
» vehicles and load requirements for assessment
» assessment in a loaded vehicle
» cabin cameras
» test yourself questions
Driver licences Driver licences are issued in the categories shown in the diagram on the next page. If you have a licence, you may drive any class of vehicle within or above your licence category as shown in the diagram.
Check what you can drive with each category of licence. The letters written in brackets are the code for the licence class. This code will be printed on your new licence in the square labelled Licence Type.
The National Heavy Vehicle licence scheme includes all vehicles above 4.5 tonnes.
All states and territories are implementing common rules and categories for heavy vehicles.
Penalties for unlicensed driving It is an offence to drive a vehicle in a category for which you are not licensed. It is also an offence to employ or allow someone who does not hold the right category of licence to drive that vehicle.
If you have a crash while driving a vehicle you are not licensed to drive, the Transport Accident Commission may not pay all your compensation claim.
Learning to drive a heavy vehicle Until you get your heavy vehicle licence you may drive a heavy vehicle only if you are accompanied by a person who holds a valid licence for the type of vehicle you are driving.
You must display Driver Under Instruction plates at the front and rear of the vehicle.
While learning to drive a heavy vehicle, you must have a zero Blood Alcohol Concentration (BAC) at all times.

7
Chapter 1 - D
river Licences
National heavy vehicle licence classification
CAR (C)A vehicle of 4.5 tonnes GVM or less, seating up to 12 people.
You are eligible for a car licence at 18 years of age.
LIGHT RIGID (LR)A vehicle greater than 4.5 tonnes but no greater than 8 tonnes GVM or which seats more than 12 people (including driver).
You are eligible for a LIGHT RIGID licence after holding a car licence for 1 year.
MEDIUM RIGID (MR)Any 2 axle rigid vehicle greater than 8 tonnes GVM.
You are eligible for a MEDIUM RIGID licence after holding a car licence for 1 year.
HEAVY RIGID (HR)A vehicle 8 tonnes GVM and above, with 3 or more axles.
You are eligible for a HEAVY RIGID licence after holding a car licence for 2 years.
HEAVY COMBINATION (HC)(a) A prime mover to which is attached a single semi-trailer that has a GVM more than 9 tonnes plus any unladen converter dolly; or (b) A rigid motor vehicle to which is attached a trailer that has a GVM more than 9 tonnes plus any unladen converter dolly.
You are eligible for a HEAVY COMBINATION licence after 2 years of holding a licence, with at least 1 year of holding either a MEDIUM RIGID or HEAVY RIGID vehicle licence.
MULTI COMBINATION (MC)A Heavy Combination vehicle with more than one trailer.
You are eligible for a MULTI COMBINATION licence after 1 year of holding a HEAVY COMBINATION or a HEAVY RIGID vehicle licence. You must also successfully complete an approved MULTI COMBINATION training course.
Note: The content and duration of the course will depend on the category of licence held.

8
Carrying dangerous goods To transport bulk dangerous goods on Victorian roads a driver must:
» be registered with the Victorian Work Cover Authority » have a current permit issued by the Victorian Work
Cover Authority » carry the permit at all times when driving a vehicle
carrying bulk dangerous goods » have a valid driver licence for the category of vehicle
being driven.If you are not a Victorian resident, you must have a permit to carry that class of goods and a valid driver licence for the vehicle you are driving issued by your own state or territory. You must carry the permit and driver licence with you at all times.
Mobile equipment Operator certificates must be held by drivers who operate:
» mobile cranes » self-loading cranes » fork-lifts » concrete pumps with booms.
Enquiries about Dangerous Goods and Mobile Equipment can be made to the Victorian Workcover Authority on (03) 9641 1555.
Special note 1. If you are tested in a vehicle fitted with
synchromesh gears, a condition on your licence will apply. The letter “B” will show on your licence.
To have the condition removed, you will need to be retested in a vehicle with non-synchromesh gears.
2. If you have a manual car licence and you are tested in a heavy vehicle with an automatic transmission, you will be restricted to driving heavy vehicles with synchromesh gears. The letter “B” will show on your licence.
3. If you have an automatic car licence and you are tested in an automatic heavy vehicle, you will be restricted to automatic vehicles during your probationary period.
After your probationary period, your licence will be converted to manual for car only, but the condition limiting you to synchromesh gears for heavy vehicles will continue to apply unless you are retested. The letter “B” will show on your licence.

9
Vehicles for which you need special permits to drive Driver Accreditation must be held by drivers of:
» passenger buses » private omnibuses » special purpose vehicles » restricted hire vehicles.
Driver accreditation Holding a vehicle licence does not automatically entitle you to drive passenger vehicles. You will normally only be issued a certificate if you have:
» a good driving record » no criminal convictions, including sex, alcohol or drug
offences
» no medical condition which may affect the skills needed to drive a commercial vehicle.
Enquiries about Driver Accreditation should be made to the Victorian Taxi Directorate on 1800 638 802 (Toll free). Ask for Driver Accreditation.
Chapter 1 - D
river Licences
Vehicle and load requirements for assessment
Vehicle requirementsThe vehicle used for a Competency Test or Final Competency Assessment must be the correct type and configuration for the class of licence for which the applicant is applying and approved by VicRoads as detailed below. It must be registered, roadworthy and comprehensively insured. Any vehicle fitted with a manual gear box, but having its gears changed by robotic or computerised systems, is regarded as an automatic vehicle.
Multi Combination (MC) » A Heavy Combination vehicle with more than one
trailer. The vehicle must be B-Double rated and have all the pertinent documentation, permits etc. The combination must be at least 22 metres in length, in B-double configuration.
» The minimum vehicle type for an MC is a three axle prime mover with an A and B trailer each with bogie axles.
Heavy Combination (HC) » A vehicle consisting of a prime mover and a semi-trailer.
The prime mover must have a minimum of three axles and the semi-trailer a minimum of two axles. The vehicle must have a GCM rating of at least 39 tonnes; or
» A Heavy Rigid vehicle which is towing a trailer. The trailer must have at least two axles and a GVM of 12 tonnes or more.

10
Heavy Rigid (HR) » A rigid vehicle, not being an unladen prime mover, with
a minimum of three axles and a minimum 15 tonnes GVM; or
» A modified three axle prime mover with a certified detachable tray (with the capacity to carry 75% of its specified GVM) with a minimum GVM of 15 tonnes and holds dual registration (HC and HR), or
» A three axle articulated bus*; or
» A three axle bus* above 15 tonnes GVM.
Medium Rigid (MR) » A two axle rigid truck, not being a prime mover, above
8 tonnes GVM; or
» A two axle bus* above 8 tonnes GVM.
Light Rigid (LR) » A rigid truck above 4.5 tonnes GVM but less than or
equal to 8 tonnes GVM; or
» A rigid bus* with less than or equal to 8 tonnes GVM or seats more than 12 adults, including the driver.
Vehicle restrictionsMost vehicles will be suitable for on-road tests, however some have restrictions placed on them as follows and cannot be used for licence testing:
» Armoured vehicles
» Dual control vehicles
» Vehicles displaying trade plates
» Vehicles carrying a placard of dangerous goods
» Special Purpose Vehicles (except emergency service vehicles) Cranes, specialised road working vehicles and farm machinery
» Federal Interstate Registered vehicles These vehicles may only be used if a special permit has been supplied by the relevant transport authority
» Livestock transport vehicles If the load is livestock
» * Buses, coaches and motor homes Buses or motor homes will only be permitted to be used as an assessment vehicle for light rigid assessments only as long as the vehicle fits the specification for a light rigid vehicle (see above).
For all other vehicle categories, buses, coaches and motor homes will only be approved for use as an assessment vehicle in special circumstances as determined by VicRoads.
11
In such circumstances these vehicles are exempt from carrying a load. Assessments must not be conducted in these vehicles when carrying passengers, with the exception of VicRoads auditors.
Assessment in a loaded vehicleTo check an applicant’s ability to drive a loaded heavy vehicle some tasks, specifically the on-road drive tasks, require the vehicle to be loaded. All loads must be positioned and secured in compliance with the National Transport Commission’s guidelines, available at ntc.gov.au
The loaded vehicle must have a mass which is at least 75% of the maximum mass allowable for the vehicle to be driven on public roads. This is at least 75% of either the legal mass limit, Gross Vehicle Mass (GVM) for rigid vehicles or Gross Combination Mass (GCM), for articulated or heavy trailer combinations. The vehicle must be able to maintain adequate road speed. See Chapter 10 for details on loads.
If the applicant is being assessed in their own vehicle, it is the applicant’s responsibility to check the load requirements beforehand and be prepared to provide documented evidence such as a weighbridge ticket that was issued within the past 24 hours. The accredited heavy vehicle assessment provider must ensure that photographic evidence of the load in the applicant’s vehicle is captured and kept on file for auditing purposes.
Cabin camerasIt is a requirement that vehicles are equipped with cabin technology approved by VicRoads. The practical assessment will need to be recorded using audio, video and GPS technology. Both the applicant and assessor will be recorded during the assessment.
Chapter 1 - D
river Licences

12
Notes

13
Test yourself questions (Answers to test yourself questions are upside down at the bottom of this page)
1 If you do not hold a heavy vehicle licence you may drive a heavy vehicle only if A. you are accompanied by a person who has a licence
for that type of vehicle and you display Driver Under Instruction plates
B. you display L plates and do not drive on highways
C. you drive in daylight hours only and are accompanied by a person who has a licence for that type of vehicle
2 If you have a Medium Rigid (MR) licence, you may also drive a A. Heavy Combination (HC) vehicle
B. Heavy Rigid (HR) vehicle
C. Light Rigid (LR) vehicle
Answers 1A 2C
Chapter 1 - D
river Licences

14
Chapter 2 – The law
This chapter includes: » law enforcement
» speed limits
» seatbelts
» hours of driving
» work diaries
» portable warning triangles
» railway crossings
» requirements to weigh your vehicle
» parking
» test yourself questions
This chapter tells you about laws for owners and drivers of all categories of heavy vehicles.
In addition to these laws, drivers of heavy vehicles must comply with all road laws. A summary of these road laws can be found in the ‘Road to Solo Driving’ handbook which is available from VicRoads Customer Service Centres, RACV offices and some newsagents.
You should have a copy of it to read together with this handbook.
Law enforcement Police and VicRoads Transport Safety Services Officers enforce the law for heavy vehicles.
To enforce heavy vehicle law, VicRoads Transport Safety Service Officers use both marked and unmarked vehicles with magenta flashing lights.
Local councils may also enforce parking and load limits within their boundaries.
You must stop when you are signalled to do so by a Police Officer or a VicRoads Transport Safety Services Officer. They may check:
» the mass, height and width of your vehicle and its load » the condition of your vehicle » your work diary, paperwork and licence details.
It is an offence not to stop when asked or signalled to do so.
You must also pull into a weighbridge when directed by Police or VicRoads Transport Safety Services Officers or when road signs direct you to do so.

15
Chapter 2 - The Law
Speed limits All heavy vehicles with pneumatic tyres must travel at speeds no greater than the speed displayed on a speed limit sign as well as complying with the following conditions:
» 40 km/h in a local traffic zone signed 40 km/h
» 50 km/h in a built-up area not otherwise signed
» 100 km/h in a 100 km/h zone
» 100 km/h in a 110 km/h zone.
It is an offence for any heavy vehicle to travel faster than 100 km/h anywhere in Victoria.
If any tyre on a vehicle is not a pneumatic tyre, the maximum speed for the vehicle on any road is 25 km/h, (a pneumatic tyre is one which is filled with air.)
Warning Note The legal speed limit may not always be the safe speed for a heavy vehicle because of the vehicle’s different handling, higher centre of gravity and performance.
Drivers should always travel at a speed which is safe for the conditions.
Seatbelts In Victoria, drivers of heavy vehicles must wear a properly adjusted and fastened seatbelt where one is fitted, or is required by law to be fitted to the vehicle.
Passengers in trucks are also required to wear seatbelts. Seatbelts must not be removed if already fitted. All vehicles manufactured after 1 July 1977 are required to have seatbelts fitted.
As part of managing fatigue there is an exemption from wearing seatbelts for two-up drivers in sleeping compartments.
Hours of driving Drivers of the following fatigue regulated heavy vehicles, are required to comply with Driving Hours requirements:
» A motor vehicle with a GVM of more than 12 tonnes
» A combination with a GVM of more than 12 tonnes
» A bus with more than 12 seats including the driver.
There are three driving hour options available:
1. Standard Hours (‘default’ 12 working hours a day)
2. Basic Fatigue Management (BFM) (up to 14 hours work that is linked to accreditation)
3. Advanced Fatigue Management (AFM) (accredited risk management approach).
The Standard Hours option for solo drivers sets out minimum rest and maximum work hours and includes basic record keeping requirements. A Standard Hours option is also available for two-up and bus drivers.
The BFM option offers more flexible hours than Standard Hours, including the ability to work up to 14 hours a day.

16
BFM gives operators more flexibility in when they can work and rest, providing the risks of working long hours and nights are properly managed.
The AFM option brings a genuine risk management approach to managing fatigue, rather than prescribing work and rest hours. AFM accreditation offers more flexible hours than Standard Hours or BFM in return for the operator demonstrating greater accountability for managing fatigue risks.
To access BFM or AFM hours an operator must be accredited and drivers and staff involved with managing the fatigue of drivers must undergo the appropriate training.
For further details of BFM and AFM driving hours and training requirements please refer to VicRoads website vicroads.vic.gov.au and VicRoads fact sheets.
Stationary rest time as prescribed in the tables is the time a driver spends out of a regulated heavy vehicle or in an approved sleeper berth of a stationary regulated heavy vehicle.
Night rest breaks as prescribed in Tables 1, 2 and 3 are seven continuous hours stationary rest time taken between the hours of 10pm one day and 8am on the next day (using the time zone of the base of the driver), or a 24 continuous hours stationary rest break.
In any period of...
Maximum work time
Minimum rest time
5 1/2 hours 5 1/4 hours 15 minutes continuous rest
8 hours 7 1/2 hours 30 minutes in 15 minute continuous blocks
11 hours 10 hours 60 minutes rest in 15 minute continuous blocks
24 hours 12 hours 7 hours continuous stationary rest time
7 days 72 hours 24 hours continuous stationary rest time
14 days 144 hours 2 consecutive night rest breaks of 7 hours rest between 10pm-8am plus 2 other night rest breaks
Table 1 - Standard Hours (Solo Driving)
In any period of...
Maximum work time
Minimum rest time
5 1/2 hours 5 1/4 hours 15 minutes continuous rest
8 hours 7 1/2 hours 30 minutes in 15 minute continuous blocks
11 hours 10 hours 60 minutes rest in 15 minute continuous blocks
24 hours 12 hours 7 hours continuous stationary rest time
7 days 84 hours 6 night rest breaks of 7 hours rest between 10pm-8am
28 days 288 hours 4 x 24 hours continuous stationary rest time
Table 2 - Standard Hours (Solo Bus Drivers)
17
Chapter 2 - The Law
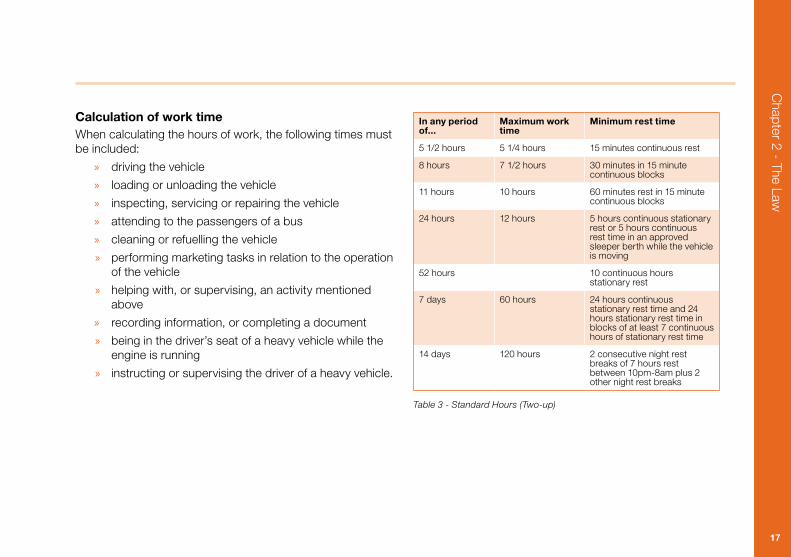
Calculation of work time When calculating the hours of work, the following times must be included:
» driving the vehicle
» loading or unloading the vehicle
» inspecting, servicing or repairing the vehicle
» attending to the passengers of a bus
» cleaning or refuelling the vehicle
» performing marketing tasks in relation to the operation of the vehicle
» helping with, or supervising, an activity mentioned above
» recording information, or completing a document
» being in the driver’s seat of a heavy vehicle while the engine is running
» instructing or supervising the driver of a heavy vehicle.
In any period of...
Maximum work time
Minimum rest time
5 1/2 hours 5 1/4 hours 15 minutes continuous rest
8 hours 7 1/2 hours 30 minutes in 15 minute continuous blocks
11 hours 10 hours 60 minutes rest in 15 minute continuous blocks
24 hours 12 hours 5 hours continuous stationary rest or 5 hours continuous rest time in an approved sleeper berth while the vehicle is moving
52 hours 10 continuous hours stationary rest
7 days 60 hours 24 hours continuous stationary rest time and 24 hours stationary rest time in blocks of at least 7 continuous hours of stationary rest time
14 days 120 hours 2 consecutive night rest breaks of 7 hours rest between 10pm-8am plus 2 other night rest breaks
Table 3 - Standard Hours (Two-up)

18
Driving records In Victoria drivers operating under Standard Hours on a journey that will take them more than 100 km from their base must maintain a driving record in the form of a work diary issued by VicRoads.
Drivers must carry in the vehicle, a record showing all the driving times within the previous 28 days of journeys which went beyond a radius of 100 km of the driver base.
Note: Driver base is the place from which the driver normally works and receives instructions.
Drivers of a fatigue regulated heavy vehicle working solely within 100 km of their driver base must record their hours of driving. Their employers must keep the driver’s record at their base for three years.
Drivers of a fatigue regulated heavy vehicle working at BFM or AFM hours are required to carry and complete a work diary at all times.
Work diaries A work diary must be obtained from a VicRoads Customer Service Centre. See inside rear cover for locations.
When getting a work diary you must show your current driver licence and take your old diary with you if you have one.
Filling in the work diary You must follow the instructions in the front of the work diary and any instructions which accompany the work diary. See page 19 for an example of a work diary page.
Interstate journeys When driving interstate, you must comply with the regulations that apply in that particular state or territory.
Portable Warning TrianglesIf you drive a heavy vehicle with a Gross Vehicle Mass (GVM) over 12 tonnes, you must carry three approved portable warning triangles in your vehicle at all times.
If you have to stop your vehicle or if any part of your load falls onto the road (including the shoulder), three portable warning triangles must be placed on the road.
On roads with a speed limit of 80km/h or more, if the vehicle is not visible for 300 metres in all directions:
» one triangle must be placed 200-250 metres behind the vehicle or fallen load, » one triangle must be placed 200-250 metres in front
of the vehicle or fallen load, and » one triangle must be placed by the side of the vehicle
or fallen load. On roads with a speed limit of less than 80km/h, if the vehicle is not visible for 200 metres in all directions:
» one triangle must be placed 50-150 metres behind the vehicle or fallen load, » one triangle must be placed 50-150 metres in front
of the vehicle or fallen load, and » one triangle must be placed by the side of the vehicle
or fallen load. Please see more details about Portable Warning Triangles on page 20.

19
Chapter 2 - The Law
W O R K D I A R Y S A M P L E P A G E
Two-up Driver Name:
Work Diary No:
Licence No:
State/Territory Issued:
Two-up Driver Signature:By signing this sheet you verify the information given is true and correct in every detail.
Name of Location at Work/Rest Change(rest area, truck stop, suburb, or town)
Odometer Reading(record at start & end of day & at work/rest change & vehicle change)
Number Plate (record at start & end of day & at work/rest change & vehicle change)
Rest
SoloWork
Total Solo:
Total Rest:
Two-up Work
Total Two-up:
All drivers: calculate totals
Driver Signature:By signing this daily sheet you verify the information given is true and correct in every detail.
midnight midnight1 2 3 4 5 6 7 8 9 10 11 noon 1 2 3 4 5 6 7 8 9 10 11
N A T I O N A L D R I V E R W O R K D I A R Y D A I L Y S H E E T
BFM/AFM drivers only.
BFM/AFM Accreditation No:Driver’s Name: Licence No:
Day of the Week:
S M T W T F S
State/Territory Issued:
Date:Pre-trip check (optional):
ORIGINAL (To remain in work diary):
Time:
Security No:
Solo driver work/rest options: Standard Standard (Bus) BFM AFM
Two-up driver work/rest options:
Standard BFM AFM
midnight midnight1 2 3 4 5 6 7 8 9 10 11 noon 1 2 3 4 5 6 7 8 9 10 11
Time Zone:
State/Territory (Driver Base)
DETA
ILS
OF A
CTIV
ITIE
S re
cord
at s
tart
and
end
of d
ay a
nd a
t cha
nge
of a
ctiv
ity a
nd/o
r hea
vy v
ehic
le
___ ___ /___ ___ /___ ___ ___ ___
YOU MUST SIGN THIS PAGE BEFORE STARTING A NEW DAILY SHEET
Tick the work/rest option for this daily sheet only
Work/rest hours exemption: (if applicable)
ROBBIE O’BRIEN 2311000 QUEENSLAND Q002X
X X2 8 1 1 2 0 0 8 QUEENSLAND
13 1/4
10 3/4
R. O’BRIEN
GYM
PIE,
QLD
53
0693
BC2
414
ACAC
IA R
IDGE
530
886
BC24
14
BLAC
KB
830135 TTU
BC24
14
KING
AROY
5311
01
BC24
14
GYM
PIE,
QLD
531
243
BC24
14
6.30 AM
For more information on work diaries, please contact VicRoads (see inside Front Cover)

20
If the road is a one-way road or divided road (this does not include a road with a painted median), three triangles are still needed but there is no requirement to place a triangle in front of the vehicle. This triangle should instead be placed between the vehicle or fallen load and the triangle behind the vehicle.
Nine 38mm buttons equally spaced
If your vehicle is wider than 2.2 metres and you stop on a road or the shoulder of a road at night, you must have all required clearance and side marker lights operating and clearly visible for at least 200 metres in all directions.
If your vehicle is less than 2.2 metres wide, you must use parking lights, unless there is street lighting and your vehicle is visible for 200 metres in all directions.
Warning triangles must comply with the Australian Standard AS 3790
Railway crossingsIf you are the driver of a bus that seats more than 12 adults (including the driver) approaching an uncontrolled railway level crossing (without gates, booms, barriers, or twin red lights) you must:
» stop the bus so that the nearest part of the bus is not less than 3 metres and not more than 12 metres from the nearest rail of the railway
» satisfy yourself that there is no train or light rail vehicle on the track
» once reaching the crossing, proceed across in a manner which avoids the need to change gears until the crossing has been completely cleared
» leave the crossing as soon as you can do so safely.
Special rules apply for vehicles transporting dangerous goods at railway level crossings. Check these rules with the Victorian Workcover Authority (see page 8 for details).
Requirements to weigh your vehicle Drivers must stop to allow their vehicles to be weighed and checked when signalled to do so by Police or a VicRoads Transport Safety Services Officer.
It is an offence to disobey traffic signs or hand signals instructing you to enter a weighbridge. It is also an offence to refuse to allow your vehicle to be weighed. You can be fined.

21
Chapter 2 - The Law
Vehicles can be weighed at weighbridge locations or by portable equipment carried by VicRoads Transport Safety Services Officers.(See Chapter 10, “Dimensions and Load Limits” for weight limits)
Parking
Any time Unless a parking sign says that long vehicles are allowed to park in an area, you must not park in a built-up area for more than one hour if your vehicle has a GVM over 4.5 tonnes or is 7.5 metres long or longer, unless permitted by the local Council, or if you are engaged in dropping off or picking up goods. If any parking sign limits parking to less than one hour, you must obey that sign. You must always be careful and try to park as far away from the stream of traffic as possible.
What is the chain of responsibility? The chain of responsibility means that anybody – not just the driver – who has control in a transport operation can be held responsible for breaches of road laws and may be made legally liable. In other words, if you use road transport as part of your business, you share responsibility for ensuring breaches of road laws do not occur. So, if a breach of road transport law occurs due to your action, inaction or demands, you may be legally accountable. Put simply this means: Control = responsibility = legal liability.
Test yourself questions (Answers to test yourself questions are upside down at the bottom of this page)
1. Drivers of heavy vehicles A. do not have to wear seatbelts
B. must wear seatbelts if travelling more than 80 kms
C. are required by law to wear seatbelts when fitted.
2. When driving at Standard Hours you are required to fill in a work diaryA. only if you are carrying goods
B. if you are driving a fatigue regulated heavy vehicle on a journey that will take you more than 100 km from your driver base
C. on all trips in a heavy vehicle.
3. When driving a bus at a railway level crossing you must stop the bus A. at the nearest rail
B. between 3-12 metres from the nearest rail
C. between 10-20 metres from the nearest rail.
Answers 1C 2B 3B

22
Chapter 3 – Ready to drive: driver health and safety
This chapter includes: » alertness
» preventing fatigue
» overcoming fatigue
» alcohol
» other drugs
» seating
» occupational safety
» test yourself questions
Alertness Driving a heavy vehicle is hard work, and driving a heavy vehicle for long hours is tiring. There are many things that good drivers do to prevent becoming fatigued.
Preventing fatigue The best way to be alert and avoid dozing at the wheel is to not become tired in the first place. Here are some suggestions.
1. Get plenty of sleep Starting a long trip if you are already tired is inviting trouble. If you have a long trip to make, be sure that you get a good night’s sleep before you start.
2. Timing your trip Your body gets used to sleeping during certain hours. If you drive during these hours, you will be tired. Try to make long trips during the hours when you would normally be awake.
3. Avoid medicines Some medicines may cause drowsiness. Those that can cause drowsiness have labels on them warning against operating vehicles or machinery. Always ask your chemist about possible effects on driving while on medication, whether the medication is prescribed by your doctor or bought over the counter.
Common medicines that may cause drowsiness include cold tablets, hayfever and allergy medicines.
If you have to drive while you have a cold, hay fever or allergy, it is much safer to drive with these symptoms than to take medicines which will cause drowsiness at the wheel.

23
Chapter 3 - R
eady to drive: Driver H
ealth and Safety
4. Keep cool A hot, stuffy cabin can make you sleepy. Depending on the weather, keep the window open to get some fresh air while driving, or use the fan, air vents or air conditioner. Make sure that fresh air is entering the cabin and you are not just circulating air from within the cabin.
5. Take breaks Short breaks keep you alert. Take them before you become tired.
6. Stop often Walk around and inspect the vehicle. It also helps to do some simple physical exercises such as running on the spot, touching your toes or knee-bends.
7. Change routes
Try not to travel the same route all the time. Travelling the same way all the time causes boredom and makes you drowsy.
8. Keep your mind on the road You can also do many things to keep your mind alert, like counting interstate cars or noting landmarks as you approach them.
Invent your own ways of keeping your mind on the road and on the job.
9. Watch your food Fresh fruit and vegetables are much better for you at any time. Eating these foods on a trip will stop you from being tired after a meal.
Do not eat starchy foods (e.g. bread, pasta, potatoes, pies, chips) while you are on a long trip.
Do not eat a heavy meal before you begin driving because big meals will make you tired.
Eat small meals. You can eat small meals more often to help keep you alert.
Overcoming fatigue Driving while tired is a major cause of fatal crashes. Fatigue is a factor in up to 60% of all heavy vehicle crashes.
Here are some important rules to follow.
1. Stop to sleep When your body needs sleep, sleep is the only thing that will work. If you are planning to make a stop during your trip, make it whenever you get tired, even if it is before you planned.
You can keep to your plan by getting up a little earlier the next day. This reduces the danger of driving while you are tired. Remember the regulations about driving hours as set out in Chapter 2, page 14.
2. Take a nap If you cannot stop for the night, at least pull off the road and take a nap. A short nap for thirty minutes will do more to overcome fatigue than a thirty minute coffee stop. You’ll feel more alert, rested and able to keep your mind on your driving and the road.

24
3. Ventilation Make sure you have fresh air in your cabin at all times. In cold weather, use the heater but make sure fresh air is coming in from outside the vehicle. Do not have stale air re-circulating in your vehicle.
Alcohol The effects of alcohol on driving performance are well known. It is an offence to exceed the legally prescribed limit whilst driving a large vehicle in Victoria.
You must have a zero Blood Alcohol Concentration (BAC) at all times if you are the driver of:
» any bus » any rigid or articulated truck over 15 tonnes GVM » a heavy vehicle with Driver Under Instruction plates
because you are learning.
The effects of alcohol take a long time to wear off. If you drink alcohol the night before, you may be over the legal limit the next morning. It is best not to drink at all on the night before driving, or have only one or two drinks many hours before driving.
Avoid alcohol Alcohol makes you tired and more likely to have a crash. Water is good for you. Tea or coffee is better for you than sugar-laden soft drinks.
Other drugs Beware of drugs that have not been prescribed by a doctor. If you really need to take medicines that are not prescribed, you should ask your chemist about what effect they will have on your driving.
Any drug you take will affect you.
Any combination of drugs, or a combination of drugs with alcohol, will affect you much worse than any one taken separately. Be very careful and check with your doctor or chemist for what is safe for a long distance driver.
Police have the power to undertake roadside saliva testing of drivers and riders, to detect the presence of:
» speed (methamphetamine)
» cannabis (THC)
» ecstasy (MDMA).
Driving with these drugs in the blood or saliva is an offence and penalties (including licence loss) will apply.
Avoid drugs
There are no known drugs that can overcome of fatigue. Some substances may keep you awake for a while, but will not make you alert. Later on, you may be even more tired than if you had not taken them at all! Sleep is the only thing that can overcome fatigue, so stop and sleep as soon as you are tired.

25
Chapter 3 - R
eady to drive: Driver H
ealth and Safety
Seating Adjusting the driving seat is very important for drivers.
If you are uncomfortable you get tired more quickly and you spend less time looking at the road. Also, you are likely to suffer from aches and pains that might mean you have to take time off work.
It only takes a few minutes to make your seating comfortable, so take a few minutes to get it feeling right for you.
Adjusting your seat If you can adjust your seat, this is what you should do.
1. Sit in the seat with your back and shoulders against the back rest
2. Put your feet flat on the floor in front of the seat3. Sit comfortably so your feet can reach the pedals.
Adjust your seat forward and back so that your foot can push the clutch pedal completely to the floor while your leg still has a small bend at the knee (about 15 to 20 degrees).
Occupational safety You are responsible for making sure that your working conditions are safe. Follow these basic steps.
Basic workplace safety Before driving, always make sure that there are no loose objects in the cabin like drink cans or clip-boards. Be careful about loose things on the floor of the cab that could get in the way of your foot connecting with the brake, clutch and accelerator pedal. Make sure you can push the clutch, brake and accelerator pedals all the way to the floor.
If your vehicle is parked on the road, approach the vehicle from the front. In this position you can see oncoming traffic. See the diagram on the next page.
As you leave the cab, climb out facing the cab, but watch for oncoming traffic to see if there is any danger from approaching vehicles.
The driver of a vehicle (except an emergency vehicle or police vehicle) must not use a handheld phone while the vehicle is moving, or is stationary but not parked.
Be careful when you are climbing into or leaving the cab. It is easy to injure yourself. Always use the vehicle steps, foot-holds and grab handles. When you climb down from, or up into the cab, make sure that you face towards the vehicle.

26
Approach your vehicle from the front so that you are facing oncoming traffic
Never jump out of a vehicle If you have to step on a tyre, to get into or out of the cab, be careful if the tyre is wet. Tyres can get very slippery. You might fall and hurt yourself or fall into the path of moving vehicles.
Changing wheels If you are able to, change wheels well off the road. Be very careful changing a wheel on the right side of the vehicle if you are near to traffic on the road.
Use hazard warning lights and warning triangles if there is any risk to you or to other road users (see page 18 & 20).
Lifting any heavy object Learn how to lift properly. Information is available from the Victorian Workcover Authority, about the correct way to handle heavy objects.
When you start to lift heavy objects, have your back straight and your knees bent.

27
Chapter 3 - R
eady to drive: Driver H
ealth and Safety
Notes Test yourself questions (Answers to test yourself questions are upside down at the bottom of this page)
1. If you become sleepy while driving you should A. increase your speed so that you will get home more quickly
B. stop and take a break
C. listen to some music on the radio.
2. When driving any large vehicle over 15 tonnes Gross Vehicle Mass (GVM), you must have a Blood Alcohol Concentration (BAC) of A. 0.1
B. 1.0
C. .00
Answers 1B 2C

28
Chapter 4 – Vehicle checks
This chapter includes: » keeping your vehicle in good
condition
» pre-drive
» additional checks
» after departure checks
» test yourself questions
Special Note The pressure readings and other measurements used in this chapter are those commonly used in Australia.
Different vehicles use different systems. You should check the recommended measurements and gauge readings in the vehicle manufacturer’s handbook.
Keeping your vehicle in good condition As a heavy vehicle driver, you must carry out daily inspections of your vehicle before you drive it.
Because professional drivers drive further and longer, they demand more of their vehicles than other drivers.
The time you spend checking your vehicle is an investment in safe, efficient, trouble-free running, and reduces the chance of a crash. Regular daily and weekly vehicle checks reduce maintenance costs and payouts for fines.
Remember that, you as the driver, have final responsibility for your vehicle and what it does on the road.
It does not matter who maintains the vehicle, it is the driver’s responsibility if the vehicle is unroadworthy.
Any fines for vehicle defects are payable by the driver as well as the vehicle’s owner.
Make sure that your vehicle remains roadworthy by making daily and weekly checks. You need to inspect your vehicle regularly, using the following checklist.

29
Chapter 4 - Vehicle C
hecks
Pre-trip inspection
Daily checks These daily checks should be done by the driver.
1. Around the vehicle External check. Walk around the vehicle and look for any problems. Look for signs that there may be a problem with the load.
Vehicle tilt. If the vehicle sags to one side, look for a flat tyre. The problem could be overloading or incorrect loading. There could be something wrong with the suspension. Refer to Chapter 10, “Dimensions and Load Limits” for correct loading procedures.
Load. Check that the trailer doors or load doors are closed and fastened. On open loading areas, check that the load is not hanging over the side. Check that all lashings and tarpaulins are secure.
Load security. Unless you are carrying a sealed load, check that the load is well packed. The load can be easily damaged if it shifts. A shifting load is dangerous.
Check all tie-downs. Make sure all area load doors are latched. Check that tailgate, liftgate, sliding ramp and other equipment are put away ready for travel.
On an open trailer, the load may be covered. Make sure the cover is fastened down. Unsecured tarpaulins and loads can fall off and cause crashes. Loose and flapping tarpaulins will obscure your view of other road users in your mirrors.
Remember that a tarpaulin or other cover alone will not secure your load, but will only give it weather protection. Do not depend on a tarpaulin for securing your load. Your load must be properly secured. There are heavy fines for unsecured loads.
Load height. Make sure you know what the highest point of your vehicle is from road level. You need to know your height when you plan your route so you can avoid low bridges.
Vehicle damage. Check for cracks in the lights and windows. Check for dents and missing parts, like mud flaps. Check for loose parts, for instance, a fuel tank hanging by its straps.
Leaks. Check under the vehicle for signs of any leaks of oil, coolant, grease or fuel.
Area check. Check for objects lying around on the ground near your vehicle, which could be damaged when you move. Check above too, for wires, low branches, air conditioners in windows and verandahs.
Wheels and rims. Check for rim damage on each wheel. A bent or damaged rim might cause a tyre to lose pressure or come off the rim. Multi-piece rims are under high pressure. They can explode if they are damaged.
Check wheel nuts. If some are missing, the others have to take extra strain and may fail. Check for rust streaks around the wheel nuts. This is a possible sign that the wheel nuts are loose. You can not check wheel nuts by hand. You need the correct tool.

30
Also check the wheels for signs of leaks from wheel bearings and seals. Spilled or leaking grease can cause a fire or a wheel to lock.
Tyres. Check all tyres for tread wear, damage and proper fit. Worn tyres may blow-out. They make it harder to stop on slippery roads.
Be especially careful and check for: » worn front tyres. These may cause loss of steering
control.
» worn trailer tyres. These may cause a “jack-knife” action, where your trailer skids sideways, out of control, to crash into the prime mover.
» worn steering tyres. These may cause your vehicle to “aquaplane”, where the tyre loses contact with the road and “water-skis” on water on top of the road.
Worn tyres are a potential crash risk. Tyre pressure. Check the tyre pressure with a gauge. Thumping and kicking will not help you to find out if a tyre has low pressure. Low pressure on steering axles makes steering harder and unsafe. Low pressure causes heat build-up in tyres. Low pressure in dual tyres can cause them to rub together at the bottom and start a tyre fire or cause a blow-out.
Spacing between dual wheels. Check the space between dual wheels. Rocks or mud caught between the wheels can unbalance a wheel and damage the tyre tread and wheel
bearings. These rocks can be thrown out later and damage your vehicle and other vehicles.
Spacing between brake drum and wheel. Check the space between the brake drum and the wheel for rocks and mud. Things caught in there may damage the brakes and the tyre.
Fuel system. Check that fuel tanks are firmly attached. Test fuel caps by hand to make sure they are properly closed. Check for leaking fuel.
2. Engine checks First, visually check the engine area for signs of damage and problems with engine, steering mechanism and suspension, then go through this checklist.
Fluid levels. Check crank case oil, radiator coolant, battery fluid and windscreen washer fluid. Check automatic transmission and the oil make-up tank if one is fitted. Check the power steering fluid reservoir. Top up all fluids.
Leaks. Look for signs of leaks of oil, water or brake fluid. If there are leaks, have them checked before you leave.
Electrical system. Check for loose electrical wires and get them fixed before you leave.
Belts and pulleys. Check the belts on the generator, alternator, water pump, air conditioner and air compressor. Make sure they are intact and are not frayed or cracked. If you need to adjust them, look at the vehicle manufacturer’s handbook for instructions on how to make these adjustments and how tight the belts should be.

31
Chapter 4 - Vehicle C
hecks
Brakes. If brakes are hydraulic, check the master cylinder fluid level. If it is low, check for leaks around the master cylinder and from each wheel cylinder.
If brakes are air brakes, check that the air intake filter is not clogged. Open the air tank taps and check for oil in the air that comes out. (If oil comes out there may be a problem with the compressor and this must be checked by a mechanic.) Do not forget to close the taps afterwards.
Finally. Securely close the bonnet or lower the cab, locking it in position.
3. Checking driver’s controls Vehicle entry. Check that everything is safe. For trucks, check the ladder, grab handles and door handles.
For buses, check hand rails and operation of door(s).
Emergency and safety equipment. Make sure you have all the proper equipment, including:
» fully charged fire extinguisher » first-aid kit » at least three, two-faced portable warning triangles » spare fuses » seatbelts (in good order and easy to get at).
Mirrors and glass. Clean all windows and mirrors. Check the windscreen wipers work and that the wiper blades are not worn. Check that windscreen washers work.
Adjust the position of the seat, the mirrors and the seatbelt to suit your height so that you can see and sit comfortably.
Engine start-up. Before starting up the engine, check that the parking brake is on. Read the vehicle manufacturer’s handbook and follow the start-up procedures for your vehicle. Start the engine and let it idle until full oil pressure shows on the dashboard gauge. Increase the engine revs slightly until the water temperature gauge starts to rise.
Instruments and gauges. With the engine running, check all instruments and gauges:
» oil pressure gauge should begin to register within a few seconds of starting the engine and then gradually rise to normal position.
» ammeter or volt meter needle should flutter and then show “charge” or “+” on the dial
» warning lights for oil, coolant, generator or alternator should go out almost as soon as the engine is started, if the engine is operating normally.
Primary controlsWith the engine still running, check the following:
» steering wheel for any slackness
» the clutch. Press the clutch until you feel a slight resistance (some free play is normal). Too much or too little free play may make it hard to change gears, may cause gears to clash and could cause transmission damage
» accelerator and brake are operational.

32
Secondary controls Check the following:
» switches and signal lamps for your vehicle’s defroster, heater and fan
» operation of windscreen wipers and washers
» interior and dashboard lights
» horn
» indicator lights for left and right turn signals, hazard warning lights, and high beam indicator
» that the cabin is clear of rubbish which could wedge under foot controls or hinder your movements. Make sure all loose equipment is stowed away
» that the low beam, hazard warning lights, number plate and running lights are working. Switch headlights to high beam and check them. You will need to get out of the vehicle to check these
» the brake lights (ask someone to help check outside for you while you put your foot on the brake pedal)
» reflectors. Wipe dust and grease from all lights and reflectors. It is easy to check that all your lights are working, with the help from a colleague or other drivers at your stops.
Switch lights off before replacing any defective bulbs.
Additional checks Always check the manufacturer’s handbook for the vehicle you are driving when conducting these additional checks.
1. Air brake vehicles For air brake vehicles you must make extra checks of pressure levels. Check the manufacturer’s handbook for the vehicle you are driving for each type of check.
Low air pressure warning buzzer should operate constantly until the air pressure builds up to manufacturer’s settings. If air pressure in the tank is already high this may not happen when the engine is running.
Air pressure gauge should show a steady increase.
Air pressure cut-off. Check manufacturer’s setting.
Air pressure loss. Note any pressure lost since the last stop. You must fix a problem like this before driving.
Low pressure emergency systems. Stop the engine and reduce air pressure by pressing the brake pedal a number of times. Watch the air pressure gauge. Check that the low pressure warning buzzer comes on close to manufacturer’s setting.
Keep moving the brake pedal up and down. Check that the protection valve moves by itself from normal to emergency or that the “deadman” operates.

33
Chapter 4 - Vehicle C
hecks
Trailer brake check. Apply trailer brakes only and try to move forward gently. The vehicle should not move.
When doing this, make sure you do not place too much strain on the clutch. If the vehicle does move, check that the air lines between the prime mover and the trailer are connected correctly. Perform the test again. If there is a problem, get it fixed by a mechanic.
2. Hydraulic brake vehicles Pump the brake pedal three times. Push the pedal firmly and hold it down for five seconds. If, after five seconds, you feel the brake pedal sinking, there is a leak in the system. You must have it fixed before driving.
3. All vehicles For all vehicles you must check the following.
Parking brake check. Try to drive forward in low gear. The vehicle should not move. Do not put too much strain on the clutch.
Full service brake check. In first gear move forward at no more than 5 km/h. Apply the brakes firmly. If the brakes feel “mushy” and slow to respond, or if the vehicle pulls to one side, the brakes need attention from a mechanic.
Final steering check. Pay close attention to steering performance as you move off.
4. Prime movers and semi-trailers For all prime movers and semi-trailers it is important to check:
» turntable slack. With the trailer brake on, gently pull forward and reverse to make sure there is no slack in the turntable connection.
Pig trailers and dog trailers. Check for slack in the coupling by moving gently forward and back.
After departure checks Visually check that your load is secure, using all your mirrors.
After you have driven for about an hour, stop in a safe spot away from the traffic flow. Do a quick extra check around the vehicle, the same as the one you did before you started the trip.
With your hand, check the temperatures of tyres and brake drums. Be careful not to burn yourself. Look for under-inflated tyres and over-heated brakes. Look for any liquid leaks which may have become visible.
Each time you stop, repeat the after departure checks before continuing the trip. That is, visually check your load; check around the vehicle; check by hand the temperature of tyres and brake drums, and check for liquid leaks.

34
Test yourself questions (Answers to test yourself questions are upside down at the bottom of this page)
1. If you drive an unroadworthy vehicle, you A. may be liable for a fine
B. and the owner may be liable for a fine
C. may have your registration plates removed.
2. You should adjust your vehicle’s mirrors A. before entering the vehicle
B. as you move off
C. after adjusting the seat.
Answers 1B 2C

35
Chapter 4 - Vehicle C
hecks
Notes

36
Chapter 5 – Controlling your vehicle
This chapter includes: » accelerating
» steering
» reversing
» changing gears
» braking
» test yourself questions
Safe operation of a heavy vehicle requires skill in: » accelerating » steering » reversing » gear shifting » braking.
Whatever vehicle you drive, all its handling characteristics are affected by the load you carry, including passengers.
Accelerating Accelerate smoothly and gradually so the vehicle does not jerk. Rough or rapid acceleration may cause your load to shift and damage the drive train on any vehicle.
Early easing off the accelerator can result in a reduction in speed.
When pulling a trailer, the king pin or its coupling could be damaged by rough acceleration.
Rain, snow and gravel You should accelerate more slowly whenever you drive in situations of rain, snow or gravel. If you over-accelerate, the wheels will spin, and if you are pulling a trailer, it could “jack-knife”, which means the trailer could fold against the towing vehicle in a skidding movement.
Steering Steering a large vehicle requires more knowledge and skill than driving a car, so follow these tips.
Holding the wheel Hold the steering wheel firmly with both hands. When you hit a kerb or pot
37
Chapter 5 - C
ontrolling your vehicle
hole, you could lose control of the steering wheel unless you are holding it with two hands. Keep your thumbs clear of steering wheel spokes. A spinning steering wheel can break bones. For safety, never reach through the steering wheel in order to operate controls.
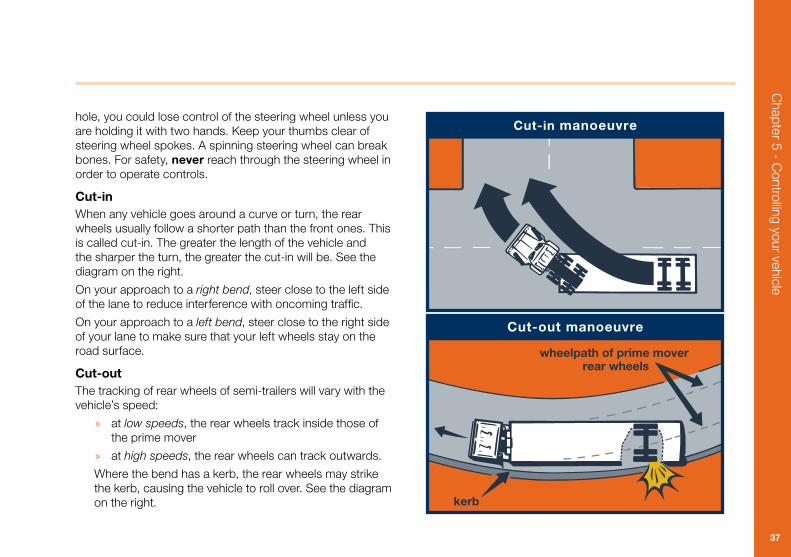
Cut-in When any vehicle goes around a curve or turn, the rear wheels usually follow a shorter path than the front ones. This is called cut-in. The greater the length of the vehicle and the sharper the turn, the greater the cut-in will be. See the diagram on the right.
On your approach to a right bend, steer close to the left side of the lane to reduce interference with oncoming traffic.
On your approach to a left bend, steer close to the right side of your lane to make sure that your left wheels stay on the road surface.
Cut-out The tracking of rear wheels of semi-trailers will vary with the vehicle’s speed:
» at low speeds, the rear wheels track inside those of the prime mover
» at high speeds, the rear wheels can track outwards.
Where the bend has a kerb, the rear wheels may strike the kerb, causing the vehicle to roll over. See the diagram on the right.

38
Reversing When reversing a vehicle and trailer, you must use the correct technique.
Your training school will advise you of the correct reversing technique for the type of vehicle you are driving.
Tips for reversing with a trailer » set up your vehicle so that the trailer is directly behind
it, with all wheels pointing straight ahead.
» avoid sharp turns.
» reverse slowly. this allows you to make small corrections as you go so that you stay on course.
» use all your mirrors to see that the trailer is correctly positioned.
» correct any drifting off-course, immediately by turning the steering wheel into the direction of the drift. Be careful not to over correct or the trailer will drift off course in the opposite direction.
» pull up and move forward. If you have to reverse around a sharp corner, it is often easier to correct the steering wheel before you stop and then reverse.
Changing gears Changing gears smoothly and at the right time will help you to keep a steady speed and keep your vehicle as close as possible to the speed of surrounding traffic.
It also saves on fuel and engine wear and tear if you change gears at correct engine speeds.
Gear changes made at the wrong engine speeds are bad for:
» the clutch
» the transmission and
» fuel consumption.
Double-clutching Vehicles with crash-boxes need to be double-clutched to change gears. With most manual transmissions gear shifts are quicker and smoother if you double-clutch.
You don’t need to double-clutch a vehicle with a synchromesh gearbox.
To double-clutch, check that you do what the vehicle manufacturer’s handbook suggests on gear changes, and/or go through the following sequences:
» press the clutch
» shift to neutral
» release the clutch
» adjust engine RPM (Revolutions Per Minute or revs) to vehicle speed needed for the change to next gear.

39
Chapter 5 - C
ontrolling your vehicle
With experience, you will learn what the engine should sound like at the best moment for each gear change. Either let the revs die down or press the accelerator pedal to get the revs correct, then:
» press the clutch again
» shift to the gear you want
» release clutch
» accelerate to required speed.
Double-clutching requires practice. If you have trouble engaging your new gear, do not force it, return to neutral, re-adjust your revs with the clutch pedal out, press the clutch pedal and try again.
Knowing when to shift gears There are two ways of knowing when to shift gear. You can use either or both:
» Engine speed (RPM). The vehicle manufacturer’s handbook will specify maximum and minimum revs and road speed for each gear. Your vehicle may have a tachometer (tacho), which measures engine revs. If so use it.
» Engine sound. After a while you will recognise, from the sound of the engine, when to change gear.
Changing down gears There are special times when you should change down gears.
Going up hills. You may have enough speed to make it up the hill without changing. But if you start to slow down you must change down gears to prevent the engine from “labouring”.
Slowing or stopping. Use your brakes first. Then select the right gear to change down into.
Before entering a bend. You should brake, then change down to a gear that is safe for the bend. You need to provide slight power through the bend to keep the vehicle stable. You can also accelerate out of the bend.
Before turning. You should brake, then change down to a gear that is safe for the turn. You need to provide slight power for the turn to keep the vehicle stable. You can also accelerate out of the turn.
Before starting down a hill. Always make sure you are in the proper gear before starting down a hill. Once going down the hill, use your brakes if you need to. Be very careful changing gears going down hill as you may get stuck in neutral and lose control of your speed.

40
Braking You must be familiar with all braking devices and how they work for your vehicle. You should know what sort of braking system your vehicle has: whether it has hydraulic brakes or air brakes.
Remember, the heavier a vehicle is, the harder it is to stop and the more time is needed for it to stop.
You must know the height, weight and width of your vehicle.
How brakes work Most heavier vehicles use air brakes rather than the hydraulic type brakes fitted to passenger cars. But some rigid vehicles do use hydraulic brakes.
Warning Note Heavy vehicle brakes are designed to operate most effectively when the vehicle is loaded. When the vehicle is unloaded or only partly loaded the braking performance is very different. So take care and be sure you know how to control the different behaviours of your vehicle, loaded or unloaded.
All brakes Reducing brake pedal pressure. As the vehicle slows down, you need less pressure from your foot on the brake pedal to keep slowing down. So you have to ease your foot off the brake pedal, as you slow down.
If you do not ease your foot off the brake pedal, the wheels may lock and cause the vehicle to skid.
Effect of load. The heavier your load, the harder it is to stop and the more distance you need to stop. With a heavy load you must brake earlier and harder.
Braking on hills. Continuous heavy braking on a long hill will cause brake linings to heat up. After a while the brakes will no longer slow the vehicle. This is called “brake fade”. To help reduce brake fade, shift into a lower gear before starting down a hill and use auxiliary brakes or “retarders”.
When going down a hill, you should use brakes to prevent speed build-up before it occurs. Do not wait until speed has built up or it may be too late.
You must select the proper gear before starting down the hill.
You might need to brake going down a hill even when you have selected the correct gear before starting down. Apply the brakes firmly to reduce your speed then release them to prevent brake fade. Repeat this when you need to.
Braking with an empty vehicle. An empty vehicle, or one with a light load, is very different to handle. You notice this most when braking, steering and going up hills. You may need to adjust your braking if your vehicle is empty.
Hydraulic brakes Hydraulic brakes consist of a master cylinder which works like a pump operated by the brake pedal. The master cylinder may be assisted by a vacuum or air booster unit. When the brake pedal is pushed, the master cylinder pumps hydraulic fluid through a pipe to a wheel cylinder (at least one to each brake drum).

41
Chapter 5 - C
ontrolling your vehicle
The arrangement distributes the pressure of the system to the different sets of wheels so as to keep the vehicle on course.
What this means for the driver is that when the brake pedal is pushed, the piston in each wheel cylinder is pushed out, pressing its brake shoe or pad against the brake drum or disc.
The harder you press the brake pedal, the harder the brakes will work to stop your vehicle.
Large, hydraulic brake vehicles are equipped with emergency brake systems that mostly work off vacuum or booster units. These are automatic systems similar to those in air brake vehicles.
If there is a trailer breakaway or a lack of hydraulic fluid, the Emergency Braking system should stop the vehicle very quickly.
If this happens you will need to be ready to handle a skid, as the emergency brakes will “grab” differently to your standard hydraulic brakes.
Air brakes Air brakes are often used on heavier and multi-axle vehicles.
Pressing the brake pedal opens a valve which releases compressed air from a tank. The air reaches the brakes through air lines and forces the brake shoe or pads against each drum or disc.
The harder the pedal is pushed, the more air is released from the tank and the more pressure is applied at each brake, so the harder the brakes will work to stop your vehicle.
Like hydraulic brakes, air is supplied to the brakes through a distribution system so that the whole rig will stay on course during braking.
In air braking systems on heavy vehicles, a brake ratio valve can sometimes be adjusted. You adjust it according to the weight of different loads. These valves work in different ways so you must check the vehicle manufacturer’s handbook before changing the setting.
Warning Note Air brakes feel different from hydraulic brakes.
There is a delay time of up to one second for air to reach the brakes after you push the pedal. This means that at 60 km/h you will travel 17 metres from when you begin to push the pedal until the brakes start to work and then it will take further time to stop.
This means you need to think well ahead and brake much earlier than you would in a passenger car.
Spring-loaded brakes Most vehicles with air brakes also have spring-loaded brakes, for emergencies and parking. Springs push the brakes on. The springs are held back by air pressure. When there is a serious air loss, the springs are released and the brakes go on automatically.
42
Spring brakes act as:
emergency brakes. When there is not enough air pressure to work the air brakes, the spring brakes automatically bring the vehicle to a sudden stop.
Spring brakes stop a fully loaded vehicle, so if your load is light, your wheels may lock up before the vehicle has stopped.
If this happens you should be ready to handle a skid situation.
Spring brakes also act as parking brakes. When the engine is off, air pressure falls and the spring brakes then work automatically.
When you put the park brake on with the engine running, it releases the air supply to the spring brakes, causing them to come on.
Auxiliary brakes or speed retarders Auxiliary brakes are often fitted to larger vehicles.
Auxiliary brakes slow either the engine or the drive train.
Auxiliary brakes or speed retarders are often used during long descents. Many auxiliary brakes are noisy. Try not to use them in built-up areas. You may be fined for excessive noise.
Check the vehicle manufacturer’s handbook for the sort of auxiliary brakes used on your vehicle.
Speed retarders are separate from wheel brakes. They come in a number of forms. Speed retarders will only slow, not stop the vehicle.
However, on wet or slippery road surfaces, the use of auxiliary brakes can cause drive wheel lock-up. This can result in a rapid and unrecoverable sideways sliding, and vehicle jack-knifing.
Trailer brakes The air brakes on a trailer work every time the foot brake is used. A separate hand control brake allows the trailer brakes to be put on without the prime mover brakes being applied.
Trailer brakes may be used when:
» you are stopped at lights
» when changing down a gear while going down a hill
» starting on a hill.
Be very careful using trailer brakes by themselves at road speeds.
The trailer brakes may be used alone but you should try not to use them often as there is a danger of trailer brakes overheating and fading.
Trailer brake ratio valve It is very important to adjust the ratio valve whenever your vehicle’s load changes.
Some prime movers have a ratio valve which changes the proportion of brake pressure going to the trailer brakes.
Read the vehicle manufacturer’s handbook carefully to find out how and when to use the ratio valve.
Do not assume that you know how to use it.

43
Chapter 5 - C
ontrolling your vehicle
Notes Test yourself questions (Answers to test yourself questions are upside down at the bottom of this page)
1. Cut-in means that A. the rear wheels follow a longer path than the front wheels
B. both sets of wheels follow the same path
C. the rear wheels follow a shorter path than the front wheels.
2. In what situations might engine brakes cause wheel lock-up? A. engine brakes can be used in slippery conditions and
will never cause wheel lock-up
B. engine brakes should not be used in slippery conditions.
C. it all depends upon how much experience you have had as a driver.
3. When reversing a trailer, if you drift off course, you should A. turn the steering wheel away from the direction of the
drift
B. turn the steering wheel into the direction of the drift
C. correct the drift after waiting a few minutes.
Answers 1C 2B 3B

44
Chapter 6 – Driving on the road: planning and observing
This chapter includes: » low risk driving behaviours
» looking around you
» what to look for on the road
» regular mirror checks
» what to watch out for when reversing
» how to make space around your vehicle
» left turns
» right turns
» test yourself questions
Low risk driving behavioursLow Risk Driving (LRD) involves the proactive application of skills and behaviours that can effectively reduce crash risk. Central to LRD is the concept of Crash Avoidance Space (CAS). CAS is the space required to avoid or reduce the risk of a crash occurring. As well as being created, CAS must also be maintained and protected. This is a conscious and continuous process that requires both awareness and skill. Heavy vehicle drivers in particular need to have a good understanding of LRD and the various ways it can be applied to enhance road safety.
Looking around you Because you share the road with other drivers you need to be looking around you all the time to know what other traffic is doing.
You need to know the size of your vehicle and how it handles so you can always have enough space between your vehicle and others that can accelerate and brake more quickly than you can.
Road markings are set up to leave plenty of room for smaller cars. For bigger vehicles it can be a tight squeeze. Special skill is required to share the road safely.
You need to be observant and to look ahead.
Check in all directions around your lane. Failure to do so is a major cause of crashes.
We all look ahead on the road as we drive. But some drivers do not look far enough ahead. Heavy vehicle drivers need to look further ahead because stopping, changing lanes and turning takes more time in a heavy vehicle.

45
You need more time to get ready to stop or move left or right. You need to look well ahead to be ready to make these moves safely.
Looking further ahead helps you maintain a steady speed. You can plan when to change lanes and manage your speed more effectively. This makes for smoother driving, better fuel economy and reduced wear and tear.
What to look for on the road How far ahead you should look
You should be looking, and planning, about 12-15 seconds ahead because heavy vehicles take longer to stop.
In built-up areas, this means about a city block ahead.
On the open road you should plan about a kilometre ahead when you can.
You have to notice things closer to you, on each side and behind you. Check both sides, in your side mirrors and near and far ahead of your vehicle all the time.
What to look for
In a word, everything. Because you are higher, you can often see over the cars in front of you. However, extra height also means you have to think about overhead obstacles.
Know how high your load is and watch for low bridges, overhanging tree branches, telephone and electricity wires.
Use your mirrors: scan constantly. Look on both sides, near and far, front and back.
Chapter 6 - D
riving on the Road: P
lanning and Observing

46
Traffic Watch for cars entering the road in front of you. Watch out for cars ahead changing lane or turning. Look for other vehicle’s indicators, brake lights or movements you would not expect.
By checking these things you can anticipate and adjust your speed or change lanes to avoid problems.
Road conditions Watch for hills, curves or merging lanes. Watch for vehicles ahead, changes of width in the road and other situations for which you may need to slow down or change lanes.
Unpredictable surfaces Potholes, wheel ruts or grooves, slippery surfaces and loose gravel all affect how your vehicle reacts. Always try to be aware of the road surface conditions and adjust your driving to the conditions.
Check for road signs and traffic signals If a traffic light has been green for a long time, prepare to stop in case it changes to red before you get to it. Beware of vehicles starting up too soon on the intersecting road.
If a light has been red for a long time, slow down. It could turn green before you get there and then you will not have to stop. But beware of vehicles “running the red light”.
Where there are parked cars, keep a special lookout for:
» cars leaving the kerb
» cars leaving driveways
» pedestrians crossing from between parked cars
» children - who are smaller, harder to see and may be less cautious than adults
» drivers and passengers opening their car door.
Other road users do not know how long it takes you to stop. They misjudge your speed, so you have to make allowances for other drivers’ mistakes.
Good professional drivers recognise hazards, understand how to anticipate them and then act in time. The following diagram shows the spots where you should be especially careful.
Regular mirror checks
Using your mirrors Use all mirrors to monitor traffic beside and behind you. It requires practice to use mirrors well.
Use your mirrors often. Scan them and look back to the road.
At 90 km/h, you will travel 25 metres in one second. So keep each glance to no more than a second at a time.
Build a habit of short, regular glances in all your mirrors and around the vehicle – a 360 degree scan.

47
Chapter 6 - D
riving on the Road: P
lanning and Observing
Make sure that you understand what you see in your mirrors. Be aware that mirror images are reversed. Convex (or curved) mirrors give you a wider view. But they make things look further away than they really are.
Always check in your flat mirror as well, to gauge the real distance of traffic behind you. You must have flat mirrors on your vehicle.
You may also have convex mirrors, which must not get in the way of flat mirrors.
Use your mirrors to keep a check on your tyres. Especially watch out for tyre fires.
You can use mirrors to check on open loads. Watch out for loose straps, ropes or chains, open luggage bin doors and loose or flapping tarpaulins.
Also use the mirrors to check that your trailer is straight behind you, not drifting to one side.

48
Blind spots You need to check your mirrors often for overtaking vehicles, but there are some blind spots where the mirrors cannot help you.
There are also other areas beyond the range of your mirrors. Smaller vehicles or motorcyclists right behind you and level with the cab beside you are hard to see.
If you use your mirrors all the time, you may see them before they move into the blind spots. You will know that they are there.
Special mirror checks There are also special mirror checks you must make when you change lanes, turn, merge into traffic and go through tight spaces.
Changing lanes. Before you change lanes, check your mirrors to make sure no-one is beside you, or is about to overtake you.
Check to be sure that:
» there is enough space
» your path is clear.
Then look, indicate and wait before you change lanes. Flat mirror Convex mirror
Mirror use for vehicle check: You can use your mirror to check your load.
Note: that a portion of your truck is usually visible in your mirror.

49
Chapter 6 - D
riving on the Road: P
lanning and Observing
Turns. As you make a right turn, check your mirrors to make sure you will not hit any stationary vehicles parked or stopped close to the intersection of the street you are turning into. Remember to allow space for the cutting-in of the rear end of your vehicle!
As you make a left turn, use your left mirror. Check that your rear wheels do not mount the kerb, strike a post or hit a parked vehicle. Also be very careful to check that a car is not trying to overtake you on the left side.
Merge. When you are about to merge, use your mirrors to check that there is enough room for you to enter your new lane safely. Traffic behind may have sped up or changed lanes, shortening the gap so that there is less room for your move.
Tight manoeuvres. When driving through a crowded intersection or narrow road, keep checking your mirrors. Make sure you can get the full length of your vehicle through without hitting anything.
Reversing Because you cannot see what is directly behind you, reversing is risky. So avoid reversing if possible.
Driveways. Where possible, reverse into a driveway so you can drive away forwards.
If you have to reverse make sure you do the following:
Inspect your path. Check your line of travel before you begin. Get out and walk around your vehicle.
Check your clearance. Make sure the road or surface will support the vehicle. Check for overhead wires and air conditioners in windows.
Reverse slowly. This way you can easily correct steering errors and stop quickly.
Reverse and turn to driver’s side. Because you see more in the right mirror than the left mirror, it is safer to reverse in by reversing to the right (driver’s) side, where you can see more. Reverse and turn to the driver’s side wherever you can. It is easier and safer to reverse to the right. When turning towards the driver’s side, you can watch the rear of your vehicle out the side window and in the right mirror. You cannot see as much in the left mirror. With a box trailer you will see nothing but the front left corner of the trailer in the left mirror.
Instead of reversing to the left, you could do a U-turn and approach the same driveway from the other side of the road, so you can reverse into it from the right.
Use a person to help guide you. You cannot see directly behind your vehicle. There are other blind spots. So use a person to guide you wherever you can. The guiding person should stand where they get the clearest view of your vehicle and can signal to you. You probably will not be able to hear your guide properly, so work out some hand signals for communication before you start.

50
A guide can see your blind spots and guide you through them
How to make space around your vehicle To drive safely you need space all around your vehicle. Space gives you time to stop. Space gives you time to check your mirror and make a lane change.
Space in front You need enough space in front so you can always stop safely. You need enough space so you do not crash into the vehicle in front of you. You need enough space in front of you so you can slow down gradually leaving enough space so that a vehicle behind you does not crash into the back of your vehicle.
Remember:
» a smaller vehicle in front of you can probably stop more quickly than you can
» if you are driving a vehicle with air brakes, it can take up to one second after you press the brake pedal for the air to reach the brakes and start slowing your vehicle
» it can take between two and three seconds for you to see a problem ahead and get your foot to the brake pedal.
So, it could be as long as 3 seconds after you’ve seen a problem ahead of you, before your vehicle begins to slow down.
In that 3 seconds, at just 60 km/h, your vehicle will have travelled an extra 51 metres (60 km/h is the same as 17 metres per second). At higher speeds you will travel even further!
The table on page 51 shows you how much space you need to leave between you and the vehicle in front of you.

51
Chapter 6 - D
riving on the Road: P
lanning and Observing
It is important to remember that the figures above apply to:
» vehicles with good tyres and brakes
» driving on good quality, sealed roads
» driving on dry roads.
Keeping a safe distance away from the vehicle in front is easy.
Note when the vehicle in front passes an object on the side of the road.
Start counting off the seconds: a thousand and one, a thousand and two, a thousand and three and so on.
Stop counting when the front of your vehicle reaches the same object on the side of the road.
Check the table above.
If you are not enough seconds behind the vehicle in front, ease off the accelerator.
Special Note If the road is wet, traffic is heavy or vision restricted, double the gap between your vehicle and the one in front.
At night, remember that you can see no further than your headlights, so increase the gap.
On gravel roads, double your gap.
Space behind your vehicle You cannot force other vehicles to stay a safe distance behind you. But you can make sure that you do the best you can in managing space around your vehicle.
Heavy vehicles are often “tailgated” when they cannot move as fast as other traffic, for example, when going up a hill with a heavy load. Tailgating is when another vehicle drives too closely behind you. In this situation, stay as far left as you can. On hills, use “slow vehicle” lanes and do not overtake other vehicles unless you can do it quickly or there is no other traffic. On multi-lane roads with a speed limit over 80 km/h or roads signed “Keep Left Unless Overtaking” you must stay left unless you can safely overtake.
Professional drivers do not obstruct other traffic by overtaking another truck at nearly the same speed.

52
Start counting time in seconds, as the vehicle in front of you passes a landmark until the time that you get to the same landmark
Handle tailgaters safely Heavy vehicles must keep a sufficiently safe distance behind other vehicles to enable them to stop and avoid a collision.
When being tailgated, follow these tips:
» slow down gradually, this will encourage other drivers to overtake and to do so more quickly
» avoid quick changes of speed, slow down gradually and signal early
» increase the distance between yourself and the vehicle you are following. Opening up more room in front of you reduces the risk of having to make sudden changes to speed and direction
» do not speed up. Tailgaters will tend to stay behind you and it is safer at lower speed
» avoid tricks. Do not turn on tail lights or flash your brake lights. It will cause confusion.
Remember you are the professional driver, so do not let the tailgater pressure you into behaving unprofessionally.

53
Chapter 6 - D
riving on the Road: P
lanning and Observing
Special Law If you are driving a long vehicle (any vehicle which, together with its trailer, is at least 7.5 metres long) and you are following another long vehicle you drive at least 60 metres away from it, except:
» in a built-up area (one with street lights)
» on a multi-lane road
» a road train must keep a following distance of 200 metres or more when following a long vehicle.
Changing lanes If you want to return to your lane after overtaking another vehicle, the extra length of your heavy vehicle makes it hard to judge whether you can change lanes safely. You should follow these tips:
» when in doubt leave plenty of space and time, especially when it is a multi-laned road and there is no need to change in a hurry
» do not trust other drivers’ signals that it is safe to change lanes. Always be sure yourself. Make your own decision
» use your mirrors to check that you can see the vehicle behind you before moving back into your original lane.
Space around the sides of your vehicle The wider a vehicle is, the more space it needs on either side.
Roads and lanes on multi-lane roads are wide enough for cars but not so for heavy vehicles. So heavy vehicle drivers need more skill in managing space on both sides of their vehicles.
Drive in the centre of your lane To keep a margin of safety on both sides, drive in the centre of your lane whenever:
» another vehicle is coming the other way
» another vehicle is overtaking you
» you are overtaking another vehicle.
Only pull to the left of the lane to allow a car approaching from the other direction more room if you are sure it is safe. It may put you too close to traffic to your left. Let the other vehicle move over, because it is smaller and needs less space.
Travelling next to other vehicles If you are travelling beside other vehicles keep in mind that:
» another vehicle could change lanes suddenly and run into you
» you could be trapped in a lane when you need to change to another lane.
The best way to avoid these problems is to drive in the open and not in a group of vehicles. If traffic is too heavy to find an open space, try and keep as much space as possible between you and other vehicles. Drop back or pull forward to make sure that other drivers know that you are there.
When it is safe to do so, stay in the left lane.

54
Space above your vehicle Colliding with overhead objects causes damage to loads and vehicles as well as overhead doors. It can cause crashes involving other vehicles.
Know the height of your vehicle and your load.
Be cautious when going under trees, bridges, overhead signs, traffic lights, power lines and other wires. If you are not sure your vehicle will fit, stop and check.
When driving remember:
» the weight of your vehicle affects its height. The fact that you got under with a load does not mean you will get under when you are running empty. When empty, your vehicle travels higher. When loaded, the weight lowers your vehicle
» check the height of things like wires, verandahs and installed air-conditioners in shop windows
» your vehicle might tilt to the left, because of the road’s camber (slope) or different levels of surfacing. Be careful of trees, sign posts and power lines along the
side of the road. You may have to drive closer to the centre of the road to clear them
» before reversing, get out and look up for obstructions.
Space below your vehicle It is easy to forget the space beneath your vehicle. When a vehicle is loaded, especially a deep frame type, there is not much space underneath. So watch out for:
Railway tracks. They often stick up above the road surface, most often in yards and on dirt roads. Your wheels may get stuck in the gaps between the rails.
Soft surfaces. Make sure that a soft surface will support the weight of your vehicle.
Be wary of:
» shopping centre parking areas. Often these are constructed for light vehicles only. Always get out and check. Ask the management if you are not sure
» unpaved roads and parking areas. These could be trouble spots especially after rain. Be very wary of grass and gravel surfaces
» construction areas are often dug up to connect services beneath the surface. Loose earth may be covered by planks that will not support your vehicle. Take care in these places
» trailer support legs. Make sure that the ground will not give way under them. Use planks or boards under the legs.

55
Chapter 6 - D
riving on the Road: P
lanning and Observing
Space for turns Space around a heavy vehicle is very important for turns.
Because of cutting-in, heavy vehicles often sideswipe other vehicles and objects during turns (see page 37).
Left turns Intersection markings are often too tight for large vehicles. It is likely that you will have to approach the turn wide to make a left turn.
Try to place your vehicle so that others behind cannot overtake on your left. Make sure you have the best view possible of the road you are turning into. Turn as wide as you need so your trailer safely enters the left lane of the road you are turning into.
Heavy vehicle drivers need to start a left turn further into an intersection than a car. This way, the back wheels do not run over the kerb.
The longer your vehicle, the further into the intersection you have to drive before you start turning.
Remember your vehicle’s length Be careful of oncoming traffic in the street you are turning into. Watch the cut-in of the back of your vehicle. Use your left mirror to check that you will clear poles and parked cars on your left.

56
Warning Note If your vehicle is less than 7.5 metres long or it does not display a sign saying “Do Not Overtake Turning Vehicle” you must always drive as near as possible within the marked lane on the road. This includes when you are turning.
If your vehicle is 7.5 metres or longer and easily visible signs saying “Do Not Overtake Turning Vehicle” are attached to the rear, you may use more than one lane if you need to and if it is safe.
Do not swing wider than you have to from the kerb. A driver behind you might think you are turning right and try to overtake you on your left side. Try to position your vehicle before you make the turn so traffic cannot overtake you on the left. (See diagram on previous page)
You must be within 50 metres of the corner when you move out of the lane you are driving in.
Before you start your turn:
» make sure you can get around any vehicle stopped or parked near the intersection
» if there is no room to get around any vehicle, do not start the turn. Wait until they move out of your way
» return to the left lane as soon as you safely can
» if the centre oncoming traffic lane of the street you are turning into is blocked by traffic, and you can not complete your turn, stop. Allow these drivers to move around you. Never reverse
» be careful moving into the left lane of the street you have turned into. There may be cars overtaking you on the left
» as you are turning, if you are towing a trailer, bring the prime mover into the left lane of the new street while the trailer blocks other cars from overtaking you on the left.

57
Two left turning lanes
Chapter 6 - D
riving on the Road: P
lanning and Observing
Two left turning lanes
When there are two left turning lanes, always start your turn so that where possible you are mostly in the turning lane that is furthest to the left.
If you only use the left turning lane that is closer to the centre of the road, a car may try to move into the lane on your left. The car driver will not expect your vehicle’s rear to move into their lane as the back of your vehicle cuts in. Remember, vehicles on your left side are always harder to see in your mirrors.
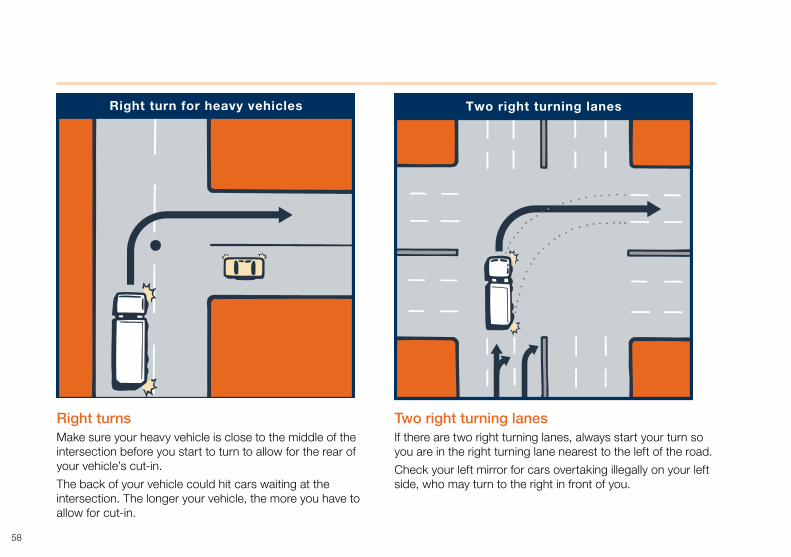
58
Right turns Make sure your heavy vehicle is close to the middle of the intersection before you start to turn to allow for the rear of your vehicle’s cut-in.
The back of your vehicle could hit cars waiting at the intersection. The longer your vehicle, the more you have to allow for cut-in.
Two right turning lanes If there are two right turning lanes, always start your turn so you are in the right turning lane nearest to the left of the road.
Check your left mirror for cars overtaking illegally on your left side, who may turn to the right in front of you.

59
Chapter 6 - D
riving on the Road: P
lanning and Observing
Use your right mirror to check traffic which might overtake on your right.
If you use the lane shown in the right hand diagram on page 58, you can drive further into the intersection without cutting off other road users.
Leaving space when crossing or merging You need to allow for the size and weight of your vehicle when you cross or enter traffic.
Remember:
» your acceleration is slower and you need a large amount of space. You must have a large gap in traffic to get across intersections or turn into a new street
» if your vehicle is loaded, it will be slower than when it is empty
» you need to judge a gap in the traffic that is big enough for you. You need to get all of your vehicle safely through the corner or intersection.
Test yourself questions (Answers to test yourself questions are upside down at the bottom of this page)
1. The best way to use your mirrors is to A. look in each mirror for one second
B. glance in your right mirror and then look over your shoulder
C. glance quickly in all mirrors and then back at the road ahead.
2. You should handle tailgaters by A. gradually slowing to encourage them to overtake
B. flashing on your brake lights to warn them they are too close
C. getting off the road onto the shoulder to let them overtake.
3. If you are doing a left turn and your path is blocked by a vehicle in the street you are entering you should A. continue and force the other car to reverse
B. reverse to let it through
C. slow down or stop so that the vehicle can move around you.
Answers 1C 2A 3C

60
Chapter 7 – Communicating with other drivers and how to judge safe speed
This chapter includes: » communicating your presence to
other drivers
» signalling your intentions
» managing speed
» traffic and speed
» test yourself questions
Communicating your presence to other drivers If you make sure that other drivers know you are there and what your intentions are, you can help to prevent crashes.
Sometimes, drivers do not see even a large vehicle like yours.
Overtaking. If you are overtaking another vehicle, a cyclist or a pedestrian, assume that they do not realise where you are. They might move out into your path. If necessary, a light tap on the horn will warn them of your presence without scaring them. People who are suddenly scared may swerve out into your path.
Another driver unexpectedly signals a turn. If necessary, sound your horn. Watch in case they start a turn without signalling.
It is hard to see. At sunset or sunrise, in rain or fog, a heavy vehicle can be just as hard to see as any other vehicle.
When you have trouble seeing oncoming vehicles, they also have trouble seeing you. Turn on your headlights or fog lights. Make sure your headlights are on low beam. Do not rely on clearance lights only.
Slow moving vehicles going in the same direction as you. Remember, they are also hard to see at sunset, sunrise and in rain or fog.
Keep a careful look-out for motorcyclists and cyclists at times when It is hard to see. Always slow down when you are driving near them.
Stop for a break if you are not sure you will be able to see other road users and wait for visibility to improve.
Parking at the side of the road. You may only park where your vehicle will not obstruct other traffic and where local regulations allow.

61
Chapter 7 - C
omm
unicating with O
ther Drivers
and how
to Judge Safe S
peed
There are different requirements for day and night:
Day. Use hazard warning lights if you are stopped and there may be a danger to traffic
Night. Use all required parking lights. Use hazard warning lights if there may be danger to traffic and you are stopped.
In a built-up area, a vehicle of 4.5 tonnes GVM or 7.5 metres in length or longer may park for only one hour even if the parking signs say you may park longer. If parking signs say less than one hour, obey these signs.
The only places you can park for more than one hour in a built-up area, in a place are with a special parking sign that says it is for long vehicles or is permitted by the local Council or the driver is engaged in dropping off, or picking up goods.
Any vehicle over 2.2 metres wide must have all required clearance and side marker lamps lit when parked at night unless you are clearly visible by street lighting for 200 metres in all directions.
If your vehicle is disabled, there are guidelines to follow:
» at all times. If possible you should park your vehicle on the side of the road or a part of the road not used by the main body of traffic.
» during the day. Use portable warning triangles and hazard warning lights if your vehicle could be a danger to other traffic (see page 18).
» at night. If your vehicle is wider than 2.2 metres and you stop on a road or the shoulder of a road at night, you must have all required clearance and side marker lights operating and clearly visible for at least 200 metres in all directions.
If your vehicle is less than 2.2 metres wide, you must use parking lights, unless there is street lighting and your vehicle is visible for 200 metres in all directions.
Three portable warning trianglesIf your vehicle has a Gross Vehicle Mass over 12 tonnes, you must set out three portable warning triangles if your vehicle has stopped.
For an explanation on how to position portable warning triangles, refer to page 18.
Warning Note Hazard warning lights are for use only where you are stopped in a hazardous position on a road, when you are moving slowly and likely to obstruct other road users, stopped in an emergency stopping lane, driving in hazardous weather (eg. fog or smoke), or the lights are operating as part of an anti-theft device or alcohol interlock. The only exception to this is school buses picking up or dropping off children.

62
Signalling your intentions You are legally required to show other road users what you are going to do. It also helps prevent crashes, if others understand what you are going to do.
Turns Signal early. You must give sufficient warning to other road users before starting a turn. Try not to confuse other drivers or pedestrians by giving a signal for too long.
You must keep signalling for the whole period you are stopped waiting to do a turn.
Remember your vehicle’s size makes it hard for you to see vehicles behind you that may overtake you.
Keep the signal going. Do not cancel the turn signal until you have completed your turn.
Cancel your signal. When you have completed the turn, cancel your signal straight away. Make a practice of cancelling it before changing gear. This way you will not forget.
Lane changes You must signal in the same way for lane changes as you do for turns. You must signal to give sufficient warning to other road users.
Allow sufficient time for drivers who have not noticed your signal to get clear before you move into the new lane.
Remember to cancel your signal as soon as you have completed the lane change.
When changing lanes you must give way to any driver in the lane you are entering.
Slowing down Drivers expect the vehicle ahead of them to keep moving. Your heavy vehicle will obscure the view of drivers behind you. They may not even see a red traffic light ahead. Give drivers behind you as much warning as possible of your intention to slow down or stop. Brake gently over a longer distance. Your brake lights will warn them of your intentions.
63
Chapter 7 - C
omm
unicating with O
ther Drivers
and how
to Judge Safe S
peed
Trouble ahead Slow down early and gradually to warn the drivers following. Be prepared to stop if needed.
Stopping on the road All buses and some trucks have to stop at railway level crossings (see Chapter 2). Other drivers will not expect this. It is good practice to keep your foot on the brake whilst stopped at a railway crossing. That way your brake lights will warn drivers behind you.
Do not direct traffic Heavy vehicle drivers are very responsible, but you should never signal other drivers when you think it is safe for them to pass. You could face legal action and high risk if there was a vehicle that you did not see and someone was killed or injured as a result.
Managing speed Managing speed is one of the important parts of safe driving. The faster you are going, the more distance you will cover between seeing a situation where you need to use the brake and actually getting your foot to it.
Also, the faster you are going, the more distance you will cover while braking before you actually stop.
The table over page gives some figures for a typical heavy vehicle on dry roads. Check the vehicle manufacturer’s handbook for your own vehicle’s braking performance.
The distance travelled while braking and the total stopping distance will vary according to conditions.
What this means for you is that the faster you are travelling, the more time and distance you have to allow, before you can stop.
The faster you are travelling, the harder it is to turn and the more distance it takes to turn. If you turn too fast you may end up in a skid. Heavy vehicles are easier to overturn than smaller cars with a lower centre of gravity.
Warning Note Air brake vehicles experience a delay of up to one second between pushing the brake pedal and the brakes beginning to work, so you need to start braking even earlier.
Adjusting speed There is no single safe speed. You must adjust your speed for the road surface. You cannot stop, steer or turn a vehicle without traction between your tyres and the road. Some road surfaces reduce your traction and so you need to reduce speed accordingly.
Be careful with slippery surfaces. It takes much longer to stop or turn on slippery roads. If the road is wet or unmade, reduce your speed by 15-30 km/h. On snow, reduce speed by half. On ice, reduce speed to a crawl.

64
Stopping distances for different speeds: Assuming – dry road, roadworthy tyres, fit and alert driver
Speed (kilometres per hour – km/h)
Distance travelled (metres per second – m/s)
Metres (m) travelled from when you see you have to stop
until vehicle begins to slow down
Metres (m) travelled while braking
Total stopping distance in metres (m)
10 km/h 2.77 m/s 7 m 6 m 13 m 20 km/h 5.55 m/s 14 m 9 m 23 m 30 km/h 8.33 m/s 21 m 17 m 38 m 40 km/h 11.11 m/s 28 m 27 m 55 m 50 km/h 13.88 m/s 35 m 38 m 73 m 60 km/h 16.66 m/s 42 m 55 m 97 m 70 km/h 19.44 m/s 49 m 74 m 123 m 80 km/h 22.22 m/s 56 m 102 m 158 m 90 km/h 25.00 m/s 63 m 122 m 185 m 100 km/h 27.77 m/s 70 m 145 m 215 m
If the car on the left is travelling at more than 60 km/h, anybody stepping out between the buses would certainly be injured

65
Chapter 7 - C
omm
unicating with O
ther Drivers
and how
to Judge Safe S
peed
There are things to check for if the road may be slippery:
» shady areas can indicate that the road may be slippery. Ice, snow and water will remain longer in a shady section of road
» road surfacing can melt in hot weather. Look for patches of road which are shiny or look wet
» on unmade roads look for loose dirt and sand which has been built up by other traffic. Try to steer in the tracks of vehicles in front of you where the surface should be firm
» after it starts to rain, water mixes with oil left on the road and makes the road very slippery. Be very careful after it starts to rain.
Be aware that your vehicle could “aquaplane” on wet roads. Where water collects on the road, it is possible for your vehicle to aquaplane, which is like waterskiing. The tyres lose contact with the road and skim over the surface of the water instead. You cannot brake or steer. All you can do is release the accelerator. Never brake, as braking will make you skid.
Aquaplaning does not need a lot of water on the road. It is more common at higher speeds, though it may happen as low as 60 km/h. Aquaplaning is more likely to happen if you have worn tyre treads and/or low tyre pressure.
Bends Adjusting your speed before taking a bend is important in a heavy vehicle because of its high centre of gravity. If you take a bend too fast, one of three things could happen.
» the wheels could lose traction. If this happens it does not matter which way you turn the wheel, you will go straight ahead in a skid
» the wheels could hold their traction, but the vehicle will not turn. The vehicle will roll over
» your load could move or even roll off the vehicle. braking in a bend can be dangerous because it is easy to lock the wheels and produce a skid.
Ease off the accelerator and change down your gears before entering the bend. If you are in a gear that will let you accelerate slightly as you come out of the bend, it will help to keep your vehicle stable.
Pick the smoothest line through a bend that needs the least steering adjustment. This will reduce the “pendulum effect” which can start your load swaying side to side.

66
How far can you see?
Adjust your speed according to how far you can see. Look at the top diagram (left) to see the difference between seeing distance and stopping distance.
There is a simple rule. You should drive at the speed that will let you stop within the distance that you can see ahead of you.
For instance, at night, on low beam, you can probably see about 80 metres. If you are driving at 70 km/h on low beam, you would not be able to stop in time to avoid hitting something on the road. However, at 50 km/h, you would be able to stop, because your braking distance is within the visible distance ahead.
Make sure your low beam lights are properly adjusted so that they do not dazzle oncoming drivers.
Fog lights should only be used in appropriate weather conditions, not as a driving aid at night.
Glaring sunlight, fog, rain and the lights of oncoming vehicles will further reduce how far you can see. You must slow down so you can stop within the distance that you can see.

67
Traffic and speed The safest speed to drive in heavy traffic is the same speed as other vehicles, so long as this is within the speed limit. Vehicles going in the same direction at the same speed do not often run into each other.
Rear-end crashes happen when vehicles are moving at different speeds.
The more you change lanes, the more chances there are of having a crash.
It is tiring to be always changing lanes, speeding up and braking.
Overtaking uses more fuel.
If you overtake you may have to brake heavily or swerve to avoid a crash.
Overtaking puts more stress on the driver and vehicle.
Test yourself questions (Answers to test yourself questions are upside down at the bottom of this page)
1 When stopped in a dangerous position on a road, you should A. sound your horn
B. switch on your hazard warning lights
C. stand well clear of the vehicle.
2 When the road is slippery, you should A. drive slowly and carefully
B. watch out for road speed sign warnings
C. change up your gears.
3 Portable warning (reflective) triangles must be used A. at night when it rains
B. if your vehicle cannot be seen from a distance of 200 metres in any direction on a road with a speed limit less than 80 km/hr, or for at least 300 metres on a road with a speed limit of 80 km/hr or more
C. if your vehicle is parked more than 100 metres from a corner.
Answers 1B 2A 3B
Chapter 7 - C
omm
unicating with O
ther Drivers
and how
to Judge Safe S
peed
68
Chapter 8 – Vehicle emergencies
This chapter includes: » emergencies
» emergency braking
» skids
» emergency steering techniques
» leaving the road
» using the horn
» dangerous vehicle emergencies
» brake failure
» tyre failure
» fires
» test yourself questions
Emergencies Emergencies are those situations in which only your quick response can prevent a crash.
Emergency braking If someone pulls out in front of you, it is a natural response to brake. This is a good response if there is enough distance to stop and you use your brakes the right way.
Braking the proper way You need to brake in a way that will keep your vehicle in a straight line and allow you to turn if you have to.
The best way of doing this is:
» apply your brakes just hard enough to almost lock the wheels
» if the vehicle starts to skid, release the brake so the vehicle straightens out
» as soon as the wheels start rolling, apply the brakes again a bit more gently.
It takes time for the wheels to start rolling again after you release the brakes. If you use the brakes again before the wheels are rolling, the vehicle will not straighten out.

69
Chapter 8 - Vehicle E
mergencies
Emergency braking does not mean stepping on the brake pedal as hard as you can. This will only lock the wheels causing a skid and possibly causing your load to shift. Proper braking will prevent this and allow you to stop in the shortest possible distance.
Skids Skids occur when tyres lose their grip on the road. Skids are caused by:
» over-braking – when you apply the brakes too hard and lock the wheels
» over-steering – when you turn the wheels more sharply than the vehicle can turn
» giving too much power to the drive wheels, causing them to lose grip and spin.
Most skids result from driving too fast for road conditions. If you adjust your speed to suit the road conditions you will not get into a skid.
Drive-wheel skids The most common sort of skid is where the drive wheels lose traction because of applying the brakes too hard or giving too much power to the drive wheels, causing them to spin and lose grip. These usually happen on slippery surfaces. They are stopped by easing off the accelerator.
Drive-wheel braking skids These happen when you put too much pressure on the brake pedal for the road conditions. The drive wheels lock and the vehicle skids.
In a rigid vehicle, the whole vehicle will slide sideways. A rigid vehicle with trailer attached will be even more difficult to control and correct.
In an articulated vehicle, or when towing a trailer, a rear wheel skid is worse because:
» the trailer pushes the back of the prime mover or rigid vehicle sideways
» the trailer can jack-knife – skidding around until it hits the cab of the prime mover.

70
Correcting a drive-wheel braking skid Stop braking. This lets the drive wheels start rolling again, restores traction and the wheels stop sliding sideways.
Steer in the direction you want to go.
Counter-steer. As the vehicle comes back on course, it has a tendency to keep on turning. Correct this by briefly steering in the opposite direction, to counter the skid.
Trailer skids You have probably seen skid marks on the highways caused by trucks. Imagine what could happen if a car was behind the truck when this happened.
These skids are often caused when heavy vehicles are travelling empty and drivers have forgotten to adjust their trailer brake proportioning valve after unloading their cargo and travelling lightweight.
Some modern vehicles do not have trailer brake proportioning valves, but if yours does, you must know how to use it properly.
Remember to adjust your trailer brake proportioning valve when you unload part of a load, change loads, or when you are running empty.
Check the vehicle manufacturer’s handbook for details on adjusting the proportioning valve.
Front wheel skids In a front wheel skid, the front end tends to go straight ahead, no matter how you turn the steering wheel. If the surface is slippery you can fail to make it around a turn or a bend.
When you have a front wheel skid, release the brakes and make sure the wheels are turning before using the brakes again.
Excessive speed is the main cause, but another contributing factor may be poor loading of the vehicle.
Evasive steering Stopping may be the safest thing to do in an emergency. When you do not have enough room to stop, or you aren’t sure whether you can stop, you will have to steer and turn away from whatever is in your path.
Remember, you can often turn more quickly than you can stop. But also remember that a heavy vehicle will tend to continue in a straight line, because of its mass and momentum.
A firm grip is essential in an emergency. Keep both hands on the steering wheel whenever possible. See the next section for tips on emergency steering techniques.

71
Chapter 8 - Vehicle E
mergencies
Emergency steering techniques A quick turn can be made safely, if It is done the right way. Here are some points:
» use a steering method that allows quick and accurate control of the steering wheel. Your instructor will assist you with this
» do not brake while you are turning. It is very easy to lock your wheels in a turn. If that happens, you’ll be skidding out of control before you realise it
» do not turn any more than needed to clear whatever is in your way. The more sharply you turn, the greater the chance of a skid or rollover
» be prepared to counter-steer. That is, to turn the wheel back in the other direction, once you’ve passed whatever was in your path. Unless you are prepared to counter-steer, you will not be able to do it quickly enough. You should think of emergency steering and counter-steering as two parts of the one driving action. Always keep these steering movements to the minimum required to avoid the obstacle.
Where to steer If an oncoming driver has drifted into your lane, move to the left. Realising what has happened, the other driver’s natural response will be to return to their own lane.
If a vehicle has stopped in your path, the best escape route will depend upon the situation.
Because you have been using your mirrors, you’ll know which lane is empty and can be used safely.
If the shoulder on the left side is clear, that may be your best bet. No one should be driving on the shoulder but someone may be overtaking you on the right. Again, you will know this if you have been using your mirrors.
If you do not have a clear lane, or aren’t sure, a move to the left is best. At least you will not force anyone into an opposing lane and a possible head-on collision. A lane change is almost always better than crashing into, and possibly over-riding, the vehicle in front of you.
Leaving the road In some emergencies, you might have to leave the road. Almost all drivers are fearful of driving on an unpaved shoulder. But It is better than colliding with another vehicle.
Most shoulders are strong enough to support the weight of a large vehicle. They can be an escape route. Here are some guidelines if you have to leave the road.

72
Avoid braking. If possible, avoid using the brakes until your speed has dropped. Then brake very gently to avoid skidding if there is loose surface.
Stay on the shoulder. If the shoulder is clear, stay on it until your vehicle has come to a stop. Check your mirrors. Signal before pulling back onto the road.
Returning to the road. If you are forced to return to the road before you can stop, use the following procedure:
» keep a minimum of power on to aid your steering
» try to ease gradually back onto the road
» be careful in case your tyres grab unexpectedly and your vehicle is pushed across the road
» be ready to counter-steer.
Using the horn A loud blast on the horn may stop whatever is causing the emergency. For example, use it when:
» an oncoming driver is drifting into your lane
» a driver in a side street starts to move into your path
» a pedestrian is about to step onto the road in your path
» a driver beside you is moving towards your vehicle
» an animal wanders into your path.
Dangerous vehicle emergencies There are three vehicle emergencies that can be very dangerous:
» brake failure
» tyre failure
» fires.
Brake failure Brakes kept in good condition rarely fail. Most brake failures occur for the following reasons:
» loss of air pressure
» loss of hydraulic pressure
» brake fade on long hills
» poorly maintained brakes.
Loss of air pressure
At all times when driving you should make sure that sufficient air pressure remains for one long brake application.
A loss of air pressure can be caused by a leak in the air lines or over-use of the brakes. A warning buzzer/light or drop-arm will indicate that the pressure has fallen to a dangerously low level. When this happens, stop as quickly as you can. Do not wait until the pressure is gone completely.
The first thing to do is change down gears.

73
This will help in two ways. It will cause engine compression to slow the vehicle. It will also increase engine speed and cause the air compressor to work harder. This will then supply more air to the brake system.
Keep changing down, for as long as it is safe to do so.
Once your vehicle is moving slowly, apply the brakes. You may have enough pressure to bring the vehicle to a stop. If the air supply is gone, the emergency brakes will come on and bring the vehicle to a stop. Be prepared for the wheels to lock up and skid.
Loss of hydraulic pressure
Not all vehicles with hydraulic brakes have emergency braking systems. If your vehicle is one of these, when hydraulic brakes fail, you will have to bring your vehicle to a stop by other means.
Here are some actions you can take:
» change down gears. If you are able to change down gears, this will help to slow the vehicle
» pump the brakes. Sometimes pumping the brake pedal will produce enough hydraulic pressure to stop the vehicle
Chapter 8 - Vehicle E
mergencies
» use the parking brake. The parking brake is separate from the hydraulic brake system, so it can be used to slow the vehicle. Be sure to press the ratchet release button (if fitted) and keep it pressed at the same time you use the brake. You can then adjust the brake pressure and stop the wheels from locking
» find an escape route. While slowing down, try to find an escape route. It could be a driveway, an open paddock, or a side street. In larger hydraulic brake vehicles, the emergency braking system will start working when brake fluid problems develop. Be prepared for a skid when this happens.
Brake fade on long hills
Being in the proper gear (page 38) and braking properly (page 40) will prevent most brake failures on long hills. But if the brakes have failed, you will have to look outside your vehicle for something to stop it.
If there’s a safety ramp, road signs will tell you about it. Use it.
If there is no safety ramp, take the best escape route you can, such as an open paddock, or a side road that flattens out or turns uphill. Make the move as soon as you can not control the vehicle. The longer you wait, the faster you’ll go, so it will be harder to stop.
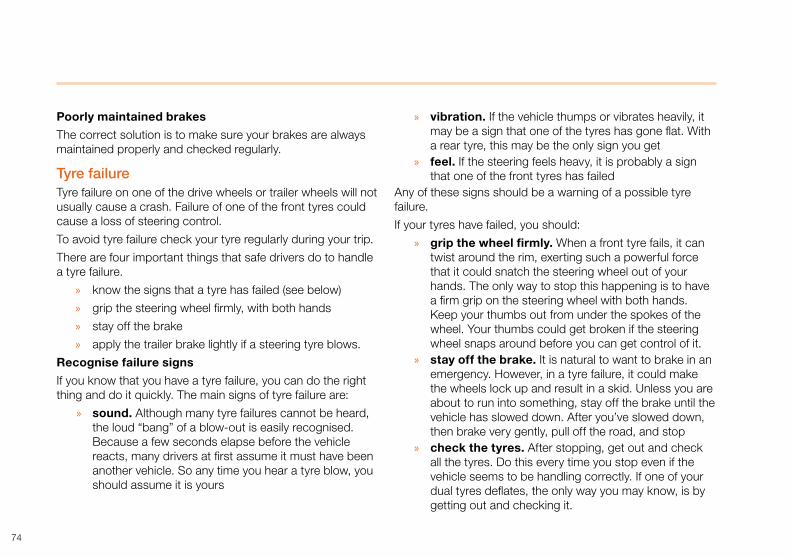
74
Poorly maintained brakes
The correct solution is to make sure your brakes are always maintained properly and checked regularly.
Tyre failure Tyre failure on one of the drive wheels or trailer wheels will not usually cause a crash. Failure of one of the front tyres could cause a loss of steering control.
To avoid tyre failure check your tyre regularly during your trip.
There are four important things that safe drivers do to handle a tyre failure.
» know the signs that a tyre has failed (see below)
» grip the steering wheel firmly, with both hands
» stay off the brake
» apply the trailer brake lightly if a steering tyre blows.
Recognise failure signs
If you know that you have a tyre failure, you can do the right thing and do it quickly. The main signs of tyre failure are:
» sound. Although many tyre failures cannot be heard, the loud “bang” of a blow-out is easily recognised. Because a few seconds elapse before the vehicle reacts, many drivers at first assume it must have been another vehicle. So any time you hear a tyre blow, you should assume it is yours
» vibration. If the vehicle thumps or vibrates heavily, it may be a sign that one of the tyres has gone flat. With a rear tyre, this may be the only sign you get
» feel. If the steering feels heavy, it is probably a sign that one of the front tyres has failed
Any of these signs should be a warning of a possible tyre failure.
If your tyres have failed, you should:
» grip the wheel firmly. When a front tyre fails, it can twist around the rim, exerting such a powerful force that it could snatch the steering wheel out of your hands. The only way to stop this happening is to have a firm grip on the steering wheel with both hands. Keep your thumbs out from under the spokes of the wheel. Your thumbs could get broken if the steering wheel snaps around before you can get control of it.
» stay off the brake. It is natural to want to brake in an emergency. However, in a tyre failure, it could make the wheels lock up and result in a skid. Unless you are about to run into something, stay off the brake until the vehicle has slowed down. After you’ve slowed down, then brake very gently, pull off the road, and stop
» check the tyres. After stopping, get out and check all the tyres. Do this every time you stop even if the vehicle seems to be handling correctly. If one of your dual tyres deflates, the only way you may know, is by getting out and checking it.

75
Fires Vehicle fires are a frequent cause of damage and injury.
Learn the cause of fires and how to prevent them.
Know how to extinguish fires.
Causes of fire
The major causes of large vehicle fires are listed below. All of these fire causes can be avoided!
» crashes. Spilled fuel after a crash » tyres. Under-inflated tyres and dual tyres that touch
each other » brakes. “Riding” the brakes or excessive use of
brakes on hills causes linings to over-heat and ignite the wheel lubricant
» wheel bearings. Running hot (not enough lubricant) » electrical system. Damaged insulation, loose wires » exhaust system. Lack of proper insulation, parking
in dry grass, sparks or hot exhaust gas coming into contact with loads that are easy to burn such as hay or loose fibres
» fuel. Driver smoking, improper fuelling, loose fuel connections
» load. Flammable loads, improperly sealed or loaded, poor ventilation.
Chapter 8 - Vehicle E
mergencies
Fire prevention
Preventing fires needs no more than normal caution on the part of the driver. If you make the following checks, you will reduce the chance of a fire.
» pre-trip inspection. Make a complete inspection of the electrical, fuel and exhaust systems, tyres and load
» during the trip inspections. During the trip, make sure you often check the tyres, wheels, and vehicle body for signs of heat
» follow safety procedures. Follow the vehicle manufacturer’s handbook safety procedures for fuelling the vehicle, using brakes and other actions that could prevent a fire.
» Monitoring. Check the instruments and gauges often. Use the mirrors to look for signs of smoke from tyres or the vehicle.
Caution. Use normal caution in handling anything flammable.
Fire fighting
There are special instructions for vehicles carrying hazardous goods in bulk. Know these instructions and follow them.
Preventing a fire is the best way to avoid injury or damage. Knowing how to fight fires is the second best. Fires can be made worse by drivers who do not know what to do when they have a fire. Here are some steps to follow in the event of a fire.
Do not panic.

76
Pull off the road. The first step is to get the vehicle off the road and stop. In doing so:
» park in an open area away from buildings, trees, bushes, other vehicles or anything that might catch fire.
» do not pull into a service station.
Stop immediately. In the event of a tyre fire, stop immediately.
Notify emergency services. Use the nearest public telephone or, if available, your mobile telephone or CB radio to notify the Police and Fire Brigade (phone 000) of your problem and your location. They can often get fire-fighting equipment to you.
When describing your location, give as much information as possible:
» name of street » suburb » in country areas:
› distance from the nearest town › a landmark that will help identify where you
are.
Stop the engine. Isolate battery or batteries if possible.
Stop the fire from spreading if it is safe to do so. Otherwise, ensure that any members of the public have been moved to a safe distance.
Before trying to put out the fire, make sure that it does not spread any further.
With an engine fire, keep the bonnet or engine cover closed. This stops air reaching the fire to fuel it. If you can, shoot a dry powder extinguisher or foam through louvres, radiator grill or from underneath the vehicle.
For a load fire in a van or box trailer, keep doors closed until you have sufficient extinguishers and help available, or leave closed and notify the Fire Brigade.
When a tyre is smouldering and cannot be extinguished try to remove it. Get it away from the vehicle, only if safe to do so.
To extinguish a tyre fire, water is the best extinguishing agent. A large dry chemical extinguisher may present the next best extinguishing medium. In all cases the Fire Brigade must be notified as soon as possible.
If a trailer fire is out of control and it is safe to do so, quickly unhook the prime mover and get it away from the fire.
Use the correct extinguisher
Check the Fire Protection Association Australia website: fpaa.com.au for the right type of extinguisher.
Using the wrong type of extinguisher could spread the fire and make it worse.

77
Chapter 8 - Vehicle E
mergencies
Know the type of extinguisher that is in your vehicle. Make sure you’ve read the extinguisher’s instructions before driving. It is hard to read the fine print during an emergency.
On an electrical fire, do not use water (water conducts electricity).
On a fuel fire, do not use water (it will just spread the flames).
For best results, get trained in extinguisher use.
Putting out the fire
Here are some rules to follow when you have to put out a fire.
» know how the fire extinguisher works. Every time you see a different type of extinguisher, find out how it works and, if possible, get practical experience in using it
» stay away from the fire. Use the full squirting distance of the extinguisher
» aim at the source or base of the fire, not up in the flames
» position yourself upwind. Let the wind carry the extinguisher contents to the fire rather than carry the flames back to you
» continue using the extinguisher until whatever was burning is cool. No smoke or flame does not mean the fire is out or will not start again.

78
Notes

79
Test yourself questions (Answers to test yourself questions are upside down at the bottom of this page)
1 The chances of a skid are increased by A. over-braking
B. over-steering
C. both of the above.
2 Brakes kept in good condition A. rarely fail
B. never fail
C. still can not be trusted.
Chapter 8 - Vehicle E
mergencies
Answers 1C 2A

80
Chapter 9 – Crashes
This chapter includes: » what you must do at a crash
» test yourself questions
What you must do at a crash When you are involved in a crash or come upon a crash you need to take prompt and proper action to prevent further injury or damage.
The basic steps to be taken at any crash scene are:
» stop
» protect the area
» care for injured
» notify authorities - where are you? How many injured?
» provide your name, address and registration details and the vehicle owner’s name to the other parties involved in the crash, or their representative, and to the police (if in attendance).
It is a serious offence if you fail to:
» stop and help at a crash » exchange all required details after being involved in a crash.
Protect the area The first thing to do at a crash scene is to prevent another crash from happening at the same spot.
The crash area needs to be protected.
If your vehicle is involved in a crash, try to get it to the side of the road to prevent another crash and to allow traffic to move. Use hazard warning lights or your portable warning triangles.
If you are stopping to help, park away from the crash. Emergency vehicles will need to get close. Put on your hazard warning lights. A large vehicle is easier to see than a car and its hazard warning lights will be more noticeable.

81
Set out portable warning triangles or emergency lamps to warn other traffic. Make sure they can be seen.
Notify authorities If you have a CB radio, put out a call over the emergency channel before you get out of the vehicle. Do not forget to say exactly where you are. Otherwise, wait until after the crash scene has been properly protected and then send someone to phone the police. Tell the police if anyone has been hurt and, if so, how many people are injured. Try to determine exactly where you are so you can give the exact location. A long and sometimes fatal delay can occur if rescue people are sent to the wrong place.
Chapter 9 - C
rashes
Test yourself questions (Answers to test yourself questions are upside down at the bottom of this page)
1 If your vehicle is involved in a crash you must stop and then first of all A. care for the injured
B. protect the area so another crash will not happen
C. exchange names, addresses and registration numbers.
2 If you stop your vehicle at a crash, you should A. park very close to the crash
B. put on your hazard warning lights
C. first notify the authorities.
Answers 1B 2B

82
Chapter 10 – Dimensions and load limits
This chapter includes: » dimensions
» mass (weight)
» loading
» load security
» test yourself questions
It is important that you know the dimensions and load limits of your vehicle.
DimensionsVehicle dimensions
Maximum overall dimensions
VEHICLE
HEIGHT (m) WIDTH (m) LENGTH (m)
Rigid truck or bus 4.3 2.5 12.5
Controlled access bus (a bus which, due to its additional length, operates under permit on set routes)
4.3 2.5 14.5
Articulated bus 4.3 2.5 18.0A prime mover and semi-trailer combination,a rigid truck and trailer combination and a bus and trailer combination 4.3 2.5 19.0
B-doubles (on approved routes) 4.3 2.5 25.0
B-doubles appropriately configured 4.3 2.5 26.0
The operator, driver and registered operator, together with the loader, packer, consignee and consignor of the goods on the vehicle may all be liable if dimension limits are exceeded.
Length The maximum overall length of a vehicle including any load, is equal to the maximum length permitted for your class of vehicle.
For the following special cases, the procedures given below must be carried out.
» Poles and logs. Must be carried lengthways, they must be supported

83
with steel chocks and chained to the vehicle with at least two sets of chains
» maximum forward projection of loads. The load on a motor vehicle must not project more than 1.2 metres in front of the vehicle.
A rearward projecting load greater than 1.2 metres, or a load that cannot be easily distinguished when seen from behind, or is on a pole-type trailer, must display a warning device.
1. The warning device must be:
a) in daytime, a brightly coloured flag or piece of material, with each side at least 300 millimetres long; or
b) at night, a red light that can be seen for at least 200 metres.
The overall length including any projection must not exceed the statutory length limit for that class of vehicle (see table on p.82.)
Height Your vehicle with its load must be no more than 4.3 metres in height. You must know the overall height of your vehicle and its load. To get the full height, you measure the height from the ground to the highest part of the load.
Width Your vehicle with its load must be no more than 2.5 metres wide. This does not include mirrors, lights, or reflectors that comply with the standard for registration, tyre inflation systems and tyre pressure gauges.
Chapter 10 - D
imensions and Load Lim
its
If your vehicle with its load is wider than 2.5 metres you must have a permit or be covered by a gazetted general permit. (Enquire at VicRoads.)
Provided the total width of truck and load does not exceed 2.5 metres, your load may project up to 150mm on either side beyond the truck.
Note
A load cannot extend beyond 150 mm on either side of the vehicle unless the load is one large item that cannot be divided.
Rear overhang
Rear overhang is generally measured from the centreline of the rear axle group or single rear axle as relevant, to the end of the load/vehicle. It must be the lesser of 60% of the wheelbase or 3.7 metres. Detailed information on rear overhang limits can be obtained from the VicRoads website.
Loading All loads must be positioned and secured in compliance with the National Transport Commission’s guidelines, available at ntc.gov.au
The first step in making sure you can safely carry any load is to select the appropriate vehicle and correctly position the load.
Loads must not be placed in a way that makes the vehicle unstable or unsafe.

84
Loads must be secured on a vehicle using an appropriate load restraint method:
» to prevent any part of the load hanging or projecting from the vehicle in such a way that it could injure a person, damage property or cause a hazard to other road users
» to prevent any part of the load being dislodged or falling from the vehicle.
Mass (Weight) The mass, or weight of a vehicle that can be driven without a permit depends on the sort of vehicle, together with the type and number of tyres.
Below is a summary of the axle limits required for Victorian vehicles. Read the list carefully to determine the appropriate limits for your vehicle.
Remember, it is your responsibility to ensure that:
the total mass of the loaded vehicle must not exceed whichever is the lesser of:
» the vehicle manufacturer’s rating, also known as the GVM and GCM
» the respective ratings for tyres, wheels and axles, and
» the mass limits for axles and axle groups in the Regulations
If you are in doubt about the legal mass limits for your vehicle, contact VicRoads on 13 11 71.
Axle limits
General Axle Mass limits are as follows:
Single axle
» 6.0 tonnes, for an axle fitted with two tyres.
» 9.0 tonnes, if fitted with not less than 4 tyres.
» 10.0 tonnes, with four tyres and with road friendly suspension.
Tandem axle (not a twin steer axle group)
» 15 tonnes on a pig trailer.
» 17 tonnes with road friendly suspension.
Tri-axle
» 20 tonnes, except 18 tonnes on a pig trailer.
Twin-steer axles
» 11 tonnes, with load sharing suspension.
» 10 tonnes, with non load sharing suspensions.
Higher mass limits only apply to vehicles fitted with Road Friendly Suspension Systems. For further information and applicable fees contact VicRoads on 13 11 71.
If your vehicle is over 4.5 tonnes Gross Vehicle Mass (GVM) and it is not a prime mover, generally you must not tow a trailer whose mass is more than the mass of the towing vehicle. You can only do this with approval from VicRoads.
The operator, driver and registered operator, together with the loader, packer, consignee and consignor of the goods on the vehicle may all be liable if mass limits are exceeded.

85
Oversize permits When you wish to transport any load that can not be divided into smaller loads that is in excess of any legal mass, height, width or length dimension, you should contact VicRoads to check if a permit is required before you can drive the vehicle.
Remember both the owner and driver of a vehicle are guilty of offences if a vehicle is found not to comply with the conditions of a VicRoads permit.
Load security All loads must be positioned and secured in compliance with the National Transport Commission’s guidelines, available at ntc.gov.au
The basics
It is your responsibility to make sure the vehicle is appropriate for your load.
Any load must be stopped from moving or falling from a vehicle by indirect or direct methods, or a combination of both.
Guidelines and performance standards for the safe carriage of loads on road vehicles can be found in the Load Restraint Guide published by the National Transport Commission.
The Load Restraint Guide can be downloaded from the National Transport Commission website ntc.gov.au
Chapter 10 - D
imensions and Load Lim
its
Indirect restraint is clamping the load against the vehicle body structure to increase frictional restraint, for instance tie-down lashing.
Direct restraint means:
» containing the load within the vehicle’s body structure
» baulking the load in one or more directions against the vehicle body structure or attachment, and
» attaching the load to the vehicle body structure using lashing or mechanical locking devices.
Lashings and baulking are required because the friction between the load and the vehicle platform will not be sufficient to prevent the load from moving:
» up and down, on bumpy roads
» forwards, when braking
» backwards, when in reverse gear and braking
» sideways, when going around curves or corners.
Consider the following when securing your load.
Friction
A slippery vehicle platform surface is never safe. Make sure the bottom surface of the load and the platform surface are clean, dry and free of grease. Clean all these surfaces, this way you can get more friction. Avoid metal to metal contact by putting timber or rubber between the metal surfaces.

86
Dunnage (Packing)
Sometimes you need to use dunnage for support or because of the shape of the load. Dunnage must be carefully selected and secured to prevent it from moving and to provide access for slings or forklift forks.
Timber packing should all be of the same thickness and each piece should be as wide as possible. The width should be at least twice the thickness.
A single layer of dunnage (packing) between the base of the load and the deck is better than two layers.
A single layer of dunnage (packing) is also better between the layers of the load.
Baulking
The front of the load should be hard against the headboard, front rack or bulkhead of the vehicle. If you can not do this, then use an obstacle which can be fitted across the vehicle platform and firmly attached to the chassis frame. The front of the load should be hard against this obstacle.
Baulks, wedges and chocks can be used to prevent single items from moving in any direction. These must be strong enough for the load and properly secured to the platform.
Load anchoring points
Anchoring points which are secured to wooden parts of the vehicle are not likely to be strong enough to legally secure the load. Where anchoring points are not strong enough or can not be used, baulking and extra lashing will be required.
Lashings
Lashings, fastening devices, dogs and chains, cables, clamps, load binders and other equipment must be in good order and able to transmit all the forces of the load to the vehicle chassis.
» lashings and fastenings must be properly tensioned at all times and checked often during the journey
» they must keep the load hard against the headboard, bulkhead or obstacle. Be careful of over-tensioning
» it can strain tensioners, lashings and perhaps damage the load
» the whole restraining system must be arranged so that failure or slackening of one part does not affect other parts of the system
» lashings that provide restraint forwards and backwards must be as close to horizontal as you can get them. They must never be at an angle of more than 60 degrees to the horizontal
» lashings must not contact any sharp edges of the load or the vehicle. They can be protected by the use of corner protectors, sleeves or other packing material.
Tarpaulins
Except for very light bulk loads, sheets or tarpaulins provide weather protection only. Loads must be properly restrained against movement as well as protected by the tarpaulin.

87
Make the load restraint system tamper-proof
It must be arranged so it won’t be released by vibration or load movement.
Load distribution and arrangement The first priority when loading a vehicle is to keep within load limits for the vehicle and its wheel, axle and axle group load limits (see p.84).
The load must comply with dimension limits as well.
The load should be placed against the headboard. Sometimes you cannot do this, because of the load shape, or because it will affect vehicle handling. Then you must baulk the front of the load as described on page 86.
Try to spread the load to give an even weight distribution over the entire floor area and to put an even load over the axle groups and each side of the axles.
Keep the centre of gravity as low as you can. This means that heavier and bigger items should be at the bottom.
To maintain stability in the sideways direction the centre of gravity of the load should be on, or as near as you can get it, to the centre line of the vehicle.
Heavy items should be carried on the centre line, not at the sides. Heavy, solid items should be placed in front of light crushable items. Part loads of heavy items should be placed over, or nearly over, the axles. Baulking may be needed to achieve this.
Chapter 10 - D
imensions and Load Lim
its
The load should be rearranged whenever practical, or after each partial unloading, to maintain weight, height and balance distribution.
A load should not be leaned against a rack unless the rack has been designed for that purpose.
Small heavy items should be distributed on side members, or a platform.
High loads have poor stability so there is a greater chance of overturning when cornering. High loads should be carried on low platform vehicles with multiple axle groups.
All loads must be positioned and secured in compliance with the National Transport Commission’s guidelines, available at ntc.gov.au
The registered operator of the vehicle, the driver and any person who caused or permitted the vehicle to be used on the highway are each guilty of an offence if a load is not properly secured.

88
Test yourself questions (Answers to test yourself questions are upside down at the
bottom of this page)
1. The maximum overall length of your vehicle is A. equal to the maximum length permitted by your class
of vehicle
B. 1.2 metres in front, or 3.5 metres behind the vehicle
C. 2.5 metres in front, or 2.5 metres behind the vehicle.
2. The person responsible for making sure the load is appropriate for your vehicle is A. the owner
B. the manufacturer of the goods
C. the driver.
Answers 1A 2C

89
Chapter 10 - D
imensions and Load Lim
its
Notes

90
Chapter 11 – Heavy vehicle signs
This chapter includes: » what these signs mean
» test yourself questions
What these signs mean
Do not overtake turning vehicle This sign may be attached to the rear of heavy vehicles over 7.5 metres long. Traffic following behind you must be able to see it clearly. The sign allows the driver to occupy space outside an assigned lane when turning so long as:
» the vehicle is within 50 metres from the corner
» the move can be made safely
» wherever possible, you should set up the back of your vehicle so that traffic behind you cannot overtake your vehicle on the side you are turning to.
Bus give way This sign may be attached to the right side of the rear of a public commercial passenger vehicle.
In a built up area, a bus may drive from a parked position on the side of a road to enter the nearest traffic lane. The bus is not required to give way to other vehicles in the nearest lane provided that:
» the bus driver signals properly
» the bus driver takes care to allow other vehicles to give way
» it is safe for the bus to enter.

91
Chapter 11 - H
eavy Vehicle Signs
Bus lane
A bus lane may be used only by buses or may be shared with other vehicles. As shown in the example above, the bus lane is shared with bicycles. A bus lane may be permanent or operate during certain hours.
Only those vehicles shown on the sign may use the bus lane during the hours on the sign.
Other vehicles may enter the bus lane to turn only when they are within 100 metres from the corner.
Vehicles using the lane should take special care when approaching an intersecting road.
Truck lane restrictionsThis sign has been introduced on some three-lane and four-lane freeways in Victoria.
This sign prohibits all heavy vehicles over 4.5 tonnes, except buses and caravans, from travelling in the right lane wherever it is displayed.
The restriction applies 24 hours a day.
Load limit
Load limit signs may apply to bridges or sections of road.
You must not pass this sign if the gross vehicle mass (GVM), or axle group mass, of your vehicle is more than that allowed by the sign.
Fines are heavy and you might have to pay for damage caused to roads that cannot take the weight of your vehicle.

92
Trucks must enter
If the driver of a truck drives past a trucks must enter sign, the driver must enter the area indicated by information on or with the sign.
No buses
Buses must not pass this sign unless the mass of the bus is less than the mass limit on the sign or shorter than the length limit on the sign. If there is no mass or length limit displayed on the sign, a bus must not pass this sign.
No trucks
No goods-carrying vehicle over 4.5 tonnes GVM can pass this sign without a permit from VicRoads or from the local council, unless the following exemptions apply:
» the driver travels beyond the sign in any other lane, or
» the driver of the truck is loading or unloading at a location beyond the No Truck sign and no suitable alternative route to the location exists
» the driver is escorted by a police officer or an authorised officer of the corporation.
Apart from paying a fine, there may also be road repair costs that the driver and owner must pay.

93
Chapter 11 - H
eavy Vehicle Signs
Over-dimension
OD stands for “Over-Dimension”. You must use OD routes when you are driving on a permit.
Each sign also has a number. If you are driving on a permit, you must use the OD route number specified on the permit.
Low bridge ahead
This sign will tell you the clearance under the bridge and may indicate a detour to avoid the obstruction.
Check that your vehicle will fit under the bridge. You must know your maximum vehicle height.
Low clearance
A low clearance sign will tell you the clearance under the obstruction.
If your vehicle is the height shown on the sign or higher, you must not drive under it.
Clearance
Clearance signs will tell you the clearance under an obstruction.
These signs are only used where the clearance is at least 4 metres. If your vehicle is the height on the sign or higher, you must not drive under it.

94
Automatic clearance gauges
Some gauges automatically measure your height. If your vehicle is too high, red flashing lights will light up on a clearance or low clearance sign like the one on the previous page.
Other gauges only work if your vehicle is in the proper lane.
Look for signs telling you which lane this is, for instance in the next illustration.
Provided you are in the proper lane, a white light will show you which way you can go to avoid the obstruction.
Oversize
This sign is being phased in and must be constructed as shown in the illustration.
They must be mounted on heavy vehicles which are over 2.5 metres wide and/or over 22 metres long.
This sign can be split into two parts, the part mounted on the left must show the letters “OVER” and the part mounted on the right must show the letters “SIZE”.

95
Chapter 11 - H
eavy Vehicle Signs
Notes Heavy vehicles which are over 25 metres long or 3.5 metres wide are supported by pilot vehicles and VicRoads Transport Safety Services vehicles. Pilot vehicles provide advance warning to other road users of the presence of OVERSIZE vehicles and VicRoads vehicles manage traffic at intersections and other locations to assist with safe traffic flow.
Pilot Vehicle
VicRoads Transport Safety Services Vehicle
Test yourself questions (Answers to test yourself questions are upside down at the bottom of this page)
1. A Bus Give Way sign attached to the right hand side, rear of a public commercial passenger vehicle, means that the bus driver A. must give way to all traffic approaching from behind
B. does not have to give way to all traffic if the bus driver signals properly
C. is not required to give way to vehicles in the nearest lane if the bus driver signals properly.
2 Load limit signs appear on some roads. They tell you that A. you must not drive past this sign if your vehicle’s gross
mass is less than the weight shown on the sign
B. you must not drive past this sign if your vehicle’s gross mass is more than the weight shown on the sign
C. you can ignore this sign if you are not fully loaded.
Answers 1C 2B

96
Chapter 12 – Coupling and uncoupling trailers
This chapter includes: » coupling or “hooking up” trailers
» uncoupling or “unhooking” trailers
» test yourself questions
It is very important that you follow proper procedures when coupling and uncoupling trailers. Doing it the wrong way will damage equipment. There is risk of injury to the person doing the coupling or uncoupling, as well as the danger of a crash on the road.
The best way to reduce these risks is by following a set of procedures that you always go through in the same way, step by step.
Your instructor will train you in how to couple and uncouple trailers.
Coupling or “hooking up” trailers Check that the brake lines are long enough for the trailer when it has to make a tight turn and that your trailer and prime mover coupling mechanisms are compatible, that is, that they will fit and work together.
1. Inspect the area and secure the semi-trailer. Make sure the area is clear of obstacles and people. Chock the front and back of the semi-trailer wheels on both sides. To “chock” the wheels, you block the wheels with a wedge to stop them from moving. If the semi-trailer has spring loaded brakes, you should not have to chock the wheels.
2. Inspect or check coupling devices for damage and to see that they will fit together correctly. The turntable should be tilted back with the jaws open. (The turntable is mounted on the back of the prime mover and connects the prime mover and trailer.
Drive the prime mover so that it is positioned squarely in front of the semi-trailer. Use the right mirror to line up the outside edge of the right rear prime mover wheel with the right edge of the semi-trailer. Get out and check that the prime mover and semi-trailer are lined up accurately. If the prime mover is not straight you could knock the semi-trailer down and damage the load, the semi-trailer or the prime mover.

97
3. Check trailer height. The prime mover should lift the trailer slightly as it hooks up. The trailer’s skid plate should be just lower than the prime mover’s turntable. If the semi-trailer is too high, the king-pin may miss the turntable and you’ll have to start again. If the semi-trailer is too low you may hit it and knock it over. Check that king-pin and turntable are aligned.
Under no circumstances should you go under the nose of the semi-trailer, until it is supported by the prime mover. If the landing gear collapses you could be seriously injured or killed.
4. Back the prime mover slowly in a straight line. Avoid jarring the semi-trailer. Stop when the turntable top plate just touches the trailer apron plate.
5. Secure the prime mover, apply parking brake and leave the cab to have a look at what you’ve done so far.
6. Safety first, watch out for greasy and wet areas on the truck that could cause you to slip and fall while you are climbing on the back of the prime mover to connect the lines.
For trailers other than Spring Brake trailers, connect air lines to the trailer so that you can use the trailer brakes while you finish coupling. Make sure air lines are correctly and properly connected and that the lines are safely supported so they will not be crushed when you back up. Do not connect the electrical cables as they could be torn out if the vehicle rolls forward.
Chapter 12 - C
oupling and Uncoupling Trailers
Return to the cab and supply air to the trailer by moving the protection air valve in the cabin from emergency to normal. Release and apply trailer brakes to check that they are working. Re-apply trailer brakes to prepare for coupling.
7. Back the prime mover slowly under the trailer skid plate, using the lowest reverse gear. Avoid hitting the king pin too hard or you will damage it and push the trailer back. This could damage the load. If this were to happen, you would probably have to start the coupling procedure again. Disengage the clutch pedal when you feel and hear the turntable engage the king pin.
8. Check connection. Pull forward gently against the locked trailer brakes or chocked wheels. Disengage the clutch as soon as you feel resistance. Repeat this step, to be sure.
9. Secure the vehicle. Apply the parking brake and go to the trailer.
10. Visually inspect the coupling by looking under the semi-trailer. Use a torch if you can not see well. Check that the turntable jaws have engaged on the shaft, not the head of the king pin. If the jaws are around the head, the king pin could bounce out of the jaws. If this were to happen, the semi-trailer, load and other traffic could be severely damaged. If the turntable is not fixed, there must be a locking block on the skid plate of the trailer. The truck must not be used if this block is missing.

98
Make sure there is no space between the upper and lower parts of the turntable. Check that the locking lever has moved to the “locked” position.
Check that the safety catch is in place over the locking lever to prevent accidental opening. On some rigs, the safety catch has to be placed into position manually.
11. Connect the electrical cable. Engage the locking device to prevent loss of power to the trailer on the road. Double check air lines and electrical cable for faults. Secure all lines and cables away from moving parts of the vehicle. Check all lights and other electrical equipment on the trailer.
12. Raise the trailer supports (landing gear). If the trailer has two speed gears to raise the supports, use low gear until the supports are away from the ground and then change to high gear. Continue cranking until supports are fully raised. Check that the crank handle is secured. Check that there is enough clearance between the prime mover rear wheels and the nose of the trailer to allow sharp turns. Check also that the landing gear is raised enough to allow for the swing of the frame on sharp turns. At the same time check that all air lines and electrical cables have been secured for travelling.
13. Remove trailer wheel chocks and stow in a safe place.
Uncoupling or “unhooking” trailers 1. Position the vehicle. The surface that your vehicle
is standing on must be able to support the trailer and the bases of the landing gear. Putting support plates or strong boards into position under the landing gear is strongly recommended.
2. Apply the trailer brakes to hold the trailer. Back up gently to ease pressure on the king pin. This will make releasing the king pin lock lever easier.
Place the prime mover protection valve in the “emergency” position to cut off air between prime mover and trailer. This prepares the air lines to be disconnected. If the trailer has spring brakes, this action will put them in the “on” position.
3. Secure the vehicle. Apply the parking brake. Leave the cab. Chock the front and back of the rear trailer wheels if necessary.
4. Lower the landing gear with the crank handle until the supports make firm contact with the support plates, boards or ground beneath them. The prime mover will rise as the weight of the trailer is taken by the landing gear. When the prime mover stops rising, the landing gear is supporting the trailer. Stop cranking.

99
Chapter 12 - C
oupling and Uncoupling Trailers
5. Disconnect air lines and electrical cable. Place the air lines in a secure place at the back of the prime mover to prevent dust from getting into them. Make sure the electrical cable is secured with the plug hanging face down so that moisture does not get in. Lift the plug clear, above any water sources, like puddles. Secure the lines to avoid damage. On some vehicles, air supply line taps, at the back of the prime mover, need to be turned off.
6. Release the turntable latch. Raise the release handle lock pin and pull the handle to the “open” position. If the handbrake is not on properly, the whole rig may move. Keep your legs and feet away from the rig to avoid injury.
If the handle will not move, there is too much pressure on the king pin and you will need to return to the cab and back up very gently to release pressure. After securing the prime mover again, leave the cab, release the latch and return to the cab.
7. Pull the prime mover partially clear of the semi-trailer. Release the parking brake and move the prime mover forward until the turntable begins to clear the semi-trailer skid plate. Use the lowest forward gear. Stop with the prime mover frame still under the semi-trailer. This will prevent the semi-trailer from falling if the landing gear collapses or sinks.
8. Secure the prime mover again. Apply the parking brake.
9. Inspect the semi-trailer support. Make sure the ground is supporting the semi-trailer. Check the landing gear for damage. Go back to the cab.
10. Release the parking brake and pull clear of the trailer.

100
Warning Note If you stand on or near the turntable to connect airlines or electrical cables, be careful. It is easy to slip on greasy parts. Also be very careful when the weather is wet.
When coupling or uncoupling a semi-trailer, do not take short-cuts.
Check the surface where your vehicle is standing. Make sure it can support the weight of the semi-trailer. Use base boards if you are not sure.
Use low gear on the crank for the landing gear when the trailer legs are on or near the ground.

101
Chapter 12 - C
oupling and Uncoupling Trailers
Notes Test yourself questions (Answers to test yourself questions are upside down at the bottom of this page)
1. When coupling a prime mover to a semi-trailer A. the turntable on the prime mover should be just lower
than the skid plate on the semi-trailer
B. the trailer should be the same height as the prime mover
C. the turntable on the prime mover should be just higher than the skid plate on the semi-trailer.
2. Chocking the front and back of the trailer means you A. check the front and back of the trailer
B. block the wheels with wedges to stop them from moving
C. throw out any debris that has collected in these places.
3. When uncoupling a prime mover from a semi-trailer and the turntable latch handle does not move, you should A. pull harder to get it to move into the open position
B. put some oil onto it to get it to move more easily
C. return to the cab and back up very gently to release pressure.
Answers 1C 2B 3C

102
Chapter 13 – Skills required to drive a bus
This chapter includes: » before starting the trip
» what you need to do before you pull in at a bus stop
» what you need to do before pulling out from a bus stop
» passengers
» driving a bus
» test yourself questions
As a bus driver you are responsible for the safety of your passengers whenever they are getting on to, travelling in or getting off your bus. Your good driving, care and courtesy are important, because you are the human face of the organisation for which you work.
If you drive a bus there are procedures you need to know and follow that will help make your passengers’ journey a safe one.
Before starting the trip Before you start your journey, make the following special checks to see that the equipment is working:
» rear door safety interlock (if applicable)
» passenger seats are secure and not moving on their hinges
» mirrors are properly adjusted
» steps and walkways are clear of anything which might cause problems for passengers.
What you need to do before you pull in at a bus stop » indicate correctly
» slow down smoothly
» stop close to the kerb so that passengers can get on and off easily - if possible, passengers should be able to step onto the footpath without having to step onto the road
» If picking up or dropping off school children you must turn on your Hazard Warning Lights
» check mirrors before opening doors to make sure that a door will not strike any passengers.

103
» make sure the bus does not move while passengers are getting on and off
What you need to do before pulling out from a bus stop Mirror checks:
» near side mirror (closest to kerb) for passengers getting on
» rear door mirror for passengers getting off
» internal mirror for standing passengers
» driver’s side mirror for overtaking vehicles.
When safe, close passenger doors. If picking up or dropping off school children you must turn off your Hazard Warning Lights.
Re-check mirrors, indicate for at least five seconds, and when it is safe, move out from the bus stop.
Passengers Watch that passengers get on and off safely.
Make sure any passenger having difficulty getting on and off the bus has assistance.
Scan the road ahead, so that you see passengers waiting at a bus stop and can slow down to pick them up.
Chapter 13 - S
kills required to Drive a B
us
Driving a bus Regularly scan the internal mirrors to make sure the passengers are in no danger.
Drive smoothly and avoid sudden changes in direction when accelerating or braking.
Allow for passengers’ movements as you travel. Passengers may want to move to the exit door while you are still driving.
Take note of stop requests and respond to them.
Warning note Remember that your vehicle’s dimensions may be up to 14.5 metres long, 2.5 metres wide and 4.3 metres high. Make sure that you have enough space around you and that you take notice of any signs telling you height, width and length limits.
Also, your bus will handle differently depending on the number and distribution of passengers. Make sure you alter your driving to allow for this.

104
Notes

105
Chapter 13 - S
kills required to Drive a B
us
Test yourself questions (Answers to test yourself questions are upside down at the bottom of this page)
1. Before you start your journey, you should A. have a last cup of coffee
B. radio ahead to check road and traffic conditions
C. make sure passenger seats are secure and safe.
2. Before you pull in at a bus stop you should A. slow down smoothly, stop close to the kerb to allow
passengers to leave easily and check the mirrors before opening doors
B. slow down smoothly, stop far away from the kerb to rejoin traffic easily and check mirrors before opening doors
C. maintain driving speed until the last minute, slow down, stop close to the kerb to allow passengers to leave easily and check the mirrors before opening the doors.
3. When scanning your mirrors while driving, you should look for A. other drivers tailgating you
B. passenger safety and behaviour
C. public phones in case the bus breaks down.
Answers 1C 2A 3B

106
Words that heavy vehicle drivers need to know
Anchor points Strong devices for attaching lashings to mainframe or chassis to restrain the load.
Articulated truck A vehicle consisting of a prime mover and a semi-trailer.
Baffles Barriers erected crossways and sometimes lengthways in tanks used for transporting fluids. Baffles are used to limit surging of tank contents when there are changes in acceleration.
Balking or baulking Large timber at least 4” x 4” (100 mm x 100 mm) used to prevent lengthways movement of the load under deceleration or acceleration. This applies mainly when the load cannot be placed against a gate.
B-double or Multi Combination An articulated vehicle with more than one trailer attached.
Bolster That part of a machine or mechanism which forms a hard support or base.
Blocks or blocking Suitable material used as baulking or packing against a load.
Bulkhead See Gates.
Cantling A support frame used under an object shaped like a cylinder.
Cap tarp Tarpaulins fitted across the top of the load and tarpaulins fitted to cap the others.
Chocks Suitable blocks used to restrain loads which could move during transit. Also called cleats or scotches or gluts.
Claw A device with springs for grappling or holding.
Coaming A raised frame border or edge around the load platform of a vehicle.
Cribbing A reliable method of supporting loads. Alternate layers of packing are placed at 90 degrees to one another to form a stable column.
Crossbearer A support placed transversely across the loading platform.
Dog trailer A trailer with a moveable front axle.
Edge protectors Material used to protect the exposed edges of soft sheet and similar materials from the lashings used.
Flush deck A flat tray deck without coaming.
Gates Vertical frames used at the front, sides and rear of load carrying platform to contain the load. The front gate is also known as a loading rack, bulkhead or headboard. The front rack must be strong enough to stop the load shifting, such as in a crash or when you brake very hard.

107
Words that heavy vehicle drivers need to know
Gross Train Mass or Gross Combination Mass (GCM) The maximum of the sum (as named by the manufacturer) of the loaded mass of the vehicle plus the axle loads of any vehicle being towed as a semitrailer or trailer. It can also mean the measured weighbridge mass or the road regulation limit.
Gross Vehicle Mass (GVM) The maximum loaded mass specified by the manufacturer and given on the vehicle’s registration certificate. The total mass must never exceed the GVM.
Headboard See Gates.
Lading protectors Material used to prevent the load being damaged through contact with restraining chains or lashings.
Lashings Fastening devices, chains, cables, ropes or webbing used to restrain loads.
Lifts Dressed timber or steel which has been stacked in layers.
Load anchor points Strong devices for attaching lashings to the mainframe or chassis to restrain the load.
Load binder A device fitted to each chain or lashing used to tighten the lashing. Follow the manufacturer’s instructions.
Load capacity The maximum load that can be carried in or on a vehicle on the road. This is fixed by VicRoads. It is equivalent to GVM minus the tare mass.
Loading stake, peg or pin A metal fixture used for load control when set in pockets.
Outrigger A horizontal beam, spar of framework projecting from the loading platform on the vehicle. Some may be retracted or extended.
Pallet A portable platform or tray onto which loads are placed to facilitate mechanical handling.
Pig trailer A trailer with a fixed front axle.
Pockets Housings fixed to the vehicle to locate gates, stakes or loading pegs.
Prime mover A motor vehicle which is constructed, designed or adapted for connecting to a semi-trailer.
Rave A rail or framework around the platform to increase load capacity.
Road train A Multi Combination vehicle, i.e. a prime mover with more than one trailer attached.
Rope hooks Hooks around the load platform to help hold the tarpaulin down. They must not be used to restrain loads.
Rope rail A rail that goes round the load platform under the coaming, which is the raised edge at the side of a trailer/tray. Used to tie rope to. Support points may be used for limited load restraint.
Round timber Felled trees, logs.
Scotch A wedge block or chock used to restrain a wheel.

108
Semi-trailer An unpowered vehicle which is attached to a prime mover by a turntable, forward of the prime mover’s rear axle, for the purpose of being towed by that vehicle.
Shackle A metal coupling link closed by a bolt. Used for connecting chains to anchor points. The two principal shapes are “D” and “bow”.
Shooks Broken down cases.
Shoring bar Metal or wooden load-carrying beam or fabricated truss section used to restrain or transmit a load from one frame column post, wall or bearing point to another. They may be adjustable. Also known as shoring pole.
Sling A length of hemp core rope or steel wire rope with eyes formed by splicing at each end. Used to hoist or restrain loads. May be webbing.
Spreader A transverse spar of frame used to support tarpaulins, or for load control.
Spigot The cylindrical end of a fitting which mates with a hole in another component forming a joint (connection, support).
Strop A cradle made from flexible material to make it easy to load with a hoist or pulley. Also known as a snotter.
Strut A rigid support intended to bear loads along its length.
Tarpaulin (tarp) A waterproof sheet used to cover and protect goods from the weather.
Thimble A metal liner usually pear-shaped and concave on the outside. It is fitted into the eye of a rope to prevent chafing and to distribute the load.
Tie-down fittings An anchor point designed to fasten or restrain a load.
Transverse beam (spar) A beam aligned across the minor span of an area rather than lengthways along the major span.
Turnbuckle A type of coupling fitted between the ends of a lashing or between two lashings. Used mainly for adjusting or regulating the tension in lashings. It consists of a loop or sleeve with a screw thread on one end and a swivel at the other. Sometimes it has an internal screw thread at each end.
Twist lock A locking device designed to fasten containers to the vehicle on which they are being transported. Australian Standard E45 applies.
Wedge A piece of wood or metal, thick at one end and tapering to a thin edge at the other.
Winch Load control device which uses chains, ropes or webbing lashes.

109
Notes
Words that heavy vehicle drivers need to know

110
Index
A Accelerating 36 Accredited providers 4 Ahead, looking 44 Alcohol 24 Alertness 22 Aquaplane 65
B Bend, left 37 Bend, right 37 Bend, speed 65 Blind spots 48 Blow-out 30, 74 Brake, fade 40, 73 Brake failure 72 Brakes, air 31, 41 Brakes, auxiliary 42 Brakes, how they work 40 Brakes, spring 41 Braking, empty vehicle 40 Braking, hills 40
C Cabin cameras 11Clearance 54, 93 Conditions, road 46 Controls, driver’s 31 Counter-steer 70 Coupling trailer 96 Cut-in, Cut-out 37
D Dangerous goods 8 Dimensions 82 Disabled vehicle 61 Do not overtake turning vehicle 90 Double-clutching 38 Driver certificates 8 Driver, learning, heavy vehicle 6Driver licence, categories 7 Driving test 3 Drugs 24
E Emergencies 68, 72 Engine check 30
F Fatigue 15, 22 Fire, causes 75 Fire, extinguishers 76 Fire prevention 75
G Gear changing 38
H Hazard lights 61, 80 Height 83Height, loads 29 Hills, braking on 40, 73
Horn 72 Hours of driving 15 Hydraulic brakes 31, 33, 40, 73
I Inspection 29 Instructor to teach 4 Instruments, check 31 Interstate, hours driven 18
J Jack-knife 30, 36, 42, 69
L Lanes, changing 62 Law enforcement 14 Length 82 Load 83, 85Load distribution 87 Load, limits 91 Load, security 29, 85Low risk driving 44
M Mass 84 Medical eligibility 5 Mirrors 31, 46, 48 Mobile equipment 8
O Occupational safety 25 Operator certificates 8Oversize permits 85
P Parking 21 Parking lights 20, 61 Parking, night 21 Passengers 103Portable warning triangles 18, 20Projecting load 83, 84
R Railway crossing 20 Rest breaks 16Reversing, observing 49 Reversing, trailer 38Road, leaving 71
S Seatbelts 15 Seating 25 Signalling 62 Skids 69Solo drivers 15 Space, behind 51 Space, front 50Space, overhead 54 Space, sides 53

111
IndexSpeed limits 15 Speed, managing 63 Steering, emergency 70, 71 Stopping distance 64
T Tailgaters 52Traffic 46 Trailer, brake 42 Triangles, reflective 18, 20, 61 Turns, left 55 Turns, right 58 Turns, signalling 62 Turntable, slack 33 Two-up drivers 15, 17 Tyre failure 30, 74
U Uncoupling trailers 98 Unlicensed driving 6
W Width 83 Work Diary 19

112
Notes

More informationFor further information please phone 13 11 71 or visit vicroads.vic.gov.au
Latest information on road lawsRoad laws change from time to time. So, tests for the road laws will change as well. Check that you have the most recent edition of this book by visiting vicroads.vic.gov.au. If you are in doubt, check with any of the Customer Service Centres.
CopyrightThis work is copyright. Apart from uses permitted under the Copyright Act 1968, no part may be reproduced, in whole or in part, by any process without written permission from VicRoads. Permission is hereby given to copy and distribute parts of this work (within the limitations specified in the Copyright Act) for the purposes of bona fide research and instruction, provided such copies are made available free of charge.
Publication informationAuthorised and published by VicRoads 60 Denmark Street, Kew, Victoria 3101
ISBN 9789 0 7311 9165 9
First published July 1988
Reprinted with amendments July 2013
© Crown Copyright
Roads Corporation, Victoria, Australia.
Customer Service Centres
ARARATShop 2, 56 High StreetARARAT 3377
BAIRNSDALE535 Princes HighwayBAIRNSDALE 3875
BALLARAT88 Learmonth RoadWENDOUREE 3355
BENALLA50-52 Clarke StreetBENALLA 3672
BENDIGO53-61 Lansell StreetBENDIGO 3550
BROADMEADOWSCnr Pearcedale Parade/Johnstone StreetBROADMEADOWS 3047
BUNDOORA8 Graduate RoadUniversity HillBUNDOORA 3083
BURWOOD EAST12 Lakeside Drive,BURWOOD EAST 3151
CAMBERWELL3 Prospect Hill RoadCAMBERWELL 3124
CARLTON459 Lygon StreetCARLTON 3053
COBRAMShop 1, 39 Station StreetCOBRAM 3644
COLAC10 Scott StreetCOLAC 3250
DANDENONG72-74 Greens RoadDANDENONG SOUTH 3175
DROMANAShop 11, Dromana Central143 Point Nepean RoadDROMANA 3936
ECHUCA55 Mundarra RoadECHUCA 3564
FRANKSTON71 Hartnett DriveSEAFORD 3198
GEELONG180 Fyans StreetSOUTH GEELONG 3220
HAMILTONRiley StreetHAMILTON 3300
HOPPERS CROSSING64 Old Geelong Road(Spotlight Centre)HOPPERS CROSSING 3029
HORSHAM14 O‘Callaghans ParadeHORSHAM 3400
KYNETON2 Beauchamp StreetKYNETON 3444
LEONGATHAAnderson Street(South Gippsland Highway)LEONGATHA 3953
MELTON267 High StreetMELTON 3337
MILDURA109-111 Orange AvenueMILDURA 3500
MORWELL87 Princes DriveMORWELL 3840
OAKLEIGH SOUTH1 Eskay RoadOAKLEIGH SOUTH 3167
PORTLAND114A Percy StreetPORTLAND 3305
SALE28-32 Princes HighwaySALE 3850
SEYMOUR5 Crawford StreetSEYMOUR 3660
SHEPPARTON231-239 Corio StreetSHEPPARTON 3630
SUNBURY7/36 Macedon StreetSUNBURY 3429
SUNSHINE499 Ballarat RoadSUNSHINE 3020
SWAN HILLShop1, 1 McNeill CourtSWAN HILL 3585
WANGARATTA62-68 Ovens StreetWANGARATTA 3677
WARRAGULUnit 5, 131 North RoadWARRAGUL 3820
WARRNAMBOOL29 Jamieson StreetWARRNAMBOOL 3280
WODONGA82-86 Elgin BoulevardWODONGA 3690
For further information ring 13 11 71

vicroads.vic.gov.au
VR
PN
0012
3 0
7.13
9835
0
The Victorian Bus & Truck Drivers’ Handbook
Th
e Victo
rian B
us &
Tru
ck Drivers’ H
and
bo
ok