The Urban Cultivator Residential - Datatailmedia.datatail.com/docs/manual/201258_en.pdfThe Urban...
27
Page 1 Call Us 7 Days a Week: 1-877-352-0490 Watch Video Tutorials: www.urbancultivator/videomanual The Urban Cultivator Residential User Manual TM
-
Upload
truongtuyen -
Category
Documents
-
view
236 -
download
0
Transcript of The Urban Cultivator Residential - Datatailmedia.datatail.com/docs/manual/201258_en.pdfThe Urban...

Page 1
Call Us 7 Days a Week: 1-877-352-0490
Watch Video Tutorials: www.urbancultivator/videomanual
The Urban Cultivator ResidentialUser Manual
TM

Page 2
Call Us 7 Days a Week: 1-877-352-0490
Watch Video Tutorials: www.urbancultivator/videomanual
Please read the information inside this Instruction Booklet carefully and keep it as a reference manual.
These symbols are used to highlight important information:
Warnings!
Information and best practices.
Environmental information.
If you are unclear about any aspect of information in this manual please contact Urban Cultivator using [email protected] or telephone our toll free number +1 877 352 0490 available
seven days a week.

Page 3
Call Us 7 Days a Week: 1-877-352-0490
Watch Video Tutorials: www.urbancultivator/videomanual
Safety PrecautionsChild Safety
Safety Precautions In Daily UseDisposal
UnpackingHardware & AccessoriesInstallation Instructions
Your EnvironmentBuilt In
City Hook-Up OptionStand Alone Option
Installing The Lights And Glass PanelsInstalling Castor Wheels (Optional)
Installing Counter Top (Optional)Replacing The Grow Lights
Electrical ConnectionDescribing Your Urban Cultivator Residential
The Grow TraysThe Control Panel
Your First GrowSetting Up Your Growing Preferences
Planting Your First Herbs And MicrogreensMixing Nutrients
Nutrient Feeding TableTop Ten Growing Tips
Planting, Growing & Cultivation TableMaintenance
Cleaning The Grow TraysCleaning The Reservoir In Stand Alone Mode
Cleaning The Pipes In Stand Alone ModeCleaning The Reservoir In City Hook Up Mode
Cleaning The Pipes In City Hook Up ModeCleaning The Counter Top
Technical SpecificationsExternal Dimensions
Encloser SpecificationConnecting The Power, Water and Electricity
Process & Instrumentation DiagramFrequently Asked Questions
Service And Spare PartsCustomer Care
Standard Guarantee Condition
4
4
4
5
6
6
7
7
7
7
8
8
8
9
10
10
11
12
13
14
14
15
16
16
17
18
19
19
19
19
20
20
20
21
21
22
23
24
25
27
27
27

Page 4
Call Us 7 Days a Week: 1-877-352-0490
Watch Video Tutorials: www.urbancultivator/videomanual
Safety PrecautionsUrban Cultivator cares about your plants and safety. We want you to be familiar with the following safety instructions.
It is important that this instruction manual remain with the Urban Cultivator Residential appliance so that new owners can also learn about the product and relevant safety precautions.
You must carefully read through this instruction manual before installing and using the Urban Cultivator Residential.
If you are unclear about any aspect of information within please contact Urban Cultivator using [email protected] or telephone our toll free number +1 877 352 0490 available seven days a week.
Child Safety• This appliance is designed to be operated by adults.• Keep all packaging materials away from children and please dispose of them in a responsible manner.• The water from your Urban Cultivator Residential is not for drinking. Biological residues may still be
present and could be harmful.• Keep your Seeds, Nutrients and Growing Mediums in a safe, dry storage area that is well away from
children.
The Cultivator’s Control Panel has a Child Safety Lock. Refer to the Control Panel Table for more information.
Safety Precautions In Daily UseContaminated items and/ or garbage must not be present in the Urban Cultivator Residential.• Always keep the door closed.• Do not remove the grow trays or lighting shelf when the machine is watering or providing light. Refer
to the Control Panel (Page 13) table for instructions on controlling the watering & lighting schedules.• Only use products that have been designed to be used with the Urban Cultivator Residential.• Ensure that the Urban Cultivator Residential door is always closed to avoid injury.• Do not sit or stand on the open door.• Always unplug the power cord from the outlet and disconnect the water mains when not in use.• The Urban Cultivator Residential must be serviced by a licensed professional.• Only use genuine spare parts from Urban Cultivator or that have been CSA and or UA approved.
Using unauthorized components void your warranty.• Any attempts to fix the Urban Cultivator Residential without an authorised professional can be
dangerous.

Page 5
Call Us 7 Days a Week: 1-877-352-0490
Watch Video Tutorials: www.urbancultivator/videomanual
Whenever you take a Grow Tray out be careful of water that may not have drained completely after a watering cycle. It can take up to ten minutes for the Grow Tray to drain.
Please secure the Cultivator to the building structure using the strap and fixing provided. See below.
Attach To Wall
Affix Straps To Top Body Screws
Vacuum Breaker Installation• Install the Vacuum Breaker in all Canadian Installations to meet CSA standard. • Install direct after the city valve for ease of access and maintenance. Warning, the Vacuum Breaker
could leak in the event of a pressure drop due to City water.
Hose To Urban Cultivator
City WaterHookup
Ensure Direction GoesTo Urban Cultivator
Disposal• Dispose of all packaging material correctly.• All packaging can be recycled.• Cardboard material is made from recycled paper and should be recycled.• Should you cease to use your Urban Cultivator Residential please understand that many of its
components can be recycled.• You must take this unit to a recycling centre for disposal.

Page 6
Call Us 7 Days a Week: 1-877-352-0490
Watch Video Tutorials: www.urbancultivator/videomanual
UnpackingCarefully open the product packaging and gently remove the Urban Cultivator Residential. We recommend two people to remove the unit.
Hardware & AccessoriesPlease check that all the components for your Urban Cultivator Residential are accounted for and that none have been damaged in shipping. Please refer to the Checklist provided.
Hardware OptionsRight or Left Swing Door
Castors or Adjustable Feet
Stand Alone or City Water Hook Up10 Litre Reservoir, Hose Connection
Optional Cutting BoardsMaple, Red Oak, Walnut, Ash, Lyptus
Optional Custom DoorsGraphic Inlays, Screen or Film Options
Consumable OptionsOrganic or Non Organic Nutrients
Select Up To Four Plants From Our On-Line Herb Guide
Available As Four Months or Yearly Supplies Including; Nutrients
1. Counter Top (optional)
2. Door
3. Humidity Domes (x4)
4. Top & Bottom Grow Tray & Grow Flats (x4)
5. Consumables (optional seeds, soil, nutrients)
6. Reservoir Access
7. Front Grill
8. Control Panel
9. Safety Wall Straps
For City Water Hook Ups
Braided City Hose & City Drain Hose
For Stand Alone
Optional Drain Hose With Valve & Mounting Clip
Component Names Fragi le Components
Grow Lights (x8) (x4 spare)
Glass Panel & Thumb Screws (2)
Refer to Installing The Lights And Glass Panels section.
T
B
73
4
6
1
5
9
8 2
Check the Urban Cultivator Residential for any shipping damage. Never connect or start growing with a damaged machine. Please contact us on our toll free number +1 877 352 0490 or e mail [email protected] if your Urban Cultivator Residential is damaged.

Page 7
Call Us 7 Days a Week: 1-877-352-0490
Watch Video Tutorials: www.urbancultivator/videomanual
Installation InstructionsAll plumbing work required to install the Urban Cultivator Residential should be done by a certified professional (applicable for City Water Hook Up only).
Remove all the product packaging before positioning the Urban Cultivator Residential. The City Hook Up version needs to be five feet from the city water connection and the drain pipe should be no higher than two feet from ground level. Both versions, the City Hook Up and Stand Alone need a 120V power outlet to plug into.
Your EnvironmentThe Urban Cultivator Residential has been designed to work inside your home. Ideally the ambient room temperature should be 55 to 90 degrees Fahrenheit (13 to 32 degrees Celsius), and relative humidity between 30% to 60%.
Built InThe Urban Cultivator Residential has been designed to fit under a North American kitchen counter top or work surface as a single cupboard unit. It can slide between other cupboards and only requires one opening at the front. No vent openings are required however you need to allow the water fill and drain hose as well as the power supply cable to pass through from the rear of the unit. Ensure that your Urban Cultivator Residential is levelled. Refer to the external dimensions (p. 21) and installation manual diagram.
The Urban Cultivator Residential is available with lockable castor wheels or adjustable feet so you can adjust its height.
City Hook-Up OptionThe Urban Cultivator Residential should be connected to cold water from your city mains supply located within five feet from the Cultivator. The unit also needs to be connected to your city drain that should be no higher than two feet from ground level.
The water inlet hose is located at the rear of the unit and comes with a 3/8 inch hose connection. Connect the valve from your Urban Cultivator Residential to your city water line and vacuum breaker which should supply a water pressure of around 90psi for the Urban Cultivator Residential to be able to fill and drain its Reservoir effectively.
Pipes which have not been in regular use should be cleaned with running water before connecting the Urban Cultivator Residential.
Make sure that the water inlet and drain hoses are not twisted, crushed, entangled or leaking in any way. Do not use connection hoses that have been used previously by other appliances.

Page 8
Call Us 7 Days a Week: 1-877-352-0490
Watch Video Tutorials: www.urbancultivator/videomanual
The water intake connection is equipped with a vacuum breaker that must be installed directly after the city valve to prevent any water from entering the drinking water supply.
Stand Alone OptionIf you’ve set up your Cultivator as a stand alone island, you will have to re-fill and drain it manually
whenever the button flashes green. Use the Drain Hose to drain the water out of the reservoir and the Mounting Clip to help locate the drain hose into a bucket. Use a pot or small bucket to re-fill the Reservoir which has a 17 litre capacity.
Installing The Lights And Glass PanelsThe four Grow Lights and two protective Glass Panels are fragile and have been packed separately to ensure that they don’t get damaged in transport. You need to locate four Grow Lights each into their holders at the top of the unit and the light shelf. Align either end of the Grow Lights to their holders and gently twist the Grow Light to lock it in position. Once these have been locked in place take the Glass Panel and use the provided thumb screw to lock the Glass in place. The thumb screw is located right in the middle of the Glass Panel (refer to diagram on next page).
Your Urban Cultivator Residential comes with six Grow Lights two of which are spare bulbs.
Installing Castor Wheels (Standalone model)To install castor wheels first remove the 3 bolts and 1 rubber foot from each corner on the bottom of your Urban Cultivator Residential. Then secure castor wheels to the unit using the bolts (note: 4 extra bolts are provided with your Urban Cultivator for wheel installation).
x3 x1X 4

Page 9
Call Us 7 Days a Week: 1-877-352-0490
Watch Video Tutorials: www.urbancultivator/videomanual
Installing Countertop (Standalone model)To install the countertop piece, first remove the four black plastic filler pegs from the four holes in the top of the machine. Then screw in the 4 stainless steel studs that were provided with your Urban Cultivator Residential counter top.
X4
Position the counter top piece onto the studs and slide towards the back of the machine to lock the counter top into place.

Page 10
Call Us 7 Days a Week: 1-877-352-0490
Watch Video Tutorials: www.urbancultivator/videomanual
Replacing The Grow Lights
• Press the button and turn off the Urban Cultivator Residential.• Unscrew the thumb screw whilst supporting the glass sheet with your free hand so that it doesn’t fall.• Gently twist the Grow Light a quarter turn and remove it from its holder.• Insert a new Grow Light.• Replace the glass window and ensure it is secured safely with the thumb screw.
2
12
1. Thumb Screw
Turn clockwise to tighten and anti-clockwise to loosen and release the glass light cover.
2. Twist & Pull To Release
Turn bulb clockwise or anti-clockwise a 1/4 turn to release or lock in the grow light.
Unplug the Urban Cultivator Residential from the main power supply.Ensure that the light bulbs are cool before handling them with your hands.Unplug the power chord for the Removable Light Shelf before changing the Lights.
Electrical ConnectionThe Urban Cultivator Residential must be grounded (earthed). Urban Cultivator does not accept any responsibilty should this safety measure not be followed.
Electricity can be dangerous and an unsafe plug inserted into a power socket could result in a serious safety hazard. Do not connect the Urban Cultivator Residential via an extension cable.
Ensure that the plug is still accessible after the Urban Cultivator Residential has been installed.If you need to replace the electrical cable call us toll free on +1 877 352 0490 or e mail [email protected].

Page 11
Call Us 7 Days a Week: 1-877-352-0490
Watch Video Tutorials: www.urbancultivator/videomanual
Describing Your Urban Cultivator ResidentialHow Does The Urban Cultivator Residential WorkThe Urban Cultivator Residential provides a self-contained growing environment for herbs and greens. Lights imitate the sun’s rays and an irrigation system delivers water and/ or nutrients from the reservoir to the plants. The automated system provides everything for the plants at the correct times and measures to ensure your herbs and greens will sprout and continue to grow all year round.
1
2
4
4
3
1. Water I n , Out and E lec tr ic i t y Connec-t ions
2. Reser voir Sends & Receives Water To & From Each Grow Tray
3. Plants Use Their Roots To Grow I n The Grow Tray ’s
4. L ights Shine Down On Each Grow Level
5. Air Chambers Keep Temperatures At Ambient Room Temperature
Component Names
5
If you’ve connected your Cultivator to the city plumbing it will automatically re-fill and drain the water once per week. If you’ve set up your Cultivator as a stand alone island, you will have
to re-fill and drain it manually whenever the light turns on (once per week).

Page 12
Call Us 7 Days a Week: 1-877-352-0490
Watch Video Tutorials: www.urbancultivator/videomanual
The Grow TraysYour Urban Cultivator Residential comes with two growing levels referred to as the Top and Bottom Grow Trays. Both tray levels are removable to provide easy access for cultivating crops, cleaning and maintenance. Be careful when removing the trays as they may be heavy and unevenly balanced. We recommend putting them on your kitchen counter with the back of the tray towards the sink where they can be safely and easily accessed when you are working with your plants.
To continue growing herbs and greens the trays must be returned into their original position. Ensure
that the top grow tray T is placed back into the top rails and the bottom grow tray B into the bottom rails. You can do this by sliding the uppermost edge of the grow tray in-between the tray guide rails. Make sure that the tray handle is facing towards you so that the coupler valves at the rear align themselves correctly. Make sure that the grow trays are pushed all the way into the machine.
Please be careful when removing the trays as they could be unbalanced, heavy and will contain some residual water.
• If you remove a Grow Tray for more than one day turn off its Watering Schedule. Refer to the Control Panel table.
• The Bottom Grow Tray receives water an hour after the Top Grow Tray after lights turn on. Both trays take about ten minutes to drain.
• Filters located at the back of the Grow Trays catch sediment and should be rinsed out with clean water every week.
• The Cultivator will continue to water according to the Watering Cycle. If the trays are removed when watering, ensure that the plant receive the water that they have missed.

Page 13
Call Us 7 Days a Week: 1-877-352-0490
Watch Video Tutorials: www.urbancultivator/videomanual
The Control PanelThe Control Panel controls the automated funciton of your Urban Cultivator Residential. You can customize the program using the menu outlined below.
01:46:29PM 65°F
24/02/2011 50%RH
TimeFac tor y default i s 8am
Temperature
Relat ive Humidit y
LED StatusI ndicators
Reser voir Water Level or Date
On / O � Turns the Urban Cult ivator Res ident ia l on and o�.
Con�rm Selec t ionFor a l l avai lable opt ions, press enter to con�rm your se lec t ion.
Scrol l ingSelec t bet ween sub -menus.
Lighting CyclesMatch a l ight ing cycle to a l ist of herbs,
micro-greens and lettuces.
Menu HeadingsKeep pressing the menu button and
scrol l through al l the menu opt ions
A city water connection fully automates plant watering and reservoir water levels.
12 hours on, 12 hour o�.
18 hours on 6 hours o� (Factory default. Starts 8am)
Always on.
Set Date & Clock
Set Temp C/F Select temperature for fan control .
Set Lights Time Select what t ime to turn on the l ights.
Set Water On Time Control how long to water your plants for. Factory default is 5 minutes.
Set Recycle Rate Control how often to drain & fill the reservoir. Factory default is 7 days.
Top Up Reservoir * I f connected to ci ty water
Air Pump on/off *Not Recommended
Set Mode Select between standalone & ci ty water setups. Refer to Installation Instruction for details.
Urban Cult ivator This displays your program version number.
Add Nutr ientsThis i s a 7 day countdown.
Rec ycle Reser voirSelec t when you want to drain & �l l your reser voir.
Top Water ing CycleSelec t when you would l ike to water your plants in the top grow tray.
Bottom Water ing CycleSelec t when you would l ike to water your plants in the bottom grow tray.
Once in 2, 3 or 4 days.
Manual Cycle immediately waters your plants
then resets your previous schedule.
Always off .
Twice per day.
Once per day.
Factory setting.
The LED l ight turns on once the countdown has ended.You can set the countdaown for a maximum of 7 days.
Drain Reser voir - Yes or No
Fill Reservoir - Yes or No (*City Hookup Only)
Safet y LockHold both buttons together for 3 second to unlock the Control Panel .The Control Panel will lock after 60 seconds of inactivity.

Page 14
Call Us 7 Days a Week: 1-877-352-0490
Watch Video Tutorials: www.urbancultivator/videomanual
Your First GrowSetting Up Your Growing PreferencesNow that you’ve installed the Cultivator, understand how it works and are able to control it, you’ll want to set up the Cultivator’s computer system using the Control Panel before Growing Herbs & Greens.
• Release the Safety Lock
• Press the Power button and turn your Cultivator on.
• Press the Menu button and scroll through each of the Menu Headings setting your preferences as you go along (see previous page “Menu Headings”).
The Cultivator waters when the lights come on. The Bottom Grow Tray waters one hour after the Top Grow Tray.

Page 15
Call Us 7 Days a Week: 1-877-352-0490
Watch Video Tutorials: www.urbancultivator/videomanual
Planting Your First Herbs And Microgreens• Remove both grow trays and place them on a table so it’s easier to work with.• Mix approximately six parts soil to one part water until the lumps are gone.• Fill the Grow Inserts 1/2 to 3/4 full and level the soil without patting it down.• Sprinkle your seeds into the top layer of the soil with an even amount of space between the seeds.
Refer to the Planting, Growing And Cultivation table (Page 17) for detailed information.• Slide the Grow Trays back into the Cultivator ensuring that all the Safety Latches have clicked into
place.
• Press the button and run a Manual Watering Cycle. Press the button and run a Manual Watering Cycle.
• Place the Humidity Domes with the air vents closed for two days onto the Grow Trays.• Use the Control Panel to customise settings however the Cultivator’s default Lighting Cycles and
Watering Schedules are appropriate for growing all the herbs and microgreens listed on our Planting, Growing & Cultivation table (Page 18).
• Close the Cultivator’s door.• After two days remove the Humidity Domes and wipe away the condensed water. If there is an
established growth open the Humidity Dome’s air vents and put them back onto the Grow Trays for one more day before removing the Domes for the remainder of the plants growing life (This may vary slightly between plant varieties but this is a good average).
You will be working with water and soil which can be messy so make sure you’re in an appropriate location.
Use the Humidity Domes and their adjustable air vents for germinating seeds. The domes increases temperature and humidity levels inside to help germinate the seeds.

Page 16
Call Us 7 Days a Week: 1-877-352-0490
Watch Video Tutorials: www.urbancultivator/videomanual
Mixing Nutrients• Remove the Bottom Grow Tray to access the Reservoir.• Add the correct amount of Nutrients into the Reservoir. Refer to the Nutrient Feeding Table for
more information.• Insert the Lower Grow Tray back into position ensuring that all the grow tray have clicked into place
before closing the door.• The Urban Cultivator Residential will automatically mix the nutrients and draw the water
along with the added nutrients from the Reservoir during its next scheduled water cycle.
Add your chosen Grow Nutrients into the Reservoir. Make sure to follow the directions on the back of your chosen product. The Urban Cultivator Residential holds 17 litres of water inside its Reservoir.
Add nutrients to fresh water only. In City Water Mode press the button to drain and fill your Reservoir with fresh water. In Stand Alone Mode use the supplied Drain Hose to drain the Reservoir and manually fill it back up again
Only add nutrients after at least one week of seed germination.
Nutrient Feeding Table
Week 1Don’t add nutr ients
Week 2Add 4 cc ’s / ml ’s per l i t re 68 cc ’s
Week 3Add 8 cc ’s / ml ’s per l i t re 136 cc ’s
Week 4 And OngoingAdd 8 cc ’s / ml ’s per l i t re 136 cc ’s

Page 17
Call Us 7 Days a Week: 1-877-352-0490
Watch Video Tutorials: www.urbancultivator/videomanual
Top Ten Growing Tips
Room Temperature And HumidityKeep your room temperature between 55F - 90F (13C - 32C and humidity levels between 30% -
60%.
Keep Everything CleanKeep your growing environment clean. Clean your Reservoir , Reservoir F i l ter and Grow Trays
every month and r inse out the fil ter inside the grow trays every week or 2 weeks.
Don’t OverwaterDon't overwater especial ly at the beginning of the plants l i fe as i t may br ing on mould and
mi ldew. We have factory set the water ing levels for once every 4 days but th is wi l l vary depending
on what your ambient temperature and humidity is. The goal is to have the plant want water
before you water but not to dry out
Humidity Domes Help Germinate PlantsUse the Humidity Domes to increase temperature and humidity in the Grow Trays when germinat-
ing seeds. Keep the Domes on for the first two or three days after the seeds have been planted
with the air vents closed. Li f t domes off once per day to ensure fresh air c i rculat ion.
Use Proper soi l or pads.We highly recommend the soi l brands Sunshine #4 or Premiere HP. You can use other mediums,
such as our Sure to Grow white pads or green screens but we have found better results with soi l .
Don’t Add Too Much Nutr ientsOverfeeding can cause damage to the plants l isted in our Plant ing, Growing & Cult ivat ion Table.
Fol low the Nutr ient Feeding Table (Page 16). Most quick growing micro greens (1-2 weeks) don't
require any nutr ients. Only longer growing greens (herbs, arugula, etc) require nutr ients and
should only be added after week 1 or 2 at the ear l iest .
Restart After Fourteen WeeksMost of the herbs and microgreens l isted in our Plant ing, Growing & Cult ivat ion Table should be
re-sown and replanted after a maximum of fourteen weeks.
Keep pH Levels Between 5 - 7Balancing your pH level at 5 is smart as i t wi l l increase throughout the week.
Sow Seeds A Li t t le Heavy And Thin Out Young PlantsPluck out young plants to al low others to grow and fil l out. This is a great way to enjoy your
Cult ivator Every Day
Use Hydrogen PeroxideIf you accidental ly keep your humidity domes on too long or overwater and develop unwanted
bacter ia, you can spray with Hydrogen Peroxide and water (30% HP – 1 Gal water) . Only spray the
soi l and not the plants as this can cause your plants to rot in on themselves
Love Your PlantsTake t ime and care with your plants. Look at them, pick them up ( for weight. I f i ts l ight, water ) .Cal l Us Tol l Free, Seven Days A Week and check out www.urbancult ivator.net/v ideomanuals

Page 18
Call Us 7 Days a Week: 1-877-352-0490
Watch Video Tutorials: www.urbancultivator/videomanual
Planting, Growing & Cultivation Table
ArugulaBasi lBeat TopsBroccol iBuck wheatCabbageCher vi lChivesCi lantroDi l lFenugreekFlaxK aleKomatsunaLemon BalmLenti lsLettuceMarjoramMung BeanMustard GreensNastur t iumOnionOreganoPars leyPea Tendr i lsPeppercressPeppermintR adishSageSpinachSun�owerThymeWheatgrass
35-6
21123
2-333
2-32-3
224133121
2-334
2-32-3
4124141
2 tsp1 tsp
½ cup2 tbsp1 cup2 tbsp2 tbsp2 tbsp¼ cup1 tbsp½ cup1 tbsp1 tbsp2 tsp2 tsp
½ cup1 tbsp1 tsp1 cup1 tbsp½ cup2 tbsp1 tsp
1 tbsp2 cups2 tbsp1 tbsp2 tbsp2 tbsp1 cup1 cup2 tsp
2 cups
Herbs & M icrogreens Seeds per �at Cult ivate ( Weeks)
Fi l l the Grow I nser ts (�ats) hal f way to three - quar ters fu l l with Plant ing Soi l or Sure To Grow Pads.
Water once ever y four days.
Keep l ights on for e ighteen hours and o� for s ix .
The Cult ivator ’s default L ight ing Cycle and Water-ing Schedule are appropr iate for growing a l l the herbs and micro-greens l i s ted here.As you become more
exper ienced you’ l l
want to begin
customis ing your
growing condit ions
us ing the Control
Panel to control the
Cult ivator ’s auto-
mated features.
I f your seed isn’t on the cult ivat ion table, check UrbanCul t i va tor.net or ca l l your f r iendly Urban Cult ivator Rep for advice.
The above is a recommendation only. Flats can be sown heavier or thinner.
You can sow heavy then thin out as the plants grow by plucking out patches allowing the other greens to fill out.

Page 19
Call Us 7 Days a Week: 1-877-352-0490
Watch Video Tutorials: www.urbancultivator/videomanual
MaintenanceCleaning The Grow TraysClean your grow trays between each harvest however you should immediately clean mould or unwanted organic matter.
Do not use any chemically damaging or unhealthy cleaning products such as bleach. Using chemical cleaning products may be toxic and could potentially erode the Grow Trays. You can use 30% Hydrogen Peroxide to clean the reservoir and water lines (5 tsp per gallon). Read all warning labels on the Hydrogen Peroxide labels.
You should rinse out the filter at the rear of your Grow Trays on a weekly basis.
Cleaning The Reservoir In Stand Alone Mode• Release the Safety Latches and remove the both Grow Tray’s.
• Press the button and select Yes to drain the reservoir.• Re-fill the Reservoir with clean water and add your preferred cleaning agent (please follow the
guidelines on the rear of the agent’s packaging. The Cultivator’s Reservoir holds 17 litres of water).
• Press the button and select Yes to drain the reservoir.
If you wipe clean the Reservoir do not knock the pumps, mis-align the Pipes and in particular the Pressure Sensor that detects the water level located at the top towards the front of the Cultivator.
Cleaning The Pipes In Stand Alone Mode• Fill your Reservoir with clean fresh water and add your preferred cleaning agent following the guidelines
on the rear of the agent’s packaging. The Cultivator’s Reservoir holds 17 litres of water.• Insert the Grow Tray’s and lock all the Safety Latches.
• Run a Manual Cycle (watering) to the Top and Bottom Grow Tray’s.
• Press the button and select Yes to drain the reservoir.• Re-fill the Reservoir with clean water and drain one more time ensuring that there is no residual
cleaning product.
We recommend using a non-chlorine bleach purchased from a reputable environmentally conscience company. Please follow the quantity guidelines on its packaging.

Page 20
Call Us 7 Days a Week: 1-877-352-0490
Watch Video Tutorials: www.urbancultivator/videomanual
Draining the reservoir sends water down and out from the Drain Hose. Ensure that drained water from the hose goes into an appropriate vessel such as a bucket. Water from your Urban Cultivator Residential is not for drinking. Biological residues may still be present and could be harmful.
Cleaning The Reservoir In City Hook Up Mode
• Press the button and select Yes to drain the reservoir.• Add your preferred cleaning agent following the guidelines on the rear of the agent’s packaging for 5
litres of water.
• Press the button and select Yes to drain the reservoir.
If you wipe clean the Reservoir do not knock the pumps, mis-align the Pipes and in particular the Pressure Sensor that detects the water level located at the top towards the front of the Cultivator.
In City Water Mode the Cultivator will fill and drain your Reservoir with 5 litres of water twice. This takes about 15 minutes.
Cleaning The Pipes In City Hook Up Mode• Insert the Grow Tray’s and lock the Safety Latches.• Add your preferred cleaning agent following the guidelines on the rear of the agent’s packaging for 5
litres of water.
• Run two Manual Cycle’s (watering) for the Top and Bottom Grow Tray’s.
• Press the button and select Yes to drain the reservoir.
Cleaning The Counter TopUse soapy water or commonly available kitchen counter top cleaners. Do not let moisture stand on the surface.
This counter top is otherwise known as a “Butchers Block”. The finish is formulated to repel most household solvents such as detergents and alcohol. Stains will normally be on the surface of the finish and can be removed with finger nail polish remover or bleach.

Page 21
Call Us 7 Days a Week: 1-877-352-0490
Watch Video Tutorials: www.urbancultivator/videomanual
Technical SpecificationsExternal Dimensions
(b)(a1)
(a2)
(c)
Dimensions With Counter Top(a1) 633mm or 25”
(a1+a2) 1160mm or 46“
(b) 633mm or 25”
(c) 965mm or 38”
Growing Space(d) 241mm or 10”
(e) 610mm or 24”
Dimensions WithoutCounter Top Or Wheels(a) 605mm or 24”
(b) 605mm or 24”
(c) 876.3mm or 34.5”
T
B
(d)
(e)
Use (a) to deter mine depth.
Page 22
Call Us 7 Days a Week: 1-877-352-0490
Watch Video Tutorials: www.urbancultivator/videomanual
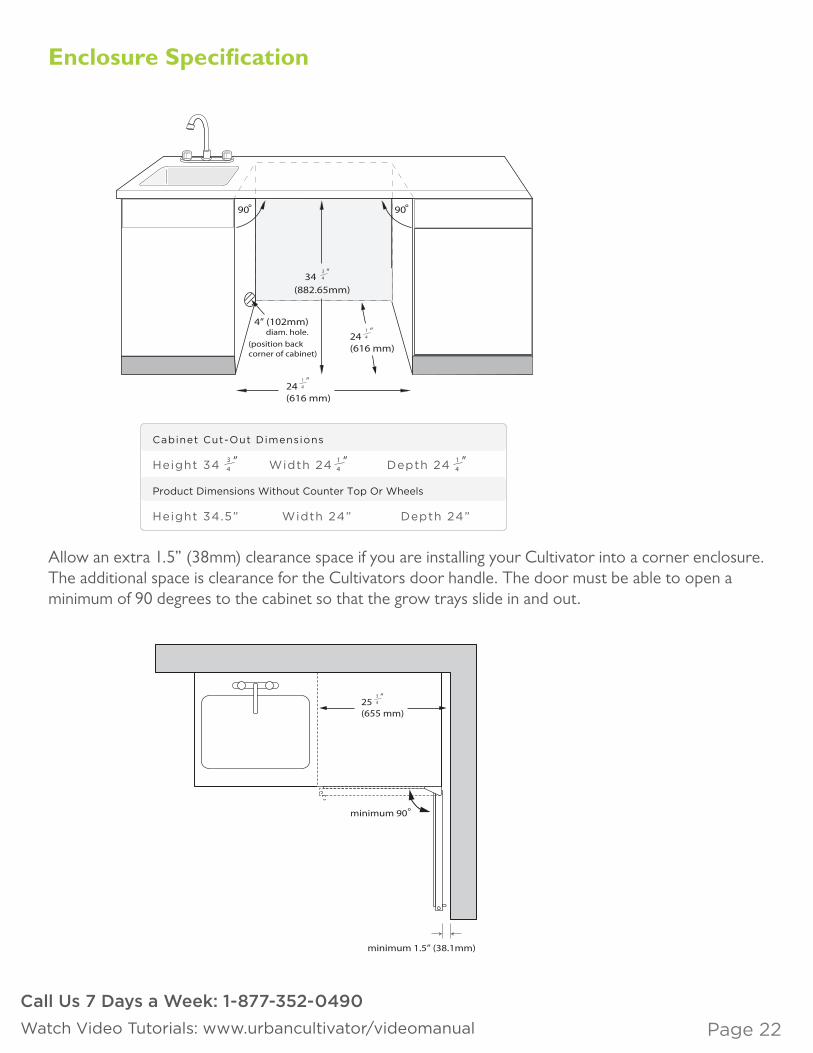
Enclosure Specification
90°90°
(882.65mm)34
34
”
24(616 mm)
14
”
24(616 mm)
14
”4” (102mm)
diam. hole.
(position backcorner of cabinet)
Cabinet Cut-Out Dimensions
Height 34 Width 24 Depth 24
Product Dimensions Without Counter Top Or Wheels
Height 34.5” Width 24” Depth 24”
34
” 14
” 14
”
Allow an extra 1.5” (38mm) clearance space if you are installing your Cultivator into a corner enclosure. The additional space is clearance for the Cultivators door handle. The door must be able to open a minimum of 90 degrees to the cabinet so that the grow trays slide in and out.
minimum 90°
25(655 mm)
34
”
minimum 1.5” (38.1mm)

Page 23
Call Us 7 Days a Week: 1-877-352-0490
Watch Video Tutorials: www.urbancultivator/videomanual
Connecting The Power, Water and Electricity
Numbered I tems
1. City Water In Connect ionUse the vacuum breaker & braided City Hose to connect to your c i ty water connect ion. The hose comes with a standard 3⁄8” compress ion fitt ing.
2. City Drain Out Connect ionConnect the City Drain Hose (1/2” to 3/4“ hose connect ion) to your c i ty drain which should be no fur ther than 6 ’ f rom the Cult ivator and 2 ’ up f rom the floor.
3. Power Connect ionConnect the Cult ivator to a standard 120V power out let . The e lectr ic i ty plug should be no fur ther than 2 ’ away f rom the unit and should run out on the same s ide as the water and drain hose.
4. Hole S ize For Al l Connect ionsUse a 4” hole saw and remove par t of the bottom shel f of the cabinet adjacent to the Cult ivator where a l l the connect ions run f rom.
5. Adjustable FeetTwist the Cult ivators feet to adjust i ts overal l height f rom 34” to 34 ½”
Leave 1½” c learance gap for the door swing and handle when insta l l ing the Kitchen Cult ivator adjacent to a wal l .
Water In , C i ty Drain Out & E lectr ic i ty connect ions run out f rom one s ide only, the left or the r ight . P lease contact Urban Cult ivator us ing suppor t@urbancult ivator.net or t le lphone our tol l f ree number +1 877 352 0490 avai lable seven days a week.
1
32
45
2’0” (610mm) maximum from
�oor to City Drain.
6’0” (1829mm) maximum from the Cultivator to the City Drain connection.
Connect the supplied drain hose to the drain pipe of the kitchen sink either:- above the P trap- to the dishwasher connector of the garbage disposal.
Vacuum Breaker

Page 24
Call Us 7 Days a Week: 1-877-352-0490
Watch Video Tutorials: www.urbancultivator/videomanual
Process & Instrumentation Diagram
COMP. NUMBER
PHONE +1-877-352-0490ADDRESS: UNIT 311 - 13060 80TH AVENUE SURREY, BC,CANADA V3W 3B2, CANADA.
COMPONENT
DRAWING
QTY
COMP. NUMBER
KITCHEN CULTIVATOR
PROCESS & INSTRUMENTATION DGM
QTY
DRAWN UNLESS OTHERWISE SPECIFIED
DIMENSIONS ARE IN MMTOLERANCE: N/AMATERIAL: VARIABLEFINISH: VARIABLEDRAWING SCALE: N/ADO NOT SCALE
CHECKED
ENGINEER
MANU
Q.A.
FILE
VERSION #002
KC_SCHEMATIC.AI
DM
ART PROPRIETORY & CONFIDENTIALTHE INFRMATION CONTAINED WITHIN THIS RAWING IS THE SOLE PROPERTY OF URBAN CULTIVATOR. ANY REPRODUC -TION IN PART OR WITHOUT THE WRITTEN PERMISSION OF URBAN CULTIVATOR IS PROHIBITED.
THE KITCHEN CULTIVATORPROCESS AND INSTRUMENTATION DIAGRAM
T
B
SOF
PS
SAFET Y OVERFLOW
BOTTOM RESERVOIR TRAY
LIGHTS
TOP GROW TRAY
CONTROL INTERFACE
PRESSURE SWITCH
NORMALLY CLOSEDSOLONOID VALVE
AXIAL FAN
PUMPS(B) BOTTOM (T) TOP
AIR DIFFUSERDIF
T
B
LEGEND
PMP
T
B
T
RESERVOIR
PMP
1CIT YWATER
IN
CIT YWATER
OUT
NC PS
SOP
DIFPMP
2
PMP
T
PMP
B
PMP
T

Page 25
Call Us 7 Days a Week: 1-877-352-0490
Watch Video Tutorials: www.urbancultivator/videomanual
Frequently Asked Questions
How often should I do maintenance on my cultivator?Wet/dry shop vacuum or wipe down reservoir and levels every 6-8 weeks. Ensure to check filters and pumps for seed and soil build up.
Is my Cultivator pre-programmed?Yes, it comes pre-programmed for an average growing environment and an average for all plants needs. To set it to your environment or specific plant’s needs check the manual, call our support line or check urbancultivator.net/videomanual
How many flats will I get out of one of my seed containers?You will get 3-6 flats out of every Urban Cultivator seed containers. You can plant heavy and thin out young plants and use as you go or plant more flats thinner and let them grow out before you harvest. Try using the shaker to sow seeds evenly.
How much soil should I put in my flats?You should fill each flat ½ to ¾ with our recommended potting soil (Sunshine #4 and Premiere HP). ½ full for shorter life cycle (1-2 weeks) plants such as; Pea Tendrils, Wheat Grass, Sunflower, Broccoli, etc. Fill your flat ¾ full when planting longer life cycle (2-14 weeks) plants such as; Classic Herbs (basil, oregano, etc), Arugula, Beet Tops, etc.
Do I mix in my seeds or cover them with dirt?We have found great results by covering the newly sown seeds with a light dusting of soil that’s been shifted through a regular strainer. The finer soil spreads nicely and makes a protective blanket during germination. Sow your seeds over the dirt, then give them a good spray of water from a spray bottle, next cover with the sifted dirt and then another light spraying of water just to moisten the top blanket. Be careful not to spray too much or too close and wash off the thin dirt blanket.
Does my water reservoir keep itself filled?Yes, if you received your Cultivator with City Hook-up capabilities and have it plumbed in, then it is pre-programmed to exchange the water in the reservoir once a week. If you have received your Cultivator as a Stand alone please refill as needed and recycle when required.
What do I do if my reservoir won’t exchange?Check to insure the connection on your city drain is open and free of blockage. If the cultivator is new it may not be primed and may need 2 to 3 minutes to prime. If it is still not draining, remove the bottom grow tray to access your reservoir. Insure there is more then 50% water inside, then reach in and make sure the pump is on and vibrating. If is, take it off the outtake hose and insure the water is running.

Page 26
Call Us 7 Days a Week: 1-877-352-0490
Watch Video Tutorials: www.urbancultivator/videomanual
What do I do if my level won’t water?Ensure there wasn’t a level just watered before, as it may be waiting for the last water of another level to drain back into the reservoir before it waters the next. Ensure the reservoir has higher then 50% water level. Ensure that the level is set into a schedule and not in Always Off. If still no watering, get access to your reservoir and insure the pump is on and primed, as listed above.
What should my lighting schedule be?We have pre-programmed our lighting schedules for most herbs, micro greens, lettuces, etc, which is 18 hours light and 6 hours dark. If you wish to grow cherry tomato’s or peppers or other plants that require a fruiting schedule, you can easily change your light schedule to 12 hours on and 12 hours off.
How often should I change my bulbs?For maximum plant growth, we recommend you change your bulbs every 6 months.

Page 27
Call Us 7 Days a Week: 1-877-352-0490
Watch Video Tutorials: www.urbancultivator/videomanual
Service And Spare PartsPlease call our toll free number +1 877 352 0490 or e mail [email protected] if you think there is a problem with you Urban Cultivator Residential.
Customer CareIn the event that your Urban Cultivator Residential requires service, or you wish to purchase plant supplies and spare parts please call us toll free on +1 877 352 0490 or e mail [email protected].
Please provide the following information when you are calling to arrange for an engineer or return of goods:• Your name, address, zip number or postal code.• Your contact telephone number and best time to be reached.• Clear and concise details of the problem.• The model and serial number of the appliance can be found on the back of the product and by scrolling
to the last option.
• The purchase date and name of the sales representative who sold you the Urban Cultivator Residential.
Standard Guarantee ConditionsUrban Cultivator Limited guarantee that if within 12 months of the date of purchase this Urban Cultivator Residential appliance or any part thereof is proved to be defective due to faulty workmanship or materials, we will, at our option repair or replace the same FREE OF CHARGE for labour, materials or carriage on condition that:• The Urban Cultivator Residential has been correctly installed and used only on the electricity supply
stated on the rating plate.• The Urban Cultivator Residential has been used in accordance to the manufacturer’s instructions.• The Urban Cultivator Residential has not been tampered with by any person not authorised by us.• All service work under this guarantee must be authorised by Urban Cultivator.• Any appliance or defective component shall become the property of Urban Cultivator.• This guarantee is in addition to your statutory and other legal rights.
Manual Version: 3.0613