
The University of North Texas Denton, TX Manual of ...aslp.hps.unt.edu/sites/default/files/Audiology...
52
1 The University of North Texas Denton, TX Manual of Audiology Procedures Speech and Hearing Clinic Department of Speech and Hearing Sciences
Transcript of The University of North Texas Denton, TX Manual of ...aslp.hps.unt.edu/sites/default/files/Audiology...
1
The University of North Texas Denton, TX
Manual of Audiology Procedures
Speech and Hearing Clinic Department of Speech and Hearing Sciences
2
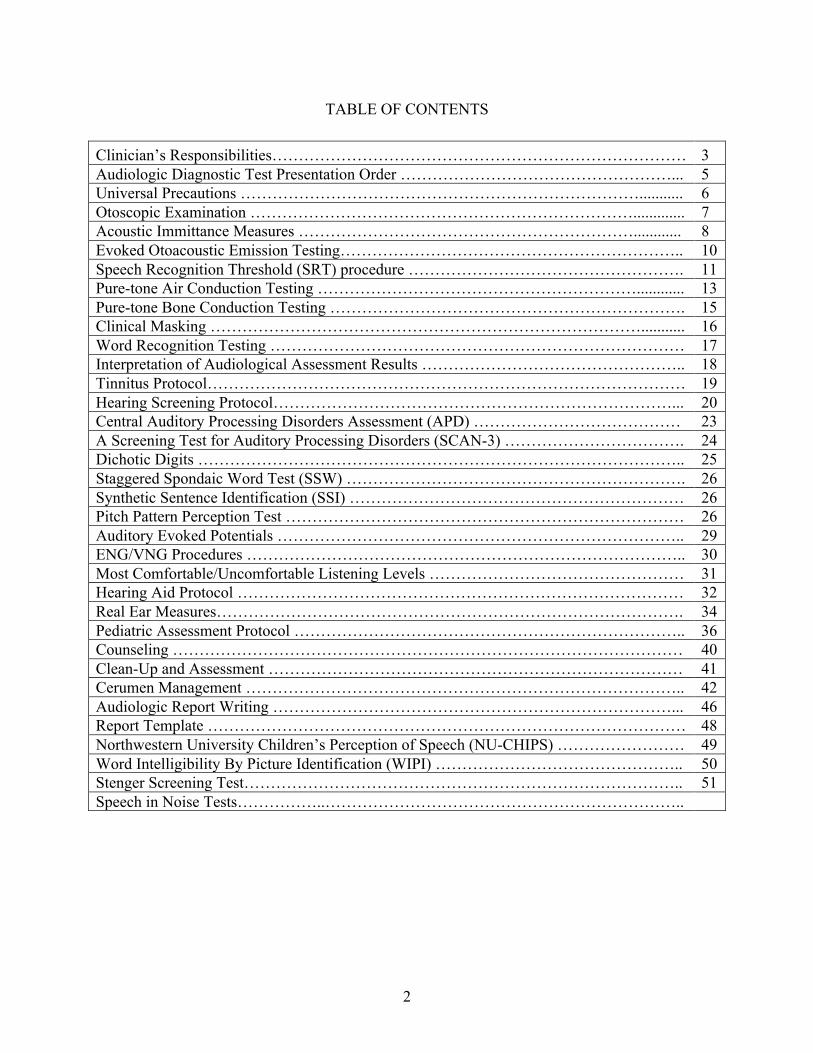
TABLE OF CONTENTS
Clinician’s Responsibilities…………………………………………………………………… 3 Audiologic Diagnostic Test Presentation Order ……………………………………………... 5 Universal Precautions …………………………………………………………………........... 6 Otoscopic Examination ………………………………………………………………............. 7 Acoustic Immittance Measures ………………………………………………………............ 8 Evoked Otoacoustic Emission Testing……………………………………………………….. 10 Speech Recognition Threshold (SRT) procedure ……………………………………………. 11 Pure-tone Air Conduction Testing ……………………………………………………............ 13 Pure-tone Bone Conduction Testing …………………………………………………………. 15 Clinical Masking ………………………………………………………………………........... 16 Word Recognition Testing …………………………………………………………………… 17 Interpretation of Audiological Assessment Results ………………………………………….. 18 Tinnitus Protocol……………………………………………………………………………… 19 Hearing Screening Protocol…………………………………………………………………... 20 Central Auditory Processing Disorders Assessment (APD) ………………………………… 23 A Screening Test for Auditory Processing Disorders (SCAN-3) ……………………………. 24 Dichotic Digits ……………………………………………………………………………….. 25 Staggered Spondaic Word Test (SSW) ………………………………………………………. 26 Synthetic Sentence Identification (SSI) ……………………………………………………… 26 Pitch Pattern Perception Test ………………………………………………………………… 26 Auditory Evoked Potentials ………………………………………………………………….. 29 ENG/VNG Procedures ……………………………………………………………………….. 30 Most Comfortable/Uncomfortable Listening Levels ………………………………………… 31 Hearing Aid Protocol ………………………………………………………………………… 32 Real Ear Measures……………………………………………………………………………. 34 Pediatric Assessment Protocol ……………………………………………………………….. 36 Counseling …………………………………………………………………………………… 40 Clean-Up and Assessment …………………………………………………………………… 41 Cerumen Management ……………………………………………………………………….. 42 Audiologic Report Writing …………………………………………………………………... 46 Report Template ……………………………………………………………………………… 48 Northwestern University Children’s Perception of Speech (NU-CHIPS) …………………… 49 Word Intelligibility By Picture Identification (WIPI) ……………………………………….. 50 Stenger Screening Test……………………………………………………………………….. 51 Speech in Noise Tests……………..…………………………………………………………..
3
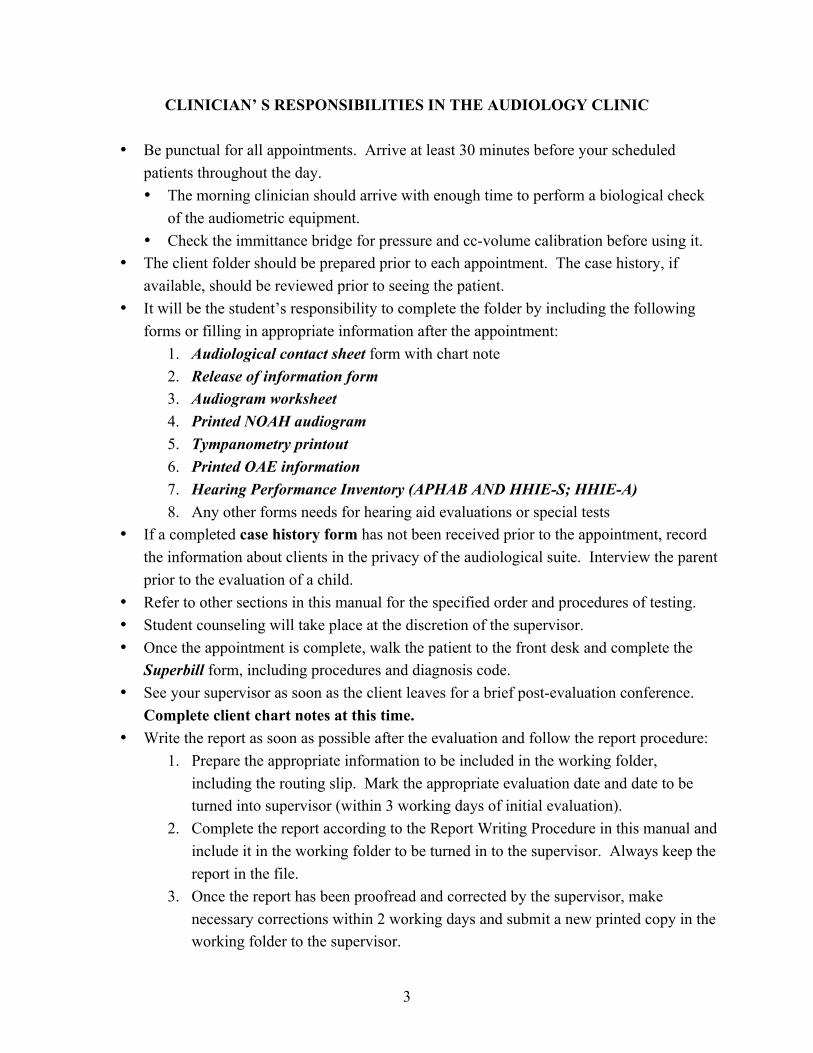
CLINICIAN’ S RESPONSIBILITIES IN THE AUDIOLOGY CLINIC
• Be punctual for all appointments. Arrive at least 30 minutes before your scheduled patients throughout the day. • The morning clinician should arrive with enough time to perform a biological check
of the audiometric equipment. • Check the immittance bridge for pressure and cc-volume calibration before using it.
• The client folder should be prepared prior to each appointment. The case history, if available, should be reviewed prior to seeing the patient.
• It will be the student’s responsibility to complete the folder by including the following forms or filling in appropriate information after the appointment:
1. Audiological contact sheet form with chart note 2. Release of information form 3. Audiogram worksheet 4. Printed NOAH audiogram 5. Tympanometry printout 6. Printed OAE information 7. Hearing Performance Inventory (APHAB AND HHIE-S; HHIE-A) 8. Any other forms needs for hearing aid evaluations or special tests
• If a completed case history form has not been received prior to the appointment, record the information about clients in the privacy of the audiological suite. Interview the parent prior to the evaluation of a child.
• Refer to other sections in this manual for the specified order and procedures of testing. • Student counseling will take place at the discretion of the supervisor. • Once the appointment is complete, walk the patient to the front desk and complete the
Superbill form, including procedures and diagnosis code. • See your supervisor as soon as the client leaves for a brief post-evaluation conference.
Complete client chart notes at this time. • Write the report as soon as possible after the evaluation and follow the report procedure:
1. Prepare the appropriate information to be included in the working folder, including the routing slip. Mark the appropriate evaluation date and date to be turned into supervisor (within 3 working days of initial evaluation).
2. Complete the report according to the Report Writing Procedure in this manual and include it in the working folder to be turned in to the supervisor. Always keep the report in the file.
3. Once the report has been proofread and corrected by the supervisor, make necessary corrections within 2 working days and submit a new printed copy in the working folder to the supervisor.
4
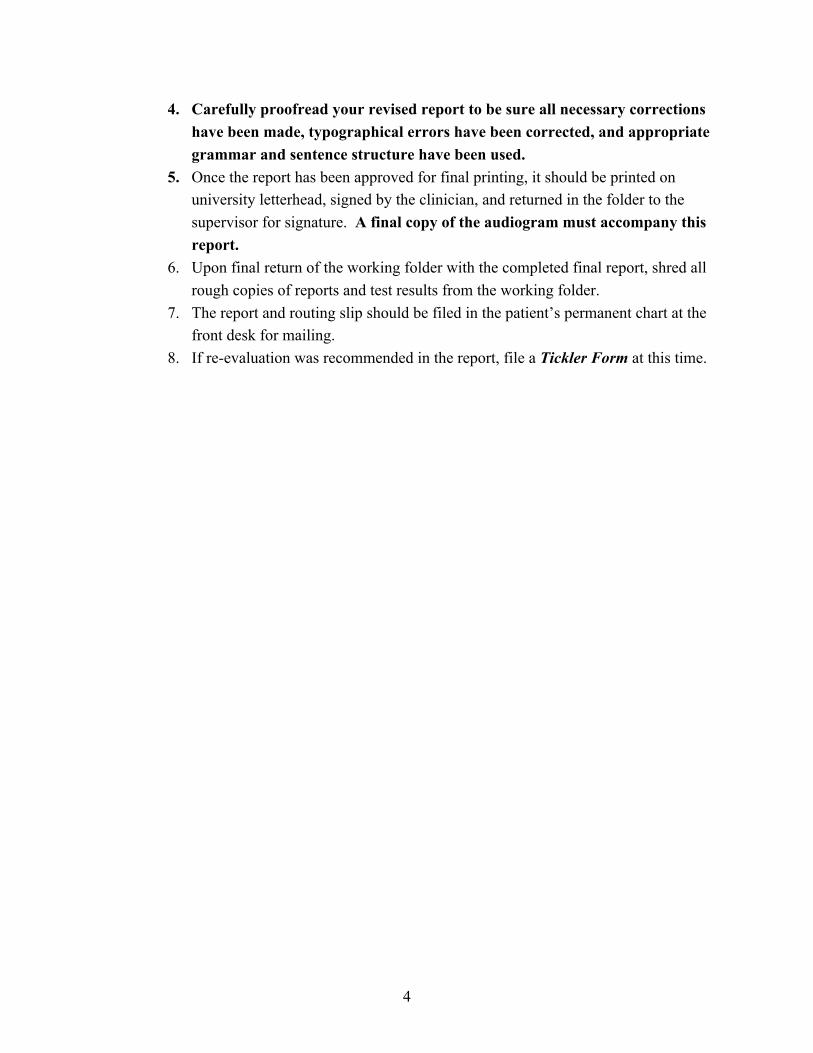
4. Carefully proofread your revised report to be sure all necessary corrections have been made, typographical errors have been corrected, and appropriate grammar and sentence structure have been used.
5. Once the report has been approved for final printing, it should be printed on university letterhead, signed by the clinician, and returned in the folder to the supervisor for signature. A final copy of the audiogram must accompany this report.
6. Upon final return of the working folder with the completed final report, shred all rough copies of reports and test results from the working folder.
7. The report and routing slip should be filed in the patient’s permanent chart at the front desk for mailing.
8. If re-evaluation was recommended in the report, file a Tickler Form at this time.

5
AUDIOLOGIC DIAGNOSTIC TEST PRESENTATION ORDER
Adults and Children 1. Otoscopic examination 2. Immittance
a. Tympanometry b. Acoustic Reflex thresholds
i. Ipsilateral thresholds ii. Contralateral thresholds
iii. Reflex decay 3. Otoacoustic emissions (OAE) 4. SRT 5. Pure-tone thresholds (air and bone) 6. Word identification 7. Additional tests as indicated or advised (e.g. ABR, Stenger, STAT, APD tests, etc.)

6
UNIVERSAL PRECAUTIONS
Purpose: Audiologists are likely to come in contact with bodily fluids or secretions that may be infected with viruses such as AIDS or Hepatitis B. Transmission through saliva and cerumen may be miniscule, however, oral lesions may produce blood in saliva and lesions in the ear canal or tympanic membrane may produce blood that mixes with cerumen. It is imperative to take the necessary precautions when we may come in contact with these substances. Protocol: GLOVES may be worn when handling hearing aids, and should always be worn when performing cerumen management. Gloves should also be worn in the presence of any infection or rash that is visible on the outer ear or mastoid area where hands may come in contact with the skin. Hands are to be washed once the gloves are removed. GOGGLES and MASKS are worn at the discretion of the audiologist. HAND-WASHING is paramount in any infection control plan. Hands should be washed before and after each patient. Antibacterial soap and warm water are to be used for sink washing. Antibacterial hand sanitizer may also be used between patients, but hands should still be washed before the first patient and after the last.

7
OTOSCOPIC EXAMINATION
The first step in any audiological testing should be an otoscopic examination. Appropriate sized specula should be selected for each client. When looking into the ear, the landmarks of the ear canal and tympanic membrane should be noted, including the cone of light and manubrium of the malleus. The color of the tympanic membrane should be pinkish-grey. The clinician should also be aware of P.E. tubes or perforations in the eardrum, as well as irritation, redness, bulging or retraction. Excessive cerumen in the canal can prohibit testing. In such situations the audiologist will perform cerumen management or refer the patient to his/her doctor before audiologic testing. Any anomalies in the ear canal or tympanic membrane should also be noted, and the patient should be referred if necessary. Video Otoscopy Procedure: Video otoscopy should be used in cases where the patient can tolerate the procedure. The monitor and video light should be turned on. The video light should be free of debris and cleaned with an alcohol prep pad prior to otoscopy. Interesting cases should be considered for capture to share with other students and faculty for learning purposes. The clinician should always remember to brace against the patient’s head to ensure that the otoscope does not slip if the patient should move suddenly. Hand-held Procedure: Hand-held otoscopy should be performed prior to all audiologic testing. A fully charged battery should be used with the otoscope to ensure the light is bright enough to visualize the deep ear canal and tympanic membrane. The clinician should again remember to brace against the patient’s head.

8
ACOUSTIC IMMITTANCE MEASUREMENTS
Currently, acoustic immittance testing is separated into two areas: tympanometry and acoustic reflex measures. Tympanometry is a measure of acoustic admittance in the ear canal in response to changes in air pressure. This can provide information as to the status of the tympanic membrane, middle ear, and Eustachian tube. Acoustic reflex measurements assess changes in acoustic admittance following contraction of the stapedius muscle. These measurements give further indications of the health of the middle ear, along with an assessment of the sensory and motor pathways of the acoustic reflex arc, namely the 7th and 8th cranial nerves. Acoustic immittance measurements should be completed using only calibrated equipment. Clinicians should make every attempt to utilize diagnostic equipment when possible, although screening tympanometers are available. Tympanometry Procedure: The equipment used to measure acoustic immittance includes a probe connected to the machine that will measure the changes in admittance. The probe contains a loudspeaker to produce the probe signal, a microphone to monitor the sound pressure level in the ear canal, and a port for the pneumatic device to alter air pressure. After performing an otoscopic exam and determining that the canals will accommodate the probe, the clinician will select the appropriately sized probe tip and obtain a hermetic seal of the external ear canal (note that the equipment will not begin measurement until a seal is maintained). The clinician will then start the machine to measure the changes in admittance. Criteria for normal measures - normative data is to be used as a guideline as results may vary based on equipment or patient variance
a. Tympanometry: - 226-Hz probe tone for infants greater than 2 months and 1000-Hz probe tone for
younger infants i. Tympanometric shape: description or type
ii. Peak compensated static acoustic admittance:
(Margolis & Hunter, 2000; Margolis et al., 2003) iii. Ear canal volume:
Passing criteria for volume of ear canal between probe tip and tympanic membrane
Adult (16+ years) 0.9-2.0 cc Child (4 to 16 years) 0.5-1.0 cc Infant (0–3 years) 0.3-0.9 cc
(Margolis & Hunter, 2000; Northern & Downs 2002)
Passing criteria for peak compensated static acoustic admittance
Adult (16+ years) 0.7-2.0 cc Child (4 to 16 years) 0.5-1.0 cc Infant (0–3 years) 0.3-0.9 cc
1000 Hz: 1.5-3.9 cc
9
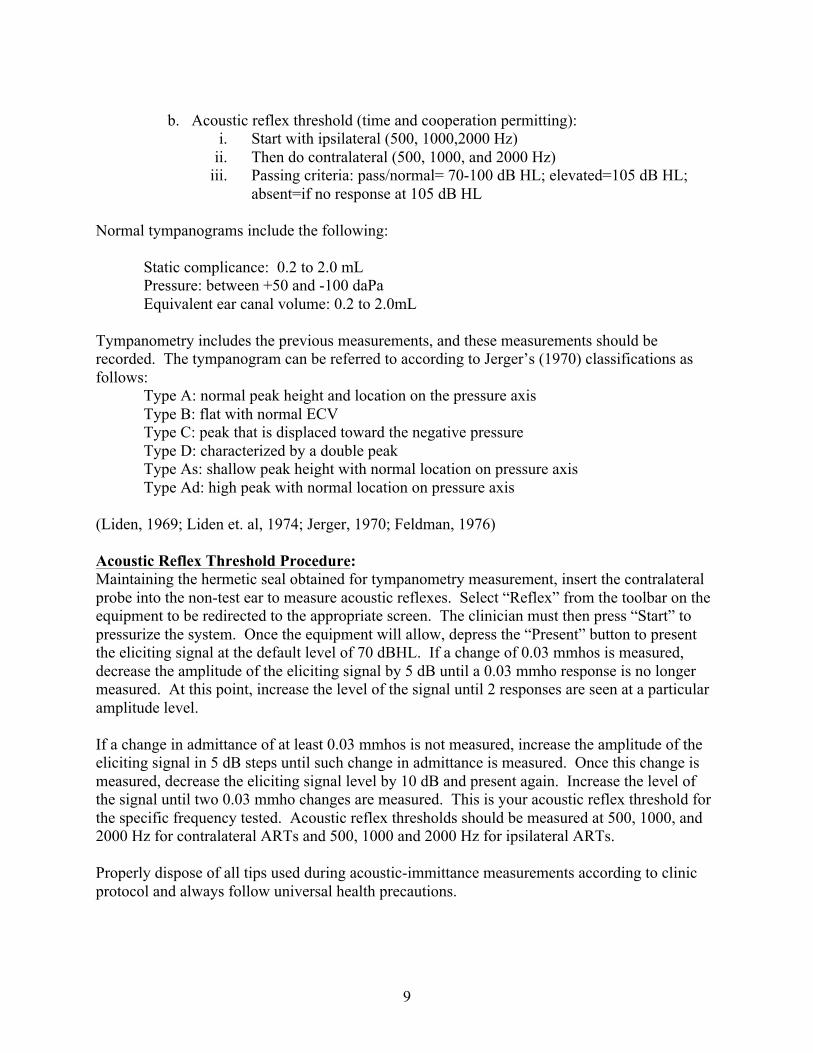
b. Acoustic reflex threshold (time and cooperation permitting):
i. Start with ipsilateral (500, 1000,2000 Hz) ii. Then do contralateral (500, 1000, and 2000 Hz)
iii. Passing criteria: pass/normal= 70-100 dB HL; elevated=105 dB HL; absent=if no response at 105 dB HL
Normal tympanograms include the following: Static complicance: 0.2 to 2.0 mL Pressure: between +50 and -100 daPa Equivalent ear canal volume: 0.2 to 2.0mL Tympanometry includes the previous measurements, and these measurements should be recorded. The tympanogram can be referred to according to Jerger’s (1970) classifications as follows: Type A: normal peak height and location on the pressure axis Type B: flat with normal ECV Type C: peak that is displaced toward the negative pressure Type D: characterized by a double peak Type As: shallow peak height with normal location on pressure axis Type Ad: high peak with normal location on pressure axis (Liden, 1969; Liden et. al, 1974; Jerger, 1970; Feldman, 1976) Acoustic Reflex Threshold Procedure: Maintaining the hermetic seal obtained for tympanometry measurement, insert the contralateral probe into the non-test ear to measure acoustic reflexes. Select “Reflex” from the toolbar on the equipment to be redirected to the appropriate screen. The clinician must then press “Start” to pressurize the system. Once the equipment will allow, depress the “Present” button to present the eliciting signal at the default level of 70 dBHL. If a change of 0.03 mmhos is measured, decrease the amplitude of the eliciting signal by 5 dB until a 0.03 mmho response is no longer measured. At this point, increase the level of the signal until 2 responses are seen at a particular amplitude level. If a change in admittance of at least 0.03 mmhos is not measured, increase the amplitude of the eliciting signal in 5 dB steps until such change in admittance is measured. Once this change is measured, decrease the eliciting signal level by 10 dB and present again. Increase the level of the signal until two 0.03 mmho changes are measured. This is your acoustic reflex threshold for the specific frequency tested. Acoustic reflex thresholds should be measured at 500, 1000, and 2000 Hz for contralateral ARTs and 500, 1000 and 2000 Hz for ipsilateral ARTs. Properly dispose of all tips used during acoustic-immittance measurements according to clinic protocol and always follow universal health precautions.
10
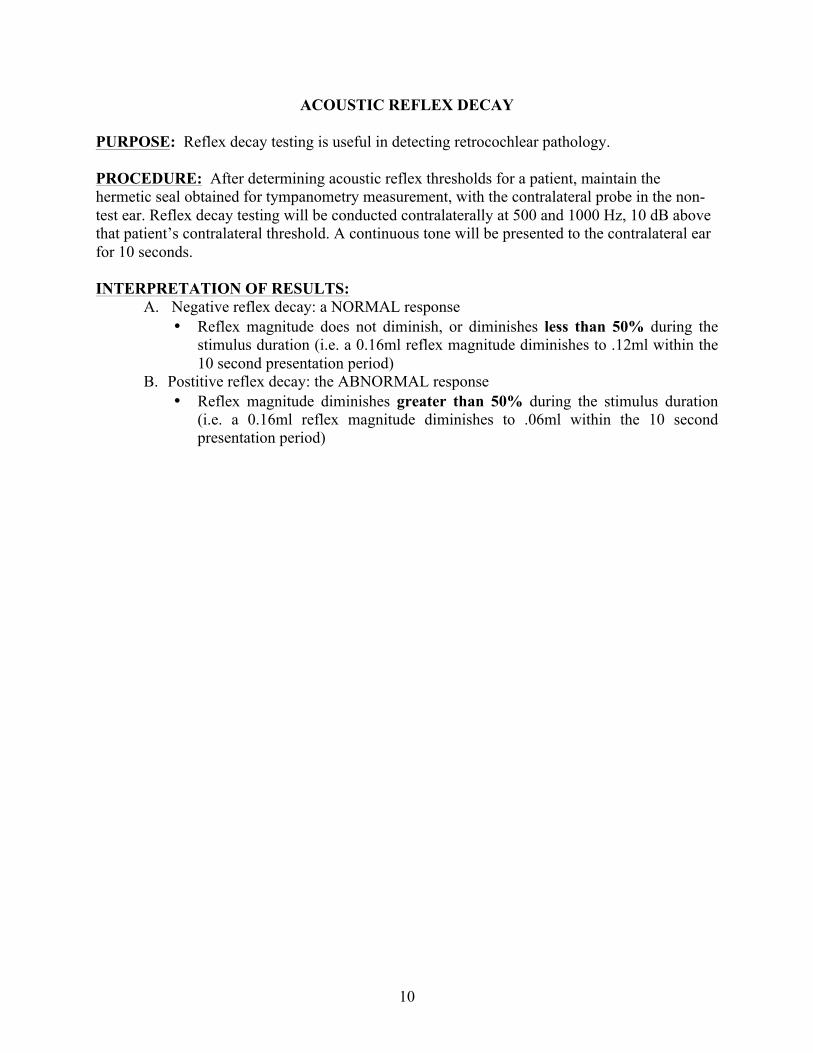
ACOUSTIC REFLEX DECAY
PURPOSE: Reflex decay testing is useful in detecting retrocochlear pathology. PROCEDURE: After determining acoustic reflex thresholds for a patient, maintain the hermetic seal obtained for tympanometry measurement, with the contralateral probe in the non-test ear. Reflex decay testing will be conducted contralaterally at 500 and 1000 Hz, 10 dB above that patient’s contralateral threshold. A continuous tone will be presented to the contralateral ear for 10 seconds. INTERPRETATION OF RESULTS:
A. Negative reflex decay: a NORMAL response • Reflex magnitude does not diminish, or diminishes less than 50% during the
stimulus duration (i.e. a 0.16ml reflex magnitude diminishes to .12ml within the 10 second presentation period)
B. Postitive reflex decay: the ABNORMAL response • Reflex magnitude diminishes greater than 50% during the stimulus duration
(i.e. a 0.16ml reflex magnitude diminishes to .06ml within the 10 second presentation period)

11
EVOKED OTOACOUSTIC EMISSION TESTING
PURPOSE: The clinical applications of otoacoustic emissions (OAEs) include, but are certainly not limited to: newborn hearing screenings, testing pediatric populations not capable of behavioral testing, use with difficult to test populations, monitoring ototoxicity, assessing suspected functional hearing losses, and assessing suspected CAPD cases. OAEs may show early signs of cochlear dysfunction prior to the audiogram reflecting changes. POLICY: Universal health precautions should be followed throughout the test battery to ensure patient and clinician safety and health. PROCEDURE: Prior to testing a patient, calibrate the OAE measurement system following the prompts on the computer screen. Following calibration, select the appropriate type of OAE to measure from the menu toolbar at the top of the screen. The clinician will select the appropriate sized eartip for the patient and insert the probe into the patient’s ear. A hermetic seal is not required, but a more snug fit will typically yield better results. When the probe is seated in the patient’s ear canal, the clinician will quiet the patient and any other observers in the room prior to beginning measurement. A quiet room is essential to fast and accurate measurement of OAEs. The specific procedures for transient-evoked OAEs (TEOAE) and distortion product OAEs (DPOAEs) are as follows: TEOAE Select TEOAEs from the mode menu. Check that the stimulus level is 80 dB and begin measurement by selecting “Start” from the TEOAE screen. The equipment will automatically check the probe fit prior to presenting the transient stimuli. Repeat the procedure in the opposite ear. To measure contralateral TEOAE suppression, use an insert earphone and the GSI-61 audiometer. To measure, present 70 dB HL white noise to the ear without the OAE probe and begin measuring TEOAEs again by selecting start. TEOAEs without suppression should always be measured first. Repeat for each ear. DPOAE Select DPOAE from the mode menu and then select DP-Gram to be redirected to the correct screen. Ensure that the test levels are as follows: f1 level: 65 dB, frequency: 1500 Hz, SN-Ratio Stop: 6.0 dB. Begin measurement by selecting “Start” from the DPOAE screen. The equipment will again check the probe fit automatically and alert you to a poor fit that should be corrected prior to continuing with testing.
12
SPEECH RECOGNITION THRESHOLD PROCEDURE
Test Material: The standard test materials used for SRT testing are a closed set of spondee words. Recorded material or monitored live voice can be used to obtain the speech threshold. Recorded presentation of the test material is the preferred procedure (ASHA, 2006). When monitored live voice is used, each spondaic word should peak at 0 dB on the VU-meter. Response: When obtaining the SRT, the response mode is the repetition of the stimulus word. For patients where a verbal response is not possible, alternate response modes are necessary. Examples of alternate modes of response are picture pointing, signing, or pointing to body parts. Familiarization: The client must first be familiarized with all of the words that will be used during testing. The test list can be read to the client either face-to-face or through the audiometer. All visual cues should be eliminated. If the client has any problems understanding or responding to any spondaic word, that word should be eliminated from the test list. Articulation errors in the words can be considered correct responses, as long as the responses are consistent. Threshold determination: Students should be familiar with the ASHA recommended procedure as well as the bracketing procedure. Students should also be able to perform speech audiometry with both live and recorded speech material. ASHA Recommended Preliminary Phase
a. Present one spondaic word at a hearing level 30-40 dB above the estimated SRT. If they do not respond correctly to the first word, increase the hearing level in 20 dB steps until a correct response is obtained. Then begin going down in 10 dB steps after each correct response.
b. When one word has been missed, present a second word at the same level. Continue going down in 10 dB steps until two consecutive words are missed at the same level.
c. Increase the hearing level by 10 dB (above the level that two words were missed. This is the starting level.
2. Test Phase a. Present two words at the starting level and at each 2 dB decrease in hearing level. b. Continue this process if five out of the first six words are repeated correctly. If
this is not obtained, increase the starting level by 4-10 dB. c. The process of decreasing the hearing level is complete when the client responds
incorrectly to five of the last six words presented. 3. Calculation of threshold
a. To determine the threshold, subtract the total number of correct responses from the starting level and add a correction factor of 1.

13
(An acceptable alternative is to present five words in 5dB steps. If five words are presented in 5dB steps, then the descending series is terminated when all words at a single intensity are not correctly recognized.) Bracketing Method Begin testing at a hearing level 30-40 dB above the client’s estimated SRT. The tone levels of the next presentations will depend on the preceding response. After a failure to respond to a signal, the intensity is raised in 5 dB steps until a response occurs. After a correct response to the stimulus, decrease the intensity by 10 dB and begin another ascending series. Continue until a threshold is determined. Threshold is the lowest level that a person responds at least half of a series of ascending trials with a minimum of three responses required at a single level. Masking: Appropriate masking procedures must be used to prevent the non-test’s participation during speech audiometry.

14
PURE-TONE AIR CONDUCTION TESTING
Instructions: ASHA (2006) recommendations will be adopted. Instruct patient on how they should respond (i.e., raise hand, push button) to the stimulus. Let them know that they should respond even if the stimulus is very faint. Each ear will be tested separately. If, at any time during the test, the clinician feels the patient’s responses are unreliable, the patient should be reinstructed. Students must be proficient in using both inserts as well as headphones during air conduction testing. Familiarization: Familiarize the patient by presenting a 1000 Hz tone at a level of 30 dB HL. If the patient responds, begin threshold determination. If the patient does not respond, present a tone at 50 dB HL and continue to increase by 20 dB until the patient does respond. After they respond, begin threshold determination. Frequencies: Test octave intervals from 250 to 8000 Hz and also include 3000 and 6000 Hz. Other interoctave frequencies should be tested when there is a 20 dB or more difference between adjacent octaves. Test Order: Begin testing the right ear first unless the patient reports that they hear better from one ear. Then test the better ear first. Frequencies should be tested in the following order: 1000, 2000, 4000, 6000, 8000, 1000, 500, 250 Hz, although modifications may be made based on patient cooperation and clinician impressions of the patient. Signal Duration: The test signal should be presented for 3-4 pulses. The time between presentations should be at least as long as the signal and vary from one presentation to the next so that the patient does not become accustomed to a testing pattern. Threshold Determination: Threshold determination should begin 10 dB below the level of the listener’s response to the familiarization presentation. The tone levels of the next presentations will depend on the preceding response. A modified Hughson-Westlake approach will be used for threshold determination. When the patient responds correctly to a presentation, the intensity will be decreased in 10 dB steps until the patient fails to respond. When the patient does not respond, the intensity will be increased in 5 dB steps in an ascending trial until they do respond again. Hearing Threshold: Threshold is the lowest level that a person responds at least half of a series of ascending trials with a minimum of three responses required at a single level.
15
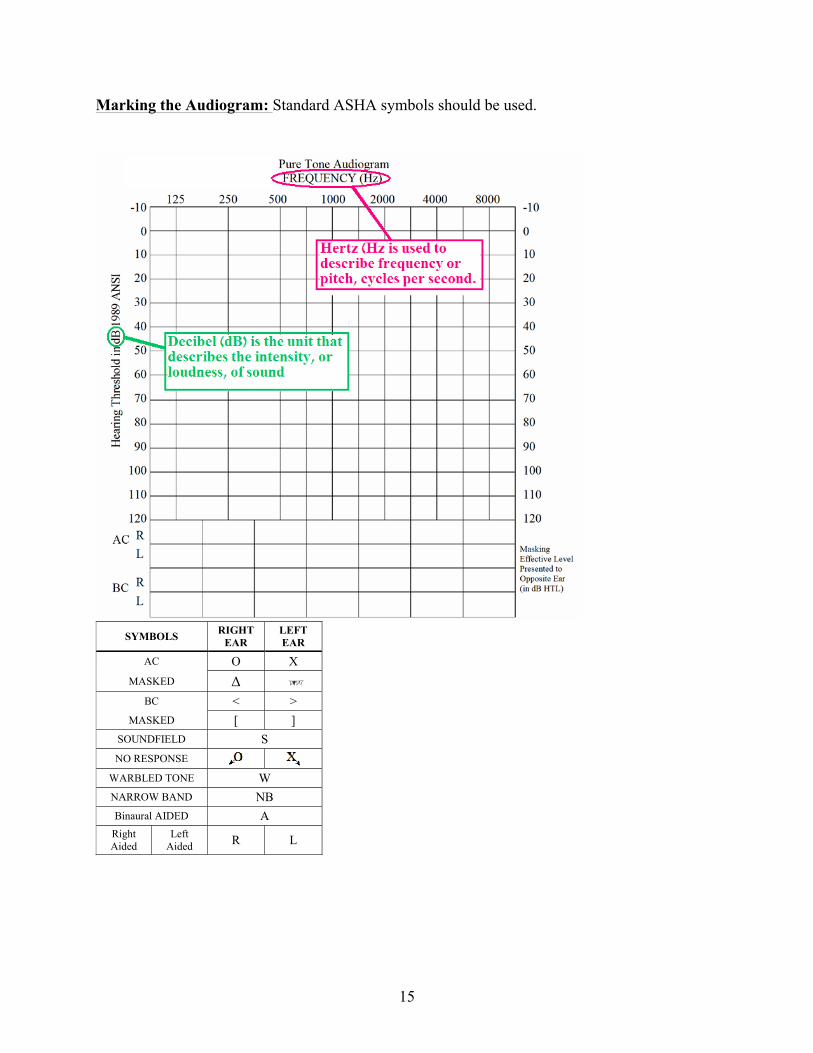
Marking the Audiogram: Standard ASHA symbols should be used.
SYMBOLS RIGHT EAR
LEFT EAR
AC O X MASKED Δ
BC < > MASKED [ ]
SOUNDFIELD S NO RESPONSE
WARBLED TONE W NARROW BAND NB Binaural AIDED A
Right Aided
Left Aided R L
16
PURE-TONE BONE CONDUCTION TESTING
Bone conduction thresholds will be obtained in all cases when air conduction responses occur at 15 dB or greater. Preparation: ASHA (2006) recommendations will be adopted. Place the bone oscillator on the patient’s mastoid of the ear to be tested. If masking will be used, place the supra-aural earphone or insert earphone on the contralateral ear. Instructions: Instruct patient on how they should respond (i.e., raise hand, push button) to the stimulus. Let them know that they should respond even if the stimulus is very faint Familiarization: Familiarize the patient by presenting a 1000 Hz tone at a level of 20dB HL above the AC threshold of the better ear. If the patient responds, begin threshold determination. If the patient does not respond, present a tone at 30dB HL above the AC threshold of the better ear. Continue to increase by 20 dB until the patient does respond. After they respond, begin threshold determination. Frequencies Octave intervals from 250 to 4000 Hz will be tested when meeting the above criteria. Test Order: Begin testing the better ear as shown by the audiogram. Frequencies should be tested in the following order: 1000, 2000, 4000, 500, and 250 Hz. Signal Duration: The test signal should be presented for 3-4 pulses. The time between presentations should be at least as long as the signal and vary from one presentation to the next. Threshold Determination: Threshold determination should begin 10 dB below the level of the listener’s response to the familiarization presentation. The tone levels of the next presentation will depend on the preceding response. After a failure to respond to a signal, the intensity is raised in 5-dB steps until a response occurs. After a correct response to the signal, decrease the intensity by 10 dB and begin another ascending series. Continue until a threshold is determined. Hearing Threshold: Threshold is the lowest level that a person responds at least half of a series of ascending trials with a minimum of three responses required at a single level.
17
CLINICAL MASKING
The Need for Masking: Masking must be used in cases where the signal presented to the test ear has the potential for crossover and can be heard in the non-test ear. (Katz, J., and Lezynski, J., 2002) Modified Hood (Plateau) Method of Masking First obtain an unmasked pure-tone threshold. Introduce a masking noise to the non-test ear at initial minimum masking level, typically 10 dB above the threshold of the non-test ear. The level of the tone or noise is increased by 5 dB. If there is a response to the tone, the level of the noise is increased by 5 dB. If there is no response to the signal, the level of the tone is raised in 5 dB steps until a response is obtained. A plateau is reached when the level of the noise can be raised 15 to 20 dB without an upward shift in the threshold of the tone. To account for the occlusion effect using headphones or insert earphones, add the following to the minimum masking levels:
• 15 dB at 250 Hz • 10 dB at 500 Hz • 5 dB at 1000 Hz
Applications: Masking must be used as needed/as possible in the following situations:
1. Air conduction pure tone testing 2. Bone conduction pure tone testing 3. Speech audiometry
18
WORD RECOGNITION TESTING
Test Material: The standard test materials are open set monosyllabic words; therefore familiarization should not be included. The two most popular word lists are the Central Institute for the Deaf (CID) W-22 and the Northwestern University Test No. 6 (NU-6) (Wiley, T., et al, 1995). Either recorded material or monitored live voice can be used to obtain the word recognition score. Recorded presentation of the test material is the preferred procedure (ASHA, 2006). When monitored live voice is used, each word should peak at 0 dB on the VU-meter. Response Mode: When obtaining the word recognition score, the response mode is the repetition of the stimulus word at the end of a carrier phrase. Level of Presentation: The presentation level should be at the person’s most comfortable loudness level (MCL). Most clinicians use a 40 SL in reference to the SRT presentation level or an 80 dB signal with 50 dB of masking. Both techniques have been shown to be clinically effective. These methods should not be interpreted as a PB-Max score because a performance intensity function has not been performed.
19
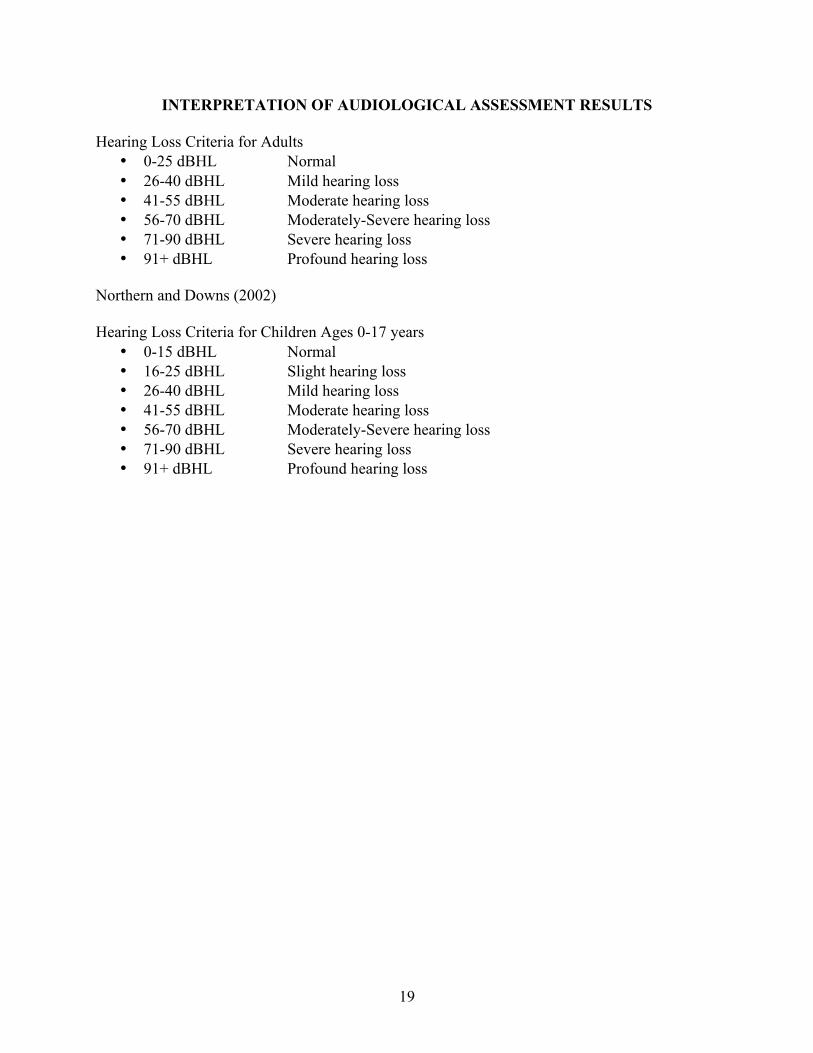
INTERPRETATION OF AUDIOLOGICAL ASSESSMENT RESULTS
Hearing Loss Criteria for Adults • 0-25 dBHL Normal • 26-40 dBHL Mild hearing loss • 41-55 dBHL Moderate hearing loss • 56-70 dBHL Moderately-Severe hearing loss • 71-90 dBHL Severe hearing loss • 91+ dBHL Profound hearing loss
Northern and Downs (2002) Hearing Loss Criteria for Children Ages 0-17 years
• 0-15 dBHL Normal • 16-25 dBHL Slight hearing loss • 26-40 dBHL Mild hearing loss • 41-55 dBHL Moderate hearing loss • 56-70 dBHL Moderately-Severe hearing loss • 71-90 dBHL Severe hearing loss • 91+ dBHL Profound hearing loss
20
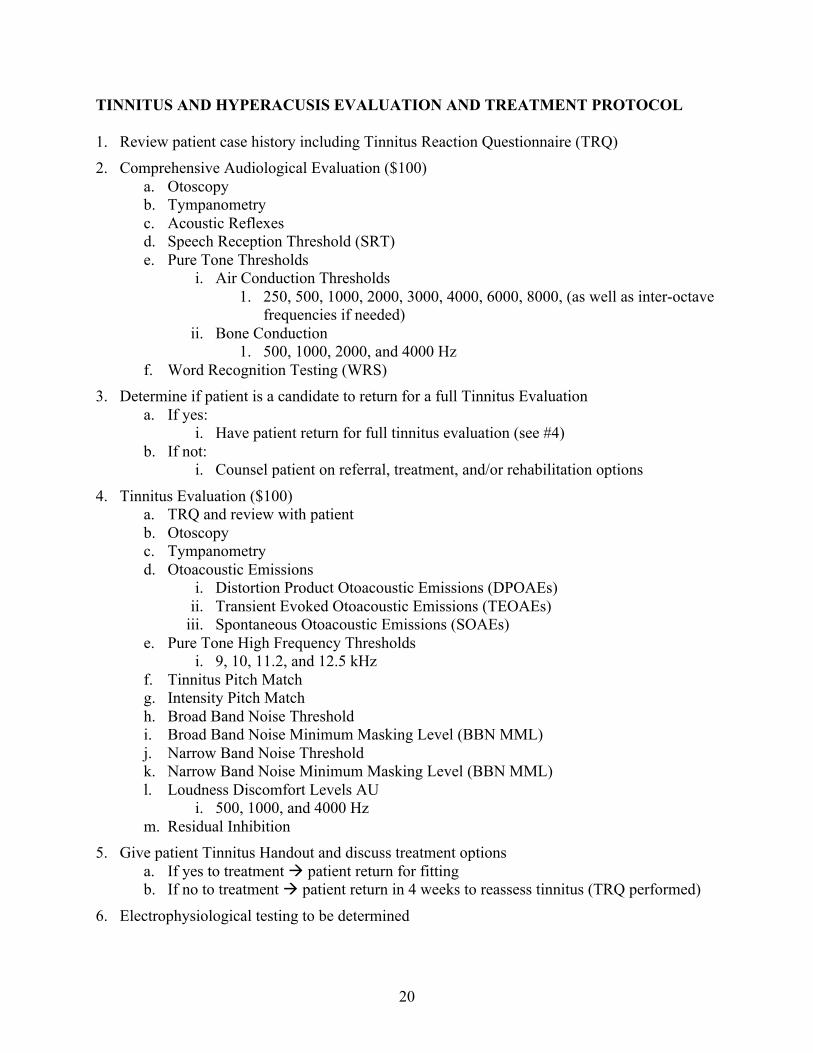
TINNITUS AND HYPERACUSIS EVALUATION AND TREATMENT PROTOCOL 1. Review patient case history including Tinnitus Reaction Questionnaire (TRQ) 2. Comprehensive Audiological Evaluation ($100)
a. Otoscopy b. Tympanometry c. Acoustic Reflexes d. Speech Reception Threshold (SRT) e. Pure Tone Thresholds
i. Air Conduction Thresholds 1. 250, 500, 1000, 2000, 3000, 4000, 6000, 8000, (as well as inter-octave
frequencies if needed) ii. Bone Conduction
1. 500, 1000, 2000, and 4000 Hz f. Word Recognition Testing (WRS)
3. Determine if patient is a candidate to return for a full Tinnitus Evaluation a. If yes:
i. Have patient return for full tinnitus evaluation (see #4) b. If not:
i. Counsel patient on referral, treatment, and/or rehabilitation options
4. Tinnitus Evaluation ($100) a. TRQ and review with patient b. Otoscopy c. Tympanometry d. Otoacoustic Emissions
i. Distortion Product Otoacoustic Emissions (DPOAEs) ii. Transient Evoked Otoacoustic Emissions (TEOAEs)
iii. Spontaneous Otoacoustic Emissions (SOAEs) e. Pure Tone High Frequency Thresholds
i. 9, 10, 11.2, and 12.5 kHz f. Tinnitus Pitch Match g. Intensity Pitch Match h. Broad Band Noise Threshold i. Broad Band Noise Minimum Masking Level (BBN MML) j. Narrow Band Noise Threshold k. Narrow Band Noise Minimum Masking Level (BBN MML) l. Loudness Discomfort Levels AU
i. 500, 1000, and 4000 Hz m. Residual Inhibition
5. Give patient Tinnitus Handout and discuss treatment options a. If yes to treatment à patient return for fitting b. If no to treatment à patient return in 4 weeks to reassess tinnitus (TRQ performed)
6. Electrophysiological testing to be determined

21
HEARING SCREENING Including Pure-tone and Immittance Screening
PURPOSE: The purpose of an identification audiometry program is to detect as rapidly and efficiently as possible, hearing losses which may be physically, educationally, and socially handicapping to a child or adult. Hearing screening should include a manually administered individual pure-tone air-conduction procedure as well as acoustic immittance screening of middle-ear function for children. The procedures, which are outlined below for both pure-tone air conduction and immittance screening, are based upon ASHA guidelines (ASHA, 1975, 1978, 2002, 2006).
Immittance Screening
PROCEDURE: Perform otoscopy to be sure the ear canal is free of debris and excessive cerumen. Using the immittance bridge or screening tympanometer, perform tympanometry and review results. Perform acoustic reflex measures for ipsilateral and contralateral conditions. Reflexes are considered present when measured at 85, 95, or 105 dB HL at 1000 Hz. Remember that a patent P.E. tube will ordinarily yield measures of large ear canal volume, low compliance, and absent acoustic reflexes. PASS, RETEST, REFERRAL CRITERIA: See ASHA guidelines. ASHA GUIDELINES FOR TYMPANOMETRY SCREENING PROCEDURE:
1. Practice universal precautions. 2. When possible, obtain a case history through verbal report of parent or guardian. 3. Inspection of outer ears to identify risk factors for outer and middle ear disease. 4. Otoscopy 5. Perform tympanometry 6. Pass/Refer Criteria
a. Pass if no abnormal results exist for test criteria in both ears b. Refer for medical examination (family doctor, pediatrician, ENT) of the ears if:
• Ear drainage is observed • Visual identification of previously undetected natural defect of ear
occurs. • Ear canal abnormalities such as obstruction, impacted cerumen or
foreign bodies, blood or other secretions, stenosis or atresia, otitis externa, and perforations or other abnormalities of the tympanic membrane are apparent.
• Ear canal volume (ECV) is greater than 1.0 ml and is accompanied by a flat (Type B) tympanogram (at risk for TM perforation). DO NOT refer

22
if a PE tube is present or a perforation of the TM is under management of a physician.
c. Refer for a re-screening in 6 to 8 weeks form date of initial screen if the test results are outside of the test criteria presented below.
• Recommend immediate medical evaluation for the child when the re-screening results continue to indicate abnormality.
Tympanometric Re-screen Criteria: Peak admittance is <0.2 mmho for infants, and <0.3 mmho for children one year to school age OR Tympanometric Width (TW), also referred to as “gradient”, is >235 daPa for infants, and >200 daPa for children one year to school age.
Pure-tone Screening PROCEDURE: Screenings may be performed using a diagnostic audiometer or a screening audiometer. Instruct the patient as to what procedures you will be performing and how you would like the patient to respond. Frequencies to be tested for adults are 1000, 2000, 3000, and 4000 Hz, and 1000, 2000, and 4000 Hz for children. Tones are presented at 20 dB HL in each ear. PASS/FAIL CRITERIA: Response at all frequencies at 20 dB HL constitutes a pass of the screening. Failure to respond at even one frequency in one ear constitutes failure of the screening test and indicates the need for further testing. Failure of the screening does not confirm a hearing loss but merely indicates the possibility of a problem that needs further investigation. RESCREENING: All failures should be re-screened, preferably within the same session in which they failed, but definitely within one week after the initial screening. Re-screening includes removing the earphones (if accomplished during the same session) and carefully re-instructing about listening for the softest detectable tone and the response task.
23
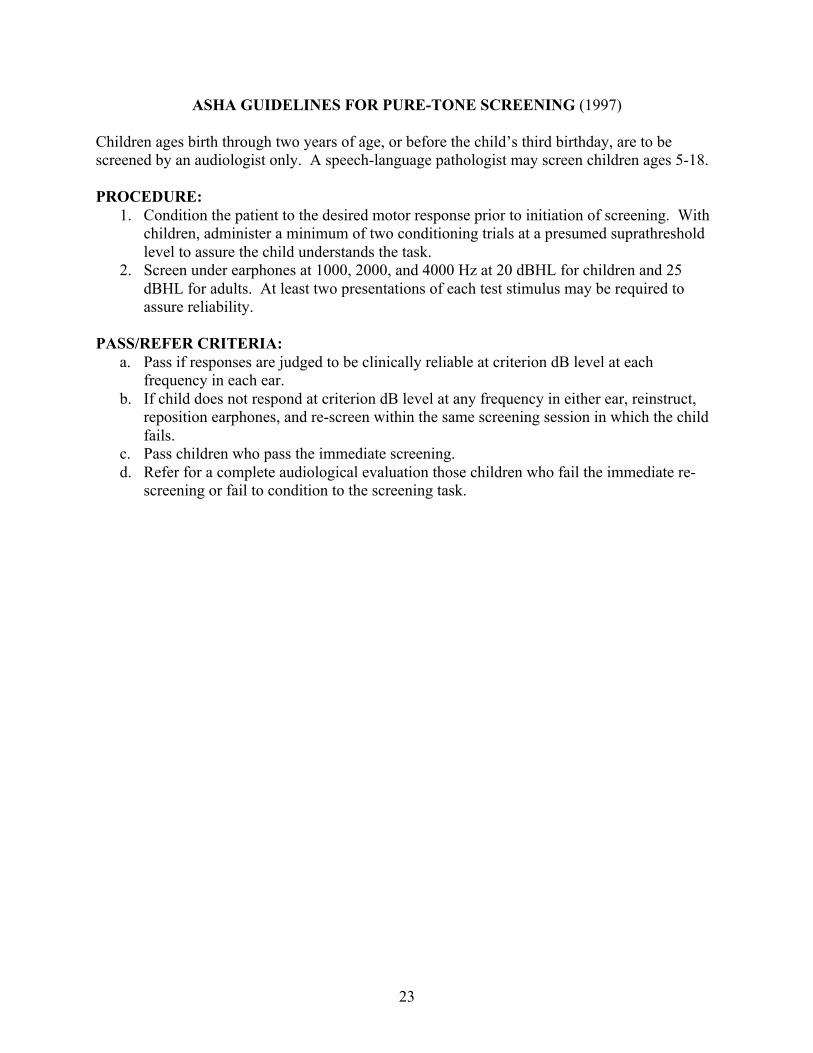
ASHA GUIDELINES FOR PURE-TONE SCREENING (1997) Children ages birth through two years of age, or before the child’s third birthday, are to be screened by an audiologist only. A speech-language pathologist may screen children ages 5-18. PROCEDURE:
1. Condition the patient to the desired motor response prior to initiation of screening. With children, administer a minimum of two conditioning trials at a presumed suprathreshold level to assure the child understands the task.
2. Screen under earphones at 1000, 2000, and 4000 Hz at 20 dBHL for children and 25 dBHL for adults. At least two presentations of each test stimulus may be required to assure reliability.
PASS/REFER CRITERIA:
a. Pass if responses are judged to be clinically reliable at criterion dB level at each frequency in each ear.
b. If child does not respond at criterion dB level at any frequency in either ear, reinstruct, reposition earphones, and re-screen within the same screening session in which the child fails.
c. Pass children who pass the immediate screening. d. Refer for a complete audiological evaluation those children who fail the immediate re-
screening or fail to condition to the screening task.
24
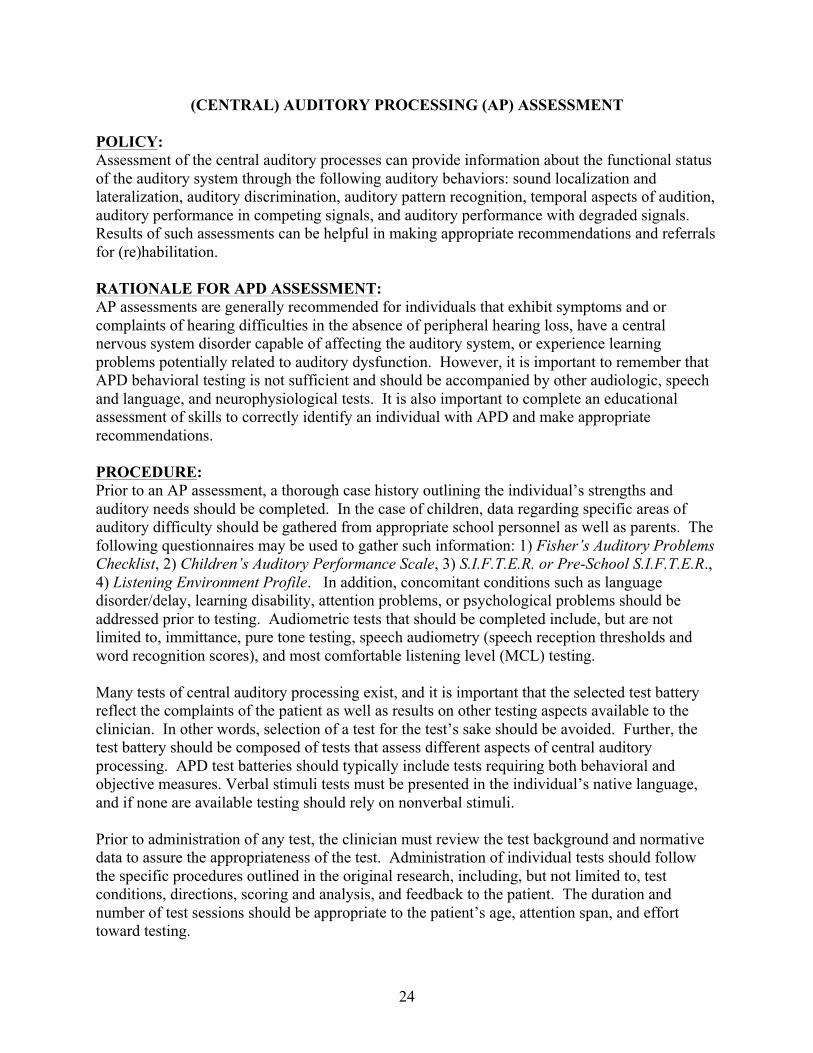
(CENTRAL) AUDITORY PROCESSING (AP) ASSESSMENT
POLICY: Assessment of the central auditory processes can provide information about the functional status of the auditory system through the following auditory behaviors: sound localization and lateralization, auditory discrimination, auditory pattern recognition, temporal aspects of audition, auditory performance in competing signals, and auditory performance with degraded signals. Results of such assessments can be helpful in making appropriate recommendations and referrals for (re)habilitation. RATIONALE FOR APD ASSESSMENT: AP assessments are generally recommended for individuals that exhibit symptoms and or complaints of hearing difficulties in the absence of peripheral hearing loss, have a central nervous system disorder capable of affecting the auditory system, or experience learning problems potentially related to auditory dysfunction. However, it is important to remember that APD behavioral testing is not sufficient and should be accompanied by other audiologic, speech and language, and neurophysiological tests. It is also important to complete an educational assessment of skills to correctly identify an individual with APD and make appropriate recommendations. PROCEDURE: Prior to an AP assessment, a thorough case history outlining the individual’s strengths and auditory needs should be completed. In the case of children, data regarding specific areas of auditory difficulty should be gathered from appropriate school personnel as well as parents. The following questionnaires may be used to gather such information: 1) Fisher’s Auditory Problems Checklist, 2) Children’s Auditory Performance Scale, 3) S.I.F.T.E.R. or Pre-School S.I.F.T.E.R., 4) Listening Environment Profile. In addition, concomitant conditions such as language disorder/delay, learning disability, attention problems, or psychological problems should be addressed prior to testing. Audiometric tests that should be completed include, but are not limited to, immittance, pure tone testing, speech audiometry (speech reception thresholds and word recognition scores), and most comfortable listening level (MCL) testing. Many tests of central auditory processing exist, and it is important that the selected test battery reflect the complaints of the patient as well as results on other testing aspects available to the clinician. In other words, selection of a test for the test’s sake should be avoided. Further, the test battery should be composed of tests that assess different aspects of central auditory processing. APD test batteries should typically include tests requiring both behavioral and objective measures. Verbal stimuli tests must be presented in the individual’s native language, and if none are available testing should rely on nonverbal stimuli. Prior to administration of any test, the clinician must review the test background and normative data to assure the appropriateness of the test. Administration of individual tests should follow the specific procedures outlined in the original research, including, but not limited to, test conditions, directions, scoring and analysis, and feedback to the patient. The duration and number of test sessions should be appropriate to the patient’s age, attention span, and effort toward testing.
25
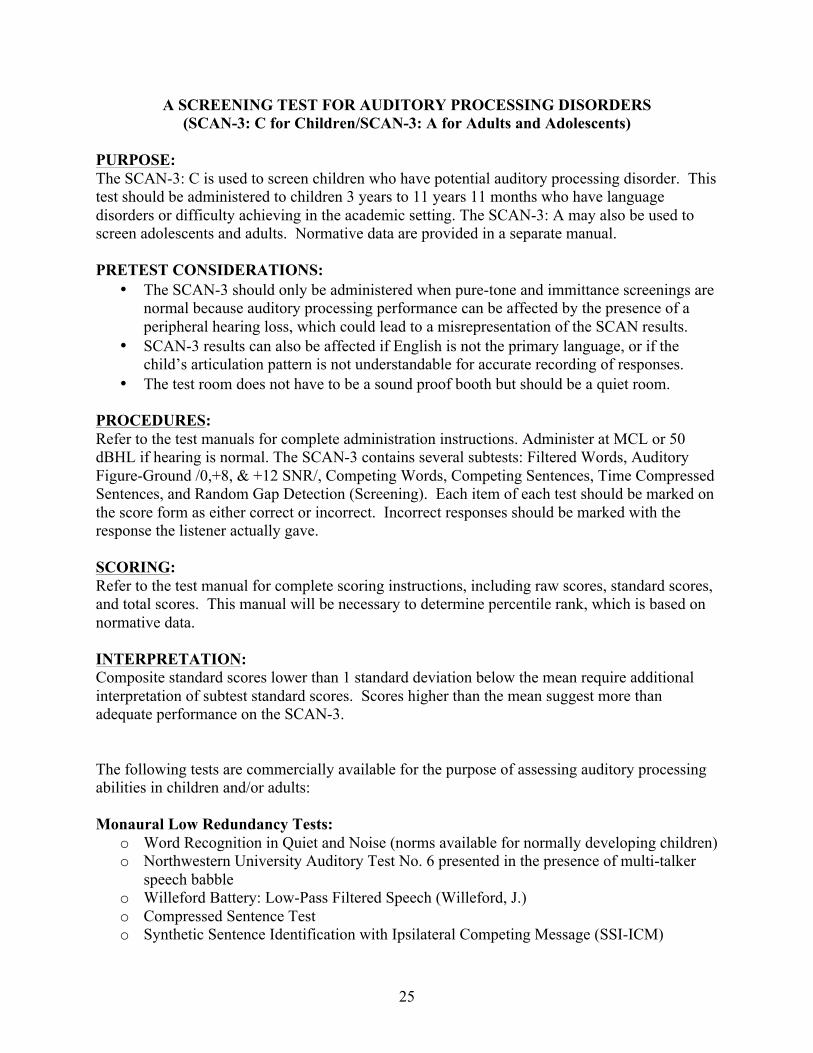
A SCREENING TEST FOR AUDITORY PROCESSING DISORDERS (SCAN-3: C for Children/SCAN-3: A for Adults and Adolescents)
PURPOSE: The SCAN-3: C is used to screen children who have potential auditory processing disorder. This test should be administered to children 3 years to 11 years 11 months who have language disorders or difficulty achieving in the academic setting. The SCAN-3: A may also be used to screen adolescents and adults. Normative data are provided in a separate manual. PRETEST CONSIDERATIONS:
• The SCAN-3 should only be administered when pure-tone and immittance screenings are normal because auditory processing performance can be affected by the presence of a peripheral hearing loss, which could lead to a misrepresentation of the SCAN results.
• SCAN-3 results can also be affected if English is not the primary language, or if the child’s articulation pattern is not understandable for accurate recording of responses.
• The test room does not have to be a sound proof booth but should be a quiet room. PROCEDURES: Refer to the test manuals for complete administration instructions. Administer at MCL or 50 dBHL if hearing is normal. The SCAN-3 contains several subtests: Filtered Words, Auditory Figure-Ground /0,+8, & +12 SNR/, Competing Words, Competing Sentences, Time Compressed Sentences, and Random Gap Detection (Screening). Each item of each test should be marked on the score form as either correct or incorrect. Incorrect responses should be marked with the response the listener actually gave. SCORING: Refer to the test manual for complete scoring instructions, including raw scores, standard scores, and total scores. This manual will be necessary to determine percentile rank, which is based on normative data. INTERPRETATION: Composite standard scores lower than 1 standard deviation below the mean require additional interpretation of subtest standard scores. Scores higher than the mean suggest more than adequate performance on the SCAN-3. The following tests are commercially available for the purpose of assessing auditory processing abilities in children and/or adults: Monaural Low Redundancy Tests:
o Word Recognition in Quiet and Noise (norms available for normally developing children) o Northwestern University Auditory Test No. 6 presented in the presence of multi-talker
speech babble o Willeford Battery: Low-Pass Filtered Speech (Willeford, J.) o Compressed Sentence Test o Synthetic Sentence Identification with Ipsilateral Competing Message (SSI-ICM)
26
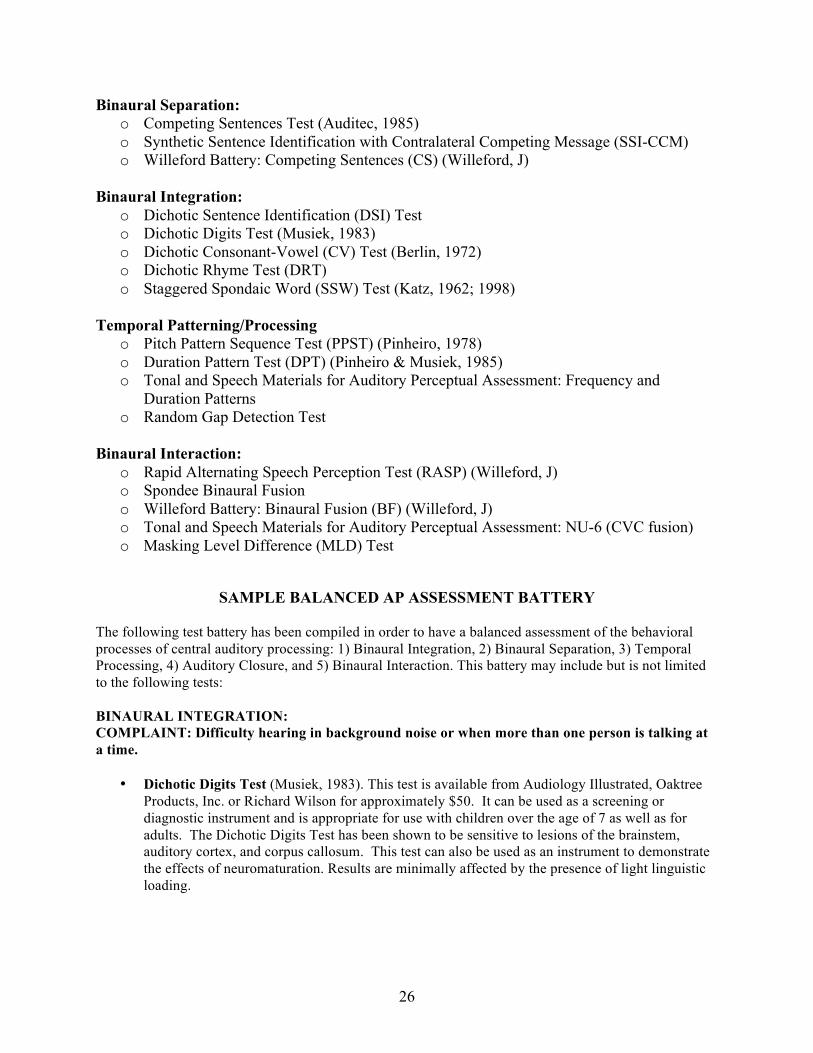
Binaural Separation: o Competing Sentences Test (Auditec, 1985) o Synthetic Sentence Identification with Contralateral Competing Message (SSI-CCM) o Willeford Battery: Competing Sentences (CS) (Willeford, J)
Binaural Integration:
o Dichotic Sentence Identification (DSI) Test o Dichotic Digits Test (Musiek, 1983) o Dichotic Consonant-Vowel (CV) Test (Berlin, 1972) o Dichotic Rhyme Test (DRT) o Staggered Spondaic Word (SSW) Test (Katz, 1962; 1998)
Temporal Patterning/Processing o Pitch Pattern Sequence Test (PPST) (Pinheiro, 1978) o Duration Pattern Test (DPT) (Pinheiro & Musiek, 1985) o Tonal and Speech Materials for Auditory Perceptual Assessment: Frequency and
Duration Patterns o Random Gap Detection Test
Binaural Interaction:
o Rapid Alternating Speech Perception Test (RASP) (Willeford, J) o Spondee Binaural Fusion o Willeford Battery: Binaural Fusion (BF) (Willeford, J) o Tonal and Speech Materials for Auditory Perceptual Assessment: NU-6 (CVC fusion) o Masking Level Difference (MLD) Test
SAMPLE BALANCED AP ASSESSMENT BATTERY
The following test battery has been compiled in order to have a balanced assessment of the behavioral processes of central auditory processing: 1) Binaural Integration, 2) Binaural Separation, 3) Temporal Processing, 4) Auditory Closure, and 5) Binaural Interaction. This battery may include but is not limited to the following tests: BINAURAL INTEGRATION: COMPLAINT: Difficulty hearing in background noise or when more than one person is talking at a time.
• Dichotic Digits Test (Musiek, 1983). This test is available from Audiology Illustrated, Oaktree Products, Inc. or Richard Wilson for approximately $50. It can be used as a screening or diagnostic instrument and is appropriate for use with children over the age of 7 as well as for adults. The Dichotic Digits Test has been shown to be sensitive to lesions of the brainstem, auditory cortex, and corpus callosum. This test can also be used as an instrument to demonstrate the effects of neuromaturation. Results are minimally affected by the presence of light linguistic loading.
27
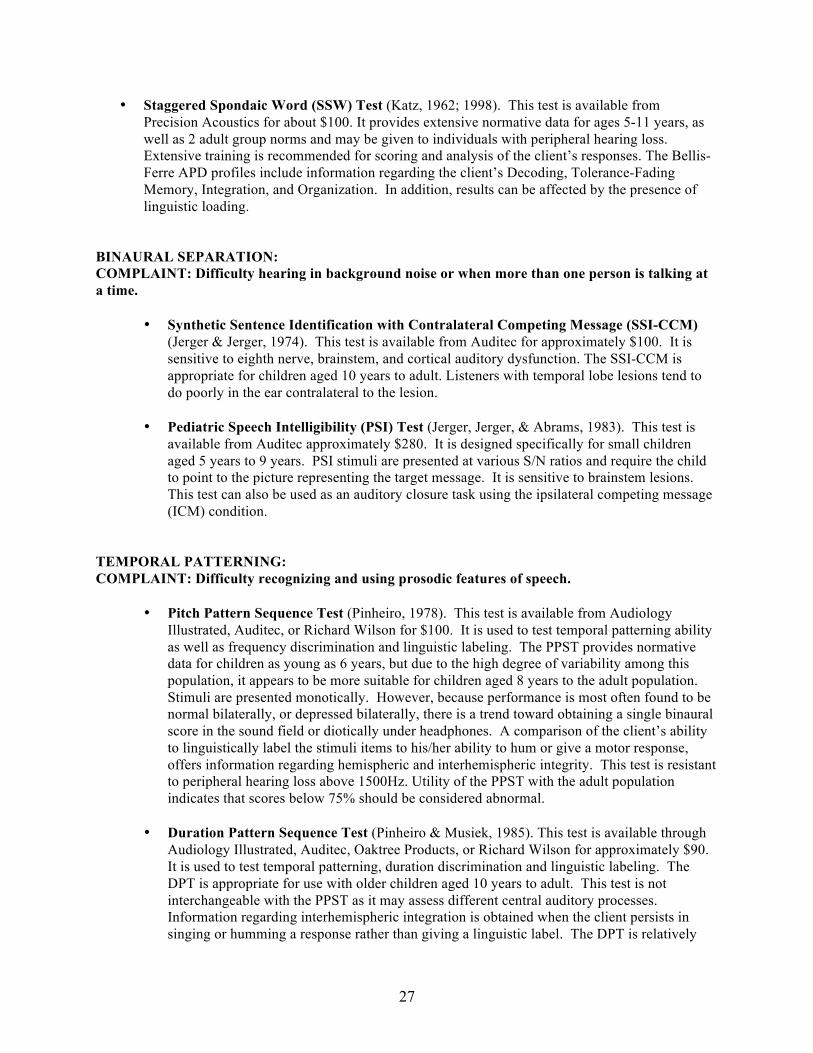
• Staggered Spondaic Word (SSW) Test (Katz, 1962; 1998). This test is available from Precision Acoustics for about $100. It provides extensive normative data for ages 5-11 years, as well as 2 adult group norms and may be given to individuals with peripheral hearing loss. Extensive training is recommended for scoring and analysis of the client’s responses. The Bellis-Ferre APD profiles include information regarding the client’s Decoding, Tolerance-Fading Memory, Integration, and Organization. In addition, results can be affected by the presence of linguistic loading.
BINAURAL SEPARATION: COMPLAINT: Difficulty hearing in background noise or when more than one person is talking at a time.
• Synthetic Sentence Identification with Contralateral Competing Message (SSI-CCM) (Jerger & Jerger, 1974). This test is available from Auditec for approximately $100. It is sensitive to eighth nerve, brainstem, and cortical auditory dysfunction. The SSI-CCM is appropriate for children aged 10 years to adult. Listeners with temporal lobe lesions tend to do poorly in the ear contralateral to the lesion.
• Pediatric Speech Intelligibility (PSI) Test (Jerger, Jerger, & Abrams, 1983). This test is
available from Auditec approximately $280. It is designed specifically for small children aged 5 years to 9 years. PSI stimuli are presented at various S/N ratios and require the child to point to the picture representing the target message. It is sensitive to brainstem lesions. This test can also be used as an auditory closure task using the ipsilateral competing message (ICM) condition.
TEMPORAL PATTERNING: COMPLAINT: Difficulty recognizing and using prosodic features of speech.
• Pitch Pattern Sequence Test (Pinheiro, 1978). This test is available from Audiology Illustrated, Auditec, or Richard Wilson for $100. It is used to test temporal patterning ability as well as frequency discrimination and linguistic labeling. The PPST provides normative data for children as young as 6 years, but due to the high degree of variability among this population, it appears to be more suitable for children aged 8 years to the adult population. Stimuli are presented monotically. However, because performance is most often found to be normal bilaterally, or depressed bilaterally, there is a trend toward obtaining a single binaural score in the sound field or diotically under headphones. A comparison of the client’s ability to linguistically label the stimuli items to his/her ability to hum or give a motor response, offers information regarding hemispheric and interhemispheric integrity. This test is resistant to peripheral hearing loss above 1500Hz. Utility of the PPST with the adult population indicates that scores below 75% should be considered abnormal.
• Duration Pattern Sequence Test (Pinheiro & Musiek, 1985). This test is available through
Audiology Illustrated, Auditec, Oaktree Products, or Richard Wilson for approximately $90. It is used to test temporal patterning, duration discrimination and linguistic labeling. The DPT is appropriate for use with older children aged 10 years to adult. This test is not interchangeable with the PPST as it may assess different central auditory processes. Information regarding interhemispheric integration is obtained when the client persists in singing or humming a response rather than giving a linguistic label. The DPT is relatively

28
resistant to mild to moderate hearing loss. Utility of this instrument with the adult population will require the development of age- and gender-specific norms.
• Random Gap Detection Test (RGDT), (Keith, 2000). The RGDT is available from Auditec
for slightly more than $100. This test is administered in the sound field to children aged 5-11 years. It evaluates temporal resolution by determining the smallest time interval that can be detected between two closely approximated stimuli. The RGDT presents low linguistic loading and is relatively resistant to peripheral hearing loss. A RGDT threshold greater than 20 msec is likely to indicate a temporal processing deficit that interferes with normal speech perception and phoneme recognition.
AUDITORY CLOSURE (Monaural Low Redundancy): COMPLAINT: Difficulty filling in the missing components when part of the auditory signal is inaccessible.
• Compressed Sentence Test (Keith, 2002). This test is a monaural low redundancy speech test that is available from Auditec for $120. The CST is recommended for use with children aged 7 to 12 years. Utility with the adult population will require the establishment of age- and gender-specific normative data. Time compressed speech tasks are most sensitive to diffuse pathology involving the primary auditory cortex. Studies have indicated that a compression rate of 45% is more appropriate for clinical use. This test is an appropriate follow-up for individuals who have difficulty on the RGDT. Additional information to support the presence of deficient performance on this auditory closure task is the utility of time-compressed speech with reverberation, which provides a guide in determining problematic acoustic environments.
• Word Recognition in Quiet and Noise (normative data available for normally developing children)
o Northwestern University Auditory Test No. 6 presented in the presence of multi-talker speech babble
• Quick SIN – a speech in noise task BINAURAL INTERACTION: COMPLAINT: Difficulty localizing and lateralizing auditory information, leading to difficulty in detecting signals in noise.
• Masking Level Difference (MLD) Test. This test is available in tonal and speech presentation from Richard Wilson for approximately $190 (both stimuli). Spondee words are more meaningful for the pediatric and adolescent populations, however, tonal stimuli, (particularly in the lower 300-600Hz range) are more sensitive to central auditory dysfunction. The MLD test is sensitive to brainstem lesions and provides normative data for children and adults. An MLD smaller than 5.5 should be considered abnormal for listeners with normal hearing.
29
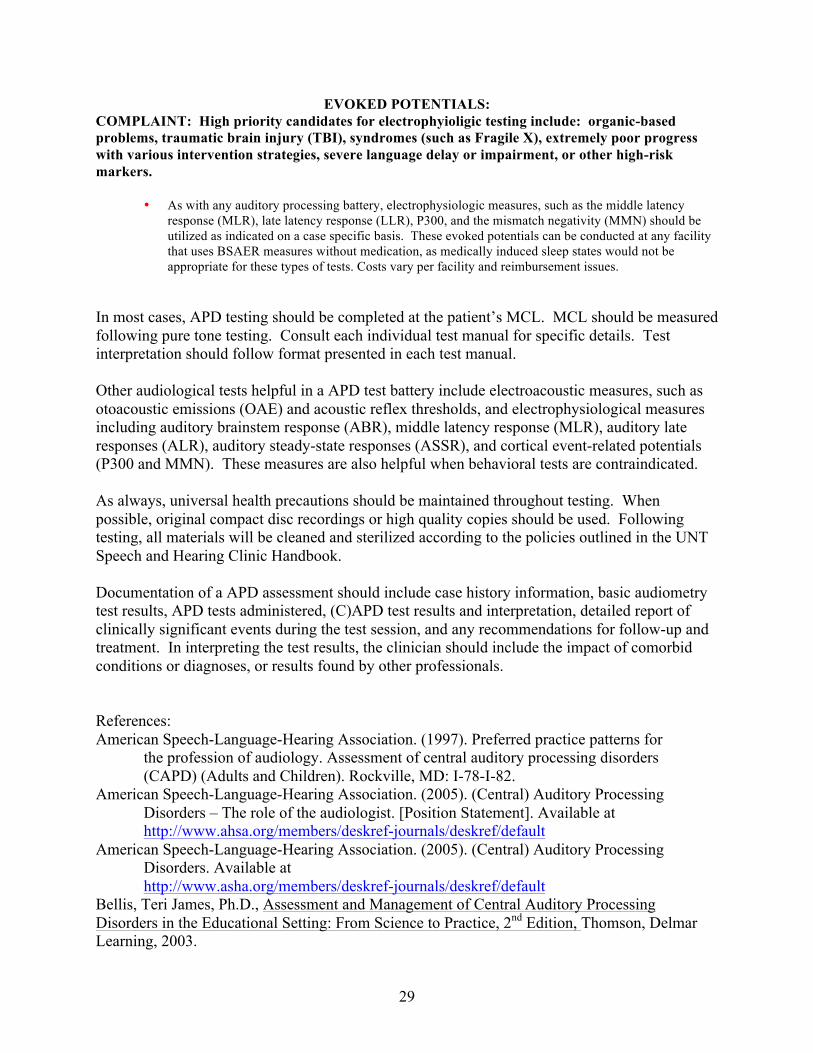
EVOKED POTENTIALS: COMPLAINT: High priority candidates for electrophyioligic testing include: organic-based problems, traumatic brain injury (TBI), syndromes (such as Fragile X), extremely poor progress with various intervention strategies, severe language delay or impairment, or other high-risk markers.
• As with any auditory processing battery, electrophysiologic measures, such as the middle latency response (MLR), late latency response (LLR), P300, and the mismatch negativity (MMN) should be utilized as indicated on a case specific basis. These evoked potentials can be conducted at any facility that uses BSAER measures without medication, as medically induced sleep states would not be appropriate for these types of tests. Costs vary per facility and reimbursement issues.
In most cases, APD testing should be completed at the patient’s MCL. MCL should be measured following pure tone testing. Consult each individual test manual for specific details. Test interpretation should follow format presented in each test manual. Other audiological tests helpful in a APD test battery include electroacoustic measures, such as otoacoustic emissions (OAE) and acoustic reflex thresholds, and electrophysiological measures including auditory brainstem response (ABR), middle latency response (MLR), auditory late responses (ALR), auditory steady-state responses (ASSR), and cortical event-related potentials (P300 and MMN). These measures are also helpful when behavioral tests are contraindicated. As always, universal health precautions should be maintained throughout testing. When possible, original compact disc recordings or high quality copies should be used. Following testing, all materials will be cleaned and sterilized according to the policies outlined in the UNT Speech and Hearing Clinic Handbook. Documentation of a APD assessment should include case history information, basic audiometry test results, APD tests administered, (C)APD test results and interpretation, detailed report of clinically significant events during the test session, and any recommendations for follow-up and treatment. In interpreting the test results, the clinician should include the impact of comorbid conditions or diagnoses, or results found by other professionals. References: American Speech-Language-Hearing Association. (1997). Preferred practice patterns for
the profession of audiology. Assessment of central auditory processing disorders (CAPD) (Adults and Children). Rockville, MD: I-78-I-82.
American Speech-Language-Hearing Association. (2005). (Central) Auditory Processing Disorders – The role of the audiologist. [Position Statement]. Available at http://www.ahsa.org/members/deskref-journals/deskref/default
American Speech-Language-Hearing Association. (2005). (Central) Auditory Processing Disorders. Available at http://www.asha.org/members/deskref-journals/deskref/default
Bellis, Teri James, Ph.D., Assessment and Management of Central Auditory Processing Disorders in the Educational Setting: From Science to Practice, 2nd Edition, Thomson, Delmar Learning, 2003.
30
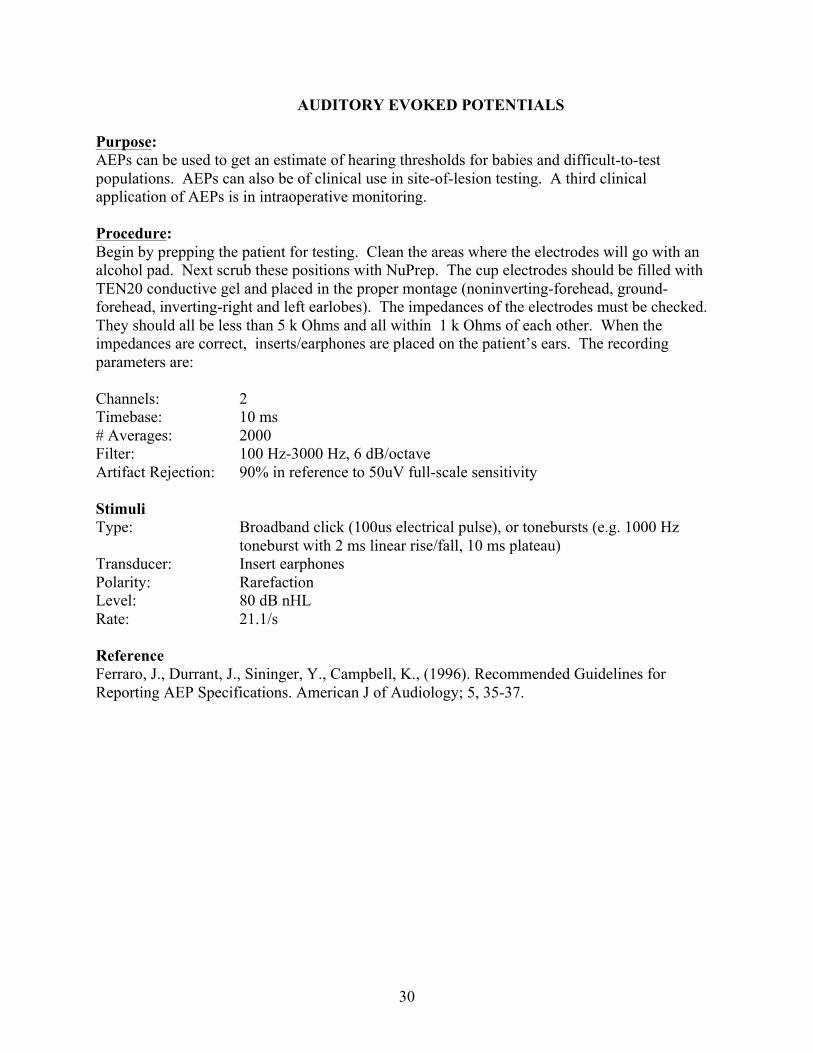
AUDITORY EVOKED POTENTIALS
Purpose: AEPs can be used to get an estimate of hearing thresholds for babies and difficult-to-test populations. AEPs can also be of clinical use in site-of-lesion testing. A third clinical application of AEPs is in intraoperative monitoring. Procedure: Begin by prepping the patient for testing. Clean the areas where the electrodes will go with an alcohol pad. Next scrub these positions with NuPrep. The cup electrodes should be filled with TEN20 conductive gel and placed in the proper montage (noninverting-forehead, ground-forehead, inverting-right and left earlobes). The impedances of the electrodes must be checked. They should all be less than 5 k Ohms and all within 1 k Ohms of each other. When the impedances are correct, inserts/earphones are placed on the patient’s ears. The recording parameters are: Channels: 2 Timebase: 10 ms # Averages: 2000 Filter: 100 Hz-3000 Hz, 6 dB/octave Artifact Rejection: 90% in reference to 50uV full-scale sensitivity Stimuli Type: Broadband click (100us electrical pulse), or tonebursts (e.g. 1000 Hz
toneburst with 2 ms linear rise/fall, 10 ms plateau) Transducer: Insert earphones Polarity: Rarefaction Level: 80 dB nHL Rate: 21.1/s Reference Ferraro, J., Durrant, J., Sininger, Y., Campbell, K., (1996). Recommended Guidelines for Reporting AEP Specifications. American J of Audiology; 5, 35-37.

31
ENG/VNG PROTOCOL
ENG: Clean the patient’s skin with an alcohol pad and place electrodes in appropriate positions. Check the impedance and range. VNG: Position goggles on the patient and make appropriate adjustments to goggle settings. Check the range.
• Darken the test room. • Instruct patient for calibration. Run calibration. Make adjustments needed or
continue. • Complete the following measures:
o Saccade test (20-40 seconds) o Gaze test (20-40 seconds in each direction: up, down, left, right) o Sinusoidal tracking test (one complete cycle of the test pattern) o Optokinetic tracking test (20-40 seconds) o Dix-Hallpike maneuver (30-60 seconds, depending on response)
§ Contradictions: neck or spine injury, limited range of motion o Positional test (30-60 seconds, eyes closed or covered, with tasking) o Caloric test (warm and cool, 60 seconds, eyes closed or covered, with tasking)
Nystagmus at 6° or greater is significant.
32
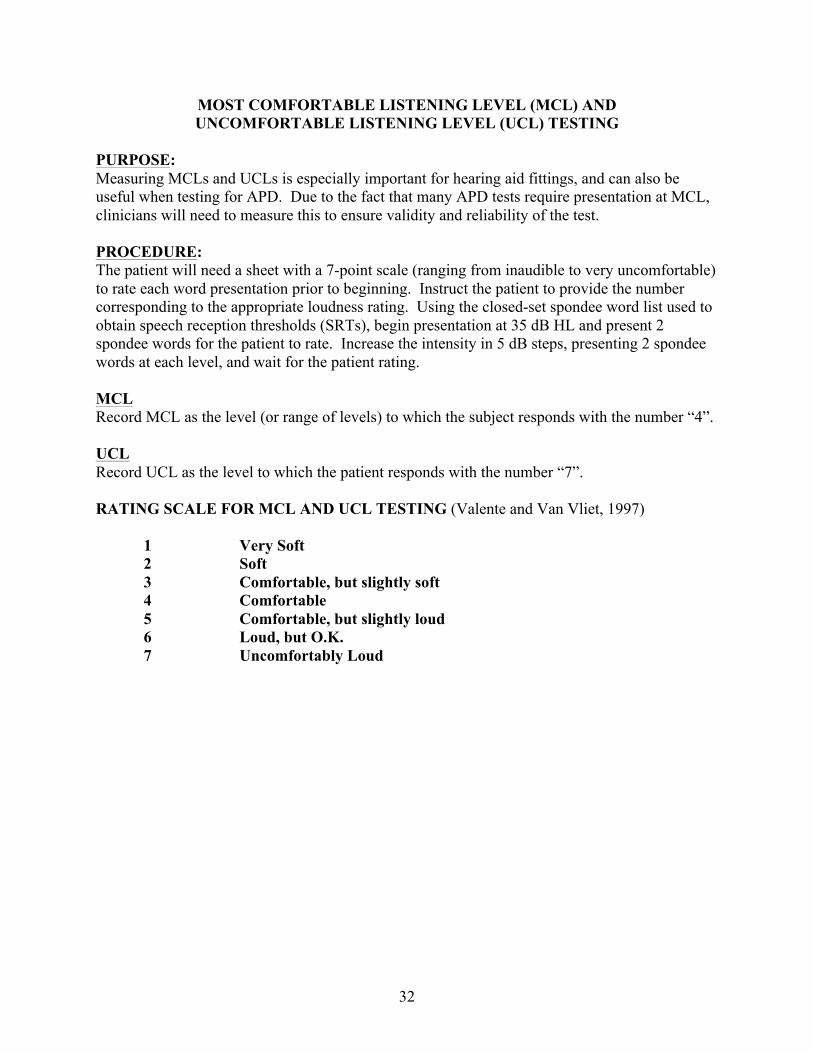
MOST COMFORTABLE LISTENING LEVEL (MCL) AND UNCOMFORTABLE LISTENING LEVEL (UCL) TESTING
PURPOSE: Measuring MCLs and UCLs is especially important for hearing aid fittings, and can also be useful when testing for APD. Due to the fact that many APD tests require presentation at MCL, clinicians will need to measure this to ensure validity and reliability of the test. PROCEDURE: The patient will need a sheet with a 7-point scale (ranging from inaudible to very uncomfortable) to rate each word presentation prior to beginning. Instruct the patient to provide the number corresponding to the appropriate loudness rating. Using the closed-set spondee word list used to obtain speech reception thresholds (SRTs), begin presentation at 35 dB HL and present 2 spondee words for the patient to rate. Increase the intensity in 5 dB steps, presenting 2 spondee words at each level, and wait for the patient rating. MCL Record MCL as the level (or range of levels) to which the subject responds with the number “4”. UCL Record UCL as the level to which the patient responds with the number “7”. RATING SCALE FOR MCL AND UCL TESTING (Valente and Van Vliet, 1997)
1 Very Soft 2 Soft 3 Comfortable, but slightly soft 4 Comfortable 5 Comfortable, but slightly loud 6 Loud, but O.K. 7 Uncomfortably Loud
33
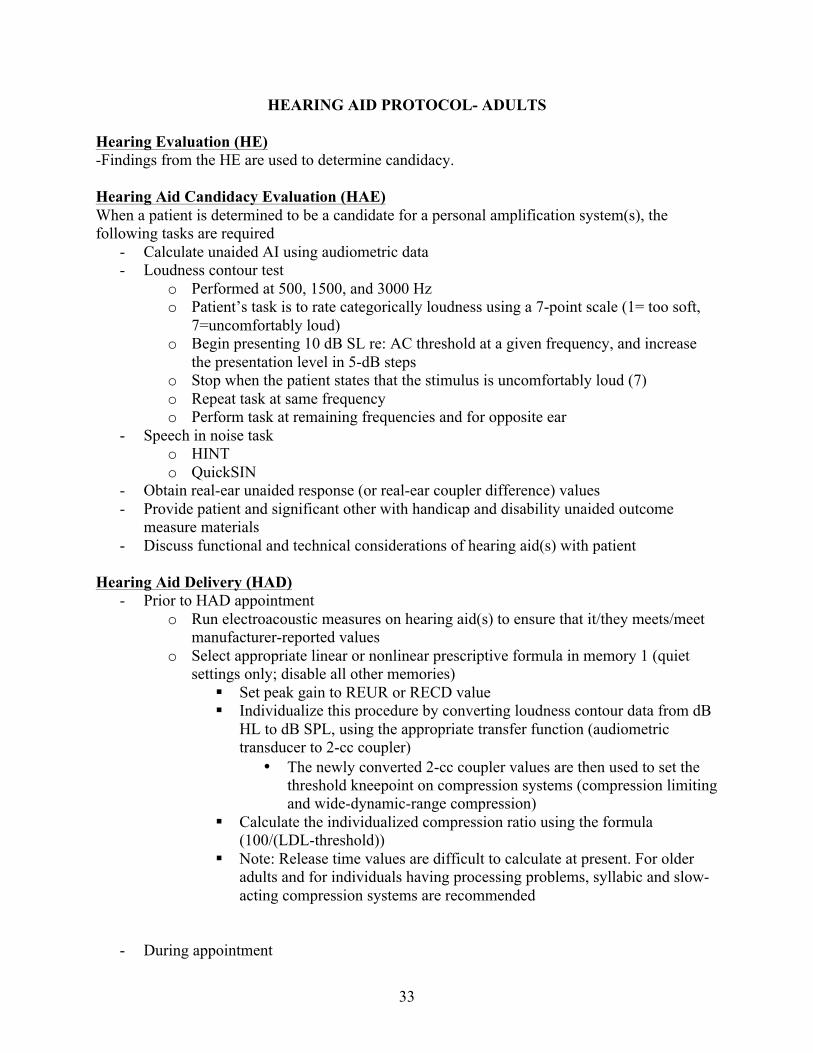
HEARING AID PROTOCOL- ADULTS Hearing Evaluation (HE) -Findings from the HE are used to determine candidacy. Hearing Aid Candidacy Evaluation (HAE) When a patient is determined to be a candidate for a personal amplification system(s), the following tasks are required
- Calculate unaided AI using audiometric data - Loudness contour test
o Performed at 500, 1500, and 3000 Hz o Patient’s task is to rate categorically loudness using a 7-point scale (1= too soft,
7=uncomfortably loud) o Begin presenting 10 dB SL re: AC threshold at a given frequency, and increase
the presentation level in 5-dB steps o Stop when the patient states that the stimulus is uncomfortably loud (7) o Repeat task at same frequency o Perform task at remaining frequencies and for opposite ear
- Speech in noise task o HINT o QuickSIN
- Obtain real-ear unaided response (or real-ear coupler difference) values - Provide patient and significant other with handicap and disability unaided outcome
measure materials - Discuss functional and technical considerations of hearing aid(s) with patient
Hearing Aid Delivery (HAD)
- Prior to HAD appointment o Run electroacoustic measures on hearing aid(s) to ensure that it/they meets/meet
manufacturer-reported values o Select appropriate linear or nonlinear prescriptive formula in memory 1 (quiet
settings only; disable all other memories) § Set peak gain to REUR or RECD value § Individualize this procedure by converting loudness contour data from dB
HL to dB SPL, using the appropriate transfer function (audiometric transducer to 2-cc coupler)
• The newly converted 2-cc coupler values are then used to set the threshold kneepoint on compression systems (compression limiting and wide-dynamic-range compression)
§ Calculate the individualized compression ratio using the formula (100/(LDL-threshold))
§ Note: Release time values are difficult to calculate at present. For older adults and for individuals having processing problems, syllabic and slow-acting compression systems are recommended
- During appointment

34
o Obtain completed unaided handicap and disability outcome measure scales o Spend time counseling patient on use, care, and maintenance of hearing aids;
repair and loss warranty issues; battery ingestion; acclimatization effects o Ask patient to keep diary of auditory experiences o Perform real-ear measures (REUR, REAR [multiple presentation levels for
WDRC devices], RESR, REOR [if shell/ear mold is vented]) o Perform speech in noise task using same test used initially o Be sure to obtain appropriate signatures, paperwork, and collect any financial
obligations Hearing Aid Check 1 (HACH-1)
- Provide patient/significant other with results from outcome measures - Make adjustments to program 1, using subjective responses from the patient/significant
other - If changes are made, then perform real-ear measures (Unaided and aided SF also, but
only for WDRC devices) - Calculate aided AI using real-ear data - Re-counsel, as needed
Hearing Aid Check 2 (HACH-2) - Once program 1 requires no additional changes, set programs 2, 3….n - If a program is set for noise with an omnidirectional microphone
o Then perform speech in noise task (using same test as before) and compare memories 1 and 2
o Perform real-ear measures (REUR, REAR [multiple presentation levels for WDRC devices], RESR, REOR [if shell/ear mold is vented])
- When programming a directional-microphone system, be sure to address fixed vs. adaptive, slope of low-frequency roll-off
o Perform front-to-back measure, with back measures being performed at 180o, + 45o and 90o re: 180o
- Calculate aided AI using real-ear data - Re-counsel, as needed
Hearing Aid Check 3 (HACH-3) - Make adjustments to programs 2, 3…n, using subjective responses from the
patient/significant other - If changes are made, then perform real-ear measures (Unaided and aided SF also, but
only for WDRC devices) - Calculate aided AI using real-ear data - Re-counsel, as needed - Ask patient/significant other to complete outcome measures
Hearing Aid Check 4 (HACH-4) - End of trial period, if applicable - Be sure that appropriate signatures, paperwork, monies that need collecting are in order - Score aided outcome measure data and report results to patient/significant other
35
REAL EAR MEASURES
I. Hearing Aid Test (HAT) a. HAT calibration – see Verifit manual to compare/confirm stability of ref. mic b. Use appropriate 2cc coupler to attach hearing aid to ref. mic
i. Run aid FULL ON for all gain and frequency response curve settings ii. Determine if AGC or Linear depending based on programming settings
iii. Compare HA to manufacturer specifications for OSPL90, Full On Gain, Distortion, and compression attack and release times.
iv. Run HA on USER SETTINGS. Adjust for gain/output needs for patient v. Determine efficacy of user programmed settings in any of following:
1. Simulated Real Ear 2. Multi-Curve Function 3. Directionality 4. Battery Drain 5. Telecoil
II. Real Ear Measures (REM) a. REM Calibration – see Verifit manual to compare/confirm stability of ref. mic
i. Use probe mics marked “for calibration only” 1. Both mics MUST be calibrated
b. Real Ear to Coupler Difference (RECD) – used to determine if more or less output is needed for HA programming based on patient’s individual ear canal resonance
i. Place probe mic in ear canal with earmold or foam tip in place attached to REM coupler
ii. Run same stimulus with REM coupler attached to 2 cc coupler – compare results and make adjustment to HA to avoid over or under amplification
c. Speech Map i. Select AUDIOMETRY and enter audiogram.
ii. Select appropriate target iii. Insert probe mic into ear canal IN FRONT of HA receiver or earmold iv. Choose stimulus presentation for soft and moderate levels, & MPO v. Adjust HAs if needed to achieve maximum aided benefit and test again
vi. Print results, as data is lost when a new patient test begins vii. Paste a COPY of REM results in pt. chart (thermal paper fades over time)
d. Insertion Gain i. Select AUDIOMETRY and enter audiogram (for aided only)
ii. Insert probe mic in ear canal IN FRONT of HA receiver or earmold iii. Present pink noise or sweep frequency iv. Adjust HAs if needed to achieve maximum aided benefit and test again v. Print results, as data is lost when a new patient test begins
vi. Paste a COPY of REM results in pt. chart (thermal paper fades over time) e. Musician Ear Plug Verification
i. Place probe mic into ear canal UNOCCLUDED ii. Place MEP in ear without moving probe mic.
iii. Review AVERAGE attenuation values across frequency range (table or graph view)

36
PEDIATRIC AUDIOLOGIC ASSESSMENT PROTOCOLS
II. Case History/Medical Release Forms III. Otoscopic Examination:
- looking for contraindications for doing immittance and/or OAEs including drainage, foreign objects, occluding cerumen, atretic canal
IV. Immittance:
a. Tympanometry: - 226-Hz probe tone for infants greater than 2 months and 1000-Hz probe tone for
younger infants i. Tymanometric shape: description or type
ii. Peak compensated static acoustic admittance:
(Margolis & Hunter, 2000; Margolis et al., 2003) iii. Ear canal volume:
Passing criteria for volume of ear canal between probe tip and tympanic membrane
Adult (16+ years) 0.9-2.0 cc Child (4 to 16 years) 0.5-1.0 cc Infant (0–3 years) 0.3-0.9 cc
(Margolis & Hunter, 2000; Northern & Downs 2002) b. Acoustic reflex threshold (time and cooperation permitting):
i. Start with ipsilateral (500, 1000) ii. Then do contralateral (500, 1000, 2000, and 4000 Hz)
iii. Passing criteria: pass/normal= 70-100 dB HL; elevated=100 dB HL; absent=if no response at 100 dB HL
V. Transient Otoacoustic Emissions: Pass/Fail
Passing criteria for peak compensated static acoustic admittance
Adult (16+ years) 0.7-2.0 cc Child (4 to 16 years) 0.5-1.0 cc Infant (0–3 years) 0.3-0.9 cc
1000 Hz: 1.5-3.9 cc

37
VI. Speech-Detection Threshold (SDT) and Speech-Recognition Threshold (SRT): a. Use Modified Hughson-Westlake threshold procedure (see age-specific information in table below) b. Ear-specific information should always be attempted c. Recorded stimuli should be used when applicable* d. Type of stimuli used should always be recorded on the audiogram form e. Bone-conduction SRT/SAT with necessary masking may be used when pure-tone
BC thresholds cannot be obtained reliably f. Masking is needed when the presentation level is 45 dB or more, greater than the
best bone-conduction threshold at the speech frequencies (500, 1000, 2000 Hz) in the non-test ear
(Ling, 1978; Madell, 1990, 1998)
Developmental Age
Type of Test Procedure
Type of Stimuli Order of Preferred Transducer
0-6 months SDT using BOA - Conversational voice - 5-sound test (a, i, u, sh, s) - 3-sound test (ba, sh, s)
Insert earphones Headphones Sound field
6-18 months SDT using VRA - Conversational voice - 5-sound test (a, I, u, sh, s) - 3-sound test (ba, sh, s)
Insert earphones Headphones Sound field
18-30 months SRT using VRA - Body parts - Familiar toys or objects
Insert earphones Headphones Sound field
30 months to 4 years
SRT using Play - Body parts - Familiar toys or objects - Numbers - Spondee pictures/objects* - Spondee words*
Insert earphones Headphones Sound field
4+ years SRT using play or standard procedure
- Spondee pictures/objects* - Spondee words*
Insert earphones Headphones
38
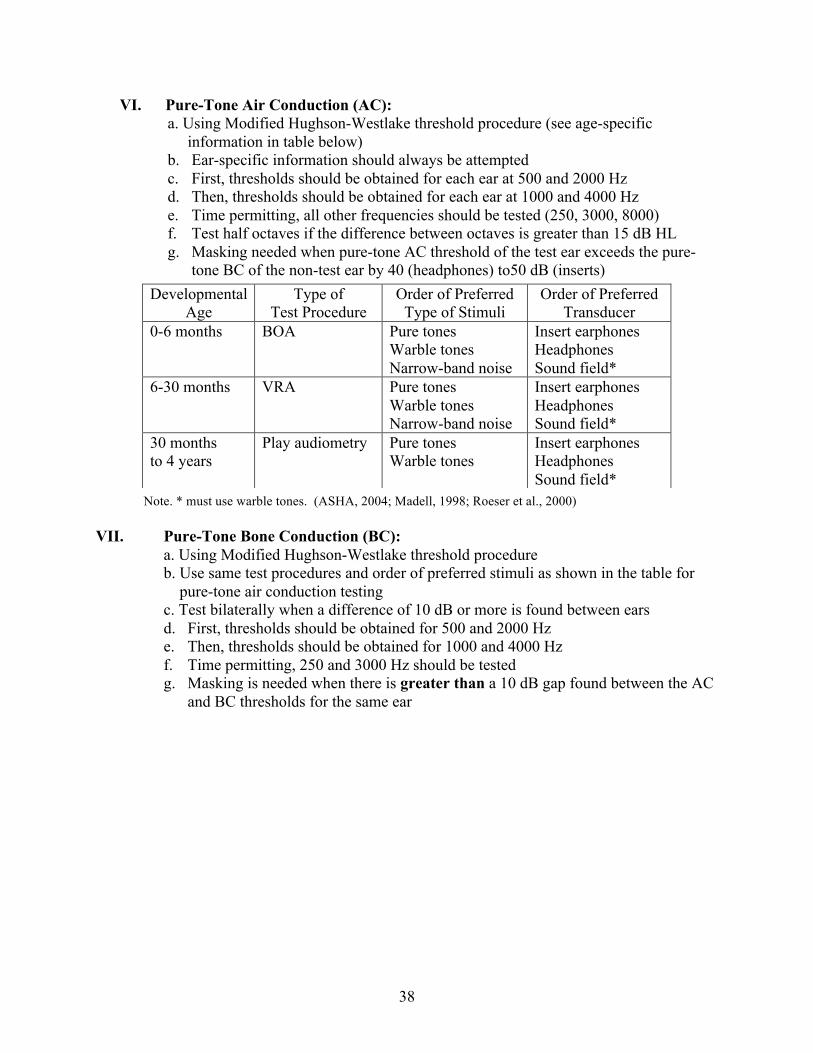
VI. Pure-Tone Air Conduction (AC): a. Using Modified Hughson-Westlake threshold procedure (see age-specific
information in table below) b. Ear-specific information should always be attempted c. First, thresholds should be obtained for each ear at 500 and 2000 Hz d. Then, thresholds should be obtained for each ear at 1000 and 4000 Hz e. Time permitting, all other frequencies should be tested (250, 3000, 8000) f. Test half octaves if the difference between octaves is greater than 15 dB HL g. Masking needed when pure-tone AC threshold of the test ear exceeds the pure-
tone BC of the non-test ear by 40 (headphones) to50 dB (inserts)
Note. * must use warble tones. (ASHA, 2004; Madell, 1998; Roeser et al., 2000)
VII. Pure-Tone Bone Conduction (BC):
a. Using Modified Hughson-Westlake threshold procedure b. Use same test procedures and order of preferred stimuli as shown in the table for pure-tone air conduction testing
c. Test bilaterally when a difference of 10 dB or more is found between ears d. First, thresholds should be obtained for 500 and 2000 Hz e. Then, thresholds should be obtained for 1000 and 4000 Hz f. Time permitting, 250 and 3000 Hz should be tested g. Masking is needed when there is greater than a 10 dB gap found between the AC
and BC thresholds for the same ear
Developmental Age
Type of Test Procedure
Order of Preferred Type of Stimuli
Order of Preferred Transducer
0-6 months BOA Pure tones Warble tones Narrow-band noise
Insert earphones Headphones Sound field*
6-30 months VRA Pure tones Warble tones Narrow-band noise
Insert earphones Headphones Sound field*
30 months to 4 years
Play audiometry Pure tones Warble tones
Insert earphones Headphones Sound field*
39
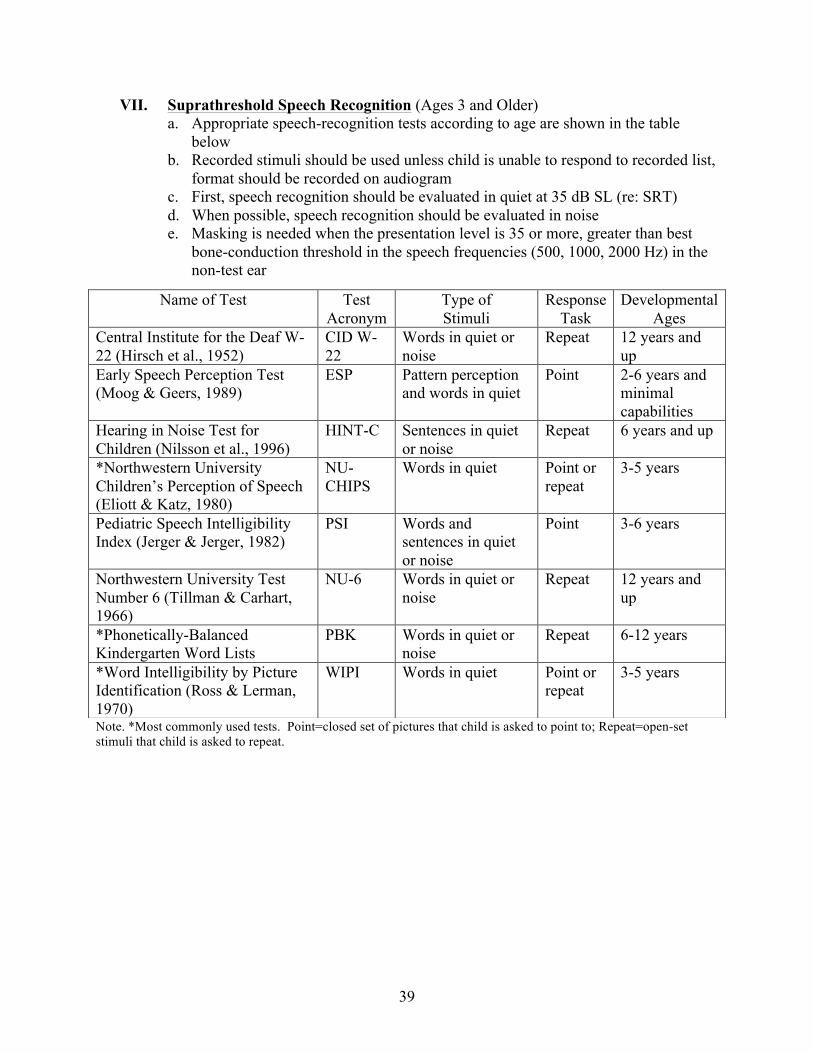
VII. Suprathreshold Speech Recognition (Ages 3 and Older) a. Appropriate speech-recognition tests according to age are shown in the table
below b. Recorded stimuli should be used unless child is unable to respond to recorded list,
format should be recorded on audiogram c. First, speech recognition should be evaluated in quiet at 35 dB SL (re: SRT) d. When possible, speech recognition should be evaluated in noise e. Masking is needed when the presentation level is 35 or more, greater than best
bone-conduction threshold in the speech frequencies (500, 1000, 2000 Hz) in the non-test ear
Note. *Most commonly used tests. Point=closed set of pictures that child is asked to point to; Repeat=open-set stimuli that child is asked to repeat.
Name of Test Test Acronym
Type of Stimuli
Response Task
Developmental Ages
Central Institute for the Deaf W-22 (Hirsch et al., 1952)
CID W-22
Words in quiet or noise
Repeat 12 years and up
Early Speech Perception Test (Moog & Geers, 1989)
ESP Pattern perception and words in quiet
Point 2-6 years and minimal capabilities
Hearing in Noise Test for Children (Nilsson et al., 1996)
HINT-C Sentences in quiet or noise
Repeat 6 years and up
*Northwestern University Children’s Perception of Speech (Eliott & Katz, 1980)
NU-CHIPS
Words in quiet Point or repeat
3-5 years
Pediatric Speech Intelligibility Index (Jerger & Jerger, 1982)
PSI Words and sentences in quiet or noise
Point 3-6 years
Northwestern University Test Number 6 (Tillman & Carhart, 1966)
NU-6 Words in quiet or noise
Repeat 12 years and up
*Phonetically-Balanced Kindergarten Word Lists
PBK Words in quiet or noise
Repeat 6-12 years
*Word Intelligibility by Picture Identification (Ross & Lerman, 1970)
WIPI Words in quiet Point or repeat
3-5 years

40
COUNSELING
Our Role: Our main role as clinicians is to listen to the client or parents and their concerns. We are there to educate, provide information, and help the client or parent make their own decisions. Counseling is critical in providing the client with a satisfactory visit and information regarding their hearing, for which they came to see us. Discussing Test Results: Test results should be presented in a way that the client can understand. Do not use audiological jargon they will not understand. Explain each test and what it was designed to evaluate. Keep physiological explanations simple and allow room for questions. Be sure to state the facts, exactly what you did, and what you observed. Using the audiogram, show where we expect adults or children to perform and where the actual results are. If there is a loss, explain how the hearing loss might affect speech, language, and/or academic development. Supplemental pictures, research, or literature may be used to support findings. Providing Information: Clients may feel overwhelmed after discussing test results, especially when there is a hearing loss. Provide objective resources that they make take such as:
• description of hearing loss • habilitation options • amplification options • resources for additional information • financial information for obtaining therapy and amplification
Northern, J.L. & Downs, M.P. (2002). Hearing in Children, 5th ed. Amplification.
Philadelphia: Lippincott Williams & Wilkins, pp. 338-339.

41
CLEAN-UP AND STERILIZATION PROCEDURE
POLICY: Proper cleaning and sterilization of indispensable equipment is an essential safeguard for the health and wellness of clinic patients and staff, as well as clinicians. PROCEDURE: Otoscopy specula and imittance tips are disposable. Video otoscopy specula and OAE tips are NOT disposable. Non-disposable tips should be placed in covered basins located in each suite. At the end of the day, basins should be emptied into the ultrasonic cleaner and ran for ten minutes before removing, rinsing under running warm water, and allowing to air dry. Any equipment that comes into contact with blood or other body fluids should be placed in the Omnicide overnight soak. This includes cerumen management curettes and picks. Clinicians who place equipment into the overnight soak are responsible for removing and rinsing the equipment the next day. Surfaces should be wiped clean with antibacterial, antiviral wipes located in each suite.

42
CERUMEN MANAGEMENT
PURPOSE: Delineation of the procedures to be followed for cerumen management (CM) by audiologists and graduate clinicians at the UNT Speech and Hearing Center. POLICY: In order for an audiologist or graduate clinician to perform CM, he or she must have had special instruction and demonstrate competency in CM. The UNT Speech and Hearing Center policy follows guidelines established by the American Speech-Language-Hearing Association, the American Academy of Audiology, and the Texas State Board of Examiners for Speech-Language Pathology and Audiology. RATIONALE FOR CERUMEN MANAGEMENT: Most often, audiologists remove cerumen when it has the potential to interfere with other audiological procedures (e.g. immittance testing, audiological evaluation, earmold impressions, real ear measurements, and hearing aid fitting and use). RISKS TO THE PATIENT DURING CERUMEN MANAGEMENT:
1. Cardiac depression from vagal stimulation 2. Injury to ear structures 3. Infection
Proper training in CM should minimize each of these risks, though each case should be judged individually. CONTRAINDICATIONS TO CERUMEN MANAGEMENT:
1. The purpose of CM is unrelated to an audiological procedure. In other words, avoid performing CM for the sole purpose of CM.
2. The audiologist or clinician exercises clinical judgment and is uncomfortable performing the procedure for any reason.
3. The audiologist is yet to receive training in CM. 4. Patient safety is compromised by any of the following conditions:
a. Recent otalgia b. History of ear surgery c. Trauma to the ear d. Perforation of the tympanic membrane
i. As evidenced by visualization or other indications (e.g. large physical volume on tympanometric testing, or an inability to obtain hermetic seal)
e. Presence of pressure equalization (PE) tubes f. Dizziness g. Diabetes mellitus h. Ear drainage i. Immunocompromised patients
i. HIV/AIDS j. CM would require contact with the tympanic membrane k. A patient refusing to cooperate during the procedure l. A patient or family that is disgruntled
43
m. A patient undergoing anticoagulant therapy or suffering from anticoagulatory disease process (hemophilia)
n. A patient with cardiac-related problems o. Determination that the cerumen is impacted
In such cases, a physician referral should be the next course of action. PROCEDURE: After preparation of the equipment, obtaining a case history, obtaining informed consent, and performing immittance testing, the audiologist or graduate clinician should determine if CM should be performed or a physician referral should be made. Cerumen can be removed mechanically or through irrigation of the ear canal. EQUIPMENT:
• Otoscope • Gloves • Paper towels • Seating arrangement to elevate patient’s ear to clinician’s eye level • Headlight • Curettes • Cerumen removal wire loops • Water irrigator • Plastic protector for patient’s clothes • Warm water • Emesis basin • Solution of 50% white vinegar and 50% alcohol
o Or 70% alcohol FOLLOW UNIVERSAL PRECAUTIONS
• As found in UNT Speech and Hearing Center Clinical Policies. OBTAIN APPROPRIATE CASE HISTORY
• In addition to routine audiological case history, clinicians should ask specific questions to determine if contraindications are present (see “CONTRAINDICATIONS”, above).
OBTAIN INFORMED CONSENT
• Inform patient/parent regarding procedural steps in CM and it’s associated risks. • Ask if patient/parent agrees to the procedure and document response. • Note to the patient/parent that the outcome of CM cannot be guaranteed. • Instruct patient to inform clinician of discomfort during the procedure.
OTOSCOPY
• Perform otoscopy as described in UNT Audiological Procedures o Verify the presence of cerumen and rule out drainage, foreign substance, and
other such debris. o Determine consistency and amount of cerumen.
44
§ Note percentage of the occlusion of the ear canal by the cerumen (e.g. 50% occluded, 100% occluded).
o Note any contraindications to CM. IMMITTANCE TESTING
• Use an acoustic-immittance meter to obtain a tympanogram prior to CM to determine the intactness of the tympanic membrane via the ear canal volume (ECV) measurement. This is especially important if the tympanic membrane was not visible during otoscopy.
• If ear canal volume is less than (approximately 0.4 cm³ for children under the age of 6 (Margolis and Heller, 1987), or 0.63 cm³ for adults (Margolis and Heller, 1987) or a type B tympanogram is obtained and the tympanic membrane is not visualized, use a wax pick to create and opening in the cerumen and repeat the tympanogram.
• If ear canal volume falls within normal range (0.4 – 0.9 cm³ for children 6 and under and 0.63 – 1.46 cm³ for adults (Margolis and Heller, 1987)) proceed with CM.
• If tympanic membrane is not visible and the patient reports otalgia, a physician referral should be made.
RECOMMENDATION OF CERUMENOLYTIC AGENTS
• Act to soften cerumen to aid in CM. • Best if used 2-3 times/day, for 3-5 days prior to CM. If impossible, use cerumenolytic
agent for as long as possible. o Also recommend cover for bedding while using cerumenolytic agents.
• Commercial products are available. o Mineral oil, baby oil, and alpha keri oil may also be recommended.
IRRIGATION
• LOW PRESSURE is essential. • Water temperature should be 37˚C. • Use covering to protect patient’s clothing. • Instruct patient to slightly tilt head downward and hold emesis bowl against head and
neck, directly under ear. • Straighten ear canal by pulling up and back on pinna. • Insert irrigator tip only to entrance of ear canal. • Direct stream of water towards unobstructed wall (usually the superior canal wall). • Irrigate for 20-30 seconds. • If at any point the patient report discomfort, discontinue the procedure. • Perform otoscopy to visualize tympanic membrane and inspect ear canal. • Dry patient’s ear canal. • Use clinical judgment to determine when to stop and refer to physician. Usually, limit to
four irrigations. MECHANICAL REMOVAL
• Use an appropriate light source to ensure adequate visualization of ear canal. • Use a curette to dislodge cerumen and remove from ear canal. • Properly dispose of or sterilize all materials (procedure found in Au.D. Clinic
Handbook). • Perform otoscopy to inspect ear canal and determine if CM was successful.
45
• Ear canal may be red following the procedure, check for blood in the ear canal. • If there is no bleeding following CM, dry the patient’s ear canal. • If at any point the patient report discomfort, discontinue the procedure.
DRYING PROCEDURE
• Using the above mentioned vinegar/alcohol mixture to dry the ear canal and restore pH balance.
• Dry ear using a towel following application of the solution. IMMITTANCE PROCEDURE
• Use acoustic-immittance meter to obtain a post-CM tympanogram to verify the tympanic membrane is intact.
DOCUMENTATION
• Document the actions taken and the outcome. If blood is seen in the ear canal or the patient is uncomfortable following the procedure, a physician referral should be made.
FINAL PROCEDURES
• Follow clinic protocol found in Au.D. Clinic Handbook to clean and sterilize all equipment.
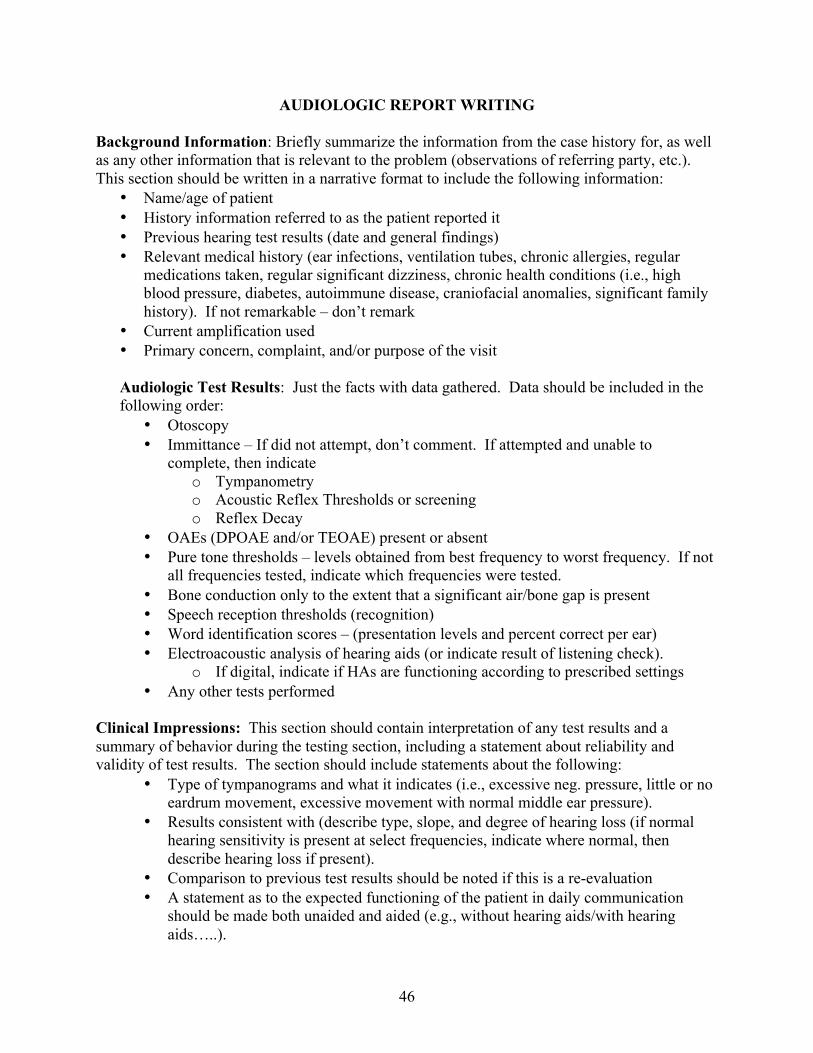
46
AUDIOLOGIC REPORT WRITING
Background Information: Briefly summarize the information from the case history for, as well as any other information that is relevant to the problem (observations of referring party, etc.). This section should be written in a narrative format to include the following information:
• Name/age of patient • History information referred to as the patient reported it • Previous hearing test results (date and general findings) • Relevant medical history (ear infections, ventilation tubes, chronic allergies, regular
medications taken, regular significant dizziness, chronic health conditions (i.e., high blood pressure, diabetes, autoimmune disease, craniofacial anomalies, significant family history). If not remarkable – don’t remark
• Current amplification used • Primary concern, complaint, and/or purpose of the visit Audiologic Test Results: Just the facts with data gathered. Data should be included in the following order:
• Otoscopy • Immittance – If did not attempt, don’t comment. If attempted and unable to
complete, then indicate o Tympanometry o Acoustic Reflex Thresholds or screening o Reflex Decay
• OAEs (DPOAE and/or TEOAE) present or absent • Pure tone thresholds – levels obtained from best frequency to worst frequency. If not
all frequencies tested, indicate which frequencies were tested. • Bone conduction only to the extent that a significant air/bone gap is present • Speech reception thresholds (recognition) • Word identification scores – (presentation levels and percent correct per ear) • Electroacoustic analysis of hearing aids (or indicate result of listening check).
o If digital, indicate if HAs are functioning according to prescribed settings • Any other tests performed
Clinical Impressions: This section should contain interpretation of any test results and a summary of behavior during the testing section, including a statement about reliability and validity of test results. The section should include statements about the following:
• Type of tympanograms and what it indicates (i.e., excessive neg. pressure, little or no eardrum movement, excessive movement with normal middle ear pressure).
• Results consistent with (describe type, slope, and degree of hearing loss (if normal hearing sensitivity is present at select frequencies, indicate where normal, then describe hearing loss if present).
• Comparison to previous test results should be noted if this is a re-evaluation • A statement as to the expected functioning of the patient in daily communication
should be made both unaided and aided (e.g., without hearing aids/with hearing aids…..).
47
Recommendations: A brief numerical listing of at least two recommendations. No new information here. Examples: (this list is not exhaustive) • Hearing recheck annually (or indicate frequency), if a hearing loss is noted. • Daily, consistent hearing aid use. • Referral to physician (specify why) or specific organization • Preferential seating • Avoid loud noise levels • Avoid exposure to second-hand smoke • Hearing aid evaluation Try to keep written report to one page when at all possible. Font should be no smaller than 10, but preferably 12. Be sure that alignment, spelling, grammar, and patient information is accurate before submitting to your supervisor.
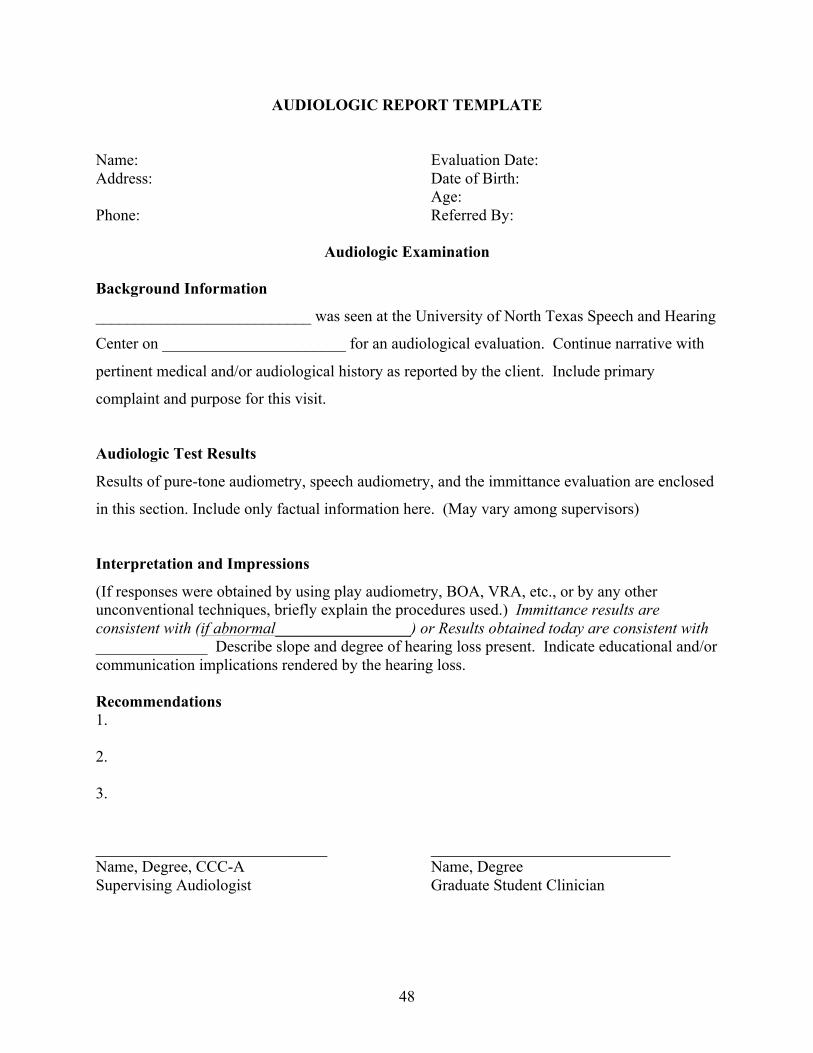
48
AUDIOLOGIC REPORT TEMPLATE
Name: Evaluation Date: Address: Date of Birth: Age: Phone: Referred By:
Audiologic Examination
Background Information
___________________________ was seen at the University of North Texas Speech and Hearing
Center on _______________________ for an audiological evaluation. Continue narrative with
pertinent medical and/or audiological history as reported by the client. Include primary
complaint and purpose for this visit.
Audiologic Test Results
Results of pure-tone audiometry, speech audiometry, and the immittance evaluation are enclosed
in this section. Include only factual information here. (May vary among supervisors)
Interpretation and Impressions
(If responses were obtained by using play audiometry, BOA, VRA, etc., or by any other unconventional techniques, briefly explain the procedures used.) Immittance results are consistent with (if abnormal_________________) or Results obtained today are consistent with ______________ Describe slope and degree of hearing loss present. Indicate educational and/or communication implications rendered by the hearing loss. Recommendations 1. 2. 3. _____________________________ ______________________________ Name, Degree, CCC-A Name, Degree Supervising Audiologist Graduate Student Clinician

49
NORTHWESTERN UNIVERSITY- CHILDREN’S PERCEPTION OF SPEECH (NU-CHIPS)
PURPOSE: This closed-set word recognition test is designed for children with a language age as young as three years. This test incorporates word identification by pointing to pictures presented in two picture response books containing 50 monosyllabic nouns. The test items are not presented with a carrier phrase. PROCEDURE: Instruct the child of the task. Present words at a level consistent with word recognition testing. A 25 or 50 word list may be presented at the discretion of the clinician. Score the test using a percent-correct format. (Elliott & Katz)

50
WORD INTELLIGIBILITY BY PICTURE IDENTIFICATION (WIPI)
PURPOSE: This closed set test is used to obtain word recognition scores for children ages 3-5, children with moderate hearing loss from 5-6 years of age, and for those with severe losses from 7-8 years of age. This test incorporates word identification by pointing to pictures presented in a book containing 26 sets of six-word matrices. The test may also be adapted and used as an open-set test, excluding the picture book from the test. PROCEDURE: Ideally, and assistant to the examiner should be in the testing booth with the child. Instruct the child of the task and place the picture book within clear sight and reach of the child. Practice examples for familiarization are recommended. Each word should be presented with a carrier phrase such as “show me” or “point to”. This test is presented and scored in the same way as word identification indicated within this manual. (Adapted from Ross & Lerman, 1971)
51
STENGER SCREENING TEST
Adapted from the Audiology Unit at Glan Clwyd Hospital URL: http://www.glanclwyd.demon.co.uk/audiology/clinprot/stengerscreeningpolicy.htm PURPOSE: If tones of the same frequency are presented simultaneously to both ears, only the loudest is perceived. The test can find a threshold in the worst ear of someone with non-organice unilateral hearing loss to within 10 dB of the true threshold. PROCEDURE:
A. Find the lowest level in the better ear where four positive responses occur (e.g. threshold)
B. Find the highest level in the worse ear where four negative responses occur (e.g. threshold – 5dB)
C. Present the levels obtained in (A) and (B) together, twice. i. If two postitive responses obtained – true hearing loss
ii. If two negative responses obtained – non-organic hearing loss iii. If inconsistent responses obtained – recheck initial levels and repeat
STENGER MEASUREMENT TEST
Determines true threshold in worst ear if non-organic hearing loss identified.
1. Keep level constant in the better ear (as found in section (A)). 2. Reduce intensity of sound by 10dB in worst ear from level found in (B). 3. Present combination of tones twice. 4. Reduce the level in the worst ear again in 10dB steps until 2 postitive responses
occur. When this occurs, increase the level in the worst ear in 5dB steps until 2 negative responses occur.
5. If a postitive/negative response is obtained, present the levels a further 3 times so a majority positive or negative decision may be made.
6. Theshold is taken to be the lowest level in the worst ear where a majority postitive response is obtained.
7. Final re-check: § Present the level found in (A) to the better ear only, twice. It should give reliable
positive responses. § Present the true threshold level found for the worst ear twice. It should give
reliable negative responses, however the person may respond here, in which case they have been “caught”.
§ Results recording: Mark Stenger threshold at each frequency tested on the audiogram using aided threshold symbol and make a note on the audiogram that this refers to Stenger test thresholds.

52
SPEECH IN NOISE TESTS BKB SIN The BKB-SIN was developed to test speech understanding noise in cochlear implant listeners and other people with hearing loss. The sentences are spoken by a male talker in four-talker babble at prerecorded signal-to-noise ratios that decrease in 3 dB steps. Results are reported as the SNR in dB at which the listener understands 50% of the key words in the sentence. See manual for complete test procedures. Channel 1 of the audiometer will need to be turned off. QuickSIN The QuickSIN is comprised of lists of sentences in noise (4-talker babble) that can be used to determine SNR loss. These lists take approximately one minute to administer. You will need to calibrate both channels 1 and 2 prior to testing on track 2 of the CD. There are blocks of recordings intended for evaluation of basic SNR loss, directional microphone effectiveness, ski-slope losses, and/or benefit or degradation of speech intelligibility with hearing aids having extended high-frequency emphasis. See manual for complete test procedures. AzBio The AzBio test was developed as a more difficult speech in noise test for instances where the ceiling effect was reached during other speech in noise tests. These sentences are spoken by multiple male and female talkers in a conversational as opposed to deliberate speaking style with limited contextual cues. The AzBio can be presented in quiet and in noise. Both channels 1 and 2 will need to be calibrated prior to testing. See manual for complete test procedures.