
Unified EMS/SNMS of Optical Network SDH Service Configuration Operations

Version 1.2 April 2020
The SkyWeather2 Configuration and Operations Manual
April 2021 Version 1.2
Version 1.2 April 2020
Table of Contents Cautions when building and using SkyWeather2 .............................................................................................. 2
Errata ..................................................................................................................................................................... 6
What is The SkyWeather2 System? .................................................................................................................... 7
Quick Start of your SkyWeather2 System .......................................................................................................... 8 Update Your SkyWeather2 Software .............................................................................................................. 8
Initial Testing of your SkyWeather2 System...................................................................................................... 9
Configuring SkyWeather2 to Restart on Raspberry Pi Bootup ....................................................................... 9
Configuration Screens on your SkyWeather2 .................................................................................................. 10
The Tabs in SkyWeatherConfigure .................................................................................................................. 12 Main Screen Buttons ....................................................................................................................................... 12 DMW Tab ........................................................................................................................................................ 13 MTN Tab .......................................................................................................................................................... 15 PSMax Tab ...................................................................................................................................................... 17 WS-WU Tab .................................................................................................................................................... 18 Pins Tab ............................................................................................................................................................ 20 MQTTR Tab .................................................................................................................................................... 21 Camera Tab ..................................................................................................................................................... 22 What is in your JSON configuration file? ..................................................................................................... 22
The DASH App on your Raspberry Pi ............................................................................................................. 23 Screen by Screen Review of the Dash App ................................................................................................... 23
Main Screen Tab ............................................................................................................................................ 23 Weather Screen Tab ....................................................................................................................................... 24 Indoor T/H Screen Tab .................................................................................................................................. 26 Logs Screen Tab ............................................................................................................................................ 27 Documentation Screen Tab ........................................................................................................................... 28
Disclaimer ............................................................................................................................................................ 28
Cautions when building and using SkyWeather2
1) Keep all water away from the electronics and power supply at all times! 2) This is not a toy! Keep it out of reach of young children and pets. 3) SwitchDoc Labs assumes no liabilities in the use of this kit, beyond the refund of the purchase
price.

6 Page Version 1.2 April 2021
Errata

7 Page Version 1.2 April 2021
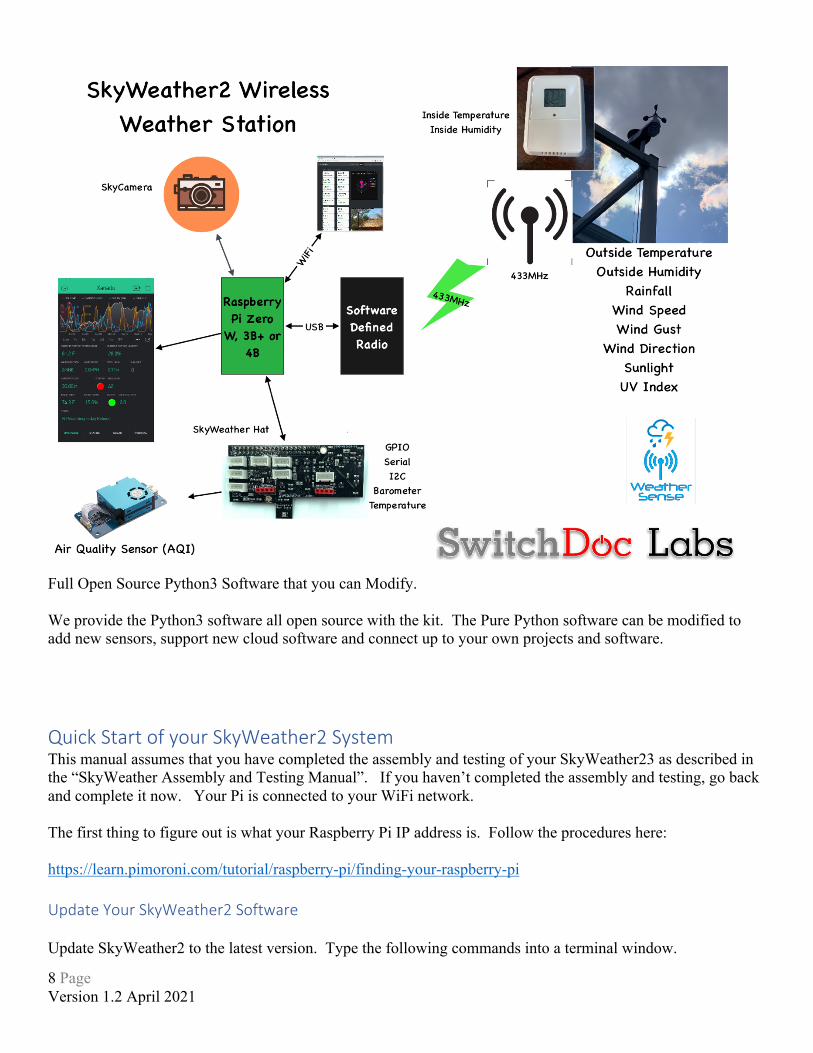
What is The SkyWeather2 System? Easy to build. Easy to learn about the IOT (Internet Of Things) and the Raspberry Pi. TheheartofthenewSkyWeather2projectisournewcustommadewirelessWeatherSensorpackagecalledtheWeatherRack2.
TheSkyWeather2kitissosimplethatevenmiddleschoolchildrencanbuilditwithjustalittleadulthelpforconfigurationandinstallation.
8 Page Version 1.2 April 2021
Full Open Source Python3 Software that you can Modify. We provide the Python3 software all open source with the kit. The Pure Python software can be modified to add new sensors, support new cloud software and connect up to your own projects and software.
Quick Start of your SkyWeather2 System This manual assumes that you have completed the assembly and testing of your SkyWeather23 as described in the “SkyWeather Assembly and Testing Manual”. If you haven’t completed the assembly and testing, go back and complete it now. Your Pi is connected to your WiFi network. The first thing to figure out is what your Raspberry Pi IP address is. Follow the procedures here: https://learn.pimoroni.com/tutorial/raspberry-pi/finding-your-raspberry-pi Update Your SkyWeather2 Software Update SkyWeather2 to the latest version. Type the following commands into a terminal window.
9 Page Version 1.2 April 2021
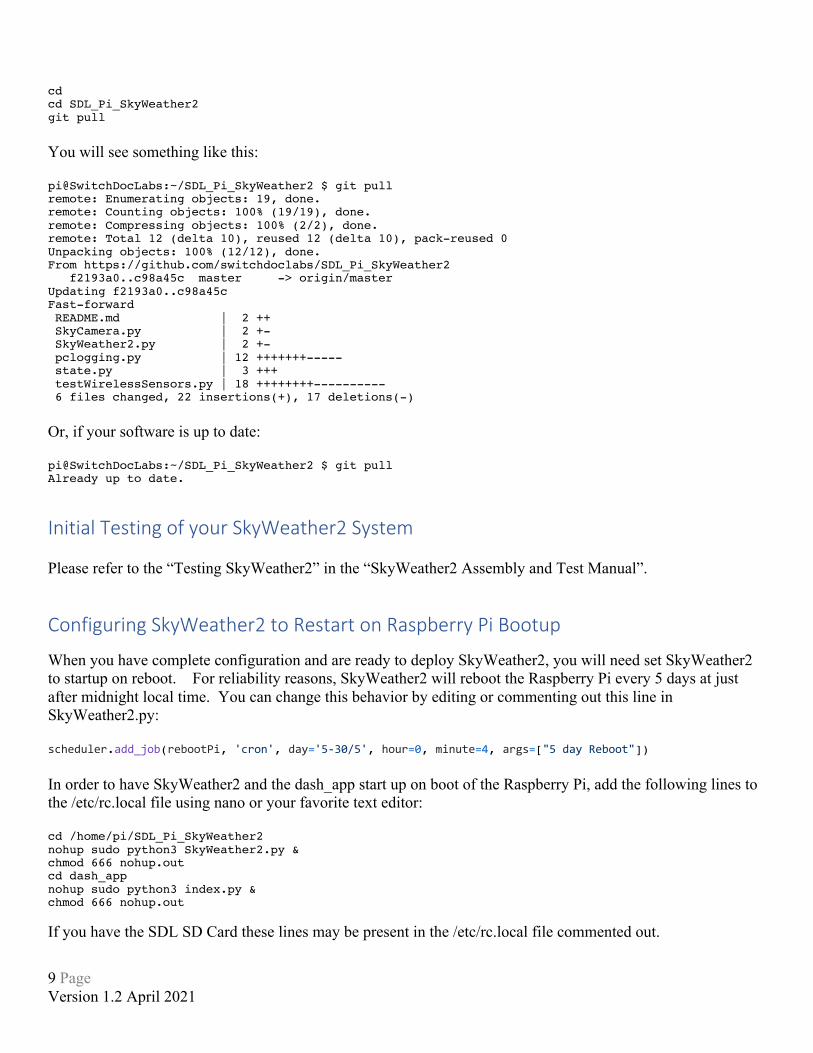
cd cd SDL_Pi_SkyWeather2 git pull You will see something like this: pi@SwitchDocLabs:~/SDL_Pi_SkyWeather2 $ git pull remote: Enumerating objects: 19, done. remote: Counting objects: 100% (19/19), done. remote: Compressing objects: 100% (2/2), done. remote: Total 12 (delta 10), reused 12 (delta 10), pack-reused 0 Unpacking objects: 100% (12/12), done. From https://github.com/switchdoclabs/SDL_Pi_SkyWeather2 f2193a0..c98a45c master -> origin/master Updating f2193a0..c98a45c Fast-forward README.md | 2 ++ SkyCamera.py | 2 +- SkyWeather2.py | 2 +- pclogging.py | 12 +++++++----- state.py | 3 +++ testWirelessSensors.py | 18 ++++++++---------- 6 files changed, 22 insertions(+), 17 deletions(-) Or, if your software is up to date: pi@SwitchDocLabs:~/SDL_Pi_SkyWeather2 $ git pull Already up to date.
Initial Testing of your SkyWeather2 System Please refer to the “Testing SkyWeather2” in the “SkyWeather2 Assembly and Test Manual”.
Configuring SkyWeather2 to Restart on Raspberry Pi Bootup
When you have complete configuration and are ready to deploy SkyWeather2, you will need set SkyWeather2 to startup on reboot. For reliability reasons, SkyWeather2 will reboot the Raspberry Pi every 5 days at just after midnight local time. You can change this behavior by editing or commenting out this line in SkyWeather2.py: scheduler.add_job(rebootPi, 'cron', day='5-30/5', hour=0, minute=4, args=["5 day Reboot"]) In order to have SkyWeather2 and the dash_app start up on boot of the Raspberry Pi, add the following lines to the /etc/rc.local file using nano or your favorite text editor: cd /home/pi/SDL_Pi_SkyWeather2 nohup sudo python3 SkyWeather2.py & chmod 666 nohup.out cd dash_app nohup sudo python3 index.py & chmod 666 nohup.out If you have the SDL SD Card these lines may be present in the /etc/rc.local file commented out.
10 Page Version 1.2 April 2021
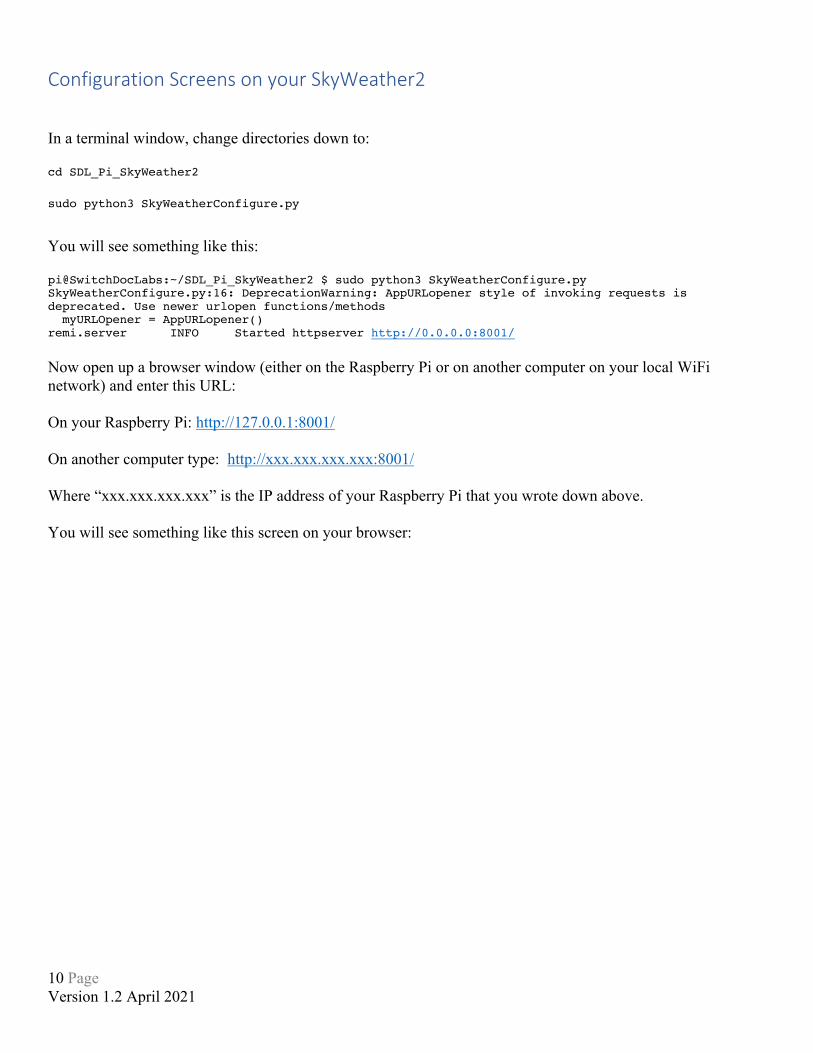
Configuration Screens on your SkyWeather2 In a terminal window, change directories down to: cd SDL_Pi_SkyWeather2 sudo python3 SkyWeatherConfigure.py You will see something like this: pi@SwitchDocLabs:~/SDL_Pi_SkyWeather2 $ sudo python3 SkyWeatherConfigure.py SkyWeatherConfigure.py:16: DeprecationWarning: AppURLopener style of invoking requests is deprecated. Use newer urlopen functions/methods myURLOpener = AppURLopener() remi.server INFO Started httpserver http://0.0.0.0:8001/ Now open up a browser window (either on the Raspberry Pi or on another computer on your local WiFi network) and enter this URL: On your Raspberry Pi: http://127.0.0.1:8001/ On another computer type: http://xxx.xxx.xxx.xxx:8001/ Where “xxx.xxx.xxx.xxx” is the IP address of your Raspberry Pi that you wrote down above. You will see something like this screen on your browser:
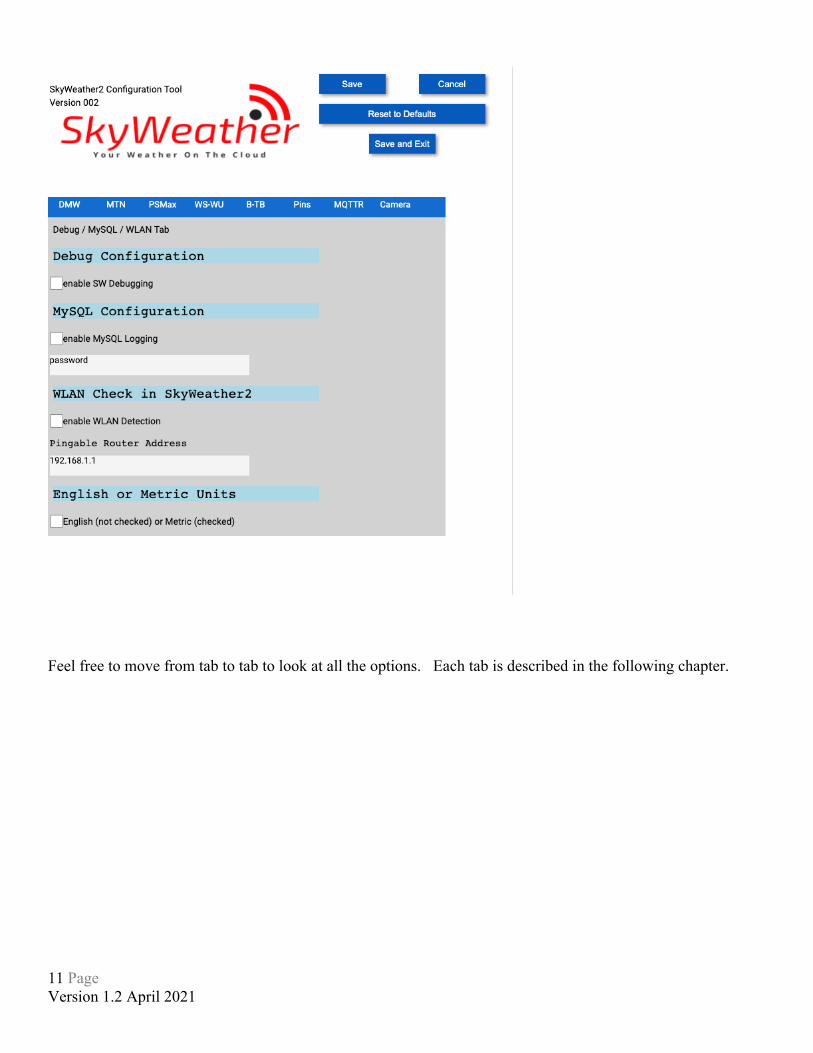
11 Page Version 1.2 April 2021
Feel free to move from tab to tab to look at all the options. Each tab is described in the following chapter.

12 Page Version 1.2 April 2021
The Tabs in SkyWeatherConfigure Remember the process for changing your configuration in SkyWeather2 is: Step 1: Start SkyWeatherConfigure.py Step 2: Make Changes to your configuration Step 3: Save and Exit SkyWeatherConfigure Step 4: Restart SkyWeather2.py Main Screen Buttons
• Save Button – Saves your configuration into SkyWeather2.JSON. Does not reload the SkyWeather2 program with your values until SkyWeather2 is restarted.
• Cancel Button – Clears all your changes and reloads the original JSON file. • Reset to Defaults – Resets the configuration to the factory default values. • Save and Exit – Saves your configuration into SkyWeather2.JSON and exits the program. Does not
reload the SkyWeather2 program with your values until SkyWeather2 is restarted.
13 Page Version 1.2 April 2021
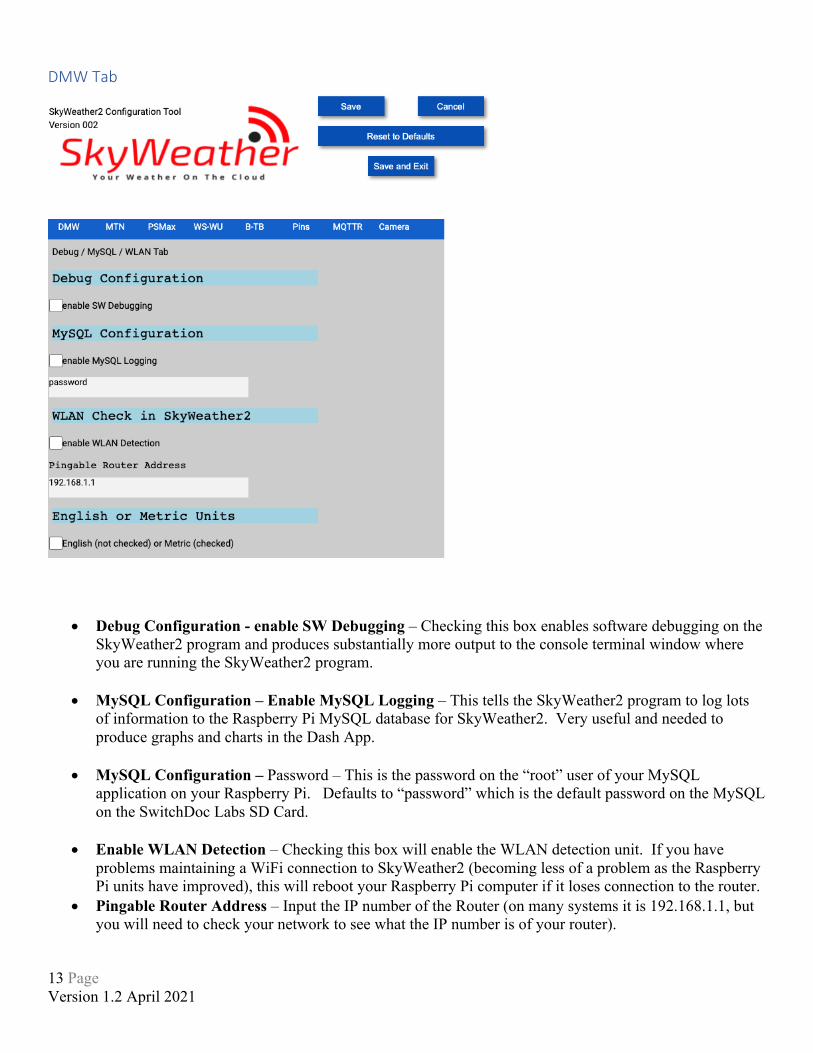
DMW Tab
• Debug Configuration - enable SW Debugging – Checking this box enables software debugging on the
SkyWeather2 program and produces substantially more output to the console terminal window where you are running the SkyWeather2 program.
• MySQL Configuration – Enable MySQL Logging – This tells the SkyWeather2 program to log lots
of information to the Raspberry Pi MySQL database for SkyWeather2. Very useful and needed to produce graphs and charts in the Dash App.
• MySQL Configuration – Password – This is the password on the “root” user of your MySQL
application on your Raspberry Pi. Defaults to “password” which is the default password on the MySQL on the SwitchDoc Labs SD Card.
• Enable WLAN Detection – Checking this box will enable the WLAN detection unit. If you have
problems maintaining a WiFi connection to SkyWeather2 (becoming less of a problem as the Raspberry Pi units have improved), this will reboot your Raspberry Pi computer if it loses connection to the router.
• Pingable Router Address – Input the IP number of the Router (on many systems it is 192.168.1.1, but you will need to check your network to see what the IP number is of your router).

14 Page Version 1.2 April 2021
• English or Metric Units – Checking this box will set the units used by SkyWeather2 to metric (versus the default of English units).

15 Page Version 1.2 April 2021
MTN Tab
• Mail Username – The username for your email account – for gmail (a good choice!) would be
• Mail Password – The password for your email account.
• Notify Address –Email updates from SkyWeather2 will be sent to this email address
• From Address – Enter the email address you would like your notifications and email to come from. Note: For some mail servers, this will need to match your account information.
• Enable Text Messaging Checkbox – Checking this box will enable text notifications of special events, like lightning strikes (from the optional ThunderBoard add-on Kit). Other notifications will be added.
• Text Notify Address –updates from SkyWeather2 will be sent to this email address, customized for your mobile text provider ( see this website: https://www.dialmycalls.com/blog/send-text-messages-email-address ).

16 Page Version 1.2 April 2021
17 Page Version 1.2 April 2021
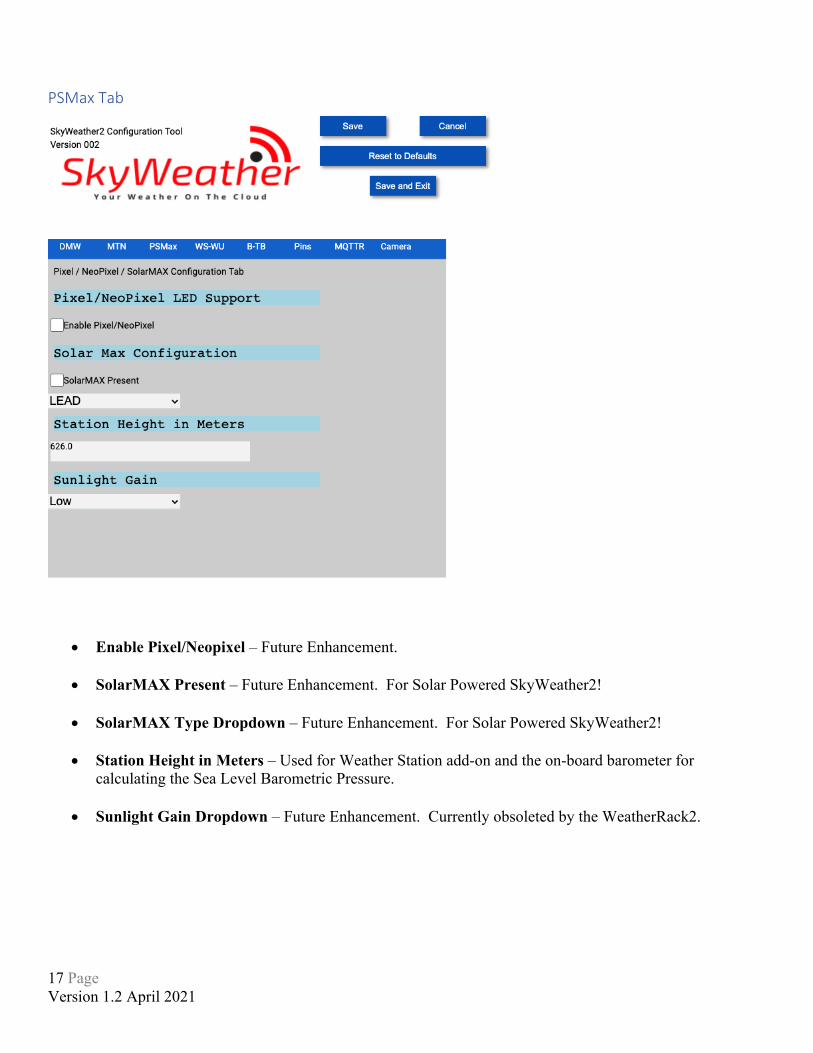
PSMax Tab
• Enable Pixel/Neopixel – Future Enhancement.
• SolarMAX Present – Future Enhancement. For Solar Powered SkyWeather2!
• SolarMAX Type Dropdown – Future Enhancement. For Solar Powered SkyWeather2!
• Station Height in Meters – Used for Weather Station add-on and the on-board barometer for
calculating the Sea Level Barometric Pressure.
• Sunlight Gain Dropdown – Future Enhancement. Currently obsoleted by the WeatherRack2.
18 Page Version 1.2 April 2021
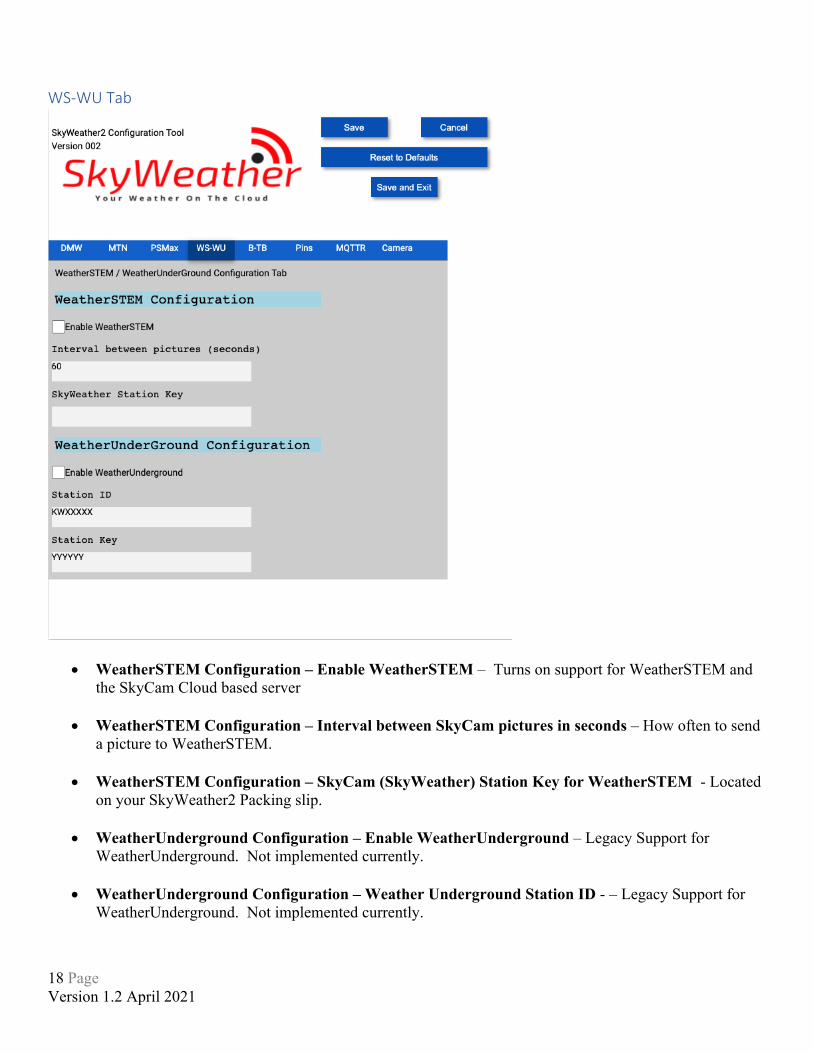
WS-WU Tab
• WeatherSTEM Configuration – Enable WeatherSTEM – Turns on support for WeatherSTEM and the SkyCam Cloud based server
• WeatherSTEM Configuration – Interval between SkyCam pictures in seconds – How often to send
a picture to WeatherSTEM.
• WeatherSTEM Configuration – SkyCam (SkyWeather) Station Key for WeatherSTEM - Located on your SkyWeather2 Packing slip.
• WeatherUnderground Configuration – Enable WeatherUnderground – Legacy Support for
WeatherUnderground. Not implemented currently.
• WeatherUnderground Configuration – Weather Underground Station ID - – Legacy Support for WeatherUnderground. Not implemented currently.

19 Page Version 1.2 April 2021
• WeatherUnderground Configuration – Station Key – Legacy Support for WeatherUnderground. Not implemented currently.

20 Page Version 1.2 April 2021
Pins Tab
This screen is for physical pin mapping to your Raspberry Pi and SkyWeather2. Usually, you won’t ever have to change these, but if you are customizing your software, this is a convenient way of doing the change.
• Dust Sensor SCL Pin – GPIO Pin for the Dust Sensor I2C SCL Pin • Dust Sensor SCL Pin – GPIO Pin for the Dust Sensor I2C SDA Pin • Dust Sensor Power Pin – GPIO Pin to turn the Dust Sensor On or Off (save power for Solar Systems!) • Fan Power Pin Signal 1 – Turns on the optional cooling fan in the SkyWeather2 Box. • Fan Power Pin Signal 2 – Turns on the optional cooling fan in the SkyWeather2 Box. Same as Signal
1. • WatchDog Trigger Pin – Used to “Pat the Dog” for the optional SwitchDoc Labs WatchDog Timer
Board.

21 Page Version 1.2 April 2021
MQTTR Tab
• REST Interface – REST Enable – Enables the REST interface for SkyWeather2 on the Raspberry Pi –
Future enhancement. MQTT Configuration is for the use of an MQTT interface FROM the SkyWeather2 computer to another computer of your choosing. For future enhancement.
• MQTT Configuration Checkbox – MQTT Enable – For future enhancement.
• MQTT Configuration – MQTT Broker Server URL – For future enhancement.
• MQTT Configuration – MQTT Broker Server Port Number – For future enhancement.
• MQTT Configuration – How Often MQTT Send in Seconds – For future enhancement.

22 Page Version 1.2 April 2021
Camera Tab
• Night Vision Enable Checkbox – Enables night vision option for the SkyCam supplied with SkyWeather2 – For future enhancement.
• Camera Rotation – If you have oriented the box differently than expected or have installed the camera oriented differently than assumed, you can rotate the SkyCam picture to your liking.
What is in your JSON configuration file? After you complete your configuration changes and save the JSON file, you will find a SkyWeather2.JSON file in your SDL_Pi_SkyWeather2 directory. JSON files consist of “key” : “value” pairs. An example of this file is below: pi@SwitchDocLabs:~/SDL_Pi_SkyWeather2 $ more SkyWeather2.JSON {"key": "value", "ProgramName": "SkyWeather2", "ConfigVersion": "001", "SWDEBUG": false, "e nable_MySQL_Logging": false, "MySQL_Password": "password", "enable_WLAN_Detection": false, "PingableRouterAddress": "192.168.1.1", "mailUser": "yourusername", "mailPassword": "yourma ilpassword", "notifyAddress": "[email protected]", "fromAddress": "[email protected] m", "enableText": false, "textnotifyAddress": "yournumber@yourprovider", "runLEDs": false,

23 Page Version 1.2 April 2021
"SolarMAX_Present": false, "SolarMAX_Type": "LEAD", "BMP280_Altitude_Meters": "626.0", "Sun light_Gain": "Low", "USEWEATHERSTEM": false, "INTERVAL_CAM_PICS__SECONDS": "60", "STATIONKE Y": "", "WeatherUnderground_Present": false, "WeatherUnderground_StationID": "KWXXXXX", "We atherUnderground_StationKey": "YYYYYY", "USEBLYNK": false, "BLYNK_AUTH": "", "AS3935_Lightn ing_Config": "[2,1,3,0,3,3]", "DustSensorSCL": "20", "DustSensorSDA": "21", "DustSensorPowe rPin": "5", "GPIO_Pin_PowerDrive_Sig1": "4", "GPIO_Pin_PowerDrive_Sig2": "4", "WATCHDOGTRIG GER": "6", "REST_Enable": false, "Camera_Night_Enable": false, "Camera_Rotation": 0, "MQTT_ Enable": false, "MQTT_Server_URL": "", "MQTT_Port_Number": "5900", "MQTT_Send_Seconds": "50 0", "English_Metric": false}
The DASH App on your Raspberry Pi Open another terminal window and type: cd cd SDL_Pi_SkyWeather2 cd dash_app sudo python3 index.py Now open up a browser window (either on the Raspberry Pi or on another computer on your local WiFi network) and enter this URL: On your Raspberry Pi: http://127.0.0.1:8050/ On another computer type: http://xxx.xxx.xxx.xxx:8050/ Where “xxx.xxx.xxx.xxx” is the IP address of your Raspberry Pi that you wrote down above. You will see this screen on your browser (or one of the other pages in the app): Screen by Screen Review of the Dash App Main Screen Tab

24 Page Version 1.2 April 2021
Weather Screen Tab
The Weather Tab shows your current local weather conditions in your location and a variety of graphs. The graphs continue below the weather values and are shown below. Note the AQI graph from the optional Laser

25 Page Version 1.2 April 2021
Air Quality Sensor. Note that this screen will be blank if you have not configured your MySQL database in SkyWeatherConfigure.py. The information will be current after 15 minutes of running your SkyWeather2 Software.
26 Page Version 1.2 April 2021
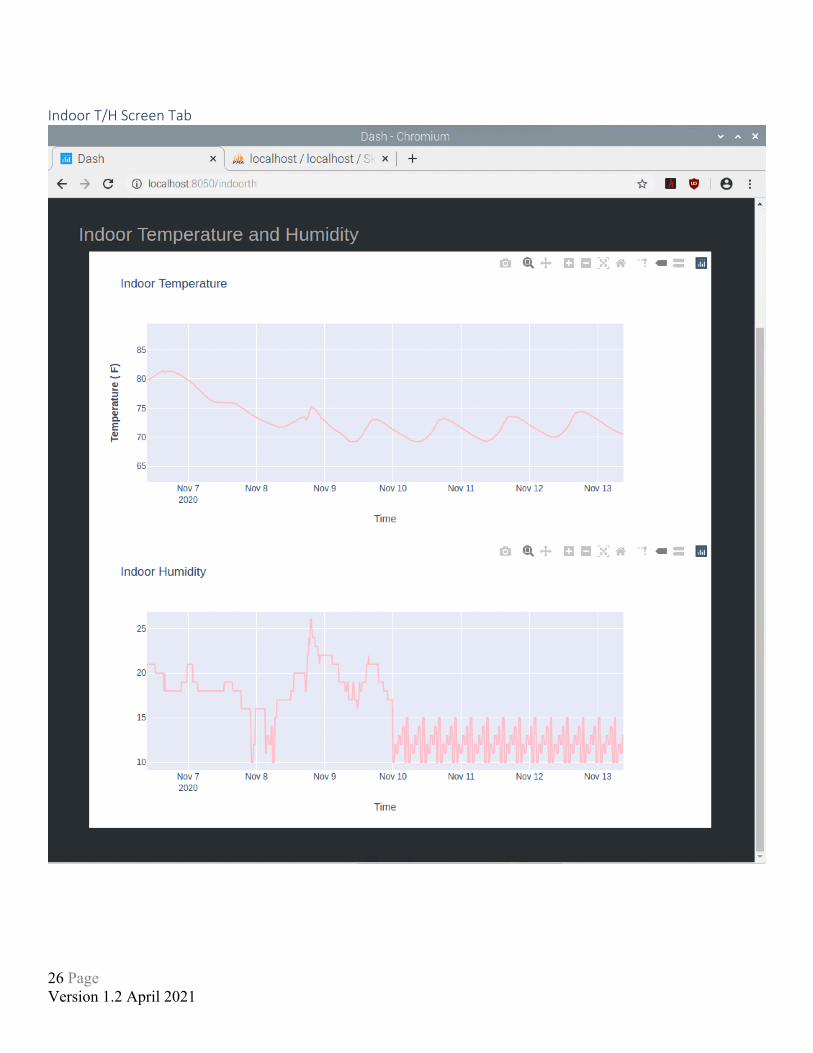
Indoor T/H Screen Tab
27 Page Version 1.2 April 2021
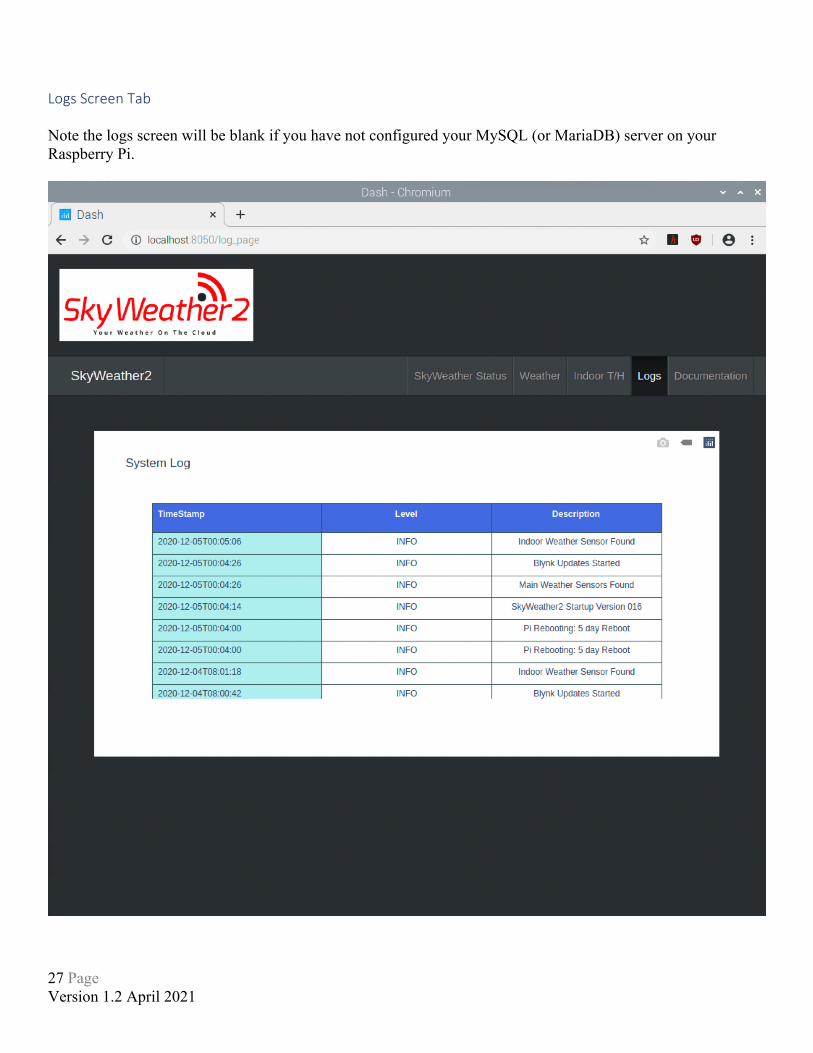
Logs Screen Tab Note the logs screen will be blank if you have not configured your MySQL (or MariaDB) server on your Raspberry Pi.

28 Page Version 1.2 April 2021
Documentation Screen Tab Clicking on this tab takes you to the shop.switchdoc.com SkyWeather2 page which has links to all the current documentation and software.
Disclaimer SwitchDoc Labs, LLC takes no responsibility for any physical injuries and possession loss caused by those reasons which are not related to product quality, such as operating without following the operating manual and cautions, natural disasters or force majeure. SwitchDoc Labs, LLC has compiled and published this manual which covers the latest product description and specification. The contents of this manual are subject to change without notice.