The Roseate Shade(正文)
49
The Roseate Shade
Transcript of The Roseate Shade(正文)

Th
e R
os
ea
te
Sh
ad
e

Designer's Message
These 6 artefacts are my final master collection for the MA fashion artefact
(2014-2015), London College of Fashion, University of Arts London.
The collection inspired by the most famous British ship wreck Mary Rose and
this book will show all the process of designing and making, also explain my
own methodology.
Hope you will like it.
Na Kang

Contents
Chapter 2. Context 06Chapter 1. Intro 02 Chapter 3. Research 14 Chapter 5. Development 56Chapter 4. Studio Practice 28 Chapter 6. Conclusion 80

Chapter 1. Intro
01 02

Inspired by the famous shipwreck Mary Rose,
the collection of 6 wearable artefacts present an
abstract concept of shipwreck. Everything from
ship wreck is just like a piece of shade, they are
the reflection of the certain ship lost in the long
history, but they aren’t themselves anymore by the
time and sea.
Research question: How the sea and the shipwreck interact with each other?
As we all know that the ship sank in the sea is the
beginning of the story. For the result of the sea
swallowed the ship we can say that the sea beat
the ship, obviously the ship could not afford the
power of the strength from the wind and the sea
wave. But thinking from the other side, the sea
saved the ship and let it to become into eternity.
In my opinion, a ship turns into a shipwreck is not
because of the ship sank into the sea but the ship
is totally changed after the extremely long period of
time undersea.
The chemical elements of the water in the sea
reacted and corroded the body of ship, the marine
creatures living on the everywhere of the surface
of ship, can we say the ship was eaten by the
sea? I think it is not like that. The metal was hard
and strong originally, after sank for a long time the
metal etched by the salty water of the sea and.
When the metal body of the ship become weaker
and weaker, the microorganism of the sea turns
into the new host within all the metal components.
The tiny little microorganism become a soft but
powerful force to support the huge and heavy
body of the shipwreck, and the home that marine
parasites built transform into the steady foundation.
According to my research question, I found that the
deconstructing and reconstructing with the existing
objects of shipwreck attracted me a lot. Considering
the relationship between the shipwreck and the
sea carefully I inspired by the recombination of
manmade objects and natural creatures, the
alternation of soft and hard materials, and reunion
the multiple textures. I fascinated into these points
and I will take them forward into the concept with
my design of the final master project.
03 04

Chapter 2. Context
05 06

07 08

Depending on my idea of combining different material together, I researched some artworks
from the famous Canadian designer David Altmejd. The pieces he made in Fig.1 are using
very different materials combining together such as polyurethane foam, epoxy clay, epoxy gel,
synthetic hair, quartz, glass stain, resin, acrylic paint and so on (David, 2014). I like his ideas
and his way to combine all the materials together. He chose the human’s head as the media
to support his unique material language, there is a big contrast between his materials and the
human-liked components which makes the concept of this collection much stronger.
In the collection which named 11:11 presented from Fig.2, the designer Winde Rienstra showed
her special aspect for the structure and space. The aim of her collection is to discover the
ambiguity between clothing and objects (Winde, 2015). As wearable pieces, the designer utilizes
the original body silhouettes to create the relation of human body and art works. I am fond of the
space created between the wood structures and the body lines of human, I believe that the large
wearable body pieces has to be interacted with the body and space. Fig.2
Fig.1
09 10

From the jewellery pieces presented in the Fig.3, the Japanese jewellery
designer Mari Ishikawa created those brooches with Silver, Black diamonds,
Pearls, Charcoals, Japanese Kozo Paper, Japanese lacquer, and Tahiti
Pearls. The main process of making with these pieces is casting, the
designer cast the original elements of the nature into silver and then combine
the metal components with other materials.(Mari, 2014) I quite like the way
that the designer utilizing the natural and organic silhouette, and creating
with multiple materials gives these pieces more different attractive textures.
Fig.3 Fig.4
The 5 rings of the Fig.4 are jewellery art works designed by the fantastic
British jewellery designer and maker Maud Traon. She is fond of working
with the found objects so much, must of the time found objects are
becoming the starting point of a new piece of jewellery. The found objects
determined the palette of colours, the textures, and the design as well,
therefore the designer has to choose the right elements to match found
objects and balancing the design. The materials that she used in these
jewellery pieces are silver, gold, liquid foam, glitter, synthetic stone, gem,
and varieties of found objects.(Maud, 2015) In my opinions, found objects
have their unique attractions individually, once the designer can control
them in a right direction during cooperating with other materials, the found
objects will fascinated audiences by their specialty.
11 12

Chapter 3. Research
13 14

15 16

As I started my journey with some simple experiments of new material exploring, I found
that the transparent, colourful and crystallized test pieces attracted me a lot. Besides
ordinary materials of artefacts, I’d like to discover more from other background of
knowledge. After searching for a long time I found that there is something called “hot ice”
which has similar effect and characteristic with both of the ice and water. It has conditions
in both of liquid and solid, it is a sort of flexible material with non-toxic characteristics;
these drive me to explore more on this material. The hot ice is a kind of chemical reaction
with supersaturated solution of Sodium Acetate, the cold solution turns from a liquid into
a solid just need a few seconds. This process is exothermic and after solid the “ice” has a
warm touch, opposite to the one that people would expect of ordinary ice (Amazing, 2008).
However, the chemical ingredient of hot ice is the sodium acetate, the molecular formula
of it is C2H3NaO2. And the crystalized form of sodium acetate is C2H3NaO2.3H2O which is
called the sodium acetate trihydrate, the crystalized form is very soluble into water and
soluble into the ethanol with 96%, the Fig.5 shows both of them (Council, 1987).
According to my test pieces of the material sodium acetate, I feel
like they have more possibilities in developing into organic and
special textured creatures such as marine organism. The picture
shown in Fig.6 indicates some marine parasites and a few lived in
the seabed. The parasites are an integral part of every ecosystem.
The marine parasites can be either infecting many host species or
infect only one or a few closely related host species (Kate, 2009).
They gathered into small units and quite intensive. The marine
organisms have soft and flexible tentacles, intensive acetabulums,
unique textures, and bright colour conbinations, I can see the
potential of developing from my new explored materials.
Fig.5
Fig.6
17 18

As shown in the Fig.7, the drawings are made by Ernst
Heinrich Philipp August Haeckel, he was a German biologist,
naturalist, philosopher, physician, professor, and artist. These
illustrations reflect delicate details of marine organisms and
structures of different species of marine protozoa. He showed
up the natural beauty of the marine organisms in the illustration
way (Gloria, 2013). Through his drawings I inspied by the
details that he developed from the original marine creartures,
and with complex and delicate detailed structrues the artist
chose a simple colour palette to balance the drawing.
Fig.7
Fig.8
Considering about the mysterious world undersea, except the marine creatures there might be some
belongings left by humanbeings as well like Fig.8 showed. They used to symbolise the craftsmanship
and technology of their times, but after years sleeping under the sea they eroded by the sea and
become homes of parasites. These changing affect their construction of metal components, they
were strong and firm but through the reconstruction they are becoming weak and fragile. After
wrecked for a long time the tiny sea parasites, soft marine plants and elements of water in the sea
become the new members of these ships, these fragile things protect the fragility of the ships on the
contrary (Carl, 2013). The contrast and alternation between the fragility and strong are fascinated me
a lot. And the outlines of ships are fragmentary but we can still recognize the shape of these ships. I
like the effect of rust on the metal surface, uneven colour and the incomplete silhouettes.
19 20

The 2 shipwrecks from the Fig.9 present the condition of their surface after soaking into the sea for a long time. Corrosion is the
deterioration a material experiences as a result of its interaction with its surroundings. The chemical reactions that take place in
corrosion processes are reduction-oxidation reactions. The sea and the salty atmosphere are saline media that are highly aggressive to
metals. Marine structures such as ships, bridges, and drilling rigs and platforms usually suffer heavy corrosion unless they have been
properly protected (Chemistry, 2012). Through my understanding of the background knowledge with the corrosion, I try to create the rust
through my own experiments. I quite like the effect of the rust and I decide to use this as a sort of element into my final collection.
In addition to this, I desired to explore more on the chemical reaction related to the sea. The salt, as the most important
element in the sea cannot be ignored with. The common salt as we all know is a mineral composed primarily of sodium
chloride (NaCl),(wiki, 2015) Regarding to my research within the field of chemistry, there is a chemical reaction with chemical
elements Cu and Na which could get the precipitate in turquoise as the Fig.10 indicated. The chemical formula of that reaction is
2CuSO4+2Na2CO3+H2O=Cu2(OH)2CO3↓+2Na2SO4+CO2↑(Baike, 2014), through this formula I hypothesise that the copper can be reacted
in the solution of salt. After experimented, the turquoise crystal of salt excites me and makes me determined to use it as a special
element in my design.Fig.9
Furthermore, as the picture shown in Fig.11, there is a special
natural phenomenon from a waterfall of Knaresborough. The
petrifying well has a sort of process of evaporation and deposition
in water with an unusual high mineral content so that anything
thrown into the well gets turned into stone gradually (Leeds-
list, 2013). The petrochemical process shows the undeniable
powerful strength of the nature, the varieties of manmade materials
combined together under this strong force during a long period of
time. The reconstruction of existing objects bring the new textures,
components, and silhouettes to the original pieces, the combination
of natural elements and manmade objects inspired me a lot. Fig.9
Fig.11
21 22

Fig.12 Fig.1223 24

Fig.12 shows the research from the museum of Mary Rose which was a warship of the English Tudor navy of King
Henry VIII. After 33 years of fighting against France, Scotland, and Brittany the Mary Rose took her last action
on the date of 19 July 1545. While leading the attack on the galleys of a French invasion fleet, she sank in the
Solent which is located in the straits north of the Isle of Wight (Mary, 2015). As one of the most famous shipwreck
of England in the world, the Mary Rose kept huge amount of beautiful and delicate details of the history. When I
walked into the museum of Mary Rose, I feel like the time frozen at the day that she sank. Regarding to the objects
exhibited in the museum which including broken components of equipment for operating the ship, weapons for
fighting, daily necessities of people on board, currencies, food and containers, and also the atmosphere of 16
centuries, the reflection of that period of time appeared in front of my eyes. With all the stuffs deconstructed and
reconstructed by time and the sea, the existing manmade objects become multi-textured and abstract. Invite all
there mysterious narrative objects into a world of imagination, the unexpected inspiration rises before my eyes.
Fig.13
As the original intention of using metal frame to create the structure
of my final design referencing with the skeleton of shipwreck, I have
to consider about except the structure of shipwrecks what sort of
silhouettes of objects from the Mary Rose could be utilized into my
design. Among the large amount of types of objects, I chose the
clothing at that time as the main inspiration of the outside shape
design which shown in Fig.13 and realize that the silhouettes
of clothing have better effect than others even just with the liny
hollowed shapes, and as wearable pieces the silhouettes of clothing
could be more fitted in following the human body lines.
Fig.13
25 26

Chapter 4. Studio Practice
27 28
29 30

In the beginning of the starting stage, I begin to experiment with the
leather and cold enamel. Cold Enamel is a sort of two parts Epoxy
System to achieve an effect like vitreous enamel with resin and
hardener (Hasulith, 2015). Due to the thick layer of cold enamel lost its
transparency, I prefer to create a shell of the cold enamel by moulding
with the silicone. As the result of the experiment in Fig.14, the cold
enamel immerged into leather so that they strongly connected together.
And I like the colourful and transparent stained glass effect.
Since then, I realized that the material with high flexibility attracts me more. Starting
with the cold enamel, I transfer to silicone and resin afterwards. Resin is a sort of
two part liquid that set into a hard lacquer. There are two kinds of resin, one is the
plant resin, and the other one is modern resin, which I used in my experiments
(oxford.2014). Silicone is a two-part system used to create rubber moulds and
casting resins, foams, rubber, and low-temperature alloys. The silicone is typically
heat-resistant and rubber-like (Joe. 2007). As shown in Fig.15, the first piece is made
by clear resin with cold enamel. The resin shell was simply moulded, I’m fond of
the effect but I don't like the bubbles of air in the clear resin, then I replace the clear
crystal resin with the glazing resin. The other two pieces are mainly made by silicon; I
like the soft touch and bouncy texture of it.Fig.14
Fig.15
31 32

According to test pieces from
Fig.16, after soaking into resin
the sponge turned to rock hard
and has a shiny light-reflected
uneven surface. After pigmented
the effect looks like colourful
shining corals from the seabed
which is what I want. Fig.16
Fig.17
Fig.18
Fig.19
There are more test pieces developed from sponge in Fig.17. I tried different kinds of sponge, and I tried to connect the resin soaked
sponge with other materials from the previous experiment. Moreover, I try to build up a frame for the sponge with either laser cut acrylic
or metal. I want to achieve a metal piece with the combination of all related materials on.
With the new material that I discovered, I try to test the sodium acetate combining with other materials like in Fig.18. During the
experiments I found that the sodium acetate has the characteristics of soluble in water which attracts me a lot.
To continue exploring more I set up more experiments. The Fig.19 shows the original mould which is resin-soaked bread; I like the
uneven and irregular surface. I formed the shape of silicone mould with foil and pour the silicone afterwards. After 10 hours of drying,
I heat up the sodium acetate and pour into these moulds. Just a few minutes later, the liquid of sodium acetate becomes solid, but the
crystal will be totally dried in 5 hours. I apply a layer of resin onto the solid crystal, and soaked into water for a few minutes after the
resin dried for 12 hours. The achievement of this experiment is a hollow casted resin shell, I like it’s colourful, fragile, light and bumpy.
33 34

The test pieces presented in Fig.20 show my
experiments of material collaboration. I use
cracked glass pieces, resin, sodium acetate and
laser cut acrylic sheets to create them, and I’m
fond of the combination of different textures.
Fig.20
Fig.21
In addition to this, I cast one of the cracked glass pieces
into sodium acetate and try to fix the broken part of the
glass container. The Fig.21 expresses the process of
silicone mould making and sodium acetate casting. As
shown in the picture, the resin shell brings new colour and
texture to the found object which fascinates me a lot.
35 36

Fig.22
Fig.23
After I done all the material experiments above, I create a test piece which aims at
achieving the cooperation of multiple new materials, interpreting the design concept
of shipwreck, and utilizing metalsmithing skills that I learnt before. In this piece which
presents in Fig.22, I use copper mesh, liquid foam, laser cut clear acrylic sheet and
hollow casted resin shell with the sodium acetate combine with the square copper rod
soldered frame. From the research of shipwreck, I fascinated about the incomplete
metal skeleton of shipwrecks, the residuary components of facilities remain on the
shipwrecks, and all the manmade stuffs reacted with the sea and marine organisms.
Therefore this piece is designed to express all the points above.
Meanwhile, regarding to the research I did from structure of ships,
I build up ship models by myself to feel the different between
multiple types of ships like pictures from Fig.23. In addition to this,
I try to apply a layer of silicone to get a mould of the shape from
the ship because I want to utilize the silhouette of real ships. But
I failed in the experiment of moulding the ship models, the reason
of failure is that there are many undercuts in the ship models so
that the silicone cannot be took off after solid. Thus I have to find
the other way to keep the structure of ships.
37 38

Fig.24
Fig.25
According to the silhouette of ship is complex and professionally standard, I decide to use milling
machine to mill on the foam. Milling is the machining process of using rotary cutters to remove
material from a workpiece advancing or feeding in a direction at an angle with the axis of the tool
(CNC, 2015). With my rhino file, the milling machine could help me to cut the foam into a certain
3D shape as the processes below in Fig.24. After I get the milled foam of ship model, I start to
make a mould of it with the silicone. The container of silicone is made by a piece of foil, the reason
I chose foil is that it is more flexible so that I can make the silicone mould thinner which makes the
mould easier to open and close. Pour the silicone between the foil container and the foam mould,
then take out the ship mould after 10 hours drying. Following next steps are heat up the sodium
acetate, pour into silicone mould, take out the solid sodium acetate from the mould, weight the
resin and apply onto the crystal, at last dissolve the sodium acetate into water to get the hollow
casted resin shell. In this way, I can keep a fragile, translucent, uneven surfaced and incomplete
structure of the ship, that is what I want to achieve regarding to my research and design.
The Fig.25 indicates the process developed from the former experiments.
Before pour the liquid sodium acetate into the silicon mould, I added
some metal and fabric net, mesh, chain, with found objects into the
mould. Therefore the objects was casted into the resin shell.
39 40

From the pictures shown in Fig.26, I use water colour to pigmented
the sodium acetate. After tried different kinds of pigments I found
that the only water soluble pigments can be used in sodium acetate,
therefore I chose the water colour in the end. As I failed many times
on colouring the sodium acetate in even colour, there is a conclusion
drawn: 1. Totally dissolved the water colour into water first. 2. Add the
colour after heat up the sodium acetate. 3. Never stirring.
Fig.27
Fig.26
As the Fig.27 shown, there are 3 colours crystals I made with sodium acetate.
These colours come from the colour palette of my final master project. The
first one is blend with white, black and red. The second one blends with white
black and purple. And the third one is white, black and turquoise.
41 42

Based on the research I did about the sea and salt, I start to experiment
the salt with metal. After tried different kinds of metals I found that copper
is the most active metal reacted with the salt. Soaking into the salt solution
for a week, the surface of copper reacted well with the salt. The product
of this chemical reaction is the copper sulfate, also called bluestone. It is
turquoise colour which shown in the Fig.28, and after dried the salt become
into solid with the turquoise colour as well. I try to soak other materials into
the salt and I add in some metal rust to combine with the bluestone.Fig.29
Fig.28
In addition to this, I developed the result of experiments into components
making for my final collection presented in the Fig.29. I quite like the
effect of natural bluestone colour, I soaked copper mesh, copper net,
fabric net, foam, glass, and other found objects into the solution of copper
sulfate, stirring and pour out randomly, applying a layer of resin after
dried. I am fond of the effect of it, it looks like freeze the moment of the
shipwreck belongings precipitating under the deep dark sea.
43 44

As shown in Fig.30, I made some patterns with the foam sheet in the
thickness of 3mm. I utilize the research I did to create the patterns.
Moreover, inspired by the inner structure of ship I use some of wood
sticks combining with foam sheet to create a structure similar with the
ship. The following next steps before finish are glue them together,
apply resin on the surface, and change to the other side.
Fig.30
Fig.31Fig.32
According to the research of metal oxidation and etching, I experiment the
metal with hydrogen peroxide solution. I soaked coins, metal mesh, metal
nets, and other metal found objects into the solution, after soaking for
about 3 days the surface of metal start bubbling as shown in Fig.31. About
a week after the metal conponents are becoming orange, and there will be
orange precipitation in the container of solution as well.
After decided to focus on the certain shipwreck as the main concept of my
design, I choose the Mary Rose in the end. From pictures of Fig.32 we
can see that there are some wood models of Mary Rose, for researching
deeper into these models I cut them into blocks by the band saw.
45 46
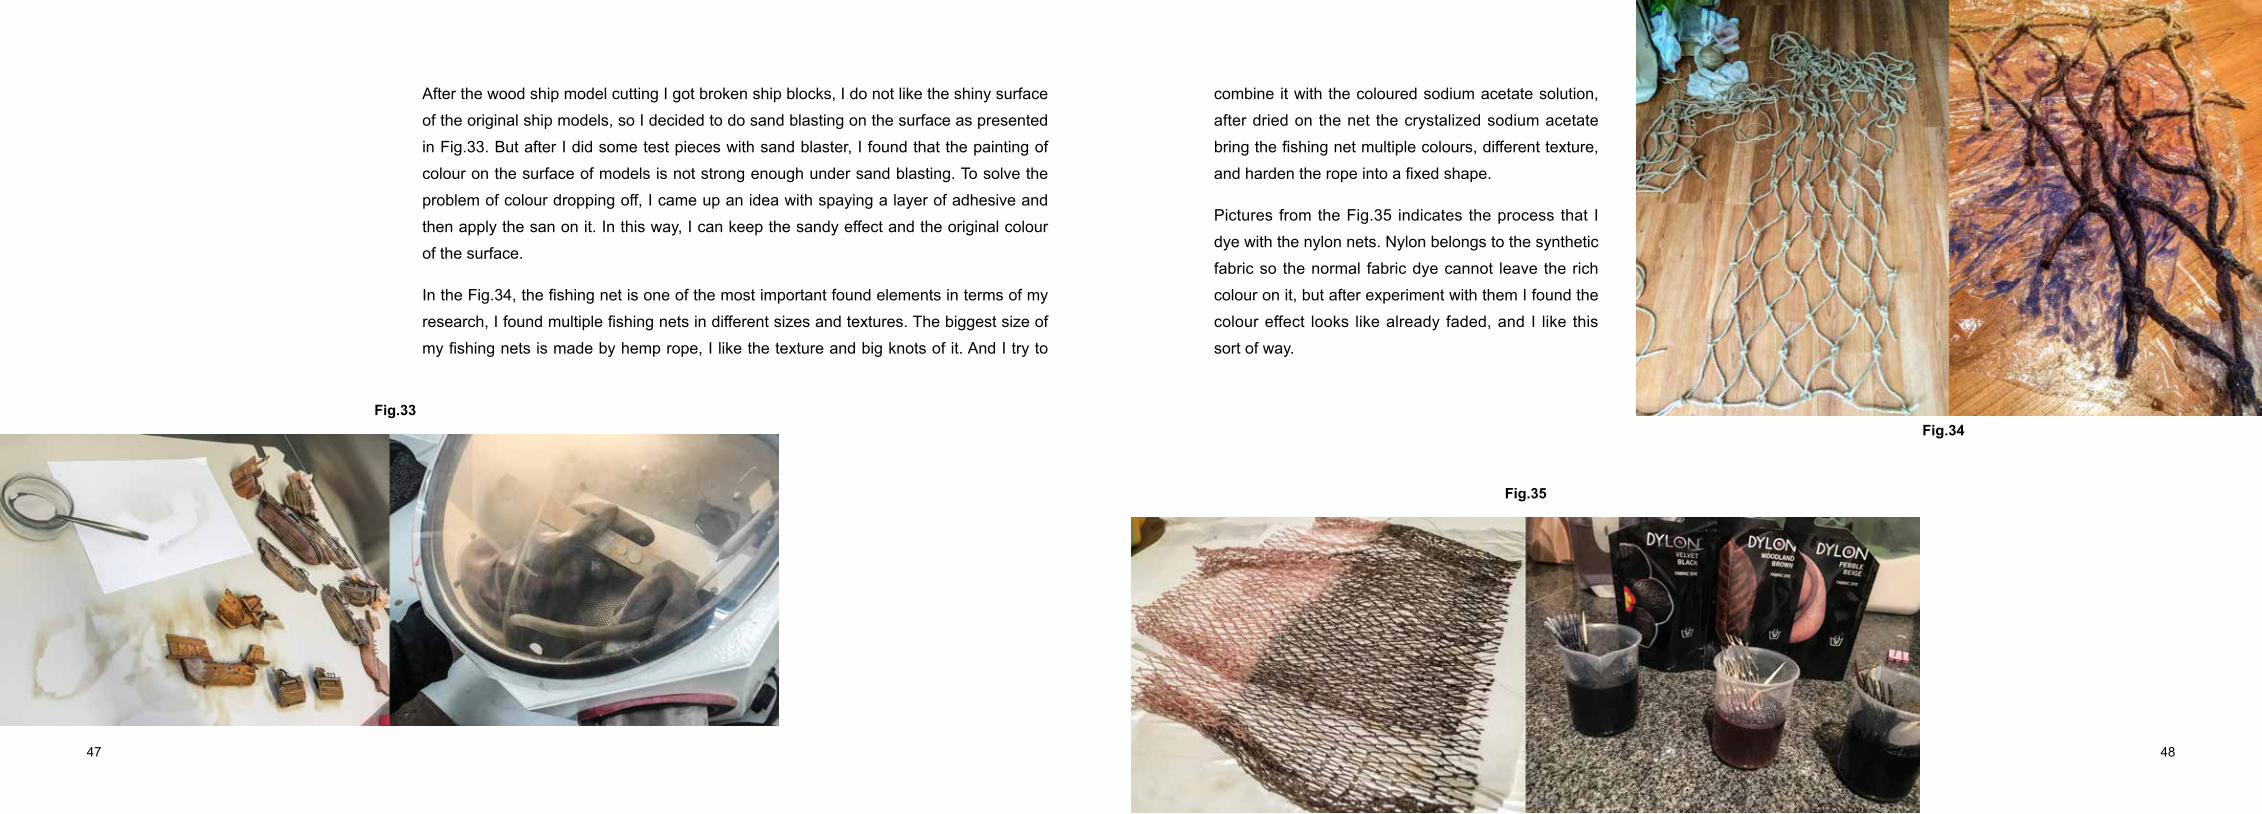
After the wood ship model cutting I got broken ship blocks, I do not like the shiny surface
of the original ship models, so I decided to do sand blasting on the surface as presented
in Fig.33. But after I did some test pieces with sand blaster, I found that the painting of
colour on the surface of models is not strong enough under sand blasting. To solve the
problem of colour dropping off, I came up an idea with spaying a layer of adhesive and
then apply the san on it. In this way, I can keep the sandy effect and the original colour
of the surface.
In the Fig.34, the fishing net is one of the most important found elements in terms of my
research, I found multiple fishing nets in different sizes and textures. The biggest size of
my fishing nets is made by hemp rope, I like the texture and big knots of it. And I try to
Fig.34Fig.33
combine it with the coloured sodium acetate solution,
after dried on the net the crystalized sodium acetate
bring the fishing net multiple colours, different texture,
and harden the rope into a fixed shape.
Pictures from the Fig.35 indicates the process that I
dye with the nylon nets. Nylon belongs to the synthetic
fabric so the normal fabric dye cannot leave the rich
colour on it, but after experiment with them I found the
colour effect looks like already faded, and I like this
sort of way.
Fig.35
47 48

Thinking about how can I connect these two sort of nets together, I came up with the idea of sewing the small net
onto the big one as presented in Fig.36. The thread I choose is the hemp string which has the same texture and
quality with the large fishing net. After I finish the connection between nets, I try to form the shape with sodium
acetate and resin. I found that it is very hard to get a perfect round shape without a mould, then I try to blow the
balloon into the right size and moulding the nets onto it. This method works well, after the resin layer dried the shape
stays into a perfect round.
As the pictures of Fig.37, I break the sea shell to be the found object of my final pieces. I like the original texture and
colour of the sea shell but after broken the shell has more spaces, and can be interact with other mterials better.
Fig.36
Fig.37
49 50
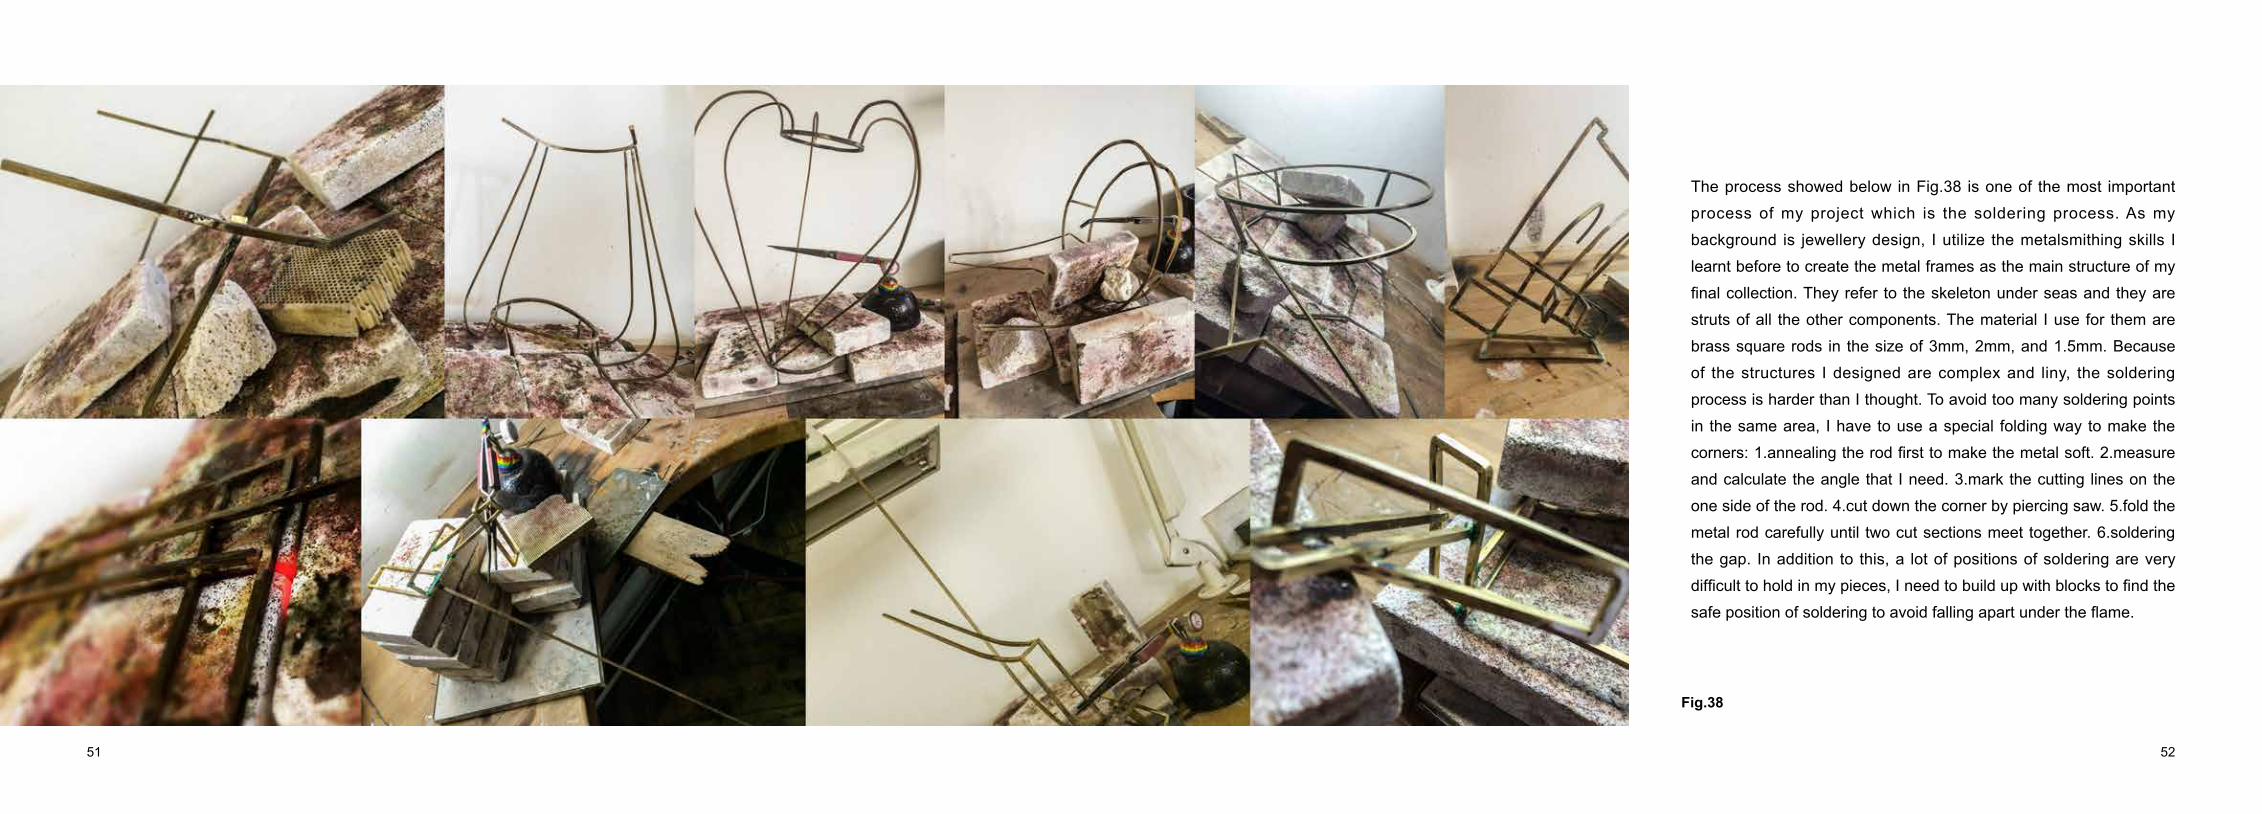
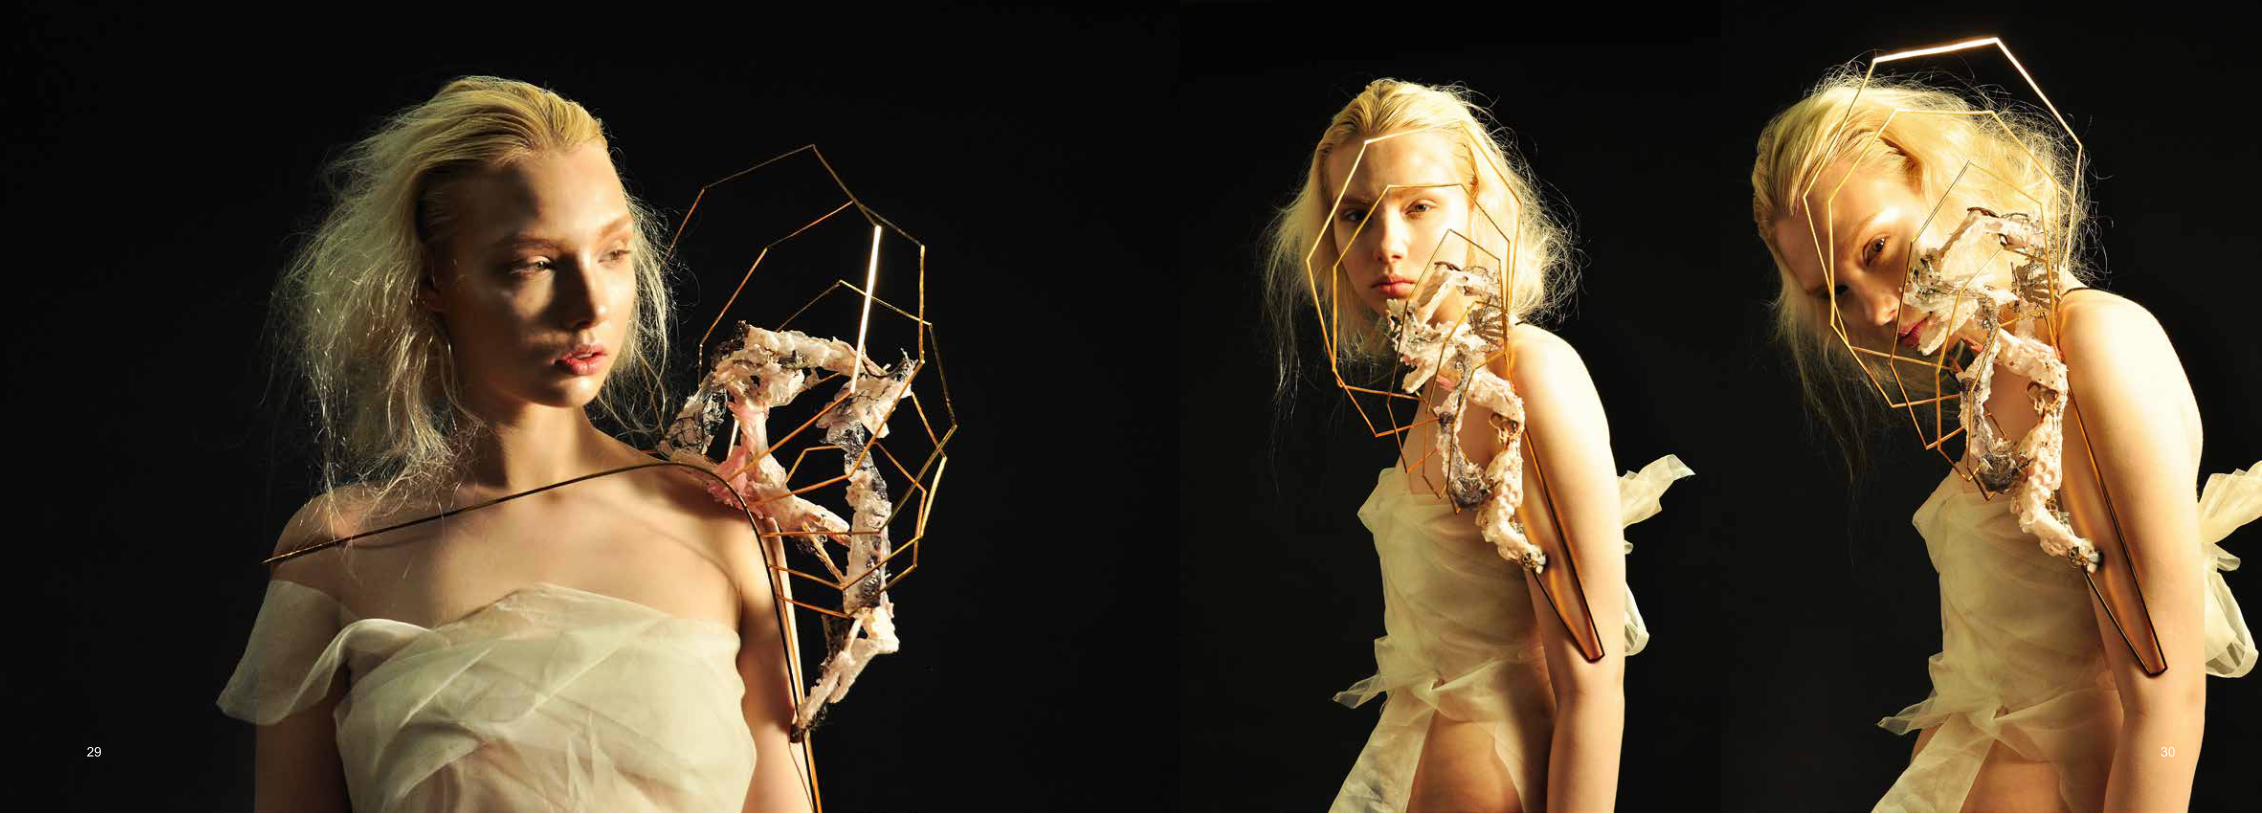
The process showed below in Fig.38 is one of the most important
process of my project which is the soldering process. As my
background is jewellery design, I utilize the metalsmithing skills I
learnt before to create the metal frames as the main structure of my
final collection. They refer to the skeleton under seas and they are
struts of all the other components. The material I use for them are
brass square rods in the size of 3mm, 2mm, and 1.5mm. Because
of the structures I designed are complex and liny, the soldering
process is harder than I thought. To avoid too many soldering points
in the same area, I have to use a special folding way to make the
corners: 1.annealing the rod first to make the metal soft. 2.measure
and calculate the angle that I need. 3.mark the cutting lines on the
one side of the rod. 4.cut down the corner by piercing saw. 5.fold the
metal rod carefully until two cut sections meet together. 6.soldering
the gap. In addition to this, a lot of positions of soldering are very
difficult to hold in my pieces, I need to build up with blocks to find the
safe position of soldering to avoid falling apart under the flame.
Fig.38
51 52

After finished all the frame works in summer, I decided to adjust
one of them which is the gun inspired one. In my previous design,
the main body of this piece was straight. I found that the straight
silhouette is not follow the body shape well when wearing on the
hand, therefore I changed the top part of the piece into curve
shape. I cut all the four lines in the oblique line and re-solder them
together into a sharp angel like photos of Fig.39. After soldering
I re-plated it into antique brass finishing which fits more with the
turquoise colour palette than the silver finishing.
Fig.39
Fig.40
The safety of my structures during air transportation is also a
big problem for me. Because I made all my final structures of
the master project in China and they are big, fragile, and easy
deformation, I need to protect them as much as possible during
the transportation. As the Fig.40 showing below, I assembled a
two parts thick foam box for these structures. After placed them in
the most safe way I groove the foam for certain positions of every
pieces of my structures on both sides of the foam box.
53 54

Chapter 5. Development
55 56

57 58

Fig.41
Here are some of my design sheets to
indicate my process of design in Fig.41.
59 60

Except hand drawings I also did collages from the
selection of some research to try the new combination
of colours and textures such as showed in Fig.42.
Fig.42
61 62

Fig.43 is the spec sheet I did
through the way of collage
and computer graphics.
63 64

65 66

67 68

69 70

71 72

73 74

75 76

77 78

Chapter 6. Conclusion
79 80

81 82

The whole journey of my MA study passed quickly, now it is
almost going to the end. I proud of the 6 final outcomes I made
and I enjoy the process of this 2 years quite a lot. After went
through all the parts of this master course, I found that the
process and method of design is not all the same with every
designer, different people has different way of thinking. In my
opinion, the most important meaning of taking this master
course is to explore my own method of thinking and designing.
I believe that how to think is more important than what to do,
once you discovered your own way, everything is getting easier.
In BA stage, we required design our works through the order
of primary research, secondary research, contextual research,
2D development, and 3D development. The frame restrict our
thinking and not suit for everyone.
As the very beginning of the whole journey, the clueless material
experiments lead me to the direction of exploring new materials.
I feel like that I interested into working with multiple materials so
that I start my design with material experiments.
At first I started with the familiar materials of mine to test new
possibilities of them. Secondly, I selected the most successful
test pieces to analysis that what sort of effect of them are truly
what I want. Therefore I could organize a clear direction from
just clueless tests of material. Depending on my favorite results
of experiments I tried to find related new materials from other
academic fields to test with. Then I did more research on the
new materials and experiment them with every possible ways.
After that I combined new materials with familiar materials
to see if there will be some unexpected surprise. Analyzing
and organizing again with experiments helped me on the
later process of design. Regarding to the most successful
results from material experiments, I researched some related
information of possible concept and inspirations of design. Then
find the best harmony between results of tests and concept of
design. After decided the concept and inspirations, I developed
both of them at the same time and let them support each other.
In this way, I could get the best balance of both material and
design. After all the process I have been through, I realized that
the study of materials needs broad imaginations and lack of
clear directions but the process of design need directly aiming,
so that the balance of them needs to be adjust frequently to
make sure they cooperated well with each other. During the
period of my MA studying, I found that I really enjoy to start my
design process with material exploring. I will take this forward in
my designs in the future. And in my plan of the next design, I will
continue focus on the new material discovering.
83 84

Reference
85 86

87 88
Images:
Fig.1: [david] n.d.[image online] Available at:<http://www.davidaltmejd.com/untitled-8-rabbit-holes>[Accessed 4th Sep. 2015]
Fig.2: [winde] n.d.[image online] Available at:<https://www.notjustalabel.com/designer/winde-rienstra?collection=141293>[Accessed 4th Sep. 2015]
Fig.3: [mari] n.d.[image online] Available at:<http://klimt02.net/jewellers/mari-ishikawa >[Accessed 4th Sep. 2015]
Fig.4: [maud] n.d.[image online] Available at:<http://www.maudtraon.com/#precious-metal>[Accessed 4th Sep. 2015]
Fig.5: [sodium acetate] n.d.[image online] Available at:<http://www.visitchem.com/product/sodium-acetate-anhydrous/>[Accessed 4th Sep. 2015]
Fig.6: [marine creature] n.d.[image online] Available at:<http://www.marineparasites.com/introduction.html>[Accessed 4th Sep. 2015]
Fig.7: [ernst] n.d.[image online] Available at:<http://www.britannica.com/EBchecked/topic/251305/Ernst-Haeckel>[Accessed 4th Sep. 2015]
Fig.8&9: [shipwreck] n.d.[image online] Available at:<http://go.huanqiu.com/html/2014/picture_1222/1471_11.html>[Accessed 4th Sep. 2015]
Fig.10: [chemistry] n.d.[image online] Available at:<http://www.baike.com/wiki/%E9%93%9C%E7%BB%BF>[Accessed 4th Sep. 2015]
Fig.11: [leeds] n.d.[image online] Available at:<http://leeds-list.com/out-and-about/weird-and-wonderful-dates/>[Accessed 4th Sep. 2015]
Fig.13: [clothing] n.d.[image online] Available at:<https://thepragmaticcostumer.wordpress.com/tag/16th-century/>[Accessed 4th Sep. 2015]
Except these references, all the images are self-taken images.
Articles:1. David Altmejd. 2014. work. Accessed on 4 Sep 2015 <http://www.davidaltmejd.com/untitled-8-rabbit-holes>
2. Winde Rienstra. 2015. Collection. Accessed on 4 Sep 2015 <https://www.notjustalabel.com/designer/winde-rienstra?collection=141293>
3. Mari Ishikawa. 2014. jewellers. Accessed on 4 Sep 2015 <http://klimt02.net/jewellers/mari-ishikawa>
4. Maudl Traon. 2015. Collection. Accessed on 4 Sep 2015 <http://www.maudtraon.com/#precious-metal>
5. Cold enamel. 2015. hasulith. Accessed on 4 Sep 2015 <http://www.hasulith.com/cold-enamel/index.html>
6. Oxford University Press. 2014. resin, n. and adj. OED Online. Accessed on 4 Sep 2015
<http://www.oed.com/?authRejection=true&url=%2Fview%2FEntry%2F163629>
7. Joe Hildreth. 2007. Chapter 8 - Silicone Caulk Molds. Accessed on 4 Sep 2015 <http://www.myheap.com/chapter-8-silicone-caulk-molds.html>
8. Caristan, Charles L. 2004. Laser cutting guide for manufacturing. Accessed on 4 Sep 2015
<http://books.google.co.uk/books?id=pRah71xUxbMC&pg=PA38&hl=zh-CN#v=onepage&q&f=false>
9. Liverpool museums. 2015. Bracelet, by Peter Chang. Accessed on 4 Sep 2015
<http://www.liverpoolmuseums.org.uk/picture-of-month/displaypicture.aspx?id=333>
10. Amazing rust. 2008. Hot ice. Accessed on 4 Sep 2015 <http://www.amazingrust.com/Experiments/how_to/Hot-Ice.html>
11. Council of Europe. 1987. Sodium acetate. pharmeuropa. edqm. vol 18, numb 1, 2006, P146.
12. Leeds-list. 2013. A day out in Knaresborough. Accessed on 4 Sep 2015 <http://leeds-list.com/out-and-about/weird-and-wonderful-dates/>
13. CNC Machine HQ. 2015. A Guide to the CNC Milling Machine. Accessed on 4 Sep 2015<http://cncmachinehq.com/guide-to-cnc-milling-machine/>
14. Carl Thomson. 2013. Introduction. Shipwreck in art and literature- images and interpretations from antiquity to the present day. Routledge. P1-P26.
15. Marine Parasites. 2009. Kate Hutson. Accessed on 4 Sep 2015 <http://www.marineparasites.com/introduction.html>.
16. Gloria Robinson. 2013. Encyclopedia Britannica. Accessed on 4 Sep 2015 <http://www.britannica.com/EBchecked/topic/251305/Ernst-Haeckel>.
Special thanks: Dai Rees, Naomi Filmer, Mala Siamptani, Spencer Bailey and my family.
89 90

91