The Purchasing System
43
Purchasing 2 file:///C|/Documents%20and%20Settings/harpere/My%20Documents/coin-static/Part1_Manual/Purchasing.htm (1 of 43)06/07/2007 11:35:5 The Purchasing System 1. INTRODUCTION 2. The LOCAL VENDOR Module 2.1 CREATE New Local Vendor and EDIT Local Vendor Details Imported from FAS 2.2 EDIT existing Local Vendor Details 3. The PURCHASE ORDER Module 3.3 CREATE INTERNATIONAL (Field) Purchase Order 2.3 ACTIVATE/DEACTIVATE Vendor 2.4 VIEW Local Vendor, Locations or Contacts 2.5 DELETE Local Vendor, Locations or Contacts 3.1 CREATE LOCAL Purchase Order 3.1.1 CREATE PO Header 3.1.2 ADD Order Lines 3.1.3 ADD Financial Information (Budget Code ) 3.1.4 Finalise the Order 3.2 CREATE LOCAL Purchase Order importing details FROM FAS COMMITMENT N0. 3.2.1 Create PO Header 3.2.2 Edit Order Lines 3.2.3 EDIT Financial Information (Budget Code) 3.2.4 Finalise the Order 3.3.1 IMPORT INTERNATIONAL VENDOR from Oracle Database 3.3.2 ADD NEW INTERNATIONAL VENDOR 3.3.3 ADD Order Lines and Financial Information (Budget Code) 3.3.4 FINALISE the Order and SEND E-mail 3.4 EDIT Purchase Order 2.1.1 EDIT Default Properties Imported from FAS 2.1.2 EDIT Location Imported from FAS 2.1.3 EDIT Contact Imported from FAS 2.2.1 EDIT existing Default Properties 2.2.2 EDIT existing Location 2.2.2 EDIT existing Contact 2.2.3 ADD NEW Location to existing Vendor 2.2.4 ADD NEW Contact to existing Location 3.4.1 EDIT Header
Transcript of The Purchasing System

Purchasing
2file:///C|/Documents%20and%20Settings/harpere/My%20Documents/coin-static/Part1_Manual/Purchasing.htm (1 of 43)06/07/2007 11:35:5
The Purchasing System
1. INTRODUCTION
2. The LOCAL VENDOR Module
2.1 CREATE New Local Vendor and EDIT Local Vendor Details Imported from FAS
2.2 EDIT existing Local Vendor Details
3. The PURCHASE ORDER Module
3.3 CREATE INTERNATIONAL (Field) Purchase Order
2.3 ACTIVATE/DEACTIVATE Vendor 2.4 VIEW Local Vendor, Locations or Contacts 2.5 DELETE Local Vendor, Locations or Contacts
3.1 CREATE LOCAL Purchase Order
3.1.1 CREATE PO Header 3.1.2 ADD Order Lines 3.1.3 ADD Financial Information (Budget Code ) 3.1.4 Finalise the Order
3.2 CREATE LOCAL Purchase Order importing details FROM FAS COMMITMENT N0.
3.2.1 Create PO Header 3.2.2 Edit Order Lines 3.2.3 EDIT Financial Information (Budget Code) 3.2.4 Finalise the Order
3.3.1 IMPORT INTERNATIONAL VENDOR from Oracle Database 3.3.2 ADD NEW INTERNATIONAL VENDOR 3.3.3 ADD Order Lines and Financial Information (Budget Code) 3.3.4 FINALISE the Order and SEND E-mail
3.4 EDIT Purchase Order
2.1.1 EDIT Default Properties Imported from FAS 2.1.2 EDIT Location Imported from FAS 2.1.3 EDIT Contact Imported from FAS
2.2.1 EDIT existing Default Properties 2.2.2 EDIT existing Location 2.2.2 EDIT existing Contact 2.2.3 ADD NEW Location to existing Vendor 2.2.4 ADD NEW Contact to existing Location
3.4.1 EDIT Header

Purchasing
2file:///C|/Documents%20and%20Settings/harpere/My%20Documents/coin-static/Part1_Manual/Purchasing.htm (2 of 43)06/07/2007 11:35:5
The Purchasing System allows Decentralised Offices to create Vendors and issue Local and International Purchase Orders for the purchase of Goods and Services. It also allows the automatic recording of expendable equipment in the local inventory module and the automation of requests for insertion of non-expendable equipment in the official inventory of the Organization through the COIN mailing system.
It is divided into three main Modules:
1. INTRODUCTION
● THE LOCAL VENDOR Module, dealing with the creation and administration of "Local" Suppliers. It is made of three main areas: Vendor, its Locations and location's Contacts.
● THE PURCHASE ORDER Module, dealing with the creation and administration of Local and International Purchase Orders. It is divided into three main areas: Header, Order Lines and Financial Information (Budget Code and FAS Commitment number where applicable). It also allows the Creation of International Vendors.
● The RECEIVING Module, dealing with the acknowledge receipt of goods and for inventory purposes. (Not available yet)
3.9 PRINT Terms & Conditions
4. The RECEIVING Module
4.1 INSERT delivery details 4.2 RECEIVING & REGISTERING Goods
3.5 DUPLICATE Local & International Purchase Order 3.6 VIEW Purchase Order 3.7 DELETING Purchase Order 3.8 GENERATE Purchase Order, PDF Format
4.3 AFSP Guidelines
3.4.2 EDIT Order Lines 3.4.3 EDIT Financial Information (Budget Code)
4.2.1 Registering goods received in Local Inventory 4.2.2 Registering goods received selecting the “Not Applicable” option 4.3.3 Registering goods received in Fixed Assets

Purchasing
2file:///C|/Documents%20and%20Settings/harpere/My%20Documents/coin-static/Part1_Manual/Purchasing.htm (3 of 43)06/07/2007 11:35:5
The MAIN SCREEN will display the "Manage Purchase Orders" List with two buttons at the top: the "New Purchase Order "
button to issue a New Purchase Order and the "Vendors" button to access to the "Local Vendors" Module.
Screen 1- Purchasing Flow Diagram
1.1 How to get there
1. Log-on using your COIN User ID and password. Click here for instructions on how to log on.
2. Enter the “Edit mode” by clicking on the button on the right-hand side of the screen.
3. Click on the button situated on the left-hand side of the screen.4. On the left-hand side vertical menu, select the "Administrative Functions " option and then “Purchasing".

Purchasing
2file:///C|/Documents%20and%20Settings/harpere/My%20Documents/coin-static/Part1_Manual/Purchasing.htm (4 of 43)06/07/2007 11:35:5
The Local Vendor module deals with the creation and administration of "Local" Suppliers. It is made of three main areas: Vendor, its Locations and Location's Contacts.
Screen 2- MAIN SCREEN showing the "Manage Purchase Orders" List
2. The LOCAL Vendor Module
Click on the "Vendors" button . When opening the vendors module for the first time, the message "No Vendors available" is displayed. Subsequently, the list of vendors added to the module will be displayed in alphabetical order.
The VENDORS screen will display the "Manage Vendors" List with two buttons at the top: the "Purchasing" button to go back to the MAIN SCREEN and the "Add Local Vendor" button to import a local vendor from FAS.
When accessing this page for the first time, the message "No Purchase Order available" is displayed. Subsequently, the list of purchase orders added to the module will be displayed.
International Suppliers are dealt directly in the Purchase order module. See paragraph 3.3.1 and 3.3.2

Purchasing
2file:///C|/Documents%20and%20Settings/harpere/My%20Documents/coin-static/Part1_Manual/Purchasing.htm (5 of 43)06/07/2007 11:35:5
Screen 1- List of Vendors
2.1 CREATE new Local Vendor (IMPORT FROM FAS)
Name Self Explanatory
Status
FAS Ref. Code
FAS Reference Code (not editable)
COIN System number (not editable)
Action
The "Status" column provides the following information:
Number
The "Action" column provides the following functions:
Vendors reported as "active" are inserted in the Purchase Order List of Vendors and can be selected for use.
Vendors reported as "inactive" are removed from the Purchase Order List of Vendors and cannot be selected for use.
When all information has been inserted. The Vendor is automatically Active.
When there is still information missing. The Vendor is automatically Inactive.
View: Allows to view data.
Edit: Allows to modify/add data. The Vendor needs to be ACTIVE in order to be Edited. So it must be Activated first.
Activate: Adds vendor to the Vendor Selection List which is recalled in the Purchase Order module when importing the Vendor, so that it can be selected for use. Once it is completed of all information needed the Vendor is automatically Active. It can be Deactivated at anytime.
Deactivate: Removes Vendor from the Vendor Selection List which is recalled in the Purchase Order module when importing the Vendor. It can be Activated at anytime.
Delete: Allows to delete, but Vendor can be deleted only if there are NO purchase orders associated to it.
Active
Inactive
Complete
Incomplete

Purchasing
2file:///C|/Documents%20and%20Settings/harpere/My%20Documents/coin-static/Part1_Manual/Purchasing.htm (6 of 43)06/07/2007 11:35:5
Local Vendors MUST be imported from FAS Database, but if the chosen Vendor is not available in FAS, it must be added to FAS Database first.
Click on the "Add Local Vendor" button at the top of the main screen to open the form to complete.
All Local Vendors MUST be imported from FAS, click on the "Import Vendor from FAS' button
to open a pop-up search box, type the Vendor's name in full or just the initial letter/s and press the "Search" Button.
All Vendors imported from FAS come with Default Properties, locations and contacts.
Screen 2- Import Vendor from FAS
Screen 3- Pop-up window - Search FAS Vendors From the list, click on the name of the chosen Vendor. This action imports all available Vendor details stored in FAS database.
2.2.1 Edit Default Properties Imported from FAS
Purchasing
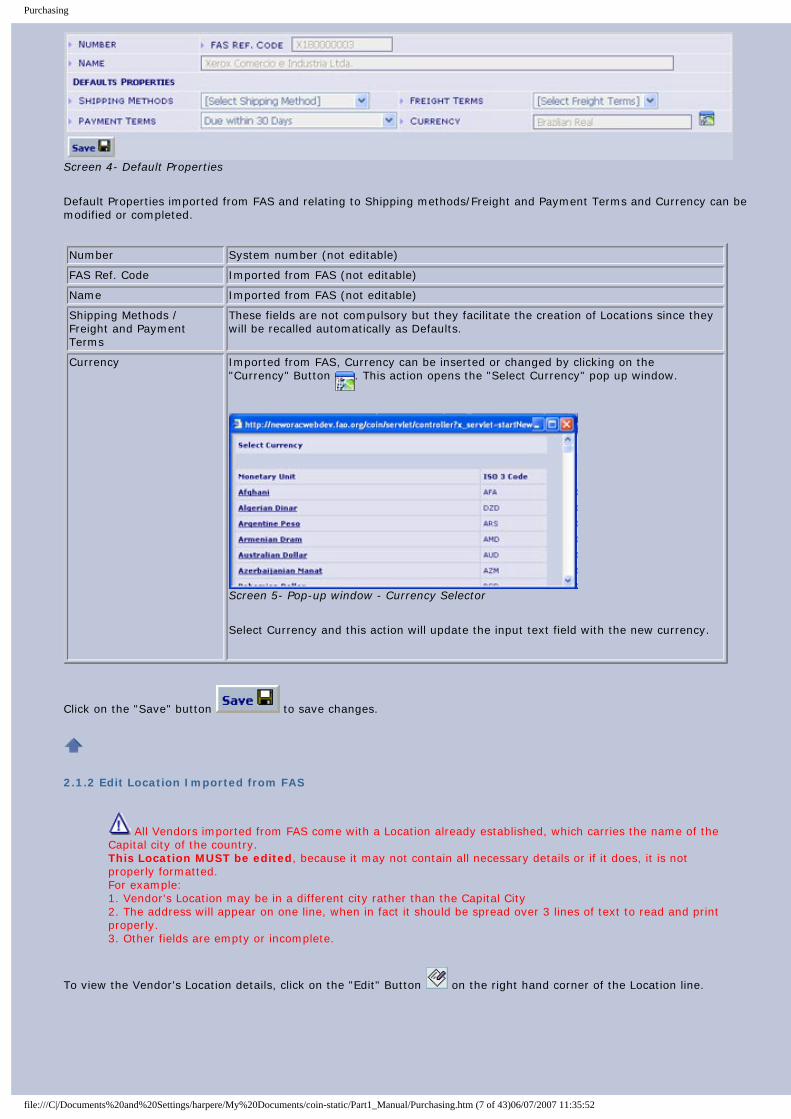
2file:///C|/Documents%20and%20Settings/harpere/My%20Documents/coin-static/Part1_Manual/Purchasing.htm (7 of 43)06/07/2007 11:35:5
Default Properties imported from FAS and relating to Shipping methods/Freight and Payment Terms and Currency can be modified or completed.
Click on the "Save" button to save changes.
To view the Vendor's Location details, click on the "Edit" Button on the right hand corner of the Location line.
Screen 4- Default Properties
2.1.2 Edit Location Imported from FAS
All Vendors imported from FAS come with a Location already established, which carries the name of the Capital city of the country. This Location MUST be edited, because it may not contain all necessary details or if it does, it is not properly formatted. For example: 1. Vendor's Location may be in a different city rather than the Capital City 2. The address will appear on one line, when in fact it should be spread over 3 lines of text to read and print properly. 3. Other fields are empty or incomplete.
System number (not editable)
FAS Ref. Code Imported from FAS (not editable)
Name Imported from FAS (not editable)
Shipping Methods / Freight and Payment Terms
These fields are not compulsory but they facilitate the creation of Locations since they will be recalled automatically as Defaults.
Currency Imported from FAS, Currency can be inserted or changed by clicking on the "Currency" Button . This action opens the "Select Currency" pop up window.
Number
Select Currency and this action will update the input text field with the new currency.
Screen 5- Pop-up window - Currency Selector

Purchasing
2file:///C|/Documents%20and%20Settings/harpere/My%20Documents/coin-static/Part1_Manual/Purchasing.htm (8 of 43)06/07/2007 11:35:5
The information is displayed in Read mode. To modify or complete the Vendor Location Details (imported from FAS), click on
the "Edit" Button on the right hand corner of the "View Vendor Location" line.
After having completed the form click on the "Save" Button to save changes.
Some Vendors (imported from FAS) come with a Location's "Contact Person" already established.
Screen 6- Edit Location
2.1.3 EDIT Contact Person Imported from FAS
Insert the name of the city. If more than one site in the same city, insert the name of the area where the vendor is located. Eg: City North, City South etc.
Address Format address so that it can be divided over more lines. There are 3 available text fields.
City Self explanatory
Insert if applicable
Self explanatory
Telephone / Fax Country Code if applicable and Area Code to be inserted in the first input field. Telephone and Fax numbers to be inserted in the second input field.
Shipping Methods / Freight and Payment Terms
These fields are not compulsory but they facilitate the issuing of a Purchase Order, since they will be recalled automatically. If they have been selected in the previous form they will appear as Defaults, but can be overwritten to suit each individual Location.
Site Name
State / Province
Postal Code / Country

Purchasing
2file:///C|/Documents%20and%20Settings/harpere/My%20Documents/coin-static/Part1_Manual/Purchasing.htm (9 of 43)06/07/2007 11:35:5
To save changes, click on the "Save" button .
The "Back to Contact Button" takes you back without saving to the list of contacts of this particular location.
To view the new Vendor and its Locations click on the "Back to Locations" button .
Screen 7- Edit Contact Person
To view the "Contact Person" details, click on the "Edit" Button on the right hand corner of the line. These details can be modified.
Screen 8- Edit Contact Person Details
2.2 EDIT Existing Local Vendor Details
To modify an existing Local Vendor click on the "Vendors" button .
Select from drop down menu
First Name Self explanatory
Last Name Self explanatory
Job Title
Self explanatory
Telephone Country Code if applicable and Area Code to be inserted in the first input field. Telephone number to be inserted in the second input field.
Title of Courtesy
Title

Purchasing
52file:///C|/Documents%20and%20Settings/harpere/My%20Documents/coin-static/Part1_Manual/Purchasing.htm (10 of 43)06/07/2007 11:35:
To edit a Vendor, click on the "Edit" Button next to the Vendor's name in the ACTION column on the main Vendor List.
To modify the existing Default Properties click on the "Edit" Button on the right hand corner of the Vendor's line.
Screen 9- Main Vendor List
To Edit a Vendor, the Vendor needs to be ACTIVE. So it must be Activated first.
Screen 10- Edit existing vendor details
2.2.1 EDIT existing Default Properties

Purchasing
52file:///C|/Documents%20and%20Settings/harpere/My%20Documents/coin-static/Part1_Manual/Purchasing.htm (11 of 43)06/07/2007 11:35:
Click on the "Save" Button to save record.
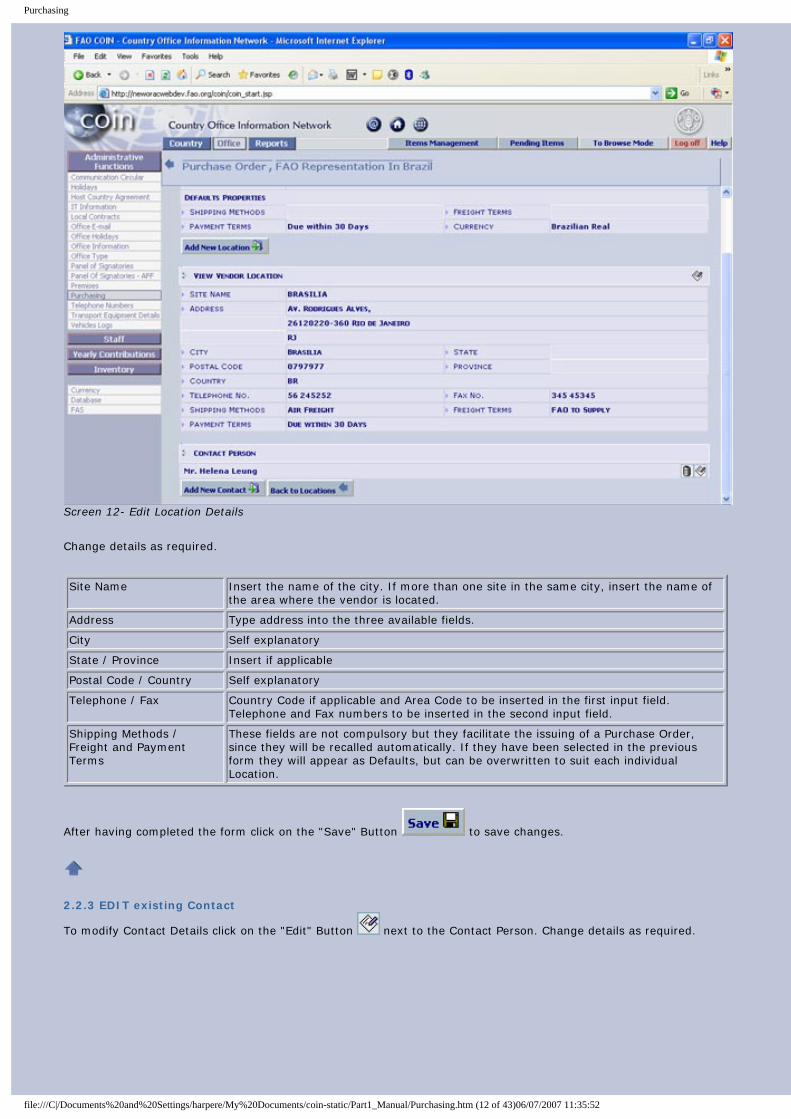
To modify the data related to existing Locations click on the "Edit" Button next to the chosen Location.
2.2.2 EDIT existing Location
Vendor ID Number (non editable)
FAS REF. Code FAS ID Number (non editable)
Name Vendor name (non editable)
Default Properties:
Shipping methods, Freight and Payment Terms
Select as appropriate if different from defaults
Currency
Number
Currency can be inserted or changed by clicking on the "Currency" Button . This action opens the "Select Currency" pop up window.
Select Currency and this action will update the input text field with the new currency.
Screen 11- Pop-up window - Currency Selector
Purchasing
52file:///C|/Documents%20and%20Settings/harpere/My%20Documents/coin-static/Part1_Manual/Purchasing.htm (12 of 43)06/07/2007 11:35:
Change details as required.
After having completed the form click on the "Save" Button to save changes.
Screen 12- Edit Location Details
2.2.3 EDIT existing Contact
To modify Contact Details click on the "Edit" Button next to the Contact Person. Change details as required.
Insert the name of the city. If more than one site in the same city, insert the name of the area where the vendor is located.
Address Type address into the three available fields.
City Self explanatory
Insert if applicable
Self explanatory
Telephone / Fax Country Code if applicable and Area Code to be inserted in the first input field. Telephone and Fax numbers to be inserted in the second input field.
Shipping Methods / Freight and Payment Terms
These fields are not compulsory but they facilitate the issuing of a Purchase Order, since they will be recalled automatically. If they have been selected in the previous form they will appear as Defaults, but can be overwritten to suit each individual Location.
Site Name
State / Province
Postal Code / Country

Purchasing
52file:///C|/Documents%20and%20Settings/harpere/My%20Documents/coin-static/Part1_Manual/Purchasing.htm (13 of 43)06/07/2007 11:35:
To save click on the "Save" Button .
Click on the "Save" button .
The "Back to Locations" button at the page bottom takes you back to the List of Locations for this particular Vendor.
The information saved is now in read mode but it can be re-edited by clicking on the "Edit" Button on the top right hand side of the Location form.
Screen 13- Edit Contact Details
2.2.4 ADD NEW Location to Existing Vendor
To Add a New Location click on click on the "Edit" Button next to the Selected Vendor and then click on the "Add New
Location" button .
Screen 14- Adding a New Location
Insert the name of the city. If more than one site in the same city, insert the name of the area where the vendor is located.
Address Self explanatory
City Self explanatory
Insert if applicable
Self explanatory
Telephone / Fax Country Code if applicable and Area Code to be inserted in the first input field. Telephone and Fax numbers to be inserted in the second input field.
Shipping Methods / Freight and Payment Terms / Invoice Currency
The system displays by default the Vendor main Default properties previously saved. These can be changed to suit each individual location. Default properties will not change.
Site Name
State / Province
Postal Code / Country

Purchasing
52file:///C|/Documents%20and%20Settings/harpere/My%20Documents/coin-static/Part1_Manual/Purchasing.htm (14 of 43)06/07/2007 11:35:
To Add a New Contact click on the "Edit" Button next to the Selected Location and then click on the "Add New Location"
button .
Click on the "Save" button .
The "Back to Contact Button" takes you back without saving to the list of contacts of this particular location.
Click on the "Back to Locations" button to view the New Vendor and its Locations
Click on "Add New Location" button to add another location otherwise the operation is completed.
Vendors can be Active or Inactive, this means that if we do not want to use a particular Vendor anymore, we can Deactivate it. This action removes this vendor from the Vendor Selection List of the Purchase Order module when importing the Vendor.
2.2.5 ADD NEW Contact to Existing Location
Screen 15- Insert a New Contact
Click on the "Vendors" button to find the new Vendor Listed in alphabetical order.
2.3ACTIVATE / DEACTIVATE Vendor
Choose from the drop-down box the Contact's Title of Courtesy
First Name / Last Name Self explanatory
Title Office Title
Self explanatory
Telephone Country Code if applicable and Area Code to be inserted in the first input field. Telephone numbers to be inserted in the second input field.
Activate: Allows Vendor visibility in the Purchase Order List of Vendors, so that it can be selected for use. Once it is completed of all information needed the Vendor is automatically Active. It can be Deactivated at anytime by clicking on the "Deactivate" Button .
Deactivate: Removes Vendor visibility in the Purchase Order List of Vendors, it can be Activated at anytime by clicking on the "Activate" Button .
Title of Courtesy

Purchasing
52file:///C|/Documents%20and%20Settings/harpere/My%20Documents/coin-static/Part1_Manual/Purchasing.htm (15 of 43)06/07/2007 11:35:
Vendors, including its location and contacts can be deleted by clicking on the "Delete" Button next to the chosen Vendor, under the ACTION column in the main List of Vendors.
Click on the "Edit" Button next to the chosen Vendor, under the ACTION column in the main List of Vendors.
To delete Location Details click on the "Delete" Button next to the Vendor Location. This action will automatically delete all contact for that Location.
To delete a Contact click on the "Edit" Button next to the chosen Location, click on the "Delete" Button next to the Contact.
The Purchase Order module deals with the creation and administration of Local and International Purchase Orders as well as the import of International Vendors from Oracle and the creation of NEW International Vendors. It is divided into three main areas: Header, Order Lines and Financial Information (Budget Code and FAS Commitment number where applicable).
2.4 VIEW Local Vendor Details
Click on the "Vendors" button .
Click on the "View" Button next to the chosen Vendor, in the Main Vendor List. This action opens Vendor details in read mode.
Click on the "View" Button next to the chosen Location. This action opens Location details in read mode and the Contact
List if available. Click on the "View" Button next to the chosen Contact. This actions opens Contact Details in read mode.
2.5 DELETE Local Vendor
Click on the "Vendors" button .
2.5.1 Delete Location or Contact
Click on the "Vendors" button .
3. The PURCHASE ORDER Module
1. Log-on using your COIN User ID and password. Click here for instructions on how to log on.
2. Enter the “Edit mode” by clicking on the button on the right-hand side of the screen.
A Vendor with associated Purchase Orders cannot be deleted but it can be deactivated, so that it is prevented from being used.
Locations and Contacts can be deleted only if they do NOT have purchase order associated to it.

Purchasing
52file:///C|/Documents%20and%20Settings/harpere/My%20Documents/coin-static/Part1_Manual/Purchasing.htm (16 of 43)06/07/2007 11:35:
The MAIN SCREEN will display the "Manage Purchase Orders" List with two buttons at the top: the "New Purchase Order "
button to issue a New Purchase Order and the "Vendors" button to access to the "Local Vendors" Module.
To access this page page while navigating through the module click on the "Purchasing" Button on the top left hand side of the screen.
3. Click on the button situated on the left-hand side of the screen.4. On the left-hand side vertical menu, select the "Administrative Functions " option and then “Purchasing".
On first time use of this module, Vendors must be Added before issuing a Purchase Order.
Screen 1- List of Purchase Orders
When opening the Purchase Order module for the first time, the message "No Purchase Orders available" is displayed. Subsequently, the list of Purchase Orders added to the module will be displayed.
The Purchase Order number is given by the system, it contains the Issuing Country code, the year of issuing and a sequential number.
Type L stands for Local and I for International
Vendor Alphabetical List of Vendors
Currency Self explanatory
Self explanatory
Date of creation of Purchase Order
Status
Number
Amount
Date
Draft - The order is not completed and can be modified or deleted at anytime. Finalised - The order is completed and ready for Receiving (It contains all details) and it cannot be modified. Received F - Goods Received in Full (Not yet Implemented) Received P - Goods Partially Received waiting for remaining goods (Not yet Implemented) Closed - Goods Partially Received not expecting anymore goods (Not yet Implemented) Cancelled - The order has been deleted, but it can still be Viewed, Printed or Duplicated.

Purchasing
52file:///C|/Documents%20and%20Settings/harpere/My%20Documents/coin-static/Part1_Manual/Purchasing.htm (17 of 43)06/07/2007 11:35:
The "ACTION" column provides the following functions:
Click on the "New Purchase Order " button at the top of the main screen to create a new Purchase Order.
Select Purchase Order Type "Local" from drop down menu.
This action opens a new PO Header.
3.1 CREATE LOCAL Purchase Order
3.1.1 CREATE PO Header
Close: It is only possible once the Order is receiving goods and when some of the goods ordered have been delivered but the remaining goods are unavailable. Click this Button to close the order and terminate the receiving process. A pop up window will ask reasons for closing. This Receiving module is still under development.
A Finalised Purchase Order cannot be modified. To make changes to a Finalised Order, the order must be Duplicated first, and the Original Order must be Deleted. The Duplicate copy (in Draft mode) must be edited but the Original Order Number must be quoted in the "Note to Vendor" section!
International Suppliers are dealt within this module. See paragraphs 3.3.1 and 3.3.2
View: Allows to view data
Edit: Allows to modify/add data. If the Purchase order is Finalised, it cannot be modified.
Delete: Allows to delete PO in Draft or Finalised Status. If the Purchase order is Finalised, a justification must be given. A pop up window will ask reasons for deleting.
Duplicate: Allows to make a copy of a Purchase Order. The copy will open the order in Draft mode under a new number, to facilitate the user to make a new order re-editing existing information previously saved.
Receiving: This icon appears when an order is finalised. When goods are received click this button to record goods received and to register items in the Local Inventory or in Fixed Assets. This Receiving module is still under development.

Purchasing
52file:///C|/Documents%20and%20Settings/harpere/My%20Documents/coin-static/Part1_Manual/Purchasing.htm (18 of 43)06/07/2007 11:35:
Screen 2- Create PO Header
Type Set to Local (not editable)
Purchase Order Number (not editable)
Date System Date (not editable)
Status When adding a new Purchase order, status is automatically in Draft mode.
Mailing Address FAO Representation Address (not editable)
Delivery Address Type Delivery address only if different from mailing address.
Originator Select user name from list of Local Office Employees.
Click on the "Import" Button to import Purchase Order details stored in FAS under a
specific Commitment number.
Quotation Number Insert if applicable.
Vendor
Number
Import Details from FAS Commitment number
Click on the "Add Vendor" Button. This action opens the "Search Vendor" pop up
window. Click on the "Search" Button to get full list of Vendors or to narrow your search, type the Vendor's name in full or just the initial letter/s and click on the "Search" Button.
Select Vendor by clicking on Vendor name.
If there is only one Vendor available, the Vendor will be automatically selected. If Vendor is not listed, Vendors must be Added to the Vendor Module.

Purchasing
52file:///C|/Documents%20and%20Settings/harpere/My%20Documents/coin-static/Part1_Manual/Purchasing.htm (19 of 43)06/07/2007 11:35:
Once the form is completed, click on the "Save" Button .
The saved Information is displayed in READ mode but it is always editable by clicking on the "Edit" Button on the top right hand side of the form.
Click on the "Add Order Line" Button .
Select Purchasing Type from drop down menu, Goods (default setting) or Services.
3.1.2 ADD Order Lines
Vendor Location
Contact Person
Note to Vendor Free text area to write notes to Vendor, if required.
Shipping Methods / Freight and Payment Terms / Invoice Currency
The system displays automatically the Vendor main Default properties. These can be changed to suit each individual Purchase Order.
Currency
Expected Delivery date
Enter the expected delivery date by clicking on the Calendar Icon and select date.
After having selected the Vendor, if there is only one location this field is automatically filled. If there is more than one location, Location can be selected by clicking on the "Add Location"
Button. This action opens the "Select Location " pop up window.
After having selected the Location, if there is only one Contact this field is automatically filled. If there is more than one Contact, the Contact can be selected by clicking on the "Add
Contact" Button. This action opens the "Select Contact " pop up window.
Select Contact by clicking on Contact name.
Local Currency is selected by default but can be changed by selecting a different currency from the drop down List.
Select Location by clicking on Location name.

Purchasing
52file:///C|/Documents%20and%20Settings/harpere/My%20Documents/coin-static/Part1_Manual/Purchasing.htm (20 of 43)06/07/2007 11:35:
Screen 2- Purchasing Type: Goods
Screen 3- Purchasing Type: Service
Once the form is completed, to save the information click on the "Save" Button . This action will display the new
order line in Read mode, this can be Edited again or Deleted by clicking on either the "Edit" Button or the "Delete"
Button next to the chosen Order Line.
To Close window without saving click on "Close" Button .
Click on the "Add Order Line" Button to add more order lines.
The "Get PDF" Button is available after the first saved order line, by clicking this button a DRAFT Version of the Order in PDF format will be created.
3.1.3 ADD Financial Information (Budget Code )
Click on the "Add Budget Code" Button .
Screen 4- Add Budget Code
Select Goods (default) or Service.
Class If Purchasing type is set to "Goods", select Class from a drop down list.
Category If Purchasing type is set to "Goods", select Category from a drop down list
Service If Purchasing type is set to "Service", select Service from a drop down list.
Sequential Line number (non editable)
Self explanatory
Unit Select an Item from a drop down List. If Service has been selected, Unit is automatically set to Currency and it is not editable.
Qty Quantity - Defaulted to "1" when Purchasing type is set to "Services".
Unit Price Self Explanatory
Tot. Amount This is an automatic calculation (non editable)
Purchasing Type
No
Description

Purchasing
52file:///C|/Documents%20and%20Settings/harpere/My%20Documents/coin-static/Part1_Manual/Purchasing.htm (21 of 43)06/07/2007 11:35:
Budget code can be entered either by entering the information in each text input field or by clicking on the " Information" Button next to each Code Sections.
FUND
ORG
ACTIVITY
Click on the " Information" Button next to FUND. This action opens the "Select FUND" pop up window.
Select FUND by clicking on Code.
Click on the " Information" Button next to ORG. This action opens the "Select Organisation" pop up window.
Click on the " Information" Button next to ACTIVITY. This action opens the "Select Activity" pop up window.
Enter the beginning of the Activity Code or the beginning of its Description and click the
"Search" Button . Select Activity by clicking on the resulting code.
Enter the beginning of the Org Code or the beginning of its Description and click the
"Search" Button . Select Organisation by clicking on the resulting code.

Purchasing
52file:///C|/Documents%20and%20Settings/harpere/My%20Documents/coin-static/Part1_Manual/Purchasing.htm (22 of 43)06/07/2007 11:35:
If the order is completed, click on the "Finalise" Button to Finalise the Order. The screen will return to the main Purchase Order List where the order will be listed with status: Finalised and ready for receiving. The "Receiving" Button
appears under the Action column next to the order.
Once the form is completed, to save the information click on the "Save" Button . This action will display the new
Budget Code in Read mode, this can be Edited again or Deleted by clicking on either the "Edit" Button or the "Delete"
Button next to the chosen BC Line.
To Close window without saving click on "Close" Button .
Click on the "Add Budget Code" Button to add more Budget Codes.
Click on the "Get PDF" Button , to get a DRAFT Version of the Order in PDF format.
3.1.4 FINALISE the Order
ACCOUNT Click on the " Information" Button next to ACCOUNT. This action opens the "Select
Account" pop up window.
Enter the beginning of the Account Code or the beginning of its Description and click the "Search" Button . Select Activity by clicking on the resulting code.
SPARE Fixed field (not editable)
SUBLINE Fixed field (not editable)
AMOUNT
To view/print a Finalised Version of the Purchase Order, in PDF format, click on the "View" Button
next to the chosen Purchase Order in the Main PO List and click on the "Get PDF" Button .
The total amount of the budget codes must be equal to the total amount of the order lines.

Purchasing
52file:///C|/Documents%20and%20Settings/harpere/My%20Documents/coin-static/Part1_Manual/Purchasing.htm (23 of 43)06/07/2007 11:35:
Select Purchase Order Type "Local" from drop down menu.
This action opens a new Local PO Header.
Click on the "Import" Button to import Purchase Order details stored in FAS under a specific Commitment number. This action opens the "Search FAS Procurement Commitments" pop up window.
3.2 CREATE LOCAL Purchase Order importing Data FROM FAS COMMITMENT NUMBER
3.2.1 CREATE PO Header
From the main Purchase Order List click on the "New Purchase Order" button at the top of the main screen to create a new Purchase Order.
Screen 1- Create PO Header
A Finalised Purchase Order cannot be modified. To make changes to a Finalised Order, the order must be Duplicated first, and the Original Order must be Deleted with a given justification. The Duplicate copy must be edited but the Original Order Number must be quoted in the Note to Vendor section!

Purchasing
52file:///C|/Documents%20and%20Settings/harpere/My%20Documents/coin-static/Part1_Manual/Purchasing.htm (24 of 43)06/07/2007 11:35:
In the Search input box, type the beginning of the number and click on the "Search" Button . You can also click on the "Search" Button directly. Click on the chosen record displayed in the Description column. This action will open a new Purchase Order in Edit Mode, where all details stored in FAS will be imported.
Screen 2- Search FAS Commitment Number
Screen 3- Edit PO Header
Some of the fields will be automatically loaded, but not all. Enter the missing Information or Change the imported details as required.
If Vendor information is incomplete when retrieving data from FAS commitment number, Vendor details can ONLY be subsequently Edited in the Vendor Module. (i.e. modifying Vendor imported from FAS)
Type Set to Local (not editable)
Purchase Order Number (not editable)
Date System Date (not editable)
Status Status is automatically in Draft mode.
Mailing Address FAO Representation Address (not editable)
Delivery Address Type Delivery address only if different from mailing address.
Originator Select name from list of Local Office Employees.
Import Details from FAS Commitment number
Click on the "Import" Button to import Purchase Order details stored in FAS under a
specific Commitment number.
Number

Purchasing
52file:///C|/Documents%20and%20Settings/harpere/My%20Documents/coin-static/Part1_Manual/Purchasing.htm (25 of 43)06/07/2007 11:35:
Once the form is completed, press the "Save" Button . The Header information will display in Read Mode but it
remains editable by clicking on the "Edit" Button on the top right hand side of the screen.
3.2.2 EDIT Order Lines
When the Purchase Order is imported from FAS Commitment Number, the Order lines are automatically entered but the
Quotation Number Insert if applicable
Vendor
Vendor Location
Contact Person
Note to Vendor Free text area to write notes to Vendor, if required.
Shipping Methods / Freight and Payment Terms / Invoice Currency
The system displays by default the Vendor main Default properties previously saved. When the Vendor is recalled from a FAS Commitment number, these fields may be empty and must be selected to suit the Purchase Order.
Currency
Expected Delivery date
Enter the expected delivery date by clicking on the Calendar Icon and select date.
Vendor (not editable)
If there is only one location this field is automatically filled. If there is more than one
location, the Location can be changed by clicking on the "Add Location" Button. This action opens the "Select Location" pop up window.
This information is not always available. If there is only one Contact this field is automatically filled. If there is more than one Contact, the Contact can be selected by
clicking on the "Add Contact" Button. This action opens the "Select Contact" pop up window.
Select Contact by clicking on the Contact name.
Local Currency is selected by default but can be changed by selecting a different currency from the drop down List.
Select Location by clicking on the Location name.

Purchasing
52file:///C|/Documents%20and%20Settings/harpere/My%20Documents/coin-static/Part1_Manual/Purchasing.htm (26 of 43)06/07/2007 11:35:
Purchasing Type, Class and Category fields are not automatically selected. These MUST be selected before "Finalising" the Order.
Click on the "Edit" Button next to the Order Line and complete entries, select "Purchasing type", "Class" and "Category" from the drop down menu before saving. If Purchasing type is set to "Service" just Select "Service".
To ADD further Order Lines adopt same procedures explained in the "Add Order Lines" section. See paragraph 3.1.2.
Click on the "Save" Button . This action will display the new Order Line in Read mode, this can be Edited again or
Deleted by clicking on either the "Edit" Button or the "Delete" Button next to the chosen Order Line.
To Close window without saving click on "Close" Button .
Click on the "Get PDF" Button , to get a DRAFT Version of the Order in PDF format .
3.2.3 EDIT Financial Information (Budget Code)
Click on the "Edit" Button next to the Budget Code and make changes.
Choose between Goods or Service. Goods is set as default.
Class If Purchasing type is set to "Goods", select Class from a drop down list.
Category If Purchasing type is set to "Goods", select Category from a drop down list
Service If Purchasing type is set to "Service", select a Service from a drop down list.
Sequential Line number (non editable)
Self explanatory
Unit Select an Item from a drop down List. If Service has been selected, Unit is set to Currency and it is not editable.
Qty Quantity - Defaulted to "1" when Purchasing type is set to "Currency".
Unit Price Self Explanatory
Tot. Amount This is an automatic calculation (non editable)
Purchasing Type
No
Description

Purchasing
52file:///C|/Documents%20and%20Settings/harpere/My%20Documents/coin-static/Part1_Manual/Purchasing.htm (27 of 43)06/07/2007 11:35:
When the order is completed, click on the "Finalise" Button to Finalise the Order. The screen will return to the main Purchase Order List where it is listed with status: Finalised. The order is now ready for receiving and the "Receiving"
Button appears in the Action column.
Click on the "New Purchase Order " button at the top of the main screen to create a new Purchase Order.
Select Purchase Order Type "International" from drop down menu.
To add further Budget Codes adopt same procedures explained in the Add Budget Code section of the Local Purchase Order. See paragraph 3.1.3
Click on the "Save" Button . This action will display the new Budget Code in Read mode, this can be Edited again
or Deleted by clicking on either the "Edit" Button or the "Delete" Button next to the chosen BC Line.
To Close window without saving click on "Close" Button .
3.2.4 FINALISE Order
3.3 CREATE INTERNATIONAL (Field) Purchase Order
3.3.1 IMPORT INTERNATIONAL VENDOR from Oracle Database
When the Purchase Order is imported from FAS Commitment Number, this number is displayed AUTOMATICALLY (not editable) next to the Budget Code.
To view/print a Finalised Version of the Purchase Order, in PDF format, click on the "View" Button
next to the chosen Purchase Order in the Main PO List and click on the "Get PDF" Button .
A Finalised Purchase Order cannot be modified. To make changes to a Finalised Order, the order must be Duplicated first, and the Original Order must be Deleted with a given justification. The Duplicate copy can be edited but the Original Order Number must be quoted in the Note to Vendor section!

Purchasing
52file:///C|/Documents%20and%20Settings/harpere/My%20Documents/coin-static/Part1_Manual/Purchasing.htm (28 of 43)06/07/2007 11:35:
This action opens a new International PO Header.
Click on the "Import" Button to import International Vendor from Oracle Database. This action opens the "Search ORACLE PO Suppliers" pop up window.
Type beginning of the Vendor's name and click on the "Search" Button .
Select Vendor from list by Clicking on Supplier Name.
Screen 1- Create an International PO Header
Screen 2- Search Oracle International Supplier
The form will automatically updated with the selected Vendor information. Contacts are NOT always available, so if the contact field is empty, it is NOT possible to add a contact.
Type Set to International (not editable)
Purchase Order Number (not editable)
Date System Date (not editable)
Status Status is set to Draft mode.
Mailing Address FAO Representation Address (not editable)
Delivery Address Type Delivery address only if different from mailing address.
Originator Select name from list of Local Office Employees.
Number

Purchasing
52file:///C|/Documents%20and%20Settings/harpere/My%20Documents/coin-static/Part1_Manual/Purchasing.htm (29 of 43)06/07/2007 11:35:
Once the form is completed, press the "Save" Button . The Header information will display in Read Mode but it
remains editable by clicking on the "Edit" Button on the top right hand side of the screen.
Click on the "New Purchase Order " button at the top of the main screen to create a new Purchase Order.
Select "Intl." (International) from the TYPE drop down menu .
3.3.2 ADD NEW International Vendor
If the Vendor is not listed in Oracle Database.
Click on the "Add New Intl Vendor" Button . This action will open a New Form and all Information entered will be saved in the Purchase Order but the Vendor will NOT be saved in the Oracle International Vendor list. After finalising the Purchase Order an automatic Email will be sent to AFSP requesting the New vendor details to be added to the main Oracle International Vendor's List.
Screen 1- Add New International Vendor
Quotation Number Insert if applicable
Vendor Click on the "Import" Button to import International Vendor from Oracle Database.
Available Location and contact are listed.
Add New Intl Vendor
Vendor Location
Contact Person
Note to Vendor Free text area to write notes to Vendor, if applicable.
Shipping Methods / Freight and Payment Terms / Currency
Expected Delivery date
Enter the expected delivery date by clicking on the Calendar Icon and select date.
Prepay Freight Type City/Town where freight will be prepaid to, if applicable.
Transaction Reason Select a Reason for choosing such International Supplier from drop down menu.
Location is pre selected with the Vendor Selection (not editable)
Contact if available is automatically selected. (not editable)
Select from drop down menu. Note that Freight Terms, in an International PO, is defaulted to: "Vendor to Supply".
If the Vendor is not listed in Oracle Database. Click on "Add International Vendor" Button
. This action will open a New Form and all Information entered will be saved under this Purchase Order. After finalising the Purchase Order an Email will be sent to AFSP to Add this particular Vendor to the Oracle Vendor's List. See paragraph 3.3.2

Purchasing
52file:///C|/Documents%20and%20Settings/harpere/My%20Documents/coin-static/Part1_Manual/Purchasing.htm (30 of 43)06/07/2007 11:35:
Click the "OK" Button to save, or the "Cancel" Button to Close window.
From this point onwards, procedures to complete the Order are described in the Add Order Lines and Add Financial Information (Budget Code) sections of the Local Purchase Order. See paragraphs 3.1.2 and 3.1.3
This action opens the "Finalise" pop up window where further final information will be requested to complete the Finalising" process of this International Purchase Order.
3.3.3 Add Order Lines and Financial Information (Budget Code)
3.3.4 FINALISE the Order and SEND E-mail
Once all information has been entered, click on the "Finalise & Send Email" Button .
Screen 2- Further Information Request
● Reason/Authorisation for Exceeding US$25.000 limit: Only if the purchase is over the US$25.000 limit the
Self explanatory
Address * Type address into the three available fields.
City * Self explanatory
Insert if applicable
Self explanatory
Telephone Country Code if applicable and Area Code to be inserted in the first input field. Telephone and Fax numbers to be inserted in the second input field.
Contact Person Self explanatory
Contact Title Office Title
Contact Telephone Direct Number
Contact Email Self explanatory
All fields marked with an "*" Asterisk are mandatory.
In an International Purchase Order when adding new lines there is only one choice of Purchasing type, so it is defaulted to "Goods".
In an International Purchase Order "Class" Selection is only for reference purposes and "Category" is not available for selection.
● Estimated Freight amount: this amount has to be added in the same currency selected for the Purchase order but
it is not mandatory. If there is no estimated freight the field can be left blank and the "OK" Button must be clicked.
Name *
State / Province
Postal Code / Country *

Purchasing
52file:///C|/Documents%20and%20Settings/harpere/My%20Documents/coin-static/Part1_Manual/Purchasing.htm (31 of 43)06/07/2007 11:35:
Click the "OK" Button to save or the "Cancel" Button to take you back to the Purchase Order still in Draft mode.
After clicking on the "OK" Button , an automatic Email to AFSP will be generated. It contains as an attachment, a Finalised copy (PDF Format) of the International Purchase order and the Newly created International Supplier details to be added to the Oracle database.
Click on "Send Now" Button to send E-mail.
Click on the "Edit" Button next to the chosen Purchase Order, in the Action column. The Selected Purchase Order opens in Read Mode.
system will ask to enter a Reason/Authorization. This data will be printed on the PDF Internal Version and will be incorporated into the email to AFSP.
Screen 3- Finalise & Send Email
3.4 EDIT Purchase Order
Click on the "Purchasing" button .
Only Draft Purchase Order can be Edited/Modified. A Finalised Purchase Order cannot be modified. To make changes to a Finalised Order, the order must be Duplicated first, and the Original Order must be Deleted with a given justification. The Duplicate copy can be edited but the Original Order Number must be quoted in the Note to Vendor section!

Purchasing
52file:///C|/Documents%20and%20Settings/harpere/My%20Documents/coin-static/Part1_Manual/Purchasing.htm (32 of 43)06/07/2007 11:35:
**** TEMPORARILY THE HEADER SECTION WILL OPENS DIRECTLY IN EDIT MODE, PLEASE NOTE IT WILL BE CHANGED LATER****
3.4.1 EDIT Header
Click on the "Edit" Button on the top right hand side, Modify the Header section as appropriate and click on the "Save"
Button .
3.4.2 EDIT Order Lines
Click on the "Edit" Button next to the Order Line and make changes.
Screen 1- Edit Order Lines
Click on the "Save" Button .
To Close window without saving click on "Close" Button .
3.4.3 EDIT Financial Information (Budget Code)
Click on the "Edit" Button next to the Budget Code and make changes.
Screen 1- Edit Budget Code
Click on the "Save" Button .

Purchasing
52file:///C|/Documents%20and%20Settings/harpere/My%20Documents/coin-static/Part1_Manual/Purchasing.htm (33 of 43)06/07/2007 11:35:
When the order is completed, click on the "Finalise" Button or the "Finalise & Send Email" Button
. to Finalise the Local or International Order respectively. The screen will return to the main Purchase Order List where it is listed with status: Finalised. The order is now ready for receiving and the "Receiving" Button
appears in the Action column.
To Close window without saving click on "Close" Button .
Click on the "Get PDF" Button , to get a DRAFT Version of the Order in PDF format .
3.5 DUPLICATE Local & International Purchase Order
Click on the "Purchasing" button .
To duplicate a Purchase Order click on the "Copy Purchase Order" Button next to the chosen Purchase Order in the Action column. The Order will be duplicated and a new number will be assigned to it. This new Order is in DRAFT Mode and can be edited entirely with the exception of the VENDOR which must remain the same, although its Locations and Contacts can be changed.
All other Editing (Order Lines, Budget Code Etc.) is done by clicking on the "Edit" Button next to each section as explained in previous chapter Edit Purchase Order. See paragraph 3.4
3.6 VIEW Purchase Order
Click on the "Purchasing" button .
Click on the "View" Button next to the chosen Purchase Order, in the ACTION column. Then click on the "View" Button
next to each other section throughout the Purchase Order. All Purchase Order Information will be displayed in READ mode and it is therefore not editable.
3.7 DELETING Purchase Order
Click on the "Purchasing" button .
3.7.1. DELETE Purchase Order
To view/print a Finalised Version of the Purchase Order, in PDF format, click on the "View" Button
next to the chosen Purchase Order in the Main PO List and click on the "Get PDF" Button .
To view/print a Draft or Finalised Version of the Purchase Order in PDF format, click on the "View"
Button next to the chosen Purchase Order in the Main PO List and click on the "Get PDF" Button
.

Purchasing
52file:///C|/Documents%20and%20Settings/harpere/My%20Documents/coin-static/Part1_Manual/Purchasing.htm (34 of 43)06/07/2007 11:35:
There are three types of PDFs generated by the system, a "DRAFT" Version, "FINALISED" Version and a "CANCELLED" Version.
This Version is generated when the Purchase Order is Finalised. It will print two copies, one for the "Supplier" and one for "Internal use".
The resulting PDF will show "CANCELLED" on the top right hand side.
Both types of Purchase Order need to be completed with "FAO Terms & Conditions" attached. These documents are available in PDF Format on the main Purchasing Page.
Click on the "Delete" Button next to the chosen Purchase Order in the ACTION column. If the order is Finalised, a pop up window will appear asking for a reason for deleting.
3.8 GENERATE Purchase Order, PDF Format
3.8.1 DRAFT Version
Click on the "Edit" Button OR the on the "View" Button next to the chosen Purchase Order, under the ACTION
column in the main List of Purchase Orders and click on the "Get PDF" Button .
The resulting PDF will show "DRAFT" on the top right hand side. This Version is generated when the Purchase Order is NOT Finalised, some information it may still be missing. This version cannot be used as a valid Purchase Order until this is Finalised.
3.8.2 FINALISED Version
Click on the "View" Button next to the chosen Purchase Order under the ACTION column in the main List of Purchase
Orders and click on the "Get PDF" Button .
● The Supplier version needs to be attached to the Terms & Conditions and the Instructions, available for download in the Purchasing main page.
● The Internal version is marked as such, and contains all financial information needed for internal use.
3.8.3 CANCELLED Version
Click on the "View" Button next to the chosen Purchase Order, under the ACTION column in the main List of Purchase
Orders and click on the "Get PDF" Button .
3.9 PRINT Terms & Conditions
A Finalised Purchase Order can be deleted only if a reason for deleting has been entered. The Order will
still be listed with Status "Deleted". This order can be duplicated by clicking on the "Duplicate" Button to allow user to make changes to the order in Draft mode.

Purchasing
52file:///C|/Documents%20and%20Settings/harpere/My%20Documents/coin-static/Part1_Manual/Purchasing.htm (35 of 43)06/07/2007 11:35:
To get there:
Click on the "Terms & Conditions Local PO" or "Terms & Conditions Intl. PO"
Link to open and PRINT appropriate PDF file.
The RECEIVING Module, deals with the receipt of goods and for inventory purposes of finalised orders.
Once the goods are received c lick on the “Receiving” Button next to the chosen Purchase Order, in the Action column of the Main Purchase Order List. This action opens the Receiving Main List for that particular Purchase Order.
1. Log-on using your COIN User ID and password. Click here for instructions on how to log on.
2. Enter the “Edit mode” by clicking on the button on the right-hand side of the screen.
3. Click on the button situated on the left-hand side of the screen.4. On the left-hand side vertical menu, select the "Administrative Functions " option and then “Purchasing".
4. RECEIVING MODULE
How to get there
● Log-on using your COIN User ID and password.
● Enter the “Edit mode” by clicking on the button on the right-hand side of the screen.
● Click on the button situated on the left-hand side of the screen. ● On the left-hand side vertical menu, select the "Administrative Functions " option and then “Purchasing". ● The MAIN SCREEN will display the Purchase Order List.
Screen 1- MAIN SCREEN showing the Purchase Order List

Purchasing
52file:///C|/Documents%20and%20Settings/harpere/My%20Documents/coin-static/Part1_Manual/Purchasing.htm (36 of 43)06/07/2007 11:35:
The Receiving Main List shows the following:
4.1 INSERT Delivering Details
When goods are received, to add Delivery details, click on the “Add Details” Button .
This action will open a form to complete.
Screen 2 - Receiving Main List
Screen 3 – Add Details
Line Sequential line number
Description Description of the Purchase Order Lines
Qty Quantity ordered
Delivered Quantity delivered
Left Quantity yet not delivered
Registered Quantity registered
In Registered in either LI (Local Inventory), FA (Fixed Assets) or NA (Not Applicable)
Status
Action Click on the “Receive” Button to acknowledge the receipt of goods.
Open : when the goods are still to be received and/or registered. Closed: when goods have been received and registered.
When status is closed the “Receive” Button will disappear.

Purchasing
52file:///C|/Documents%20and%20Settings/harpere/My%20Documents/coin-static/Part1_Manual/Purchasing.htm (37 of 43)06/07/2007 11:35:
The fields are not mandatory but they are useful as reference information. Click on the “Save” Button to save or the “Cancel” Button to disregard changes and close window.
The window can be re-opened and re-edited at anytime by clicking on the “Add Details” Button again.
Goods received must be registered in one of the following areas by clicking on:
the “Add to Local Inventory” Button , the Not Applicable” Button (when goods
cannot be registered in Local Inventory or Fixed Assets) or the “Add to Fixed Assets” Button respectively.
4.2.1 Registering goods received in Local Inventory
Click on the “Add to Local Inventory”Button to register goods in Local Inventory. This action will automatically update the Local Inventory with the new item and the Receiving Main List.
4.2 RECEIVING & REGISTERING Goods
To acknowledge the receipt of goods click on the “Receive” Button next to the received item, this action opens a pop up window with a form to complete.
Screen 4 – Goods Receiving
No. Items Select from drop down menu (the order amount is displayed by default)
Date Select date from pop up calendar
Bill of lading Enter Bill of Lading (optional)
Comments Insert if required

Purchasing
52file:///C|/Documents%20and%20Settings/harpere/My%20Documents/coin-static/Part1_Manual/Purchasing.htm (38 of 43)06/07/2007 11:35:
The Receiving Main List after registration will show the Main Purchase Order line(s) (displayed in blue) followed by the itemised quantity dealt in individual registration lots (displayed in white).
Screen 5 – Receiving Main List after registration in Local Inventory
Line Sequential line number
Description Order Description (displayed in blue) followed by registration itemised lots (displayed in white).
Qty Quantity Purchased (displayed in blue) and Lot quantity (displayed in white).
Delivered Quantity Delivered
Balance Outstanding quantity to receive
Qty Registered Quantity Registered (displayed in blue) and registered Lot quantity (displayed in white)
IN Registered in LI (Local Inventory)
Status OPEN (when registration is not completed) or CLOSED (When registration is completed) Successful, Failed or Partial Failure of itemised registration lots.
Action Register in Local Inventory
Register in Fixed Assets
When goods cannot be registered in Local Inventory or Fixed Assets.
Click to recover from registration partial failure
Please note that when registering goods received, there may be a power failure or some other technical problem. In this case the registration status will show the current situation in the status column. The registration must be completed by re-registering the failed items or in the case of “Partial Failure” by clicking on the “Recover” Button. When registration is “Successful” the Status will be CLOSED.
Please note also that if after registration there is an option available for changing between Local Inventory and Not Applicable.

Purchasing
52file:///C|/Documents%20and%20Settings/harpere/My%20Documents/coin-static/Part1_Manual/Purchasing.htm (39 of 43)06/07/2007 11:35:
4.2.2 Registering goods received selecting the “Not Applicable” option
if goods cannot be registered in Local Inventory or Fixed Assets, click on “Not Applicable” Button .
This action will open a text area where a reason must be given for choosing NA. By clicking on the “Save “ Button the screen will return to the main list showing the updated information.
The Receiving Main List after registration will show the Main Purchase Order line(s) (displayed in blue) followed by the itemised quantity dealt individually (displayed in white).
Screen 6 – Window asking for reason for choosing the Not Applicable” option.
Screen 7 – Receiving Main List after having selected “Not Applicable”.
Line Sequential line number
Description Order Description (displayed in blue) followed by registration itemised lots (displayed in white).
Qty Quantity Purchased (displayed in blue) and Lot quantity (displayed in white).
Delivered Quantity Delivered
Balance Outstanding quantity to receive
Qty Registered Quantity Registered (displayed in blue) and registered Lot quantity (displayed in white)

Purchasing
52file:///C|/Documents%20and%20Settings/harpere/My%20Documents/coin-static/Part1_Manual/Purchasing.htm (40 of 43)06/07/2007 11:35:
4.2.3 Registering goods received in Fixed Assets
Click on the “Add to Fixed Assets” Button to register goods in Fixed Assets. This action will open a pop up window with a form to complete.
Screen 8 – Registering Goods Received in Fixed Assets
IN Registered in NA (Not Applicable)
Status OPEN (when registration is not completed) or CLOSED (When registration is completed) Successful, Failed or Partial Failure of itemised registration lots.
Action
Payment Date Select date from pop up calendar Select from drop down menu
Item X Serial Number Insert a serial number for each received item
Select Budget Code Budget code must be selected from the dropdown menu, one for each received item. If there is only one Budget code, this will be displayed in read mode and will be not editable.
Security Click on the Security box if the Item is a Security Item
Remarks Insert if applicable
Register in Local Inventory
Register in Fixed Assets
When goods cannot be registered in Local Inventory or Fixed Assets.
Click to recover from registration partial failure
Please note that when registering goods received, there may be a power failure or some other technical problem. In this case the registration status will show the current situation in the status column. The registration must be completed by re-registering the failed items or in the case of “Partial Failure” by clicking on the “Recover” Button. When registration is “Successful” the Status will be CLOSED.
Please note also that if after registration there is an option available for changing between Local Inventory and Not Applicable.

Purchasing
52file:///C|/Documents%20and%20Settings/harpere/My%20Documents/coin-static/Part1_Manual/Purchasing.htm (41 of 43)06/07/2007 11:35:
Click on the “Export” Button , a file containing the necessary information for registering in FA will be created and will be automatically added to a file which will be sent at periodical intervals via e-mail to AFSP for approval. This action will automatically update the Receiving Main List.
The following screen shows the main list after the Fixed Assets Module has been updated, note that the Button has disappeared and the STATUS is Pending, waiting for AFSP Approval.
The Receiving Main List after registration will show the Main Purchase Order line(s) (displayed in blue) followed by the itemised quantity dealt individually (displayed in white).
Screen 9 – Receiving Main List after Fixed Assets Registration
Line Sequential line number
Description Order Description (displayed in blue) followed by registration itemised lots (displayed in white).
Qty Quantity Purchased (displayed in blue) and Lot quantity (displayed in white).
Delivered Quantity Delivered
Balance Outstanding quantity to receive
Qty Registered Quantity Registered (displayed in blue) and registered Lot quantity (displayed in white)
IN Registered in FA (Fixed Assets)
Status OPEN (when registration is not completed) or CLOSED (When registration is completed) Pending (waiting for AFSP Approval).
Action Action column will be empty because registration is Pending.
Please note also that if AFSP does not accept Registration, the status will be “Failed”. In this case there will be an option available for re-registering in Local Inventory or selection the Not Applicable option.

Purchasing
52file:///C|/Documents%20and%20Settings/harpere/My%20Documents/coin-static/Part1_Manual/Purchasing.htm (42 of 43)06/07/2007 11:35:
AFSP Officers can also access the “Reminder” area of COIN where the file will appear in a list:
By clicking on the View Icon, the following information will be displayed:
The AFSP Officer will click on the relevant Button, depending on what action has been taken in regard to this registration in FA.
If the file has been Accepted, by clicking on the Accept File Button, such action will display in the COIN interface as follows:
4.3 AFSP Guidelines
After clicking on the “Export” Button for Registration in Fixed Assets, all the necessary information for registering in FA will be added to a FA Interface file which will be sent at periodical intervals via e-mail to AFSP for approval.
Screen 10 – Email to AFSP with link to FA Interface File for Fixed Asset Registration
Screen 11 - Reminders
Screen 12 – FA Interface

Purchasing
52file:///C|/Documents%20and%20Settings/harpere/My%20Documents/coin-static/Part1_Manual/Purchasing.htm (43 of 43)06/07/2007 11:35:
If the file has been Rejected, by clicking on the Reject File Button, such action will display in the COIN interface as follows:
Screen 13 – Registration Main List showing FA registration success
Screen 14 – Registration Main List showing FA registration failure
If the file has been Partially Accepted, by clicking on the Partially Accept File Button, such action will display in the COIN interface as follows:
Screen 15 – Registration Main List showing FA registration partial failure
Please note also that if AFSP does not accept Registration, than there will be an option available for changing between
Local Inventory and Not Applicable by clicking on the “LI” Button or “NA” Button respectively. The “FA” Button will be no longer available.