The Practice Fusion API Client Installation & Usage … · API Client Installation & Usage Guide...
19
API Client Installation & Usage Guide for Windows 1 The Practice Fusion API Client Installation & Usage Guide for Windows Quickly and easily connect your Results Information System with Practice Fusion’s Electronic Health Record (EHR) System
Transcript of The Practice Fusion API Client Installation & Usage … · API Client Installation & Usage Guide...
API Client Installation & Usage Guide for Windows 1
The Practice Fusion API Client Installation &
Usage Guide for Windows Quickly and easily connect your Results Information System with
Practice Fusion’s Electronic Health Record (EHR) System
API Client Installation & Usage Guide for Windows 2
Contents
Introduction to the Practice Fusion API Client ............................................................................................ 3
Results ...................................................................................................................................................... 3
Orders ....................................................................................................................................................... 4
Preparing for installation ............................................................................................................................. 5
Install Java ............................................................................................................................................... 5
Creating folders and configuring permissions ........................................................................................ 5
Installation ................................................................................................................................................... 7
Downloading the Practice Fusion API Client ........................................................................................... 7
Performing a new installation of the Practice Fusion API Client ............................................................ 8
Configuring the Practice Fusion API Client.............................................................................................. 9
Scheduling a task to run the Practice Fusion API client ........................................................................... 12
Features and Settings ................................................................................................................................ 16
Statistics Tab .......................................................................................................................................... 16
Errors Tab ............................................................................................................................................... 17
Send Email on Error ............................................................................................................................... 18
Connections & Logging .......................................................................................................................... 19
Service URLs ........................................................................................................................................... 19
API Client Installation & Usage Guide for Windows 3
Introduction to the Practice Fusion API Client The Practice Fusion API Client is an application that enables vendors to receive orders from and exchange
results with Practice Fusion’s Electronic Health Record (EHR) platform. It runs on a computer at your center,
continuously checking for results to send to Practice Fusion or for incoming orders from the Practice Fusion API.
Results
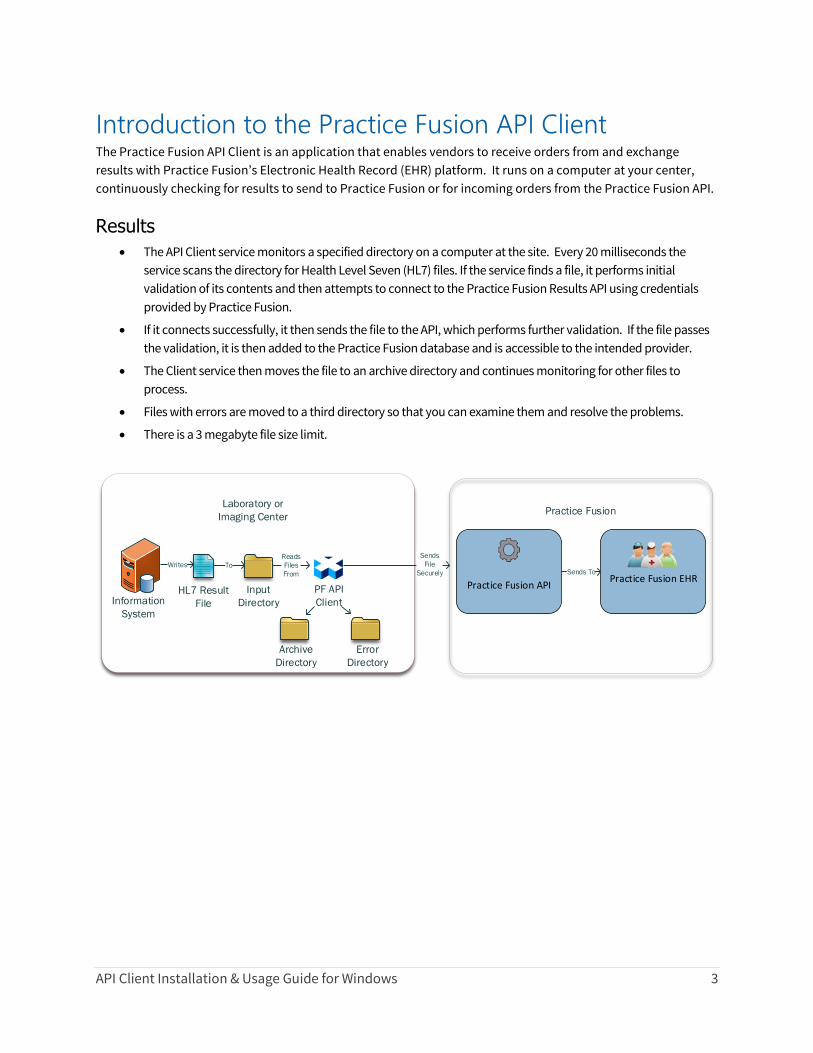
The API Client service monitors a specified directory on a computer at the site. Every 20 milliseconds the
service scans the directory for Health Level Seven (HL7) files. If the service finds a file, it performs initial
validation of its contents and then attempts to connect to the Practice Fusion Results API using credentials
provided by Practice Fusion.
If it connects successfully, it then sends the file to the API, which performs further validation. If the file passes
the validation, it is then added to the Practice Fusion database and is accessible to the intended provider.
The Client service then moves the file to an archive directory and continues monitoring for other files to
process.
Files with errors are moved to a third directory so that you can examine them and resolve the problems.
There is a 3 megabyte file size limit.
Information
System
Input
Directory
Writes
HL7 Result
File
To
Reads
Files
From
Practice Fusion API
Sends
File
SecurelyPractice Fusion EHR
Sends To
Practice Fusion
Archive
Directory
Error
Directory
Laboratory or
Imaging Center
PF API
Client
API Client Installation & Usage Guide for Windows 4
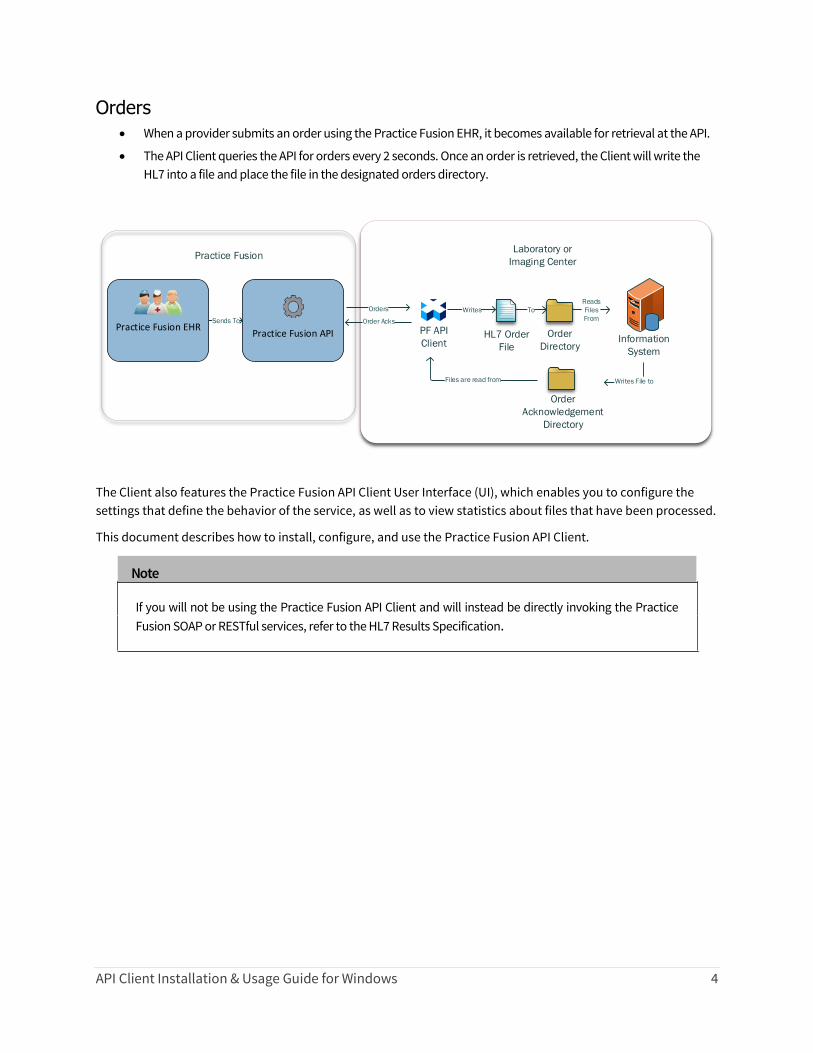
Orders
When a provider submits an order using the Practice Fusion EHR, it becomes available for retrieval at the API.
The API Client queries the API for orders every 2 seconds. Once an order is retrieved, the Client will write the
HL7 into a file and place the file in the designated orders directory.
Information
System
Order
Directory
Writes
HL7 Order
File
To
Reads
Files
From
Practice Fusion APIPractice Fusion EHR
Sends To
Practice Fusion
Order
Acknowledgement
Directory
Laboratory or
Imaging Center
PF API
Client
Writes File toFiles are read from
Orders
Order Acks
The Client also features the Practice Fusion API Client User Interface (UI), which enables you to configure the
settings that define the behavior of the service, as well as to view statistics about files that have been processed.
This document describes how to install, configure, and use the Practice Fusion API Client.
Note
If you will not be using the Practice Fusion API Client and will instead be directly invoking the Practice
Fusion SOAP or RESTful services, refer to the HL7 Results Specification.
API Client Installation & Usage Guide for Windows 5
Preparing for installation
Install Java
1. If 32-bit Java version 7 or later is already installed on your computer, you can skip this step.
2. You can download Java at http://java.com/en/download/
3. Please note that the 32-bit version of Java is required. To verify if you have the 32-bit version of Java, do one of
the following:
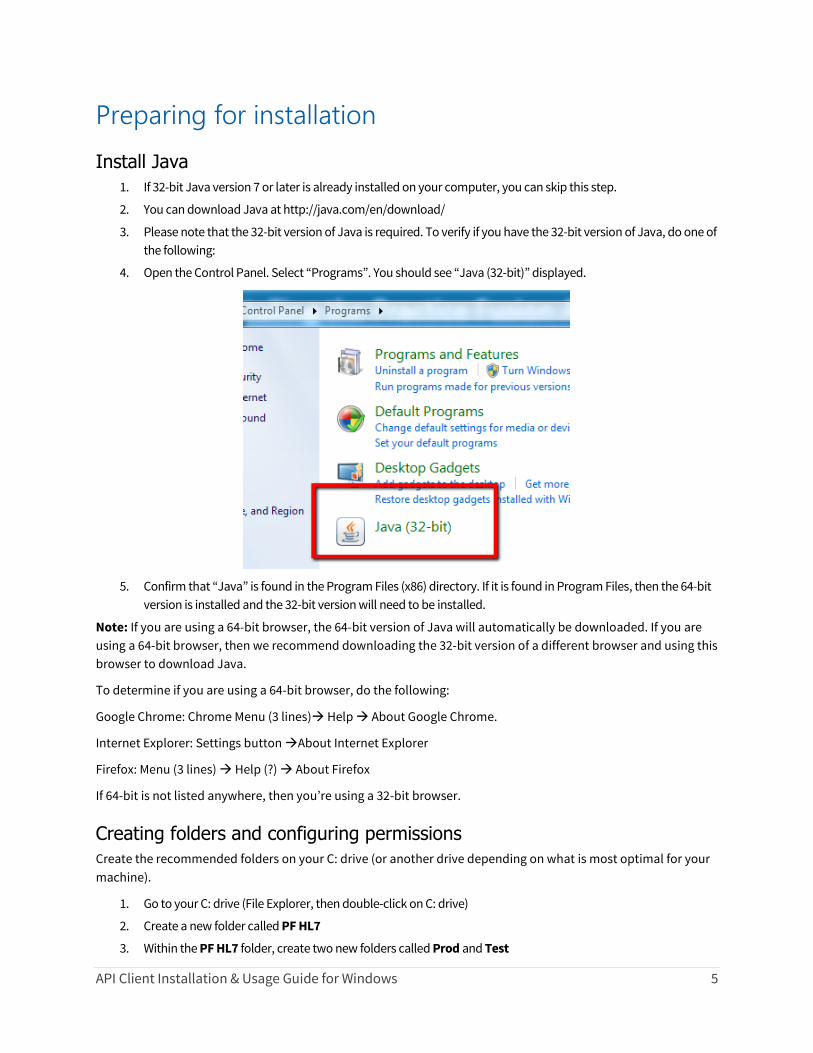
4. Open the Control Panel. Select “Programs”. You should see “Java (32-bit)” displayed.
5. Confirm that “Java” is found in the Program Files (x86) directory. If it is found in Program Files, then the 64-bit
version is installed and the 32-bit version will need to be installed.
Note: If you are using a 64-bit browser, the 64-bit version of Java will automatically be downloaded. If you are
using a 64-bit browser, then we recommend downloading the 32-bit version of a different browser and using this
browser to download Java.
To determine if you are using a 64-bit browser, do the following:
Google Chrome: Chrome Menu (3 lines) Help About Google Chrome.
Internet Explorer: Settings button About Internet Explorer
Firefox: Menu (3 lines) Help (?) About Firefox
If 64-bit is not listed anywhere, then you’re using a 32-bit browser.
Creating folders and configuring permissions
Create the recommended folders on your C: drive (or another drive depending on what is most optimal for your
machine).
1. Go to your C: drive (File Explorer, then double-click on C: drive)
2. Create a new folder called PF HL7
3. Within the PF HL7 folder, create two new folders called Prod and Test
API Client Installation & Usage Guide for Windows 6
4. Within the Test folder, create three new folders called Results Input, Results Archive, and Results Error
5. If you are also implementing an orders interface, create an additional folder called Orders. If Acks will be
provided for the order messages, then also create a folder called Order Ack.
6. Repeat steps 4 and 5 for the Prod folder.
7. Create a folder called PFAPIClient (separate from the PF HL7 folder) on your C: drive.
Ensure the folders have the required read, write, and execute permissions.
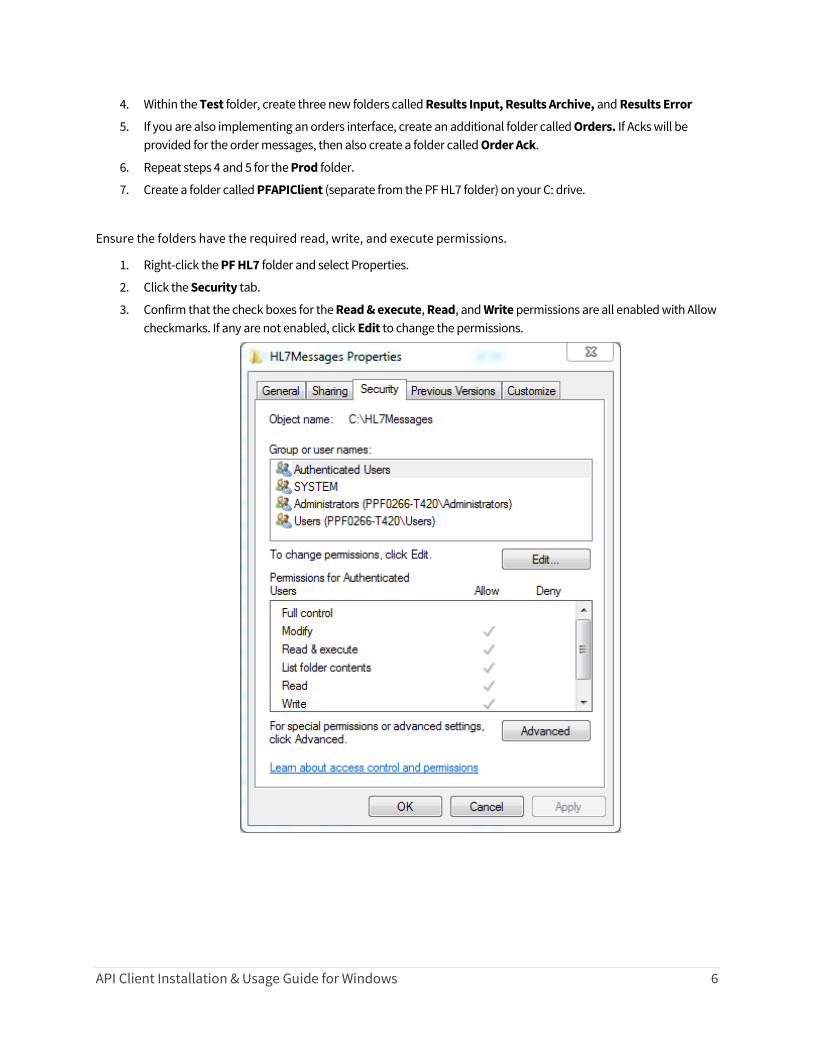
1. Right-click the PF HL7 folder and select Properties.
2. Click the Security tab.
3. Confirm that the check boxes for the Read & execute, Read, and Write permissions are all enabled with Allow
checkmarks. If any are not enabled, click Edit to change the permissions.
API Client Installation & Usage Guide for Windows 7
Installation
Downloading the Practice Fusion API Client
6. The Practice Fusion API Client is contained in a compressed file:
7. https://labresultapi.practicefusion.com/PFAPI/DevKit/pfapiclient.zip
8. You must have a file extraction program already installed in order to unzip the file.
9. a. Some Windows systems have the ability to extract a file. To determine if yours does, right-click a
compressed file in Windows Explorer then select “Extract All”
10. b. If this menu item is not available, you can download 7zip at http://www.7zip.org
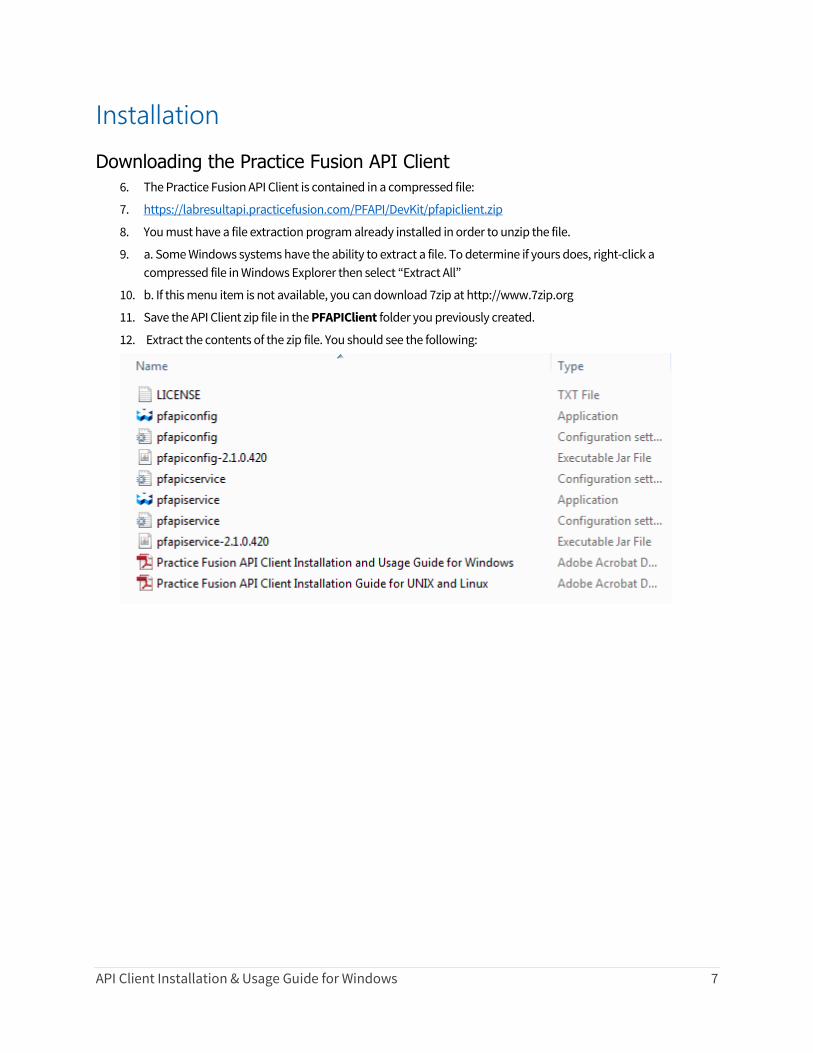
11. Save the API Client zip file in the PFAPIClient folder you previously created.
12. Extract the contents of the zip file. You should see the following:
API Client Installation & Usage Guide for Windows 8
Performing a new installation of the Practice Fusion API Client
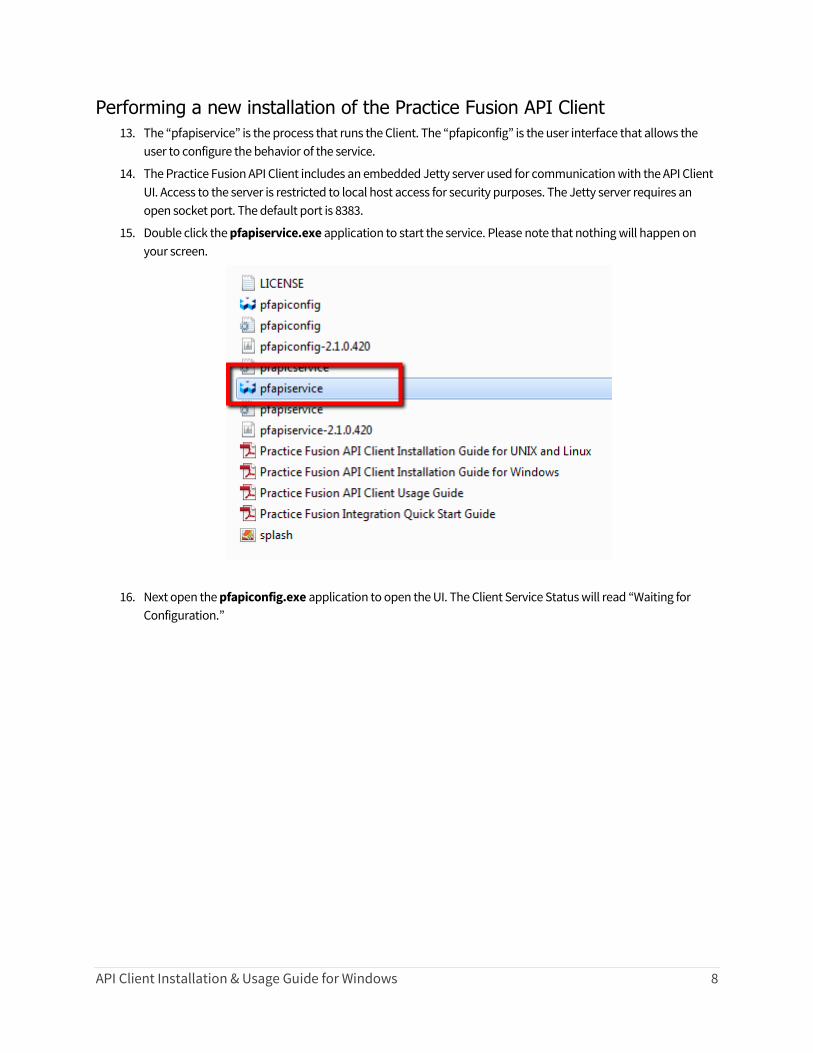
13. The “pfapiservice” is the process that runs the Client. The “pfapiconfig” is the user interface that allows the
user to configure the behavior of the service.
14. The Practice Fusion API Client includes an embedded Jetty server used for communication with the API Client
UI. Access to the server is restricted to local host access for security purposes. The Jetty server requires an
open socket port. The default port is 8383.
15. Double click the pfapiservice.exe application to start the service. Please note that nothing will happen on
your screen.
16. Next open the pfapiconfig.exe application to open the UI. The Client Service Status will read “Waiting for
Configuration.”
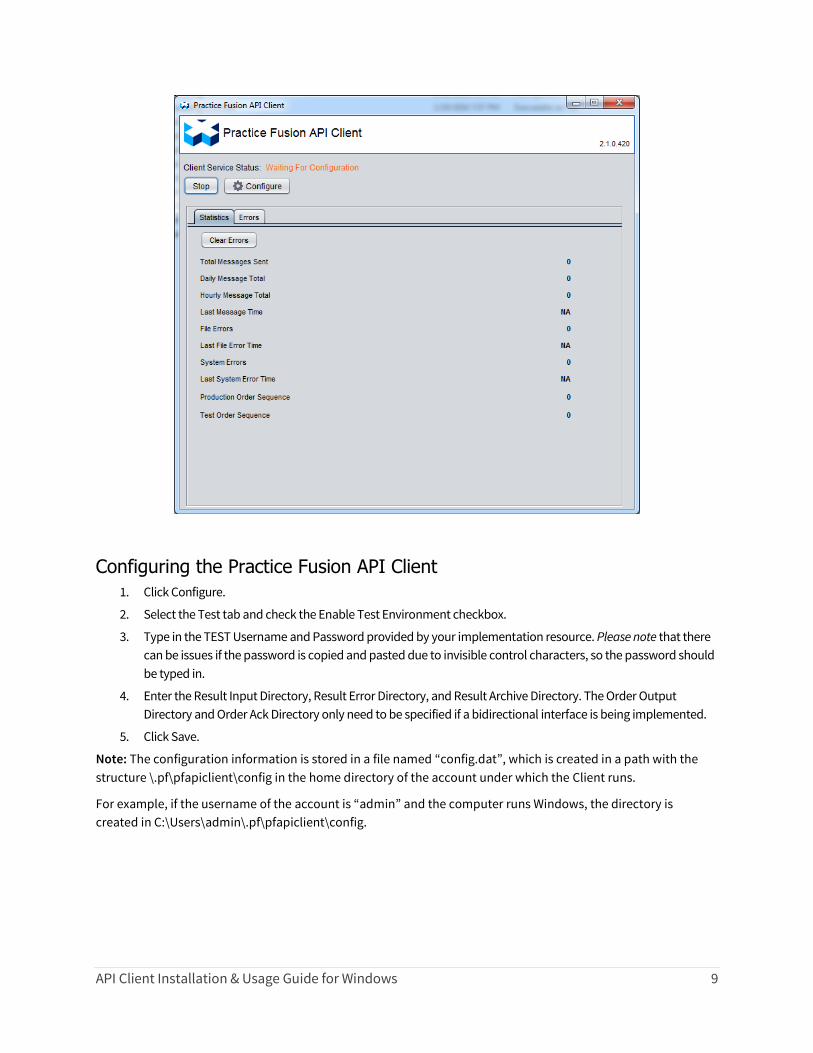
API Client Installation & Usage Guide for Windows 9
Configuring the Practice Fusion API Client
1. Click Configure.
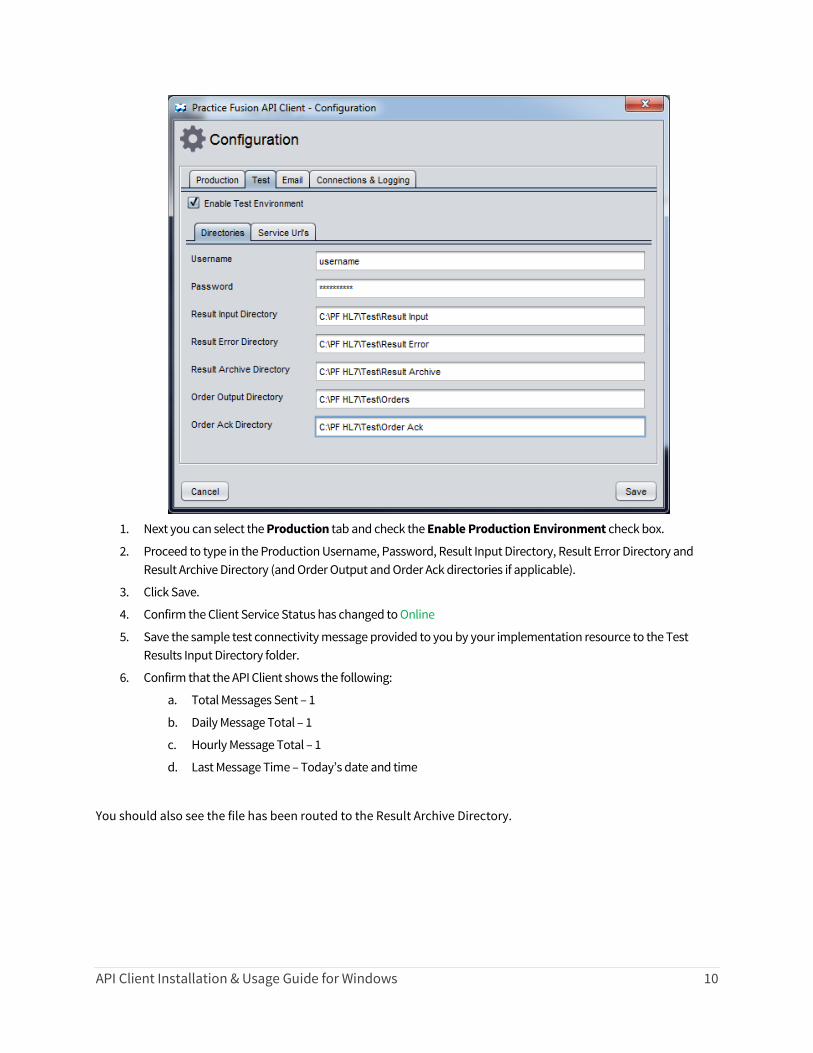
2. Select the Test tab and check the Enable Test Environment checkbox.
3. Type in the TEST Username and Password provided by your implementation resource. Please note that there
can be issues if the password is copied and pasted due to invisible control characters, so the password should
be typed in.
4. Enter the Result Input Directory, Result Error Directory, and Result Archive Directory. The Order Output
Directory and Order Ack Directory only need to be specified if a bidirectional interface is being implemented.
5. Click Save.
Note: The configuration information is stored in a file named “config.dat”, which is created in a path with the
structure \.pf\pfapiclient\config in the home directory of the account under which the Client runs.
For example, if the username of the account is “admin” and the computer runs Windows, the directory is
created in C:\Users\admin\.pf\pfapiclient\config.
API Client Installation & Usage Guide for Windows 10
1. Next you can select the Production tab and check the Enable Production Environment check box.
2. Proceed to type in the Production Username, Password, Result Input Directory, Result Error Directory and
Result Archive Directory (and Order Output and Order Ack directories if applicable).
3. Click Save.
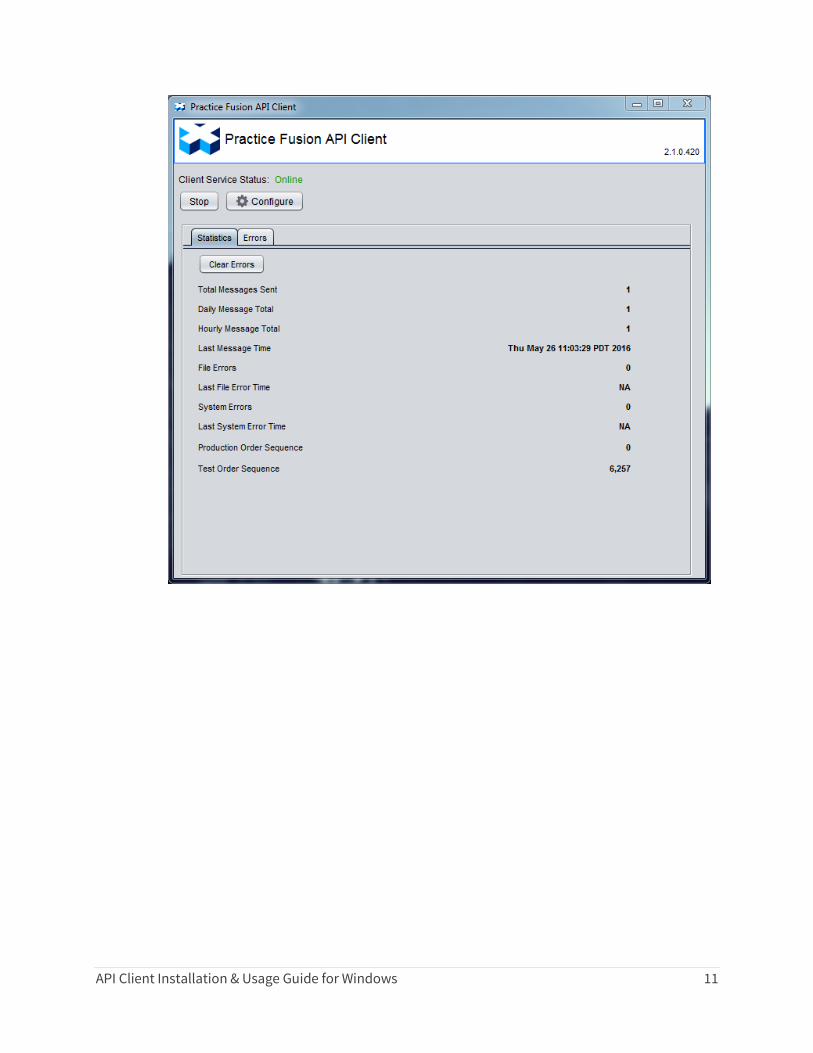
4. Confirm the Client Service Status has changed to Online
5. Save the sample test connectivity message provided to you by your implementation resource to the Test
Results Input Directory folder.
6. Confirm that the API Client shows the following:
a. Total Messages Sent – 1
b. Daily Message Total – 1
c. Hourly Message Total – 1
d. Last Message Time – Today’s date and time
You should also see the file has been routed to the Result Archive Directory.
API Client Installation & Usage Guide for Windows 11
API Client Installation & Usage Guide for Windows 12
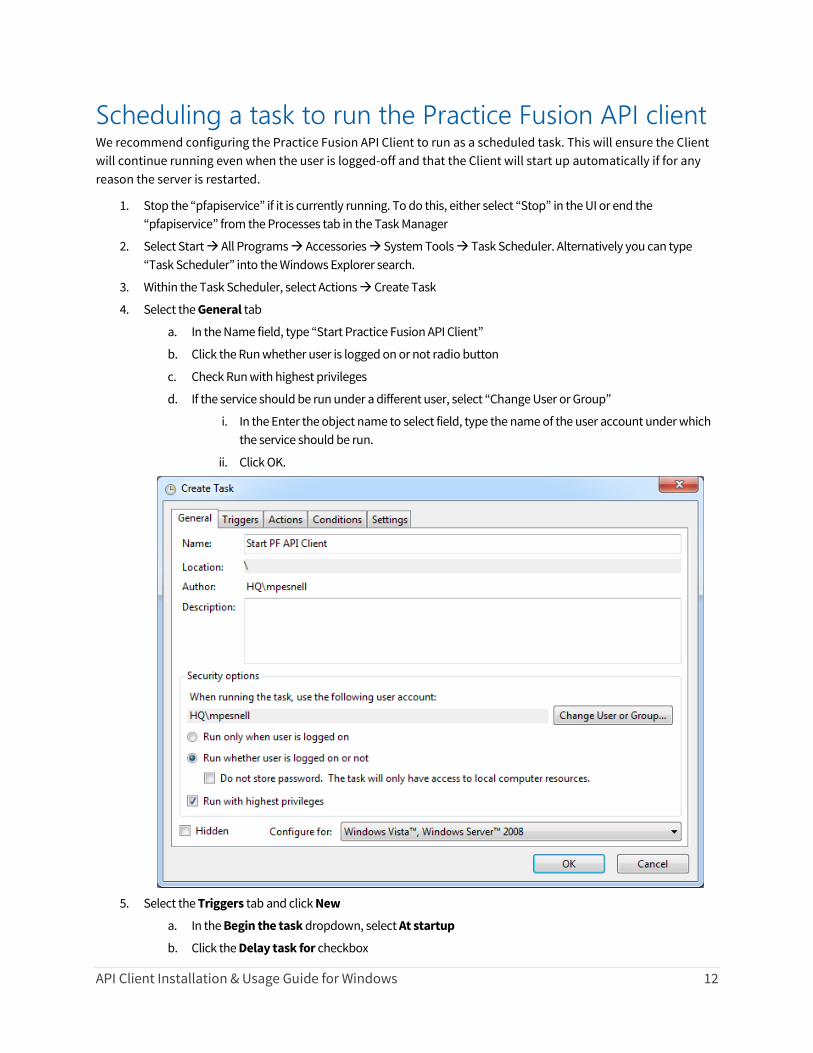
Scheduling a task to run the Practice Fusion API client We recommend configuring the Practice Fusion API Client to run as a scheduled task. This will ensure the Client
will continue running even when the user is logged-off and that the Client will start up automatically if for any
reason the server is restarted.
1. Stop the “pfapiservice” if it is currently running. To do this, either select “Stop” in the UI or end the
“pfapiservice” from the Processes tab in the Task Manager
2. Select Start All Programs Accessories System Tools Task Scheduler. Alternatively you can type
“Task Scheduler” into the Windows Explorer search.
3. Within the Task Scheduler, select Actions Create Task
4. Select the General tab
a. In the Name field, type “Start Practice Fusion API Client”
b. Click the Run whether user is logged on or not radio button
c. Check Run with highest privileges
d. If the service should be run under a different user, select “Change User or Group”
i. In the Enter the object name to select field, type the name of the user account under which
the service should be run.
ii. Click OK.
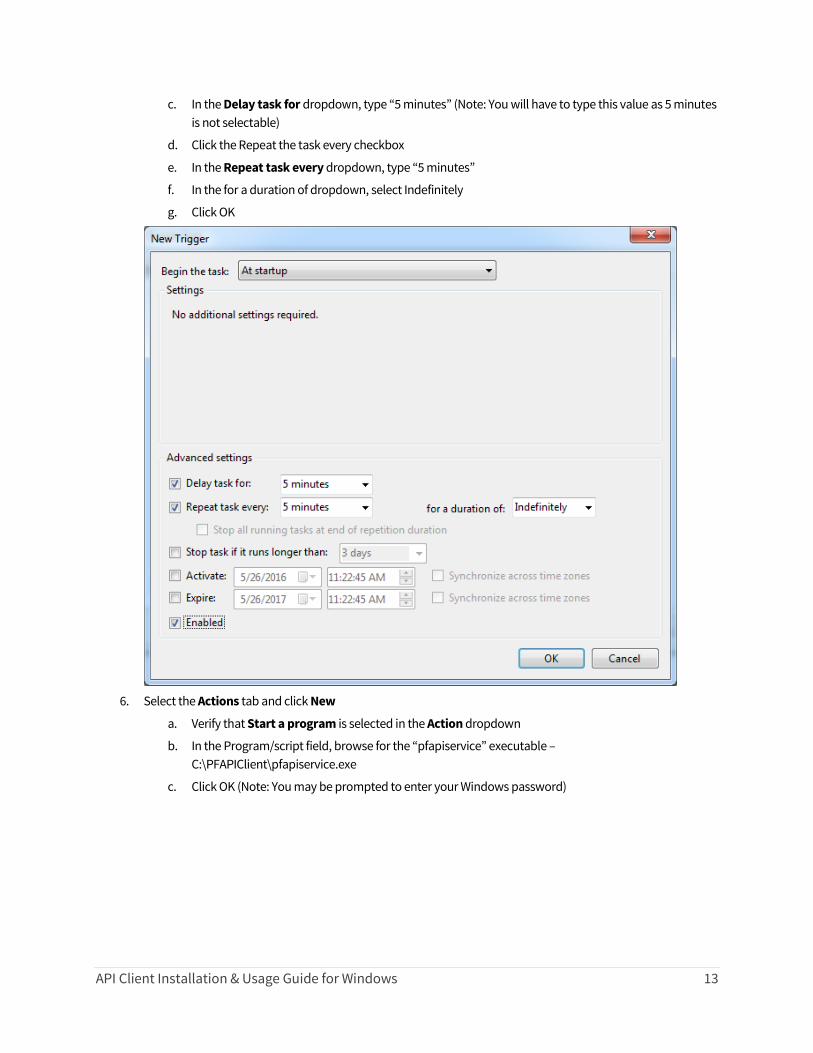
5. Select the Triggers tab and click New
a. In the Begin the task dropdown, select At startup
b. Click the Delay task for checkbox
API Client Installation & Usage Guide for Windows 13
c. In the Delay task for dropdown, type “5 minutes” (Note: You will have to type this value as 5 minutes
is not selectable)
d. Click the Repeat the task every checkbox
e. In the Repeat task every dropdown, type “5 minutes”
f. In the for a duration of dropdown, select Indefinitely
g. Click OK
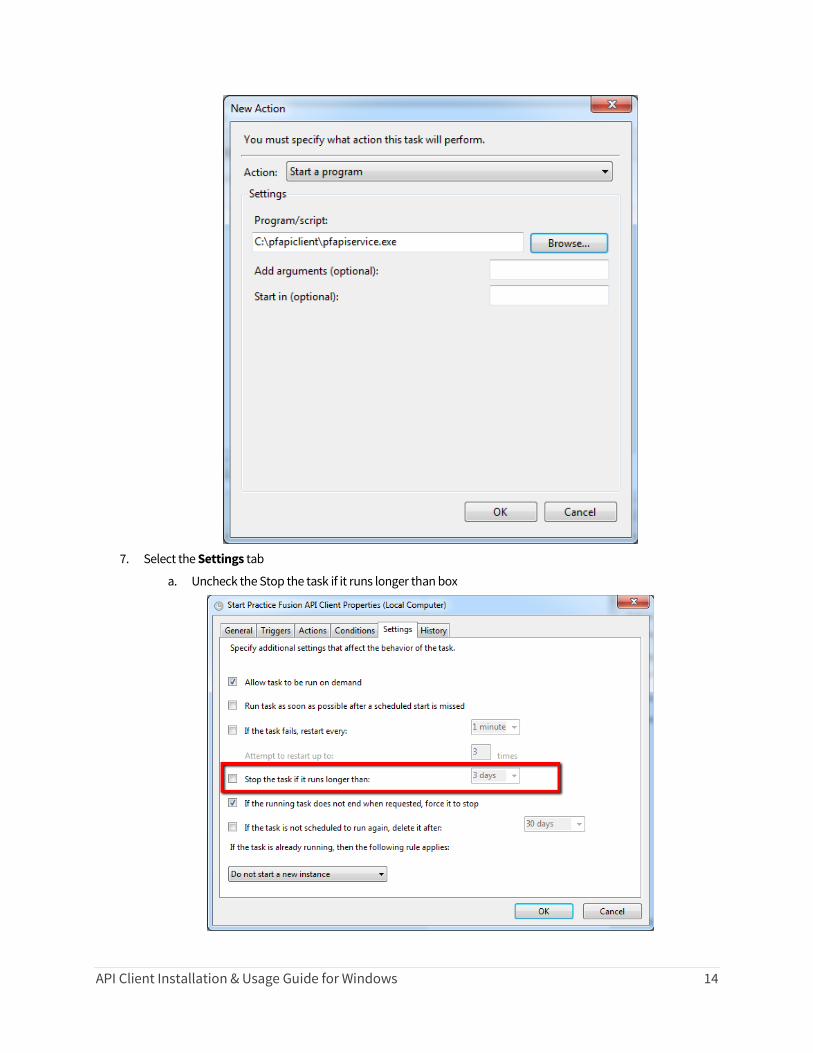
6. Select the Actions tab and click New
a. Verify that Start a program is selected in the Action dropdown
b. In the Program/script field, browse for the “pfapiservice” executable –
C:\PFAPIClient\pfapiservice.exe
c. Click OK (Note: You may be prompted to enter your Windows password)
API Client Installation & Usage Guide for Windows 14
7. Select the Settings tab
a. Uncheck the Stop the task if it runs longer than box

API Client Installation & Usage Guide for Windows 15
8. Select Task Scheduler Library. Right-click on the Start Practice Fusion API Client task. Select Run. Confirm
that the Status is “Running”.
API Client Installation & Usage Guide for Windows 16
Features and Settings
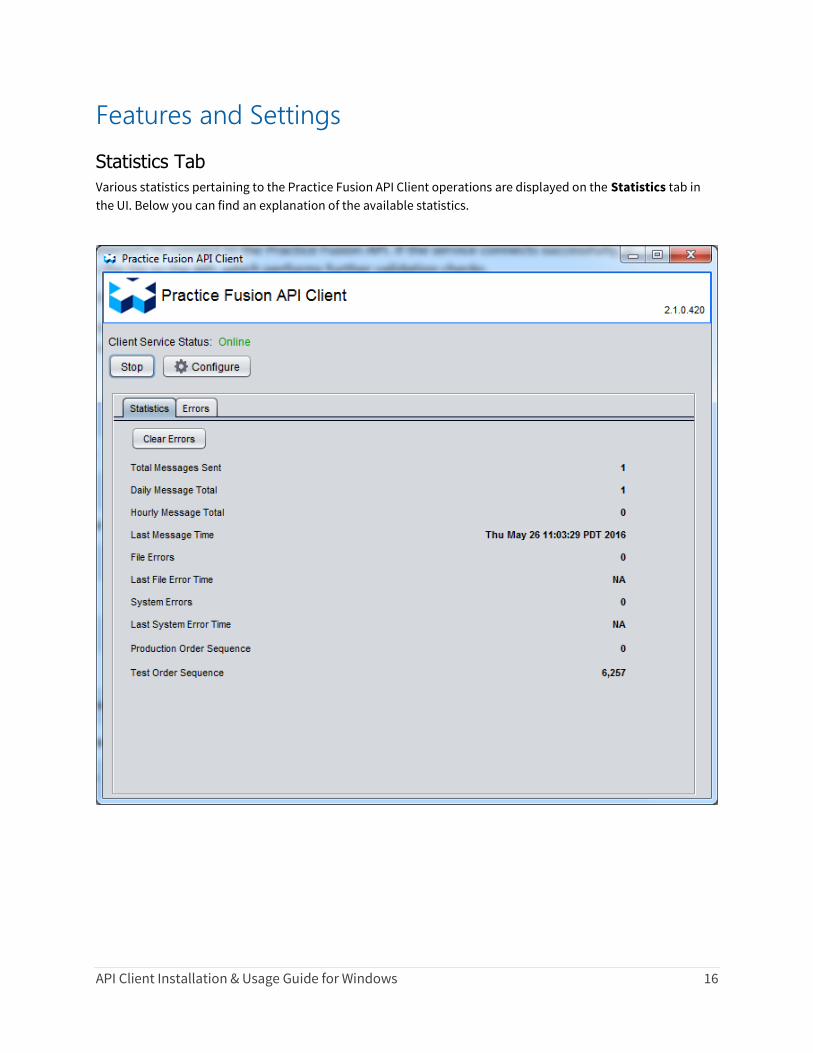
Statistics Tab
Various statistics pertaining to the Practice Fusion API Client operations are displayed on the Statistics tab in
the UI. Below you can find an explanation of the available statistics.
API Client Installation & Usage Guide for Windows 17
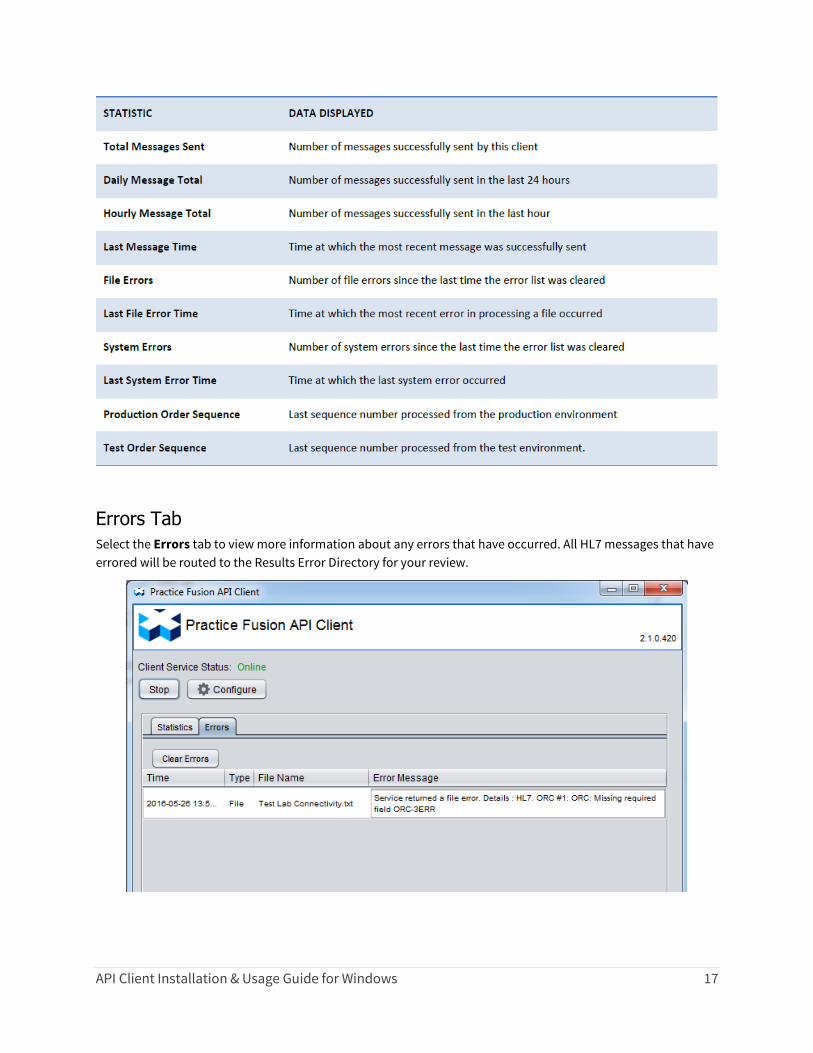
Errors Tab
Select the Errors tab to view more information about any errors that have occurred. All HL7 messages that have
errored will be routed to the Results Error Directory for your review.
API Client Installation & Usage Guide for Windows 18
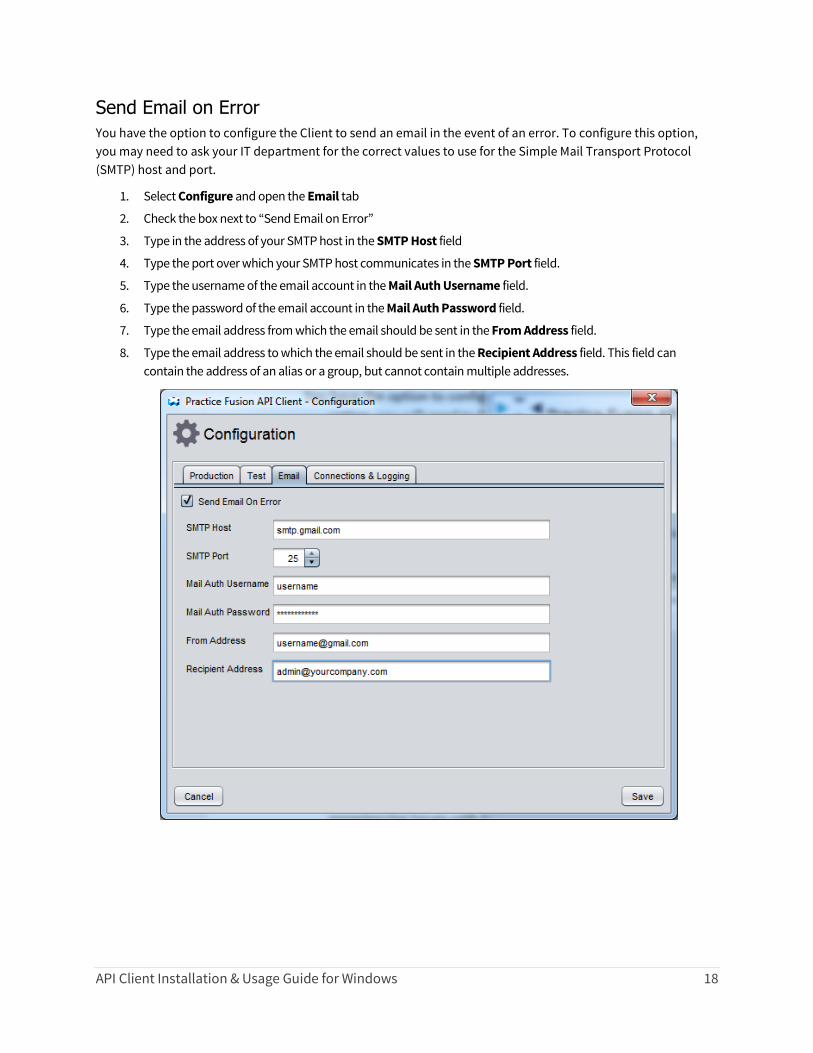
Send Email on Error
You have the option to configure the Client to send an email in the event of an error. To configure this option,
you may need to ask your IT department for the correct values to use for the Simple Mail Transport Protocol
(SMTP) host and port.
1. Select Configure and open the Email tab
2. Check the box next to “Send Email on Error”
3. Type in the address of your SMTP host in the SMTP Host field
4. Type the port over which your SMTP host communicates in the SMTP Port field.
5. Type the username of the email account in the Mail Auth Username field.
6. Type the password of the email account in the Mail Auth Password field.
7. Type the email address from which the email should be sent in the From Address field.
8. Type the email address to which the email should be sent in the Recipient Address field. This field can
contain the address of an alias or a group, but cannot contain multiple addresses.
API Client Installation & Usage Guide for Windows 19
Connections & Logging
The Practice Fusion API Client records information about its execution in log files. There are log files for both the
Client Service and the Client UI. Each will grow to 100 MB in size, at which point in time the file is renamed with a
number at the end and a new file is created. The log file is also compressed at this time, reducing its size to
about 10 MB. Only ten log files are maintained; the Client deletes files older than the tenth. The total space
required for logging typically does not exceed 400MB even with heavy usage.
The default logging level is set to “INFO”. This level of logging provides information about events such as
configuration changes, error messages, and start up and shut down activities.
To obtain more verbose logging information, you can change the level to “DEBUG” which can be helpful in
resolving errors and when contacting Practice Fusion support. You can also set a lower logging verbosity level
(Error or Warning). To do this:
1. Click the Connections & Logging tab
2. Select the desired value from Logging Level drop-down menu
The log files can be found in the “.pf” folder mentioned in the “Configuring the Practice Fusion API Client”
section.
Service URLs
The Client communicates with the Practice Fusion APIs by using the Uniform Resource Locators (URLs), or
addresses, of the services. The default configuration contains the proper values and should not be changed.
If a Service URL is accidentally modified, select “Load Defaults.”


![CONSUMPTION PLAN [client] [project name] [usage lead]](https://static.fdocuments.net/doc/165x107/56649eff5503460f94c14ce2/consumption-plan-client-project-name-usage-lead.jpg)