the Paper Illusions Guide - Home Decorating Ideas: The ... · 3 Introduction How The Paper...
29
The Paper Illusions Guide An informational guide explaining all there is to know about PaperIllusion™ wallpaper By: Carrie Wigal www.ThePIguide.com DISCLAIMER: The Manufacturer and Licensed Distributor of the PaperIllusion™ Product and Brand Name are the Owners of the Registered Trademarks, Trade Dress and Copyrights in said Product and Trademarks. WallpaperIllusions.com, PaperItFun.com, and ThePIGuide.com, being entirely separate companies, are not related to or affiliated with the Manufacturer or any of the Licensed Distributors of this PaperIllusion™ Product and Brand Name. The information and opinions expressed here represent that of my own and fellow users of the PaperIllusion™ product and not those of the Manufacturer and Licensed Distributor. All information in this Document is provided “AS IS” without warranty of any kind. I am not responsible for the actions, content, accuracy, opinions expressed, privacy policies, products or services or for any damages or losses, directly or indirectly, caused or alleged to have been caused as a result of your use or reliance on the information provided by this Document. This Document includes links to other sites operated by third parties. These links are provided as a convenience to you and as an additional avenue of access to the information contained therein. We have not reviewed all of the information on other sites and are not responsible for the content of any other sites or any products or services that may be offered through other sites. Please use common sense and follow the published manufacturer’s instructions on the various products mentioned within this Document. By reading the content of this Document you agree to the above terms. Copyright ©2007 All Rights Reserved. The PI Guide by Carrie Wigal
Transcript of the Paper Illusions Guide - Home Decorating Ideas: The ... · 3 Introduction How The Paper...

The Paper Illusions Guide
An informational guide explaining all there is to know about
PaperIllusion™ wallpaper
By: Carrie Wigal
www.ThePIguide.com
DISCLAIMER: The Manufacturer and Licensed Distributor of the PaperIllusion™ Product and Brand Name are the Owners of the Registered Trademarks, Trade Dress and Copyrights in said Product and Trademarks. WallpaperIllusions.com, PaperItFun.com, and ThePIGuide.com, being entirely separate companies, are not related to or affiliated with the Manufacturer or any of the Licensed Distributors of this PaperIllusion™ Product and Brand Name. The information and opinions expressed here represent that of my own and fellow users of the PaperIllusion™ product and not those of the Manufacturer and Licensed Distributor. All information in this Document is provided “AS IS” without warranty of any kind. I am not responsible for the actions, content, accuracy, opinions expressed, privacy policies, products or services or for any damages or losses, directly or indirectly, caused or alleged to have been caused as a result of your use or reliance on the information provided by this Document. This Document includes links to other sites operated by third parties. These links are provided as a convenience to you and as an additional avenue of access to the information contained therein. We have not reviewed all of the information on other sites and are not responsible for the content of any other sites or any products or services that may be offered through other sites. Please use common sense and follow the published manufacturer’s instructions on the various products mentioned within this Document. By reading the content of this Document you agree to the above terms.
Copyright ©2007 All Rights Reserved. The PI Guide by Carrie Wigal

2
Table of Contents
1. What is PaperIllusion™?
o An Introduction & Overview Of This Amazing Product
2. The Perfect Cover Up
o Remedy for Damaged or Problem Surface Areas
3. How to Prepare Your Surface
o Wash and Prime
4. How to Install PaperIllusion™
o Tear, Dip and Apply
5. How to Repair/Maintain PaperIllusion™
o Washable
6. How to Remove PaperIllusion™
o Saturate & Peel
7. Tools for the Job
o What You Need and Where To Get It
8. Measuring Up
o How To Calculate How Much You Need
9. It’s Not Just For Walls
o Discover All That Can Be Done With PaperIllusion™
10. Photo Gallery
o Get Inspired
11. Testimonials
o Don’t Just Take My Word For It
12. Why Get a Sample Book
o Seeing is Believing
13. Where to Buy PaperIllusion™
o Wallpaper Illusions Is The Paper Illusions Place
Copyright ©2007 All Rights Reserved. The PI Guide by Carrie Wigal

3
Introduction How The Paper Illusions Guide Came About
I first heard about the PaperIllusion™ product from my husband when he was working at
my father’s retail wallpaper store. While he told me right away this paper was a gold
mine, I didn’t see the value in it because frankly, I wasn’t a huge fan of wallpaper and
assumed it was just like any other wall covering.
It wasn’t until I saw it demonstrated in person that I got excited about it. It is SO easy to
do! The demonstrator also had a few knick-knacks decorated with this paper on display
that caught my eye, a picture frame and a tissue box cover. Wow, that was neat, I
thought. He then told me this paper was perfect for paneling. That really captured my
interest in particular because our home was filled with paneled walls.
How come I never heard of this product before? I started doing demonstrations at
local fairs & festivals and found those few that had heard of it, had seen it on QVC.
We then began marketing this product on the Internet. When surveying the competition
online I couldn’t believe how little information was available. It seemed every site had the
same regurgitated “tear, dip & apply” pictures and limited text on the subject.
Except at the Village Café…
At the time F. Schumacher & Co was distributing the product and had a discussion
board online and an 800 number you could call to get specific information about
PaperIllusion™, and I thought that was wonderful. However, although it was nice to see
those resources were available, I felt the discussion board could have been improved
upon. So I took it upon myself to start my own, Paper It Fun!
Then in 2006 PaperIllusion™ switched hands and the Village Café went by the wayside.
So I turned up the volume on Paper It Fun!. I asked current members of the community
to submit photos of their PaperIllusion™ projects and I featured them online in a Photo
Gallery.
Copyright ©2007 All Rights Reserved. The PI Guide by Carrie Wigal

4
Early 2007 I got into the blogging craze and added that component to the Paper It Fun!
Resource Network: providing project ideas, tips and testimonials, publicly answering
frequently asked questions, and announcing new colors & product availability.
After seeing the growth of Paper It Fun! further explode, I realized not everyone had the
time to search the entire network to find answers to their basic questions. So, I decided
to create an all-inclusive guide on this product answering as many basic questions as
possible.
While this publication may undergo future improvements, for now this is the most
exhaustive bit of information on PaperIllusion™ available anywhere. I hope you will find
all that you need in this guide to get started on using this product.
Keep reading and see how you can easily have an amazing transformation in your own
home or office. I know you’ll be impressed with the simplicity of using this wall covering,
inspired to see what all can be done with it, motivated to get started on your own project
and proud to show off the results.
Thank you in advance for allowing me the opportunity to share with you my most favorite
decorating product on the market today. Enjoy and have fun papering it!
Sincerely,
Carrie Wigal
Author & Founder of Paper It Fun!
Copyright ©2007 All Rights Reserved. The PI Guide by Carrie Wigal

5
What is PaperIllusion™? An introduction & overview of this amazing product
HOW IT BEGAN…
I had the distinct pleasure of meeting the designer of PaperIllusion™, Jane Gauss, in the
spring of 2007. After a few exchanges I asked her to write a brief bio specifically
addressing her relationship with this product, and here’s an excerpt of what she had to
say…
A trend that was … being seen in the custom market was hand-painted wallpaper that the artists would design, paint, let dry, tear into stone-like pieces, paste and then apply to the wall. The look was incredible—an instant faux finish—yet the process was less than easy, and certainly not for a beginning faux painter. This whole concept for PaperIllusion™ came from these hand-painted papers and the desire to make this “look” accessible, affordable, and doable for a beginning decorator. And so began PaperIllusion™ which Liza [Glenn] and I licensed to F. Schumacher & Company in New York City. I became very involved with their design team in the development of colors, surfaces, instructions while making trade show appearances to introduce this new decorating technique for beginners. At one of these shows, the executives from QVC knew this was a product for them. I had been on QVC with Carol Smith and Plaid Enterprises for several years before PaperIllusion, so this was just another product for me to share. It was such fun to receive the phone calls from people who had tried PaperIllusion for the first time and were delighted with what they had done! … New patterns, colors, and techniques are constantly being developed. The paper is now being manufactured and distributed through a large Canadian company and they are very excited about all the new techniques, the new look for the packaging, and all the usages being found for PaperIllusion.
The complete version of this biographical essay can be found at: http://paper-it-fun.com/2007/08/07/jane-gauss-designer-of-paper-illusions-wallpaper/
As of July 2007 Jane made herself available to personally answer any questions, receive
feedback and/or discuss your PaperIllusion™ projects at the Paper It Fun! Discussion
Forum. I strongly encourage you to take advantage of her expertise and experience to
further explore the wonderful world of PaperIllusion™. http://www.paperitfun.com/phpbb/
Copyright ©2007 All Rights Reserved. The PI Guide by Carrie Wigal

6
SO WHAT EXACTLY IS IT? As Jane mentioned, PaperIllusion™ is a faux finish wallpaper that is made to be torn
into pieces and applied to a surface in an overlapping manner, creating an additional
faux finish effect. It is pre-pasted, so you don’t need to add paste. Instead, you just tear
it, dip it into water and apply it to your properly prepared surface. That’s it.
Here is an example of what PaperIllusion™ looks like on the roll:
Here is an example of what it looks like applied to a surface:
See the difference? Copyright ©2007 All Rights Reserved. The PI Guide by Carrie Wigal
The paper is printed with a painted faux finish effect…meaning there’s a painted design on the paper of random splashes, swirls and such in different colors. That in itself is a faux finish effect. There are presently seven different patterns available: Hearthstone, Florentine, Roman, Travertine, Crepe, Script and Olympus Stone. Each of these patterns comes in multiple colors (including reds, golds, purple/pink, yellow/orange, blues, greens, browns, creams/neutrals, silver/grays, and bronze).
When you tear PaperIllusion™ into pieces and apply them to your surface, overlapping each piece, it creates an additional faux finish effect. The torn edges are visible. Depending on the color of the paper’s backing, this will determine the color of the torn edges. For example, Script Cobalt Blue has a gray backing, whereas Florentine Marble Earth has a white backing. Depending on the size of the pieces, this will determine how many torn edges are visible.
7
The Perfect Cover Up Remedy for Damaged or Problem Surface Areas
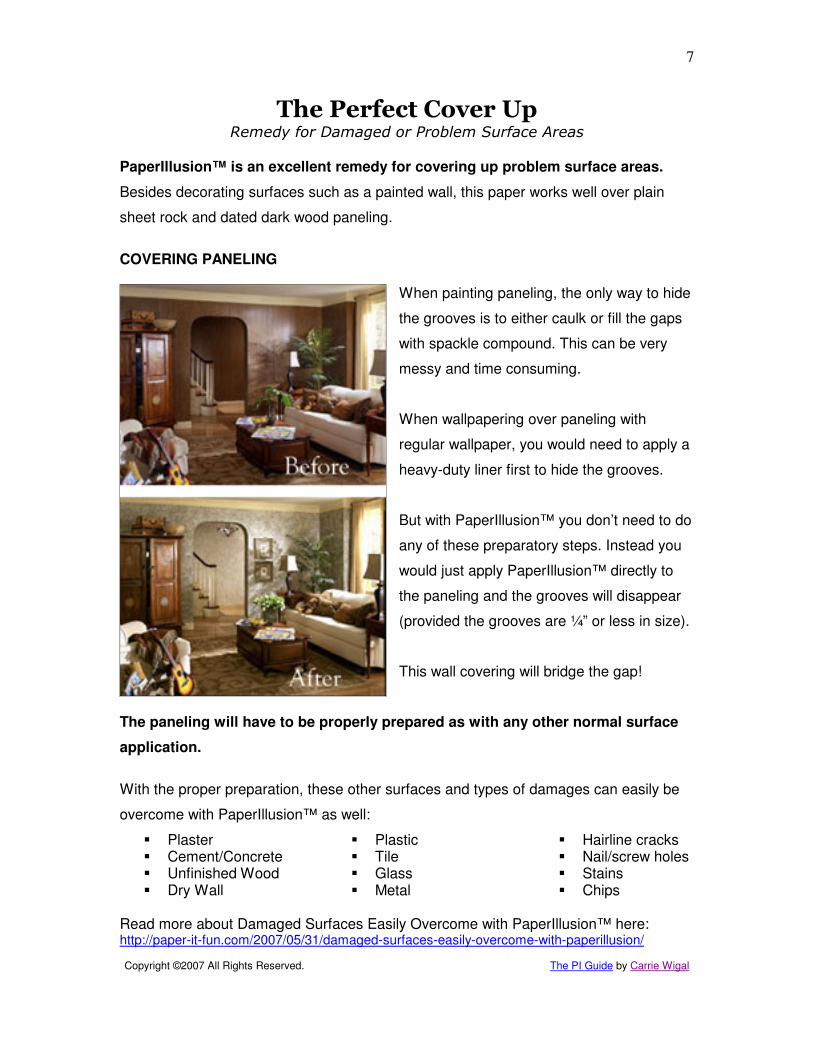
PaperIllusion™ is an excellent remedy for covering up problem surface areas.
Besides decorating surfaces such as a painted wall, this paper works well over plain
sheet rock and dated dark wood paneling.
COVERING PANELING
When painting paneling, the only way to hide
the grooves is to either caulk or fill the gaps
with spackle compound. This can be very
messy and time consuming.
When wallpapering over paneling with
regular wallpaper, you would need to apply a
heavy-duty liner first to hide the grooves.
But with PaperIllusion™ you don’t need to do
any of these preparatory steps. Instead you
would just apply PaperIllusion™ directly to
the paneling and the grooves will disappear
(provided the grooves are ¼” or less in size).
This wall covering will bridge the gap!
The paneling will have to be properly prepared as with any other normal surface
application.
With the proper preparation, these other surfaces and types of damages can easily be
overcome with PaperIllusion™ as well:
� Plaster � Cement/Concrete � Unfinished Wood � Dry Wall
� Plastic � Tile � Glass � Metal
� Hairline cracks � Nail/screw holes � Stains � Chips
Read more about Damaged Surfaces Easily Overcome with PaperIllusion™ here: http://paper-it-fun.com/2007/05/31/damaged-surfaces-easily-overcome-with-paperillusion/
Copyright ©2007 All Rights Reserved. The PI Guide by Carrie Wigal

8
How to Prepare Your Surface Wash and Prime
START WITH A CLEAN SLATE
It is important that you begin your project by making sure you are working with a clean
surface. This may seem like an unimportant step, but I promise you, it is VERY
important.
Remove any existing wallpaper first. If you’re looking for a product to help
you with this, you can use DIF Wallpaper Remover. It comes in a liquid
and a gel and is made by Zinsser.
If you prefer not to work with harsh chemicals or steamers,
there’s also a Wallpaper & Paste Removal System known
as WallWik available. “It uses special highly absorbent fabric
sheets that are soaked in a powerful, yet non-toxic paste
dissolving solution. The sheets adhere to the wall, allowing
the solution to penetrate through the wallpaper and dissolve
the paste. After a short time the sheets are removed and the
wallpaper practically drops off the wall.” It comes with a 100% Satisfaction Guarantee.
Visit http://www.wallwik.com/ for more details.
If you prefer a more eco-friendly method, you can try the following home remedy to
remove your existing wallpaper. Mix equal parts of vinegar and hot water. Then,
spray or brush the solution onto the existing wallpaper to wet the paper thoroughly.
Repeat. The paper should peel off in sheets.
Whichever method you choose, it is best to completely remove the existing wallpaper
first. However, if you absolutely cannot get the paper off…I mean if it’s really stuck to the
wall, you can apply PaperIllusion™ over it. Just be sure to prepare the surface as I
explain in the next few pages.
Copyright ©2007 All Rights Reserved. The PI Guide by Carrie Wigal
9
Why Washing Your Surface First Matters… When we bought my grandparents home several years ago, we knew we wanted to fix it
up a bit before moving everyone in. Unsure of exactly how we wanted to decorate, we
decided to first give everything a fresh coat of paint.
Well, my husband, being a contractor and having done many residential remodels
himself started out by washing down the ceilings and walls. Oh my goodness. I can’t
even begin to tell you how bad it smelled, let alone the endless flow of brown residue
dripping off the surfaces.
My grandfather was a heavy smoker and it was evident in every room in the house.
While my husband did a very thorough job in cleaning, there were spots that were
missed. Of course, those areas were not evident until the time came to paint.
He primed the walls after cleaning them and then proceeded to paint. After the paint
dried, you could literally see where the brown residue from the cigarettes did not come
clean.
All the work of priming and painting could not cover that up. Was it the fault of the paint
or the primer? No. It was the fact that the wall was not completely clean prior to priming
and painting.
My point is…PLEASE don’t skip this step. The “dirt” (grease, oil, tar, etc.) may not be
visible now to the naked eye, but if you attempt to prime and paper or paint without
thoroughly cleaning the surface, you’ll have less than ideal results, and you will be sorry.
Having said all that…
Copyright ©2007 All Rights Reserved. The PI Guide by Carrie Wigal

10
PREPARATORY STEP 1: Wash
For surfaces known to be exposed to grease or cigarette smoke, we
recommend washing with TSP (TriSodium Phosphate). This is a non-
sudsing powdered compound that is formulated for heavy duty cleaning. It
is preferred by painting and cleaning professionals for removing heavy
deposits of greasy grime, smoke, soot stains and chalked paint from walls,
woodwork and floors. It also removes mildew and mildew stains when mixed with
bleach.
It’s very inexpensive and very easy to find. You can get it anywhere. Be sure to follow
the manufacturers directions when mixing and using it.
TIP: There’s a phosphate-free version of this product for areas where phosphates are
prohibited.
For paneling, we also recommend washing with TSP. Depending on how
glossy the paneling is, you may need to use a Deglosser as well. It etches
high-gloss enamel and varnish to improve bonding and saves time by
eliminating sanding prior to priming.
For new or freshly painted surfaces, you can just wash them with a mild detergent to
remove any dust or surface dirt.
PREPARATORY STEP 2: Prime If you were to ask me the number one question I get about using PaperIllusion™, I will
have to say this is it…Do I need to prime the surface first? My answer is…YES! Always
and forever, yes. ALWAYS prime first.
Please prime your surface first, I implore you.
And not just any primer…it must be wallpaper primer. Paint primer is not recommended
for hanging wallpaper. Paint primer is for paint. Wallpaper primer is for wallpaper.
Copyright ©2007 All Rights Reserved. The PI Guide by Carrie Wigal
11
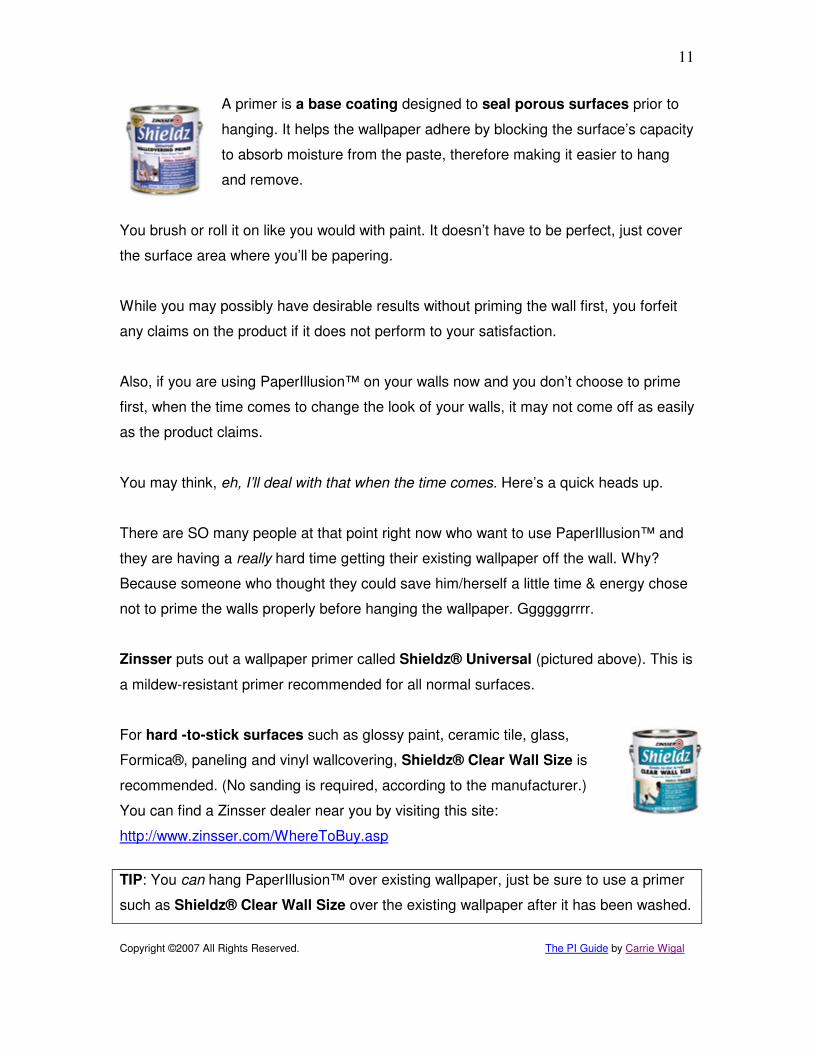
A primer is a base coating designed to seal porous surfaces prior to
hanging. It helps the wallpaper adhere by blocking the surface’s capacity
to absorb moisture from the paste, therefore making it easier to hang
and remove.
You brush or roll it on like you would with paint. It doesn’t have to be perfect, just cover
the surface area where you’ll be papering.
While you may possibly have desirable results without priming the wall first, you forfeit
any claims on the product if it does not perform to your satisfaction.
Also, if you are using PaperIllusion™ on your walls now and you don’t choose to prime
first, when the time comes to change the look of your walls, it may not come off as easily
as the product claims.
You may think, eh, I’ll deal with that when the time comes. Here’s a quick heads up.
There are SO many people at that point right now who want to use PaperIllusion™ and
they are having a really hard time getting their existing wallpaper off the wall. Why?
Because someone who thought they could save him/herself a little time & energy chose
not to prime the walls properly before hanging the wallpaper. Ggggggrrrr.
Zinsser puts out a wallpaper primer called Shieldz® Universal (pictured above). This is
a mildew-resistant primer recommended for all normal surfaces.
For hard -to-stick surfaces such as glossy paint, ceramic tile, glass,
Formica®, paneling and vinyl wallcovering, Shieldz® Clear Wall Size is
recommended. (No sanding is required, according to the manufacturer.)
You can find a Zinsser dealer near you by visiting this site:
http://www.zinsser.com/WhereToBuy.asp
TIP: You can hang PaperIllusion™ over existing wallpaper, just be sure to use a primer
such as Shieldz® Clear Wall Size over the existing wallpaper after it has been washed.
Copyright ©2007 All Rights Reserved. The PI Guide by Carrie Wigal

12
How to Install PaperIllusion™ Tear, Dip & Apply
Step 1: Tear
Tear Paperillusion™ into irregular shapes (about 8” x 12” in size at
first, then smaller as needed).
TIP: Tear the paper away from you to have less of the backing
showing. Tear it towards you to have more of the backing showing.
If you don’t like the “torn & overlapping” effect, then you have a few options.
1. You can alter the look of the torn effect by cutting pieces instead of tearing
them, creating a crisper edge.
2. If you still like the torn effect but prefer a neater edge than when it’s torn, you
can use deckle-edge scissors to cut the pieces.
3. You can tone down the appearance of the torn edge by coloring the edges
(after paper has been applied and dries completely) with watercolor pencils.
Choose a color that coordinates with the pattern to better blend the edges.
4. If you simply don’t like the overlapping effect, then you may want to consider
going with a regular faux finish wallpaper that is hung more traditionally in
strips (measure, cut, match & hang).
It is not recommended to hang PaperIllusion™ on the wall like you would with regular
wallpaper. If you do so, you will not get the appearance you are expecting. This paper is
not a “random” match, which technically means there is no pattern to match horizontally.
An example of a “random match” is vertical stripes. When you are hanging a vertically
striped pattern, there is nothing to match when hanging the next strip.
With PaperIllusion™ there are variations throughout the paper creating a design, but it is
not consistent so there is no “pattern repeat”. If you were to hang one strip next to
another, it would give the appearance of panels on the wall because you will not be able
to match the pattern horizontally.
Copyright ©2007 All Rights Reserved. The PI Guide by Carrie Wigal

13
Of course, if you are covering an area that is not as wide as 20.5″ (the width of the roll),
then you can just cut the paper to cover your whole surface area, and you will only
experience the first faux finish effect as it appears printed on the roll of paper.
To get a better idea of what the effects look like, I suggest getting individual samples.
Then you can see the pattern as it’s printed on the paper and tear the sample into
smaller pieces & do a test application to see the torn edge effect.
TIP: When you tear the pieces, separate the pieces into two piles/groups: 1-straight
edges & 2-torn edges. This will make the application process in step 3 go much faster.
Step 2: Dip
Dip pieces into water just long enough to get it wet. Make sure the
whole piece gets wet. Allow any excess water to drip off.
TIP: Dip only one piece at a time. This will make it easy to start and
stop as needed.
PaperIllusion™ is pre-pasted, which means it comes with paste already on the back of
the paper. To activate the glue, you just need to get it wet.
Unlike regular pre-pasted wallpaper that needs to be “booked” to activate the glue,
PaperIllusion™ just needs to get wet and it’s ready to be applied…no need to soak or let
sit.
Some patterns seem to be more gooey than others when they get wet, but nonetheless
there should be a sufficient amount of glue on the paper to stick properly.
Copyright ©2007 All Rights Reserved. The PI Guide by Carrie Wigal

14
Step 3: Apply
Apply pieces in an overlapping manner.
This paper is made of a unique substrate, allowing the pieces to
adhere to one another. You cannot tear regular wallpaper and apply
it in an overlapping manner expecting the pieces to stick to each
other, they won’t.
TIP: Apply the straight edge pieces along all the straight edges of your surface (i.e.
ceiling, baseboards, window & door frames). Fill in the middle with the remaining torn
edge pieces.
As you apply each piece, use a smoothing tool to smooth out any excess water or paste
underneath. Start from the center of the piece working out to the edges of each piece.
TIP: Since you’ll be working with water around electrical outlets, it’s always a good idea
to flip the breakers off. Better to be safe than sorry.
Then, use a slightly moistened sponge or terry cloth over each piece to wipe up any
excess glue or water.
HINT: By applying one piece at a time, it makes it super-easy to start and stop as
needed.
When you apply the next piece, slightly overlap the previous piece’s edge by about ¼-
1/2”. Don’t worry if you see a few bubbles, they will work themselves out as the paper
dries tight to the wall.
TIP: For the best results, do not apply a straight edge piece in the middle of your surface
area.
Fill in the smaller gaps with smaller pieces.
Copyright ©2007 All Rights Reserved. The PI Guide by Carrie Wigal

15
When applying a piece to an inside corner, using a smoothing tool, gently press against
the paper into the corner to mold the paper to the corner. When applying a piece to an
outside corner, just wrap a torn edge piece over the edge. This will make it very easy to
finish, reducing the need to trim.
However, when the need arises to trim the paper (i.e. around switch boxes or drapery
hardware), apply the paper then trim it using a blade knife while it is still wet.
TIP: Be sure to save the trimmed pieces because they can be used again.
Copyright ©2007 All Rights Reserved. The PI Guide by Carrie Wigal

16
How to Maintain/Repair PaperIllusion™ Washable
Wallpaper is usually identified with special terms indicating how to care for the product,
such as “washable”, “scrubbable”, “peelable”, and so on.
In the case of PaperIllusion™, it is considered “washable”, which means it can be
washed infrequently with warm water, soap, and a soft sponge. It is okay to get it wet,
but it is not meant to be soaked. Most marks can be wiped clean this way.
Do not use abrasive cleansers or scrubbers, products containing bleach, or solvents of
any kind.
TIP: For best results, wash from the top of the wall and work your way down to avoid
letting dirty water run down the face of the clean portion of the wallpaper.
Rinse thoroughly with clean warm water. Dry with a soft lint-free cloth.
If you experience a stain that will not come clean or the surface area gets damaged
somehow, PaperIllusion™ is so easy to repair…just tear another piece, dip it into water
and apply over the damaged surface.
HINT: Always have extra paper on hand for when damages occur. You never know
when the pattern you’ve chosen will be discontinued.
Copyright ©2007 All Rights Reserved. The PI Guide by Carrie Wigal
17
How to Remove PaperIllusion™ Saturate & Peel
As I mentioned before PaperIllusion™ is not meant to be soaked with water…the reason
being that the way to remove this wallpaper is to saturate the paper with water, and the
pieces will peel right off.
You can either use a spray bottle, a roller/brush or a sponge. Just apply water until the
paper is completely saturated. Then, peel the pieces off.
Provided you prepped the surface properly (used a wallpaper primer prior to application)
and you did not apply a sealer over the PaperIllusion™, the removal process will be a
breeze.
No need to score the paper or use a steamer…just saturate with water and peel away. It
doesn’t get much easier than that.
Copyright ©2007 All Rights Reserved. The PI Guide by Carrie Wigal

18
Tools for the Job What you need and where to get it
Here’s a breakdown of the tools you’ll need to apply PaperIllusion™ from start to finish
and a quick guide as to where you can find them.
Preparatory Step 1 (Wash):
� Wallpaper Removal Product/System, if removing existing wallpaper
� Cleaning Detergent (TSP)
� Bucket of Water
� Gloves (Depending on how strong you mix the TSP)
� Rag/Sponge/Scouring Pad/Brush (as needed depending on how hard it is to
clean your surface)
Preparatory Step 2 (Prime):
� Wallpaper Primer
� Paint Roller/Sponge Pad/Brush (to apply wallpaper primer)
Installation (Tear, Dip & Apply):
� PaperIllusion™ Wallpaper*
� Rag/Sponge/Terry Cloth
� Smoothing Tool
� Trim Knife/Blade Knife/Box Cutter (to trim as needed)
� Bucket/Pail/Pan of Water
Ideas of Where to Find the Above Items:
� PaperIllusion™ available at:
o Wallpaper Illusions (every color) – http://www.wallpaperillusions.com
� Sundry Items available at:
o Wal-Mart/Hardware Store
o Wallpaper/Paint Store
o Home Improvement Store (Home Depot/Lowes)
Copyright ©2007 All Rights Reserved. The PI Guide by Carrie Wigal

19
Measuring Up How to calculate how much you need
This product comes in rolls and each roll is packaged in a box. Each roll contains
85 square feet (about the size of a triple roll of regular wallpaper). When ordering, you
would order the number of “boxes” by determining the number of rolls needed.
The thing to keep in mind when calculating how much you need of PaperIllusion™ is
unlike regular wallpaper this paper is installed in an overlapping manner, so you’ll have
some waste. For example, to do a surface area of 75 square feet, you’ll need about 85
square feet to have enough (provided you don’t get carried away when you overlap your
pieces). If you have 85 square feet of space to cover, one roll will not do it no matter how
hard you try, you’ll need more.
“Mini-rolls” are available at Wallpaper Illusions. These are partial rolls that have
been cut by us and are provided as a convenience product. They are perfect for small
projects or when you only need a little bit more to complete a larger project and don’t
want to buy a whole box. These mini-rolls are approximately 13 square feet (8 feet long
x 20.5 inches wide).
To measure for PaperIllusion™, you’ll need to determine the surface area you are going
to cover. Measure the width in feet and multiply it by the height in feet. This will give you
total square footage needed to cover. Divide that number by 75 (not 85) and that will
indicate how many boxes to order.
If your calculation is barely over a whole number (like 2.1) then consider whether or not
you have openings (like windows or doors) in the surface area you measured. A
standard size door is about 21 square feet and a standard size window is about 15
square feet. These are rough measurements but a good gauge for calculating the
number of rolls needed. Take the total square footage (before dividing by 75) and
subtract for windows and doors. Take that net square footage and divide by 75 and
round up to the whole number to determine the number of boxes needed.
Copyright ©2007 All Rights Reserved. The PI Guide by Carrie Wigal

20
If the above explanation doesn’t help you in the least then use the Quick Reference
Chart below to determine how many boxes you need.
Measure the distance around your room and the ceiling height in feet. Refer to the
chart below to determine how many boxes you need.
QUICK REFERENCE: PaperIllusion™ Box Estimating Chart for Walls
Ceiling Height in Feet Distance around room in
feet 7-7.5 7.5-8 8-8.5 8.5-9 9-9.5 9.5-10 10-10.5
0-18 2 2 2 3 3 3 3
19-22 3 3 3 3 3 3 4
23-26 3 3 3 4 4 4 4
27-30 3 4 4 4 4 4 5
31-34 4 4 4 5 5 5 5
35-38 4 5 5 5 5 6 6
39-42 5 5 5 5 6 6 6
43-46 5 5 6 6 6 7 7
47-50 5 6 6 6 7 7 7
51-54 6 6 7 7 7 8 8
55-58 6 7 7 7 8 8 9
59-62 7 7 7 8 8 9 9
63-66 7 7 8 8 9 9 10
67-70 7 8 8 9 9 10 10
71-74 8 8 9 9 10 10 11
What if I run out and need more?
Unlike regular wallpaper, PaperIllusion™ does not have run or dye lot numbers ascribed
to it. While it is manufactured in large batches, it is not identified by each batch. I’m
guessing the idea is you don’t need to worry about trying to match one roll to the next.
Since there are so many color/shade variations within each pattern, it wouldn’t be that
noticeable if you had rolls from two different batches.
What if I order too much?
Great! That means you have some leftover to keep on hand in case you need to make
future repairs. Remember, future repairs are a cinch with PaperIllusion™. Just tear off
another piece, get it wet and apply it over the damaged area. You don’t need to prime it
again…this paper is made to adhere to itself. You can also use the extra paper to do
other projects, because as I mentioned before…
Copyright ©2007 All Rights Reserved. The PI Guide by Carrie Wigal
21
It’s Not Just For Walls! Discover All That Can Be Done With PaperIllusion™
When we began marketing this product online I started receiving questions about
PaperIllusion™ on counter tops. Hmm. Interesting concept, but did it really work?
Yes, it certainly does. There are many folks who have used this paper to give their
counter tops a faux finish face-lift at a fraction of the cost of real stone…floors too! You
can see examples of these projects at Paper It Fun! along with instructions on how they
were done.
You can cover other items as well such as:
> Picture Frames &/or
Mattes
>Paper Mache Boxes
>Waste Baskets
>Lamp Shades
>Switch Plates
>Paper Weights
>Pen/Pencil Holders
>Desk Pads
>Book Covers
>Storage Containers
>Wall Clocks
>Tissue Box Covers
>Hat Boxes
>Photo Album Covers
>Photo Boxes (line the
inside with archival/
acid-free quality paper
to protect photos)
>Serving Trays
>Folding Screens
>Vases
>Soap/Lotion
>Dispensers
>Napkin Holders
>Flower Pots
>Tin Canisters
>Urns
Here’s a quick reference of some project sheets to get you inspired:
Turning Trash into Treasures http://www.wallpaperillusions.com/projects/Pitreasures.pdf Faux Tile Flooring using Paper Illusions Wallpaper http://www.christopherlowell.com/demo.php?id=36 Resurface Butcher Block Countertops http://www.wallpaperillusions.com/projects/Picountertops.pdf Glass Top Trunk Coffee Table http://www.unctv.org/foryourhome/projectssheets/PItrunk.htm
Copyright ©2007 All Rights Reserved. The PI Guide by Carrie Wigal
22
Photo Gallery Get Inspired
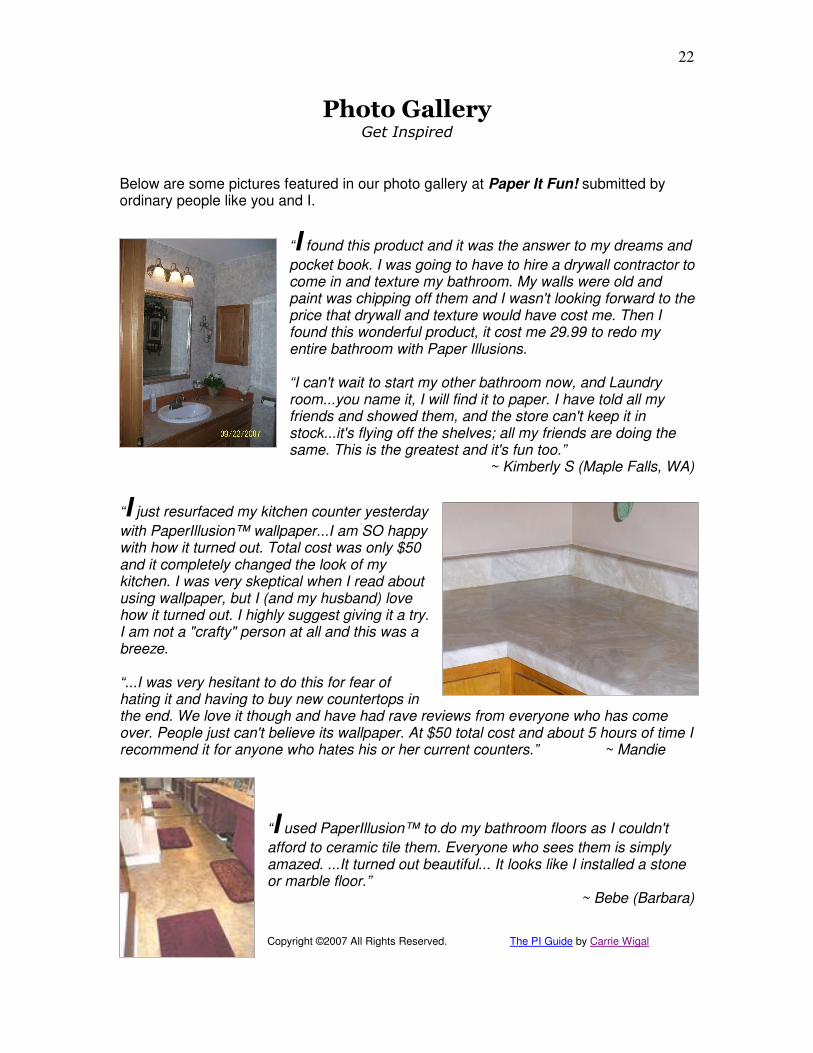
Below are some pictures featured in our photo gallery at Paper It Fun! submitted by ordinary people like you and I.
“I found this product and it was the answer to my dreams and
pocket book. I was going to have to hire a drywall contractor to come in and texture my bathroom. My walls were old and paint was chipping off them and I wasn't looking forward to the price that drywall and texture would have cost me. Then I found this wonderful product, it cost me 29.99 to redo my entire bathroom with Paper Illusions. “I can't wait to start my other bathroom now, and Laundry room...you name it, I will find it to paper. I have told all my friends and showed them, and the store can't keep it in stock...it's flying off the shelves; all my friends are doing the same. This is the greatest and it's fun too.”
~ Kimberly S (Maple Falls, WA)
“I just resurfaced my kitchen counter yesterday
with PaperIllusion™ wallpaper...I am SO happy with how it turned out. Total cost was only $50 and it completely changed the look of my kitchen. I was very skeptical when I read about using wallpaper, but I (and my husband) love how it turned out. I highly suggest giving it a try. I am not a "crafty" person at all and this was a breeze.
“...I was very hesitant to do this for fear of hating it and having to buy new countertops in the end. We love it though and have had rave reviews from everyone who has come over. People just can't believe its wallpaper. At $50 total cost and about 5 hours of time I recommend it for anyone who hates his or her current counters.” ~ Mandie
“I used PaperIllusion™ to do my bathroom floors as I couldn't
afford to ceramic tile them. Everyone who sees them is simply amazed. ...It turned out beautiful... It looks like I installed a stone or marble floor.”
~ Bebe (Barbara) Copyright ©2007 All Rights Reserved. The PI Guide by Carrie Wigal
23
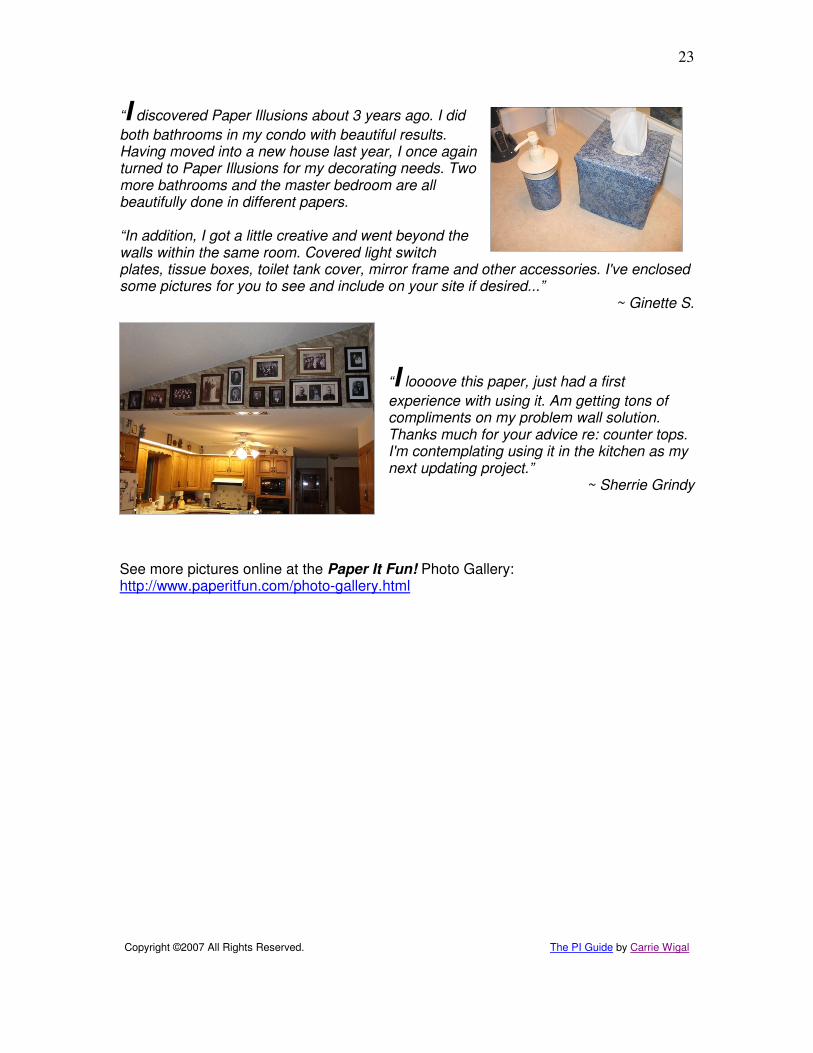
“I discovered Paper Illusions about 3 years ago. I did
both bathrooms in my condo with beautiful results. Having moved into a new house last year, I once again turned to Paper Illusions for my decorating needs. Two more bathrooms and the master bedroom are all beautifully done in different papers. “In addition, I got a little creative and went beyond the walls within the same room. Covered light switch plates, tissue boxes, toilet tank cover, mirror frame and other accessories. I've enclosed some pictures for you to see and include on your site if desired...”
~ Ginette S.
“I loooove this paper, just had a first
experience with using it. Am getting tons of compliments on my problem wall solution. Thanks much for your advice re: counter tops. I'm contemplating using it in the kitchen as my next updating project.”
~ Sherrie Grindy
See more pictures online at the Paper It Fun! Photo Gallery: http://www.paperitfun.com/photo-gallery.html
Copyright ©2007 All Rights Reserved. The PI Guide by Carrie Wigal
24
Testimonials Don’t Just Take My Word For It
Below are some testimonials from customers who have used PaperIllusion™...
“I really like this product. The walls in our home were damaged from years of abuse,
and even though I repaired them, painting was really not a good option. I found this product and have done two bathrooms, an entry hall, and a formal dining room. Each in a different pattern, each in a different color, and each with a very different look. This product is very forgiving and covers little imperfections with ease. It is very simple to apply and the scraps can be used for room accessories, I covered the mattes on pictures and reframed prints. I even covered the cold air return grates so they would not be so obvious. I really highly recommend this product to anyone who wants a very stylish look that is easy to get.”
~ Gerrie Nowak
“I'm having so much fun!!!!!! My original idea was to line my kitchen cabinets. It has
snow balled to the sides of my cabinets. I don't like to paint. This is the answer!!!!!!! With my order today- I'm moving on to the laundry room. We're remodeling-GUESS WHAT-I'm doing every room in the house with the PAPER ILLUSION™. The BESTEST part is I can do all this myself. No more listening to the other half when you "ask" for help. DON'T NEED ANY HELP. CAN DO MYSELF. Sincerely, Ruth”
~Ruth V (Easton, PA)
“This paper is wonderful, I re-did my kitchen in the Roman Champagne, it is beautiful, I
am now going to do my bedroom in this color also. Stunning and easy to do, what else could you ask for? Thank you for such a good product.”
~ Joan N (Madison Heights, VA)
“I just had to write and let you know my experience with PI. I just finished doing my living
and hall in a 1970 ranch home. At first I didn't visualize what the end results would be so I started in the back of the hallway. I had done part of the small wall going into the bathroom when my son came in and told me how good it looked. The house was used as a rental property for a while and the paneling was hideous. The PI covered all the paneling lines and the 60 to 70 holes around the picture window where people had hung different curtains. “I have finished and put up my candleholders and pictures and everyone that has seen it cannot believe that you take the paper and tear it, dip it, and hang it up. They cannot believe the coverage over the paneling and the fresh look of the room. “I want to thank you for a fine product and I will look for more of your products in the future. I bought my paper at Lowes and when I had to return to get another roll the assistant there said she had just done her bedroom and it was fabulous. Copyright ©2007 All Rights Reserved. The PI Guide by Carrie Wigal

25
“I know of 4 people that have now gone out and purchased PI and are in the process of redoing their rooms. “Thanks again for a great product.”
~Dianna
“I enjoy using this product. To date I have done the paneling in the kitchen and guests
feel it to see if it is real stone. I now am doing my daughter's bathroom for her.... simply love the effects and ease of using Paper Illusions... thanks for the wonderful product...”
~ Nancy N (Harveys Lake, PA)
“I have an old house built circa late 1930's. The walls are plaster with some heavy
texture and the previous owner had removed and changed walls/doorways, which left lots of bulges. “Well PI has made such a dramatic difference that people don't realize it is wall paper, they think I sponge painted the walls. I used champagne on 3 walls and bronze on the fourth wall. PI covers up a multitude of sins and construction errors not to mention all the cracks that appeared if you just looked at the wall. “As I was doing my living room I had a contractor come in to replace a ceiling, he just didn't quite understand the concept of PI and he was asking so many questions about it. 2 years later I had him back to do more ceilings and when he saw the finished living room he could not get over it. He brought some of his employees back to show them. PI really makes plaster walls look great. And you can't make mistakes, but I have learned a few tricks to it. “I am now doing a room that has had paneling for at least 30+ years. I have waited 20 years to do something with it. I cannot believe the difference when I finished just one wall. I have 3 more walls to go, one wall will be a contrasting color as was the living room.
“I just brought another house for retiring to in 3 years and all the walls have dark
paneling so the problem is just picking out colors to go on them. I should by stock in the company who makes it. I see a lot of rolls in my future.”
~ Paula
“I have been using the various paperillusions wallpaper colors for the last 6 or 7 years. I
love them because they look funky and are extremely easy to use, more so than regular wall paper. I also like that you can easily stick a piece over another piece at a later time if there is a mark or damage to the original, rather than having to re-wallpaper the whole wall or room. I have used it in my last few houses and love it, though it is very difficult to find.”
~ Michelle Bowden Copyright ©2007 All Rights Reserved. The PI Guide by Carrie Wigal
26
Purchase a Sample Book Seeing is Believing
Unlike regular wallpaper, PaperIllusion™ cannot be found in a traditional wallpaper
book. At one time when there were only a few colors available, you could find them in a
wallpaper book by Village. However, that book has been discontinued for quite some
time now. Since then the color offerings have grown from just a handful to over 30
different colors.
While you may find a local dealer near you who offers this product for sale, more than
likely you will not find every color available for purchase. Having a sample book in your
hands allows you the opportunity to see and feel every color. You’ll know all the colors
that are available to choose from and you’ll have a good idea of what you’re getting
before you get it.
It is strongly recommended that you do not make a color decision solely based on how
the paper appears on a computer screen. Here’s why:
1. The actual picture being displayed on the computer can vary due to the lighting and quality of equipment used to capture the image.
2. Different monitors have varied image resolution…so a particular color can appear different in hue depending on which computer monitor is used to view the picture.
3. The lighting in your home is going to affect the appearance of the color. For example fluorescent lighting would make the color on the paper appear totally different than natural light coming in from the outdoors. It is always a good idea to make a final color decision with a swatch/sample in hand.
When you purchase a sample book, you receive actual samples of the product, not
just pictures of the product. Each sample book also includes color pictures of various
room shots using many of the different colors. Inspiring examples of PaperIllusion™ not
only on walls but also on furniture and countertops are included as well. You’ll also
receive printed instructions, a product/price list and valuable coupons (over $70
value) to offset your first PaperIllusion™ purchase.
Sample Books => http://www.WallpaperIllusions.com/sample-book.html
Copyright ©2007 All Rights Reserved. The PI Guide by Carrie Wigal

27
Where To Buy PaperIllusion™ Wallpaper Illusions is The Paper Illusions Place
As I mentioned in the chapter on “Tools for the Job”, PaperIllusion™ is available online
at Wallpaper Illusions. It is not the manufacturer of this paper but rather an authorized
dealer. PaperIllusion™ is licensed to and distributed by Blue Mountain Wallcoverings
based out of Canada.
I recommend Wallpaper Illusions because that is the website my husband and I own
and operate. We are one of the very few companies that focus specifically on this brand
of wallpaper.
We are so sold on this product that we put together this free Paper Illusions Guide you
are reading now and a free resource network, known as Paper It Fun! This is where we
discuss all that can be done with PaperIllusion™.
There you’ll find:
� A Photo Gallery showcasing various projects using PaperIllusion™,
� A Discussion Forum where PaperIllusion™ enthusiasts gather to discuss their
questions & projects, and
� A Blog that shares creative crafts & project ideas, tips & testimonials, informative
articles, special announcements, etc…all centered around this unique product.
This resource network is free. We do not get paid to run it. Instead we rely on sales of
PaperIllusion™ and other unique products such as the Mini-Rolls & Sample Books
mentioned in previous chapters to provide for our family.
If you have enjoyed the information provided in this guide as well as the free information
available at Paper It Fun!, we would greatly appreciate your shopping at Wallpaper
Illusions for all of your PaperIllusion™ needs.
Wallpaper Illusions => http://www.wallpaperillusions.com
Paper It Fun! => http://www.paperitfun.com
The Paper Illusions Guide => http://www.thepiguide.com
Copyright ©2007 All Rights Reserved. The PI Guide by Carrie Wigal

28
One Last Note Help Me to Help Others Just Like Us
...So tell me, what do you think of The Paper Illusions Guide? Not necessarily the
PaperIllusion™ product, because obviously you probably haven’t tried it yet. But this
guide you’re reading right now.
I hope you’ll agree that it was worth the read – and that you got great value out of it. If
so, you can help me and I would really appreciate it.
One of the big reasons I take the time to put together resource information like this is to
help educate the average consumer (like you and I) about products & services I happen
to love and feel don’t get enough exposure.
The simple fact is, every time I write a guide like this, readers just like you introduce me
to hundreds of new friends by telling others about it.
So, if you like what you’ve read I have two requests…
1. Help me spread the word about Paperillusion™ by referring your friends to The
PI Guide website. Just send them to http://www.thepiguide.com and let the
guide explain to them all about this product (because I can tell you for sure,
they’re going to ask you how you transformed your home with this product…of
course, after they pick their jaw up off the ground).
2. Go to my Paper It Fun! blog and post your comments – tell me and the rest of
the world what you think of The PI Guide plus share with me what else you’d like
me to share with you over the next two weeks to help you decorate your home
with PaperIllusion™. You can do that by going to:
http://paper-it-fun.com/2007/12/06/the-paper-illusions-guide-now-available/.
Would you do that for me right now? Thanks!
Copyright ©2007 All Rights Reserved. The PI Guide by Carrie Wigal

29
About the Author
Carrie Wigal
www.CarrieWigal.com
I am a wife, mother, and editor of Paper It Fun!, a free resource network focused on
discovering all that can be done with PaperIllusion®. My husband and I live on a farm in
Central Virginia, where we both raise our four children and work from home.
RESOURCES
Wallpaper Illusions: http://www.wallpaperillusions.com
Paper It Fun!: http://www.paperitfun.com
The PI Guide: http://www.thepiguide.com
Carrie Wigal: http://www.carriewigal.com
CONTACT INFORMATION
WiggleWigal LC, PO Box 601, Palmyra, Virginia 22963 United States
Email: [email protected]
Help Desk: http://wigglewigal.com/help/?page_id=9
DISCLAIMER: The Manufacturer and Licensed Distributor of the PaperIllusion™ Product and Brand Name are the Owners of the Registered Trademarks, Trade Dress and Copyrights in said Product and Trademarks. WallpaperIllusions.com, PaperItFun.com, and ThePIGuide.com, being entirely separate companies, are not related to or affiliated with the Manufacturer or any of the Licensed Distributors of this PaperIllusion™ Product and Brand Name. ** Please refer to the complete Disclaimer found on Page One of this Document. ** Copyright ©2007 All Rights Reserved. The PI Guide by Carrie Wigal