
The MiniOneTM Reagent Kit
28
Crime Scene Invesitigation The MiniOne TM Reagent Kit: Cat#: M3005
Transcript of The MiniOneTM Reagent Kit

Crime Scene InvesitigationThe MiniOneTM Reagent Kit:
Cat#: M3005

Crime Scene Investigation2
Reagent Kit ComponentsOther Required MaterialsLaboratory Safety
Experiment Procedures Teacher’s Guide Student Worksheet
Additional ResourcesOrdering Consumables
Page333
4 - 1516 - 27
2829
Table of Contents

3Crime Scene Investigation
Reagent Kit ComponentsReady-to-Load Samples (please see scenario)
• DNA V (Victim)• DNA S1 (Suspect 1)• DNA S2 (Suspect 2)• DNA S3 (Suspect 3)• DNA H (Hair 2)
Supplies• 10x 1% Agarose GreenGel in-a-Cup• Concentrated 20x Sodium Borate (20x SB) running buffer• Microcentrifuge tubes• Micropipette tips
Required MaterialsMiniOneTM Electrophoresis System
• Running tank• Carriage base• Photo hood• 42V Power Supply• Conicalflask
MiniOneTM Casting System• Casting stand• Gel trays• Gel combs
Other Materials• Micropipette• Microwave Oven• Digital Camera or Cell Phone Camera
1. Exercise caution when heating and/or melting reagents.2. Exercise caution when working with electrical equipment.3. Gloves and eye protection should be used whenever possible, as a part of good
laboratory practice.4. Always wash hands thoroughly after handling biological materials or reagents.
Laboratory Safety

Teacher’s Guide4 Crime Scene Investigation
Teacher’s GuideNote: This guide is provided to give sample answers to questions and to explain certain steps in the protocol. There may be other correct answers that are not included. Since there are variations in data, students should carefully analyze their data and justify their conclusions based on them.
To develop an understanding of electrophoresis principles. To understand and use forensic science principles to analyze data and to determine a probable conclusion.
Experiment Objective
Dr. Phillip Ward, a prominent physician, was found dead in his apartment. The cause of death was apparently from potassium cyanide ingestion. Dr. Ward lives alone and does not own any pets. The police suspect that this may be a suicide case, but they are not sure at this time. Your team of forensic specialists had been assigned to this case and upon examining the crime scene, you found several pieces of evidence. Traces of potassium cyanide were found in Dr. Ward’s coffee cup. When examiningthecup,youliftedsomefingerprints.Onfloorofthekitchen,youfoundapiece of hair that did not match the color of the victim’s hair. Lastly, among the trash in the apartment, you found a bag with white powder, which contains traces of potassium cyanide. You also found an eyelash stuck on the bag. There was just enough of the hair root on the second hair sample that you were able to extract another DNA sample. You also took light microscope images of both hair samples.
The police want information based on the physical evidence as soon as possible. Does the evidence support a suicide theory, or could this be a murder case?
Is there evidence that someone other than Dr. Ward was in his apartment?
Scenario
Day 1- Introduce scenario and crime scene. Hair analysis (30-45mins depending on background)
Day 2- Fingerprint analysis (30-45mins depending on background). Day 3- Pour gels (30 mins).
DNA analysis (30 mins)
Lesson Plan Time Line
Note: Ifstudentshavesufficientbackgroundalready,hairandfingerprintanalysiscanbecombinedinoneday.Hairandfingerprintmakethestorymoreinterestingbuteitherarenotessentialtosolvingthecase.DNAanalysiscanbesufficient.The teacher can pour all the gels for students to reduce the time needed.

Teacher’s Guide 5Crime Scene Investigation
Crime Scene EvidenceDNA Samples:
• DNA V (Victim)• DNA S1 (Suspect 1)
Fingerprints:Victim Fingerprint 1
on coffee cupFingerprint 2 on coffee cup
Hair Samples:Victim Microscope Image
of Hair 1Microscope Image
of Hair 2
Other:• Coffee cup• Bag with white powder

Teacher’s Guide6 Crime Scene Investigation
Suspects The police have been identifying and investigating suspects in the possible murder of Dr. ward. They have narrowed the list of suspects to three people. The police also took samples of their DNA.
(S1) Dr. Caroline Powell: Dr. Powell is a colleague of Dr. Ward’s and they were co-owners of their joint practice for the past ten years. Employees remarked that Dr. Powell seemed to resent Dr. Ward for his success and felt eclipsed by him. Dr. Pow-ell had been heard arguing with Dr. Ward recently. Now that Dr. Ward is dead, their practice belongs solely to her. She does not have an alibi. Dr. Powell owns a cat.
(S2) Mrs. Julie Fischer: A neighbor of Dr. Ward’s in the same apartment building. Mrs. Fischer owns a Pomeranian. Other neighbors said that Dr. Ward had com-plained about Mrs. Fischer’s dog barking too loudly and had threatened to report her to their building management. Mrs. Fischer claims that she was eating out with her husband that night. Her husband’s version of the story is slightly different.
(S3) Miss Lauren White: The receptionist at Dr. Ward’s practice. She is also the girlfriend of Dr. Ward’s nephew, Oliver. Oliver was Dr. Ward’s only living relative andwasthebeneficiaryofhislifeinsurancepolicy.MissWhiteclaimsthatshewasatthemoviesthatnight,butnoonecanconfirmheralibi.MissWhitedoesnotownany pets, but Oliver owns a cat.
Suspect Dr. Powell Mrs. Fischer Miss WhiteDNA
Sample S1 S2 S3
Fingerprint
Hair Sample

Teacher’s Guide 7Crime Scene Investigation
Hair can be important pieces of evidence during an investigation. Since hair is easily transferred during physical contact, hair samples can associate a person to a crime scene. What would you do if you were given hair and asked to determine if itcamefromasuspect?Oneofthefirstquestionsascientistwillaskiswhetherthehair came from an animal or a human. If the hair is of animal origin, they will examine its morphology with a light microscope to determine the species. However, it is not possible to distinguish the hair between individual animals. If the hair is from a human, it may be possible to identify individuals. Although the morphology of human hair is shared across individuals in the population, there are certain physical characteristics (such as arrangement, distribution or appearance) that skilled scientists can use to distinguish between people.
Physical Structure of Hair:
Cuticle – outer coating, made of overlapping scalesCortex – main body of hair, is protein-rich and contains pigment granulesMedulla – central core, may be absent, fragmented or distinctly structured
As you examine these images from different species, think about how they differ and which characteristics you could use to determine identity. Fill in the chart below.
Species Microscope Image Description
HumanCuticle - Not prominent, smoothCortex - Pigment dense, clustered
Medulla - Amorphous, fragmented
DogCuticle - Not prominent, smoothCortex - Ovoid bodies present
Medulla - Continuous, wide
CatCuticle - Spiny, prominent
Cortex - Not prominentMedulla - Continuous, uniserial ladder
Rabbit
Cuticle - Not prominent, smooth
Cortex - Not prominentMedulla - Continuous, multiserial
ladder
Hair Analysis
Cuticle Cortex Medulla
Teacher’s Guide8 Crime Scene Investigation
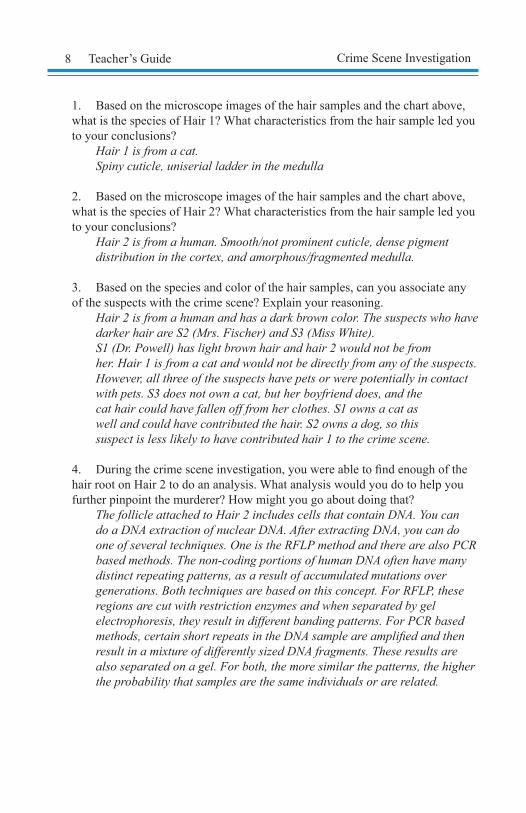
1. Based on the microscope images of the hair samples and the chart above, what is the species of Hair 1? What characteristics from the hair sample led you to your conclusions? Hair 1 is from a cat. Spiny cuticle, uniserial ladder in the medulla
2. Based on the microscope images of the hair samples and the chart above, what is the species of Hair 2? What characteristics from the hair sample led you to your conclusions? Hair 2 is from a human. Smooth/not prominent cuticle, dense pigment distribution in the cortex, and amorphous/fragmented medulla.
3. Based on the species and color of the hair samples, can you associate any of the suspects with the crime scene? Explain your reasoning. Hair 2 is from a human and has a dark brown color. The suspects who have darker hair are S2 (Mrs. Fischer) and S3 (Miss White). S1 (Dr. Powell) has light brown hair and hair 2 would not be from her. Hair 1 is from a cat and would not be directly from any of the suspects. However, all three of the suspects have pets or were potentially in contact with pets. S3 does not own a cat, but her boyfriend does, and the cat hair could have fallen off from her clothes. S1 owns a cat as well and could have contributed the hair. S2 owns a dog, so this suspect is less likely to have contributed hair 1 to the crime scene.
4. Duringthecrimesceneinvestigation,youwereabletofindenoughofthehair root on Hair 2 to do an analysis. What analysis would you do to help you further pinpoint the murderer? How might you go about doing that? The follicle attached to Hair 2 includes cells that contain DNA. You can do a DNA extraction of nuclear DNA. After extracting DNA, you can do one of several techniques. One is the RFLP method and there are also PCR based methods. The non-coding portions of human DNA often have many distinct repeating patterns, as a result of accumulated mutations over generations. Both techniques are based on this concept. For RFLP, these regions are cut with restriction enzymes and when separated by gel electrophoresis, they result in different banding patterns. For PCR based methods,certainshortrepeatsintheDNAsampleareamplifiedandthen result in a mixture of differently sized DNA fragments. These results are also separated on a gel. For both, the more similar the patterns, the higher the probability that samples are the same individuals or are related.

Teacher’s Guide 9Crime Scene Investigation
Fingerprints are still considered as one of the best types of physical evidence for various reasons. Fingerprints are more unique than DNA. Although identical twins sharegeneticinformation,theydonotsharethesamefingerprints.Whilefingerprintformation has some genetic basis, they are made when pressure on the skin layers of the fetus experience pressure, resulting ridges patterns. These patterns do not change when a person ages, although the prints can acquire scars or get worn down. Each ridge contains pores, which are connected to sweat glands. When you touch a surface,youleavefingerprintsbecauseofthissweat.Scientistscanpinpointminutedifferencesinfingerprintpatternstodistinguishbetweenthem.Youwilltakeonthisroletodaybydeterminingifanyofthesuspectscouldhaveleftfingerprintsatthecrime scene.
1. Identifythefingerprintpatternsforeachofthesuspectsandthevictim. S1 (Dr. Powell): Right pocket loop, S2 (Mrs. Fischer): Right loop, S3 (Miss White): Whorl, Victim: Whorl
2. Whatfingerprintpatternscanyoupickoutinthefingerprintsonthecoffeecup? On the bag? Fingerprint 1: appears to be a mix of 2 or more prints. Perhaps a whorl or a type of loop, Fingerprint 2: Whorl
3. Basedonthefingerprintanalysis,whichsuspectismoresuspicious,if any? Why? For Fingerprint 1, the mixed prints may result from the victim and/or the murderer touching the cup. Whorls are most prominent in this print, which may point to S3 as a possibility. Fingerprint2doesnotmatchthevictim’sfingerprint.Thesuspectwhoalso hasawhorlfingerprintisS3,againpointingtoherhavingcontactwiththe coffee cup and possibly the one responsible for adding potassium cyanide.
Types of Fingerprint Patterns:
Fingerprint Analysis

Teacher’s Guide10 Crime Scene Investigation
While each individual is unique, their very DNA holds clues to their history and heritage. These clues are held in the non-coding regions of DNA, where random mutations are more likely to come up. As these changes usually do not affect essential genes to survival, the variation is passed along from parent to offspring and over generations, the DNA region has a distinct pattern. The technique of DNA fingerprintingtakesadvantageofthisconcepttoaccessthesimilaritybetweencertain individuals. Restriction enzymes recognize particular DNA sequences and areusedinDNAfingerprintingtocreatedifferentlysizedpiecesofDNA.Whenseparated by gel electrophoresis, we can create a banding pattern for each individual’s DNA sample. The more similar banding patterns, the higher the probability that individuals are related. This technique is now used in many areas, from crime scenes to paternity cases for determining identity or relationships.
DNA Analysis
Prepare Running Buffer1. The kit provides 100 ml of concentrated 20x Sodium Borate (20x SB)
buffer. Dilute 1 volume of the concentrated 20x SB buffer with 19 volumes of DI water to get a 1x SB working concentration. Estimate that each experiment will need 125 ml of running buffer, plus extra in case of spills.
Example calculation: (for 10 runs plus extra)Final volume: 2000 ml20x SB needed: 2000 ml / 20 = 100 ml DI water needed: 2000 ml – 100 ml = 1900 ml
2. Following the calculation, dilute 100 ml of 20x SB with 1900 ml of DI water to get 2 L of 1x SB for running buffer.
3. Optional: Aliquot 125 ml of diluted SB running buffer for each group of studentsbeforeclassstarts,usingtheprovidedconicalflasks.
Prepare Sample Aliquots1. Thekitprovidesatotalof120μlforeachsample.2. Withtheprovidedmicrocentrifugetubes,aliquot12μlpersampleforeach
group. There are a total of 5 DNA samples.Other Materials (Each group will need)
• 1 MiniOne Casting System• 1 MiniOne Electrophoresis System• 1 Agarose GreenGel in-a-Cup• 5 sample aliquots• 125mlofdilutedSBrunningbuffer,intheconicalflask• 1 micropipette & 5 pipette tips
Before the Lab Note: This kit provides enough materials to run 10 experiments. The following suggested preparation steps assume that you are preparing to run all 10 experiments.
Teacher’s Guide 11Crime Scene Investigation
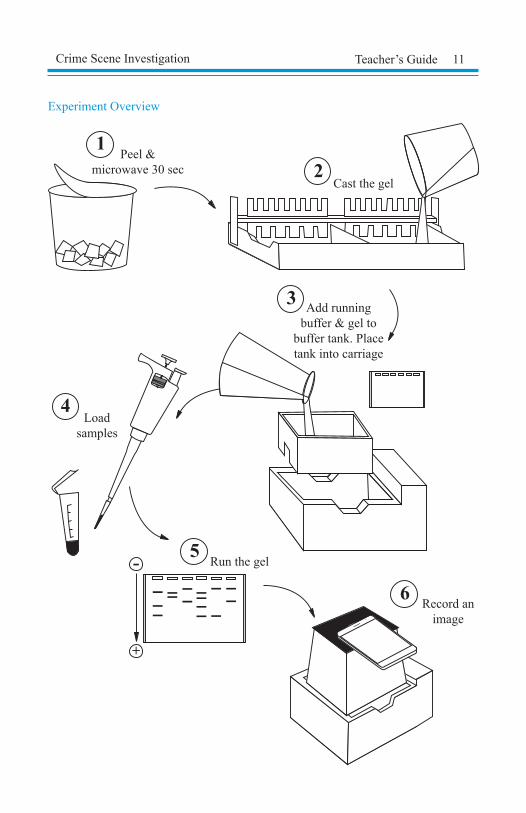
Experiment Overview
1Peel &
microwave 30 sec 2Cast the gel
4Load
samples
5Run the gel
6Record an
image
3 Add running buffer & gel to
buffer tank. Place tank into carriage
+
-

Teacher’s Guide12 Crime Scene Investigation
Questions1. What is DNA and what does it do? Deoxyribonucleic acid, makes you who you are, codes for proteins, etc.
2. What are chromosomes and how many copies do you have in each of your cells? Who did they come from? Chromosomes are DNA that is packaged with proteins, so that they willfitintothenucleusofacell. You have 2 copies of each of the 22 autosomal (non-sex determining) chromosomes and either 2 X’s, if you are female, or an X and Y, if you are male. One entire set of 23 chromosomes (22 autosomal+1 sex chromosome) came from your mother and an entire other set from your father, totaling 46 chromosomes in every cell of the body.
3. How much DNA do you share with each of your parents? How much DNA do you share with your siblings? Parents: 50%, a set of 23 chromosomes from each. Siblings: Between 0% and 100% (baring in mind that all humans are 99.9% the same on a DNA level, these numbers are DNA that you received directly from your parents and that your siblings received directly from your parents.)
4. What are some characteristics or properties of DNA? Double helix, double stranded, negatively charged, colorless, unique sequence in each individual
Prelab

Teacher’s Guide 13Crime Scene Investigation
Materials1 MiniOne Casting System1 MiniOne Electrophoresis System1 Agarose GreenGel in-a-Cup5 samplesDiluted SB running buffer1 micropipette & 5 pipette tipsPhoto hood
Part I: Electrophoresis Well Sample Name Loading Volume
1 Victim (V) 10μl2 Suspect 1 (S1) 10μl3 Suspect 2 (S2) 10μl4 Suspect 3 (S3) 10μl5 DNA from Hair 2
(H)10μl
Procedure1. Assemble MiniOne casting system. Place the casting stand on a level surface. Place gel trays in the two cavities of the casting stand and insert the comb into the slots at the top of the casting stand, such that the 6 well side is facing down.
2. Partially peel away the seal of a Agarose GreenGel in-a-Cup and microwave for 30 secs. Slowly pour the hot gel solution into a gel tray. Check to see that there are no air bubbles in the gel solution. Let the agarose gel harden and turn opaque, approximately 20-30 mins. (DO NOT touch or move your gel until time is up.)
3. Meanwhile, assemble the MiniOne electrophoresis system. With the included power supply, plug the carriage into the wall outlet. Leave the clear running tank separate from the carriage for now. Place the platform into the tank if it is not already installed. (DO NOT turn the power on yet.)
4. After the gel has hardened, carefully remove the comb. Then, remove the gel with the gel tray from the casting stand.
5. Place the gel with the gel tray inside the running tank. Make sure that the wells are towards the negative end. (DO NOT turn the power on yet.)
Note: If melting multiple cups together, still microwave for 30 secs. Then check that each cup is completely melted. If not, add time in 5 sec incre-ments until fully melted.
Air bubbles in the gel solution, especially near the wells, can make it hard for DNA to migrate evenly (if there are bubbles, you can remove them with a pi-pette tip or a toothpick). If the gel is disturbed before it fully hardens, the gel can break or solidify unevenly, making it harder for DNA to migrate evenly.
Note: If you are having trouble removing the comb, pour some SB buffer on top of the gel and then completely pull the comb out.

Teacher’s Guide14 Crime Scene Investigation
6. Measure out 125 ml of diluted SB running buffer and pour slowly into one sideofthetank.Thebufferwillflowunderthegel,towardstheotherside,andremove any air bubbles. Place the tank into the carriage, so that it sits level.
7. Turn the low intensity lights on by pressing the button on the carriage to help visualize the wells. Load your DNA samples into the wells, using 10 μl per well and changing to a new pipette tip each time. Remember to keep track of which samples you loaded in which wells.
8. Run that gel! While being careful not to bump your gel too much, make sure that the power cord is completely plugged in and place the photo hood on the carriage. Then press the power button. The green LED next to the power button should turn on.
9. The blue light allows you to see the DNA as it is running, and the orange photohoodhelpsfilterexcesslighttoimprovecontrast.Ifyouremovethephotohood during the run, power will shut off immediately. Remember to replace the hood and press the power button to resume run.
10. Allow the gel to run approximately 25-30 mins or until DNA separation is sufficient.Afteryourruniscomplete,turnoffthepowerbypressingbutton.Use the photo hood and either your cell phone or camera to take a picture of the DNA. (Be sure to wipe off condensation from the inside of the hood, if any).
Note: The power will not turn on if 1) the tank is not appropriately inside the carriage, 2) there is no buffer in the tank or 3) the photo hood is not on on the carriage.
Part II: ResultsWhat does your gel look like? Record an image of the gel.
Sample Results
Note: DNA is negatively charged, so to move the DNA into the gel with electricity, the DNA needs to be loaded on the negative side. It will then move towards the positive.What do you think the SB buffer is for? SB conducts electricity and completes the circuit so that DNA can be separated.
V S1 S2 S3 H

Teacher’s Guide 15Crime Scene Investigation
Part III: Analyze Your Data1. What electrical charge did your samples carry? How do you know? All the samples have components that are negatively charged. You know because they all move towards the positive end when the power is turned on. If there were anything positively charged, then they would migrate towards the negative end and can run out the top of the gel.
2. According to the results on the gel and other pieces of evidence from the crime scene, who was responsible for the death of Dr. Ward? How did you come to this conclusion? The eyelash stuck on the bag with potassium cyanide is a crucial piece of information because only a person who had handled the poison could have left it. If the DNA of the eyelash had been Dr. Ward’s, then this points towards suicide. However, if the DNA had been any of the suspects’, then either they were responsible or were an accomplice.
Students should carefully analyze their data and come to a conclusion. Theycanalsousetheinformationinferredfromthefingerprintsandhair samples to present their case. If their data is inconclusive, they should explain that they would need to redo the experiment.

Student Worksheet16 Crime Scene Investigation
Student Worksheet
To develop an understanding of electrophoresis principles. To understand and use forensic science principles to analyze data and to determine a probable conclusion.
Experiment Objective
Dr. Phillip Ward, a prominent physician, was found dead in his apartment. The cause of death was apparently from potassium cyanide ingestion. Dr. Ward lives alone and does not own any pets. The police suspect that this may be a suicide case, but they are not sure at this time. Your team of forensic specialists had been assigned to this case and upon examining the crime scene, you found several pieces of evidence. Traces of potassium cyanide were found in Dr. Ward’s coffee cup. When examiningthecup,youliftedsomefingerprints.Onfloorofthekitchen,youfoundapiece of hair that did not match the color of the victim’s hair. Lastly, among the trash in the apartment, you found a bag with white powder, which contains traces of potassium cyanide. You also found an eyelash stuck on the bag. There was just enough of the hair root on the second hair sample that you were able to extract another DNA sample. You also took light microscope images of both hair samples.
The police want information based on the physical evidence as soon as possible. Does the evidence support a suicide theory, or could this be a murder case?
Is there evidence that someone other than Dr. Ward was in his apartment?
Scenario

17Student WorksheetCrime Scene Investigation
Crime Scene EvidenceDNA Samples:
• DNA V (Victim)• DNA S1 (Suspect 1)
Fingerprints:Victim Fingerprint 1
on coffee cupFingerprint 2 on coffee cup
Hair Samples:Victim Microscope Image
of Hair 1Microscope Image
of Hair 2
Other:• Coffee cup• Bag with white powder

18 Student Worksheet Crime Scene Investigation
Suspects The police have been identifying and investigating suspects in the possible murder of Dr. ward. They have narrowed the list of suspects to three people. The police also took samples of their DNA.
(S1) Dr. Caroline Powell: Dr. Powell is a colleague of Dr. Ward’s and they were co-owners of their joint practice for the past ten years. Employees remarked that Dr. Powell seemed to resent Dr. Ward for his success and felt eclipsed by him. Dr. Pow-ell had been heard arguing with Dr. Ward recently. Now that Dr. Ward is dead, their practice belongs solely to her. She does not have an alibi. Dr. Powell owns a cat.
(S2) Mrs. Julie Fischer: A neighbor of Dr. Ward’s in the same apartment building. Mrs. Fischer owns a Pomeranian. Other neighbors said that Dr. Ward had com-plained about Mrs. Fischer’s dog barking too loudly and had threatened to report her to their building management. Mrs. Fischer claims that she was eating out with her husband that night. Her husband’s version of the story is slightly different.
(S3) Miss Lauren White: The receptionist at Dr. Ward’s practice. She is also the girlfriend of Dr. Ward’s nephew, Oliver. Oliver was Dr. Ward’s only living relative andwasthebeneficiaryofhislifeinsurancepolicy.MissWhiteclaimsthatshewasatthemoviesthatnight,butnoonecanconfirmheralibi.MissWhitedoesnotownany pets, but Oliver owns a cat.
Suspect Dr. Powell Mrs. Fischer Miss WhiteDNA
Sample S1 S2 S3
Fingerprint
Hair Sample

19Student WorksheetCrime Scene Investigation
Hair can be important pieces of evidence during an investigation. Since hair is easily transferred during physical contact, hair samples can associate a person to a crime scene. What would you do if you were given hair and asked to determine if itcamefromasuspect?Oneofthefirstquestionsascientistwillaskiswhetherthehair came from an animal or a human. If the hair is of animal origin, they will examine its morphology with a light microscope to determine the species. However, it is not possible to distinguish the hair between individual animals. If the hair is from a human, it may be possible to identify individuals. Although the morphology of human hair is shared across individuals in the population, there are certain physical characteristics (such as arrangement, distribution or appearance) that skilled scientists can use to distinguish between people.
Physical Structure of Hair:
Cuticle – outer coating, made of overlapping scalesCortex – main body of hair, is protein-rich and contains pigment granulesMedulla – central core, may be absent, fragmented or distinctly structured
As you examine these images from different species, think about how they differ and which characteristics you could use to determine identity. Fill in the chart below.
Species Microscope Image Description
HumanCuticle -Cortex -
Medulla -
DogCuticle -Cortex -
Medulla -
CatCuticle -
Cortex -Medulla -
Rabbit
Cuticle -
Cortex -Medulla -
Hair Analysis
Cuticle Cortex Medulla

20 Student Worksheet Crime Scene Investigation
1. Based on the microscope images of the hair samples and the chart above, what is the species of Hair 1? What characteristics from the hair sample led you to your conclusions?
2. Based on the microscope images of the hair samples and the chart above, what is the species of Hair 2? What characteristics from the hair sample led you to your conclusions?
3. Based on the species and color of the hair samples, can you associate any of the suspects with the crime scene? Explain your reasoning.
4. Duringthecrimesceneinvestigation,youwereabletofindenoughofthehair root on Hair 2 to do an analysis. What analysis would you do to help you further pinpoint the murderer? How might you go about doing that?

21Crime Scene Investigation Student Worksheet
Fingerprints are still considered as one of the best types of physical evidence for various reasons. Fingerprints are more unique than DNA. Although identical twins sharegeneticinformation,theydonotsharethesamefingerprints.Whilefingerprintformation has some genetic basis, they are made when pressure on the skin layers of the fetus experience pressure, resulting ridges patterns. These patterns do not change when a person ages, although the prints can acquire scars or get worn down. Each ridge contains pores, which are connected to sweat glands. When you touch a surface,youleavefingerprintsbecauseofthissweat.Scientistscanpinpointminutedifferencesinfingerprintpatternstodistinguishbetweenthem.Youwilltakeonthisroletodaybydeterminingifanyofthesuspectscouldhaveleftfingerprintsatthecrime scene.
1. Identifythefingerprintpatternsforeachofthesuspectsandthevictim.
2. Whatfingerprintpatternscanyoupickoutinthefingerprintsonthecoffeecup? On the bag?
3. Basedonthefingerprintanalysis,whichsuspectismoresuspicious,if any? Why?
Types of Fingerprint Patterns:
Fingerprint Analysis

22 Student Worksheet Crime Scene Investigation
While each individual is unique, their very DNA holds clues to their history and heritage. These clues are held in the non-coding regions of DNA, where random mutations are more likely to come up. As these changes usually do not affect essential genes to survival, the variation is passed along from parent to offspring and over generations, the DNA region has a distinct pattern. The technique of DNA fingerprintingtakesadvantageofthisconcepttoaccessthesimilaritybetweencertain individuals. Restriction enzymes recognize particular DNA sequences and areusedinDNAfingerprintingtocreatedifferentlysizedpiecesofDNA.Whenseparated by gel electrophoresis, we can create a banding pattern for each individual’s DNA sample. The more similar banding patterns, the higher the probability that individuals are related. This technique is now used in many areas, from crime scenes to paternity cases for determining identity or relationships.
DNA Analysis
Questions1. What is DNA and what does it do?
2. What are chromosomes and how many copies do you have in each of your cells? Who did they come from?
3. How much DNA do you share with each of your parents? How much DNA do you share with your siblings?
4. What are some characteristics or properties of DNA?
Prelab

23Crime Scene Investigation Student Worksheet
Experiment Overview
1Peel &
microwave 30 sec 2Cast the gel
4Load
samples
5Run the gel
6Record an
image
3 Add running buffer & gel to
buffer tank. Place tank into carriage
+
-

24 Student Worksheet Crime Scene Investigation
Part I: ElectrophoresisMaterials
1 MiniOne Casting System1 MiniOne Electrophoresis System1 Agarose GreenGel in-a-Cup5 samplesDiluted SB running buffer1 micropipette & 5 pipette tipsPhoto hood
Well Sample Name Loading Volume
1 Victim (V) 10μl2 Suspect 1 (S1) 10μl3 Suspect 2 (S2) 10μl4 Suspect 3 (S3) 10μl5 DNA from Hair 2
(H)10μl
Procedure1. Assemble MiniOne casting system. Place the casting stand on a level surface. Place gel trays in the two cavities of the casting stand and insert the comb into the slots at the top of the casting stand, such that the 6 well side is facing down.
2. Partially peel away the seal of a Agarose GreenGel in-a-Cup and microwave for 30 secs. Slowly pour the hot gel solution into a gel tray. Check to see that there are no air bubbles in the gel solution. Let the agarose gel harden and turn opaque, approximately 20-30 mins. (DO NOT touch or move your gel until time is up.)
3. Meanwhile, assemble the MiniOne electrophoresis system. With the included power supply, plug the carriage into the wall outlet. Leave the clear running tank separate from the carriage for now. Place the platform into the tank if it is not already installed. (DO NOT turn the power on yet.)
4. After the gel has hardened, carefully remove the comb. Then, remove the gel with the gel tray from the casting stand.
5. Place the gel with the gel tray inside the running tank. Make sure that the wells are towards the negative end. (DO NOT turn the power on yet.)
6. Measure out 125 ml of diluted SB running buffer and pour slowly into one sideofthetank.Thebufferwillflowunderthegel,towardstheotherside,andremove any air bubbles. Place the tank into the carriage, so that it sits level.
7. Turn the low intensity lights on by pressing the button on the carriage to help visualize the wells. Load your DNA samples into the wells, using 10 μl per well and changing to a new pipette tip each time. Remember to keep track of which samples you loaded in which wells.

25Crime Scene Investigation Student Worksheet
Procedure (cont.)8. Run that gel! While being careful not to bump your gel too much, make sure that the power cord is completely plugged in and place the photo hood on the carriage. Then press the power button. The green LED next to the power button should turn on.
9. The blue light allows you to see the DNA as it is running, and the orange photohoodhelpsfilterexcesslighttoimprovecontrast.Ifyouremovethephotohood during the run, power will shut off immediately. Remember to replace the hood and press the power button to resume run.
10. Allow the gel to run approximately 25-30 mins or until DNA separation is sufficient.Afteryourruniscomplete,turnoffthepowerbypressingbutton.Use the photo hood and either your cell phone or camera to take a picture of the DNA. (Be sure to wipe off condensation from the inside of the hood, if any).

26 Student Worksheet Crime Scene Investigation
Part II: ResultsWhat does your gel look like? Record images of the gel.
Part III: Analyze Your Data1. What electrical charge did your samples carry? How do you know?
2. According to the results on the gel and other pieces of evidence from the crime scene, who was responsible for the death of Dr. Ward? How did you come to this conclusion?

27Crime Scene Investigation
Additional ResourcesHair Analysis: Background Information & Imageshttp://www.fbi.gov/about-us/lab/forensic-science-communications/fsc/jan2004/research/2004_01_research01b.htm
http://www.fbi.gov/about-us/lab/forensic-science-communications/fsc/july2004/research/2004_03_research02.htm
DNA Testing: Introductionhttp://www.scientific.org/tutorials/articles/riley/riley.html

28 Crime Scene Investigation
Ordering Consumables
(858)684-3190♦www.theminione.com
Call (858) 684-3190 or (800) 255-1777Cat # Item Name Description
M3001 Electrophoresis 101 Kit Basics of electrophoresis, for 10 groups.M3002 How to Pipette & Practice
Gel Loading KitLearntopipetteandpracticefinemotorcontrol, for 20 groups.
M3003 PTC- To Taste or Not To Taste Kit
Relate genetics and electrophoresis as a tool, for 10 groups.
M3004 DNA Fingerprinting Kit Examine genetic variations, for 10 groups.M3005 Crime Scene
InvestigationIntro to forensic science, including hair, fingerprint&DNAanalysis,for10groups
M3102 1% Agarose GreenGels in-a-cup
Easily cast gels to adapt your experiments, 10 gels/pk.
M3101 Concentrated 20x Sodium Borate Buffer
Just dilute and it is ready to use.
M3104 MiniOne Marker Load next to samples for easy comparison5bands,500μlfor50loads
M3107 0.6 mL Microcentrifuge Tubes, Clear
For sample storage, 200/pk
M3108 0.6 mL Microcentrifuge Tubes, Rainbow
For sample storage, 200/pk
M3109 1.7 mL Microcentrifuge Tubes, Clear
For sample storage, 200/pk
M3110 1.7 mL Microcentrifuge Tubes, Rainbow
For sample storage, 200/pk
M3111 1-200μl,MicropipetteTips, Clear
For use with micropipette, non-sterile, 250/pk
M3112 1-10μl,MicropipetteTips, Clear
For use with micropipette, non-sterile, 250/pk