The HOME DEPOT FOUNDATION COMMUNITY IMPACT GRANT ...
27
1 The HOME DEPOT FOUNDATION COMMUNITY IMPACT GRANT COMPLETION GUIDE 2021 Please read through all information on this guide before beginning the application so you will become acquainted with the general rules and process. Do not worry that your Post is not a registered 501(c)(3) nonprofit organization. You can still apply as a 501(c)(19), nonprofit veterans group. You may access the application using the link found toward the bottom of this page. Once you have begun the application, try to complete it in one session without saving. We have received multiple reports that using the “Save and Finish Later” option has led to a loss of work and applicants had to re-enter parts of the application. It is strongly recommended that you copy your answers to a separate document after completing the essay style questions. PLEASE NOTE: Applicants must provide a Project Budget via a Microsoft Excel File. Details and an example of how to do this can be found on pages beginning on page 21 of this document. If you have any questions about this application or guide, please contact Grants & External Relations Coordinator Jason Couch at [email protected] or at 816-968-1174. TO APPLY FOR A HOME DEPOT COMMUNITY IMPACT GRANT, BEGIN BY GOING TO THE FOLLOWING WEBSITE: https://corporate.homedepot.com/grants/community-impact-grants Once the page has loaded, read all of the details and scroll to the heading, “How do organizations apply?” and press the orange text labeled “CLICK HERE.” A tab should launch in your browser and you will arrive at the screen seen on the next page of this guide.
Transcript of The HOME DEPOT FOUNDATION COMMUNITY IMPACT GRANT ...

1
The HOME DEPOT FOUNDATION COMMUNITY IMPACT GRANT
COMPLETION GUIDE 2021
Please read through all information on this guide before beginning the application so you will
become acquainted with the general rules and process. Do not worry that your Post is not a
registered 501(c)(3) nonprofit organization. You can still apply as a 501(c)(19), nonprofit
veterans group.
You may access the application using the link found toward the bottom of this page.
Once you have begun the application, try to complete it in one session without saving. We have
received multiple reports that using the “Save and Finish Later” option has led to a loss of work
and applicants had to re-enter parts of the application.
It is strongly recommended that you copy your answers to a separate document after
completing the essay style questions.
PLEASE NOTE: Applicants must provide a Project Budget via a Microsoft Excel File. Details and
an example of how to do this can be found on pages beginning on page 21 of this document.
If you have any questions about this application or guide, please contact Grants & External
Relations Coordinator Jason Couch at [email protected] or at 816-968-1174.
TO APPLY FOR A HOME DEPOT COMMUNITY IMPACT GRANT, BEGIN BY GOING TO THE
FOLLOWING WEBSITE:
https://corporate.homedepot.com/grants/community-impact-grants
Once the page has loaded, read all of the details and scroll to the heading, “How do
organizations apply?” and press the orange text labeled “CLICK HERE.”
A tab should launch in your browser and you will arrive at the screen seen on the next page of
this guide.
2
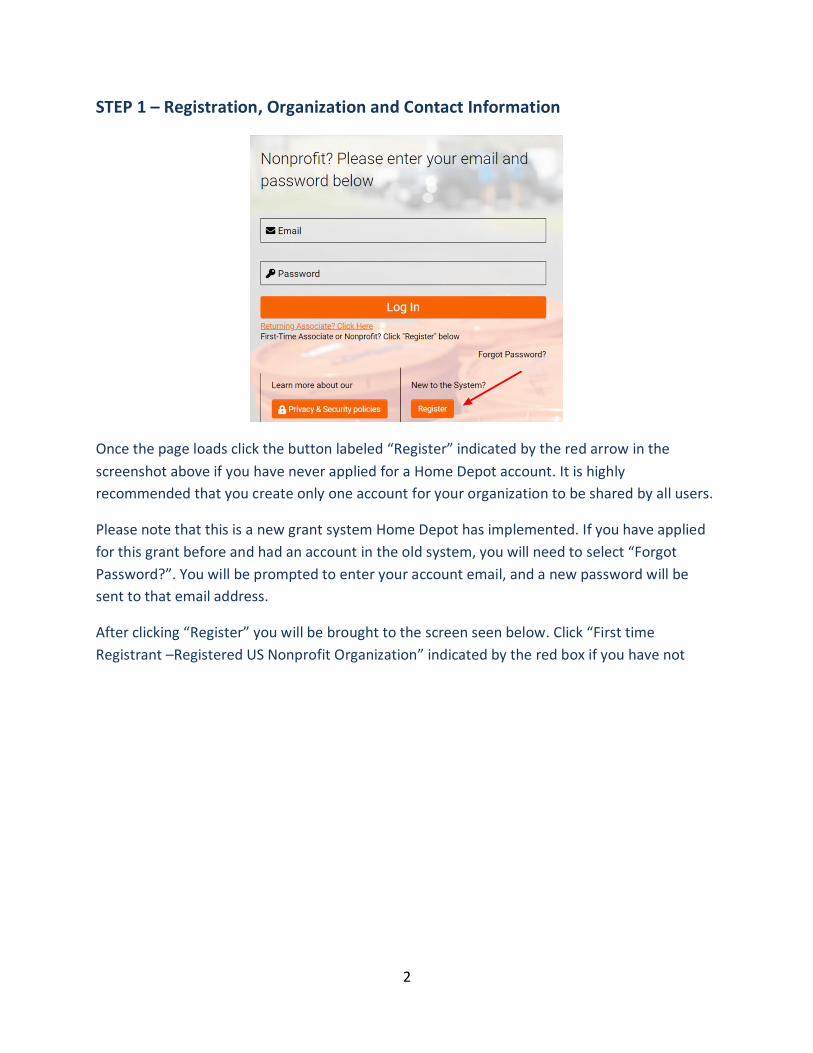
STEP 1 – Registration, Organization and Contact Information
Once the page loads click the button labeled “Register” indicated by the red arrow in the
screenshot above if you have never applied for a Home Depot account. It is highly
recommended that you create only one account for your organization to be shared by all users.
Please note that this is a new grant system Home Depot has implemented. If you have applied
for this grant before and had an account in the old system, you will need to select “Forgot
Password?”. You will be prompted to enter your account email, and a new password will be
sent to that email address.
After clicking “Register” you will be brought to the screen seen below. Click “First time
Registrant –Registered US Nonprofit Organization” indicated by the red box if you have not

3
applied before.
Once you have clicked that button, you will be brought to the page seen below. Enter your EIN,
Post name, city and state in the fields below. Your EIN number, also called a Tax ID number, can
be found at the top of your most recent tax return (990). Be sure not to include any dashes in
the EIN and use the two letter abbreviation for your state. After you have completed all fields,
click “search” at the bottom of the screen.

4
If the information matches what the IRS has on file for your Post, you will get a result in your
search and be met with a screen that looks similar to this, but with information for your Post:
Click the result indicated by the red box which will take you to the next page.
The information on the top of the page, the beginning of the Organization Information section,
will be imported from the previous page as shown below. Please note that the top field says
“Organization Name/Home Depot Store #,” disregard “Home Depot Store #,” as this field is also
for applying stores and not your nearest store. You should not need to enter any information in

5
the “Legal Name” field. If your Post does business, for example, as “Waters-Gilmour Post 1234,”
you can enter that information in a later section, but do not write it here.
The next field is where you would write your doing business as (DBA) name, as shown below.
The address information should have also been imported from the previous page.
You will now need to provide your Post’s phone number and website address. You can use
www.vfw.org if you do not have your own website. It might be more preferable to use your
6
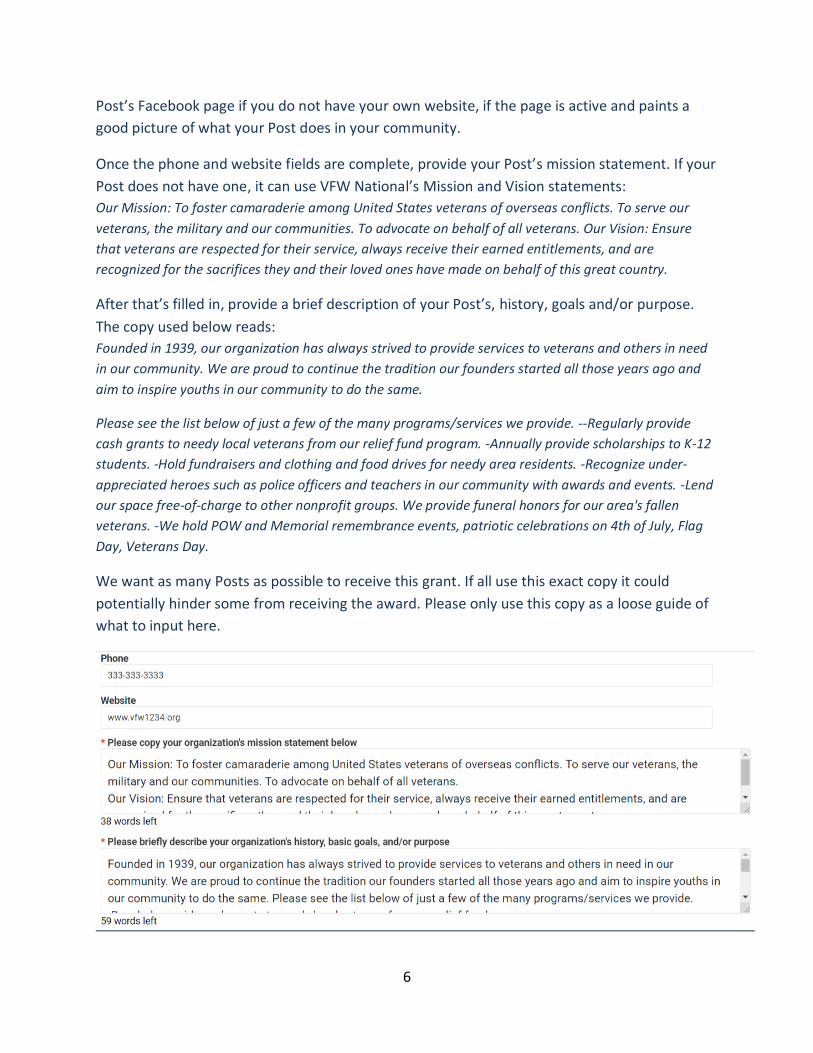
Post’s Facebook page if you do not have your own website, if the page is active and paints a
good picture of what your Post does in your community.
Once the phone and website fields are complete, provide your Post’s mission statement. If your
Post does not have one, it can use VFW National’s Mission and Vision statements:
Our Mission: To foster camaraderie among United States veterans of overseas conflicts. To serve our
veterans, the military and our communities. To advocate on behalf of all veterans. Our Vision: Ensure
that veterans are respected for their service, always receive their earned entitlements, and are
recognized for the sacrifices they and their loved ones have made on behalf of this great country.
After that’s filled in, provide a brief description of your Post’s, history, goals and/or purpose.
The copy used below reads:
Founded in 1939, our organization has always strived to provide services to veterans and others in need
in our community. We are proud to continue the tradition our founders started all those years ago and
aim to inspire youths in our community to do the same.
Please see the list below of just a few of the many programs/services we provide. --Regularly provide
cash grants to needy local veterans from our relief fund program. -Annually provide scholarships to K-12
students. -Hold fundraisers and clothing and food drives for needy area residents. -Recognize under-
appreciated heroes such as police officers and teachers in our community with awards and events. -Lend
our space free-of-charge to other nonprofit groups. We provide funeral honors for our area's fallen
veterans. -We hold POW and Memorial remembrance events, patriotic celebrations on 4th of July, Flag
Day, Veterans Day.
We want as many Posts as possible to receive this grant. If all use this exact copy it could
potentially hinder some from receiving the award. Please only use this copy as a loose guide of
what to input here.

7
On the same page below the Organization Information section is the Contact Information
section. In this section you will need to provide the personal information for the person
overseeing the grant. You can use the Post’s information for the address but we highly
recommend you use a cell phone for the phone number and an email address that is checked
often. If you select the “Copy Address” button, it will import some of the information you
provided in the Organization Information section.
Complete all fields and press the orange “Submit” button.

8
You will then get a “Registration Complete” notice informing you that you will be emailed a
username.
It should take ten to fifteen minutes to get the email. It will be from
[email protected] and will look similar, but not exactly like what is listed
on the image below. There should be a link to click that will take you to your account.
STEP 2 – Starting an Application & Eligibility Questions
You should now arrive at a page that looks like the image below. Click on “Organization Profile.”

9
You should be taken to the page shown below. Most of the information should have been
imported and you should only have to complete one field. Write “6,200” in answer to the
affiliates question indicated by the blue arrow, then click the “next button” indicated by the red
arrow.
After clicking “Next,” you will need to answer three questions and upload a list of board
members (we will use Post Officers). In answer to Financial 990 question, click the drop down
box and select “Yes.” Estimate the number of people who use the Post to answer the first
Community question. For the second Community question, use the number of Post members
you have plus the number of patrons and community members who volunteer at your Post.

10
Once that information has been entered, click “Edit/Update Board Names.”
When you click it, a new window that looks like the one below. Put the Post Commander’s
name and title in the first three fields. Then press the “+” and three more fields will appear. Do
this until all of your Post’s officers have been entered. Then press “Save.” A green checkmark
should appear confirming that the information was saved. Close the window.

11
You can confirm that the process was successfully completed by scrolling to the bottom of the
page. If it was done correctly the board member names will be listed like they are below. Click
“Save” on the organizational profile page. Then click the small Home Depot icon at the top left
corner of the same page, it will take you back to the main menu.
Scroll down to the heading “New Applications” and click “Start A New Application.”
12
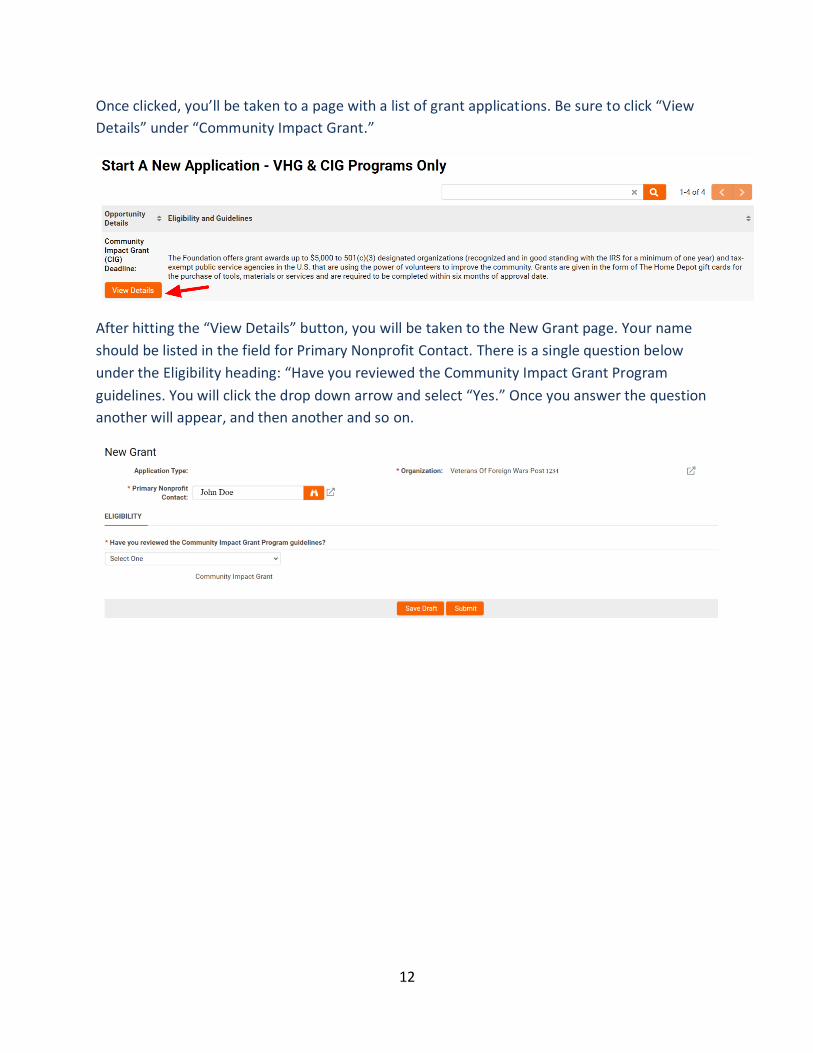
Once clicked, you’ll be taken to a page with a list of grant applications. Be sure to click “View
Details” under “Community Impact Grant.”
After hitting the “View Details” button, you will be taken to the New Grant page. Your name
should be listed in the field for Primary Nonprofit Contact. There is a single question below
under the Eligibility heading: “Have you reviewed the Community Impact Grant Program
guidelines. You will click the drop down arrow and select “Yes.” Once you answer the question
another will appear, and then another and so on.

13
The first ten questions should be answered “Yes.”
The eleventh question, “Have you received a Home Depot Community Impact Grant in the last
12 months?,” should be answered “No.” If your Post has, it is not eligible to receive another
grant until the twelve months has passed. The thirteenth question asks, “Are you requesting a
grant for any of the following?” Select “Veteran service organization projects directly impacting
veterans.”
Please note that all questions MUST be answered as shown in the above images or you will not
be able to proceed. Once the questions have all been answered, press the orange “Submit”
button at the bottom of the page.

14
STEP 3: Grant Application and Project Information
If you answered the questions correctly, you should now be on the application portal page. The
top of the page looks like the image below. Scroll down and go to the Grant Summary heading.
You will first need to enter a project title. For this example, we are calling our project
“Restroom Repair – Toilet and Wall Replacement.” We recommend using a concise but
comprehensive title that clearly explains what you would accomplish if you were awarded this
grant.
The next section is the project description. You will need to fully and clearly articulate exactly
how you would spend the funding and how you would use the materials. For our example,
restroom repair, we have provided the following answer: “Four of our six toilets in our two
restrooms are in need of repair and in one of the restrooms black mold is starting to grow. We have
made minor repairs to the walls and toilets in the past, but this has merely put a Band-Aid on the
problem. We are in need of new toilets and parts for them. Several of the members at our Post have
made this repair before in their own homes, and solved all of their problems with a full replacement. One
of our members is a drywall professional who told us what we would need to fully replace the walls and
ceiling, and possibly some of the studs. An itemized list of materials he recommended can be found on
the project budget. We will need sheetrock, paint, etc. to repair the part of the wall affected with black
mold among other materials. We will also need calking to reseal the windows and cut down on the
moisture causing the mold. We believe our old central air system is mostly to blame. It sits directly
underneath the restroom in question. The rest of the building has been unaffected. To ensure the
problem is abated after we make all of our repairs, we would like to install a dehumidifier for the same
purpose.”

15
The next question asks for project outcomes. For our example we have answered: “The
outcomes of this project would be providing safe and functional restrooms for our visitors. Our post is
used as a gathering space for our community's veterans and for other social and nonprofit groups, such
as the Boy Scouts, Girl Scouts, JAYCEES, and more. We are afraid that if the problem is unabated, it could
lead to a major plumbing problem, or worse, someone could get sick. A gift from the Home Depot
Foundation would ensure that veterans and other members of our community have a safe, working
restroom to use without fear of falling ill.”
The final Grant Summary question asks us to provide three-five short and long term goals. We have
responded: “Our first short-term goal is to provide working toilets for all those who use our facility. Our
second short term goal is to remove the mold-affected sheetrock, possible effected studs, put up a vapor
barrier, install a dehumidifier and replace the wall afterwards. The long term goal is to complete the
project in such a way to ensure these problems stay solved, and the members of our community have a
safe and working restroom to use. Our building and maintenance committee have recommended these
repairs for two years, but we have been unable to raise the needed funding, as we had to purchase a
new roof last year. They do monthly inspections of our property to note deficiencies and ensure that
everything is in safe and working order. They will keep a close eye on the repaired spaces to make sure
this goal is continually being achieved.”
You will now need to request an amount for your project. Complete the field and then click the
“Next” button at the bottom right of the page.

16
Step 3.5: Creating and Uploading a Budget
You have now reached the Financials page and will need to upload a budget in Excel format. In
years passed you could provide an estimated budget to The Home Depot. This is no longer the
case. You must provide a detailed, line item budget in an Excel file. You can obtain a template
for a budget by contacting the Foundation staff using the information found on the first page of
this document. Before any of the answers can be completed, you will need to ascertain the
amount the project will cost. There are two ways to do this. You can go into a Home Depot
store and get the prices of the items you will need, or use The Home Depot online store. We
strongly recommend using the online store, because there is more information available about
each item.
This section of the guide will cover each of the three steps needed to finish the Project
Financials and later portions of the application. These steps are:
1) Obtaining the value of each item using The Home Depot Store.
2) Creating a budget using the collected information.
3) Using the budget to answers questions in the grant application.
1) Creating an Items List
Before you do anything, please consult with the key figures doing the labor for your project and
determine everything you’re going to need. Once you have a list of items you are going to need,
proceed to The Home Depot website https://www.homedepot.com.
Once you have accessed the website, type in an item in the search bar as shown below. In most
cases, suggestions should pop-up below as you type. For our example project, we will need dry
wall screws. Notice that it gives the option to click, “in dry wall screws.” If you get an option
with “in” before it, select it. This is a dedicated section they have designed for this product type
and will give you the most results.

17
You should now see a page full of search results as shown on the next page.
You can use the filter in the top right, shown here reading “Best Match,” or use the selections
on the left side to narrow down the results. Determine which item is right for your project and
click on its page.

18
Once you have chosen an item, click on its page and click “Add to Cart.” You do not need to
create a Home Depot account, but you should create your item list in one sitting so as not to
lose your work. After clicking “Add to Cart” a pop-up window will appear. Click “Continue
Shopping” in the top right of the window as indicated by the red arrow.

19
You should now be back to the page you had just come from. If you look at the top right, you
should notice that next to cart it says “1 Item.”
Continue this process until everything you need to complete your project is in your cart.
Once everything you need is in the cart click the cart button on the top right hand side of the
screen. For this example, fifteen items are in our cart but only two are shown. It is strongly
recommended that you print out this page to make it easier to create a line item budget.
Review all of your items and ensure you have everything.

20
Pay special attention to the quantities of each item and make sure they’re correct. We will use
the data under “Your Order,” as well as the data from each item to build our spread sheet as
seen on the next page.
2) Creating a Budget
Now that you have established which and how many materials you will need, you can proceed
to creating your budget. Again, if you are not skilled with Excel, a template can be obtained by
contacting the VFW Foundation staff. The budget must be submitted in Excel format. FYI: More
than likely, your budget sheet will be quite longer than the example, which you can see on the
next page of this guide.
When creating your budget, it is recommended to use the following five column names:
Item Description – Copy this straight from the item page as labeled by The Home Depot.
Model Number – Also copy this verbatim, it could be used by The Home Depot staff to
determine accuracy.

21
Quantity - Ensure the quantities are correct for each item.
Individual Price - The unit price of each item.
Total Price - This is the item price times the quantity.
Once you have all of the data entered, add the numbers in the Total Price column to get your
Item Total Cost result.
Now that you have the Item Total Cost of the items combined, add a row for Estimated
Shipping and one for Sales Tax. Make sure they are doubled spaced and placed directly
underneath the Item Total Cost to include the additional costs in your Grand Total. These two
figures can be found on the “Your Cost” box on the Cart page as shown on the next page of this
guide.

22
Do not include the “Discount” figure, as this could include current sales that may no longer be
valid by the time your grant is reviewed. Add the three items together to determine your Grant
Total as shown below.
3) Now that you have completed the budget, you can upload it to the website. Go back to
the website and click the orange upload button indicated by the red arrow in the screen
grab image below.

23
Pressing this button will open a small prompt window as shown below. Once it loads, click the
orange button with the file icon it.
Pressing this button will cause your computer to launch a file explorer window. Navigate to the
place you saved your budget, select the budget file and press “Open” (If using Chrome, another
browser may say “OK” or “Upload.”

24
After selecting “Open,” the file explorer will close. The small prompt window will remain, but
you should see the name of your budget file after “Select File.” Click the orange “Upload”
button.
Once it loads, close the file upload window. You should be back to the Financials page, and the
name of your file should be in orange text next to the upload icon button. You can press the
trashcan and repeat the process if you selected the wrong file.
The final question of the Financials section asks if your Post has received a Community Impact
Grant from Home Depot, answer appropriately. If you answer “Yes,” another question asking
how you spent those funds will be asked. Answer the question and press the “Next” button in
the bottom right corner of the screen. Nothing will appear if you select “No.” Press the “Next”
button on the bottom right corner of the screen.
The next page is the Store Info section. If you do not know the store numbers of the two closest
Home Depot stores to your Post, you will need to visit the Home Depot Store Finder to identify
them. This is the link to that page: https://www.homedepot.com/l/search/4136/full/. Put your
Post’s zip code into the search box. You’ll see the number next to the name of the store you’re
looking for.
25
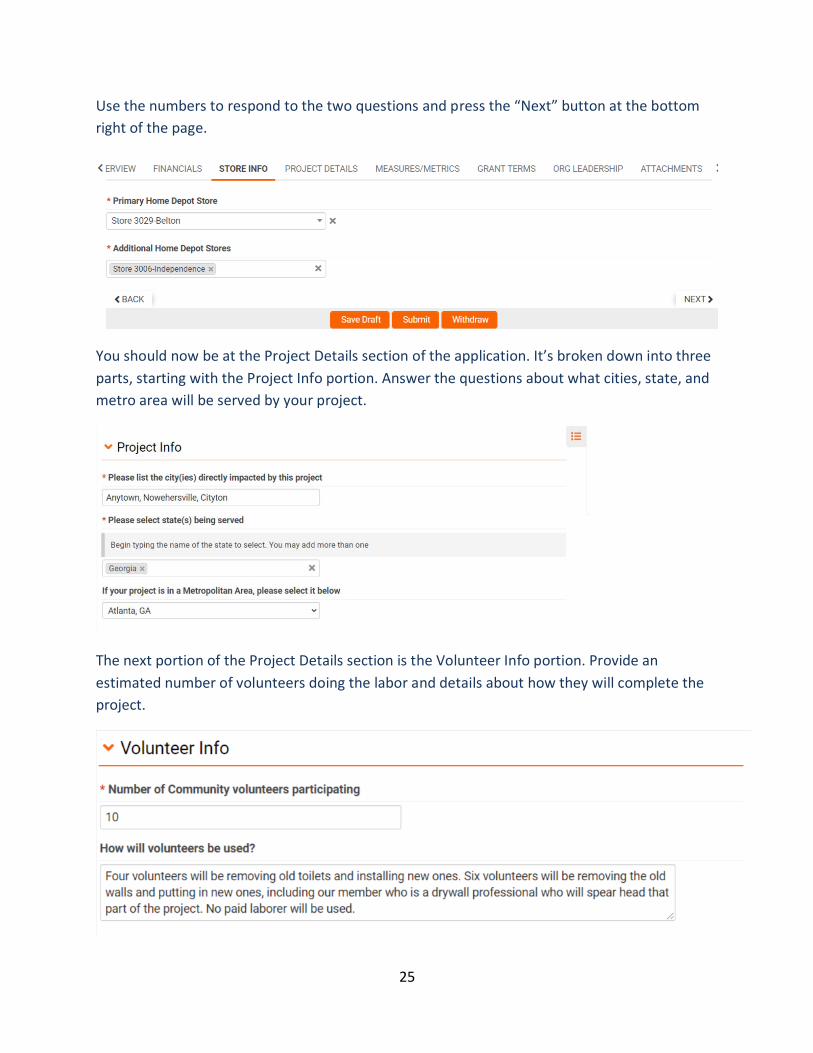
Use the numbers to respond to the two questions and press the “Next” button at the bottom
right of the page.
You should now be at the Project Details section of the application. It’s broken down into three
parts, starting with the Project Info portion. Answer the questions about what cities, state, and
metro area will be served by your project.
The next portion of the Project Details section is the Volunteer Info portion. Provide an
estimated number of volunteers doing the labor and details about how they will complete the
project.

26
The final portion of this section asks questions about your facility. Answer the questions as
shown below and then press the “Next” button at the bottom right corner of the screen.
You will now be at the Measures/Metrics section which asks two questions. Provide a rough
estimate of the number of veterans who will use your facility or benefit from its use. Select the
type of veterans who will benefit most from your project using the dropdown box. Once both
questions have been answered, press the “Next” button at the bottom right corner of the
window.
You will now be directed to the Grant Terms section. Read the section and click the check box
next to “I Agree.” Then press the “Next” button at the bottom right corner of the page.

27
You are now at the Organization Leadership page. We completed this portion in the
Organization Portal before we started the application. You should only need to click the
checkbox that ask you to verify that the list above is correct. Click “Next” to proceed.
You have now reached the final portion of the grant application! This is the attachments page,
but you should not need to provide anything. Click “Submit” at the bottom of the page and
your application is submitted! You may receive an email confirmation upon submitting. Be sure
to check your email address regularly for a notification of the decision.