THE HIVE™ - Squarespace · manual the hive™ life of the mealworm hive overview parts getting...
16
MANUAL THE HIVE™ LIFE OF THE MEALWORM HIVE OVERVIEW PARTS GETTING STARTED FEEDING YOUR WORMS MAINTAINING A CLEAN COLONY HARVESTING PUPAE HARVESTING FAQ (SAFETY) (COOKING & RECIPES) (TROUBLESHOOTING) (GLOSSARY)
-
Upload
trinhnguyet -
Category
Documents
-
view
216 -
download
0
Transcript of THE HIVE™ - Squarespace · manual the hive™ life of the mealworm hive overview parts getting...

MANUAL
THE H IVE™
LIFE OF THE MEALWORMH IVE OVERVIEW
PARTSGETT ING STARTED
FEED ING YOUR WORMS MAINTAIN ING A CLEAN COLONY
HARVEST INGPUPAE HARVEST ING
FAQ(SAFETY )
(COOKING & REC I PES )(TROUBLESHOOT ING)
(GLOSSARY )
HEADER
32 theme of the page
1. References and bookmarks of the page
2. Copyrights too
THIS IS THE SUBHEADER
This is the main text, preferrably built up in columns.afdafdsaa
All rights reserved by LIVIN farms Ltd.This is a preliminary User manual for Hive customers.
LIVIN farms assumes no liability for the content of externally linked websites. All content on LIVIN farms is created with care.
However, LIVIN farms assumes no guarantee for completeness and accuracy. All offers are subject to confirmation and are subject to
modifications.
©
PRELIMINARY DRAFTMARCH 2017
5
If not otherwise stated, all the photography in this publication is owned by © Livin Farms Ltd
intro
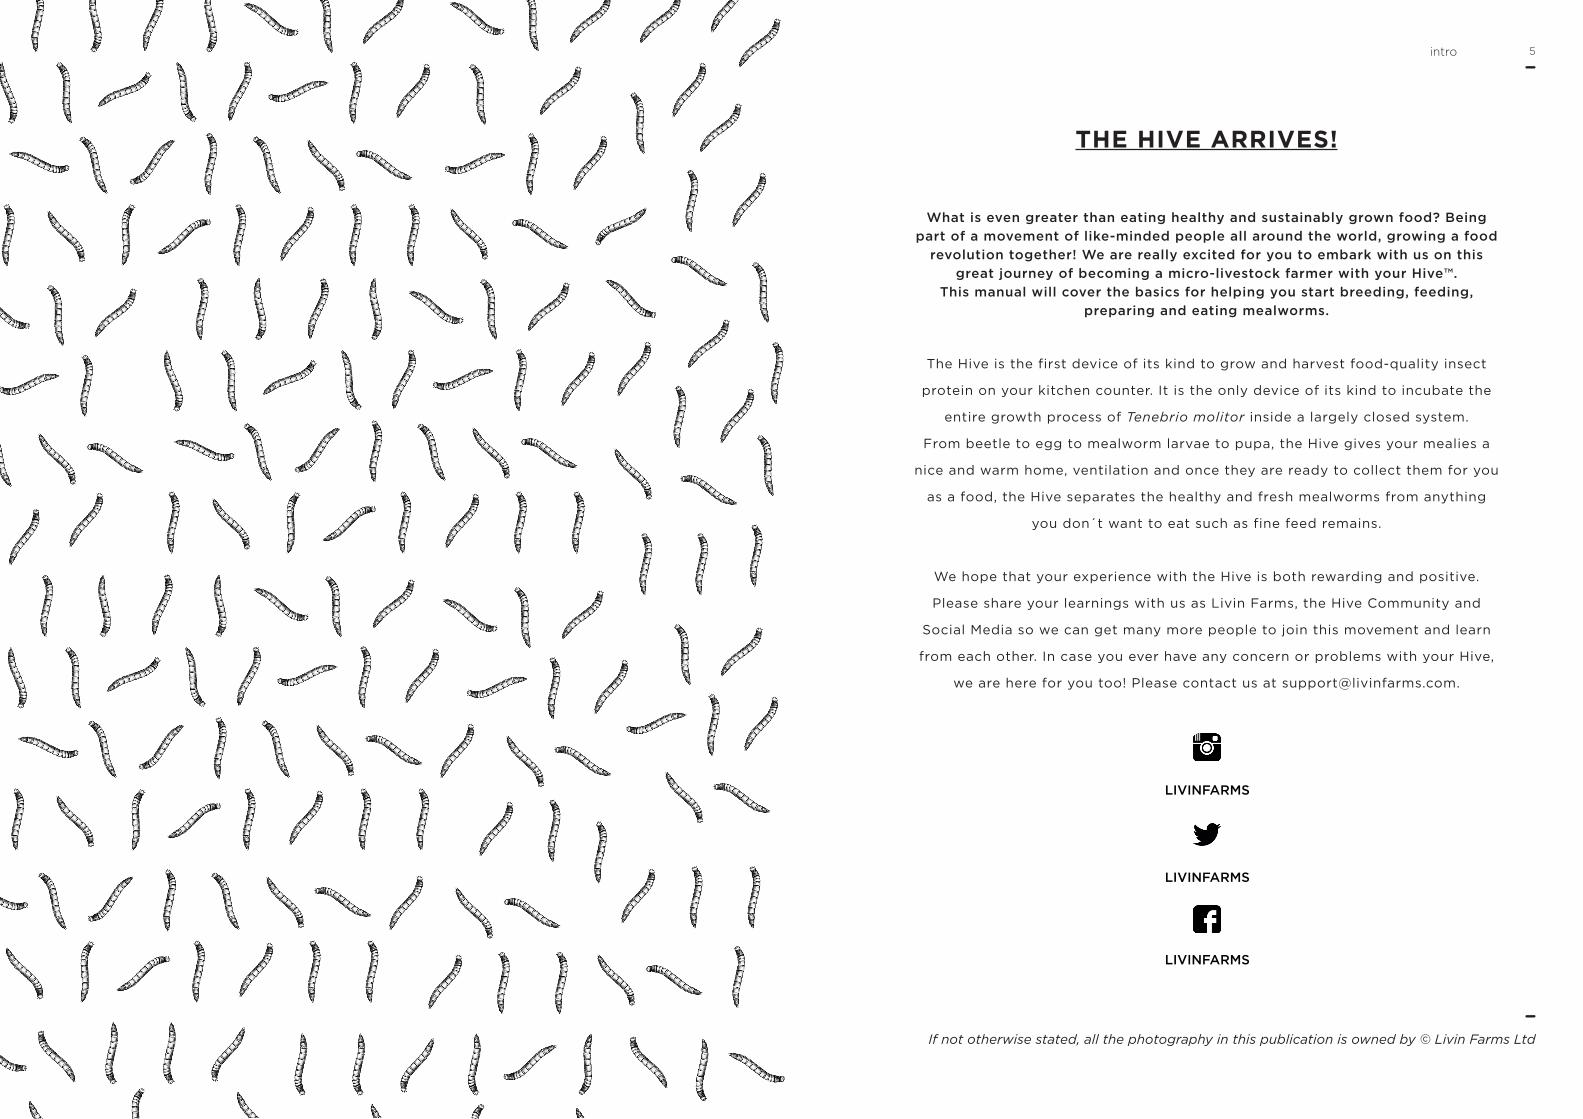
THE HIVE ARRIVES!
What is even greater than eating healthy and sustainably grown food? Being part of a movement of like-minded people all around the world, growing a food
revolution together! We are really excited for you to embark with us on this great journey of becoming a micro-livestock farmer with your Hive™.
This manual will cover the basics for helping you start breeding, feeding, preparing and eating mealworms.
The Hive is the first device of its kind to grow and harvest food-quality insect
protein on your kitchen counter. It is the only device of its kind to incubate the
entire growth process of Tenebrio molitor inside a largely closed system.
From beetle to egg to mealworm larvae to pupa, the Hive gives your mealies a
nice and warm home, ventilation and once they are ready to collect them for you
as a food, the Hive separates the healthy and fresh mealworms from anything
you don´t want to eat such as fine feed remains.
We hope that your experience with the Hive is both rewarding and positive.
Please share your learnings with us as Livin Farms, the Hive Community and
Social Media so we can get many more people to join this movement and learn
from each other. In case you ever have any concern or problems with your Hive,
we are here for you too! Please contact us at [email protected].
LIVINFARMS
LIVINFARMS
LIVINFARMS
76 about the mealwormabout the mealworm
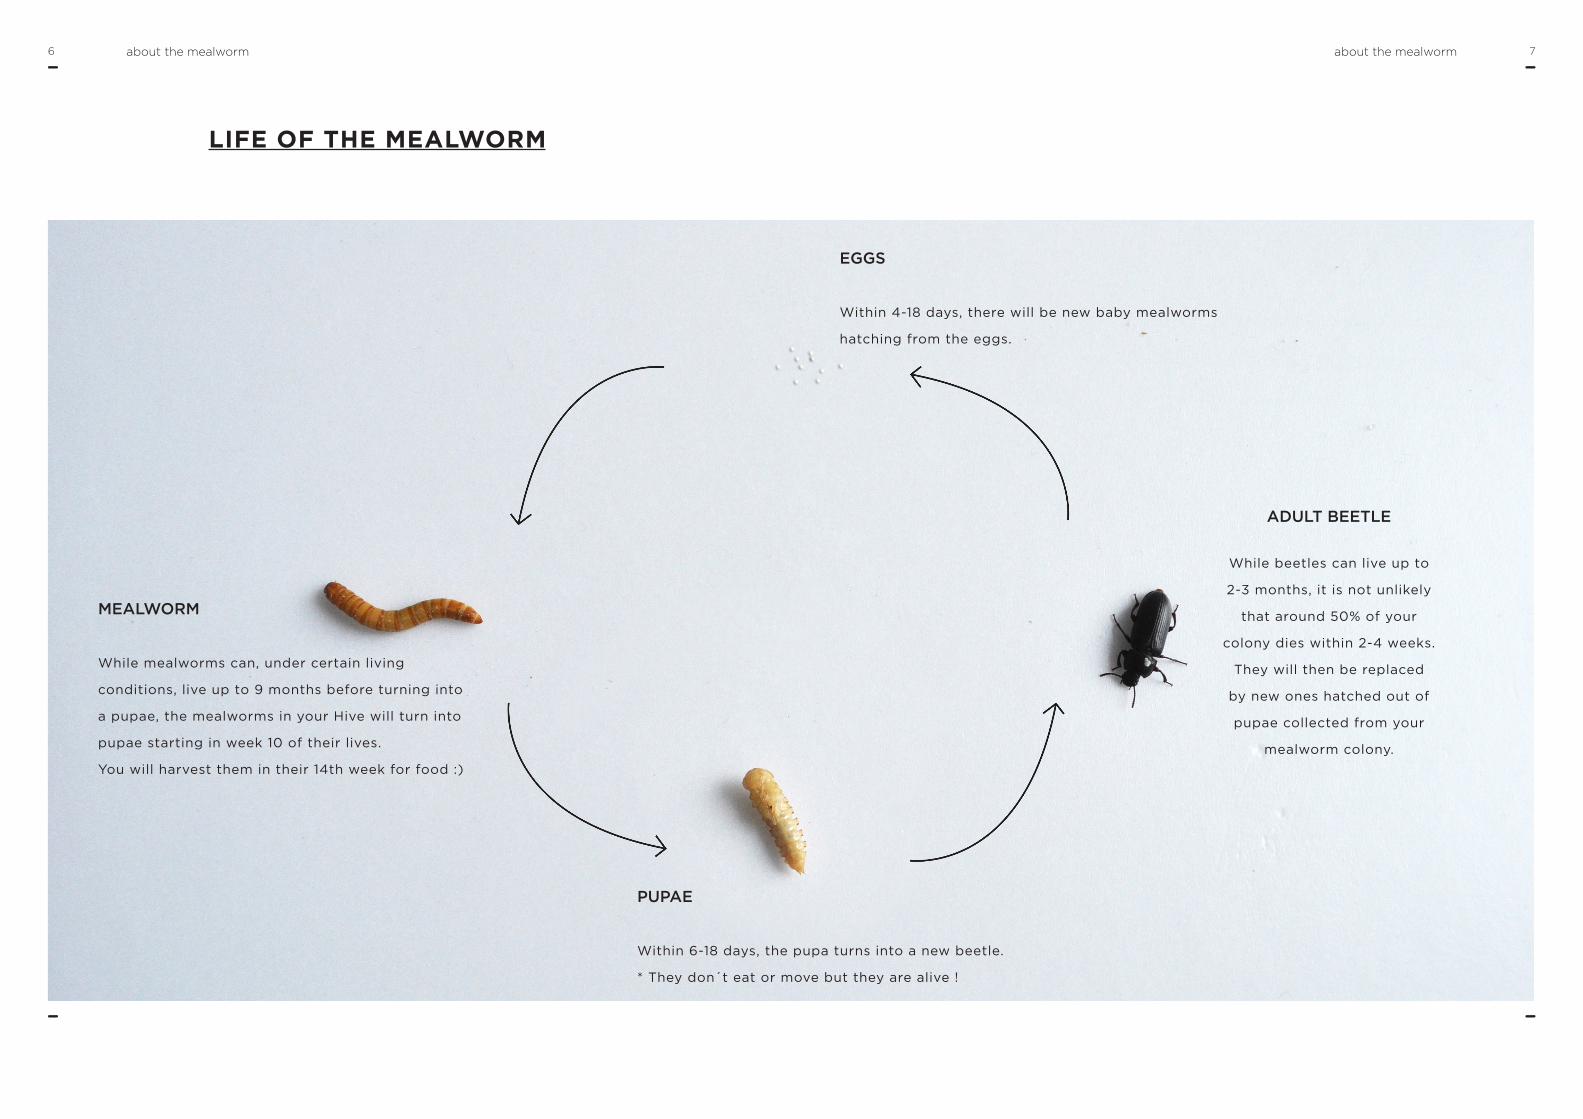
LIFE OF THE MEALWORM
PUPAE
Within 6-18 days, the pupa turns into a new beetle.
* They don´t eat or move but they are alive !
ADULT BEETLE
While beetles can live up to
2-3 months, it is not unlikely
that around 50% of your
colony dies within 2-4 weeks.
They will then be replaced
by new ones hatched out of
pupae collected from your
mealworm colony.
EGGS
Within 4-18 days, there will be new baby mealworms
hatching from the eggs.
MEALWORM
While mealworms can, under certain living
conditions, live up to 9 months before turning into
a pupae, the mealworms in your Hive will turn into
pupae starting in week 10 of their lives.
You will harvest them in their 14th week for food :)
98 Hive overviewHive overview
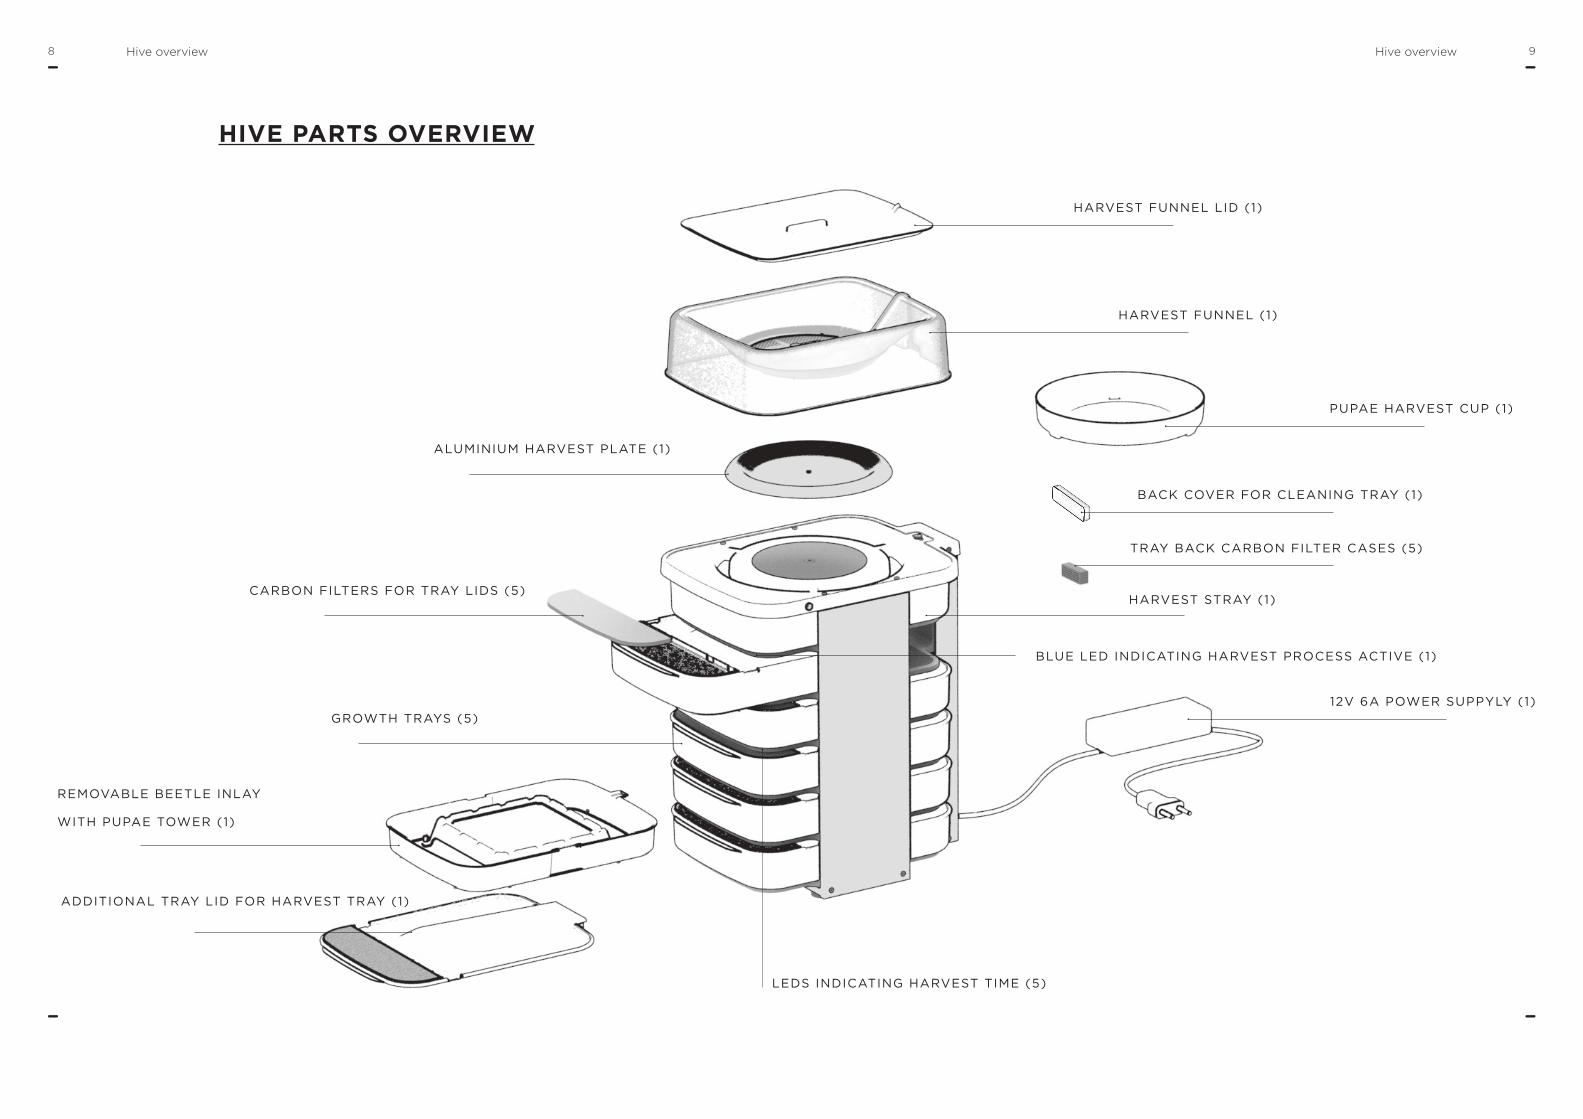
HIVE PARTS OVERVIEW
REMOVABLE BEETLE INLAY
WITH PUPAE TOWER (1)
ADDITIONAL TRAY LID FOR HARVEST TRAY (1)
CARBON FILTERS FOR TRAY LIDS (5)
ALUMINIUM HARVEST PLATE (1)
12V 6A POWER SUPPYLY (1)
TRAY BACK CARBON FILTER CASES (5)
PUPAE HARVEST CUP (1)
HARVEST FUNNEL (1)
HARVEST FUNNEL LID (1)
HARVEST STRAY (1)
GROWTH TRAYS (5)
LEDS INDICATING HARVEST TIME (5)
BACK COVER FOR CLEANING TRAY (1)
BLUE LED INDICATING HARVEST PROCESS ACTIVE (1)

1110 Hive overviewHive overview
HIVE PARTS OVERVIEW
HARVEST TRAY
HARVEST AREA
HARVEST BUTTON
GROWTH TRAYS
VENTILATION OUTLETS
ON/OFF SWITCH
RESET BUTTON

1312 parts explanationparts explanation
LID
FAN FOR VENTILATION
CARBON FILTER COVERED
FEEDING LUKE AND AIR VENT
OPENING FOR SENSORS
BACK CARBON FILTER CASE
LAYER STRUCTURE
BUILT INTO HIVE
HEAT PROVIDED FROM BOTTOM
PUPAE TOWER
BEETLE AREA
BEETLE INLAY
IS MOVED BETWEEN TRAYS
BEETLE INLAY
1514 parts explanationparts explanation
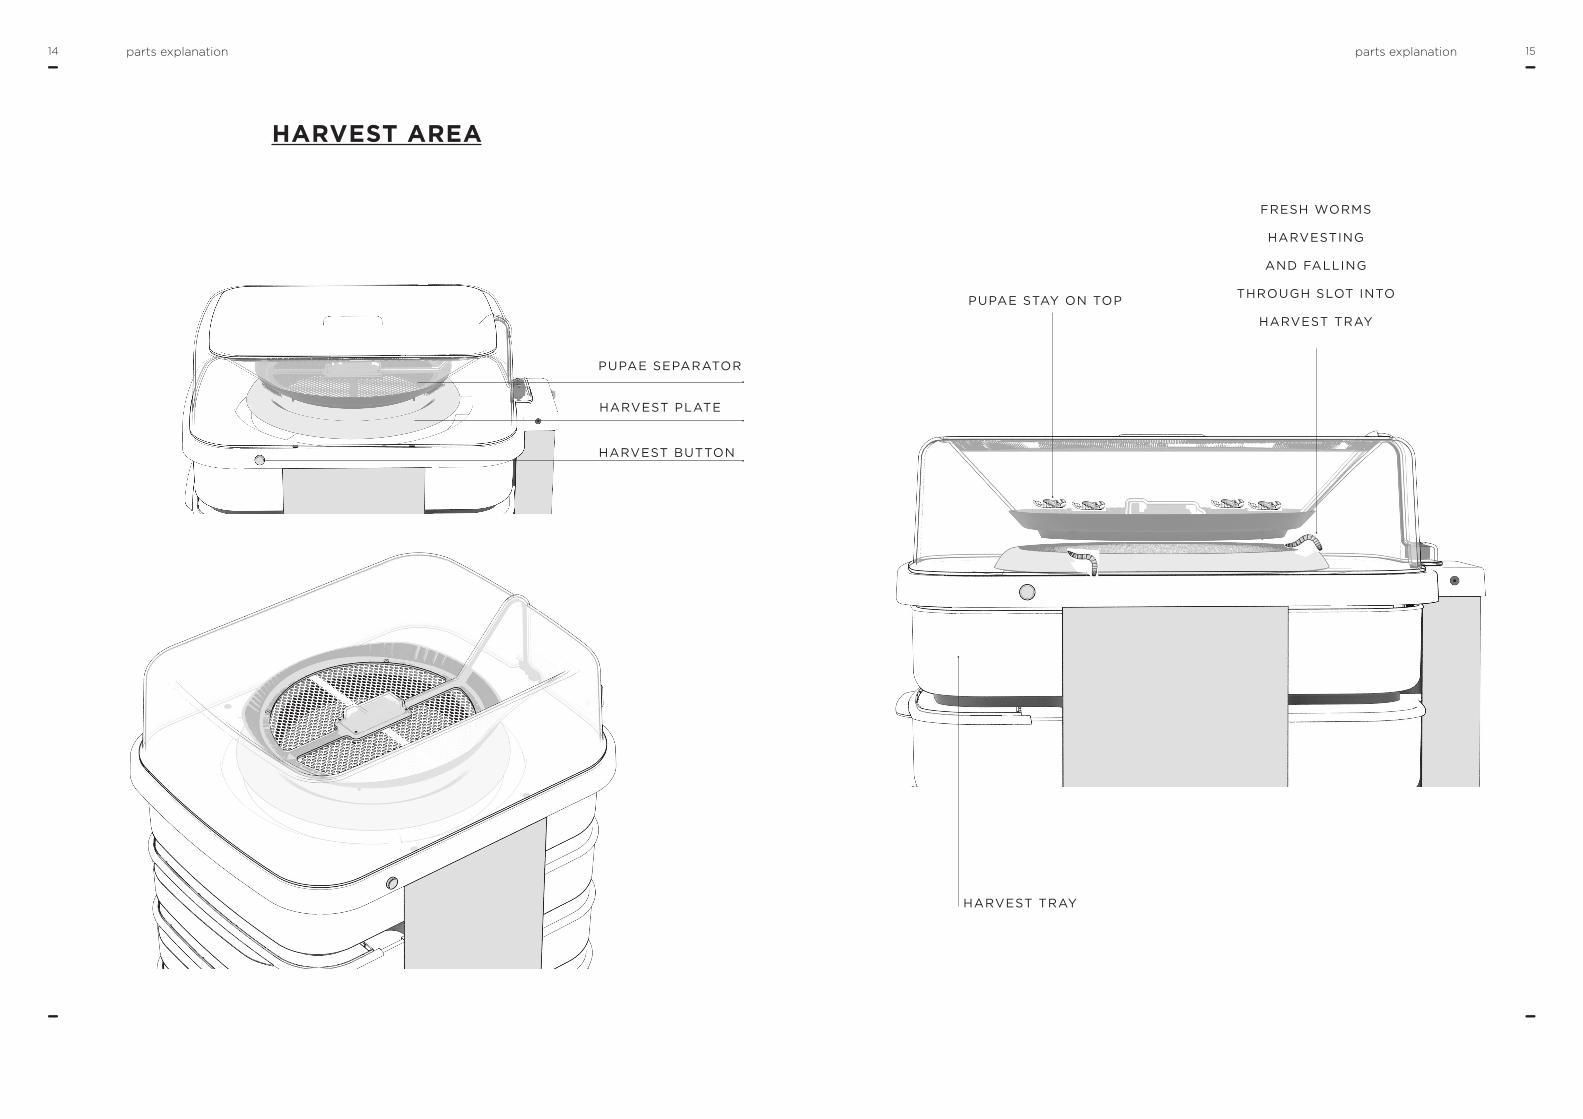
HARVEST AREA
PUPAE SEPARATOR
HARVEST PLATE
HARVEST BUTTON
HARVEST TRAY
PUPAE STAY ON TOP
FRESH WORMS
HARVESTING
AND FALLING
THROUGH SLOT INTO
HARVEST TRAY
1716 getting startedgetting started
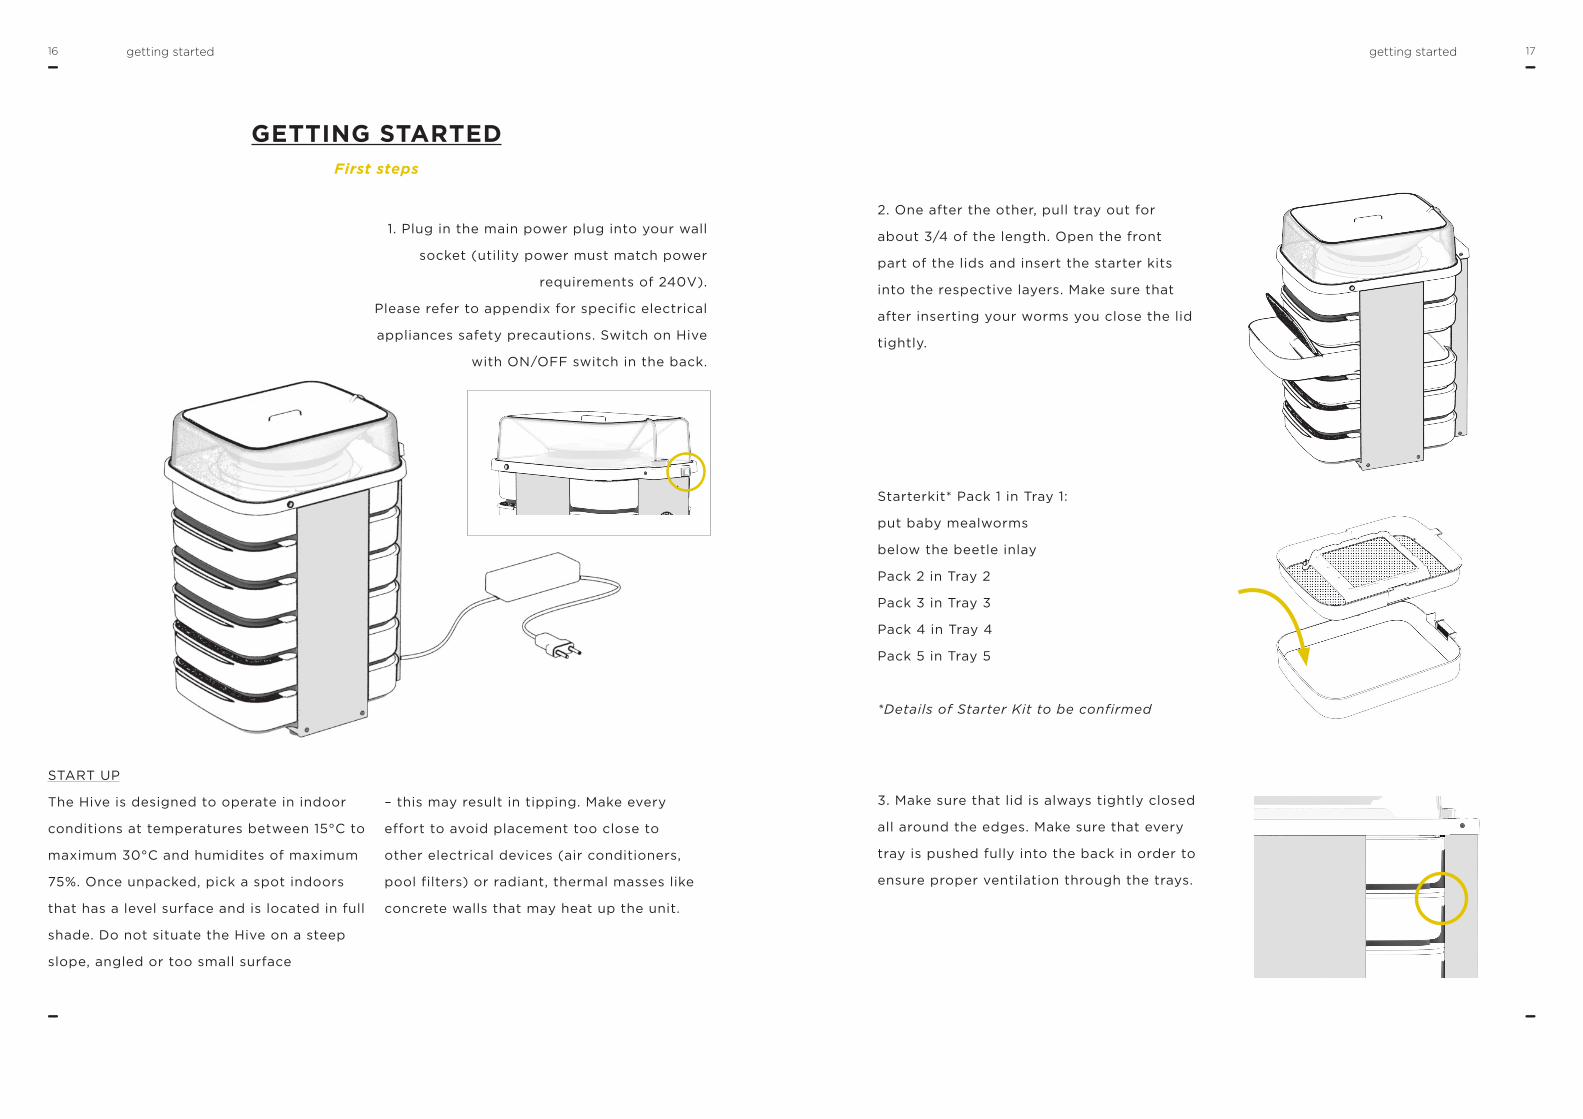
GETTING STARTEDFirst steps
1. Plug in the main power plug into your wall
socket (utility power must match power
requirements of 240V).
Please refer to appendix for specific electrical
appliances safety precautions. Switch on Hive
with ON/OFF switch in the back.
START UP
The Hive is designed to operate in indoor
conditions at temperatures between 15°C to
maximum 30°C and humidites of maximum
75%. Once unpacked, pick a spot indoors
that has a level surface and is located in full
shade. Do not situate the Hive on a steep
slope, angled or too small surface
– this may result in tipping. Make every
effort to avoid placement too close to
other electrical devices (air conditioners,
pool filters) or radiant, thermal masses like
concrete walls that may heat up the unit.
2. One after the other, pull tray out for
about 3/4 of the length. Open the front
part of the lids and insert the starter kits
into the respective layers. Make sure that
after inserting your worms you close the lid
tightly.
3. Make sure that lid is always tightly closed
all around the edges. Make sure that every
tray is pushed fully into the back in order to
ensure proper ventilation through the trays.
Starterkit* Pack 1 in Tray 1:
put baby mealworms
below the beetle inlay
Pack 2 in Tray 2
Pack 3 in Tray 3
Pack 4 in Tray 4
Pack 5 in Tray 5
*Details of Starter Kit to be confirmed
1918 feeding
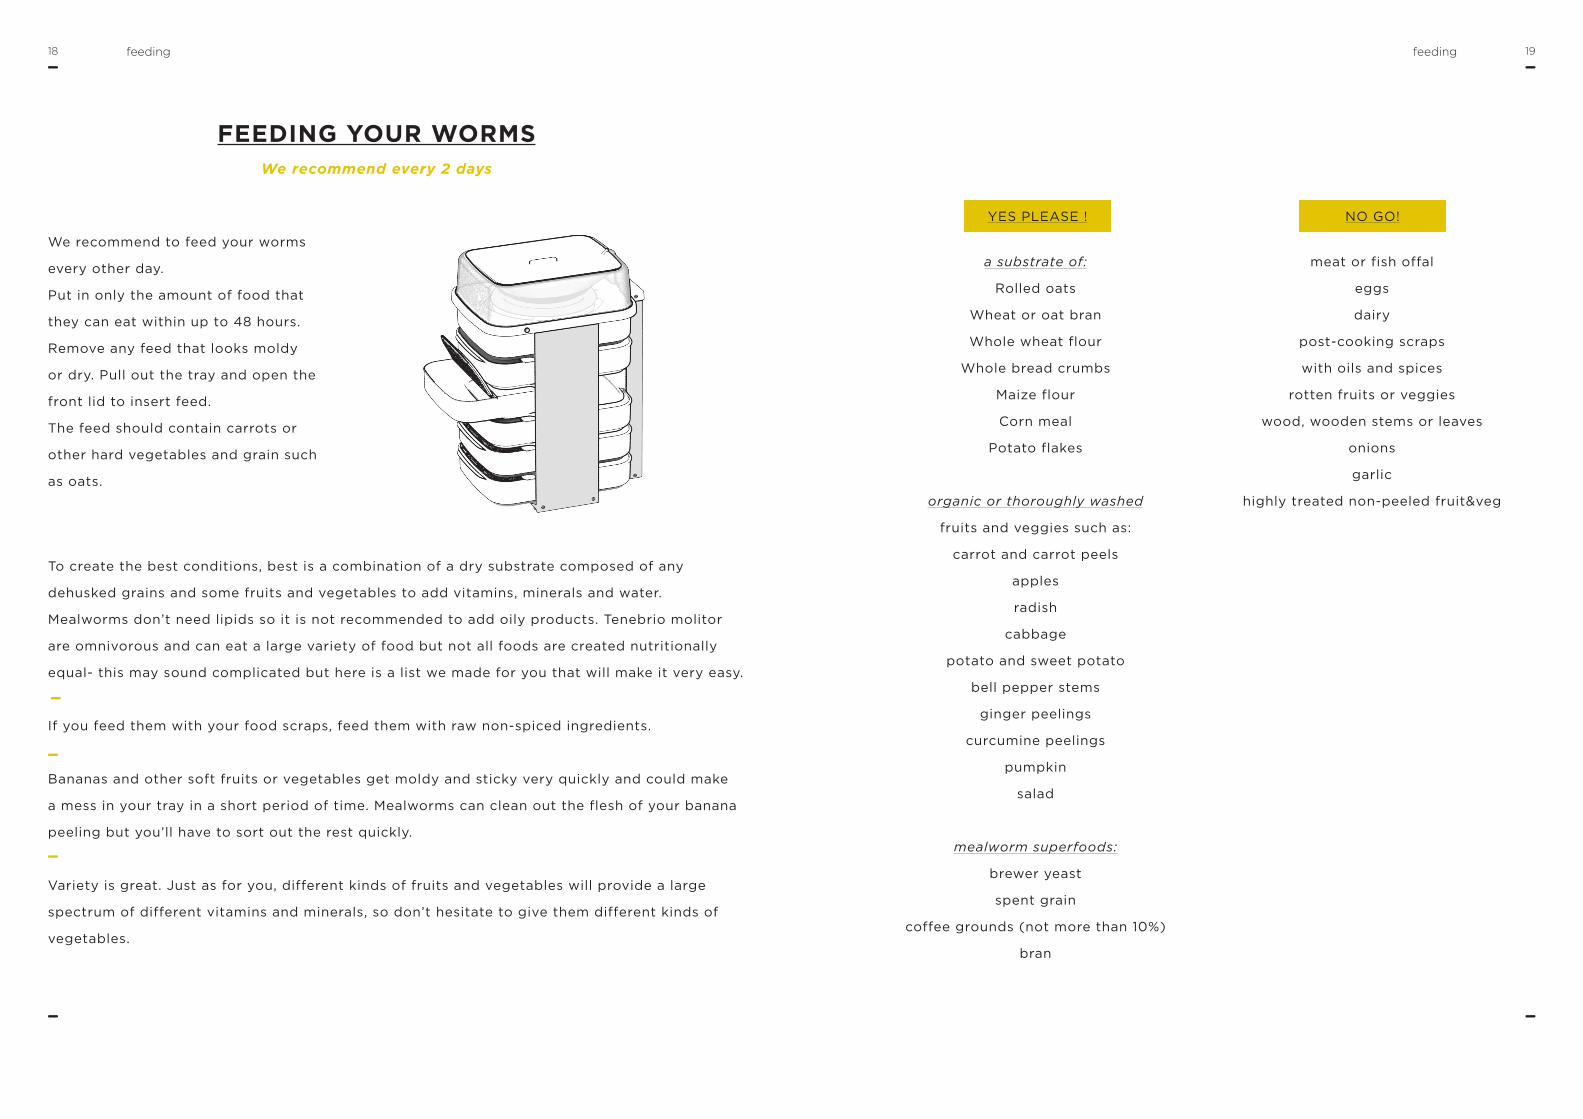
FEEDING YOUR WORMSWe recommend every 2 days
We recommend to feed your worms
every other day.
Put in only the amount of food that
they can eat within up to 48 hours.
Remove any feed that looks moldy
or dry. Pull out the tray and open the
front lid to insert feed.
The feed should contain carrots or
other hard vegetables and grain such
as oats.
YES PLEASE ! NO GO!
a substrate of:
Rolled oats
Wheat or oat bran
Whole wheat flour
Whole bread crumbs
Maize flour
Corn meal
Potato flakes
organic or thoroughly washed
fruits and veggies such as:
carrot and carrot peels
apples
radish
cabbage
potato and sweet potato
bell pepper stems
ginger peelings
curcumine peelings
pumpkin
salad
mealworm superfoods:
brewer yeast
spent grain
coffee grounds (not more than 10%)
bran
meat or fish offal
eggs
dairy
post-cooking scraps
with oils and spices
rotten fruits or veggies
wood, wooden stems or leaves
onions
garlic
highly treated non-peeled fruit&veg
To create the best conditions, best is a combination of a dry substrate composed of any
dehusked grains and some fruits and vegetables to add vitamins, minerals and water.
Mealworms don’t need lipids so it is not recommended to add oily products. Tenebrio molitor
are omnivorous and can eat a large variety of food but not all foods are created nutritionally
equal- this may sound complicated but here is a list we made for you that will make it very easy.
If you feed them with your food scraps, feed them with raw non-spiced ingredients.
Bananas and other soft fruits or vegetables get moldy and sticky very quickly and could make
a mess in your tray in a short period of time. Mealworms can clean out the flesh of your banana
peeling but you’ll have to sort out the rest quickly.
Variety is great. Just as for you, different kinds of fruits and vegetables will provide a large
spectrum of different vitamins and minerals, so don’t hesitate to give them different kinds of
vegetables.
feeding
2120 cleaning the trays
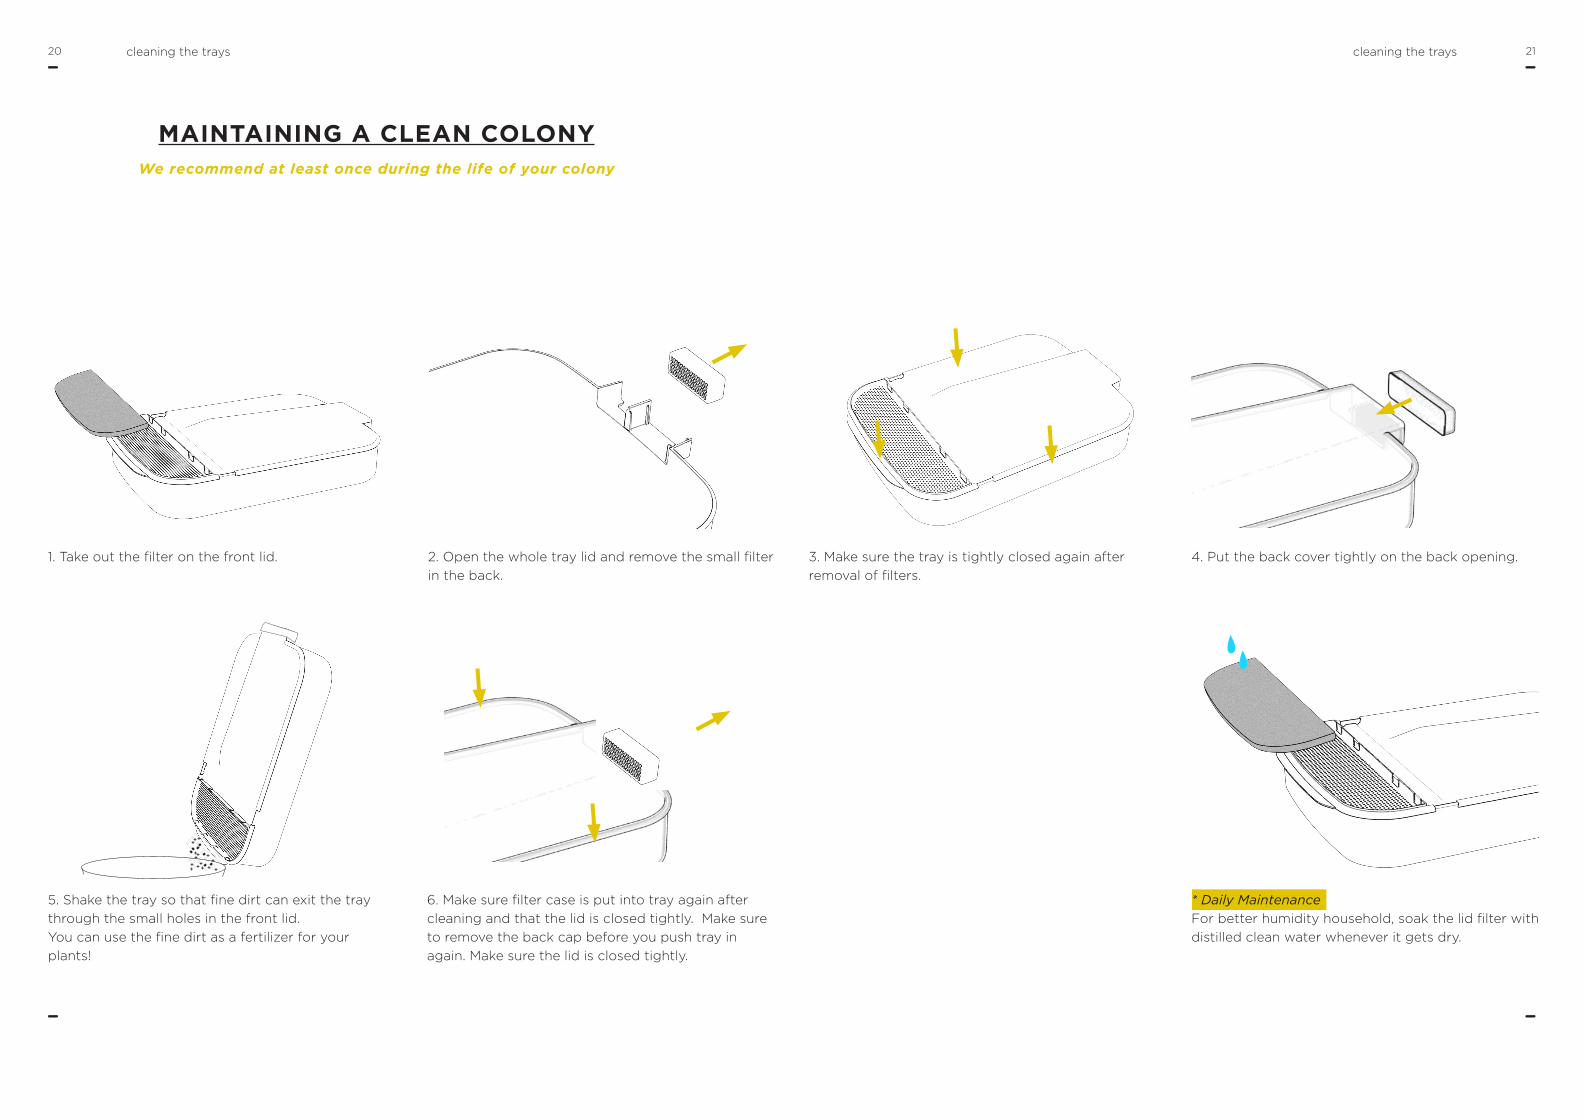
MAINTAINING A CLEAN COLONYWe recommend at least once during the life of your colony
1. Take out the filter on the front lid. 2. Open the whole tray lid and remove the small filter in the back.
3. Make sure the tray is tightly closed again after removal of filters.
5. Shake the tray so that fine dirt can exit the tray through the small holes in the front lid.You can use the fine dirt as a fertilizer for your plants!
* Daily MaintenanceFor better humidity household, soak the lid filter with distilled clean water whenever it gets dry.
cleaning the trays
4. Put the back cover tightly on the back opening.
6. Make sure filter case is put into tray again after cleaning and that the lid is closed tightly. Make sure to remove the back cap before you push tray in again. Make sure the lid is closed tightly.
2322 harvestharvest
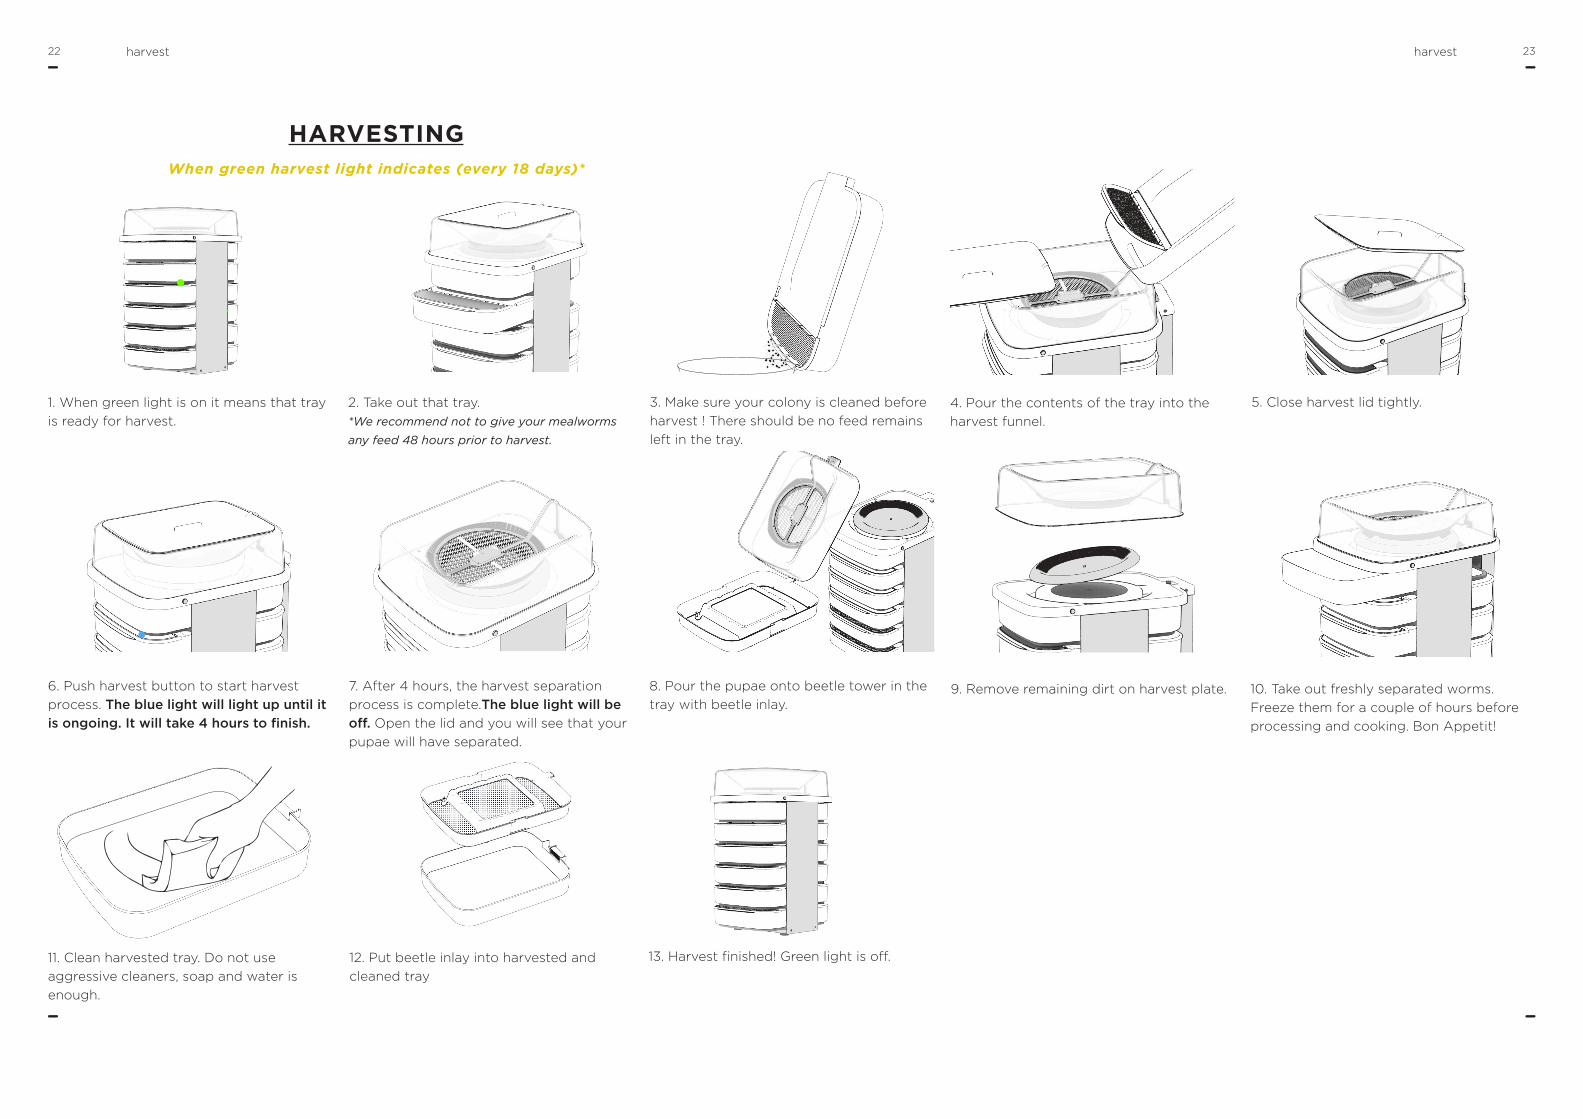
HARVESTINGWhen green harvest light indicates (every 18 days)*
1. When green light is on it means that tray is ready for harvest.
2. Take out that tray.*We recommend not to give your mealworms
any feed 48 hours prior to harvest.
3. Make sure your colony is cleaned before harvest ! There should be no feed remains left in the tray.
4. Pour the contents of the tray into the harvest funnel.
5. Close harvest lid tightly.
6. Push harvest button to start harvest process. The blue light will light up until it is ongoing. It will take 4 hours to finish.
7. After 4 hours, the harvest separation process is complete.The blue light will be off. Open the lid and you will see that your pupae will have separated.
8. Pour the pupae onto beetle tower in the tray with beetle inlay.
9. Remove remaining dirt on harvest plate. 10. Take out freshly separated worms. Freeze them for a couple of hours before processing and cooking. Bon Appetit!
12. Put beetle inlay into harvested and cleaned tray
13. Harvest finished! Green light is off. 11. Clean harvested tray. Do not use aggressive cleaners, soap and water is enough.

2524 pupae separationpupae separation
PUPAE HARVESTINGWe recommend at least once during lifetime, after you see pupae
1. Starting in week 10 of the mealworm development,
you will start to see pupae. In order to keep them safe,
we recommend that you harvest them regularly.
3. Place pupae cup onto harvest surface.2. Remove harvest plate from harvest area.
7. Pour rest of the worm harvest back into tray to
continue growing.
8. Put harvest plate back into harvest area.5. Push harvest button several times, check in between
whether material went through.
6. Pour harvested pupae onto pupae tower in beetle
inlay.
4. Pour the contents of the tray into the harvest area

2726 FAQFAQ
FAQmost commonly asked questions
WHAT IS YOUR “CLIMATE SMART ENVIRONMENT”?
Insects are the perfect survivalitst, that’s how they became the most successful living
creatures on planet earth. Each species of insect adapted to fulfill a special niche. In the
Hive™, we created an optimal niche for your mealworms and beetles. With our technology
of micro-controllers and sensors connected to a set of heat plates and fans, there will be
perfect climate conditions at any time. With the dimensions of our trays, mealworms and
beetles will live in high density surrounded by their feed.
WHAT CAN I DO WITH THE MANURE THAT I CLEAN OUT?
It is a valuable plant fertilizer! Put it into your plant bins and see your plants flourish and
bloom. Almost nothing that comes from your Hive is waste.
WHAT AMOUNT OF MEALWORMS DO I NEED TO EAT TO FULFILL MY PROTEIN NEED?
A typical serving of traditional meats like lean beef, pork, chicken, and fish ranges from
60-100g. We recommend a similar serving size for mealworms, although it may be less
when used in a mixed dish. Fresh mealworms contain about 20% protein, which is the
same as raw beef! Together with a healthy and diverse diet, mealworms can easily help
you fulfill your dietary needs as a healthy meat substitute.
WHAT CAN I FEED MY MEALWORMS? ANYTHING I SHOULD NOT PUT INTO THE DEVICE?
Typical kitchen scraps that we would feed our mealworms are for example: carrots, apples,
potatoes, some cheese scraps, tomatoes, different fruits, roots, salads. They also love
grain such as oats or bread. Basically, you can feed them anything. Just make sure that
you don’t put in: moldy or rotten foods, soups or very greasy, oily or liquid substances,
dishes that are very spicy or acidic. Also do not feed too much cellulose heavy foods
(salads, grass). In general, just make sure that you feed a good proportion of moist and
dry foods. We recommend against feeding meat scraps, mealworms can be considered
vegetarian! Please also take care you don´t feed them things with pesticides on it. You
have the power to control how healthy your food is!
HOW MUCH FEED DO THEY NEED?
This depends very much on the type of feed that you add as well as at which life stage
your mealworms are. Rule of thumb is about half a small apple and about a hand full of
oats. You will soon find out how fast your mealworms eat. Just check in the first weeks
of having them, as soon as the food is gone, you can feed again. Never let any food get
moldy in there!
IF I ONLY FEED THEM ON XYZ, WILL THEY TASTE LIKE IT?
Insects are very simple organisms and the type of feed you add does influence their taste.
Be creative! But make sure your mealworms are still healthy when experimenting with
different feeds!
DO I HAVE TO BE CONCERNED ABOUT ANIMAL WELFARE WITH THE HIVE?
Every organism has to be treated with respect, no matter how large or small it is.
We are concerned with animal welfare at Livin Farms and want to act absolutely
protective of all the species that we deal with.
We designed the Hive in a way that the worms can be happy in there. Insects in nature
occur in large amounts on small spaces. Therefore, we can assume that they feel well
when held like this, totally opposite from a cow or pig!
The harvest process was also designed so that the worms harvest without much stress.
WILL THERE BE ANY NOISE COMING FROM MY HIVE?
There will be a very mild humming from the ventilation and occasional vibration that is
happening in the device. Apart from that, you will not notice your Hive. Of course, if you
get really, really close you might be able to hear a tiny bit of mealworm wriggling ;)

2928 FAQFAQ
WILL THERE BE ANY SMELL COMING FROM MY HIVE?
There are really only two sources where smell could come from: the fine excrements of the
mealworms and the food that you place in the trays. Ideally, you will never overfeed your
worms which should prevent any unwanted smell from rotten foods. The excrements are
usually very dry which makes them almost odorless. Make sure you never feed too moist
substances. The Hive has carbon filtration pads in the back and front of each growing
tray through which air is ventilated. Therefore, occasional smells are typically very well
contained.
COULD THE WORMS ESCAPE?
We designed the Hive so that the worms will be very well contained in the device and can
not escape. That being said, they are still living beings and in some very unlikely case,
it could happen that one or the other one finds its way out somehow. But don’t worry,
unless they are a huge hoard, they won’t start breeding somewhere unwanted in your
house and they are also not hard to catch. They are all in all very lovely beings, relax!
WHAT HAPPENS IF I FORGET TO FEED THEM OR GO ON A HOLIDAY?
Mealworms can live for several weeks without feeding. However, mind that this is a stress
situation for your mealworms and they won’t be growing in the same speed as they would
with normal feeding. If you go on a holiday, treat your Hive like an aquarium- have your
neighbor come by once a week at least to check if it’s all alright. Another option is to put
your worms and beetles in the fridge at about 8°C. They will fall asleep (hibernate) and
wake up even after several weeks. Eggs, Babies and Pupae can be more sensitive to this.
WHAT HAPPENS IF I FORGET TO HARVEST THEM?
Harvesting is happening in 18 days cycles. The green LED below the harvest-ready tray will
light up. If you do forget to harvest or decide not to for one week that´s fine too and your
mealworms will have more time to grow bigger. If you do not harvest for another 18 days,
another tray LED will light up to indicate that there are harvest-ready worms. As soon as
the trays are harvested and you insert the beetle inlay, the LED will go off and the Hive
will know that in that tray the cycle is starting all over again.
HOW DO I KILL THEM? IS IT CRUEL?
The best way is to put them into your freezer. Insects are very dependent on their outside
temperature. In freezing them, their body temperature comes down and they start
hibernating and die without stress. There is no slaughtering here, they go take a winter
CAN I EAT THEM RAW? HOW IS THE FURTHER PROCESSING?
We very explicitly recommend to cook them before processing further. Please consider
mealworms like any other type of meat. If raw or undercooked, people can react
sensitively to it. If you cook them thoroughly (in boiling water for a few minutes), they are
totally safe to eat and process further. You can then fry them, roast them, mix them into
sauces or all kinds of recipes. Be creative and have fun with this new type of meat! Dried
and ground we also use them as protein source in sweet dishes like granola or cookies.
WHAT IF I HAVE A BIG FAMILY, A RESTAURANT OR SIMPLY WANT TO HARVEST MORE?
For now, we recommend you to simply get more than one Hive. We are working on
modular and scalable Hive versions for scaling up production. If you have a commercial
restaurant project, please get in touch with us and we can design a solution tailored to
your needs!
HOW MANY MEALS CAN I MAKE OF ONE HARVEST?
This depends how meat-heavy you make your meals! We are typically getting about 3
mixed meat dishes out of one week´s harvest (e.g. risotto, lasagne or salads).
We have previously made 4 burger patties out of 100-200g of mealworms!
HOW DO I KEEP MY HIVE CLEAN?
In your harvest routine, you will have one harvest every 18 days, after which you can take
out the harvest area and put your pupae back into the pupation chamber in the beetle
area in the top. Also, it is a chance then to clean the last tray before the harvest area, as it
will be empty. Simply swipe it with a wet cloth.
nap, something that they are used to in nature. Please make sure they are deeply frozen
for a reasonable amount of time (minimum 5 hours), so they are not in the hibernation
mode anymore.
CAN THERE BE ANY ALLERGIES OR DISEASES FROM MEALWORMS?
People with shellfish allergies might react sensitively to eating insects too!
The only allergies that have been reported to come from mealworms were from people
sieving mealworms from their frass, getting in touch with a lot of the dirt and fine
excrements. This is not the case when harvesting with the Hive.
Anatomically, mealworms are very different from humans, it is very unlikely that there are

3130 FAQ
WHAT KIND OF POWER SUPPLY DO I NEED?
Plug in the main power plug into your wall socket (utility power must match power
requirements of 240V). Please refer to appendix for specific electrical appliances safety
precautions.
WHAT EXACTLY HAPPENS IN THE HARVEST PROCESS?
All the mature mealworms with their frass, some dead ones and some pupae fall into the
harvest area. There, they land on the first vibrating separation membrane. The pupae stay
on top of this first membrane while all the rest goes through to a second plate, the harvest
plate. This one has an angled surface and is heated in a certain rythm, motivating your
fresh worms to crawl down into the harvest area. The fresh, lively mealworms will start
wriggling away from the center, crawl on the angled surface edge and fall into the harvest
tray. The fine dirt and the dead ones (don´t worry in every healthy colony you have some
dead ones) and frass will stay on the membrane. You can then clean the dirt and frass and
harvest the pure, clean mealworms in the harvest area.
any diseases transmitted - unlike other livestock like pigs which are closer related to us and
therefore can transmit their diseases easier.
You are in charge of growing your mealworms healthy and feed them responsibly.
Livin farms does not take any responsibility or liability for the consumed harvest.