
The GrandOrgue Architecture for Sample-set Designers – A ...
28
GO Architecture 1 Rev C1 – April 2019 The GrandOrgue Architecture for Sample-set Designers – A Tutorial Contents 1 Introduction ...................................................................................................................... 2 2 About Models ................................................................................................................... 2 2.1 A Room for an Organ ............................................................................................... 3 2.2 Global System Configuration .................................................................................... 3 2.2.1 Audio Output ..................................................................................................... 5 2.2.2 MIDI Devices ..................................................................................................... 5 2.2.3 Other tabs.......................................................................................................... 6 2.3 The model for an individual organ ............................................................................ 6 2.3.1 Organ Packages................................................................................................ 6 2.3.2 Looking inside the Demo organ – a detour ....................................................... 7 2.3.3 What is inside a real organ and therefore modelled in a virtual organ? ............ 8 3 Details of an organ and its ODF .................................................................................... 10 3.1 ODF Rubric............................................................................................................. 10 3.2 ODF Sections ......................................................................................................... 10 3.3 Object types and their properties ............................................................................ 13 3.4 A Digression into databases ................................................................................... 14 3.5 Grandorgue organs viewed as databases .............................................................. 15 3.6 Connecting objects together ................................................................................... 18 3.7 Some properties seem to be defined more than once! ........................................... 19 3.8 The CMB file ........................................................................................................... 20 3.9 A few traps in building an ODF ............................................................................... 21 4 ODF Tricks..................................................................................................................... 21 4.1.1 Borrowing stops............................................................................................... 21 4.1.2 Reusing a single sample for several pipes ...................................................... 22 4.1.3 Mixtures and Plein Jeu .................................................................................... 23 4.1.4 Multiple release samples ................................................................................. 25 4.1.5 Multiple attack samples ................................................................................... 26 4.1.6 Noises ............................................................................................................. 26 4.1.7 Tuning properties ............................................................................................ 26 4.1.8 Hints on reading ODFs .................................................................................... 27 5 Conclusion and feedback .............................................................................................. 27 6 Sources.......................................................................................................................... 27 7 Revision History ............................................................................................................. 27
Transcript of The GrandOrgue Architecture for Sample-set Designers – A ...

GO Architecture 1 Rev C1 – April 2019
The GrandOrgue Architecture for Sample-set Designers – A Tutorial
Contents
1 Introduction ...................................................................................................................... 2 2 About Models ................................................................................................................... 2
2.1 A Room for an Organ ............................................................................................... 3 2.2 Global System Configuration .................................................................................... 3
2.2.1 Audio Output ..................................................................................................... 5 2.2.2 MIDI Devices ..................................................................................................... 5 2.2.3 Other tabs .......................................................................................................... 6
2.3 The model for an individual organ ............................................................................ 6 2.3.1 Organ Packages ................................................................................................ 6 2.3.2 Looking inside the Demo organ – a detour ....................................................... 7 2.3.3 What is inside a real organ and therefore modelled in a virtual organ? ............ 8
3 Details of an organ and its ODF .................................................................................... 10 3.1 ODF Rubric ............................................................................................................. 10 3.2 ODF Sections ......................................................................................................... 10 3.3 Object types and their properties ............................................................................ 13 3.4 A Digression into databases ................................................................................... 14 3.5 Grandorgue organs viewed as databases .............................................................. 15 3.6 Connecting objects together ................................................................................... 18 3.7 Some properties seem to be defined more than once! ........................................... 19 3.8 The CMB file ........................................................................................................... 20 3.9 A few traps in building an ODF ............................................................................... 21
4 ODF Tricks ..................................................................................................................... 21 4.1.1 Borrowing stops ............................................................................................... 21 4.1.2 Reusing a single sample for several pipes ...................................................... 22 4.1.3 Mixtures and Plein Jeu .................................................................................... 23 4.1.4 Multiple release samples ................................................................................. 25 4.1.5 Multiple attack samples ................................................................................... 26 4.1.6 Noises ............................................................................................................. 26 4.1.7 Tuning properties ............................................................................................ 26 4.1.8 Hints on reading ODFs .................................................................................... 27
5 Conclusion and feedback .............................................................................................. 27 6 Sources .......................................................................................................................... 27 7 Revision History ............................................................................................................. 27

GO Architecture 2 Rev C1 – April 2019
1 Introduction
This document is aimed at helping GrandOrgue (GO) users who want to make new or modify existing organs to play in GO. This is sometimes called making and modifying sample-sets although it is often more concerned with the layout and logic of the (virtual) console than the more difficult task of recording samples from existing organs.
The target readership will understand something of the controls of a pipe organ and be familiar with using computers with a mouse or touch-screen graphical user interface (GUI).
GO has a very detailed Help system localised for many languages and this should be treated as the definitive description of how the system will perform. I think the difficulty with using it arises from the fact that it does not contain an overview of how things fit together. This document aims to give you a “big picture”.
Attempting this is not without risks to you, the reader. I am not a developer of the system and so my understanding might be incorrect and is certainly incomplete; worse I might explain things that currently work in a particular way but this is not how the GO architects intend it to be used. It is rather like explaining that a block of apartments with a large flat concrete roof could readily be provided with an open-air swimming pool by blocking the drain outlets. It will hardly be safe walking on the top of the parapet walls and the structural engineer will not have allowed for the weight of 1.2 metres of water. I hope that feedback via the GrandOrgue Forum will allow me to improve the quality of this information.
2 AboutModels
GrandOrgue is a system that allows the running of a model of an instrument (usually a pipe organ) on a digital computer. User inputs, in the form of key presses on manuals and a pedal board and stop knobs/tablets movement, can come from real “hardware” or by interaction by mouse or touch with the computer screen. The model will generate sound via headphones or a loud-speaker system. The realism of the possible models is very high so the difference in sound from staccato playing, noises from the mechanical parts of the original instrument and different room acoustics can all be achieved.
The performer does not need to understand much about the model but an organ builder needs to know how it works. The list defining the basic parameters of a GO organ (i.e. the reference section of the help file runs to 30 pages) but the overall structure of things is, hopefully, simple to grasp.
Figure 1 – Swimming anyone?
GO Architecture 3 Rev C1 – April 2019
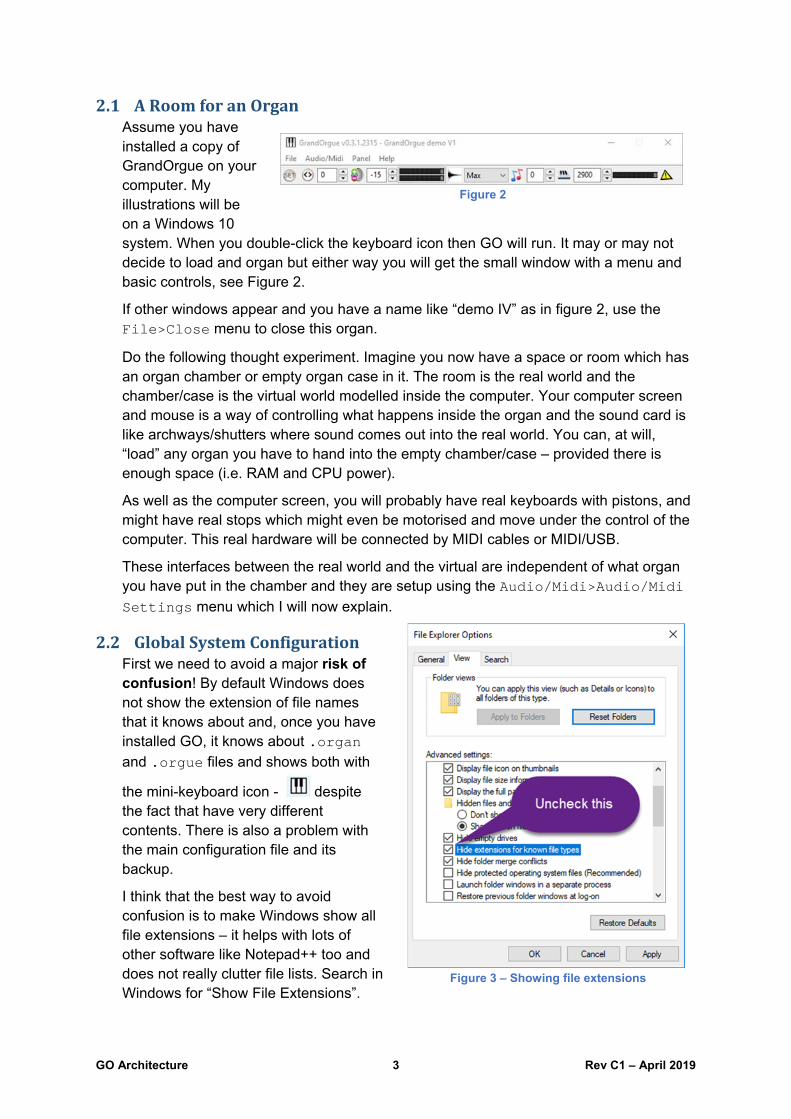
2.1 ARoomforanOrganAssume you have installed a copy of GrandOrgue on your computer. My illustrations will be on a Windows 10 system. When you double-click the keyboard icon then GO will run. It may or may not decide to load and organ but either way you will get the small window with a menu and basic controls, see Figure 2.
If other windows appear and you have a name like “demo IV” as in figure 2, use the File>Close menu to close this organ.
Do the following thought experiment. Imagine you now have a space or room which has an organ chamber or empty organ case in it. The room is the real world and the chamber/case is the virtual world modelled inside the computer. Your computer screen and mouse is a way of controlling what happens inside the organ and the sound card is like archways/shutters where sound comes out into the real world. You can, at will, “load” any organ you have to hand into the empty chamber/case – provided there is enough space (i.e. RAM and CPU power).
As well as the computer screen, you will probably have real keyboards with pistons, and might have real stops which might even be motorised and move under the control of the computer. This real hardware will be connected by MIDI cables or MIDI/USB.
These interfaces between the real world and the virtual are independent of what organ you have put in the chamber and they are setup using the Audio/Midi>Audio/Midi
Settings menu which I will now explain.
2.2 GlobalSystemConfigurationFirst we need to avoid a major risk of confusion! By default Windows does not show the extension of file names that it knows about and, once you have installed GO, it knows about .organ
and .orgue files and shows both with
the mini-keyboard icon - despite the fact that have very different contents. There is also a problem with the main configuration file and its backup.
I think that the best way to avoid confusion is to make Windows show all file extensions – it helps with lots of other software like Notepad++ too and does not really clutter file lists. Search in Windows for “Show File Extensions”.
Figure 2
Figure 3 – Showing file extensions

GO Architecture 4 Rev C1 – April 2019
You will be taken to a Control Panel dialog like figure 3
Uncheck Hide extensions to known file types and click Apply
Now Windows Explorer will show you what types of file you have and we can look at the configuration processes.
The Audio/Midi Settings menu has 10 tabs for all the different areas of the interface which apply to whatever organ you decide to load – i.e. global settings. I will concentrate on ones that help illustrate the way GO is configured.
The configuration information is stored in a file called GrandOrgueConfig (note there
is no file extension). This is buried in the folder structure of your Windows hard drive. Typically this will be C:\Users\login-name\AppData\Roaming.
Figure 4 shows its location on my computer as my username is John.
You will notice in figure 4 that there is a GrandOrgueConfig.last file; this is the version before your latest use of Save in
GrandOrgue.
On my system there are also GrandOrgueConfig-1 and GrandOrgueConfig-
1.last files. They are there because it is
sometimes useful to be able to have several different instances of a GrandOrgue installation available to you on one computer – perhaps to support different keyboard stacks or different sound cards/DACs.
You can configure GO shortcuts to select these alternative configuration by adding a -i parameter. Figure 5 shows the setup for instance 1 that we see above.
The GrandOrgueConfig file is edited using the GO Audio/Midi Settings dialogs (see figure 6) but the contents can be inspected with any text editor (my favourite is Notepad++ for small to medium sized files). As there is no filename extension you will need to use the File>Open menu of your editor rather than a right-click option.
We now look at the data defined on two of the tabs of Audio Output and Midi Devices in more detail.
Figure 4– Location of GrandOrgueConfig on my computer
Figure 5 – Starting an instance of GO
GO Architecture 5 Rev C1 – April 2019
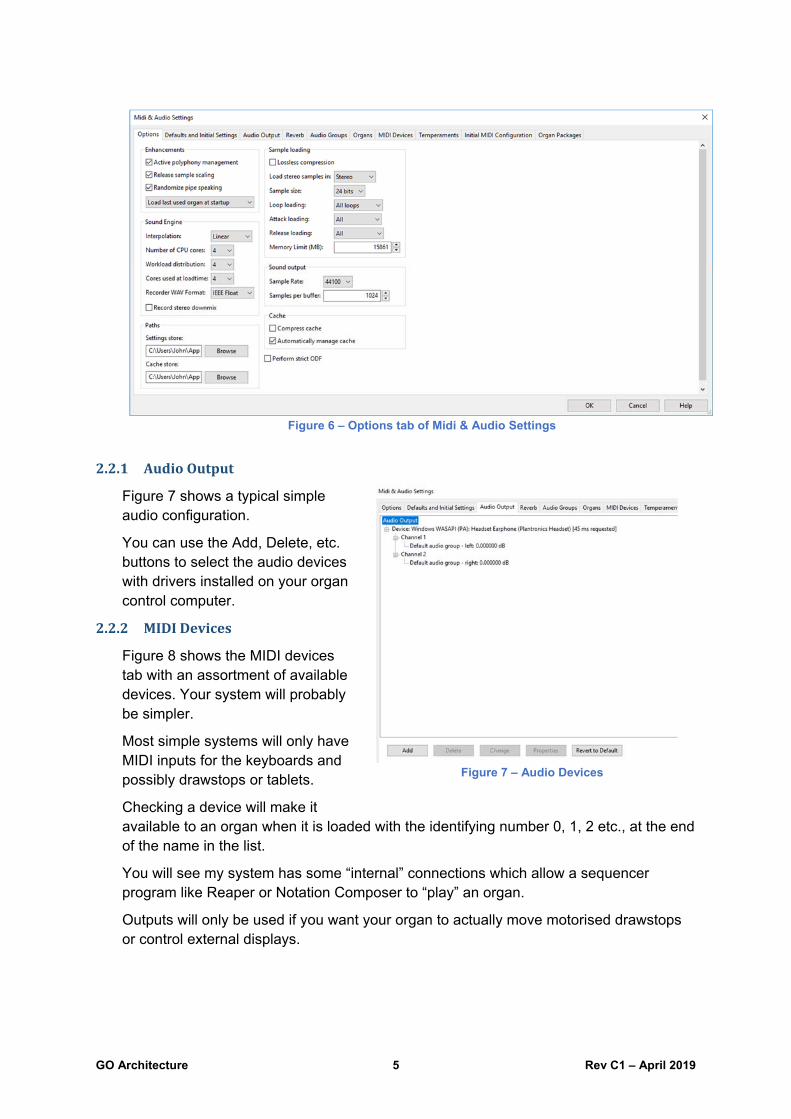
2.2.1 AudioOutput
Figure 7 shows a typical simple audio configuration.
You can use the Add, Delete, etc. buttons to select the audio devices with drivers installed on your organ control computer.
2.2.2 MIDIDevices
Figure 8 shows the MIDI devices tab with an assortment of available devices. Your system will probably be simpler.
Most simple systems will only have MIDI inputs for the keyboards and possibly drawstops or tablets.
Checking a device will make it available to an organ when it is loaded with the identifying number 0, 1, 2 etc., at the end of the name in the list.
You will see my system has some “internal” connections which allow a sequencer program like Reaper or Notation Composer to “play” an organ.
Outputs will only be used if you want your organ to actually move motorised drawstops or control external displays.
Figure 6 – Options tab of Midi & Audio Settings
Figure 7 – Audio Devices

GO Architecture 6 Rev C1 – April 2019
2.2.3 Othertabs
Provided you remember that the purpose of the whole dialog is to control the environment into which any organ will be loaded you should find that the descriptions of the other tabs that are given in the Help file are quite clear.
2.3 Themodelforanindividualorgan
2.3.1 OrganPackages
When you get, or make, a GrandOrgue organ this will consist of a definition of the layout of the virtual console and its controls and a whole set of files giving the digitised sound of each pipe, images of stops, keys and other console features. This “package” is sometimes referred to as a Sample Set.
There are two different ways in which you might get the “package”.
The “modern” way is in a single file whose file name extension is .orgue
When you install GrandOrgue you will get a free Demo organ and this will be loaded when you first start GO. Its virtual console is shown in figure 9.
Many older GO packages are distributed via the Internet in .zip or .rar format archive
files. Here you need to unzip the archive, by right clicking on it, into a folder conventionally put in My Documents>GrandOrgue>Organs This unzipped folder will
Figure 8 – MIDI Devices tab
Figure 9 – The Demo Organ
GO Architecture 7 Rev C1 – April 2019
have a file whose name is the organ name and with the extension .organ and also
have several folders with names like images and pipe.
Figure 10 shows the Demo package file in its normal place after a GO installation.
You will see it is larger than a .organ file – it has the sound samples for the organ –
Some .orgue files can be several gigabytes. It has a very odd looking name. That is
correct and normal!
When you are using a .orgue package you don’t have to perform any installation steps
which you might be used to if you use Hauptwerk. This is very convenient for using modern packaged organs but we need to take a small detour as later I want to look inside the Demo organ to help explain the process of constructing and configuring your own organ.
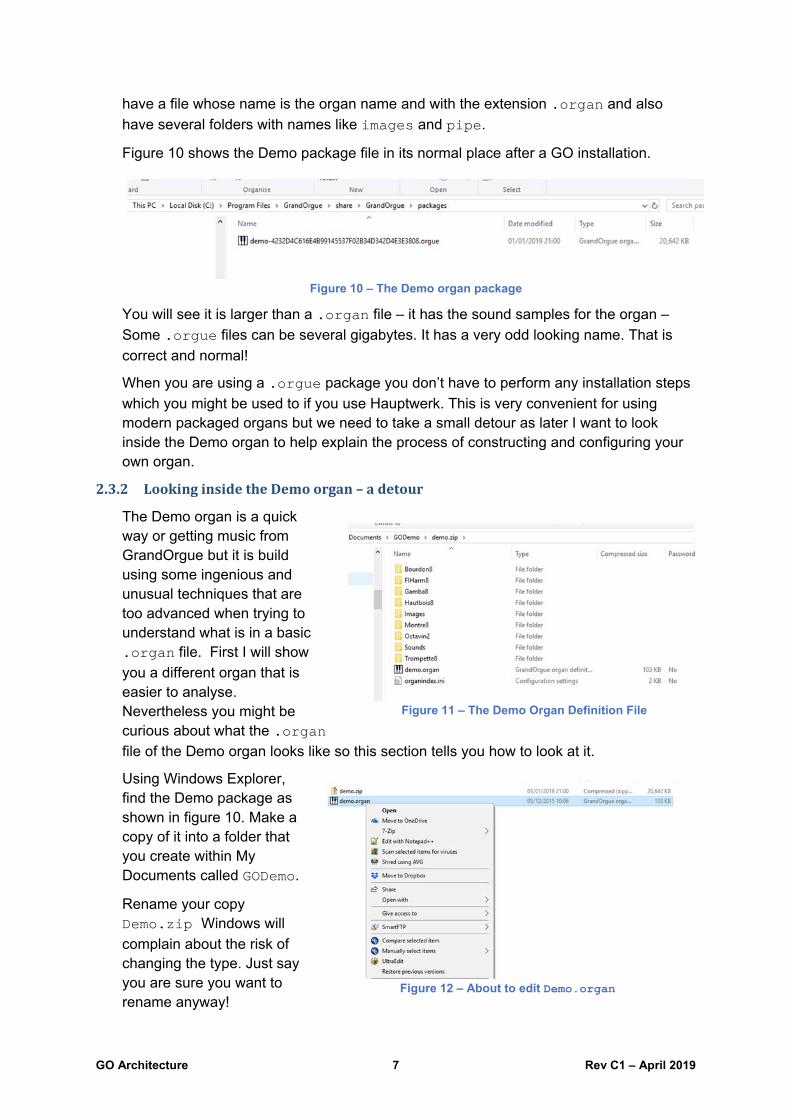
2.3.2 LookinginsidetheDemoorgan–adetour
The Demo organ is a quick way or getting music from GrandOrgue but it is build using some ingenious and unusual techniques that are too advanced when trying to understand what is in a basic .organ file. First I will show
you a different organ that is easier to analyse. Nevertheless you might be curious about what the .organ
file of the Demo organ looks like so this section tells you how to look at it.
Using Windows Explorer, find the Demo package as shown in figure 10. Make a copy of it into a folder that you create within My Documents called GODemo.
Rename your copy Demo.zip Windows will
complain about the risk of changing the type. Just say you are sure you want to rename anyway!
Figure 10 – The Demo organ package
Figure 11 – The Demo Organ Definition File
Figure 12 – About to edit Demo.organ
GO Architecture 8 Rev C1 – April 2019
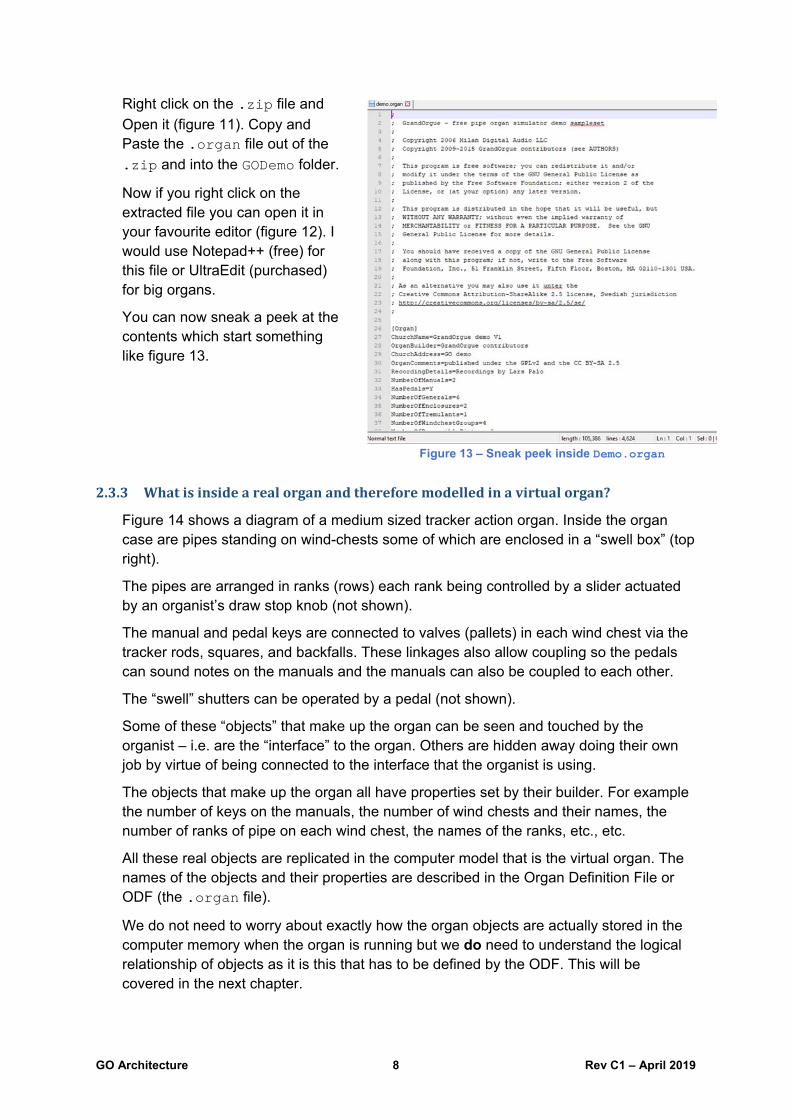
Right click on the .zip file and
Open it (figure 11). Copy and Paste the .organ file out of the
.zip and into the GODemo folder.
Now if you right click on the extracted file you can open it in your favourite editor (figure 12). I would use Notepad++ (free) for this file or UltraEdit (purchased) for big organs.
You can now sneak a peek at the contents which start something like figure 13.
2.3.3 Whatisinsidearealorganandthereforemodelledinavirtualorgan?
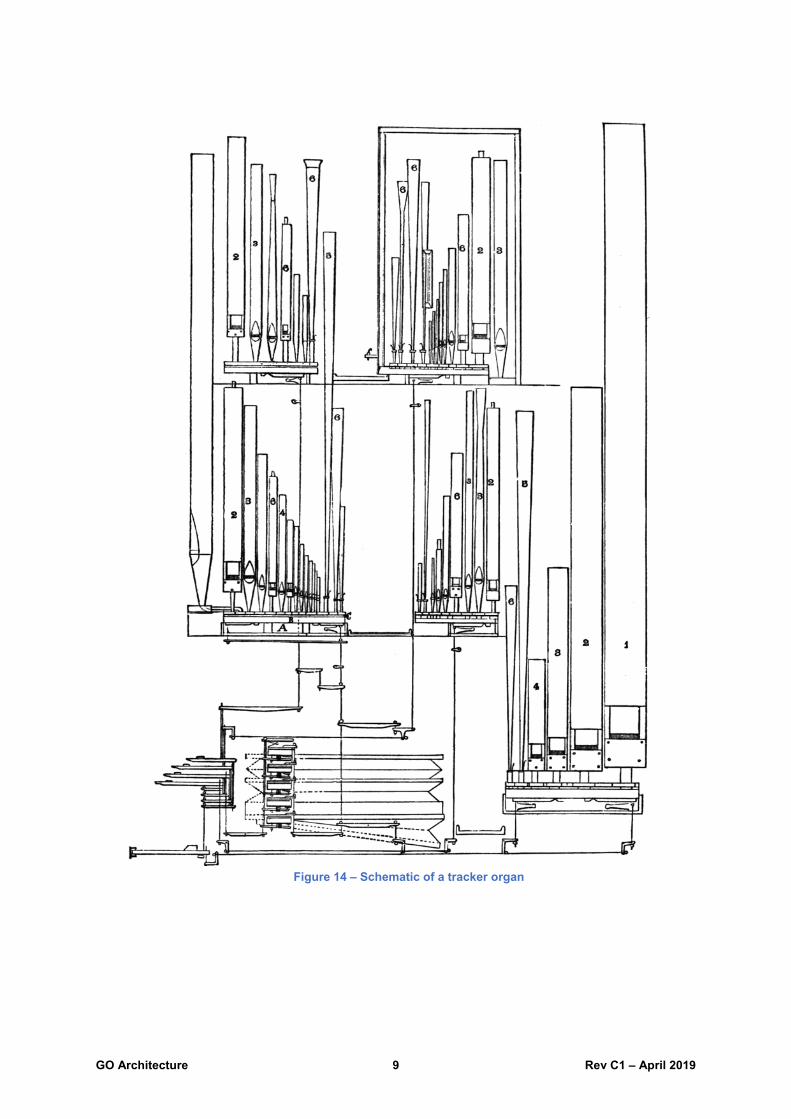
Figure 14 shows a diagram of a medium sized tracker action organ. Inside the organ case are pipes standing on wind-chests some of which are enclosed in a “swell box” (top right).
The pipes are arranged in ranks (rows) each rank being controlled by a slider actuated by an organist’s draw stop knob (not shown).
The manual and pedal keys are connected to valves (pallets) in each wind chest via the tracker rods, squares, and backfalls. These linkages also allow coupling so the pedals can sound notes on the manuals and the manuals can also be coupled to each other.
The “swell” shutters can be operated by a pedal (not shown).
Some of these “objects” that make up the organ can be seen and touched by the organist – i.e. are the “interface” to the organ. Others are hidden away doing their own job by virtue of being connected to the interface that the organist is using.
The objects that make up the organ all have properties set by their builder. For example the number of keys on the manuals, the number of wind chests and their names, the number of ranks of pipe on each wind chest, the names of the ranks, etc., etc.
All these real objects are replicated in the computer model that is the virtual organ. The names of the objects and their properties are described in the Organ Definition File or ODF (the .organ file).
We do not need to worry about exactly how the organ objects are actually stored in the computer memory when the organ is running but we do need to understand the logical relationship of objects as it is this that has to be defined by the ODF. This will be covered in the next chapter.
Figure 13 – Sneak peek inside Demo.organ
GO Architecture 9 Rev C1 – April 2019
Figure 14 – Schematic of a tracker organ

GO Architecture 10 Rev C1 – April 2019
3 DetailsofanorgananditsODF
This section describes the contents of an ODF. The organ chosen is samples from one built in 2002 by Grenzing at Escola Superior de Música de Catalunya (ESMUC). The GO organ was produced by Pere Casulleras. This organ is licenced under the Creative Commons licence so is free to copy and use. The detailed licencing is in the package a copy of which can be downloaded from my site at:
www.castlewoodconsultants.com/GrandOrgue/orgueesmuc.zip
The original is a .rar file but my copy, which is a .zip, is easier to de-archive in
Windows. It also has the single .organ file that I refer to rather than multiple versions in
the original and this .organ file has many detailed changes so I can illustrate
explanations of the GO system architecture.
3.1 ODFRubric;############################################################### ;Orgue Grenzing de 2002, Escola Superior de Música de Catalunya ; ;ODF-Version 26.08.2014 by chilissimo & mikelektric ; Adapted (April 2019) by John Prentice to illustrate additional ; architectural features of GO .organ files ; ;################################################################
The semicolons introduce “comment” lines that are just present for human readers.
As with all open source software, when you are making an organ you should consider the licence conditions. If you are making a Derived Work then, of course, you must base your licence on the original work. For an original work you can choose your licence but make sure it is clear by including suitable conditions in the ODF.
3.2 ODFSectionsThe remainder of the ODF consists of a number of Sections. For example:
[Organ] ChurchName=Orgue de l'ESMUC ChurchAddress=Escola Superior de Música de Barcelona OrganBuilder=Gerhard Grenzing OrganBuildDate=2002 OrganComments=ODF-Version 26.08.2014 by chilissimo & mikelektric RecordingDetails=Pere Casulleras 2008 NumberOfManuals=2 HasPedals=Y NumberOfGenerals=0 NumberOfRanks=2 ; most Stops have inline rank information NumberOfEnclosures=1 NumberOfTremulants=1 NumberOfWindchestGroups=5 NumberOfReversiblePistons=0 NumberOfLabels=14 NumberOfImages=1 NumberOfDivisionalCouplers=0 DispDrawstopCols=4 DispDrawstopRows=14 DispDrawstopColsOffset=Y DispDrawstopOuterColOffsetUp=N

GO Architecture 11 Rev C1 – April 2019
DispScreenSizeHoriz=Small DispScreenSizeVert=Medium DispControlLabelFont=Times New Roman DispShortcutKeyLabelFont=Arial DispShortcutKeyLabelColour=Yellow DispGroupLabelFont=Times New Roman DispDrawstopBackgroundImageNum=15 DispConsoleBackgroundImageNum=15 DispKeyHorizBackgroundImageNum=16 DispKeyVertBackgroundImageNum=15 DispDrawstopInsetBackgroundImageNum=15 DispExtraButtonRows=3 DispPairDrawstopCols=N DivisionalsStoreTremulants=N DivisionalsStoreIntermanualCouplers=Y DivisionalsStoreIntramanualCouplers=Y GeneralsStoreDivisionalCouplers=N CombinationsStoreNonDisplayedDrawstops=N AmplitudeLevel=100 DispExtraDrawstopRows=2 DispExtraDrawstopCols=6 DispExtraDrawstopRowsAboveExtraButtonRows=Y DispTrimAboveExtraRows=Y DispButtonCols=10 DispButtonsAboveManuals=N DispTrimAboveManuals=Y DispTrimBelowManuals=N DispExtraPedalButtonRow=N DispExtraPedalButtonRowOffset=Y DispExtraPedalButtonRowOffsetRight=Y DispDrawstopWidth=58 DispDrawstopHeight=51 [Manual000] Name=PEDAL MIDIInputNumber=001 NumberOfLogicalKeys=30 NumberOfAccessibleKeys=30 FirstAccessibleKeyLogicalKeyNumber=1 FirstAccessibleKeyMIDINoteNumber=36 NumberOfStops=2 Stop001=001 Stop002=002 NumberOfCouplers=2 Coupler001=001 Coupler002=002 NumberOfTremulants=0 NumberOfDivisionals=0 ;DispKeyColourWooden=Y DispKeyColourInverted=N Displayed=Y [Manual001] Name=GREAT MIDIInputNumber=002 NumberOfLogicalKeys=56 NumberOfAccessibleKeys=56 FirstAccessibleKeyLogicalKeyNumber=1 FirstAccessibleKeyMIDINoteNumber=36 NumberOfStops=5
GO Architecture 12 Rev C1 – April 2019
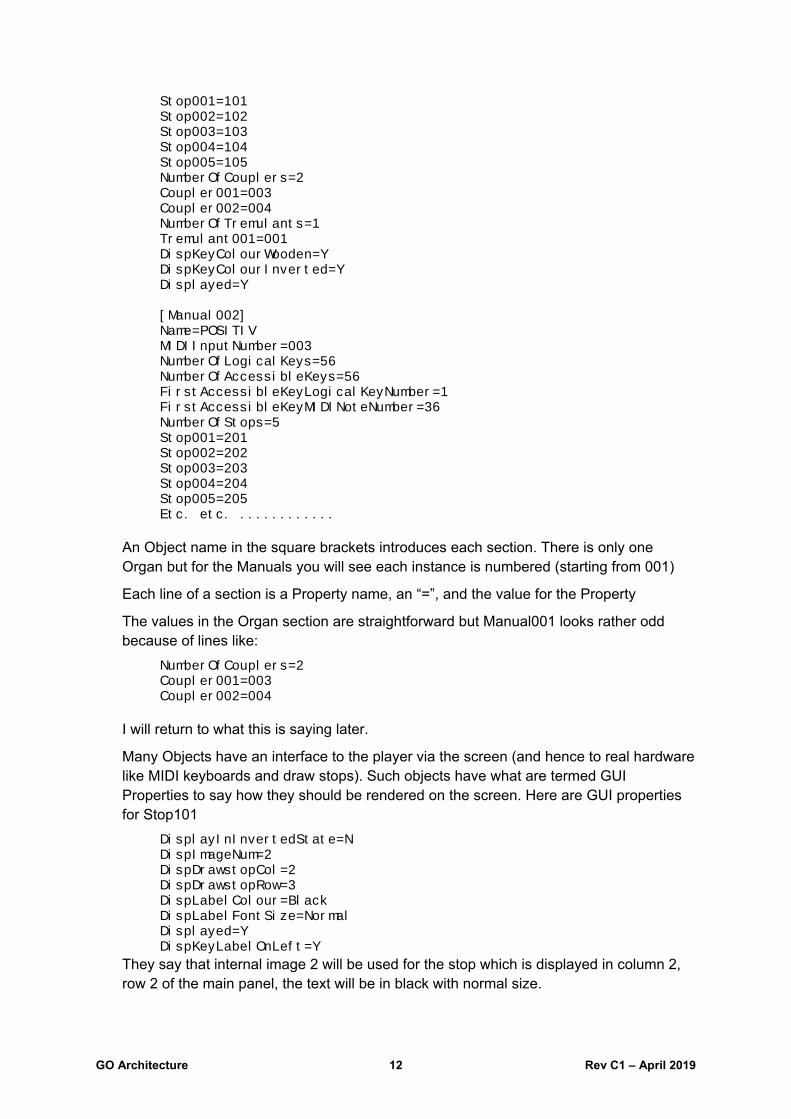
Stop001=101 Stop002=102 Stop003=103 Stop004=104 Stop005=105 NumberOfCouplers=2 Coupler001=003 Coupler002=004 NumberOfTremulants=1 Tremulant001=001 DispKeyColourWooden=Y DispKeyColourInverted=Y Displayed=Y [Manual002] Name=POSITIV MIDIInputNumber=003 NumberOfLogicalKeys=56 NumberOfAccessibleKeys=56 FirstAccessibleKeyLogicalKeyNumber=1 FirstAccessibleKeyMIDINoteNumber=36 NumberOfStops=5 Stop001=201 Stop002=202 Stop003=203 Stop004=204 Stop005=205 Etc. etc. ............
An Object name in the square brackets introduces each section. There is only one Organ but for the Manuals you will see each instance is numbered (starting from 001)
Each line of a section is a Property name, an “=”, and the value for the Property
The values in the Organ section are straightforward but Manual001 looks rather odd because of lines like:
NumberOfCouplers=2 Coupler001=003 Coupler002=004
I will return to what this is saying later.
Many Objects have an interface to the player via the screen (and hence to real hardware like MIDI keyboards and draw stops). Such objects have what are termed GUI Properties to say how they should be rendered on the screen. Here are GUI properties for Stop101
DisplayInInvertedState=N DispImageNum=2 DispDrawstopCol=2 DispDrawstopRow=3 DispLabelColour=Black DispLabelFontSize=Normal Displayed=Y DispKeyLabelOnLeft=Y
They say that internal image 2 will be used for the stop which is displayed in column 2, row 2 of the main panel, the text will be in black with normal size.
GO Architecture 13 Rev C1 – April 2019
If you open the .organ file on your system you will see that Stop104 has different
properties as it uses a custom pair of images and does not display the text on the stop head.
3.3 ObjecttypesandtheirpropertiesYou have seen how each “section” of the ODF defines the Properties of an instance of an object. I now need to show you how to find the names and meanings of Properties for any type of object.
All the information is in the GO Help system but it is easier to find with some hints.
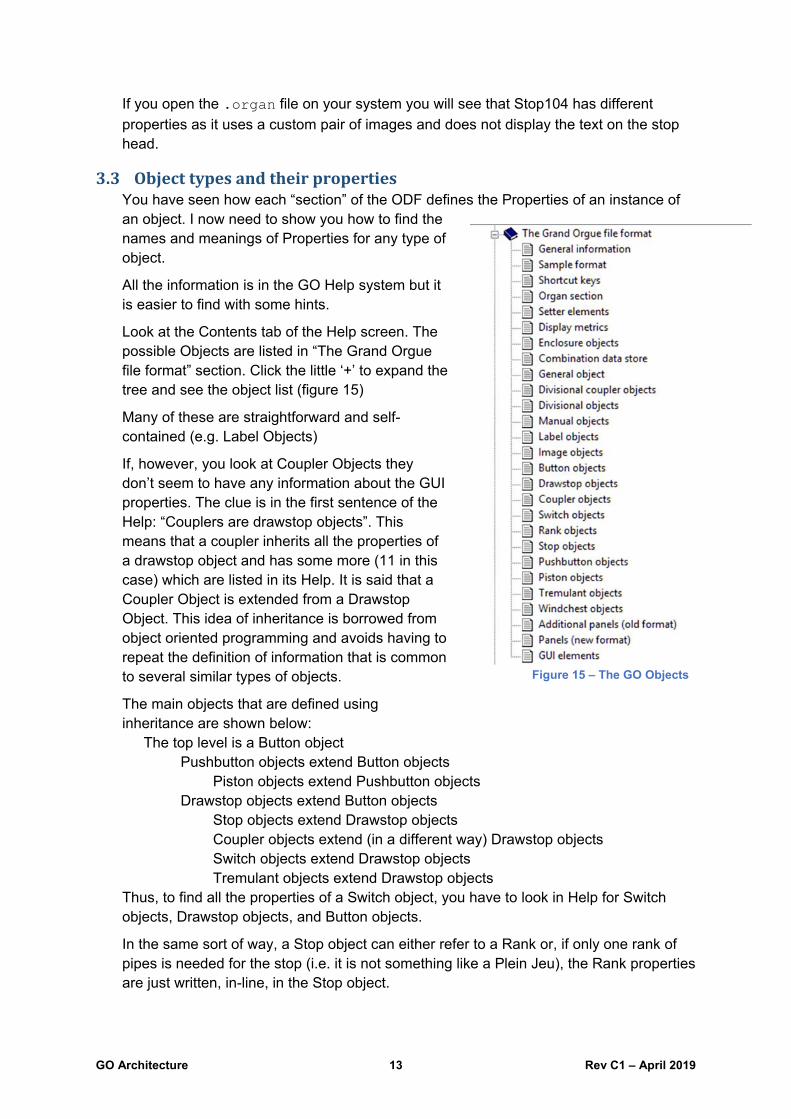
Look at the Contents tab of the Help screen. The possible Objects are listed in “The Grand Orgue file format” section. Click the little ‘+’ to expand the tree and see the object list (figure 15)
Many of these are straightforward and self-contained (e.g. Label Objects)
If, however, you look at Coupler Objects they don’t seem to have any information about the GUI properties. The clue is in the first sentence of the Help: “Couplers are drawstop objects”. This means that a coupler inherits all the properties of a drawstop object and has some more (11 in this case) which are listed in its Help. It is said that a Coupler Object is extended from a Drawstop Object. This idea of inheritance is borrowed from object oriented programming and avoids having to repeat the definition of information that is common to several similar types of objects.
The main objects that are defined using inheritance are shown below:
The top level is a Button object Pushbutton objects extend Button objects
Piston objects extend Pushbutton objects Drawstop objects extend Button objects
Stop objects extend Drawstop objects Coupler objects extend (in a different way) Drawstop objects Switch objects extend Drawstop objects Tremulant objects extend Drawstop objects
Thus, to find all the properties of a Switch object, you have to look in Help for Switch objects, Drawstop objects, and Button objects.
In the same sort of way, a Stop object can either refer to a Rank or, if only one rank of pipes is needed for the stop (i.e. it is not something like a Plein Jeu), the Rank properties are just written, in-line, in the Stop object.
Figure 15 – The GO Objects
GO Architecture 14 Rev C1 – April 2019
The order in which you define properties of an object in a section of an ODF does not matter to GO but it is better for human readers to be consistent for each object and keep the GUI properties together. One effective scheme is to list them in the order they are explained on the Help system pages starting with the top level (Button) properties and following down the inheritance (e.g. Drawstop, Switch)
3.4 ADigressionintodatabasesIf you have done any database programming you might wish to just skim-read this section.
A Database is a way of organising information stored in a computer system so that can be retrieved and updated whenever required. A Relational database uses a particular organisation to ensure the information can be quickly retrieved but is always consistent and reliable. You will probably have been irritated by telling a company that your address has changed but still getting letters sent by some part of that company to your old address. This is probably because their customer database system is not well designed.
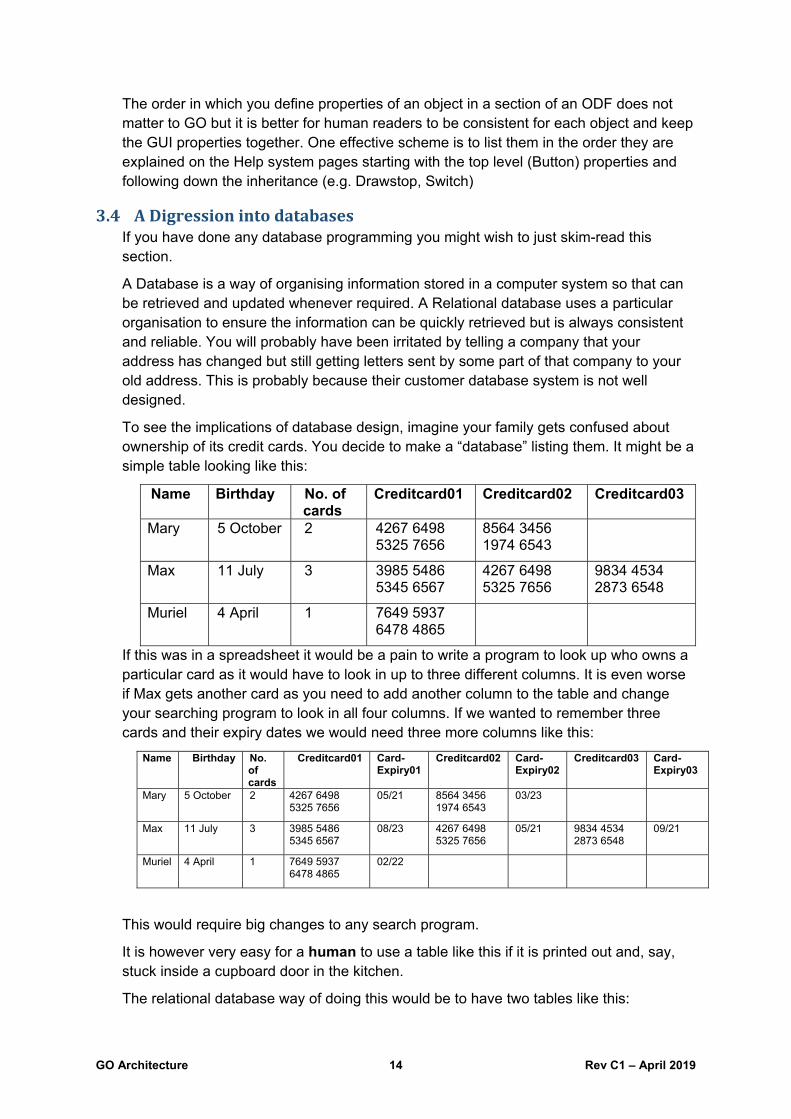
To see the implications of database design, imagine your family gets confused about ownership of its credit cards. You decide to make a “database” listing them. It might be a simple table looking like this:
Name Birthday No. of cards
Creditcard01 Creditcard02 Creditcard03
Mary 5 October 2 4267 6498 5325 7656
8564 3456 1974 6543
Max 11 July 3 3985 5486 5345 6567
4267 6498 5325 7656
9834 4534 2873 6548
Muriel 4 April 1 7649 5937 6478 4865
If this was in a spreadsheet it would be a pain to write a program to look up who owns a particular card as it would have to look in up to three different columns. It is even worse if Max gets another card as you need to add another column to the table and change your searching program to look in all four columns. If we wanted to remember three cards and their expiry dates we would need three more columns like this:
Name Birthday No. of cards
Creditcard01 Card-Expiry01
Creditcard02 Card-Expiry02
Creditcard03 Card-Expiry03
Mary 5 October 2 4267 6498 5325 7656
05/21 8564 3456 1974 6543
03/23
Max 11 July 3 3985 5486 5345 6567
08/23 4267 6498 5325 7656
05/21 9834 4534 2873 6548
09/21
Muriel 4 April 1 7649 5937 6478 4865
02/22
This would require big changes to any search program.
It is however very easy for a human to use a table like this if it is printed out and, say, stuck inside a cupboard door in the kitchen.
The relational database way of doing this would be to have two tables like this:

GO Architecture 15 Rev C1 – April 2019
Name Birthday
Mary 5 October
Max 11 July
Muriel 4 April
Key CardNumber Owner
1 9834 4534 2873 6548 Max
2 3985 5486 5345 6567 Max
3 7649 5937 6478 4865 Muriel
4 4267 6498 5325 7656 Mary
5 8564 3456 1974 6543 Mary
6 4267 6498 5325 7656 Max
Note:
a) It is very easy to add another card for anyone – it is just another row in the second table. No change is needed in a program that looks up who owns a particular card number even if someone has one hundred cards.
b) It would be easy to add a column to the second table giving the card expiry date for every card.
c) The database not only allows one person to have any number of cards it also allows cards with the same number to be owned by more than one person. In other words there can be a many-to-many relationship between cards and owners.
d) We have got rid of the possibility for inconsistency. In the original scheme you might say that Mary has three cards but only provide the numbers for two or, perhaps worse, provide three numbers but only declare there to be two cards either of which could confuse the search program!
e) It was OK to put the birthdays in the first database table because a person can only have one birthday. It would be OK to put expiry dates in the second table because a card only has one expiry date.
f) The two tables are not so easy to use for a human as having all the information in one table.
Point f) becomes more and more significant as the complexity of the database increases. Suppose we added a third table which is a list of hundreds of audio CDs owned by each person with the credit card number used to buy them. A computer program (incidentally, usually called a Query) would have no difficulty in telling which CDs might be presents by seeing that the purchasing credit card is not owned by the owner of the CD but doing this “by hand” looking at paper lists, while possible, would be very tedious.
3.5 GrandorgueorgansviewedasdatabasesHaving looked, albeit superficially, at database design it is now useful to see how the definition of an organ in GO is actually a database.
GO Architecture 16 Rev C1 – April 2019
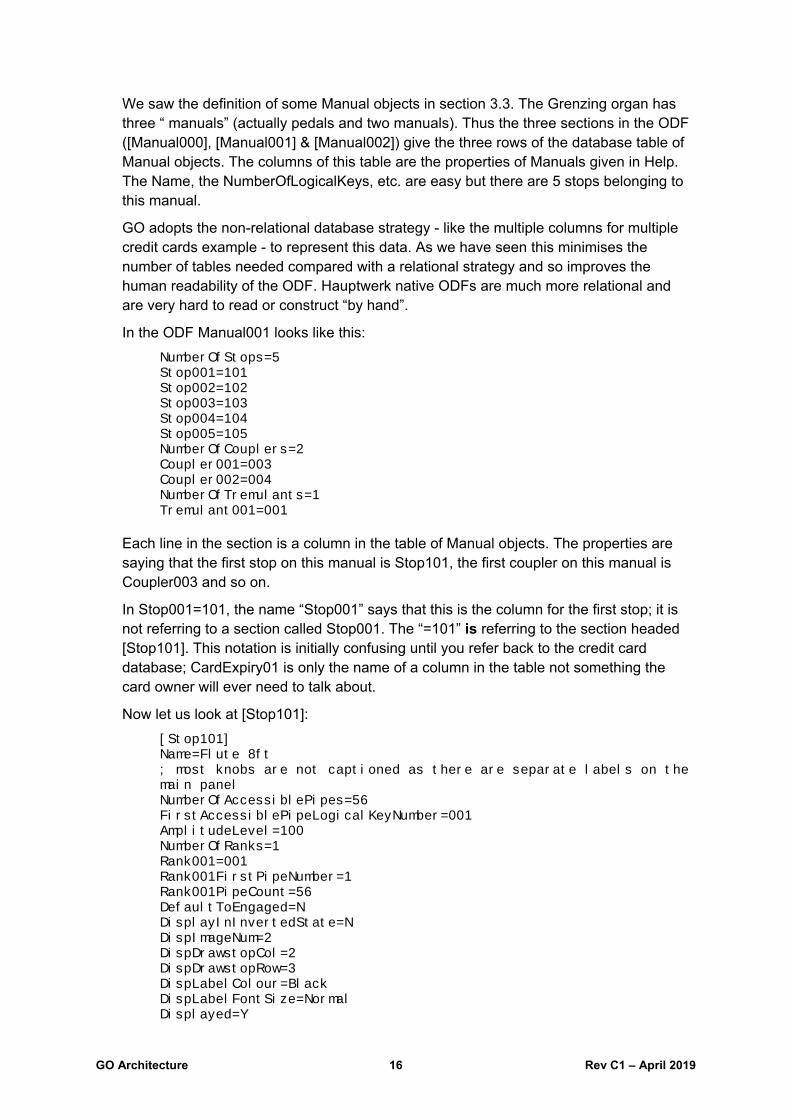
We saw the definition of some Manual objects in section 3.3. The Grenzing organ has three “ manuals” (actually pedals and two manuals). Thus the three sections in the ODF ([Manual000], [Manual001] & [Manual002]) give the three rows of the database table of Manual objects. The columns of this table are the properties of Manuals given in Help. The Name, the NumberOfLogicalKeys, etc. are easy but there are 5 stops belonging to this manual.
GO adopts the non-relational database strategy - like the multiple columns for multiple credit cards example - to represent this data. As we have seen this minimises the number of tables needed compared with a relational strategy and so improves the human readability of the ODF. Hauptwerk native ODFs are much more relational and are very hard to read or construct “by hand”.
In the ODF Manual001 looks like this:
NumberOfStops=5 Stop001=101 Stop002=102 Stop003=103 Stop004=104 Stop005=105 NumberOfCouplers=2 Coupler001=003 Coupler002=004 NumberOfTremulants=1 Tremulant001=001
Each line in the section is a column in the table of Manual objects. The properties are saying that the first stop on this manual is Stop101, the first coupler on this manual is Coupler003 and so on.
In Stop001=101, the name “Stop001” says that this is the column for the first stop; it is not referring to a section called Stop001. The “=101” is referring to the section headed [Stop101]. This notation is initially confusing until you refer back to the credit card database; CardExpiry01 is only the name of a column in the table not something the card owner will ever need to talk about.
Now let us look at [Stop101]:
[Stop101] Name=Flute 8ft ; most knobs are not captioned as there are separate labels on the main panel NumberOfAccessiblePipes=56 FirstAccessiblePipeLogicalKeyNumber=001 AmplitudeLevel=100 NumberOfRanks=1 Rank001=001 Rank001FirstPipeNumber=1 Rank001PipeCount=56 DefaultToEngaged=N DisplayInInvertedState=N DispImageNum=2 DispDrawstopCol=2 DispDrawstopRow=3 DispLabelColour=Black DispLabelFontSize=Normal Displayed=Y

GO Architecture 17 Rev C1 – April 2019
DispKeyLabelOnLeft=Y
First, notice that although there is only one rank of pipes I have referred to a separate named Rank object; this is because the Help file defines Pipe properties in the Rank object.
This Stop’s Rank is Rank001. It is defined like this:
[Rank001] Name=Flute 8' pipes FirstMidiNoteNumber=36 NumberOfLogicalPipes=56 WindchestGroup=002 HarmonicNumber=8 Gain=6 Percussive=N Pipe001=.\om_flautat\flautat_01.wav Pipe001PitchTuning=-4 Pipe001Gain=3 Pipe002=.\om_flautat\flautat_02.wav Pipe002PitchTuning=3 Pipe002Gain=1 Pipe003=.\om_flautat\flautat_03.wav Pipe003PitchTuning=5 Pipe003Gain=2 Pipe004=.\om_flautat\flautat_04.wav Pipe005=.\om_flautat\flautat_05.wav
| |
Pipe050=.\om_flautat\flautat_50.wav Pipe051=.\om_flautat\flautat_51.wav Pipe052=.\om_flautat\flautat_52.wav Pipe053=.\om_flautat\flautat_53.wav Pipe054=.\om_flautat\flautat_54.wav Pipe055=.\om_flautat\flautat_55.wav Pipe056=.\om_flautat\flautat_56.wav
Pipes 006 to 049 are omitted here to save space.
Three properties are given for the first three pipes – the name of the sample file, the tuning and the Gain (volume in dBs). The remainder of the pipes only name the sample file with the other properties taking their default values. The property NumberOfLogicalPipes=56 says there are 56 pipes so in total there would seem to be 168 columns giving details about the pipes of the rank. If this is not obvious just compare it to the example of people with up to three credit cards which have expiry dates that is given above.
Notes:
a) In the Help file, these property columns are described as Pipe999PitchTuning, Pipe999Gain, and Pipe999. I find it helpful to think of, for example, Pipe999PitchTuning as PipennnPitchTuning to emphasise that the 999 (nnn) is a placeholder for a range of numbers (usually starting at 001). The range of 999 (nnn) that must be given will be defined by a count property – in this case 56 which is the NumberOfLogicalPipes.
b) The property Pipe999 would be more easily understood if it was called Pipe999Attack but this shortened version is historical and is used quite often – not
GO Architecture 18 Rev C1 – April 2019
always for a textual name property (for example see Enclosure999 and Tremulant999 in Windchest objects).
c) Although we seem to have given 3 x 56 extra columns in the object table there will in fact be many more columns than this because of all the properties that have default values (Percussive, AmplitudeLevel, HarmonicNumber, TrackerDelay, etc., etc. – see the full list in the Help file for Rank objects); there will be 56 columns for each of these actually stored as the Rank object in GO’s memory.
d) To re-iterate, the number part of the column names is only there to make them unique and does not have any special meaning. You can see this in the credit card example – Muriel will not put a sticker on the card to say it is “CreditCard1”.
e) We only have one Rank of pipes in Stop101. It is possible to need several ranks because it is a mixture rank like a Plein Jeu which is made of several separately recorded pipes per note or because you have samples of the action noise that you play with the notes. If you only have one then you can make the ODF shorter by including the Pipe999 properties in the Stop section. Stop103 is defined like this. I show you the more “verbose” layout for Stop101 first because the Help file defines the list of possible properties under the Rank heading. You can understand how Stop103 works by realizing that it has the shortcut of the anonymous Rank built into it.
f) The way of defining the mapping of keys to the Pipe999 entry differs if you have and anonymous rank in the Stop section or a separate Rank section. If you have an anonymous rank (i.e. NumberOfRanks=0) then you must specify FirstAccessiblePipeLogicalPipeNumber. If you have one sample per key then this will be 001. If you have, say 12, additional samples going down in pitch (e.g. to support a sub-octave coupler) then it would be 013. If you have named ranks then you must define FirstMidiNoteNumber for the rank instead of FirstAccessiblePipeLogicalPipeNumber. GO is quite helpful in noting unused property definitions in the log when an organ is loaded. This will alert you if you break this rank/no-rank coding convention.
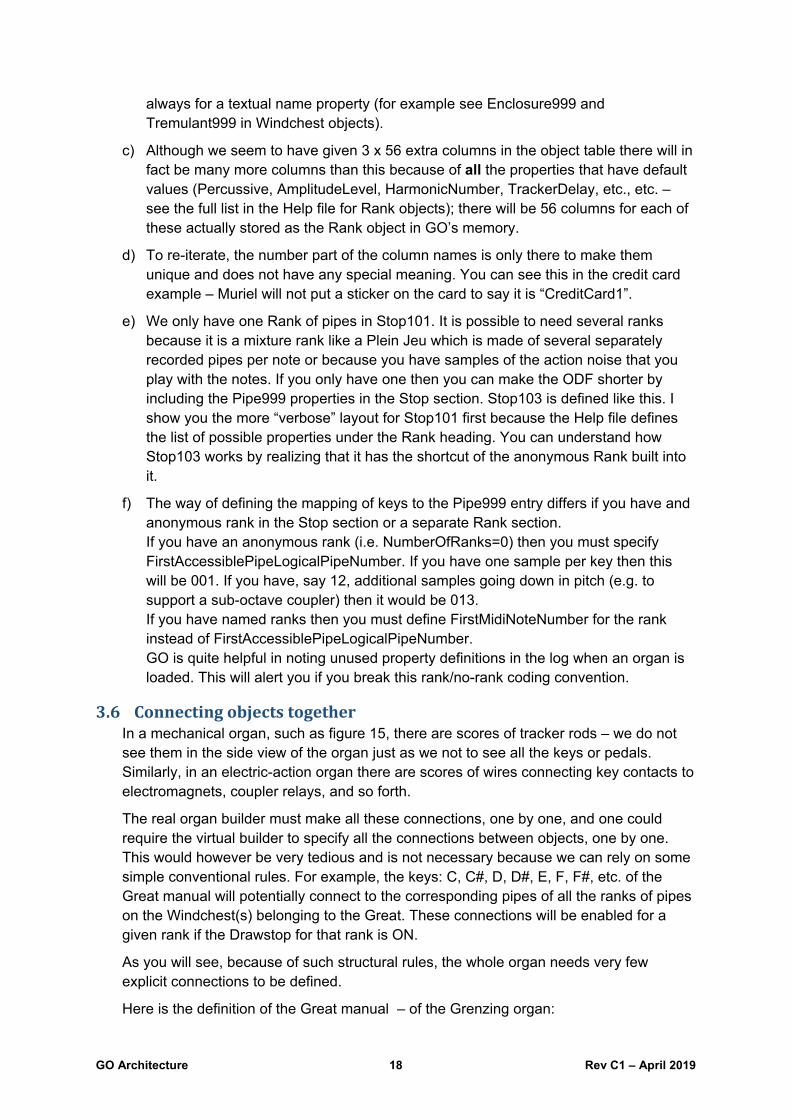
3.6 ConnectingobjectstogetherIn a mechanical organ, such as figure 15, there are scores of tracker rods – we do not see them in the side view of the organ just as we not to see all the keys or pedals. Similarly, in an electric-action organ there are scores of wires connecting key contacts to electromagnets, coupler relays, and so forth.
The real organ builder must make all these connections, one by one, and one could require the virtual builder to specify all the connections between objects, one by one. This would however be very tedious and is not necessary because we can rely on some simple conventional rules. For example, the keys: C, C#, D, D#, E, F, F#, etc. of the Great manual will potentially connect to the corresponding pipes of all the ranks of pipes on the Windchest(s) belonging to the Great. These connections will be enabled for a given rank if the Drawstop for that rank is ON.
As you will see, because of such structural rules, the whole organ needs very few explicit connections to be defined.
Here is the definition of the Great manual – of the Grenzing organ:
GO Architecture 19 Rev C1 – April 2019
[Manual001] Name=GREAT MIDIInputNumber=002 NumberOfLogicalKeys=56 NumberOfAccessibleKeys=56 FirstAccessibleKeyLogicalKeyNumber=1 FirstAccessibleKeyMIDINoteNumber=36 NumberOfStops=5 Stop001=101 Stop002=102 Stop003=103 Stop004=104 Stop005=105 NumberOfCouplers=2 Coupler001=003 Coupler002=004 NumberOfTremulants=1 Tremulant001=001 DispKeyColourWooden=Y DispKeyColourInverted=Y Displayed=Y
We have already seen Stop101 and Stop103 and we now have seen all the main connections to play the stops of the Great.
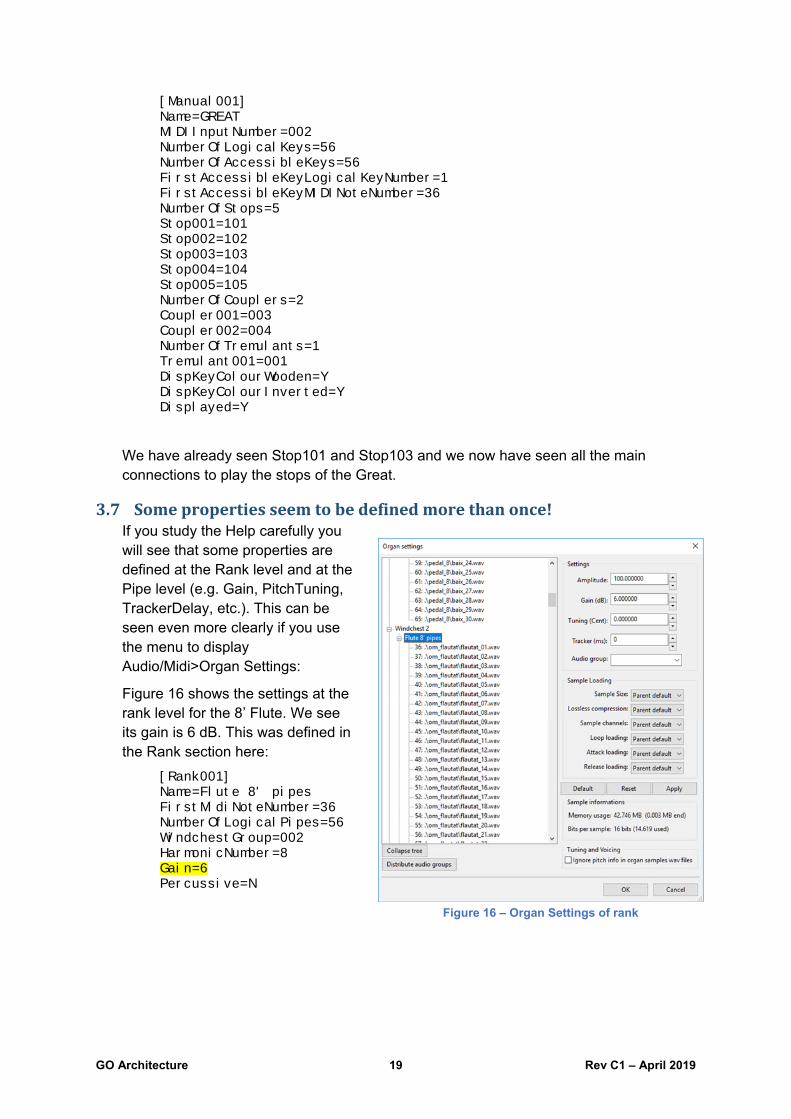
3.7 Somepropertiesseemtobedefinedmorethanonce!If you study the Help carefully you will see that some properties are defined at the Rank level and at the Pipe level (e.g. Gain, PitchTuning, TrackerDelay, etc.). This can be seen even more clearly if you use the menu to display Audio/Midi>Organ Settings:
Figure 16 shows the settings at the rank level for the 8’ Flute. We see its gain is 6 dB. This was defined in the Rank section here:
[Rank001] Name=Flute 8' pipes FirstMidiNoteNumber=36 NumberOfLogicalPipes=56 WindchestGroup=002 HarmonicNumber=8 Gain=6 Percussive=N
Figure 16 – Organ Settings of rank
GO Architecture 20 Rev C1 – April 2019
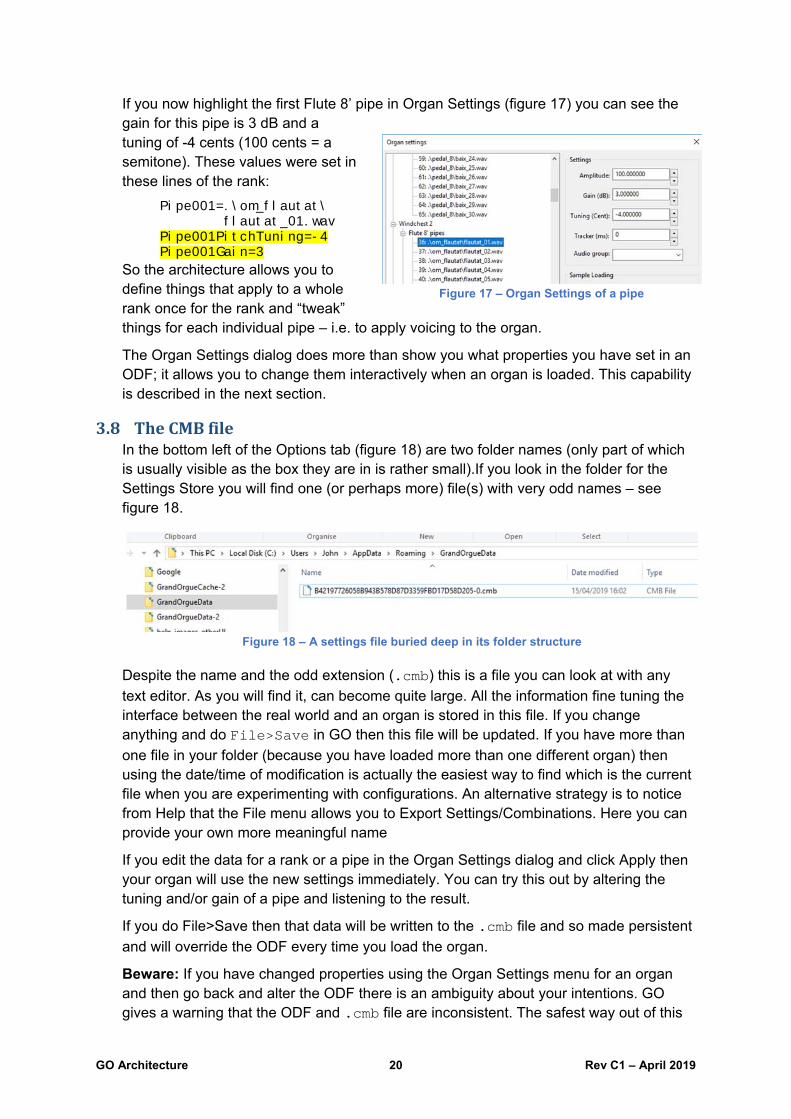
If you now highlight the first Flute 8’ pipe in Organ Settings (figure 17) you can see the gain for this pipe is 3 dB and a tuning of -4 cents (100 cents = a semitone). These values were set in these lines of the rank:
Pipe001=.\om_flautat\ flautat_01.wav Pipe001PitchTuning=-4 Pipe001Gain=3
So the architecture allows you to define things that apply to a whole rank once for the rank and “tweak” things for each individual pipe – i.e. to apply voicing to the organ.
The Organ Settings dialog does more than show you what properties you have set in an ODF; it allows you to change them interactively when an organ is loaded. This capability is described in the next section.
3.8 TheCMBfileIn the bottom left of the Options tab (figure 18) are two folder names (only part of which is usually visible as the box they are in is rather small).If you look in the folder for the Settings Store you will find one (or perhaps more) file(s) with very odd names – see figure 18.
Despite the name and the odd extension (.cmb) this is a file you can look at with any
text editor. As you will find it, can become quite large. All the information fine tuning the interface between the real world and an organ is stored in this file. If you change anything and do File>Save in GO then this file will be updated. If you have more than
one file in your folder (because you have loaded more than one different organ) then using the date/time of modification is actually the easiest way to find which is the current file when you are experimenting with configurations. An alternative strategy is to notice from Help that the File menu allows you to Export Settings/Combinations. Here you can provide your own more meaningful name
If you edit the data for a rank or a pipe in the Organ Settings dialog and click Apply then your organ will use the new settings immediately. You can try this out by altering the tuning and/or gain of a pipe and listening to the result.
If you do File>Save then that data will be written to the .cmb file and so made persistent
and will override the ODF every time you load the organ.
Beware: If you have changed properties using the Organ Settings menu for an organ and then go back and alter the ODF there is an ambiguity about your intentions. GO gives a warning that the ODF and .cmb file are inconsistent. The safest way out of this
Figure 17 – Organ Settings of a pipe
Figure 18 – A settings file buried deep in its folder structure
GO Architecture 21 Rev C1 – April 2019
is to delete the .cmb file. You will lose any combinations that have been saved and of
course your “voicing” will be lost so the general rule is to freeze the overall design of the organ in the ODF before using Organ Settings.
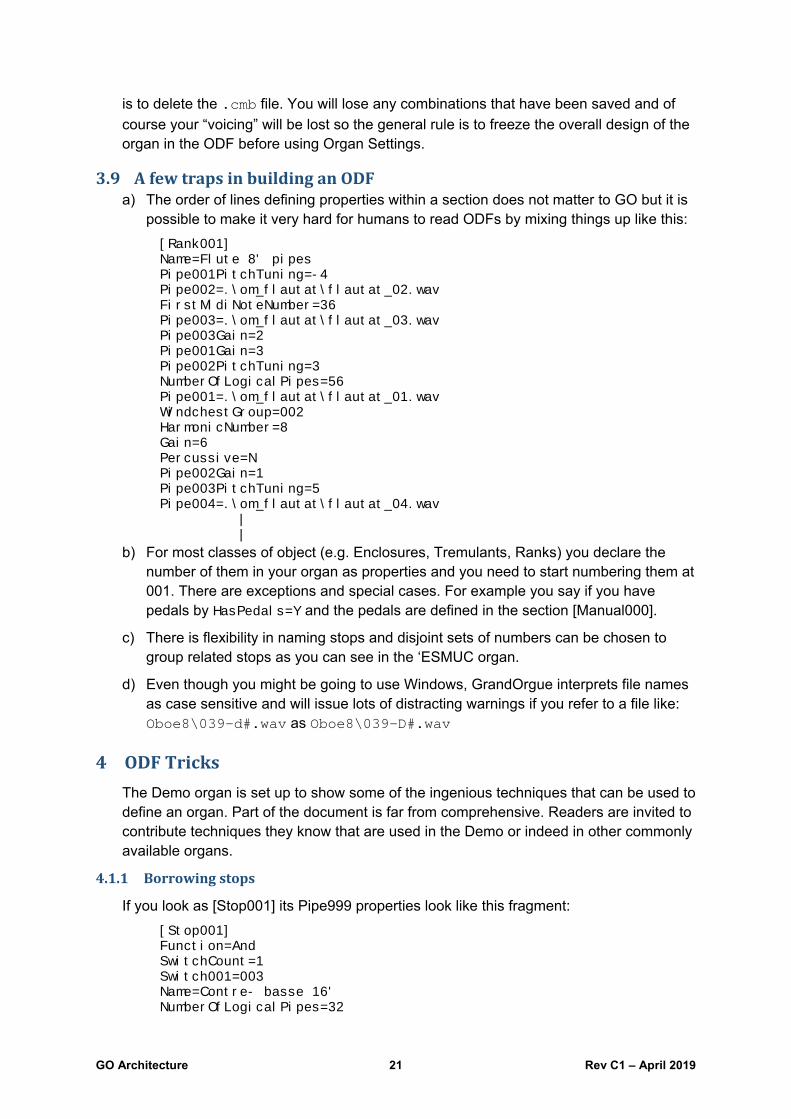
3.9 AfewtrapsinbuildinganODFa) The order of lines defining properties within a section does not matter to GO but it is
possible to make it very hard for humans to read ODFs by mixing things up like this:
[Rank001] Name=Flute 8' pipes Pipe001PitchTuning=-4 Pipe002=.\om_flautat\flautat_02.wav FirstMidiNoteNumber=36 Pipe003=.\om_flautat\flautat_03.wav Pipe003Gain=2 Pipe001Gain=3 Pipe002PitchTuning=3 NumberOfLogicalPipes=56 Pipe001=.\om_flautat\flautat_01.wav WindchestGroup=002 HarmonicNumber=8 Gain=6 Percussive=N Pipe002Gain=1 Pipe003PitchTuning=5 Pipe004=.\om_flautat\flautat_04.wav
| |
b) For most classes of object (e.g. Enclosures, Tremulants, Ranks) you declare the number of them in your organ as properties and you need to start numbering them at 001. There are exceptions and special cases. For example you say if you have pedals by HasPedals=Y and the pedals are defined in the section [Manual000].
c) There is flexibility in naming stops and disjoint sets of numbers can be chosen to group related stops as you can see in the ‘ESMUC organ.
d) Even though you might be going to use Windows, GrandOrgue interprets file names as case sensitive and will issue lots of distracting warnings if you refer to a file like: Oboe8\039-d#.wav as Oboe8\039-D#.wav
4 ODFTricks
The Demo organ is set up to show some of the ingenious techniques that can be used to define an organ. Part of the document is far from comprehensive. Readers are invited to contribute techniques they know that are used in the Demo or indeed in other commonly available organs.
4.1.1 Borrowingstops
If you look as [Stop001] its Pipe999 properties look like this fragment:
[Stop001] Function=And SwitchCount=1 Switch001=003 Name=Contre- basse 16' NumberOfLogicalPipes=32
GO Architecture 22 Rev C1 – April 2019
NumberOfAccessiblePipes=32 FirstAccessiblePipeLogicalPipeNumber=001 FirstAccessiblePipeLogicalKeyNumber=001 WindchestGroup=001 Percussive=N Displayed=N AmplitudeLevel=100 HarmonicNumber=4 Pipe001=REF:001:001:001 Pipe002=REF:001:001:002 Pipe003=REF:001:001:003 Pipe004=REF:001:001:004 Pipe005=REF:001:001:005 Pipe006=REF:001:001:006 Pipe007=REF:001:001:007 Pipe008=REF:001:001:008 etc.....
These Pipe lines replace the name of the .wav file for a pipe by a REFerence to another
pipe. The first number after REF: is the manual number, the second the stop on that manual and the third the pipe of the stop’s rank. In Demo, manual 001 is the Great, the first stop on it is Stop101 (the Montre 8’), and the pipes correspond one-for-one.
You can check this with the Demo ODF.
One thing seems wrong: Stop001 is the Contre-basse 16’ but we are borrowing pipes of an 8’ Montre. If you play the organ you find the Contre-basse does play an octave below the Montre as implied by the 16’ and 8’ in their names. The secret is that the Montre 8’ has samples in the octave below bottom C on the manuals (e.g. a sample Montre8\030-F#.wav). The primary purpose of this is to allow the sub-octave coupler
to continue its effect in the bottom octave but the REF:001:001:001 makes the Contre-basse borrow from the lowest, generally invisible, note which, of course, sounds at 16’ pitch.
Borrowing the pipes of a stop like this is like an extension, or unit chest, physical organ. You could think of two pull-downs opening the pallet or two signals ORed together to actuate a magnet-valve. Playing a pipe from two places at once is, of course, not twice as loud – it is still one pipe and this is equally true with borrowed pipes in GO.. You can, of course, duplicate the sample files and so load a pipe’s sound more than once. Then playing both together is twice as loud.
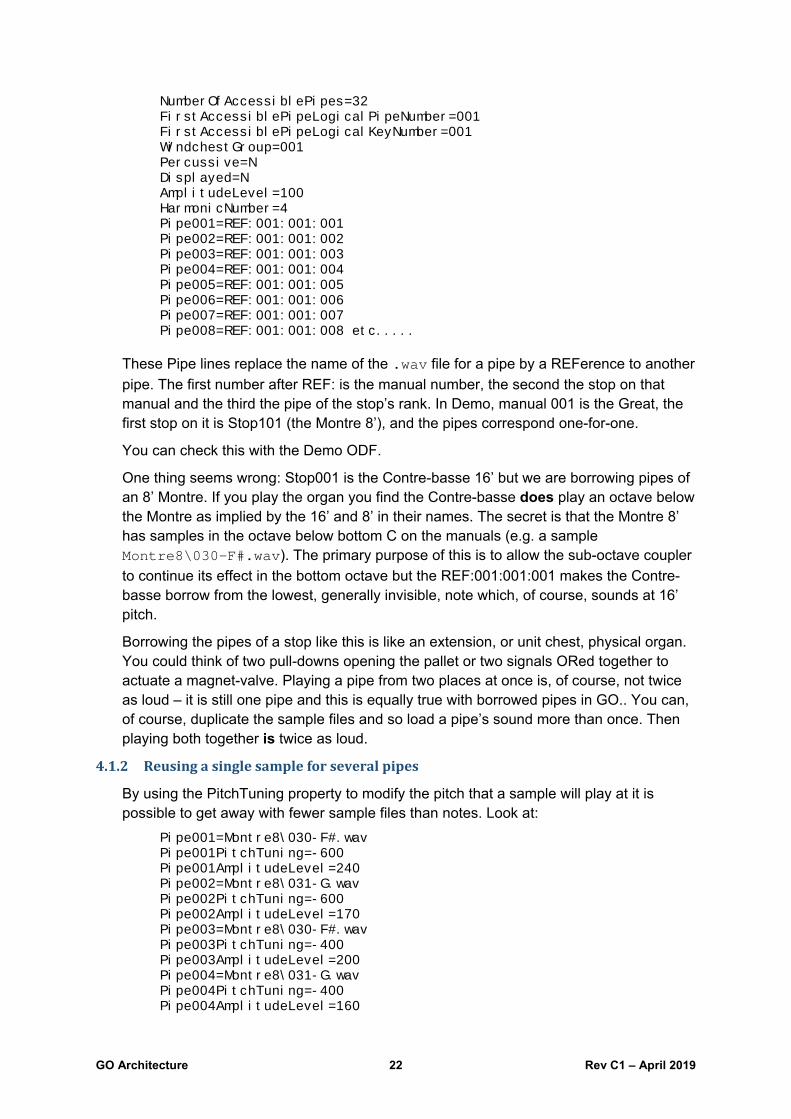
4.1.2 Reusingasinglesampleforseveralpipes
By using the PitchTuning property to modify the pitch that a sample will play at it is possible to get away with fewer sample files than notes. Look at:
Pipe001=Montre8\030-F#.wav Pipe001PitchTuning=-600 Pipe001AmplitudeLevel=240 Pipe002=Montre8\031-G.wav Pipe002PitchTuning=-600 Pipe002AmplitudeLevel=170 Pipe003=Montre8\030-F#.wav Pipe003PitchTuning=-400 Pipe003AmplitudeLevel=200 Pipe004=Montre8\031-G.wav Pipe004PitchTuning=-400 Pipe004AmplitudeLevel=160

GO Architecture 23 Rev C1 – April 2019
Pipe005=Montre8\030-F#.wav Pipe005PitchTuning=-200 Pipe005AmplitudeLevel=180 Pipe006=Montre8\031-G.wav Pipe006PitchTuning=-200 Pipe006AmplitudeLevel=150 Pipe007=Montre8\030-F#.wav Pipe007AmplitudeLevel=170 Pipe008=Montre8\031-G.wav Pipe008AmplitudeLevel=140 Pipe009=Montre8\030-F#.wav Pipe009PitchTuning=200 Pipe009AmplitudeLevel=160 Pipe010=Montre8\031-G.wav Pipe010PitchTuning=200 Pipe010AmplitudeLevel=130 Pipe011=Montre8\030-F#.wav Pipe011PitchTuning=400 Pipe011AmplitudeLevel=150 Pipe012=Montre8\031-G.wav Pipe012PitchTuning=400 Pipe012AmplitudeLevel=120
Here two sample files give a complete octave of the Montre 8’ in the Demo organ. Notice that it was necessary to tweak the AmplitudeLevel to get a smooth sounding scale.
I am not sure how worthwhile this is carried to such an extreme but certainly allows you to extend a 56 note rank of samples for playing on a 61 note console.
4.1.3 MixturesandPleinJeu
When samples are recorded from a real organ, then mixture stops will generally have one sample file per note because it is not practicable to silence all but one pipe in a set when making the recordings.
The Demo is therefore unusual in that its mixtures are synthesised from multiple pipes per note. This complicates the ODF and uses up polyphony but does allow you to construct mixture stops with arbitrary breaks and amplitudes of the different harmonics. As an example of this look at [Stop106]
[Stop106] Function=And SwitchCount=1 Switch001=009 Name=Plein jeu III NumberOfRanks=3 Rank001=001 Rank002=002 Rank003=003 NumberOfAccessiblePipes=61 FirstAccessiblePipeLogicalKeyNumber=013 Displayed=N [Rank001] FirstMidiNoteNumber=36 Name=Plein jeu 1st rank NumberOfLogicalPipes=61 WindchestGroup=002 Percussive=N AmplitudeLevel=190

GO Architecture 24 Rev C1 – April 2019
Pipe001=Gamba8\066-F#.wav Pipe001HarmonicNumber=32 Pipe001PitchTuning=-600 Pipe002=Gamba8\067-G.wav Pipe002HarmonicNumber=32 Pipe002PitchTuning=-600 Pipe003=Gamba8\066-F#.wav Pipe003HarmonicNumber=32 Pipe003PitchTuning=-400
| |
Pipe060=Bourdon8\102-F#.wav Pipe060HarmonicNumber=12 Pipe060PitchTuning=0 Pipe061=Bourdon8\103-G.wav Pipe061HarmonicNumber=12 Pipe061PitchTuning=0 [Rank002] FirstMidiNoteNumber=36 Name=Plein jeu 2nd rank NumberOfLogicalPipes=61 WindchestGroup=002 Percussive=N AmplitudeLevel=180 Pipe001AmplitudeLevel=60 Pipe002AmplitudeLevel=60 Pipe003AmplitudeLevel=60
| |
Pipe024AmplitudeLevel=60 Pipe025AmplitudeLevel=60 Pipe001=Bourdon8\067-G.wav Pipe001HarmonicNumber=48 Pipe001PitchTuning=0 Pipe002=Bourdon8\066-F#.wav Pipe002HarmonicNumber=48 Pipe002PitchTuning=200 Pipe003=Bourdon8\067-G.wav Pipe003HarmonicNumber=48 Pipe003PitchTuning=200
| |
Pipe060=FlHarm8\103-G.wav Pipe060HarmonicNumber=16 Pipe060PitchTuning=400 Pipe060AmplitudeLevel=30 Pipe061=FlHarm8\102-F#.wav Pipe061HarmonicNumber=16 Pipe061PitchTuning=600 Pipe061AmplitudeLevel=30 [Rank003] FirstMidiNoteNumber=36 Name=Plein jeu 3rd rank NumberOfLogicalPipes=61 WindchestGroup=002 Percussive=N AmplitudeLevel=180 Pipe001AmplitudeLevel=40 Pipe002AmplitudeLevel=40

GO Architecture 25 Rev C1 – April 2019
Pipe003AmplitudeLevel=40 Pipe004AmplitudeLevel=40 Pipe005AmplitudeLevel=40 Pipe006AmplitudeLevel=40 Pipe007AmplitudeLevel=40 Pipe008AmplitudeLevel=40 Pipe009AmplitudeLevel=40 Pipe010AmplitudeLevel=40 Pipe011AmplitudeLevel=40 Pipe012AmplitudeLevel=40 Pipe013AmplitudeLevel=40 Pipe014AmplitudeLevel=40 Pipe015AmplitudeLevel=40 Pipe016AmplitudeLevel=40 Pipe017AmplitudeLevel=40 Pipe018AmplitudeLevel=40 Pipe019AmplitudeLevel=40 Pipe020AmplitudeLevel=40 Pipe021AmplitudeLevel=40 Pipe022AmplitudeLevel=40 Pipe023AmplitudeLevel=40 Pipe024AmplitudeLevel=40 Pipe025AmplitudeLevel=40 Pipe001=Octavin2\054-F#.wav Pipe001HarmonicNumber=64 Pipe001PitchTuning=-570 Pipe002=Octavin2\055-G.wav Pipe002HarmonicNumber=64 Pipe002PitchTuning=-570 Pipe003=Octavin2\054-F#.wav Pipe003HarmonicNumber=64 Pipe003PitchTuning=-370
| |
Pipe060=Bourdon8\102-F#.wav Pipe060HarmonicNumber=24 Pipe060PitchTuning=1200 Pipe061=Bourdon8\103-G.wav Pipe061HarmonicNumber=24 Pipe061PitchTuning=1200
You can see the stop has three Ranks and they are quoted with the usual snipping in the middle of the pipes to save space here.
Look at the original and you should be able to see how the PitchTuning trick is used with the HarmonicNumber property to define the required breaks in the separate ranks of the mixture.
4.1.4 Multiplereleasesamples
With wet samples (i.e. ones recorded with the reverberation of the building) notes played staccato (i.e. much shorter than the reverb. time) never reach a steady state and it is beneficial to use different samples during the note-release time for them depending on the length of time the key is actually depressed. GO will measure the key press time and choose a suitable sample from a range that can be defined in the ODF.
Although it is not necessary to organised files like this, it is common to have the release samples in a sub-folder whose name indicates the key press time to which they relate.
GO Architecture 26 Rev C1 – April 2019
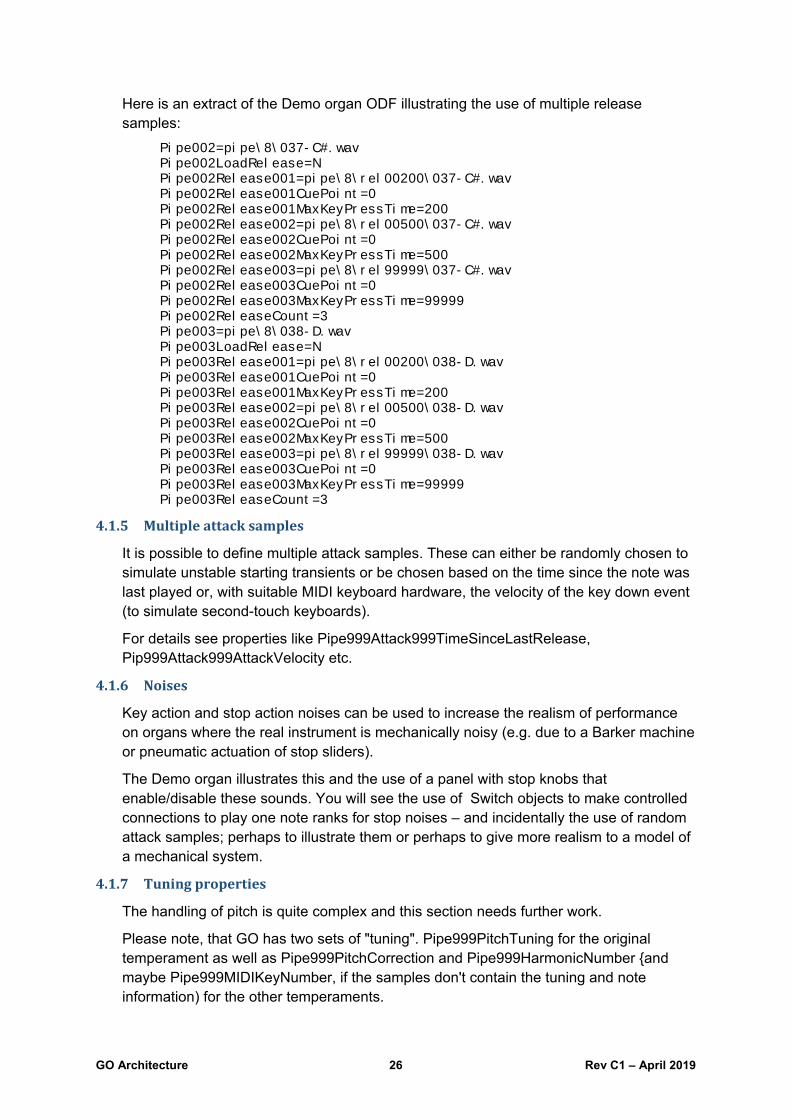
Here is an extract of the Demo organ ODF illustrating the use of multiple release samples:
Pipe002=pipe\8\037-C#.wav Pipe002LoadRelease=N Pipe002Release001=pipe\8\rel00200\037-C#.wav Pipe002Release001CuePoint=0 Pipe002Release001MaxKeyPressTime=200 Pipe002Release002=pipe\8\rel00500\037-C#.wav Pipe002Release002CuePoint=0 Pipe002Release002MaxKeyPressTime=500 Pipe002Release003=pipe\8\rel99999\037-C#.wav Pipe002Release003CuePoint=0 Pipe002Release003MaxKeyPressTime=99999 Pipe002ReleaseCount=3 Pipe003=pipe\8\038-D.wav Pipe003LoadRelease=N Pipe003Release001=pipe\8\rel00200\038-D.wav Pipe003Release001CuePoint=0 Pipe003Release001MaxKeyPressTime=200 Pipe003Release002=pipe\8\rel00500\038-D.wav Pipe003Release002CuePoint=0 Pipe003Release002MaxKeyPressTime=500 Pipe003Release003=pipe\8\rel99999\038-D.wav Pipe003Release003CuePoint=0 Pipe003Release003MaxKeyPressTime=99999 Pipe003ReleaseCount=3
4.1.5 Multipleattacksamples
It is possible to define multiple attack samples. These can either be randomly chosen to simulate unstable starting transients or be chosen based on the time since the note was last played or, with suitable MIDI keyboard hardware, the velocity of the key down event (to simulate second-touch keyboards).
For details see properties like Pipe999Attack999TimeSinceLastRelease, Pip999Attack999AttackVelocity etc.
4.1.6 Noises
Key action and stop action noises can be used to increase the realism of performance on organs where the real instrument is mechanically noisy (e.g. due to a Barker machine or pneumatic actuation of stop sliders).
The Demo organ illustrates this and the use of a panel with stop knobs that enable/disable these sounds. You will see the use of Switch objects to make controlled connections to play one note ranks for stop noises – and incidentally the use of random attack samples; perhaps to illustrate them or perhaps to give more realism to a model of a mechanical system.
4.1.7 Tuningproperties
The handling of pitch is quite complex and this section needs further work.
Please note, that GO has two sets of "tuning". Pipe999PitchTuning for the original temperament as well as Pipe999PitchCorrection and Pipe999HarmonicNumber {and maybe Pipe999MIDIKeyNumber, if the samples don't contain the tuning and note information) for the other temperaments.
GO Architecture 27 Rev C1 – April 2019
So PitchTuning affects the "original temperament", while just one HarmonicNumber does the magic for the other temperaments.
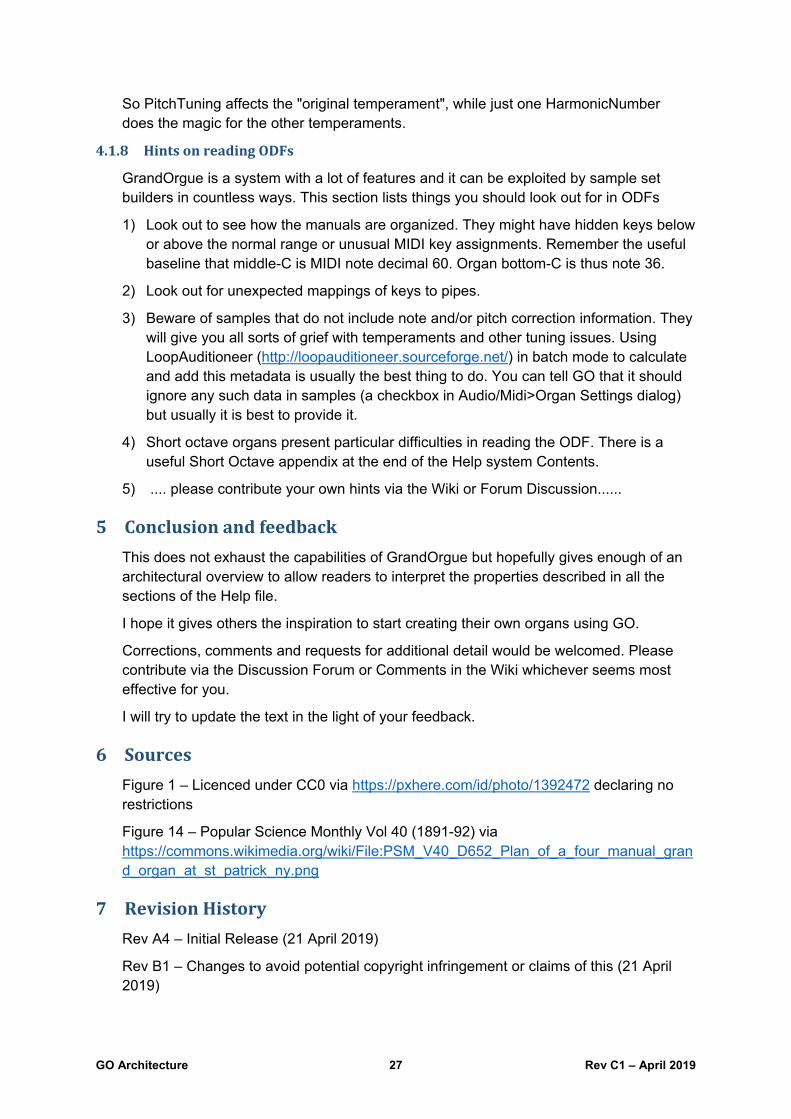
4.1.8 HintsonreadingODFs
GrandOrgue is a system with a lot of features and it can be exploited by sample set builders in countless ways. This section lists things you should look out for in ODFs
1) Look out to see how the manuals are organized. They might have hidden keys below or above the normal range or unusual MIDI key assignments. Remember the useful baseline that middle-C is MIDI note decimal 60. Organ bottom-C is thus note 36.
2) Look out for unexpected mappings of keys to pipes.
3) Beware of samples that do not include note and/or pitch correction information. They will give you all sorts of grief with temperaments and other tuning issues. Using LoopAuditioneer (http://loopauditioneer.sourceforge.net/) in batch mode to calculate and add this metadata is usually the best thing to do. You can tell GO that it should ignore any such data in samples (a checkbox in Audio/Midi>Organ Settings dialog) but usually it is best to provide it.
4) Short octave organs present particular difficulties in reading the ODF. There is a useful Short Octave appendix at the end of the Help system Contents.
5) .... please contribute your own hints via the Wiki or Forum Discussion......
5 Conclusionandfeedback
This does not exhaust the capabilities of GrandOrgue but hopefully gives enough of an architectural overview to allow readers to interpret the properties described in all the sections of the Help file.
I hope it gives others the inspiration to start creating their own organs using GO.
Corrections, comments and requests for additional detail would be welcomed. Please contribute via the Discussion Forum or Comments in the Wiki whichever seems most effective for you.
I will try to update the text in the light of your feedback.
6 Sources
Figure 1 – Licenced under CC0 via https://pxhere.com/id/photo/1392472 declaring no restrictions
Figure 14 – Popular Science Monthly Vol 40 (1891-92) via https://commons.wikimedia.org/wiki/File:PSM_V40_D652_Plan_of_a_four_manual_grand_organ_at_st_patrick_ny.png
7 RevisionHistory
Rev A4 – Initial Release (21 April 2019)
Rev B1 – Changes to avoid potential copyright infringement or claims of this (21 April 2019)
GO Architecture 28 Rev C1 – April 2019
Rev C1:
1. Provision of table of contents and this revision history
2. Correction of misleading information on the storage of global GO settings, ability to have several simultaneously installed sets of configurations (-i), clarifications on use of .cmb files
3. Some clarification and amplification of the different tuning, pitch and harmonic number properties.
John Prentice Nottingham
23 April 2019


![[Architecture Ebook] Steel Designers' Manual - 6th ed](https://static.fdocuments.net/doc/165x107/546a1700af79593b558b4f84/architecture-ebook-steel-designers-manual-6th-ed.jpg)


![[Architecture Book] the Designers Workspace - Ultimate Office Design (Excellent Book)](https://static.fdocuments.net/doc/165x107/55cf9a15550346d033a06345/architecture-book-the-designers-workspace-ultimate-office-design-excellent.jpg)


