The Gorman-Holbert Black and White Conversion Description ... · location (for example desktop>new...
9
© 2014 Phil Service ([email protected]) Last revised: 04 December 2014 The Gorman-Holbert Black and White Conversion: Description and Analysis Phil Service Flagstaff, Arizona, USA 9 November 2014 Summary The Gorman-Holbert black and white conversion is discussed with reference to Gorman’s instructions for creating a Photoshop action. The conversion is based on the lightness channel of the L*a*b* color model. As such, it appears to be particularly useful for images with limited color palettes. The conversion also employs the Photoshop High Pass filter as a “finishing” step. The principal effect of the High Pass filter in this application appears to be to increase contrast, which enhances image detail, particularly in the mid tones. The High Pass filter is compared to the Clarity adjustment of Adobe Camera Raw/Lightroom, and to the Unsharp Mask filter that is also available in Photoshop. Two simple modifications to the Gorman-Holbert conversion are suggested. The first substitutes a Gradient Map adjustment layer to enable true split toning. The second implements the High Pass filter as a smart filter so that its radius setting can be easily adjusted. Key words: Gorman-Holbert black and white conversion, Photoshop, Lab color, High Pass filter, Clarity adjustment, Unsharp Mask 1. Introduction The Gorman -Holbert black and white conversion is based on the lightness channel of the L*a*b* color model. As such, it is a good candidate for images with limited color palettes — 1 images in which “information” resides chiefly in tonality differences rather than hue differences. Fig. 1a provides an extreme, and artificial, example of such an image. All colors have identical values for the a* and b* coordinates. They vary only in their L* coordinates. All “information” in this image is conveyed solely by the lightness differences, as is shown by the image of the lightness channel (Fig. 1b) isolated from the combined color channels (Fig. 1c). In addition to basing the black and white conversion on L*a*b* lightness, a second distinguishing feature of the G-H conversion is its use of Photoshop’s High Pass filter as a “finishing” step. If you google “Photoshop high pass filter” you will probably find a number of references to its use as a sharpening tool. I will have more to say below about what the High Pass filter seems to be doing in the G-H conversion. Useful descriptions of the Gorman-Holbert conversion can be found here and here. Although Gorman 1 does not discuss the rationale behind the conversion, he does provide a downloadable Photoshop action, and instructions for creating your own Photoshop action, on his website: http:// www.gormanphotography.com/#mi=1&pt=0&pi=40&p=-1&a=0&at=0 1
Transcript of The Gorman-Holbert Black and White Conversion Description ... · location (for example desktop>new...
© 2014 Phil Service ([email protected]) Last revised: 04 December 2014
The Gorman-Holbert Black and White Conversion: Description and Analysis
Phil Service Flagstaff, Arizona, USA
9 November 2014
Summary The Gorman-Holbert black and white conversion is discussed with reference to Gorman’s instructions for creating a Photoshop action. The conversion is based on the lightness channel of the L*a*b* color model. As such, it appears to be particularly useful for images with limited color palettes. The conversion also employs the Photoshop High Pass filter as a “finishing” step. The principal effect of the High Pass filter in this application appears to be to increase contrast, which enhances image detail, particularly in the mid tones. The High Pass filter is compared to the Clarity adjustment of Adobe Camera Raw/Lightroom, and to the Unsharp Mask filter that is also available in Photoshop. Two simple modifications to the Gorman-Holbert conversion are suggested. The first substitutes a Gradient Map adjustment layer to enable true split toning. The second implements the High Pass filter as a smart filter so that its radius setting can be easily adjusted.
Key words: Gorman-Holbert black and white conversion, Photoshop, Lab color, High Pass filter, Clarity adjustment, Unsharp Mask
1. Introduction The Gorman -Holbert black and white conversion is based on the lightness channel of the L*a*b* color model. As such, it is a good candidate for images with limited color palettes — 1
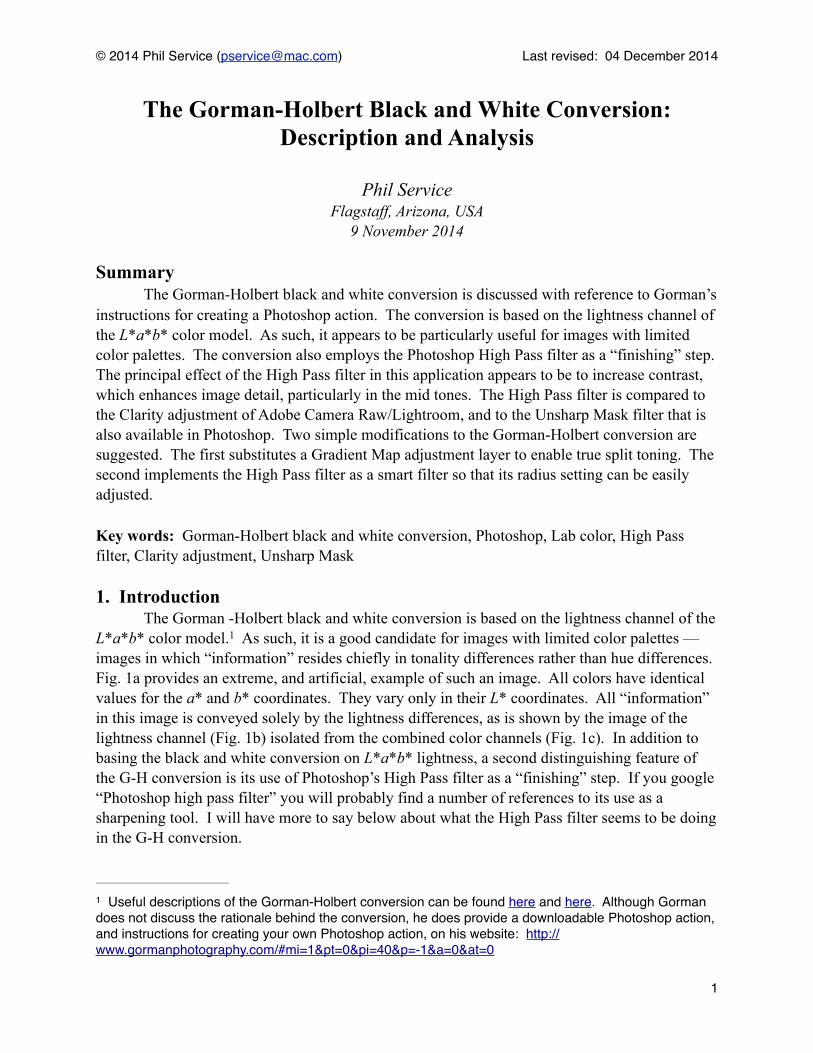
images in which “information” resides chiefly in tonality differences rather than hue differences. Fig. 1a provides an extreme, and artificial, example of such an image. All colors have identical values for the a* and b* coordinates. They vary only in their L* coordinates. All “information” in this image is conveyed solely by the lightness differences, as is shown by the image of the lightness channel (Fig. 1b) isolated from the combined color channels (Fig. 1c). In addition to basing the black and white conversion on L*a*b* lightness, a second distinguishing feature of the G-H conversion is its use of Photoshop’s High Pass filter as a “finishing” step. If you google “Photoshop high pass filter” you will probably find a number of references to its use as a sharpening tool. I will have more to say below about what the High Pass filter seems to be doing in the G-H conversion.
Useful descriptions of the Gorman-Holbert conversion can be found here and here. Although Gorman 1
does not discuss the rationale behind the conversion, he does provide a downloadable Photoshop action, and instructions for creating your own Photoshop action, on his website: http://www.gormanphotography.com/#mi=1&pt=0&pi=40&p=-1&a=0&at=0
�1
© 2014 Phil Service ([email protected]) Last revised: 04 December 2014
My goal in this paper is to provide what I hope is some useful explication of the conversion, and to suggest a couple of modifications to Gorman’s Photoshop action. I stress that I have no access to Greg Gorman and therefore no special knowledge of his or Mac Holbert’s reasons for proposing this particular method of black and white conversion. In particular, I have no information about why they chose to use the High Pass filter.
�2
Fig. 1. (a) Image with colors that have identical values for the a* and b* coordinates of the L*a*b* color model; (b) image of the L* channel only; (c) image of the combined a* and b* channels (L* = 50).
© 2014 Phil Service ([email protected]) Last revised: 04 December 2014
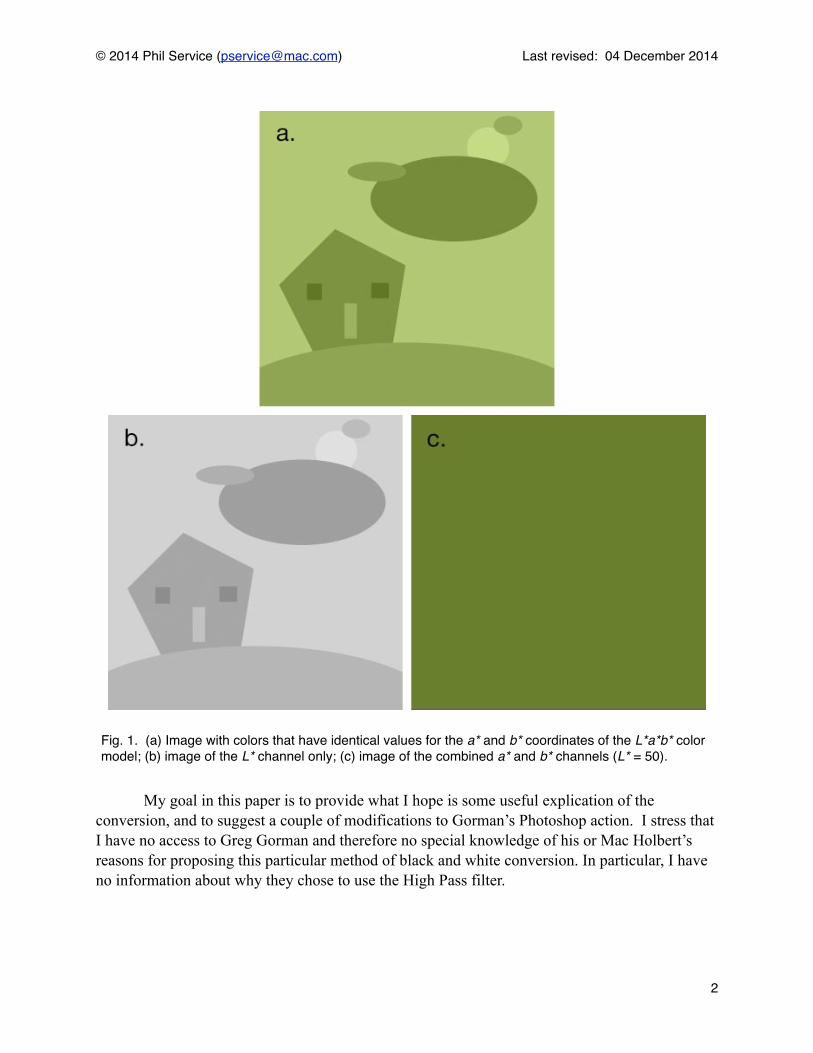
2. Greg Gorman’s Instructions for Making a Photoshop Action — Annotated The following is Greg Gorman’s instructions for creating a Photoshop action for the G-H conversion. Conveniently, Gorman chose to use all upper-case letters, so his text is easily distinguishable from my annotations in red. 2
CREATING AN ACTION FOR GORMAN/HOLBERT BLACK AND WHITE CONVERSION
1. OPEN A COLOR IMAGE IN PHOTOSHOP 2. UNDER YOUR ACTION PALETTE POP OUT MENU, SELECT NEW ACTION 3. NAME THE ACTION BLACK AND WHITE CONVERSION 4. ASSIGN A FUNCTION KEY SUCH AS F1 TO YOUR ACTION 5. SELECT RECORD 6. UNDER THE IMAGE MENU, SELECT MODE>LAB COLOR 7. CLICK (HIGHLIGHT) THE LIGHTNESS CHANNEL This is important. If you merely turn off the a and b channels but do not select the Lightness channel you will simply get a standard grayscale conversion in the next step.
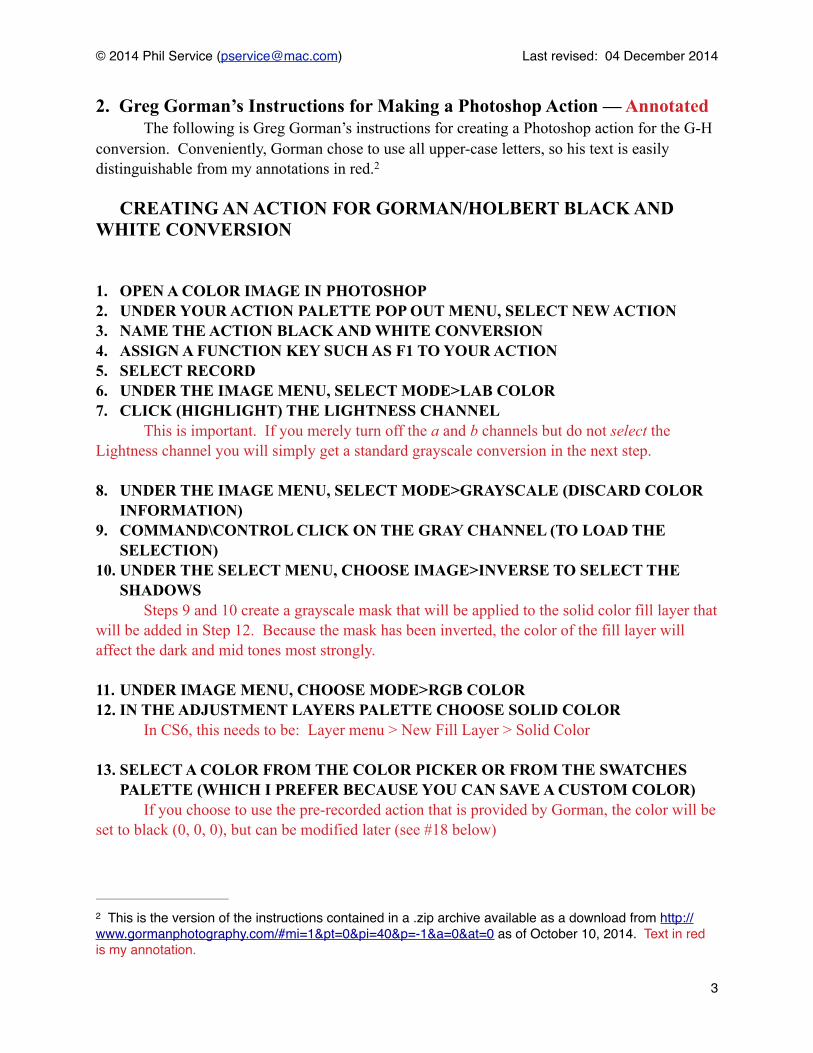
8. UNDER THE IMAGE MENU, SELECT MODE>GRAYSCALE (DISCARD COLOR INFORMATION)
9. COMMAND\CONTROL CLICK ON THE GRAY CHANNEL (TO LOAD THE SELECTION)
10. UNDER THE SELECT MENU, CHOOSE IMAGE>INVERSE TO SELECT THE SHADOWS
Steps 9 and 10 create a grayscale mask that will be applied to the solid color fill layer that will be added in Step 12. Because the mask has been inverted, the color of the fill layer will affect the dark and mid tones most strongly.
11. UNDER IMAGE MENU, CHOOSE MODE>RGB COLOR 12. IN THE ADJUSTMENT LAYERS PALETTE CHOOSE SOLID COLOR In CS6, this needs to be: Layer menu > New Fill Layer > Solid Color
13. SELECT A COLOR FROM THE COLOR PICKER OR FROM THE SWATCHES PALETTE (WHICH I PREFER BECAUSE YOU CAN SAVE A CUSTOM COLOR)
If you choose to use the pre-recorded action that is provided by Gorman, the color will be set to black (0, 0, 0), but can be modified later (see #18 below)
This is the version of the instructions contained in a .zip archive available as a download from http://2
www.gormanphotography.com/#mi=1&pt=0&pi=40&p=-1&a=0&at=0 as of October 10, 2014. Text in red is my annotation.
�3
© 2014 Phil Service ([email protected]) Last revised: 04 December 2014
14. YOUR CHOICE OF COLOR SHOULD BE BASED ON THE TONAL RANGE YOU WISH TO SEE IN YOUR FINAL TONED B&W
15. GO TO YOUR LAYERS PALETTE AND CHANGE YOUR BLENDING MODE TO MULITIPLY
16. BECAUSE YOUR COLOR FILL IS ON A LAYER YOU MAY ADJUST THE OPACITY TO DIAL BACK THE COLOR THAT YOU DESIRE
The opacity is set to 29% in Gorman’s pre-recorded action.
17. IN ADDITION (IMPORTANT), YOU MAY ADD A CURVES OR LEVELS ADJUSTMENT TO ACHIEVE THE DESIRED CONTRAST
Gorman’s pre-recorded action inserts a Curves adjustment layer. A Levels adjustment layer before the Curves layer should also be considered.
18. SHOULD YOU WISH TO CHANGE THE COLOR OF YOUR B&W “DUOTONE” SIMPLY DOUBLE CLICK THE COLOR FILL AND RESELECT THE COLOR
19. CREATE A NEW LAYER Select New > Layer from the Layer menu. This is the layer that will contain the high pass filter. This action defaults to naming it “Layer 1”. I suggest giving it a more informative name, such as “High Pass”.
20. WHILE HOLDING THE OPTION BUTTON GO TO THE POP OUT MENU AND SELECT MERGE VISIBLE
21. CHANGE THE BLENDING MODE TO OVERLAY 22. REDUCE THE OPACITY TO 20% 23. CHOOSE FILTER-OTHER. THEN SELECT-HIGH PASS. SET RADIUS AT 50
PIXELS If you google Photoshop high pass filter, most of the results will describe its use for sharpening. As such, the specified radius is generally 1 – 5 pixels. The effect of the filter radius will be discussed below.
24. DOUBLE CLICK THE NEW LAYER TO BRING UP LAYER PROPERTIES Double-click the new layer to bring up the Layer Style dialog. Click on Blending Options. IMPORTANT: the actions described in steps #25 and #26 should be applied to the sliders corresponding to Underlying Layer.
25. BRING THE BLACK POINT ARROW IN TO 70. NEXT OPTION CLICK THE BLACK POINT ARROW TO SPLIT THEM, PULLING ONE HALF OF THE ARROW BACK TO 50
26. BRING THE WHITE POINT ARROW IN TO 185. NEXT OPTION CLICK THE WHITE POINT ARROW TO SPLIT THEM, PULLING ONE HALF OF THE ARROW BACK TO 205. CLICK OK
Steps 25 and 26 restrict the effect of the high pass filter to the mid-tones of the image. I believe that the intent is prevent loss of shadow and highlight detail.
�4
© 2014 Phil Service ([email protected]) Last revised: 04 December 2014
27. IF NECESSARY THE OPACITY [of the filter layer] MAY BE VARIED TO REACH YOUR DESIRED ADJUSTMENT
The Bending Options settings (steps 25 an 26) can also be adjusted.
28. UNDER THE FILE MENU SELECT SAVE AS AND CHOOSE YOUR FILE AND LOCATION (FOR EXAMPLE DESKTOP>NEW FOLDER> BLACK AND WHITE CONVERSIONS)
29. IF YOU CHOOSE NOT TO FLATTEN YOUR FILE AT THIS TIME YOU MAY BE ABLE TO CHANGE THE TONAL AND CONTRAST ADJUSTMENTS TO DIFFERENT SETTINGS IN THE FUTURE IF DESIRED
30. CLOSE YOUR FILE 31. STOP YOUR ACTION IN YOUR ACTION PALETTE 32. THIS COMPLETES CREATING YOUR ACTION AND ASSIGNING A FUNCTION
KEY. ALL THAT IS NECESSARY TO DO AFTER OPENING A COLOR IMAGE IN PHOTOSHOP IS TO PRESS YOUR FUNCTION KEY. ALL YOUR FINE TUNING ADJUSTMENTS MAY NOW BE PERFORMED ON THE INDIVIDUAL LAYERS AS DESIRED
3. Possible Modifications of the G-H Black and White Conversion I suggest two modifications of the above action: the first to enable true split toning, the second to add the High Pass filter as a smart filter.
3.1. Gradient Map layer instead of Solid Color Fill layer The solid color fill layer added in steps 12-13 does not produce true split toning. True split toning can be implemented by substituting a gradient map adjustment layer for the color fill layer. Use the Gradient Editor to choose separate tones for the darker and lighter areas of the image. Set the blending mode of the gradient map layer to Multiply and fine-tune the amount of toning by adjusting the layer opacity.
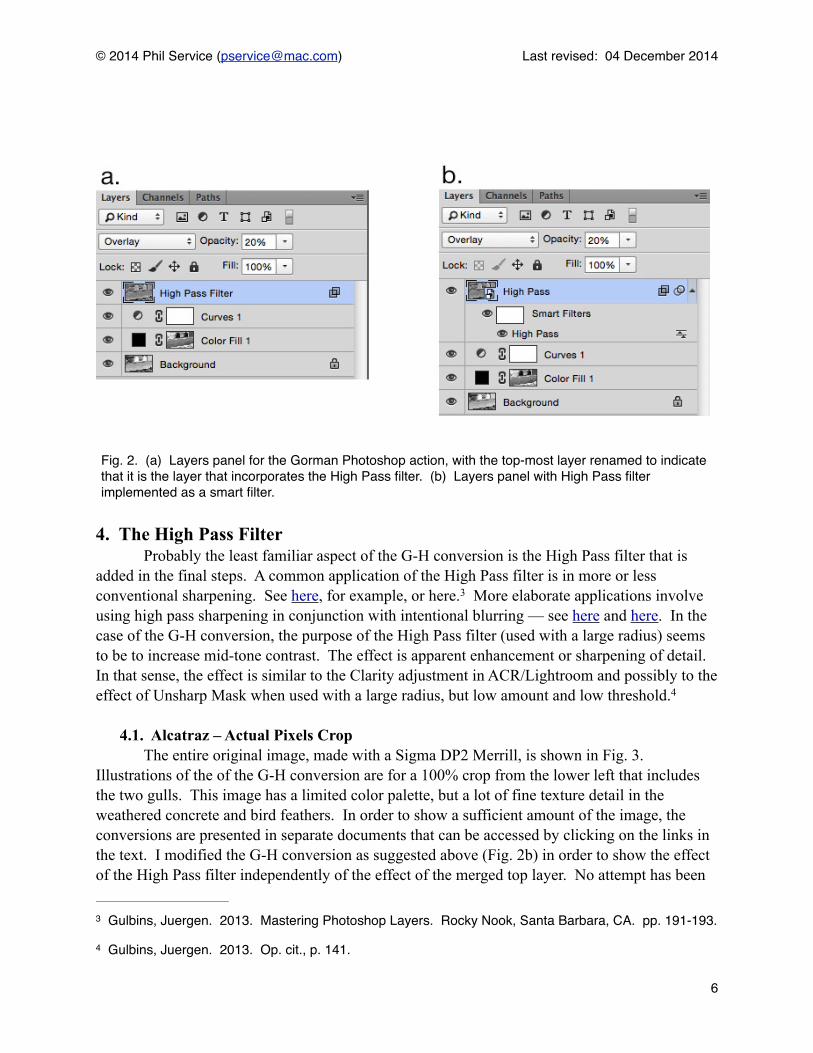
3.2. Make the High Pass filter a smart filter As implemented by Gorman’s Photoshop action, the effect of the High Pass filter can be altered only by adjusting the layer blending mode and opacity. In order to change the filter radius setting, it is necessary to delete and re-create the the entire merged layer. If file size is not an issue, more flexibility can be obtained by converting the merged layer to a smart object before adding the High Pass filter. That is, add a step 21a in the above sequence: Layer > Smart Objects > Convert to Smart Object. For purposes of the present discussion, this also makes it possible to distinguish the effect of the filter per se from the effect of the top-most merged layer. Fig. 2a shows the layers panel that is produced by the Gorman Photoshop action, except that I have re-named the top layer from “Layer 1” to “High Pass Filter”. Fig. 2b shows the layers panel for the same end result, except that the High Pass layer is a smart object and the High Pass filter is a smart filter.
�5
© 2014 Phil Service ([email protected]) Last revised: 04 December 2014
4. The High Pass Filter Probably the least familiar aspect of the G-H conversion is the High Pass filter that is added in the final steps. A common application of the High Pass filter is in more or less conventional sharpening. See here, for example, or here. More elaborate applications involve 3
using high pass sharpening in conjunction with intentional blurring — see here and here. In the case of the G-H conversion, the purpose of the High Pass filter (used with a large radius) seems to be to increase mid-tone contrast. The effect is apparent enhancement or sharpening of detail. In that sense, the effect is similar to the Clarity adjustment in ACR/Lightroom and possibly to the effect of Unsharp Mask when used with a large radius, but low amount and low threshold. 4
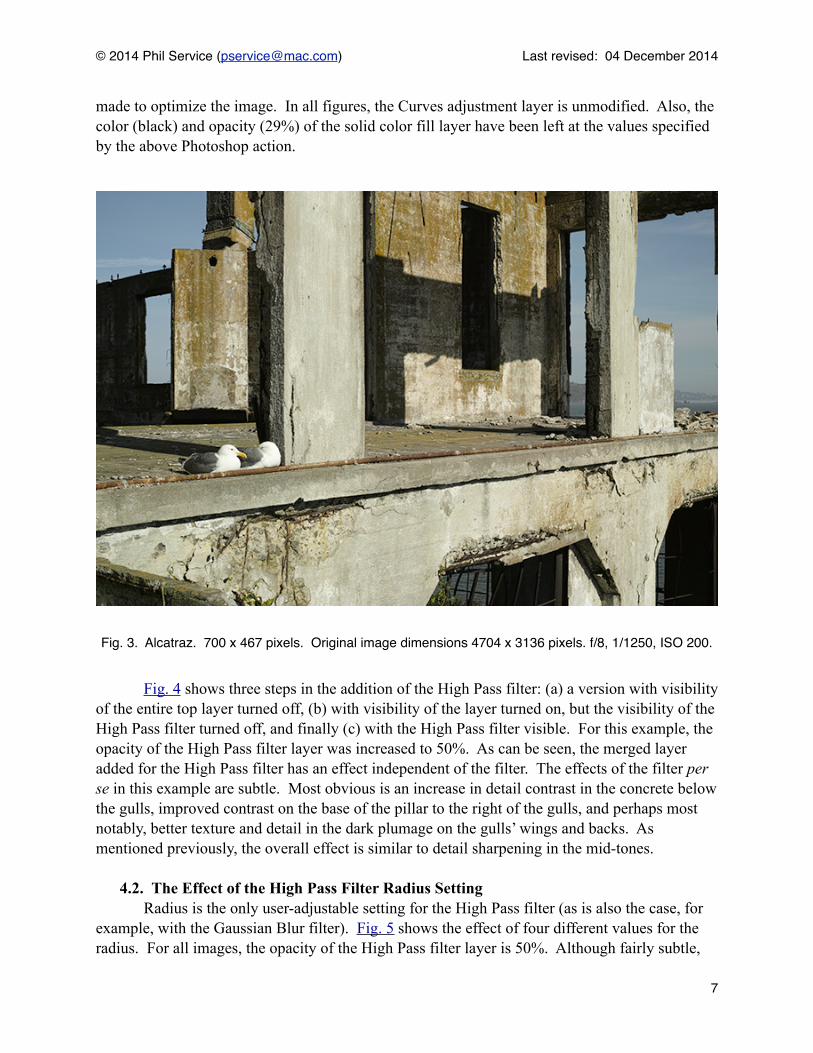
4.1. Alcatraz – Actual Pixels Crop The entire original image, made with a Sigma DP2 Merrill, is shown in Fig. 3. Illustrations of the of the G-H conversion are for a 100% crop from the lower left that includes the two gulls. This image has a limited color palette, but a lot of fine texture detail in the weathered concrete and bird feathers. In order to show a sufficient amount of the image, the conversions are presented in separate documents that can be accessed by clicking on the links in the text. I modified the G-H conversion as suggested above (Fig. 2b) in order to show the effect of the High Pass filter independently of the effect of the merged top layer. No attempt has been
Gulbins, Juergen. 2013. Mastering Photoshop Layers. Rocky Nook, Santa Barbara, CA. pp. 191-193.3
Gulbins, Juergen. 2013. Op. cit., p. 141.4
�6
Fig. 2. (a) Layers panel for the Gorman Photoshop action, with the top-most layer renamed to indicate that it is the layer that incorporates the High Pass filter. (b) Layers panel with High Pass filter implemented as a smart filter.
© 2014 Phil Service ([email protected]) Last revised: 04 December 2014
made to optimize the image. In all figures, the Curves adjustment layer is unmodified. Also, the color (black) and opacity (29%) of the solid color fill layer have been left at the values specified by the above Photoshop action.
Fig. 4 shows three steps in the addition of the High Pass filter: (a) a version with visibility of the entire top layer turned off, (b) with visibility of the layer turned on, but the visibility of the High Pass filter turned off, and finally (c) with the High Pass filter visible. For this example, the opacity of the High Pass filter layer was increased to 50%. As can be seen, the merged layer added for the High Pass filter has an effect independent of the filter. The effects of the filter per se in this example are subtle. Most obvious is an increase in detail contrast in the concrete below the gulls, improved contrast on the base of the pillar to the right of the gulls, and perhaps most notably, better texture and detail in the dark plumage on the gulls’ wings and backs. As mentioned previously, the overall effect is similar to detail sharpening in the mid-tones.
4.2. The Effect of the High Pass Filter Radius Setting Radius is the only user-adjustable setting for the High Pass filter (as is also the case, for example, with the Gaussian Blur filter). Fig. 5 shows the effect of four different values for the radius. For all images, the opacity of the High Pass filter layer is 50%. Although fairly subtle,
�7
Fig. 3. Alcatraz. 700 x 467 pixels. Original image dimensions 4704 x 3136 pixels. f/8, 1/1250, ISO 200.
© 2014 Phil Service ([email protected]) Last revised: 04 December 2014
there is a progressive increase in contrast with larger radius. Look, for example, at the dark plumage on the gulls, at the pipe immediately in front of the gulls, at the concrete ledge below the gulls and the shadow area beneath the ledge, and at the pillar to the right of the gulls. The overall effect of increasing radius is to enhance image detail — at least up to a point. Given that sharpening methods typically rely on increasing local contrast, it seems reasonable to characterize the High Pass filter as a detail sharpener. The reason for setting the layer blending options so that the effect of the High Pass filter is limited to the mid tones would seem to be to prevent loss of detail in the highlights and shadows, as could occur with increasing contrast.
4.3. High Pass Filter vs. Clarity Adjustment vs. Unsharp Mask. Given that the High Pass filter acts as a sharpener or enhancer of detail, its effect may be generally similar to the Clarity adjustment in ACR/Lightroom and to the effect of the Unsharp Mask filter when used with a large radius. Fig. 6 presents a comparison between the three adjustments. The Clarity adjustment is accessible as a Camera Raw filter in Photoshop CC. The goal is not to determine a “best” adjustment, but rather to gain some insight into the workings of the High Pass filter by comparing it to more familiar adjustments. The images are not optimized, but I have tried to make them appear reasonably similar. As previously, settings for all other layers are at their “default” values. For the Unsharp Mask and Clarity versions, I simply replaced the High Pass smart filter with the appropriate alternative. The layer blending mode options were left as for the High Pass filter version. In particular, the smart filter was applied only to the mid-tones of the lower layers. The Clarity adjustment was set to 75, and the layer opacity was 35%. The Unsharp Mask settings were: amount 50%, radius 200 pixels, and threshold 0; and the layer opacity was 40%. The High Pass filter setting are as for Figs. 4c and 5c (50 px radius, and 50% opacity). The Clarity adjustment and the Unsharp Mask filter produce remarkably similar results (Figs. 6b, c). Arguably, both do a better job than the High Pass filter in bringing out the textural detail in the concrete ledge below the gulls. On the other hand, the High Pass filter (Fig. 6a) seems to do better with the detail at the base of the concrete pillar to the right of the gulls; and also does a better job of revealing the detail in the dark plumage on the back of the gull on the left. Further adjustments, particularly with the solid color fill layer, with the Curves layer, or with the various filter settings might lead to different conclusions. Also, it is worth remembering that some of the apparent effect all three smart filters is actually attributable to the merged layer that contains them, rather than to the filters themselves.
5. Discussion I have illustrated the G-H conversion with a crop from a single image. It is quite possible that conclusions about its merits would be different if I used a different image, or even a different part of the same image. There are many other methods for black and white conversion. I have chosen not to compare them to the G-H. Some comparisons can be found online, but in any event it is probably best for the reader to experiment with his or her own images. The Photoshop action provided by Gorman, or a customized version of it, should not be viewed as producing a final product. For one thing, there are many adjustments possible within
�8

© 2014 Phil Service ([email protected]) Last revised: 04 December 2014
the conversion: including the color and opacity of the solid color fill layer, Curves adjustments, and the opacity and blending mode of the High Pass filter layer. Second, additional adjustment layers may be desirable. For example, it might be useful to add a Levels adjustment layer beneath the Curves layer. Finally, it will almost always be desirable to do some adjustments on the color image before conversion — especially exposure correction and highlight and shadow recovery.
�9